Embed Size (px)
Citation preview
Owners manual and maintenance guide
RT & RTX SERIES JI
skirou/e._,
index
Break-in period .................. ................................... ....... 14
Controls ...................................................................... 8-9
Do and Do not ... ........................................................ ... 17
Driving hints .......................................................... ...... 15
Dri ving positions ................................ ........................ 16
Electric circuits ...................................................... 35-36 Emergency ..... . ........... ...... . .................. ... .............. ....... 18 Features .................................................... ........... ....... 3
Foreword ...................... .............................................. ..
Fuel mixing ........................................................... ....... 10
Fuel mixing procedure ................................................ 11
Identification of your Skiroule .................................. 7
Lubrication chart .................................................... 33-34
Maintenance ............................................................ 19-28
Pre-start check ............................................................ 12
Specifications ............................................................ 4-6 Starting procedure ...................................................... 13 Suggestions to novices .. .................. ........................ 15
The beautifu difference .............................................. 2 Trouble-shooting ................. ...... ......... ... ....................... 29
FORM 3213·9001 PRINTED IN CANADA Warranty .................................................................. 30-32
foreword
skiroule. 11ltlf®J,4rl
Your choice of the new Skiroule Snowmobile is a very wise om;.. With the model you have just purchased, you own the best !ha( money can buy. Every Skiroule is precision engineered and "'" constructed to the finest standards o( quality and workmanship by expert craft smen and technicians considered as second to none in the industry.
Your new Skiroule will give you and your family continued enjoyment with re•:Jsonable care. In order to ensure your winter pleasure. we hav,e prepared the ·Owner's Manual & Maintenance Guide to help you keep your Skiroule at peak efficiency. Read it carefully; the new models have features you should learn about. Pay particular attention to the maintenance section; it is streamlined to make it simple and easy for everyone to enjoy carefree snowmobiling. Carry your handy manual. at all times. when you hit the trail.
With your new Skiroule, winter is yours to enjoy as never before. keep it that way by following the instructions and giving your machin,e the simple care suggested here.
-1 -
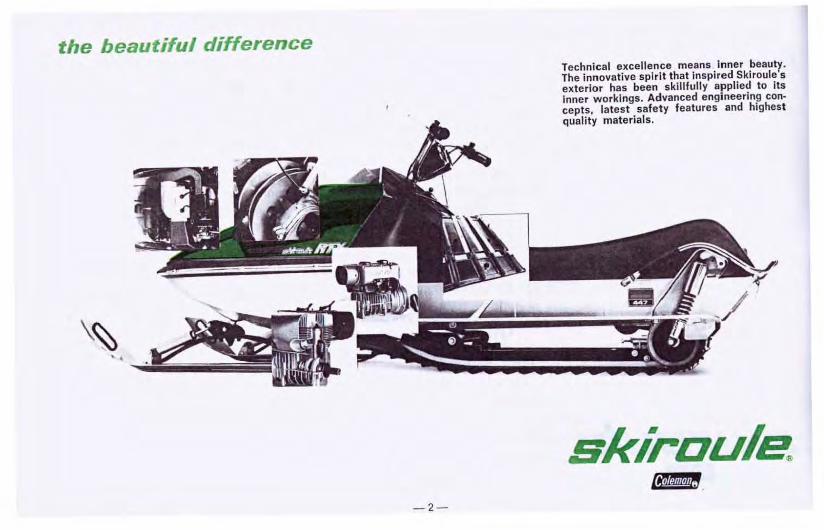
the beautiful difference
\~
-2-
Technical excellence means inner beauty. The innovative spirit that inspired Sklroule s exterior has been skillfully applied to its Inner workings. Advanced engineering concepts, latest safety features and highest quality materials.
skiroule.
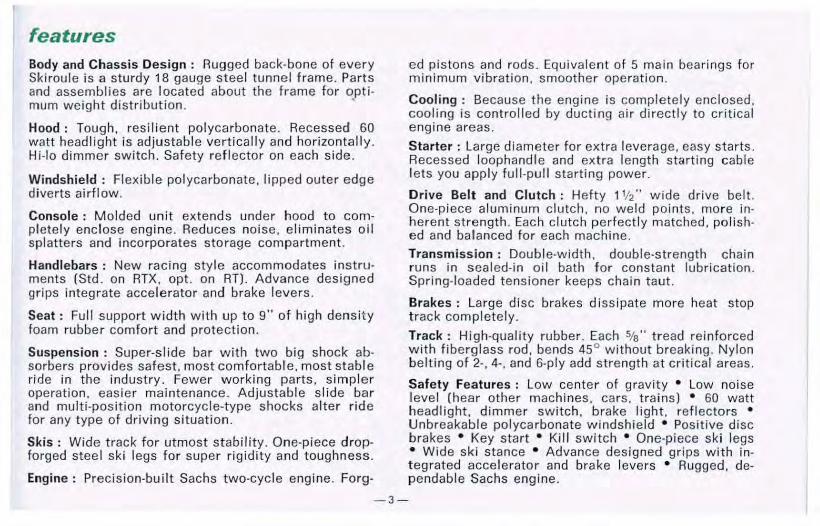
features Body and Chassis Design : Rugged back-bone of every Skiroule is a sturdy 18 gauge steel tunnel frame . Parts and assemblies are located about the frame for opti-mum weight dis tribution. •
Hood : Tough, resil ient polycarbonate. Recessed 60 watt headlight is adjustab le vertical ly and horizontally. Hi-lo dimmer switch. Safety ref lector on each side.
Windshield : Flexible polycarbonate, l ipped outer edge diverts airflow.
Console : Molded unit extends under hood to completely enclose engine. Reduces noise, eliminates oil splatters and incorporates storage compartment.
Handlebars : New racing style accommodates instruments (Std . on RTX, opt. on AT) . Advance designed grips integrate accelerator and brake levers.
Seat: Full support width with up to 9" of high density foam rubber comfort and protection.
Suspension : Super-slide bar with two big shock absorbers provides safest , most comfortable , most stable ride in t he industry. Fewer working parts , simple!r operation. easier mai ntenance. Adjustable slide bar and multi-pos ition motorcycle-type shocks alter r ide for any type of driving situation.
Skis : Wide track for utmost stabil ity. One-piece dropforged steel ski legs for super rigid i ty and toughness.
ed pistons and rods. Equivalent of 5 main bearings for m inimum vibration, smoother operation.
Cooling : Because the engine is completely enclosed, cooling is controlled by ducting air directly to critical engine areas.
Starter : Large diameter for extra leverage, easy starts. Recessed loophandle and extra length starting cable lets you apply full-pull starting power.
Drive Belt and Clutch : Hefty 1 112 •· wide drive belt. One-piece aluminum clutch, no weld points, more inherent strength. Each clutch perfectly matched, polished and balanced for each machine.
Transmission : Double-width. double-strength chain runs in sealed-in oil bath for constant lubrication. Spring-loaded tensioner keeps chain taut.
Brakes: Large di sc brakes dissipate more heat stop track completely.
Track : High-quality rubber. Each Sfa" tread reinforced with fiberglass rod . bends 45° wi thout breaking. Nylon belting of 2-. 4-. and 6-ply add strength at critical areas.
Safety Features : Low center of gravity • Low noise level (hear other machines, cars. trains) • 60 watt headlight, dimmer switch, brake ligh t , refl ectors • Unbreakable polycarbonate windshield • Positive disc brakes • Key start • Ki l l swi tch • One-piece ski legs • Wide ski stance • Advance des igned grips with integrated accelerator and brake levers • Rugged, dependable Sachs engine. Engine : Precision-bui lt Sachs two-cycle eng ine. For~J
-3-
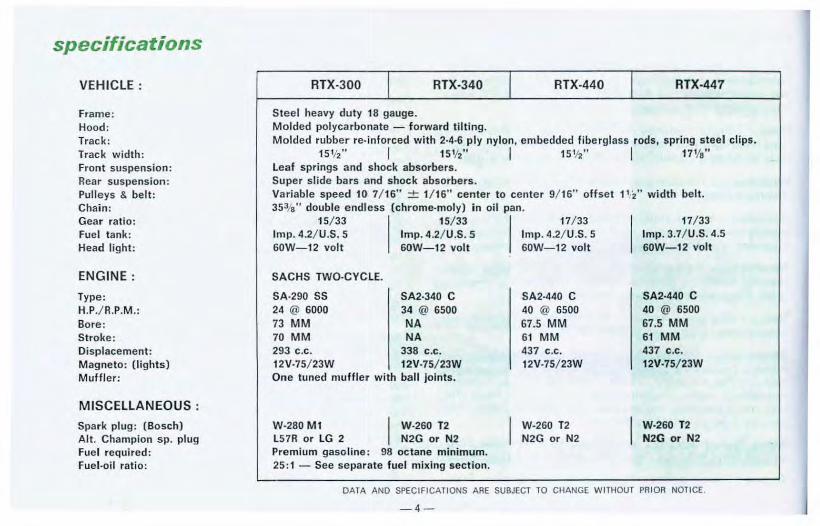
specifications
VEHICLE:
Frame: Hood: Track: Track width: Front suspension: Rear suspension: Pulleys & belt: Chain: Gear ratio: Fuel t ank: Head light:
ENGINE :
Type: H.P./R.P.M.: Bore: Stroke: Displacement: Magneto: (lights) Muffler :
MISCELLANEOUS:
Spark plug : (Bosch) Alt. Champion sp. plug Fuel required: Fuel-oil ratio :
RTX-300 RTX-340 RTX-440 RTX-447
Steel heavy duty 18 gauge. Molded polycarbonate - forward tilting. Molded rubber re-Inforced with 2·4·6 ply nylon, embedded fiberglass rods, spring steel clips.
15Vz'' I 1sw· I 15112" I t 71fs" Leaf springs and shock absorbers. Super slide bars and shock absorbers. Variable speed 101 7 / 16" + 1/ 16" center to center 9/ 16" offset 11 2" width belt. 353/a" double endless (chrome-moly) in oil pan.
15/ 33 I 15/ 33 I 17/ 33 Imp. 4.2/ U.S. 5 Imp. 4.2/ U.S. 5 Imp. 4.2/ U.S. 5 60W- 12 volt 6DW-12 volt 60W- 12 volt
SACHS TWO-CYC:LE.
SA-290 55 24 @ 6000 73 MM 70 MM
SA2-340 C 34 @ 6500 NA NA
293 c.c. 338 c.c. 12V-75/ 23W 12V-75/ 23W One tuned muffler with ball joints.
W-280 Mt I W-260 T2 L57R or LG 2 N2G or N2 Premium gasoline : 98 octane minimum. 25:1 - See separate fuel mixing section.
SA2-440 C 40 @ 6500 67.5 MM 61 MM 437 c.c. 12V-75/ 23W
W-260 T2 N2G or N2
I 17/ 33
Imp. 3.7/ U.S. 4.5 60W-12 volt
SA2-440 C 40 @ 6500 67.5 MM 61 MM 437 c.c. 12V-75/ 23W
W-260 T2 N2G or N2
DATA AND SPECIFICATIONS ARE SUBJECT TO CHANGE WITHOUT PRIOR NOTICE.
- 4 -
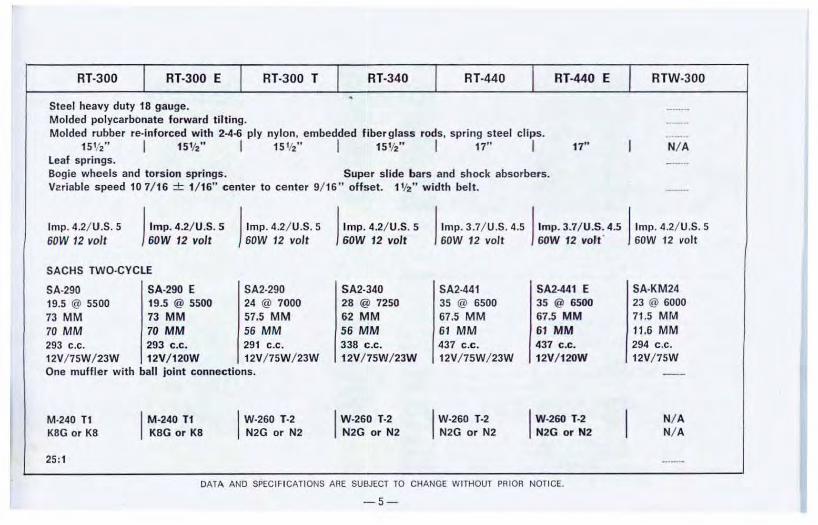
RT-300 RT-300 E RT-300 T RT-340 RT-440 RT-440 E RTW-300
Steel heavy duty 18 gauge. Molded polycarbonate forward tilting. Molded rubber re-inforced with 2-4-6 ply nylon, embedded fiberglass rods, spring steel clips.
15 '12.. I 15 'h.. I 15 '12.. I 15 'h" I 17" I 17" N/ A Leaf springs. Bogie wheels and torsion springs. Supc~r slide bars and shock absorbers. Variable speed 10 7/ 16 + 1/ 16" center to center 9/ 16" offset. 11f2" width belt.
Imp. 4.2/ U.S. 5 60W 12 volt J
Imp. 4.2/ U.S. 5 60W 12 volt J
Imp. 4.2/ U.S. 5 60W 12 volt J
Imp. 4.2/ U.S. 5 GOW 12 volt J
Imp. 3.7/ U.S. 4.5 J Imp. 3.7/ U.S. 4.5 J Imp. 4.2/U.S. 5 60W 12 volt GOW 12 volt" 60W 12 volt
SACHS TWO-CYCLE
SA-290 SA-290 E SA2·290 19.5 @ 5500 19.5 @ 5500 24 @ 7000 73 MM 73 MM 57.5 MM 70 MM 70 MM 56 MM 293 c.c. 293 c.c. 291 c.c. 12V/75W/ 23W 12V/ 120W 12V/ 75W/ 23W One muffler with ball joint connections.
M-240 T1 K8G or K8
25:1
I M-240 T1 K8G or K8 I W-260 T-2
N2G or N2
SA2-340 28 @ 7250 62 MM 56 MM 338 IC.C.
12V/ 75W/ 23W
I W-260 T-2 N2G or N2
SA2-441 35 @ 6500 67.5 MM 61 MM 437 c.c. 12V/ 7SW/ 23W
I W-260 T-2 N2G or N2
SA2-441 E 35 @ 6500 67.5 MM 61 MM 437 c .c. 12V/ 120W
I W-260 T-2 N2G or N2
DATA AND SPECIFICATIONS ARE SUBJECT TO CHANGE WITHOUT PRIOR NOTICE.
·-5-
SA-KM24 23 @ 6000 71.5 MM 11.6 MM 294 c .c. 12V/75W
N/ A N/ A
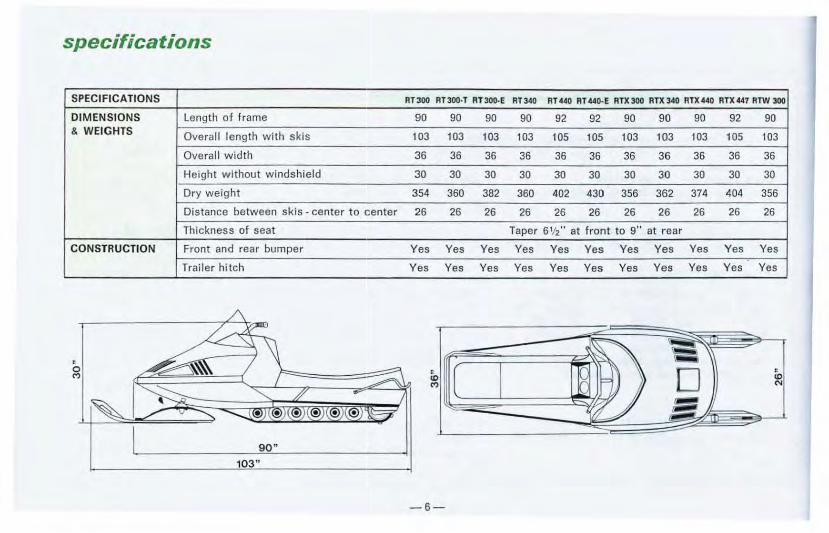
specifications
SPECIFICATIONS RT 300 RT 300·T RT 300·E RT340 RT 440 RT 440· E RTX 300 RTX 340 RTX 440 RTX 447 RTW 300
DIMENSIONS length of frame 90 90 90 90 92 92 90 90 90 92 90 & WEIGHTS Overall length with skis 103 103 103 103 105 105 103 103 103 105 103
Overall width 36 36 36 36 36 36 36 36 36 36 36
Height without windshield 30 30 30 30 30 30 30 30 30 30 30
Dry weight 354 360 382 360 402 430 356 362 374 404 356
Distance between skis· center to 1:enter 26 26 26 26 26 26 26 26 26 26 26
Thickness of seat Taper 61h ·· at front to 9·· at rear
CONSTRUCTION Front and rear bumper Yes Yes Yes Yes Yes Yes Yes Yes Yes Yes Yes
Trailer hitch Yes Yes Yes Yes Yes Yes Yes Yes Yes Yes Yes
90"
103"
-6-
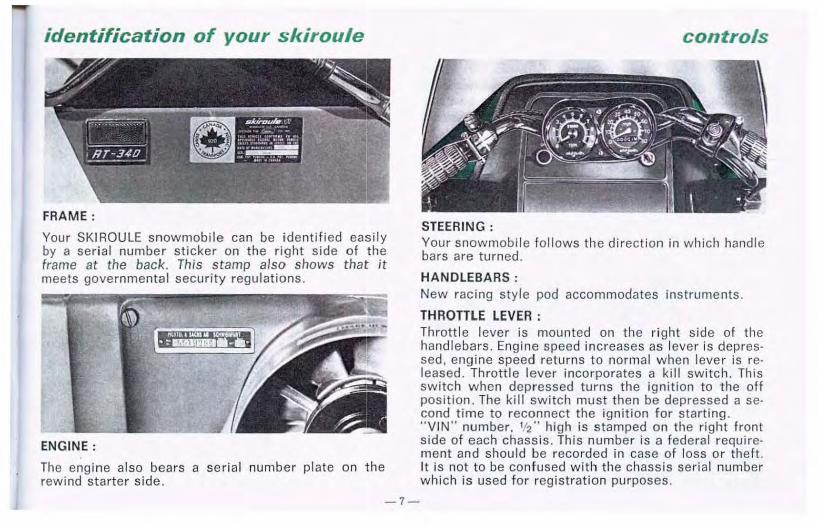
identification of your skiroule
FRAME :
Your SKI ROULE snowmobi le can be identified ea:sily by a serial number sticker on the right side of the frame at the back. This stamp also shows thalt it meets governmental secur ity regulations .
controls
STEERING : Your snowmobile follows the direction in which handle bars are turned.
HANDLEBARS : New racing style pod accommodates instruments.
THROTTLE LEVER :
ENGINE:
The eng ine also bears a seri al number plate on the rewind starter side.
-7-
Throttle lever is mounted on the right side of the handlebars. Engine speed increases as lever is depressed, engine speed returns to normal when lever is released. Throttle lever incorporates a kill switch. This switch when depressed turns the ignition to the off position. The kill switch must then be depressed a second time to reconnect the ignition for starting. "VIN" number, 112 •• high is stamped on the right front side of each chassis. This number is a federa l requirement and should be recorded in case of loss or theft. It is not to be confu sed w ith the chassis serial number which is used for registration purposes.
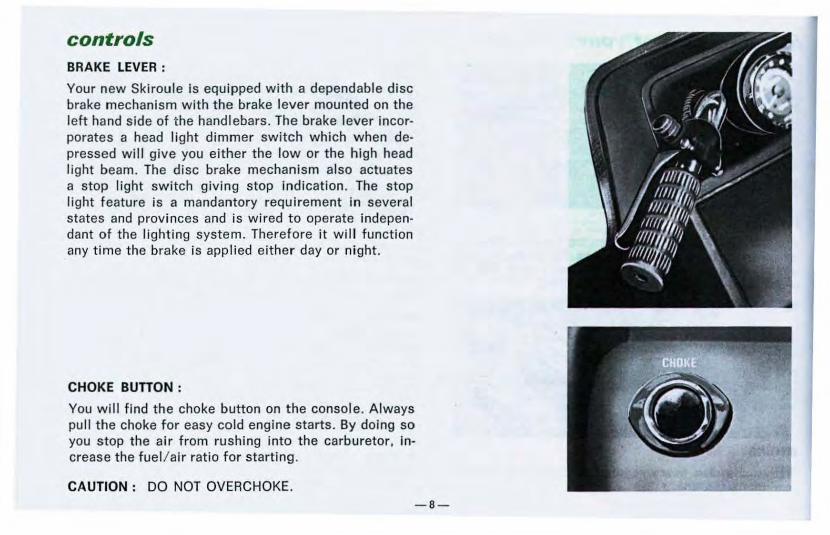
controls BRAKE LEVER :
Your new Skiroule is equipped with a dependable disc brake mechanism with the brake lever mounted on the left hand side of the handlebars. The brake lever incorporates a head light dimmer switch which when depressed will give you either the low or the high head light beam. The disc brake mechanism also actuates a stop light switch giving stop indication. The stop light feature is a mandantory requirement in several states and provinces and is wired to operate independant of the lighting system. Therefore it wil l function any time the brake is applied either day or night.
CHOKE BUTTON :
You will find the choke button on the console. Always pull the choke for easy cold engine starts. By doing so you stop the air from rushing into the carburetor, increase the fuel/ air ratio for starting.
CAUTION : DO NOT OVERCHOKE.
-8-
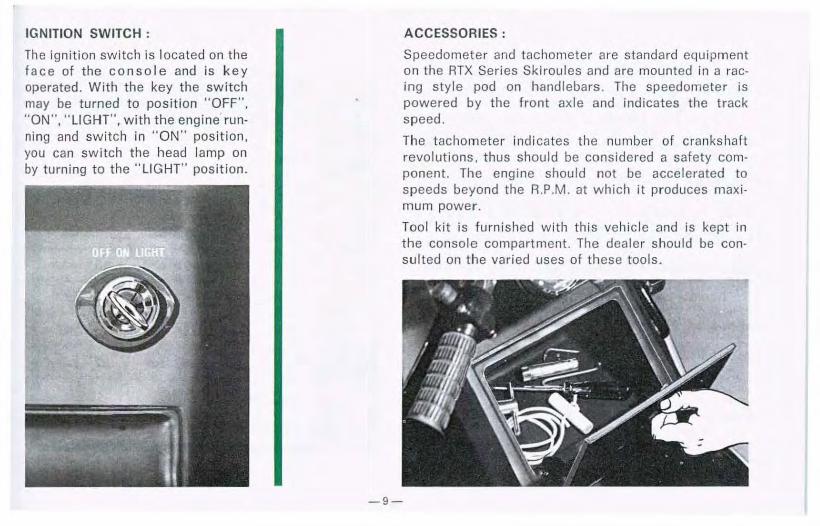
IGNITION SWITCH :
The ignition switch is located on the f ace of the console and is key operated. With the key the switch may be turned to position "OFF", " ON" , " LIGHT", with the engine running and switch in " ON" position, you can switch the head lamp on by turning to the " LIGHT" position.
ACCESSORIES :
Speedometer and tachometer are standard equ ipment on t he RTX Series Skirou les and are mounted in a racing style pod on handlebars. The speedon1eter is powered by the front axle and indicates the track speed.
The tachometer ind icates the number of crankshaft revolutions, thus should be considered a safety component. The engine should not be accelerated to speeds beyond the R.P.M. at wh ich it produces maximum power.
Tool kit is furnished with this vehicle and is kept in the console compartment. The dealer should be consulted on the varied uses of these tools.
-9-
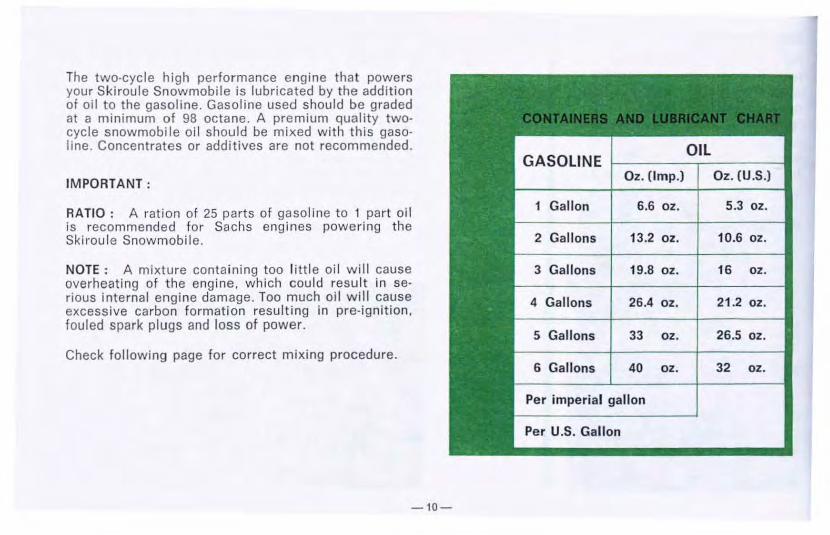
The two-cycle high performance engine that powers your Skiroule Snowmobile is lubricated by the addition of oil to the gasoline. Gasoline used should be graded at a minimum of 98 octane. A premium quality twocycle snowmobile oil should be mixed with this gasol ine. Concentrates or additives are not recommended.
IM PORTANT:
RATIO : A ration of 25 parts of gasoline to 1 part oil is recommended for Sachs engi nes powering the Skiroule Snowmobile.
NOTE : A mixture contain ing too l ittle oi l will cause overheating of the engine . which cou ld result in serious internal engine damage. Too much oil will cause excessive carbon formation resulting in pre-ignition, fouled spark plugs and loss of power.
Check following page for correct mixing procedure.
-10-
Oz. (Imp.)
1 Gallon 6.6 oz.
2 Gallons 13.2 oz.
3 Gallons 19.8 oz.
4 Gallons 26.4 oz.
5 Gallons 33 oz.
6 Gallons 40 oz.
Per imperial gallon
Per U.S. Gallon
Oz. (U.S.)
5.3 oz.
10.6 oz.
16 oz.
21.2 oz.
26.5 oz.
32 oz.
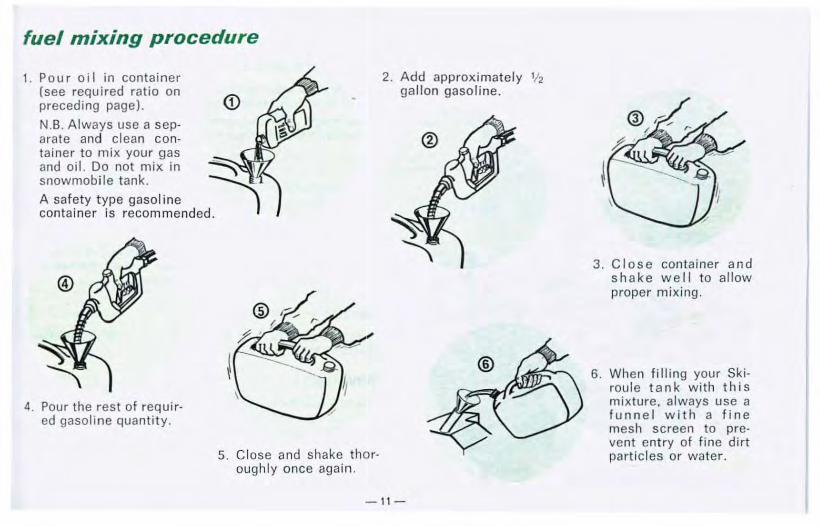
fuel mixing procedure
1. Pour oil in container (see required ratio on preceding page).
N.B. Always use a separate and clean container to mix your gas
<D
and oil. Do not mix in :-"\ 1 snowmobile tank. ~ A safety type gasoline container is recommended.
4. Pour the rest of required gasoline quantity.
5. Close and shake thoroughly once again .
2. Add approximately 112 gallon gasol ine.
·-11-
3. C l ose container and shake well to allow proper mix ing.
6. When fi I ling your Ski· roule tank with t h is mixture, always use a funnel with a fine mesh screen to prevent entry of fine dirt particles or water.
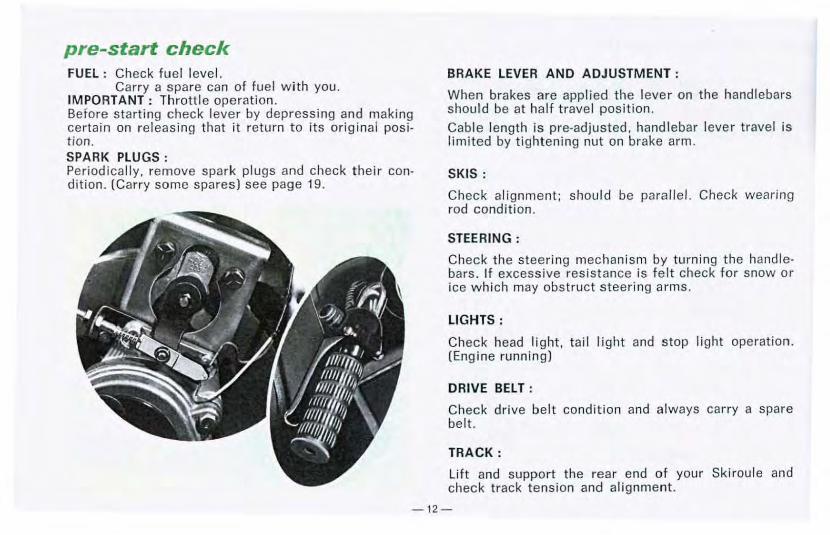
pre-start check FUEL : Check fue l level.
Carry a spare can of fuel with you. IMPORTANT : Thrott le operation. Before starting check lever by depressing and making certain on releas ing t hat it return to its original position. SPARK PLUGS : Periodically, remove spark plugs and check their condition. (Carry some spares) see page 19.
BRAKE LEVER AND ADJUSTMENT :
When brakes are applied the lever on the handlebars shou ld be at half trave l position.
Cable length is pre-adjusted, handlebar lever travel is limited by ti ghtening nut on brake arm.
SKIS:
Check alignment; shou ld be parallel. Check wearing rod condition.
STEERING :
Check the steering mechanism by turning the handlebars. If excess ive resistance is felt check for snow or ice which may obstruct steering arms.
LIGHTS:
Check head light, tail light and stop light operation. (Engine running)
DRIVE BELT :
Check drive belt condition and always carry a spare belt.
TRACK :
Lift and support the rear end of your Skiroule and check track tension and alignment.
- 12-
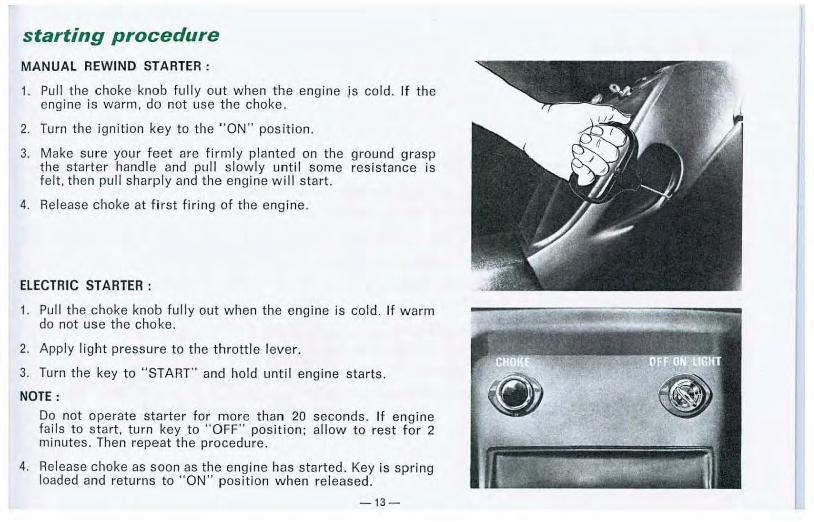
starting procedure MANUAL REWIND STARTER:
1. Pull the choke knob fully out w hen the engine js cold. If the engine is warm, do not use the choke.
2. Turn the ignition key to the "ON " position.
3. Make sure your feet are firmly planted on the ground grasp the starter handle and pull slowly until some resistance is felt, then pull sharply and the engine w i ll start.
4. Release choke at first f iring of the eng ine.
ELECTRIC STARTER :
1. Pull the choke knob fully out when the engine is cold. If warm do not use the choke.
2. Apply light pressure to the throttle lever.
3. Turn the key to "START" and hold unti l engine start s.
NOTE:
Do not operate starter for more than 20 seconds. If engine fails to start, turn key to " OFF" position; allow to rest for 2 minutes. Then repeat the procedure.
4. Release choke as soon as the engine has started. Key is spr ing loaded and returns to "ON" position when released.
-13-
break-in period
Do not be too anxious to see how fast your machine will go, take it easy and avoid trouble later.
1. To obtain the best overall performance from your Skiroule Snowmobile, a break-in period of 12 operating hours should be observed, before the machine can be run at full power.
2. The throttle position should never exceed 3f4 maximum travel or 40 miles per hour during this period.
3. All through the break-in period fuel-air mixture screws on the carburetor must be left at their pre-set adjustment.
4. We cannot overstress the importance of the break-in-period . It may mean the difference between complete enjoyment and trouble. If care is not taken during this period, engine damage will likely result. While it may not show up immediately , it will eventually cause engine failure .
5. After 12 hours of operation, we recommend that you return your Skiroule to your dealer for its first inspection and adjustment.
suggestions ·to novices Develop confidence in your Skiroule and in yourse lf as a snowmobiler. Select large, flat areas, clear of trees or other obstructions for your first rides. Get used to the various controls of your Skiroule and to its feel and balance. Do not attempt to trave l at high speed or far away.
Avoid the mistake of pressing and releasing throttle and brake levers abruptly. Always squeeze smoothly for jerkless acceleration and braking.
Remember that releasing the throttle lever has a natural slowing action and that a gentle pressure on the brake lever will be sufficient. You will be less and less dependent on the brake as your driving improves.
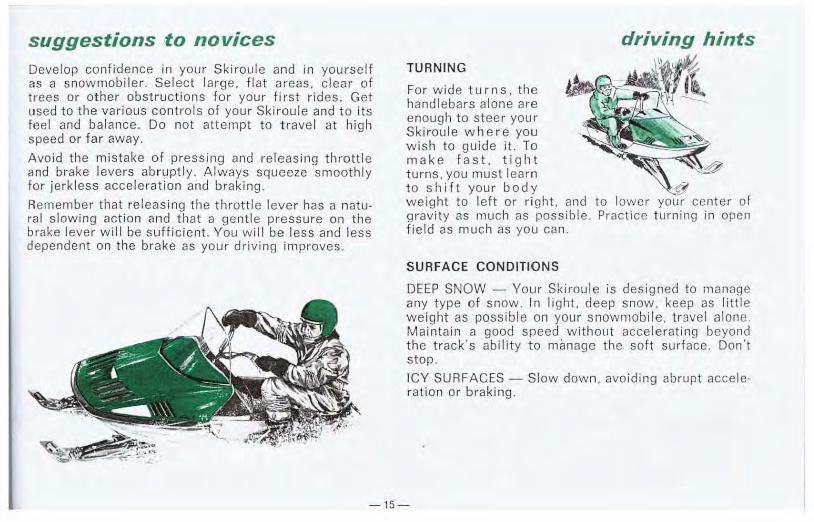
TURNING
For wide turns, the handlebars alone are enough to steer your Skiroule where you wish to guide it. To make fast, tight turns, you must learn to shift your body
driving hints
weight to left or right. and to lower your center of gravity as much as possible . Practice turning in open field as much as you can.
SURFACE CONDITIONS
DEEP SNOW - Your Skiroule is designed to manage any type of snow. In light, deep snow. keep as little weight as possible on your snowmobile . travel alone. Maintain a good speed without accelerating beyond the track's ability to manage the soft surface. Don't stop.
ICY SURFACES- Slow down. avoiding abrupt acceleration or braking.
-15-
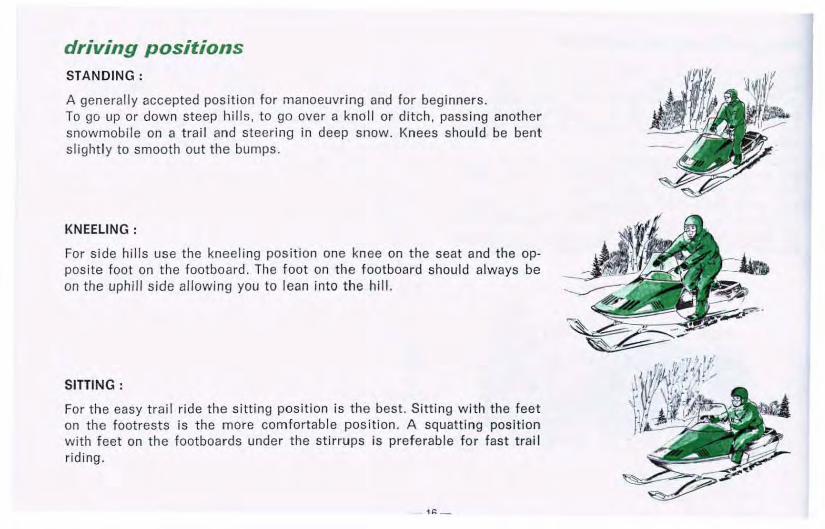
driving positions STANDING :
A generally accepted position for manoeuvring and for beginners. To go up or down steep hil ls, to go over a knol l or ditch, passing another snowmobile on a trail and steering in deep snow. Knees should be bent slightly to smooth out the bumps.
KNEELING :
For side hills use the kneeling position one knee on the seat and the opposite foot on the footboard. The foot on the footboard should always be on the uphill side allowing you to lean into the hill.
SITTING :
For the easy trail ride the sitting position is the best. Sitting with the feet on the footrests is the more comfortab le position. A squatting position with feet on the footboards under the stirrups is preferable for fast trail riding .
11: _
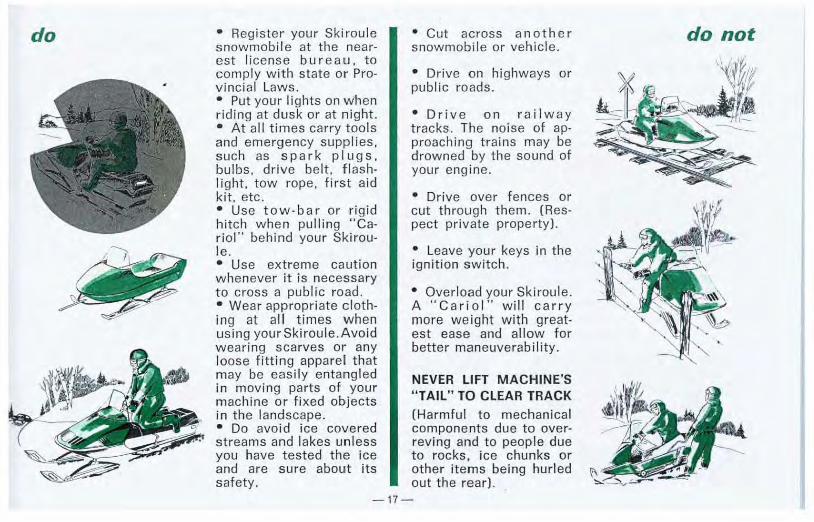
do • Register your Skiroule snowmobite at the nearest license bureau. to comply with state or Provincial Laws. • Put your lights on when riding at dusk or at night. • At al l times carry tools and emergency supplies, such as spark p I u g s, bulbs. drive belt, f lashl ight, tow rope, first aid k it, etc. • Use tow-bar or rigid hitch when pu lling "Car iol" behind your Skiroule. • Use extreme caution w henever it is necessary to cross a public road. • Wear appropriate clothing at all times w hen using yourSkiroul e.Avoid wearing scarves or any loose fitting apparel that may be easi ly entangled in moving parts of your machine or f ixed objects in t he landscape. • Do avoid ice covered streams and lakes unless you have tested the ice and are sure about its safety.
• Cut across anothe r snowmobile or vehicle.
• Drive on highways or public roads.
• Drive on railway tracks. The noise of approaching trains may be drowned by the sound of your eng ine.
• Drive over fences or cut through them. (Respect private property).
• Leave your keys in the ignition switch.
• Overload your Skiroule. A "Car i o l " wi ll car r y more weight with greatest ease and allow for better maneuverabi lity.
NEVER LIFT MACHINE'S "TAIL" TO CLEAR TRACK
(Harmfu l to mechanical components due to overreving and to people due to rocks, ice chunks or other items being hurled out the rear) .
-17-
do not
emergency
EMERGENCY SITUATION
Emergency situations may orise. Be ready to cope with them. Always carry a set of tools and spare parts for minor and even major repairs on the tra i I.
EMERGENCY MATERIALS
In addition to the standard tool kit supplied with your SKIROULE, carry : - An adjustable wrench - pliers - thin-bladed screw driver - a fuel filter · some spark plugs- a light bulb - a good rope - and a throttle cable.
TOWING A SNOWMOBILE
1. Remove the drive belt (see photo).
2. Tie both skis to your rear bumper.
3. TAKE driver on your SKIROULE and tow vehicle slowly.
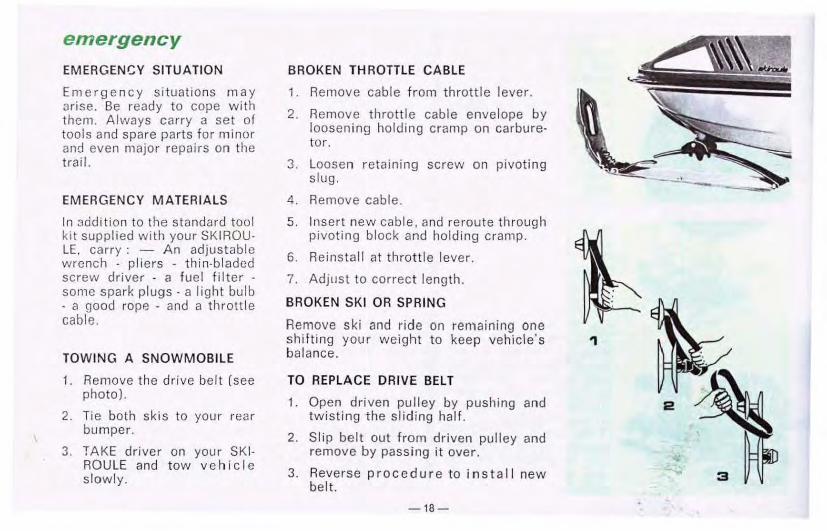
BROKEN THROTTLE CABLE
1. Remove cable from throttle lever.
2. Remove throttle cable envelope by loosenin!~ holding cramp on carburetor.
3. Loosen retaining screw on pivoting slug.
4. Remove ·cable .
5. Insert new cable, and reroute through pivoting block and holding cramp.
6. Reinstall at throttle lever.
7. Adjust to correct length.
BROKEN SKI OR SPRING
Remove ski and ride on rema1n1ng one shifting your weight to keep vehicle's balance.
TO REPLACE DRIVE BELT
1. Open driven pulley by pushing and twisting the sliding half.
2. Slip belt out from driven pulley and remove by passing it over.
3. Reverse procedu re t o install new belt.
-18-
REWIND STARTER BROKEN ROPE
Remove rewind starter unit. Wind rope around starting pulley. Start engine as usual.
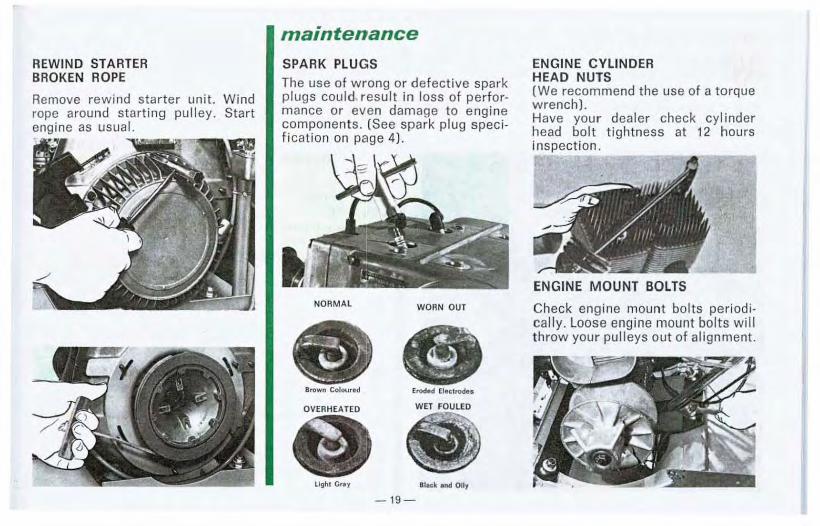
maintenance SPARK PLUGS
The use of wrong or defective spark plugs could result in loss of performance or even damage to engine c.om~onents. (See spark plug specificatiOn on page 4).
NORMAL WORN OUT
Brown Coloured Eroded Electrodes
OVERHEATED WET FOUlED
Ught Gray BIKJ< and Oily
-19-
ENGINE CYLINDER HEAD NUTS (We recommend the use of a torque wrench). Have your dealer check cylinder head bolt tightness at 12 hours inspection .
ENGINE MOUNT BOLTS
Check engine mount bolts periodi· cally. Loose engine mount bolts will throw your pulleys out of alignment.
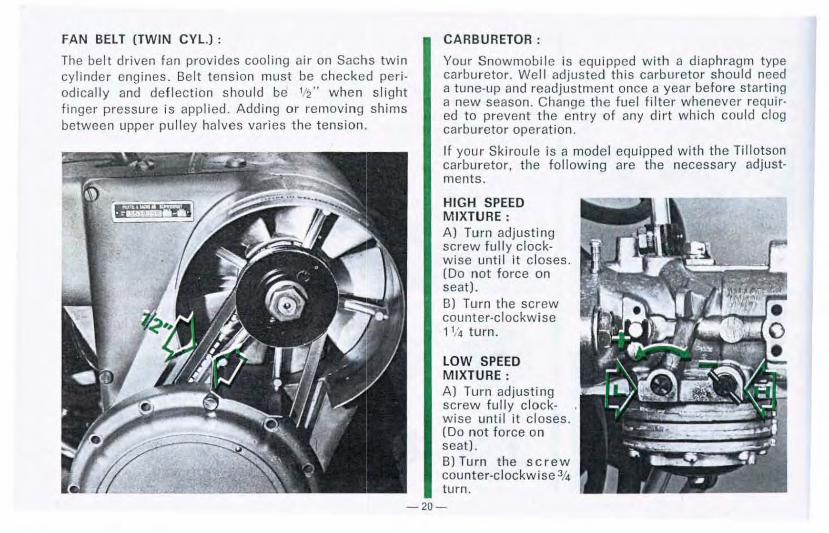
FAN BELT (TWIN CYL.) :
The belt driven fan provides cooling air on Sachs twin cylinder engines. Belt t ension must be checked periodically and def lection should be 112" when slight finger pressure is applied. Add ing or removing shims between upper pulley halves varies the tension ..
CARBURETOR :
Your Snowmobile is equipped with a diaphragm type carburetor. Wel l adjusted this carburetor should need a tune-up and readjustment once a year before starting a new season. Change the fuel filter whenever required to prevent the entry of any dirt which could clog carburetor operation.
If your Skiroule is a model equipped w ith the Till otson carburetor. the following are the necessary adjustments.
HIGH SPEED MIXTURE: A) Turn adjusting screw fully clockw ise until it closes. (Do not force on seat)_ B) Turn the screw counter-clockwise 11/ 4 turn .
LOW SPEED MIXTURE : A) Turn adjusting screw fully clockwise until it c loses. (Do not force on seat). B) Turn the screw counter-clockwise% turn.
-20-
IDLE SPEED ADJUSTMENT :
A) Turn adjusting screw counter-clockwise until iit clears the throttle lever then turn in clockwise 1112 turns.
B) Start engine and readjust if nece_ssary.
NOTE:
These carburetor adjustments are primary adjustments on a cold engine. Once the engine has been started and operating temperatures reached these adjustments will vary slightly.
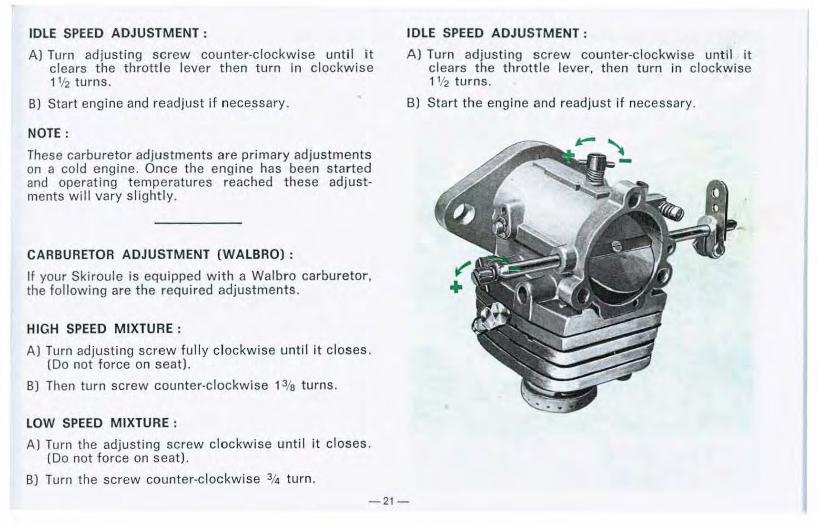
CARBURETOR ADJUSTMENT (WALBRO) :
If your Skiroule is equipped with a Walbro carburetor, the following are the required adjustments.
HIGH SPEED MIXTURE :
A) Turn adjusting screw fully clockwise until it closes. (Do not force on seat).
B) Then turn screw counter-clockwise 13/s turns.
LOW SPEED MIXTURE :
A) Turn the adjusting screw clockwise until it closes. (Do not force on seat).
B) Turn the screw counter-clockwise 314 turn .
IDLE SPEED ADJUSTMENT :
A) Turn adjusting screw counter-clockwise until it clears the throttle lever, then turn in clockwise 1112 turns.
B) Start the engine and readjust if necessary.
-21-
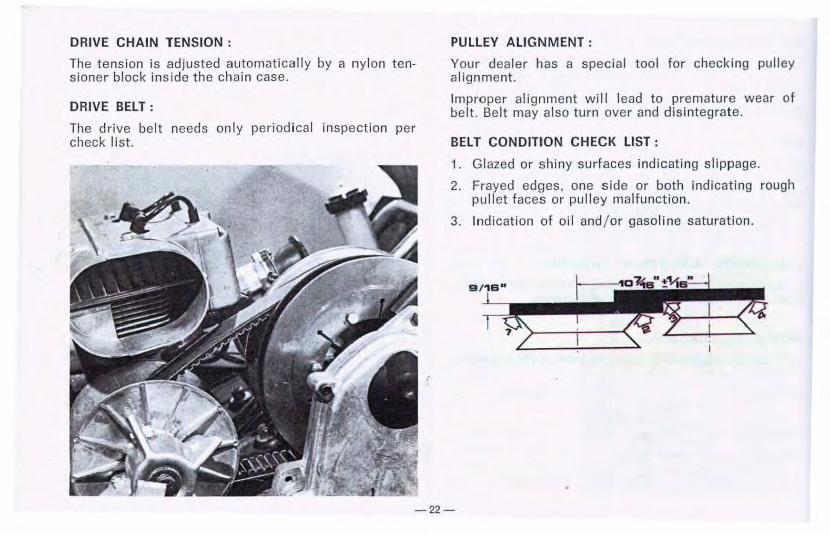
DRIVE CHAIN TENSION :
The tension is adjusted automatically by a nylon tensioner block inside the cha in case.
DRIVE BELT :
The drive belt needs only period ical inspection per check list.
PULLEY ALIGNMENT :
Your dealer has a special tool for checking pulley alignment.
Improper alignment w ill lead to premature wear of belt. Belt may also turn over and disintegrate.
BELT CONDITlON CHECK LIST :
1. Glazed or shiny surfaces indicating slippage.
2. Frayed edges, one side or both ind icating rough pullet faces or pulley malfunction.
3. Indication of oil and / or gasoline saturation.
-22-
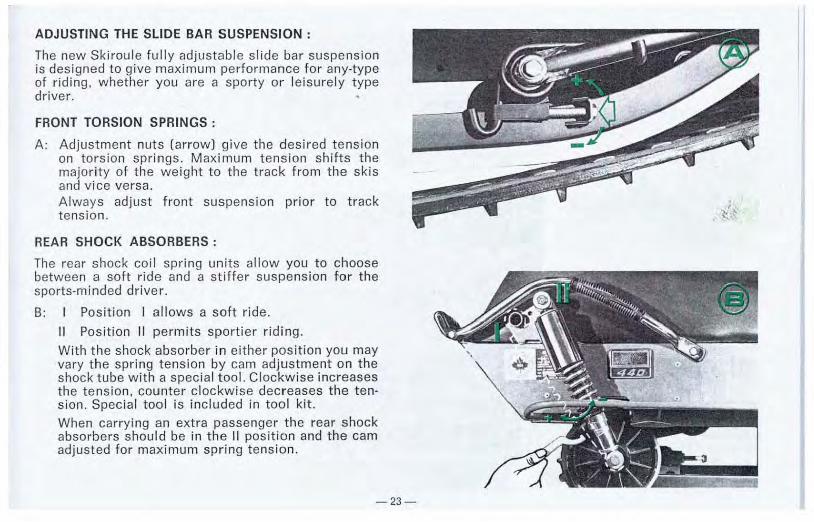
ADJUSTING THE SLIDE BAR SUSPENSION :
The new Skiroule fu lly adjustable slide bar suspension is designed to give maximum performance for any-type of riding, whether you are a sporty or leisurely type driver.
FRONT TORSION SPRINGS :
A: Adjustment nuts (arrow) give the desired tension on torsion springs. Maximum tension shifts the majority of the weight to the track from the skis and vice versa . Always adjust front suspension prior to track tension.
REAR SHOCK ABSORBERS :
The rear shock coil spring units allow you to choose between a soft ride and a stiffer suspension for the sports-minded driver.
8: Position I allows a soft ride.
II Position II permit s sportier r id ing.
With the shock absorber in either posit ion you may vary the spring tension by cam adjustment on the shock tube with a special tool. Clockwise increases the tension, counter clockwise decreases the tens ion. Special tool is included in tool kit. When carrying an extra passenger the rear shock absorbers should be in the II position and the cam adjusted for maximum spring tension.
-23-
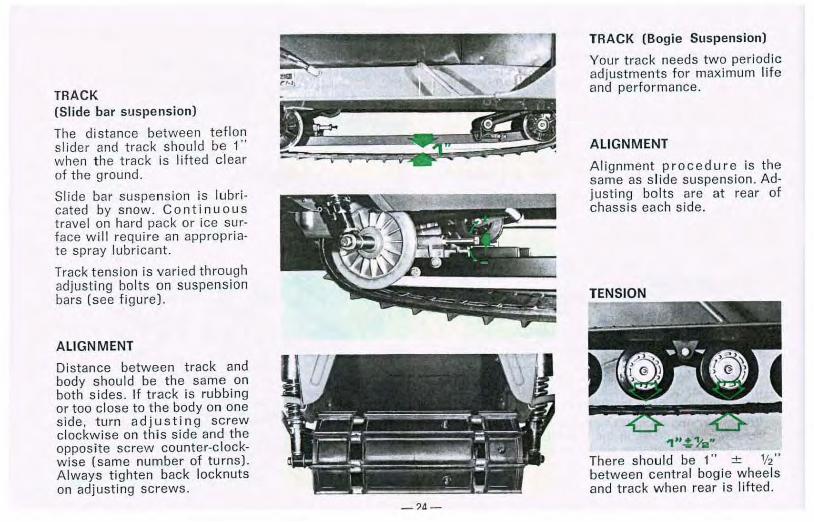
TRACK (Slide bar suspension)
The distance between teflon slider and track should be 1" when the track is lifted clear of the ground.
Slide bar suspension is lubricated by snow. Cont i nuous travel on hard pack or ice surface w ill require an appropriate spray lubricant.
Track tension is varied through adjusting bolts on suspension bars (see figure).
ALIGNMENT
Distance between track and body should be t he same on both sides. If track is rubbing or too close to the body on one side, t urn ad j ust in g screw clockwise on this side and t he opposite screw counter-c lockwise (same number of turns). A lways t ighten back locknuts on adjusting screws.
-?4-
TRACK (Bogie Suspension)
Your track needs two period ic adjustments for maximum life and performance.
ALIGNMENT
Alignment procedure is the same as slide suspension. Adjusting bolts are at rear of chass is each side.
'1".!-Y'e" There should be 1" ± liz" between central bog ie wheels and track when rear is l ifted.
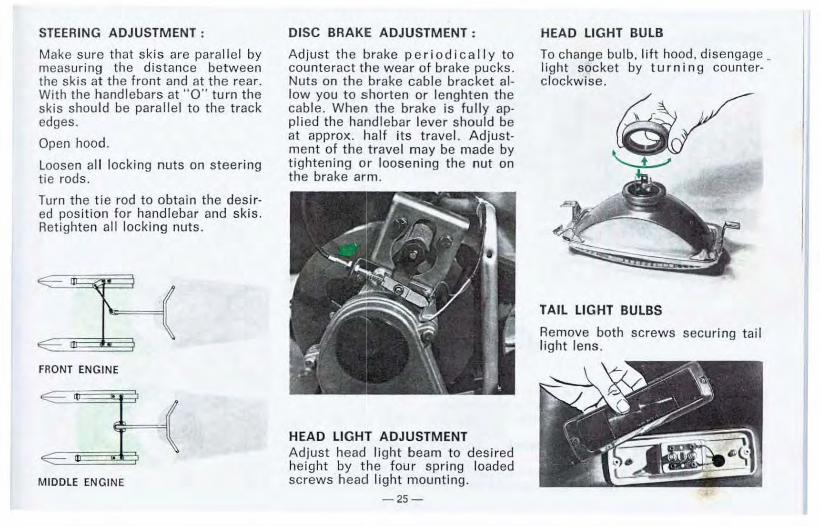
STEERING ADJUSTMENT :
Make sure that skis are parallel by measuring the distance between the skis at the front and at the rear. With the handlebars at "0" turn the skis should be parallel to the track edges.
Open hood.
Loosen all locking nuts on steering tie rods.
Turn the tie rod to obtain the des ired position for handlebar and skis. Retighten al l locking nuts.
FRONT ENGINE
MIDDLE ENGINE
DISC BRAKIE ADJUSTMENT :
Adjust the brake period i ca ll y to counteract tlhe wear of brake pucks. Nuts on the brake cable bracket allow you to shorten or lenghten the cable. When the brake is fully applied the handlebar lever should be at approx. half its travel. Adjustment of the t ravel may be made by tightening or loosening the nut on the brake arm.
HEAD LIGH·r ADJUSTMENT Adjust head light beam to desired height by the four spring loaded screws head light mounting.
-25-
HEAD LIGHT BULB
To change bulb, lift hood, disengage _ light socket by turning counterclockwise.
TAIL LIGHT BULBS
Remove both screws securing tail l ight lens.
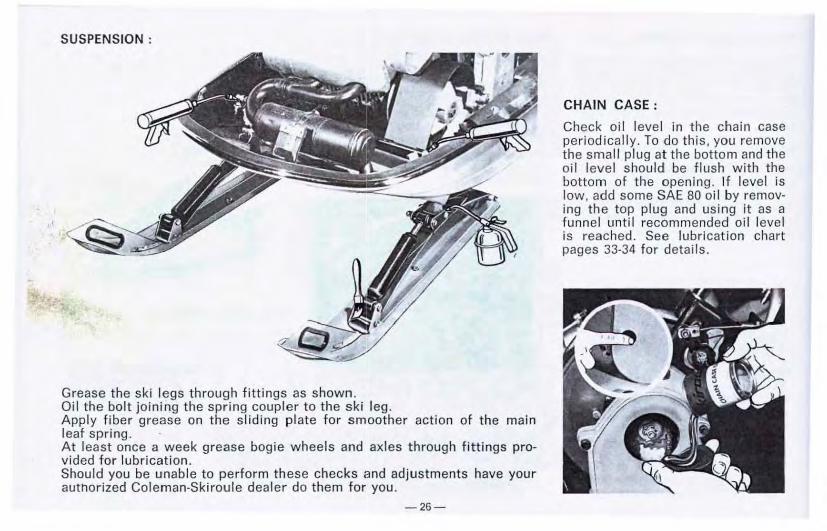
SUSPENSION :
Grease the ski legs through fittings as shown. Oil the bolt joining the spring coupler to the ski leg. Apply fiber grease on the sliding plate for smoother action of the main leaf spring. At least once a week grease bogie wheels and axles through fittings provided for lubrication. Should you be unable to perform these checks and adjustments have your authorized Coleman-Skiroule dealer do them for you.
-26-
CHAIN CASE :
Check oil level in the chain case periodically. To do this, you remove the small plug at the bottom and the oi l level should be flush with the bottom of the opening. If level is low, add some SAE 80 oil by removing the top plug and using it as a funnel until recommended oil level is reached. See lubrication chart pages 33-34 for details.
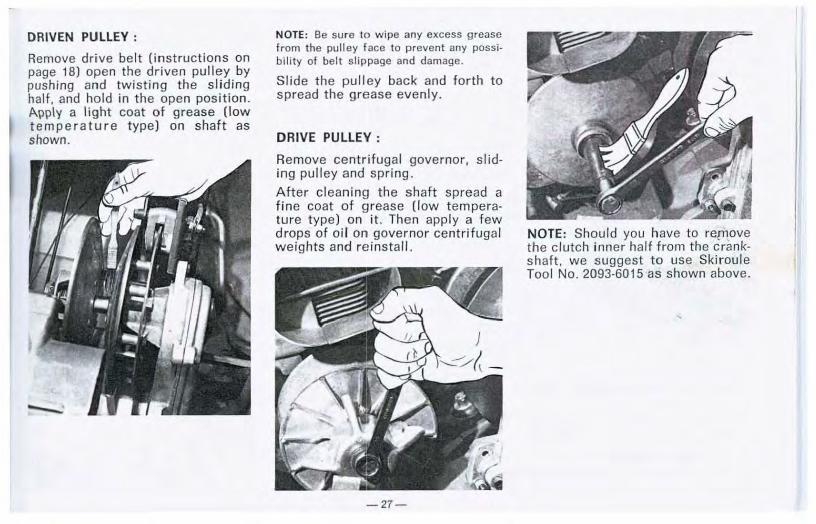
DRIVEN PULLEY :
Remove drive belt (instructions on page 18) open the driven pulley by pushing and twisting the sliding half, and hold in the open position. A\)ply a light coat of grease (low temperature type) on shaft as shown.
NOTE: Be sur e to wipe any excess grease from the pulley lace to prevent any possibility of belt slippage and damage.
Slide the pulley back and forth to spread the grease evenly.
DRIVE PULLEY :
Remove centrifugal governor, sliding pulley and spring.
After c l ean in ~J the shaft spread a fine coat of ~Jrease (low temperature type) on it. Then apply a few drops of oi l on governor centrifugal weights and reinstall .
-27-
NOTE: Should you have to re[l1ove the c lutch inner hal f from the crankshaft, we suggest to use Skiroule Tool No. 2093-6015 as shown above.
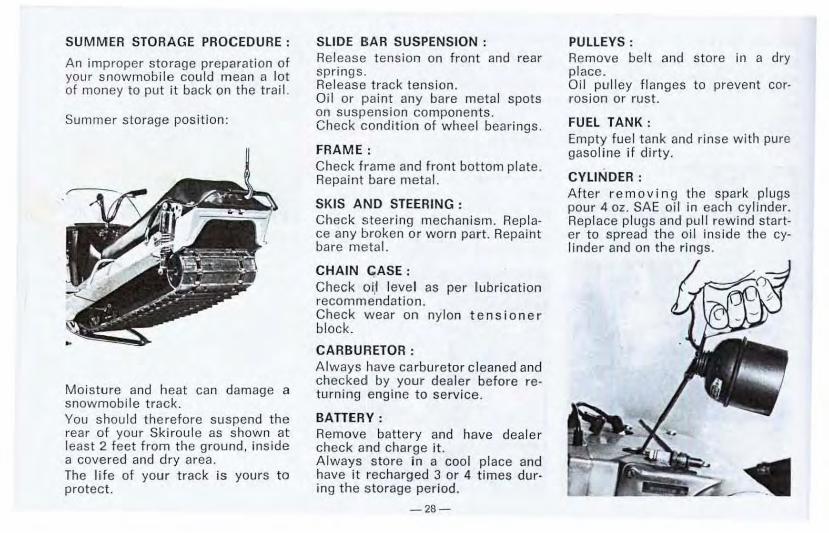
SUMMER STORAGE PROCEDURE :
An improper storage preparation of your snowmobile could mean a lot of money to put it back on the trail.
Summer storage position:
Moisture and heat can damage a snowmobile track. You should therefore suspend the rear of your Skiroule as shown at least 2 feet from the ground, inside a covered and dry area. The life of your track is yours to protect.
SliDE E:AR SUSPENSION : Release tension on front and rear springs. Release track tension. Oil or paint any bare metal spots on suspension components. Check condition of wheel bearings.
FRAME : Check frame and front bottom plate. Repaint bare metal.
SKIS AND STEERING : Check steering mechanism. Replace any broken or worn part. Repaiht bare metal.
CHAIN CASE : Check oi,i level as per lubrication recommendation. Check wear on ny lon te nsioner block.
CARBUI~ETOR : A lways have carburetor cleaned and checked! by your dealer before returning engine to service.
BATIERY : Remove battery and have dealer check and charge i t . Always store in a cool place and have it recharged 3 or 4 t imes during the storage period.
-2B-
PULLEYS: Remove belt and store in a dry place. Oi l pulley flanges to prevent cor· rosion or rust.
FUEL TANK : Empty fuel tank and rinse with pure gasoline i f dirty.
CYLINDER : After remov in g the spark plugs pour 4 oz. SAE oi l in each cylinder. Replace plugs and pull rewind starter to spread the oil inside the cylinder and on the r ings.
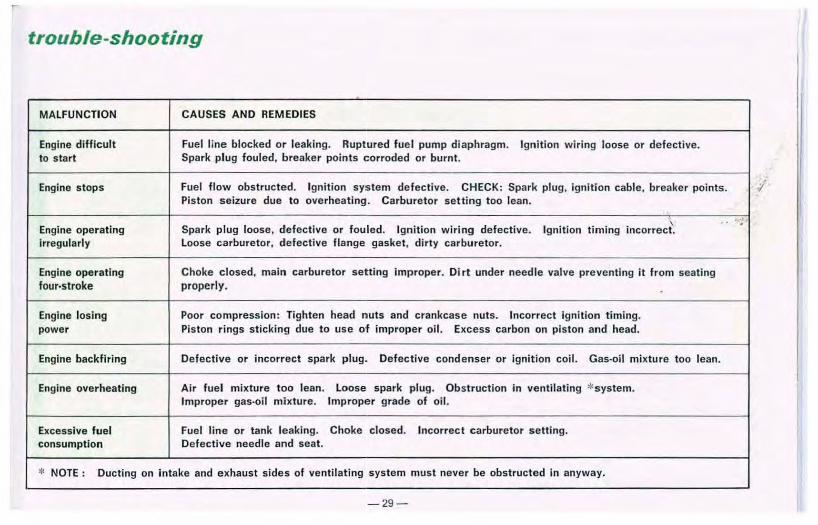
trouble-shooting
-MALFUNCTION CAUSES AND REMEDIES
Engine difficult Fuel l ine blocked or leaking. Ruptured fuel pump diaphragm. Ignition wiring loose or defective. to start Spark plug fouled, breaker points corroded or burnt.
Engine stops Fuel flow obstructed. Ignition sy:stem defective. CHECK: Spark plug, ignition cable, breaker points. j Piston seizure due to overheating. Carburetor setting too lean.
Ignition timing incorrec~ .. . :· Engine operating Spark plug loose, defective or fouled. Ignition wiring defective. irregularly Loose carburetor, defective flange gasket , dirty carburetor.
Engine operating Choke closed, main carburetor se1tting improper. Dirt under needle valve preventing it from seating tour·stroke properly.
Engine losing Poor compression: Tighten head muts and crankcase nuts. Incorrect ignition timing. power Piston rings sticking due to use o·f improper oil. Excess carbon on piston and head.
Engine backfiring Defective or incorrect spark plug .. Defective condenser or ignition coil . Gas-oil mixture too lean.
Engine overheating Air fuel mixture too lean. Loose spark plug. Obstruction in ventilating '~ system.
Improper gas-oil mixture. lmpropo~r grade of oil.
Excessive fuel Fuel line or tank leaking. Choke closed. Incorrect carburetor setting. consumption Defective needle and seat.
* NOTE : Ducting on intake and exhaust sides of ventilating system must never be obstructed in anyway.
-2g-
.:.rrr1rnr1mr1rur1rrtr1mr1rnr,rnr,rrtrr•"'''"'"'"''"'''"'''"'''"''"'''''~'"''''"'''"''"''''"'''"'''"'''"'''"'''"'''"'""'''"'''"'''"'''"'''"'''"'''"'''"'''"'''"'''"'''"'''"'''"'''"'''"''''-=. ;"""~~._:~~~ .,.......,.....: :( ~
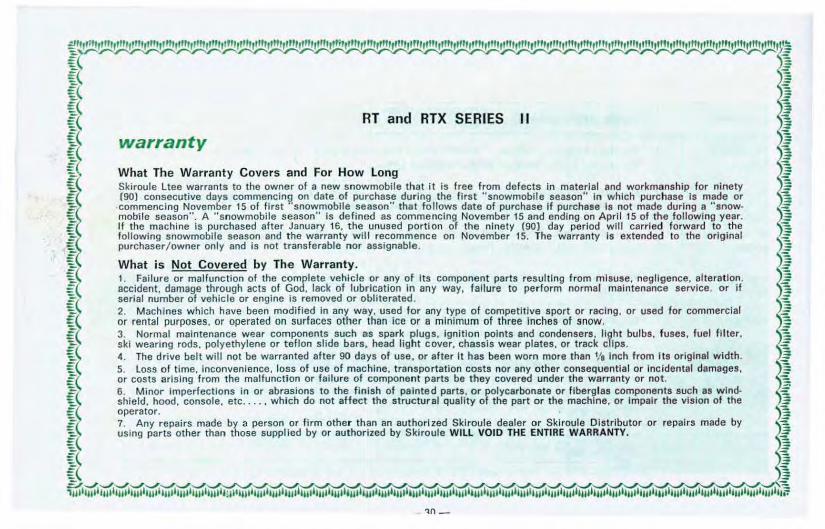
~ ~ \ ~ h ~ ~~ warranty liT and RTX SERIES II ~
~ What The Warranty Covers and For How Long ~ -:;. Skiroule Ltee warrants to the owner of a new snowmobile that it is free from defects In material and workmanship for ninety _: : (90) consecutive days commencing on date of pu1rchase during the first "snowmobile season" In which purchase Is made or :: g commencing November 15 of first "snowmobile season" that follows date of purchase If purchase Is not made during a "snow- ~-
mobile season". A "snowmobile season" is defin1~d as commencing November 15 and ending on April 15 of the following year. E If the machine Is purchased after January 16, the unused portion of the ninety (90) day period will carri ed forward to the ~ --==--_-_ following snowmobile season and the warranty will recommence on November 15. The warranty Is extended to the original -_-_-::.-==
purchaser/ owner only and is not transferable nor assignable.
-:. What is Not Covered by The Warranty. .:: € 1. Failure or malfunction of the complete vehicle or any of Its component parts resulting from misuse. negligence. alteration. :: E( accident. damage through acts of God. lack of lubrication In any way, failure to perform normal maintenance service. or if "i '=:.1 serial number of vehicle or engine is removed or obliterated. )_:
::_~==-=!' 2. Machines which have been modified In any wa1y, used for any type of competitive sport or racing. or used for commercial ~----_-=_-==-or rental purposes. or operated on surfaces other than lee or a minimum of three Inches of snow. 3. Normal maintenance wear components such fiS spark plugs. Ignition points and condensers. light bulbs, fuses, fuel filter, ski wearing rods. polyethylene or teflon slide bars .. head light cover, chassis wear plates. or track clips.
~ 4. The drive belt will not be warranted after 90 days of use. or after It has been worn more than '/e Inch from Its original width. 3: : ~ =_-:.. 5. Loss of time. inconvenience. loss of use of machine, transportation costs nor any other consequential or Incidental damages. __ ;:
or costs arising from the malfunction or failure of component parts be they covered under the warranty or not. ~~ 6. Minor Imperfections in or abrasions to the f inish of painted parts. or polycarbonate or fiberglas components such as wind- ~ ~> shield. hood. console. etc . .. . . which do not aHect· the structural quality of the part or the machine. or Impair the vision of the ,€ -, operator. -'§.( 7. Any repairs made by a person or firm other than an authorized Sklroule dealer or Skiroule Distributor or repairs made by ~ ~( using parts other than those supplied by or authorized by Sklroule WILL VOID THE ENTIRE WARRANTY. ~
~ ~ ~ -i b:-----~---~-~-~ ... ...,~~~~~~~~~ ,u•'•u•'•u•hu•••u•'•u•••u•'•u•••w'IIII'IW••u•'•lll''"''hllliulltuiliuiliullJutllutlluJIJutliuillullJUIIIutllutllullhiiiiUiilulllulhUIIIJiillulllulllullilllllulhUIIIulillllllitllilli''"'"'~
!ltt1tllt1tllt1t"'''"'''"'''"'''"'''"'''"''''''''"'''"''''''''"'''"'•'"'H"'''"'''"'''"'''"'''"'''"'''n'''"'''"'''"'''''''''''''"'''"'''"'''"'''"'''""'"'''"'''"'''"'''"'''"'''"'''r''''"'''"'''"'" ~~~.,....,....,....,....,....,.....,.....,...._.,.....,.....,....,....~--'1----.,...~.,.....,......,.....,.....,...~~-.,...---~
~ ~
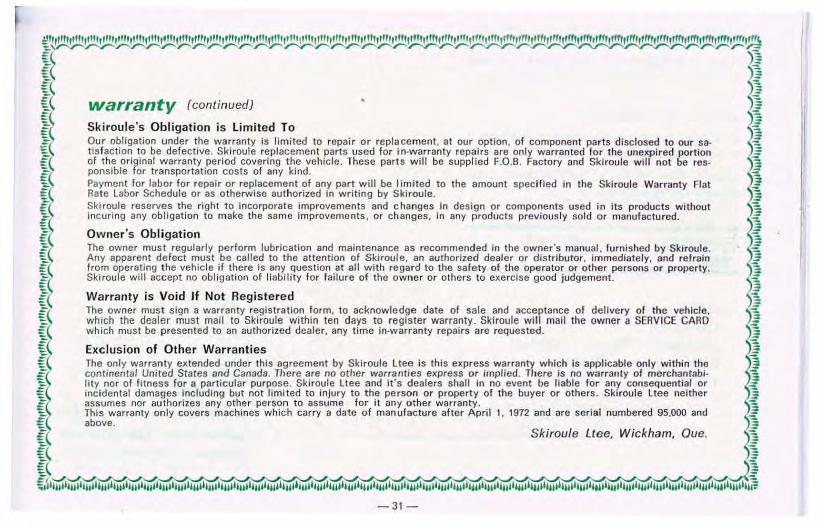
~~ warranty (continued) 5-i {( Skiroule's Obligation is Limited To )}
=:-
::_=:-=:_== __ f( Our obligation under the warranty is limited to repair or replacement. at our option. of component parts disclosed to our sa- ~)~---_~====-=-::--( tis faction to be defective. Skiroule replacement parts usl!d for in-warranty repairs are only warranted for the unexpired portion of the original warranty period covering the vehicle. These parts w ill be supplied F.O.B. Factory and Skiroule will not be responsible for transportation costs of any kind. Payment for labor for repair or replacement of any part will be I imlted to the amount specified in the Skiroule Warranty Flat Rate Labor Schedule or as otherwise authorized In writing by Skiroule.
€1 Sklroule reserves the right to incorporate improvements and changes in design or components used in its products without \} == __ -:,:( incuring any obligation to make the same improvements, or changes, In any products previously sold or manufactured. ~'::_-::. __ _
( Owner's Obligat ion
( The owner must regularly perform lubrication and maintenance as recommended in the owner's manual, furnished by Skiroule. -
=
=_;t Any apparent defect must be called to the attention of .Skiroule. an authorized dealer or distributor, immediately, and refrain ,-_~----from operating the vehicle if there Is any question at all with regard to the safety of the operator or other persons or property. J
- Skiroule will accept no obligation of liability for failure o'f the owner or others to exercise good judgement. )-
~( Warranty is Void If Not Registered ~~ ~~ The owner must sign a warranty registration form. to acknowledge date of sale and acceptance of delivery of the vehicle. -ff : which the dealer must mall to Skiroule within ten days to register warranty. Skiroule will mail the owner a SERVICE CARD j --=-~-= which must be presented to an authorized dealer. any t irne in-warranty repairs are requested. -=-~-=
Exclusion of Other Warranties : The only warranty extended under this agreement by Skiroule Ltee is this express warranty which is applicable only within the ; :;.~ continental United States and Canada. There are no other warranties express or implied. There is no warranty of merchantabi- ~ : lity nor of fitness for a particular purpose. Skiroule Ltee .and it's dealers shall in no event be liable for any consequential or : € 1ncidental damages including but not limited to injury to lthe person or property of the buyer or others. Skiroule Ltee nei ther ~ :.;. assumes nor authorizes any other person to assume for it any other warranty. ~ =£ This warranty only covers machines which carry a date c•f manufacture after April 1, 1972 and are serial numbered 95,000 and = { obo••· Skl,oule Uee, Wickham, Oue. sJ ~ ~ ~{-.J:-.J:-.J:-.J.._,._,~~~~~~~{..~ ~,rlrullrulllur••u•••u•••u•hulliulllulllulllulihllllulilulllulihll•lulllulllulhulhulllulllulhulilulilulllulllulllulilulilulh&~llhllllulllullltllliulllulhlllllulhulllulllulllulllulllu-:-
-31-
r
TO VALIDATE YOUR WARRANTY
A) You should make sure your warranty registration forms are completed at the time of purchase.
B) You must sign these forms.
C) Your dealer must forward them immediately for registration of your warranty.
D) Within a few days you will receive your Warranty Service Card.
sklrou/e ll/1111111
John Doe 100 State St .
C . .tR1 E IJ E ~ER J ICf.
CA RD
Anywhere North America RTX - 447 115000 11573 5519959
-32-
Skiroule reserves the right to change data and specifications
included in this manual at any
time and without prior notice.
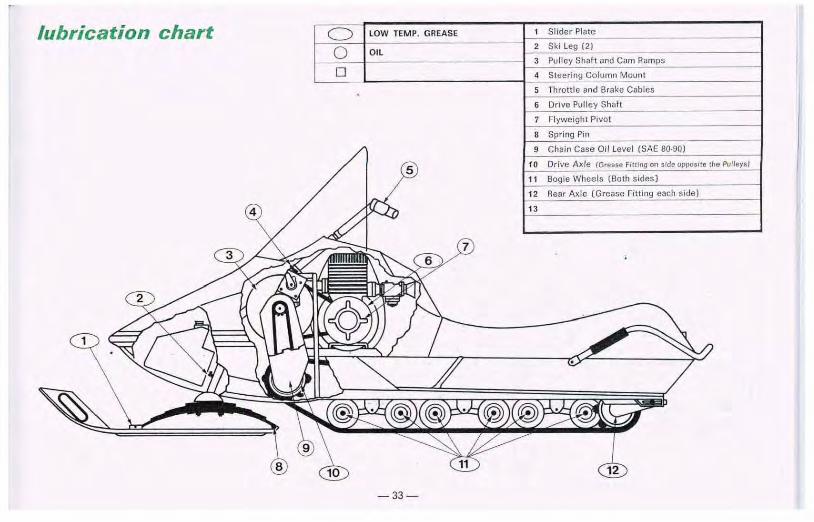
lubrication chart 0 LOW TEMP. GREASE
0 OIL
D
5
4
7
-33 -
1 Slider Plate
2 Ski leg (2)
Pulley Shaft and Cam Ramps
4 Steering Column Mount
Throttle and Brake Cables
Drive Pulley Shalt
7 Flyweight Povot
8 Spring Pin
9 Chain Case Oil level (SAE 80·90)
10 Drive Axle (Grease follong on side opposote the Pulleys}
11 Bogie Wheels (Both sides)
12 Rear Axle (Grease Fitting each side)
13
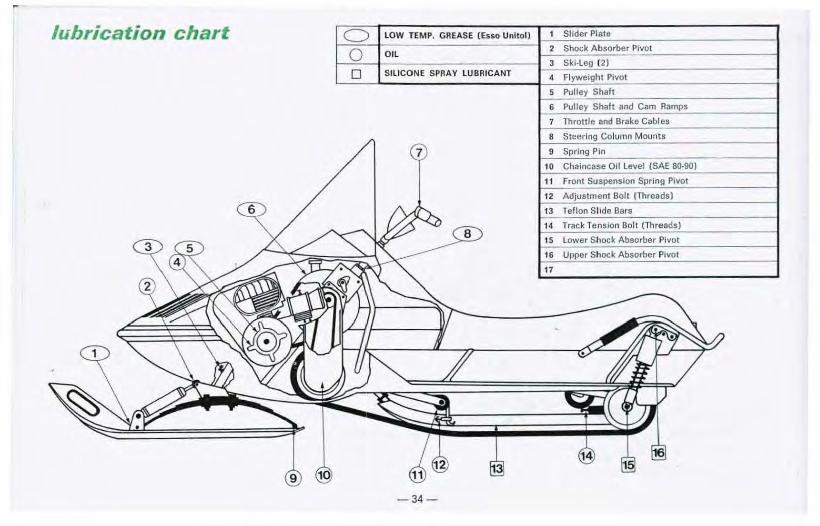
lubrication chart I ~O -~-r~~~~~~T:E~M~P~.:G;RE~A~S~E:(~Es~s:o:U~n-it-ol-1~~~~~~----------------------~
SILICONE SPRAY LUBRICANT
Slider Plate
2 Shock Absorber Pivot
3 Ski·Leg (2)
4 Flyweight Pivot
5 Pulley Shaft
6 Pulley Shalt and Cam Ramps
7 Throttle and Brake Cables
8 Steering Column Mounts
9 Spring Pin
10 Chaincase Oil Level (SAE 80·90)
11 Front Suspension Spring Pivot
12 Adjustment Bolt (Threads)
13 Teflon Slide Bars
14 Track Tension Bolt (Threads)
15 Lower Shock Absorber Pivot
16 Upper Shock Absorber Pivot
17
- 34-

WIRING FROM
ENGINE
KILl SWITCH
DIMMER SWITCH
BRAKE SWITCH
VOLTAGE REGULATOR
NOTE : SOM£ UNITS ARE NOT EQUIPPED W ITH 2JW SUPPLEMENTARY LICHT COIL WINDING YELLOW WIRE TO L·6 INSTEAD OF GROUND
r-- Bl UE TO M· l
BLUE & REO TO M-2
YELLOW TO GROUND
GREEN TO GROUND
YELLOW & GREEN TO ALT.
GREEN & BLACK TO ALT.
-
BLACK TO M- 1
TO M-2 (FOR 2 CYL. )
TO GROUND (FOR I CYL )
BLACK & WHITE TO LIGHT
fJL---._J~-B_LA_C_K __ T~O_L_·_I __________ ___
~ BLACK TO l-2
D REO TO L·3
WHITE TO AlT. --
BROWN TO GROUND
BLACK TO A LT.
I • • • • • • I GROUNDS
[!:TI] I:!:TIJ LIGHT ALT.
1m!~ L· l M· l
[!I!] [TI]] L·2 M·2
liT:!] C!::!:!] L·J L·4
[IT:!) C!::!:!] L·S L-6
TERMINAL BOARD
YELlOW
~ <(
g ~
~ >
I
~ z 0 .... > 0
"' a: 0 0 z !;, ::>
0 "' - a: i :::; C)
g e 0 .....
" "' z
0 u ~ s s 0 a:
"" "" ""
IGNITION SWITCH
I
manual start models
BLACK TO GROUND
YELLOW TO AL-T-. -----,~ TACHQ.
REO TO LIGHT ,---t__...lJ METER
BLACK TO GROUND SPEEDO· RW TO LIGHT q
---------------· METER
BROWN TO GROUND D __ G_R_E_E_N_T_O __ L·_I -------------------- FRONT
BLACK TO L·2 . LIGHT
GREEN TO GROUND
BLACK TO LIGHT
YELLOW TO L 3
LIGHT BULB CHART
LOCATION NO. WATIAGE
HO. LIGHT - 60
TAll LIGHT IGI 26
BRA~E LIGHT 194 (2) 37
SPEEDO LIGHT 53 I 7
TACHO. LI GHT 53 I 7

electric start models
WIRING FROM
ENGINE
KILL SWITCH
DIMMER SWITCH
BRAKE SWITCH
VOLT ACE REGULATOR
SOLENOID
- BLUE & RED TO M -2
BLUE TO M-1
YELLOW TO L-1
GREEN TO L-1
YELLOW & GREEN TO L-2
GREEN & BLACK TO L-2
-
TO M -1 (FOR 2 CYL. )
~ ~~OUND (FOR 1 CYL l
-~
BLACK & WHITE TO LIGHT
~~-B_LA_C_K __ T_O_L_·_J ____________ __
L___j=j BLACK TO L-4
D RED TO L-5
WHITE TO ALT.
YELLOW TO L-1
YELLOW TO L-2
GREEN TO GROUND
BLACK TO ALT.
- RED TO AlT.
RED FROM BATTERY
RED TO STARTER
BLACK TO GROUND
WHITE TO L-6
-
> 0 0
"' LU z 0 ~
e X: 0
5 "'
L-2
tn:Jl L-3
!III! L·S
TERMINAL BOARD
..... 0 < z 0 ~ z a: LU ..... LU
0 I-
"' > 0
a:
!: I-
fil < a: e
BATTERY
0 z :;:)
0 a: C>
e z ~ a: .,
I
i 0 .... " 0 ::'i .,
--36--
~ z 0 ..... > 0 !:!. ~
.... "'
:t
i c( 0
0 ::;
e .... 0 3:
I-
" ~ z
0 LU
::'i w w a: ., > C>
IGNITION SWITCH
"' ..:. 0 I-
~ x 3:
l
BLACK TO GROUND
~Y~E~LL~O~W~TO~L~- 1-----=======~~ RED TO LI GHT 1---{j
0
0 z w 5 "' ::;; 0 a: "-
REO TO LIGHT
BLACK TO GROUND
BROWN TO GROUND
GREEN TO L-3
BLACK TO L-4
GREEN TO GROUND
BLACK TO LIGHT
YELLOW TO L-5
~~ STARTER -
LIGHT BULB CHART
TACHOMETER
SPEEDOMETER
FRONT LICHT
REAR LICHT
LOCATION NO. WATTAGE
HO. LIGHT - 60
TAIL LIGHT 161 26
BRAkE LIGHT 194 12) 37
SPEEOO LIGHT 53 I 7
TACHO LIGHT 53 1 7