Embed Size (px)
Citation preview

j AZI P/N 700-0108-L Last update May 2017
USER MANUAL
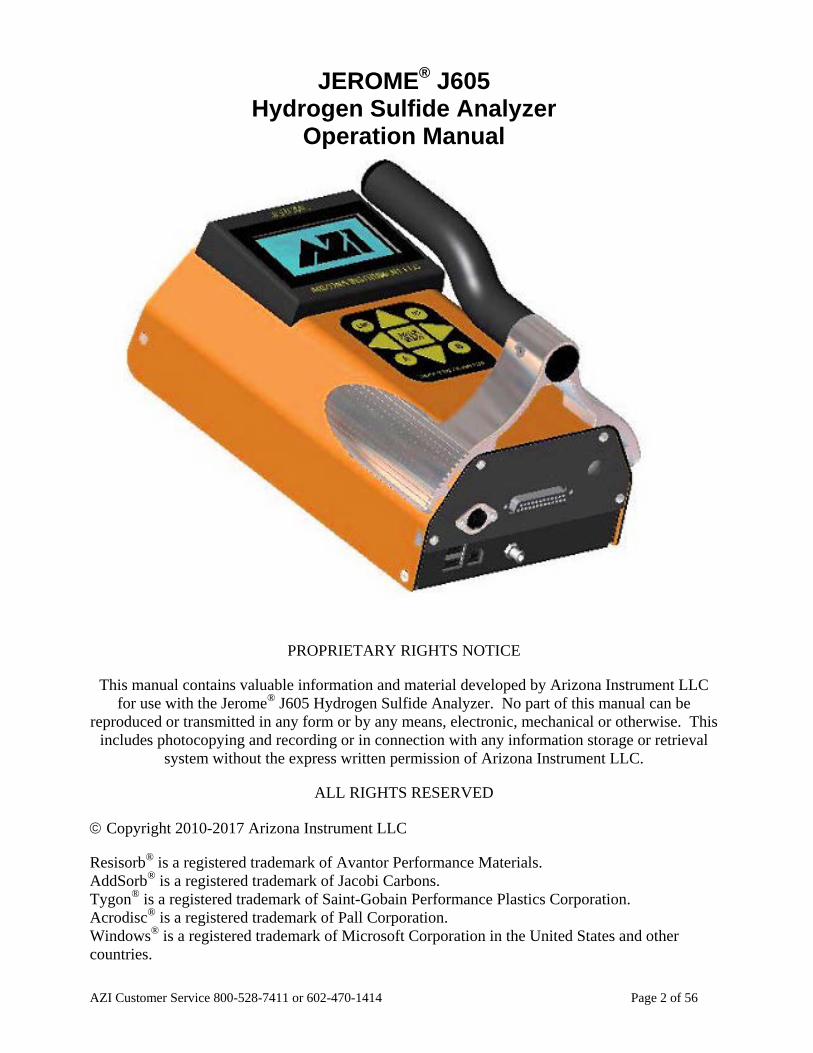
JEROME® J605 HYDROGEN SULFIDE ANALYZER
May 2017
Firmware v1.3X
ARIZONA INSTRUMENT LLC 3375 N Delaware Street | Chandler, AZ 85225 USA
800.528.7411 | 602.470.1414 | f 602.281.1745
www.azic.com
Email: General – [email protected]
International – [email protected] Customer Service – [email protected]
AZI Customer Service 800-528-7411 or 602-470-1414 Page 2 of 56
JEROME® J605 Hydrogen Sulfide Analyzer
Operation Manual
PROPRIETARY RIGHTS NOTICE
This manual contains valuable information and material developed by Arizona Instrument LLC
for use with the Jerome® J605 Hydrogen Sulfide Analyzer. No part of this manual can be reproduced or transmitted in any form or by any means, electronic, mechanical or otherwise. This
includes photocopying and recording or in connection with any information storage or retrieval system without the express written permission of Arizona Instrument LLC.
ALL RIGHTS RESERVED
Copyright 2010-2017 Arizona Instrument LLC
Resisorb® is a registered trademark of Avantor Performance Materials. AddSorb® is a registered trademark of Jacobi Carbons. Tygon® is a registered trademark of Saint-Gobain Performance Plastics Corporation. Acrodisc® is a registered trademark of Pall Corporation. Windows® is a registered trademark of Microsoft Corporation in the United States and other countries.

AZI Customer Service 800-528-7411 or 602-470-1414 Page 3 of 56
Table of Contents
1. UNPACKING THE INSTRUMENT .....................................................................................................4 2. INTRODUCTION ...................................................................................................................................6 3. JEROME® J605 TECHNICAL SPECIFICATIONS ...........................................................................8 4. PRINCIPLE OF OPERATION ..............................................................................................................9
Zero Air Filter (AZI P/N Z2600 3905) .......................................................................................................11 5. INSTRUMENT OPERATION ...............................................................................................................12
J605 Main Screen Display ..........................................................................................................................12 J605 Back Panel Connections.....................................................................................................................13 J605 User Interface Main Menu Structure ..................................................................................................14 SAMPLE menu ..........................................................................................................................................15 REGEN menu .............................................................................................................................................17 DATA menu ...............................................................................................................................................18 SYSTEM menu ..........................................................................................................................................20 Daily Operations .........................................................................................................................................22 Sensor Regeneration ...................................................................................................................................23 Sample Mode ..............................................................................................................................................24 Survey Mode ..............................................................................................................................................25 Operating on AC Power or Generator ........................................................................................................26 Operating on Internal Battery Power ..........................................................................................................26 Battery Management ..................................................................................................................................26 External Battery Power ...............................................................................................................................27 Charging Internal Battery ...........................................................................................................................28 Retrieving Data ...........................................................................................................................................29 Instrument I/O Interface .............................................................................................................................30 4-20mA Output ...........................................................................................................................................30
6. MAINTENANCE .....................................................................................................................................34 Preventive Maintenance Calendar ..............................................................................................................34 Flow System ...............................................................................................................................................35
.25 inch Fritware Filter ........................................................................................................................35 Internal Filters .....................................................................................................................................36
Replacing the Battery Pack ........................................................................................................................37 7. CALIBRATION .......................................................................................................................................38
Factory Calibration Service ........................................................................................................................38 Verification of Functionality and Quality Control .....................................................................................38
8. J605 TROUBLESHOOTING .................................................................................................................39 Potential Interferences ................................................................................................................................41
9. ACCESSORIES & MAINTENANCE PARTS .....................................................................................42 Spare Parts & Accessories ..........................................................................................................................44
10. APPENDIX A – USB/HYPERTERMINAL SETUP ............................................................................47 11. APPENDIX B - J605 FUNCTIONAL TEST MODULE ......................................................................54
Simple Operation ........................................................................................................................................54 12. WARRANTY ...........................................................................................................................................55
An up-to-date electronic copy of this manual can be found on the AZI website at http://www.azic.com/
NOTE: For levels less than 10 ppb, it is necessary to run a warm-up routine before sampling. To initiate the automatic five minute warm-up, install a Zero Air Filter (AZI
P/N Z2600 3905) in the intake and select Warmup from the REGEN menu. Refer to the Daily Operations section for more information.
AZI Customer Service 800-528-7411 or 602-470-1414 Page 4 of 56
1. UNPACKING THE INSTRUMENT This manual contains details that will optimize the results and the life of your instrument. Read and refer to the manual for complete details on operation, maintenance and troubleshooting, special voltage inputs and data output. The Jerome® J605 is easy to operate and ready for use upon receipt from the factory. • Remove the instrument from the packing material.
Retain all packaging materials for any future shipment of the instrument.
If the instrument is returned to AZI for any reason, it must be placed in the original packaging materials that have been tested and
proven to be effective protection during shipment.
• Call AZI Customer Service at 800-528-7411 or 602-470-1414 or go to the AZI website www.azic.com for Return Material Authorization (RMA) information prior to returning an instrument.
• Boxes and packing materials for all shipments are available from AZI. • Pack the Jerome® instrument only in a Jerome® shipping container.
AZI WILL NOT BE RESPONSIBLE FOR SHIPPING DAMAGE. IF YOU RETURN THE INSTRUMENT IMPROPERLY PACKAGED OR
SHIPPED, YOU SHOULD INSURE IT FOR FULL VALUE.
• Check for any damage and confirm receipt of all parts on your packing list. Contact Arizona Instrument Customer Service at (800) 528-7411 or (602) 470-1414 if you have any questions.
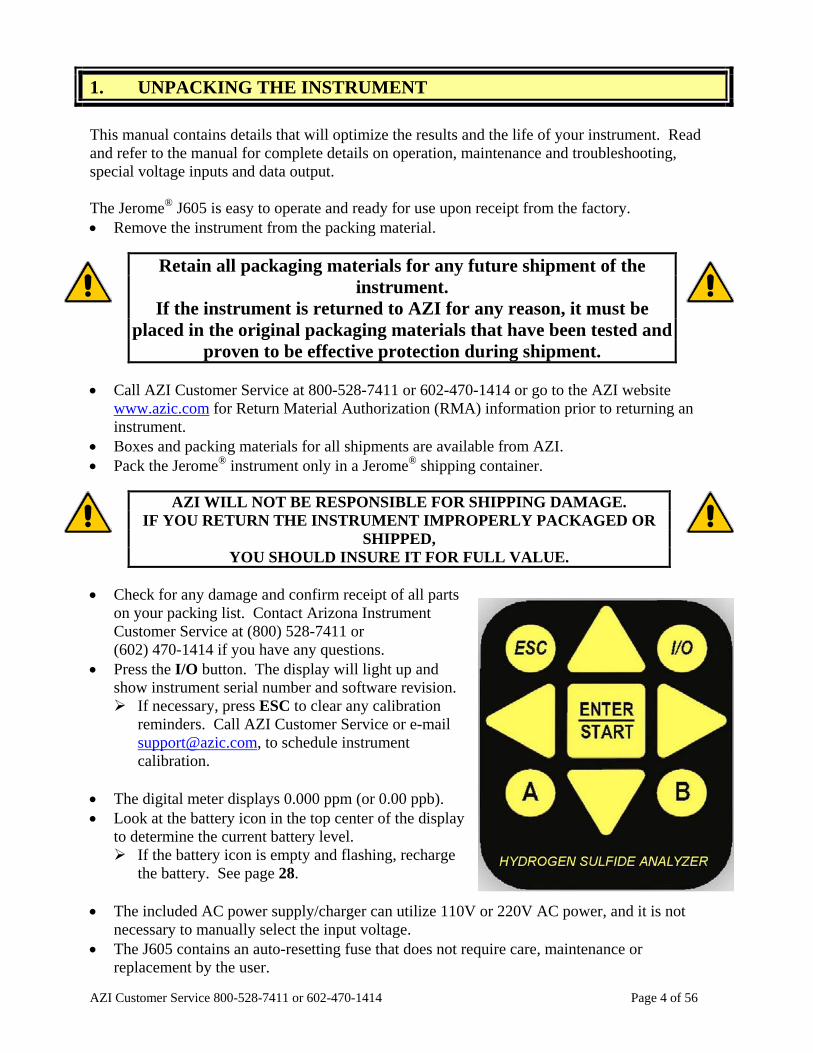
• Press the I/O button. The display will light up and show instrument serial number and software revision. If necessary, press ESC to clear any calibration
reminders. Call AZI Customer Service or e-mail [email protected], to schedule instrument calibration.
• The digital meter displays 0.000 ppm (or 0.00 ppb). • Look at the battery icon in the top center of the display
to determine the current battery level. If the battery icon is empty and flashing, recharge
the battery. See page 28.
• The included AC power supply/charger can utilize 110V or 220V AC power, and it is not necessary to manually select the input voltage.
• The J605 contains an auto-resetting fuse that does not require care, maintenance or replacement by the user.
AZI Customer Service 800-528-7411 or 602-470-1414 Page 5 of 56
• Perform a sensor regeneration by following these steps: Connect the AC power supply/charger between the matching (DIN) connector on the back
of the J605 and an AC power outlet or connect the external battery pack to the back of the J605.
If the J605 is turned off, press the I/O power button to turn the instrument on. Press the RIGHT arrow button (►) to enter the main menu. Press the DOWN arrow button (▼) to move the cursor to Regen. Press the RIGHT arrow button (►) to select Regen from the menu. Press the ENTER/START button on the keypad to select Regen Now from the Regen
menu. The instrument will now begin a 45-minute regeneration cycle, indicated by
“Regeneration in Progress” on the display. Do not interrupt this cycle. For a complete description of this process, see page 23.
If any error message appears on the display, see the J605 TROUBLESHOOTING section beginning on page 39.
• Ensure the instrument has been powered on for at least five (5) minutes prior to sampling. • The instrument is now ready to sample. • The instrument is designed for ambient air monitoring.
• The instrument is not explosion proof.
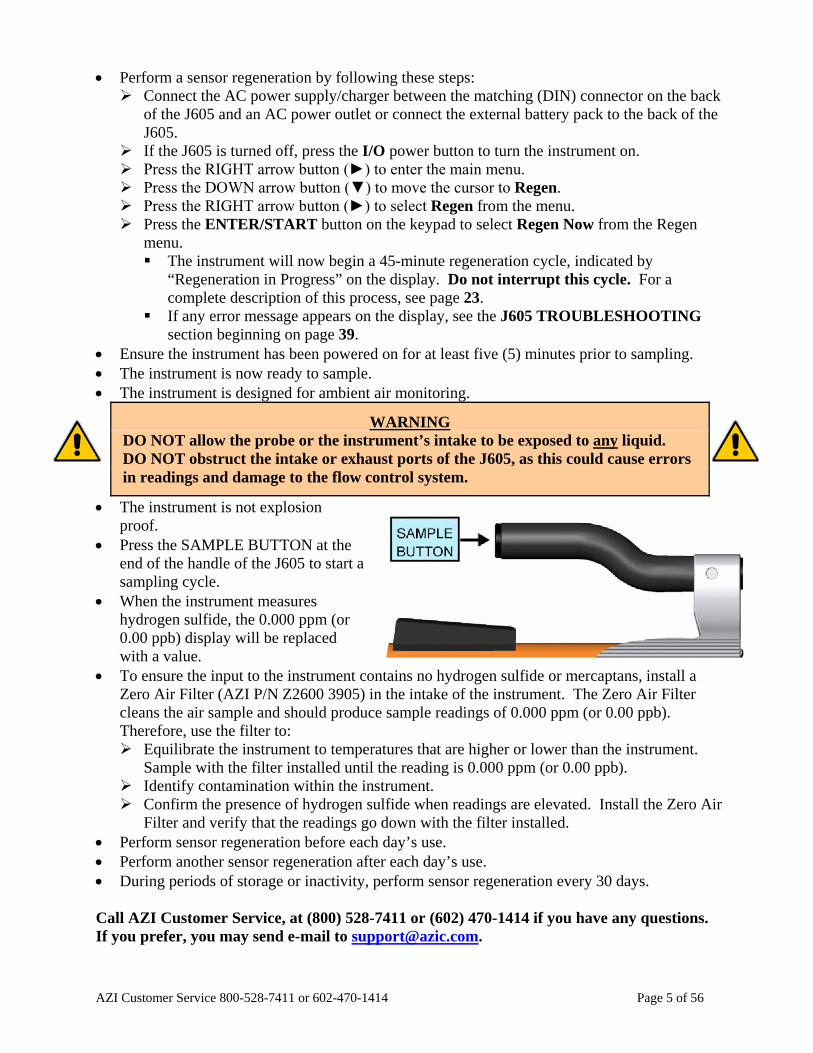
• Press the SAMPLE BUTTON at the end of the handle of the J605 to start a sampling cycle.
• When the instrument measures hydrogen sulfide, the 0.000 ppm (or 0.00 ppb) display will be replaced with a value.
• To ensure the input to the instrument contains no hydrogen sulfide or mercaptans, install a Zero Air Filter (AZI P/N Z2600 3905) in the intake of the instrument. The Zero Air Filter cleans the air sample and should produce sample readings of 0.000 ppm (or 0.00 ppb). Therefore, use the filter to: Equilibrate the instrument to temperatures that are higher or lower than the instrument.
Sample with the filter installed until the reading is 0.000 ppm (or 0.00 ppb). Identify contamination within the instrument. Confirm the presence of hydrogen sulfide when readings are elevated. Install the Zero Air
Filter and verify that the readings go down with the filter installed. • Perform sensor regeneration before each day’s use. • Perform another sensor regeneration after each day’s use. • During periods of storage or inactivity, perform sensor regeneration every 30 days.
Call AZI Customer Service, at (800) 528-7411 or (602) 470-1414 if you have any questions. If you prefer, you may send e-mail to [email protected].
WARNING DO NOT allow the probe or the instrument’s intake to be exposed to any liquid. DO NOT obstruct the intake or exhaust ports of the J605, as this could cause errors in readings and damage to the flow control system.

AZI Customer Service 800-528-7411 or 602-470-1414 Page 6 of 56
2. INTRODUCTION The Jerome® J605 Hydrogen Sulfide Analyzer is an ambient air analyzer with a range of 3 parts per billion (ppb) to 10 parts per million hydrogen sulfide (ppm H2S). Readings of 100 ppb or less are displayed in units of ppb, and readings above 100 ppb (0.100 ppm) are displayed in ppm. Readings of zero are displayed as 0.00 ppb.
CAUTION: The Jerome® J605 is for gaseous vapor use only.
DO NOT allow the probe or the instrument's intake to be exposed to any liquid, dust
or other foreign material. The J605 is designed to be easy to operate for quick and accurate analysis of hydrogen sulfide levels. It has few maintenance requirements. However, please take a moment to read this manual before attempting operation. If you have any questions about your application or operation, please call AZI Customer Service at (800) 528-7411 or (602) 470-1414 or e-mail [email protected] for assistance.
J605 Features
• Accurate analysis of hydrogen sulfide concentrations in seconds. • 3 ½ inch (9 cm) backlit display, showing everything you need to be confident in the
instrument, including 5/8 inch (1.6 cm) tall character readout, battery charge indicator, and sensor saturation percentage.
• Microprocessor ensures a linear response throughout the entire range of the sensor. • Inherently stable gold film sensor. • Wide detection range allows for multiple applications. • Survey mode for rapid source detection of hydrogen sulfide concentrations. • Rechargeable internal battery pack for portability. • Easy to understand diagnostic and error detection. • Auto zero bridge adjustment. • Updated electronics including 24-bit a/d conversion, and on-board storage for 20,000
samples. • Controlled temperature film heat ensures the sensor removes all hydrogen sulfide and
returns to its original state. • The Jerome® J605 can be operated for 18 hours from the internal 12V battery or it can
be operated using the external AC power supply/charger.
Accessories and Maintenance Parts The Accessories and optional items available to support the J605 are listed and pictured beginning on page 42.

AZI Customer Service 800-528-7411 or 602-470-1414 Page 7 of 56
Applications • Regulatory compliance • Ambient air analysis • Odor nuisance monitoring • Control room corrosion monitoring • Waste water treatment facilities • Quality control • Scrubber efficiency testing • Accuracy check for other hydrogen sulfide monitors and control systems • Hydrogen sulfide source detection • Leak detection • Portable hydrogen sulfide detection. (The Jerome® J605 is operated from the internal
12V battery. For charging the battery, an external AC power supply/charger is included.)

AZI Customer Service 800-528-7411 or 602-470-1414 Page 8 of 56
3. JEROME® J605 TECHNICAL SPECIFICATIONS
Range* 3 ppb (0.003 ppm) to 10 ppm H2S in three graduated ranges Resolution 0.02 ppb (20 ppt) H2S (range dependent)
Response time – sample mode 1.0 to 10.0 ppm (Range 2)
0.10 to 1.0 ppm (Range 1) 3 to 100 ppb (Range 0)
3 ppb to 10.0 ppm (full range)
12 seconds (manual range selection) 18 seconds (manual range selection) 12 to 27 seconds (manual range selection) 12 to 53 seconds (Auto-range mode)
Response time – survey mode Manual range selection:
Range 2 Range 1 Range 0
Auto-range mode
12 seconds for each reading 18 seconds for each reading 12 to 27 seconds for each reading 12 to 53 seconds for each reading
Flow rate 150ml/min (0.15 liters/min)
Power requirements
12 VDC for the instrument (provided by the internal battery, AC power supply/charger, external battery pack or car accessory cable)
100-240VAC, 47-63Hz, 3.2A for the AC power supply/charger Fuse Auto-resetting fuse Internal battery pack Rechargeable nickel metal hydride (NiMH) Operating environment 0 °C to 40 °C, non-condensing, non-explosive Case construction Aluminum, powder coated Dimensions 11 in L x 6 in W x 6.5 in H (28 cm L x 16 cm W x 17 cm H) Weight 5.4 pounds (2.5 kilograms) Digital meter display 3 ½ inch (9 cm) backlit liquid crystal display (LCD) Data storage capacity 20,000 samples
Output Digital: USB serial data to PC, printer, or USB flash drive Analog: 4-20mA current loop (requires external power source)
accurate to 0.3% of output Certifications TUV 61010, CE Accuracy and Precision:
Range Accuracy Precision (RSD) Range 0: 5 ppb H2S ± 1 ppb 10%
50 ppb H2S ± 3 ppb 5% Range 1: 0.50 ppm H2S ± 0.03 ppm 5% Range 2: 5.0 ppm H2S ± 0.3 ppm 5%
*Sample values below 3 ppb (0.003 ppm) are recorded and displayed as 0.00 ppb by the J605. Sample values above 10 ppm (or above the upper limit of the chosen range) are recorded and displayed as “High Concentration.”
AZI Customer Service 800-528-7411 or 602-470-1414 Page 9 of 56
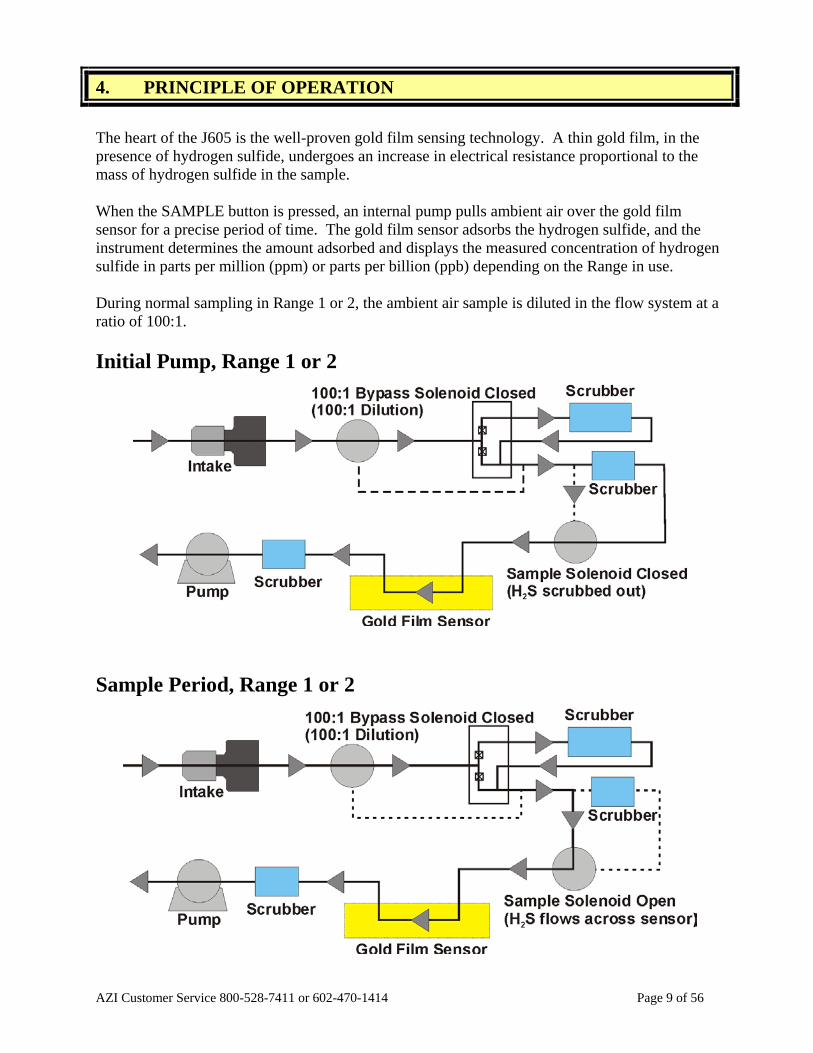
4. PRINCIPLE OF OPERATION The heart of the J605 is the well-proven gold film sensing technology. A thin gold film, in the presence of hydrogen sulfide, undergoes an increase in electrical resistance proportional to the mass of hydrogen sulfide in the sample. When the SAMPLE button is pressed, an internal pump pulls ambient air over the gold film sensor for a precise period of time. The gold film sensor adsorbs the hydrogen sulfide, and the instrument determines the amount adsorbed and displays the measured concentration of hydrogen sulfide in parts per million (ppm) or parts per billion (ppb) depending on the Range in use. During normal sampling in Range 1 or 2, the ambient air sample is diluted in the flow system at a ratio of 100:1. Initial Pump, Range 1 or 2
Sample Period, Range 1 or 2
AZI Customer Service 800-528-7411 or 602-470-1414 Page 10 of 56
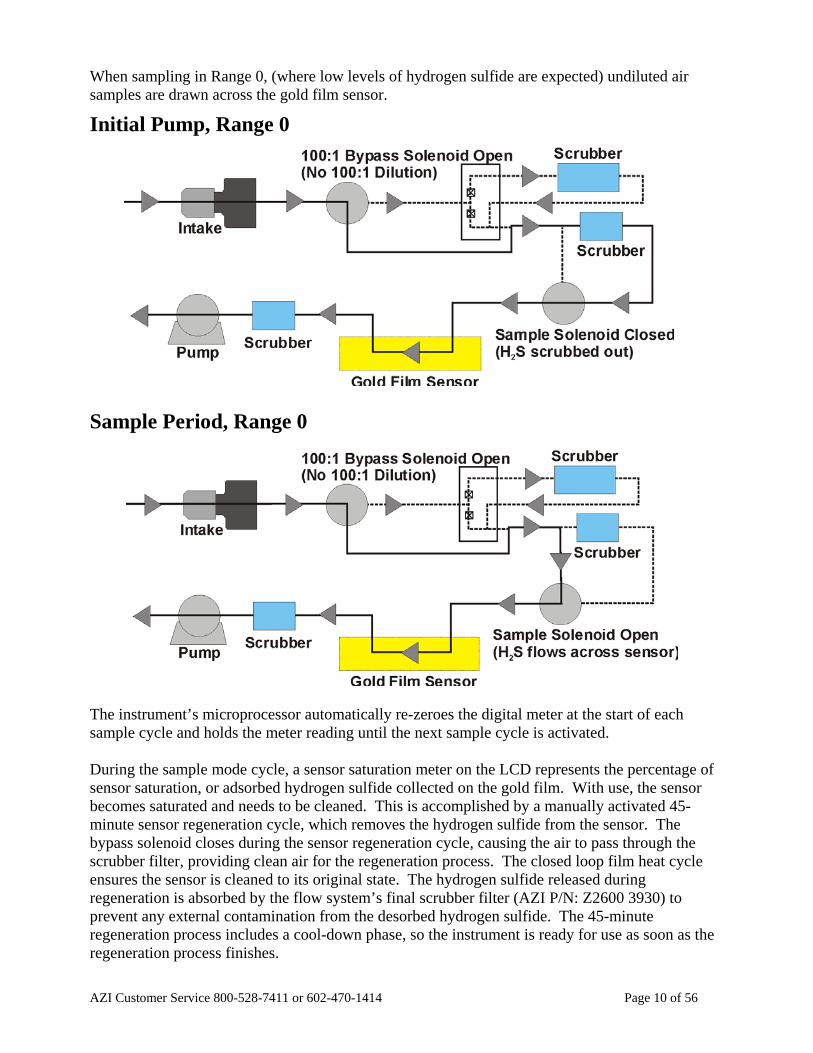
When sampling in Range 0, (where low levels of hydrogen sulfide are expected) undiluted air samples are drawn across the gold film sensor.
Initial Pump, Range 0
Sample Period, Range 0
The instrument’s microprocessor automatically re-zeroes the digital meter at the start of each sample cycle and holds the meter reading until the next sample cycle is activated. During the sample mode cycle, a sensor saturation meter on the LCD represents the percentage of sensor saturation, or adsorbed hydrogen sulfide collected on the gold film. With use, the sensor becomes saturated and needs to be cleaned. This is accomplished by a manually activated 45-minute sensor regeneration cycle, which removes the hydrogen sulfide from the sensor. The bypass solenoid closes during the sensor regeneration cycle, causing the air to pass through the scrubber filter, providing clean air for the regeneration process. The closed loop film heat cycle ensures the sensor is cleaned to its original state. The hydrogen sulfide released during regeneration is absorbed by the flow system’s final scrubber filter (AZI P/N: Z2600 3930) to prevent any external contamination from the desorbed hydrogen sulfide. The 45-minute regeneration process includes a cool-down phase, so the instrument is ready for use as soon as the regeneration process finishes.
AZI Customer Service 800-528-7411 or 602-470-1414 Page 11 of 56
Zero Air Filter (AZI P/N Z2600 3905) The Zero Air Filter (AZI P/N Z2600 3905) removes hydrogen sulfide, mercury vapor and mercaptans from the air sample. Readings with the filter installed should be near 0.000 ppm (or 0.00 ppb). For maximum accuracy, wait 15 seconds between samples to allow the sensor to restabilize. Because air that is cooler than the instrument will cause low readings and warmer air will cause higher readings, the Zero Air Filter should be used to equilibrate the instrument to ambient air. Repeated sampling with clean air will not cause saturation of the gold film sensor but will equalize temperatures faster to allow accurate analysis to begin sooner. For maximum accuracy, wait 15 seconds between samples to allow the sensor to restabilize. The Zero Air Filter can also be used to identify contamination within the instrument. If the readings do not reduce to near 0.000 ppm with the filter installed, contamination should be suspected. If the readings do drop to near 0.000 ppm with the filter installed but elevate with the filter removed, the presence of hydrogen sulfide at the sampled location is confirmed. Again, for maximum accuracy, wait 15 seconds between samples to allow the sensor to restabilize. The Zero Air Filter should be inserted into the intake of the instrument when running the instrument Warm-up. For more information on the use of the Zero Air Filter, contact customer service at 1-800-528-7411 or 1-602-470-1414.

AZI Customer Service 800-528-7411 or 602-470-1414 Page 12 of 56
5. INSTRUMENT OPERATION
J605 Main Screen Display The J605 Main Screen is depicted below, followed by explanations of the labeled items.
SYSTEM TIME – As set in the SYSTEM menu. (See SYSTEM menu on page 20) BATTERY – Indicates current charge level and charging status (See Charging Internal Battery
on page 28) SOUND ICON – Indicates if the audible alarm is turned on or muted, as set in the SYSTEM
menu. (See SYSTEM menu on page 20). SYSTEM DATE – As set in the SYSTEM menu. (See SYSTEM menu on page 20) SENSOR SATURATION METER – Graphically indicates the hydrogen sulfide saturation level
of the J605 sensor. (See REGEN menu on page 17). USB ICON – Indicates proper functioning of USB ports, and flashes during USB transmission of
data. (See Retrieving Data on page 29). If the USB icon is not present, this option is not activated. Contact your AZI Sales Representative for details on the USB option.
RANGE – Indicates in which Range the J605 is set to sample: 0, 1, 2 or A (Auto-range), as set in the SAMPLE menu. (See Range in SAMPLE menu on page 15).
AUTO SAMPLING INDICATOR – Indicates if the J605 is set to sample automatically at regular intervals, as set in Sample Mode in the SAMPLE menu. (See SAMPLE menu on page 15).
HYDROGEN SULFIDE READING – The hydrogen sulfide concentration detected by the J605, in the units indicated.
UNITS – Units for the hydrogen sulfide reading: parts per million (ppm) or parts per billion (ppb), depending on the Range in use and the sample concentration detected. Readings of zero are displayed as 0.000 ppm or 0.00 ppb, depending on the Range being used.
AVAILABLE KEYPAD COMMANDS – The bottom line of the screen indicates the currently available keypad commands. From the main screen, as shown here, the Main Menu can be accessed using the ► key.
AZI Customer Service 800-528-7411 or 602-470-1414 Page 13 of 56
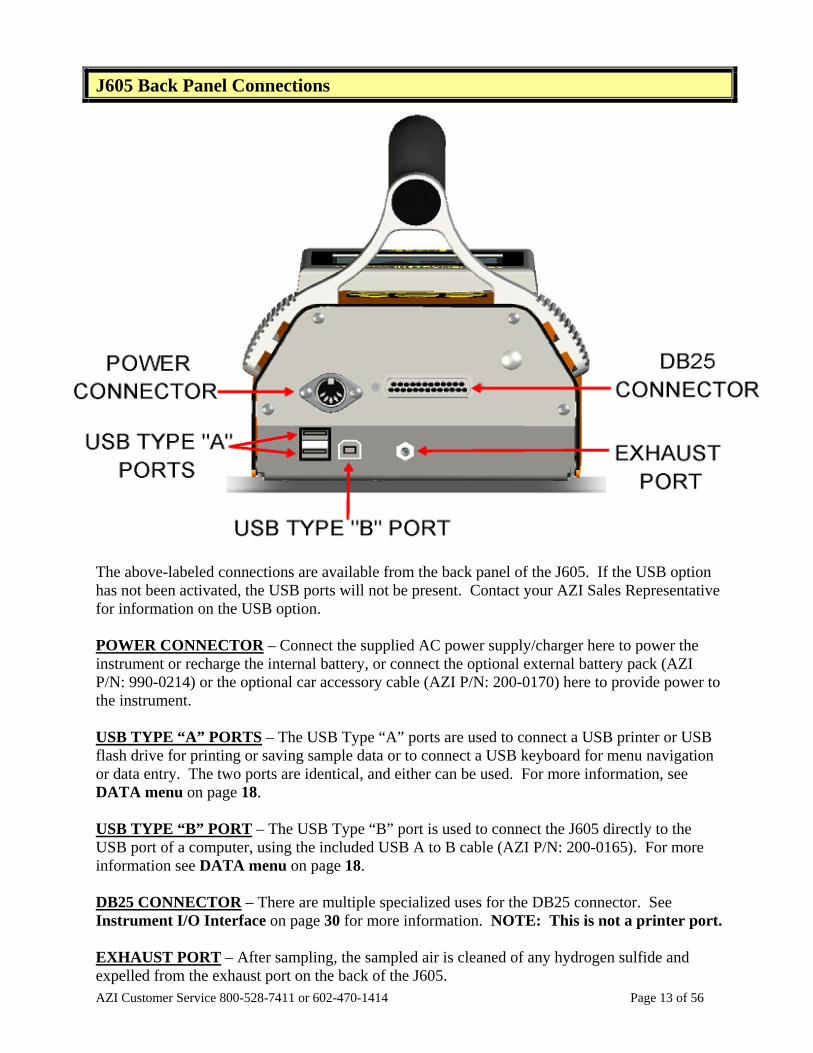
J605 Back Panel Connections
The above-labeled connections are available from the back panel of the J605. If the USB option has not been activated, the USB ports will not be present. Contact your AZI Sales Representative for information on the USB option. POWER CONNECTOR – Connect the supplied AC power supply/charger here to power the instrument or recharge the internal battery, or connect the optional external battery pack (AZI P/N: 990-0214) or the optional car accessory cable (AZI P/N: 200-0170) here to provide power to the instrument. USB TYPE “A” PORTS – The USB Type “A” ports are used to connect a USB printer or USB flash drive for printing or saving sample data or to connect a USB keyboard for menu navigation or data entry. The two ports are identical, and either can be used. For more information, see DATA menu on page 18. USB TYPE “B” PORT – The USB Type “B” port is used to connect the J605 directly to the USB port of a computer, using the included USB A to B cable (AZI P/N: 200-0165). For more information see DATA menu on page 18. DB25 CONNECTOR – There are multiple specialized uses for the DB25 connector. See Instrument I/O Interface on page 30 for more information. NOTE: This is not a printer port. EXHAUST PORT – After sampling, the sampled air is cleaned of any hydrogen sulfide and expelled from the exhaust port on the back of the J605.

AZI Customer Service 800-528-7411 or 602-470-1414 Page 14 of 56
J605 User Interface Main Menu Structure
NOTE: The main menu also contains a selection labeled “Factory.” This option is for AZI factory use only and is not accessible by the end user.
AZI Customer Service 800-528-7411 or 602-470-1414 Page 15 of 56
A USB keyboard (AZI P/N: 990-0230) can be used to navigate the menu system and for data entry for items such as Location Names. Connect the USB keyboard to one of the two USB Type “A” ports on the back of the instrument. Either upper or lower case characters may be entered when using a USB keyboard, while only upper case letters are available from the J605 keypad. The keyboard arrow keys can be used to navigate the menu system, and the F1 and F2 keys can be used for the A and B keys on the J605 keypad, respectively.
SAMPLE menu SAMPLE MODE The Sample Mode setting provides the choice between auto-sampling and manual sampling. For normal use, use manual sampling, which is the instrument default setting. If auto-sampling is selected, the instrument will automatically sample at the interval set in SET SAMPLE INTERVAL (below) without monitoring or attendance by the user. Use the ▲and ▼arrows to toggle between Manual and Auto, and use ENTER/START to save the selection. Use the ESC key to exit without saving changes. If auto-sampling is selected, the word Auto will appear below the system date on the instrument’s main screen. RANGE Three different ranges and an Auto-ranging function are available in the J605. If the approximate value of the expected H2S concentration is known, the instrument can be set into that specific range prior to sampling (0, 1, or 2). If the expected H2S concentration is not known, Auto-ranging can be used instead, and the J605 will test each sample in each range before displaying the concentration. Using Auto-ranging results in longer test times, however accuracy is not affected. The selected range also determines what units the J605 will use to display the results. The three ranges and their default display units (ppb or ppm) are shown below:
RANGE CONCENTRATION 0 3 to 100 ppb 1 0.10 to 1.0 ppm 2 1.0 to 10.0 ppm
The range can be set or Auto-ranging can be toggled on or off by selecting Range from the SAMPLE menu. Use ▲ and ▼ to scroll through the ranges 0, 1, 2 and Auto, and press ENTER/START to make a selection. Press ESC to exit without saving changes. The selected range will be displayed on the main screen as a number (0, 1, 2) or as an A for Auto-ranging. See J605 Main Screen Display on page 12 for the location of the Range indicator. SET SAMPLE INTERVAL If auto-sampling is being used (as set in SAMPLE MODE above), the sample interval determines how often the J605 will automatically take samples. Use the ▲and ▼arrow keys to scroll through the available sample intervals of 1, 2, 5, 10, 15, 30, 45, 60, 90 and 120 minutes, and use ENTER/START to save the selected interval. Use the ESC key to exit without saving changes. The sample intervals refer to specific times on the instrument clock as measured in whole multiples of the selected interval. For example, selecting a 10-minute sample interval will result

AZI Customer Service 800-528-7411 or 602-470-1414 Page 16 of 56
in samples being taken on the hour, 10 minutes after the hour, 20 minutes after the hour, etc., not every ten minutes from when auto-sampling is initiated. Refer to the chart below for examples of how these intervals work. The Main Screen must be displayed for autosampling takes place, and autosampling will start when the clock reads :00 seconds. Interval Samples on the: Examples: 1 minute 1-minute marks 12:00, 12:01, 12:02, 12:03, 12:04, 12:05, 12:06, etc.
2 minutes 2-minute marks 12:00, 12:02, 12:04, 12:06, 12:08, 12:10, 12:12, etc.
5 minutes 5-minute marks 12:00, 12:05, 12:10, 12:15, 12:20, 12:25, 12:30, etc.
10 minutes 10-minute marks 12:00, 12:10, 12:20, 12:30, 12:40, 12:50, 1:00, etc.
15 minutes Quarter hour 12:00, 12:15, 12:30, 12:45, 1:00, 1:15, 1:30, etc.
30 minutes Half hour 12:00, 12:30, 1:00, 1:30, 2:00, 2:30, 3:00, etc.
45 minutes Times that are an even 45 minutes from midnight or noon
12:00, 12:45, 1:30, 2:15, 3:00, 3:45, 4:30, 5:15, 6:00, 6:45, 7:30, 8:15, 9:00, 9:45, 10:30, 11:15, etc.
60 minutes Hour 12:00, 1:00, 2:00, 3:00, 4:00, 5:00, 6:00, etc.
90 minutes Times that are an even 90 minutes from midnight or noon
12:00, 1:30, 3:00, 4:30, 6:00, 7:30, 9:00, 10:30, etc.
120 minutes Times that are an even 120 minutes from midnight or noon
12:00, 2:00, 4:00, 6:00, 8:00, 10:00, etc.
SET LOCATION NAME Up to 80 unique location presets are available using the J605. This feature is useful if sampling is done in multiple locations and there is a need to record which readings came from which locations. Use the ▲and ▼arrows to scroll through the list of 80 presets until the location to be edited is highlighted. Press ENTER/START to begin editing the name of the selected location. Use the ▲and ▼arrows to scroll through the available alphanumeric characters and punctuation. When the desired character is displayed, use the ► arrow to move to the next character field. If a mistake is made, the ◄ arrow can be used to return to the previous character. When the location has been named as desired, press ENTER/START to save the location name, and return to the list of locations. To select an existing location from the list for the samples to be taken, use the ▲and ▼arrows to scroll to the desired location, and press ENTER/START twice. Note the asterisk (*) located to the left of the currently selected location. The selected location name will be stored with the sample data for all samples taken until a different location is selected instead. Use ESC to return to the sample menu. See Retrieving Data on page 29 for more info.
WARNING The J605 is not intended for continuous sampling 24 hours a day / 7 days a week. Continuous sampling may reduce sensor life and may affect your warranty.
AZI Customer Service 800-528-7411 or 602-470-1414 Page 17 of 56
SURVEY MODE Highlight SURVEY MODE in the SAMPLE menu and press ENTER/START to begin immediate sampling in survey mode. In survey mode, after an initial four-second pause to purge the flow system, the J605 will sample continuously. For complete information on survey mode, see Survey Mode on page 25.
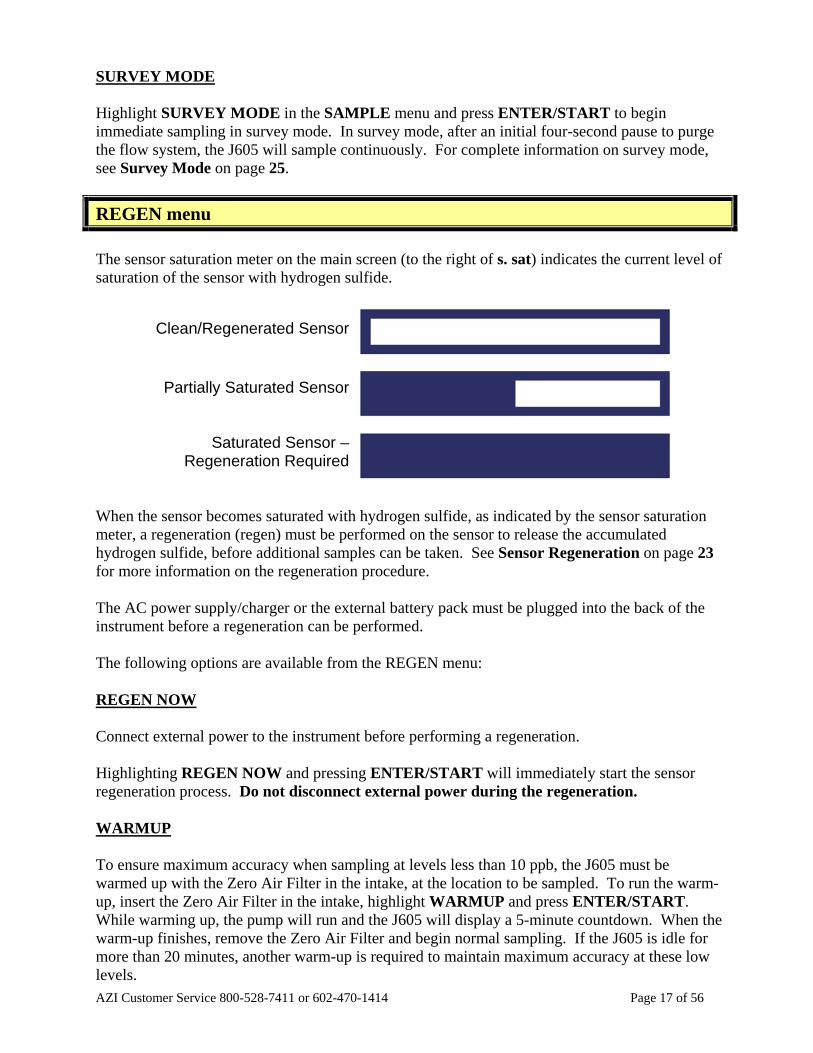
REGEN menu The sensor saturation meter on the main screen (to the right of s. sat) indicates the current level of saturation of the sensor with hydrogen sulfide. When the sensor becomes saturated with hydrogen sulfide, as indicated by the sensor saturation meter, a regeneration (regen) must be performed on the sensor to release the accumulated hydrogen sulfide, before additional samples can be taken. See Sensor Regeneration on page 23 for more information on the regeneration procedure. The AC power supply/charger or the external battery pack must be plugged into the back of the instrument before a regeneration can be performed. The following options are available from the REGEN menu: REGEN NOW Connect external power to the instrument before performing a regeneration. Highlighting REGEN NOW and pressing ENTER/START will immediately start the sensor regeneration process. Do not disconnect external power during the regeneration. WARMUP To ensure maximum accuracy when sampling at levels less than 10 ppb, the J605 must be warmed up with the Zero Air Filter in the intake, at the location to be sampled. To run the warm-up, insert the Zero Air Filter in the intake, highlight WARMUP and press ENTER/START. While warming up, the pump will run and the J605 will display a 5-minute countdown. When the warm-up finishes, remove the Zero Air Filter and begin normal sampling. If the J605 is idle for more than 20 minutes, another warm-up is required to maintain maximum accuracy at these low levels.
Clean/Regenerated Sensor
Partially Saturated Sensor
Saturated Sensor – Regeneration Required
AZI Customer Service 800-528-7411 or 602-470-1414 Page 18 of 56
SET INTERVAL If auto-sampling is being used (as set in SAMPLE MODE above), the J605 can be configured to automatically perform sensor regenerations at a predetermined interval. Use the ▲and ▼arrows to scroll through the available selections of 6, 12, 24, and 48 hours or Saturation, and press ENTER/START to save the selection. If 6, 12 or 24 hours is selected, the J605 will automatically perform a sample followed by a regeneration every 6, 12, or 24 hours as selected, starting at the time set in SET HOUR below. If 48 hours is selected, the instrument will perform a sample followed by a regeneration every 24 hours at the time set below. If the interval is set to Saturation, the regeneration will automatically occur instead of a sample at the end of the next sample interval after sensor saturation. Use ESC to exit without saving. SET HOUR Use the ▲and ▼arrow keys to select the hour of the day (using a 24-hr clock) to start regeneration. Press ENTER/START to save the setting. At the time set, if auto-sampling is being used, the J605 will automatically take one sample and then perform a regeneration. This process will repeat at the interval indicated in SET INTERVAL above. Use ESC to exit without saving. If the interval was set to Saturation above, then the Set Hour value is ignored by the J605. NOTE: If the sensor is saturated and a regeneration cycle is performed and completed before the set hour, the instrument will perform another regeneration at the set hour. However, if the regeneration cycle does not complete prior to the set hour, the regeneration at the set hour will be skipped.
DATA menu Sample data can be stored within the instrument, up to a maximum of twenty thousand (20,000) data points. On instruments that have the USB Communications option, in addition to viewing the sample data on the instrument, data can be retrieved from the instrument in one of three ways:
1. SEND TO PC 2. SAVE TO USB FLASH DRIVE 3. PRINT DIRECTLY TO AN AZI APPROVED PRINTER (AZI P/N: Y990-0098)
The presence of the USB icon on the main screen indicates that the Communications option has been purchased and that the USB ports are functioning properly. The USB icon will flash during data transmission. See J605 Main Screen Display on page 12 for the location of the USB icon. The data is stored in non-volatile memory and will not be affected if the battery is changed or disconnected. VIEW STORED DATA Select VIEW STORED DATA to view previous sample and regeneration history on the screen of the J605. The Location Name (if specified) corresponding to the data is displayed at the top of the screen and up to three sample values at a time are displayed at the bottom of the screen, along with the time and date the sample was taken. The most recent sample is displayed at the top of the list, and regenerations are indicated by the word “Regen” instead of a sample value. Use the ▲ and ▼ arrow keys to scroll through the data. If Location Names are used, the Location Name displayed will automatically update during scrolling to reflect the sampling location of the data being displayed. The J605 will beep-beep upon reaching the end of the list. After viewing the data, press ESC to exit and return to the DATA menu.
AZI Customer Service 800-528-7411 or 602-470-1414 Page 19 of 56
On instruments that have the USB Communications option, all of the data is accessible from the VIEW STORED DATA menu selection. On instruments that do not have the USB Communications option, only the previous two samples are stored. SAVE TO USB DRIVE Before selecting SAVE TO USB DRIVE, connect the target USB flash drive (AZI P/N: 990-0219) to either USB TYPE “A” PORT on the back panel of the J605. When ENTER/START is pressed, all of the stored data on the J605 will be transmitted to the target drive as a comma-delimited text file. See Retrieving Data on page 29 for more information.
NOTE: The J605 is NOT compatible with USB flash drives that have the U3 program pre-installed. Do not use USB flash drives that have the U3 program with the J605.
SEND TO PC Before using SEND TO PC, the USB driver must be installed on the target PC, and HyperTerminal must be configured on the target PC. The USB driver is on the J605 CD or the AZI Documents USB Drive, and on the AZI website at www.azic.com. See APPENDIX A – USB/HYPERTERMINAL SETUP on page 47 for detailed instructions on installing the USB driver, configuring HyperTerminal (if being used), and downloading data from the J605. Once the target PC has been configured, connect the included USB A to B cable (AZI P/N: 200-0165) between the USB TYPE “B” PORT on the back panel of the J605 and the USB PORT of the target computer, and launch HyperTerminal. On the J605, with SEND TO PC highlighted, press ENTER/START, and all of the stored data on the J605 will be transmitted to the target computer as a comma-delimited text file. See Retrieving Data on page 29 for more information. PRINT DATA Before selecting PRINT DATA, connect an AZI printer (AZI P/N: Y990-0098) to either USB TYPE “A” PORT on the back panel of the J605 using the cable supplied with the printer. When ENTER/START is pressed, all of the stored data on the J605 will be printed on the attached printer. See Retrieving Data on page 29 for more information. VIEW MEMORY USAGE The J605 can store up to 20,000 data points. Selecting VIEW MEMORY USAGE will display what percentage of the data storage area is in use. Once the data memory is full, no additional data can be stored until the data on the instrument is deleted. If the memory is full, the J605 will continue to perform as expected, but it will indicate that the memory is full and no new sample data will be retained. The storage area can be cleared using DELETE DATA as described below. DELETE DATA Selecting DELETE DATA will delete all sample data stored on the J605. Prior to deletion, the J605 will prompt the user for confirmation as a precaution.
AZI Customer Service 800-528-7411 or 602-470-1414 Page 20 of 56
SYSTEM menu The SYSTEM menu is password protected to prevent unwanted or accidental changes to operating parameters. The default initial password is AZI, but should be changed to something unique if restricted access to the SYSTEM menu is desired. The password can be up to 10 characters long. When the SYSTEM menu is selected from the Main Menu, the J605 will prompt for the password. Input the password using ▲ and ▼ to change the alphanumeric character, and ► and ◄ to move between characters. Press ENTER/START to proceed after entering the password. The SYSTEM menu will remain unlocked until the instrument is powered off and back on. After the correct password is entered, the password can be changed using the CHANGE PASSWORD selection at the bottom of the SYSTEM menu. SET ALARM LEVELS When sampling, if the hydrogen sulfide level exceeds the selected alarm level, the word “ALARM” will flash on the J605 display. If the AUDIBLE ALARM is set ON, the J605 will also beep three times. Two different alarm levels can be set using this menu option. Use the ▲and ▼arrow keys to change the value of the blinking field, and the ► arrow to move to the next character in the alarm level setting. Typically, the high alarm is used for an industrial level, while the low alarm is set to a residential value. Use the A and B buttons to switch between the high and low alarm settings by pressing A to select the high alarm or B to select the low alarm. Once the alarm level has been set, press ENTER/START to select the highlighted alarm level as the current alarm level to be used. Upon returning to the SET ALARM LEVELS screen, there will be asterisk next to the currently selected alarm level (either high or low). It is recommended to set the alarm level higher than .003 ppm. The alarm can be muted using AUDIBLE ALARM ON/OFF in the SYSTEM menu. The alarm levels are ignored if auto-sampling is being used. AUDIBLE ALARM ON/OFF Use the ▲and ▼arrow keys to toggle the audible alarm on or off, and use ENTER/START to save the desired setting. Press ESC to exit without saving changes. The main screen display has a sound icon that indicates if the alarm is currently turned on or muted. The action lines in front of the sound icon on the main screen will disappear when the audible alarm is muted. See J605 Main Screen Display on page 12 to locate the sound icon. DISPLAY MODE From the DISPLAY MODE screen, use the ▲and ▼arrow keys to toggle between Threshold and Scientific display modes, and press ENTER/START to save the setting. In Scientific display mode, the J605 displays the sample reading for every sample taken. In Threshold display mode, the sample reading must be within 85% of the set alarm level to be displayed. Results below 85% of the alarm level value will be displayed as 0.000 ppm or 0.00 ppb depending on the current Range selected. Use ESC to exit without saving. See SET ALARM LEVELS above to set Threshold limits.
AZI Customer Service 800-528-7411 or 602-470-1414 Page 21 of 56
VIEW SENSOR STATS Use VIEW SENSOR STATS to display the current saturation level of the sensor, the number of regenerations performed on the sensor, and the total number of samples read by the sensor. Press any key to exit the screen when finished. SET SYSTEM TIME The J605 maintains the system time using a 24-hr clock format. Use the ▲and ▼arrow keys to change the value in the field where the cursor is flashing. Use the ◄ and ► arrow keys to move between the two digits within the hour or minute fields, and use the A and B keys to switch between the hour and minute fields. Use ENTER/START to save the indicated time as the system time or ESC to exit without saving. SET SYSTEM DATE Use the ▲and ▼arrow keys to change the highlighted field, and the ◄ and ► arrow keys to move between characters within the day or year fields. Use the A and B keys to move between the day, month, and year fields. Press ENTER/START to save the system date or ESC to exit without saving. RUN DIAGNOSTICS Selecting RUN DIAGNOSTICS will start the J605’s self-diagnostic procedure. As the instrument proceeds through each diagnostic check, follow the on-screen prompts, and the instrument will display the specific check being performed and the pass/fail result of the check. If the check is not applicable to the current configuration of the instrument, the result field will be blank instead of indicating pass or fail. • After viewing each result, press any key (except I/O or ESC) to move to the next diagnostic
check. (I/O should not be used during the diagnostics because I/O will power off the instrument and ESC should only be used when specifically indicated by the instrument.)
• When testing the keypad, follow the on-screen prompts to press each of the keys in turn. The J605 will not indicate a pass/fail for this test. Instead, if all of the keys work and the instrument proceeds to the next diagnostic test, the keypad diagnostic has passed.
• If the 4-20mA output function of the J605 is not in use, press ENTER/START to cycle through the 4, 8, 12, 16 and 20mA checks in the diagnostic routine. If the 4-20mA output is in use, the diagnostics can be used to verify proper operation. Refer to 4-20mA Output on page 30 for more information.
After the last diagnostic result has been displayed, the instrument will display “Done,” and pressing any key will return to the main screen of the J605. SET CONTRAST The display contrast can be set from 0 (highest contrast) to 127 (least contrast) by using ▲ and ▼ to adjust the contrast. By default, ▲ and ▼will adjust the contrast in increments of 1 unit. Press B to switch to a coarse adjustment of 10 units for each press of ▲ or ▼. Press A to switch back to the default fine adjustment mode. Press ENTER/START to save the contrast setting and exit. CHANGE PASSWORD Select CHANGE PASSWORD to change the password on the SYSTEM menu. Use ▲ and ▼ to change each alphanumeric character, and ► and ◄ to move between characters. Press ENTER/START to proceed after entering the password.

AZI Customer Service 800-528-7411 or 602-470-1414 Page 22 of 56
Daily Operations Before each day's use of the Jerome® J605, perform the following steps to verify proper instrument operation: • Press the power I/O button to turn the instrument on.
The display will light up and show instrument serial number and software revision. If necessary, press ESC to clear any calibration reminders. Call AZI Customer
Service at 800-528-7411 or 602-470-1414, or e-mail [email protected], to schedule instrument calibration.
The digital meter displays 0.000 ppm (or 0.00 ppb, depending on what Range is currently selected).
Check the battery level as indicated by the battery icon at the top center of the instrument display. If the battery meter is empty and flashing, refer to Charging Internal Battery on
page 28. If the battery meter is not empty, but is flashing, then the instrument is currently
charging the battery. When the instrument is plugged in and powered off, the display will stay active
and indicate “Charging.” To ensure the instrument's electronics have stabilized, allow a 5-minute warm up
before beginning the next step. • Perform sensor regeneration. Refer to Sensor Regeneration on page 23 for the procedure. • Ensure the instrument has been powered on for at least five (5) minutes prior to sampling. • Use the Zero Air Filter to equilibrate the instrument to ambient air temperature.
Install the Zero Air Filter in the instrument’s intake. Sample repeatedly every 15 seconds until the readings stabilize, then remove the Zero
Air Filter.
• Press the SAMPLE button (at the end of the handle). • At the end of the sampling cycle, read the digital meter.
The number shown on the digital meter is the hydrogen sulfide concentration in ppb or ppm as appropriate.
This sampled hydrogen sulfide value remains on the display until the next sample is taken.
The digital meter automatically re-zeroes at the start of each sample. • At the end of each day's use, perform sensor regeneration as described in the next section.
DO NOT ALLOW HYDROGEN SULFIDE TO STAY ON THE GOLD FILM SENSOR OVERNIGHT.
NOTE: For levels less than 10 ppb, it is necessary to run a warm-up routine before sampling. To initiate the automatic five minute warm-up, install a Zero Air Filter (AZI P/N Z2600 3905)
in the intake, and select Warmup from the REGEN menu. For levels of 10 ppb and above, the warm-up routine is not necessary.
AZI Customer Service 800-528-7411 or 602-470-1414 Page 23 of 56
Sensor Regeneration Sensor regeneration is needed to clean the J605 sensor of any accumulated hydrogen sulfide and to prolong the life of the sensor. This simple procedure should be done:
• At the beginning of the day on which the instrument is to be used. • During the day when the sensor becomes saturated. • At the end of the day before storing the instrument. • At a minimum of 30-day intervals while the instrument is in storage.
To perform sensor regeneration:
• Plug the AC power supply/charger or the external battery pack into the back of the instrument.
• Press the power I/O button to power on the instrument. • If necessary, press ESC to clear any calibration reminders. Call AZI Customer Service at
800-528-7411 or 602-470-1414, or e-mail [email protected], to schedule instrument calibration.
• From the Main Screen, press the RIGHT arrow button (►) to enter the main menu. • Press the DOWN arrow button (▼) to move the cursor to Regen. • Press the RIGHT arrow button (►) to select Regen from the menu. • Press the ENTER/START button on the keypad to select Regen Now from the Regen
menu. The instrument will begin a 45-minute regeneration cycle, indicated by “Regeneration
in Progress” on the display. Do not interrupt this cycle. If any error message appears on the display, see the J605 TROUBLESHOOTING
section beginning on page 39. • The LCD screen displays “Regeneration in Progress” for the duration of the 45-minute
cycle and displays a countdown timer as well once the instrument enters the cooling process of the regeneration. When the cycle is completed, the instrument returns to the main screen.
DO NOT INTERRUPT THIS CYCLE. Wait until the cycle is completed before continuing with the next step.
If the regeneration is interrupted, restart the regeneration process.
• The instrument can be used immediately following the sensor regeneration if necessary. • The Jerome® J605 is ready for sampling.
CAUTION: The Jerome® J605 is intended for gaseous vapor use only.
DO NOT allow the probe or the instrument's intake to be exposed to liquids, dust or other foreign material. Moisture or liquids drawn
into the instrument can damage the sensor and flow system.
AZI Customer Service 800-528-7411 or 602-470-1414 Page 24 of 56
Sample Mode This mode, used for standard operation, produces optimum accuracy with the Jerome® J605. See JEROME® J605 TECHNICAL SPECIFICATIONS on page 8 for the accuracy specifications. • Press the power I/O button. The display will light up and briefly show the instrument serial
number and software revision. If necessary, press ESC to clear any calibration reminders. Next, the digital meter displays 0.000 ppm (or 0.00 ppb, depending on the selected
Range). If the battery meter is empty and flashing, recharge the battery. See the section Charging Internal Battery on page 28.
• To ensure the instrument's electronics have stabilized, allow a 5-minute warm up before beginning the next step.
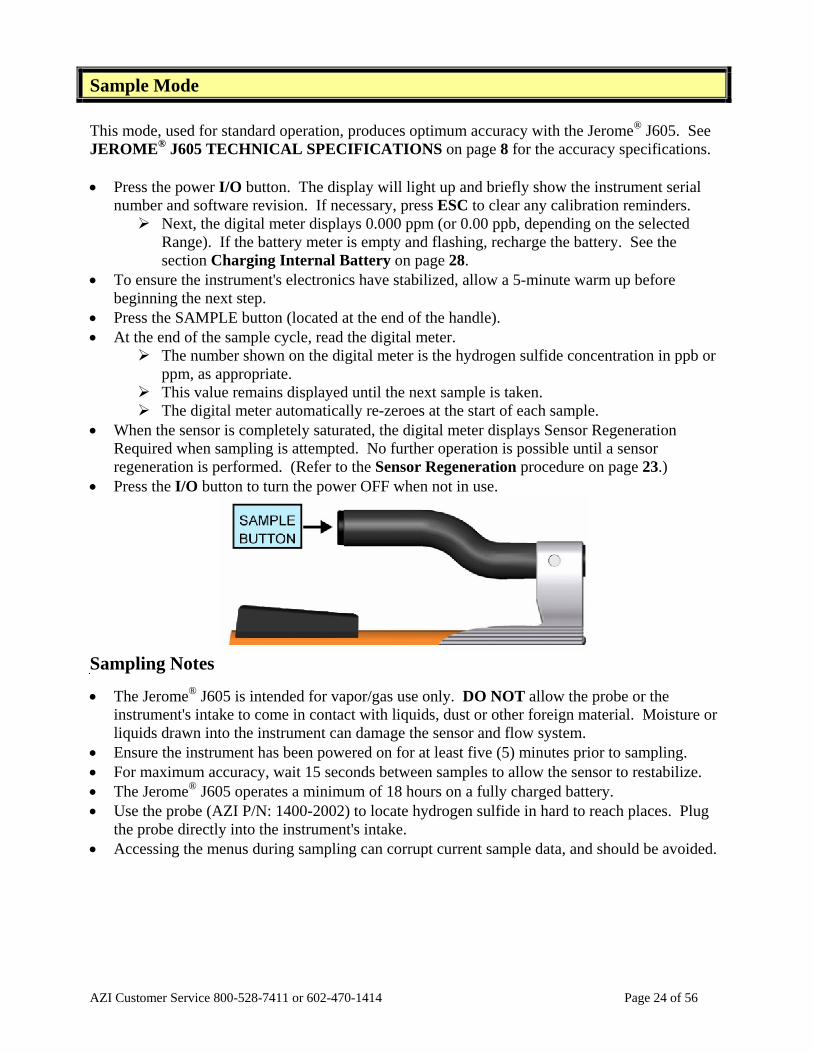
• Press the SAMPLE button (located at the end of the handle). • At the end of the sample cycle, read the digital meter.
The number shown on the digital meter is the hydrogen sulfide concentration in ppb or ppm, as appropriate.
This value remains displayed until the next sample is taken. The digital meter automatically re-zeroes at the start of each sample.
• When the sensor is completely saturated, the digital meter displays Sensor Regeneration Required when sampling is attempted. No further operation is possible until a sensor regeneration is performed. (Refer to the Sensor Regeneration procedure on page 23.)
• Press the I/O button to turn the power OFF when not in use.
Sampling Notes • The Jerome® J605 is intended for vapor/gas use only. DO NOT allow the probe or the
instrument's intake to come in contact with liquids, dust or other foreign material. Moisture or liquids drawn into the instrument can damage the sensor and flow system.
• Ensure the instrument has been powered on for at least five (5) minutes prior to sampling. • For maximum accuracy, wait 15 seconds between samples to allow the sensor to restabilize. • The Jerome® J605 operates a minimum of 18 hours on a fully charged battery. • Use the probe (AZI P/N: 1400-2002) to locate hydrogen sulfide in hard to reach places. Plug
the probe directly into the instrument's intake. • Accessing the menus during sampling can corrupt current sample data, and should be avoided.

AZI Customer Service 800-528-7411 or 602-470-1414 Page 25 of 56
Survey Mode Survey Mode takes samples continuously. The result is displayed every 12 to 53 seconds (in Auto-range mode), depending on the H2S concentration present. Use this mode to locate hydrogen sulfide leaks or hot spots, or to assess areas of potentially high hydrogen sulfide concentrations. Survey Mode can also be used locked in a range if the expected hydrogen sulfide concentrations are known. Sampling in the survey mode is not as accurate. • Press the power I/O button. • The display will light up and show the instrument serial number and software revision.
If necessary, press ESC to clear any calibration reminders. Next, the digital meter displays 0.000 ppm (or 0.00 ppb, depending on the selected
Range). If the battery meter is empty and flashing, recharge the battery. See Charging Internal Battery on page 28.
To ensure the instrument's electronics have stabilized, allow a 5-minute warm up before beginning the next step.
• From the Main Screen, press ► to enter the Main Menu. • From the Main Menu, select the Sample menu. • Scroll through the Sample menu to Survey Mode. • Press ENTER/START to select Survey Mode and begin sampling.
The instrument performs a 4-second purge of the flow system, and then begins survey mode sampling.
The display updates the measured concentrations at the end of each sample cycle. NOTE: Approximately 100 samples at 0.5 ppm may be taken in Range 1 before a sensor
regeneration is required. The pump will continue to run and the display will update with a new hydrogen sulfide
concentration reading every 12 to 52 seconds. Press any button to stop survey mode sampling and perform a final purge of the flow
system. The instrument remains in the survey mode until one of the following occurs: A button is pressed on the keypad. The SAMPLE button is pressed. The sensor is saturated. A low battery signal is encountered. The instrument is turned OFF. A ‘High Concentration’ sample is taken.
The final survey value remains displayed on the main screen until the next sample is taken.
• Press the power I/O button to turn the instrument off when not in use.
AZI Customer Service 800-528-7411 or 602-470-1414 Page 26 of 56
Operating on AC Power or Generator • For stationary use, the J605 may be operated on AC power.
Operating the instrument on AC power at all times eliminates the need for the battery pack and its necessary maintenance.
The battery may be disconnected internally or removed completely whenever the instrument is operating on AC power, however, the system date and time will have to be reset whenever the AC power is reconnected.
Operating on Internal Battery Power For portable use, the J605 may be operated on battery power. • When you operate the instrument on battery power, please be aware of the following:
A fully charged battery pack (AZI P/N 200-0143) provides power for a minimum of eighteen (18) hours of operation.
For operating more than eighteen (18) hours, an extra fully charged battery pack is needed.
Complete battery recharging takes 3 hours. Refer to Charging Internal Battery on page 28.
The J605 uses a rechargeable Nickel Metal Hydride battery. Dispose of worn-out batteries properly when you are replacing the battery pack.
When operating on battery power, the J605 will shut down after twenty (20) minutes of non-usage. However, if the instrument is running in Survey Mode or Auto-Sampling mode, the instrument will not shut off after twenty minutes. If the J605 is reading low levels of hydrogen sulfide in Survey or Auto-Sampling mode, it will continue to sample until the battery runs out. However, if the J605 is reading high levels of hydrogen sulfide in Survey mode, when the sensor reaches saturation a message will appear indicating that sensor regeneration is required, and twenty minutes later the instrument will automatically power off. In Auto-Sampling mode, the instrument will regenerate automatically when the sensor is saturated, provided external power is connected. If external power is not connected, the instrument will indicate “Regen Required” and the regeneration will not be performed.
Battery Management With all handheld and battery powered instruments, there is a need to keep the battery properly charged and ready for use. Proper battery management will not only ensure the instrument is ready when needed, but will also extend the life of the battery. There are 3 different battery management methods recommended based on the frequency of instrument use. An additional option to ensure the instrument is ready to go at a moment’s notice is to purchase an AZI external battery pack (AZI P/N: 990-0214). See External Battery Power on page 27 for more information on the External Battery Pack. High Frequency user: Daily and weekly usage. For this type of user, the instrument should be plugged in anytime the instrument is not being used.
AZI Customer Service 800-528-7411 or 602-470-1414 Page 27 of 56
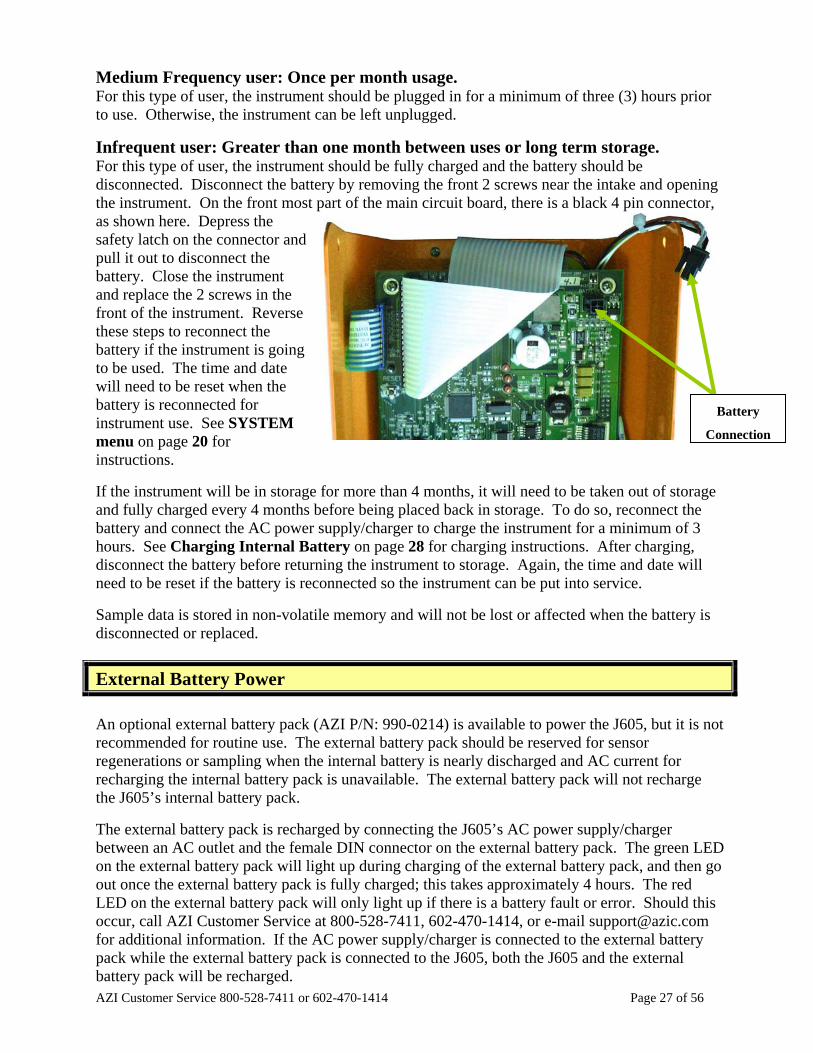
Medium Frequency user: Once per month usage. For this type of user, the instrument should be plugged in for a minimum of three (3) hours prior to use. Otherwise, the instrument can be left unplugged. Infrequent user: Greater than one month between uses or long term storage. For this type of user, the instrument should be fully charged and the battery should be disconnected. Disconnect the battery by removing the front 2 screws near the intake and opening the instrument. On the front most part of the main circuit board, there is a black 4 pin connector, as shown here. Depress the safety latch on the connector and pull it out to disconnect the battery. Close the instrument and replace the 2 screws in the front of the instrument. Reverse these steps to reconnect the battery if the instrument is going to be used. The time and date will need to be reset when the battery is reconnected for instrument use. See SYSTEM menu on page 20 for instructions. If the instrument will be in storage for more than 4 months, it will need to be taken out of storage and fully charged every 4 months before being placed back in storage. To do so, reconnect the battery and connect the AC power supply/charger to charge the instrument for a minimum of 3 hours. See Charging Internal Battery on page 28 for charging instructions. After charging, disconnect the battery before returning the instrument to storage. Again, the time and date will need to be reset if the battery is reconnected so the instrument can be put into service. Sample data is stored in non-volatile memory and will not be lost or affected when the battery is disconnected or replaced.
External Battery Power
An optional external battery pack (AZI P/N: 990-0214) is available to power the J605, but it is not recommended for routine use. The external battery pack should be reserved for sensor regenerations or sampling when the internal battery is nearly discharged and AC current for recharging the internal battery pack is unavailable. The external battery pack will not recharge the J605’s internal battery pack. The external battery pack is recharged by connecting the J605’s AC power supply/charger between an AC outlet and the female DIN connector on the external battery pack. The green LED on the external battery pack will light up during charging of the external battery pack, and then go out once the external battery pack is fully charged; this takes approximately 4 hours. The red LED on the external battery pack will only light up if there is a battery fault or error. Should this occur, call AZI Customer Service at 800-528-7411, 602-470-1414, or e-mail [email protected] for additional information. If the AC power supply/charger is connected to the external battery pack while the external battery pack is connected to the J605, both the J605 and the external battery pack will be recharged.
Battery
Connection
AZI Customer Service 800-528-7411 or 602-470-1414 Page 28 of 56
When operating using the external battery pack, the J605 will shut down after twenty (20) minutes of non-usage. However, if the instrument is running in Survey Mode or Auto-Sampling mode, the instrument will not shut off after twenty minutes. If the J605 is reading low levels of hydrogen sulfide in Survey or Auto-Sampling mode, it will continue to sample until the battery runs out. However, if the J605 is reading high levels of hydrogen sulfide in Survey mode, when the sensor reaches saturation a message will appear indicating that sensor regeneration is required, and twenty minutes later the instrument will automatically power off. In Auto-Sampling mode, the instrument will regenerate automatically when the sensor is saturated. Additionally, using the optional car accessory cable (AZI P/N: 200-0170), the J605 may be powered from a car accessory jack (cigarette lighter) and draw power directly from the battery of a vehicle. The car accessory cable can be used for sensor regenerations or sampling when the internal battery is nearly discharged and AC current for recharging the internal battery pack is unavailable. The car accessory cable will not recharge the J605’s internal battery pack. In order to use the external battery pack or the car accessory cable, the J605’s internal battery pack must be installed in the instrument. If the internal battery pack is disconnected or removed, neither of these accessories will be able to provide power to the instrument. To order either of these accessories or for additional information, call AZI Customer Service at 800-528-7411, 602-470-1414, or e-mail [email protected].
Charging Internal Battery
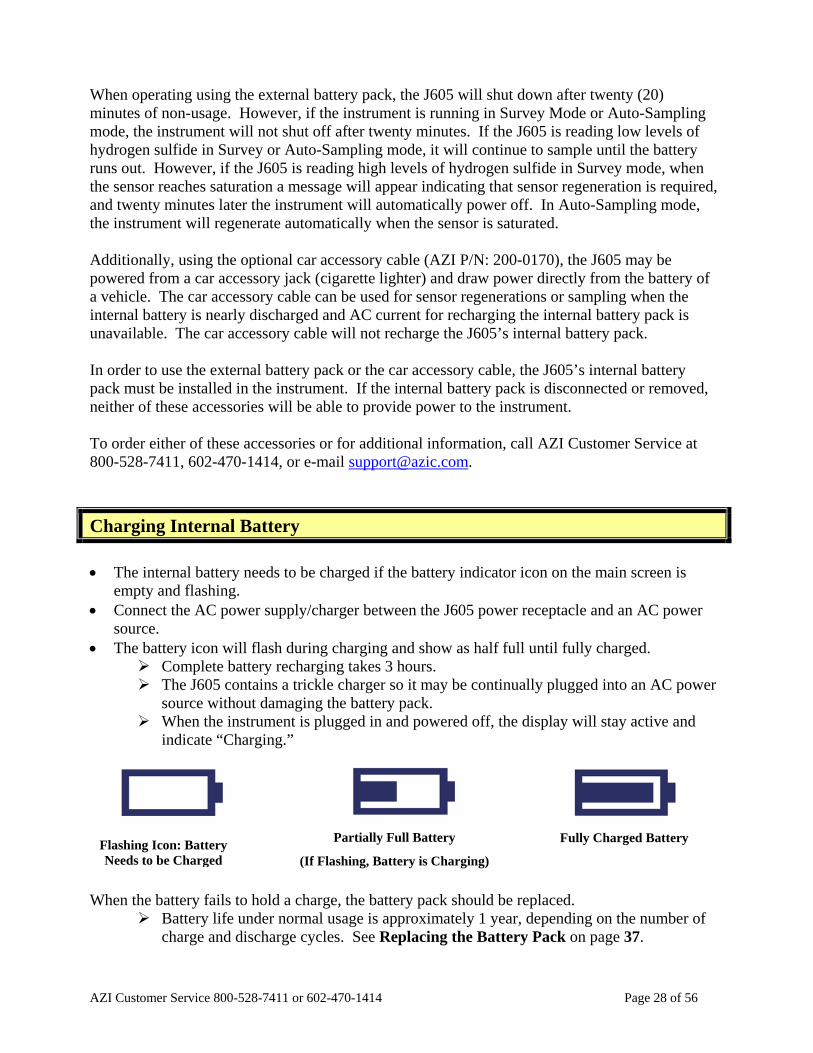
• The internal battery needs to be charged if the battery indicator icon on the main screen is empty and flashing.
• Connect the AC power supply/charger between the J605 power receptacle and an AC power source.
• The battery icon will flash during charging and show as half full until fully charged. Complete battery recharging takes 3 hours. The J605 contains a trickle charger so it may be continually plugged into an AC power
source without damaging the battery pack. When the instrument is plugged in and powered off, the display will stay active and
indicate “Charging.”
When the battery fails to hold a charge, the battery pack should be replaced. Battery life under normal usage is approximately 1 year, depending on the number of
charge and discharge cycles. See Replacing the Battery Pack on page 37.
Flashing Icon: Battery Needs to be Charged
Partially Full Battery
(If Flashing, Battery is Charging)
Fully Charged Battery
AZI Customer Service 800-528-7411 or 602-470-1414 Page 29 of 56
Retrieving Data On instruments that have the USB Communications option, in addition to viewing the sample data on the instrument, sample data can be transmitted from the J605 for analysis using the USB connections on the back panel of the J605. Data may be transmitted directly to a PC, saved to a USB flash drive plugged into the J605 or printed to an AZI printer connected to the J605. See the DATA menu section on page 18 for the specific data transmission options available. If the USB Communications option has not been purchased, the USB ports will not be present. Contact your AZI Sales Representative for information on the USB option. The data is transmitted in a comma-delimited text file named “serialnumber.txt” (for example 60500019.txt) with a four-line header indicating the model and serial number of the instrument, the date and time of the report, and the gas being detected. The first line of the data indicates the contents of each data field, as shown below. The USB icon on the main screen will flash during data transmission. If an instrument data file with the same filename already exists on the USB flash drive, the current data will be appended to the existing file. The data file will look like this example: Jerome Model: J605-0001 Serial Number: 605-00019 Date: 01-OCT-2010 11:03:22 Gas: H2S dd-MMM-yyyy,hh:mm:ss,Reading,Units,Temp-C,Type,Location 01-OCT-2010,09:07:05,4.65 ,ppb,26.12,S,LAB 01-OCT-2010,09:07:32,4.68 ,ppb,26.12,S,LAB 01-OCT-2010,09:07:59,4.79 ,ppb,26.12,S,LAB 01-OCT-2010,09:18:30,5.37 ,ppb,27.87,M,LAB 01-OCT-2010,09:20:12,5.31 ,ppb,28.06,M,LAB 01-OCT-2010,09:28:42,5.26 ,ppb,27.93,A,LAB 01-OCT-2010,09:30:42,5.25 ,ppb,27.93,A,LAB 01-OCT-2010,09:32:42,5.24 ,ppb,27.93,A,LAB 01-OCT-2010,10:17:19,0.000,ppm,27.31,R,LAB
• The Temp field lists the internal temperature of the instrument in degrees Celsius at the time of sampling.
• The Type field lists a single letter code that indicates the type of sample taken, as follows:
M: Manual Sample A: Auto Sample S: Survey Mode Sample R: Regeneration (indicates date and time of regeneration).
(For regenerations, the sample value listed will always be 0.000 ppm.)
• The Location field lists the location where the sample was taken, as set using SET LOCATION NAME in the SAMPLE menu. See the SAMPLE menu section on page 15 for more details. If Location Names are used and the data is output to a printer from the J605, consecutive samples at the same location will be grouped together.
• If the data is transmitted directly to a PC, there will be one additional line at the end of the file indicating the number of records. This line will be in the form [DATA:####] with the #### indicating the number of records, as shown on page 53.

AZI Customer Service 800-528-7411 or 602-470-1414 Page 30 of 56
Instrument I/O Interface The J605 I/O port is a DB-25F connector on the back of the instrument that provides numerous specialized functions for specific industrial applications and for factory use. System integration utilizing the 4-20mA output feature is the most common use of the I/O port. 4-20mA Output The 4-20 mA output can be used to indicate the H2S reading level on a proportional scale from 4-20 milliamps for connection to certain industrial systems, such as SCADA. Output varies depending on the range selected, as explained below.
Auto-range In Auto-range, a 4 mA current level corresponds to an H2S reading of 3 ppb or less, while a 20 mA current level corresponds to an H2S reading of 10 ppm. Concentrations higher than 10 ppm will result in a 20.5 mA output. Current levels between 4 and 20 mA correspond to H2S readings between 3 ppb and 10 ppm on a proportional scale, as determined by this equation:
The relationship between the H2S concentration detected and the current level present can be represented graphically as follows:
NOTE: This is NOT a printer connection. It is a specialized interface. Connecting any non-AZI authorized device to this connector may damage both the device and the J605 and may void the warranty on the J605.
AZI Customer Service 800-528-7411 or 602-470-1414 Page 31 of 56
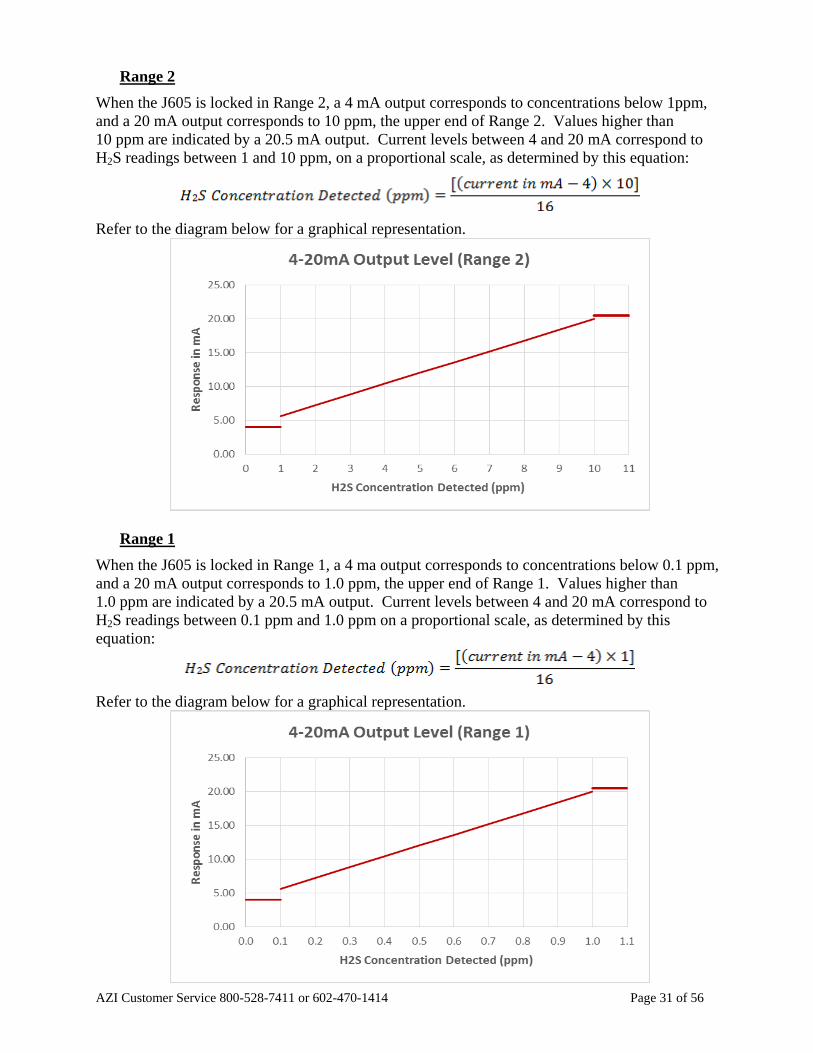
Range 2 When the J605 is locked in Range 2, a 4 mA output corresponds to concentrations below 1ppm, and a 20 mA output corresponds to 10 ppm, the upper end of Range 2. Values higher than 10 ppm are indicated by a 20.5 mA output. Current levels between 4 and 20 mA correspond to H2S readings between 1 and 10 ppm, on a proportional scale, as determined by this equation:
Refer to the diagram below for a graphical representation.
Range 1
When the J605 is locked in Range 1, a 4 ma output corresponds to concentrations below 0.1 ppm, and a 20 mA output corresponds to 1.0 ppm, the upper end of Range 1. Values higher than 1.0 ppm are indicated by a 20.5 mA output. Current levels between 4 and 20 mA correspond to H2S readings between 0.1 ppm and 1.0 ppm on a proportional scale, as determined by this equation:
Refer to the diagram below for a graphical representation.

AZI Customer Service 800-528-7411 or 602-470-1414 Page 32 of 56
Range 0 When the J605 is locked in Range 0, a 4 ma output corresponds to concentrations below 3 ppb, and a 20 mA output corresponds to 100 ppb, the upper end of Range 0. Values higher than 100 ppb are indicated by a 20.5 mA output. Current levels between 4 and 20 mA correspond to H2S readings between 3 ppb and 100 ppb on a proportional scale, as determined by this equation:
Refer to the diagram below for a graphical representation.
Example Readings The chart below shows some example 4-20 mA readout levels and the corresponding H2S concentrations in a given range: 4-20 mA Output Auto-range Range 2 Range 1 Range 0
4.00 mA < 3 ppb < 1.0 ppm < 0.10 ppm < 3 ppb 5.60 mA 1.0 ppm 1.0 ppm 0.10 ppm 10 ppb 12.00 mA 5.0 ppm 5.0 ppm 0.50 ppm 50 ppb 20.00 mA 10.0 ppm 10.0 ppm 1.00 ppm 100 ppb
When the J605 is powered off, either manually or automatically, the output current will drop to 3.5mA to indicate this condition. However, if the J605 is operating with the internal battery disconnected and loses AC power, the J605’s 4-20mA circuit will continue to output the last current value as long as power to the external current loop is maintained.
AZI Customer Service 800-528-7411 or 602-470-1414 Page 33 of 56
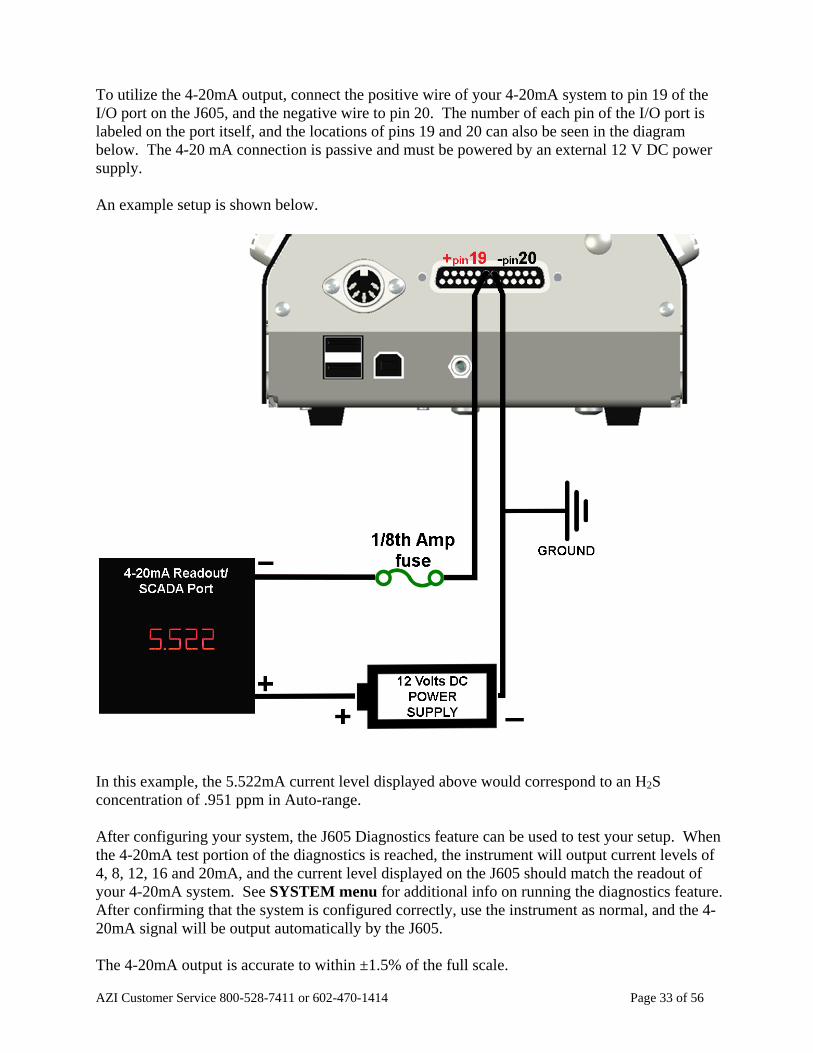
To utilize the 4-20mA output, connect the positive wire of your 4-20mA system to pin 19 of the I/O port on the J605, and the negative wire to pin 20. The number of each pin of the I/O port is labeled on the port itself, and the locations of pins 19 and 20 can also be seen in the diagram below. The 4-20 mA connection is passive and must be powered by an external 12 V DC power supply. An example setup is shown below.
In this example, the 5.522mA current level displayed above would correspond to an H2S concentration of .951 ppm in Auto-range. After configuring your system, the J605 Diagnostics feature can be used to test your setup. When the 4-20mA test portion of the diagnostics is reached, the instrument will output current levels of 4, 8, 12, 16 and 20mA, and the current level displayed on the J605 should match the readout of your 4-20mA system. See SYSTEM menu for additional info on running the diagnostics feature. After confirming that the system is configured correctly, use the instrument as normal, and the 4-20mA signal will be output automatically by the J605. The 4-20mA output is accurate to within ±1.5% of the full scale.
AZI Customer Service 800-528-7411 or 602-470-1414 Page 34 of 56
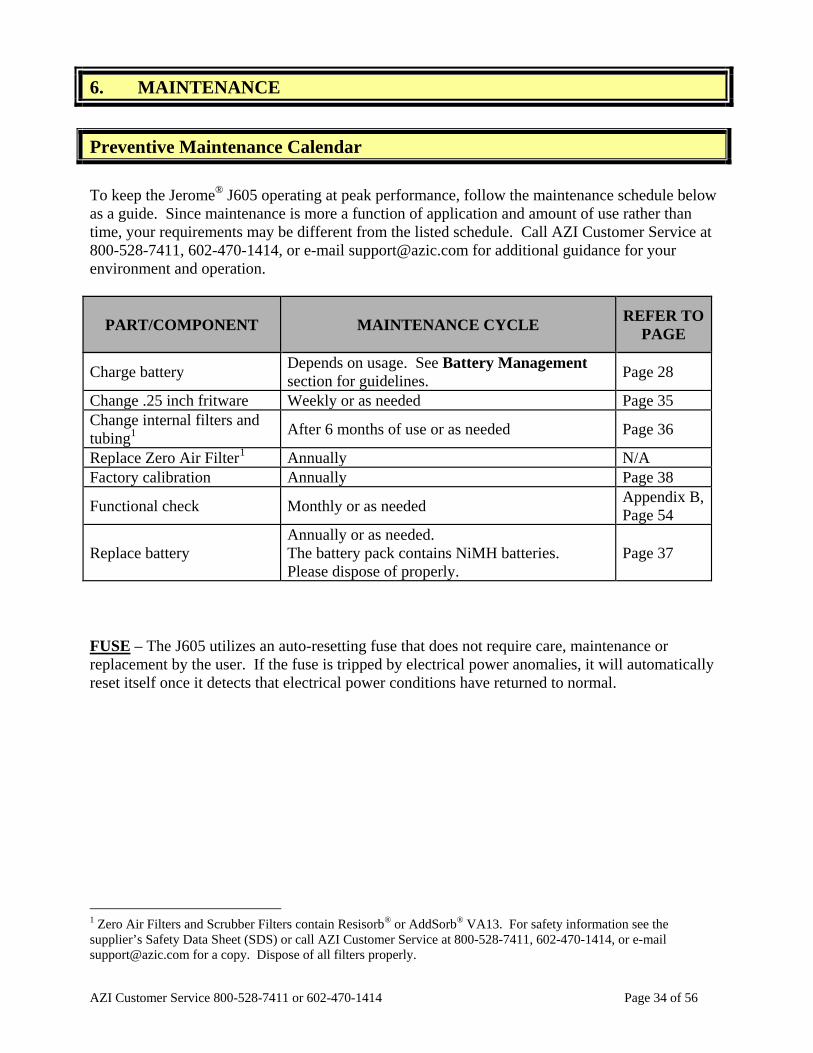
6. MAINTENANCE Preventive Maintenance Calendar To keep the Jerome® J605 operating at peak performance, follow the maintenance schedule below as a guide. Since maintenance is more a function of application and amount of use rather than time, your requirements may be different from the listed schedule. Call AZI Customer Service at 800-528-7411, 602-470-1414, or e-mail [email protected] for additional guidance for your environment and operation.
PART/COMPONENT MAINTENANCE CYCLE REFER TO PAGE
Charge battery Depends on usage. See Battery Management section for guidelines. Page 28
Change .25 inch fritware Weekly or as needed Page 35 Change internal filters and tubing1 After 6 months of use or as needed Page 36
Replace Zero Air Filter1 Annually N/A Factory calibration Annually Page 38
Functional check Monthly or as needed Appendix B, Page 54
Replace battery Annually or as needed. The battery pack contains NiMH batteries. Please dispose of properly.
Page 37
FUSE – The J605 utilizes an auto-resetting fuse that does not require care, maintenance or replacement by the user. If the fuse is tripped by electrical power anomalies, it will automatically reset itself once it detects that electrical power conditions have returned to normal.
1 Zero Air Filters and Scrubber Filters contain Resisorb® or AddSorb® VA13. For safety information see the supplier’s Safety Data Sheet (SDS) or call AZI Customer Service at 800-528-7411, 602-470-1414, or e-mail [email protected] for a copy. Dispose of all filters properly.
AZI Customer Service 800-528-7411 or 602-470-1414 Page 35 of 56
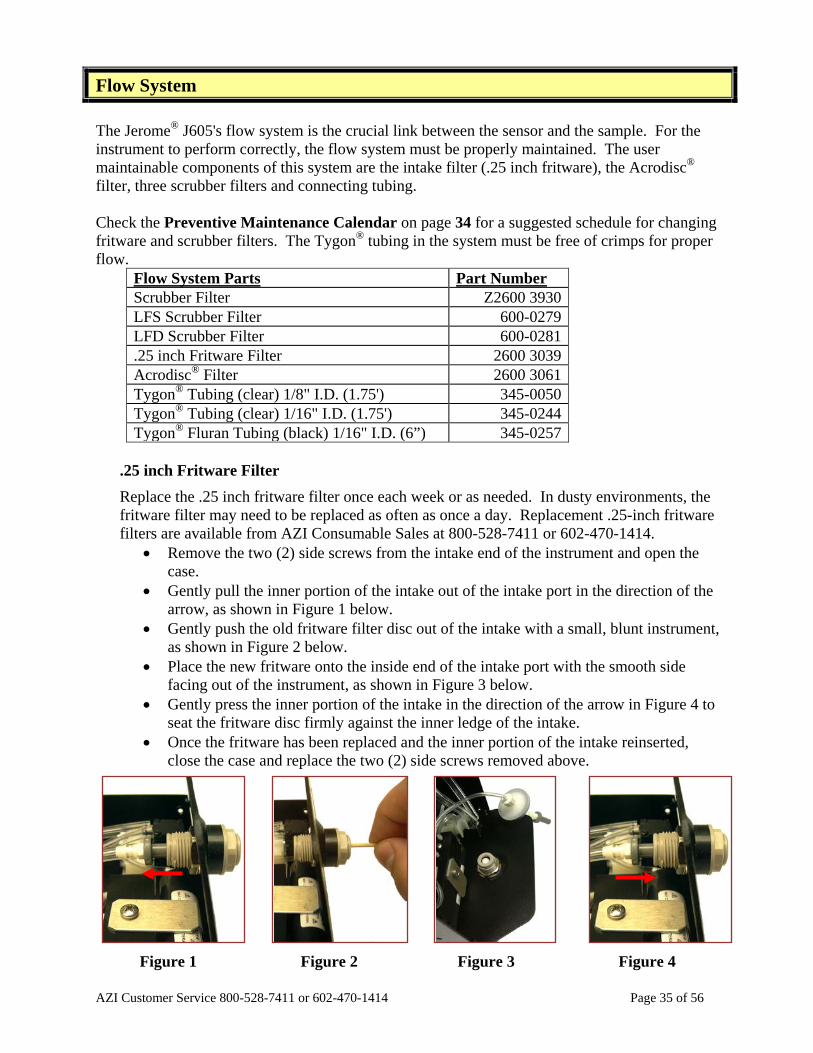
Flow System The Jerome® J605's flow system is the crucial link between the sensor and the sample. For the instrument to perform correctly, the flow system must be properly maintained. The user maintainable components of this system are the intake filter (.25 inch fritware), the Acrodisc® filter, three scrubber filters and connecting tubing. Check the Preventive Maintenance Calendar on page 34 for a suggested schedule for changing fritware and scrubber filters. The Tygon® tubing in the system must be free of crimps for proper flow.
Flow System Parts Part Number Scrubber Filter Z2600 3930 LFS Scrubber Filter 600-0279 LFD Scrubber Filter 600-0281 .25 inch Fritware Filter 2600 3039 Acrodisc® Filter 2600 3061 Tygon® Tubing (clear) 1/8" I.D. (1.75') 345-0050 Tygon® Tubing (clear) 1/16" I.D. (1.75') 345-0244 Tygon® Fluran Tubing (black) 1/16" I.D. (6”) 345-0257
.25 inch Fritware Filter Replace the .25 inch fritware filter once each week or as needed. In dusty environments, the fritware filter may need to be replaced as often as once a day. Replacement .25-inch fritware filters are available from AZI Consumable Sales at 800-528-7411 or 602-470-1414.
• Remove the two (2) side screws from the intake end of the instrument and open the case.
• Gently pull the inner portion of the intake out of the intake port in the direction of the arrow, as shown in Figure 1 below.
• Gently push the old fritware filter disc out of the intake with a small, blunt instrument, as shown in Figure 2 below.
• Place the new fritware onto the inside end of the intake port with the smooth side facing out of the instrument, as shown in Figure 3 below.
• Gently press the inner portion of the intake in the direction of the arrow in Figure 4 to seat the fritware disc firmly against the inner ledge of the intake.
• Once the fritware has been replaced and the inner portion of the intake reinserted, close the case and replace the two (2) side screws removed above.
Figure 1 Figure 2 Figure 3 Figure 4

AZI Customer Service 800-528-7411 or 602-470-1414 Page 36 of 56
Internal Filters Replace the internal filters after six (6) months of use, or as needed. • Press the I/O button to turn the power OFF and unplug the power cord. • Remove the two (2) side screws from the intake end of the instrument and open the case. • Carefully disconnect the Tygon® tubing from both ends of the filters and discard the old
filters.
CAUTION: Scrubber filters contain Resisorb® or AddSorb® VA13. Used filters will also
contain trace amounts of hydrogen sulfide. Use proper methods when disposing of used filters. Call AZI Customer Service at 800-528-7411, 602-
470-1414, or e-mail [email protected] for a copy of the Resisorb® or AddSorb® VA13 SDS or for other questions.
• Replace the old filters with new filters, oriented as shown in the diagram above. Push the Tygon® tubing as far as it will go onto the filter fittings.
• Push the filters into the mounting clips, and if deteriorated due to heat and/or age, replace the o-rings on the solenoid clips as well.
• Remove any crimps or twists in the tubing and ensure that tubing connections are secure. If the tubing is loose, readings may not be accurate. Replace any tubing that has deteriorated due to heat and/or age.
• Close the case and replace the screws. • Dispose of all filters in accordance with state and federal environmental regulations.
600-0281 LFD Scrubber Filter
600-0279 LFS Scrubber Filter
Z2600 3930 Scrubber Filter
2600 3061 Acrodisc® Filter

AZI Customer Service 800-528-7411 or 602-470-1414 Page 37 of 56
Replacing the Battery Pack
• Press the I/O button to turn the power OFF. • Unplug the power cord and any USB accessories from the instrument. • Use a Phillips screwdriver to remove the four (4) screws securing the battery panel as shown
above. • After removing the screws, carefully set the panel to the side. Note that it is still connected to
the instrument via the power connector. • Slide the battery pack out of the J605. • Disconnect the battery connector to detach the old battery. • Install the new battery by connecting it to the battery connector and sliding it into the J605. • Tuck the cabling into the gap between the battery and the case. • Replace the battery panel and secure with the four (4) screws removed above. • Dispose of the old nickel metal hydride (NiMH) battery in accordance with state and federal
regulations. • After battery replacement, the date and time will need to be updated. See the SYSTEM
menu on page 20 for directions. Sample data is stored in non-volatile memory and will not be lost or affected when the battery is disconnected or replaced.

AZI Customer Service 800-528-7411 or 602-470-1414 Page 38 of 56
7. CALIBRATION
Factory Calibration Service The Jerome® J605's gold film sensor is inherently stable and does not require frequent calibration. The interval between calibrations depends upon the application and frequency of use; however, the recommended interval is every 12 months. The Jerome® J605 has been factory calibrated using laboratory equipment containing NIST traceable permeation tubes. In order to calibrate the Jerome® J605, a sophisticated calibration system is required that ensures stability of the calibration gas source, eliminates any pressure in the calibration gas stream, and controls the temperature of the calibration environment. We strongly recommend you take advantage of our calibration and maintenance service at Arizona Instrument. Service includes filter replacement, component testing, and instrument calibration to NIST traceable standards. A certificate of calibration is issued from AZI when your instrument is factory calibrated.
For scheduling and shipping authorization, call AZI Customer Service at (800) 528-7411 or (602) 470-1414, or visit our website at www.azic.com.
Verification of Functionality and Quality Control The Functional Test Module (AZI P/N: Z2600 0918 or Z2600 0930) is used to determine if your instrument is functioning correctly between recommended annual factory calibrations. It allows you to have complete confidence in the sample results. This test verifies proper instrument operation through the introduction of a known concentration of hydrogen sulfide into the Jerome® analyzer.
THIS TEST DOES NOT CALIBRATE THE INSTRUMENT. If your application requires frequent verification of instrument function, this test demonstrates the instrument’s operation and function. Recording FTM results in an instrument log provides a quality control/quality assurance record of instrument function between regular calibrations. If test results fall within the expected range, you may assume the instrument is functioning correctly. See APPENDIX B - J605 FUNCTIONAL TEST MODULE on page 54 for more information about the FTM procedures. Complete instructions for use are supplied with the test kit, AZI P/N Z2600 0918. To order the FTM, contact your AZI Sales Representative at (800) 528-7411 or (602) 470-1414.
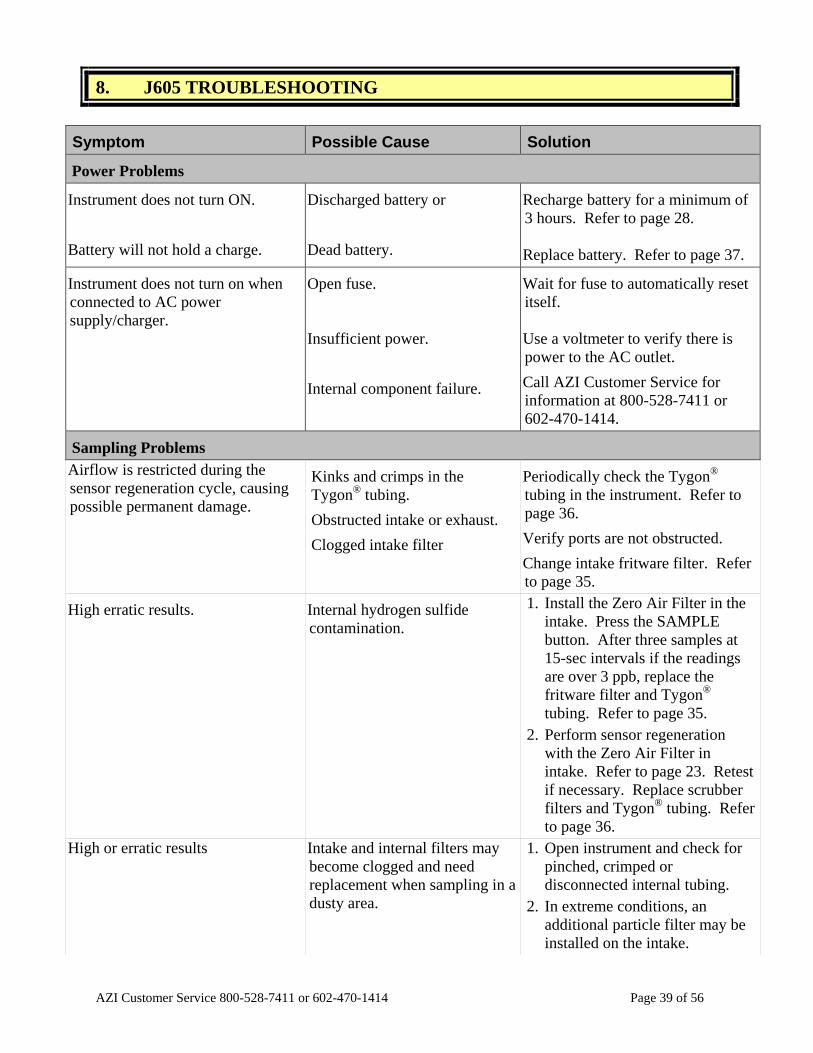
AZI Customer Service 800-528-7411 or 602-470-1414 Page 39 of 56
8. J605 TROUBLESHOOTING
Symptom Possible Cause Solution
Power Problems
Instrument does not turn ON. Battery will not hold a charge.
Discharged battery or Dead battery.
Recharge battery for a minimum of 3 hours. Refer to page 28. Replace battery. Refer to page 37.
Instrument does not turn on when connected to AC power supply/charger.
Open fuse. Insufficient power. Internal component failure.
Wait for fuse to automatically reset itself. Use a voltmeter to verify there is power to the AC outlet. Call AZI Customer Service for information at 800-528-7411 or 602-470-1414.
Sampling Problems Airflow is restricted during the sensor regeneration cycle, causing possible permanent damage.
Kinks and crimps in the Tygon® tubing. Obstructed intake or exhaust. Clogged intake filter
Periodically check the Tygon® tubing in the instrument. Refer to page 36. Verify ports are not obstructed. Change intake fritware filter. Refer to page 35.
High erratic results. Internal hydrogen sulfide contamination.
1. Install the Zero Air Filter in the intake. Press the SAMPLE button. After three samples at 15-sec intervals if the readings are over 3 ppb, replace the fritware filter and Tygon® tubing. Refer to page 35.
2. Perform sensor regeneration with the Zero Air Filter in intake. Refer to page 23. Retest if necessary. Replace scrubber filters and Tygon® tubing. Refer to page 36.
High or erratic results Intake and internal filters may become clogged and need replacement when sampling in a dusty area.
1. Open instrument and check for pinched, crimped or disconnected internal tubing.
2. In extreme conditions, an additional particle filter may be installed on the intake.
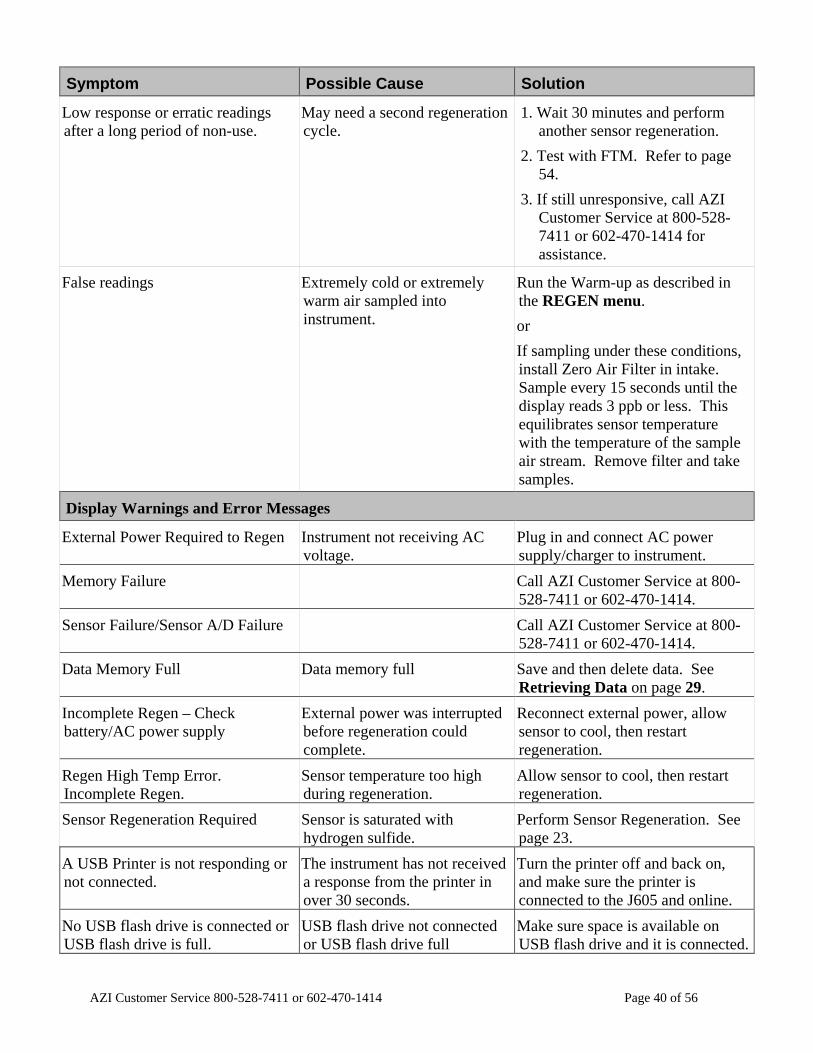
AZI Customer Service 800-528-7411 or 602-470-1414 Page 40 of 56
Symptom Possible Cause Solution
Low response or erratic readings after a long period of non-use.
May need a second regeneration cycle.
1. Wait 30 minutes and perform another sensor regeneration.
2. Test with FTM. Refer to page 54.
3. If still unresponsive, call AZI Customer Service at 800-528-7411 or 602-470-1414 for assistance.
False readings Extremely cold or extremely warm air sampled into instrument.
Run the Warm-up as described in the REGEN menu. or If sampling under these conditions, install Zero Air Filter in intake. Sample every 15 seconds until the display reads 3 ppb or less. This equilibrates sensor temperature with the temperature of the sample air stream. Remove filter and take samples.
Display Warnings and Error Messages
External Power Required to Regen Instrument not receiving AC voltage.
Plug in and connect AC power supply/charger to instrument.
Memory Failure Call AZI Customer Service at 800-528-7411 or 602-470-1414.
Sensor Failure/Sensor A/D Failure Call AZI Customer Service at 800-528-7411 or 602-470-1414.
Data Memory Full Data memory full Save and then delete data. See Retrieving Data on page 29.
Incomplete Regen – Check battery/AC power supply
External power was interrupted before regeneration could complete.
Reconnect external power, allow sensor to cool, then restart regeneration.
Regen High Temp Error. Incomplete Regen.
Sensor temperature too high during regeneration.
Allow sensor to cool, then restart regeneration.
Sensor Regeneration Required Sensor is saturated with hydrogen sulfide.
Perform Sensor Regeneration. See page 23.
A USB Printer is not responding or not connected.
The instrument has not received a response from the printer in over 30 seconds.
Turn the printer off and back on, and make sure the printer is connected to the J605 and online.
No USB flash drive is connected or USB flash drive is full.
USB flash drive not connected or USB flash drive full
Make sure space is available on USB flash drive and it is connected.

AZI Customer Service 800-528-7411 or 602-470-1414 Page 41 of 56
Potential Interferences Potential interferences to the Jerome® hydrogen sulfide analyzers are rare and most of these can be eliminated with proper maintenance procedures. However, erroneously high readings can sometimes occur. Here are a few things to be aware of when using the instrument: The gold film sensors used in the Jerome® hydrogen sulfide analyzers do not respond to the following compounds:
• Hydrocarbons • CO, CO2, and SO2 • Water vapor (Note that water vapor condensation on the gold film can cause
irreparable harm to the sensor and must be avoided.) However, the following compounds may cause the gold film sensor to respond:
• Chlorine • Ammonia • NO2 • Most mercaptans (organic sulfur compounds or “thiols”)
Special filters designed to remove chlorine or ammonia gas are available from Arizona Instrument and may be ordered as Chlorine Filter, AZI P/N Z2600-3940 or Ammonia Filter, AZI P/N 990-0183. Visit the “Tech Notes” section at www.azic.com for more information concerning the chlorine and ammonia filters. Filter replacement at regular intervals, or when unexpectedly high readings are encountered in areas of these potential interferents, may resolve these problems.
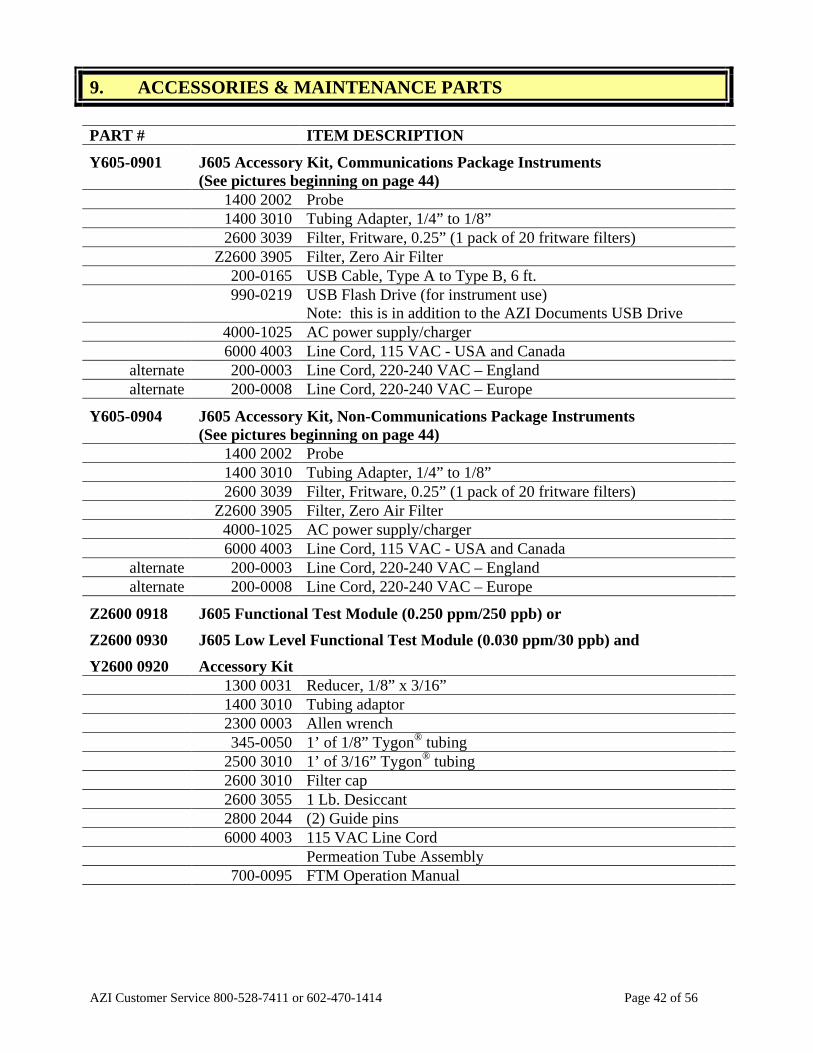
AZI Customer Service 800-528-7411 or 602-470-1414 Page 42 of 56
9. ACCESSORIES & MAINTENANCE PARTS PART # ITEM DESCRIPTION
Y605-0901 J605 Accessory Kit, Communications Package Instruments (See pictures beginning on page 44)
1400 2002 Probe 1400 3010 Tubing Adapter, 1/4” to 1/8” 2600 3039 Filter, Fritware, 0.25” (1 pack of 20 fritware filters) Z2600 3905 Filter, Zero Air Filter 200-0165 USB Cable, Type A to Type B, 6 ft. 990-0219 USB Flash Drive (for instrument use)
Note: this is in addition to the AZI Documents USB Drive
4000-1025 AC power supply/charger 6000 4003 Line Cord, 115 VAC - USA and Canada
alternate 200-0003 Line Cord, 220-240 VAC – England alternate 200-0008 Line Cord, 220-240 VAC – Europe
Y605-0904 J605 Accessory Kit, Non-Communications Package Instruments (See pictures beginning on page 44)
1400 2002 Probe 1400 3010 Tubing Adapter, 1/4” to 1/8” 2600 3039 Filter, Fritware, 0.25” (1 pack of 20 fritware filters) Z2600 3905 Filter, Zero Air Filter 4000-1025 AC power supply/charger 6000 4003 Line Cord, 115 VAC - USA and Canada
alternate 200-0003 Line Cord, 220-240 VAC – England alternate 200-0008 Line Cord, 220-240 VAC – Europe
Z2600 0918 Z2600 0930 Y2600 0920
J605 Functional Test Module (0.250 ppm/250 ppb) or J605 Low Level Functional Test Module (0.030 ppm/30 ppb) and Accessory Kit
1300 0031 Reducer, 1/8” x 3/16” 1400 3010 Tubing adaptor 2300 0003 Allen wrench 345-0050 1’ of 1/8” Tygon® tubing 2500 3010 1’ of 3/16” Tygon® tubing 2600 3010 Filter cap 2600 3055 1 Lb. Desiccant 2800 2044 (2) Guide pins 6000 4003 115 VAC Line Cord Permeation Tube Assembly 700-0095 FTM Operation Manual
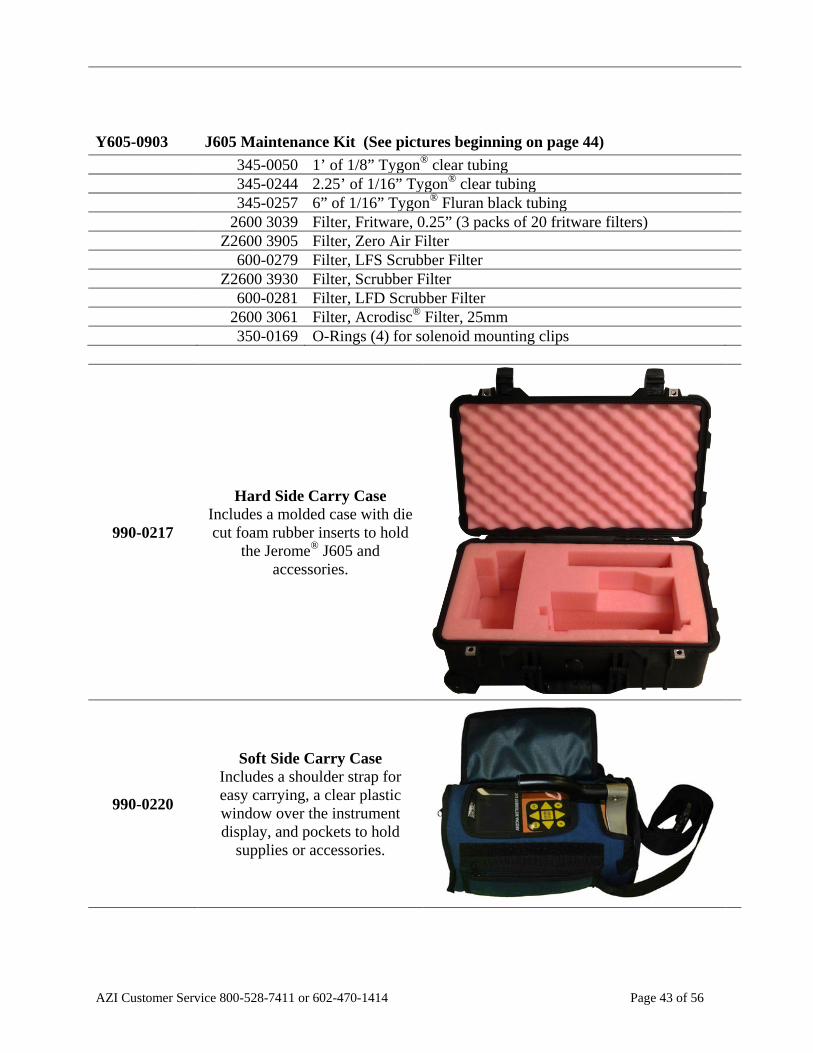
AZI Customer Service 800-528-7411 or 602-470-1414 Page 43 of 56
Y605-0903 J605 Maintenance Kit (See pictures beginning on page 44)
345-0050 1’ of 1/8” Tygon® clear tubing 345-0244 2.25’ of 1/16” Tygon® clear tubing 345-0257 6” of 1/16” Tygon® Fluran black tubing 2600 3039 Filter, Fritware, 0.25” (3 packs of 20 fritware filters) Z2600 3905 Filter, Zero Air Filter 600-0279 Filter, LFS Scrubber Filter Z2600 3930 Filter, Scrubber Filter 600-0281 Filter, LFD Scrubber Filter 2600 3061 Filter, Acrodisc® Filter, 25mm 350-0169 O-Rings (4) for solenoid mounting clips
990-0217
Hard Side Carry Case Includes a molded case with die cut foam rubber inserts to hold
the Jerome® J605 and accessories.
990-0220
Soft Side Carry Case Includes a shoulder strap for easy carrying, a clear plastic window over the instrument display, and pockets to hold
supplies or accessories.
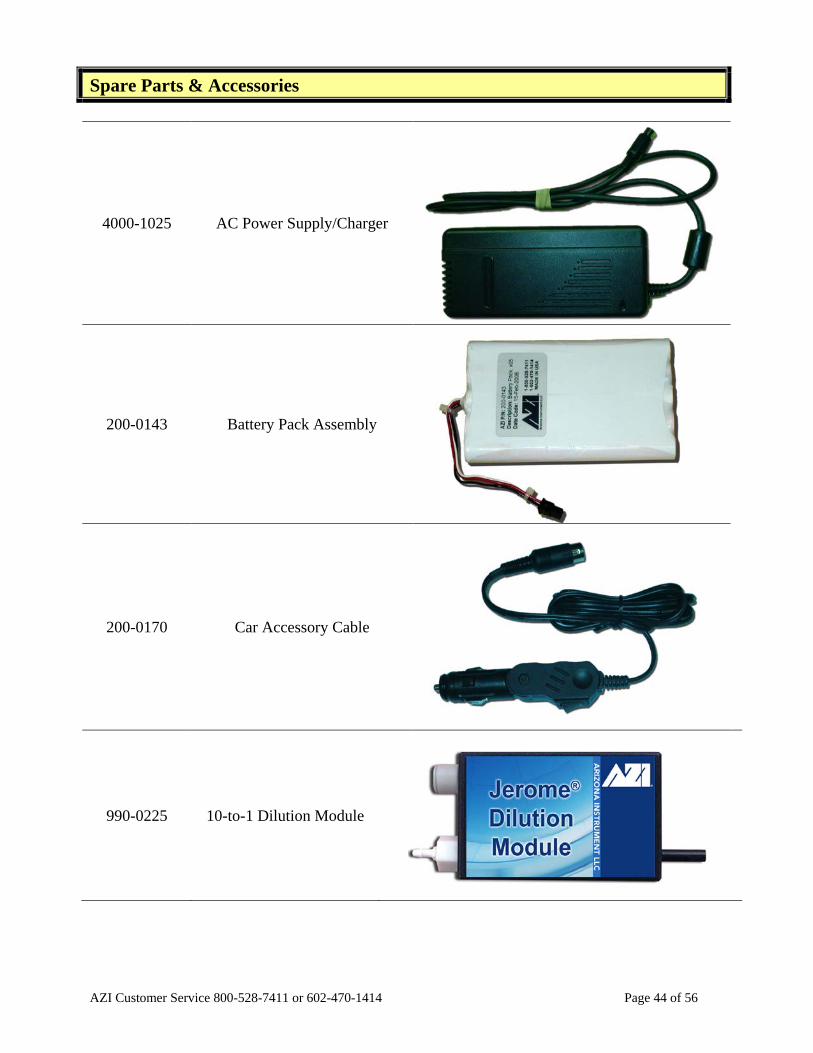
AZI Customer Service 800-528-7411 or 602-470-1414 Page 44 of 56
Spare Parts & Accessories
4000-1025 AC Power Supply/Charger
200-0143 Battery Pack Assembly
200-0170 Car Accessory Cable
990-0225 10-to-1 Dilution Module
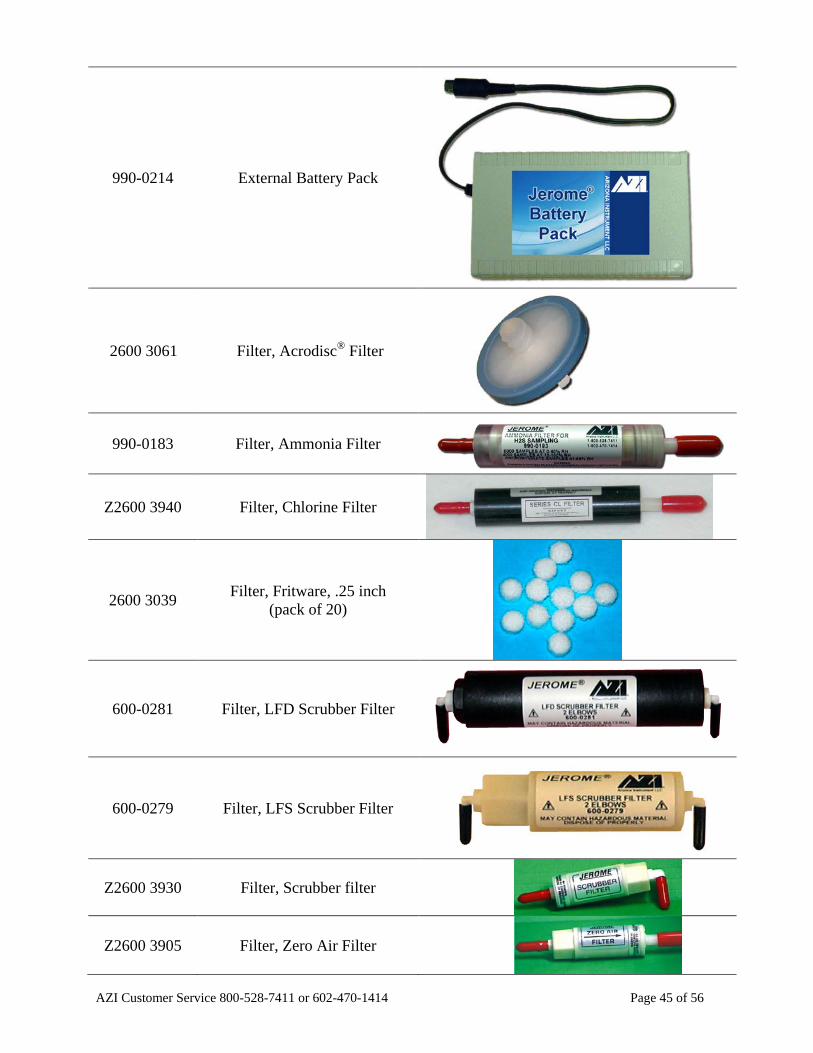
AZI Customer Service 800-528-7411 or 602-470-1414 Page 45 of 56
990-0214 External Battery Pack
2600 3061 Filter, Acrodisc® Filter
990-0183 Filter, Ammonia Filter
Z2600 3940 Filter, Chlorine Filter
2600 3039 Filter, Fritware, .25 inch (pack of 20)
600-0281 Filter, LFD Scrubber Filter
600-0279 Filter, LFS Scrubber Filter
Z2600 3930 Filter, Scrubber filter
Z2600 3905 Filter, Zero Air Filter
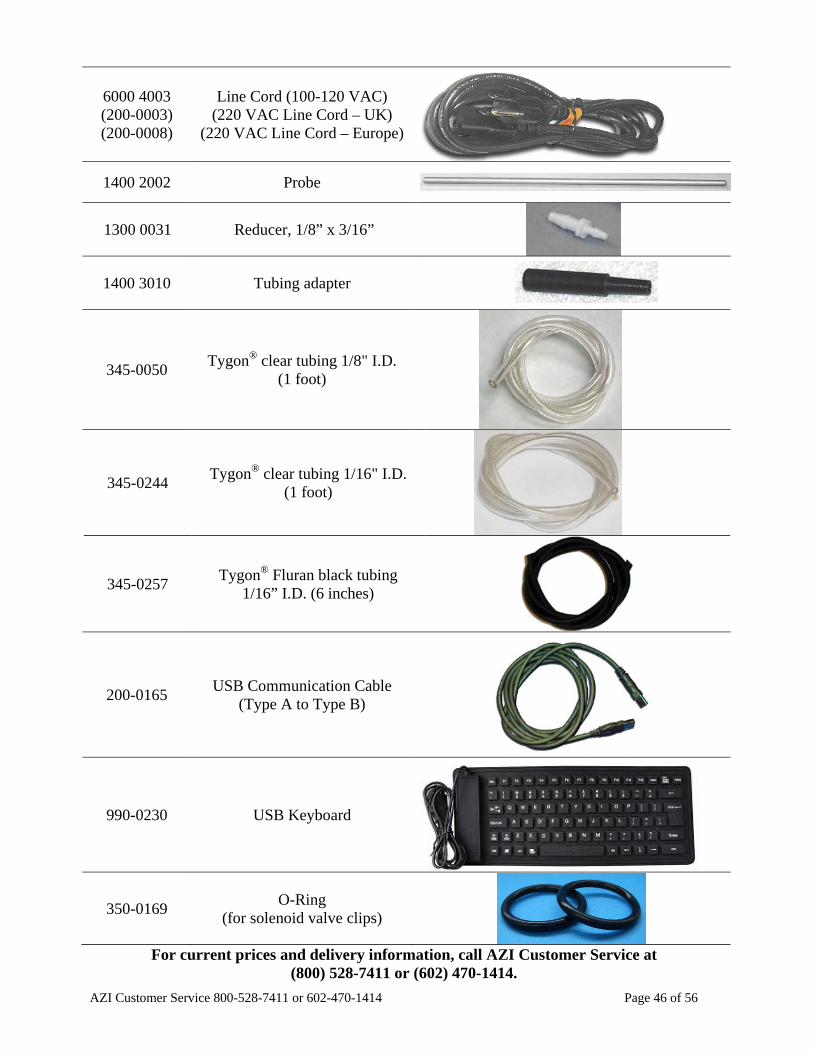
AZI Customer Service 800-528-7411 or 602-470-1414 Page 46 of 56
6000 4003 (200-0003) (200-0008)
Line Cord (100-120 VAC) (220 VAC Line Cord – UK)
(220 VAC Line Cord – Europe)
1400 2002 Probe
1300 0031 Reducer, 1/8” x 3/16”
1400 3010 Tubing adapter
345-0050 Tygon® clear tubing 1/8" I.D. (1 foot)
345-0244 Tygon® clear tubing 1/16" I.D. (1 foot)
345-0257 Tygon® Fluran black tubing 1/16” I.D. (6 inches)
200-0165 USB Communication Cable (Type A to Type B)
990-0230 USB Keyboard
350-0169 O-Ring (for solenoid valve clips)
For current prices and delivery information, call AZI Customer Service at
(800) 528-7411 or (602) 470-1414.
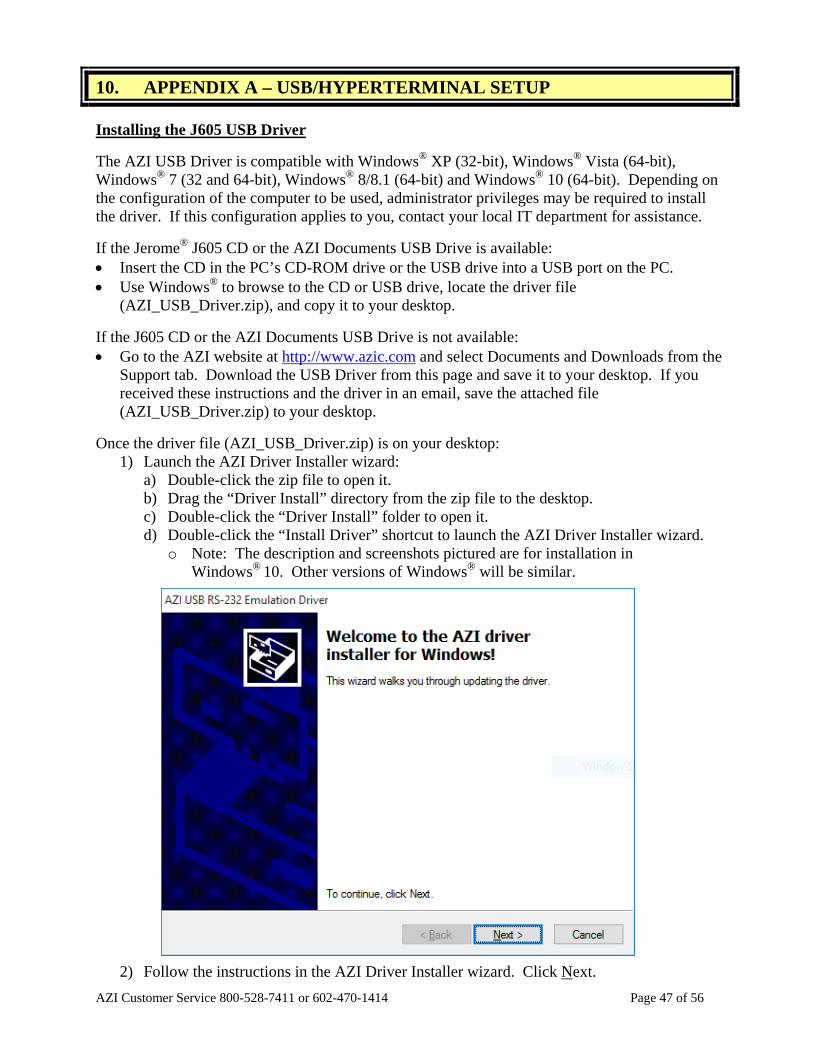
AZI Customer Service 800-528-7411 or 602-470-1414 Page 47 of 56
10. APPENDIX A – USB/HYPERTERMINAL SETUP Installing the J605 USB Driver The AZI USB Driver is compatible with Windows® XP (32-bit), Windows® Vista (64-bit), Windows® 7 (32 and 64-bit), Windows® 8/8.1 (64-bit) and Windows® 10 (64-bit). Depending on the configuration of the computer to be used, administrator privileges may be required to install the driver. If this configuration applies to you, contact your local IT department for assistance. If the Jerome® J605 CD or the AZI Documents USB Drive is available: • Insert the CD in the PC’s CD-ROM drive or the USB drive into a USB port on the PC. • Use Windows® to browse to the CD or USB drive, locate the driver file
(AZI_USB_Driver.zip), and copy it to your desktop. If the J605 CD or the AZI Documents USB Drive is not available: • Go to the AZI website at http://www.azic.com and select Documents and Downloads from the
Support tab. Download the USB Driver from this page and save it to your desktop. If you received these instructions and the driver in an email, save the attached file (AZI_USB_Driver.zip) to your desktop.
Once the driver file (AZI_USB_Driver.zip) is on your desktop:
1) Launch the AZI Driver Installer wizard: a) Double-click the zip file to open it. b) Drag the “Driver Install” directory from the zip file to the desktop. c) Double-click the “Driver Install” folder to open it. d) Double-click the “Install Driver” shortcut to launch the AZI Driver Installer wizard.
o Note: The description and screenshots pictured are for installation in Windows® 10. Other versions of Windows® will be similar.
2) Follow the instructions in the AZI Driver Installer wizard. Click Next.

AZI Customer Service 800-528-7411 or 602-470-1414 Page 48 of 56
3) Depending on the version of Windows® being used, one or more warning messages may appear. It is safe to ignore these warnings. Click “Install” to continue.
4) When the installation completes, click Finish.
5) Turn on the J605 and connect it to the target computer using the included USB cable (AZI P/N: 200-0165). Windows® will detect the J605 and its Communications Port and automatically start ‘Device Setup’. When ‘Device Setup’ completes, the instrument-to-USB interface is complete and ready for use. On older versions of Windows®, the ‘New Hardware’ wizard will launch instead of ‘Device Setup’. Follow the on-screen prompts, bypass any warnings that may appear, and do not connect to Windows® Update if prompted. Windows® will indicate when the hardware has been installed successfully.
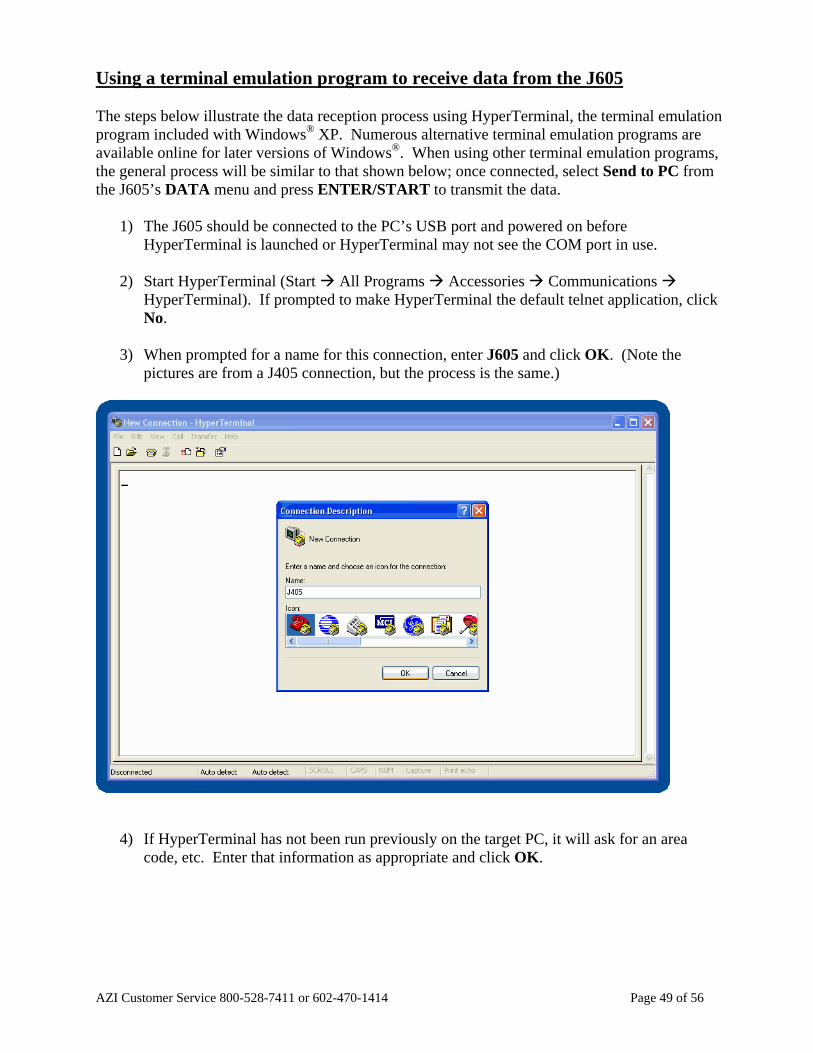
AZI Customer Service 800-528-7411 or 602-470-1414 Page 49 of 56
Using a terminal emulation program to receive data from the J605 The steps below illustrate the data reception process using HyperTerminal, the terminal emulation program included with Windows® XP. Numerous alternative terminal emulation programs are available online for later versions of Windows®. When using other terminal emulation programs, the general process will be similar to that shown below; once connected, select Send to PC from the J605’s DATA menu and press ENTER/START to transmit the data.
1) The J605 should be connected to the PC’s USB port and powered on before HyperTerminal is launched or HyperTerminal may not see the COM port in use.
2) Start HyperTerminal (Start All Programs Accessories Communications HyperTerminal). If prompted to make HyperTerminal the default telnet application, click No.
3) When prompted for a name for this connection, enter J605 and click OK. (Note the
pictures are from a J405 connection, but the process is the same.)
4) If HyperTerminal has not been run previously on the target PC, it will ask for an area code, etc. Enter that information as appropriate and click OK.
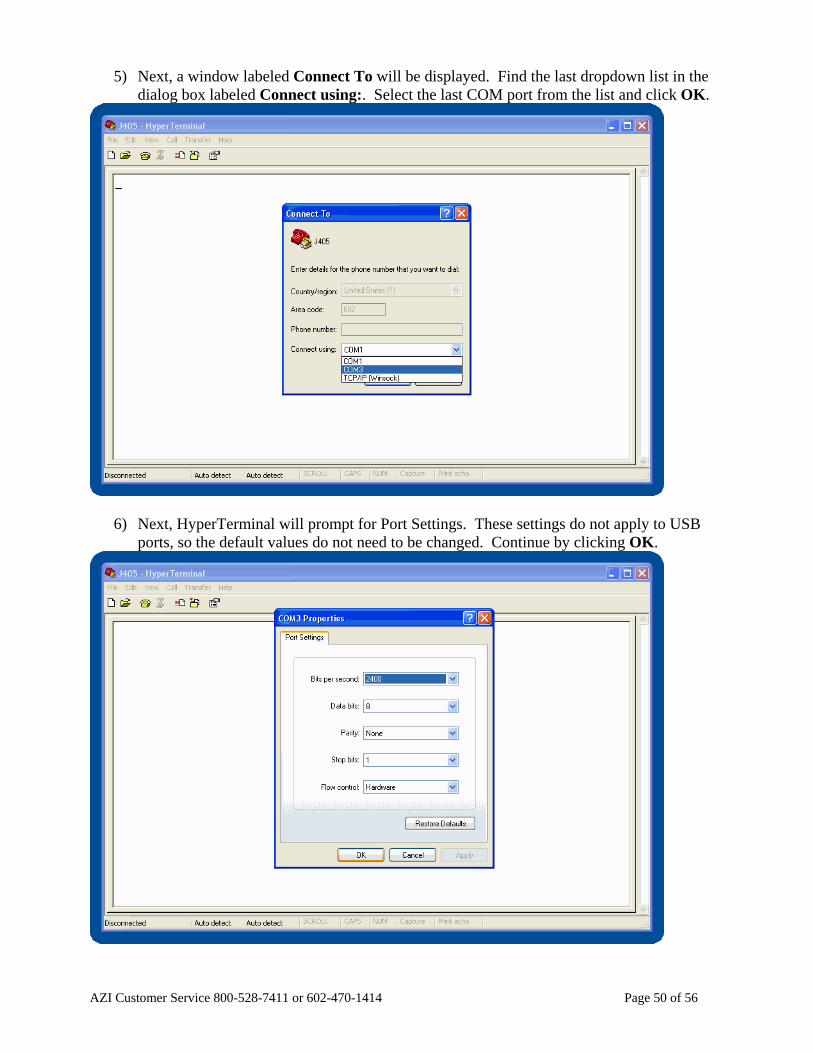
AZI Customer Service 800-528-7411 or 602-470-1414 Page 50 of 56
5) Next, a window labeled Connect To will be displayed. Find the last dropdown list in the dialog box labeled Connect using:. Select the last COM port from the list and click OK.
6) Next, HyperTerminal will prompt for Port Settings. These settings do not apply to USB
ports, so the default values do not need to be changed. Continue by clicking OK.

AZI Customer Service 800-528-7411 or 602-470-1414 Page 51 of 56
7) A blank HyperTerminal screen will be displayed. On the status bar in the lower left hand corner it should say Connected.
8) Select Capture Text... from the Transfer menu on the main HyperTerminal window.
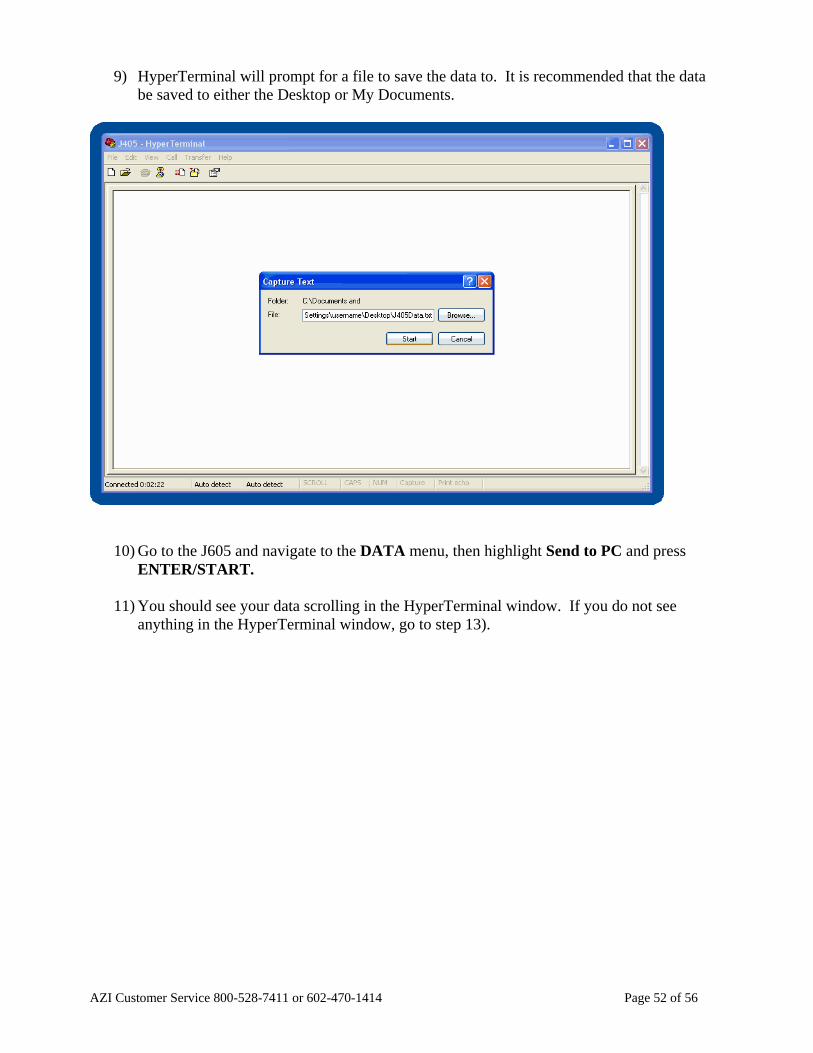
AZI Customer Service 800-528-7411 or 602-470-1414 Page 52 of 56
9) HyperTerminal will prompt for a file to save the data to. It is recommended that the data be saved to either the Desktop or My Documents.
10) Go to the J605 and navigate to the DATA menu, then highlight Send to PC and press ENTER/START.
11) You should see your data scrolling in the HyperTerminal window. If you do not see
anything in the HyperTerminal window, go to step 13).

AZI Customer Service 800-528-7411 or 602-470-1414 Page 53 of 56
12) When the J605 stops sending data, Click HyperTerminal's Transfer menu again and click Capture Text, then Stop
13) If you did not receive any text from the J605:
a) Go to the Call menu, click Disconnect b) Go to the File menu, click Properties c) You will see the same window as in step 4) above. Try selecting a different COM
port and continue from step 4). Keep trying each COM port in the list. If you have tried all of them and still cannot receive data from the J605, try re-installing the J605 USB driver. If that does not solve the problem, call AZI Customer Service at 800-528-7411 or 602-470-1414 or email [email protected].
See Retrieving Data on page 29 for an explanation of the fields in the data file.

AZI Customer Service 800-528-7411 or 602-470-1414 Page 54 of 56
11. APPENDIX B - J605 FUNCTIONAL TEST MODULE The Jerome® Hydrogen Sulfide Functional Test Module (AZI P/N: Z2600 0918 or Z2600 0930) provides a fast and easy method of verifying that Jerome® J605 Hydrogen Sulfide Analyzers are functioning correctly. The Functional Test Module is beneficial: In applications where frequent verification of functionality is required, such as ISO 9000
documentation, To verify proper instrument operation when unexpected readings are obtained in normal
sampling, As part of a weekly maintenance routine, and To determine if analyzer calibration is needed.
Simple Operation The Functional Test Module includes a permeation tube containing hydrogen sulfide. When activated, the test module releases H2S from the permeation tube at a specific, known concentration, which is then sampled by the J605. The H2S flows over the gold film sensor of the Jerome® analyzer, which then measures the concentration of the gas. The flow rate and temperature of the H2S release are factory set to provide a concentration of approximately 0.250 ppm (250 ppb) ± 20% (Z2600 0918) or 0.030 ppm (30 ppb) ± 20% (Z2600 0930). The user then compares the reading on the Jerome® analyzer with the known concentration from the module. If the H2S level shown on the analyzer’s display falls within the expected range, the instrument is functioning properly. If the level is not in the expected range, the instrument should be returned to the factory for NIST-traceable calibration. Complete usage details are provided in the manual included with the FTM. See page 42 for a list of the components that make up the FTM and its accessory kit. The FTM, with the exception of the permeation tube, carries a limited one-year warranty to be free from defects or workmanship. The permeation tube is warranted for 90 days. Refer to the FTM Operation Manual (AZI P/N: 700-0095) for complete operation and warranty information.
AZI Customer Service 800-528-7411 or 602-470-1414 Page 55 of 56
12. WARRANTY Arizona Instrument LLC (seller) warrants to buyer that Jerome® products delivered pursuant to this agreement shall, at the time of delivery, and for a period of one (1) year thereafter (the Internal Battery Pack, where applicable, is warranted for a period of ninety [90] days only), be free from defects in material or workmanship and shall conform to seller's specifications or such other specifications as seller has agreed to in writing. Seller's obligations with respect to claims under this warranty shall be limited, at seller's option, either to the replacement of defective or non-conforming product or to an appropriate credit for the purchase price thereof subject to the provisions of seller's Warranty Policy as amended from time to time, said Policy being incorporated herein by reference. All defective parts replaced by AZI become the property of AZI. Returned products under warranty claims will be shipped to seller’s plant by buyer at buyer's expense and shall be accompanied by a statement of the reason for the return and an approved Return Material Authorization Number issued by seller. Buyer remains responsible for payment for products not accepted for warranty adjustment, handling costs, and freight costs associated therewith. Notwithstanding the foregoing, no warranty shall be enforceable in the event that product has been subjected to environmental or stress testing by buyer or any third party without written approval of seller prior to such testing. Further, no warranty shall be enforceable if the alleged defect is found to have occurred because of misuse, neglect, improper installation, repair, alteration, accident, or improper return handling procedure by buyer. Discontinued product is warranted only for a credit or replacement at seller's option. THE EXPRESS WARRANTIES GRANTED ABOVE SHALL EXTEND DIRECTLY TO BUYER AND NOT TO BUYER'S CUSTOMERS, AGENTS, OR REPRESENTATIVES AND, EXCEPT FOR WARRANTY OF TITLE, IS IN LIEU OF ALL OTHER WARRANTIES, WHETHER EXPRESSED OR IMPLIED, INCLUDING ANY IMPLIED WARRANTIES OF FITNESS FOR A PARTICULAR PURPOSE AND MERCHANTABILITY, SUCH OTHER WARRANTIES BEING SPECIFICALLY DISCLAIMED BY SELLER. IN NO EVENT SHALL EITHER PARTY'S LIABILITY FOR ANY BREACH OR ALLEGED BREACH OF THIS AGREEMENT EXCEED THE TOTAL EXTENDED PRICE OR PRICES SHOWN ON UNFILLED ORDERS, NOR SHALL EITHER PARTY BE LIABLE FOR ANY SPECIAL, INCIDENTAL OR CONSEQUENTIAL DAMAGES RESULTING FROM BREACH OR ALLEGED BREACH. Notwithstanding the foregoing, if any product covered by order(s) placed hereunder is designated as “developmental,” “prototype” or “experimental,” no warranty whatsoever except a warranty of title to component materials, will be applicable thereto and buyer shall indemnify seller for any claims for liability asserted seller in connection therewith. The foregoing state the entire liability of seller in connection with products supplied hereunder.

AZI Customer Service 800-528-7411 or 602-470-1414 Page 56 of 56
TRADEMARK AND COPYRIGHT PROTECTION Jerome®, Arizona Instrument®, AZI® and the stylized AZI logo are all registered trademarks of Arizona Instrument LLC. Instrument firmware is copyright protected. All specifications subject to change without notice. © Copyright 2010-2017 Arizona Instrument LLC. All Rights Reserved. Resisorb® is a registered trademark of Avantor Performance Materials. AddSorb® is a registered trademark of Jacobi Carbons. Tygon® is a registered trademark of Saint-Gobain Performance Plastics Corporation. Acrodisc® is a registered trademark of Pall Corporation. Windows® is a registered trademark of Microsoft Corporation in the United States and other countries. Arizona Instrument LLC Jerome® J605 Hydrogen Sulfide Analyzer Operation Manual Part Number 700-0108 If you have any questions regarding the operation of this instrument, please call our toll free number (800) 528-7411. Internationally, call (602) 470-1414 or fax (480) 804-0656.
Arizona Instrument LLC 3375 N Delaware Street
Chandler, AZ 85225
(800) 528-7411 (602) 470-1414
Fax (480) 804-0656 http://www.azic.com
email: [email protected] - General
[email protected] - International [email protected] - Customer Support