Embed Size (px)
Citation preview
Job and Employment Management System
Rate and Title Adjustment System Manual Last modified/reviewed on 08/09/16

TABLE OF CONTENTS
Introduction ............................................................................................. 3
Manual Goals, Objectives, and Intended for .............................................. 3 Key Terms ................................................................................................... 3 Notables ......................................................................................................3 Frequently Asked Questions ....................................................................... 4
Steps for Accessing the R/T System ......................................................... 5
Screens ................................................................................................... 6 Main Menu Screen ......................................................................................6 List of Tabs and Descriptions ...................................................................... 7 Appointment Tab – Create a New R/T Adjustment .................................... 8 Appointment Tab Fields ............................................................................. 9 Draft Status ...............................................................................................10 C-Basis Eligible Dates Screen .....................................................................11 Salary/Title Tab ..........................................................................................12 Adjustment Calculator ...............................................................................14 Rate History Screen ...................................................................................16 Contact Tab ...............................................................................................17 Appointment History Tab ..........................................................................19 Funding/Docs Tab ......................................................................................20 Principle Duties Tab ...................................................................................21 Justification Tab .........................................................................................25 Budget Tab ................................................................................................26 Comment Tab ............................................................................................27 Status Tab ..................................................................................................28 Actions Menu – Changing Statuses ............................................................29
Windows .............................................................................................. 30 Errors Window ...........................................................................................30 Tools Window ............................................................................................31
Printing and Searching the R/T System .................................................. 32 Printing a R/T Adjustment .........................................................................32 Searching the R/T Adjustment System ......................................................33

pg. 3
JEMS I Rate and Title Adjustment Manual Last Reviewed 08/17/16
Introduction
Manual Goal
The objective of this document is to understand how to use the web-based system to request Rate and Title Adjustments for faculty, limited appointees, academic staff, and university staff (for adjustments not involving a change in duties).
Manual objectives At the conclusion of this course, you will have the skills and knowledge to:
Know what a Rate and Title Adjustment is
Know how and when to use the Rate and Title Adjustment system
Navigate the JEMS – Rate and Title Adjustment System
Create new Rate and Title Adjustments
Search and manage submitted Rate and Title Adjustments
The Rate and Title Adjustment feature is intended for:
HR professionals who are responsible for requesting Rate and Title Adjustments for faculty, limited appointees, academic staff, and university staff (for adjustments not involving a change in duties).
Key Terms
The Job and Employment Management System (JEMS) – Is used as a front end system by UW Madison that pushes and pulls information to and from HRS.
Rate and Title Adjustment (R/T) – Rate and Title Adjustments are requests to make a change to an employee’s rate of pay or title based on position of job duty changes.
PVL/Cert Number – The Position Vacancy Listing (PVL) is a package of recruitment information for a position.
APO – Academic Personnel Office, this term is no longer used. Anytime you see APO in this document or in the JEMS System you should refer to this as OHR.
Human Resource System (HRS) – This acronym will be used in this manual; it refers to the PeopleSoft system where information ends up about employees, and where the payroll is run.

pg. 4
JEMS I Rate and Title Adjustment Manual Last Reviewed 08/17/16
Notables
Based on security access, only authorized buttons will be navigable (not grayed out) on the Main Menu
Spell check is available on all of the large text fields (e.g. Duties Tab), right click in the field to get Spell Check from the floating menu.
There is mention to the HRS Knowledgebase throughout this manual. Access, https://kb.wisc.edu/hrs/ for more information when you see this reference.
Frequently Asked Questions
Where can I find information on when people can receive lump sum payments.
There are reasons people can choose lump sum payments that are processed in the JEMS. There is information that you can be found in BOX and in the HRS KB (https://kb.wisc.edu/hrs/page.php?id=21524).

pg. 5
JEMS I Rate and Title Adjustment Manual Last Reviewed 08/17/16
Steps for Accessing the R/T Adjustment system
In order to access the JEMS – Rate and Title Adjustment system, it is required that access is approved from the department’s division office. When accessing the JEMS Homepage, there will be a JEMS Authorization Form (https://uwservice.wisconsin.edu/docs/forms/jems-authorization-form.pdf) that must be completed and submitted to [email protected]. Once access has been granted, an email will be sent to the user granting access.
1 Access the JEMS Homepage https://uwservice.wisconsin.edu/hrs/jems/
2 Click on Login Click on JEMS PVL and Rate/Title Change System Login button
4 Popup Screen The JEMS PVL and Rate/Title Change Login system will pop up in a new window
3 JEMS System Enter Logon and Password and click Log On
4 Log In Click Log On
Steps for Updating Password
The system will require each individual to update their password to a permanent password the first time they access the PVL and R/T Adjustment system.
1 Click on link http://fastar.wisconsin.edu/pass_chg.html
2 Access reset password portal Click on Password Update for UW Production
3 Update Password Update user password
4 Submit Click on Submit button

pg. 6
JEMS I Rate and Title Adjustment Manual Last Reviewed 08/17/16
Main Menu Screen
The PVL Main Menu Screen functions include:
1 Click <Create a New Rate Adjustment> button to start a new Rate or Title change for an employee.
2 Click <List My Rate Adjustments> button to see Rate/Title change records in progress.
3 Click <List Adjustment Notices> button to see system notices the require review.
4 Click <Exit Unclassified Systems> to exit.

pg. 7
JEMS I Rate and Title Adjustment Manual Last Reviewed 08/17/16
List of Tabs and Descriptions
Tab Description
Appointment The Appointment tab contains basic data about the Adjustment, the Employee and the Employee’s appointment departments.
Salary/Title The Salary/Title tab is where the Rate and Title Change Reasons, the Proposed Salary and Proposed Title information is created, updated and viewed.
Contact The Contact tab is where information about the Primary and Additional contact is entered, updated or viewed.
Appt History The Appt History tab displays summary data regarding the person’s employment history with UW (including the appointment referenced on the current Adjustment) can be viewed.
Funding/Docs
The Funding/Docs tab is where funding sources for the rate change are entered, updated or viewed. Also, if additional documents for the adjustment are required (such as Market Data), it is the place where the Document received dates are entered, updated or viewed.
Duties The Duties tab is where the individual’s new Duties are entered, updated or viewed. This tab is also where the Number of FTEs supervised field is found.
Justification/Lump Sum The Justification tab is where one can enter, update or view data on how the duties have changed or how the promotion criteria is met (if Promotion is selected as one of the change reason codes).
Budget The Budget tab is where information about the person’s Budgetary responsibilities is entered, updated and viewed.
Comment The Comment tab is where comments are created, updated and viewed.
Status History The Status History tab displays the history of statuses that a particular Adjustment has had in date descending order (most recent status on top).

pg. 8
JEMS I Rate and Title Adjustment Manual Last Reviewed 08/17/16
Appointment Tab – Creating a New Rate/Title Adjustment
If <Create a New Rate Adjustment> is selected from the Main Menu Screen, the above screen is displayed.
A Complete Adjustment Section See next page on how to fill out this section.
B Fill out all asterisked fields Asterisk fields required to do initial save.
C Click <SAVE> Once <save> button is clicked, the Employee and Appointment Department(s) sections will automatically populate with information from HRS.

pg. 9
JEMS I Rate and Title Adjustment Manual Last Reviewed 08/17/16
Appointment Tab Fields
Fields Information for filling out fields
Adjustment Section This section is required in order for the initial save for the adjustment. The Employee and Appointment Departments sections will auto populate once this section is complete and the <SAVE> button is click.
Empl ID* The Empl ID in the Adjustment Section must be filled in for the Employee and Appointment Departments Sections to automatically populate with information. Once the Empl ID is entered click on <Find Job> button and choose the appropriate Job record.
Empl Rcd The Employee Record (Rcd) will automatically populate once the Job record is chosen.
Proposed Effective Date*
Date format – MMDDYY A‐Basis = Effective the first day of a month. C‐Basis = Effective on the payroll pay period. For C‐Basis, if you are unsure of which dates can be used as Effective Dates, press the <Check Payroll Calendar> button to view a list of C‐Basis dates. The effective date has to be today’s date or any date in the future. If the effective date is a date that has already passed, then use the “Comments” tab to record the date and the reason for using a past date.
Position Nbr The Position Number (Nbr) will automatically populate once the appropriate Job record is chosen in the Empl ID field.
Adjustment Duration Chose in the drop down if the adjustment is temporary, permanent (default), or one time.
Adjustment End Date This field become navigable if Temporary is indicated in the Adjustment Duration field.
Employee Section This section displays employee data pulled from the HRS system. This section automatically populates once the initial <SAVE> is completed. Note: the appointment data is not modifiable from the Rate/Title Change System.
Name Employee full name (Last, First Middle Initial)
Empl Class This is the employment classification for the employee’s position
PVL/CERT Number PVL is the number refers to a number specific to each PVL. Cert # is pulled from JEMS CHRIS, this is the transaction # of the job that the employee is hired on.
Job Effective Date Effective Date of the job
Working Title Working Title of the employee
Appointment Departments Section
This section displays appointment data pulled from the HRS system. This section auto populates once the initial <SAVE> is completed. Note: If the data is incorrect or out of date, the data in HRS prior to completing the Rate and Title Change request.
Dept ID Appointments current department.
Name Name of the department.
Major Dept Indicates whether the department is the major department.
FTE Indicates the status of the position.
Approval Date The date that the division has approved the R/T request.
Division Approved This is where Divisions/Departments approval of the adjustment is indicated. All Divisions/Department must approve the adjustment prior to the adjustment’s status getting updated to Division Approved.

pg. 10
JEMS I Rate and Title Adjustment Manual Last Reviewed 08/17/16
Draft Status
After completing the required data, just prior to the initial <Save>, the Screen will look similar to the one displayed just below.
Upon pressing the <Save> button for the new R/T Adjustment for the first time, the system puts the request into Draft status. All tabs on the screen that are appropriate to the R/T will then display and become navigable (no longer grayed out). Note: The Appointment ID is no longer modifiable after the initial save. If the wrong Appointment ID has been entered into the field, a new adjustment is required and the Draft of the wrong request should be deleted by selecting Delete RA in the Edit menu.
00012345
00012345 Smith, John
Smith, John

pg. 11
JEMS I Rate and Title Adjustment Manual Last Reviewed 08/17/16
C-Basis Eligible Dates
This screen is available when pressing the button <Check Payroll Calendar> button on the Appointment tab and <C-Basis Eligible Dates> button on the Salary/Title tab. The screen lists the C – Basis Payroll dates. Double click on a record to populate the Adjustment Effective date with a date on the list.

pg. 12
JEMS I Rate and Title Adjustment Manual Last Reviewed 08/17/16
Salary/Title Tab
Field Description
Proposed Salary You may either enter the Proposed Salary here, if known, or use the <Adjustment Calculator> to run calculations and have the program transfer the calculated Proposed Salary to this field.
Proposed Salary Basis
The default is the Current Salary Basis. Modify as needed. Valid Values are:
Academic
Annual
Hourly If changing the current salary basis, use the “Salary Basis Conversion Calculator” to convert the amount from one salary base to the other. Under the “Tools” menu click on “Salary Basis Conversion Calculator” (follow instructions on the popup screen)
Salary Change Reason
Select the appropriate Salary Change Reason(s) from the list using either the <Add> button or the down arrow button to the left of the field. The list is context sensitive. That is, the content of the list varies depending on the appointment’s appointment type, title and the major appointment department.
$ Increase
Enter the appropriate Adjustment amount for the Salary Change Reason, or use the <Adjustment Calculator> to run calculations and have the program transfer the calculated amount. Note: the amount may be a negative value, as in the case of a Temporary Adjustment End.
Smith, John 00012345

pg. 13
JEMS I Rate and Title Adjustment Manual Last Reviewed 08/17/16
% Increase
Enter the appropriate Adjustment Percentage for the Salary Change Reason, or use the <Adjustment Calculator> to run calculations and have the program transfer the calculated amount. Note: the value may be a negative value, as in the case of a Temporary Adjustment End.
Adjustment Totals – Base Adjustment
Enter the total base adjustment amount. This will auto populate if the <Adjustment Calculator> is used. The Base Adjustment amount is the Proposed (#1) salary minus Current salary (in dollars).
Adjustment Totals - % Increase
Enter the total percent increase. Note: this # is the total sum of all the change reason percentages.
Adjustment Totals - Lock Indicate which value to Lock in, the Percent or Dollar amount of the Adjustment.
Title - Proposed
Same Title = enter the same title code or click the <Same> button. New Title = enter the known title code in the field, or click <Suggest> to see other titles in the same series <Find> button = for a list of all titles for the Employee’s appointment type.
Exceed Salary Max Pre-Approved
The field is position specific and not title specific. Selecting YES is required ONLY when the department wishes to use a pre‐approved salary that is above the category “A” salary maximum. If set to YES, the <Select> button is made available. Click the <Select> button to go to the screen that will allow you to choose a Pre‐Approval record to support the higher market range. You must make a selection if the field is set to YES. Yes = Has a pre‐approved extraordinary salary range. No = Does not have a pre‐approved extraordinary range (default).
Request New Market Range
The field is position (not title) specific and is required only when there is a request to pay above the maximum of the salary range or above the ESG‐6 rate. Yes = request for a new extraordinary salary range. *market data to support request is required (Market data should be sent to division then C&T liaison). No = Proposed salary max is within the range (default).
Title Change Reason If the title will change with this Adjustment, enter a Title Change Reason. The Title Change Reason must match one of the Salary Change Reason codes, if this is a Title and Salary adjustment (e.g. 03/003). The field is blank if the Title remains the same.
Pay Adj Policy If clicked, will open a new browser window and display Chapter 10 of the Unclassified Policies and Procedures.
UTG If clicked, will open a new browser window and display the Unclassified Title Guideline. This will assist you in viewing the UW‐Madison prefix criteria and title definition.
pg. 14
JEMS I Rate and Title Adjustment Manual Last Reviewed 08/17/16
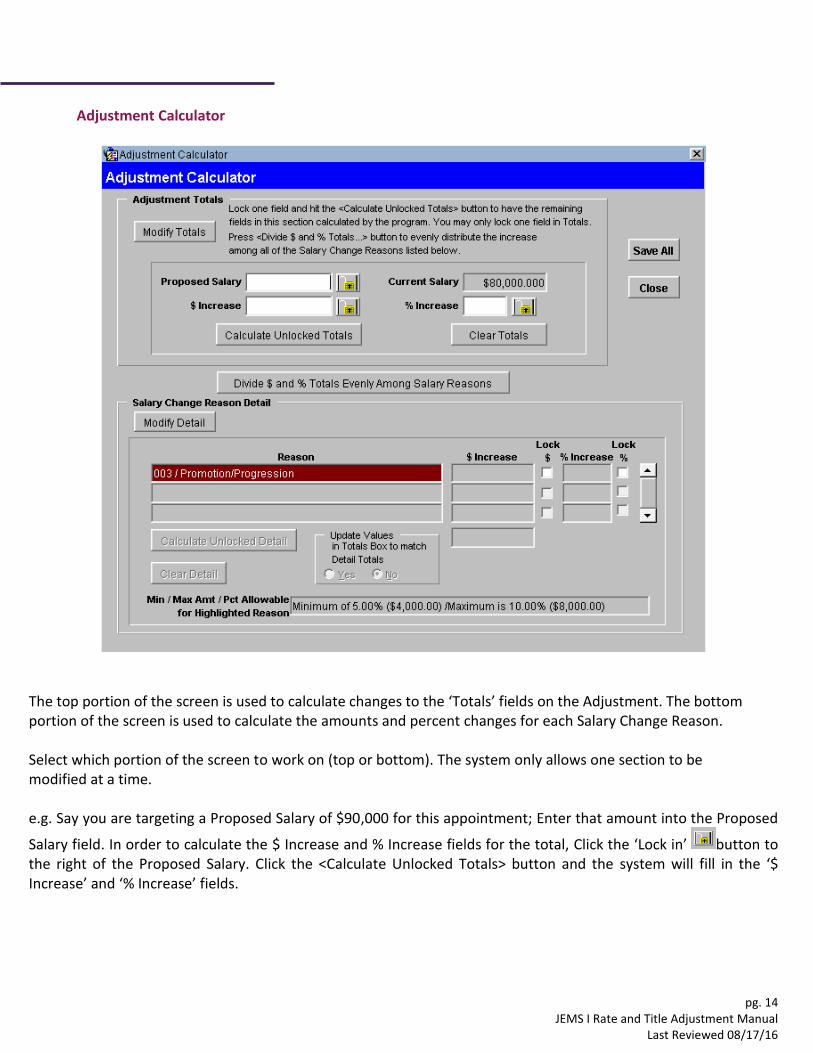
Adjustment Calculator
The top portion of the screen is used to calculate changes to the ‘Totals’ fields on the Adjustment. The bottom portion of the screen is used to calculate the amounts and percent changes for each Salary Change Reason. Select which portion of the screen to work on (top or bottom). The system only allows one section to be modified at a time. e.g. Say you are targeting a Proposed Salary of $90,000 for this appointment; Enter that amount into the Proposed
Salary field. In order to calculate the $ Increase and % Increase fields for the total, Click the ‘Lock in’ button to the right of the Proposed Salary. Click the <Calculate Unlocked Totals> button and the system will fill in the ‘$ Increase’ and ‘% Increase’ fields.

pg. 15
JEMS I Rate and Title Adjustment Manual Last Reviewed 08/17/16
Adjustment Calculator cont’d
The amount can be distributed between multiple Salary Change Reasons. Click the <Divide $ and % Totals Evenly Among Salary Reasons> button. This will distribute the amount evenly between all the reasons listed. Use the <Modify Detail> button to adjust the $ Increase and % Increase amounts. Use the lock checkboxes similar to the top section of the Adjustment Calculator and click <Calculate Unlocked Detail> button. e.g. if you wanted to change the 003/Promotion/Progression reason to increase to 8 %, click on the <Modify Detail> button, change the % Increase to 8 on the reason line, check the checkbox in the Lock % column, and click on the <Calculate Unlocked Detail> button. It will change the unlocked fields accordingly. Click <Save All> for the changes to copy to the “main” Salary/Title Tab. These fields can be modified up until the R/T change is submitted for approval.

pg. 16
JEMS I Rate and Title Adjustment Manual Last Reviewed 08/17/16
Rate History Screen Tab
If the <Rate History> button is clicked on the Salary/Title Tab, all of the Rate changes to date for the Position # entered on the Appointment tab (including Merit) will be viewable. The upper scrolling region has the rate change summary by date. The lower scrolling region displays detail for the rate change selected in the upper scrolling region. e.g. if more than one Rate Change Reason was applied on that date, the detailed breakdown of Rate Reason and Amount shows in the Detail box.
Smith, John 00012345

pg. 17
JEMS I Rate and Title Adjustment Manual Last Reviewed 08/17/16
Contact Tab
This tab stores information about one or more persons who may be contacted about the R/T Adjustment. You may have any number of Additional Contacts added. If you are unsure of a contacts information, click on the <Search Address Listings> button. A screen will popup that you can search using the contacts name (this information pulls from the directory).
Field Description
Add Contact Button Click the <Add Contact> button, this will open up the entry fields in the bottom portion of the screen.
Contact Type* Primary Contact: The individual whose name should appear on the PVL. Additional: Name of a secondary contact. This information will not show on the PVL.
Last Name* Enter last name.
First Name* Enter first name plus any prefixes.
Email Address* Enter email address.
Address* For the Primary Contact, the address should be the U.S. mailing (including zip code) address.
Phone 1* Enter 10-digit phone number.
Phone 2* Additional contact number of contact (not required).
Fax Optional.
00012345

pg. 18
JEMS I Rate and Title Adjustment Manual Last Reviewed 08/17/16
Contact Tab cont’d
Press the <Done> button when entry is completed.
Multiple contacts can be added or copied to different Contact Type (Primary, Administrative, or Alternate).
00012345
00012345 Smith, John
Smith, John

pg. 19
JEMS I Rate and Title Adjustment Manual Last Reviewed 08/17/16
Appointment (Appt) History Tab
The Appointment History Tab displays a history of the Employee’s appointments with the UW in summary form. This data is pulled from the HRS system.
00012345 Smith, John

pg. 20
JEMS I Rate and Title Adjustment Manual Last Reviewed 08/17/16
Funding/Docs Tab
Indicate the funding sources for the rate change. If additional documentation is needed to support the Rate and/or Title change, the appropriate document type must be selected and the date received at the various offices must be noted.
FIELD Instructions
Funding: Grad School The option defaults to NO. Indicate “Yes” if the position has Graduate School funding.
Funding: Continuing Studies The option defaults to NO. Indicate “Yes” if the position has Continuing Studies funding.
Fund Type of funds e.g. 101. 133. 144
Program Code
Enter Program Code. To review the definitions of each program code, access the UW System Website: https://www.wisconsin.edu/financial-administration/accounting-and-budget-control/chart-of-accounts/
Account Account Number
Document Type Select the appropriate Document Type from the drop down list.
Date Received: Department Indicates the date the document was received by the departmental office.
Date Received: Division Indicates the date the document was received by the division office.
Date Received: OHR Indicates the date the document was received by OHR.
Date Received: System Indicates the date the document was received by UW System (only applies to Market Data)
Smith, John 00012345

pg. 21
JEMS I Rate and Title Adjustment Manual Last Reviewed 08/17/16
Principle Duties Tab
Whenever the following rate change reasons are used, and if former duties are not already in the Rate/Title Change System, it is required to provide the former and the current duties. Although percentage breakdown is strongly encouraged for Former Duties, it is a requirement for the Current Duties. 001 – Change in duties 025 ‐ Temporary 030 ‐ Due to Title Appeal 031 – Activate Rate (former duties is not req’d) 053 – Board Attainment 054 – New title assignment (by UW System)
FIELD DETAILS
Number of FTEs Supervised Number of FTE(s) employee supervises both directly and indirectly (through subordinates).
Add/Modify Duties
Use the <Add/Modify duties> button to navigate to the “Compare Old and New Principal Duties” screen. If Principal Duties are required for the submission of the Adjustment, first complete the “Compare Old and New Principal Duties” screen. The above screen will automatically populate once the “Compare Old and New Principal Duties” have been filled out on the Add/Modify Duties screen.
# Line number to identify the individual duty. This information will automatically populate from the “Compare Old/New Duties” screen.
New/Changed Duties Describe the principal duties and responsibilities of the position (including new duties and changes in/additional responsibilities). This information will automatically populate from the “Compare Old/New Duties” screen.
% Indicate what portion of the job, each individual duty comprises (the percentages should total to 100%). This information will automatically populate from the “Compare Old/New Duties” screen.
Smith, John 00012345

pg. 22
JEMS I Rate and Title Adjustment Manual Last Reviewed 08/17/16
Compare Old and New Principal Duties Screen
If Principal Duties are required for the submission of the Adjustment, you must also complete the Compare Old and New Principal Duties screen (as shown above). The left hand section of the screen (labeled ‘Former Duties’) should list, in itemized form, the employee’s former duties (the source for this can be the PVL the person had been hired under, a prior Rate/Title Change or any other document that had been filed with the OHR office describing the position). The right side of the screen, labeled ‘New/Changed Duties’ should indicate what had changed (the duty itself or the proportion of time the duty occupies for the position (the percentage). If the “Former Duties” side is blank, start completing this section first, numbering each line and assigning a percentage for each duty. Use the arrow button (they look like this) pointing to the right side to move the duties that the person is still performing to the “New/Changed Duties” column. If there is a change in that section, indicate what changed, if anything (the duty itself or the percentage of the position) on the “New/Changed Duties” side. If the duty is no longer performed, you may leave the #/duty/% fields blank. Note: spell check is available on all of the large text fields (right click to get Spell Check from the floating menu).

pg. 23
JEMS I Rate and Title Adjustment Manual Last Reviewed 08/17/16
Compare Old and New Principal Duties Screen cont’d
The table below discusses features that are found on this page and their functionality.
Feature Functionality
Comparison Sort Order You may sort the data on the screen using any of the options in the drop down.
Ascending/Descending Use these buttons to further refine the Comparison Sort Order.
> < Use the > < buttons to copy data from one side to the other
# This field should be numbered sequentially. The order in which the duties are listed can change based on position and duty changes.
% Indicate the proportion of time spent for each duty in % format. % can change if the position and duties change.
Copy PVL Duties to Former Duties If there is a PVL associated with the Appointment ID and the Principal Duties text is stored in the PVL system you can bring up a popup where the information can be cut and copied.
Copy PVL Duties to New/Changed Duties
If there is a PVL associated with the Appointment ID and the Principal Duties text is stored in the PVL system you can bring up a popup where the information can be cut and copied.
Add Record This button will add a new line on the bottom (both left and right sides of screen).
Delete Record This button will delete an entire line of data (both left and right sides). Note that you must have the cursor on the line you wish to Delete, before hitting the button.
Use the PRINT button to print a hard copy of this page
Use the PRINT button to print a hard copy of this page
Use the COPY ALL button to copy all data from one side to the
other Use the COPY ALL button to copy all data from one side to the other
Delete Use the DELETE all buttons to remove content from a field

pg. 24
JEMS I Rate and Title Adjustment Manual Last Reviewed 08/17/16
Compare Old and New Principal Duties Screen cont’d
The table below outlines information regarding making adjustments to duties.
Former Duties to Principal Duties
Teal Color Upon saving changes, the program will color the changed data with a teal background (see example above).
Blank fields If the duty is being added or removed from the position the adjacent field should be left blank. In the example above, the #4 Former Duty is no longer part of the change in duties.
Copy PVL Duties to New/Changed Duties
If there is a PVL associated with the Appointment ID and the Principal Duties text is stored in the PVL system you can bring up a popup where the information can be cut and copied.
Add Record This button will add a new line on the bottom (both left and right sides of screen).
Delete Record This button will delete an entire line of data (both left and right sides). Note that you must have the cursor on the line you wish to Delete, before hitting the button.
Use the PRINT button to print a hard copy of this page
Use the PRINT button to print a hard copy of this page
Use the COPY ALL button to copy all data from one side to the
other Use the COPY ALL button to copy all data from one side to the other
Delete Use the DELETE all buttons to remove content from a field

pg. 25
JEMS I Rate and Title Adjustment Manual Last Reviewed 08/17/16
Justification Tab
Justification is required upon Department Approval when applying certain Rate Change Reason codes for the Adjustment. Indicate in the blank space, justification supporting the Rate/Title Adjustment request. If an adjustment is being submitted as part of a campus wide funding initiative, check the appropriate box corresponding to the appropriate program (AS/US Discretionary Comp Fund, Block Grant, Performance Lump Sum Fund). When entering a Lump Sum adjustment (having selected One time in the Adjustment Duration on the appointment tab), select the appropriate reason from the drop down menu (options vary depending on the Empl Class of the employee) and enter the amount of the lump sum payment. Note: The No ID means No Income Code, which applies to the majority of employees. https://kb.wisc.edu/hrs/page.php?id=21524 For faculty, academic staff and limited appointees:
Smith, John 00012345

pg. 26
JEMS I Rate and Title Adjustment Manual Last Reviewed 08/17/16
Justification Tab cont.
When entering a Lump Sum adjustment (having selected One time in the Adjustment Duration on the appointment tab), select the appropriate reason from the drop down menu (options vary depending on the Empl Class of the employee) and enter the amount of the lump sum payment. Note: The No ID means No Income Code, which applies to the majority of employees. https://kb.wisc.edu/hrs/page.php?id=21524 For faculty, academic staff and limited appointees:
For university staff:

pg. 27
JEMS I Rate and Title Adjustment Manual Last Reviewed 08/17/16
Budget Tab
Budgetary Responsibility is required upon Department Approval when applying certain Rate Change Reason codes for the Adjustment.
Field Description
Will the Incumbent Have Budgetary Responsibility?
Yes/No, as appropriate, if the person will have budgetary responsibility.
Budgetary Responsibility If the budget responsibility is “Yes”, list in detail the specific budgetary responsibilities the incumbent will have.
Spell Check Use this to spell check your text.
Delete Use this to delete your text

pg. 28
JEMS I Rate and Title Adjustment Manual Last Reviewed 08/17/16
Comment Tab
This tab is for comments associated with the Adjustment. Only the creator or OHR staff may update or delete a comment entered here.
System generated comments are listed on this tab (called Events).
Existing comments are displayed in order by Created Date with the most recent Comment on top.
Feature Description
Add Comment Click the <Add Comment> button. To UPDATE a Comment: Place the cursor on the Comment record you wish to change in the first half of the screen (the background color of the record will be dark red) and press the <Edit/View button>.
Delete Place the cursor on the Comment record you wish to change in the first half of the screen (the background color of the record will be dark red) and click the <Delete Comment> button.

pg. 29
JEMS I Rate and Title Adjustment Manual Last Reviewed 08/17/16
Status Tab
The data on this tab is not modifiable. It displays the history of statuses that a particular Adjustment has had. Anyone with update or view access can view the status history of an Adjustment. The statuses are displayed with the most recent status on the top line by status effective date (MM/DD/YYYY). List of Statuses:
• Draft • Entered • Department Approved • Division Approved • Division Hold • APO Approved • APO Hold • Auth Rate Adjustment (Authorized for entry into HRS) • Finished – Payrolled (having been entered in HRS). This is a system‐assigned status. • Revised • Cancelled

pg. 30
JEMS I Rate and Title Adjustment Manual Last Reviewed 08/17/16
Actions Menu
Use the ACTIONS portion of the menu to modify the Status of the Rate and Title Adjustment.
Action Description
Submit Used to move the R/T Adjustment from Draft to Entered status.
Approve
Used to move the R/T Adjustment from Entered to Department Approved status. Also used to move the R/T Adjustment from Department Approved to Division Approved status (program checks to see the current status to determine which of the 2 statues is appropriate).
Reject Used to move the R/T Adjustment to a prior status (e.g., from Dept. Approved to Entered).
Cancel Used to Cancel further work on a R/T Adjustment.
Hold Used to temporarily suspend work on the R/T Adjustment.
Uncancel Used to place the R/T Adjustment in the status it had just prior to the Cancellation so that work on the R/T Adjustment may resume.
Unhold Used to remove the Hold on the R/T Adjustment so that work on it may resume.
When an Action is selected the PVL data is checked for completeness and integrity. If no errors exist, a “successful” message appears indicating the status has been changed. Note that the “Current Status “display is modified to reflect the new status. Note that the Department may not modify the R/T Adjustment after the R/T Adjustment is Department Approved (which effectively forwards it to the Division for further approval) and the Division cannot modify the R/T Adjustment after it is Division Approved and submitted to OHR for further review.

pg. 31
JEMS I Rate and Title Adjustment Manual Last Reviewed 08/17/16
Error(s) Window
If errors were found when you attempted to change the R/T Adjustment status, an Error window will display with:
1. The status for which the R/T Adjustment was validated. 2. The number of Errors. 3. The Error Message and, adjacent to it, the Actions needed to remediate the error. 4. A <Go To Error> button that will take you to the field needed to correct the error.

pg. 32
JEMS I Rate and Title Adjustment Manual Last Reviewed 08/17/16
Tools Menu
If you wish to check the R/T Adjustment for errors without having to change the status of the R/T Adjustment, use the TOOLS Menu. From the TOOLS menu you can check for Errors at the Current Status or for the next status that would advance the PVL, e.g., from Draft status, you can validate the R/T Adjustment for Entered status without changing the R/T Adjustment status to Entered. Note that, if you are in Edit mode, the R/T Adjustment is validated for whatever the current status may be when you close out the record. On closing out the R/T Adjustment, if you get a list of errors which are “Critical” or “Informational”, you may still exit the R/T Adjustment without correcting the data. However, the errors must be corrected if you wish to move the R/T Adjustment to the next level.

pg. 33
JEMS I Rate and Title Adjustment Manual Last Reviewed 08/17/16
Printing a Rate and Title Adjustment
ADOBE ACROBAT READER installation is needed to be able to print a R/T Adjustment. The <Print> button in the upper right corner can be used to access the Print R/T Adjustment screen. The Print R/T Adjustment screen may also be accessed from the File pull down menu and the Main Menu screen. On the Print R/T Adjustment screen, select which report you wish to print and then press the <Print/Preview Report> button. You must have your browser set to accept Pop-ups from this site in order to print. After pressing the <Print/Preview Report> button, the system launches Adobe Acrobat and the report appears in a separate window. From this window, you may then send the report to your local printer, if a hard copy is needed, or you can choose to save the PDF. Only one R/T Adjustment may be printed at a time. If you want to print more than one PVL, you may change the PVL number on the Print Screen to print a different PVL. Available reports:
Administrative – Includes funding, prior incumbent’s name/appointment ID, if waiver, name and reason for the waiver, comments for the PVL, etc.
Public – The Released PVL for Open recruitment (the data as it would appear on the Web listing).
Person Hired – Only available after the PVL has been filled and only available to the users with the hiring department authorization for the PVL. This report adds a cover sheet to the Administrative report with details on the person hired for the recruitment.

pg. 34
JEMS I Rate and Title Adjustment Manual Last Reviewed 08/17/16
Searching the R/T System
Feature Description
List my Rate Adjustments Displays a list of R/T Adjustments based on the criteria entered.
List Adjustment Notices Displays a list of notices sent out for the selected time period.
The first time you log into the Rate/Title Change system you are given a default Search profile. The default search profile is composed of your UDDS authorization (or one of your UDDS authorizations, if you have more than one) and a ‘Current Status’ of ‘Draft’. Your Search Profile is loaded into the Search Rate Adjustment Quick Search Criteria when you invoke the screen. If there are Adjustments in the system at the time for your UDDS and in Draft status, you will see them listed in the Results in the second portion of the screen. If there are no records in that status and UDDS, you will receive the message that ‘No Records Were Found’. In order to change my profile, I will press the <Set Profile> button after clicking on <List My Rate Adjustments> button and create a profile that is more suited to my needs. Once a new profile is created it will not take effect until you exit the system and log back in.

pg. 35
JEMS I Rate and Title Adjustment Manual Last Reviewed 08/17/16
Searching cont’d
The Query Selection screen is used to create individualized queries not restricted by UDDS authorization.
Field Description
UDDS Enter a full or partial UDDS code(s). This field may not be left blank.
Current Status Search for a specific current status as of the today’s date.
Appointment Type Enter in appointment type or leave blank to search all appointment types.
Title Code Specify a full or partial title code (e.g. E10 or E10FN). The search will be performed on the Title the employee had at the time the adjustment was initiated.
Major Department Yes = Select all Adjustments where the specified UDDS is the Major Department. No = Select all Adjustments where the specified UDDS is the Appointment Department.
Rate or Title Change Reason
Select a Change Reason code from the drop down list if you prefer to narrow the list with to Adjustments linked to a given Change Reason. The default search is for Adjustments regardless of the Rate or Title change reason(s) assigned to the Adjustment.
Submit Action: ‐ Press the <SUBMIT > button to get Results from your modified Criteria.
Use the buttons with the binoculars to quickly navigate to a specific record in the Results. For example, if the list is large, one can press the binocular button above the list of Names and you will get a list of all the names in the Results. When you select a person on the drop down list, the program will then place you on the line with that person’s data.
View Use the <View> button to navigate to the Adjustment in View mode.
Edit Use the <Edit> button to navigate to the Adjustment in Edit mode.
Print List Use the <Print List> button to bring up a screen that will allow you to create either a hard copy or an Excel Spreadsheet of the Results (Excel program is required in order to generate Spreadsheet).