Embed Size (px)
Citation preview
Kolcraft® Enterprises, Inc. C01J-R3 6/09
UTILITY
TRANSPORT
COVERAGEJeep
®2-in-1 Baby Carrier Instruction Sheet
Hoja de instrucciones del transportador de bebés 2en 1 Jeep
®

2
�WARNING - FALL HAZARD:Small children can fall through a leg opening. To avoid falling or strangulation,ALWAYS adjust leg openings to fit baby’s legs snugly. FOR INFANTS 8-12 lbs., thewebbing loop and toggle in the leg openings must be attached and the seat zip-pered to its highest position.Avoid serious injury from baby falling or sliding out. Your child's safety depends onyou. Proper Carrier use cannot be assured unless you follow these instructions. DONOT ASSEMBLE OR USE CARRIER UNTIL YOU READ AND UNDERSTAND THESEINSTRUCTIONS. Keep instructions for future reference.
IMPORTANT SAFETY INFORMATION:How to Keep Your Child Safe While Using this Baby Carrier• MINIMUM CHILD REQUIREMENT: 8 lbs. (3.5 kg) and 20" (50.8 cm)
MAXIMUM: 26 lbs. (11.5 kg)INFANT MUST MEET THE FOLLOW CRITERIA:• DO NOT use this Carrier unless infant meets weight requirements listed above,
and can be properly positioned with legs straddling the seat and arms extending through the armholes.
• Check to assure all buckles, toggles, straps and adjustments are secure before each use.
• Always make sure that your infant's nose and mouth are clear and unobstructed by the Carrier, weather shield (select models) or clothing. Always keep some distance between the infant’s face and the adult’s body to ensure easy breathing.
• The infant must face towards user until infant can hold its head and shoulders upright unassisted.
When Using This Baby Carrier:• Hold on to your infant tightly until all buckles and latches are secured in place
and straps are pulled tight around the user's body. Sit down when placing and removing infant.
• NEVER Leave Child Unattended. NEVER leave child in the baby Carrier unattachedto user.
• DO NOT bend at waist when stooping down; bend at the knees to make sure baby stays secure in the Baby Carrier.
• This Baby Carrier is designed for use by adults while walking only. Please be aware that while using carrier, normal activities or motions may now be dangerous to your child and caution should be used. DO NOT cook, clean, run, ski, bike, ride horses or use any type of motorized vehicles, etc. while using this carrier.
• PRODUCT WEAR WARNING: This product is subject to normal wear and tear over
Continued on next pageContinuación en la página siguiente
�WARNING

time. The user should inspect this product before each use for signs of deterioration such as hardware not locking, loose seams or tears. DO NOT USE THIS CARRIER IF PROBLEMS ARE DETECTED. CALL 1-800-453-7673 or outsideU.S.A. and Canada 1-910-944-9345.
• DO NOT put items into the carrier with the child. This may interfere with the child’s ability to breathe.
• MAKE SURE child’s body parts and skin are clear when locking buckles or snaps to prevent pinching.
• DO NOT place sharp objects into carrier pockets.• Let Carrier cool after leaving in sun or hot car.User Should Not Use This Baby Carrier:• If experiencing back problems• If Carrier obstructs the wearer's vision• As a backpack or hip Carrier• As a car safety seat. • Lying down.
3
�ADVERTENCIA-PELIGRO DE CAER:Los niños pequeños pueden caerse a través de la abertura de una pierna. Paraevitar caídas o estrangulaciones, ajuste SIEMPRE las aberturas de las piernashasta el tamaño más pequeño adecuado para el infante. PARA LOS INFANTES de8-12 libras, el lazo y el pasador en las aberturas de la pierna debe unirse al asientoy asegurarse con el cierre en la posición más alta. Evite las heridas o lesiones serias a consecuencia de una caída o deslizamiento delbebé. La seguridad de su hijo depende de usted. No se puede garantizar el usoseguro a menos que siga estas instrucciones. NO ENSAMBLE O UTILICE EL TRANS-PORTADOR HASTA QUE NO HAYA LEÍDO Y COMPRENDIDO ESTAS INSTRUCCIONES.Mantenga las instrucciones para referencias futuras.
INFORMACIÓN IMPORTANTE DE SEGURIDAD:Cómo mantener a su hijo seguro mientras está usando este transportador• REQUISITO MÍNIMO DEL BEBÉ: 8 libras (3.5 kg) y 20" (50.8 cm)
MÁXIMO: 26 libras (11.5 kg)EL INFANTE DEBE CUMPLIR CON LOS SIGUIENTES CRITERIOS:• NO use este transportador a menos que el infante cumpla con los requisitos de
peso que se alistan arriba y pueda ser posicionado adecuadamente con las piernas a cada lado del asiento y los brazos extendidos a través de las aberturas para los brazos.
�ADVERTENCIA
Continued on next pageContinuación en la página siguiente

• Verifique que todas las hebillas, cierres, tiras y ajustes estén asegurados antes del uso.
• Asegúrese siempre de que la boca y la nariz de su infante no tienen obstrucciones por parte del transportador, protección contra el clima (modelos selectos) o la ropa. Mantenga siempre algo de distancia entre el rostro del bebé yel cuerpo del adulto para asegurarse de que puede respirar con facilidad.
• El infante debe estar mirando hacia el usuario hasta que pueda sostener su cabeza y sus hombros parados sin ayuda.
Cuando este utilizando este transportador:• Sujete firmememente a su infante hasta que todas las hebillas y cierres estén en
su sitio y las ataduras se hayan ajustado alrededor del cuerpo del usuario. Siéntese cuando esté situando y removiendo al infante.
• NUNCA deje a su hijo sin atención. NUNCA deje a su hijo en el transportador sin unirlo al usuario.
• NO SE DOBLE por la cintura cuando se agache; doble las rodillas para asegurarsede que el bebé permanece seguro en el transportador.
• Este transportador de bebés está diseñado para el uso por adultos sólo mientras están caminando. Por favor, tenga en cuenta que mientras utiliza el transportador,las actividades normales o movimientos pueden ahora ser peligrosos para su hijo y debe utilizar precaución. NO cocine, limpie, corra, esquíe, monte en bicicleta, monte a caballo ni utilice ningún tipo de vehículo motorizado etc. mientras está utilizando este transportador.
• AVISO SOBRE EL DESGASTE DEL PRODUCTO: este producto está sujeto al desgaste normal a lo largo del tiempo. El ususario debe inspeccionar este producto antes de cada uso para buscar signos de deterioro, como piezas que no encajen, costuras descosidas o desgarros. NO UTILICE ESTE TRANSPORTADOR SI SE DETECTAN PROBLEMAS. LLAME AL 1-800-453-7673 o 1-910-944-9345.
• NO ponga objetos en el transportador con el niño. Esto puede interferir con la capacidad del niño para respirar.
• ASEGÚRESE de que las partes del cuerpo del niño y la piel no pueden quedar atrapadas o ser pellizadas cuando esté cerrando los ajustes o cierres.
• NO sitúe objetos punzantes en los bolsillos del transportador. • Deje que el transportador se enfríe después de haber estado al sol dentro de un
automóvil caliente.
El usuario no debe utilizar este transportador en caso de que: • Haya experimentado problemas de espalda• Si el transportador obstruye la visión del que lo lleva• Como mochila o transportador de cadera• Como asiento de automóvil • Cuando esté recostado.
4

5
Parts List Lista de partes
BACK VIEWVISIÓN TRASERA
FRONT VIEWVISTA FRONTAL
Head Support BuckleHebilla del soporte de lacabeza
Secure Fit® Locking LatchPasador de cierre Secure Fit®
Webbing Loop & ToggleLazo y pasador
Harness Adjustment StrapArnés de ajuste del cinturón
Head Support LeverApoyo del soporte de lacabeza
Cool-Climate Roll-Up (selectmodels)Enrollado para ventilación (modelos selectos)
Cross PiecePieza cruzada
2” Harness BucklesHebillas del arnés de 2”
Zipper Seat AdjustmentAjuste del cierre del asiento
Harness Adjustment StrapCinturón de ajuste del arnés
Locking Latch ReceiverReceptor del pasador decierre

6
HOW TO ASSEMBLE YOUR BABY CARRIER/ CÓMO ENSAMBLAR SU TRANSPORTADOR DE BEBÉ
To Prepare Baby Carrier Para preparar el transportador debebéDiscard packing material from the travel bag (selectmodels).
Desheche los cartones de los bolsillos y el material(modelos selectos).
Remove Carrier from travel bag.
Remueva el transportador de la bolsa de almacenaje.
Release Head Support Buckles.
Suelte las hebillas del soporte de la cabeza.
To release Secure Fit® Locking Latches, locate leveron back of latch. Slide lever away from Carrier bodythen pull up.
Para soltar los pasadores de cierre Secure Fit®, localiceel apoyo del soporte de la cabeza. Deslice el apoyohacia afuera del cuerpo del transportador y luego jálelohacia arriba.
2
3
3
1
4
4
Female BuckleHebilla hembra Male Buckle
Hebilla macho
1
Carrier HarnessArnés del trans-portador
Carrier BodyCuerpo del trans-portador
Travel Bag (select models)
Bolsa de viaje(modelos selectos)

7
For use with newborns, make sure Zipper is in itssmallest position. Only one zipper will be visible atthe bottom of the Body as shown. The Carrier shouldalready be in this position when you purchased it.See “Adjusting Seat Height” on page 13 for moredetails.
Cuando lo use con recién nacidos asegúrese de que elcierre está en su posición más pequeña. Sólo habrá uncierre visible en la parte inferior del cuerpo, como semuestra. El transportador debe estar ya en estaposición cuando usted lo compre. Vea “Ajustar laaltura del asiento” en la página 13, para más detalles.
Loosen Harness Adjustment Straps to widest posi-tion.
Afloje los cinturones de ajuste del arnés a su posiciónmás amplia.
Place harness over your head, so that Head SupportBuckles are at chest level.
Sitúe el arnés en por encima de su cabeza forma quelas hebillas de soporte de la cabeza estén al nivel delpecho.
The Cross Piece should be at the bottom of theshoulder blades for maximum comfort. Slide CrossPiece adjustment until it is in place.
La pieza cruzada debe estar en la parte inferior de laspaletillas de los hombros para la máxima comodidad.Deslice el ajuste de la pieza de cruce hasta quequede en su lugar.
1
2
3
2
3
To Put on Baby Carrier Para poner el transportador debebé
4
1
4
Continued on next pageContinuación en la página siguiente

8
CAUTION: Always secure the Carrier on your bodybefore putting your baby into the product.
PRECAUCIÓN: asegure siempre el transportador a sucuerpo antes de poner a su bebé en el producto.
On both sides of your torso, connect 2” harness bucklesuntil a “click” is heard.
En los dos lados de su torso conecta las hebillas delarnés de 2” hasta que un “clic” se escucha.
Pull adjustment straps forward. Tighten straps untilCarrier fits snug around your torso.
Jale de las tiras de ajuste hacia adelante. Ajuste los cin-turones hasta que el transportador esté ajustado alrede-dor de su torso.
Starting on either side, slide Secure Fit® Locking Latchinto receiver on harness until you hear a click and seelock indicator turn red.
Comenzando en cualquier de los lados, deslice la hebillade cierre Secure Fit® en el receptor del arnés hasta queescuche un clic y vea que el indicador de cierre se havuelto rojo.
On the same side as the Secure Fit® Latch, secure theHead Support Buckle. Make sure buckles are laying flatand not twisted.
En el mismo lado que la hebilla de cierre Secure Fit®,asegure la hebilla de la cabeza del soporte. Asegúrese deque las hebillas están planas y no retorcidas.
5
6
7
6
87
5
9
To Secure an Infant into Baby CarrierFacing the Parent
While seated and supporting the infant’s head, slideyour infant facing toward you into the Carrier on theopen side. IMPORTANT: Hold on to your infant until the Carrieris fully attached. Make sure your infant’s legs arestraddling the seat evenly and their arm is throughthe arm hole.
Mientras esté sentado y sujetando la cabeza del bebé,deslice a su infante mirando hacia usted en el ladoabierto del transportador. IMPORTANTE: sujete a su infante hasta que eltransportador esté totalmente unido. Asegúrese deque las piernas de su infante están a ambos ladosdel asiento por igual y que el brazo pasa a travésde la abertura para el brazo.
To avoid the possibility of your infant being pinched,make sure infant’s skin, fingers and all other bodyparts are far away from all buckles and latcheswhen being secured. Lift infant up slightly and slideother Secure Fit® Locking Latch into receiver untilyou hear a click and see lock indicator turn Red.
Para evitar la posibilidad de que su infante resulte pel-lizcado, asegúrese de que la piel del infante, dedos ytodas las partes del cuerpo están lejos de todas lashebillas y pasadores cuando estén aseguradas. Eleveal infante ligeramente y deslice otro pasador de cierreSecure Fit® en el receptor hasta que escuche un clic yvea que el indicador de cierre se vuelve rojo.
1
2
�WARNING This Carrier can accomodate children by hav-ing them either face toward or away from par-ent. Until an infant can hold up their head andshoulders unassisted, the infant must facetoward the parent.
TO AVOID SUFFOCATION: ALWAYS make surethat your child’s nose and mouth are clear andunobstructed by the Carrier or your clothing.
�ADVERTENCIAEste transportador puede acomodar a niños mirandohacia el padre o hacia el lado opuesto. Hasta que uninfante pueda mantener su cabeza y sus hombrosparados sin ayuda, el bebé debe mirar hacia el padre.
PARA EVITAR LA ASFIXIA: Asegúrese SIEMPRE deque la nariz y la boca de su hijo no están obstruídaspor el transportador o por su ropa.
Continued on next pageContinuación en la página siguiente
1
2
HOW TO PROPERLY USE YOUR NEW BABY CARRIER / CÓMO UTILIZAR DE FORMA ADECUADA SU NUEVO TRANSPORTADOR DE BEBÉ
Para asegurar un infante al transportador debebés mirando al padre
10
Secure other Head Support Buckle. Both armsshould be below buckle and through the arm holes.Baby’s arms should fit in the U-Shape opening nextto the Secure Fit® Locking Latch for maximum safetyand support. If infant’s arms are too high, see“Adjusting Seat Height” on pages 13 & 14.
Asegure la otra hebilla de soporte de la cabeza. Ambosbrazos deben estar por debajo de la hebilla y a travésde las aberturas para los brazos. Los brazos del bebédeben caber en la abertura en forma de U al lado delpasador de cierre Secure Fit® para proporcionar unmáxima seguridad y soporte. Si los brazos de uninfante están demasiado altos, vea “Ajuste de la alturadel asiento” en las páginas 13 y 14.
To PREVENT babies between 8 - 12 lbs from slippingthrough leg openings, secure Webbing Loop onHarness to the Toggles located on the body of thecarrier. Be sure to secure leg openings on BOTHsides of Carrier.
Para EVITAR que los bebés entre 8 - 12 libras sedeslicen a través de las aberturas de las piernas, ase-gure el lazo en el arnés a los pasadores situados en elcuerpo del transportador. Asegúrese de asegurar lasaperturas de las piernas en AMBOS lados del trans-portador.
While holding onto your infant, pull Harness Adjust-ment Straps one at a time until infant is close andhigh upon your chest for their safety and your com-fort. You should be able to easily kiss the top yourinfant’s head. Make sure their arms are resting com-fortably through the openings and their legs aresecured.
Mientras sujeta al bebé, jale de las tiras de ajuste delarnés una a la vez hasta que el infante esté cerca y ala altura de su pecho para su seguridad y su comodi-dad. Debe poder besar con facilidad la parte superiorde la cabeza de su infante. Asegúrese de que sus bra-zos están descansando comodamente a través de lasaberturas en las piernas y de que sus piernas estánaseguradas.
3
4
5
5
CORRECTCORRECTO
INCORRECTINCORRECTO
4
4
U-ShapedOpening
Apertura enforma de U
3

11
4
3
To Secure Baby in Forward FacingPosition
1 When baby is able to hold their head and shouldersup unassisted, you may place them in the forwardfacing position.
Cuando el bebé pueda mantener parada su cabeza ysus hombros sin ayuda, puede situarlos en la posiciónmirando hacia adelante.
Follow original steps on how to put on the Carrier asdescribed on pages 7-9.
Siga los pasos originales sobre cómo poner el trans-portador como se describe en las páginas 7-9.
While supporting the baby’s chest, slide them into theCarrier facing forward. Make sure legs are straddlingthe Carrier evenly. While holding onto your baby, securethem into the Carrier as described in steps 1 & 2 onpage 10.
Mientras sujeta el pecho del bebé, deslícelo en el trans-portador mirando hacia adelante. Asegúrese de que laspiernas están a ambos lados del transportador por igual.Mientras sujeta a su bebé, asegúrelo en el transportadorcomo se describe en los pasos 1 & 2 en la página 10.
Fold down the Head Support and attach the HeadSupport Buckles either above or below baby’s shoul-ders. The arms of the younger baby should bethrough the armholes, while the older baby can havetheir arms above the folded head support as shown.
Doble el soporte de la cabeza y una las hebillas desoporte de la cabeza por arriba o por abajo de loshombros del bebé. Los brazos de los bebés máspequeños deben pasar a través de las aberturas parabrazos, mientras que los bebés más grandes puedentener sus brazos por encima del soporte doblado de lacabeza, como se muestra.
2
Para asegurar a un bebé en la posiciónmirando hacia adelante
3
4
4
1
1
To Adjust Head Support Para ajustar el soporte de la cabeza
For Infants who can not hold up their head withoutassistance, lift Head Support Lever and pull HeadAdjustment Strap until their head is supported. Tolock, push down on Head Support Lever until strapdoes not move.
Para los infantes que no pueden sujetar su cabeza sinasistencia, eleve el soporte del apoyo de la cabezahasta que su cabeza esté apoyada. Para cerrar, pre-sione hacia abajo en el soporte de apoyo de la cabezahasta que el cinturón no se mueva.
Arms BelowHead SupportBrazos de abajode el soporte dela cabeza
Arms Above HeadSupportBrazos de arriba deel soporte de lacabeza

12
Adjusting Seat Height
This Carrier can be adjusted to 3 Seat Height positionsas your baby grows.
Este transportador se puede ajustar a 3 posiciones dealtura del asiento a medida que su bebé crece.
Zipper Position 1 is the smallest position and is to beused with newborns along with Webbing Loop &Toggle.
La posición 1 del cierre es la posición más pequeña y seutiliza con recién nacidos junto con el lazo y el pasador.
Zipper Position 2 is the middle position and is to beused when baby’s head is significantly over the HeadSupport and /or arms are above Head Support Buckles.
La posición 2 del cierre es la posición media y se usacuando la cabeza del bebé está significaticamente porencima del soporte de la cabeza y/o los brazos están porencima de las hebillas de soporte de la cabeza.
Ajuste de la altura del asiento
CORRECT POSITIONPOSICIÓN CORRECTA
1
Continued on next pageContinuación en la página siguiente
Head SupportSoporte de la
cabeza
ZipperPosition 1Posición 1
del cierreZipperPosition 2Posición 2del cierre
UnzippedPositionPosiciónabierta
2
CAUTION: When baby’s head is signifi-cantly over the Head Support and /orarms are above Head Support Buckles,adjust Zipper Seat Adjustment to ZipperPosition 2 or Unzipped Position to allowbaby more room.
PRECACUCIÓN: cuando la cabeza delbebé está significativamente por encimadel soporte de la cabeza y/o los brazosestán por encima de las hebillas desoporte de la cabeza, ajuste el asiento delcierre a la posición de cierre 2, o a la posi-ción de abierto, para dar más espacio albebé.
CAUTION: If baby’s head is signifi-cantly below the Head Support and/or arms are raised close to theirhead, adjust Zipper Seat Adjustmentto a higher zipper position.
PRECAUCIÓN: si la cabeza del bebéestá significativamente por debajo delsoporte de la cabeza y/o los brazosestán elevados por ecima de sucabeza, ajuste el cierre del asiento ala posición más arriba.
TOO HIGH - INCORRECTDEMASIADO ALTO INCORRECTO
TOO LOW- INCORRECTDEMASIADO BAJO - INCORRECTO

13
Unzipped Position is the largest position and is usedwhen baby no longer fits comfortably in ZipperPosition 1 or 2.
La posición con el cierre abierto es la posición másamplia y se usa cuando el bebé ya no cabe de formaconfortable en la posición 1 y 2 del cierre.
To readjust the seat height, remove baby fromCarrier and remove from your body. Rezip todesired seat position. To avoid baby slippingthrough leg openings, ALWAYS select a seat heightposition that provides the smallest leg opening suit-able for them.
Para reajustar la altura del asiento, remueva al bebédel transportador y separe el transportador del cuerpo.Vuelva a cerrarlo hasta la posición del asiento desea-da. Para evitar que el bebé se deslice a través de lasaperturas de las piernas, seleccione SIEMPRE unaposición para la altura del asiento que proporcione lamenor apertura de piernas adecuada para estas.
3
4
Head SupportSoporte de la cabeza
ZipperPosition 1
Posición 1 delcierre
ZipperPosition 2Posición 2del cierre
Unzipped PositionPosición con elcierre abierto

14
The Weather Shield has been designed to help pro-tect your child during unexpected weatherchanges.
El protección contra el clima esta diseñado para prote-ger su niño durante cambios de clima.
Caution! Check baby often to make sure baby is notover heated. Look often to ensure fabric is not nearbabys face.
Precaución! Compruebe el bebé a menudo para ase-gurarse de que no tiene demasiado calor. Miré con fre-cuencia para asegurarse de que la tela no está cercade la cara del bebé.
Unfold and secure webbing loops around Carriershoulder straps.
Abra y asegure los lazos del red alrededor de lostirantes de los hombros del transportador.
1
1
�WARNING TO AVOID SUFFOCATION: ALWAYS makesure that your child’s nose and mouth areclear and unobstructed by the Carrier, thisweather shield or your clothing. Check babyoften to make sure baby is not over heated.
�ADVERTENCIAPARA EVITAR LA ASFIXIA: Asegúrese SIEMPREde que la nariz y la boca de su hijo no estánobstruídas por el transportador el protector declima o por su ropa. Compruebe al bebé amenudo para asegurarse de que no estádemasiado acalorado.
To Use Weather Shield(select models)
Para usar el protector de clima (modelosselectos)

To Remove Baby from Carrier Para remover al bebé del trans-portador
Para ajustar el enrrollado de venti-lación (modelos selectos)
15
1
1
To allow for better air circulation during hot weather,unzip Cool-Climate Roll-Up on front of Carrier, roll-upand secure with toggle.
Para permitir una mejor circulación del aire durante eltiempo caluroso, abra el enrrollado de ventilaciónfrente al transportador, enrróllelo y asegúrelo con elpasador.
1 While seated and holding onto your baby, releaseboth fabric leg straps.
Mientras esté sentado y sujetando a su bebé, suelteambas tiras de tela de las piernas.
If infant is facing you, support their head and releasethe Head Support Buckle on one side.
Si el infante está mirando hacia usted, sujete sucabeza y suelte la hebilla de soporte de la cabeza enun lado.
If baby is facing forward, support their chest andrelease the Head Support Buckle on one side.
Si el bebé está mirando hacia adelante, sujete sucabeza y suelte la hebilla de soporte de la cabeza enun lado.
To release Secure Fit® Locking Latches, locate leveron back of latch. Lift baby slightly and slide leveraway from Carrier body then pull up on latch.
Para soltar los pasadores de cierre Secure Fit®,encuentre el soporte en la parte trasera del pasador.Eleve ligeramente al bebé y deslice el soporte lejos delcuerpo de transportador y luego jale del pasador.
Continued on next pageContinuación en la página siguiente
2
3
4
2
4Back ofLatch
Parte traseradle pasador
To Adjust Cool-Climate Roll-Up (selectmodels)
16
• Lávelo a mano en agua fría y cuélguelo parasecarlo.
• Revise periódicamente para ver si tiene partes gastadas, materiales rotos o partesdescosidas.
• Cambie inmediatamente cualquier parte daña-da.
CARE & MAINTENANCE / CUIDADO & MANTENINIENTO• Hand wash in cold water and line dry.• Periodically check for worn parts, torn
materials or stitching.• Replace any damaged parts
immediately.
Gently remove your baby from the Carrier.
Remueva con cuidado a su bebé del transportador.
TO REMOVE A SLEEPING BABY, follow steps 1 - 3above but release other side of Carrier’s HeadSupport Buckle & Secure Fit® Latch and gentlyremove your baby from the carrier.
PARA REMOVER A UN BEBÉ QUE ESTÁ DURMIENDO,siga los pasos 1 - 3 arriba pero libere la otra parte de lahebilla de soporte de la cabeza y el pasador Secure Fit®
y remueva con cuidado a su bebé del transportador.
To ensure Carrier is ready for its next use, inspect forbuckles that are not locking and any wear on sewnareas, especially at seams and connection to hard-ware. Report any damage to customer serviceimmediately and discontinue use. To protect Carrier,place in travel bag when not in use.
Para asegurarse de que el transportador está listo parasu siguiente uso, inspeccione las hebillas que no estáncerradas y cualquier desgaste en las áreas cosidas,especialmente en las costuras y la conexión con laspiezas duras. Reporte cualquier daño al servicio alcliente de forma inmediata e interrumpa el uso. Paraproteger el transportador, sitúelo dentro la bolsa dealmacenamiento cuando no lo esté usando.
5
7
�WARNING DO NOT allow baby to sleep in Carrier onceremoved from harness. Baby could roll over andsuffocate.
�ADVERTENCIANO permita que el bebé se duerma en el trans-portador una vez que haya sido removido delarnés. El bebe podría rodar y asfixiarse.
6
7

Jeep® is a registered trademark of Chrysler LLC and is used under license by Kolcraft®. © Chrysler LLC 2009 Kolcraft® warrants this product to be free of defects in materials and workmanship, as follows: For a period ofONE YEAR from the date of purchase, Kolcraft will repair or replace, at its option, the defective product. If youhave a problem or are not satisfied with this product, please contact the Consumer Service Department atKolcraft. REPAIR OR REPLACEMENT AS PROVIDED UNDER THIS WARRANTY IS THE EXCLUSIVE REMEDY OF THE CON-SUMER. KOLCRAFT SHALL NOT BE LIABLE FOR ANY INCIDENTAL OR CONSEQUENTIAL DAMAGES FOR BREACHOF ANY EXPRESS OR IMPLIED WARRANTY ON THIS PRODUCT, EXCEPT TO THE EXTENT REQUIRED BY APPLICA-BLE LAW. ANY IMPLIED WARRANTY OF MERCHANTABILITY OR FITNESS FOR A PARTICULAR PURPOSE ON THISPRODUCT IS LIMITED TO THE DURATION OF THIS WARRANTY. Some states do not allow the exclusion or limitation of warranties set forth above, so the above exclusions maynot apply to you. This warranty gives you specific legal rights, and you may also have other rights which varyfrom state to state. We sincerely thank you for your purchase of this Kolcraft product. To obtain warranty service, please call Kolcraft’s Consumer Service Department at 1-800-453-7673 in U.S. andCanada, 1-910-944-9345 outside U.S. and Canada or contact us via email at [email protected] the product is returned to Kolcraft’s Consumer Service Department for repair or replacement, it must beshipped prepaid and adequately insured. For further information visit www.kolcraft.comRECALL WEBSITE: HELP KEEP YOUR CHILD SAFE. Check www.recall.gov to see if any products you use withyour child or any of your child's toys have been recalled.
Jeep® es una marca registrada de Chrysler LLC y es utilizada bajo licencia por Kolcraft®. © Chrysler LLC 2009 Kolcraft® garantiza que este producto estará libre de defectos en materiales y fabricación de la siguiente man-era: Por un período de UN AÑO después de la fecha de compra, Kolcraft reparará o reemplazará, a su opción, elproducto defectuoso. Si usted tiene un problema o no está satisfecho con este producto, por favor diríjase alDepartamento de Servicio al Consumidor de Kolcraft. LA REPARACIÓN O EL REEMPLAZO SEGÚN SE DISPONE EN ESTA GARANTÍA ES EL REMEDIO EXCLUSIVO DECONSUMIDOR. KOLCRAFT NO SE HARÁ RESPONSABLE DE NINGÚN DAÑO INCIDENTAL O EMERGENTE PORVIOLACIÓN DE CUALQUIER GARANTÍA EXPRESA O IMPLÍCITA DE ESTE PRODUCTO, SALVO EN LA MEDIDAREQUERIDA POR LA LEY APLICABLE. CUALQUIER GARANTÍA IMPLÍCITA DE COMERCIABILIDAD O IDONEIDADPARA UN FIN EN PARTICULAR DE ESTE PRODUCTO ESTÁ LIMITADA EN DURACIÓN AL TÉRMINO DE ESTAGARANTÍA. Algunos estados no permiten la exclusión o limitación de garantías según se dispone anteriormente, de man-era que es posible que las antedichas exclusiones no sean aplicables a usted. Esta garantía le otorga derechoslegales específicos y es posible que también disponga de otros derechos, los cuales pueden variar de un estadoa otro. Le agradecemos sinceramente por haber comprado este producto Kolcraft.Para obtener servicio de garantía, llame al Departamento de Servicio al Consumidor de Kolcraft al 1-800-453-7673 en Estados Unidos y Canada; fuera de Estados Unidos y Canada: 1-910-944-9345 o envianos un mensajepor correo electrónico a [email protected]. Si el producto se devuelve al Departamento de Servicio al Consumidor de Kolcraft para ser arreglado o reem-plazado, debe mandarse con el flete pagado y debidamente asegurado. Para mayor información visítenos enwww.kolcraft.comSITIO DE WEB DE HACER VOLVER: MANTENGA A SU HIJO SEGURO. Compruebe www.recall.gov para ver sicualquiera de los productos que utiliza con su hijo o cualquiera de sus juguetes han sido retirados.
17
LIMITED WARRANTY / GARANTÍA LIMITADA

18
PERSONAL RECORD CARD / TARJETA DE REGISTRO PERSONAL
Once in a while, we are less than perfect and one of our products reaches a customer with a problem. Inmost cases, we can solve your problem with replacement parts. Please contact us before you return oneof our products to the store. Once a product is returned, it cannot be resold. The materials and the energyused to make it are wasted.
Please fill in the information in the space provided and attach a copy of your purchase receipt. You willneed this information to obtain warranty service.
You can find the Model Number and Date of Manufacture on a label located on a strap of the baby carrier.
Ocasionalmente no logramos la perfección y uno de nuestros productos presenta algún problema al llegar alcliente. En la mayor parte de los casos podemos resolver el problema con piezas de reemplazo. Sírvase ponerseen contacto con nosotros antes de devolver uno de nuestros productos a la tienda. Una vez que se devuelve unproducto, no se pude volver a vender. Se desperdician los materiales y la energía que se usó en su fabricación.
Por favor escriba la información en el espacio provisto y adjunte una copia de su recibo de compra. Usted nece-sitará esta información para obtener los servicios incluidos en la garantía.
Puede encontrar el número del modelo y la fecha de fabricación en la etiqueta situada en uno de los cinturonesdel transportador de bebés.
Please direct any comments, questions or replacement part requests to:Favor de remitir cualquier comentario, preguntas o pedidos de piezas de respuesto a:
Kolcraft® Enterprises, Inc. Consumer Service Department10832 NC Highway 211 EastAberdeen, NC 28315
1-800-453-7673 in U.S. & Canada, 1-910-944-9345 outside U.S. & CanadaEastern Standard Time, 8 am-6:45 pm Monday - Thursday, 8 am-3:30 pm Friday
1-800-453-7673 en los Estados Unidos y en Canada, 1-910-944-9345 fuera de los Estados Unidos y Canadatiempo estándar del este, 8 am-6:45 pm Lunes - Jueves, 8 am-3:30 pm Viernes
fax / fax: 910-944-3490e-mail / correo electrónico: [email protected]
Model / Style Number:
Número de Modelo/Estilo: _________________________
Date of Manufacture:
Fecha de fabricación: ______________________________
Date of Purchase:Fecha de compra: _________________________________

19
Circle the Part You Need
REPLACEMENT PARTS LIST / LISTA DE PIEZAS DE REPUESTO
Marque con un círculo el repuesto quenecesita
Las piezas de recambio se pueden ver lig-eramente diferentes de como se muestran abajo.
Replacement parts may look slightly differentthan what is shown below.
Cross PiecePieza cruzada
$3.00
Travel Bag (select models)
Bolsa de viaje(modelos selectos)
$5.00
Weather Shield (select models)
Protector para el clima(modelos selectos)
$10.00
20
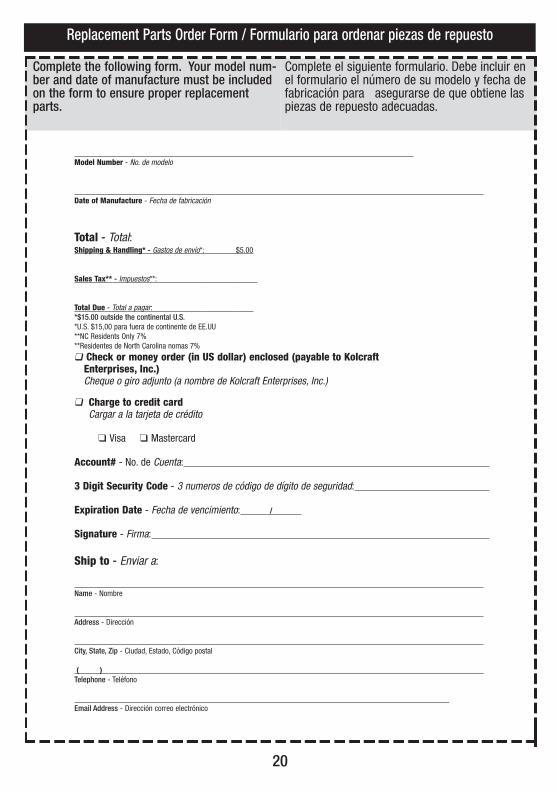
Model Number - No. de modelo
Date of Manufacture - Fecha de fabricación
Total - Total:Shipping & Handling* - Gastos de envío*: $5.00
Sales Tax** - Impuestos**:
Total Due - Total a pagar: *$15.00 outside the continental U.S.*U.S. $15,00 para fuera de continente de EE.UU**NC Residents Only 7%**Residentes de North Carolina nomas 7%
❑ Check or money order (in US dollar) enclosed (payable to Kolcraft Enterprises, Inc.)Cheque o giro adjunto (a nombre de Kolcraft Enterprises, Inc.)
❑ Charge to credit cardCargar a la tarjeta de crédito
❑ Visa ❑ Mastercard
Account# - No. de Cuenta:
3 Digit Security Code - 3 numeros de código de dígito de seguridad:
Expiration Date - Fecha de vencimiento: /
Signature - Firma:
Ship to - Enviar a:
Name - Nombre
Address - Dirección
City, State, Zip - Ciudad, Estado, Código postal
( ) Telephone - Teléfono
Email Address - Dirección correo electrónico
Complete the following form. Your model num-ber and date of manufacture must be includedon the form to ensure proper replacementparts.
Complete el siguiente formulario. Debe incluir enel formulario el número de su modelo y fecha defabricación para asegurarse de que obtiene laspiezas de repuesto adecuadas.
Replacement Parts Order Form / Formulario para ordenar piezas de repuesto


![jeep willys manual jeep militar [jipenet]](https://img.pdfslide.us/doc/110x75/5571f31d49795947648d86b9/jeep-willys-manual-jeep-militar-jipenet.jpg)