Embed Size (px)
DESCRIPTION
JCI Denmark proudly presents the brand new version of our guide to best practises for online presence. This is the second version and we're already working on the third edition. Stay tuned!
Citation preview

Online presence for JCI
A GUIDE TO BEST PRACTICES FOR
LOCAL AND NATIONAL ORGANIZATIONS

Page 2 of 36
Argentina Armenia Australia Austria Bangladesh Belgium Benin Bolivia Botswana Brazil Bulgaria Burkina Faso Cambodia Cameroon Canada Catalonia Chile Colombia Comoros Congo Costa Rica Cote d'lvoire Cyprus Denmark Dominican Republic Dutch Caribbean Ecuador Egypt Estonia Finland France Gabon Germany Ghana Greece Guatemala Guinea Haiti Honduras Hong Kong, China Hungary Iceland India Indonesia Ireland Italy Japan Jordan Kenya Korea Latvia Lebanon Lesotho Lithuania Luxembourg Macao, China Madagascar Malaysia Maldives Mali Malta Mauritius Mexico Monaco Mongolia Morocco Nepal Netherlands New Zealand Nicaragua Niger Nigeria Norway Pacific Pakistan Panama Paraguay Peru Philippines Poland Portugal Puerto Rico Romania Russia Rwanda Scotland Senegal Serbia Sierra Leone Singapore Slovakia South Africa Sri Lanka Suriname Sweden Switzerland Syria Taiwan Thailand Togo Tunisia Turkey Uganda Ukraine United Kingdom United States of America Uruguay Venezuela Vietnam West Indies
Zimbabwe
CONTENT
WORDPRESS TUTORIAL ............................................................................. 4
How to update your website in WordPress.......................................................................... 4
Log into your WordPress-page........................................................................................... 4
Changing the language ........................................................................................................ 4
Dashboard – the front page................................................................................................. 5 The Dashboard menu ........................................................................................................... 6 Other menu items ................................................................................................................. 6
Write or edit news to your blog (called posts) ................................................................ 7 Create a new post ................................................................................................................ 7 Correct a post ....................................................................................................................... 8
Edit pages or create new ....................................................................................................... 8 Create a new page ............................................................................................................... 8 Edit a page ........................................................................................................................... 9
Make a link in your text .......................................................................................................... 9 Change text to a link ........................................................................................................... 10 Linking to own content ........................................................................................................ 10 PDF files ............................................................................................................................. 10
Add photos on the website ............................................................................................... 10 Details and placement ........................................................................................................ 11 Correcting the inserted photo ............................................................................................. 11
How to load pdf files on the website .................................................................................. 12 Check the link ..................................................................................................................... 12
Create a new menu (structure) ......................................................................................... 13 Pages ................................................................................................................................. 13 Links ................................................................................................................................... 13 Categories .......................................................................................................................... 13 Settings and Save .............................................................................................................. 13
How to customize the menu ................................................................................................ 14 New items in the menu ..................................................................................................... 14 Change the menu title ........................................................................................................ 14
Create new user ................................................................................................................... 15 Six levels for users ............................................................................................................. 15
Edit user profile ................................................................................................................... 16 Role – permission ............................................................................................................... 16 Show name......................................................................................................................... 16 Password ............................................................................................................................ 16
Widgets ................................................................................................................................. 17 How do I find my widgets? ................................................................................................. 17

Argentina Armenia Australia
Austria Bangladesh
Belgium Benin
Bolivia Botswana
Brazil Bulgaria
Burkina Faso Cambodia Cameroon
Canada Catalonia
Chile Colombia Comoros
Congo Costa Rica
Cote d'lvoire Cyprus
Denmark Dominican Republic
Dutch Caribbean Ecuador
Egypt Estonia Finland France Gabon
Germany Ghana
Greece Guatemala
Guinea Haiti
Honduras Hong Kong, China
Hungary Iceland
India Indonesia
Ireland Italy
Japan Jordan Kenya Korea Latvia
Lebanon Lesotho
Lithuania Luxembourg
Macao, China Madagascar
Malaysia Maldives
Mali Malta
Mauritius Mexico
Monaco Mongolia Morocco
Nepal Netherlands
New Zealand Nicaragua
Niger Nigeria Norway Pacific
Pakistan Panama
Paraguay Peru
Philippines Poland
Portugal Puerto Rico
Romania Russia
Rwanda Scotland Senegal
Serbia Sierra Leone
Singapore Slovakia
South Africa Sri Lanka Suriname
Sweden Switzerland
Syria Taiwan
Thailand Togo
Tunisia Turkey
Uganda Ukraine
United Kingdom United States of America
Uruguay Venezuela
Vietnam West Indies
Zimbabwe
Junior Chamber International Denmark
Page 3 of 36
How do I get new widgets? ................................................................................................ 17
Plugins .................................................................................................................................. 17
Guide for Slider ................................................................................................................... 18
FACEBOOK ................................................................................................ 20
TWITTER ..................................................................................................... 21
MAILCHIMP................................................................................................. 22
What is MailChimp? ........................................................................................................... 22
Setting up MailChimp account ......................................................................................... 22
Entering information ............................................................................................................ 24
Starting up... ......................................................................................................................... 26 Importing email addresses ................................................................................................. 26 The first campaign ............................................................................................................. 30 Recipients .......................................................................................................................... 30 Setup .................................................................................................................................. 30 Template ............................................................................................................................ 32 Design ................................................................................................................................ 32 Confirm .............................................................................................................................. 34
LINKEDIN .................................................................................................... 35
ISSUU .......................................................................................................... 35
YOUTUBE ................................................................................................... 36
CONTACT ................................................................................................... 36

Page 4 of 36
Argentina Armenia Australia Austria Bangladesh Belgium Benin Bolivia Botswana Brazil Bulgaria Burkina Faso Cambodia Cameroon Canada Catalonia Chile Colombia Comoros Congo Costa Rica Cote d'lvoire Cyprus Denmark Dominican Republic Dutch Caribbean Ecuador Egypt Estonia Finland France Gabon Germany Ghana Greece Guatemala Guinea Haiti Honduras Hong Kong, China Hungary Iceland India Indonesia Ireland Italy Japan Jordan Kenya Korea Latvia Lebanon Lesotho Lithuania Luxembourg Macao, China Madagascar Malaysia Maldives Mali Malta Mauritius Mexico Monaco Mongolia Morocco Nepal Netherlands New Zealand Nicaragua Niger Nigeria Norway Pacific Pakistan Panama Paraguay Peru Philippines Poland Portugal Puerto Rico Romania Russia Rwanda Scotland Senegal Serbia Sierra Leone Singapore Slovakia South Africa Sri Lanka Suriname Sweden Switzerland Syria Taiwan Thailand Togo Tunisia Turkey Uganda Ukraine United Kingdom United States of America Uruguay Venezuela Vietnam West Indies
Zimbabwe
WORDPRESS TUTORIAL
HOW TO UPDATE YOUR WEBSITE IN WORDPRESS This is a manual for the most basic things, so you can edit the content and add new on your
website.
LOG INTO YOUR WORDPRESS-PAGE To work on your website, you must first log in to the
administration section. If you do not have a direct
link, the address is: www.dinhjemmeside.dk/wp-
admin/.
Enter your username and password that you've got
the mail from the super admin.
Be aware of uppercase or lowercase letters. When
you are finished working on your website, you can
sign out top right of the control panel.
In case you forgot your password, click on "Lost
your password" and you will be sent an email,
which you can create a new password.
CHANGING THE LANGUAGE Note! This tutorial is in English. To change the language of your admin page, do the following
after you have logged in:
Click Settings / Preferences - General
Change the language of the Site Language to English, Danish etc.

Argentina Armenia Australia
Austria Bangladesh
Belgium Benin
Bolivia Botswana
Brazil Bulgaria
Burkina Faso Cambodia Cameroon
Canada Catalonia
Chile Colombia Comoros
Congo Costa Rica
Cote d'lvoire Cyprus
Denmark Dominican Republic
Dutch Caribbean Ecuador
Egypt Estonia Finland France Gabon
Germany Ghana
Greece Guatemala
Guinea Haiti
Honduras Hong Kong, China
Hungary Iceland
India Indonesia
Ireland Italy
Japan Jordan Kenya Korea Latvia
Lebanon Lesotho
Lithuania Luxembourg
Macao, China Madagascar
Malaysia Maldives
Mali Malta
Mauritius Mexico
Monaco Mongolia Morocco
Nepal Netherlands
New Zealand Nicaragua
Niger Nigeria Norway Pacific
Pakistan Panama
Paraguay Peru
Philippines Poland
Portugal Puerto Rico
Romania Russia
Rwanda Scotland Senegal
Serbia Sierra Leone
Singapore Slovakia
South Africa Sri Lanka Suriname
Sweden Switzerland
Syria Taiwan
Thailand Togo
Tunisia Turkey
Uganda Ukraine
United Kingdom United States of America
Uruguay Venezuela
Vietnam West Indies
Zimbabwe
Junior Chamber International Denmark
Page 5 of 36
DASHBOARD – THE FRONT PAGE
Once you are logged in, you start at the Dashboard. The page gives a quick overview of your
website into different information fields:
Activities: latest release, commentary mm.
An overview: number of pages, posts, etc.
Quick draft: drafts awaiting release
WordPress news: information about WordPress
You can move the information fields around by grabbing the box and dragging it where you
want it. In addition, you can open or close the different fields by clicking on the small arrow in
the right corner of each window.
Black bar "follows you”
The black bar at the top comes with on the website as long as you are logged in. It offers
appropriate shortcuts that change according to where you are and what you are doing. See
e.g. + New.
If you are visiting the website, you can quickly edit the page you are in, or walk to a function
in dashboard via the black bar.
But otherwise you will usually use the left menu in the control panel to go to the appropriate
places.
Go to the website
At the top left area you can click to come to the public
website to see your changes. Note the little house icon - instead of “Test side” will say the
name of your page.
A good tip is to right-click and open the public page in a new tab. So you can quickly switch
between the admin page and the public page to see the results of your work. Remember to
update the site when you correct something, for example with F5.
When you are finished working on the website, log out the top right of your name.

Page 6 of 36
Argentina Armenia Australia Austria Bangladesh Belgium Benin Bolivia Botswana Brazil Bulgaria Burkina Faso Cambodia Cameroon Canada Catalonia Chile Colombia Comoros Congo Costa Rica Cote d'lvoire Cyprus Denmark Dominican Republic Dutch Caribbean Ecuador Egypt Estonia Finland France Gabon Germany Ghana Greece Guatemala Guinea Haiti Honduras Hong Kong, China Hungary Iceland India Indonesia Ireland Italy Japan Jordan Kenya Korea Latvia Lebanon Lesotho Lithuania Luxembourg Macao, China Madagascar Malaysia Maldives Mali Malta Mauritius Mexico Monaco Mongolia Morocco Nepal Netherlands New Zealand Nicaragua Niger Nigeria Norway Pacific Pakistan Panama Paraguay Peru Philippines Poland Portugal Puerto Rico Romania Russia Rwanda Scotland Senegal Serbia Sierra Leone Singapore Slovakia South Africa Sri Lanka Suriname Sweden Switzerland Syria Taiwan Thailand Togo Tunisia Turkey Uganda Ukraine United Kingdom United States of America Uruguay Venezuela Vietnam West Indies
Zimbabwe
THE DASHBOARD MENU
The left menu in WordPress allows you to access the various
functions. The most commonly used is:
Posts: Write new posts to the blog, or edit old posts and drafts.
Media: Here you will find your media files, such as photos. Pdf
files and other documents will also be here.
Pages: Write new pages or edit existing.
OTHER MENU ITEMS Comments: Keep track of what others write on your website.
You can view or. approve comments before they appear on the
page. You can also delete unwanted spam.
Appearance: Here you can change the website theme and edit
menu. Often you can switch top photo and background. You'll
also find widgets, the small boxes on the sides with small texts,
links and the like.
Plugins are small and large programs, you can use to add extra
features on your website. There are numerous opportunities that
you can download and set up. Some require a little more
expertise than others do. Active plugins are often placed on the
main menu bar or found in Settings.
Users: See your user profile and keep track of the others, if you
are an administrator. There are different levels for users, not
everyone can edit and write new posts and pages.
Tools: Here you can make a backup of the website with Export.
Settings: Control of reading, writing, media files and more. You
can include change the text at the top of the page here. Many
plugins settles under this section.

Argentina Armenia Australia
Austria Bangladesh
Belgium Benin
Bolivia Botswana
Brazil Bulgaria
Burkina Faso Cambodia Cameroon
Canada Catalonia
Chile Colombia Comoros
Congo Costa Rica
Cote d'lvoire Cyprus
Denmark Dominican Republic
Dutch Caribbean Ecuador
Egypt Estonia Finland France Gabon
Germany Ghana
Greece Guatemala
Guinea Haiti
Honduras Hong Kong, China
Hungary Iceland
India Indonesia
Ireland Italy
Japan Jordan Kenya Korea Latvia
Lebanon Lesotho
Lithuania Luxembourg
Macao, China Madagascar
Malaysia Maldives
Mali Malta
Mauritius Mexico
Monaco Mongolia Morocco
Nepal Netherlands
New Zealand Nicaragua
Niger Nigeria Norway Pacific
Pakistan Panama
Paraguay Peru
Philippines Poland
Portugal Puerto Rico
Romania Russia
Rwanda Scotland Senegal
Serbia Sierra Leone
Singapore Slovakia
South Africa Sri Lanka Suriname
Sweden Switzerland
Syria Taiwan
Thailand Togo
Tunisia Turkey
Uganda Ukraine
United Kingdom United States of America
Uruguay Venezuela
Vietnam West Indies
Zimbabwe
Junior Chamber International Denmark
Page 7 of 36
WRITE OR EDIT NEWS TO YOUR BLOG (CALLED POSTS)
Posts to the blog as news or articles, often continuously replaced. The alternative is Pages,
which is more permanent.
Click Posts in the menu.
This will give you a list of posts you have already made:
CREATE A NEW POST
If you want to make a post,
click on the Add new or at
the +New at the top of the
page.
On the new page, type the
title in the top field and the
text of the topic in the
window below.
Have you pre-written text
into Word or similar, you
may get a lot of
unnecessary coding when
you copy it. Therefore, use
one of the Paste functions in
the toolbar. Or select the
Text tab instead of Visual. Paste the text in here and go back to Visual afterwards to continue.
If you want to make a link, mark the text and click the chain icon in the toolbar. You can insert
images or link to PDFs with the button above, Add media.
Remember to select one or more appropriate categories for the post. Otherwise you run the
risk that it does not show up in the right place on the website. Tags are good for search engine
optimization.
Click the Publish button on the right side when the ball is ready for the web. Otherwise, you
can save it as a draft. You can also set a different date for the automatic release later.

Page 8 of 36
Argentina Armenia Australia Austria Bangladesh Belgium Benin Bolivia Botswana Brazil Bulgaria Burkina Faso Cambodia Cameroon Canada Catalonia Chile Colombia Comoros Congo Costa Rica Cote d'lvoire Cyprus Denmark Dominican Republic Dutch Caribbean Ecuador Egypt Estonia Finland France Gabon Germany Ghana Greece Guatemala Guinea Haiti Honduras Hong Kong, China Hungary Iceland India Indonesia Ireland Italy Japan Jordan Kenya Korea Latvia Lebanon Lesotho Lithuania Luxembourg Macao, China Madagascar Malaysia Maldives Mali Malta Mauritius Mexico Monaco Mongolia Morocco Nepal Netherlands New Zealand Nicaragua Niger Nigeria Norway Pacific Pakistan Panama Paraguay Peru Philippines Poland Portugal Puerto Rico Romania Russia Rwanda Scotland Senegal Serbia Sierra Leone Singapore Slovakia South Africa Sri Lanka Suriname Sweden Switzerland Syria Taiwan Thailand Togo Tunisia Turkey Uganda Ukraine United Kingdom United States of America Uruguay Venezuela Vietnam West Indies
Zimbabwe
CORRECT A POST If you want to edit a post, click on the headline to open a menu where you can select different
options. Select "Edit" and you can now edit the text, title, categories, etc. The rightmost icon
on the toolbar opens a line with more features for editing. Click on the blue button Update
when you are finished.
Images can both be inserted directly into the topic via an upload function, or added as a media
on the side. You can read more about photos here.
As an admin, it might be a good idea to set some guidelines for images on Posts, so they look
alike. These are the measurements for the theme selected by JCI Denmark:
Banner image: 1920 x 260 px.
Thumb nail: 870 x 290 px.
I can recommend the programs Paint or Microsoft Office 2010 to edit the pictures in. It's pretty
tedious in WordPress. I use image size and trim-functions to correct the images.
EDIT PAGES OR CREATE NEW In WordPress pages show
more long-term content - as
opposed to blog posts, which
are often a kind of news. A
page is usually static and
more durable content.
CREATE A NEW PAGE
If you want to make a whole
new page, click on the Add
New menu or at the top of the
page under the heading
On the new page, type the title in the top field and the text in the window underneath.
Have you pre-written text into Word or similar, you can get a lot of unnecessary coding when
you copy it. Therefore, use one of the Paste functions in the toolbar, or select the Text tab
instead of Visual. Paste text in here and go back to Visual afterwards to continue.
If you want to make
a link, mark the text
and click the chain
icon in the toolbar.
You can insert
images or link to
PDFs with the
button above, Add
media.

Argentina Armenia Australia
Austria Bangladesh
Belgium Benin
Bolivia Botswana
Brazil Bulgaria
Burkina Faso Cambodia Cameroon
Canada Catalonia
Chile Colombia Comoros
Congo Costa Rica
Cote d'lvoire Cyprus
Denmark Dominican Republic
Dutch Caribbean Ecuador
Egypt Estonia Finland France Gabon
Germany Ghana
Greece Guatemala
Guinea Haiti
Honduras Hong Kong, China
Hungary Iceland
India Indonesia
Ireland Italy
Japan Jordan Kenya Korea Latvia
Lebanon Lesotho
Lithuania Luxembourg
Macao, China Madagascar
Malaysia Maldives
Mali Malta
Mauritius Mexico
Monaco Mongolia Morocco
Nepal Netherlands
New Zealand Nicaragua
Niger Nigeria Norway Pacific
Pakistan Panama
Paraguay Peru
Philippines Poland
Portugal Puerto Rico
Romania Russia
Rwanda Scotland Senegal
Serbia Sierra Leone
Singapore Slovakia
South Africa Sri Lanka Suriname
Sweden Switzerland
Syria Taiwan
Thailand Togo
Tunisia Turkey
Uganda Ukraine
United Kingdom United States of America
Uruguay Venezuela
Vietnam West Indies
Zimbabwe
Junior Chamber International Denmark
Page 9 of 36
Each page has an area to make headlines, put a banner up and put a highlighted image on.
You must also select the page structure; this is called "Page Sidebars". As starting points, five
sidebars available for you to choose from. The great thing about the sidebars is that it allows
you to reuse inserted widgets, plug-ins, etc. on your pages. See more about this in the section
Widgets. If you need to get done several sidebars, contact your super admin.
The title will be a block of the same color as the theme, ie green on the departments' websites.
When you are finished with the page, put it up on the website with the Publish button on the
right side. Subsequently, the blue button is renamed Update.
EDIT A PAGE
You get to pages by selecting the option in the left menu. It provides an overview of the existing
pages. Click on a title to open the page for editing
Click the Update button on the right side when you are done. If you want to remove a page, it
should be moved to the trash with the link next to it.
MAKE A LINK IN YOUR TEXT Links are one of the best features on the net. Remember to link to other relevant pages of your
own or elsewhere on the Web. It’s good for everyone.
To create a link, you must be inside the specific page or post in which you want to create a
hyperlink.
This is where to find the button to make links:

Page 10 of 36
Argentina Armenia Australia Austria Bangladesh Belgium Benin Bolivia Botswana Brazil Bulgaria Burkina Faso Cambodia Cameroon Canada Catalonia Chile Colombia Comoros Congo Costa Rica Cote d'lvoire Cyprus Denmark Dominican Republic Dutch Caribbean Ecuador Egypt Estonia Finland France Gabon Germany Ghana Greece Guatemala Guinea Haiti Honduras Hong Kong, China Hungary Iceland India Indonesia Ireland Italy Japan Jordan Kenya Korea Latvia Lebanon Lesotho Lithuania Luxembourg Macao, China Madagascar Malaysia Maldives Mali Malta Mauritius Mexico Monaco Mongolia Morocco Nepal Netherlands New Zealand Nicaragua Niger Nigeria Norway Pacific Pakistan Panama Paraguay Peru Philippines Poland Portugal Puerto Rico Romania Russia Rwanda Scotland Senegal Serbia Sierra Leone Singapore Slovakia South Africa Sri Lanka Suriname Sweden Switzerland Syria Taiwan Thailand Togo Tunisia Turkey Uganda Ukraine United Kingdom United States of America Uruguay Venezuela Vietnam West Indies
Zimbabwe
CHANGE TEXT TO A LINK
Start by selecting the text to be a link.
Then click on the icon with the link in the
toolbar (see above). This opens the Insert
/ edit link.
URL: If you want to link to another
website, type the web address here.
The title is the text that appears when you
drive over the link with your mouse. It's
best with a relevant title with good
keywords, the search engines are happy
with it.
LINKING TO OWN CONTENT
Linking to a place on your own website,
you don’t have to know the www address.
Instead, you can find it in the table below. If it’s not open, click the Or link to ...
Locate and select the place you want to link to.
Finally, click the Add link. Then it's ready to use when you update.
If you later want to edit the same link, highlight and click the link icon again. If you want to
delete a link, click the Remove link in the toolbar.
PDF FILES
In principle, you can use this method to pdf files. Then type the full address under URL. It is
far easier instead to use the Add media.
ADD PHOTOS ON THE WEBSITE It's easy to use images in your posts or pages: First place
the cursor at the point where you want to insert your
image. Then click Add media to the left of the toolbar.
This opens the Insert media, and here you can go
directly into the Media Library, if your photo is already.

Argentina Armenia Australia
Austria Bangladesh
Belgium Benin
Bolivia Botswana
Brazil Bulgaria
Burkina Faso Cambodia Cameroon
Canada Catalonia
Chile Colombia Comoros
Congo Costa Rica
Cote d'lvoire Cyprus
Denmark Dominican Republic
Dutch Caribbean Ecuador
Egypt Estonia Finland France Gabon
Germany Ghana
Greece Guatemala
Guinea Haiti
Honduras Hong Kong, China
Hungary Iceland
India Indonesia
Ireland Italy
Japan Jordan Kenya Korea Latvia
Lebanon Lesotho
Lithuania Luxembourg
Macao, China Madagascar
Malaysia Maldives
Mali Malta
Mauritius Mexico
Monaco Mongolia Morocco
Nepal Netherlands
New Zealand Nicaragua
Niger Nigeria Norway Pacific
Pakistan Panama
Paraguay Peru
Philippines Poland
Portugal Puerto Rico
Romania Russia
Rwanda Scotland Senegal
Serbia Sierra Leone
Singapore Slovakia
South Africa Sri Lanka Suriname
Sweden Switzerland
Syria Taiwan
Thailand Togo
Tunisia Turkey
Uganda Ukraine
United Kingdom United States of America
Uruguay Venezuela
Vietnam West Indies
Zimbabwe
Junior Chamber International Denmark
Page 11 of 36
Otherwise, you can upload the image from your
computer: Click the Upload tab files and drag your photo
into. Or use the Select files and find it on your computer.
It is then uploaded immediately.
DETAILS AND PLACEMENT
When you insert the image from the media library, look
to the right of the image to view and edit the details that
belong to it.
Title: Appears when you hold the mouse over the image.
Caption: Can be displayed on the page with the image.
Alt Text: Appears if the image cannot be seen, for
example, by a blind person
Description is mostly for you, otherwise it is not used.
Adjusting indicates the position in relation to the text.
Left or right moves the text next to the picture. Center
moves the text before and after picture.
Jump to: Here you usually select None. Should make
the image as a link to the original file. Custom URL
provides a common link to the image on its own page.
Size: Select one of the preset sizes, from a small
thumbnail for full size. If you want something else, you must edit the picture after it is inserted.
When you are ready, click the blue button Insert.
CORRECTING THE INSERTED PHOTO
You can easily change your photo after it is inserted.
Click on the photo to make two icons come forward, Edit
or Delete to the left.
Under Edit example, you can change the alignment link
address or size. But beware of quality if you resize. It
may be best to delete the image and put it back in.

Page 12 of 36
Argentina Armenia Australia Austria Bangladesh Belgium Benin Bolivia Botswana Brazil Bulgaria Burkina Faso Cambodia Cameroon Canada Catalonia Chile Colombia Comoros Congo Costa Rica Cote d'lvoire Cyprus Denmark Dominican Republic Dutch Caribbean Ecuador Egypt Estonia Finland France Gabon Germany Ghana Greece Guatemala Guinea Haiti Honduras Hong Kong, China Hungary Iceland India Indonesia Ireland Italy Japan Jordan Kenya Korea Latvia Lebanon Lesotho Lithuania Luxembourg Macao, China Madagascar Malaysia Maldives Mali Malta Mauritius Mexico Monaco Mongolia Morocco Nepal Netherlands New Zealand Nicaragua Niger Nigeria Norway Pacific Pakistan Panama Paraguay Peru Philippines Poland Portugal Puerto Rico Romania Russia Rwanda Scotland Senegal Serbia Sierra Leone Singapore Slovakia South Africa Sri Lanka Suriname Sweden Switzerland Syria Taiwan Thailand Togo Tunisia Turkey Uganda Ukraine United Kingdom United States of America Uruguay Venezuela Vietnam West Indies
Zimbabwe
HOW TO LOAD PDF FILES ON THE WEBSITE Pdf files are considered a media file like images, video, etc. The easiest way is to put it in the
media library and link to it there.
Go to the place in the text where your link will be. Then click Add Media overwrite the box to
the left.
If the pdf is already located in the Media Library, you will find it in the list and select it.
Otherwise, select Upload files top of the next window, find your PDF file on your computer and
transfer it.
CHECK THE LINK In the window on the right side, you can see details about the file.
Most important is the point Link to. Here you must select Media file that provides a link that
opens the PDF file directly.
The option Side with attachment provides an independent site with a link. We do not want that
here. Title, Caption and Description are not relevant to pdf.
Finally, click the blue button Insert bottom right. This will take you back to the text, where there
is now a link to your pdf. Link text is likely the file name so you'll fix it.
It works well if you put the link to open the PDF in a new window: Select the link and select
the link icon in the toolbar. Insert the notch in Open link in new.

Argentina Armenia Australia
Austria Bangladesh
Belgium Benin
Bolivia Botswana
Brazil Bulgaria
Burkina Faso Cambodia Cameroon
Canada Catalonia
Chile Colombia Comoros
Congo Costa Rica
Cote d'lvoire Cyprus
Denmark Dominican Republic
Dutch Caribbean Ecuador
Egypt Estonia Finland France Gabon
Germany Ghana
Greece Guatemala
Guinea Haiti
Honduras Hong Kong, China
Hungary Iceland
India Indonesia
Ireland Italy
Japan Jordan Kenya Korea Latvia
Lebanon Lesotho
Lithuania Luxembourg
Macao, China Madagascar
Malaysia Maldives
Mali Malta
Mauritius Mexico
Monaco Mongolia Morocco
Nepal Netherlands
New Zealand Nicaragua
Niger Nigeria Norway Pacific
Pakistan Panama
Paraguay Peru
Philippines Poland
Portugal Puerto Rico
Romania Russia
Rwanda Scotland Senegal
Serbia Sierra Leone
Singapore Slovakia
South Africa Sri Lanka Suriname
Sweden Switzerland
Syria Taiwan
Thailand Togo
Tunisia Turkey
Uganda Ukraine
United Kingdom United States of America
Uruguay Venezuela
Vietnam West Indies
Zimbabwe
Junior Chamber International Denmark
Page 13 of 36
CREATE A NEW MENU (STRUCTURE) You find the point Menus under
in the Dashboard
left menu. Click on the link next
to the Select button to create a
new menu. Give it a name and
click Create Menu.
Now you can create menu items.
Actually, it just links, but there
are three types that you find on
the left: Pages, Links and
Categories.
PAGES Choose among the pages you've already made: Tick the ones you need and click the Add
button to the menu. Then they set up the right side. You can easily add other items for later.
LINKS
Here you can enter a common link to a site on the web. In the Label field, type the menu item
name, e.g. other news, Facebook, etc.
You can also link to your own website, for example, to an image or a PDF file. It is also the
only way to get a blog post with the menu.
CATEGORIES
You can create links to categories, i.e. parts of your blog post. A category page is a list of
messages in the category. It may be convenient to link directly to specific categories, e.g. JCI
News or minutes of meetings. Tick the categories you want to use, and add them.
SETTINGS AND SAVE
Move around so that the items fit and lastly check Menu
Settings at the bottom. If it’s the main menu, highlight it here.
You can also use the menu in a box, but it can be done under
Widgets.
You can select the new pages will be added automatically in
the menu, but I would not recommend this. It is hard to grasp
and a new item will be added at the bottom, so you have edit
it anyway.
Save in the end with the blue button on the right side.
Note! Only the Super Admin can change the theme of the
page to be able to create menus.
1: Example of adding pages
to a menu

Page 14 of 36
Argentina Armenia Australia Austria Bangladesh Belgium Benin Bolivia Botswana Brazil Bulgaria Burkina Faso Cambodia Cameroon Canada Catalonia Chile Colombia Comoros Congo Costa Rica Cote d'lvoire Cyprus Denmark Dominican Republic Dutch Caribbean Ecuador Egypt Estonia Finland France Gabon Germany Ghana Greece Guatemala Guinea Haiti Honduras Hong Kong, China Hungary Iceland India Indonesia Ireland Italy Japan Jordan Kenya Korea Latvia Lebanon Lesotho Lithuania Luxembourg Macao, China Madagascar Malaysia Maldives Mali Malta Mauritius Mexico Monaco Mongolia Morocco Nepal Netherlands New Zealand Nicaragua Niger Nigeria Norway Pacific Pakistan Panama Paraguay Peru Philippines Poland Portugal Puerto Rico Romania Russia Rwanda Scotland Senegal Serbia Sierra Leone Singapore Slovakia South Africa Sri Lanka Suriname Sweden Switzerland Syria Taiwan Thailand Togo Tunisia Turkey Uganda Ukraine United Kingdom United States of America Uruguay Venezuela Vietnam West Indies
Zimbabwe
HOW TO CUSTOMIZE THE MENU Go to Menus in the
main menu. You
should be aware
that before this is
possible, first and
foremost a menu
must be added. If
you have already
created menus they
will be in a top bar
where you can
choose the menu
you want to work on.
Add the pages you want to add (if any are added already, they will show in the middle)
You can take hold of any point and move it. Dragging it slightly to the right, it becomes an item
to the above. Move to the left to make it a separate top menu item. In the event that this does
not appear then go to the previous item in this manual "Create menu" and start from there.
NEW ITEMS IN THE MENU If you need more points, you can add them from the
left side. There are three cases:
Pages: choose between the pages you have
published.
Links: write a path to a location on the network
or a file.
Categories: The menu shows a summary page
with posts in the selected category.
New items will be added at the bottom, so you should
probably move them into place afterwards.
CHANGE THE MENU TITLE
The text on your menu comes from the page title or
category name. However, it is often too long for the
menu. You can change the text by opening point of
the arrow to the right of the item. Write what you want
in the Menu Title.
The title attribute is what emerges when the arrow lies on the menu. You do not have to write
anything here.
You can delete an item by clicking the Remove link at the bottom left.
Once you are happy with the menu, click on the blue button on the right side, Save menu.

Argentina Armenia Australia
Austria Bangladesh
Belgium Benin
Bolivia Botswana
Brazil Bulgaria
Burkina Faso Cambodia Cameroon
Canada Catalonia
Chile Colombia Comoros
Congo Costa Rica
Cote d'lvoire Cyprus
Denmark Dominican Republic
Dutch Caribbean Ecuador
Egypt Estonia Finland France Gabon
Germany Ghana
Greece Guatemala
Guinea Haiti
Honduras Hong Kong, China
Hungary Iceland
India Indonesia
Ireland Italy
Japan Jordan Kenya Korea Latvia
Lebanon Lesotho
Lithuania Luxembourg
Macao, China Madagascar
Malaysia Maldives
Mali Malta
Mauritius Mexico
Monaco Mongolia Morocco
Nepal Netherlands
New Zealand Nicaragua
Niger Nigeria Norway Pacific
Pakistan Panama
Paraguay Peru
Philippines Poland
Portugal Puerto Rico
Romania Russia
Rwanda Scotland Senegal
Serbia Sierra Leone
Singapore Slovakia
South Africa Sri Lanka Suriname
Sweden Switzerland
Syria Taiwan
Thailand Togo
Tunisia Turkey
Uganda Ukraine
United Kingdom United States of America
Uruguay Venezuela
Vietnam West Indies
Zimbabwe
Junior Chamber International Denmark
Page 15 of 36
CREATE NEW USER
To create a new user, select
in the main menu and Add New.
Type the required information in the fields.
You should at least write username, email
address and password.
Be careful with the user name, it must be
used to login. You can only use English
characters and it cannot be changed later.
SIX LEVELS FOR USERS Choose a role that determines how much a user should have access to. There are five levels
to make use of:
Administrator, the highest level: access to edit everything, including other people's user
profiles.
Editor. Can write and publish posts and pages for others.
Author. Can write and publish pages and posts.
Contributor. Can write to the website but not publish
Subscriber. Lowest level. Adds only access to read any closed sections of the site and
edit their own profile.
A user level is not fixed it can be changed by an administrator. For example, if someone else
will write news to the blog.
If the users themselves must create a user profile on the website, you can choose the role
they automatically get from the start. You do this under Settings in the main menu.
Finally, click the Add new user.
Now you come back to user list. From here you can go into the new user profile and possibly
correct several options.
The sixth level is a super admin, as there is only one. In JCI Denmark is the communications
director who owns the super admin account.
Super Admin has
access to more menus
than regular admin
users.
This applies to e.g.:
Establishing sub-sites and assignment of admin rights
Activation of themes
Installation of plug-ins
Upload logo on the underside
Allocation of social links, i.e. the logos directly to Facebook, Twitter, etc. on the front.
Page 16 of 36
Argentina Armenia Australia Austria Bangladesh Belgium Benin Bolivia Botswana Brazil Bulgaria Burkina Faso Cambodia Cameroon Canada Catalonia Chile Colombia Comoros Congo Costa Rica Cote d'lvoire Cyprus Denmark Dominican Republic Dutch Caribbean Ecuador Egypt Estonia Finland France Gabon Germany Ghana Greece Guatemala Guinea Haiti Honduras Hong Kong, China Hungary Iceland India Indonesia Ireland Italy Japan Jordan Kenya Korea Latvia Lebanon Lesotho Lithuania Luxembourg Macao, China Madagascar Malaysia Maldives Mali Malta Mauritius Mexico Monaco Mongolia Morocco Nepal Netherlands New Zealand Nicaragua Niger Nigeria Norway Pacific Pakistan Panama Paraguay Peru Philippines Poland Portugal Puerto Rico Romania Russia Rwanda Scotland Senegal Serbia Sierra Leone Singapore Slovakia South Africa Sri Lanka Suriname Sweden Switzerland Syria Taiwan Thailand Togo Tunisia Turkey Uganda Ukraine United Kingdom United States of America Uruguay Venezuela Vietnam West Indies
Zimbabwe
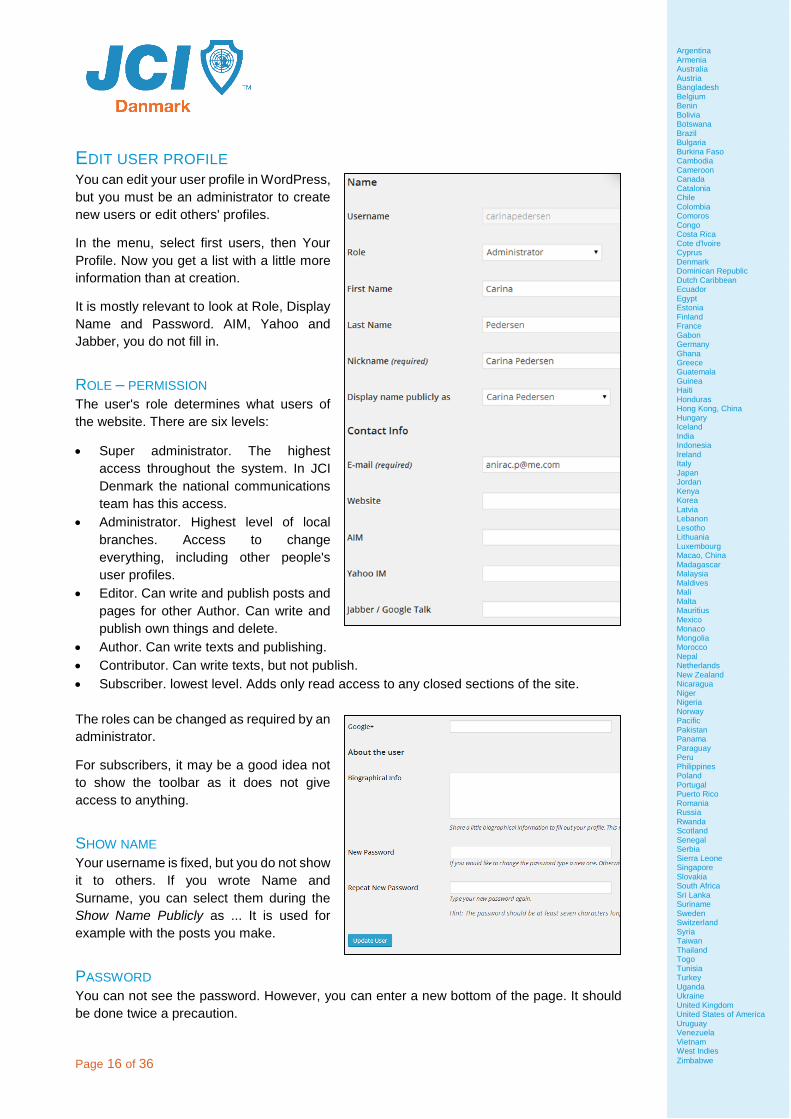
EDIT USER PROFILE You can edit your user profile in WordPress,
but you must be an administrator to create
new users or edit others' profiles.
In the menu, select first users, then Your
Profile. Now you get a list with a little more
information than at creation.
It is mostly relevant to look at Role, Display
Name and Password. AIM, Yahoo and
Jabber, you do not fill in.
ROLE – PERMISSION The user's role determines what users of
the website. There are six levels:
Super administrator. The highest
access throughout the system. In JCI
Denmark the national communications
team has this access.
Administrator. Highest level of local
branches. Access to change
everything, including other people's
user profiles.
Editor. Can write and publish posts and
pages for other Author. Can write and
publish own things and delete.
Author. Can write texts and publishing.
Contributor. Can write texts, but not publish.
Subscriber. lowest level. Adds only read access to any closed sections of the site.
The roles can be changed as required by an
administrator.
For subscribers, it may be a good idea not
to show the toolbar as it does not give
access to anything.
SHOW NAME Your username is fixed, but you do not show
it to others. If you wrote Name and
Surname, you can select them during the
Show Name Publicly as ... It is used for
example with the posts you make.
PASSWORD You can not see the password. However, you can enter a new bottom of the page. It should
be done twice a precaution.

Argentina Armenia Australia
Austria Bangladesh
Belgium Benin
Bolivia Botswana
Brazil Bulgaria
Burkina Faso Cambodia Cameroon
Canada Catalonia
Chile Colombia Comoros
Congo Costa Rica
Cote d'lvoire Cyprus
Denmark Dominican Republic
Dutch Caribbean Ecuador
Egypt Estonia Finland France Gabon
Germany Ghana
Greece Guatemala
Guinea Haiti
Honduras Hong Kong, China
Hungary Iceland
India Indonesia
Ireland Italy
Japan Jordan Kenya Korea Latvia
Lebanon Lesotho
Lithuania Luxembourg
Macao, China Madagascar
Malaysia Maldives
Mali Malta
Mauritius Mexico
Monaco Mongolia Morocco
Nepal Netherlands
New Zealand Nicaragua
Niger Nigeria Norway Pacific
Pakistan Panama
Paraguay Peru
Philippines Poland
Portugal Puerto Rico
Romania Russia
Rwanda Scotland Senegal
Serbia Sierra Leone
Singapore Slovakia
South Africa Sri Lanka Suriname
Sweden Switzerland
Syria Taiwan
Thailand Togo
Tunisia Turkey
Uganda Ukraine
United Kingdom United States of America
Uruguay Venezuela
Vietnam West Indies
Zimbabwe
Junior Chamber International Denmark
Page 17 of 36
WIDGETS
Widgets in WordPress are
plugins that adds visual or
functional properties on your
website. It may be for
example a widget in sidebar,
where you can share your
website.
HOW DO I FIND MY WIDGETS? Click Appearance and Widgets. Once you have clicked your way in, you will be presented with
this photo.
To the left is the box with the available widgets and to the right is the sidebars that are in your
theme.
To add widgets to a sidebar, simply drag Widgets "box" into a sidebar. Be aware that this may
result in the Widget being displayed to your visitors immediately!
HOW DO I GET NEW WIDGETS?
WordPress provides as standard a variety of widgets which are primarily useful for bloggers.
If you are interested in getting new Widgets, you can start by clicking here to go to
WordPress.org. At this writing, there are over 20,000 free plugins available.
Many plugins add new widgets to your website, but themes from WooThemes for example, or
Genesis gives you a number of Widgets that often works better than various free plugins.
For video-tutorial click here:
http://www.nemprogrammering.dk/Tutorials/Wordpress/wordpress_kursus9.php.
PLUGINS A plugin is an absolutely essential part of WordPress, and acts as an extension of the
WordPress original features. E.g. if you want a calendar on your website you via Plugins
arrange this, even though the calendar function is not an executive function in WordPress.
Most plugins are published in English, and therefore it can often be a good idea to search in
English. So many of the popular plugins has gradually translated into languages such as
Danish.
Find plugins in menu . Click activate. . If you need a plugin, contact your Super
Administrator.
Page 18 of 36
Argentina Armenia Australia Austria Bangladesh Belgium Benin Bolivia Botswana Brazil Bulgaria Burkina Faso Cambodia Cameroon Canada Catalonia Chile Colombia Comoros Congo Costa Rica Cote d'lvoire Cyprus Denmark Dominican Republic Dutch Caribbean Ecuador Egypt Estonia Finland France Gabon Germany Ghana Greece Guatemala Guinea Haiti Honduras Hong Kong, China Hungary Iceland India Indonesia Ireland Italy Japan Jordan Kenya Korea Latvia Lebanon Lesotho Lithuania Luxembourg Macao, China Madagascar Malaysia Maldives Mali Malta Mauritius Mexico Monaco Mongolia Morocco Nepal Netherlands New Zealand Nicaragua Niger Nigeria Norway Pacific Pakistan Panama Paraguay Peru Philippines Poland Portugal Puerto Rico Romania Russia Rwanda Scotland Senegal Serbia Sierra Leone Singapore Slovakia South Africa Sri Lanka Suriname Sweden Switzerland Syria Taiwan Thailand Togo Tunisia Turkey Uganda Ukraine United Kingdom United States of America Uruguay Venezuela Vietnam West Indies
Zimbabwe
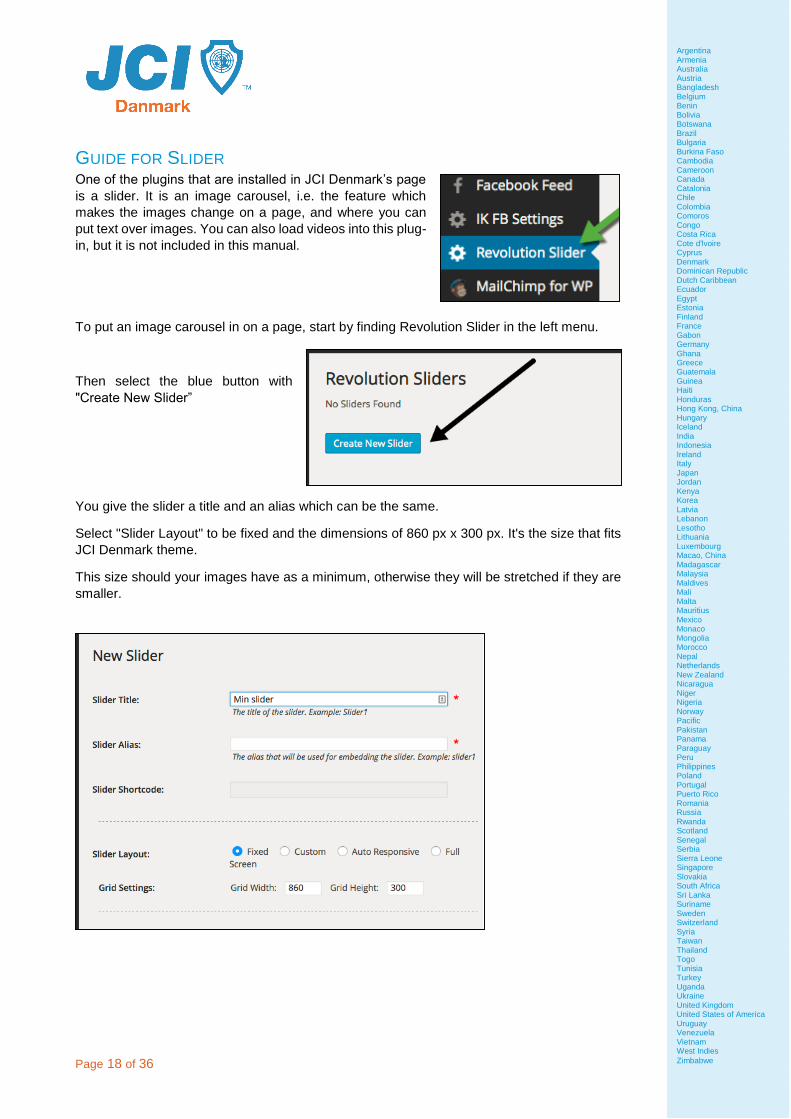
GUIDE FOR SLIDER One of the plugins that are installed in JCI Denmark’s page
is a slider. It is an image carousel, i.e. the feature which
makes the images change on a page, and where you can
put text over images. You can also load videos into this plug-
in, but it is not included in this manual.
To put an image carousel in on a page, start by finding Revolution Slider in the left menu.
Then select the blue button with
"Create New Slider”
You give the slider a title and an alias which can be the same.
Select "Slider Layout" to be fixed and the dimensions of 860 px x 300 px. It's the size that fits
JCI Denmark theme.
This size should your images have as a minimum, otherwise they will be stretched if they are
smaller.

Argentina Armenia Australia
Austria Bangladesh
Belgium Benin
Bolivia Botswana
Brazil Bulgaria
Burkina Faso Cambodia Cameroon
Canada Catalonia
Chile Colombia Comoros
Congo Costa Rica
Cote d'lvoire Cyprus
Denmark Dominican Republic
Dutch Caribbean Ecuador
Egypt Estonia Finland France Gabon
Germany Ghana
Greece Guatemala
Guinea Haiti
Honduras Hong Kong, China
Hungary Iceland
India Indonesia
Ireland Italy
Japan Jordan Kenya Korea Latvia
Lebanon Lesotho
Lithuania Luxembourg
Macao, China Madagascar
Malaysia Maldives
Mali Malta
Mauritius Mexico
Monaco Mongolia Morocco
Nepal Netherlands
New Zealand Nicaragua
Niger Nigeria Norway Pacific
Pakistan Panama
Paraguay Peru
Philippines Poland
Portugal Puerto Rico
Romania Russia
Rwanda Scotland Senegal
Serbia Sierra Leone
Singapore Slovakia
South Africa Sri Lanka Suriname
Sweden Switzerland
Syria Taiwan
Thailand Togo
Tunisia Turkey
Uganda Ukraine
United Kingdom United States of America
Uruguay Venezuela
Vietnam West Indies
Zimbabwe
Junior Chamber International Denmark
Page 19 of 36
Press the "Create Slider" again when you've finished
editing.
Find this short code and copy it, it states that you used as an alias.
This code must be inserted into the page
where you want the slider.
In order to get some pictures into the slider,
press the "Edit Slides”.
Then click "New Slide" and here you have
the option to either upload an image or find
one in your media library.
If you want some text over the image, press
the "Add Layer" and from here you can so
even play around with the possibilities of placement, font color, etc.

Page 20 of 36
Argentina Armenia Australia Austria Bangladesh Belgium Benin Bolivia Botswana Brazil Bulgaria Burkina Faso Cambodia Cameroon Canada Catalonia Chile Colombia Comoros Congo Costa Rica Cote d'lvoire Cyprus Denmark Dominican Republic Dutch Caribbean Ecuador Egypt Estonia Finland France Gabon Germany Ghana Greece Guatemala Guinea Haiti Honduras Hong Kong, China Hungary Iceland India Indonesia Ireland Italy Japan Jordan Kenya Korea Latvia Lebanon Lesotho Lithuania Luxembourg Macao, China Madagascar Malaysia Maldives Mali Malta Mauritius Mexico Monaco Mongolia Morocco Nepal Netherlands New Zealand Nicaragua Niger Nigeria Norway Pacific Pakistan Panama Paraguay Peru Philippines Poland Portugal Puerto Rico Romania Russia Rwanda Scotland Senegal Serbia Sierra Leone Singapore Slovakia South Africa Sri Lanka Suriname Sweden Switzerland Syria Taiwan Thailand Togo Tunisia Turkey Uganda Ukraine United Kingdom United States of America Uruguay Venezuela Vietnam West Indies
Zimbabwe
Background: Facebook is the most used social media in Denmark – almost 50 % of the
population has a Facebook profile! This means that Facebook is also the preferred social
media for LOM’s in Denmark.
Over the years, the usage of Facebook has become very fragmented, meaning that it’s tricky
for JCI members to understand that’s going on in other chapters or regions, and it’s especially
difficult for external stakeholders to get a grasp on what JCI’s various LOMs have to offer.
Solution: By setting up simple guidelines for the usage of Facebook pages and groups, AND
providing good national examples, alongside with a high level of service and short response
times from the national communications team, we have managed to get a third of the LOMs
to improve their Facebook presence.
These are the guidelines:
Use pages for external commination and interaction with stakeholders
Addresses of pages should be www.facebook.com/jci/yourname
Pages can be added as co-hosts in event, thus you can list all local organisations’ events
on your national page, if the nationale page is added as a co-host.
Pages:
o Use the official JCI logo for respective NOM or LOM in 180 by 180 pixels as profile
photo
o Use an “active” photo of the chapter/NOM in a good resolution for the cover photo.
Alternatively, you can use the images available on www.jci.cc
o Should promote the activities which we want to shape the understanding of JCI
externally
Use groups for internal communication with JCI members
o Individual groups for LOM’s, managed by local boards
o Individual groups for regions, managed by regional presidents
o National group for Local Presidents and national board for easy communication,
managed by Local Leaders Training Manager

Argentina Armenia Australia
Austria Bangladesh
Belgium Benin
Bolivia Botswana
Brazil Bulgaria
Burkina Faso Cambodia Cameroon
Canada Catalonia
Chile Colombia Comoros
Congo Costa Rica
Cote d'lvoire Cyprus
Denmark Dominican Republic
Dutch Caribbean Ecuador
Egypt Estonia Finland France Gabon
Germany Ghana
Greece Guatemala
Guinea Haiti
Honduras Hong Kong, China
Hungary Iceland
India Indonesia
Ireland Italy
Japan Jordan Kenya Korea Latvia
Lebanon Lesotho
Lithuania Luxembourg
Macao, China Madagascar
Malaysia Maldives
Mali Malta
Mauritius Mexico
Monaco Mongolia Morocco
Nepal Netherlands
New Zealand Nicaragua
Niger Nigeria Norway Pacific
Pakistan Panama
Paraguay Peru
Philippines Poland
Portugal Puerto Rico
Romania Russia
Rwanda Scotland Senegal
Serbia Sierra Leone
Singapore Slovakia
South Africa Sri Lanka Suriname
Sweden Switzerland
Syria Taiwan
Thailand Togo
Tunisia Turkey
Uganda Ukraine
United Kingdom United States of America
Uruguay Venezuela
Vietnam West Indies
Zimbabwe
Junior Chamber International Denmark
Page 21 of 36
The symbol ‘#’ (called hashtags) is used to channel tweets into feeds, sorted by the
hashtag.
We propose to define a range of # in the beginning of the year, related to the national
goals and activities. The examples below refer to national projects, yearly slogan and
national congresses: #jcidoitright, #jcifk2014, #jcink2014, #jcidagen, #jciibevægelse
Promote the # to your members, so they can use them in their social activity during the
year, and contribute to the news on Twitter
Instruct members to include your account in their tweets, if the tweets should be included
in the national twitter account/news feed.
Example: @jcidanmark

Page 22 of 36
Argentina Armenia Australia Austria Bangladesh Belgium Benin Bolivia Botswana Brazil Bulgaria Burkina Faso Cambodia Cameroon Canada Catalonia Chile Colombia Comoros Congo Costa Rica Cote d'lvoire Cyprus Denmark Dominican Republic Dutch Caribbean Ecuador Egypt Estonia Finland France Gabon Germany Ghana Greece Guatemala Guinea Haiti Honduras Hong Kong, China Hungary Iceland India Indonesia Ireland Italy Japan Jordan Kenya Korea Latvia Lebanon Lesotho Lithuania Luxembourg Macao, China Madagascar Malaysia Maldives Mali Malta Mauritius Mexico Monaco Mongolia Morocco Nepal Netherlands New Zealand Nicaragua Niger Nigeria Norway Pacific Pakistan Panama Paraguay Peru Philippines Poland Portugal Puerto Rico Romania Russia Rwanda Scotland Senegal Serbia Sierra Leone Singapore Slovakia South Africa Sri Lanka Suriname Sweden Switzerland Syria Taiwan Thailand Togo Tunisia Turkey Uganda Ukraine United Kingdom United States of America Uruguay Venezuela Vietnam West Indies
Zimbabwe
MAILCHIMP
WHAT IS MAILCHIMP? MailChimp is one of the leading suppliers of newsletter tools.
There are plenty of opportunities to
create recipient lists, registration
modules and templates for your
newsletters, even if you settle for a
free subscription.
MailChimp is free of charge unless
you send many campaigns and to
many recipients. Thus, it is free to
use MailChimp up to 2000 pieces
per. month. A few tools are also
available solely to payment accounts, but again more aimed at high-volume users.
You can also give more people access to the account, and thus it is very flexible in an
organization like JCI, where we change roles all the time: You can easily work on the previous
year's work, because you can see all the old newsletters and recipient lists. See more in the
section "Entering Information".
SETTING UP MAILCHIMP ACCOUNT Go to www.mailchimp.com and click "Sign Up Free"
Select the e-mail address, username
and password. Please note that the
selected password must be
approved before you can set up the
account (see all the requirements for
the password during field)
Example of password:

Argentina Armenia Australia
Austria Bangladesh
Belgium Benin
Bolivia Botswana
Brazil Bulgaria
Burkina Faso Cambodia Cameroon
Canada Catalonia
Chile Colombia Comoros
Congo Costa Rica
Cote d'lvoire Cyprus
Denmark Dominican Republic
Dutch Caribbean Ecuador
Egypt Estonia Finland France Gabon
Germany Ghana
Greece Guatemala
Guinea Haiti
Honduras Hong Kong, China
Hungary Iceland
India Indonesia
Ireland Italy
Japan Jordan Kenya Korea Latvia
Lebanon Lesotho
Lithuania Luxembourg
Macao, China Madagascar
Malaysia Maldives
Mali Malta
Mauritius Mexico
Monaco Mongolia Morocco
Nepal Netherlands
New Zealand Nicaragua
Niger Nigeria Norway Pacific
Pakistan Panama
Paraguay Peru
Philippines Poland
Portugal Puerto Rico
Romania Russia
Rwanda Scotland Senegal
Serbia Sierra Leone
Singapore Slovakia
South Africa Sri Lanka Suriname
Sweden Switzerland
Syria Taiwan
Thailand Togo
Tunisia Turkey
Uganda Ukraine
United Kingdom United States of America
Uruguay Venezuela
Vietnam West Indies
Zimbabwe
Junior Chamber International Denmark
Page 23 of 36
Then click "Create my account"
You will receive an activation email,
which you need to open to verify your
email address.
Go to your inbox and find the email
from MailChimp. It could possibly
end up in spam, so look here if it has
not appeared within a few minutes.
Click the "Activate Account".
Then you need to verify that you are
human by typing a code on the login
page. Note that there is usually only
one number, even though it says that
you must enter two numbers.

Page 24 of 36
Argentina Armenia Australia Austria Bangladesh Belgium Benin Bolivia Botswana Brazil Bulgaria Burkina Faso Cambodia Cameroon Canada Catalonia Chile Colombia Comoros Congo Costa Rica Cote d'lvoire Cyprus Denmark Dominican Republic Dutch Caribbean Ecuador Egypt Estonia Finland France Gabon Germany Ghana Greece Guatemala Guinea Haiti Honduras Hong Kong, China Hungary Iceland India Indonesia Ireland Italy Japan Jordan Kenya Korea Latvia Lebanon Lesotho Lithuania Luxembourg Macao, China Madagascar Malaysia Maldives Mali Malta Mauritius Mexico Monaco Mongolia Morocco Nepal Netherlands New Zealand Nicaragua Niger Nigeria Norway Pacific Pakistan Panama Paraguay Peru Philippines Poland Portugal Puerto Rico Romania Russia Rwanda Scotland Senegal Serbia Sierra Leone Singapore Slovakia South Africa Sri Lanka Suriname Sweden Switzerland Syria Taiwan Thailand Togo Tunisia Turkey Uganda Ukraine United Kingdom United States of America Uruguay Venezuela Vietnam West Indies
Zimbabwe
ENTERING INFORMATION Entering personal information is used, among other
things to write the sender information in your emails.
Entering organizational information is primarily used
for statistics for MailChimp. Here I have chosen to
use an imaginary local organization as an example.
My starting point is JCI Andeby.
Choose the number of people in your
organization -> number of paying members
(juniors, seniors, senators)
Choose the age of organization -> how long have
you been around?
Do you have a list of email addresses that you
can import into the list of recipients of your
newsletter? Probably yes, since we have a
section of members.
Do you work for another organization or client?
Probably no.
Industry type: JCI is a ”Non-Profit organisation”
Choose your timezone (it’s ”Central European” in
Danmark)
Upload to a photo of yourself to make it easier to
distinguish between profiles if more people have
access to the account.
Finish with "Save and Get Started". You will now
be prompted to log in again.

Argentina Armenia Australia
Austria Bangladesh
Belgium Benin
Bolivia Botswana
Brazil Bulgaria
Burkina Faso Cambodia Cameroon
Canada Catalonia
Chile Colombia Comoros
Congo Costa Rica
Cote d'lvoire Cyprus
Denmark Dominican Republic
Dutch Caribbean Ecuador
Egypt Estonia Finland France Gabon
Germany Ghana
Greece Guatemala
Guinea Haiti
Honduras Hong Kong, China
Hungary Iceland
India Indonesia
Ireland Italy
Japan Jordan Kenya Korea Latvia
Lebanon Lesotho
Lithuania Luxembourg
Macao, China Madagascar
Malaysia Maldives
Mali Malta
Mauritius Mexico
Monaco Mongolia Morocco
Nepal Netherlands
New Zealand Nicaragua
Niger Nigeria Norway Pacific
Pakistan Panama
Paraguay Peru
Philippines Poland
Portugal Puerto Rico
Romania Russia
Rwanda Scotland Senegal
Serbia Sierra Leone
Singapore Slovakia
South Africa Sri Lanka Suriname
Sweden Switzerland
Syria Taiwan
Thailand Togo
Tunisia Turkey
Uganda Ukraine
United Kingdom United States of America
Uruguay Venezuela
Vietnam West Indies
Zimbabwe
Junior Chamber International Denmark
Page 25 of 36
You can give more people
access to use your MailChimp
account under Accounts /
Account settings / User details.
Here you can click on “Invite a
user”, and thus add more
editors.

Page 26 of 36
Argentina Armenia Australia Austria Bangladesh Belgium Benin Bolivia Botswana Brazil Bulgaria Burkina Faso Cambodia Cameroon Canada Catalonia Chile Colombia Comoros Congo Costa Rica Cote d'lvoire Cyprus Denmark Dominican Republic Dutch Caribbean Ecuador Egypt Estonia Finland France Gabon Germany Ghana Greece Guatemala Guinea Haiti Honduras Hong Kong, China Hungary Iceland India Indonesia Ireland Italy Japan Jordan Kenya Korea Latvia Lebanon Lesotho Lithuania Luxembourg Macao, China Madagascar Malaysia Maldives Mali Malta Mauritius Mexico Monaco Mongolia Morocco Nepal Netherlands New Zealand Nicaragua Niger Nigeria Norway Pacific Pakistan Panama Paraguay Peru Philippines Poland Portugal Puerto Rico Romania Russia Rwanda Scotland Senegal Serbia Sierra Leone Singapore Slovakia South Africa Sri Lanka Suriname Sweden Switzerland Syria Taiwan Thailand Togo Tunisia Turkey Uganda Ukraine United Kingdom United States of America Uruguay Venezuela Vietnam West Indies
Zimbabwe
STARTING UP... The first time you log on MailChimp suggests 3
functions that are good to start with:
1. Import of email addresses
2. Make your first campaign, i.e. newsletter
and distribution of the
3. Build an audience, i.e. registration forms,
and integration with, for example a website
or Facebook page.
We’ll take it one thing at a time
IMPORTING EMAIL ADDRESSES
Before you start putting receivers into your list,
it is important that you think about who you
want to add. I made a mistake at first calling it
JCI Andeby members, and later it dawned on
me that I really wanted to share the newsletter
with both internal and external recipients.
Therefore I have made a completely
comprehensive list, which is for ALL interested
in my organization, which I can then create sub-
groupings and then I can send campaigns to a
part of my receivers, such as my local
members.
This I have described in the name of the list,
"Interested in JCI Duckburg", and also in the
text that accompanies when recipients get an
email that they have been added to the list, see "Remind people how ...".
Last part of the page is called "Notifications", and here I would suggest that you start to turn
as many notifications as possible to the beginning. You can always downgrade to "Daily
Summary" in your personal settings (see section "Settings").

Argentina Armenia Australia
Austria Bangladesh
Belgium Benin
Bolivia Botswana
Brazil Bulgaria
Burkina Faso Cambodia Cameroon
Canada Catalonia
Chile Colombia Comoros
Congo Costa Rica
Cote d'lvoire Cyprus
Denmark Dominican Republic
Dutch Caribbean Ecuador
Egypt Estonia Finland France Gabon
Germany Ghana
Greece Guatemala
Guinea Haiti
Honduras Hong Kong, China
Hungary Iceland
India Indonesia
Ireland Italy
Japan Jordan Kenya Korea Latvia
Lebanon Lesotho
Lithuania Luxembourg
Macao, China Madagascar
Malaysia Maldives
Mali Malta
Mauritius Mexico
Monaco Mongolia Morocco
Nepal Netherlands
New Zealand Nicaragua
Niger Nigeria Norway Pacific
Pakistan Panama
Paraguay Peru
Philippines Poland
Portugal Puerto Rico
Romania Russia
Rwanda Scotland Senegal
Serbia Sierra Leone
Singapore Slovakia
South Africa Sri Lanka Suriname
Sweden Switzerland
Syria Taiwan
Thailand Togo
Tunisia Turkey
Uganda Ukraine
United Kingdom United States of America
Uruguay Venezuela
Vietnam West Indies
Zimbabwe
Junior Chamber International Denmark
Page 27 of 36
Finish by clicking "Create List And Go To Import".
This will take you to the page where you can import email addresses. You can from several
different file formats or applications to help you.
For example if you have your mail addresses stored in a spreadsheet, you can choose "Copy
Paste from Excel" and if they're on Google Drive you can also download them from there.
Note that MailChimp later allows you to sort the information, but one important thing is to first
names and last names must be separated into two columns or fields. It gives the best results
for making campaigns personal.
Here's an example via
import from spreadsheets
The blue box with the
disclaimer is a reminder that
you can only import contacts
that have given you
permission to add them your
list. This could be your
members in the local
organization who have
agreed to receive
information from you when
they first registered.

Page 28 of 36
Argentina Armenia Australia Austria Bangladesh Belgium Benin Bolivia Botswana Brazil Bulgaria Burkina Faso Cambodia Cameroon Canada Catalonia Chile Colombia Comoros Congo Costa Rica Cote d'lvoire Cyprus Denmark Dominican Republic Dutch Caribbean Ecuador Egypt Estonia Finland France Gabon Germany Ghana Greece Guatemala Guinea Haiti Honduras Hong Kong, China Hungary Iceland India Indonesia Ireland Italy Japan Jordan Kenya Korea Latvia Lebanon Lesotho Lithuania Luxembourg Macao, China Madagascar Malaysia Maldives Mali Malta Mauritius Mexico Monaco Mongolia Morocco Nepal Netherlands New Zealand Nicaragua Niger Nigeria Norway Pacific Pakistan Panama Paraguay Peru Philippines Poland Portugal Puerto Rico Romania Russia Rwanda Scotland Senegal Serbia Sierra Leone Singapore Slovakia South Africa Sri Lanka Suriname Sweden Switzerland Syria Taiwan Thailand Togo Tunisia Turkey Uganda Ukraine United Kingdom United States of America Uruguay Venezuela Vietnam West Indies
Zimbabwe
Click "Copy Paste From Excel"
Go into your spreadsheet and select the appropriate cells
Copy the cells in your clipboard (Ctrl + C)
Put them into the box in MailChimp (Ctrl + V) and click "Import List"
Now you need to match the information with the correct field names, so MailChimp in
control of what information is first name, last name, email address, etc.
If you have more information in your spreadsheet must also be matched or skipped.

Argentina Armenia Australia
Austria Bangladesh
Belgium Benin
Bolivia Botswana
Brazil Bulgaria
Burkina Faso Cambodia Cameroon
Canada Catalonia
Chile Colombia Comoros
Congo Costa Rica
Cote d'lvoire Cyprus
Denmark Dominican Republic
Dutch Caribbean Ecuador
Egypt Estonia Finland France Gabon
Germany Ghana
Greece Guatemala
Guinea Haiti
Honduras Hong Kong, China
Hungary Iceland
India Indonesia
Ireland Italy
Japan Jordan Kenya Korea Latvia
Lebanon Lesotho
Lithuania Luxembourg
Macao, China Madagascar
Malaysia Maldives
Mali Malta
Mauritius Mexico
Monaco Mongolia Morocco
Nepal Netherlands
New Zealand Nicaragua
Niger Nigeria Norway Pacific
Pakistan Panama
Paraguay Peru
Philippines Poland
Portugal Puerto Rico
Romania Russia
Rwanda Scotland Senegal
Serbia Sierra Leone
Singapore Slovakia
South Africa Sri Lanka Suriname
Sweden Switzerland
Syria Taiwan
Thailand Togo
Tunisia Turkey
Uganda Ukraine
United Kingdom United States of America
Uruguay Venezuela
Vietnam West Indies
Zimbabwe
Junior Chamber International Denmark
Page 29 of 36
In this example, select "First Name" the first column, "Last Name" in the last column and "Email
Address" at the end. Click "Save" after each election.
Once you have matched all the information message "Hooray ..."
Finish by clicking "Complete Import"
Once you have completed the import of the list you will see a pop-up message on how to apply
in your list of recipients. This information is really smart when you start getting multiple
recipients.
Note that you are now working in "Lists".
You can always come back to this area, if you later need to add more recipients or edit
information on existing users.

Page 30 of 36
Argentina Armenia Australia Austria Bangladesh Belgium Benin Bolivia Botswana Brazil Bulgaria Burkina Faso Cambodia Cameroon Canada Catalonia Chile Colombia Comoros Congo Costa Rica Cote d'lvoire Cyprus Denmark Dominican Republic Dutch Caribbean Ecuador Egypt Estonia Finland France Gabon Germany Ghana Greece Guatemala Guinea Haiti Honduras Hong Kong, China Hungary Iceland India Indonesia Ireland Italy Japan Jordan Kenya Korea Latvia Lebanon Lesotho Lithuania Luxembourg Macao, China Madagascar Malaysia Maldives Mali Malta Mauritius Mexico Monaco Mongolia Morocco Nepal Netherlands New Zealand Nicaragua Niger Nigeria Norway Pacific Pakistan Panama Paraguay Peru Philippines Poland Portugal Puerto Rico Romania Russia Rwanda Scotland Senegal Serbia Sierra Leone Singapore Slovakia South Africa Sri Lanka Suriname Sweden Switzerland Syria Taiwan Thailand Togo Tunisia Turkey Uganda Ukraine United Kingdom United States of America Uruguay Venezuela Vietnam West Indies
Zimbabwe
THE FIRST CAMPAIGN
After you import your recipients click on the Monkey-icon to return to the main menu. Here you
will see that you have completed step 1 as the "Import Lists" is crossed out.
Click "Create Campaign" to embark on your first newsletter. Note that a newsletter is called a
campaign in MailChimp.
Note: You can always find your way back to your newsletters, both published and drafts, by
clicking on "Campaigns ".
Tip: You can reuse an already deployed campaign as a draft for the next newsletters. The
instruction can be found in “insert link to Replicate campaign”.
RECIPIENTS
The first step is to choose who should receive the newsletter – should everyone on your list
receive it or just a small select group? At this point you should select all, but when you begin
to segment your recipients can use the other features.
Click "Next" to proceed
SETUP

Argentina Armenia Australia
Austria Bangladesh
Belgium Benin
Bolivia Botswana
Brazil Bulgaria
Burkina Faso Cambodia Cameroon
Canada Catalonia
Chile Colombia Comoros
Congo Costa Rica
Cote d'lvoire Cyprus
Denmark Dominican Republic
Dutch Caribbean Ecuador
Egypt Estonia Finland France Gabon
Germany Ghana
Greece Guatemala
Guinea Haiti
Honduras Hong Kong, China
Hungary Iceland
India Indonesia
Ireland Italy
Japan Jordan Kenya Korea Latvia
Lebanon Lesotho
Lithuania Luxembourg
Macao, China Madagascar
Malaysia Maldives
Mali Malta
Mauritius Mexico
Monaco Mongolia Morocco
Nepal Netherlands
New Zealand Nicaragua
Niger Nigeria Norway Pacific
Pakistan Panama
Paraguay Peru
Philippines Poland
Portugal Puerto Rico
Romania Russia
Rwanda Scotland Senegal
Serbia Sierra Leone
Singapore Slovakia
South Africa Sri Lanka Suriname
Sweden Switzerland
Syria Taiwan
Thailand Togo
Tunisia Turkey
Uganda Ukraine
United Kingdom United States of America
Uruguay Venezuela
Vietnam West Indies
Zimbabwe
Junior Chamber International Denmark
Page 31 of 36
When you start to fill out
information about your
campaign, consider the
following:
”Name your Campaign”
What should I call the
campaign, so my co-editors
can understand what it is
about?
”Email subject”
What shall I call the campaign so the recipients will want to open it?
”From Name”
Who will be the sender? Your organization's name or your personal name? It is up to you
to decide from campaign to campaign.
Personalise the ”To” field
Should the message be personalized? This can be done by inserting the recipient's first
name, as suggested here by MailChimp
Before you proceed, make sure to get verified your email address - click on ”verify this
domain”.
This opens a popup window
where you click "Send
Verification Email" - leave the
popup box open. Open a new
browser and go to your email
inbox, where you can click on the
big "Verify ..." button and copy
the little code into the pop-up
box.
Finish with "Verify me”.
We skip the section on "Tracking"
while "Social Media" is important.
Here you can connect to your
local or national organization’s
Facebook or Twitter accounts.
If you connect with the social media, be sure to write an exciting text for your mail update. On
Twitter, it is important with the right # (hashtags), but Facebook requires a more genuine text.
See an example here of how the same newsletter is presented in two ways in Facebook and
Twitter.
2: Example of how the same campaign is presented at
Facebook and Twitter respectively

Page 32 of 36
Argentina Armenia Australia Austria Bangladesh Belgium Benin Bolivia Botswana Brazil Bulgaria Burkina Faso Cambodia Cameroon Canada Catalonia Chile Colombia Comoros Congo Costa Rica Cote d'lvoire Cyprus Denmark Dominican Republic Dutch Caribbean Ecuador Egypt Estonia Finland France Gabon Germany Ghana Greece Guatemala Guinea Haiti Honduras Hong Kong, China Hungary Iceland India Indonesia Ireland Italy Japan Jordan Kenya Korea Latvia Lebanon Lesotho Lithuania Luxembourg Macao, China Madagascar Malaysia Maldives Mali Malta Mauritius Mexico Monaco Mongolia Morocco Nepal Netherlands New Zealand Nicaragua Niger Nigeria Norway Pacific Pakistan Panama Paraguay Peru Philippines Poland Portugal Puerto Rico Romania Russia Rwanda Scotland Senegal Serbia Sierra Leone Singapore Slovakia South Africa Sri Lanka Suriname Sweden Switzerland Syria Taiwan Thailand Togo Tunisia Turkey Uganda Ukraine United Kingdom United States of America Uruguay Venezuela Vietnam West Indies
Zimbabwe
TEMPLATE
The first campaign will take
significantly longer than the
following campaigns because
everything has to be setup for the
first time. Therefore, do not be put
off by the fact that it may take a
few hours to put the first
newsletter together. Time is
running particularly fast if you are
so detailed that it could be used
as a template for future e-mails -
but it is time well spent!
Since many people today read mails on their phones, it is important to choose a template that
does not require too much width. Most are comfortable with scrolling down the cell phone while
it quickly becomes annoying to have to scroll sideways.
In JCI Denmark, we have used the template "Right Sidebar - drag and drop" for many years
and we base this manual on this - click "Select”.
DESIGN
Once a template is
selected, there are a lot of
predefined fields, which are
mandatory fields. You need
to complete this - it is
simply done by clicking on
the box, and then edit in the
editing window on the right
side. In this example I am
editing the "Designing Your
E-mail" field.
Note that there are three
different tabs, which you can edit by "Content", "Style" and "Settings".
In addition, you can drag as many fields into the newsletter that you need. You can watch a
video on how to do right here or on this link:
http://kb.mailchimp.com/campaigns/design/design-a-campaign-in-mailchimp
I would suggest that you start to correct the things that are standard and rarely changes. E.g
the top picture, text in the sidebar to the right and the small text at the top.
Once this is done, you can save the campaign as a template, click the "Save As Template" at
the top of the page.

Argentina Armenia Australia
Austria Bangladesh
Belgium Benin
Bolivia Botswana
Brazil Bulgaria
Burkina Faso Cambodia Cameroon
Canada Catalonia
Chile Colombia Comoros
Congo Costa Rica
Cote d'lvoire Cyprus
Denmark Dominican Republic
Dutch Caribbean Ecuador
Egypt Estonia Finland France Gabon
Germany Ghana
Greece Guatemala
Guinea Haiti
Honduras Hong Kong, China
Hungary Iceland
India Indonesia
Ireland Italy
Japan Jordan Kenya Korea Latvia
Lebanon Lesotho
Lithuania Luxembourg
Macao, China Madagascar
Malaysia Maldives
Mali Malta
Mauritius Mexico
Monaco Mongolia Morocco
Nepal Netherlands
New Zealand Nicaragua
Niger Nigeria Norway Pacific
Pakistan Panama
Paraguay Peru
Philippines Poland
Portugal Puerto Rico
Romania Russia
Rwanda Scotland Senegal
Serbia Sierra Leone
Singapore Slovakia
South Africa Sri Lanka Suriname
Sweden Switzerland
Syria Taiwan
Thailand Togo
Tunisia Turkey
Uganda Ukraine
United Kingdom United States of America
Uruguay Venezuela
Vietnam West Indies
Zimbabwe
Junior Chamber International Denmark
Page 33 of 36
Now you can begin to
add the specific
content of the
newsletter including
adding more boxes for
content.
Photos are essential,
and can be uploaded
from your PC or
insertet via URLs. You
can watch a video on
the subject at this link:
http://kb.mailchimp.com/campaigns/image-videos-files/upload-and-edit-images-in-campaigns
Another important thing in your newsletters is social media. Be sure to make it easy for your
recipients to visit you in your social media and also share things on social media. There are
two blocks of content specific to it among the 'content blocks'.
When you are about to finish, you can see an example by clicking 'Preview' at the top. There's
a preview shown here:
In addition to the existing fields I have added ...
'Social Follow' box with links to Facebook, Twitter and website
A text box below the introduction
Two 'Dividers' over / under the new textbox to highlight it
'Social Share' box (bottom)
When you are finished with your newsletter, it's a good idea to send a test e-mail, so you can
check the setup and links etc. works. This is done by opening the 'Preview And Test' \ 'Send
a test email'.

Page 34 of 36
Argentina Armenia Australia Austria Bangladesh Belgium Benin Bolivia Botswana Brazil Bulgaria Burkina Faso Cambodia Cameroon Canada Catalonia Chile Colombia Comoros Congo Costa Rica Cote d'lvoire Cyprus Denmark Dominican Republic Dutch Caribbean Ecuador Egypt Estonia Finland France Gabon Germany Ghana Greece Guatemala Guinea Haiti Honduras Hong Kong, China Hungary Iceland India Indonesia Ireland Italy Japan Jordan Kenya Korea Latvia Lebanon Lesotho Lithuania Luxembourg Macao, China Madagascar Malaysia Maldives Mali Malta Mauritius Mexico Monaco Mongolia Morocco Nepal Netherlands New Zealand Nicaragua Niger Nigeria Norway Pacific Pakistan Panama Paraguay Peru Philippines Poland Portugal Puerto Rico Romania Russia Rwanda Scotland Senegal Serbia Sierra Leone Singapore Slovakia South Africa Sri Lanka Suriname Sweden Switzerland Syria Taiwan Thailand Togo Tunisia Turkey Uganda Ukraine United Kingdom United States of America Uruguay Venezuela Vietnam West Indies
Zimbabwe
CONFIRM
Once you have tested your mail, you must send it. In the 'Confirm' section MailChimp checks
out a whole range of things for you, so you have the maximum chance of getting through to
your receiver.
One of the key elements is Social Cards, which allows you to select an image for when the
promotion will be posted on Facebook or Twitter. Click the "Resolve" to select an image and
add a little text.
Once done, you are completely ready for broadcast.
You can choose to send the campaign immediately
or schedule the broadcast, for example, the next
day. This is done by clicking ’Schedule’.
REMEMBER: Check your time zone when you
select the date and whether it is AM or PM time!
Send via schedule
Send immediately

Argentina Armenia Australia
Austria Bangladesh
Belgium Benin
Bolivia Botswana
Brazil Bulgaria
Burkina Faso Cambodia Cameroon
Canada Catalonia
Chile Colombia Comoros
Congo Costa Rica
Cote d'lvoire Cyprus
Denmark Dominican Republic
Dutch Caribbean Ecuador
Egypt Estonia Finland France Gabon
Germany Ghana
Greece Guatemala
Guinea Haiti
Honduras Hong Kong, China
Hungary Iceland
India Indonesia
Ireland Italy
Japan Jordan Kenya Korea Latvia
Lebanon Lesotho
Lithuania Luxembourg
Macao, China Madagascar
Malaysia Maldives
Mali Malta
Mauritius Mexico
Monaco Mongolia Morocco
Nepal Netherlands
New Zealand Nicaragua
Niger Nigeria Norway Pacific
Pakistan Panama
Paraguay Peru
Philippines Poland
Portugal Puerto Rico
Romania Russia
Rwanda Scotland Senegal
Serbia Sierra Leone
Singapore Slovakia
South Africa Sri Lanka Suriname
Sweden Switzerland
Syria Taiwan
Thailand Togo
Tunisia Turkey
Uganda Ukraine
United Kingdom United States of America
Uruguay Venezuela
Vietnam West Indies
Zimbabwe
Junior Chamber International Denmark
Page 35 of 36
LinkedIn is a strong platform globally. In order to ensure the ownership and governance on
LinkedIn, it’s important to create a company page and link it to your official web domain.
Example: JCI Denmark on LinkedIn is linked to www.jci.dk, meaning that only LinkedIn
members with an [email protected] email address can appear as employees on the page and become
administrators. This is really practical in an organization like JCI, where the positions change
very often.
An additional feature for the company pages is the ability to present them in multiple
languages, reusing images, domains etc.
ISSUU
All national publications are made available on the online platform Issuu. This makes it easy
to share, members can subscribe to it and it’s easy to google documents.
In JCI Denmark, we have published plans of action, quarterly report, job descriptions for the
national positions and much more. Feel free to get inspired at www.issuu.com/jcidanmark - it’s
easy to get started!

Page 36 of 36
Argentina Armenia Australia Austria Bangladesh Belgium Benin Bolivia Botswana Brazil Bulgaria Burkina Faso Cambodia Cameroon Canada Catalonia Chile Colombia Comoros Congo Costa Rica Cote d'lvoire Cyprus Denmark Dominican Republic Dutch Caribbean Ecuador Egypt Estonia Finland France Gabon Germany Ghana Greece Guatemala Guinea Haiti Honduras Hong Kong, China Hungary Iceland India Indonesia Ireland Italy Japan Jordan Kenya Korea Latvia Lebanon Lesotho Lithuania Luxembourg Macao, China Madagascar Malaysia Maldives Mali Malta Mauritius Mexico Monaco Mongolia Morocco Nepal Netherlands New Zealand Nicaragua Niger Nigeria Norway Pacific Pakistan Panama Paraguay Peru Philippines Poland Portugal Puerto Rico Romania Russia Rwanda Scotland Senegal Serbia Sierra Leone Singapore Slovakia South Africa Sri Lanka Suriname Sweden Switzerland Syria Taiwan Thailand Togo Tunisia Turkey Uganda Ukraine United Kingdom United States of America Uruguay Venezuela Vietnam West Indies
Zimbabwe
YOUTUBE
To ensure that only relevant and correct videos are distributed under the JCI brand, we have
created an official channel on YouTube: www.youtube.com/jcidanmark.
In this way, we ensure that the viewer does not receive suggestions based on personal activity;
it is only related to correct JCI activity. The channel contains multiple playlists for various types
of videos, e.g. local organizations, projects, conferences and congresses etc.
We suggest that you make it possible for members to add videos, but ensure that an admin
approves them before they are posted on the channel.
A further great feature on YouTube is the subscribe functionality, which means that you show
which other channels you follow. For JCI Denmark, we have decided to follow the international
JCI channel.
CONTACT
If you have any questions to this publication, feel free to contact us via the contact form @
http://www.jci.dk/kontakt/ or send an email to one of the authors.
Happy branding and best regards
Andreas Høyer Jørgensen, PR & Branding Manager 2014 - [email protected]
Kathrine Nygaard Stannov, Communications Manager 2014 - [email protected]
Junior Chamber International Denmark