Embed Size (px)
Citation preview
JBoss Enterprise Application Platform 5
Admin Console User Guide
for Use with JBoss Enterprise Application Platform 5
Edition 5.2.0
Last Updated: 2017-10-12

JBoss Enterprise Application Platform 5 Admin Console User Guide
for Use with JBoss Enterprise Application Platform 5Edition 5.2.0
JBoss Operations Network Development Team
Edited by
Elspeth Thorne
Eva Kopalova
Isaac Rooskov
Laura Bailey
Petr Penicka
Russell Dickenson
Scott Mumford
Legal Notice
Copyright © 2012 Red Hat, Inc.
This document is licensed by Red Hat under the Creative Commons Attribution-ShareAlike 3.0Unported License. If you distribute this document, or a modified version of it, you must provideattribution to Red Hat, Inc. and provide a link to the original. If the document is modified, all RedHat trademarks must be removed.
Red Hat, as the licensor of this document, waives the right to enforce, and agrees not to assert,Section 4d of CC-BY-SA to the fullest extent permitted by applicable law.
Red Hat, Red Hat Enterprise Linux, the Shadowman logo, JBoss, OpenShift, Fedora, the Infinitylogo, and RHCE are trademarks of Red Hat, Inc., registered in the United States and othercountries.
Linux ® is the registered trademark of Linus Torvalds in the United States and other countries.
Java ® is a registered trademark of Oracle and/or its affiliates.
XFS ® is a trademark of Silicon Graphics International Corp. or its subsidiaries in the UnitedStates and/or other countries.
MySQL ® is a registered trademark of MySQL AB in the United States, the European Union andother countries.
Node.js ® is an official trademark of Joyent. Red Hat Software Collections is not formally relatedto or endorsed by the official Joyent Node.js open source or commercial project.
The OpenStack ® Word Mark and OpenStack logo are either registered trademarks/service marksor trademarks/service marks of the OpenStack Foundation, in the United States and othercountries and are used with the OpenStack Foundation's permission. We are not affiliated with,endorsed or sponsored by the OpenStack Foundation, or the OpenStack community.
All other trademarks are the property of their respective owners.
Abstract
This book is a user guide to the Admin Console of JBoss Enterprise Application Platform 5 and itspatch releases.
. . . . . . . . . . . . . . . . . . . . . . . . . . . . . . . . . . . . . . . . . . . . . . . . . . . . . . . . . . . . . . . . . . . . . . . . . . . . . . . . . . . . . . . . . . . . . . . . . . . . . . . . . . . . . . . . . . . . . . . . . . . . . . . . . . . . . . . . . . . . . . . . . . . . . . . . . . . . . . . . . . . . . . . . . . . . . . . . . . . . . . . . . . . . . . . . . . . . . . . . . . . . . . . . . . . . . . . . . . . . . . . . . . . . . . . . . . . . . . . . . . . . . . . . . . . . . . . . . . . . . . . . . . . . . . . . . . . . . . . .
. . . . . . . . . . . . . . . . . . . . . . . . . . . . . . . . . . . . . . . . . . . . . . . . . . . . . . . . . . . . . . . . . . . . . . . . . . . . . . . . . . . . . . . . . . . . . . . . . . . . . . . . . . . . . . . . . . . . . . . . . . . . . . . . . . . . . . . . . . . . . . . . . . . . . . . . . . . . . . . . . . . . . . . . . . . . . . . . . . . . . . . . . . . . . . . . . . . . . . . . . . . . . . . . . . . . . . . . . . . . . . . . . . . . . . . . . . . . . . . . . . . . . . . . . . . . . . . . . . . . . . . . . . . . . . . . . . . . . . . .
. . . . . . . . . . . . . . . . . . . . . . . . . . . . . . . . . . . . . . . . . . . . . . . . . . . . . . . . . . . . . . . . . . . . . . . . . . . . . . . . . . . . . . . . . . . . . . . . . . . . . . . . . . . . . . . . . . . . . . . . . . . . . . . . . . . . . . . . . . . . . . . . . . . . . . . . . . . . . . . . . . . . . . . . . . . . . . . . . . . . . . . . . . . . . . . . . . . . . . . . . . . . . . . . . . . . . . . . . . . . . . . . . . . . . . . . . . . . . . . . . . . . . . . . . . . . . . . . . . . . . . . . . . . . . . . . . . . . . . . .
. . . . . . . . . . . . . . . . . . . . . . . . . . . . . . . . . . . . . . . . . . . . . . . . . . . . . . . . . . . . . . . . . . . . . . . . . . . . . . . . . . . . . . . . . . . . . . . . . . . . . . . . . . . . . . . . . . . . . . . . . . . . . . . . . . . . . . . . . . . . . . . . . . . . . . . . . . . . . . . . . . . . . . . . . . . . . . . . . . . . . . . . . . . . . . . . . . . . . . . . . . . . . . . . . . . . . . . . . . . . . . . . . . . . . . . . . . . . . . . . . . . . . . . . . . . . . . . . . . . . . . . . . . . . . . . . . . . . . . . .
. . . . . . . . . . . . . . . . . . . . . . . . . . . . . . . . . . . . . . . . . . . . . . . . . . . . . . . . . . . . . . . . . . . . . . . . . . . . . . . . . . . . . . . . . . . . . . . . . . . . . . . . . . . . . . . . . . . . . . . . . . . . . . . . . . . . . . . . . . . . . . . . . . . . . . . . . . . . . . . . . . . . . . . . . . . . . . . . . . . . . . . . . . . . . . . . . . . . . . . . . . . . . . . . . . . . . . . . . . . . . . . . . . . . . . . . . . . . . . . . . . . . . . . . . . . . . . . . . . . . . . . . . . . . . . . . . . . . . . . .
. . . . . . . . . . . . . . . . . . . . . . . . . . . . . . . . . . . . . . . . . . . . . . . . . . . . . . . . . . . . . . . . . . . . . . . . . . . . . . . . . . . . . . . . . . . . . . . . . . . . . . . . . . . . . . . . . . . . . . . . . . . . . . . . . . . . . . . . . . . . . . . . . . . . . . . . . . . . . . . . . . . . . . . . . . . . . . . . . . . . . . . . . . . . . . . . . . . . . . . . . . . . . . . . . . . . . . . . . . . . . . . . . . . . . . . . . . . . . . . . . . . . . . . . . . . . . . . . . . . . . . . . . . . . . . . . . . . . . . . .
Table of Contents
CHAPTER 1. INTRODUCTION TO THE ADMIN CONSOLE
CHAPTER 2. CONFIGURE THE ADMIN CONSOLE2.1. SECURITY
2.1.1. Authentication2.1.2. Enable Authentication2.1.3. Users and Roles2.1.4. Disable Authentication
2.2. ACCESS THE ADMIN CONSOLE2.3. PORT CONFIGURATION
2.3.1. Configure the Service Binding Manager2.3.2. Add a Service Binding Set2.3.3. Service Binding Set Configuration2.3.4. Display Bindings for a Service Binding Set2.3.5. Delete Service Binding Sets
CHAPTER 3. APPLICATIONS3.1. DEPLOY AN APPLICATION3.2. UPDATE AN APPLICATION3.3. UNDEPLOY AN APPLICATION3.4. CONTROLLING APPLICATIONS
CHAPTER 4. RESOURCES4.1. JBOSS MESSAGING
4.1.1. View the Deployed Messaging Queues4.1.2. Add a JBoss Messaging Resource4.1.3. Remove a JBoss Messaging Resource4.1.4. JBoss Messaging Resource Configuration4.1.5. JBoss Messaging Resource Control
4.2. CONNECTION FACTORY4.2.1. Add a Connection Factory Resource4.2.2. Remove a Connection Factory Resource4.2.3. Connection Factory Resource Configuration4.2.4. Control a Connection Factory Resource
4.3. DATASOURCES4.3.1. Add a Datasource4.3.2. Remove a Datasource4.3.3. Datasource Configuration4.3.4. Datasource Control
4.4. SCRIPTS
CHAPTER 5. MONITOR THE JBOSS ENTERPRISE APPLICATION PLATFORM INSTANCE
APPENDIX A. REVISION HISTORY
3
444457899
10101010
1212121313
1515151516161617171818181919
20202021
23
24
Table of Contents
1
Admin Console User Guide
2
CHAPTER 1. INTRODUCTION TO THE ADMIN CONSOLEThe JBoss Enterprise Application Platform Admin Console is a browser-based management tool forthe applications and resources of a JBoss Enterprise Application Platform instance. Read this guide foran overview of Admin Console features; descriptions of administrative tasks; and procedures toperform those tasks.
This release of the Admin Console provides the following administrative features:
Services Binding Manager configuration, management and control
Enterprise Application Platform instance information
Application configuration, management and control for:
Java EE Enterprise Applications (EARs)
Web Applications (WARs)
Resource Adapters (RARs)
Enterprise JavaBean 2 and 3 (EJBs)
Resource configuration, management and control for:
data sources
connection factories
JMS queues and topics (based on JBoss Messaging)
The Admin Console provided with Enterprise Application Platform retains the JMX and web consoles.It is included in the production, all, web and default profiles. It has also been tested with the standard server profile. Copy admin-console.war from JBOSS_HOME/server/production/deploy to the JBOSS_HOME/server/standard/deploydirectory to use the Admin Console with the standard profile.
NOTE
The Admin Console is not intended for use with the minimal configuration providedwith the distribution. Custom configurations based on this configuration should not beused with the Admin Console, either.
CHAPTER 1. INTRODUCTION TO THE ADMIN CONSOLE
3

CHAPTER 2. CONFIGURE THE ADMIN CONSOLE
2.1. SECURITY
The Admin Console is secured by the JAAS security domain jmx-console. When the EnterpriseApplication Platform is installed using the zip archive, this security domain has no user accounts. Thisis to eliminate the possibility of default username/password based attacks. When the EnterpriseApplication Platform is installed using the Graphical Installer, a JAAS security domain and a useraccount is created as part of the install process. Even if the name of the JAAS security domain waschanged during installation, the users are stored in the same location.
2.1.1. Authentication
Authentication is the process where a user identifies themselves to a system. The Admin Consolemakes use of username/password authentication, with permissions and roles assigned to users via the jmx-console and jboss-web domains.
2.1.2. Enable Authentication
The Enterprise Application Platform ships with authentication on the default security domains enabledby default. In order to check that authentication is enabled, or re-enable authentication that haspreviously been disabled, follow this procedure. For more information on security domains andauthentication in the Enterprise Application Platform, refer to the Security Guide.
Procedure 2.1. Enabling Authentication
1. Enabling Authentication on the JMX consoleIn this web.xml file:
JBOSS_HOME/server/PROFILE/deploy/jmx-console.war/WEB-INF/web.xml
ensure the following security-constraint fragment is uncommented.
2. Enabling Security Domain on the JMX consoleIn this jboss-web.xml file:
JBOSS_HOME/server/PROFILE/deploy/jmx-console.war/WEB-INF/jboss-web.xml
<security-constraint> <web-resource-collection> <web-resource-name>HtmlAdaptor</web-resource-name> <description> An example security config that only allows users with the role JBossAdmin to access the HTML JMX console web application </description> <url-pattern>/*</url-pattern> </web-resource-collection> <auth-constraint> <role-name>JBossAdmin</role-name> </auth-constraint></security-constraint>
Admin Console User Guide
4
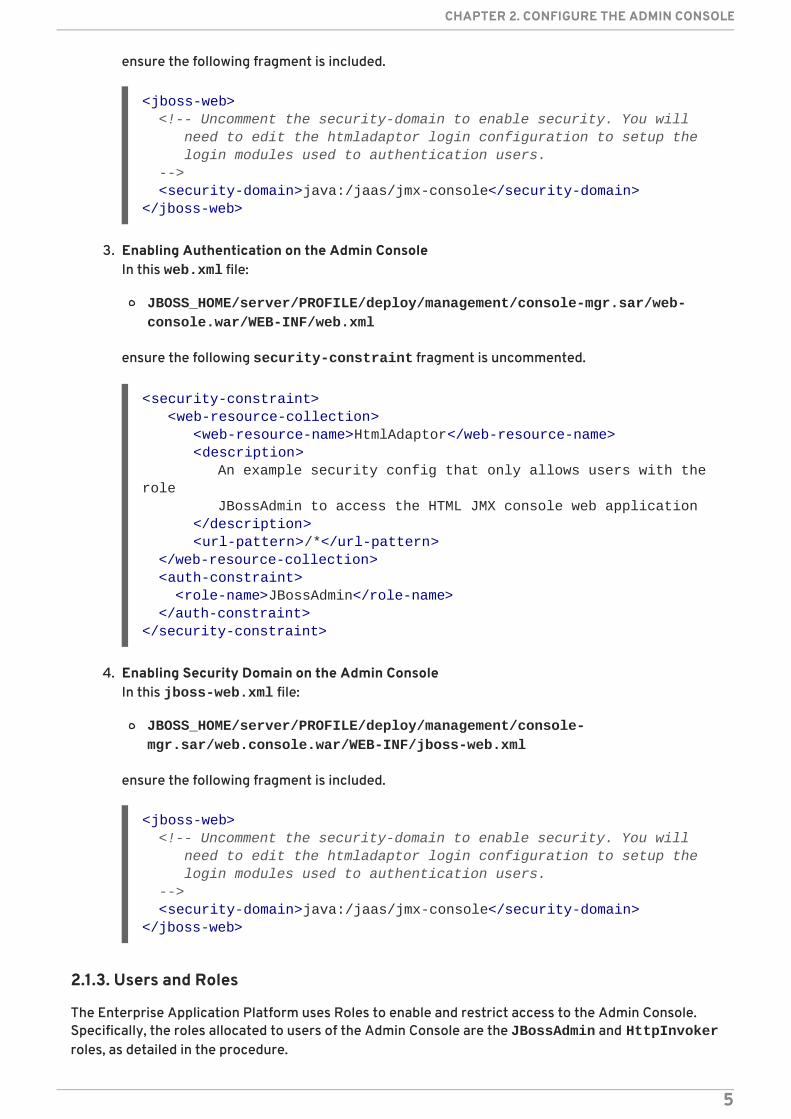
ensure the following fragment is included.
3. Enabling Authentication on the Admin ConsoleIn this web.xml file:
JBOSS_HOME/server/PROFILE/deploy/management/console-mgr.sar/web-console.war/WEB-INF/web.xml
ensure the following security-constraint fragment is uncommented.
4. Enabling Security Domain on the Admin ConsoleIn this jboss-web.xml file:
JBOSS_HOME/server/PROFILE/deploy/management/console-mgr.sar/web.console.war/WEB-INF/jboss-web.xml
ensure the following fragment is included.
2.1.3. Users and Roles
The Enterprise Application Platform uses Roles to enable and restrict access to the Admin Console.Specifically, the roles allocated to users of the Admin Console are the JBossAdmin and HttpInvokerroles, as detailed in the procedure.
<jboss-web> <!-- Uncomment the security-domain to enable security. You will need to edit the htmladaptor login configuration to setup the login modules used to authentication users. --> <security-domain>java:/jaas/jmx-console</security-domain></jboss-web>
<security-constraint> <web-resource-collection> <web-resource-name>HtmlAdaptor</web-resource-name> <description> An example security config that only allows users with the role JBossAdmin to access the HTML JMX console web application </description> <url-pattern>/*</url-pattern> </web-resource-collection> <auth-constraint> <role-name>JBossAdmin</role-name> </auth-constraint></security-constraint>
<jboss-web> <!-- Uncomment the security-domain to enable security. You will need to edit the htmladaptor login configuration to setup the login modules used to authentication users. --> <security-domain>java:/jaas/jmx-console</security-domain></jboss-web>
CHAPTER 2. CONFIGURE THE ADMIN CONSOLE
5
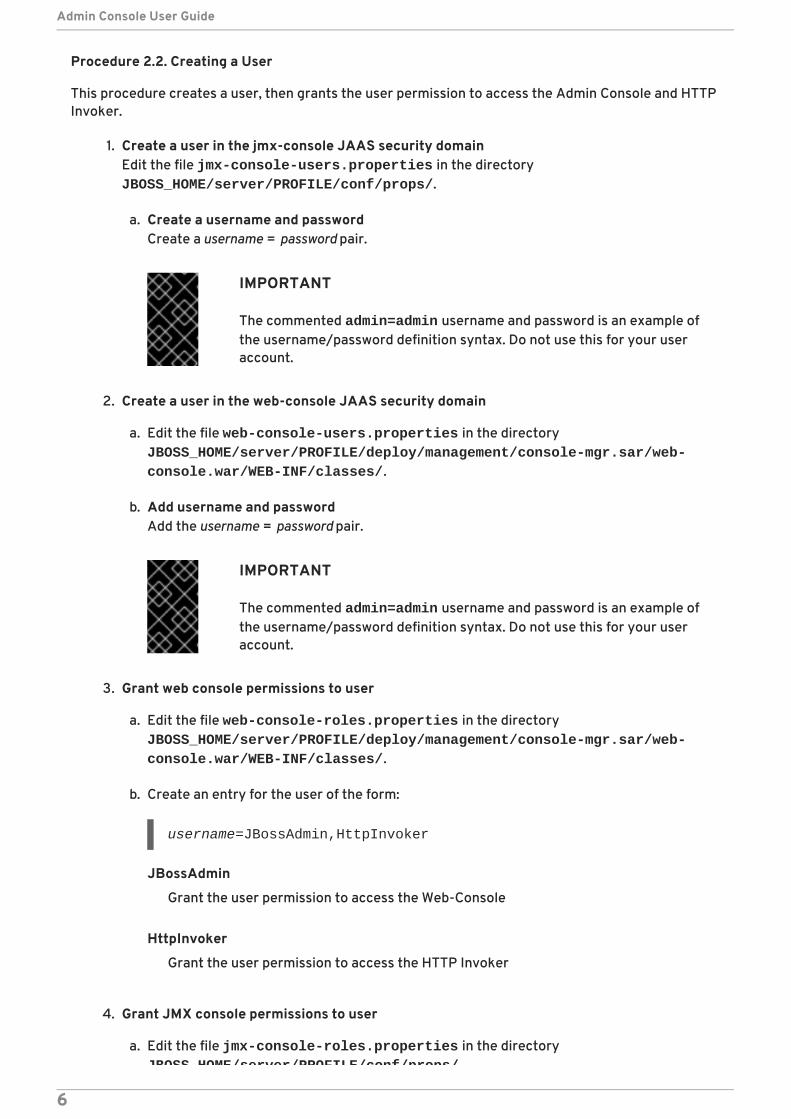
Procedure 2.2. Creating a User
This procedure creates a user, then grants the user permission to access the Admin Console and HTTPInvoker.
1. Create a user in the jmx-console JAAS security domainEdit the file jmx-console-users.properties in the directory JBOSS_HOME/server/PROFILE/conf/props/.
a. Create a username and passwordCreate a username = password pair.
IMPORTANT
The commented admin=admin username and password is an example ofthe username/password definition syntax. Do not use this for your useraccount.
2. Create a user in the web-console JAAS security domain
a. Edit the file web-console-users.properties in the directory JBOSS_HOME/server/PROFILE/deploy/management/console-mgr.sar/web-console.war/WEB-INF/classes/.
b. Add username and passwordAdd the username = password pair.
IMPORTANT
The commented admin=admin username and password is an example ofthe username/password definition syntax. Do not use this for your useraccount.
3. Grant web console permissions to user
a. Edit the file web-console-roles.properties in the directory JBOSS_HOME/server/PROFILE/deploy/management/console-mgr.sar/web-console.war/WEB-INF/classes/.
b. Create an entry for the user of the form:
JBossAdmin
Grant the user permission to access the Web-Console
HttpInvoker
Grant the user permission to access the HTTP Invoker
4. Grant JMX console permissions to user
a. Edit the file jmx-console-roles.properties in the directory JBOSS_HOME/server/PROFILE/conf/props/.
username=JBossAdmin,HttpInvoker
Admin Console User Guide
6
JBOSS_HOME/server/PROFILE/conf/props/.
b. Create an entry for the user of the form:
JBossAdmin
Grant the user permission to access the Web-Console
HttpInvoker
Grant the user permission to access the HTTP Invoker
2.1.4. Disable Authentication
Authentication can be disabled for use in development environments, where the installation is on asecure, internal machine.
WARNING
Do not disable authentication on an externally-facing installation.
Procedure 2.3. Disabling Authentication
1. Disable security constraints on the JMX ConsoleIn this web.xml file:
JBOSS_HOME/server/PROFILE/deploy/jmx-console.war/WEB-INF/web.xml
comment out the security-constraint fragment.
2. Disabling Security Domain on the JMX ConsoleIn this jboss-web.xml file:
JBOSS_HOME/server/PROFILE/deploy/jmx-console.war/WEB-INF/jboss-
username=JBossAdmin,HttpInvoker
<security-constraint> <web-resource-collection> <web-resource-name>HtmlAdaptor</web-resource-name> <description> An example security config that only allows users with the role JBossAdmin to access the HTML JMX console web application </description> <url-pattern>/*</url-pattern> </web-resource-collection> <auth-constraint> <role-name>JBossAdmin</role-name> </auth-constraint></security-constraint>
CHAPTER 2. CONFIGURE THE ADMIN CONSOLE
7
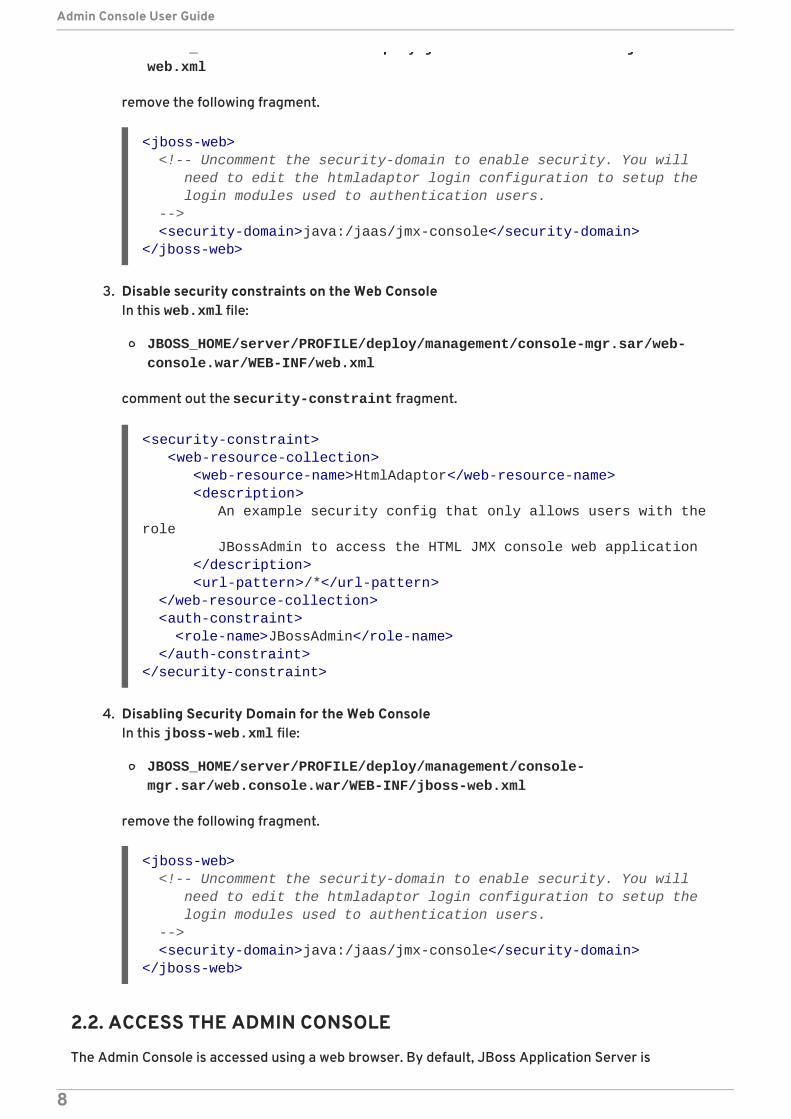
JBOSS_HOME/server/PROFILE/deploy/jmx-console.war/WEB-INF/jboss-web.xml
remove the following fragment.
3. Disable security constraints on the Web ConsoleIn this web.xml file:
JBOSS_HOME/server/PROFILE/deploy/management/console-mgr.sar/web-console.war/WEB-INF/web.xml
comment out the security-constraint fragment.
4. Disabling Security Domain for the Web ConsoleIn this jboss-web.xml file:
JBOSS_HOME/server/PROFILE/deploy/management/console-mgr.sar/web.console.war/WEB-INF/jboss-web.xml
remove the following fragment.
2.2. ACCESS THE ADMIN CONSOLE
The Admin Console is accessed using a web browser. By default, JBoss Application Server is
<jboss-web> <!-- Uncomment the security-domain to enable security. You will need to edit the htmladaptor login configuration to setup the login modules used to authentication users. --> <security-domain>java:/jaas/jmx-console</security-domain></jboss-web>
<security-constraint> <web-resource-collection> <web-resource-name>HtmlAdaptor</web-resource-name> <description> An example security config that only allows users with the role JBossAdmin to access the HTML JMX console web application </description> <url-pattern>/*</url-pattern> </web-resource-collection> <auth-constraint> <role-name>JBossAdmin</role-name> </auth-constraint></security-constraint>
<jboss-web> <!-- Uncomment the security-domain to enable security. You will need to edit the htmladaptor login configuration to setup the login modules used to authentication users. --> <security-domain>java:/jaas/jmx-console</security-domain></jboss-web>
Admin Console User Guide
8
configured to only offer this service on the local machine. To configure the Application Server toenable remote access of the Admin Console and other services, refer to the Installation Guide.
NOTE
The Admin Console has been tested against and is supported for use with MozillaFirefox 2.0, 3.0, 3.5 and 3.6; and Internet Explorer 6 and 7. It may also work in otherbrowsers, but it is only supported in the browsers listed here.
NOTE
Ensure that the Enterprise Application Platform has been configured as described inSection 2.1, “Security”, and is running locally.
Procedure 2.4. Access the Admin Console
1. Using a web browser, navigate to http://localhost:8080. The JBoss Welcome Page isdisplayed.
2. Select the 'Admin Console' link. The Admin Console login page is displayed.
3. Enter credentials created in Section 2.1.3, “Users and Roles”, and click Login. The AdminConsole is displayed.
2.3. PORT CONFIGURATION
The Service Binding Manager co-ordinates which ports the Enterprise Application Platform instancelistens on when it starts up. Which port set is used by the Service Binding Manager can be configuredusing the Admin Console. The Enterprise Application Platform ships with four port sets predefined:
ports-default: The standard ports, for instance JBoss Web listens for HTTP requests on 8080.
ports-01: The standard ports incremented by 100. For example, HTTP is on 8180
ports-02: The standard ports incremented by 200. For example, HTTP is on 8280
ports-03: The standard ports incremented by 300. For example, HTTP is on 8380
Additional port sets can also be created. All port sets can be deleted, configured and have their servicebindings displayed using the Admin Console.
2.3.1. Configure the Service Binding Manager
The Service Binding Manager can be configured to use a different Service Binding Set (different set ofports) on the Enterprise Application Platform.
Procedure 2.5. Configuring the Service Binding Manager
1. Navigate to the Service Binding Manager.
2. Click the 'Configuration' tab.
3. Edit 'Active Binding Set Name' to reflect the Service Binding Set to use.
CHAPTER 2. CONFIGURE THE ADMIN CONSOLE
9
4. Click Save. For these changes to take effect, the Enterprise Application Platform must berestarted.
2.3.2. Add a Service Binding Set
Alternative Service Binding Sets can be added to the Service Binding Manager using the AdminConsole.
Procedure 2.6. Adding a Service Binding Set
1. Navigate to 'Service Binding Sets', located under the 'Service Binding Manager' menu.
2. Click Add a new resource.
3. Select the Resource Template to use (Service Binding Set). Click Continue.
4. Enter Name, Default Host Name and Port Offset.
5. Enter in any Override Bindings, by clicking Add New, and entering the required data. Click OKwhen finished.
6. Click Save.
2.3.3. Service Binding Set Configuration
Procedure 2.7. Configuring a Service Binding Set
1. Navigate to 'Service Binding Sets' and click on the Service Binding Set to be configured.
2. Click on the 'Configuration' tab.
3. Edit the fields to be changed.
4. Click Save.
2.3.4. Display Bindings for a Service Binding Set
Procedure 2.8. Displaying Bindings for a Service Binding Set
1. Navigate to 'Service Binding Sets' and click on the Service Binding Set for which the bindingsare to be displayed.
2. Click the 'Control' tab.
3. Click Display Bindings. The bindings are displayed.
2.3.5. Delete Service Binding Sets
Procedure 2.9. Deleting a Service Binding Set
1. Navigate to 'Service Binding Sets'.
2. Click Delete to delete the Service Binding Set.
Admin Console User Guide
10
3. Click OK to confirm the Service Binding Set is to be deleted.
CHAPTER 2. CONFIGURE THE ADMIN CONSOLE
11
CHAPTER 3. APPLICATIONSApplications are deployed on the Enterprise Application Platform. They are user-facing, providingservices and interfaces such as web sites, APIs, and other resources.
These application types can be managed through the Admin Console Applications section of theinterface:
Enterprise ARchives (EARs)
Web Application aRchives (WARs)
Resource Adapter aRchives (RARs)
Enterprise Java Bean archives (EJBs), both EJB2 and EJB3
EARs can contain other application types. When EARs containing other applications are deployed,these embedded applications are shown in the Embedded Application_Type section of the AdminConsole. Control of these embedded applications is through the parent EAR.
3.1. DEPLOY AN APPLICATION
Deployed applications are available for end users, and can be manipulated through the Admin Console.Follow this procedure to deploy an application to the Enterprise Application Platform ready for use.
Procedure 3.1. Deploying an Application
1. Navigate to the Application type
a. Expand the Applications menu by clicking on it.
b. Click on the submenu of the type of application to add.
2. Configuring the Application
a. Click Add a new resource.
b. Specify the file to be deployed.
c. Set options to deploy the application exploded, and to deploy the application as farmed.
3. Deploy the ApplicationClick Continue to deploy the application.
3.2. UPDATE AN APPLICATION
An application is typically updated to apply a patch or similar change, by replacing the originalapplication archive with a new file. To update an application, follow this procedure.
Procedure 3.2. Updating an Application
1. Navigating to the Content tab
a. Click on the application's type submenu to expand it.
b. Click on the application.
Admin Console User Guide
12
c. Click on the Content Tab.
2. Finding the updated application file.
a. Click Browse.
b. Browse to the location of the updated application file.
c. Click Open.
3. Performing the update.Click Update. The currently deployed application will be replaced by the new application file.
IMPORTANT
The file to be updated must have the same name as the original application,otherwise the operation will fail.
3.3. UNDEPLOY AN APPLICATION
Undeploying an application using the Admin Console removes it from the server. The application can nolonger be managed using the Admin Console, until it is deployed again. To undeploy an application,follow this procedure.
Procedure 3.3. Undeploying an Application
1. Navigate to the ApplicationClick on the application's type submenu to expand it.
2. Undeploy the Application
a. Click Delete next to the application.
b. Confirm the removal of the application. The application is undeployed.
3.4. CONTROLLING APPLICATIONS
Applications can be started, restarted, and stopped using the Admin Console. Control operationsavailable for applications are:
Start
Stop
Restart
To perform these control operations, follow this procedure.
Procedure 3.4. Using Application Controls
1. Navigate to the Control Tab
a. Click on the application's type submenu to expand it.
b. Click on the application.
CHAPTER 3. APPLICATIONS
13
c. Click the Control Tab.
2. Perform the operationClick the operation to perform. The results of the operation are displayed.
Admin Console User Guide
14
CHAPTER 4. RESOURCESAnything managed by the Admin Console is a resource. This includes Applications, Services, andDatasources. The Admin Console separates Applications out from other managed resources. Theremaining resources are accessible by navigating to the 'Resources' menu item in the Admin Console.They are categorized as JBoss Messaging, JBoss Web, Scripts, Connection Factories, and Datasources.
IMPORTANT
Resources deployed and modified using the Admin Console should continue to beadministered using the Admin Console, as changes are not reflected in the originalconfiguration file for the resource. Manual editing of configuration files and changesmade using the Admin Console are not compatible.
4.1. JBOSS MESSAGING
JBoss Messaging provides the Java Messaging Services for the Enterprise Application Platform. Onlydestinations for JBoss Messaging can be configured through the Admin Console. Destinations aredivided into Topics and Queues.
4.1.1. View the Deployed Messaging Queues
A list of Messaging Queues deployed on the EAP server is available in the Admin Console. To view thislist:
Procedure 4.1.
1. Log in to the Admin Console of the Server at 127.0.0.1:8080/admin-console
2. a. For JBoss Messaging:Click on Resources → JBoss Messaging → Queues
b. For HornetQ:Click on JMS Manager → JMS Queues
A list of the JMS queues deployed on the server will be displayed.
4.1.2. Add a JBoss Messaging Resource
To add new destinations to the Enterprise Application Platform instance, use the following procedures.
Procedure 4.2. Adding a JBoss Messaging Queue
1. Click Resources → JBoss Messaging → Queues. Click Add a new resource.
2. Select the Template to use for the resource.
3. Enter in the name of the Queue, and the JNDI name.
4. Optional: Edit the other values available. For more information about Queue settings, refer tothe JBoss Messaging User Guide.
5. Click Save.
CHAPTER 4. RESOURCES
15
Procedure 4.3. Adding a JBoss Messaging Topic
1. Click Resources → JBoss Messaging → Topics. Click Add a new resource.
2. Select the Template to use for the resource.
3. Enter in the name of the Topic, and the JNDI name.
4. Optional: Edit the other values available, or leave them set to their default values. For moreinformation about Topic settings, see the JBoss Messaging User Guide.
5. Click Save.
4.1.3. Remove a JBoss Messaging Resource
Removing a Messaging Resource will discard all messages associated with that resource. Do this withcaution.
Procedure 4.4. Removing a JBoss Messaging Resource
1. Navigate to the JBoss Messaging Type - Topic or Queue, under Resources → JBossMessaging.
2. Click Delete next to the resource to be deleted.
3. Click OK to confirm the delete operation.
4.1.4. JBoss Messaging Resource Configuration
Messaging resources can be fine tuned using configuration options. To change the configuration of amessaging resource, follow this procedure.
Procedure 4.5. Configuring a JBoss Messaging Resource
1. Navigate to the resource to be configured, using Resources → JBoss Messaging →MESSAGING_TYPE → RESOURCE_NAME.
2. Click the 'Configuration' tab.
3. When configuration options have been changed, click Save. For more information aboutconfiguration options, refer to the JBoss Messaging User Guide.
4.1.5. JBoss Messaging Resource Control
Various control operations are available for Queues and Topics. Both Messaging Resources have theseoperations available:
Remove all messages - removes all messages from the destination.
Start - starts the destination.
Stop - stops the destination.
List All Messages - lists all messages for the specified selector.
List Durable Messages - lists all durable messages for the specified selector.
Admin Console User Guide
16
List Non Durable Messages - lists all non durable messages for the specified selector.
Queue specific control operations are:
List Message Counter As HTML - displays the message counter as HTML.
List Message Counter History As HTML - displays the message counter history as HTML.
Reset Message Counter - resets the message counter to zero.
Reset Message Counter History - clears the message counter history.
Topic specific control operations are:
List All Subscriptions - displays all subscriptions to the topic.
List All Subscriptions As HTML - displays all subscriptions to the topic in HTML.
List Durable Subscriptions - displays all durable subscriptions.
List Durable Subscriptions As HTML - displays all durable subscriptions in HTML.
List Non-Durable Subscriptions - displays all non-durable subscriptions.
List Non-Durable Subscriptions As HTML - displays all non-durable subscriptions in HTML.
To perform any of these control operations, follow this procedure.
Procedure 4.6. Controlling a JBoss Messaging Resource
1. Navigate to the resource, using Resources → JBoss Messaging → MESSAGING_TYPE →RESOURCE_NAME.
2. Click the 'Control' tab.
3. Click the operation to be performed. For information about the effect of these operations, referto the JBoss Messaging User Guide.
4.2. CONNECTION FACTORY
Connection Factories provide connection objects to the Resource Adapter (deployed in a RAR) theyare associated with. The following types of Connection Factories are managed through the AdminConsole:
No Tx Connection Factories - these do not take part in JTA transactions
Local Transaction Connection Factories - these participate in local JTA transactions
XA Transaction Connection Factories - these participate in distributed JTA transactions
4.2.1. Add a Connection Factory Resource
To add a Connection Factory for use by a Resource Adapter, follow this procedure.
Procedure 4.7. Adding a Connection Factory to JBoss Messaging
CHAPTER 4. RESOURCES
17
1. Navigate to the Connection Factory type required, under Resources → Connection Factories .
2. Click Add a new resource.
3. Select the template to use, and click Continue.
4. Enter the JNDI name, RAR name, and Connection Definition in the labeled fields.
NOTE
The RAR for the associated Resource Adapter must be deployed before addingthe Connection Factory.
5. Configure extra options for the connection factory. For more information about configurationoptions, see the JBoss Messaging User Guide.
6. Click Save. The new Connection Factory will be displayed in the Admin Console.
4.2.2. Remove a Connection Factory Resource
Removing a Connection Factory removes the ability to connect to the associated ResourceApplication. Similarly, if a Resource Application is removed, the corresponding Connection Factoryshould be removed. To perform this function, follow this procedure.
Procedure 4.8. Removing a Connection Factory
1. Navigate to the Connection Factory type of the Connection Factory to be removed, underResources → Connection Factories .
2. Click Delete next to the Connection Factory to be removed.
3. Click OK to confirm the removal of the Connection Factory. The Connection Factory isremoved.
4.2.3. Connection Factory Resource Configuration
Connection Factories have attributes that can be changed using the Admin Console. To access theseattributes and change them, follow this procedure.
Procedure 4.9. Configuring a Connection Factory
1. Navigate to the Connection Factory type, under Resources → Connection Factories .
2. Click the Connection Factory.
3. Click the 'Configuration' tab.
4. When the attributes have been edited, click Save. The configuration of the Connection Factoryis changed.
4.2.4. Control a Connection Factory Resource
Maintenance operations can be performed using Connection Factories. These operations are:
Admin Console User Guide
18
Flush - Flush the connections in the pool
List Formatted Sub Pool Statistics - gives a report on sub pool statistics
List Statistics - general statistics report for the Connection Factory
Test Connection - test the Connection Factory to ensure that connections can be obtained
To perform these operations, follow this procedure.
Procedure 4.10. Controlling a Connection Factory
1. Navigate to the Connection Factory type, under Resources → Connection Factories .
2. Click the Connection Factory.
3. Click the 'Control' tab.
4. Click the required operation. Result of the operation is displayed.
4.3. DATASOURCES
Datasources are generally databases. In order to make datasources available to applications in theEnterprise Application Platform, they need to be defined and published using JNDI. For more aboutdatasources, refer to the Administration and Configuration Guide.
Three types of datasources can be added to an Enterprise Application Platform instance:
No Tx datasource. This does not take part in JTA transactions. Uses java.sql.Driver.
Local Tx datasource. This does not support two phase commit. Uses java.sql.Driver.Suitable for a single database or a non-XA-aware resource.
XA datasource. This supports two phase commit. Uses javx.sql.XADataSource.
4.3.1. Add a Datasource
Adding a datasource to the Enterprise Application Platform makes it available for use by applicationson the instance. To add a datasource, use the following procedure.
Procedure 4.11. Adding a Local Tx or No Tx Datasource
1. Navigate to the Datasource type to be added, under Resources → Datasources.
2. Click Add a new resource.
3. Select the resource template from the drop-down box, and click Continue.
4. Enter required parameters of JNDI Name, JDBC Driver Class and Connection URL.
5. Optional: Configure extra options for the datasource. For more information about datasourceconfiguration, see the Administration and Configuration Guide.
6. Click Save. The datasource is available.
CHAPTER 4. RESOURCES
19
Procedure 4.12. Adding an XA Datasource
1. Navigate to the XA Datasource type, Resources → Datasources → XA Datasources.
2. Click Add a new resource.
3. Select the resource template from the drop-down box, and click Continue.
4. Enter required parameters of JNDI Name and XA DataSource Class.
5. Optional: Configure extra options for the datasource. For more information about datasourceconfiguration, see the Administration and Configuration Guide.
6. Click Save. The XA datasource is available.
4.3.2. Remove a Datasource
When a datasource is no longer in use, it can be removed from the Enterprise Application Platformusing the following procedure.
Procedure 4.13. Removing a Datasource
1. Navigate to the Datasource type, under Resources → Datasources.
2. Click Delete next to the datasource to be removed.
3. Click OK to confirm the removal of the datasource. The datasource is removed.
4.3.3. Datasource Configuration
Datasources have a number of configuration options. To configure a datasource, follow this procedure.
Procedure 4.14. Configuring a Datasource
1. Navigate to the Datasource type, under Resources → Datasources.
2. Click the Datasource.
3. Click the 'Configuration' tab.
4. When the attributes have been edited, click Save. The configuration of the Datasource ischanged.
4.3.4. Datasource Control
These operations are available for datasources:
Flush. This flushes connections in the datasource pool.
List Formatted Sub Pool Statistics. Displays a formatted sub pool statistics report.
List Statistics. Displays a statistics report.
Test Connection. Check that a connection is obtainable.
To perform maintenance, or display statistics, use the following procedure.
Admin Console User Guide
20
Procedure 4.15. Controlling a Datasource
1. Navigate to the datasource, at Resources → Datasources → DATASOURCE_TYPE →DATASOURCE_NAME.
2. Click the 'Control' tab.
3. Click the operation to be performed.
4.4. SCRIPTS
Several scripts come with the Enterprise Application Platform, and are visible in the Admin Console.
classpath.sh - used to set the class path for server and client.
jboss_init_hpux.sh - sample initialization script for HP-UX systems.
jboss_init_solaris.sh - sample initialization script for Solaris systems.
password_tool.sh
probe.sh - used to discover EAP clusters.
run.sh - starts an instance of the Enterprise Application Platform. For usage, see the GettingStarted Guide.
shutdown.sh - shuts down the Enterprise Application Platform instance.
twiddle.sh
wsconsume.sh - generates portable JAX-WS artifacts from a WSDL file.
wsprovide.sh - generates portable JAX-WS artifacts for an endpoint implementation.
wsrunclient.sh - builds correct classpath and libraries for JAX-WS web service client.
wstools.sh
Only some of these scripts are useful to run from Admin Console, as they are command line tools. Torun a script using the Admin Console, use the following procedure.
Procedure 4.16. Running a Script
1. Navigating to the script
a. Navigate to the Scripts section in the Admin Console, Resources → Scripts.
b. Click the script to be run.
c. Click the 'Control' tab.
2. Running the script
a. Click Execute Script.
b. Enter in the appropriate parameters, if any, and click OK.
CHAPTER 4. RESOURCES
21
c. When the script has finished running, the results are displayed.
Admin Console User Guide
22
CHAPTER 5. MONITOR THE JBOSS ENTERPRISEAPPLICATION PLATFORM INSTANCEMetrics associated with the JBoss Enterprise Application Platform instance can be viewed in theAdmin Console. Data such as memory usage, transactions, and thread counts are available. For morecomplete metrics and monitoring, use the JBoss Operations Network.
Metrics are offered for the following:
The EAP instance
Queues
Topics
Connection Factories
Datasources
To access these metrics, follow this procedure.
Procedure 5.1. Accessing Metrics
1. Navigate to the resource you wish to display metrics for.
2. Click the 'Metrics' tab. Metrics are displayed.
3. Optional: Click Refresh to get the latest data.
CHAPTER 5. MONITOR THE JBOSS ENTERPRISE APPLICATION PLATFORM INSTANCE
23
APPENDIX A. REVISION HISTORY
Revision 5.2.0-100.400 2013-10-30 Rüdiger LandmannRebuild with publican 4.0.0
Revision 5.2.0-100 Wed 23 Jan 2013 Russell DickensonIncorporated changes for JBoss Enterprise Application Platform 5.2.0 GA. For information about documentation changes tothis guide, refer to Release Notes 5.2.0.
Revision 5.1.2-102 17 Sep 2012 Russell DickensonBump to have book re-Brewed
Revision 5.1.2-101 Mon 30 January 2012 Russell DickensonBugzilla ticket: https://bugzilla.redhat.com/show_bug.cgi?id=772990 - Fix for missing step in procedure
Revision 5.1.2-100 Thu Dec 8 2011 Jared MorganIncorporated changes for JBoss Enterprise Application Platform 5.1.2 GA. For information about documentation changes tothis guide, refer to Release Notes 5.1.2.
Revision 5.1.1-100 Mon Jul 18 2011 Jared MorganIncorporated changes for JBoss Enterprise Application Platform 5.1.1 GA. For information about documentation changes tothis guide, refer to Release Notes 5.1.1.
Revision 5.1.0-100 Tue Aug 03 2010 Rebecca NewtonChanged version number in line with new versioning requirements.Revised for JBoss Enterprise Application Platform 5.1.0.GA, including:JBPAPP-3278JBPAPP-3276JBPAPP-4776
Admin Console User Guide
24