Embed Size (px)
Citation preview

107
CHAPTER 6
JavaScript IRL
“A mind is a simulation that simulates itself.”
—Erol Ozan
Get excited; this chapter is about robots, JavaScript and, well, nothing else. But seriously, robots and JavaScript should be enough. In this chapter, I will quickly survey the field of physical computing and how robots written in JavaScript fit in. The bulk of this chapter covers the ways in which you can interact with the world around you using machines that listen to JavaScript.
Diary of a Hardware Wannabe When I was growing up, my little brother Matt got all the hand-me-down tech. Anytime our family upgraded a piece of consumer electronics, the old version went to Matt, who would almost immediately curl up with it on the carpet of his room, wrapping his legs around to secure his kill. Then, like a vulture with OCD, he would begin methodically picking apart the plastic carcass with his kid-sized screwdriver set. Eventually the machine would give up the ghost, and small plastic gears, wires, and circuit boards would spill out. Then sometimes he would try and put it back together or save the parts for later. Matt was interested in a whole different kind of machine learning.
Hardware hacking was not a phase that he outgrew. He was becoming a boy wizard with a right–angle Makita screw gun instead of a wand. When he was 15, he landed a job installing car audio systems for a company called Dashboard Stereo. He badgered the owner Darrell until he relented and gave Matt a job. Matt was the youngest technician by at least a decade, but he was already better than most of them would ever be. He was the youngest-ever Mobile Electronics Certified Professional (MECP) installer at the age of 15. He worked at the stereo shop until college and then went off to Virginia Tech. Not surprisingly, Matt became an electrical engineer and is now a member of the research staff at MIT.
Fire Hoses As a high school student, I was accepted into the North Carolina School of the Arts, which meant I lived about two hours away from home. At the start of the year, Matt lent me his powered subwoofer to take with me back to my dorm. Unfortunately, once I arrived at school, I realized I’d left the plug for the speaker at home. I went down to Radio Shack and bought a universal power adapter, which looked like a shuriken but with plugs of various sizes instead of metal points. I returned to school and plugged the shuriken into the back of the speaker and stood with the other side of the cord in my hand looking at the wall.
Growing up I dreamed of unlocking hardware the way Matt could, but here I was petrified by even plugging something in. I realized I had no idea what I was doing, so I called my dad. This, as it turns out, was a bad idea. My father is another gifted machine whisperer; at times when my brother and he had nothing else in common they at

CHAPTER 6 ■ JAVASCRIPT IRL
108
least spoke the common language of watts and ohms. I explained my problem about not knowing which plug to use, and this is what he told me:
The problem you have here is that you don't know the correct voltage or amperage to power the speaker. Think of it is as if your speaker runs on water, and so you hook it to a fire hose. The water then flows through the hose is the voltage, the velocity at which it travels is the amperage.
I know he felt he’d explained it in such a way that a first grader would have understood it. But I stood there with the pay phone receiver pressed against my ear, trying to visualize what he just said. I might as well have called China, though, because he lost me at fire hose . I returned to my dorm room and again picked up the end of the cord. How bad could it be, I thought?
I chose a power setting in the middle of the available options and plugged the cord into the wall outlet. Instantly I heard a faint buzzing coming from the speaker, then a loud pop , and then absolutely nothing. I quickly realized that I’d nuked my brother’s speaker, and any illusions I harbored that the ability to commune with hardware somehow ran in our family evaporated. Gray smoke slowly wafted out of the port hole of the speaker. Matt, of course, was furious when he found out, maybe because I didn’t ask him, and maybe because he couldn’t fathom how someone could be so ignorant about the basics of electricity. After that, I was too chicken to try again—that is, until as an adult I discovered the Arduino.
Hardware for Everyone Else I was attending a presentation at UCLA and I went to hear Casey Reas speak about his project “Processing.” Processing is a program he and Ben Fry created to enable artists to sketch with code. Reas had recently joined the Design Media Arts department at UCLA, and I was interested to meet him in person having followed his work from afar when he was a student at MIT. As part of the presentations that night, someone else spoke about a new effort to create a cheap microcontroller that would fit on a single board. The board and the project were going by the name of Arduino, and it sought to make hardware accessible to the uninitiated in the same way Processing had done for programming. The goal was to liberate physical computing devices through the production of open-source hardware.
I casually followed the project as an interested observer and finally purchased my own board sometime later. When the board arrived, it went up on a shelf in my office and sat there like a trophy for a sport I didn’t play. I looked at the Arduino from time to time, taking it off the shelf during conference calls, running my fingers around the edge of the PCB, and pressing my thumb against the jumper pins as if they were a mini bed of nails. This little piece of metal and silicone contained both promise and peril of hardware to me. I wanted desperately to interact with the world though hardware of my own design, but all that I could envision was that gray smoke wafting from my brother’s speakers.
Let’s Get Physical One of the great qualities about software programming is that it is very hard to screw up the computer’s hardware. Sure, you can inadvertently wipe your hard drive by writing rm -rf / instead of rm -rf ./ (I am speaking from experience here), but the drive still functions fine. Software is more forgiving and allows for more trial and error. Hardware can be like a trial by fire (literally). There is the possibility that you can fry your Arduino or your computer (or both) with an inadvertently misplaced wire. Yet hardware beckons me with an undeniable siren song played through a Piezo buzzer. The potential for a blinking LED under my control is more rewarding than it has any right to be.
Much of this first section was dedicated to my own personal frustrations and fears when it comes to hardware. I included the section as a means of encouragement to those of you who are sitting on the concrete lip of the hardware pool with your JavaScript floaty wings on. If I can learn to swim here, so can you. Come on in; the water (I mean voltage ) is fine.

CHAPTER 6 ■ JAVASCRIPT IRL
109
Physical Computing I know I promised robots, and I’ll get there, but much of what you will be learning about in this chapter is lumped into the category of physical computing. The name itself sounds so spectacularly vague that it borders on meaninglessness. Starting with a definition will help you get your bearings. Wikipedia defines physical computing this way:
Physical computing, in the broadest sense, means building interactive physical systems by the use of software and hardware that can sense and respond to the analog world. While this definition is broad enough to encompass things such as smart automotive traffic control systems or factory automation processes, it is not commonly used to describe them. In the broad sense, physical computing is a creative framework for understanding human beings’ relationship to the digital world. In practical use, the term most often describes handmade art, design or DIY hobby projects that use sensors and microcontrollers to translate analog input to a software system, and/or control electro-mechanical devices such as motors, servos, lighting or other hardware. 1
In popular culture, physical computing is typically associated with engineering outsiders or new media artists who orbit outside the gravitational pull of professional engineering. Many of the most interesting examples of physical computing take one of two approaches:
They interweave the computer into an existing analog physical process in an unexpected way. •
They map rules, tropes, or artifacts of the virtual world into physical space. •
Even though the Wikipedia definition infers a DIY quality to physical computing, that is not to say that the field has no place for consumer-grade, mass market electronics. The Microsoft Kinect is a perfect example of such a device.
The name Kinect cleverly alludes to its purpose, which is to use its camera to read a player’s body gestures as the means to control a game. The name is the amalgamation of kinetics (movement) and connect (data transmission), two key facets of physical computing. The Kinect is a great example of a finely polished and extremely sophisticated physical computing device.
You may be asking yourself this question: what is the line in the silicone that divides devices that are and are not for physical computing? Consider the differences between the Kinect and a digital video camera. The important distinction between the two is not the asymmetry in technical complexity, but rather that the Kinect uses video capture as part of a larger feedback processing loop involving the player, the game system, and potentially remote servers. Alternatively, the video camera merely stores all available input indiscriminately and waits for further instruction.
The point of physical computing is not to make more things . The goal is to make new pathways between the physical and virtual worlds, which allow users to read, remix, and rebroadcast the world around them.
An Internet of Things Physical computing devices are often referred to as being part of the “Internet of Things.” Kevin Ashton is credited with coining this term, which he used to theorize a world in which all devices would be persistently connected together through omnipresent networks and low-powered, cheap, and promiscuous sensors. He was interested in how these devices might track and categorize themselves or speak up when needed by the user. Much of his emphasis was on the emerging field of radio frequency identification (RFID) tags , which are small circuits that can be read from and written to when energized by external power. RFID tags are now incredibly pervasive in daily life. They are
1 http://en.wikipedia.org/wiki/Physical_computing

CHAPTER 6 ■ JAVASCRIPT IRL
110
embedded in everything from credit cards to the scruff of the neck of a family pet. Ashton explained his concept in the July 2009 edition of the RFID journal:
Today computers—and, therefore, the Internet—are almost wholly dependent on human beings for information. Nearly all of the roughly 50 petabytes (a petabyte is 1,024 terabytes) of data available on the Internet were first captured and created by human beings—by typing, pressing a record button, taking a digital picture or scanning a bar code. Conventional diagrams of the Internet . . . leave out the most numerous and important routers of all - people. The problem is, people have limited time, attention and accuracy—all of which means they are not very good at capturing data about things in the real world. And that's a big deal. We're physical, and so is our environment . . . You can't eat bits, burn them to stay warm or put them in your gas tank. Ideas and information are important, but things matter much more. Yet today's information technology is so dependent on data originated by people that our computers know more about ideas than things. If we had computers that knew everything there was to know about things—using data they gathered without any help from us—we would be able to track and count everything, and greatly reduce waste, loss and cost. We would know when things needed replacing, repairing or recalling, and whether they were fresh or past their best. The Internet of Things has the potential to change the world, just as the Internet did. Maybe even more so. 2
—Kevin Ashton
Today, this term has been co-opted by several other fields. Depending on who you are talking to, the Internet of Things now simultaneously describes:
Inventory and fulfillment systems as in Ashton’s definition •
Physical computing devices like the Kinect •
Augmented reality devices that overlay virtual objects into a specific real spaces, which can • be viewed only through virtual portholes (i.e., a smartphone)
Virtual objects that exist as patterns to be produced using rapid prototyping tools like • 3D printers.
Because this is a chapter about JavaScript robots, I’ll be using the second definition.
Why JavaScript As discussed earlier, physical computing is not a hardware-only affair. It is actually a carefully choreographed dance of I/O cycles between the physical and virtual. The language you choose determines how effortlessly the dance appears to the user. JavaScript, as it turns out, allows these two partners to embrace one another almost effortlessly, but not for the reasons you might expect. JavaScript has both technical and semantic characteristics that lend themselves to physical computing, and a growing collection of libraries that make hardware less hard. This section explains why JavaScript is a great choice for physical computing.
Building Bridges Chris Williams, the creator of NodeBots (which I’ll discuss later), has thought a lot about the how JavaScript empowers robotics. While working on a project to enable sensors to communicate over various wireless spectrums he became dissatisfied with the methods used in other libraries. He felt that the approach, although technically adept,
2 http://en.wikipedia.org/wiki/Internet_of_Things
CHAPTER 6 ■ JAVASCRIPT IRL
111
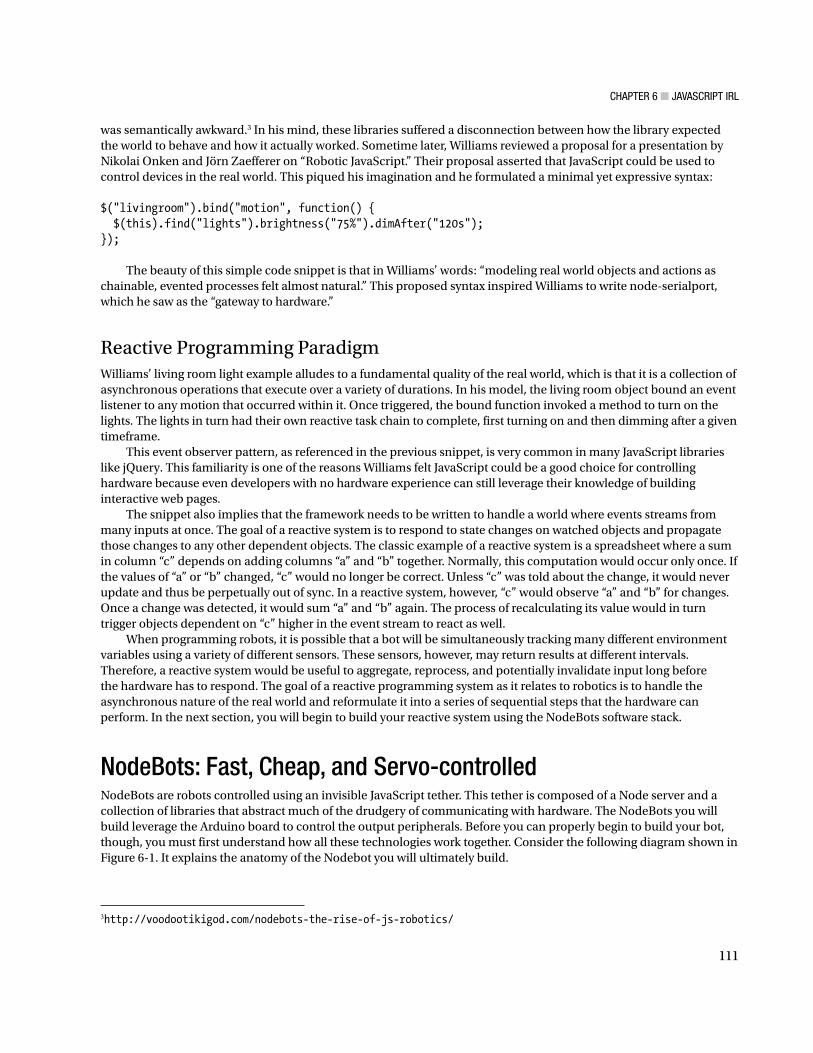
was semantically awkward. 3 In his mind, these libraries suffered a disconnection between how the library expected the world to behave and how it actually worked. Sometime later, Williams reviewed a proposal for a presentation by Nikolai Onken and Jörn Zaefferer on “Robotic JavaScript.” Their proposal asserted that JavaScript could be used to control devices in the real world. This piqued his imagination and he formulated a minimal yet expressive syntax: $("livingroom").bind("motion", function() { $(this).find("lights").brightness("75%").dimAfter("120s"); });
The beauty of this simple code snippet is that in Williams’ words: “modeling real world objects and actions as chainable, evented processes felt almost natural.” This proposed syntax inspired Williams to write node-serialport, which he saw as the “gateway to hardware.”
Reactive Programming Paradigm Williams’ living room light example alludes to a fundamental quality of the real world, which is that it is a collection of asynchronous operations that execute over a variety of durations. In his model, the living room object bound an event listener to any motion that occurred within it. Once triggered, the bound function invoked a method to turn on the lights. The lights in turn had their own reactive task chain to complete, first turning on and then dimming after a given timeframe.
This event observer pattern, as referenced in the previous snippet, is very common in many JavaScript libraries like jQuery. This familiarity is one of the reasons Williams felt JavaScript could be a good choice for controlling hardware because even developers with no hardware experience can still leverage their knowledge of building interactive web pages.
The snippet also implies that the framework needs to be written to handle a world where events streams from many inputs at once. The goal of a reactive system is to respond to state changes on watched objects and propagate those changes to any other dependent objects. The classic example of a reactive system is a spreadsheet where a sum in column “c” depends on adding columns “a” and “b” together. Normally, this computation would occur only once. If the values of “a” or “b” changed, “c” would no longer be correct. Unless “c” was told about the change, it would never update and thus be perpetually out of sync. In a reactive system, however, “c” would observe “a” and “b” for changes. Once a change was detected, it would sum “a” and “b” again. The process of recalculating its value would in turn trigger objects dependent on “c” higher in the event stream to react as well.
When programming robots, it is possible that a bot will be simultaneously tracking many different environment variables using a variety of different sensors. These sensors, however, may return results at different intervals. Therefore, a reactive system would be useful to aggregate, reprocess, and potentially invalidate input long before the hardware has to respond. The goal of a reactive programming system as it relates to robotics is to handle the asynchronous nature of the real world and reformulate it into a series of sequential steps that the hardware can perform. In the next section, you will begin to build your reactive system using the NodeBots software stack.
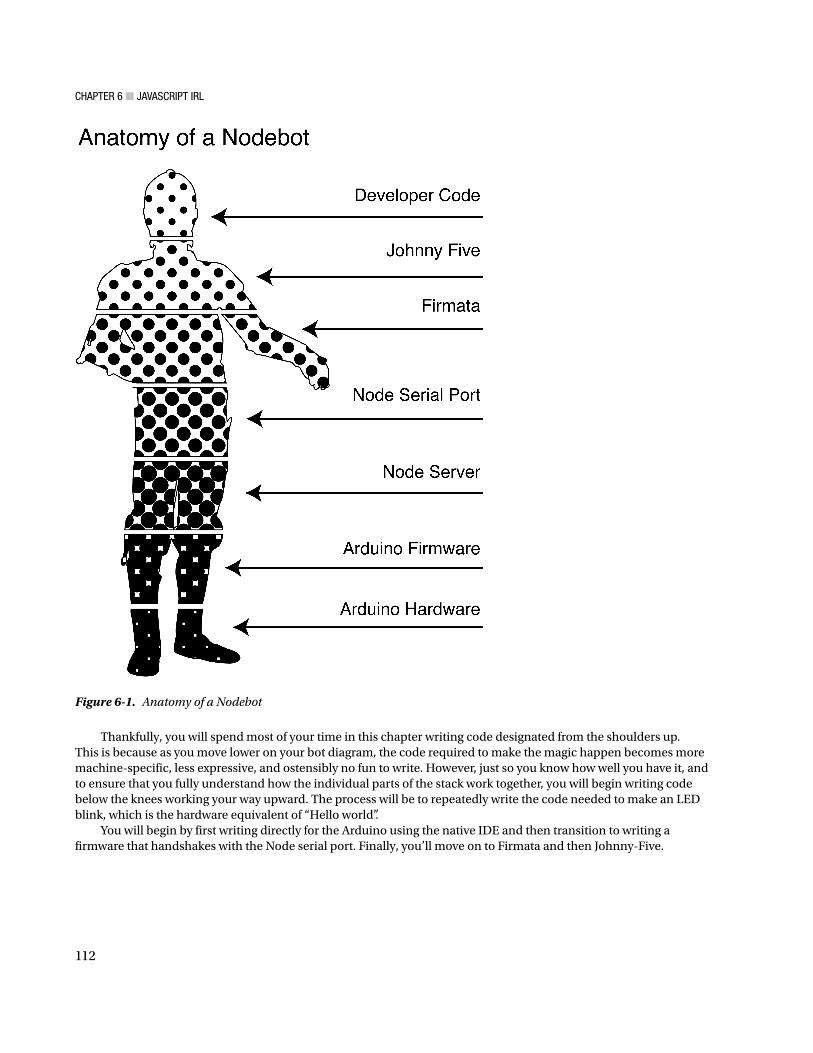
NodeBots: Fast, Cheap, and Servo-controlled NodeBots are robots controlled using an invisible JavaScript tether. This tether is composed of a Node server and a collection of libraries that abstract much of the drudgery of communicating with hardware. The NodeBots you will build leverage the Arduino board to control the output peripherals. Before you can properly begin to build your bot, though, you must first understand how all these technologies work together. Consider the following diagram shown in Figure 6-1 . It explains the anatomy of the Nodebot you will ultimately build.
3 http://voodootikigod.com/nodebots-the-rise-of-js-robotics/
CHAPTER 6 ■ JAVASCRIPT IRL
112
Thankfully, you will spend most of your time in this chapter writing code designated from the shoulders up. This is because as you move lower on your bot diagram, the code required to make the magic happen becomes more machine-specific, less expressive, and ostensibly no fun to write. However, just so you know how well you have it, and to ensure that you fully understand how the individual parts of the stack work together, you will begin writing code below the knees working your way upward. The process will be to repeatedly write the code needed to make an LED blink, which is the hardware equivalent of “Hello world”.
You will begin by first writing directly for the Arduino using the native IDE and then transition to writing a firmware that handshakes with the Node serial port. Finally, you’ll move on to Firmata and then Johnny-Five.
Figure 6-1. Anatomy of a Nodebot

CHAPTER 6 ■ JAVASCRIPT IRL
113
REPL I mentioned earlier that the machines will be linked to a host computer using JavaScript. This is much different from the typical approach, which is to edit the source files and then compile it down into byte code so that it can be stored directly on the chip of the Arduino. Only then can the program be run. This development cycle is called edit-compile-run-debug (ECRD) , and is how most Arduino bots are built. In contrast, NodeBots keep the robot’s brains on the host computer and use a read-eval-print-loop (REPL) environment. This approach has certain advantages and disadvantages that I’ll enumerate here.
Advantages Encourages experimentation because of the real-time interaction between the host computer • and hardware.
Reduces complexity in debugging because the code remains accessible on the host computer • and is not compiled down into a different form, which may introduce inconsistencies.
Affords a clear separation of concerns between the low-level control of the hardware and • high-level business logic.
Programs can be more complex due to the additional resources available from the host • computer.
Disadvantages Requires a persistent tether, which may limit the autonomy of the robot. •
Increases dependencies needed to make the robot run. •
May incur a delay in responsiveness between the host computer and the bot due to the time it • takes for messages to be sent over the tether.
Why Bother? For years when I would badger my brother Matt for advice over the phone about my newest pie-in-the-sky hardware idea, he would typically respond the same way, “Why would you want to do that?” His verbal pin always popped my mental bubble, and I’d deflate back down to earth, feeling dejected that real engineers would think my idea was dumb. The couple of times that he did try to answer my question, I was quickly lost in concepts and minutiae that I had no frame of reference to understand. I know he was not out to hurt my feelings, and maybe in his mind he was saving me time and effort in pursuing what he knew to be a naive approach. As I began to get excited about JavaScript robots I asked myself this question: would real robotic engineers thumb their noses at NodeBots as being without merit ? To find out, I asked a real robotics engineer.
Raquel Vélez is a mechanical engineer who trained at Caltech and has since worked in the robotics field for nearly a decade. She also happens to be very active in the NodeBots community. Because Vélez is an insider in both the professional and hobbyist robotics communities I felt she could answer the “why bother” question. When I posed it to her, she said this:
It's true that NodeBots are still in their infancy; we're not going to be running a self-driving car with node anytime soon. But the point isn't that node is going to replace C++/Python—rather, by opening the robotics community to the JavaScript community, we're enabling a whole world of people to robotics that didn't exist before. This influx, in turn, increases the diversity of people trying to solve hard problems, and thereby pushes all technology (the web, robotics) forward.
CHAPTER 6 ■ JAVASCRIPT IRL
114
She continued to compare and contrast the two communities this way:
Basically, having the ability to be truly open source, with a super fast turn-around time is something you can't get in the "traditional" robotics industry. When I worked in academia/industry, you had to have lots of money, experience, and time to get any significant work done. With NodeBots, you don't need any of those things—you can just get started.
I was sold on the idea even before Vélez gave it the expert’s thumbs up for all the reasons that she mentioned, but also because I didn’t need to ask anyone’s permission to get started. There is literally no barrier to entry, provided you can cobble together less than a hundred dollars in parts and tools, which I’ll cover next.
Prerequisites This chapter has a variety of external and system-specific prerequisites that need to be met to be able to follow along step-by-step. Please ensure that you have taken the necessary time to confirm that your environment meets the following preconditions before attempting to replicate the Nodebot examples.
General Before installing anything, make sure that your system has the ability to compile any and all native modules for Node . At the time of this writing, Python 2.x is required; using version 3.x will result in failure because node-serialport depends on node-gyp , which requires Python 2.x
Windows You must have Visual Studio 2010+ installed (Express edition is fine). If you will use the Arduino, ensure that you install the necessary drivers. 4
Mac OS X You must ensure that you have the xCode command line tools 5 installed (at a minimum).
Linux Most likely, no special dependencies exist for your system above and beyond the general prerequisites.
Shopping List Before you can build your robot army, you must get a basic kit of parts and a small selection of tools together. What follows is the minimum shopping list required to replicate the examples in this chapter. If you think JavaScript robots might be something that will hold your interest for some time, you might consider buying a pre-bundled kit. These packs include your required parts and a few other nice-to-have components. Many times these kits are marketed under names such as explorer , inventor or introductory ; and are available through a variety of local and online electronics retailers.
4 http://arduino.cc/en/Main/Software 5 https://developer.apple.com/xcode/

CHAPTER 6 ■ JAVASCRIPT IRL
115
An Arduino Uno R3 Board • 6
10 ft. USB 2.0 Certified 480Mbps Type A Male to B Male Cable •
A few basic Red 5mm LEDs •
A package of breadboard jumper wires •
Micro servo motor •
Safety glasses •
Arduino IDE In this section, you will make an Arduino blink using the native IDE. You will write a trivial script, which must then be uploaded to the Arduino board. This two-step process is needed only when using the IDE; as soon as you add a Node serial port to your stack, you will have the means for creating a persistent connection to your Arduino board.
Setup You will first need to download the Arduino IDE 7 and get it successfully installed. Once you install it, you will want to place the longer leg (positive) of your LED in pin slot 13 and the shorter leg (negative) in the ground slot. The reason you use pin 13 is because it has a resistor already built in. Once installed, your board should look something like Figure 6-2 .
Figure 6-2. Board layout for the blink example
6 http://arduino.cc/en/Main/arduinoBoardUno 7 http://arduino.cc/en/Main/Software

CHAPTER 6 ■ JAVASCRIPT IRL
116
Smoke Test To perform this test, you will need to follow a series of steps to get your LED to blink.
Step 1: Connect the Board Connect the USB cord to the Arduino and the computer. You should see a small LED on the board light and remain lit. This LED indicates power is flowing to the board.
Note ■ On a Windows machine, you may be prompted by the hardware wizard to install drivers for the Arduino. You will need to unzip FTDI USB Drivers.zip , which can be found in the drivers folder of the Arduino distribution you downloaded with the IDE. Point the wizard to these drivers from the (Advanced) menu option.
Step 2: Select the Correct Board Ensure that you have the correct board selected inside the IDE. You can do this by picking the board from the Tools ➤ Board submenu, as shown in Figure 6-3 .
Note ■ This chapter assumes that you are using the Arduino Uno. If you are using another kind of board, the preceding screenshot will not be 100 percent accurate.
Step 3: Write Firmware The Arduino IDE uses the metaphor of a sketch book in which every page is a sketch that can be loaded into the Arduino. Sketches are saved with the .ino file extension. Below is the sketch that you will upload to your Arduino. Fortunately you will not need to transcribe it because this code can be found in the examples folder inside the IDE (see Figure 6-4 ).
Figure 6-3. Arduino IDE board selection menu

CHAPTER 6 ■ JAVASCRIPT IRL
117
/* Blink Turns on an LED on for one second, then off for one second, repeatedly. This example code is in the public domain. */ // Pin 13 has an LED connected on most Arduino boards. // give it a name: int led = 13; // the setup routine runs once when you press reset: void setup() { // initialize the digital pin as an output. pinMode(led, OUTPUT); } // the loop routine runs over and over again forever: void loop() { digitalWrite(led, HIGH); // turn the LED on (HIGH is the voltage level) delay(1000); // wait for a second digitalWrite(led, LOW); // turn the LED off by making the voltage LOW delay(1000); // wait for a second }
This code should be pretty self-explanatory; it just initializes the board and then begins to loop repeatedly. During each loop, the code issues a call to write either a high or low value to pin 13 of the Arduino. One aspect of this code that is hard to understand is what the constants OUTPUT , HIGH , and LOW actually do.
Figure 6-4. Arduino IDE example selection menu

CHAPTER 6 ■ JAVASCRIPT IRL
118
Step 4: Compile and Upload a Firmware Once the blink tutorial is selected, a new sketch window will appear. This new window has several icons running along the top. Locate the check mark icon and press it. This action tells the IDE to verify and compile the code into a format suitable for upload to the Arduino board. If everything works, you should see a Done Compiling message near the bottom of the interface.
Click the right-arrow icon in the top menu, which will upload the code to the Arduino. You will see a progress indicator near the bottom appear that updates as the code is transferred to the board. Once you see Done Uploading, you should see your Arduino rhythmically blinking an LED for you.
Step 5: Unplug Arduino Once you have successfully completed this test, unplug the USB cable from your computer, which should cut power to the Arduino.
Node Serial Port The node serial port is the base of the NodeBot layer cake. Every other library covered in this chapter will depend on this library in one way or another. However, before you can communicate with the Arduino using the Node serial port, you need to create the custom .ino firmware, which allows handshaking between the Node code and the Arduino.
Smoke Test Step 1: Connect the Board Reconnect your board to the computer using the USB cable. You should see the onboard LED become lit, designating the board has power.
Note ■ If you skipped the previous Arduino example, please refer to that section to ensure that you have installed all the requisite drivers.
Step 2: Select the Correct Board Ensure that you have the correct board selected inside the IDE just as you did in the previous Arduino IDE example.
Step 3: Write Firmware Open a new sketch file in the Arduino IDE and transcribe the following code:
int bytesRead = 0; boolean isPinSet; byte stored[2]; void setup() { Serial.begin(57600); }

CHAPTER 6 ■ JAVASCRIPT IRL
119
void loop() { while (Serial.available()) { int data = Serial.read(); stored[bytesRead] = data; bytesRead++; if (bytesRead == 2) { if (isPinSet == false) { isPinSet = true; pinMode(stored[0], OUTPUT); } else { digitalWrite(stored[0], stored[1]); } bytesRead = 0; } } }
Step 4: Compile and Upload Firmware Once you have transcribed the previous code into your sketch file, click the check mark icon to verify and compile the source. If you have typed everything correctly, you should see the message “Done compiling” toward the bottom of the interface. Next, click the right arrow to upload the compiled code to the Arduino. You should see a progress indicator appear as it transfers the code. Once everything completes, you should see the message “Done uploading” toward the bottom of the interface.
Step 5: Install Node Serial Port Provided that you already have node and npm installed on your computer, you can install node-serial port like this: npm install serialport
Step 6: Write a Program Create a new file from within your favorite text editor, and type the following code. Once transcribed, save it as serial-blinky.js to the same folder you installed node serial port. var serial = require("serialport"), raddress = /usb|acm|com/i, pin = 13; serial.list(function(err, result) { var read = new Buffer(0), address, port, bite; if (result.length) { address = result.filter(function(val) {

CHAPTER 6 ■ JAVASCRIPT IRL
120
// Match only address that Arduino cares about // ttyUSB#, cu.usbmodem#, COM# if (raddress.test(val.comName)) { return val; } }).map(function(val) { return val.comName; })[0]; port = new serial.SerialPort(address, { baudrate: 57600, buffersize: 1 }); port.on("open", function() { var bite; function loop() { port.write([pin, (bite ^= 0x01)]); } setInterval(loop, 500); }); } else { console.log("No valid port found"); } });
Now run your code from the command line using this: node serial-blinky.js
If everything works, the LED should begin to blink for you.
Caution ■ If you get a “Cannot find module ‘serialport’” error, you will need to save this sketch beside the ‘node_modules’ folder that contains the node serial-port library.
Step 7: Unplug Arduino Once you have successfully completed this test, unplug the USB cable from your computer. Doing so should cut power to the Arduino.
Too Close for Comfort This approach actually feels more cumbersome than writing just for the Arduino because it requires two tightly coupled files to work. If you made substantial changes to your JavaScript file, you would need to reflect those changes in your .ino file. This is because Node serial port is a low-level library meant just for communicating over the serial port, nothing more; nothing less. Thankfully, you will be moving one layer higher in abstraction as you move on to Firmata.
CHAPTER 6 ■ JAVASCRIPT IRL
121
Firmata Firmata is a generic protocol for communicating between an Arduino and host computer. In this example, you will be working with two forms of Firmata. The first will be a firmware .ino file that you will load directly onto the Arduino. The second Firmata is a Node library that handshakes with the firmware. In this section, you will re-create the blinking example, but this time using Firmata as a bridge.
Smoke Test Step 1: Connect the Board Reconnect your board to the computer using the USB cable. You should see the onboard LED become lit, designating that the board has power.
Note ■ If you skipped the previous Arduino example, please refer to that section to ensure that you have installed all the requisite drivers.
Step 2: Select the Correct Board Ensure that you have the correct board selected inside the IDE just as you did in the Arduino IDE example.
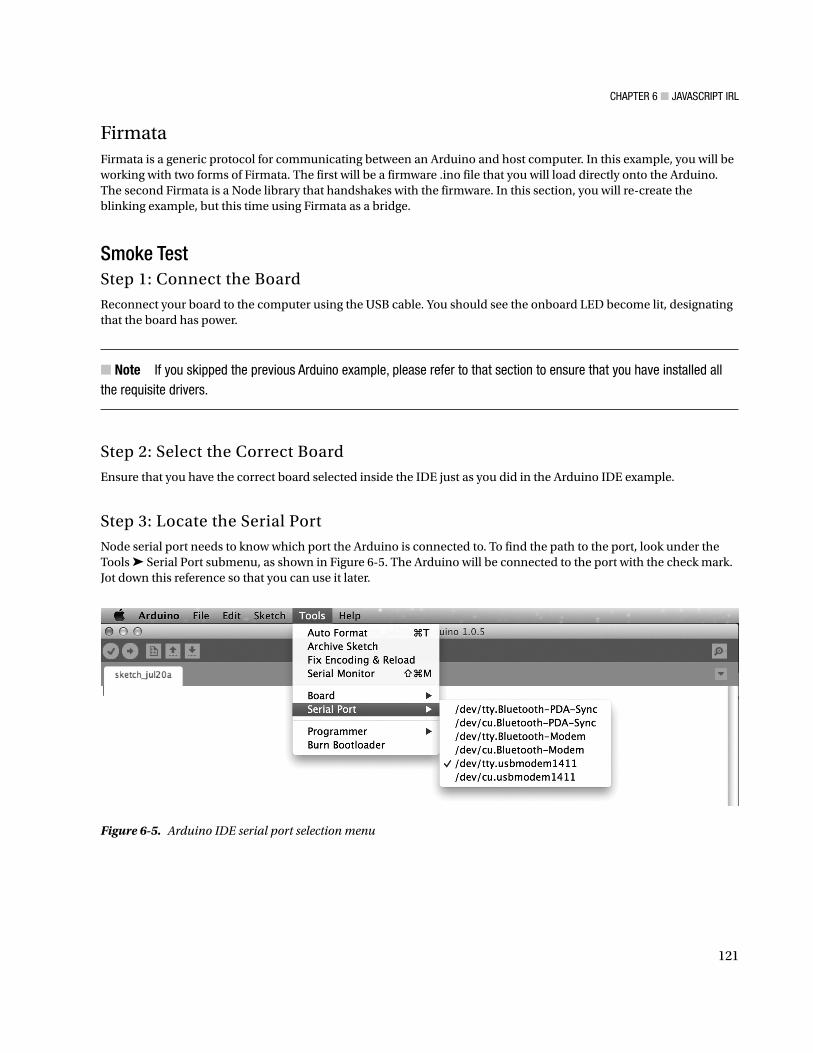
Step 3: Locate the Serial Port Node serial port needs to know which port the Arduino is connected to. To find the path to the port, look under the Tools ➤ Serial Port submenu, as shown in Figure 6-5 . The Arduino will be connected to the port with the check mark. Jot down this reference so that you can use it later.
Figure 6-5. Arduino IDE serial port selection menu

CHAPTER 6 ■ JAVASCRIPT IRL
122
Step 4: Install Firmata Firmware To set up the REPL development environment, you must install the StandardFirmata firmware onto your Arduino. Fortunately, this code comes bundled with the IDE. Simply choose File ➤ Examples ➤ Firmata ➤ StandardFirmata, as seen in Figure 6-6 . This will open a new sketch window with the required code already present. Now click the right arrow and upload the compiled code to the board.
Figure 6-6. Arduino IDE Firmata selection menu
Once the upload completes, your REPL environment is good to go. At this point, you can close native Arduino IDE; you will not need it again for the rest of the chapter.
Step 5: Install the Firmata Library Now that you have loaded the standard Firmata firmware onto your board,, you need to install the Firmata Node library that understands how to communicate with it. From within the same directory that you installed node-serialport, type the following: npm install firmata

CHAPTER 6 ■ JAVASCRIPT IRL
123
Step 6: Write a Program Provided that Firmata installed correctly, you are ready to rewrite your blinking program. In a text editor, transcribe the following code and save it as ’ firmata-blinky.js ’ in the same folder in which you used to store your previous examples: /** * Sample script to blink LED 13 */ console.log('blink start ...'); var pin = 13; var firmata = require('firmata'); var board = new firmata.Board('/dev/cu.usbmodem1411', function(err) { var bite; board.pinMode(pin, board.MODES.OUTPUT); function loop() { board.digitalWrite([pin, (bite ^= 0x01)]); } setInterval(loop, 500); });
Now run your code from the command line using the following: node firmata-blinky.js
If everything works, you should see the LED begin to blink for you.
Step 7: Unplug Arduino Once you have successfully completed this test unplug the USB cable from your computer, which should cut power to the Arduino.
REPL for Real Now that you have the Firmata firmware installed and communicating with the Firmata library on your host computer, you have a true REPL development environment setup. This means that (unlike in your Node serial port version) you would not be forced to update the firmware each time you changed your source code on the host computer. Unfortunately, as great as Firmata is, the JavaScript code that you have to write is still very domain-specific. Just as in the Arduino IDE example, there are several obtuse constants and modes that you need to understand before your code will work correctly. To write code that is even more hardware-agnostic, you need to climb one more layer up the stack. Onward to Johnny-Five!

CHAPTER 6 ■ JAVASCRIPT IRL
124
Johnny-Five Rick Waldron is serious about robots, so much so that he built his own to propose to his wife. Not being an engineer and with no robot emissary of her own, she instead gave Waldron the happy news in her best robot voice. Personally, I think of Waldron as a Crash Override figure in the JavaScript community—one who happily exploits his own intellect for fun over profit, yet is serious in his commitment to pushing the community and the language forward.
Waldron created Johnny-Five , which is an open-source Arduino programming framework that sits on top of the Firmata and Node serial port stack. Johnny-Five has a clean expressive API that feels like the JavaScript most developers are used to writing in other contexts. It is the closest to the platonic ideal that Chris Williams proposed in his hypothetical living room example. I asked Waldron about Johnny-Five and why he, like others, felt a JavaScript REPL environment would be ideal for programming robots. He responded this way:
All hardware is implicitly synchronous; it exists in the real world. If you tell something to move, it takes actual time to move. This means any program written to interact with hardware must be aware of these temporal constraints and capable of providing efficient control mechanisms. Traditionally, this achieved with multi-threaded, interrupt based programming models; I believe that a single threaded, turn based execution model can provide the same level of efficient control.
Consider a simple sensor attached to an Arduino; traditionally, you’d have some function that is called repeatedly to read and process the value of an analog sensor and conditionally executing some other part of the program based on a change in the value. When writing the same program within JavaScript, using the Johnny-Five framework, the programming model changes to an observer in the form of an event bus. A sensor's value changes, and listeners are notified.
When programming output, the ideas are the same but have much more impact. Let's say we want our program to move a servo from 0 to 180 degrees and back; using the datasheet for our servo, we calculate that it takes 1000ms to travel the full 180 degrees. If you wrote this in Arduino C, it would require a delay(1000) after the first move, which blocks the execution process for entire second. If this is in a loop, then each loop suffers a 1 second hold. If the program must also read sensors for some conditional execution, those sensors are also blocked for 1000ms. In JavaScript on Node.js, using Johnny-Five, tasks that require a “delay” or “loop” will not block execution. Instead, they are scheduled tasks that will be invoked in a later execution turn, allowing the rest of the program to continue as normal.
The turn based execution model is actually not part of the JavaScript language; it’s a paradigm of the embedded environment, e.g. a browser, or in this case Node.js. Node.js’s turn based execution is implemented in the form of libuv, which provides an asynchronous, event based execution environment. This model is an implicit analog to the explicit loop() in Arduino C.
—Rick Waldron
Waldron’s approach is very much in the spirit of the Reactive Programming paradigm that was covered earlier in the chapter. The way state changes propagate throughout the framework means that you can write much less code to efficiently model an analog for the real world. In the next section, you will re-create the blinking LED. Then you will explore Johnny-Five’s REPL environment by creating a more advanced example.
Smoke Test Step 1: Connect the Board Reconnect your board to the computer using the USB cable. You should see the onboard LED become lit, designating that the board has power.

CHAPTER 6 ■ JAVASCRIPT IRL
125
Step 2: Install Johnny-Five This step assumes that you have already flashed the StandardFirmata firmware onto your Arduino. If you have not completed this step, consult the Firmata section earlier in the chapter. From within the same directory that you installed node-serialport and Firmata, type the following: npm install johnny-five
Step 3: Write a Program Assuming that Johnny-Five installed correctly, you are ready to rewrite your blinking LED example. In a text editor, transcribe the following code and save it as ’ johnny-blinky.js ’ in the same folder you used to store your previous examples: var five = require("johnny-five"), board = new five.Board(); board.on("ready", function() { (new five.Led(13)).strobe(); });
Now run your code from the command line using the following: node johnny-blinky.js
If everything works, the LED should begin to blink for you.
Step 4: Unplug Arduino Once you have successfully completed this test, unplug the USB cable from your computer, which should cut power to the Arduino.
Fiddling with Johnny-Five It should be clear by simply looking at the number of lines that Johnny-Five requires to blink the LED that this framework really does make writing for the Arduino much easier. However, you are just getting started! In the next example, you will control a micro server motor in real-time using the REPL console. Through this process, you’ll understand more about how Johnny-Five models hardware internally and how you can use this knowledge to improve your own programs.
Step 1: Prepare the Board In this example, you will be controlling a micro servo using Johnny-Five. Provided you have your motor available, plug the data wire into pin 10 and the power wire into the 5 volt pin. Finally, plug the ground wire into one of the available ground pins (see Figure 6-7 ).

CHAPTER 6 ■ JAVASCRIPT IRL
126
Note ■ This diagram shows wires connecting directly to the Arduino’s pin slots. However, in reality you will probably need to use jumper wires to connect your servo to the Arduino.
Step 2: Connect the Board Reconnect your board to the computer using the USB cable. You should see the onboard LED become lit designating the board has power.
Step 3: Write a Program You will now write a simple program to interact with your servo. In a text editor, transcribe the following code into a file. Save the file as ’ servo.js ’ in the same directory that you have been using for your examples. var five = require("johnny-five"), board = new five.Board();
Figure 6-7. Wiring diagram for servo example

CHAPTER 6 ■ JAVASCRIPT IRL
127
board.on("ready", function() { var servo = new five.Servo(10); this.repl.inject({ servo: servo }); servo.center(); servo.on("move", function(err, degrees) { console.log("move", degrees); }); });
Now run your code from the command line using the following: node servo.js
If everything works, you should see the servo center and the following output in the terminal window: 1374513199929 Board Connecting... 1374513199933 Serial Found possible serial port /dev/cu.usbmodem1411 1374513199934 Board -> Serialport connected /dev/cu.usbmodem1411 1374513203157 Board <- Serialport ready /dev/cu.usbmodem1411 1374513203158 Repl Initialized >>
From within the REPL console, type this: this.servo.move(90)
Two things should happen: you should see the servo rotate 90 degrees and see Johnny-Five’s representation of the hardware state rendered to the console (which you’ll explore in detail in the next section).
Step 4: Unplug Arduino Once you have successfully completed this test, unplug the USB cable from your computer, which should cut power to the Arduino.
Number Five Is Alive As you issue commands to Johnny-Five’s REPL instance, it returns a JavaScript object presenting the current environment state. In your servo example, after you issued a move command, Johnny-Five returned an object that looked a bit like this: { board: { ready: true, firmata: {...}, register: [ [Circular] ], id: '98880E34-5D9E-49A9-8BA0-89496E54F765', debug: true, pins: { '0': [Object], '1': [Object], '2': [Object], '3': [Object], '4': [Object], '5':

CHAPTER 6 ■ JAVASCRIPT IRL
128
[Object], '6': [Object], '7': [Object], '8': [Object], '9': [Object], '10': [Object], '11': [Object], '12': [Object], '13': [Object], '14': [Object], '15': [Object], '16': [Object],'17': [Object], '18': [Object], '19': [Object] }, repl: { context: [Object], ready: false, _events: {} }, _events: { ready: [Function] }, port: '/dev/cu.usbmodem1411' }, firmata: {...}, _maxListeners: 10, MODES: { INPUT: 0, OUTPUT: 1, ANALOG: 2, PWM: 3, SERVO: 4 }, I2C_MODES: { WRITE: 0, READ: 1, CONTINUOUS_READ: 2, STOP_READING: 3 }, STEPPER: { TYPE: [Object], RUNSTATE: [Object], DIRECTION: [Object] }, HIGH: 1, LOW: 0, pins: [ [Object], [Object], [Object], [Object], [Object], [Object], [Object], [Object], [Object], [Object], [Object], [Object], [Object], [Object], [Object], [Object], [Object], [Object], [Object], [Object]], analogPins: [14, 15, 16, 17, 18, 19], version: { major: 2, minor: 3 }, firmware: { version: [Object], name: 'StandardFirmata.ino'}, currentBuffer: [], versionReceived: true, sp: { domain: null, _events: [Object], _maxListeners: 10, options: [Object], path: '/dev/cu.usbmodem1411', fd: 11, readStream: [Object] } }, id: '946C9829-5DB0-4EA2-8283-6249CC8E25F6',

CHAPTER 6 ■ JAVASCRIPT IRL
129
pin: 10, mode: 4, range: [0, 180], type: 'standard', specs: { speed: 0.17 }, history: [{ timestamp: 1374513576399, degrees: 90 }], interval: null, isMoving: true, _events: { move: [Function] } }
In this object, you can see not only a representation of the Arduino’s hardware in terms of pins and ports but you also see Firmata described and the capabilities of your attached servo. In addition to the current state of the board, there is also a history array that contains a list of changes over time. This, of course, is invaluable when you try to debug a complex interaction between multiple inputs and outputs over time.
I cannot oversell how fantastic the ability to fiddle on the fly with the Johnny Five REPL environment is. Just as Raquel Vélez pointed out earlier, part of her excitement with NodeBots is that you can prototype quickly. Using the REPL environment, you can test a hardware hunch interactively in the console, sketching in broad strokes before you refine things into a precisely composed program.
Fauxbots Although you did get a servo to spin under your control, I would be hard pressed to call this a robot. Practically speaking you could spend an entire book explaining and building NodeBots. Therefore I limited the scope of this chapter to explaining just enough to give you the necessary context to explore them on your own. Here are a couple of key concepts about programming robots using this approach:
There is the potential for fire or other real-world mishaps when programming hardware, but it • doesn’t mean it will happen.
Interesting things happen when you interweave the computer into an existing analog physical • process in an unexpected way.
Interesting things happen when you map qualities of the virtual world into physical space. •
Network-aware objects can be considered part of the Internet of Things. •
The Reactive Programming paradigm handles state change by observing data flows between • objects in the aggregate.
Reactive programming is particularly appropriate for converting an asynchronous world into a • series of chainable evented processes.
Much of traditional hardware development uses the edit-compile-run-debug (ECRD) process, • which allows hardware to run in a stand-alone context, but can be slow to develop and debug.
NodeBots use a read-eval-print-loop (REPL) environment, which allows for faster • development and real-time coding. However, this approach requires the hardware to be persistently tethered.
CHAPTER 6 ■ JAVASCRIPT IRL
130
The interest in JavaScript robots is palpable among a subset of the JS community. So much so that NodeBot developers have spawned their own web sites, meet-ups, and conferences; and even created an international NodeBots day in which nerds huddle together and solder among themselves. If you are fascinated, like me, with the potentials this has to offer, I encourage you to seek others with similar interests and get building!
Additional Resources The Arduino diagrams in this chapter were produced using Fritzing, which is an open-source hardware initiative to support designers, artists, researchers, and hobbyists to work creatively with interactive electronics. It has a wonderful set of tools and tutorials to help hardware novices plan and ultimately produce their own designs. Find out more here: http://fritzing.org/ .


![Index []...2003/01/28 · IRL Jack O'Leary 04/11/1997 IRL Peter Lynch 26/11/1997 IRL Darragh McElhinney 2000 IRL Fearghal Curtin 14/07/1998 IRL Charlie O'Donovan 06/08/1999 IRL Barry](https://img.pdfslide.us/doc/110x75/5e9ad3bf924b7b6d1915a79a/index-20030128-irl-jack-oleary-04111997-irl-peter-lynch-26111997.jpg)