Embed Size (px)
Citation preview

www.fisher-price.com
J8209, J8210, J8211
GE

GThis package contains small parts in its unassembled state. Adult assembly is required.
EContiene piezas pequeñas necesarias para el montaje del producto. Requiere montaje por parte de un adulto.
GCAUTION ECAUTION
2
GConsumer Information EServicio de atención al consumidor
GREAT BRITAIN Mattel UK Ltd, Vanwall Business Park, Maidenhead SL6 4UB. Helpline: 01628 500303; www.service.mattel.com/uk.
ESPAÑAMattel España, S.A., Aribau 200. 08036 Barcelona. [email protected]. Tel: 902.20.30.10; http://www.service.mattel.com/es.
Introduction
�
G Introduction E Introducción
G• Please keep this instruction booklet for future reference, as it contains important information. • Requires four “AA” (LR6) alkaline batteries (not included) and one CR2032 lithium button cell battery (included). • Adult assembly is required for battery and software installation. • Tool required for battery installation: Phillips screwdriver (not included). Loosen and tighten screws with a Phillips
screwdriver. Do not over-tighten the screws. • Your Kid Tough™ Digital Camera includes PhotoShow™ Deluxe Software to view, manage or edit your digital
pictures. If you already have image viewing/editing/managing software installed on your computer, you do not need to use PhotoShow™ Deluxe Software.
• When your camera is connected to your computer, you can delete or copy pictures by accessing your camera as a removable storage device.
• For additional picture storage, this camera accepts a Secure Digital (SD) card (not included).
E• Guardar estas instrucciones para futura referencia, ya que contienen información de importancia acerca de este producto.
• Funciona con cuatro pilas alcalinas AA/LR6 (no incluidas) y una pila de botón de litio CR2032 (incluida). • La colocación de las pilas debe ser realizada por un adulto. • Herramienta necesaria para la colocación de las pilas: destornillador de estrella (no incluido). Atención: apretar
y aflojar los tornillos con un destornillador de estrella. Recomendamos no apretarlos en exceso. • “Mi Primera Cámara Digital” incorpora el software PhotoShow™ Deluxe para ver, administrar o retocar fotos
digitales. Si el niño ya tiene instalado en su ordenador otro software para ver/retocar/gestionar fotos, no es necesario usar el software PhotoShow™ Deluxe.
• Con la cámara conectada al ordenador, se pueden borrar o copiar fotos accediendo a la cámara como dispositivo de almacenamiento extraíble.
• Esta cámara es compatible con tarjetas Secure Digital (SD) (no incluidas) para una mayor capacidad de almacenamiento de fotos.
GTips for Better Images! EConsejos para hacer buenas fotos
GBefore your child uses the camera independently, we recommend that you first thoroughly read these instructions. Explain to your child how to use the camera and then practice taking pictures with your child.
1. Use Bright Light Indoors Make sure there is a bright light source when taking indoor pictures. The light source (sun, lamp or window) should
be above or facing your picture subject. Do not place your picture subject in front of the light source since the picture subject will look dark in your photo.
2. Hold Still Make sure the picture taker and the picture subject aren’t moving. Also be sure your child holds the camera with two
hands. �. Proper Distance Centre the picture subject on the LCD screen. The picture subject should be no closer than 1,22 m (4 feet) from
camera. For flash pictures, make sure your subject is no further than 2,23 m away (7.5 feet).
EAntes de que el niño use la cámara por sí solo, recomendamos a los padres que lean detenidamente estas instruc-ciones, le expliquen al niño cómo usar la cámara y luego practiquen juntos tomando algunas fotos de prueba.
1. Usar mucha luz en fotos de interior. Las fotos en el interior requieren gran cantidad de luz. La fuente de luz (sol, lámpara o ventana) debe estar situada
por encima del objeto/sujeto a fotografiar u orientada hacia él. No poner el objeto/sujeto de la foto enfrente de la fuente de luz, ya que saldrá oscuro en la imagen.
2. No moverse. Tanto el fotógrafo como el sujeto fotografiado deben mantenerse lo más quietos posible y el fotógrafo debe sujetar
la cámara con ambas manos. �. Distancia adecuada Centrar el objeto/sujeto de la foto en la pantalla LCD. El objeto/sujeto de la foto debe encontrarse a un mínimo
de aproximadamente 1,22 m de la cámara. Para hacer fotos con flash, el objeto/sujeto debe encontrarse a una distancia máxima de la cámara de 2,23 metros aproximadamente.
�
G CameraE Cámara fotográfica
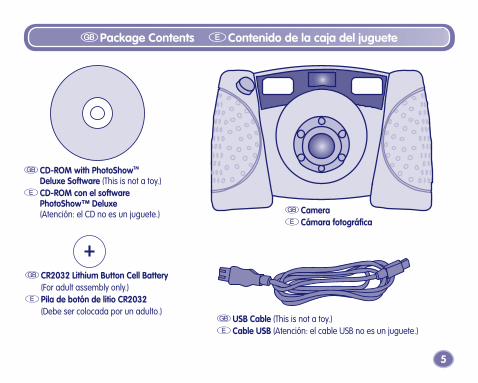
GUSB Cable (This is not a toy.)ECable USB (Atención: el cable USB no es un juguete.)
G CD-ROM with PhotoShowTM Deluxe Software (This is not a toy.)
E CD-ROM con el software PhotoShow™ Deluxe (Atención: el CD no es un juguete.)
GCR20�2 Lithium Button Cell Battery (For adult assembly only.)EPila de botón de litio CR20�2 (Debe ser colocada por un adulto.)
�
GPackage Contents EContenido de la caja del juguete
G The Kid Tough™ Digital Camera is picture-perfect for your little one! It’s a real digital camera with a durable, drop resistant design. It’s a perfect way for kids to get creative by taking, viewing and even printing their own digital pictures!
E ¡”Mi Primera Cámara Digital” es la cámara ideal para los más pequeños! Porque es una cámara digital de verdad con un diseño muy resistente....¡la manera perfecta para que los niños den rienda suelta a su creatividad tomando, viendo y hasta imprimiendo sus propias fotos digitales!
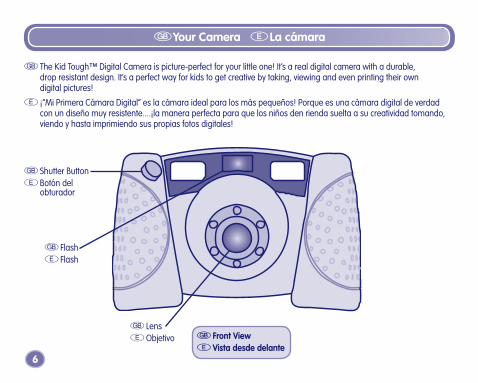
GLensEObjetivo
G Shutter ButtonE Botón del
obturador
Introduction
G Front ViewE Vista desde delante
GFlashEFlash
�
GYour Camera ELa cámara
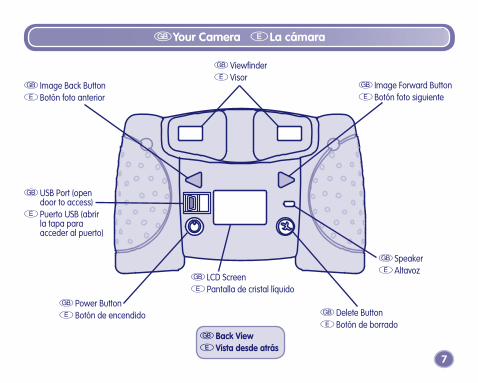
G ViewfinderE Visor
�
GYour Camera ELa cámara
G Back ViewE Vista desde atrás
G Image Back ButtonEBotón foto anterior
G USB Port (open door to access)
E Puerto USB (abrir la tapa para acceder al puerto)
G Power ButtonE Botón de encendido
G LCD ScreenE Pantalla de cristal líquido
G Delete ButtonE Botón de borrado
G SpeakerE Altavoz
G Image Forward ButtonE Botón foto siguiente
8
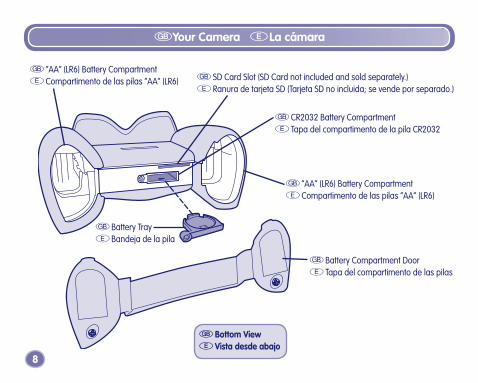
GYour Camera ELa cámara
G “AA“ (LR6) Battery CompartmentE Compartimento de las pilas “AA” (LR6)
G Battery TrayE Bandeja de la pila
G Battery Compartment DoorE Tapa del compartimento de las pilas
G CR2032 Battery CompartmentE Tapa del compartimento de la pila CR2032
G SD Card Slot (SD Card not included and sold separately.)E Ranura de tarjeta SD (Tarjeta SD no incluida; se vende por separado.)
G Bottom ViewE Vista desde abajo
G “AA“ (LR6) Battery CompartmentE Compartimento de las pilas “AA” (LR6)
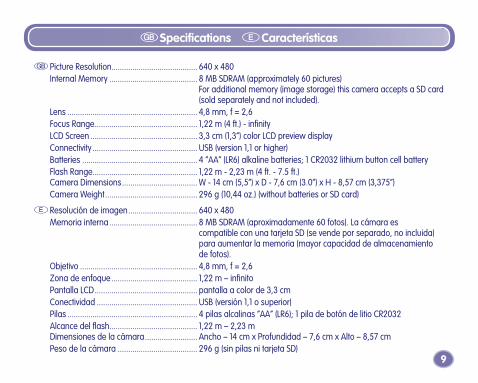
G Picture Resolution......................................... 640 x 480 Internal Memory .......................................... 8 MB SDRAM (approximately 60 pictures)
...................................................................... For additional memory (image storage) this camera accepts a SD card ...................................................................... (sold separately and not included).
Lens .............................................................. 4,8 mm, f = 2,6 Focus Range ................................................. 1,22 m (4 ft.) - infinity LCD Screen ................................................... 3,3 cm (1,3”) color LCD preview display Connectivity .................................................. USB (version 1,1 or higher) Batteries ....................................................... 4 “AA” (LR6) alkaline batteries; 1 CR2032 lithium button cell battery Flash Range .................................................. 1,22 m - 2,23 m (4 ft. - 7.5 ft.)
Camera Dimensions .................................... W - 14 cm (5,5”) x D - 7,6 cm (3.0”) x H - 8,57 cm (3,375”) Camera Weight ............................................ 296 g (10,44 oz.) (without batteries or SD card)
E Resolución de imagen ................................. 640 x 480 Memoria interna .......................................... 8 MB SDRAM (aproximadamente 60 fotos). La cámara es
...................................................................... compatible con una tarjeta SD (se vende por separado, no incluida) ...................................................................... para aumentar la memoria (mayor capacidad de almacenamiento ...................................................................... de fotos).
Objetivo ........................................................ 4,8 mm, f = 2,6 Zona de enfoque ......................................... 1,22 m – infinito Pantalla LCD ................................................. pantalla a color de 3,3 cm Conectividad ................................................ USB (versión 1,1 o superior) Pilas .............................................................. 4 pilas alcalinas “AA” (LR6); 1 pila de botón de litio CR2032 Alcance del flash.......................................... 1,22 m – 2,23 m
Dimensiones de la cámara ......................... Ancho – 14 cm x Profundidad – 7,6 cm x Alto – 8,57 cm Peso de la cámara ...................................... 296 g (sin pilas ni tarjeta SD)
GSpecifications ECaracterísticas
9
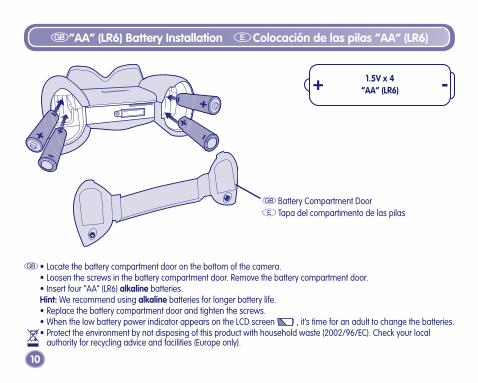
G Battery Compartment DoorE Tapa del compartimento de las pilas
10
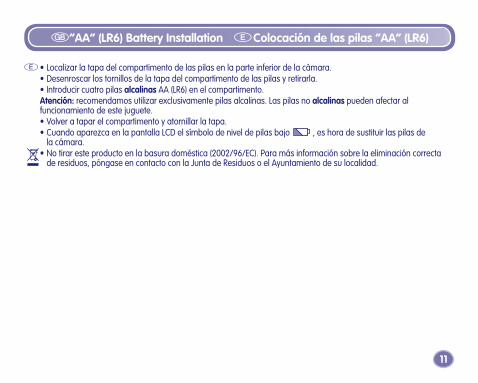
G • Locate the battery compartment door on the bottom of the camera. • Loosen the screws in the battery compartment door. Remove the battery compartment door. • Insert four “AA” (LR6) alkaline batteries. Hint: We recommend using alkaline batteries for longer battery life. • Replace the battery compartment door and tighten the screws. • When the low battery power indicator appears on the LCD screen , it’s time for an adult to change the batteries. • Protect the environment by not disposing of this product with household waste (2002/96/EC). Check your local
authority for recycling advice and facilities (Europe only).
G“AA“ (LR�) Battery Installation EColocación de las pilas “AA” (LR�)
1.�V x �“AA” (LR�)
11
E • Localizar la tapa del compartimento de las pilas en la parte inferior de la cámara. • Desenroscar los tornillos de la tapa del compartimento de las pilas y retirarla. • Introducir cuatro pilas alcalinas AA (LR6) en el compartimento. Atención: recomendamos utilizar exclusivamente pilas alcalinas. Las pilas no alcalinas pueden afectar al
funcionamiento de este juguete. • Volver a tapar el compartimento y atornillar la tapa. • Cuando aparezca en la pantalla LCD el símbolo de nivel de pilas bajo , es hora de sustituir las pilas de
la cámara. • No tirar este producto en la basura doméstica (2002/96/EC). Para más información sobre la eliminación correcta
de residuos, póngase en contacto con la Junta de Residuos o el Ayuntamiento de su localidad.
G“AA“ (LR�) Battery Installation EColocación de las pilas “AA” (LR�)
12
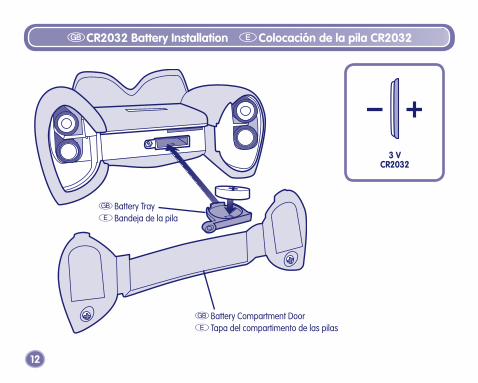
G Battery Compartment DoorE Tapa del compartimento de las pilas
G Battery TrayE Bandeja de la pila
GCR20�2 Battery Installation EColocación de la pila CR20�2
� VCR20�2
1�
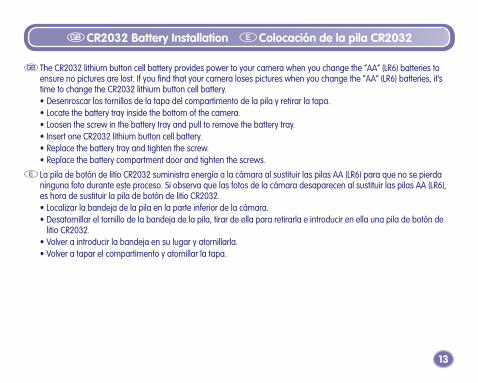
G The CR2032 lithium button cell battery provides power to your camera when you change the “AA” (LR6) batteries to ensure no pictures are lost. If you find that your camera loses pictures when you change the “AA” (LR6) batteries, it’s time to change the CR2032 lithium button cell battery.
• Desenroscar los tornillos de la tapa del compartimento de la pila y retirar la tapa. • Locate the battery tray inside the bottom of the camera. • Loosen the screw in the battery tray and pull to remove the battery tray. • Insert one CR2032 lithium button cell battery. • Replace the battery tray and tighten the screw. • Replace the battery compartment door and tighten the screws.
E La pila de botón de litio CR2032 suministra energía a la cámara al sustituir las pilas AA (LR6) para que no se pierda ninguna foto durante este proceso. Si observa que las fotos de la cámara desaparecen al sustituir las pilas AA (LR6), es hora de sustituir la pila de botón de litio CR2032.
• Localizar la bandeja de la pila en la parte inferior de la cámara. • Desatornillar el tornillo de la bandeja de la pila, tirar de ella para retirarla e introducir en ella una pila de botón de
litio CR2032. • Volver a introducir la bandeja en su lugar y atornillarla. • Volver a tapar el compartimento y atornillar la tapa.
GCR20�2 Battery Installation EColocación de la pila CR20�2
G In exceptional circumstances, batteries may leak fluids that can cause a chemical burn injury or ruin your toy. To avoid battery leakage:
• Do not mix old and new batteries or batteries of different types: alkaline, standard (carbon-zinc) or rechargeable (nickel-cadmium).
• Insert batteries as indicated inside the battery compartment. • Remove batteries during long periods of non-use. Always remove exhausted batteries from the toy. Dispose of
batteries safely. Do not dispose of this product in a fire. The batteries inside may explode or leak. Never short-circuit the battery terminals.
• Use only batteries of the same or equivalent type, as recommended. • Do not charge non-rechargeable batteries. • Remove rechargeable batteries from the toy before charging. • If removable, rechargeable batteries are used, they are only to be charged under adult supervision.
E En circunstancias excepcionales, las pilas pueden desprender líquido corrosivo que puede provocar quemaduras o dañar el juguete. Para evitar el derrame de líquido corrosivo:
• No mezclar pilas nuevas con gastadas ni pilas de diferentes tipos: alcalinas, estándar (carbono-cinc) y recargables (níquel-cadmio).
• Colocar las pilas tal como se indica en el interior del compartimento. • Retirar las pilas del juguete si no se va a utilizar durante un largo período de tiempo. No dejar nunca pilas
gastadas en el juguete. Un escape de líquido corrosivo podría estropearlo. Desechar las pilas gastadas en un contenedor de reciclaje de pilas. No quemar el juguete ya que las pilas de su interior podrían explotar o desprender líquido corrosivo.
• Evitar cortocircuitos en los polos de las pilas. • Utilizar pilas del tipo recomendado en las instrucciones o equivalente. • No intentar cargar pilas no-recargables. • Antes de recargar las pilas recargables, sacarlas del juguete. • Recargar las pilas recargables siempre bajo supervisión de un adulto.
1�
GBattery Safety Installation E Información de seguridad acerca de las pilas
1�
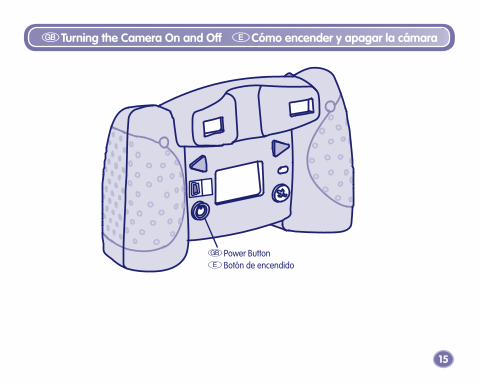
GTurning the Camera On and Off ECómo encender y apagar la cámara
G Power ButtonE Botón de encendido
1�
G • Press the power button on the back of the camera to turn power on. You will hear a tone. • To turn power off, press and hold the power button until you hear a tone. Hint: If you have not used the camera for a while, it shuts off automatically. To turn it back on, simply press the
power button.
E • Para encenderla, pulsar el botón de encendido situado en la parte posterior de la cámara. Al hacerlo, sonará un pitido.
• Para apagarla, pulsar el botón de encendido y mantenerlo pulsado durante unos segundos hasta oír un pitido. Atención: si no se utiliza la cámara durante un rato, se apaga automáticamente. Para volver a encenderla, pulsar el
botón de encendido.
GTurning the Camera On and Off ECómo encender y apagar la cámara
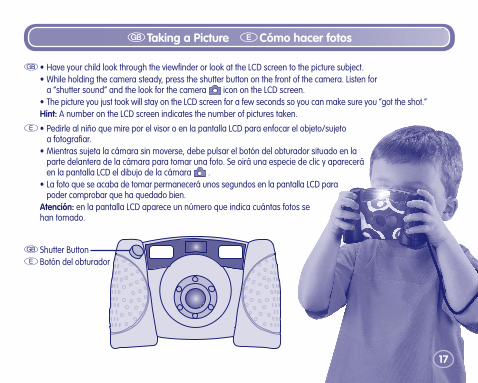
G • Have your child look through the viewfinder or look at the LCD screen to the picture subject. • While holding the camera steady, press the shutter button on the front of the camera. Listen for
a “shutter sound” and the look for the camera icon on the LCD screen. • The picture you just took will stay on the LCD screen for a few seconds so you can make sure you “got the shot.” Hint: A number on the LCD screen indicates the number of pictures taken.
E • Pedirle al niño que mire por el visor o en la pantalla LCD para enfocar el objeto/sujeto a fotografiar.
• Mientras sujeta la cámara sin moverse, debe pulsar el botón del obturador situado en la parte delantera de la cámara para tomar una foto. Se oirá una especie de clic y aparecerá en la pantalla LCD el dibujo de la cámara .
• La foto que se acaba de tomar permanecerá unos segundos en la pantalla LCD para poder comprobar que ha quedado bien.
Atención: en la pantalla LCD aparece un número que indica cuántas fotos se han tomado.
1�
G Shutter ButtonE Botón del obturador
GTaking a Picture ECómo hacer fotos
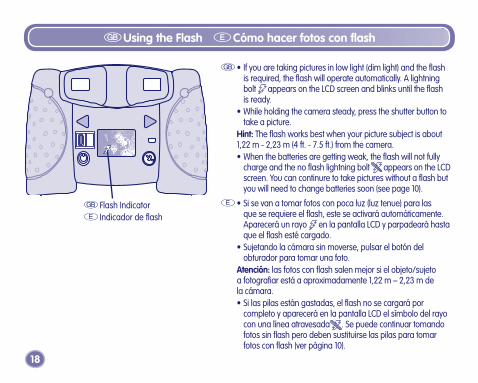
G • If you are taking pictures in low light (dim light) and the flash is required, the flash will operate automatically. A lightning bolt appears on the LCD screen and blinks until the flash is ready.
• While holding the camera steady, press the shutter button to take a picture.
Hint: The flash works best when your picture subject is about 1,22 m - 2,23 m (4 ft. - 7.5 ft.) from the camera. • When the batteries are getting weak, the flash will not fully
charge and the no flash lightning bolt appears on the LCD screen. You can continure to take pictures without a flash but you will need to change batteries soon (see page 10).
E • Si se van a tomar fotos con poca luz (luz tenue) para las que se requiere el flash, este se activará automáticamente. Aparecerá un rayo en la pantalla LCD y parpadeará hasta que el flash esté cargado.
• Sujetando la cámara sin moverse, pulsar el botón del obturador para tomar una foto.
Atención: las fotos con flash salen mejor si el objeto/sujeto a fotografiar está a aproximadamente 1,22 m – 2,23 m de la cámara.
• Si las pilas están gastadas, el flash no se cargará por completo y aparecerá en la pantalla LCD el símbolo del rayo con una línea atravesada . Se puede continuar tomando fotos sin flash pero deben sustituirse las pilas para tomar fotos con flash (ver página 10).
18
G Flash IndicatorE Indicador de flash
GUsing the Flash ECómo hacer fotos con flash
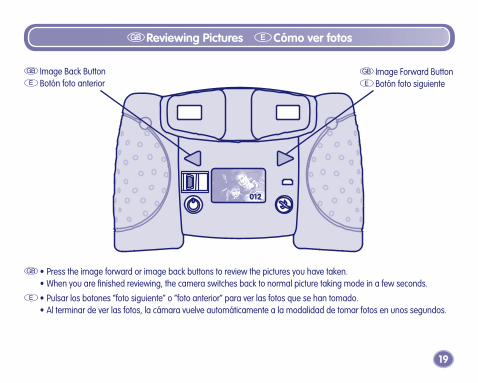
G • Press the image forward or image back buttons to review the pictures you have taken. • When you are finished reviewing, the camera switches back to normal picture taking mode in a few seconds.
E • Pulsar los botones “foto siguiente” o “foto anterior” para ver las fotos que se han tomado. • Al terminar de ver las fotos, la cámara vuelve automáticamente a la modalidad de tomar fotos en unos segundos.
19
012
G Image Back ButtonE Botón foto anterior
G Image Forward ButtonE Botón foto siguiente
GReviewing Pictures ECómo ver fotos
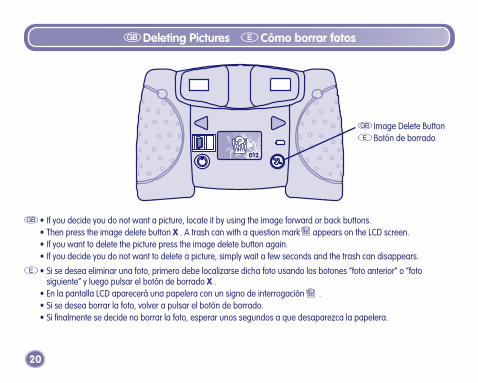
G • If you decide you do not want a picture, locate it by using the image forward or back buttons. • Then press the image delete button X . A trash can with a question mark appears on the LCD screen. • If you want to delete the picture press the image delete button again. • If you decide you do not want to delete a picture, simply wait a few seconds and the trash can disappears.
E • Si se desea eliminar una foto, primero debe localizarse dicha foto usando los botones “foto anterior” o “foto siguiente” y luego pulsar el botón de borrado X .
• En la pantalla LCD aparecerá una papelera con un signo de interrogación . • Si se desea borrar la foto, volver a pulsar el botón de borrado. • Si finalmente se decide no borrar la foto, esperar unos segundos a que desaparezca la papelera.
012
20
G Image Delete ButtonE Botón de borrado
GDeleting Pictures ECómo borrar fotos
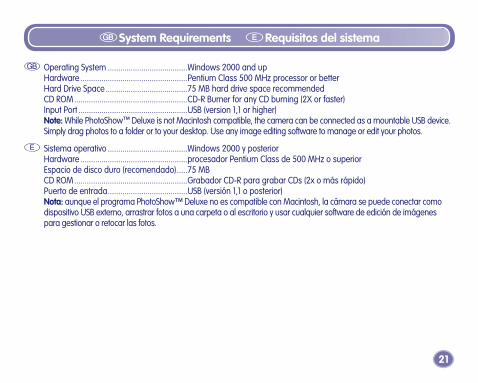
G Operating System ......................................Windows 2000 and up Hardware ...................................................Pentium Class 500 MHz processor or better Hard Drive Space .......................................75 MB hard drive space recommended CD ROM ......................................................CD-R Burner for any CD burning (2X or faster) Input Port ....................................................USB (version 1,1 or higher) Note: While PhotoShow™ Deluxe is not Macintosh compatible, the camera can be connected as a mountable USB device.
Simply drag photos to a folder or to your desktop. Use any image editing software to manage or edit your photos.
E Sistema operativo ......................................Windows 2000 y posterior Hardware ...................................................procesador Pentium Class de 500 MHz o superior Espacio de disco duro (recomendado) .....75 MB CD ROM ......................................................Grabador CD-R para grabar CDs (2x o más rápido) Puerto de entrada ......................................USB (versión 1,1 o posterior) Nota: aunque el programa PhotoShow™ Deluxe no es compatible con Macintosh, la cámara se puede conectar como
dispositivo USB externo, arrastrar fotos a una carpeta o al escritorio y usar cualquier software de edición de imágenes para gestionar o retocar las fotos.
21
GSystem Requirements ERequisitos del sistema
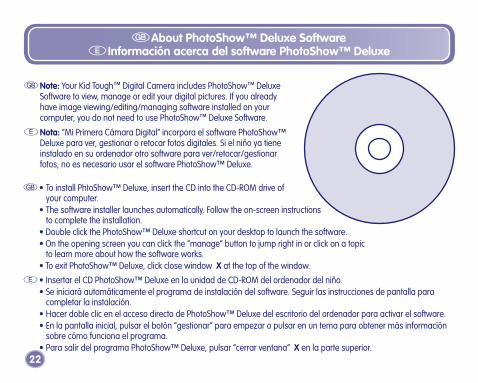
G • To install PhtoShow™ Deluxe, insert the CD into the CD-ROM drive of your computer.
• The software installer launches automatically. Follow the on-screen instructions to complete the installation.
• Double click the PhotoShow™ Deluxe shortcut on your desktop to launch the software. • On the opening screen you can click the “manage” button to jump right in or click on a topic
to learn more about how the software works. • To exit PhotoShow™ Deluxe, click close window X at the top of the window.
E • Insertar el CD PhotoShow™ Deluxe en la unidad de CD-ROM del ordenador del niño. • Se iniciará automáticamente el programa de instalación del software. Seguir las instrucciones de pantalla para
completar la instalación. • Hacer doble clic en el acceso directo de PhotoShow™ Deluxe del escritorio del ordenador para activar el software. • En la pantalla inicial, pulsar el botón “gestionar” para empezar o pulsar en un tema para obtener más información
sobre cómo funciona el programa. • Para salir del programa PhotoShow™ Deluxe, pulsar “cerrar ventana” X en la parte superior.
22
G Note: Your Kid Tough™ Digital Camera includes PhotoShow™ Deluxe Software to view, manage or edit your digital pictures. If you already have image viewing/editing/managing software installed on your computer, you do not need to use PhotoShow™ Deluxe Software.
E Nota: “Mi Primera Cámara Digital” incorpora el software PhotoShow™ Deluxe para ver, gestionar o retocar fotos digitales. Si el niño ya tiene instalado en su ordenador otro software para ver/retocar/gestionar fotos, no es necesario usar el software PhotoShow™ Deluxe.
GAbout PhotoShow™ Deluxe Software E Información acerca del software PhotoShow™ Deluxe
2�
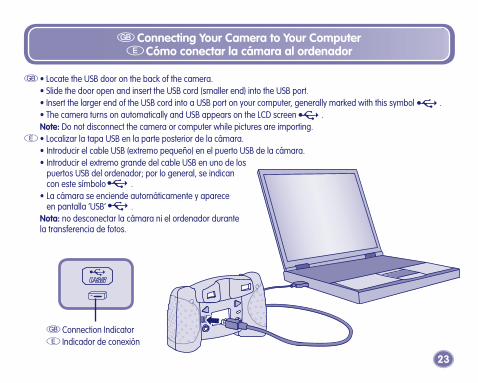
G • Locate the USB door on the back of the camera. • Slide the door open and insert the USB cord (smaller end) into the USB port. • Insert the larger end of the USB cord into a USB port on your computer, generally marked with this symbol . • The camera turns on automatically and USB appears on the LCD screen . Note: Do not disconnect the camera or computer while pictures are importing.E • Localizar la tapa USB en la parte posterior de la cámara. • Introducir el cable USB (extremo pequeño) en el puerto USB de la cámara. • Introducir el extremo grande del cable USB en uno de los
puertos USB del ordenador; por lo general, se indican con este símbolo .
• La cámara se enciende automáticamente y aparece en pantalla ‘USB’ .
Nota: no desconectar la cámara ni el ordenador durante la transferencia de fotos.
G Connection IndicatorE Indicador de conexión
GConnecting Your Camera to Your Computer ECómo conectar la cámara al ordenador

2�
G • To disconnect your camera, click “eject disk” on your computer’s task bar.
• Select the “USB Mass Storage Device” (your camera) and click “stop.”
• Click “OK” to confirm. • A message will appear on your computer
screen advising you to remove your device (camera).
E • Para desconectar la cámara, pulsar “expulsar disco” en la barra de tareas del ordenador.
• Seleccionar “dispositivo de almacenamiento masivo” (la cámara) y pulsar “detener”.
• Pulsar “aceptar” para confirmarlo. • Aparecerá un mensaje en pantalla
indicando que se debe desconectar el dispositivo (la cámara).
GDisconnecting Your Camera ECómo desconectar la cámara
G • Unplug the USB cord from your computer, then your camera. Close the USB door on the camera. The camera shuts off automatically.
E • Desenchufar el cable USB del ordenador y luego de la cámara. Cerrar la tapa USB de la cámara. Esta se apagará automáticamente.
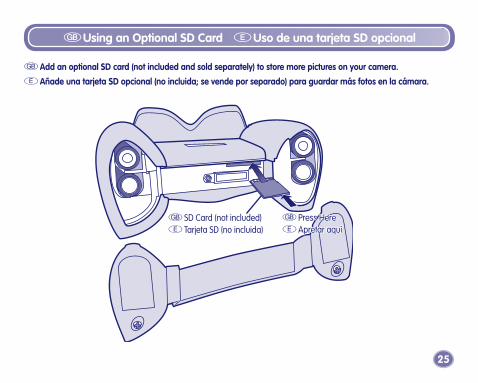
G Add an optional SD card (not included and sold separately) to store more pictures on your camera.
E Añade una tarjeta SD opcional (no incluida; se vende por separado) para guardar más fotos en la cámara.
G SD Card (not included)E Tarjeta SD (no incluida)
2�
GUsing an Optional SD Card EUso de una tarjeta SD opcional
G Press HereE Apretar aquí
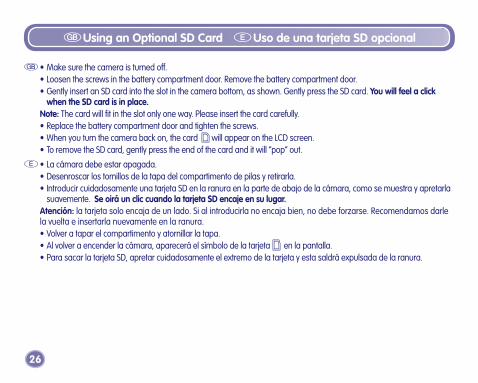
G • Make sure the camera is turned off. • Loosen the screws in the battery compartment door. Remove the battery compartment door. • Gently insert an SD card into the slot in the camera bottom, as shown. Gently press the SD card. You will feel a click
when the SD card is in place. Note: The card will fit in the slot only one way. Please insert the card carefully. • Replace the battery compartment door and tighten the screws. • When you turn the camera back on, the card will appear on the LCD screen. • To remove the SD card, gently press the end of the card and it will “pop“ out.
E • La cámara debe estar apagada. • Desenroscar los tornillos de la tapa del compartimento de pilas y retirarla. • Introducir cuidadosamente una tarjeta SD en la ranura en la parte de abajo de la cámara, como se muestra y apretarla
suavemente. Se oirá un clic cuando la tarjeta SD encaje en su lugar. Atención: la tarjeta solo encaja de un lado. Si al introducirla no encaja bien, no debe forzarse. Recomendamos darle
la vuelta e insertarla nuevamente en la ranura. • Volver a tapar el compartimento y atornillar la tapa. • Al volver a encender la cámara, aparecerá el símbolo de la tarjeta en la pantalla. • Para sacar la tarjeta SD, apretar cuidadosamente el extremo de la tarjeta y esta saldrá expulsada de la ranura.
2�
GUsing an Optional SD Card EUso de una tarjeta SD opcional
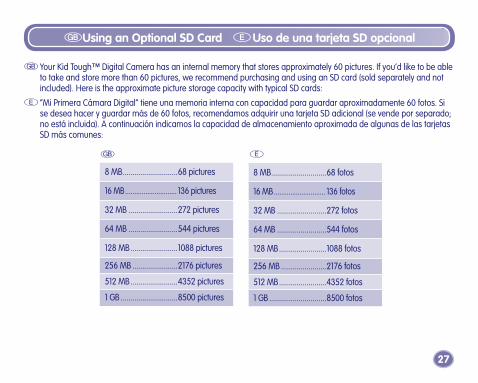
8 MB ............................68 pictures
16 MB ............................ 136 pictures
32 MB .........................272 pictures
64 MB .........................544 pictures
128 MB ........................1088 pictures
256 MB .......................2176 pictures
512 MB ........................4352 pictures
1 GB .............................8500 pictures
G E
2�
G Your Kid Tough™ Digital Camera has an internal memory that stores approximately 60 pictures. If you’d like to be able to take and store more than 60 pictures, we recommend purchasing and using an SD card (sold separately and not included). Here is the approximate picture storage capacity with typical SD cards:
E “Mi Primera Cámara Digital” tiene una memoria interna con capacidad para guardar aproximadamente 60 fotos. Si se desea hacer y guardar más de 60 fotos, recomendamos adquirir una tarjeta SD adicional (se vende por separado; no está incluida). A continuación indicamos la capacidad de almacenamiento aproximada de algunas de las tarjetas SD más comunes:
GUsing an Optional SD Card EUso de una tarjeta SD opcional
8 MB ............................68 fotos
16 MB ............................ 136 fotos
32 MB .........................272 fotos
64 MB .........................544 fotos
128 MB ........................1088 fotos
256 MB .......................2176 fotos
512 MB ........................4352 fotos
1 GB .............................8500 fotos
28
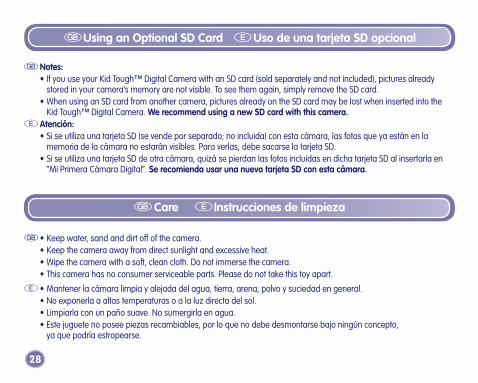
G Notes: • If you use your Kid Tough™ Digital Camera with an SD card (sold separately and not included), pictures already
stored in your camera’s memory are not visible. To see them again, simply remove the SD card. • When using an SD card from another camera, pictures already on the SD card may be lost when inserted into the
Kid Tough™ Digital Camera. We recommend using a new SD card with this camera.E Atención: • Si se utiliza una tarjeta SD (se vende por separado; no incluida) con esta cámara, las fotos que ya están en la
memoria de la cámara no estarán visibles. Para verlas, debe sacarse la tarjeta SD. • Si se utiliza una tarjeta SD de otra cámara, quizá se pierdan las fotos incluidas en dicha tarjeta SD al insertarla en
“Mi Primera Cámara Digital”. Se recomienda usar una nueva tarjeta SD con esta cámara.
GUsing an Optional SD Card EUso de una tarjeta SD opcional
G • Keep water, sand and dirt off of the camera. • Keep the camera away from direct sunlight and excessive heat. • Wipe the camera with a soft, clean cloth. Do not immerse the camera. • This camera has no consumer serviceable parts. Please do not take this toy apart.
E • Mantener la cámara limpia y alejada del agua, tierra, arena, polvo y suciedad en general. • No exponerla a altas temperaturas o a la luz directa del sol. • Limpiarla con un paño suave. No sumergirla en agua. • Este juguete no posee piezas recambiables, por lo que no debe desmontarse bajo ningún concepto,
ya que podría estropearse.
GCare EInstrucciones de limpieza
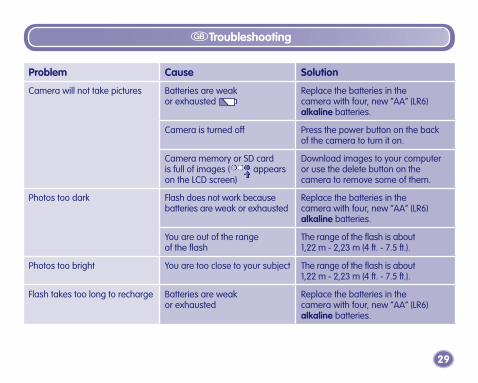
Problem Cause Solution
Camera will not take pictures Batteries are weak or exhausted
Replace the batteries in the camera with four, new “AA” (LR6) alkaline batteries.
Camera is turned off Press the power button on the back of the camera to turn it on.
Camera memory or SD card is full of images ( appears on the LCD screen)
Download images to your computer or use the delete button on the camera to remove some of them.
Photos too dark Flash does not work because batteries are weak or exhausted
Replace the batteries in the camera with four, new “AA” (LR6) alkaline batteries.
You are out of the range of the flash
The range of the flash is about 1,22 m - 2,23 m (4 ft. - 7.5 ft.).
Photos too bright You are too close to your subject The range of the flash is about 1,22 m - 2,23 m (4 ft. - 7.5 ft.).
Flash takes too long to recharge Batteries are weak or exhausted
Replace the batteries in the camera with four, new “AA” (LR6) alkaline batteries.
29
GTroubleshooting
�0
GTroubleshooting
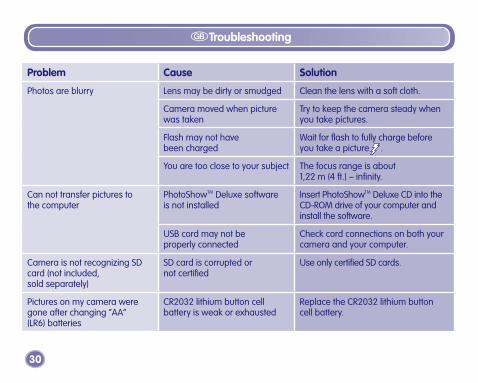
Problem Cause Solution
Photos are blurry Lens may be dirty or smudged Clean the lens with a soft cloth.
Camera moved when picture was taken
Try to keep the camera steady when you take pictures.
Flash may not have been charged
Wait for flash to fully charge before you take a picture .
You are too close to your subject The focus range is about 1,22 m (4 ft.) – infinity.
Can not transfer pictures to the computer
PhotoShowTM Deluxe software is not installed
Insert PhotoShowTM Deluxe CD into the CD-ROM drive of your computer and install the software.
USB cord may not be properly connected
Check cord connections on both your camera and your computer.
Camera is not recognizing SD card (not included, sold separately)
SD card is corrupted or not certified
Use only certified SD cards.
Pictures on my camera were gone after changing “AA” (LR6) batteries
CR2032 lithium button cell battery is weak or exhausted
Replace the CR2032 lithium button cell battery.
�1
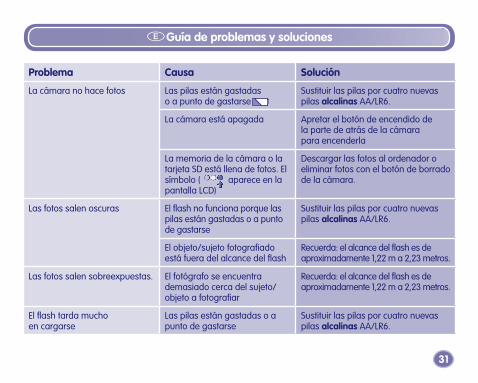
Problema Causa Solución
La cámara no hace fotos Las pilas están gastadas o a punto de gastarse
Sustituir las pilas por cuatro nuevas pilas alcalinas AA/LR6.
La cámara está apagada Apretar el botón de encendido de la parte de atrás de la cámara para encenderla
La memoria de la cámara o la tarjeta SD está llena de fotos. El símbolo ( aparece en la pantalla LCD)
Descargar las fotos al ordenador o eliminar fotos con el botón de borrado de la cámara.
Las fotos salen oscuras El flash no funciona porque las pilas están gastadas o a punto de gastarse
Sustituir las pilas por cuatro nuevas pilas alcalinas AA/LR6.
El objeto/sujeto fotografiado está fuera del alcance del flash
Recuerda: el alcance del flash es de aproximadamente 1,22 m a 2,23 metros.
Las fotos salen sobreexpuestas. El fotógrafo se encuentra demasiado cerca del sujeto/ objeto a fotografiar
Recuerda: el alcance del flash es de aproximadamente 1,22 m a 2,23 metros.
El flash tarda mucho en cargarse
Las pilas están gastadas o a punto de gastarse
Sustituir las pilas por cuatro nuevas pilas alcalinas AA/LR6.
EGuía de problemas y soluciones
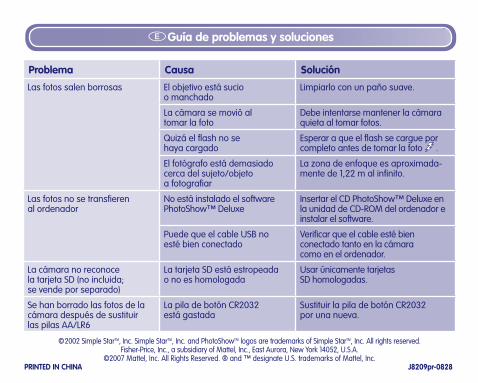
EGuía de problemas y soluciones
Problema Causa Solución
Las fotos salen borrosas El objetivo está sucio o manchado
Limpiarlo con un paño suave.
La cámara se movió al tomar la foto
Debe intentarse mantener la cámara quieta al tomar fotos.
Quizá el flash no se haya cargado
Esperar a que el flash se cargue por completo antes de tomar la foto .
El fotógrafo está demasiado cerca del sujeto/objeto a fotografiar
La zona de enfoque es aproximada-mente de 1,22 m al infinito.
Las fotos no se transfieren al ordenador
No está instalado el software PhotoShow™ Deluxe
Insertar el CD PhotoShow™ Deluxe en la unidad de CD-ROM del ordenador e instalar el software.
Puede que el cable USB no esté bien conectado
Verificar que el cable esté bien conectado tanto en la cámara como en el ordenador.
La cámara no reconoce la tarjeta SD (no incluida; se vende por separado)
La tarjeta SD está estropeada o no es homologada
Usar únicamente tarjetas SD homologadas.
Se han borrado las fotos de la cámara después de sustituir las pilas AA/LR6
La pila de botón CR2032 está gastada
Sustituir la pila de botón CR2032 por una nueva.
©2002 Simple StarTM, Inc. Simple StarTM, Inc. and PhotoShowTM logos are trademarks of Simple StarTM, Inc. All rights reserved.Fisher-Price, Inc., a subsidiary of Mattel, Inc., East Aurora, New York 14052, U.S.A.
©2007 Mattel, Inc. All Rights Reserved. ® and ™ designate U.S. trademarks of Mattel, Inc.PRINTED IN CHINA J8209pr-0828


![J8209, J8210, J8211 - Mattel · Asegúrese de que haya una fuente de luz brillante al tomar fotos bajo techo. La fuente de luz [sol, lámpara o ventana] debe apuntar a la parte de](https://img.pdfslide.us/doc/110x75/5eabd071084d8c36942c91ce/j8209-j8210-j8211-mattel-asegrese-de-que-haya-una-fuente-de-luz-brillante.jpg)