Embed Size (px)
Citation preview
J2ME 101, Part 1: Introduction to MIDP's high-leveluser interfaceSkill Level: Introductory
John MuchowAuthor
20 Nov 2003
This is the first installment of a comprehensive four-part introduction to Java 2 MicroEdition (J2ME) and the Mobile Information Device Profile (MIDP). The series willconsist of two tutorials and two companion articles. In this first tutorial, you will learnabout the essential components of J2ME, with a primary focus on MIDP. The focus ison MIDP's high-level user interface, with a step-by-step introduction to thecomponents that facilitate the main interaction between the user and the devicedisplay.
Section 1. Getting started
What is this tutorial about?
This is first installment in a four-part comprehensive introduction -- two tutorials andtwo articles -- to Java 2 Micro Edition (J2ME) and the Mobile Information DeviceProfile (MIDP). In this tutorial you will learn about the essential components of J2ME,with a primary focus on MIDP. We'll focus here on MIDP's high-level user interface,with a step-by-step introduction to the components that facilitate the main interactionbetween the user and the device display. These components include TextField,Gauge, and DateField, among others. You will also learn about event-handlingtechniques for the high-level API, using both Command and Item objects.
In the second part of the tutorial you will learn how to work with MIDP's low-leveluser interface. We'll walk through exercises that include creating and drawing on acanvas, working with fonts, and drawing shapes. As part of this discussion you willbecome familiar with all the J2ME components that work directly with the devicedisplay.
Two companion articles round out this introduction to J2ME. The first article will
J2ME 101, Part 1: Introduction to MIDP's high-level user interface© Copyright IBM Corporation 1994, 2008. All rights reserved. Page 1 of 59
introduce you to the Record Management System (RMS), which is the persistentstorage environment within MIDP. The second article will cover networking supportfor J2ME. You'll learn about the Generic Connection Framework, opening networkconnections and communicating with remote systems, talking with Java Servlets,and a few other goodies.
Portions of this tutorial are used with permission from the book Core J2METechnology and MIDP by John W. Muchow, published by Sun Microsystems Pressand Prentice Hall. Copyright 2002 Sun Microsystems Inc.
Should I take this tutorial?
This tutorial is intended for experienced Java programmers who would like to learnhow to develop mobile applications using J2ME. The code examples are notparticularly complex, but it is assumed that you understand how classes are created,inherited, and instantiated within the Java platform. You will also benefit from aworking knowledge of using and creating Java Archive Files (JARs). See Resourcesfor more information on using JARs.
Software and installation requirements
To complete this tutorial you will need to install JDK version 1.4 or greater, alongwith the J2ME Wireless Toolkit (WTK). The WTK download contains an IDE forcreating Java applications, commonly called MIDlets, as well as the librariesrequired for creating them.
The WTK is contained within a single executable file. Run this file to begin theinstallation. It is recommended that you use the default installation directory. If youchoose another directory, make sure that the path you select does not include anyspaces.
Section 2. Introduction to J2ME and MIDP
J2ME and MIDP overview
This section is an overview of many of the essential components that will let youcreate and run applications on J2ME, focusing specifically on the Mobile InformationDevice Profile (MIDP). Each of the components discussed in this section will beutilized in the tutorial. Here you will learn the basics of how each one is put togetherand interacts with the other technologies or components to aid in the development ofmobile device applications on the Java platform.
developerWorks® ibm.com/developerWorks
J2ME 101, Part 1: Introduction to MIDP's high-level user interfacePage 2 of 59 © Copyright IBM Corporation 1994, 2008. All rights reserved.
Components of J2ME
Given the size and complexity of J2SE, there was a need to create a Javaimplementation targeted at devices with limited memory and/or processing power.J2ME is intended to fill this gap, providing a platform and development languagefamiliar to millions of programmers.
Even among "micro" devices there are significant variations in capability. Forexample, a typical personal digital assistant (PDA) has a much larger screen, morememory, and a faster processor than a mobile phone. To support these differences,J2ME introduced the concept of configurations and profiles. Basically, aconfiguration outlines a set of device requirements (memory and connectivity,among others). A profile is the API that sits on top of a given configuration, providingthe specific features and capabilities for a range of devices.
In this tutorial we will work with the Connected Limited Device Configuration (CLDC)and the MIDP. We'll begin by learning more about configurations and profiles, aswell as the other foundational components of J2ME, in the next few panels.
Configurations
A J2ME configuration defines a Java platform for a range of devices. Eachconfiguration encompasses the features available in the Java language as well asthe core libraries. A J2ME application can be built to meet the requirements of one oftwo device configurations: the Connected Device Configuration (CDC) or theConnected, Limited Device Configuration (CLDC). A device that implements theCDC has the following characteristics:
• 512 kilobytes (minimum) memory for running Java programs
• 256 kilobytes (minimum) for run time memory allocation
• Network connectivity, possibly persistent, and high-bandwidth
And here are the typical characteristics of a device that implements the CLDC:
• 128 KB of memory for running Java programs
• 32 KB of memory for run time memory allocation
• A limited user interface
• Runs on battery power
• Wireless network connection, low bandwidth
All of the example applications we develop for this tutorial will be for devices of theCLDC type.
ibm.com/developerWorks developerWorks®
J2ME 101, Part 1: Introduction to MIDP's high-level user interface© Copyright IBM Corporation 1994, 2008. All rights reserved. Page 3 of 59
Profiles
A J2ME profile is an extension of a configuration. As noted earlier, it defines thelibraries available to a developer writing applications for a specific device type.
The MIDP extends the CLDC. MIDP defines APIs for user interface components,input and event handling, persistent storage, and networking and timers -- all withconsideration for the screen and memory limitations of mobile devices within theCLDC configuration.
We will use MIDP to develop all of the example applications used in this tutorial.
MIDP's high-level and low-level APIs
MIDP offers a high-level API and a low-level API for user interface development. Wewill focus on the high-level API in this first half of the tutorial. MIDP's high-levelinterface is used to build common user-interface components such as Form s,TextBox es, and Gauge s, among others. The high-level API handles mostcomponent functionality for you, such as drawing each component on the screen.
The low-level API offers more flexibility than the high-level one, but is also moredemanding to work with. The low-level interface and its components will beintroduced in the second part of this tutorial.
MIDlets
A Java application that is built on top of the CLDC and MIDP is known as a MIDlet. AMIDlet suite consists of one or more MIDlets packaged together as a JAR. TheMIDlets we develop together in this tutorial will help you to learn about the varioushigh-level components of J2ME and MIDP.
The application manager
The application manager is the software on a mobile device that is responsible forinstalling, running, and removing MIDlets. We'll run each of the applications wedevelop together in this tutorial, giving you the opportunity to learn firsthand how theapplication manager works.
J2ME and MIDP summary
In this section you learned about the components that will let you create and runapplications on the J2ME platform. J2ME is a subset of the Java platform designedspecifically for the development of mobile device applications. Applications built onthe J2ME platform are developed for a particular device configuration and device
developerWorks® ibm.com/developerWorks
J2ME 101, Part 1: Introduction to MIDP's high-level user interfacePage 4 of 59 © Copyright IBM Corporation 1994, 2008. All rights reserved.
profile. In this tutorial we will work with example programs developed for the CLDCand its extension, MIDP.
Section 3. Event handling
Event handling overview
In this section you will learn about event handling for MIDP's high-level interface.High-level MIDP events are divided into two categories: Command and Item events.In the simplest sense, Command events are triggered by keypresses on the device,whereas Item events are the result of visual components changing on the display.In this section you'll learn how both event types are processed.
Command objects
When an event occurs on a mobile device, a Command object holds informationabout that event. This information includes the type of command executed, the labelof the command, and its priority. In J2ME, commands are commonly representedwith soft-buttons on the device. Figure 1 shows two Command objects, one with thelabel "Exit" and one with label "View."
Figure 1. Command objects and soft-buttons
ibm.com/developerWorks developerWorks®
J2ME 101, Part 1: Introduction to MIDP's high-level user interface© Copyright IBM Corporation 1994, 2008. All rights reserved. Page 5 of 59

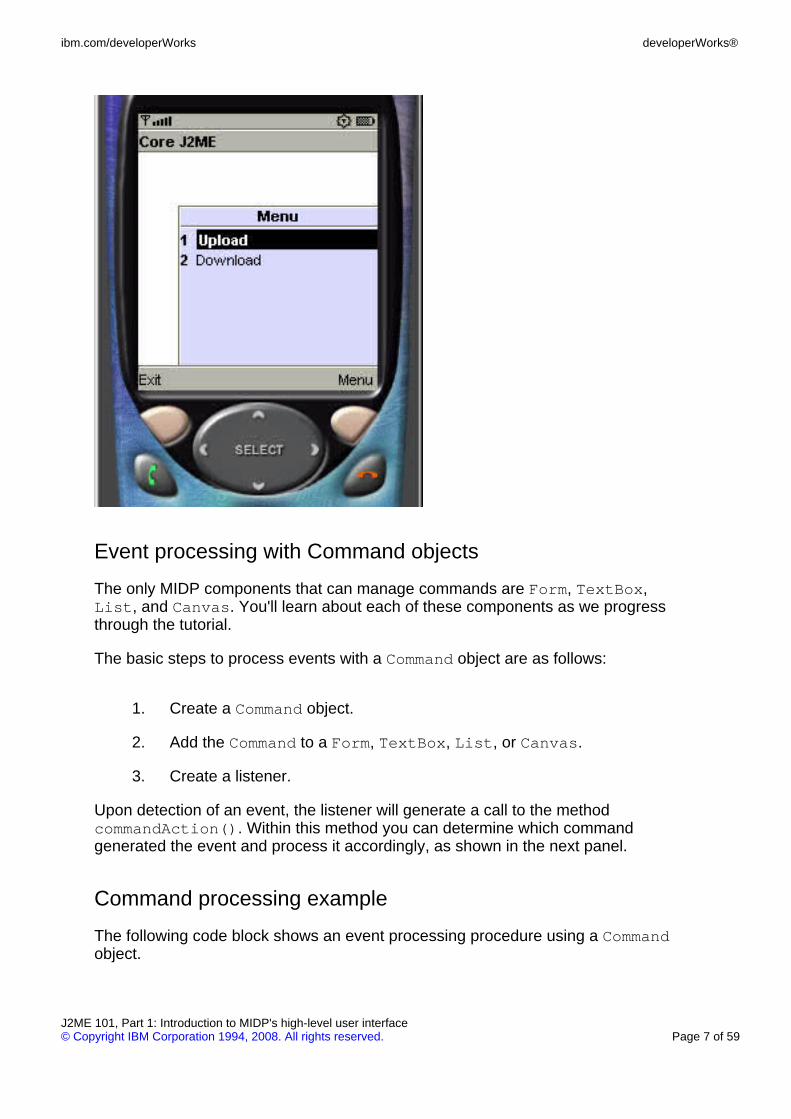
If there are too many commands to be shown on the display, a device will create amenu to hold multiple commands. Figure 2 shows how this might look.
Figure 2. Command objects and a menu
developerWorks® ibm.com/developerWorks
J2ME 101, Part 1: Introduction to MIDP's high-level user interfacePage 6 of 59 © Copyright IBM Corporation 1994, 2008. All rights reserved.
Event processing with Command objects
The only MIDP components that can manage commands are Form, TextBox,List, and Canvas. You'll learn about each of these components as we progressthrough the tutorial.
The basic steps to process events with a Command object are as follows:
1. Create a Command object.
2. Add the Command to a Form, TextBox, List, or Canvas.
3. Create a listener.
Upon detection of an event, the listener will generate a call to the methodcommandAction(). Within this method you can determine which commandgenerated the event and process it accordingly, as shown in the next panel.
Command processing example
The following code block shows an event processing procedure using a Commandobject.
ibm.com/developerWorks developerWorks®
J2ME 101, Part 1: Introduction to MIDP's high-level user interface© Copyright IBM Corporation 1994, 2008. All rights reserved. Page 7 of 59
private Form fmMain; // Formprivate Command cmExit; // Command to exit the MIDlet
...fmMain = new Form("Core J2ME"); // Create Form and give it a title
// Create Command object, with label, type and prioritycmExit = new Command("Exit", Command.EXIT, 1);...fmMain.addCommand(cmExit); // Add Command to FormfmMain.setCommandListener(this); // Listen for Form events
...
public void commandAction(Command c, Displayable s){if (c == cmExit){
destroyApp(true);notifyDestroyed();
}}
Item objects
It is also possible to process events using Item objects. Several Item s arepredefined in MIDP for processing particular event types. For example, theDateField item allows the user to select the date and time that will display on thescreen, and the TextField item allows a user to enter a series of alpha-numericand special characters.
Event processing with Item objects
With the exception of StringItem, Spacer, and ImageItem, each Item has theability to recognize events. As with a Command object, you must first create a listenerbefore events will be acknowledged. When a change occurs on a given item -- forexample, the text of a TextField component is updated -- an event is generated.
When a change occurs in any Item component, the methoditemStateChanged() will be called. Within this method you can determine whichItem generated the event.
A note about device implementations
Device implementations may differ in their handling of Item events. MIDP does notspecify when an Item event must be acknowledged, so itemStateChange() maynot automatically be called for every event on an Item. For example, if the yearvalue of a DateField component is updated, the method itemStateChange()may not be called the moment the change is detected. The device may notacknowledge this event until the user moves to another component on the display.
Item processing example
developerWorks® ibm.com/developerWorks
J2ME 101, Part 1: Introduction to MIDP's high-level user interfacePage 8 of 59 © Copyright IBM Corporation 1994, 2008. All rights reserved.
The following code block shows simple event processing for a DateFieldItemobject.
private Form fmMain; // Formprivate DateField dfToday; // DateField item...fmMain = new Form("Core J2ME"); // Create Form objectdfToday = new DateField("Today:", DateField.DATE); // Create DateField...fmMain.append(dfToday); // Add DateField to FormfmMain.setItemStateListener(this); // Listen for Form events
...
public void itemStateChanged(Item item){// If the datefield initiated this eventif (item == dfToday)
...}
A MIDlet for event processing
Our first MIDlet will demonstrate both Command and Item event processing. Foreach MIDlet we develop in this tutorial, we'll follow the same typical J2MEdevelopment procedure, as follows:
1. Create the project.
2. Write the source code.
3. Compile and preverify the code.
4. Run the MIDlet.
Now, let's get to it.
Create the project
We begin by creating a new project in the J2ME Wireless Toolkit, as follows:
1. Click New Project.
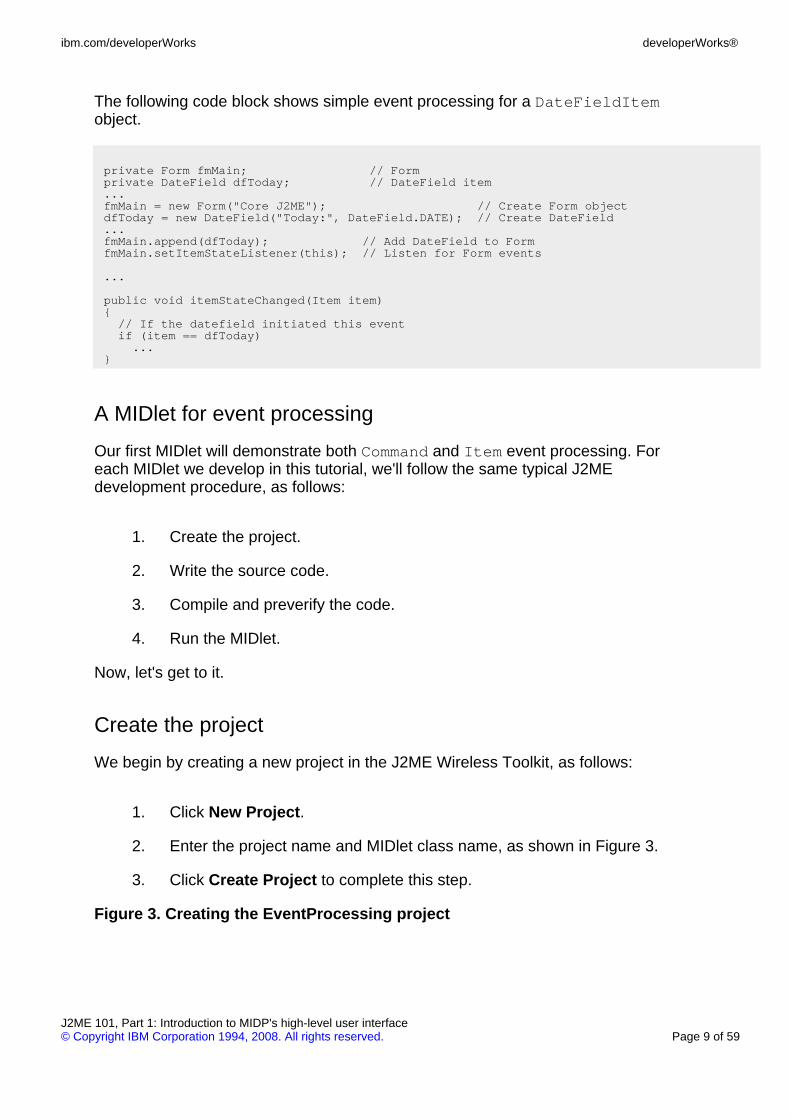
2. Enter the project name and MIDlet class name, as shown in Figure 3.
3. Click Create Project to complete this step.
Figure 3. Creating the EventProcessing project
ibm.com/developerWorks developerWorks®
J2ME 101, Part 1: Introduction to MIDP's high-level user interface© Copyright IBM Corporation 1994, 2008. All rights reserved. Page 9 of 59
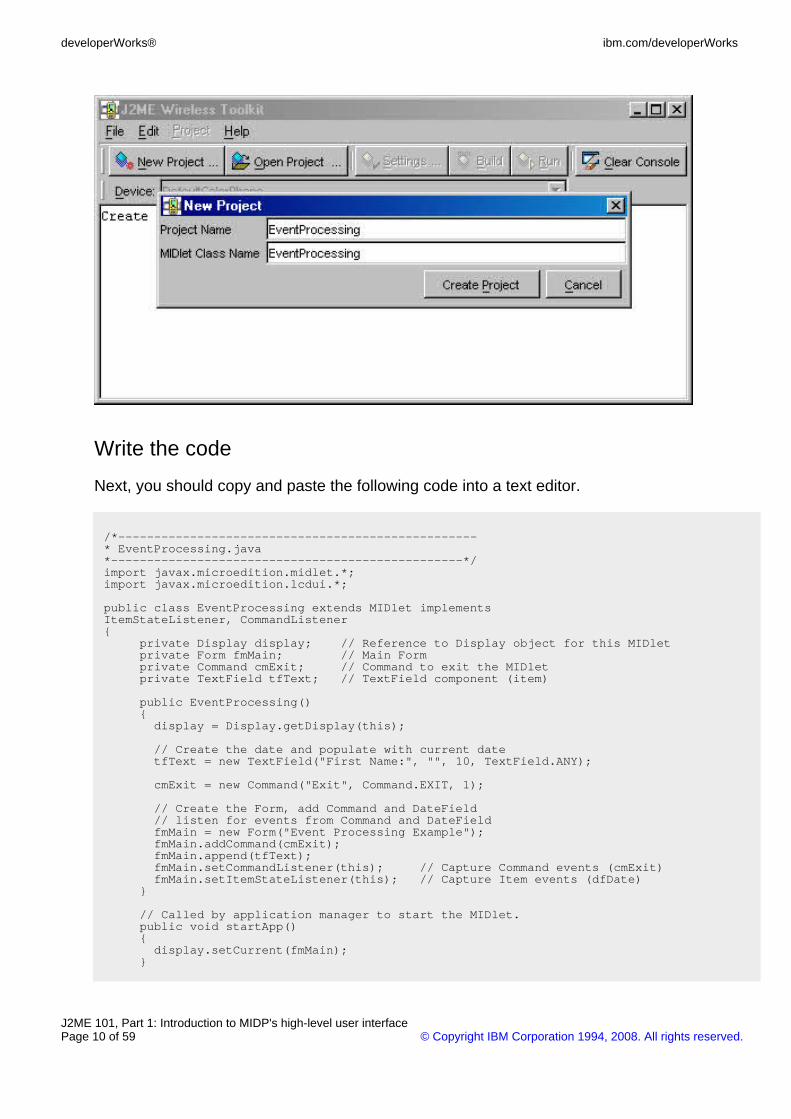
Write the code
Next, you should copy and paste the following code into a text editor.
/*--------------------------------------------------* EventProcessing.java*-------------------------------------------------*/import javax.microedition.midlet.*;import javax.microedition.lcdui.*;
public class EventProcessing extends MIDlet implementsItemStateListener, CommandListener{
private Display display; // Reference to Display object for this MIDletprivate Form fmMain; // Main Formprivate Command cmExit; // Command to exit the MIDletprivate TextField tfText; // TextField component (item)
public EventProcessing(){display = Display.getDisplay(this);
// Create the date and populate with current datetfText = new TextField("First Name:", "", 10, TextField.ANY);
cmExit = new Command("Exit", Command.EXIT, 1);
// Create the Form, add Command and DateField// listen for events from Command and DateFieldfmMain = new Form("Event Processing Example");fmMain.addCommand(cmExit);fmMain.append(tfText);fmMain.setCommandListener(this); // Capture Command events (cmExit)fmMain.setItemStateListener(this); // Capture Item events (dfDate)
}
// Called by application manager to start the MIDlet.public void startApp(){display.setCurrent(fmMain);
}
developerWorks® ibm.com/developerWorks
J2ME 101, Part 1: Introduction to MIDP's high-level user interfacePage 10 of 59 © Copyright IBM Corporation 1994, 2008. All rights reserved.
public void pauseApp(){ }
public void destroyApp(boolean unconditional){ }
public void commandAction(Command c, Displayable s){System.out.println("Inside commandAction()");
if (c == cmExit){
destroyApp(false);notifyDestroyed();
}}
public void itemStateChanged(Item item){System.out.println("Inside itemStateChanged()");
}}
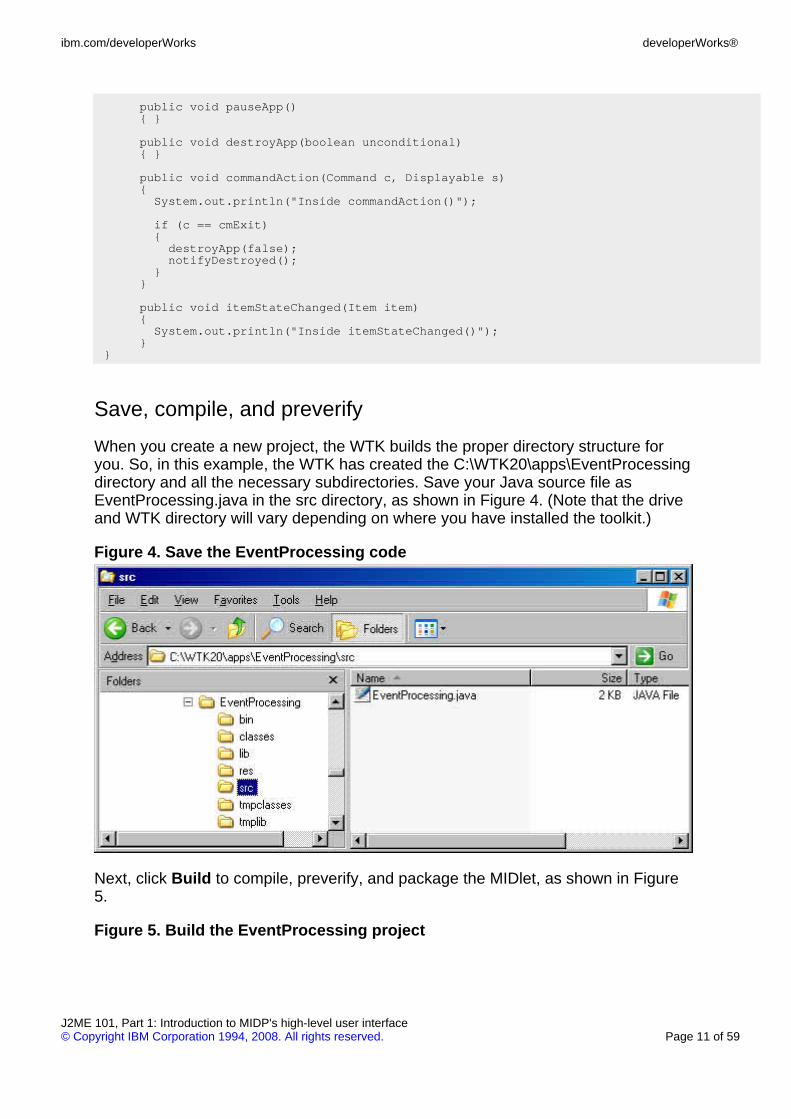
Save, compile, and preverify
When you create a new project, the WTK builds the proper directory structure foryou. So, in this example, the WTK has created the C:\WTK20\apps\EventProcessingdirectory and all the necessary subdirectories. Save your Java source file asEventProcessing.java in the src directory, as shown in Figure 4. (Note that the driveand WTK directory will vary depending on where you have installed the toolkit.)
Figure 4. Save the EventProcessing code
Next, click Build to compile, preverify, and package the MIDlet, as shown in Figure5.
Figure 5. Build the EventProcessing project
ibm.com/developerWorks developerWorks®
J2ME 101, Part 1: Introduction to MIDP's high-level user interface© Copyright IBM Corporation 1994, 2008. All rights reserved. Page 11 of 59
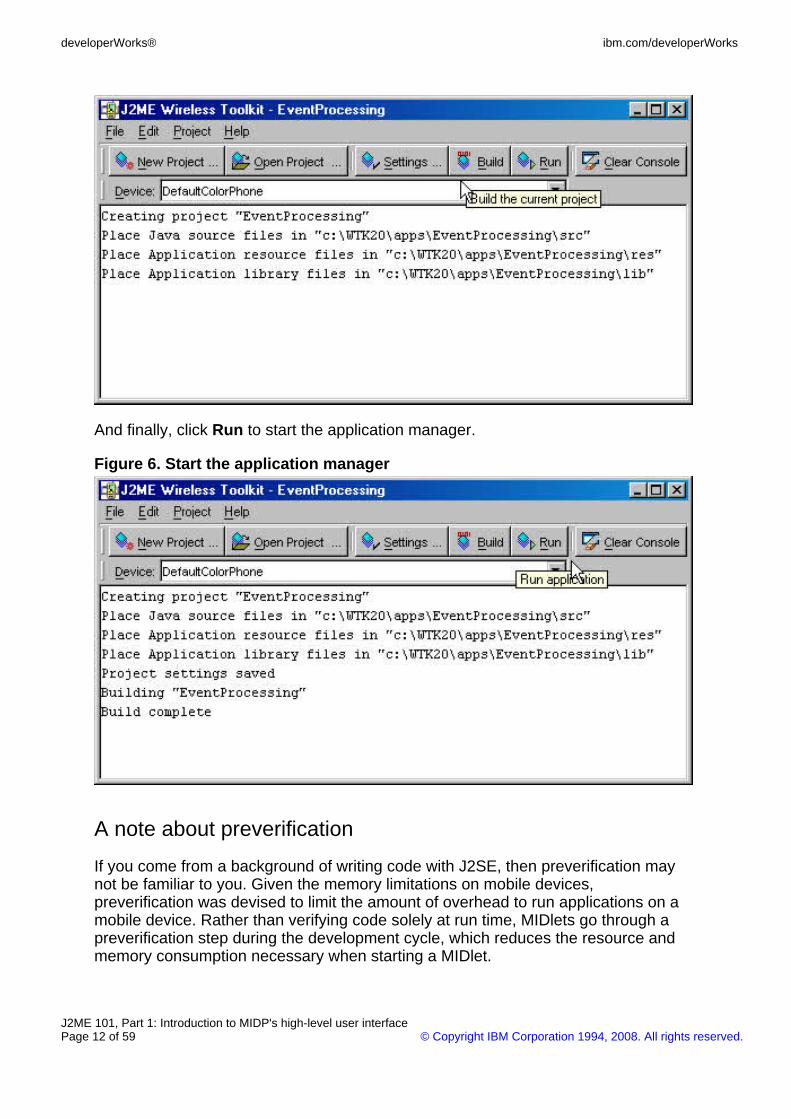
And finally, click Run to start the application manager.
Figure 6. Start the application manager
A note about preverification
If you come from a background of writing code with J2SE, then preverification maynot be familiar to you. Given the memory limitations on mobile devices,preverification was devised to limit the amount of overhead to run applications on amobile device. Rather than verifying code solely at run time, MIDlets go through apreverification step during the development cycle, which reduces the resource andmemory consumption necessary when starting a MIDlet.
developerWorks® ibm.com/developerWorks
J2ME 101, Part 1: Introduction to MIDP's high-level user interfacePage 12 of 59 © Copyright IBM Corporation 1994, 2008. All rights reserved.
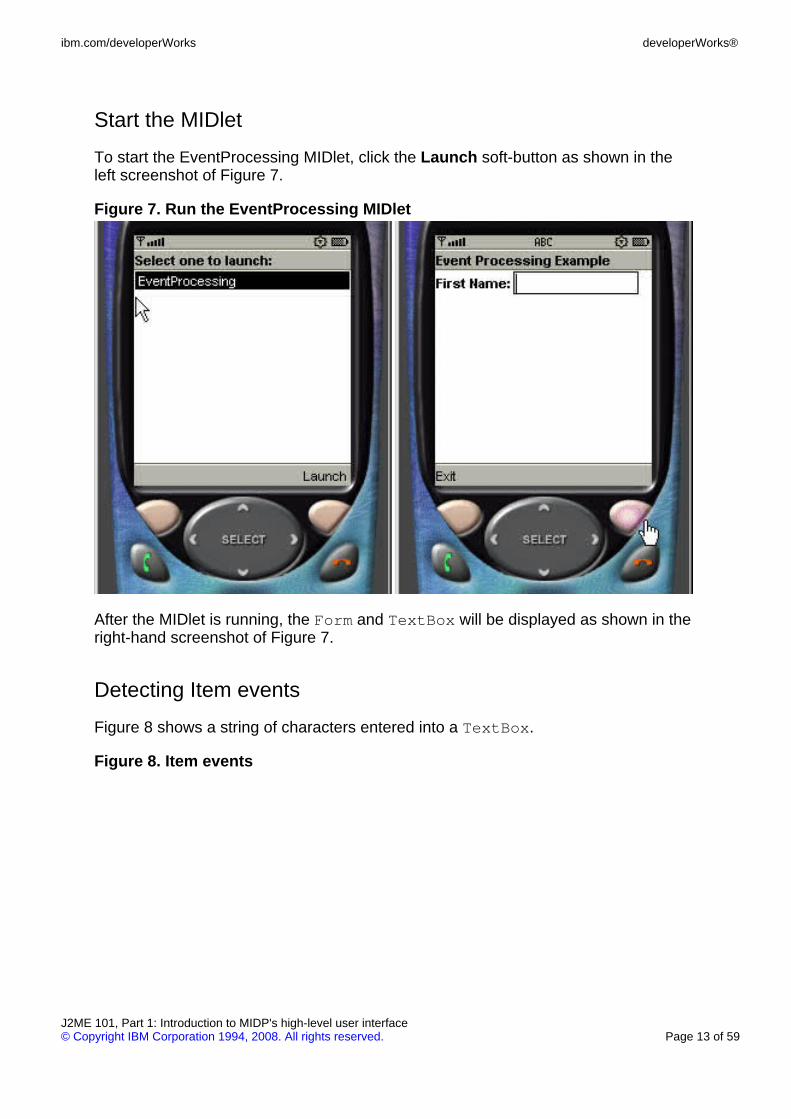
Start the MIDlet
To start the EventProcessing MIDlet, click the Launch soft-button as shown in theleft screenshot of Figure 7.
Figure 7. Run the EventProcessing MIDlet
After the MIDlet is running, the Form and TextBox will be displayed as shown in theright-hand screenshot of Figure 7.
Detecting Item events
Figure 8 shows a string of characters entered into a TextBox.
Figure 8. Item events
ibm.com/developerWorks developerWorks®
J2ME 101, Part 1: Introduction to MIDP's high-level user interface© Copyright IBM Corporation 1994, 2008. All rights reserved. Page 13 of 59
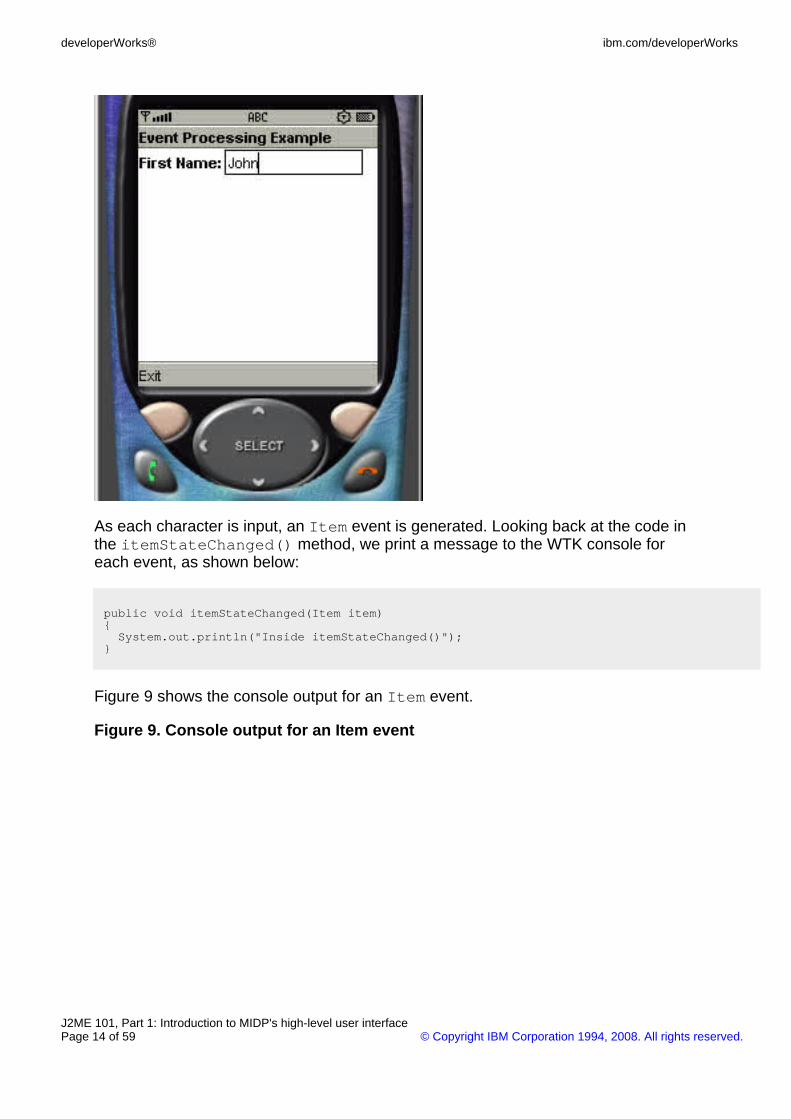
As each character is input, an Item event is generated. Looking back at the code inthe itemStateChanged() method, we print a message to the WTK console foreach event, as shown below:
public void itemStateChanged(Item item){System.out.println("Inside itemStateChanged()");
}
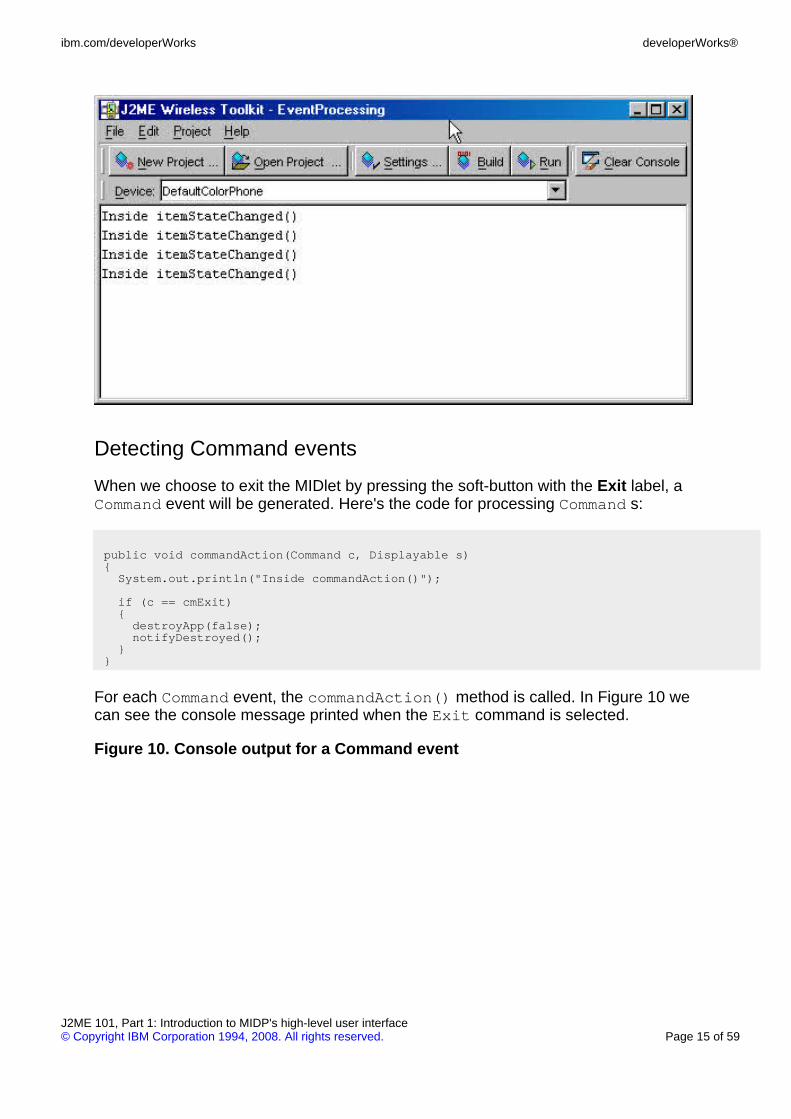
Figure 9 shows the console output for an Item event.
Figure 9. Console output for an Item event
developerWorks® ibm.com/developerWorks
J2ME 101, Part 1: Introduction to MIDP's high-level user interfacePage 14 of 59 © Copyright IBM Corporation 1994, 2008. All rights reserved.
Detecting Command events
When we choose to exit the MIDlet by pressing the soft-button with the Exit label, aCommand event will be generated. Here's the code for processing Command s:
public void commandAction(Command c, Displayable s){System.out.println("Inside commandAction()");
if (c == cmExit){
destroyApp(false);notifyDestroyed();
}}
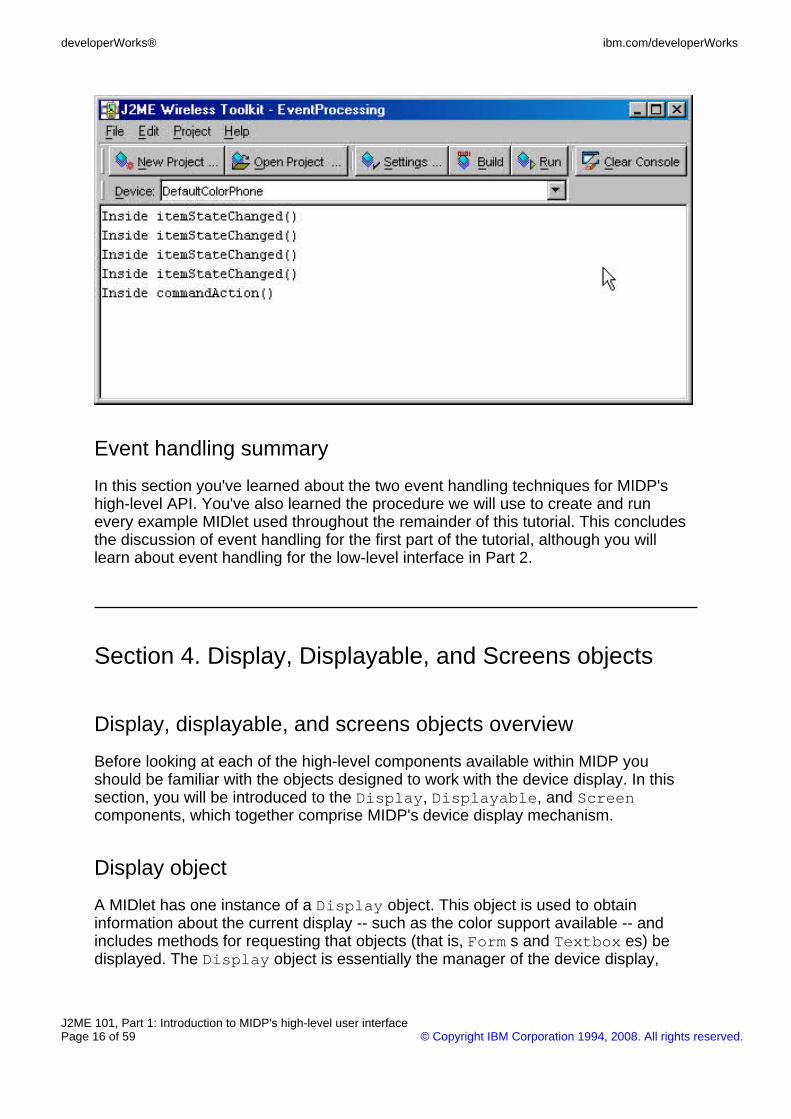
For each Command event, the commandAction() method is called. In Figure 10 wecan see the console message printed when the Exit command is selected.
Figure 10. Console output for a Command event
ibm.com/developerWorks developerWorks®
J2ME 101, Part 1: Introduction to MIDP's high-level user interface© Copyright IBM Corporation 1994, 2008. All rights reserved. Page 15 of 59
Event handling summary
In this section you've learned about the two event handling techniques for MIDP'shigh-level API. You've also learned the procedure we will use to create and runevery example MIDlet used throughout the remainder of this tutorial. This concludesthe discussion of event handling for the first part of the tutorial, although you willlearn about event handling for the low-level interface in Part 2.
Section 4. Display, Displayable, and Screens objects
Display, displayable, and screens objects overview
Before looking at each of the high-level components available within MIDP youshould be familiar with the objects designed to work with the device display. In thissection, you will be introduced to the Display, Displayable, and Screencomponents, which together comprise MIDP's device display mechanism.
Display object
A MIDlet has one instance of a Display object. This object is used to obtaininformation about the current display -- such as the color support available -- andincludes methods for requesting that objects (that is, Form s and Textbox es) bedisplayed. The Display object is essentially the manager of the device display,
developerWorks® ibm.com/developerWorks
J2ME 101, Part 1: Introduction to MIDP's high-level user interfacePage 16 of 59 © Copyright IBM Corporation 1994, 2008. All rights reserved.
controlling what is shown on the device.
Displayable object
Although there is only one Display object per MIDlet, many objects within a MIDletmay be displayable -- that is, Form s, TextBox es, ChoiceGroup s, etc.
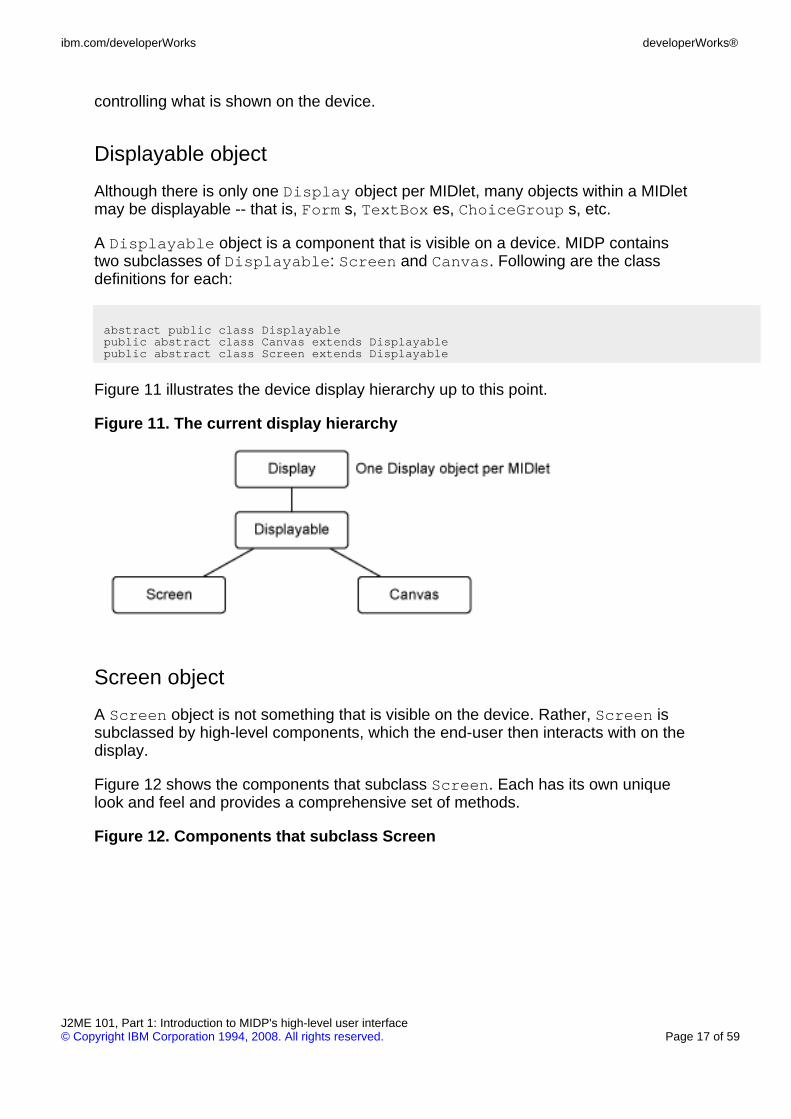
A Displayable object is a component that is visible on a device. MIDP containstwo subclasses of Displayable: Screen and Canvas. Following are the classdefinitions for each:
abstract public class Displayablepublic abstract class Canvas extends Displayablepublic abstract class Screen extends Displayable
Figure 11 illustrates the device display hierarchy up to this point.
Figure 11. The current display hierarchy
Screen object
A Screen object is not something that is visible on the device. Rather, Screen issubclassed by high-level components, which the end-user then interacts with on thedisplay.
Figure 12 shows the components that subclass Screen. Each has its own uniquelook and feel and provides a comprehensive set of methods.
Figure 12. Components that subclass Screen
ibm.com/developerWorks developerWorks®
J2ME 101, Part 1: Introduction to MIDP's high-level user interface© Copyright IBM Corporation 1994, 2008. All rights reserved. Page 17 of 59

Object hierarchy summary
This section has introduced the object hierarchy for working with the user interfacecomponents in MIDP. Each MIDlet consists of one Display object and any numberof Displayable objects. The two subclasses of Displayable are Screen andCanvas. Screen supports high-level user interface components, whereas canvassupports low-level ones. You'll learn about Canvas in Part 2 of this tutorial.
Section 5. Form and Item components
Form and item components overview
This section will introduce the components that may be shown on a Form. A Form isessentially a container to hold other components, where each component is asubclass of the Item class.
In the sections that follow, we'll look at each of the device-display components thatcomprise MIDP's high-level API, namely:
• DateField
• Gauge
developerWorks® ibm.com/developerWorks
J2ME 101, Part 1: Introduction to MIDP's high-level user interfacePage 18 of 59 © Copyright IBM Corporation 1994, 2008. All rights reserved.
• StringItem
• TextField
• ChoiceGroup
• Spacer
• CustomItem
• Image and ImageItem
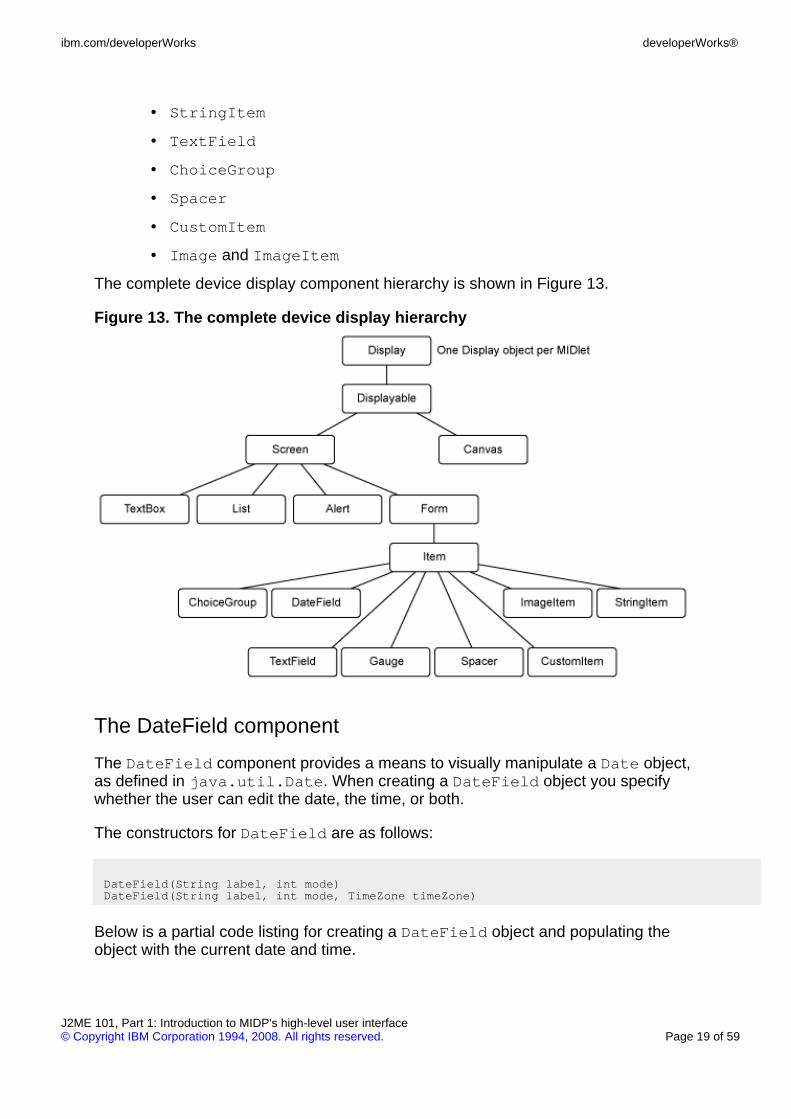
The complete device display component hierarchy is shown in Figure 13.
Figure 13. The complete device display hierarchy
The DateField component
The DateField component provides a means to visually manipulate a Date object,as defined in java.util.Date. When creating a DateField object you specifywhether the user can edit the date, the time, or both.
The constructors for DateField are as follows:
DateField(String label, int mode)DateField(String label, int mode, TimeZone timeZone)
Below is a partial code listing for creating a DateField object and populating theobject with the current date and time.
ibm.com/developerWorks developerWorks®
J2ME 101, Part 1: Introduction to MIDP's high-level user interface© Copyright IBM Corporation 1994, 2008. All rights reserved. Page 19 of 59
private DateField dfAlarm;
// DateField with label, that allows both date and time to be changeddfAlarm = new DateField("Set Alarm Time", DateField.DATE_TIME);dfAlarm.setDate(new Date());
The DateFieldTest MIDlet
We'll create a simple DateFieldTest MIDlet to demonstrate the DateFieldcomponent. As you will recall, the steps to create and run the MIDlet are as follows:
1. Create a new project with the name DateFieldTest.
2. Copy and paste the DateFieldTest source code into a text editor.
3. Save the source code as DateFieldTest.java in the directory\apps\DateFieldTest\src of your WTK installation.
4. Build and run the project.
DateFieldTest source
Here's the source code for our example DateFieldTest MIDlet:
/*--------------------------------------------------* DateFieldTest.java*-------------------------------------------------*/import java.util.*;import javax.microedition.midlet.*;import javax.microedition.lcdui.*;import java.util.Timer;import java.util.TimerTask;
public class DateFieldTest extends MIDlet implements ItemStateListener, CommandListener{private Display display; // Reference to display objectprivate Form fmMain; // Main formprivate Command cmExit; // Exit MIDletprivate DateField dfAlarm; // DateField component
public DateFieldTest(){
display = Display.getDisplay(this);
// The main formfmMain = new Form("DateField Test");
// DateField with todays date as a defaultdfAlarm = new DateField("Set Alarm Time", DateField.DATE_TIME);dfAlarm.setDate(new Date());
// All the commands/buttonscmExit = new Command("Exit", Command.EXIT, 1);
// Add to form and listen for eventsfmMain.append(dfAlarm);fmMain.addCommand(cmExit);fmMain.setCommandListener(this);
developerWorks® ibm.com/developerWorks
J2ME 101, Part 1: Introduction to MIDP's high-level user interfacePage 20 of 59 © Copyright IBM Corporation 1994, 2008. All rights reserved.
fmMain.setItemStateListener(this);}
public void startApp (){
display.setCurrent(fmMain);}
public void pauseApp(){ }
public void destroyApp(boolean unconditional){ }
public void itemStateChanged(Item item){
System.out.println("Date field changed.");}
public void commandAction(Command c, Displayable s){
if (c == cmExit){destroyApp(false);notifyDestroyed();
}}
}
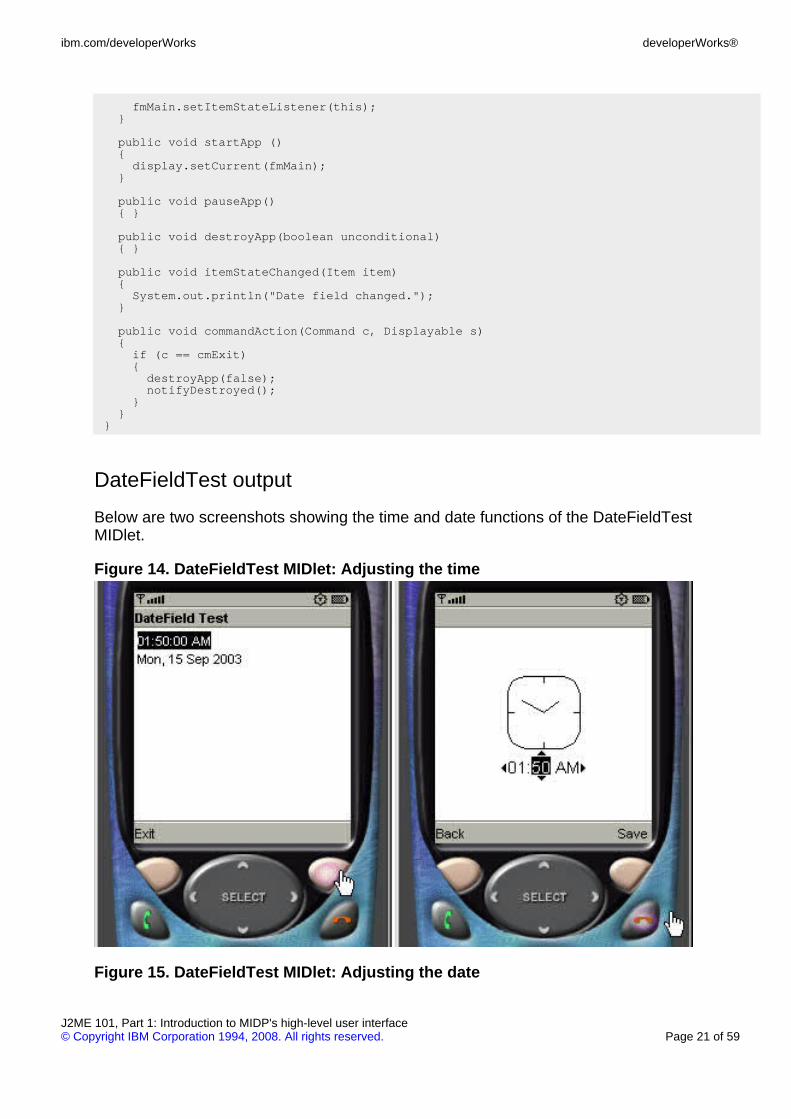
DateFieldTest output
Below are two screenshots showing the time and date functions of the DateFieldTestMIDlet.
Figure 14. DateFieldTest MIDlet: Adjusting the time
Figure 15. DateFieldTest MIDlet: Adjusting the date
ibm.com/developerWorks developerWorks®
J2ME 101, Part 1: Introduction to MIDP's high-level user interface© Copyright IBM Corporation 1994, 2008. All rights reserved. Page 21 of 59
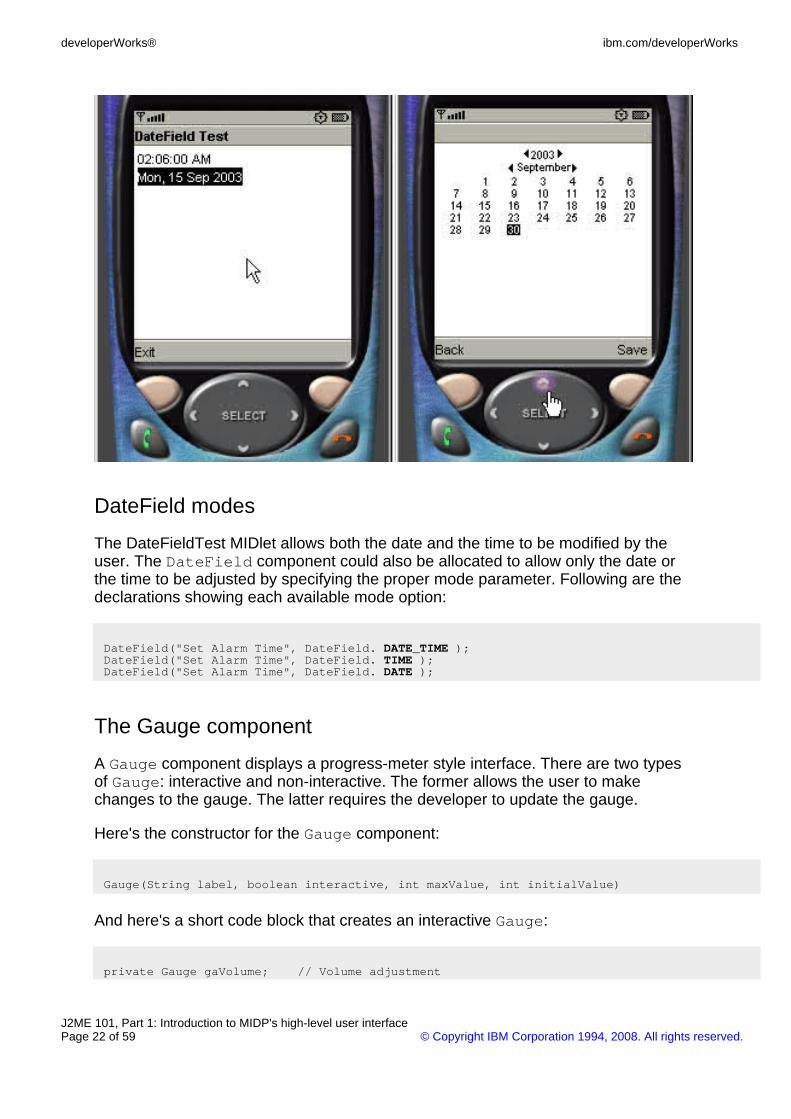
DateField modes
The DateFieldTest MIDlet allows both the date and the time to be modified by theuser. The DateField component could also be allocated to allow only the date orthe time to be adjusted by specifying the proper mode parameter. Following are thedeclarations showing each available mode option:
DateField("Set Alarm Time", DateField. DATE_TIME );DateField("Set Alarm Time", DateField. TIME );DateField("Set Alarm Time", DateField. DATE );
The Gauge component
A Gauge component displays a progress-meter style interface. There are two typesof Gauge: interactive and non-interactive. The former allows the user to makechanges to the gauge. The latter requires the developer to update the gauge.
Here's the constructor for the Gauge component:
Gauge(String label, boolean interactive, int maxValue, int initialValue)
And here's a short code block that creates an interactive Gauge:
private Gauge gaVolume; // Volume adjustment
developerWorks® ibm.com/developerWorks
J2ME 101, Part 1: Introduction to MIDP's high-level user interfacePage 22 of 59 © Copyright IBM Corporation 1994, 2008. All rights reserved.
gaVolume = new Gauge("Sound Level", true, 100, 4);
The InteractiveGauge MIDlet
Follow these steps to create a MIDlet with an interactive gauge:
1. Create a new project with the name InteractiveGauge.
2. Copy and paste the InteractiveGauge source code into a text editor.
3. Save the source code as InteractiveGauge.java in the directory\apps\InteractiveGauge\src of your WTK installation.
4. Build and run the project.
InteractiveGauge source
Here's the source code for our InteractiveGauge MIDlet:
/*--------------------------------------------------* InteractiveGauge.java*-------------------------------------------------*/import javax.microedition.midlet.*;import javax.microedition.lcdui.*;
public class InteractiveGauge extends MIDlet implements CommandListener{private Display display; // Reference to display objectprivate Form fmMain; // The main formprivate Command cmExit; // Exit the formprivate Gauge gaVolume; // Volume adjustment
public InteractiveGauge(){
display = Display.getDisplay(this);
// Create the gauge and exit commandgaVolume = new Gauge("Sound Level", true, 50, 4);cmExit = new Command("Exit", Command.EXIT, 1);
// Create form, add commands, listen for eventsfmMain = new Form("");fmMain.addCommand(cmExit);fmMain.append(gaVolume);fmMain.setCommandListener(this);
}
// Called by application manager to start the MIDlet.public void startApp(){
display.setCurrent(fmMain);}
public void pauseApp(){ }
public void destroyApp(boolean unconditional){ }
ibm.com/developerWorks developerWorks®
J2ME 101, Part 1: Introduction to MIDP's high-level user interface© Copyright IBM Corporation 1994, 2008. All rights reserved. Page 23 of 59
public void commandAction(Command c, Displayable s){
if (c == cmExit){destroyApp(false);notifyDestroyed();
}}
}
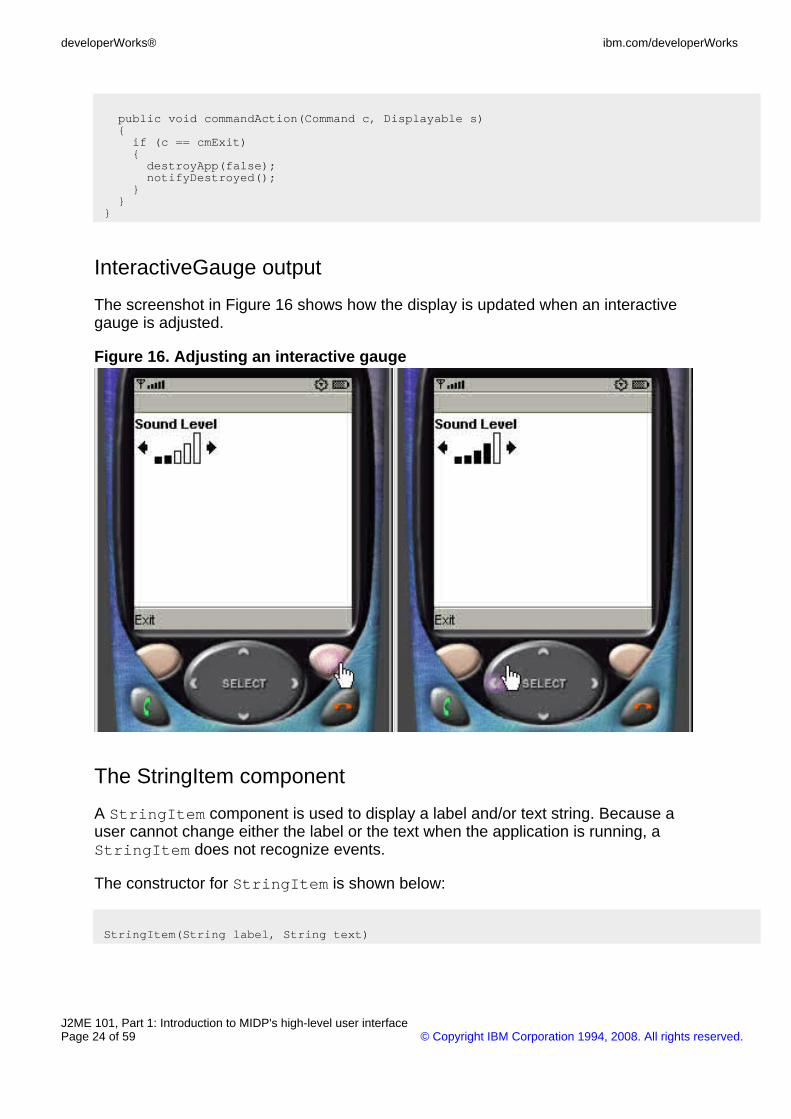
InteractiveGauge output
The screenshot in Figure 16 shows how the display is updated when an interactivegauge is adjusted.
Figure 16. Adjusting an interactive gauge
The StringItem component
A StringItem component is used to display a label and/or text string. Because auser cannot change either the label or the text when the application is running, aStringItem does not recognize events.
The constructor for StringItem is shown below:
StringItem(String label, String text)
developerWorks® ibm.com/developerWorks
J2ME 101, Part 1: Introduction to MIDP's high-level user interfacePage 24 of 59 © Copyright IBM Corporation 1994, 2008. All rights reserved.
The StringItemTest MIDlet
The StringItemTest MIDlet defines and displays a StringItem. The applicationalso incorporates a command labeled Change that can programmatically changethe label and message. Here are the steps to create a StringItemTest MIDlet:
1. Create a new project with the name StringItemTest.
2. Copy and paste the StringItemTest source code into a text editor.
3. Save the source code as StringItemTest.java in the directory\apps\StringItemTest\src of your WTK installation.
4. Build and run the project.
StringItemTest source
Here's the source code for our StringItemTest MIDlet:
/*--------------------------------------------------* StringItemTest.java*-------------------------------------------------*/import javax.microedition.midlet.*;import javax.microedition.lcdui.*;
public class StringItemTest extends MIDlet implements CommandListener{private Display display; // Reference to Display objectprivate Form fmMain; // Main formprivate StringItem siMsg; // StringItemprivate Command cmChange; // Change the label and messageprivate Command cmExit; // Exit the MIDlet
public StringItemTest(){
display = Display.getDisplay(this);
// Create text message and commandssiMsg = new StringItem("Website: ", "www.IBM.com");cmChange = new Command("Change", Command.SCREEN, 1);cmExit = new Command("Exit", Command.EXIT, 1);
// Create Form, add Command and StringItem, listen for eventsfmMain = new Form("StringItem Test");fmMain.addCommand(cmExit);fmMain.addCommand(cmChange);fmMain.append(siMsg);fmMain.setCommandListener(this);
}
// Called by application manager to start the MIDlet.public void startApp(){
display.setCurrent(fmMain);}
public void pauseApp(){ }
public void destroyApp(boolean unconditional)
ibm.com/developerWorks developerWorks®
J2ME 101, Part 1: Introduction to MIDP's high-level user interface© Copyright IBM Corporation 1994, 2008. All rights reserved. Page 25 of 59
{ }
public void commandAction(Command c, Displayable s){
if (c == cmChange){// Change labelsiMsg.setLabel("Section: ");
// Change textsiMsg.setText("developerWorks");
// Remove the commandfmMain.removeCommand(cmChange);
}else if (c == cmExit){destroyApp(false);notifyDestroyed();
}}
}
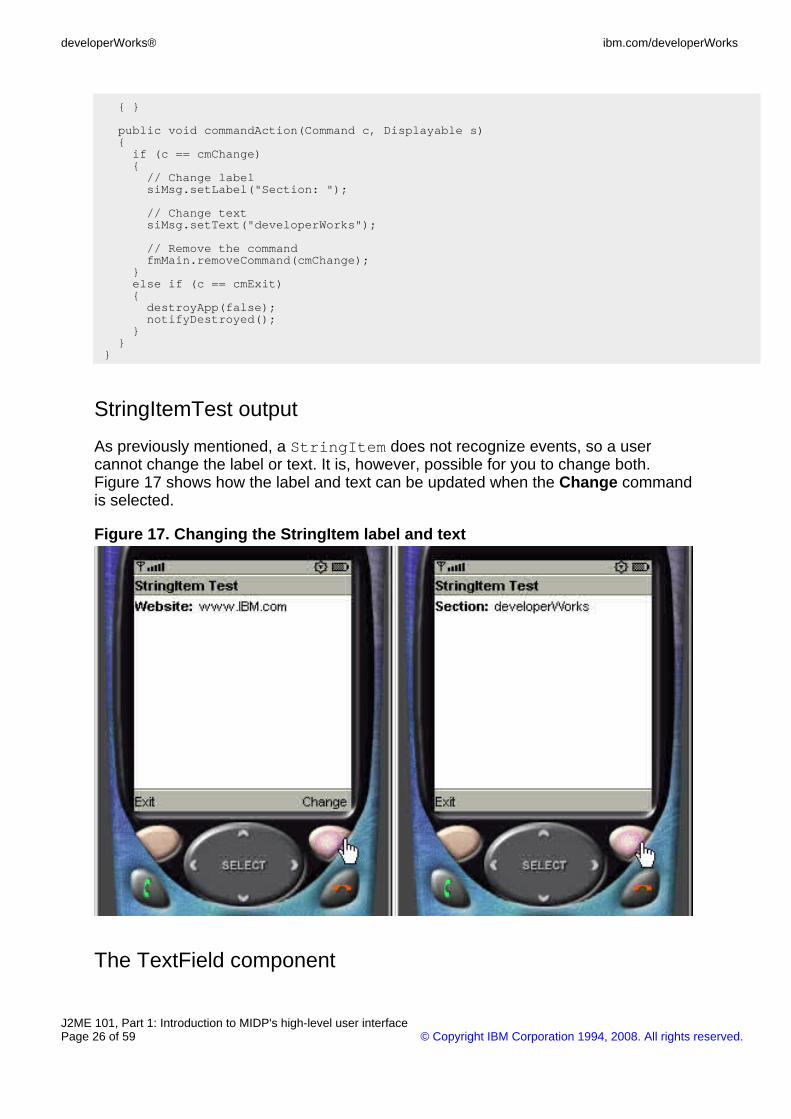
StringItemTest output
As previously mentioned, a StringItem does not recognize events, so a usercannot change the label or text. It is, however, possible for you to change both.Figure 17 shows how the label and text can be updated when the Change commandis selected.
Figure 17. Changing the StringItem label and text
The TextField component
developerWorks® ibm.com/developerWorks
J2ME 101, Part 1: Introduction to MIDP's high-level user interfacePage 26 of 59 © Copyright IBM Corporation 1994, 2008. All rights reserved.
A Textfield is analogous to any typical text entry field. You can specify a label,the maximum number of characters, and the type of data you will accept. TheTextField component also implements a password modifier that masks charactersas they are input.
Here is the constructor for TextField:
TextField(String label, String text, int maxSize, int constraints)
The final parameter, constraints, is the one we're interested in, because it is ourmeans to specify the type of input allowed in the TextField.
TextField constraints
MIDP defines the following constraint parameters for the TextField component:
• ANY allows any characters.
• EMAILADDR allows only valid email addresses.
• NUMERIC allows any numeric value.
• PHONENUMBER allows only phone numbers.
• URL allows only characters that are valid within URL.
• PASSWORD masks all characters as they are input.
The TextFieldTest MIDlet
The TextFieldTest MIDlet will demonstrate a TextField that obtains and displays aseries of characters input by a user. Here's the procedure to create and run theTextFieldTest MIDlet:
1. Create a new project with the name TextFieldTest.
2. Copy and paste the TextFieldTest source code into a text editor.
3. Save the source code as TextFieldTest.java in the directory\apps\TextFieldTest\src of your WTK installation.
4. Build and run the project.
TextFieldTest source
Here's the source code for our TextFieldTest MIDlet:
ibm.com/developerWorks developerWorks®
J2ME 101, Part 1: Introduction to MIDP's high-level user interface© Copyright IBM Corporation 1994, 2008. All rights reserved. Page 27 of 59
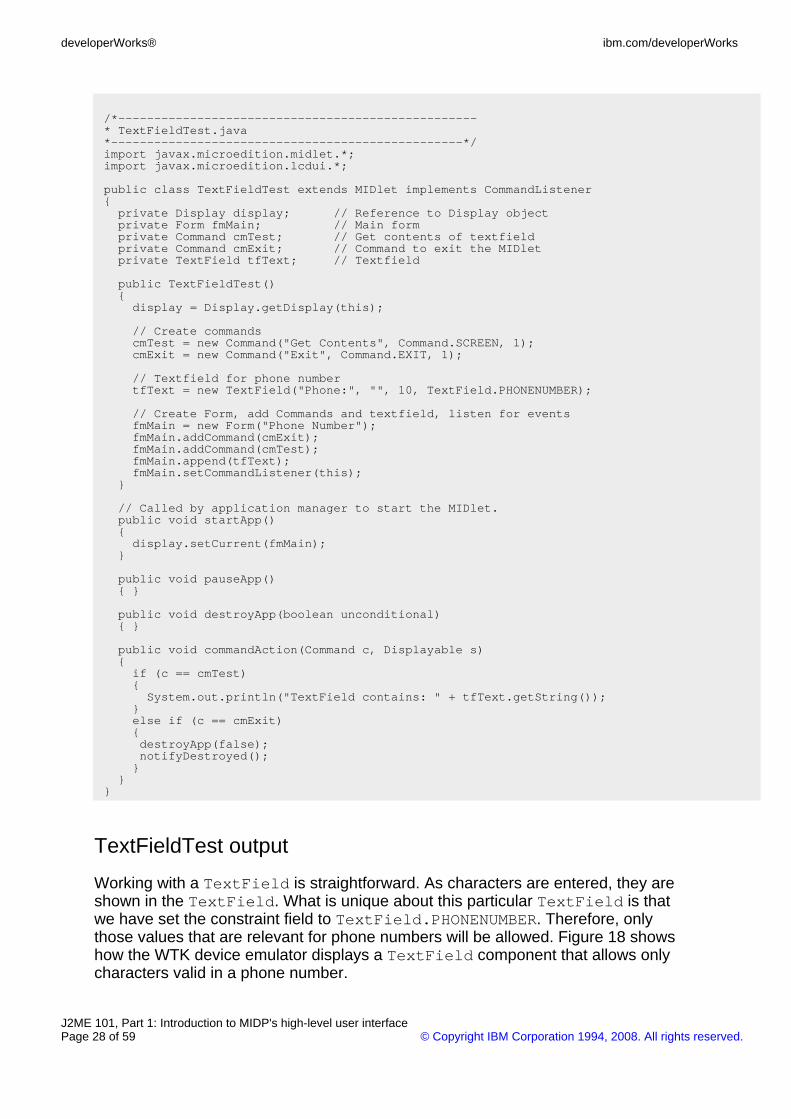
/*--------------------------------------------------* TextFieldTest.java*-------------------------------------------------*/import javax.microedition.midlet.*;import javax.microedition.lcdui.*;
public class TextFieldTest extends MIDlet implements CommandListener{private Display display; // Reference to Display objectprivate Form fmMain; // Main formprivate Command cmTest; // Get contents of textfieldprivate Command cmExit; // Command to exit the MIDletprivate TextField tfText; // Textfield
public TextFieldTest(){
display = Display.getDisplay(this);
// Create commandscmTest = new Command("Get Contents", Command.SCREEN, 1);cmExit = new Command("Exit", Command.EXIT, 1);
// Textfield for phone numbertfText = new TextField("Phone:", "", 10, TextField.PHONENUMBER);
// Create Form, add Commands and textfield, listen for eventsfmMain = new Form("Phone Number");fmMain.addCommand(cmExit);fmMain.addCommand(cmTest);fmMain.append(tfText);fmMain.setCommandListener(this);
}
// Called by application manager to start the MIDlet.public void startApp(){
display.setCurrent(fmMain);}
public void pauseApp(){ }
public void destroyApp(boolean unconditional){ }
public void commandAction(Command c, Displayable s){
if (c == cmTest){System.out.println("TextField contains: " + tfText.getString());
}else if (c == cmExit){destroyApp(false);notifyDestroyed();
}}
}
TextFieldTest output
Working with a TextField is straightforward. As characters are entered, they areshown in the TextField. What is unique about this particular TextField is thatwe have set the constraint field to TextField.PHONENUMBER. Therefore, onlythose values that are relevant for phone numbers will be allowed. Figure 18 showshow the WTK device emulator displays a TextField component that allows onlycharacters valid in a phone number.
developerWorks® ibm.com/developerWorks
J2ME 101, Part 1: Introduction to MIDP's high-level user interfacePage 28 of 59 © Copyright IBM Corporation 1994, 2008. All rights reserved.
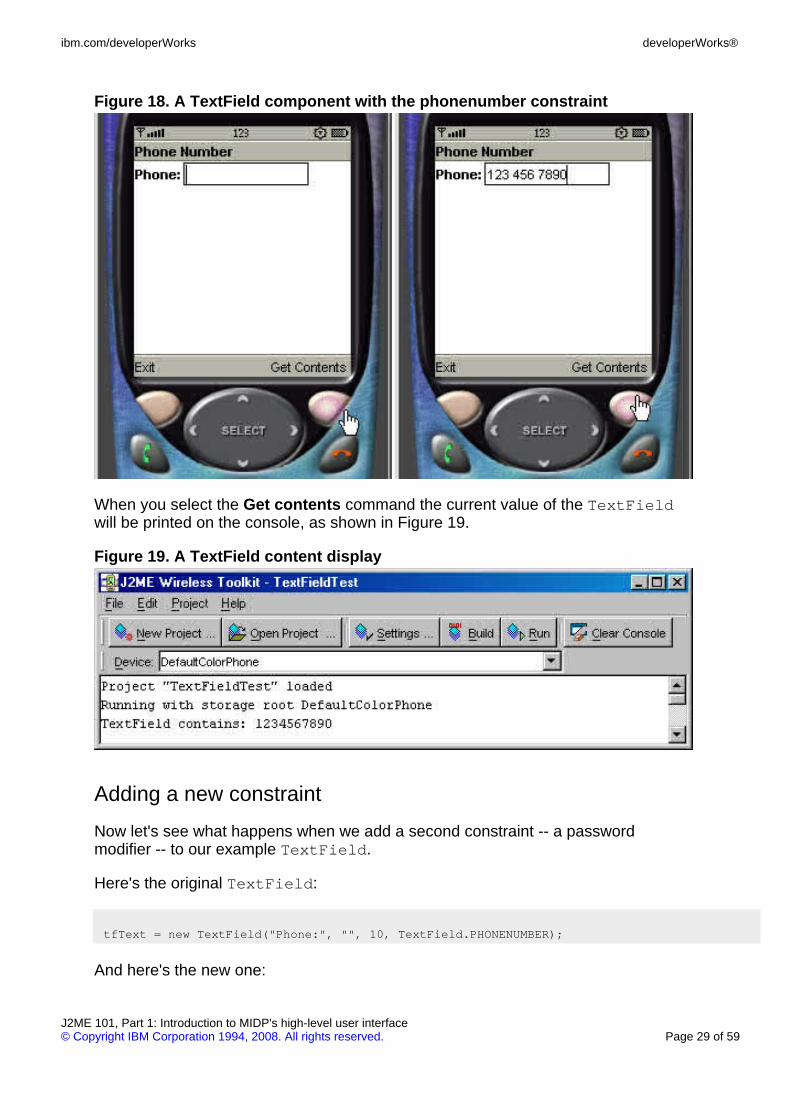
Figure 18. A TextField component with the phonenumber constraint
When you select the Get contents command the current value of the TextFieldwill be printed on the console, as shown in Figure 19.
Figure 19. A TextField content display
Adding a new constraint
Now let's see what happens when we add a second constraint -- a passwordmodifier -- to our example TextField.
Here's the original TextField:
tfText = new TextField("Phone:", "", 10, TextField.PHONENUMBER);
And here's the new one:
ibm.com/developerWorks developerWorks®
J2ME 101, Part 1: Introduction to MIDP's high-level user interface© Copyright IBM Corporation 1994, 2008. All rights reserved. Page 29 of 59
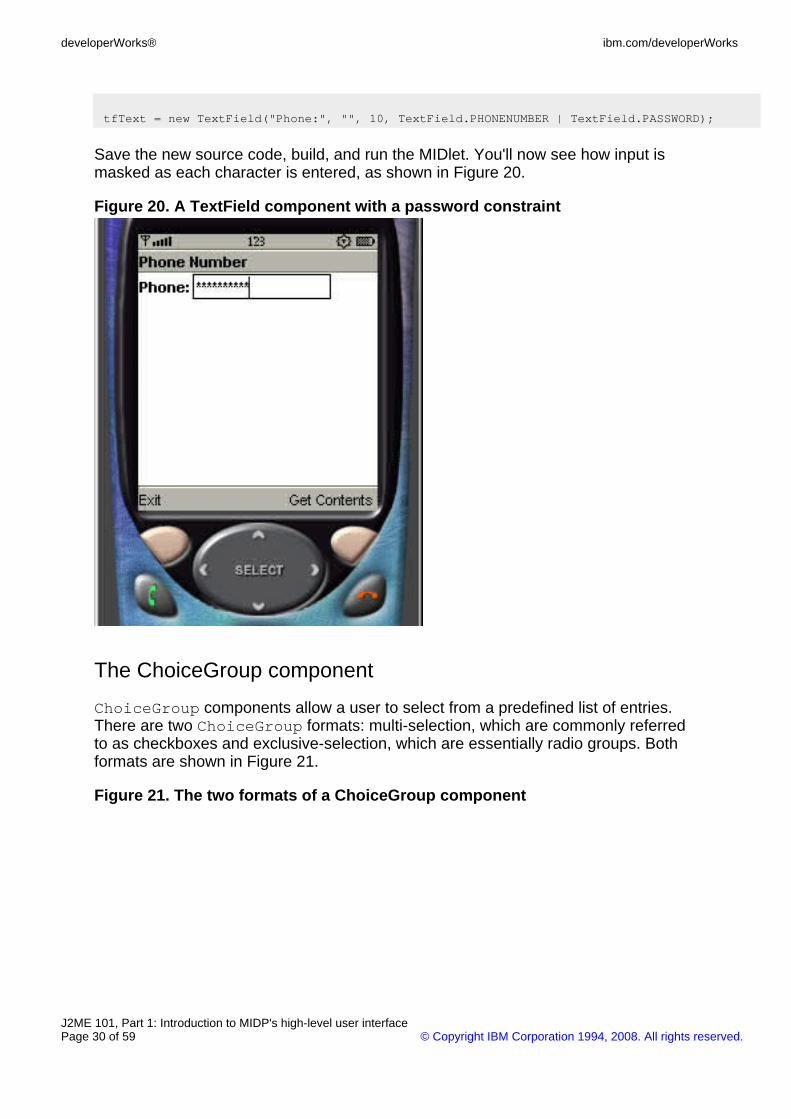
tfText = new TextField("Phone:", "", 10, TextField.PHONENUMBER | TextField.PASSWORD);
Save the new source code, build, and run the MIDlet. You'll now see how input ismasked as each character is entered, as shown in Figure 20.
Figure 20. A TextField component with a password constraint
The ChoiceGroup component
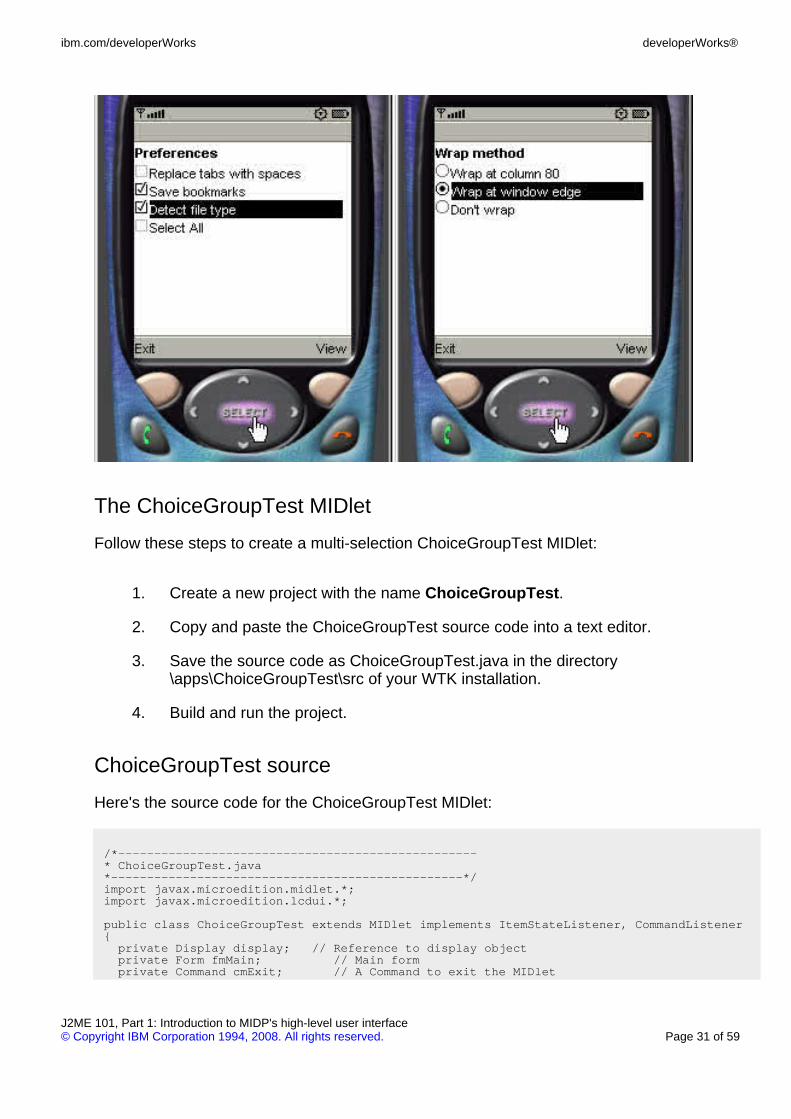
ChoiceGroup components allow a user to select from a predefined list of entries.There are two ChoiceGroup formats: multi-selection, which are commonly referredto as checkboxes and exclusive-selection, which are essentially radio groups. Bothformats are shown in Figure 21.
Figure 21. The two formats of a ChoiceGroup component
developerWorks® ibm.com/developerWorks
J2ME 101, Part 1: Introduction to MIDP's high-level user interfacePage 30 of 59 © Copyright IBM Corporation 1994, 2008. All rights reserved.
The ChoiceGroupTest MIDlet
Follow these steps to create a multi-selection ChoiceGroupTest MIDlet:
1. Create a new project with the name ChoiceGroupTest.
2. Copy and paste the ChoiceGroupTest source code into a text editor.
3. Save the source code as ChoiceGroupTest.java in the directory\apps\ChoiceGroupTest\src of your WTK installation.
4. Build and run the project.
ChoiceGroupTest source
Here's the source code for the ChoiceGroupTest MIDlet:
/*--------------------------------------------------* ChoiceGroupTest.java*-------------------------------------------------*/import javax.microedition.midlet.*;import javax.microedition.lcdui.*;
public class ChoiceGroupTest extends MIDlet implements ItemStateListener, CommandListener{private Display display; // Reference to display objectprivate Form fmMain; // Main formprivate Command cmExit; // A Command to exit the MIDlet
ibm.com/developerWorks developerWorks®
J2ME 101, Part 1: Introduction to MIDP's high-level user interface© Copyright IBM Corporation 1994, 2008. All rights reserved. Page 31 of 59
private Command cmView; // View the choice selectedprivate int selectAllIndex; // Index of the "Select All" optionprivate ChoiceGroup cgPrefs; // Choice Group of preferences
private int choiceGroupIndex; // Index of choice group on form
public ChoiceGroupTest(){
display = Display.getDisplay(this);
// Create a multiple choice groupcgPrefs = new ChoiceGroup("Preferences", Choice.MULTIPLE);
// Append options, with no associated imagescgPrefs.append("Replace tabs with spaces", null);cgPrefs.append("Save bookmarks", null);cgPrefs.append("Detect file type", null);selectAllIndex = cgPrefs.append("Select All", null);
cmExit = new Command("Exit", Command.EXIT, 1);cmView = new Command("View", Command.SCREEN,2);
// Create Form, add components, listen for eventsfmMain = new Form("");choiceGroupIndex = fmMain.append(cgPrefs);fmMain.addCommand(cmExit);fmMain.addCommand(cmView);fmMain.setCommandListener(this);fmMain.setItemStateListener(this);
}
public void startApp(){
display.setCurrent(fmMain);}
public void pauseApp(){ }
public void destroyApp(boolean unconditional){ }
public void commandAction(Command c, Displayable s){
if (c == cmView){boolean selected[] = new boolean[cgPrefs.size()];
// Fill array indicating whether each element is checkedcgPrefs.getSelectedFlags(selected);
for (int i = 0; i < cgPrefs.size(); i++)System.out.println(cgPrefs.getString(i) +
(selected[i] ? ": selected" : ": not selected"));
}else if (c == cmExit){destroyApp(false);notifyDestroyed();
}}
public void itemStateChanged(Item item){
if (item == cgPrefs){// Is "Select all" option checked ?if (cgPrefs.isSelected(selectAllIndex)){
// Set all checkboxes to truefor (int i = 0; i < cgPrefs.size(); i++)cgPrefs.setSelectedIndex(i, true);
developerWorks® ibm.com/developerWorks
J2ME 101, Part 1: Introduction to MIDP's high-level user interfacePage 32 of 59 © Copyright IBM Corporation 1994, 2008. All rights reserved.
// Remove the check by "Select All"cgPrefs.setSelectedIndex(selectAllIndex, false);
}}
}}
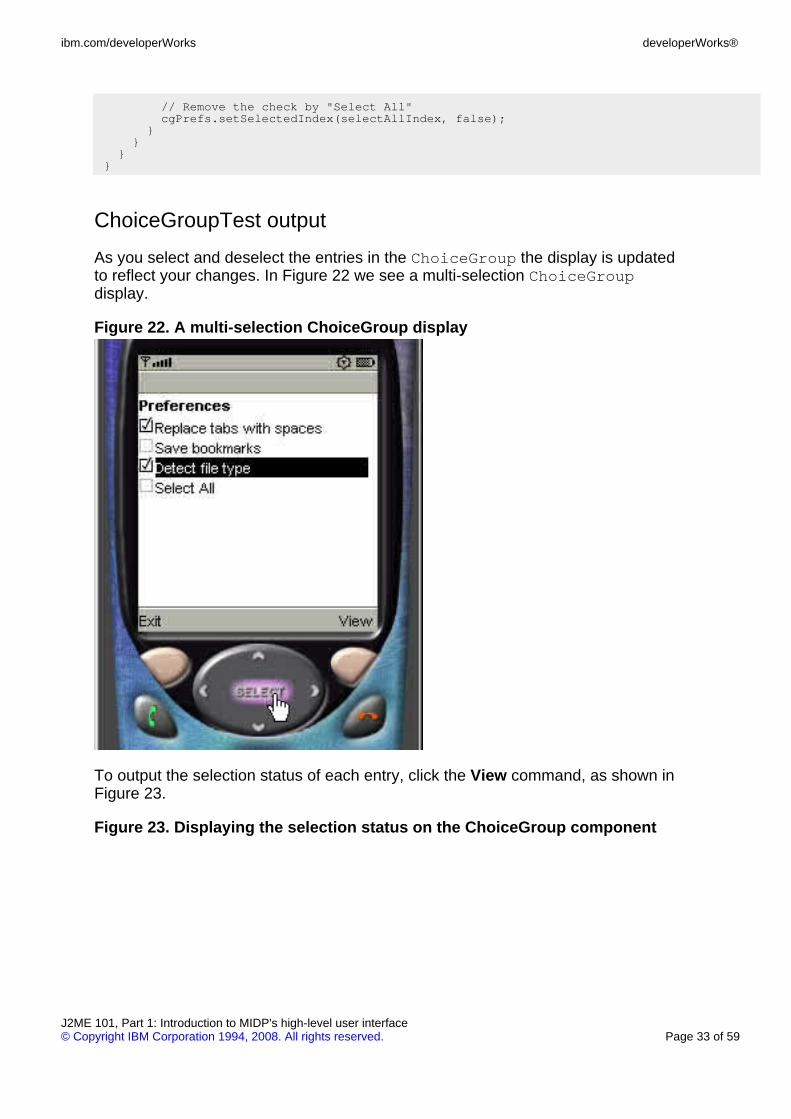
ChoiceGroupTest output
As you select and deselect the entries in the ChoiceGroup the display is updatedto reflect your changes. In Figure 22 we see a multi-selection ChoiceGroupdisplay.
Figure 22. A multi-selection ChoiceGroup display
To output the selection status of each entry, click the View command, as shown inFigure 23.
Figure 23. Displaying the selection status on the ChoiceGroup component
ibm.com/developerWorks developerWorks®
J2ME 101, Part 1: Introduction to MIDP's high-level user interface© Copyright IBM Corporation 1994, 2008. All rights reserved. Page 33 of 59
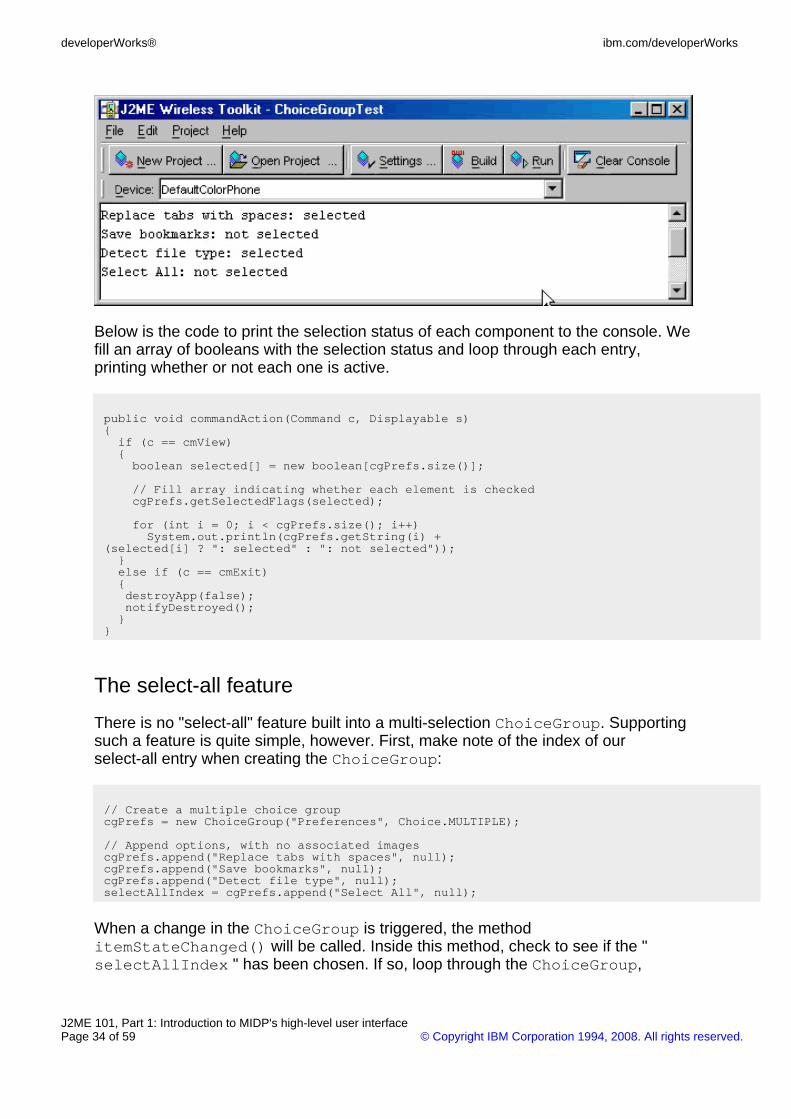
Below is the code to print the selection status of each component to the console. Wefill an array of booleans with the selection status and loop through each entry,printing whether or not each one is active.
public void commandAction(Command c, Displayable s){if (c == cmView){
boolean selected[] = new boolean[cgPrefs.size()];
// Fill array indicating whether each element is checkedcgPrefs.getSelectedFlags(selected);
for (int i = 0; i < cgPrefs.size(); i++)System.out.println(cgPrefs.getString(i) +
(selected[i] ? ": selected" : ": not selected"));}else if (c == cmExit){destroyApp(false);notifyDestroyed();
}}
The select-all feature
There is no "select-all" feature built into a multi-selection ChoiceGroup. Supportingsuch a feature is quite simple, however. First, make note of the index of ourselect-all entry when creating the ChoiceGroup:
// Create a multiple choice groupcgPrefs = new ChoiceGroup("Preferences", Choice.MULTIPLE);
// Append options, with no associated imagescgPrefs.append("Replace tabs with spaces", null);cgPrefs.append("Save bookmarks", null);cgPrefs.append("Detect file type", null);selectAllIndex = cgPrefs.append("Select All", null);
When a change in the ChoiceGroup is triggered, the methoditemStateChanged() will be called. Inside this method, check to see if the "selectAllIndex " has been chosen. If so, loop through the ChoiceGroup,
developerWorks® ibm.com/developerWorks
J2ME 101, Part 1: Introduction to MIDP's high-level user interfacePage 34 of 59 © Copyright IBM Corporation 1994, 2008. All rights reserved.
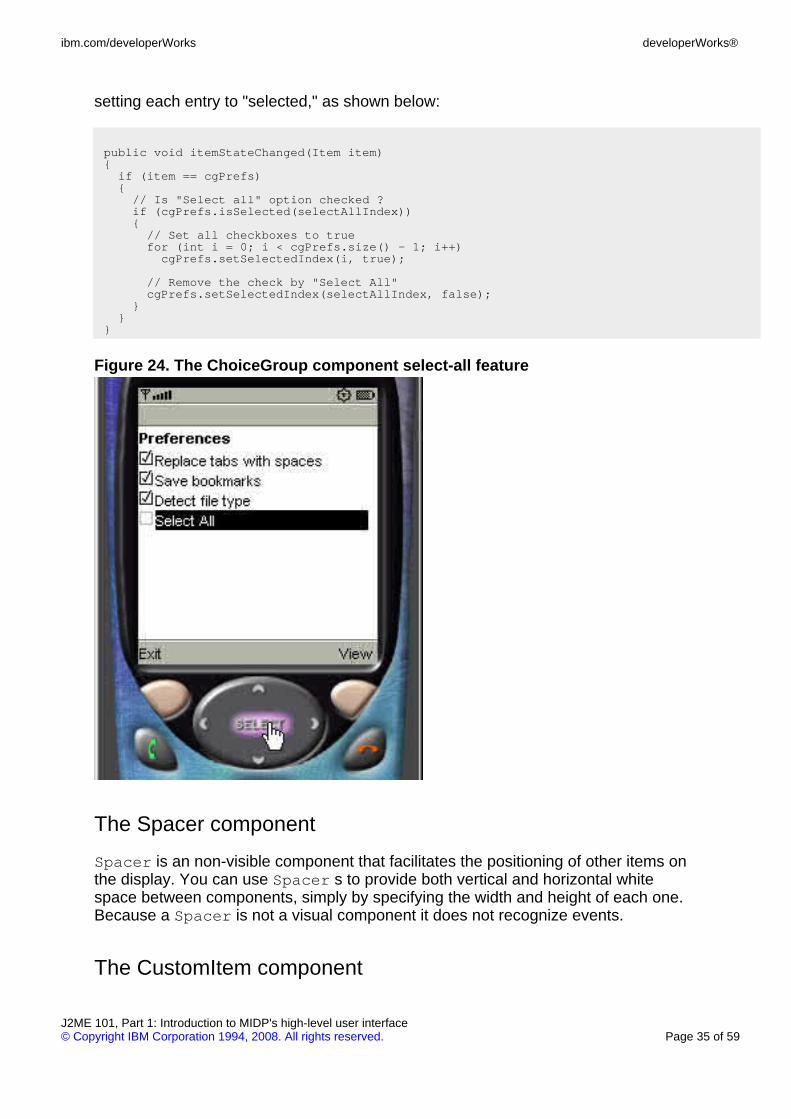
setting each entry to "selected," as shown below:
public void itemStateChanged(Item item){if (item == cgPrefs){
// Is "Select all" option checked ?if (cgPrefs.isSelected(selectAllIndex)){// Set all checkboxes to truefor (int i = 0; i < cgPrefs.size() - 1; i++)
cgPrefs.setSelectedIndex(i, true);
// Remove the check by "Select All"cgPrefs.setSelectedIndex(selectAllIndex, false);
}}
}
Figure 24. The ChoiceGroup component select-all feature
The Spacer component
Spacer is an non-visible component that facilitates the positioning of other items onthe display. You can use Spacer s to provide both vertical and horizontal whitespace between components, simply by specifying the width and height of each one.Because a Spacer is not a visual component it does not recognize events.
The CustomItem component
ibm.com/developerWorks developerWorks®
J2ME 101, Part 1: Introduction to MIDP's high-level user interface© Copyright IBM Corporation 1994, 2008. All rights reserved. Page 35 of 59
The CustomItem component lets you create your own Item components. As withother Item s, this type of component can be added to a Form and can recognizeand process events.
CustomItem s are drawn onto the display with the paint() method. As the creatorof the component, it is up to you to write the code inside paint(). The process ofcreating a CustomItem is no different from working with any other Java platformobject that extends another class. The shell of a simple CustomItem component isshown below:
public class NewItem extends CustomItem{
public NewItem(String label){super(label);...
}
protected void paint(Graphics g, int width, int height){...
}
protected int getMinContentHeight(){...;
}
protected int getMinContentWidth(){...
}
protected int getPrefContentHeight(int width){...
}
protected int getPrefContentWidth(int height){...
}
...
}
While CustomItem is one of the most exciting components of the MIDP's high-levelinterface, it is beyond the scope of this tutorial for us to create one together. SeeResources to learn more about the CustomItem component.
The ImageItem and Image components
Two classes are used to work with display images: Image and ImageItem. Imageis used to create an image object and holds information such as the height andwidth, and whether or not the image is mutable. ImageItem defines how an imagewill be displayed; that is, whether the image will be centered, to the left, at the top ofthe screen, etc.
MIDP offers two types of images: immutable and mutable. An immutable image
developerWorks® ibm.com/developerWorks
J2ME 101, Part 1: Introduction to MIDP's high-level user interfacePage 36 of 59 © Copyright IBM Corporation 1994, 2008. All rights reserved.
cannot be changed once it has been created. Typically, this type of image is readfrom a resource such as a file. A mutable image is essentially a chunk of memory. Itis up to you to create the contents of the image by writing it into the memory block.We'll work with immutable images in the sections that follow. You'll learn aboutmutable images in Part 2, when we discuss the low-level interface.
Constructors for the Image and ImageItem classes
Following are the constructors for the Image and ImageItem classes:
Image createImage(String name)Image createImage(Image source)Image createImage(byte[] imageDate, int imageOffset, int imageLength)Image createImage(int width, int height)Image createImage(Image image, int x, int y, int width,
int height, int transform)Image createImage(InputStream stream)Image createRGBImage(int[] rgb, int width, int height,
boolean processAlpha)
ImageItem(String label, Image img, int layout, String altText)
Steps for displaying an image
The following code shows how we could create an image from a file, associate itwith an ImageItem object, and append the image onto a Form.
Form fmMain = new Form("Images");
...
// Create an imageImage img = Image.createImage("/house.png");
// Append to a formfmMain.append(new ImageItem(null, img, ImageItem.LAYOUT_CENTER, null));
The ImageTest MIDlet
The ImageTest MIDlet will display an image that is read from a file. The file will bestored in the same JAR file that contains the MIDlet. The build-and-run cycle for theImageTest MIDlet will be slightly different from the one we've used for earlier MIDletsbecause it will incorporate the use of multiple image files. Here's the process forcreating the ImageTest MIDlet:
1. Create a new project with the name ImageTest.
2. Copy and paste the ImageTest source code into a text editor.
3. Save the source code as ImageTest.java in the directory
ibm.com/developerWorks developerWorks®
J2ME 101, Part 1: Introduction to MIDP's high-level user interface© Copyright IBM Corporation 1994, 2008. All rights reserved. Page 37 of 59
\apps\ImageTest\src of your WTK installation.
4. Create two PNG images, one with the name image_color.png, and theother with the name image_bw.png. Save these images in the\apps\ImageTest\res directory.
5. Build and run the project.
*Note that Portable Network Graphics (PNG) is the only image format required forany MIDP device implementation. See Resources to learn more about PNG.
ImageTest source
Here's the source code for the ImageTest MIDlet:
/*--------------------------------------------------* ImageTest.java*-------------------------------------------------*/import javax.microedition.midlet.*;import javax.microedition.lcdui.*;
public class ImageTest extends MIDlet implements CommandListener{private Display display; // Reference to Display objectprivate Form fmMain; // The main formprivate Command cmExit; // Command to exit the MIDlet
public ImageTest(){
display = Display.getDisplay(this);
cmExit = new Command("Exit", Command.EXIT, 1);fmMain = new Form("");fmMain.addCommand(cmExit);fmMain.setCommandListener(this);
try{// Read the appropriate image based on color supportImage im = Image.createImage((display.isColor()) ?
"/image_color.png":"/image_bw.png");
fmMain.append(new ImageItem(null, im, ImageItem.LAYOUT_CENTER, null));
display.setCurrent(fmMain);}catch (java.io.IOException e){System.err.println("Unable to locate or read .png file");
}}
public void startApp(){
display.setCurrent(fmMain);}
public void pauseApp(){}
public void destroyApp(boolean unconditional){}
developerWorks® ibm.com/developerWorks
J2ME 101, Part 1: Introduction to MIDP's high-level user interfacePage 38 of 59 © Copyright IBM Corporation 1994, 2008. All rights reserved.
public void commandAction(Command c, Displayable s){
if (c == cmExit){destroyApp(false);notifyDestroyed();
}}
}
Color or grayscale?
You most likely noted that the Image source code contains a provision for displayingthe appropriate image based on whether or not a device supports color. When theapplication is started the appropriate image will be read from the JAR file, as shownbelow:
// Read the appropriate image based on color supportImage im = Image.createImage((display.isColor()) ?
"/image_color.png":"/image_bw.png");
// Create ImageItem and append to the formfmMain.append(new ImageItem(null, im, ImageItem.LAYOUT_CENTER, null));
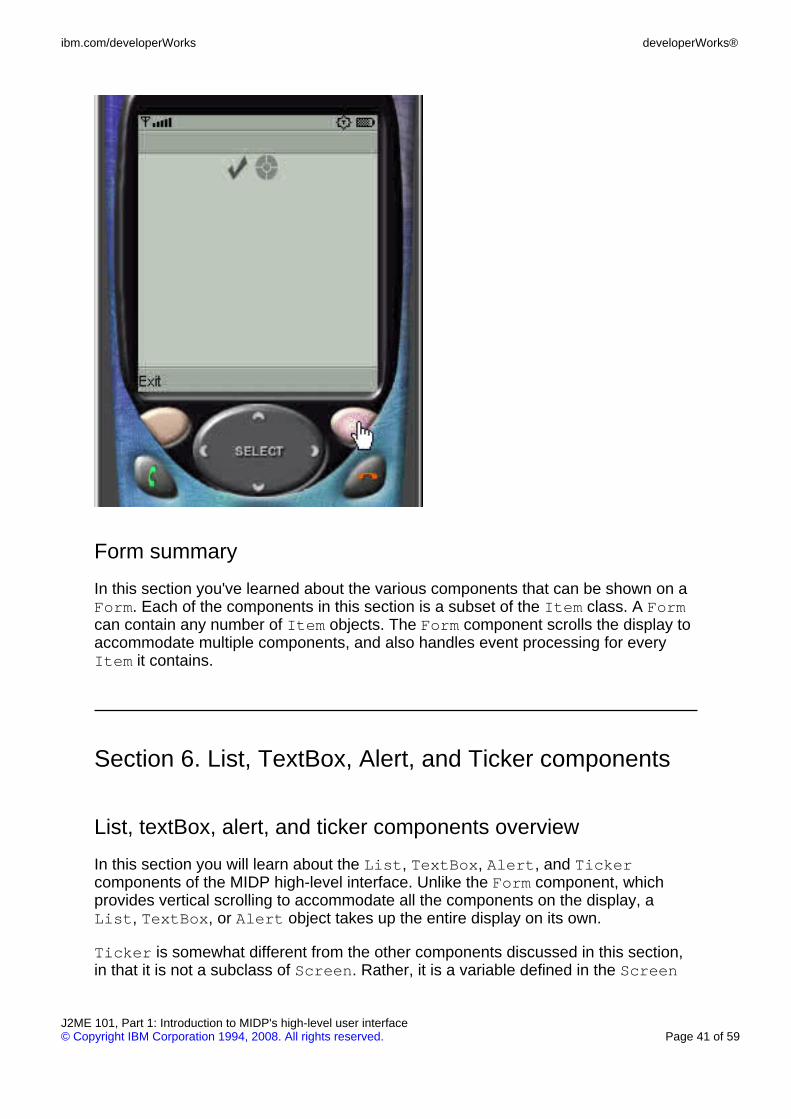
ImageTest output
By default, the WTK emulator uses the DefaultColorPhone, and the device willdisplay the image_color.png file, as shown in Figure 25.
Figure 25. Displaying an image from a default file
ibm.com/developerWorks developerWorks®
J2ME 101, Part 1: Introduction to MIDP's high-level user interface© Copyright IBM Corporation 1994, 2008. All rights reserved. Page 39 of 59

If you change the emulator to use the DefaultGrayPhone, as shown in Figure 26,the MIDlet will load bw_image.png.
Figure 26. Changing the default emulator
The resulting image is shown in Figure 27.
Figure 27. The resulting black-and-white image
developerWorks® ibm.com/developerWorks
J2ME 101, Part 1: Introduction to MIDP's high-level user interfacePage 40 of 59 © Copyright IBM Corporation 1994, 2008. All rights reserved.
Form summary
In this section you've learned about the various components that can be shown on aForm. Each of the components in this section is a subset of the Item class. A Formcan contain any number of Item objects. The Form component scrolls the display toaccommodate multiple components, and also handles event processing for everyItem it contains.
Section 6. List, TextBox, Alert, and Ticker components
List, textBox, alert, and ticker components overview
In this section you will learn about the List, TextBox, Alert, and Tickercomponents of the MIDP high-level interface. Unlike the Form component, whichprovides vertical scrolling to accommodate all the components on the display, aList, TextBox, or Alert object takes up the entire display on its own.
Ticker is somewhat different from the other components discussed in this section,in that it is not a subclass of Screen. Rather, it is a variable defined in the Screen
ibm.com/developerWorks developerWorks®
J2ME 101, Part 1: Introduction to MIDP's high-level user interface© Copyright IBM Corporation 1994, 2008. All rights reserved. Page 41 of 59
class. As a result, any object that subclasses Screen can also display a Ticker.
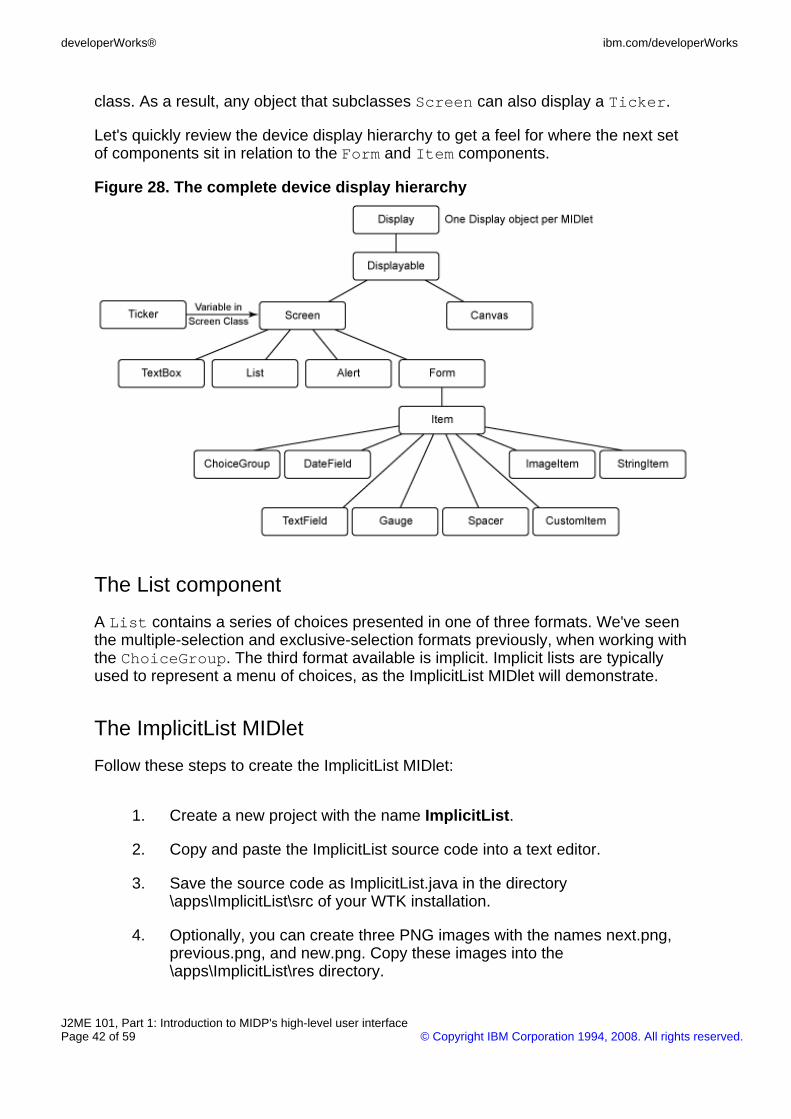
Let's quickly review the device display hierarchy to get a feel for where the next setof components sit in relation to the Form and Item components.
Figure 28. The complete device display hierarchy
The List component
A List contains a series of choices presented in one of three formats. We've seenthe multiple-selection and exclusive-selection formats previously, when working withthe ChoiceGroup. The third format available is implicit. Implicit lists are typicallyused to represent a menu of choices, as the ImplicitList MIDlet will demonstrate.
The ImplicitList MIDlet
Follow these steps to create the ImplicitList MIDlet:
1. Create a new project with the name ImplicitList.
2. Copy and paste the ImplicitList source code into a text editor.
3. Save the source code as ImplicitList.java in the directory\apps\ImplicitList\src of your WTK installation.
4. Optionally, you can create three PNG images with the names next.png,previous.png, and new.png. Copy these images into the\apps\ImplicitList\res directory.
developerWorks® ibm.com/developerWorks
J2ME 101, Part 1: Introduction to MIDP's high-level user interfacePage 42 of 59 © Copyright IBM Corporation 1994, 2008. All rights reserved.
5. Build and run the project.
ImplicitList source
Here's the source code for our ImplicitList MIDlet:
/*--------------------------------------------------* ImplicitList.java*-------------------------------------------------*/import javax.microedition.midlet.*;import javax.microedition.lcdui.*;
public class ImplicitList extends MIDlet implements CommandListener{private Display display; // Reference to Display objectprivate List lsDocument; // Main listprivate Command cmExit; // Command to exit
public ImplicitList(){
display = Display.getDisplay(this);
// Create the CommandscmExit = new Command("Exit", Command.EXIT, 1);
try{// Create array of image objectsImage images[] = {Image.createImage("/next.png"),
Image.createImage("/previous.png"),Image.createImage("/new.png")};
// Create array of corresponding string objectsString options[] = {"Next", "Previous", "New"};
// Create list using arrays, add commands, listen for eventslsDocument = new List("Document Option:", List.IMPLICIT, options, images);
// If you have no images, use this line to create the list// lsDocument = new List("Document Option:", List.IMPLICIT, options, null);
lsDocument.addCommand(cmExit);lsDocument.setCommandListener(this);
}catch (java.io.IOException e){
System.err.println("Unable to locate or read .png file");}
}
public void startApp(){
display.setCurrent(lsDocument);}
public void pauseApp(){}
public void destroyApp(boolean unconditional){}
public void commandAction(Command c, Displayable s){
// If an implicit list generated the eventif (c == List.SELECT_COMMAND){
ibm.com/developerWorks developerWorks®
J2ME 101, Part 1: Introduction to MIDP's high-level user interface© Copyright IBM Corporation 1994, 2008. All rights reserved. Page 43 of 59
switch (lsDocument.getSelectedIndex()){
case 0:System.out.println("Next selected");break;
case 1:System.out.println("Previous selected");break;
case 2:System.out.println("New selected");break;
}}else if (c == cmExit){destroyApp(false);notifyDestroyed();
}}
}
ImplicitList output
With this example, we included several images to display alongside each entry in thelist. The code block to allocate the images and labels of each string is shown here:
// Create array of image objectsImage images[] = {Image.createImage("/next.png"),
Image.createImage("/previous.png"),Image.createImage("/new.png")};
// Create array of corresponding string objectsString options[] = {"Next", "Previous", "New"};
// Create list using arrays, add commands, listen for eventslsDocument = new List("Document Option:", List.IMPLICIT,
options, images);
The ImplicitList and associated image output are shown in Figure 29.
Figure 29. ImplicitList output
developerWorks® ibm.com/developerWorks
J2ME 101, Part 1: Introduction to MIDP's high-level user interfacePage 44 of 59 © Copyright IBM Corporation 1994, 2008. All rights reserved.

Determining which list entry was selected
As previously mentioned, an implicit list is typically used to represent a menu ofchoices. We've completed the first step in working with a menu-style interface -- asshown in Figure 29 on the previous section, ImplicitList output, the ImplicitListcomponent now displays each entry. We can see how the list is managed internallyby reviewing the code inside commandAction().
public void commandAction(Command c, Displayable s){// If an implicit list generated the eventif (c == List.SELECT_COMMAND){
switch (lsDocument.getSelectedIndex()){case 0:
System.out.println("Next selected");break;
case 1:System.out.println("Previous selected");break;
case 2:System.out.println("New selected");break;
}}
ibm.com/developerWorks developerWorks®
J2ME 101, Part 1: Introduction to MIDP's high-level user interface© Copyright IBM Corporation 1994, 2008. All rights reserved. Page 45 of 59
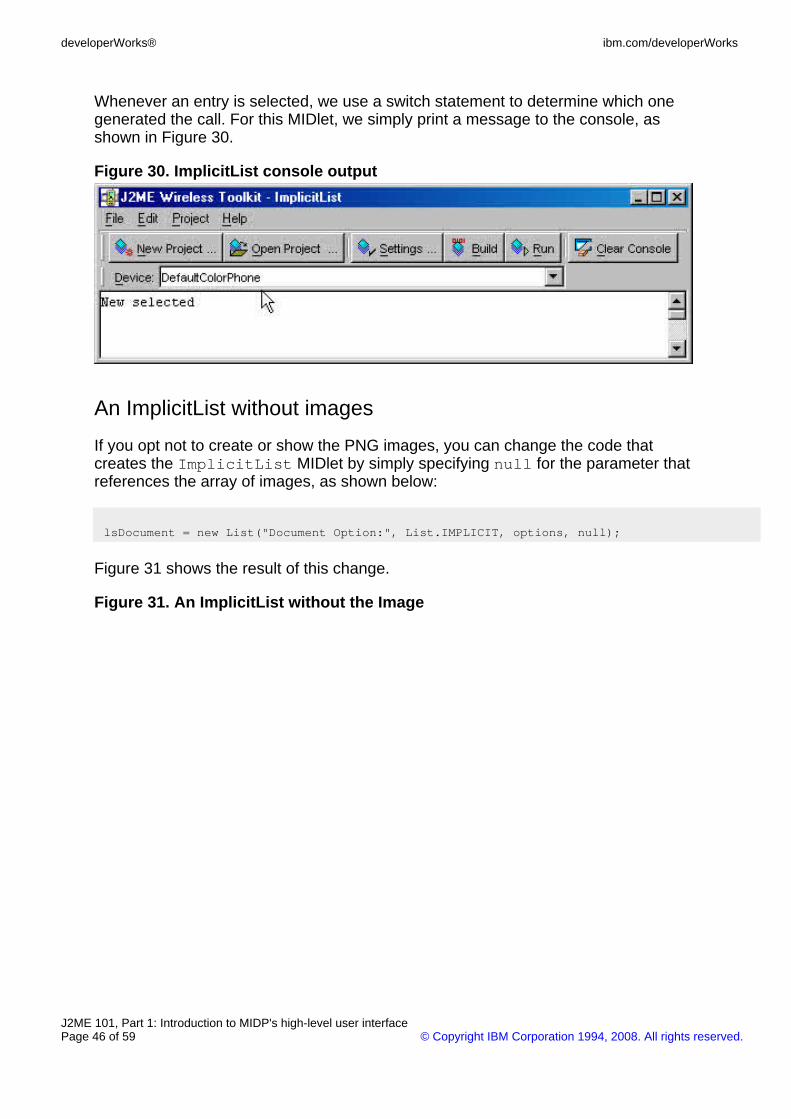
Whenever an entry is selected, we use a switch statement to determine which onegenerated the call. For this MIDlet, we simply print a message to the console, asshown in Figure 30.
Figure 30. ImplicitList console output
An ImplicitList without images
If you opt not to create or show the PNG images, you can change the code thatcreates the ImplicitList MIDlet by simply specifying null for the parameter thatreferences the array of images, as shown below:
lsDocument = new List("Document Option:", List.IMPLICIT, options, null);
Figure 31 shows the result of this change.
Figure 31. An ImplicitList without the Image
developerWorks® ibm.com/developerWorks
J2ME 101, Part 1: Introduction to MIDP's high-level user interfacePage 46 of 59 © Copyright IBM Corporation 1994, 2008. All rights reserved.

The TextBox component
TextBox components are used to allow for multiple-line input. The TextBox andTextField components share the same constraints (see TextField constraints ) forspecifying the type of content allowed (for example, ANY, EMAIL, URL, etc.).
Here's the constructor for a TextBox:
TextBox(String title, String text, int maxSize, int constraints)
The TextBoxTest MIDlet
Here are the steps for creating a TextBoxTest MIDlet:
1. Create a new project with the name TextBoxTest.
2. Copy and paste the TextBoxTest source code into a text editor.
3. Save the source code as TextBoxTest.java in the directory\apps\TextBoxTest\src of your WTK installation.
4. Build and run the project.
ibm.com/developerWorks developerWorks®
J2ME 101, Part 1: Introduction to MIDP's high-level user interface© Copyright IBM Corporation 1994, 2008. All rights reserved. Page 47 of 59
TextBoxTest source
Here's the source code for the TextBoxTest MIDlet:
/*--------------------------------------------------* TextBoxTest.java*-------------------------------------------------*/import javax.microedition.midlet.*;import javax.microedition.lcdui.*;
public class TextBoxTest extends MIDlet implements CommandListener{private Display display; // Reference to Display objectprivate TextBox tbClip; // Main textboxprivate Command cmExit; // Command to exit
public TextBoxTest(){
display = Display.getDisplay(this);
// Create the Commands. Notice the priorities assignedcmExit = new Command("Exit", Command.EXIT, 1);
tbClip = new TextBox("Textbox Test", "Contents go here..",125, TextField.ANY);tbClip.addCommand(cmExit);tbClip.setCommandListener(this);
}
public void startApp(){
display.setCurrent(tbClip);}
public void pauseApp(){}
public void destroyApp(boolean unconditional){}
public void commandAction(Command c, Displayable s){
if (c == cmExit){destroyApp(false);notifyDestroyed();
}}
}
TextBoxTest output
The TextBox component supports multiple lines of input, as shown in Figure 32.
Figure 32. TextBox component output
developerWorks® ibm.com/developerWorks
J2ME 101, Part 1: Introduction to MIDP's high-level user interfacePage 48 of 59 © Copyright IBM Corporation 1994, 2008. All rights reserved.
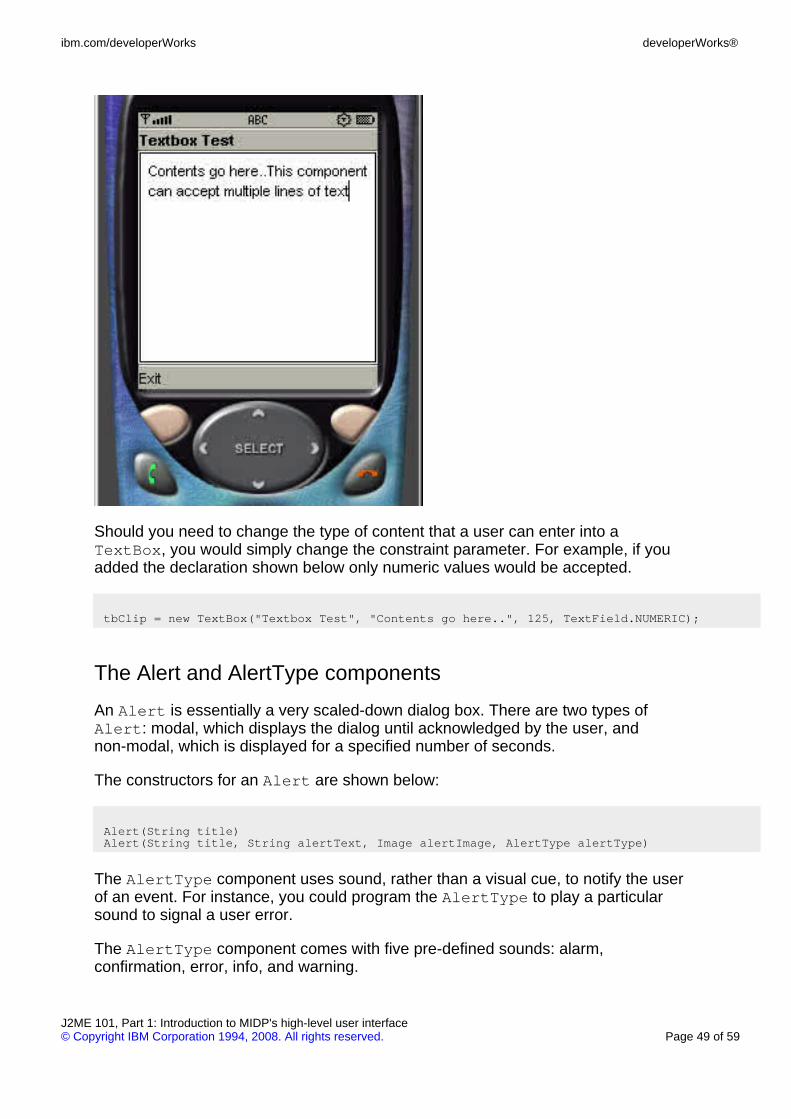
Should you need to change the type of content that a user can enter into aTextBox, you would simply change the constraint parameter. For example, if youadded the declaration shown below only numeric values would be accepted.
tbClip = new TextBox("Textbox Test", "Contents go here..", 125, TextField.NUMERIC);
The Alert and AlertType components
An Alert is essentially a very scaled-down dialog box. There are two types ofAlert: modal, which displays the dialog until acknowledged by the user, andnon-modal, which is displayed for a specified number of seconds.
The constructors for an Alert are shown below:
Alert(String title)Alert(String title, String alertText, Image alertImage, AlertType alertType)
The AlertType component uses sound, rather than a visual cue, to notify the userof an event. For instance, you could program the AlertType to play a particularsound to signal a user error.
The AlertType component comes with five pre-defined sounds: alarm,confirmation, error, info, and warning.
ibm.com/developerWorks developerWorks®
J2ME 101, Part 1: Introduction to MIDP's high-level user interface© Copyright IBM Corporation 1994, 2008. All rights reserved. Page 49 of 59
Looking back at Alert constructors, notice that an Alert can also include areference to a AlertType. The end result is an Alert dialog that is preceded bythe sound indicated in the AlertType.
The AlertTest MIDLet
The MIDlet we create in this section will demonstrate how the Alert andAlertType components can work together. We'll start with an exclusiveChoiceGroup that contains an entry for each sound that can be broadcast by theAlertType component. When you select one of the entries, the Alert dialog willdeclare which entry has been chosen and the AlertType component will output theappropriate sound. Here are the steps to create and run the AlertTest MIDlet:
1. Create a new project with the name AlertTest.
2. Copy and paste the AlertTest source code into a text editor.
3. Save the source code as AlertTest.java in the directory\apps\AlertTest\src of your WTK installation.
4. Build and run the project.
AlertTest source
Here's the source code for our AlertTest MIDlet:
/*--------------------------------------------------* AlertTest.java*-------------------------------------------------*/import javax.microedition.midlet.*;import javax.microedition.lcdui.*;
public class AlertTest extends MIDlet implements ItemStateListener, CommandListener{private Display display; // Reference to display objectprivate Form fmMain; // Main formprivate Command cmExit; // Command to exit the MIDletprivate ChoiceGroup cgSound; // Choice group
public AlertTest(){
display = Display.getDisplay(this);
// Create an exclusive (radio) choice groupcgSound = new ChoiceGroup("Choose a sound", Choice.EXCLUSIVE);
// Append options, with no associated imagescgSound.append("Info", null);cgSound.append("Confirmation", null);cgSound.append("Warning", null);cgSound.append("Alarm", null);cgSound.append("Error", null);
cmExit = new Command("Exit", Command.EXIT, 1);
// Create Form, add components, listen for events
developerWorks® ibm.com/developerWorks
J2ME 101, Part 1: Introduction to MIDP's high-level user interfacePage 50 of 59 © Copyright IBM Corporation 1994, 2008. All rights reserved.
fmMain = new Form("");fmMain.append(cgSound);fmMain.addCommand(cmExit);fmMain.setCommandListener(this);fmMain.setItemStateListener(this);
}
public void startApp(){
display.setCurrent(fmMain);}
public void pauseApp(){ }
public void destroyApp(boolean unconditional){ }
public void commandAction(Command c, Displayable s){
if (c == cmExit){
destroyApp(false);notifyDestroyed();
}}
public void itemStateChanged(Item item){
Alert al = null;
switch (cgSound.getSelectedIndex()){case 0:
al = new Alert("Alert sound", "Info sound",null, AlertType.INFO);
break;
case 1:al = new Alert("Alert sound", "Confirmation sound",
null, AlertType.INFO);break;
case 2:al = new Alert("Alert sound", "Warning sound",
null, AlertType.INFO);break;
case 3:al = new Alert("Alert sound", "Alarm sound",
null, AlertType.INFO);break;
case 4:al = new Alert("Alert sound", "Error sound",
null, AlertType.INFO);break;
}
if (al != null){// Wait for user to acknowledge the alertal.setTimeout(Alert.FOREVER);
// Display alert, show main form when donedisplay.setCurrent(al, fmMain);
}}
}
ibm.com/developerWorks developerWorks®
J2ME 101, Part 1: Introduction to MIDP's high-level user interface© Copyright IBM Corporation 1994, 2008. All rights reserved. Page 51 of 59
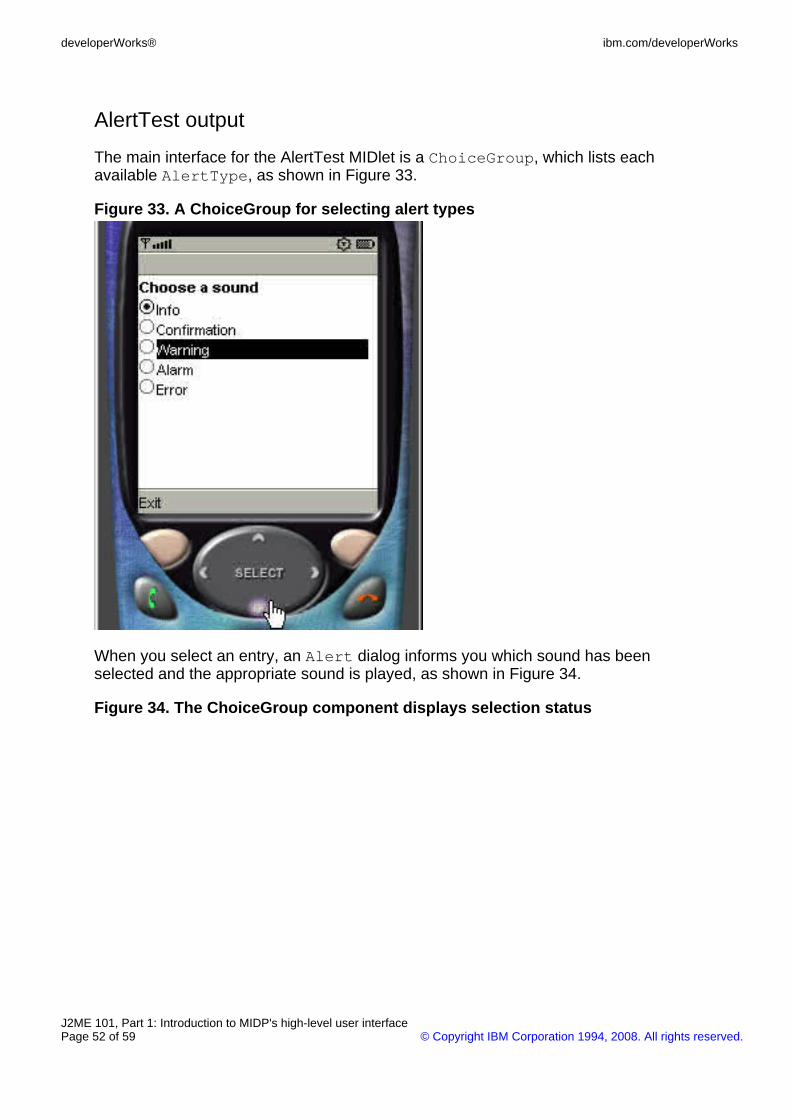
AlertTest output
The main interface for the AlertTest MIDlet is a ChoiceGroup, which lists eachavailable AlertType, as shown in Figure 33.
Figure 33. A ChoiceGroup for selecting alert types
When you select an entry, an Alert dialog informs you which sound has beenselected and the appropriate sound is played, as shown in Figure 34.
Figure 34. The ChoiceGroup component displays selection status
developerWorks® ibm.com/developerWorks
J2ME 101, Part 1: Introduction to MIDP's high-level user interfacePage 52 of 59 © Copyright IBM Corporation 1994, 2008. All rights reserved.
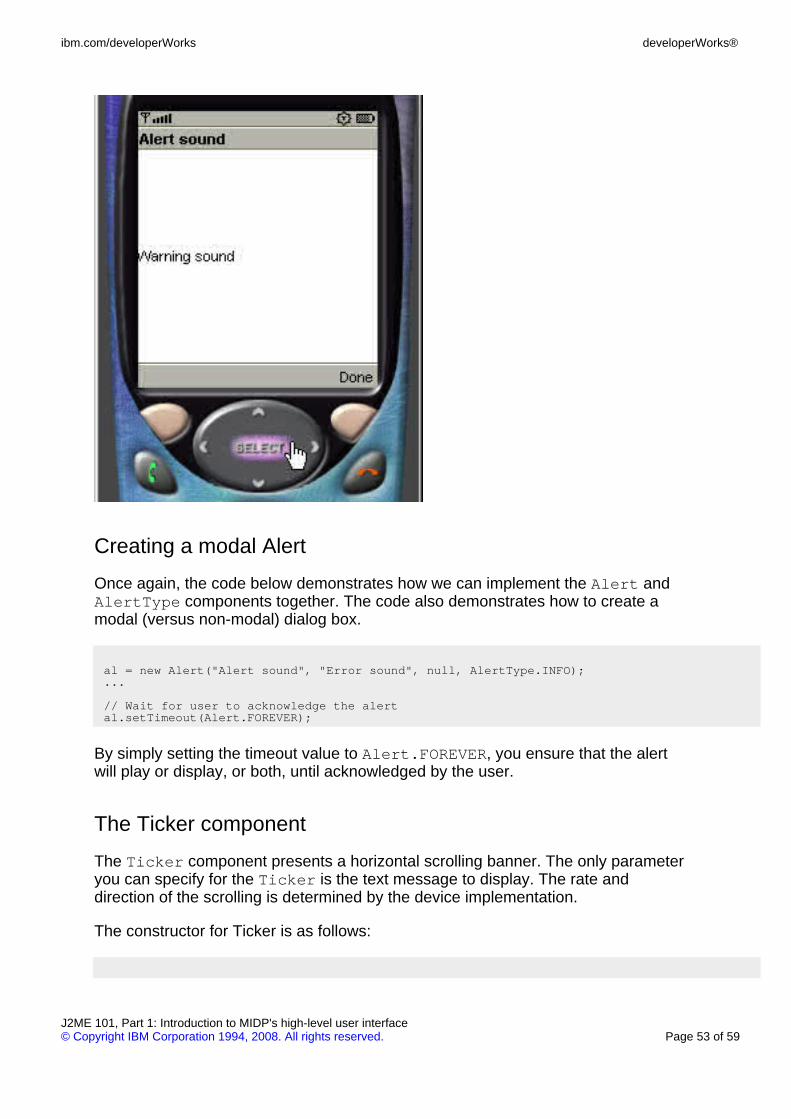
Creating a modal Alert
Once again, the code below demonstrates how we can implement the Alert andAlertType components together. The code also demonstrates how to create amodal (versus non-modal) dialog box.
al = new Alert("Alert sound", "Error sound", null, AlertType.INFO);...
// Wait for user to acknowledge the alertal.setTimeout(Alert.FOREVER);
By simply setting the timeout value to Alert.FOREVER, you ensure that the alertwill play or display, or both, until acknowledged by the user.
The Ticker component
The Ticker component presents a horizontal scrolling banner. The only parameteryou can specify for the Ticker is the text message to display. The rate anddirection of the scrolling is determined by the device implementation.
The constructor for Ticker is as follows:
ibm.com/developerWorks developerWorks®
J2ME 101, Part 1: Introduction to MIDP's high-level user interface© Copyright IBM Corporation 1994, 2008. All rights reserved. Page 53 of 59
Ticker(String str)
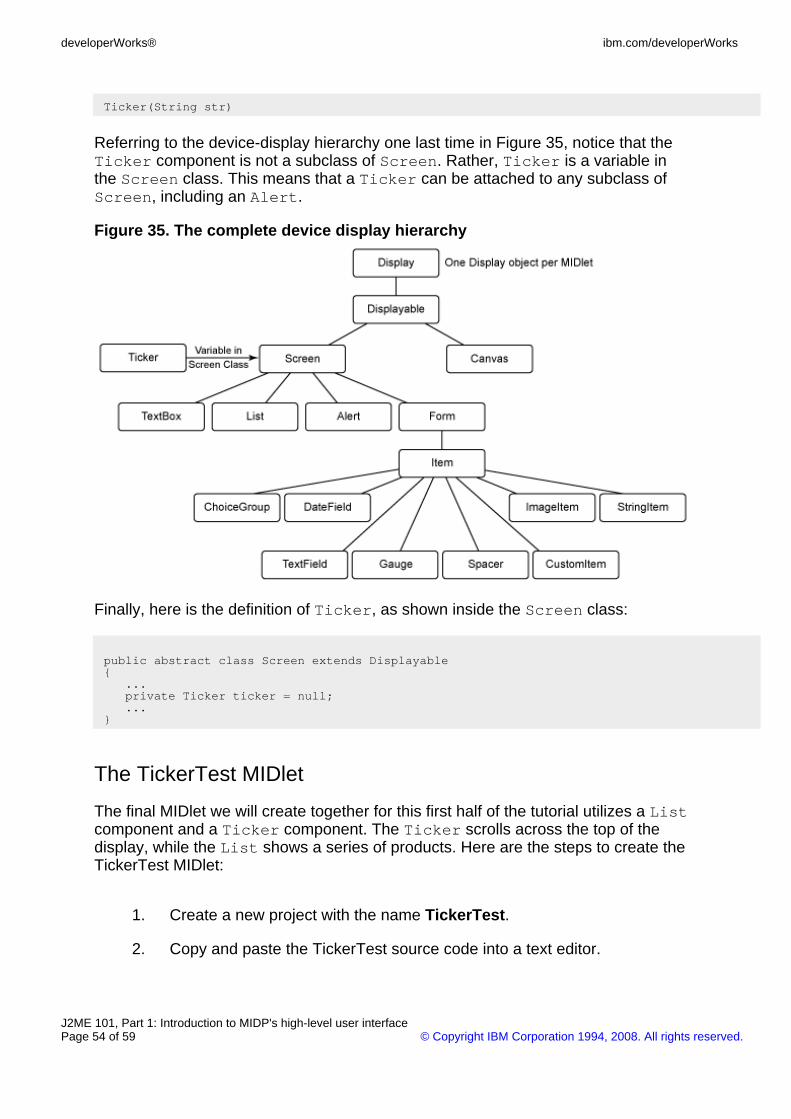
Referring to the device-display hierarchy one last time in Figure 35, notice that theTicker component is not a subclass of Screen. Rather, Ticker is a variable inthe Screen class. This means that a Ticker can be attached to any subclass ofScreen, including an Alert.
Figure 35. The complete device display hierarchy
Finally, here is the definition of Ticker, as shown inside the Screen class:
public abstract class Screen extends Displayable{
...private Ticker ticker = null;...
}
The TickerTest MIDlet
The final MIDlet we will create together for this first half of the tutorial utilizes a Listcomponent and a Ticker component. The Ticker scrolls across the top of thedisplay, while the List shows a series of products. Here are the steps to create theTickerTest MIDlet:
1. Create a new project with the name TickerTest.
2. Copy and paste the TickerTest source code into a text editor.
developerWorks® ibm.com/developerWorks
J2ME 101, Part 1: Introduction to MIDP's high-level user interfacePage 54 of 59 © Copyright IBM Corporation 1994, 2008. All rights reserved.
3. Save the source code as TickerTest.java in the directory\apps\TickerTest\src of your WTK installation.
4. Build and run the project.
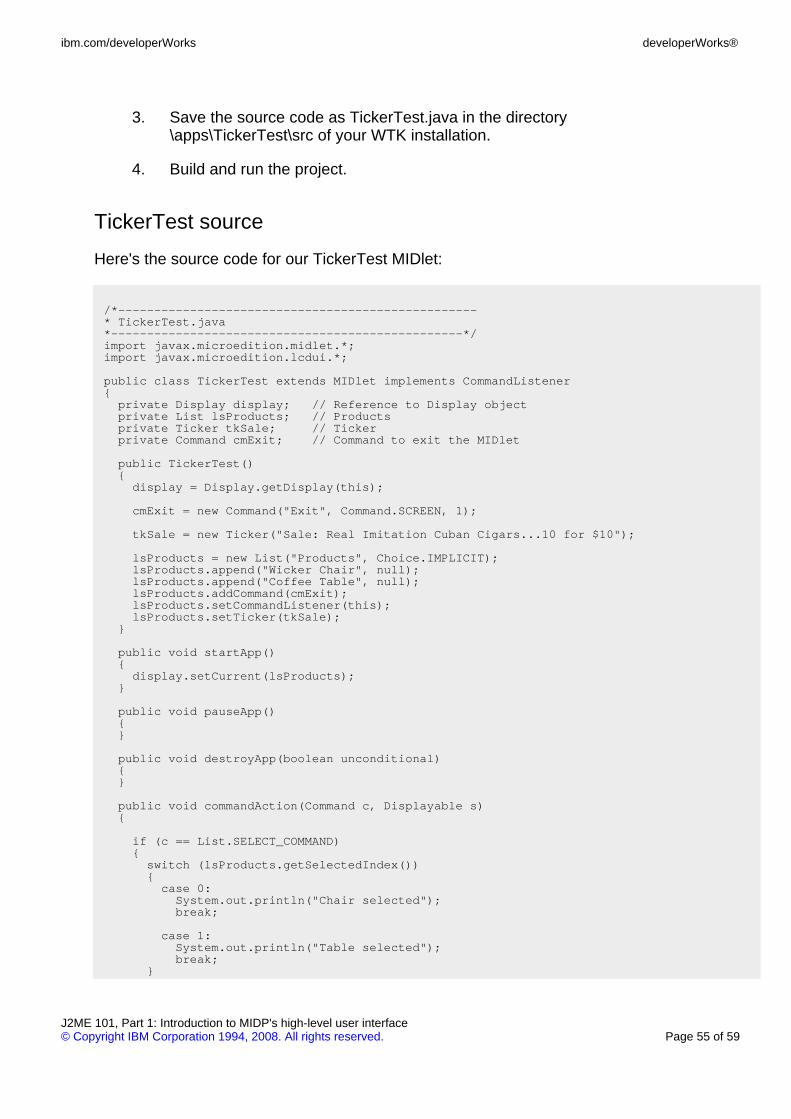
TickerTest source
Here's the source code for our TickerTest MIDlet:
/*--------------------------------------------------* TickerTest.java*-------------------------------------------------*/import javax.microedition.midlet.*;import javax.microedition.lcdui.*;
public class TickerTest extends MIDlet implements CommandListener{private Display display; // Reference to Display objectprivate List lsProducts; // Productsprivate Ticker tkSale; // Tickerprivate Command cmExit; // Command to exit the MIDlet
public TickerTest(){
display = Display.getDisplay(this);
cmExit = new Command("Exit", Command.SCREEN, 1);
tkSale = new Ticker("Sale: Real Imitation Cuban Cigars...10 for $10");
lsProducts = new List("Products", Choice.IMPLICIT);lsProducts.append("Wicker Chair", null);lsProducts.append("Coffee Table", null);lsProducts.addCommand(cmExit);lsProducts.setCommandListener(this);lsProducts.setTicker(tkSale);
}
public void startApp(){
display.setCurrent(lsProducts);}
public void pauseApp(){}
public void destroyApp(boolean unconditional){}
public void commandAction(Command c, Displayable s){
if (c == List.SELECT_COMMAND){switch (lsProducts.getSelectedIndex()){
case 0:System.out.println("Chair selected");break;
case 1:System.out.println("Table selected");break;
}
ibm.com/developerWorks developerWorks®
J2ME 101, Part 1: Introduction to MIDP's high-level user interface© Copyright IBM Corporation 1994, 2008. All rights reserved. Page 55 of 59
}else if (c == cmExit){destroyApp(true);notifyDestroyed();
}}
}
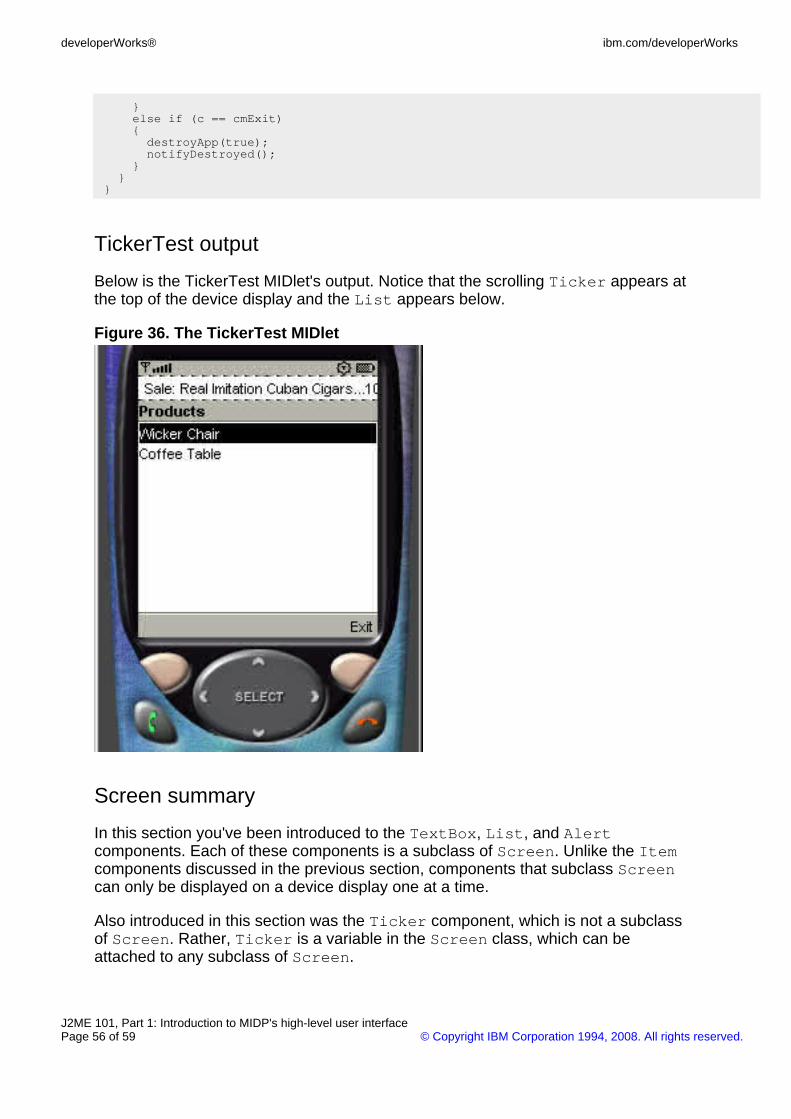
TickerTest output
Below is the TickerTest MIDlet's output. Notice that the scrolling Ticker appears atthe top of the device display and the List appears below.
Figure 36. The TickerTest MIDlet
Screen summary
In this section you've been introduced to the TextBox, List, and Alertcomponents. Each of these components is a subclass of Screen. Unlike the Itemcomponents discussed in the previous section, components that subclass Screencan only be displayed on a device display one at a time.
Also introduced in this section was the Ticker component, which is not a subclassof Screen. Rather, Ticker is a variable in the Screen class, which can beattached to any subclass of Screen.
developerWorks® ibm.com/developerWorks
J2ME 101, Part 1: Introduction to MIDP's high-level user interfacePage 56 of 59 © Copyright IBM Corporation 1994, 2008. All rights reserved.

This completes our discussion of the high-level user interface components withinMIDP.
Section 7. Wrap-up
Summary
You've completed the first part of this two-part introduction to J2ME and MIDP. Inthis first part of the tutorial, you've learned about the user-interface components thatcomprise MIDP's high-level API, as well as the two event-handling techniques for theAPI. As part of the tutorial, you've also gained considerable hands-on experiencewith creating and running MIDlets in the J2ME environment.
At this point, you know enough to start creating your own MIDlets with simpleuser-interface capabilities. In Part 2 of the tutorial, we'll expand on what you'velearned here, with an introduction to MIDP's low-level user interface components.The low-level API component are more complex than the ones discussed here, butthey'll also afford you a lot more control over the look-and-feel of your mobile deviceapplications.
ibm.com/developerWorks developerWorks®
J2ME 101, Part 1: Introduction to MIDP's high-level user interface© Copyright IBM Corporation 1994, 2008. All rights reserved. Page 57 of 59
Resources
Learn
• Don't miss the other content in the J2ME 101 series:
• " J2ME 101, Part 2: Introduction to MIDP's low-level UI" ( developerWorks,December 2003)
• " J2ME 101, Part 3: Inside the Record Management System" (developerWorks, December 2003)
• " J2ME 101, Part 4: The Generic Connection Framework" (developerWorks, January 2004)
• Also see the IBM Developer Kits for the Java platform page.
• Explore the power of the JAR file format in " JAR files revealed" (developerWorks, October 2003).
• If you are new to the Wireless Toolkit, " MIDlet development with the WirelessToolkit" ( developerWorks, March 2003) provides an excellent starting point forlearning to use it.
• To learn more about the PNG image format, visit the PNG Website.
• Mikko Kontio's " Custom GUI development with MIDP 2.0" ( developerWorks,May 2003) is a good introduction to the CustomItem class.
• The WebSphere Micro Environment provides an end-to-end solution connectingcellular phones, PDAs, and other pervasive devices to e-business.
• The alphaWorks Web Services Toolkit for Mobile Devices provides tools and arun time environments for developing applications that use Web services onsmall mobile devices, gateway devices, and intelligent controllers.
• Core J2ME (Prentice Hall PTR, 2002) by John W. Muchow is a comprehensiveguide to J2ME development. You can also visit the Core J2ME Web site foradditional articles, tutorials, and developer resources.
• The developerWorks Wireless zone offers a wealth of technical content onpervasive computing.
• You'll find hundreds of articles about every aspect of Java programming in thedW Java technology zone.
• Also see the Java technology zone tutorials page for a complete listing of freeJava-related tutorials from developerWorks.
Get products and technologies
• Download the JDK version 1.4.1.
• Download the J2ME Wireless Toolkit version 2.0.
developerWorks® ibm.com/developerWorks
J2ME 101, Part 1: Introduction to MIDP's high-level user interfacePage 58 of 59 © Copyright IBM Corporation 1994, 2008. All rights reserved.
About the author
John MuchowJohn Muchow is a contributing developerWorks author.
ibm.com/developerWorks developerWorks®
J2ME 101, Part 1: Introduction to MIDP's high-level user interface© Copyright IBM Corporation 1994, 2008. All rights reserved. Page 59 of 59