Embed Size (px)
Citation preview
36 F I N E W O O D W O R K I N G Photos, except where noted: Michael Pekovich; this page: Tim Sams
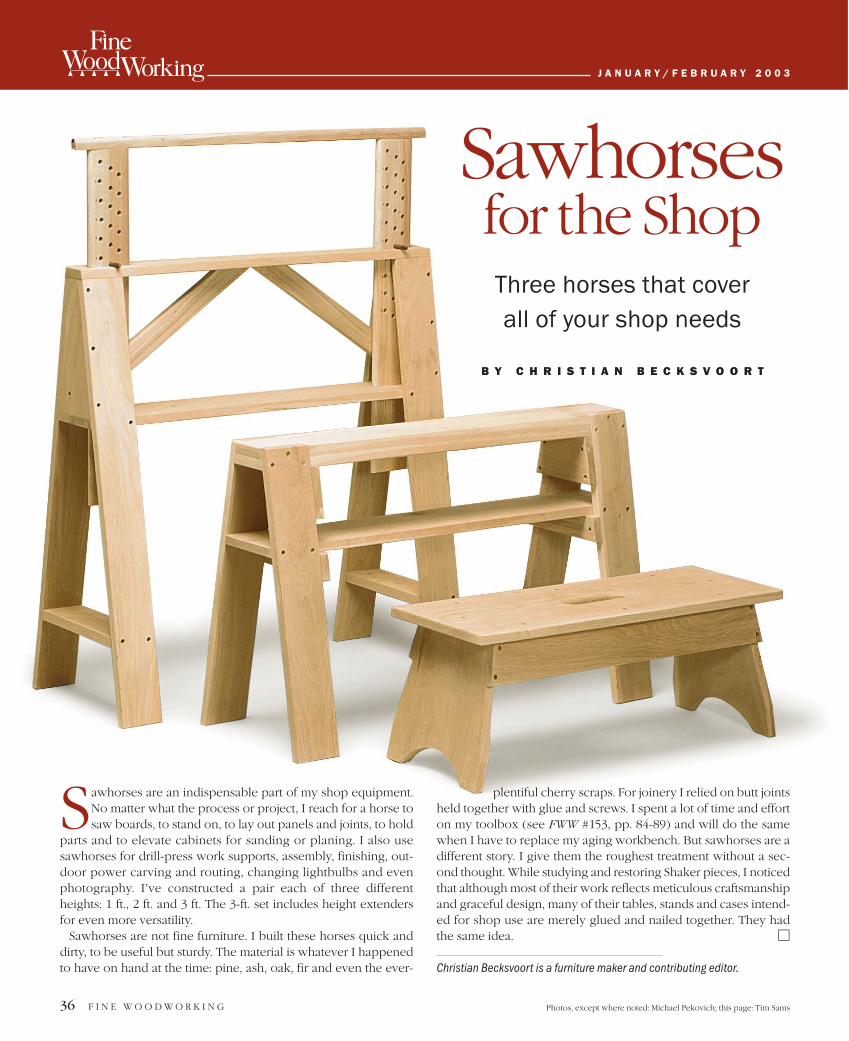
Sawhorses for the ShopThree horses that cover all of your shop needs
B Y C H R I S T I A N B E C K S V O O R T
J A N U A R Y / F E B R U A R Y 2 0 0 3w
awhorses are an indispensable part of my shop equipment.No matter what the process or project, I reach for a horse tosaw boards, to stand on, to lay out panels and joints, to hold
parts and to elevate cabinets for sanding or planing. I also usesawhorses for drill-press work supports, assembly, finishing, out-door power carving and routing, changing lightbulbs and evenphotography. I’ve constructed a pair each of three differentheights: 1 ft., 2 ft. and 3 ft. The 3-ft. set includes height extendersfor even more versatility.
Sawhorses are not fine furniture. I built these horses quick anddirty, to be useful but sturdy. The material is whatever I happenedto have on hand at the time: pine, ash, oak, fir and even the ever-
plentiful cherry scraps. For joinery I relied on butt jointsheld together with glue and screws. I spent a lot of time and efforton my toolbox (see FWW #153, pp. 84-89) and will do the samewhen I have to replace my aging workbench. But sawhorses are adifferent story. I give them the roughest treatment without a sec-ond thought. While studying and restoring Shaker pieces, I noticedthat although most of their work reflects meticulous craftsmanshipand graceful design, many of their tables, stands and cases intend-ed for shop use are merely glued and nailed together. They hadthe same idea. �
Christian Becksvoort is a furniture maker and contributing editor.
S
J A N U A R Y / F E B R U A R Y 2 0 0 3 37Drawings: Heather Lambert
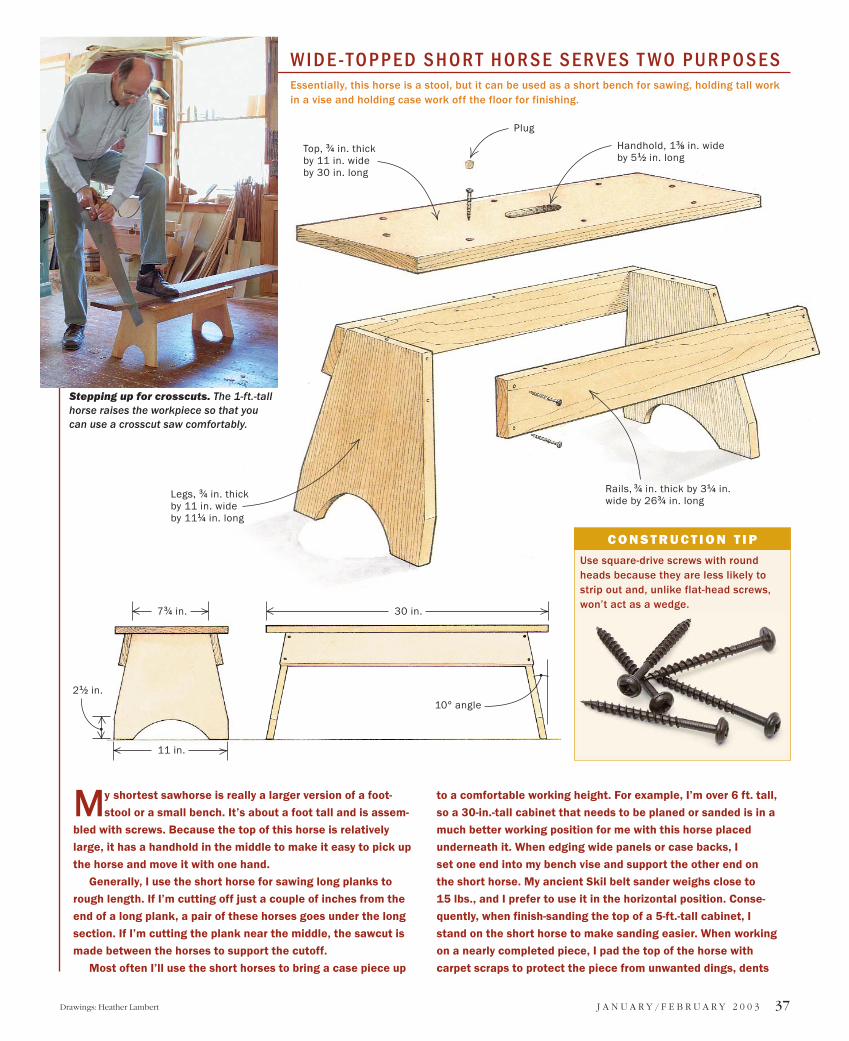
W I D E -T O P P E D S H O R T H O R S E S E R V E S T W O P U R P O S E SEssentially, this horse is a stool, but it can be used as a short bench for sawing, holding tall workin a vise and holding case work off the floor for finishing.
MMy shortest sawhorse is really a larger version of a foot-
stool or a small bench. It’s about a foot tall and is assem-
bled with screws. Because the top of this horse is relatively
large, it has a handhold in the middle to make it easy to pick up
the horse and move it with one hand.
Generally, I use the short horse for sawing long planks to
rough length. If I’m cutting off just a couple of inches from the
end of a long plank, a pair of these horses goes under the long
section. If I’m cutting the plank near the middle, the sawcut is
made between the horses to support the cutoff.
Most often I’ll use the short horses to bring a case piece up
to a comfortable working height. For example, I’m over 6 ft. tall,
so a 30-in.-tall cabinet that needs to be planed or sanded is in a
much better working position for me with this horse placed
underneath it. When edging wide panels or case backs, I
set one end into my bench vise and support the other end on
the short horse. My ancient Skil belt sander weighs close to
15 lbs., and I prefer to use it in the horizontal position. Conse-
quently, when finish-sanding the top of a 5-ft.-tall cabinet, I
stand on the short horse to make sanding easier. When working
on a nearly completed piece, I pad the top of the horse with
carpet scraps to protect the piece from unwanted dings, dents
Stepping up for crosscuts. The 1-ft.-tallhorse raises the workpiece so that youcan use a crosscut saw comfortably.
C O N S T R U C T I O N T I P
Use square-drive screws with roundheads because they are less likely tostrip out and, unlike flat-head screws,won’t act as a wedge.
Top, 3⁄4 in. thickby 11 in. wideby 30 in. long
Plug
Handhold, 13⁄8 in. wideby 51⁄2 in. long
Rails, 3⁄4 in. thick by 31⁄4 in.wide by 263⁄4 in. long
Legs, 3⁄4 in. thickby 11 in. wideby 111⁄4 in. long
10° angle
11 in.
30 in.
21⁄2 in.
73⁄4 in.
38 F I N E W O O D W O R K I N G
and scratches. I’m not the only one who finds my short sawhorses
useful. The short horse gives every Fine Woodworking photograph-
er who comes into my shop a great view of work in progress on my
tall workbench.
The footprint of the base is the same size as the top so that
the horse is safe to stand on, and a pair can be stacked. The
legs are cut at 10° along both sides and are tilted at the same
angle when attaching the side rails. A “V” or half-round cutout on
both ends results in four feet. The rails are screwed in place, and
the top is attached to the base with screws. I plugged the screw
holes to keep chips and oil from accumulating in them, and I
beveled all edges with a block plane before putting this horse
into service.
When I build a pair of these horses again, I’ll make one im-
provement: The rails will be 4 in. to 6 in. wide for added strength
and racking resistance. My set, after 20 years of use, is starting
to wobble a bit. Otherwise, I’m pretty happy with them.
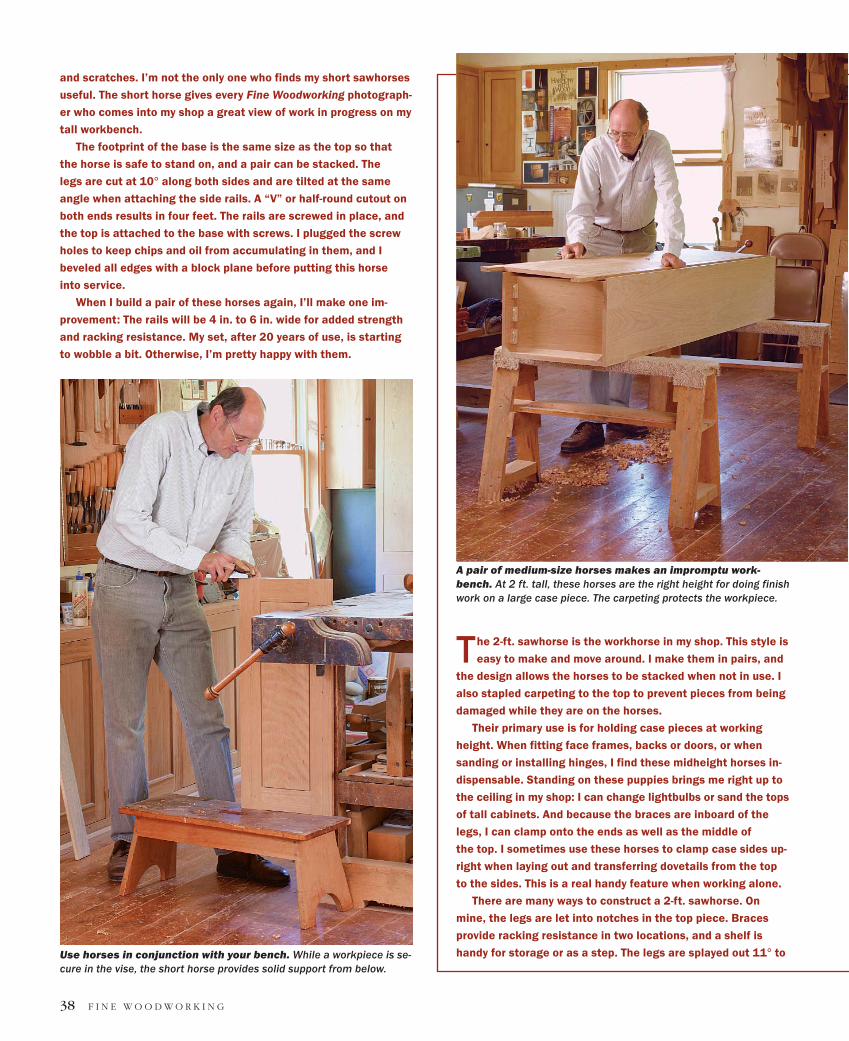
A pair of medium-size horses makes an impromptu work-bench. At 2 ft. tall, these horses are the right height for doing finishwork on a large case piece. The carpeting protects the workpiece.
TThe 2-ft. sawhorse is the workhorse in my shop. This style is
easy to make and move around. I make them in pairs, and
the design allows the horses to be stacked when not in use. I
also stapled carpeting to the top to prevent pieces from being
damaged while they are on the horses.
Their primary use is for holding case pieces at working
height. When fitting face frames, backs or doors, or when
sanding or installing hinges, I find these midheight horses in-
dispensable. Standing on these puppies brings me right up to
the ceiling in my shop: I can change lightbulbs or sand the tops
of tall cabinets. And because the braces are inboard of the
legs, I can clamp onto the ends as well as the middle of
the top. I sometimes use these horses to clamp case sides up-
right when laying out and transferring dovetails from the top
to the sides. This is a real handy feature when working alone.
There are many ways to construct a 2-ft. sawhorse. On
mine, the legs are let into notches in the top piece. Braces
provide racking resistance in two locations, and a shelf is
handy for storage or as a step. The legs are splayed out 11° toUse horses in conjunction with your bench. While a workpiece is se-cure in the vise, the short horse provides solid support from below.
J A N U A R Y / F E B R U A R Y 2 0 0 3 39
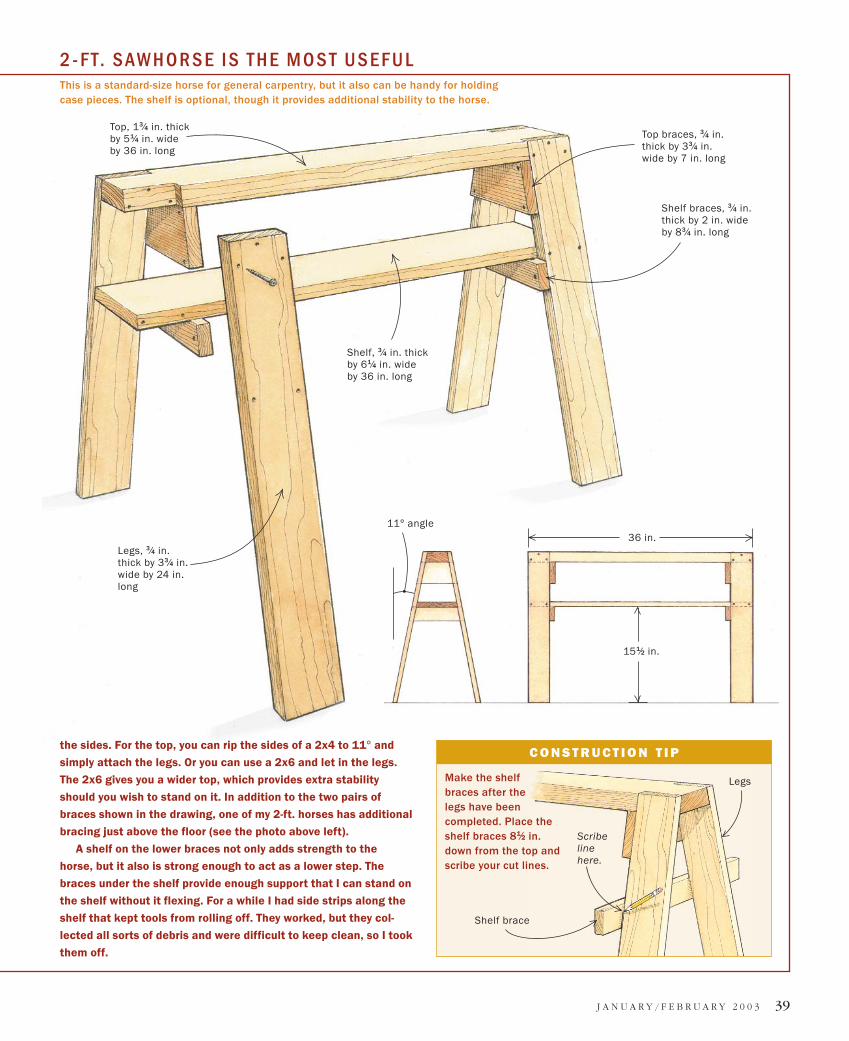
2 - F T. S A W H O R S E I S T H E M O S T U S E F U LThis is a standard-size horse for general carpentry, but it also can be handy for holdingcase pieces. The shelf is optional, though it provides additional stability to the horse.
the sides. For the top, you can rip the sides of a 2x4 to 11° and
simply attach the legs. Or you can use a 2x6 and let in the legs.
The 2x6 gives you a wider top, which provides extra stability
should you wish to stand on it. In addition to the two pairs of
braces shown in the drawing, one of my 2-ft. horses has additional
bracing just above the floor (see the photo above left).
A shelf on the lower braces not only adds strength to the
horse, but it also is strong enough to act as a lower step. The
braces under the shelf provide enough support that I can stand on
the shelf without it flexing. For a while I had side strips along the
shelf that kept tools from rolling off. They worked, but they col-
lected all sorts of debris and were difficult to keep clean, so I took
them off.
11° angle
Top, 13⁄4 in. thickby 51⁄4 in. wideby 36 in. long
Legs, 3⁄4 in.thick by 33⁄4 in.wide by 24 in.long
Shelf, 3⁄4 in. thickby 61⁄4 in. wideby 36 in. long
C O N S T R U C T I O N T I P
Make the shelfbraces after thelegs have beencompleted. Place theshelf braces 81⁄2 in.down from the top andscribe your cut lines.
Shelf brace
Scribelinehere.
Legs
151⁄2 in.
36 in.
Top braces, 3⁄4 in.thick by 33⁄4 in.wide by 7 in. long
Shelf braces, 3⁄4 in.thick by 2 in. wideby 83⁄4 in. long
40 F I N E W O O D W O R K I N G
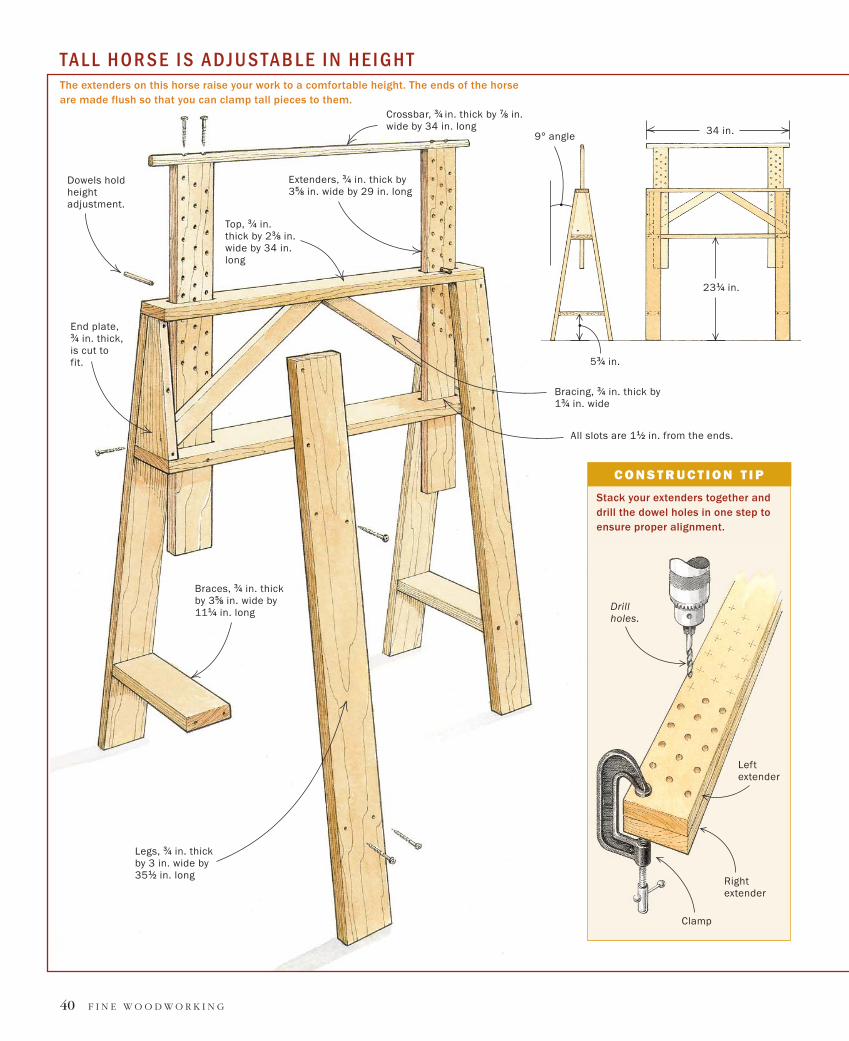
TA L L H O R S E I S A D J U S TA B L E I N H E I G H TThe extenders on this horse raise your work to a comfortable height. The ends of the horseare made flush so that you can clamp tall pieces to them.
Top, 3⁄4 in.thick by 23⁄8 in.wide by 34 in.long
Dowels holdheightadjustment.
Extenders, 3⁄4 in. thick by35⁄8 in. wide by 29 in. long
Legs, 3⁄4 in. thickby 3 in. wide by351⁄2 in. long
Braces, 3⁄4 in. thickby 35⁄8 in. wide by111⁄4 in. long
9° angle
C O N S T R U C T I O N T I P
Leftextender
Clamp
Rightextender
231⁄4 in.
53⁄4 in.
Drillholes.
End plate,3⁄4 in. thick,is cut tofit.
Bracing, 3⁄4 in. thick by13⁄4 in. wide
All slots are 11⁄2 in. from the ends.
Stack your extenders together anddrill the dowel holes in one step toensure proper alignment.
34 in.
Crossbar, 3⁄4 in. thick by 7⁄8 in.wide by 34 in. long

J A N U A R Y / F E B R U A R Y 2 0 0 3 41
IIrecently added a third pair of
sawhorses that can be adjust-
ed in height between 36 in. and
55 in.
I use these horses mainly for
sanding and finishing. Even
though they’re 36 in. tall, I still
have to bend over slightly,
hence the extenders. For my
height, 42 in. to 44 in. is ideal
for sanding and finishing, espe-
cially tabletops. For fine, close-
up work like carving or inlaying,
I prefer 48 in. to 54 in. That’s
about mid-chest height for me,
just right for the real fussy
stuff. When I have messy work
to do, I haul these horses out-
side, remove the extenders and
use them like a bench for seat
carving, grinding, sanding and
routing. At the drill press, the
extenders are useful for holding
long work at the correct height.
The tall horses are built al-
most like the two-footers. The
major difference is that I have
enclosed the ends and added
diagonal braces for strength.
The extenders consist of two
35⁄8-in.-wide boards connected
to a 3⁄4-in.-thick crossbar. The
boards are drilled at 1⁄2-in. intervals and fit into
slots in the top and the lower shelf, much like a
centerboard of a sailboat. Two 3⁄8-in.-dia. dowels
through the 25⁄64-in. holes hold the extenders at the
desired height. The crossbar is padded with 3⁄4-in.-
dia. foam pipe insulation to protect the workpiece.
It also provides grip to prevent panels from sliding
around when they’re being sanded.
Feel free to customize these horses as needed
for specific applications. For example, the cross-
bar is fine for supporting wide panels, but it won’t
take the weight of a 4-in.-thick plank. A wider
board or even a T-shaped crosspiece would make a
good substitute. On occasion, when I use the hors-
es as a single unit, I have scrap V boards fitted be-
tween them. Two bar clamps hold the whole unit
together so that I can use it as a bench.
Height adjustment is made with adowel. The holes are numbered onboth sides for quick alignment.
Pad the crossbars to protect yourwork. Foam pipe insulation workswell and easily slips on and off the top.
Adjustable-height sawhorses are versatile. Avoid back fatigue byraising the work up to a comfortable height.


![14 Fine WoodWorking ]ANUARY/FEBRUARy'1979](https://img.pdfslide.us/doc/110x75/577cdbe11a28ab9e78a9525b/14-fine-woodworking-anuaryfebruary1979.jpg)