Embed Size (px)
Citation preview


2
EN
Italiano
English
Français
Español
Deutsch
Pусский
Svenska
Ελληνικά
3
EN
ALWAYS KEEP THIS MANUAL WITH YOUR FIREARM. INCLUDE IT WITHTHE FIREARM WHEN IT CHANGES OWNERSHIP.
WARNING: FIREARMS CAN BE DANGEROUS AND CAN POTENTIALLY CAUSE SERIOUS INJURY, DAMAGE TO PROPERTY OR DEATH, IF HANDLEDIMPROPERLY. THE FOLLOWING SAFETY RULES ARE AN IMPORTANT REMINDER THAT FIREARM SAFETY IS YOUR RESPONSIBILITY.
WARNING: Always ensure that the safety is fully engaged until ready to fire.
NOTICE: The Manufacturer and/or its Local Official Distributors assume no liability for product malfunction or for physical injury or property damage resulting in whole or in part from criminal or negligent use of the product, improper or careless handling, unauthorised modifications, use of defective, improper, handloaded, reloaded or remanufactured ammunition, customer misuse or neglect of the product, or other factors beyond manufacturer's direct and immediate control.
In addition to the Basic Safety Rules, there are other Safety Rules pertaining to the loading, unloading, disassembly, assembly and use of this firearm, located throughout this manual.
WARNING: READ THE ENTIRE MANUAL CAREFULLY BEFORE USING THIS FIREARM. MAKE SURE THAT ANY PERSON USING OR HAVING ACCESS TO THIS FIREARM READS AND UNDERSTANDS THIS ENTIRE MANUAL PRIOR TO USE OR ACCESS.
NOTICE: As the interchangeable barrel of this shotgun has a serial number different from that stamped on the receiver, it may be necessary, when referring to the gun, to specify also the serial number of the barrel/s.
WE RECOMMEND THE USE OF ORIGINAL BERETTA SPARE PARTS AND ACCESSORIES. THE USE OF OTHER MANUFACTURER'S SPARE PARTS AND ACCESSORIES COULD CAUSE MALFUNCTIONS AND/OR BREAKAGES THAT WILL NOT BE COVERED BY THE BERETTA WARRANTY.
WARNING: Do not attempt to load more cartridges into your Beretta shotgun than local legislation permits. Beretta will not be held responsible for any productmalfunction, property damage, physical injury or legal repercussions which have been caused through not abiding by the loading instructions as stated in the present manual. Alterations or adjustments (not contemplated by the manufacturer) to any part of the shotgun which change the ammunition capacity voids the manufacturer's warranty.
4
EN
BASIC SAFETY RULESCAUTION: READ THIS MANUAL CAREFULLY BEFORE USING THE SHOTGUN.
CAUTION: FIREARMS CAN BE DANGEROUS AND CAN POTENTIALLY CAUSE SERIOUS INJURY, DAMAGE TO PROPERTY OR DEATH, IF HANDLED IMPROPERLY. THE FOLLOWING SAFETY RULES ARE AN IMPORTANT REMINDER THAT FIREARM SAFETY IS YOUR RESPONSIBILITY.
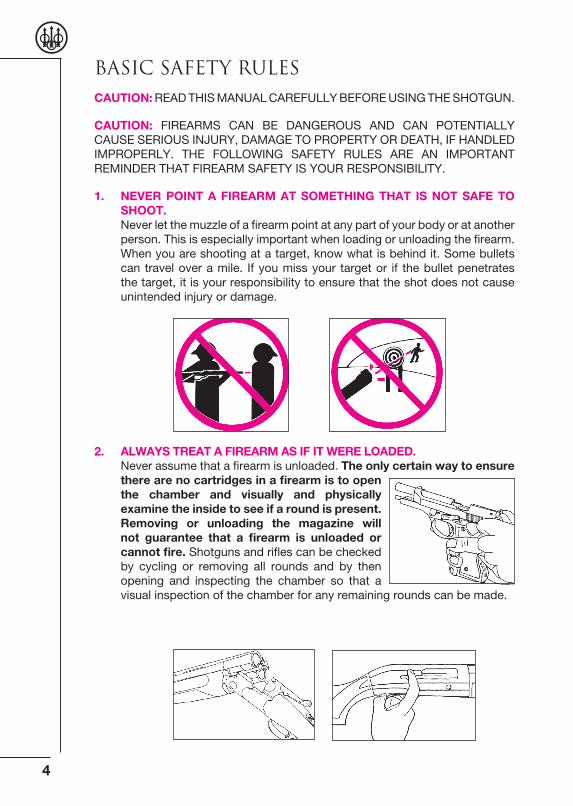
1. NEVER POINT A FIREARM AT SOMETHING THAT IS NOT SAFE TO SHOOT.Never let the muzzle of a firearm point at any part of your body or at another person. This is especially important when loading or unloading the firearm. When you are shooting at a target, know what is behind it. Some bullets can travel over a mile. If you miss your target or if the bullet penetrates the target, it is your responsibility to ensure that the shot does not cause unintended injury or damage.
2. ALWAYS TREAT A FIREARM AS IF IT WERE LOADED.Never assume that a firearm is unloaded. The only certain way to ensure there are no cartridges in a firearm is to open the chamber and visually and physically examine the inside to see if a round is present. Removing or unloading the magazine will not guarantee that a firearm is unloaded or cannot fire. Shotguns and rifles can be checked by cycling or removing all rounds and by then opening and inspecting the chamber so that a visual inspection of the chamber for any remaining rounds can be made.
5
EN
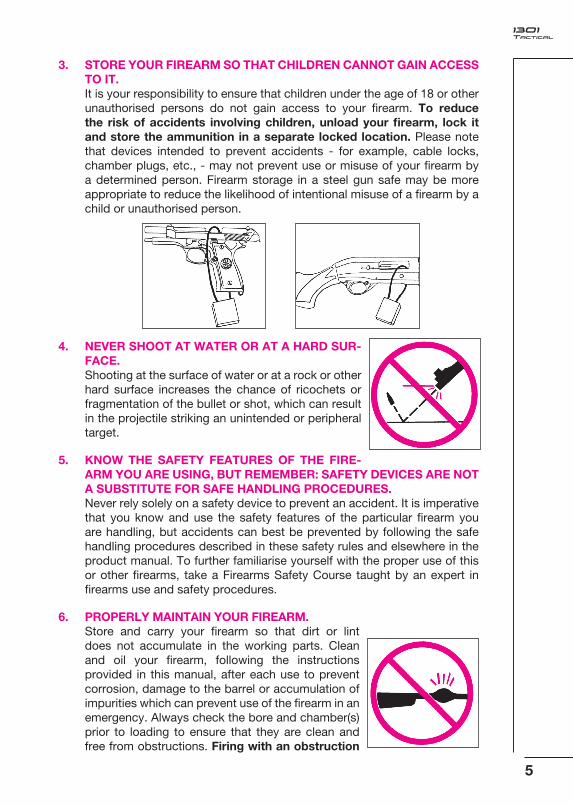
3. STORE YOUR FIREARM SO THAT CHILDREN CANNOT GAIN ACCESS TO IT.It is your responsibility to ensure that children under the age of 18 or other unauthorised persons do not gain access to your firearm. To reduce the risk of accidents involving children, unload your firearm, lock it and store the ammunition in a separate locked location. Please note that devices intended to prevent accidents - for example, cable locks, chamber plugs, etc., - may not prevent use or misuse of your firearm by a determined person. Firearm storage in a steel gun safe may be more appropriate to reduce the likelihood of intentional misuse of a firearm by a child or unauthorised person.
4. NEVER SHOOT AT WATER OR AT A HARD SUR-FACE.Shooting at the surface of water or at a rock or other hard surface increases the chance of ricochets or fragmentation of the bullet or shot, which can result in the projectile striking an unintended or peripheral target.
5. KNOW THE SAFETY FEATURES OF THE FIRE-ARM YOU ARE USING, BUT REMEMBER: SAFETY DEVICES ARE NOT A SUBSTITUTE FOR SAFE HANDLING PROCEDURES.Never rely solely on a safety device to prevent an accident. It is imperative that you know and use the safety features of the particular firearm you are handling, but accidents can best be prevented by following the safe handling procedures described in these safety rules and elsewhere in the product manual. To further familiarise yourself with the proper use of this or other firearms, take a Firearms Safety Course taught by an expert in firearms use and safety procedures.
6. PROPERLY MAINTAIN YOUR FIREARM.Store and carry your firearm so that dirt or lint does not accumulate in the working parts. Clean and oil your firearm, following the instructions provided in this manual, after each use to prevent corrosion, damage to the barrel or accumulation of impurities which can prevent use of the firearm in an emergency. Always check the bore and chamber(s) prior to loading to ensure that they are clean and free from obstructions. Firing with an obstruction
6
EN
in the barrel or chamber can rupture the barrel and injure you or others nearby. In the event you hear an unusual noise when shooting, stop firing immediately, engage the manual safety and unload the firearm. Make sure the chamber and barrel are free from any obstruction, like a bullet blocked inside the barrel due to defective or improper ammunition.
7. USE PROPER AMMUNITION.Only use factory-loaded, new ammunition manufactured to industry specifications: CIP (Europe and elsewhere), SAAMI® (U.S.A.). Be certain that each round you use is in the proper calibre or gauge and type for the particular firearm. The calibre or gauge of the firearm is clearly marked on the barrels of shotguns and on the slide or barrel of pistols. The use of reloaded or remanufactured ammunition can increase the likelihood of excessive cartridge pressures, case-head ruptures or other defects in the ammunition that can cause damage to your firearm and injury to yourself or others nearby.
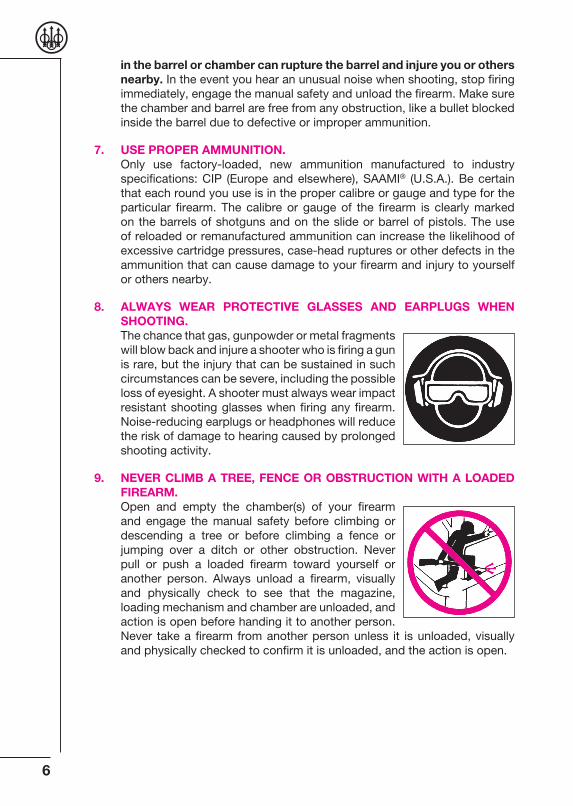
8. ALWAYS WEAR PROTECTIVE GLASSES AND EARPLUGS WHEN SHOOTING.The chance that gas, gunpowder or metal fragments will blow back and injure a shooter who is firing a gun is rare, but the injury that can be sustained in such circumstances can be severe, including the possible loss of eyesight. A shooter must always wear impact resistant shooting glasses when firing any firearm. Noise-reducing earplugs or headphones will reduce the risk of damage to hearing caused by prolonged shooting activity.
9. NEVER CLIMB A TREE, FENCE OR OBSTRUCTION WITH A LOADED FIREARM.Open and empty the chamber(s) of your firearm and engage the manual safety before climbing or descending a tree or before climbing a fence or jumping over a ditch or other obstruction. Never pull or push a loaded firearm toward yourself or another person. Always unload a firearm, visually and physically check to see that the magazine, loading mechanism and chamber are unloaded, and action is open before handing it to another person. Never take a firearm from another person unless it is unloaded, visually and physically checked to confirm it is unloaded, and the action is open.
7
EN
10. AVOID ALCOHOLIC BEVERAGES OR JUDGE-MENT/REFLEX IMPAIRING MEDICATION WHEN SHOOTING.Do not drink and shoot. If you take medication that can impair motor reactions or judgement, do not handle a firearm while you are under the influence of the medication.
11. NEVER TRANSPORT A LOADED FIREARM.Unload a firearm before putting it in a vehicle (chamber empty, magazine empty). Hunters and target shooters should load their firearm only at their destination, and only when they are ready to shoot. If you carry a firearm for self-protection, leaving the chamber unloaded can reduce the chance of an unintentional discharge.
12. LEAD WARNING.Discharging firearms in poorly ventilated areas, cleaning firearms, or handling ammunition may result in exposure to lead and other substances known to cause birth defects, reproductive harm, and other serious physical injury. Have adequate ventilation at all times. Wash hands thoroughly after exposure.
CAUTION: It is YOUR responsibility to know and abide by Federal, State and Local laws governing the sale, transportation and use of firearms in your area.
WARNING: This firearm has the capability of taking your life or the life of someone else! Always be extremely careful with your firearm. An accident is almost always the result of not following basic firearm safety rules.
Especially for U.S. consumers:For information about Firearm Safety Courses in your area, please visit the National Rifle Association’s web site at www.nra.org.
8
EN
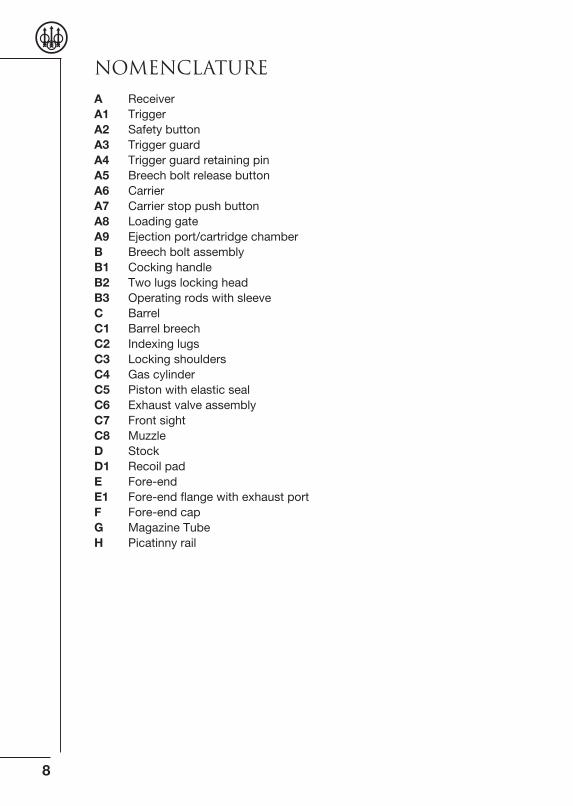
NOMENCLATUREA ReceiverA1 TriggerA2 Safety buttonA3 Trigger guardA4 Trigger guard retaining pinA5 Breech bolt release buttonA6 CarrierA7 Carrier stop push buttonA8 Loading gateA9 Ejection port/cartridge chamberB Breech bolt assemblyB1 Cocking handleB2 Two lugs locking headB3 Operating rods with sleeveC BarrelC1 Barrel breechC2 Indexing lugsC3 Locking shouldersC4 Gas cylinderC5 Piston with elastic sealC6 Exhaust valve assemblyC7 Front sightC8 MuzzleD StockD1 Recoil padE Fore-endE1 Fore-end flange with exhaust portF Fore-end capG Magazine TubeH Picatinny rail

9
EN
ContentsBASIC SAFETY RULES 4
NOMENCLATURE 8
DESCRIPTION 10
DATA AND TECHNICAL CHARACTERISTICS 12
OBSTRUCTION / CHOKE TUBES CONDITION CHECK 13
LOAD CHECK 14
AMMUNITION 15
HOW TO LOAD AND FIRE 17
HOW TO UNLOAD THE SHOTGUN 19
DISASSEMBLY 20
ROUTINE MAINTENANCE 22
SPECIAL MAINTENANCE 24
REASSEMBLY 25
STOCK DROP AND CAST MODIFICATION 27
STORAGE 29
10
EN
DESCRIPTIONDeveloped from the versatile Beretta gas operated, self-cleaning system, the new 1301 Tactical utilizes an exclusive exhaust valve that allows the shotgun to fire a broad range of ammunition. In combination with the rotating head of the breech bolt, the new B Link system further reduces the already low felt recoil, directing the recoil force directly in line with the shooter's shoulder. This minimizes recoil of the firearm on firing and lends additional stability to the shotgun in firing subsequent rounds.
The 1301 Tactical has also been optimized to ensure lower gas dispersal. As a result, the system has a self-cleaning feature that further minimizes maintenance and significantly reduces the stress to which the operating parts are subjected to at higher charges, thereby ensuring the greatest possible service life of the firearm. The shotgun without any adjustment or intervention can shoot cartridges from 70 mm (2 ¾ in) /24 g (7/8 oz), to 76 mm (3 in) /57 g (2 oz).
The new piston has been designed to constantly clean out gunpowder residuein the cylinder, increasing the efficiency of the firearm and reducing the need formaintenance. The elastic piston seal has a rough finish to optimise cleaning.
SHOTGUN ASSEMBLY WARNING: In order to prevent damage to the elastic piston seal, first insert the piston into the chamber cylinder and then insert the magazine tube through the piston hole.
The valve unit is connected to the barrel, making assembly and disassembly of the barrel itself easier.
The cocking handle, the bolt release lever, and the safety button are oversized to minimize effort and ease manipulation. The safety button on trigger guard is reversible for left-handed shooters.
The rounded profile receiver guarantee a quick instinctive aiming.
The trigger guard, in heavy duty polymer, has an innovative new texture. Its new semi-square shape makes finger positioning easier. The rounded shape and absence of sharp corners have been designed for more rapid, more secure trigger grip.
The 1301 Tactical shotgun comes with a standard Picatinny rail (MIL STD 1913) on the receiver for convenient mounting of a scope, red dot, laser device, flashlight or other type of accessory.
The stock and fore-end are designed with aggressive checkering for improved grip in order to enjoy the best performance during the competition.
11
EN
The low felt recoil is obtained thanks to the rubber recoil pad that ensures at the same time the stability of the shotgun on the shooter’s shoulder.
STEELIUM TECHNOLOGY
Steelium is the production technology of the Beretta barrels that transforms the special tri-alloy steel into an exceptional barrel, also due to manufacturing process that is just as unique. Thanks to the deep drilling, cold hammer forging and to the special vacuum distension, the steel acquires the ideal characteristics to offer the best ballistic performance available today.
OPTIMA-BORE®HP
The special Optima-Bore® HP geometry is conceived to offer the best performance, even with High Performance steel shot. The shot pattern remains perfect and uniform with the fixed choke cylinder.
DROP AND CAST SPACERS
Between the stock and the receiver is a technopolymer spacer and inside the stock is a stainless steel plate that can be used to change the drop and cast ofthe stock by simply modifying the assembly configuration. A set of additional spacers is also provided to further change the drop by replacing the spacer pair.
12
EN
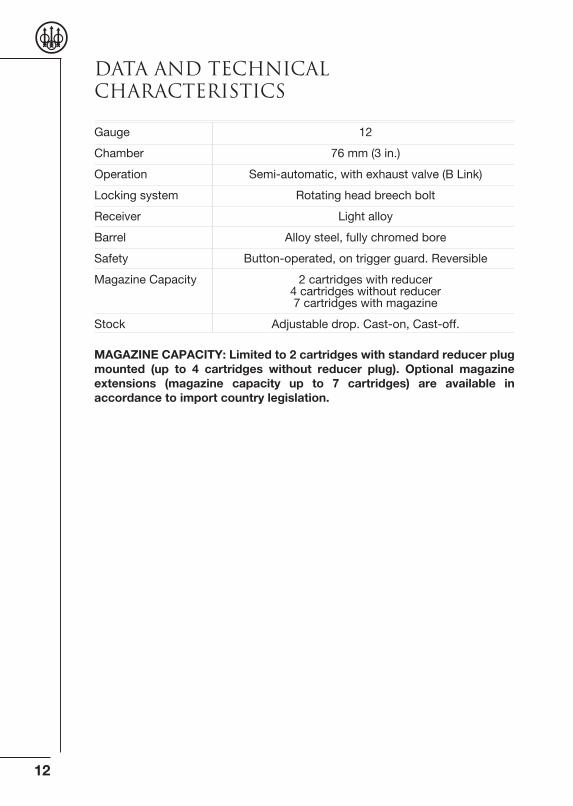
DATA AND TECHNICAL CHARACTERISTICS
MAGAZINE CAPACITY: Limited to 2 cartridges with standard reducer plug mounted (up to 4 cartridges without reducer plug). Optional magazine extensions (magazine capacity up to 7 cartridges) are available in accordance to import country legislation.
Gauge 12
Chamber 76 mm (3 in.)
Operation Semi-automatic, with exhaust valve (B Link)
Locking system Rotating head breech bolt
Receiver Light alloy
Barrel Alloy steel, fully chromed bore
Safety Button-operated, on trigger guard. Reversible
Magazine Capacity 2 cartridges with reducer 4 cartridges without reducer 7 cartridges with magazine
Stock Adjustable drop. Cast-on, Cast-off.
13
EN
OBSTRUCTION / CHOKE TUBES CONDITION CHECK Check the barrel to ensure there are no obstructions in the chamber and bore. This is extremely important because serious injury can result to the user or to nearby persons if a cartridge is fired in an obstructed barrel or chamber.
Check the inside of the barrel prior to completely assembling the firearm and before use; if the firearm is already assembled the following procedure should be followed:
• Followthe instructions inthe“Disassembly”sectionandremovethebarrelfrom the shotgun.
• Afterremovingthebarrel,lookrightthroughthebarrelfromtherearandmakesure there are no obstructions, even minor ones.
• Ifanobstructioninthebarrelisdetected,acompetentgunsmithmustremovethe obstruction. Inspect again the shotgun before it can be fired.
• Remount thebarrel, following the instructionssetout in the“Reassembly”section.
14
EN
LOAD CHECKAt various points in this manual, you will be requested to inspect the ejection port, the loading gate, and the cartridge chamber of your Beretta semi-automatic 1301 Tactical to ensure that it is unloaded. This should become second nature to you, as should the following precautions:
• Neverassumethatthegunisunloaded.
• Neverpointorpushtheguntowardyourselforanotherperson.
• Alwaysinspecttheejectionport,theloadinggateandthecartridgechamberto make sure they are empty. The cartridge chamber is the portion of the barrel into which the cartridge is inserted.
• Pullback thebreechbolt to lock it into theopenpositionandengage thesafety before handing the shotgun to another person.
• Nevertakefromorgivetheshotguntoanotherpersonunlessthebreechbolthas been opened and the ejection port, loading gate and cartridge chamber have been inspected to ensure they are completely empty.
Inspect the ejection port, the loading gate and cartridge chamber as indicated below:
CAUTION: Keep your finger off the trigger and keep the barrel pointed in a safe direction.
• Check that the carrier stop push button is pressed all the way down.Otherwise, push it down (Fig. 1).
• Usethecockinghandletoretractthebreechboltuntilitlocksintotheopenposition (Fig. 2).
• Engagethemanualsafetybypressingthesafetybuttontohidetheredring(Fig. 3).
• Inspect the firearm by looking through the ejection port, the feeding gateand the cartridge chamber. They must be empty. Check that there are no cartridges in the magazine tube. If there are, unload the firearm as indicated in“Howtounloadtheshotgun”.
• Pressthebreechboltreleasebuttonandgentlyguidethebreechbolttothelocked position (Fig. 4).
• Disengagethesafety(Fig. 5) (red ring visible) and hold the breech bolt back 2 cm, pull the trigger, to decock the hammer.
CAUTION: When the safety button shows the red ring, the SAFETY IS DISENGAGED, so the firearm is ready for use. When the red ring is not visible on the safety button, the SAFETY IS ENGAGED.
15
EN
AMMUNITIONWARNING: Beretta assumes no liability for physical injury or property damage resulting from the use of defective, improper, hand-loaded, reloaded or remanufactured ammunition. Serious damage or injury, even death, may be caused from the use of ammunition that is not suitable, loaded with force, or loaded with obstructions in the barrel.
The Beretta 1301 Tactical does not require adjustments or interventions to shoot from 70 mm (2 3/4 in) /24 g (7/8 oz), to 76 mm (3 in) /57 g (2 oz) cartridges.
CAUTION: The Beretta 1301 Tactical has an Optima-Bore® HP barrel that make it possible to fire High Performance steel shot ammunition. You will find the markings for the gauge and chamber length for your shotgun on the side of the barrel. Every 1301 Tactical has been tested with special proof test ammunition at 1320 bar with high performance steel shot. These tests guarantee the ability to shoot either ordinary or HP steel shot (usually higher than 3.5 mm of diameter) which cause higher pressure in the barrel.
You will find the markings for the gauge and chamber length for your shotgun on the side of the barrel. Every 1301 Tactical has been tested with special proof test ammunition at 1320 bar with high performance steel shot. These tests guarantee the ability to shoot either ordinary or HP steel shot (usually higher than 3.5 mm of diameter) which cause higher pressure in the barrel.
CAUTION: Never use cartridges that do not correspond to the indicators on the barrel.
CAUTION: Only use cartridges with a length equal to or less than the chamber length indicated on the barrel.
CAUTION: To avoid using improper ammunition, always check the characteristics stamped on the cartridge box and on the cartridge. Be sure to use the right cartridge gauge and length for your firearm.
STEEL SHOT
All Beretta barrels, are designed for use with factory steel shot cartridges loaded to international standard specifications. The use of reloaded or remanufactured ammunition can increase the likelihood of excessive pressure, case rupture or other defects in the ammunition.
MAGAZINE CAPACITY
The magazine of the 1301 Tactical has a capacity limited to 2 shots, in line with the current hunting regulations in many countries, due to the insertion of a reducer.
16
EN
This reducer restricts firearm use to no more than three rounds (two in the magazine, and one in the cartridge chamber).This device is fitted by Beretta during manufacture and assembly of the 1301 Tactical.
WARNING: Wholesalers, dealers or gunsmiths are not authorised to carry out any Warranty repair or adjustment on behalf of the Manufacturer (unless they are a Repair Point authorised by the Manufacturer and/or by its Local Official Distributors).
17
EN
HOW TO LOAD AND FIREWARNING: Before loading the firearm, it is a good idea to practice the following handling procedures without the use of ammunition. Never handle a loaded firearm until you are fully familiar with the loading procedures. Always inspect the ejection port, the loading gate and the cartridge chamber to make sure they are empty. Check that there are no cartridges in the magazine tube. Before loading the firearm, ensure that the safety is engaged. Always keep the firearm pointed in a safe direction. (See points 1, 2 and 4 of the BASIC SAFETY RULES.)
WARNING: Always check the barrel before loading the firearm to make sure that it is clean and free of possible obstructions.
WARNING: Check the conditions and correct tightness of the choke tubes in the barrel. Never use the shotgun without the choke tube inserted.
WARNING: The shooter and all bystanders must always wear protective eye-wear and ear protection during shooting. Residue from gunpowder, lubricant or metal fragments may be projected backwards and cause injury. Noise-reducing earplugs or earmuffs will reduce the risk of damage to hearing caused by prolonged shooting activity.
CAUTION: Always keep your finger off the trigger and avoid contact of other objects with the trigger if you don't intend to fire.
• Check that the carrier stop push button is pressed all the way down.Otherwise, push it down (Fig. 1).
• Usethecockinghandletoretractthebreechboltuntilitsnapsintotheopenposition (Fig. 2).
• Engagethemanualsafetybypressingthesafetybuttontohidetheredring(Fig. 3).
CAUTION: The safety can only be engaged with the hammer in the cocked position. The hammer is cocked by pulling back the breech bolt. When the safety button shows the red ring, the SAFETY IS DISENGAGED (Fig. 5), so the firearm is ready for use. When the red ring is not visible on the safety button, the SAFETY IS ENGAGED (Fig. 3).
WARNING: The manual safety is merely a mechanical device and is in no way a substitute for the Basic Safety Rules of firearm handling.
• Introducethefirstcartridgeintothecartridgechamberthroughtheejectionport (Fig. 6).
• Keepingyourhandsawayfromtheejectionport,pressthereleasebuttonandguide the breech bolt to lock.
18
EN
WARNING: The firearm is now loaded and ready to fire after the manual safety is disengaged. Always keep your finger off the trigger and avoid contact with the trigger by other objects if you don't intend to fire. Never point a firearm at something that is not safe to shoot. (See points 1, 2 and 4 of the BASIC SAFETY RULES).
WARNING: Beretta assumes no liability for any injury or property damage resulting from improper or careless handling or intentional or accidental firing of the shotgun.
•Movethecarriertoinsertthecartridgesintothemagazinethroughtheloadingport to latch behind the cartridge retaining lever (Fig. 7).
• Tofire,disengagethesafety (Fig. 5) (red ring visible) and pull the trigger.
• Afterfiringthefirstshot,releasethetriggertosetuptheshotgunforthenextcartridge.
• The shotgun will fire the cartridge in the chamber first, and then it willautomatically introduce the cartridge from the magazine tube into the chamber.
WARNING: After pulling the trigger, if the shotgun doesn't fire, engage the safety, wait at least one minute and unload the shotgun as described in the corresponding section.Never attempt to reuse or fire ammunition that did not fire the first time. Dispose of unfired or damaged ammunition properly, in accordance with the ammunition manufacturer’s recommendations.
WARNING: If another cartridge is fired into an obstructed barrel, damage and very serious injury may occur.
If you do not plan to fire a second shot, engage the safety (red ring not visible) (Fig. 3) keeping the firearm pointed in a safe direction and the fingers away from thetrigger.Ifyouhavefinishedfiring,unloadtheshotgunasindicatedin:“Howtounloadtheshotgun”.
•When the last cartridges has been fired, the breech bolt remains open,showing that the magazine is empty.
• Engagethesafety (Fig. 3) (red ring not visible) and if necessary, reload the shotgun according to the instructions given previously.
WARNING: Always unload the firearm immediately after firing is completed. Neverstorealoadedfirearm.Tostoretheshotgun,see:“Storage”.
19
EN
HOW TO UNLOAD THE SHOTGUNWARNING: The firearm is loaded and ready to fire. Always keep your finger off the trigger and avoid contact with the trigger by other objects if you don't intend to fire. Never point the firearm at someone or at hard, flat surfaces. (See points 1, 2 and 4 of the BASIC SAFETY RULES.)
• Keeping the firearm pointed in a safe direction, check that the safety isengaged (Fig. 3) (red ring not visible).
• Pull back the breech bolt to extract and expel the live cartridge from thechamber (Fig. 8).
•Releasethebreechboltsothatitlocks.
•Raisethecarrier,pushthecartridgelightlyintothemagazinetubeandatthesame time press down the release button, guiding the cartridges out of the magazine tube.
•Afterchecking themagazine tubeand the receiverareempty,keeping theshotgun pointed in a safe direction, disengage the safety (Fig. 5) (red ring visible).
•Keepingthebreechboltpulledback2cm,pullthetrigger,therebydecockingthe hammer.

20
EN
DISASSEMBLYWARNING: Always check that the shotgun is unloaded (empty cartridge chamber, empty receiver, empty magazine). Inspect the firearm by looking through the ejection port, the loading gate and the chamber. If it is not empty, unload it as instructed in the relevant section. Check that the hammer is decocked.
WARNING: Never point the firearm at someone or at hard, flat surfaces. Always treat the shotgun as if it were loaded. (See points 1, 2 and 4 of the BASIC SAFETY RULES.)
NOTICE: It is advisable to carry out the disassembly operations over a table to catch components should they drop.
BARREL
• Checkthatthecarrierstoppushbuttonispressedallthewaydown.Ifitisnot, push it all the way down (Fig. 1).
• Pullthebreechboltallthewaybacksothatitremainsopen.
• Unscrewthefrontcapofthefore-endinananti-clockwisedirection(Fig. 9).
•Holdingtheshotgunbythebarrel,pullthefore-endstraightouttowardthemuzzle (Fig. 10).
• Pull thebarreloutof thestock-receiverassemblywhileholding thepistoninside the gas cylinder (Fig. 11).
NOTICE: NEVER STRIP the spring of the valve or the valve retaining nut. The valve device is self-cleaning and requires no maintenance. If necessary, contact a competent gunsmith.
BREECH BOLT ASSEMBLY
(Breech bolt, operating rods with sleeve, recoil spring, and piston stop.)
WARNING: The breech bolt assembly need only to be disassembled in order to clean its components.
• Keepingthe indexormiddlefingerof the lefthandonthecockinghandle,press the release button and allow the breech bolt to move forward slowly until it stops (Fig. 12).
• Presstheheadofthebreechboltuntilthegrooveonitsneckcorrespondstothe edge of the bolt body (Fig. 13).
• Keepingtheheaddepressedinthisposition,extractthecockinghandlefromthe breech bolt, pulling forcefully (Fig. 14).
•Overaflatsurface,withtheejectionportpointedupwards,pullforwardonthebreech bolt assembly, the operating rods with sleeve, the recoil spring, and
21
EN
the spring holder, to force the breech bolt out from the receiver (Fig. 15).
TRIGGER PLATE
NOTICE: The trigger plate only needs to be disassembled in order to clean the trigger mechanism.
• Engagethesafety(thehammeriscocked)(Fig. 3).
• Pressthecarrierstoppushbutton,ifithasnotalreadybeenpressed(Fig. 1).
• Removethetriggerguardretainingpinbypressingwithapinpunchoranawl(Fig. 16 and 17).
• Keepingthereleasebuttonpushedallthewaydown,removethetriggerplatefrom the receiver using the trigger guard as a lever, first in the direction of the barrel and then outward (Fig. 18 and 19).
22
EN
ROUTINE MAINTENANCEClean and lubricate your shotgun any time combustion residue, grease or dirt is deposited in any of the mechanisms. Cleaning and lubrication of the firearm after each use is the best way of ensuring that the components are protected against combustion corrosion or rusting from use in humid or salty environments.At the end of a shooting day, carry out the Routine Maintenance as indicated below.
WARNING: Always check that the shotgun is unloaded (empty cartridge chamber, empty receiver, empty magazine). Inspect the firearm by looking through the ejection port, the loading gate and the chamber. If it is not empty, unload it as instructed in the relevant section. Check that the hammer is decocked.
WARNING: Never point the firearm at someone or at hard, flat surfaces. Always treat the shotgun as if it were loaded. (See points 1, 2 and 4 of the BASIC SAFETY RULES).
NOTICE: For Routine Maintenance, simply disassemble it following the procedures described in the relevant section.
BARREL
• Carefully clean the inside of the barrel with a cloth patch to remove anycombustion residue.
• Thoroughlycleanthelockingshouldersonthebarrelbreech.
• Pullasoft,clean,drycloththroughthebarrel.
• LightlylubricatethebarrelwithasoftcleanclothsoakedwithBerettaGunOil.
• Checkthebarrel.Thebarrelandcartridgechambermustbecleanandfreefrom obstructions.
CAUTION: Excess oil or grease obstructing the barrel, even partially, is very dangerous when firing and may cause damage to the shotgun and serious injury to the shooter and to bystanders. Never spray or apply oil to the cartridges. Use lubricants properly. You are responsible for the proper care and maintenance of your firearm.
GAS CYLINDER, PISTON, MAGAZINE TUBE
CAUTION: Use of Magnum and Super Magnum cartridges results in high combustion gas emissions.The particular composition of the powders of some Super Magnum ammunition can leave consistent deposits of combustion residue. The parts of the shotgun where this problem is most likely to arise are the gas cylinder, the piston and elastic piston seal and the magazine tube.
23
EN
• Ensurethatthepistonglidesfreelyonthemagazinetube.
• Tocleanthewallsofthegascylinder,spraythewallswithBerettaGunOilandclean thoroughly with a bronze brush.
• Afterremovinganycombustionresidue,cleantheinsideofthegascylinderwith a clean cloth.
NOTICE: The components specified above must not be lubricated.
EXHAUST VALVE ASSEMBLY
NOTICE: NEVER DISASSEMBLE the exhaust valve assembly. If necessary, contact a competent gunsmith.
24
EN
SPECIAL MAINTENANCEDepending on the conditions of use of the firearm, and at the end of the hunting season, Beretta recommends you carry out the following extraordinary maintenance operations in order to keep the shotgun in perfect working order.
BREECH BOLT ASSEMBLY
(Breech bolt, operating rods with sleeve, recoil spring, and piston stop).
• SpraythepartsandcleanwithBerettaGunOil.
• Thoroughlydrywithasoftclothandlightlylubricate.
TRIGGER PLATE
• Thoroughlycleanthepartswithasoftcloth.
• Lightlylubricateallthemetalcomponentsandthetriggerplateretainingpin.
RECEIVER
• Proceedasindicatedforthebreechbolt.Cleanthoroughlywithasoftclothand lubricate the internal breech bolt guides.
CAUTION: Do not attempt to carry out repairs to any firearm without proper knowledge or training. Do not alter parts or use substitute parts not manufactured by Beretta. Any alterations or adjustments that may be necessary to the operating mechanism should be performed by the Manufacturer or by its Local Authorised Distributor.
25
EN
REASSEMBLYWARNING: Always check that the shotgun is unloaded (empty cartridge chamber, empty receiver, empty magazine). Inspect the firearm by looking through the ejection port, the loading gate and the chamber. If it is not empty, unload it as instructed in the relevant section.
WARNING: Never point the firearm at someone or at hard, flat surfaces. Always treat the shotgun as if it were loaded. (See points 1, 2 and 4 of the BASIC SAFETY RULES).
TRIGGER PLATE
•Workinreverseordertoassembly,takingcaretoensurethatthehammeriscocked (Fig. 20), the safety is engaged and the carrier stop push button is pressed down.
• Keeping the release button pressedwell down,make the rear part of thetrigger plate adhere precisely to the receiver and push firmly towards the stock, as far as it will go.
• Rotatethetriggerplateuntilitisinsertedinitshousinginthereceiver.
• Insertthetriggerguardretainingpinonlywhentheholeofthetriggerguardiscentred on the receiver.
BREECH BOLT ASSEMBLY
(Breech bolt, operating rods with sleeve, recoil spring, and piston stop).
•Workingonaflatsurfacewiththeejectionportturnedup,mountthebreechbolt assembly, operating rods with sleeve, recoil spring and piston stop on the magazine tube (Fig. 15).
• Pushtheoperatingrodswithsleeveallthewayintoinsertthebreechboltintothe receiver.
• Presstheheadofthebreechboltuntilthegrooveonitsneckcorrespondstothe edge of the bolt body.
• Keepingtheheadpresseddowninthisposition,insertthecockinghandleonthe breech bolt. Fasten it into position by hitting it firmly (Fig. 14).
BARREL
• Checkthebarrel.Thebarrelandcartridgechambermustbecleanandfreefrom obstructions.
• Insertthepistonintothegascylinderofthebarrel,tighteningtheelasticsealwith the fingers to make it easier to install the piston in the cylinder (Fig. 21 and 22).
26
EN
• Checkthatthecarrierstoppushbuttonispressedallthewaydown.Ifitisnot, push it all the way down (Fig. 1).
• Pullthebreechboltallthewaybacksothatitremainsopen(Fig. 2).
CAUTION: When the release button is pressed, the breech bolt is pushed forward by the recoil spring, until it is stopped at the ejection port by the cocking handle, with the likelihood of damage to both parts.
• Insertthebarrelintothereceiver,ensuringthatthemagazinetubeentersthepiston hole as well as that of the gas cylinder and the valve assembly (Fig. 23).
• Pushitallthewayintothereceiveruntilitstops.
• Slidethefore-endintoplaceoverthegascylinder/thevalveassemblyandmagazine tube (Fig. 10). checking for the correct centering on the receiver face. The fore-end is in the correct position when it is fully against the receiver.
• Screwthefore-endcapthemagazinetubeextensionontightly(Fig. 9).
• Keepyourfingersawayfromtheejectionport,pressthebreechboltreleasebutton and gently guide the breech bolt to lock.
• Keepingthebreechboltpulledback2cm,pullthetrigger,therebydecockingthe hammer.
WARNING: Store your firearm so that children or other persons not familiar with firearms cannot gain access to it. To reduce the risk of accidents involving children, unload your firearm and lock it away. Store the ammunition in a separate locked location. (See point 3 of the BASIC SAFETY RULES).
NOTICE: If the firearm will not be used for a long time, keep it lubricated and disassembled(seethechapters“Maintenance”and“Storage”).
27
EN
STOCK DROP AND CAST MODIFICATIONWARNING: Always check that the shotgun is unloaded (empty cartridge chamber, empty receiver, empty magazine). Inspect the firearm by looking through the ejection port, the loading gate and the chamber. If it is not empty, unload it as instructed in the relevant section.
WARNING: Never point the firearm at someone or at hard, flat surfaces. Always treat the shotgun as if it were loaded. (See points 1, 2 and 4 of the BASIC SAFETY RULES).
The Beretta semi-automatic 1301 Tactical has a pre-set factory stock cast-off setting (for right-handed shooters) with 65 or 50 mm drop.
The components which govern the drop and the cast are (see Fig. 24):
� the drop-cast front spacer, made of reinforced technopolymer fibreglass.
the stock steel plate.
Both the front spacer � and the plate are designed to secure two different drops, each with a cast-off or a cast-on (for left-handed shooters) depending on how they are assembled. A set of additional spacers is also provided to further change the drop by replacing the spacer pair.
REPLACING THE STOCK DROP AND CAST SPACERS
NOTICE: The right-hand cast is designated by the initials DX. The left-hand cast is designated by the initials SX. The drop and cast of the front spacer � and plate must always be synchronised.
WARNING: Stock drop and cast modification must be carried out by a competent gunsmith. Failure to comply with these instructions can lead to damage to property or injury to persons.
REQUIRED TOOLS
1 Philips and 1 flat-head screwdriver.
1 Torque wrench T15.
1 Hexagonal wrench, 6 mm.
1 Tube wrench, 13 mm.
1 Torque wrench (previously mentioned) with a 13-mm pipe extension.
28
EN
FIELD STRIPPING
• UsethePhillipsscrewdrivertoremovethetwoscrewssunkintothestock.
• RemovetheBerettaMicrocorerecoilpadfromthestock.
• Usethe13-mmtubewrenchtocompletelyunscrewtheretainingnutofthestock and remove the nut, spring washer and plate .
• Separatethestockfromthereceiverandremovetheplate�.
REASSEMBLY
• Centrethefrontspacer� on the stock bolt tube. Make sure that the indicator showingthedesireddropandcast(“C-60-DX”inthediagram)isvisibleonthe spacer.
• Repositionthestock.Placetherearplate inside the stock. Make sure that the same marking is visible on the plates.
• Usethe13-mmtubewrenchtoinserttheretainingnutofthestockandspringwasher and tighten down with tightening torque 1.6 - 1.8 Kgm (Kilogram-meters). The use of a proper dynamometric wrench is recommended.

29
EN
STORAGEWARNING: To reduce the risk of accidents involving children or unauthorised persons, keep your firearm locked away and store the ammunition in a separate locked location!
NOTICE: Store the firearm disassembled (barrel/fore-end and receiver/stock) in the supplied case. Before storage, always check the condition of the shotgun and its case. Ensure that they are perfectly dry.Moisture and water drops can damage the shotgun.
NOTICE: Do not store the shotgun in a leather or fabric case. These materials attract moisture, even though they may appear to be perfectly dry.
30
EN
NOTES
31
EN
NOTES

32
EN
NOTES