Embed Size (px)
Citation preview
iSupplier Training Guide
Page i
Training Guide
Oracle Training – iSupplier for End‐Users
Jacksonville Aviation Authority (JAA)
iSupplier Training Guide
Page ii
Table of Contents
Introduction ................................................................................................................. 1
Objectives .................................................................................................................... 3
Topic 1: iSupplier Portal and Home Page Review .................................................. 4
Topic 2: iSupplier Home Page ‐ Orders Tab………………………………………………………….7 Topic 3: iSupplier Home Page ‐ Shipments Tab………………………………………………....15 Topic 4: iSupplier Home Page ‐ Finance Tab……………………………………………………...25 Topic 5: Create Invoices…………………………………………………………………………….........30 Topic 6: Create Advance Shipment Notices……………………………………………….........36
Topic 7: iSupplier Administrative Updates……………………………………….………….........44 Topic 8: Sourcing Supplier Portal…………………………………………………………………......51
Summary………………………………………………………………………………………………………………….43
iSupplier Training Guide
Page 1
Introduction
Oracle iSupplier Oracle iSupplier Portal is being deployed at JAA to enable suppliers to efficiently manage interaction and communication with the district for all purchasing activity. The portal provides a secure, Internet‐based access point that enables direct and real‐time access to purchasing and invoicing activity with JAA. Suppliers access the latest information for their individual accounts, including:
Purchase Orders
Shipments and Shipment Notices
Receipt information
Delivery information
Invoice and Payment status The two‐way collaboration enables suppliers to:
Submit change requests
Process shipment notices
Create and submit invoices
Update profile data
Sourcing Supplier Portal Registered suppliers will also have access to the Sourcing Supplier portal. This portal also provides a secure, Internet‐based access point that enables direct and real‐time access for responding to bid invitations and communicating directly with the JAA purchasing administration. The Sourcing Supplier Portal enables suppliers to:
Receive immediate notification of bid request invitations from JAA
Complete and submit complete bid responses online
Communicate through messaging directly with JAA purchasing administrators for any questions or information requests related to bid invitations and responses

iSupplier Training Guide
Page 2
iSupplier Training Guide
Page 3
Objectives
During this training course, supplier users will learn how to:
Access the iSupplier portal and Home Page
Use the Orders tab and related functions
Use the Shipments tab and related functions
Use the Finance tab and related functions
Create and submit invoices
Create and submit Advanced Shipment Notices
Perform profile updates through the Admin tab
Use the Sourcing responsibility to respond to bid requests and communicate directly with JAA purchasing administrators
iSupplier Training Guide
Page 4
Topic 1: iSupplier Portal and Home Page Review Supplier Access and Account Setup Approved supplier users will be registered at JAA for access to the iSupplier portal. Registered suppliers will receive valid UserID and Password login credentials via email from designated JAA administrators. The email information will also include the appropriate link to the iSupplier login page for access.
This topic covers:
Navigation to the iSupplier Home Page
Review of Home Page elements
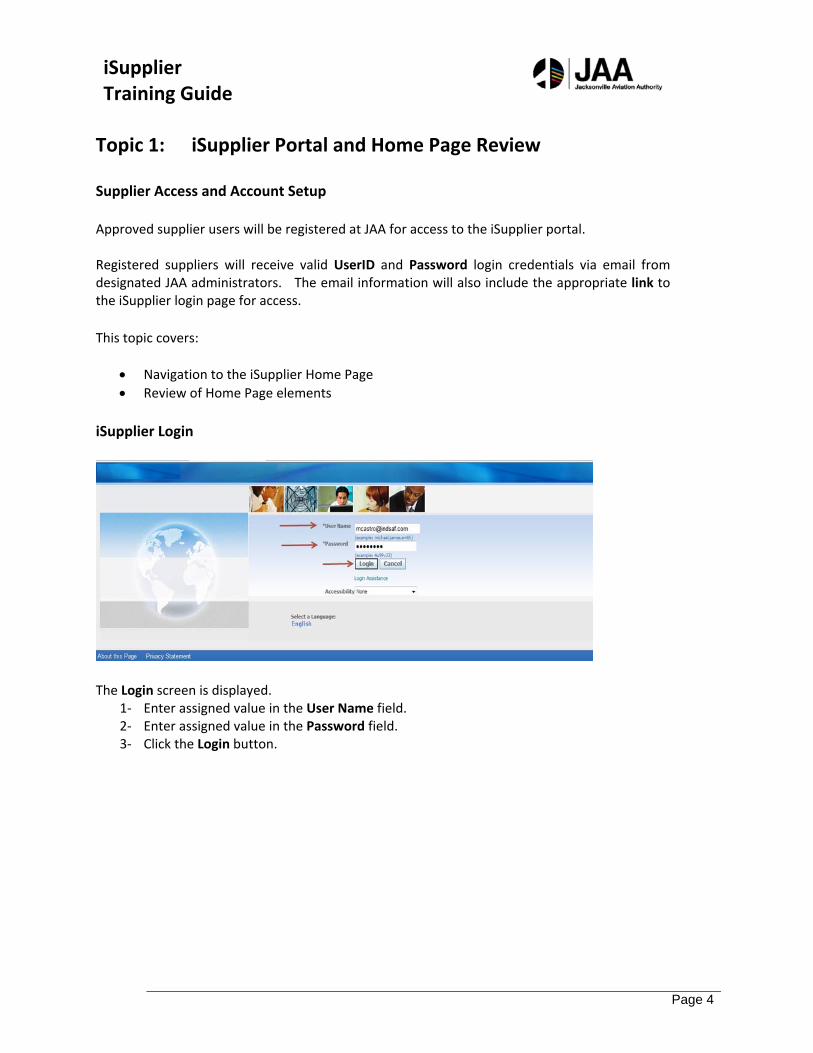
iSupplier Login
The Login screen is displayed.
1‐ Enter assigned value in the User Name field. 2‐ Enter assigned value in the Password field. 3‐ Click the Login button.
iSupplier Training Guide
Page 5
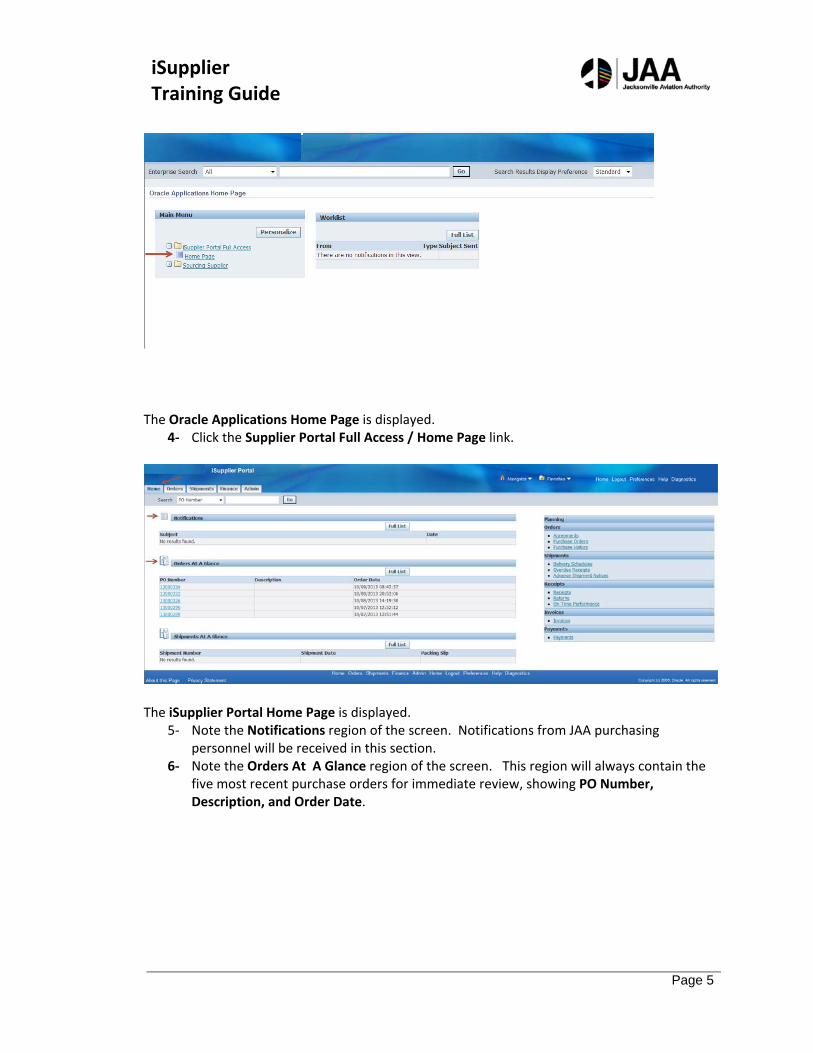
The Oracle Applications Home Page is displayed.
4‐ Click the Supplier Portal Full Access / Home Page link.
The iSupplier Portal Home Page is displayed.
5‐ Note the Notifications region of the screen. Notifications from JAA purchasing personnel will be received in this section.
6‐ Note the Orders At A Glance region of the screen. This region will always contain the five most recent purchase orders for immediate review, showing PO Number, Description, and Order Date.
iSupplier Training Guide
Page 6
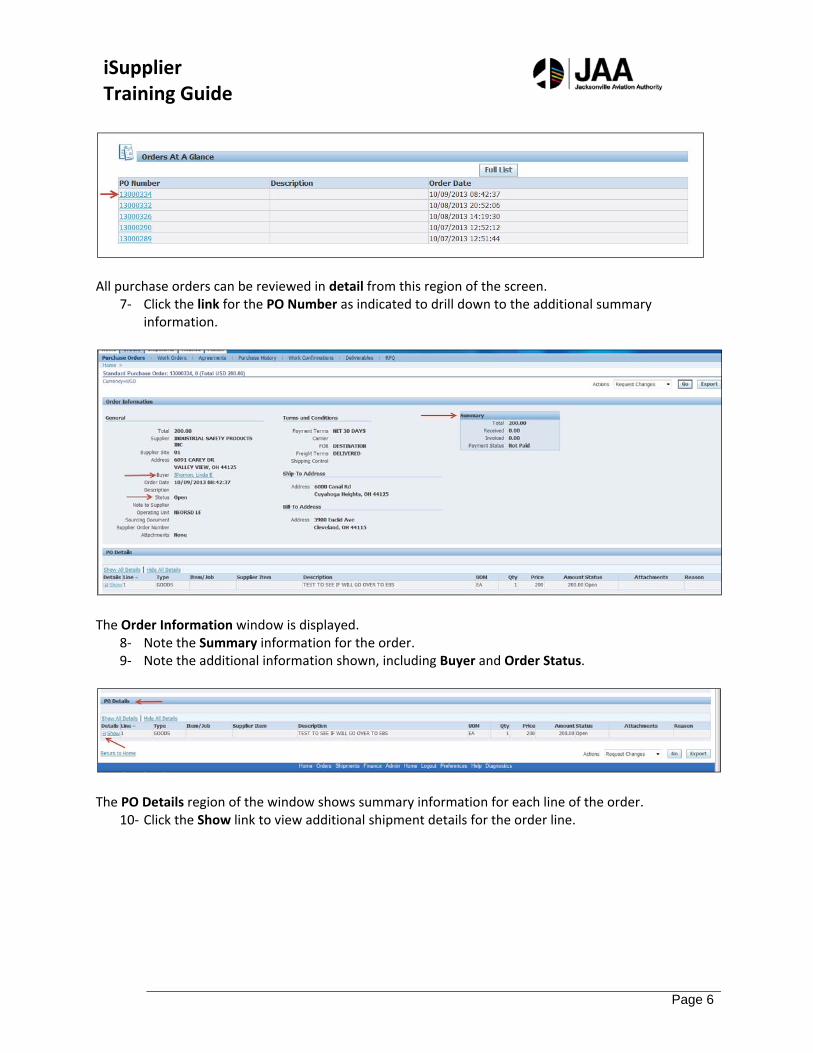
All purchase orders can be reviewed in detail from this region of the screen.
7‐ Click the link for the PO Number as indicated to drill down to the additional summary information.
The Order Information window is displayed.
8‐ Note the Summary information for the order. 9‐ Note the additional information shown, including Buyer and Order Status.
The PO Details region of the window shows summary information for each line of the order.
10‐ Click the Show link to view additional shipment details for the order line.
iSupplier Training Guide
Page 7
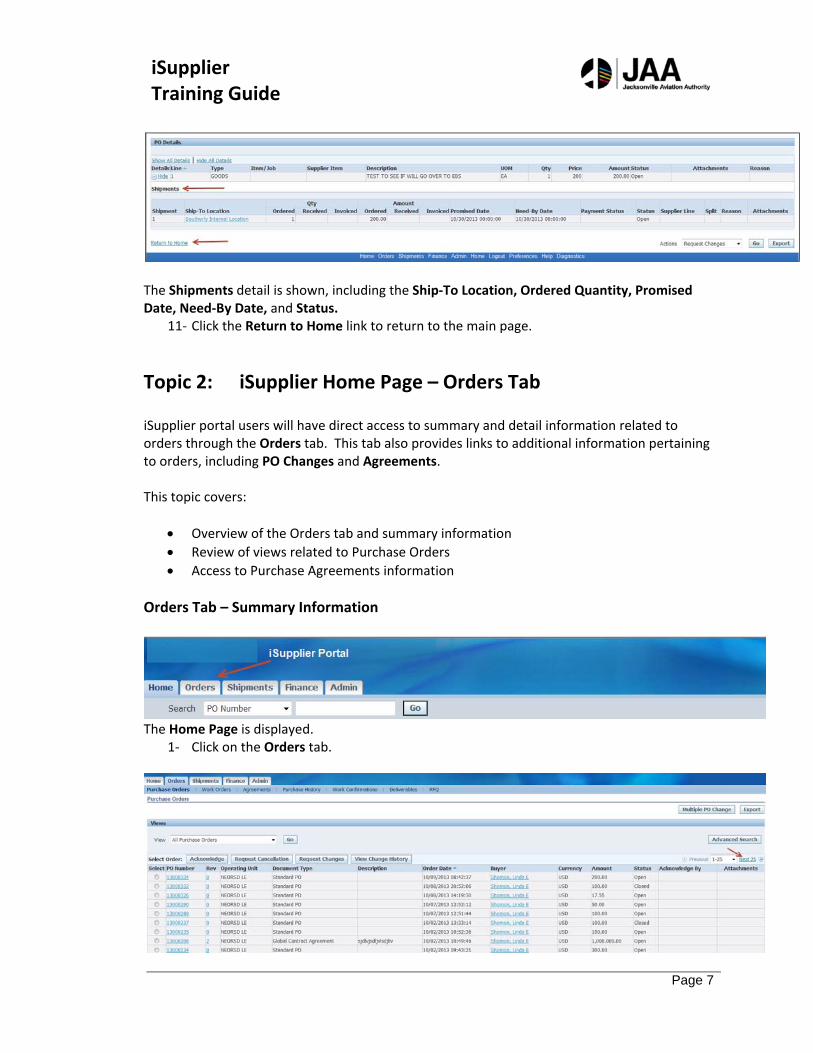
The Shipments detail is shown, including the Ship‐To Location, Ordered Quantity, Promised Date, Need‐By Date, and Status.
11‐ Click the Return to Home link to return to the main page.
Topic 2: iSupplier Home Page – Orders Tab
iSupplier portal users will have direct access to summary and detail information related to orders through the Orders tab. This tab also provides links to additional information pertaining to orders, including PO Changes and Agreements. This topic covers:
Overview of the Orders tab and summary information
Review of views related to Purchase Orders
Access to Purchase Agreements information
Orders Tab – Summary Information
The Home Page is displayed.
1‐ Click on the Orders tab.
iSupplier Training Guide
Page 8
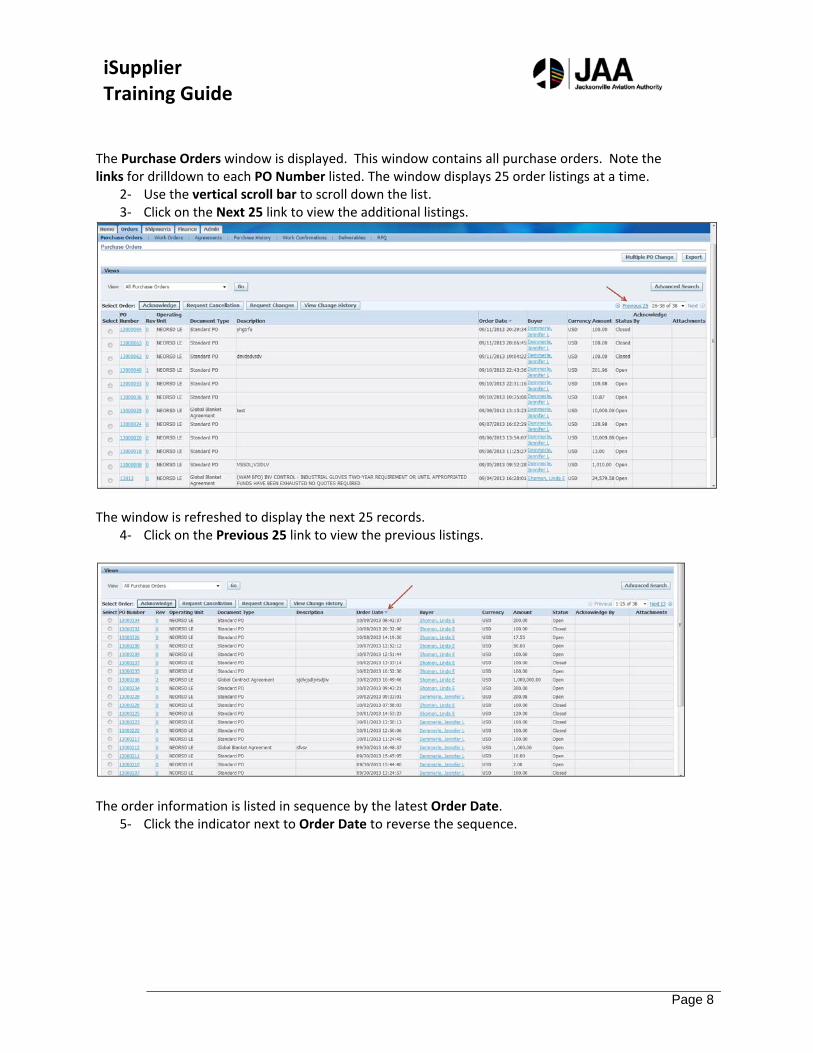
The Purchase Orders window is displayed. This window contains all purchase orders. Note the links for drilldown to each PO Number listed. The window displays 25 order listings at a time.
2‐ Use the vertical scroll bar to scroll down the list. 3‐ Click on the Next 25 link to view the additional listings.
The window is refreshed to display the next 25 records.
4‐ Click on the Previous 25 link to view the previous listings.
The order information is listed in sequence by the latest Order Date.
5‐ Click the indicator next to Order Date to reverse the sequence.
iSupplier Training Guide
Page 9
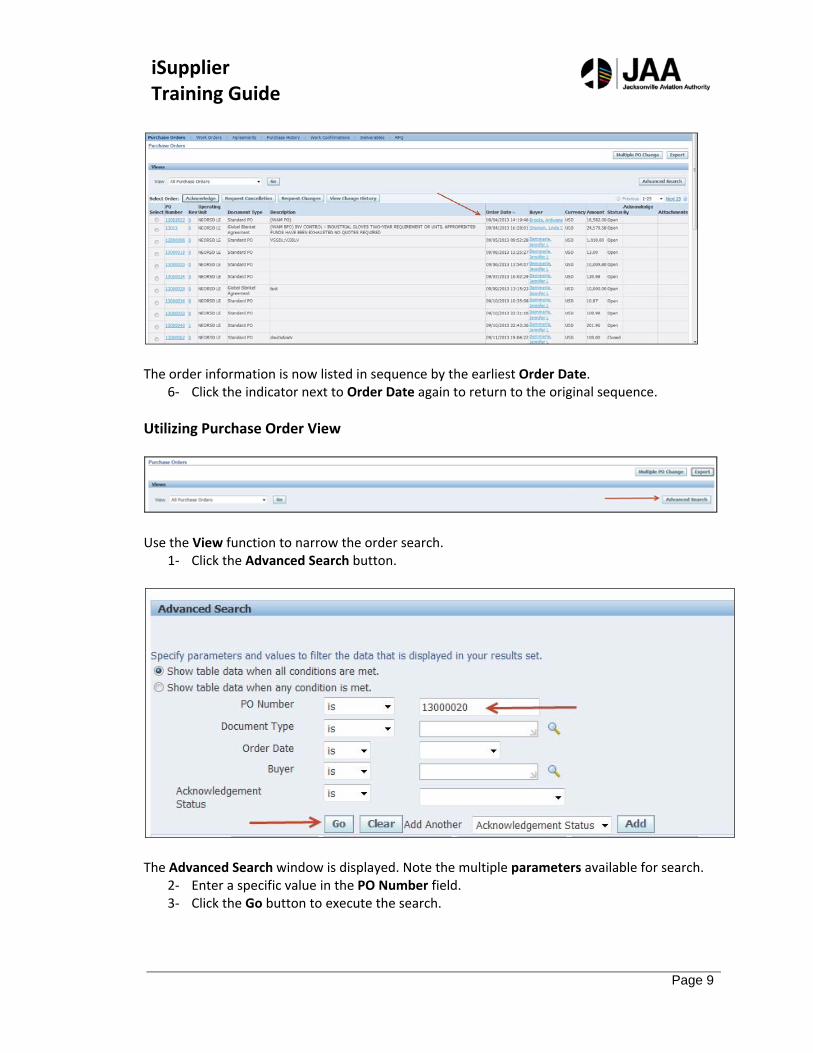
The order information is now listed in sequence by the earliest Order Date.
6‐ Click the indicator next to Order Date again to return to the original sequence.
Utilizing Purchase Order View
Use the View function to narrow the order search.
1‐ Click the Advanced Search button.
The Advanced Search window is displayed. Note the multiple parameters available for search.
2‐ Enter a specific value in the PO Number field. 3‐ Click the Go button to execute the search.
iSupplier Training Guide
Page 10
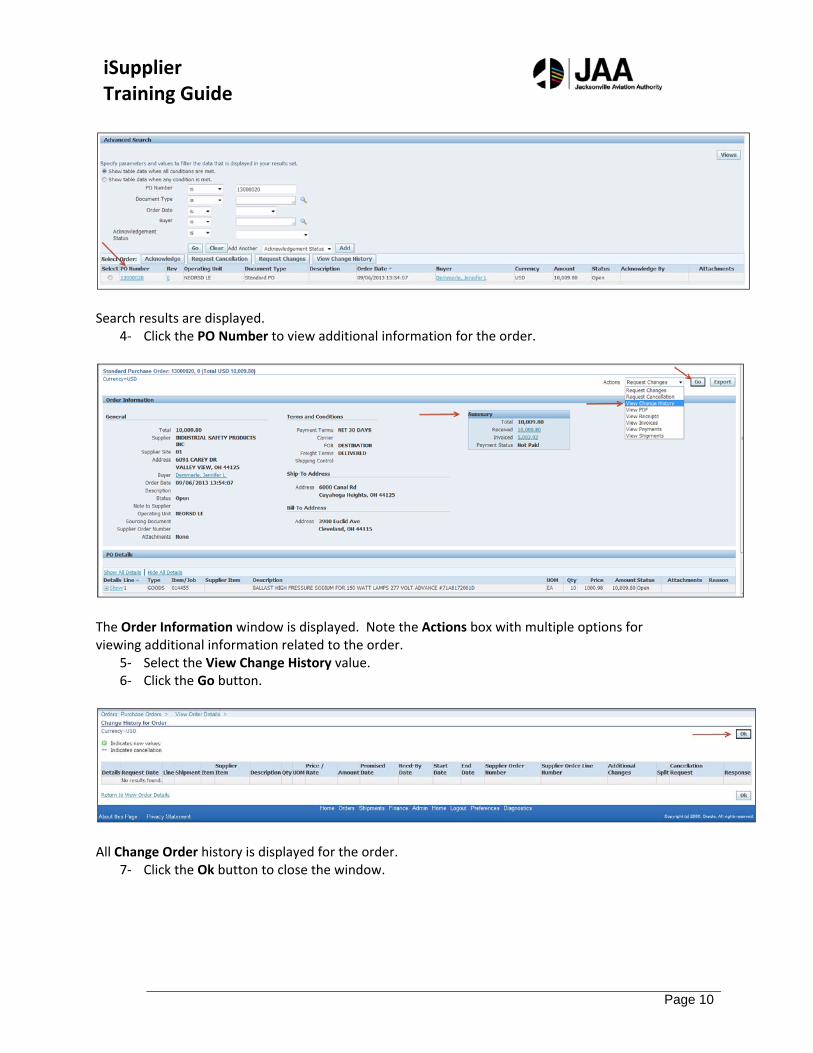
Search results are displayed.
4‐ Click the PO Number to view additional information for the order.
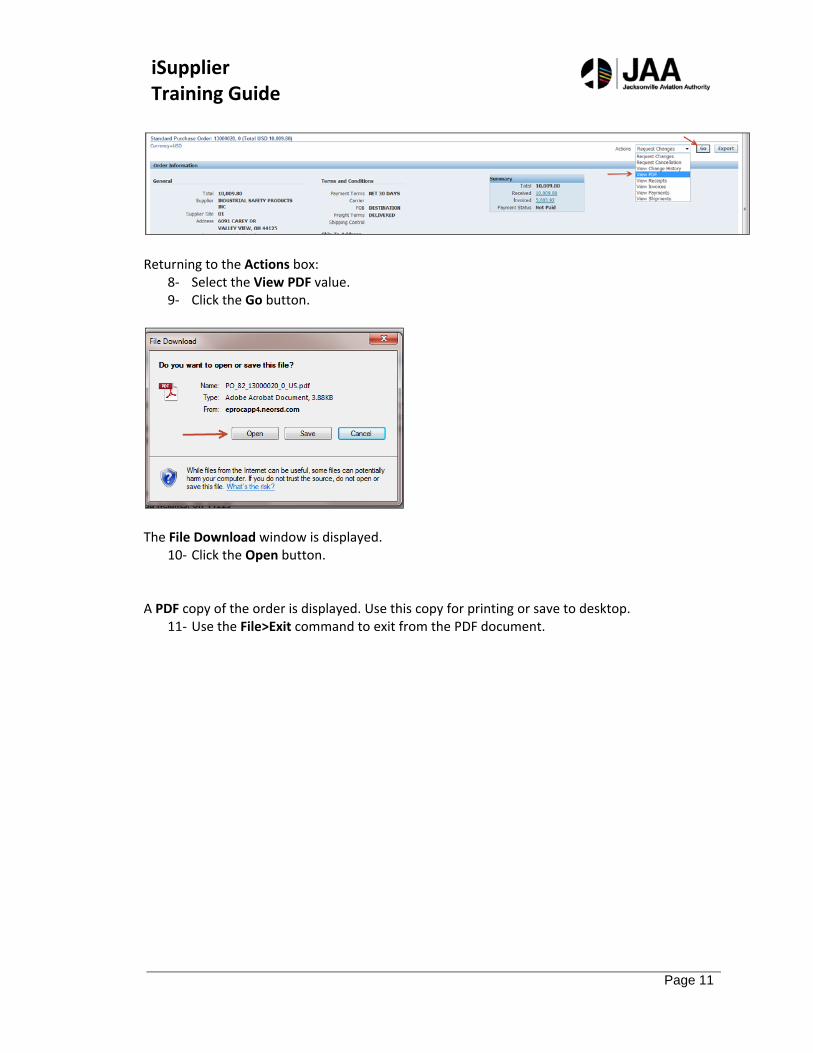
The Order Information window is displayed. Note the Actions box with multiple options for viewing additional information related to the order.
5‐ Select the View Change History value. 6‐ Click the Go button.
All Change Order history is displayed for the order.
7‐ Click the Ok button to close the window.
iSupplier Training Guide
Page 11
Returning to the Actions box:
8‐ Select the View PDF value. 9‐ Click the Go button.
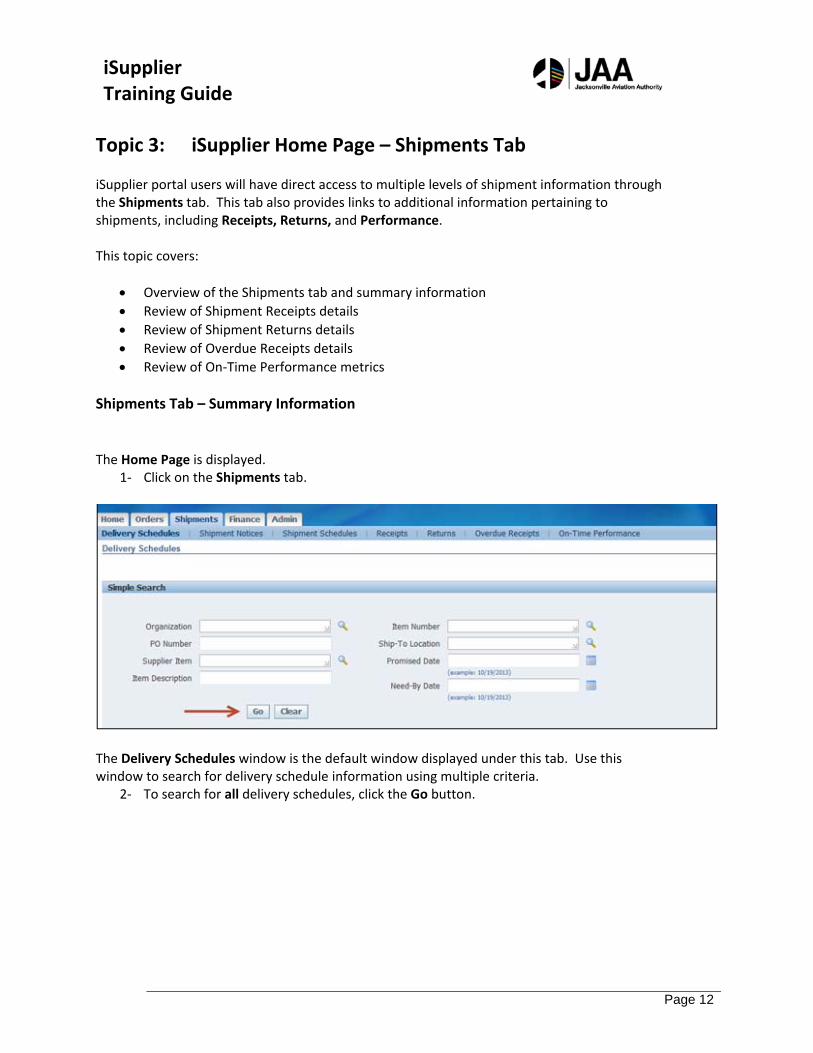
The File Download window is displayed.
10‐ Click the Open button. A PDF copy of the order is displayed. Use this copy for printing or save to desktop.
11‐ Use the File>Exit command to exit from the PDF document.
iSupplier Training Guide
Page 12
Topic 3: iSupplier Home Page – Shipments Tab iSupplier portal users will have direct access to multiple levels of shipment information through the Shipments tab. This tab also provides links to additional information pertaining to shipments, including Receipts, Returns, and Performance. This topic covers:
Overview of the Shipments tab and summary information
Review of Shipment Receipts details
Review of Shipment Returns details
Review of Overdue Receipts details
Review of On‐Time Performance metrics
Shipments Tab – Summary Information The Home Page is displayed.
1‐ Click on the Shipments tab.
The Delivery Schedules window is the default window displayed under this tab. Use this window to search for delivery schedule information using multiple criteria.
2‐ To search for all delivery schedules, click the Go button.

iSupplier Training Guide
Page 13
The Delivery Schedules window shows search results in summary.
3‐ Note the multiple fields of information, included comparison of Promised Date and Need‐By Date.
Shipment Receipt Details
1‐ Click the Receipts link under the Shipments tab.
The View Receipts window is displayed. Multiple search criteria are available for query.
2‐ Enter the PO Number value. 3‐ Click the Go button.
iSupplier Training Guide
Page 14
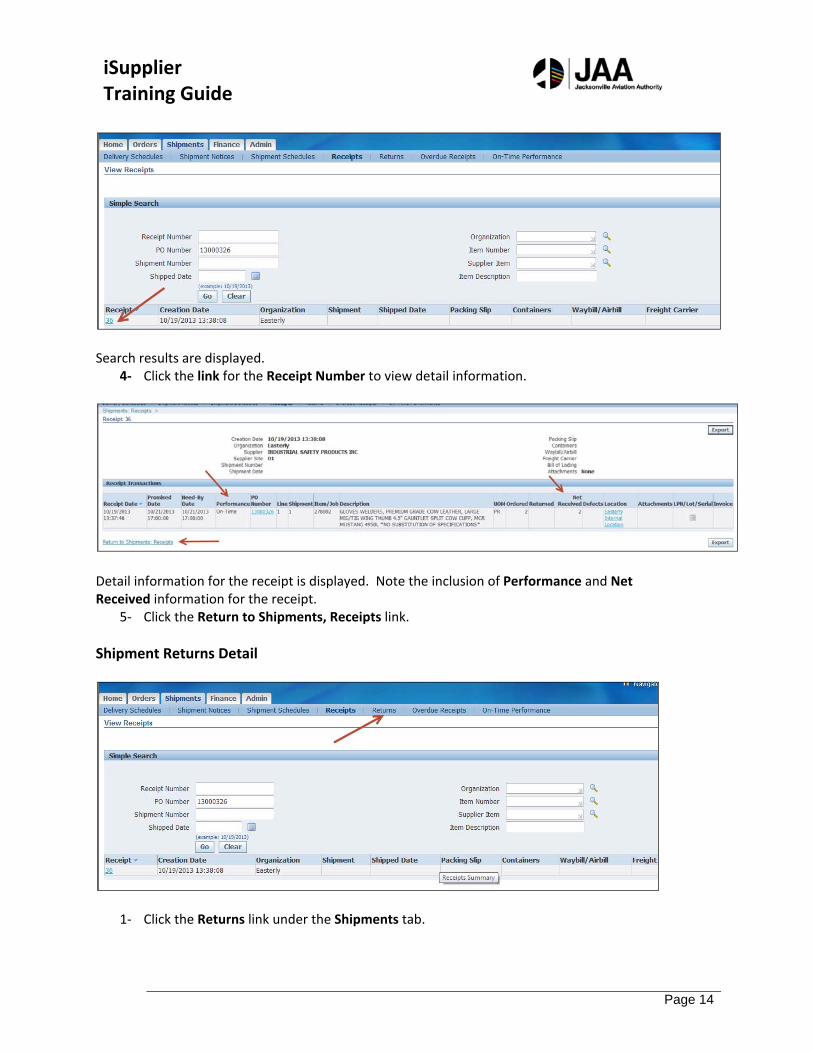
Search results are displayed.
4‐ Click the link for the Receipt Number to view detail information.
Detail information for the receipt is displayed. Note the inclusion of Performance and Net Received information for the receipt.
5‐ Click the Return to Shipments, Receipts link.
Shipment Returns Detail
1‐ Click the Returns link under the Shipments tab.
iSupplier Training Guide
Page 15
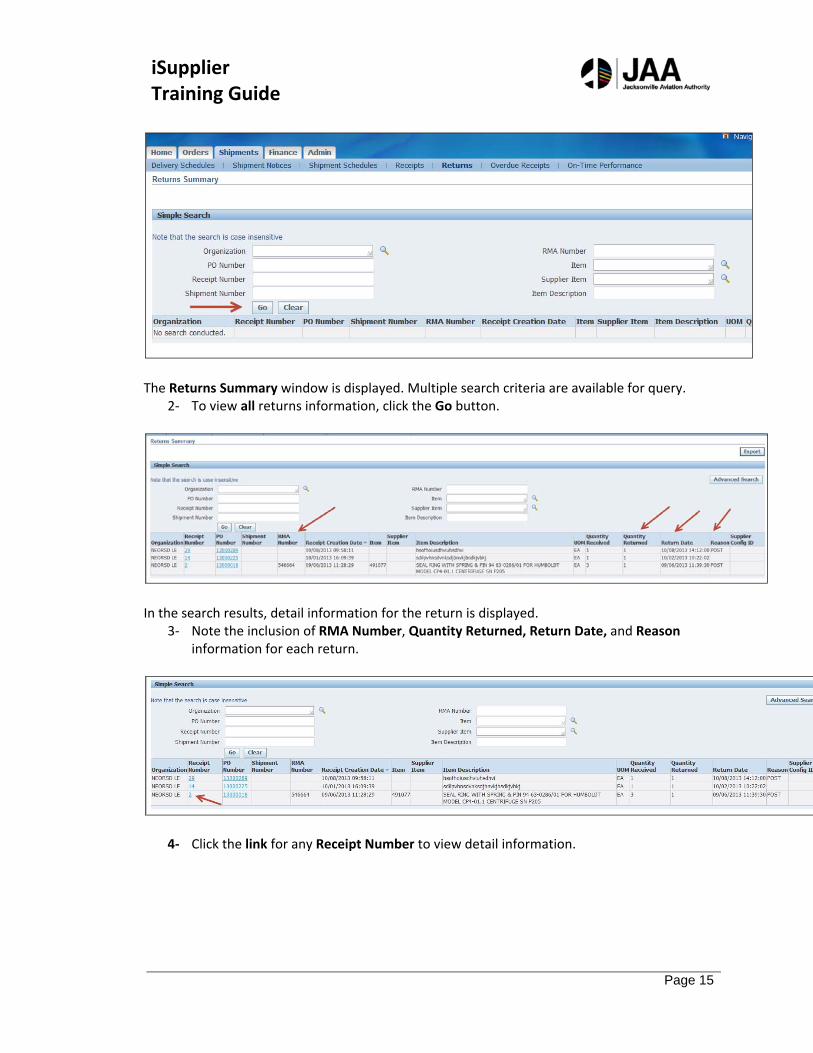
The Returns Summary window is displayed. Multiple search criteria are available for query.
2‐ To view all returns information, click the Go button.
In the search results, detail information for the return is displayed.
3‐ Note the inclusion of RMA Number, Quantity Returned, Return Date, and Reason information for each return.
4‐ Click the link for any Receipt Number to view detail information.
iSupplier Training Guide
Page 16
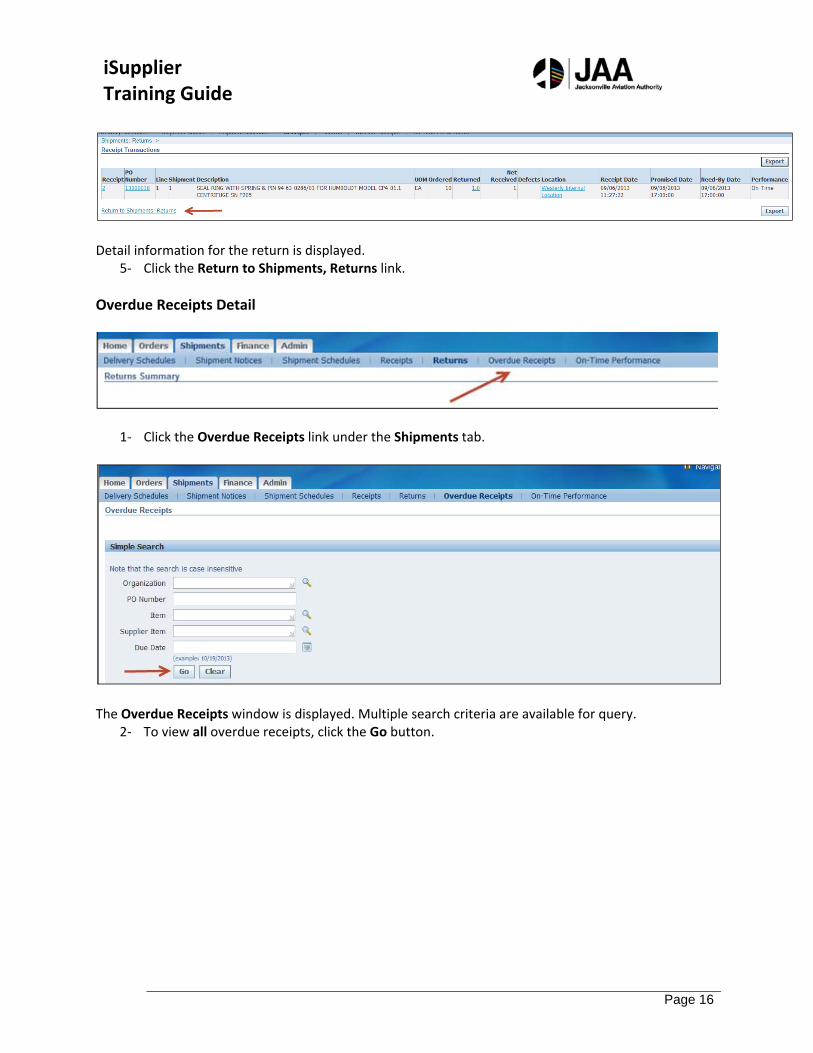
Detail information for the return is displayed.
5‐ Click the Return to Shipments, Returns link.
Overdue Receipts Detail
1‐ Click the Overdue Receipts link under the Shipments tab.
The Overdue Receipts window is displayed. Multiple search criteria are available for query.
2‐ To view all overdue receipts, click the Go button.
iSupplier Training Guide
Page 17
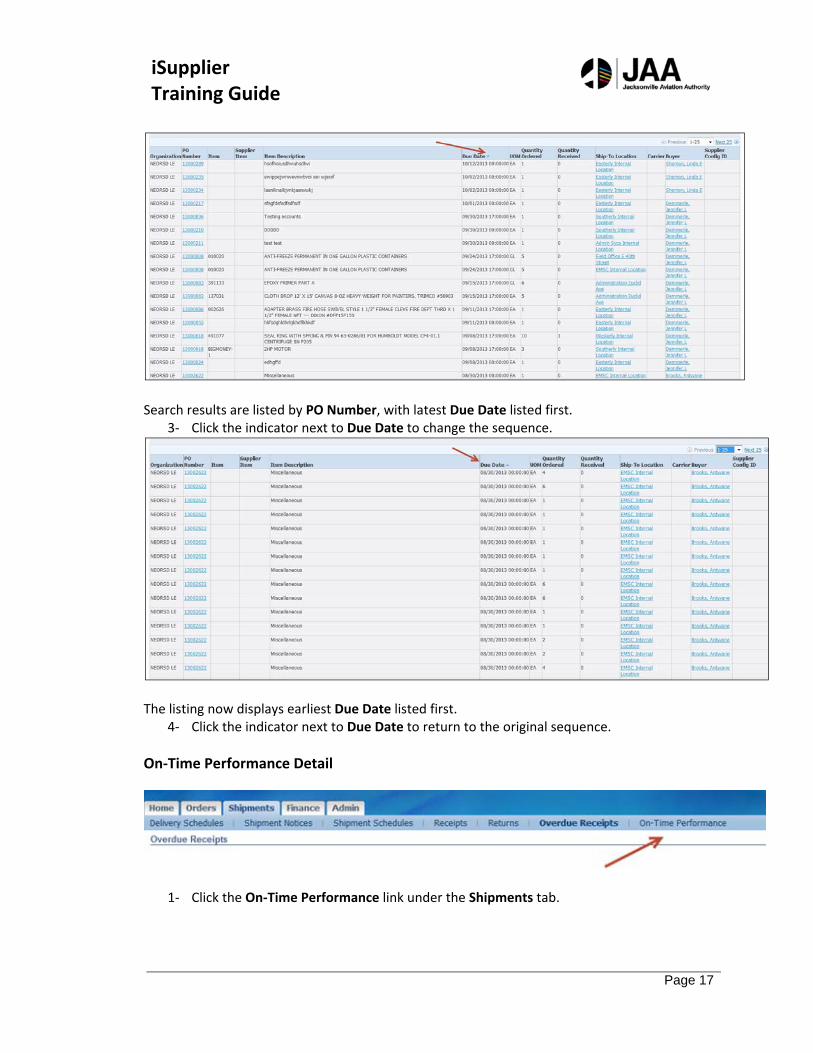
Search results are listed by PO Number, with latest Due Date listed first.
3‐ Click the indicator next to Due Date to change the sequence.
The listing now displays earliest Due Date listed first.
4‐ Click the indicator next to Due Date to return to the original sequence.
On‐Time Performance Detail
1‐ Click the On‐Time Performance link under the Shipments tab.
iSupplier Training Guide
Page 18
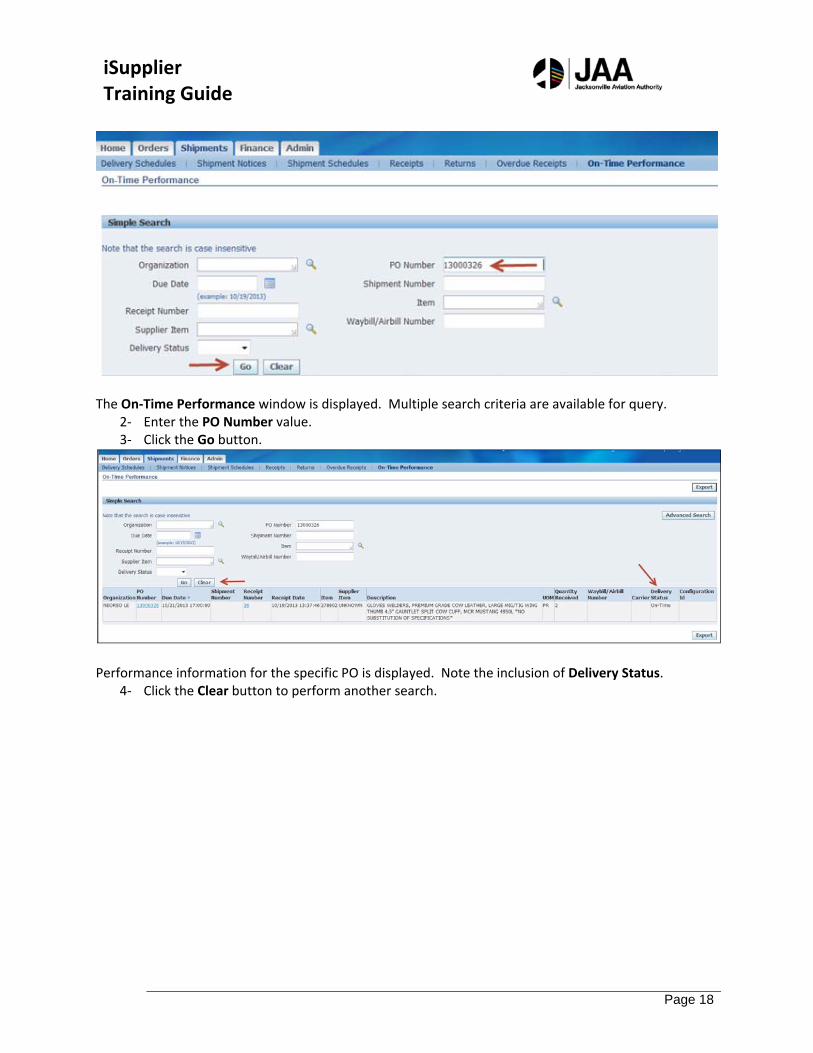
The On‐Time Performance window is displayed. Multiple search criteria are available for query.
2‐ Enter the PO Number value. 3‐ Click the Go button.
Performance information for the specific PO is displayed. Note the inclusion of Delivery Status.
4‐ Click the Clear button to perform another search.
iSupplier Training Guide
Page 19
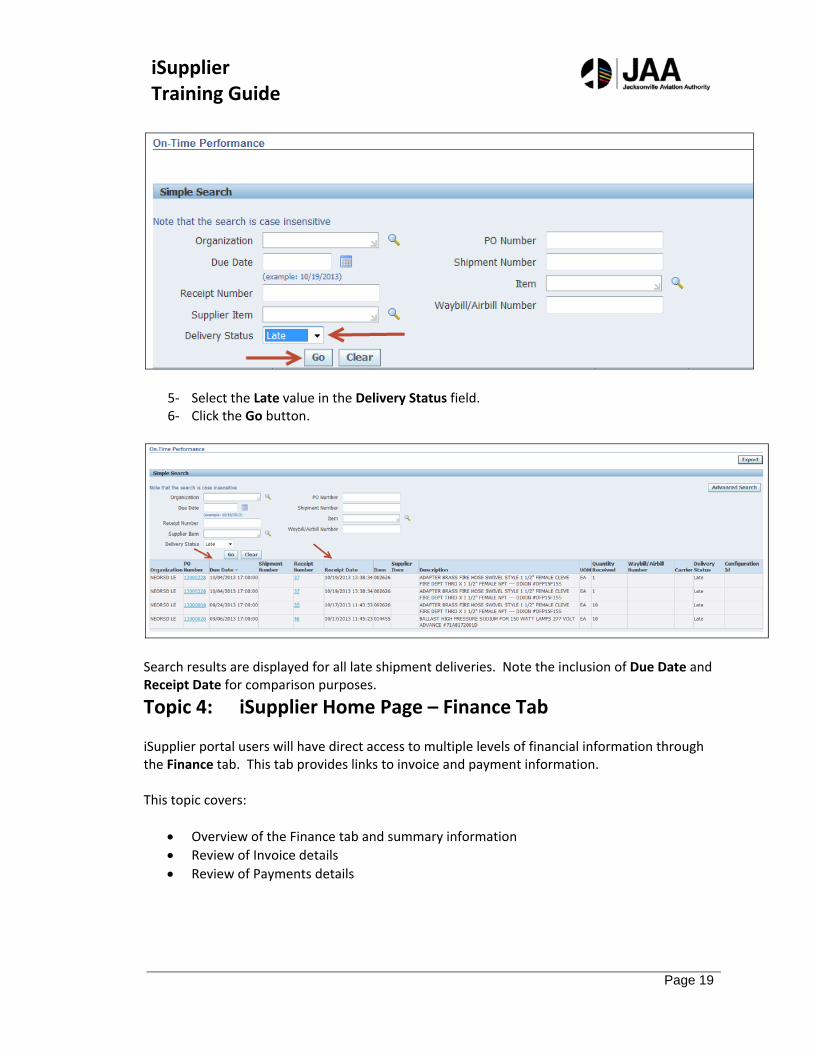
5‐ Select the Late value in the Delivery Status field. 6‐ Click the Go button.
Search results are displayed for all late shipment deliveries. Note the inclusion of Due Date and Receipt Date for comparison purposes.
Topic 4: iSupplier Home Page – Finance Tab iSupplier portal users will have direct access to multiple levels of financial information through the Finance tab. This tab provides links to invoice and payment information. This topic covers:
Overview of the Finance tab and summary information
Review of Invoice details
Review of Payments details
iSupplier Training Guide
Page 20
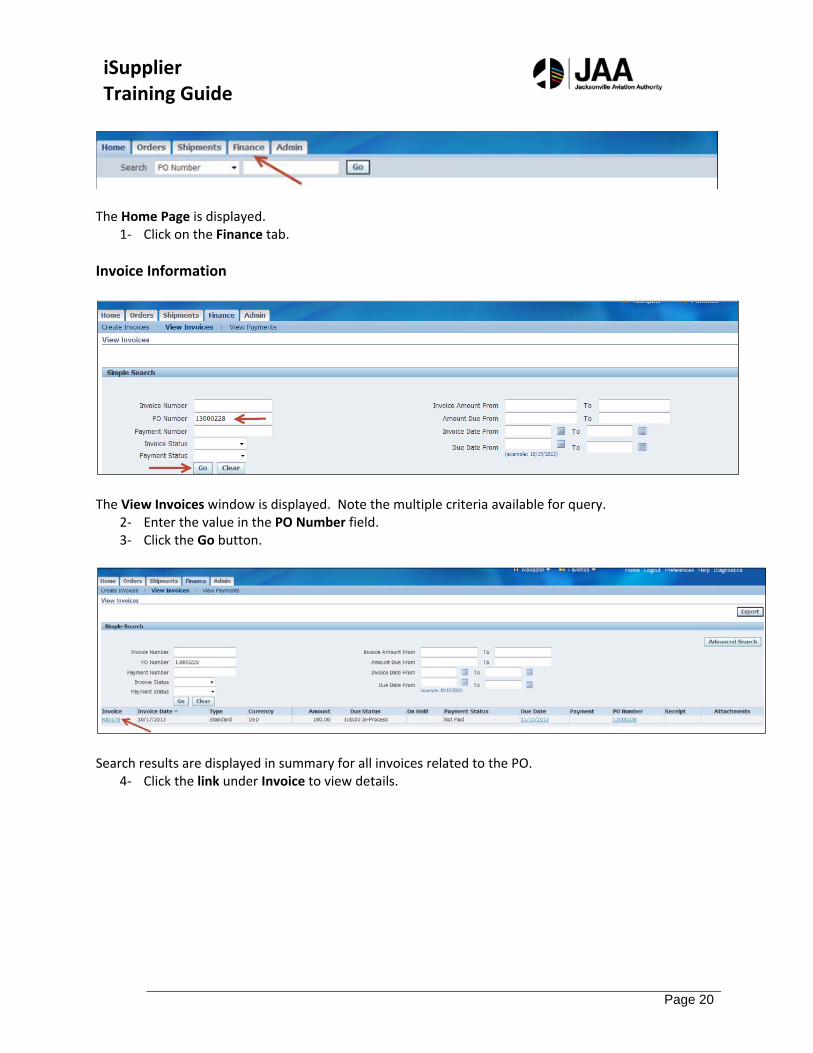
The Home Page is displayed.
1‐ Click on the Finance tab.
Invoice Information
The View Invoices window is displayed. Note the multiple criteria available for query.
2‐ Enter the value in the PO Number field. 3‐ Click the Go button.
Search results are displayed in summary for all invoices related to the PO.
4‐ Click the link under Invoice to view details.
iSupplier Training Guide
Page 21
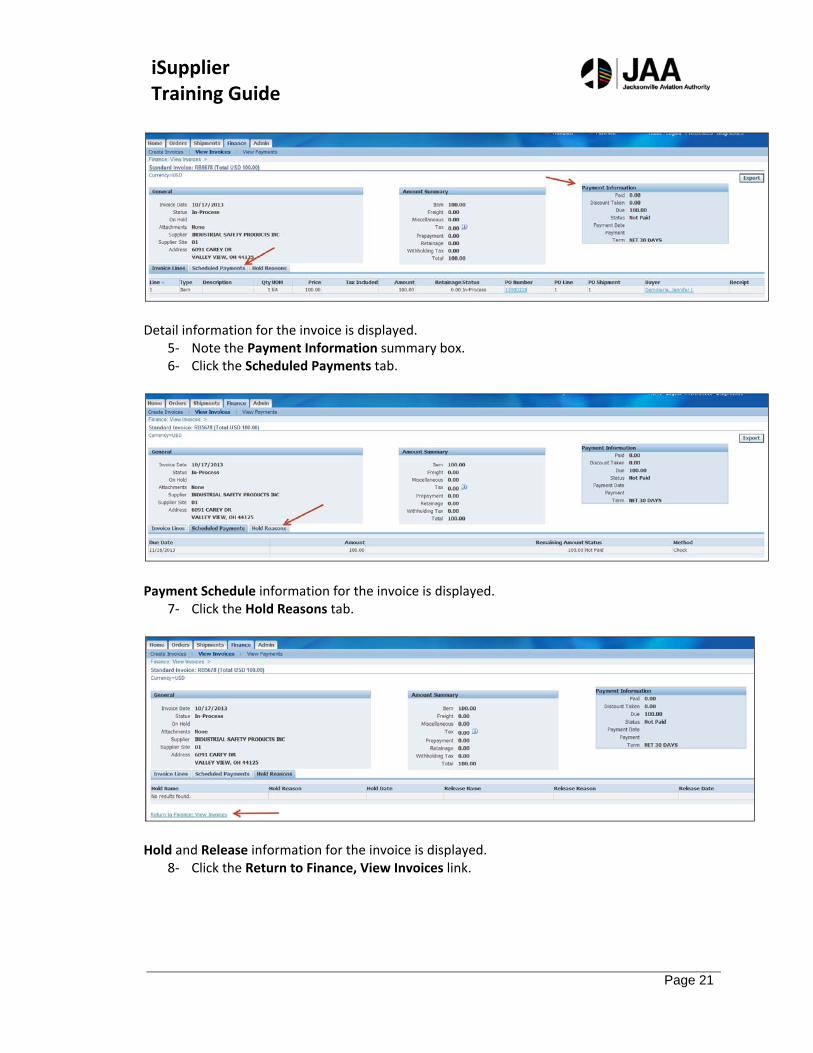
Detail information for the invoice is displayed.
5‐ Note the Payment Information summary box. 6‐ Click the Scheduled Payments tab.
Payment Schedule information for the invoice is displayed.
7‐ Click the Hold Reasons tab.
Hold and Release information for the invoice is displayed.
8‐ Click the Return to Finance, View Invoices link.
iSupplier Training Guide
Page 22
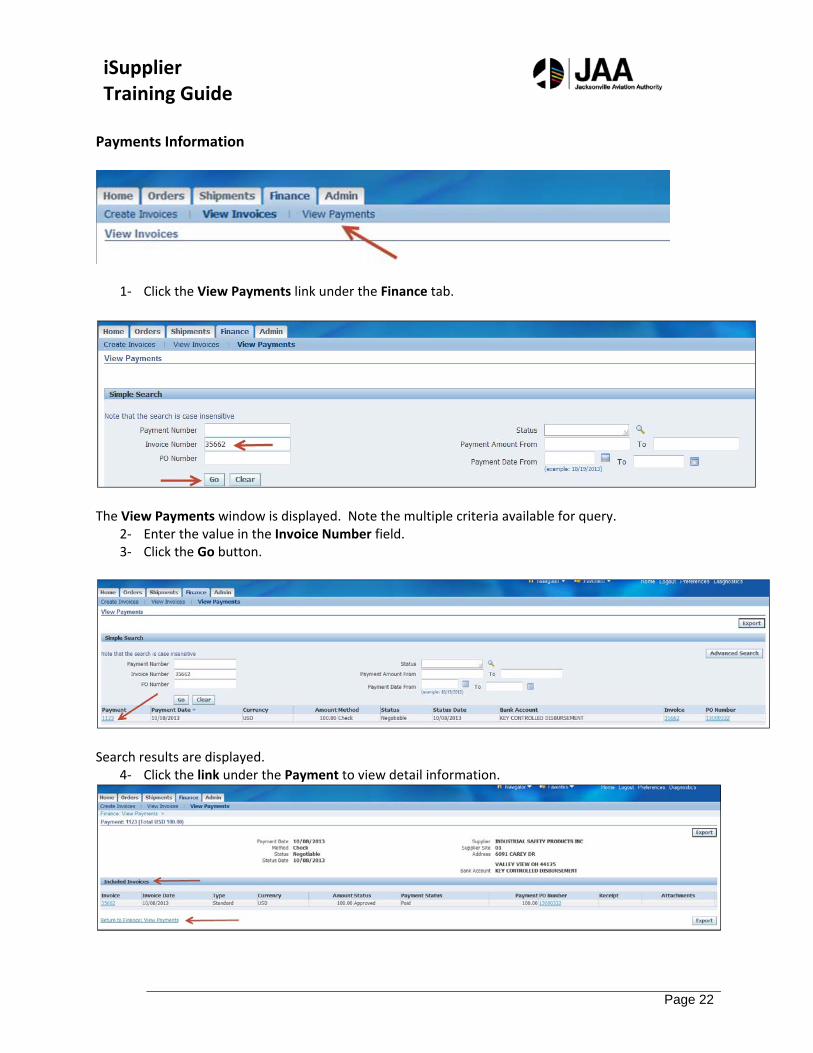
Payments Information
1‐ Click the View Payments link under the Finance tab.
The View Payments window is displayed. Note the multiple criteria available for query.
2‐ Enter the value in the Invoice Number field. 3‐ Click the Go button.
Search results are displayed.
4‐ Click the link under the Payment to view detail information.
iSupplier Training Guide
Page 23
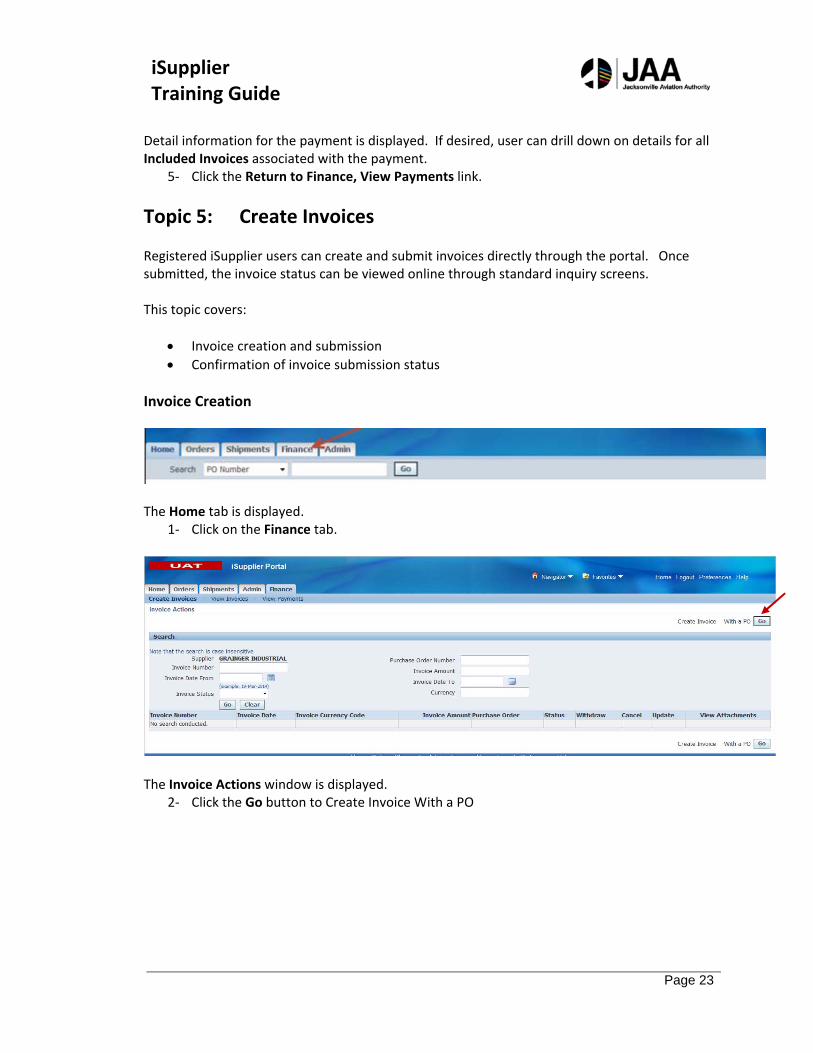
Detail information for the payment is displayed. If desired, user can drill down on details for all Included Invoices associated with the payment.
5‐ Click the Return to Finance, View Payments link.
Topic 5: Create Invoices Registered iSupplier users can create and submit invoices directly through the portal. Once submitted, the invoice status can be viewed online through standard inquiry screens. This topic covers:
Invoice creation and submission
Confirmation of invoice submission status
Invoice Creation
The Home tab is displayed.
1‐ Click on the Finance tab.
The Invoice Actions window is displayed.
2‐ Click the Go button to Create Invoice With a PO
iSupplier Training Guide
Page 24
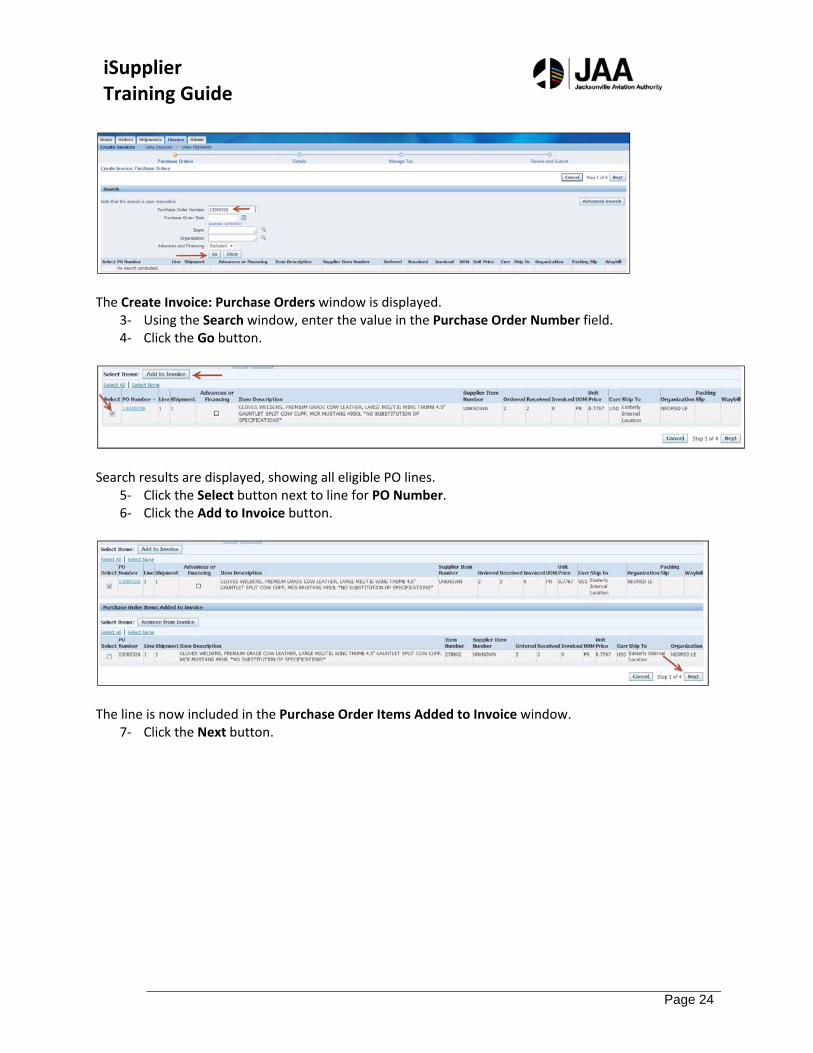
The Create Invoice: Purchase Orders window is displayed.
3‐ Using the Search window, enter the value in the Purchase Order Number field. 4‐ Click the Go button.
Search results are displayed, showing all eligible PO lines.
5‐ Click the Select button next to line for PO Number. 6‐ Click the Add to Invoice button.
The line is now included in the Purchase Order Items Added to Invoice window.
7‐ Click the Next button.
iSupplier Training Guide
Page 25
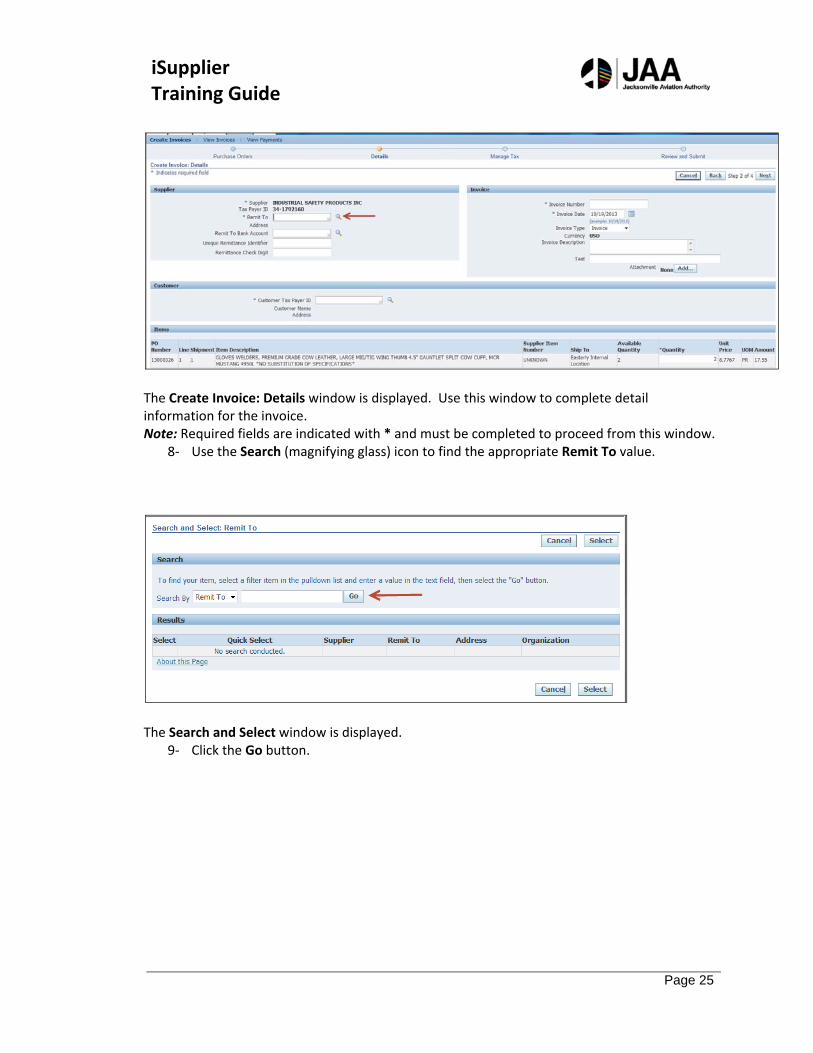
The Create Invoice: Details window is displayed. Use this window to complete detail information for the invoice. Note: Required fields are indicated with * and must be completed to proceed from this window.
8‐ Use the Search (magnifying glass) icon to find the appropriate Remit To value.
The Search and Select window is displayed.
9‐ Click the Go button.
iSupplier Training Guide
Page 26
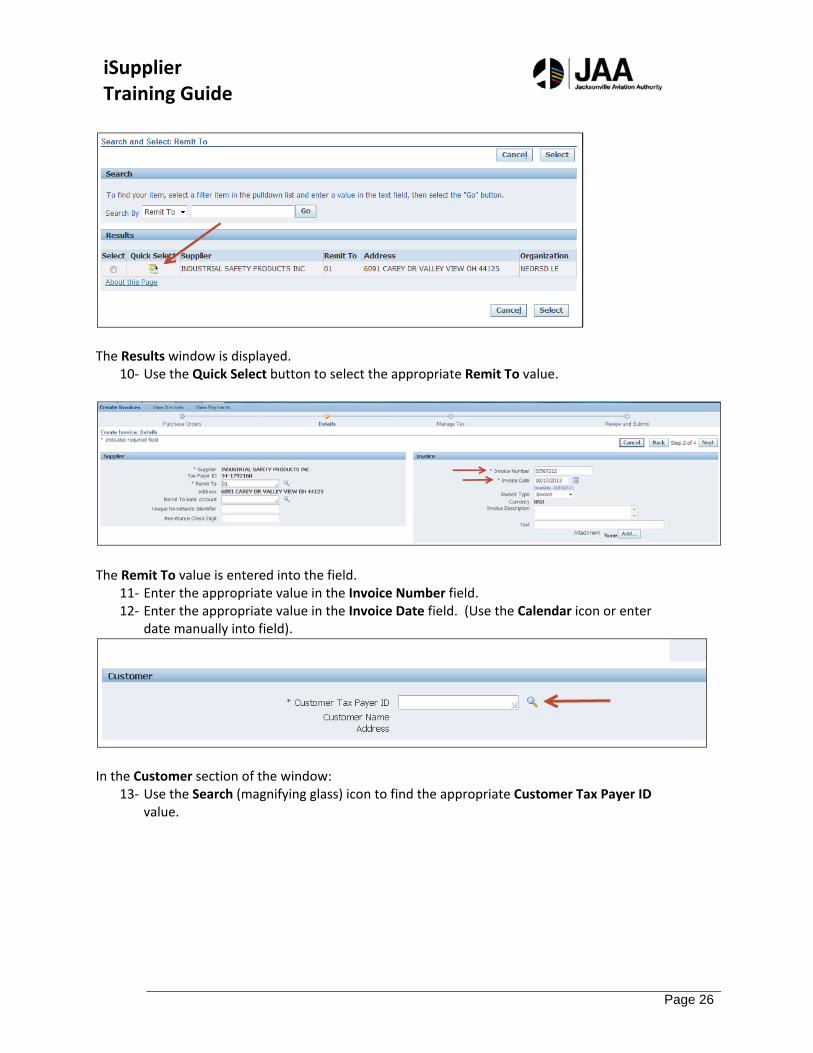
The Results window is displayed.
10‐ Use the Quick Select button to select the appropriate Remit To value.
The Remit To value is entered into the field.
11‐ Enter the appropriate value in the Invoice Number field. 12‐ Enter the appropriate value in the Invoice Date field. (Use the Calendar icon or enter
date manually into field).
In the Customer section of the window:
13‐ Use the Search (magnifying glass) icon to find the appropriate Customer Tax Payer ID value.
iSupplier Training Guide
Page 27
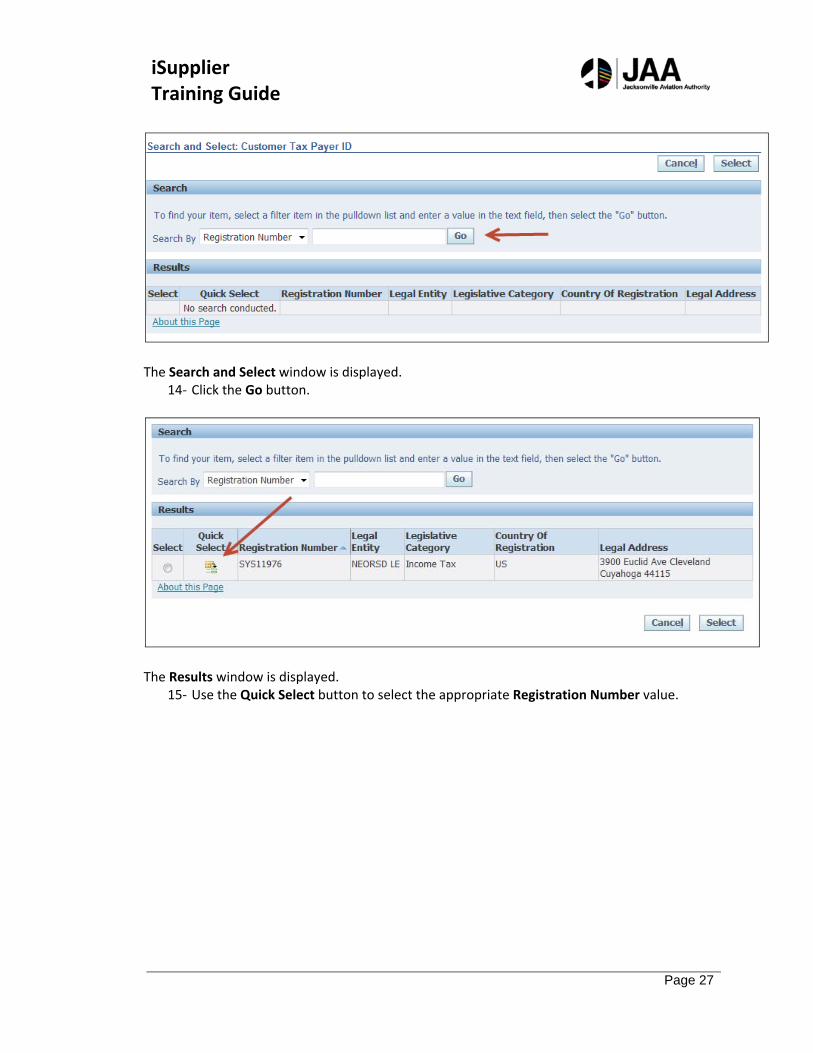
The Search and Select window is displayed.
14‐ Click the Go button.
The Results window is displayed.
15‐ Use the Quick Select button to select the appropriate Registration Number value.
iSupplier Training Guide
Page 28
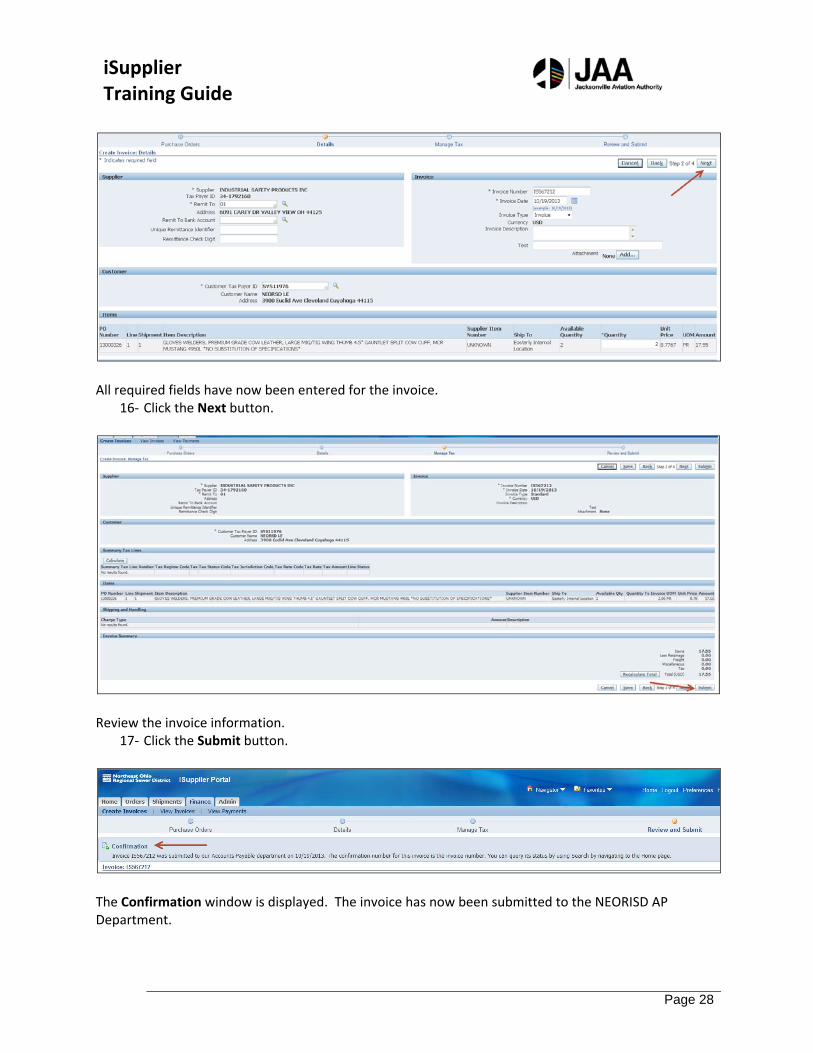
All required fields have now been entered for the invoice.
16‐ Click the Next button.
Review the invoice information.
17‐ Click the Submit button.
The Confirmation window is displayed. The invoice has now been submitted to the NEORISD AP Department.
iSupplier Training Guide
Page 29
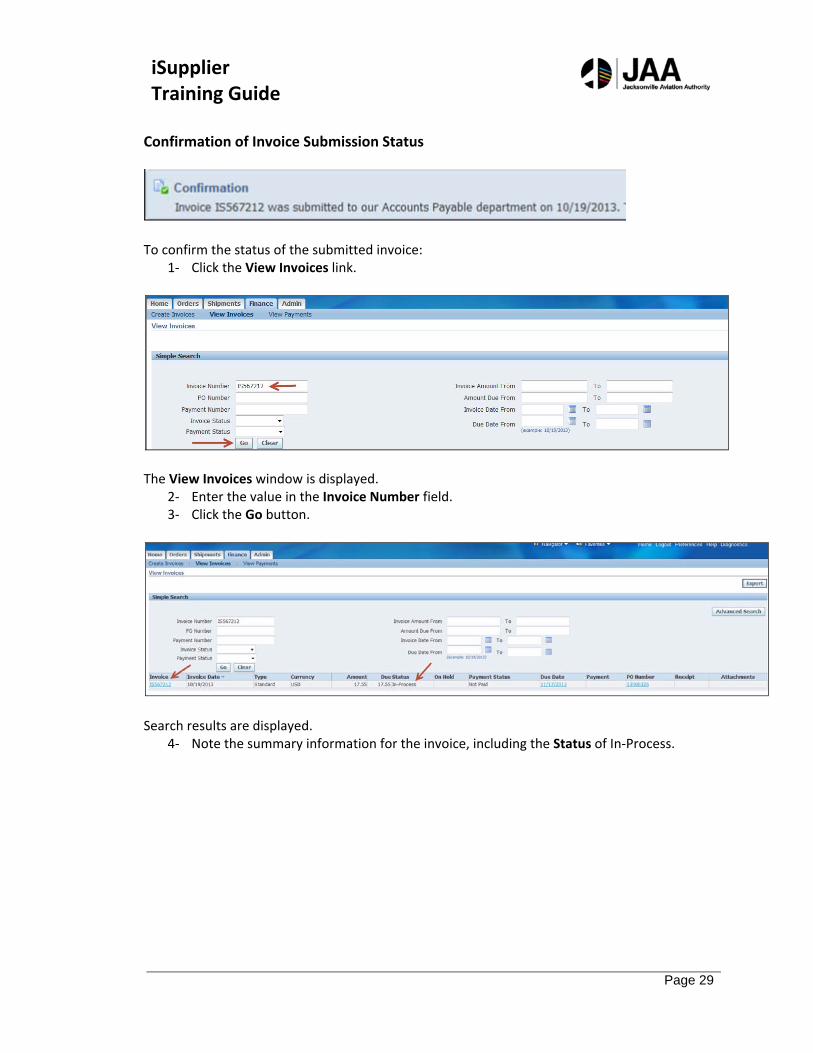
Confirmation of Invoice Submission Status
To confirm the status of the submitted invoice:
1‐ Click the View Invoices link.
The View Invoices window is displayed.
2‐ Enter the value in the Invoice Number field. 3‐ Click the Go button.
Search results are displayed.
4‐ Note the summary information for the invoice, including the Status of In‐Process.
iSupplier Training Guide
Page 30
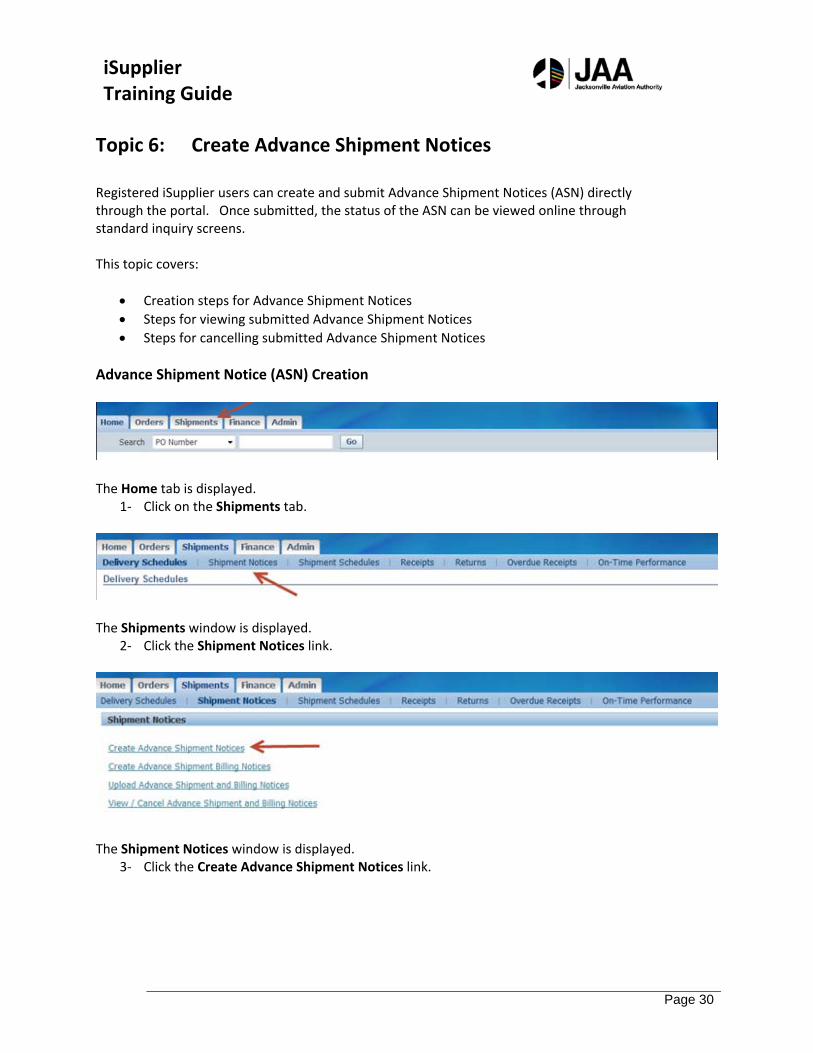
Topic 6: Create Advance Shipment Notices Registered iSupplier users can create and submit Advance Shipment Notices (ASN) directly through the portal. Once submitted, the status of the ASN can be viewed online through standard inquiry screens. This topic covers:
Creation steps for Advance Shipment Notices
Steps for viewing submitted Advance Shipment Notices
Steps for cancelling submitted Advance Shipment Notices
Advance Shipment Notice (ASN) Creation
The Home tab is displayed.
1‐ Click on the Shipments tab.
The Shipments window is displayed.
2‐ Click the Shipment Notices link.
The Shipment Notices window is displayed.
3‐ Click the Create Advance Shipment Notices link.
iSupplier Training Guide
Page 31
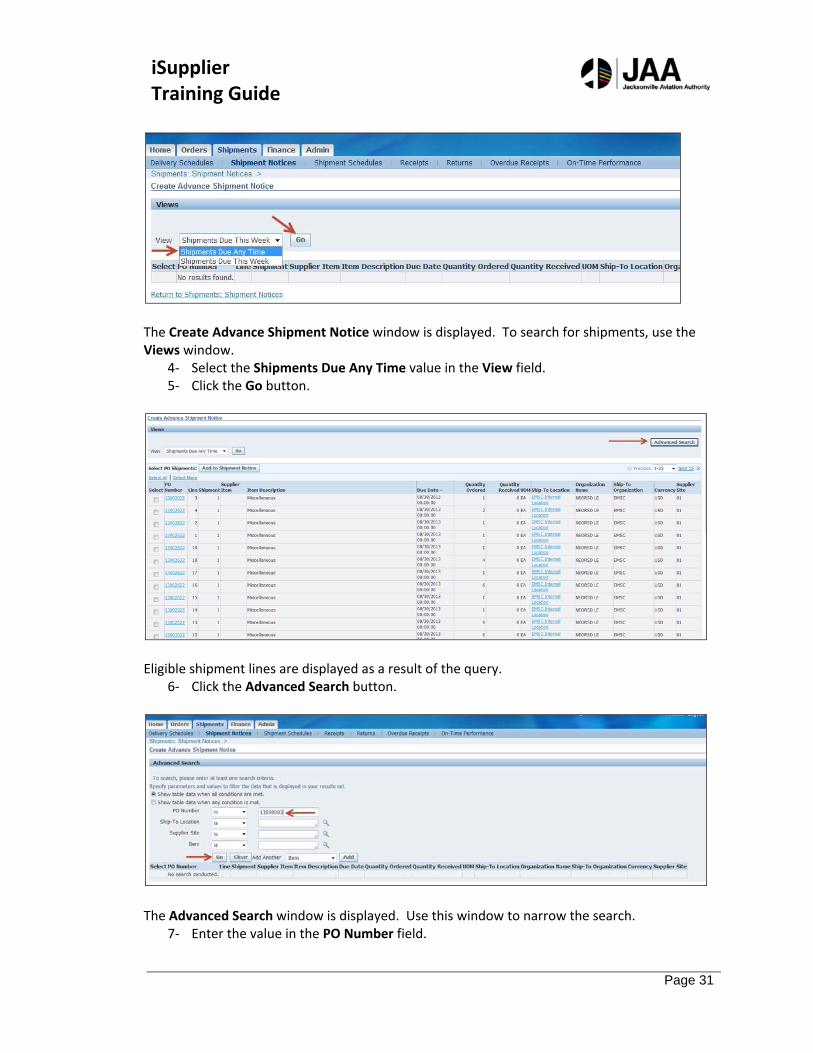
The Create Advance Shipment Notice window is displayed. To search for shipments, use the Views window.
4‐ Select the Shipments Due Any Time value in the View field. 5‐ Click the Go button.
Eligible shipment lines are displayed as a result of the query.
6‐ Click the Advanced Search button.
The Advanced Search window is displayed. Use this window to narrow the search.
7‐ Enter the value in the PO Number field.
iSupplier Training Guide
Page 32
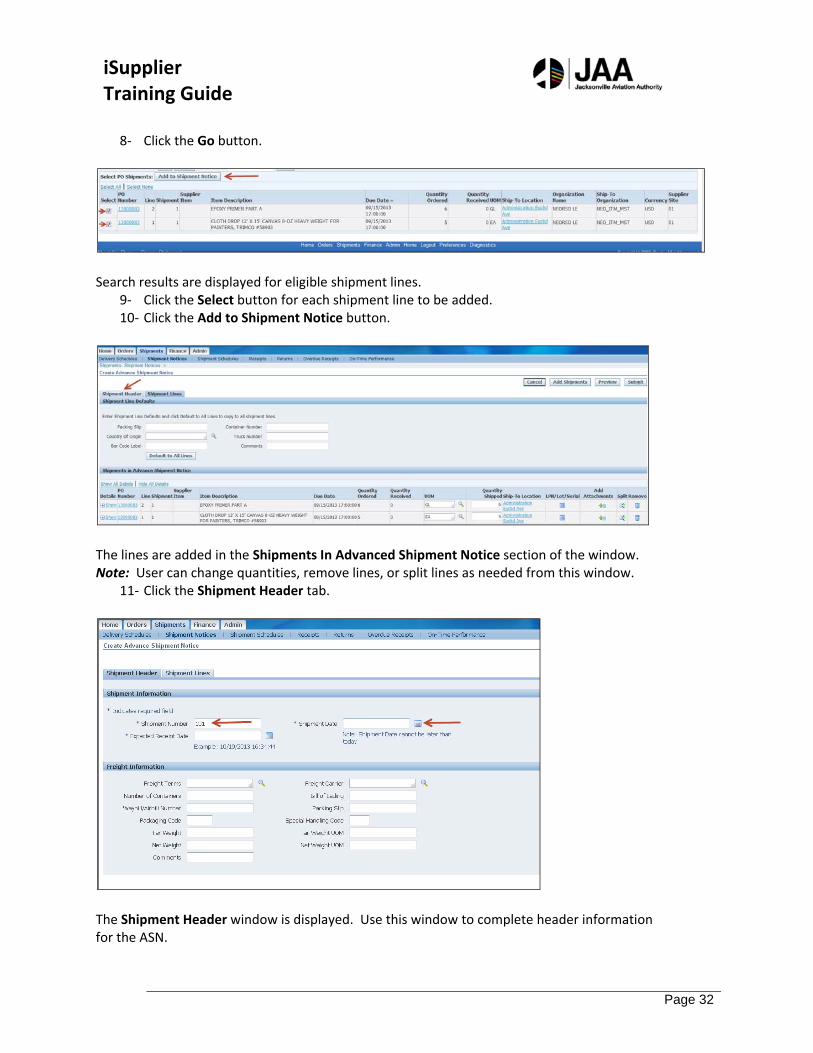
8‐ Click the Go button.
Search results are displayed for eligible shipment lines.
9‐ Click the Select button for each shipment line to be added. 10‐ Click the Add to Shipment Notice button.
The lines are added in the Shipments In Advanced Shipment Notice section of the window. Note: User can change quantities, remove lines, or split lines as needed from this window.
11‐ Click the Shipment Header tab.
The Shipment Header window is displayed. Use this window to complete header information for the ASN.
iSupplier Training Guide
Page 33
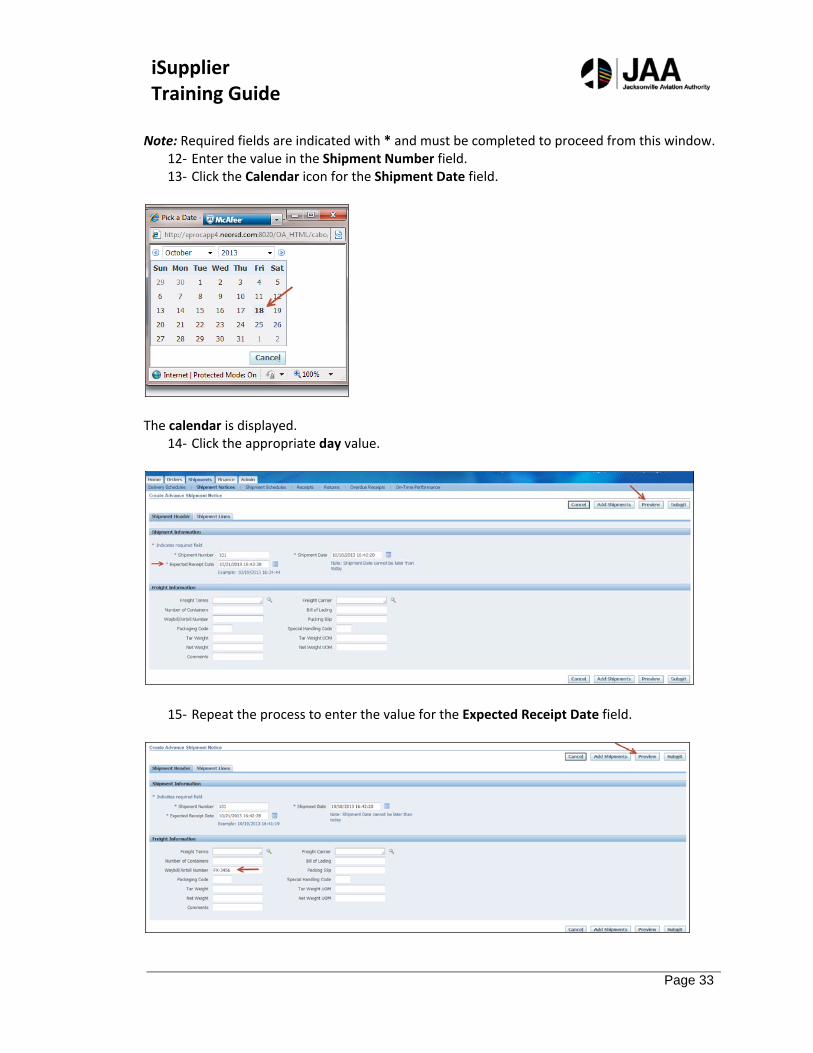
Note: Required fields are indicated with * and must be completed to proceed from this window. 12‐ Enter the value in the Shipment Number field. 13‐ Click the Calendar icon for the Shipment Date field.
The calendar is displayed.
14‐ Click the appropriate day value.
15‐ Repeat the process to enter the value for the Expected Receipt Date field.
iSupplier Training Guide
Page 34
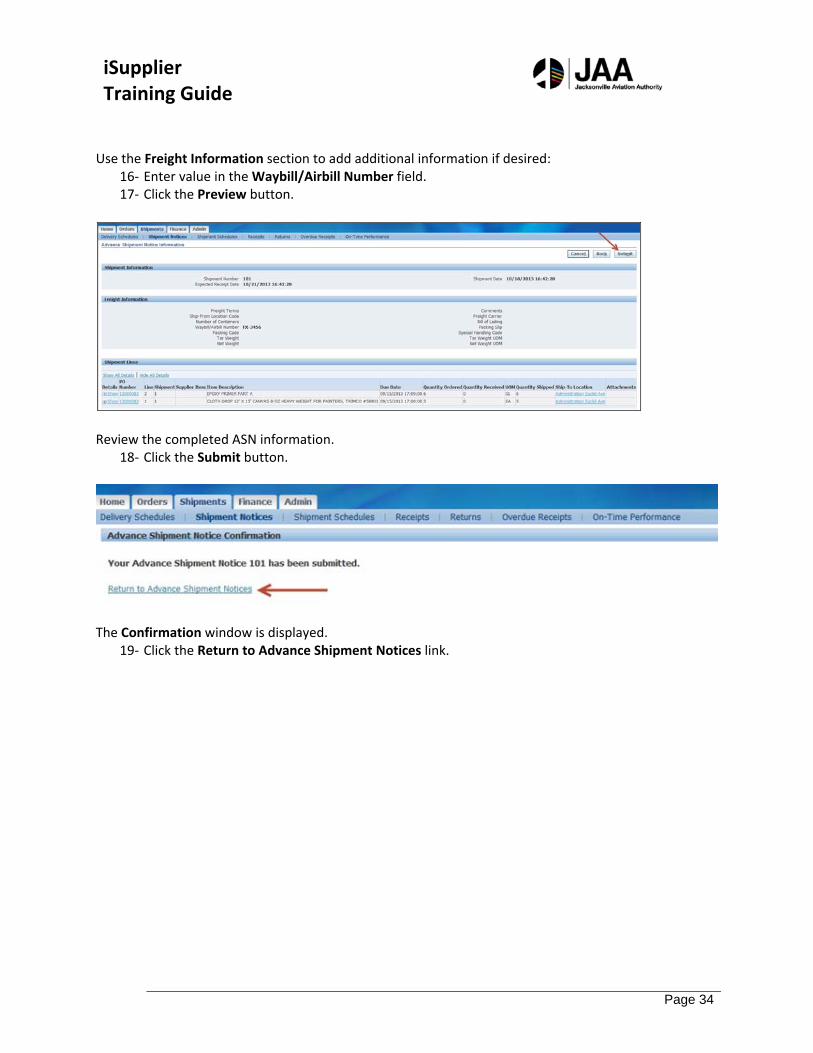
Use the Freight Information section to add additional information if desired:
16‐ Enter value in the Waybill/Airbill Number field. 17‐ Click the Preview button.
Review the completed ASN information.
18‐ Click the Submit button.
The Confirmation window is displayed.
19‐ Click the Return to Advance Shipment Notices link.
iSupplier Training Guide
Page 35
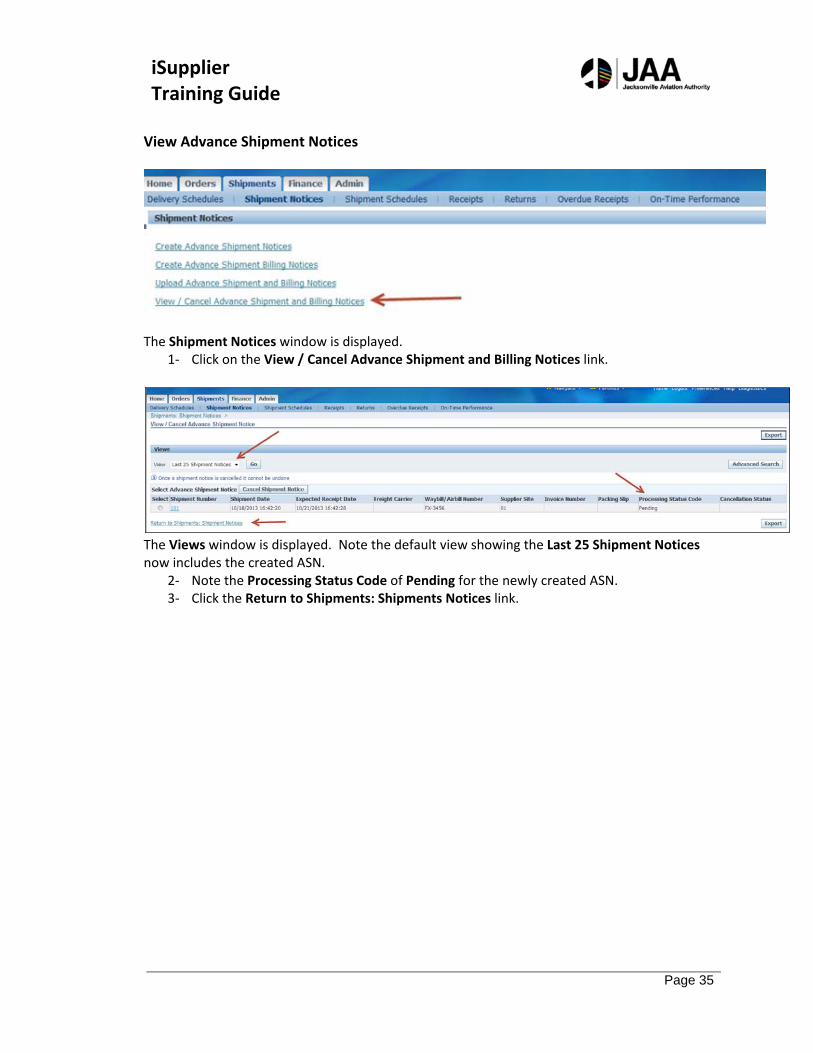
View Advance Shipment Notices
The Shipment Notices window is displayed.
1‐ Click on the View / Cancel Advance Shipment and Billing Notices link.
The Views window is displayed. Note the default view showing the Last 25 Shipment Notices now includes the created ASN.
2‐ Note the Processing Status Code of Pending for the newly created ASN. 3‐ Click the Return to Shipments: Shipments Notices link.
iSupplier Training Guide
Page 36
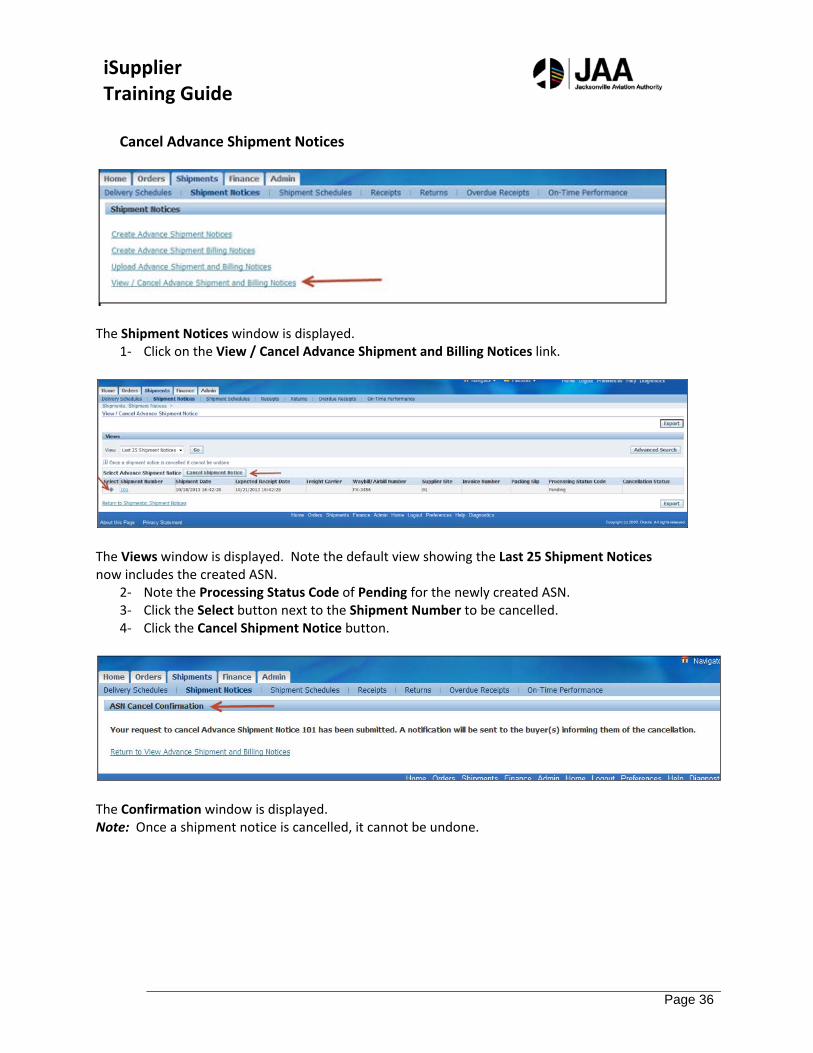
Cancel Advance Shipment Notices
The Shipment Notices window is displayed.
1‐ Click on the View / Cancel Advance Shipment and Billing Notices link.
The Views window is displayed. Note the default view showing the Last 25 Shipment Notices now includes the created ASN.
2‐ Note the Processing Status Code of Pending for the newly created ASN. 3‐ Click the Select button next to the Shipment Number to be cancelled. 4‐ Click the Cancel Shipment Notice button.
The Confirmation window is displayed. Note: Once a shipment notice is cancelled, it cannot be undone.
iSupplier Training Guide
Page 37
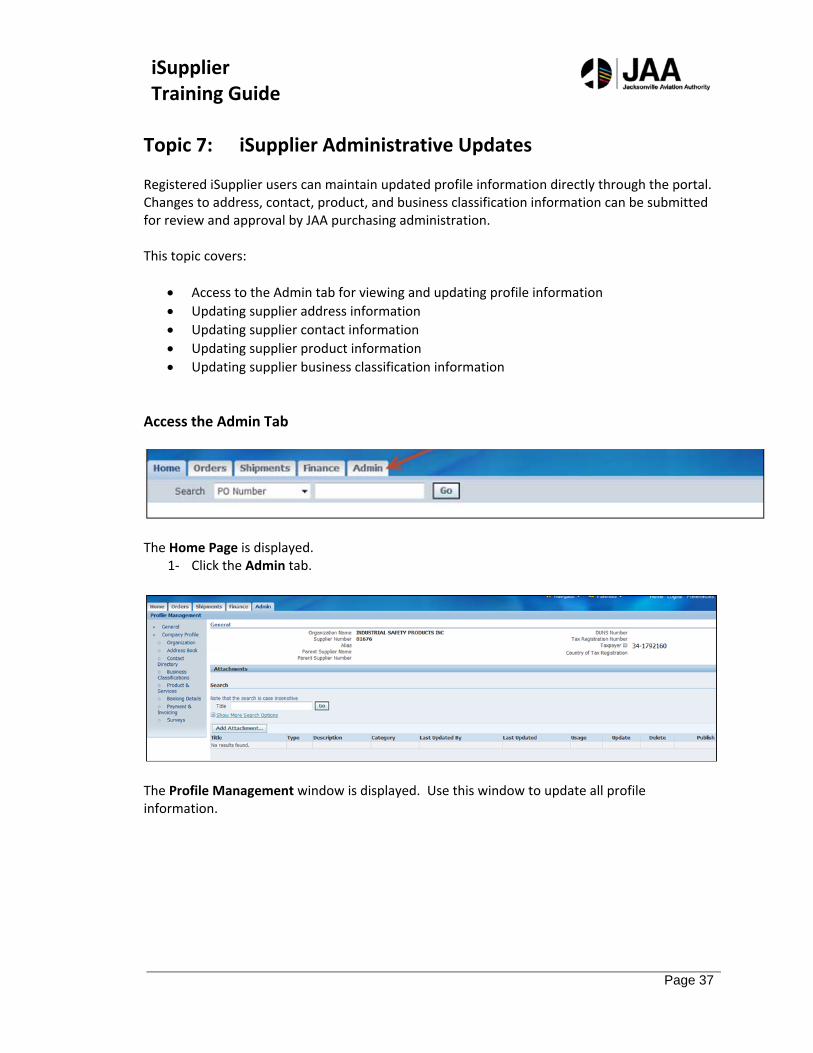
Topic 7: iSupplier Administrative Updates Registered iSupplier users can maintain updated profile information directly through the portal. Changes to address, contact, product, and business classification information can be submitted for review and approval by JAA purchasing administration. This topic covers:
Access to the Admin tab for viewing and updating profile information
Updating supplier address information
Updating supplier contact information
Updating supplier product information
Updating supplier business classification information
Access the Admin Tab
The Home Page is displayed.
1‐ Click the Admin tab.
The Profile Management window is displayed. Use this window to update all profile information.
iSupplier Training Guide
Page 38
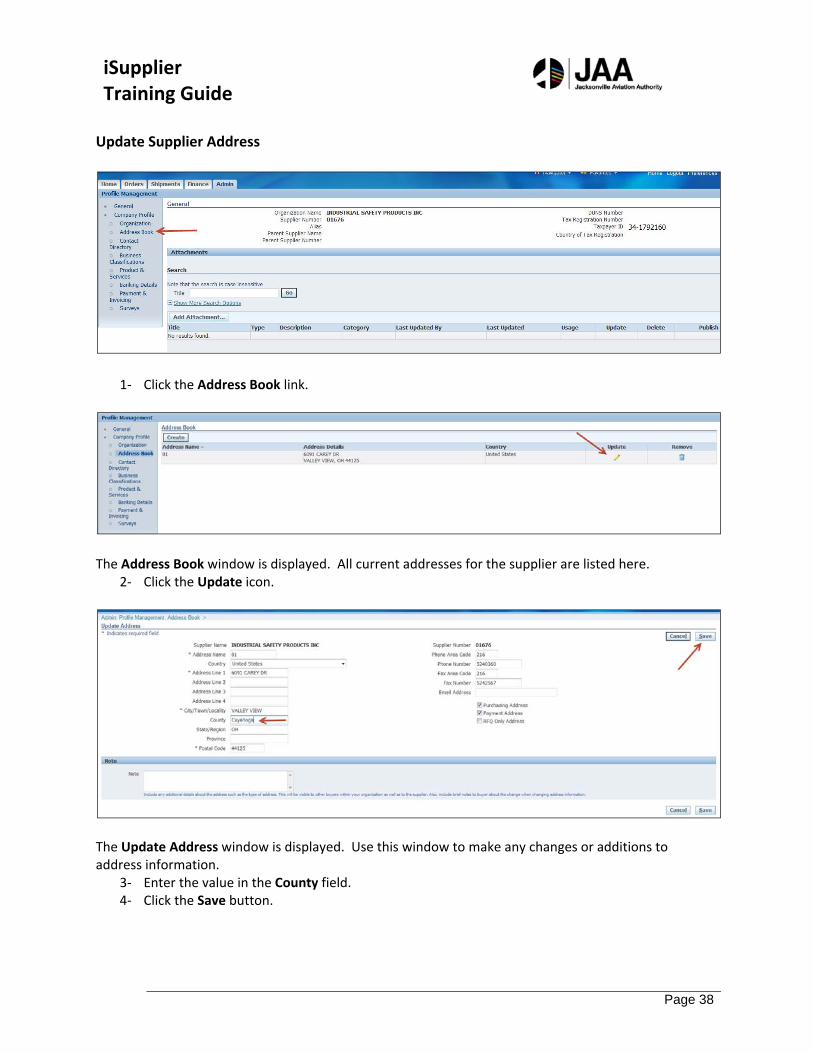
Update Supplier Address
1‐ Click the Address Book link.
The Address Book window is displayed. All current addresses for the supplier are listed here.
2‐ Click the Update icon.
The Update Address window is displayed. Use this window to make any changes or additions to address information.
3‐ Enter the value in the County field. 4‐ Click the Save button.
iSupplier Training Guide
Page 39
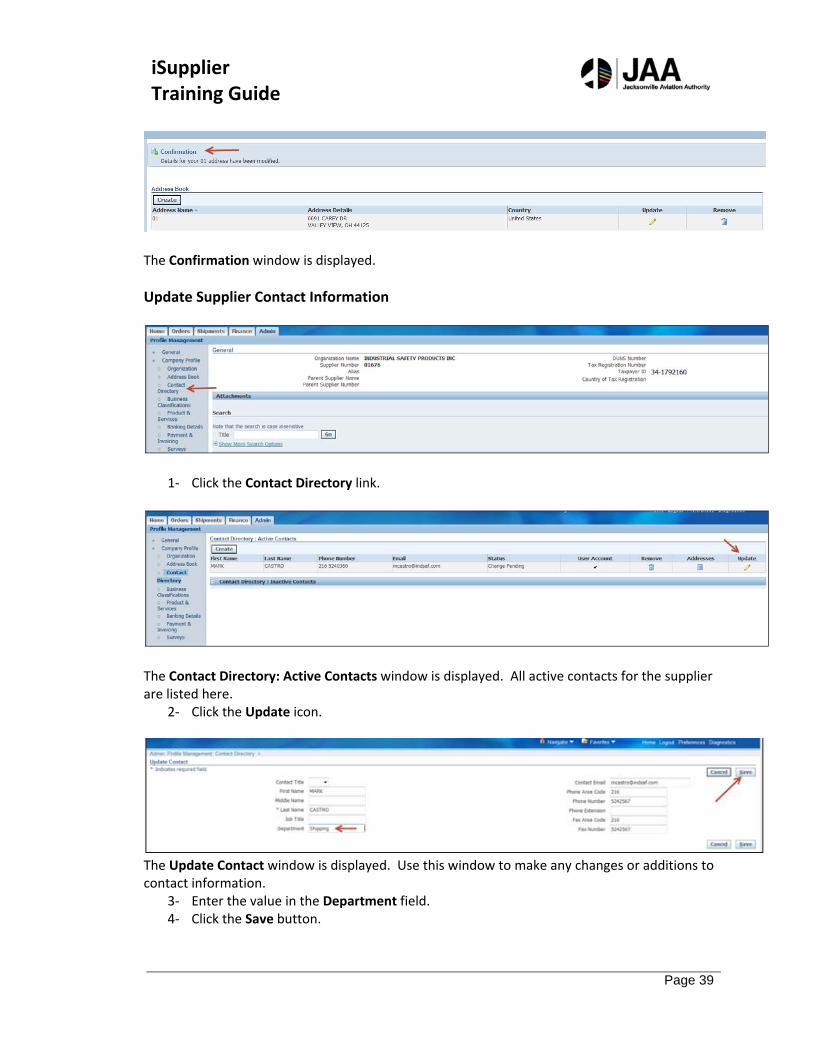
The Confirmation window is displayed.
Update Supplier Contact Information
1‐ Click the Contact Directory link.
The Contact Directory: Active Contacts window is displayed. All active contacts for the supplier are listed here.
2‐ Click the Update icon.
The Update Contact window is displayed. Use this window to make any changes or additions to contact information.
3‐ Enter the value in the Department field. 4‐ Click the Save button.
iSupplier Training Guide
Page 40
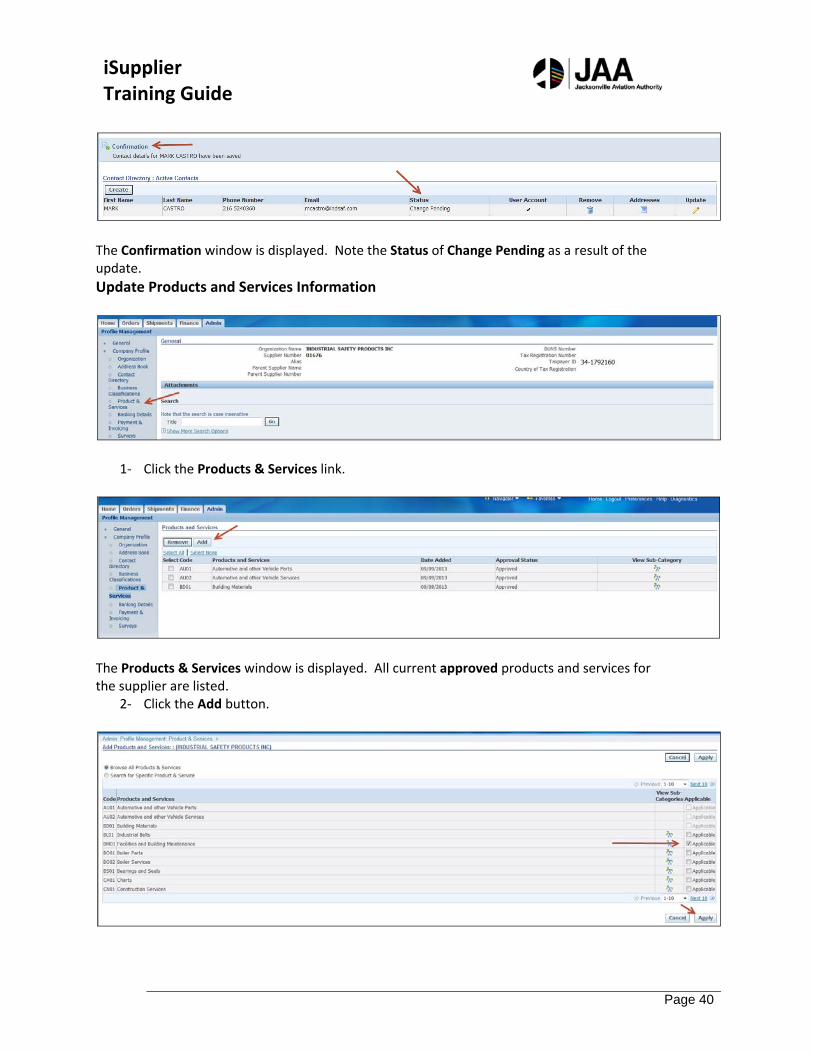
The Confirmation window is displayed. Note the Status of Change Pending as a result of the update.
Update Products and Services Information
1‐ Click the Products & Services link.
The Products & Services window is displayed. All current approved products and services for the supplier are listed.
2‐ Click the Add button.
iSupplier Training Guide
Page 41
The Add Products and Services window is displayed. Use this window to browse through the values, or select the Search option for a specific search if desired. Note: Only applicable values are listed or available for search for each supplier.
3‐ Click the checkbox for the desired Applicable value(s). 4‐ Click the Apply button.
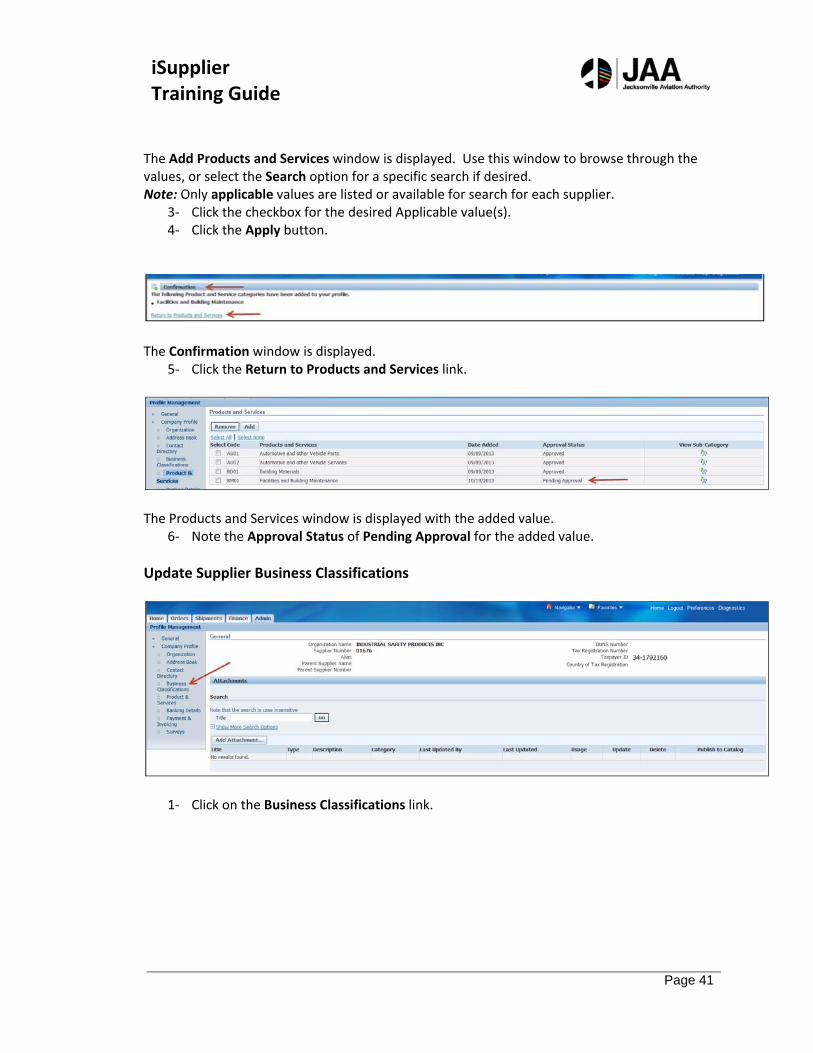
The Confirmation window is displayed.
5‐ Click the Return to Products and Services link.
The Products and Services window is displayed with the added value.
6‐ Note the Approval Status of Pending Approval for the added value.
Update Supplier Business Classifications
1‐ Click on the Business Classifications link.
iSupplier Training Guide
Page 42
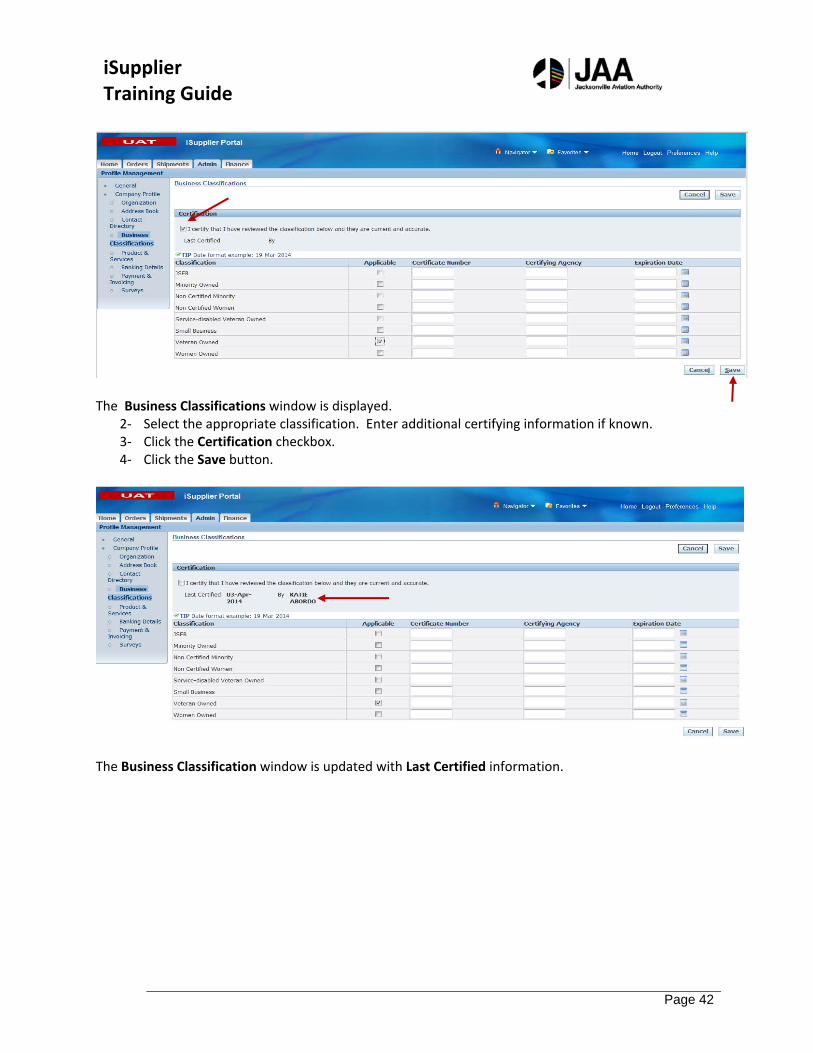
The Business Classifications window is displayed.
2‐ Select the appropriate classification. Enter additional certifying information if known. 3‐ Click the Certification checkbox. 4‐ Click the Save button.
The Business Classification window is updated with Last Certified information.
iSupplier Training Guide
Page 43
Topic 8: Sourcing Supplier Portal Supplier Access to Sourcing Supplier Portal Approved supplier users will be registered at JAA for access to this portal. Registered suppliers will receive valid UserID and Password login credentials via email from designated JAA administrators. The email information will also include the appropriate link to the login page for access.
This topic covers:
Navigation to the Sourcing Supplier Home Page and Review
Responding to RFQ invitations through online quote creation
Creating online discussions through portal messaging
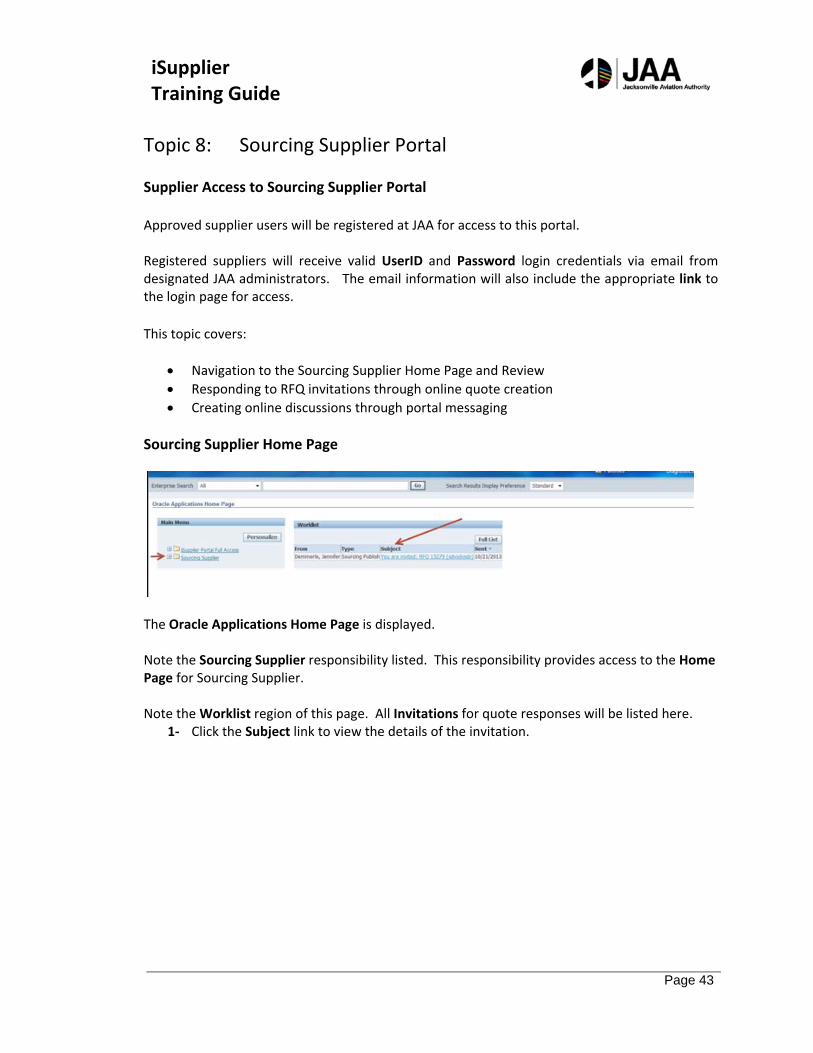
Sourcing Supplier Home Page
The Oracle Applications Home Page is displayed. Note the Sourcing Supplier responsibility listed. This responsibility provides access to the Home Page for Sourcing Supplier. Note the Worklist region of this page. All Invitations for quote responses will be listed here.
1‐ Click the Subject link to view the details of the invitation.
iSupplier Training Guide
Page 44
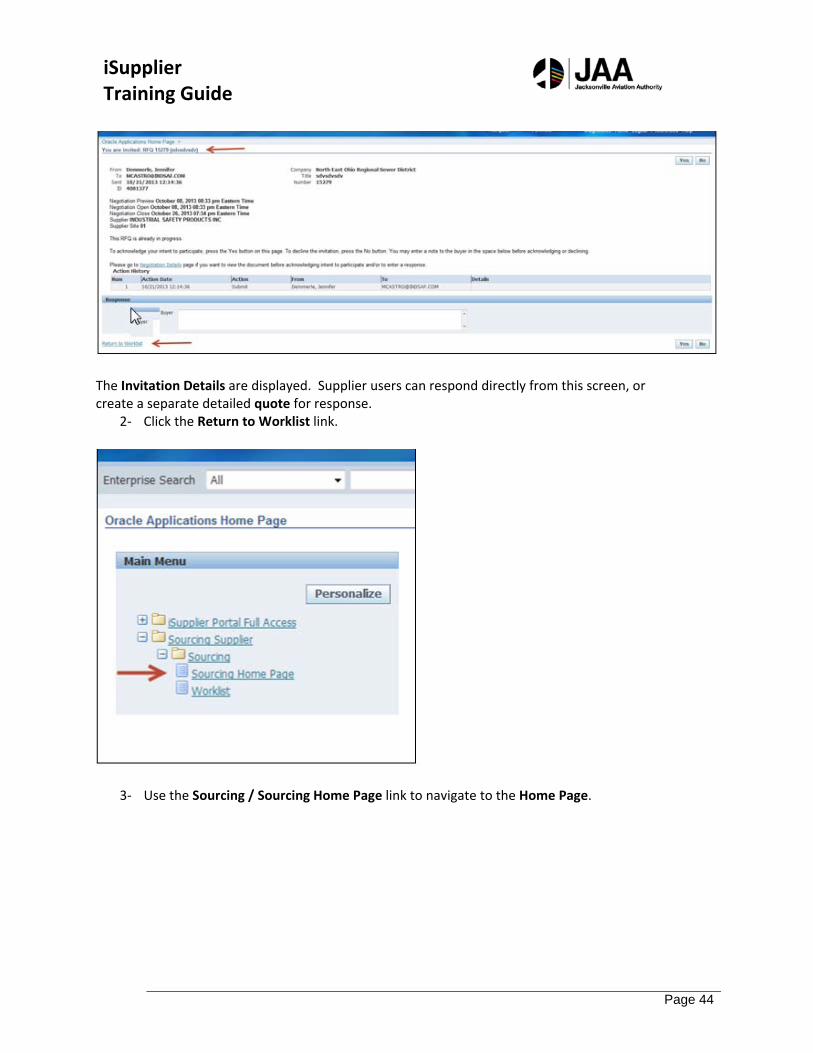
The Invitation Details are displayed. Supplier users can respond directly from this screen, or create a separate detailed quote for response.
2‐ Click the Return to Worklist link.
3‐ Use the Sourcing / Sourcing Home Page link to navigate to the Home Page.
iSupplier Training Guide
Page 45
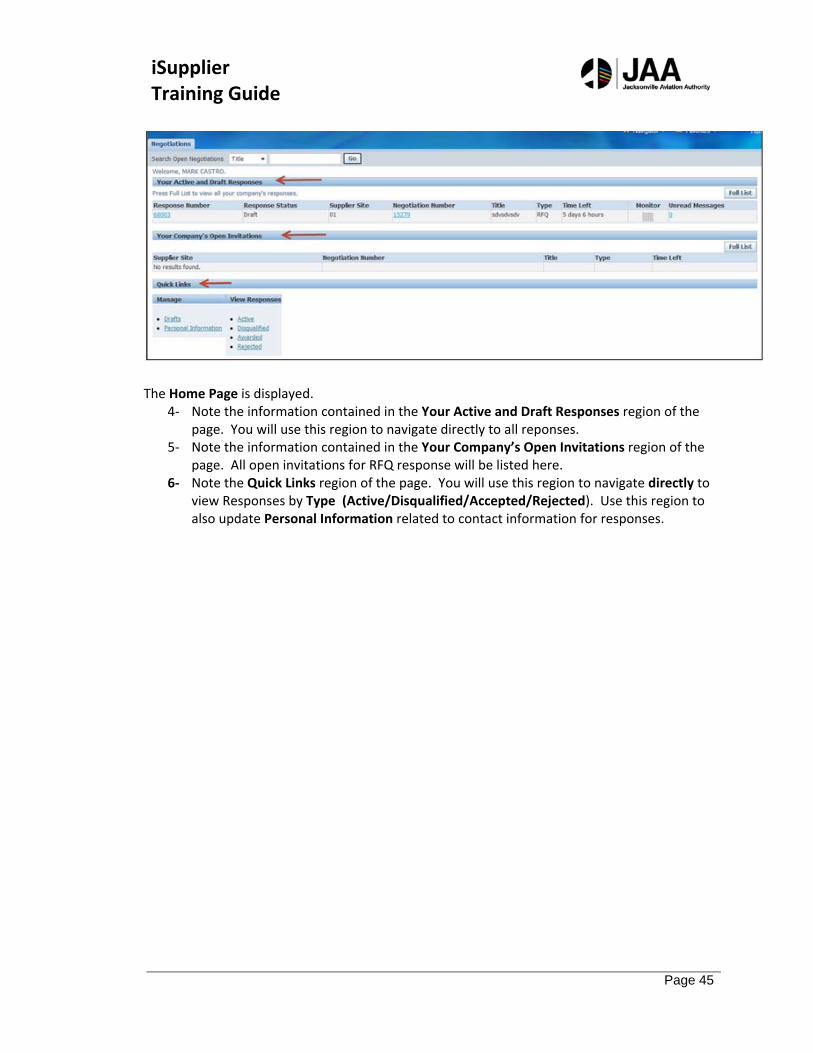
The Home Page is displayed.
4‐ Note the information contained in the Your Active and Draft Responses region of the page. You will use this region to navigate directly to all reponses.
5‐ Note the information contained in the Your Company’s Open Invitations region of the page. All open invitations for RFQ response will be listed here.
6‐ Note the Quick Links region of the page. You will use this region to navigate directly to view Responses by Type (Active/Disqualified/Accepted/Rejected). Use this region to also update Personal Information related to contact information for responses.
iSupplier Training Guide
Page 46
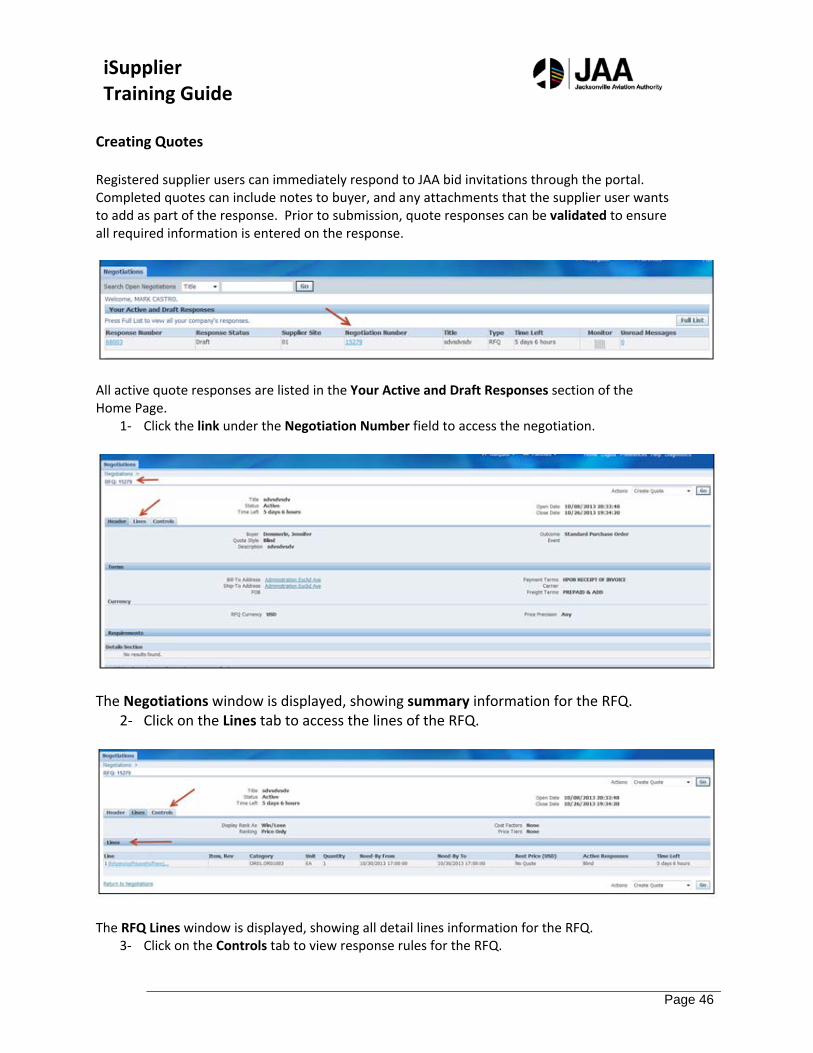
Creating Quotes Registered supplier users can immediately respond to JAA bid invitations through the portal. Completed quotes can include notes to buyer, and any attachments that the supplier user wants to add as part of the response. Prior to submission, quote responses can be validated to ensure all required information is entered on the response.
All active quote responses are listed in the Your Active and Draft Responses section of the Home Page.
1‐ Click the link under the Negotiation Number field to access the negotiation.
The Negotiations window is displayed, showing summary information for the RFQ.
2‐ Click on the Lines tab to access the lines of the RFQ.
The RFQ Lines window is displayed, showing all detail lines information for the RFQ.
3‐ Click on the Controls tab to view response rules for the RFQ.

iSupplier Training Guide
Page 47
The Controls window is displayed, listing the Schedule information and all valid Response Rules established by JAA for the RFQ.
4‐ Review the information in this window. 5‐ To initiate the creation of the quote response, select the Create Quote value in the
Actions box. 6‐ Click the Go button.
The Create Quote window is displayed. The window defaults to the Header area of the quote.
7‐ Use the Calendar icon to enter the appropriate value for the Quote Valid Until date.
The Calendar window is displayed.
iSupplier Training Guide
Page 48
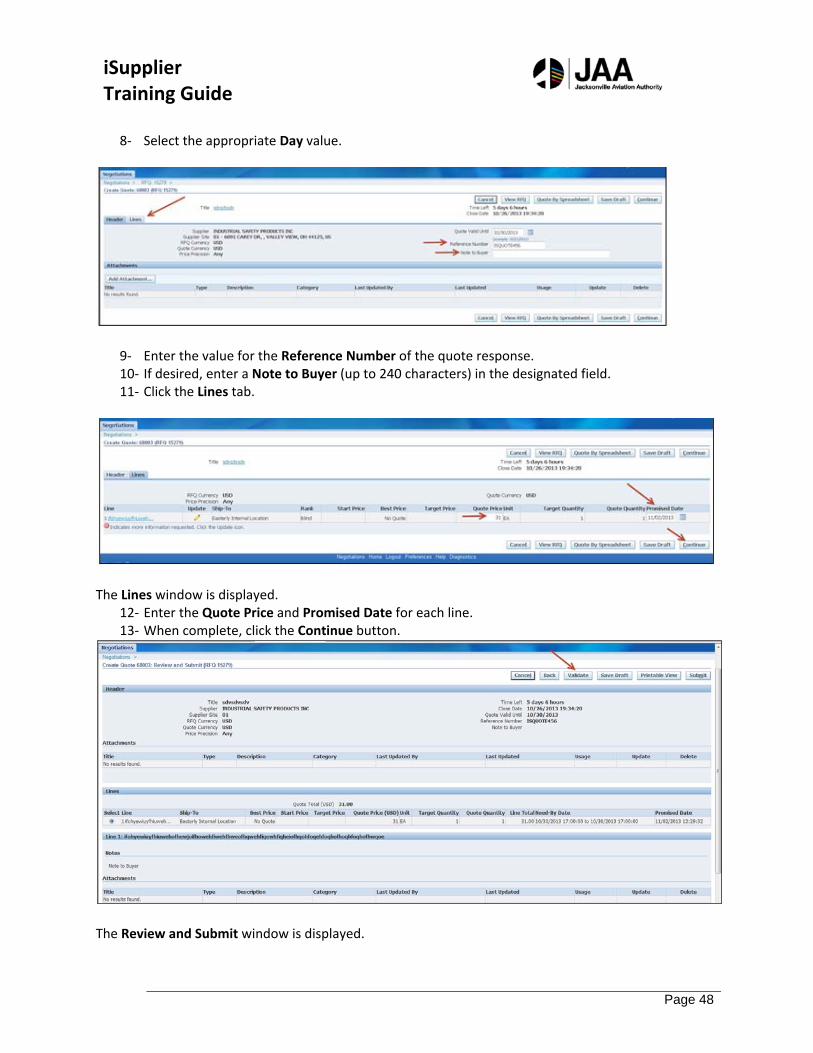
8‐ Select the appropriate Day value.
9‐ Enter the value for the Reference Number of the quote response. 10‐ If desired, enter a Note to Buyer (up to 240 characters) in the designated field. 11‐ Click the Lines tab.
The Lines window is displayed.
12‐ Enter the Quote Price and Promised Date for each line. 13‐ When complete, click the Continue button.
The Review and Submit window is displayed.
iSupplier Training Guide
Page 49
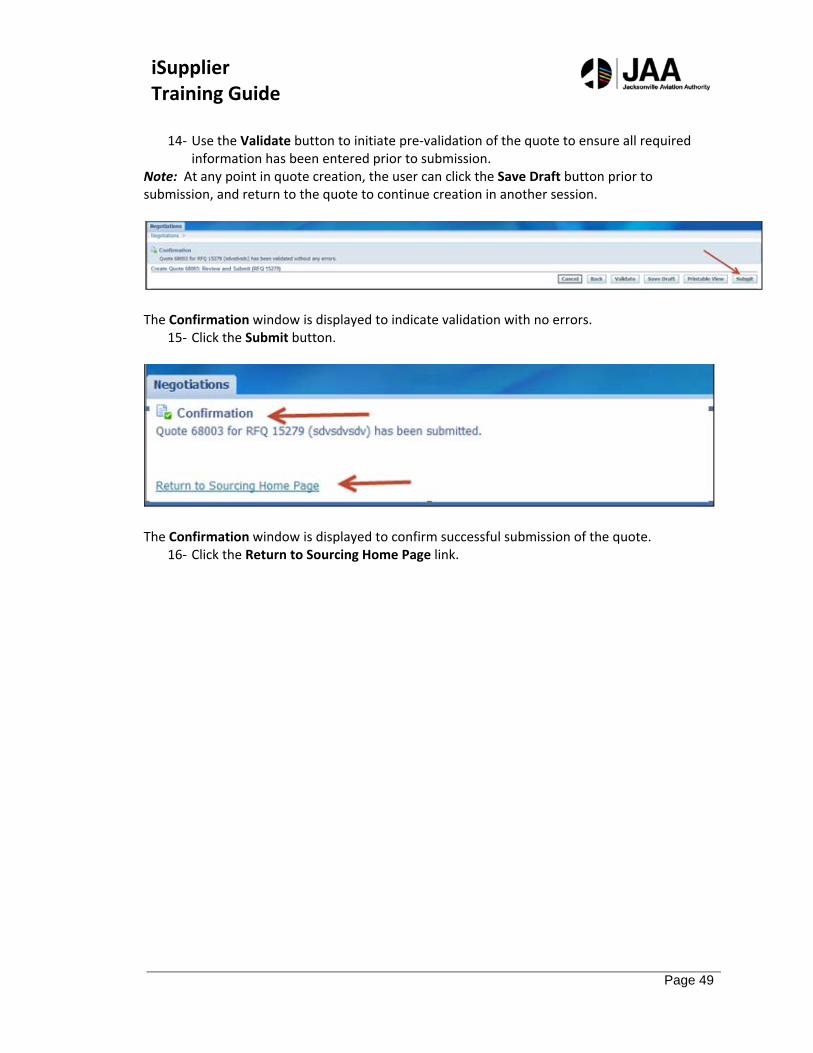
14‐ Use the Validate button to initiate pre‐validation of the quote to ensure all required information has been entered prior to submission.
Note: At any point in quote creation, the user can click the Save Draft button prior to submission, and return to the quote to continue creation in another session.
The Confirmation window is displayed to indicate validation with no errors.
15‐ Click the Submit button.
The Confirmation window is displayed to confirm successful submission of the quote.
16‐ Click the Return to Sourcing Home Page link.
iSupplier Training Guide
Page 50
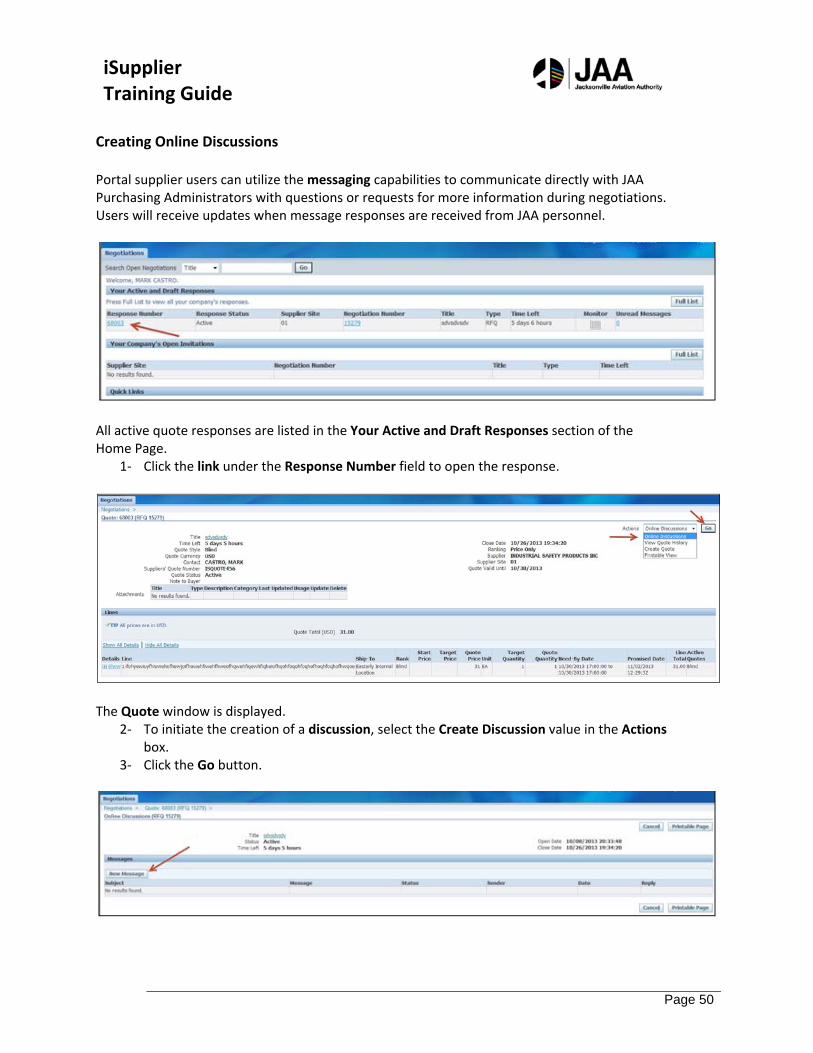
Creating Online Discussions Portal supplier users can utilize the messaging capabilities to communicate directly with JAA Purchasing Administrators with questions or requests for more information during negotiations. Users will receive updates when message responses are received from JAA personnel.
All active quote responses are listed in the Your Active and Draft Responses section of the Home Page.
1‐ Click the link under the Response Number field to open the response.
The Quote window is displayed.
2‐ To initiate the creation of a discussion, select the Create Discussion value in the Actions box.
3‐ Click the Go button.
iSupplier Training Guide
Page 51
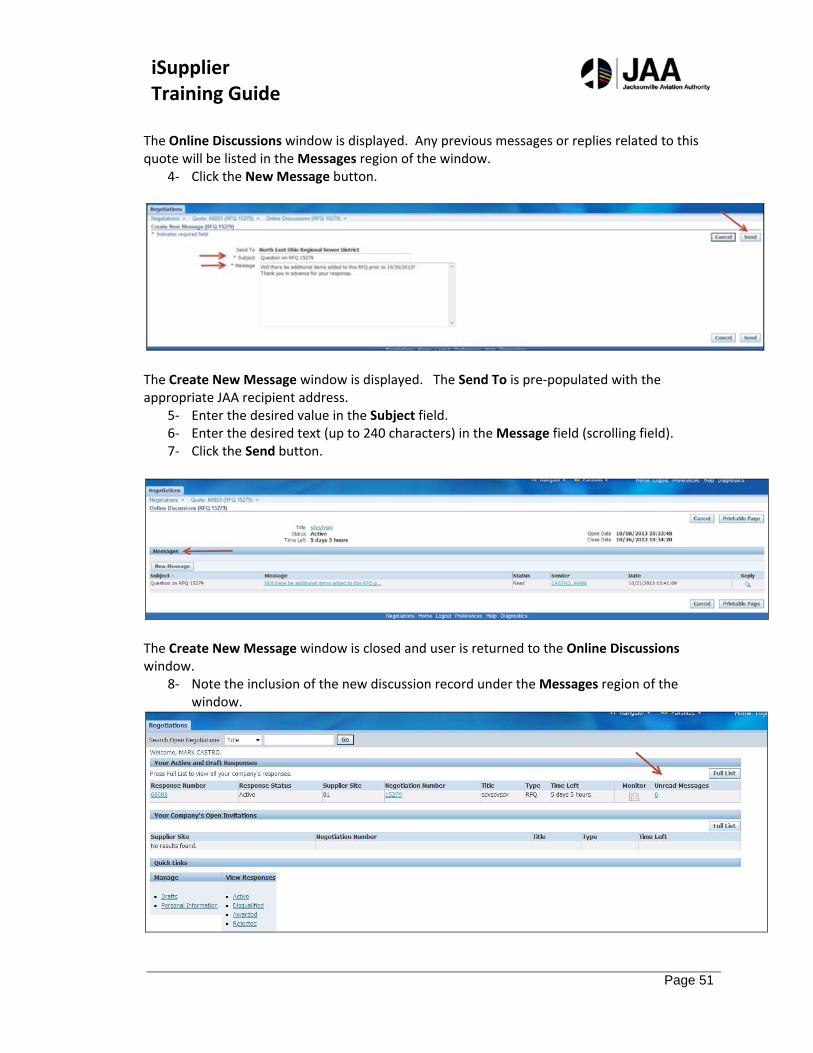
The Online Discussions window is displayed. Any previous messages or replies related to this quote will be listed in the Messages region of the window.
4‐ Click the New Message button.
The Create New Message window is displayed. The Send To is pre‐populated with the appropriate JAA recipient address.
5‐ Enter the desired value in the Subject field. 6‐ Enter the desired text (up to 240 characters) in the Message field (scrolling field). 7‐ Click the Send button.
The Create New Message window is closed and user is returned to the Online Discussions window.
8‐ Note the inclusion of the new discussion record under the Messages region of the window.
iSupplier Training Guide
Page 52
The message has now been sent directly to JAA purchasing administration.
9‐ Note the Unread Messages column in the Your Active and Draft Responses section of the Home Page window – any reply to your message will display an update to the link in this column.
Summary
Congratulations! You have now learned how to:
Access the iSupplier portal and Home Page
Use the Orders tab and related functions
Use the Shipments tab and related functions
Use the Finance tab and related functions
Create and submit invoices
Create and submit Advanced Shipment Notices
Perform profile updates through the Admin tab
Use the Sourcing responsibility to respond to bid requests and communicate directly with JAA purchasing administrators