Embed Size (px)
Citation preview
Isolation of the Vimentin Protein fromBreast Cancer Epithelial Cells
Sofia Bauer
Degree project in biology, Bachelor of science, 2014Examensarbete i biologi 15 hp till kandidatexamen, 2014Biology Education Centre, Uppsala University, and University of Cape TownSupervisors: David van der Spoel and Catherine H. Kaschula
1
Abstract
Vimentin is one of the proteins that make up the intermediate filaments of regular mesenchymal
cells. However, overexpression of the Vimentin protein has also been observed in different
epithelial cancers (Satelli et al., 2011) such as breast cancer, where its increased expression has
often been correlated with the aggressiveness of the cancer. The aim of this thesis project is to
isolate the Vimentin protein from the mRNA of breast cancer epithelial cells (MDA-MB-231)
which is of interest in order to be able to investigate its function further as well as finding out
what its actual connection to cancer is.
In order to start the experimental procedure, the mRNA had to be converted into cDNA to isolate
the Vimentin gene through PCR. The Vimentin gene would then have to be purified before it
could be ligated into the pGEM®-T Easy maintenance vector. During transformation into XL1
blue competent cells, the pGEM®-T Easy vector with the ligated Vimentin gene would enter the
cells and as the cells grew the vector with its insert would be cloned. In order to afterwards
screen for which colonies had taken up the pGEM®-T Easy vector with the ligated Vimentin
gene, a colony PCR was carried out. Lastly, the plasmids were extracted and in order to express
the final Vimentin protein its coding sequence had to be transfered from the pGEM-T Easy
vector into a new pET-22b(+) cloning/expression vector.
The Vimentin protein was isolated well from the mRNA of breast cancer epithelial cells, and
even though the last part was not performed in the laboratory due to time constraints but was
designed instead, the fact that the Vimentin gene was shown able to transfer onto the pET-22b(+)
cloning/expression vector could be of wide use. The Vimentin protein could be overexpressed in
different cells, such as cancer cells and from there its function could be investigated. It is hoped
that the Vimentin protein can become a future therapeutic target, and the use of therapeutic
agents in combination with other anti-cancer agents directed at Vimentin should be encouraged
as well (Satelli et al., 2011).

2
Table of Contents
Abbreviation list
1 Introduction……………………………………………………….………....4
2 Materials and methods……………………………………………………....5
2.1 cDNA conversion…………………………………………………………………………....5
2.2 PCR……………………………………………………………………………………….....6
2.2.1 Primer design………………………………………………………………………... 6
2.2.2 Running of PCR………………………………………………………………………7
2.3 Gel electrophoresis…………………………………………………………………………..9
2.4 Purification of PCR products……..……………………………………………………... 10
2.5 Ligation…………………………………………………………………………………… 11
2.6 Transformation…………………………………………………………………………..... 13
2.7 Colony PCR………………………………………………………………………………. 14
2.8 Colony screening…………………………………………………………………………..16
2.9 Plasmid extraction…………………………………………………………………………16
2.10 Cloning and expression design…………………………………………………………….17
2.10.1 RE site digestion analysis of Vimentin……………………………………………18
2.10.2 The pET-22b(+) cloning/expression vector……….………………………………..19
2.10.3 Choice of adequate REs…………………………………………………………....21
2.10.4 BamHI and SalI RE sequences and cut sites………………………........................21
2.10.5 Primer design with RE sites.......................................................................................21
3 Results……………………………………………………………………….25
3.1 Primer design……………………………………………………………………………....25
3.2 Gel electrophoresis…………………………………………………………………………26
3.3 Purification of PCR products...……………………………………………………….…...26
3.4 Transformation....…………………………………………………………………………..27
3.5 Colony screening………………………………………………………………………......28
3.6 Plasmid extraction………………………………………………………………………....29
4 Discussion………………….……………………………………….………..30
Acknowledgements
5 References.………..………………………………………………………….32
3
Abbreviation list
°C: Celsius degree
µg: Micrograms
µl: Microliters
µM: Micromolar
A: Adenosine
Amp and Ap: Ampicillin
C: Cytosine
cDNA: Complementary DNA
Conc: Concentration
dATP: Adenosine deoxyribo-nucleotides
dCTP: Cytosine deoxyribo-nucleotides
dGTP: Guanine deoxyribo-nucleotides
DNA: Deoxyribonucleic acid
dNTPs: Deoxyribo-nucleotides
dTTP: Tyrosine deoxyribo-nucleotides
EMT: Epithelial-mesenchymal transition
F primer: Forward primer
g (for centrifugation): Gravitational force
g: Grams
G: Guanine
His Tag: Histidine Tag
IPTG: Isopropyl-β-D-thiogalactopyranoside
Kb: Kilobases
kcal: Kilocalorie
LA: Luria Agar
lacZ: Lactose operon of Escherichia Coli
LB: Lysogeny broth
M: Molarity
MDA-MB-231: Human Breast Carcinoma
cell line
mg: Micrograms
ml: Milliliters
mM: Millimolar
mol: Mole
mRNA: Messenger RNA
MCS: Multiple cloning site
MW: Molecular weight
NaCl: Sodium chloride
NCBI: National Center for Biotechnology
Information
ng: Nanograms
NT and nt: Nucleotide
OD: Optical density
Oligo(dt): Tyrosine deoxyribo-
oligonucleotide primer
ORF: Open reading frame
PCR: Polymerase chain reaction
R primer: Reverse primer
RE: Restriction enzyme
RE site: Restriction enzyme site
RNA: Ribonucleic acid
RT: Reverse transcription.
T: Tyrosine
UV-light: Ultraviolet light
X-Gal: 5-bromo-4-chloro-3-indolyl-β-D-
galactopyranoside
XL1 blue: Competent cells
4
1 Introduction
Vimentin is a protein found in the intermediate filaments of regular mesenchymal cells, where it
is of a big importance (Satelli et al., 2011). Together with the microfilaments and the
microtubules, the intermediate filaments make up the cytoskeleton of cells. Therefore, one of the
functions of Vimentin is that it helps to maintain a stable and strong structure of the
mesenchymal cells where it is being expressed.
It has also been observed that the Vimentin protein is overexpressed in different kinds of
epithelial cancers (Satelli et al., 2011). Therefore, it is of interest to isolate it in order to
investigate its real function and its actual connection with cancer, which to a large extent remains
unsure today. In previous studies, it has been seen how overexpression of the Vimentin protein
was correlated with faster tumor growth as well as an increased migration of the cancer cells
(Satelli et al., 2011). It is hoped that the overexpression of the protein in various cancers could
serve as a possible therapeutic target in the future (Satelli et al., 2011).
In the context of breast cancer Vimentin’s increased expression has often been related to the
aggressiveness of the cancer, as the cells become more invasive when there is more of the
protein present. It has also been observed how Vimentin is of great importance during the
process of epithelial-mesenchymal transition (EMT) in breast cancer (Satelli et al., 2011). EMT
is a cellular process where epithelial cells acquire the same constitution as mesenchymal cells,
resulting in their shape being alterred as well as they experience an increase in motility (Satelli et
al., 2011).
With this thesis project the aim is to isolate the Vimentin protein from the mRNA of breast
cancer epithelial cells (MDA-MB-231). In order to do so, the Vimentin gene sequence will first
have to be isolated from the mRNA through PCR. The ligation of the Vimentin gene into the
pGEM®-T Easy maintenance vector (Promega) will then be followed by the transformation of
pGEM®-T Easy into XL1 blue competent cells in order for it to be cloned. Finally, the Vimentin
gene will be isolated from pGEM®-T Easy in order to be transferred to the pET-22b(+)
cloning/expression vector (Novagen) for the final expression of the Vimentin protein.

5
2 Materials and methods
The experimental procedure for the isolation of the Vimentin protein started from the mRNA of
the breast cancer epithelial cells (MDA-MB-231). The mRNA had already been received from
another laboratory and the reason as to why it was preferred, rather than the DNA was because
both contained the exons that code for the Vimentin protein, but the mRNA is free of introns.
This makes the mRNA shorter and easier to work with.
2.1 cDNA conversion
To start with, the mRNA from breast cancer epithelial cells was converted into cDNA through
reverse transcription (RT). This was done since a PCR would be carried out afterwards in order
to isolate the Vimentin gene from its cDNA. In general, mRNA is much less stable than cDNA
since it is single stranded compared to cDNA which is double stranded. The fact that mRNA is
unstable makes it more vulnerable to degradation, which would not bring the best results after
running the PCR.
In order to proceed with the cDNA conversion, the Promega protocol for Standard First-Strand
Synthesis of cDNA was followed. For the mRNA mix, 2 µl of mRNA, 1 µl of Oligo(dt) and 11
µl of nuclease-free water (to reach the final volume of 14 µl) were added together into a sterile
eppendorf tube. The Oligo(dt) is a primer which is often used in RT reactions and would also be
used this time. Before use, all materials would also have to be centrifuged before added together,
so that all the contents in each tube would gather at the bottom.
The eppendorf tube containing the mRNA mix was afterwards placed on a heating block for
incubation at 70 °C degrees for 5 minutes, which was done in order to denature the secondary
structure of the mRNA. Once the tube was taken out it was left to cool on ice for an additional 5
minutes, so that the Oligo(dt) primer would successfully anneal to the mRNA template.
During the 5 minutes of heating and the 5 minutes of cooling of the mRNA mix, the second mix
for the transcription reaction was prepared in a new, sterile eppendorf tube. The mix would
contain 5 µl of M-MLV RT 5x reaction buffer, 1.25 µl dATP (10 mM), 1.25 µl dCTP (10 mM),
1.25 µl dGTP (10 mM), 1.25 µl dTTP (10 mM), 1 µl M-MLV (H-) point mutant and 1 µl of
RNasin® (Promega) which prevents the action of RNases that would otherwise catalyze the
hydrolysis of mRNA.
Once both mixes were ready, the second mix was added to the mRNA mix. The final mix was
then placed on a heating block for incubation at 40 °C degrees for the initial 10 minutes, then the
temperature was increased to 55 °C degrees for an additional 50 minutes, in order to allow
reverse transcription to occur. Once 50 minutes had passed, the mix was placed on a heating
6
block at 70 °C for 15 minutes in order to inactivate the reverse transcriptase and stop the cDNA
conversion.
2.2 PCR
2.2.1 Primer design
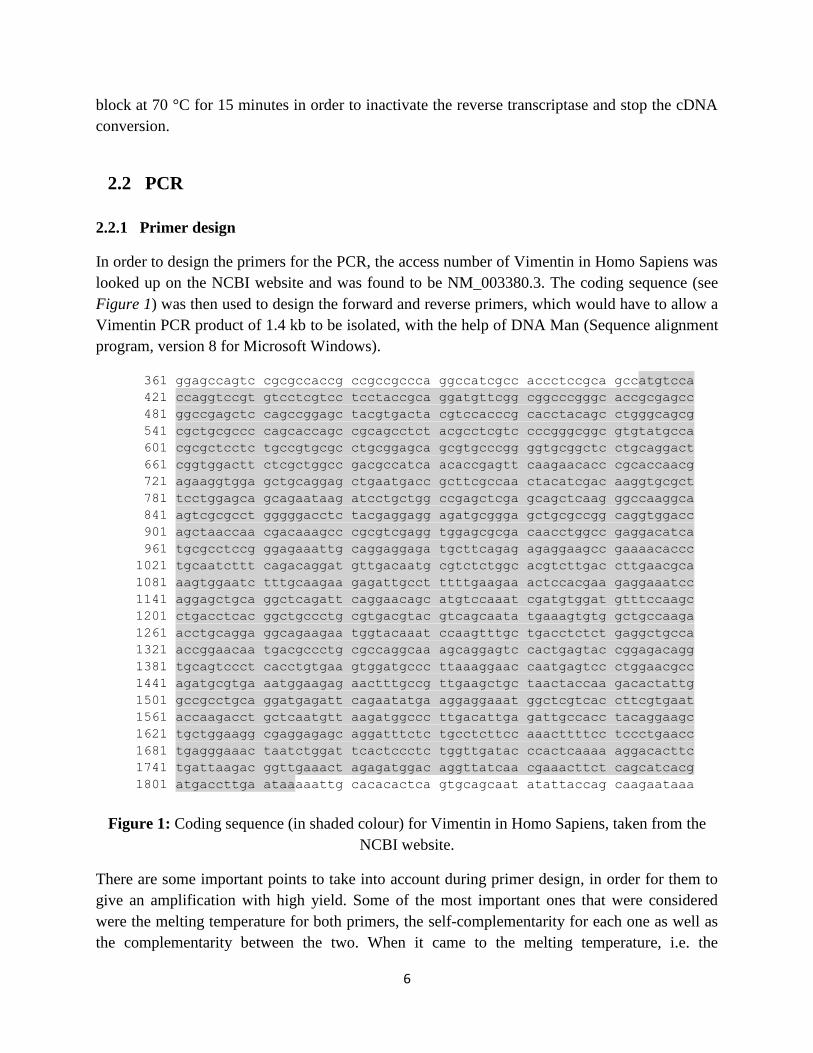
In order to design the primers for the PCR, the access number of Vimentin in Homo Sapiens was
looked up on the NCBI website and was found to be NM_003380.3. The coding sequence (see
Figure 1) was then used to design the forward and reverse primers, which would have to allow a
Vimentin PCR product of 1.4 kb to be isolated, with the help of DNA Man (Sequence alignment
program, version 8 for Microsoft Windows).
361 ggagccagtc cgcgccaccg ccgccgccca ggccatcgcc accctccgca gccatgtcca
421 ccaggtccgt gtcctcgtcc tcctaccgca ggatgttcgg cggcccgggc accgcgagcc
481 ggccgagctc cagccggagc tacgtgacta cgtccacccg cacctacagc ctgggcagcg
541 cgctgcgccc cagcaccagc cgcagcctct acgcctcgtc cccgggcggc gtgtatgcca
601 cgcgctcctc tgccgtgcgc ctgcggagca gcgtgcccgg ggtgcggctc ctgcaggact
661 cggtggactt ctcgctggcc gacgccatca acaccgagtt caagaacacc cgcaccaacg
721 agaaggtgga gctgcaggag ctgaatgacc gcttcgccaa ctacatcgac aaggtgcgct
781 tcctggagca gcagaataag atcctgctgg ccgagctcga gcagctcaag ggccaaggca
841 agtcgcgcct gggggacctc tacgaggagg agatgcggga gctgcgccgg caggtggacc
901 agctaaccaa cgacaaagcc cgcgtcgagg tggagcgcga caacctggcc gaggacatca
961 tgcgcctccg ggagaaattg caggaggaga tgcttcagag agaggaagcc gaaaacaccc
1021 tgcaatcttt cagacaggat gttgacaatg cgtctctggc acgtcttgac cttgaacgca
1081 aagtggaatc tttgcaagaa gagattgcct ttttgaagaa actccacgaa gaggaaatcc
1141 aggagctgca ggctcagatt caggaacagc atgtccaaat cgatgtggat gtttccaagc
1201 ctgacctcac ggctgccctg cgtgacgtac gtcagcaata tgaaagtgtg gctgccaaga
1261 acctgcagga ggcagaagaa tggtacaaat ccaagtttgc tgacctctct gaggctgcca
1321 accggaacaa tgacgccctg cgccaggcaa agcaggagtc cactgagtac cggagacagg
1381 tgcagtccct cacctgtgaa gtggatgccc ttaaaggaac caatgagtcc ctggaacgcc
1441 agatgcgtga aatggaagag aactttgccg ttgaagctgc taactaccaa gacactattg
1501 gccgcctgca ggatgagatt cagaatatga aggaggaaat ggctcgtcac cttcgtgaat
1561 accaagacct gctcaatgtt aagatggccc ttgacattga gattgccacc tacaggaagc
1621 tgctggaagg cgaggagagc aggatttctc tgcctcttcc aaacttttcc tccctgaacc
1681 tgagggaaac taatctggat tcactccctc tggttgatac ccactcaaaa aggacacttc
1741 tgattaagac ggttgaaact agagatggac aggttatcaa cgaaacttct cagcatcacg
1801 atgaccttga ataaaaattg cacacactca gtgcagcaat atattaccag caagaataaa
Figure 1: Coding sequence (in shaded colour) for Vimentin in Homo Sapiens, taken from the
NCBI website.
There are some important points to take into account during primer design, in order for them to
give an amplification with high yield. Some of the most important ones that were considered
were the melting temperature for both primers, the self-complementarity for each one as well as
the complementarity between the two. When it came to the melting temperature, i.e. the
7
temperature at which a primer would anneal to their complementary cDNA sequence, it was
important that the primers did not differ too much. The PCR would also have to be set to the
lowest annealing temperature (one primer would have a lower one than the other primer). If set
to a higher temperature, the primer with the lowest melting temperature would no longer be able
to bind to its complementary cDNA sequence (which is fine for the primer with the highest
melting temperature, as it would still be able to bind at a lower temperature).
2.2.2 Running of PCR
In order to prepare for the PCR the primers had to be diluted in nuclease-free water first, which
was done to obtain the same amount of each primer for the best results i.e. an outcome of as
much PCR product as possible. The PCR mixes had to be prepared as well in small PCR tubes,
which was done following the Promega protocol for Go Taq® PCR Core Systems (with some
slight changes). The PCR was done in order to isolate the gene of interest coding for Vimentin
from the cDNA and three reactions were carried out in total. Two of them contained the cDNA
(made two in order to compare them) while the third one was used as a negative control and
therefore only contained nuclease-free water.
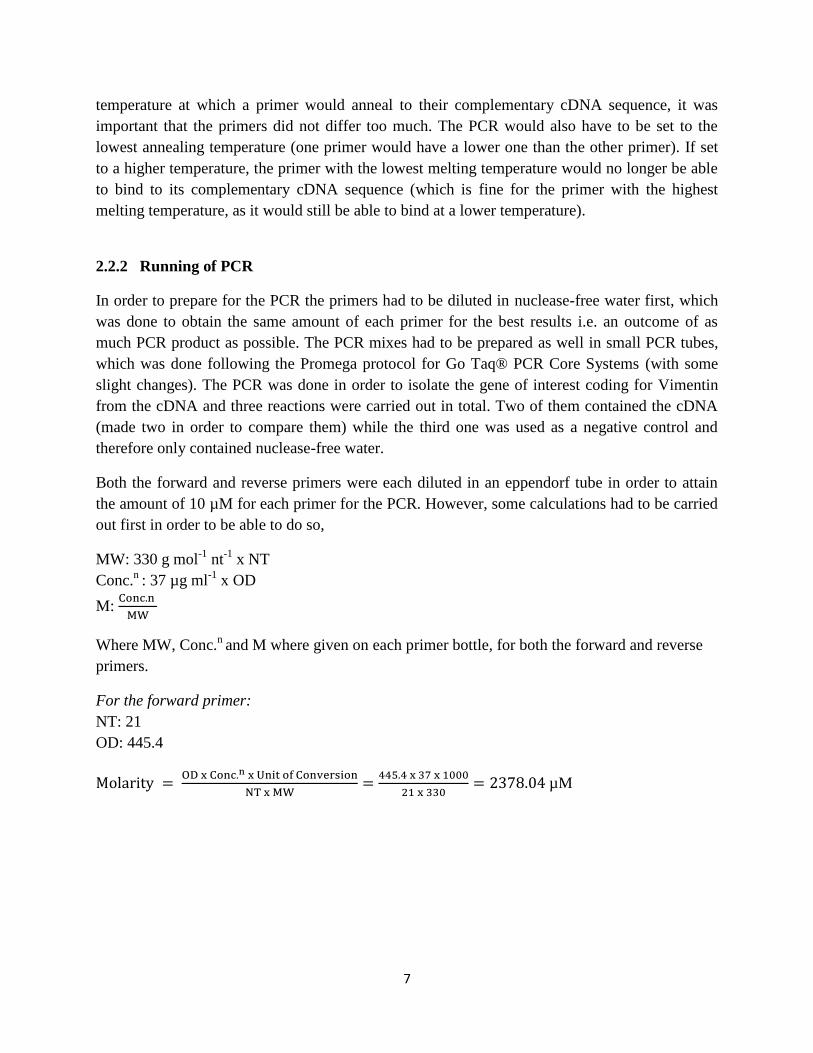
Both the forward and reverse primers were each diluted in an eppendorf tube in order to attain
the amount of 10 µM for each primer for the PCR. However, some calculations had to be carried
out first in order to be able to do so,
MW: 330 g mol-1
nt-1
x NT
Conc.n
: 37 µg ml-1
x OD
M: Conc.n
MW
Where MW, Conc.n
and M where given on each primer bottle, for both the forward and reverse
primers.
For the forward primer:
NT: 21
OD: 445.4
Molarity = OD x Conc.n x Unit of Conversion
NT x MW=
445.4 x 37 x 1000
21 x 330= 2378.04 µM
8
In order to reach the final volume of 500 µl (which had been chosen, both for usage and storage)
the final amount of primers (10 µM) was divided with the initial amount of primers (2378.04
µM) times 500,
Needed primer volume: 10
2378.04 x 500 = 2.1 µl
Needed nuclease-free water volume (to reach the final volume of 500 µl) : 500-2.1 = 497.9 µl
For the reverse primer:
NT: 24
OD: 746.7
Molarity =746.7 x 37 x 1000
24 x 330= 3488.4 µM
Needed primer volume: 10
3488.4 x 500 = 1.4 µl
Needed nuclease-free water volume: 500-1.4 = 498.6 µl
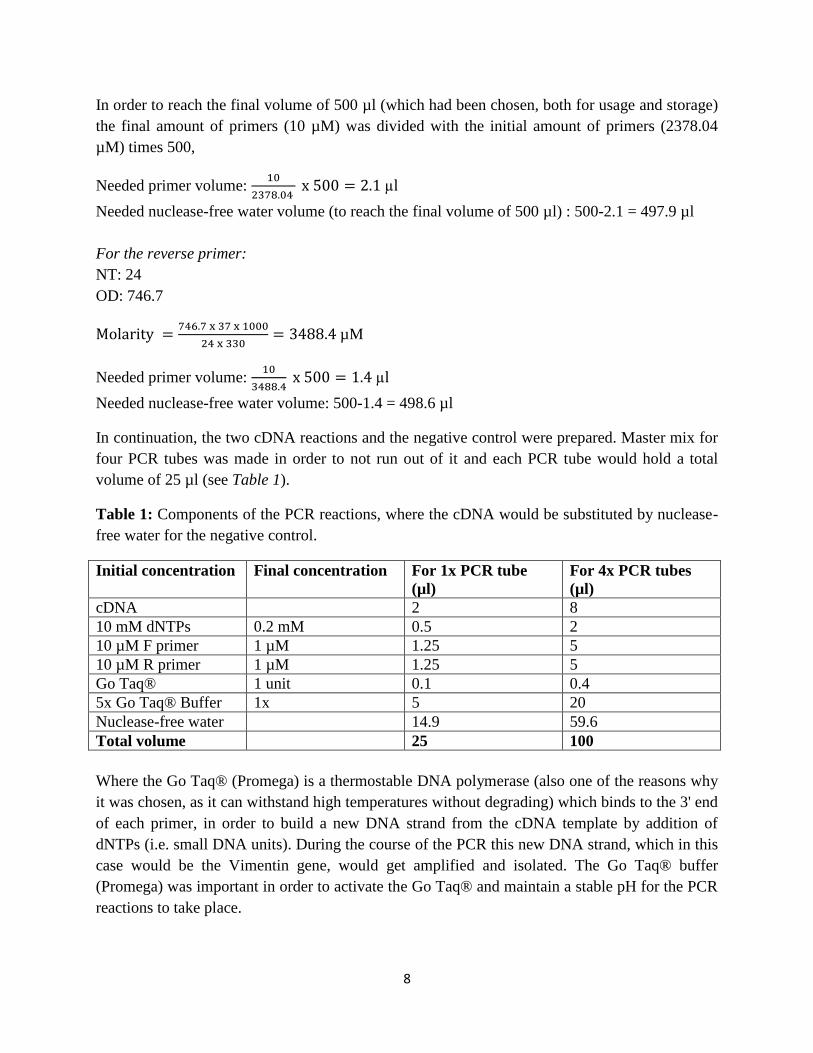
In continuation, the two cDNA reactions and the negative control were prepared. Master mix for
four PCR tubes was made in order to not run out of it and each PCR tube would hold a total
volume of 25 µl (see Table 1).
Table 1: Components of the PCR reactions, where the cDNA would be substituted by nuclease-
free water for the negative control.
Initial concentration Final concentration For 1x PCR tube
(µl)
For 4x PCR tubes
(µl)
cDNA 2 8
10 mM dNTPs 0.2 mM 0.5 2
10 µM F primer 1 µM 1.25 5
10 µM R primer 1 µM 1.25 5
Go Taq® 1 unit 0.1 0.4
5x Go Taq® Buffer 1x 5 20
Nuclease-free water 14.9 59.6
Total volume 25 100
Where the Go Taq® (Promega) is a thermostable DNA polymerase (also one of the reasons why
it was chosen, as it can withstand high temperatures without degrading) which binds to the 3' end
of each primer, in order to build a new DNA strand from the cDNA template by addition of
dNTPs (i.e. small DNA units). During the course of the PCR this new DNA strand, which in this
case would be the Vimentin gene, would get amplified and isolated. The Go Taq® buffer
(Promega) was important in order to activate the Go Taq® and maintain a stable pH for the PCR
reactions to take place.
9
In order to calculate the volume of each component that was needed the following equation was
used for all components,
Ex. For 10 mM dNTPs: Final concentration
Initial concentration x Total volume =
0.2
10x 25 = 0.5 µl
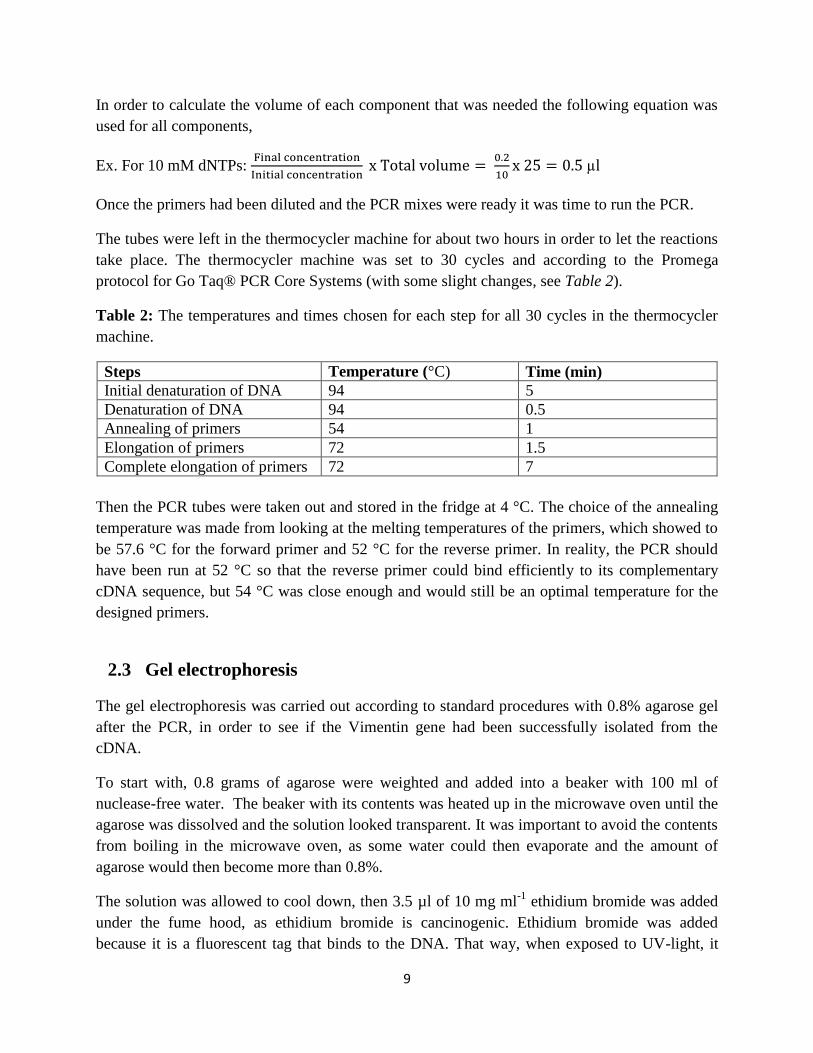
Once the primers had been diluted and the PCR mixes were ready it was time to run the PCR.
The tubes were left in the thermocycler machine for about two hours in order to let the reactions
take place. The thermocycler machine was set to 30 cycles and according to the Promega
protocol for Go Taq® PCR Core Systems (with some slight changes, see Table 2).
Table 2: The temperatures and times chosen for each step for all 30 cycles in the thermocycler
machine.
Steps Temperature (°C) Time (min)
Initial denaturation of DNA 94 5
Denaturation of DNA 94 0.5
Annealing of primers 54 1
Elongation of primers 72 1.5
Complete elongation of primers 72 7
Then the PCR tubes were taken out and stored in the fridge at 4 °C. The choice of the annealing
temperature was made from looking at the melting temperatures of the primers, which showed to
be 57.6 °C for the forward primer and 52 °C for the reverse primer. In reality, the PCR should
have been run at 52 °C so that the reverse primer could bind efficiently to its complementary
cDNA sequence, but 54 °C was close enough and would still be an optimal temperature for the
designed primers.
2.3 Gel electrophoresis
The gel electrophoresis was carried out according to standard procedures with 0.8% agarose gel
after the PCR, in order to see if the Vimentin gene had been successfully isolated from the
cDNA.
To start with, 0.8 grams of agarose were weighted and added into a beaker with 100 ml of
nuclease-free water. The beaker with its contents was heated up in the microwave oven until the
agarose was dissolved and the solution looked transparent. It was important to avoid the contents
from boiling in the microwave oven, as some water could then evaporate and the amount of
agarose would then become more than 0.8%.
The solution was allowed to cool down, then 3.5 µl of 10 mg ml-1
ethidium bromide was added
under the fume hood, as ethidium bromide is cancinogenic. Ethidium bromide was added
because it is a fluorescent tag that binds to the DNA. That way, when exposed to UV-light, it
10
would fluoresce and the DNA could be detected. The gel was poured onto a gel chamber
afterwards and was then left for about 20-30 minutes to solidify.
Once the gel was solid 12 µl of each PCR product was mixed together with 3 µl of blue loading
dye, which would allow the tracking of the DNA as the gel electrophoresis proceeded, in order to
reach a total volume of 15 µl. The Fermentas 1 kb ladder was used and 5 µl was loaded onto the
first lane. Then the negative control was loaded onto the second lane, followed by the two cDNA
reactions on lane three and four.
The gel electrophoresis ran for about one hour and a half before any clear bands for the
Vimentin gene could be seen from the results on the gel.
2.4 Purification of PCR products
Once the gel electrophoresis had been carried out, either one could dissolve the gel slices or
process the PCR products in order to get rid of excess primers, excess Go Taq enzyme etc. and
be left with the purified Vimentin gene solely. The second option, i.e. the processing of the PCR
products was chosen, which was further divided into three steps according to the Promega
protocol for Wizard® SV Gel and PCR Clean-Up System, namely binding, washing and elution
of the gene DNA.
Firstly, an equal volume of membrane binding solution, used to activate the gene DNA in the
PCR product so it would later bind to the membrane of the minicolumn, was added to the two
PCR products. Then they were transferred from the small PCR tubes onto two SV minicolumn
assemblies (with collection tubes attached below) and were after incubated for 5 minutes at room
temperature. The PCR products were then centrifuged at 16 000 x g for 1 minute, followed by
the removal of the flowthrough from both collection tubes.
During the washing step 700 µl of membrane wash solution i.e. ethanol, used to wash out all
PCR product excess components but the gene DNA from the membrane, was added. The SV
minicolumn assemblies were centrifuged at 16 000 x g for 1 minute and the flowthrough was
again removed. This same procedure was repeated one more time, but with 400 µl of membrane
wash solution instead and 5 minutes (rather than 1 minute) of centrifugation at 16 000 x g. To
finish off the washing of the gene DNA, only the minicolumns were centrifuged for about 1
minute with the centrifuge lid open. This was done in order to allow evaporation of any
remaining ethanol.
In continuation, following the elution step the minicolumns were put into two new, sterilized 1.5
ml eppendorf tubes, followed by the addition of 50 µl of nucelase-free water (to store the gene
DNA with it) to each tube and a 1 minute long incubation at room temperature. The minicolumns
were then centrifuged one more time at 16 000 x g for 1 minute, followed by the quantification
11
of the purified Vimentin gene which was carried out in the Nanodrop spectrophotometer. Lastly,
the purified PCR product was stored in a fridge at -20 °C.
2.5 Ligation
In order to later be able to clone the purified Vimentin gene in XL1-blue cells, i.e. competent
cells for further research, its sequence had to be ligated into a maintenance vector first. The one
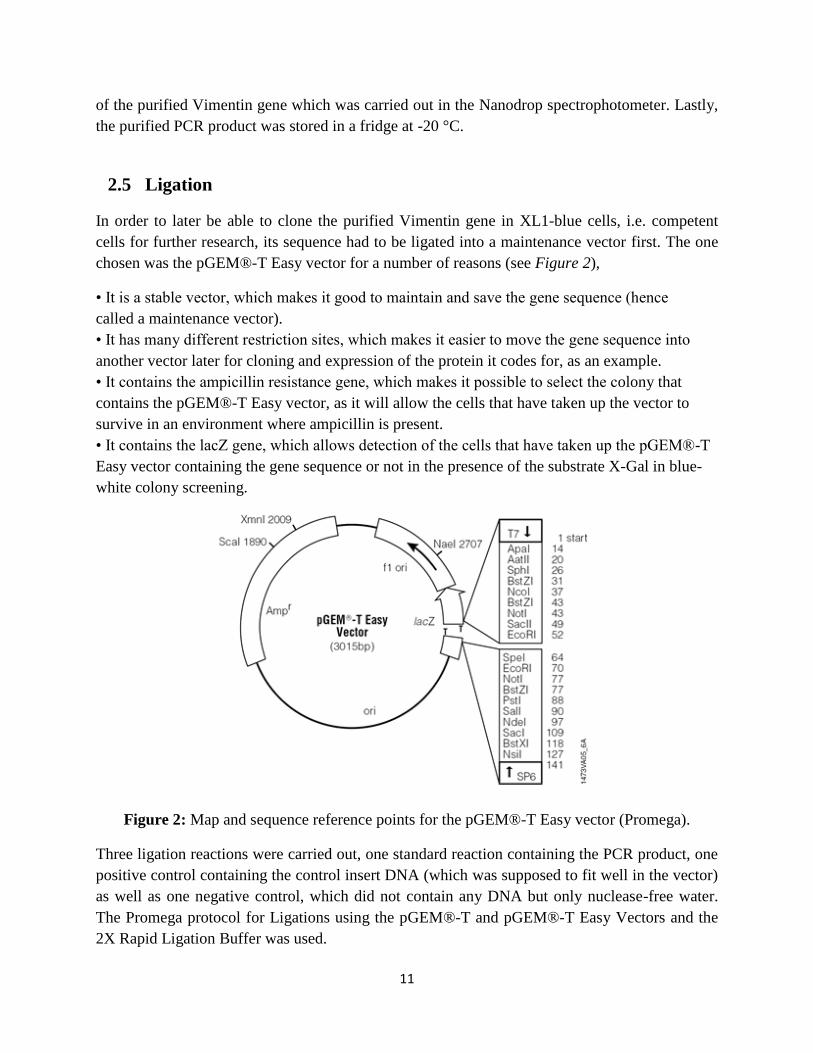
chosen was the pGEM®-T Easy vector for a number of reasons (see Figure 2),
• It is a stable vector, which makes it good to maintain and save the gene sequence (hence
called a maintenance vector).
• It has many different restriction sites, which makes it easier to move the gene sequence into
another vector later for cloning and expression of the protein it codes for, as an example.
• It contains the ampicillin resistance gene, which makes it possible to select the colony that
contains the pGEM®-T Easy vector, as it will allow the cells that have taken up the vector to
survive in an environment where ampicillin is present.
• It contains the lacZ gene, which allows detection of the cells that have taken up the pGEM®-T
Easy vector containing the gene sequence or not in the presence of the substrate X-Gal in blue-
white colony screening.
Figure 2: Map and sequence reference points for the pGEM®-T Easy vector (Promega).
Three ligation reactions were carried out, one standard reaction containing the PCR product, one
positive control containing the control insert DNA (which was supposed to fit well in the vector)
as well as one negative control, which did not contain any DNA but only nuclease-free water.
The Promega protocol for Ligations using the pGEM®-T and pGEM®-T Easy Vectors and the
2X Rapid Ligation Buffer was used.
12
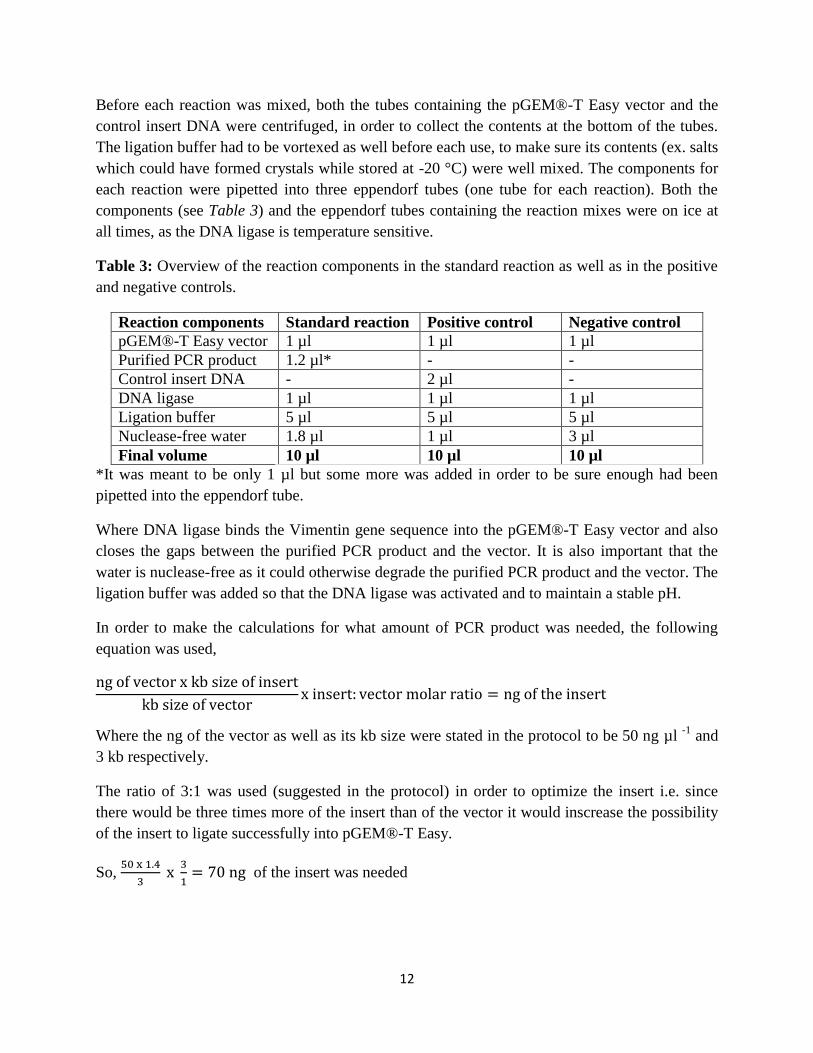
Before each reaction was mixed, both the tubes containing the pGEM®-T Easy vector and the
control insert DNA were centrifuged, in order to collect the contents at the bottom of the tubes.
The ligation buffer had to be vortexed as well before each use, to make sure its contents (ex. salts
which could have formed crystals while stored at -20 °C) were well mixed. The components for
each reaction were pipetted into three eppendorf tubes (one tube for each reaction). Both the
components (see Table 3) and the eppendorf tubes containing the reaction mixes were on ice at
all times, as the DNA ligase is temperature sensitive.
Table 3: Overview of the reaction components in the standard reaction as well as in the positive
and negative controls.
Reaction components Standard reaction Positive control Negative control
pGEM®-T Easy vector 1 µl 1 µl 1 µl
Purified PCR product 1.2 µl* - -
Control insert DNA - 2 µl -
DNA ligase 1 µl 1 µl 1 µl
Ligation buffer 5 µl 5 µl 5 µl
Nuclease-free water 1.8 µl 1 µl 3 µl
Final volume 10 µl 10 µl 10 µl
*It was meant to be only 1 µl but some more was added in order to be sure enough had been
pipetted into the eppendorf tube.
Where DNA ligase binds the Vimentin gene sequence into the pGEM®-T Easy vector and also
closes the gaps between the purified PCR product and the vector. It is also important that the
water is nuclease-free as it could otherwise degrade the purified PCR product and the vector. The
ligation buffer was added so that the DNA ligase was activated and to maintain a stable pH.
In order to make the calculations for what amount of PCR product was needed, the following
equation was used,
ng of vector x kb size of insert
kb size of vectorx insert: vector molar ratio = ng of the insert
Where the ng of the vector as well as its kb size were stated in the protocol to be 50 ng µl -1
and
3 kb respectively.
The ratio of 3:1 was used (suggested in the protocol) in order to optimize the insert i.e. since
there would be three times more of the insert than of the vector it would inscrease the possibility
of the insert to ligate successfully into pGEM®-T Easy.
So, 50 x 1.4
3 x
3
1= 70 ng of the insert was needed
13
In order to calculate the volume of the PCR product needed, its mass was divided with its
concentration according to the following equation,
m
c=
70
71.7= 1 µl of the insert was needed
Where 71.7 ng µl-1
was the concentration of the purified Vimentin gene that had previously been
quantified from the Nanodrop spectrophotometer.
Once the reactions were mixed, they were placed for incubation in a fridge at 4 °C overnight, in
order to get the maximum number of transformants.
2.6 Transformation
In order to proceed with the transformation, the Promega protocol for Transformation using the
pGEM®-T and the pGEM®-T Easy Vector Ligation Reactions (with some slight changes) was
followed. The transformation into XL1 blue, i.e. competent cells was carried out in order to
clone the Vimentin gene.
To start with, the Luria agar (LA) plates with ampicillin/IPTG/X-Gal were prepared. In order to
blend for 500 ml of LA (which was the amount made) 2.5 grams of yeast extract, 5 grams of
tryptore, 2.5 grams of NaCl as well as 7.5 grams of bacterioligical agar were added to 500 ml of
nuclease-free water. The same method for the transformation was used for all three ligation
reactions (i.e. for the standard reaction, the positive control and the negative control).
Firstly, 100 µl of XL1-blue were added to the whole 10 µl ligation reaction. The reaction mix
was placed on ice for 10 minutes, then heated at 37 °C for 4 ½ minutes. Heating up the cells
during this step would allow the pGEM®-T Easy vectors to be able to enter them. Since the cells
were said to be permeable, this step was used to heat-shock them. The reaction mix was then
placed on ice for another 2 minutes before 900 µl of LB medium (per 100 ml of LB: 1 gram
tryptone, 0.5 gram yeast extract, 2 grams NaCl and 95 ml of nuclease-free water) was added, in
order to let the cells grow. In continuation, the reaction mix was put in a water bath at 37 °C for
about one hour, to allow the expression of all proteins (including the lacZ protein).
Once an hour had passed, the LA plates were taken out from the fridge were they had been
stored at 4 °C. Four plates were used for the standard reaction, three plates were used for the
positive control and another three plates were used for the negative control (so 10 plates in total).
Different amounts of each reaction mix were pipetted onto their respective plates.
For the standard reaction there were three plates with ampicillin and one which was left without.
For the three plates with ampicillin the amount of reaction mix that was pipetted onto them was
of 50 µl, 100 µl and onto the third plate, the remaining amount of reaction mix was poured (the
reaction was centrifuged, almost all the supernatant was absorbed and the pellet was then
14
resuspended with the rest of the supernatant before pipetted onto the plate). Before that though,
50 µl of the reaction mix were also pipetted onto the plate with no ampicillin.
The same was done for the positive and negative controls, although no plate with 100 µl was
used for these. It was only used in the standard reaction in order to be able to compare it with the
plate with 50 µl (should get twice as many colonies on the one with 100 µl of reaction).
Between each addition of reaction mix onto the plates, the plate spreader was dipped in ethanol
and held under the flame from a bunsen burner in order to sterilize it. The plates where
afterwards put to shake in an incubator at 37 °C overnight so that the colonies could grow.
2.7 Colony PCR
The same procedure was carried out as for the PCR earlier, i.e. the same Promega protocol for
Go Taq® PCR Core Systems (with some slight changes) was used. However, 16.9 µl of
nuclease-free water was to be used here rather than 14.9 µl in each PCR tube. This was because
the colony that was going to undergo the Colony PCR was so small, and would not reach 2 µl.
Otherwise all the materials were the same. The Colony PCR was carried out in order to isolate
the Vimentin gene from the pGEM®-T Easy vector in 10 different colonies.
Since it was not for certain that all pGEM®-T Easy vectors, which had been taken up by all the
white colonies, had ligated the Vimentin gene (some of the pGEM®-T Easy vectors could have
ligated something else to them that closed them, given that some sort of contamination had
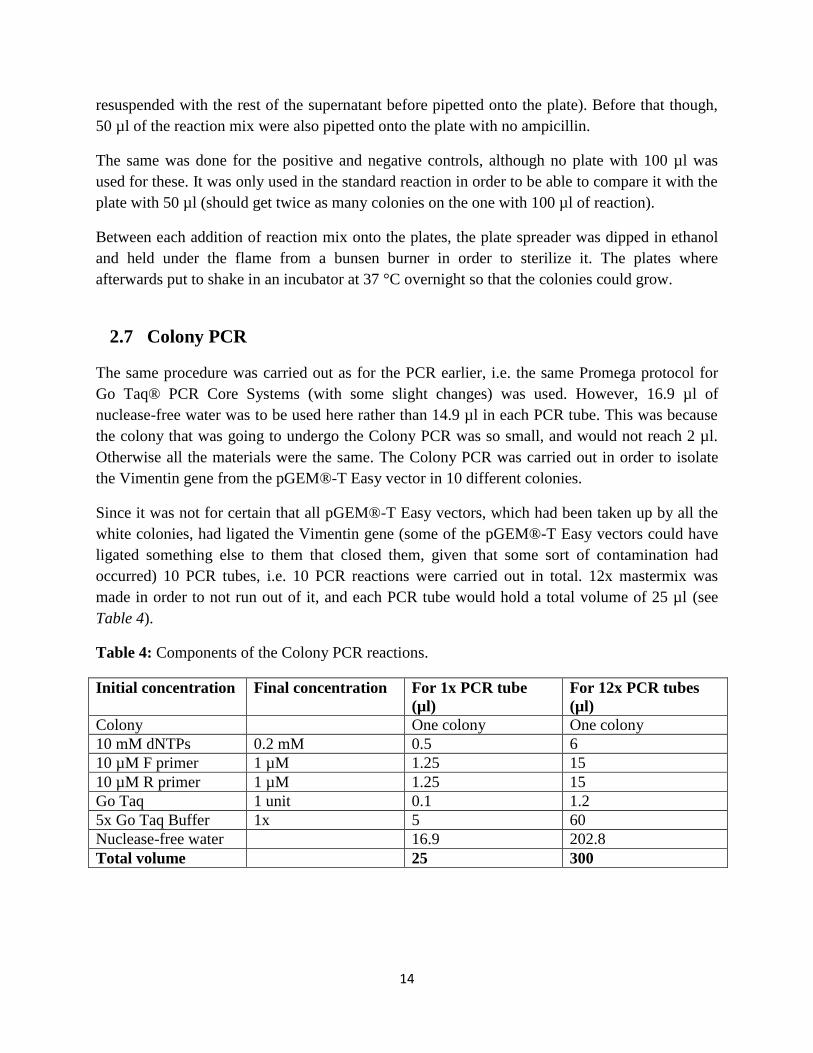
occurred) 10 PCR tubes, i.e. 10 PCR reactions were carried out in total. 12x mastermix was
made in order to not run out of it, and each PCR tube would hold a total volume of 25 µl (see
Table 4).
Table 4: Components of the Colony PCR reactions.
Initial concentration Final concentration For 1x PCR tube
(µl)
For 12x PCR tubes
(µl)
Colony One colony One colony
10 mM dNTPs 0.2 mM 0.5 6
10 µM F primer 1 µM 1.25 15
10 µM R primer 1 µM 1.25 15
Go Taq 1 unit 0.1 1.2
5x Go Taq Buffer 1x 5 60
Nuclease-free water 16.9 202.8
Total volume 25 300
15
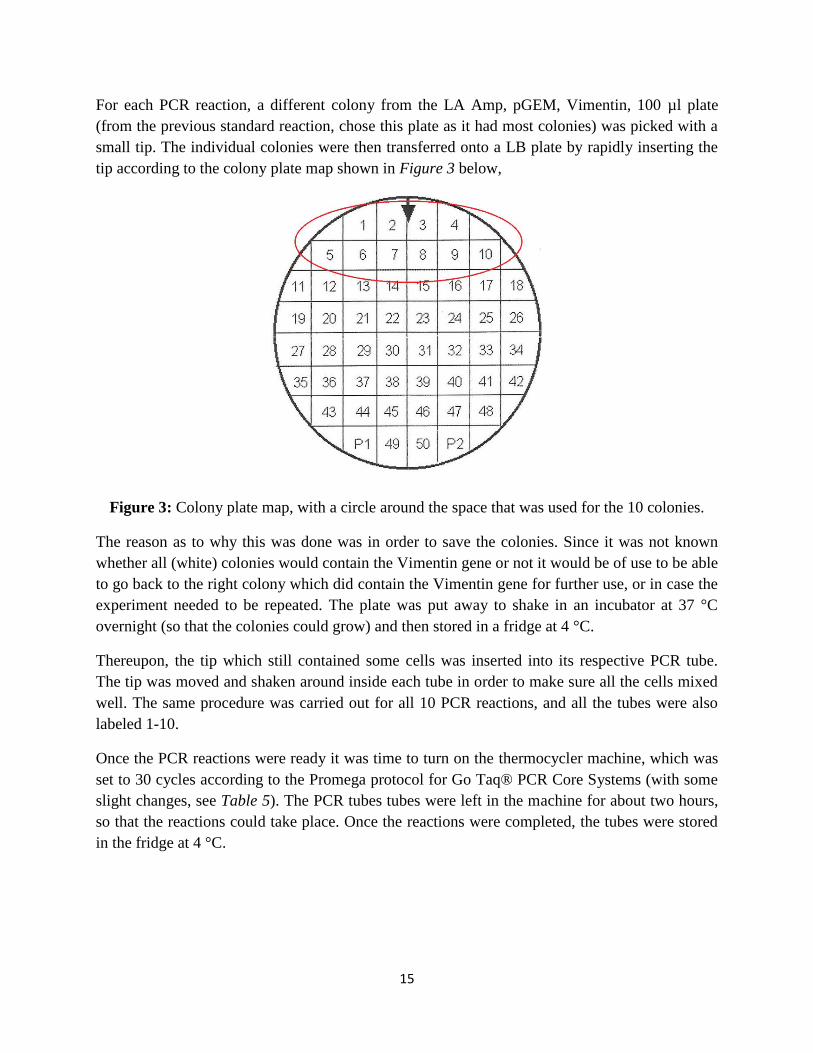
For each PCR reaction, a different colony from the LA Amp, pGEM, Vimentin, 100 µl plate
(from the previous standard reaction, chose this plate as it had most colonies) was picked with a
small tip. The individual colonies were then transferred onto a LB plate by rapidly inserting the
tip according to the colony plate map shown in Figure 3 below,
Figure 3: Colony plate map, with a circle around the space that was used for the 10 colonies.
The reason as to why this was done was in order to save the colonies. Since it was not known
whether all (white) colonies would contain the Vimentin gene or not it would be of use to be able
to go back to the right colony which did contain the Vimentin gene for further use, or in case the
experiment needed to be repeated. The plate was put away to shake in an incubator at 37 °C
overnight (so that the colonies could grow) and then stored in a fridge at 4 °C.
Thereupon, the tip which still contained some cells was inserted into its respective PCR tube.
The tip was moved and shaken around inside each tube in order to make sure all the cells mixed
well. The same procedure was carried out for all 10 PCR reactions, and all the tubes were also
labeled 1-10.
Once the PCR reactions were ready it was time to turn on the thermocycler machine, which was
set to 30 cycles according to the Promega protocol for Go Taq® PCR Core Systems (with some
slight changes, see Table 5). The PCR tubes tubes were left in the machine for about two hours,
so that the reactions could take place. Once the reactions were completed, the tubes were stored
in the fridge at 4 °C.
16
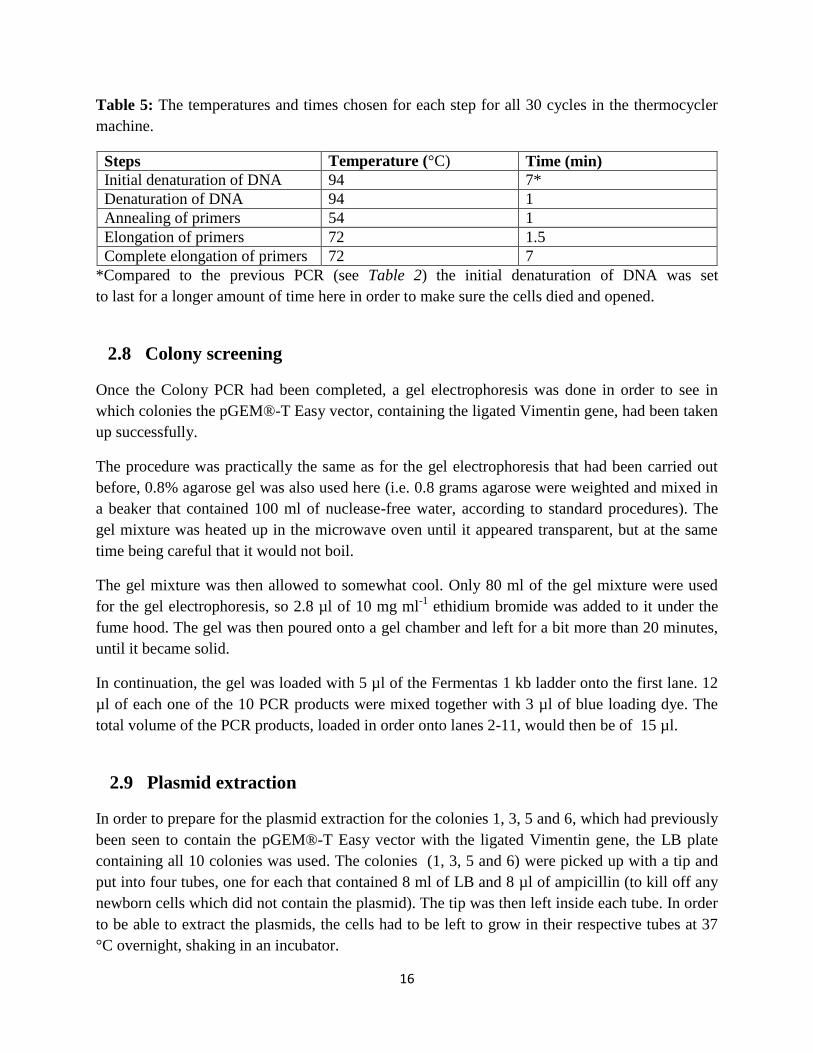
Table 5: The temperatures and times chosen for each step for all 30 cycles in the thermocycler
machine.
Steps Temperature (°C) Time (min)
Initial denaturation of DNA 94 7*
Denaturation of DNA 94 1
Annealing of primers 54 1
Elongation of primers 72 1.5
Complete elongation of primers 72 7
*Compared to the previous PCR (see Table 2) the initial denaturation of DNA was set
to last for a longer amount of time here in order to make sure the cells died and opened.
2.8 Colony screening
Once the Colony PCR had been completed, a gel electrophoresis was done in order to see in
which colonies the pGEM®-T Easy vector, containing the ligated Vimentin gene, had been taken
up successfully.
The procedure was practically the same as for the gel electrophoresis that had been carried out
before, 0.8% agarose gel was also used here (i.e. 0.8 grams agarose were weighted and mixed in
a beaker that contained 100 ml of nuclease-free water, according to standard procedures). The
gel mixture was heated up in the microwave oven until it appeared transparent, but at the same
time being careful that it would not boil.
The gel mixture was then allowed to somewhat cool. Only 80 ml of the gel mixture were used
for the gel electrophoresis, so 2.8 µl of 10 mg ml-1
ethidium bromide was added to it under the
fume hood. The gel was then poured onto a gel chamber and left for a bit more than 20 minutes,
until it became solid.
In continuation, the gel was loaded with 5 µl of the Fermentas 1 kb ladder onto the first lane. 12
µl of each one of the 10 PCR products were mixed together with 3 µl of blue loading dye. The
total volume of the PCR products, loaded in order onto lanes 2-11, would then be of 15 µl.
2.9 Plasmid extraction
In order to prepare for the plasmid extraction for the colonies 1, 3, 5 and 6, which had previously
been seen to contain the pGEM®-T Easy vector with the ligated Vimentin gene, the LB plate
containing all 10 colonies was used. The colonies (1, 3, 5 and 6) were picked up with a tip and
put into four tubes, one for each that contained 8 ml of LB and 8 µl of ampicillin (to kill off any
newborn cells which did not contain the plasmid). The tip was then left inside each tube. In order
to be able to extract the plasmids, the cells had to be left to grow in their respective tubes at 37
°C overnight, shaking in an incubator.
17
The Plasmid extraction was divided into three main steps according to the Promega protocol for
Wizard® Plus SV Minipreps DNA Purification System (Centrifugation protocol), namely
production of lysate as well as binding, washing and elution of the p-GEM®-T Easy vector
DNA. For the plasmid extraction, 5 ml from each overnight culture were used (3 other ml for
glycerol stock, important for long-term storage at -20 °C) and the same procedure was done for
all four tubes.
To start with, the 5 ml of overnight culture were pelleted for 5 minutes (i.e. the LB was removed)
in a sterile eppendorf tube. Then the pellet was resuspended with 250 µl of cell resuspension
solution in an eppendorf tube, followed by the addition of another 250 µl of cell lysis solution,
used to degrade the cells completely. To the mix 10 µl of alkaline protease solution, used to
degrade the remaining proteins (i.e. to clean up around the vector) was added and the tube was
incubated for about 5 minutes in room temperature. In continuation, 350 µl of neutralization
solution were added, used to stop all reactions (from lysis and alkaline protease solutions)
followed by centrifugation of the tube at maximum speed for 10 minutes.
It was important to note that all the solutions had to be mixed well after they were added, so the
tube would also be inverted four times between each addition.
In order to start the binding step of the extraction, a spin column was inserted into the collection
tube and the lysate was poured into the spin column. The assembly was then centrifuged at
maximum speed for 1 minute as well as the flowthrough was removed afterwards.
During the washing step 750 µl of wash solution, i.e. ethanol was added. The assembly was
centrifuged at maximum speed for 1 minute and the flowthrough was removed. This same
procedure was repeated, but this time 250 µl of wash solution was added. To finalize this step,
the assembly was centrifuged again at maximum speed for another 2 minutes.
Lastly, and in order to elute the plasmid DNA, the spin column was transferred to a 1.5 ml new,
sterile eppendorf tube. 100 µl of nuclease-free water was added (which was going to be stored
together with the vector DNA) followed by centrifugation at maximum speed for 1 minutes and
removal of the spin column. The DNA was then stored in a fridge at -20 °C before further use.
2.10 Cloning and expression design
The final cloning and expression of the Vimentin protein was, due to time constraints, designed
but not carried out in the laboratory. The aim of this step was to move the coding sequence of
Vimentin from the pGEM®-T Easy maintenance vector into the pET-22b(+) cloning/expression
vector.
In order to do this, two common restriction enzyme (RE) sites had to be found on both the
Vimentin coding sequence and the pET-22b(+) vector sequence. With the purpose of isolating
18
the largest Vimentin ORF from the pGEM®-T-Easy vector, PCR had to be carried out. For that,
a set of primers had to be designed which also contained the RE sequences. The chosen REs
would then also be used to cut the pET-22b(+) vector open so that the isolated Vimentin
sequence could fit in it and ligate to it, in order to later clone and express the final Vimentin
protein. Both the Vimentin coding sequence and the pET-22b(+) vector sequence had to be cut
with two REs in order for the protein sequence to be in frame with the promoter of the vector.
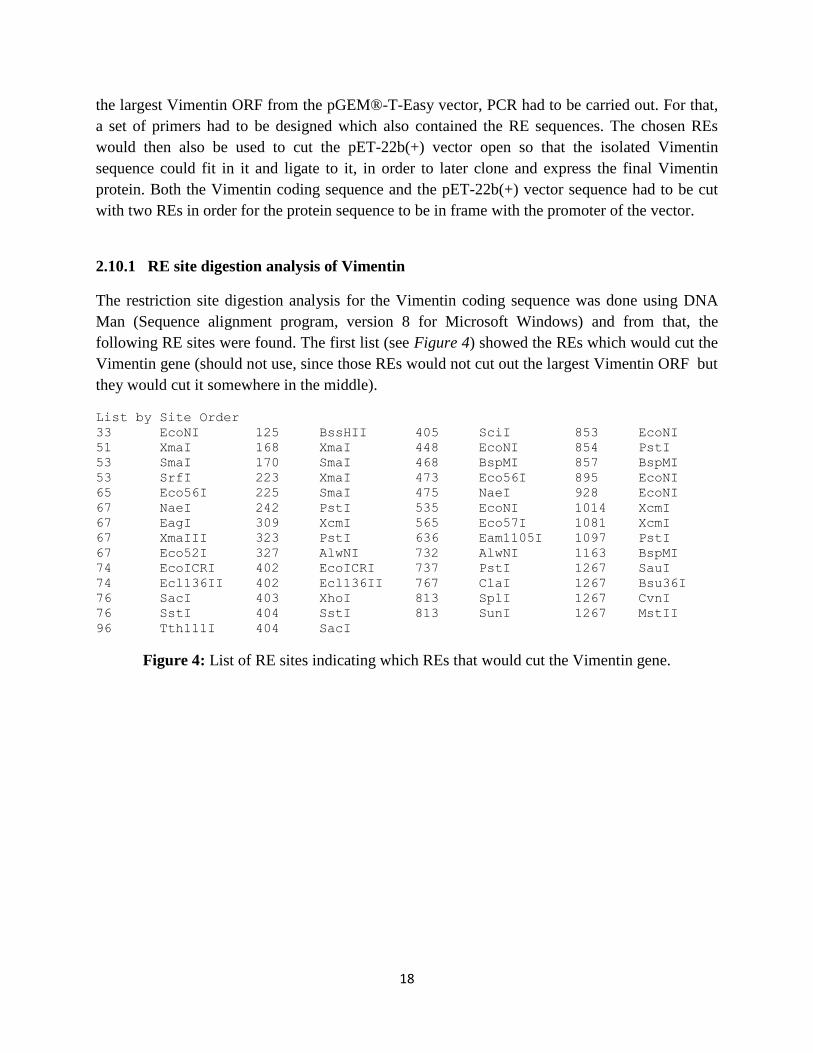
2.10.1 RE site digestion analysis of Vimentin
The restriction site digestion analysis for the Vimentin coding sequence was done using DNA
Man (Sequence alignment program, version 8 for Microsoft Windows) and from that, the
following RE sites were found. The first list (see Figure 4) showed the REs which would cut the
Vimentin gene (should not use, since those REs would not cut out the largest Vimentin ORF but
they would cut it somewhere in the middle).
List by Site Order
33 EcoNI 125 BssHII 405 SciI 853 EcoNI
51 XmaI 168 XmaI 448 EcoNI 854 PstI
53 SmaI 170 SmaI 468 BspMI 857 BspMI
53 SrfI 223 XmaI 473 Eco56I 895 EcoNI
65 Eco56I 225 SmaI 475 NaeI 928 EcoNI
67 NaeI 242 PstI 535 EcoNI 1014 XcmI
67 EagI 309 XcmI 565 Eco57I 1081 XcmI
67 XmaIII 323 PstI 636 Eam1105I 1097 PstI
67 Eco52I 327 AlwNI 732 AlwNI 1163 BspMI
74 EcoICRI 402 EcoICRI 737 PstI 1267 SauI
74 Ecl136II 402 Ecl136II 767 ClaI 1267 Bsu36I
76 SacI 403 XhoI 813 SplI 1267 CvnI
76 SstI 404 SstI 813 SunI 1267 MstII
96 Tth111I 404 SacI
Figure 4: List of RE sites indicating which REs that would cut the Vimentin gene.
19
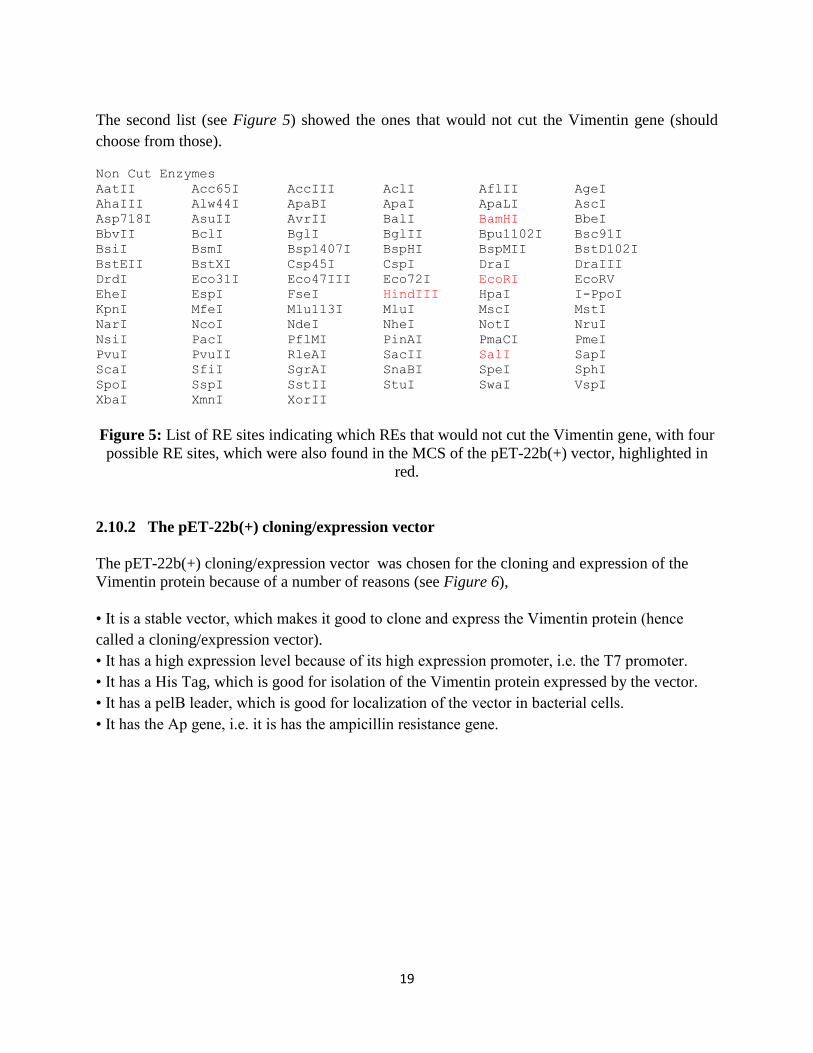
The second list (see Figure 5) showed the ones that would not cut the Vimentin gene (should
choose from those).
Non Cut Enzymes
AatII Acc65I AccIII AclI AflII AgeI
AhaIII Alw44I ApaBI ApaI ApaLI AscI
Asp718I AsuII AvrII BalI BamHI BbeI
BbvII BclI BglI BglII Bpu1102I Bsc91I
BsiI BsmI Bsp1407I BspHI BspMII BstD102I
BstEII BstXI Csp45I CspI DraI DraIII
DrdI Eco31I Eco47III Eco72I EcoRI EcoRV
EheI EspI FseI HindIII HpaI I-PpoI
KpnI MfeI Mlu113I MluI MscI MstI
NarI NcoI NdeI NheI NotI NruI
NsiI PacI PflMI PinAI PmaCI PmeI
PvuI PvuII RleAI SacII SalI SapI
ScaI SfiI SgrAI SnaBI SpeI SphI
SpoI SspI SstII StuI SwaI VspI
XbaI XmnI XorII
Figure 5: List of RE sites indicating which REs that would not cut the Vimentin gene, with four
possible RE sites, which were also found in the MCS of the pET-22b(+) vector, highlighted in
red.
2.10.2 The pET-22b(+) cloning/expression vector
The pET-22b(+) cloning/expression vector was chosen for the cloning and expression of the
Vimentin protein because of a number of reasons (see Figure 6),
• It is a stable vector, which makes it good to clone and express the Vimentin protein (hence
called a cloning/expression vector).
• It has a high expression level because of its high expression promoter, i.e. the T7 promoter.
• It has a His Tag, which is good for isolation of the Vimentin protein expressed by the vector.
• It has a pelB leader, which is good for localization of the vector in bacterial cells.
• It has the Ap gene, i.e. it is has the ampicillin resistance gene.
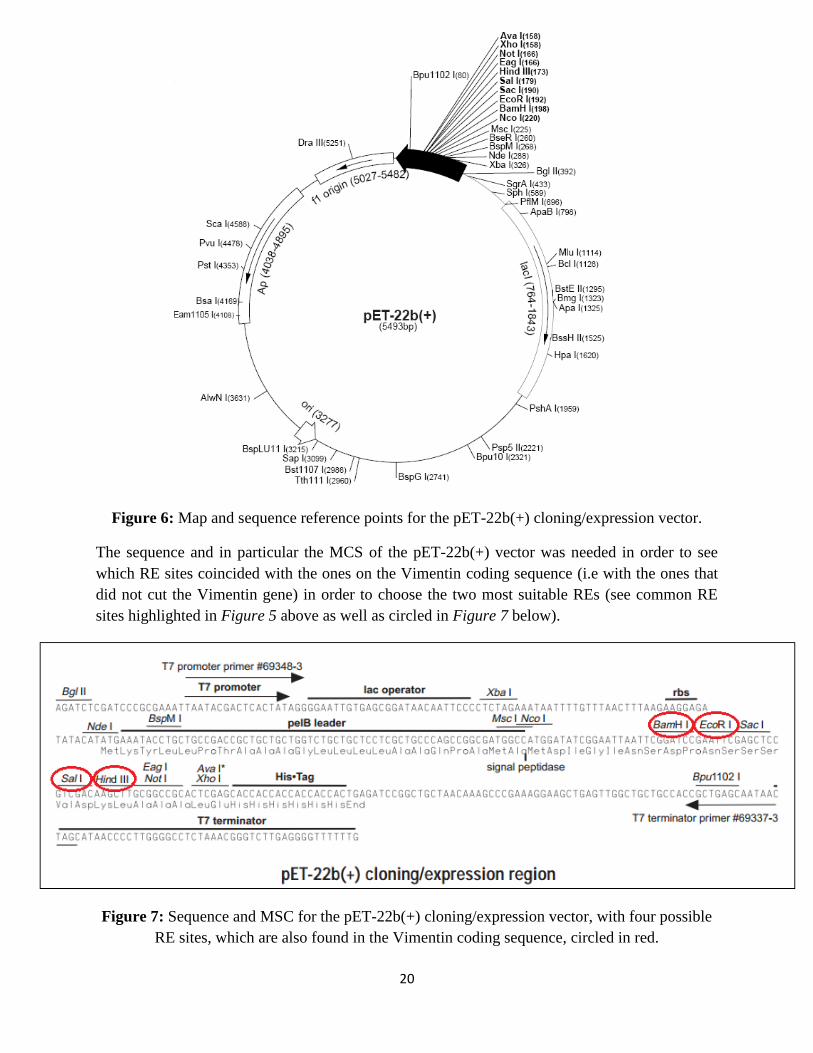
20
Figure 6: Map and sequence reference points for the pET-22b(+) cloning/expression vector.
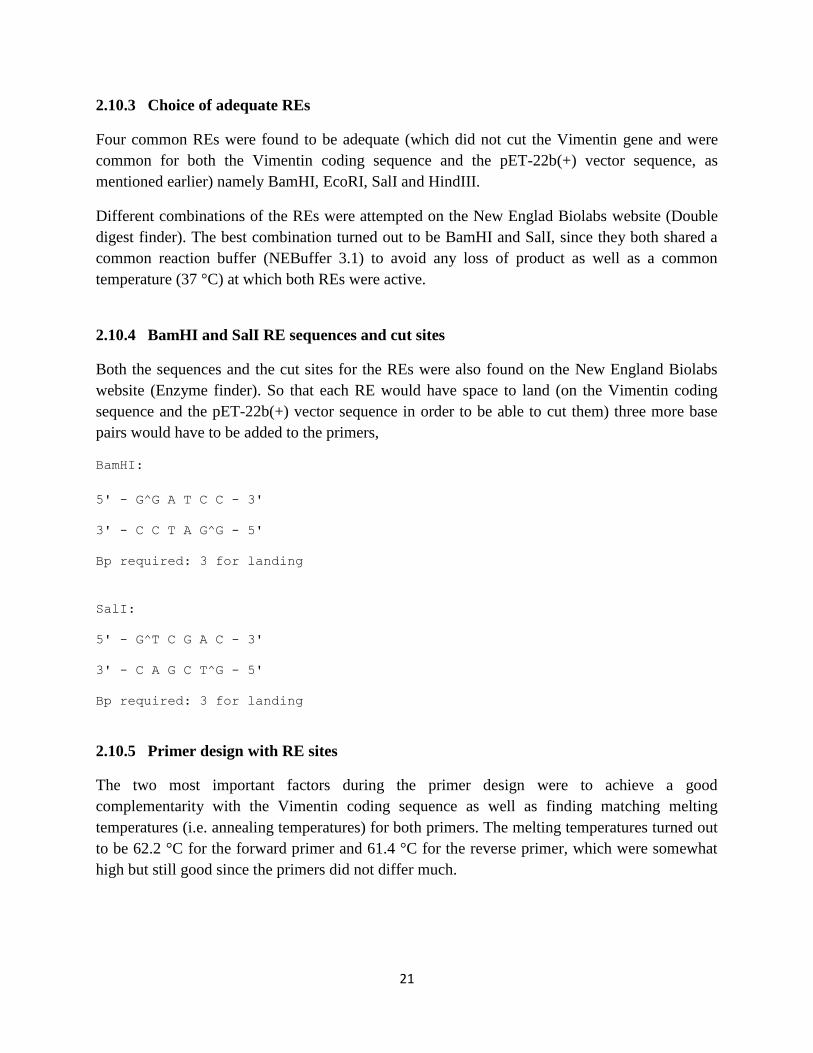
The sequence and in particular the MCS of the pET-22b(+) vector was needed in order to see
which RE sites coincided with the ones on the Vimentin coding sequence (i.e with the ones that
did not cut the Vimentin gene) in order to choose the two most suitable REs (see common RE
sites highlighted in Figure 5 above as well as circled in Figure 7 below).
Figure 7: Sequence and MSC for the pET-22b(+) cloning/expression vector, with four possible
RE sites, which are also found in the Vimentin coding sequence, circled in red.
21
2.10.3 Choice of adequate REs
Four common REs were found to be adequate (which did not cut the Vimentin gene and were
common for both the Vimentin coding sequence and the pET-22b(+) vector sequence, as
mentioned earlier) namely BamHI, EcoRI, SalI and HindIII.
Different combinations of the REs were attempted on the New Englad Biolabs website (Double
digest finder). The best combination turned out to be BamHI and SalI, since they both shared a
common reaction buffer (NEBuffer 3.1) to avoid any loss of product as well as a common
temperature (37 °C) at which both REs were active.
2.10.4 BamHI and SalI RE sequences and cut sites
Both the sequences and the cut sites for the REs were also found on the New England Biolabs
website (Enzyme finder). So that each RE would have space to land (on the Vimentin coding
sequence and the pET-22b(+) vector sequence in order to be able to cut them) three more base
pairs would have to be added to the primers,
BamHI:
5' - G^G A T C C - 3'
3' - C C T A G^G - 5'
Bp required: 3 for landing
SalI:
5' - G^T C G A C - 3'
3' - C A G C T^G - 5'
Bp required: 3 for landing
2.10.5 Primer design with RE sites
The two most important factors during the primer design were to achieve a good
complementarity with the Vimentin coding sequence as well as finding matching melting
temperatures (i.e. annealing temperatures) for both primers. The melting temperatures turned out
to be 62.2 °C for the forward primer and 61.4 °C for the reverse primer, which were somewhat
high but still good since the primers did not differ much.

22
Forwards
5' NNNGGATCCATGTCCACCAGGTCCGTG 3'
5' TCCGGATCCCATGTCCACCAGG 3'
For the final forward primer, the first three nucleotides (from the left to the right) were for
landing of the RE BamHI, the next six nucleotides made up the the BamHI site (where the RE
would cut the Vimentin sequence, highlighted in yellow), the one C nucleotide (highlighted in
red ) was in order for the protein sequence to be in frame with the promoter of the vector and the
last 12 nucleotides were to bind onto the Vimentin coding sequence (in order to isolate it during
PCR).
The fact that the nucleotides TCC (for the landing of BamHI) and the nucleotide C (for the
protein sequence to be in frame) as well as the amount of 12 binding nucleotides were chosen,
was in order to find a matching melting temperature, since the factors that increase it are the
primer’s GC-content as well as the amount of nucleotides the primer is made up of. The same
applied when designing the reverse primer.
Reverses
5' GATGACCTTGAATAAGTCGACNNN 3'
3' NNNCAGCTGAATAAGTTCCAGTAG 5'
5' NNNGTCGACTTATTCAAGGTCATC 3'
5' CCCGTCGACTTATTCAAGGTCATC 3'
For the final reverse primer, the first three nucelotides (from the left to the right) were for
landing of the RE SalI, the next six nuceltides made up the SalI site (where the RE would cut the
Vimentin sequence, highlighted in yellow) and the last 16 nucleotides were to bind onto the
Vimentin coding sequence.
23
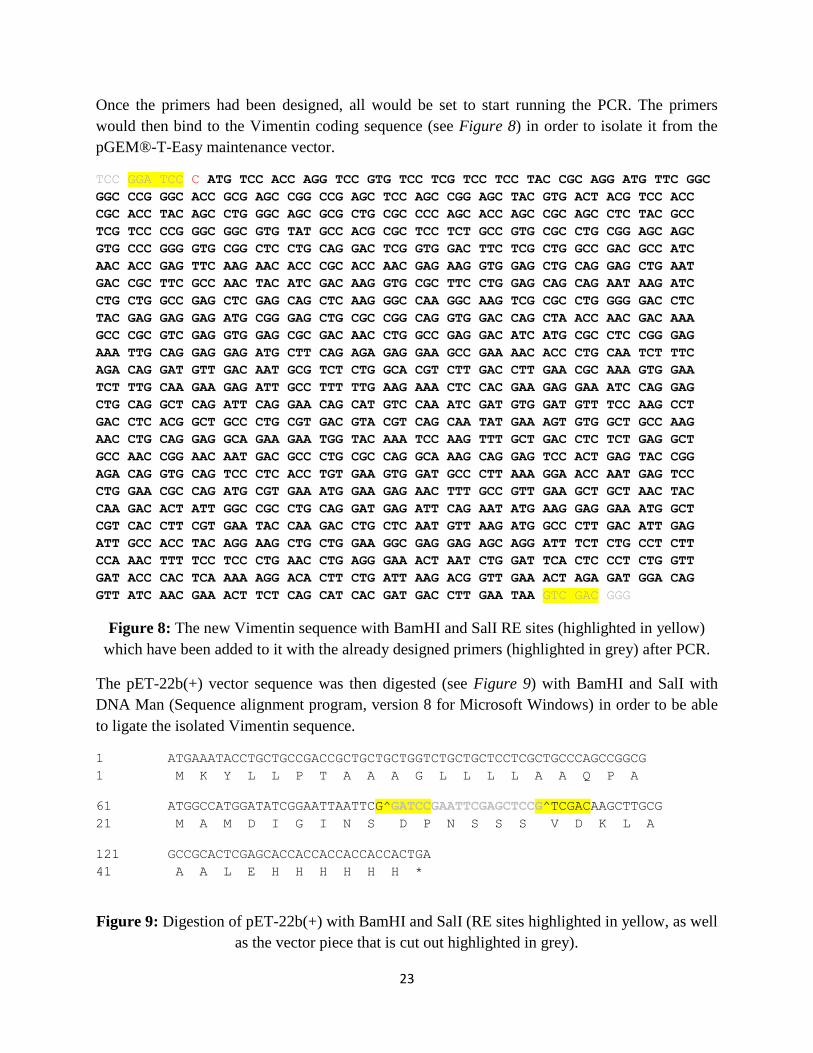
Once the primers had been designed, all would be set to start running the PCR. The primers
would then bind to the Vimentin coding sequence (see Figure 8) in order to isolate it from the
pGEM®-T-Easy maintenance vector.
TCC GGA TCC C ATG TCC ACC AGG TCC GTG TCC TCG TCC TCC TAC CGC AGG ATG TTC GGC
GGC CCG GGC ACC GCG AGC CGG CCG AGC TCC AGC CGG AGC TAC GTG ACT ACG TCC ACC
CGC ACC TAC AGC CTG GGC AGC GCG CTG CGC CCC AGC ACC AGC CGC AGC CTC TAC GCC
TCG TCC CCG GGC GGC GTG TAT GCC ACG CGC TCC TCT GCC GTG CGC CTG CGG AGC AGC
GTG CCC GGG GTG CGG CTC CTG CAG GAC TCG GTG GAC TTC TCG CTG GCC GAC GCC ATC
AAC ACC GAG TTC AAG AAC ACC CGC ACC AAC GAG AAG GTG GAG CTG CAG GAG CTG AAT
GAC CGC TTC GCC AAC TAC ATC GAC AAG GTG CGC TTC CTG GAG CAG CAG AAT AAG ATC
CTG CTG GCC GAG CTC GAG CAG CTC AAG GGC CAA GGC AAG TCG CGC CTG GGG GAC CTC
TAC GAG GAG GAG ATG CGG GAG CTG CGC CGG CAG GTG GAC CAG CTA ACC AAC GAC AAA
GCC CGC GTC GAG GTG GAG CGC GAC AAC CTG GCC GAG GAC ATC ATG CGC CTC CGG GAG
AAA TTG CAG GAG GAG ATG CTT CAG AGA GAG GAA GCC GAA AAC ACC CTG CAA TCT TTC
AGA CAG GAT GTT GAC AAT GCG TCT CTG GCA CGT CTT GAC CTT GAA CGC AAA GTG GAA
TCT TTG CAA GAA GAG ATT GCC TTT TTG AAG AAA CTC CAC GAA GAG GAA ATC CAG GAG
CTG CAG GCT CAG ATT CAG GAA CAG CAT GTC CAA ATC GAT GTG GAT GTT TCC AAG CCT
GAC CTC ACG GCT GCC CTG CGT GAC GTA CGT CAG CAA TAT GAA AGT GTG GCT GCC AAG
AAC CTG CAG GAG GCA GAA GAA TGG TAC AAA TCC AAG TTT GCT GAC CTC TCT GAG GCT
GCC AAC CGG AAC AAT GAC GCC CTG CGC CAG GCA AAG CAG GAG TCC ACT GAG TAC CGG
AGA CAG GTG CAG TCC CTC ACC TGT GAA GTG GAT GCC CTT AAA GGA ACC AAT GAG TCC
CTG GAA CGC CAG ATG CGT GAA ATG GAA GAG AAC TTT GCC GTT GAA GCT GCT AAC TAC
CAA GAC ACT ATT GGC CGC CTG CAG GAT GAG ATT CAG AAT ATG AAG GAG GAA ATG GCT
CGT CAC CTT CGT GAA TAC CAA GAC CTG CTC AAT GTT AAG ATG GCC CTT GAC ATT GAG
ATT GCC ACC TAC AGG AAG CTG CTG GAA GGC GAG GAG AGC AGG ATT TCT CTG CCT CTT
CCA AAC TTT TCC TCC CTG AAC CTG AGG GAA ACT AAT CTG GAT TCA CTC CCT CTG GTT
GAT ACC CAC TCA AAA AGG ACA CTT CTG ATT AAG ACG GTT GAA ACT AGA GAT GGA CAG
GTT ATC AAC GAA ACT TCT CAG CAT CAC GAT GAC CTT GAA TAA GTC GAC GGG
Figure 8: The new Vimentin sequence with BamHI and SalI RE sites (highlighted in yellow)
which have been added to it with the already designed primers (highlighted in grey) after PCR.
The pET-22b(+) vector sequence was then digested (see Figure 9) with BamHI and SalI with
DNA Man (Sequence alignment program, version 8 for Microsoft Windows) in order to be able
to ligate the isolated Vimentin sequence.
1 ATGAAATACCTGCTGCCGACCGCTGCTGCTGGTCTGCTGCTCCTCGCTGCCCAGCCGGCG 1 M K Y L L P T A A A G L L L L A A Q P A
61 ATGGCCATGGATATCGGAATTAATTCG^GATCCGAATTCGAGCTCCG^TCGACAAGCTTGCG 21 M A M D I G I N S D P N S S S V D K L A
121 GCCGCACTCGAGCACCACCACCACCACCACTGA 41 A A L E H H H H H H *
Figure 9: Digestion of pET-22b(+) with BamHI and SalI (RE sites highlighted in yellow, as well
as the vector piece that is cut out highlighted in grey).

24
Once the Vimentin coding sequence had been isolated from the pGEM-T-Easy maintenance
vector and the RE sites had been added to it after the PCR, it was time to ligate it into the pET-
22b(+) cloning/expression vector for final expression of the Vimentin protein. Before this, the
pET-22b(+) vector sequence had also been digested (with the help DNA Man, Sequence
alignment program, version 8 for Microsoft Windows) with BamHI and SalI in order to cut the
vector open and make sure the protein sequence was in frame with the promoter of the vector
(see Figure 10).
ATG AAA TAC CTG CTG CCG ACC GCT GCT GCT GGT CTG CTG CTC CTC GCT GCC CAG CCG
GCG ATG GCC ATG GAT ATC GGA ATT AAT TCG GAT CCC ATG TCC ACC AGG TCC GTG TCC TCG TCC TCC TAC CGC AGG ATG TTC GGC GGC CCG GGC ACC GCG AGC CGG CCG AGC TCC
AGC CGG AGC TAC GTG ACT ACG TCC ACC CGC ACC TAC AGC CTG GGC AGC GCG CTG CGC
CCC AGC ACC AGC CGC AGC CTC TAC GCC TCG TCC CCG GGC GGC GTG TAT GCC ACG CGC
TCC TCT GCC GTG CGC CTG CGG AGC AGC GTG CCC GGG GTG CGG CTC CTG CAG GAC TCG
GTG GAC TTC TCG CTG GCC GAC GCC ATC AAC ACC GAG TTC AAG AAC ACC CGC ACC AAC
GAG AAG GTG GAG CTG CAG GAG CTG AAT GAC CGC TTC GCC AAC TAC ATC GAC AAG GTG
CGC TTC CTG GAG CAG CAG AAT AAG ATC CTG CTG GCC GAG CTC GAG CAG CTC AAG GGC
CAA GGC AAG TCG CGC CTG GGG GAC CTC TAC GAG GAG GAG ATG CGG GAG CTG CGC CGG
CAG GTG GAC CAG CTA ACC AAC GAC AAA GCC CGC GTC GAG GTG GAG CGC GAC AAC CTG
GCC GAG GAC ATC ATG CGC CTC CGG GAG AAA TTG CAG GAG GAG ATG CTT CAG AGA GAG
GAA GCC GAA AAC ACC CTG CAA TCT TTC AGA CAG GAT GTT GAC AAT GCG TCT CTG GCA
CGT CTT GAC CTT GAA CGC AAA GTG GAA TCT TTG CAA GAA GAG ATT GCC TTT TTG AAG
AAA CTC CAC GAA GAG GAA ATC CAG GAG CTG CAG GCT CAG ATT CAG GAA CAG CAT GTC
CAA ATC GAT GTG GAT GTT TCC AAG CCT GAC CTC ACG GCT GCC CTG CGT GAC GTA CGT
CAG CAA TAT GAA AGT GTG GCT GCC AAG AAC CTG CAG GAG GCA GAA GAA TGG TAC AAA
TCC AAG TTT GCT GAC CTC TCT GAG GCT GCC AAC CGG AAC AAT GAC GCC CTG CGC CAG
GCA AAG CAG GAG TCC ACT GAG TAC CGG AGA CAG GTG CAG TCC CTC ACC TGT GAA GTG
GAT GCC CTT AAA GGA ACC AAT GAG TCC CTG GAA CGC CAG ATG CGT GAA ATG GAA GAG
AAC TTT GCC GTT GAA GCT GCT AAC TAC CAA GAC ACT ATT GGC CGC CTG CAG GAT GAG
ATT CAG AAT ATG AAG GAG GAA ATG GCT CGT CAC CTT CGT GAA TAC CAA GAC CTG CTC
AAT GTT AAG ATG GCC CTT GAC ATT GAG ATT GCC ACC TAC AGG AAG CTG CTG GAA GGC
GAG GAG AGC AGG ATT TCT CTG CCT CTT CCA AAC TTT TCC TCC CTG AAC CTG AGG GAA
ACT AAT CTG GAT TCA CTC CCT CTG GTT GAT ACC CAC TCA AAA AGG ACA CTT CTG ATT
AAG ACG GTT GAA ACT AGA GAT GGA CAG GTT ATC AAC GAA ACT TCT CAG CAT CAC GAT
GAC CTT GAA GTC GAC AAG CTT GCG GCC GCA CTC GAG CAC CAC CAC CAC CAC CAC TGA
Figure 10: Ligation of the pET-22b(+) vector (highlighted in grey) and Vimentin (highlighted in
black).
25
3 Results
3.1 Primer design
The forward and reverse primers were designed with the help of the Vimentin coding sequence
taken from NCBI as well as with the help of DNA Man (Sequence alignment program, version 8
for Microsoft Windows). Taking into account the melting temperature for both primers, the self-
complementarity for each one as well as the complementarity between the two the following
primers were designed,
Forward primer:
5'-ATGTCCACCAGGTCCGTGTCC-3' (21 base pairs)
Melting temperature: 56.7 °C
Comments: Good, as an optimal melting temperature would be considered to be somewhere
between 52 and 58 °C (PREMIER Biosoft).
Self-complementarity: -0.57 kcal mol-1
Comments: Good, as the G-value is not too low. If the G-value had been much lower it would
have increased the risk for self-complementation, i.e. when the primer binds to itself and creates
secondary structures. This would lead to the Taq (DNA) polymerase not being able to bind well
to the primer in order to carry out the elongation step during the PCR.
Reverse primer:
5'-TTATTCAAGGTCATCGTGATGCTG-3' (24 base pairs)
Melting temperature: 52 °C
Comments: Quite a low melting temperature, The maximum difference should also be ±5 °C
between the primers, so this primer would be at the limit. However, it would have to do as the
amount of base pairs had already been increased (which in turn increases the primer's melting
temperature) and only these primers could be used (as the coding sequence for Vimentin was
already known and the primers had to bind to it).
Self-complementarity: -0.25 kcal mol-1
Comments: Good, as the G-value is not too low.
Once the designed primers were ready, they would be used for PCR. The purpose of the PCR
was to isolate the Vimentin gene from the cDNA (that had been previously converted from the
mRNA of breast cancer epithelial cells, MDA-MB-231).
26
3.2 Gel electrophoresis
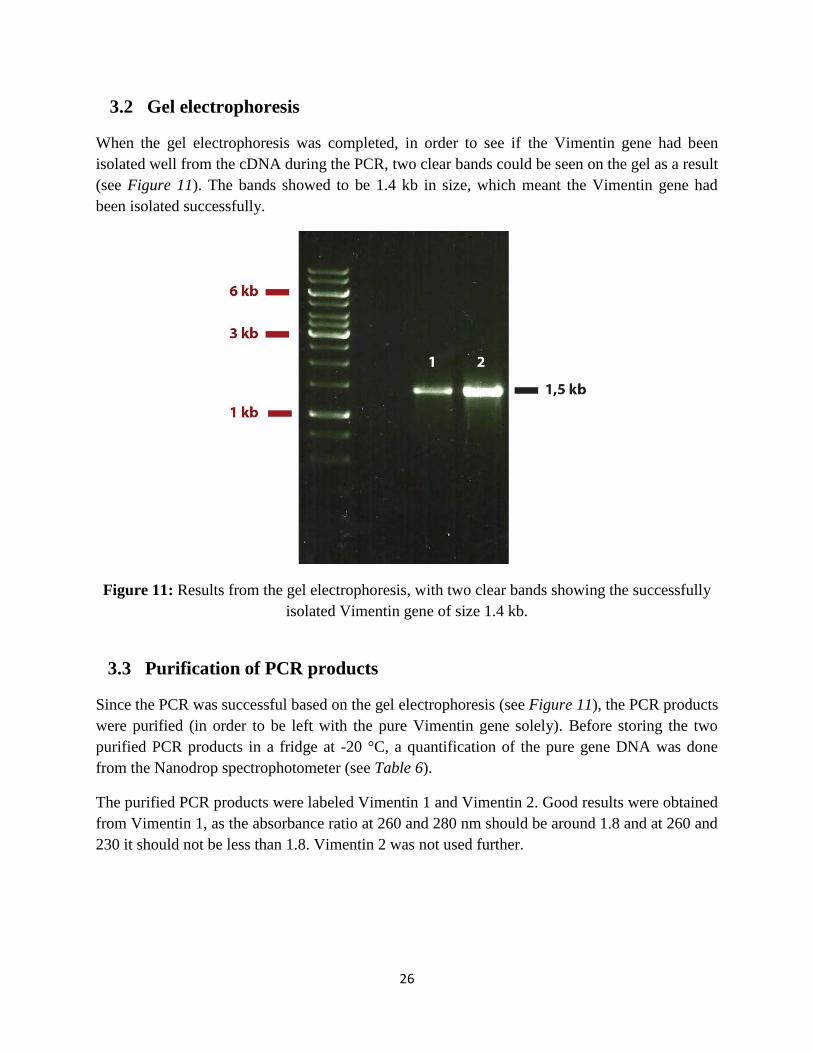
When the gel electrophoresis was completed, in order to see if the Vimentin gene had been
isolated well from the cDNA during the PCR, two clear bands could be seen on the gel as a result
(see Figure 11). The bands showed to be 1.4 kb in size, which meant the Vimentin gene had
been isolated successfully.
Figure 11: Results from the gel electrophoresis, with two clear bands showing the successfully
isolated Vimentin gene of size 1.4 kb.
3.3 Purification of PCR products
Since the PCR was successful based on the gel electrophoresis (see Figure 11), the PCR products
were purified (in order to be left with the pure Vimentin gene solely). Before storing the two
purified PCR products in a fridge at -20 °C, a quantification of the pure gene DNA was done
from the Nanodrop spectrophotometer (see Table 6).
The purified PCR products were labeled Vimentin 1 and Vimentin 2. Good results were obtained
from Vimentin 1, as the absorbance ratio at 260 and 280 nm should be around 1.8 and at 260 and
230 it should not be less than 1.8. Vimentin 2 was not used further.
27
Table 6: Quantification of the purified Vimentin gene from the Nanodrop spectrophotometer.
Conc.n (ng µl
-1) 260/280 260/230
Vimentin 1 71.7 1.91 1.51
Vimentin 2 3.4 1.75 0.46
3.4 Transformation
In order to be able to clone the purified Vimentin gene in XL1-blue cells (competent cells) its
sequence had to be ligated into the maintenance vector pGEM®-T Easy to start with. For the
transformation 10 plates with ampicillin/IPTG/X-Gal were used, four for the standard reaction,
three for the positive control and another three for the negative control. In order to see what
results had been obtained, the plates were taken taken out from shaking in the incubator at 37 °C
after the colonies had grown overnight.
There were some white colonies (containing vectors with inserts) and some blue colonies
(containing vectors without inserts) observed on all plates, for all reactions. The white colour of
the colonies was because once the insert ligated with the vector, the lacZ protein could no longer
be expressed. When the insert does not manage to ligate into the vector, expression of the lacZ
protein is induced by the IPTG in the presence of the substrate of X-gal, which gives the colonies
their blue colour. The observations that were made from the 10 LA plates could be summarized
in Table 7 below.
Table 7: Observations made from blue-white colony screening of the LA plates for the standard
reaction as well as for the positive and negative controls.
Standard reaction Positive control Negative control
LA Amp, 50 µl Few colonies Few colonies Very few colonies
LA Amp, 100 µl Twice as many
colonies as for 50 µl
-
LA Amp, pelleted Many colonies, but
can still see the
individual colonies
Many colonies, but
can still see the
individual colonies
Few colonies
LA, 50 µl So many colonies one
can no longer see the
individual ones. No
amp to kill them,
whether they take up
the plasmid or not
So many colonies one
can no longer see the
individual ones. No
amp to kill them,
whether they take up
the plasmid or not
So many colonies one
can no longer see the
individual ones. No
amp to kill them,
whether they take up
the plasmid or not
Some differences were observed between the plates for all three reactions. The three first plates
for the standard reaction got somewhat more colonies compared to the plates for the positive
28
control. Both reactions should have gotten more or less the same amount of colonies, so the
results turned out good for those plates. However, some colonies were observed on the plates for
the negative control as well, even though there should be none since there was no DNA that
could have been inserted into the vectors. The vectors would need something to ligate to them
and close them in order to be able to enter the cells and help them survive against the ampicillin
on the plates, which means something else rather than DNA could have ligated to them. On the
LA, 50 µl plate there was a lawn of cells for all reactions.
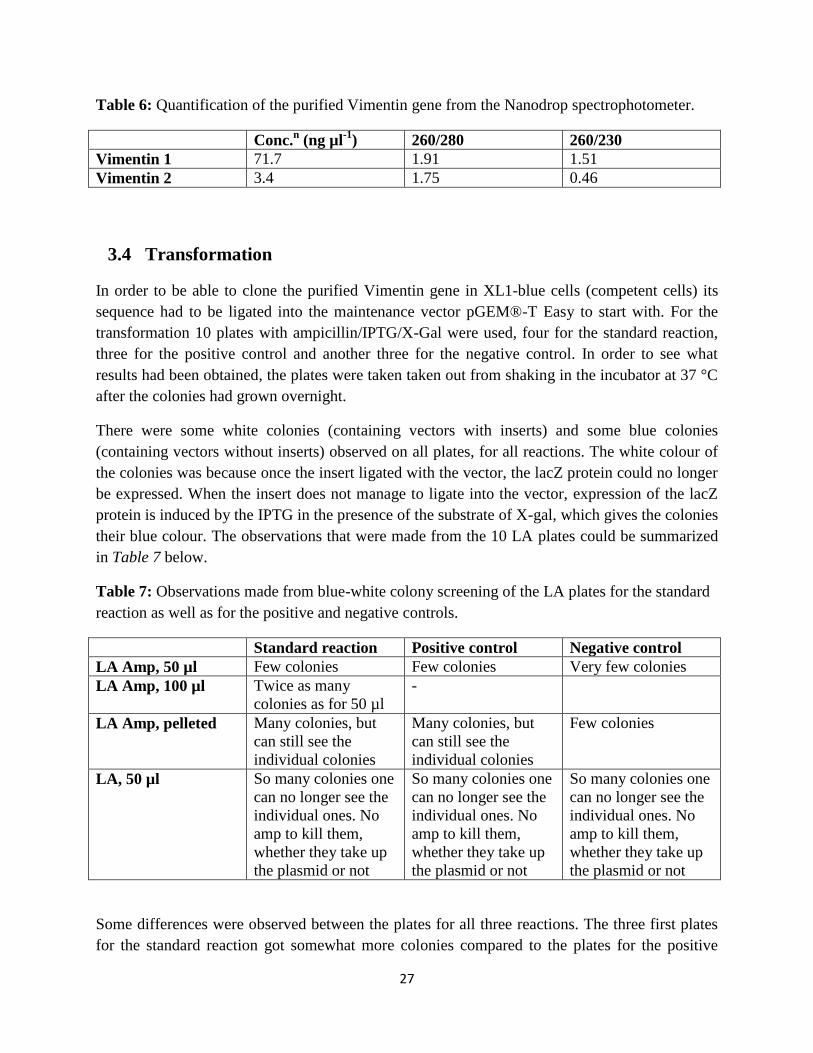
3.5 Colony screening
Following the transformation a Colony PCR was carried out, in order to isolate the Vimentin
gene from the pGEM-T Easy vector in 10 different colonies, which had in turn been picked from
the LA Amp, 100 µl plate. In order to see in which colonies the Vimentin gene had been
transformed successfully, a gel electrophoresis was carried out.
It could be seen that the Vimentin gene had been transformed successfully into the 1st, 3
rd, 5
th and
6th
colonies (se Figure 12) from the gel electrophoresis results.
Figure 12: Results from the gel electrophoresis, with four clear bands showing the transformed
Vimentin gene of size 1.4 kb into the 1st, 3
rd, 5
th, and 6
th colonies.
These four colonies would then undergo plasmid extraction in order to separate the plasmid
DNA from the bacterial cells, as it was necessary to purify the plasmid DNA before it could be
used further.
29
3.6 Plasmid extraction
Once the plasmid DNA had been extracted from the 1st, 3
rd, 5
th and 6
th colonies, and before it was
stored at -20 °C, it was taken to the Nanodrop spectrophotometer in order to see how much of
the plasmid DNA the colonies contained, i.e. the concentration of the Vimentin gene sequence.
The results where 60.4 ng µl-1
for the 1st colony, 233.1 ng µl
-1 for the 3
rd colony, 139.4 ng µl
-1 for
the 5th
colony and 72.8 ng µl-1
for the 6th
colony. Since colonies 3 and 5 showed to have the
highest concentration of the gene sequence, they were sent off to another laboratory for
sequencing (in order to see that the sequence obtained agreed with the Vimentin gene sequence
from the NCBI website, which was later confirmed).
30
4 Discussion
The results from all parts of the experimental procedure showed to be good and therefore the
Vimentin protein was isolated successfully from the mRNA of breast cancer epithelial cells
(MDA-MB.231). Even if there was not enough time to do the last part in the laboratory but it
was designed instead, the cloning and the expression design showed how it is possible to transfer
the Vimentin gene onto a high expression vector such as pET-22b(+). The pET-22b(+) vector
would make it possible for the Vimentin protein to be overexpressed in different kinds of cells,
and from there it would in turn be feasible to investigate its function in both normal conditions
as well as in disease conditions and compare them. This would be of interest for further studies,
as it is still quite uncertain which is the real function of the Vimentin protein.
In some previous studies it had been suggested how the overexpression of the Vimentin protein
was correlated with the progression of aggressive cancer cell lines as well as an increased
migration of such cells (Satelli et al., 2011). In the future, it is hoped that the Vimentin protein
can become a therapeutic target where research of new therapeutic agents, together with other
anti-cancer agents, should be done. The Vimentin protein could also serve as a useful biomarker,
i.e. its expression could be of help when looking at what stage a given cancer is at (Satelli et al.,
2011).
31
Acknowledgements
I would like to express my sincerest thanks to Catherine Kaschula and David van der Spoel for
letting me take part in this research project. I would also like to thank Suhail Rafudeen for all his
support and also to the two best supervisors one could have, Tamaryn Ellick and Ali Kiyaei for
their great guidance and constructive advice. Special thanks goes to Chiara Testini who was with
me from the beginning to the end, from helping me find the project to helping me with my thesis
during the last week before it had to be handed in. Last but not least I would also like to thank all
the members of the Plant Biotechnology laboratory at the University of Cape Town for making
me feel so welcome and for an excellent team spirit, which made it into an awesome experience
both from a professional and social perspective.
32
5 References
A. Satelli, S. Li; "Vimentin in cancer and its potential as a molecular target for cancer therapy";
Cellular and Molecular Life Sciences, 2011
pGEM®-T Easy maintenance vector (Promega)
pET-22b(+) cloning/expression vector (Novagen)
Promega protocol for Standard First-Strand Synthesis of cDNA
RNasin® (Promega)
NCBI website, access number NM_003380.3,
http://www.ncbi.nlm.nih.gov/nuccore/NM_003380.3
Promega protocol for Go Taq® PCR Core Systems
Go Taq® (Promega)
Go Taq® buffer (Promega)
Promega protocol for Wizard® SV Gel and PCR Clean-Up System
Promega protocol for Ligations using the pGEM®-T and pGEM®-T Easy Vectors
Promega protocol for Transformation using the pGEM®-T and the pGEM®-T Easy Vector
Ligation Reactions
Promega protocol for Wizard® Plus SV Minipreps DNA Purification System (Centrifugation
protocol)
New Englad Biolabs website (Double digest finder),
https://www.neb.com/tools-and-resources/interactive-tools/double-digest-finder
New England Biolabs website (Enzyme finder),
https://www.neb.com/tools-and-resources/interactive-tools/enzyme-finder
PREMIER Biosoft website,
http://www.premierbiosoft.com/tech_notes/PCR_Primer_Design.html
DNA Man, Sequence alignment program, version 8 for Microsoft Windows