Embed Size (px)
Citation preview

Isn’t Christmas Jolly?
©ME Ink

3 To make the checkerboard border: Alternately sew 2–1½"x 22" red dot and 2–1½"x 22" green dot strips together.Press in one direction. Make 4 strip sets. Cut 30 segments 2½" wide.
4 Assemble the checkerboard border: Sew 8 segments together to make 2 side borders. Sew 7 segments, 1–2½” red dot and 1–2½”green dot square together to make the top and bottom borders. Make 2.
"x 58"
Construction
1 Trim Isn’t Christmas Jolly center panel ¼" beyond the narrow white border (outside theynarrow red border). Then measure length of the trimmed panel. Note: Use this measurementto cut green tonal dot center side border.
2 Cut 2 green dot borders to the above measurement. Sew to the sides of panel. Press borders away from the panel. Measure width of panel, including green side borders, andcut top and bottom borders to that measurement. Add to top and bottom of the panel. Press away from the panel.Repeat above steps to add white border strips to quilt center. Sew sides first then top and bottom.Press away from the panel. Use rotary cutter to trim quilt center to measure 28½"x 32½" with seams.
Quilter Basics
Side borders.Make 2.
2½”x32½” with seams.
Isn’t Christmas Jolly?
Join 8 segments.
Join 7 segments.
Top and bottom borders.Make 2.
2½”x32½” with seams.2½” 2½”
Make 30.2½"x4½
with seams.
Make 4 strip sets. Cut into 2½” wide segments.
1½"x 22" strip2 p
1½” g
reen
dot
bor
der
1½” green dot border4½" white border
4½" w
hite
bor
der
©ME Ink
4
’t
on and peppermint candy, stockings full of toys, glittering trees, isn't Christmas jolly? Easy bopiecing and corner triangles will have you snuggling under this holiday quilt in no time!p
Trim quilt center to measure
28½"x 32½"with seams.
©ME Ink
Main BlockMake 38.
4½”x4½”with seamsSet aside 34.
Make 4
54½”x58½” with seams
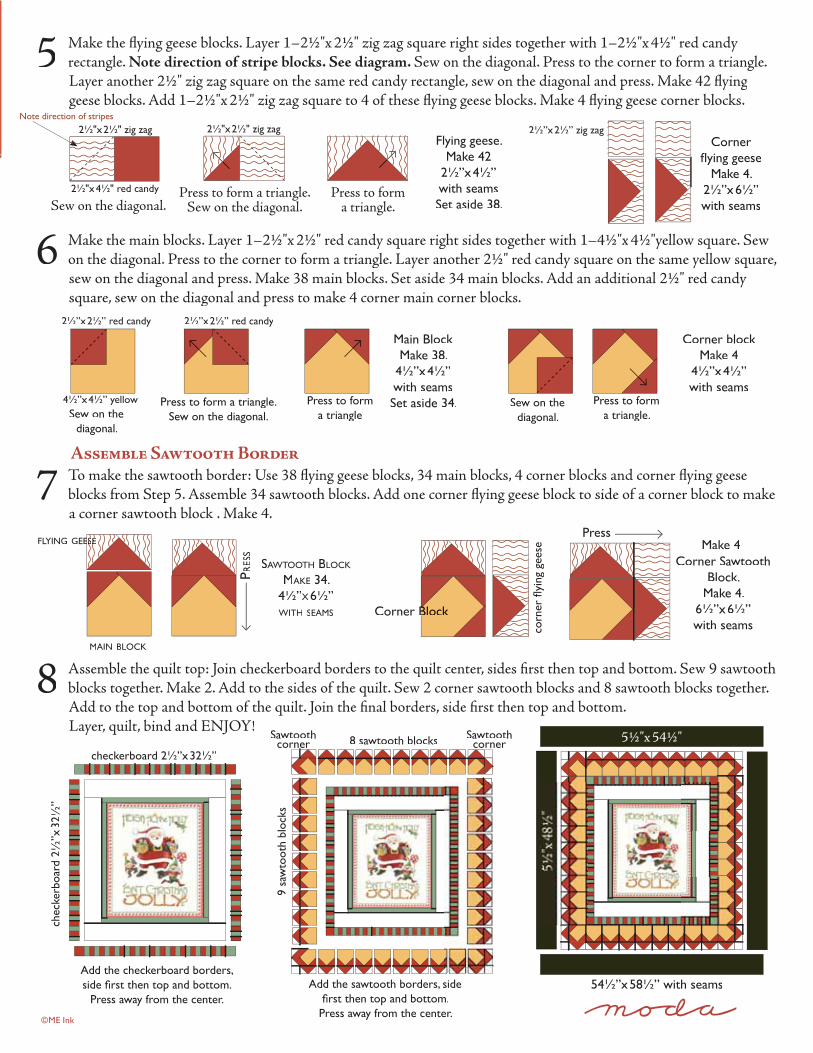
5 Make the flying geese blocks. Layer 1–2½"x 2½" zig zag square right sides together with 1–2½"x 4½" red candy rectangle. Note direction of stripe blocks. See diagram. Sew on the diagonal. Press to the corner to form a triangle. Layer another 2½" zig zag square on the same red candy rectangle, sew on the diagonal and press. Make 42 flying geese blocks. Add 1–2½"x 2½" zig zag square to 4 of these flying geese blocks. Make 4 flying geese corner blocks.
6 Make the main blocks. Layer 1–2½"x 2½" red candy square right sides together with 1–4½"x 4½"yellow square. Sewon the diagonal. Press to the corner to form a triangle. Layer another 2½" red candy square on the same yellow square, sew on the diagonal and press. Make 38 main blocks. Set aside 34 main blocks. Add an additional 2½" red candy square, sew on the diagonal and press to make 4 corner main corner blocks.
7 To make the sawtooth border: Use 38 flying geese blocks, 34 main blocks, 4 corner blocks and corner flying geese blocks from Step 5. Assemble 34 sawtooth blocks. Add one corner flying geese block to side of a corner block to make a corner sawtooth block . Make 4.
8 Assemble the quilt top: Join checkerboard borders to the quilt center, sides first then top and bottom. Sew 9 sawtooth blocks together. Make 2. Add to the sides of the quilt. Sew 2 corner sawtooth blocks and 8 sawtooth blocks together. Add to the top and bottom of the quilt. Join the final borders, side first then top and bottom. Layer, quilt, bind and ENJOY!
Press to form a triangle.Sew on the diagonal.
Press to forma triangle
Press to form a triangle.
Make 422½”x4½”with seamsSet aside 38.Sew on the diagonal.
2½"x2½" zig zag
Press to form a triangle.Sew on the diagonal.
2½"x2½" zig zag
Press to form a triangle.
Corner blockMake 4
4½”x4½”with seams
Corner Sawtooth Block.
Make 4.6½”x6½”with seams
Corner
Make 4.2½”x6½”with seams
Sew on thediagonal.
Sew on the diagonal.
Press
Add the checkerboard borders,
chec
kerb
oard
2½
”x32
½”
checkerboard 2½”x32½”
5½"x 54½"
5½"x
48½
"
Add the sawtooth borders, side
9 sa
wto
oth
bloc
ks
8 sawtooth blocksSawtooth corner
Note direction of stripes
2½”x2½” zig zag
Assemble Sawtooth Border
Sawtooth corner
SAWTOOTH BLOCK
MAKE 34.4½”X 6½”WITH SEAMS
MAIN BLOCK
PRES
S
FLYING GEEEEESSEE
Corner BBlockBBBBBBB
©ME Ink

Fabric requirements
Isn’t Christmas Jolly?
PS18010 — SUGGESTED RETAIL $3.00
www.modafabrics.comwww.maryengelbreit.com
Backing – 4 yards
Yellow Tree Print18016–14 ⅔ yardYellow sawtooth
Red and White Stripe18012–12 ½ yardZig zag
Black Candy Print18011–13 one yardFinal border
White Border Print18015–14 ⅝ yardWhite border
Red Candy Print18011–12 ⅞ yardRed sawtooth
Isn't Christmas Jolly PanelI18010-121⅔ yard approx.⅔
Green Tonal Dot18004-41 ½ yardGreen border & checkerboard
Red Tonal Dot
18004-42 1 yardRed checkerboard & binding
Green Tonal Dot(Green border & checkerboard))Cut 8–1½"x WOF strips
cut 4 strips at fold to yield8–1½”x 22” for checkerboard
use 4 remaining strips for center borderCut 2–2½"x 2½"
Isn't Christmas Jolly Panel Cutting directions inside.
Yellow Tree Print (Yellow sawtooth)Cut 5–4½”x½½ WOF strips
subcut 38–4½”x 4½” squares
Red and White Stripe (Zig zag)Cut 6–2½”x WOF strips
subcut 88–2½”x 2½” squares
Black Candy Print (Final border)Cut 5–5½”x½½ WOF strips
piece and cut 2–5½”x 48½” and 2–5½”x 54½” borders
White Border Print(Center Border)Cut 4–4½”x WOF strips
Red Candy Print(Red sawtooth)Cut 10–2½”x½½ WOF strips
subcut 42–2½”x 4½” and 80–2½”x 2½” squares
Red Tonal Dot (Red checkerboard)Cut 4–1½”x½½ WOF cut at fold to yield
8–1½”x 22”Cut 6–2½”x½½ WOF strips
Subcut (2) 2½"x 2½" squares useremainder for binding
Cutting:
©ME Ink