Embed Size (px)
Citation preview
APPLICATION NOTE
Copyright © 2009, Juniper Networks, Inc.
IPS SecurIty PolIcy creatIon for JunIPer networkS SrX SerIeS ServIceS GatewayS
Enabling Advanced Security on SRX Series Services Gateways
ii Copyright © 2009, Juniper Networks, Inc.
aPPlIcatIon note - IPS Security Policy creation for Juniper networks SrX Series Services Gateways
Table of ContentsIntroduction . . . . . . . . . . . . . . . . . . . . . . . . . . . . . . . . . . . . . . . . . . . . . . . . . . . . . . . . . . . . . . . . . . . . . . . . . . . . . . . . . . . . . . . . 1
Scope . . . . . . . . . . . . . . . . . . . . . . . . . . . . . . . . . . . . . . . . . . . . . . . . . . . . . . . . . . . . . . . . . . . . . . . . . . . . . . . . . . . . . . . . . . . . . . 1
FAQs . . . . . . . . . . . . . . . . . . . . . . . . . . . . . . . . . . . . . . . . . . . . . . . . . . . . . . . . . . . . . . . . . . . . . . . . . . . . . . . . . . . . . . . . . . 1
Basic Configuration Steps . . . . . . . . . . . . . . . . . . . . . . . . . . . . . . . . . . . . . . . . . . . . . . . . . . . . . . . . . . . . . . . . . . . . . . . . 1
System Licensing . . . . . . . . . . . . . . . . . . . . . . . . . . . . . . . . . . . . . . . . . . . . . . . . . . . . . . . . . . . . . . . . . . . . . . . . . . . . . . . 2
SrX Series and clI Security Policy configuration . . . . . . . . . . . . . . . . . . . . . . . . . . . . . . . . . . . . . . . . . . . . . . . . . . . . . . . . 3
Basic Network Configuration. . . . . . . . . . . . . . . . . . . . . . . . . . . . . . . . . . . . . . . . . . . . . . . . . . . . . . . . . . . . . . . . . . . . . . 3
Initial Configuration Assumptions. . . . . . . . . . . . . . . . . . . . . . . . . . . . . . . . . . . . . . . . . . . . . . . . . . . . . . . . . . . . . . . . . . 3
configure networking and Basic Security . . . . . . . . . . . . . . . . . . . . . . . . . . . . . . . . . . . . . . . . . . . . . . . . . . . . . . . . . . . . . . . 4
Interfaces . . . . . . . . . . . . . . . . . . . . . . . . . . . . . . . . . . . . . . . . . . . . . . . . . . . . . . . . . . . . . . . . . . . . . . . . . . . . . . . . . . 4
Security Zones. . . . . . . . . . . . . . . . . . . . . . . . . . . . . . . . . . . . . . . . . . . . . . . . . . . . . . . . . . . . . . . . . . . . . . . . . . . . . . 4
Security Policies . . . . . . . . . . . . . . . . . . . . . . . . . . . . . . . . . . . . . . . . . . . . . . . . . . . . . . . . . . . . . . . . . . . . . . . . . . . . . . . . 5
IPS Security Policy . . . . . . . . . . . . . . . . . . . . . . . . . . . . . . . . . . . . . . . . . . . . . . . . . . . . . . . . . . . . . . . . . . . . . . . . . . 5
Firewall Security Policy . . . . . . . . . . . . . . . . . . . . . . . . . . . . . . . . . . . . . . . . . . . . . . . . . . . . . . . . . . . . . . . . . . . . . . 7
IPS Logging . . . . . . . . . . . . . . . . . . . . . . . . . . . . . . . . . . . . . . . . . . . . . . . . . . . . . . . . . . . . . . . . . . . . . . . . . . . . . . . . . . . . 9
IPS Security-Package Update . . . . . . . . . . . . . . . . . . . . . . . . . . . . . . . . . . . . . . . . . . . . . . . . . . . . . . . . . . . . . . . . . . . . . 9
Verify Configuration . . . . . . . . . . . . . . . . . . . . . . . . . . . . . . . . . . . . . . . . . . . . . . . . . . . . . . . . . . . . . . . . . . . . . . . . . . . . 11
Log Sample . . . . . . . . . . . . . . . . . . . . . . . . . . . . . . . . . . . . . . . . . . . . . . . . . . . . . . . . . . . . . . . . . . . . . . . . . . . . . . . 11
SrX Series and nSM Security Policy configuration . . . . . . . . . . . . . . . . . . . . . . . . . . . . . . . . . . . . . . . . . . . . . . . . . . . . . . 12
Overview. . . . . . . . . . . . . . . . . . . . . . . . . . . . . . . . . . . . . . . . . . . . . . . . . . . . . . . . . . . . . . . . . . . . . . . . . . . . . . . . . . . . . . 12
Import SRX Series Device into NSM . . . . . . . . . . . . . . . . . . . . . . . . . . . . . . . . . . . . . . . . . . . . . . . . . . . . . . . . . . . . . . . 13
Configuring Security Policy . . . . . . . . . . . . . . . . . . . . . . . . . . . . . . . . . . . . . . . . . . . . . . . . . . . . . . . . . . . . . . . . . . . . . . 16
Inventory Reconciliation . . . . . . . . . . . . . . . . . . . . . . . . . . . . . . . . . . . . . . . . . . . . . . . . . . . . . . . . . . . . . . . . . . . . . 16
IDP Detector Update. . . . . . . . . . . . . . . . . . . . . . . . . . . . . . . . . . . . . . . . . . . . . . . . . . . . . . . . . . . . . . . . . . . . . . . . . . . . 18
Configuring from Central Management Policy Mode . . . . . . . . . . . . . . . . . . . . . . . . . . . . . . . . . . . . . . . . . . . . . . . . . 19
Firewall Rule Base . . . . . . . . . . . . . . . . . . . . . . . . . . . . . . . . . . . . . . . . . . . . . . . . . . . . . . . . . . . . . . . . . . . . . . . . . 20
Configure Firewall Zones . . . . . . . . . . . . . . . . . . . . . . . . . . . . . . . . . . . . . . . . . . . . . . . . . . . . . . . . . . . . . . . . . . . . 20
Configuring from In-Device Management Policy Mode. . . . . . . . . . . . . . . . . . . . . . . . . . . . . . . . . . . . . . . . . . . . . . . . 21
Access Configuration Details . . . . . . . . . . . . . . . . . . . . . . . . . . . . . . . . . . . . . . . . . . . . . . . . . . . . . . . . . . . . . . . . . 21
Configure Interfaces . . . . . . . . . . . . . . . . . . . . . . . . . . . . . . . . . . . . . . . . . . . . . . . . . . . . . . . . . . . . . . . . . . . . . . . . 21
Configure Security Zones . . . . . . . . . . . . . . . . . . . . . . . . . . . . . . . . . . . . . . . . . . . . . . . . . . . . . . . . . . . . . . . . . . . . 22
Assign Interfaces to Security Zones . . . . . . . . . . . . . . . . . . . . . . . . . . . . . . . . . . . . . . . . . . . . . . . . . . . . . . . . . . . 22
Create Firewall Policy and Associate IPS Services . . . . . . . . . . . . . . . . . . . . . . . . . . . . . . . . . . . . . . . . . . . . . . . 23
Select Default Firewall Policy . . . . . . . . . . . . . . . . . . . . . . . . . . . . . . . . . . . . . . . . . . . . . . . . . . . . . . . . . . . . . . . . 23
Configure IPS Policy . . . . . . . . . . . . . . . . . . . . . . . . . . . . . . . . . . . . . . . . . . . . . . . . . . . . . . . . . . . . . . . . . . . . . . . . 24
Set Traceoptions . . . . . . . . . . . . . . . . . . . . . . . . . . . . . . . . . . . . . . . . . . . . . . . . . . . . . . . . . . . . . . . . . . . . . . . . . . . 24
Set Logging . . . . . . . . . . . . . . . . . . . . . . . . . . . . . . . . . . . . . . . . . . . . . . . . . . . . . . . . . . . . . . . . . . . . . . . . . . . . . . . 25
Update Device . . . . . . . . . . . . . . . . . . . . . . . . . . . . . . . . . . . . . . . . . . . . . . . . . . . . . . . . . . . . . . . . . . . . . . . . . . . . . 25
Copyright © 2009, Juniper Networks, Inc. iii
aPPlIcatIon note - IPS Security Policy creation for Juniper networks SrX Series Services Gateways
SrX Series and J-web Security Policy configuration . . . . . . . . . . . . . . . . . . . . . . . . . . . . . . . . . . . . . . . . . . . . . . . . . . . . . 26
Overview. . . . . . . . . . . . . . . . . . . . . . . . . . . . . . . . . . . . . . . . . . . . . . . . . . . . . . . . . . . . . . . . . . . . . . . . . . . . . . . . . . . . . . 26
Configure Device . . . . . . . . . . . . . . . . . . . . . . . . . . . . . . . . . . . . . . . . . . . . . . . . . . . . . . . . . . . . . . . . . . . . . . . . . . . . . . . 26
Network Interfaces . . . . . . . . . . . . . . . . . . . . . . . . . . . . . . . . . . . . . . . . . . . . . . . . . . . . . . . . . . . . . . . . . . . . . . . . . 26
Security Zone. . . . . . . . . . . . . . . . . . . . . . . . . . . . . . . . . . . . . . . . . . . . . . . . . . . . . . . . . . . . . . . . . . . . . . . . . . . . . . 27
Configure Security Policy . . . . . . . . . . . . . . . . . . . . . . . . . . . . . . . . . . . . . . . . . . . . . . . . . . . . . . . . . . . . . . . . . . . . . . . . 28
Firewall . . . . . . . . . . . . . . . . . . . . . . . . . . . . . . . . . . . . . . . . . . . . . . . . . . . . . . . . . . . . . . . . . . . . . . . . . . . . . . . . . . 28
IPS. . . . . . . . . . . . . . . . . . . . . . . . . . . . . . . . . . . . . . . . . . . . . . . . . . . . . . . . . . . . . . . . . . . . . . . . . . . . . . . . . . . . . . . 29
Set Notification . . . . . . . . . . . . . . . . . . . . . . . . . . . . . . . . . . . . . . . . . . . . . . . . . . . . . . . . . . . . . . . . . . . . . . . . . . . . 30
Activate Policy . . . . . . . . . . . . . . . . . . . . . . . . . . . . . . . . . . . . . . . . . . . . . . . . . . . . . . . . . . . . . . . . . . . . . . . . . . . . . 30
Install and Configure Security Package Update. . . . . . . . . . . . . . . . . . . . . . . . . . . . . . . . . . . . . . . . . . . . . . . . . . 31
Configure Logging. . . . . . . . . . . . . . . . . . . . . . . . . . . . . . . . . . . . . . . . . . . . . . . . . . . . . . . . . . . . . . . . . . . . . . . . . . 31
about Juniper networks . . . . . . . . . . . . . . . . . . . . . . . . . . . . . . . . . . . . . . . . . . . . . . . . . . . . . . . . . . . . . . . . . . . . . . . . . . . . . 32
Copyright © 2009, Juniper Networks, Inc. 1
aPPlIcatIon note - IPS Security Policy creation for Juniper networks SrX Series Services Gateways
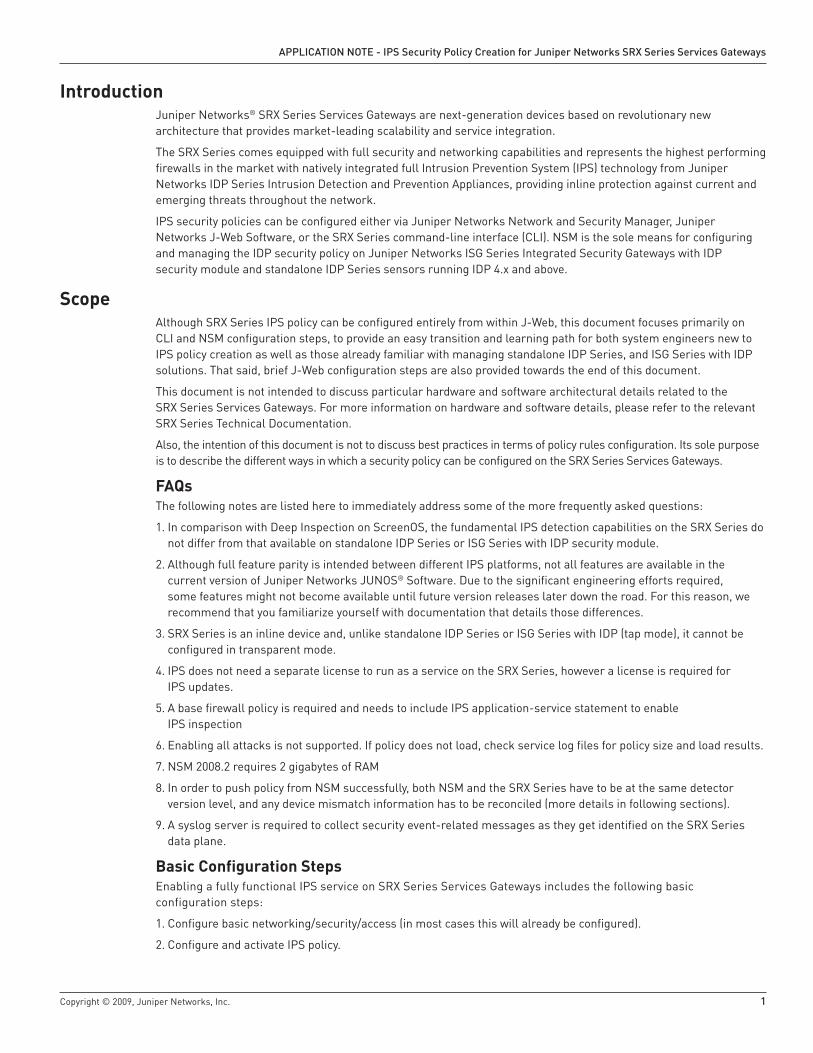
IntroductionJuniper Networks® SRX Series Services Gateways are next-generation devices based on revolutionary new architecture that provides market-leading scalability and service integration.
The SRX Series comes equipped with full security and networking capabilities and represents the highest performing firewalls in the market with natively integrated full Intrusion Prevention System (IPS) technology from Juniper Networks IDP Series Intrusion Detection and Prevention Appliances, providing inline protection against current and emerging threats throughout the network.
IPS security policies can be configured either via Juniper Networks Network and Security Manager, Juniper Networks J-Web Software, or the SRX Series command-line interface (CLI). NSM is the sole means for configuring and managing the IDP security policy on Juniper Networks ISG Series Integrated Security Gateways with IDP security module and standalone IDP Series sensors running IDP 4.x and above.
ScopeAlthough SRX Series IPS policy can be configured entirely from within J-Web, this document focuses primarily on CLI and NSM configuration steps, to provide an easy transition and learning path for both system engineers new to IPS policy creation as well as those already familiar with managing standalone IDP Series, and ISG Series with IDP solutions. That said, brief J-Web configuration steps are also provided towards the end of this document.
This document is not intended to discuss particular hardware and software architectural details related to the SRX Series Services Gateways. For more information on hardware and software details, please refer to the relevant SRX Series Technical Documentation.
Also, the intention of this document is not to discuss best practices in terms of policy rules configuration. Its sole purpose is to describe the different ways in which a security policy can be configured on the SRX Series Services Gateways.
FAQsThe following notes are listed here to immediately address some of the more frequently asked questions:
In comparison with Deep Inspection on ScreenOS, the fundamental IPS detection capabilities on the SRX Series do 1. not differ from that available on standalone IDP Series or ISG Series with IDP security module.
Although full feature parity is intended between different IPS platforms, not all features are available in the 2. current version of Juniper Networks JUNOS® Software. Due to the significant engineering efforts required, some features might not become available until future version releases later down the road. For this reason, we recommend that you familiarize yourself with documentation that details those differences.
SRX Series is an inline device and, unlike standalone IDP Series or ISG Series with IDP (tap mode), it cannot be 3. configured in transparent mode.
IPS does not need a separate license to run as a service on the SRX Series, however a license is required for 4. IPS updates.
A base firewall policy is required and needs to include IPS application-service statement to enable 5. IPS inspection
Enabling all attacks is not supported. If policy does not load, check service log files for policy size and load results.6.
NSM 2008.2 requires 2 gigabytes of RAM7.
In order to push policy from NSM successfully, both NSM and the SRX Series have to be at the same detector 8. version level, and any device mismatch information has to be reconciled (more details in following sections).
A syslog server is required to collect security event-related messages as they get identified on the SRX Series 9. data plane.
Basic Configuration StepsEnabling a fully functional IPS service on SRX Series Services Gateways includes the following basic configuration steps:
Configure basic networking/security/access (in most cases this will already be configured).1.
Configure and activate IPS policy.2.
2 Copyright © 2009, Juniper Networks, Inc.
aPPlIcatIon note - IPS Security Policy creation for Juniper networks SrX Series Services Gateways
Configure firewall policy to associate specific rules with IPS3.
Configure logging.4.
Update security-package.5.
Verify configuration and test functionality.6.
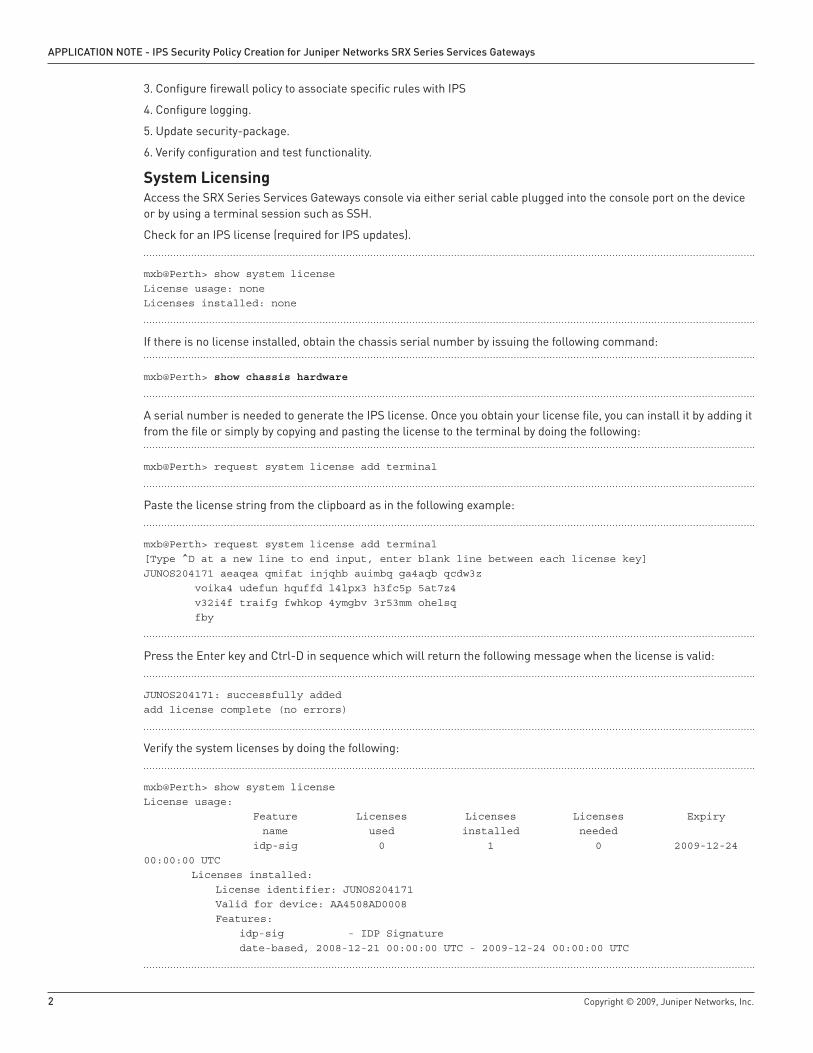
System LicensingAccess the SRX Series Services Gateways console via either serial cable plugged into the console port on the device or by using a terminal session such as SSH.
Check for an IPS license (required for IPS updates).
mxb@Perth> show system license License usage: noneLicenses installed: none
If there is no license installed, obtain the chassis serial number by issuing the following command:
mxb@Perth> show chassis hardware
A serial number is needed to generate the IPS license. Once you obtain your license file, you can install it by adding it from the file or simply by copying and pasting the license to the terminal by doing the following:
mxb@Perth> request system license add terminal
Paste the license string from the clipboard as in the following example:
mxb@Perth> request system license add terminal [Type ^D at a new line to end input, enter blank line between each license key]JUNOS204171 aeaqea qmifat injqhb auimbq ga4aqb qcdw3z voika4 udefun hquffd l4lpx3 h3fc5p 5at7z4 v32i4f traifg fwhkop 4ymgbv 3r53mm ohelsq fby
Press the Enter key and Ctrl-D in sequence which will return the following message when the license is valid:
JUNOS204171: successfully addedadd license complete (no errors)
Verify the system licenses by doing the following:
mxb@Perth> show system license License usage: Feature Licenses Licenses Licenses Expiry name used installed needed idp-sig 0 1 0 2009-12-24 00:00:00 UTC Licenses installed: License identifier: JUNOS204171 Valid for device: AA4508AD0008 Features: idp-sig - IDP Signature date-based, 2008-12-21 00:00:00 UTC - 2009-12-24 00:00:00 UTC
Copyright © 2009, Juniper Networks, Inc. 3
aPPlIcatIon note - IPS Security Policy creation for Juniper networks SrX Series Services Gateways
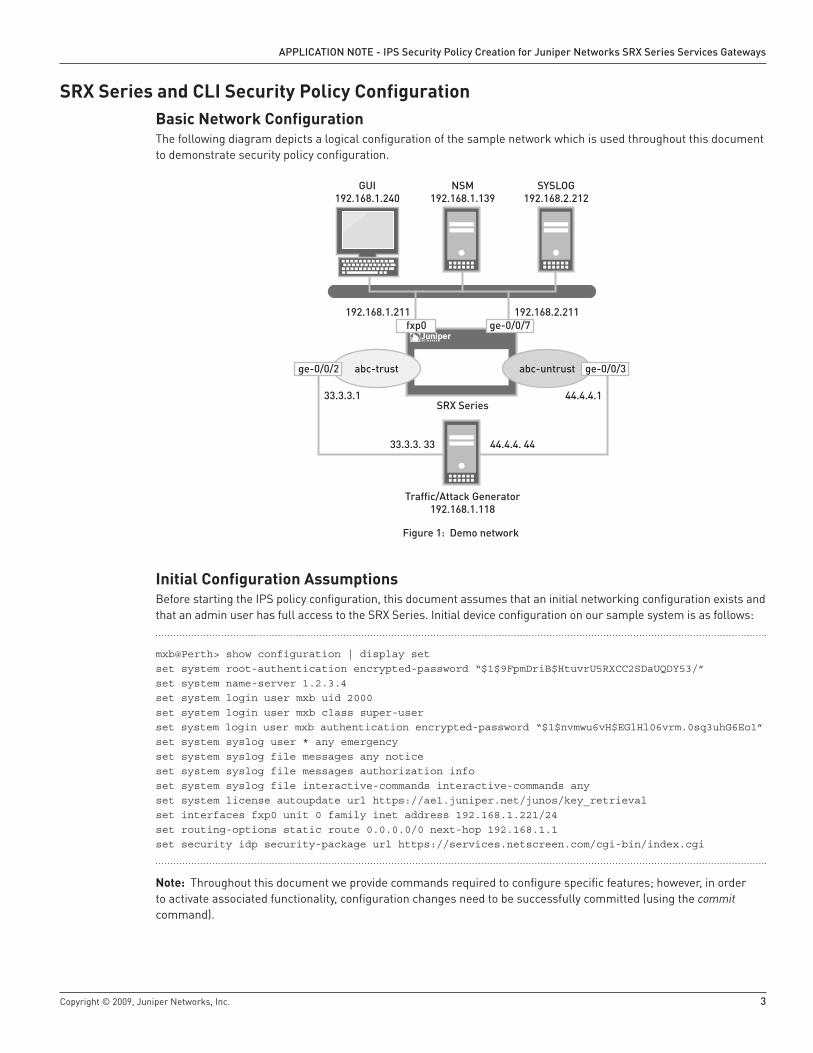
SRX Series and CLI Security Policy ConfigurationBasic Network ConfigurationThe following diagram depicts a logical configuration of the sample network which is used throughout this document to demonstrate security policy configuration.
figure 1: Demo network
Initial Configuration AssumptionsBefore starting the IPS policy configuration, this document assumes that an initial networking configuration exists and that an admin user has full access to the SRX Series. Initial device configuration on our sample system is as follows:
mxb@Perth> show configuration | display set set system root-authentication encrypted-password “$1$9FpmDriB$HtuvrU5RXCC2SDaUQDY53/”set system name-server 1.2.3.4set system login user mxb uid 2000set system login user mxb class super-userset system login user mxb authentication encrypted-password “$1$nvmwu6vH$EGlHl06vrm.0sq3uhG6Eo1”set system syslog user * any emergencyset system syslog file messages any noticeset system syslog file messages authorization infoset system syslog file interactive-commands interactive-commands anyset system license autoupdate url https://ae1.juniper.net/junos/key_retrievalset interfaces fxp0 unit 0 family inet address 192.168.1.221/24set routing-options static route 0.0.0.0/0 next-hop 192.168.1.1set security idp security-package url https://services.netscreen.com/cgi-bin/index.cgi
Note: Throughout this document we provide commands required to configure specific features; however, in order to activate associated functionality, configuration changes need to be successfully committed (using the commit command).
fxp0 ge-0/0/7192.168.2.211192.168.1.211
33.3.3.1 44.4.4.1
33.3.3. 33 44.4.4. 44
abc-trust abc-untrust
SRX Series
Traffic/Attack Generator192.168.1.118
NSM192.168.1.139
SYSLOG192.168.2.212
GUI192.168.1.240
ge-0/0/3ge-0/0/2
4 Copyright © 2009, Juniper Networks, Inc.
aPPlIcatIon note - IPS Security Policy creation for Juniper networks SrX Series Services Gateways
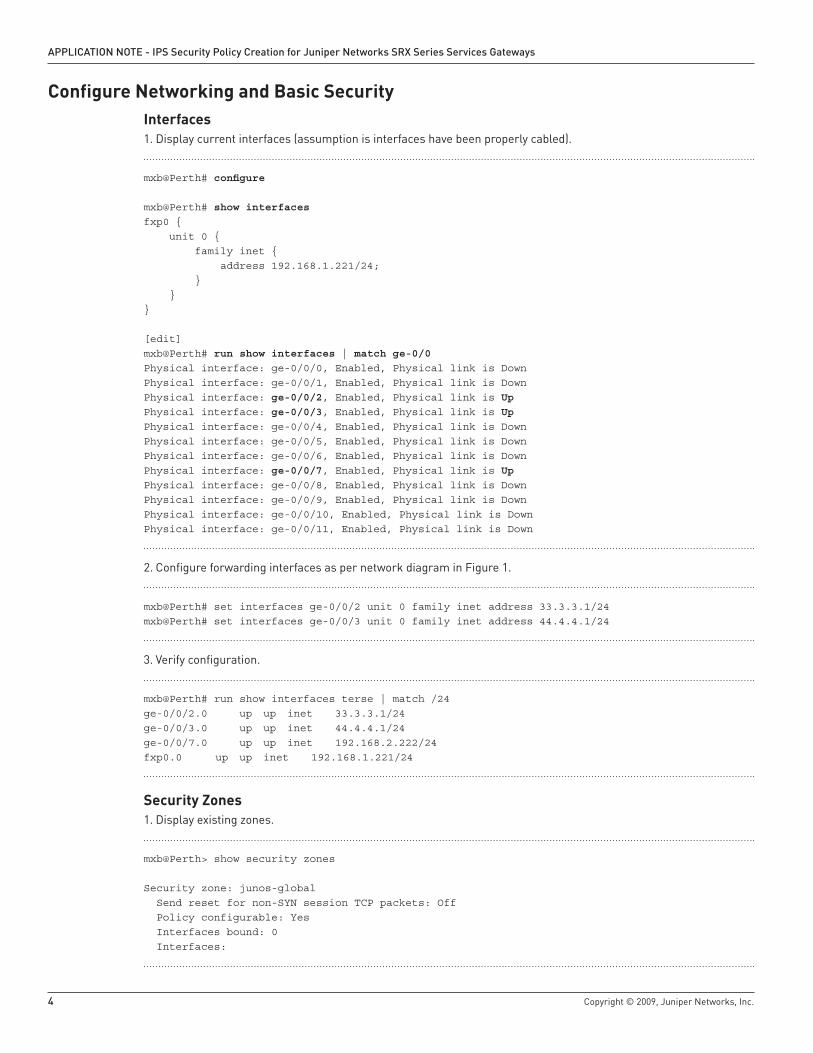
Configure Networking and Basic SecurityInterfaces
Display current interfaces (assumption is interfaces have been properly cabled).1.
mxb@Perth# configure
mxb@Perth# show interfaces fxp0 { unit 0 { family inet { address 192.168.1.221/24; } }}
[edit]mxb@Perth# run show interfaces | match ge-0/0 Physical interface: ge-0/0/0, Enabled, Physical link is DownPhysical interface: ge-0/0/1, Enabled, Physical link is DownPhysical interface: ge-0/0/2, Enabled, Physical link is UpPhysical interface: ge-0/0/3, Enabled, Physical link is UpPhysical interface: ge-0/0/4, Enabled, Physical link is DownPhysical interface: ge-0/0/5, Enabled, Physical link is DownPhysical interface: ge-0/0/6, Enabled, Physical link is DownPhysical interface: ge-0/0/7, Enabled, Physical link is UpPhysical interface: ge-0/0/8, Enabled, Physical link is DownPhysical interface: ge-0/0/9, Enabled, Physical link is DownPhysical interface: ge-0/0/10, Enabled, Physical link is DownPhysical interface: ge-0/0/11, Enabled, Physical link is Down
Configure forwarding interfaces as per network diagram in Figure 1.2.
mxb@Perth# set interfaces ge-0/0/2 unit 0 family inet address 33.3.3.1/24 mxb@Perth# set interfaces ge-0/0/3 unit 0 family inet address 44.4.4.1/24
Verify configuration.3.
mxb@Perth# run show interfaces terse | match /24ge-0/0/2.0 up up inet 33.3.3.1/24ge-0/0/3.0 up up inet 44.4.4.1/24ge-0/0/7.0 up up inet 192.168.2.222/24fxp0.0 up up inet 192.168.1.221/24
Security ZonesDisplay existing zones.1.
mxb@Perth> show security zones
Security zone: junos-global Send reset for non-SYN session TCP packets: Off Policy configurable: Yes Interfaces bound: 0 Interfaces:
Copyright © 2009, Juniper Networks, Inc. 5
aPPlIcatIon note - IPS Security Policy creation for Juniper networks SrX Series Services Gateways
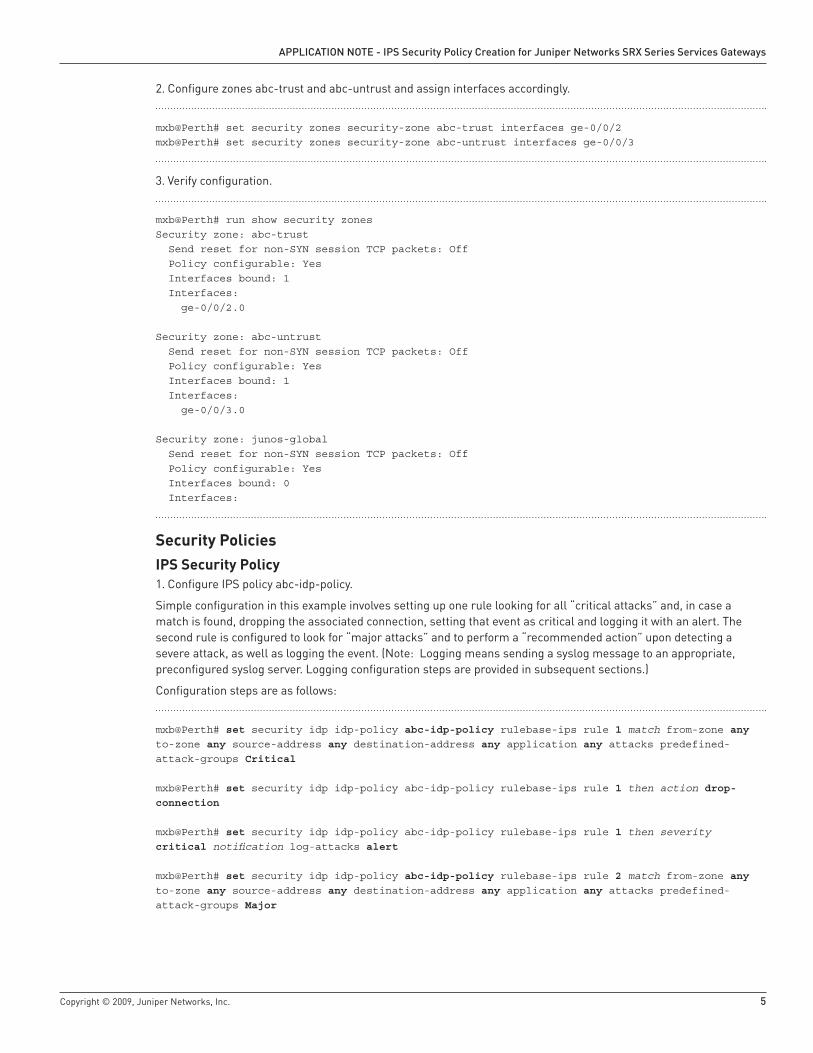
Configure zones abc-trust and abc-untrust and assign interfaces accordingly.2.
mxb@Perth# set security zones security-zone abc-trust interfaces ge-0/0/2mxb@Perth# set security zones security-zone abc-untrust interfaces ge-0/0/3
Verify configuration.3.
mxb@Perth# run show security zones Security zone: abc-trust Send reset for non-SYN session TCP packets: Off Policy configurable: Yes Interfaces bound: 1 Interfaces: ge-0/0/2.0
Security zone: abc-untrust Send reset for non-SYN session TCP packets: Off Policy configurable: Yes Interfaces bound: 1 Interfaces: ge-0/0/3.0
Security zone: junos-global Send reset for non-SYN session TCP packets: Off Policy configurable: Yes Interfaces bound: 0 Interfaces:
Security PoliciesIPS Security Policy
Configure IPS policy abc-idp-policy. 1.
Simple configuration in this example involves setting up one rule looking for all “critical attacks” and, in case a match is found, dropping the associated connection, setting that event as critical and logging it with an alert. The second rule is configured to look for “major attacks” and to perform a “recommended action” upon detecting a severe attack, as well as logging the event. (Note: Logging means sending a syslog message to an appropriate, preconfigured syslog server. Logging configuration steps are provided in subsequent sections.)
Configuration steps are as follows:
mxb@Perth# set security idp idp-policy abc-idp-policy rulebase-ips rule 1 match from-zone any to-zone any source-address any destination-address any application any attacks predefined-attack-groups Critical
mxb@Perth# set security idp idp-policy abc-idp-policy rulebase-ips rule 1 then action drop-connection
mxb@Perth# set security idp idp-policy abc-idp-policy rulebase-ips rule 1 then severity critical notification log-attacks alert
mxb@Perth# set security idp idp-policy abc-idp-policy rulebase-ips rule 2 match from-zone any to-zone any source-address any destination-address any application any attacks predefined-attack-groups Major
6 Copyright © 2009, Juniper Networks, Inc.
aPPlIcatIon note - IPS Security Policy creation for Juniper networks SrX Series Services Gateways
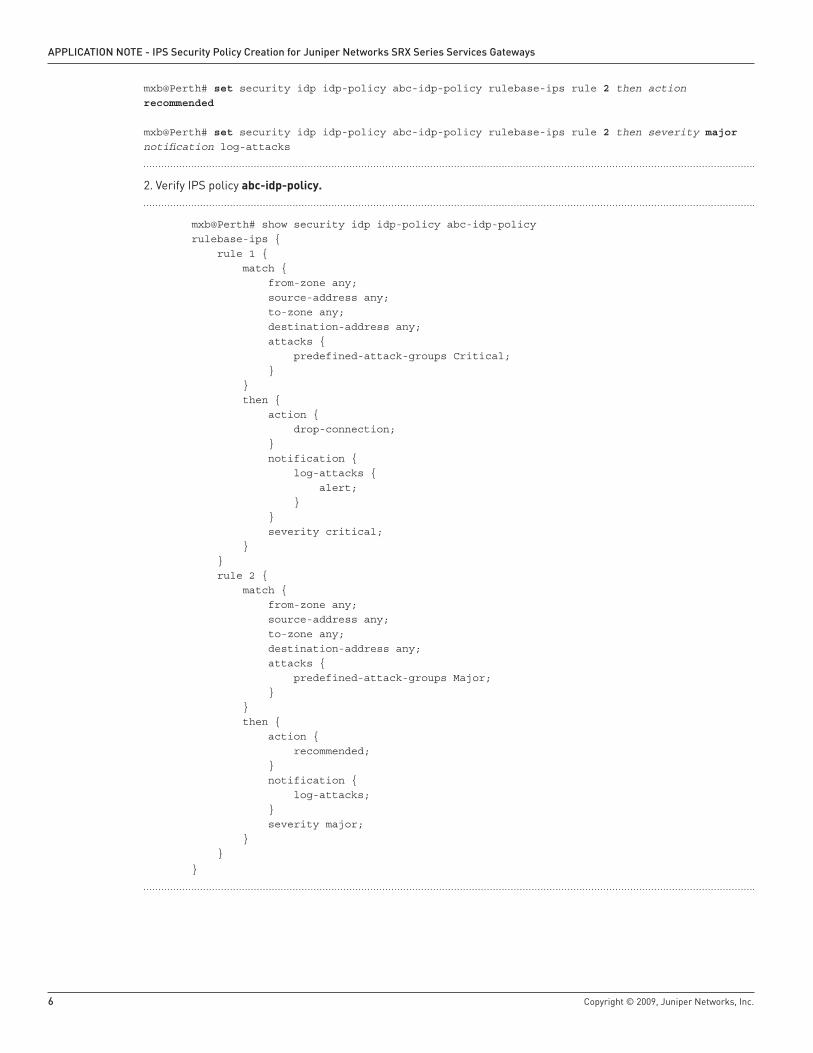
mxb@Perth# set security idp idp-policy abc-idp-policy rulebase-ips rule 2 then action recommended
mxb@Perth# set security idp idp-policy abc-idp-policy rulebase-ips rule 2 then severity major notification log-attacks
Verify IPS policy 2. abc-idp-policy.
mxb@Perth# show security idp idp-policy abc-idp-policy rulebase-ips { rule 1 { match { from-zone any; source-address any; to-zone any; destination-address any; attacks { predefined-attack-groups Critical; } } then { action { drop-connection; } notification { log-attacks { alert; } } severity critical; } } rule 2 { match { from-zone any; source-address any; to-zone any; destination-address any; attacks { predefined-attack-groups Major; } } then { action { recommended; } notification { log-attacks; } severity major; } }
}
Copyright © 2009, Juniper Networks, Inc. 7
aPPlIcatIon note - IPS Security Policy creation for Juniper networks SrX Series Services Gateways
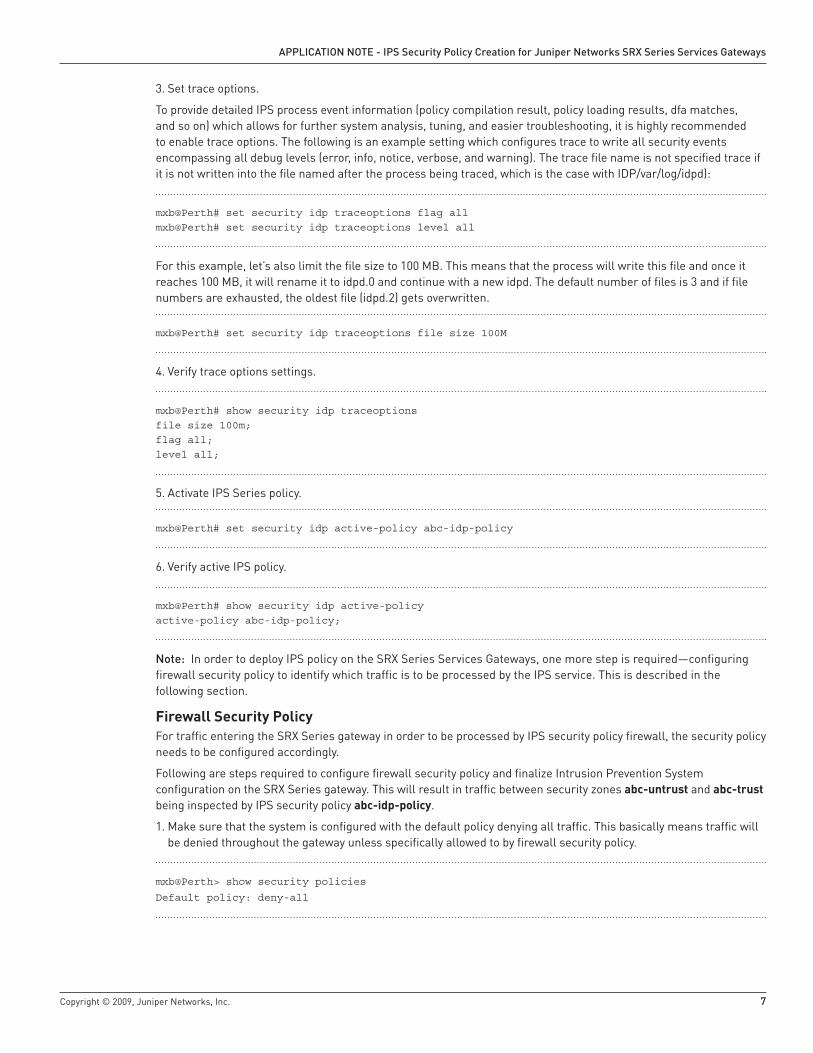
Set trace options.3.
To provide detailed IPS process event information (policy compilation result, policy loading results, dfa matches, and so on) which allows for further system analysis, tuning, and easier troubleshooting, it is highly recommended to enable trace options. The following is an example setting which configures trace to write all security events encompassing all debug levels (error, info, notice, verbose, and warning). The trace file name is not specified trace if it is not written into the file named after the process being traced, which is the case with IDP/var/log/idpd):
mxb@Perth# set security idp traceoptions flag allmxb@Perth# set security idp traceoptions level all
For this example, let’s also limit the file size to 100 MB. This means that the process will write this file and once it reaches 100 MB, it will rename it to idpd.0 and continue with a new idpd. The default number of files is 3 and if file numbers are exhausted, the oldest file (idpd.2) gets overwritten.
mxb@Perth# set security idp traceoptions file size 100M
Verify trace options settings.4.
mxb@Perth# show security idp traceoptionsfile size 100m;flag all;level all;
Activate IPS Series policy.5.
mxb@Perth# set security idp active-policy abc-idp-policy
Verify active IPS policy.6.
mxb@Perth# show security idp active-policy active-policy abc-idp-policy;
note: In order to deploy IPS policy on the SRX Series Services Gateways, one more step is required—configuring firewall security policy to identify which traffic is to be processed by the IPS service. This is described in the following section.
Firewall Security PolicyFor traffic entering the SRX Series gateway in order to be processed by IPS security policy firewall, the security policy needs to be configured accordingly.
Following are steps required to configure firewall security policy and finalize Intrusion Prevention System configuration on the SRX Series gateway. This will result in traffic between security zones abc-untrust and abc-trust being inspected by IPS security policy abc-idp-policy.
Make sure that the system is configured with the default policy denying all traffic. This basically means traffic will 1. be denied throughout the gateway unless specifically allowed to by firewall security policy.
mxb@Perth> show security policies
Default policy: deny-all
8 Copyright © 2009, Juniper Networks, Inc.
aPPlIcatIon note - IPS Security Policy creation for Juniper networks SrX Series Services Gateways
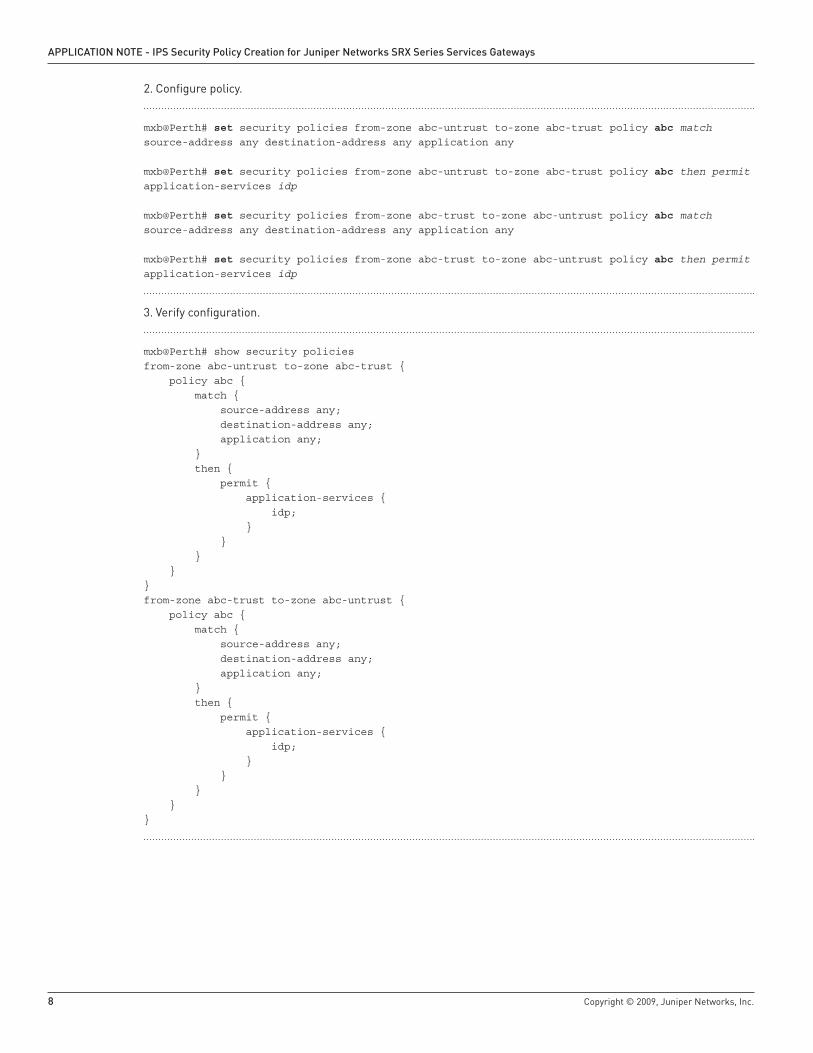
Configure policy.2.
mxb@Perth# set security policies from-zone abc-untrust to-zone abc-trust policy abc match source-address any destination-address any application any
mxb@Perth# set security policies from-zone abc-untrust to-zone abc-trust policy abc then permit application-services idp
mxb@Perth# set security policies from-zone abc-trust to-zone abc-untrust policy abc match source-address any destination-address any application any
mxb@Perth# set security policies from-zone abc-trust to-zone abc-untrust policy abc then permit application-services idp
Verify configuration.3.
mxb@Perth# show security policies from-zone abc-untrust to-zone abc-trust { policy abc { match { source-address any; destination-address any; application any; } then { permit { application-services { idp; } } } }}from-zone abc-trust to-zone abc-untrust { policy abc { match { source-address any; destination-address any; application any; } then { permit { application-services { idp; } } } }}
Copyright © 2009, Juniper Networks, Inc. 9
aPPlIcatIon note - IPS Security Policy creation for Juniper networks SrX Series Services Gateways
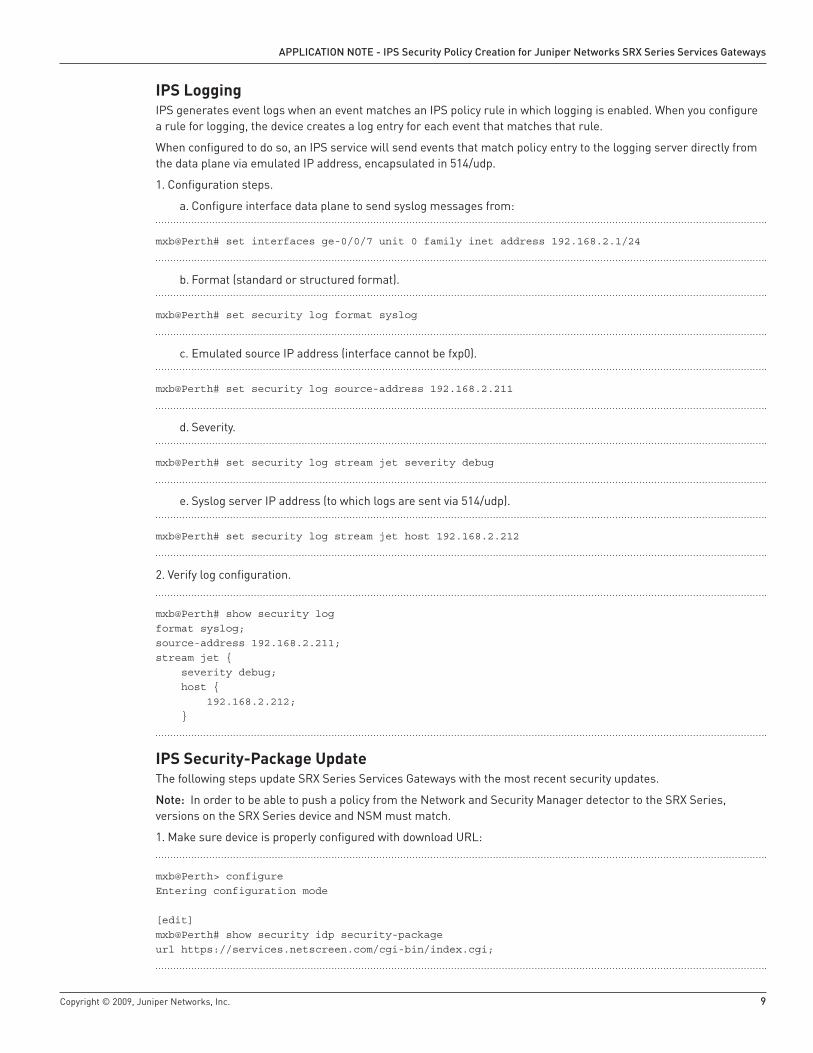
IPS LoggingIPS generates event logs when an event matches an IPS policy rule in which logging is enabled. When you configure a rule for logging, the device creates a log entry for each event that matches that rule.
When configured to do so, an IPS service will send events that match policy entry to the logging server directly from the data plane via emulated IP address, encapsulated in 514/udp.
Configuration steps.1.
Configure interface data plane to send syslog messages from:a.
mxb@Perth# set interfaces ge-0/0/7 unit 0 family inet address 192.168.2.1/24
Format (standard or structured format).b.
mxb@Perth# set security log format syslog
Emulated source IP address (interface cannot be fxp0).c.
mxb@Perth# set security log source-address 192.168.2.211
Severity.d.
mxb@Perth# set security log stream jet severity debug
Syslog server IP address (to which logs are sent via 514/udp).e.
mxb@Perth# set security log stream jet host 192.168.2.212
Verify log configuration.2.
mxb@Perth# show security log format syslog;source-address 192.168.2.211;stream jet { severity debug; host { 192.168.2.212; }
IPS Security-Package UpdateThe following steps update SRX Series Services Gateways with the most recent security updates.
note: In order to be able to push a policy from the Network and Security Manager detector to the SRX Series, versions on the SRX Series device and NSM must match.
Make sure device is properly configured with download URL:1.
mxb@Perth> configureEntering configuration mode
[edit]mxb@Perth# show security idp security-packageurl https://services.netscreen.com/cgi-bin/index.cgi;
10 Copyright © 2009, Juniper Networks, Inc.
aPPlIcatIon note - IPS Security Policy creation for Juniper networks SrX Series Services Gateways
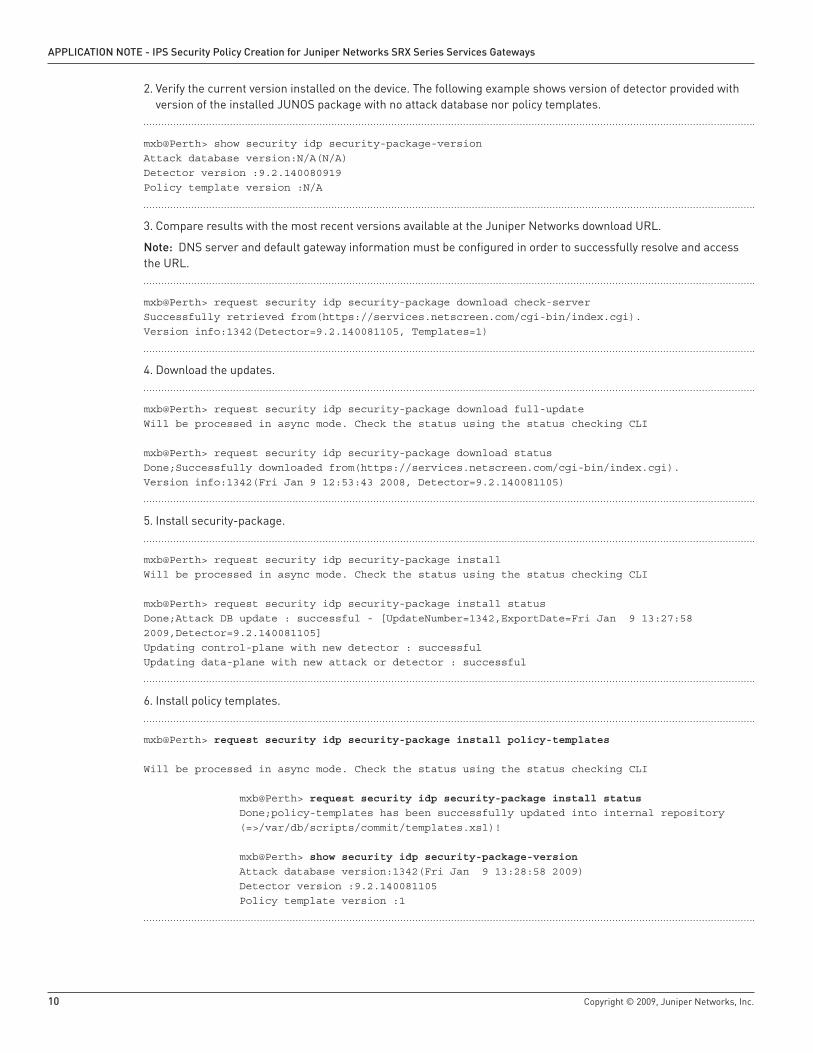
Verify the current version installed on the device. The following example shows version of detector provided with 2. version of the installed JUNOS package with no attack database nor policy templates.
mxb@Perth> show security idp security-package-version Attack database version:N/A(N/A)Detector version :9.2.140080919Policy template version :N/A
Compare results with the most recent versions available at the Juniper Networks download URL. 3.
note: DNS server and default gateway information must be configured in order to successfully resolve and access the URL.
mxb@Perth> request security idp security-package download check-server Successfully retrieved from(https://services.netscreen.com/cgi-bin/index.cgi).Version info:1342(Detector=9.2.140081105, Templates=1)
Download the updates.4.
mxb@Perth> request security idp security-package download full-updateWill be processed in async mode. Check the status using the status checking CLI
mxb@Perth> request security idp security-package download status Done;Successfully downloaded from(https://services.netscreen.com/cgi-bin/index.cgi).Version info:1342(Fri Jan 9 12:53:43 2008, Detector=9.2.140081105)
Install security-package.5.
mxb@Perth> request security idp security-package installWill be processed in async mode. Check the status using the status checking CLI
mxb@Perth> request security idp security-package install status Done;Attack DB update : successful - [UpdateNumber=1342,ExportDate=Fri Jan 9 13:27:58 2009,Detector=9.2.140081105]Updating control-plane with new detector : successfulUpdating data-plane with new attack or detector : successful
Install policy templates.6.
mxb@Perth> request security idp security-package install policy-templates Will be processed in async mode. Check the status using the status checking CLI
mxb@Perth> request security idp security-package install status Done;policy-templates has been successfully updated into internal repository (=>/var/db/scripts/commit/templates.xsl)!
mxb@Perth> show security idp security-package-version Attack database version:1342(Fri Jan 9 13:28:58 2009) Detector version :9.2.140081105 Policy template version :1
Copyright © 2009, Juniper Networks, Inc. 11
aPPlIcatIon note - IPS Security Policy creation for Juniper networks SrX Series Services Gateways
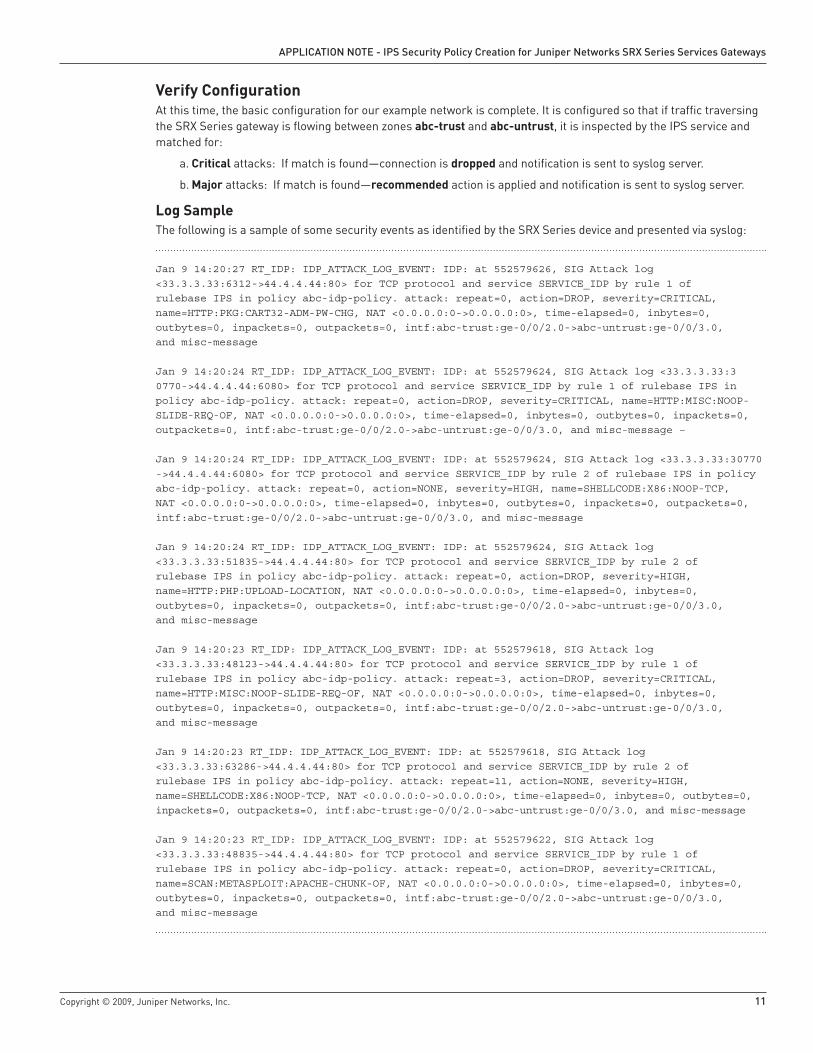
Verify ConfigurationAt this time, the basic configuration for our example network is complete. It is configured so that if traffic traversing the SRX Series gateway is flowing between zones abc-trust and abc-untrust, it is inspected by the IPS service and matched for:
Criticala. attacks: If match is found—connection is dropped and notification is sent to syslog server.
Majorb. attacks: If match is found—recommended action is applied and notification is sent to syslog server.
Log SampleThe following is a sample of some security events as identified by the SRX Series device and presented via syslog:
Jan 9 14:20:27 RT_IDP: IDP_ATTACK_LOG_EVENT: IDP: at 552579626, SIG Attack log <33.3.3.33:6312->44.4.4.44:80> for TCP protocol and service SERVICE_IDP by rule 1 of rulebase IPS in policy abc-idp-policy. attack: repeat=0, action=DROP, severity=CRITICAL, name=HTTP:PKG:CART32-ADM-PW-CHG, NAT <0.0.0.0:0->0.0.0.0:0>, time-elapsed=0, inbytes=0, outbytes=0, inpackets=0, outpackets=0, intf:abc-trust:ge-0/0/2.0->abc-untrust:ge-0/0/3.0, and misc-message
Jan 9 14:20:24 RT_IDP: IDP_ATTACK_LOG_EVENT: IDP: at 552579624, SIG Attack log <33.3.3.33:30770->44.4.4.44:6080> for TCP protocol and service SERVICE_IDP by rule 1 of rulebase IPS in policy abc-idp-policy. attack: repeat=0, action=DROP, severity=CRITICAL, name=HTTP:MISC:NOOP-SLIDE-REQ-OF, NAT <0.0.0.0:0->0.0.0.0:0>, time-elapsed=0, inbytes=0, outbytes=0, inpackets=0, outpackets=0, intf:abc-trust:ge-0/0/2.0->abc-untrust:ge-0/0/3.0, and misc-message –
Jan 9 14:20:24 RT_IDP: IDP_ATTACK_LOG_EVENT: IDP: at 552579624, SIG Attack log <33.3.3.33:30770->44.4.4.44:6080> for TCP protocol and service SERVICE_IDP by rule 2 of rulebase IPS in policy abc-idp-policy. attack: repeat=0, action=NONE, severity=HIGH, name=SHELLCODE:X86:NOOP-TCP, NAT <0.0.0.0:0->0.0.0.0:0>, time-elapsed=0, inbytes=0, outbytes=0, inpackets=0, outpackets=0, intf:abc-trust:ge-0/0/2.0->abc-untrust:ge-0/0/3.0, and misc-message
Jan 9 14:20:24 RT_IDP: IDP_ATTACK_LOG_EVENT: IDP: at 552579624, SIG Attack log <33.3.3.33:51835->44.4.4.44:80> for TCP protocol and service SERVICE_IDP by rule 2 of rulebase IPS in policy abc-idp-policy. attack: repeat=0, action=DROP, severity=HIGH, name=HTTP:PHP:UPLOAD-LOCATION, NAT <0.0.0.0:0->0.0.0.0:0>, time-elapsed=0, inbytes=0, outbytes=0, inpackets=0, outpackets=0, intf:abc-trust:ge-0/0/2.0->abc-untrust:ge-0/0/3.0, and misc-message
Jan 9 14:20:23 RT_IDP: IDP_ATTACK_LOG_EVENT: IDP: at 552579618, SIG Attack log <33.3.3.33:48123->44.4.4.44:80> for TCP protocol and service SERVICE_IDP by rule 1 of rulebase IPS in policy abc-idp-policy. attack: repeat=3, action=DROP, severity=CRITICAL, name=HTTP:MISC:NOOP-SLIDE-REQ-OF, NAT <0.0.0.0:0->0.0.0.0:0>, time-elapsed=0, inbytes=0, outbytes=0, inpackets=0, outpackets=0, intf:abc-trust:ge-0/0/2.0->abc-untrust:ge-0/0/3.0, and misc-message
Jan 9 14:20:23 RT_IDP: IDP_ATTACK_LOG_EVENT: IDP: at 552579618, SIG Attack log <33.3.3.33:63286->44.4.4.44:80> for TCP protocol and service SERVICE_IDP by rule 2 of rulebase IPS in policy abc-idp-policy. attack: repeat=11, action=NONE, severity=HIGH, name=SHELLCODE:X86:NOOP-TCP, NAT <0.0.0.0:0->0.0.0.0:0>, time-elapsed=0, inbytes=0, outbytes=0, inpackets=0, outpackets=0, intf:abc-trust:ge-0/0/2.0->abc-untrust:ge-0/0/3.0, and misc-message
Jan 9 14:20:23 RT_IDP: IDP_ATTACK_LOG_EVENT: IDP: at 552579622, SIG Attack log <33.3.3.33:48835->44.4.4.44:80> for TCP protocol and service SERVICE_IDP by rule 1 of rulebase IPS in policy abc-idp-policy. attack: repeat=0, action=DROP, severity=CRITICAL, name=SCAN:METASPLOIT:APACHE-CHUNK-OF, NAT <0.0.0.0:0->0.0.0.0:0>, time-elapsed=0, inbytes=0, outbytes=0, inpackets=0, outpackets=0, intf:abc-trust:ge-0/0/2.0->abc-untrust:ge-0/0/3.0, and misc-message
12 Copyright © 2009, Juniper Networks, Inc.
aPPlIcatIon note - IPS Security Policy creation for Juniper networks SrX Series Services Gateways
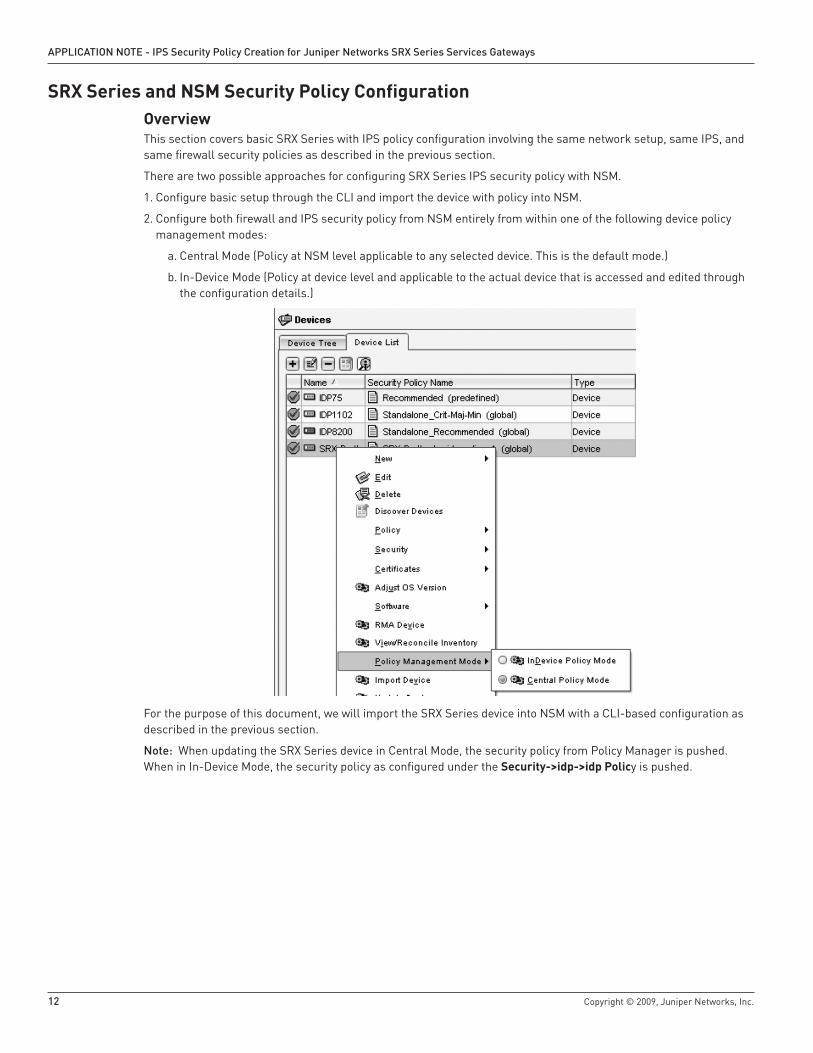
SRX Series and NSM Security Policy ConfigurationOverview This section covers basic SRX Series with IPS policy configuration involving the same network setup, same IPS, and same firewall security policies as described in the previous section.
There are two possible approaches for configuring SRX Series IPS security policy with NSM.
Configure basic setup through the CLI and import the device with policy into NSM.1.
Configure both firewall and IPS security policy from NSM entirely from within one of the following device policy 2. management modes:
Central Mode (Policy at NSM level applicable to any selected device. This is the default mode.)a.
In-Device Mode (Policy at device level and applicable to the actual device that is accessed and edited through b. the configuration details.)
For the purpose of this document, we will import the SRX Series device into NSM with a CLI-based configuration as described in the previous section.
note: When updating the SRX Series device in Central Mode, the security policy from Policy Manager is pushed. When in In-Device Mode, the security policy as configured under the Security->idp->idp Policy is pushed.
Copyright © 2009, Juniper Networks, Inc. 13
aPPlIcatIon note - IPS Security Policy creation for Juniper networks SrX Series Services Gateways
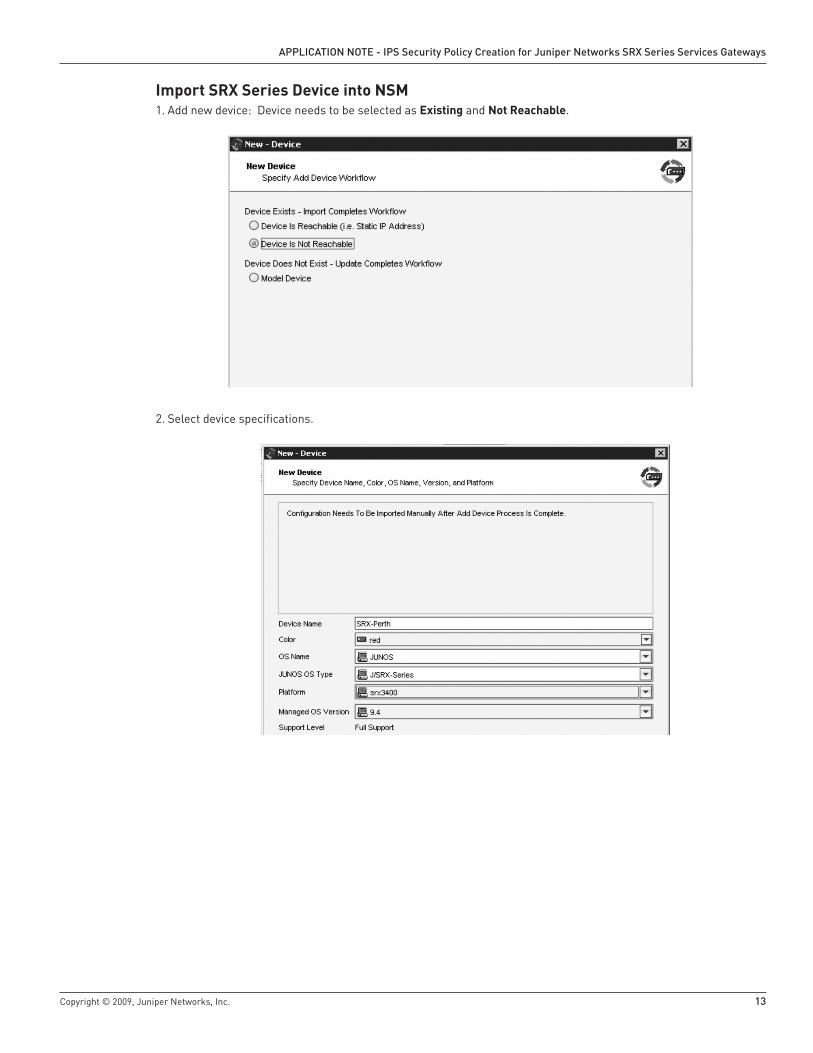
Import SRX Series Device into NSMAdd new device: Device needs to be selected as 1. Existing and Not Reachable.
Select device specifications.2.
14 Copyright © 2009, Juniper Networks, Inc.
aPPlIcatIon note - IPS Security Policy creation for Juniper networks SrX Series Services Gateways
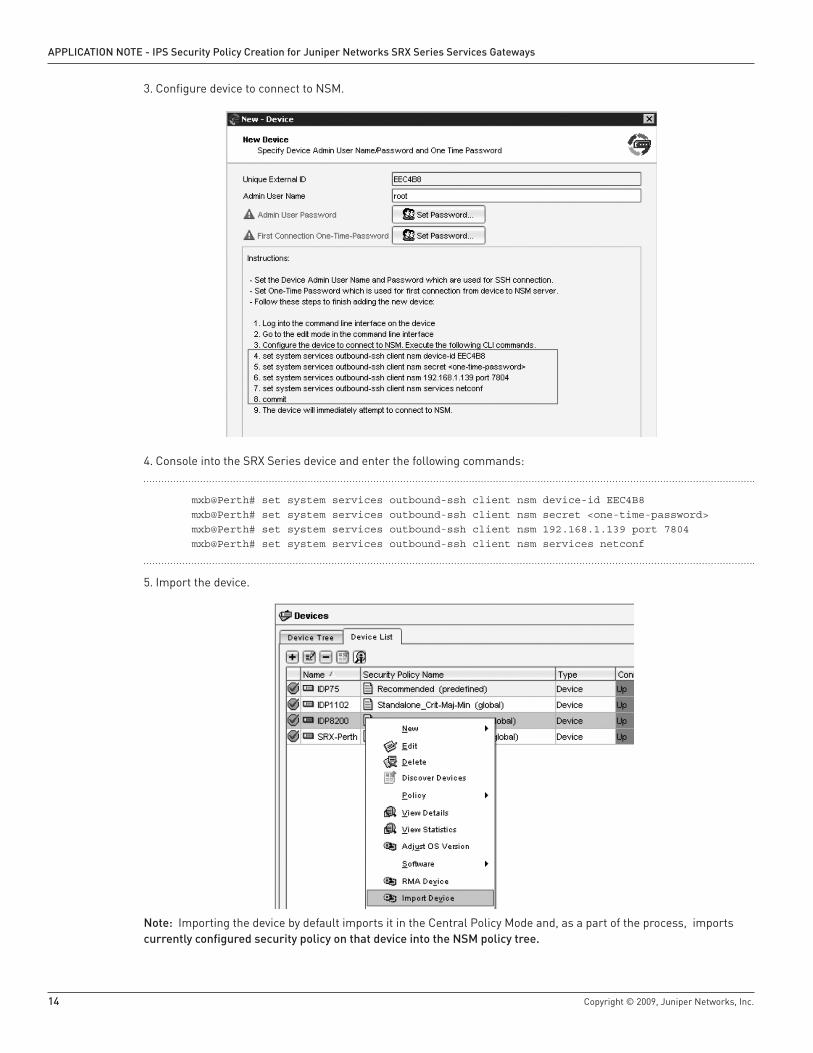
Configure device to connect to NSM.3.
Console into the SRX Series device and enter the following commands:4.
mxb@Perth# set system services outbound-ssh client nsm device-id EEC4B8 mxb@Perth# set system services outbound-ssh client nsm secret <one-time-password> mxb@Perth# set system services outbound-ssh client nsm 192.168.1.139 port 7804 mxb@Perth# set system services outbound-ssh client nsm services netconf
Import the device.5.
note: Importing the device by default imports it in the Central Policy Mode and, as a part of the process, imports currently configured security policy on that device into the nSM policy tree .
Copyright © 2009, Juniper Networks, Inc. 15
aPPlIcatIon note - IPS Security Policy creation for Juniper networks SrX Series Services Gateways
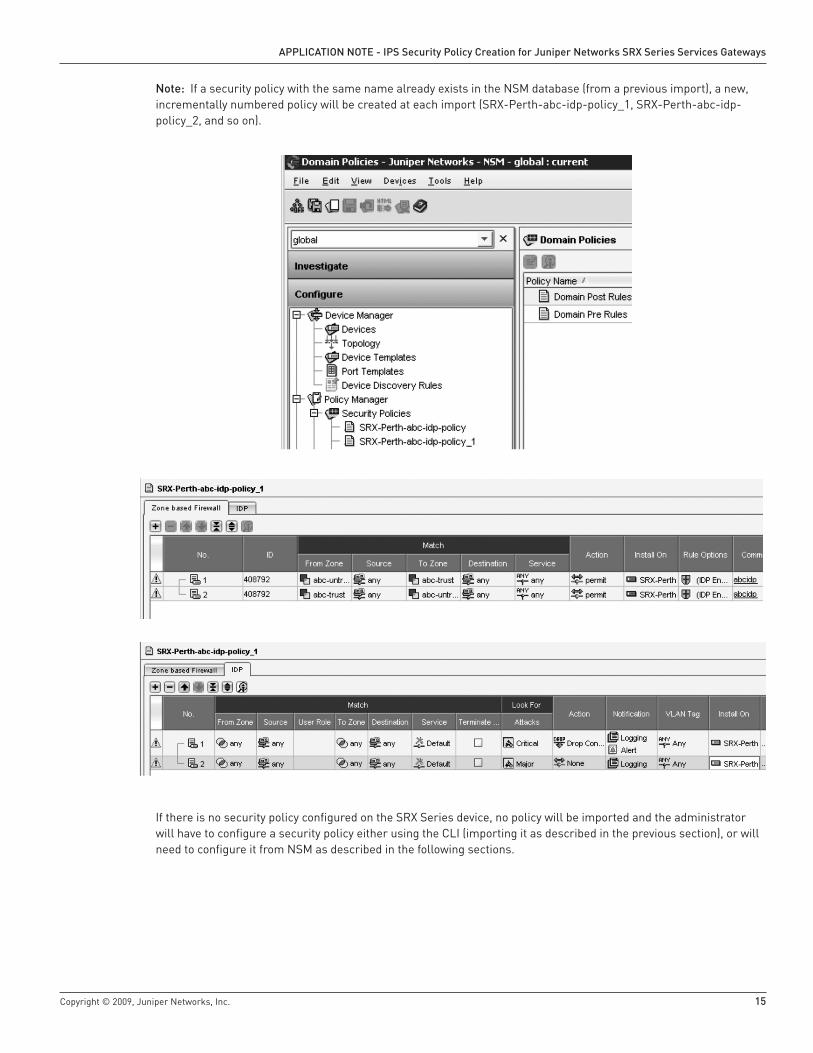
note: If a security policy with the same name already exists in the NSM database (from a previous import), a new, incrementally numbered policy will be created at each import (SRX-Perth-abc-idp-policy_1, SRX-Perth-abc-idp-policy_2, and so on).
If there is no security policy configured on the SRX Series device, no policy will be imported and the administrator will have to configure a security policy either using the CLI (importing it as described in the previous section), or will need to configure it from NSM as described in the following sections.
16 Copyright © 2009, Juniper Networks, Inc.
aPPlIcatIon note - IPS Security Policy creation for Juniper networks SrX Series Services Gateways
Configuring Security PolicyAfter successfully importing the device, the administrator can create a new security policy or tune/change the existing policy and then deploy changes and/or updates by the following standard Update Device procedures.
This section describes security policy configuration and deployment through Central Policy Mode. Policy SRX-Recommended will be created (based on Recommended security policy template) and applied to the SRX Series device.
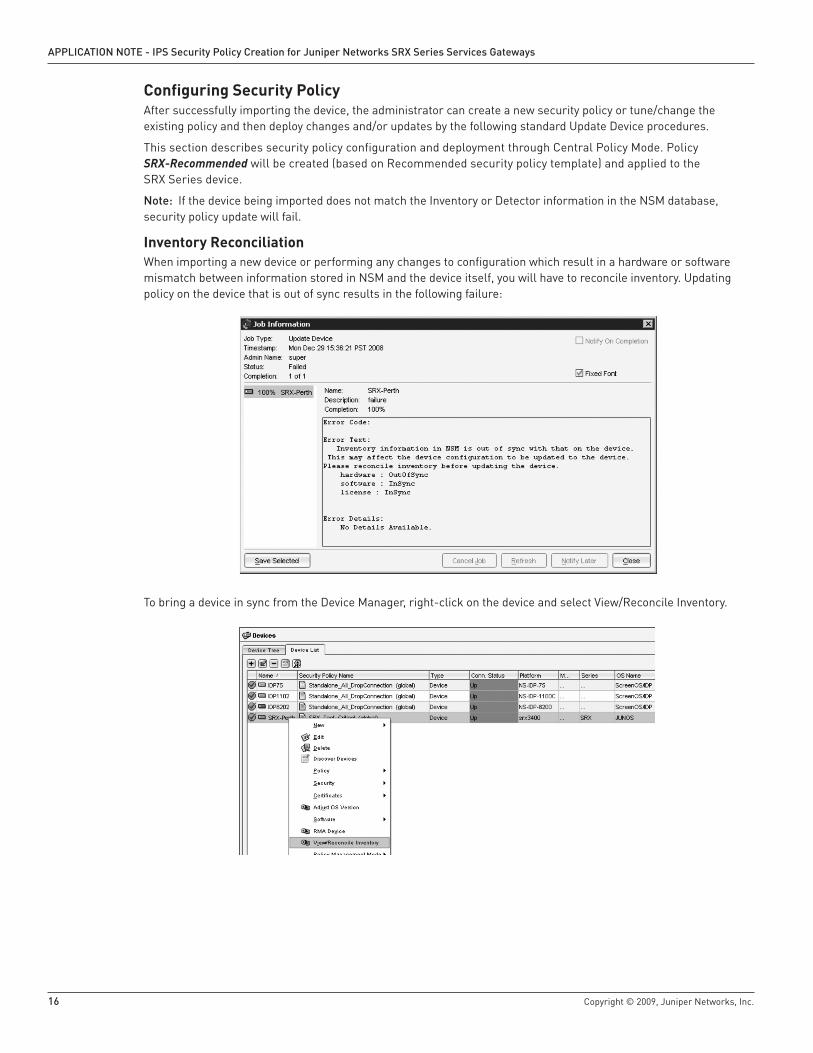
note: If the device being imported does not match the Inventory or Detector information in the NSM database, security policy update will fail.
Inventory ReconciliationWhen importing a new device or performing any changes to configuration which result in a hardware or software mismatch between information stored in NSM and the device itself, you will have to reconcile inventory. Updating policy on the device that is out of sync results in the following failure:
To bring a device in sync from the Device Manager, right-click on the device and select View/Reconcile Inventory.
Copyright © 2009, Juniper Networks, Inc. 17
aPPlIcatIon note - IPS Security Policy creation for Juniper networks SrX Series Services Gateways
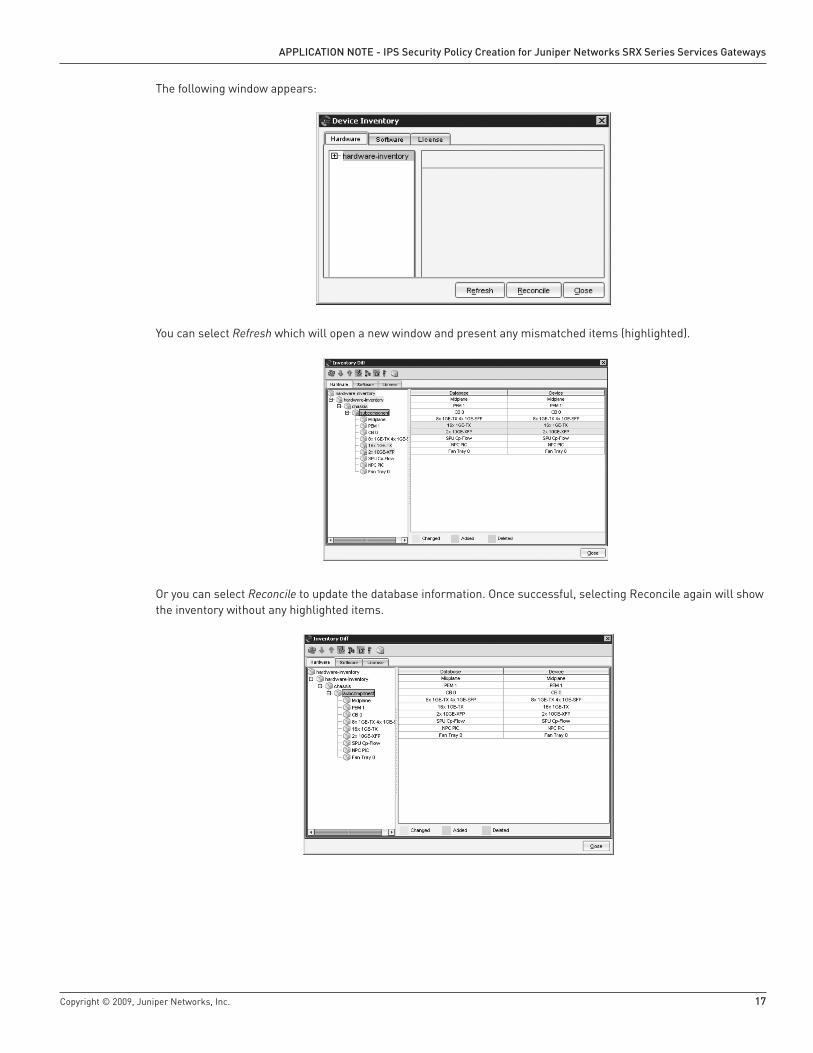
The following window appears:
You can select Refresh which will open a new window and present any mismatched items (highlighted).
Or you can select Reconcile to update the database information. Once successful, selecting Reconcile again will show the inventory without any highlighted items.
18 Copyright © 2009, Juniper Networks, Inc.
aPPlIcatIon note - IPS Security Policy creation for Juniper networks SrX Series Services Gateways
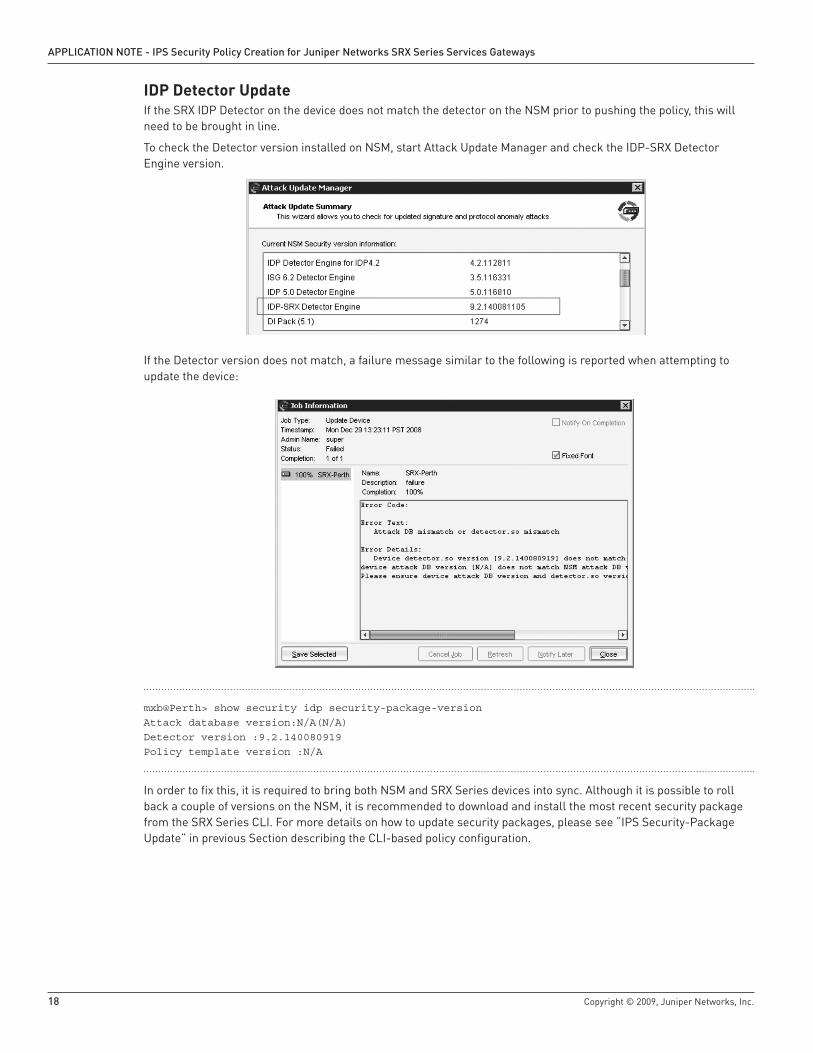
IDP Detector UpdateIf the SRX IDP Detector on the device does not match the detector on the NSM prior to pushing the policy, this will need to be brought in line.
To check the Detector version installed on NSM, start Attack Update Manager and check the IDP-SRX Detector Engine version.
If the Detector version does not match, a failure message similar to the following is reported when attempting to update the device:
mxb@Perth> show security idp security-package-version Attack database version:N/A(N/A)Detector version :9.2.140080919Policy template version :N/A
In order to fix this, it is required to bring both NSM and SRX Series devices into sync. Although it is possible to roll back a couple of versions on the NSM, it is recommended to download and install the most recent security package from the SRX Series CLI. For more details on how to update security packages, please see “IPS Security-Package Update” in previous Section describing the CLI-based policy configuration.
Copyright © 2009, Juniper Networks, Inc. 19
aPPlIcatIon note - IPS Security Policy creation for Juniper networks SrX Series Services Gateways
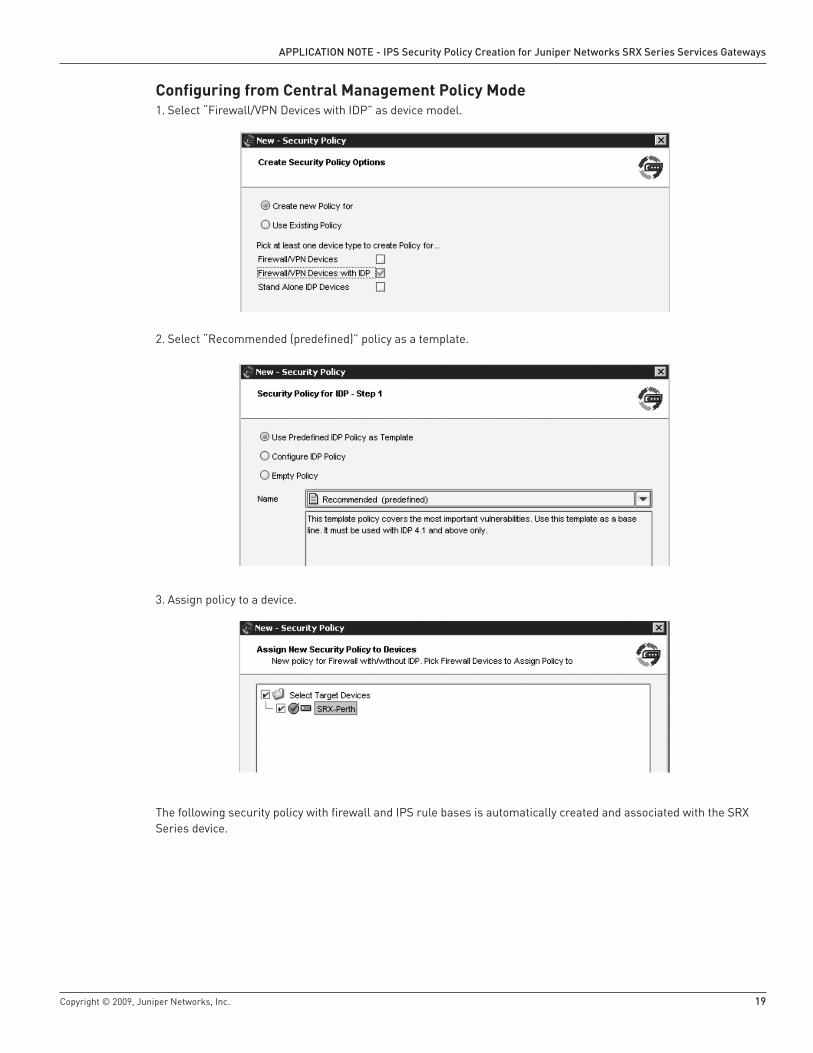
Configuring from Central Management Policy ModeSelect “Firewall/VPN Devices with IDP” as device model.1.
Select “Recommended (predefined)” policy as a template.2.
Assign policy to a device.3.
The following security policy with firewall and IPS rule bases is automatically created and associated with the SRX Series device.
20 Copyright © 2009, Juniper Networks, Inc.
aPPlIcatIon note - IPS Security Policy creation for Juniper networks SrX Series Services Gateways
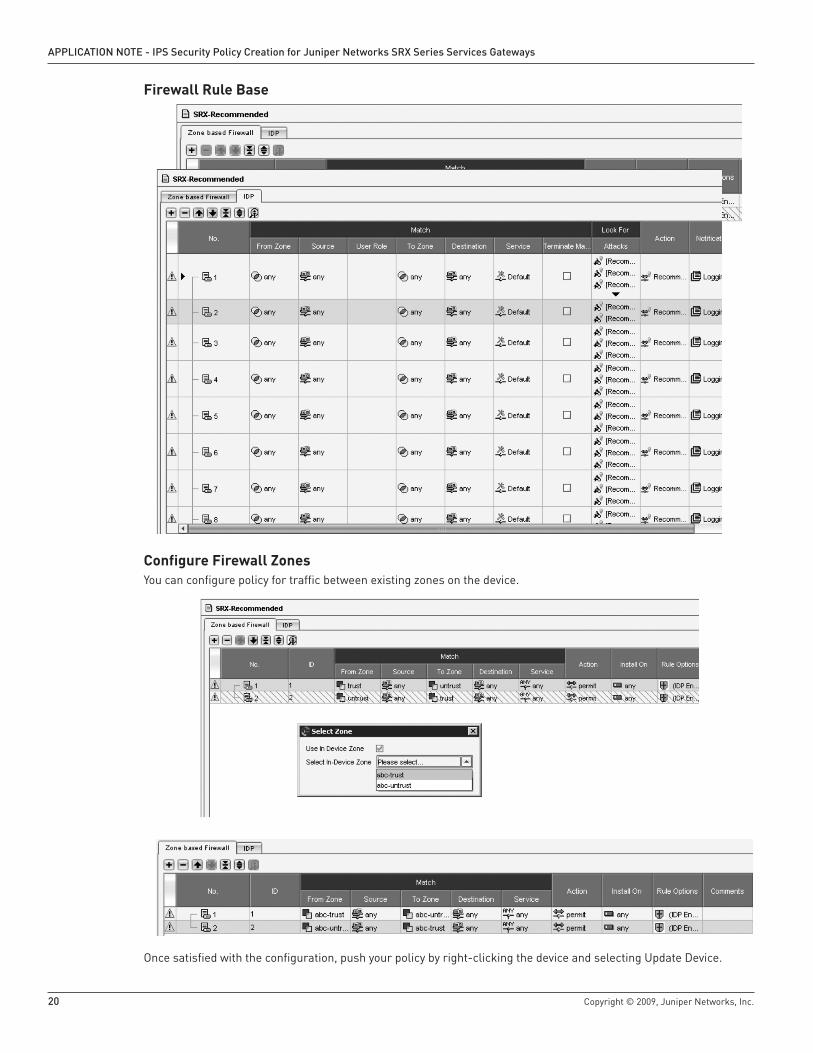
Firewall Rule Base
Configure Firewall ZonesYou can configure policy for traffic between existing zones on the device.
Once satisfied with the configuration, push your policy by right-clicking the device and selecting Update Device.
Copyright © 2009, Juniper Networks, Inc. 21
aPPlIcatIon note - IPS Security Policy creation for Juniper networks SrX Series Services Gateways
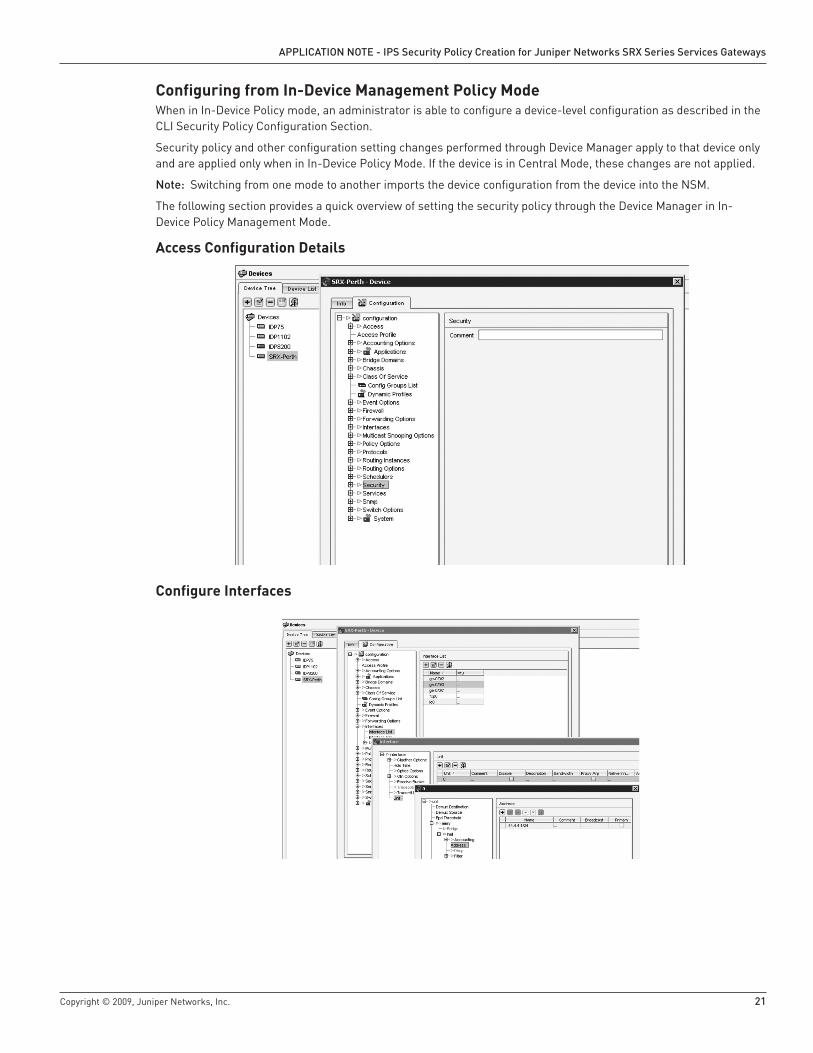
Configuring from In-Device Management Policy ModeWhen in In-Device Policy mode, an administrator is able to configure a device-level configuration as described in the CLI Security Policy Configuration Section.
Security policy and other configuration setting changes performed through Device Manager apply to that device only and are applied only when in In-Device Policy Mode. If the device is in Central Mode, these changes are not applied.
note: Switching from one mode to another imports the device configuration from the device into the NSM.
The following section provides a quick overview of setting the security policy through the Device Manager in In-Device Policy Management Mode.
Access Configuration Details
Configure Interfaces
22 Copyright © 2009, Juniper Networks, Inc.
aPPlIcatIon note - IPS Security Policy creation for Juniper networks SrX Series Services Gateways
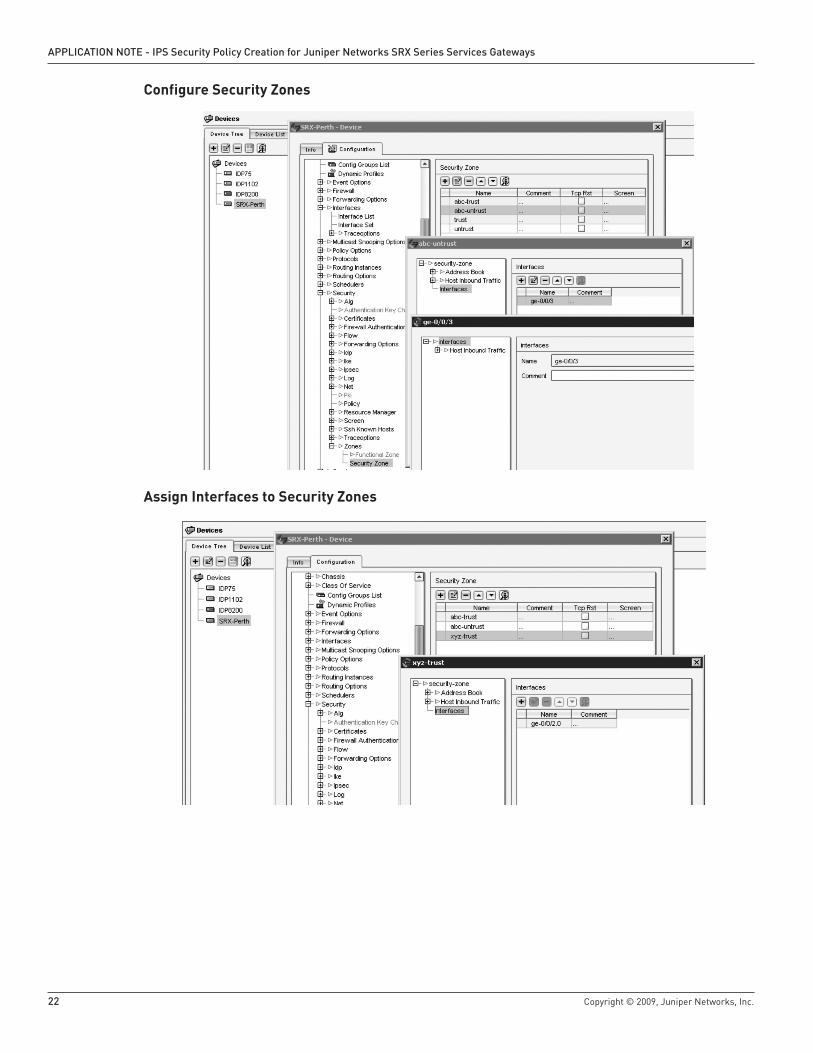
Configure Security Zones
Assign Interfaces to Security Zones
Copyright © 2009, Juniper Networks, Inc. 23
aPPlIcatIon note - IPS Security Policy creation for Juniper networks SrX Series Services Gateways
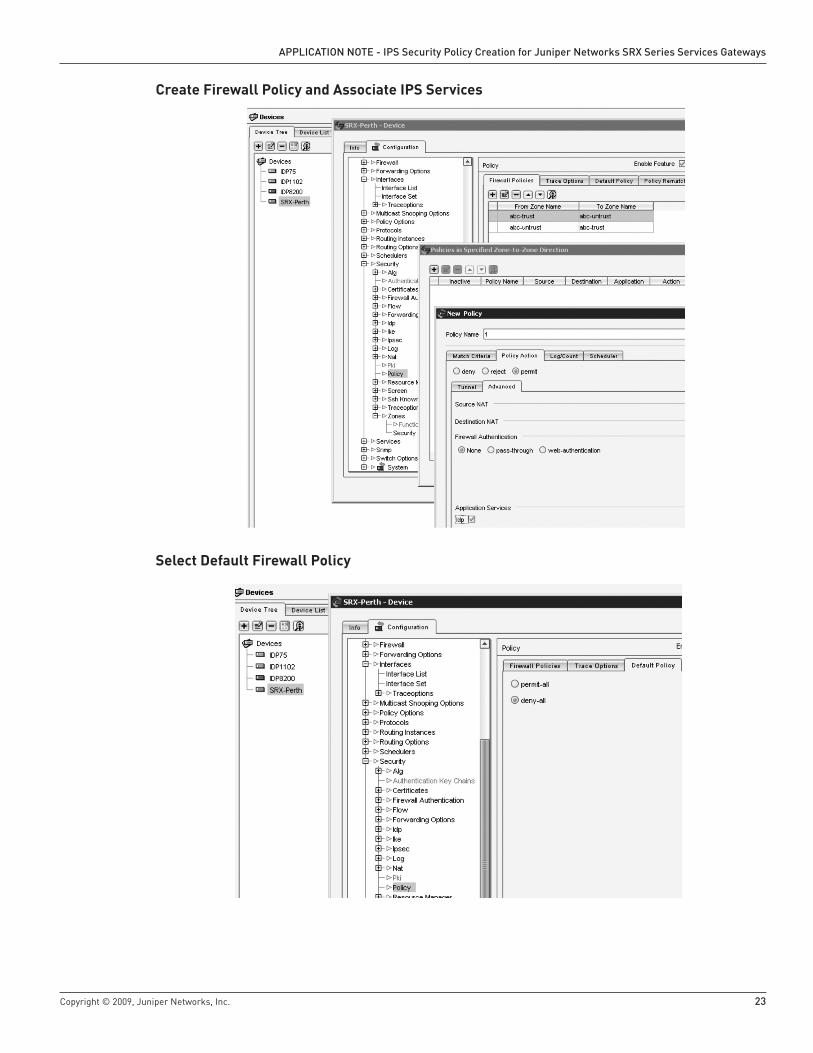
Create Firewall Policy and Associate IPS Services
Select Default Firewall Policy
24 Copyright © 2009, Juniper Networks, Inc.
aPPlIcatIon note - IPS Security Policy creation for Juniper networks SrX Series Services Gateways
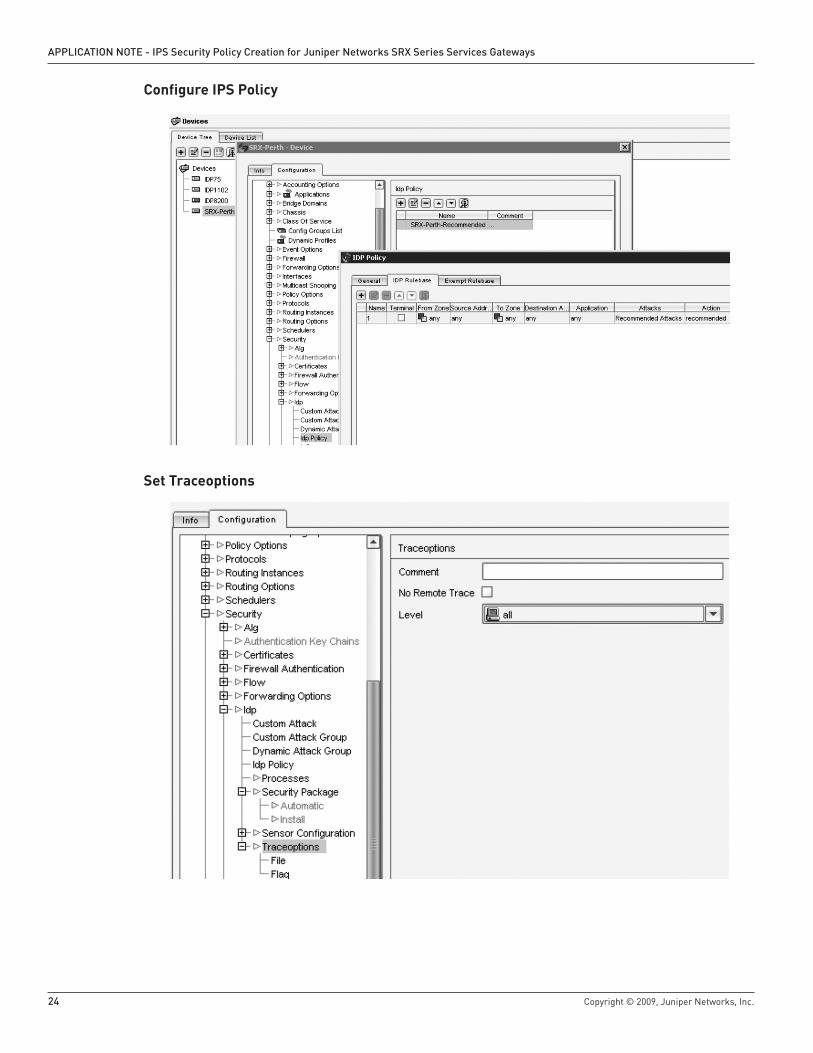
Configure IPS Policy
Set Traceoptions
Copyright © 2009, Juniper Networks, Inc. 25
aPPlIcatIon note - IPS Security Policy creation for Juniper networks SrX Series Services Gateways
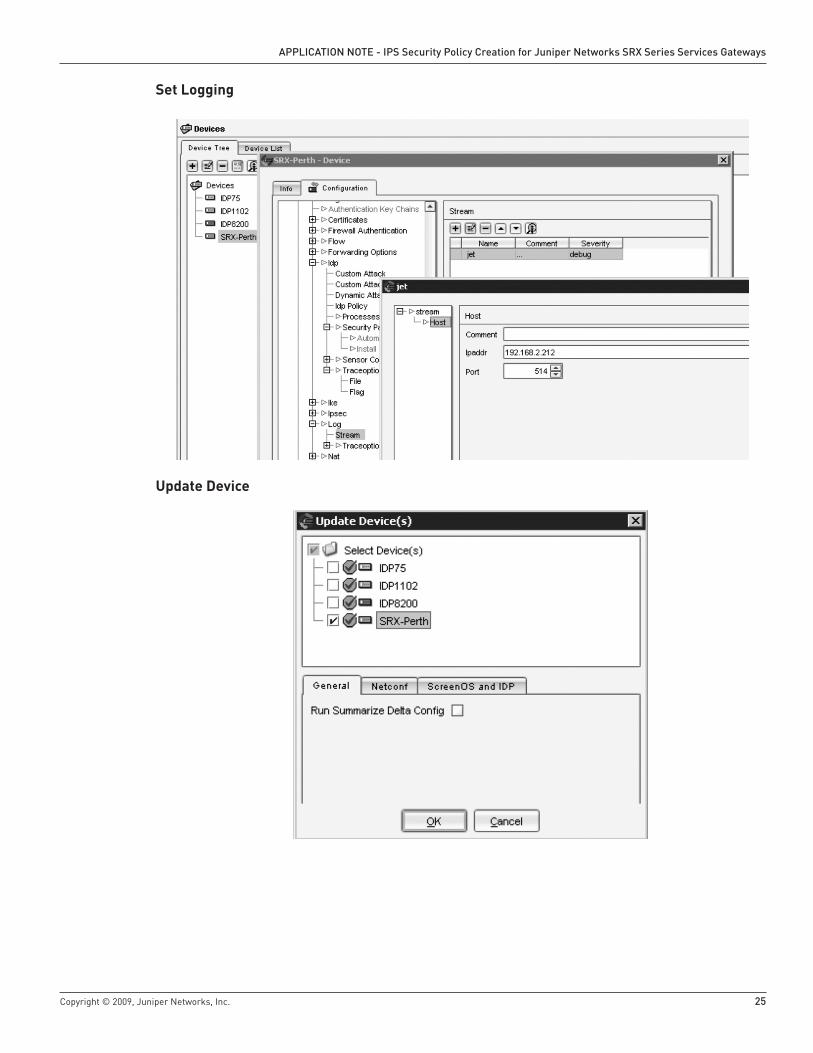
Set Logging
Update Device
26 Copyright © 2009, Juniper Networks, Inc.
aPPlIcatIon note - IPS Security Policy creation for Juniper networks SrX Series Services Gateways
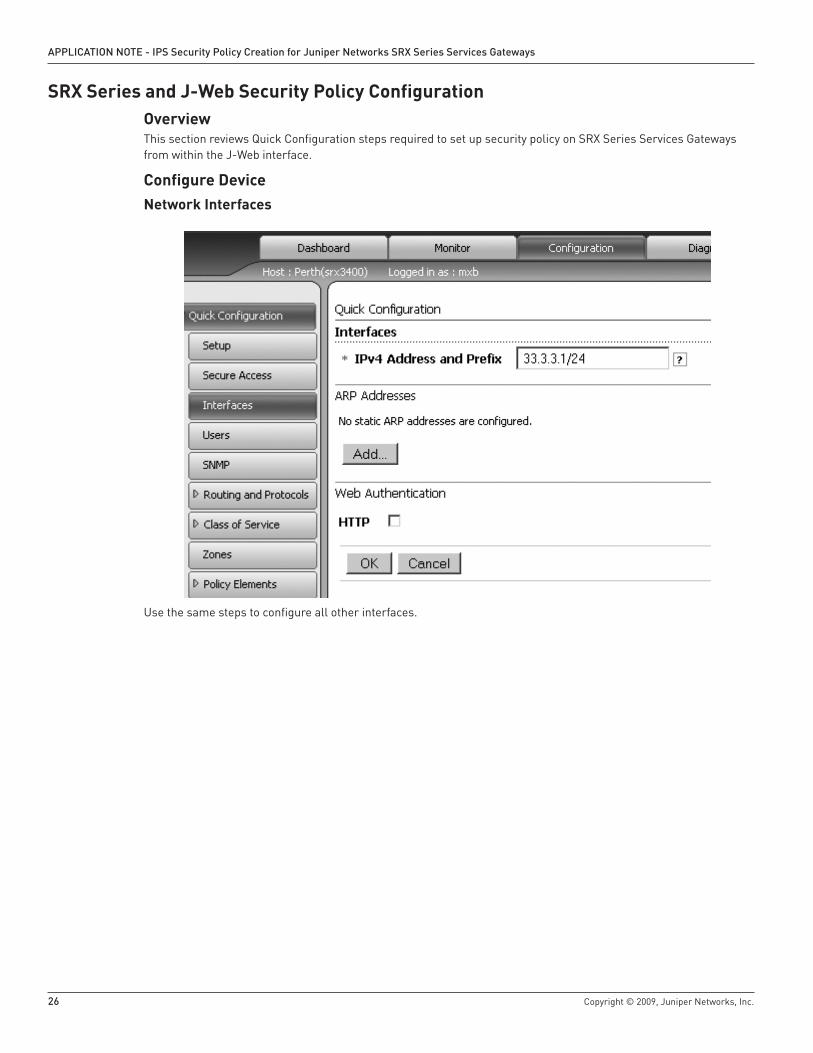
SRX Series and J-Web Security Policy ConfigurationOverviewThis section reviews Quick Configuration steps required to set up security policy on SRX Series Services Gateways from within the J-Web interface.
Configure DeviceNetwork Interfaces
Use the same steps to configure all other interfaces.

Copyright © 2009, Juniper Networks, Inc. 27
aPPlIcatIon note - IPS Security Policy creation for Juniper networks SrX Series Services Gateways
Security Zone
Use same steps to configure other security zones
28 Copyright © 2009, Juniper Networks, Inc.
aPPlIcatIon note - IPS Security Policy creation for Juniper networks SrX Series Services Gateways
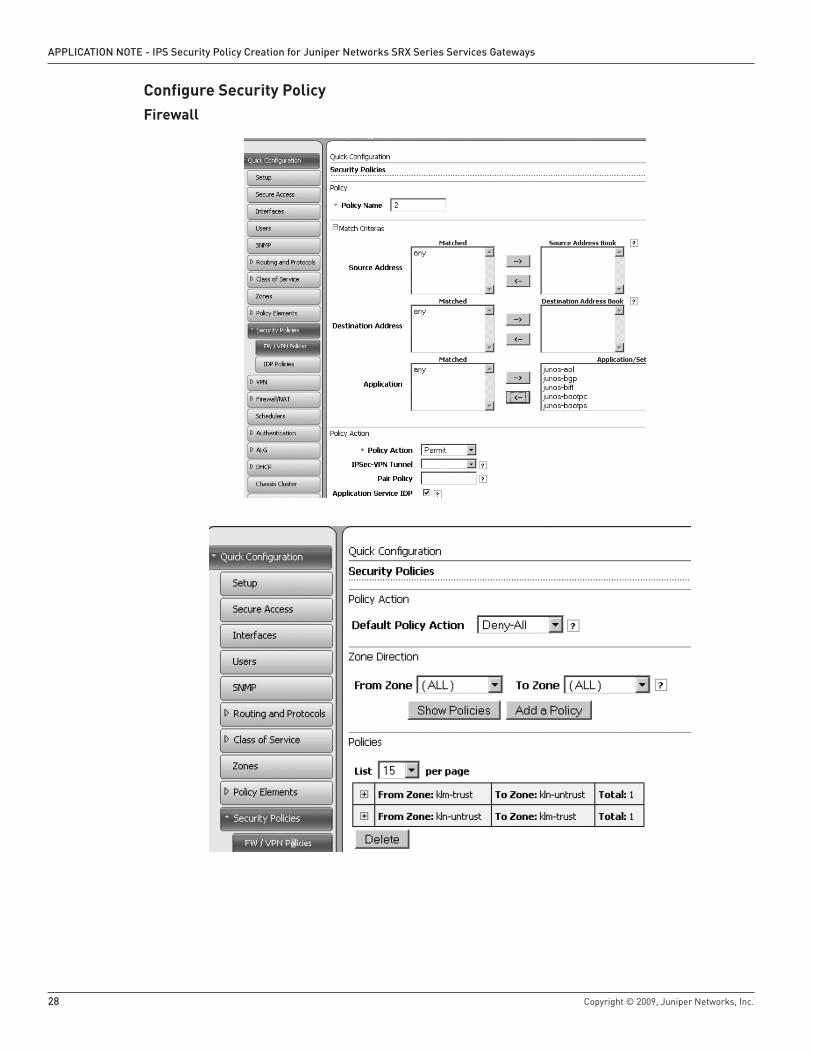
Configure Security PolicyFirewall
Copyright © 2009, Juniper Networks, Inc. 29
aPPlIcatIon note - IPS Security Policy creation for Juniper networks SrX Series Services Gateways
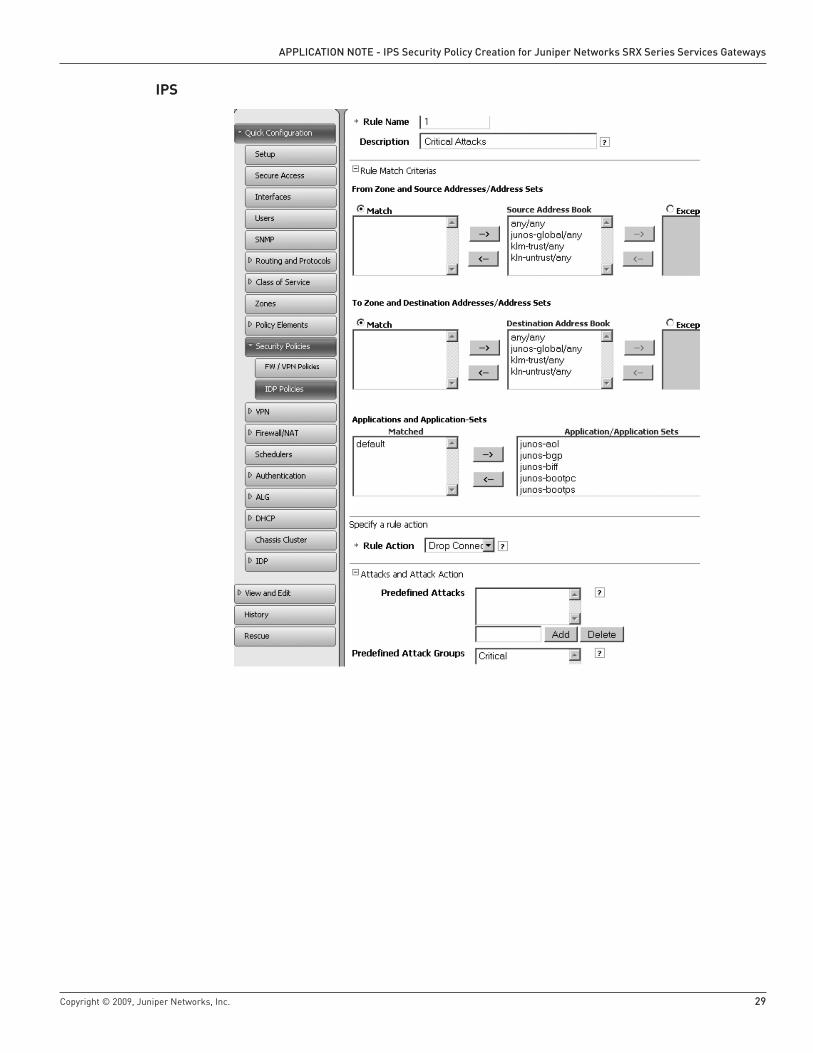
IPS
30 Copyright © 2009, Juniper Networks, Inc.
aPPlIcatIon note - IPS Security Policy creation for Juniper networks SrX Series Services Gateways
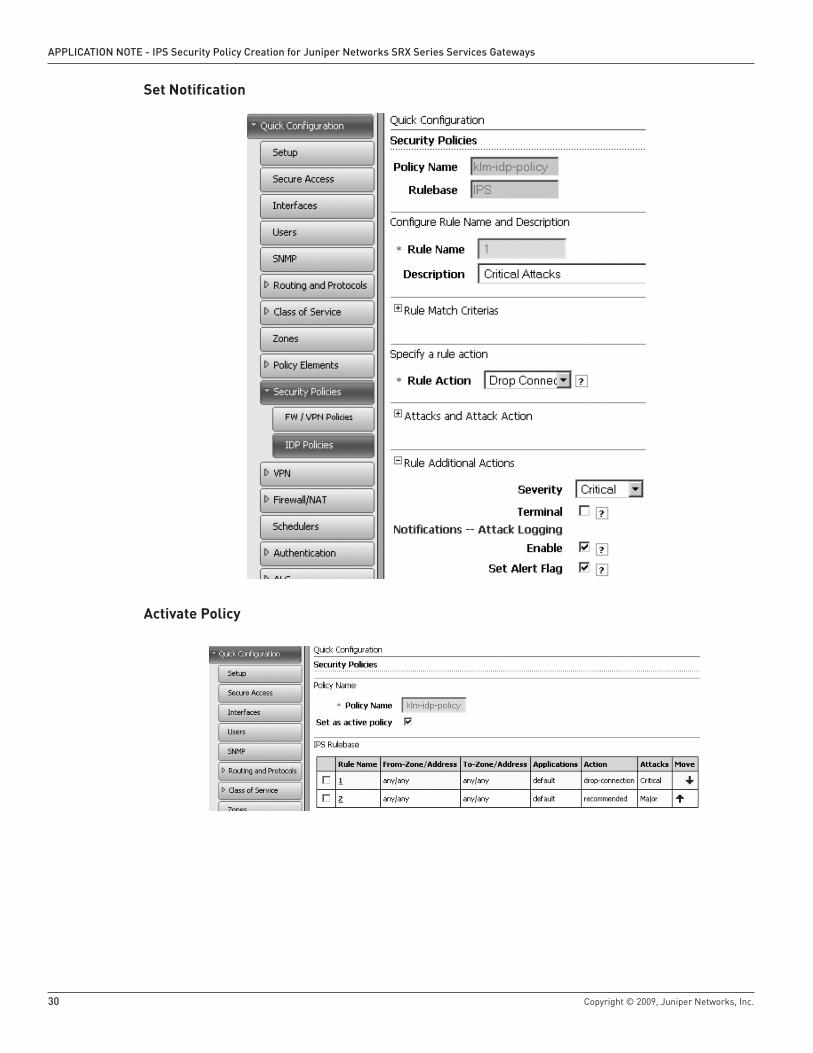
Set Notification
Activate Policy
Copyright © 2009, Juniper Networks, Inc. 31
aPPlIcatIon note - IPS Security Policy creation for Juniper networks SrX Series Services Gateways
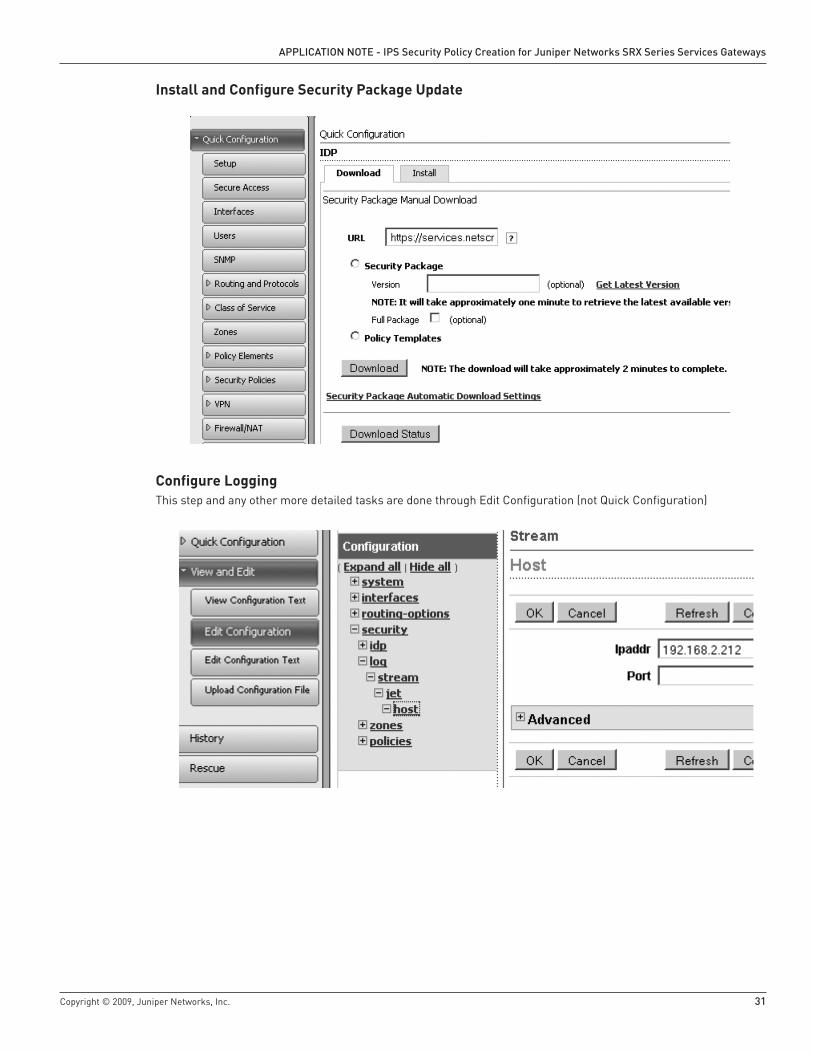
Install and Configure Security Package Update
Configure LoggingThis step and any other more detailed tasks are done through Edit Configuration (not Quick Configuration)
aPPlIcatIon note - IPS Security Policy creation for Juniper networks SrX Series Services Gateways
32
corporate and Sales Headquarters Juniper Networks, Inc. 1194 North Mathilda Avenue Sunnyvale, CA 94089 USA Phone: 888.JUNIPER (888.586.4737) or 408.745.2000 Fax: 408.745.2100
aPac HeadquartersJuniper Networks (Hong Kong) 26/F, Cityplaza One 1111 King’s Road Taikoo Shing, Hong Kong Phone: 852.2332.3636 Fax: 852.2574.7803
eMea HeadquartersJuniper Networks Ireland Airside Business Park Swords, County Dublin, Ireland Phone: 35.31.8903.600 Fax: 35.31.8903.601
Copyright 2009 Juniper Networks, Inc. All rights reserved. Juniper Networks, the Juniper Networks logo, JUNOS, NetScreen, and ScreenOS are registered trademarks of Juniper Networks, Inc. in the United States and other countries. JUNOSe is a trademark of Juniper Networks, Inc. All other trademarks, service marks, registered marks, or registered service marks are the property of their respective owners. Juniper Networks assumes no responsibility for any inaccuracies in this document. Juniper Networks reserves the right to change, modify, transfer, or otherwise revise this publication without notice.
3500146-001-EN Mar 2009 Printed on recycled paper.
To purchase Juniper Networks solutions, pleasecontact your Juniper Networks representative
at 1-866-298-6428 or authorized reseller.
About Juniper NetworksJuniper Networks, Inc. is the leader in high-performance networking. Juniper offers a high-performance network infrastructure that creates a responsive and trusted environment for accelerating the deployment of services and applications over a single network. This fuels high-performance businesses. Additional information can be found at www .juniper .net.