Embed Size (px)
Citation preview
Passy-Muir® TracheosToMy & VenTilaTor swallowing and sPeaking ValVes
PaTienT educaTion handbook
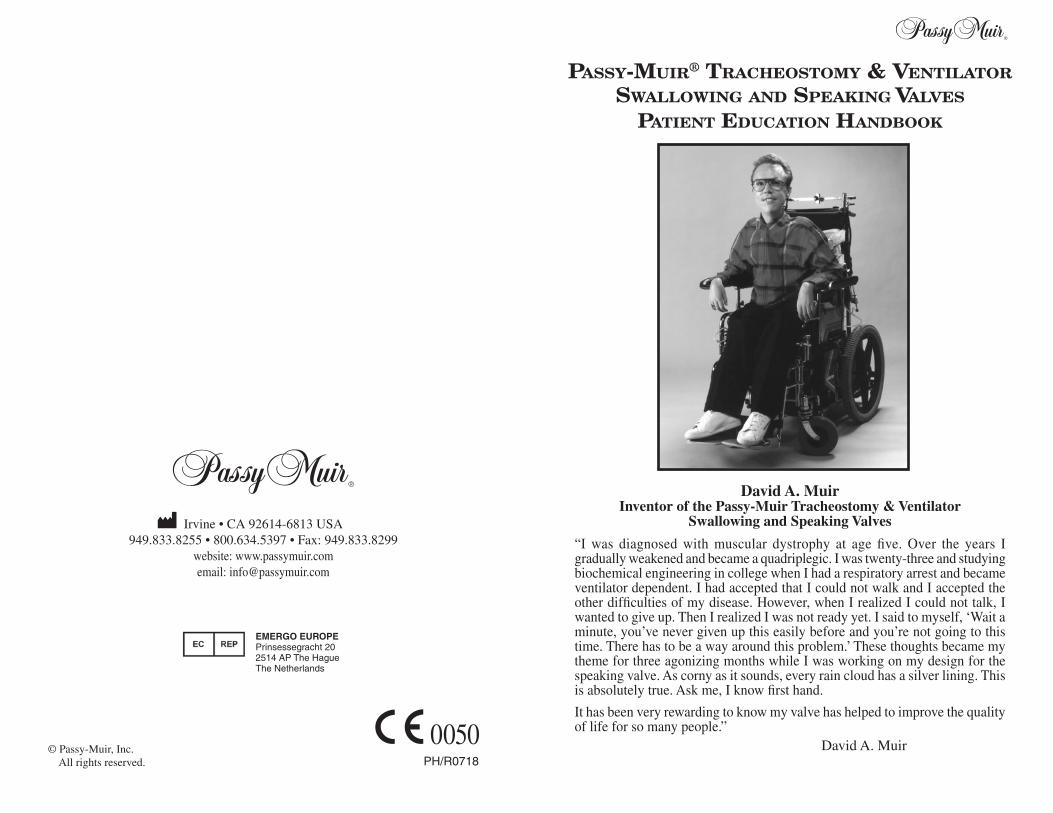
David A. MuirInventor of the Passy-Muir Tracheostomy & Ventilator
Swallowing and Speaking Valves
“I was diagnosed with muscular dystrophy at age five. Over the years I gradually weakened and became a quadriplegic. I was twenty-three and studying biochemical engineering in college when I had a respiratory arrest and became ventilator dependent. I had accepted that I could not walk and I accepted the other difficulties of my disease. However, when I realized I could not talk, I wanted to give up. Then I realized I was not ready yet. I said to myself, ‘Wait a minute, you’ve never given up this easily before and you’re not going to this time. There has to be a way around this problem.’ These thoughts became my theme for three agonizing months while I was working on my design for the speaking valve. As corny as it sounds, every rain cloud has a silver lining. This is absolutely true. Ask me, I know first hand.
It has been very rewarding to know my valve has helped to improve the quality of life for so many people.”
David A. Muir© Passy-Muir, Inc. All rights reserved.
0050PH/R0718
Irvine • CA 92614-6813 USA949.833.8255 • 800.634.5397 • Fax: 949.833.8299
website: www.passymuir.comemail: [email protected]
EMERGO EUROPE Prinsessegracht 20 2514 AP The Hague The Netherlands
David’s Legacy
The Passy-Muir® Tracheostomy & Ventilator Swallowing and Speaking Valves were designed by David Muir. He was twenty-three years old and a quadriplegic when he had a respiratory arrest that left him ventilator dependent and unable to speak. Although medically frail, David had courage, genius, determination and a spirit that led him to invent his tracheostomy & ventilator swallowing and speaking valves for his own communication needs. David also had the commitment, the caring and the motivation to share his valves with other tracheostomized and ventilator dependent patients. His valves have given the gift of communication to thousands of tracheostomized and ventilator dependent patients throughout the world.
David passed away in August of 1990. We miss his presence, his smile, and his humor. However, through our efforts to educate clinicians, patients and families about speaking with David’s valves, his spirit continues. We at Passy-Muir Inc. believe that communication is the essence of the human spirit and it is essential to individual rights and dignity. We are committed in our efforts to offer tracheostomized and ventilator dependent patients a step towards independence and dignity through speech.
Additional educational materials on the Passy-Muir Tracheostomy & Ventilator Swallowing and Speaking Valves are available free of charge
from Passy-Muir and can be obtained by calling 800.634.5397.
This PMV belongs to: _______________________________ Date: _______
Date I began using this PMV: _________________________(PMV should be evaluated for replacement after two months)
I am using the following PMV:
❑ PMV® 005 (white) ❑ PMV® 2000 (clear) ❑ PMA® 2000❑ PMV® 007 (Aqua Color™) ❑ PMV® 2001 (Purple Color™) Oxygen Adapter
My tracheostomy tube is:
Name brand:_____________________________ Size:_________________
❑ Cuffless ❑ Fenestrated ❑ Cuffed/Amount of air in cuff:______________
Special Instructions:_____________________________________________________________________________________________________________Instructions for PMV use:
I should wear my PMV _________ hours per day
I should wear my PMV when eating: ❑ Yes ❑ No
Special Instructions:__________________________________________________________________________________________________________________
WARNING: IF YOU ARE HAVING ANY DIFFICULTY WHILE WEARING THE PMV, REMOVE THE PMV IMMEDIATELY AND CONTACT YOUR DOCTOR.
I am _____ /am not _____ using a ventilator
Special instructions [i.e. vent settings, Peak Inspiratory Pressure (PIP)]: ________________________________________________________________
________________________________________________________________
My Doctor’s name is:______________________________________________
Phone #_______________________________________
My Speech Pathologist’s name is:_____________________________________
Phone #_______________________________________
My Respiratory Therapist’s name is:___________________________________
Phone #_______________________________________
I can order a replacement PMV from:__________________________________
Phone #_______________________________________
The PMV can be obtained from your Doctor, Home Equipment Company or Hospital. You will need a prescription for the PMV. The PMV is Medicare/MediCal and Medicaid reimbursable. If you have any questions about the PMV, need any assistance or more information on PMV use, please call our respiratory and speech clinical specialists at: Passy-Muir Inc. 800.634.5397.
PASSY-MUIR® TRACHEOSTOMY & VENTILATOR SWALLOWING AND SPEAKING VALVE (PMV®) USER INFORMATION
I. INTRODUCTION
This handbook was designed for tracheostomized and/or ventilator dependent patients, their caregivers and families. Each person involved with the care and use of the Passy-Muir® Tracheostomy & Ventilator Swallowing and Speaking Valve (PMV®) requires the appropriate training to ensure patient safety and appropriate PMV use. This handbook covers the PMV 005 (white), PMV 007 (Aqua Color™) , PMV 2000 (clear), and the PMV 2001 (Purple Color™) valves and it should be used along with hands-on training as well as with the PMV Instruction Booklet and Warning Labels contained in the PMV Patient Care Kit.
WARNING: YOU MUST BE EVALUATED AND MONITORED BY A QUALIFIED HEALTHCARE PROFESSIONAL WHEN TRYING THE PMV FOR THE FIRST TIME TO ENSURE YOUR SAFETY AND PROPER USE OF THE PMV. NEVER ATTEMPT TO USE THE PMV UNTIL AFTER YOU HAVE BEEN EVALUATED AND TRAINED TO USE IT BY A QUALIFIED HEALTHCARE PROFESSIONAL.
Note: Terms that can be found in the glossary are written in bold letters in the text for easy identification.
The following are general guidelines. For specific instructions ask your physician and/or healthcare professional. These guidelines apply to both tracheostomy and ventilator use of the PMV. Using the PMV with a ventilator will require additional instructions found at the end of each section denoted by a For Ventilator Use.
CAUTION: This booklet should be used as a guide only. Additional and patient specific instructions will be provided by your doctor, nurse, respiratory therapist, and/or speech-language pathologist.
PATIENT EDUCATION HANDBOOKTABLE OF CONTENTS
I. Introduction ...................................................................................1
II. Passy-Muir® Tracheostomy & Ventilator Swallowing and Speaking Valves (PMVs) .............................................................2
What is a PMV®? ..........................................................................2 Types of PMVs .............................................................................3 Patient Care Kit ............................................................................4
III. Placement of the PMV ..................................................................6 1. Positioning ................................................................................6 2. Checking Vital Signs ................................................................6 3. Suctioning .................................................................................8 4. Deflating the Cuff .....................................................................8 5. PMV Placement ......................................................................10 6. Removing the PMV ................................................................16 7. Getting used to the PMV (Transitioning) ...............................16
IV. Troubleshooting .........................................................................18
V. Cleaning, Care and Lifetime of the PMV ..................................23
VI. Use of the PMVs with Different Types of Tracheostomy Tubes ..................................................................25
Cuffed Tracheostomy Tubes .......................................................25 Cuffless Tracheostomy Tubes .....................................................26 Fenestrated Tracheostomy Tubes................................................26 Metal Tracheostomy Tubes .........................................................26 Neonatal and Pediatric Tracheostomy Tubes ..............................27 Foam Filled Cuffed Tracheostomy Tubes ...................................27
VII. Understanding Your Tracheostomy/ PMV Benefits ..................28
Understanding Your Tracheostomy.............................................28
PMV Benefits .............................................................................29 Improves Speech and Voice Production ........................29 Improves Swallowing ...................................................30 Improves Secretion Management .................................30 Improves Senses of Smell and Taste .............................30 Impacts Infection Control .............................................30 Assists With Ventilator Weaning ...................................30 Assists With Decannulation ..........................................31 Quality of Life Issues ...................................................31
VIII. Glossary ....................................................................................33
IX. Resources ...................................................................................34
X. Passy-Muir Clinical Support and Educational Materials ..........35
“Although I cannot tolerate having my tracheostomy tube plugged, I do tolerate wearing the PMV very well. I can cover my tracheostomy tube and the PMV with a scarf to minimize their presence while still being able to work and talk. I have found that the PMV reduces airway irritation and facilitates secretion control so that I can go for long periods without coughing. The PMV is terrific! It has helped to normalize life for me.”
Mimi Collins, M.D. Bilateral Vocal Cord Paralysis Philadelphia, PA
1
All of the PMVs covered by this handbook fit directly on the tracheostomy tube and can be adapted to use with a ventilator. PMVs can be used on almost all types and sizes of tracheostomy tubes including neonatal, pediatric and adult (See Chapter VI, Use of the PMV® with Different Types of Tracheostomy Tubes. Page 25).
Types of PMVs
All PMVs covered by this handbook can be used with adults, children and infants who are tracheostomized and/or ventilator dependent. These valves can be placed directly on the hub of the tracheostomy tube or used with various adapters in-line with the ventilator as described later in this booklet.
WARNING: THE TRACHEOSTOMY TUBE CUFF MUST BE COMPLETELY DEFLATED BEFORE PLACING THE PMV. AN INFLATED CUFF WILL BLOCK THE SPACE IN THE AIRWAY AROUND THE TRACHEOSTOMY TUBE AND PREVENT THE PMV USER FROM EXHALING. THE PMV USER WILL BE UNABLE TO BREATHE IF CUFF IS NOT COMPLETELY DEFLATED TO ALLOW AIR TO BE EXHALED AROUND THE TRACHEOSTOMY TUBE AND OUT OF THE MOUTH AND NOSE.
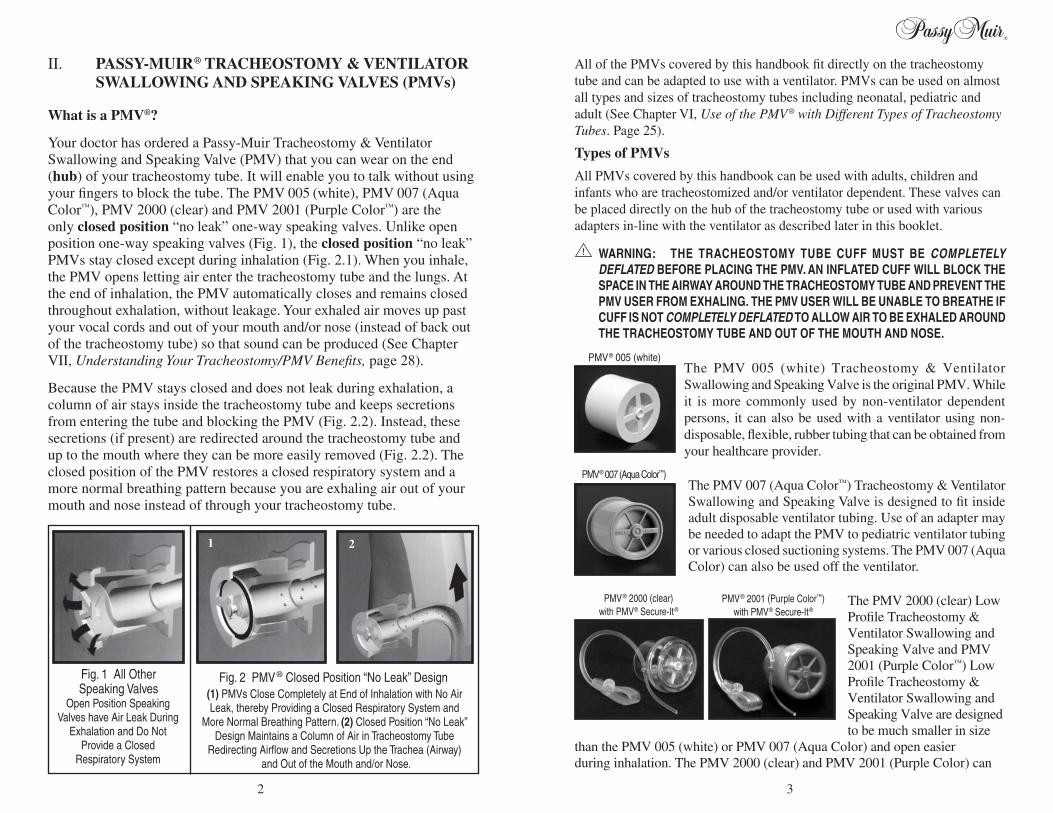
The PMV 005 (white) Tracheostomy & Ventilator Swallowing and Speaking Valve is the original PMV. While it is more commonly used by non-ventilator dependent persons, it can also be used with a ventilator using non-disposable, flexible, rubber tubing that can be obtained from your healthcare provider.
The PMV 007 (Aqua Color™) Tracheostomy & Ventilator Swallowing and Speaking Valve is designed to fit inside adult disposable ventilator tubing. Use of an adapter may be needed to adapt the PMV to pediatric ventilator tubing or various closed suctioning systems. The PMV 007 (Aqua Color) can also be used off the ventilator.
The PMV 2000 (clear) Low Profile Tracheostomy & Ventilator Swallowing and Speaking Valve and PMV 2001 (Purple Color™) Low Profile Tracheostomy & Ventilator Swallowing and Speaking Valve are designed to be much smaller in size
than the PMV 005 (white) or PMV 007 (Aqua Color) and open easier during inhalation. The PMV 2000 (clear) and PMV 2001 (Purple Color) can
PMV® 2000 (clear) with PMV® Secure-It®
PMV® 007 (Aqua Color™)
PMV® 005 (white)
PMV® 2001 (Purple Color™) with PMV® Secure-It®
Open Position Speaking Valves have Air Leak During
Exhalation and Do Not Provide a Closed
Respiratory System
(1) PMVs Close Completely at End of Inhalation with No Air Leak, thereby Providing a Closed Respiratory System and
More Normal Breathing Pattern. (2) Closed Position “No Leak” Design Maintains a Column of Air in Tracheostomy Tube
Redirecting Airflow and Secretions Up the Trachea (Airway) and Out of the Mouth and/or Nose.
Fig. 1 All Other Speaking Valves
Fig. 2 PMV® Closed Position “No Leak” Design
1 2
II. PASSY-MUIR® TRACHEOSTOMY & VENTILATOR SWALLOWING AND SPEAKING VALVES (PMVs)
What is a PMV®?
Your doctor has ordered a Passy-Muir Tracheostomy & Ventilator Swallowing and Speaking Valve (PMV) that you can wear on the end (hub) of your tracheostomy tube. It will enable you to talk without using your fingers to block the tube. The PMV 005 (white), PMV 007 (Aqua Color™), PMV 2000 (clear) and PMV 2001 (Purple Color™) are the only closed position “no leak” one-way speaking valves. Unlike open position one-way speaking valves (Fig. 1), the closed position “no leak” PMVs stay closed except during inhalation (Fig. 2.1). When you inhale, the PMV opens letting air enter the tracheostomy tube and the lungs. At the end of inhalation, the PMV automatically closes and remains closed throughout exhalation, without leakage. Your exhaled air moves up past your vocal cords and out of your mouth and/or nose (instead of back out of the tracheostomy tube) so that sound can be produced (See Chapter VII, Understanding Your Tracheostomy/PMV Benefits, page 28).
Because the PMV stays closed and does not leak during exhalation, a column of air stays inside the tracheostomy tube and keeps secretions from entering the tube and blocking the PMV (Fig. 2.2). Instead, these secretions (if present) are redirected around the tracheostomy tube and up to the mouth where they can be more easily removed (Fig. 2.2). The closed position of the PMV restores a closed respiratory system and a more normal breathing pattern because you are exhaling air out of your mouth and nose instead of through your tracheostomy tube.
32
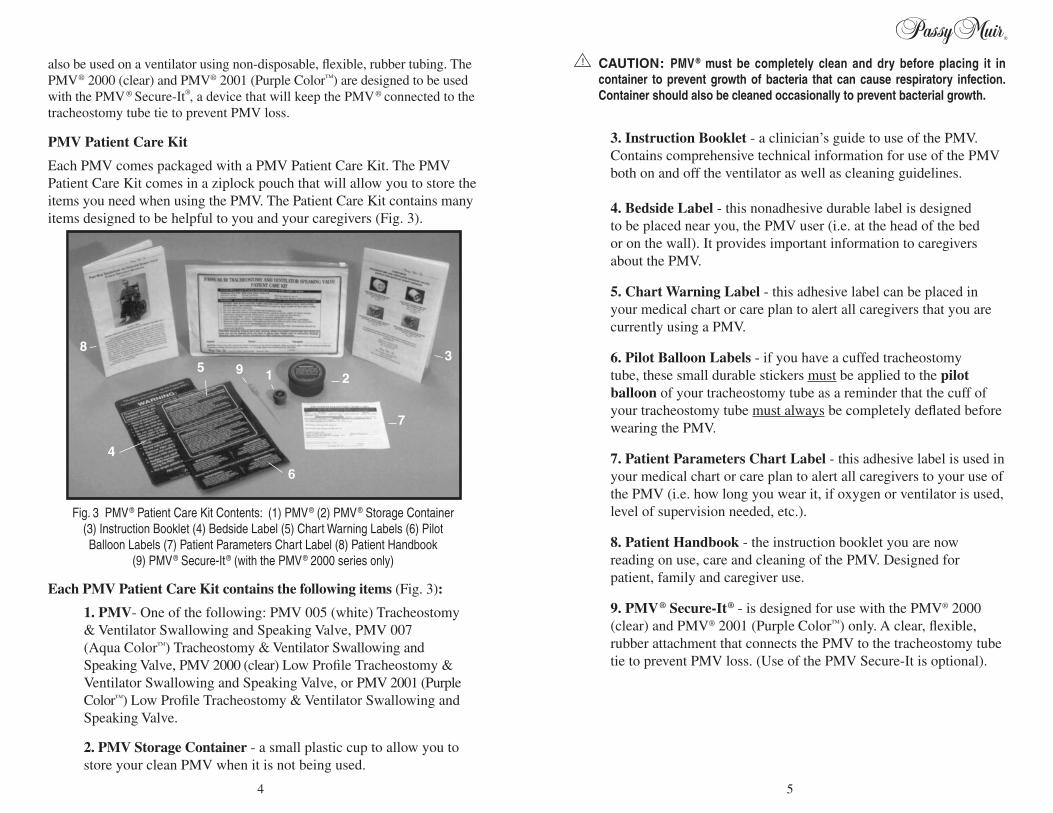
CAUTION: PMV ® must be completely clean and dry before placing it in container to prevent growth of bacteria that can cause respiratory infection. Container should also be cleaned occasionally to prevent bacterial growth.
3. Instruction Booklet - a clinician’s guide to use of the PMV. Contains comprehensive technical information for use of the PMV both on and off the ventilator as well as cleaning guidelines.
4. Bedside Label - this nonadhesive durable label is designed to be placed near you, the PMV user (i.e. at the head of the bed or on the wall). It provides important information to caregivers about the PMV.
5. Chart Warning Label - this adhesive label can be placed in your medical chart or care plan to alert all caregivers that you are currently using a PMV.
6. Pilot Balloon Labels - if you have a cuffed tracheostomy tube, these small durable stickers must be applied to the pilot balloon of your tracheostomy tube as a reminder that the cuff of your tracheostomy tube must always be completely deflated before wearing the PMV.
7. Patient Parameters Chart Label - this adhesive label is used in your medical chart or care plan to alert all caregivers to your use of the PMV (i.e. how long you wear it, if oxygen or ventilator is used, level of supervision needed, etc.).
8. Patient Handbook - the instruction booklet you are now reading on use, care and cleaning of the PMV. Designed for patient, family and caregiver use.
9. PMV® Secure-It® - is designed for use with the PMV® 2000 (clear) and PMV® 2001 (Purple Color™) only. A clear, flexible, rubber attachment that connects the PMV to the tracheostomy tube tie to prevent PMV loss. (Use of the PMV Secure-It is optional).
also be used on a ventilator using non-disposable, flexible, rubber tubing. The PMV® 2000 (clear) and PMV® 2001 (Purple Color™) are designed to be used with the PMV® Secure-It®, a device that will keep the PMV® connected to the tracheostomy tube tie to prevent PMV loss.
PMV Patient Care Kit
Each PMV comes packaged with a PMV Patient Care Kit. The PMV Patient Care Kit comes in a ziplock pouch that will allow you to store the items you need when using the PMV. The Patient Care Kit contains many items designed to be helpful to you and your caregivers (Fig. 3).
Each PMV Patient Care Kit contains the following items (Fig. 3):
1. PMV- One of the following: PMV 005 (white) Tracheostomy & Ventilator Swallowing and Speaking Valve, PMV 007 (Aqua Color™) Tracheostomy & Ventilator Swallowing and Speaking Valve, PMV 2000 (clear) Low Profile Tracheostomy & Ventilator Swallowing and Speaking Valve, or PMV 2001 (Purple Color™) Low Profile Tracheostomy & Ventilator Swallowing and Speaking Valve.
2. PMV Storage Container - a small plastic cup to allow you to store your clean PMV when it is not being used.
Fig. 3 PMV® Patient Care Kit Contents: (1) PMV® (2) PMV® Storage Container (3) Instruction Booklet (4) Bedside Label (5) Chart Warning Labels (6) Pilot Balloon Labels (7) Patient Parameters Chart Label (8) Patient Handbook
(9) PMV® Secure-It® (with the PMV® 2000 series only)
21
7
6
5
83
9
4
4 5
Before PMV® During PMV After PMV
My heart rate is _____ _____ _____
My heart rate range is __________________________
My respiratory rate is _____ _____ _____
My respiratory rate range is __________________________
My oxygen saturation is _____ _____ _____
My oxygen saturation range is __________________________
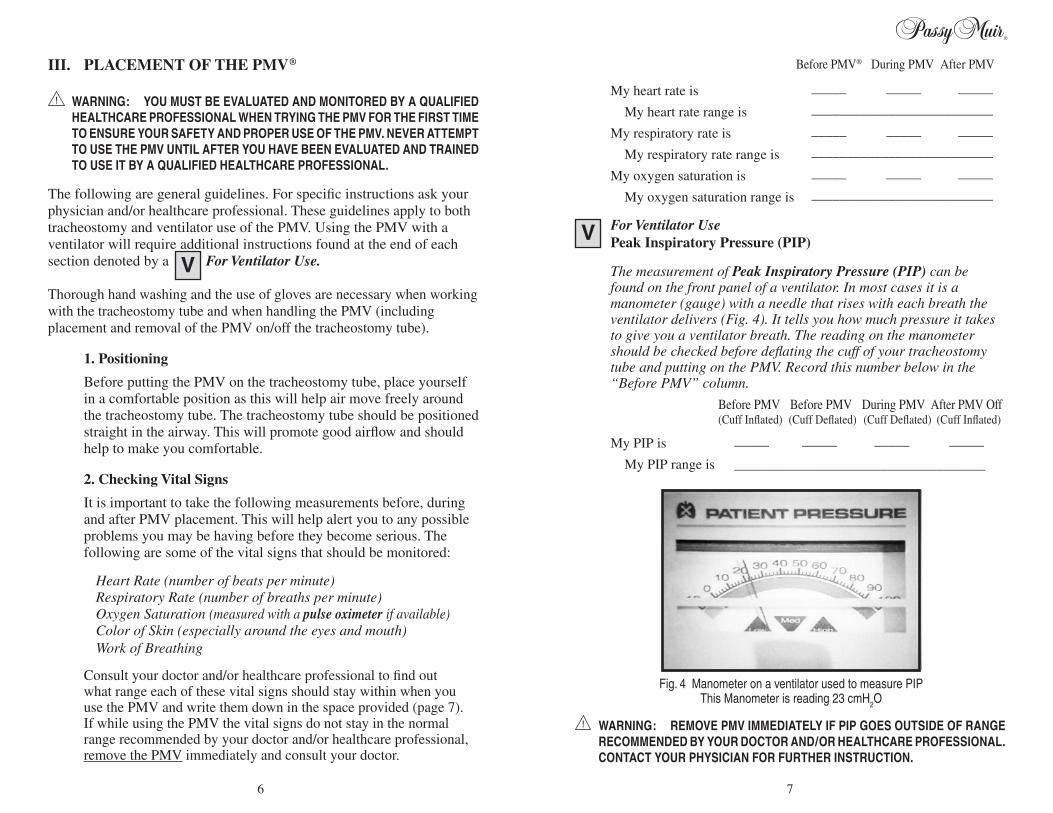
For Ventilator Use Peak Inspiratory Pressure (PIP) The measurement of Peak Inspiratory Pressure (PIP) can be
found on the front panel of a ventilator. In most cases it is a manometer (gauge) with a needle that rises with each breath the ventilator delivers (Fig. 4). It tells you how much pressure it takes to give you a ventilator breath. The reading on the manometer should be checked before deflating the cuff of your tracheostomy tube and putting on the PMV. Record this number below in the “Before PMV” column.
Before PMV Before PMV During PMV After PMV Off (Cuff Inflated) (Cuff Deflated) (Cuff Deflated) (Cuff Inflated)
My PIP is _____ _____ _____ _____
My PIP range is ____________________________________
WARNING: REMOVE PMV IMMEDIATELY IF PIP GOES OUTSIDE OF RANGE RECOMMENDED BY YOUR DOCTOR AND/OR HEALTHCARE PROFESSIONAL. CONTACT YOUR PHYSICIAN FOR FURTHER INSTRUCTION.
III. PLACEMENT OF THE PMV®
WARNING: YOU MUST BE EVALUATED AND MONITORED BY A QUALIFIED HEALTHCARE PROFESSIONAL WHEN TRYING THE PMV FOR THE FIRST TIME TO ENSURE YOUR SAFETY AND PROPER USE OF THE PMV. NEVER ATTEMPT TO USE THE PMV UNTIL AFTER YOU HAVE BEEN EVALUATED AND TRAINED TO USE IT BY A QUALIFIED HEALTHCARE PROFESSIONAL.
The following are general guidelines. For specific instructions ask your physician and/or healthcare professional. These guidelines apply to both tracheostomy and ventilator use of the PMV. Using the PMV with a ventilator will require additional instructions found at the end of each section denoted by a For Ventilator Use.
Thorough hand washing and the use of gloves are necessary when working with the tracheostomy tube and when handling the PMV (including placement and removal of the PMV on/off the tracheostomy tube).
1. Positioning
Before putting the PMV on the tracheostomy tube, place yourself in a comfortable position as this will help air move freely around the tracheostomy tube. The tracheostomy tube should be positioned straight in the airway. This will promote good airflow and should help to make you comfortable.
2. Checking Vital Signs
It is important to take the following measurements before, during and after PMV placement. This will help alert you to any possible problems you may be having before they become serious. The following are some of the vital signs that should be monitored:
Heart Rate (number of beats per minute) Respiratory Rate (number of breaths per minute) Oxygen Saturation (measured with a pulse oximeter if available) Color of Skin (especially around the eyes and mouth) Work of Breathing
Consult your doctor and/or healthcare professional to find out what range each of these vital signs should stay within when you use the PMV and write them down in the space provided (page 7). If while using the PMV the vital signs do not stay in the normal range recommended by your doctor and/or healthcare professional, remove the PMV immediately and consult your doctor.
Fig. 4 Manometer on a ventilator used to measure PIP This Manometer is reading 23 cmH2O
76
3. Suctioning
Suction your tracheostomy tube and mouth (as needed) to remove excess secretions before placing the PMV ®. Removing excess secretions from your airway before using the PMV will allow air to move more freely around the tracheostomy tube and will make you feel more comfortable while wearing the PMV. These secretions can cause breathing difficulties and may cause excessive coughing if not removed.
4. Deflating the Cuff
If you have a cuffed tracheostomy tube, please read the following very carefully as the cuff must be completely deflated before you use the PMV. A deflated cuff will allow air to be exhaled around the tracheostomy tube and out of the mouth and nose when the PMV is being used. Attach the Pilot Balloon Label to the pilot balloon line of the tracheostomy tube, if not already in place. If you have a cuffed tracheostomy tube you might wish to consider asking your doctor to evaluate you for a cuffless tracheostomy tube (described on page 26), so the need for cuff deflation will be eliminated when using the PMV.
If you have a cuffless (no cuff) tube, you may skip this step and continue to step #5 (page 10) because you have no cuff to be deflated. Your cuffless tube should allow you to exhale air around it and out of your mouth and nose while using the PMV.
WARNING: TRACHEOSTOMY TUBE CUFF MUST BE COMPLETELY DEFLATED BEFORE PLACING THE PMV. AN INFLATED CUFF WILL BLOCK THE SPACE IN THE AIRWAY AROUND THE TRACHEOSTOMY TUBE AND PREVENT THE PMV USER FROM EXHALING. PMV USER WILL BE UNABLE TO BREATHE IF CUFF IS NOT COMPLETELY DEFLATED TO ALLOW AIR TO BE EXHALED AROUND THE TRACHEOSTOMY TUBE AND OUT OF THE MOUTH AND NOSE.
Suctioning may be needed before and after cuff deflation both through the tracheostomy tube and in the mouth. Secretions can build up around the cuff of a tracheostomy tube and when deflated these secretions drop into the airway and may cause breathing difficulties and/or persistent coughing if not removed.
If you have a cuffed tracheostomy tube, (as described in Chapter VI, Use the PMVs with Different Types of Tracheostomy Tubes, page 25) you
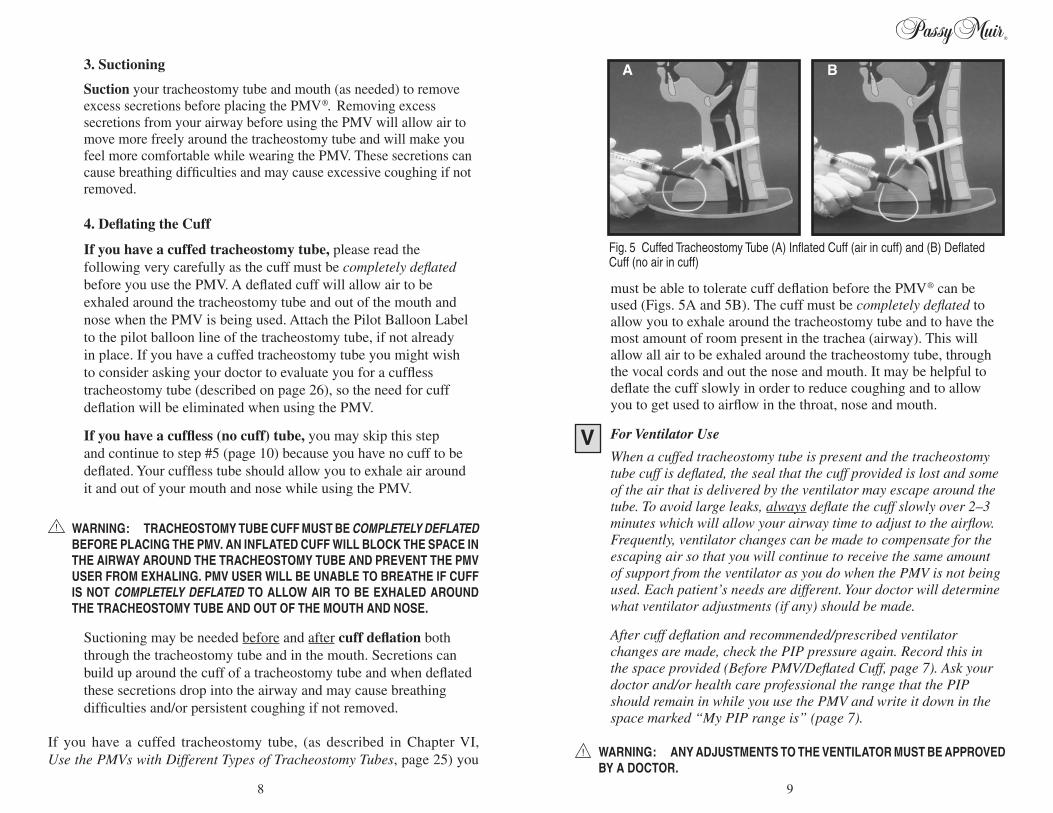
Fig. 5 Cuffed Tracheostomy Tube (A) Inflated Cuff (air in cuff) and (B) Deflated Cuff (no air in cuff)
A B
must be able to tolerate cuff deflation before the PMV® can be used (Figs. 5A and 5B). The cuff must be completely deflated to allow you to exhale around the tracheostomy tube and to have the most amount of room present in the trachea (airway). This will allow all air to be exhaled around the tracheostomy tube, through the vocal cords and out the nose and mouth. It may be helpful to deflate the cuff slowly in order to reduce coughing and to allow you to get used to airflow in the throat, nose and mouth.
For Ventilator Use
When a cuffed tracheostomy tube is present and the tracheostomy tube cuff is deflated, the seal that the cuff provided is lost and some of the air that is delivered by the ventilator may escape around the tube. To avoid large leaks, always deflate the cuff slowly over 2–3 minutes which will allow your airway time to adjust to the airflow. Frequently, ventilator changes can be made to compensate for the escaping air so that you will continue to receive the same amount of support from the ventilator as you do when the PMV is not being used. Each patient’s needs are different. Your doctor will determine what ventilator adjustments (if any) should be made.
After cuff deflation and recommended/prescribed ventilator changes are made, check the PIP pressure again. Record this in the space provided (Before PMV/Deflated Cuff, page 7). Ask your doctor and/or health care professional the range that the PIP should remain in while you use the PMV and write it down in the space marked “My PIP range is” (page 7).
WARNING: ANY ADJUSTMENTS TO THE VENTILATOR MUST BE APPROVED BY A DOCTOR.
98
Removing the PMV® Secure-It®
1. Unbutton the PMV Secure-It from the tracheostomy tube tie.
2. Remove the PMV® from the hub of the tracheostomy tube as described in #6 Removing the PMV (page 16).
3. Gently pull the PMV Secure-It out of the small hole on the side of the PMV.
Part B - Attaching the PMV to the Tracheostomy Tube
Attach the PMV to the end of the tracheostomy tube (hub) using a firm 1/4 twist with one hand while holding on to the neckplate of the tracheostomy tube with the other hand (Fig. 7.1 and 7.2). The 1/4 twist provides friction to help prevent the PMV from popping off. It may be helpful to use a mirror if you are putting the PMV on yourself. Chart Warning Labels, Bedside Label and Patient Parameters Chart Label should be placed at the bedside and in the chart, if this has not already been done, in order to alert all caregivers of PMV use.
CAUTION: Do not place the PMV forcefully onto the tracheostomy tube as that may make it difficult to remove the PMV and may cause the PMV membrane to stick.
After the PMV has been placed on the tracheostomy tube, changes in vital signs should be checked. Record your vital signs while wearing the PMV in the “During” column (page 7). Continue to monitor vital signs periodically while the PMV is in place. If these vital signs fall outside of the ranges recommended to you by your doctor and/or healthcare professional, remove the PMV immediately and contact your doctor. Note: For infants and children, restlessness, wheezing, grunting, unusual sleepiness, as well as changes in vital signs indicate that the PMV should be removed immediately and the doctor contacted.
5. PMV® Placement
Allow yourself a few moments to recover from cuff deflation and suctioning before placing the PMV on the tracheostomy tube.
Please note: If you are using the PMV® 005 (white) or PMV® 007 (Aqua Color™), or are on a ventilator and using the PMV® 2000 (clear) or PMV® 2001 (Purple Color™), you will not be using the PMV® Secure-It ®. Skip to Part B below.
Part A - Using the PMV Secure-It If you are using the PMV 2000 (clear) or PMV 2001 (Purple
Color) and are not on a ventilator, attach the PMV Secure-It to the PMV before placing the PMV on the tracheostomy tube. Use the following steps (use of the PMV Secure-It is optional):
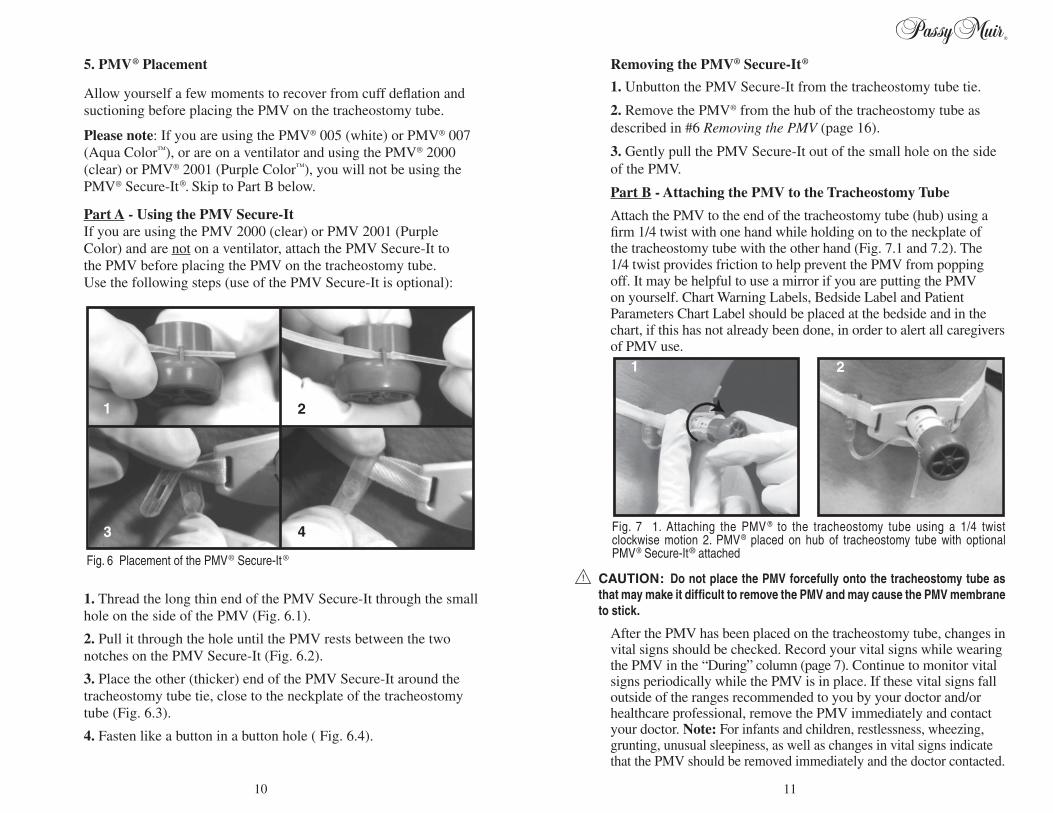
1. Thread the long thin end of the PMV Secure-It through the small hole on the side of the PMV (Fig. 6.1).
2. Pull it through the hole until the PMV rests between the two notches on the PMV Secure-It (Fig. 6.2).
3. Place the other (thicker) end of the PMV Secure-It around the tracheostomy tube tie, close to the neckplate of the tracheostomy tube (Fig. 6.3).
4. Fasten like a button in a button hole ( Fig. 6.4).
Fig. 7 1. Attaching the PMV ® to the tracheostomy tube using a 1/4 twist clockwise motion 2. PMV® placed on hub of tracheostomy tube with optional PMV® Secure-It® attached
1 2
Fig. 6 Placement of the PMV® Secure-It®
1 2
3 4
1110
If you are not using the PMV® with a ventilator, continue to page 16.
For Ventilator Use
Placing the PMV In-line with the Ventilator
The PMV® 005 (white), PMV® 007 (Aqua Color™), PMV® 2000 (clear) and the PMV® 2001 (Purple Color™) can be used with most types of ventilators (Fig. 9) and in conjunction with most ventilator settings. Your doctor will give you specific instructions that will enable you to use the PMV safely in-line with the ventilator. Careful assessment by your doctor must be made before using the PMV. Although most people on ventilators can wear the PMV comfortably all day, some people may need more time and preparation before using the PMV and/or may only be able to wear it for short periods (minutes). In some cases, changes in the ventilator settings may be needed. If changes are necessary they will be prescribed by your doctor. Important information for your doctor and healthcare professional on use of the PMV with a ventilator dependent person can be found in the Passy-Muir® Instruction Booklet that comes packaged with each PMV in the Patient Care Kit.
If you are going to use the PMV while on a ventilator, your doctor and other healthcare professionals (e.g., respiratory therapist) will also need to determine and instruct you regarding the best way for you to connect and use the PMV. There are many different types of connections that can be used to put the PMV in-line in the ventilator tubing. Some of these connections are shown in Figures 10.1 - 10.4. Although all of the PMVs can be used with a ventilator, the PMV 007 (Aqua Color) is designed to be the most convenient PMV to use
WARNING: IF YOU ARE HAVING ANY DIFFICULTY BREATHING, REMOVE THE PMV® IMMEDIATELY AND CONTACT YOUR DOCTOR AND/OR HEALTHCARE PROFESSIONAL.
If you did not feel well while wearing the PMV and removed it, see Section IV, Troubleshooting (page 18) before trying the PMV again.
If you are breathing comfortably and vital signs are normal, continue to use the PMV per doctor’s instructions.
WARNING: DO NOT WEAR THE PMV WHILE SLEEPING.
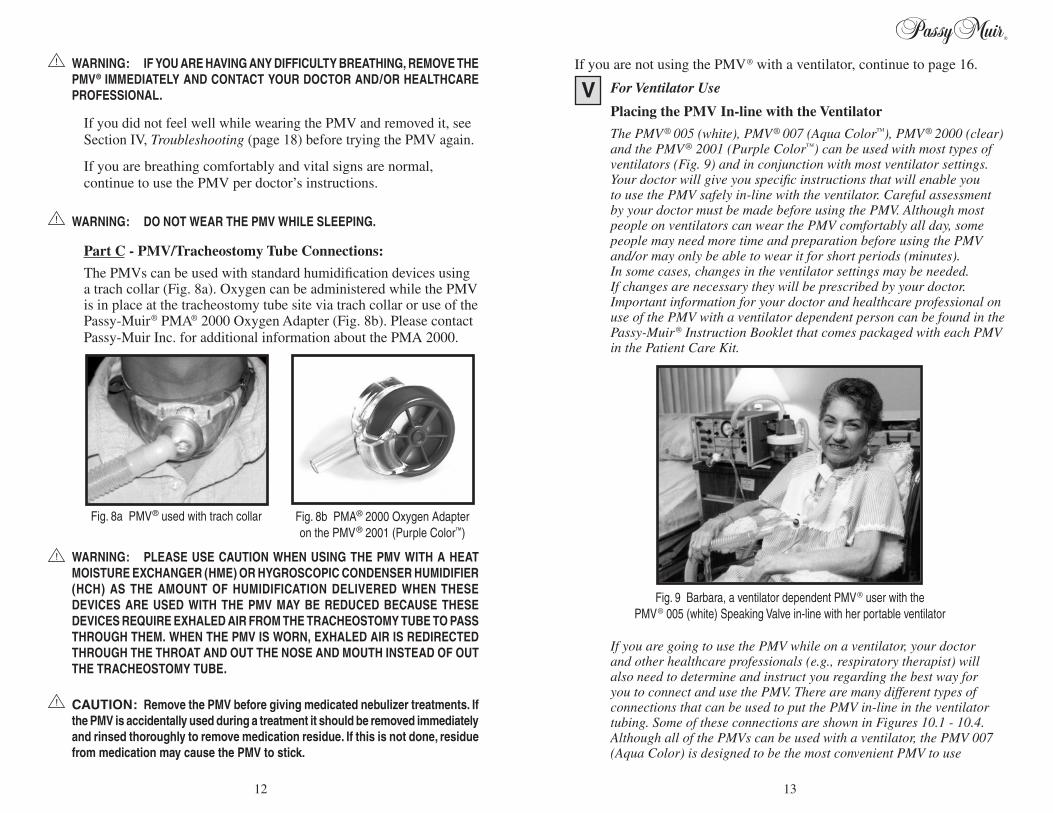
Part C - PMV/Tracheostomy Tube Connections:
The PMVs can be used with standard humidification devices using a trach collar (Fig. 8a). Oxygen can be administered while the PMV is in place at the tracheostomy tube site via trach collar or use of the Passy-Muir® PMA® 2000 Oxygen Adapter (Fig. 8b). Please contact Passy-Muir Inc. for additional information about the PMA 2000.
WARNING: PLEASE USE CAUTION WHEN USING THE PMV WITH A HEAT MOISTURE EXCHANGER (HME) OR HYGROSCOPIC CONDENSER HUMIDIFIER (HCH) AS THE AMOUNT OF HUMIDIFICATION DELIVERED WHEN THESE DEVICES ARE USED WITH THE PMV MAY BE REDUCED BECAUSE THESE DEVICES REQUIRE EXHALED AIR FROM THE TRACHEOSTOMY TUBE TO PASS THROUGH THEM. WHEN THE PMV IS WORN, EXHALED AIR IS REDIRECTED THROUGH THE THROAT AND OUT THE NOSE AND MOUTH INSTEAD OF OUT THE TRACHEOSTOMY TUBE.
CAUTION: Remove the PMV before giving medicated nebulizer treatments. If the PMV is accidentally used during a treatment it should be removed immediately and rinsed thoroughly to remove medication residue. If this is not done, residue from medication may cause the PMV to stick.
Fig. 9 Barbara, a ventilator dependent PMV® user with the PMV® 005 (white) Speaking Valve in-line with her portable ventilator
Fig. 8a PMV® used with trach collar Fig. 8b PMA® 2000 Oxygen Adapter on the PMV® 2001 (Purple Color™)
1312
After the PMV® has been placed in-line with the ventilator, monitor PIP and record the number in the “During” column (page 7). If the PIP falls outside the range recommended by your doctor and/or healthcare professional, remove the PMV immediately and consult your doctor. Continue to monitor PIP periodically to ensure adequate ventilation while the PMV is in place.
WARNING: IF YOU ARE HAVING ANY DIFFICULTY BREATHING, REMOVE THE PMV IMMEDIATELY AND CONTACT YOUR DOCTOR.
If you did not feel well while wearing the PMV and removed it, see Section IV, Troubleshooting (page 18) before trying the PMV again.
If you are breathing comfortably and vital signs and PIP are normal, continue to use the PMV per doctor’s instructions.
WARNING: DO NOT WEAR THE PMV WHILE SLEEPING.
with a ventilator because it is tapered to fit directly into disposable ventilator tubing. The PMV® 2000 (clear), PMV® 2001 (Purple Color™) and PMV® 005 (white) require the use of non-disposable, flexible, rubber ventilator tubing to place them in-line with the ventilator (Fig. 9).
WARNING: DO NOT USE THE PMV 005 (WHITE), PMV 2000 (CLEAR) OR PMV 2001 (PURPLE COLOR) WITH DISPOSABLE VENTILATOR TUBING AS THERE IS A POTENTIAL FOR DISCONNECT.
WARNING: DO NOT USE THE PMV® SECURE-IT® IN-LINE WITH A VENTILATOR AS THIS MAY CREATE ALARM PROBLEMS WITH A DISCONNECT.
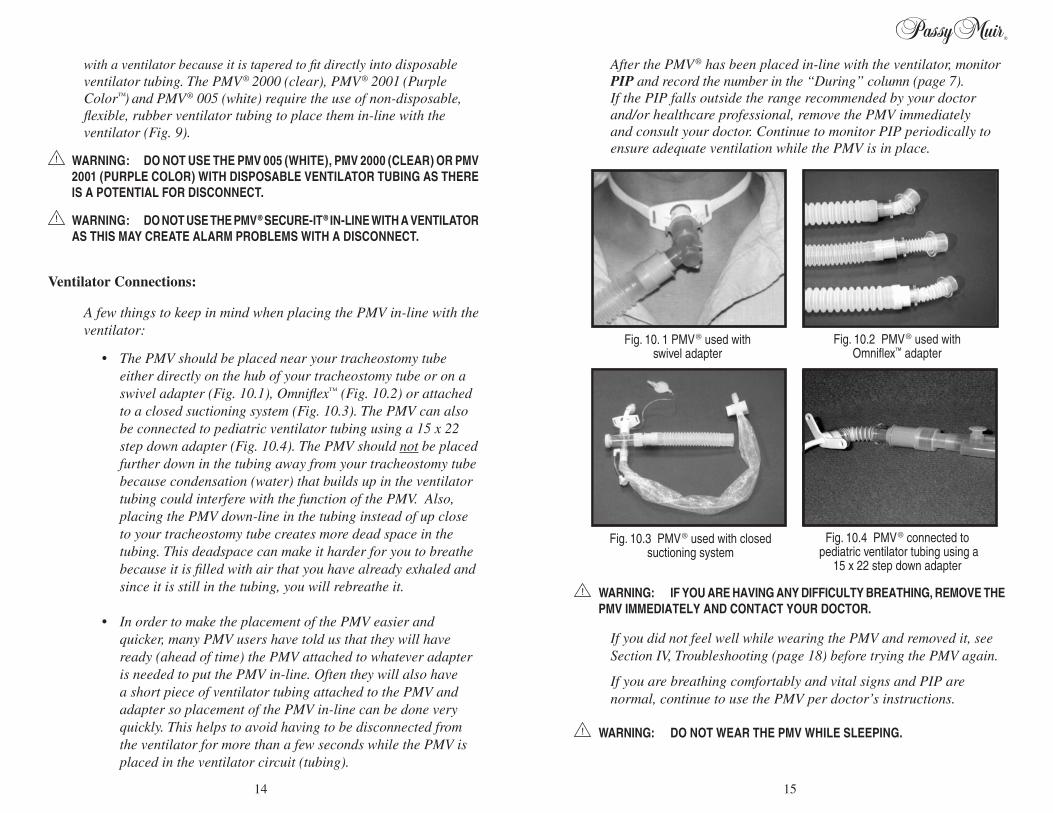
Ventilator Connections:
A few things to keep in mind when placing the PMV in-line with the ventilator:
• The PMV should be placed near your tracheostomy tube either directly on the hub of your tracheostomy tube or on a swivel adapter (Fig. 10.1), Omniflex™ (Fig. 10.2) or attached to a closed suctioning system (Fig. 10.3). The PMV can also be connected to pediatric ventilator tubing using a 15 x 22 step down adapter (Fig. 10.4). The PMV should not be placed further down in the tubing away from your tracheostomy tube because condensation (water) that builds up in the ventilator tubing could interfere with the function of the PMV. Also, placing the PMV down-line in the tubing instead of up close to your tracheostomy tube creates more dead space in the tubing. This deadspace can make it harder for you to breathe because it is filled with air that you have already exhaled and since it is still in the tubing, you will rebreathe it.
• In order to make the placement of the PMV easier and quicker, many PMV users have told us that they will have ready (ahead of time) the PMV attached to whatever adapter is needed to put the PMV in-line. Often they will also have a short piece of ventilator tubing attached to the PMV and adapter so placement of the PMV in-line can be done very quickly. This helps to avoid having to be disconnected from the ventilator for more than a few seconds while the PMV is placed in the ventilator circuit (tubing).
Fig. 10. 1 PMV® used with swivel adapter
Fig. 10.2 PMV® used with Omniflex™ adapter
Fig. 10.3 PMV® used with closed suctioning system
Fig. 10.4 PMV® connected to pediatric ventilator tubing using a
15 x 22 step down adapter
1514
6. Removing the PMV®
When removing the PMV from your tracheostomy tube, place one hand on your tracheostomy tube neckplate to keep the tracheostomy tube from moving and with the other hand gently twist the PMV off of the hub of the tube. Record your vital signs in the “After” column (page 7). If using a tracheostomy tube that has a hub that rotates it may be necessary to use a rocking rather than twisting motion to remove the PMV.
For Ventilator Use
Remove PMV from ventilator circuit and replace with set-up being used prior to PMV placement. After PMV is removed and original ventilator tubing is put in place, ventilator settings should be returned to levels they were at before PMV placement and tracheostomy tube cuff (if present) should then be reinflated. Do not inflate tracheostomy tube cuff until ventilator settings are returned to previous levels. Your PIP, after removing the PMV, should be the same as it was before placing the PMV. Record your PIP in the “After” column (page 7).
7. Getting Used to the PMV (Transitioning)
Tolerance Level - Everyone adapts to the PMV at different rates. Some people are able to wear the PMV for a few hours right away, quickly building up to wearing it all day. Other people take a little longer to become used to the PMV and breathing “a different way.” At first, they might only be able to wear the PMV for a few minutes at a time so they slowly build up the amount of time the PMV is worn. Sometimes you may find you are “having a bad day” and are not able to tolerate the PMV as long as the day before. This is not unusual, so don’t be discouraged. Try again the next day. If there is a significant difference from one day to the next, refer to Chapter IV Troubleshooting (page 18) and contact your doctor.
Motivation - Having a tracheostomy tube creates anxiety and frustration related to difficulty speaking. By taking time to allow yourself to adjust to this new breathing pattern, you should gradually become more comfortable at working towards wearing the PMV as much as you can tolerate. The following are some things you may be able to do that might help to take your mind off wearing the PMV:
“The first time I tried the PMV®, I couldn’t tolerate it. I wasn’t used to breathing out of my nose and mouth. That day I only wore the valve for two minutes. Now I wear it twelve hours a day. I had to build up my tolerance by using the PMV a little longer every day. If you only try it once and don’t try it again you are making a big mistake. I can now communicate like I used to, with my voice instead of having to write everything or have people try to read my lips. It really helps me to be more independent.”
Fitzpatrick Jones COPD, Ventilator Dependent Jamaica, NY
“Matthew was 3 1/2 years old and had been ventilator assisted for eight months before we received the PMV. He had become frustrated because he could not communicate. When we first tried the PMV, it was a little difficult, he wore it for just five minutes and cried. Later that same day we tried it again and by keeping him distracted, he was able to wear it for twenty minutes. The next day he wore it for five hours while we played and read stories to him. It was like opening up a door into his mind. Matthew is now 12 years old, very verbal, and the PMV has allowed him to go to school, talk, sing and to participate with all the other children and be with his friends. In other words, ‘to be just like any other kid’.”
Tom and Debra Poehlman Parents of Matthew Poehlman Spinal Cord Injury
Northridge, CA
• talking on the phone or visiting with a friend* • listening to music • reading a magazine or a book • whistling or playing musical instruments (especially wind
instruments - even a harmonica or kazoo)* • watching TV or a movie • children may enjoy playing games (especially any games that
involve blowing air out of the mouth - blowing a party horn, pinwheel, bubbles, whistle, etc.).*
Keep in mind that you may not be able to do the activities marked with a * right away as your vocal cords and other muscles used to produce voice/speech may need to get stronger (i.e. your doctor or speech-language pathologist may recommend exercises for you to do).
1716

IV. Troubleshooting
The following are common questions you may have regarding PMV® use: 1. When the PMV was put on the tracheostomy tube, it seemed to be
harder to breathe, what do I do?
The PMVs open very easily. The PMV® 2000 (clear) and PMV® 2001 (Purple Color™) open even easier than the PMV® 005 (white) and PMV® 007 (Aqua Color™). If it appears that you are having trouble breathing with the PMV in place, remove the PMV immediately. The following are several things you should consider trying before putting the PMV on again:
a. Check your position and the position of the tracheostomy
tube. If possible, sit upright in a chair or bed as this is generally most comfortable and will allow for full movement of your diaphragm and other respiratory muscles. It should also allow for air to pass easily around the tracheostomy tube and out of your mouth and nose. A small child may be most comfortable on a caregiver’s lap. Also, make sure that the tracheostomy tube is not sitting crooked at the neck as this can mean that it is crooked in the airway too. If the tracheostomy tube is not sitting straight in the airway, it can block the air being exhaled as it tries to pass from the lungs up around the tracheostomy tube and out of the nose and mouth.
b. Check to be sure that the tracheostomy tube cuff is completely deflated. If you have a cuffed tracheostomy tube, there may still be some air left in the cuff which can block airflow around the tracheostomy tube decreasing your ability to fully exhale. The cuff is completely deflated when you feel suction on the syringe while evacuating the air. Occasionally, even if the cuff is completely deflated, there is still not enough room for the air to move around the tube. If the problem persists, contact your doctor or healthcare professional for evaluation.
c. Suction airway through the tracheostomy tube and also the mouth again if needed. Secretions may have built up in the airway since you were suctioned. If excess secretions are not removed, breathing can become more difficult and make you uncomfortable while the PMV is worn.
d. Check amount and type of secretions coming from the tracheostomy tube. A weak cough requiring frequent suctioning, or an infection that is causing secretions to be thicker than usual needs to be considered when using the PMV®. These conditions should not stop you from trying the PMV, but you may want to wait to use the PMV until the secretions become thinner and more manageable. Consult your doctor and/or healthcare professional if your secretions have become thicker or have changed in any way.
e. Anxiety. Feeling a certain amount of nervousness about doing anything different involving your tracheostomy tube is normal. Understanding what is happening when using the PMV will help to make you feel more comfortable while using the PMV. Reading this booklet, the PMV Instruction Booklet, watching the video/DVD (available free of charge from Passy-Muir Inc.) and talking to your doctor and/or healthcare professionals will help you gain a better understanding of how the PMV works and will provide you with more confidence.
After you have checked each point listed above, you may want to try placing the PMV on the tracheostomy tube again following the same procedure as is outlined in Chapter III, Placement of the PMV (page 6).
2. All steps in #1 above have been checked, the PMV was put back on the tracheostomy tube and it was still harder to breathe. What could be causing this?
a. If you are not able to tolerate the PMV you may need to be evaluated by your doctor or a specialist such as an Ear, Nose and Throat Doctor (ENT or Otolaryngologist) or Lung Doctor (Pulmonologist). The doctor will look for a narrowing or softening of the walls of the trachea (windpipe) that might make it collapse, a build-up of scar tissue, or problems with the vocal cords. Any of these things can make it difficult or impossible to use the PMV until the problem is corrected.
b. Sometimes a tracheostomy tube is too big to allow the air to travel around the tube and into the upper airway through the vocal cords and out the mouth and nose to allow sufficient exhalation. The doctor may need to put in a smaller tracheostomy tube or a tracheostomy tube without a cuff in order for you to be able to use the PMV.
1918
c. Tracheostomy tube changes sometimes create swelling of the surrounding tissues in your airway. When you have your tracheostomy tube changed, you might find it helpful to wait a day or so before wearing the PMV® again to allow any swelling to go down.
3. When the PMV is on the tracheostomy tube, I seem to start coughing and sometimes the PMV will pop right off of my tracheostomy tube. What should I do?
PMV users have reported that they will cough when wearing the PMV, especially when they first put the PMV on their tracheostomy tube. This is because the air being exhaled is going through the throat instead of out of the tracheostomy tube and they are feeling secretions that are in the throat. Sometimes they will cough hard enough that the PMV will pop off of the tracheostomy tube. When this happens, check to see if suctioning through the tracheostomy tube and/or mouth is needed. After suctioning, place the PMV back on the tracheostomy tube. Be sure to put the PMV on the tracheostomy tube using a firm 1/4 twist as described in PMV Placement (pages 10-11) but do not force the PMV onto the tracheostomy tube.
Some PMV users have found that they are able to cough up secretions through the mouth when the PMV is on and that they don’t need to be suctioned as often.
4. I coughed the PMV off my tracheostomy tube because I had secretions that needed to be removed and now my tracheostomy tube and/or mouth have been suctioned and the PMV is put back on my tracheostomy tube. As soon as the PMV is put back on my tube, I start to cough very hard and cannot seem to stop and/or the PMV pops off again. What should I do?
Remove the PMV immediately as this excessive coughing may indicate that there is a blockage in the airway which will need to be evaluated by a doctor (see question #2 on page 19) before the PMV can continue to be used.
5. The PMV is making a “honking” noise. What do I do?
If you have been using the PMV for two months or more, this sound indicates that it is time to replace the PMV. If you have been using the PMV for less than two months, put it through one cleaning cycle as described in Chapter V, Cleaning, Care and Lifetime of the PMV (page 23). If this does not stop the noise, contact Passy-Muir Inc. for further information.
6. My tracheostomy tube does not have a 15mm hub to attach the PMV®. What do I do?
You can use an endotracheal tube (ETT) connector sized to fit your tracheostomy tube to create the 15mm hub you need to place the PMV. See Chapter VI, Use of the PMVs with Different Types of Tracheostomy Tubes (page 25) in this booklet for more information about this connector. Your healthcare professional can help you to get this connector.
7. No voice or very little voice is being produced while the PMV is being worn. What do I do?
Airflow through the vocal cords is responsible for producing speech and sound. The vocal cords may be weak from not using them if the tracheostomy tube has been in place for a while. In addition, there may be weakness of the diaphragm which can reduce the amount of breath support you have when you speak which can make your voice sound soft and weak. If this is the first time the PMV is being used, remember that sometimes it takes time and practice to coordinate breathing with voicing. The following exercises may be helpful to get you started:
1) Take a breath in through the tracheostomy tube while your PMV is on and then open your mouth and say “ahhhh” while you exhale. Try this a few times.
2) Count slowly from one to five, taking a breath before saying each number. Try this a few times.
If no voice can be produced, an evaluation of the vocal cords by an Ear, Nose and Throat Doctor may be needed to rule out vocal cord damage and/or to assess the tracheostomy tube size to consider putting a smaller tube in the airway to allow more air to reach the vocal cords. A speech-language pathologist is often consulted to help improve voice and speech production. Young children should be encouraged to play games that help them practice blowing air through the mouth (e.g., blowing bubbles, whistles, horns, etc.). You can also encourage them to imitate sounds that you make while they are wearing the PMV.
8. Why is a doctor’s prescription needed to obtain a PMV?
The PMVs are medical devices that affect the direction of airflow during breathing. It is important that your airway status be evaluated carefully by a doctor to make sure that you have a properly sized tracheostomy tube, no significant blockage of the airway and/or that no
2120
V. CLEANING, CARE AND LIFETIME OF THE PMV®
The PMVs are sold individually, however it is recommended that you have two PMVs, so that one can be cleaned while the other is being used. The PMV and PMV® Secure-It® (if used) should be cleaned daily after wearing.
WARNING: THE PMV AND PMV ACCESSORIES ARE FOR SINGLE PATIENT USE ONLY. THEY CAN BE USED BY ONLY ONE PERSON AND CANNOT BE SHARED.
CAUTION: Store PMV in a cool, dry place.
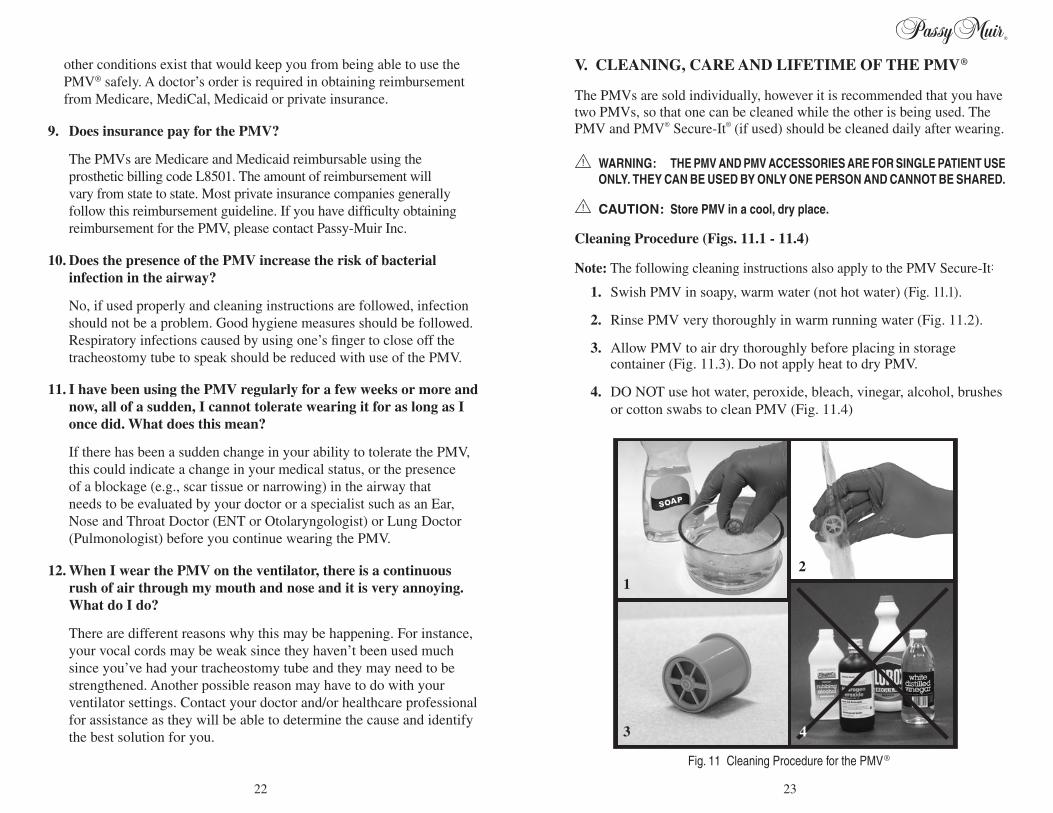
Cleaning Procedure (Figs. 11.1 - 11.4)
Note: The following cleaning instructions also apply to the PMV Secure-It:
1. Swish PMV in soapy, warm water (not hot water) (Fig. 11.1).
2. Rinse PMV very thoroughly in warm running water (Fig. 11.2).
3. Allow PMV to air dry thoroughly before placing in storage container (Fig. 11.3). Do not apply heat to dry PMV.
4. DO NOT use hot water, peroxide, bleach, vinegar, alcohol, brushes or cotton swabs to clean PMV (Fig. 11.4)
2
Fig. 11 Cleaning Procedure for the PMV®
4
1
3
other conditions exist that would keep you from being able to use the PMV® safely. A doctor’s order is required in obtaining reimbursement from Medicare, MediCal, Medicaid or private insurance.
9. Does insurance pay for the PMV?
The PMVs are Medicare and Medicaid reimbursable using the prosthetic billing code L8501. The amount of reimbursement will vary from state to state. Most private insurance companies generally follow this reimbursement guideline. If you have difficulty obtaining reimbursement for the PMV, please contact Passy-Muir Inc.
10. Does the presence of the PMV increase the risk of bacterial infection in the airway?
No, if used properly and cleaning instructions are followed, infection should not be a problem. Good hygiene measures should be followed. Respiratory infections caused by using one’s finger to close off the tracheostomy tube to speak should be reduced with use of the PMV.
11. I have been using the PMV regularly for a few weeks or more and now, all of a sudden, I cannot tolerate wearing it for as long as I once did. What does this mean?
If there has been a sudden change in your ability to tolerate the PMV, this could indicate a change in your medical status, or the presence of a blockage (e.g., scar tissue or narrowing) in the airway that needs to be evaluated by your doctor or a specialist such as an Ear, Nose and Throat Doctor (ENT or Otolaryngologist) or Lung Doctor (Pulmonologist) before you continue wearing the PMV.
12. When I wear the PMV on the ventilator, there is a continuous rush of air through my mouth and nose and it is very annoying. What do I do?
There are different reasons why this may be happening. For instance, your vocal cords may be weak since they haven’t been used much since you’ve had your tracheostomy tube and they may need to be strengthened. Another possible reason may have to do with your ventilator settings. Contact your doctor and/or healthcare professional for assistance as they will be able to determine the cause and identify the best solution for you.
2322

VI. USE OF THE PMVs WITH DIFFERENT TYPES OF TRACHEOSTOMY TUBES
There are several manufacturers of tracheostomy tubes; however there are only a few different types or designs of tubes made. Most of these types of tubes can be used with a PMV®.
WARNING: PMVs USED WITH FOAM FILLED CUFFED TRACHEOSTOMY TUBES ARE CONTRAINDICATED (AS DESCRIBED IN #7, FOAM FILLED CUFFED TRACHEOSTOMY TUBES, ON PAGE 27).
The types of tracheostomy tubes most commonly used are as follows (Figs. 12 and 13.1 - 13.5):
1. Cuffed Tracheostomy Tubes (Figs. 12 and 13.1)
A tracheostomy tube that has a cuff which, when inflated with air, acts as a seal to stop or reduce airflow from the lungs up through the nose and mouth. With an inflated cuff, you will breathe only through your tracheostomy tube. Before the PMV is placed, the cuff must be completely deflated as described in Chapter III, Placement of the PMV, (page 8) of this booklet.
WARNING : TRACHEOSTOMY TUBE CUFF MUST BE COMPLETELY DEFLATED BEFORE PLACING THE PMV. AN INFLATED CUFF WILL BLOCK THE SPACE IN THE AIRWAY AROUND THE TRACHEOSTOMY TUBE AND PREVENT THE PMV USER FROM EXHALING. PMV USER WILL BE UNABLE TO BREATHE IF CUFF IS NOT COMPLETELY DEFLATED TO ALLOW AIR TO BE EXHALED AROUND THE TRACHEOSTOMY TUBE AND OUT OF THE MOUTH AND NOSE.
Fig. 12 Cuffed tracheostomy tube with cuff inflated
“When I first started using the PMV on the ventilator, the feeling of the airflow in my throat, nose and mouth was the hardest adjustment to make. It felt like a hurricane blowing through my head. However, by taking it slowly and wearing the PMV 1/2 hour at a time, it became comfortable. I wear it all day now and I don’t even notice it is there. It’s like learning to wear contact lenses. The PMV gives me the volume and continuity of speech that I need as a public speaker and teacher and has helped to reduce my suctioning needs. I couldn’t get this any other way. The key is to just do it a little at a time until you get used to it, then before you know it, it becomes a part of you.”
Jack Rushton Spinal Cord Injury Ventilator Dependent Tustin, CA
Lifetime of the PMV®
Each PMV is guaranteed to last for a minimum of two months.
Lifetime cannot be guaranteed if the PMV is not cleaned or used properly. Due to conditions of use and maintenance beyond the control of the manufacturer, if the PMV should become sticky, noisy or vibrate before or after two months, the PMV should be replaced. The PMV can continue to be used beyond the two month period as long as it doesn’t become sticky, noisy, vibrate, cause difficulty during inhalation or any other problems.
2524
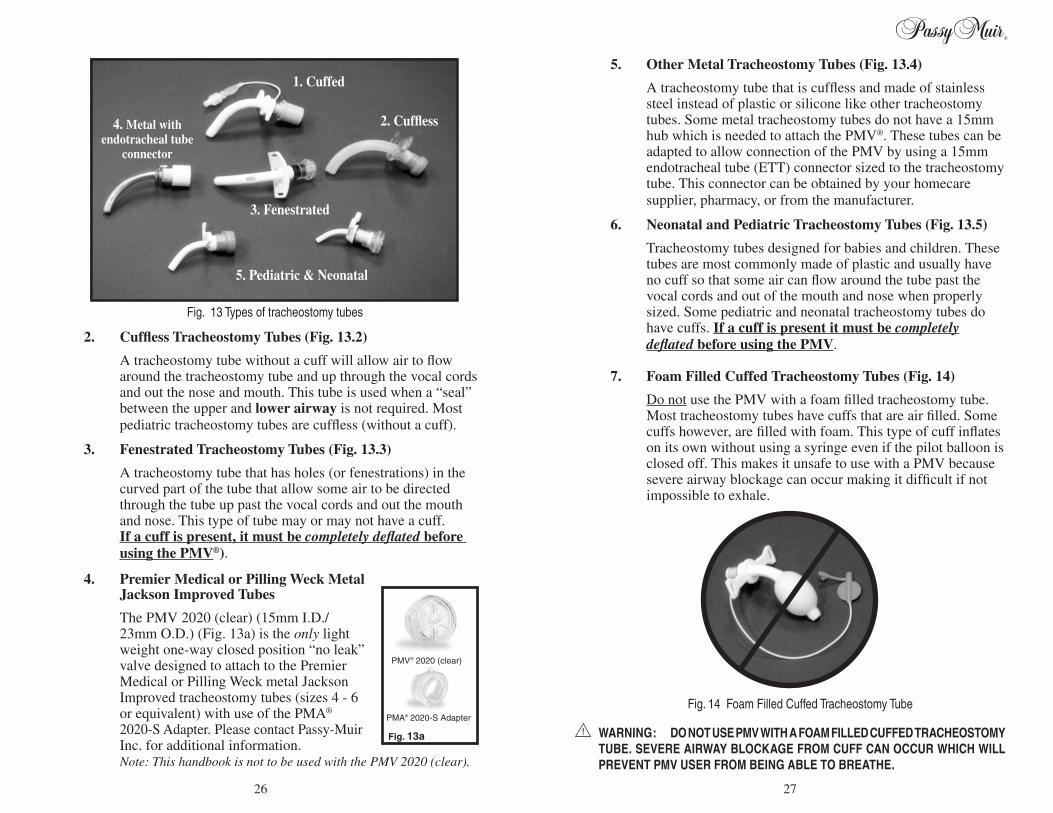
5. Other Metal Tracheostomy Tubes (Fig. 13.4)
A tracheostomy tube that is cuffless and made of stainless steel instead of plastic or silicone like other tracheostomy tubes. Some metal tracheostomy tubes do not have a 15mm hub which is needed to attach the PMV®. These tubes can be adapted to allow connection of the PMV by using a 15mm endotracheal tube (ETT) connector sized to the tracheostomy tube. This connector can be obtained by your homecare supplier, pharmacy, or from the manufacturer.
6. Neonatal and Pediatric Tracheostomy Tubes (Fig. 13.5)
Tracheostomy tubes designed for babies and children. These tubes are most commonly made of plastic and usually have no cuff so that some air can flow around the tube past the vocal cords and out of the mouth and nose when properly sized. Some pediatric and neonatal tracheostomy tubes do have cuffs. If a cuff is present it must be completely deflated before using the PMV.
7. Foam Filled Cuffed Tracheostomy Tubes (Fig. 14)
Do not use the PMV with a foam filled tracheostomy tube. Most tracheostomy tubes have cuffs that are air filled. Some cuffs however, are filled with foam. This type of cuff inflates on its own without using a syringe even if the pilot balloon is closed off. This makes it unsafe to use with a PMV because severe airway blockage can occur making it difficult if not impossible to exhale.
WARNING: DO NOT USE PMV WITH A FOAM FILLED CUFFED TRACHEOSTOMY TUBE. SEVERE AIRWAY BLOCKAGE FROM CUFF CAN OCCUR WHICH WILL PREVENT PMV USER FROM BEING ABLE TO BREATHE.
2. Cuffless Tracheostomy Tubes (Fig. 13.2)
A tracheostomy tube without a cuff will allow air to flow around the tracheostomy tube and up through the vocal cords and out the nose and mouth. This tube is used when a “seal” between the upper and lower airway is not required. Most pediatric tracheostomy tubes are cuffless (without a cuff).
3. Fenestrated Tracheostomy Tubes (Fig. 13.3)
A tracheostomy tube that has holes (or fenestrations) in the curved part of the tube that allow some air to be directed through the tube up past the vocal cords and out the mouth and nose. This type of tube may or may not have a cuff. If a cuff is present, it must be completely deflated before using the PMV®).
4. Premier Medical or Pilling Weck Metal Jackson Improved Tubes
The PMV 2020 (clear) (15mm I.D./ 23mm O.D.) (Fig. 13a) is the only light weight one-way closed position “no leak” valve designed to attach to the Premier Medical or Pilling Weck metal Jackson Improved tracheostomy tubes (sizes 4 - 6 or equivalent) with use of the PMA® 2020-S Adapter. Please contact Passy-Muir Inc. for additional information.Note: This handbook is not to be used with the PMV 2020 (clear).
Fig. 14 Foam Filled Cuffed Tracheostomy Tube
Cuffless, Fenestrated, Metal, and Neonatal/Ped tubes both
with and without valves
1. Cuffed
2. Cuffless
3. Fenestrated
4. Metal with endotracheal tube
connector
5. Pediatric & Neonatal
Fig. 13 Types of tracheostomy tubes
PMV® 2020 (clear)
Fig. 13a
PMA® 2020-S Adapter
2726
PMV® Benefits
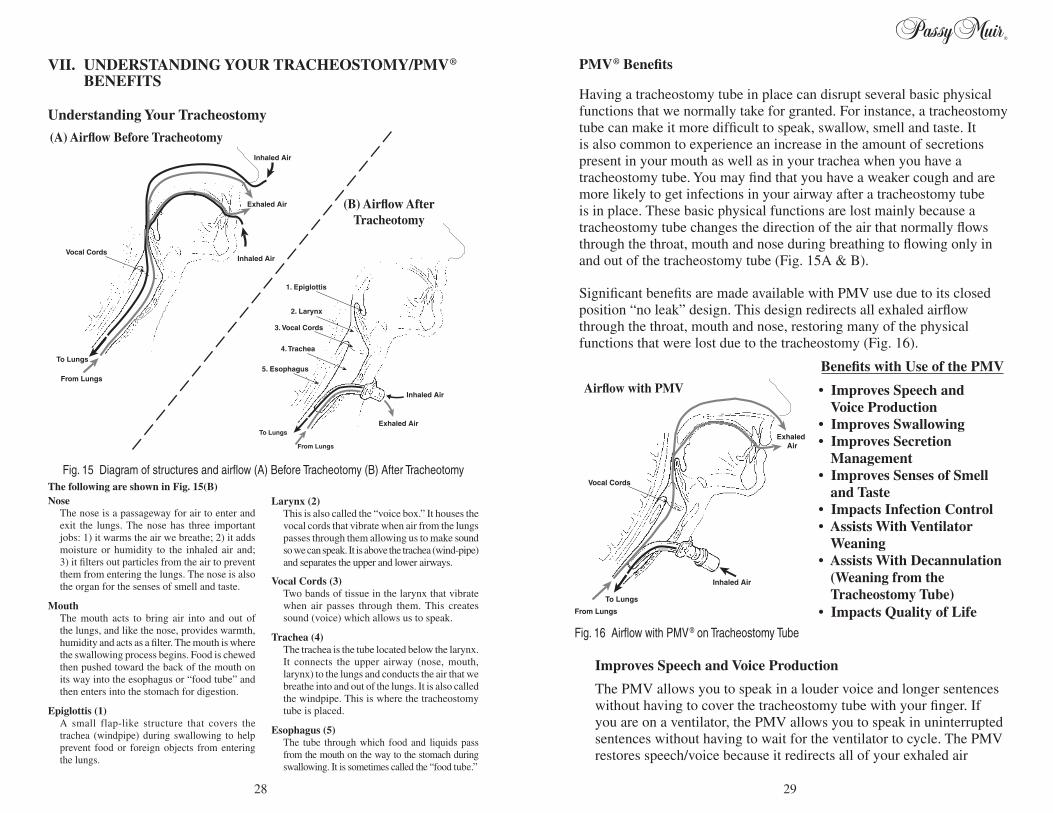
Having a tracheostomy tube in place can disrupt several basic physical functions that we normally take for granted. For instance, a tracheostomy tube can make it more difficult to speak, swallow, smell and taste. It is also common to experience an increase in the amount of secretions present in your mouth as well as in your trachea when you have a tracheostomy tube. You may find that you have a weaker cough and are more likely to get infections in your airway after a tracheostomy tube is in place. These basic physical functions are lost mainly because a tracheostomy tube changes the direction of the air that normally flows through the throat, mouth and nose during breathing to flowing only in and out of the tracheostomy tube (Fig. 15A & B).
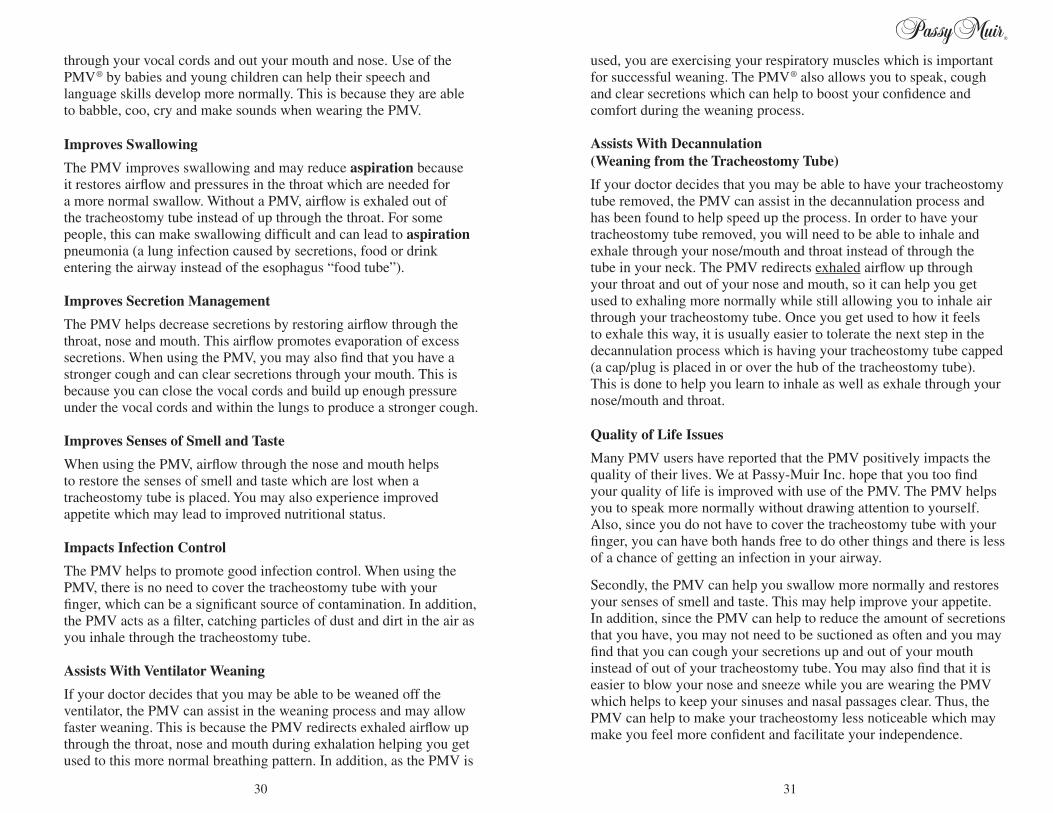
Significant benefits are made available with PMV use due to its closed position “no leak” design. This design redirects all exhaled airflow through the throat, mouth and nose, restoring many of the physical functions that were lost due to the tracheostomy (Fig. 16).
Benefits with Use of the PMV
•ImprovesSpeechand Voice Production •ImprovesSwallowing •ImprovesSecretion Management •ImprovesSensesofSmell and Taste •ImpactsInfectionControl •AssistsWithVentilator Weaning •AssistsWithDecannulation (Weaning from the Tracheostomy Tube) •ImpactsQualityofLife
Improves Speech and Voice Production
The PMV allows you to speak in a louder voice and longer sentences without having to cover the tracheostomy tube with your finger. If you are on a ventilator, the PMV allows you to speak in uninterrupted sentences without having to wait for the ventilator to cycle. The PMV restores speech/voice because it redirects all of your exhaled air
Fig. 16 Airflow with PMV® on Tracheostomy Tube
Inhaled Air
Exhaled Air
To Lungs
From Lungs
Vocal Cords
Airflow with PMV
VII. UNDERSTANDING YOUR TRACHEOSTOMY/PMV® BENEFITS Understanding Your Tracheostomy
Inhaled Air
Exhaled Air
To Lungs
From Lungs
Inhaled AirVocal Cords
To Lungs
1. Epiglottis
2. Larynx
3. Vocal Cords
4. Trachea
5. Esophagus
Inhaled Air
From Lungs
Exhaled Air
(A) Airflow Before Tracheotomy
(B) Airflow After Tracheotomy
Fig. 15 Diagram of structures and airflow (A) Before Tracheotomy (B) After TracheotomyThe following are shown in Fig. 15(B)Nose The nose is a passageway for air to enter and
exit the lungs. The nose has three important jobs: 1) it warms the air we breathe; 2) it adds moisture or humidity to the inhaled air and; 3) it filters out particles from the air to prevent them from entering the lungs. The nose is also the organ for the senses of smell and taste.
Mouth The mouth acts to bring air into and out of
the lungs, and like the nose, provides warmth, humidity and acts as a filter. The mouth is where the swallowing process begins. Food is chewed then pushed toward the back of the mouth on its way into the esophagus or “food tube” and then enters into the stomach for digestion.
Epiglottis (1) A small flap-like structure that covers the
trachea (windpipe) during swallowing to help prevent food or foreign objects from entering the lungs.
Larynx (2) This is also called the “voice box.” It houses the
vocal cords that vibrate when air from the lungs passes through them allowing us to make sound so we can speak. It is above the trachea (wind-pipe) and separates the upper and lower airways.
Vocal Cords (3) Two bands of tissue in the larynx that vibrate
when air passes through them. This creates sound (voice) which allows us to speak.
Trachea (4) The trachea is the tube located below the larynx.
It connects the upper airway (nose, mouth, larynx) to the lungs and conducts the air that we breathe into and out of the lungs. It is also called the windpipe. This is where the tracheostomy tube is placed.
Esophagus (5) The tube through which food and liquids pass
from the mouth on the way to the stomach during swallowing. It is sometimes called the “food tube.”
2928
used, you are exercising your respiratory muscles which is important for successful weaning. The PMV® also allows you to speak, cough and clear secretions which can help to boost your confidence and comfort during the weaning process.
Assists With Decannulation (Weaning from the Tracheostomy Tube)
If your doctor decides that you may be able to have your tracheostomy tube removed, the PMV can assist in the decannulation process and has been found to help speed up the process. In order to have your tracheostomy tube removed, you will need to be able to inhale and exhale through your nose/mouth and throat instead of through the tube in your neck. The PMV redirects exhaled airflow up through your throat and out of your nose and mouth, so it can help you get used to exhaling more normally while still allowing you to inhale air through your tracheostomy tube. Once you get used to how it feels to exhale this way, it is usually easier to tolerate the next step in the decannulation process which is having your tracheostomy tube capped (a cap/plug is placed in or over the hub of the tracheostomy tube). This is done to help you learn to inhale as well as exhale through your nose/mouth and throat.
QualityofLifeIssues
Many PMV users have reported that the PMV positively impacts the quality of their lives. We at Passy-Muir Inc. hope that you too find your quality of life is improved with use of the PMV. The PMV helps you to speak more normally without drawing attention to yourself. Also, since you do not have to cover the tracheostomy tube with your finger, you can have both hands free to do other things and there is less of a chance of getting an infection in your airway.
Secondly, the PMV can help you swallow more normally and restores your senses of smell and taste. This may help improve your appetite. In addition, since the PMV can help to reduce the amount of secretions that you have, you may not need to be suctioned as often and you may find that you can cough your secretions up and out of your mouth instead of out of your tracheostomy tube. You may also find that it is easier to blow your nose and sneeze while you are wearing the PMV which helps to keep your sinuses and nasal passages clear. Thus, the PMV can help to make your tracheostomy less noticeable which may make you feel more confident and facilitate your independence.
through your vocal cords and out your mouth and nose. Use of the PMV® by babies and young children can help their speech and language skills develop more normally. This is because they are able to babble, coo, cry and make sounds when wearing the PMV.
Improves Swallowing
The PMV improves swallowing and may reduce aspiration because it restores airflow and pressures in the throat which are needed for a more normal swallow. Without a PMV, airflow is exhaled out of the tracheostomy tube instead of up through the throat. For some people, this can make swallowing difficult and can lead to aspiration pneumonia (a lung infection caused by secretions, food or drink entering the airway instead of the esophagus “food tube”).
Improves Secretion Management
The PMV helps decrease secretions by restoring airflow through the throat, nose and mouth. This airflow promotes evaporation of excess secretions. When using the PMV, you may also find that you have a stronger cough and can clear secretions through your mouth. This is because you can close the vocal cords and build up enough pressure under the vocal cords and within the lungs to produce a stronger cough.
Improves Senses of Smell and Taste
When using the PMV, airflow through the nose and mouth helps to restore the senses of smell and taste which are lost when a tracheostomy tube is placed. You may also experience improved appetite which may lead to improved nutritional status.
Impacts Infection Control
The PMV helps to promote good infection control. When using the PMV, there is no need to cover the tracheostomy tube with your finger, which can be a significant source of contamination. In addition, the PMV acts as a filter, catching particles of dust and dirt in the air as you inhale through the tracheostomy tube.
Assists With Ventilator Weaning
If your doctor decides that you may be able to be weaned off the ventilator, the PMV can assist in the weaning process and may allow faster weaning. This is because the PMV redirects exhaled airflow up through the throat, nose and mouth during exhalation helping you get used to this more normal breathing pattern. In addition, as the PMV is
3130
VIII. GLOSSARY
Aspiration: Inhalation of any foreign matter, such as food, drink, saliva, or stomach contents (as after vomiting) into the airway below the level of the vocal cords.
Cuff deflation: The act of removing air from the cuff of a tracheostomy tube.
Diaphragm: A thin, dome-shaped muscle, important in breathing. Separates stomach and chest cavities.
Hub (15mm): The part of the tracheostomy tube that adapts to standard respiratory equipment, such as a ventilator.
Humidifier: A device that provides moisture to the air we breathe.
Lower Airway: That portion of the respiratory tract beginning at the larynx (voice box) and ending at the smallest units in the lungs.
Peak Inspiratory Pressure (PIP): A measurement of pressure in the lungs at the end of the inspiratory phase of ventilation. It is reflected on the airway pressure manometer of the ventilator.
Pilot balloon: Plastic sack-like component connected to the inflation line and luer valve of the tracheostomy tube which allows for inflation and deflation of the cuff.
Closed Position “No Leak”: Design pertaining to the PMV®. The PMV opens on inhalation and automatically closes at the end of inhalation. It remains closed without air leak during exhalation. This restores a closed respiratory system and a more normal breathing pattern to the PMV user.
Pulse Oximeter: Device which measures the oxygen saturation level of arterial blood when placed on finger, toe, or ear.
Suction: Removal of gas or fluid (secretions) by mechanical means.
Tracheostomy: An artificial opening in the trachea that facilitates the passage of air and removal of secretions.
Upper Airway: That portion of the respiratory tract beginning at the mouth and nose and ending at the larynx (voice box).
We Would Like To Hear From You
If you need assistance, have questions/comments or would like to share a story about using the PMV, please call our respiratory and speech clinical specialists at 800.634.5397.
“The most dramatic change with the PMV® was that it improved Nicole’s swallow immediately. Before using the PMV she aspirated everything. With the PMV, she was able to tolerate a regular diet right away. At first it was wonderful just to hear Nicole giggle and laugh. Now, only one year after using the PMV, she is able to express her thoughts and communicate and play with her sister. My advice to other parents who are using the PMV with their child is to stick with it, set short term goals and make it fun. We started with only one minute at a time and now Nicole wears the PMV all day long.”
Christine, Mother of 3 1/2 year old Nicole Bilateral Vocal Cord Paralysis Laguna Niguel, CA
“When I first tried the PMV it was very difficult for me to breathe. I realized that I had completely forgotten how to breathe through my mouth and nose. I am very grateful that my therapists and fellow nurses encouraged me to keep on trying. Practice with a new breathing pattern soon allowed me to use my PMV all day long. The PMV allowed me to communicate with my family, friends and the hospital staff without having them try to guess what I was saying by reading my lips. I was able to talk on the phone and begin to eat a more normal diet. People don’t realize how much they depend on speech to communicate until they lose the ability to talk. Because of the Passy-Muir® Valve, that gift was given back to me by the dedicated people who work toward that goal. Thanks from the bottom of my heart.”
Barbara Ann Branch, RN, CCRN, LEN, BSN, ACLS Emergency Room and Acute Care Nurse Guillian-Barré Syndrome Garden Grove, CA
3332
X. PASSY-MUIR® CLINICAL SUPPORT AND EDUCATIONAL MATERIALS
Clinical Support If you have any questions about use of the PMV® or would like
more information about the PMV, please contact our clinical specialists at 800.634.5397. Our clinical specialists have formal training in respiratory therapy and speech-language pathology and are experienced in the use of the PMV with tracheostomized and ventilator dependent children and adults. We look forward to hearing from you.
Passy Muir is committed to improving the quality of life for tracheostomized and ventilator dependent patients. Visit our website at www.passymuir.com for a variety of helpful resources for healthcare professionals, caregivers and patients.
IX. RESOURCESThe following is a list of organizations that you can contact for additional resource materials and information:
National Organization on Disability77 Water Street, Suite 204 New York, NY 10005646.505.1191646.505.1184 (FAX)www.nod.org
National Organization for Rare Disorders (NORD)55 Kenosia AvenueDanbury, CT 06810800.999.NORD203.744.0100203.798.2291 (FAX)www.rarediseases.org
National Spinal Cord Injury Association75-20 Astoria Blvd., Suite 120 East Elmhurst, NY 11370-1177800.962.9629 (Hot Line only)866.387.2196 (FAX)www.spinalcord.org
Spina Bifida Association of America1600 Wilson Blvd., Suite 800Arlington, VA 22209800.621.3141202.944.3285202.944.3295 (FAX)www.sbaa.org
United Cerebral Palsy1825 K Street, Suite 600Washington, DC 20006800.872.5827202.776.0406202.776.0414 (FAX)www.ucp.org
United States Access Board1331 F Street, NW Suite 1000Washington, DC 20004-1111800.USA.ABLE202.272.0081 (FAX)www.access-board.gov
3534
American Association for Homecare1707 L St. NW, Suite 350Washington, DC 20036202.372.0107202.835.8306 (FAX)www.aahomecare.org
American Association for Respiratory Care9425 N. MacArthur Blvd.Suite 100Irving, TX 75063-4706 972.243.2272972.484.2720 (FAX)www.aarc.org
American Cancer Society800.227.2345www.cancer.org
American Heart Association7272 Greenville Ave.Dallas, TX 75231-4596800.242.8721214.373.6300www.heart.org
American Lung Association55 W. Wacker Drive, Suite 115 Chicago, IL 60601800.LUNG.USA312.801.7630202.452.1805 (FAX)www.lung.org
Amyotrophic Lateral Sclerosis Association1275 K St. NW, Suite 250Washington, DC 20005800.782.4747202.407.8580202.289.6801 (FAX)www.alsa.org
American Speech-Language-Hearing Association2200 Research Blvd.Rockville, MD 20852800.638.8255301.296.8580 (FAX) www.asha.org
Brain Injury Association of America1608 Spring Hill Rd. Ste 110Vienna, VA 22182703.761.0750703.761.0755 (FAX)www.biausa.org
Cleft Palate-Craniofacial Foundation1504 E. Franklin St., Ste. 102Chapel Hill, NC 27514800.242.5338919.933.9044www.cleftline.org
FACES - The National Craniofacial AssociationP.O. Box 11082Chattanooga, TN 37401 800.332.2373 423.266.1632 www.faces-cranio.org
Lung LineNational Jewish Medical and Research Center1400 Jackson StreetDenver, CO 80206877.225.5654 www.nationaljewish.org
March of Dimes Birth Defects Foundation1275 Mamaroneck Ave.White Plains, NY 10605888.MODIMES914.997.4488www.modimes.org
MedExpert International1300 Hancock StreetRedwood City, CA 94063800.999.1999650.326.6000650.326.6700 (FAX)www.medexpert.com
Medical Information(Medicare) 800.633.4227www.medicare.gov
Muscular Dystrophy Association222 S. Riverside Plaza Suite 1500Chicago, IL 60606800.572.1717www.mdausa.org
Myasthenia Gravis Foundation of America (MGFA)355 Lexington Ave. 15th Floor New York, NY 10017800.541.5454212.370.9047 (FAX)www.myasthenia.org
National Disabled Rights Network (NDRN)820 1st St. NE, Suite 740Washington, DC 20002202.408.9514202.408.9520 (FAX)www.ndrn.org
National Institute of Neurological Disorders and Stroke (NIN)NIH Neurological InstituteP.O. Box 5801Bethesda, MD 20824800.352.9424301.496.5751301.402.2186 (FAX)www.ninds.nih.gov
National Multiple Sclerosis Society733 Third Ave., 3rd FloorNew York, NY 10017800.FIGHTMS212.463.7787 (24-Hour Info Resource Center)212.986.3240212.986.7981 (FAX)www.nmss.org