Embed Size (px)
Citation preview

IP PBX
Administrator’s Manual
For CS-2200 / CS-3200 / CS-4200
Version : 1.2
Date : 15 Jun 2017
1
Table of Contents
Revision History ………………………………………………………………............ P. 2
Login Screen ……………………………………………………………………………. P. 3
Backup and Restore ………………………………………………………………............. P. 4
License …………………………………………………………………………………... P. 5
System Information ………………………………………………………………………. P. 6
User Management ………………………………………………………………………. P. 7
Account Codes …………………………………………………………………………….. P. 8
Call Detail Report (CDR) …………………………………………………………………. P. 9
Call Forward Management …………………………………………………………………. P. 10
Channel Status …………………………………………………………………………….. P. 11
Dial Plan ………………………………………………………………………………….. P.12 – 15
Description, Dealing with Dial Plan …………………………………………. P.12
Understanding Dial Rule …………………………………………………….. P.13
Prefix and Strip Digits …………………………………………………….. P.14
Day / Night Mode Switching ……………………………………………..... P.15
Feature Settings ……………………………………………………………………………. P.16
IVR Menu ……………………………………………………………………………. P.17-18
Trunk Management ……....………………………………………………………… P.19-20
Voice Logs …………………..………………………………………………………… P. 21
VoIP Users ………………………..…………………………………………………… P. 22-25
On Demand Recordings (Admin) ………...…………………………………………… P. 26
Voice Mail Management …………………………………………………………… P. 27-28
Appendix A – Platon Dial Plan Command List ……………..…………………………… P. 29-32

2
Revision History
Date Version Description
2 Mar 2016 1.0 Initial Version
17 Mar 2017 1.1 Corrected typo errors in some pages
15 Jun 2017 1.2 Added Revision History
3
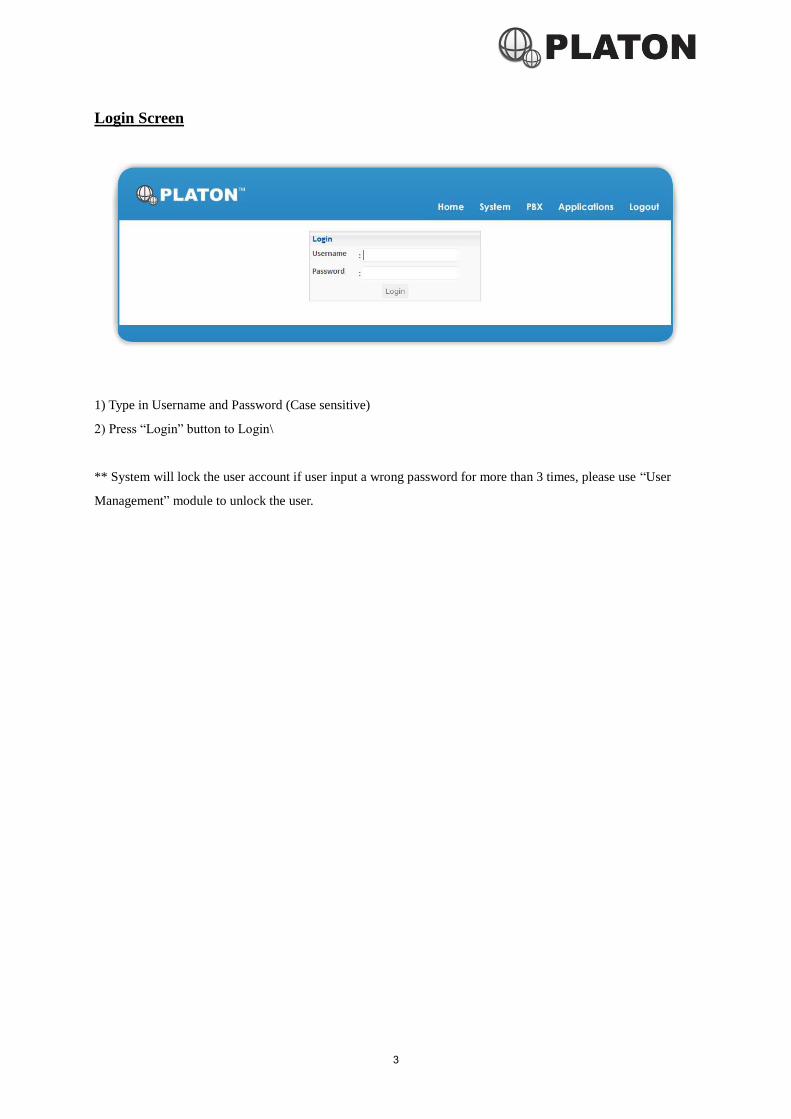
Login Screen
1) Type in Username and Password (Case sensitive)
2) Press “Login” button to Login\
** System will lock the user account if user input a wrong password for more than 3 times, please use “User
Management” module to unlock the user.
4
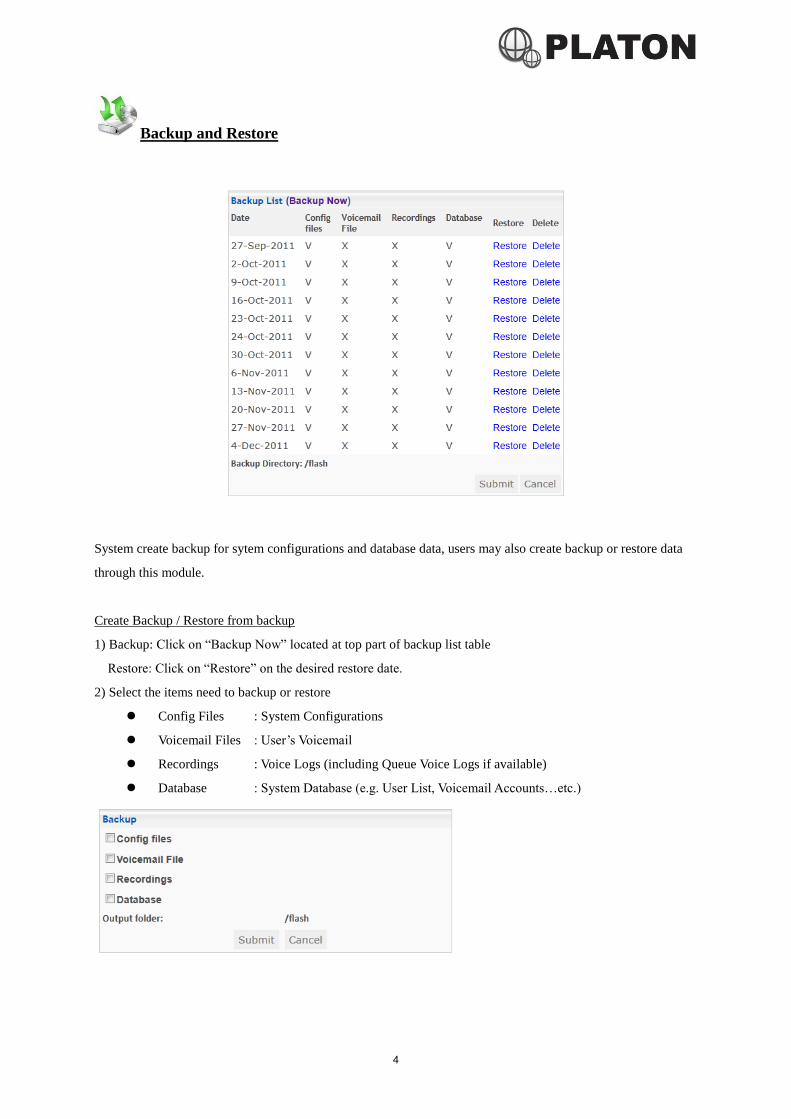
Backup and Restore
System create backup for sytem configurations and database data, users may also create backup or restore data
through this module.
Create Backup / Restore from backup
1) Backup: Click on “Backup Now” located at top part of backup list table
Restore: Click on “Restore” on the desired restore date.
2) Select the items need to backup or restore
Config Files : System Configurations
Voicemail Files : User’s Voicemail
Recordings : Voice Logs (including Queue Voice Logs if available)
Database : System Database (e.g. User List, Voicemail Accounts…etc.)
5
License
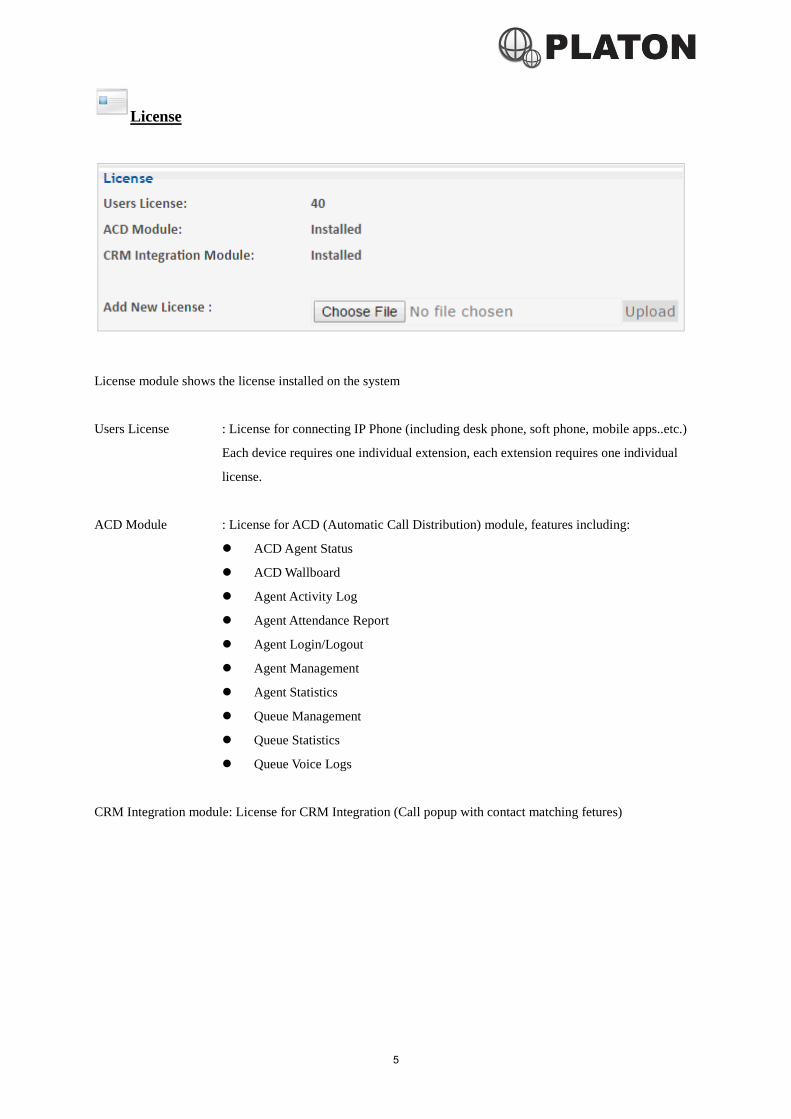
License module shows the license installed on the system
Users License : License for connecting IP Phone (including desk phone, soft phone, mobile apps..etc.)
Each device requires one individual extension, each extension requires one individual
license.
ACD Module : License for ACD (Automatic Call Distribution) module, features including:
ACD Agent Status
ACD Wallboard
Agent Activity Log
Agent Attendance Report
Agent Login/Logout
Agent Management
Agent Statistics
Queue Management
Queue Statistics
Queue Voice Logs
CRM Integration module: License for CRM Integration (Call popup with contact matching fetures)
6
System Information
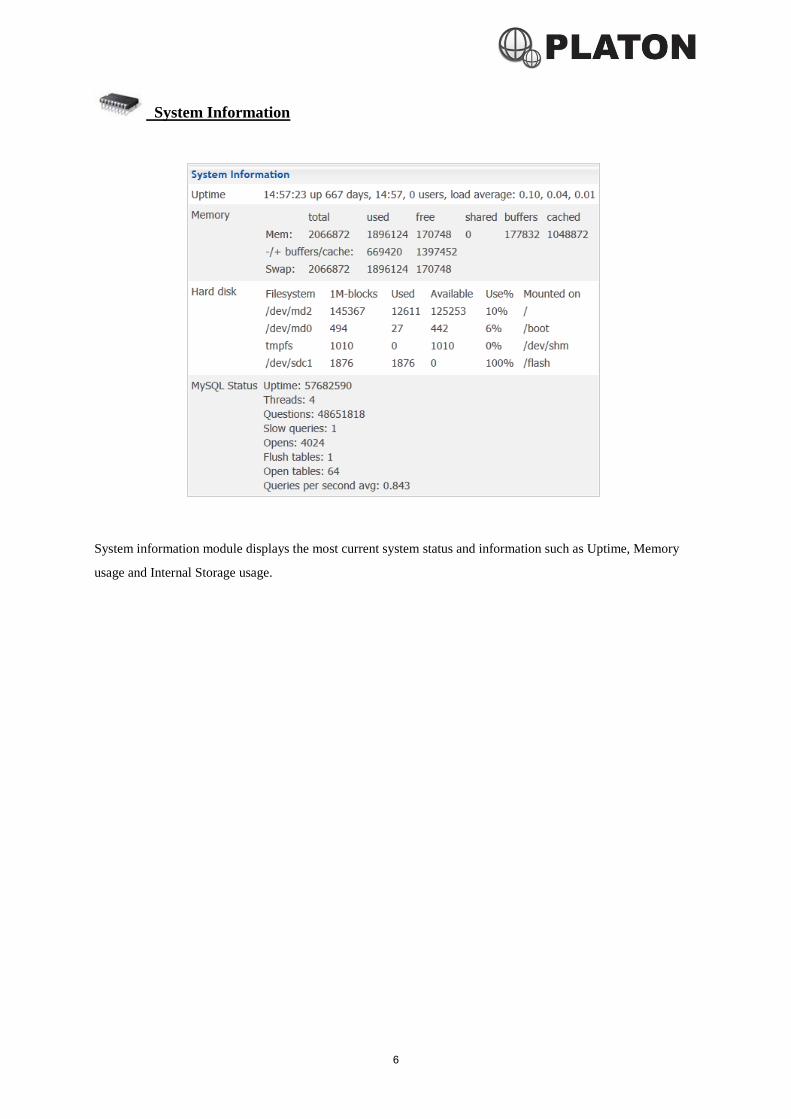
System information module displays the most current system status and information such as Uptime, Memory
usage and Internal Storage usage.
7
User Management
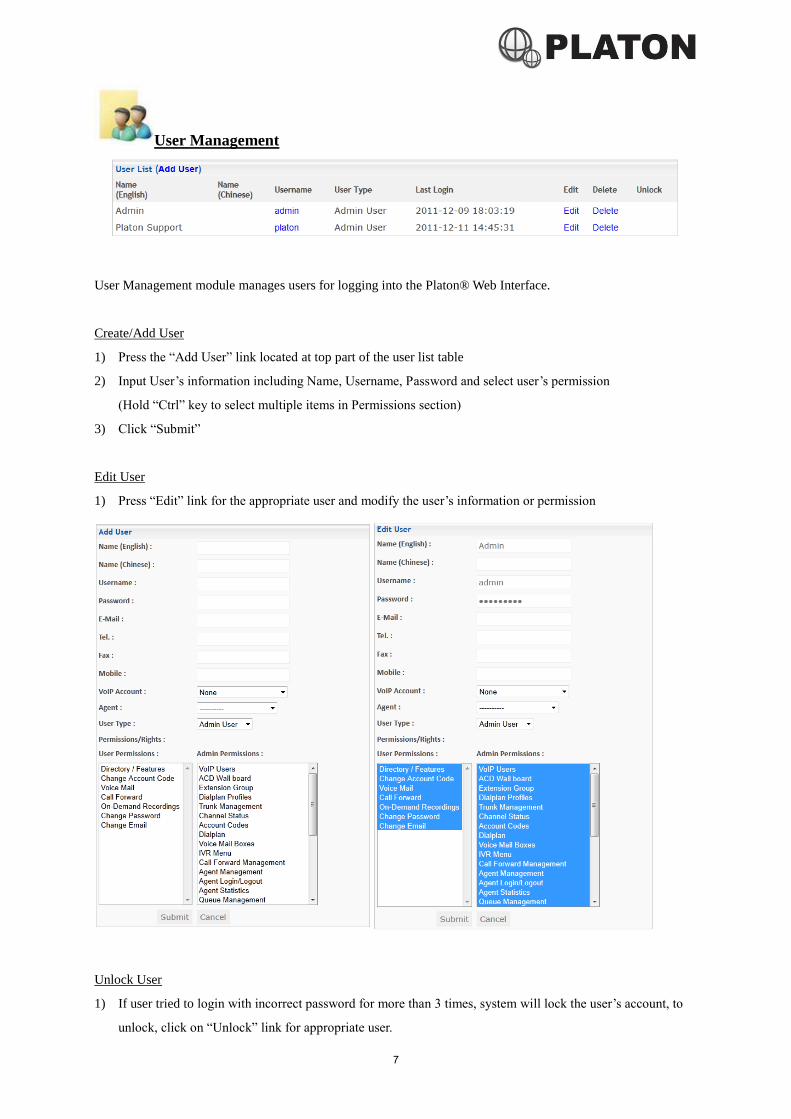
User Management module manages users for logging into the Platon® Web Interface.
Create/Add User
1) Press the “Add User” link located at top part of the user list table
2) Input User’s information including Name, Username, Password and select user’s permission
(Hold “Ctrl” key to select multiple items in Permissions section)
3) Click “Submit”
Edit User
1) Press “Edit” link for the appropriate user and modify the user’s information or permission
Unlock User
1) If user tried to login with incorrect password for more than 3 times, system will lock the user’s account, to
unlock, click on “Unlock” link for appropriate user.

8
Account Codes
To protect from IDD abuse, Account Code can be setup for each user, system will prompt for account code when
user tries to dial IDD.
Create Account Code
1) Press “Add Account Code” link located at top part of the user list
2) Input User’s information and Account Code and click “Submit” buttoon.
Department : The Department name for the user (This field is Optional)
Dept. Code : Department Code for the user (This field is Optional)
Account Name : Select the appropriate user from the list, if user is not within the list, please add a
user in “VOIP Users” module
Account Code : Account Code for the user, it should be unqiue within the whole system
Edit Account Code
1) Press “Edit” link for appropriate User
2) Change account information and click “Submit” button
** After Account Code is created, please add “Prompt for Account Code” action in Dial Plan for any IDD related
dial rule
9
Call Detail Report (CDR)
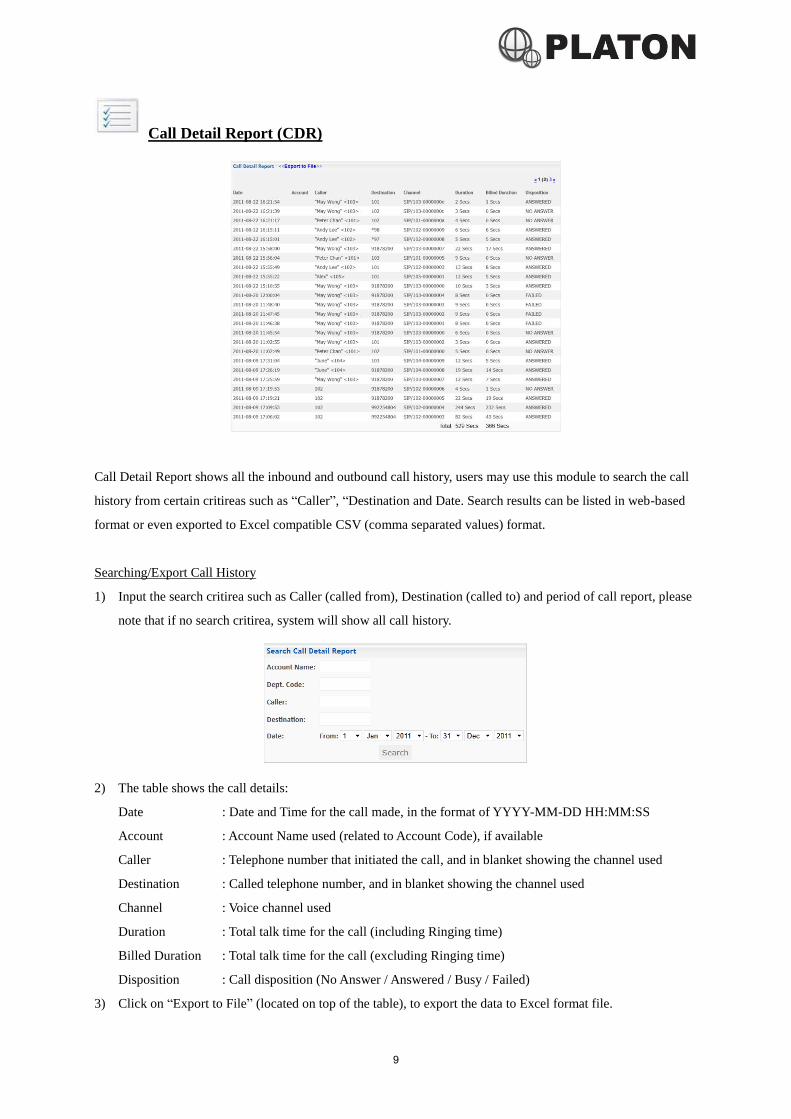
Call Detail Report shows all the inbound and outbound call history, users may use this module to search the call
history from certain critireas such as “Caller”, “Destination and Date. Search results can be listed in web-based
format or even exported to Excel compatible CSV (comma separated values) format.
Searching/Export Call History
1) Input the search critirea such as Caller (called from), Destination (called to) and period of call report, please
note that if no search critirea, system will show all call history.
2) The table shows the call details:
Date : Date and Time for the call made, in the format of YYYY-MM-DD HH:MM:SS
Account : Account Name used (related to Account Code), if available
Caller : Telephone number that initiated the call, and in blanket showing the channel used
Destination : Called telephone number, and in blanket showing the channel used
Channel : Voice channel used
Duration : Total talk time for the call (including Ringing time)
Billed Duration : Total talk time for the call (excluding Ringing time)
Disposition : Call disposition (No Answer / Answered / Busy / Failed)
3) Click on “Export to File” (located on top of the table), to export the data to Excel format file.
10
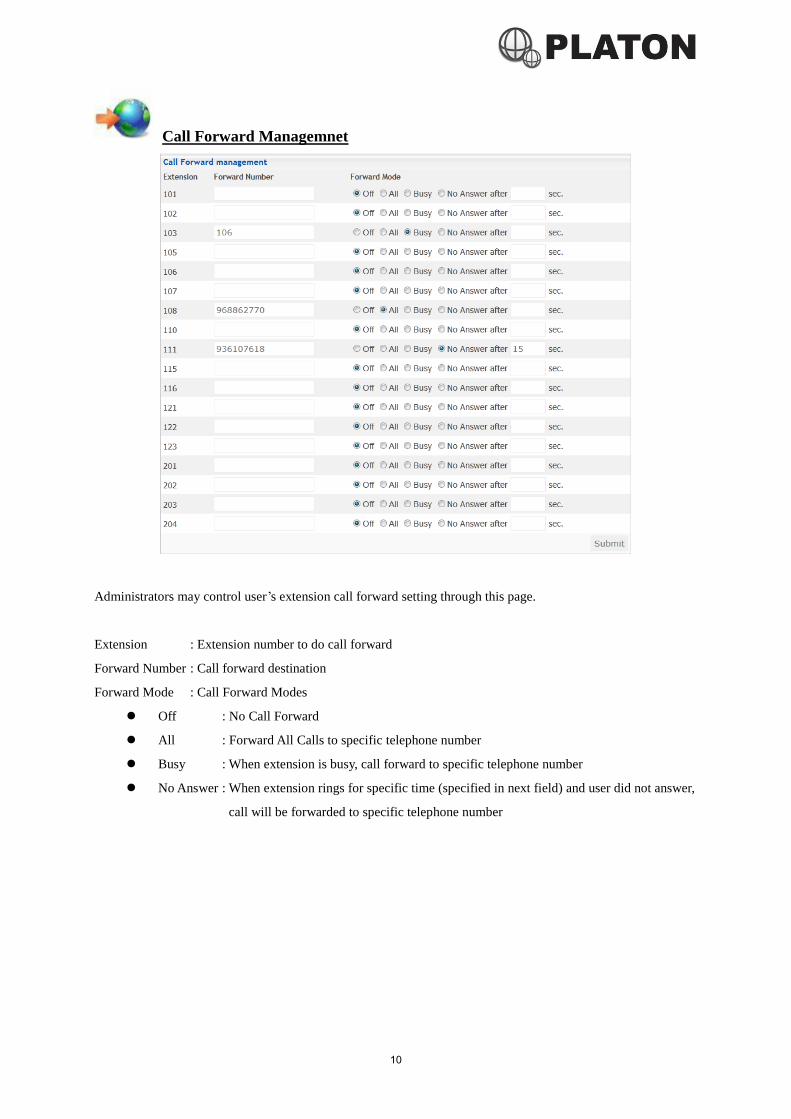
Call Forward Managemnet
Administrators may control user’s extension call forward setting through this page.
Extension : Extension number to do call forward
Forward Number : Call forward destination
Forward Mode : Call Forward Modes
Off : No Call Forward
All : Forward All Calls to specific telephone number
Busy : When extension is busy, call forward to specific telephone number
No Answer : When extension rings for specific time (specified in next field) and user did not answer,
call will be forwarded to specific telephone number
11
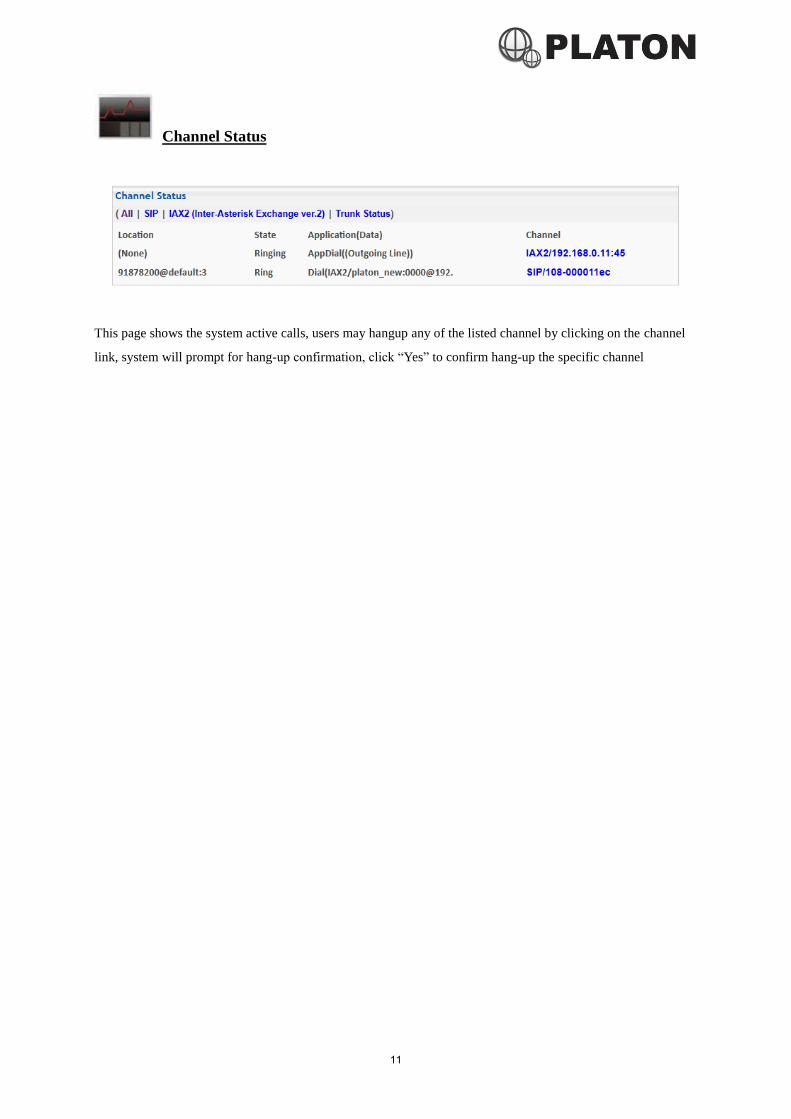
Channel Status
This page shows the system active calls, users may hangup any of the listed channel by clicking on the channel
link, system will prompt for hang-up confirmation, click “Yes” to confirm hang-up the specific channel
12
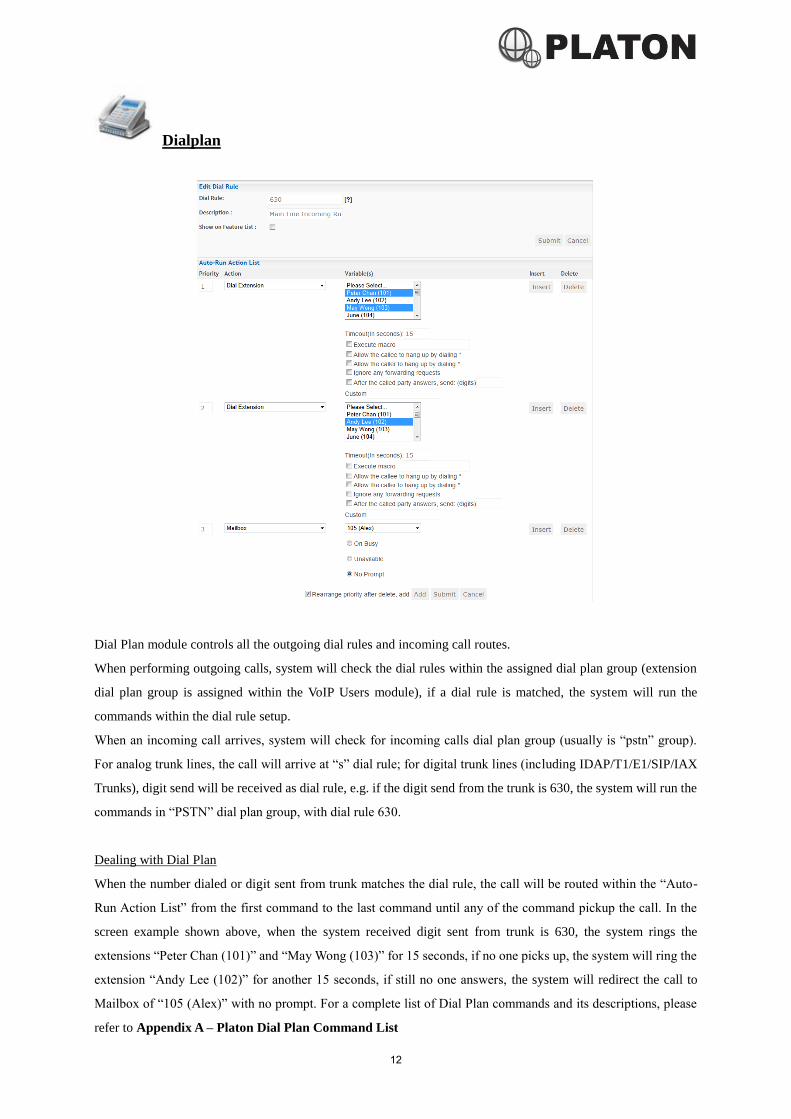
Dialplan
Dial Plan module controls all the outgoing dial rules and incoming call routes.
When performing outgoing calls, system will check the dial rules within the assigned dial plan group (extension
dial plan group is assigned within the VoIP Users module), if a dial rule is matched, the system will run the
commands within the dial rule setup.
When an incoming call arrives, system will check for incoming calls dial plan group (usually is “pstn” group).
For analog trunk lines, the call will arrive at “s” dial rule; for digital trunk lines (including IDAP/T1/E1/SIP/IAX
Trunks), digit send will be received as dial rule, e.g. if the digit send from the trunk is 630, the system will run the
commands in “PSTN” dial plan group, with dial rule 630.
Dealing with Dial Plan
When the number dialed or digit sent from trunk matches the dial rule, the call will be routed within the “Auto-
Run Action List” from the first command to the last command until any of the command pickup the call. In the
screen example shown above, when the system received digit sent from trunk is 630, the system rings the
extensions “Peter Chan (101)” and “May Wong (103)” for 15 seconds, if no one picks up, the system will ring the
extension “Andy Lee (102)” for another 15 seconds, if still no one answers, the system will redirect the call to
Mailbox of “105 (Alex)” with no prompt. For a complete list of Dial Plan commands and its descriptions, please
refer to Appendix A – Platon Dial Plan Command List
13
Dialplan (Cont’)
Understanding Dial Rules
Dial rules can be setup to match with several dial digits or digits send. Dial rule can be expressed as:
X matches any digit from 0-9
Z matches any digit from 1-9
N matches any digit from 2-9
[1237-9] matches any digit or letter in the brackets (in this example, 1,2,3,7,8,9)
. wildcard, matches one or more characters
Here are some examples:
Example 1 : 1XX dial rule matches any dial digits or digits send with 3 digits and starting with the digit “1”
Example 2 : [123XX] dial rule matches any dial digits or digits send with 3 digits and starting with the digit “1”
or “2” or “3”
Example 3 : [13-5XXX] matches any dial digits or digits send with 4 digits and starting with the digit “1” or “3”
or “4” or “5”
Eaxmple 4: 9XX. matches any dial digits with at least 4 digits and starting with “9”
14
Dialplan (Cont’)
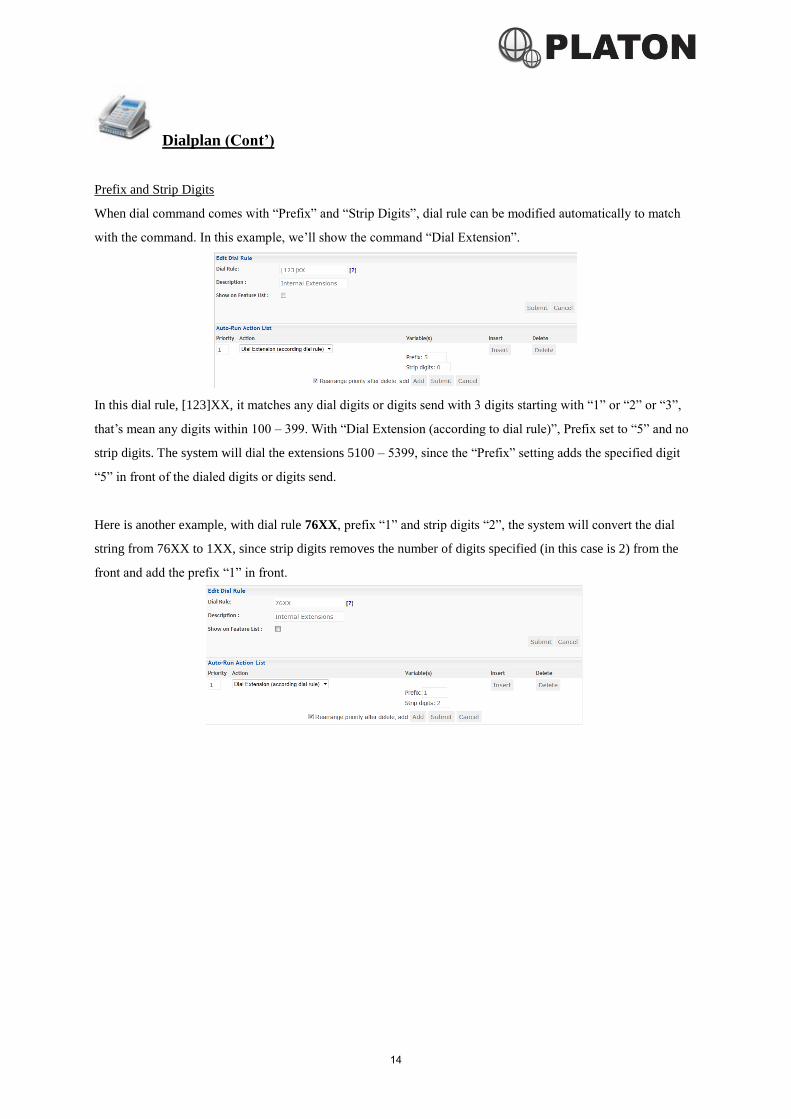
Prefix and Strip Digits
When dial command comes with “Prefix” and “Strip Digits”, dial rule can be modified automatically to match
with the command. In this example, we’ll show the command “Dial Extension”.
In this dial rule, [123]XX, it matches any dial digits or digits send with 3 digits starting with “1” or “2” or “3”,
that’s mean any digits within 100 – 399. With “Dial Extension (according to dial rule)”, Prefix set to “5” and no
strip digits. The system will dial the extensions 5100 – 5399, since the “Prefix” setting adds the specified digit
“5” in front of the dialed digits or digits send.
Here is another example, with dial rule 76XX, prefix “1” and strip digits “2”, the system will convert the dial
string from 76XX to 1XX, since strip digits removes the number of digits specified (in this case is 2) from the
front and add the prefix “1” in front.
15
Dialplan (Cont’)
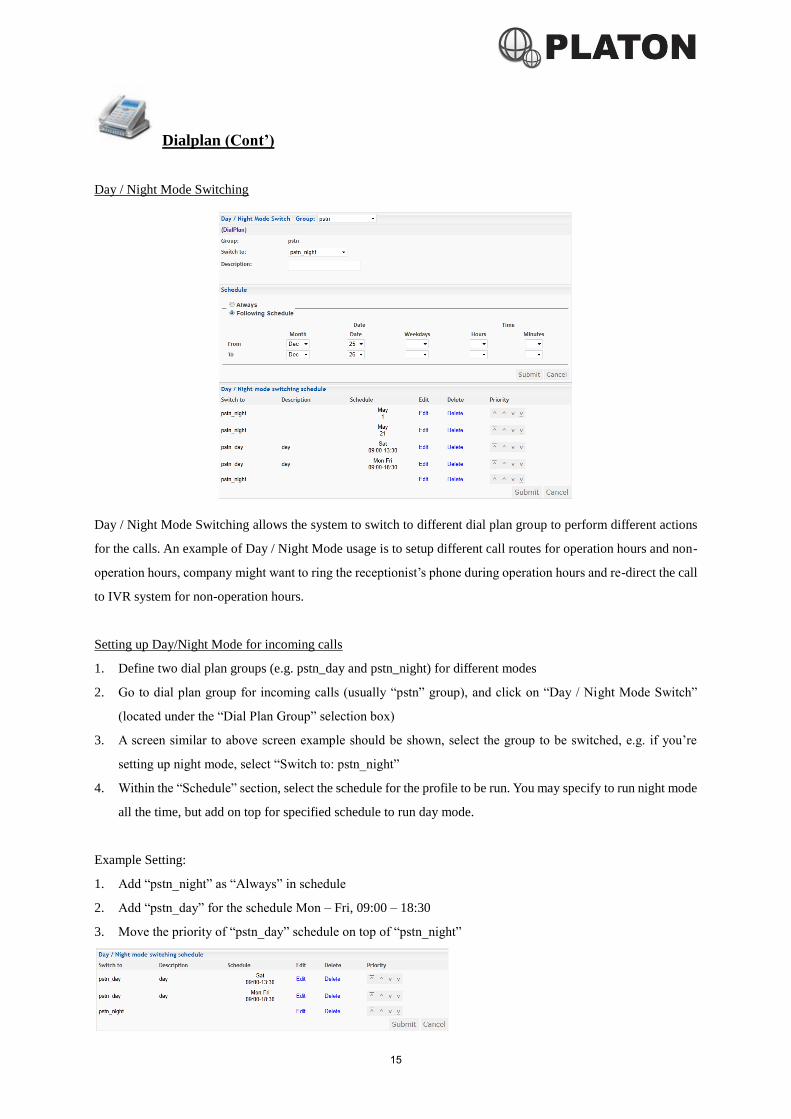
Day / Night Mode Switching
Day / Night Mode Switching allows the system to switch to different dial plan group to perform different actions
for the calls. An example of Day / Night Mode usage is to setup different call routes for operation hours and non-
operation hours, company might want to ring the receptionist’s phone during operation hours and re-direct the call
to IVR system for non-operation hours.
Setting up Day/Night Mode for incoming calls
1. Define two dial plan groups (e.g. pstn_day and pstn_night) for different modes
2. Go to dial plan group for incoming calls (usually “pstn” group), and click on “Day / Night Mode Switch”
(located under the “Dial Plan Group” selection box)
3. A screen similar to above screen example should be shown, select the group to be switched, e.g. if you’re
setting up night mode, select “Switch to: pstn_night”
4. Within the “Schedule” section, select the schedule for the profile to be run. You may specify to run night mode
all the time, but add on top for specified schedule to run day mode.
Example Setting:
1. Add “pstn_night” as “Always” in schedule
2. Add “pstn_day” for the schedule Mon – Fri, 09:00 – 18:30
3. Move the priority of “pstn_day” schedule on top of “pstn_night”

16
Features Settings
Call Park Extension : Extension number used to Park Call
Call Park Position : Define usable slot for Call Parking
Group Pickup Feature Code : Feature code for Call Pickup within the same Group
(Call Group and Pickup Group can be defined in “VoIP Users”
module)
On-Demand Recording Feature Code : Feature for starting On-Demand Recording duing conversation
Blind Transfer Feature Code : Feature Code for Blind-Transfer (for analog phones only)
Attended Transfer Feature Code : Feature Code for Attended-Transfer (for analog phones only)
17
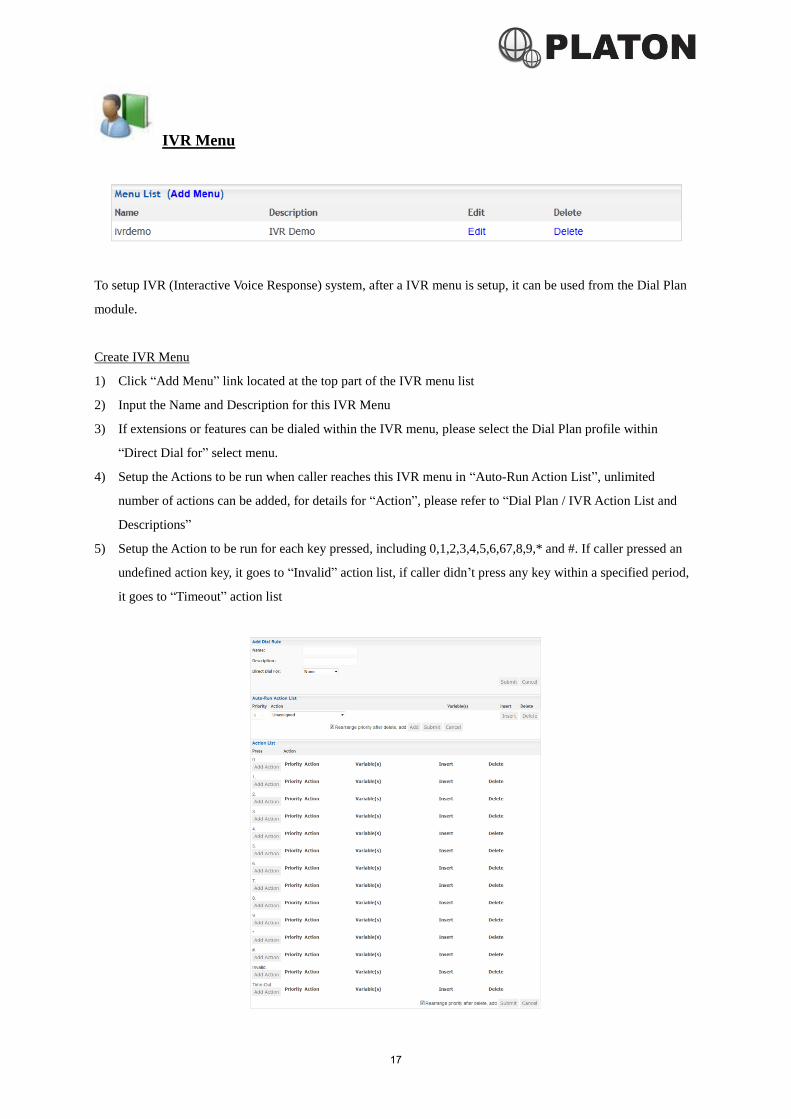
IVR Menu
To setup IVR (Interactive Voice Response) system, after a IVR menu is setup, it can be used from the Dial Plan
module.
Create IVR Menu
1) Click “Add Menu” link located at the top part of the IVR menu list
2) Input the Name and Description for this IVR Menu
3) If extensions or features can be dialed within the IVR menu, please select the Dial Plan profile within
“Direct Dial for” select menu.
4) Setup the Actions to be run when caller reaches this IVR menu in “Auto-Run Action List”, unlimited
number of actions can be added, for details for “Action”, please refer to “Dial Plan / IVR Action List and
Descriptions”
5) Setup the Action to be run for each key pressed, including 0,1,2,3,4,5,6,67,8,9,* and #. If caller pressed an
undefined action key, it goes to “Invalid” action list, if caller didn’t press any key within a specified period,
it goes to “Timeout” action list
18
IVR Menu (Cont’)
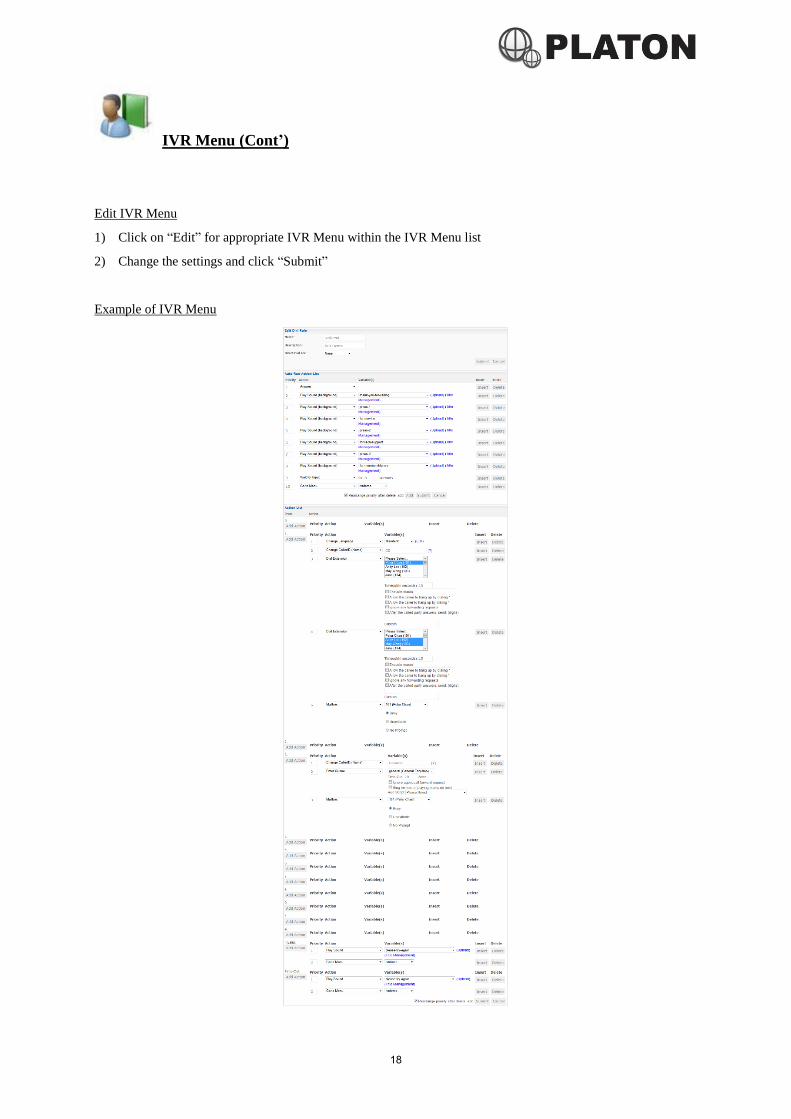
Edit IVR Menu
1) Click on “Edit” for appropriate IVR Menu within the IVR Menu list
2) Change the settings and click “Submit”
Example of IVR Menu
19
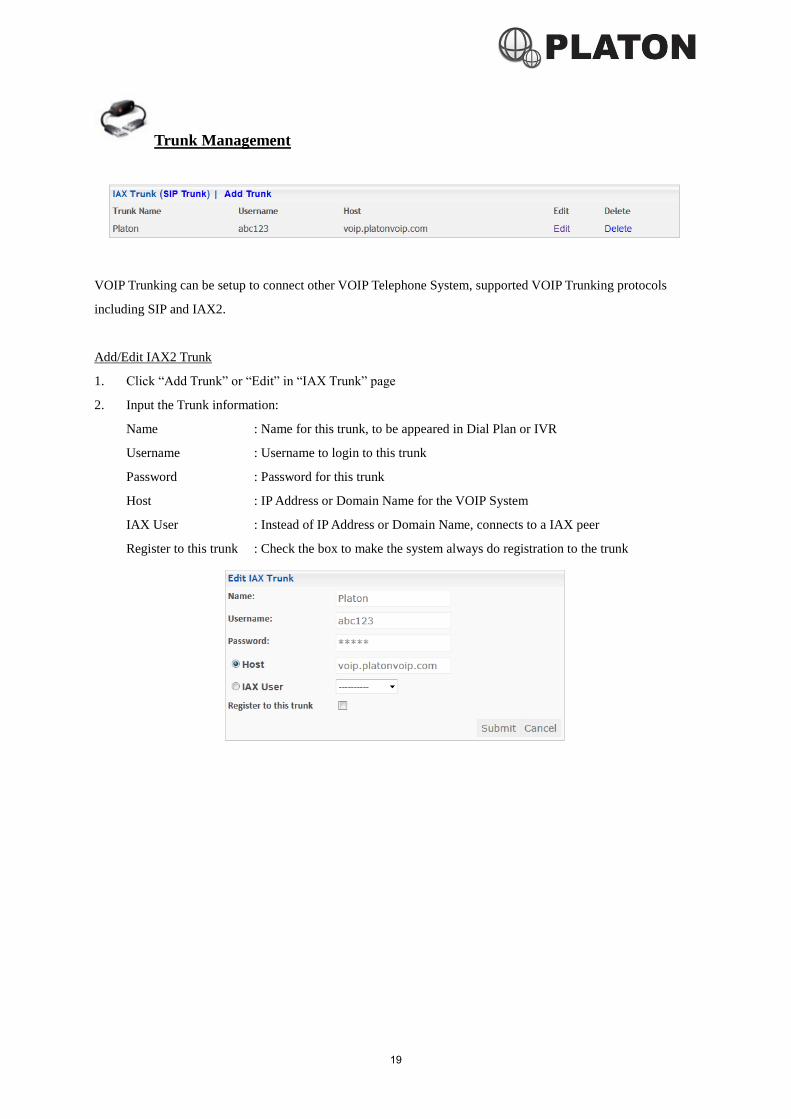
Trunk Management
VOIP Trunking can be setup to connect other VOIP Telephone System, supported VOIP Trunking protocols
including SIP and IAX2.
Add/Edit IAX2 Trunk
1. Click “Add Trunk” or “Edit” in “IAX Trunk” page
2. Input the Trunk information:
Name : Name for this trunk, to be appeared in Dial Plan or IVR
Username : Username to login to this trunk
Password : Password for this trunk
Host : IP Address or Domain Name for the VOIP System
IAX User : Instead of IP Address or Domain Name, connects to a IAX peer
Register to this trunk : Check the box to make the system always do registration to the trunk
20
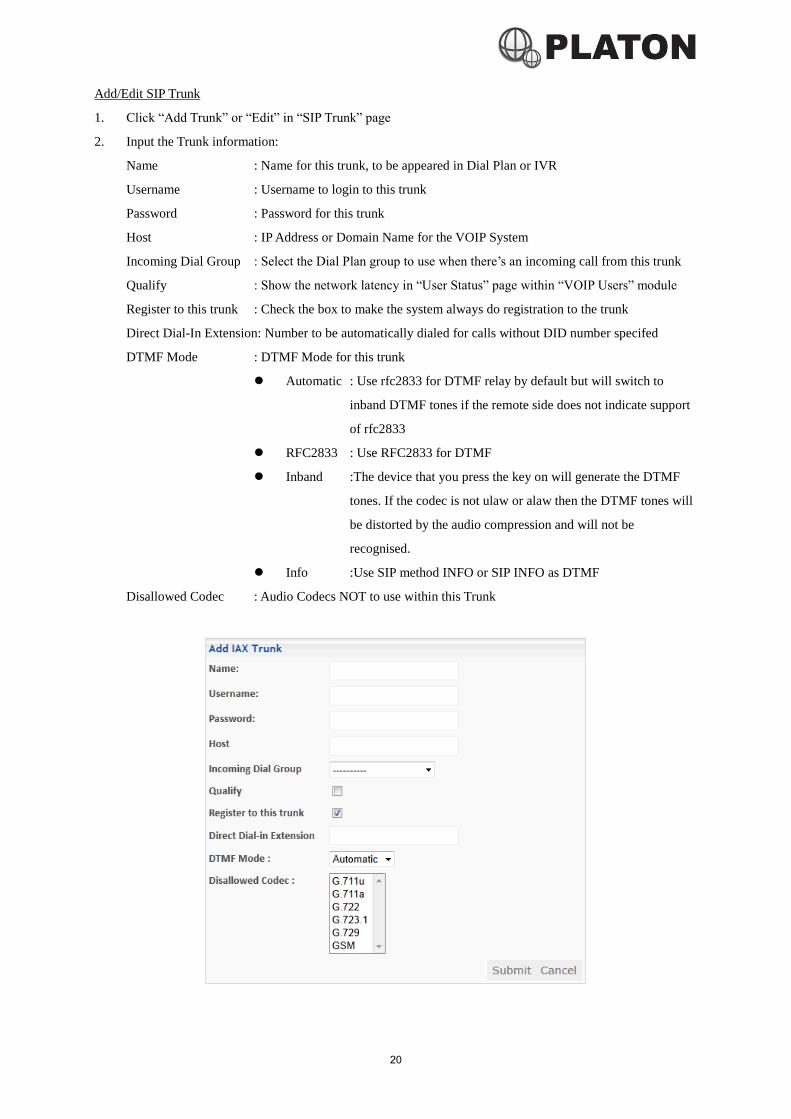
Add/Edit SIP Trunk
1. Click “Add Trunk” or “Edit” in “SIP Trunk” page
2. Input the Trunk information:
Name : Name for this trunk, to be appeared in Dial Plan or IVR
Username : Username to login to this trunk
Password : Password for this trunk
Host : IP Address or Domain Name for the VOIP System
Incoming Dial Group : Select the Dial Plan group to use when there’s an incoming call from this trunk
Qualify : Show the network latency in “User Status” page within “VOIP Users” module
Register to this trunk : Check the box to make the system always do registration to the trunk
Direct Dial-In Extension: Number to be automatically dialed for calls without DID number specifed
DTMF Mode : DTMF Mode for this trunk
Automatic : Use rfc2833 for DTMF relay by default but will switch to
inband DTMF tones if the remote side does not indicate support
of rfc2833
RFC2833 : Use RFC2833 for DTMF
Inband :The device that you press the key on will generate the DTMF
tones. If the codec is not ulaw or alaw then the DTMF tones will
be distorted by the audio compression and will not be
recognised.
Info :Use SIP method INFO or SIP INFO as DTMF
Disallowed Codec : Audio Codecs NOT to use within this Trunk
21
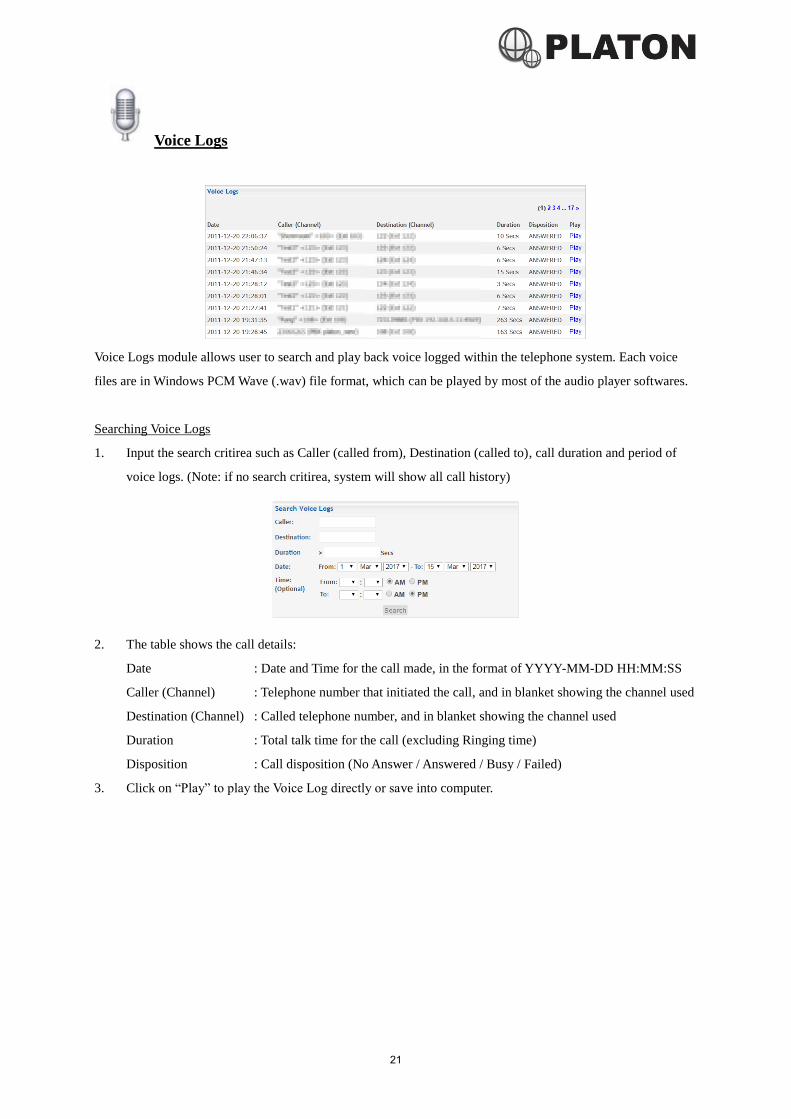
Voice Logs
Voice Logs module allows user to search and play back voice logged within the telephone system. Each voice
files are in Windows PCM Wave (.wav) file format, which can be played by most of the audio player softwares.
Searching Voice Logs
1. Input the search critirea such as Caller (called from), Destination (called to), call duration and period of
voice logs. (Note: if no search critirea, system will show all call history)
2. The table shows the call details:
Date : Date and Time for the call made, in the format of YYYY-MM-DD HH:MM:SS
Caller (Channel) : Telephone number that initiated the call, and in blanket showing the channel used
Destination (Channel) : Called telephone number, and in blanket showing the channel used
Duration : Total talk time for the call (excluding Ringing time)
Disposition : Call disposition (No Answer / Answered / Busy / Failed)
3. Click on “Play” to play the Voice Log directly or save into computer.
22
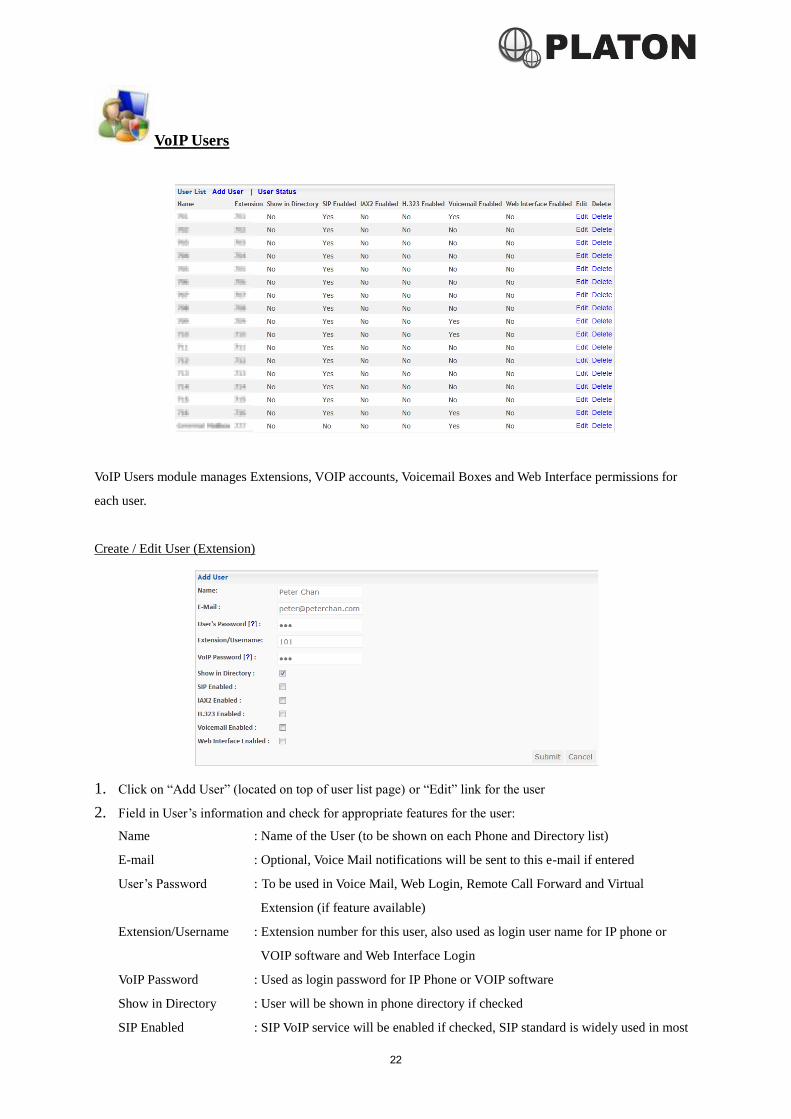
VoIP Users
VoIP Users module manages Extensions, VOIP accounts, Voicemail Boxes and Web Interface permissions for
each user.
Create / Edit User (Extension)
1. Click on “Add User” (located on top of user list page) or “Edit” link for the user
2. Field in User’s information and check for appropriate features for the user:
Name : Name of the User (to be shown on each Phone and Directory list)
E-mail : Optional, Voice Mail notifications will be sent to this e-mail if entered
User’s Password : To be used in Voice Mail, Web Login, Remote Call Forward and Virtual
Extension (if feature available)
Extension/Username : Extension number for this user, also used as login user name for IP phone or
VOIP software and Web Interface Login
VoIP Password : Used as login password for IP Phone or VOIP software
Show in Directory : User will be shown in phone directory if checked
SIP Enabled : SIP VoIP service will be enabled if checked, SIP standard is widely used in most
23
VoIP Software
IAX2 Enabled : IAX VoIP Service will be enabled if checked, IAX standard is widely used in
most IP PBX System
H.323 Enabled : H.323 VoIP Service will be enabled if checked, H.323 standard is old fashioned
VOIP service used in early VoIP hardware
Voicemail Enabled : Voice Mail feature will be enabled if checked
Web Interface Enabled : Allows user to login to this web interface if checked
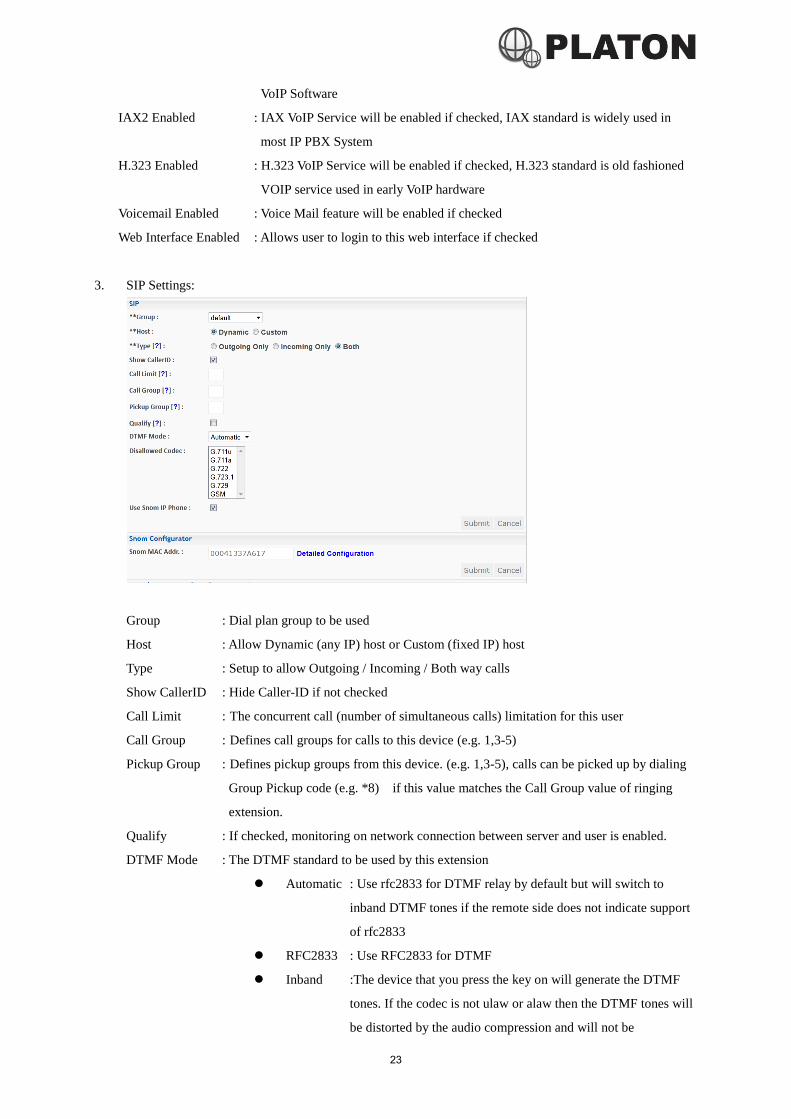
3. SIP Settings:
Group : Dial plan group to be used
Host : Allow Dynamic (any IP) host or Custom (fixed IP) host
Type : Setup to allow Outgoing / Incoming / Both way calls
Show CallerID : Hide Caller-ID if not checked
Call Limit : The concurrent call (number of simultaneous calls) limitation for this user
Call Group : Defines call groups for calls to this device (e.g. 1,3-5)
Pickup Group : Defines pickup groups from this device. (e.g. 1,3-5), calls can be picked up by dialing
Group Pickup code (e.g. *8) if this value matches the Call Group value of ringing
extension.
Qualify : If checked, monitoring on network connection between server and user is enabled.
DTMF Mode : The DTMF standard to be used by this extension
Automatic : Use rfc2833 for DTMF relay by default but will switch to
inband DTMF tones if the remote side does not indicate support
of rfc2833
RFC2833 : Use RFC2833 for DTMF
Inband :The device that you press the key on will generate the DTMF
tones. If the codec is not ulaw or alaw then the DTMF tones will
be distorted by the audio compression and will not be
24
recognised.
Info :Use SIP method INFO or SIP INFO as DTMF
Disallowed Codec : Audio Codecs NOT to used by this extension
Use Snom Phone : To specify if this extenion is connected by Snom phone or not, if enabled and
with MAC address filled in, auto configuration for the IP Phone will be enabled
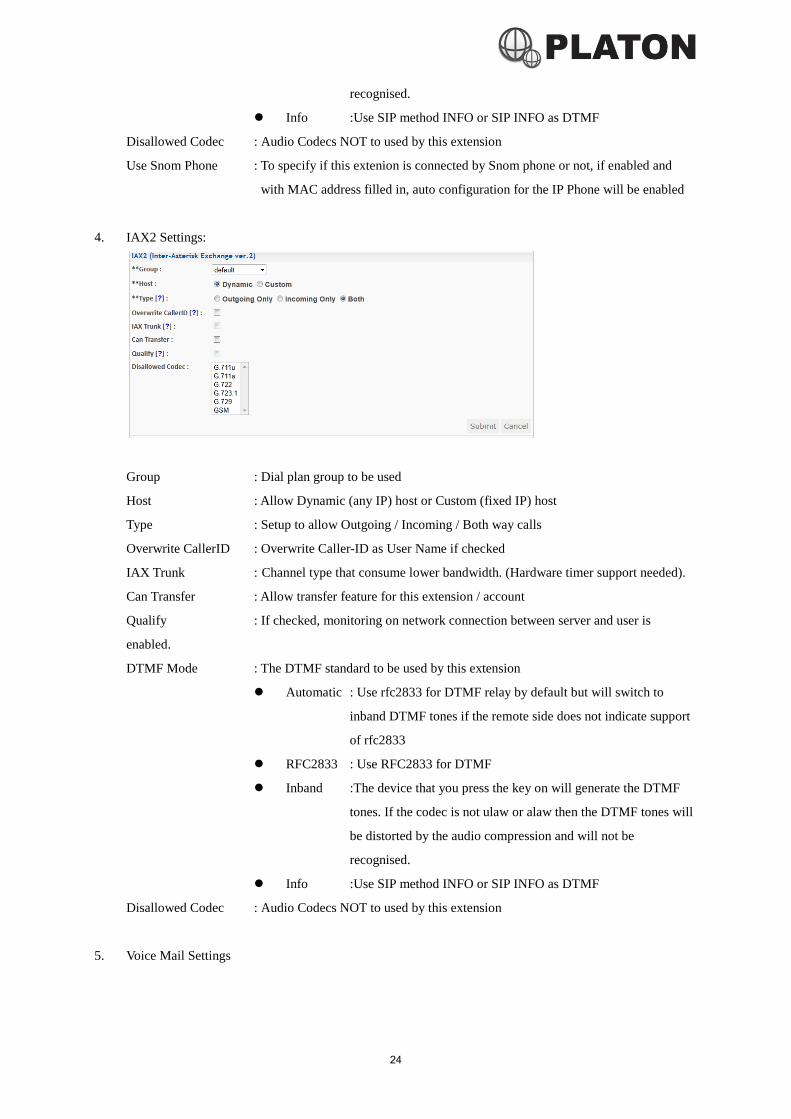
4. IAX2 Settings:
Group : Dial plan group to be used
Host : Allow Dynamic (any IP) host or Custom (fixed IP) host
Type : Setup to allow Outgoing / Incoming / Both way calls
Overwrite CallerID : Overwrite Caller-ID as User Name if checked
IAX Trunk : Channel type that consume lower bandwidth. (Hardware timer support needed).
Can Transfer : Allow transfer feature for this extension / account
Qualify : If checked, monitoring on network connection between server and user is
enabled.
DTMF Mode : The DTMF standard to be used by this extension
Automatic : Use rfc2833 for DTMF relay by default but will switch to
inband DTMF tones if the remote side does not indicate support
of rfc2833
RFC2833 : Use RFC2833 for DTMF
Inband :The device that you press the key on will generate the DTMF
tones. If the codec is not ulaw or alaw then the DTMF tones will
be distorted by the audio compression and will not be
recognised.
Info :Use SIP method INFO or SIP INFO as DTMF
Disallowed Codec : Audio Codecs NOT to used by this extension
5. Voice Mail Settings
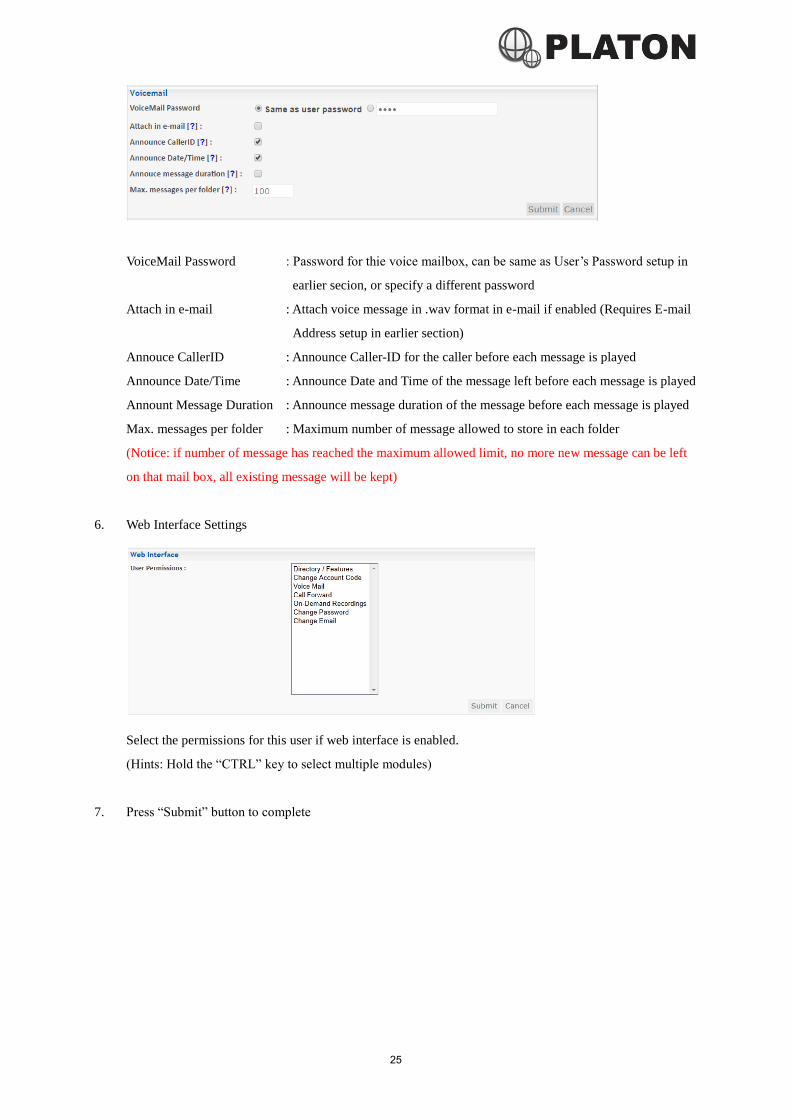
25
VoiceMail Password : Password for thie voice mailbox, can be same as User’s Password setup in
earlier secion, or specify a different password
Attach in e-mail : Attach voice message in .wav format in e-mail if enabled (Requires E-mail
Address setup in earlier section)
Annouce CallerID : Announce Caller-ID for the caller before each message is played
Announce Date/Time : Announce Date and Time of the message left before each message is played
Annount Message Duration : Announce message duration of the message before each message is played
Max. messages per folder : Maximum number of message allowed to store in each folder
(Notice: if number of message has reached the maximum allowed limit, no more new message can be left
on that mail box, all existing message will be kept)
6. Web Interface Settings
Select the permissions for this user if web interface is enabled.
(Hints: Hold the “CTRL” key to select multiple modules)
7. Press “Submit” button to complete
26
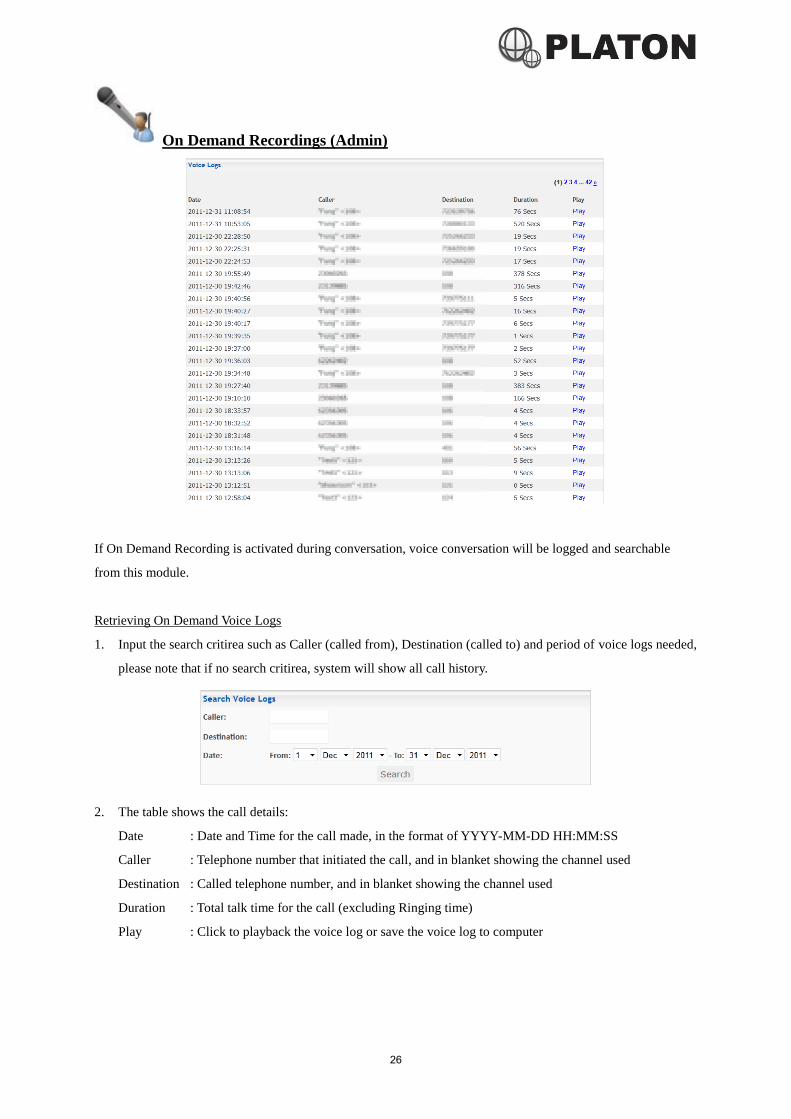
On Demand Recordings (Admin)
If On Demand Recording is activated during conversation, voice conversation will be logged and searchable
from this module.
Retrieving On Demand Voice Logs
1. Input the search critirea such as Caller (called from), Destination (called to) and period of voice logs needed,
please note that if no search critirea, system will show all call history.
2. The table shows the call details:
Date : Date and Time for the call made, in the format of YYYY-MM-DD HH:MM:SS
Caller : Telephone number that initiated the call, and in blanket showing the channel used
Destination : Called telephone number, and in blanket showing the channel used
Duration : Total talk time for the call (excluding Ringing time)
Play : Click to playback the voice log or save the voice log to computer
27
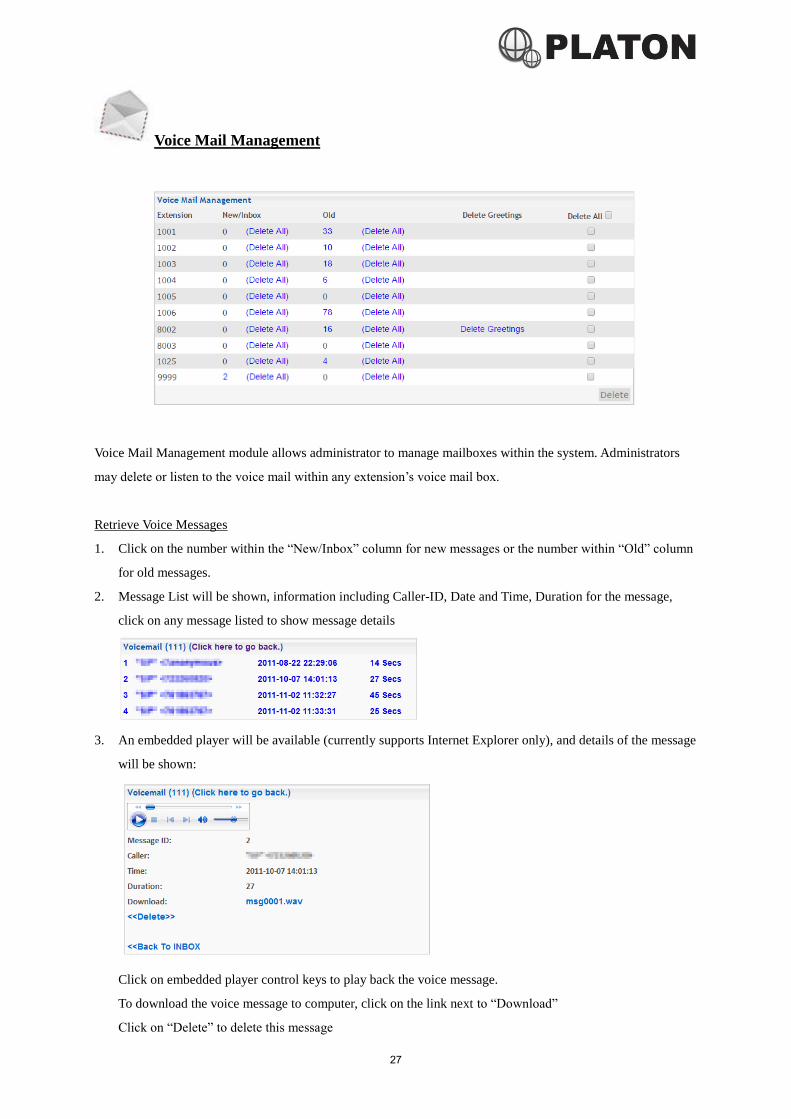
Voice Mail Management
Voice Mail Management module allows administrator to manage mailboxes within the system. Administrators
may delete or listen to the voice mail within any extension’s voice mail box.
Retrieve Voice Messages
1. Click on the number within the “New/Inbox” column for new messages or the number within “Old” column
for old messages.
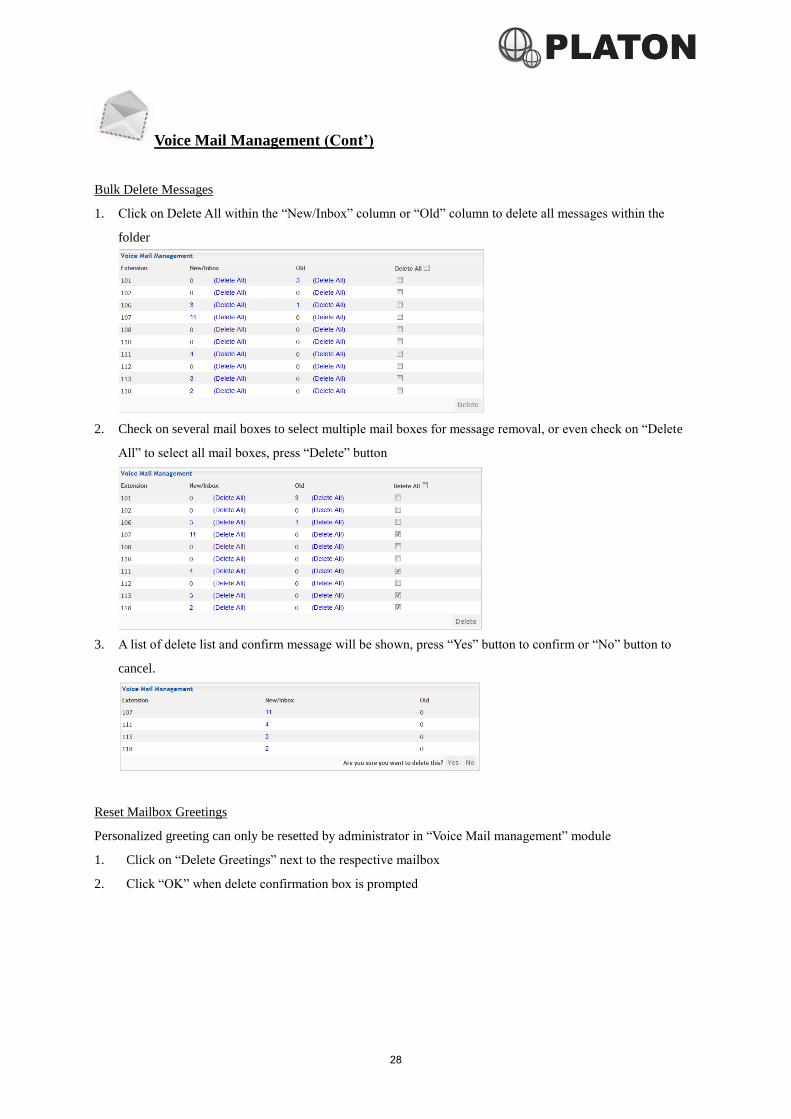
2. Message List will be shown, information including Caller-ID, Date and Time, Duration for the message,
click on any message listed to show message details
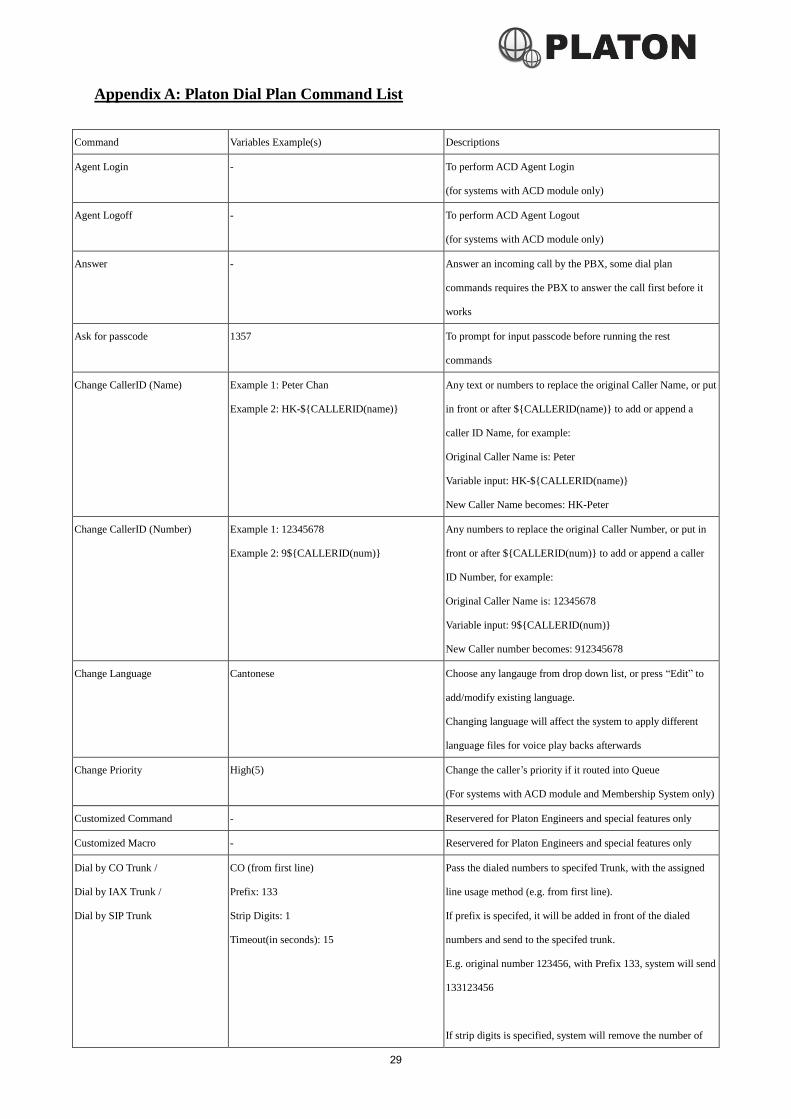
3. An embedded player will be available (currently supports Internet Explorer only), and details of the message
will be shown:
Click on embedded player control keys to play back the voice message.
To download the voice message to computer, click on the link next to “Download”
Click on “Delete” to delete this message
28
Voice Mail Management (Cont’)
Bulk Delete Messages
1. Click on Delete All within the “New/Inbox” column or “Old” column to delete all messages within the
folder
2. Check on several mail boxes to select multiple mail boxes for message removal, or even check on “Delete
All” to select all mail boxes, press “Delete” button
3. A list of delete list and confirm message will be shown, press “Yes” button to confirm or “No” button to
cancel.
Reset Mailbox Greetings
Personalized greeting can only be resetted by administrator in “Voice Mail management” module
1. Click on “Delete Greetings” next to the respective mailbox
2. Click “OK” when delete confirmation box is prompted
29
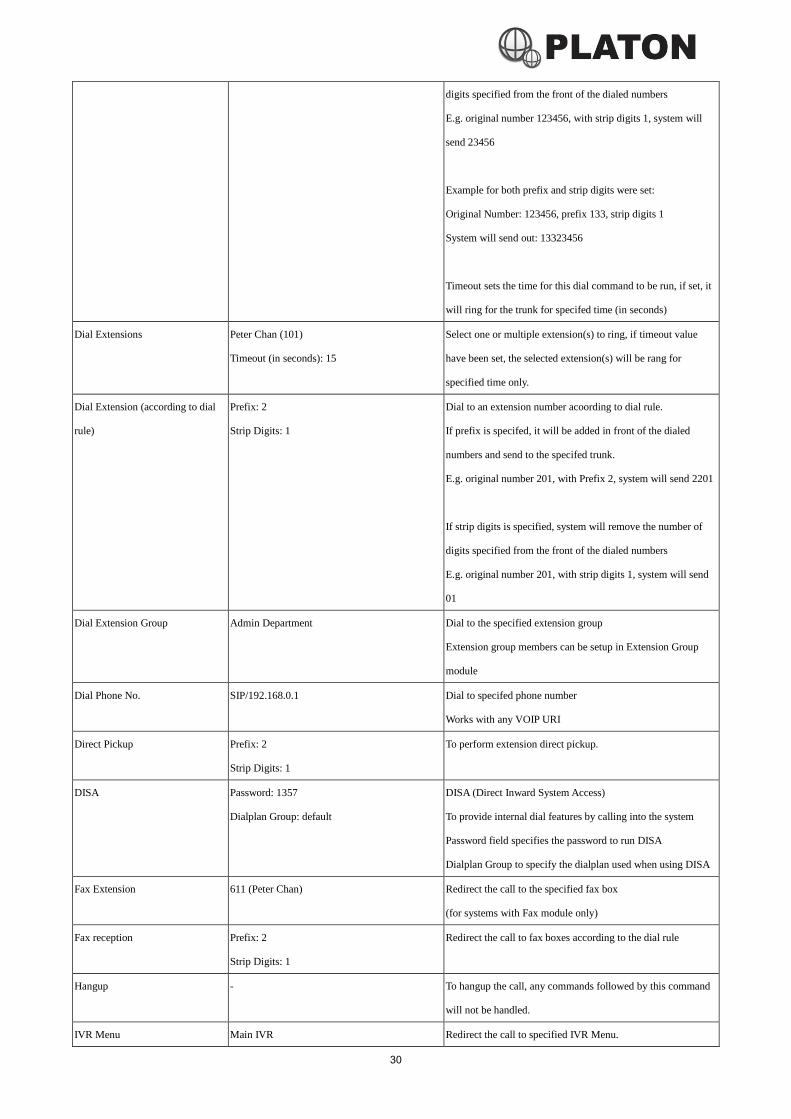
Appendix A: Platon Dial Plan Command List
Command Variables Example(s) Descriptions
Agent Login - To perform ACD Agent Login
(for systems with ACD module only)
Agent Logoff - To perform ACD Agent Logout
(for systems with ACD module only)
Answer - Answer an incoming call by the PBX, some dial plan
commands requires the PBX to answer the call first before it
works
Ask for passcode 1357 To prompt for input passcode before running the rest
commands
Change CallerID (Name) Example 1: Peter Chan
Example 2: HK-${CALLERID(name)}
Any text or numbers to replace the original Caller Name, or put
in front or after ${CALLERID(name)} to add or append a
caller ID Name, for example:
Original Caller Name is: Peter
Variable input: HK-${CALLERID(name)}
New Caller Name becomes: HK-Peter
Change CallerID (Number) Example 1: 12345678
Example 2: 9${CALLERID(num)}
Any numbers to replace the original Caller Number, or put in
front or after ${CALLERID(num)} to add or append a caller
ID Number, for example:
Original Caller Name is: 12345678
Variable input: 9${CALLERID(num)}
New Caller number becomes: 912345678
Change Language Cantonese Choose any langauge from drop down list, or press “Edit” to
add/modify existing language.
Changing language will affect the system to apply different
language files for voice play backs afterwards
Change Priority High(5) Change the caller’s priority if it routed into Queue
(For systems with ACD module and Membership System only)
Customized Command - Reservered for Platon Engineers and special features only
Customized Macro - Reservered for Platon Engineers and special features only
Dial by CO Trunk /
Dial by IAX Trunk /
Dial by SIP Trunk
CO (from first line)
Prefix: 133
Strip Digits: 1
Timeout(in seconds): 15
Pass the dialed numbers to specifed Trunk, with the assigned
line usage method (e.g. from first line).
If prefix is specifed, it will be added in front of the dialed
numbers and send to the specifed trunk.
E.g. original number 123456, with Prefix 133, system will send
133123456
If strip digits is specified, system will remove the number of
30
digits specified from the front of the dialed numbers
E.g. original number 123456, with strip digits 1, system will
send 23456
Example for both prefix and strip digits were set:
Original Number: 123456, prefix 133, strip digits 1
System will send out: 13323456
Timeout sets the time for this dial command to be run, if set, it
will ring for the trunk for specifed time (in seconds)
Dial Extensions Peter Chan (101)
Timeout (in seconds): 15
Select one or multiple extension(s) to ring, if timeout value
have been set, the selected extension(s) will be rang for
specified time only.
Dial Extension (according to dial
rule)
Prefix: 2
Strip Digits: 1
Dial to an extension number acoording to dial rule.
If prefix is specifed, it will be added in front of the dialed
numbers and send to the specifed trunk.
E.g. original number 201, with Prefix 2, system will send 2201
If strip digits is specified, system will remove the number of
digits specified from the front of the dialed numbers
E.g. original number 201, with strip digits 1, system will send
01
Dial Extension Group Admin Department Dial to the specified extension group
Extension group members can be setup in Extension Group
module
Dial Phone No. SIP/192.168.0.1 Dial to specifed phone number
Works with any VOIP URI
Direct Pickup Prefix: 2
Strip Digits: 1
To perform extension direct pickup.
DISA Password: 1357
Dialplan Group: default
DISA (Direct Inward System Access)
To provide internal dial features by calling into the system
Password field specifies the password to run DISA
Dialplan Group to specify the dialplan used when using DISA
Fax Extension 611 (Peter Chan) Redirect the call to the specified fax box
(for systems with Fax module only)
Fax reception Prefix: 2
Strip Digits: 1
Redirect the call to fax boxes according to the dial rule
Hangup - To hangup the call, any commands followed by this command
will not be handled.
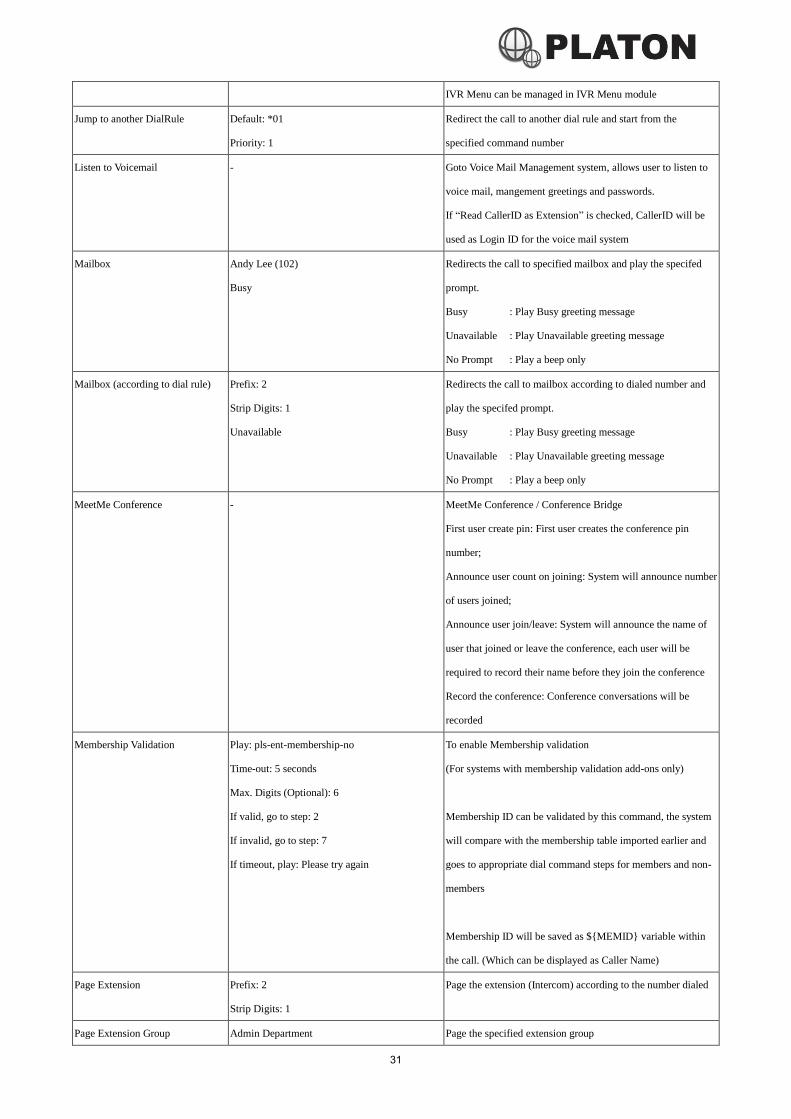
IVR Menu Main IVR Redirect the call to specified IVR Menu.
31
IVR Menu can be managed in IVR Menu module
Jump to another DialRule Default: *01
Priority: 1
Redirect the call to another dial rule and start from the
specified command number
Listen to Voicemail - Goto Voice Mail Management system, allows user to listen to
voice mail, mangement greetings and passwords.
If “Read CallerID as Extension” is checked, CallerID will be
used as Login ID for the voice mail system
Mailbox Andy Lee (102)
Busy
Redirects the call to specified mailbox and play the specifed
prompt.
Busy : Play Busy greeting message
Unavailable : Play Unavailable greeting message
No Prompt : Play a beep only
Mailbox (according to dial rule) Prefix: 2
Strip Digits: 1
Unavailable
Redirects the call to mailbox according to dialed number and
play the specifed prompt.
Busy : Play Busy greeting message
Unavailable : Play Unavailable greeting message
No Prompt : Play a beep only
MeetMe Conference - MeetMe Conference / Conference Bridge
First user create pin: First user creates the conference pin
number;
Announce user count on joining: System will announce number
of users joined;
Announce user join/leave: System will announce the name of
user that joined or leave the conference, each user will be
required to record their name before they join the conference
Record the conference: Conference conversations will be
recorded
Membership Validation Play: pls-ent-membership-no
Time-out: 5 seconds
Max. Digits (Optional): 6
If valid, go to step: 2
If invalid, go to step: 7
If timeout, play: Please try again
To enable Membership validation
(For systems with membership validation add-ons only)
Membership ID can be validated by this command, the system
will compare with the membership table imported earlier and
goes to appropriate dial command steps for members and non-
members
Membership ID will be saved as ${MEMID} variable within
the call. (Which can be displayed as Caller Name)
Page Extension Prefix: 2
Strip Digits: 1
Page the extension (Intercom) according to the number dialed
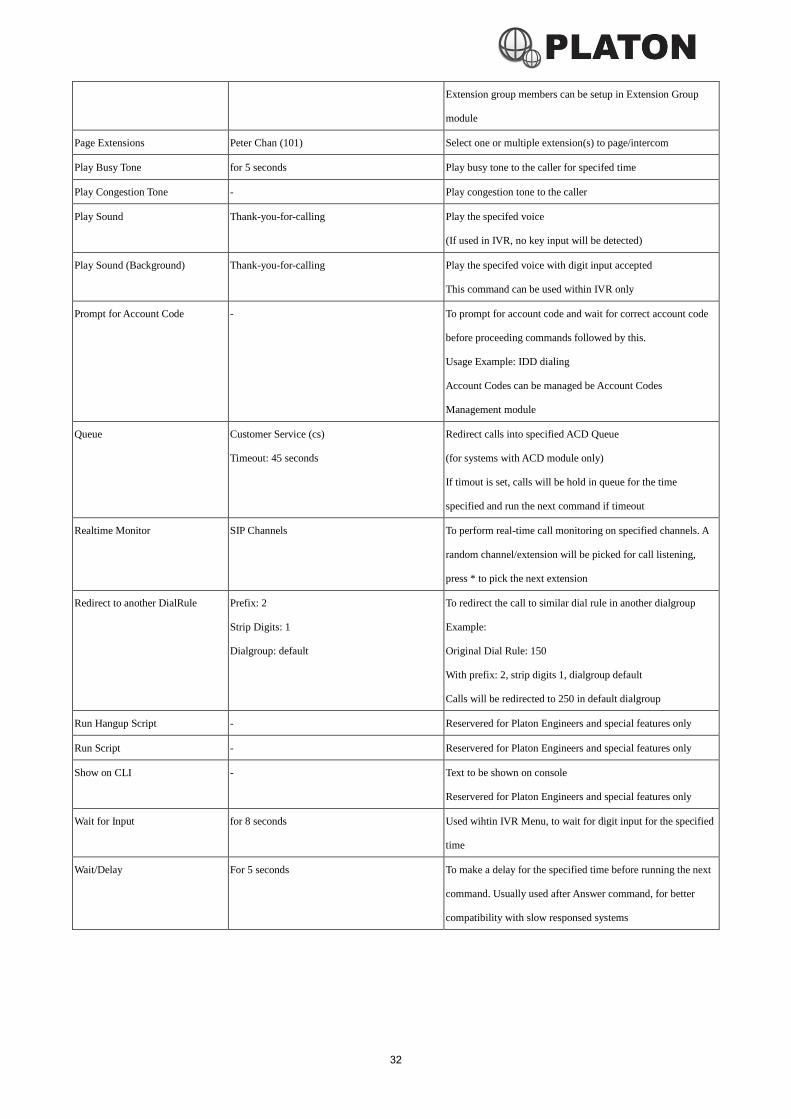
Page Extension Group Admin Department Page the specified extension group
32
Extension group members can be setup in Extension Group
module
Page Extensions Peter Chan (101) Select one or multiple extension(s) to page/intercom
Play Busy Tone for 5 seconds Play busy tone to the caller for specifed time
Play Congestion Tone - Play congestion tone to the caller
Play Sound Thank-you-for-calling Play the specifed voice
(If used in IVR, no key input will be detected)
Play Sound (Background) Thank-you-for-calling Play the specifed voice with digit input accepted
This command can be used within IVR only
Prompt for Account Code - To prompt for account code and wait for correct account code
before proceeding commands followed by this.
Usage Example: IDD dialing
Account Codes can be managed be Account Codes
Management module
Queue Customer Service (cs)
Timeout: 45 seconds
Redirect calls into specified ACD Queue
(for systems with ACD module only)
If timout is set, calls will be hold in queue for the time
specified and run the next command if timeout
Realtime Monitor SIP Channels To perform real-time call monitoring on specified channels. A
random channel/extension will be picked for call listening,
press * to pick the next extension
Redirect to another DialRule Prefix: 2
Strip Digits: 1
Dialgroup: default
To redirect the call to similar dial rule in another dialgroup
Example:
Original Dial Rule: 150
With prefix: 2, strip digits 1, dialgroup default
Calls will be redirected to 250 in default dialgroup
Run Hangup Script - Reservered for Platon Engineers and special features only
Run Script - Reservered for Platon Engineers and special features only
Show on CLI - Text to be shown on console
Reservered for Platon Engineers and special features only
Wait for Input for 8 seconds Used wihtin IVR Menu, to wait for digit input for the specified
time
Wait/Delay For 5 seconds To make a delay for the specified time before running the next
command. Usually used after Answer command, for better
compatibility with slow responsed systems