Embed Size (px)
Citation preview
V1.0(2016)
USER INSTRUCTIONUSE/INSTALLATION
IP KEYBOARD CONTROLLER

- 1 -
Contents described in this manual may differ from the version you are currently using, if you are in
doubt when using this manual, please contact our technical support for help.
The manual will be updated from time to time, and the company has reserved the right without
notice.
Preface
Thank you for purchasing our products, and if any questions or needs, please contact us.
This product is specially for multi-IP PTZ dome cameras realize unified control and R&D
(Research and developed) IP keyboard controller in the same (LAN) .This equipment adopts
ONVIF protocol to start communication, connection, and control ...etc, which apply in most of
industries, can compatible with different kinds of IP PTZ cameras. Embedded Web Server, it can
support user through browser. Easy operation and maintenance for products. In order to suit
many different operate systems, This products Support all of main browsers ,such as Internet
Explorer, Firefox, Chrome, Safari...etc.This keyboard is with 7" HD monitor, support 4CH image
display, support 1ch 1080P decoding. Support HDMI HD output; 4D Japan-original joystick, with
very completely operation. Can work perfectly away from PC and monitor, realized the central-
controlling turely.
It can be applied to installed for multi-places, such as school, hospital, hotel, factory, workshop,
etc.It makes the switching much easily and quickly between the equipment.
Before installation,please check whether all the accessories are complete.If missing any
packing accessories .Please contact local distributor in time.
Statement

1. -------- ---- ------------3Product Description ------------------------------------ -
2. System setting ------------------------------------------- --------- ---- -----------6
3. The internet ----------------------------------------------------------------------8
4. PTZ Setting -----------------------------------------------------------------------9
5. IPC device information --------------------------------------------------------9
6. Device Management ----------------------------------------------------------10
7. Feature set ----------------------------------------------------------------------13
1.1
1.2 Product Features ----------------------------------------------------------------------3
1.3 keyboard interfaces -------------------------------------------------------------------3
1.4 Wiring diagram -------------------------------------------------------------------------3
1.5 Technical specification ---------------------------------------------------------------3
1.6 Key instruction -------------------------------------------------------------------------3
Application ------------------------------------------------------------------------------3
2.1 Language setting ----------------------------------------------------------------------3
2.2 Time setting -----------------------------------------------------------------------------3
2.3 IP time check ---------------------------------------------------------------------------3
2.4 System Upgrade -----------------------------------------------------------------------3
2.5 Restore Defaults -----------------------------------------------------------------------3
2.6 Version Information -------------------------------------------------------------------3
3.1 The internet -----------------------------------------------------------------------------8
4.1 PTZ Setting -----------------------------------------------------------------------------9
5.1 IPC device information ---------------------------------------------------------------9
6.1 Connection ----------------------------------------------------------------------------10
6.2 Adding ----------------------------------------------------------------------------------10
6.3 Delete ----------------------------------------------------------------------------------11
6.4 Modify the user name and password ---------------------------------------------12
6.5 Inquire ---------------------------------------------------------------------------------12
6.6 Switching ------------------------------------------------------------------------------12
7.1 Language setting ---------------------------------------------------------------------13
7.2 Time setting ---------------------------------------------------------------------------13
7.3 IP time check --------------------------------------------------------------------------14
- 2 -
Contents
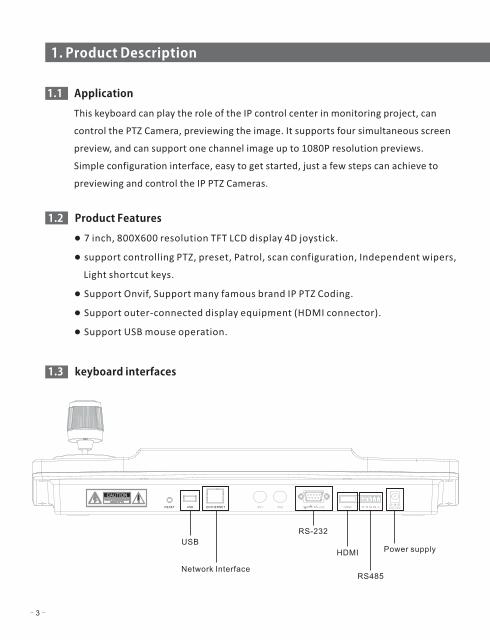
1.1 Application
This keyboard can play the role of the IP control center in monitoring project, can
control the PTZ Camera, previewing the image. It supports four simultaneous screen
preview, and can support one channel image up to 1080P resolution previews.
Simple configuration interface, easy to get started, just a few steps can achieve to
previewing and control the IP PTZ Cameras.
1.2 Product Features
●
● support controlling PTZ, preset, Patrol, scan configuration, Independent wipers,
Light shortcut keys.
● Support Onvif, Support many famous brand IP PTZ Coding.
● Support outer-connected display equipment (HDMI connector).
● Support USB mouse operation.
7 inch, 800X600 resolution TFT LCD display 4D joystick.
1.3 keyboard interfaces
- 3 -
1. Product Description
ENTHERNETUSB RS-232 DC-12VRESET HDMI TA TB RA RB GAV1 AV2
Network Interface
USB
RS-232
HDMI
RS485
Power supply
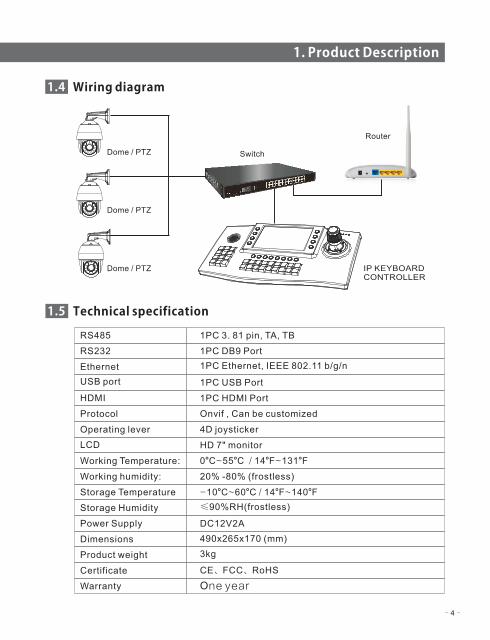
Switch
1.5 Technical specification
- 4 -
Router
DC12V2A
1PC DB9 Port
Onvif , Can be customized
0°C~55°C / 14°F~131°F
20% -80% (frostless)
-10°C~60°C / 14°F~140°F
≤90%RH(frostless)
CE、FCC、RoHS
One year
3kg
Power Supply
RS485
RS232
Ethernet
Protocol
Working Temperature:
Storage Temperature
Storage Humidity
Certificate
Warranty
Working humidity:
Product weight
Operating lever
LCD
Dimensions 490x265x170 (mm)
1PC USB Port
4D joysticker
HD 7" monitor
1PC HDMI PortHDMI
Dome / PTZ
1.4 Wiring diagram
1. Product Description
Dome / PTZ
Dome / PTZ IP KEYBOARD CONTROLLER
1PC 3. 81 pin, TA, TB
1PC Ethernet, IEEE 802.11 b/g/n
USB port

1.6 Key instruction
- 5 -
CLR
Clear
Enter
ESC
PATTERN
F1 F2 F3 F4 F5 F6 F7 F8
SET SEARCH ZOOM+ IRIS+ LIGHT
WIPER MULT IRISFOCUS
FOCUS
ESC
PATTERN PATROL PRESET
TOUR RUN SHOT
CH1
CH2
CH3
CH4
WIN1
WIN4
WIN2
WIN3
CLR
CH1
Win1
CH2 CH3
Win2 Win3 Win4
CH4
SET
Set
MULT
RUN
SEARCH
ZOOM-
PATROL
ZOOM+
FOCUS-
TOUR
FOCUS+
IRIS-
PRESET
IRIS+
WIPER
SHOT
LIGHT
1. Product Description
Confirm
NO.1 window in full display
Select the No.1 window
NO.2 window in full display
Select the No.2 window
NO.3 window in full display
Select the No.3 window
NO.4 window in full display
Select the No.4 window
Back
Setting Pattern
Inquiry
Mult
Run Pattern
Zoon in
Zoon out
Setting Patrol Call Patrol Setting Preset Call preset
FOCUS-
FOCUS+
Wiper
Light
IRIS-
IRIS+
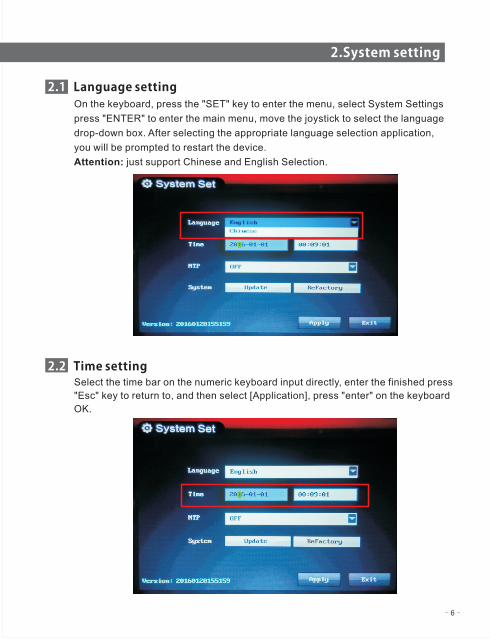
On the keyboard, press the "SET" key to enter the menu, select System Settings
press "ENTER" to enter the main menu, move the joystick to select the language
drop-down box. After selecting the appropriate language selection application,
you will be prompted to restart the device.
Attention: just support Chinese and English Selection.
- 6 -
2.System setting
Select the time bar on the numeric keyboard input directly, enter the finished press
"Esc" key to return to, and then select [Application], press "enter" on the keyboard
OK.
Language setting 2.1
Time setting 2.2
- 7 -
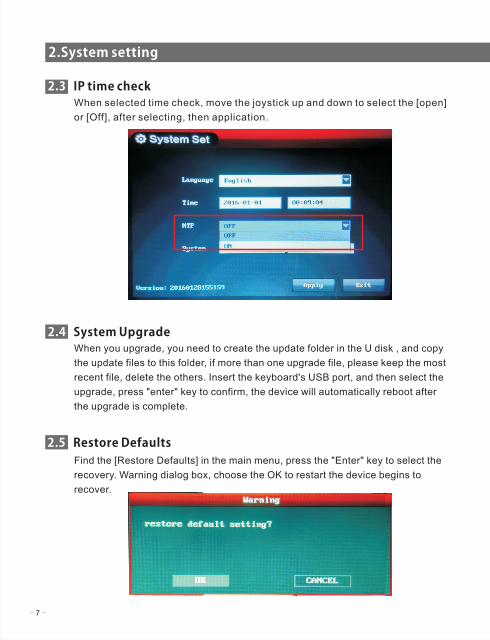
IP time check2.3 When selected time check, move the joystick up and down to select the [open]
or [Off], after selecting, then application.
System Upgrade2.4 When you upgrade, you need to create the update folder in the U disk , and copy
the update files to this folder, if more than one upgrade file, please keep the most
recent file, delete the others. Insert the keyboard's USB port, and then select the
upgrade, press "enter" key to confirm, the device will automatically reboot after
the upgrade is complete.
Restore Defaults2.5 Find the [Restore Defaults] in the main menu, press the "Enter" key to select the
recovery. Warning dialog box, choose the OK to restart the device begins to
recover.
2.System setting
- 8 -
3. The internet
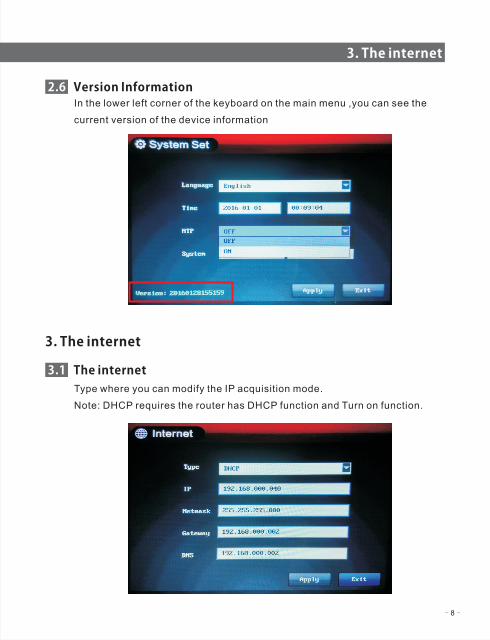
Version Information2.6 In the lower left corner of the keyboard on the main menu ,you can see the
current version of the device information
3.1 The internetType where you can modify the IP acquisition mode.
Note: DHCP requires the router has DHCP function and Turn on function.
3. The internet
- 9 -
4. PTZ Setting
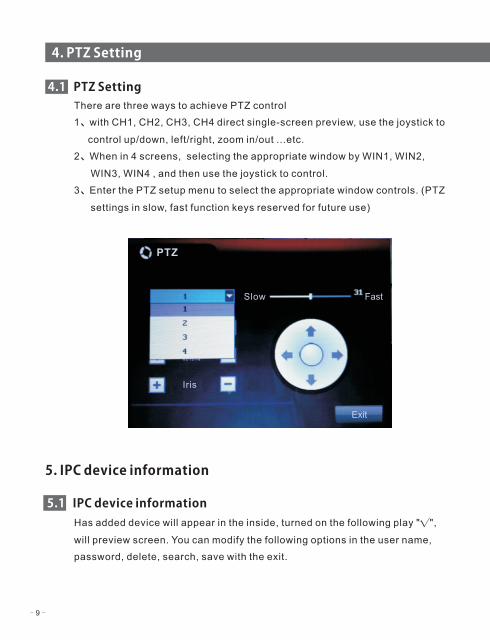
4.1 PTZ SettingThere are three ways to achieve PTZ control
1、with CH1, CH2, CH3, CH4 direct single-screen preview, use the joystick to
control up/down, left/right, zoom in/out ...etc.
2、When in 4 screens, selecting the appropriate window by WIN1, WIN2,
WIN3, WIN4 , and then use the joystick to control.
3、Enter the PTZ setup menu to select the appropriate window controls. (PTZ
settings in slow, fast function keys reserved for future use)
5.1 IPC device informationHas added device will appear in the inside, turned on the following play "√",
will preview screen. You can modify the following options in the user name,
password, delete, search, save with the exit.
5. IPC device information
Iris
Slow Fast
PTZ
Exit
- 10 -
6. Device Management
6.1 Connection6.1.1 Connected power cable
well, and connect the network
cable. After the startup is
completed, quad screen will
display on the screen.
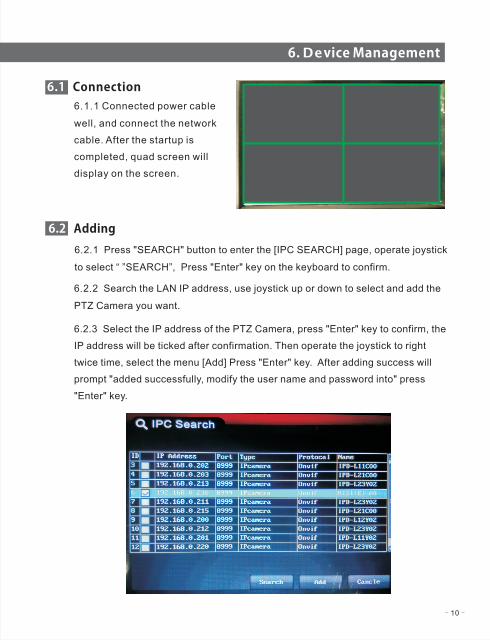
6.2 Adding
6.2.1 Press "SEARCH" button to enter the [IPC SEARCH] page, operate joystick
to select “ ”SEARCH”, Press "Enter" key on the keyboard to confirm.
6.2.2 Search the LAN IP address, use joystick up or down to select and add the
PTZ Camera you want.
6.2.3 Select the IP address of the PTZ Camera, press "Enter" key to confirm, the
IP address will be ticked after confirmation. Then operate the joystick to right
twice time, select the menu [Add] Press "Enter" key. After adding success will
prompt "added successfully, modify the user name and password into" press
"Enter" key.

6.2.4 After the addition is complete, operate the joystick to right to select [Exit]
and press the "Enter" key to confirm the exit to the [information] IPC device
interface.
6.2.5 Select the just added device press "Enter" to confirm to open, and then
save and exit. The added ptz camera image will appear on the quad screen.
6.3 Delete6.3.1 Press the "SET" key to enter the main menu, operate the joystick 3
times right to select [IPC information] , Press again "Enter" key to enter
information [IPC] sub menu.
6.3.2 Select the IP address of the device you want to delete, operate the
joystick right 3 times to select the delete key on the screen, press the "Enter"
key on your keyboard to confirm the deletion. After the removal is complete,
select Save, press "Enter" key on your keyboard to determine the save.
- 11 -
6. Device Management
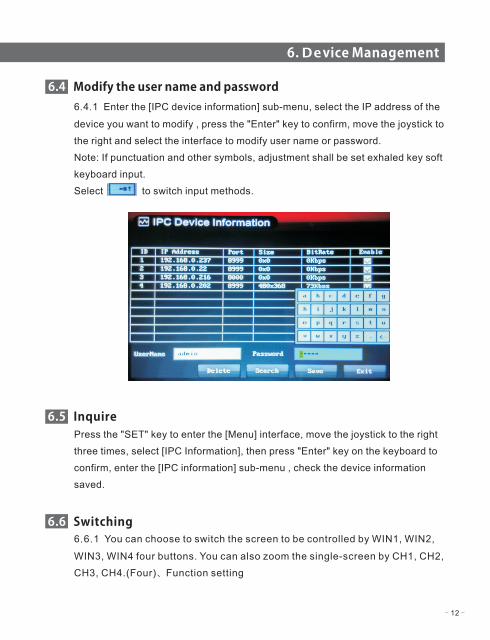
6.4 Modify the user name and password
6.4.1 Enter the [IPC device information] sub-menu, select the IP address of the
device you want to modify , press the "Enter" key to confirm, move the joystick to
the right and select the interface to modify user name or password.
Note: If punctuation and other symbols, adjustment shall be set exhaled key soft
keyboard input.
Select to switch input methods.
6.5 InquirePress the "SET" key to enter the [Menu] interface, move the joystick to the right
three times, select [IPC Information], then press "Enter" key on the keyboard to
confirm, enter the [IPC information] sub-menu , check the device information
saved.
6.6 Switching6.6.1 You can choose to switch the screen to be controlled by WIN1, WIN2,
WIN3, WIN4 four buttons. You can also zoom the single-screen by CH1, CH2,
CH3, CH4.(Four)、Function setting
- 12 -
6. Device Management
7. Feature set
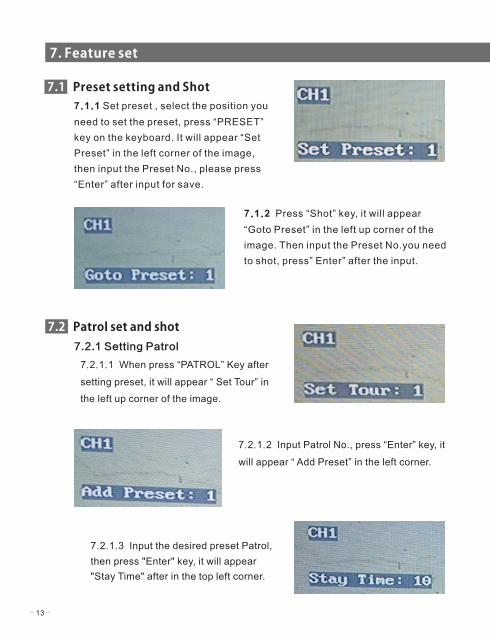
7.1 Preset setting and Shot7.1.1 Set preset , select the position you
need to set the preset, press “PRESET”
key on the keyboard. It will appear “Set
Preset” in the left corner of the image,
then input the Preset No., please press
“Enter” after input for save.
7.1.2 Press “Shot” key, it will appear
“Goto Preset” in the left up corner of the
image. Then input the Preset No.you need
to shot, press” Enter” after the input.
7.2 Patrol set and shot
7.2.1 Setting Patrol
7.2.1.1 When press “PATROL” Key after
setting preset, it will appear “ Set Tour” in
the left up corner of the image.
7.2.1.2 Input Patrol No., press “Enter” key, it
will appear “ Add Preset” in the left corner.
7.2.1.3 Input the desired preset Patrol,
then press "Enter" key, it will appear
"Stay Time" after in the top left corner.
- 13 -
7. Feature set
7.2.1.4 Input the current preset stopping time, press the "Enter" key again after
inputting. it will appear "Add preset" in the top left corner, which will return to the
step 2.
7.2.1.5 Continue to follow steps 2,3,4 after completing to add all the required
patrol presets, press the "PATROL" again to save.
7.2.2 tone cruise, pressed on the keyboard "TOUR" button, the screen will
appear the upper left corner "Goto Tour" and then enter the cruise number, press
the "OK" button
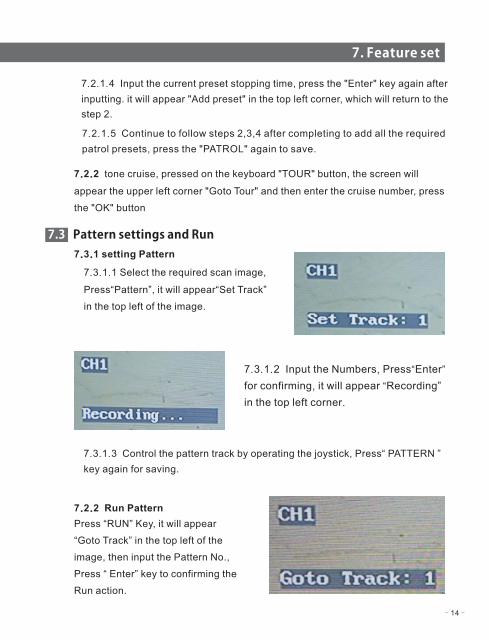
7.3 Pattern settings and Run
7.3.1 setting Pattern
7.3.1.1 Select the required scan image,
Press“Pattern”, it will appear“Set Track”
in the top left of the image.
7.3.1.2 Input the Numbers, Press Enter
for confirming, it will appear “Recording”
in the top left corner.
“ ”
7.3.1.3 Control the pattern track by operating the joystick, Press PATTERN ”
key again for saving.
“
7.2.2 Run Pattern
Press “RUN” Key, it will appear
“Goto Track” in the top left of the
image, then input the Pattern No.,
Press “ Enter” key to confirming the
Run action.
- 14 -
IP CONTROL KEYBOARD