Embed Size (px)
Citation preview
IP Camera and Encoder Software ManualProducts: BLK-IPD101 BLK-IPD102 BLK-IPE101 BLK-IPS101 BLK-IPS102M
Pleasereadthismanualbeforeusingyourcameraorencoder,andalwaysfollowtheinstructionsforsafetyandproperuse.Savethismanualforfuturereference.
BLK-IPC-SW_SM

ii www.sc-black.com
LEGAL NOTICE
SCBlackisatrademarkofSupercircuits,Inc.
SupercircuitsproductsaredesignedtomeetsafetyandperformancestandardswiththeuseofspecificSupercircuitsauthorizedaccessories.Supercircuitsdisclaimsliabilityassociatedwiththeuseofnon-Supercircuitsauthorizedaccessories.
Therecording,transmission,orbroadcastofanyperson’svoicewithouttheirconsentoracourtorderisstrictlyprohibitedbylaw.
Supercircuitsmakesnorepresentationsconcerningthelegalityofcertainproductapplicationssuchasthemaking,transmission,orrecordingofvideoand/oraudiosignalsofotherswithouttheirknowledgeand/orconsent.Weencourageyoutocheckandcomplywithallapplicablelocal,state,andfederallawsandregulationsbeforeengaginginanyformofsurveillanceoranytransmissionofradiofrequencies.
Othertrademarksandtradenamesmaybeusedinthisdocumenttorefertoeithertheentitiesclaimingthemarksandnamesortheirproducts.Supercircuits,Inc.disclaimsanyproprietaryinterestintrademarksandtradenamesotherthanitsown.
NopartofthisdocumentmaybereproducedordistributedinanyformorbyanymeanswithouttheexpresswrittenpermissionofSupercircuits,Inc.
© 2010 Supercircuits, Inc. All rights reserved.11000N.MopacExpressway,Building300,Austin,TX78759Sales/Support:1.800.335.9777|Fax:1.866.267.9777
iiiIPCameraandEncoderSoftwareManual
Table of Contents
SECTION 1 Introduction. . . . . . . . . . . . . . . . . . . . . . . . . . . . . . . . . . . . . . . . . . . . . . . . . . . . . 11 .1. Getting.started. . . . . . . . . . . . . . . . . . . . . . . . . . . . . . . . . . . . . . . . . . . . . . . 1
1 .1 .1. Installing.the.IPAdmin.Tool.. . . . . . . . . . . . . . . . . . . . . . . . . . . . . . . . . 11 .1 .2. Changing.the.device.IP.address. . . . . . . . . . . . . . . . . . . . . . . . . . . . . . 2
SECTION 2 Using.the.Internet.Explorer.browser . . . . . . . . . . . . . . . . . . . . . . . . . . . . . . . . . . 42 .1. Recommended.PC.specification. . . . . . . . . . . . . . . . . . . . . . . . . . . . . . . . . . 42 .2. Accessing.your.device.with.IE. . . . . . . . . . . . . . . . . . . . . . . . . . . . . . . . . . . 4
2 .2 .1. Troubleshooting.no.video.problems. . . . . . . . . . . . . . . . . . . . . . . . . . . 52 .2 .2. VIEW.screen.OSD.debugging.aids. . . . . . . . . . . . . . . . . . . . . . . . . . . . 6
SECTION 3 SETUP.Configuration. . . . . . . . . . . . . . . . . . . . . . . . . . . . . . . . . . . . . . . . . . . . . 103 .1. Login. . . . . . . . . . . . . . . . . . . . . . . . . . . . . . . . . . . . . . . . . . . . . . . . . . . . . 10
3 .1 .1. Apply.and.Reset. . . . . . . . . . . . . . . . . . . . . . . . . . . . . . . . . . . . . . . . . 103 .2. Basic.Configuration. . . . . . . . . . . . . . . . . . . . . . . . . . . . . . . . . . . . . . . . . . 11
3 .2 .1. User.management. . . . . . . . . . . . . . . . . . . . . . . . . . . . . . . . . . . . . . . 113 .2 .2. Web.Server.configuration.. . . . . . . . . . . . . . . . . . . . . . . . . . . . . . . . . 143 .2 .3. .Date.&.Time.Setting. . . . . . . . . . . . . . . . . . . . . . . . . . . . . . . . . . . . . 15
3 .3. Video.&.Audio. . . . . . . . . . . . . . . . . . . . . . . . . . . . . . . . . . . . . . . . . . . . . . 163 .3 .1. Video-In. . . . . . . . . . . . . . . . . . . . . . . . . . . . . . . . . . . . . . . . . . . . . . . 163 .3 .2. .Burnt-in.Text. . . . . . . . . . . . . . . . . . . . . . . . . . . . . . . . . . . . . . . . . . . 183 .3 .3. Codec. . . . . . . . . . . . . . . . . . . . . . . . . . . . . . . . . . . . . . . . . . . . . . . . . 203 .3 .4. Audio. . . . . . . . . . . . . . . . . . . . . . . . . . . . . . . . . . . . . . . . . . . . . . . . . 213 .3 .5. SnapShot. . . . . . . . . . . . . . . . . . . . . . . . . . . . . . . . . . . . . . . . . . . . . . 23
3 .4. Event.Configuration. . . . . . . . . . . . . . . . . . . . . . . . . . . . . . . . . . . . . . . . . . 243 .4 .1. Configuring.Email.subscribers. . . . . . . . . . . . . . . . . . . . . . . . . . . . . . 263 .4 .2. Configuring.Multicast.subscribers. . . . . . . . . . . . . . . . . . . . . . . . . . . 273 .4 .3. Configuring.TCP.subscribers. . . . . . . . . . . . . . . . . . . . . . . . . . . . . . . 273 .4 .4. Configuring.HTTP.subscribers. . . . . . . . . . . . . . . . . . . . . . . . . . . . . . 283 .4 .5. Configuring.FTP.subscribers. . . . . . . . . . . . . . . . . . . . . . . . . . . . . . . 29
3 .5. System.Options. . . . . . . . . . . . . . . . . . . . . . . . . . . . . . . . . . . . . . . . . . . . . 293 .5 .1. TCP/IP.(DHCP,.Static.IP,.DNS.setting). . . . . . . . . . . . . . . . . . . . . . . . 293 .5 .2. NAT . . . . . . . . . . . . . . . . . . . . . . . . . . . . . . . . . . . . . . . . . . . . . . . . . . 313 .5 .3. NTP.. . . . . . . . . . . . . . . . . . . . . . . . . . . . . . . . . . . . . . . . . . . . . . . . . . 323 .5 .4. UPnP. . . . . . . . . . . . . . . . . . . . . . . . . . . . . . . . . . . . . . . . . . . . . . . . . 34
iv www.sc-black.com
3 .5 .5. USB/SD.Storage. . . . . . . . . . . . . . . . . . . . . . . . . . . . . . . . . . . . . . . . . 353 .5 .6. USB.Wireless.LAN. . . . . . . . . . . . . . . . . . . . . . . . . . . . . . . . . . . . . . . 363 .5 .7. RTSP/RTP . . . . . . . . . . . . . . . . . . . . . . . . . . . . . . . . . . . . . . . . . . . . . 393 .5 .8. mDNS . . . . . . . . . . . . . . . . . . . . . . . . . . . . . . . . . . . . . . . . . . . . . . . . 433 .5 .9. SMTP(email). . . . . . . . . . . . . . . . . . . . . . . . . . . . . . . . . . . . . . . . . . . 443 .5 .10. .AVI.File.Recorder . . . . . . . . . . . . . . . . . . . . . . . . . . . . . . . . . . . . . . . 453 .5 .11. LED.Setting . . . . . . . . . . . . . . . . . . . . . . . . . . . . . . . . . . . . . . . . . . . . 503 .5 .12. DDNS. . . . . . . . . . . . . . . . . . . . . . . . . . . . . . . . . . . . . . . . . . . . . . . . . 52
3 .6. IO.Configuration. . . . . . . . . . . . . . . . . . . . . . . . . . . . . . . . . . . . . . . . . . . . . 533 .6 .1. DI/DO. . . . . . . . . . . . . . . . . . . . . . . . . . . . . . . . . . . . . . . . . . . . . . . . . 533 .6 .2. UART. . . . . . . . . . . . . . . . . . . . . . . . . . . . . . . . . . . . . . . . . . . . . . . . . 55
3 .7. Maintenance. . . . . . . . . . . . . . . . . . . . . . . . . . . . . . . . . . . . . . . . . . . . . . . . 583 .7 .1. Firmware.Update. . . . . . . . . . . . . . . . . . . . . . . . . . . . . . . . . . . . . . . . 583 .7 .2. .System.Log. . . . . . . . . . . . . . . . . . . . . . . . . . . . . . . . . . . . . . . . . . . . 583 .7 .3. Webpage.option.for.VCA. . . . . . . . . . . . . . . . . . . . . . . . . . . . . . . . . . 59
3 .8. VCA. . . . . . . . . . . . . . . . . . . . . . . . . . . . . . . . . . . . . . . . . . . . . . . . . . . . . . 593 .9. Motion.Detect . . . . . . . . . . . . . . . . . . . . . . . . . . . . . . . . . . . . . . . . . . . . . . 59
3 .9 .1. Zones.and.Rules . . . . . . . . . . . . . . . . . . . . . . . . . . . . . . . . . . . . . . . . 603 .10.About. . . . . . . . . . . . . . . . . . . . . . . . . . . . . . . . . . . . . . . . . . . . . . . . . . . . . 62
3 .10 .1. Version. . . . . . . . . . . . . . . . . . . . . . . . . . . . . . . . . . . . . . . . . . . . . . . . 623 .10 .2. Licenses. . . . . . . . . . . . . . . . . . . . . . . . . . . . . . . . . . . . . . . . . . . . . . . 62
SECTION 4 Safety.Mode. . . . . . . . . . . . . . . . . . . . . . . . . . . . . . . . . . . . . . . . . . . . . . . . . . . . 644 .1. Safety.Mode. . . . . . . . . . . . . . . . . . . . . . . . . . . . . . . . . . . . . . . . . . . . . . . . 644 .2. Causes.of.Safety.Mode . . . . . . . . . . . . . . . . . . . . . . . . . . . . . . . . . . . . . . . 644 .3. Recovering.from.Safety.Mode?. . . . . . . . . . . . . . . . . . . . . . . . . . . . . . . . . 644 .4. Limited.functions.under.Safety.Mode . . . . . . . . . . . . . . . . . . . . . . . . . . . . 65
SECTION 5 Reference.to.Models.. . . . . . . . . . . . . . . . . . . . . . . . . . . . . . . . . . . . . . . . . . . . . 665 .1. BLK-IPD101. . . . . . . . . . . . . . . . . . . . . . . . . . . . . . . . . . . . . . . . . . . . . . . . 665 .2. BLK-IPD102. . . . . . . . . . . . . . . . . . . . . . . . . . . . . . . . . . . . . . . . . . . . . . . . 685 .3. BLK-IPS101. . . . . . . . . . . . . . . . . . . . . . . . . . . . . . . . . . . . . . . . . . . . . . . . 705 .4. BLK-IPS102M . . . . . . . . . . . . . . . . . . . . . . . . . . . . . . . . . . . . . . . . . . . . . . 73
1IPCameraandEncoderSoftwareManual
SECTION 1: INTRODUCTION
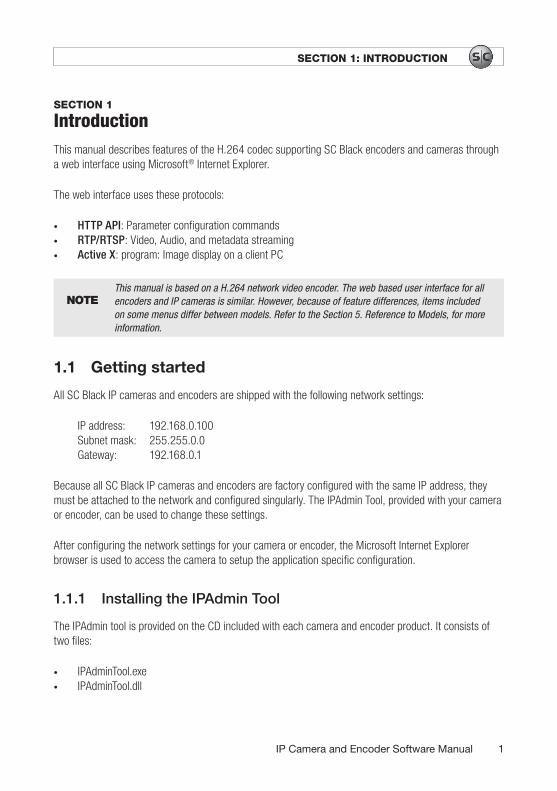
SECTION 1 IntroductionThis manual describes features of the H.264 codec supporting SC Black encoders and cameras through a web interface using Microsoft® Internet Explorer.
The web interface uses these protocols:
• HTTP API: Parameter configuration commands• RTP/RTSP: Video, Audio, and metadata streaming• Active X: program: Image display on a client PC
NOTEThis manual is based on a H.264 network video encoder. The web based user interface for all encoders and IP cameras is similar. However, because of feature differences, items included on some menus differ between models. Refer to the Section 5. Reference to Models, for more information.
1.1 Getting started
All SC Black IP cameras and encoders are shipped with the following network settings:
IP address: 192.168.0.100 Subnet mask: 255.255.0.0 Gateway: 192.168.0.1
Because all SC Black IP cameras and encoders are factory configured with the same IP address, they must be attached to the network and configured singularly. The IPAdmin Tool, provided with your camera or encoder, can be used to change these settings.
After configuring the network settings for your camera or encoder, the Microsoft Internet Explorer browser is used to access the camera to setup the application specific configuration.
1.1.1 InstallingtheIPAdminTool
The IPAdmin tool is provided on the CD included with each camera and encoder product. It consists of two files:
• IPAdminTool.exe• IPAdminTool.dll
2 www.sc-black.com
SECTION 2: INSTALLATION AND SETUP
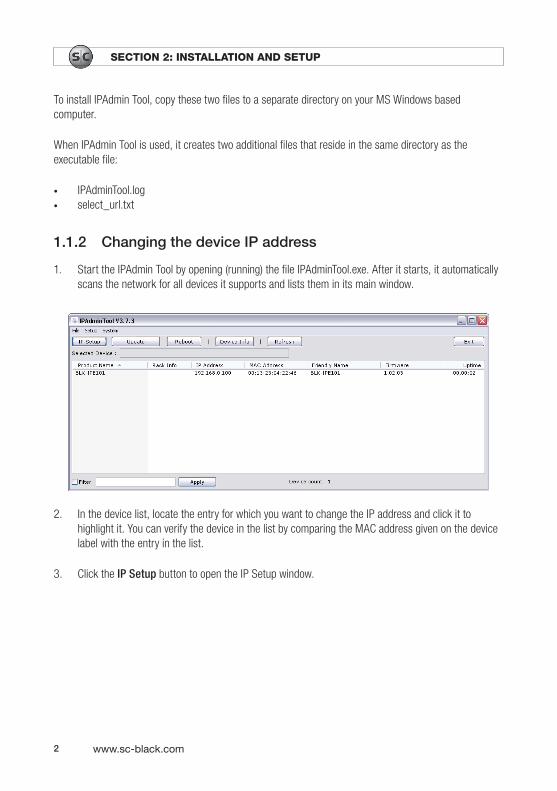
To install IPAdmin Tool, copy these two files to a separate directory on your MS Windows based computer.
When IPAdmin Tool is used, it creates two additional files that reside in the same directory as the executable file:
• IPAdminTool.log• select_url.txt
1.1.2 ChangingthedeviceIPaddress
1. Start the IPAdmin Tool by opening (running) the file IPAdminTool.exe. After it starts, it automatically scans the network for all devices it supports and lists them in its main window.
2. In the device list, locate the entry for which you want to change the IP address and click it to highlight it. You can verify the device in the list by comparing the MAC address given on the device label with the entry in the list.
3. Click the IP Setup button to open the IP Setup window.
3IPCameraandEncoderSoftwareManual
SECTION 1: INTRODUCTION
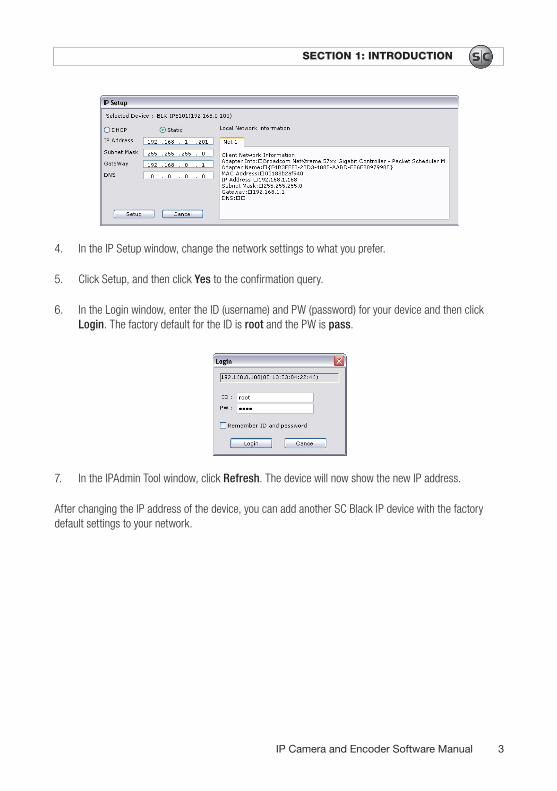
4. In the IP Setup window, change the network settings to what you prefer.
5. Click Setup, and then click Yes to the confirmation query.
6. In the Login window, enter the ID (username) and PW (password) for your device and then click Login. The factory default for the ID is root and the PW is pass.
7. In the IPAdmin Tool window, click Refresh. The device will now show the new IP address.
After changing the IP address of the device, you can add another SC Black IP device with the factory default settings to your network.
4 www.sc-black.com
SECTION 2: USING THE INTERNET EXPLORER BROWSER
SECTION 2 Using the Internet Explorer browser
2.1 Recommended PC specification
The following table specifies the minimum and recommended requirement of the PC system to use with the Internet Explorer (IE) browser for SC Black IP cameras and encoders.
Table 1. Recommended PC Specifications
Minimum Recommended
Mainboard/chipset Intel® 865 Intel 945P
CPU P4 3.0GHz Intel Core™ 2 Duo E4300
RAM 512MB 1GB
VGA
D3D support D3D support
Nvidia®, ATI™, Intel built-in graphic ATI Radeon™ Series, Nvidia GeForce® Series
Memory: 64 MB Memory: 128 MB
OS Windows® 98, ME, 2000, XP, Vista Windows XP SP2 or higher
DirectX® 9.0 9.0
2.2 Accessing your device with IE
View video from your camera or encoder and configure settings using IE:
1. Open IE and enter the URL: http://<IP address> where <IP address> is the address of your device.
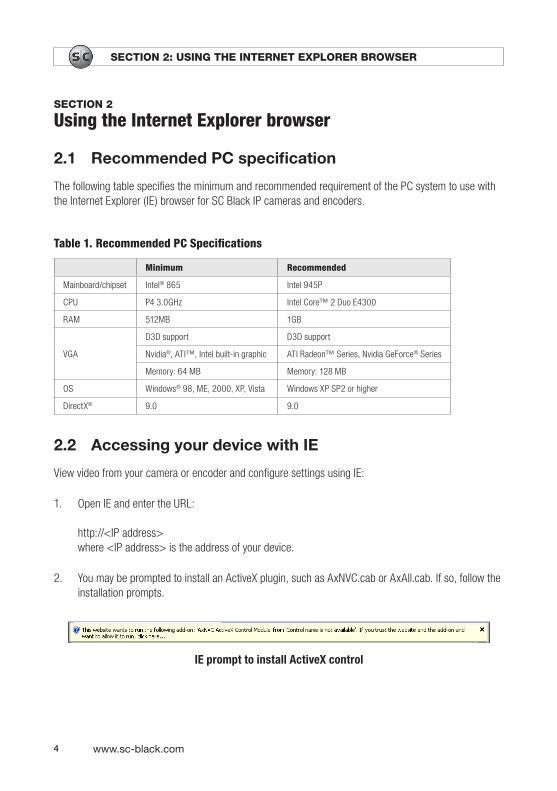
2. You may be prompted to install an ActiveX plugin, such as AxNVC.cab or AxAll.cab. If so, follow the installation prompts.
IE prompt to install ActiveX control
5IPCameraandEncoderSoftwareManual
SECTION 2: USING THE INTERNET EXPLORER BROWSER
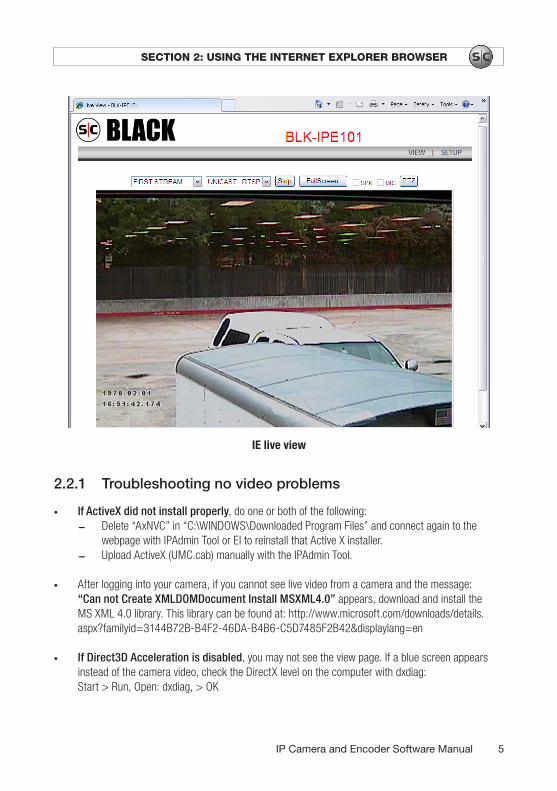
IE live view
2.2.1 Troubleshootingnovideoproblems
• If ActiveX did not install properly, do one or both of the following: — Delete “AxNVC” in “C:\WINDOWS\Downloaded Program Files” and connect again to the
webpage with IPAdmin Tool or EI to reinstall that Active X installer. — Upload ActiveX (UMC.cab) manually with the IPAdmin Tool.
• After logging into your camera, if you cannot see live video from a camera and the message: “Can not Create XMLDOMDocument Install MSXML4.0” appears, download and install the MS XML 4.0 library. This library can be found at: http://www.microsoft.com/downloads/details.aspx?familyid=3144B72B-B4F2-46DA-B4B6-C5D7485F2B42&displaylang=en
• If Direct3D Acceleration is disabled, you may not see the view page. If a blue screen appears instead of the camera video, check the DirectX level on the computer with dxdiag: Start > Run, Open: dxdiag, > OK
6 www.sc-black.com
SECTION 2: USING THE INTERNET EXPLORER BROWSER
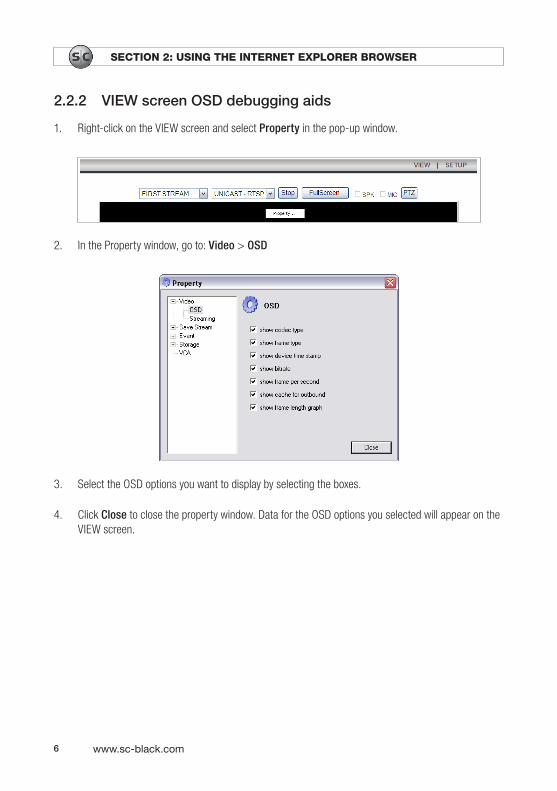
2.2.2 VIEWscreenOSDdebuggingaids
1. Right-click on the VIEW screen and select Property in the pop-up window.
2. In the Property window, go to: Video > OSD
3. Select the OSD options you want to display by selecting the boxes.
4. Click Close to close the property window. Data for the OSD options you selected will appear on the VIEW screen.
7IPCameraandEncoderSoftwareManual
SECTION 2: USING THE INTERNET EXPLORER BROWSER
A CB
H
GFED
J
I
K
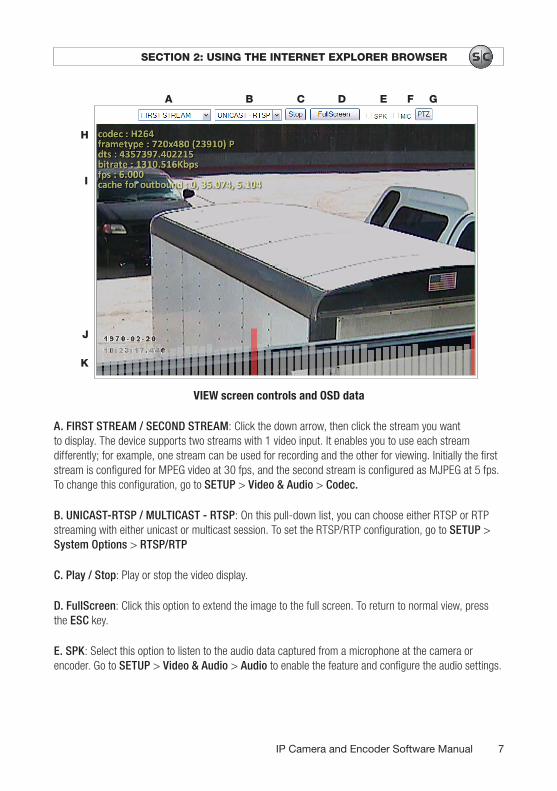
VIEW screen controls and OSD data
A. FIRST STREAM / SECOND STREAM: Click the down arrow, then click the stream you want to display. The device supports two streams with 1 video input. It enables you to use each stream differently; for example, one stream can be used for recording and the other for viewing. Initially the first stream is configured for MPEG video at 30 fps, and the second stream is configured as MJPEG at 5 fps. To change this configuration, go to SETUP > Video & Audio > Codec.
B. UNICAST-RTSP / MULTICAST - RTSP: On this pull-down list, you can choose either RTSP or RTP streaming with either unicast or multicast session. To set the RTSP/RTP configuration, go to SETUP > System Options > RTSP/RTP
C. Play / Stop: Play or stop the video display.
D. FullScreen: Click this option to extend the image to the full screen. To return to normal view, press the ESC key.
E. SPK: Select this option to listen to the audio data captured from a microphone at the camera or encoder. Go to SETUP > Video & Audio > Audio to enable the feature and configure the audio settings.
8 www.sc-black.com
SECTION 2: USING THE INTERNET EXPLORER BROWSER
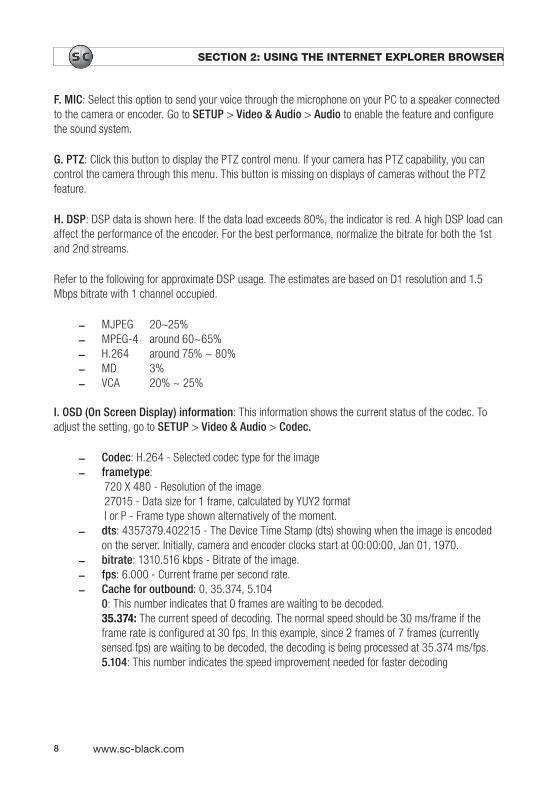
F. MIC: Select this option to send your voice through the microphone on your PC to a speaker connected to the camera or encoder. Go to SETUP > Video & Audio > Audio to enable the feature and configure the sound system.
G. PTZ: Click this button to display the PTZ control menu. If your camera has PTZ capability, you can control the camera through this menu. This button is missing on displays of cameras without the PTZ feature.
H. DSP: DSP data is shown here. If the data load exceeds 80%, the indicator is red. A high DSP load can affect the performance of the encoder. For the best performance, normalize the bitrate for both the 1st and 2nd streams.
Refer to the following for approximate DSP usage. The estimates are based on D1 resolution and 1.5 Mbps bitrate with 1 channel occupied.
— MJPEG 20~25% — MPEG-4 around 60~65% — H.264 around 75% ~ 80% — MD 3% — VCA 20% ~ 25%
I. OSD (On Screen Display) information: This information shows the current status of the codec. To adjust the setting, go to SETUP > Video & Audio > Codec.
— Codec: H.264 - Selected codec type for the image — frametype:
720 X 480 - Resolution of the image 27015 - Data size for 1 frame, calculated by YUY2 format I or P - Frame type shown alternatively of the moment.
— dts: 4357379.402215 - The Device Time Stamp (dts) showing when the image is encoded on the server. Initially, camera and encoder clocks start at 00:00:00, Jan 01, 1970.
— bitrate: 1310.516 kbps - Bitrate of the image. — fps: 6.000 - Current frame per second rate. — Cache for outbound: 0, 35.374, 5.104
0: This number indicates that 0 frames are waiting to be decoded.35.374: The current speed of decoding. The normal speed should be 30 ms/frame if the frame rate is configured at 30 fps. In this example, since 2 frames of 7 frames (currently sensed fps) are waiting to be decoded, the decoding is being processed at 35.374 ms/fps. 5.104: This number indicates the speed improvement needed for faster decoding

9IPCameraandEncoderSoftwareManual
SECTION 2: USING THE INTERNET EXPLORER BROWSER
NOTE dts and cache for outbound data are not adjustable.
J. Date and time (Burnt-in Text): The device date and time are shown on the image by a burnt-in process in the device server. This data is created before the compression of the image and is transmitted to the client PC to prevent time data from being modified.
K. Show frame length graph: This graph displays the frame length measured over time. It scrolls along the bottom image screen.
10 www.sc-black.com
SECTION 3: SETUP CONFIGURATION
SECTION 3 SETUP ConfigurationTo configure the device, click SETUP on the VIEW page. You must log in with Operator or Administrator account privileges to change settings.
3.1 Login
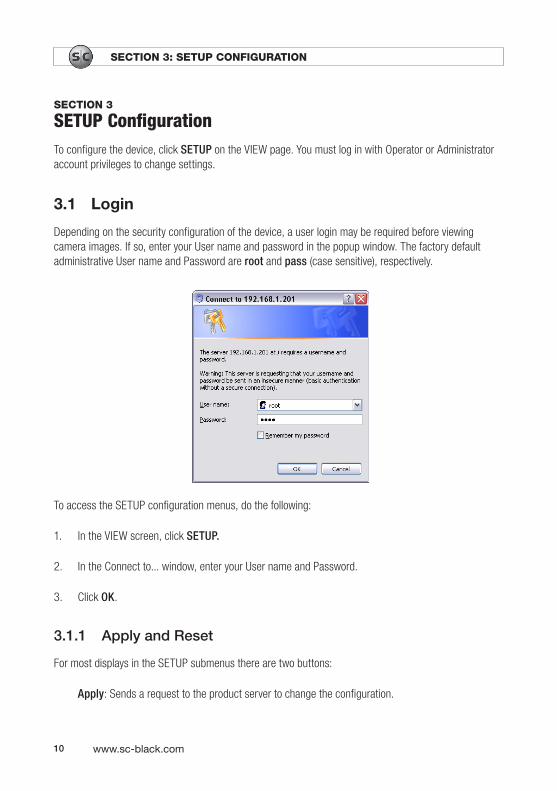
Depending on the security configuration of the device, a user login may be required before viewing camera images. If so, enter your User name and password in the popup window. The factory default administrative User name and Password are root and pass (case sensitive), respectively.
To access the SETUP configuration menus, do the following:
1. In the VIEW screen, click SETUP.
2. In the Connect to... window, enter your User name and Password.
3. Click OK.
3.1.1 ApplyandReset
For most displays in the SETUP submenus there are two buttons:
Apply: Sends a request to the product server to change the configuration.
11IPCameraandEncoderSoftwareManual
SECTION 3: SETUP CONFIGURATION
Reset: Display the current configuration.
3.2 Basic Configuration
Through menus in this category you can setup Users, the Web Server, and the Date and Time configuration. These settings require Administrator access privileges.
3.2.1 Usermanagement
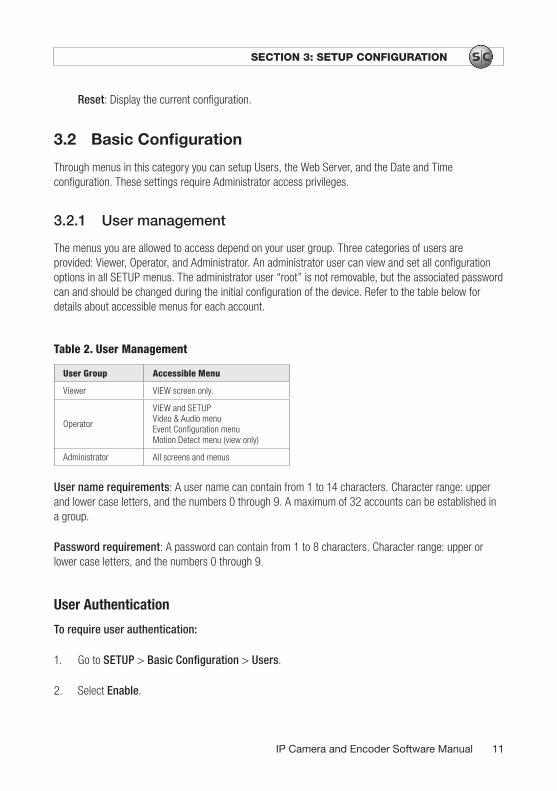
The menus you are allowed to access depend on your user group. Three categories of users are provided: Viewer, Operator, and Administrator. An administrator user can view and set all configuration options in all SETUP menus. The administrator user “root” is not removable, but the associated password can and should be changed during the initial configuration of the device. Refer to the table below for details about accessible menus for each account.
Table 2. User Management
User Group Accessible Menu
Viewer VIEW screen only.
Operator
VIEW and SETUP Video & Audio menu Event Configuration menu Motion Detect menu (view only)
Administrator All screens and menus
User name requirements: A user name can contain from 1 to 14 characters. Character range: upper and lower case letters, and the numbers 0 through 9. A maximum of 32 accounts can be established in a group.
Password requirement: A password can contain from 1 to 8 characters. Character range: upper or lower case letters, and the numbers 0 through 9.
User Authentication
To require user authentication:
1. Go to SETUP > Basic Configuration > Users.
2. Select Enable.
12 www.sc-black.com12
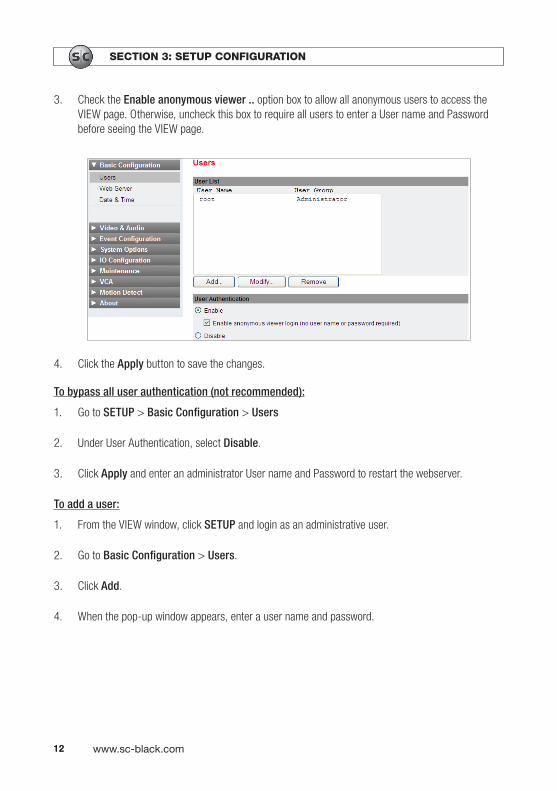
3. Check the Enable anonymous viewer .. option box to allow all anonymous users to access the VIEW page. Otherwise, uncheck this box to require all users to enter a User name and Password before seeing the VIEW page.
4. Click the Apply button to save the changes.
To bypass all user authentication (not recommended):
1. Go to SETUP > Basic Configuration > Users
2. Under User Authentication, select Disable.
3. Click Apply and enter an administrator User name and Password to restart the webserver.
To add a user:
1. From the VIEW window, click SETUP and login as an administrative user.
2. Go to Basic Configuration > Users.
3. Click Add.
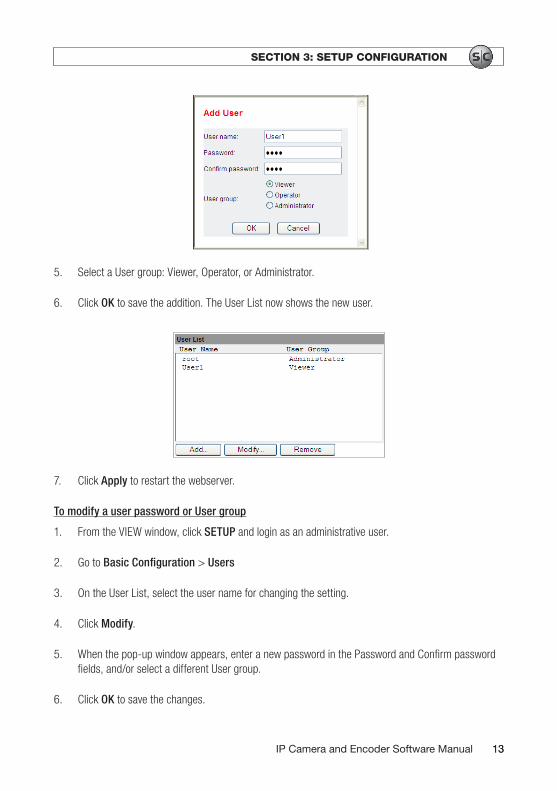
4. When the pop-up window appears, enter a user name and password.
SECTION 3: SETUP CONFIGURATION
13IPCameraandEncoderSoftwareManual
SECTION 3: SETUP CONFIGURATION
13
5. Select a User group: Viewer, Operator, or Administrator.
6. Click OK to save the addition. The User List now shows the new user.
7. Click Apply to restart the webserver.
To modify a user password or User group
1. From the VIEW window, click SETUP and login as an administrative user.
2. Go to Basic Configuration > Users
3. On the User List, select the user name for changing the setting.
4. Click Modify.
5. When the pop-up window appears, enter a new password in the Password and Confirm password fields, and/or select a different User group.
6. Click OK to save the changes.
14 www.sc-black.com
SECTION 3: SETUP CONFIGURATION
14
7. Click Apply to restart the webserver.
NOTE A user name, except for the “root” user, cannot be changed, but can be deleted.
To remove a user from the User List1. From the VIEW window, click SETUP and login as an administrative user.
2. Go to Basic Configuration > Users.
3. On the User List, click the User Name you want to remove to highlight it.
4. Click Remove.
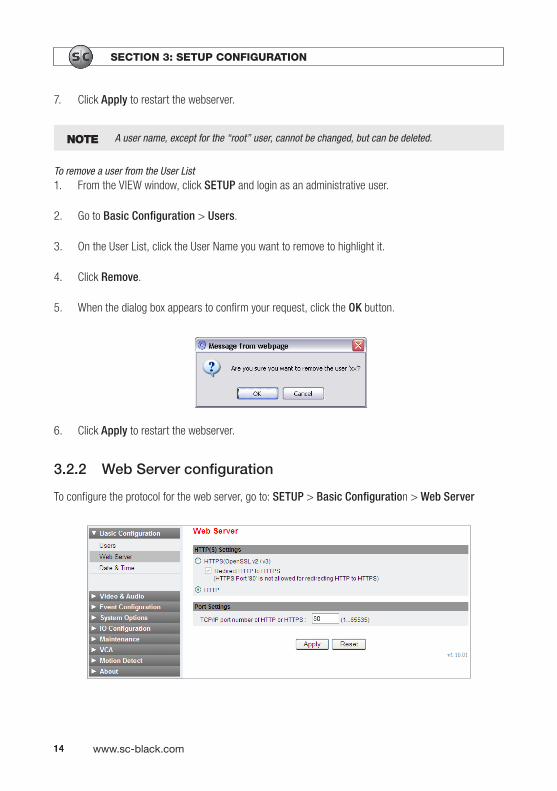
5. When the dialog box appears to confirm your request, click the OK button.
6. Click Apply to restart the webserver.
3.2.2 WebServerconfiguration
To configure the protocol for the web server, go to: SETUP > Basic Configuration > Web Server
15IPCameraandEncoderSoftwareManual
SECTION 3: SETUP CONFIGURATION
15
Although the default setting for SC Black devices is HTTP, selecting HTTPS is highly recommended for security. SC Black devices use OpenSSL.
What is SSL?SSL, Secure Socket Layer, protects the web server content and the video and audio data by using encryption when transferring files to and from the server. When you use HTTPS for communication with server, an SSL certificate, containing encryption keys, is used to encrypt/decrypt data during online transactions.
Setting the port number of web server
To communicate with a server by HTTP or HTTPS with TCP/IP, the port number can be fixed between 1 and 65535. The factory default TCP/IP port for HTTPS is 443; the default port for HTTP is 80.
When using HTTPS, do not use port 80. Otherwise, port conflicts may occur.
3.2.3 Date&TimeSetting
The device clock is used to timestamp log entries and can be burnt into to video images. Since log entries and video provide a record of events, it is extremely important that the device clock be set correctly. When the device clock setting is changed, the web server is restarted.
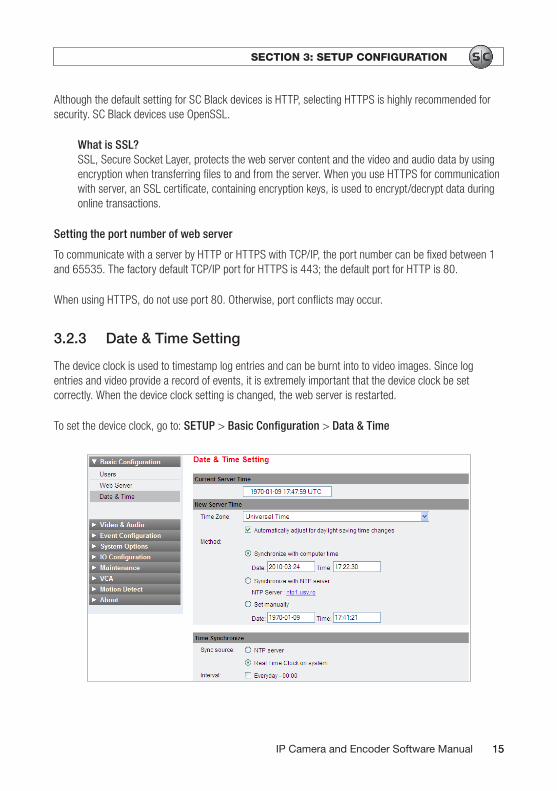
To set the device clock, go to: SETUP > Basic Configuration > Data & Time

16 www.sc-black.com
SECTION 3: SETUP CONFIGURATION
16
Current Server Time: The Current Server Time field shows the current server time.
New Server Time: Time zone: Choose a time zone from the drop-down list. If you check the ‘Automatically adjust for daylight saving time changes,’ daylight saving time is applied according to your time zone setting.
New Server Time – Method: Select one of 3 options:
• Synchronize the clock in your PC • Synchronize with NTP server - with this option you can choose up to four NTP servers from which
the device will synchronize its clock• Set the server time manually
Time synchronization
NTP server: Server time is synchronized with an NTP server. You can specify up to four NTP Servers at: SETUP > System Options > NTP, or click the server URL shown in the frame.
Real Time Clock on system: Server time is synchronized with the Real-time clock in the server. The clock is embedded in the device and is recharged when the server is started.
Interval of synchronization
• Everyday 00:00: When enabled, synchronizes the device clock at every midnight• Disabled: Synchronizes only when the device is rebooted (factory default)
3.3 Video & Audio
Through this menu you can set up the Video-in, Burnt-in Text, Codec, Audio, and Snapshot configuration. These settings require operator or administrator access privilege. To change the setting for video input, burnt-in text, audio, and snapshot, go to: SETUP > Video & Audio
3.3.1 Video-In
NOTE This section describes video input settings based on the H.264 video encoder. If you are configuring a different device, see Section 5.
When you select Video-In from the Video & Audio menu, the Video Input Setting page is displayed. The Video Input Setting page provides options to:
• Name a channel for the camera• Select the standard format for video• Activate the deinterlacing algorithm
17IPCameraandEncoderSoftwareManual
SECTION 3: SETUP CONFIGURATION
17
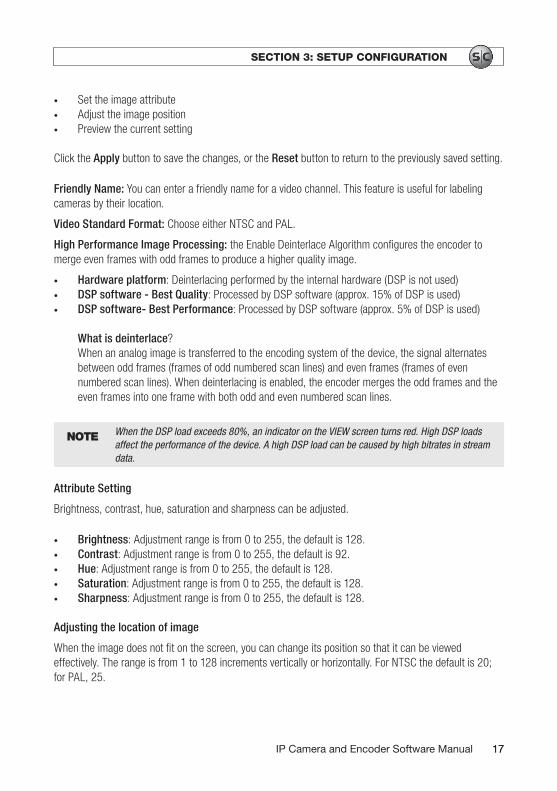
• Set the image attribute• Adjust the image position• Preview the current setting
Click the Apply button to save the changes, or the Reset button to return to the previously saved setting.
Friendly Name: You can enter a friendly name for a video channel. This feature is useful for labeling cameras by their location.
Video Standard Format: Choose either NTSC and PAL.
High Performance Image Processing: the Enable Deinterlace Algorithm configures the encoder to merge even frames with odd frames to produce a higher quality image.
• Hardware platform: Deinterlacing performed by the internal hardware (DSP is not used)• DSP software - Best Quality: Processed by DSP software (approx. 15% of DSP is used)• DSP software- Best Performance: Processed by DSP software (approx. 5% of DSP is used)
What is deinterlace?When an analog image is transferred to the encoding system of the device, the signal alternates between odd frames (frames of odd numbered scan lines) and even frames (frames of even numbered scan lines). When deinterlacing is enabled, the encoder merges the odd frames and the even frames into one frame with both odd and even numbered scan lines.
NOTE When the DSP load exceeds 80%, an indicator on the VIEW screen turns red. High DSP loads affect the performance of the device. A high DSP load can be caused by high bitrates in stream data.
Attribute Setting
Brightness, contrast, hue, saturation and sharpness can be adjusted.
• Brightness: Adjustment range is from 0 to 255, the default is 128.• Contrast: Adjustment range is from 0 to 255, the default is 92.• Hue: Adjustment range is from 0 to 255, the default is 128.• Saturation: Adjustment range is from 0 to 255, the default is 128.• Sharpness: Adjustment range is from 0 to 255, the default is 128.
Adjusting the location of image
When the image does not fit on the screen, you can change its position so that it can be viewed effectively. The range is from 1 to 128 increments vertically or horizontally. For NTSC the default is 20; for PAL, 25.
18 www.sc-black.com
SECTION 3: SETUP CONFIGURATION
18
Using PREVIEW button
PREVIEW opens a separate window displaying video from the camera. This feature allows you to make image adjustments in the Video-In menu without returning to the VIEW screen to observe the effect.
3.3.2 Burnt-inText
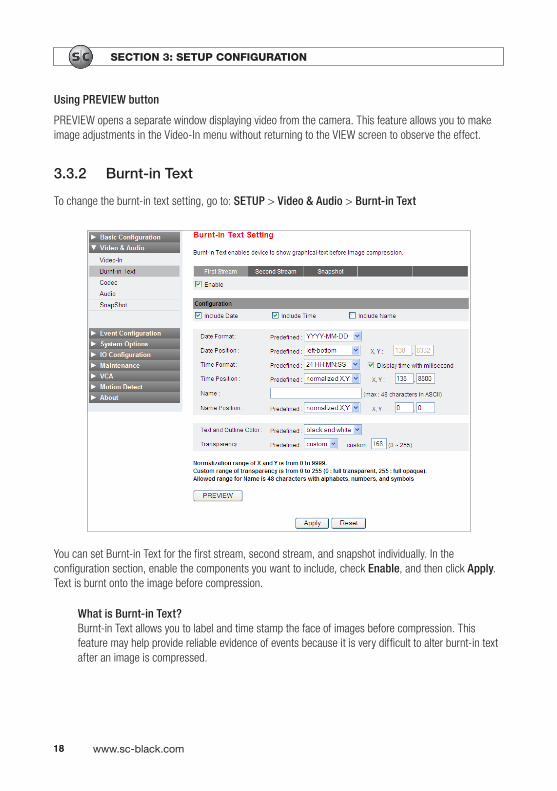
To change the burnt-in text setting, go to: SETUP > Video & Audio > Burnt-in Text
You can set Burnt-in Text for the first stream, second stream, and snapshot individually. In the configuration section, enable the components you want to include, check Enable, and then click Apply. Text is burnt onto the image before compression.
What is Burnt-in Text?Burnt-in Text allows you to label and time stamp the face of images before compression. This feature may help provide reliable evidence of events because it is very difficult to alter burnt-in text after an image is compressed.
19IPCameraandEncoderSoftwareManual
SECTION 3: SETUP CONFIGURATION
19
Configuration: Check or uncheck the data you want to include.
NOTE When you set the position of date, time and text, it’s recommended to use “normalized X, Y” positioning instead of left-top, left-bottom, right-top, right-bottom. The left-top, etc, positioning may cause an overlap of text.
Date format: Choose the format of the year, month and day. Options include:
YYYY-MM-DD or DD-MM-YYYY
Date position: Fix the position to apply the date. Options include:
normalized X,Y, left-top, left-bottom, right-top, or right-bottom
Time format: Choose the format of the time. Options include:
24 HH:MN:SS or 12 HH:MN:SS
Time position: Fix the position to apply the time. Options include:
Normalized X,Y / left-top / left-bottom / right-top / right-bottom
Name: Enter the text you want burn on. Name can include up to 48 characters using alphabet characters, numbers, and symbols.
Name position: Fix the position to display the name. Predefined options include:
normalized X,Y, left-top, left-bottom, right-top, or right-bottom
Text and Outline Color: Choose the color of the text. Options include:
white and black or black and white
Transparency
Choose the text transparency. Options include:
custom (0 ~ 255), 0%, 25%, 50%, 75%
PREVIEW
Click PREVIEW (after Apply) to see the image with the selected burnt-in text options.
20 www.sc-black.com
SECTION 3: SETUP CONFIGURATION
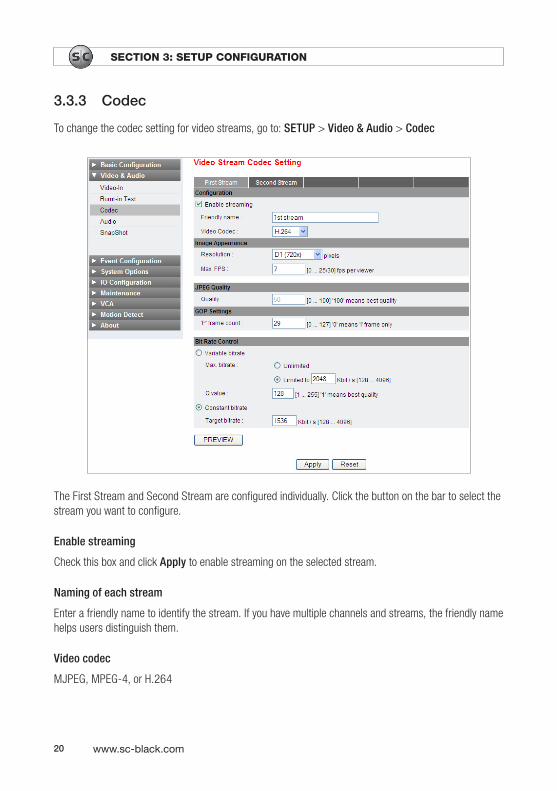
3.3.3 Codec
To change the codec setting for video streams, go to: SETUP > Video & Audio > Codec
The First Stream and Second Stream are configured individually. Click the button on the bar to select the stream you want to configure.
Enable streaming
Check this box and click Apply to enable streaming on the selected stream.
Naming of each stream
Enter a friendly name to identify the stream. If you have multiple channels and streams, the friendly name helps users distinguish them.
Video codec
MJPEG, MPEG-4, or H.264
21IPCameraandEncoderSoftwareManual
SECTION 3: SETUP CONFIGURATION
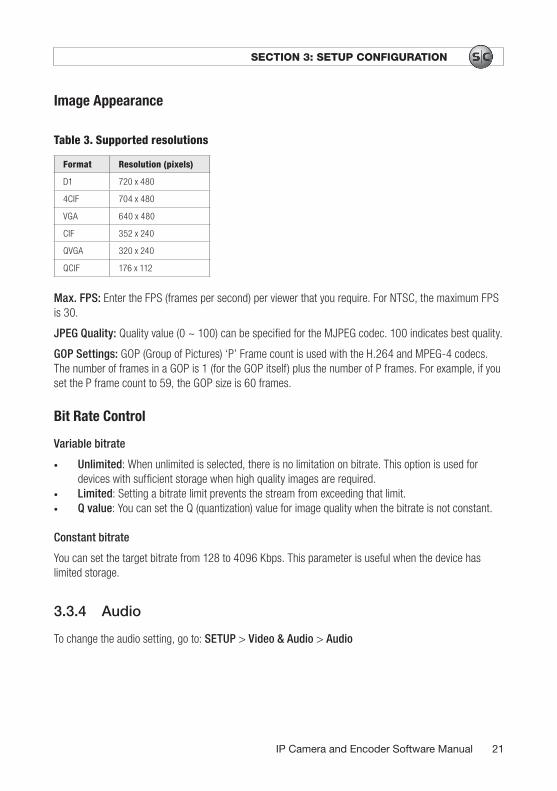
Image Appearance
Table 3. Supported resolutions
Format Resolution (pixels)
D1 720 x 480
4CIF 704 x 480
VGA 640 x 480
CIF 352 x 240
QVGA 320 x 240
QCIF 176 x 112
Max. FPS: Enter the FPS (frames per second) per viewer that you require. For NTSC, the maximum FPS is 30.
JPEG Quality: Quality value (0 ~ 100) can be specified for the MJPEG codec. 100 indicates best quality.
GOP Settings: GOP (Group of Pictures) ‘P’ Frame count is used with the H.264 and MPEG-4 codecs. The number of frames in a GOP is 1 (for the GOP itself) plus the number of P frames. For example, if you set the P frame count to 59, the GOP size is 60 frames.
Bit Rate Control
Variable bitrate
• Unlimited: When unlimited is selected, there is no limitation on bitrate. This option is used for devices with sufficient storage when high quality images are required.
• Limited: Setting a bitrate limit prevents the stream from exceeding that limit. • Q value: You can set the Q (quantization) value for image quality when the bitrate is not constant.
Constant bitrate
You can set the target bitrate from 128 to 4096 Kbps. This parameter is useful when the device has limited storage.
3.3.4 Audio
To change the audio setting, go to: SETUP > Video & Audio > Audio
22 www.sc-black.com
SECTION 3: SETUP CONFIGURATION
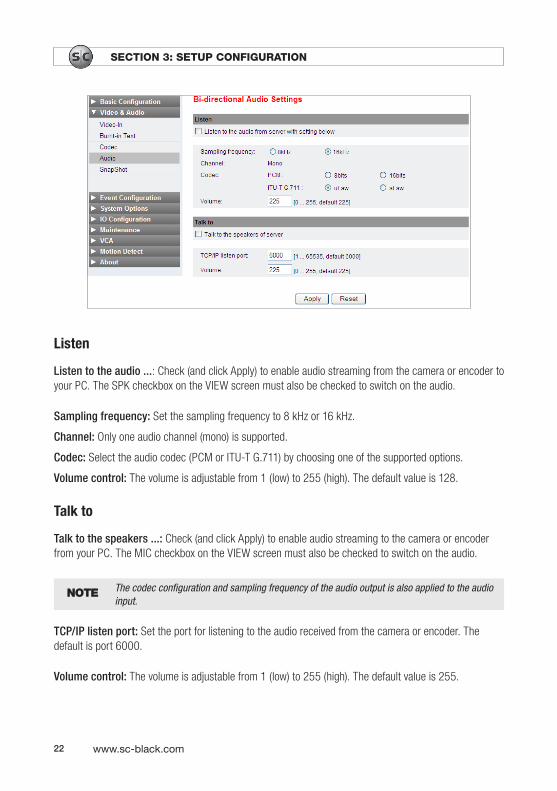
Listen
Listen to the audio ...: Check (and click Apply) to enable audio streaming from the camera or encoder to your PC. The SPK checkbox on the VIEW screen must also be checked to switch on the audio.
Sampling frequency: Set the sampling frequency to 8 kHz or 16 kHz.
Channel: Only one audio channel (mono) is supported.
Codec: Select the audio codec (PCM or ITU-T G.711) by choosing one of the supported options.
Volume control: The volume is adjustable from 1 (low) to 255 (high). The default value is 128.
Talk to
Talk to the speakers ...: Check (and click Apply) to enable audio streaming to the camera or encoder from your PC. The MIC checkbox on the VIEW screen must also be checked to switch on the audio.
NOTE The codec configuration and sampling frequency of the audio output is also applied to the audio input.
TCP/IP listen port: Set the port for listening to the audio received from the camera or encoder. The default is port 6000.
Volume control: The volume is adjustable from 1 (low) to 255 (high). The default value is 255.
23IPCameraandEncoderSoftwareManual
SECTION 3: SETUP CONFIGURATION
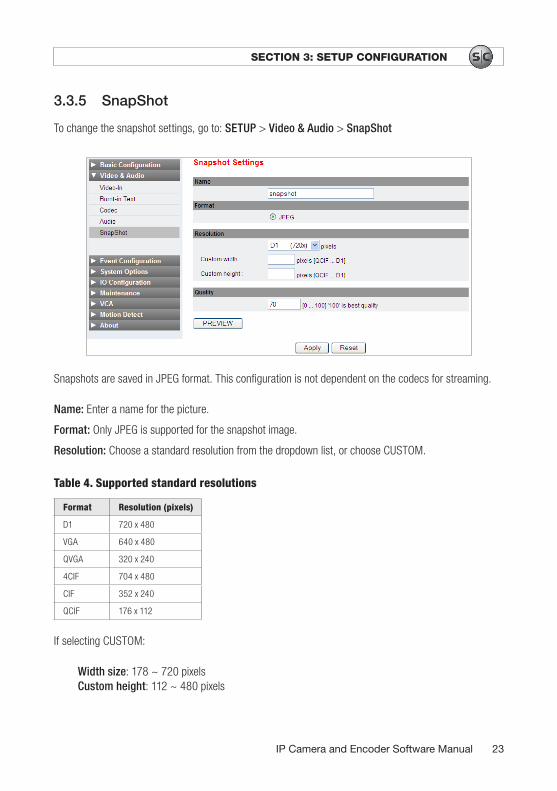
3.3.5 SnapShot
To change the snapshot settings, go to: SETUP > Video & Audio > SnapShot
Snapshots are saved in JPEG format. This configuration is not dependent on the codecs for streaming.
Name: Enter a name for the picture.
Format: Only JPEG is supported for the snapshot image.
Resolution: Choose a standard resolution from the dropdown list, or choose CUSTOM.
Table 4. Supported standard resolutions
Format Resolution (pixels)
D1 720 x 480
VGA 640 x 480
QVGA 320 x 240
4CIF 704 x 480
CIF 352 x 240
QCIF 176 x 112
If selecting CUSTOM:
Width size: 178 ~ 720 pixelsCustom height: 112 ~ 480 pixels
24 www.sc-black.com
SECTION 3: SETUP CONFIGURATION
Quality: Specify the quality measure of the SnapShot image (0 - 100).
PREVIEW: Click PREVIEW to see the captured image with the current settings.
Saving the snapshot
With the PREVIEW image window open, right-click on the image and select Save picture as… to save that image on your local PC.
3.4 Event Configuration
NOTE This Event setting page is based on the H.264 video encoder. If you are configuring a different device, see Section 5.
SC Black cameras and encoders are equipped with an event server program. This program enables you to configure event publishers and subscribers. DI, DO, Video loss, Motion Detection, VCA (Video Content Analysis), Network loss, IP change, and health of network server can publish event messages when an event occurs. These settings require operator or administrator access privilege.
Table 5. Publishers and supported subscribers
Publishers Subscribers
DI DO, Email, Multicast, TCP, HTTP, FTP
DO Email, Multicast, TCP, HTTP, FTP
Video Email, Multicast, TCP, HTTP,
Motion Detection Email, Multicast, TCP, HTTP, FTP
VCA DO, Email, Multicast, TCP, FTP
Network Email, Multicast, TCP
Health Multicast, TCP
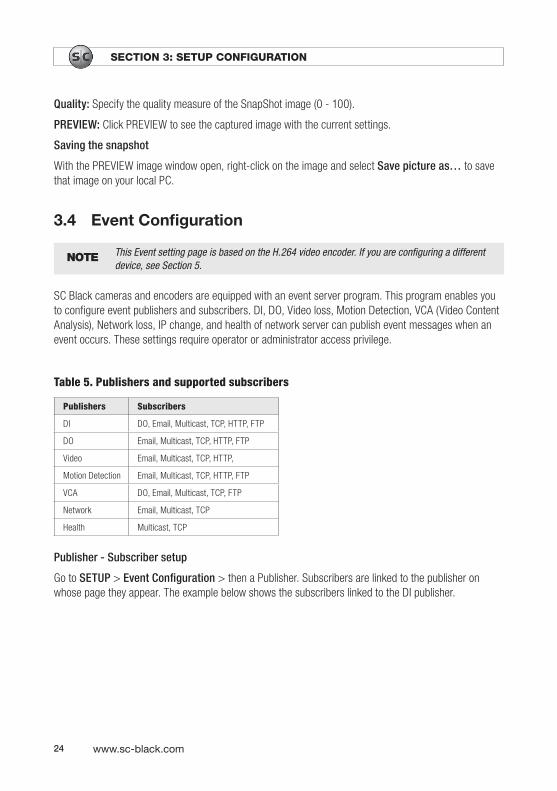
Publisher - Subscriber setup
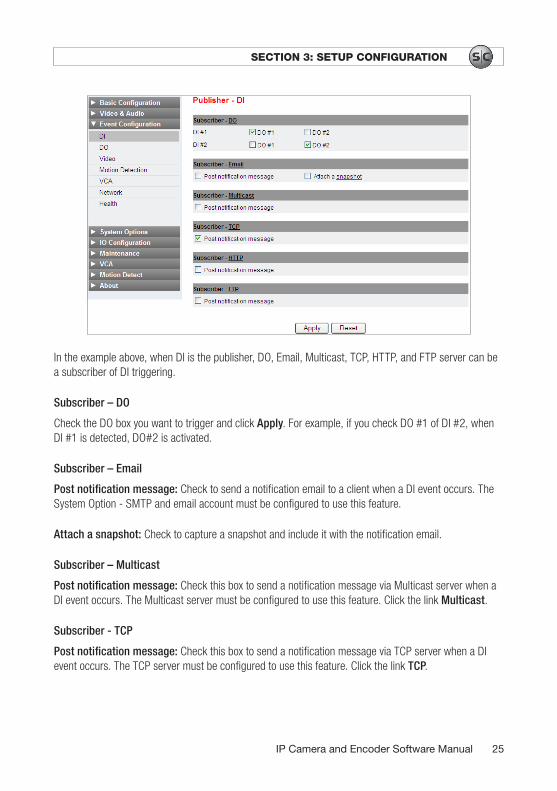
Go to SETUP > Event Configuration > then a Publisher. Subscribers are linked to the publisher on whose page they appear. The example below shows the subscribers linked to the DI publisher.
25IPCameraandEncoderSoftwareManual
SECTION 3: SETUP CONFIGURATION
In the example above, when DI is the publisher, DO, Email, Multicast, TCP, HTTP, and FTP server can be a subscriber of DI triggering.
Subscriber – DO
Check the DO box you want to trigger and click Apply. For example, if you check DO #1 of DI #2, when DI #1 is detected, DO#2 is activated.
Subscriber – Email
Post notification message: Check to send a notification email to a client when a DI event occurs. The System Option - SMTP and email account must be configured to use this feature.
Attach a snapshot: Check to capture a snapshot and include it with the notification email.
Subscriber – Multicast
Post notification message: Check this box to send a notification message via Multicast server when a DI event occurs. The Multicast server must be configured to use this feature. Click the link Multicast.
Subscriber - TCP
Post notification message: Check this box to send a notification message via TCP server when a DI event occurs. The TCP server must be configured to use this feature. Click the link TCP.
26 www.sc-black.com
SECTION 3: SETUP CONFIGURATION
Subscriber - HTTP
Post notification message: Check this box to send a notification message via HTTP server when a DI event occurs. The HTTP server must be configured to use this feature. Click the link HTTP.
Subscriber - FTP
Post notification message: Check this box to send a notification message via FTP server when a DI event occurs. The FTP server must be configured to use this feature. Click FTP to configure the server.
After configuring the publishers, click Apply to save your settings.
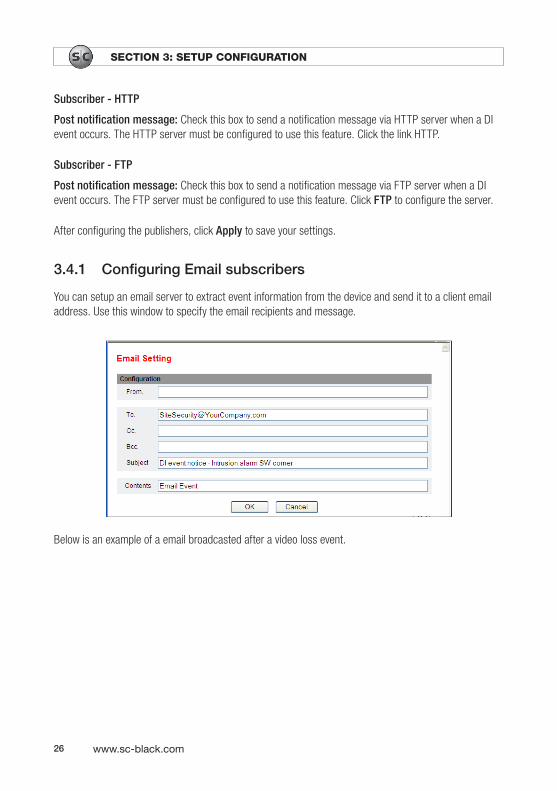
3.4.1 ConfiguringEmailsubscribers
You can setup an email server to extract event information from the device and send it to a client email address. Use this window to specify the email recipients and message.
Below is an example of a email broadcasted after a video loss event.

27IPCameraandEncoderSoftwareManual
SECTION 3: SETUP CONFIGURATION
3.4.2 ConfiguringMulticastsubscribers
You can setup a multicast server to extract event information from the device and send it to a client application. This menu helps configure the Name (event message) and Address to which the message is sent.
3.4.3 ConfiguringTCPsubscribers
You can setup a TCP server to extract event information from the device and send it to a client application. Use this window to configure the Name (event message) and Listen Port to which the message is sent.
28 www.sc-black.com
SECTION 3: SETUP CONFIGURATION
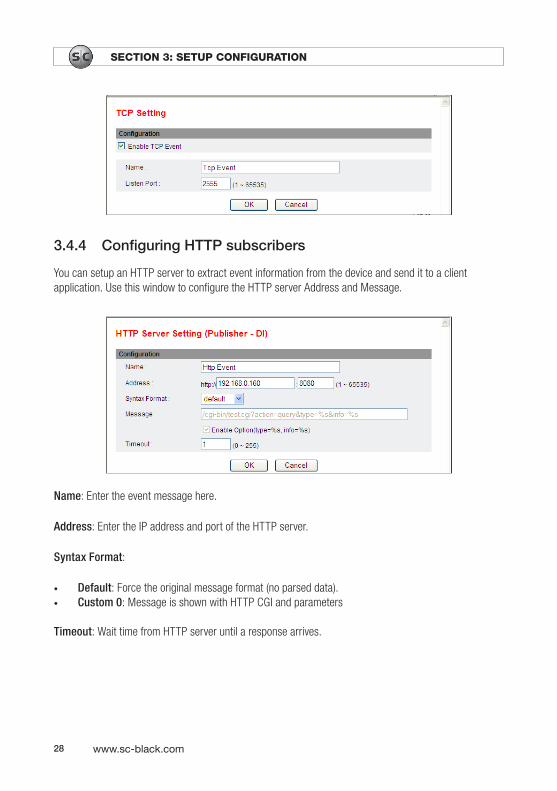
3.4.4 ConfiguringHTTPsubscribers
You can setup an HTTP server to extract event information from the device and send it to a client application. Use this window to configure the HTTP server Address and Message.
Name: Enter the event message here.
Address: Enter the IP address and port of the HTTP server.
Syntax Format:
• Default: Force the original message format (no parsed data). • Custom 0: Message is shown with HTTP CGI and parameters
Timeout: Wait time from HTTP server until a response arrives.
29IPCameraandEncoderSoftwareManual
SECTION 3: SETUP CONFIGURATION
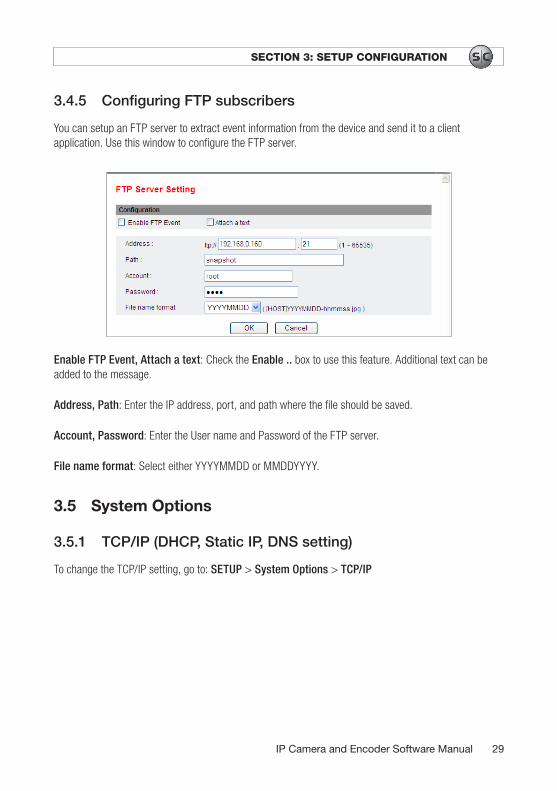
3.4.5 ConfiguringFTPsubscribers
You can setup an FTP server to extract event information from the device and send it to a client application. Use this window to configure the FTP server.
Enable FTP Event, Attach a text: Check the Enable .. box to use this feature. Additional text can be added to the message.
Address, Path: Enter the IP address, port, and path where the file should be saved.
Account, Password: Enter the User name and Password of the FTP server.
File name format: Select either YYYYMMDD or MMDDYYYY.
3.5 System Options
3.5.1 TCP/IP(DHCP,StaticIP,DNSsetting)
To change the TCP/IP setting, go to: SETUP > System Options > TCP/IP
30 www.sc-black.com
SECTION 3: SETUP CONFIGURATION
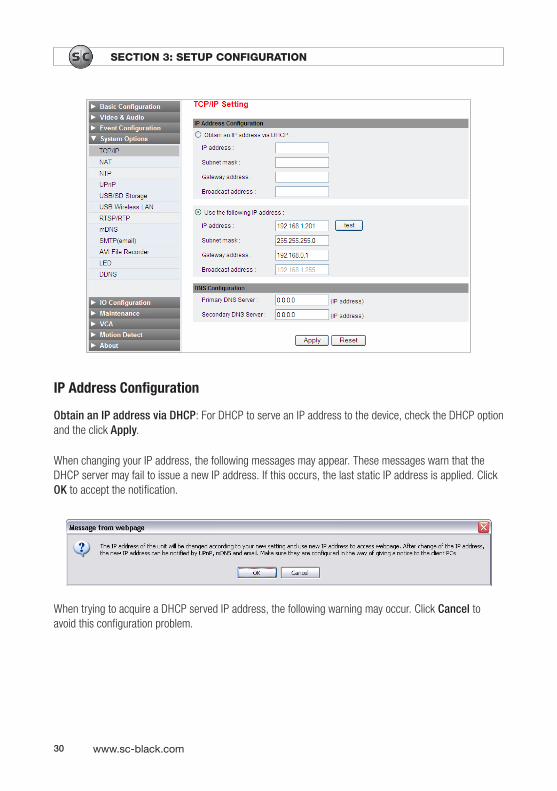
IP Address Configuration
Obtain an IP address via DHCP: For DHCP to serve an IP address to the device, check the DHCP option and the click Apply.
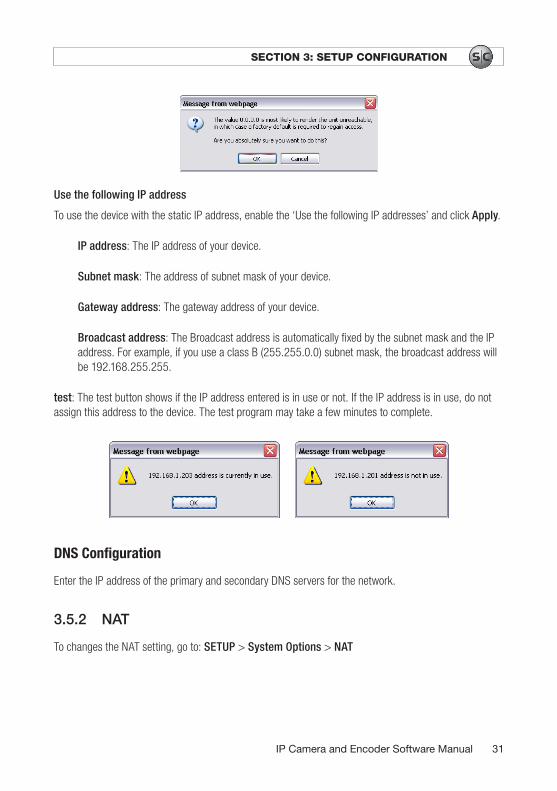
When changing your IP address, the following messages may appear. These messages warn that the DHCP server may fail to issue a new IP address. If this occurs, the last static IP address is applied. Click OK to accept the notification.
When trying to acquire a DHCP served IP address, the following warning may occur. Click Cancel to avoid this configuration problem.
31IPCameraandEncoderSoftwareManual
SECTION 3: SETUP CONFIGURATION
Use the following IP address
To use the device with the static IP address, enable the ‘Use the following IP addresses’ and click Apply.
IP address: The IP address of your device.
Subnet mask: The address of subnet mask of your device.
Gateway address: The gateway address of your device.
Broadcast address: The Broadcast address is automatically fixed by the subnet mask and the IP address. For example, if you use a class B (255.255.0.0) subnet mask, the broadcast address will be 192.168.255.255.
test: The test button shows if the IP address entered is in use or not. If the IP address is in use, do not assign this address to the device. The test program may take a few minutes to complete.
DNS Configuration
Enter the IP address of the primary and secondary DNS servers for the network.
3.5.2 NAT
To changes the NAT setting, go to: SETUP > System Options > NAT
32 www.sc-black.com
SECTION 3: SETUP CONFIGURATION
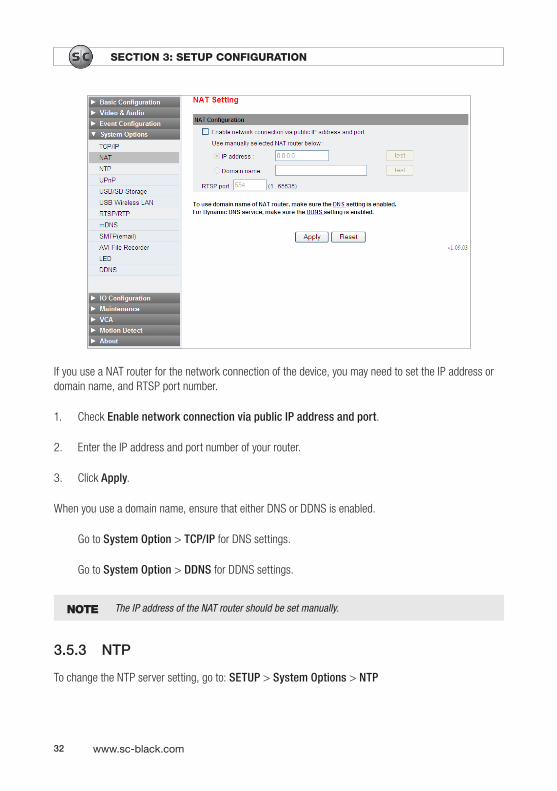
If you use a NAT router for the network connection of the device, you may need to set the IP address or domain name, and RTSP port number.
1. Check Enable network connection via public IP address and port.
2. Enter the IP address and port number of your router.
3. Click Apply.
When you use a domain name, ensure that either DNS or DDNS is enabled.
Go to System Option > TCP/IP for DNS settings.
Go to System Option > DDNS for DDNS settings.
NOTE The IP address of the NAT router should be set manually.
3.5.3 NTP
To change the NTP server setting, go to: SETUP > System Options > NTP
33IPCameraandEncoderSoftwareManual
SECTION 3: SETUP CONFIGURATION
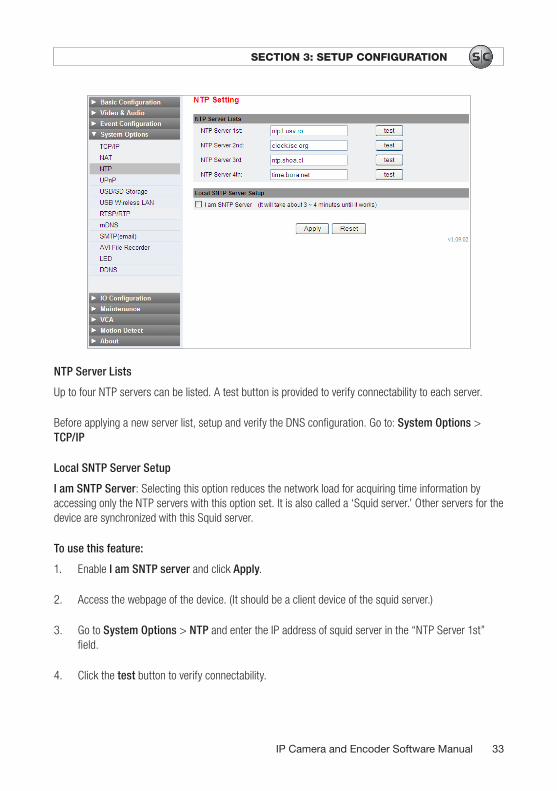
NTP Server Lists
Up to four NTP servers can be listed. A test button is provided to verify connectability to each server.
Before applying a new server list, setup and verify the DNS configuration. Go to: System Options > TCP/IP
Local SNTP Server Setup
I am SNTP Server: Selecting this option reduces the network load for acquiring time information by accessing only the NTP servers with this option set. It is also called a ‘Squid server.’ Other servers for the device are synchronized with this Squid server.
To use this feature:
1. Enable I am SNTP server and click Apply.
2. Access the webpage of the device. (It should be a client device of the squid server.)
3. Go to System Options > NTP and enter the IP address of squid server in the “NTP Server 1st” field.
4. Click the test button to verify connectability.
34 www.sc-black.com
SECTION 3: SETUP CONFIGURATION
NOTE It usually takes 3~4 minutes for the squid server to respond.
5. Go to: SETUP > Basic Configuration > Date & Time. In the New Server Time menu, choose the method Synchronize with NTP server. Verify that the NTP Server displays the squid server’s IP address with red characters.
6. Click Apply.
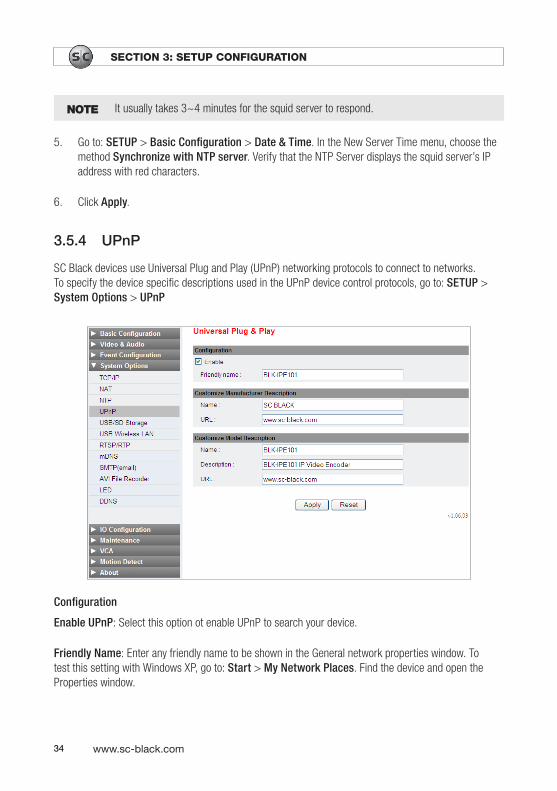
3.5.4 UPnP
SC Black devices use Universal Plug and Play (UPnP) networking protocols to connect to networks. To specify the device specific descriptions used in the UPnP device control protocols, go to: SETUP > System Options > UPnP
Configuration
Enable UPnP: Select this option ot enable UPnP to search your device.
Friendly Name: Enter any friendly name to be shown in the General network properties window. To test this setting with Windows XP, go to: Start > My Network Places. Find the device and open the Properties window.
35IPCameraandEncoderSoftwareManual
SECTION 3: SETUP CONFIGURATION
Customize Manufacturer Description
Enter the manufacturer’s name for the device and the reference URL address.
Customize Model Description
Enter the name, description and URL of the device for display by the UPnP program.
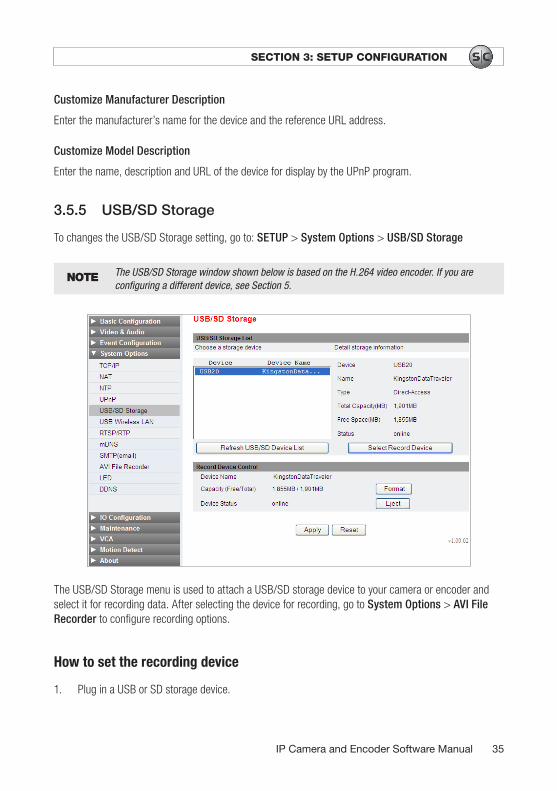
3.5.5 USB/SDStorage
To changes the USB/SD Storage setting, go to: SETUP > System Options > USB/SD Storage
NOTE The USB/SD Storage window shown below is based on the H.264 video encoder. If you are configuring a different device, see Section 5.
The USB/SD Storage menu is used to attach a USB/SD storage device to your camera or encoder and select it for recording data. After selecting the device for recording, go to System Options > AVI File Recorder to configure recording options.
How to set the recording device
1. Plug in a USB or SD storage device.
36 www.sc-black.com
SECTION 3: SETUP CONFIGURATION
2. Click Refresh USB/SD Device List. If the storage device is not listed, wait for a few seconds and click Refresh repeatedly until it is recognized.
3. Click a device in the list to highlight it. Verify that the Device Storage Information shown is correct.
4. Click Select Record Device to begin using the device for data storage. To clear all data on the device, or to format the device so that it is compatible with the encoder, click Format.
NOTE If the total capacity and free space are not shown, refresh the device list. If the Free Space information is not shown correctly, format your storage device and click Refresh.. again.
5. After completing the steps above, go to the System Options > AVI File Recorder to setup recording options.
6. To remove the storage device from the camera or encoder, return to the USB/SC Storage window and click Eject.
Format: Format causes the storage device to be reformatted. After formatting, data previously stored on the device may be unrecoverable. To format the storage device, select the device, click Format, and then click Apply.
Ejecting the disk: To remove the storage device safely, click Eject. When the ejecting process is complete, you can disconnect the device.
3.5.6 USBWirelessLAN
To use the USB Wireless LAN feature, a USB wireless adapter must be installed on the camera. The adapter is optional and usable only with some products. It is not included with the basic product.
NOTE This USB Wireless window shown below is based on the H.264 video encoder. If you are configuring a different device, see Section 5.
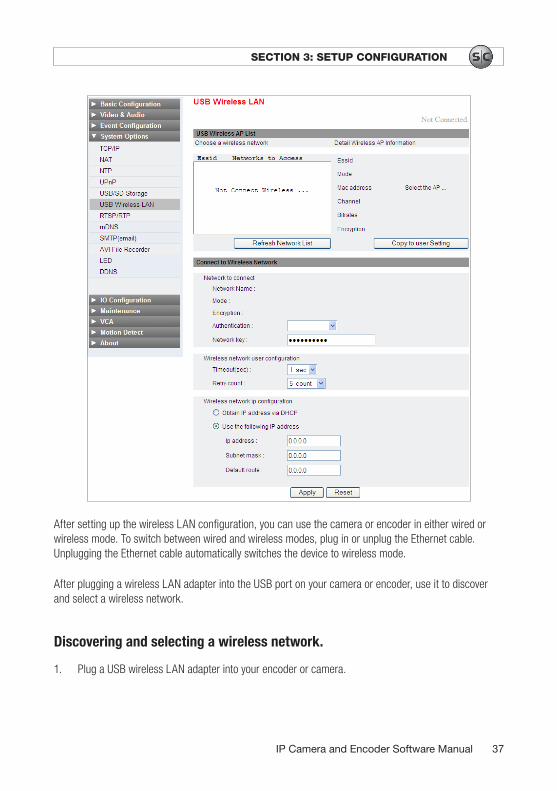
To setup the USB Wireless LAN settings, go to SETUP > System Options > USB Wireless LAN
37IPCameraandEncoderSoftwareManual
SECTION 3: SETUP CONFIGURATION
After setting up the wireless LAN configuration, you can use the camera or encoder in either wired or wireless mode. To switch between wired and wireless modes, plug in or unplug the Ethernet cable. Unplugging the Ethernet cable automatically switches the device to wireless mode.
After plugging a wireless LAN adapter into the USB port on your camera or encoder, use it to discover and select a wireless network.
Discovering and selecting a wireless network.
1. Plug a USB wireless LAN adapter into your encoder or camera.
38 www.sc-black.com
SECTION 3: SETUP CONFIGURATION
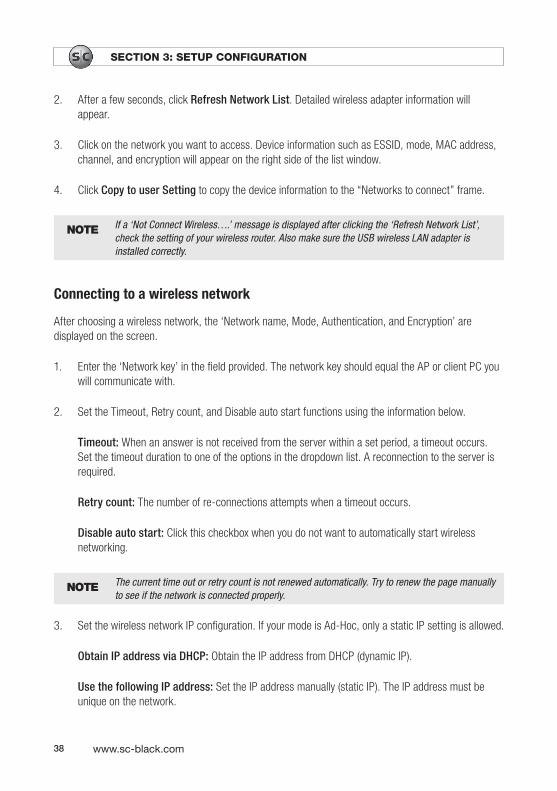
2. After a few seconds, click Refresh Network List. Detailed wireless adapter information will appear.
3. Click on the network you want to access. Device information such as ESSID, mode, MAC address, channel, and encryption will appear on the right side of the list window.
4. Click Copy to user Setting to copy the device information to the “Networks to connect” frame.
NOTE If a ‘Not Connect Wireless….’ message is displayed after clicking the ‘Refresh Network List’, check the setting of your wireless router. Also make sure the USB wireless LAN adapter is installed correctly.
Connecting to a wireless network
After choosing a wireless network, the ‘Network name, Mode, Authentication, and Encryption’ are displayed on the screen.
1. Enter the ‘Network key’ in the field provided. The network key should equal the AP or client PC you will communicate with.
2. Set the Timeout, Retry count, and Disable auto start functions using the information below.
Timeout: When an answer is not received from the server within a set period, a timeout occurs. Set the timeout duration to one of the options in the dropdown list. A reconnection to the server is required.
Retry count: The number of re-connections attempts when a timeout occurs.
Disable auto start: Click this checkbox when you do not want to automatically start wireless networking.
NOTE The current time out or retry count is not renewed automatically. Try to renew the page manually to see if the network is connected properly.
3. Set the wireless network IP configuration. If your mode is Ad-Hoc, only a static IP setting is allowed.
Obtain IP address via DHCP: Obtain the IP address from DHCP (dynamic IP).
Use the following IP address: Set the IP address manually (static IP). The IP address must be unique on the network.
39IPCameraandEncoderSoftwareManual
SECTION 3: SETUP CONFIGURATION
4. Click Apply to save and use the current settings, or click Reset to return to the previous settings.
5. Disconnect the Ethernet cable from the device. Unplugging the Ethernet cable causes the device to use the wireless network.
6. Wait about 40 seconds for the device to switch to wireless mode.
NOTE The time to switch between wired and wireless modes may be extended by network conditions.
NOTE When rebooting a device in wireless mode, the boot time may last 4~5 minutes.
NOTE If a wireless LAN does not connect normally, verify that the wireless LAN adapter is installed properly. Click the ‘Refresh Network List’ button and search again for network devices.
7. Click the Update Status button at the bottom of the screen to display the Wireless Network Link Status.
3.5.7 RTSP/RTP
For Real Time Streaming Protocol/Real-time Transport Protocol (RTSP/RTP) settings, go to SETUP > System Options > RTSP/RTP
40 www.sc-black.com
SECTION 3: SETUP CONFIGURATION
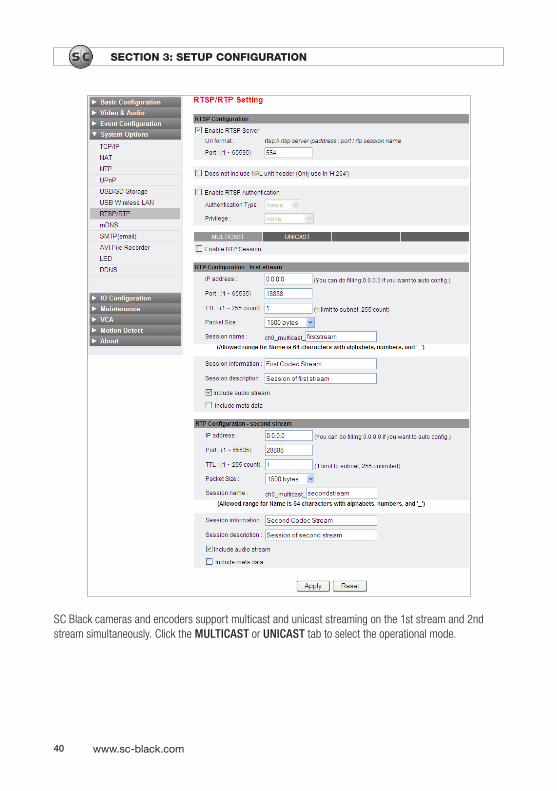
SC Black cameras and encoders support multicast and unicast streaming on the 1st stream and 2nd stream simultaneously. Click the MULTICAST or UNICAST tab to select the operational mode.
41IPCameraandEncoderSoftwareManual
SECTION 3: SETUP CONFIGURATION
RTSP Configuration
To stream video, audio or metadata from the device server, select the Enable RTSP Server option. When the box is unchecked, the stream is stopped and a real-time view is not shown on the screen.
Use the following format for the URL and Port for RTSP streaming:
rtsp://<rtsp server ipaddress>:<port>/<rtp session name> use <port>: 554 e.g. rtsp://192.168.111.32:554/ch0_unicast_firststream
NAL unit option
The network abstraction layer (NAL) option “Does not include NAL unit header (Only use in ‘H.264’)” is required only when using the H.264 codec. The product supports both standard (does not include NAL unit header) and non-standard H.264 (includes NAL unit header). To use the standard format for H.264, select the “Does not include...” option. The factory default setting is the non-standard format.
• NAL Stream: The stream consists of only NAL units (H.264 standard format)• Byte Stream: The sequence identifier, NAL header, is included between NAL streams
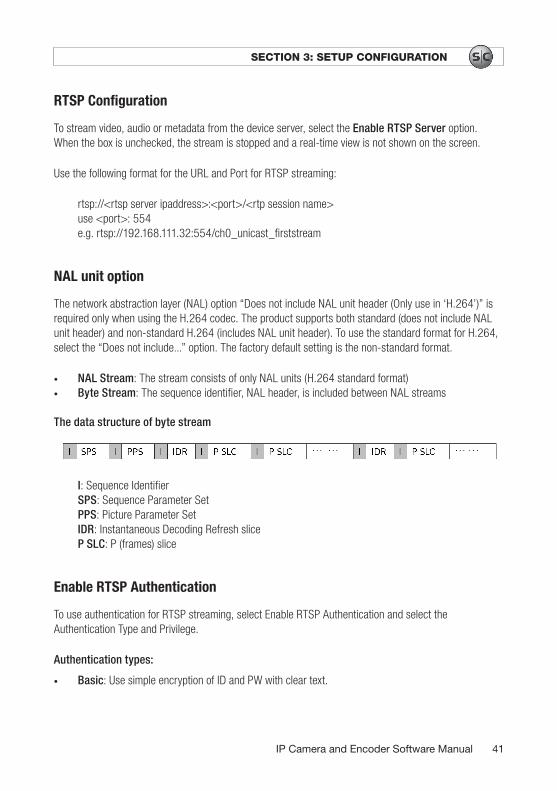
The data structure of byte stream
I: Sequence IdentifierSPS: Sequence Parameter SetPPS: Picture Parameter SetIDR: Instantaneous Decoding Refresh sliceP SLC: P (frames) slice
Enable RTSP Authentication
To use authentication for RTSP streaming, select Enable RTSP Authentication and select the Authentication Type and Privilege.
Authentication types:
• Basic: Use simple encryption of ID and PW with clear text.
42 www.sc-black.com
SECTION 3: SETUP CONFIGURATION
• Digest: Use enhanced encryption. Refer to RFC2617 - HTTP Authentication: Basic and Digest Access Authentication for additional information.
Privilege: Select an option from the dropdown list.
RTSP configuration for MULTICAST
RTSP can be configured for MULTICAST or UNICAST. Click the tab on the selection bar to choose the operational mode. In Multicast mode, the 1st stream and 2nd stream can be configured differently.
IP Address: Enter a specific IP address for streaming, or use “0.0.0.0” to allow the router to determine the IP address.
NOTE UDP/RTP multicast is not allowed for streaming.
How auto configuration of an IP address worksSince the session name for each RTP session is defined on the server, your PC can receive the stream by going to “rtsp://<rtsp server ipaddress>:<port>/<rtp session name>”.
Port: Set the port number used for the router to receive the streaming data from the product. “18888” is set for video data of 1st stream and “28888” is for video data of 2nd stream.
TTL: Set the TTL (Time to Live) value. If TTL = 1, the packet will pass 1 subnet (router).
What is TTL?TTL can be defined as the maximum number of routers a data packet is allowed to pass though on the path to its destination before it is discarded. If data packets sent from the encoder across the network live permanently on a network, a high network load can occur.
Packet Size: Select the packet size in consideration of your network bandwidth. The factory default is 1500 bytes.
Session name: Enter the session name. Session names can be at most 64 alphanumeric characters and include the underscore character ( _ ).
Session information: Enter the session information you want to display.
Session Description: Enter the session description (detailed information).
Include audio stream: Select this option to include the audio stream with the video stream.
43IPCameraandEncoderSoftwareManual
SECTION 3: SETUP CONFIGURATION
Include meta data: Metadata contains motion detection and VCA (video contents analysis) data. Select this option to include the meta stream with the video stream.
RTSP configuration for UNICAST
The RTSP configuration for a UNICAST stream is identical to the configuration of MULTICAST stream except that the IP Address, Port, and TTL apply only to the MULTICAST stream.
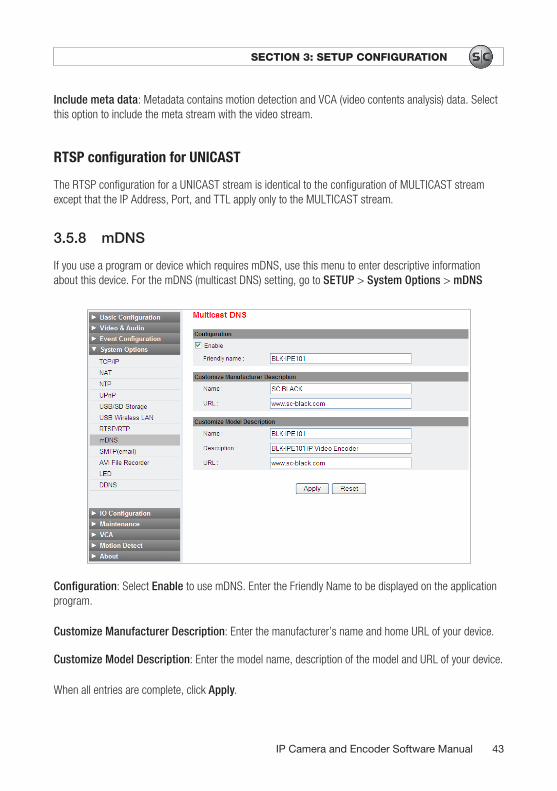
3.5.8 mDNS
If you use a program or device which requires mDNS, use this menu to enter descriptive information about this device. For the mDNS (multicast DNS) setting, go to SETUP > System Options > mDNS
Configuration: Select Enable to use mDNS. Enter the Friendly Name to be displayed on the application program.
Customize Manufacturer Description: Enter the manufacturer’s name and home URL of your device.
Customize Model Description: Enter the model name, description of the model and URL of your device.
When all entries are complete, click Apply.
44 www.sc-black.com
SECTION 3: SETUP CONFIGURATION
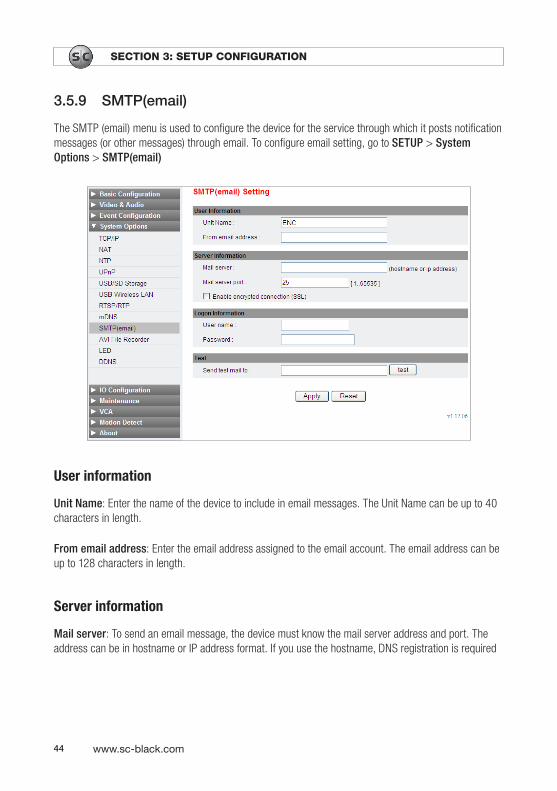
3.5.9 SMTP(email)
The SMTP (email) menu is used to configure the device for the service through which it posts notification messages (or other messages) through email. To configure email setting, go to SETUP > System Options > SMTP(email)
User information
Unit Name: Enter the name of the device to include in email messages. The Unit Name can be up to 40 characters in length.
From email address: Enter the email address assigned to the email account. The email address can be up to 128 characters in length.
Server information
Mail server: To send an email message, the device must know the mail server address and port. The address can be in hostname or IP address format. If you use the hostname, DNS registration is required
45IPCameraandEncoderSoftwareManual
SECTION 3: SETUP CONFIGURATION
in advance. Check the DNS setting on System Options > TCP/IP tab. The mail server entry can be up to 128 characters in length.
Mail server port: Enter the email server port number.
NOTE If the email server requires SSL and TLS encryption, select the “Enable encrypted connection (SSL)” check box. TLS (Transport Layer Security) and SSL (Secure Sockets Layer) algorithms may be required for secure communication over networks. Check the communication protocols of your SMTP server for requirements.
Logon Information
User name: Enter the username associated with the email account. Input range: 128 characters limit.
Password: Enter the password associated with the email account. Input range: 32 characters limit.
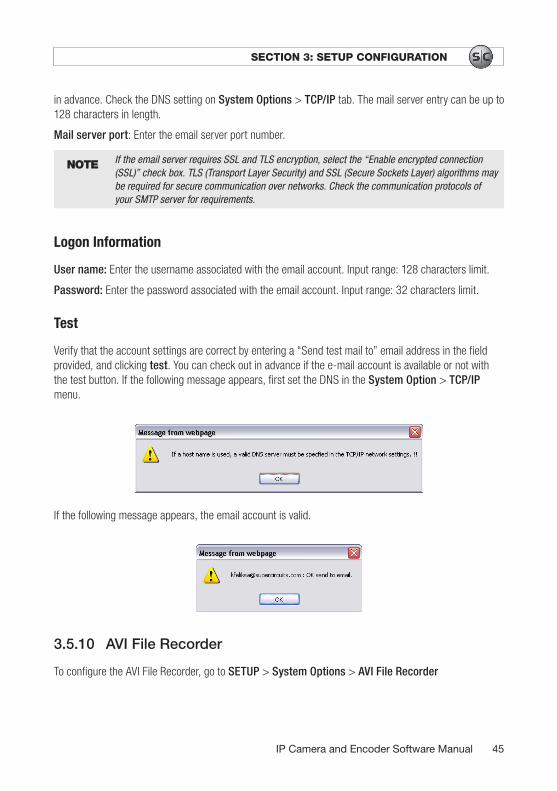
Test
Verify that the account settings are correct by entering a “Send test mail to” email address in the field provided, and clicking test. You can check out in advance if the e-mail account is available or not with the test button. If the following message appears, first set the DNS in the System Option > TCP/IP menu.
If the following message appears, the email account is valid.
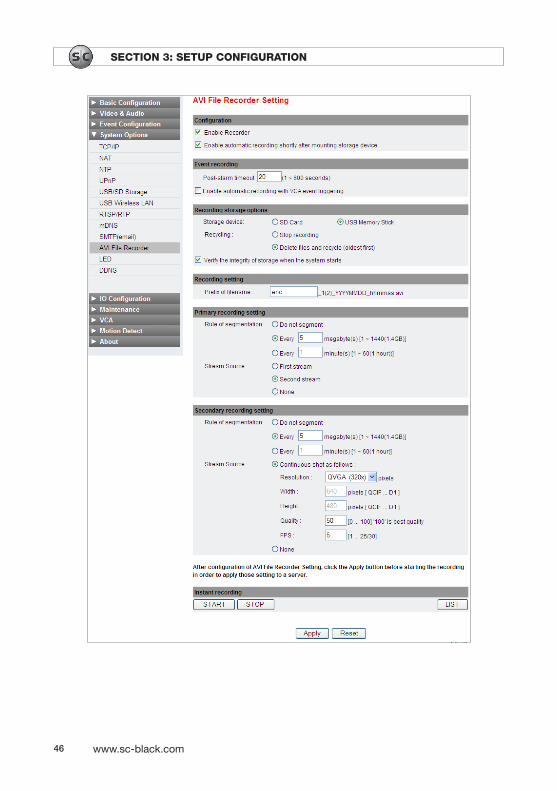
3.5.10 AVIFileRecorder
To configure the AVI File Recorder, go to SETUP > System Options > AVI File Recorder
46 www.sc-black.com
SECTION 3: SETUP CONFIGURATION
47IPCameraandEncoderSoftwareManual
SECTION 3: SETUP CONFIGURATION
Steps for manual recording
Step 1. Enable recording
Enable Recorder: Select this option to record data. If it is not selected, data is not recorded, even if you click START to record.
Enable automatic recording shortly after mounting storage device: Check this option if you want the recorder start recording when a storage device, such as an SD card or USB Memory Stick, is attached. If this option is not selected, recording starts only when it is manually started.
Step 2. Selecting the recording storage
Select either SD Card or USB Memory Stick as the storage device.
Step 3. Recycling options
Choose one of the options below when the storage is at capacity:
• Stop recording: Stops recording and keep the recorded data.• Delete files and recycle (oldest first): Replace old files with newly created files.
Step 4. Enter a filename prefix
Enter a filename prefix for the stored video files. The prefix is appended with a timestamp in the format: “_YYYYMMDD_hhmmss.avi”.
Step 5. Primary recording settings – Rule of segmentation
• Do not segment: Select this option if you want to record data as one file. • Every ___ megabyte(s): If you select this option, enter the size in MB for each segment. • Every ___ minute(s): If you select this option, enter the number of minutes for each segment.
Step 6. Primary recording settings – Stream Source
First stream: Choose primary recording source from the 1st stream. Both streams cannot be recorded at the same time.
Second stream: Choose primary recording source from the 2nd stream. Both streams cannot be recorded at the same time.
None: If this option is checked, the device will not record either stream.
48 www.sc-black.com
SECTION 3: SETUP CONFIGURATION
Step 7. Secondary recording settings – Rule of segmentation
• Do not segment: Select this option if you want to record data as one file. • Every ___ megabyte(s): If you select this option, enter the size in MB for each segment
(fragment). • Every ___ minute(s): If you select this option, enter the number of minutes for each segment.
Step 8. Secondary recording settings – Stream Source
The Secondary recording Stream Source provides a continuous snapshot mode of recording in JPEG format. This stream does not depend on the codec used for the Primary stream recording mode.
Continuous shot as follows: Check this option to select a snapshot recording stream, and then set the Resolution, Quality, and FPS (frames/second). If you choose CUSTOM Resolution, you can set the image width and height within the bounds of the standard resolution sizes.
None: If this option is selected, the device does not record a snapshot stream.
Step 9. Click Apply.
Click the Apply button to save and apply the setting.
Step 10. Click the START or STOP button to start or stop recording.
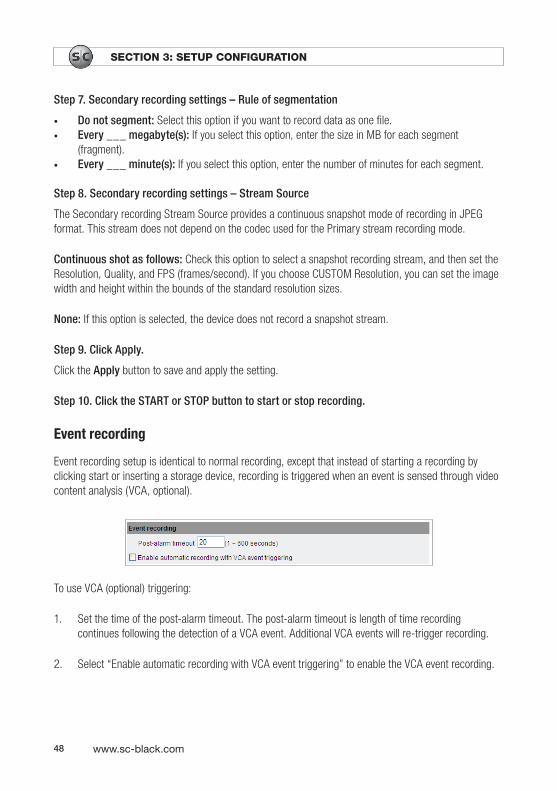
Event recording
Event recording setup is identical to normal recording, except that instead of starting a recording by clicking start or inserting a storage device, recording is triggered when an event is sensed through video content analysis (VCA, optional).
To use VCA (optional) triggering:
1. Set the time of the post-alarm timeout. The post-alarm timeout is length of time recording continues following the detection of a VCA event. Additional VCA events will re-trigger recording.
2. Select “Enable automatic recording with VCA event triggering” to enable the VCA event recording.
49IPCameraandEncoderSoftwareManual
SECTION 3: SETUP CONFIGURATION
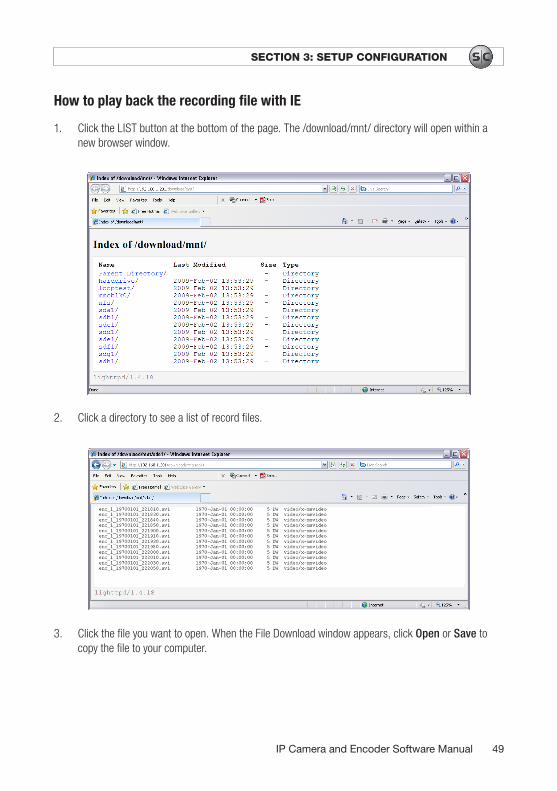
How to play back the recording file with IE
1. Click the LIST button at the bottom of the page. The /download/mnt/ directory will open within a new browser window.
2. Click a directory to see a list of record files.
3. Click the file you want to open. When the File Download window appears, click Open or Save to copy the file to your computer.
50 www.sc-black.com
SECTION 3: SETUP CONFIGURATION
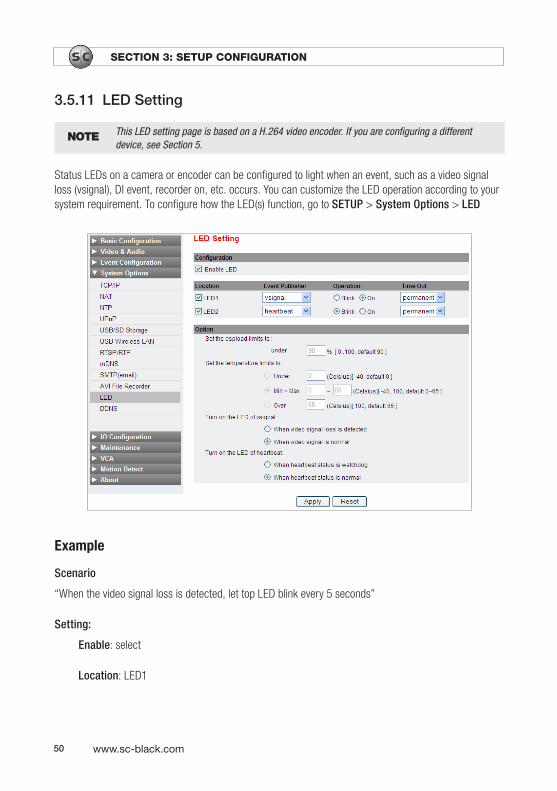
3.5.11 LEDSetting
NOTE This LED setting page is based on a H.264 video encoder. If you are configuring a different device, see Section 5.
Status LEDs on a camera or encoder can be configured to light when an event, such as a video signal loss (vsignal), DI event, recorder on, etc. occurs. You can customize the LED operation according to your system requirement. To configure how the LED(s) function, go to SETUP > System Options > LED
Example
Scenario
“When the video signal loss is detected, let top LED blink every 5 seconds”
Setting:
Enable: select
Location: LED1
51IPCameraandEncoderSoftwareManual
SECTION 3: SETUP CONFIGURATION
Event Publisher: vsignal
Operation: Blink
Time Out: 5
Option: Turn on the LED of vsignal. Select When video signal loss is detected.
Basic configuration
SC Black devices have different positions for their LEDs. Refer to the applicable user manual for more information.
1. Select Enable LED.
2. Select LED1 and/or LED2.
3. Select the Event Publisher from the dropdown list to associate with the LED.
4. Select the Operation of each LED, Blink or On.
5. Select the Time Out (duration of reporting). The LED can be lit from 1 ~ 5 seconds, or on permanently.
6. If you are configuring an LED to report DSP load (dspload), temperature, and video signal loss (vsignal), and/or heartbeat, additional configuration options are available:
— Set the dspload limits to: When setting the DSP limit and the Publisher selected is dspload, the associated LED will operate as configured in the Location section when the DSP load exceeds the limit.
— Set the temperature limits to: When setting the temperature limit(s) and the Publisher selected is temperature, the associated LED will operate as configured in the Location section when the temperature is outside the limit(s).
— Turn on the LED of vsignal: Select either “When video signal loss is detected” or “When video signal is normal”. If a Publisher selected is vsignal, the associated LED will operate as configured in the Location section when the option is satisfied.
— Turn on the LED of Heartbeat: Select either “When heartbeat status is watchdog” or “When heartbeat status is normal”. If a Publisher selected is heartbeat, the associated LED will operate as configured in the Location section when the option is satisfied.
52 www.sc-black.com
SECTION 3: SETUP CONFIGURATION
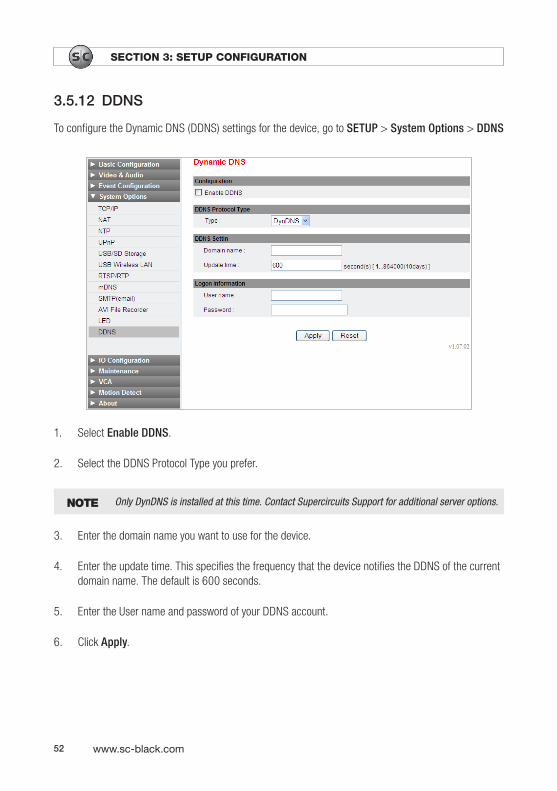
3.5.12 DDNS
To configure the Dynamic DNS (DDNS) settings for the device, go to SETUP > System Options > DDNS
1. Select Enable DDNS.
2. Select the DDNS Protocol Type you prefer.
NOTE Only DynDNS is installed at this time. Contact Supercircuits Support for additional server options.
3. Enter the domain name you want to use for the device.
4. Enter the update time. This specifies the frequency that the device notifies the DDNS of the current domain name. The default is 600 seconds.
5. Enter the User name and password of your DDNS account.
6. Click Apply.
53IPCameraandEncoderSoftwareManual
SECTION 3: SETUP CONFIGURATION
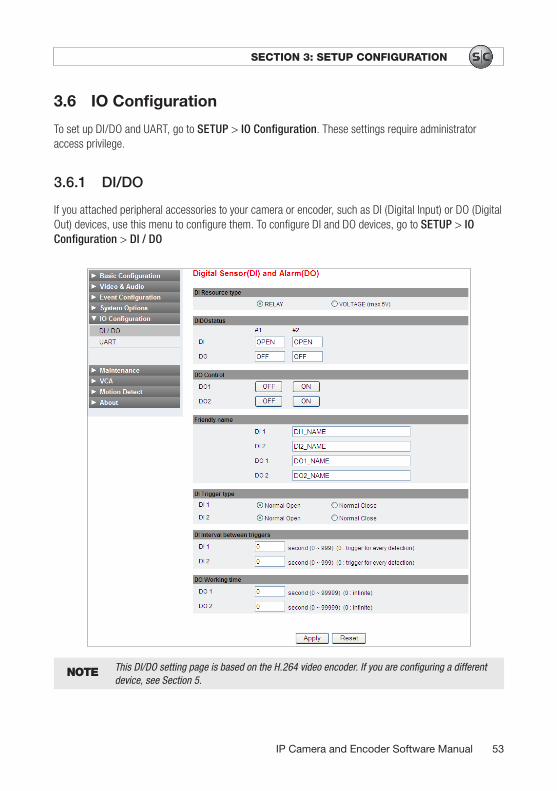
3.6 IO Configuration
To set up DI/DO and UART, go to SETUP > IO Configuration. These settings require administrator access privilege.
3.6.1 DI/DO
If you attached peripheral accessories to your camera or encoder, such as DI (Digital Input) or DO (Digital Out) devices, use this menu to configure them. To configure DI and DO devices, go to SETUP > IO Configuration > DI / DO
NOTE This DI/DO setting page is based on the H.264 video encoder. If you are configuring a different device, see Section 5.
54 www.sc-black.com
SECTION 3: SETUP CONFIGURATION
DI Resource type
For the DI accessories attached to your device, select either RELAY or VOLTAGE. Both DI#1 and DI#2 must be the same type.
DIDOstatus
This status display shows the current state of the DI and DO accessories.
DO Control
Use these four buttons to click DO#1 and DO#2 ON and OFF. The status of each device is shown in the DIDO Status frame.
Friendly name
Enter whatever friendly name for the DI and DO that you prefer. This feature is useful when DI and/or DO is activated, especially if there are multiple device servers managed by your application program.
DI Trigger type
Select the DI device trigger type for the device installed (normally open (NO) or normally closed (NC)).
DI Interval between triggers
The DI interval between triggers sets the detection time interval for the event publisher. If “0” is specified, the device reports an event every time a DI event is sensed. If “10” is specified, the device must sense multiple DIs events within 10 seconds before reporting the event.
DO Working time
The DO working time sets the duration the DO is activated. If “0” is entered, the DO remains active until it is manually turned off. If “10” is entered, DO is activated for 10 seconds.
Apply and Reset
After making configuration changes, click Apply to save the settings, or click Reset to revert to the previous settings.
Example
DI#1 and DO#1 are configured to sense and report the same event. The DI#1 trigger type is Normal Open. Suddenly DI#1 is triggered by any kind of event.
Expected Response: The status of DO#1 will change from OFF to ON if the default setting is OFF. The status of DI#1 will change from OPEN to CLOSE.
55IPCameraandEncoderSoftwareManual
SECTION 3: SETUP CONFIGURATION
3.6.2 UART
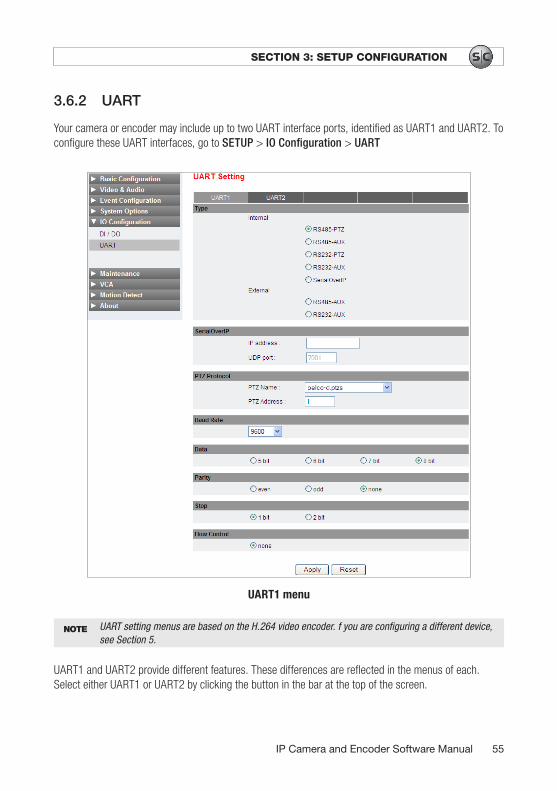
Your camera or encoder may include up to two UART interface ports, identified as UART1 and UART2. To configure these UART interfaces, go to SETUP > IO Configuration > UART
UART1 menu
NOTE UART setting menus are based on the H.264 video encoder. f you are configuring a different device, see Section 5.
UART1 and UART2 provide different features. These differences are reflected in the menus of each. Select either UART1 or UART2 by clicking the button in the bar at the top of the screen.
56 www.sc-black.com
SECTION 3: SETUP CONFIGURATION
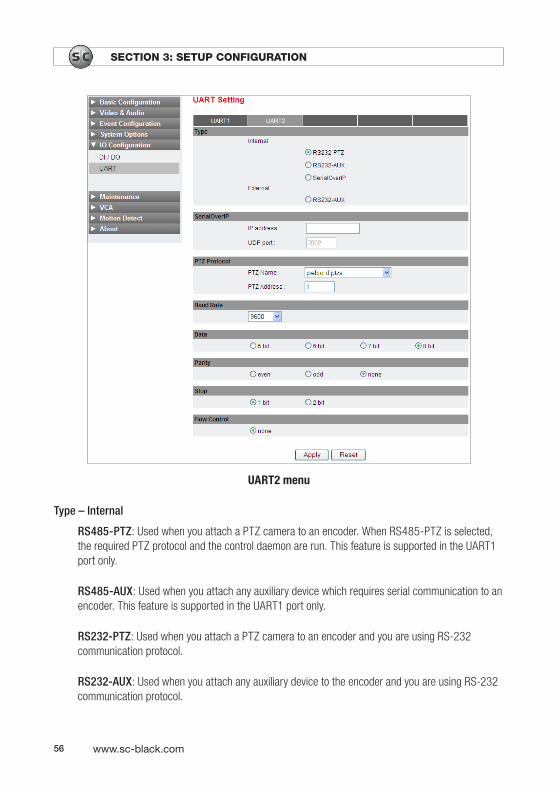
UART2 menu
Type – Internal
RS485-PTZ: Used when you attach a PTZ camera to an encoder. When RS485-PTZ is selected, the required PTZ protocol and the control daemon are run. This feature is supported in the UART1 port only.
RS485-AUX: Used when you attach any auxiliary device which requires serial communication to an encoder. This feature is supported in the UART1 port only.
RS232-PTZ: Used when you attach a PTZ camera to an encoder and you are using RS-232 communication protocol.
RS232-AUX: Used when you attach any auxiliary device to the encoder and you are using RS-232 communication protocol.
57IPCameraandEncoderSoftwareManual
SECTION 3: SETUP CONFIGURATION
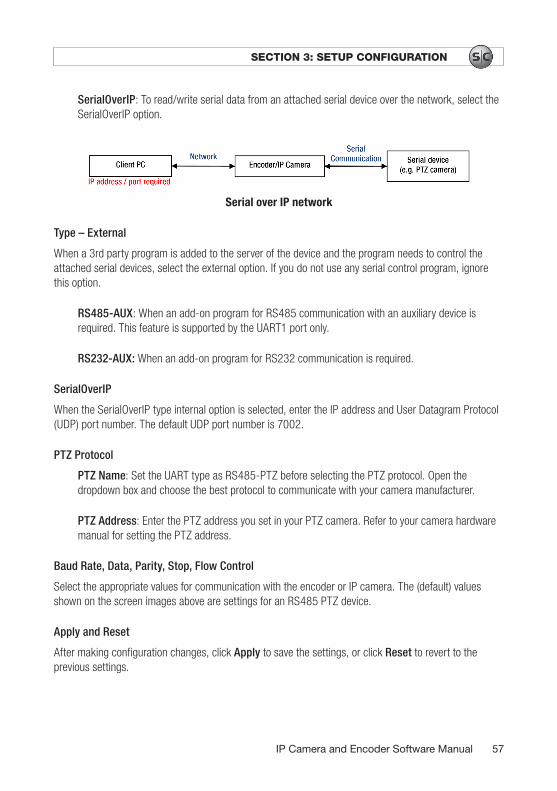
SerialOverIP: To read/write serial data from an attached serial device over the network, select the SerialOverIP option.
Serial over IP network
Type – External
When a 3rd party program is added to the server of the device and the program needs to control the attached serial devices, select the external option. If you do not use any serial control program, ignore this option.
RS485-AUX: When an add-on program for RS485 communication with an auxiliary device is required. This feature is supported by the UART1 port only.
RS232-AUX: When an add-on program for RS232 communication is required.
SerialOverIP
When the SerialOverIP type internal option is selected, enter the IP address and User Datagram Protocol (UDP) port number. The default UDP port number is 7002.
PTZ Protocol
PTZ Name: Set the UART type as RS485-PTZ before selecting the PTZ protocol. Open the dropdown box and choose the best protocol to communicate with your camera manufacturer.
PTZ Address: Enter the PTZ address you set in your PTZ camera. Refer to your camera hardware manual for setting the PTZ address.
Baud Rate, Data, Parity, Stop, Flow Control
Select the appropriate values for communication with the encoder or IP camera. The (default) values shown on the screen images above are settings for an RS485 PTZ device.
Apply and Reset
After making configuration changes, click Apply to save the settings, or click Reset to revert to the previous settings.
58 www.sc-black.com
SECTION 3: SETUP CONFIGURATION
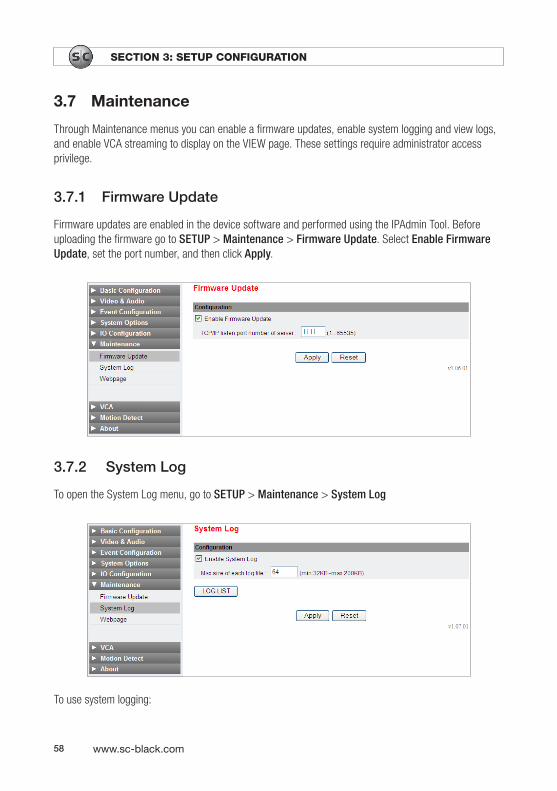
3.7 Maintenance
Through Maintenance menus you can enable a firmware updates, enable system logging and view logs, and enable VCA streaming to display on the VIEW page. These settings require administrator access privilege.
3.7.1 FirmwareUpdate
Firmware updates are enabled in the device software and performed using the IPAdmin Tool. Before uploading the firmware go to SETUP > Maintenance > Firmware Update. Select Enable Firmware Update, set the port number, and then click Apply.
3.7.2 SystemLog
To open the System Log menu, go to SETUP > Maintenance > System Log
To use system logging:

59IPCameraandEncoderSoftwareManual
SECTION 3: SETUP CONFIGURATION
1. Select Enable System Log.
2. Enter the maximum size of system log files (32KB ~ 200KB). Up to 5 files are created. When an additional file is created, it replaces the oldest one (FIFO).
3. Click Apply.
To see the log list and open a log file, click the LOG LIST button. The list displays:
Name: The log files are named automatically.Size: Log file size is updated in real time.Latest access time: Last time the device accessed the system to retrieve the file.
To open a system log, click the Name.
3.7.3 WebpageoptionforVCA
You can display the Video Contents Analysis (VCA, optional) stream on the VIEW screen. Go to SETUP > Maintenance > Webpage. On this page, select Display VCA streaming at the VIEW page and then click Apply.
3.8 VCA
3.9 Motion Detect
Motion Detect settings allow you to configure the zones and rules required for motion detection. These settings require administrator or operator access privilege.
60 www.sc-black.com
SECTION 3: SETUP CONFIGURATION
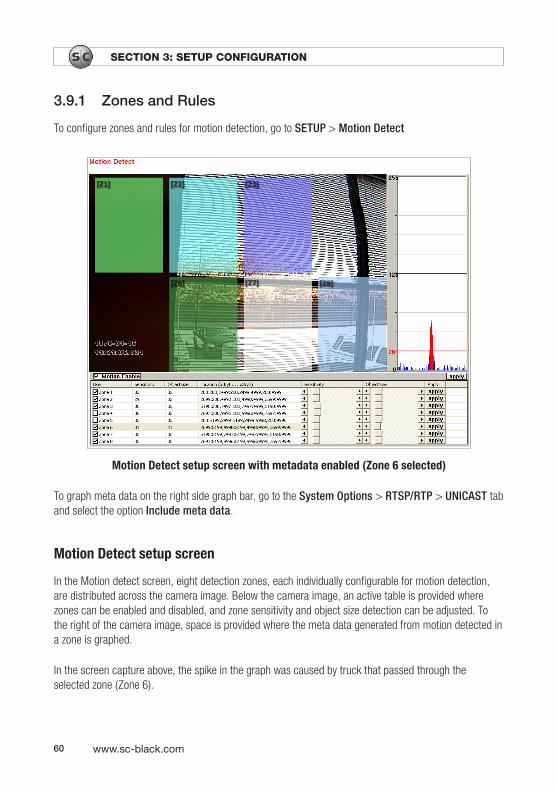
3.9.1 ZonesandRules
To configure zones and rules for motion detection, go to SETUP > Motion Detect
Motion Detect setup screen with metadata enabled (Zone 6 selected)
To graph meta data on the right side graph bar, go to the System Options > RTSP/RTP > UNICAST tab and select the option Include meta data.
Motion Detect setup screen
In the Motion detect screen, eight detection zones, each individually configurable for motion detection, are distributed across the camera image. Below the camera image, an active table is provided where zones can be enabled and disabled, and zone sensitivity and object size detection can be adjusted. To the right of the camera image, space is provided where the meta data generated from motion detected in a zone is graphed.
In the screen capture above, the spike in the graph was caused by truck that passed through the selected zone (Zone 6).
61IPCameraandEncoderSoftwareManual
SECTION 3: SETUP CONFIGURATION
Fields in the table below the camera image are defined as:
Use: To disable or enable a zone, click the checkbox.
Sensitivity and ObjectSize: This data shows the relative settings for Sensitivity and ObjectSize. Adjustments are made using sliders on the right side of the table.
Location: The bounds (pixel location) of each detection zone are shown.
Sensitivity and ObjectSize (adjustment): Sliders are used to adjust for sensitivity and object size. In the screen shown above, meta data is graphed for Zone 6 on the right side of the screen. The object size threshold is represented by the horizontal bar at 28.
About SensitivityEach motion detection zone is divided into multiple squares called Macro blocks, 16 x 16 pixels each. The Sensitivity adjustment made to the zone is applied to every macro block in the zone. To decrease the Sensitivity of a zone, increase the Sensitivity number by dragging the slider to the right. Similarly, increase the Sensitivity by dragging the slider to the left to decrease the Sensitivity number.
About ObjectSizeThe OjectSize number indicates the proportion of Macro blocks that exceeded the configured Sensitivity. To decrease the zone Sensitivity through ObjectSize, drag the ObjectSize slider to the right to increase the number (of Macro blocks). Similarly, increase the sensitivity by dragging the slider to the left.
Configuring Motion Detect zones
To configure the motion detect zone:
1. Check the box in the Use column to enable a zone for motion detection. The device supports up to 8 zones. To disable a zone, uncheck the box in the Use field.
2. Adjust the sensitivity and object size of selected zone by dragging the sliders left or right.
3. Click the Apply button on the right side of the table for the zone you are adjusting.
4. After completing the configuration setup for each zone using step 1~3, select Motion Enable to enable the motion detection for all zones enabled.
5. Click Apply.
62 www.sc-black.com
SECTION 3: SETUP CONFIGURATION
After enabling the device for motion detection, the zone area of the VIEW screen will flicker when motion detection thresholds within it are exceeded.
3.10 About
To display product information, including the hardware specification and software version, go to SETUP > About. This menu includes two sub menus: Version and Licenses.
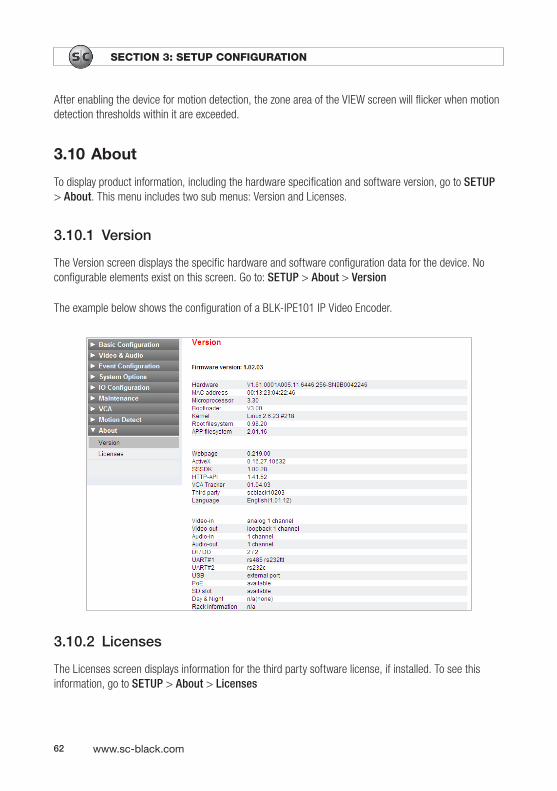
3.10.1 Version
The Version screen displays the specific hardware and software configuration data for the device. No configurable elements exist on this screen. Go to: SETUP > About > Version
The example below shows the configuration of a BLK-IPE101 IP Video Encoder.
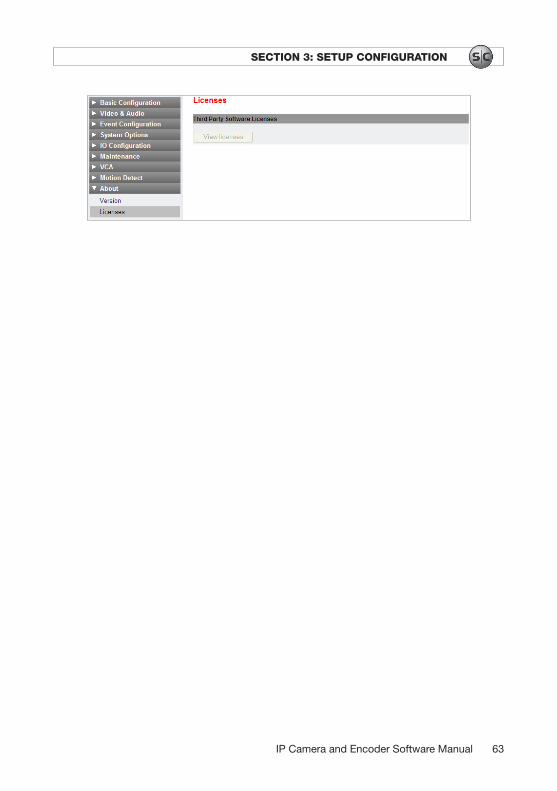
3.10.2 Licenses
The Licenses screen displays information for the third party software license, if installed. To see this information, go to SETUP > About > Licenses
63IPCameraandEncoderSoftwareManual
SECTION 3: SETUP CONFIGURATION

64 www.sc-black.com
SECTION 3: SETUP CONFIGURATION
SECTION 4 Safety Mode
4.1 Safety Mode
Your encoder or IP camera could encounter an unexpected condition such as a faulty firmware file or uncompleted firmware load during system boot up. To restore the device to a minimal level of operation, emergency firmware is loaded and the device restarts in Safety Mode.
4.2 Causes of Safety Mode
The two most common reasons why a device boots in Safety Mode are:
• The power supply is unplugged during system boot up.• Firmware files required for system boot up are damaged.
The device does not return to the Safety Mode booting until normal booting is attempted 5 times.
4.3 Recovering from Safety Mode?
When the following screen appears, the system rebooted in Safety Mode. Follow the steps shown on the screen.
65IPCameraandEncoderSoftwareManual
SECTION 3: SETUP CONFIGURATION
1. Click the Reboot button on the webpage.
2. Wait until the system restarts (about 1 minute).
3. Access the webpage to see if the display is normal.
If your system repeatedly reboots in Safety Mode after performing the steps above:
Repeated reboots in Safety Mode indicate that an element of the device firmware is damaged. Perform the following steps to recover the firmware.
1. Start IPAdmin Tool and discover the device. The device entry will indicate that the encoder or IP camera is in Safety Mode.
2. Right-click the device entry and select the Update menu.
3. After completing a firmware update, examine the webpage to verify that the device booted normally.
4.4 Limited functions under Safety Mode
Safey Mode loads only the essential executable modules and disables the normal operation of the device. The functions available and those with limited capability include:
Available functions:
IP change by IPAdmin Tool Scanning by IPAdmin Tool Searched by UPnP program
Functions with limited capability:
RTSP or HTTP streaming Event messages or alarming Recognition of HTTP API commands
66 www.sc-black.com
SECTION 3: SETUP CONFIGURATION
SECTION 5 Reference to Models SC Black devices differ by feature set. This section lists the features, by device, that are different from those in the BLK-IPE101 IP Encoder.
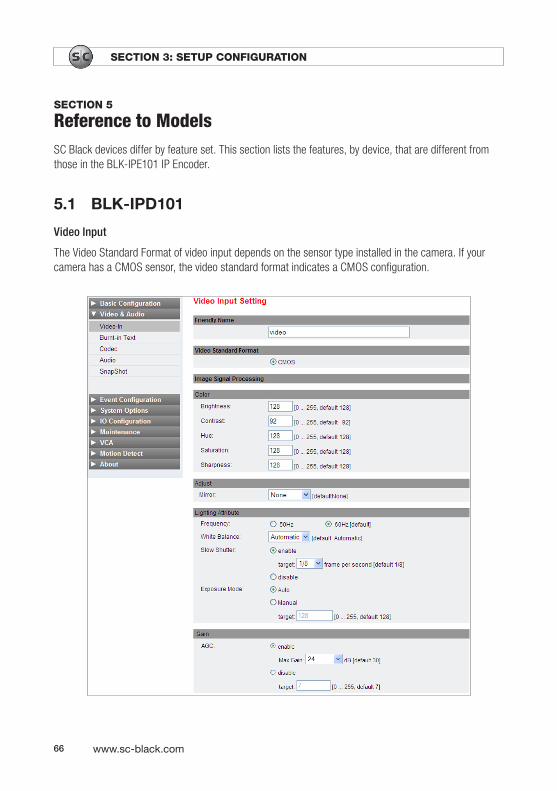
5.1 BLK-IPD101
Video Input
The Video Standard Format of video input depends on the sensor type installed in the camera. If your camera has a CMOS sensor, the video standard format indicates a CMOS configuration.

67IPCameraandEncoderSoftwareManual
SECTION 4: SAFETY MODE
Slow Shutter: You can slow the shutter speed by setting the target value. This is useful in low light conditions where slowing the shutter allows more light to impinge on the sensor.
Based on full 30 fps:
• 1/2: 15 fps (every 66 ms)• 1/4: 7.5 fps (every 133 ms)• 1/8: 3.75 fps (every 266 ms)
Exposure Mode: You can control the exposure setting of the camera to improve image quality by selecting auto or manual:
• Auto: Controls exposure automatically.• Manual: You can change the quality of image by configuring the exposure target value. Higher
values produce better image quality. The quality is optimized by balancing shutter speed and AGC.
Event Configuration
Only Video, Motion Detection, VCA, Network, and Health are supported for the event publisher (DI and DO are not supported). Refer to section 3.4. Event Configuration for an explanation of the event publisher settings.
USB/SD Storage: USB/SD ports are NOT supported.
USB Wireless LAN: USB port for Wireless LAN is NOT supported.
DI/DO Control: DI/DO is NOT supported.
UART Setting for serial device: Serial communication for users is NOT supported.
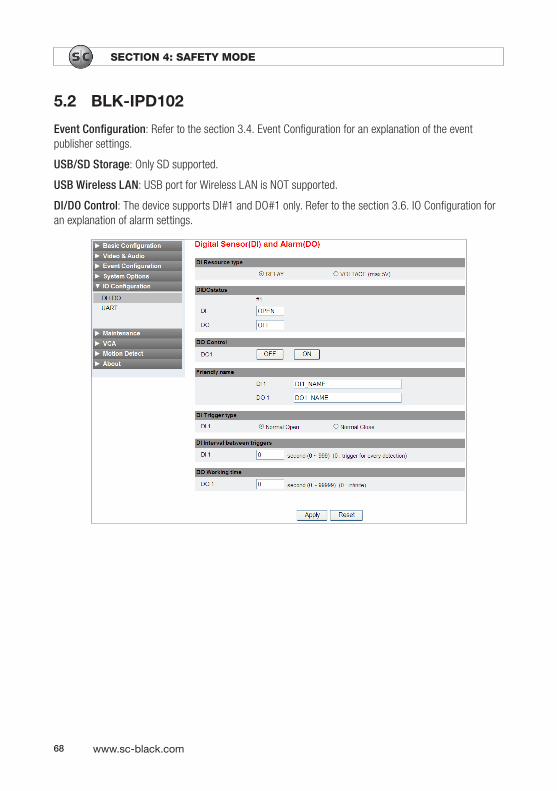
68 www.sc-black.com
SECTION 4: SAFETY MODE
5.2 BLK-IPD102
Event Configuration: Refer to the section 3.4. Event Configuration for an explanation of the event publisher settings.
USB/SD Storage: Only SD supported.
USB Wireless LAN: USB port for Wireless LAN is NOT supported.
DI/DO Control: The device supports DI#1 and DO#1 only. Refer to the section 3.6. IO Configuration for an explanation of alarm settings.
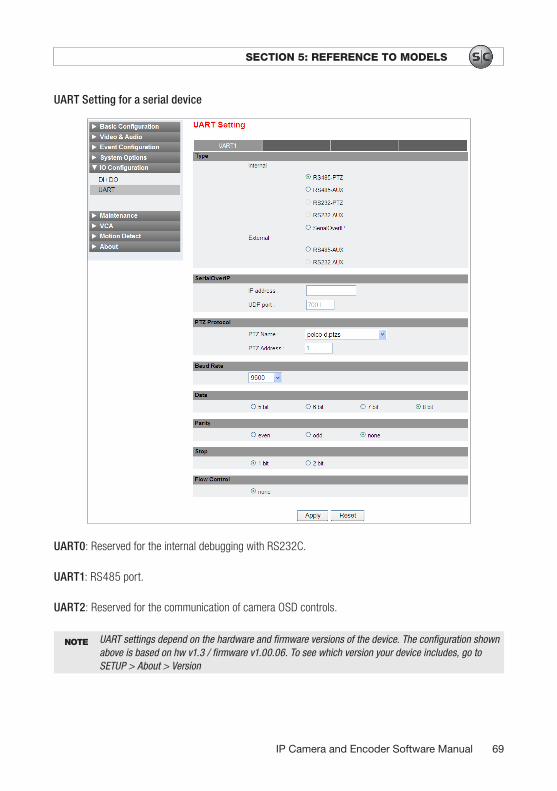
69IPCameraandEncoderSoftwareManual
SECTION 5: REFERENCE TO MODELS
UART Setting for a serial device
UART0: Reserved for the internal debugging with RS232C.
UART1: RS485 port.
UART2: Reserved for the communication of camera OSD controls.
NOTE UART settings depend on the hardware and firmware versions of the device. The configuration shown above is based on hw v1.3 / firmware v1.00.06. To see which version your device includes, go to SETUP > About > Version
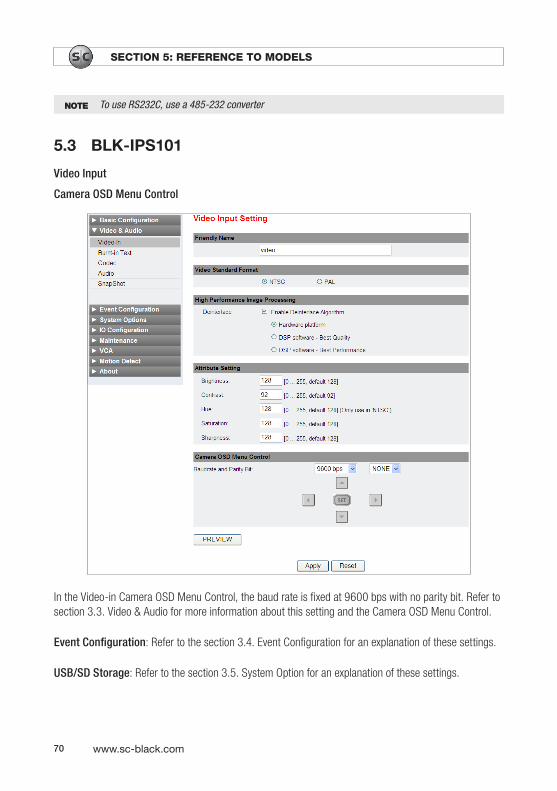
70 www.sc-black.com
SECTION 5: REFERENCE TO MODELS
NOTE To use RS232C, use a 485-232 converter
5.3 BLK-IPS101
Video Input
Camera OSD Menu Control
In the Video-in Camera OSD Menu Control, the baud rate is fixed at 9600 bps with no parity bit. Refer to section 3.3. Video & Audio for more information about this setting and the Camera OSD Menu Control.
Event Configuration: Refer to the section 3.4. Event Configuration for an explanation of these settings.
USB/SD Storage: Refer to the section 3.5. System Option for an explanation of these settings.
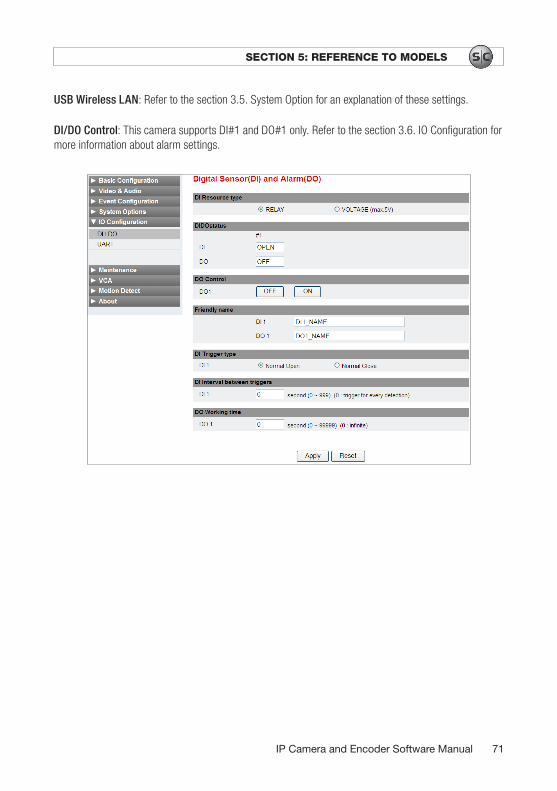
71IPCameraandEncoderSoftwareManual
SECTION 5: REFERENCE TO MODELS
USB Wireless LAN: Refer to the section 3.5. System Option for an explanation of these settings.
DI/DO Control: This camera supports DI#1 and DO#1 only. Refer to the section 3.6. IO Configuration for more information about alarm settings.
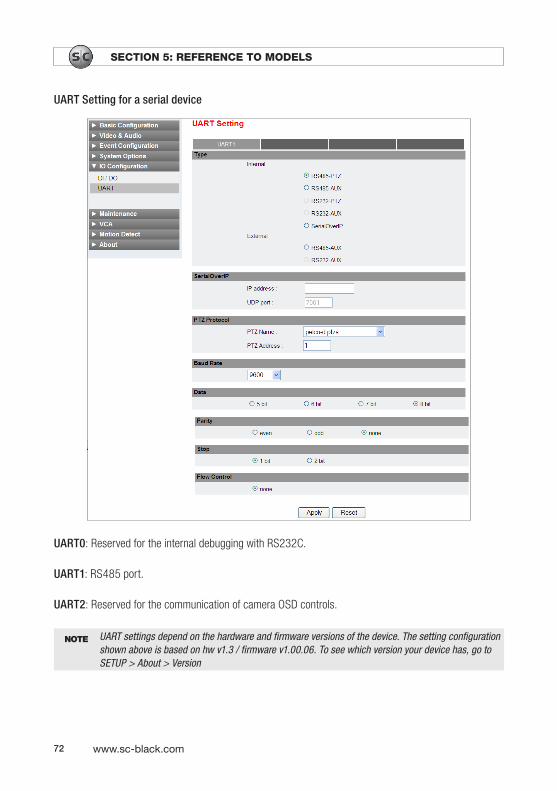
72 www.sc-black.com
SECTION 5: REFERENCE TO MODELS
UART Setting for a serial device
UART0: Reserved for the internal debugging with RS232C.
UART1: RS485 port.
UART2: Reserved for the communication of camera OSD controls.
NOTE UART settings depend on the hardware and firmware versions of the device. The setting configuration shown above is based on hw v1.3 / firmware v1.00.06. To see which version your device has, go to SETUP > About > Version
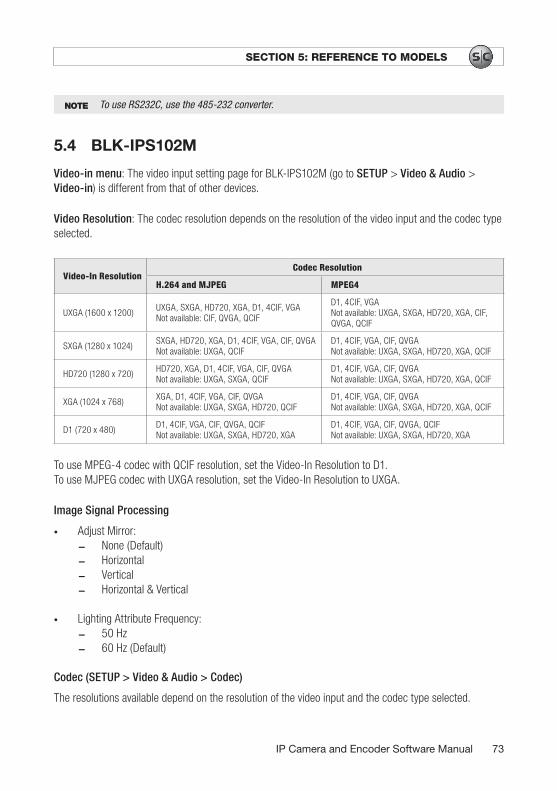
73IPCameraandEncoderSoftwareManual
SECTION 5: REFERENCE TO MODELS
NOTE To use RS232C, use the 485-232 converter.
5.4 BLK-IPS102M
Video-in menu: The video input setting page for BLK-IPS102M (go to SETUP > Video & Audio > Video-in) is different from that of other devices.
Video Resolution: The codec resolution depends on the resolution of the video input and the codec type selected.
Video-In Resolution Codec Resolution
H.264 and MJPEG MPEG4
UXGA (1600 x 1200) UXGA, SXGA, HD720, XGA, D1, 4CIF, VGA Not available: CIF, QVGA, QCIF
D1, 4CIF, VGA Not available: UXGA, SXGA, HD720, XGA, CIF, QVGA, QCIF
SXGA (1280 x 1024) SXGA, HD720, XGA, D1, 4CIF, VGA, CIF, QVGA Not available: UXGA, QCIF
D1, 4CIF, VGA, CIF, QVGA Not available: UXGA, SXGA, HD720, XGA, QCIF
HD720 (1280 x 720) HD720, XGA, D1, 4CIF, VGA, CIF, QVGA Not available: UXGA, SXGA, QCIF
D1, 4CIF, VGA, CIF, QVGA Not available: UXGA, SXGA, HD720, XGA, QCIF
XGA (1024 x 768) XGA, D1, 4CIF, VGA, CIF, QVGA Not available: UXGA, SXGA, HD720, QCIF
D1, 4CIF, VGA, CIF, QVGA Not available: UXGA, SXGA, HD720, XGA, QCIF
D1 (720 x 480) D1, 4CIF, VGA, CIF, QVGA, QCIF Not available: UXGA, SXGA, HD720, XGA
D1, 4CIF, VGA, CIF, QVGA, QCIF Not available: UXGA, SXGA, HD720, XGA
To use MPEG-4 codec with QCIF resolution, set the Video-In Resolution to D1. To use MJPEG codec with UXGA resolution, set the Video-In Resolution to UXGA.
Image Signal Processing
• Adjust Mirror: — None (Default) — Horizontal — Vertical — Horizontal & Vertical
• Lighting Attribute Frequency: — 50 Hz — 60 Hz (Default)
Codec (SETUP > Video & Audio > Codec)
The resolutions available depend on the resolution of the video input and the codec type selected.
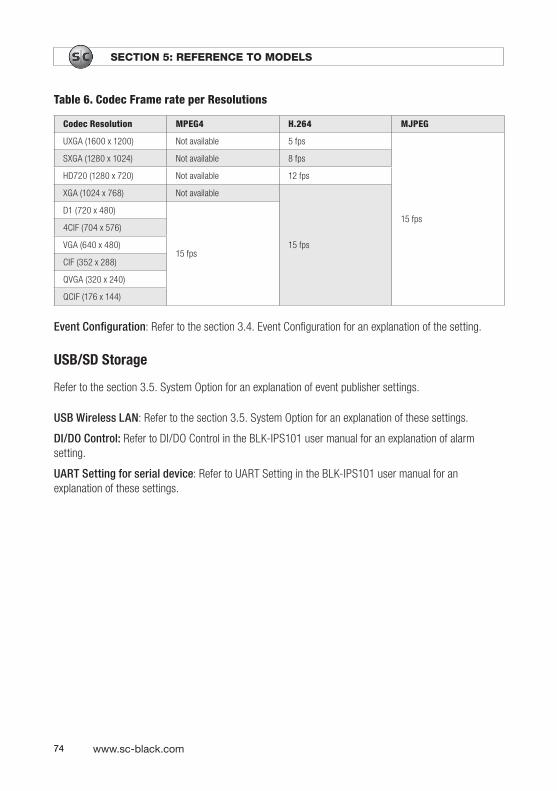
74 www.sc-black.com
SECTION 5: REFERENCE TO MODELS
Table 6. Codec Frame rate per Resolutions
Codec Resolution MPEG4 H.264 MJPEG
UXGA (1600 x 1200) Not available 5 fps
15 fps
SXGA (1280 x 1024) Not available 8 fps
HD720 (1280 x 720) Not available 12 fps
XGA (1024 x 768) Not available
15 fps
D1 (720 x 480)
15 fps
4CIF (704 x 576)
VGA (640 x 480)
CIF (352 x 288)
QVGA (320 x 240)
QCIF (176 x 144)
Event Configuration: Refer to the section 3.4. Event Configuration for an explanation of the setting.
USB/SD Storage
Refer to the section 3.5. System Option for an explanation of event publisher settings.
USB Wireless LAN: Refer to the section 3.5. System Option for an explanation of these settings.
DI/DO Control: Refer to DI/DO Control in the BLK-IPS101 user manual for an explanation of alarm setting.
UART Setting for serial device: Refer to UART Setting in the BLK-IPS101 user manual for an explanation of these settings.

75IPCameraandEncoderSoftwareManual
SECTION 5: REFERENCE TO MODELS

76 www.sc-black.com
SECTION 5: REFERENCE TO MODELS