Embed Size (px)
Citation preview
For Research Use Only. Not for use in diagnostic procedures.
Ion PI™ Hi‑Q™ Sequencing 200 KitUSER GUIDE
for use with:Ion PI™ Hi‑Q™ Sequencing 200 KitIon Proton™ SystemIon PI™ Chip v3
Catalog Numbers A26433, A26772Publication Number MAN0010947
Revision C.0
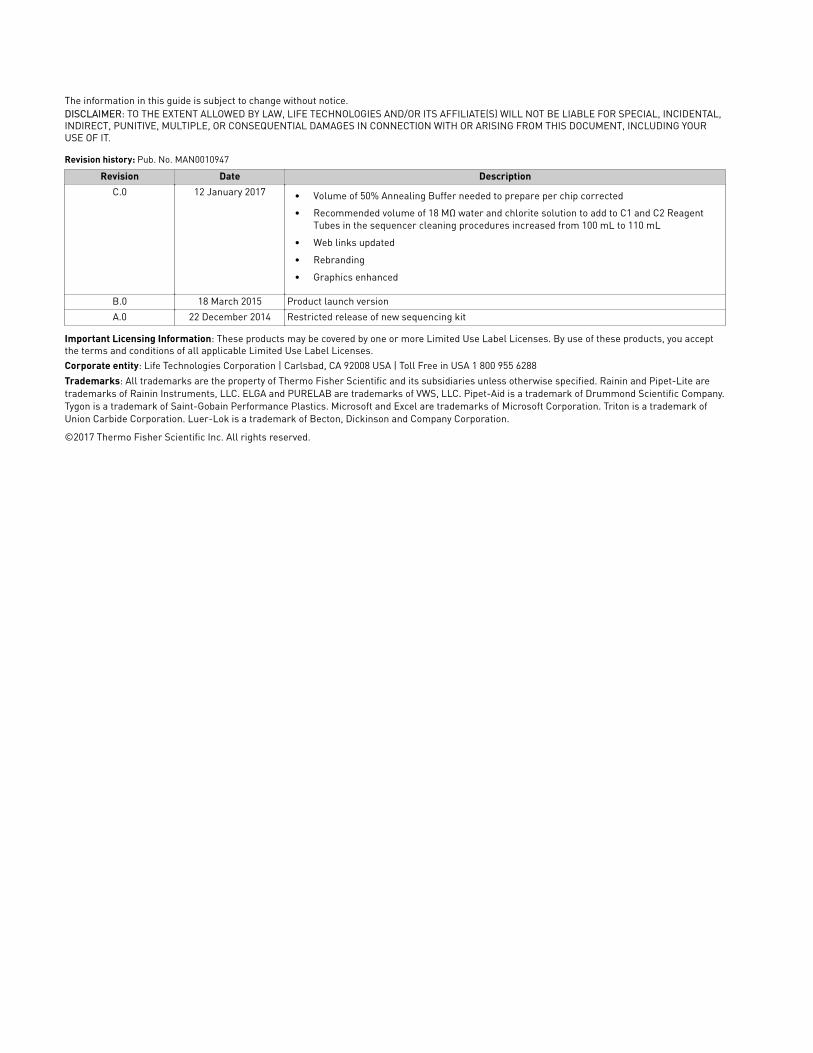
The information in this guide is subject to change without notice.DISCLAIMER: TO THE EXTENT ALLOWED BY LAW, LIFE TECHNOLOGIES AND/OR ITS AFFILIATE(S) WILL NOT BE LIABLE FOR SPECIAL, INCIDENTAL,INDIRECT, PUNITIVE, MULTIPLE, OR CONSEQUENTIAL DAMAGES IN CONNECTION WITH OR ARISING FROM THIS DOCUMENT, INCLUDING YOURUSE OF IT.
Revision history: Pub. No. MAN0010947
Revision Date DescriptionC.0 12 January 2017 • Volume of 50% Annealing Buffer needed to prepare per chip corrected
• Recommended volume of 18 MΩ water and chlorite solution to add to C1 and C2 Reagent Tubes in the sequencer cleaning procedures increased from 100 mL to 110 mL
• Web links updated
• Rebranding
• Graphics enhanced
B.0 18 March 2015 Product launch version
A.0 22 December 2014 Restricted release of new sequencing kit
Important Licensing Information: These products may be covered by one or more Limited Use Label Licenses. By use of these products, you acceptthe terms and conditions of all applicable Limited Use Label Licenses.Corporate entity: Life Technologies Corporation | Carlsbad, CA 92008 USA | Toll Free in USA 1 800 955 6288
Trademarks: All trademarks are the property of Thermo Fisher Scientific and its subsidiaries unless otherwise specified. Rainin and Pipet-Lite aretrademarks of Rainin Instruments, LLC. ELGA and PURELAB are trademarks of VWS, LLC. Pipet-Aid is a trademark of Drummond Scientific Company.Tygon is a trademark of Saint-Gobain Performance Plastics. Microsoft and Excel are trademarks of Microsoft Corporation. Triton is a trademark ofUnion Carbide Corporation. Luer-Lok is a trademark of Becton, Dickinson and Company Corporation.
©2017 Thermo Fisher Scientific Inc. All rights reserved.
Contents
■ CHAPTER 1 Product information . . . . . . . . . . . . . . . . . . . . . . . . . . . . . . . . . . . . . . . 7
Product description . . . . . . . . . . . . . . . . . . . . . . . . . . . . . . . . . . . . . . . . . . . . . . . . . . . . . . . . . . . . . 7
Library kit compatibility . . . . . . . . . . . . . . . . . . . . . . . . . . . . . . . . . . . . . . . . . . . . . . . . . . . . . . . . . . 8
Template kit compatibility . . . . . . . . . . . . . . . . . . . . . . . . . . . . . . . . . . . . . . . . . . . . . . . . . . . . . . . . 8
Software compatibility . . . . . . . . . . . . . . . . . . . . . . . . . . . . . . . . . . . . . . . . . . . . . . . . . . . . . . . . . . . 8
Ion PI™ Hi‑Q™ Sequencing 200 Kit . . . . . . . . . . . . . . . . . . . . . . . . . . . . . . . . . . . . . . . . . . . . . . . . . 9Kit contents and storage . . . . . . . . . . . . . . . . . . . . . . . . . . . . . . . . . . . . . . . . . . . . . . . . . . . . . 9
Ion Proton™ Wash 2 Bottle . . . . . . . . . . . . . . . . . . . . . . . . . . . . . . . . . . . . . . . . . . . . . . . . . . . . . . . 10
Ion PI™ Chip Kit v3 . . . . . . . . . . . . . . . . . . . . . . . . . . . . . . . . . . . . . . . . . . . . . . . . . . . . . . . . . . . . . . 10
Required materials not supplied . . . . . . . . . . . . . . . . . . . . . . . . . . . . . . . . . . . . . . . . . . . . . . . . . 10
Optional materials and equipment . . . . . . . . . . . . . . . . . . . . . . . . . . . . . . . . . . . . . . . . . . . . . . . 12
Precautions - Read before using the Ion Proton™ System . . . . . . . . . . . . . . . . . . . . . . . . . . . . 13Gas safety . . . . . . . . . . . . . . . . . . . . . . . . . . . . . . . . . . . . . . . . . . . . . . . . . . . . . . . . . . . . . . . . 13Avoid nucleic acid contamination . . . . . . . . . . . . . . . . . . . . . . . . . . . . . . . . . . . . . . . . . . . . . 13Avoid CO2 contamination . . . . . . . . . . . . . . . . . . . . . . . . . . . . . . . . . . . . . . . . . . . . . . . . . . . . 13Avoid introducing noise to instrument measurements . . . . . . . . . . . . . . . . . . . . . . . . . . 13Avoid chip damage . . . . . . . . . . . . . . . . . . . . . . . . . . . . . . . . . . . . . . . . . . . . . . . . . . . . . . . . . 13
Ion Proton™ Sequencer components . . . . . . . . . . . . . . . . . . . . . . . . . . . . . . . . . . . . . . . . . . . . . . 14
Ion Proton™ Sequencer reagent positions . . . . . . . . . . . . . . . . . . . . . . . . . . . . . . . . . . . . . . . . . 14
Workflow . . . . . . . . . . . . . . . . . . . . . . . . . . . . . . . . . . . . . . . . . . . . . . . . . . . . . . . . . . . . . . . . . . . . . 15
■ CHAPTER 2 Before you begin . . . . . . . . . . . . . . . . . . . . . . . . . . . . . . . . . . . . . . . . . . 16
Create a Planned Run . . . . . . . . . . . . . . . . . . . . . . . . . . . . . . . . . . . . . . . . . . . . . . . . . . . . . . . . . . 16About Planned Runs . . . . . . . . . . . . . . . . . . . . . . . . . . . . . . . . . . . . . . . . . . . . . . . . . . . . . . . 16Create a Planned Run . . . . . . . . . . . . . . . . . . . . . . . . . . . . . . . . . . . . . . . . . . . . . . . . . . . . . . 16Planned Run wizard: key fields . . . . . . . . . . . . . . . . . . . . . . . . . . . . . . . . . . . . . . . . . . . . . . 18
Guidelines for handling and inserting chips . . . . . . . . . . . . . . . . . . . . . . . . . . . . . . . . . . . . . . . . 19Insert a chip into the chip clamp . . . . . . . . . . . . . . . . . . . . . . . . . . . . . . . . . . . . . . . . . . . . . 19
Ion PI™ Hi‑Q™ Sequencing 200 Kit User Guide 3
■ CHAPTER 3 Clean and initialize the Ion Proton™ Sequencer . . . . . . . 21
Prepare 1 M NaOH daily . . . . . . . . . . . . . . . . . . . . . . . . . . . . . . . . . . . . . . . . . . . . . . . . . . . . . . . . . 21
Clean the Ion Proton™ Sequencer . . . . . . . . . . . . . . . . . . . . . . . . . . . . . . . . . . . . . . . . . . . . . . . . 21Materials required . . . . . . . . . . . . . . . . . . . . . . . . . . . . . . . . . . . . . . . . . . . . . . . . . . . . . . . . . 21Cleaning schedule . . . . . . . . . . . . . . . . . . . . . . . . . . . . . . . . . . . . . . . . . . . . . . . . . . . . . . . . . 2218 MΩ water cleaning . . . . . . . . . . . . . . . . . . . . . . . . . . . . . . . . . . . . . . . . . . . . . . . . . . . . . . 22Chlorite cleaning . . . . . . . . . . . . . . . . . . . . . . . . . . . . . . . . . . . . . . . . . . . . . . . . . . . . . . . . . . 24
Initialize the Ion Proton™ Sequencer . . . . . . . . . . . . . . . . . . . . . . . . . . . . . . . . . . . . . . . . . . . . . . 26Materials required . . . . . . . . . . . . . . . . . . . . . . . . . . . . . . . . . . . . . . . . . . . . . . . . . . . . . . . . . 26Initialization guidelines . . . . . . . . . . . . . . . . . . . . . . . . . . . . . . . . . . . . . . . . . . . . . . . . . . . . . 26Before you begin . . . . . . . . . . . . . . . . . . . . . . . . . . . . . . . . . . . . . . . . . . . . . . . . . . . . . . . . . . . 26Begin the initialization . . . . . . . . . . . . . . . . . . . . . . . . . . . . . . . . . . . . . . . . . . . . . . . . . . . . . . 27Prepare and install the Wash 1 and Wash 3 Reagent Tubes . . . . . . . . . . . . . . . . . . . . . . 27Prepare the Wash 2 Bottle and install . . . . . . . . . . . . . . . . . . . . . . . . . . . . . . . . . . . . . . . . 28Prepare and install the Reagent Tubes with dNTP solutions . . . . . . . . . . . . . . . . . . . . . 29
■ CHAPTER 4 Load the chip and start the sequencing run . . . . . . . . . . . . 31
Materials required . . . . . . . . . . . . . . . . . . . . . . . . . . . . . . . . . . . . . . . . . . . . . . . . . . . . . . . . . . . . . 31
Scheduling sequencing runs after initialization . . . . . . . . . . . . . . . . . . . . . . . . . . . . . . . . . . . . 32
Chip loading guidelines . . . . . . . . . . . . . . . . . . . . . . . . . . . . . . . . . . . . . . . . . . . . . . . . . . . . . . . . . 32
Before you begin . . . . . . . . . . . . . . . . . . . . . . . . . . . . . . . . . . . . . . . . . . . . . . . . . . . . . . . . . . . . . . . 33
Prepare the template-positive ISPs for sequencing . . . . . . . . . . . . . . . . . . . . . . . . . . . . . . . . . 34Add Ion PI™ Control Ion Sphere™ Particles to the enriched ISPs . . . . . . . . . . . . . . . . . . 34Anneal Sequencing Primer to the enriched ISPs . . . . . . . . . . . . . . . . . . . . . . . . . . . . . . . 34
Load the Ion PI™ Chip v3 . . . . . . . . . . . . . . . . . . . . . . . . . . . . . . . . . . . . . . . . . . . . . . . . . . . . . . . . 34Load the sample on the chip . . . . . . . . . . . . . . . . . . . . . . . . . . . . . . . . . . . . . . . . . . . . . . . . . 34Flush the chip and load the Ion PI™ Hi‑Q™ Sequencing Polymerase . . . . . . . . . . . . . . . 36
Start the sequencing run . . . . . . . . . . . . . . . . . . . . . . . . . . . . . . . . . . . . . . . . . . . . . . . . . . . . . . . . 37
■ APPENDIX A Troubleshooting . . . . . . . . . . . . . . . . . . . . . . . . . . . . . . . . . . . . . . . . . 38
Ion Proton™ Sequencer alarms and events . . . . . . . . . . . . . . . . . . . . . . . . . . . . . . . . . . . . . . . . 39
Ion Proton™ Sequencer status bar icon warnings . . . . . . . . . . . . . . . . . . . . . . . . . . . . . . . . . . . 40
Instrument leaks . . . . . . . . . . . . . . . . . . . . . . . . . . . . . . . . . . . . . . . . . . . . . . . . . . . . . . . . . . . . . . . 42
Touchscreen . . . . . . . . . . . . . . . . . . . . . . . . . . . . . . . . . . . . . . . . . . . . . . . . . . . . . . . . . . . . . . . . . . . 43
Instrument error messages . . . . . . . . . . . . . . . . . . . . . . . . . . . . . . . . . . . . . . . . . . . . . . . . . . . . . 43
Sample loading or sequencing . . . . . . . . . . . . . . . . . . . . . . . . . . . . . . . . . . . . . . . . . . . . . . . . . . . 49
Troubleshooting using the Ion PI™ Control Ion Sphere™ Particles . . . . . . . . . . . . . . . . . . . . . 50
Contents
4 Ion PI™ Hi‑Q™ Sequencing 200 Kit User Guide
■ APPENDIX B Sharing Planned Runs between Torrent Servers . . . . . 51
Enable Planned Run sharing . . . . . . . . . . . . . . . . . . . . . . . . . . . . . . . . . . . . . . . . . . . . . . . . . . . . . 51Set up Server Network (admin action) . . . . . . . . . . . . . . . . . . . . . . . . . . . . . . . . . . . . . . . . 52Transfer a Planned Run . . . . . . . . . . . . . . . . . . . . . . . . . . . . . . . . . . . . . . . . . . . . . . . . . . . . 53Undo a Planned Run transfer (administrator) . . . . . . . . . . . . . . . . . . . . . . . . . . . . . . . . . . 55Undo a Planned Run transfer (user) . . . . . . . . . . . . . . . . . . . . . . . . . . . . . . . . . . . . . . . . . . 55
■ APPENDIX C Touchscreen Reference . . . . . . . . . . . . . . . . . . . . . . . . . . . . . . . . . 56
Main menu . . . . . . . . . . . . . . . . . . . . . . . . . . . . . . . . . . . . . . . . . . . . . . . . . . . . . . . . . . . . . . . . . . . . 56Clean, Initialize, and Run . . . . . . . . . . . . . . . . . . . . . . . . . . . . . . . . . . . . . . . . . . . . . . . . . . . 56Options and Tools . . . . . . . . . . . . . . . . . . . . . . . . . . . . . . . . . . . . . . . . . . . . . . . . . . . . . . . . . . 57Chip Status icon . . . . . . . . . . . . . . . . . . . . . . . . . . . . . . . . . . . . . . . . . . . . . . . . . . . . . . . . . . . 58Touchscreen gauges . . . . . . . . . . . . . . . . . . . . . . . . . . . . . . . . . . . . . . . . . . . . . . . . . . . . . . . 58Alarms/Events pop-up . . . . . . . . . . . . . . . . . . . . . . . . . . . . . . . . . . . . . . . . . . . . . . . . . . . . . 59
■ APPENDIX D Supplemental procedures . . . . . . . . . . . . . . . . . . . . . . . . . . . . . . 60
Power instrument on or off . . . . . . . . . . . . . . . . . . . . . . . . . . . . . . . . . . . . . . . . . . . . . . . . . . . . . . 60Powering on . . . . . . . . . . . . . . . . . . . . . . . . . . . . . . . . . . . . . . . . . . . . . . . . . . . . . . . . . . . . . . 60Powering off . . . . . . . . . . . . . . . . . . . . . . . . . . . . . . . . . . . . . . . . . . . . . . . . . . . . . . . . . . . . . . 60
Update Ion Proton™ Sequencer software . . . . . . . . . . . . . . . . . . . . . . . . . . . . . . . . . . . . . . . . . . 61
Manually adjust the pH of the W2 Solution . . . . . . . . . . . . . . . . . . . . . . . . . . . . . . . . . . . . . . . . . 61
Set up and test the Ion Chip™ Minifuge . . . . . . . . . . . . . . . . . . . . . . . . . . . . . . . . . . . . . . . . . . . . 62Install the Ion S5™ /Ion Proton™ Rotor and Buckets . . . . . . . . . . . . . . . . . . . . . . . . . . . . 63Test the minifuge . . . . . . . . . . . . . . . . . . . . . . . . . . . . . . . . . . . . . . . . . . . . . . . . . . . . . . . . . . 64
■ APPENDIX E Safety . . . . . . . . . . . . . . . . . . . . . . . . . . . . . . . . . . . . . . . . . . . . . . . . . . . . . 66
Equipment use . . . . . . . . . . . . . . . . . . . . . . . . . . . . . . . . . . . . . . . . . . . . . . . . . . . . . . . . . . . . . . . . . 66
Symbols on this instrument . . . . . . . . . . . . . . . . . . . . . . . . . . . . . . . . . . . . . . . . . . . . . . . . . . . . . 67Conformity symbols on this instrument . . . . . . . . . . . . . . . . . . . . . . . . . . . . . . . . . . . . . . . 67
Safety alerts on this instrument . . . . . . . . . . . . . . . . . . . . . . . . . . . . . . . . . . . . . . . . . . . . . . . . . . 68Safety symbols used on the instrument . . . . . . . . . . . . . . . . . . . . . . . . . . . . . . . . . . . . . . . 69
Safety information for instruments not manufactured by Thermo Fisher Scientific . . . . . 70
Instrument safety . . . . . . . . . . . . . . . . . . . . . . . . . . . . . . . . . . . . . . . . . . . . . . . . . . . . . . . . . . . . . . 70General . . . . . . . . . . . . . . . . . . . . . . . . . . . . . . . . . . . . . . . . . . . . . . . . . . . . . . . . . . . . . . . . . . 70Electrical . . . . . . . . . . . . . . . . . . . . . . . . . . . . . . . . . . . . . . . . . . . . . . . . . . . . . . . . . . . . . . . . . 70Cleaning and decontamination . . . . . . . . . . . . . . . . . . . . . . . . . . . . . . . . . . . . . . . . . . . . . . . 70
Gas safety . . . . . . . . . . . . . . . . . . . . . . . . . . . . . . . . . . . . . . . . . . . . . . . . . . . . . . . . . . . . . . . . . . . . . 71
Safety and electromagnetic compatibility (EMC) standards . . . . . . . . . . . . . . . . . . . . . . . . . . 71Safety . . . . . . . . . . . . . . . . . . . . . . . . . . . . . . . . . . . . . . . . . . . . . . . . . . . . . . . . . . . . . . . . . . . . 71EMC . . . . . . . . . . . . . . . . . . . . . . . . . . . . . . . . . . . . . . . . . . . . . . . . . . . . . . . . . . . . . . . . . . . . . . 71Environmental design . . . . . . . . . . . . . . . . . . . . . . . . . . . . . . . . . . . . . . . . . . . . . . . . . . . . . . 72
Contents
Ion PI™ Hi‑Q™ Sequencing 200 Kit User Guide 5
Chemical safety . . . . . . . . . . . . . . . . . . . . . . . . . . . . . . . . . . . . . . . . . . . . . . . . . . . . . . . . . . . . . . . . 72
Biological hazard safety . . . . . . . . . . . . . . . . . . . . . . . . . . . . . . . . . . . . . . . . . . . . . . . . . . . . . . . . . 73
■ APPENDIX F Documentation and support . . . . . . . . . . . . . . . . . . . . . . . . . . . . 74
Customer and technical support . . . . . . . . . . . . . . . . . . . . . . . . . . . . . . . . . . . . . . . . . . . . . . . . . 74
Limited product warranty . . . . . . . . . . . . . . . . . . . . . . . . . . . . . . . . . . . . . . . . . . . . . . . . . . . . . . . 74
Contents
6 Ion PI™ Hi‑Q™ Sequencing 200 Kit User Guide
Product information
CAUTION! ABBREVIATED SAFETY ALERTS. Hazard symbols and hazardtypes specified in procedures may be abbreviated in this document. For thecomplete safety information, see the “Safety” appendix in this document.
IMPORTANT! Before using this product, read and understand the information in the“Safety” appendix in this document.
Product description
The Ion PI™ Hi‑Q™ Sequencing 200 Kit includes reagents and materials for sequencingup to 200‑bp average insert libraries using the Ion PI™ Chip Kit v3 on the Ion Proton™
System. The sequencing kit also includes components for cleaning and initializing theinstrument.
The kit is designed to sequence templates that have been amplified on Ion PI™ IonSphere™ Particles (ISPs) using the Ion PI™ Hi‑Q™ OT2 200 Kit (Cat. No. A26434).
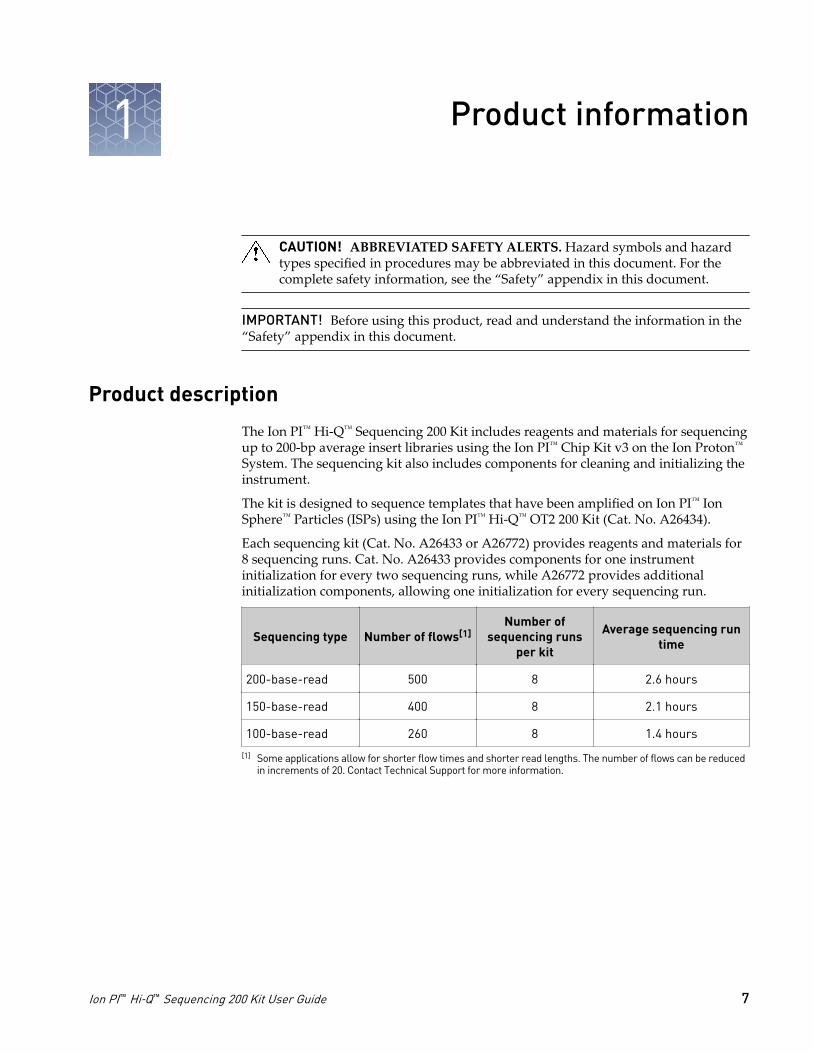
Each sequencing kit (Cat. No. A26433 or A26772) provides reagents and materials for8 sequencing runs. Cat. No. A26433 provides components for one instrumentinitialization for every two sequencing runs, while A26772 provides additionalinitialization components, allowing one initialization for every sequencing run.
Sequencing type Number of flows[1]Number of
sequencing runsper kit
Average sequencing runtime
200-base-read 500 8 2.6 hours
150-base-read 400 8 2.1 hours
100-base-read 260 8 1.4 hours
[1] Some applications allow for shorter flow times and shorter read lengths. The number of flows can be reduced in increments of 20. Contact Technical Support for more information.
1
Ion PI™ Hi‑Q™ Sequencing 200 Kit User Guide 7
Library kit compatibility
The Ion PI™ Hi‑Q™ Sequencing 200 Kit is optimized for 200‑base‑read libraries of anytype, including Ion AmpliSeq™ Exome libraries.
Template kit compatibility
The Ion PI™ Hi‑Q™ Sequencing 200 Kit must be used with the Ion PI™ Hi‑Q™ OT2 200Kit (Cat. No. A26434). Select the Ion PI™ Hi‑Q™ OT2 200 Kit when creating a PlannedRun.
Software compatibility
This sequencing kit is compatible with Torrent Suite™ Software v4.4 and later. Werecommend that you update your system software to the latest available versionbefore using this kit.
Chapter 1 Product informationLibrary kit compatibility1
8 Ion PI™ Hi‑Q™ Sequencing 200 Kit User Guide

Ion PI™ Hi‑Q™ Sequencing 200 Kit
Each Ion PI™ Hi‑Q™ Sequencing 200 Kit (Cat. No. A26433 or A26772) contains theboxes and components listed below.
• Catalog No. A26433 contains one of each box listed below, for one instrumentinitialization for every two sequencing runs.
• Catalog No. A26772 contains an additional box each of the Supplies, Solutions,and Nucleotides, which allows one initialization for every sequencing run.
Components Amount Storage
Ion PI™ Hi‑Q™Sequencing 200 Reagents (Part No. A26431)
Ion PI™ Hi‑Q™ Sequencing Polymerase (yellow cap) 48 µL –30°C to–10°C
Ion PI™ Sequencing Primer (white cap) 160 µL
Ion PI™ Control Ion Spheres (clear cap) 40 µL
Ion Proton™ Sequencing Supplies (Part No. 4488651)
Ion Proton™ Reagent Tube Caps 16 caps 15°C to 30°C
Ion Proton™ Wash Bottle Sippers (gray) 4 sippers
Ion Proton™ Reagent Tube Sippers (blue) 2 packs of32 sippers each
Ion Proton™ Reagent Tubes with labels (140 mL) 8 packs of4 tubes each
Ion PI™ Hi‑Q™ Sequencing 200 Solutions (Part No. A26430)
Ion PI™ Hi‑Q™ W2 Solution 4 × 125 mL Shipped at 15°Cto 30°C
Store at 2°C to8°C (store W2
Solutionprotected from
light)
Ion PI™ 1X W3 Solution 2 × 100 mL
Ion Cleaning tablet 4 tablets
Ion PI™ Annealing Buffer 30 mL
Ion PI™ Loading Buffer (brown cap) 80 µL
Ion PI™ Foaming Solution (violet cap) 1 mL
Ion PI™ Sequencing Nucleotides (Part No. A26432)
Ion PI™ dGTP (black cap) 280 µL –30°C to–10°C
Ion PI™ dCTP (blue cap) 280 µL
Ion PI™ dATP (green cap) 280 µL
Ion PI™ dTTP (red cap) 280 µL
Kit contents andstorage
Chapter 1 Product informationIon PI™ Hi‑Q™ Sequencing 200 Kit 1
Ion PI™ Hi‑Q™ Sequencing 200 Kit User Guide 9
Ion Proton™ Wash 2 Bottle
The Ion Proton™ Wash 2 Bottle (Cat. No. A24893) is sold separately:
Component Quantity Storage
Ion Proton™ Wash 2 Bottle w/ label 1 bottle 15°C to 30°C
Ion PI™ Chip Kit v3
The following chip kit is compatible with this sequencing kit, and is sold separately:
Component Quantity Catalog No. Storage
Ion PI™ Chip Kit v3 8 pack A26771 15°C to 30°C
Required materials not supplied
Unless otherwise indicated, all materials are available through thermofisher.com.MLS: Fisher Scientific (fisherscientific.com) or other major laboratory supplier.
Note: The procedures in this guide have been verified using these specific materials.Substitution may adversely affect system performance.
Item Source
Tank of compressed nitrogen (grade 4.5, 99.995% pure or better) MLS
Multistage (dual-stage) gas regulator (0–50 psi, 2–3 Bar output) Fisher Scientific NC0393866, or
MLS
(Optional) 1/8" x 1/4" stem reducing coupler (only required if using aseparate tank for the wash station)
McMaster5779K699
Non-interruptible Power Supply (UPS) [1] MLS
ELGA™ PURELAB™ Flex 3 Water Purification System or
Equivalent 18 MΩ water system
4474524, or
MLS
NaOH (10 M), molecular biology grade MLS
Isopropanol (100%) MLS
Nuclease-free water, molecular biology grade MLS
0.22-µm or 0.45-µm vacuum filtration system and filters MLS
Microcentrifuge[2] MLS
25-mL or 50-mL serological pipettes or
100-mL graduated cylinder
MLS
Chapter 1 Product informationIon Proton™ Wash 2 Bottle1
10 Ion PI™ Hi‑Q™ Sequencing 200 Kit User Guide
Item Source
(If using serological pipettes) Pipet-Aid™ XP Pipet Controller, orequivalent
Fisher Scientific13-681-06
Rainin™ Pipet-Lite™ LTS Pipette L‑20XLS 2 to 20 µL
(Alternatives from Gilson and Eppendorf may be used)
Rainin 17014392
Rainin™ Pipet-Lite™ LTS Pipette L‑100XLS 10 to 100 µL
(Alternatives from Gilson and Eppendorf may be used)
Rainin 17014384
Rainin™ LTS pipette tips, 20 μL, SR-L10F[3]
(Alternatives from Gilson and Eppendorf may be used)
Rainin 17005860
Rainin™ LTS pipette tips, 200 μL, SR-L200F
(Alternatives from Gilson and Eppendorf may be used)
Rainin 17005859
PCR tubes, Flat Cap, 0.2-mL (do not use polystyrene tubes) Fisher Scientific14-222-262
1.5-mL or 1.7-mL microcentrifuge tubes MLS
Glass bottles (1 L) MLS
Ice buckets and ice —
Vortex mixer with a rubber platform MLS
Thermal cycler with a heated lid MLS
Dry bath incubator MLS
Standard laboratory vacuum line or vacuum pump MLS
Liquid trap MLS
Tygon™ tubing [4] MLS
[1] For laboratories that experience frequent power outages or line voltage fluctuations, we recommend that you use an non-interruptible power supply that is compatible with 2500 W output or higher.
[2] Must fit standard 1.5- and 0.2-mL microcentrifuge tubes and generate 15,500 × g.[3] Ensure tips from any vendors are low binding tips.[4] As needed to connect laboratory vacuum to liquid trap and liquid trap to P200 pipette tip.
Chapter 1 Product informationRequired materials not supplied 1
Ion PI™ Hi‑Q™ Sequencing 200 Kit User Guide 11
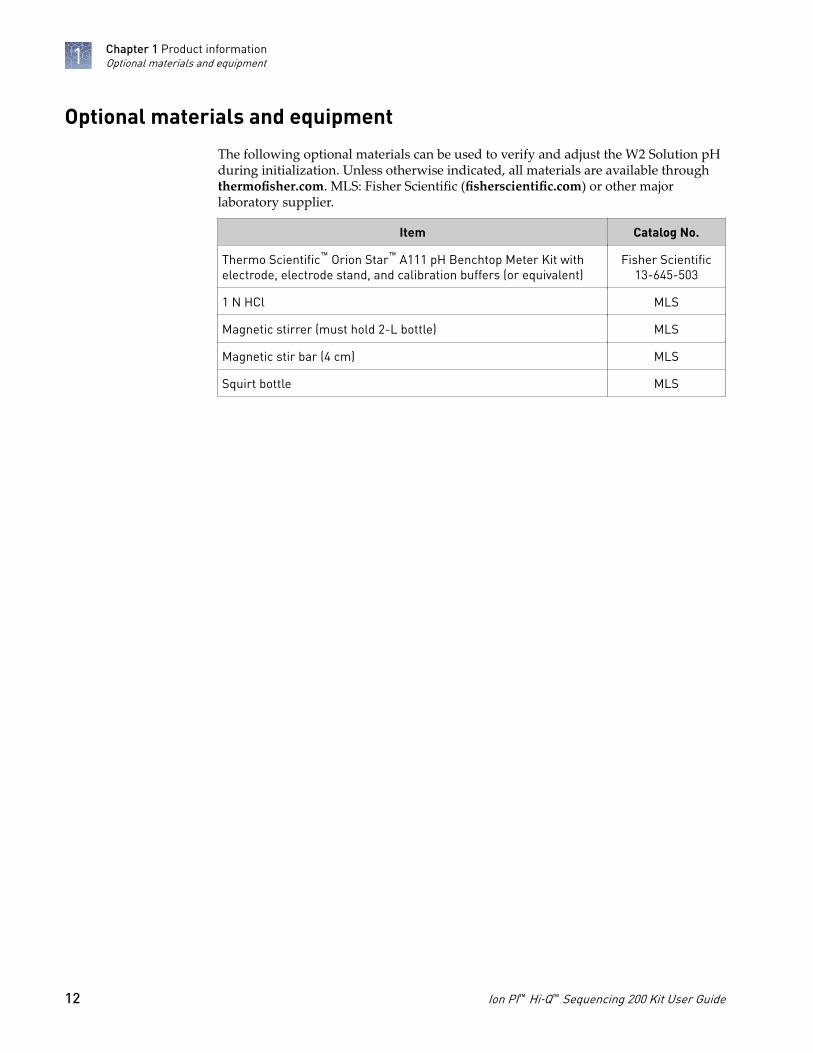
Optional materials and equipment
The following optional materials can be used to verify and adjust the W2 Solution pHduring initialization. Unless otherwise indicated, all materials are available through thermofisher.com. MLS: Fisher Scientific (fisherscientific.com) or other majorlaboratory supplier.
Item Catalog No.
Thermo Scientific™ Orion Star™ A111 pH Benchtop Meter Kit withelectrode, electrode stand, and calibration buffers (or equivalent)
Fisher Scientific13-645-503
1 N HCl MLS
Magnetic stirrer (must hold 2-L bottle) MLS
Magnetic stir bar (4 cm) MLS
Squirt bottle MLS
Chapter 1 Product informationOptional materials and equipment1
12 Ion PI™ Hi‑Q™ Sequencing 200 Kit User Guide
Precautions - Read before using the Ion Proton™ System
WARNING! Ion instrumentation should be installed and operated in a well‑ventilated environment as defined as having a minimum airflow of 6–10 airchanges per hour. Assess the need for ventilation or atmospheric monitoring toavoid asphyxiation accidents from inert gases and/or oxygen depletion, andtake measures to clearly identify potentially hazardous areas through trainingor signage. Please contact your Environmental Health and Safety Coordinatorto confirm that the Ion instruments will be installed and operated in anenvironment with sufficient ventilation.
IMPORTANT! A primary source of contamination is spurious DNA fragments fromprevious sample processing steps. Do not introduce amplified DNA into the librarypreparation laboratory or work area.
IMPORTANT! Handle nucleotides carefully to avoid cross‑contamination. Alwaysdiscard gloves after removing used Sippers from the sequencer in order to avoidcross‑contamination of the nucleotides. Always discard gloves after handlingconcentrated dNTP stocks. Barrier tips are required for all dNTP pipetting steps.
IMPORTANT! Dry ice (solid CO2) should be kept away from areas where buffers,wash solutions or sources of molecular biology grade water for the Ion Proton™
System are used. High air concentrations of subliming CO2 may influence the pH ofsuch buffers during or after their preparation. The stability of the pH of these buffersis a critical factor in the performance of the Ion Proton™ System.
IMPORTANT! Install the Ion Proton™ System on a bench that is free from vibrationsand that is not in contact with freezers, pumps, or other equipment that can causevibrations. Significant vibration during sequencing may add noise and reduce thequality of the measurements.
See the Ion Proton™ System Site Preparation Guide (Pub No. 4478733) for Ion Proton™
System space requirements and clearances.
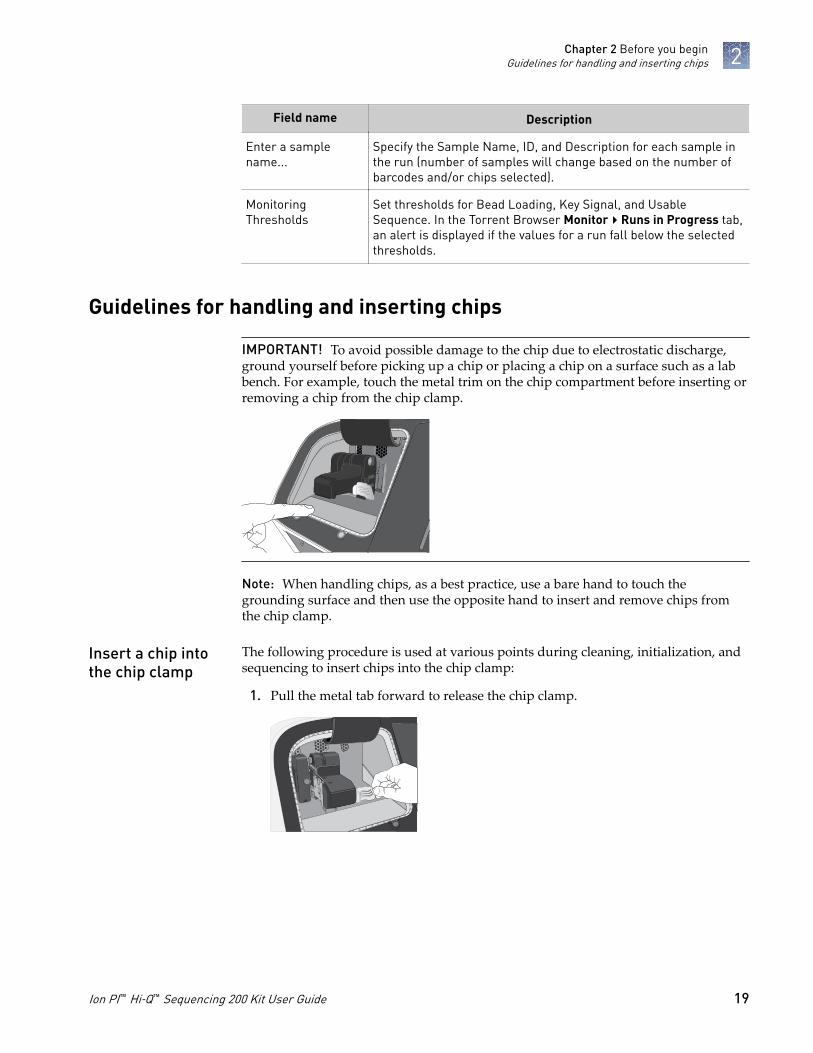
IMPORTANT! To avoid possible damage to the chip due to electrostatic discharge,ground yourself before picking up a chip or placing a chip on a surface such as a labbench. For example, touch the metal trim on the chip compartment before inserting orremoving a chip from the chip clamp.
Gas safety
Avoid nucleic acidcontamination
Avoid CO2contamination
Avoid introducingnoise toinstrumentmeasurements
Avoid chip damage
Chapter 1 Product informationPrecautions - Read before using the Ion Proton™ System 1
Ion PI™ Hi‑Q™ Sequencing 200 Kit User Guide 13
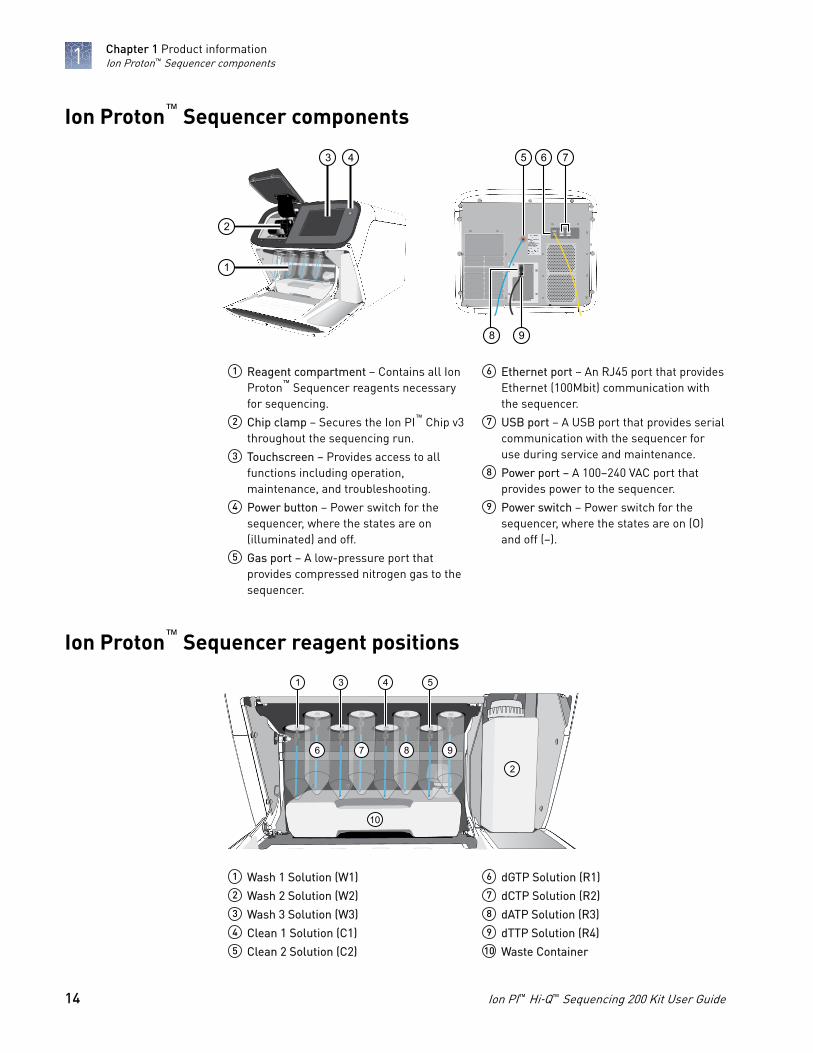
Ion Proton™ Sequencer components
1
3
2
4 76
8
5
9
1 Reagent compartment – Contains all IonProton™ Sequencer reagents necessaryfor sequencing.
2 Chip clamp – Secures the Ion PI™ Chip v3throughout the sequencing run.
3 Touchscreen – Provides access to allfunctions including operation,maintenance, and troubleshooting.
4 Power button – Power switch for thesequencer, where the states are on(illuminated) and off.
5 Gas port – A low-pressure port thatprovides compressed nitrogen gas to thesequencer.
6 Ethernet port – An RJ45 port that providesEthernet (100Mbit) communication withthe sequencer.
7 USB port – A USB port that provides serialcommunication with the sequencer foruse during service and maintenance.
8 Power port – A 100–240 VAC port thatprovides power to the sequencer.
9 Power switch – Power switch for thesequencer, where the states are on (O)and off (–).
Ion Proton™ Sequencer reagent positions
1
6
3 4 5
7 98
2
10
1 Wash 1 Solution (W1)2 Wash 2 Solution (W2)3 Wash 3 Solution (W3)4 Clean 1 Solution (C1)5 Clean 2 Solution (C2)
6 dGTP Solution (R1)7 dCTP Solution (R2)8 dATP Solution (R3)9 dTTP Solution (R4)
10 Waste Container
Chapter 1 Product informationIon Proton™ Sequencer components1
14 Ion PI™ Hi‑Q™ Sequencing 200 Kit User Guide
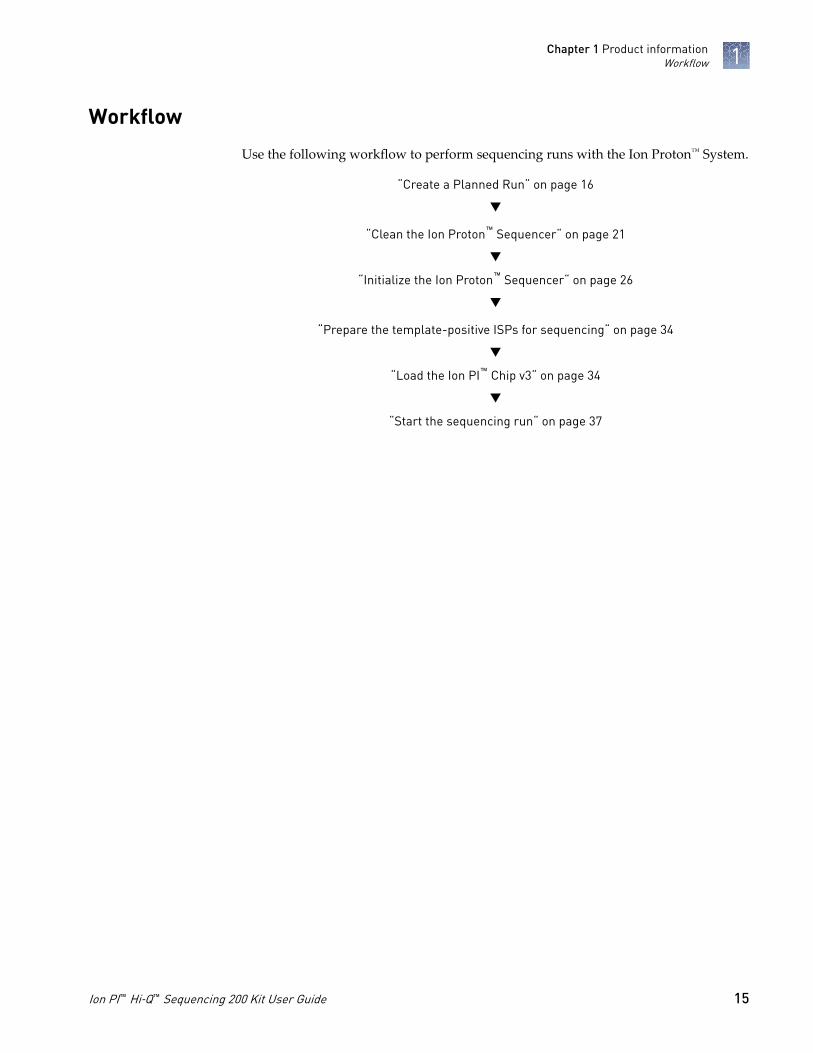
Workflow
Use the following workflow to perform sequencing runs with the Ion Proton™ System.
“Create a Planned Run“ on page 16
q
“Clean the Ion Proton™ Sequencer“ on page 21
q
“Initialize the Ion Proton™ Sequencer“ on page 26
q
“Prepare the template-positive ISPs for sequencing“ on page 34
q
“Load the Ion PI™ Chip v3“ on page 34
q
“Start the sequencing run“ on page 37
Chapter 1 Product informationWorkflow 1
Ion PI™ Hi‑Q™ Sequencing 200 Kit User Guide 15
Before you begin
Create a Planned Run
Planned Runs contain all the settings used in a sequencing run, including number offlows, kit types, barcodes, sample information, and reference files (if any). They areused to track samples, chips, and reagents throughout the sequencing workflow, fromtemplate preparation through sequencing and subsequent data analysis.
You can create a Planned Run in the Torrent Suite™ Software or Torrent Suite™ AssayDevelopment Software on the Torrent Server connected to your sequencer, and thenselect the appropriate plan on the sequencer touchscreen when you start the run.
You can also create a Planned Run on one Torrent Server and then transfer it toanother server for sequencing. See “Enable Planned Run sharing“ on page 51 formore information.
The following provides a summary of steps for creating a Planned Run in TorrentSuite™ Software, for use on the Ion Proton™ System.
For more detailed instructions, see the Torrent Suite™ Software Help Guide, available at thermofisher.com/ion-proton-docs.
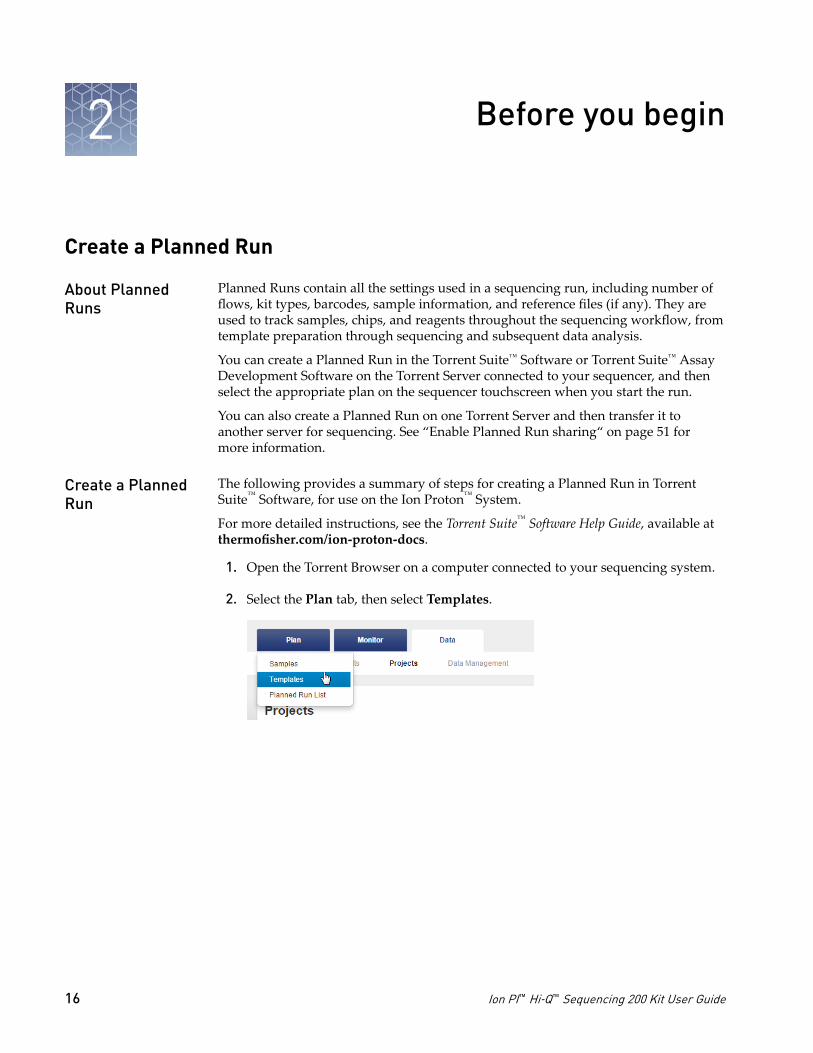
1. Open the Torrent Browser on a computer connected to your sequencing system.
2. Select the Plan tab, then select Templates.
2
About PlannedRuns
Create a PlannedRun
16 Ion PI™ Hi‑Q™ Sequencing 200 Kit User Guide

3. Select the application in the left navigation bar (for example, AmpliSeq DNA). Alist of existing Planned Run templates for that application will be displayed.Select one of the following options to create a new plan:
• To create a new Planned Run without using an existing template, click onPlan New Run.
• To create a new Planned Run from an existing template, click the buttonfor the template and select Plan Run from the drop‑down menu.
• Other options may be available depending on the selected application, suchas downloading templates from AmpliSeq.com.
4. In the wizard, make your selections on each screen, then click Next to proceed tothe next screen.
Note: For a complete description of each option, see the Torrent Suite™ SoftwareHelp Guide.
5. When you have completed your selections, click Plan Run.The run will be listed on the Planned Runs screen under the name you specified,and is available on the sequencer when you are setting up the run.
Chapter 2 Before you beginCreate a Planned Run 2
Ion PI™ Hi‑Q™ Sequencing 200 Kit User Guide 17
Field name Description
IonReporter If Ion Reporter™ Software is installed and enabled and you want toanalyze the run data using the software, select the account andworkflow.
Application Select the sequencing application you are performing.
Instrument Select the sequencing system you are using.
Chip Type Select the chip type you are using.
Library Kit Type Select the kit used to prepare the library.
Template Kit Select the instrument and kit used to prepare the templated ISPs.
Sequencing Kit Select the Ion PI™ Hi‑Q™ Sequencing 200 Kit.
Barcode Set(optional)
If you are using barcodes with:
• DNA libraries: Select the IonXpress barcode set, whichincludes all barcodes in the Ion Xpress™ Barcode Adapters1‑96 Kits.
• RNA libraries prepared using the Ion Total RNA-Seq Kit v2:Select the IonXpressRNA barcode set, which contains all 16barcodes in the Ion Xpress™ RNA BC01-16 Kit.
If you are not using barcodes with:
• DNA libraries: Leave the Barcode field blank.
• RNA libraries prepared using the Ion Total RNA-Seq Kit v2:Select RNA_Barcode_None from the drop-down list. This willensure that the proper trimming is performed on theresulting sequence when the RNA library does not have abarcode.
Flows Enter the appropriate number of flows for the sequencing kit andread length.
Plugins Select and configure the appropriate plugins for your application.
Projects Select or add a project within which to group your run data. Youcan include runs in multiple projects, and remove runs from aproject at any time.
Run Plan Name Enter a name for the run.
Reference Library Select a reference library uploaded to the Torrent Server, if any.
Target Regions andHotspot Regions
Select the Target Regions and/or HotSpot Regions BED file on theTorrent Server, if any.
Planned Runwizard: key fields
Chapter 2 Before you beginCreate a Planned Run2
18 Ion PI™ Hi‑Q™ Sequencing 200 Kit User Guide
Field name Description
Enter a samplename...
Specify the Sample Name, ID, and Description for each sample inthe run (number of samples will change based on the number ofbarcodes and/or chips selected).
MonitoringThresholds
Set thresholds for Bead Loading, Key Signal, and UsableSequence. In the Torrent Browser Monitor4Runs in Progress tab,an alert is displayed if the values for a run fall below the selectedthresholds.
Guidelines for handling and inserting chips
IMPORTANT! To avoid possible damage to the chip due to electrostatic discharge,ground yourself before picking up a chip or placing a chip on a surface such as a labbench. For example, touch the metal trim on the chip compartment before inserting orremoving a chip from the chip clamp.
Note: When handling chips, as a best practice, use a bare hand to touch thegrounding surface and then use the opposite hand to insert and remove chips fromthe chip clamp.
The following procedure is used at various points during cleaning, initialization, andsequencing to insert chips into the chip clamp:
1. Pull the metal tab forward to release the chip clamp.
Insert a chip intothe chip clamp
Chapter 2 Before you beginGuidelines for handling and inserting chips 2
Ion PI™ Hi‑Q™ Sequencing 200 Kit User Guide 19
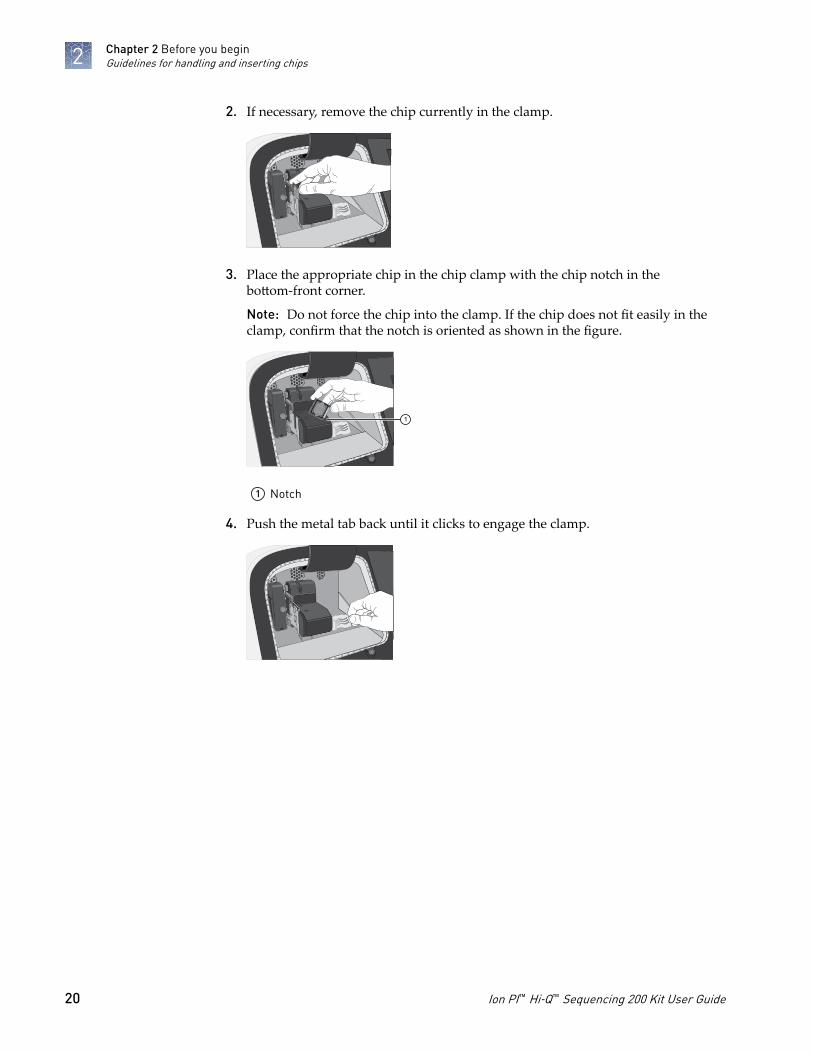
2. If necessary, remove the chip currently in the clamp.
torre
nt
530
DAB
D02
226
3. Place the appropriate chip in the chip clamp with the chip notch in thebottom‑front corner.
Note: Do not force the chip into the clamp. If the chip does not fit easily in theclamp, confirm that the notch is oriented as shown in the figure.
530
DAB
D02
226
ion
torre
nt
1
1 Notch
4. Push the metal tab back until it clicks to engage the clamp.
Chapter 2 Before you beginGuidelines for handling and inserting chips2
20 Ion PI™ Hi‑Q™ Sequencing 200 Kit User Guide
Clean and initialize the Ion Proton™
Sequencer
Prepare 1 M NaOH daily
Prepare a stock of 1 M NaOH daily by diluting 10 M NaOH with 18 MΩ water directlyfrom the purification system. Do not use water that has been collected or stored in anyother containers.
Note: You will need 32 µL for each initialization and 1 mL for each chlorite cleaning.
Clean the Ion Proton™ Sequencer
• 18 MΩ water (prepared and used directly from a water purification system, forexample, ELGA™ PURELAB® Flex 2 Water Purification System)
• Two 140‑mL Reagent Tubes (provided with kit; label the Reagent Tubes C1 andC2 before use)
• Collection tray (provided with the Ion Proton™ Sequencer)• Cleaning chip (leave chip on the instrument during cleaning)
Note: A cleaning chip is a used chip that you designate for cleaning. You can usethis chip for cleaning for up to 1 week.
• Used Sippers (from previous run or provided with the instrument)• New short blue Sippers• For chlorite cleaning only:
– Ion Cleaning Tablet (provided with kit)– 2 Reagent Tubes designated for chlorite cleaning (Relabel used C1 or C2
Reagent Tubes for this purpose)– 1 M NaOH– 0.22‑µm or 0.45‑µm vacuum filtration system and filters
3
Materials required
Ion PI™ Hi‑Q™ Sequencing 200 Kit User Guide 21
Run the cleaning program with 18 MΩ water or chlorite solution before eachinitialization according to the following schedule. Cleaning takes ~30 minutes.
Clean with: Schedule
18 MΩ water • Before each initialization.
• (Recommended) After the last run of the day if the instrument willnot be used within 72 hours after the last run (for example, cleanafter the last run before a 3-day weekend).
• Before shutting the instrument down for an extended period.
Chloritesolution
• Once a week (unless the instrument has not been used since the lastchlorite cleaning, in which case, clean with 18 MΩ water beforeusing).
• If reagents have been left on the instrument for more than 48 hours(for example, over the weekend).
IMPORTANT! For the following steps, use 18 MΩ water directly from the purificationsystem. Do not use water that has been collected or stored in any other containers.
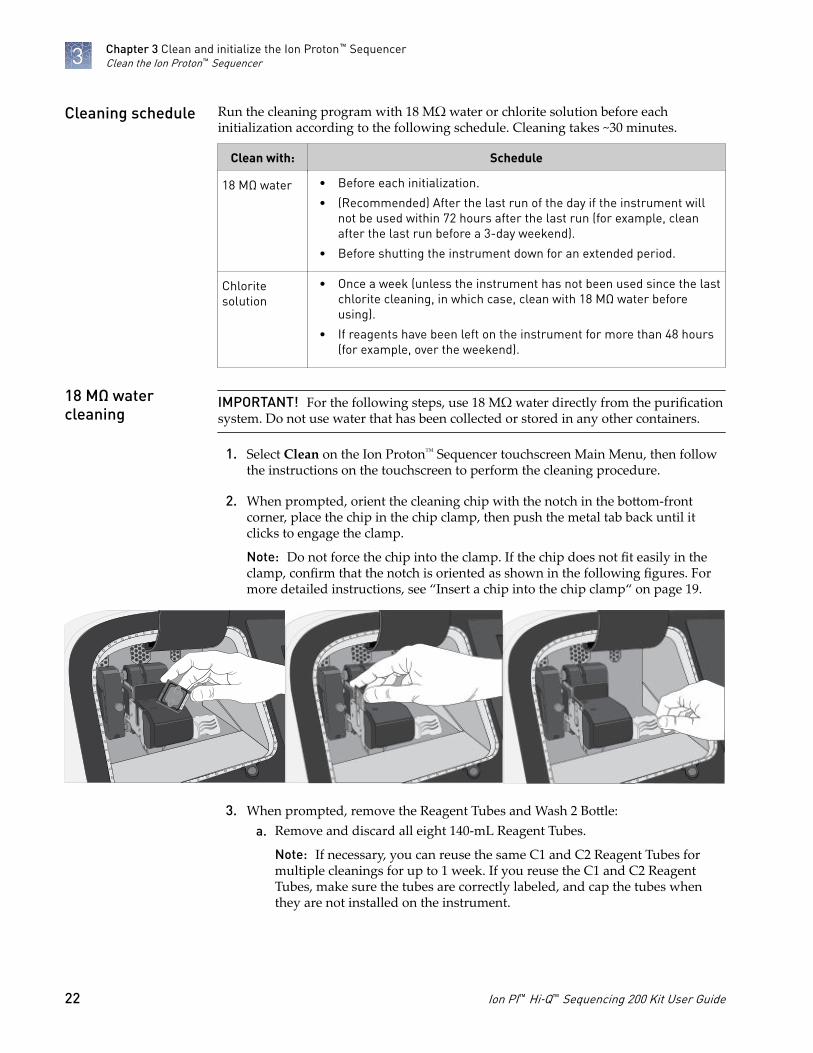
1. Select Clean on the Ion Proton™ Sequencer touchscreen Main Menu, then followthe instructions on the touchscreen to perform the cleaning procedure.
2. When prompted, orient the cleaning chip with the notch in the bottom‑frontcorner, place the chip in the chip clamp, then push the metal tab back until itclicks to engage the clamp.
Note: Do not force the chip into the clamp. If the chip does not fit easily in theclamp, confirm that the notch is oriented as shown in the following figures. Formore detailed instructions, see “Insert a chip into the chip clamp“ on page 19.
530
DAB
D02
226
ion
torre
nt
3. When prompted, remove the Reagent Tubes and Wash 2 Bottle:a. Remove and discard all eight 140‑mL Reagent Tubes.
Note: If necessary, you can reuse the same C1 and C2 Reagent Tubes formultiple cleanings for up to 1 week. If you reuse the C1 and C2 ReagentTubes, make sure the tubes are correctly labeled, and cap the tubes whenthey are not installed on the instrument.
Cleaning schedule
18 MΩ watercleaning
Chapter 3 Clean and initialize the Ion Proton™ SequencerClean the Ion Proton™ Sequencer3
22 Ion PI™ Hi‑Q™ Sequencing 200 Kit User Guide
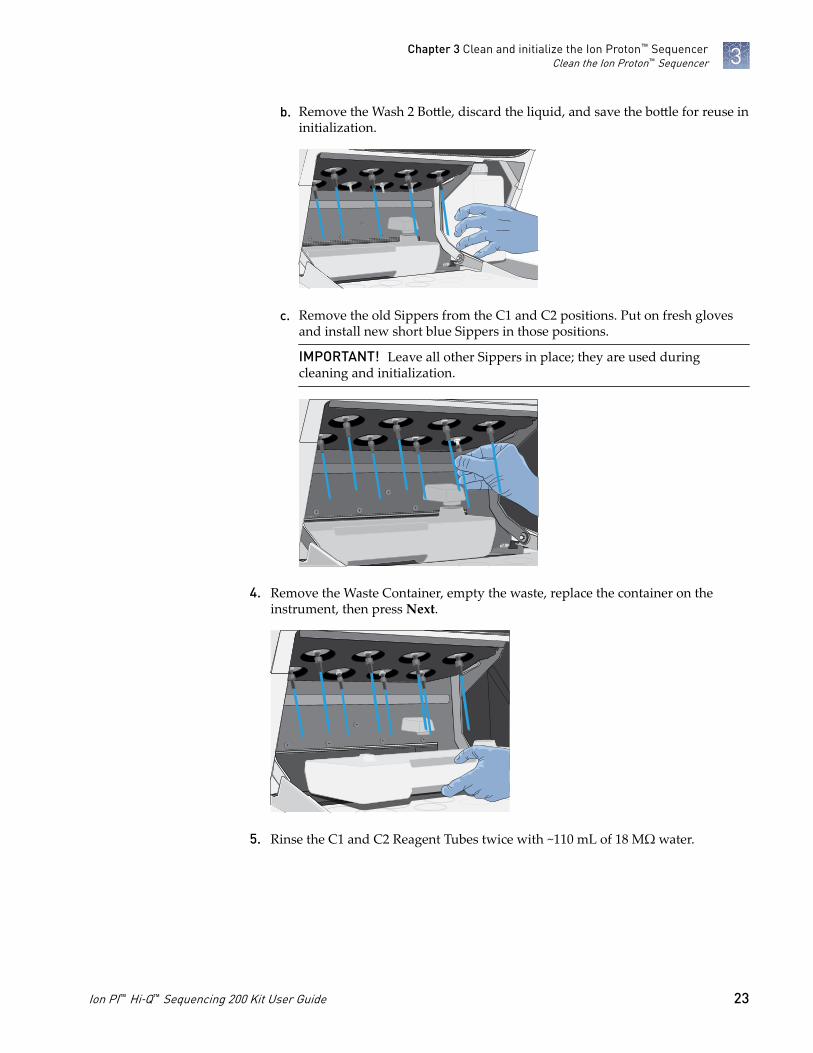
b. Remove the Wash 2 Bottle, discard the liquid, and save the bottle for reuse ininitialization.
c. Remove the old Sippers from the C1 and C2 positions. Put on fresh glovesand install new short blue Sippers in those positions.
IMPORTANT! Leave all other Sippers in place; they are used duringcleaning and initialization.
4. Remove the Waste Container, empty the waste, replace the container on theinstrument, then press Next.
5. Rinse the C1 and C2 Reagent Tubes twice with ~110 mL of 18 MΩ water.
Chapter 3 Clean and initialize the Ion Proton™ SequencerClean the Ion Proton™ Sequencer 3
Ion PI™ Hi‑Q™ Sequencing 200 Kit User Guide 23
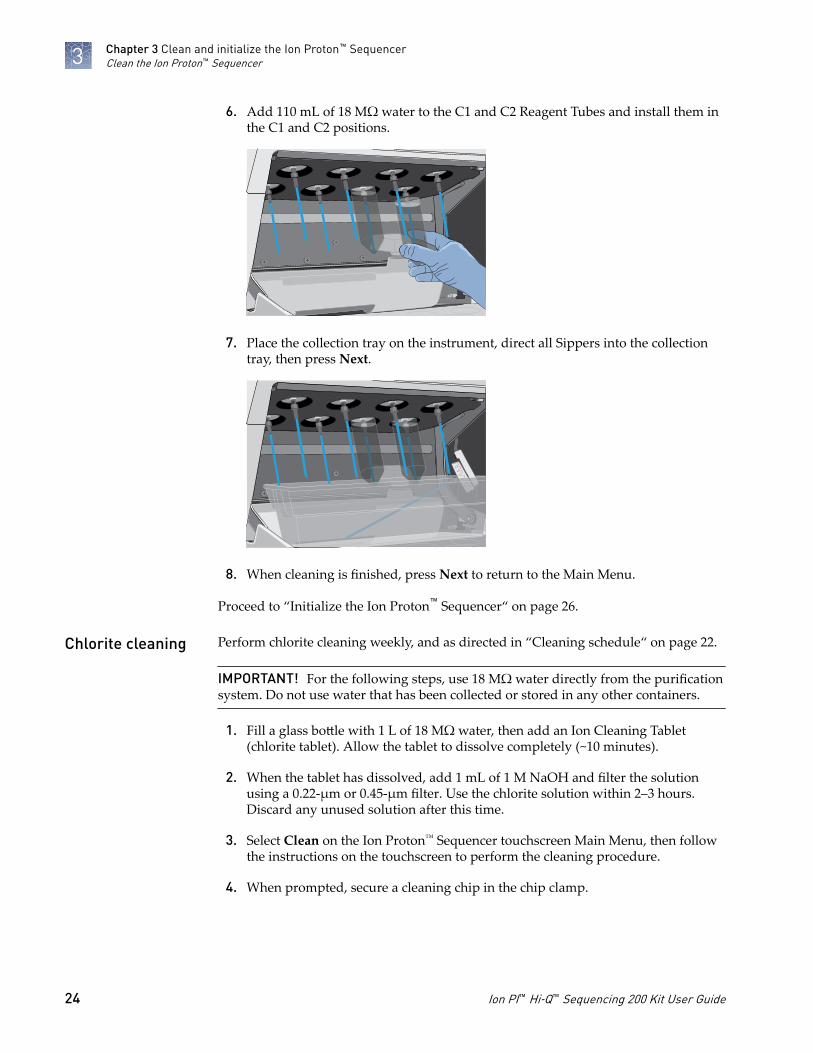
6. Add 110 mL of 18 MΩ water to the C1 and C2 Reagent Tubes and install them inthe C1 and C2 positions.
7. Place the collection tray on the instrument, direct all Sippers into the collectiontray, then press Next.
8. When cleaning is finished, press Next to return to the Main Menu.
Proceed to “Initialize the Ion Proton™ Sequencer“ on page 26.
Perform chlorite cleaning weekly, and as directed in “Cleaning schedule“ on page 22.
IMPORTANT! For the following steps, use 18 MΩ water directly from the purificationsystem. Do not use water that has been collected or stored in any other containers.
1. Fill a glass bottle with 1 L of 18 MΩ water, then add an Ion Cleaning Tablet(chlorite tablet). Allow the tablet to dissolve completely (~10 minutes).
2. When the tablet has dissolved, add 1 mL of 1 M NaOH and filter the solutionusing a 0.22‑µm or 0.45‑µm filter. Use the chlorite solution within 2–3 hours.Discard any unused solution after this time.
3. Select Clean on the Ion Proton™ Sequencer touchscreen Main Menu, then followthe instructions on the touchscreen to perform the cleaning procedure.
4. When prompted, secure a cleaning chip in the chip clamp.
Chlorite cleaning
Chapter 3 Clean and initialize the Ion Proton™ SequencerClean the Ion Proton™ Sequencer3
24 Ion PI™ Hi‑Q™ Sequencing 200 Kit User Guide

5. When prompted, remove all the Reagent Tubes and the Wash 2 Bottle:a. Remove and save the C1 and C2 Reagent Tubes for use with chlorite
solution. (Label these tubes for chlorite cleaning only, then discard after thechlorite cleaning cycle is completed. Do not use these tubes for 18 MΩ watercleaning.
b. Remove and discard all other 140‑mL Reagent Tubes.
c. Remove the Wash 2 Bottle, discard the liquid, then save the bottle for reusein initialization.
d. Remove the old Sippers from the C1 and C2 positions. Put on fresh gloves,then install new short blue Sippers in those positions.
IMPORTANT! Leave all other Sippers in place; they are used duringcleaning and initialization.
6. Remove the Waste Container, empty the waste, replace the container on theinstrument, then press Next.
7. Add 110 mL of filtered chlorite solution to each of the two Reagent Tubesdesignated for chlorite cleaning.
8. On the Ion Proton™ Sequencer, install the tubes containing chlorite solution inthe C1 and C2 positions.
9. Place the collection tray on the instrument, then direct all Sippers into thecollection tray. Press Next to start cleaning.
10. When cleaning is finished press Next to return to the Main Menu.
11. Remove and discard the Reagent Tubes and Sippers used for chlorite solutionfrom the C1 and C2 positions.
Note: If needed, you can reuse the same Reagent Tubes for multiple chloritecleanings for up to 1 month. If you reuse the chlorite cleaning tubes, ensure thetubes are correctly labeled, and cap the tubes when they are not installed on theinstrument. Do not reuse chlorite cleaning tubes for 18 MΩ water cleaning.
12. Put on fresh gloves, then install new short blue Sippers in the C1 and C2positions.
13. Rinse new C1 and C2 Reagent Tubes twice with ~110 mL of 18 MΩ water.
14. Fill the C1 and C2 Reagent Tubes with 110 mL of 18 MΩ water, then install thetubes into the corresponding positions.
15. Select Clean on the touchscreen Main Menu, then press Next to advance throughthe instrument prompts until the cleaning procedure starts.
16. When the post‑chlorite water rinse is complete, press Next to return to the MainMenu.
Proceed to “Initialize the Ion Proton™ Sequencer“.
Chapter 3 Clean and initialize the Ion Proton™ SequencerClean the Ion Proton™ Sequencer 3
Ion PI™ Hi‑Q™ Sequencing 200 Kit User Guide 25
Initialize the Ion Proton™ Sequencer
Initialization takes ~90 minutes.
Materials provided in the kit• 140‑mL Reagent Tubes for W1, W3, and dNTP reagents
Note: Use the labels provided with the kit to label the Reagent Tubes.• Long gray and short blue Sippers for Wash Bottles and Reagent Tubes• Ion PI™ dGTP, dCTP, dATP, and dTTP• Ion PI™ Hi‑Q™ W2 Solution• Ion PI™ 1X W3 Solution
Other materials and equipment• Used chip
IMPORTANT! Initialize the instrument with a chip that has previously been usedfor sequencing. Do not use a cleaning chip.
• Ion Proton™ Wash 2 Bottle (2‑L)• 18 MΩ water• 1 M NaOH (prepared fresh daily)• Ice• Filtered pipette tips and pipettes• Vortex mixer• Microcentrifuge• (If necessary to adjust pH manually) pH meter, multipoint pH calibration
reagents, pH probe, and probe stand, magnetic stirrer, stir bar, and squirt bottle
IMPORTANT! Handle nucleotides carefully to avoid cross‑contamination. Alwaysdiscard gloves after removing used Sippers from the sequencer in order to avoidcross‑contamination of the nucleotides. Always discard gloves after handlingconcentrated dNTP stocks. Barrier tips are required for all dNTP pipetting steps.
• A sequencing run should be started within 1 hour after initialization.• If you are performing more than one sequencing run per initialization, we
recommend starting the second run on the same day, but the second run can bestarted up to 24 hours after initialization.
• Replace the Reagent Tubes and Sippers every time you initialize.• Replace the Ion Proton™ Wash 2 Bottle after 40 uses (20 initializations) or
3 months, whichever comes first.• Check for updates to the Torrent Suite™ Software, then install the updates if
available.
• Remove the dNTP stock solutions from the freezer and thaw on ice.• Check the tank pressure for the nitrogen gas. When the tank pressure drops
below 500 psi, change the tank.
Materials required
Initializationguidelines
Before you begin
Chapter 3 Clean and initialize the Ion Proton™ SequencerInitialize the Ion Proton™ Sequencer3
26 Ion PI™ Hi‑Q™ Sequencing 200 Kit User Guide
1. Remove the Sippers from the W1, W2, and W3 positions. Do not remove the usedSippers from the dNTP ports until instructed to do so.
2. Select Initialize on the touchscreen Main Menu.
3. When prompted, scan or enter the barcode on the W2 Solution bottle, or selectthe Ion PI™ Hi‑Q™ Sequencing 200 Kit from the drop‑down list.
Note: If you are using a barcode scanner, press Enter barcode in the touchscreenbefore scanning the W2 Solution barcode.
4. Secure a used chip from an old sequencing run in the chip clamp (do not use acleaning chip), then press Next.The system verifies the gas pressure. If the gas pressure is low, press Yes to retrygas‑pressure verification. If the gas pressure remains low, see “Error Message:Confirm Instrument Has Gas Pressure“ on page 40.
5. Press Next to begin the initialization.
Prepare the Wash 1 and Wash 3 Reagent Tubes.
1. Add 32 µL of 1M NaOH solution to the Wash 1 Reagent Tube.
2. Add 40–50 mL of the 1X W3 Solution from the kit to the Wash 3 Reagent Tube,measured using a serological pipette or graduated cylinder.
3. With fresh gloves, install new short Sippers in the W1 and W3 positions. Do notlet the new Sippers touch other Sippers on the instrument or any othersurfaces.
4. Install the W1 and W3 Reagent Tubes into the W1 and W3 positions of the IonProton™ Sequencer, place the collection tray beneath the dNTP Sippers, thenpress Next.
Begin theinitialization
Prepare andinstall the Wash 1and Wash 3Reagent Tubes
Chapter 3 Clean and initialize the Ion Proton™ SequencerInitialize the Ion Proton™ Sequencer 3
Ion PI™ Hi‑Q™ Sequencing 200 Kit User Guide 27
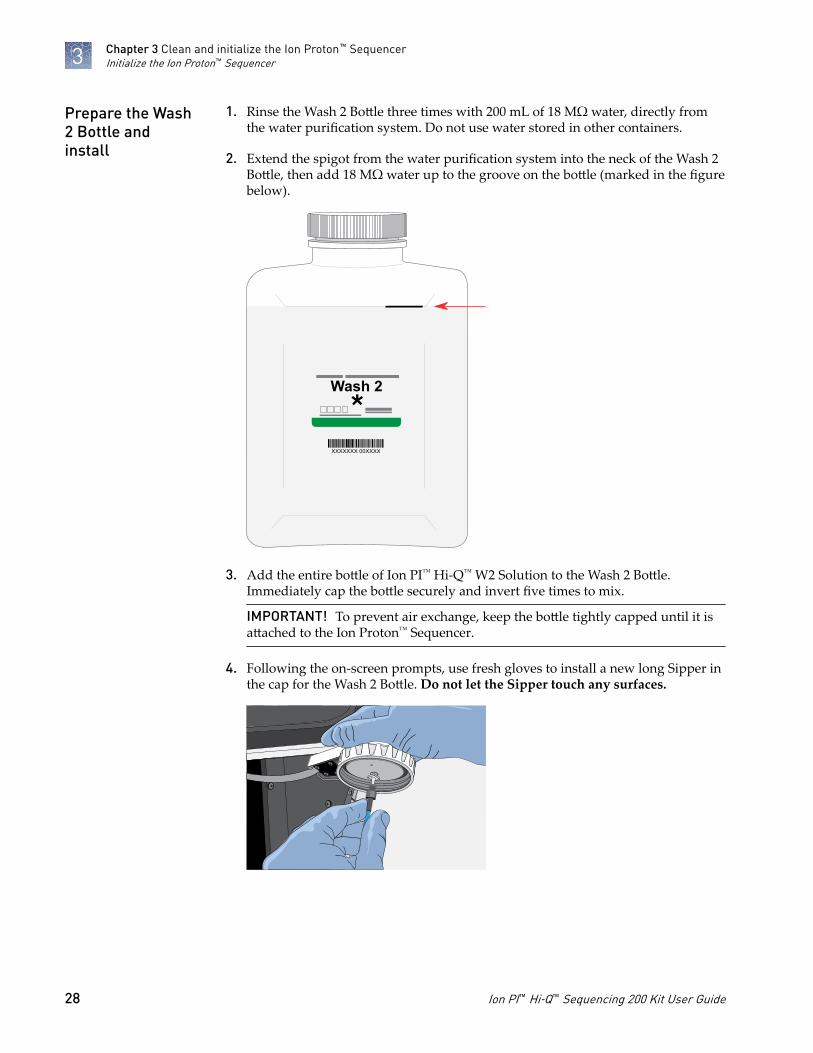
1. Rinse the Wash 2 Bottle three times with 200 mL of 18 MΩ water, directly fromthe water purification system. Do not use water stored in other containers.
2. Extend the spigot from the water purification system into the neck of the Wash 2Bottle, then add 18 MΩ water up to the groove on the bottle (marked in the figurebelow).
Wash 2
XXXXXXX 00XXXX
3. Add the entire bottle of Ion PI™ Hi‑Q™ W2 Solution to the Wash 2 Bottle.Immediately cap the bottle securely and invert five times to mix.
IMPORTANT! To prevent air exchange, keep the bottle tightly capped until it isattached to the Ion Proton™ Sequencer.
4. Following the on‑screen prompts, use fresh gloves to install a new long Sipper inthe cap for the Wash 2 Bottle. Do not let the Sipper touch any surfaces.
Prepare the Wash2 Bottle andinstall
Chapter 3 Clean and initialize the Ion Proton™ SequencerInitialize the Ion Proton™ Sequencer3
28 Ion PI™ Hi‑Q™ Sequencing 200 Kit User Guide
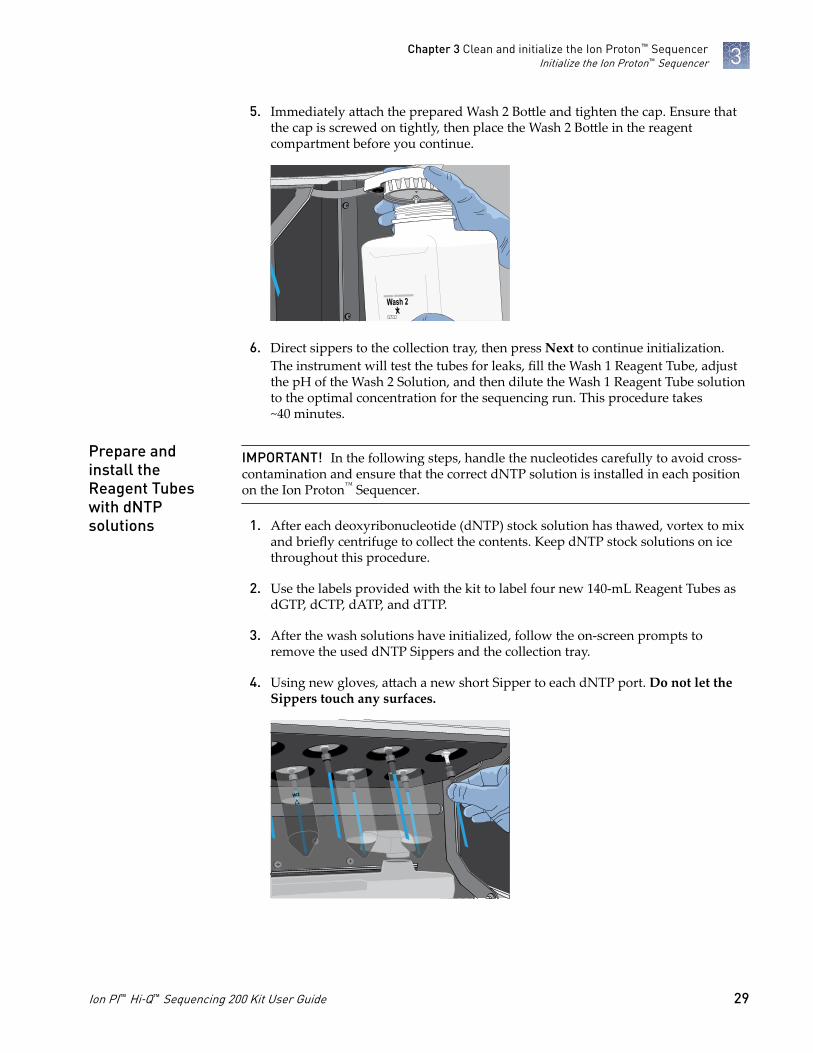
5. Immediately attach the prepared Wash 2 Bottle and tighten the cap. Ensure thatthe cap is screwed on tightly, then place the Wash 2 Bottle in the reagentcompartment before you continue.
Wash 2
6. Direct sippers to the collection tray, then press Next to continue initialization.The instrument will test the tubes for leaks, fill the Wash 1 Reagent Tube, adjustthe pH of the Wash 2 Solution, and then dilute the Wash 1 Reagent Tube solutionto the optimal concentration for the sequencing run. This procedure takes~40 minutes.
IMPORTANT! In the following steps, handle the nucleotides carefully to avoid cross‑contamination and ensure that the correct dNTP solution is installed in each positionon the Ion Proton™ Sequencer.
1. After each deoxyribonucleotide (dNTP) stock solution has thawed, vortex to mixand briefly centrifuge to collect the contents. Keep dNTP stock solutions on icethroughout this procedure.
2. Use the labels provided with the kit to label four new 140‑mL Reagent Tubes asdGTP, dCTP, dATP, and dTTP.
3. After the wash solutions have initialized, follow the on‑screen prompts toremove the used dNTP Sippers and the collection tray.
4. Using new gloves, attach a new short Sipper to each dNTP port. Do not let theSippers touch any surfaces.
W3
Prepare andinstall theReagent Tubeswith dNTPsolutions
Chapter 3 Clean and initialize the Ion Proton™ SequencerInitialize the Ion Proton™ Sequencer 3
Ion PI™ Hi‑Q™ Sequencing 200 Kit User Guide 29
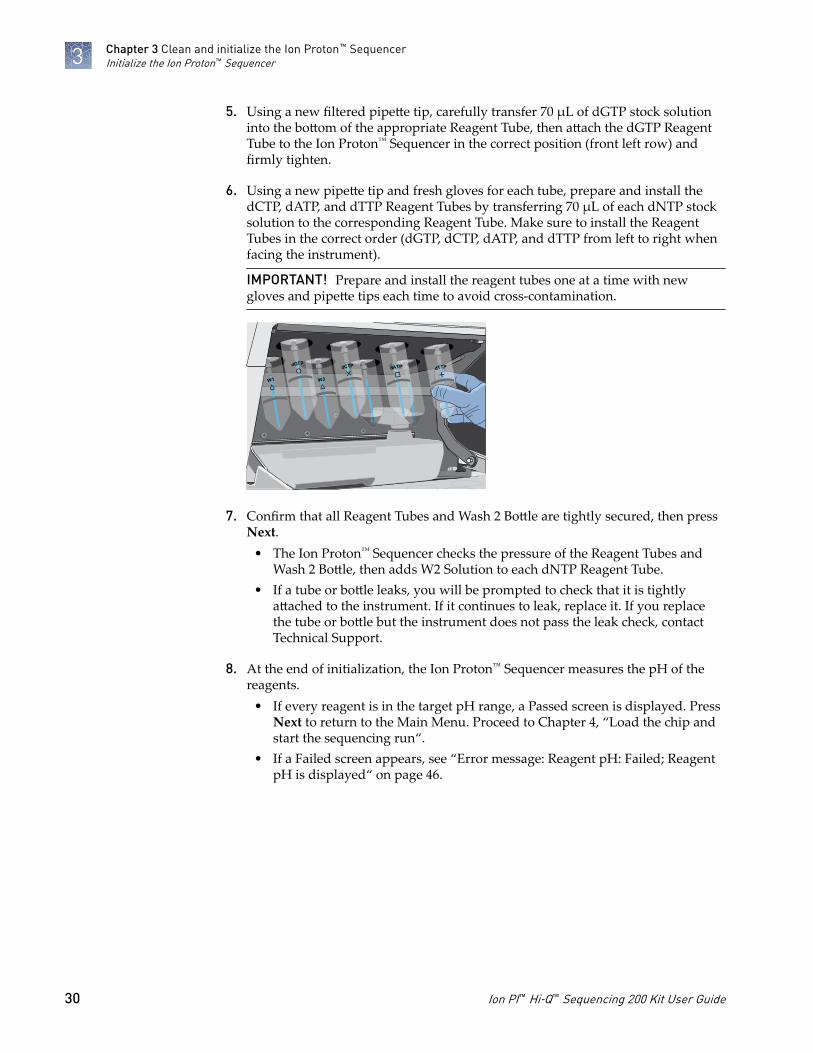
5. Using a new filtered pipette tip, carefully transfer 70 µL of dGTP stock solutioninto the bottom of the appropriate Reagent Tube, then attach the dGTP ReagentTube to the Ion Proton™ Sequencer in the correct position (front left row) andfirmly tighten.
6. Using a new pipette tip and fresh gloves for each tube, prepare and install thedCTP, dATP, and dTTP Reagent Tubes by transferring 70 µL of each dNTP stocksolution to the corresponding Reagent Tube. Make sure to install the ReagentTubes in the correct order (dGTP, dCTP, dATP, and dTTP from left to right whenfacing the instrument).
IMPORTANT! Prepare and install the reagent tubes one at a time with newgloves and pipette tips each time to avoid cross‑contamination.
W3W1
dGTPdCTP dATP dTTP
7. Confirm that all Reagent Tubes and Wash 2 Bottle are tightly secured, then pressNext.
• The Ion Proton™ Sequencer checks the pressure of the Reagent Tubes andWash 2 Bottle, then adds W2 Solution to each dNTP Reagent Tube.
• If a tube or bottle leaks, you will be prompted to check that it is tightlyattached to the instrument. If it continues to leak, replace it. If you replacethe tube or bottle but the instrument does not pass the leak check, contactTechnical Support.
8. At the end of initialization, the Ion Proton™ Sequencer measures the pH of thereagents.
• If every reagent is in the target pH range, a Passed screen is displayed. PressNext to return to the Main Menu. Proceed to Chapter 4, “Load the chip andstart the sequencing run“.
• If a Failed screen appears, see “Error message: Reagent pH: Failed; ReagentpH is displayed“ on page 46.
Chapter 3 Clean and initialize the Ion Proton™ SequencerInitialize the Ion Proton™ Sequencer3
30 Ion PI™ Hi‑Q™ Sequencing 200 Kit User Guide
Load the chip and start thesequencing run
Materials required
Materials provided in the Ion PI™ Hi-Q™ Sequencing 200 Kit• Ion PI™ Control Ion Sphere™ Particles• Ion PI™ Annealing Buffer• Ion PI™ Sequencing Primer• Ion PI™ Loading Buffer• Ion PI™ Foaming Solution (10% Triton™ X‑100)• Ion PI™ Hi‑Q™ Sequencing Polymerase
Other required materials and equipment• Ion PI™ Chip v3 Kit (Cat. No. A26771)• Enriched template‑positive Ion PI™ ISPs prepared with the Ion PI™ Hi‑Q™ OT2
200 Kit (Cat. No. A26434)• Standard laboratory vacuum line or vacuum pump• Liquid trap• Tygon™ tubing
Note: As needed to connect laboratory vacuum to liquid trap and liquid trap toP200 pipette tip.
• Rainin™ Pipet‑Lite™ XLS LTS with tips• P200 and P10 pipette and filtered tips• Vortex mixer• Molecular‑biology grade nuclease‑free water• 100% isopropanol• Thermal cycler with heated lid (programmed at 95°C for 2 minutes and 37°C for
2 minutes)• Ion Chip™ Minifuge (Cat. No. 4479672 or 4479673) equipped with Ion Proton™
Rotor and Buckets (Cat. No. 4482578)
4
Ion PI™ Hi‑Q™ Sequencing 200 Kit User Guide 31
Scheduling sequencing runs after initialization
If you are performing two sequencing runs per initialization, schedule yoursequencing runs as follows:
• The first sequencing run should be started within 1 hour after initialization.• We recommend starting the second run on the same day, but the second run may
be started up to 24 hours after initialization.
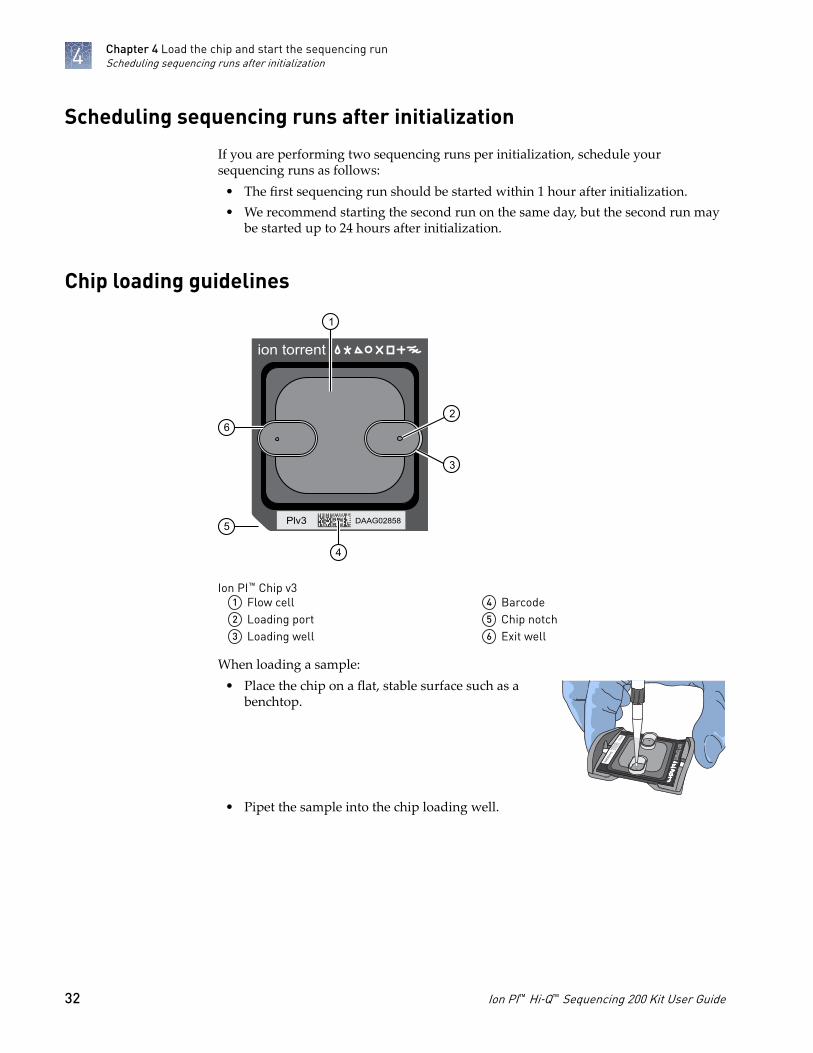
Chip loading guidelines
Plv3 DAAG02858
ion torrent
5
4
1
6
3
2
Ion PI™ Chip v31 Flow cell2 Loading port3 Loading well
4 Barcode5 Chip notch6 Exit well
When loading a sample:• Place the chip on a flat, stable surface such as a
benchtop.
• Pipet the sample into the chip loading well.
ion torrent
DAAG02858
PIv3
Chapter 4 Load the chip and start the sequencing runScheduling sequencing runs after initialization4
32 Ion PI™ Hi‑Q™ Sequencing 200 Kit User Guide
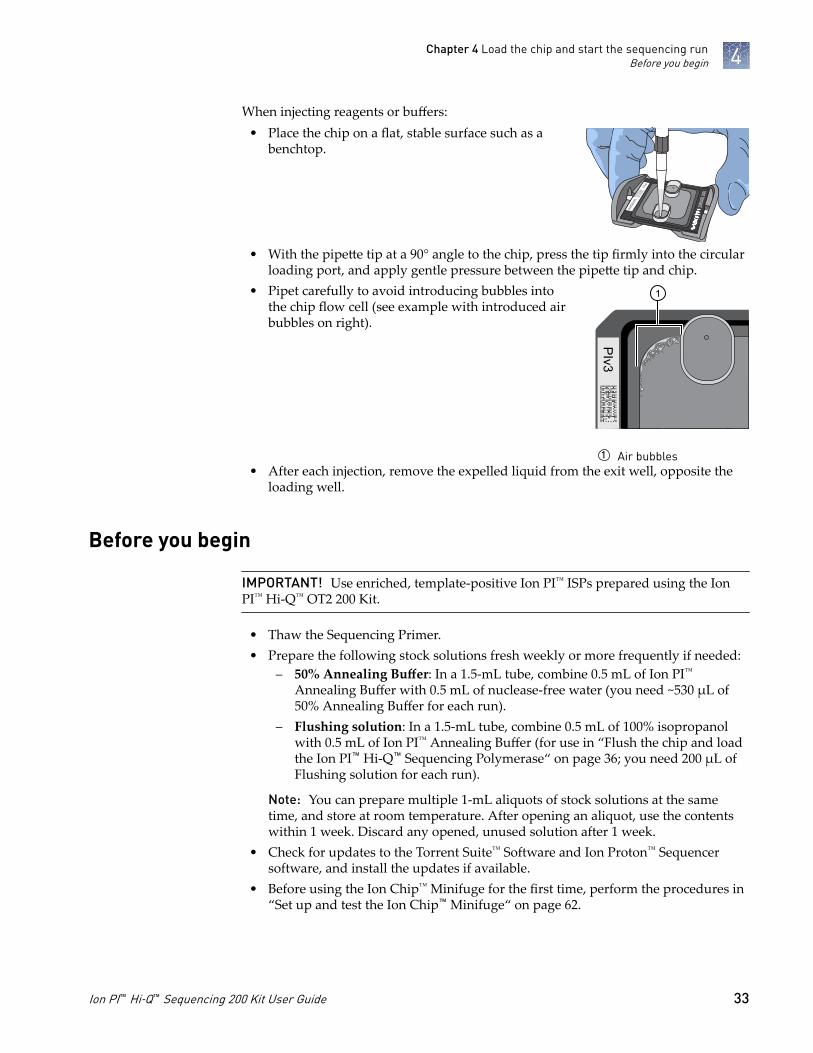
When injecting reagents or buffers:• Place the chip on a flat, stable surface such as a
benchtop.
• With the pipette tip at a 90° angle to the chip, press the tip firmly into the circularloading port, and apply gentle pressure between the pipette tip and chip.
• Pipet carefully to avoid introducing bubbles intothe chip flow cell (see example with introduced airbubbles on right).
• After each injection, remove the expelled liquid from the exit well, opposite theloading well.
Before you begin
IMPORTANT! Use enriched, template‑positive Ion PI™ ISPs prepared using the IonPI™ Hi‑Q™ OT2 200 Kit.
• Thaw the Sequencing Primer.• Prepare the following stock solutions fresh weekly or more frequently if needed:
– 50% Annealing Buffer: In a 1.5‑mL tube, combine 0.5 mL of Ion PI™
Annealing Buffer with 0.5 mL of nuclease‑free water (you need ~530 µL of50% Annealing Buffer for each run).
– Flushing solution: In a 1.5‑mL tube, combine 0.5 mL of 100% isopropanolwith 0.5 mL of Ion PI™ Annealing Buffer (for use in “Flush the chip and loadthe Ion PI™ Hi‑Q™ Sequencing Polymerase“ on page 36; you need 200 µL ofFlushing solution for each run).
Note: You can prepare multiple 1‑mL aliquots of stock solutions at the sametime, and store at room temperature. After opening an aliquot, use the contentswithin 1 week. Discard any opened, unused solution after 1 week.
• Check for updates to the Torrent Suite™ Software and Ion Proton™ Sequencersoftware, and install the updates if available.
• Before using the Ion Chip™ Minifuge for the first time, perform the procedures in “Set up and test the Ion Chip™ Minifuge“ on page 62.
ion torrent
DAAG02858
PIv3
PIv3
1
1 Air bubbles
Chapter 4 Load the chip and start the sequencing runBefore you begin 4
Ion PI™ Hi‑Q™ Sequencing 200 Kit User Guide 33
Prepare the template-positive ISPs for sequencing
IMPORTANT! If you are performing an installation or troubleshooting run, do notuse enriched ISPs. Follow the procedure in “Troubleshooting using the Ion PI™
Control Ion Sphere™ Particles“ on page 50 to prepare the control ISPs for theinstallation or troubleshooting run.
1. Vortex the Ion PI™ Control Ion Sphere™ Particles for 5 seconds, then centrifugefor 2 seconds before taking aliquots.
2. Add 5 µL of control ISPs directly to the entire volume of enriched, template‑positive ISPs in a 0.2‑mL PCR tube (non‑polystyrene), then pipet up and down tomix.
Note: The Ion PI™ ISPs are difficult to see. To avoid aspirating the particles in thefollowing steps, orient the PCR tube the same way each time when centrifuging sothat it is easy to know where the pellet has formed, and remove the supernatant fromthe top down.
1. Centrifuge the enriched, template‑positive ISPs for 5 minutes at 15,500 × g.
2. Carefully remove the supernatant without disturbing the pellet, leaving 10 µL ofsupernatant in the tube (visually compare to 10 µL of liquid in a separate tube).
3. Add 15 µL of Ion PI™ Annealing Buffer for a total volume of 25 µL.
4. Add 20 µL of Ion PI™ Sequencing Primer, then confirm that the total volume is45 µL. Add Ion PI™ Annealing Buffer if needed to bring the total volume to45 µL.
5. Briefly vortex to mix, then centrifuge briefly to collect the contents at the bottomof the tube.
6. Program a thermal cycler for 95°C for 2 minutes and then 37°C for 2 minutes,using the heated lid option.
7. Place the tube in the thermal cycler, then run the program.
8. After cycling, add 10 µL of Ion PI™ Loading Buffer, briefly vortex to mix, thencentrifuge briefly to collect the contents at the bottom of the tube.
Load the Ion PI™ Chip v3
1. Place the Ion PI™ Chip v3 on a flat, stable surface.
2. Dispense the entire prepared sample (55 µL) into the chip loading well (not thechip loading port) of the chip.
Note: Some sample enters the flow cell at this point by capillary action. Theremaining sample is loaded into the flow cell by centrifugation.
Add Ion PI™
Control IonSphere™ Particlesto the enrichedISPs
AnnealSequencingPrimer to theenriched ISPs
Load the sampleon the chip
Chapter 4 Load the chip and start the sequencing runPrepare the template-positive ISPs for sequencing4
34 Ion PI™ Hi‑Q™ Sequencing 200 Kit User Guide
3. Transfer the chip to a bucket in the Ion Chip™ Minifuge with the chip notchpointing out, away from the center of the minifuge. Place a used chip in theopposite bucket with the chip notch also pointing out.
PIv3 DABDD02226
ion torrent
PIv3DABDD02226
ion torrent
1
1
1 Chip notch
4. Centrifuge for 10 minutes.
5. In a 1.5‑mL tube, combine 49 µL of 50% Annealing Buffer with 1 µL of FoamingSolution (10% Triton™ X‑100).
Note: You can prepare a bulk mixture by combining 4.9 mL of 50% AnnealingBuffer with 100 µL of Foaming Solution. The mix can be stored at 4°C and usedfor up to 6 months.
6. Create foam by injecting air into the 50‑µL mixture from the previous step usinga Rainin™ SR‑L200F pipette set to dispense 100 µL. Next, break the large bubblesinto smaller bubbles by rapidly pipetting for ~5 seconds. Repeat this step onemore time.
Note: Do not over‑inject the air; the final volume of foam should beapproximately 250 µL.
Chapter 4 Load the chip and start the sequencing runLoad the Ion PI™ Chip v3 4
Ion PI™ Hi‑Q™ Sequencing 200 Kit User Guide 35
7. Place the chip on a stable surface such as a benchtop, then inject 100 µL of foaminto the chip loading port. Remove the expelled liquid from the opposite port.
8. Dispense 55 µL of 50% Annealing buffer into the chip loading well (not the chiploading port).
9. Place the chip back in the minifuge with the chip notch pointing out, thencentrifuge for 30 seconds.
10. Place the chip on a stable surface such as a benchtop. Remove the liquid that hasaccumulated in both of the chip loading wells.
11. Briefly "re‑foam" the foam sample by pipetting rapidly for ~5 seconds, then inject100 µL of foam into the chip loading port. Remove the expelled liquid from theopposite port.
12. Dispense 55 µL of 50% Annealing buffer into the chip loading well (not the chiploading port).
13. Place the chip back in the minifuge with the chip notch pointing out, thencentrifuge for 30 seconds. Then proceed to flushing the chip.
1. Inject 100 µL of the Flushing solution into the chip loading port 2 times. Aftereach injection, discard the solution that is expelled from the opposite port.
2. Inject 100 µL of 50% Annealing Buffer into the chip loading port 3 times. Do notintroduce air bubbles. After each injection, remove the expelled liquid from theopposite port.
3. Combine 6 µL of Ion PI™ Hi‑Q™ Sequencing Polymerase with 60 µL of 50%Annealing buffer.
4. Inject 65 µL of the polymerase solution into the chip loading port and remove theexpelled liquid from the exit port. Be careful to avoid introducing air bubbles.
5. Allow the chip to incubate for 5 minutes, then immediately proceed to “Start thesequencing run“.
Flush the chip andload the Ion PI™
Hi‑Q™ SequencingPolymerase
Chapter 4 Load the chip and start the sequencing runLoad the Ion PI™ Chip v34
36 Ion PI™ Hi‑Q™ Sequencing 200 Kit User Guide
Start the sequencing run
IMPORTANT! Do not start the sequencing run with the loaded chip. Use a used chipfor the line cleaning at the start of the run.
1. With the used chip from initialization still in the chip clamp, press Run on theMain Menu, then press Next and confirm that "Cleaning fluid lines" displays onthe instrument touchscreen. Observe the chip for leaks.
Note: Never open the chip clamp during line cleaning. If there is a leak, pressthe Abort button immediately to stop the flow to the chip, then see “Liquid indrip pan below chip clamp“ on page 42.
2. After line cleaning, press Next.
3. In the drop‑down list, select a Planned Run that you created in the Torrent Suite™
Software, then press Next.
4. Confirm that the run settings are correct, or make changes using the buttons anddrop‑down lists if necessary.
Note: If an error message appears, see “Error message: Not enough disk spacefor the necessary number of flows“ on page 41.
5. Remove the used chip from the chip clamp and secure the chip loaded withtemplate‑positive Ion PI™ ISPs. Close the chip compartment lid, wait until theChip Status icon in the lower left corner of the screen indicates "Ready" , thenpress Next to begin the sequencing run.The system calibrates the chip (~1 minute), then begins the sequencing run. Ifchip calibration fails, see “Error message: Failed: Reseat chip, then press Next torecalibrate“ on page 45.
IMPORTANT! During a run, do not open the chip compartment lid or reagentcompartment door, and avoid touching the instrument. Touching the instrumentduring the sequencing run may reduce the quality of the measurements.
When the run is complete, the touchscreen returns to the Main Menu. Use the TorrentBrowser to review your the results. Clean and initialize the instrument beforebeginning a new run. See Chapter 3, “Clean and initialize the Ion Proton™ Sequencer“.If the instrument will not be used for more than 3 days, see “Powering off“ onpage 60.
Chapter 4 Load the chip and start the sequencing runStart the sequencing run 4
Ion PI™ Hi‑Q™ Sequencing 200 Kit User Guide 37
Troubleshooting
■ Ion Proton™ Sequencer alarms and events . . . . . . . . . . . . . . . . . . . . . . . . . . . . . . . 39
■ Ion Proton™ Sequencer status bar icon warnings . . . . . . . . . . . . . . . . . . . . . . . . . 40
■ Instrument leaks . . . . . . . . . . . . . . . . . . . . . . . . . . . . . . . . . . . . . . . . . . . . . . . . . . . . . 42
■ Touchscreen . . . . . . . . . . . . . . . . . . . . . . . . . . . . . . . . . . . . . . . . . . . . . . . . . . . . . . . . . 43
■ Instrument error messages . . . . . . . . . . . . . . . . . . . . . . . . . . . . . . . . . . . . . . . . . . . . 43
■ Sample loading or sequencing . . . . . . . . . . . . . . . . . . . . . . . . . . . . . . . . . . . . . . . . . 49
■ Troubleshooting using the Ion PI™ Control Ion Sphere™ Particles . . . . . . . . . . . 50
A
38 Ion PI™ Hi‑Q™ Sequencing 200 Kit User Guide
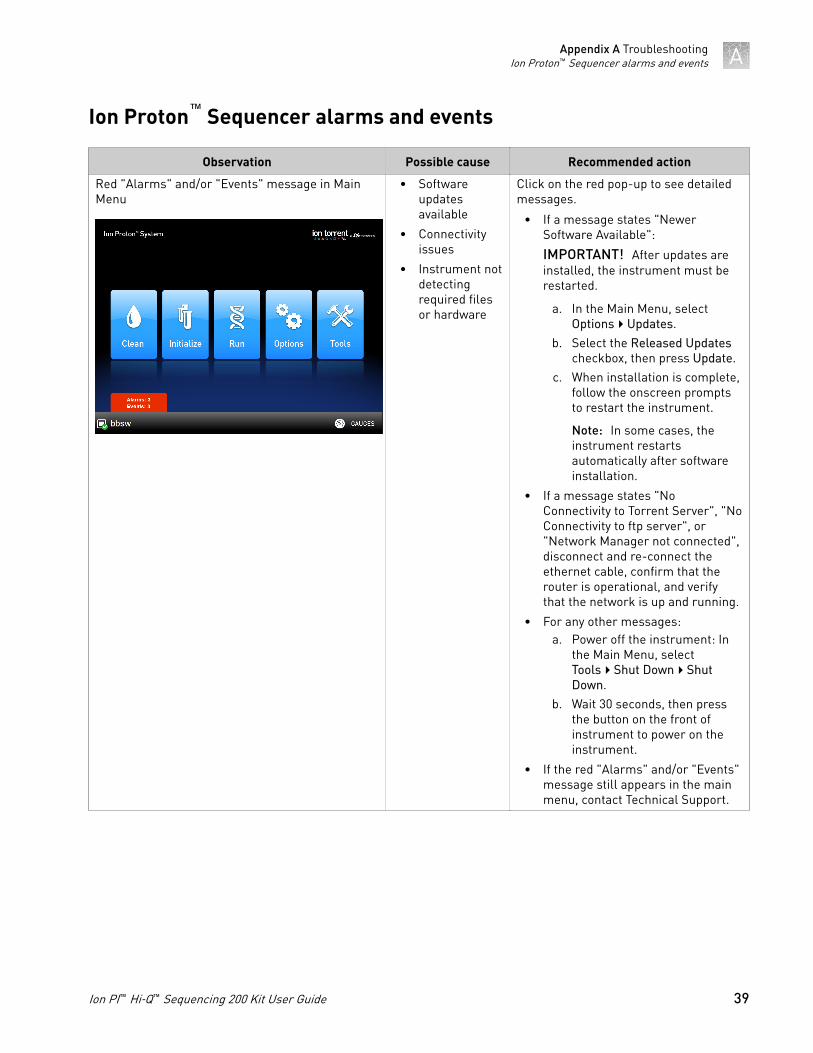
Ion Proton™ Sequencer alarms and events
Observation Possible cause Recommended action
Red "Alarms" and/or "Events" message in MainMenu
• Softwareupdatesavailable
• Connectivityissues
• Instrument notdetectingrequired filesor hardware
Click on the red pop-up to see detailedmessages.
• If a message states "NewerSoftware Available":
IMPORTANT! After updates areinstalled, the instrument must berestarted.
a. In the Main Menu, selectOptions4Updates.
b. Select the Released Updatescheckbox, then press Update.
c. When installation is complete,follow the onscreen promptsto restart the instrument.
Note: In some cases, theinstrument restartsautomatically after softwareinstallation.
• If a message states "NoConnectivity to Torrent Server", "NoConnectivity to ftp server", or"Network Manager not connected",disconnect and re-connect theethernet cable, confirm that therouter is operational, and verifythat the network is up and running.
• For any other messages:a. Power off the instrument: In
the Main Menu, selectTools4Shut Down4ShutDown.
b. Wait 30 seconds, then pressthe button on the front ofinstrument to power on theinstrument.
• If the red "Alarms" and/or "Events"message still appears in the mainmenu, contact Technical Support.
Appendix A TroubleshootingIon Proton™ Sequencer alarms and events A
Ion PI™ Hi‑Q™ Sequencing 200 Kit User Guide 39
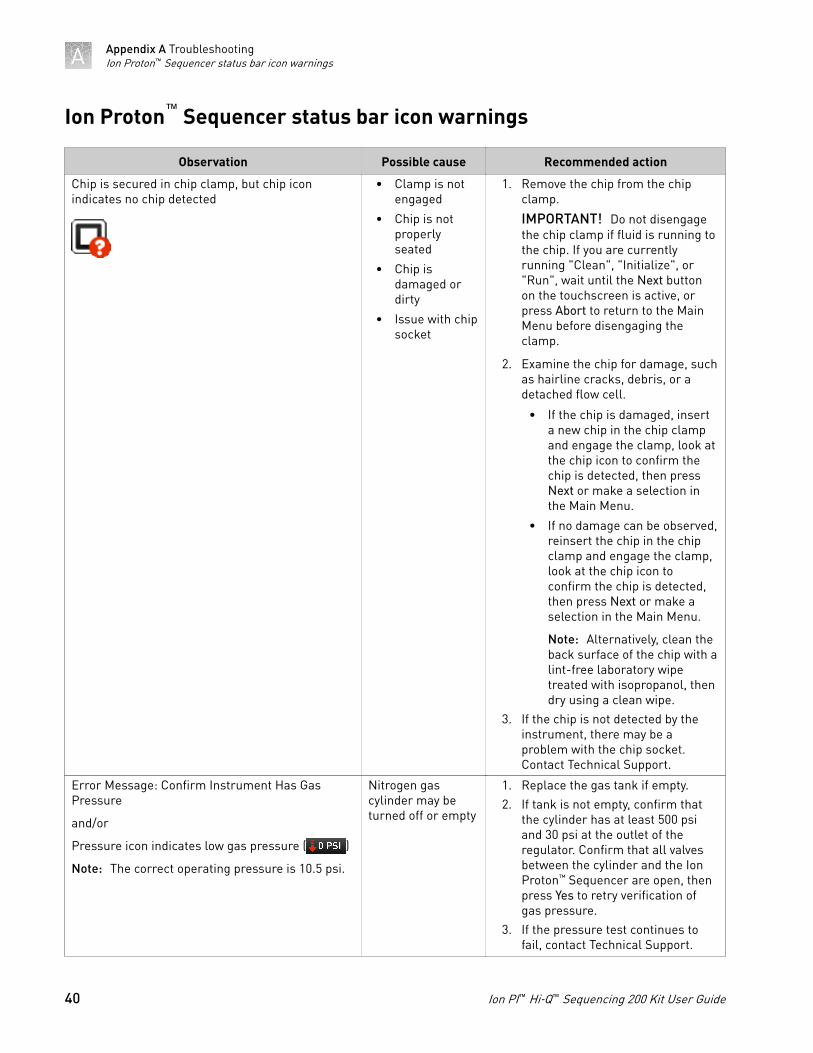
Ion Proton™ Sequencer status bar icon warnings
Observation Possible cause Recommended action
Chip is secured in chip clamp, but chip iconindicates no chip detected
• Clamp is notengaged
• Chip is notproperlyseated
• Chip isdamaged ordirty
• Issue with chipsocket
1. Remove the chip from the chipclamp.
IMPORTANT! Do not disengagethe chip clamp if fluid is running tothe chip. If you are currentlyrunning "Clean", "Initialize", or"Run", wait until the Next buttonon the touchscreen is active, orpress Abort to return to the MainMenu before disengaging theclamp.
2. Examine the chip for damage, suchas hairline cracks, debris, or adetached flow cell.
• If the chip is damaged, inserta new chip in the chip clampand engage the clamp, look atthe chip icon to confirm thechip is detected, then pressNext or make a selection inthe Main Menu.
• If no damage can be observed,reinsert the chip in the chipclamp and engage the clamp,look at the chip icon toconfirm the chip is detected,then press Next or make aselection in the Main Menu.
Note: Alternatively, clean theback surface of the chip with alint-free laboratory wipetreated with isopropanol, thendry using a clean wipe.
3. If the chip is not detected by theinstrument, there may be aproblem with the chip socket.Contact Technical Support.
Error Message: Confirm Instrument Has GasPressure
and/or
Pressure icon indicates low gas pressure ( )
Note: The correct operating pressure is 10.5 psi.
Nitrogen gascylinder may beturned off or empty
1. Replace the gas tank if empty.2. If tank is not empty, confirm that
the cylinder has at least 500 psiand 30 psi at the outlet of theregulator. Confirm that all valvesbetween the cylinder and the IonProton™ Sequencer are open, thenpress Yes to retry verification ofgas pressure.
3. If the pressure test continues tofail, contact Technical Support.
Appendix A TroubleshootingIon Proton™ Sequencer status bar icon warningsA
40 Ion PI™ Hi‑Q™ Sequencing 200 Kit User Guide
Observation Possible cause Recommended action
Temperature icon indicates chip compartmenttemperature is out of range
Thermistor in chipcompartment isdamaged
Contact Technical Support.
Note: Do not perform sequencing runsuntil this problem is corrected; non-optimal temperatures in the chipcompartment may affect sequencing.
Error message: Not enough disk space for thenecessary number of flows
(The sequencer hard drive does not containenough space for the Planned Run)
and/or
Hard drive icon indicates hard drive is almost full( )
Data normallytransferautomatically fromthe hard drive tothe Torrent Server,however this maynot happen in thecase of:
• Data transfermanuallyaborted byuser
• Issue withconnectivity ornetwork
• Incorrectconfigurationof the TorrentServer
1. Check for connectivity or networkissues, for example, unplug andreplug the ethernet cable, confirmthat the router is operational, andverify that the network is up andrunning.
2. If in "Select Planned Run", selectData Management in the touchscreen, otherwise selectTools4Data Management from theMain Menu.
3. In the Data Management screen,select All, then review the runs. Ifthere are runs that do not need tobe transferred to the TorrentServer (for example test or abortedruns), select the checkbox next tothe run names, then press DeleteSel.
4. If there are runs that you do wantto transfer, you may need to waituntil connectivity is restored for therun to transfer and thenautodelete.
On instrument analysis icon indicates error Corrupt data filesor file system, forexample, SSD filearray is corrupted
1. Power off the instrument: In theMain Menu, select Tools4ShutDown4Shut Down.
2. Wait 30 seconds, then press thebutton on the front of theinstrument to power on theinstrument.
Appendix A TroubleshootingIon Proton™ Sequencer status bar icon warnings A
Ion PI™ Hi‑Q™ Sequencing 200 Kit User Guide 41
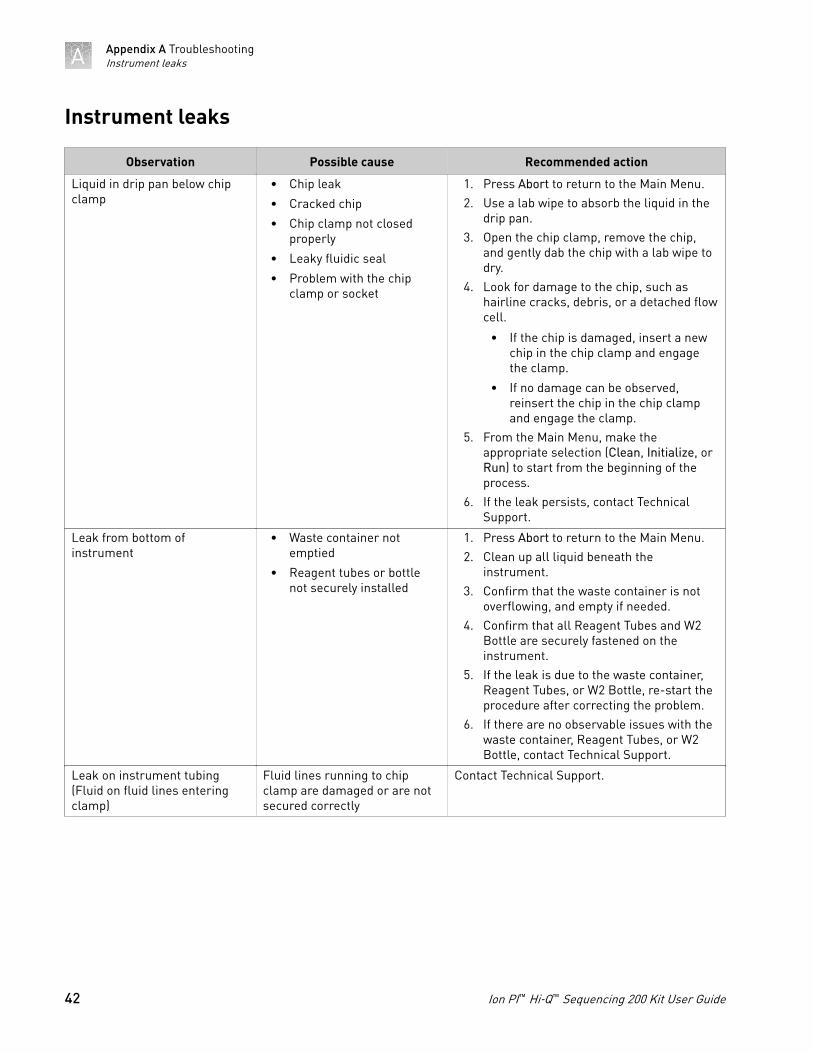
Instrument leaks
Observation Possible cause Recommended action
Liquid in drip pan below chipclamp
• Chip leak
• Cracked chip
• Chip clamp not closedproperly
• Leaky fluidic seal
• Problem with the chipclamp or socket
1. Press Abort to return to the Main Menu.2. Use a lab wipe to absorb the liquid in the
drip pan.3. Open the chip clamp, remove the chip,
and gently dab the chip with a lab wipe todry.
4. Look for damage to the chip, such ashairline cracks, debris, or a detached flowcell.
• If the chip is damaged, insert a newchip in the chip clamp and engagethe clamp.
• If no damage can be observed,reinsert the chip in the chip clampand engage the clamp.
5. From the Main Menu, make theappropriate selection (Clean, Initialize, orRun) to start from the beginning of theprocess.
6. If the leak persists, contact TechnicalSupport.
Leak from bottom ofinstrument
• Waste container notemptied
• Reagent tubes or bottlenot securely installed
1. Press Abort to return to the Main Menu.2. Clean up all liquid beneath the
instrument.3. Confirm that the waste container is not
overflowing, and empty if needed.4. Confirm that all Reagent Tubes and W2
Bottle are securely fastened on theinstrument.
5. If the leak is due to the waste container,Reagent Tubes, or W2 Bottle, re-start theprocedure after correcting the problem.
6. If there are no observable issues with thewaste container, Reagent Tubes, or W2Bottle, contact Technical Support.
Leak on instrument tubing(Fluid on fluid lines enteringclamp)
Fluid lines running to chipclamp are damaged or are notsecured correctly
Contact Technical Support.
Appendix A TroubleshootingInstrument leaksA
42 Ion PI™ Hi‑Q™ Sequencing 200 Kit User Guide
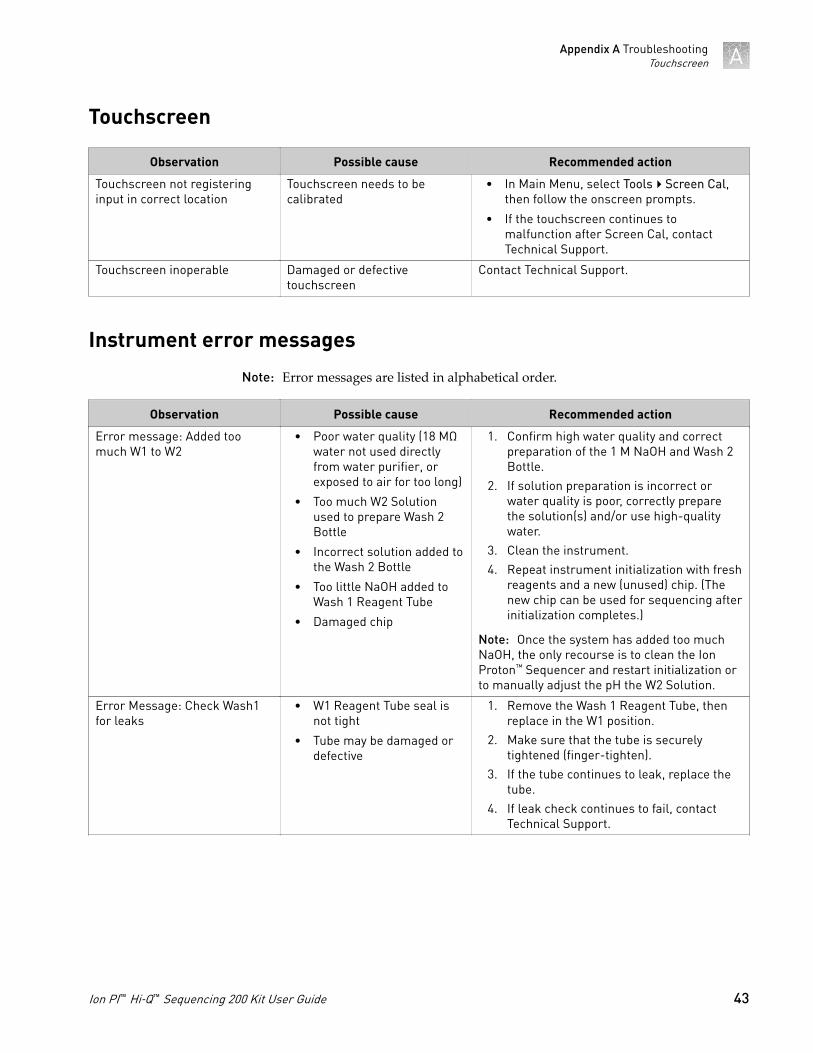
Touchscreen
Observation Possible cause Recommended action
Touchscreen not registeringinput in correct location
Touchscreen needs to becalibrated
• In Main Menu, select Tools4Screen Cal,then follow the onscreen prompts.
• If the touchscreen continues tomalfunction after Screen Cal, contactTechnical Support.
Touchscreen inoperable Damaged or defectivetouchscreen
Contact Technical Support.
Instrument error messages
Note: Error messages are listed in alphabetical order.
Observation Possible cause Recommended action
Error message: Added toomuch W1 to W2
• Poor water quality (18 MΩwater not used directlyfrom water purifier, orexposed to air for too long)
• Too much W2 Solutionused to prepare Wash 2Bottle
• Incorrect solution added tothe Wash 2 Bottle
• Too little NaOH added toWash 1 Reagent Tube
• Damaged chip
1. Confirm high water quality and correctpreparation of the 1 M NaOH and Wash 2Bottle.
2. If solution preparation is incorrect orwater quality is poor, correctly preparethe solution(s) and/or use high-qualitywater.
3. Clean the instrument.4. Repeat instrument initialization with fresh
reagents and a new (unused) chip. (Thenew chip can be used for sequencing afterinitialization completes.)
Note: Once the system has added too muchNaOH, the only recourse is to clean the IonProton™ Sequencer and restart initialization orto manually adjust the pH the W2 Solution.
Error Message: Check Wash1for leaks
• W1 Reagent Tube seal isnot tight
• Tube may be damaged ordefective
1. Remove the Wash 1 Reagent Tube, thenreplace in the W1 position.
2. Make sure that the tube is securelytightened (finger-tighten).
3. If the tube continues to leak, replace thetube.
4. If leak check continues to fail, contactTechnical Support.
Appendix A TroubleshootingTouchscreen A
Ion PI™ Hi‑Q™ Sequencing 200 Kit User Guide 43
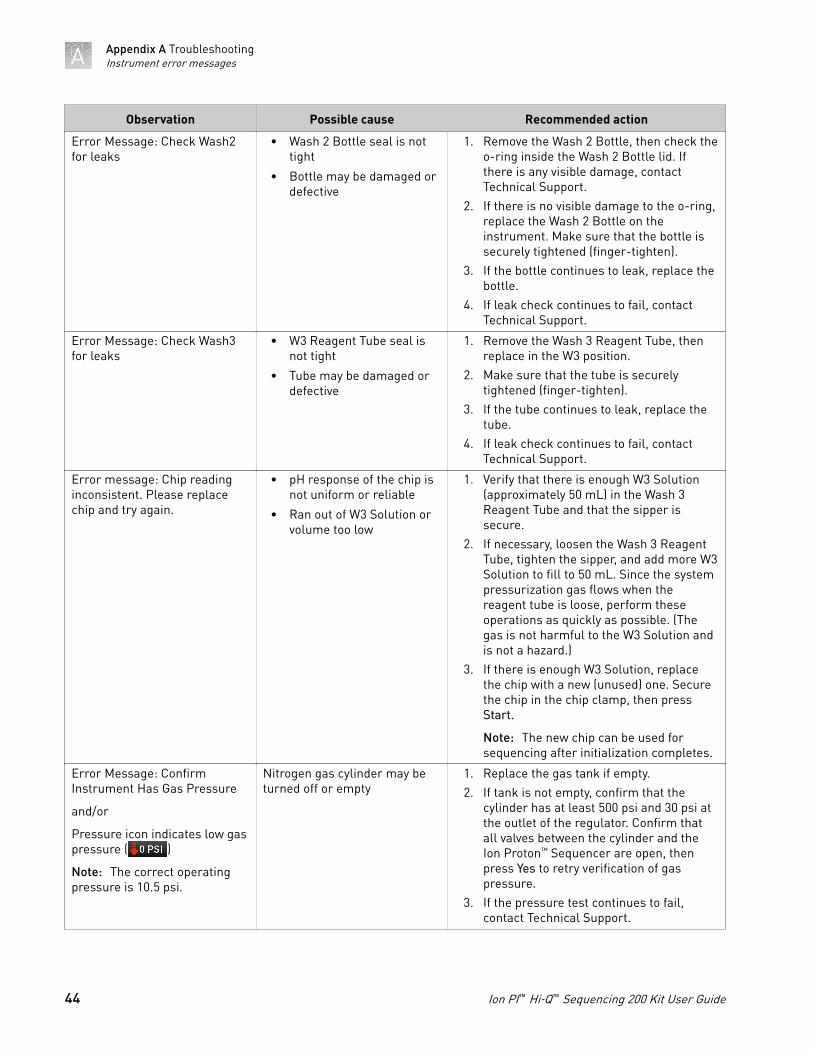
Observation Possible cause Recommended action
Error Message: Check Wash2for leaks
• Wash 2 Bottle seal is nottight
• Bottle may be damaged ordefective
1. Remove the Wash 2 Bottle, then check theo-ring inside the Wash 2 Bottle lid. Ifthere is any visible damage, contactTechnical Support.
2. If there is no visible damage to the o-ring,replace the Wash 2 Bottle on theinstrument. Make sure that the bottle issecurely tightened (finger-tighten).
3. If the bottle continues to leak, replace thebottle.
4. If leak check continues to fail, contactTechnical Support.
Error Message: Check Wash3for leaks
• W3 Reagent Tube seal isnot tight
• Tube may be damaged ordefective
1. Remove the Wash 3 Reagent Tube, thenreplace in the W3 position.
2. Make sure that the tube is securelytightened (finger-tighten).
3. If the tube continues to leak, replace thetube.
4. If leak check continues to fail, contactTechnical Support.
Error message: Chip readinginconsistent. Please replacechip and try again.
• pH response of the chip isnot uniform or reliable
• Ran out of W3 Solution orvolume too low
1. Verify that there is enough W3 Solution(approximately 50 mL) in the Wash 3Reagent Tube and that the sipper issecure.
2. If necessary, loosen the Wash 3 ReagentTube, tighten the sipper, and add more W3Solution to fill to 50 mL. Since the systempressurization gas flows when thereagent tube is loose, perform theseoperations as quickly as possible. (Thegas is not harmful to the W3 Solution andis not a hazard.)
3. If there is enough W3 Solution, replacethe chip with a new (unused) one. Securethe chip in the chip clamp, then pressStart.
Note: The new chip can be used forsequencing after initialization completes.
Error Message: ConfirmInstrument Has Gas Pressure
and/or
Pressure icon indicates low gaspressure ( )
Note: The correct operatingpressure is 10.5 psi.
Nitrogen gas cylinder may beturned off or empty
1. Replace the gas tank if empty.2. If tank is not empty, confirm that the
cylinder has at least 500 psi and 30 psi atthe outlet of the regulator. Confirm thatall valves between the cylinder and theIon Proton™ Sequencer are open, thenpress Yes to retry verification of gaspressure.
3. If the pressure test continues to fail,contact Technical Support.
Appendix A TroubleshootingInstrument error messagesA
44 Ion PI™ Hi‑Q™ Sequencing 200 Kit User Guide
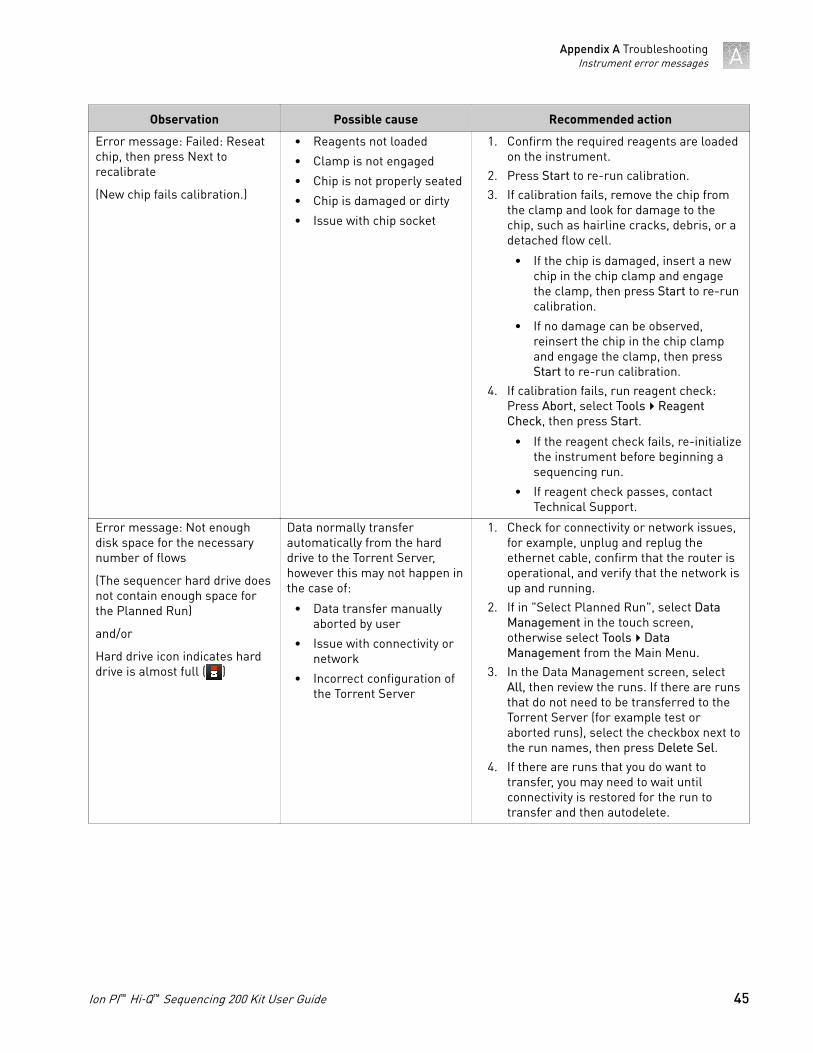
Observation Possible cause Recommended action
Error message: Failed: Reseatchip, then press Next torecalibrate
(New chip fails calibration.)
• Reagents not loaded
• Clamp is not engaged
• Chip is not properly seated
• Chip is damaged or dirty
• Issue with chip socket
1. Confirm the required reagents are loadedon the instrument.
2. Press Start to re-run calibration.3. If calibration fails, remove the chip from
the clamp and look for damage to thechip, such as hairline cracks, debris, or adetached flow cell.
• If the chip is damaged, insert a newchip in the chip clamp and engagethe clamp, then press Start to re-runcalibration.
• If no damage can be observed,reinsert the chip in the chip clampand engage the clamp, then pressStart to re-run calibration.
4. If calibration fails, run reagent check:Press Abort, select Tools4ReagentCheck, then press Start.
• If the reagent check fails, re-initializethe instrument before beginning asequencing run.
• If reagent check passes, contactTechnical Support.
Error message: Not enoughdisk space for the necessarynumber of flows
(The sequencer hard drive doesnot contain enough space forthe Planned Run)
and/or
Hard drive icon indicates harddrive is almost full ( )
Data normally transferautomatically from the harddrive to the Torrent Server,however this may not happen inthe case of:
• Data transfer manuallyaborted by user
• Issue with connectivity ornetwork
• Incorrect configuration ofthe Torrent Server
1. Check for connectivity or network issues,for example, unplug and replug theethernet cable, confirm that the router isoperational, and verify that the network isup and running.
2. If in "Select Planned Run", select DataManagement in the touch screen,otherwise select Tools4DataManagement from the Main Menu.
3. In the Data Management screen, selectAll, then review the runs. If there are runsthat do not need to be transferred to theTorrent Server (for example test oraborted runs), select the checkbox next tothe run names, then press Delete Sel.
4. If there are runs that you do want totransfer, you may need to wait untilconnectivity is restored for the run totransfer and then autodelete.
Appendix A TroubleshootingInstrument error messages A
Ion PI™ Hi‑Q™ Sequencing 200 Kit User Guide 45
Observation Possible cause Recommended action
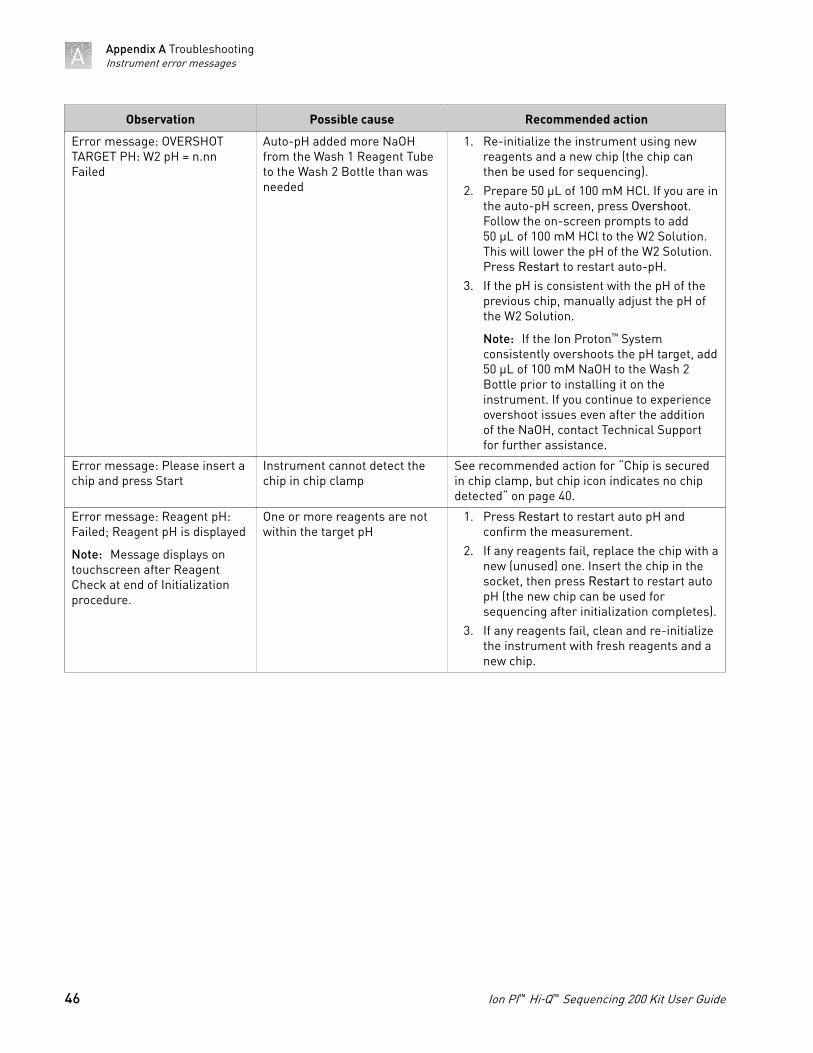
Error message: OVERSHOTTARGET PH: W2 pH = n.nnFailed
Auto-pH added more NaOHfrom the Wash 1 Reagent Tubeto the Wash 2 Bottle than wasneeded
1. Re-initialize the instrument using newreagents and a new chip (the chip canthen be used for sequencing).
2. Prepare 50 μL of 100 mM HCl. If you are inthe auto-pH screen, press Overshoot.Follow the on-screen prompts to add50 μL of 100 mM HCl to the W2 Solution.This will lower the pH of the W2 Solution.Press Restart to restart auto-pH.
3. If the pH is consistent with the pH of theprevious chip, manually adjust the pH ofthe W2 Solution.
Note: If the Ion Proton™ Systemconsistently overshoots the pH target, add50 μL of 100 mM NaOH to the Wash 2Bottle prior to installing it on theinstrument. If you continue to experienceovershoot issues even after the additionof the NaOH, contact Technical Supportfor further assistance.
Error message: Please insert achip and press Start
Instrument cannot detect thechip in chip clamp
See recommended action for “Chip is securedin chip clamp, but chip icon indicates no chipdetected“ on page 40.
Error message: Reagent pH:Failed; Reagent pH is displayed
Note: Message displays ontouchscreen after ReagentCheck at end of Initializationprocedure.
One or more reagents are notwithin the target pH
1. Press Restart to restart auto pH andconfirm the measurement.
2. If any reagents fail, replace the chip with anew (unused) one. Insert the chip in thesocket, then press Restart to restart autopH (the new chip can be used forsequencing after initialization completes).
3. If any reagents fail, clean and re-initializethe instrument with fresh reagents and anew chip.
Appendix A TroubleshootingInstrument error messagesA
46 Ion PI™ Hi‑Q™ Sequencing 200 Kit User Guide
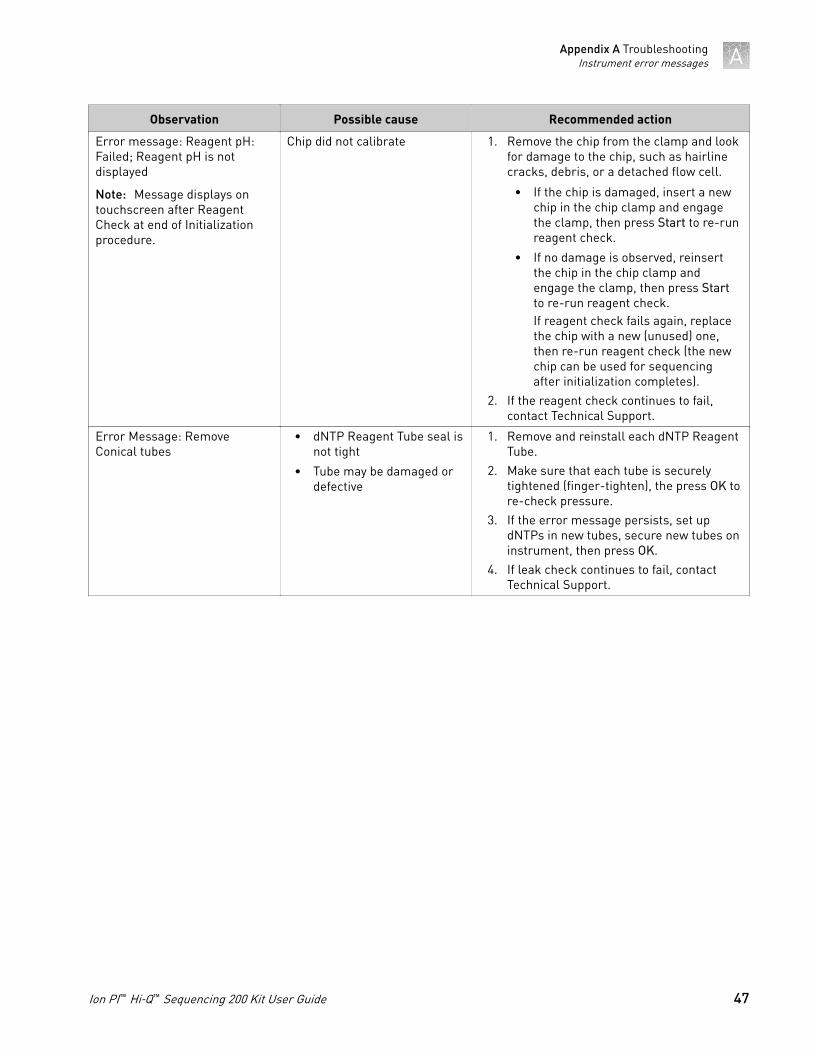
Observation Possible cause Recommended action
Error message: Reagent pH:Failed; Reagent pH is notdisplayed
Note: Message displays ontouchscreen after ReagentCheck at end of Initializationprocedure.
Chip did not calibrate 1. Remove the chip from the clamp and lookfor damage to the chip, such as hairlinecracks, debris, or a detached flow cell.
• If the chip is damaged, insert a newchip in the chip clamp and engagethe clamp, then press Start to re-runreagent check.
• If no damage is observed, reinsertthe chip in the chip clamp andengage the clamp, then press Startto re-run reagent check.If reagent check fails again, replacethe chip with a new (unused) one,then re-run reagent check (the newchip can be used for sequencingafter initialization completes).
2. If the reagent check continues to fail,contact Technical Support.
Error Message: RemoveConical tubes
• dNTP Reagent Tube seal isnot tight
• Tube may be damaged ordefective
1. Remove and reinstall each dNTP ReagentTube.
2. Make sure that each tube is securelytightened (finger-tighten), the press OK tore-check pressure.
3. If the error message persists, set updNTPs in new tubes, secure new tubes oninstrument, then press OK.
4. If leak check continues to fail, contactTechnical Support.
Appendix A TroubleshootingInstrument error messages A
Ion PI™ Hi‑Q™ Sequencing 200 Kit User Guide 47
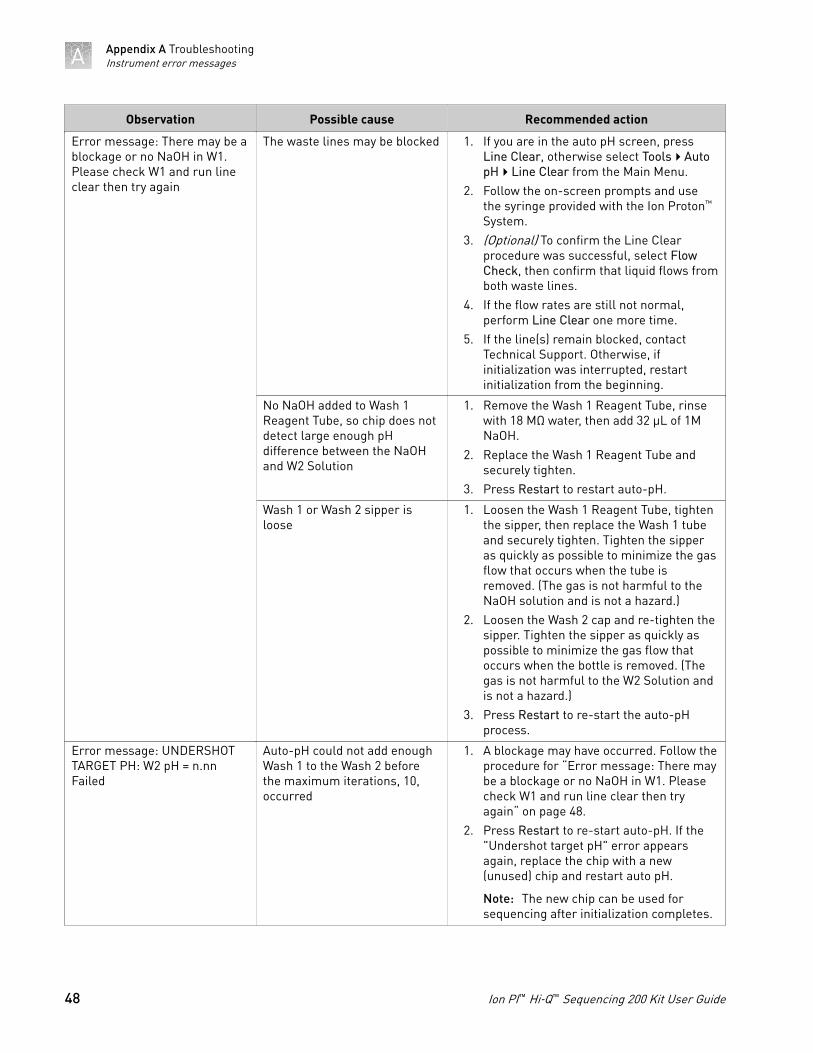
Observation Possible cause Recommended action
Error message: There may be ablockage or no NaOH in W1.Please check W1 and run lineclear then try again
The waste lines may be blocked 1. If you are in the auto pH screen, pressLine Clear, otherwise select Tools4AutopH4Line Clear from the Main Menu.
2. Follow the on-screen prompts and usethe syringe provided with the Ion Proton™
System.3. (Optional) To confirm the Line Clear
procedure was successful, select FlowCheck, then confirm that liquid flows fromboth waste lines.
4. If the flow rates are still not normal,perform Line Clear one more time.
5. If the line(s) remain blocked, contactTechnical Support. Otherwise, ifinitialization was interrupted, restartinitialization from the beginning.
No NaOH added to Wash 1Reagent Tube, so chip does notdetect large enough pHdifference between the NaOHand W2 Solution
1. Remove the Wash 1 Reagent Tube, rinsewith 18 MΩ water, then add 32 µL of 1MNaOH.
2. Replace the Wash 1 Reagent Tube andsecurely tighten.
3. Press Restart to restart auto-pH.
Wash 1 or Wash 2 sipper isloose
1. Loosen the Wash 1 Reagent Tube, tightenthe sipper, then replace the Wash 1 tubeand securely tighten. Tighten the sipperas quickly as possible to minimize the gasflow that occurs when the tube isremoved. (The gas is not harmful to theNaOH solution and is not a hazard.)
2. Loosen the Wash 2 cap and re-tighten thesipper. Tighten the sipper as quickly aspossible to minimize the gas flow thatoccurs when the bottle is removed. (Thegas is not harmful to the W2 Solution andis not a hazard.)
3. Press Restart to re-start the auto-pHprocess.
Error message: UNDERSHOTTARGET PH: W2 pH = n.nnFailed
Auto-pH could not add enoughWash 1 to the Wash 2 beforethe maximum iterations, 10,occurred
1. A blockage may have occurred. Follow theprocedure for “Error message: There maybe a blockage or no NaOH in W1. Pleasecheck W1 and run line clear then tryagain“ on page 48.
2. Press Restart to re-start auto-pH. If the"Undershot target pH" error appearsagain, replace the chip with a new(unused) chip and restart auto pH.
Note: The new chip can be used forsequencing after initialization completes.
Appendix A TroubleshootingInstrument error messagesA
48 Ion PI™ Hi‑Q™ Sequencing 200 Kit User Guide
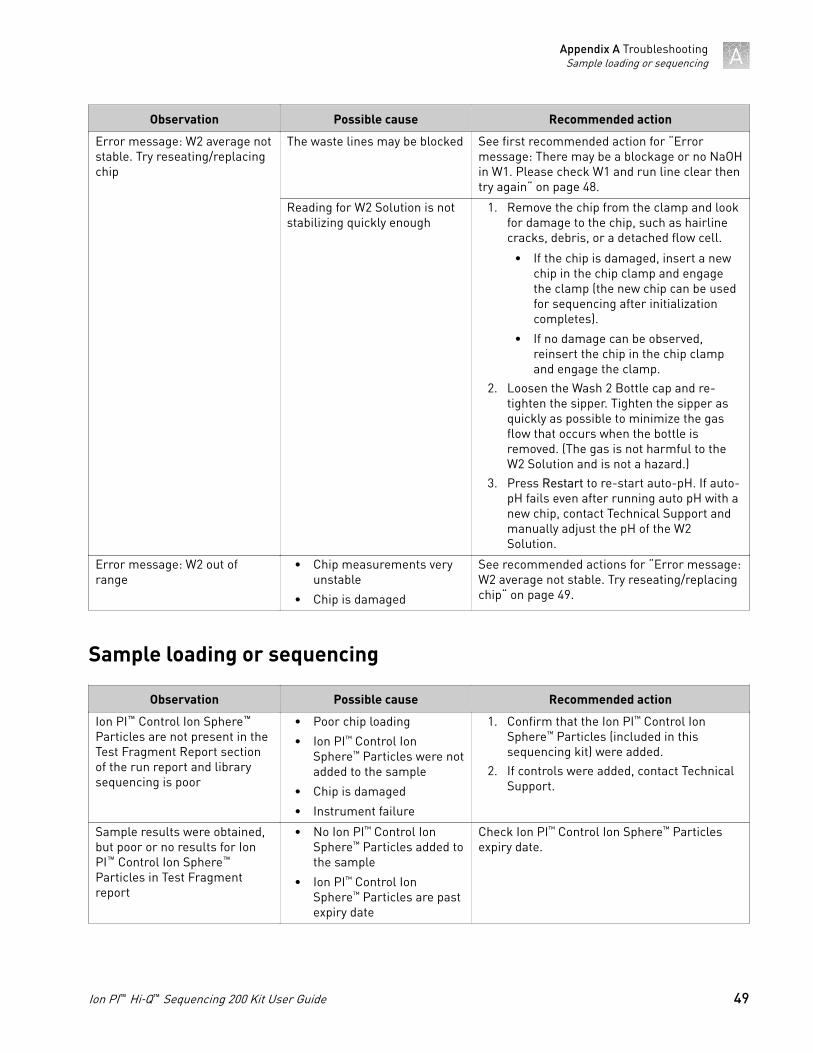
Observation Possible cause Recommended action
Error message: W2 average notstable. Try reseating/replacingchip
The waste lines may be blocked See first recommended action for “Errormessage: There may be a blockage or no NaOHin W1. Please check W1 and run line clear thentry again“ on page 48.
Reading for W2 Solution is notstabilizing quickly enough
1. Remove the chip from the clamp and lookfor damage to the chip, such as hairlinecracks, debris, or a detached flow cell.
• If the chip is damaged, insert a newchip in the chip clamp and engagethe clamp (the new chip can be usedfor sequencing after initializationcompletes).
• If no damage can be observed,reinsert the chip in the chip clampand engage the clamp.
2. Loosen the Wash 2 Bottle cap and re-tighten the sipper. Tighten the sipper asquickly as possible to minimize the gasflow that occurs when the bottle isremoved. (The gas is not harmful to theW2 Solution and is not a hazard.)
3. Press Restart to re-start auto-pH. If auto-pH fails even after running auto pH with anew chip, contact Technical Support andmanually adjust the pH of the W2Solution.
Error message: W2 out ofrange
• Chip measurements veryunstable
• Chip is damaged
See recommended actions for “Error message:W2 average not stable. Try reseating/replacingchip“ on page 49.
Sample loading or sequencing
Observation Possible cause Recommended action
Ion PI™ Control Ion Sphere™
Particles are not present in theTest Fragment Report sectionof the run report and librarysequencing is poor
• Poor chip loading
• Ion PI™ Control IonSphere™ Particles were notadded to the sample
• Chip is damaged
• Instrument failure
1. Confirm that the Ion PI™ Control IonSphere™ Particles (included in thissequencing kit) were added.
2. If controls were added, contact TechnicalSupport.
Sample results were obtained,but poor or no results for IonPI™ Control Ion Sphere™
Particles in Test Fragmentreport
• No Ion PI™ Control IonSphere™ Particles added tothe sample
• Ion PI™ Control IonSphere™ Particles are pastexpiry date
Check Ion PI™ Control Ion Sphere™ Particlesexpiry date.
Appendix A TroubleshootingSample loading or sequencing A
Ion PI™ Hi‑Q™ Sequencing 200 Kit User Guide 49
Observation Possible cause Recommended action
Good conversion rate for IonPI™ Control Ion Sphere™
Particles, but poor sampleloading and sequencing
Problems with library ortemplate preparation
Verify the quantity and quality of the library andtemplate preparations.
Troubleshooting using the Ion PI™ Control Ion Sphere™ Particles
To prepare Ion PI™ Control Ion Sphere™ Particles for an installation or troubleshootingsequencing run:
1. Create a Planned Run and clean and initialize the Ion Proton™ Sequencer asusual.
2. When you are ready to load the chip, vortex the Ion PI™ Control Ion Sphere™
Particles for 5 seconds, then centrifuge for 2 seconds before taking aliquots.
3. Add 66 µL of control ISPs to an empty 0.2‑mL PCR tube (non‑polystyrene).
4. Add 150 µL of Ion PI™ Annealing Buffer to the tube.
5. Proceed to Step 1 of “Anneal Sequencing Primer to the enriched ISPs“ on page 34,substituting the control ISPs prepared as above for the enriched template‑positive ISPs. Spin down the control ISPs, add annealing buffer and sequencingprimer to a total volume of 45 µL, and proceed with annealing, chip loading, andsequencing as described.
Appendix A TroubleshootingTroubleshooting using the Ion PI™ Control Ion Sphere™ ParticlesA
50 Ion PI™ Hi‑Q™ Sequencing 200 Kit User Guide
Sharing Planned Runs betweenTorrent Servers
Enable Planned Run sharing
Starting in Torrent Suite™ Software v4.4, Planned Runs created on one Torrent Servercan be transferred to another Torrent Server. This is useful if a sequencer connected toa particular server is offline or busy.
For example, the figure below illustrates a scenario where three Torrent Servers are onthe same subnet, and a Planned Run created on TS 1 (the "origin" server) is transferredto TS 3 (the "destination" server) for use on the sequencer connected to TS 3.
Network
TS 1(origin)
Proton 1 Proton 2
TS 2(destination)
TS 3(destination)
Proton 3
Requirements include:• All Torrent Servers must be on the same subnet.• All Torrent Servers must be running the same software version.• All Torrent Servers must have the same genomic reference, barcode set, BED files,
Variant Caller config files, etc.
B
Ion PI™ Hi‑Q™ Sequencing 200 Kit User Guide 51
1. On the origin server (e.g., TS1) Site administration page, scroll down and selectShared servers. The Select shared server to change window appears.
2. If you are adding your destination server for the first time, click Add sharedserver.
3. Define your destination server.a. Enter the name, address (can be IP address), user name and password for
the destination server.
b. Click Active if you want this server enabled for sharing.
c. (Optional) Add a comment.
d. Click one of the Save options.
4. (Optional) If you want to configure the origin Torrent Server to also be adestination server, you must go to another server and repeat these steps to set theorigin server as a destination server. Once the Torrent Servers are configured, youor a user can now transfer Planned Runs between Torrent Servers.
Set up ServerNetwork (adminaction)
Appendix B Sharing Planned Runs between Torrent ServersEnable Planned Run sharingB
52 Ion PI™ Hi‑Q™ Sequencing 200 Kit User Guide
1. Using the Torrent Browser on the origin Torrent Server, go to Plan4Planned RunList.
2. Open the Gear menu of the Planned Run you want to transfer, and selectTransfer. Then select the destination Torrent Server.
3. A confirmation window appears. Check the information, then click Transfer.
Note: You can no longer access this Planned Run on the origin server after it hastransferred.
Transfer aPlanned Run
Appendix B Sharing Planned Runs between Torrent ServersEnable Planned Run sharing B
Ion PI™ Hi‑Q™ Sequencing 200 Kit User Guide 53
4. A status window displays the results of the transfer:• The green box lists the samples successfully processed and the required
target BED files found on the destination server.• The red box lists any required BED files or plugins that are not present on
the destination server. To successfully perform the run, you will need to editthe transferred Planned Run on the destination server and manually add themissing BED files or plugins.
5. To edit the transferred Planned Run and add missing files:a. Download required files using the References tab of the Torrent browser of
the destination server
b. Go to the Edit Plan wizard of the transferred Planned Run by selecting Editon the gear pull‑down menu to the right of the Planned Run.
c. Select the files or plugins as needed, then click Update Plan.
Note: You can also navigate to the Edit Plan wizard by clicking the Edit testplan link in the status page above.
Appendix B Sharing Planned Runs between Torrent ServersEnable Planned Run sharingB
54 Ion PI™ Hi‑Q™ Sequencing 200 Kit User Guide
1. On the destination server, delete the transferred Planned Run from either thePlanned Run page or the admin page.
2. On the origin server, locate the plan onthe /admin/rundb/plannedexperiment/page, uncheck PlanExecuted and changePlanStatus to Planned.
If you transferred a Planned Run in error, you can transfer it back to the origin serveror to another server.
1. On the destination Torrent Server, navigate to Plan4Planned Run List andlocate the transferred Planned Run.
2. From the Gear menu of the Planned Run, select Transfer, then select theTorrent Server to which you wish to transfer the run.
Undo a PlannedRun transfer(administrator)
Undo a PlannedRun transfer(user)
Appendix B Sharing Planned Runs between Torrent ServersEnable Planned Run sharing B
Ion PI™ Hi‑Q™ Sequencing 200 Kit User Guide 55
Touchscreen Reference
Main menu
The Clean, Initialize, and Run programs lead you through the necessary steps toprepare the instrument for sequencing and start a sequencing run.
• The Clean program can be used to perform either 18 MΩ water or chloritesolution cleaning. Cleaning must be performed before each initialization toensure that the reagents from the previous run are cleared from the fluid lines.Abbreviated instructions are provided on the touchscreen; for the completecleaning schedule and detailed instructions, see “Clean the Ion Proton™
Sequencer“ on page 21.• The Initialize program must be performed before each run to prepare the run
reagents. The Initialize program walks you through the following steps:– Specifying the sequencing kit.– Setting up wash solutions. (After this step, the instrument adjusts and checks
the pH of the Wash 2 Bottle solution.)– Setting up dNTPs. (After this step, the instrument checks the pH of all of the
reagents.)
Abbreviated instructions are provided on the touchscreen; for detailedinstructions, see “Initialize the Ion Proton™ Sequencer“ on page 26.
• The Run program walks you through steps leading up to and throughsequencing, including:
– Calibrating a chip before loading the sample on the chip.– Placing a loaded chip on the instrument.– Calibrating the loaded chip.– Selecting a Planned Run.– Performing sequencing.
For detailed instructions, see Chapter 4, “Load the chip and start the sequencingrun“
C
Clean, Initialize,and Run
56 Ion PI™ Hi‑Q™ Sequencing 200 Kit User Guide
• The Options menu gives you access to software updates. See “Update IonProton™ Sequencer software“ on page 61 for details.
• The Tools menu gives you access to troubleshooting tools and to the instrumentShut Down and Reboot commands. See the following table for details.
Table 1 Tools menu options
Item Description When to use
Auto pH Adjusts the pH of the Wash 2 Bottle solution and checks thepH. This task is normally performed by the instrument aspart of the Initialize program.
If directed to do so by Technical Supportor as part of a troubleshooting procedure(see Appendix A, “Troubleshooting“).
Chip Cal Runs the chip calibration portion of the Run program. Chipcalibration is performed by the instrument as part of the Runprogram, both before and after sample is loaded on a chip.
If necessary to calibrate chips withoutusing the Run program.
Data Mgnt Allows you to manually delete run data or transfer the datathe server. Under normal conditions, run data isautomatically transferred to the Ion Proton™ Torrent Server,then deleted from the instrument hard drive.
To troubleshoot data managementissues. See “Error message: Not enoughdisk space for the necessary number offlows“ on page 41.
NoiseScreen
Provides real-time measurement of electrical noise readingson the chip.
For troubleshooting if directed to do so byTechnical Support.
PressureCal
Allows you to calibrate the gas pressure after installing anew gas tank or to troubleshoot gas pressure errormessages.
If seeing gas pressure error messages,see “Error Message: Confirm InstrumentHas Gas Pressure“ on page 40.
ReagentCheck
Measures the pH of all reagents on the instrument. This taskis normally performed by the instrument as part of theInitialize program.
If directed to do so by Technical Supportor as part of a troubleshooting procedure(see Appendix A, “Troubleshooting“).
Screen Cal Calibrates the touchscreen. If the touchscreen is not registeringpressure in the correct location. See “Touchscreen not registering input incorrect location“ on page 43.
Shut Down Access to "Shut Down" and "Reboot" commands.
Note: It is not necessary/recommended to shut down theinstrument overnight or over the weekend. If necessary toshut down the instrument, see “Powering off“ on page 60.
If directed to do so as part of atroubleshooting procedure.
Options and Tools
Appendix C Touchscreen ReferenceMain menu C
Ion PI™ Hi‑Q™ Sequencing 200 Kit User Guide 57

The chip status icon in the lower‑left corner of the screen tells you that the chip iscommunicating with the instrument and alerts you to chip issues. Shortly after yousecure a chip in the chip clamp, the chip status should update to "Ready". If theinstrument does not detect the chip, see “Chip is secured in chip clamp, but chip iconindicates no chip detected“ on page 40.
Ready Online Imaging Sleeping No chipdetected
Press the Gauges icon in the lower right corner of the touchscreen to show or hide theinstrument gauges.
Icon Description
Instrument gas pressure. The expected value is 10.50 psi duringcleaning and initialization, and 8.0 during a sequencing run.
If the icon is red, see “Error Message: Confirm Instrument HasGas Pressure“ on page 40.
Chip compartment temperature. The expected value when the lidis closed is 35.00 C.
If the icon is red, see “Temperature icon indicates chipcompartment temperature is out of range“ on page 41.
Percent instrument hard drive and SSD in use.
If the icon is red, see “Error message: Not enough disk space forthe necessary number of flows“ on page 41.
On-instrument analysis.
indicates on-instrument analysis is in progress.
indicates no current on-instrument analysis.
If the icon displays a red "X", see “On instrument analysis iconindicates error“ on page 41.
Chip Status icon
Touchscreengauges
Appendix C Touchscreen ReferenceMain menuC
58 Ion PI™ Hi‑Q™ Sequencing 200 Kit User Guide
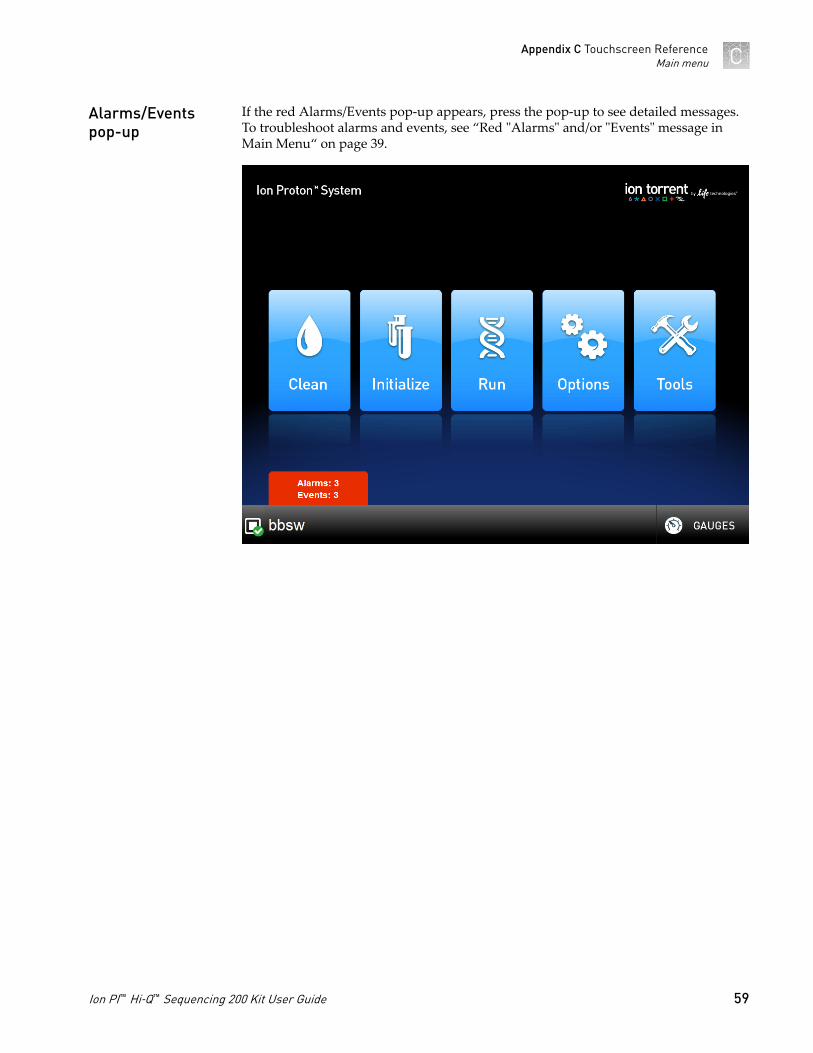
If the red Alarms/Events pop‑up appears, press the pop‑up to see detailed messages.To troubleshoot alarms and events, see “Red "Alarms" and/or "Events" message inMain Menu“ on page 39.
Alarms/Eventspop-up
Appendix C Touchscreen ReferenceMain menu C
Ion PI™ Hi‑Q™ Sequencing 200 Kit User Guide 59
Supplemental procedures
■ Power instrument on or off . . . . . . . . . . . . . . . . . . . . . . . . . . . . . . . . . . . . . . . . . . . . 60
■ Update Ion Proton™ Sequencer software . . . . . . . . . . . . . . . . . . . . . . . . . . . . . . . . 61
■ Manually adjust the pH of the W2 Solution . . . . . . . . . . . . . . . . . . . . . . . . . . . . . . 61
■ Set up and test the Ion Chip™ Minifuge . . . . . . . . . . . . . . . . . . . . . . . . . . . . . . . . . 62
Power instrument on or off
Note: If the instrument is powered on, and the touchscreen is blank, touch the screento "wake" the touchscreen.
1. Locate the power switch on the back of the instrument, then power on theinstrument.
2. Press the power button on the front of the instrument.When the instrument touchscreen Main Menu first comes up, it will appear dim.After a few minutes, the main menu will be brightly lit, indicating that theinstrument is ready for use.
3. If reagents were left on the machine for more than 48 hours, and the Cleanprogram was not run with 18 MΩ water before powering off, run the Cleanprogram with chlorite before initializing the instrument and performing asequencing run.
It is not necessary to power off the instrument overnight or over the weekend. If theinstrument will not be used for more than 3 days, then power off the instrument asfollows:
1. If powering off for more than 3 days, run the Clean program with 18 MΩ waterbefore powering off.
2. In the Main Menu, select Tools4Shut Down4Shut Down.
Note: Select Tools4Shut Down4Reboot if you want the instrument to shutdown and immediately restart.
D
Powering on
Powering off
60 Ion PI™ Hi‑Q™ Sequencing 200 Kit User Guide
Update Ion Proton™ Sequencer software
IMPORTANT! After updates are installed, the instrument must be restarted.
If an update to the Ion Proton™ Sequencer software is available, the red "Alarms andEvents" pop‑up appears in the touchscreen Main Menu to alert you. Click the redpop‑up to see the detailed messages. If a message states New SoftwareAvailable, update the software as follows:
1. In the Main Menu, select Options4Updates.
2. Select the Released Updates checkbox, then press Check.
3. When the message Press Update to begin update process appears,press Update.
Note: If the message All Software Current appears, press Back, Back toreturn to the main menu.
4. When the message Installing Completed displays, follow the onscreenprompts to restart the instrument.
Note: In some cases, the instrument restarts automatically after softwareinstallation.
Manually adjust the pH of the W2 Solution
Materials and equipment needed• Orion Star™ A111 pH Benchtop Meter Kit, or equivalent• Nitrogen gas tank, tube, and flow meter• 1 M NaOH (prepared fresh daily)• Pipette tips and pipette• Magnetic stirrer and stir bar• 100 mM HCl• Squirt bottle
If an error message during the automatic pH process indicates that there is a problemadjusting the pH of the W2 Solution, use the following procedure to adjust the pH ofthe W2 Solution in the Wash 2 Bottle manually.
1. Before proceeding, rinse an empty Wash 2 Bottle and have it ready next to theinstrument. Also have an additional Wash 2 Bottle cap ready.
Note: Gas will be flowing out of the Wash 2 cap, so perform the next steps asquickly as possible (flowing gas will not harm the W2 Solution, and is not ahazard).
2. Remove the Wash 2 Bottle attached to the instrument, then cap the bottle.
Appendix D Supplemental proceduresUpdate Ion Proton™ Sequencer software D
Ion PI™ Hi‑Q™ Sequencing 200 Kit User Guide 61
3. Secure the empty Wash 2 Bottle (from step 1) to the instrument. Do not removethe sipper. This bottle contains the gas flowing out of the instrument while youadjust the pH of the W2 Solution and protect the sipper from contamination.
4. Move the Wash 2 Bottle containing the W2 Solution to the stir plate near thenitrogen gas tube.
5. Secure the gas tube so that it extends inside the mouth of the Wash 2 Bottle butnot below the surface of the W2 Solution.
6. Set the gas flow to 0.5 lpm. Start mixing the W2 Solution fast enough for a smallwhirlpool to form.
7. Calibrate the pH meter using a three‑point calibration. Rinse any bufferingsolution from the pH probe before preparing solutions.
8. Adjust the pH of the W2 Solution to 7.7 ± 0.1 by adding a small amount(approximately 1 µL) of freshly prepared 1 M NaOH to the solution, and thenmeasuring the pH using the pH meter. Add small aliquots and allow the pH toequilibrate before adding more.
Note: If the pH rises above 7.8, use 100 mM hydrochloric acid (HCl) to readjustthe pH to 7.7 ± 0.1.
9. When the pH is stable, turn off the gas, remove the gas line, then cap the Wash 2Bottle.
10. Move the bottle to the instrument, remove the empty Wash 2 Bottle from theinstrument, then place the sipper inside the Wash 2 Bottle containing the pH‑adjusted solution.
11. Secure the cap firmly. Press Next to exit the automated pH check, then continuewith instrument initialization.
Set up and test the Ion Chip™ Minifuge
The Ion Chip™ Minifuge (Cat. No. 4479672 or 4479673) is used to load sequencingchips for use on Ion PGM™, Ion Proton™, and Ion S5™ sequencing platforms. Toaccommodate the larger chip size, Ion Proton™, and Ion S5™ sequencer users must:
• install the Ion S5™/Ion Proton™ Rotor and Buckets (Cat. No. 4482578).• test the minifuge to confirm that no liquid is lost during centrifugation.
before using the minifuge to load chips for the first time.
Note: The following protocols may also be used to convert the Ion Chip™ Minifugeback for use with Ion PGM™ sequencing chips.
Appendix D Supplemental proceduresSet up and test the Ion Chip™ MinifugeD
62 Ion PI™ Hi‑Q™ Sequencing 200 Kit User Guide
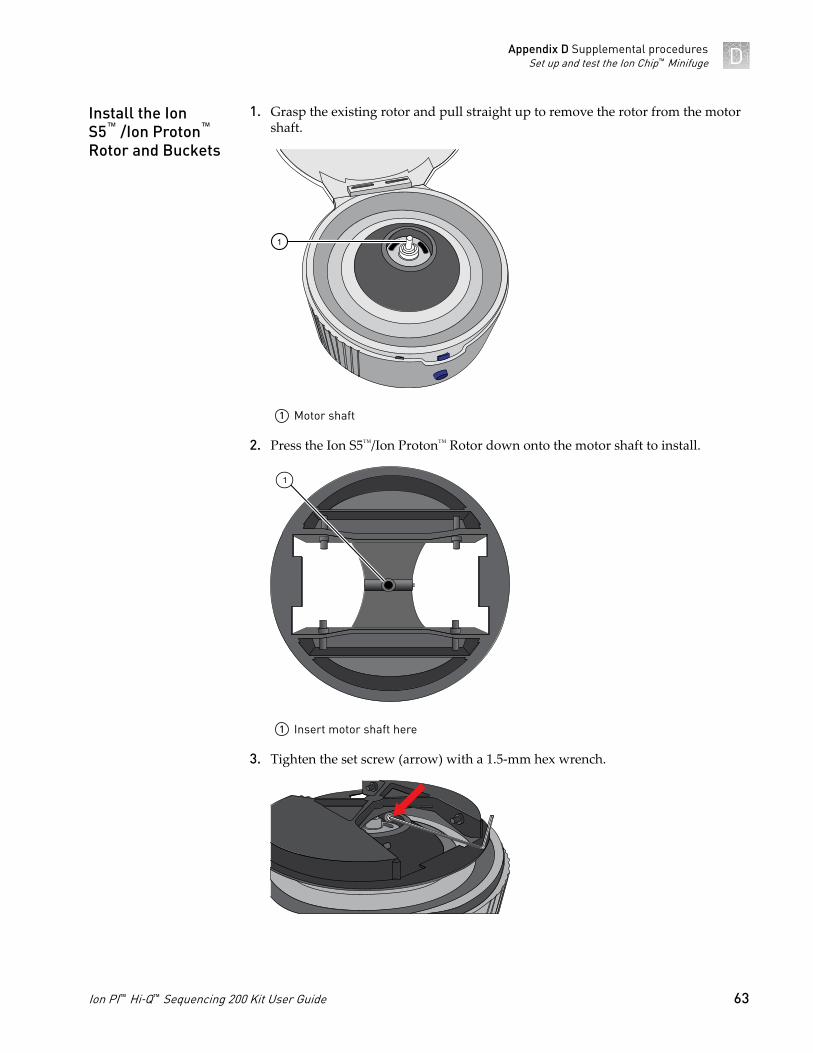
1. Grasp the existing rotor and pull straight up to remove the rotor from the motorshaft.
1
1 Motor shaft
2. Press the Ion S5™/Ion Proton™ Rotor down onto the motor shaft to install.
1
1 Insert motor shaft here
3. Tighten the set screw (arrow) with a 1.5‑mm hex wrench.
Install the IonS5™ /Ion Proton™
Rotor and Buckets
Appendix D Supplemental proceduresSet up and test the Ion Chip™ Minifuge D
Ion PI™ Hi‑Q™ Sequencing 200 Kit User Guide 63
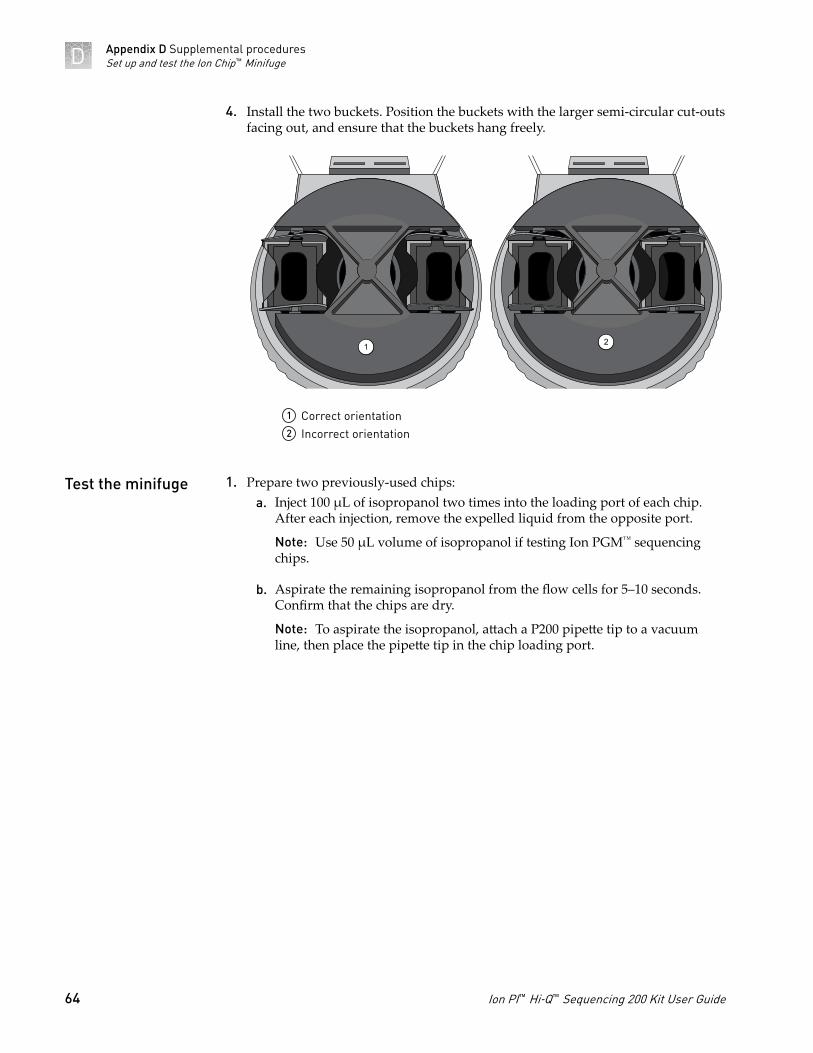
4. Install the two buckets. Position the buckets with the larger semi‑circular cut‑outsfacing out, and ensure that the buckets hang freely.
1
1 Correct orientation2 Incorrect orientation
2
1. Prepare two previously‑used chips:a. Inject 100 µL of isopropanol two times into the loading port of each chip.
After each injection, remove the expelled liquid from the opposite port.
Note: Use 50 µL volume of isopropanol if testing Ion PGM™ sequencingchips.
b. Aspirate the remaining isopropanol from the flow cells for 5–10 seconds.Confirm that the chips are dry.
Note: To aspirate the isopropanol, attach a P200 pipette tip to a vacuumline, then place the pipette tip in the chip loading port.
Test the minifuge
Appendix D Supplemental proceduresSet up and test the Ion Chip™ MinifugeD
64 Ion PI™ Hi‑Q™ Sequencing 200 Kit User Guide
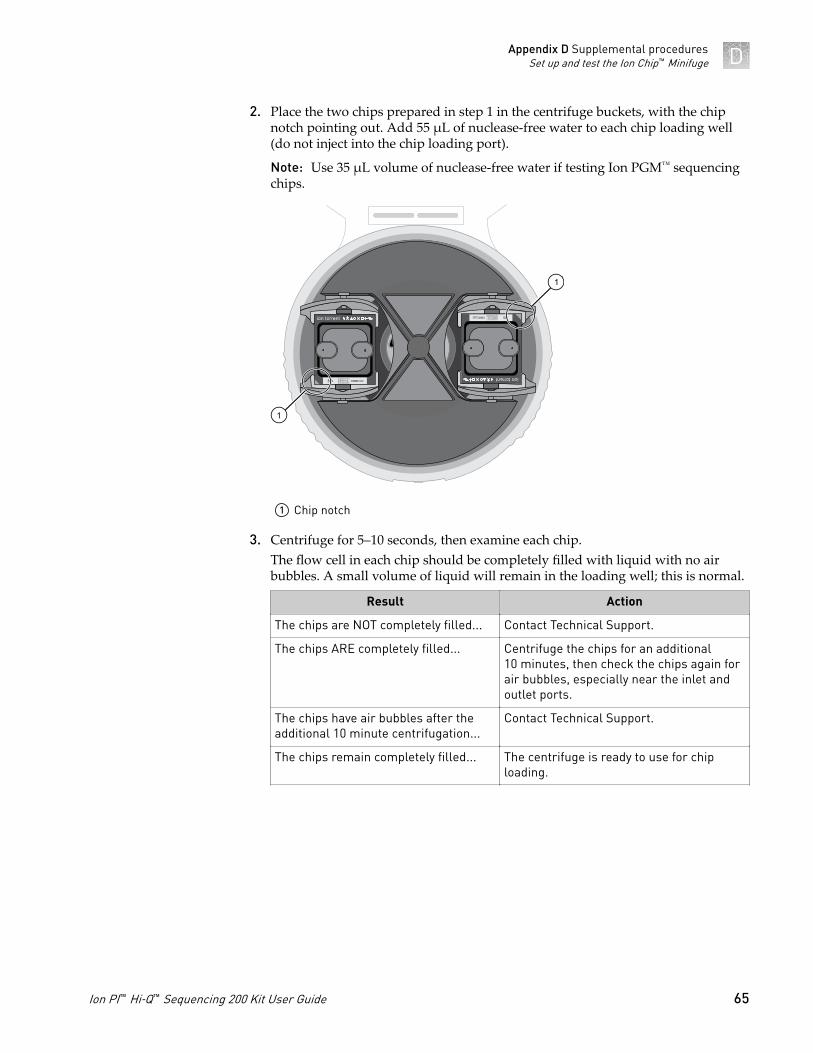
2. Place the two chips prepared in step 1 in the centrifuge buckets, with the chipnotch pointing out. Add 55 µL of nuclease‑free water to each chip loading well(do not inject into the chip loading port).
Note: Use 35 µL volume of nuclease‑free water if testing Ion PGM™ sequencingchips.
1
1
1 Chip notch
3. Centrifuge for 5–10 seconds, then examine each chip.The flow cell in each chip should be completely filled with liquid with no airbubbles. A small volume of liquid will remain in the loading well; this is normal.
Result Action
The chips are NOT completely filled... Contact Technical Support.
The chips ARE completely filled... Centrifuge the chips for an additional10 minutes, then check the chips again forair bubbles, especially near the inlet andoutlet ports.
The chips have air bubbles after theadditional 10 minute centrifugation...
Contact Technical Support.
The chips remain completely filled... The centrifuge is ready to use for chiploading.
Appendix D Supplemental proceduresSet up and test the Ion Chip™ Minifuge D
Ion PI™ Hi‑Q™ Sequencing 200 Kit User Guide 65

Safety
WARNING! GENERAL SAFETY. Using this product in a manner not specifiedin the user documentation may result in personal injury or damage to theinstrument or device. Ensure that anyone using this product has receivedinstructions in general safety practices for laboratories and the safetyinformation provided in this document.
· Before using an instrument or device, read and understand the safetyinformation provided in the user documentation provided by themanufacturer of the instrument or device.
· Before handling chemicals, read and understand all applicable Safety DataSheets (SDSs) and use appropriate personal protective equipment (gloves,gowns, eye protection, etc). To obtain SDSs, see the “Documentation andSupport” section in this document.
Equipment use
The Ion Proton™ System is for performing sequencing of amplified DNA, and shouldonly be used for life science research applications. The Ion Proton™ System shouldonly be used by professionals trained in laboratory techniques and who have studiedthe instructions for use of this instrument. If the equipment is used in a manner notspecified by the manufacturer, the protection provided by the equipment may beimpaired.
IMPORTANT! If you use and/or install the Ion Proton™ System in an unspecifiedmanner, you may impair the protection provided by the equipment.
E
66 Ion PI™ Hi‑Q™ Sequencing 200 Kit User Guide
Symbols on this instrument
Symbols may be found on the instrument to warn against potential hazards or conveyimportant safety information. In this document, the hazard symbol is used along withone of the following user attention words:
• CAUTION! – Indicates a potentially hazardous situation that, if not avoided,may result in minor or moderate injury. It may also be used to alert againstunsafe practices.
• WARNING! – Indicates a potentially hazardous situation that, if not avoided,could result in death or serious injury.
• DANGER! – Indicates an imminently hazardous situation that, if not avoided,will result in death or serious injury.
Symbol English Français
Caution, risk of danger
Consult the manual for further safetyinformation.
Attention, risque de danger
Consulter le manuel pour d’autresrenseignements de sécurité.
Protective conductor terminal (mainground)
Borne de conducteur de protection(mise à la terre principale)
Do not dispose of this product inunsorted municipal waste
CAUTION! To minimizenegative environmentalimpact from disposal ofelectronic waste, do notdispose of electronic waste inunsorted municipal waste.Follow local municipal wasteordinances for properdisposal provision andcontact customer service forinformation about responsibledisposal options.
Ne pas éliminer ce produit avec lesdéchets usuels non soumis au trisélectif.
CAUTION! Pour minimiserles conséquences négativessur l’environnement à la suitede l’élimination de déchetsélectroniques, ne pas élimin-er ce déchet électroniqueavec les déchets usuels nonsoumis au tri sélectif. Se con-former aux ordonnances lo-cales sur les déchets munici-paux pour les dispositionsd’élimination et communi-quer avec le service à la cli-entèle pour des renseigne-ments sur les options d’élimi-nation responsable.
Conformitymark English Français
Indicates conformity with safetyrequirements for Canada and U.S.A.
Indique la conformité avec lesnormes de sécurité en vigueur auCanada et aux États-Unis.
Conformitysymbols on thisinstrument
Appendix E SafetySymbols on this instrument E
Ion PI™ Hi‑Q™ Sequencing 200 Kit User Guide 67
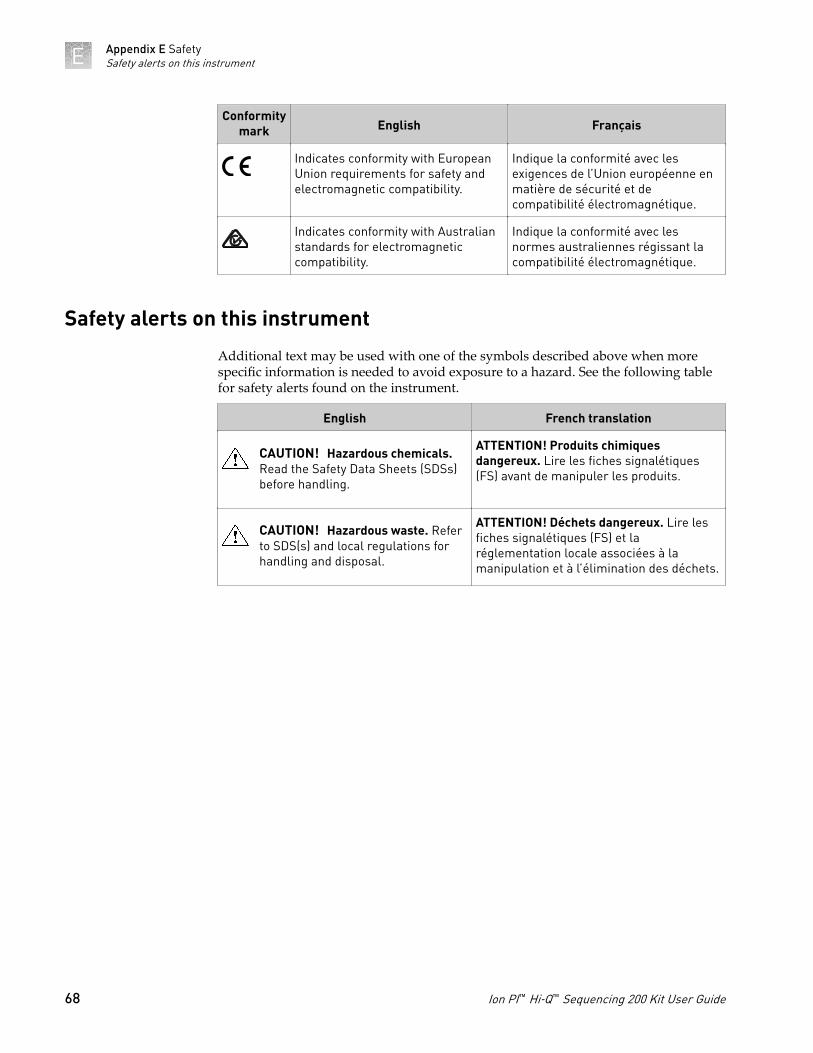
Conformitymark English Français
Indicates conformity with EuropeanUnion requirements for safety andelectromagnetic compatibility.
Indique la conformité avec lesexigences de l’Union européenne enmatière de sécurité et decompatibilité électromagnétique.
Indicates conformity with Australianstandards for electromagneticcompatibility.
Indique la conformité avec lesnormes australiennes régissant lacompatibilité électromagnétique.
Safety alerts on this instrument
Additional text may be used with one of the symbols described above when morespecific information is needed to avoid exposure to a hazard. See the following tablefor safety alerts found on the instrument.
English French translation
CAUTION! Hazardous chemicals.Read the Safety Data Sheets (SDSs)before handling.
ATTENTION! Produits chimiquesdangereux. Lire les fiches signalétiques(FS) avant de manipuler les produits.
CAUTION! Hazardous waste. Referto SDS(s) and local regulations forhandling and disposal.
ATTENTION! Déchets dangereux. Lire lesfiches signalétiques (FS) et laréglementation locale associées à lamanipulation et à l’élimination des déchets.
Appendix E SafetySafety alerts on this instrumentE
68 Ion PI™ Hi‑Q™ Sequencing 200 Kit User Guide

1
1 Safety and regulatory symbols
Safety symbolsused on theinstrument
Appendix E SafetySafety alerts on this instrument E
Ion PI™ Hi‑Q™ Sequencing 200 Kit User Guide 69
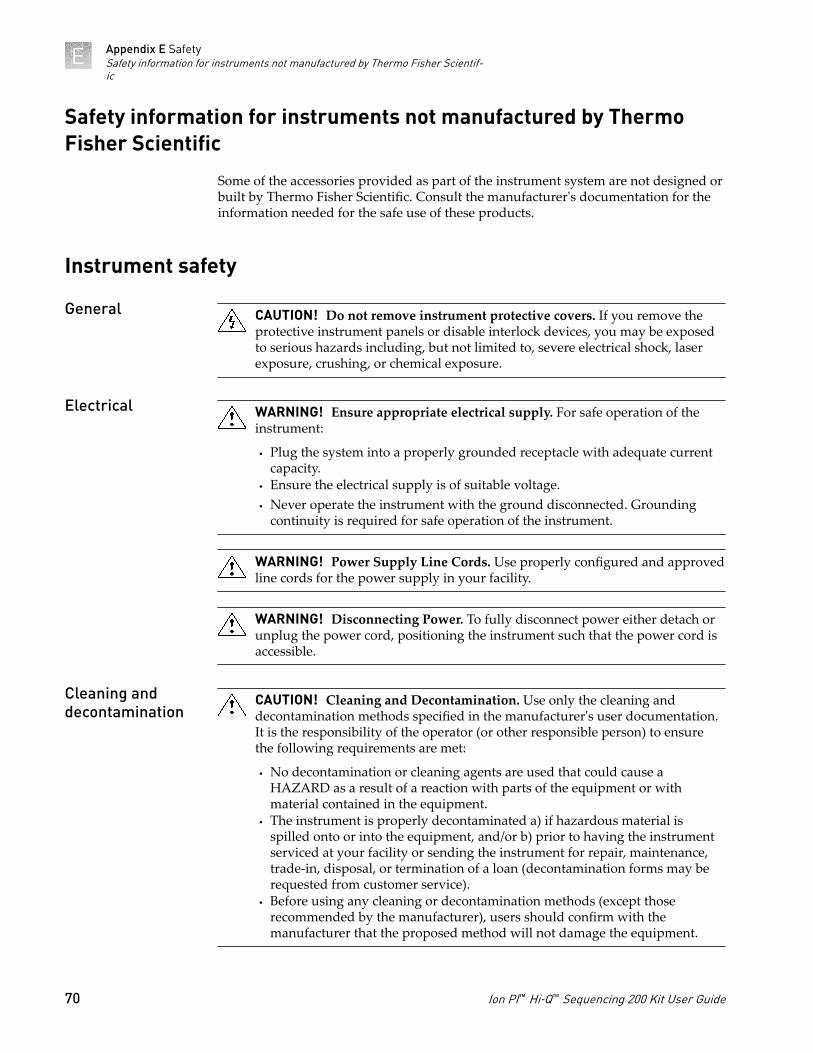
Safety information for instruments not manufactured by ThermoFisher Scientific
Some of the accessories provided as part of the instrument system are not designed orbuilt by Thermo Fisher Scientific. Consult the manufacturer's documentation for theinformation needed for the safe use of these products.
Instrument safety
CAUTION! Do not remove instrument protective covers. If you remove theprotective instrument panels or disable interlock devices, you may be exposedto serious hazards including, but not limited to, severe electrical shock, laserexposure, crushing, or chemical exposure.
WARNING! Ensure appropriate electrical supply. For safe operation of theinstrument:
· Plug the system into a properly grounded receptacle with adequate currentcapacity.
· Ensure the electrical supply is of suitable voltage.· Never operate the instrument with the ground disconnected. Grounding
continuity is required for safe operation of the instrument.
WARNING! Power Supply Line Cords. Use properly configured and approvedline cords for the power supply in your facility.
WARNING! Disconnecting Power. To fully disconnect power either detach orunplug the power cord, positioning the instrument such that the power cord isaccessible.
CAUTION! Cleaning and Decontamination. Use only the cleaning anddecontamination methods specified in the manufacturer's user documentation.It is the responsibility of the operator (or other responsible person) to ensurethe following requirements are met:
· No decontamination or cleaning agents are used that could cause aHAZARD as a result of a reaction with parts of the equipment or withmaterial contained in the equipment.
· The instrument is properly decontaminated a) if hazardous material isspilled onto or into the equipment, and/or b) prior to having the instrumentserviced at your facility or sending the instrument for repair, maintenance,trade‑in, disposal, or termination of a loan (decontamination forms may berequested from customer service).
· Before using any cleaning or decontamination methods (except thoserecommended by the manufacturer), users should confirm with themanufacturer that the proposed method will not damage the equipment.
General
Electrical
Cleaning anddecontamination
Appendix E SafetySafety information for instruments not manufactured by Thermo Fisher Scientif-ic
E
70 Ion PI™ Hi‑Q™ Sequencing 200 Kit User Guide
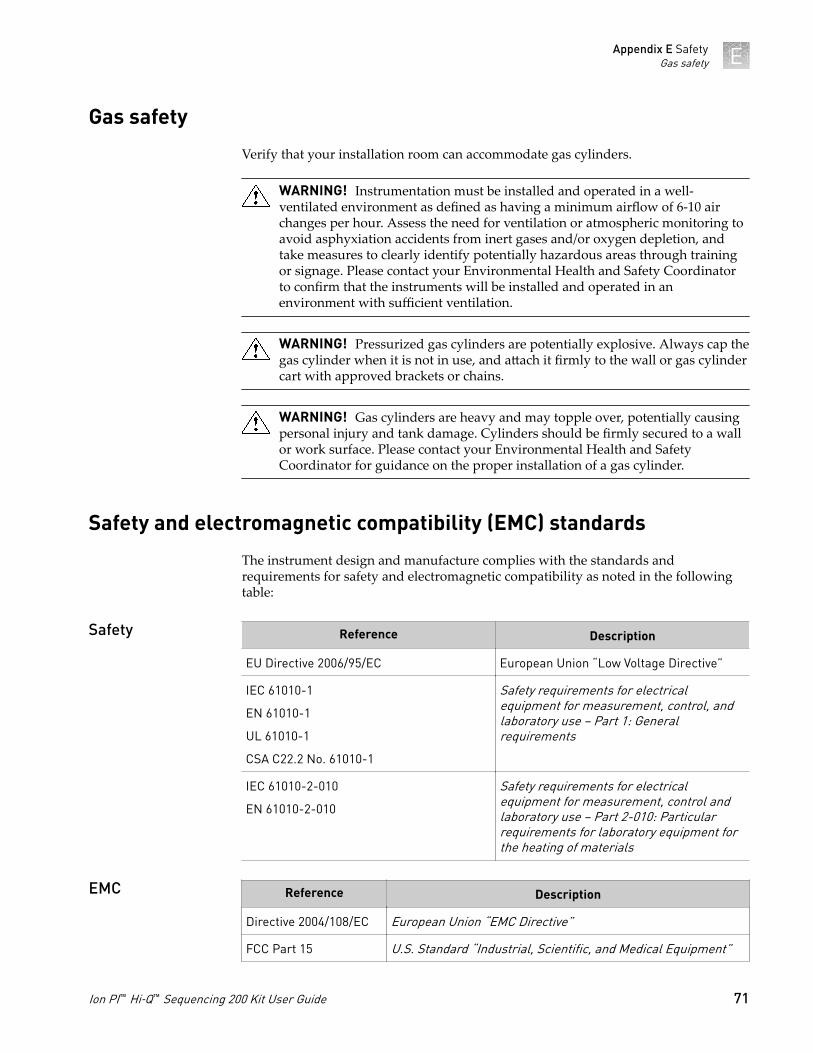
Gas safety
Verify that your installation room can accommodate gas cylinders.
WARNING! Instrumentation must be installed and operated in a well‑ventilated environment as defined as having a minimum airflow of 6‑10 airchanges per hour. Assess the need for ventilation or atmospheric monitoring toavoid asphyxiation accidents from inert gases and/or oxygen depletion, andtake measures to clearly identify potentially hazardous areas through trainingor signage. Please contact your Environmental Health and Safety Coordinatorto confirm that the instruments will be installed and operated in anenvironment with sufficient ventilation.
WARNING! Pressurized gas cylinders are potentially explosive. Always cap thegas cylinder when it is not in use, and attach it firmly to the wall or gas cylindercart with approved brackets or chains.
WARNING! Gas cylinders are heavy and may topple over, potentially causingpersonal injury and tank damage. Cylinders should be firmly secured to a wallor work surface. Please contact your Environmental Health and SafetyCoordinator for guidance on the proper installation of a gas cylinder.
Safety and electromagnetic compatibility (EMC) standards
The instrument design and manufacture complies with the standards andrequirements for safety and electromagnetic compatibility as noted in the followingtable:
Reference Description
EU Directive 2006/95/EC European Union “Low Voltage Directive”
IEC 61010-1
EN 61010-1
UL 61010-1
CSA C22.2 No. 61010-1
Safety requirements for electricalequipment for measurement, control, andlaboratory use – Part 1: Generalrequirements
IEC 61010-2-010
EN 61010-2-010
Safety requirements for electricalequipment for measurement, control andlaboratory use – Part 2-010: Particularrequirements for laboratory equipment forthe heating of materials
Reference Description
Directive 2004/108/EC European Union “EMC Directive”
FCC Part 15 U.S. Standard “Industrial, Scientific, and Medical Equipment”
Safety
EMC
Appendix E SafetyGas safety E
Ion PI™ Hi‑Q™ Sequencing 200 Kit User Guide 71
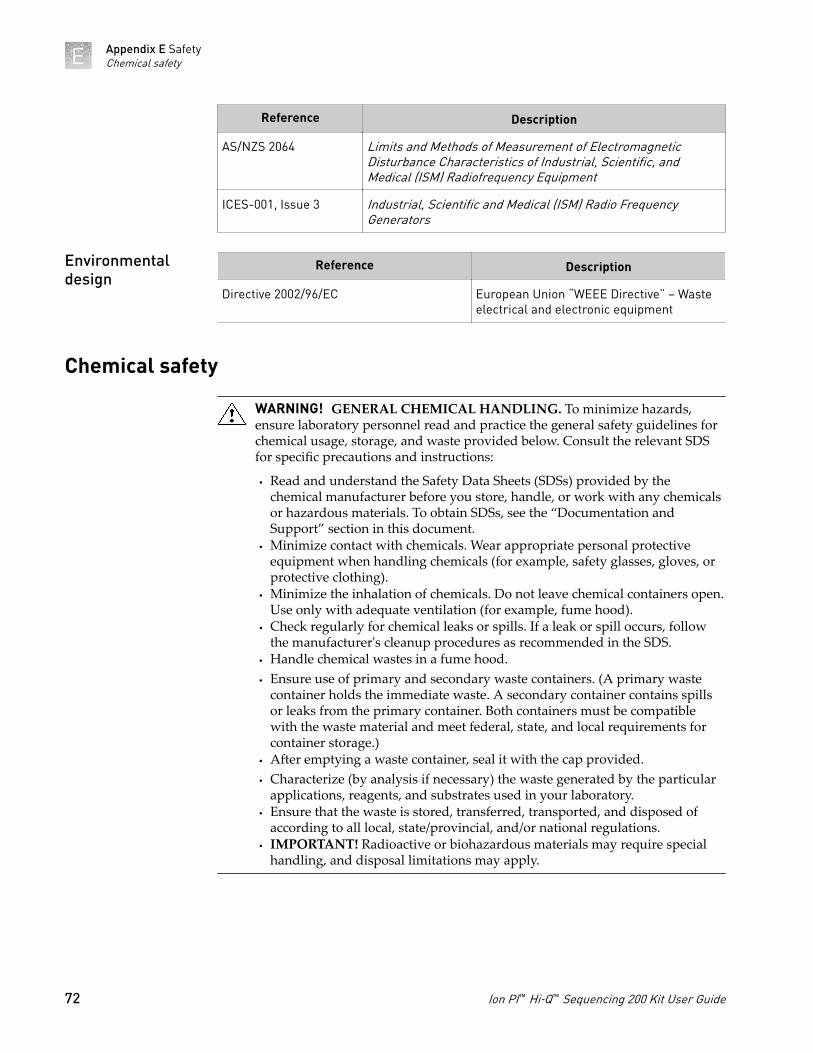
Reference Description
AS/NZS 2064 Limits and Methods of Measurement of ElectromagneticDisturbance Characteristics of Industrial, Scientific, andMedical (ISM) Radiofrequency Equipment
ICES-001, Issue 3 Industrial, Scientific and Medical (ISM) Radio FrequencyGenerators
Reference Description
Directive 2002/96/EC European Union “WEEE Directive” – Wasteelectrical and electronic equipment
Chemical safety
WARNING! GENERAL CHEMICAL HANDLING. To minimize hazards,ensure laboratory personnel read and practice the general safety guidelines forchemical usage, storage, and waste provided below. Consult the relevant SDSfor specific precautions and instructions:
· Read and understand the Safety Data Sheets (SDSs) provided by thechemical manufacturer before you store, handle, or work with any chemicalsor hazardous materials. To obtain SDSs, see the “Documentation andSupport” section in this document.
· Minimize contact with chemicals. Wear appropriate personal protectiveequipment when handling chemicals (for example, safety glasses, gloves, orprotective clothing).
· Minimize the inhalation of chemicals. Do not leave chemical containers open.Use only with adequate ventilation (for example, fume hood).
· Check regularly for chemical leaks or spills. If a leak or spill occurs, followthe manufacturer's cleanup procedures as recommended in the SDS.
· Handle chemical wastes in a fume hood.· Ensure use of primary and secondary waste containers. (A primary waste
container holds the immediate waste. A secondary container contains spillsor leaks from the primary container. Both containers must be compatiblewith the waste material and meet federal, state, and local requirements forcontainer storage.)
· After emptying a waste container, seal it with the cap provided.· Characterize (by analysis if necessary) the waste generated by the particular
applications, reagents, and substrates used in your laboratory.· Ensure that the waste is stored, transferred, transported, and disposed of
according to all local, state/provincial, and/or national regulations.· IMPORTANT! Radioactive or biohazardous materials may require special
handling, and disposal limitations may apply.
Environmentaldesign
Appendix E SafetyChemical safetyE
72 Ion PI™ Hi‑Q™ Sequencing 200 Kit User Guide
Biological hazard safety
WARNING! BIOHAZARD. Biological samples such as tissues, body fluids,infectious agents, and blood of humans and other animals have the potential totransmit infectious diseases. Conduct all work in properly equipped facilitieswith the appropriate safety equipment (for example, physical containmentdevices). Safety equipment can also include items for personal protection, suchas gloves, coats, gowns, shoe covers, boots, respirators, face shields, safetyglasses, or goggles. Individuals should be trained according to applicableregulatory and company/ institution requirements before working withpotentially biohazardous materials. Follow all applicable local, state/provincial,and/or national regulations. The following references provide generalguidelines when handling biological samples in laboratory environment.
· U.S. Department of Health and Human Services, Biosafety in Microbiologicaland Biomedical Laboratories (BMBL), 5th Edition, HHS Publication No. (CDC)21‑1112, Revised December 2009; found at:www.cdc.gov/biosafety/publications/bmbl5/BMBL.pdf
· World Health Organization, Laboratory Biosafety Manual, 3rd Edition,WHO/CDS/CSR/LYO/2004.11; found at:www.who.int/csr/resources/publications/biosafety/Biosafety7.pdf
Appendix E SafetyBiological hazard safety E
Ion PI™ Hi‑Q™ Sequencing 200 Kit User Guide 73

Documentation and support
Customer and technical support
Visit thermofisher.com/support for the latest in services and support, including:• Worldwide contact telephone numbers• Product support, including:
– Product FAQs– Software, patches, and updates– Training for many applications and instruments
• Order and web support• Product documentation, including:
– User guides, manuals, and protocols– Certificates of Analysis– Safety Data Sheets (SDSs; also known as MSDSs)
Note: For SDSs for reagents and chemicals from other manufacturers,contact the manufacturer.
Limited product warranty
Life Technologies Corporation and/or its affiliate(s) warrant their products as set forthin the Life Technologies' General Terms and Conditions of Sale found on LifeTechnologies' website at www.thermofisher.com/us/en/home/global/terms-and-conditions.html. If you have any questions, please contact LifeTechnologies at www.thermofisher.com/support.
F
74 Ion PI™ Hi‑Q™ Sequencing 200 Kit User Guide

For support visit thermofisher.com/support or email [email protected]
thermofisher.com
12 January 2017