Embed Size (px)
Citation preview
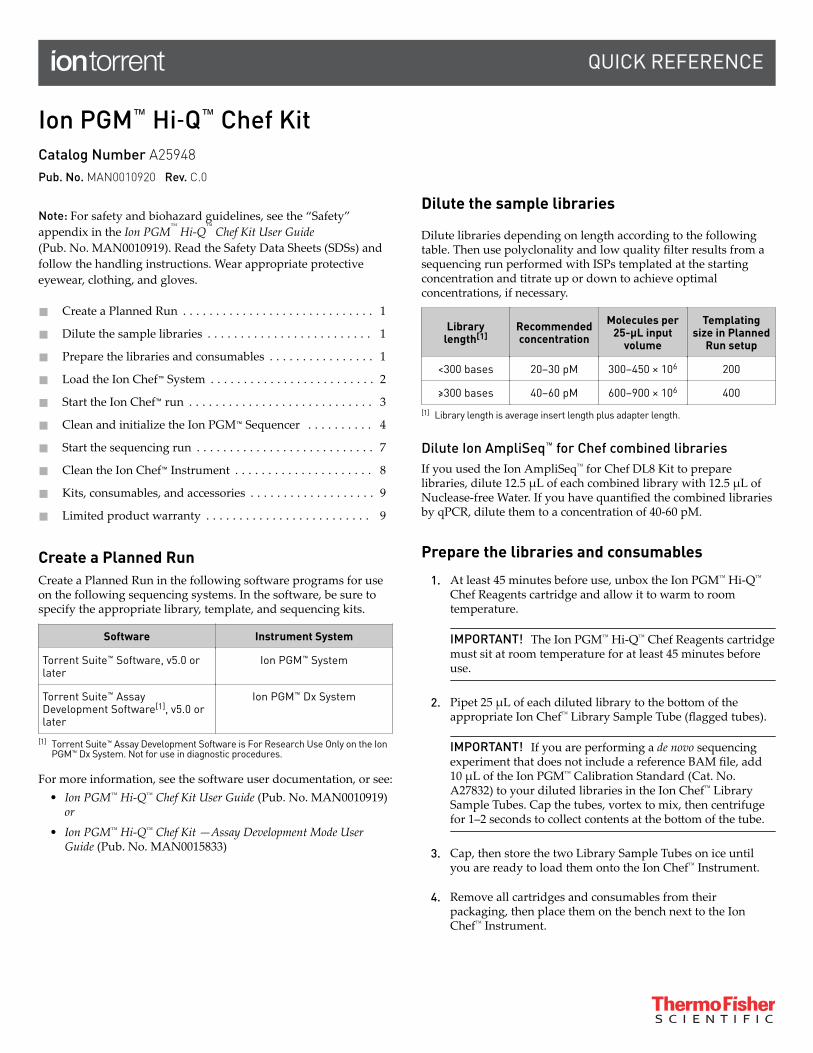
Ion PGM™ Hi‑Q™ Chef KitCatalog Number A25948Pub. No. MAN0010920 Rev. C.0
Note: For safety and biohazard guidelines, see the “Safety”appendix in the Ion PGM™ Hi‑Q™ Chef Kit User Guide(Pub. No. MAN0010919). Read the Safety Data Sheets (SDSs) andfollow the handling instructions. Wear appropriate protectiveeyewear, clothing, and gloves.
■ Create a Planned Run . . . . . . . . . . . . . . . . . . . . . . . . . . . . . 1
■ Dilute the sample libraries . . . . . . . . . . . . . . . . . . . . . . . . . 1
■ Prepare the libraries and consumables . . . . . . . . . . . . . . . . 1
■ Load the Ion Chef™ System . . . . . . . . . . . . . . . . . . . . . . . . . 2
■ Start the Ion Chef™ run . . . . . . . . . . . . . . . . . . . . . . . . . . . . 3
■ Clean and initialize the Ion PGM™ Sequencer . . . . . . . . . . 4
■ Start the sequencing run . . . . . . . . . . . . . . . . . . . . . . . . . . . 7
■ Clean the Ion Chef™ Instrument . . . . . . . . . . . . . . . . . . . . . 8
■ Kits, consumables, and accessories . . . . . . . . . . . . . . . . . . . 9
■ Limited product warranty . . . . . . . . . . . . . . . . . . . . . . . . . 9
Create a Planned RunCreate a Planned Run in the following software programs for useon the following sequencing systems. In the software, be sure tospecify the appropriate library, template, and sequencing kits.
Software Instrument System
Torrent Suite™ Software, v5.0 orlater
Ion PGM™ System
Torrent Suite™ AssayDevelopment Software[1], v5.0 orlater
Ion PGM™ Dx System
[1] Torrent Suite™ Assay Development Software is For Research Use Only on the Ion PGM™ Dx System. Not for use in diagnostic procedures.
For more information, see the software user documentation, or see:• Ion PGM™ Hi‑Q™ Chef Kit User Guide (Pub. No. MAN0010919)
or
• Ion PGM™ Hi‑Q™ Chef Kit —Assay Development Mode UserGuide (Pub. No. MAN0015833)
Dilute the sample libraries
Dilute libraries depending on length according to the followingtable. Then use polyclonality and low quality filter results from asequencing run performed with ISPs templated at the startingconcentration and titrate up or down to achieve optimalconcentrations, if necessary.
Librarylength[1]
Recommendedconcentration
Molecules per25-µL input
volume
Templatingsize in Planned
Run setup
<300 bases 20−30 pM 300−450 × 106 200
≥300 bases 40–60 pM 600–900 × 106 400
[1] Library length is average insert length plus adapter length.
Dilute Ion AmpliSeq™ for Chef combined librariesIf you used the Ion AmpliSeq™ for Chef DL8 Kit to preparelibraries, dilute 12.5 µL of each combined library with 12.5 µL ofNuclease-free Water. If you have quantified the combined librariesby qPCR, dilute them to a concentration of 40-60 pM.
Prepare the libraries and consumables
1. At least 45 minutes before use, unbox the Ion PGM™ Hi-Q™
Chef Reagents cartridge and allow it to warm to roomtemperature.
IMPORTANT! The Ion PGM™ Hi-Q™ Chef Reagents cartridgemust sit at room temperature for at least 45 minutes beforeuse.
2. Pipet 25 µL of each diluted library to the bottom of theappropriate Ion Chef™ Library Sample Tube (flagged tubes).
IMPORTANT! If you are performing a de novo sequencingexperiment that does not include a reference BAM file, add10 µL of the Ion PGM™ Calibration Standard (Cat. No.A27832) to your diluted libraries in the Ion Chef™ LibrarySample Tubes. Cap the tubes, vortex to mix, then centrifugefor 1–2 seconds to collect contents at the bottom of the tube.
3. Cap, then store the two Library Sample Tubes on ice untilyou are ready to load them onto the Ion Chef™ Instrument.
4. Remove all cartridges and consumables from theirpackaging, then place them on the bench next to the IonChef™ Instrument.
QUICK REFERENCE
Load the Ion Chef™ System
IMPORTANT!· Rated centrifuge speeds are only intended for operation with
the provided buckets and approved consumable chips, tubes,and sample preparation reagents.
· The Chip-loading centrifuge is rated to operate at the listedrotational frequencies with the chip buckets, chips, andadapters. The centrifuge must be load-balanced. Proper caremust be taken to load the buckets properly. If excessivevibrations arise, check that items are installed properly androtors are load-balanced.
· Use only the materials supplied in the Ion PGM™ Hi-Q™ ChefKit to run the centrifuges at the rated speeds. Do not remove orchange the rotors. Inspect the buckets before each use to assurenormal operation.
· Confirm that the instrument is powered ON and has beencleaned following the last use.
· Ensure all components are clean and dry before loading themonto the Ion Chef™ Instrument.
· Ensure the Reagents and Solutions station compartments arefree of condensate before loading components.
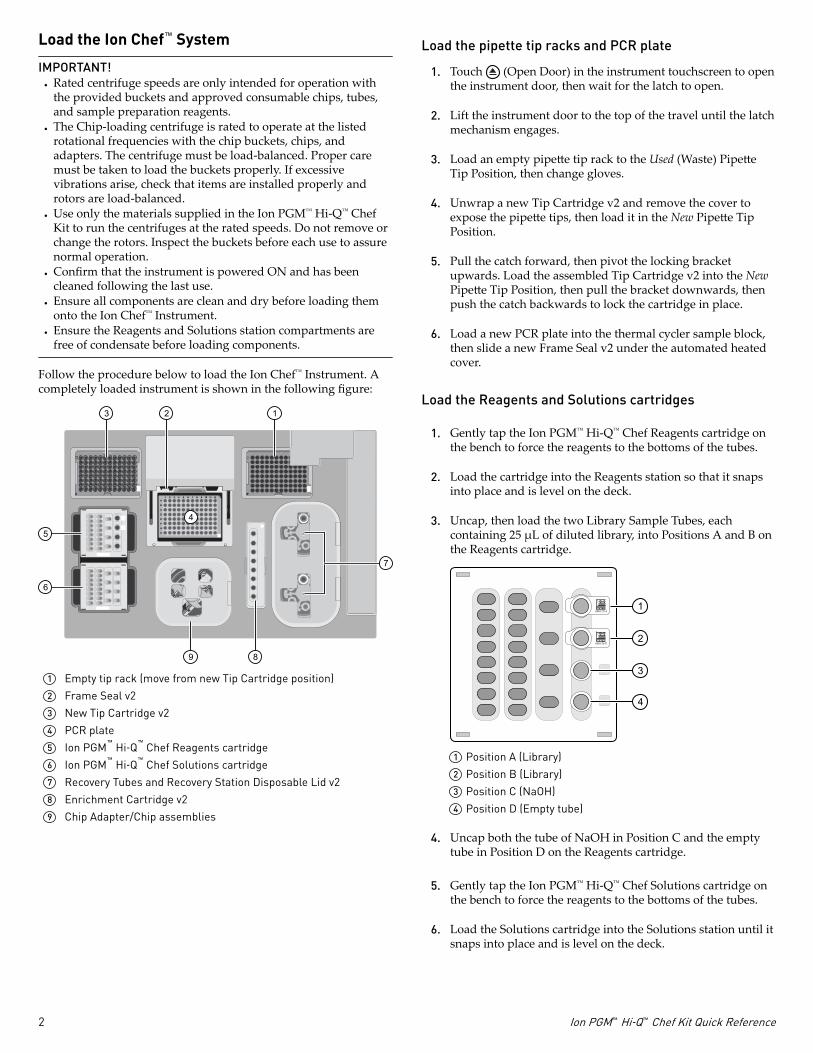
Follow the procedure below to load the Ion Chef™ Instrument. Acompletely loaded instrument is shown in the following figure:
A
B
C
D
E
F
G
H
1 2 3 4 5 6 7 8 9 10 11 12
ion318AB0005452
ion
318 AB0005452
5
3
8
12
6
7
9
4
1 Empty tip rack (move from new Tip Cartridge position)2 Frame Seal v23 New Tip Cartridge v24 PCR plate5 Ion PGM
™ Hi‑Q™
Chef Reagents cartridge6 Ion PGM
™ Hi‑Q™
Chef Solutions cartridge7 Recovery Tubes and Recovery Station Disposable Lid v28 Enrichment Cartridge v29 Chip Adapter/Chip assemblies
Load the pipette tip racks and PCR plate
1. Touch (Open Door) in the instrument touchscreen to openthe instrument door, then wait for the latch to open.
2. Lift the instrument door to the top of the travel until the latchmechanism engages.
3. Load an empty pipette tip rack to the Used (Waste) PipetteTip Position, then change gloves.
4. Unwrap a new Tip Cartridge v2 and remove the cover toexpose the pipette tips, then load it in the New Pipette TipPosition.
5. Pull the catch forward, then pivot the locking bracketupwards. Load the assembled Tip Cartridge v2 into the NewPipette Tip Position, then pull the bracket downwards, thenpush the catch backwards to lock the cartridge in place.
6. Load a new PCR plate into the thermal cycler sample block,then slide a new Frame Seal v2 under the automated heatedcover.
Load the Reagents and Solutions cartridges
1. Gently tap the Ion PGM™ Hi-Q™ Chef Reagents cartridge onthe bench to force the reagents to the bottoms of the tubes.
2. Load the cartridge into the Reagents station so that it snapsinto place and is level on the deck.
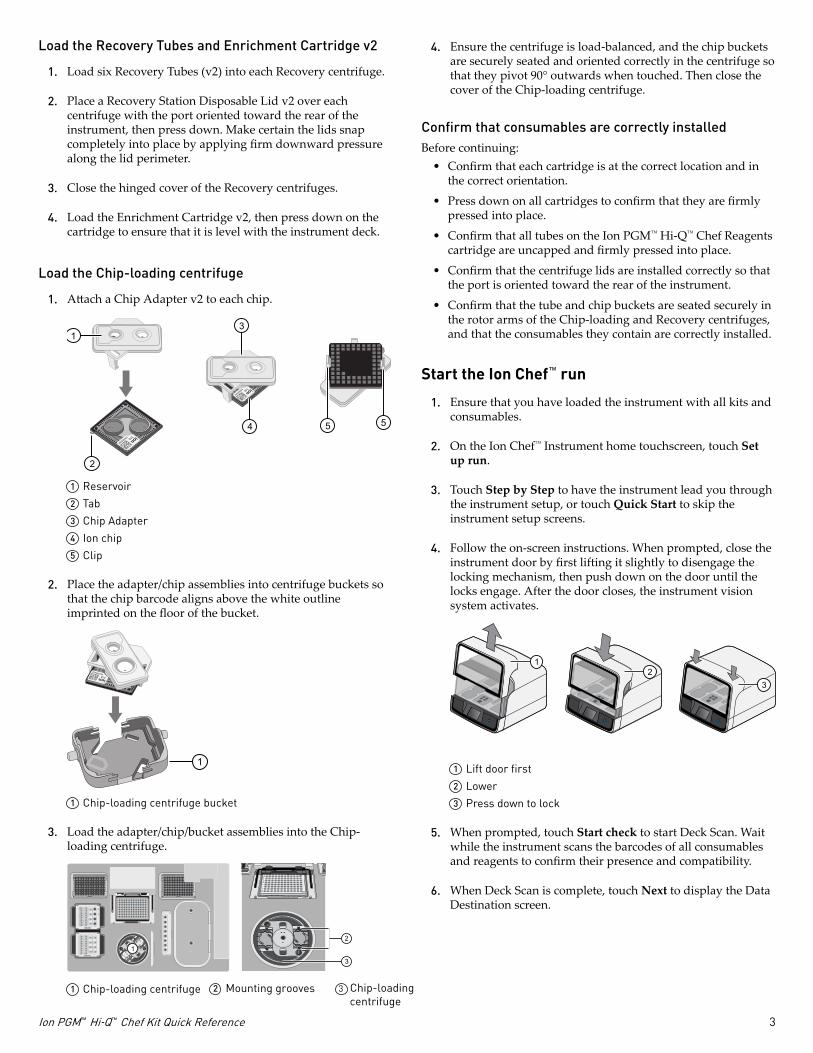
3. Uncap, then load the two Library Sample Tubes, eachcontaining 25 µL of diluted library, into Positions A and B onthe Reagents cartridge.
A
B00012647
000122161
2
C 3
D 4
1 Position A (Library)2 Position B (Library)3 Position C (NaOH)4 Position D (Empty tube)
4. Uncap both the tube of NaOH in Position C and the emptytube in Position D on the Reagents cartridge.
5. Gently tap the Ion PGM™ Hi-Q™ Chef Solutions cartridge onthe bench to force the reagents to the bottoms of the tubes.
6. Load the Solutions cartridge into the Solutions station until itsnaps into place and is level on the deck.
2 Ion PGM™ Hi‑Q™ Chef Kit Quick Reference
Load the Recovery Tubes and Enrichment Cartridge v2
1. Load six Recovery Tubes (v2) into each Recovery centrifuge.
2. Place a Recovery Station Disposable Lid v2 over eachcentrifuge with the port oriented toward the rear of theinstrument, then press down. Make certain the lids snapcompletely into place by applying firm downward pressurealong the lid perimeter.
3. Close the hinged cover of the Recovery centrifuges.
4. Load the Enrichment Cartridge v2, then press down on thecartridge to ensure that it is level with the instrument deck.
Load the Chip-loading centrifuge
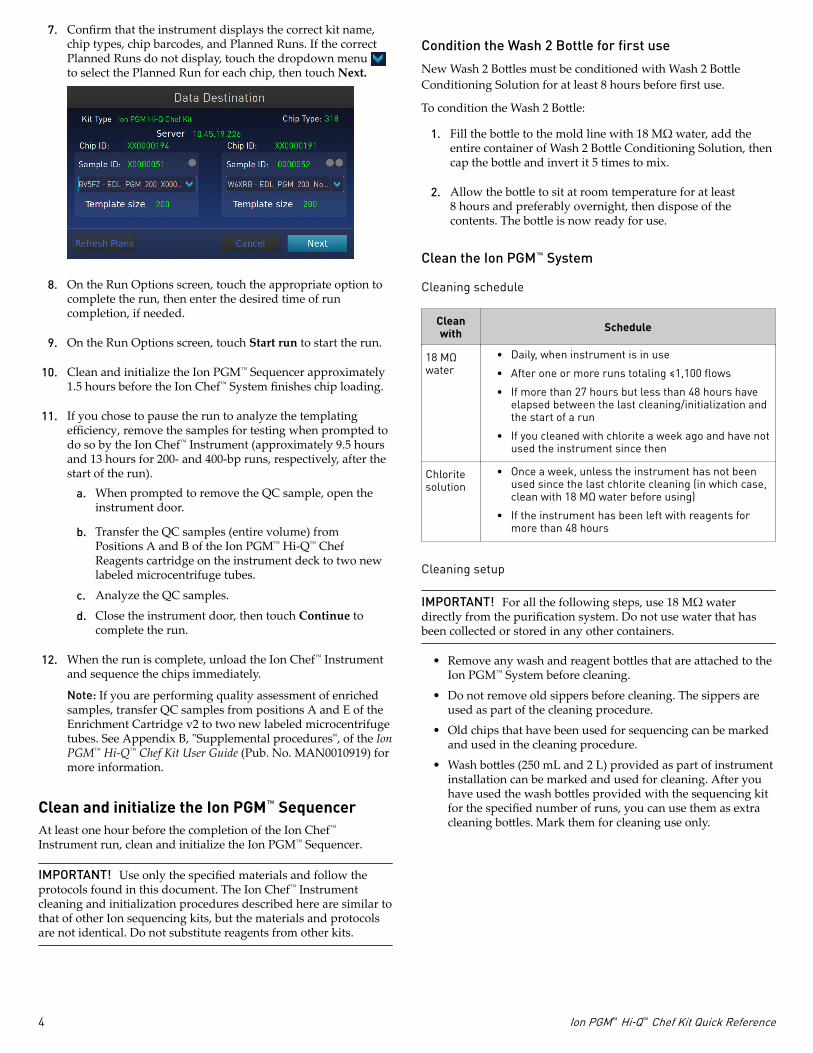
1. Attach a Chip Adapter v2 to each chip.
ion318550005452
ion318550005452
1
2
3
4 5 5
1 Reservoir2 Tab3 Chip Adapter4 Ion chip5 Clip
2. Place the adapter/chip assemblies into centrifuge buckets sothat the chip barcode aligns above the white outlineimprinted on the floor of the bucket.
ion 31855000
5452
1
1 Chip-loading centrifuge bucket
3. Load the adapter/chip/bucket assemblies into the Chip-loading centrifuge.
A
B
C
D
E
F
G
H
1 2 3 4 5 6 7 8 9 10 11 12
ion318AB0005452
ion
318 AB0005452
1
3
2
1 Chip-loading centrifuge 2 Mounting grooves
4. Ensure the centrifuge is load-balanced, and the chip bucketsare securely seated and oriented correctly in the centrifuge sothat they pivot 90° outwards when touched. Then close thecover of the Chip-loading centrifuge.
Confirm that consumables are correctly installedBefore continuing:
• Confirm that each cartridge is at the correct location and inthe correct orientation.
• Press down on all cartridges to confirm that they are firmlypressed into place.
• Confirm that all tubes on the Ion PGM™ Hi-Q™ Chef Reagentscartridge are uncapped and firmly pressed into place.
• Confirm that the centrifuge lids are installed correctly so thatthe port is oriented toward the rear of the instrument.
• Confirm that the tube and chip buckets are seated securely inthe rotor arms of the Chip-loading and Recovery centrifuges,and that the consumables they contain are correctly installed.
Start the Ion Chef™ run
1. Ensure that you have loaded the instrument with all kits andconsumables.
2. On the Ion Chef™ Instrument home touchscreen, touch Setup run.
3. Touch Step by Step to have the instrument lead you throughthe instrument setup, or touch Quick Start to skip theinstrument setup screens.
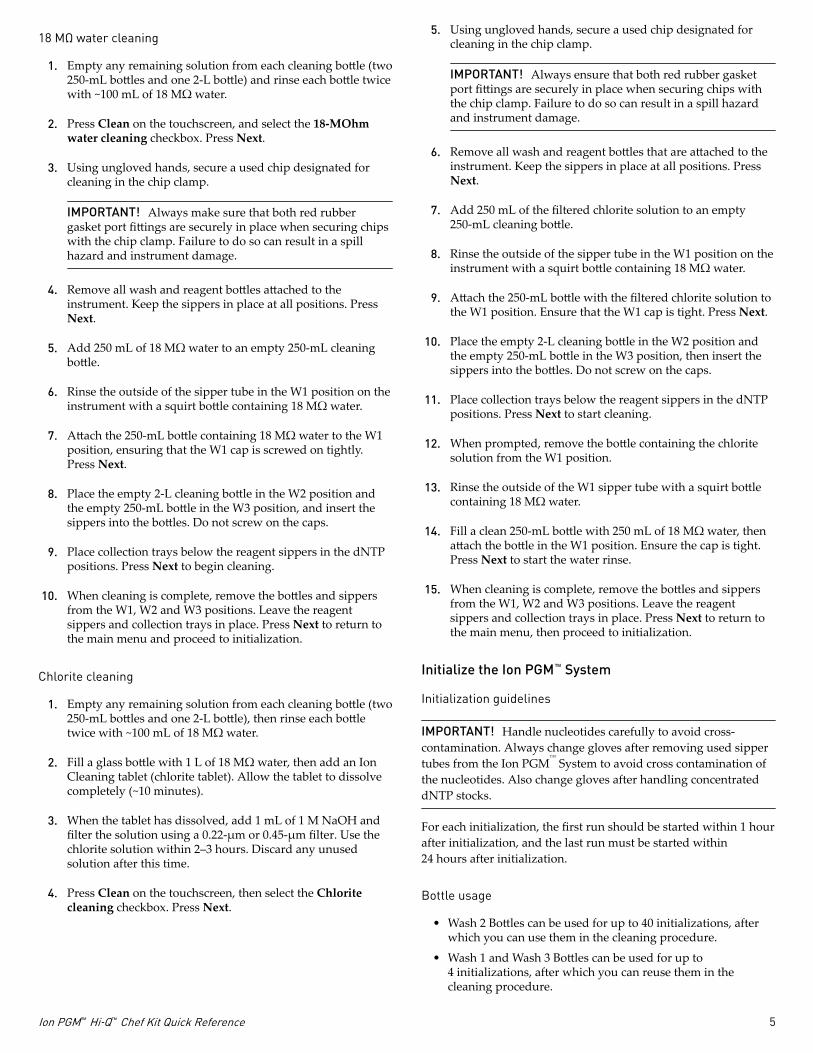
4. Follow the on-screen instructions. When prompted, close theinstrument door by first lifting it slightly to disengage thelocking mechanism, then push down on the door until thelocks engage. After the door closes, the instrument visionsystem activates.
12
3
1 Lift door first2 Lower3 Press down to lock
5. When prompted, touch Start check to start Deck Scan. Waitwhile the instrument scans the barcodes of all consumablesand reagents to confirm their presence and compatibility.
6. When Deck Scan is complete, touch Next to display the DataDestination screen.
Ion PGM™ Hi‑Q™ Chef Kit Quick Reference 3
3 Chip-loading centrifuge
7. Confirm that the instrument displays the correct kit name,chip types, chip barcodes, and Planned Runs. If the correctPlanned Runs do not display, touch the dropdown menuto select the Planned Run for each chip, then touch Next.
8. On the Run Options screen, touch the appropriate option tocomplete the run, then enter the desired time of runcompletion, if needed.
9. On the Run Options screen, touch Start run to start the run.
10. Clean and initialize the Ion PGM™ Sequencer approximately1.5 hours before the Ion Chef™ System finishes chip loading.
11. If you chose to pause the run to analyze the templatingefficiency, remove the samples for testing when prompted todo so by the Ion Chef™ Instrument (approximately 9.5 hoursand 13 hours for 200- and 400-bp runs, respectively, after thestart of the run).
a. When prompted to remove the QC sample, open theinstrument door.
b. Transfer the QC samples (entire volume) fromPositions A and B of the Ion PGM™ Hi-Q™ ChefReagents cartridge on the instrument deck to two newlabeled microcentrifuge tubes.
c. Analyze the QC samples.
d. Close the instrument door, then touch Continue tocomplete the run.
12. When the run is complete, unload the Ion Chef™ Instrumentand sequence the chips immediately.
Note: If you are performing quality assessment of enrichedsamples, transfer QC samples from positions A and E of theEnrichment Cartridge v2 to two new labeled microcentrifugetubes. See Appendix B, "Supplemental procedures", of the IonPGM™ Hi‑Q™ Chef Kit User Guide (Pub. No. MAN0010919) formore information.
Clean and initialize the Ion PGM™ SequencerAt least one hour before the completion of the Ion Chef™
Instrument run, clean and initialize the Ion PGM™ Sequencer.
IMPORTANT! Use only the specified materials and follow theprotocols found in this document. The Ion Chef™ Instrumentcleaning and initialization procedures described here are similar tothat of other Ion sequencing kits, but the materials and protocolsare not identical. Do not substitute reagents from other kits.
Condition the Wash 2 Bottle for first use
New Wash 2 Bottles must be conditioned with Wash 2 BottleConditioning Solution for at least 8 hours before first use.
To condition the Wash 2 Bottle:
1. Fill the bottle to the mold line with 18 MΩ water, add theentire container of Wash 2 Bottle Conditioning Solution, thencap the bottle and invert it 5 times to mix.
2. Allow the bottle to sit at room temperature for at least8 hours and preferably overnight, then dispose of thecontents. The bottle is now ready for use.
Clean the Ion PGM™ System
Cleaning schedule
Cleanwith Schedule
18 MΩwater
• Daily, when instrument is in use
• After one or more runs totaling ≤1,100 flows
• If more than 27 hours but less than 48 hours haveelapsed between the last cleaning/initialization andthe start of a run
• If you cleaned with chlorite a week ago and have notused the instrument since then
Chloritesolution
• Once a week, unless the instrument has not beenused since the last chlorite cleaning (in which case,clean with 18 MΩ water before using)
• If the instrument has been left with reagents formore than 48 hours
Cleaning setup
IMPORTANT! For all the following steps, use 18 MΩ waterdirectly from the purification system. Do not use water that hasbeen collected or stored in any other containers.
• Remove any wash and reagent bottles that are attached to theIon PGM™ System before cleaning.
• Do not remove old sippers before cleaning. The sippers areused as part of the cleaning procedure.
• Old chips that have been used for sequencing can be markedand used in the cleaning procedure.
• Wash bottles (250 mL and 2 L) provided as part of instrumentinstallation can be marked and used for cleaning. After youhave used the wash bottles provided with the sequencing kitfor the specified number of runs, you can use them as extracleaning bottles. Mark them for cleaning use only.
4 Ion PGM™ Hi‑Q™ Chef Kit Quick Reference
18 MΩ water cleaning
1. Empty any remaining solution from each cleaning bottle (two250-mL bottles and one 2-L bottle) and rinse each bottle twicewith ~100 mL of 18 MΩ water.
2. Press Clean on the touchscreen, and select the 18-MOhmwater cleaning checkbox. Press Next.
3. Using ungloved hands, secure a used chip designated forcleaning in the chip clamp.
IMPORTANT! Always make sure that both red rubbergasket port fittings are securely in place when securing chipswith the chip clamp. Failure to do so can result in a spillhazard and instrument damage.
4. Remove all wash and reagent bottles attached to theinstrument. Keep the sippers in place at all positions. PressNext.
5. Add 250 mL of 18 MΩ water to an empty 250-mL cleaningbottle.
6. Rinse the outside of the sipper tube in the W1 position on theinstrument with a squirt bottle containing 18 MΩ water.
7. Attach the 250-mL bottle containing 18 MΩ water to the W1position, ensuring that the W1 cap is screwed on tightly.Press Next.
8. Place the empty 2-L cleaning bottle in the W2 position andthe empty 250-mL bottle in the W3 position, and insert thesippers into the bottles. Do not screw on the caps.
9. Place collection trays below the reagent sippers in the dNTPpositions. Press Next to begin cleaning.
10. When cleaning is complete, remove the bottles and sippersfrom the W1, W2 and W3 positions. Leave the reagentsippers and collection trays in place. Press Next to return tothe main menu and proceed to initialization.
Chlorite cleaning
1. Empty any remaining solution from each cleaning bottle (two250-mL bottles and one 2-L bottle), then rinse each bottletwice with ~100 mL of 18 MΩ water.
2. Fill a glass bottle with 1 L of 18 MΩ water, then add an IonCleaning tablet (chlorite tablet). Allow the tablet to dissolvecompletely (~10 minutes).
3. When the tablet has dissolved, add 1 mL of 1 M NaOH andfilter the solution using a 0.22-µm or 0.45-µm filter. Use thechlorite solution within 2–3 hours. Discard any unusedsolution after this time.
4. Press Clean on the touchscreen, then select the Chloritecleaning checkbox. Press Next.
5. Using ungloved hands, secure a used chip designated forcleaning in the chip clamp.
IMPORTANT! Always ensure that both red rubber gasketport fittings are securely in place when securing chips withthe chip clamp. Failure to do so can result in a spill hazardand instrument damage.
6. Remove all wash and reagent bottles that are attached to theinstrument. Keep the sippers in place at all positions. PressNext.
7. Add 250 mL of the filtered chlorite solution to an empty250-mL cleaning bottle.
8. Rinse the outside of the sipper tube in the W1 position on theinstrument with a squirt bottle containing 18 MΩ water.
9. Attach the 250-mL bottle with the filtered chlorite solution tothe W1 position. Ensure that the W1 cap is tight. Press Next.
10. Place the empty 2-L cleaning bottle in the W2 position andthe empty 250-mL bottle in the W3 position, then insert thesippers into the bottles. Do not screw on the caps.
11. Place collection trays below the reagent sippers in the dNTPpositions. Press Next to start cleaning.
12. When prompted, remove the bottle containing the chloritesolution from the W1 position.
13. Rinse the outside of the W1 sipper tube with a squirt bottlecontaining 18 MΩ water.
14. Fill a clean 250-mL bottle with 250 mL of 18 MΩ water, thenattach the bottle in the W1 position. Ensure the cap is tight.Press Next to start the water rinse.
15. When cleaning is complete, remove the bottles and sippersfrom the W1, W2 and W3 positions. Leave the reagentsippers and collection trays in place. Press Next to return tothe main menu, then proceed to initialization.
Initialize the Ion PGM™ System
Initialization guidelines
IMPORTANT! Handle nucleotides carefully to avoid cross-contamination. Always change gloves after removing used sippertubes from the Ion PGM™ System to avoid cross contamination ofthe nucleotides. Also change gloves after handling concentrateddNTP stocks.
For each initialization, the first run should be started within 1 hourafter initialization, and the last run must be started within24 hours after initialization.
Bottle usage
• Wash 2 Bottles can be used for up to 40 initializations, afterwhich you can use them in the cleaning procedure.
• Wash 1 and Wash 3 Bottles can be used for up to4 initializations, after which you can reuse them in thecleaning procedure.
Ion PGM™ Hi‑Q™ Chef Kit Quick Reference 5

• Replace the Reagent Bottles and sipper tubes every time youinitialize.
Before initialization
1. Remove the dNTP stock solutions from the freezer and beginthawing on ice.
2. Check the tank pressure for the nitrogen gas. When the tankpressure drops below 500 psi, change the tank.
Prepare the Wash 2 Bottle
IMPORTANT! Do not let the new sippers touch any surfaces.
1. Rinse the Wash 2 Bottle (2 L) 3 times with 200 mL of 18 MΩwater.
2. Prepare 500 µL of 100 mM NaOH by diluting 50 µL of1 M NaOH in 450 µL of nuclease-free water.
3. If your 18 MΩ water system has a spigot, extend it into butnot below the neck of the Wash 2 Bottle. Otherwise, positionthe nozzle as close to the mouth of the bottle as possible.
4. Fill the bottle to the mold line with 18 MΩ water. The volumeof water is ~2 liters. (You can mark the mold line on the bottlefor clarity.)
5. Add the entire bottle of Ion PGM™ Hi-Q™ Sequencing W2Solution to the Wash 2 Bottle.
6. Using a P200 pipette, add 70 µL of 100 mM NaOH to theWash 2 Bottle.
7. Cap the bottle and invert 5 times to mix, and immediatelyproceed through the remainder of the initializationprocedure.
IMPORTANT! Do not store the mixed Wash 2 Bottle.
Prepare the Wash 1 and Wash 3 Bottles
1. Rinse the Wash 1 and Wash 3 Bottles 3 times with 50 mL of18 MΩ water.
2. Wash 1 Bottle: Add 350 µL of freshly prepared100 mM NaOH to the Wash 1 Bottle, then cap the bottle.
3. Wash 3 Bottle: Add Ion PGM™ Hi-Q™ Sequencing W3Solution to the 50-mL line marked on the Wash 3 Bottle, thencap the bottle.
Begin the initialization
IMPORTANT! Do not let the new sipper tubes touch any surfaces.
1. On the main menu, press Initialize.
2. Make the following selections in the next screen, then pressNext:
• Click Enter barcode to scan or enter the barcode on theIon PGM™ Hi-Q™ Sequencing W2 Solution bottle, or the2D barcode on the Ion PGM™ Hi-Q™ SequencingSolutions box.
• Alternatively, select the checkbox for the Ion PGM™
Hi-Q™ Sequencing dNTPs from the dropdown list.
• In the same screen, if you routinely experience cloggingduring initialization, select the Line Clear checkbox toclear any blockage in the fluid lines before initialization.This is optional.
After you press Next, the system will check the gas pressure.
3. Following the gas pressure check:
Result Action
If the pressure issufficient
Ensure that the cleaning chip, reagentsipper tubes, and collection trays are inplace, and press Next to start theinitialization.
If the pressure islow
Press Yes to re-check the pressure. If thepressure remains low, contact TechnicalSupport.
4. Wearing clean gloves, firmly attach a new, long gray sipperto the cap in the W2 position.
5. Immediately attach the prepared Wash 2 Bottle in the W2position, then tighten the cap. Press Next.
6. Change gloves and firmly install new sipper tubes (shortgray) in the caps in the W1 and W3 positions.
7. Immediately attach the prepared Wash 1 and 3 Bottles, thentighten the caps. Press Next.
8. Following line clear, or if you did not select that option, thesequencer begins adjusting the pH of the W2 Solution, whichtakes ~30 minutes. After 15 minutes, check the instrumenttouchscreen to confirm that initialization is proceedingnormally.
Prepare the 50‑mL Reagent Bottles with dNTPs
1. Use the labels provided with the kit to label four newReagent Bottles as dGTP, dCTP, dATP, and dTTP.
2. Confirm that no ice crystals are visible in each thawed dNTPstock solution. Vortex each tube to mix, and centrifuge tocollect the contents. Keep the dNTP stock solutions on icethroughout this procedure.
IMPORTANT! To avoid cross-contamination in the next step,open only one dNTP stock tube at a time and use a freshpipette tip for each aliquot.
6 Ion PGM™ Hi‑Q™ Chef Kit Quick Reference
3. Using separate filtered pipette tips and clean gloves,carefully transfer 20 µL of each dNTP stock solution into itsrespective Reagent Bottle.
4. Cap each Reagent Bottle and store on ice until you are readyto attach it to the instrument. Place the remaining dNTPstocks back into –20°C for storage.
Attach the sipper tubes and Reagent Bottles
1. After the wash solutions have initialized, follow thetouchscreen prompts to remove the used sipper tubes andcollection trays from the dNTP ports.
2. Change gloves, then firmly insert a new sipper tube (blue)into each dNTP port. Do not let the sipper touch anysurfaces.
3. Attach each prepared Reagent Bottle to the correct dNTP port(e.g., the dGTP tube on the port marked "G") and tightenfirmly by hand until snug. Press Next.
4. Follow the touchscreen prompts to complete initialization.The instrument will fill each Reagent Bottle with 40 mL ofW2 Solution.
5. At the end of initialization, Ion PGM™ System will measurethe pH of the reagents:
• If every reagent is in the target pH range, a green Passedscreen will be displayed.
• If a red failure screen appears, see the troubleshootingsection of the user guide.
6. Press Next to finish the initialization process and return tothe main menu.
7. Proceed to the appropriate sequencing protocol for your chiptype.
Start the sequencing run
Unload and prepare the chips for sequencing
1. Open the instrument door:
a. In the instrument touchscreen, touch (Open Door)then wait for the latch to open.
b. Lift the instrument door to the top of the travel until thelatch mechanism engages.
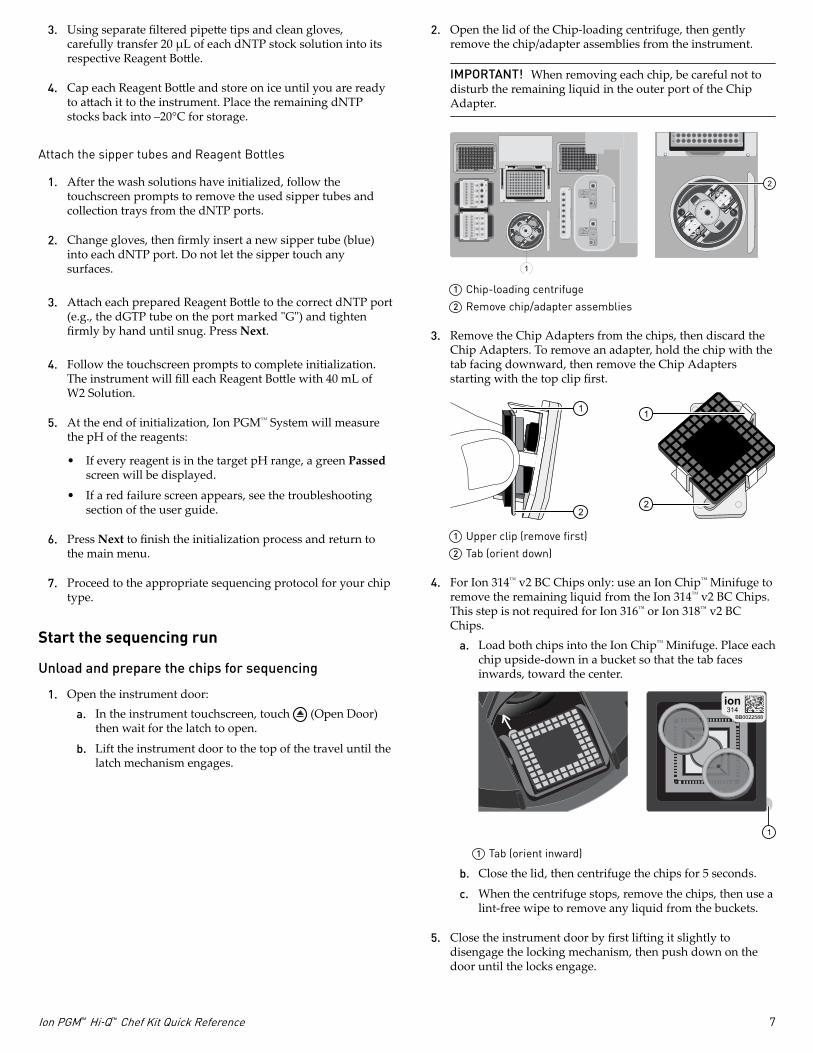
2. Open the lid of the Chip-loading centrifuge, then gentlyremove the chip/adapter assemblies from the instrument.
IMPORTANT! When removing each chip, be careful not todisturb the remaining liquid in the outer port of the ChipAdapter.
G
H
ion318AB0005452
ion
318 AB0005452
A
B
C
D
E
F
G
H
1 2 3 4 5 6 7 8 9 10 11 12
2
1
1 Chip-loading centrifuge2 Remove chip/adapter assemblies
3. Remove the Chip Adapters from the chips, then discard theChip Adapters. To remove an adapter, hold the chip with thetab facing downward, then remove the Chip Adaptersstarting with the top clip first.
11
22
1 Upper clip (remove first)2 Tab (orient down)
4. For Ion 314™ v2 BC Chips only: use an Ion Chip™ Minifuge toremove the remaining liquid from the Ion 314™ v2 BC Chips.This step is not required for Ion 316™ or Ion 318™ v2 BCChips.
a. Load both chips into the Ion Chip™ Minifuge. Place eachchip upside-down in a bucket so that the tab facesinwards, toward the center.
ion314
BB0022588
1
1 Tab (orient inward)
b. Close the lid, then centrifuge the chips for 5 seconds.
c. When the centrifuge stops, remove the chips, then use alint-free wipe to remove any liquid from the buckets.
5. Close the instrument door by first lifting it slightly todisengage the locking mechanism, then push down on thedoor until the locks engage.
Ion PGM™ Hi‑Q™ Chef Kit Quick Reference 7
6. Load one or both chips into Ion PGM™ Sequencers andpromptly start the sequencing runs.
Note: If you cannot sequence a loaded chip immediately,place the chip into a separate chip storage container aftercentrifugation and store at 4°C. For users sequencing 200base-read libraries (500 flows or fewer), sequence the secondchip within 8 hours after completion of the Ion Chef™ run foroptimal performance. For users sequencing 400 base-readlibraries, the chip can be stored for up to 24 hours, but werecommend that chips be sequenced as soon as possible foroptimal performance.
IMPORTANT! If you chose to store a loaded chip, removethe chip from the container and place it on a clean surface inthe dark to warm to room temperature at least 20 minutesbefore running it.
Sequence the Ion chips on the Ion PGM™ Sequencer
Sequence the loaded Ion chips on the Ion PGM™ Sequencer as soonas possible after unloading the Ion Chef™ Instrument.
1. Touch Run on the main menu, then follow the on-screeninstructions to empty the waste bottle, load the cleaning chip,and clean the Ion PGM™ Sequencer fluid lines.
2. When the following screen appears, touch CHEF to select theinstrument used to prepare the sample and initiate the Chefsequencing workflow. Then touch Next.
3. Scan the barcode on the loaded chip, or press Change toenter the barcode manually.
4. When prompted by the instrument, ground yourself bytouching the grounding plate next to the chip clamp on theinstrument, replace the cleaning chip in the chip socket withthe chip to be sequenced, close the chip clamp, then touchNext.
IMPORTANT! Do not wear gloves when transferring thechips on and off the instrument.
5. Touch Chip Check to perform the first chip check.
6. After the instrument successfully completes the chip check,follow the on-screen instructions to empty the waste bottle,then touch Next.
IMPORTANT! Ion PGM™ Sequencer—Blue and 400-base-read sequencing require use of the Ion PGM™ 2.5-L WasteBottle. Be sure to empty the waste container completely andreturn it before each run.
7. When prompted to select a Planned Run, confirm that thecorrect run is displayed, then touch Next.
8. When run information is displayed, confirm that the rundetails are correct, then touch Next. The instrument performsa second chip check and calibration.
During the initial part of chip check, visually inspect the chipin the clamp for leaks. If there is a leak, press Abortimmediately to stop the flow to the chip. When thecalibration is complete (~1 minute), the touchscreen indicatesthe calibration status.
• If the chip passes calibration, touch Next to begin therun.
• If the chip fails calibration, touch Abort, reseat the chip,then touch Calibrate to recalibrate. If the chip failscalibration again, proceed with the run and contactTechnical Support after the run is complete.
9. Twenty minutes before the end of the first run, remove theremaining Ion chip from the chip container in therefrigerator, then place it on a clean surface to warm to roomtemperature.
10. When first run is complete, sequence the remaining chip assoon as possible. Perform a cleaning and/or initialization ifneeded.
Clean the Ion Chef™ Instrument
IMPORTANT! Clean the Ion Chef™ Instrument after every run. Toprevent contamination, do not operate the instrument unless it hasbeen recently cleaned.
Remove and dispose of used consumables
1. Touch (Open Door) in the instrument touchscreen, thenwait for the latch to open.
2. Lift the instrument door to the top of the travel until the latchmechanism engages.
3. Remove, then discard the PCR plate from the thermal cyclersample block.
4. Remove, then discard the box of used pipette tips from thewaste tip position.
5. Move the empty Tip Cartridge v2 to the waste tip position.
6. Remove, then discard the• Ion PGM™ Hi-Q™ Chef Reagents cartridge
• Ion PGM™ Hi-Q™ Chef Solutions cartridge
• Enrichment Cartridge v2
7. Remove, then discard the consumables from the Recoverycentrifuges, including the:
• Recovery Station Disposable Lids v2
• Recovery Tubes v2
8. Close the Chip-loading centrifuge cover.
8 Ion PGM™ Hi‑Q™ Chef Kit Quick Reference
Inspect and clean the Recovery centrifuges and buckets
1. Inspect the Recovery centrifuge for residue. If excessiveliquid is present, clean the centrifuge bowl and buckets asdescribed in the Ion PGM™ Hi‑Q™ Chef Kit User Guide(Pub. No. MAN0010919).
2. Close the Recovery centrifuge cover.
Start the cleaning
1. Close the instrument door by first lifting it up slightly todisengage the locking mechanism, then pushing down on thedoor until the locks engage.
2. To start the cleaning, touch Next on the Ion Chef™ Instrumenttouchscreen that appears after run completion.
3. Confirm that you have removed all consumables from theIon Chef™ Instrument, then touch Next.
4. With the door closed, touch Start. The instrument performs aDeck Scan before starting the cleaning routine. The Ion Chef™
Instrument stops ventilation, then illuminates the ultraviolet(UV) light in the instrument for ~1 minute.
CAUTION! The Ion Chef™ Instrument emits UV lightat 254 nm. Wear appropriate eye wear, protectiveclothing, and gloves when working near theinstrument. Do not look directly at the UV light whileit is illuminated during the cleaning routine.
Kits, consumables, and accessories
Catalog orPart No. Description
A25948 Ion PGM™ Hi‑Q™ Chef Kit, 8-reactions
4488374 Ion Chef™ Installation Kit
A27293 Ion PGM™ Hi‑Q™ Chef 400 Supplies Kit [1]
4482010 Ion PGM™ Controls Kit v2
A27832 Ion PGM™ Calibration Standard
A25591 Ion PGM™ Wash 2 Bottle Kit
4488144 Ion 314™ Chip Kit v2 BC, 8-pack
4488145 Ion 316™ Chip Kit v2 BC, 4-pack
4488149 Ion 316™ Chip Kit v2 BC, 8-pack
4488146 Ion 318™ Chip Kit v2 BC, 4-pack
4488150 Ion 318™ Chip Kit v2 BC, 8-pack
[1] Enables eight initializations of the Ion PGM™ Sequencer for eight 400 bp sequencing runs when used with the full Ion PGM™ Hi‑Q™ Chef Kit.
Limited product warrantyLife Technologies Corporation and/or its affiliate(s) warrant theirproducts as set forth in the Life Technologies' General Terms andConditions of Sale found on Life Technologies' website at www.thermofisher.com/us/en/home/global/terms-and-conditions.html. If you have any questions, please contact LifeTechnologies at www.thermofisher.com/support.
The information in this guide is subject to change without notice.
DISCLAIMER: TO THE EXTENT ALLOWED BY LAW, LIFE TECHNOLOGIES AND/OR ITS AFFILIATE(S) WILL NOT BE LIABLE FOR SPECIAL, INCIDENTAL, INDIRECT, PUNITIVE,MULTIPLE, OR CONSEQUENTIAL DAMAGES IN CONNECTION WITH OR ARISING FROM THIS DOCUMENT, INCLUDING YOUR USE OF IT.
Revision history: MAN0010920
Revision Date DescriptionC.0 8 January 2017 • “Load the Ion Chef™ System“ and “Clean the Ion Chef™ Instrument“ topics reorganized for ease of use.
• Web links updated.
B.0 28 January 2016 • Guidance added for use with Torrent Suite™ Assay Development Software
• Library input recommendations added for Ion AmpliSeq™ for Chef DL8 Kit users.
• Clarifications made in the sequencing workflow, including use of the Line Clear feature in initialization.
A.0 6 February 2015 New Quick Reference
Corporate entity: Life Technologies Corporation | Carlsbad, CA 92008 USA | Toll Free in USA 1 800 955 6288
©2017 Thermo Fisher Scientific Inc. All rights reserved. All trademarks are the property of Thermo Fisher Scientific and its subsidiaries unless otherwise specified. Agilent andBioanalyzer are trademarks of Agilent Technologies, Inc.
For support visit thermofisher.com/support or email [email protected]
thermofisher.com
8 January 2017