Embed Size (px)
Citation preview

Page 516
Chapter 18 Nexsure® Training Manual - CRM
Chapter 18
Invoicing
In ThIs ChapTer
Understanding and Working with Single InvoicesInvoicing Binder BillUnderstanding and Working with Installment PlansHow the Client Balance Summary Screen WorksUnderstanding and Working with List BillsReverse and Re-bill InvoicesSummary Bill
Understanding and Working with Single Invoices
There are two levels of invoicing, the Client level and the Policy level. A single invoice can be created at the Client level to invoice the client for a premium that does not pertain to a policy. If the client is paying in full, a single invoice can be created at the Policy level to invoice an additional or return premium that is generated by some type of policy activity.
WHY Invoice from the Client LevelInvoicing from the Client level is done when an invoice needs to be created for a service the agency has provided to a client that falls outside of a premium change generated by policy activity. Maybe the agency has provided some type of consulting service to a client or the agency has done a favor for a client and will be reimbursed by the client and the agent wants to keep a record of that transaction.
HOW to Invoice Without a PolicyAfter accessing the appropriate client through SEARCH, click the TRANSACTIONS link on the Client menu.
The transaction summary tab displays.
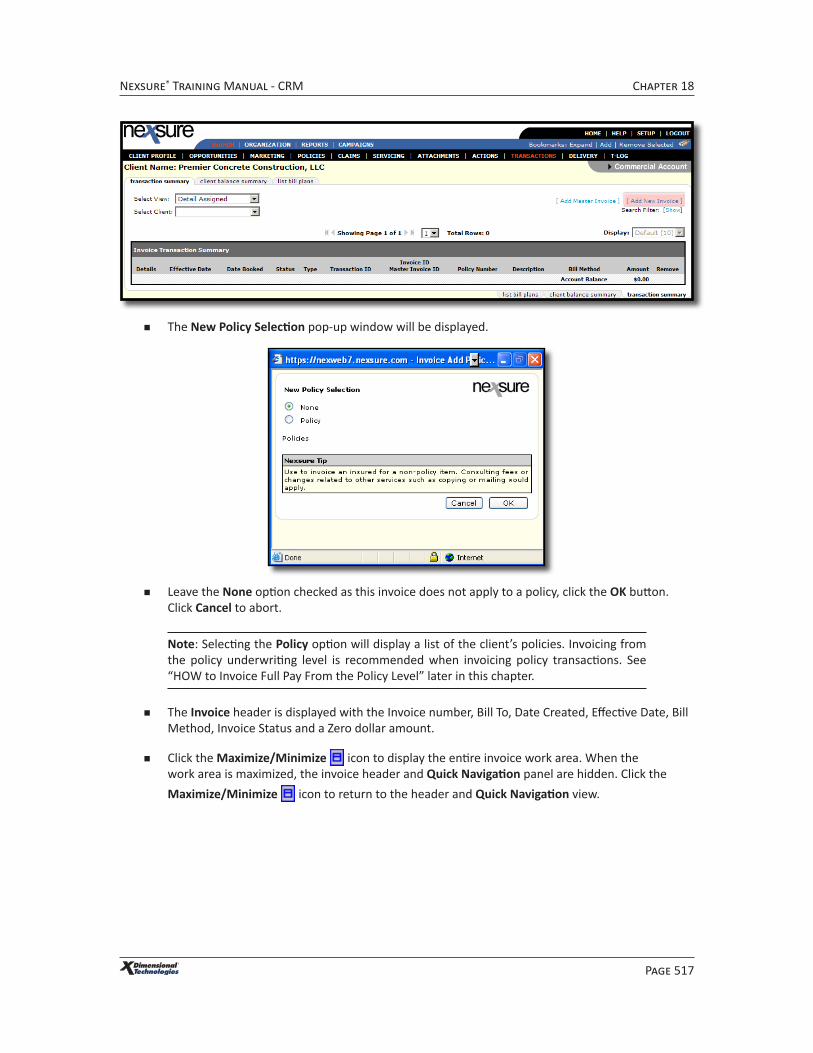
Click the [Add New Invoice] link.
Page 517
Chapter 18Nexsure® Training Manual - CRM
The New Policy Selection pop-up window will be displayed.
Leave the None option checked as this invoice does not apply to a policy, click the OK button. Click Cancel to abort.
Note: Selecting the Policy option will display a list of the client’s policies. Invoicing from the policy underwriting level is recommended when invoicing policy transactions. See “HOW to Invoice Full Pay From the Policy Level” later in this chapter.
The Invoice header is displayed with the Invoice number, Bill To, Date Created, Effective Date, Bill Method, Invoice Status and a Zero dollar amount.
Click the Maximize/Minimize icon to display the entire invoice work area. When the work area is maximized, the invoice header and Quick Navigation panel are hidden. Click the
Maximize/Minimize icon to return to the header and Quick Navigation view.

Page 518
Chapter 18 Nexsure® Training Manual - CRM
Click the [Edit Invoice Header] link.
Bill Method: This will default to Agency Bill.
Annualize: The Annualize check box will default as selected. Nexsure does not annualize non-premium Account Service transactions.
Bill Type: Select Account Service from the drop-down box. Account Service is used for creating an invoice that does not apply to a policy.
Invoice Type: This will default to Regular bill.
Department: The department will default in, if it is incorrect, select the correct one from the drop-down box.
Unit: If a unit was selected it will default in, if it is incorrect, select the correct one from the drop-down box. Units are not required.
Effective Date: This defaults to the date the invoice was created.
Date Booked: This defaults to the effective date of the servicing item or the invoice creation date based on which is later. The Date Booked may be modified only if security access is granted in the Invoice Resource Group in the users security template.
Invoice Due Date: The date will default to booked date plus the default number of days on the department in SETUP. If the user has both the ability to modify the Due Date and

Page 519
Chapter 18Nexsure® Training Manual - CRM
Prior to Effective Date security under the Resource Group of Invoice, they will be able to modify the Due Date on both invoices and master invoices with due dates prior to the Effective Date and Booked Date of the invoice. However, users will not be able to modify the Due Dates prior to the current date.
Full Pay: System controlled option.
Compound Bill: System controlled option.
Amount Due: This defaults to zero. The Amount Due for an Account Service charge is entered in the Fees section of the invoice.
Days until Past Due: Enter the number of days this bill will become past due.
# of Print Days before Effective Date: Enter the number of days prior to the effective date this invoice will automatically post and be available to print.
Note: Leave the # of print days before the effective date field blank to avoid Nexsure automatically posting the invoice. Invoices that are not automatically posted are manually posted by the user.
Unique Invoice Message: A message entered here will print out on the invoice.
Internal Note: Enter an internal note, for your record as to what this invoice is for, internal notes are for your information only and will not print on the invoice. Internal Notes are viewable from the transaction summary screen.
Click OK to save the information.
Using the scroll bar, or the links in the Quick Navigation panel, review and complete the following areas of the invoice for accuracy:
Invoice Bill To:
The invoice bill will default to the client’s information.
If the Bill To is incorrect; click the Change Bill To link.

Page 520
Chapter 18 Nexsure® Training Manual - CRM
Select the entity to be billed by select the appropriate option, enter the name and click the Search button. Select the name from the search results by clicking on it and click the Next link.
Select the Name, Location and Contact from the drop-down boxes and click Next.
Click OK to confirm or Back to edit the selection.
Changing the Bill To entity addresses the invoice to the selected entity. It does not move the receivable from the client to the selected Bill To entity.
Premiums:
This invoice in NOT attached to a policy therefore the premium line defaults in with the following message You do not have a policy attached to invoice number: ####.
Fees:
This will default to zero.
Click the Add New Fee link.
In the Add New Fee pop-up window select Invoice for the Level/LOB.
Select the Fee Code and Service Provider from the drop-down boxes and click OK.
Note: If a fee is not setup that corresponds to the item being billed, see the Nexsure point person in your agency to add the fee.
The Add Non Premium Fee Details pop-up window displays with the selected fee’s default information. Enter a Description to appear on the invoice and make any other necessary changes. Click OK to confirm the addition of the fee. Click Cancel to abort.
If the fee amount added is incorrect, click the Details icon of the fee. The Edit Non
Page 521
Chapter 18Nexsure® Training Manual - CRM
Premium Fee pop-up is displayed, enter the correct information and click OK to save. Click Cancel to abort.
Taxes:
Taxes default to zero.
If a tax is to be charged on the fee, when setting up the fee the taxable option must be checked. Click the Add New Tax link.
Select the Tax On, Level/LOB and Tax Code from the drop-down boxes.
Click the blue Default link.
The tax information set up for the Tax Code selected will default in. Make changes, if necessary, click OK to confirm the addition of the tax. Click Cancel to abort.
If the tax amount added is incorrect, click the Details icon of the tax. The Edit Non Premium Tax pop-up displays enter the correct information, click OK to save. Click Cancel to abort.
Agency Commissions and Other Commissions:
These two areas will default to zero.
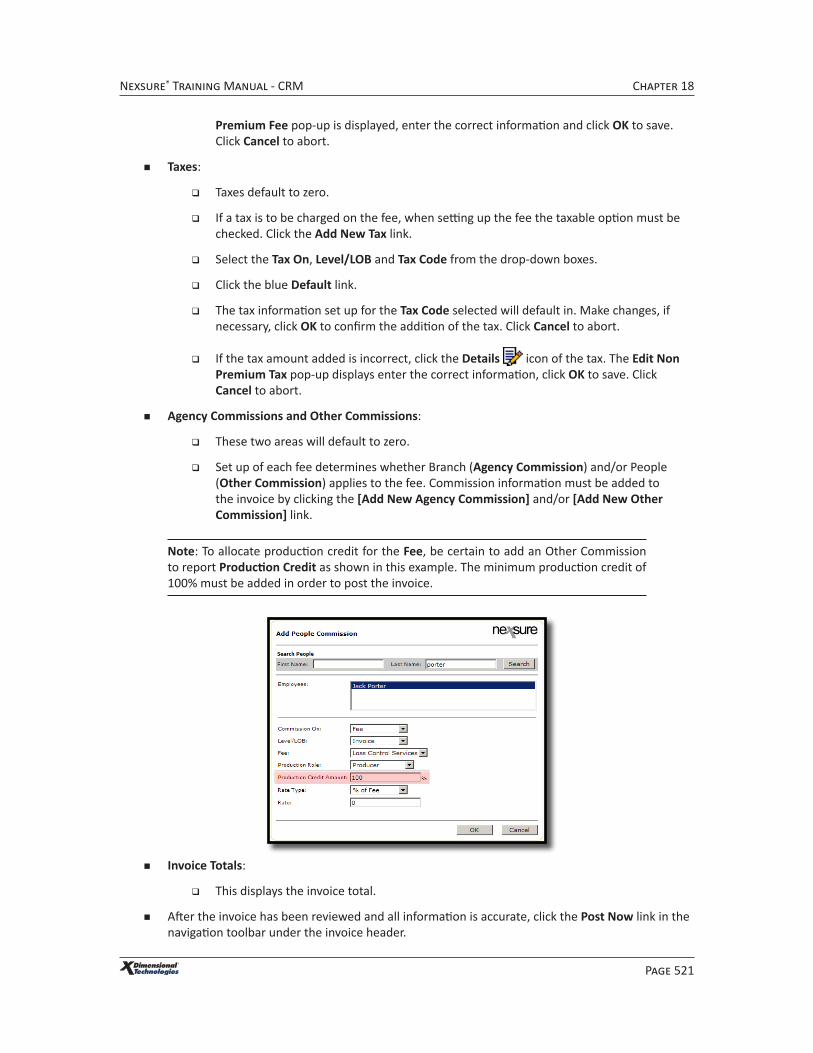
Set up of each fee determines whether Branch (Agency Commission) and/or People (Other Commission) applies to the fee. Commission information must be added to the invoice by clicking the [Add New Agency Commission] and/or [Add New Other Commission] link.
Note: To allocate production credit for the Fee, be certain to add an Other Commission to report Production Credit as shown in this example. The minimum production credit of 100% must be added in order to post the invoice.
Invoice Totals:
This displays the invoice total.
After the invoice has been reviewed and all information is accurate, click the Post Now link in the navigation toolbar under the invoice header.
Page 522
Chapter 18 Nexsure® Training Manual - CRM
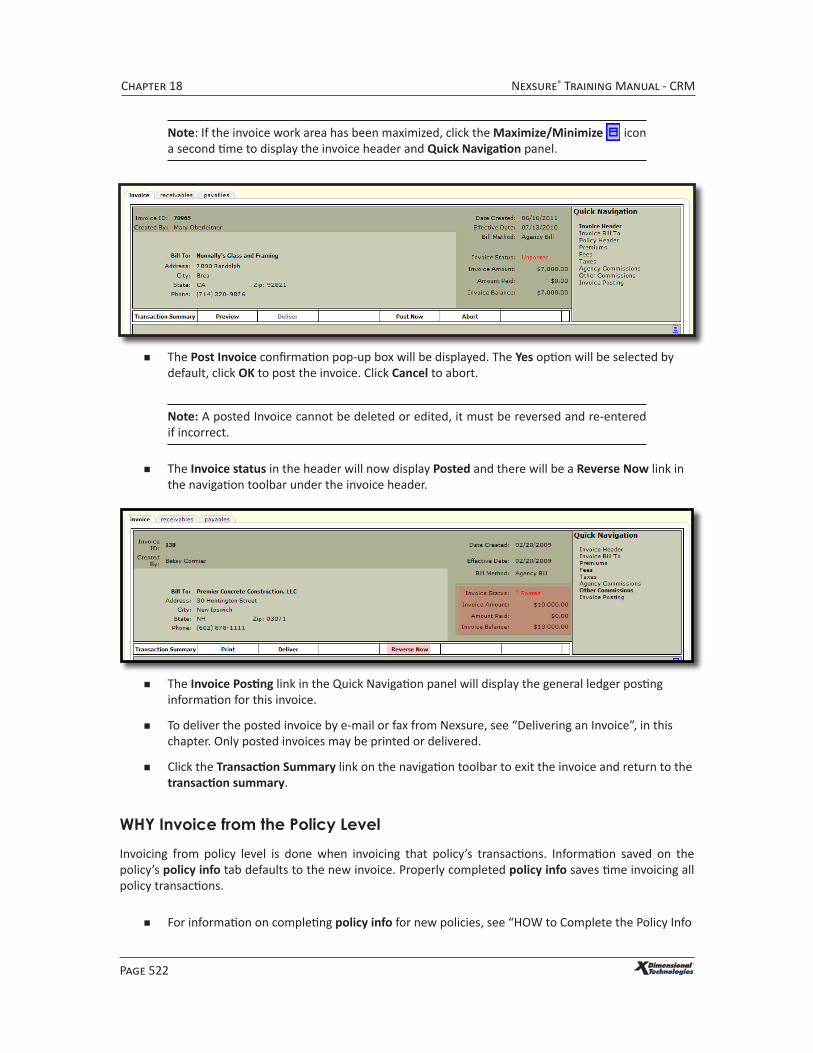
Note: If the invoice work area has been maximized, click the Maximize/Minimize icon a second time to display the invoice header and Quick Navigation panel.
The Post Invoice confirmation pop-up box will be displayed. The Yes option will be selected by default, click OK to post the invoice. Click Cancel to abort.
Note: A posted Invoice cannot be deleted or edited, it must be reversed and re-entered if incorrect.
The Invoice status in the header will now display Posted and there will be a Reverse Now link in the navigation toolbar under the invoice header.
The Invoice Posting link in the Quick Navigation panel will display the general ledger posting information for this invoice.
To deliver the posted invoice by e-mail or fax from Nexsure, see “Delivering an Invoice”, in this chapter. Only posted invoices may be printed or delivered.
Click the Transaction Summary link on the navigation toolbar to exit the invoice and return to the transaction summary.
WHY Invoice from the Policy LevelInvoicing from policy level is done when invoicing that policy’s transactions. Information saved on the policy’s policy info tab defaults to the new invoice. Properly completed policy info saves time invoicing all policy transactions.
For information on completing policy info for new policies, see “HOW to Complete the Policy Info

Page 523
Chapter 18Nexsure® Training Manual - CRM
Tab”. Chapter 5, “Marketing”.
For information on completing policy info for renewal policies, see “Updating Policy Info”, Chapter 14, “Renewing Policies”.
Important: Do not invoice Direct Bill policies at policy level if invoices are created by Accounting through Statement Entry of Direct Bill Transactions. For information on Statement Entry invoicing, see “Invoicing From Carrier Statement in the Reconciliation Worksheet” in Chapter 11, “Handling Carrier Statements”, Accounting Training Manual. For Commission Downloads, see “Commission Download” in Chapter 11, Accounting Training Manual.
Posted invoices populate policy info’s Annualized and Billed totals. These totals are reflected in the Agency’s Book of Business report.HOW to Invoice Full Pay from the Policy level
After accessing the appropriate client through SEARCH, click the POLICIES link on the Client menu. Select the policy to be invoiced.
If the invoice is for the policy term or posted servicing item (Endorsement, Audit,
Cancellation, etc.), click the Details icon of the In Force policy.
If the invoice is a result of a servicing item not yet posted, click the Details icon of the servicing item.
If the invoice is being done on a cancelled policy or expired policy that has been sent to
history, click the history tab and click the Details icon of the policy in history.

Page 524
Chapter 18 Nexsure® Training Manual - CRM
Click the policy’s transactions tab and click the [Add New Invoice] link.
The Invoice header is displayed with the Invoice ID, Bill To, Date Created, the Effective Date of the servicing item or policy term, Bill Method, Invoice Status and Amounts.
Click the Maximize/Minimize icon to display the entire invoice work area. When the work area is maximized, the invoice header and Quick Navigation panel are hidden. Click the
Maximize/Minimize icon to return to the header and Quick Navigation view.
Using the scroll bar, or the links in the Quick Navigation panel, amend the invoice as follows:
Click the Edit Invoice Header link.
Bill Method: This will default from the policy info tab. If it is incorrect, select the correct bill method from the drop-down box.
Note: Correcting the Bill Method on an invoice does not change the default Bill Method saved on policy info. Edit the policy if necessary to correct the Bill Method for future invoicing.
Annualized: The Annualized check box defaults as checked or not checked from policy info. To calculate an annualized premium for the premium being invoiced, select the check box. Refer to the Bill Type information that follows for the impact of Annualized on policy info Annualized and Billed totals for each Bill Type.

Page 525
Chapter 18Nexsure® Training Manual - CRM
Bill Type: The Bill Type will default from the policy selected for invoicing. Select the correct Bill Type if necessary from the following options in the drop-down box:
Bill Type Description Annualized Annualized
Account ServiceSelect this option for non-policy transactions.
No change for non-premium transaction.
No change for non-premium transaction.
AuditSelect this option if invoicing an audit.
No annualized calculation of the audit premium invoiced. Audit premium is added to the existing Annualized amount.
No annualized calculation of the audit premium invoiced. Audit premium is added to the existing Annualized amount.
CancellationSelect this option if invoicing a cancellation.
No change to the Annualized total as the total before cancellation is the true Annualized premium.
Cancellation billed premium is added to the current Annualized total.
EndorsementSelect this option if invoicing an endorsement.
New Annualized is calculated based on the endorsement premium change and added to the existing Annualized amount.
Endorsement premium is not annualized. Billed premium is added to the existing Annualized amount.
ReportingSelect this option if invoicing a reporting policy.
Reporting premium invoiced is added to the existing Annualized amount.
Reporting premium invoiced is added to the existing Annualized amount.
Term PolicySelect this option if invoicing a new, renewal or rewritten policy.
A new annualized premium is calculated and replaces any existing Annualized premium.
The invoiced amount overwrites the existing Annualized amount.
Note: It is important to select the correct Bill Type when invoicing a policy.
Department: The department will default in, if it is incorrect, select the correct one from the drop-down box.
Unit: If a unit was selected it will default in, if it is incorrect, select the correct one from

Page 526
Chapter 18 Nexsure® Training Manual - CRM
the drop-down box. Units are not required.
Effective Date: This defaults to the effective date of the servicing item.
Date Booked: This defaults to the effective date of the servicing item or the invoice creation date based on which is later. The Date Booked may be modified only if security access is granted in the Invoice Resource Group in the user’s security template.
Invoice Due Date: The date will default to booked date plus the default number of days on the department in SETUP. If the user has both the ability to modify the Due Date and Prior to Effective Date security under the Resource Group of Invoice, they will be able to modify the Due Date on both Invoices and master invoices with Due Dates prior to the Effective Date and booked date of the invoice. However, users will not be able to modify the Due Dates prior to the current date.
Full Pay: System controlled selection.
Compound Bill: System controlled selection.
Amount Due: The default for Amount Due is the Estimated Premium amount from policy info for Agency Bill, or the commission due for that amount if Direct Bill. The actual premium to be invoiced is not entered here.
Days until Past Due: Enter the number of days this bill will become past due.
# of Print Days before Effective Date: Enter the number of days prior to the effective date this invoice will automatically post and be available to print. Leave the # of print days blank to suspend automatic posting of the invoice and post manually.
Unique Invoice Message: A message entered here will print out on the invoice.
Internal Note: Enter an internal note, for your record of what the invoice is for. Internal notes are for your reference only and do not print on the invoice. Internal Notes are viewable from the transaction summary.
Click OK to save the changes, click Cancel to abort changes to the Invoice Header.
Page 527
Chapter 18Nexsure® Training Manual - CRM
Policy Information:
This displays the information in the policy header and cannot be changed in the invoice.
LOB Forms:
This displays all ACORD forms for the policy and cannot be changed in the invoice.
Premiums:
Premises default from the policy info tab.
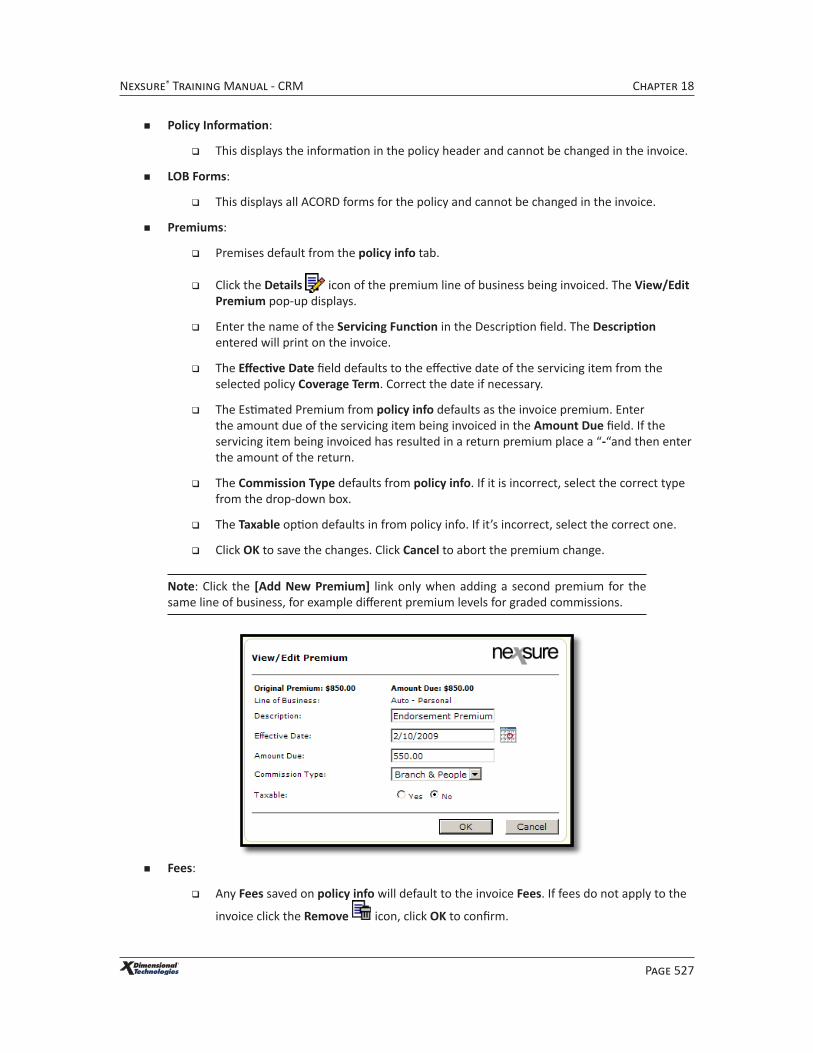
Click the Details icon of the premium line of business being invoiced. The View/Edit Premium pop-up displays.
Enter the name of the Servicing Function in the Description field. The Description entered will print on the invoice.
The Effective Date field defaults to the effective date of the servicing item from the selected policy Coverage Term. Correct the date if necessary.
The Estimated Premium from policy info defaults as the invoice premium. Enter the amount due of the servicing item being invoiced in the Amount Due field. If the servicing item being invoiced has resulted in a return premium place a “-“and then enter the amount of the return.
The Commission Type defaults from policy info. If it is incorrect, select the correct type from the drop-down box.
The Taxable option defaults in from policy info. If it’s incorrect, select the correct one.
Click OK to save the changes. Click Cancel to abort the premium change.
Note: Click the [Add New Premium] link only when adding a second premium for the same line of business, for example different premium levels for graded commissions.
Fees:
Any Fees saved on policy info will default to the invoice Fees. If fees do not apply to the
invoice click the Remove icon, click OK to confirm.
Page 528
Chapter 18 Nexsure® Training Manual - CRM
Taxes:
Any Taxes saved on policy info will default to the invoice. If the premium of the item being invoiced is taxable, and the tax is based on a percentage of the premium, Nexsure will recalculate it based on the premium entered on the Premium line.
If the tax does not to apply to the invoice click the Remove icon, click OK to confirm.
Agency Commissions:
Agency Commissions default from policy info. Nexsure will recalculate the agency commissions due based on the amount of the premium entered on the premium
line. If Agency Commission information is incorrect, click the Details icon of the commission line to correct the Rate Type and/or Rate. Correcting commission information on the invoice does not change saved commission information on policy info for future invoicing.
Other Commissions:
Other Commissions default from policy info. Nexsure will recalculate the other commissions based on the amount of the agency commissions or fees to which they
apply. If commission information is incorrect, click the Details icon of the line item. Correcting commission information on the invoice does not change policy info for future invoicing.
If multiple producers should receive production credit, the user may click the [auto allocate] link to evenly allocate production credit between all added to the Other Commission section of the screen. The production credit amounts may also be entered directly on the screen in the production credit column. Once all changes have been made, click the [Save] link to retain these changes.
Confirm that the invoice looks correct by clicking the Preview link on the Navigation Toolbar. Select the style and invoice to view and click OK. The invoice will be displayed with Draft printed in the background. To return to the invoice, click the Invoice Header link in the Quick Navigation Panel. After the invoice has been reviewed and all information is accurate, click the Post Now link in the Navigation Toolbar under the invoice header.
Note: If the invoice work area has been maximized, click the Maximize/Minimize icon to display the invoice header and Quick Navigation panel.
A Post Invoice confirmation pop-up box will be displayed. The Yes option will be selected by default, click OK to post the invoice. Click Cancel to abort.
Note: A posted invoice cannot be deleted or edited, it must be reversed and re-entered if incorrect.
The invoice status in the header will now display Posted and there will be a Reverse Now link in the navigation toolbar under the invoice header.
The Invoice Posting link in the Quick Navigation panel will display the general ledger posting information for this invoice.
To deliver the posted invoice by e-mail or fax from Nexsure, see “Delivering an Invoice”, Chapter

Page 529
Chapter 18Nexsure® Training Manual - CRM
6, “Policy”. Only posted invoices may be printed or delivered.
Click the Transaction Summary link on the navigation toolbar to exit the invoice and return to the transaction summary.
WHAT is the Receivable TabClick the receivables tab. In the Quick Navigation panel on the right side, the entity from whom the payment is expected is displayed. The receivables tab will display a summary of balances due from the client (Agency bill) or carrier (Direct bill). When a payment is received and applied to the invoice it will be displayed here as a Receive Payment and show the Credit Assigned to the invoice. The balance will display a residual amount, if any, still owed on the invoice by the client or carrier.
WHAT is the Payables TabClick the payables tab to display details. The Quick Navigation links on the right side of the payables screen display any entities expecting a portion of the premium. Clicking on different entities using the Quick Navigation links displays a summary of the portion, if any, due them. Any credit assigned to the invoice will be displayed here. As disbursements are applied to these entries, those display here as well with balances, if any, still due.

Page 530
Chapter 18 Nexsure® Training Manual - CRM
HOW to Understand the Transaction Summary ViewThe summary view will give you pertinent information for each invoice, posted or unposted, that has been created.
Clicking the Details icon will display the invoice tab.
The Effective Date is the date the installment is due.
The Date Booked displays the invoice posting date. This is the date the invoice hits the General Ledger.
The Status lists whether the invoice is unposted, posted or reversed. If an Internal Note has been added to a transaction, an asterisk is displayed next to the status of that transaction. When you hover over the asterisk, a pop-up of the Internal Note is displayed.
The Type displays the type of the invoice.
The Invoice Summary view does not include the ID of payments/recons applied to the invoice. Find this level of information on the Detail Assigned view.
The Invoice ID/Master Invoice ID will display the invoice number and if the invoice is reversed, the invoice number of the reversal.
The Policy Number will show the policy number assigned to the policy at the time of the invoice creation.
The Description displays the line of business.
The Bill Method displays how the invoice was billed.

Page 531
Chapter 18Nexsure® Training Manual - CRM
The Amount field displays the amount billed. Any amounts that have been reversed are displayed in parenthesis.
The Remove icon displays only if an Invoice has not been posted.
Invoicing Binder Bill
Binder bill invoicing is used to create an invoice for a new business policy or renewal, in a bound status, before the policy and bill is received from the carrier. Binder bill invoicing hits the general ledger but will not appear on the agent‘s account current statement. When the policy is received from the carrier, the binder bill will be reversed and a regular invoice processed. Policies issued with a premium increase or decrease will also need a manual bill invoice for the difference to send to the client.
Note: Binder bill invoicing is only done on agency billed policies and typically for policies that are on an account current basis with the agency.
HOW to Invoice a Binder Bill
Locate the appropriate client through SEARCH and click the POLICIES link on the Client menu. All in force policies for the client are displayed in a summary view.
Click the Details icon of the policy needing to be binder billed.
Click the transactions tab and click the [Add New Invoice] link.
The Invoice header is displayed.
Click the [Edit Invoice Header] link.
Change the Invoice Type to Binder Bill.

Page 532
Chapter 18 Nexsure® Training Manual - CRM
See the HOW to Invoice the Term Policy in this chapter to complete the rest of the invoicing process.
Post the binder bill.
The Binder Bill invoice displays on the transaction summary identified with an Invoice type of (B).
HOW to Reverse a Binder BillWhen the policy is received from the carrier, the binder bill will need to be reversed. Reversing the binder bill creates a new regular unposted invoice for the original amount of the binder bill. If the policy is issued with a premium increase or decrease, a manual bill for the difference can be created after posting the regular invoice.
Locate the appropriate client through SEARCH and click the POLICIES link on the Client menu. All in force policies for the client are displayed in a summary view.
Click the Details icon of the policy you need to reverse the binder bill on.
Click the transactions tab, the transaction summary view is displayed.
Click the Select View drop-down box and select Open Binder Bill.
All open binder bills are displayed in a summary view.
Click the Details icon of the binder bill to be reversed.
Page 533
Chapter 18Nexsure® Training Manual - CRM
The Invoice header will be displayed.
Click the Reverse Now link in the navigation toolbar under the invoice header.
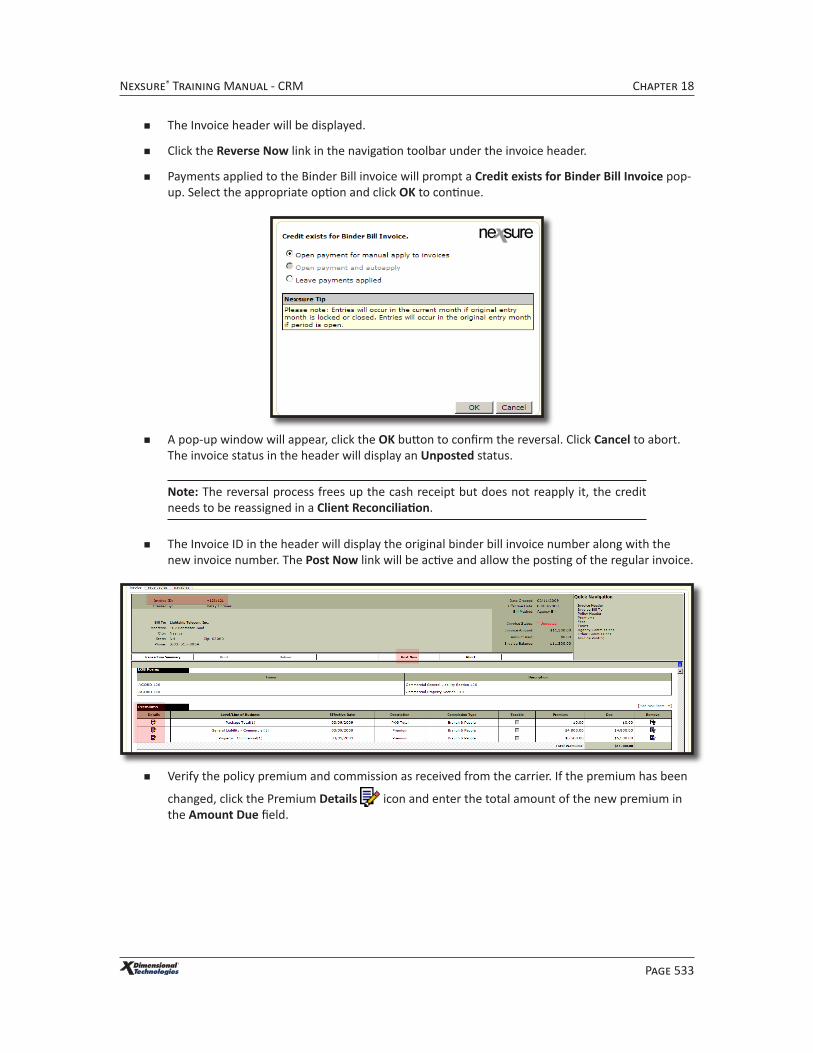
Payments applied to the Binder Bill invoice will prompt a Credit exists for Binder Bill Invoice pop-up. Select the appropriate option and click OK to continue.
A pop-up window will appear, click the OK button to confirm the reversal. Click Cancel to abort. The invoice status in the header will display an Unposted status.
Note: The reversal process frees up the cash receipt but does not reapply it, the credit needs to be reassigned in a Client Reconciliation.
The Invoice ID in the header will display the original binder bill invoice number along with the new invoice number. The Post Now link will be active and allow the posting of the regular invoice.
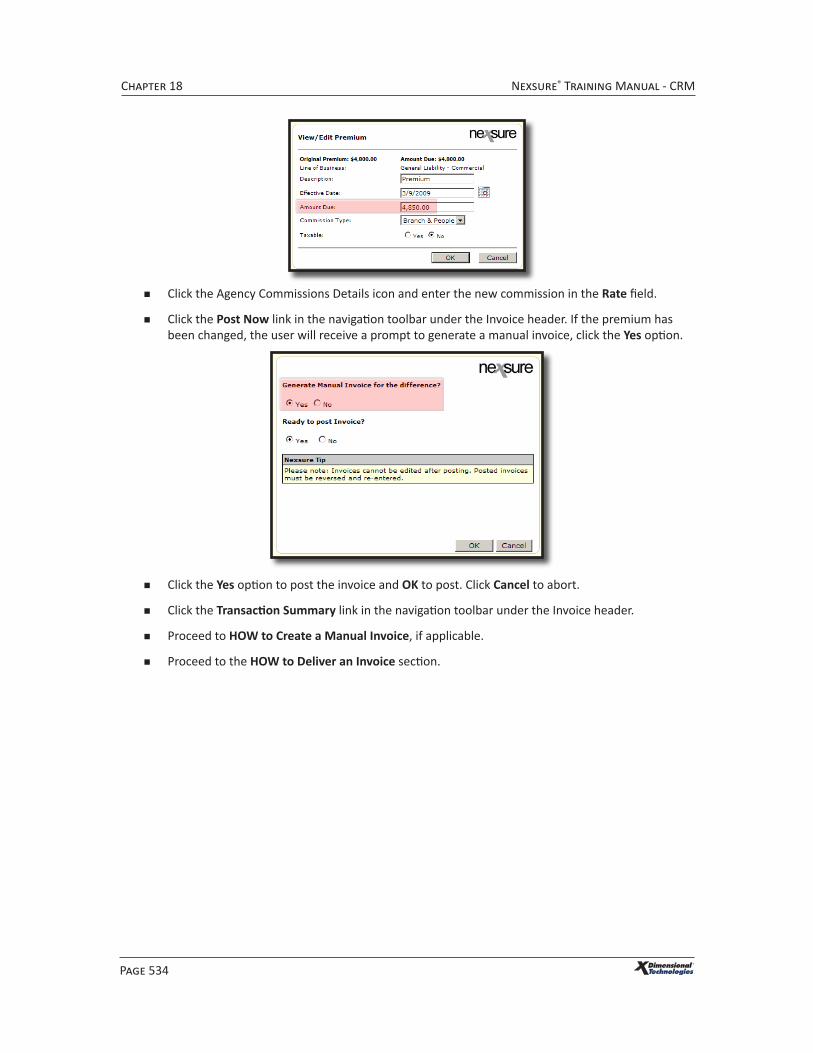
Verify the policy premium and commission as received from the carrier. If the premium has been
changed, click the Premium Details icon and enter the total amount of the new premium in the Amount Due field.
Page 534
Chapter 18 Nexsure® Training Manual - CRM
Click the Agency Commissions Details icon and enter the new commission in the Rate field.
Click the Post Now link in the navigation toolbar under the Invoice header. If the premium has been changed, the user will receive a prompt to generate a manual invoice, click the Yes option.
Click the Yes option to post the invoice and OK to post. Click Cancel to abort.
Click the Transaction Summary link in the navigation toolbar under the Invoice header.
Proceed to HOW to Create a Manual Invoice, if applicable.
Proceed to the HOW to Deliver an Invoice section.

Page 535
Chapter 18Nexsure® Training Manual - CRM
HOW to Use the Binder Bill Transaction Summary ViewThe transactions tab invoice summary view is displayed.
The Invoice ID/Master Invoice ID will display the original binder bill invoice ID, the reversed binder bill invoice ID and the new regular invoice ID:
The invoice number alone is the original binder bill invoice.
A “-” displays in front of the reversed invoice.
A “+” displays in front of the regular invoice.
The original binder bill displays the amount billed. The reversed binder bill displays the amount reversed in parenthesis. The regular invoice displays the total amount of the premium billed.
HOW to Create a Manual InvoiceIf the policy is issued with a premium increase or decrease, a manual bill for the difference can be created after posting the regular invoice to bill the client the difference.
Click the [Add New Invoice] link on the transactions tab to complete the invoicing of the manual bill.
The Invoice header will be displayed.
Click the [Edit Invoice Header] link.
Change the Invoice Type to Manual Bill and click the OK button.
Scroll to the premium and click on the Details icon. Enter the premium difference in the Amount Due field.
Post the manual bill.
Proceed to the HOW to Deliver an Invoice section.
Note: A manual bill does not hit any general ledger accounts and will not appear on the agent’s account current statement. It provides a way for the agency to create an invoice to bill the client for a difference in premium in the binder bill workflow if necessary.

Page 536
Chapter 18 Nexsure® Training Manual - CRM
Delivering the Invoice
Locate the appropriate client through SEARCH and click the POLICIES link on the Client menu. All in force policies for the client are displayed in a summary view.
Click the Details icon of the policy.
Click the transactions tab.
Click the Details icon of the invoice. If the policy is installment billed, click the Details icon of the applicable installment.
Note: The invoice must be posted in order to deliver it from Nexsure.
The invoice header is displayed, click the Print link in the navigation toolbar under the invoice header.
Make a selection from the Select Invoice Format drop-down box.
Place a check mark next to the appropriate invoice(s).
Click OK to print, this will allow a print preview of the invoice selected in Adobe. Click Cancel to Abort.
Click the Deliver link in the navigation toolbar under the invoice header.
The delivery e-mail tab is displayed with the invoice attached on the right side.
The invoice can be sent from Nexsure as and e-mail or a fax. The e-mail tab will default, if faxing the invoice click on the fax tab.
Complete the required e-mail or fax information.
Click the Send link to send the e-mail or fax. Click Close to close the screen without sending.
A dialog box will display confirming the successful delivery.
Click OK to close the dialog box.
Understanding and Working with Installment Plans
If the client is paying in installments and there has been policy activity resulting in a premium change unposted installments may be revised to divide either the additional or return premium evenly across the remaining unposted installments. Posted installments cannot be revised.
HOW to Revise Unposted Installments
After accessing the appropriate client through SEARCH, click the POLICIES link on the Client menu. If the installments to be revised are a result of a servicing function (such as an endorsement, audit, cancellation, etc) and that servicing item has not yet been posted, click the
Details icon of the pending servicing item. If the servicing item has been posted, click the

Page 537
Chapter 18Nexsure® Training Manual - CRM
Details icon of the policy to be invoiced. If the invoice is being done on a cancelled policy that
has been sent to history, click the history tab and click the Details icon of the policy in history.
Click the transactions tab.
The Invoice ID/Master Invoice ID in the transaction summary view will display each installments invoice number with the master invoice number below in parenthesis. Click the Master Invoice ID hotlink beneath any installment displayed.
The Master Invoice pop-up window will display with both posted and unposted installments.

Page 538
Chapter 18 Nexsure® Training Manual - CRM
Click the Modify Master link.
The Modify Master pop-up window displays. To split the additional or return premium over the remaining unposted installments, select Split, remove any checks from the Premium, Fees and Taxes check boxes, and click OK.
The Invoice header displays with a zero amount for the policy premium, fees taxes and commission information.

Page 539
Chapter 18Nexsure® Training Manual - CRM
The information in the invoice header defaults in from the original setup of the Installments.
The Bill Type in the invoice header should reflect the correct bill type. If it does not click the Edit Invoice Header link.
Bill Type: Select the correct bill type from the following options in the drop-down box:
Audit: Select this option if invoicing an audit.
Account Service: Select this option for invoicing anything that falls outside of the other five options.
Cancellation: Select this option if invoicing a cancellation.
Endorsement: Select this option if invoicing an endorsement change.
Reporting: Select this option if invoicing a reporting policy.
Term Policy: Select this option if invoicing a new business or renewal policy.
Note: It is important to select the correct bill type when invoicing a policy.
Make any other appropriate changes in the Invoice Header and click OK to save. Click Cancel to abort.
Scroll to the premium link and click on the Details icon.
Enter the name of the Servicing Function in the Description field.
The Effective Date will reflect the effective date of the policy.
Enter the Amount Due of the servicing item being invoiced in the amount due field. If the servicing item being invoiced has resulted in a return premium place a “-“and then enter the amount of the return.
The Commissionable field defaults in from the original Installment setup.
Select the Yes Taxable option if this amount is to be taxed.
Page 540
Chapter 18 Nexsure® Training Manual - CRM
Click OK to save the changes. Click Cancel to abort.
Using the scroll bar, or the links in the Quick Navigation panel, review the following areas of the invoice for accuracy:
Fees
Taxes
Agency Commissions
Other Commissions
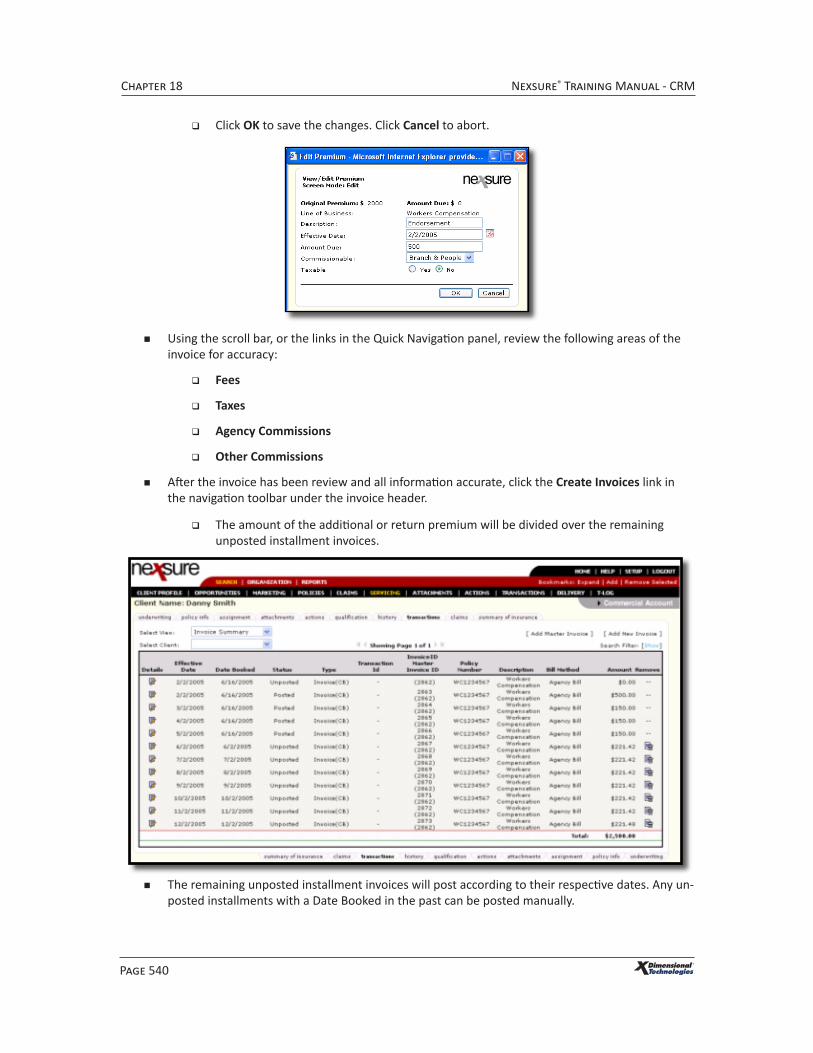
After the invoice has been review and all information accurate, click the Create Invoices link in the navigation toolbar under the invoice header.
The amount of the additional or return premium will be divided over the remaining unposted installment invoices.
The remaining unposted installment invoices will post according to their respective dates. Any un-posted installments with a Date Booked in the past can be posted manually.

Page 541
Chapter 18Nexsure® Training Manual - CRM
HOW the Client Balance Summary Screen Works
The Client Balance Summary screen is used to obtain a quick overview of a client’s agency billed balance. It displays the current balance, an aging balance of 30/60/90 days and a total, future and grand total balances.
Note: The Client Balance summary screen is automatically updated overnight.
HOW to Access the Client Balance Summary Screen
After accessing the appropriate client through SEARCH, click the TRANSACTIONS link on the Client menu.
Note: The Client Balances Summary tab is only available at the Client level.
The Review Date field displays the exact date, time and time zone of the logged in user accessing the screen.
The Last Updated Date field displays the last date the balance summary screen was internally updated.
The Last Transaction Date field displays the date of the last transaction entered that affected any information displayed on the screen.
The Status field represents whether the client information is either Current or Not Current.
If the client information is Current then the Last Transaction Date is less than or equal to the Last Update Date.
If the client information is Not Current then the Last Transaction Date is greater than the Last Update Date.

Page 542
Chapter 18 Nexsure® Training Manual - CRM
Only posted activity will be calculated:
The amount in the Current field displays any transaction affecting the client account receivables as of today’s date and 30 days prior to today’s date.
The amount in the Over 30 days field displays any transaction affecting the client account receivables as of 31 days prior to today’s date through 60 days prior to today’s date.
The amount in the Over 60 days field displays any transaction affecting the client account receivables as of 61 days prior to today’s date through 90 days prior to today’s date.
The amount in the Over 90 day’s field displays any transaction affecting the client account receivables as of 91 days prior to today’s date.
Note: The Total Due should always equal the total of the Current, Over 30 days, Over 60 days and Over 90 days amounts.
Note: The Client Balances Summary tab is only available at the Client level.
The amount in the Future field displays any transaction affecting the client account receivables after today’s date.
The amount in the Grand Total field displays all items affecting the general ledger from the beginning of the first initial invoice to the last invoice created.
The amount in the Last Payment Date field displays the last posted entry for the account entered through received payment based on date booked.
Page 543
Chapter 18Nexsure® Training Manual - CRM
Note: The Last Payment date and amount could be a future item.
In the Client Activity fields:
The amount in the Total Unposted Invoices field displays the grand total of premium, fees and taxes for any unposted invoice activity from the first initial invoice through the last invoice created. (This amount excludes any manual and book of business invoices).
The amount in the Total Unassigned Payments field displays the total for any posted residual payments. These are payments that have been received in Nexsure, but not yet applied to an invoice.
The amount in the Total Open Binder Bills field displays the total of all posted open binder bill invoices. (This amount excludes any manual and book of business invoices).
The amount in the Total Agency Bill Commissions field displays the total of all agency billed commissions from the first initial posted invoice through the last posted invoice created. (This amount excludes any manual and book of business invoices).
The amount in the Total Direct Bill Commissions field displays the total of all direct billed commissions from the first initial posted invoice through the last posted invoice created. (This amount excludes any manual and book of business invoices).
The amount in the Total Commissions field displays the total of agency plus direct billed commissions from the first initial posted invoice through the last posted invoice created. (This amount excludes any manual and book of business invoices).
The amount in the Total Commission Expense field displays the total of all commissions shown as “other” in invoices from the first initial posted invoice through the last posted invoice created. (This amount excludes any manual and book of business invoices).
The amount in the Net Commission field displays the total of commission less the total of commissions paid to “others” from the first initial posted invoice through the last posted invoice created. (This amount excludes any manual and book of business invoices).
In the Premium calculation field the policy info value totals display:
The amount in the Annualized Premiums field displays the grand total of annualized premiums on all in force policies.
The amount in the Billed Premiums field displays the grand total of billed premiums on all in force policies.
Note: Posting rules do not apply - commission earned and paid to people will be showing in the totals regardless of applicable posting rules.

Page 544
Chapter 18 Nexsure® Training Manual - CRM
Understanding and Working with List Bills
List billing is used to spread the premium over a multiple number of locations for an Insured. A list bill consists of one master policy that is billed to multiple locations. The master policy provides insurance coverage for locations insured on a policy. The locations can be attached to the master client via its related accounts tab. List billing is based on a percentage of the risk that each location will pay thus creating multiple receivables and multiple payables based on the entities involved in each individual billing. The carrier payables are based on an installment schedule generated over the specified number of locations, not time.
HOW to Setup List Bill Clients
All prospective clients (the master client and the related accounts) are added to Nexsure following the normal procedures.
For instructions see “HOW to Add a Suspect”, in Chapter 3 of this manual.
Each prospective client’s location(s) should be added on their respective locations tab.
For instructions see “HOW to Add a Location”, in Chapter 3 of this manual.
All related accounts need to be associated to the master client via its related accounts tab. As a result of list billing the related accounts policy will reside under the master client entity.
For instructions see “HOW to Add a Related Account”, in Chapter 3 of this manual.
Note: The policy will reside with the master client. The related accounts, unless they have a policy not being list billed, may never become more than a “suspect” in Nexsure.
The marketing quote is added to the master client. When completing the ACORD application for the master client; all locations, coverages, limits, etc for the related accounts are added to the marketing quote as well. The marketing quote, when in forced, will become the master policy and provide insurance coverage for all locations for the master client as well as all related accounts.
For instructions see “HOW to Add a New Marketing Quote”, in Chapter 5 of this manual.
The premium information is entered on the policy info tab for the master client following the normal procedures.
For instructions see “HOW to Complete the Policy Info Tab”, in Chapter 5 of this manual.
The marketing quote for the master client is in force following the normal procedures.
For instructions see “HOW to In force a Marketing Quote”, in Chapter 5 of this manual.
Page 545
Chapter 18Nexsure® Training Manual - CRM
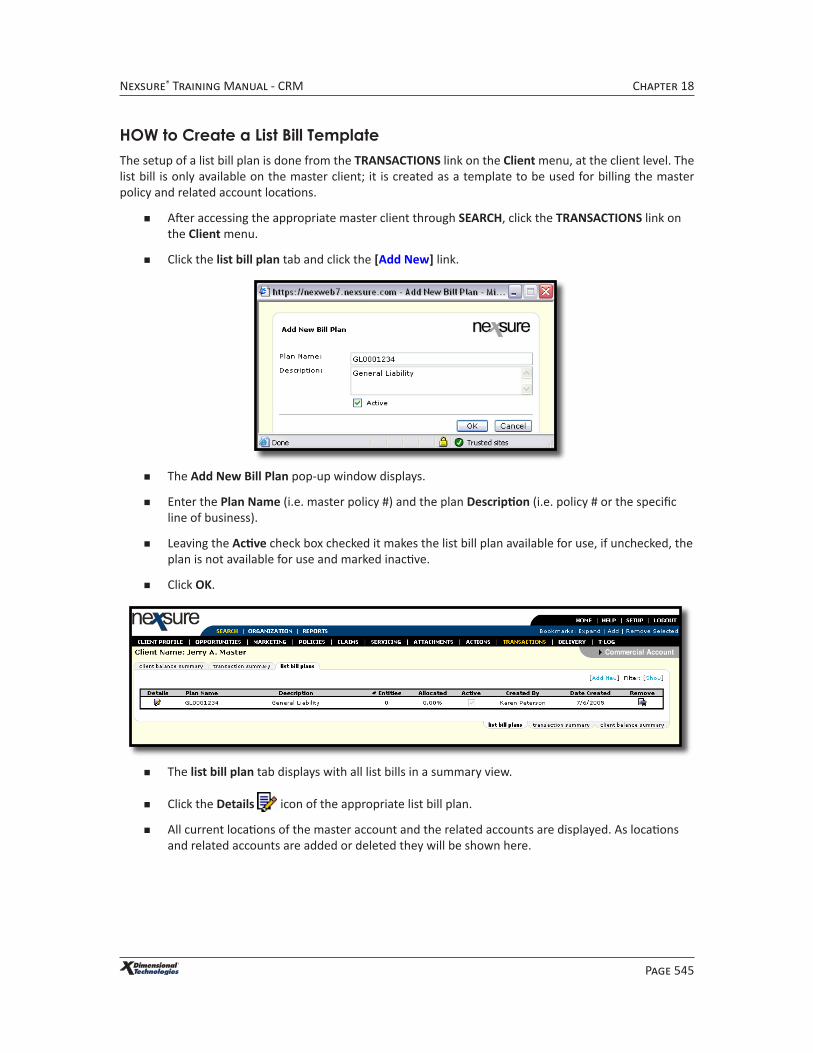
HOW to Create a List Bill TemplateThe setup of a list bill plan is done from the TRANSACTIONS link on the Client menu, at the client level. The list bill is only available on the master client; it is created as a template to be used for billing the master policy and related account locations.
After accessing the appropriate master client through SEARCH, click the TRANSACTIONS link on the Client menu.
Click the list bill plan tab and click the [Add New] link.
The Add New Bill Plan pop-up window displays.
Enter the Plan Name (i.e. master policy #) and the plan Description (i.e. policy # or the specific line of business).
Leaving the Active check box checked it makes the list bill plan available for use, if unchecked, the plan is not available for use and marked inactive.
Click OK.
The list bill plan tab displays with all list bills in a summary view.
Click the Details icon of the appropriate list bill plan.
All current locations of the master account and the related accounts are displayed. As locations and related accounts are added or deleted they will be shown here.

Page 546
Chapter 18 Nexsure® Training Manual - CRM
If changes are made to the plan name, description or active check box click the Save link in the navigation toolbar under the list bill plan header.

Page 547
Chapter 18Nexsure® Training Manual - CRM
Select the locations to be included in the list bill plan by clicking in the appropriate Select check boxes. As locations are selected, the allocate factor and the ellipsis buttons are activated.
Enter the allocation factor assigned to each location in the appropriate Alloc. Fact. box. (i.e. Total insurance to value, square footage or premium dollars. Select one factor and be consistent for each location).
Note: Nexsure will total the allocation factors and update the total under the This Page Total field at the bottom of the screen. The Alloc. Fact. box displays in red once that units total has been added to the page total field. The Alloc. Fact. box allows five decimal places (1.23456), saving the list bill plan rounds it to four decimal places (1.2346).
Click the Save link in the navigation toolbar under the list bill plan header.
Note: The percent of each unit will display under the percent column and should equal 100.
If allocation factors are changed click the Allocate link to update the page total and percentages based on the new allocation factors.
Clicking the Details icon to the right of a location displays the Branch, Department and Unit of that location.

Page 548
Chapter 18 Nexsure® Training Manual - CRM
• The Comm (commission) column will display the number of employees who are set up to receive commission for that line item.
• Clicking the ellipsis button to the right of a location displays the employee(s) commission record(s) at the bottom of the screen in a summary view for that line item. The commission will default in if it has been set up for the employee. The line will be highlighted to show which entity is being worked on.
Note: The commission for employees assigned to the master account will not prefill. The employees displayed are the employees assigned at the client level, NOT the policy level.

Page 549
Chapter 18Nexsure® Training Manual - CRM
The commission for employees assigned to the master account will not prefill.
Click the [Add New] link in the bottom right corner of the screen to pull the employee in to create a commission record for that line item.
If the employee information displayed is incorrect click the Details icon to the right of the incorrect employee commission record.
The edit people commission pop-up window displays. Make the appropriate corrections and click OK to save. Click Cancel to abort.
See Chapter 5 – Marketing / HOW to Complete the Policy Info Tab/Other Commissions for instructions.
Once the list bill plan template is created click the List Bill Summary link in the navigation toolbar under the list bill plan header.
HOW to Invoice the List Bill
After accessing the appropriate master client through SEARCH, click the TRANSACTIONS link on the Client menu.
Click the transaction summary tab.
Click the Add Master Invoice link.

Page 550
Chapter 18 Nexsure® Training Manual - CRM
Select the List Bill Plan from the drop-down box.
Note: The Active check box on the list bill template must be checked for the list bill plan to appear in the drop-down box.
Select the Policy option and click the policy in the policies box to highlight it and click OK. Click Cancel to abort.
The Add Master Invoice pop-up window is displayed. Click check boxes for Premium, Fees and/or Taxes to default in from the policy info tab, click OK. Click Cancel to abort.
The Invoice header is displayed with the policy premium, fees taxes and commission information.
Note: The information in the invoice comes from the master policy’s policy info tab.
Click the Edit Invoice Header link.
Bill Method: This will default from the policy info tab, if it is incorrect; select the correct bill method from the drop-down box.
Bill Type: Select Term Policy from the drop-down box.

Page 551
Chapter 18Nexsure® Training Manual - CRM
Invoice Type: Select the Invoice type from the drop-down box.
Department: The department will default in, if it is incorrect, select the correct one from the drop-down box.
Unit: If a unit was selected it will default in, if it is incorrect, select the correct one from the drop-down box. Units are not required.
Effective Date: This defaults to the effective date of the policy.
Date Booked: This defaults to the effective date of the policy or the invoice creation date based on which is later.
Amount Due: This defaults to the commission amount if Direct Bill, or the total premium amount if Agency Billed.
Days Until Past Due: Enter the number of days this bill will become past due.
# of Print Days Before Eff. Date: Enter the number of days prior to the effective date of the invoices they will automatically post and be available to print.
Note: To suspend the posting of an invoice leave the “# of Print Days Before the Effective Date” field blank to avoid Nexsure automatically posting the invoice.
Click OK to save. Click Cancel to abort.
Using the scroll bar, or the links in the Quick Navigation panel, review the following areas of the invoice for accuracy:
Premiums
Fees
Taxes
Agency Commissions
The Other Commissions will become available after the invoices are created.
Click the Create invoices link in the navigation toolbar under the invoice header.
A separate invoice is created for each location shown in the schedule and will post on its

Page 552
Chapter 18 Nexsure® Training Manual - CRM
respective date. The number of invoices created will reflect in the master invoice header.
Each location will have its own unique invoice number. Each invoice will reside with the client where the location record was created.
Click the Transaction Summary to close the master invoice. The transaction summary view of the master client displays only the invoice(s) for the master client.
The Invoice ID/Master Invoice ID will display each installment’s invoice number with the master invoice number below in parenthesis. The master number is a hotlink, clicking on the link will launch the entire bill plan for review and modification.
Note: Each invoice will display on the transaction summary tab at the Client level were the location record is located.
The Select Client drop-down box will display the accounts related to the master client. Select one of clients in the drop-down box to access that related accounts transaction summary tab.
The Transaction Summary view of the related account selected will display the invoices for that client’s location.
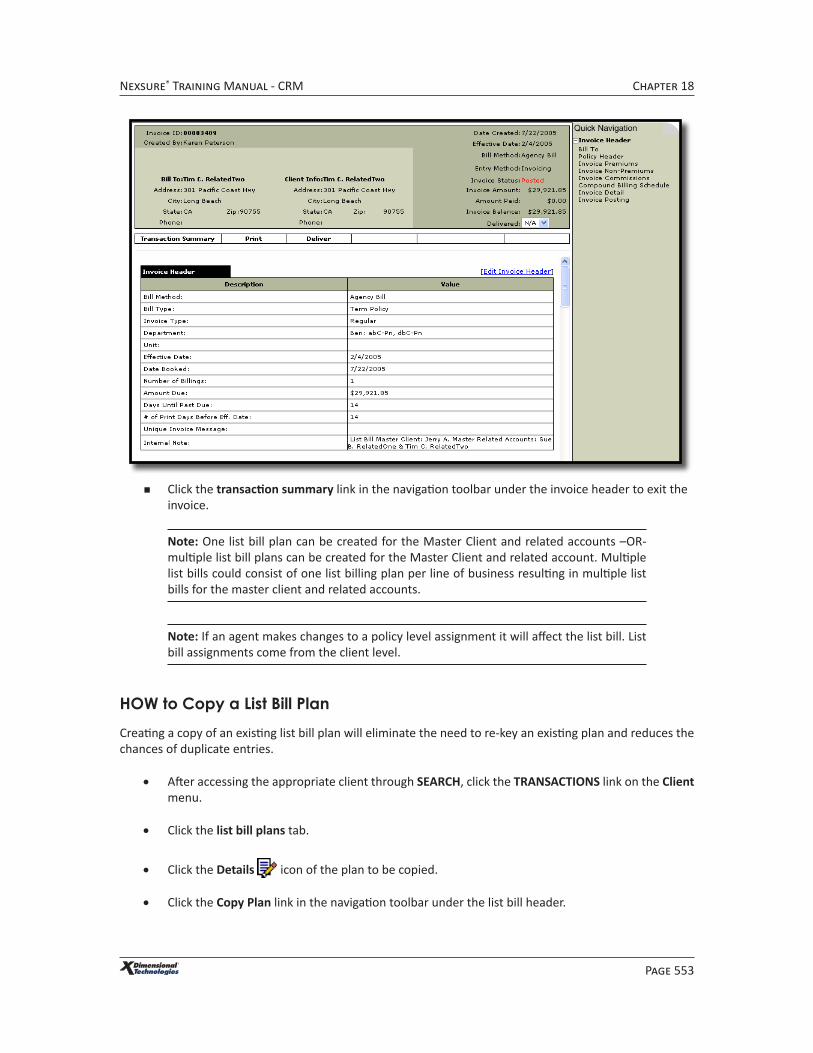
Clicking the Details icon of one of the related accounts invoices displays the invoice header with the master client information along with the location that is being billed for this invoice.
Page 553
Chapter 18Nexsure® Training Manual - CRM
Click the transaction summary link in the navigation toolbar under the invoice header to exit the invoice.
Note: One list bill plan can be created for the Master Client and related accounts –OR- multiple list bill plans can be created for the Master Client and related account. Multiple list bills could consist of one list billing plan per line of business resulting in multiple list bills for the master client and related accounts.
Note: If an agent makes changes to a policy level assignment it will affect the list bill. List bill assignments come from the client level.
HOW to Copy a List Bill PlanCreating a copy of an existing list bill plan will eliminate the need to re-key an existing plan and reduces the chances of duplicate entries.
• After accessing the appropriate client through SEARCH, click the TRANSACTIONS link on the Client menu.
• Click the list bill plans tab.
• Click the Details icon of the plan to be copied.
• Click the Copy Plan link in the navigation toolbar under the list bill header.

Page 554
Chapter 18 Nexsure® Training Manual - CRM
A confirmation pop-up window displays, click OK.
Click the List Bill Summary link in the navigation toolbar under the list bill header to exit the original list bill.
All list bill plans created will appear in a summary view on the list bill plans tab. The copy will display with Copy of before the original plan name, the Active check box will not be checked.
Click the Details icon of the copied plan. The entire plan, along with the plan name and description, can be edited as needed.
Edit the Plan Name and Description and make any applicable changes.
Click the Active check box in the upper right corner to activate the new bill plan.

Page 555
Chapter 18Nexsure® Training Manual - CRM
Click the Save link in the navigation toolbar under the list bill header to save the changes.
Click the List Bill Summary link in the navigation toolbar under the list bill header to exit the new list bill plan created.
Proceed to the HOW to Invoice the List Bill section in this chapter to invoice the new list bill plan.
Reverse and Re-bill Invoices
To reverse or reverse and re-bill an invoice, locate the invoice on the Transaction Summary screen and click
the Details icon.
On the Navigation Toolbar of the invoice if the invoice can be reversed there will be a Reverse Now link. Clicking the Reverse Now link will reverse the selected invoice without creating a new invoice to replace the reversal with.
If the invoice can be re-billed there will be a Reverse And Rebill link on the Navigation Toolbar. These links will only be available on invoices with a status of Posted or Posted-Rebill. The re-bill feature is not available on invoice types of Binder Bill and List Bill.
When the Reverse And Rebill link is clicked a pop-up message is displayed, “Are you sure you want to reverse and rebill this invoice?” and the opportunity to edit the internal note.

Page 556
Chapter 18 Nexsure® Training Manual - CRM
Clicking Cancel will return to the invoice and selecting the check box and clicking OK will bring up the invoice header of the reversal so the internal note can be edited. Once the note has been entered and OK is clicked the screen is refreshed and the new re-bill invoice is displayed. In the header beside Invoice Status Unposted Rebill is displayed in red. Re-billed invoices are tied to the reversed invoice to make it easy to see the history of the re-billed invoice. Aborting the rebill invoice will unlink the invoice number of the rebill to the original and reversed invoice and abort the rebill. The invoice header of the original invoice will have an option to Rebill so that the process may still be done if needed.
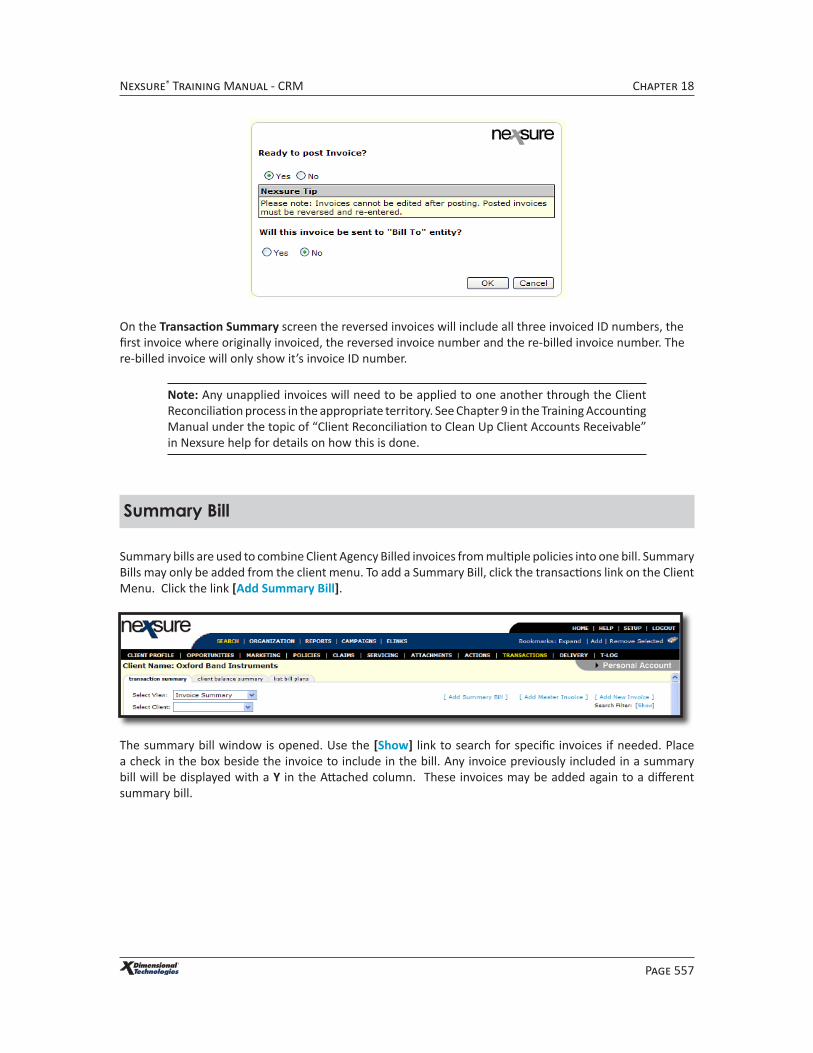
Complete all changes to the re-billed invoice. When complete click the Preview link to look at the invoice prior to posting. After confirming the invoice is as desired, click the Post Now link on the Navigation Toolbar. The confirmation pop-up window is displayed for confirmation to post and the opportunity to identify if the Bill To will be sent the re-billed invoice.
Page 557
Chapter 18Nexsure® Training Manual - CRM
On the Transaction Summary screen the reversed invoices will include all three invoiced ID numbers, the first invoice where originally invoiced, the reversed invoice number and the re-billed invoice number. The re-billed invoice will only show it’s invoice ID number.
Note: Any unapplied invoices will need to be applied to one another through the Client Reconciliation process in the appropriate territory. See Chapter 9 in the Training Accounting Manual under the topic of “Client Reconciliation to Clean Up Client Accounts Receivable” in Nexsure help for details on how this is done.
Summary Bill
Summary bills are used to combine Client Agency Billed invoices from multiple policies into one bill. Summary Bills may only be added from the client menu. To add a Summary Bill, click the transactions link on the Client Menu. Click the link [Add Summary Bill].
The summary bill window is opened. Use the [Show] link to search for specific invoices if needed. Place a check in the box beside the invoice to include in the bill. Any invoice previously included in a summary bill will be displayed with a Y in the Attached column. These invoices may be added again to a different summary bill.

Page 558
Chapter 18 Nexsure® Training Manual - CRM
To select invoices to include in the summary bill, place a check in the box beside the invoice. Click the Save link in the Navigation Toolbar.
To add a message to the summary bill, click the Edit Summary Bill message link on the Navigation Toolbar. Enter a message in the popup window and click the Save button.

Page 559
Chapter 18Nexsure® Training Manual - CRM
To Preview the summary bill, click the Preview link on the Navigation Toolbar. The first page is the summary bill including the message and mailing information. The due date is the earliest due date of all non-reversed/non-reversal selected invoices included. If no invoices or only reversed and/or reversal invoices are selected when the screen is refreshed, then it will not include a date. Until the bill is finalized, the word Draft prints on the invoice and no print option is available inside the preview window.

Page 560
Chapter 18 Nexsure® Training Manual - CRM
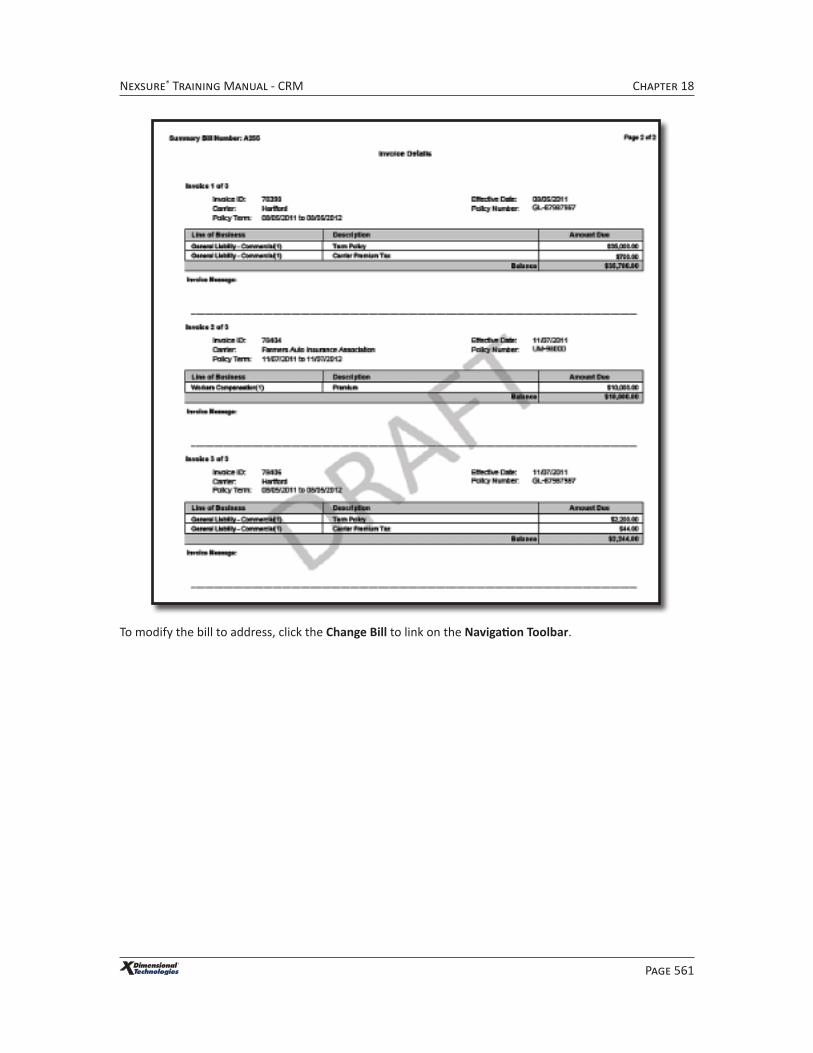
The subsequent pages show the invoice details included in the summary bill.
Page 561
Chapter 18Nexsure® Training Manual - CRM
To modify the bill to address, click the Change Bill to link on the Navigation Toolbar.

Page 562
Chapter 18 Nexsure® Training Manual - CRM
The Summary Bill may be aborted by clicking the Abort link in the Navigation Toolbar. To finalize, click the Finalize link in the Navigation Toolbar. Once finalized, the bill can be printed by clicking the Print link or delivered by fax or email by clicking the Deliver link in the Navigation Toolbar. When deliver is selected the bill is automatically added to the fax or email screen.
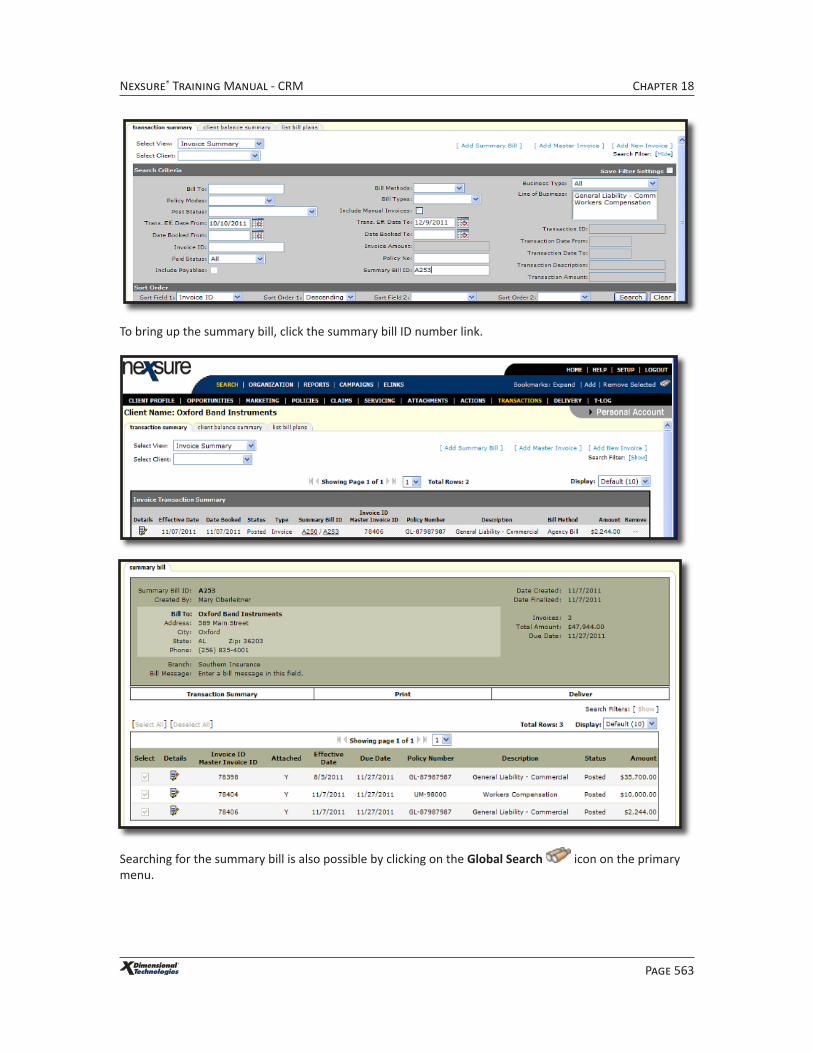
To search for a summary bill, in the invoice summary view in the show filter enter the summary bill ID number and click the search button.
Page 563
Chapter 18Nexsure® Training Manual - CRM
To bring up the summary bill, click the summary bill ID number link.
Searching for the summary bill is also possible by clicking on the Global Search icon on the primary menu.

Page 564
Chapter 18 Nexsure® Training Manual - CRM
In the Search for drop-down box select Invoice. In the search by drop-down box select Summary Bill ID. Enter the ID number into the blank field and click the Search button.
The search results will be returned. To bring up the summary bill click the summary bill ID number. To bring up the summary view filtering only for the selected ID number, click the summary icon.