Embed Size (px)
Citation preview

User GuideStorage Executive
IntroductionThis guide describes how to install and use Storage Executive to monitor and manage Micron solid state drives(SSDs).
Storage Executive provides the ability to:
• View all drives installed in a system and see current drive status and capacity, temperature, firmware version, and driver information
• View SMART attributes• Update firmware• Remove all data from a drive by performing a sanitize , format drive or physical security ID (PSID) revert
operation• Enhance burst performance by enabling the Momentum Cache feature• Improve drive performance and endurance by allocating over-provisioning capacity• Increase drive endurance by setting Flex Capacity (supported drives only)• Perform a drive self-test• Create or delete namespaces
Storage Executive User GuideIntroduction
CCMTD-1725822587-5968storage_executive_user_guide.pdf - Rev. Q - 06/20 EN 1 Micron Technology, Inc. reserves the right to change products or specifications without notice.
© 2020 Micron Technology, Inc. All rights reserved.
Products and specifications discussed herein are for evaluation and reference purposes only and are subject to change byMicron without notice. Products are only warranted by Micron to meet Micron's production data sheet specifications. All
information discussed herein is provided on an "as is" basis, without warranties of any kind.

ContentsInstalling and Starting Storage Executive ........................................................................................................... 3
Installation ................................................................................................................................................... 4Starting Storage Executive ............................................................................................................................. 4Stopping and Exiting Storage Executive ......................................................................................................... 4Obtaining Help ............................................................................................................................................. 4Updating Storage Executive .......................................................................................................................... 4
Using Storage Executive .................................................................................................................................... 7Management Options ................................................................................................................................... 7System Information ...................................................................................................................................... 7Detected Drives ............................................................................................................................................ 7Refreshing Information ............................................................................................................................... . 9 Selecting a Drive .......................................................................................................................................... 9
Viewing and Saving Drive Details .................................................................................................................... 10Viewing Basic Information .......................................................................................................................... 10Viewing Drive Performance and Optimization ............................................................................................. 12Viewing SMART Thresholds ........................................................................................................................ 13Saving Drive Debug Data ............................................................................................................................ 14
Removing a Drive (PCIe Drives Only) ............................................................................................................... 16Displaying SMART Attributes .......................................................................................................................... 17Performing a Firmware Update ....................................................................................................................... 19
Checking for Firmware Updates .................................................................................................................. 19Updating Firmware .................................................................................................................................... 20Manually Updating Firmware ..................................................................................................................... 21
Erasing a Drive ............................................................................................................................................... 22Performing a Sanitize Drive Operation ........................................................................................................ 22Performing a Format Drive Operation ........................................................................................................... 24Performing a PSID Revert Operation ..................................................................................................................................................... 25
Running PSID Revert .............................................................................................................................. 26Configuring Linux Systems to Perform a PSID Revert Operation ............................................................... 27
Enabling or Disabling Momentum Cache ........................................................................................................ 28Setting Over-Provisioning Capacity ................................................................................................................. 29
Enabling Over-Provisioning ........................................................................................................................ 29Disabling Over-Provisioning ....................................................................................................................... 30
Setting Flex Capacity ...................................................................................................................................... 31Setting Capacity ......................................................................................................................................... 31Returning to Native Drive Capacity ............................................................................................................. 32
Running Device Self-Test ................................................................................................................................ 33Managing Namespaces ................................................................................................................................... 34
Creating a Namespace ................................................................................................................................ 34Deleting a Namespace ................................................................................................................................ 35
Revision History ............................................................................................................................................. 36
Storage Executive User GuideIntroduction
2 Micron Technology, Inc. reserves the right to change products or specifications without notice.© 2020 Micron Technology, Inc. All rights reserved.
CCMTD-1725822587-5968storage_executive_user_guide.pdf - Rev. Q 06/20 EN

Installing and Starting Storage ExecutiveStorage Executive supports the SSDs listed below. Install Storage Executive on each sys-tem containing the SSD(s) you want to manage.
Table 1: System Requirements
Requirement Description
Micron SSD SATA SSDs:
• 5300 Series• 5210• 5200 Series• 5100 Series• 1300• 1100• M500• M500DC• M500IT• M510• M510DC• M550• M600• P400M
SAS SSDs:
• S610DC• S630DC• S650DC• S655DC
NVMe™ SSDs:
• 2100AI, 2100AT• 2200• 2210• 2300• 9300 Series• 9200 Series• 9100 Series• 7300 Series• 7100 Series
Operating system • Microsoft Windows Server® 2019
• Microsoft Windows Server 2016
• Windows Server 2012, 2012 R2
• Windows Server 2008 SP2 (x64), 2008 R2
• Windows® 10 (x86, x64)
• Windows 8.1, 8 (x86, x64)
• Windows 7 (x86, x64)
• Red Hat® Enterprise Linux® version 6.0 or later
• SUSE® Linux Enterprise Desktop 12, 11
• Ubuntu® Desktop 16.04, 18.04
• CentOS 7.x, 6.x, 5.x
Table 2: NVMe Driver Support
Driver Description
Micron Windows NVMe For all supported versions of Windows; supports all Storage Executive features
Inbox Microsoft Windows 10NVMe
For Windows 10; supports all Storage Executive features except:-Configure Power Management feature for an NVMe drive-Perform format namespace operation
Storage Executive User GuideInstalling and Starting Storage Executive
3 Micron Technology, Inc. reserves the right to change products or specifications without notice.© 2020 Micron Technology, Inc. All rights reserved.
CCMTD-1725822587-5968storage_executive_user_guide.pdf - Rev. Q 06/20 EN

Table 3: RAID Controller Support
RAID Controller Details
Avago MegaRAID Drives connected to MegaRAID controllers appear with the following device name, where Xindicates the ID of the MegaRAID controller and Y indicates the ID of the drive behind thecontroller: mraidX:Y
Installation
1. Download Storage Executive from micron.com.
2. Run the installation file:
• Windows: Storage-Executive-setup.exe• Linux: Storage-Executive-setup.run
3. Follow the instructions on the screen.
4. Click Finish when the installation completes.
Starting Storage Executive
In Windows:
1. Open the Windows Start menu.
2. Click All Programs > Micron Storage Executive > Micron Storage Executive.
In Linux:
1. Navigate to /opt/MicronTechnology/MicronStorageExecutive.
2. Run the following command: ./StorageExecutiveClient.run
When Storage Executive starts, the System Information screen appears (Figure 1 (page7)).
Stopping and Exiting Storage Executive
To stop and exit Storage Executive, click the X in the upper right window of the applica-tion.
Obtaining Help
For help or additional information while using Storage Executive, click the Help link.
To contact customer support, click the Support link and enter the requested informa-tion.
For a list of global SSD support websites, click the About link and select SSD SupportWebsite.
Updating Storage Executive
To view the version of Storage Executive installed on the system, click the About link.
Storage Executive User GuideInstalling and Starting Storage Executive
4 Micron Technology, Inc. reserves the right to change products or specifications without notice.© 2020 Micron Technology, Inc. All rights reserved.
CCMTD-1725822587-5968storage_executive_user_guide.pdf - Rev. Q 06/20 EN

When a new version of the software becomes available, a notice automatically appearsabove the management options.
Storage Executive User GuideInstalling and Starting Storage Executive
5 Micron Technology, Inc. reserves the right to change products or specifications without notice.© 2020 Micron Technology, Inc. All rights reserved.
CCMTD-1725822587-5968storage_executive_user_guide.pdf - Rev. Q 06/20 EN

Using Storage ExecutiveAt startup, Storage Executive detects all supported Micron SSDs installed in the systemas well as standard hard drives and third-party SSDs. The System Information screenappears and displays:
• Management options• System information• All detected drives and their status
Figure 1: System Information
Storage Executive User GuideUsing Storage Executive
6 Micron Technology, Inc. reserves the right to change products or specifications without notice.© 2020 Micron Technology, Inc. All rights reserved.
CCMTD-1725822587-5968storage_executive_user_guide.pdf - Rev. Q 06/20 EN

Management Options
Options for managing a drive appear on the left side of the screen. Options availablevary depending on the type and model of drive(s) installed in the system:
• System Information• Drive Details• SMART• Firmware Updates• Sanitize Drive• Format Drive
• PSID Revert• Momentum Cache• Flex Capacity• Over-Provisioning• Device Self-Test• Namespace Management
System InformationGeneral system information appears at the top of the screen:
• System details: hostname, IP address, and installed operating system.• Physical memory: amount of memory installed in the system.• Virtual memory: amount of virtual memory configured in the system.
Detected Drives
All drives installed in the system appear in the lower portion of the screen. Informationdisplayed depends on the type and model of drive(s) detected:
• Drive status: Overall status of the drive (Table 4).• Drive number and name: Name and number assigned to the drive. Click on the drive
number to view the drive's details.• Serial number: Manufacturing serial number of the drive.• Firmware availability: Indicates if a new version of firmware is available for the drive.
This information is not available for standard hard drives or third-party SSDs.• Current temperature: Current operating temperature of the drive as reported by the
SMART temperature attribute. This information is not available for standard harddrives or third-party SSDs.
• Drive capacity: Percentage of drive capacity used out of total capacity.• SMART button: Click to view the drive's Self-Monitoring, Analysis, and Reporting
Technology (SMART) attributes.
The order of the drives displayed on the screen is determined by the status of eachdrive. Drives with errors or warnings appear before drives that are functioning properly(with no errors).
Storage Executive User GuideUsing Storage Executive
7 Micron Technology, Inc. reserves the right to change products or specifications without notice.© 2020 Micron Technology, Inc. All rights reserved.
CCMTD-1725822587-5968storage_executive_user_guide.pdf - Rev. Q 06/20 EN

Table 4: Drive Status
Drive Status Description
Good Health
Drive is operating properly (no errors).
Busy
Drive is busy with an operation. This is a temporary stateand occurs when a long-running operation is in progress.
Sanitize In Progress
Sanitize drive operation is in progress.
Near TBW/Has Met TBW
Drive is nearing or has met its limit for total bytes written(TBW). The drive will continue to operate normally; howev-er, it is recommended to back up all drive data to an alter-nate storage device and replace the drive as soon as possi-ble.
Nearing Write Protect
Drive is approaching the end of its lifespan and will soonenter write protect (read-only) mode. It is recommended toback up all data to an alternate storage device and replacethe drive as soon as possible.
SMART Threshold Exceeded
One or more SMART threshold values has been exceeded onthe drive.
In Write Protect
Drive has reached the end of its lifespan and is in write pro-tect (read-only) mode. Any pending data should be saved toan alternate storage device and the drive replaced as soonas possible.
In Fault State
Drive is in a faulty state, which could result in unreliable be-havior (drive operations may fail or drive information mayno longer be available). Contact Micron support on theContact Support page.
Storage Executive User GuideUsing Storage Executive
8 Micron Technology, Inc. reserves the right to change products or specifications without notice.© 2020 Micron Technology, Inc. All rights reserved.
CCMTD-1725822587-5968storage_executive_user_guide.pdf - Rev. Q 06/20 EN

Refreshing Information
Click the Refresh icon in the upper right corner of the screen to refresh detected drivesand drive information:
Selecting a Drive
Select a drive using one of two methods:
• Click on a drive number to view the drive's details (Figure 2)• Click a management option and then select a drive to manage (Figure 3)
Figure 2: Selecting a Drive for Details
Storage Executive User GuideUsing Storage Executive
9 Micron Technology, Inc. reserves the right to change products or specifications without notice.© 2020 Micron Technology, Inc. All rights reserved.
CCMTD-1725822587-5968storage_executive_user_guide.pdf - Rev. Q 06/20 EN

Figure 3: Selecting a Drive to Manage
Viewing and Saving Drive DetailsThe Drive Details screen provides various information about a selected drive, including:
• Basic information such as capacity, interface, temperature, and driver versions• Performance and optimization information• SMART threshold alerts• Debug data including controller and OS information
Viewing Basic Information
1. Click a drive number on the System Information screen or click on theDrive Details menu and select a drive.
The drive’s details appear.
Storage Executive User GuideViewing and Saving Drive Details
10 Micron Technology, Inc. reserves the right to change products or specifications without notice.© 2020 Micron Technology, Inc. All rights reserved.
CCMTD-1725822587-5968storage_executive_user_guide.pdf - Rev. Q 06/20 EN
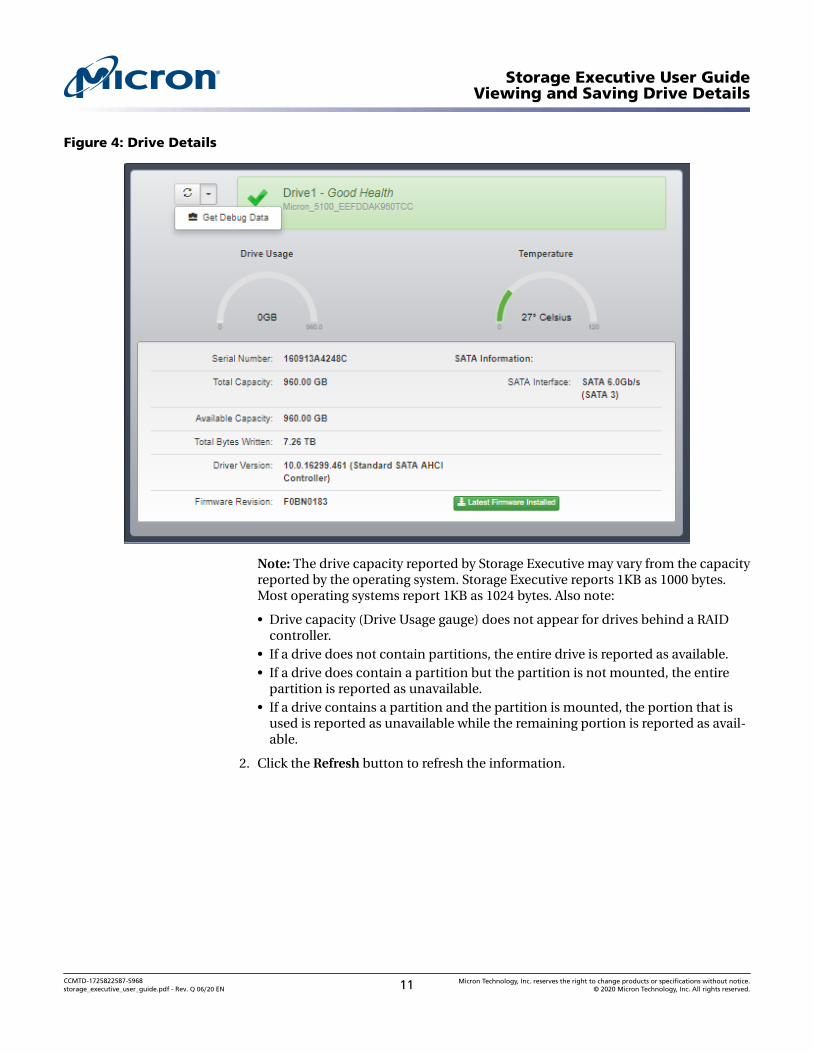
Figure 4: Drive Details
Note: The drive capacity reported by Storage Executive may vary from the capacityreported by the operating system. Storage Executive reports 1KB as 1000 bytes.Most operating systems report 1KB as 1024 bytes. Also note:
• Drive capacity (Drive Usage gauge) does not appear for drives behind a RAIDcontroller.
• If a drive does not contain partitions, the entire drive is reported as available.• If a drive does contain a partition but the partition is not mounted, the entire
partition is reported as unavailable.• If a drive contains a partition and the partition is mounted, the portion that is
used is reported as unavailable while the remaining portion is reported as avail-able.
2. Click the Refresh button to refresh the information.
Storage Executive User GuideViewing and Saving Drive Details
11 Micron Technology, Inc. reserves the right to change products or specifications without notice.© 2020 Micron Technology, Inc. All rights reserved.
CCMTD-1725822587-5968storage_executive_user_guide.pdf - Rev. Q 06/20 EN

Viewing Drive Performance and Optimization
If the selected drive can be optimized for performance, information appears at the topof the Drive Details screen describing what action(s) can be taken.
Note: This information varies and only appears if the selected drive is not meeting aperformance or optimization condition.
Figure 5: Performance and Optimization Information
Storage Executive User GuideViewing and Saving Drive Details
12 Micron Technology, Inc. reserves the right to change products or specifications without notice.© 2020 Micron Technology, Inc. All rights reserved.
CCMTD-1725822587-5968storage_executive_user_guide.pdf - Rev. Q 06/20 EN

Viewing SMART Thresholds
If the selected drive exceeds a SMART threshold, a warning appears at the top of theDrive Details screen with a list of SMART attributes.
Figure 6: Drive Details—SMART Threshold Exceeded
Storage Executive User GuideViewing and Saving Drive Details
13 Micron Technology, Inc. reserves the right to change products or specifications without notice.© 2020 Micron Technology, Inc. All rights reserved.
CCMTD-1725822587-5968storage_executive_user_guide.pdf - Rev. Q 06/20 EN

Saving Drive Debug Data
Drive debug data can be useful when contacting customer support. This informationincludes:
• Controller information (firmware logs, SMART data, and SMART logs)• Drive information (serial number, model number, firmware version, drive status, and
driver version)• OS information (memory usage, kernel version, system interrupts, and CPU informa-
tion)
1. Open the drop-down menu at the top of the Drive Details screen and select theGet Debug Data option.
Figure 7: Get Debug Data Option
The data is saved as a .zip file in the Storage Executive installation directory, as no-ted at the top of the Drive Details screen:
Figure 8: Debug Data
Storage Executive User GuideViewing and Saving Drive Details
14 Micron Technology, Inc. reserves the right to change products or specifications without notice.© 2020 Micron Technology, Inc. All rights reserved.
CCMTD-1725822587-5968storage_executive_user_guide.pdf - Rev. Q 06/20 EN

2. You can send the debug data to Micron support by clicking the Yes, I want to senddebug data button.
3. Click the Get Debug Data option multiple times to overwrite the .zip file with thelatest information.
Storage Executive User GuideViewing and Saving Drive Details
15 Micron Technology, Inc. reserves the right to change products or specifications without notice.© 2020 Micron Technology, Inc. All rights reserved.
CCMTD-1725822587-5968storage_executive_user_guide.pdf - Rev. Q 06/20 EN

Removing a Drive (PCIe Drives Only)This section describes how to use Storage Executive to prepare a drive for physical re-moval from the system.
Note: This option is available only with hot-swappable PCIe drives.
1. Click on the Drive Details menu and select a drive.
2. Click the drop-down menu at the top of the screen and select Prepare for Remov-al.
Figure 9: Prepare for Removal
Storage Executive User GuideRemoving a Drive (PCIe Drives Only)
16 Micron Technology, Inc. reserves the right to change products or specifications without notice.© 2020 Micron Technology, Inc. All rights reserved.
CCMTD-1725822587-5968storage_executive_user_guide.pdf - Rev. Q 06/20 EN

Displaying SMART AttributesThis section describes how to display the Self-Monitoring, Analysis, and ReportingTechnology (SMART) attributes of a Micron SSD. SMART is a monitoring frameworkused to detect and report various indicators of consistency and anticipate failures.
1. Click on the SMART menu and select a drive.
2. The standard SMART attributes and attribute IDs for the selected drive appear.
For a customer-specific list of SMART attribute details, see the Client SSD SMARTAttribute Reference Technical Note (TN-FD-22) available on micron.com, or con-tact your Micron customer representative.
If a drive exceeds a SMART attribute threshold, the status appears on the DriveDetails screen. See Figure 6 (page 14).
Storage Executive User GuideDisplaying SMART Attributes
17 Micron Technology, Inc. reserves the right to change products or specifications without notice.© 2020 Micron Technology, Inc. All rights reserved.
CCMTD-1725822587-5968storage_executive_user_guide.pdf - Rev. Q 06/20 EN

Figure 10: SMART Attributes
3. Click the Refresh button to refresh the drive’s SMART details.
Storage Executive User GuideDisplaying SMART Attributes
18 Micron Technology, Inc. reserves the right to change products or specifications without notice.© 2020 Micron Technology, Inc. All rights reserved.
CCMTD-1725822587-5968storage_executive_user_guide.pdf - Rev. Q 06/20 EN

Performing a Firmware UpdateThis section describes how to check for and perform firmware updates on supporteddrives.
Checking for Firmware Updates
To see if a firmware update is available, view the drive information on the System Infor-mation screen (Figure 11).
If your system has Internet access and is not behind a proxy server, Storage Executivedetects and automatically displays the status of a drive's firmware version: Latest Firm-ware Installed, New Firmware Available, Update Firmware, or Firmware Not Available.For some drives, a Check Firmware button is available to manually check the status. Forstandard hard drives or third-party SSDs, firmware update is not available.
Figure 11: System Information—Firmware Update Availability
Storage Executive User GuidePerforming a Firmware Update
19 Micron Technology, Inc. reserves the right to change products or specifications without notice.© 2020 Micron Technology, Inc. All rights reserved.
CCMTD-1725822587-5968storage_executive_user_guide.pdf - Rev. Q 06/20 EN

Systems Behind a Proxy Server
If your system is behind a proxy server, set the proxy server information (on the SystemInformation screen or the Firmware Update screen) to enable firmware update checks:
Figure 12: Set Proxy Settings
Updating Firmware
Before performing a firmware update, save all work and close any applications that maybe running. All drives in the system of the same model type are updated when you per-form this operation.
1. Click the Firmware Updates menu and select a drive.
2. Review the information on the screen.
Storage Executive User GuidePerforming a Firmware Update
20 Micron Technology, Inc. reserves the right to change products or specifications without notice.© 2020 Micron Technology, Inc. All rights reserved.
CCMTD-1725822587-5968storage_executive_user_guide.pdf - Rev. Q 06/20 EN

Figure 13: Update Firmware
3. Click Update Firmware Now.
During the update, Storage Executive runs in an ISO environment. A reboot oc-curs automatically after the firmware is installed (Windows systems only).
4. After the firmware is updated, verify the new version by viewing the drive's detailson the System Information screen.
Manually Updating Firmware
1. Download the latest firmware from micron.com.
2. Click the Choose File option and locate the firmware package file.
3. Click Update Firmware Now.
Storage Executive User GuidePerforming a Firmware Update
21 Micron Technology, Inc. reserves the right to change products or specifications without notice.© 2020 Micron Technology, Inc. All rights reserved.
CCMTD-1725822587-5968storage_executive_user_guide.pdf - Rev. Q 06/20 EN

Erasing a DriveThis section explains how to remove all data from a drive by performing a sanitize, Format drive or physical security ID (PSID) revert operation.
Performing a Sanitize Drive Operation
The sanitize drive operation is supported on all drives except for encrypted drives(those with TCG-enabled/password-protected). These drives must use the PSID revert operation to remove data. See Performing a PSID Revert Operation (page 26).
Also note:
• This operation runs on systems in AHCI mode. If your system is in IDE mode, changeto AHCI mode and then proceed.
• This operation cannot be performed on mounted drives. Unmount the drive beforeproceeding. See Unmounting Drives and Drive Partitions.
• This operation cannot be performed on drives connected behind a RAID controller.
CAUTION: This operation completely removes all data from a drive. If possible, back upimportant data to alternate storage media before performing the operation.
1. Click the Sanitize Drive menu and select a drive.
2. Review the information on the screen.
Figure 14: Sanitize Drive for non-NVMe drives
For NVMe drive Block Erase, Crypto Erase, or Overwrite can be selected.
Storage Executive User GuideErasing a Drive
22 Micron Technology, Inc. reserves the right to change products or specifications without notice.© 2020 Micron Technology, Inc. All rights reserved.
CCMTD-1725822587-5968storage_executive_user_guide.pdf - Rev. Q 06/20 EN

3. If the drive is mounted or contains mounted partitions, an option to take the drive offline and unmount all partitions appears. Click this option to continue with the operation.
4. Click Yes, sanitize drive and remove ALL data to perform the operation.
5. The operation starts. On Windows systems (boot drives only), the system reboots
during the sanitize drive process. No reboot occurs on Linux systems or on non-boot
drives in Windows systems.
When complete, all data from the drive is removed.
Storage Executive User GuideErasing a Drive
23 Micron Technology, Inc. reserves the right to change products or specifications without notice.© 2020 Micron Technology, Inc. All rights reserved.
Figure 15: Sanitize Drive for NVMe drives
CCMTD-1725822587-5968storage_executive_user_guide.pdf - Rev. Q 06/20 EN

4. Click Yes, Perform format to perform format operation on drive and removeall data.
5. The operation starts. When complete, all data from the drive is removed.
Storage Executive User GuideErasing a Drive
24 Micron Technology, Inc. reserves the right to change products or specifications without notice.© 2020 Micron Technology, Inc. All rights reserved.
Figure 16: Format Drive for NVMe drives
Performing a Format Drive Operation
The Format operation is used to low level format the NVM media. This may destroy all data and metadata associated with the specified namespace(s). This is used when the host wants to change the LBA data size and/or metadata size.
The format operation is supported on all drives except for encrypted drives (those with TCG-enabled/password-protected). These drives must use the PSID revert operation to remove data. See Performing a PSID Revert Operation (page 26).
This operation cannot be performed on mounted drives. Unmount the drive before proceeding. See Unmounting Drives and Drive Partitions.
1. Click the Format Drive menu and select a drive.
2. Select the namespace(s) and Format type to perform format operation
3. Review the information on the screen.
CCMTD-1725822587-5968storage_executive_user_guide.pdf - Rev. Q 06/20 EN

Performing a PSID Revert Operation
The PSID revert operation removes all data from an encrypted drive (one with TCG ena-bled/password-protected). It can also be used in the event you have an encrypted drivefor which you have lost the authentication code to return the drive to its factory defaultstate.
TCG is automatically enabled on drives that are initialized in systems runningWindows 8 or later, or it can be enabled with third-party software utilities. For more in-formation on TCG, refer to http://www.trustedcomputinggroup.org/.
To determine if TCG is enabled on your drive, view the Drive Details screen. Drives withTCG enabled appear with the following icon next to the drive number:
Figure 15: TCG-Enabled Drive
Before You Begin
Obtaining the PSID Code
The drive's PSID code is required to run this operation. The PSID code is located on thefront label of the drive (Figure 16). Obtain this code before proceeding.
Figure 16: PSID Code
Unmounting Drives and Drive Partitions
A PSID revert operation cannot be performed on mounted drives or drives with moun-ted partitions.
To unmount a drive in Linux, issue the unmount command.
To unmount a drive in Windows:
1. Open an administrator command prompt.
2. Run the following command: compmgmt.msc
3. Select Disk Management.
4. Right-click on the target drive and select Offline.
Storage Executive User GuideErasing a Drive
25 Micron Technology, Inc. reserves the right to change products or specifications without notice.© 2020 Micron Technology, Inc. All rights reserved.
CCMTD-1725822587-5968storage_executive_user_guide.pdf - Rev. Q 06/20 EN

Running PSID Revert
These instructions apply to both Windows and Linux systems. However, some configu-ration is required on Linux systems before performing this operation. See ConfiguringLinux Systems to Perform a PSID Revert Operation (page 27).
CAUTION: This operation completely removes all data from the drive and returns thedrive to its factory default state. If possible, back up important data to alternate mediabefore performing the operation.
1. Click the PSID Revert menu and select a drive.
2. Review the information on the screen.
Figure 17: PSID Revert
3. In the PSID field, enter the 32 character PSID code found on the front label of thedrive.
4. Click Yes, perform PSID Revert to perform the operation.
The operation begins and takes a few seconds to complete. When complete, aconfirmation message appears and all data is removed from the drive.
Storage Executive User GuideErasing a Drive
26 Micron Technology, Inc. reserves the right to change products or specifications without notice.© 2020 Micron Technology, Inc. All rights reserved.
CCMTD-1725822587-5968storage_executive_user_guide.pdf - Rev. Q 06/20 EN

Configuring Linux Systems to Perform a PSID Revert Operation
TCG commands must be enabled on a Linux system to run the PSID revert operation.By default, all TCG commands are disabled (blocked) by a Linux kernel. To enable TCGcommands, an additional kernel boot parameter (libata.allow_tpm=1) must be added.The steps to add a kernel boot parameter vary by Linux distribution. The following aregeneric steps for adding a kernel boot parameter using the boot loader GRUB:
1. As a root user, make a back-up copy of the grub.conf file:cp/boot/grub/grub.conf /boot/grub/grub.conf.backup
2. As a root user open: /boot/grub/grub.conf
3. Go to the kernel boot line (the line that begins with "kernel /vmlinuz").Some Linux distributions with multiple boot options have multiple kernel bootlines. In this case, you must determine the boot option that you would like to usefor performing the PSID revert operation and edit that menu option.
4. Append the following option to the line: libata.allow_tpm=1
5. Save changes to /boot/grub/grub.conf.
6. Reboot the system.
7. Perform the PSID revert operation following the instructions in Performing a PSIDRevert Operation (page 25).
8. As a root user, reinstate the backup copy of the grub.conf file:mv/boot/grub/grub.conf.back /boot/grub/grub.conf
9. Reboot the system.
Storage Executive User GuideErasing a Drive
27 Micron Technology, Inc. reserves the right to change products or specifications without notice.© 2020 Micron Technology, Inc. All rights reserved.
CCMTD-1725822587-5968storage_executive_user_guide.pdf - Rev. Q 06/20 EN

Enabling or Disabling Momentum CacheMomentum Cache is an intelligent software driver that dynamically leverages unusedsystem resources to enhance burst performance. This feature runs on supported drivescontaining a boot volume in Windows systems only. It is recommended to enable Mo-mentum Cache on your system's boot drive.
For more information on Momentum Cache, see the Enhancing Burst Performancewith Momentum Cache Technical Note (TN-FD-32) available on micron.com.
Before enabling or disabling this feature, save all work and shut down any running ap-plications.
1. Click the Momentum Cache menu.
2. Review the information on the screen.
Figure 18: Momentum Cache
3. Click the button next to a drive to enable or disable the Momentum Cache feature.
4. Confirm the operation when prompted.
5. The system reboots after the operation completes.
Storage Executive User GuideEnabling or Disabling Momentum Cache
28 Micron Technology, Inc. reserves the right to change products or specifications without notice.© 2020 Micron Technology, Inc. All rights reserved.
CCMTD-1725822587-5968storage_executive_user_guide.pdf - Rev. Q 06/20 EN

Setting Over-Provisioning CapacityOver-provisioning allocates a percentage of a drive's free space to improve performanceand endurance. The over-provisioning space becomes available exclusively to thedrive's controller, enabling the controller to use the space for various managementfunctions. This leaves less usable capacity, but results in improved performance and en-durance.
Requirements:
• Over-provisioning can be enabled on supported drives with NTFS file systems only.• A drive must have a partition to enable over-provisioning (the over-provisioning ca-
pacity is set on the last accessible partition).
Restrictions:
• Over-provisioning can be set on a RAW partition; however, it is not recommended asdamage to data can occur.
• Over-provisioning cannot be set on SAS drives.• Over-provisioning cannot be set on drives with the following configurations: USB-at-
tached, write-protect enabled, offline status, dynamic status, or security locked.
Enabling Over-Provisioning
1. Click the Over-Provisioning menu and select a drive.
2. Click Initiate Over-Provisioning.
Figure 19: Over-Provisioning
Storage Executive User GuideSetting Over-Provisioning Capacity
29 Micron Technology, Inc. reserves the right to change products or specifications without notice.© 2020 Micron Technology, Inc. All rights reserved.
CCMTD-1725822587-5968storage_executive_user_guide.pdf - Rev. Q 06/20 EN

3. To enable Storage Executive to automatically allocate the recommended amountof over-provisioning capacity, click the button next to Recommended. Theamount of over-provisioning capacity appears in the Custom field.
To allocate your own amount of over-provisioning capacity, do not select the but-ton. Simply enter the percentage amount (from 1–50%) in the Custom field.
4. Click Set OP.
5. Confirm the operation when prompted.
The over provisioning capacity is set immediately. No reboot is required.
Disabling Over-Provisioning
1. Click the Over-Provisioning menu and select a drive.
2. Click Initiate Over-Provisioning.
3. Click Clear OP.
Storage Executive User GuideSetting Over-Provisioning Capacity
CCMTD-1725822587-5968storage_executive_user_guide.pdf - Rev. P 1/20 EN 30 Micron Technology, Inc. reserves the right to change products or specifications without notice.
© 2020 Micron Technology, Inc. All rights reserved.

Setting Flex CapacityThe Flex Capacity feature allows you to change the capacity of a drive to help improvedrive endurance. This feature changes the user allocated space, which limits theamount of data that can be stored on the drive. The capacity you set appears as thedrive's new capacity in the OS; the remaining capacity becomes available to the drivefor the purpose of performing background activities, which can help extend drive life.
The new capacity can be as low as 1GB but cannot exceed the native maximum capacityof the drive.
This feature is available on supported drives only.
Important:
• All data is removed from the drive when you set the Flex Capacity.• Before performing this operation, backup your data and unmount any mounted par-
titions.• Do not turn off the system while the operation is in progress.
Setting Capacity
1. Click the Flex Capacity menu.
Storage Executive User GuideSetting Flex Capacity
31 Micron Technology, Inc. reserves the right to change products or specifications without notice.© 2020 Micron Technology, Inc. All rights reserved.
CCMTD-1725822587-5968storage_executive_user_guide.pdf - Rev. Q 06/20 EN

Figure 20: Setting Drive Capacity
2. Enter the new maximum capacity for the drive in the New Capacity field.
3. Click Set Drive Capacity.
4. After the operation completes, power cycle the system. (A reboot is not sufficient;a full power cycle is required.)
Returning to Native Drive Capacity
1. Click the Flex Capacity menu.
2. Click Reset to Native Max. Capacity.
Storage Executive User GuideSetting Flex Capacity
32 Micron Technology, Inc. reserves the right to change products or specifications without notice.© 2020 Micron Technology, Inc. All rights reserved.
CCMTD-1725822587-5968storage_executive_user_guide.pdf - Rev. Q 06/20 EN

Running Device Self-TestThe Device Self-Test feature allows you to test the health of the drive. The drive remainsoperational during testing and all data on the drive is preserved; however, performancemay be reduced during the test operation.
This feature is available on supported drives only.
1. Click the Device Self-Test menu.
Figure 21: Running the Device Self-Test
2. Select the type of test to run:
• Short Self-Test: performs a quick test of the drive.• Extended Self-Test: performs a more in-depth test of the drive, consisting of
reads and writes.
3. Click Run Self Test.
4. The test progress appears. When complete, the results of the test appear under thedrive name.
Storage Executive User GuideRunning Device Self-Test
33 Micron Technology, Inc. reserves the right to change products or specifications without notice.© 2020 Micron Technology, Inc. All rights reserved.
CCMTD-1725822587-5968storage_executive_user_guide.pdf - Rev. Q 06/20 EN

Managing NamespacesThe Namespace Management feature allows you to create or delete namespaces on asupported NVMe drive. A namespace is a collection of logical blocks with addresses thatrange from 0 to the size of the namespace. A namespace appears as a standard-blockdevice on which file systems and applications can be deployed without any modifica-tion.
Creating a Namespace
1. Click the Namespace Management menu and select a drive.
2. Click Create Namespace.
Figure 22: Namespace Management
3. In the Namespace Type field, select TLC or SLC.
If you select TLC, provide the namespace size in LBs. If you select SLC, provide thenamespace size in terms of percentage. Valid percentages are: 10, 20, 30, 40, 50,100.
4. Click Create.
Deleting a Namespace
1. Click the Namespace Management menu and select a drive.
2. Click Delete Namespace next to the namespace to be deleted.
3. Confirm the operation when prompted.
Storage Executive User GuideManaging Namespaces
34 Micron Technology, Inc. reserves the right to change products or specifications without notice.© 2020 Micron Technology, Inc. All rights reserved.
CCMTD-1725822587-5968storage_executive_user_guide.pdf - Rev. Q 06/20 EN

Rev. N – 7/19
Rev. M – 4/19
Rev. L – 11/18
Rev. K – 10/18
Rev. J – 8/18
Rev. I – 4/18
Rev. H – 10/17
• Added Format Namespace feature
• Added 2100AI, 2100AT SSDs• Added Namespace Management feature
• Updated for release 5.05• Added 5300, 7300 Series SSDs• Removed P1 SSD
• Added P1, 1300, 9300 Series SSDs
• Updated OS support information
• Updated for release 3.63• Added 2200 Series• Updated OS support information
• Updated for release 3.60• Updated operating system
requirements
• Updated for release 3.58• Added Device Self-Test feature• Updated Firmware Update feature
• Updated for release 3.56• Added 5210 and 5200 Series
• Updated for release 3.49• Added 9200 Series• Updated Flex Capacity information• Updated OS support information
Storage Executive User GuideRevision History
35 Micron Technology, Inc. reserves the right to change products or specifications without notice.© 2020 Micron Technology, Inc. All rights reserved.
Revision History
Rev. Q – 6/20
Rev. P – 12/16
Rev. O – 10/19
CCMTD-1725822587-5968storage_executive_user_guide.pdf - Rev. Q 06/20 EN
Rev. F – 8/16
Rev. E – 4/16
Rev. D – 10/15
Rev. C – 5/15
Rev. B – 2/15
Rev. A – 1/15
• Updated for release 3.38• Added 1100 and 5100 series support• Added RAID controller support• Added FlexCap feature• Updated Installing and Starting Storage Executive section
• Updated for release 3.34• Added NVMe support• Revised Viewing and Saving Drive Details and Performing a Firmware Update sec-
tions• Added Viewing Drive Performance and Optimization section• Added Removing a Drive section
• Updated for release 3.30
• Updated for release 3.24• Added support for M500IT and SAS drives, over-provisioning, and live firmware up-
dates
• Updated for release 3.20• Added support for P400m, Momentum Cache, SMART threshold exceeded drive
sta-tus
• Updated for release 3.17
• Initial release; version 3.15
8000 S. Federal Way, P.O. Box 6, Boise, ID 83707-0006, Tel: 208-368-4000www.micron.com/products/support Sales inquiries: 800-932-4992
Micron and the Micron logo are trademarks of Micron Technology, Inc.All other trademarks are the property of their respective owners.
Storage Executive User GuideRevision History
CCMTD-1725822587-5968storage_executive_user_guide.pdf - Rev. Q 06/20 EN 36 Micron Technology, Inc. reserves the right to change products or specifications without notice.
© 2020 Micron Technology, Inc. All rights reserved.
Rev. G – 12/16