Embed Size (px)
Citation preview

Hands-On LabsIntroduction To Workflow 4
Lab version: 1.0.0
Last updated: 5/5/2023

Contents
OVERVIEW................................................................................................................................................. 4
EXERCISE 1: HELLO WORKFLOW..........................................................................................................7Task 1 – Creating a Simple Hello Workflow Application......................................................................7
Exercise 1: Verification 10
EXERCISE 2: REFACTORING WORKFLOWS........................................................................................11Task 1 – Renaming Workflow1 to SayHello.......................................................................................11
Task 2 – Updating the Main Method to Use the New Name.............................................................13
Exercise 2: Verification 14
EXPLORE: XAML AND WORKFLOWS...................................................................................................14
EXERCISE 3: THE CODEACTIVITY........................................................................................................15Task 1 – Creating the SayHelloInCode Activity...................................................................................17
Task 2 – Updating Main to Call SayHelloInCode................................................................................17
Exercise 3: Verification 18
EXERCISE 4: DYNAMIC WORKFLOWS WITH XAML............................................................................19Task 1 – Modifying SayHello.xaml Files Properties............................................................................19
Task 2 – Modifying Main() to Load the SayHello.xaml File................................................................20
Exercise 4: Verification 21
EXERCISE 5: TESTING WORKFLOWS...................................................................................................22Task 1 – Creating the Unit Test Project..............................................................................................23
Task 2 – Creating the Test..................................................................................................................24
Task 3 – Getting the Application to Compile......................................................................................26
Task 4 – Seeing the Test Fail..............................................................................................................28
Task 5 – Making the Test Pass...........................................................................................................28
Exercise 5: Verification 30
EXERCISE 6: WORKFLOWAPPLICATION.............................................................................................31Task 1 – Writing The Test To Verify That The Workflow Thread ID Is Returned As An Out Argument...........................................................................................................................................................31
Task 2 – Returning the WorkflowThread as an Argument.................................................................33
Task 3 – Modifying Test to Use WorkflowApplication.......................................................................37
EXERCISE 7: ADDING IF/ELSE LOGIC..................................................................................................41Task 1 – Writing the Test for a New Requirement.............................................................................41
Task 2 – Implementing the New Requirement in the Workflow........................................................43
Exercise 7: Verification 47
EXERCISE 8: ERROR HANDLING..........................................................................................................48Task 1 – Writing a Test to Observe Error Behavior............................................................................48
Task 2 – Adding the Try/Catch Activity to the Workflow...................................................................50
Exercise 8: Verification 53
EXERCISE 9: ACTIVITY DESIGNERS.....................................................................................................54Task 1- Create a Custom NativeActivity.............................................................................................54
Task 2 – Create the Activity Designer................................................................................................58
Task 3 – Link the Activity Designer to the Activity.............................................................................61
Exercise 9: Verification 62
EXERCISE 10: HOSTED DESIGNER.......................................................................................................65Task 1 – Add new WPF Application....................................................................................................65
Exercise 10: Verification 72
SUMMARY................................................................................................................................................ 73
Overview
Welcome to Windows Workflow Foundation 4 (WF) Microsoft's programming model, engine and tools for quickly building workflow-enabled applications. This release of WF in .NET Framework 4 changes several development paradigms from previous versions: Workflows are now easier to create, execute, and maintain, and implement a host of new functionality.
In this lab you will get to know the basics of creating, hosting and running a workflow. This lab is also intended to be an introduction to the new workflow authoring constructs in the .NET Framework 4 and Visual Studio 2010, including the new Workflow Designer, expressions, variables and arguments. Additionally, you will explore the use of some basic built-in activities.
In the first exercise, you will be creating a workflow application that prints a hello message in a console window. The workflow of the application will be constructed both using the designer and XAML, and also using C# or Visual Basic code.
In the second exercise, you will add conditional logic to the workflow by using an If activity to print a different hello message depending on a custom condition. Finally, in the third exercise you will learn about error handling in running workflows by using exception-handling activities.
Additionally, across this lab you will be using the "write the test first" approach, which primarily consists on first writing a test for the new feature being added and then implementing the necessary code to make the test pass.
Objectives
In this Hands-On Lab, you will learn:
How to create a sequential workflow using the designer and XAML or, alternatively, using plain C# or Visual Basic code
How to run and test the sequential workflow using the WorkflowApplication and WorkflowInvoker classes
How to pass InArguments and receive OutArguments from a workflow
How Expressions and Variables are used
How to use the WriteLine, If, TryCatch, Catch<T> and Throw activities
How to load and run an activity from a .xaml file
How to create an activity designer
How to host the WorkflowDesigner in your own application
System Requirements
You must have the following items to complete this lab:
Microsoft Visual Studio 2010 Beta 2
Microsoft .NET Framework 4 Beta 2
Setup
All the requisites for this lab are verified using the Dependency Checker. To make sure that everything is correctly configured, follow these steps:
Note: To perform the setup steps you need to run the scripts in a command window with administrator privileges.
1. Run the Dependency checker for the Training Kit if you haven't done it previously. To do this, run the CheckDependencies.cmd script located under the %TrainingKitInstallationFolder%\Labs\IntroToWF\Setup folder. Install any pre-requisites that are missing (rescanning if necessary) and complete the wizard.
Note: For convenience, much of the code you will be managing along this lab is available as Visual Studio code snippets. The CheckDependencies.cmd file launches the Visual Studio installer file that installs the code snippets. If you cannot find the snippets when you write the solutions, make sure you installed the code snippets inside Visual Studio 2010 Code Snippets Repository.
Exercises
This Hands-On Lab comprises the following exercises:
1. Hello Workflow
2. Refactoring Workflow
3. The CodeActivity
4. Dynamic Workflows with XAML
5. Testing Workflows
6. WorkflowApplication
7. Adding If/Else Logic
8. Error Handling
9. Activity Designers
10. Hosted Designer
Starting Materials
This Hands-On Lab includes the following starting materials.
Visual Studio solutions. Depending on the exercise you will find Visual Studio solutions for C# and Visual Basic that you can use as starting point for the exercises.
What if I get stuck?
The source code that accompanies this hands-on lab includes an end folder where you can find a Visual Studio solution with the code that you would obtain if you complete the steps in each exercise. You can use this solution as a guide if you need additional help working through the exercises.
Remember to build the solutions before opening any file using the workflow designer.
Exercise 1: Hello Workflow
Workflows are a way to execute a business process. Each step in that process is implemented by an Activity.
In this exercise, you will create and test a simple “Hello World” business process using Windows Workflow Foundation 4.
Task 1 – Creating a Simple Hello Workflow Application
In this task you will create a very simple workflow that will be the equivalent to this code:
C#
private static void SayHello(){ Console.WriteLine("Hello Workflow 4");}
Visual Basic
Private Shared Sub SayHello() Console.WriteLine("Hello Workflow 4")End Sub
1. Start Microsoft Visual Studio 2010 from Start | All Programs | Microsoft Visual Studio 2010.
2. Create a new project in Visual Studio 2010 of type Workflow Console Application (under the Workflow project type) in either the Visual C# or Visual Basic projects Templates list. Ensure .NET Framework 4 is selected as the target runtime, and name it HelloWorkflow. Name the solution Begin, set the desired location, and click OK.

Figure 1Creating a new Workflow Console Application (C#)
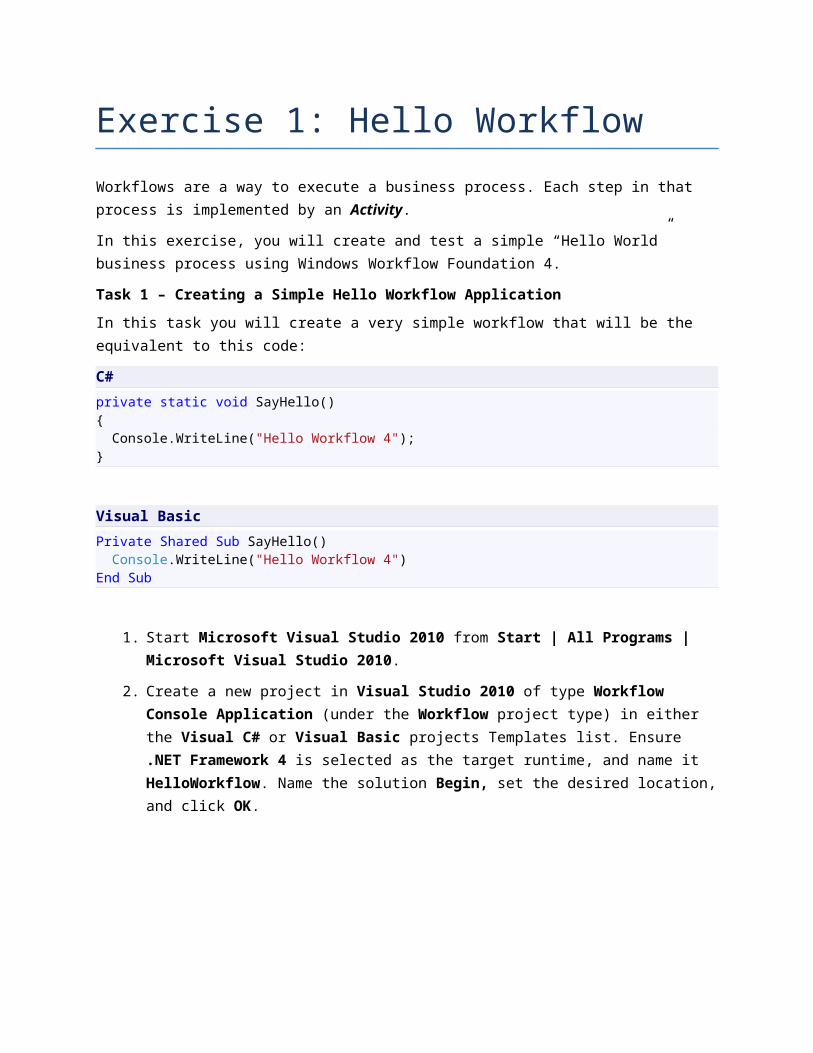
Figure 2Creating a new Workflow Console Application (Visual Basic)
3. Since your business process is a 1 step process, you can simply add a WriteLine activity to implement the process. From the Toolbox, drag a WriteLine activity and drop it on the design surface.
Figure 5Adding a WriteLine activity
Note: If the Toolbox window is not visible, select Toolbox from the View menu.

4. Set the WriteLine Text property to "Hello Workflow 4".
Figure 6Setting the Text property
WriteLine Activity
The WriteLine activity is a simple activity that will display a message on the console. The text property is an Expression which could be the result of calling a function or evaluating the property of an object. In this case, the expression is a literal string so you must quote the string.
Next Steps
Exercise 1: Verification
Exercise 1: Verification
1. Press CTRL+F5 to build and run the workflow without debugging. The application should run in a console window and print the message “Hello Workflow 4”.
Figure 3The completed HelloWorkflow application
Next Steps
Exercise 2: Refactoring Workflows

Exercise 2: Refactoring Workflows
Note: In this exercise you will refactor the solution created in exercise 1. If you have not completed exercise 1, you can use the solution provided by the Lab. In %TrainingKitInstallFolder%\Labs\IntroToWF\Source\Ex2-RefactoringWorkflow\Begin folder, you will find the begin solution for C# and Visual Basic.
Even though you have a working application, you might want to make a few improvements. In this exercise, as Workflow1 is not a very descriptive name, you will change it to SayHello.
Task 1 – Renaming Workflow1 to SayHello
1. To change the name of the workflow defined in Workflow1.xaml, Open it with the workflow designer and click on an empty area the designer surface. This will allow you to change the properties of the workflow.
Figure 4Click on an empty area of the designer surface so you can set the name of the workflow
2. In the Properties window, set the Name property of the Workflow to HelloWorkflow.SayHello (C#) or SayHello (VB)
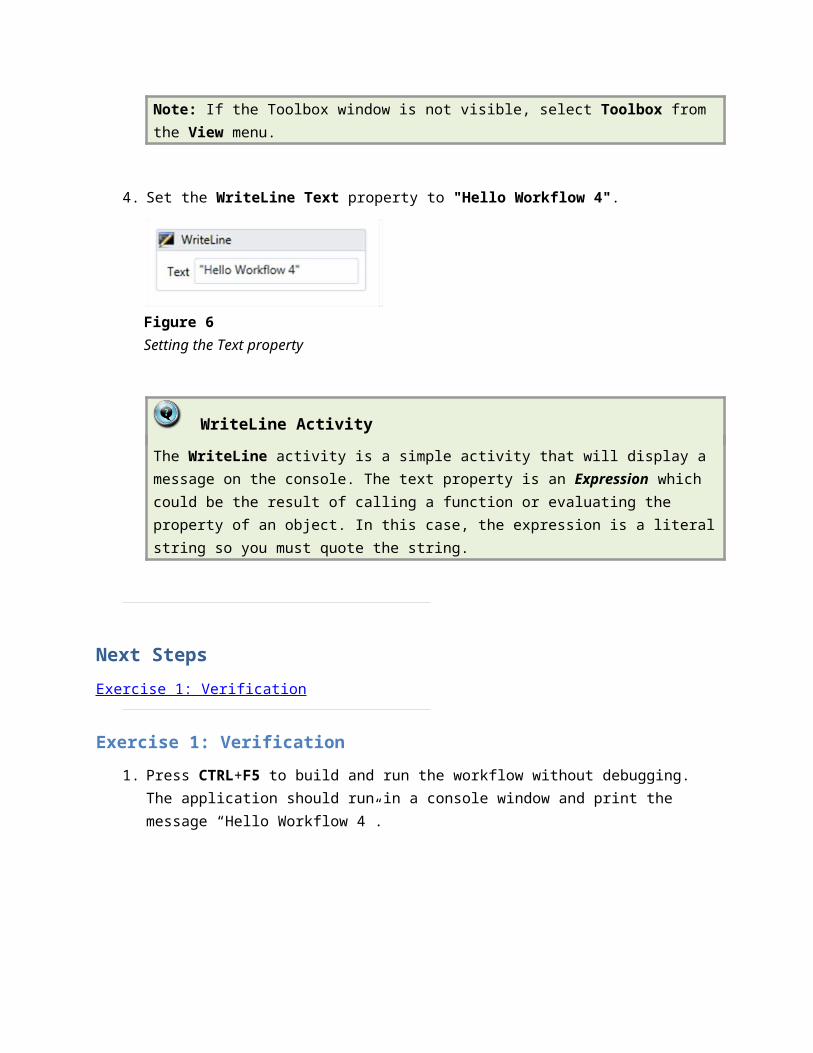
Figure 5Set the Name property of the workflow (C#)
Figure 6Set the Name property of the workflow (VB)
3. While it is not required, it is a good idea for the name of the .xaml file to match the name of the activity contained in it. In Solution Explorer, right-click Workflow1.xaml, select Rename and type SayHello.xaml.
Watch Out
When you rename C# or Visual Basic files, Visual Studio asks you if you want refactoring to change the name of the class also. It does not do this when renaming XAML files, so if you want to change the name of the workflow also you need to do this manually.
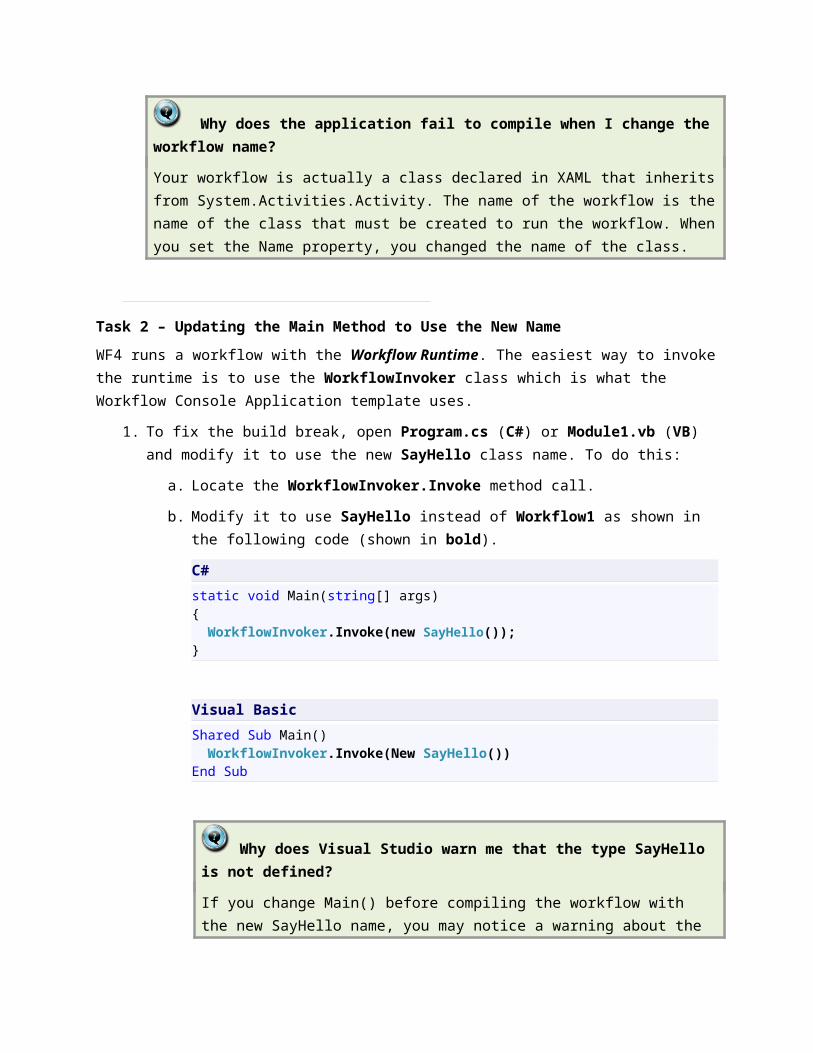
4. Press CTRL+SHIFT+B to build the solution. It will fail to compile because you changed the name of the workflow.
Figure 7
The workflow fails to compile (C#)
Figure 8The workflow fails to compile (VB)
Why does the application fail to compile when I change the workflow name?
Your workflow is actually a class declared in XAML that inherits from System.Activities.Activity. The name of the workflow is the name of the class that must be created to run the workflow. When you set the Name property, you changed the name of the class.
Task 2 – Updating the Main Method to Use the New Name
WF4 runs a workflow with the Workflow Runtime. The easiest way to invoke the runtime is to use the WorkflowInvoker class which is what the Workflow Console Application template uses.
1. To fix the build break, open Program.cs (C#) or Module1.vb (VB) and modify it to use the new SayHello class name. To do this:
a. Locate the WorkflowInvoker.Invoke method call.
b. Modify it to use SayHello instead of Workflow1 as shown in the following code (shown in bold).
C#
static void Main(string[] args){ WorkflowInvoker.Invoke(new SayHello());}
Visual Basic
Shared Sub Main() WorkflowInvoker.Invoke(New SayHello())End Sub

Why does Visual Studio warn me that the type SayHello is not defined?
If you change Main() before compiling the workflow with the new SayHello name, you may notice a warning about the type SayHello not being defined. The reason for this is that Visual Studio is not aware of types declared in XAML until you build the solution.
Next Steps
Exercise 2: Verification
Exercise 2: Verification
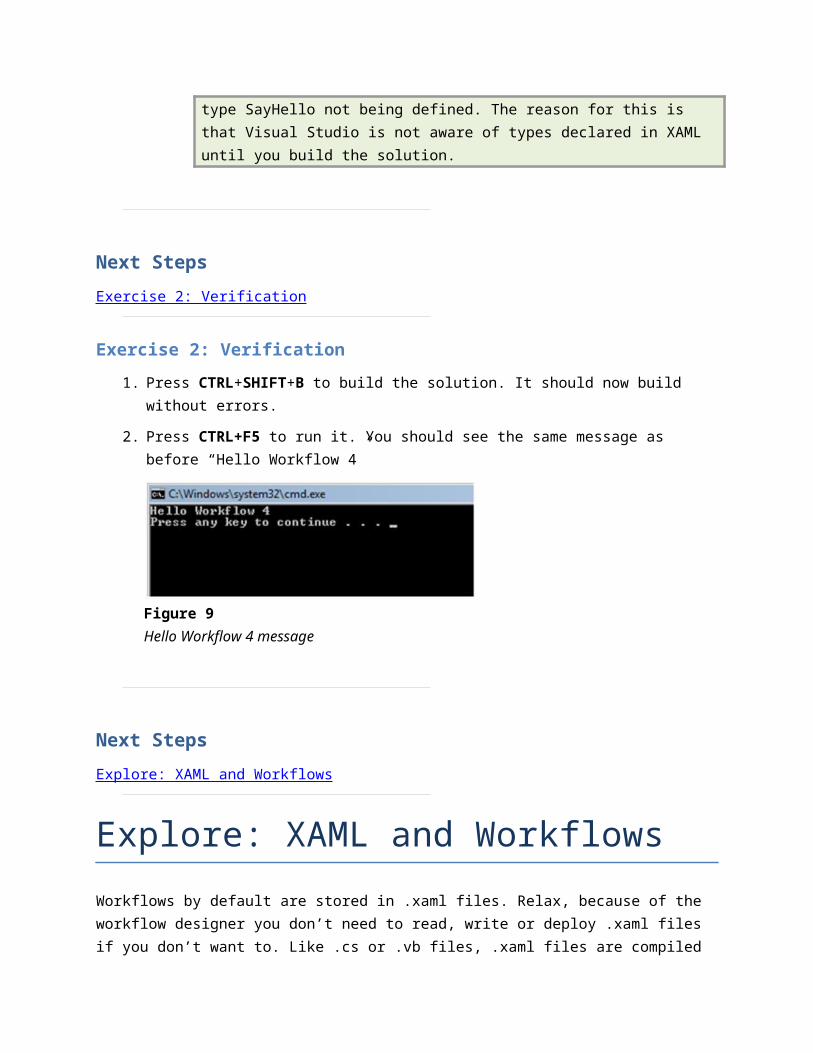
1. Press CTRL+SHIFT+B to build the solution. It should now build without errors.
2. Press CTRL+F5 to run it. You should see the same message as before “Hello Workflow 4”
Figure 9Hello Workflow 4 message
Next Steps
Explore: XAML and Workflows
Explore: XAML and Workflows
Workflows by default are stored in .xaml files. Relax, because of the workflow designer you don’t need to read, write or deploy .xaml files if you don’t want to. Like .cs or .vb files, .xaml files are compiled and the types declared in them are included in the assembly that your project creates.
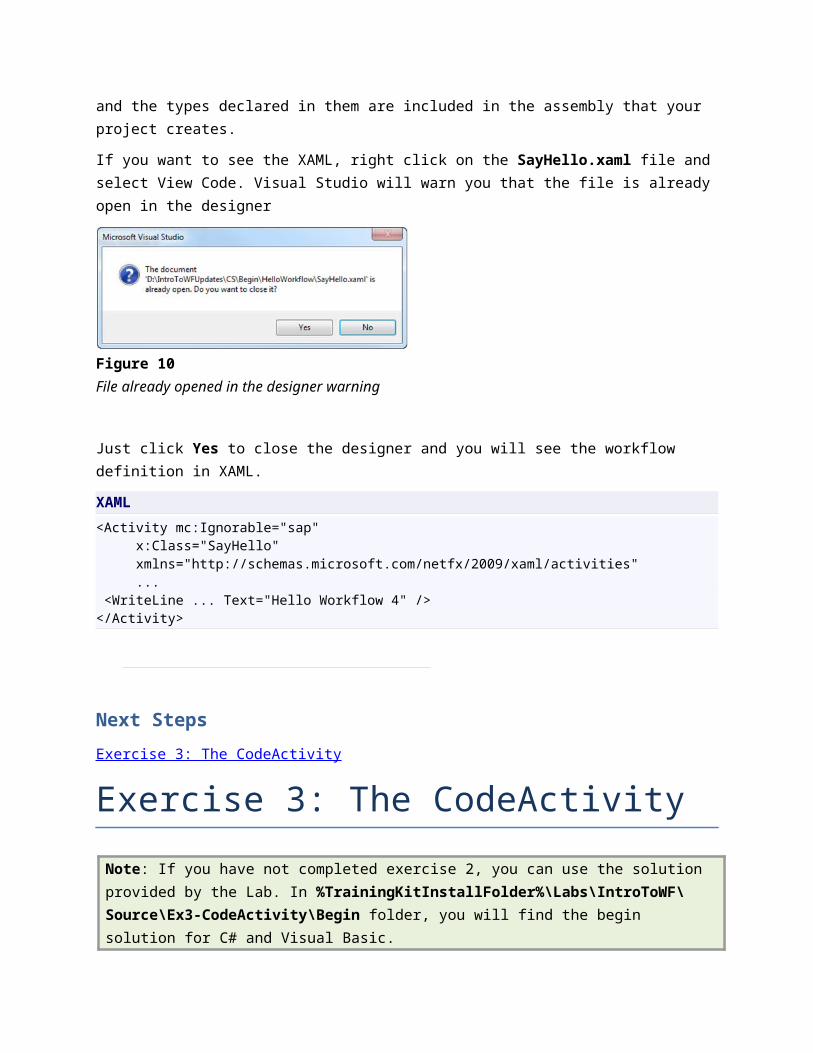
If you want to see the XAML, right click on the SayHello.xaml file and select View Code. Visual Studio will warn you that the file is already open in the designer
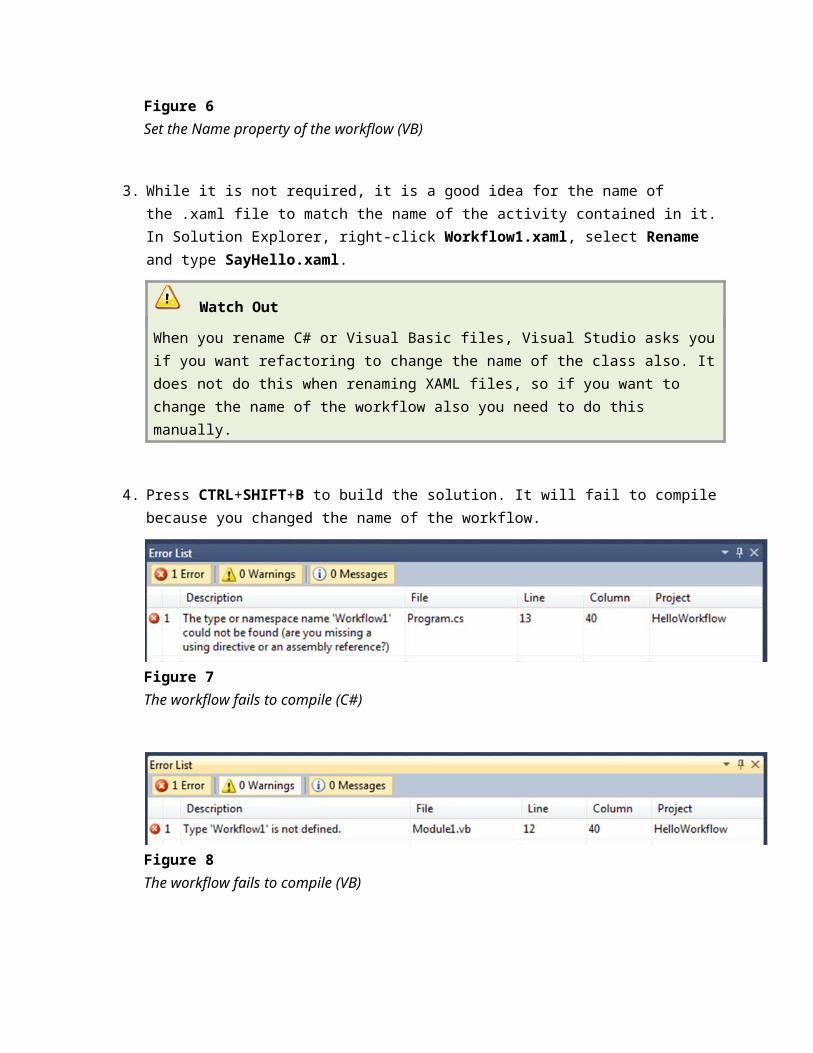
Figure 10File already opened in the designer warning
Just click Yes to close the designer and you will see the workflow definition in XAML.
XAML
<Activity mc:Ignorable="sap" x:Class="SayHello" xmlns="http://schemas.microsoft.com/netfx/2009/xaml/activities" ... <WriteLine ... Text="Hello Workflow 4" /></Activity>
Next Steps
Exercise 3: The CodeActivity
Exercise 3: The CodeActivity
Note: If you have not completed exercise 2, you can use the solution provided by the Lab. In %TrainingKitInstallFolder%\Labs\IntroToWF\Source\Ex3-CodeActivity\Begin folder, you will find the begin solution for C# and Visual Basic.
As you have seen so far, WF4 consists of a designer that edits .xaml files and a runtime that invokes activities. When you author a workflow, you are creating a new kind of activity and because activities are just classes that inherit from System.Activities.Activity or one of its subclasses, you can declare workflows using C#, VB or XAML. In this exercise, you will implement your “greeting” business process by creating an activity in C# or VB.
Activities implement a business process. Some activities will implement the process by invoking other activities. For example, your SayHello activity didn’t actually write text to the console but instead used the WriteLine activity to do the work. You could have implemented the same SayHello activity in C# or
VB by inheriting from System.Activities.Activity and overriding the Implementation property as you see in the following examples:
C#
public class SayHelloActivity : Activity{ public override Func<Activity> Implementation { get { // Return a Lambda expression // that creates an implementation for // the activity return () => { return new WriteLine() { Text = "Hello Workflow 4" }; }; } }}
Visual Basic
Public Class SayHelloActivity Inherits Activity Public Overrides Property Implementation As System.Func(Of Activity) Get ' Return a function that ' creates an implementation for ' the activity Return Function() Return New WriteLine() With {.Text = "Hello Workflow 4"} End Function End Get Set(ByVal value As System.Func(Of Activity)) MyBase.Implementation = value End Set End PropertyEnd Class
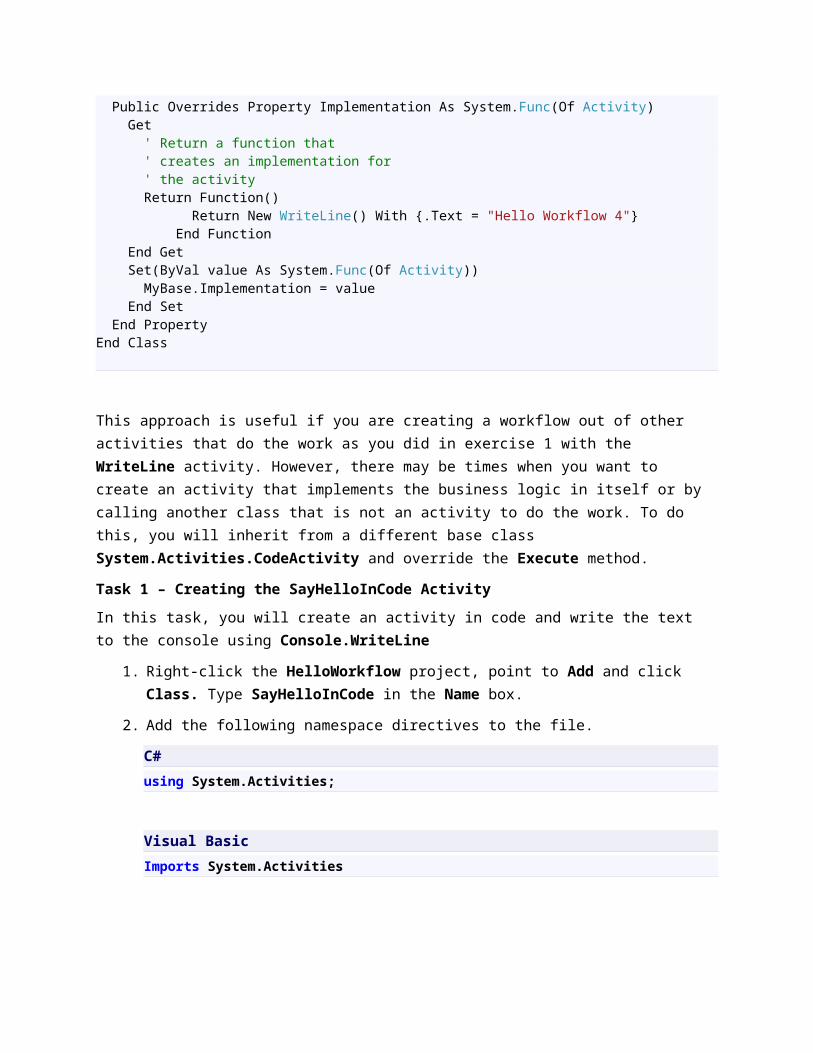
This approach is useful if you are creating a workflow out of other activities that do the work as you did in exercise 1 with the WriteLine activity. However, there may be times when you want to create an activity that implements the business logic in itself or by calling another class that is not an activity to do
the work. To do this, you will inherit from a different base class System.Activities.CodeActivity and override the Execute method.
Task 1 – Creating the SayHelloInCode Activity
In this task, you will create an activity in code and write the text to the console using Console.WriteLine
1. Right-click the HelloWorkflow project, point to Add and click Class. Type SayHelloInCode in the Name box.
2. Add the following namespace directives to the file.
C#
using System.Activities;
Visual Basic
Imports System.Activities
3. CodeActivity is an abstract class. That means that when you inherit from it, you must override the Execute method. This is the place where you will do the work of your activity. Replace the default implementation of the class with the following code.
(Code Snippet - Introduction to WF Lab - SayHelloInCode Class CSharp)
C#public class SayHelloInCode : CodeActivity{ protected override void Execute(CodeActivityContext context) { Console.WriteLine("Hello Workflow 4 in code"); }}
(Code Snippet - Introduction to WF Lab - SayHelloInCode Class VB)
Visual Basic
Public Class SayHelloInCode Inherits CodeActivity Protected Overrides Sub Execute(ByVal context As CodeActivityContext) Console.WriteLine("Hello Workflow 4 in code") End SubEnd Class
Task 2 – Updating Main to Call SayHelloInCode
1. Change Program.cs (C#) or Module1.vb (Visual Basic) to use the new SayHelloInCode class. To do this, locate the WorkflowInvoker.Invoke method code, and replace it with the following code:
C#
static void Main(string[] args){ WorkflowInvoker.Invoke(new SayHelloInCode());}
Visual Basic
Shared Sub Main(ByVal args() As String) WorkflowInvoker.Invoke(New SayHelloInCode()) End Sub
Next Steps
Exercise 3: Verification
Exercise 3: Verification
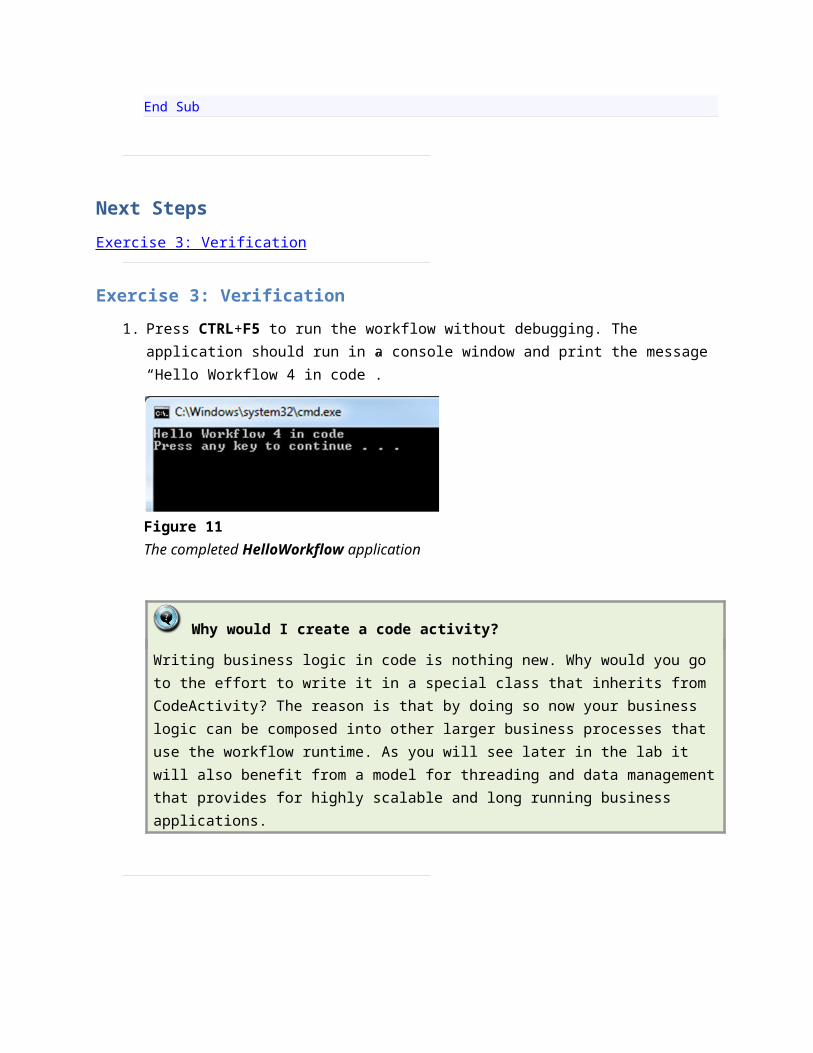
1. Press CTRL+F5 to run the workflow without debugging. The application should run in a console window and print the message “Hello Workflow 4 in code”.
Figure 11The completed HelloWorkflow application
Why would I create a code activity?
Writing business logic in code is nothing new. Why would you go to the effort to write it in a special class that inherits from CodeActivity? The reason is that by doing so now your business logic can be composed into other larger business processes that use the workflow runtime. As

you will see later in the lab it will also benefit from a model for threading and data management that provides for highly scalable and long running business applications.
Next Steps
Exercise 4: Dynamic Workflows with XAML
Exercise 4: Dynamic Workflows with XAML
Note: If you have not completed exercise 3, you can use the solution provided by the Lab. In %TrainingKitInstallFolder%\Labs\IntroToWF\Source\Ex4-DynamicWorkflows\Begin folder, you will find the begin solution for C# and Visual Basic.
Up to this point you have been authoring workflows in .xaml, .cs or .vb files. These files then get compiled into types that are included in the assembly of the project and run by the workflow runtime.
While it might look like the format of the source files does not matter, .xaml files offer some distinct advantages over authoring workflows in C# or VB.
The Workflow Designer works with .xaml files only, workflows authored in C# or VB have no designer support.
XAML can be loaded and run dynamically without compiling it into an assembly
Dynamic workflows provide some interesting possibilities for programs that want to generate business logic or make a runtime decision on which business logic to load and run.
Task 1 – Modifying SayHello.xaml Files Properties
In this task you will modify the HellowWorkflow program to load and run the SayHello.xaml file. Then you will modify the text of SayHello.xaml and observe the change in the message the next time you run the application.
1. You need to tell Visual Studio to treat SayHello.xaml as content that must be deployed rather than code that must be built. To do this
a. In Solution Explorer select SayHello.xaml
b. In the Properties windows, set the build action to Content
c. Set the Copy To Output file property on SayHello.xaml to Copy if newer
d. Set the Custom Tool to blank
Figure 12Change the properties of SayHello.xaml to treat it as content
Task 2 – Modifying Main() to Load the SayHello.xaml File
Previously your class was compiled into a type. To invoke a workflow from a .xaml file you will need to use ActivityXamlServices to load the .xaml file into memory and create an instance of System.Activities.DynamicActivity that WorkflowInvoker can invoke. Keep in mind that any assemblies that your .xaml file references must be available when the workflow is invoked.
1. Add the following namespace directives to the file.
C#
using System.Activities.XamlIntegration;
Visual Basic
Imports System.Activities.XamlIntegration
2. Modify program.cs to use ActivityXamlServices and also add a call to Console.ReadKey this will make it easier to see what is happening with your app when running it from Windows Explorer. To do this, replace the Main method implementation with the following code:
C#
static void Main(string[] args){ WorkflowInvoker.Invoke(ActivityXamlServices.Load("SayHello.xaml")); Console.ReadKey(false);}

Visual Basic
Shared Sub Main() WorkflowInvoker.Invoke(ActivityXamlServices.Load("SayHello.xaml")) Console.ReadKey(False)End Sub
Next Steps
Exercise 4: Verification
Exercise 4: Verification
In this verification you will run the HelloWorld application, then modify the SayHello.xaml file and see if the new text appears in the console window.
1. Press CTRL+F5 to run the workflow without debugging. The application should run in a console window and print the message “Hello Workflow 4”.
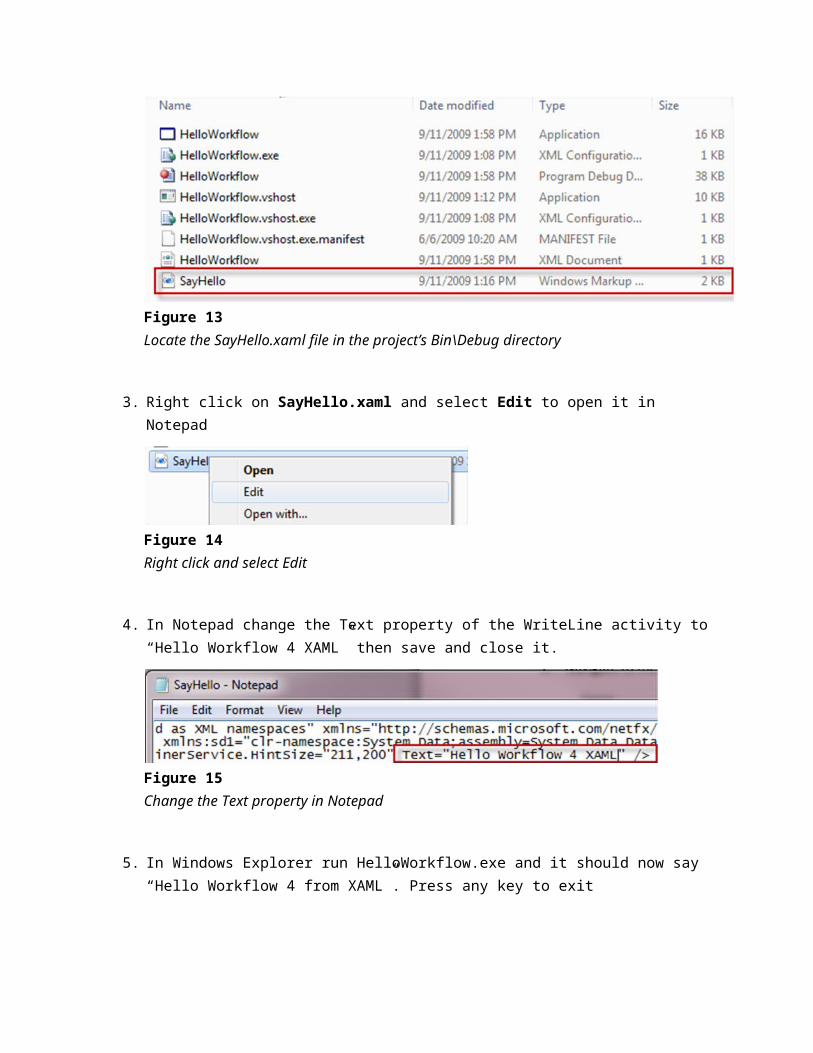
2. Navigate to the Bin\Debug directory under your project folder and locate SayHello.xaml.
Figure 13Locate the SayHello.xaml file in the project’s Bin\Debug directory
3. Right click on SayHello.xaml and select Edit to open it in Notepad
Figure 14Right click and select Edit
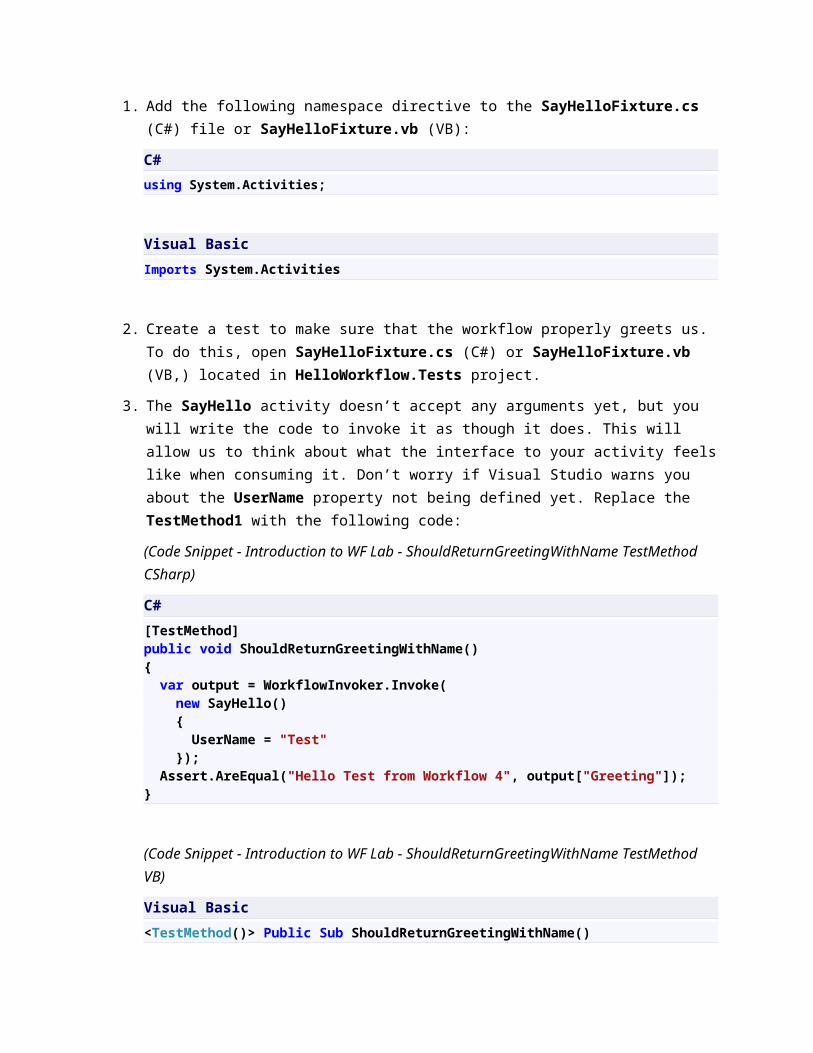
4. In Notepad change the Text property of the WriteLine activity to “Hello Workflow 4 XAML” then save and close it.
Figure 15Change the Text property in Notepad
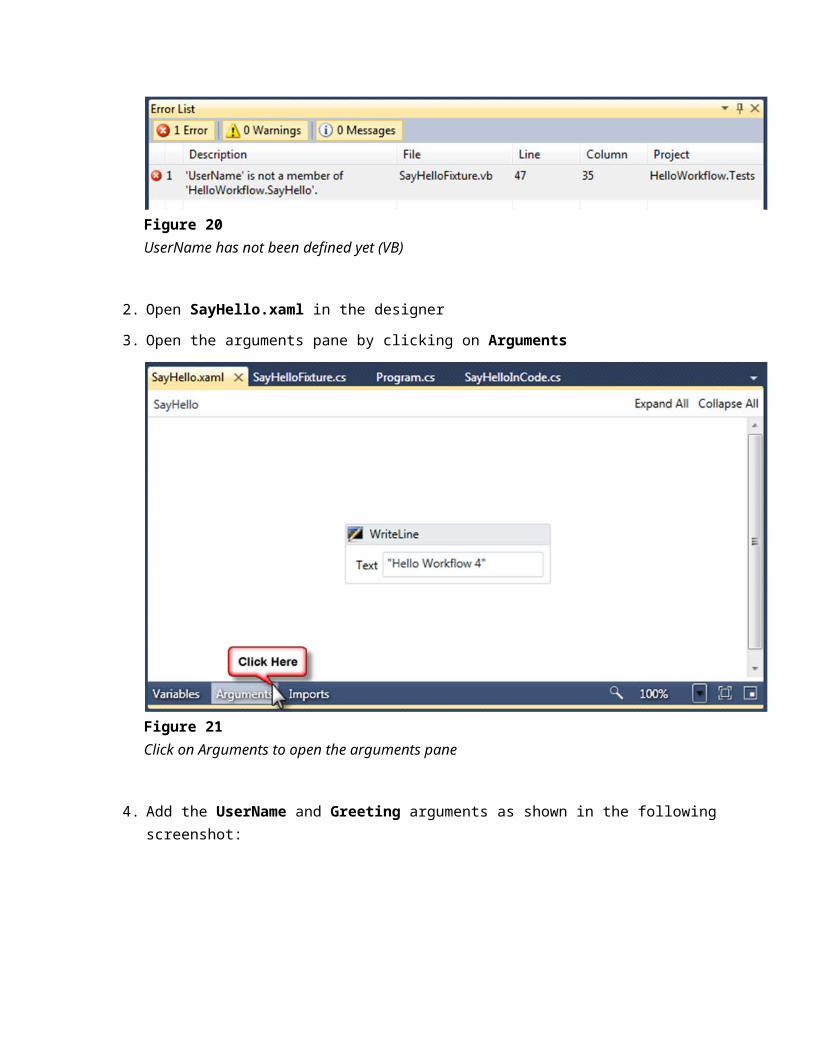
5. In Windows Explorer run HelloWorkflow.exe and it should now say “Hello Workflow 4 from XAML”. Press any key to exit
Figure 16HelloWorkflow.exe showing a new message from the .xaml file
Next Steps
Exercise 5: Testing Workflows
Exercise 5: Testing Workflows
Up to this point the application is not very interesting. It is only working in a console and does not receive any input arguments. Most applications that do meaningful work will have to deal with input and output arguments. Additionally, the application is not easily tested in its current form.
In this task, you will modify the SayHello activity to use arguments and prepare it to be useful in other non-console application environments by returning a greeting rather than writing directly to the Console with the WriteLine activity. You will be doing this using the "write the test first" approach. First you will create a test that fails and then add the necessary code to make it pass.
The resulting application will be the equivalent of the following code.
C#
private static string SayHello(string name){ return "Hello " + name + " from Workflow 4";}
Visual Basic
Private Shared Function SayHello(ByVal name As String) As String Return "Hello " & name & " from Workflow 4"End Function
Task 1 – Creating the Unit Test Project
1. Open the Begin solution located under %TrainingKitInstallFolder%\Labs\IntroToWF\Source\Ex5-TestingWorkflows\Begin folder. Alternatively, you can continue with the end solution of exercise 3.
2. To begin with, create a unit test for the workflow to ensure that it behaves as it should. In Solution Explorer, right-click the Begin solution and point to Add and click New Project. In the Add New Project dialog box, select the Test Project under the Test project type in either the Visual C# or Visual Basic project Templates list and enter HelloWorkflow.Tests as the project Name. Leave the location by default.
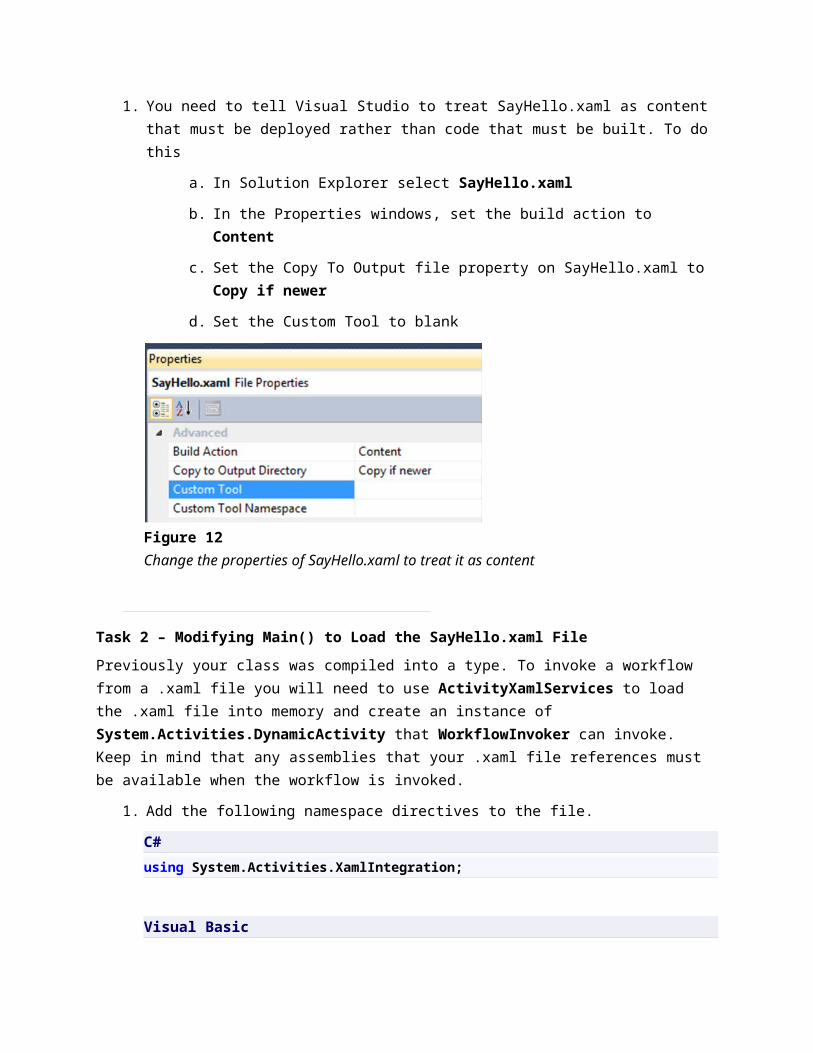
Figure 17Adding a new Test Project to the solution (C#)
Figure 18Adding a new Test Project to the solution (Visual Basic)
3. Right-click the HelloWorkflow.Tests project and click Add Reference. Using the Projects tab, add a project reference to the HelloWorkflow project. Repeat these steps, using the .NET tab instead to add a reference to the System.Activities library.
4. Right-click UnitTest1.cs (C#) or UnitTest1.vb (VB), click Rename and change its name to SayHelloFixture.cs (C#) or SayHelloFixture.vb (VB). When prompted to rename the UnitTest1 class select Yes.
Task 2 – Creating the Test
In this task you will create the test before you actually implement the behavior in the activity.
1. Add the following namespace directive to the SayHelloFixture.cs (C#) file or SayHelloFixture.vb (VB):
C#
using System.Activities;

Visual Basic
Imports System.Activities
2. Create a test to make sure that the workflow properly greets us. To do this, open SayHelloFixture.cs (C#) or SayHelloFixture.vb (VB,) located in HelloWorkflow.Tests project.
3. The SayHello activity doesn’t accept any arguments yet, but you will write the code to invoke it as though it does. This will allow us to think about what the interface to your activity feels like when consuming it. Don’t worry if Visual Studio warns you about the UserName property not being defined yet. Replace the TestMethod1 with the following code:
(Code Snippet - Introduction to WF Lab - ShouldReturnGreetingWithName TestMethod CSharp)
C#
[TestMethod]public void ShouldReturnGreetingWithName(){ var output = WorkflowInvoker.Invoke( new SayHello() { UserName = "Test" }); Assert.AreEqual("Hello Test from Workflow 4", output["Greeting"]);}
(Code Snippet - Introduction to WF Lab - ShouldReturnGreetingWithName TestMethod VB)
Visual Basic
<TestMethod()> Public Sub ShouldReturnGreetingWithName() Dim output = WorkflowInvoker.Invoke( _ New SayHello() With {.UserName = "Test"}) Assert.AreEqual("Hello Test from Workflow 4", output("Greeting"))End Sub
How do I pass arguments to an activity?
You can create the activity and initialize the arguments (which are public properties) using object initialization or you can pass a Dictionary<string, object> (C#) or Dictionary(Of String, Object) (VB) of input parameters that map to the names of the input arguments of the activity.
How do I get data from output?
The output variable is an IDictionary<string, object> (C#) or IDictionary(Of String, Object) (VB) that contains a map of output variables using the name of the variable as the key.
Task 3 – Getting the Application to Compile
The interface to your Activity (in terms of input and output arguments) looks good but your application doesn’t compile. Your first goal is to get the app into a state where it will compile.
1. Press CTRL+SHIFT+B to build the application it should fail with a compile error
Figure 19UserName has not been defined yet (C#)
Figure 20UserName has not been defined yet (VB)
2. Open SayHello.xaml in the designer
3. Open the arguments pane by clicking on Arguments
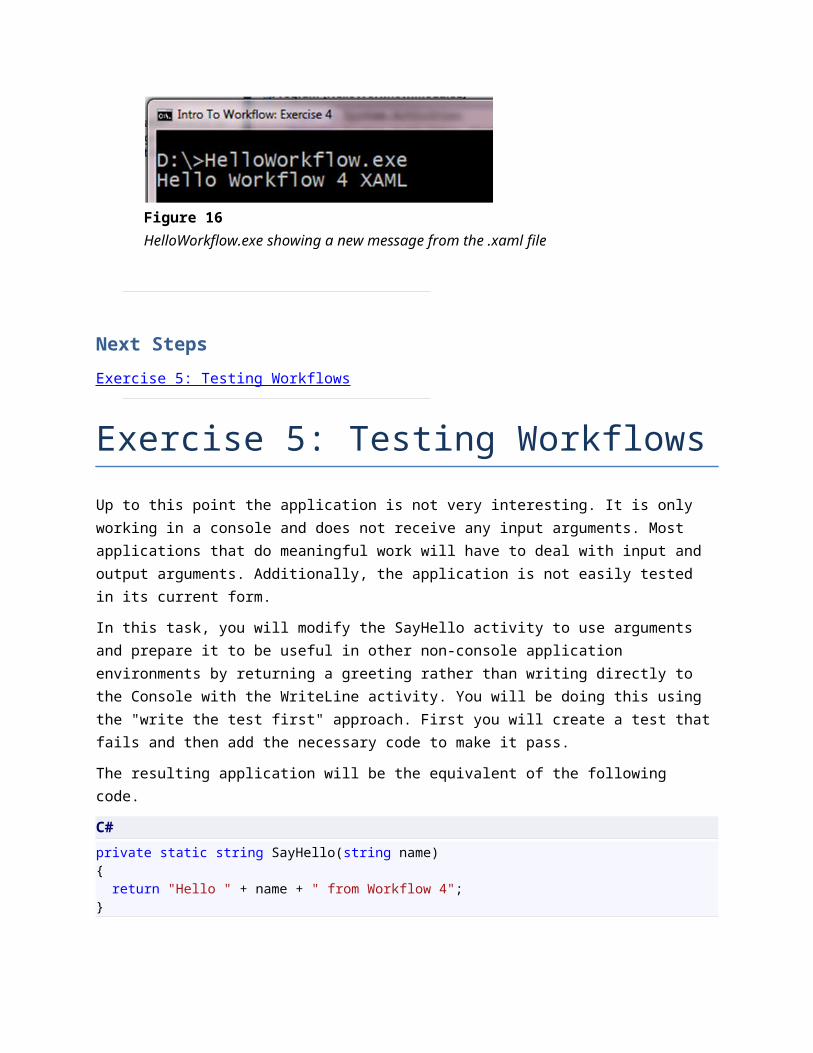
Figure 21Click on Arguments to open the arguments pane
4. Add the UserName and Greeting arguments as shown in the following screenshot:
Figure 22Declare the arguments to the activity
Arguments
In Windows Workflow Foundation (WF), arguments represent the flow of data into and out of an activity. An activity has a set of arguments and they make up the signature of the activity. Each argument has a specified direction: input, output, or input/output.
5. Press CTRL+SHIFT+B to build the solution, it should now build without errors.

Task 4 – Seeing the Test Fail
It is important to see your test fail because it is possible that you have a bug in your test that would cause it to always succeed. In this task you will insure that your test does indeed fail.
1. Open the SayHelloTestFixture.cs (C#) or SayHelloTestFixture.vb (VB) file.
2. Press CTRL+R, T to run the unit tests in the current context. The test will run but it will fail, because the activity is not returning anything in the Greeting out argument.
Figure 23ShouldReturnGreetingwithName test
Task 5 – Making the Test Pass
Now that you know your test is working, you need to do the simplest possible thing you can to make the test pass.
1. Writing text to the console with WriteLine isn’t going to make the test pass so delete the WriteLine activity by right clicking on it and selecting Delete ( ).
2. You need to set the value of the Greeting out argument. To do this, drag an Assign activity from the Toolbox and drop it onto the designer surface.
Figure 24Drag an Assign activity to the design surface
3. Set the To property to Greeting
Figure 25

Type Greeting in the left box
4. You could type the greeting expression into the design surface but since your expression is longer, use the properties window. Click the button to the right of the Value property to open the expression editor
Figure 26Click the button to the right of the Value property
5. In the expression editor, you can enter longer expressions. Set the expression to "Hello " & UserName & " from Workflow 4"
Figure 27The Assign activity that sets the Greeting argument
6. Press CTRL+SHIFT+B to build the solution, it should compile without errors.
Next Steps
Exercise 5: Verification
Exercise 5: Verification
Now you are ready to run the test and see if your activity passes the test
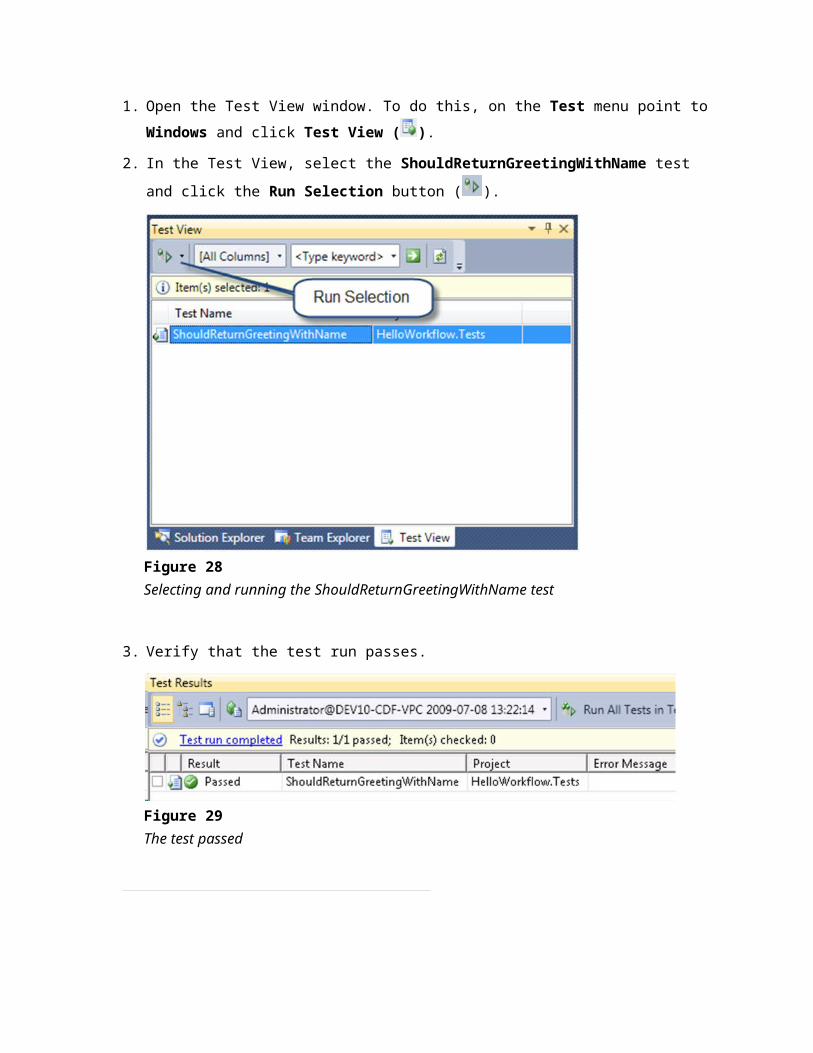
1. Open the Test View window. To do this, on the Test menu point to Windows and click Test
View ( ).
2. In the Test View, select the ShouldReturnGreetingWithName test and click the Run Selection
button ( ).
Figure 28Selecting and running the ShouldReturnGreetingWithName test
3. Verify that the test run passes.
Figure 29The test passed

Next Steps
Exercise 6: WorkflowApplication
Exercise 6: WorkflowApplication
Note: If you have not completed exercise 5, you can use the solution provided by the Lab. In %TrainingKitInstallFolder%\Labs\IntroToWF\Source\Ex6-WorkflowApplication\Begin folder, you will find the begin solution for C# and Visual Basic.
To this point in the labs you have focused on creating an activity and invoking it in the simplest way possible with the WorkflowInvoker class. The WorkflowInvoker.Invoke method is simple because it is synchronous and invokes the workflow on the same thread as the caller.
Another way to invoke a workflow is with the WorkflowApplication class. This class allows you to run a workflow on a separate thread and to supply delegates that will be invoked when the workflow completes, goes idle, terminates or has an unhandled exception. This allows you to create multi-threaded server or client programs more easily than you can without workflow.
In this exercise you will modify the host application to run your SayHello activity with WorkflowApplication and observe the threading behavior. Therefore you now have two requirements for your workflow:
1. Return a personalized greeting
2. Return a non-zero Int32 value containing the managed thread ID that the workflow was invoked on
Using the “write the test first” approach you will begin by writing a test that verifies your new requirement for the workflow thread ID.
Task 1 – Writing The Test To Verify That The Workflow Thread ID Is Returned As An Out Argument
In this task you will create a test that verifies that the workflow returns a non-zero integer in the output arguments named WorkflowThread.
1. Open SayHelloFixture.cs and add the following namespace directives
C#
using System.Threading;using System.Diagnostics;
Visual Basic
Imports System.Threading
2. Add the ShouldReturnWorkflowThread test as shown
(Code Snippet - Introduction to WF Lab - ShouldReturnWorkflowThread TestMethod CSharp)
C#
/// <summary>/// Verifies that the workflow returns an Out Argument/// Name: WorkflowThread/// Type: Int32/// Value: Non-Zero/// </summary>[TestMethod]public void ShouldReturnWorkflowThread(){ var output = WorkflowInvoker.Invoke( new SayHello() { UserName = "Test" });
Assert.IsTrue(output.ContainsKey("WorkflowThread"), "SayHello must contain an OutArgument named WorkflowThread");
// Don't know for sure what it is yet var outarg = output["WorkflowThread"];
Assert.IsInstanceOfType(outarg, typeof(Int32), "WorkflowThread must be of type Int32");
Assert.AreNotEqual(0, outarg, "WorkflowThread must not be zero");
Debug.WriteLine("Test thread is " + Thread.CurrentThread.ManagedThreadId); Debug.WriteLine("Workflow thread is " + outarg.ToString());}
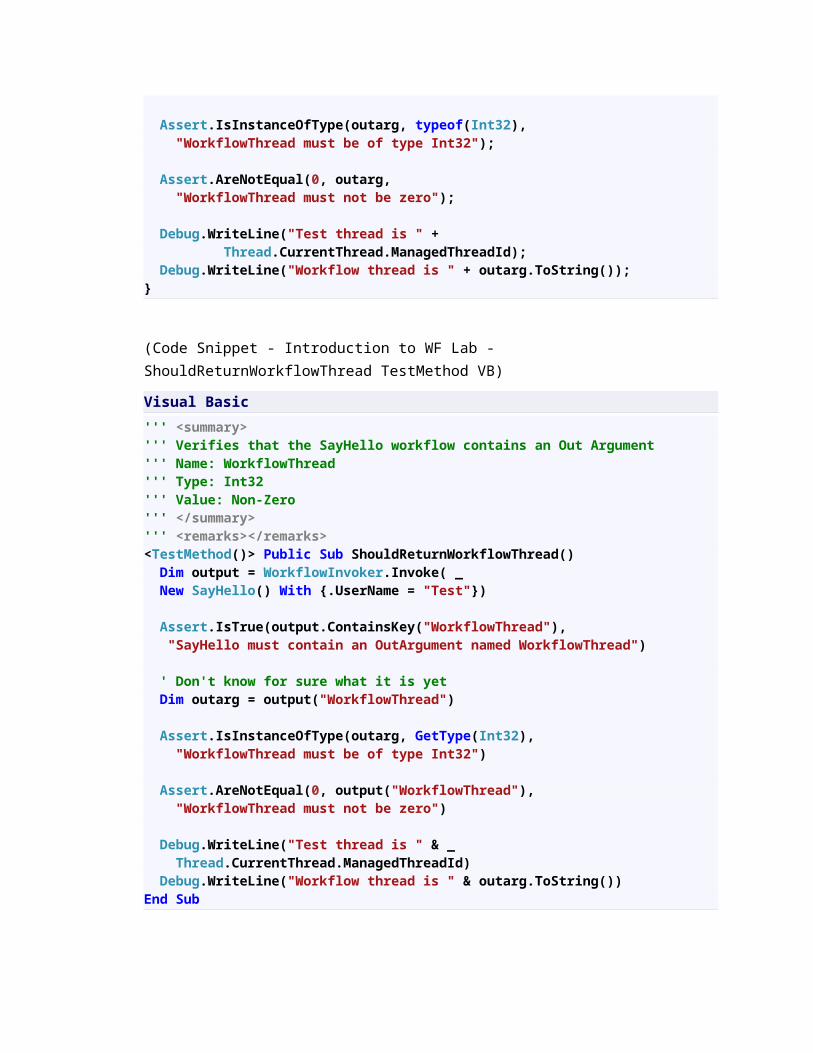
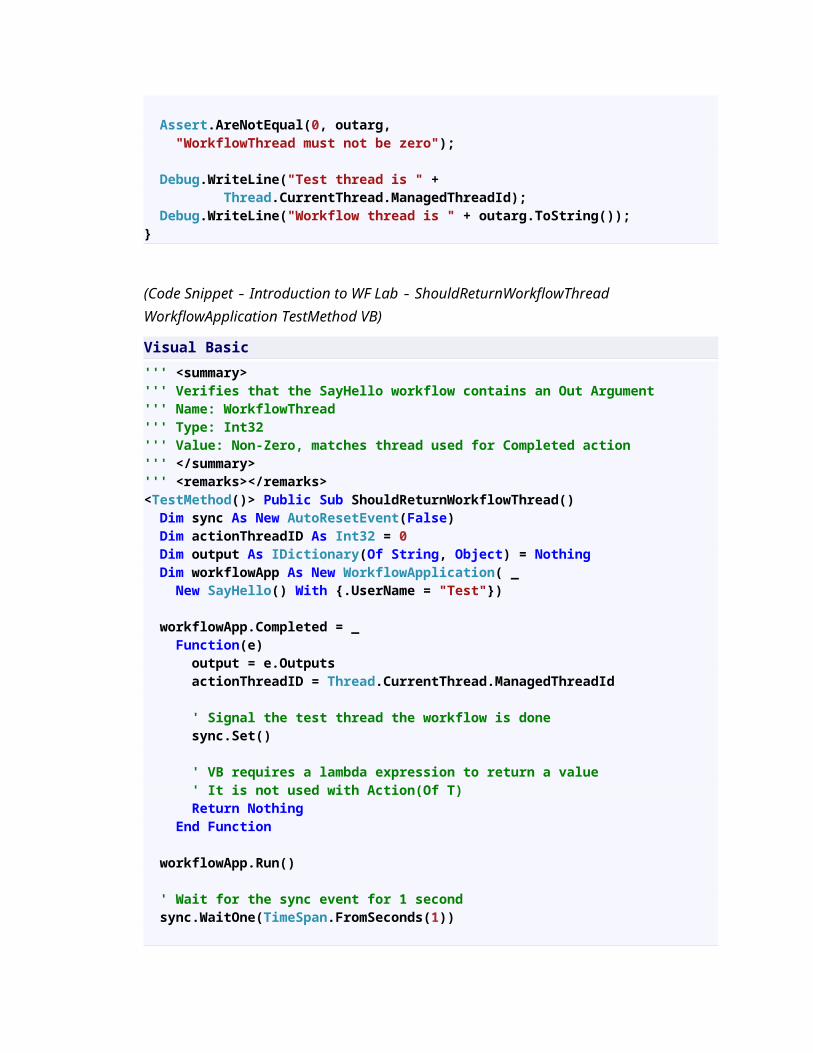
(Code Snippet - Introduction to WF Lab - ShouldReturnWorkflowThread TestMethod VB)
Visual Basic
''' <summary>''' Verifies that the SayHello workflow contains an Out Argument''' Name: WorkflowThread''' Type: Int32''' Value: Non-Zero

''' </summary>''' <remarks></remarks><TestMethod()> Public Sub ShouldReturnWorkflowThread() Dim output = WorkflowInvoker.Invoke( _ New SayHello() With {.UserName = "Test"})
Assert.IsTrue(output.ContainsKey("WorkflowThread"), "SayHello must contain an OutArgument named WorkflowThread")
' Don't know for sure what it is yet Dim outarg = output("WorkflowThread")
Assert.IsInstanceOfType(outarg, GetType(Int32), "WorkflowThread must be of type Int32")
Assert.AreNotEqual(0, output("WorkflowThread"), "WorkflowThread must not be zero")
Debug.WriteLine("Test thread is " & _ Thread.CurrentThread.ManagedThreadId) Debug.WriteLine("Workflow thread is " & outarg.ToString())End Sub
3. Press CTRL + SHIFT + B to rebuild the application.
4. Press CTRL+R, T to run all tests in the current context. You should see the test fail because you have not added the WorkflowThread out argument yet.
Figure 30One test passes, one test fails because you have no WorkflowThread argument
Task 2 – Returning the WorkflowThread as an Argument
Now that you have a test to verify the behavior, you need modify your workflow to make the test pass.
1. Add an Out argument named WorkflowThread of type Int32

Figure 31Add the WorkflowThread Out argument
Until now your workflow has been just one activity. But now you need two activities, one to assign the greeting and another to assign the workflow thread. You need to modify the workflow to use an activity that will contain the two assign activities and there are several activities you could choose from to do this, but let’s begin with the simplest one, the Sequence activity.
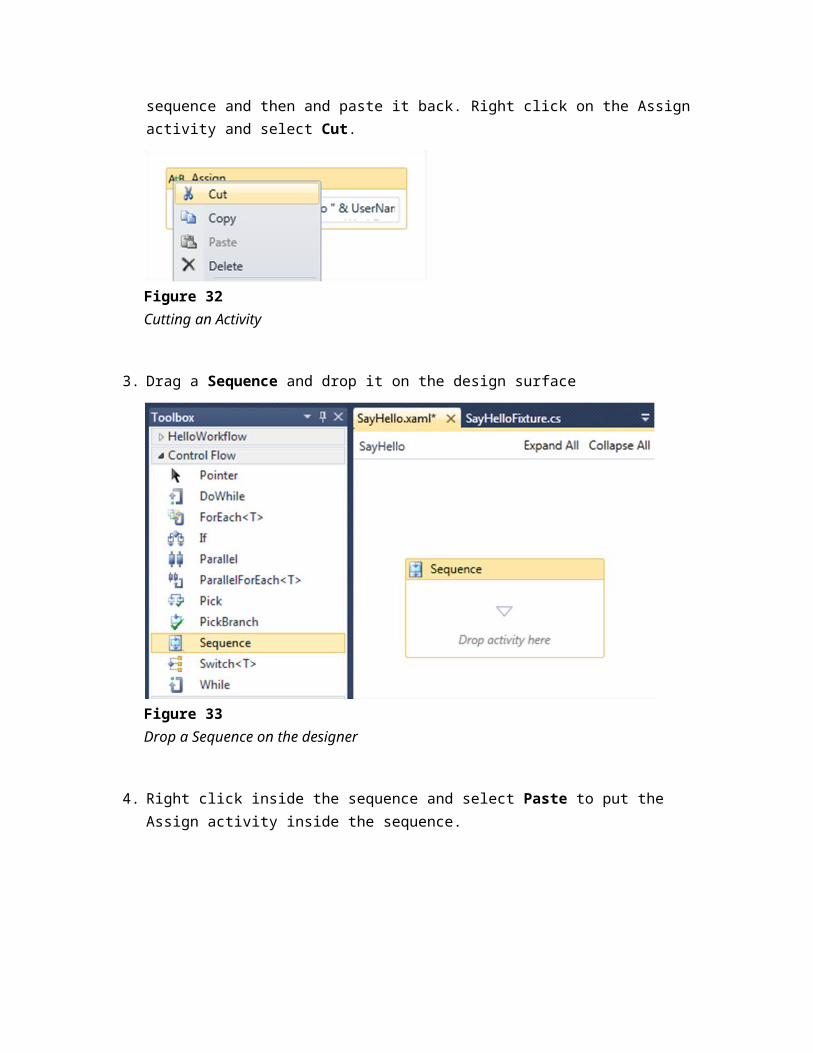
2. You cannot drop a sequence on the designer until you remove the Assign activity that is already there. You will use this assign activity inside the sequence so you need to cut it, drop the sequence and then and paste it back. Right click on the Assign activity and select Cut.
Figure 32Cutting an Activity
3. Drag a Sequence and drop it on the design surface
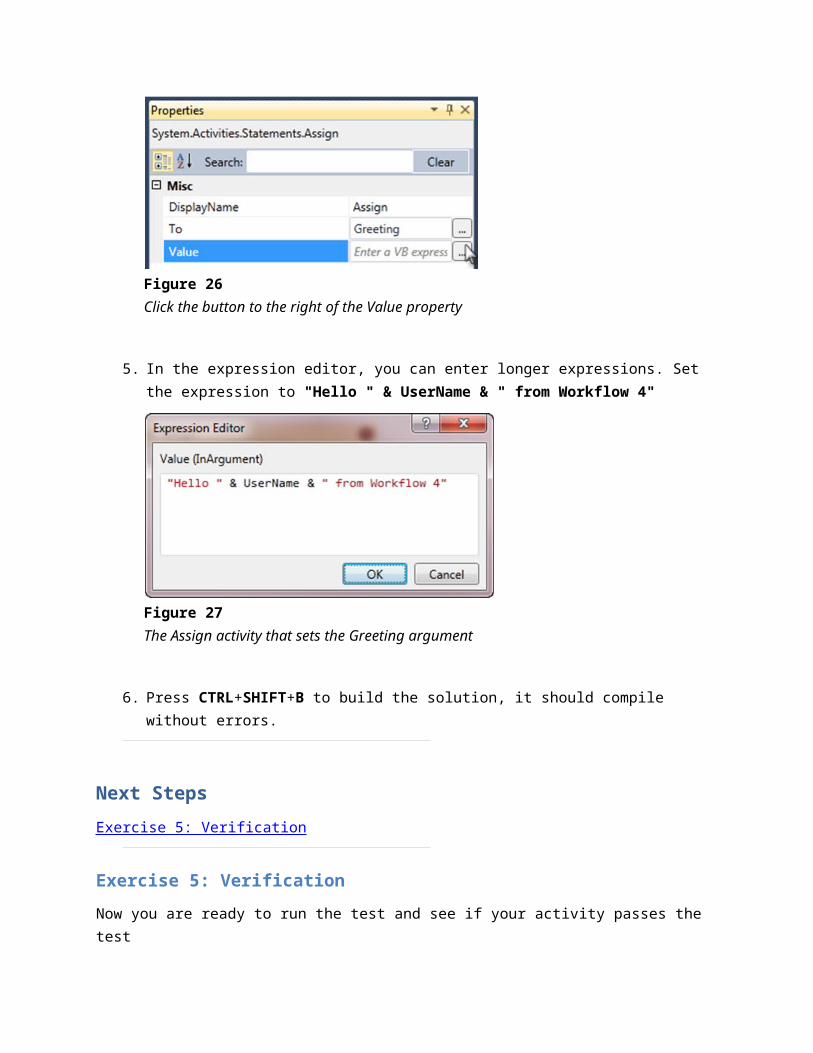
Figure 33Drop a Sequence on the designer
4. Right click inside the sequence and select Paste to put the Assign activity inside the sequence.
Figure 34Paste the assign activity inside the sequence
5. Import the System.Threading namespace into your workflow. Click on Imports and add System.Threading
Figure 35Click on Imports and add System.Threading
Do I have to add System.Threading to Imports?
No, this is optional just as it would be in any C# or VB project. If you don’t import the namespace you will have to fully qualify classes from the name space as in System.Threading.Thread
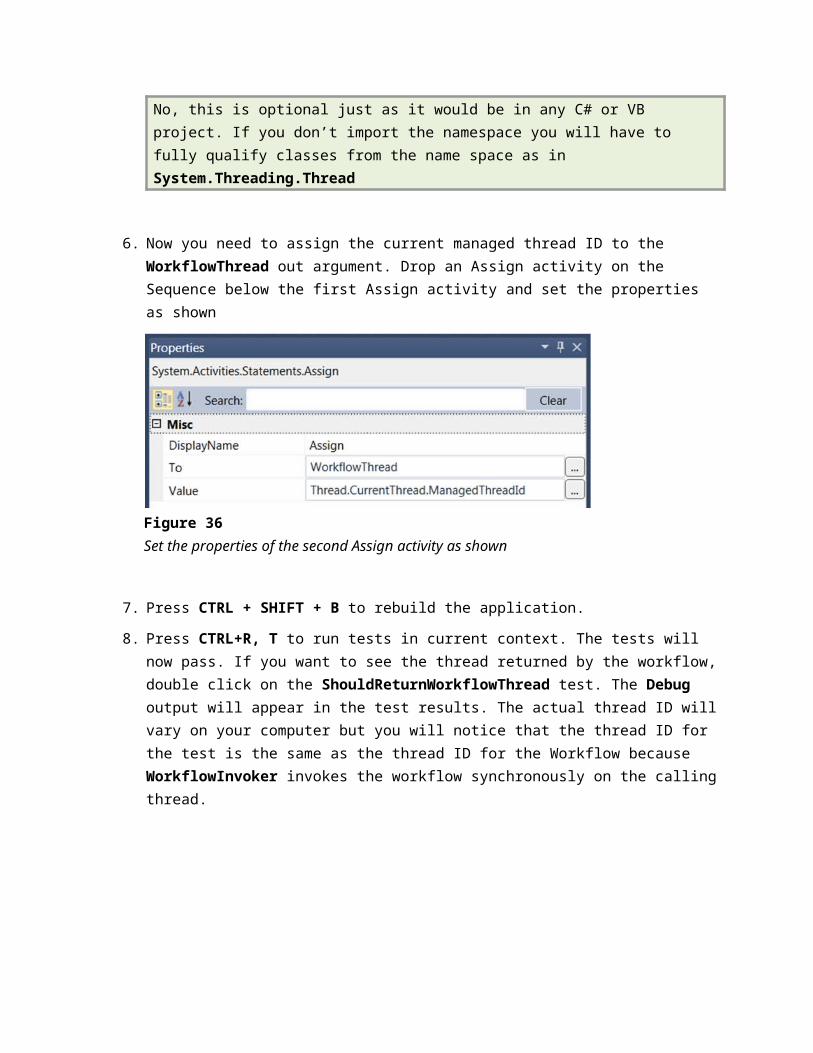
6. Now you need to assign the current managed thread ID to the WorkflowThread out argument. Drop an Assign activity on the Sequence below the first Assign activity and set the properties as shown
Figure 36Set the properties of the second Assign activity as shown
7. Press CTRL + SHIFT + B to rebuild the application.

8. Press CTRL+R, T to run tests in current context. The tests will now pass. If you want to see the thread returned by the workflow, double click on the ShouldReturnWorkflowThread test. The Debug output will appear in the test results. The actual thread ID will vary on your computer but you will notice that the thread ID for the test is the same as the thread ID for the Workflow because WorkflowInvoker invokes the workflow synchronously on the calling thread.
Figure 37Debug trace output appears in test results
Task 3 – Modifying Test to Use WorkflowApplication
Your test is good but it has one weakness. It verifies that the WorkflowThread returned is non-zero but it does not verify that it returns the actual managed thread ID that the workflow ran on. Your test would pass if the workflow always returned 1.
If you want to verify the actual thread ID you will need to use WorkflowApplication to invoke it. In this task you will modify the test to capture the thread of the workflow by obtaining it during a call to the WorkflowApplication.Completed action and then comparing that value to the value returned from the workflow.
1. Open SayHelloFixture.cs (C#) or SayHelloFixture.vb (VB) and locate the ShouldReturnWorkflowThread test. Replace the test with the following code, to use the WorkflowApplication class to run the workflow. This code will use the WorkflowApplication.Completed action to capture the output arguments and thread ID.
(Code Snippet - Introduction to WF Lab – ShouldReturnWorkflowThread WorkflowApplication TestMethod CSharp)
C#
/// <summary>/// Verifies that the workflow returns an Out Argument

/// Name: WorkflowThread/// Type: Int32/// Value: Non-Zero, matches thread used for Completed action/// </summary>[TestMethod]public void ShouldReturnWorkflowThread(){ AutoResetEvent sync = new AutoResetEvent(false); Int32 actionThreadID = 0; IDictionary<string, object> output = null;
WorkflowApplication workflowApp = new WorkflowApplication( new SayHello() { UserName = "Test" });
// Create an Action<T> using a lambda expression // To be invoked when the workflow completes workflowApp.Completed = (e) => { output = e.Outputs; actionThreadID = Thread.CurrentThread.ManagedThreadId;
// Signal the test thread the workflow is done sync.Set(); };
workflowApp.Run();
// Wait for the sync event for 1 second sync.WaitOne(TimeSpan.FromSeconds(1));
Assert.IsNotNull(output, "output not set, workflow may have timed out");
Assert.IsTrue(output.ContainsKey("WorkflowThread"), "SayHello must contain an OutArgument named WorkflowThread");
// Don't know for sure what it is yet var outarg = output["WorkflowThread"];
Assert.IsInstanceOfType(outarg, typeof(Int32), "WorkflowThread must be of type Int32");
Assert.AreNotEqual(0, outarg, "WorkflowThread must not be zero");
Debug.WriteLine("Test thread is " + Thread.CurrentThread.ManagedThreadId); Debug.WriteLine("Workflow thread is " + outarg.ToString());}
(Code Snippet - Introduction to WF Lab - ShouldReturnWorkflowThread WorkflowApplication TestMethod VB)
Visual Basic
''' <summary>''' Verifies that the SayHello workflow contains an Out Argument''' Name: WorkflowThread''' Type: Int32''' Value: Non-Zero, matches thread used for Completed action''' </summary>''' <remarks></remarks><TestMethod()> Public Sub ShouldReturnWorkflowThread() Dim sync As New AutoResetEvent(False) Dim actionThreadID As Int32 = 0 Dim output As IDictionary(Of String, Object) = Nothing Dim workflowApp As New WorkflowApplication( _ New SayHello() With {.UserName = "Test"})
workflowApp.Completed = _ Function(e) output = e.Outputs actionThreadID = Thread.CurrentThread.ManagedThreadId
' Signal the test thread the workflow is done sync.Set()
' VB requires a lambda expression to return a value ' It is not used with Action(Of T) Return Nothing End Function
workflowApp.Run()
' Wait for the sync event for 1 second sync.WaitOne(TimeSpan.FromSeconds(1))
Assert.IsNotNull(output, "output not set, workflow may have timed out")
Assert.IsTrue(output.ContainsKey("WorkflowThread"), "SayHello must contain an OutArgument named WorkflowThread")
' Don't know for sure what it is yet

Dim outarg = output("WorkflowThread")
Assert.IsInstanceOfType(outarg, GetType(Int32), "WorkflowThread must be of type Int32")
Assert.AreNotEqual(0, output("WorkflowThread"), "WorkflowThread must not be zero")
Debug.WriteLine("Test thread is " & _ Thread.CurrentThread.ManagedThreadId) Debug.WriteLine("Workflow thread is " & outarg.ToString())End Sub
Delegates, not events
WorkflowApplication.Completed and other properties of WorkflowApplication are not events but delegates. Handling them requires you to provide a method, anonymous delegate or lambda expression.
Next Steps
Exercise 6: Verification
Exercise 6: Verification
Now you are ready to r
un the test and see if your activity passes the test with the new requirements
1. Press CTRL+R, T to run tests in current context
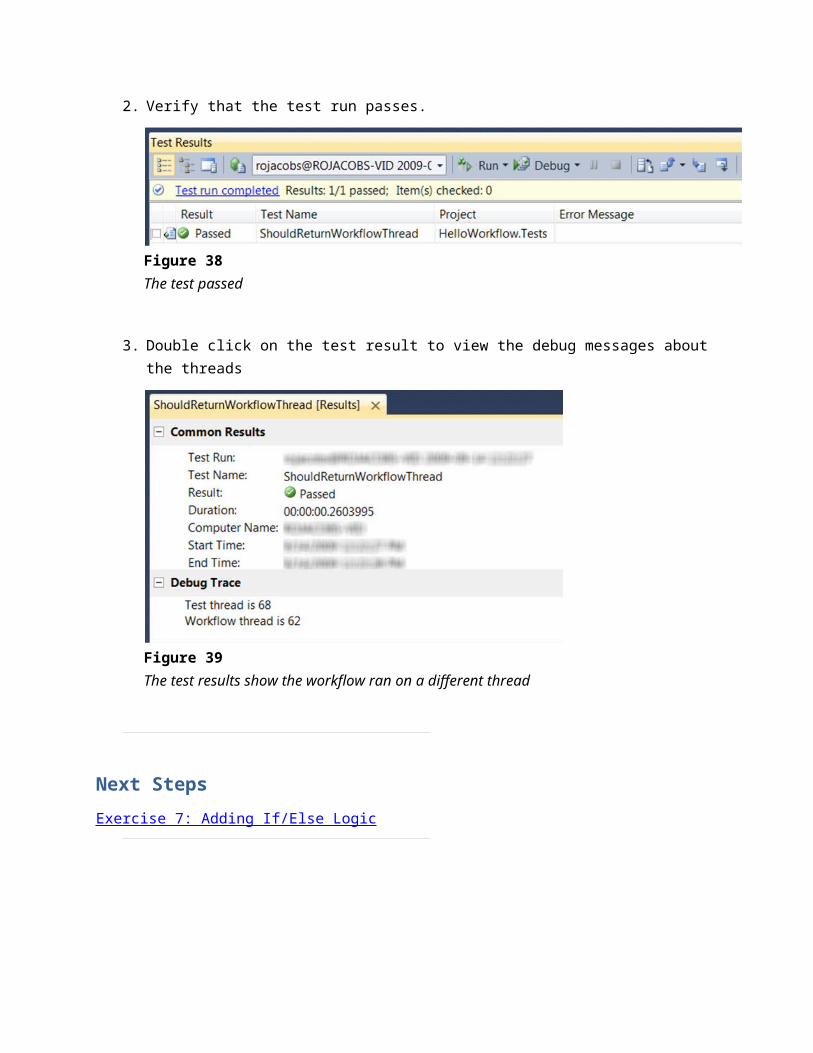
2. Verify that the test run passes.
Figure 38The test passed
3. Double click on the test result to view the debug messages about the threads
Figure 39The test results show the workflow ran on a different thread
Next Steps
Exercise 7: Adding If/Else Logic
Exercise 7: Adding If/Else Logic
Note: If you have not complete
d exercise 6, you can use the solution provided by the Lab. In %TrainingKitInstallFolder%\Labs\IntroToWF\Source\Ex7-IfElse\Begin folder, you will find the begin solution for C# and Visual Basic.
In the previous exercise you created an enhanced Hello Workflow application with a custom hello message. In this exercise, you will add If/Else logic to the workflow to display a different Hello message depending on a custom condition.
This exercise will use the "write the test first" approach, that is, first writing a test for the new requirement and then implementing the necessary code to make it pass.
Task 1 – Writing the Test for a New Requirement

A new requirement for your application has been introduced. If the name has an odd number of letters then you want the first word of the greeting to be "Greetings", otherwise the first word should be "Hello". As an example, now your workflow will be the equivalent of this code:
C#
private static string SayHello(string userName){ string FirstWord = null;
if (userName.Length % 2 == 0) FirstWord = "Hello"; else FirstWord = "Greetings";
return FirstWord + ", " + userName +" from Workflow 4";}
Visual Basic
Private Shared Function SayHello(ByVal userName As String) As String Dim FirstWord As String = Nothing
If userName.Length Mod 2 = 0 Then FirstWord = "Hello" Else FirstWord = "Greetings" End If
Return FirstWord & ", " & userName & " from Workflow 4"End Function
1. Create a test to verify the new requirement. To do this, open the SayHelloFixture.cs file (C#) or SayHelloFixture.vb (VB), located under the HelloWorkflow.Test project, and add the following test.
(Code Snippet - Introduction to WF Lab - ShouldReturnGreetingWithOddLengthName Test CSharp)
C#
[TestMethod]public void ShouldReturnGreetingWithOddLengthName(){ var output = WorkflowInvoker.Invoke( new SayHello() { UserName = "Odd" });
string greeting = output["Greeting"].ToString();
Assert.AreEqual("Greetings Odd from Workflow 4", greeting);}
(Code Snippet - Introduction to WF Lab - ShouldReturnGreetingWithOddLengthName Test VB)
Visual Basic
<TestMethod()>Public Sub ShouldReturnGreetingWithOddLengthName() Dim output = WorkflowInvoker.Invoke( _ New SayHello() With {.UserName = "Odd"}) Assert.AreEqual("Greetings Odd from Workflow 4", output("Greeting").ToString())End Sub
2. Right-click over test method and select Run Tests ( ). The test will fail because you have not modified the workflow yet to return a different hello message in each case.
Figure 40ShouldReturnGreetingWithOddLengthName test failing
Task 2 – Implementing the New Requirement in the Workflow
1. Open SayHello.xaml in the workflow designer. To do this, double-click the file in Solution Explorer.
2. Add a FirstWord variable to store the first word of the hello message, whether it is "Hello" or "Greetings". To do this, follow these steps:
a. Select the Sequence by clicking over the shape surface.
b. Click the Variables button. A panel that displays the available variables for the Sequence activity appears.
c. Click <Create Variable>.
d. Type FirstWord in the Name box.

Figure 41Adding the FirstWord variable of type String to Sequence
Variables
In Windows Workflow Foundation (WF), Variables represent the storage of data. Arguments, on the other side, represent the flow of data into and out of an activity. Variables have a scope just as they do in C# or Visual Basic. If you open the variables pane without selecting an activity you won't be able to add a variable. The activity selected in the designer will provide the scope for the variable. In this case, FirstWord belongs to the Sequence scope.
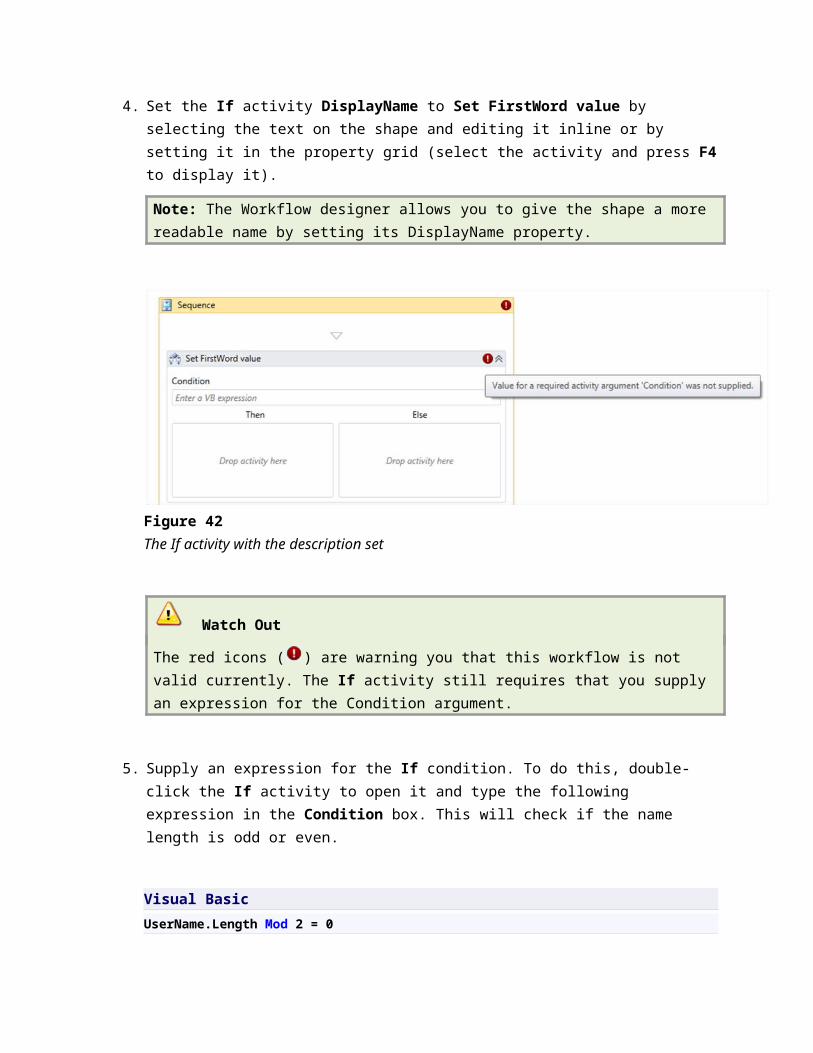
3. Now you need to test the UserName argument to see if it has an even or odd number of characters. To do this, drag an If activity from the Toolbox and drop it into the Sequence activity above the Assign activity.
4. Set the If activity DisplayName to Set FirstWord value by selecting the text on the shape and editing it inline or by setting it in the property grid (select the activity and press F4 to display it).
Note: The Workflow designer allows you to give the shape a more readable name by setting its DisplayName property.

Figure 42The If activity with the description set
Watch Out
The red icons ( ) are warning you that this workflow is not valid currently. The If activity still requires that you supply an expression for the Condition argument.
5. Supply an expression for the If condition. To do this, double-click the If activity to open it and type the following expression in the Condition box. This will check if the name length is odd or even.
Visual Basic
UserName.Length Mod 2 = 0
Expressions
Expressions are program statements that can be a literal string, a conditional statement, or an expression that concatenates several strings or calls a method or invokes another activity. Expressions are written using Visual Basic syntax even if the application is in C#. This means capitalization does not matter, comparison is performed using a single equals sign instead of “==”, and the Boolean operators are the words "And" and "Or" instead of the symbols "&&" and "||".
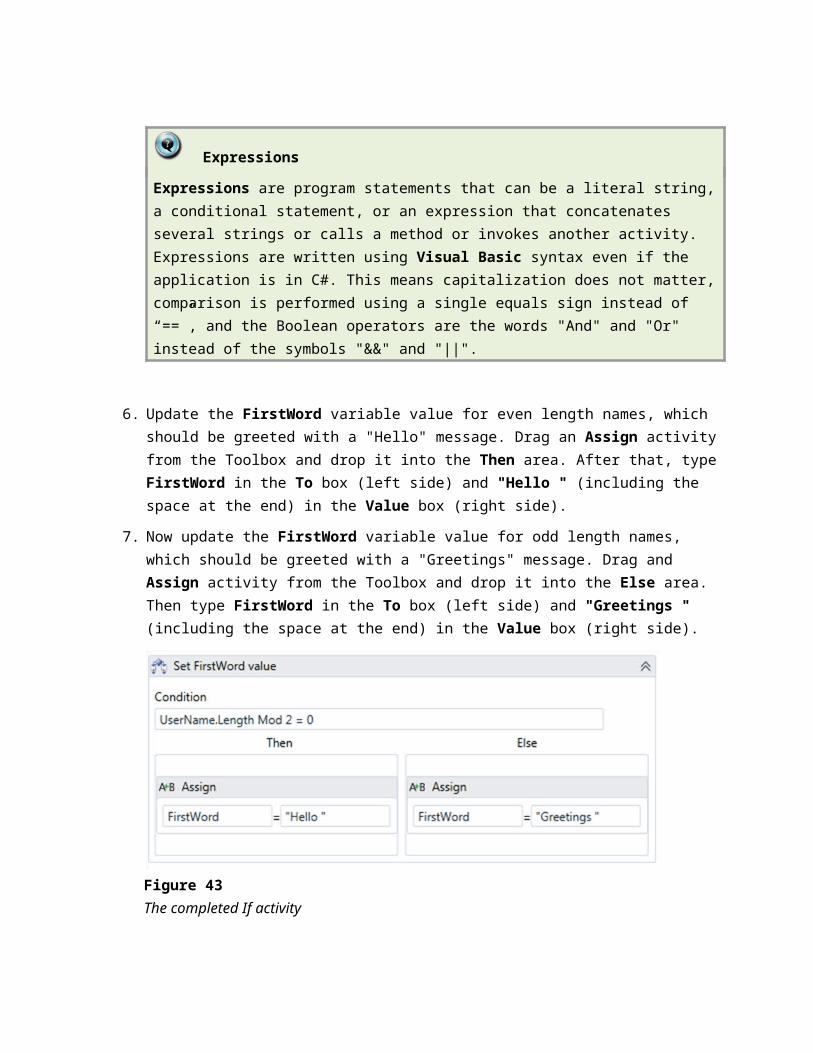
6. Update the FirstWord variable value for even length names, which should be greeted with a "Hello" message. Drag an Assign activity from the Toolbox and drop it into the Then area. After that, type FirstWord in the To box (left side) and "Hello " (including the space at the end) in the Value box (right side).
7. Now update the FirstWord variable value for odd length names, which should be greeted with a "Greetings" message. Drag and Assign activity from the Toolbox and drop it into the Else area. Then type FirstWord in the To box (left side) and "Greetings " (including the space at the end) in the Value box (right side).
Figure 43The completed If activity
8. Modify the final Assign activity to customize the hello message displayed based on the FirstWord value. To do this, in the Assign activity located below the If activity replace the content of the Value box (right side) with the following expression:
Visual Basic
FirstWord & UserName & " from Workflow 4"

Figure 44The Completed Workflow
9. Press CTRL+SHIFT+B to build the solution.
Next Steps
Exercise 7: Verification
Exercise 7: Verification
In order to verify that you have correctly performed all the steps of the exercise you will run the all the tests of the solution and ensure they pass.
1. From the menu select Test / Run / All Tests In Solution or press CTRL+R,A
2. Verify that all the tests pass.
Figure 45Tests pass
Next Steps
Exercise 8: Error Handling
Exercise 8: Error Handling
Note: If you have not completed exercise 6, you can use the solution provided by the Lab. In %TrainingKitInstallFolder%\Labs\IntroToWF\Source\Ex8-ErrorHandling\Begin folder, you will find the begin solution for C# and Visual Basic.
You may have noticed a potential bug in your simple application. What happens if you don't pass a UserName to the workflow? In this exercise, you will add some error handling capabilities to your workflow by using the Try/Catch, Catch<T> and Throw built-in activities.
Task 1 – Writing a Test to Observe Error Behavior
Notice that if you pass an empty string ("") the application should function correctly. The only way to get a null name passed to the workflow is to create it without supplying the in argument for UserName.
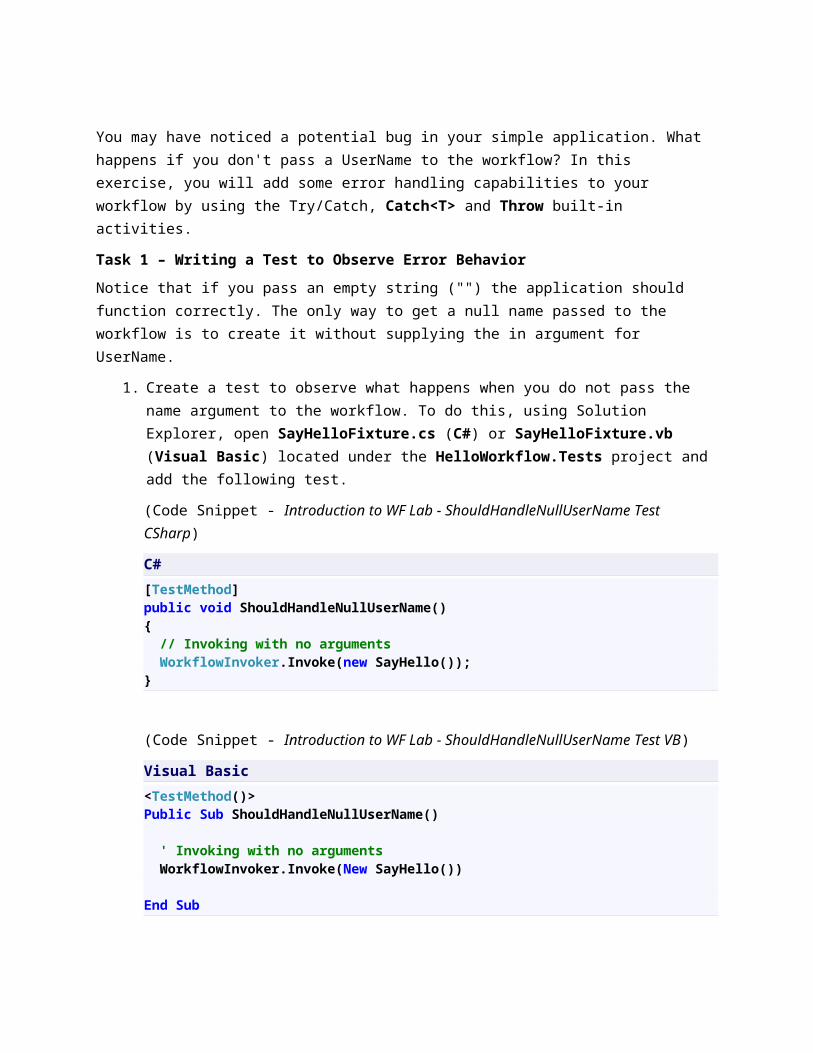
1. Create a test to observe what happens when you do not pass the name argument to the workflow. To do this, using Solution Explorer, open SayHelloFixture.cs (C#) or SayHelloFixture.vb (Visual Basic) located under the HelloWorkflow.Tests project and add the following test.
(Code Snippet - Introduction to WF Lab - ShouldHandleNullUserName Test CSharp)

C#
[TestMethod]public void ShouldHandleNullUserName(){ // Invoking with no arguments WorkflowInvoker.Invoke(new SayHello());}
(Code Snippet - Introduction to WF Lab - ShouldHandleNullUserName Test VB)
Visual Basic
<TestMethod()>Public Sub ShouldHandleNullUserName()
' Invoking with no arguments WorkflowInvoker.Invoke(New SayHello())
End Sub
2. Now run the test. Right-click over test method name and select Run Tests ( ).
Figure 46Run the test
3. The result is that the test fails with a NullReferenceException because you have an expression that uses UserName.Length in the If activity and UserName was null.
Figure 47ShouldHandleNullUserName test failing
Test Result

HelloWorkflow.Tests.SayHelloFixture.ShouldHandleNullUserName threw exception: System.NullReferenceException: Object reference not set to an instance of an object.
Task 2 – Adding the Try/Catch Activity to the Workflow
To handle the error, you could validate the name argument prior to using it or you could simply catch the exception and deal with it. In this task, you will be catching the exception.
1. Open SayHello.xaml in the designer and drag a TryCatch activity from Toolbox and drop it at the top of the sequence.
Figure 48The TryCatch activity in the Toolbox
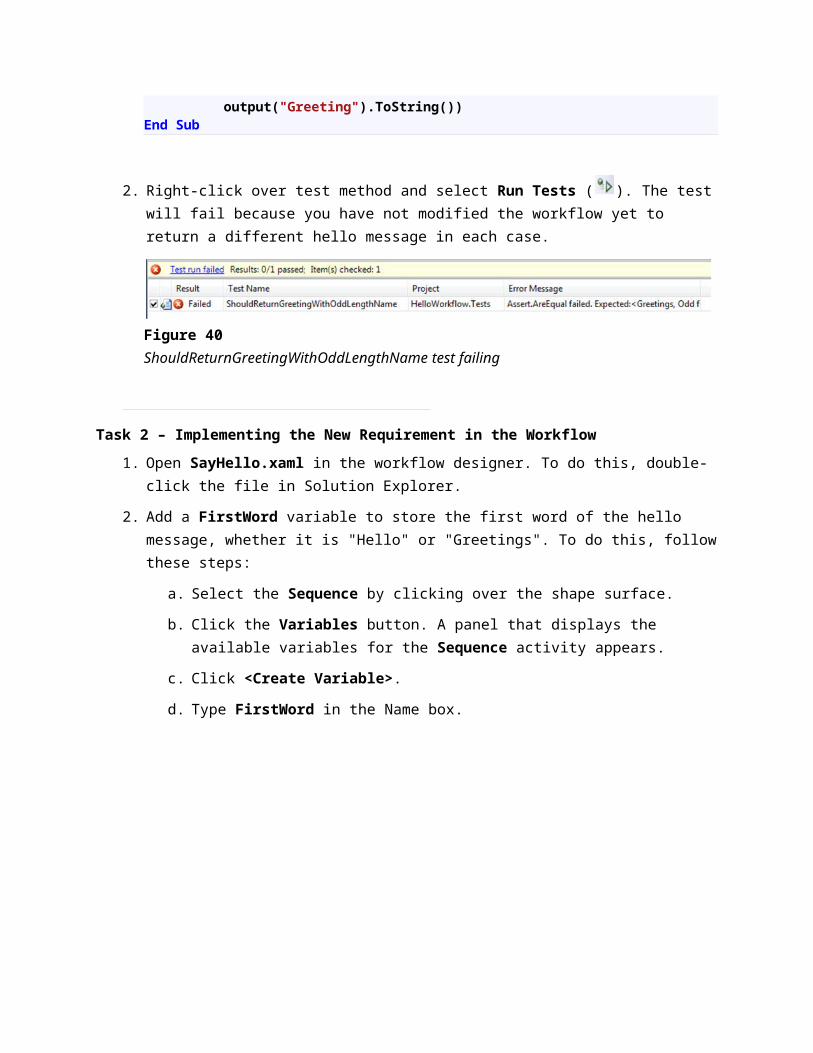
Figure 49Adding a TryCatch activity
Try/Catch Activity
Workflows can use the TryCatch activity to handle exceptions that are raised during the execution of a workflow. These exceptions can be handled or they can be re-thrown using the Throw activity. Activities in the Finally section are executed when either the Try section or the Catches section completes.
2. Now you need to move the If activity inside the Try block.
a. Collapse the If activity ( ) to make the diagram smaller
b. Drag-and-drop the if activity into the Try block.
Figure 50Moving the If activity
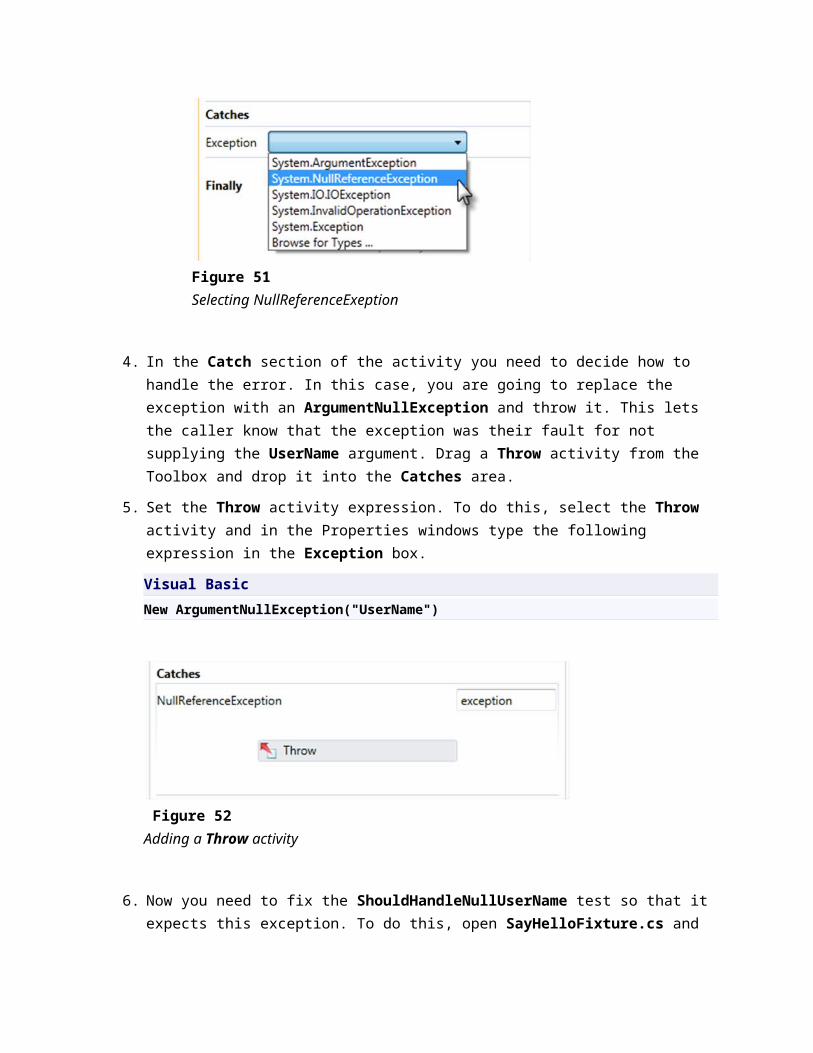
3. Now you need to catch a NullReferenceException. To do this, follow these steps:
a. Click on Add new catch.
b. Select System.NullReferenceExeption from the combo box and press Enter.
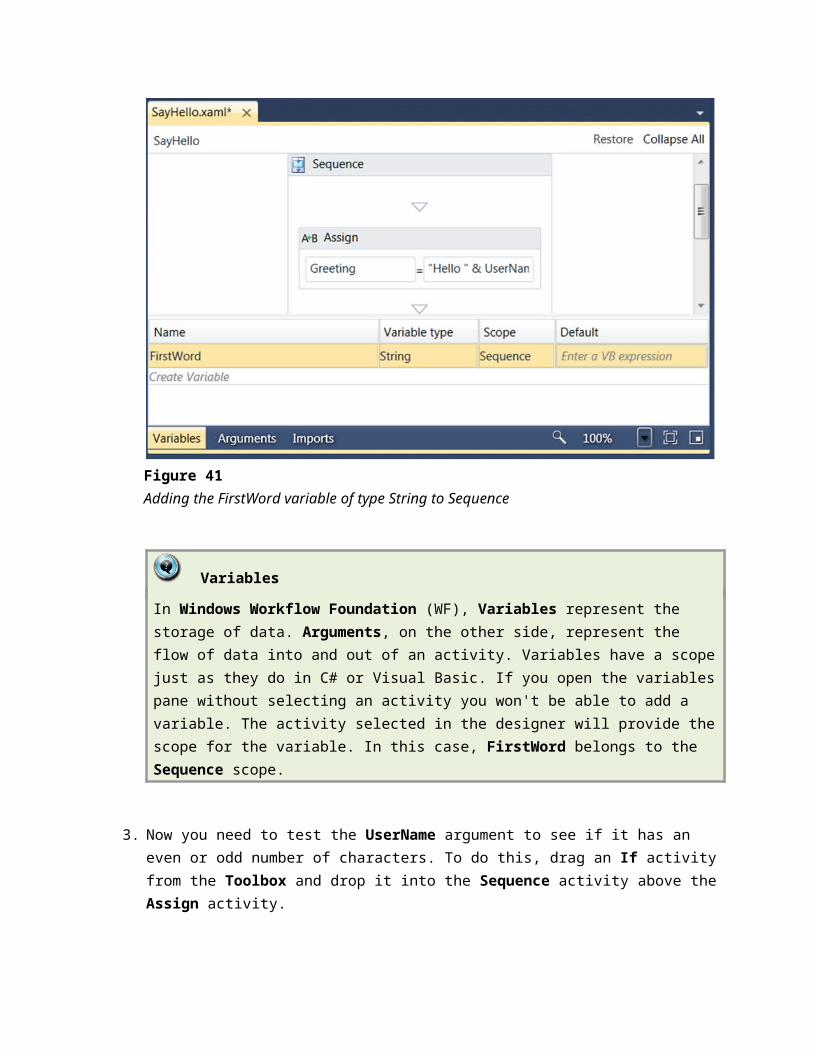
Figure 51Selecting NullReferenceExeption
4. In the Catch section of the activity you need to decide how to handle the error. In this case, you are going to replace the exception with an ArgumentNullException and throw it. This lets the caller know that the exception was their fault for not supplying the UserName argument. Drag a Throw activity from the Toolbox and drop it into the Catches area.
5. Set the Throw activity expression. To do this, select the Throw activity and in the Properties windows type the following expression in the Exception box.
Visual Basic
New ArgumentNullException("UserName")
Figure 52Adding a Throw activity
6. Now you need to fix the ShouldHandleNullUserName test so that it expects this exception. To do this, open SayHelloFixture.cs and add an ExpectedException annotation to the test method as shown in the following code.
C#
[TestMethod][ExpectedException(typeof(ArgumentNullException))]public void ShouldHandleNullUserName(){
// Invoking with no arguments WorkflowInvoker.Invoke(new SayHello());}
Visual Basic
<TestMethod(), ExpectedException(GetType(ArgumentNullException))>Public Sub ShouldHandleNullUserName()
' Invoking with no arguments WorkflowInvoker.Invoke(New SayHello())
End Sub
7. Press CTRL+SHIFT+B to build the solution.
Next Steps
Exercise 8: Verification
Exercise 8: Verification
1. From the menu select Test / Run / All Tests In Solution or press CTRL+R,A
2. Verify that all the tests pass.
Figure 53Tests pass
Next Steps
Exercise 9: Activity Designers
Exercise 9: Activity Designers
As you have already seen Windows Workflow allows you to build custom activities in code. There are several types of custom activities you can build depending on the base class.
Base Class Used For
Activity Activities that are composed of other activities
CodeActivity Activities that want to control execution
AsyncCodeActivity Activities that want to do async work during execution
NativeActivity Activities that contain other activities or need advanced services from the workflow runtime
Task 1- Create a Custom NativeActivity
In this task you will create a simple custom activity that includes Pre/Post processing capabilities.
1. Start Microsoft Visual Studio 2010 from Start | All Programs | Microsoft Visual Studio 2010.
2. To begin this exercise you can use the solution you finished from the previous exercise.
Alternatively, if you did not finish it successfully, you can open the starting solution for exercise three located under the %TrainingKitInstallFolder%\Labs\IntroToWF\Ex9-ActivityDesigner \Begin folder, choosing the language of you preference (C# or VB) and use it as the starting point for this exercise.
3. Press CTRL+SHIFT+B to build the solution.
4. In the Solution Explorer, right click on the HelloWorkflow solution file and select Add / New Project…
5. Select the Workflow templates and choose Activity Library. Name the project HelloWorkflow.Activities.
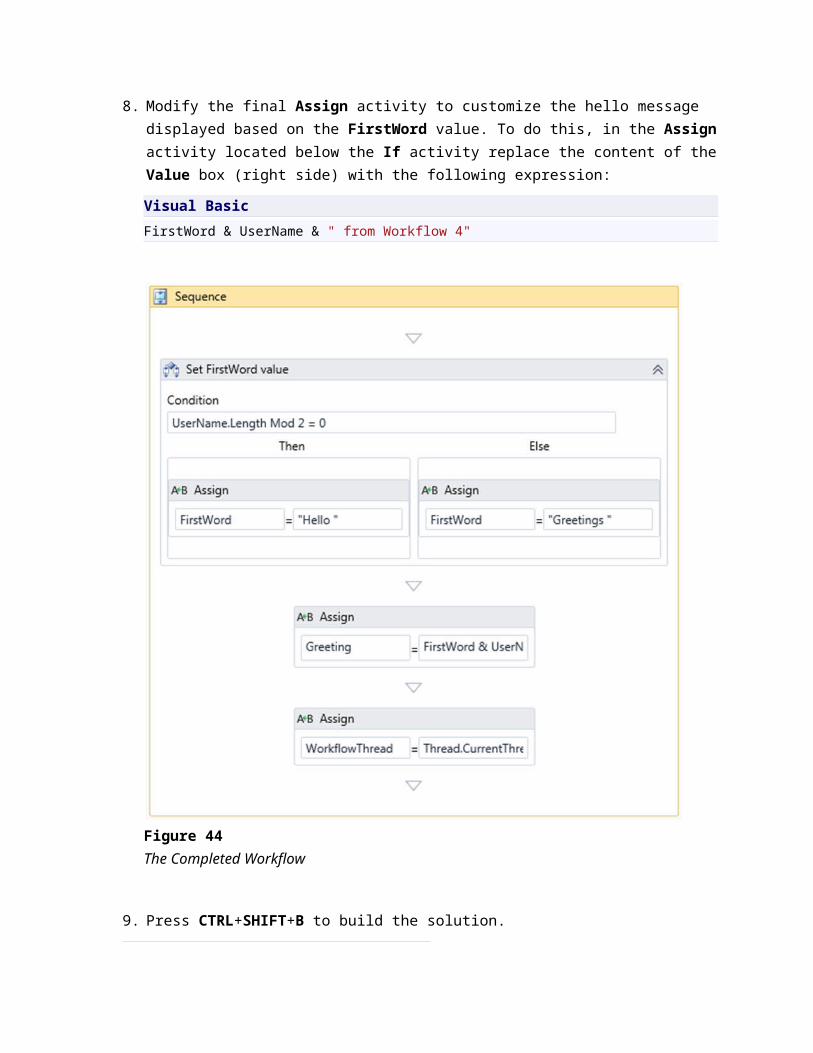
Figure 54Add a new Activity Library project named HelloWorkflow.Activities
6. Delete Activity1.xaml, you will not need it for this lab.
7. In the Solution Explorer, right click on the HelloWorkflow.Activities project and select Add / NewItem (Ctrl+Shift+A)
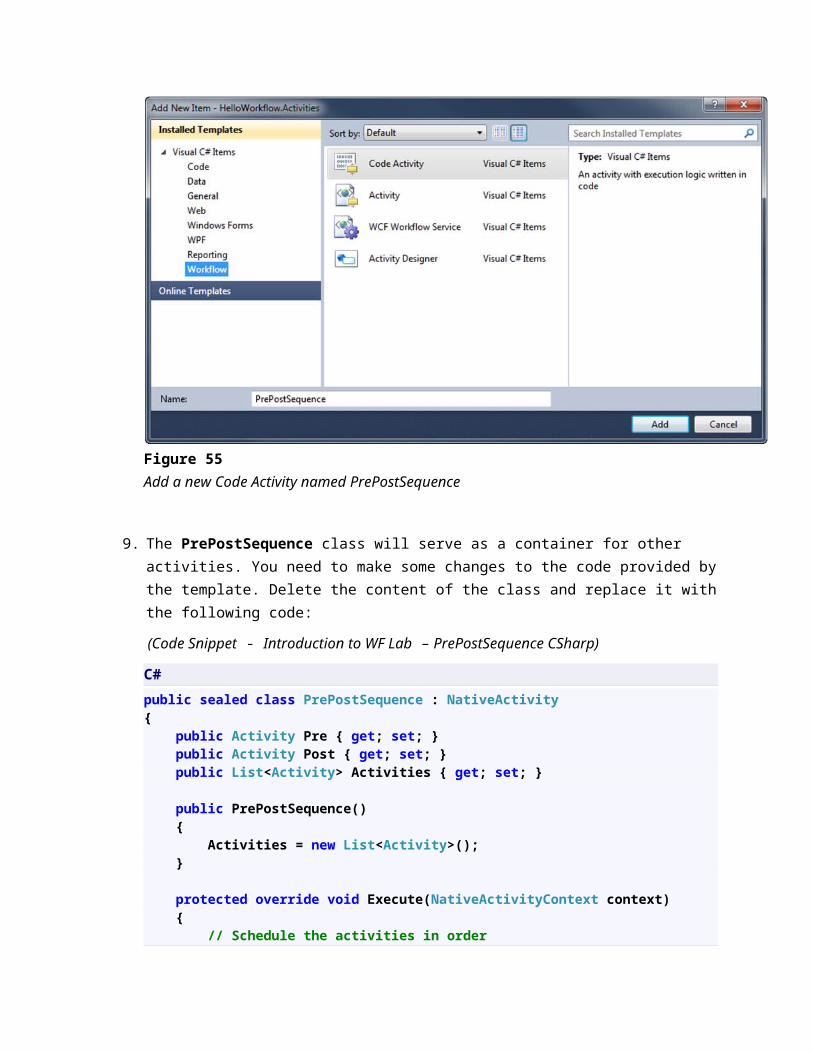
8. From the Workflow templates select Code Activity and name it PrePostSequence
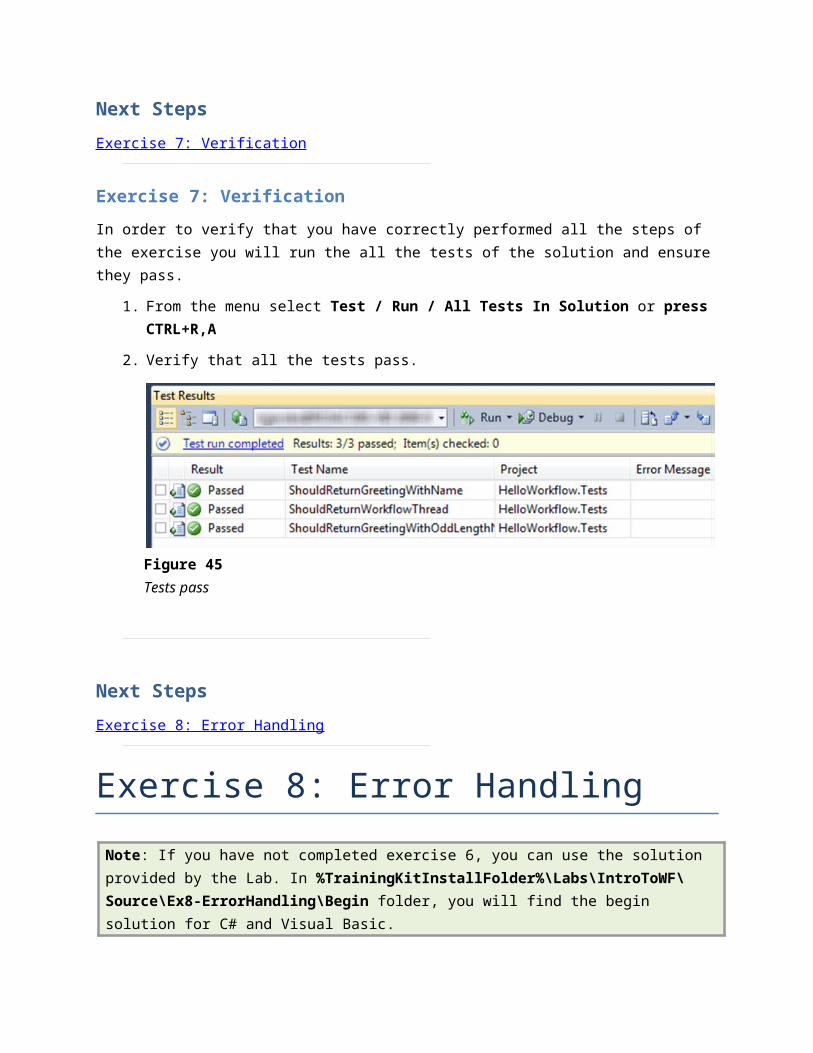
Figure 55Add a new Code Activity named PrePostSequence
9. The PrePostSequence class will serve as a container for other activities. You need to make some changes to the code provided by the template. Delete the content of the class and replace it with the following code:
(Code Snippet - Introduction to WF Lab – PrePostSequence CSharp)
C#
public sealed class PrePostSequence : NativeActivity{ public Activity Pre { get; set; } public Activity Post { get; set; } public List<Activity> Activities { get; set; }
public PrePostSequence() { Activities = new List<Activity>(); }
protected override void Execute(NativeActivityContext context) { // Schedule the activities in order context.ScheduleActivity(Pre); Activities.ForEach((a) => { context.ScheduleActivity(a); }); context.ScheduleActivity(Post);
}}
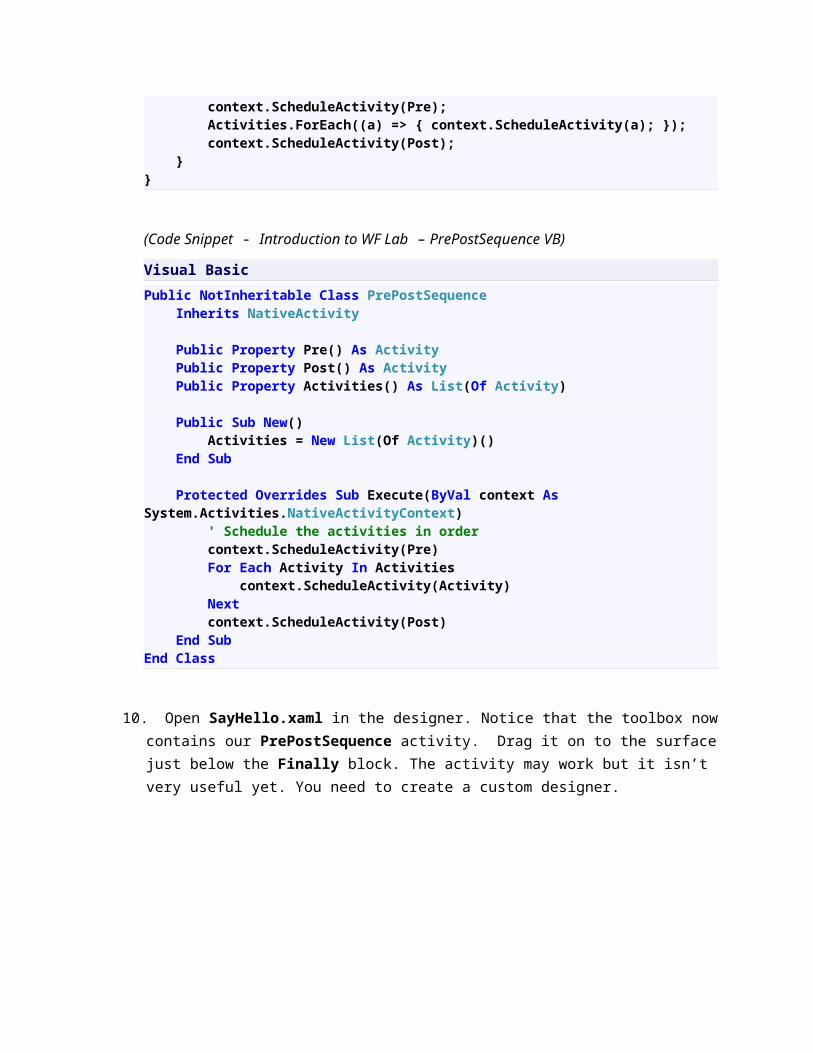
(Code Snippet - Introduction to WF Lab – PrePostSequence VB)
Visual Basic
Public NotInheritable Class PrePostSequence Inherits NativeActivity
Public Property Pre() As Activity Public Property Post() As Activity Public Property Activities() As List(Of Activity)
Public Sub New() Activities = New List(Of Activity)() End Sub
Protected Overrides Sub Execute(ByVal context As System.Activities.NativeActivityContext) ' Schedule the activities in order context.ScheduleActivity(Pre) For Each Activity In Activities context.ScheduleActivity(Activity) Next context.ScheduleActivity(Post) End SubEnd Class
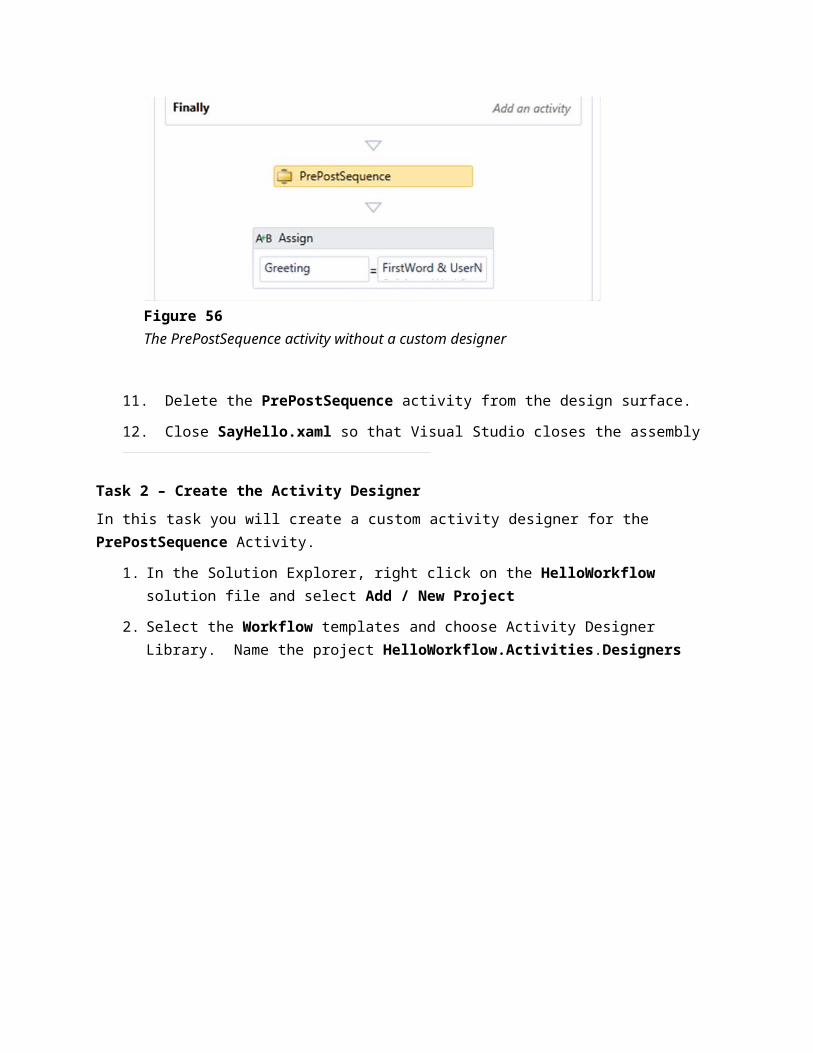
10. Open SayHello.xaml in the designer. Notice that the toolbox now contains our PrePostSequence activity. Drag it on to the surface just below the Finally block. The activity may work but it isn’t very useful yet. You need to create a custom designer.
Figure 56The PrePostSequence activity without a custom designer

11. Delete the PrePostSequence activity from the design surface.
12. Close SayHello.xaml so that Visual Studio closes the assembly
Task 2 – Create the Activity Designer
In this task you will create a custom activity designer for the PrePostSequence Activity.
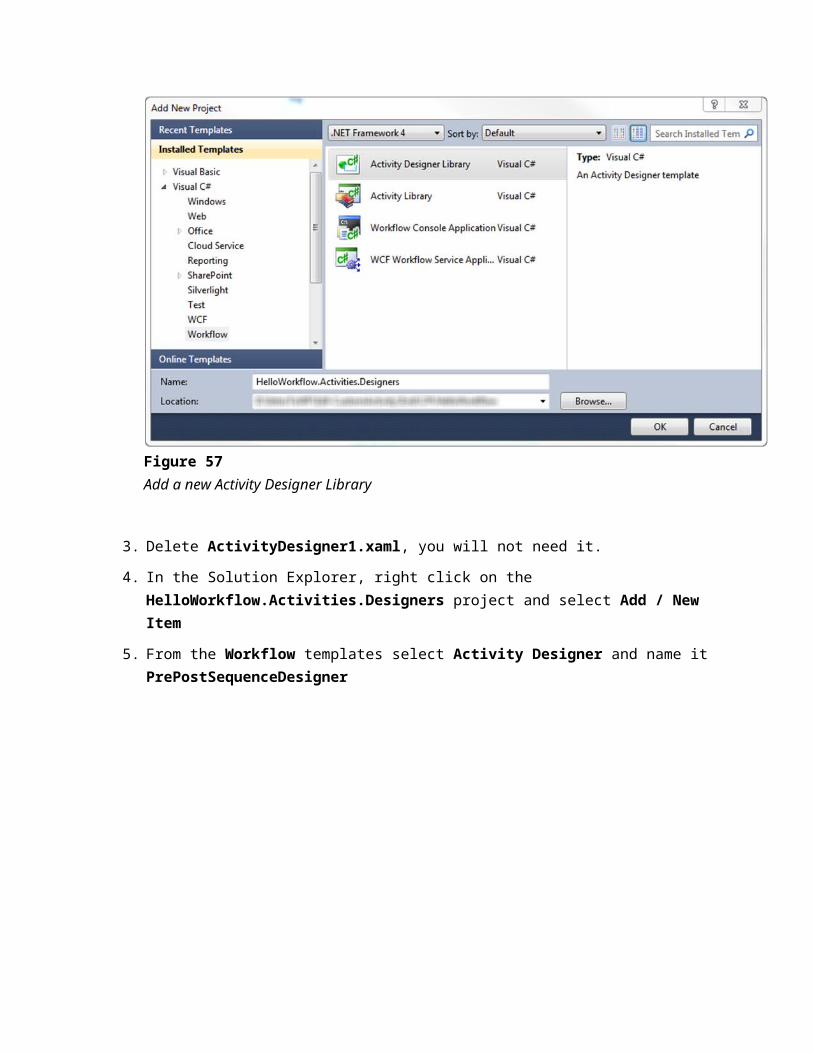
1. In the Solution Explorer, right click on the HelloWorkflow solution file and select Add / New Project
2. Select the Workflow templates and choose Activity Designer Library. Name the project HelloWorkflow.Activities.Designers
Figure 57Add a new Activity Designer Library
3. Delete ActivityDesigner1.xaml, you will not need it.
4. In the Solution Explorer, right click on the HelloWorkflow.Activities.Designers project and select Add / New Item
5. From the Workflow templates select Activity Designer and name it PrePostSequenceDesigner
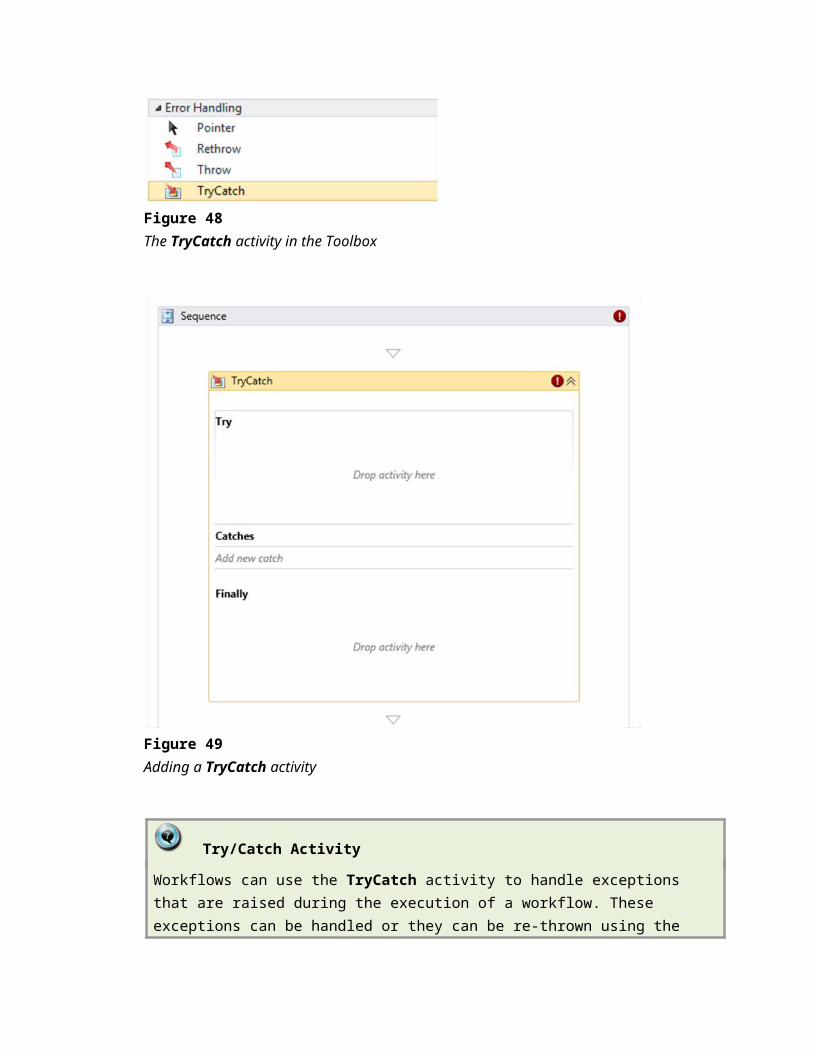
Figure 58Add the PrePostSequenceDesigner activity designer
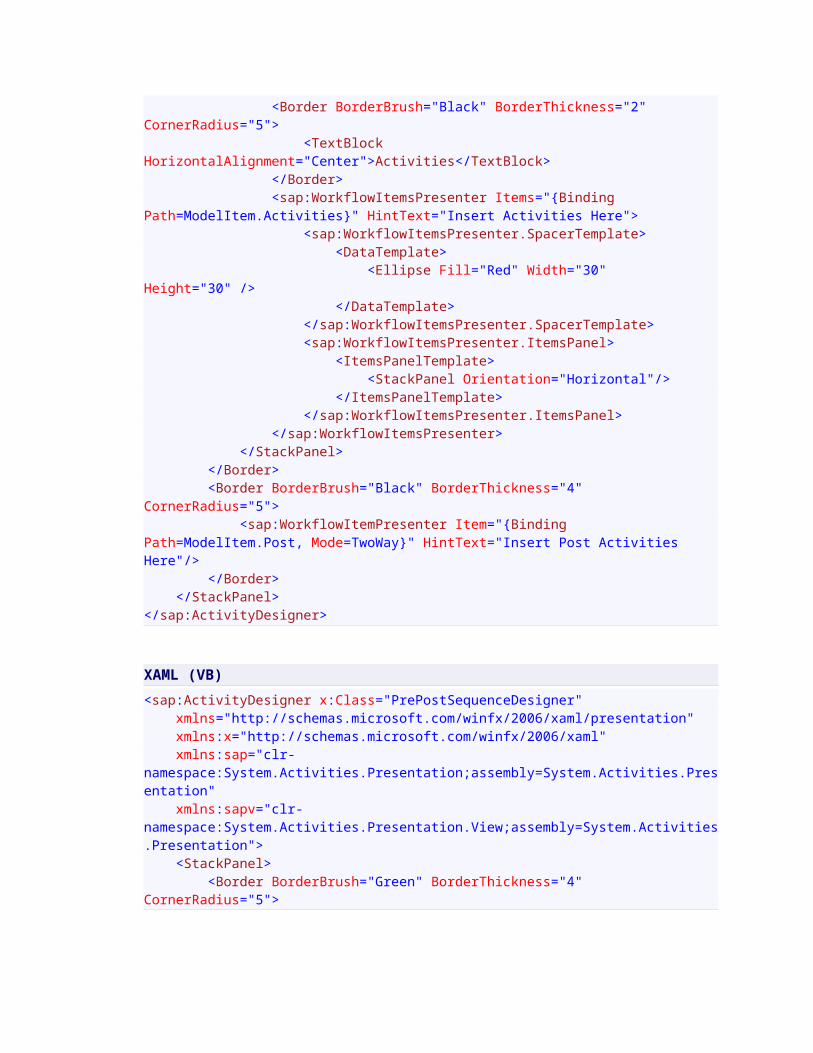
6. Replace the template XAML with the following:
XAML (C#)
<sap:ActivityDesigner x:Class="HelloWorkflow.Activities.Designers.PrePostSequenceDesigner" xmlns="http://schemas.microsoft.com/winfx/2006/xaml/presentation" xmlns:x="http://schemas.microsoft.com/winfx/2006/xaml" xmlns:sap="clr-namespace:System.Activities.Presentation;assembly=System.Activities.Presentation" xmlns:sapv="clr-namespace:System.Activities.Presentation.View;assembly=System.Activities.Presentation"> <StackPanel> <Border BorderBrush="Green" BorderThickness="4" CornerRadius="5"> <sap:WorkflowItemPresenter Item="{Binding Path=ModelItem.Pre, Mode=TwoWay}" HintText="Insert Pre Activities Here"/> </Border> <Border BorderBrush="Red" BorderThickness="4" CornerRadius="5"> <StackPanel> <Border BorderBrush="Black" BorderThickness="2" CornerRadius="5">

<TextBlock HorizontalAlignment="Center">Activities</TextBlock> </Border> <sap:WorkflowItemsPresenter Items="{Binding Path=ModelItem.Activities}" HintText="Insert Activities Here"> <sap:WorkflowItemsPresenter.SpacerTemplate> <DataTemplate> <Ellipse Fill="Red" Width="30" Height="30" /> </DataTemplate> </sap:WorkflowItemsPresenter.SpacerTemplate> <sap:WorkflowItemsPresenter.ItemsPanel> <ItemsPanelTemplate> <StackPanel Orientation="Horizontal"/> </ItemsPanelTemplate> </sap:WorkflowItemsPresenter.ItemsPanel> </sap:WorkflowItemsPresenter> </StackPanel> </Border> <Border BorderBrush="Black" BorderThickness="4" CornerRadius="5"> <sap:WorkflowItemPresenter Item="{Binding Path=ModelItem.Post, Mode=TwoWay}" HintText="Insert Post Activities Here"/> </Border> </StackPanel></sap:ActivityDesigner>
XAML (VB)
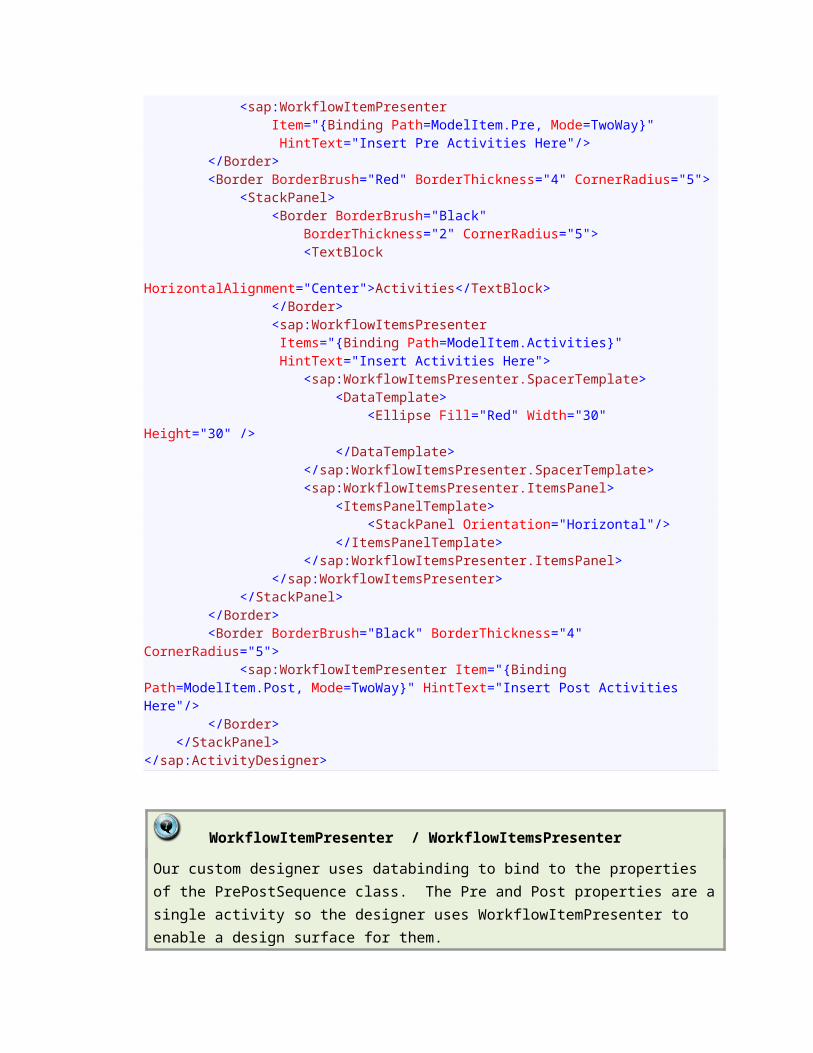
<sap:ActivityDesigner x:Class="PrePostSequenceDesigner" xmlns="http://schemas.microsoft.com/winfx/2006/xaml/presentation" xmlns:x="http://schemas.microsoft.com/winfx/2006/xaml" xmlns:sap="clr-namespace:System.Activities.Presentation;assembly=System.Activities.Presentation" xmlns:sapv="clr-namespace:System.Activities.Presentation.View;assembly=System.Activities.Presentation"> <StackPanel> <Border BorderBrush="Green" BorderThickness="4" CornerRadius="5"> <sap:WorkflowItemPresenter Item="{Binding Path=ModelItem.Pre, Mode=TwoWay}" HintText="Insert Pre Activities Here"/> </Border> <Border BorderBrush="Red" BorderThickness="4" CornerRadius="5"> <StackPanel>
<Border BorderBrush="Black" BorderThickness="2" CornerRadius="5"> <TextBlock HorizontalAlignment="Center">Activities</TextBlock> </Border> <sap:WorkflowItemsPresenter Items="{Binding Path=ModelItem.Activities}" HintText="Insert Activities Here"> <sap:WorkflowItemsPresenter.SpacerTemplate> <DataTemplate> <Ellipse Fill="Red" Width="30" Height="30" /> </DataTemplate> </sap:WorkflowItemsPresenter.SpacerTemplate> <sap:WorkflowItemsPresenter.ItemsPanel> <ItemsPanelTemplate> <StackPanel Orientation="Horizontal"/> </ItemsPanelTemplate> </sap:WorkflowItemsPresenter.ItemsPanel> </sap:WorkflowItemsPresenter> </StackPanel> </Border> <Border BorderBrush="Black" BorderThickness="4" CornerRadius="5"> <sap:WorkflowItemPresenter Item="{Binding Path=ModelItem.Post, Mode=TwoWay}" HintText="Insert Post Activities Here"/> </Border> </StackPanel></sap:ActivityDesigner>
WorkflowItemPresenter / WorkflowItemsPresenter
Our custom designer uses databinding to bind to the properties of the PrePostSequence class. The Pre and Post properties are a single activity so the designer uses WorkflowItemPresenter to enable a design surface for them.
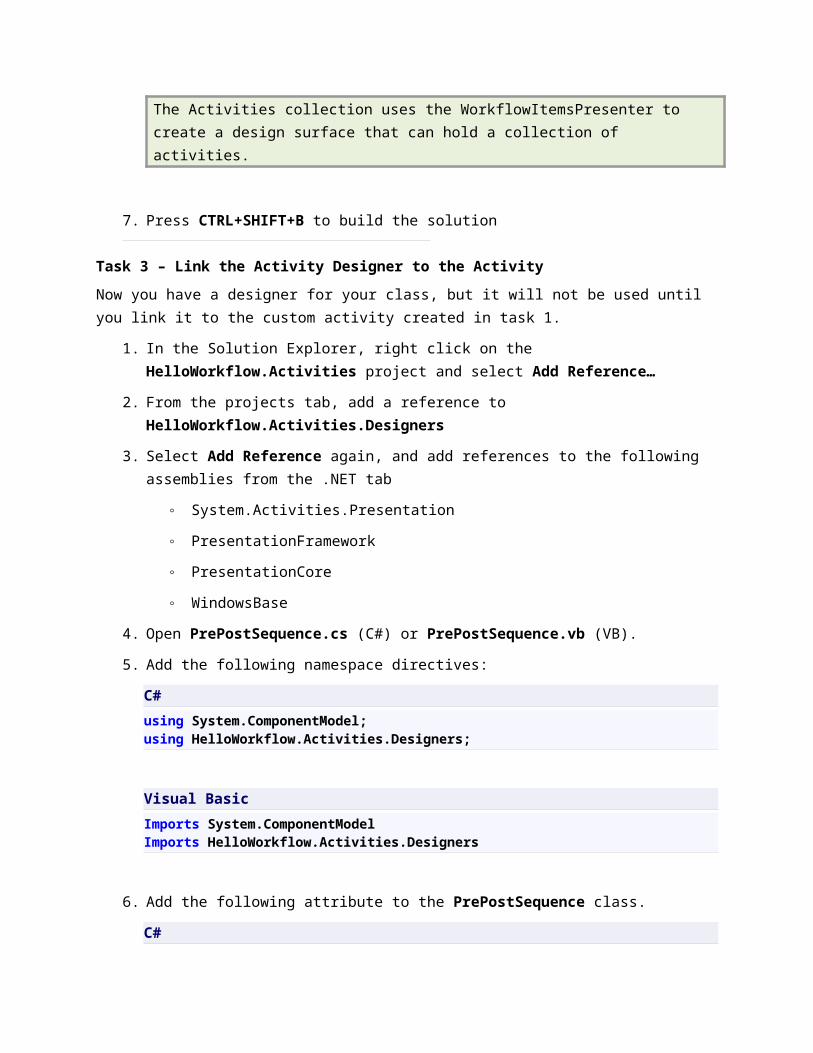
The Activities collection uses the WorkflowItemsPresenter to create a design surface that can hold a collection of activities.
7. Press CTRL+SHIFT+B to build the solution
Task 3 – Link the Activity Designer to the Activity

Now you have a designer for your class, but it will not be used until you link it to the custom activity created in task 1.
1. In the Solution Explorer, right click on the HelloWorkflow.Activities project and select Add Reference…
2. From the projects tab, add a reference to HelloWorkflow.Activities.Designers
3. Select Add Reference again, and add references to the following assemblies from the .NET tab
◦ System.Activities.Presentation
◦ PresentationFramework
◦ PresentationCore
◦ WindowsBase
4. Open PrePostSequence.cs (C#) or PrePostSequence.vb (VB).
5. Add the following namespace directives:
C#
using System.ComponentModel;using HelloWorkflow.Activities.Designers;
Visual Basic
Imports System.ComponentModelImports HelloWorkflow.Activities.Designers
6. Add the following attribute to the PrePostSequence class.
C#
[Designer(typeof(PrePostSequenceDesigner))]public sealed class PrePostSequence : NativeActivity
Visual Basic
<Designer(GetType(PrePostSequenceDesigner))>Public NotInheritable Class PrePostSequence
7. The HelloWorkflow host project will need a reference to the custom activity project. In the Solution Explorer, right click the HelloWorkflow project, and select Add Reference. From the project tab select HelloWorkflow.Activities.

Next Steps
Exercise 9: Verification
Exercise 9: Verification
In this verification you will create a test to verify that you have successfully performed all the steps in the exercise.
1. Press CTRL+SHIFT+B to build the solution.
2. The HelloWorkflow.Tests project will need a reference to the custom activity project. In the Solution Explorer, right click the HelloWorkflow project, and select Add Reference. From the project tab select HelloWorkflow.Activities.
3. Add a new test to the SayHelloTests.cs (C#) or SayHelloTests.vb (VB) file as shown.
(Code Snippet - Introduction to WF Lab – ShouldreturnPrePostMessages CSharp)
C#
[TestMethod]public void ShouldReturnPrePostMessages(){ IDictionary<string, object> output;
output = WorkflowInvoker.Invoke(new SayHello() { UserName = "Test" });
Assert.AreEqual("This is Pre-Sequence", output["PreMessage"]); Assert.AreEqual("This is Post-Sequence", output["PostMessage"]);}
(Code Snippet - Introduction to WF Lab – ShouldreturnPrePostMessages VB)
Visual Basic
<TestMethod()>Public Sub ShouldReturnPrePostMessages() Dim output = WorkflowInvoker.Invoke( New SayHello() With {.UserName = "Test"})
Assert.AreEqual("This is Pre-Sequence", output("PreMessage")) Assert.AreEqual("This is Post-Sequence", output("PostMessage"))End Sub

4. Run the new test by right clicking on the test name (ShouldReturnPostMessages) and clicking on Run Tests. The test will fail because you have not implemented the PrePostSequence yet.
5. In the Solution Explorer, double-click SayHello.xaml to open it.
6. Drop a PrePostSequence below the Finally activity, you should see the new PrePostSequence Activity Designer
7. Add 2 new out arguments to hold a message from the Pre and Post areas of the PrePostSequence.
Figure 59Add the PreMessage and PostMessage out arguments
8. Drop an Assign activity from the Primitives group on the Pre Activities area and set the properties
a. To: PreMessage
b. Value: "This is Pre-Sequence"
9. Drop another Assign activity on the Post Activities area and set the properties
a. To: PostMessage
b. Value: "This is Post-Sequence"
10. Drag the two Assign activities below the PrePostSequence and drop them inside the activities area. To do this, move the cursor over the red dot when dropping the activities.

Figure 60The Completed Workflow with PrePostSequence in place.
11. Press CTRL+SHIFT+B to build the solution
12. Press Ctrl+R, A to run all tests. All the tests should now pass.
Next Steps
Exercise 10: Hosted Designer
Exercise 10: Hosted Designer
What if you wanted to create a custom activity like the PrePostSequence and have someone else who does not have Visual Studio use it? Many products allow end users to customize workflows. Windows Workflow Foundation 4 allows you to host the designer in an application quite easily. In this exercise, you will host the designer and use your custom activity.
Task 1 – Add new WPF Application
1. In the Solution Explorer, right click on the HelloWorkflow solution and select Add / New Project…
2. From the Windows templates Add new WPF Application named HelloDesigner
3. Set the HelloDesigner project as the Startup project. To do this, in the Solution Explorer, right click on the HelloDesigner project and point to Set as Startup Project
4. In the Solution Explorer, right-click on the HelloDesigner project and point to Add references. Choose the following assemblies from the .Net tab
◦ System.Activities.Presentation
◦ System.Activities.Core.Presentation
◦ System.Activities
5. From the Projects tab, add the following assemblies:
◦ HelloWorkflow.Activities
◦ HelloWorkflow.Activities.Designers
6. Open MainWindow.xaml and modify it as shown
XAML (C#)
<Window x:Class="HelloDesigner.MainWindow" xmlns="http://schemas.microsoft.com/winfx/2006/xaml/presentation" xmlns:x="http://schemas.microsoft.com/winfx/2006/xaml" Title="MainWindow" Height="600" Width="1000"> <Grid> <Grid.RowDefinitions> <RowDefinition Height="4*" /> <RowDefinition Height="*" /> </Grid.RowDefinitions> <Grid Name="grid1"> <Grid.ColumnDefinitions> <ColumnDefinition Width="Auto" /> <ColumnDefinition Width="4*" /> <ColumnDefinition Width="Auto" /> </Grid.ColumnDefinitions> </Grid> <TextBox Grid.Row="1" Name="textXAML" VerticalScrollBarVisibility="Visible" /> </Grid></Window>
XAML (VB)
<Window x:Class="MainWindow" xmlns="http://schemas.microsoft.com/winfx/2006/xaml/presentation" xmlns:x="http://schemas.microsoft.com/winfx/2006/xaml" Title="MainWindow" Height="600" Width="1000"> <Grid> <Grid.RowDefinitions> <RowDefinition Height="4*" /> <RowDefinition Height="*" />
</Grid.RowDefinitions> <Grid Name="grid1"> <Grid.ColumnDefinitions> <ColumnDefinition Width="Auto" /> <ColumnDefinition Width="4*" /> <ColumnDefinition Width="Auto" /> </Grid.ColumnDefinitions> </Grid> <TextBox Grid.Row="1" Name="textXAML" VerticalScrollBarVisibility="Visible" /> </Grid></Window>
7. Open MainWindow.xaml.cs (C#) or MainWindow.xaml.vb, to do this, right-click the MainWindow.xaml file and choose View Code (F7).
8. Add the following namespace directives:
(Code Snippet - Introduction to WF Lab – MainWindow Namespace Directives CSharp)
C#
using System.Activities.Presentation;using System.Activities.Statements;using System.Activities.Presentation.Toolbox;using System.Activities.Core.Presentation;using System.Activities.Presentation.Metadata;using System.ComponentModel;using HelloWorkflow.Activities;using HelloWorkflow.Activities.Designers;
(Code Snippet - Introduction to WF Lab – MainWindow Namespace Directives VB)
Visual Basic
Imports System.Activities.PresentationImports System.Activities.StatementsImports System.Activities.Presentation.ToolboxImports System.Activities.Core.PresentationImports System.Activities.Presentation.MetadataImports System.ComponentModelImports HelloWorkflow.ActivitiesImports HelloWorkflow.Activities.Designers
9. Add a field of type WorkflowDesigner:
C#
WorkflowDesigner workflowDesigner = new WorkflowDesigner();
Visual Basic
Private workflowDesigner As WorkflowDesigner = New WorkflowDesigner()
10. Create a new function named RegisterMetadata as shown.
(Code Snippet - Introduction to WF Lab – RegisterMetadata CSharp)
C#
private void RegisterMetadata(){ DesignerMetadata metaData = new DesignerMetadata(); metaData.Register(); AttributeTableBuilder builder = new AttributeTableBuilder(); MetadataStore.AddAttributeTable(builder.CreateTable());}
(Code Snippet - Introduction to WF Lab – RegisterMetadata VB)
Visual Basic
Public Sub RegisterMetadata() Dim metaData As DesignerMetadata = New DesignerMetadata() metaData.Register() Dim builder As AttributeTableBuilder = New AttributeTableBuilder() MetadataStore.AddAttributeTable(builder.CreateTable())End Sub
Note: This function enables the designer metadata store.
When you host the designer you can control the toolbox. You choose what controls will appear, the categories that will appear in, and even the names of the controls.
11. Add a function named CreateToolboxControl, which will create and populate the toolbox with four items.
(Code Snippet - Introduction to WF Lab – CreateToolboxControl CSharp)
C#
private ToolboxControl CreateToolboxControl(){ //Create the ToolBoxControl ToolboxControl ctrl = new ToolboxControl();
//Create a collection of category items ToolboxCategory category = new ToolboxCategory("Hello Workflow");
//Creating toolboxItems ToolboxItemWrapper tool0 = new ToolboxItemWrapper( "System.Activities.Statements.Assign", "System.Activities, Version=4.0.0.0, Culture=neutral, PublicKeyToken=31bf3856ad364e35" , null, "Assign"); ToolboxItemWrapper tool1 = new ToolboxItemWrapper( "System.Activities.Statements.Sequence", "System.Activities, Version=4.0.0.0, Culture=neutral, PublicKeyToken=31bf3856ad364e35", null, "Sequence"); ToolboxItemWrapper tool2 = new ToolboxItemWrapper( "System.Activities.Statements.TryCatch", "System.Activities, Version=4.0.0.0, Culture=neutral, PublicKeyToken=31bf3856ad364e35", null, "Try It"); // Can use a different name ToolboxItemWrapper tool3 = new ToolboxItemWrapper( "HelloWorkflow.Activities.PrePostSequence", "HelloWorkflow.Activities", null, "PrePostSequence");
//Adding the toolboxItems to the category. category.Add(tool0); category.Add(tool1); category.Add(tool2); category.Add(tool3);
//Adding the category to the ToolBox control. ctrl.Categories.Add(category); return ctrl;}
(Code Snippet - Introduction to WF Lab – CreateToolboxControl VB)
Visual Basic
Private Function CreateToolboxControl() As ToolboxControl 'Create the ToolBoxControl Dim ctrl As ToolboxControl = New ToolboxControl()
'Create a collection of category items

Dim category As ToolboxCategory = New ToolboxCategory("Hello Workflow")
'Creating toolboxItems Dim tool0 As ToolboxItemWrapper = New ToolboxItemWrapper( "System.Activities.Statements.Assign", "System.Activities, Version=4.0.0.0, Culture=neutral, PublicKeyToken=31bf3856ad364e35", Nothing, "Assign") Dim tool1 As ToolboxItemWrapper = New ToolboxItemWrapper( "System.Activities.Statements.Sequence", "System.Activities, Version=4.0.0.0, Culture=neutral, PublicKeyToken=31bf3856ad364e35", Nothing, "Sequence") Dim tool2 As ToolboxItemWrapper = New ToolboxItemWrapper( "System.Activities.Statements.TryCatch", "System.Activities, Version=4.0.0.0, Culture=neutral, PublicKeyToken=31bf3856ad364e35", Nothing, "Try It") ' Can use a different name Dim tool3 As ToolboxItemWrapper = New ToolboxItemWrapper( "HelloWorkflow.Activities.PrePostSequence", "HelloWorkflow.Activities", Nothing, "PrePostSequence")
'Adding the toolboxItems to the category. category.Add(tool0) category.Add(tool1) category.Add(tool2) category.Add(tool3)
'Adding the category to the ToolBox control. ctrl.Categories.Add(category) Return ctrlEnd Function
12. Add a function named AddDesigner which will add the designer to your window.
(Code Snippet - Introduction to WF Lab – AddDesigner CSharp)
C#
private void AddDesigner(){ //Create an instance of WorkflowDesigner class this.workflowDesigner = new WorkflowDesigner();
//Place the WorkflowDesigner in the middle column of the grid Grid.SetColumn(this.workflowDesigner.View, 1);
// Flush the workflow when the model changes workflowDesigner.ModelChanged += (s, e) => { workflowDesigner.Flush(); textXAML.Text = workflowDesigner.Text; };
//Load a new Sequence as default. this.workflowDesigner.Load(new Sequence());
//Add the WorkflowDesigner to the grid grid1.Children.Add(this.workflowDesigner.View);
// Add the Property Inspector Grid.SetColumn(workflowDesigner.PropertyInspectorView, 2); grid1.Children.Add(workflowDesigner.PropertyInspectorView);
// Add the toolbox ToolboxControl tc = CreateToolboxControl(); Grid.SetColumn(tc, 0); grid1.Children.Add(tc);}
(Code Snippet - Introduction to WF Lab – AddDesigner VB)
Visual Basic
Private Sub AddDesigner()
'Create an instance of WorkflowDesigner class workflowDesigner = New WorkflowDesigner()
'Place the WorkflowDesigner in the middle column of the grid Grid.SetColumn(workflowDesigner.View, 1)
' Setup the Model Changed event handler AddHandler workflowDesigner.ModelChanged, Function(sender As Object, e As System.EventArgs) ' Flush the workflow when the model changes workflowDesigner.Flush() textXAML.Text = workflowDesigner.Text Return Nothing End Function
'Load a new Sequence as default.
workflowDesigner.Load(New Sequence())
'Add the WorkflowDesigner to the grid grid1.Children.Add(workflowDesigner.View)
' Add the Property Inspector Grid.SetColumn(workflowDesigner.PropertyInspectorView, 2) grid1.Children.Add(workflowDesigner.PropertyInspectorView)
' Add the toolbox Dim tc As ToolboxControl = CreateToolboxControl() Grid.SetColumn(tc, 0) grid1.Children.Add(tc)End Sub
13. Modify MainWindow’s constructor to call the functions you have just added:
(Code Snippet - Introduction to WF Lab – MainWindows Constructor CSharp)
C#
public MainWindow(){ InitializeComponent(); RegisterMetadata(); AddDesigner();}
(Code Snippet - Introduction to WF Lab – MainWindows Constructor VB)
Visual Basic
Public Sub New() ' This call is required by the designer. InitializeComponent()
' Add any initialization after the InitializeComponent() call. RegisterMetadata() AddDesigner()End Sub
Next Steps
Exercise 10: Verification
Exercise 10: Verification
To verify that you have followed all the steps correctly, you will run the HelloDesigner Application and modify a workflow
1. Ensure that HelloDesigner is set as the startup project.
2. Press F5 to launch the application in debug mode.
3. When the design window appears drop a PrePostSequence on the designer surface.
4. You should see the following:
Figure 61The HelloDesigner application hosting the WorkflowDesigner
Next Steps
Summary
Summary
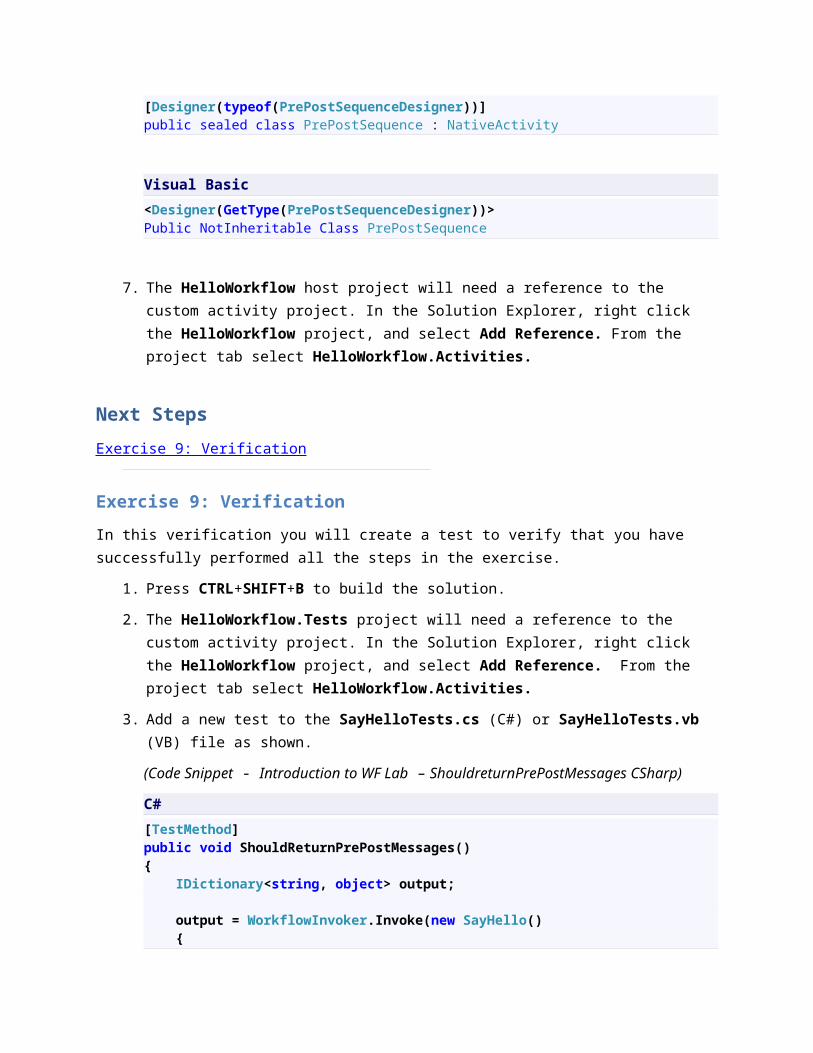
In this Hands-On Lab you have learned the basics of workflow authoring in Windows Workflow Foundation 4 by creating a simple Windows Workflow application. During the lab you learned how to create a workflow using the new Visual Studio 2010 workflow designer, and as an alternative, you also learned how create it using C# or VB code. You have explored the use of input and output arguments, seen how to add if/else logic to your workflow with the If activity and, finally, you have learned how to handle error conditions in your workflows by using exception-handling specific activities like the Try/Catch, Catch<T> and Throw activities. Of course there is much more to Windows Workflow 4. You recommend you look at the Flowchart and Workflow Services labs for more information about building Workflow enabled applications.
Feedback
What do you think of this lab? What do you think of the new Windows Workflow 4? Your feedback is important; it will help us build the best product for you. Please take a moment to provide it. Send your comments to [email protected]