Embed Size (px)
Citation preview
Hands-On LabIntroduction to Windows Azure Marketplace for ApplicationsLab version: 1.0.0
Last updated: 5/20/2023
CONTENTS
OVERVIEW................................................................................................................................................. 3Get a Windows Azure 30 Day Pass (optional)..........................................................................................4Configure Access Control Services...........................................................................................................4Configure the Solutions............................................................................................................................4
EXERCISE 0: UNDERSTANDING A SAAS SUBSCRIPTION SCENARIO................................................6Task 1 – Running the Application.........................................................................................................6
Task 2 – Provisioning a Tenant...........................................................................................................10
EXERCISE 1: MODIFY YOUR APPLICATION TO SUPPORT WINDOWS AZURE MARKETPLACE SUBSCRIPTIONS..................................................................................................................................... 19
Task 1 – Adding OAuthUtility and AzureMarketplace Wrapper to Interact With the Windows Azure Marketplace.......................................................................................................................................20
Task 2 – Updating Your Solution to Handle New Subscription Messages..........................................22
EXERCISE 2: REGISTER THE APPLICATION IN WINDOWS AZURE MARKETPLACE AND TEST SUBSCRIPTIONS WITH THE DEV PLAYGROUND................................................................................30
Task 1 – Subscribing to the Windows Azure Marketplace for Applications.......................................31
Task 2 – Configuring your Application...............................................................................................35
Task 3 – Running a Test Provisioning Through the Developer Playground........................................37
EXERCISE 3: ADD SUPPORT FOR UNSUBSCRIBE MESSAGES........................................................38Task 1 – Handling Unsubscribe Messages..........................................................................................38
Task 2 – Gathering the Required Information to Deploy to Windows Azure.....................................40
Task 3 – Configuring MySaaSApplication for Deployment.................................................................43
Task 4 – Testing Unsubscribe.............................................................................................................46
EXERCISE 4: LEARN HOW TO PUBLISH IN WINDOWS AZURE MARKETPLACE, EXPLORE THE FINISHED APP......................................................................................................................................... 48
Task 1 – Publishing your production release application in the Windows Azure Marketplace for Applications.......................................................................................................................................49
SUMMARY................................................................................................................................................ 54
APPENDIX A: GET A WINDOWS AZURE 30-DAY PASS.......................................................................54
APPENDIX B: CONFIGURE ACCESS CONTROL SERVICES...............................................................55
APPENDIX C: USING THE CODE SNIPPETS.........................................................................................57

Overview
The Windows Azure Marketplace is a global online market where ISVs and Data Publishers can publish and sell Windows Azure applications, services, building block components and premium datasets. The Marketplace provides partners a global online sales channel to rapidly accelerate the return on their Windows Azure investments, to land new customers, new markets and new revenue opportunities. The Windows Azure Marketplace is a one-stop location supported by Microsoft to help you succeed.
In this lab, you will learn the basis of the Microsoft Windows Azure Marketplace for Applications. This service includes listings of components, services and finished applications which can be incorporated by other developers into their Windows Azure Applications.
Through the exercises, you will learn how to publish your application in the Windows Azure Marketplace for Applications. By doing so, you will allow others to buy a subscription and use it. You will also learn how to handle those subscriptions from a developer perspective, associate a user account to your application leveraging the Windows Azure Access Control Services to federate with the social identity providers (for example, Windows Live ID) and how your application needs to be updated to manage the subscription lifecycle (subscribe, register, access, use, unsubscribe).
Objectives
In this Hands-On Lab, you will learn how to:
Publish your application in Windows Azure Marketplace for Applications.
Update your application to integrate with the Windows Azure Marketplace for Applications.
Handle the subscription lifecycle for your Marketplace Application.
System Requirements
You must have the following items to complete this lab:
Microsoft® .NET Framework 4
Microsoft® Visual Studio 2010
ASP.NET and ASP.NET MVC 3
Microsoft® Windows Identity Foundation Runtime
Microsoft® Windows Identity Foundation SDK 4.0
Windows Azure SDK and Windows Azure Tools for Microsoft Visual Studio 1.6
Setup
In order to run the solutions provided with this lab you will need to set up and configure your environment.
The steps below will guide you though the process gathering the required information and running the setup script to configure your environment.
Note: Make sure you have checked all the dependencies for this lab before running the setup.
Get a Windows Azure 30 Day Pass (optional)
A Windows Azure Pass provides a promotional access to Windows Azure so you can try Windows Azure and SQL Azure for free.
If you don’t have a Windows Azure Account you can obtain one following the steps in the Appendix A: Get a Windows Azure 30-Day Pass section.
Configure Access Control Services
Additionally, you will need to set up the Access Control Services to federate the users with the Social Identity Providers.
Note: Be sure you record the ACS Namespace and Management Key since you will need them later to set up the Lab solutions.
If you need help configuring Access Control Services you can follow the steps in the Appendix B: Configure Access Control Services section.
Configure the Solutions
Before you perform the Exercises of this Lab, you have to run a Setup script that will configure your solutions and your Access Control Service.
1. Open a Windows Explorer window and browse to the Source folder of this Lab.
2. Run the setup.cmd script “as Administrator”. It will launch the setup process that will configure your environment and install the Visual Studio code snippets for this lab.
Note: The scripts will perform the following actions:
- First, it will request your ACS credentials and storage account settings (only if you are deploying to Windows Azure). These values will be stored in a Configuration.xml file to avoid requesting those values again next time you use the Setup script.
- Then, it will validate that the Configuration.xml file has all the required values.
- Install the SSL certificates used by the application.
- Build and install the ACS Cmdlets. This tool will be used for configuring your ACS namespace for running the application.
- Configure the ACS Namespace using the cmdlets. This implies adding the relying party application; configure the identity providers, among other tasks.
- Configure the WIF settings based on the ACS Namespace configuration in the five solutions included in this lab.
3. Since you will run the solutions in the Compute Emulator, type Y and press ENTER.
Note: If you want to deploy the lab solutions to Windows Azure you need to enter N. In addition to this, you need to create a Hosted Service, providing its url as the RelyingPartyRealm, and a Storage Account providing its AccountName and AccountKey.
4. Now you need to enter the ACS Namespace and Management Key of the Acess Control Service you created in Configure Access Control Services section.
5. Additionally, you need to enter the RelyingPartyRealm. Type https://localhost/. Remember that if you want to deploy the application to Windows Azure, you need to provide the Hosted Service URL instead (e.g. https://yournamespace.cloudapp.net/).
Note: If you leave the value this way ACS will be configured to expect requests from an application located in either https://127.0.0.1:443 or https://localhost:443. Make sure the port is not being used by another application in your local IIS.
6. Wait for the setup.cmd script to complete and press ENTER.
Using the Code Snippets
With code snippets, you have all the code you need at your fingertips. If you don’t know how to use them you should read the guidance described in the Appendix C: Using the Code Snippets section.
Exercises
This Hands-On Lab contains the following exercises:
1. Exercise 0 – Understanding a SaaS Subscription Scenario
2. Exercise 1 – Modify your Application to Support Windows Azure Marketplace Subscriptions
3. Exercise 2 – Register the Application in the Windows Azure Marketplace and Test Subscriptions with the Dev Playground
4. Exercise 3 – Add Support for Unsubscribe Messages
5. Exercise 4 – Learn how to publish in Windows Azure Marketplace, Explore the Finished App
Note: The source code that accompanies this hands-on lab includes in each folder an End folder where you can find a Visual Studio solution with the code as if you completed the steps in each exercise. You can use this solution as a guide if you need additional help working through the exercises.
If you’re running the End solutions without following the lab, notice that some may require manual configuration. To do this, please follow the instructions on each README.txt file located in the same folder of the End solution.
Estimated time to complete this lab: 90 minutes
Exercise 0: Understanding a SaaS Subscription Scenario
In this exercise, you will walk through the process of running the application and provisioning a tenant to understand how a typical SaaS subscription-based scenario might be implemented before integrating it with the Windows Azure Marketplace.
The SaaS sample application was built using ASP.NET MVC 3, razor and Windows Azure and simulates a real world subscription-based application. The application itself is a simple placeholder but the provisioning process is fully implemented. It guides the user to redeem a subscription ID obtained from an external source, associate it with a user and a tenant upon creation.
Task 1 – Running the Application
In this task, you will open the provided begin solution in order to understand its project structure and then run it locally in the Compute Emulator.
1. Open Visual Studio as administrator from Start | All Programs | Microsoft Visual Studio 2010 by right clicking the Microsoft Visual Studio 2010 shortcut and choosing Run as administrator.
2. In the File menu, choose Open and then Project/Solution.
3. In the Open Project dialog, browse to Source\Ex0-UnderstandingTheScenario\Begin, select Begin.sln in the folder and click Open.
Figure 1My SaaS Application Solution
Note: The begin solution contains two separate projects. The first project, named MySaaSApplication, is a Windows Azure Project which contains the web role definition and configuration for the application.
The second project, named MySaaSApplication.Web, is an ASP.NET MVC 3 project containing the logic of the multitenant sample application.
4. In the Solution Explorer, expand MySaaSApplication and then, inside it, the Roles node to display the nodes of the application.
5. Right click on MySaaSApplication role and, under Launch In Browser, make sure only HTTPS is checked.
Figure 2Launch In Browser configuration
Note: If you have problems unchecking the HTTP setting, close the solution and re-run it As Administrator.
6. Press F5 to start the application.
Note: When you use the storage emulator for the first time, it needs to execute a one-time initialization procedure to create the necessary database and tables. If this is the case, wait for the procedure to complete and examine the Development Storage Initialization dialog to ensure that it completes successfully.
7. Since the certificate used to secure the SSL binding is a self-signed certificate, Internet Explorer will show a warning indicating that the certificate is not trusted. To continue to the web site click on Continue to this website.
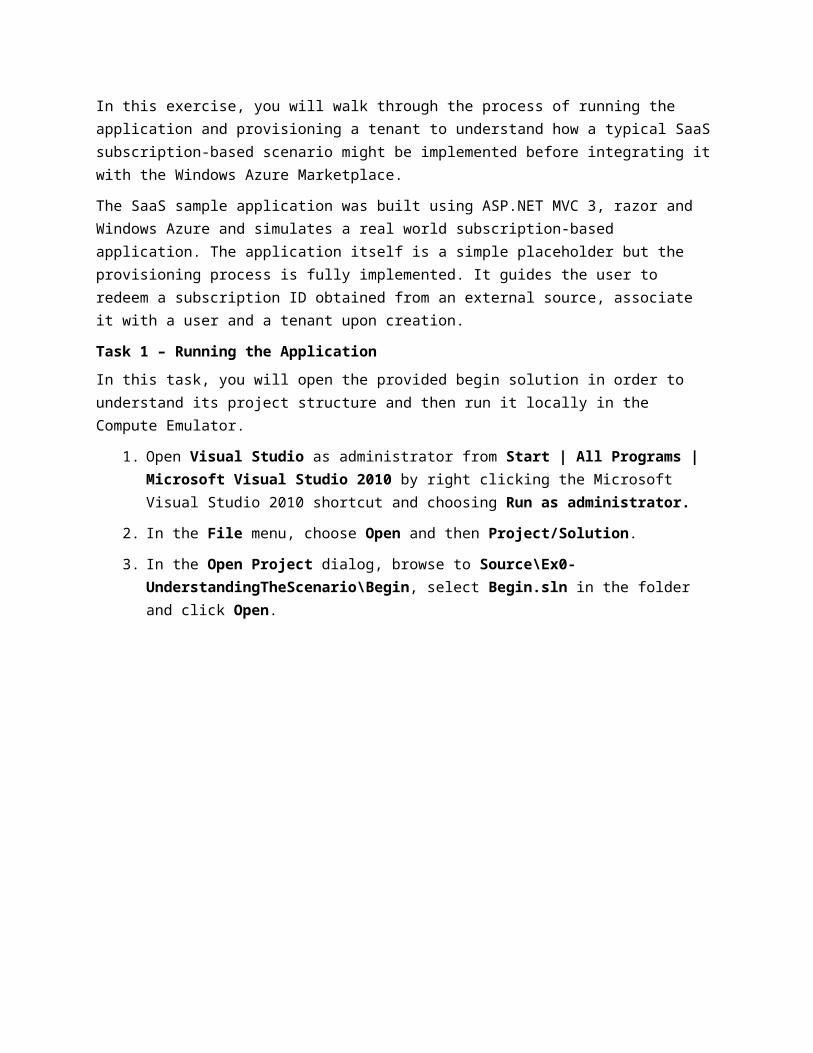
Figure 3Internet Explorer certificate warning
Note: In a real world scenario, this warning indicates that the site you are trying to access might not be the real site since its identity cannot be verified. If you have any doubts you should not continue to it.
8. After you ignore the security certificate warning you will be redirected to the application’s homepage.
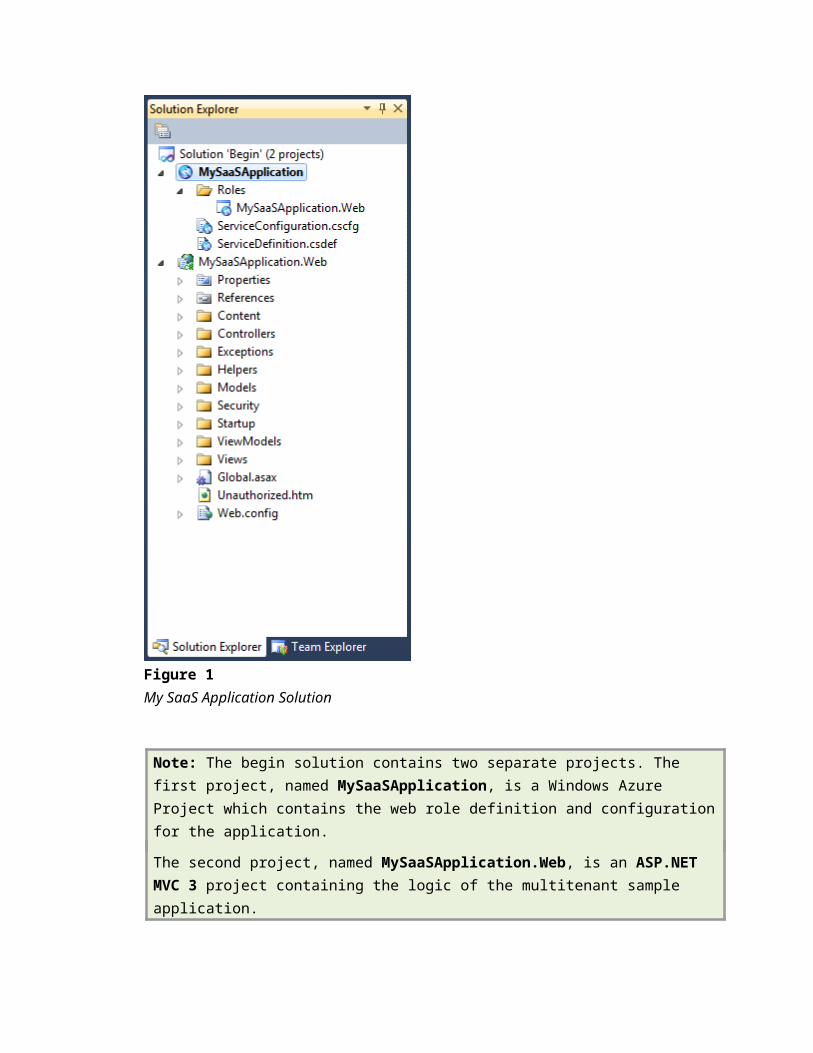
Figure 4My SaaS Application Home Page
Task 2 – Provisioning a Tenant
In this task, you will go through the steps of provisioning a new tenant. The provisioning flow starts when you redeem a valid subscription code and continues by asking you to sign up to the site (logging in using the configured Social Identity Providers) and finishes when you provide the tenant-specific information required to complete the provisioning.
1. If you have closed the browser from task 1, go back to Visual Studio, press F5 and ignore the security warning. Otherwise, in Internet Explorer, click on Redeem Subscription Code.
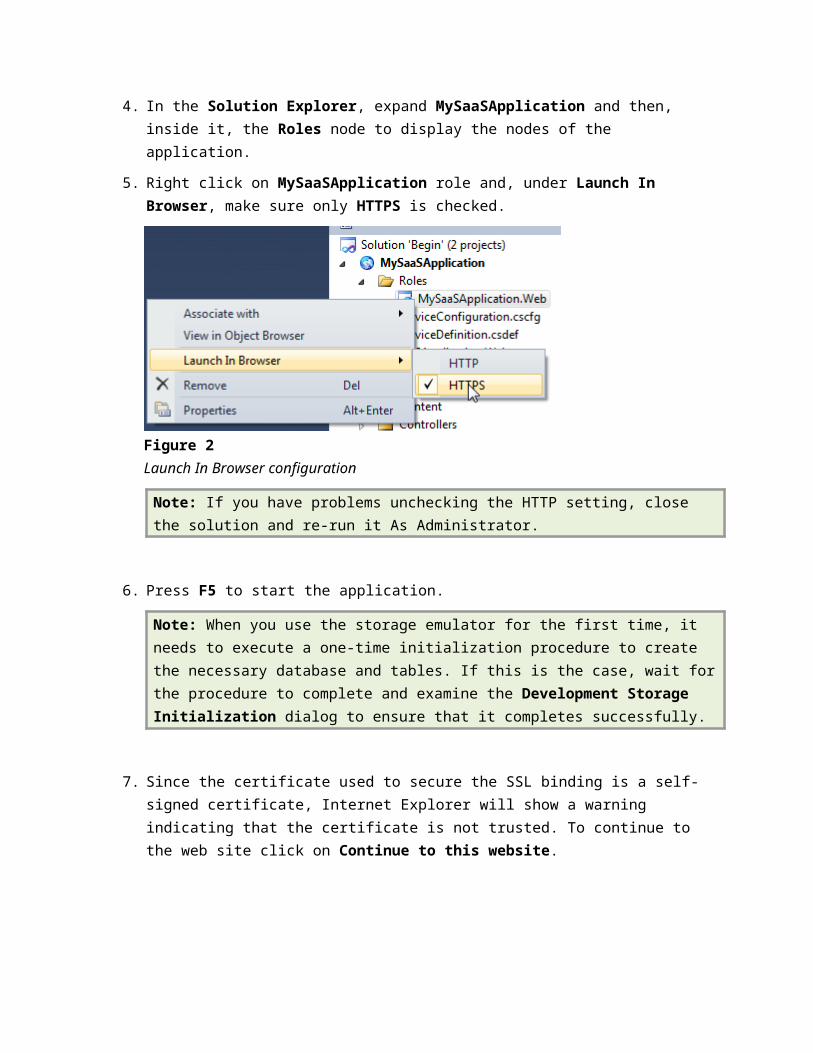
Figure 5My SaaS Application Redeem Subscription Code Link
2. Enter 123456 as subscription ID and press submit button.
Note: For sample purposes, the subscription id is unique and provided in the body of the page, in a typical subscription-based real world SaaS application you would buy a subscription code from an external source and then activate it through some means like this.
Figure 6My SaaS Application Redeem Subscription Code Page
3. Next, you’ll be asked to Sign Up using one of the defined Social Identity Providers.
Note: In order to federate with the Social Identity Providers the sample leverages Access Control Services. For more information about it you can refer to the Introduction to Windows Azure Access Control Service 2.0 lab which is part of the Identity Training Course.
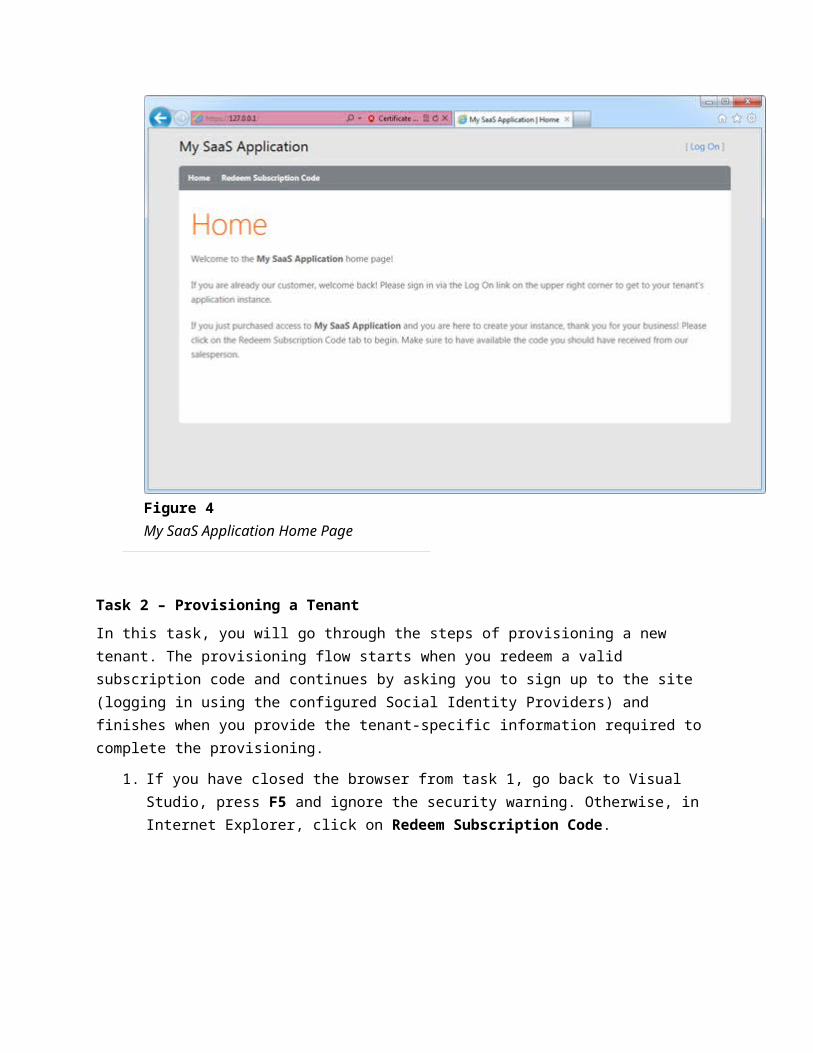
Figure 7My SaaS Application Sign Un Page
4. Choose Windows Live ID as the Social Identity Provider.
5. In the Windows Live Login page, provide your Windows Live credentials and click Sign in.
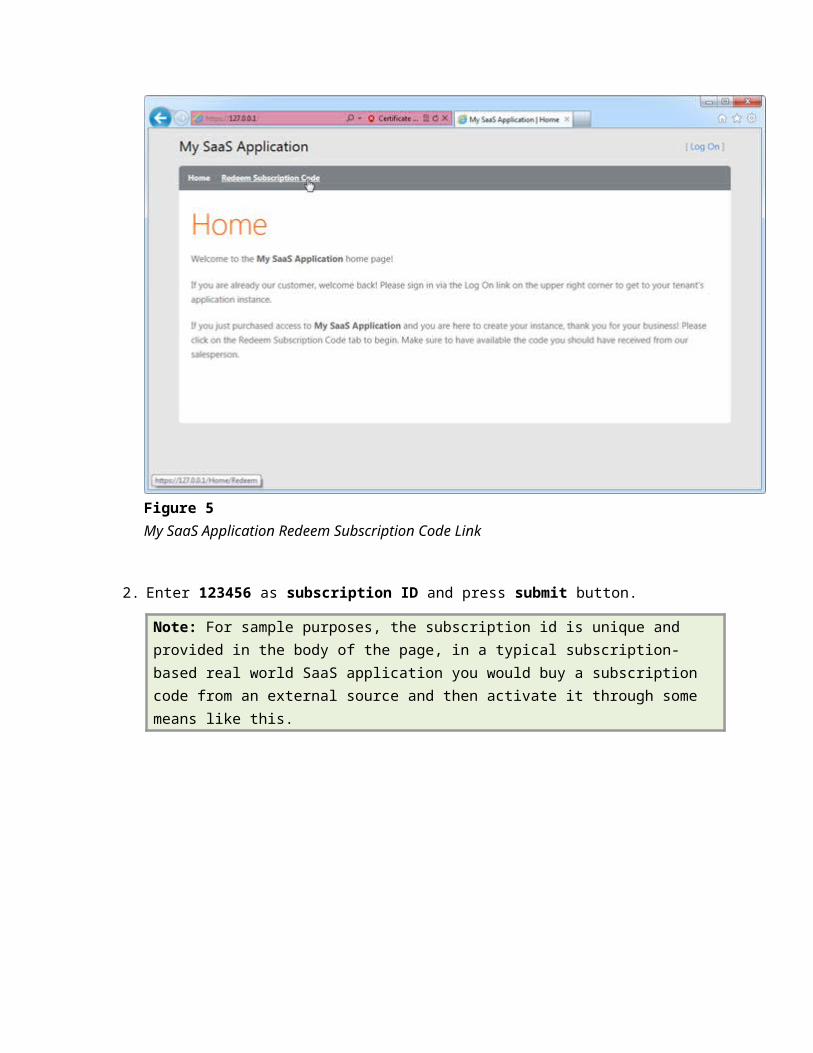
Figure 8Windows Live ID Login Page
6. Upon successful login, you will be redirected back to the application and asked to register the user by providing all those values that are not provided by the identity provider you selected.
7. Complete the missing information and click submit to continue.
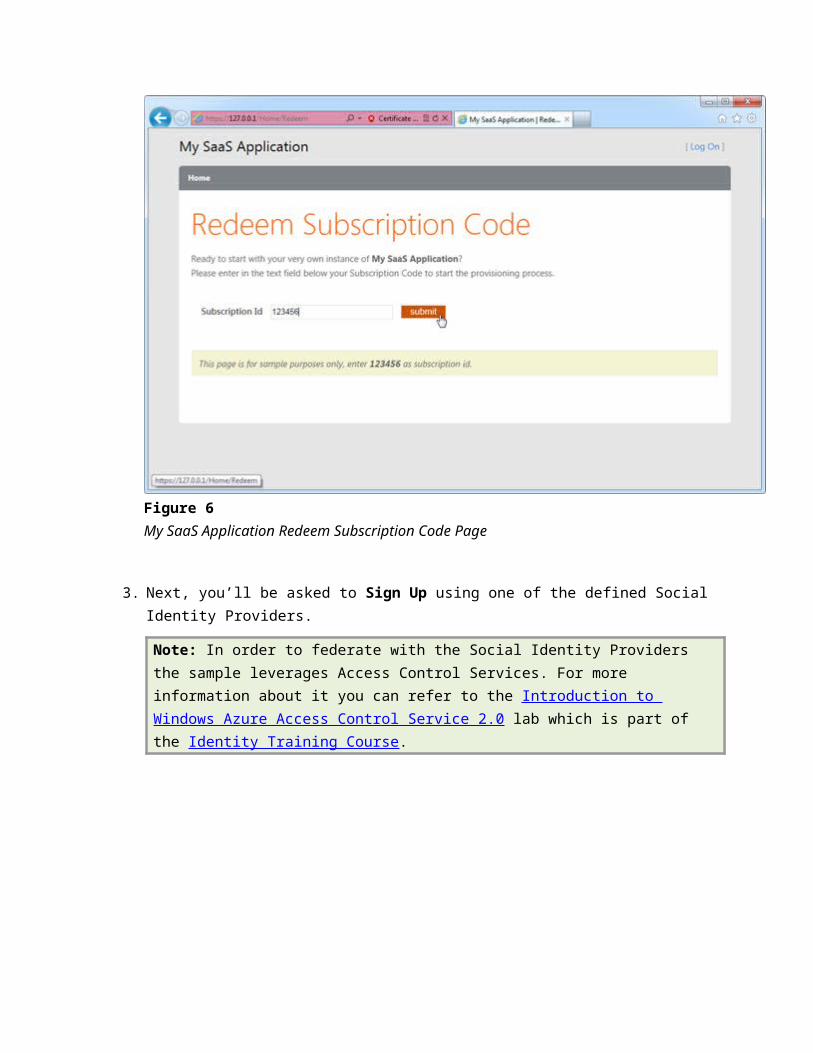
Figure 9My SaaS Application User Profile Registration Page
Note: If you are not redirected to the Registration page don’t worry, that means that the identity provider you selected already provided all the required information for you.
8. The last step of the provisioning flow is providing the Name and Logo for your tenant.
9. In the Tenant Registration page, complete the required information and click provision to finish the flow.
Note: This tenant will be associated with the user you have signed in with. If you want to access the tenant in the future you will need to log in with that same user, otherwise you will not have access to it.
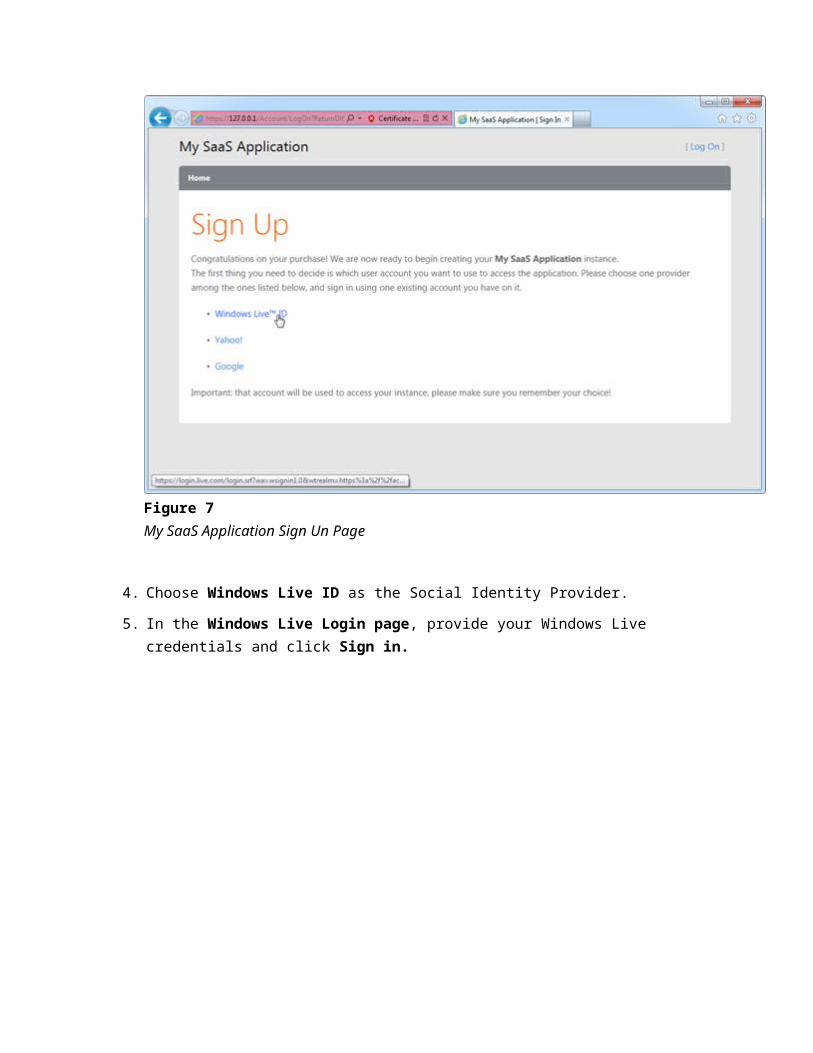
Figure 10My SaaS Application Tenant Registration Page
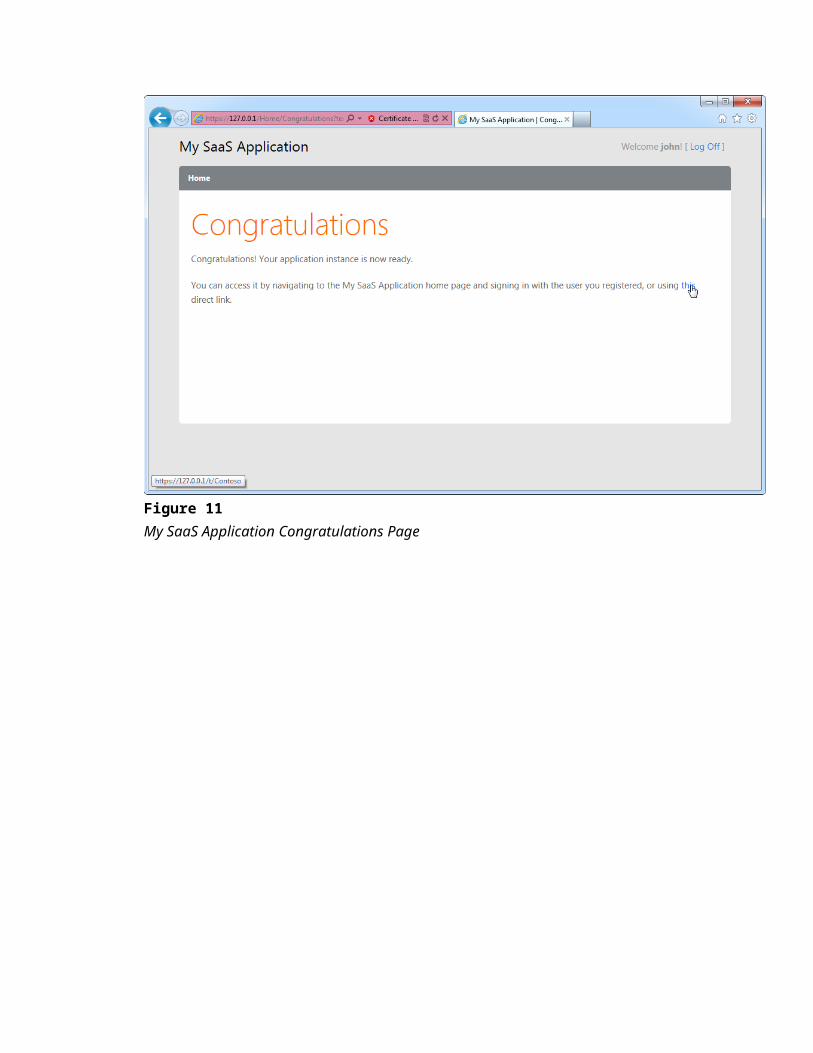
10. Once the tenant is provisioned, you will be redirected to a confirmation page. Click on the link which will redirect you to the tenant’s home page.
Note: Once again, since this is a sample application you will notice that the SaaS application is only a placeholder where the actual application should live. Additionally you will notice that the tenant instance of this application is branded with the tenant name and logo you provided as part of the provisioning flow.
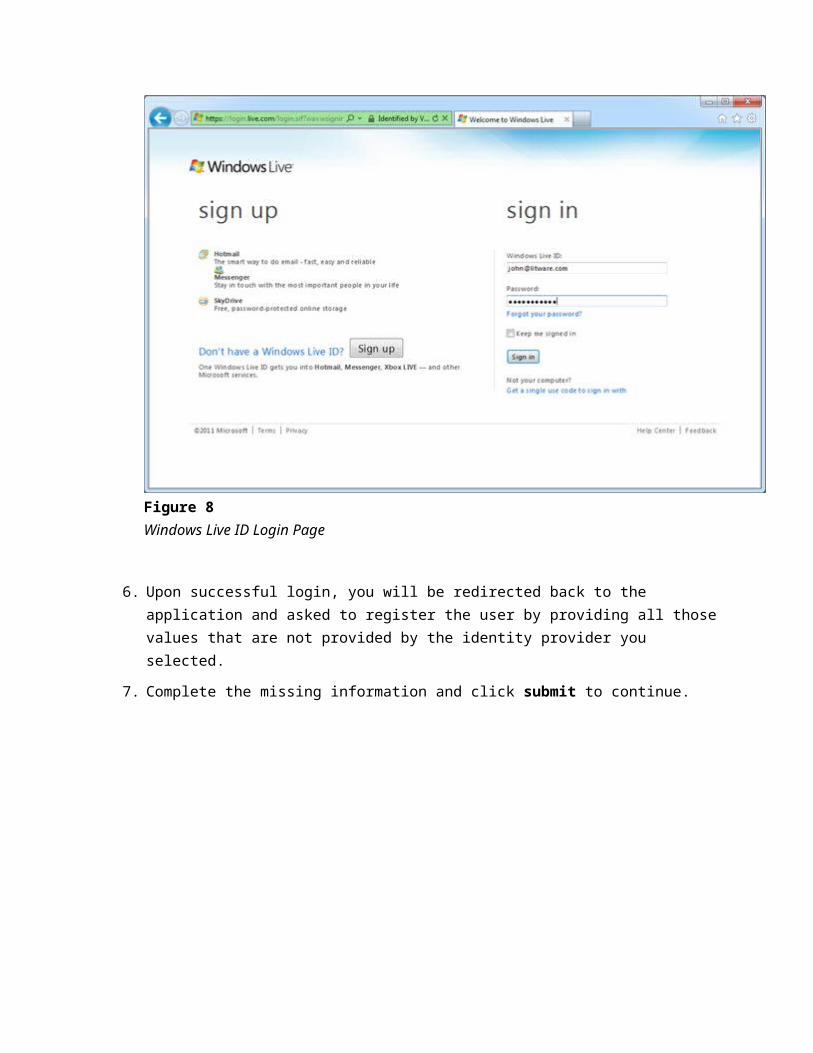
Figure 11My SaaS Application Congratulations Page
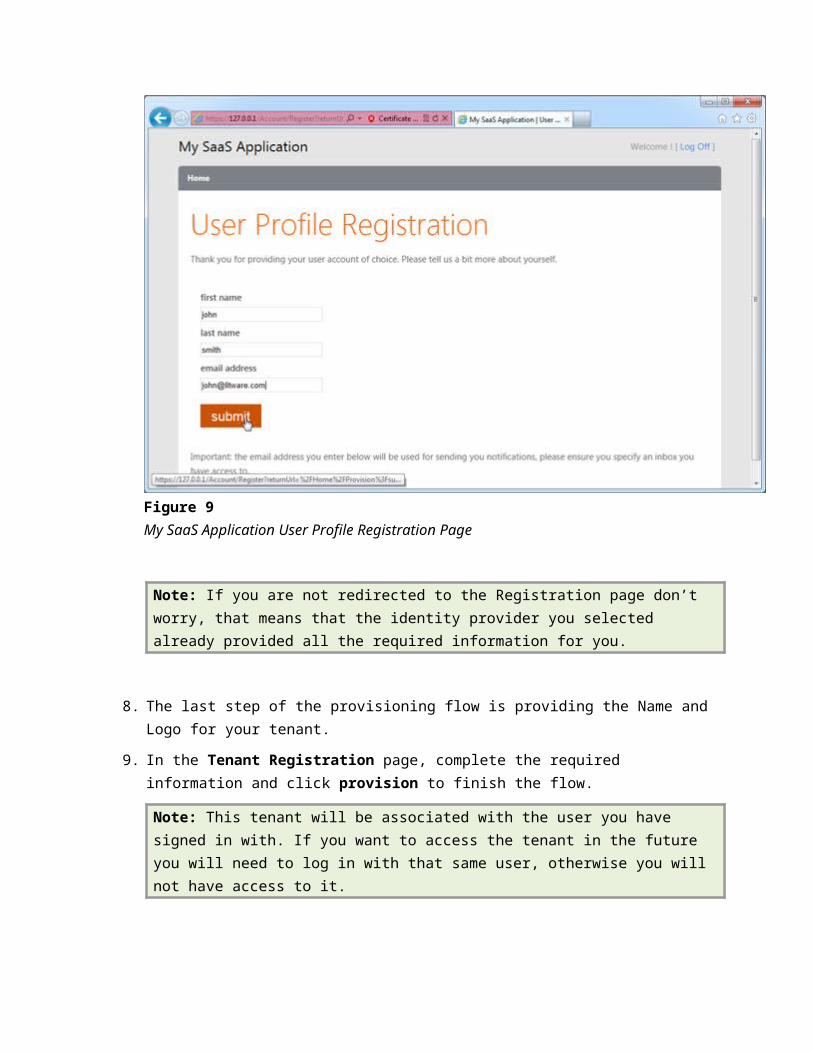
Figure 12Application Page, branded with the tenant data
11. Close the Browser.
12. Open the Windows Azure Storage Emulator. To do this, right-click the Windows Azure icon located in the system tray and select Show Storage Emulator UI.
Figure 13Showing the Storage Emulator UI
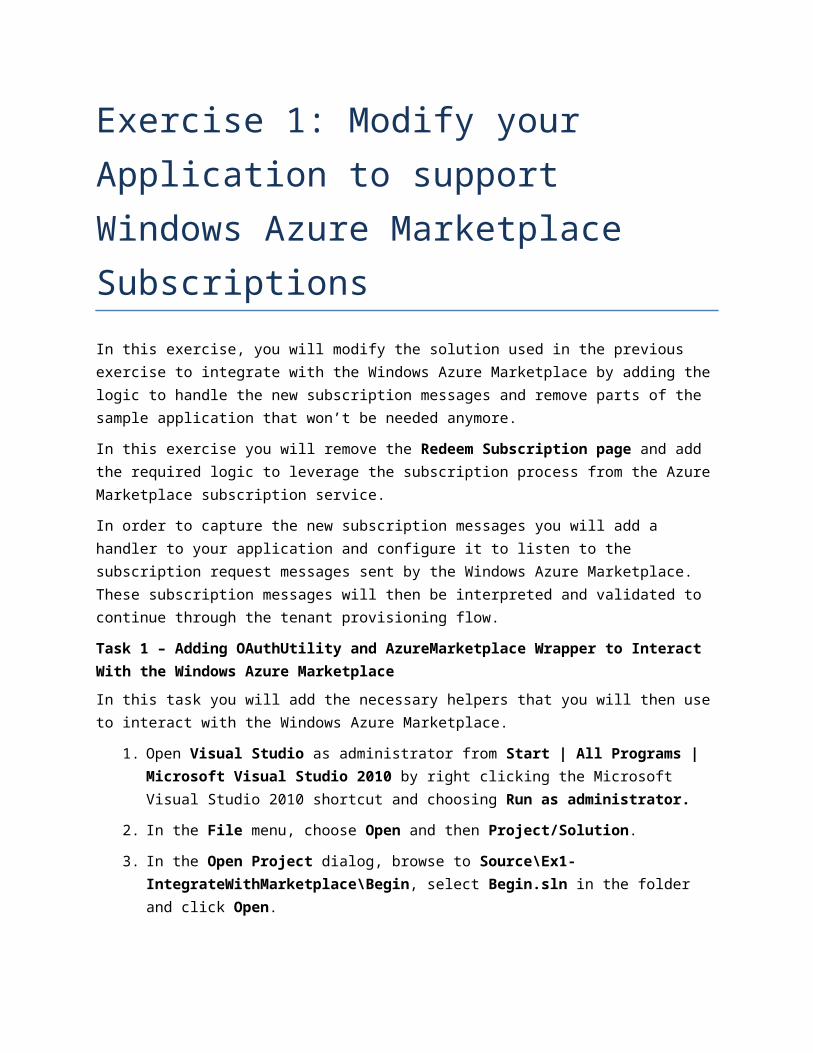
13. In the Storage Emulator window, click Reset and then select Yes. By doing this, you are deleting all the data stored by the services.
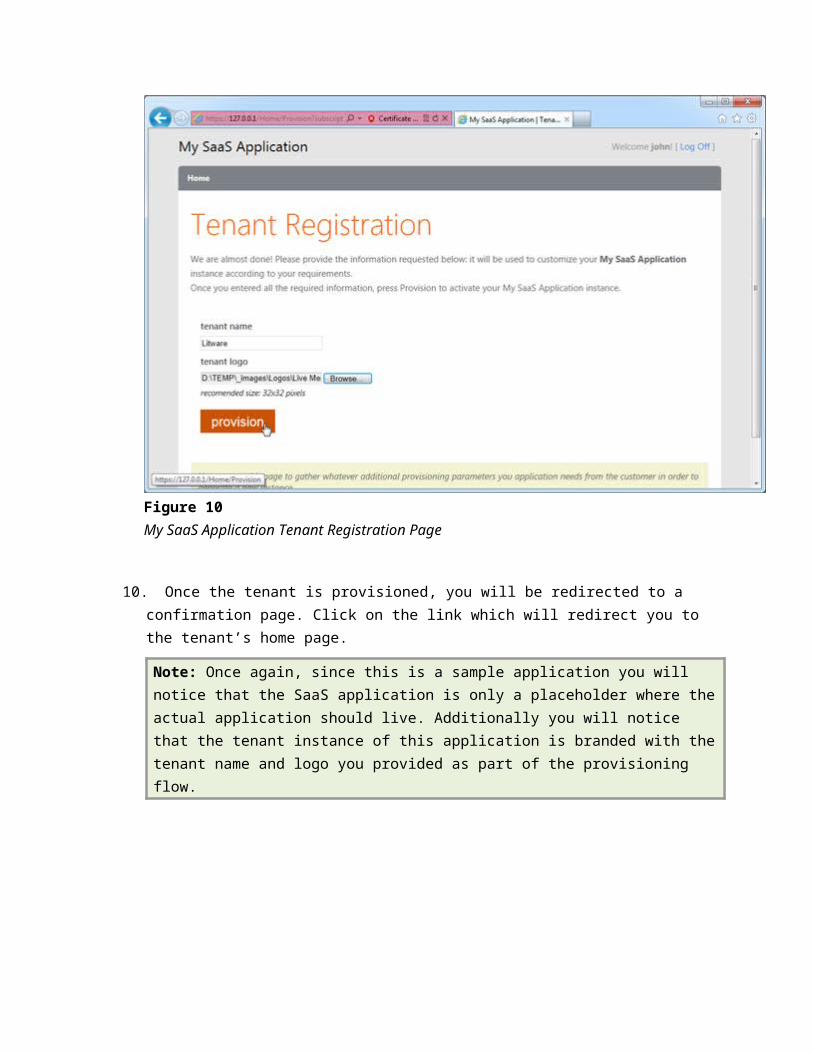
Figure 14Clicking Reset to clean the local storage
14. Wait until the status of all the services is set to Running to close the window.
Note: If you log in with the same Windows Live account you have already linked to a tenant, an error will be shown. By removing all the data stored in the User and Tenants table, you are avoiding this issue so you can use the same account in the next Exercises, or if you want to run the Lab again.
Exercise 1: Modify your Application to support Windows Azure Marketplace Subscriptions
In this exercise, you will modify the solution used in the previous exercise to integrate with the Windows Azure Marketplace by adding the logic to handle the new subscription messages and remove parts of the sample application that won’t be needed anymore.
In this exercise you will remove the Redeem Subscription page and add the required logic to leverage the subscription process from the Azure Marketplace subscription service.
In order to capture the new subscription messages you will add a handler to your application and configure it to listen to the subscription request messages sent by the Windows Azure Marketplace. These subscription messages will then be interpreted and validated to continue through the tenant provisioning flow.
Task 1 – Adding OAuthUtility and AzureMarketplace Wrapper to Interact With the Windows Azure Marketplace
In this task you will add the necessary helpers that you will then use to interact with the Windows Azure Marketplace.
1. Open Visual Studio as administrator from Start | All Programs | Microsoft Visual Studio 2010 by right clicking the Microsoft Visual Studio 2010 shortcut and choosing Run as administrator.
2. In the File menu, choose Open and then Project/Solution.
3. In the Open Project dialog, browse to Source\Ex1-IntegrateWithMarketplace\Begin, select Begin.sln in the folder and click Open.
Note: Alternatively, you can continue working with the solution used in Exercise 0.
The first step is to add the OAuthUtility that will wrap the Windows Identity Foundation OAuth Client Library.
Note: Windows Identity Foundation OAuth Client Library is currently in CTP and can be downloaded from here. For simplicity, the required assemblies are provided in the Lib folder inside Source\Assets. Please note that the license for the CTP is for non-production purposes only.
The OAuthUtility project contains helper classes that are needed to communicate with the Windows Azure Marketplace.
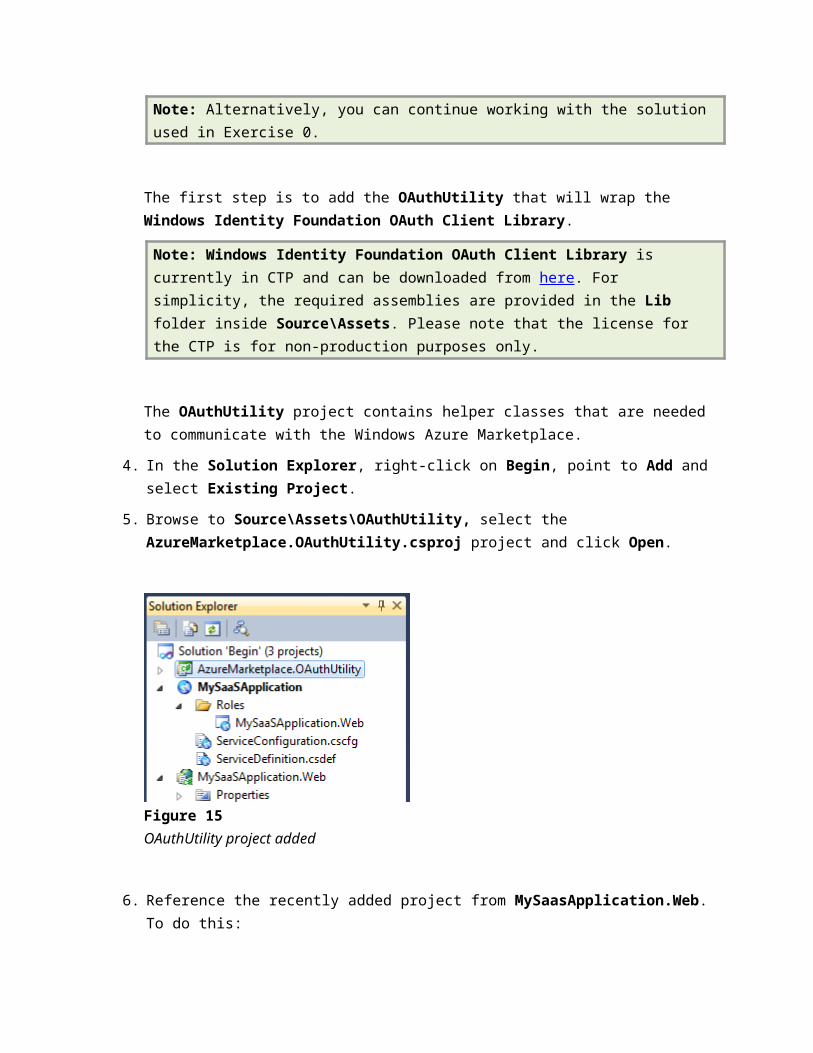
4. In the Solution Explorer, right-click on Begin, point to Add and select Existing Project.
5. Browse to Source\Assets\OAuthUtility, select the AzureMarketplace.OAuthUtility.csproj project and click Open.
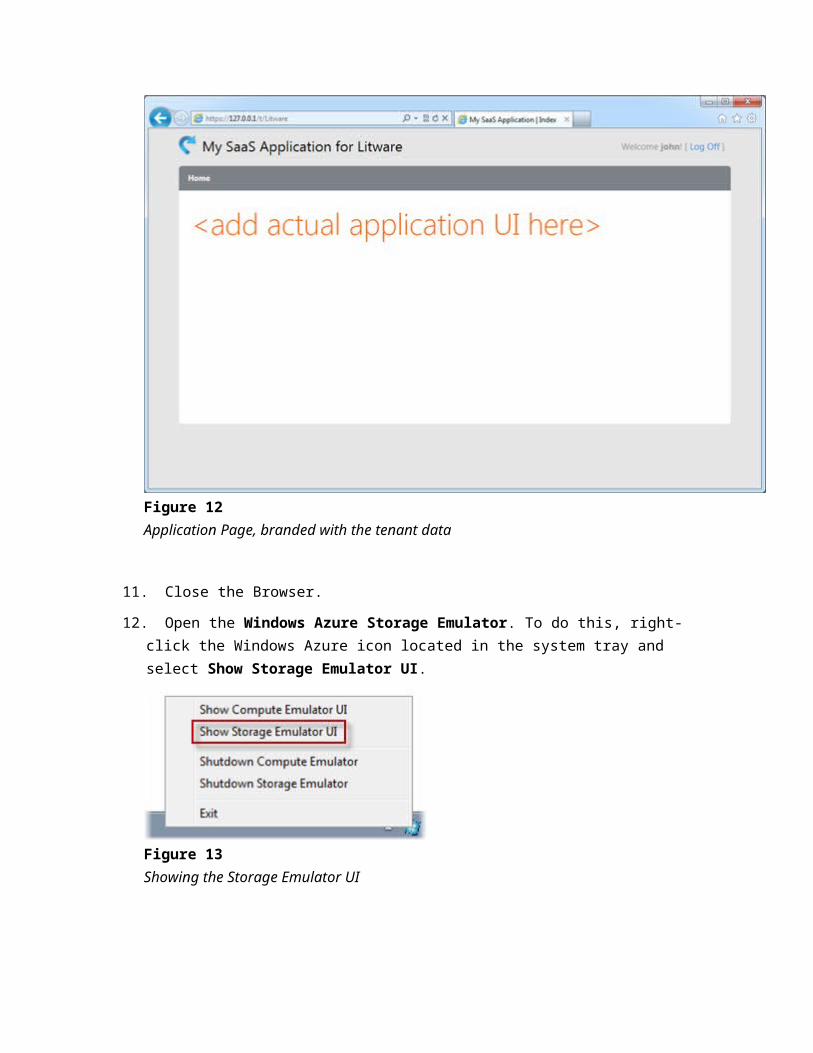
Figure 15OAuthUtility project added
6. Reference the recently added project from MySaasApplication.Web. To do this:
a. In the Solution Explorer, right-click the MySaasApplication.Web project node and select Add Reference.
b. In the Add Reference dialog, switch to the Projects tab, select the AzureMarketplace.OAuthUtility project and click OK.
Next, you need to add the classes that will be used to leverage the OAuthUtility to handle the subscription messages and the appropriate interface to interact with your application.
7. In the Solution Explorer, right click on MySaasApplication.Web, point to Add and select New Folder.
8. Name the new folder AzureMarketplace.
9. Right click in the AzureMarketplace folder, point to Add and select Existing Item.
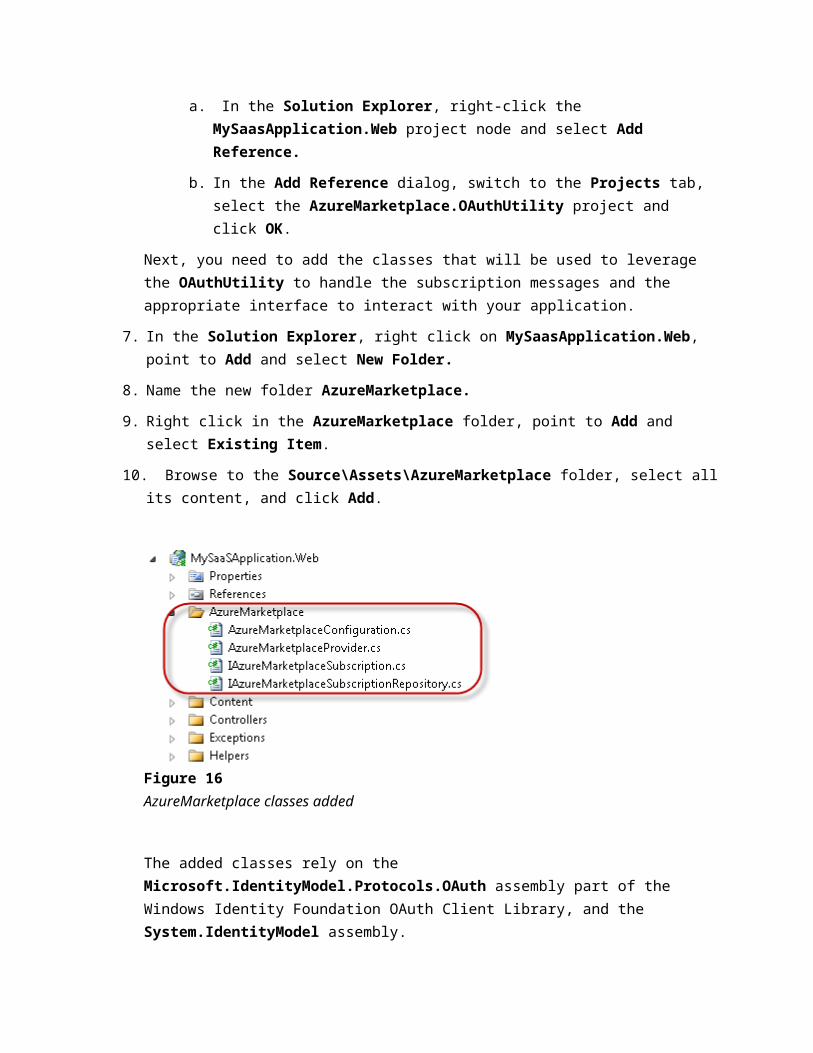
10. Browse to the Source\Assets\AzureMarketplace folder, select all its content, and click Add.
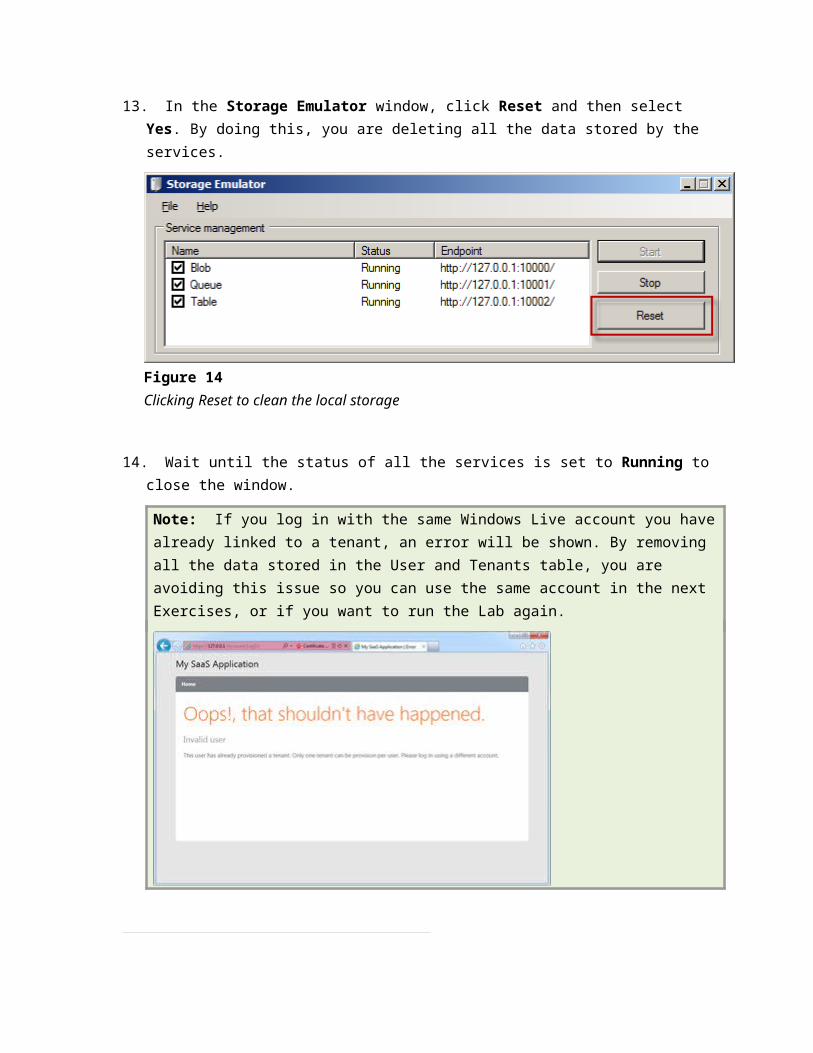
Figure 16AzureMarketplace classes added
The added classes rely on the Microsoft.IdentityModel.Protocols.OAuth assembly part of the Windows Identity Foundation OAuth Client Library, and the System.IdentityModel assembly.
11. In the Solution Explorer, right-click on MySaasApplication.Web and select Add Reference.
12. In the Add Reference dialog, switch to the Browse tab and browse to the Source\Assets\Lib.
13. Select the Microsoft.IdentityModel.Protocols.OAuth.dll component and click OK.
14. Repeat step 11 to add a new reference but this time, in the Add Reference dialog, switch to the .NET tab.
15. Select the System.IdentityModel component and click OK.
Task 2 – Updating Your Solution to Handle New Subscription Messages
So far you added the logic for interacting with the Windows Azure Marketplace and validating the subscription.
In this task you will add the logic to handle the new subscription messages, updating the repositories to store the new subscription in table storage and modifying the current MVC controllers and views to be consistent with the new flow.
First, you will add the subscription entity which you will use to store the received subscription into the table storage. To do this you will inherit the TableServiceEntity class and implement the IAzureMarketplaceSubscription.
The IAzureMarketplaceSubscription provides a common interface known by the AzureMarketplaceProvider with the properties provided by the AzureMarketplace (SubscriptionId, AccessToken, RefreshToken, LicenseCount, OfferingId and CreatedDate)
1. In the Solution Explorer, right click on the Models folder, point to Add and select Class.
2. In the Add New Item dialog, set the class name to Subscription.cs and click Add.
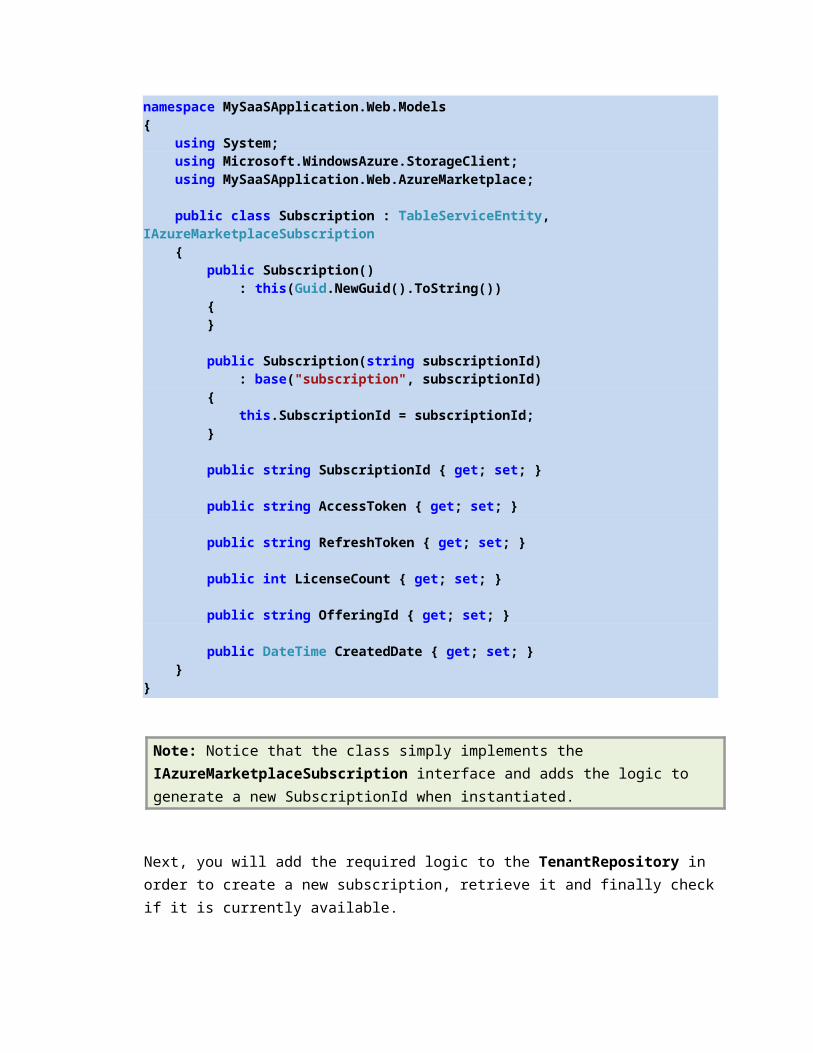
3. Replace the entire class implementation with the following code snippet.
(Code Snippet - Intro to WAz Marketplace for Apps- Ex1 Subscription Entity- CS)
C#
namespace MySaaSApplication.Web.Models{ using System; using Microsoft.WindowsAzure.StorageClient; using MySaaSApplication.Web.AzureMarketplace;
public class Subscription : TableServiceEntity, IAzureMarketplaceSubscription { public Subscription() : this(Guid.NewGuid().ToString()) { }
public Subscription(string subscriptionId) : base("subscription", subscriptionId) { this.SubscriptionId = subscriptionId; }
public string SubscriptionId { get; set; }
public string AccessToken { get; set; }
public string RefreshToken { get; set; }
public int LicenseCount { get; set; }
public string OfferingId { get; set; }
public DateTime CreatedDate { get; set; } }}
Note: Notice that the class simply implements the IAzureMarketplaceSubscription interface and adds the logic to generate a new SubscriptionId when instantiated.
Next, you will add the required logic to the TenantRepository in order to create a new subscription, retrieve it and finally check if it is currently available.
In order to do this, you will implement IAzureMarketplaceSubscriptionRepository which is an interface known by the AzureMarketplaceProvider.
Note: The TenantRepository contains all the required logic to interact with the table storage, and already handles the basic operations for storing Tenants and Users.
4. In the Solution Explorer, double click on the TenantRepository.cs file, located inside the Models folder to open it and insert the following namespace declaration:
C#
using MySaaSApplication.Web.AzureMarketplace;
5. Add the bolded code next to the TenantRepository class declaration to indicate that it will implement the IAzureMarketplaceSubscriptionRepository interface.
C#
public class TenantRepository : ITenantRepository, IAzureMarketplaceSubscriptionRepository
6. With the cursor located right after the “y” in IAzureMarketplaceSubscriptionRepository, press ALT+SHIFT+F10 and select the option Implement interface ‘IAzureMarketplaceSubscriptionRepository’.
7. Add the subscriptionTable field as shown below.
C#
public class TenantRepository : ITenantRepository, IAzureMarketplaceSubscriptionRepository{ private IAzureTable<Tenant> tenantTable;
private IAzureTable<User> userTable;
private IAzureTable<Subscription> subscriptionTable;
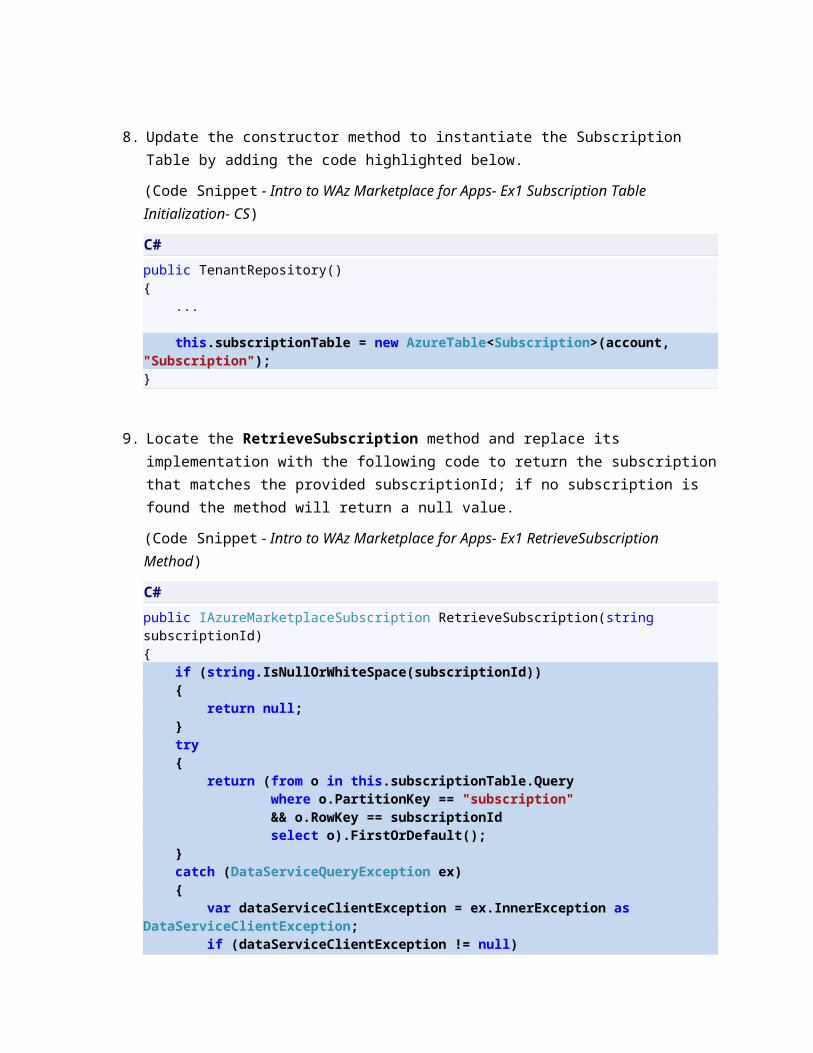
8. Update the constructor method to instantiate the Subscription Table by adding the code highlighted below.
(Code Snippet - Intro to WAz Marketplace for Apps- Ex1 Subscription Table Initialization- CS)
C#
public TenantRepository(){ ...
this.subscriptionTable = new AzureTable<Subscription>(account, "Subscription");}
9. Locate the RetrieveSubscription method and replace its implementation with the following code to return the subscription that matches the provided subscriptionId; if no subscription is found the method will return a null value.
(Code Snippet - Intro to WAz Marketplace for Apps- Ex1 RetrieveSubscription Method)
C#
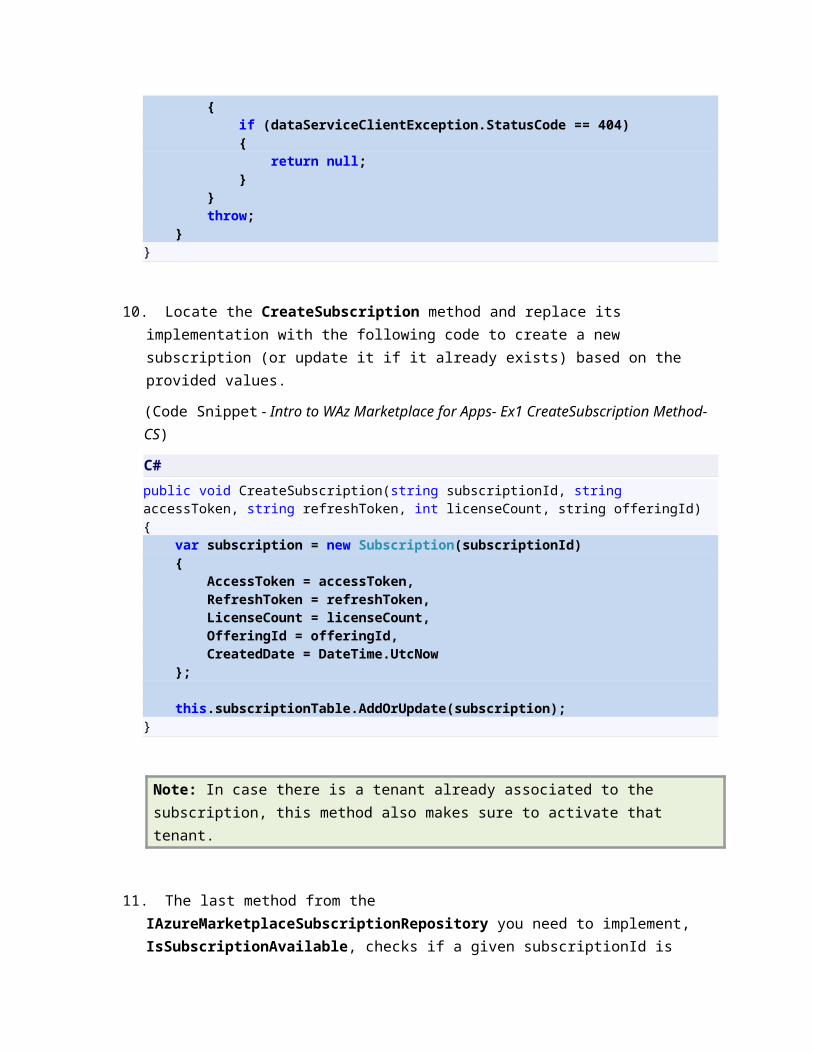
public IAzureMarketplaceSubscription RetrieveSubscription(string subscriptionId){ if (string.IsNullOrWhiteSpace(subscriptionId)) { return null; } try { return (from o in this.subscriptionTable.Query where o.PartitionKey == "subscription" && o.RowKey == subscriptionId select o).FirstOrDefault(); } catch (DataServiceQueryException ex) { var dataServiceClientException = ex.InnerException as DataServiceClientException; if (dataServiceClientException != null) { if (dataServiceClientException.StatusCode == 404) { return null; } } throw; }}
10. Locate the CreateSubscription method and replace its implementation with the following code to create a new subscription (or update it if it already exists) based on the provided values.
(Code Snippet - Intro to WAz Marketplace for Apps- Ex1 CreateSubscription Method- CS)
C#
public void CreateSubscription(string subscriptionId, string accessToken, string refreshToken, int licenseCount, string offeringId){ var subscription = new Subscription(subscriptionId) { AccessToken = accessToken, RefreshToken = refreshToken, LicenseCount = licenseCount, OfferingId = offeringId, CreatedDate = DateTime.UtcNow };
this.subscriptionTable.AddOrUpdate(subscription);}
Note: In case there is a tenant already associated to the subscription, this method also makes sure to activate that tenant.
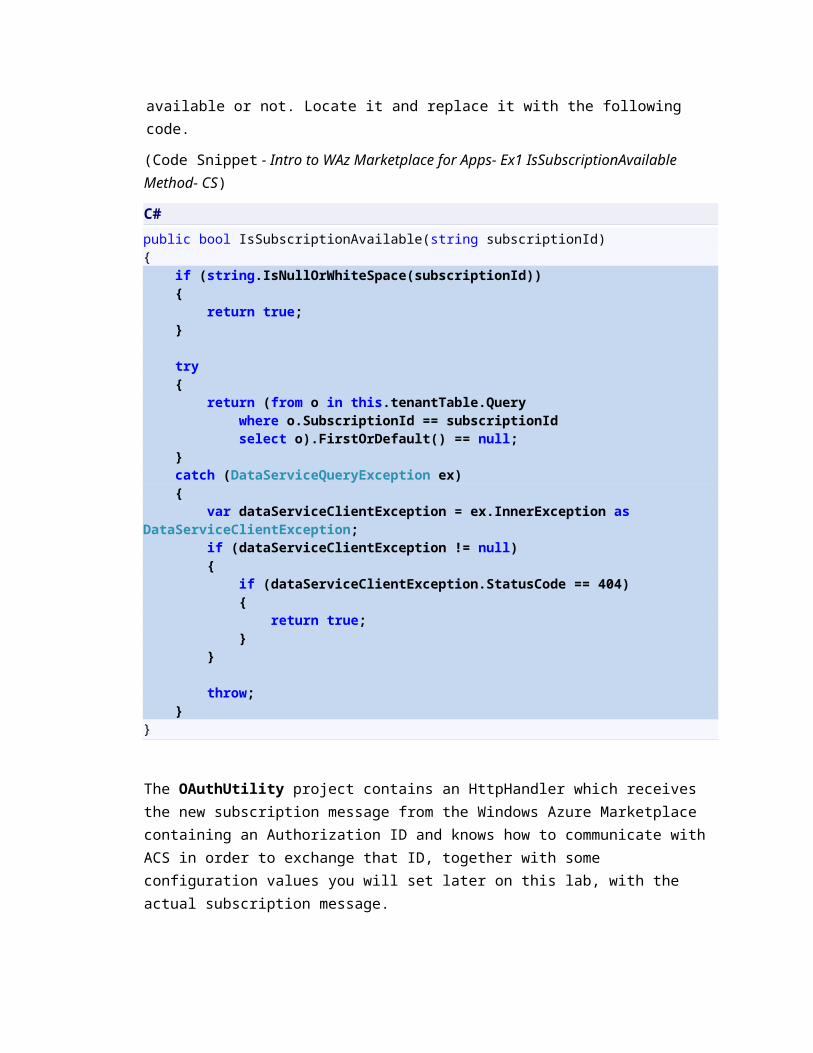
11. The last method from the IAzureMarketplaceSubscriptionRepository you need to implement, IsSubscriptionAvailable, checks if a given subscriptionId is available or not. Locate it and replace it with the following code.
(Code Snippet - Intro to WAz Marketplace for Apps- Ex1 IsSubscriptionAvailable Method- CS)
C#
public bool IsSubscriptionAvailable(string subscriptionId){ if (string.IsNullOrWhiteSpace(subscriptionId)) { return true; }
try { return (from o in this.tenantTable.Query where o.SubscriptionId == subscriptionId select o).FirstOrDefault() == null; } catch (DataServiceQueryException ex) { var dataServiceClientException = ex.InnerException as DataServiceClientException; if (dataServiceClientException != null) { if (dataServiceClientException.StatusCode == 404) { return true; } }
throw; }}
The OAuthUtility project contains an HttpHandler which receives the new subscription message from the Windows Azure Marketplace containing an Authorization ID and knows how to
communicate with ACS in order to exchange that ID, together with some configuration values you will set later on this lab, with the actual subscription message.
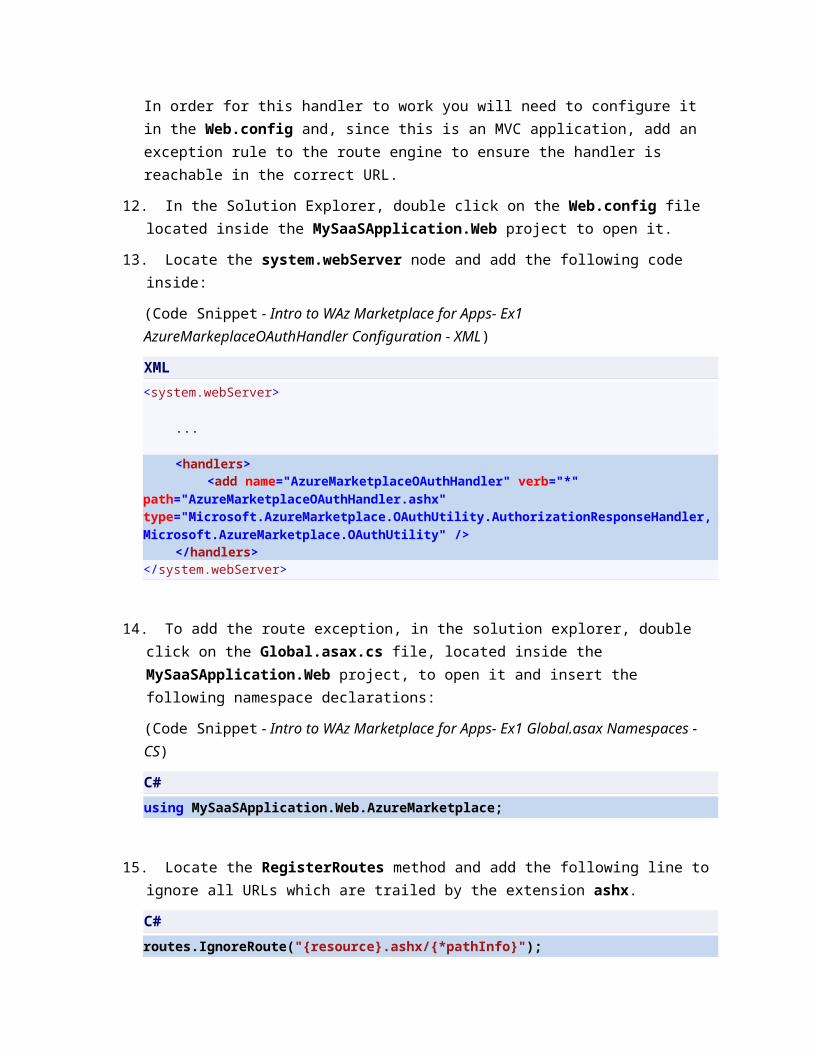
In order for this handler to work you will need to configure it in the Web.config and, since this is an MVC application, add an exception rule to the route engine to ensure the handler is reachable in the correct URL.
12. In the Solution Explorer, double click on the Web.config file located inside the MySaaSApplication.Web project to open it.
13. Locate the system.webServer node and add the following code inside:
(Code Snippet - Intro to WAz Marketplace for Apps- Ex1 AzureMarkeplaceOAuthHandler Configuration - XML)
XML
<system.webServer>
...
<handlers> <add name="AzureMarketplaceOAuthHandler" verb="*" path="AzureMarketplaceOAuthHandler.ashx" type="Microsoft.AzureMarketplace.OAuthUtility.AuthorizationResponseHandler, Microsoft.AzureMarketplace.OAuthUtility" /> </handlers></system.webServer>
14. To add the route exception, in the solution explorer, double click on the Global.asax.cs file, located inside the MySaaSApplication.Web project, to open it and insert the following namespace declarations:
(Code Snippet - Intro to WAz Marketplace for Apps- Ex1 Global.asax Namespaces - CS)
C#
using MySaaSApplication.Web.AzureMarketplace;
15. Locate the RegisterRoutes method and add the following line to ignore all URLs which are trailed by the extension ashx.
C#
routes.IgnoreRoute("{resource}.ashx/{*pathInfo}");
Additionally, in Global.asax.cs, you will configure the application to initialize the Subscription Table every time it starts.
16. To do this, locate the Application_Start method and paste the following line at the end of the method.
C#
protected void Application_Start(){ ...
// initialize tables var account = CloudStorageAccount.FromConfigurationSetting("DataConnectionString"); new AzureTable<Tenant>(account, "Tenants").EnsureExist(); new AzureTable<User>(account, "User").EnsureExist(); new AzureTable<Subscription>(account, "Subscription").EnsureExist();}
Also, you will add the logic to initialize the AzureMarketplaceProvider. This initialization method loads the OAuth configuration you will add later on this lab and injects the IAzureMarketplaceSubscriptionRepository which in your solution is the TenantRepository.
17. Add the following line at the end of the Application_Start method:
C#
AzureMarketplaceProvider.ConfigureOAuth(new TenantRepository());
The final steps in this task involve adding the required logic in the MVC Controllers and Views in order to support the new provisioning flow.
18. Open the HomeController.cs file, located inside the Controllers folder of the MySaaSApplication.Web project and insert the following namespace declarations:
C#
using MySaaSApplication.Web.AzureMarketplace;using System;
19. Locate the Provision action method, decorated with the HttpGet attribute, and replace the content with the code shown below in order to validate the subscription ID and redirect the user to the proper action, depending whether an existing tenant is already associated to the given subscription or not.
(Code Snippet - Intro to WAz Marketplace for Apps- Ex1 Subscription Validation Get- CS)
C#
if (!AzureMarketplaceProvider.IsSubscriptionValid(subscription))
{ throw new InvalidOperationException("The provided subscription is invalid. Please contact your administrator.");}
var tenant = repository.RetrieveTenantBySubscription(subscription);if (tenant == null){ var existingSubscription = AzureMarketplaceProvider.RetrieveSubscription(subscription); this.ViewBag.OfferingId = existingSubscription.OfferingId;
return View(new TenantProvisioningViewModel() { SubscriptionId = subscription });}else{ if (!tenant.Active) { this.repository.ActivateTenant(tenant.Name);
return RedirectToAction("Congratulations", new { tenantName = tenant.Name }); }
return RedirectToAction("Index", "Tenant", new { tenantName = tenant.Name });}
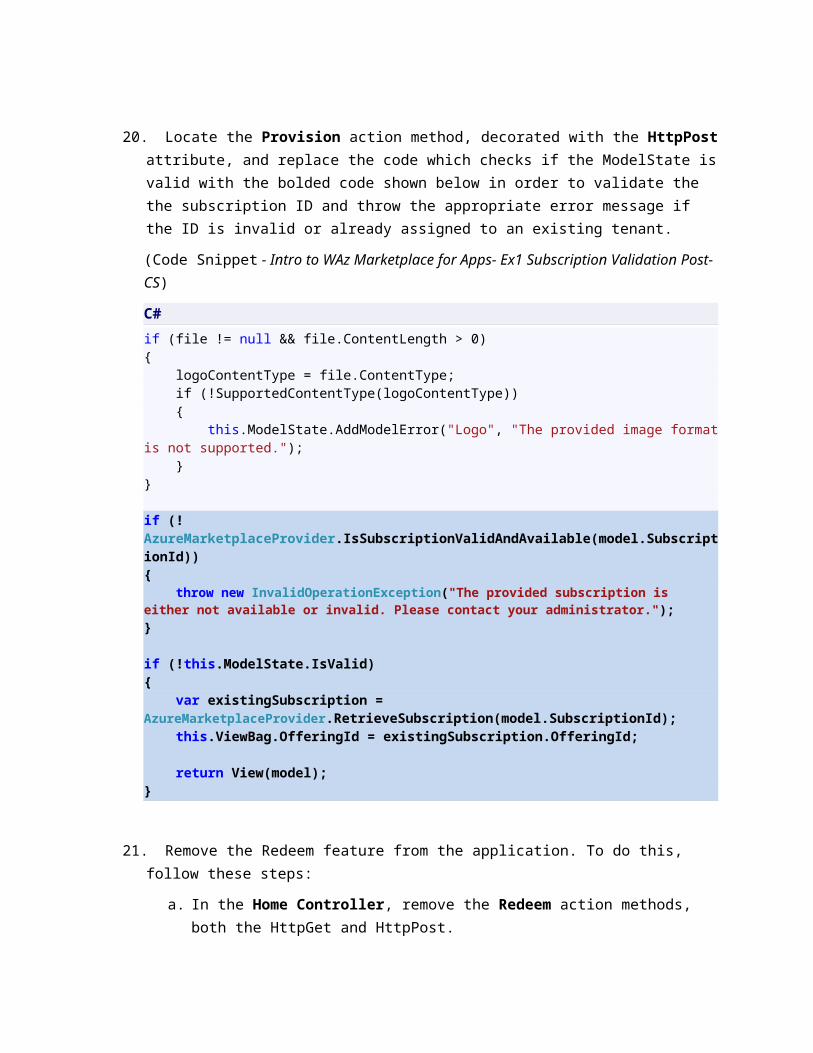
20. Locate the Provision action method, decorated with the HttpPost attribute, and replace the code which checks if the ModelState is valid with the bolded code shown below in order to validate the the subscription ID and throw the appropriate error message if the ID is invalid or already assigned to an existing tenant.
(Code Snippet - Intro to WAz Marketplace for Apps- Ex1 Subscription Validation Post- CS)
C#
if (file != null && file.ContentLength > 0){ logoContentType = file.ContentType; if (!SupportedContentType(logoContentType)) { this.ModelState.AddModelError("Logo", "The provided image format is not supported."); }}
if (!AzureMarketplaceProvider.IsSubscriptionValidAndAvailable(model.SubscriptionId)){ throw new InvalidOperationException("The provided subscription is either not available or invalid. Please contact your administrator.");}
if (!this.ModelState.IsValid){ var existingSubscription = AzureMarketplaceProvider.RetrieveSubscription(model.SubscriptionId); this.ViewBag.OfferingId = existingSubscription.OfferingId;
return View(model);}
21. Remove the Redeem feature from the application. To do this, follow these steps:
a. In the Home Controller, remove the Redeem action methods, both the HttpGet and HttpPost.
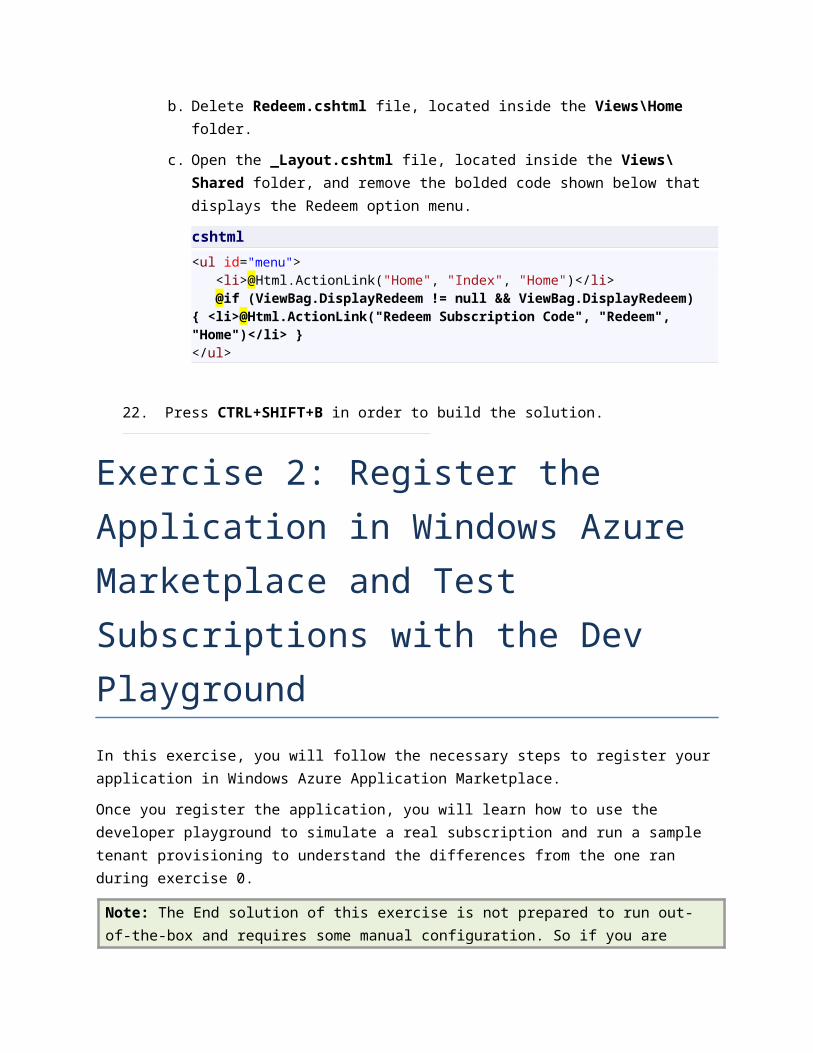
b. Delete Redeem.cshtml file, located inside the Views\Home folder.
c. Open the _Layout.cshtml file, located inside the Views\Shared folder, and remove the bolded code shown below that displays the Redeem option menu.
cshtml
<ul id="menu"> <li>@Html.ActionLink("Home", "Index", "Home")</li> @if (ViewBag.DisplayRedeem != null && ViewBag.DisplayRedeem) { <li>@Html.ActionLink("Redeem Subscription Code", "Redeem", "Home")</li> }</ul>
22. Press CTRL+SHIFT+B in order to build the solution.
Exercise 2: Register the Application in Windows Azure Marketplace and Test Subscriptions with the Dev Playground
In this exercise, you will follow the necessary steps to register your application in Windows Azure Application Marketplace.
Once you register the application, you will learn how to use the developer playground to simulate a real subscription and run a sample tenant provisioning to understand the differences from the one ran during exercise 0.
Note: The End solution of this exercise is not prepared to run out-of-the-box and requires some manual configuration. So if you are running the End solution without following the steps in this exercise, please first perform all setup steps described in the Overview section of this Lab, and also Task 1 and 2 of this exercise.
Task 1 – Subscribing to the Windows Azure Marketplace for Applications
In this task, you will go through the process of registering your application in the Windows Azure Marketplace for Applications.
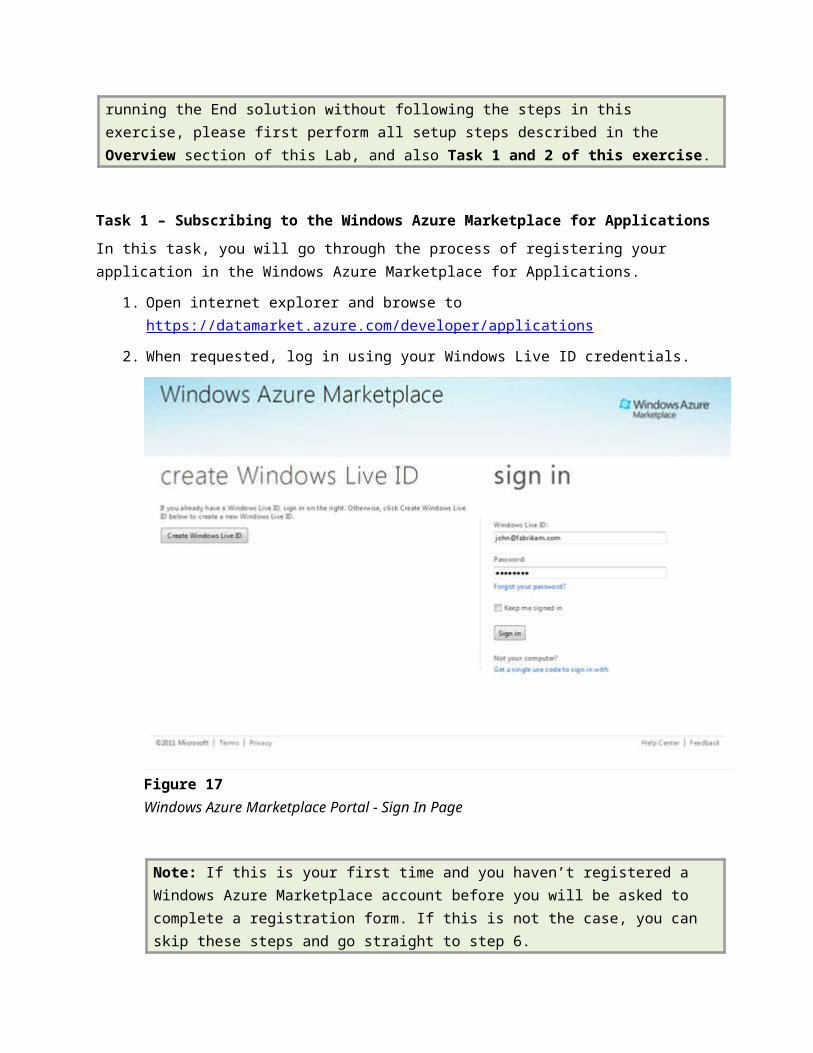
1. Open internet explorer and browse to https://datamarket.azure.com/developer/applications
2. When requested, log in using your Windows Live ID credentials.
Figure 17Windows Azure Marketplace Portal - Sign In Page
Note: If this is your first time and you haven’t registered a Windows Azure Marketplace account before you will be asked to complete a registration form. If this is not the case, you can skip these steps and go straight to step 6.
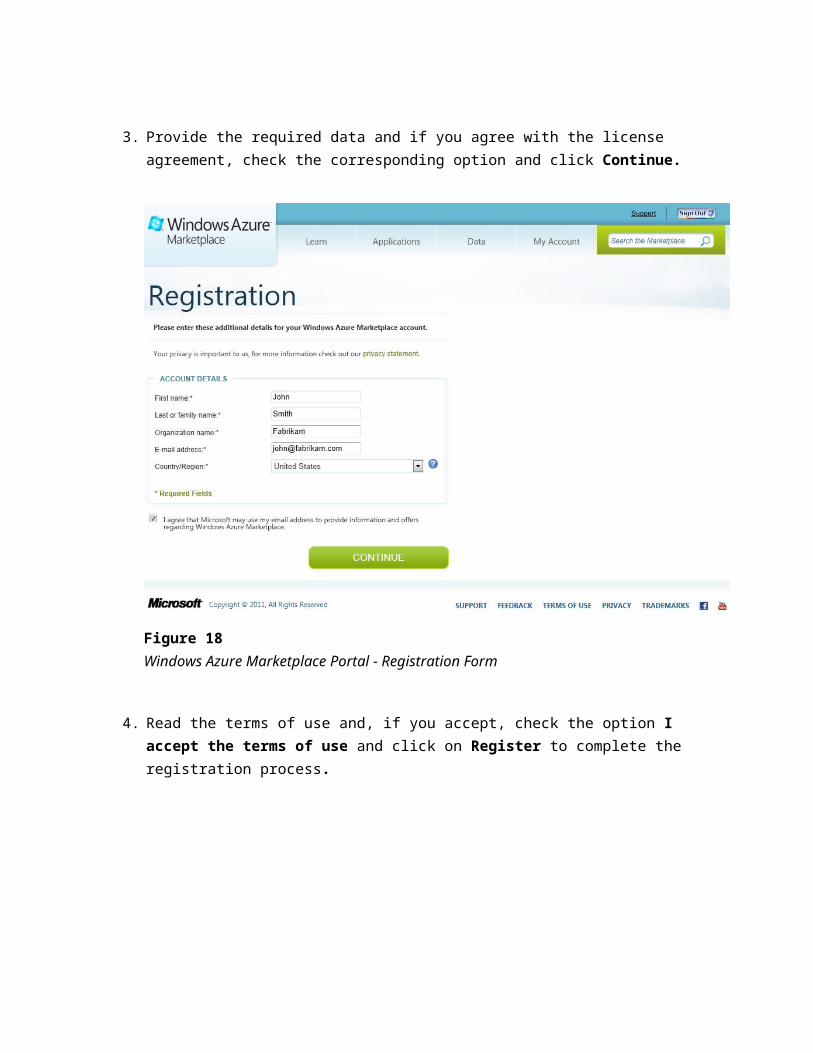
3. Provide the required data and if you agree with the license agreement, check the corresponding option and click Continue.
Figure 18Windows Azure Marketplace Portal - Registration Form
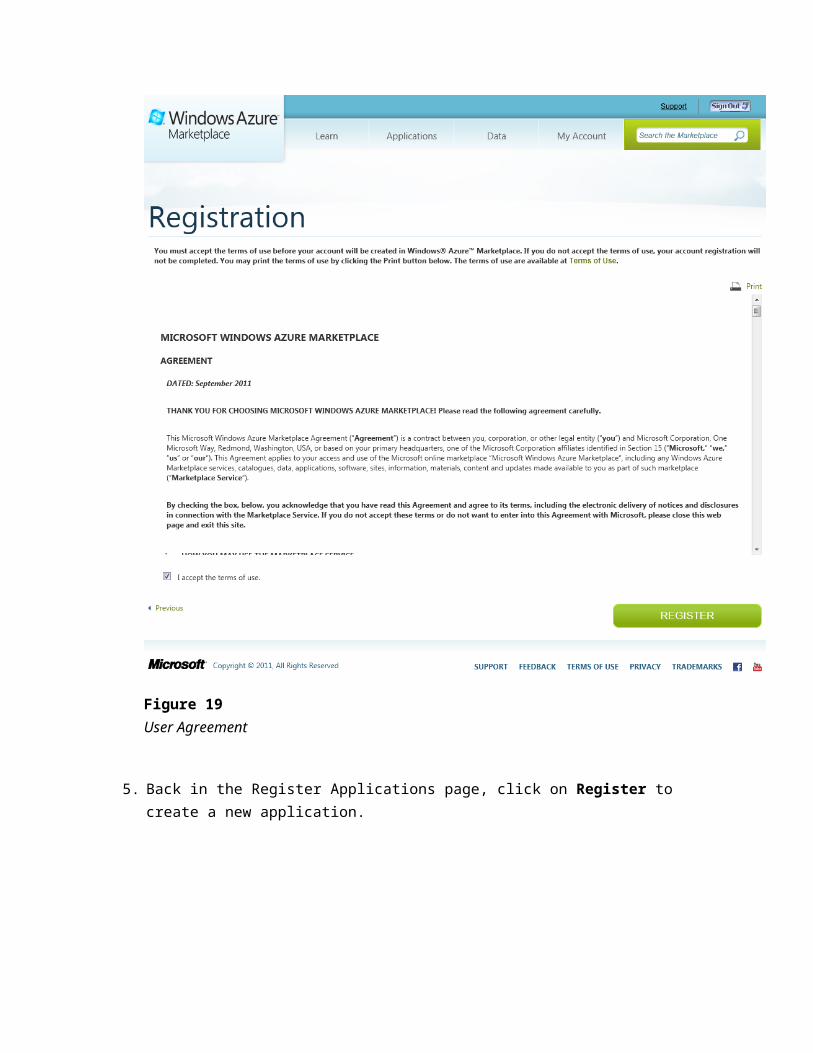
4. Read the terms of use and, if you accept, check the option I accept the terms of use and click on Register to complete the registration process.
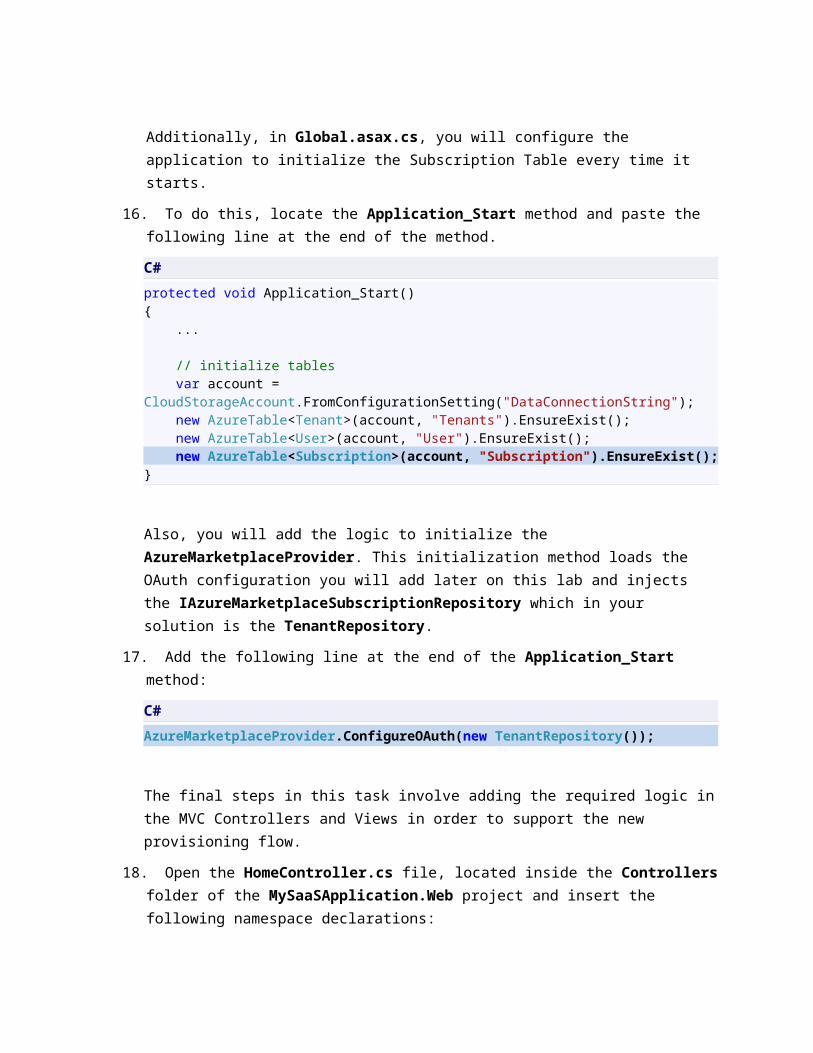
Figure 19User Agreement
5. Back in the Register Applications page, click on Register to create a new application.
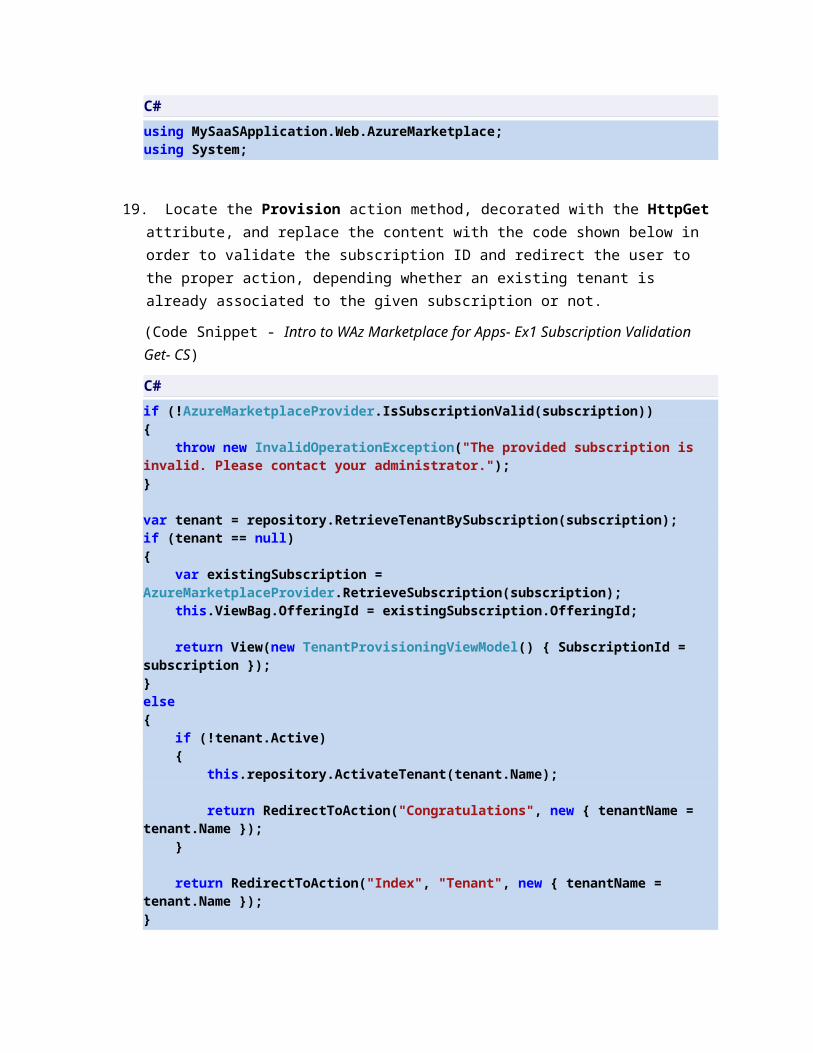
Figure 20Registered Applications Page
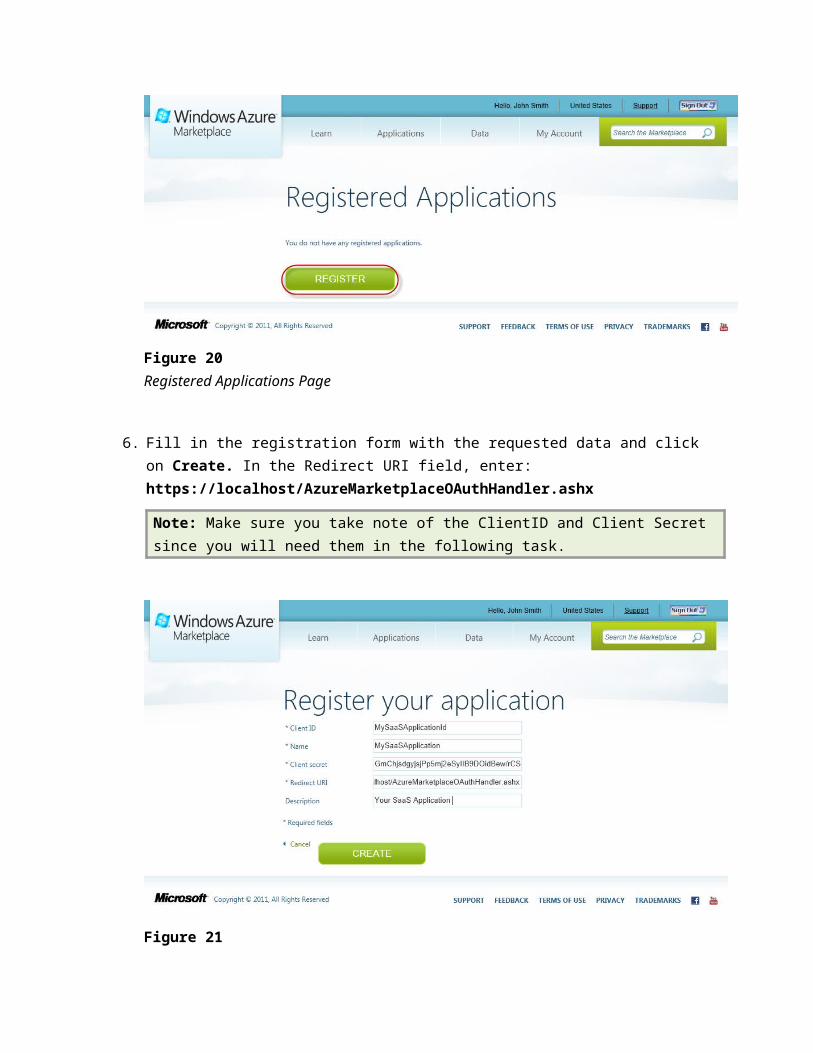
6. Fill in the registration form with the requested data and click on Create. In the Redirect URI field, enter: https://localhost/AzureMarketplaceOAuthHandler.ashx
Note: Make sure you take note of the ClientID and Client Secret since you will need them in the following task.
Figure 21Registering your application
Note: When filling the registration form, take into account the following:
- Client ID: is a name or code that will identify your application within the marketplace. You can use here anything you want, e.g. MySaasApplicationId. Be sure to remember or take note of this value since you will use it in a future step of this lab.
- Name: is the friendly name of the application.
- Client Secret: provided by default, is the secret that will be used, together with the Client ID, to integrate your application with the Marketplace, be sure to take note of this value as well.
- Redirect URI: is the URI where the marketplace will post the Purchase message, you will get further information on this in a future step.
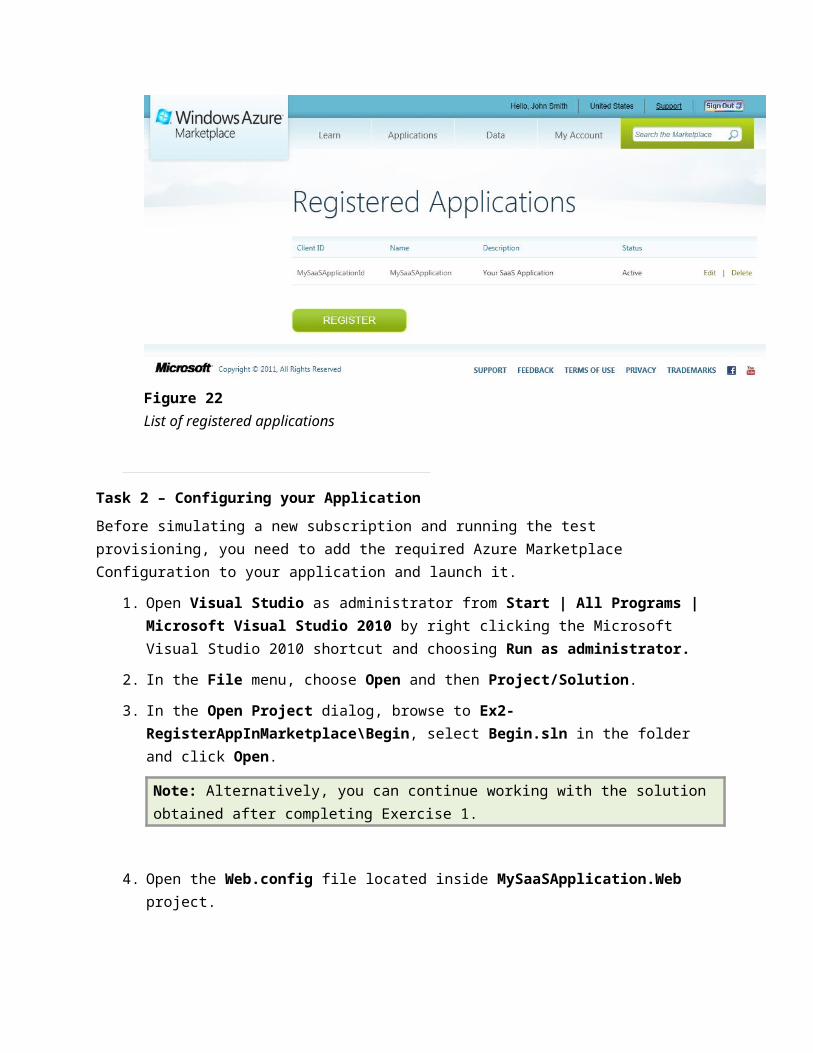
7. After the registration completes, you will be redirected to the list of registered applications. You can see that your application is now added to this list. This indicates that you have successfully registered your application in the marketplace.
Figure 22List of registered applications
Task 2 – Configuring your Application
Before simulating a new subscription and running the test provisioning, you need to add the required Azure Marketplace Configuration to your application and launch it.
1. Open Visual Studio as administrator from Start | All Programs | Microsoft Visual Studio 2010 by right clicking the Microsoft Visual Studio 2010 shortcut and choosing Run as administrator.
2. In the File menu, choose Open and then Project/Solution.
3. In the Open Project dialog, browse to Ex2-RegisterAppInMarketplace\Begin, select Begin.sln in the folder and click Open.
Note: Alternatively, you can continue working with the solution obtained after completing Exercise 1.
4. Open the Web.config file located inside MySaaSApplication.Web project.
5. Locate the configSections node and include the following configuration section declaration:
(Code Snippet - Intro to WAz Marketplace for Apps- Ex2 Azure Marketplace Configuration Section Declaration - XML)
XML
<configSections> <section name="microsoft.identityModel" type="Microsoft.IdentityModel.Configuration.MicrosoftIdentityModelSection, Microsoft.IdentityModel, Version=3.5.0.0, Culture=neutral, PublicKeyToken=31bf3856ad364e35" /> <section name="azureMarketplaceConfiguration" type="MySaaSApplication.Web.AzureMarketplace.AzureMarketplaceConfiguration, MySaaSApplication.Web" requirePermission="false"/></configSections>
6. Next, add the following to the end of the configuration section prior to the configuration closing tag:
Note: Make sure to replace the ClientID and ClientSecret with the values registered in the first task of this exercise.
(Code Snippet - Intro to WAz Marketplace for Apps- Ex2 Azure Marketplace Configuration Section - XML)
XML
<azureMarketplaceConfiguration appSpecificAzureMarketplaceOAuthClientId="{ClientID}" appSpecificAzureMarketplaceOAuthClientSecret = "{ClientSecret}" appSpecificPostConsentRedirectUrl = "https://localhost/AzureMarketplaceOAuthHandler.ashx" appSpecificWellKnownPostConsentUseUri = "https://localhost/Home/Provision"/></configuration>
7. Press F5 to start the application in the Compute Emulator.
Task 3 – Running a Test Provisioning Through the Developer Playground
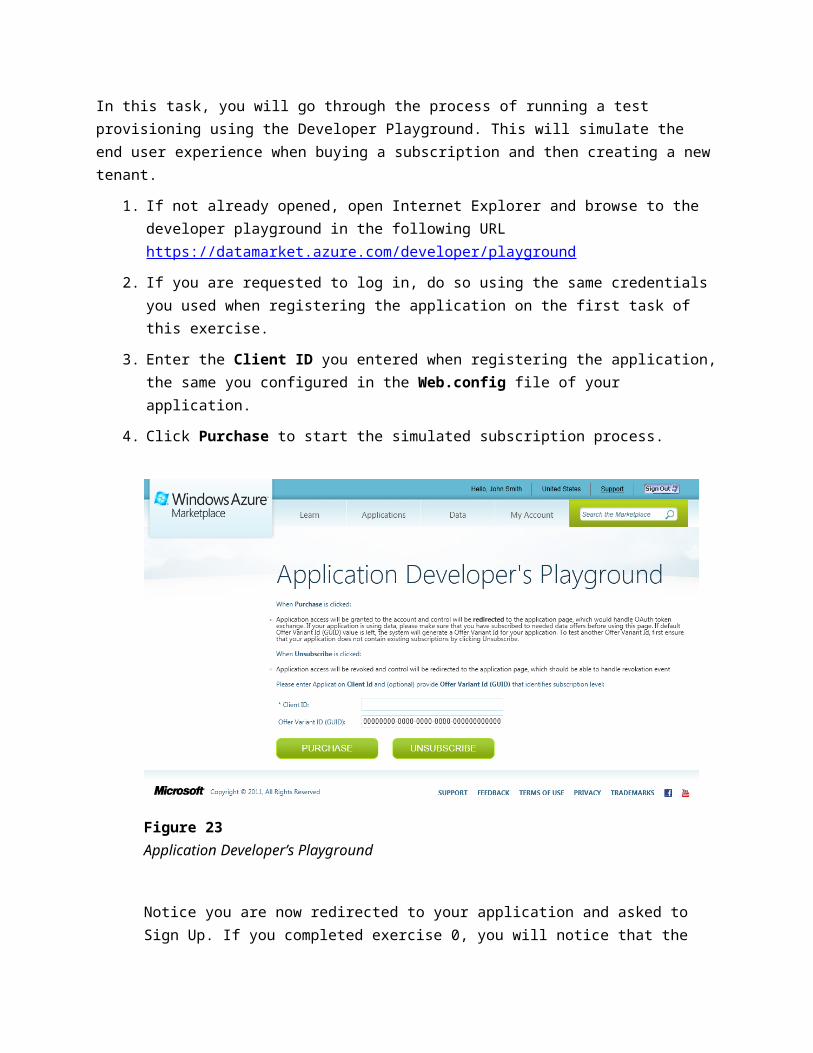
In this task, you will go through the process of running a test provisioning using the Developer Playground. This will simulate the end user experience when buying a subscription and then creating a new tenant.
1. If not already opened, open Internet Explorer and browse to the developer playground in the following URL https://datamarket.azure.com/developer/playground
2. If you are requested to log in, do so using the same credentials you used when registering the application on the first task of this exercise.
3. Enter the Client ID you entered when registering the application, the same you configured in the Web.config file of your application.
4. Click Purchase to start the simulated subscription process.
Figure 23Application Developer’s Playground
Notice you are now redirected to your application and asked to Sign Up. If you completed exercise 0, you will notice that the provisioning flow has started but you no longer need to provide a subscription ID. Instead this is now provided by the Windows Azure Marketplace.
Follow the next steps in order to complete the provisioning of a new tenant.
5. Log in with one of the configured Social Identity Providers.
Note: Make sure you choose a different identity than used in exercise 0 or you will receive an error when trying to create the tenant. If you receive an Invalid User exception in Visual Studio, could be that you are using a user account that is already registered. You can avoid this, using another account, another provider or you can reset the Windows Azure Emulator if you are using the solution locally.
6. Upon successful login, you will be redirected back to the application and asked to register the user by providing all those values that are not provided by the identity provider you selected.
7. Complete the missing information and click Submit to continue.
8. In the Tenant Registration page, complete the required information and click Provision to finish the flow.
Note: This tenant will be associated with the user you have signed in with. If you want to access the tenant in the future you will need to log in with that same user, otherwise you will not have access to it.
9. Once the tenant is provisioned, you will be redirected to a confirmation page. Click on the link which will redirect you to the tenant’s home page.
10. Close the Browser.
Exercise 3: Add Support for Unsubscribe messages
In this exercise, you will modify the solution used in previous exercises to handle unsubscribed messages sent by the Windows Azure Marketplace and, when the message is received, disable the subscription so the Tenant can no longer access its instance.
Additionally, you will follow the necessary steps to deploy the application to Windows Azure to verify the changes were successfully performed.
Note: The End solution of this exercise is not prepared to run out-of-the-box and requires some manual configuration. So if you are running the solution without following the steps in this exercise, please first follow the instructions in Task 1 and 2 of Exercise 2. Additionally, perform Task 3 of this exercise.
Task 1 – Handling Unsubscribe Messages
In this task, you will add logic to your application for handing unsubscribed tokens received from Windows Azure Marketplace and act in consequence deactivating the specific Tenant.
Note: Since a subscription can be cancelled by either payment reasons or if the user decides to do so, a good approach is not to remove a Tenant permanently from your database, instead you can disable it and have your application do a simple activation if the user decides to subscribe again.
If you are not using the solution obtained after completing exercise 2, follow the steps below to open the begin solution and also the first task of exercise 2 in order to obtain the required values (Client ID and Client Secret.) After you obtain those, open the Web.config file of the MySaaSApplication.Web project and configure the required values inside the azureMarkeplaceConfiguration section. Otherwise skip to step 4.
1. Open Visual Studio as administrator from Start | All Programs | Microsoft Visual Studio 2010 by right clicking the Microsoft Visual Studio 2010 shortcut and choosing Run as administrator.
2. In the File menu, choose Open and then Project/Solution.
3. In the Open Project dialog, browse to Source\Ex3-HandleUnsubscribe\Begin, select Begin.sln in the folder and click Open.
Note: Alternatively you can continue working with the end solution obtained after completing the previous exercise.
In the following steps, you will update the subscription repository to handle Windows Azure Marketplace tokens with cancelled subscriptions.
4. Open the TenantRepository.cs file, located inside the Models folder.
5. Locate the Unsubscribe method and replace its implementation with the following code to mark a tenant as inactive.
(Code Snippet - Intro to WAz Marketplace for Apps- Ex3 Unsubscribe Method- CS)
C#
public void Unsubscribe(string subscriptionId)
{ var tenant = this.RetrieveTenantBySubscription(subscriptionId);
if (tenant != null && tenant.Active) { tenant.Active = false; this.AddOrUpdateTenant(tenant); }}
Note: Notice that you simply needed to implement this method in order to support unsubscribed messages. This is because the AzureMarketplaceProvider is implemented to invoke the Unsubscribe method of the IAzureMarketplaceSubscriptionRepository when an unsubscribe message is received.
Task 2 – Gathering the Required Information to Deploy to Windows Azure
In this task, you will gather all the required information before configuring MySaaSApplication and deploying it to Windows Azure.
First, you need a Windows Azure Storage account for leveraging Blob Storage.
Note: If you already have one available you can move forward to step 7. You will need the Storage Account and its Primary Key so make sure to record these values.
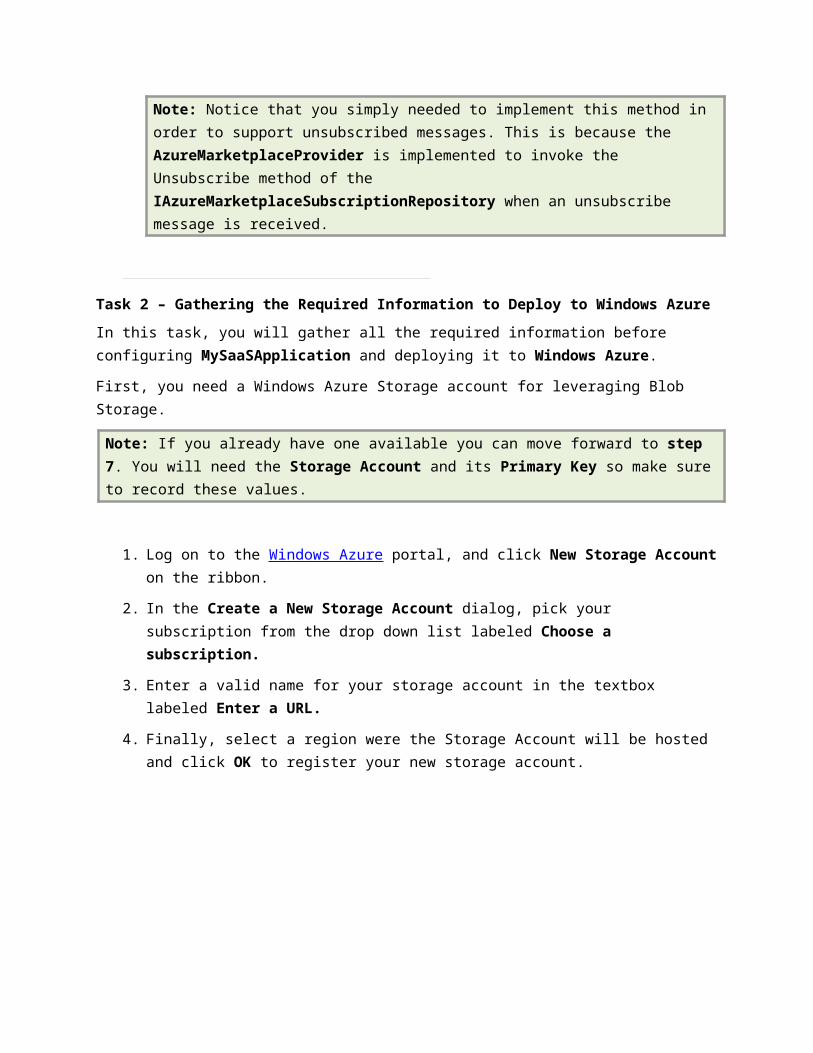
1. Log on to the Windows Azure portal, and click New Storage Account on the ribbon.
2. In the Create a New Storage Account dialog, pick your subscription from the drop down list labeled Choose a subscription.
3. Enter a valid name for your storage account in the textbox labeled Enter a URL.
4. Finally, select a region were the Storage Account will be hosted and click OK to register your new storage account.

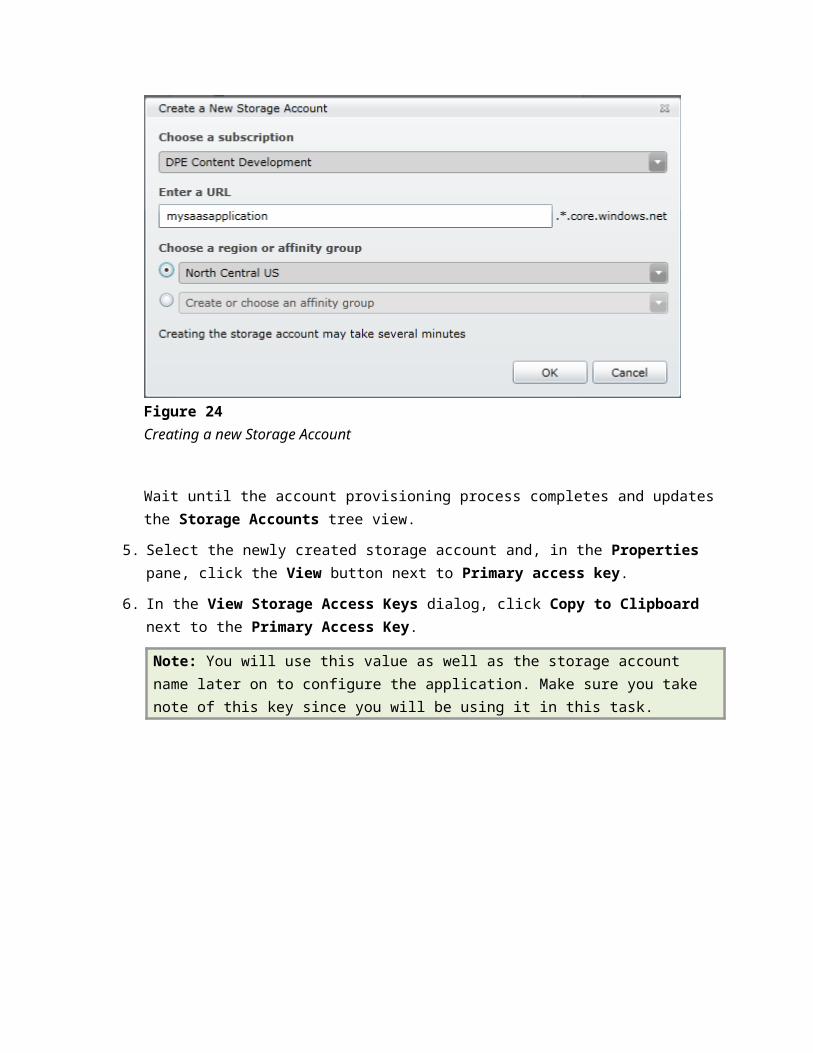
Figure 24Creating a new Storage Account
Wait until the account provisioning process completes and updates the Storage Accounts tree view.
5. Select the newly created storage account and, in the Properties pane, click the View button next to Primary access key.
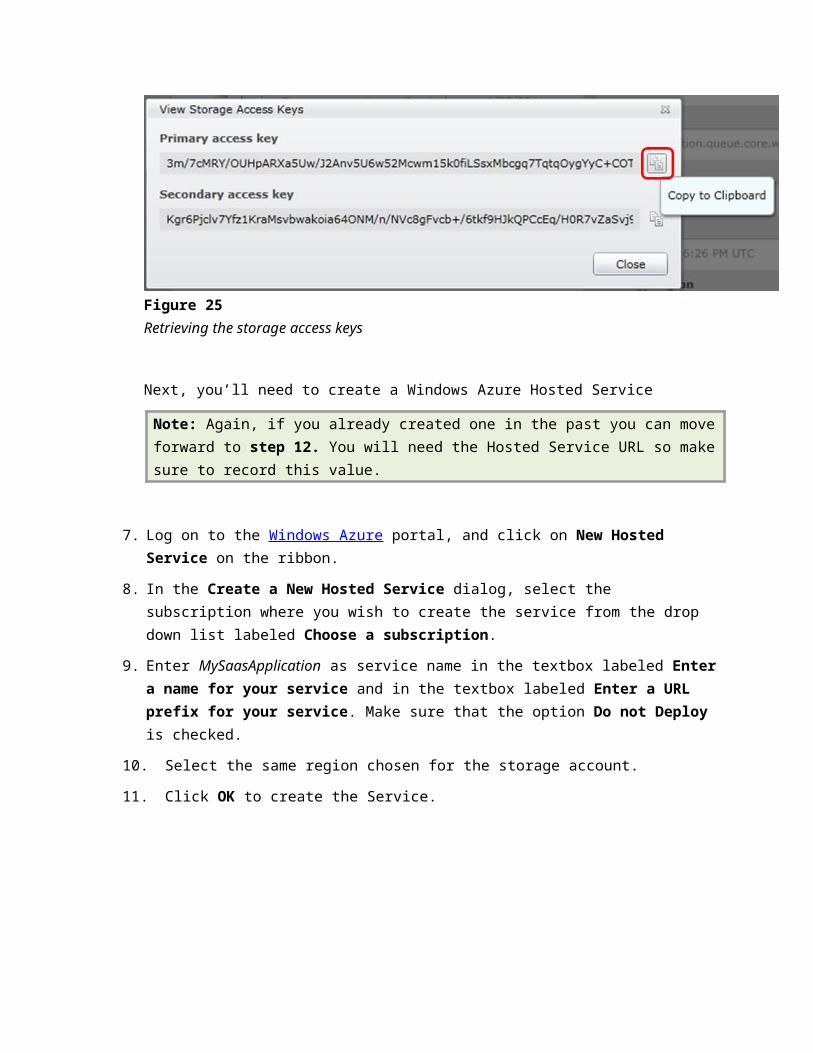
6. In the View Storage Access Keys dialog, click Copy to Clipboard next to the Primary Access Key.
Note: You will use this value as well as the storage account name later on to configure the application. Make sure you take note of this key since you will be using it in this task.
Figure 25Retrieving the storage access keys
Next, you’ll need to create a Windows Azure Hosted Service
Note: Again, if you already created one in the past you can move forward to step 12. You will need the Hosted Service URL so make sure to record this value.
7. Log on to the Windows Azure portal, and click on New Hosted Service on the ribbon.
8. In the Create a New Hosted Service dialog, select the subscription where you wish to create the service from the drop down list labeled Choose a subscription.
9. Enter MySaasApplication as service name in the textbox labeled Enter a name for your service and in the textbox labeled Enter a URL prefix for your service. Make sure that the option Do not Deploy is checked.
10. Select the same region chosen for the storage account.
11. Click OK to create the Service.
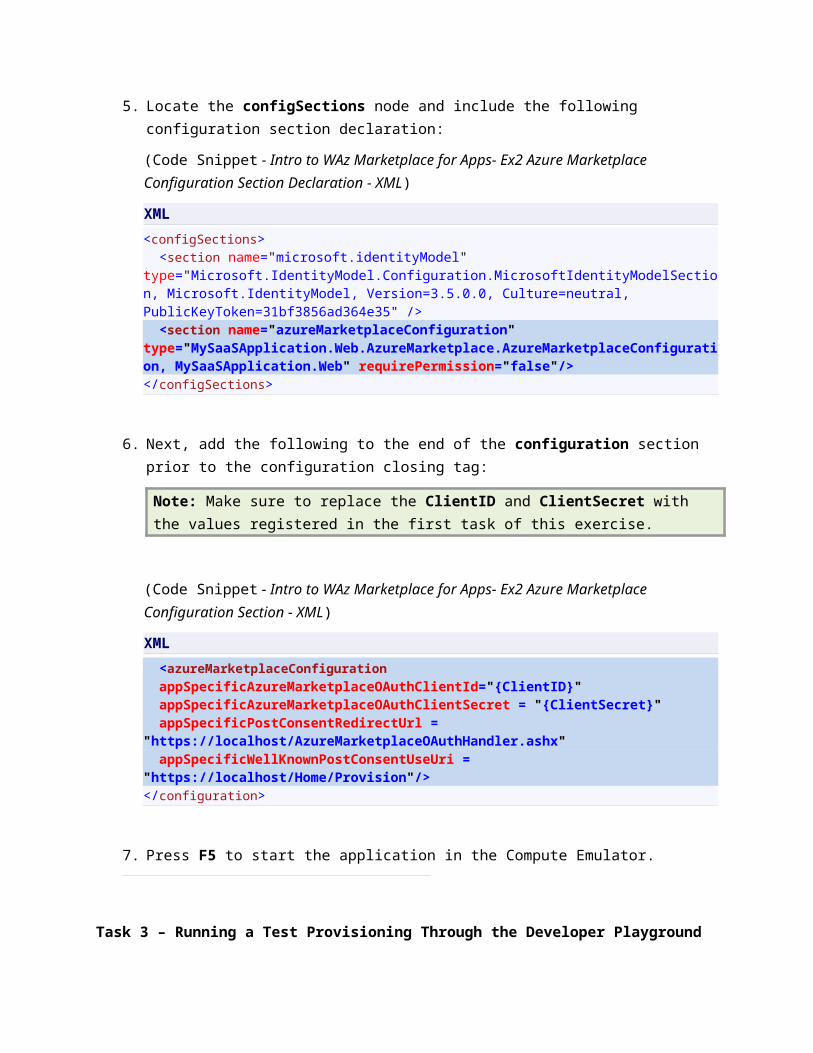
Figure 26Creating the Windows Azure Hosted Service
To complete the setup of the Hosted Service, you will need to upload the certificate used for the SSL binding to it. To do this:
12. Expand the Hosted Service you will use to deploy the sample and select the Certificates folder.
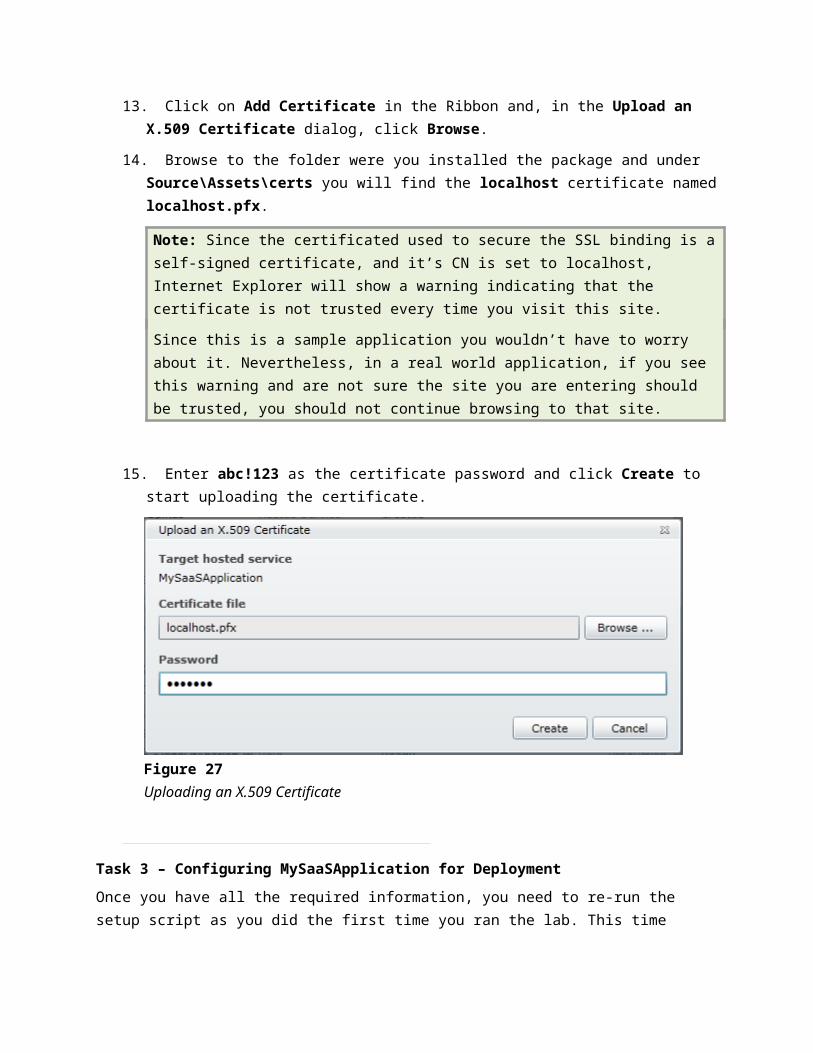
13. Click on Add Certificate in the Ribbon and, in the Upload an X.509 Certificate dialog, click Browse.
14. Browse to the folder were you installed the package and under Source\Assets\certs you will find the localhost certificate named localhost.pfx.
Note: Since the certificated used to secure the SSL binding is a self-signed certificate, and it’s CN is set to localhost, Internet Explorer will show a warning indicating that the certificate is not trusted every time you visit this site.
Since this is a sample application you wouldn’t have to worry about it. Nevertheless, in a real world application, if you see this warning and are not sure the site you are entering should be trusted, you should not continue browsing to that site.
15. Enter abc!123 as the certificate password and click Create to start uploading the certificate.
Figure 27Uploading an X.509 Certificate
Task 3 – Configuring MySaaSApplication for Deployment
Once you have all the required information, you need to re-run the setup script as you did the first time you ran the lab. This time though, you will enter different values and update the Web.config files to support the deployment to Windows Azure.
1. Open a Windows Explorer window and browse to the Source folder.
2. Run the setup.cmd script “as Administrator”. It will show your current settings (configured to use local deployment) and ask you if you want to change them. Type Y and press ENTER.
3. This time you will configure the solutions to be deployed in Windows Azure. Therefore, when asked to run the application locally, enter N and press ENTER.
4. Enter your ACS Namespace and press ENTER. Do the same for the ACS Management Key (you can grab the values you used the first time from the Configuration.xml file, located in the Source folder of this Lab).
5. Update the RelyingPartyRealm to point to your Hosted Service URL (e.g. https://yournamespace.cloudapp.net/).
6. Now, enter your Storage AccountName and AccountKey related to your Windows Azure Account.
7. Wait for the script to complete and press ENTER.
Note: Running the setup.cmd script again will enable your lab solutions to run in Windows Azure, but you won't be able to run them locally. In order to run the solutions in localhost again, follow the steps described in the Configure the Solutions section of the Overview.
8. Open Web.config, located inside MySaaSApplication.Web project.
9. Locate the azureMarketplaceConfiguration element and replace localhost with the Hosted Service URL you created in a previous task.
XML
<azureMarketplaceConfiguration appSpecificAzureMarketplaceOAuthClientId="{ClientID}" appSpecificAzureMarketplaceOAuthClientSecret = "{ClientSecret}" appSpecificPostConsentRedirectUrl = "https://{yourApplication}.cloudapp.net/AzureMarketplaceOauthHandler.ashx" appSpecificWellKnownPostConsentUseUri = "https://{yourApplication}.cloudapp.net/Home/Provision"/></configuration>
Note: Make sure to replace the ClientID and ClientSecret with the values registered in the first task of the exercise #2.
10. Save and close the file.
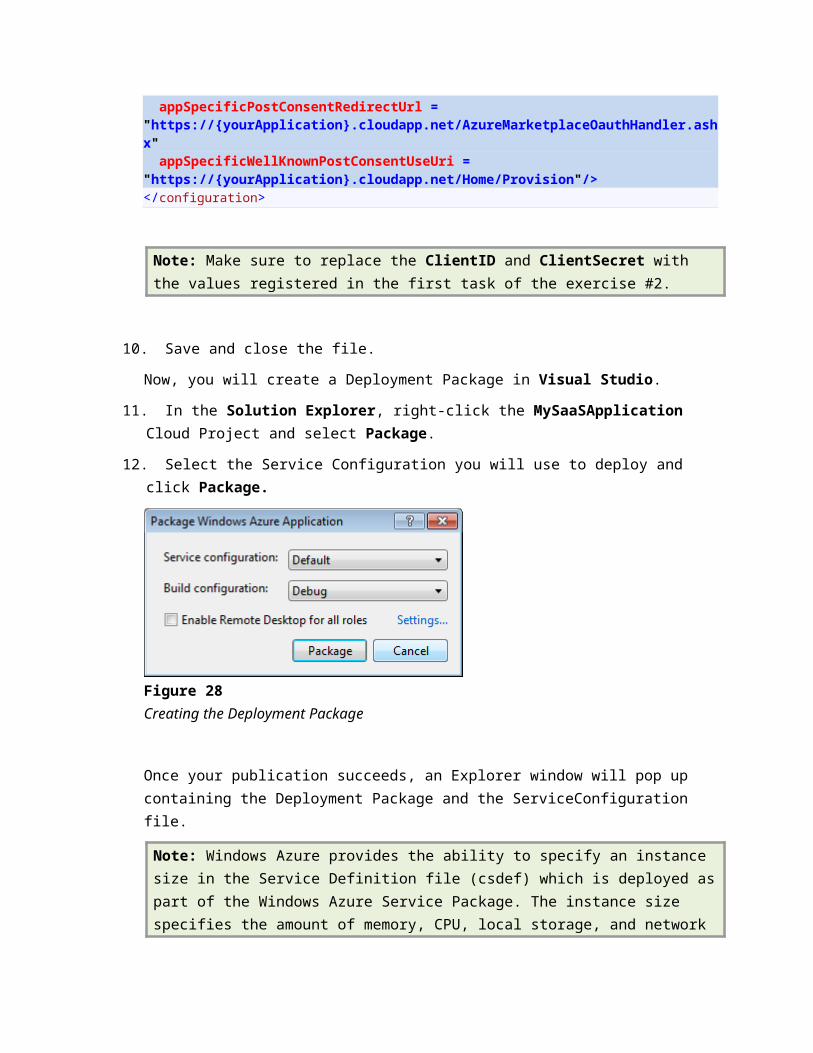
Now, you will create a Deployment Package in Visual Studio.
11. In the Solution Explorer, right-click the MySaaSApplication Cloud Project and select Package.
12. Select the Service Configuration you will use to deploy and click Package.

Figure 28Creating the Deployment Package
Once your publication succeeds, an Explorer window will pop up containing the Deployment Package and the ServiceConfiguration file.
Note: Windows Azure provides the ability to specify an instance size in the Service Definition file (csdef) which is deployed as part of the Windows Azure Service Package. The instance size specifies the amount of memory, CPU, local storage, and network performance for the underlying Virtual Machine image. By default, the accelerator is configured to use two extra small instances. For more information about instance sizes, please review the MSDN documentation on this subject located here. Each instance size also has different pricing. You can find more information about pricing here.
Now that you have the Deployment Package, you will upload it to the previously created Hosted Service.
13. Go back to the Windows Azure portal.
14. Click on the Hosted Services, Storage Accounts & CDN button, in the bottom left navigation pane.
15. In the Folders pane, select Hosted Services and select MySaaSApplication.
16. In the ribbon, click on New Production Deployment.
17. Enter a deployment name in the textbox labeled Deployment Name.
18. Click on Browse Locally button beside the textbox labeled Package location. Select MySaaSApplication.cspkg and repeat the steps for the Configuration file.
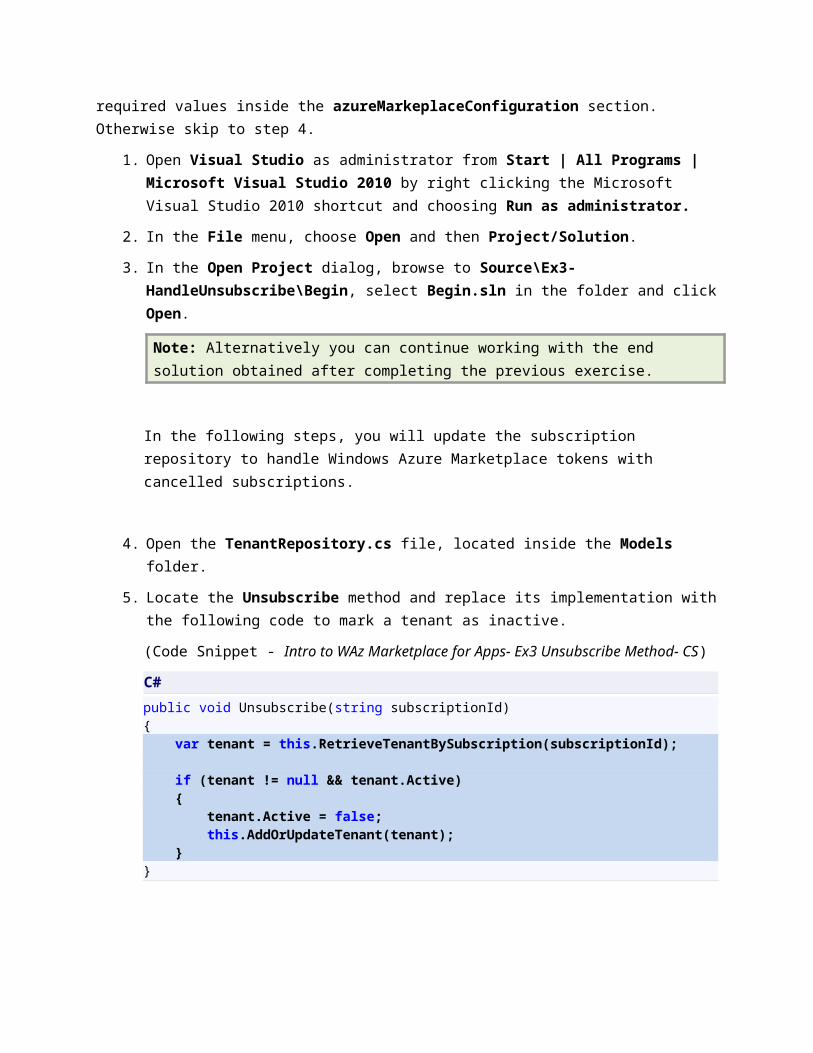
Figure 29Creating a new hosted service deployment
19. Click OK to start the deployment.
Note: Wait until the deployment process finishes, which may take several minutes. At this point, you have already uploaded the package and it is in a Ready state.
Task 4 – Testing Unsubscribe
In this task, you will first perform a new purchase through the playground as you did in exercise 2 and then test the unsubscribe functionality from the same site.
1. Open Internet Explorer and browse to https://datamarket.azure.com/developer/applications
2. Locate the application you created in the second exercise of this lab and edit the Redirect URI to point to the Hosted Service URI where MySaaSApplication was deployed, trailed by AzureMarketplaceOAuthHandler.ashx.
E.g.: https://mysaasapplication.cloudapp.net/AzureMarketplaceOAuthHandler.ashx
3. Save the changes and then follow the steps described in Exercise 2 Task 3 to purchase a subscription and then register a new Tenant in the application.
4. Once you complete those steps, browse back to the developers playground (https://datamarket.azure.com/developer/playground)
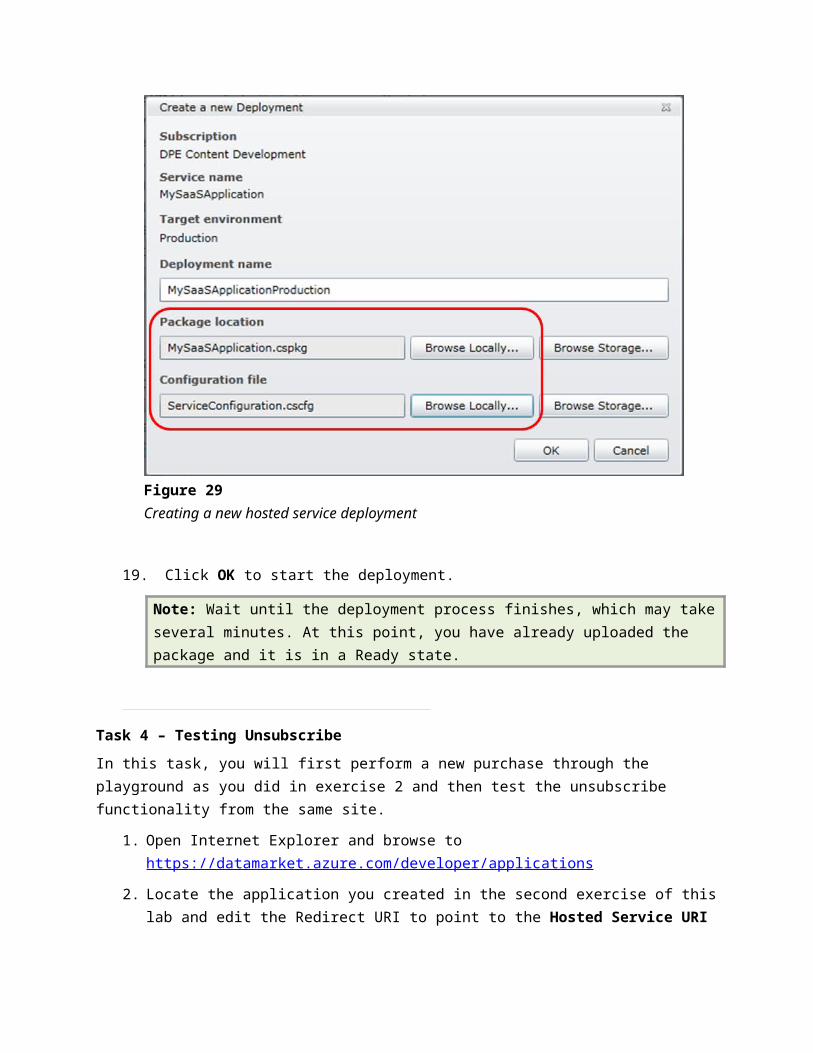
5. Enter the Client ID of your application and click on Unsubscribe.
Figure 30Unsubscribing from MySaaSApplication
6. Since you have deployed the application using a self-signed certificate, you will receive an error message indicating that a trusted relationship could not be established.
Figure 31Error Message
Note: In your “real” production SaaS application, you will need a certificate which CN matches your fully qualified domain name and that is issued by a well-known Certificate Authority such as Verisign, Thawte, etc.
7. If you deploy the application with a valid certificate, once the Unsubscribe process completes, you will be prompted with a “Successfully unsubscribed from the application.” message.
Figure 32Successfully unsubscribed from the application.”
8. If you then try to access your tenant instance you will notice that it is now disabled as you are redirected to the Home Page.
Exercise 4: Learn how to Publish in Windows Azure Marketplace, Explore the Finished App
Up to this point you have been configuring a sample application to prepare it for Windows Azure Marketplace publication. However, since the Windows Azure Marketplace is only for production released code, you cannot actually complete the following steps with the sample application. This exercise is provided for you to see what your next steps would be and to provide insight into how your production SaaS application will appear on the marketplace once it is published. For this purpose, you
will simply browse the catalog to preview an already provisioned application (this is where you will find your application once it gets published).
Task 1 – Publishing your production release application in the Windows Azure Marketplace for Applications
Once your production SaaS application is ready for release and is registered in the Windows Azure Marketplace, you need to publish it for it to become discoverable by potential users. In this task, you will see the process for gathering the required information and then sending it in order to publish your application in the Windows Azure Marketplace.
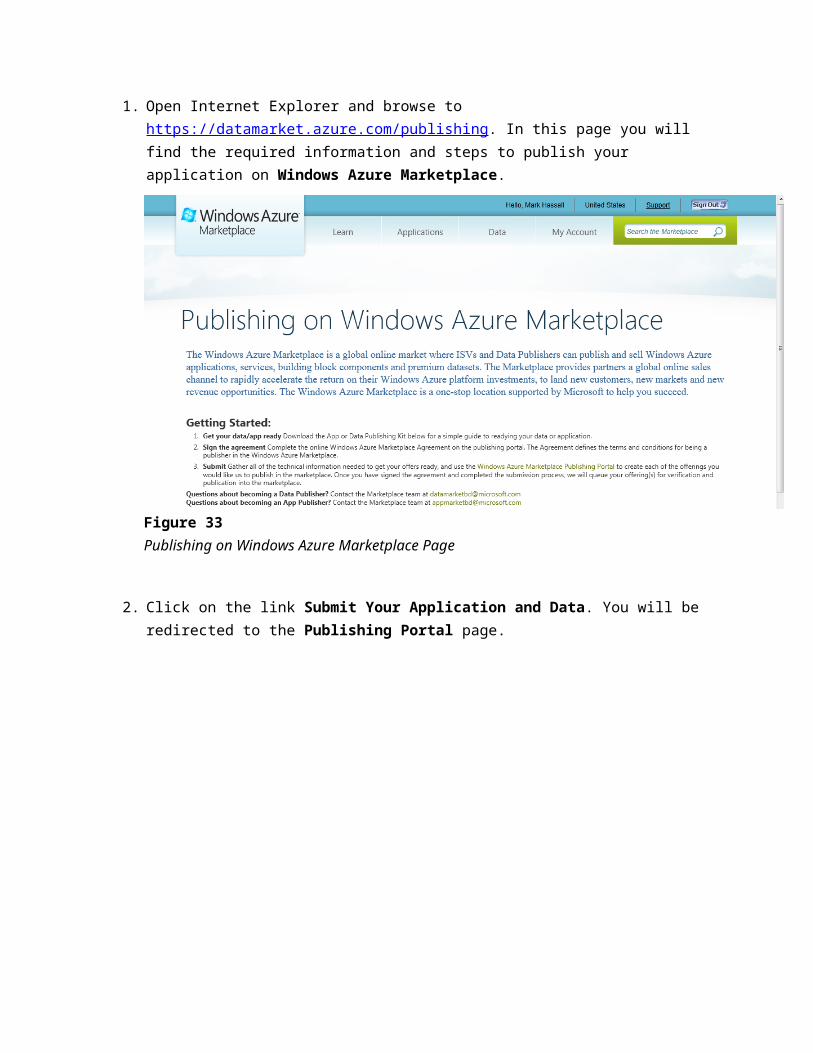
1. Open Internet Explorer and browse to https://datamarket.azure.com/publishing. In this page you will find the required information and steps to publish your application on Windows Azure Marketplace.
Figure 33Publishing on Windows Azure Marketplace Page
2. Click on the link Submit Your Application and Data. You will be redirected to the Publishing Portal page.
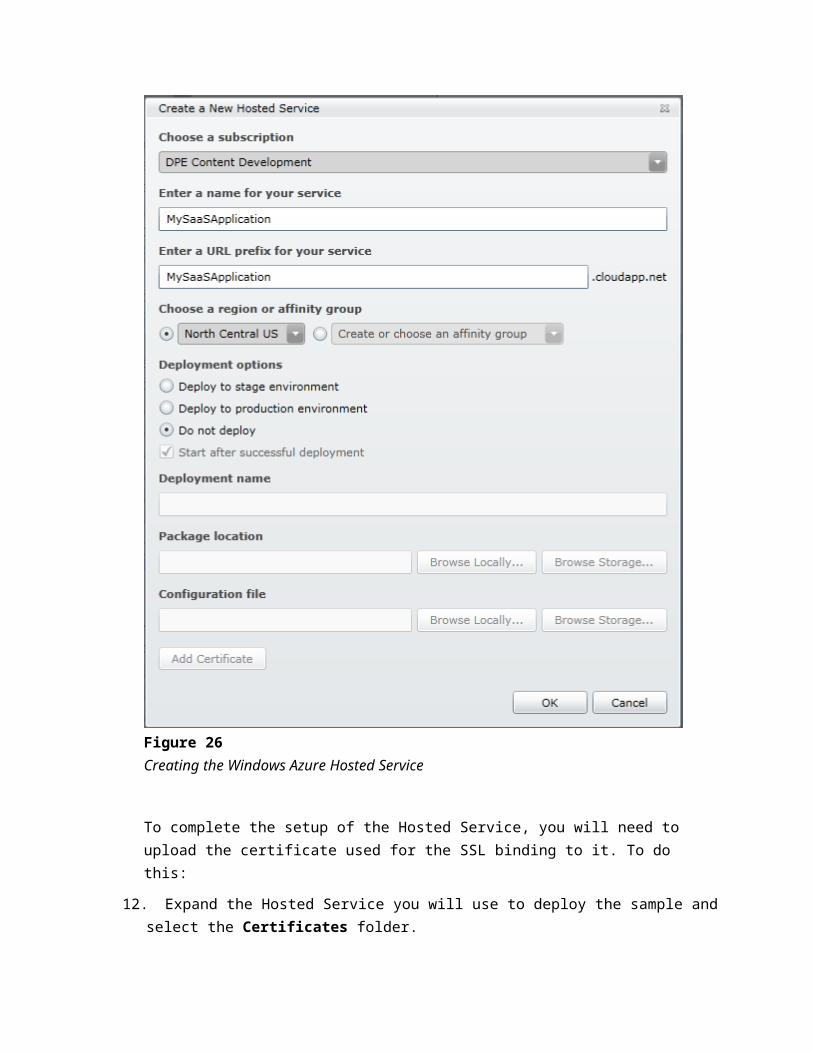
Figure 34Clicking on the Submit Your Application and Data link
3. Since you want to publish applications, click on the application submission page link. It will redirect you to the Submission Portal page.
Figure 35Publishing Portal page
4. Now, click on Accept Agreement. Scroll down the Windows Azure Marketplace Agreement and complete the form below. Click I Accept. You will be prompted for your Windows Live ID credentials if you are not already signed in.
Figure 36Windows Azure Marketplace Agreement
Figure 37Agreement Accepted
5. Next, click on Submit New Offering.
6. Complete the form with all the required information.
Figure 38Submit New Offering Form
Note: Take special consideration at the Submit New Offering form. The information you provide will be used to publish your application (such as Contact Information, Company Name and Company Description). In particular, the Offering Type indicates how your application will be consumed by the Marketplace users.
There are available three offering types:
1. Commercial application: the application can be purchased through the Marketplace.
2. Listing-only application: the application is not part of Marketplace offerings, but will be listed in the Applications Catalog.
3. Data: to register a data set through the Marketplace.
Also, you will specify your application subscriptions and its price. Windows Azure Marketplace only supports monthly subscriptions. You can choose to add multiple monthly subscriptions. In
order to differentiate each offering, please assign a Global Unique Identifier (GUID), for example:
1.Enterprise Subscription: free (B40878F0-2100-4754-A6C1-50141E6ADC0F)
2.Business Subscription: free (E52E4425-09E6-4F0B-9764-4FDB0D814526)
3.Personal Subscription: free (79D8743E-9025-4749-8179-AE516C85FE3E)
You can generate your own GUID using the GUID Generator tool included with the Visual Studio.
If you want to further describe the differences between each subscription type, you can do so in the Features section of the form.
7. Once all your information is submitted a confirmation page will be shown. You will be contacted by a marketplace representative within the following 30 days.
Figure 39App/Data Submission Email Template
8. To see an example of a published application in the Marketplace, browse to https://datamarket.azure.com/application/AA1EA7A3-E3FE-4EE5-B7B5-CBF4142CB983.
This page shows a sample application and gives you an idea of an application published with the information provided in the offering forms. In the right column you can see the different subscription levels specified in the Offering Form document.
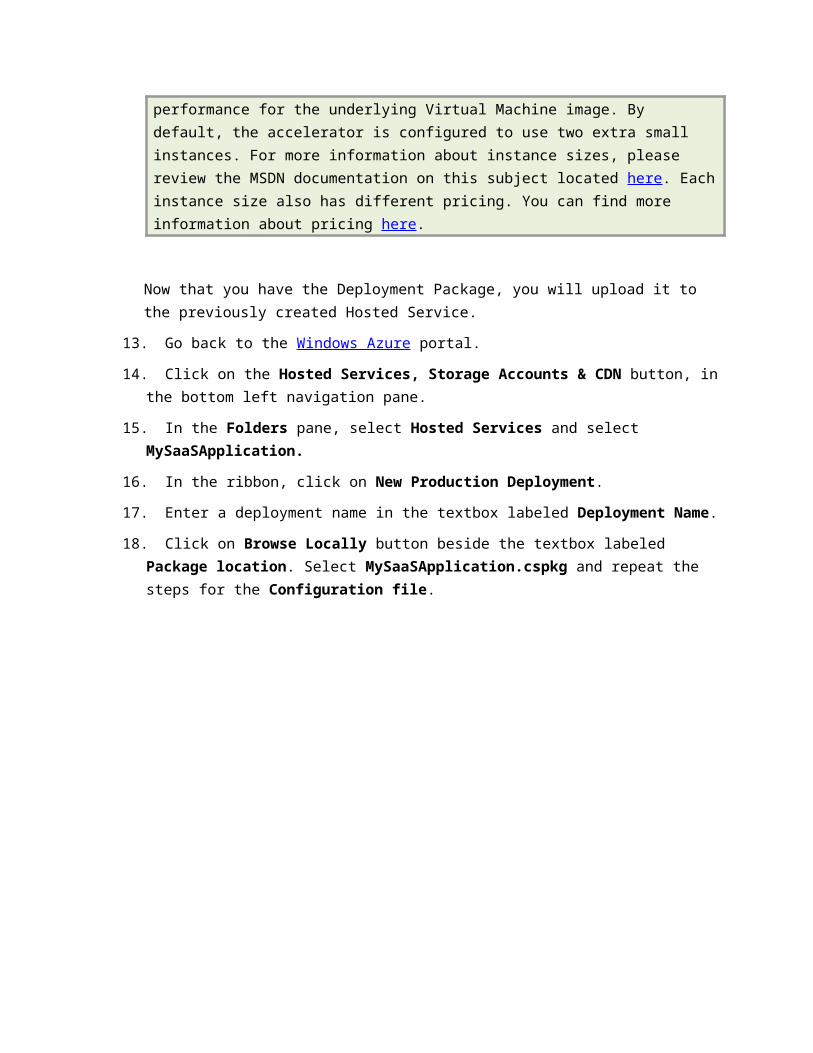
Figure 40Published Application Details
Summary
By completing this hands-on lab, you have learned how to provision your Web applications in Windows Azure Marketplace for Applications and how to handle user subscriptions within your site. Also, you have seen how it is the process of publicly publishing an application in Windows Azure Marketplace by filling and sending the corresponding forms.
Appendix A: Get a Windows Azure 30-Day Pass
1. Browse to http://windowsazurepass.com/
2. Enter your country and promotional code as requested. If you don’t have a promotional code, you can sign up with your windows live ID. Please note that the code won’t be provided instantly but you’ll be added to a waitlist.
3. Fill out the forms in order to get your free pass to try Windows Azure.
Appendix B: Configure Access Control Services
1. Browse to the Windows Azure portal and click on Service Bus, Access Control and Caching.
2. Select Access Control and click on New in the ribbon.
3. In the Create a new Service Namespace dialog, choose a name for your namespace and select a Country /Region and then click Create Namespace.
Figure 41Create a new Service Namespace Dialog
4. Locate the new entry in the list of configured service namespaces and then wait for its Status column to show the namespace as Active.
5. In the ribbon, click on Access Control Service to browse to the ACS Management site.

Figure 42Access the Access Control Service Management Portal.
6. In the left pane of the Access Control Service Management Portal, select Management Service, and then choose ManagementClient.
Figure 43Access Control Service Management Portal.
7. Click on Symmetric Key to view its value and record it since you will need it to set up this sample.
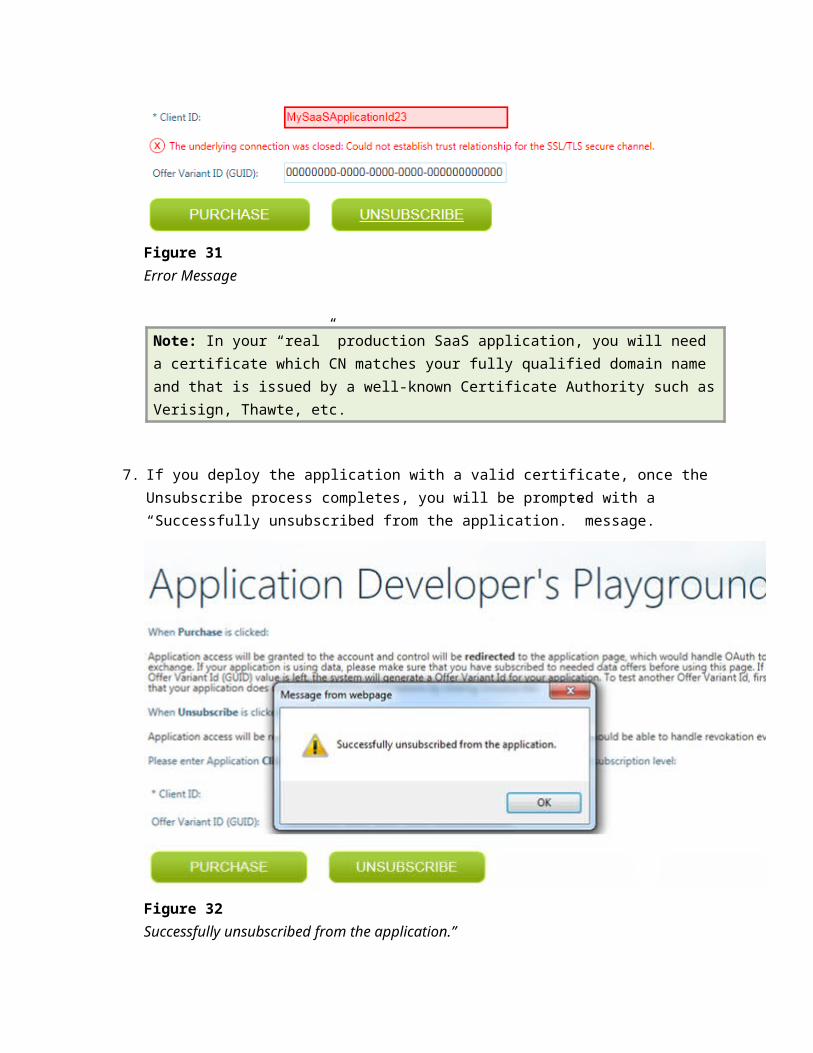
Figure 44Recording the Symmetric Key
Appendix C: Using the Code Snippets
With code snippets, you have all the code you need at your fingertips. The lab document will tell you exactly when you can use them, as shown in the following figure.
Figure 45Using Visual Studio code snippets to insert code into your project
To add a code snippet using the keyboard (C# only)
1. Place the cursor where you would like to insert the code.
2. Start typing the snippet name (without spaces or hyphens).
3. Watch as IntelliSense displays matching snippets' names.
4. Select the correct snippet (or keep typing until the entire snippet's name is selected).
5. Press the Tab key twice to insert the snippet at the cursor location.
Figure 46Start typing the snippet name
Figure 47Press Tab to select the highlighted snippet
Figure 48Press Tab again and the snippet will expand
To add a code snippet using the mouse (C#, Visual Basic and XML)
1. Right-click where you want to insert the code snippet.
2. Select Insert Snippet followed by My Code Snippets.
3. Pick the relevant snippet from the list, by clicking on it.
Figure 49Right-click where you want to insert the code snippet and select Insert Snippet
Figure 50Pick the relevant snippet from the list, by clicking on it