Embed Size (px)
Citation preview
Introduction to theArcon Evaluation System
Arcon FCE Training Module - Copyright © Arcon VerNova, Inc. 2014 Page 1 of 22
Arcon FCE - Main Program Screen
Click on the “Patients” button now to display the Patient Information Screen
Click on the “Patients” button now to display the Patient Information ScreenLet’s start with the elements on the main program
screen. We’ll identify each one and explain briefly how they are used. Subsequent training modules will go into more detail on the specific features of the program.
Proceed at your own pace…
Let’s start with the elements on the main program screen. We’ll identify each one and explain briefly how they are used. Subsequent training modules will go into more detail on the specific features of the program.
Proceed at your own pace…
The Control Bar is located at the top of the program screen. Buttons are used to access various features of the program, as well as to enter subject information, perform functional evaluations and report results.
Note that buttons may occasionally be “inactive” if a particular function is not enabled at that time.
The Status Bar is located at the bottom of the program screen. It shows the clinic name, the software version, the current operator, and a “System Status” panel that reports test instrument and program status.
There is seldom interaction with the status bar during program operation – it merely provides information.
The center of the screen is the Active Area where FCE data and subject information is entered and/or displayed. This area is updated continuously during the course of an evaluation, and will be the primary focus of your attention as you use the program.
Let’s take a look at some of those information screens.
This training module will introduce you to the latest version of the ARCON FCE software. The module is self-paced, so you will need to click with your mouse or press the space bar to advance to the next step in the presentation.
Go ahead and do that now…
This training module will introduce you to the latest version of the ARCON FCE software. The module is self-paced, so you will need to click with your mouse or press the space bar to advance to the next step in the presentation.
Go ahead and do that now…
Introduction to theArcon Evaluation System
Arcon FCE Training Module - Copyright © Arcon VerNova, Inc. 2014 Page 2 of 22
Arcon FCE – Patient Screen
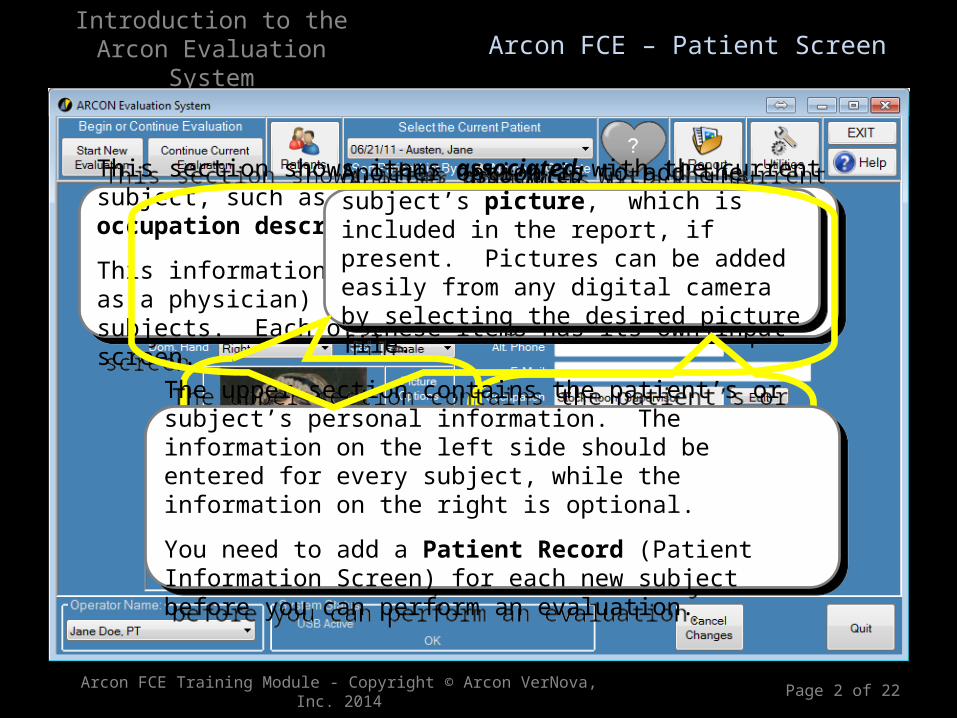
This section shows items associated with the current subject, such as an employer, a physician, or an occupation description.
This information is optional, and any item (such as a physician) can be shared by multiple subjects. Each of these items has its own input screen.
This section shows items associated with the current subject, such as an employer, a physician, or an occupation description.
This information is optional, and any item (such as a physician) can be shared by multiple subjects. Each of these items has its own input screen.
Another option is to add the subject’s picture, which is included in the report, if present. Pictures can be added easily from any digital camera by selecting the desired picture file.
Another option is to add the subject’s picture, which is included in the report, if present. Pictures can be added easily from any digital camera by selecting the desired picture file.
The upper section contains the patient’s or subject’s personal information. The information on the left side should be entered for every subject, while the information on the right is optional.
You need to add a Patient Record (Patient Information Screen) for each new subject before you can perform an evaluation.
Introduction to theArcon Evaluation System
Arcon FCE Training Module - Copyright © Arcon VerNova, Inc. 2014 Page 3 of 22
Arcon FCE – Patient Screen
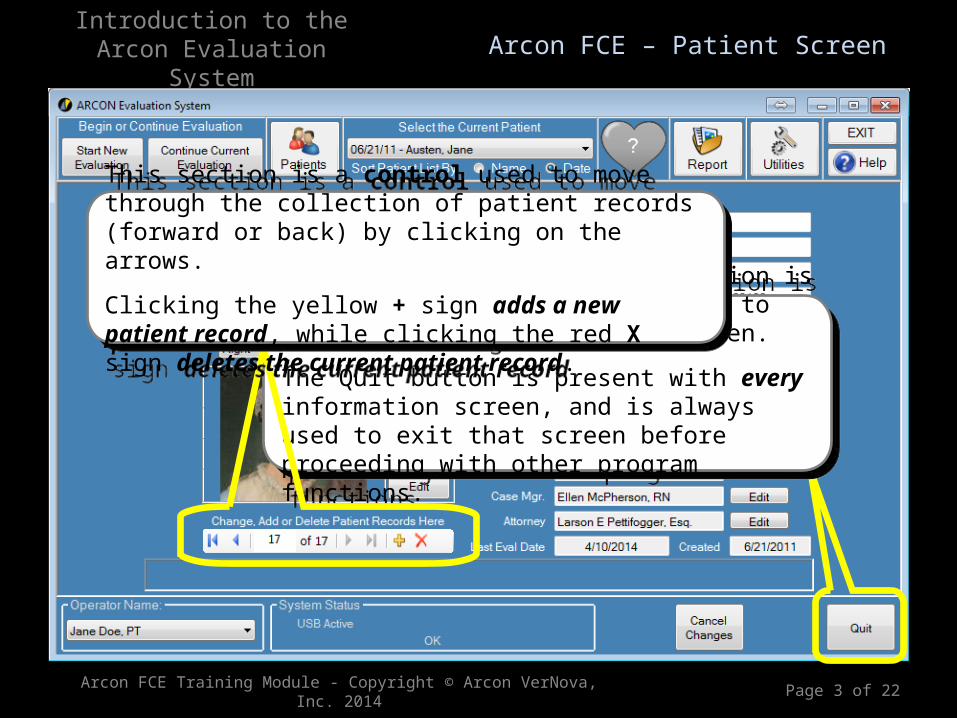
After entry of Patient Information is complete, click the Quit button to return to the main program screen.
The Quit button is present with every information screen, and is always used to exit that screen before proceeding with other program functions.
After entry of Patient Information is complete, click the Quit button to return to the main program screen.
The Quit button is present with every information screen, and is always used to exit that screen before proceeding with other program functions.
This section is a control used to move through the collection of patient records (forward or back) by clicking on the arrows.
Clicking the yellow + sign adds a new patient record, while clicking the red X sign deletes the current patient record.
This section is a control used to move through the collection of patient records (forward or back) by clicking on the arrows.
Clicking the yellow + sign adds a new patient record, while clicking the red X sign deletes the current patient record.
Introduction to theArcon Evaluation System
Arcon FCE Training Module - Copyright © Arcon VerNova, Inc. 2014 Page 4 of 22
Arcon FCE – Current Patient Selection
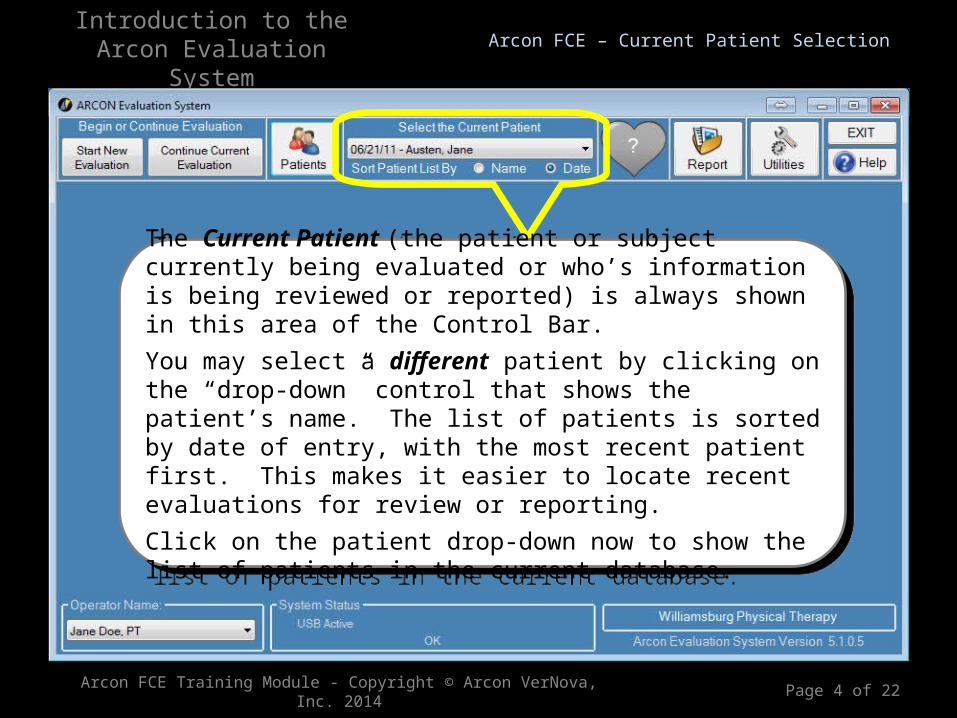
The Current Patient (the patient or subject currently being evaluated or who’s information is being reviewed or reported) is always shown in this area of the Control Bar.
You may select a different patient by clicking on the “drop-down” control that shows the patient’s name. The list of patients is sorted by date of entry, with the most recent patient first. This makes it easier to locate recent evaluations for review or reporting.
Click on the patient drop-down now to show the list of patients in the current database.
Introduction to theArcon Evaluation System
Arcon FCE Training Module - Copyright © Arcon VerNova, Inc. 2014 Page 5 of 22
Arcon FCE – Current Patient Selection
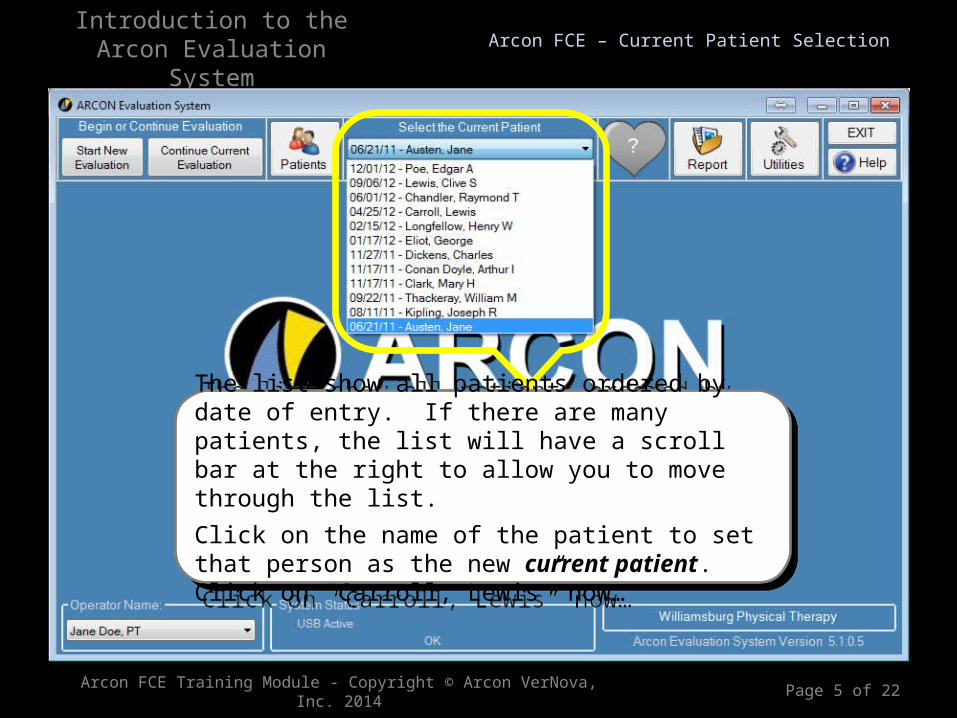
The list show all patients ordered by date of entry. If there are many patients, the list will have a scroll bar at the right to allow you to move through the list.
Click on the name of the patient to set that person as the new current patient. Click on “Carroll, Lewis” now…
The list show all patients ordered by date of entry. If there are many patients, the list will have a scroll bar at the right to allow you to move through the list.
Click on the name of the patient to set that person as the new current patient. Click on “Carroll, Lewis” now…
Introduction to theArcon Evaluation System
Arcon FCE Training Module - Copyright © Arcon VerNova, Inc. 2014 Page 6 of 22
Arcon FCE – Current Patient Selection
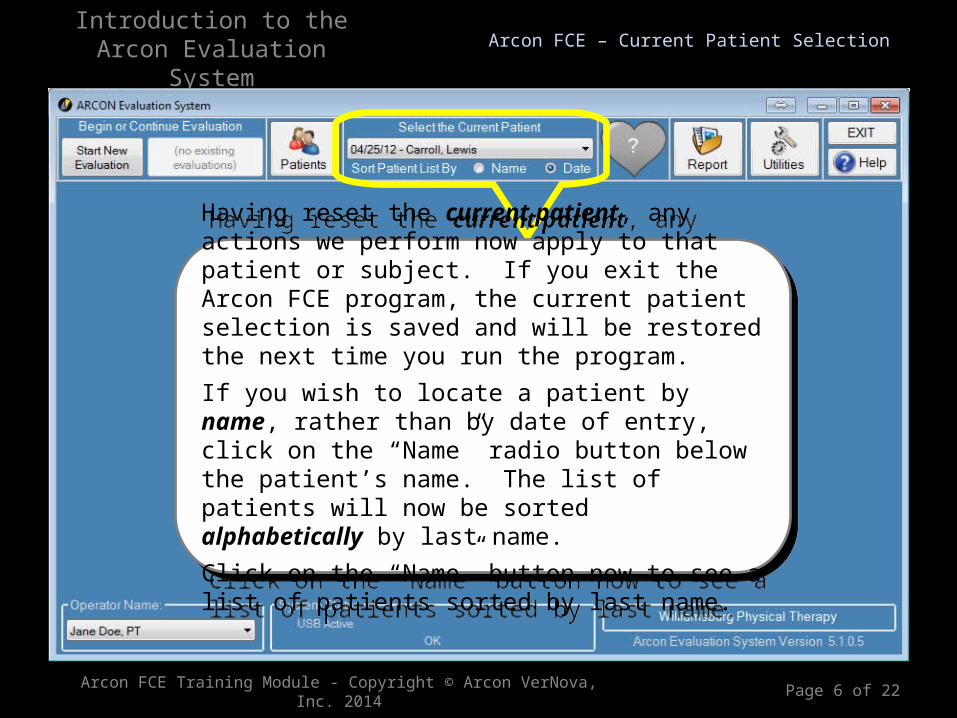
Having reset the current patient, any actions we perform now apply to that patient or subject. If you exit the Arcon FCE program, the current patient selection is saved and will be restored the next time you run the program.
If you wish to locate a patient by name, rather than by date of entry, click on the “Name” radio button below the patient’s name. The list of patients will now be sorted alphabetically by last name.
Click on the “Name” button now to see a list of patients sorted by last name.
Introduction to theArcon Evaluation System
Arcon FCE Training Module - Copyright © Arcon VerNova, Inc. 2014 Page 7 of 22
Arcon FCE – Current Patient Selection
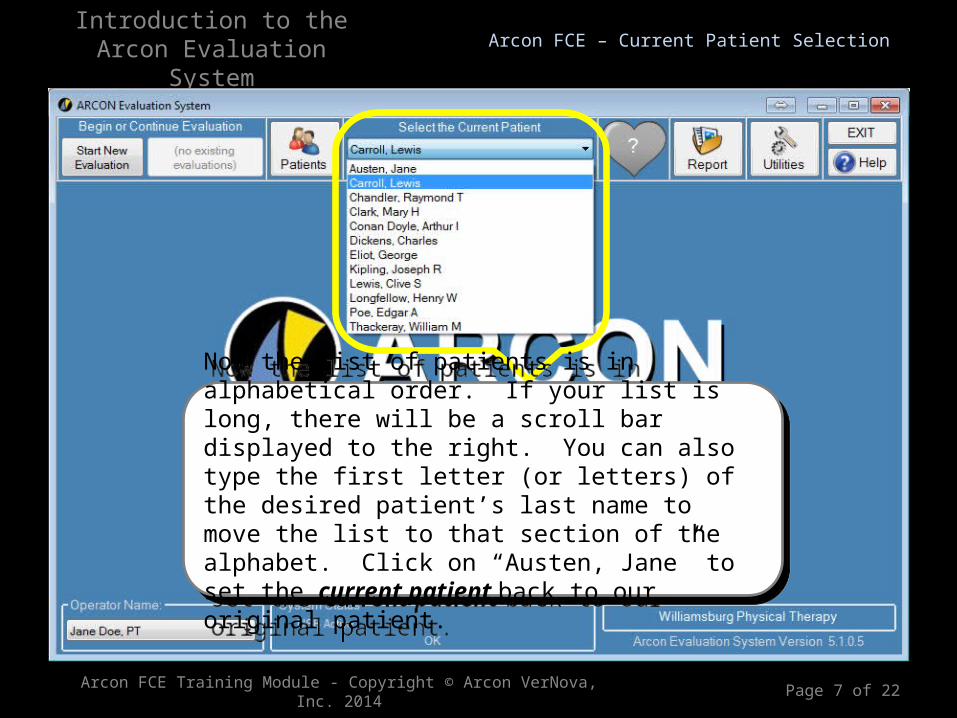
Now the list of patients is in alphabetical order. If your list is long, there will be a scroll bar displayed to the right. You can also type the first letter (or letters) of the desired patient’s last name to move the list to that section of the alphabet. Click on “Austen, Jane” to set the current patient back to our original patient.
Now the list of patients is in alphabetical order. If your list is long, there will be a scroll bar displayed to the right. You can also type the first letter (or letters) of the desired patient’s last name to move the list to that section of the alphabet. Click on “Austen, Jane” to set the current patient back to our original patient.
Introduction to theArcon Evaluation System
Arcon FCE Training Module - Copyright © Arcon VerNova, Inc. 2014 Page 8 of 22
Arcon FCE – Evaluations
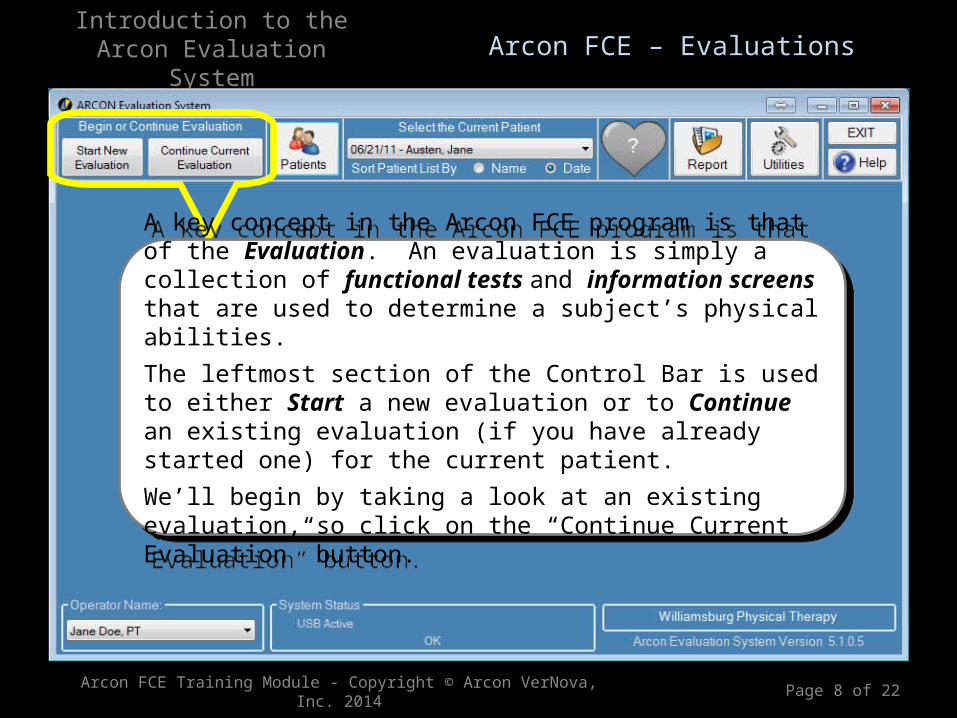
A key concept in the Arcon FCE program is that of the Evaluation. An evaluation is simply a collection of functional tests and information screens that are used to determine a subject’s physical abilities.
The leftmost section of the Control Bar is used to either Start a new evaluation or to Continue an existing evaluation (if you have already started one) for the current patient.
We’ll begin by taking a look at an existing evaluation, so click on the “Continue Current Evaluation” button.
Introduction to theArcon Evaluation System
Arcon FCE Training Module - Copyright © Arcon VerNova, Inc. 2014 Page 9 of 22
Arcon FCE – The Evaluation Area
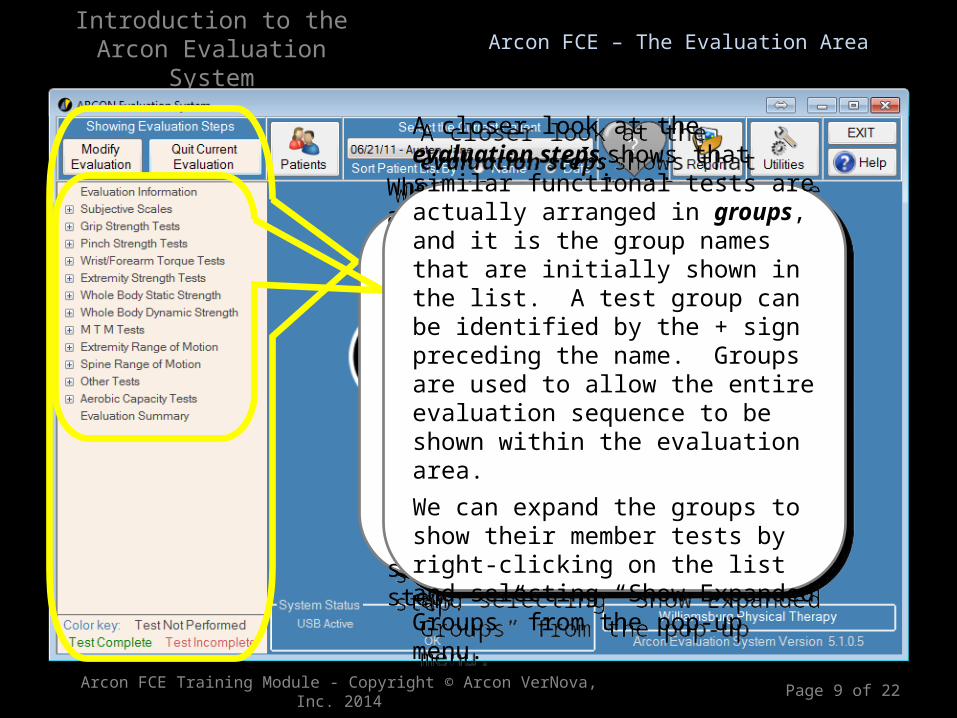
Whenever an evaluation is active, the contents or “steps” of that evaluation are shown in the Evaluation Area at the left of the program screen.
Control buttons at the top are used to either Modify or Quit the evaluation. The center section shows a list of evaluation steps, and the bottom section shows a color key for interpreting the state of each evaluation step.
A closer look at the evaluation steps shows that similar functional tests are actually arranged in groups, and it is the group names that are initially shown in the list. A test group can be identified by the + sign preceding the name. Groups are used to allow the entire evaluation sequence to be shown within the evaluation area.
We can expand the groups to show their member tests by right-clicking on the list and selecting “Show Expanded Groups” from the pop-up menu.
Introduction to theArcon Evaluation System
Arcon FCE Training Module - Copyright © Arcon VerNova, Inc. 2014 Page 10 of 22
Arcon FCE – The Evaluation Area
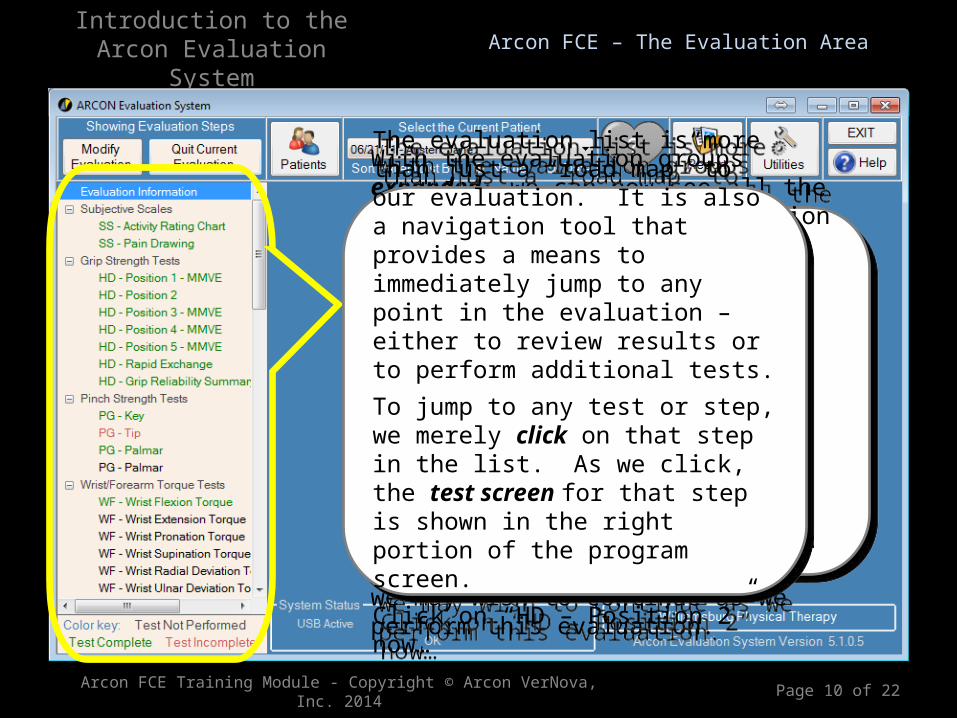
With the evaluation groups expanded, we can now see all the individual tests and information screens that comprise this evaluation. The scroll bars indicate that there are additional tests below the visible section of the list.
We can also see that some steps have been completed (green color), one step is incomplete (red), and a number of steps have not yet been performed (black). The color key aids in determining the point at which we may wish to continue as we perform this evaluation.
The evaluation list is more than just a “road map” to our evaluation. It is also a navigation tool that provides a means to immediately jump to any point in the evaluation – either to review results or to perform additional tests.
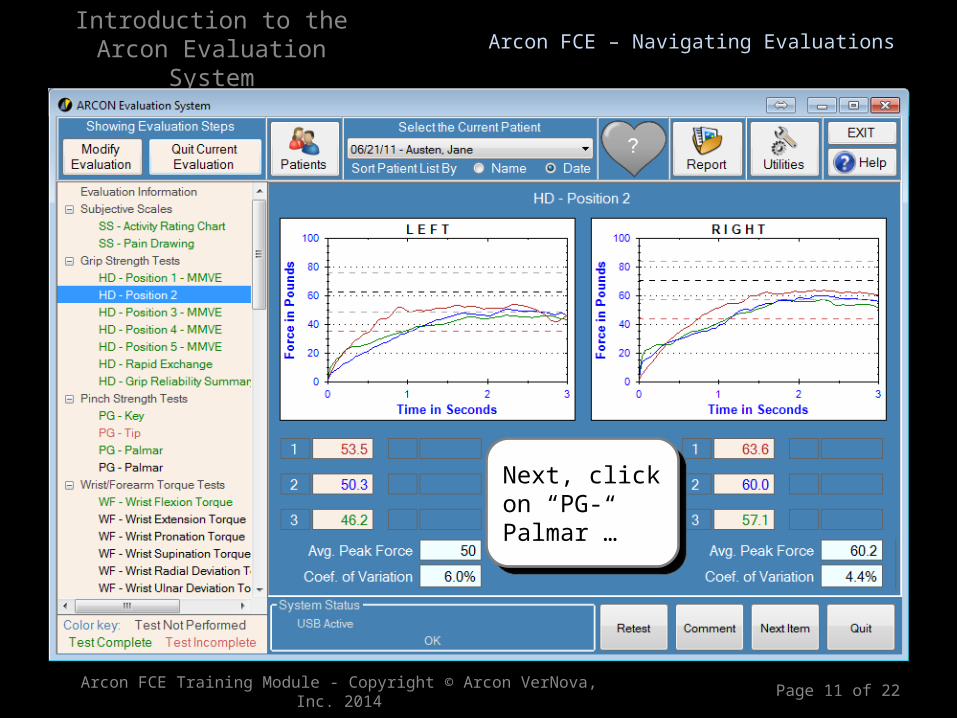
To jump to any test or step, we merely click on that step in the list. As we click, the test screen for that step is shown in the right portion of the program screen.
Click on “HD – Position 2” now…
The evaluation list is more than just a “road map” to our evaluation. It is also a navigation tool that provides a means to immediately jump to any point in the evaluation – either to review results or to perform additional tests.
To jump to any test or step, we merely click on that step in the list. As we click, the test screen for that step is shown in the right portion of the program screen.
Click on “HD – Position 2” now…
Introduction to theArcon Evaluation System
Arcon FCE Training Module - Copyright © Arcon VerNova, Inc. 2014 Page 11 of 22
Arcon FCE – Navigating Evaluations
Next, click on “PG-Palmar”…
Next, click on “PG-Palmar”…
Introduction to theArcon Evaluation System
Arcon FCE Training Module - Copyright © Arcon VerNova, Inc. 2014 Page 12 of 22
Arcon FCE – Navigating Evaluations
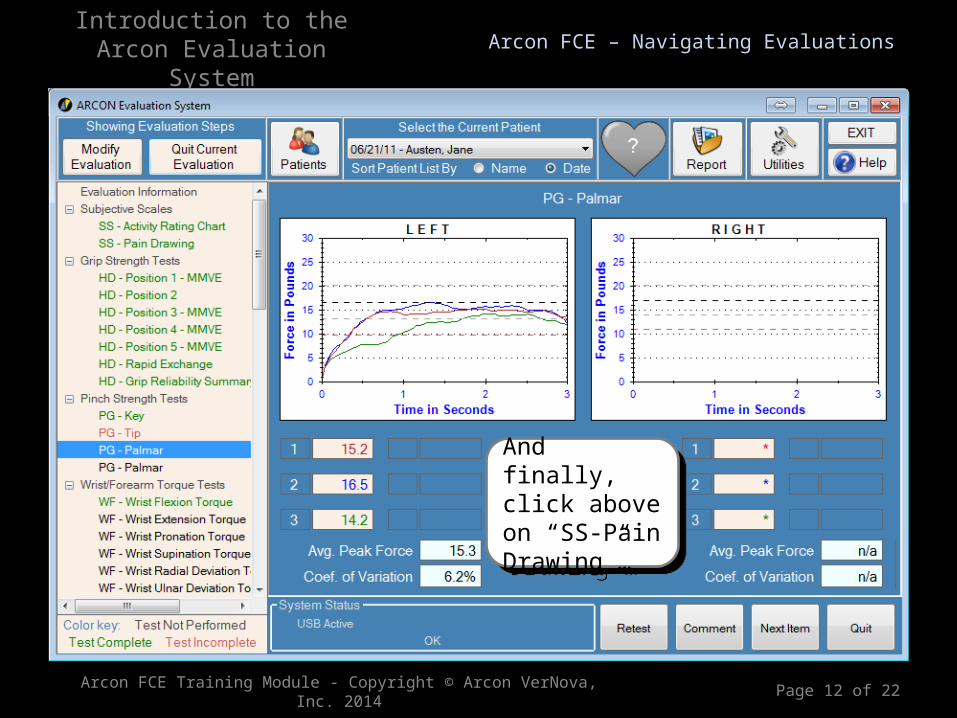
And finally, click above on “SS-Pain Drawing”…
And finally, click above on “SS-Pain Drawing”…
Introduction to theArcon Evaluation System
Arcon FCE Training Module - Copyright © Arcon VerNova, Inc. 2014 Page 13 of 22
Arcon FCE – Navigating Evaluations
As you can see, navigating an evaluation is very simple. We will present each of the test screens in another training module, so don’t worry that we haven’t discussed the contents of the screens we just viewed.
As you can see, navigating an evaluation is very simple. We will present each of the test screens in another training module, so don’t worry that we haven’t discussed the contents of the screens we just viewed.
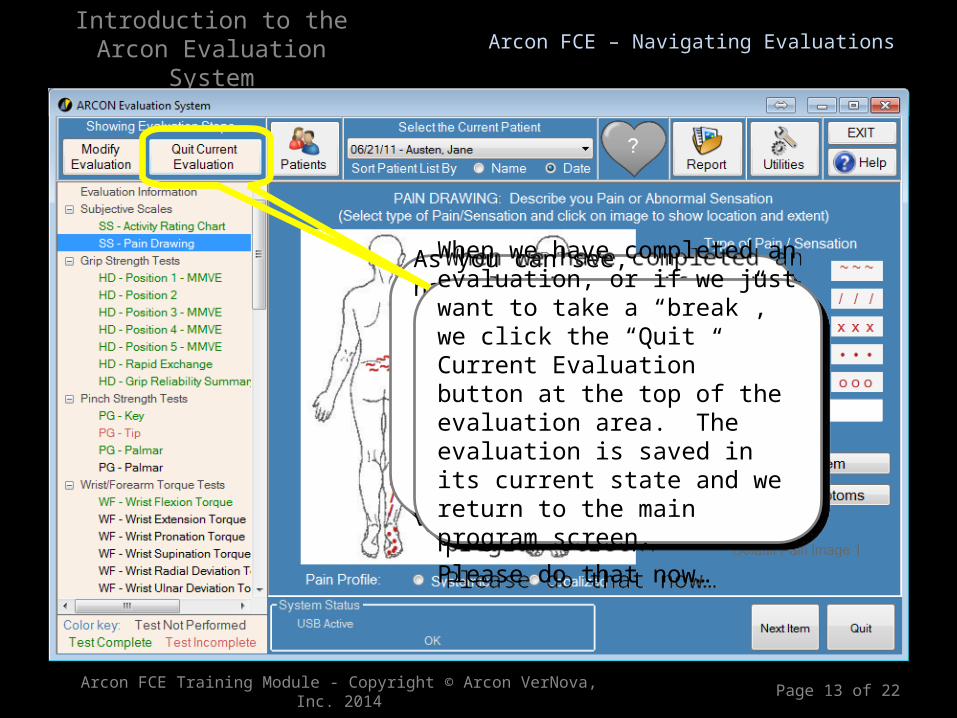
When we have completed an evaluation, or if we just want to take a “break”, we click the “Quit Current Evaluation” button at the top of the evaluation area. The evaluation is saved in its current state and we return to the main program screen.
Please do that now…
When we have completed an evaluation, or if we just want to take a “break”, we click the “Quit Current Evaluation” button at the top of the evaluation area. The evaluation is saved in its current state and we return to the main program screen.
Please do that now…
Introduction to theArcon Evaluation System
The Heart Rate Indicator shows the subject’s current heart rate, if that rate is being measured by the Arcon wireless HR receiver.
If the wireless heart rate receiver is not active, then the heart icon is shown in a gray color as it appears above.
The Heart Rate Indicator shows the subject’s current heart rate, if that rate is being measured by the Arcon wireless HR receiver.
If the wireless heart rate receiver is not active, then the heart icon is shown in a gray color as it appears above.
Arcon FCE Training Module - Copyright © Arcon VerNova, Inc. 2014 Page 14 of 22
Arcon FCE – Heart Rate Indicator
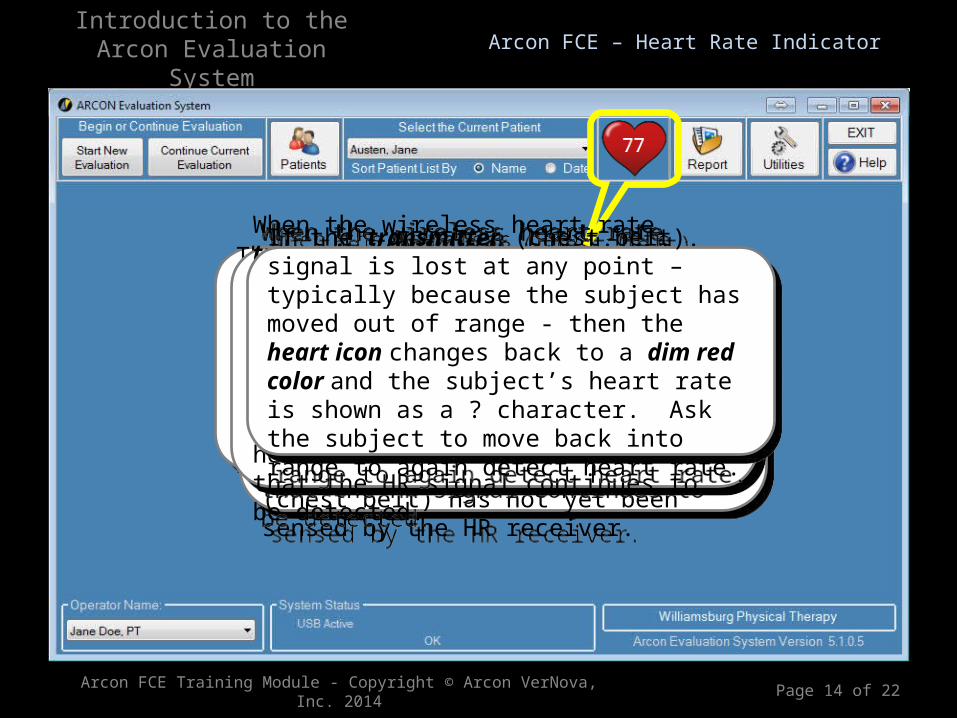
When the wireless heart rate receiver is connected to the computer (becomes active), then the heart icon changes to a red color as shown above.
Note that the subject’s heart rate is not shown (indicated by a ? character). That is because the wireless HR transmitter signal (chest belt) has not yet been sensed by the HR receiver.
When the wireless heart rate transmitter (chest belt) signal is detected, then the heart icon changes to a bright red color as shown above, and the subject’s heart rate is displayed, in real time, as it is received. The HR icon will blink briefly for each heart beat as visual feedback that the HR signal continues to be detected.
When the wireless heart rate transmitter (chest belt) signal is detected, then the heart icon changes to a bright red color as shown above, and the subject’s heart rate is displayed, in real time, as it is received. The HR icon will blink briefly for each heart beat as visual feedback that the HR signal continues to be detected.
If the transmitter (chest belt) signal is lost at any point – typically because the subject has moved out of range - then the heart icon changes back to a dim red color and the subject’s heart rate is shown as a ? character. Ask the subject to move back into range to again detect heart rate.
If the transmitter (chest belt) signal is lost at any point – typically because the subject has moved out of range - then the heart icon changes back to a dim red color and the subject’s heart rate is shown as a ? character. Ask the subject to move back into range to again detect heart rate.

Introduction to theArcon Evaluation System
Arcon FCE Training Module - Copyright © Arcon VerNova, Inc. 2014 Page 15 of 22
Arcon FCE – Review & Report Screen
The Report button is used to review or report the results of any existing evaluations for the current patient.
Click on the “Report” button now...
The Report button is used to review or report the results of any existing evaluations for the current patient.
Click on the “Report” button now...
Introduction to theArcon Evaluation System
Arcon FCE Training Module - Copyright © Arcon VerNova, Inc. 2014 Page 16 of 22
Arcon FCE – Review & Report Screen
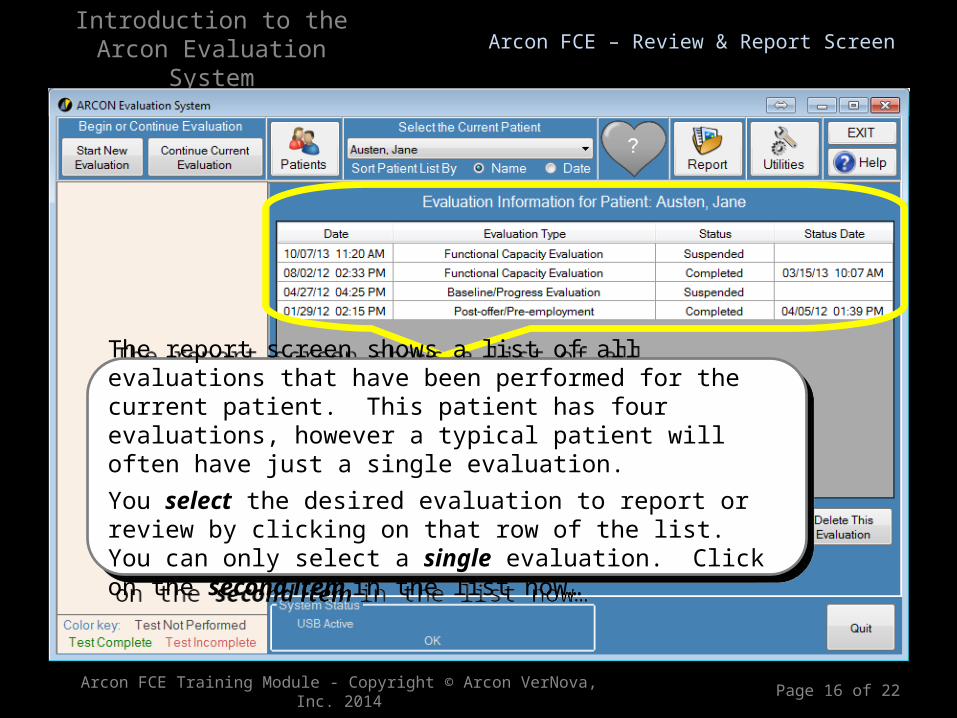
The report screen shows a list of all evaluations that have been performed for the current patient. This patient has four evaluations, however a typical patient will often have just a single evaluation.
You select the desired evaluation to report or review by clicking on that row of the list. You can only select a single evaluation. Click on the second item in the list now…
Introduction to theArcon Evaluation System
Arcon FCE Training Module - Copyright © Arcon VerNova, Inc. 2014 Page 17 of 22
Arcon FCE – Review & Report Screen
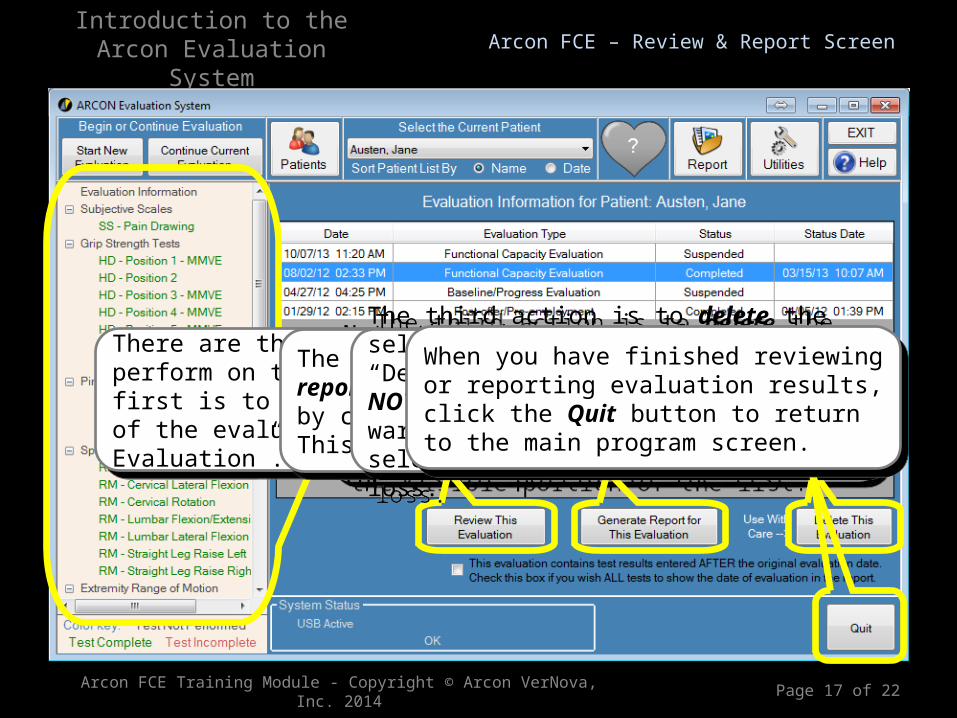
Note that the contents of the selected evaluation are shown at the left side of the screen. The scroll bars indicate that there are additional evaluation steps below the visible portion of the list.
Note that the contents of the selected evaluation are shown at the left side of the screen. The scroll bars indicate that there are additional evaluation steps below the visible portion of the list.
There are three different actions you can perform on the selected evaluation. The first is to review the contents (test results) of the evaluation by clicking “Review This Evaluation”.
There are three different actions you can perform on the selected evaluation. The first is to review the contents (test results) of the evaluation by clicking “Review This Evaluation”.
The second action is to generate a report for the selected evaluation by clicking “Generate Report for This Evaluation”.
The second action is to generate a report for the selected evaluation by clicking “Generate Report for This Evaluation”.
The third action is to delete the selected evaluation by clicking “Delete This Evaluation”. This is NOT commonly performed, and a warning message is shown if you select this action to prevent data loss.
The third action is to delete the selected evaluation by clicking “Delete This Evaluation”. This is NOT commonly performed, and a warning message is shown if you select this action to prevent data loss.
When you have finished reviewing or reporting evaluation results, click the Quit button to return to the main program screen.
When you have finished reviewing or reporting evaluation results, click the Quit button to return to the main program screen.
Introduction to theArcon Evaluation System
Arcon FCE Training Module - Copyright © Arcon VerNova, Inc. 2014 Page 18 of 22
Arcon FCE – Utilities Screen
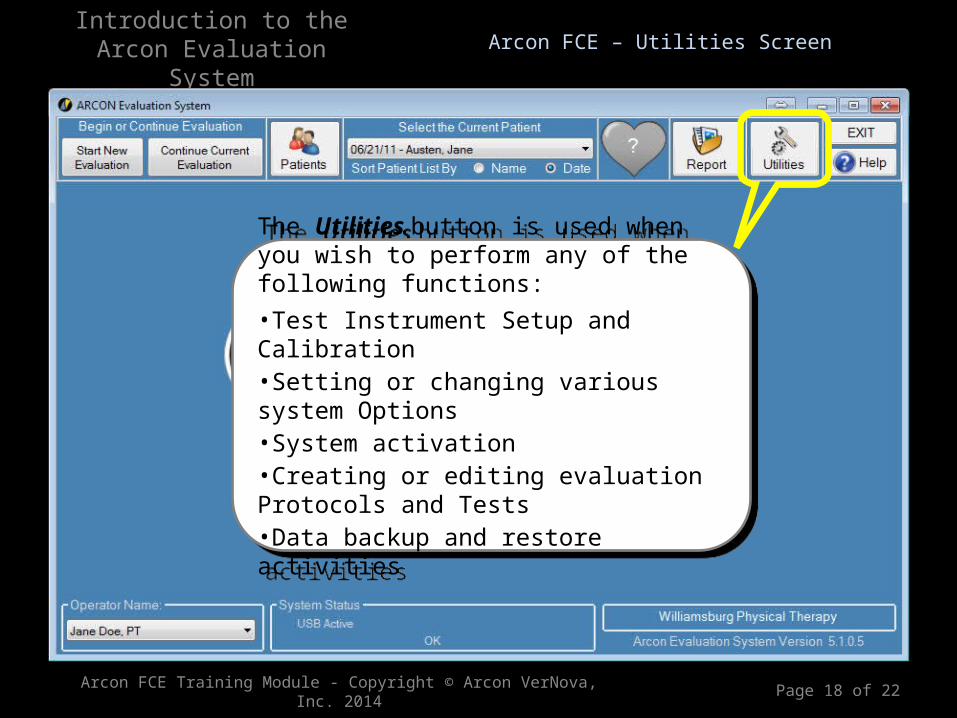
The Utilities button is used when you wish to perform any of the following functions:•Test Instrument Setup and Calibration•Setting or changing various system Options•System activation•Creating or editing evaluation Protocols and Tests•Data backup and restore activities
The Utilities button is used when you wish to perform any of the following functions:•Test Instrument Setup and Calibration•Setting or changing various system Options•System activation•Creating or editing evaluation Protocols and Tests•Data backup and restore activities
Introduction to theArcon Evaluation System
Arcon FCE Training Module - Copyright © Arcon VerNova, Inc. 2014 Page 19 of 22
Arcon FCE – Other Buttons
The Help button displays the Arcon FCE Help File. This is a context sensitive help system that shows the corresponding help topic for the current program screen.
Arcon provides the Help File in place of a program manual, as the help file is always up-to-date with any program changes.
The Help button displays the Arcon FCE Help File. This is a context sensitive help system that shows the corresponding help topic for the current program screen.
Arcon provides the Help File in place of a program manual, as the help file is always up-to-date with any program changes.
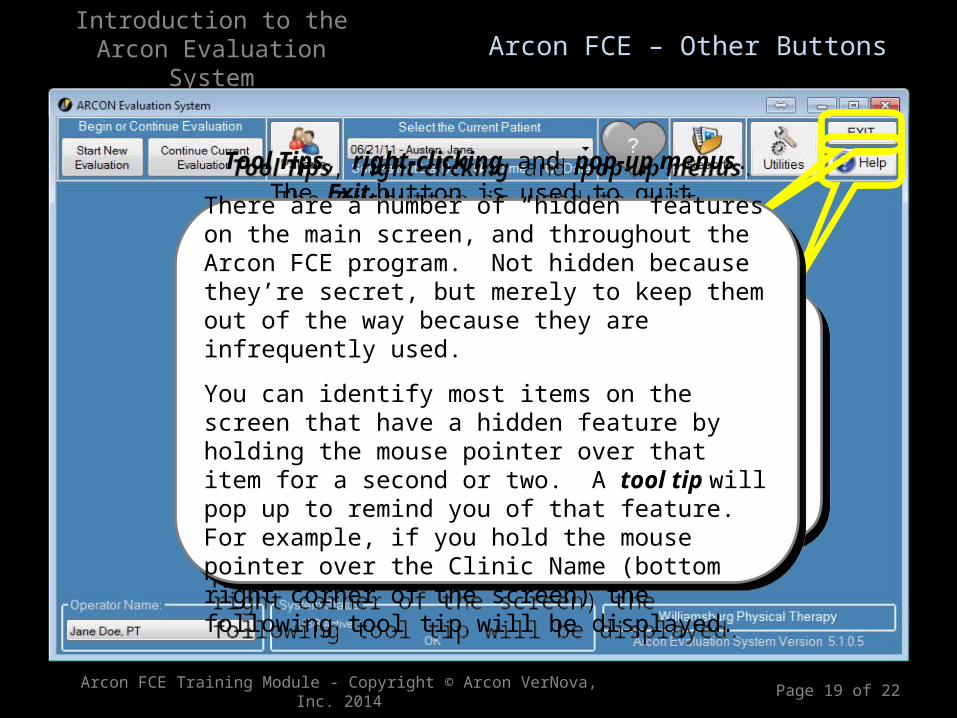
The Exit button is used to quit the Arcon FCE program. A verification box will appear to prevent accidental program exit.
On exit, the program saves the current patient, the current evaluation (if in progress), the current operator and the program screen location and size. These are restored the next time the program is started.
Tool Tips, right-clicking and pop-up menus.
There are a number of “hidden” features on the main screen, and throughout the Arcon FCE program. Not hidden because they’re secret, but merely to keep them out of the way because they are infrequently used.
You can identify most items on the screen that have a hidden feature by holding the mouse pointer over that item for a second or two. A tool tip will pop up to remind you of that feature. For example, if you hold the mouse pointer over the Clinic Name (bottom right corner of the screen) the following tool tip will be displayed.
Introduction to theArcon Evaluation System
Arcon FCE Training Module - Copyright © Arcon VerNova, Inc. 2014 Page 20 of 22
Arcon FCE – “Hidden” features
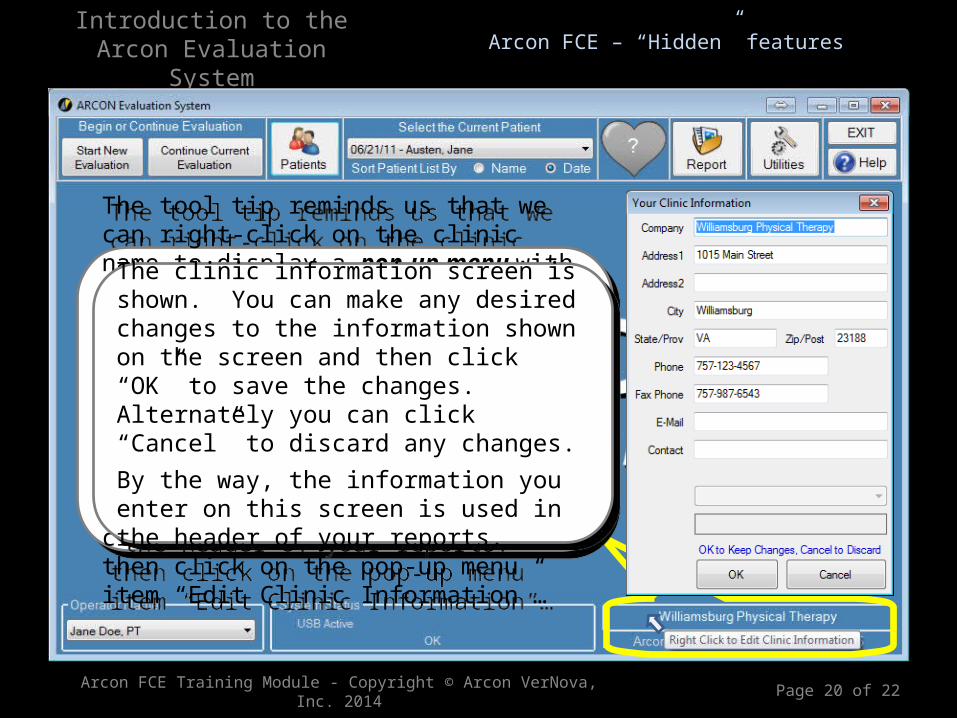
The tool tip reminds us that we can right-click on the clinic name to display a pop-up menu with an option to edit the clinic information.
Since we don’t do this very often, we don’t have to include a button on the screen for this function – the pop-up menu serves that purpose.
Notice what happens if we right-click on the clinic name, and then click on the pop-up menu item “Edit Clinic Information”…
The clinic information screen is shown. You can make any desired changes to the information shown on the screen and then click “OK” to save the changes. Alternately you can click “Cancel” to discard any changes.
By the way, the information you enter on this screen is used in the header of your reports.
Introduction to theArcon Evaluation System
Arcon FCE Training Module - Copyright © Arcon VerNova, Inc. 2014 Page 21 of 22
Arcon FCE – “Hidden” features
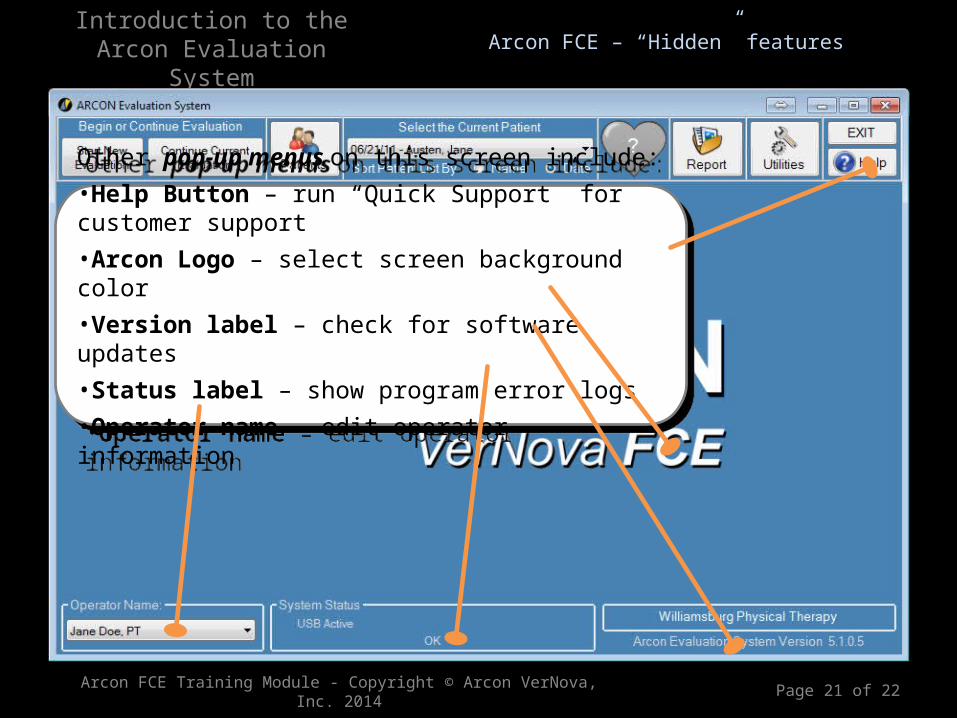
Other pop-up menus on this screen include: •Help Button – run “Quick Support” for customer support•Arcon Logo – select screen background color•Version label – check for software updates•Status label – show program error logs•Operator name – edit operator information
Other pop-up menus on this screen include: •Help Button – run “Quick Support” for customer support•Arcon Logo – select screen background color•Version label – check for software updates•Status label – show program error logs•Operator name – edit operator information
Introduction to theArcon Evaluation System
Arcon FCE Training Module - Copyright © Arcon VerNova, Inc. 2014 Page 22 of 22
Arcon FCE – End of Introduction Module
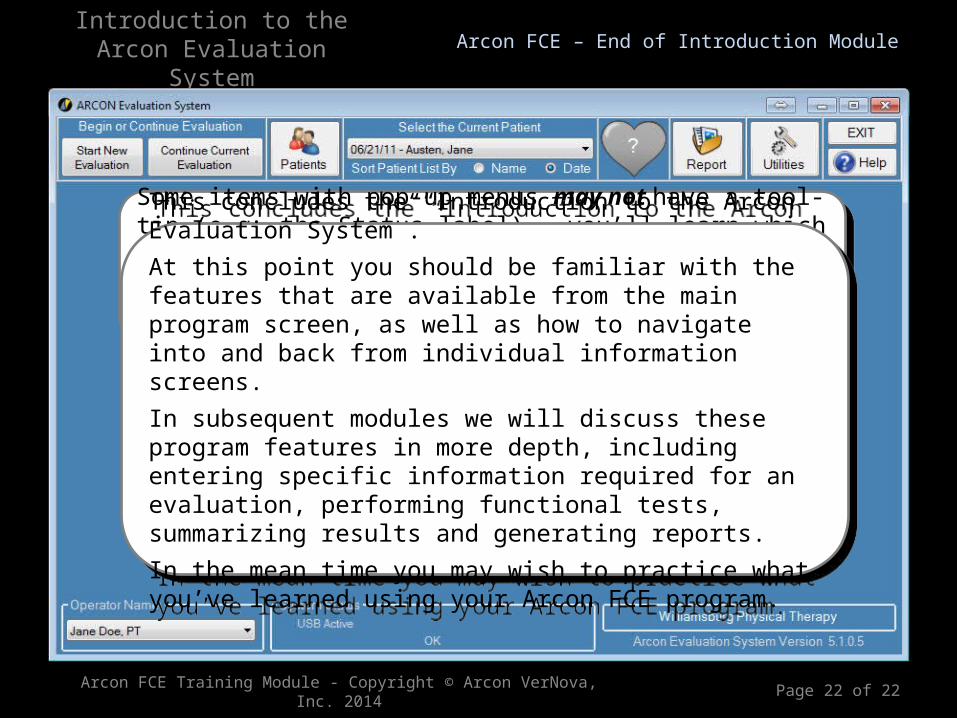
Some items with pop-up menus may not have a tool-tip (e.g. the Status label) – you’ll learn which ones are which as you use them. The important point to remember is that right-clicking to show pop-up menus is common throughout the Arcon FCE program.
Some items with pop-up menus may not have a tool-tip (e.g. the Status label) – you’ll learn which ones are which as you use them. The important point to remember is that right-clicking to show pop-up menus is common throughout the Arcon FCE program.
This concludes the “Introduction to the Arcon Evaluation System”.
At this point you should be familiar with the features that are available from the main program screen, as well as how to navigate into and back from individual information screens.
In subsequent modules we will discuss these program features in more depth, including entering specific information required for an evaluation, performing functional tests, summarizing results and generating reports.
In the mean time you may wish to practice what you’ve learned using your Arcon FCE program.