Embed Size (px)
Citation preview

1
Introduction to the Android Platform Guide
Overview
AirWatch provides you with a robust set of mobility management solutions for enrolling, securing, configuring and managing your Android device deployment. Through the AirWatch Admin Console you have several tools and features at your disposal for managing the entire life-cycle of corporate and employee owned devices. You can also enable end users to perform task themselves through the Self-Service Portal (SSP) and user self-enrollment, which will save you vital time and resources.
Ensuring devices are compliant and secure is also an important part of managing a device fleet, and you can do this by assigning compliance policies and security profiles to specific groups and individuals in your organization. Finally, custom reporting tools and a searchable, customizable dashboard make it easy for you to perform ongoing maintenance and management of your device fleet.
In This Guide
Before You Begin – Details useful background information and things to keep in mind before diving into AirWatch and Android device management, including prerequisites and suggested reading.
Android Device Enrollment – Describes how to set up email auto discovery, blacklist and whitelist registration, the enrollment process, using the AirWatch Agent and configuring the AirWatch Agent.
Android Device Profiles – Details the available profiles for securing and configuring Android devices.
Containerization with Samsung KNOX – Describes how to enable and deploy the Samsung KNOX container.
Compliance – Explains how the AirWatch Compliance Engine works and how to create compliance policies.
Applications for Android Devices – Covers the available AirWatch applications for Android devices and options for configuring the AirWatch Agent.
Shared Devices – Explains how to enable and use shared device mode for Android devices.
Mobile Kiosks – Explains how to enable and use shared device mode for Android devices.
Managing Android Devices – Reviews the management tools available for administrators and end users in the AirWatch Admin Console, and the SSP.
Appendix A: OEM Specific Key Features Matrix – Outlines the OEM specific profiles, OEM specific restrictions, supported Samsung devices and devices by manufacturer and version in matrices.

2
Before You Begin
Overview
Before deploying Android devices, you should consider the following pre-requisites, requirements, supporting materials, and helpful suggestions from the AirWatch team. Familiarizing yourself with the information available in this section helps prepare you for deploying Android devices.
In This Section
Supported Devices and OS Versions – A comprehensive list of supported devices, browsers and versions.
Requirements – The prerequisites for a successful Android deployment.
Recommended Reading – Helpful background and supporting information available from other AirWatch guides.
Supported Devices and OS Versions
Supported Operating Systems
2.3.X Gingerbread
3.X Honeycomb
4.0.X Ice Cream Sandwich
4.1.X Jelly Bean
4.2.X Jelly Bean
4.3.X Jelly Bean
OEMs that offer additional management capability:
Samsung
LG
Lenovo
HTC
Motorola
Amazon
Barnes and Noble
Sony

3
Requirements
Before using the procedures in this guide, please ensure you have the following:
Google ID with a corresponding device UID – Allows you to integrate with and search applications in the Google Play Store.
Appropriate Admin Permissions – Allows you to create profiles, policies and manage devices within the AirWatch Admin Console.
Enrollment URL – Links to your organization's enrollment environment and takes you directly to the enrollment screen. For example, mdm.acme.com.
Group ID – Associates your device with your corporate role and is defined in the AirWatch Admin Console.
Credentials – Authenticates you as an end user in your AirWatch environment. These credentials may be the same as your network directory services or may be uniquely defined in the AirWatch Admin Console.
Recommended Reading
This guide touches on aspects of mobile device management and Android device management. For an extensive background on these topics, please refer to the following guides:
The Mobile Device Management (MDM) Guide is referenced for additional information on using the Self-Service Portal (SSP) in device management.
The Mobile Application Management (MAM) Guide is referenced for information on how to apply AirWatch features to internal applications using the Software Development Kit (SDK).

4
Android Device Enrollment
Overview
Each Android device in your organization's deployment must be enrolled before it can communicate with AirWatch and access internal content and features. This is facilitated with the AirWatch Agent. You can enroll devices using a web-based process that automatically detects if the AirWatch Agent is already installed. Additionally, you can pre-enroll devices for end users, or end users can enroll their own devices.
End users are prompted for the Enrollment URL and Group ID provided by you. Android devices must begin communicating with AirWatch to access internal content and features, which is facilitated using the AirWatch Agent. Available for download from the Google Play Store and the Amazon App Store, the AirWatch Agent provides a single resource to enroll a device as well as provide device and connection details. Additionally, agent-based enrollment allows you to:
Authenticate users via basic or Directory Services, such as AD/LDAP/Domino, SAML, tokens or proxies.
Register devices in bulk or allow users to self-register.
Define approved OS versions, models and maximum number of devices per user.
Note: Certain Android OEM vendors offer features and capabilities that you can enable in the AirWatch Admin Console. See Downloading the OEM Service App for more information.
Enrolling Requirements
The following information is required prior to enrolling your Android device:
Email address – This is your email address associated to your organization. For example, [email protected].
Credentials – This username and password allow you to access your AirWatch environment. These credentials may be the same as your network directory services or may be uniquely defined in the AirWatch Admin Console.
If a domain is not associated to your environment, you are still prompted to enter your email address. Since auto discovery is not enabled, you are then prompted for the following information:
Enrollment URL – This URL is unique to your organization's enrollment environment and takes you directly to the enrollment screen. For example, mdm.acme.com.
Group ID – The Group ID associates your device with your corporate role and is defined in the AirWatch Admin Console.
Credentials – This unique username and password pairing allows you to access your AirWatch environment. These credentials may be the same as your network directory services or may be uniquely defined in the AirWatch Admin Console.
To download the Agent and subsequently enroll an Android device, you'll need the following information:
Enrollment URL – The enrollment URL is AWAgent.com for all users, organizations and devices enrolling into AirWatch.

5
In This Section
Enrolling an Android Device with the AirWatch Agent – Learn how to secure a connection between Android devices and your AirWatch environment.
Downloading the OEM Service Application – Discover how to enable additional MDM capabilities that only pertain to a specific OEM device.
Sideloading the AirWatch Agent – Learn how to deploy the AirWatch Agent via sideloading in the instance where you cannot deploy it through the Google Play Store.
6
Enrolling an Android Device with the AirWatch Agent
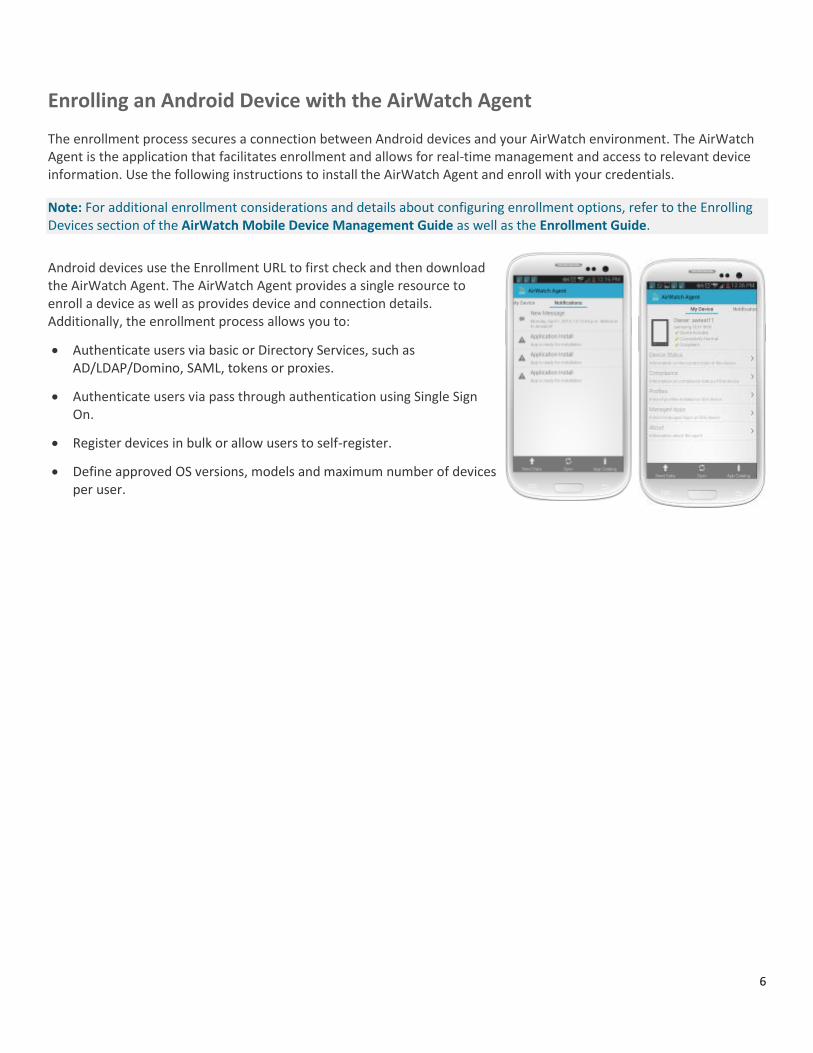
The enrollment process secures a connection between Android devices and your AirWatch environment. The AirWatch Agent is the application that facilitates enrollment and allows for real-time management and access to relevant device information. Use the following instructions to install the AirWatch Agent and enroll with your credentials.
Note: For additional enrollment considerations and details about configuring enrollment options, refer to the Enrolling Devices section of the AirWatch Mobile Device Management Guide as well as the Enrollment Guide.
Android devices use the Enrollment URL to first check and then download the AirWatch Agent. The AirWatch Agent provides a single resource to enroll a device as well as provides device and connection details. Additionally, the enrollment process allows you to:
Authenticate users via basic or Directory Services, such as AD/LDAP/Domino, SAML, tokens or proxies.
Authenticate users via pass through authentication using Single Sign On.
Register devices in bulk or allow users to self-register.
Define approved OS versions, models and maximum number of devices per user.

7
The following instructions are for enrolling a device using the MDM agent.
1. Navigate to AWAgent.com from your browser.
AirWatch automatically detects if the AirWatch Agent is installed on your device and, if it is not, it redirects you to the App Store to download it.
Note: A Google ID is required to download the AirWatch Agent from the Google Play store.
Note: You can also send the enrollment URL to devices via SMS text message.
2. Download and install the AirWatch Agent from the App Store, if needed.
3. Launch the AirWatch Agent or return to your browser session to continue enrollment.
If you have configured email autodiscovery, then it prompts you for your email address. In addition, you may be prompted to select your Group ID from a list.
If you have not configured email autodiscovery, then it will prompt you for the Enrollment URL and a Group ID.
4. Enter your username and password.
5. Follow the remaining prompts to complete enrollment.
You may be notified at this time if your user account is not allowed or blocked because your account is blacklisted and not approved for enrollment.

8
Downloading the OEM Service App
After you enroll, AirWatch automatically detects if the device can take advantage of additional vendor capabilities, and deploys an Original Equipment Manufacturer (OEM) specific service application to your Android.
This application is a “plug-in” app that is only installed and used in combination with AirWatch MDM Agent enrollment. It allows for additional MDM capabilities that only pertain to a specific OEM device. The example below shows how to run the AirWatch Samsung Service.
After installing the Agent, you are automatically prompted to begin installing the service app. Select Install, when prompted.
Once it installs, you are prompted to activate the device administrator. Select Activate.
The blue screen indicates the Service Application upload is successful.
View the homepage to see the successfully downloaded Agent and Service Application.
Note: In order to install the Samsung Service App, enable Push Service App from Play Store in Service Applications. Otherwise, end users must first enable Allow Non-Market Applications in device settings.
Sideloading the AirWatch Agent
In most situations, the AirWatch Agent for Android devices (the Agent) deploys through the Google Play Store. However, you might experience cases where you cannot use this method of deployment. For these situations, use sideloading to deploy the Agent to Android devices.
Sideload the Agent in the following situations:
Sideload the Agent on to the following devices because these devices do not have access to the Google Play Store:
o Motorola ET1
o Motorola MC40

9
Sideload the Agent if the company prohibits the use of Google Accounts. Users need a Google Account to access the Google Play Store.
There are two methods for sideloading the Agent on to your applicable Android devices:
Sideloading Using a USB Port – Drag and drop the Agent from a computer to Android devices. Use this method to stage the agent on a small number of devices.
Sideloading Using a Hosted Download – Send users a link that connects their Android devices to the Agent .apk file that you host on an internal server. Use this method to deploy the Agent to a large number of devices.
Sideloading Using a USB Port
1. Put the Agent .apk file on a computer for easy access. Ask you AirWatch Account Manager for the latest version if you do not have it.
2. Prepare the Android device for sideloading. On the device, navigate to Settings ► Security ► Unknown sources and select Allow installation of non-Market apps.
3. Connect a device to the computer using the USB port and a USB cable.
4. In order for the computer to communicate with the device, click the Turn on USB storage button on the device. The computer detects the device drive.
5. Select the Open folder to view files option on the computer to open the device drive.
6. From the computer, drag and drop the Agent .apk file to the device.
Note: Do not put the .apk file in the device’s USB Storage folder because you cannot access the USB Storage folder from the device.
7. Disconnect the device from the computer.
8. Using the native file manager or the Files application on the device, select the AirWatchAgent_x.x.apk file.
9. Click install. After the installation completes, click the prompt to open the Agent and begin enrollment.
Sideloading Using a Hosted Download Site
1. Host the Agent .apk file on an internal server that is accessible by devices for download. Ask your AirWatch Account Manager for the latest version if you do not have it. Instruct users to prepare the device for sideloading. On the device, users navigate to Settings ► Security ► Unknown sources and select Allow installation of non-Market apps.
2. Send an email or text message that contains a direct link to the Agent .apk file to applicable users.
3. Direct users to navigate to and select the hosted file to install the Agent.
4. Instruct users to select the Agent download notification in the download notifications area on the device.
5. Instruct users to select the AirWatchAgent_x.x apk file.
Note: If users miss the download notification, they can find the Agent .apk file in the Download folder. The Download folder is in the native file manager or the Files application.
6. Direct users to click install. After installation completes, have users click the prompt to open the Agent and begin enrollment.

10
Upgrading After Sideloading
The process of sideloading an Android device affects the device’s ability to upgrade the Agent version. In order for the sideloaded Android device to receive an Agent upgrade, you must deploy the new Agent version as an internal application through the AirWatch Console. You can get the upgrade file from your AirWatch Account Manager.
You do not need to deploy the Agent as an internal application for upgrade if the company does not prohibit the use of Google Accounts. When users receive staged devices, they can download personal Google Accounts to the staged devices. With their personal Google Accounts, they can access the Google Play Store to upgrade the Agent.

11
Android Device Profiles
Overview
Create Android device profiles to ensure proper usage of devices, protection of sensitive data, and workplace functionality. Profiles serve many different purposes, from letting you enforce corporate rules and procedures to tailoring and preparing Android devices for how they will be used. The individual settings you configure, such as those for passcodes, Wi-Fi, VPN and email, are referred to as payloads. In most cases it is recommended that you only configure one payload per profile, which means you will have multiple profiles for the different settings you wish to push to devices. For example, you can create a profile to integrate with your email server and another to connect devices to your workplace Wi-Fi network.
Device Profiles and Container Profiles
You can create profiles for two types of Android devices. The first is for devices, and applies to all Android devices. The second is for containers, and only applies to Samsung KNOX devices. This section only covers device profiles. For more information about creating container profiles for Samsung KNOX devices, see Configuring Containerization for Samsung KNOX. Note that when you apply a device profile to a Samsung KNOX device, it will take effect but apply to the entire device – not just the container – by default.
In This Section
Configuring General Profile Settings – Covers how to set up a profile's general settings.
Enforcing a Device Passcode Policy – Covers the multiple fields and levels of complexity for a passcode policy in the AirWatch Admin Console.
Enforcing Device Restrictions – Details the restriction payloads used to secure and protect Android devices available in the AirWatch Admin Console.
Configuring Wi-Fi Access – Details the steps required to configure a device with your organization's Wi-Fi network.
Configuring Virtual Private Network (VPN) Access – Details the steps required to configure a device with your organization's VPN client.
Creating a Websense Content Filter Profile – Leverage your existing content filtering categories in Websense and apply those to devices you manage within the AirWatch Admin Console.
Deploying Email Account Settings – Explains how to create an Email profile for Android devices to configure email settings on the device.
Enabling Exchange ActiveSync (EAS) Mail for Android Devices – Outlines the process for configuring EAS for accessing mail on Android devices.
Deploying EAS Mail via Native Mail Client for Android Devices – Details deploying an EAS payload leveraging the native Android email client.
Deploying EAS Mail via NitroDesk's TouchDown Client for Android Devices – Details deploying an EAS payload leveraging the NitroDesk TouchDown email client.

12
Deploying EAS Mail via AirWatch Inbox – Details deploying an EAS payload leveraging the AirWatch Inbox email client.
Deploying EAS Mail via Lotus Notes – Details deploying an EAS payload leveraging Lotus Notes.
Configuring Application Control for Android – Describes how to whitelist and blacklist selected applications.
Deploying Bookmarks – Explains setting up bookmark shortcuts on your device.
Deploying Credentials – Details how to deploy corporate certificates for user authentication to managed devices.
Deploying the Secure Launcher – Describes how to configure the Secure Launcher to create a device-level kAndroidk.
Configuring a Global HTTP Proxy – Explains configuring global http proxy settings.
Setting Date/Time – Details how to provide your fleet with appropriate regional date/time formats.
Configuring Sound Profiles – Details how to set the sound settings for devices.
Configuring a Display Profile – Explains how to set the display settings for devices.
Deploying Advanced Profiles – Describes configuring Android APN settings.
Time Schedules – Details time schedules and how they are created and applied to profiles.

13
Configuring General Profile Settings
The process for creating a profile consists of two parts. First, you must specify the General settings for the profile. The General settings determine how the profile is deployed and who receives it as well as other overall settings. Next, you must specify the payload for the profile. The payload is the type of restriction or setting applied to the device when the profile is installed. The general settings listed below apply to any profile:
1. Navigate to Devices ► Profiles ► List View and select Add.
2. Select the appropriate platform for the profile you wish to deploy.
3. Configure General settings on the applicable tab. These include:
Name – Name of the profile to be displayed in the AirWatch Admin Console.
Description – A brief description of the profile that indicates its purpose.
Deployment – Determines if the profile will be automatically removed upon unenrollment:
o Managed – The profile is removed.
o Manual – The profile remains installed until removed by the end user.
Assignment Type – Determines how the profile is deployed to devices:
o Auto – The profile is deployed to all devices automatically.
o Optional – The end user can optionally install the profile from the Self-Service Portal (SSP) or can be deployed to individual devices at the administrator's discretion.
o Interactive – This is a unique assignment type in which the profile integrates with third-party systems to deploy a specific payload to a device.
o Compliance – The profile is deployed when the end user violates a compliance policy applicable to the device.
Minimum Operating System – The minimum operating system required to receive the profile.
Model – The type of device to receive the profile.
Ownership – Determines which ownership category receives the profile:
Allow Removal – Determines if the profile can be removed by the device's end user:
o Always – The end user can manually remove the profile at any time.
o With Authorization – The end user can remove the profile with the authorization of the administrator.
o Never – The end user cannot remove the profile from the device.
Managed By – The Organization Group with administrative access to the profile.
Assigned Organization Groups – The Organization Groups that receive the profile.
Additional Assignment Criteria – These check boxes enable additional restrictions for the profile:
o Publish only to users in selected User Groups – Specify one or more User Groups to receive the profile.

14
o Enable Scheduling and install only during selected time periods – Specify a configured time schedule in which devices receive the profile only within that time-frame. See Time Schedules for more information.
4. Configure a payload for the device platform.
Note: For step-by-step instructions on configuring a specific payload for a particular platform, please refer to the applicable Platform Guide.
5. Select Save & Publish.

15
Enforcing a Device Passcode Policy
You can enforce two types of passcode policies; one for devices and another for access to applications.
Device Passcode Profile
End users access sensitive corporate information from their devices, making device security a major enterprise concern. Setting a passcode policy requires your end users to enter a passcode, providing a first layer of defense for sensitive data on devices.
Create a device passcode profile to ensure basic device security:
1. Navigate to Devices ► Profiles ► List Views ► Add. Select Android.
2. Select Device to deploy your profile to a device.
Alternatively, select Container to deploy your profile to a container within a Samsung KNOX device.
Note: For more information on Samsung KNOX containerization, please see the Containerization with Samsung KNOX section.
3. Configure General profile settings.
4. Select the Passcode payload.
Complete the fields. Consider the following configuration options when creating a passcode profile payload. Keep in mind available passcode configuration options are dependent on the Android device manufacturer and installed operating system version:
Minimum Passcode Length – Ensure passcodes are appropriately complex by setting a minimum number of characters.
Passcode Content – Ensure the passcode content meets your security requirements by selecting Any, Numeric, Alphanumeric, Alphabetic or Complex from the dropdown menu.
Maximum Number of Failed Attempts – Specify the number of attempts allowed before the device is wiped.
Grace Period for Passcode Change – Specify the length of time an end user can wait before changing the device passcode following expiry.
Maximum Number of Repeating Characters – Prevent your end users from entering easily cracked repetitive passcodes like "1111" by setting a maximum number of repeating characters.
Maximum Length of Numeric Sequences – Prevent your end user from entering an easily cracked numeric sequence like "1234" as their passcode by setting.
Maximum passcode age (days) – Specify the maximum number of days the passcode can be active.
Passcode history – Set the number of times a passcode must be changed before a previous passcode can be used again.
Device Lock Timeout (in Minutes) – Set the period of inactivity before the device screen locks automatically.
Require Storage Encryption – Indicate if internal storage requires encryption.
Require SD Card Encryption – Indicate if the SD card requires encryption.

16
5. Select Save to save the Passcode profile, or Save & Publish to assign the profile to associated devices.
Note: Complex Passcode Policies require a minimum Operating System of Android 3.0.
6. Select Save & Publish.
Enforcing Device Restrictions
Restrictions profiles provide a second layer of device data protection by allowing you to specify and control how, when and where your employees use their devices.
Restriction profiles lock down native functionality of Android devices and vary significantly based on OEM. To create a restrictions profile:
1. Navigate to Devices ► Profiles ► List Views ► Add. Select Android.
2. Select Device to deploy your profile to a device.
Alternatively, select Container to deploy your profile to a container within a Samsung KNOX device.
Note: For more information on Samsung KNOX containerization, please see the Containerization with Samsung KNOX section.
3. Configure General profile settings.
4. Select the Restrictions payload from the list. You can select multiple restrictions as part of a single restrictions payload.
5. Configure Restrictions settings, including:
Note: For a comprehensive understanding of restrictions by OEM, please reference the OEM Restrictions matrix in the appendix.
Device Functionality – Device-level restrictions can disable core device functionality such as the camera, screen capture and factory reset to help improve productivity and security. For example, disabling the camera protects sensitive materials from being photographed and transmitted outside of your organization. Prohibiting device screen captures helps protect the confidentiality of corporate content on the device.
Sync and Storage – Control how information is stored on devices, allowing you to maintain the highest balance of productivity and security. For example disabling Google or USB Backup keeps corporate mobile data on each managed device and out of the wrong hands.
Application – Application-level restrictions can disable certain applications such as YouTube, Google Play Store and native browser, which enables you to enforce adherence to corporate policies for device usage.
Bluetooth – Limit file sharing via bluetooth by disallowing bluetooth behaviors such as outgoing calls and data transfer.
Network – Prevent devices from accessing Wi-Fi and data connections to ensure that end users are not viewing sensitive information via a connection that can be easily hacked.
Roaming – Allow/disallow device functionality while roaming to configure telecom settings for your devices.
Tethering – Prevent end users tethering with other devices to keep unmanaged devices from viewing sensitive information about your device fleet.

17
Browser – Limit the behavior of your browser to maximize security. If implementing AirWatch Browser, ensure you disable Allow Native Android Browser to restrict browsing activity to the AirWatch Browser.
Miscellaneous – Configure the font and font size for your device to give it a customized look and feel.
Hardware Restrictions – Determine the hard keys end users can utilize to limit the level of device functionality to a level that is appropriate for your organization.
6. Select Save & Publish.
Configuring Wi-Fi Access
Configuring a Wi-Fi profile lets devices connect to corporate networks, even if they are hidden, encrypted or password protected. This can be useful for end users who travel to various office locations that have their own unique wireless networks or for automatically configuring devices to connect to the appropriate wireless network while in an office.
1. Navigate to Devices ► Profiles ► List Views ► Add. Select Android.
2. Select Device to deploy your profile to a device.
3. Configure General profile settings.
4. Select the Wi-Fi payload.
5. Configure Wi-Fi settings, including:
Service Set Identifier – Provide the name of the network the device connects to.
Hidden Network – Indicate if the Wi-Fi network is hidden.
Active Network – Indicate if the device will connect to the network with no end-user interaction.
Security Type – Specify the access protocol used and whether certificates are required.
Password – Provide the required credentials for the device to connect to the network.
6. Select Save & Publish.
Configuring Virtual Private Network (VPN) Access
Virtual private networks (VPNs) provide devices with a secure and encrypted tunnel to access internal resources. VPN profiles enable each device to function as if it were connected through the on-site network. Configuring a VPN profile ensures end users have seamless access to email, files and content.
Creating a VPN Profile
Configuring a VPN connection provides devices a secure and encrypted tunnel to an internal network, effectively allowing each device to function as seamlessly as if they were using the network on-site. Email function, access to files and content and normal internal network capabilities all function as if connected by a hard-wire.
Depending on the connection type and authentication method, leverage look-up values to automatically pull and fill username info to streamline the login process. Additionally, prefill a shared secret or shared key to ease authentication of each device.
18
When creating a VPN profile:
1. Navigate to Devices ► Profiles ► List Views ► Add. Select Android.
2. Select Device to deploy your profile to a device. Alternatively, select Container to deploy your profile to a container within a Samsung KNOX device.
Note:For more information on Samsung KNOX containerization, please see the Containerization with Samsung KNOX section.
3. Configure General profile settings.
4. Select VPN.
5. Configure VPN settings, including:
Connection Type – Specify the protocol used to facilitate VPN sessions.
If you are using Websense for content filtering, please see Creating a Websense Content Filter Profile.
Connection Name – Specify the assigned to the connection created by the profile.
Server – Specify the name or address of the used for VPN connections.
Username – Provide the credentials required for end-user VPN access.
Shared Secret – Provide the encrypted key stored on the VPN server and used by the profile for VPN access.
Authentication – Specify the method required to authenticate the VPN session, if applicable.
Note: Cisco AnyConnect, Juniper Junos Pulse and F5 SSL connections require specific applications to be installed on each device before the VPN profile is deployed. These applications can be included as a Recommended App from the App Catalog for easy access. Additionally, a Websense specific Certificate Authority must be established to enable a Websense VPN connection.
6. Select Save & Publish.
Creating a Websense Content Filter Profile
AirWatch integration with Websense lets you leverage your existing content filtering categories in Websense and apply those to devices you manage within the AirWatch Admin Console. Allow or block access to websites according to the rules you configure in Websense and then deploy a VPN payload to force devices to comply with those rules. Directory users enrolled in AirWatch are validated against Websense to determine which content filtering rules to apply based on the specific end user.
Note: You can enforce content filtering with Websense in one of two ways: 1) Use a VPN profile, which applies to all web traffic using browsers other than the AirWatch Browser. This method is described below. 2) Use the Settings and Policies page, which applies to all web traffic using the AirWatch Browser. For detailed instructions on configuring your Websense for use in the Content Filtering setting in Settings and Policies, please refer to the AirWatch Browser Guide.

19
1. Navigate to Devices ► Profiles ► List View ► Add and choose Android from the list of platform options.
2. Select Device to deploy your profile to a device.
3. Fill in General settings and select VPN.
4. Select Websense as the Connection Type.
5. Enter your Websense Server and Username/Password details.
You can also optionally Test Connection.
6. Select Save & Publish.
Directory-based end users will now have access to permitted sites based on your Websense categories.
Deploying Email Account Settings
You can also configure email settings external from EAS by deploying an Email Settings profile payload. This profile creates an IMAP or POP account using your individual email settings and your devices native mail client. From the Email Settings tab of the Android profile menu, configure the following payload settings according to your devices and users:
1. Navigate to Devices ► Profiles ► List Views ► Add. Select Android.
2. Select Device to deploy your profile to a device.
Alternatively, select Container to deploy your profile to a container within a Samsung KNOX device.
Note: For more information on Samsung KNOX containerization, please see the Containerization with Samsung KNOX section.
3. Configure General profile settings.
4. Select the Email Settings profile payload.
5. Configure Email Setting settings, including:
Specifying the basic rules for an email account and its interaction with the mail client including Email Account, Email Address, Sync Interval, Sender's Name, Signature, Set as Default Account, Max Emails to Show, Allow Attachments and Maximum Attachment Size.
Specifying the mail server settings required for Incoming Mail and Outgoing Mail to the account including if you want to Use SSL, Use TLS, Protocol, Host Name, Port, Username, Password, Path Prefix and Ignore SSL Errors.
6. Select Save & Publish.
Enabling Exchange Active Sync (EAS) Mail for Android Devices
The industry standard protocol designed for email synchronization on mobile devices is called Exchange Active Sync (EAS). To guarantee a secure connection to internal email, calendars and contacts, AirWatch integrates with multiple mail clients that configure EAS accounts on Android devices.
You have the option to configure the EAS profile payload using NitroDesk TouchDown, Lotus Notes, the AirWatch Mail Client or the mail client native to the device.

20
Creating a Generic EAS Profile for Multiple Users
Before you create an EAS profile that automatically enables devices to pull data from your mail server, you must first ensure users have the appropriate information in their user account records. For Directory Users, or those users who enrolled with their directory credentials, such as Active Directory, this information is automatically populated during enrollment. However, for Basic Users this information is not automatically known and must be populated in one of two ways:
You can edit each user record and populate the Email Address and Email Username fields.
You can prompt users to enter this information during enrollment by navigating to Devices ► Settings ► General ► Enrollment and under the Optional Prompt tab, checking the Enable Enrollment Email Prompt box.
Deploying EAS Mail via Native Mail Client for Android Devices
1. Navigate to Devices ► Profiles ► List View ► Add. Select Android.
2. Select Device to deploy your profile to a device.
Alternatively, select Container to deploy your profile to a container within a Samsung KNOX device.
Note: For more information on Samsung KNOX containerization, please see the Containerization with Samsung KNOX section.
3. Configure General profile settings as appropriate.
4. Select the Exchange ActiveSync payload.
5. Select Native Mail Client for the Mail Client. Fill in the Account Name field with a description of this mail account. Fill in the Exchange ActiveSync Host with the external URL of your company's ActiveSync server.
Note: The ActiveSync server can be any mail server that implements the ActiveSync protocol, such as Lotus Notes Traveler, Novell Data Synchronizer, and Microsoft Exchange.
6. Enable Ignore SSL Errors, if desired.
7. Fill in the Domain, User, and Email Address using look-up values. Look-up values pull directly from the user account record. To use the {EmailUserName} and {EmailDomain} look-up values, ensure your AirWatch user accounts have an email address and email username defined.
8. Leave the Password field empty to prompt the user to enter a password.
9. Select the desired Identity Certificate from the drop-down menu to provide credentials for cert-based authentication after the certificate is added to the Credentials payload.
10. Set the following optional Settings, as necessary:
Set the Past Days of Mail/Calendar to Sync that should sync and display.
Enable Sync Calendar, Sync Contacts and Allow Sync Tasks, if desired.
Provide a Maximum Email Truncation Size.
Add an Email Signature.
11. Provide the following Restrictions, if desired:
21
Enable Allow Attachments and provide a Maximum Attachment Size.
Disable Allow Email Forwarding to prevent data loss.
Enable Allow HTML Format to display in a plain text format.
EnableDisable Screenshotsto prevent the device user from taking screenshots on the device.
12. Configure the Peak Days for Sync Schedule to set the syncing schedule.
Schedule the peak week days for syncing and the Start Time and End Time for sync on selected days.
Set the frequency of Sync Schedule Peak and Sync Schedule Off Peak.
o Choosing Automatic syncs email whenever updates occur.
o Choosing Manual only syncs email when selected.
o Choosing a time value syncs the email on a set schedule.
Enable Use SSL, Use TLS and Default Account, if desired.
13. Select Use S/MIMEand provide aMigration Host if you are using S/MIME certificates for encryption. From here you can select an S/MIME certificate you associate as a User Certificate on the Credentialspayload.
14. SelectSaveto save the settings orSave & Publishto save and push the profile settings to the required device.

22
Deploying EAS Mail via NitroDesk's TouchDown Client for Android Devices
Once each user has an email address and email username you can create an EAS profile with the following steps:
1. Navigate to Devices ► Profiles ► List View ► Add. Select Android.
2. Select Device to deploy your profile to a device.
Alternatively, select Container to deploy your profile to a container within a Samsung KNOX device.
Note: For more information on Samsung KNOX containerization, please see the Containerization with Samsung KNOX section.
3. Configure General profile settings as appropriate.
4. Select the Exchange ActiveSync profile payload.
5. Choose the NitroDesk TouchDown Mail Client when deploying mail to Android devices. Assign an Account Name, enter the name or address of the Exchange ActiveSync Host server, and indicate if AirWatch should Ignore SSL Errors by selecting the applicable check box.
Optionally, select Use S/MIME if you are using S/MIME certificates for encryption. From here you can select an S/MIME certificate you associate as a User Certificate on the Credentials payload.
6. Leverage user account info to simplify authentication in Login Information. Fill in the Domain, User and Email Address using look-up values to pull directly from the user account record. To use the {EmailUserName} and {EmailDomain} look-up values ensure your AirWatch user accounts have an email address and email username defined.
7. Leave the Password field empty to prompt the user to enter a password.
8. Select the desired Identity Certificate from the drop-down menu to provide credentials for certification-based authentication after the certificate is added to the Credentials payload.
9. Set the following optional Settings, as necessary:
Set the Past Days of Mail/Calendar to Sync that should sync and display.
Provide a Maximum Email Truncation Size.
Add an Email Signature, and Enable Signature Editing, if desired.
10. Configure Passcode Settings.
Enable Require Passcode to necessitate the input of a Passcode to access EAS mail.
Enable Suppress Application PIN, if desired.
11. Enable Security Restrictions to enable or disable functionality that TouchDown may natively restrict. The following list details some of the key settings you can apply to your EAS profile to allow certain functionality:
Enable Allow Copy-paste the copying and pasting of data from the TouchDown client.
Enable Copy to Phonebook to cause TouchDown to copy contacts to the device phonebook.
Select Allow SD Card.
Enable Allow Attachments to permit users to download email attachments.

23
Set the Maximum Attachment Size (in MB) that emails can receive.
Require Device Encryption.
Require SD Card Encryption.
Select Allow Widgets to enable or disable widget functionality including: Email Widget, Calendar Widget, Task Widget, Universal Widget and Show Data On Lock Screen Widgets.
Enable Show Email/Calendar/Task Info on Notification Bar TouchDown to show information (for example, the first few lines of an email) as a notification when email/calendar/task information is received.
Enable Data/Settings Backup to allow end users to backup data and settings to an SD card.
12. Provide an enterprise License Key under TouchDown License for a seamless end-user experience. After deploying Touchdown as a recommended app, all profile configurations are applied to the app automatically.
13. Select Save & Publish.
Deploying EAS Mail via AirWatch Inbox
Use the following steps to create a configuration profile for the AirWatch Inbox:
1. Navigate to Device ► Profiles ► List View.
2. Click Add and select Android as the platform.
3. Configure General profile settings as appropriate.
4. Select the Exchange ActiveSync payload and then select the AirWatch Mail Client from the Mail Client drop-down.
5. Enter the Exchange ActiveSync Host, which is the information from your EAS server. For example, webmail.corpmdm.com.
6. Enter Login Information, which is the information used to authenticate user connections to your EAS Host. The profile supports lookup fields for inserting enrollment user’s information and login information. See Username and Password for more information.
You can also select an Identity Certificate that you have defined in the AirWatch Admin Console.
7. Configure general email Settings, such as:
Past Days of Mail to Sync
Sync Interval
Past Days of Calendar to Sync
Email Signature
8. Set which Contacts and Calendar data to use within the AirWatch Inbox:
Native Contacts/Calendars – Syncs the native calendar and contact app with AirWatch Inbox.
AirWatch Contacts/Calendars – AirWatch has now introduced its own Contacts and Calendar applications as an add-on to the AirWatch Inbox. These applications are downloaded together as a single app from the Play Store. Unlike Native Contacts/Calendars application, AirWatch Contacts/Calendars application encrypts the contacts and calendar data.

24
o Additionally, AirWatch Inbox allows you to export individual contacts or in bulk from the corporate contact to the AirWatch Contacts app.
Do Not Sync – You can disable the sync of contacts and calendars within the AirWatch Inbox profile.
9. Configure a Passcode for AirWatch Inbox. You can require an end user to enter a passcode when the AirWatch Inbox is opened. This is not the email account password, but the passcode the user enters to access the application. The following passcode settings are available:
Authentication Type
To allow Android users to log in using their Active Directory credentials, select Active Directory Password as the Authentication Type under the Passcode section.
Passcode Complexity.
Minimum Passcode Length.
Minimum Number of Complex Characters.
Maximum Passcode Age (days).
Passcode History.
Auto-Lock Timeout (min).
Auto-Lock When Device Locks.
Maximum Number of Failed Attempts.
10. Configure additional restrictions and security settings. The following restrictions are available:
Allow Copy and Paste:
o Disable user’s ability to long press email text and copy it to the clipboard.
o Disable user’s ability to copy text from outside of the email client and paste it into a mail message.
Allow Attachments.
Restrict attachments to set which applications can open attachments.
Restrict taking screenshots in the app.
Restrict domains by creating either a blacklist or whitelist of domain names.
Allow opening of links only through the AirWatch Browser.
11. Select Save & Publish when you are done.
Username and Password
You can define the username that is used for users to log in to the AirWatch Inbox. This could be their actual email address or an email username that is different from their actual email address. When configuring the Exchange ActiveSync (EAS) payload in the AirWatch Inbox profile settings, there is a User field under Login Information that you can set to a predefined lookup value.
If you have email usernames that are different than users' email addresses, you can use the {EmailUserName} field, which corresponds to the email usernames imported during directory service integration. If your users' email usernames are same as their email addresses, you would still use the {EmailUserName} field, which would use their email addresses as they were imported during directory service integration.

25
Deploying EAS Mail via Lotus Notes
1. Navigate to Devices ► Profiles ► List View ► Add. Select Android.
2. Select Device to deploy your profile to a device.
Alternatively, select Container to deploy your profile to a container within a Samsung KNOX device.
Note: For more information on Samsung KNOX containerization, please see the Containerization with Samsung KNOX section.
3. Configure General profile settings as appropriate.
4. Select the Exchange ActiveSync payload.
5. Select Lotus Notes for the Mail Client. Fill in the Account Name field with a description of this mail account. Fill in the Exchange ActiveSync Host with the external URL of your company's ActiveSync server.
Note: The ActiveSync server can be any mail server that implements the ActiveSync protocol, such as Lotus Notes Traveler, Novell Data Synchronizer and Microsoft Exchange.
Optionally, select Use S/MIME if you are using S/MIME certificates for encryption. From here you can select an S/MIME certificate you associate as a User Certificate on the Credentials payload.
6. Fill in the User field using look-up values. Look-up values pull directly from the user account record. To use the {EmailUserName} look-up values, ensure your AirWatch user accounts have an email username defined.
7. Determine the Contacts and Calendar export behavior by enabling Allow Single Contact Export and Allow Bulk Contact Export.
8. Select Save & Publish.
Configuring Application Control for Android
To allow or prevent installation of applications on devices, you enable Application Control to whitelist and blacklist specific applications. While the Compliance Engine sends alerts and takes administrative actions when a user installs or uninstalls certain applications, Application Control prevents users from even attempting to make those changes. For example, prevent a certain game application from ever installing on a device, or force the AirWatch Agent to remain on a device.
Note: Application Control is available only for specific device models. See the OEM Specific Key Features Matrix for more information.
1. Navigate to Devices ► Profiles ► List View ► Add. Select Android.
2. Select Device to deploy your profile to a device.
Alternatively, select Container to deploy your profile to a container within a Samsung KNOX device.
Note: For more information on Samsung KNOX containerization, please see the Configuring Containerization with Samsung KNOX section.
3. Configure General profile settings as appropriate.
4. Select the Application Control payload.

26
5. Enable or disable the following settings to set the level of control for your application deployments:
Enable Prevent Installation of Blacklisted Apps to enforce the automatic removal and/or prevent the installation of blacklisted apps defined in Application Groups.
Enable Prevent Un-Installation of Required Appsto prevent the un-installation of required apps defined in Application Groups.
Enable Only Allow installation of Whitelisted Apps to prevent the installation of any application that is not a whitelisted app defined in Applications Groups.
6. Select Save & Publish.
Note: For instructions on creating application groups, see Configuring an Application Group.

27
Configuring an Application Group
The AirWatch Admin Console provides the ability to group applications into blacklisted, whitelisted, and required applications. These groups are called Application Groups and each application group is tied to an Organization Group. Use application groups to assign whitelists and blacklists to users.
Note: For more information about creating an Application Control profile, see Appendix C – Enforcing Application Control for Android and Windows Phone 8.
1. Navigate to Apps & Books ► Applications ► Settings ► App Groups.
2. Select Add Group.
List tab:
o Select Type as Whitelist, Blacklist, Required or MDM Application. On selecting the Type, the Name field is automatically populated.
Note: Select MDM Application for custom MDM applications.
o Select Platform as either Apple, Android or Windows Phone 8.
o Enter the Application Name and the Application ID. The Application ID automatically completes when you use the search function to search for the app from an app store.
o Select Add Application to add multiple applications and then select Next to navigate to the Assignment tab. Add exceptions to your application group to create detailed whitelists and blacklists.
Assignment tab:
o Enter a Description for the application group.
o Define the Device Ownership as Corporate-Dedicated, Corporate-Shared, Employee Owned, or Undefined.
o Assign the device Model and the Operating System.
o Select the Organization Group and User Group for the application group to be assigned to and then select Finish to complete the process.

28
Deploying Bookmarks
Bookmarks function much like an app on a device, providing end users a simple way to access a URL directly from an icon on their device's menu. The end user sees the bookmark icon and title, selects the bookmark and connects directly to a specified URL.
Bookmarks are particularly useful for easy navigation to extended URLs with a large amount of characters. End users can have bookmarks directly next to apps they use on a day-to-day basis, and connect to internal content repositories or login screens without having to open a browser and type out a long URL.
When configuring a bookmark:
1. Navigate to Devices ► Profiles ► List View ► Add. Select Android.
2. Select Device to deploy your profile to a device.
3. Configure General profile settings as appropriate.
4. Select the Bookmarks payload.
5. Configure the Bookmarks settings, including:
Label – Provide the name that appears on the device menu.
URL – Specify the link destination that the user is brought to upon selecting the Bookmark.
Icon – Add an image for the bookmark as it appears on the device menu.
6. Determine whether the bookmark appears on the device's homescreen (first page of the device menu) with Add to Homescreen. Additionally you can select Show in App Catalog/Workspace.
7. Select Save & Publish.
Deploying Credentials
Credentials profiles deploy corporate certificates for user authentication to managed devices. Configure the following options to apply corporate certificates:
1. Navigate to Devices ► Profiles ► List View ► Add. Select Android.
2. Select Device to deploy your profile to a device.
Alternatively, select Container to deploy your profile to a container within a Samsung KNOX device.
Note: For more information on Samsung KNOX containerization, please see the Containerization with Samsung KNOX section.
3. Configure General profile settings as appropriate.
4. Select the Credentials payload.
5. Use the drop-down menu to select either Upload, Defined Certificate Authority or User Certificate for the Credential Source.
Note: The remaining payload options are source-dependent. If you select Upload, you must enter a Credential Name and upload a new certificate. If you select Defined Certificate Authority, you must choose a predefined

29
Certificate Authority and Template. If you select User Certificate select either a S/MIME Certificate or a S/MIME Encryption Certificate.
6. Select Save & Publish.
Deploying the Secure Launcher
Lock devices down to individual use cases by deploying the Android Secure Launcher payload. This payload allows complete customization of the look and feel of the device as well as access to important settings and native applications. Though the initial settings are configured and the Secure Launcher payload is deployed, you can still reconfigure those settings for each device.
The AirWatch Secure Launcher allows your organization to completely customize the look and behavior of managed Android devices. Designed for all Android 2.3 devices and higher, the Secure Launcher App will replace your device's graphical user interface with one that has been custom tailored to your organization's specifications. Even more, the AirWatch Admin Console provides an easy-to-follow configurations page to configure and manage layout and display settings in a centralized environment.
Note: Secure Launcher is designed for all Android 2.3 devices and higher. The Kindle Fire HD is not supported by the AirWatch Secure Launcher.
Use Cases
Configuring Secure Launcher settings in the AirWatch Admin Console tailors devices for deployment in any number of situations, such as:
Retail – Lock each device into a single app with no access to other features or settings. Customers can browse store products or place food orders without employee interaction.
Education – Load a single education or research app for students to use while in class. Students are unable to surf the web or download additional apps onto devices.
Healthcare – Loan out devices with whitelisted apps for patient-use, such as games and entertainment apps. Enable phone features and customize an address book with important hospital contact information.
Capabilities
Utilizing the Secure Launcher App gives an administrator full control of how a user sees and uses their device, including layout and access options to allow:
Phone icon presence – Disable access to phone and calling function.
Display settings – Disable access to display configuration on the device, including brightness and auto-rotate.
Sound settings – Disable access to sound configuration on the device, including volume, ring-tone and silent mode.
Bluetooth settings – Disable ability to turn on/off Bluetooth features.
30
Wi-Fi settings – Disable access to Wi-Fi configuration, including network lists and passwords.
Security settings – Disable ability to configure security on the device, including passcode and screen-lock.
Device wallpaper – Upload and lock device wallpaper.
Screen count – Set number of screens available to user.
Prevention of icon rearrangement – Lock icon arrangement in the menu.
Application Whitelist – Define every application that end user will be able to access and use.
Creating Your Profile
Locking down your devices with the Secure Launcher is an easy process that only requires the configuration of a profile and the installation or provision of the application on a device. To configure an Android profile with a Secure Launcher payload:
1. Navigate to Devices ► Profiles ► List View ► Add. Select Android.
2. Select Device as the profile configuration type.
3. Configure General profile settings.
4. Select the profile payload type as Secure Launcher from the menu at left and click Configure.

31
5. Select the app mode as either Single or Multi mode. The below two images show the tabs available on the Secure Launcher payload configuration page for Single App and Multi App mode.
Note: While in Single App Mode, the device is locked in a single application and the home button is also disabled until the profile is removed/changed. Upon wake or reboot, the device returns to the specified application automatically. In Multi App Mode, the device user is locked and limited to only use admin-specified applications.
Note: The Preferences tab for both Single App and Multi App mode have similar configurations except the Settings configuration which is present only for Multi App mode.
Single App Mode
Under Add App tab, you can perform the following to configure kiosk payload:
Select the type of app as either Public or Internal or Miscellaneous from the drop-down to perform the app search.
Note: Apps other than Public and Internal are called Miscellaneous apps.
Enter the name of the app in the Filter App List field to filter the list of similar apps that are available in the AirWatch Admin console.
If the app is not found in the list, Add an app by providing the Application Name and Application ID.
Note: You can drag the apps from the filter list and place it on the Preview side of the payload page.
Note: You can also hide some of the whitelisted apps by dragging and dropping in the Hidden Apps section on the left side of the page. These hidden whitelist apps will be invisible on the home screen to prevent its direct access by the users but will be invoked by some other whitelisted apps.

32
Under Preferences tab, you can configure the required settings:
Enter an Administrative Passcode to access the device menu in order to add an applications or to exit from the Launcher/Single App mode.
Enable the checkbox to persist the admin passcode if Kiosk Profile is removed from the device.
Enable/Disable where applicable to allow access to specific device functions and settings.
Multi App Mode
The Preview section helps you to view the position of apps on various devices on Portrait and Landscape view depending on:
Manufacturer - Select the options such as Generic, Samsung, Nexus.
Model - Select the appropriate model based on the selected manufacturer.
Grid - Select the grid size from the drop-down to specify how the icons should appear with the specified numbers of grid rows and columns.
You can Add and Delete the number of pages to appear on the device.
Under Organize tab, you can customize the look and feel of the Secure Launcher:
Add single or multiple Folders to store all the apps within it.
Customize the name of the launcher appearing on the device title bar in Title Bar field.
Upload an image for the launcher's title bar and a Wallpaper image for the launcher.
6. Click Save to add the profile to AirWatch or Save & Publish to add the profile and immediately deploy it to applicable Android devices.
Note: When the Secure Launcher profile is removed from the device, the corresponding service application running in the background is automatically uninstalled.

33
Deploying the App
Now that the profile includes the Secure Launcher settings, navigate to Devices ► Settings ► Android ► Service Applications to determine which version of the Launcher you wish to deploy to your device fleet.
Note: If you do not want to deploy the Secure Launcher to your entire fleet, provision the Secure Launcher app to selected devices using Organization Groups. For more information on deploying profiles by Organization Group, please see the Mobile Device Management Guide.
If Always use the Latest Version of Secure Launcher is enabled, the latest version of the app automatically pushes to devices when it becomes available.
Deselect this option to manually choose the Secure Launcher Version you wish to deploy from the dropdown menu.
Configuring a Global HTTP Proxy
Configure global http proxy settings in AirWatch so that SAFE devices are configured automatically.
1. Navigate to Devices ► Profiles ► List View ► Add. Select Android.
2. Select Device to deploy your profile to a device.
3. Configure General profile settings as appropriate.
4. Select the Global HTTP Proxy payload.
5. Set the Proxy Type as Auto or Manual.
6. Provide the Proxy Server and the Proxy Server Port.
7. Add hostnames to the Exclusion List to prevent them from routing through the proxy.

34
Setting Date/Time
Set the date and time as well as the display format to provide your fleet with the appropriate regional format.
1. Navigate to Devices ► Profiles ► List View ► Add and choose Android from the list of platform options.
2. Select Device to deploy your profile to a device.
3. Configure General profile settings as appropriate.
4. Select the Date/Time payload.
5. Set the Date Format to change the order that the Month, Day and Year display.
6. Choose a Time Format of 12 or 24 Hours.
7. Set the Date/Time as Automatic or Server.
8. Specify the Time Zone by Organization Group or by Choosing Manually.
Configuring Sound Profiles
Note: This profile can only be used by Motorola Rugged devices running Android.
Deploy a Sound profile to control on an admin level the volume for ringtones, voice, and music. You can also use these profiles to enable/disable other phone sounds such as touch tone or screen lock sounds.
To configure a Sound profile, follow the steps detailed below:
1. Navigate to Devices ► Profiles ► List Views ► Add and select Android.
2. Configure General profile settings.
3. Configure the Sound settings, including:
Music, Video, Games, and Other Media – Set the slider to the volume level you wish to set on the device.
Ringtones & Notifications – Set the slider the volume you wish to set on the device.
Voice Calls – Set the slider to the volume you wish to set on the device.
Enable Default Notifications – Allows default notifications on the device to sound.
Enable Dial Pad Touch Tones – Allows dial pad touch tones on the device to sound.
Enable Touch Tones – Allows touch tones on the device to sound.
Enable Screen Lock Sounds – Allows the sound played during screen lock to sound.
Enable Vibrate on Touch – Allows the device to vibrate every time the end user touches the screen.
4. Select Save & Publish to push the profile to the device.

35
Configuring a Display Profile
Note: This profile can only be used by Motorola Rugged devices running Android.
Deploy a display profile to devices to control the brightness of the display. You can also set how long the device stays awake before shutting off the screen.
To configure a Display profile, follow the steps detailed below:
1. Navigate to Devices ► Profiles ► List Views ► Add and select Android.
2. Configure General profile settings.
3. Configure the Display settings, including:
Display Brightness – Set the slider to the brightness level you wish to set on the device.
Enable Auto-Rotate Screen – Allows the screen to auto-rotate
Set Sleep – Choose the amount of time before the screen will set to sleep mode.
Enable Stay Awake – Allow the device to not go to sleep mode.
4. Select Save & Publish to push the profile to devices.
Deploying Advanced Profiles
Configure Android devices Access Point Name (APN) settings to unify device fleet carrier settings and correct misconfigurations.
1. Navigate to Devices ► Profiles ► List View ► Add and choose Android from the list of platform options.
2. Select Device to deploy your profile to a device.
3. Configure General profile settings as appropriate.
4. Select the Advanced payload.
5. Configure the following required settings:
Provide a Display Name.
Provide an Access Point Name.
Specify the Access Point Type as default, mms or supl.
Set a Mobile Country Code and a Mobile Network Code.
Choose a MMS Server.
6. Configure the remaining settings, if desired:
Choose a MMS Proxy Server and a MMS Proxy Server Port.
Select a Server.
Specify a Proxy Server and a Proxy Server Port.
Set an Access Point Username and Password.

36
Set the Authentication Type as None, PAP, CHAP or either PAP or CHAP.
Using Custom Settings
The Custom Settings payload can be used when new Android functionality or features that AirWatch does not currently support through its native payloads. If you do not want to wait for the newest release of AirWatch to be able to control these settings, you can use the Custom Settings payload and XML code to manually enable or disable certain settings. To do this you would use the following instructions:
1. Navigate to Devices ► Profiles ► List View ► Add. Select Android.
2. Select Device to deploy your profile to a device.
Alternatively, select Container to deploy your profile with a container to a Samsung KNOX device.
Note: For more information on Samsung KNOX containerization, please see the Containerization with Samsung KNOX section.
3. Configure General profile settings as appropriate and then configure the appropriate payload (for example, Restrictions or Passcode).
You can work on a copy of your profile, saved under a "test" Organization Group, to avoid affecting other users before you are ready to Save and Publish.
4. Save, but do not publish, your profile.
5. Select View XML from the actions menu in the Profiles List View for the row of the profile you wish to customize.
6. Find the section of text starting with <dict> ... </dict> that you configured previously, for example, Restrictions or Passcode. The section contains a configuration type identifying its purpose, for example, restrictions.
7. Copy this section of text and close the XML View. Open your profile.
8. Select the Custom Settings payload and click Configure. Paste the XML you copied in the text box. The XML code you paste should contain the complete block of code, from <dict> to </dict>.
9. Remove the original payload you configured by selecting the base payload section and clicking the minus [-] button.
You can now enhance the profile by adding custom XML code for the new functionality.
Note: Any device not upgraded to the latest version ignores the enhancements you create. Since the code is now custom, you should test the profile devices with older versions to verify expected behavior.
10. Select Save & Publish.

37
Time Schedules
In addition to simply assigning applicable profiles, you have the ability to enhance device management further by controlling when each profile assigned to the device is active. Configure and apply time schedules to restrict when profiles are active on the device. Applying time schedules to profiles secures your corporate resources by only allowing employees access during the specific days and time frames. Conversely, applying time schedules can also limit personal content and access during work hours.
In This Section
Defining Time Schedules – See how to create a time schedule, which allows or denies access to internal content and features based on the day and time.
Applying a Time Schedule to a Profile – See how to apply a time schedule to a profile, which lets you control when and how a particular profile is activated.
Defining Time Schedules
To create a time schedule:
1. Navigate to Devices ► Profiles ► Settings ► Time Schedules.
2. Select Add Schedule to launch the Add Schedule window.
3. Enter a name for the schedule in the Schedule Name field.
4. Select the applicable Time Zone using the drop-down menu.
5. Select the Add Schedule hyperlink.
6. Select the Day of the Week, Start Time and End Time using the applicable drop-down menus. You can also select the All Day check box to disable start and end times for the schedule. To remove a day from the schedule, select the applicable X under Actions.

38
7. Repeat steps 5 and 6 as many times as is necessary to add additional days to the schedule.
8. Select Save.
Applying a Time Schedule to a Profile
Once you have defined a time schedule, you can apply it to a profile and combine it with other payloads to create more robust profiles. For example, you can define time schedules for the normal work hours of different organization groups and add a Restrictions payload that denies access to the Game Center, multiplayer gaming or YouTube content based on ratings and other settings.
Once activated, the employees of the Organization Group to whom the profile was applied will no longer have access to these functions during the specified times.
1. Navigate to Devices ► Profiles ► List View ► Add and select your platform.
2. Select Enable Scheduling and install only during selected time periods on the General tab. An Assigned Schedules box displays.
3. Enter one or multiple Time Schedules to this profile.
4. Configure a payload, such as Passcode, Restrictions or Wi-Fi that you want to apply only while devices are inside the time frames.
5. Select Save & Publish.

39
Containerization with Samsung KNOX
Overview
Samsung KNOX is a device that is designed for dual use as an enterprise and personal device. This is possible with the implementation of an enterprise container within the device. Within this container, all enterprise functions are securely managed. Outside of the enterprise container, you can use your phone as a personal device in an uninterrupted end-user experience. Samsung KNOX truly gives the experience of having two phones, inside of one device.
In This Section
Enabling Samsung KNOX Container – Discover how to enable the KNOX container in the AirWatch Admin Console.
Deploying Container Profiles for KNOX – Learn how to deploy container profiles to help secure a corporate container within your Samsung KNOX device.
Deploying KNOX Passcodes – Covers the multiple fields and levels of complexity for a passcode policy in the AirWatch Admin Console.
Enforcing KNOX Browser Restrictions – Details how to manage settings for the native browser within the isolated company container.
Enabling Per App VPN for Container Applications – Covers how to set up Per App VPN within the container, which forces all traffic for certain apps through your VPN provider.
Activating Email for KNOX Container – Explains how to create an Email profile to configure email settings in the container.
Configuring an Exchange Active Sync Mail Client for the KNOX Container – Outlines the process for configuring EAS for accessing mail within the KNOX Container.
Configuring Single Sign On for the KNOX Container – Describes the process for enabling single sign on authentication for your containerized apps.
Deploying Credentials for the KNOX Container – Details how to deploy corporate certificates for user authentication.
Configuring Application Control for the KNOX Container – Describes how to whitelist and blacklist selected applications.
Implementing Smart Card Authentication for the KNOX Container – Explains how to require end-user identity verification using SmartCard authentication for browser and email access.
Setting Restrictions for the KNOX Container – Details the restriction payloads used to secure and protect the KNOX container.
Enabling Samsung KNOX Container
Before you can configure security profiles for KNOX devices you must first enable containers.

40
1. Navigate to Devices ► Settings ► Android ► Agent Settings.
2. Select Enable Containers under Samsung KNOX.
3. Enter your KNOX License Key you obtained from Samsung.
The KNOX License key is used as part of the Samsung KNOX License Management System (KLMS) and is required to activate the KNOX services on the device. You can only obtain a KNOX license key directly from Samsung.
4. Select Save to enable the creation of Container profiles.
Auto-Configuring the KNOX Container
1. Enroll your device.
2. Tap OK on the KNOX validation key prompt once enrollment completes.
3. Accept the Terms and Conditions; KNOX downloads.
4. Follow the prompts to install KNOX and set your container password.
5. Launch KNOX by tapping the push notification in the notification tray.
Using the KNOX Container
The KNOX container is auto-configured upon selection. This one-time configuration can be expanded with additional container profiles. When complete, access corporate configurations from KNOX Home. Revert to the personal configuration by selecting the Personal icon within the corporate container.
Deploying Container Profiles for KNOX
Configure container profiles to help secure a corporate container within your Samsung KNOX device. Containerization of Enterprise content provides you with a dual device experience, successfully splitting the enterprise functions of your device into an encrypted container. This allows you to use your phone as a personal and work device, without sacrificing security.

41
Note: While you can apply a device profile to a KNOX device, it applies to the personal container by default thus undermining the value of containerization. Hence, the only way to apply a profile to the KNOX container is to configure a container profile.
1. Navigate to Devices ► Profiles ► List View ► Add ► Android ► Container.
2. Configure General profile settings as appropriate.
3. Select a payload to configure advanced KNOX settings.
4. When complete, select Save and Publish.
Note: If you installed a Personal KNOX container before enrolling in AirWatch, your personal container is replaced by the AirWatch Container when you select Save.
5. Devices are now provisioned with enterprise containers.
Deploying KNOX Passcodes
As an additional line of defense for your corporate data and content, enforce a KNOX passcode to secure the isolated business container on a KNOX device. To configure container passcode policy settings:
1. Navigate to Devices ► Profiles ► List View ► Add ► Android ► Container.
2. Configure General profile settings as appropriate.
3. Access the Passcode tab and configure the Passcode payload.
Require a Minimum Passcode Length.
Set Maximum Number of Failed Attempts before container is completely locked.
Require basic Passcode Content as any, alphanumeric or complex.
Set Maximum Passcode Age in days, provide a Passcode History and set the Device Lock Timeout, if desired.
Set Minimum Number of Characters Changed from previous passcode.
Establish Forbidden Strings of characters that cannot be used in a passcode.
Allow Password Visibility to view password characters as they are entered.
4. Select Save & Publish.
Enforcing KNOX Browser Restrictions
Similar to application-based restrictions for SAFE devices, use KNOX browser restrictions to manage settings for the native browser within the isolated company container. End users may use access from the corporate container via the browser to view and use internal content, so implement KNOX browser restrictions to minimize vulnerability and maximize security. To configure KNOX Browser Restrictions:
1. Navigate to Devices ► Profiles ► List View ► Add ► Android ► Container.

42
2. Configure General profile settings as appropriate.
3. Select the Browser payload and configure the settings accordingly. When configuring KNOX Browser settings, keep in mind:
Allow Pop-Ups
Allow Cookies
Allow Auto Fill
Allow JavaScript
4. Select Save & Publish.
Enabling Per App VPN for Container Applications
Configuring a virtual private network (VPN) connection provides devices a secure and encrypted tunnel to an internal network, effectively allowing each device to function as seamlessly as if they were using the network on-site.
For Samsung KNOX devices, you can also set up Per App VPN for container applications, which secures the network traffic specifically for those applications in the KNOX container.
1. Navigate to Devices ► Profiles ► List View ► Add ► Android ► Container.
2. Configure General profile settings as appropriate.
3. Select the VPN payload.
4. Specify the Connection Info:
a. Choose a Client Type from the drop-down menu.
b. Provide a Connection Name.
c. Specify the name or address of the Server used for VPN connection.
5. Set the Authentication parameters to define how your end users access VPN:
Enable Use Authentication to require Username and Password credentials for VPN access.
Select a Connection Type:
o For Certificate, select an Identity Certificate and/or a Root Certificate (configured via the Credentials payload).
o For PSK, enter the applicable Pre Shared Key and IKE Id values.
6. Set Advanced configurations, if necessary.
7. Select an Assignment Level, either All Container Applications or Individual Applications.
For Individual Applications, enter the application package name (app identifier) for the apps you want to have app level VPN. Examples include:
Container application – sec_container_1.airwatchEmailClient.xxx
Application outside the container – com.airwatch.androidagent
8. Select Save & Publish.

43
Activating Email for KNOX Container
Provide email access to the KNOX Container.
1. Navigate to Devices ► Profiles ► List View ► Add ► Android ► Container.
2. Configure General profile settings as appropriate.
3. Select the Email payload.
4. Enter the Email Account to define how the account is labeled in the mail client.
5. Enter the Email Address to assign the email address.
6. Specify the Sender’s Name and provide an Email Signature.
7. Enable Set As Default Account if this is the primary email account and Allow Email Forwarding to allow end users to share forwarded content and HTML Email.
8. Provide the following for Incoming Mail and Outgoing Mail:
Enable Use SSL to encrypt EAS data.
Specify the Protocol, Host Name and Port used to receive mail.
Define the Username for the authentication credentials using lookup values. Leave the Password blank to allow end users to set their own password.
Select Ignore SSL Errors, if desired.
9. Select Save & Publish.
Configuring an Exchange Active Sync Mail Client for the KNOX Container
The industry standard protocol designed for email synchronization on mobile devices is called Exchange Active Sync (EAS). To guarantee a secure connection to internal email, calendars and contacts, AirWatch utilizes the native Android Email Client to access EAS mail from the corporate container on KNOX devices.
Once each user has an Email Address and Email Username you can create an EAS profile with the following steps:
Note: Deploying a KNOX Container profile applies the profile to the corporate container, not the entire device.
1. Navigate to Devices ► Profiles ► List View ► Add ► Android ► Container.
2. Configure General profile settings as appropriate.
3. Select the Exchange ActiveSync (EAS) payload.
4. Select Native Mail Client.
5. Enter Account Name and the EAS Host URL where the EAS server can be reached.
6. Complete the Login Information.
Use lookup values to define the Domain, User and Email Address for the authentication credentials.
Leave the Password blank to allow end users to set their own password.
Provide a Path Prefix, and select a Identity Certificate from a dropdown menu.

44
7. Set parameters for syncing calendar and mail from Settings.
Define the Past Days of Mail to Sync.
Set Sync Interval to define how often EAS Mail Sync occurs.
Determine the sync frequency while roaming using the Sync Schedule for Roaming dropdown menu.
Set the Retrieval Size.
Select frequency from the Period Calendar dropdown menu.
Select AcceptCertificates, Enable HTML Email and Allow Email Forwarding to enable these features.
Provide an Email Signature.
8. Use Peak Days for Sync Schedule to assign specific days when EAS data is synced to avoid data overages.
In addition to Peak Days, identify Peak Start and EndTimes.
To encrypt EAS data enable Use SSL.
Specify alert options and optionally assign the EAS account as the Default Account.
9. Select Save & Publish.
Configuring Single Sign-On for the KNOX Container
Configure your KNOX container to implement Single Sign-On (SSO) for the internal applications it contains. This feature allows your employees to move from application to application within the container without the hassle of repetitively signing in.
1. Navigate to Devices ► Profiles ► List View ► Add ► Android ► Container.
2. Configure General profile settings as appropriate.
3. Select the Single Sign-On payload.
4. Configure the Bookmarks settings, including:
Single Sign-On Vendor – Select your vendor from the drop-down menu.
Company Name – Provide a company name.
Icon – Upload an icon, if desired.
Customer ID – Provide a form of identification.
5. Select Add to add applications that are included with SSO.
6. Select Save & Publish.
Deploying Credentials for the KNOX Container
Credentials profiles deploy corporate certificates for user authentication to managed devices. Configure the following options to apply corporate certificates:

45
1. Navigate to Devices ► Profiles ► List View ► Add ► Android ► Container.
2. Configure General profile settings as appropriate.
3. Fill in General settings and select Credentials.
4. Use the drop-down menu to select either Upload or Defined Certificate Authority for the Credential Source.
Note: The remaining payload options are source-dependent. If you select Upload, you must enter a Credential Name and upload a new certificate. If you select Defined Certificate Authority, you must choose a predefined Certificate Authority and Template.
5. Select Save & Publish.
Configuring Application Control for the KNOX Container
Set parameters around your application deployments on devices by Preventing Installation of Blacklisted Apps and Only Allowing installation of Whitelisted Apps.
1. Navigate to Devices ► Profiles ► List View ► Add. Select Android.
2. Select Container to deploy your profile to a container within a Samsung KNOX device.
3. Configure General profile settings as appropriate.
4. Select the Application Control payload.
5. Enable or disable the following settings to set the level of control for your application deployments:
Enable Prevent Installation of Blacklisted Apps to enforce the automatic removal and/or prevent the installation of blacklisted apps defined in Application Groups.
Enable Only Allow installation of Whitelisted Apps to prevent the installation of any application that is not a whitelisted app defined in Applications Groups.
Application Groups
The AirWatch Admin Console provides the ability to group applications into blacklisted, whitelisted, and required applications. These groups are called Application Groups and each application group is tied to an Organization Group. Use application groups to give access to desired users and to restrict access to unnecessary users.
Using the AirWatch Admin Console you can ensure users have access to the appropriate applications based on their organizational roles.
1. Navigate to Apps & Books ► Applications ► Settings ► App Groups.
2. Select Add Group.

46
List tab:
o Select Type as Whitelist, Blacklist, Required or MDM Application. On selecting the Type, the Name field gets automatically populated.
Note: Select MDM Application for custom MDM applications.
o Select Platform as either Apple, Android or Windows Phone 8.1.
Note: Selecting Windows Phone 8.1 removes the Assignment tab, displays an option to Add Publishers, and prevents the ability to create compliance policies for this application group.
o Enter the Application Name and the Application ID. The Application ID automatically completes when you use the search function to search for the app from an app store.
o Select Add Application to add multiple applications and then select Next to navigate to the Assignment tab. Add exceptions to your application group to create detailed whitelists and blacklists.
o Select Add Publisher for Windows Phone 8.1 to add multiple publishers to application groups. Publishers are organizations that create applications. Combine this option with Add Application entries and exceptions to create detailed whitelists and blacklists for your Windows Phone 8 applications.
Select Next to navigate to an application control profile. You must complete and apply an application control profile for Windows Phone 8.1.
Assignment tab:
o Enter a Description for the application group.
o Define the Device Ownership as Corporate-Dedicated, Corporate-Shared, Employee Owned, or Undefined.
o Assign the device Model and the Operating System.
o Select the Organization Group and User Group for the application group to be assigned to and then select Finish to complete the process.

47
You must add and apply an Application Control profile for Android and Windows Phone 8.1 application groups. See the applicable platform guide for more details.
Implementing Smart Card Authentication for the KNOX Container
Require end user identity verification using SmartCard authentication for browser and email access. End users who try to authenticate without a Smart Card after this feature is enabled, can not access their email.
1. Navigate to Devices ► Profiles ► List View ► Add ► Android ► Container.
2. Configure General profile settings as appropriate.
3. Select the SmartCard payload.
4. Enable Require SmartCard Authentication for Email and enter the Email Address you would like to require SmartCard authentication for.
5. Select Save & Publish.

48
Setting Restrictions for the KNOX Container
Prevent data leaks by enabling listed restrictions in the KNOX container.
1. Navigate to Devices ► Profiles ► List View ► Add ► Android ► Container.
2. Configure General profile settings as appropriate.
3. Select the Restrictions payload.
4. Enable or Disable the desired settings:
Disable Display of Share Via List to prevent your end users from accessing their share options for sensitive content.
Disable KNOX Camera to protect sensitive content from unauthorized sharing.
Disable Non-secure Keypad Usage to prevent end users from downloading and using third-party keyboard applications.
Enable KNOX Account Addition to allow adding a KNOX account.
Enable Contact Info Outside the Container to allow contact information from the container to sync with personal contact information.
5. Select Save & Publish.

49
Compliance
The Compliance Engine is an automated tool by AirWatch that ensures all devices abide by your policies. Your policies may include basic security settings such as requiring a passcode and having a minimum device lock period. You may also decide to set password strength, blacklist certain apps and require device check-in intervals to ensure devices are safe and in-contact with the AirWatch servers.
Once configuration is complete and devices are out of compliance, the Compliance Engine begins to warn the user to fix compliance errors to prevent disciplinary action on the device. For example, if a user loads blacklisted games or social media apps onto their device, the Compliance Engine sends a message to notify the user that their device is out of compliance. If the errors are not corrected in the amount of time specified, the device loses access to certain content and applications.
You may even automate the escalation process if corrections are not made. Lock down the device and notify the user to contact you to unlock the device. These escalation steps, disciplinary actions, grace periods and messages are all completely customizable with the AirWatch Admin Console.
Enforcing mobile security policies is as easy as:
Building your policies – Customize your policy to cover everything from application list, compromised status, encryption, model and OS version, passcode and roaming.
Defining escalation – Configure time-based actions in minutes, hours or days and take a tiered approach to those actions.
Specifying actions – Send SMS, email or push notifications to the user's device or send an email only to an Administrator. Request device check-in, remove or block specific profiles, install compliance profiles, remove or block apps and perform an enterprise wipe.
In This Section
Enforcing Device Compliance – Details the general process for setting up Compliance policies and the Compliance Engine.

50
Enforcing Device Compliance
Follow the steps below to set up and initiate the Compliance Engine complete with profiles and automated escalations:
1. Navigate to Devices ► Compliance Policies ► List View and select Add. Match Any or All rules to detect conditions. Select Next when rule definition is complete. The supported compliance policies by Platform are as follows:
Compliance Policy Apple iOS Android Mac OS X Windows
Mobile
(Motorola)
Windows
Phone 8
Application List ✓ ✓ ✓
Compromised Status ✓ ✓ ✓
Device Last Seen ✓ ✓ ✓ ✓
Encryption ✓ ✓ ✓ ✓
Interactive Certificate Profile Expiry ✓ ✓
Last Compromised Scan ✓ ✓
MDM Terms of Use Acceptance ✓ ✓ ✓
Model ✓ ✓ ✓ ✓
OS Version ✓ ✓ ✓ ✓
Passcode ✓ ✓ ✓
Roaming ✓ ✓
SIM Card Change ✓ ✓
Application List – Detect specific, blacklisted apps that are installed on a device, or detect all apps that are not whitelisted.
You can either specifically prohibit certain apps, such as social media or entertainment apps, or specifically permit only the apps you specify, such as internal applications for business use.
Compromised Status – Select if the device is non-compliant when compromised.
Prohibit the use of jailbroken devices that are enrolled with AirWatch. Jailbroken devices strip away integral security settings and may introduce malware in your network and provide access to your enterprise resources. Monitoring for compromised device status is especially important in BYOD environments where employees have various versions of devices and operating systems. For more information, refer to the Detecting Compromised Devices document available on the AirWatch Resources Portal.
Device Last Seen – Select if the device is non-compliant when the device fails to check in within an allotted time window.
Encryption – Select if the device is non-compliant when Encryption is not enabled.
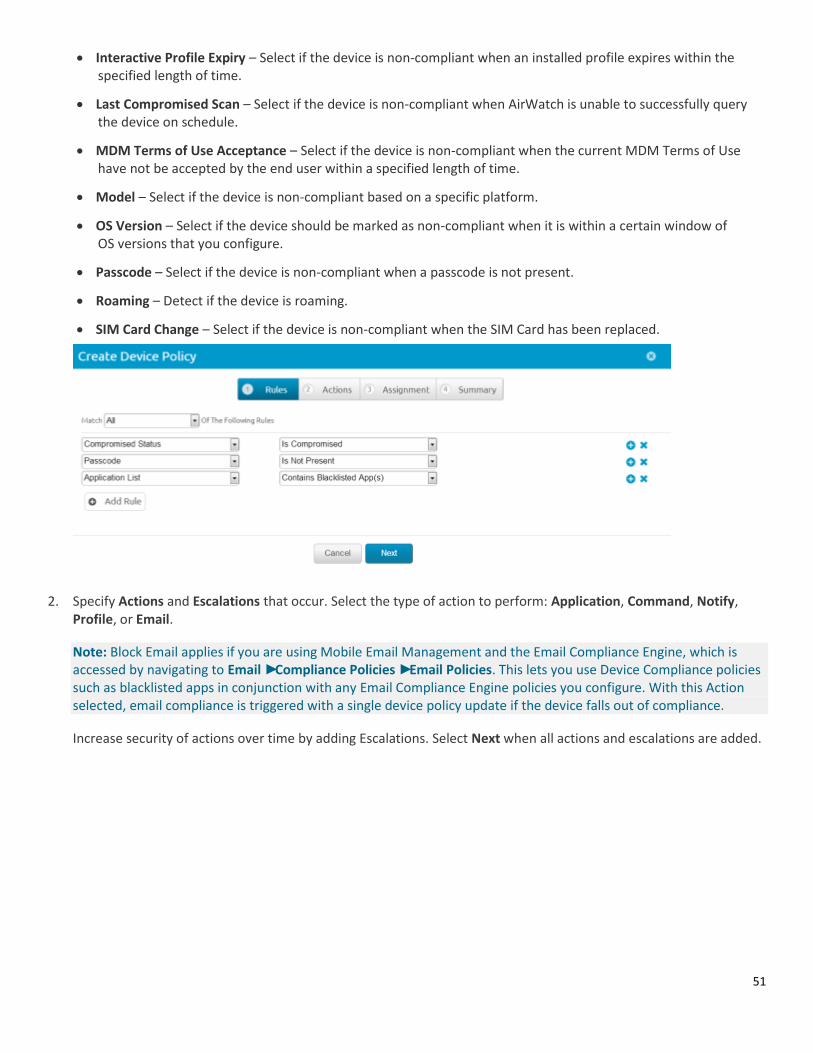
51
Interactive Profile Expiry – Select if the device is non-compliant when an installed profile expires within the specified length of time.
Last Compromised Scan – Select if the device is non-compliant when AirWatch is unable to successfully query the device on schedule.
MDM Terms of Use Acceptance – Select if the device is non-compliant when the current MDM Terms of Use have not be accepted by the end user within a specified length of time.
Model – Select if the device is non-compliant based on a specific platform.
OS Version – Select if the device should be marked as non-compliant when it is within a certain window of OS versions that you configure.
Passcode – Select if the device is non-compliant when a passcode is not present.
Roaming – Detect if the device is roaming.
SIM Card Change – Select if the device is non-compliant when the SIM Card has been replaced.
2. Specify Actions and Escalations that occur. Select the type of action to perform: Application, Command, Notify, Profile, or Email.
Note: Block Email applies if you are using Mobile Email Management and the Email Compliance Engine, which is accessed by navigating to Email ► Compliance Policies ► Email Policies. This lets you use Device Compliance policies such as blacklisted apps in conjunction with any Email Compliance Engine policies you configure. With this Action selected, email compliance is triggered with a single device policy update if the device falls out of compliance.
Increase security of actions over time by adding Escalations. Select Next when all actions and escalations are added.
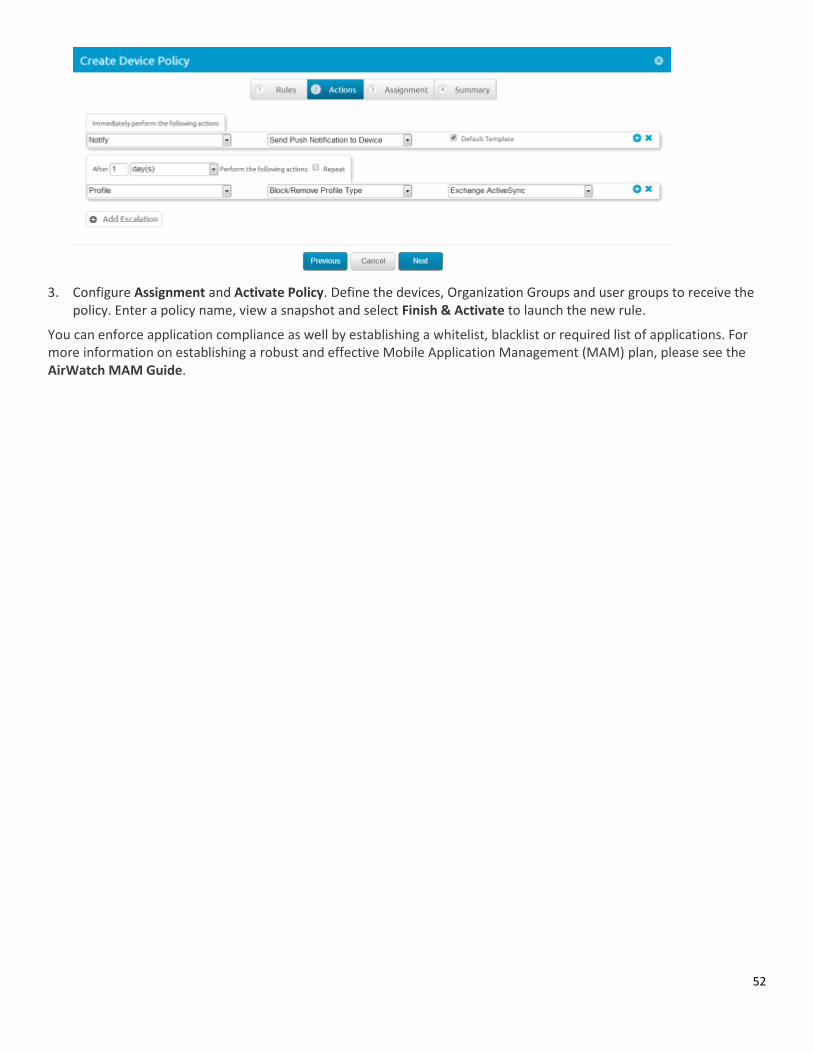
52
3. Configure Assignment and Activate Policy. Define the devices, Organization Groups and user groups to receive the policy. Enter a policy name, view a snapshot and select Finish & Activate to launch the new rule.
You can enforce application compliance as well by establishing a whitelist, blacklist or required list of applications. For more information on establishing a robust and effective Mobile Application Management (MAM) plan, please see the AirWatch MAM Guide.

53
Applications for Android Devices
You can use AirWatch applications in addition to AirWatch MDM features to further secure devices and configure them with added functionality.
In This Section
Using the AirWatch MDM Agent for Android – Learn more about how the AirWatch Agent is used to secure devices and how to configure its settings.
Using the AirWatch Browser for Android – Learn more about the AirWatch Browser for Android devices.
Using the AirWatch Inbox for Android – Learn more about the AirWatch Inbox for Android devices.
Using AirWatch Workspace for Android – Learn more about the AirWatch Workspace for Android devices.
Enforcing Application-Level Single Sign On Passcodes – Learn more about how you can apply a single app-level SSO passcode for end users to access applications without having to authenticate each time.
Using the AirWatch MDM Agent for Android
There are two categories of APIs that AirWatch leverages on Android devices for management and tracking capabilities:
Over-the-Air (OTA) MDM APIs are activated through the enrollment process regardless if an agent is used or not.
Native Android SDK APIs are available to any third-party application, including the AirWatch MDM Agent and any other application using the AirWatch Software Development Kit (SDK).
The AirWatch MDM Agent for Android refers to the application that enables the Native Android SDK API layer of management that AirWatch hooks into. Primarily, these applications have been developed with AirWatch. With the AirWatch SDK, applications can take advantage of key MDM features that are available above what is offered in the Over-the-Air (OTA) MDM API layer, such as:
Compromised Device Detection
Additional Network Details such as IP address
Additional Battery and Memory statistics
Native number badging
APNs Push Messaging
Configuring Agent Settings
Customize the capability of the Agent.
1. Navigate to Devices ► Settings ► Android ► Agent Settings.
2. Set the Heartbeat, Data Sample, Data Transmit and Profile Refresh time interval for device data collection. Tailoring the time interval allows you to achieve the desired balance between battery drain caused by frequent beaconing and the security that comes with consistent monitoring.
54
Heartbeat Interval – Reports beacon data to the AirWatch Admin Console. The primary purpose of this report is to show compromised device status. However, beacon data also includes GPS, IP address and other minor data, such as model and OS version.
Data Sample Interval – Collects interrogator data and reports all data collected by the Agent, including Telecom and Network data, as well as the battery, power and memory status.
Data Transmit Interval – Reports interrogator data to the AirWatch Admin Console.
Profile Refresh Interval – Checks in with the AirWatch Admin Console for profile updates or new profiles.
3. Configure the remaining General settings including:
Administrative Passcode – Set a password to require administrators to authenticate before performing certain device-side actions. This keeps end users from disabling the settings you put in place.
Require Google Account – Require a Google Account to leverage Google Cloud Messaging (GCM) to send remote commands to devices. Only deselect this option if you are utilizing AWCM.
Require Phone Number – Enable an additional prompt during enrollment. This phone number is recorded in AirWatch to serve as a backup contact number in case devices are lost, off or do not have access to Internet.
Disable Un-Enroll Option in Agent – Select this option to ensure end users cannot un-enroll their devices.
Enterprise Wipe on Root Detection – Enable this feature to automatically wipe devices upon root detection for additional device security and protection.
4. Determine the application settings by configuring the Application List Interval in minutes, and setting the Install Options as Direct Prompt or Status Bar Notification.
5. Only select Enable Containers if you are enrolling Samsung KNOX devices.
If enabled, provide a KNOX License Key.
6. Configure Location settings to give yourself greater administrative visibility into the location of your fleet on an individual device level. These configurations allow you to set the balance between battery drain and information collection that works best for your organization.
Set the GPS Tracking Mode to Satellite Based or Network Tower Based.
Enable Force GPS On.
Set the GPS Time Poll Interval and GPS Distance Poll Delta.
7. Enable specific Telecom settings like Call Logs, SMS Logs and Cellular Data Usage to allow logging and tracking of device use.
8. Only enable AirWatch Cloud Messaging (AWCM) if you wish to implement this option instead of GCM. If you choose this option, additionally determine the Deployment Type as Manual or Always Running and the AWCM Client Timeout Value in minutes.
9. Select an SDK Profile from the drop-down menu.
Configuring Service Applications
1. Navigate to Devices ► Settings ► Android ► Service Applications.
2. Enable the following features to customize the manner in which your end users get their Service Application:

55
Select Require Service App to ensure end users get the Service App and display the Push Service App from Play Store option to install the OEM service through the Google Play Store before or during enrollment. Pushing the Service App simplifies enrollment for your end users by removing the need to accept "unknown sources" during the enrollment process.
Select Always use the Latest Version of Telecom Sampler or manually enter the Telecom Sampler Version into the box.
Select Always use the Latest Version of Secure Launcher or manually enter the Secure Launcher Version into the box.

56
Using the AirWatch Agent for Android
After enrolling, use the AirWatch Agent to access and manage device information and settings. Access device information from the following tabs on the left of the device display:
My Device – Displays the name of the enrolled end user, the device Friendly Name, current enrollment status, connectivity method and compliance status.
Device Status – Displays the current enrollment status including:
o The server to which the device is currently connected.
o The Organization Group to which the device is currently enrolled.
o The current network status including the active Wi-Fi SSID to which the device is connected.
Compliance – Displays a list of compliance policies currently active for the device.
Profiles – Displays a list of profiles currently installed on the device. From the profiles list, you have the ability to refresh and reapply profiles from your device that might be out of sync or uninstalled.
Managed Apps – Displays a list of apps managed by AirWatch installed on the device as well as their install status.
About – Displays the version number of the AirWatch Agent installed on the device and provides a hyperlink to the associated Privacy Policy agreed to upon device enrollment.
Perform basic device management functions from the AirWatch Agent menu at the top of the display:
Send Data – Transmit the latest device data to AirWatch.
Sync – Synchronize corporate directory services data and resources on the device.
App Catalog – Launch the application catalog within the AirWatch Agent or the native web browser, if applicable.
Additional functionality is accessible from the application menu in the upper-right corner of the display:
Edit Phone Number – Modify the assigned phone number, if applicable.
Send Debug Log – Transmit a debug log for the device to AirWatch.
Un-enroll – Unenroll the device from AirWatch.
Using the AirWatch Browser for Android
The AirWatch Browser is a safe, accessible and manageable Internet browser for your devices. You can customize and configure the AirWatch Browser to meet unique business and end user needs, restrict web access to certain websites, provide a secure Internet portal for devices used as a mobile point-of-sale and more.
For maximum security, AirWatch recommends deploying the AirWatch Browser in conjunction with a restrictions profile blocking the native browser.

57
For additional information about preparing and configuring the AirWatch Browser for deployment, refer to the AirWatch Browser Guide.
Implementing Workspace for Android
AirWatch Workspace offers a flexible new approach to BYOD through management by “containerization" within the device. The Workspace creates a virtual container where all corporate applications (AirWatch and internal) may be visible inside and outside the Workspace view but are secure through a shared container passcode. Productivity tools are granted to end users as apps in the container and can be managed by the administrator at the app- level rather than the device level.
Each app maintains security controls built in to prevent data leakage outside of the app. These apps include AirWatch Inbox, AirWatch Browser. Multiple apps interact seamlessly via Single Sign On to avoid multiple authentication prompts, and an app-level intranet tunnel connects to any required backend services.
“Dual-Persona” separation between work and play – Separates from a privacy perspective and does not allow AirWatch visibility into personal apps or the ability to wipe any personal items.
Passcode/Encryption enforced only within Workspace – Sets complex passcodes that do not intrude on personal life; encryption is only enforced locally within the applications.
No MDM Required – Avoids OS prompts.
All devices — whether MDM- or Workspace-enrolled — can be managed from a single pane of glass with hybrid deployments.
Note: Refer to the AirWatch Workspace Guide for more information about configuring and setting up the AirWatch Workspace for Android devices.
Using the AirWatch Inbox for Android
AirWatch Inbox is a fully containerized email management solution for iOS and Android devices. The AirWatch Inbox enables administrators to remotely configure and manage enterprise email accounts while keeping personal and enterprise data separate for end users. The application features support for Exchange ActiveSync and offers encryption for email messages and attachments. Some of its data loss prevention features include:
Setting a passcode to access the application.
Configuring restrictions such as disable copy/paste.
Removing email messages and attachments upon an enterprise wipe.
For more information on AirWatch Inbox, please see the AirWatch Inbox Guide.
Enforcing Application-Level Single Sign On Passcodes
AirWatch's single sign on (SSO) feature allows end users to access all AirWatch apps with a single SSO Passcode without having to enter login credentials for each application. Using either the AirWatch MDM Agent or the AirWatch Workspace as a "broker application", end users can authenticate once using either their normal credentials or an SSO Passcode and then gain access to other applications so long as the SSO session is active.

58
Enabling Single Sign On
Enable SSO as part of the Security Policies that you configure to apply to all AirWatch apps, wrapped apps, and SDK-enabled apps using a Default SDK Profile. To enable SSO:
1. Navigate to Groups & Settings ► All Settings ► Apps ► Settings and Policies ► Security Policies.
2. Set Single Sign On to Enabled to allow end users to access all AirWatch applications and maintain a persistent login.
3. Optionally set Passcode Mode to either Numeric or Alphanumeric to require an SSO Passcode on the device. If you enable SSO but do not enable a Passcode Mode, end users will use their normal credentials (either directory service or AirWatch account) to authenticate, and an SSO Passcode will not exist.
Note: Wrapped apps must have a passcode, either numeric or alphanumeric. Without this passcode, wrapped apps do not display true SSO functionality.
SSO Session
Once an end user authenticates with either the Workspace or the Agent, an SSO session is opened. It lasts so long as the Workspace is running in the background or until the Passcode Timeout value defined in the Passcode Mode settings is exceeded. With an active session, end users can access managed applications without having to enter their SSO Passcode.

59
Shared Devices
Overview
Issuing a device to every employee in your organization can be expensive. With AirWatch MDM, you can share mobile devices among end users using either a single fixed configuration for all end users or a unique configuration setting for each individual end user. AirWatch's Shared Device/Multi-User Device functionality ensures security and authentication are in place for every unique end user, and if applicable, allows only specific end users to access sensitive information.
When administering shared devices, you must first provision devices with applicable settings and restrictions before deploying them to end users. Once deployed, AirWatch utilizes a simple Login/Logout process for shared devices in which end users simply enter their directory services or dedicated credentials to log in. The end user's role determines their level of access to corporate resources, including content, features, and applications. This ensures the automatic configuration of features and resources that are available after the user logs in. The Login/Logout functions are self-contained within the AirWatch Agent, so the device's enrollment status is never affected, and the device can be managed in the AirWatch Admin Console whether it is in use or not.
System Capabilities
Functionality
Configure a single managed device which can be used by multiple end users.
Personalize each end user’s experience without losing corporate-wide settings.
Configure corporate access, apps, files, and device privileges based on user or Organization Group.
Allow for a seamless login/logout process that is self-contained in the AirWatch Agent.
Security
Provision devices with the shared device settings before providing devices to end users.
Login and Logout devices without affecting device enrollment in AirWatch.
Authenticate end users during device login with directory services or dedicated AirWatch credentials.
Manage devices even when a device is not logged in.
Supported Platforms
Android 2.3+ and iOS devices with AirWatch MDM Agent v4.2+ support shared device/multi-user device functionality.

60
In This Section
This document discusses the detailed setup and configuration of Shared Device mode. It is divided into the following sections:
Organizing Shared Devices – Talks about how and where to create organization hierarchy to organize devices in the AirWatch Admin Console.
Configuring Shared Devices – Details the multiple ways to configure shared device functionality on to the devices.
Using Shared Devices – Explains how to use shared device functionality on the device.
Organizing Shared Devices
The easiest way to manage your mobile fleet is to organize the devices you administer based on your corporate hierarchy and geographic location, if applicable. Because employee permissions, device restrictions and corporate access are often based on defined roles within the hierarchy, it is both logical and beneficial for you to mirror this structure when organizing groups within the AirWatch Admin Console for the first time.
Defining the Device Hierarchy
In most cases, when you first log in to the AirWatch Admin Console, you will see a single Organization Group that has been created for you with the name of your organization. This group serves as your top-level Organization Group, and you will create subgroups underneath it to build out your company's hierarchical structure.
To define the device hierarchy:
1. Navigate to Groups & Settings ► Groups ► Organization Groups ► Organization Group Details. Here, you can see an Organization Group representing your company.
2. Ensure the Organization Group Details displayed are accurate and then use the available data entry fields and drop-down menus to make any modifications, if necessary. If you make changes, click Save.
3. Select Add Child Organization Group.
4. Enter the following information for the first Organization Group to reside within the top-level Organization Group:
Organization Group Name - Enter a name for the child Organization Group to be displayed within the AirWatch Admin Console.
Group ID - Enter an identifier for the Organization Group for the end users to use for device to log in.
Note: Ensure the end users who share devices receive the Group ID as it may be required for device to log in depending on your Shared Device configuration.
Organization Group Type - Select the preconfigured Organization Group Type that reflects the category for the child Organization Group.
Country - Select the country where the Organization Group is based.
Locale - Select the language classification for selected country.

61
5. Create additional groups and subgroups in the same manner as needed to build out your corporate hierarchical structure. If configuring a Fixed Organization Group, then ensure you have created the single Organization Group for end user to log in or log out. If you configure Prompt Users for Organization Group, then ensure you have created the multiple Organization Groups that are required for your various end-user log in or log out roles. For more information, see Configuring Shared Devices.
6. Select Save.
Configuring Shared Devices
You can utilize Shared Device functionality by navigating to Groups & Settings ► All Settings ► Devices & Users ► General ► Shared Device. Configure devices in one of three ways:
Select Fixed Organization Group to limit your managed devices to settings and content applicable to a single Organization Group.
Each end user who logs in to a device has access to the same settings, applications, and content. This method, for example, can be beneficial in a retail use case where employees use shared devices for similar purposes such as checking inventory.
Select User Group Organization Group to enable features based on both User Groups and Organization Groups across your hierarchy.
When an end user logs in to a device, the settings, applications, and content to which they have access are based on their specific role within the hierarchy. For example, if an end user is a member of the 'Sales' User Group, which is mapped to the 'Standard Access' Organization Group, then when that end user logs in to the device, the device will be configured with the settings, applications and content available to the 'Standard Access' Organization Group. Consider an other example, hospitals can utilize this method by configuring different device profiles for different employees. A doctor can log in to a device and have access to certain applications and information related to a patient’s personal information, treatment, and diagnosis. A nurse can log in to the same device and have access to an entirely different set of resources applicable to their role.
Select Prompt User for Organization Group to have the end user enter a Group ID for an Organization Group each time they log in to a device.
With this method, you have the flexibility to provide access to the settings, applications, and content of the Organization Group entered. Using this approach, an end user is not restricted to accessing only the settings, applications, and content for the Organization Group to which they are enrolled.

62
Configuring Shared Device Settings
1. Navigate to Groups & Settings ► All Settings ► Devices & Users ► General ► Shared Device.
2. Select the Override radio button.
3. Select any one of the following applicable radio button to enable the Group Assignment Mode that meets your shared device requirements:
Prompt User for Organization Group – Select to prompt the end user to enter a valid Group ID and credentials to log in to a device, thereby allowing the device to leverage the settings, applications, and content of a particular Organization Group.
Fixed Organization Group – Select to restrict the end user to a particular Organization Group when they log in to a device. A Group ID is not required, but an end user may be prompted to enter credentials to log in to a device.
User Group Organization Group – Select to use the User Group-to-Organization Group mapping configured in the AirWatch Admin Console to determine access to settings, applications, and content.
Note: The User Group-to-Organization Group mapping is done on the console. Navigate to Groups & Settings ► All Settings ► Devices & Users ► General ► Enrollment. Select the Grouping tab and fill in the required details.
Always Prompt Terms of Use – Select this checkbox to prompt the end user to accept Terms of Use agreement before logging into a device.
4. Select the Auto Logout Enabled check box to configure automatic logout after a specific time period.
5. Select the Enable Single App Mode check box to configure Single App Mode, which locks the device into a single application when an end user logs into the device.
Note: Single App Mode applies only to Supervised iOS devices.
6. Click Save.

63
Enabling Multi-User Device Staging
Similar to single-user device staging, multi-user device/shared device staging allows an IT administrator to provision devices intended to be used by more than one user. However, multi-user devices require configuration of the device to accept any allowed users to sign-in and use the device as necessary.
1. Navigate to Accounts ► Users ► List View and select Edit for the user account for which you want to enable device staging.
2. Select Enable Device Staging and then select the staging settings that will apply to this staging user.
Multi User Devices – Stages devices for use by multiple users.
3. Open a device's Internet browser, navigate to the enrollment URL and enter the proper Group ID.
4. Complete enrollment and install the Mobile Device Management (MDM) profile by following the prompts. Once you are done, the Login/Logout screen displays and prompts any users of the device to check out the device to access the applications, settings and content for their Organization Group, which is assigned based on the Group Assignment Mode settings you specify under Devices ► Settings ► Devices & Users ► General ► Shared Device.
The device is now staged and ready for use by the new users.
Using Shared Devices
Logging in a device automatically configures it with the specific settings, applications, and content based on the end-user's role. After the end user is done using the device and logging out of the device, the configuration settings of that session are wiped and the device is ready for login by another end user.
To utilize Shared Device functionality on Android devices, you need to enroll the device using the AirWatch MDM Agent and set the Android Secure Launcher application as the default home screen. The Secure Launcher application is automatically downloaded during enrollment. Once the application is installed and set as default home screen, the device is in a checked-in state and prompts an end user to check out the device. End users will be unable to navigate away from this page.

64
Logging In and Logging Out Devices
Login to a device:
1. Launch the AirWatch Agent on the device.
2. Enter your credentials. If the device is logged into the Agent, then you will be prompted to enter your SSO Passcode. If not, then you will be prompted to enter a username and password.
Note: end users are required to enter a Group ID to log in to a device if Prompt User for Organization Group is enabled on the console. See Configuring and Enabling Shared Devices for more information.
3. Select Login and accept the Terms of Use.
Log out of a device:
1. Navigate to My Device.
2. Select Log out and then Yes, when prompted.
Note: When the shared device is logged out, both the device's passcode and Single Sign On passcode are cleared without any warning or notification. Thus, allowing the next user to configure another passcode.

65
Mobile Kiosks
Overview
AirWatch offers you the ability to utilize devices in your mobile fleet as kiosks. Mobile kiosks limit your employees to single website browsing, as well as to specify the applications allowed for use. Devices can act as electronic kiosks at different layers of mobile architecture based on your resources and needs:
Web Kiosks restrict browsing to a specific website or web application and automatically revert to the configured home page after certain period of inactivity.
o Enable browsing through AirWatch Browser app.
o Remove all navigation.
o Define cookies policy.
o Assign a single homepage URL and force return to homepage at specified inactivity period.
o Available for iOS and Android devices.
Note: For more information about configuring a web kiosk, see the AirWatch Browser Guide.
Device Kiosks enforce which specific settings, applications, and device wallpapers are permitted and limit functionality at the device level.
o Overlay screen to the homepage.
o Remotely configure allowed applications, background images, allowed widgets, and screen settings via profile.
o Available for Android 2.3+ devices.
Note: For more information, see Deploying the Secure Launcher.
You can implement mobile kiosks in several ways. For example, an educational institution can deploy devices as web kiosks for use by students who need the ability to research a particular web resource, but should not be allowed to browse elsewhere. In the case of application kiosks, a transportation company can deploy iOS devices as application kiosks restricted to an internal app used by employees for specialized tasks like scheduling, booking and logistics. Finally, a retail establishment can deploy devices in device kiosk mode for use in store, utilizing corporate applications for in-store functionality like querying inventory and checking product pricing as well as custom branding to enhance the kiosk functionality.

66
Supported Devices
Kiosk mode availability differs based on the device platform and operating system version:
Android and iOS devices support web kiosk functionality using the AirWatch Browser.
Android 2.3+ devices support device kiosks.

67
Managing Android Devices
Overview
You can manage all of your deployment’s devices from the AirWatch Dashboard. The Dashboard is a searchable, customizable view you can use to filter and find specific devices based on various criteria. This simplifies performing actions and administrative functions on a particular set of devices. In addition, you can set up the Self-Service Portal (SSP) to empower end users to manage their own devices and reduce the strain on Help Desk personnel.
In This Section
Using the Device Dashboard– Explains how administrators can locate and manage devices in the AirWatch Admin Console.
Using List View – Details how to use the Devices List View to search for, filter and perform remote actions on multiple Android devices.
Using the Device Details Page – Walks through the ways you can manage Android devices from using the Device Details Page in the AirWatch Admin Console.
Utilizing Reports – Presents reports and collected data within the AirWatch Admin Console featuring detailed information on all aspects of your deployment.
Using the Hub – Presents the data flow within AirWatch Hub and how to use the data within.
Enabling AirWatch Cloud Messaging – Explains how to configure the AirWatch Cloud Messaging (AWCM) connection.
Using the Self-Service Portal – Explains how users can manage their Android devices from the Self-Service Portal (SSP).
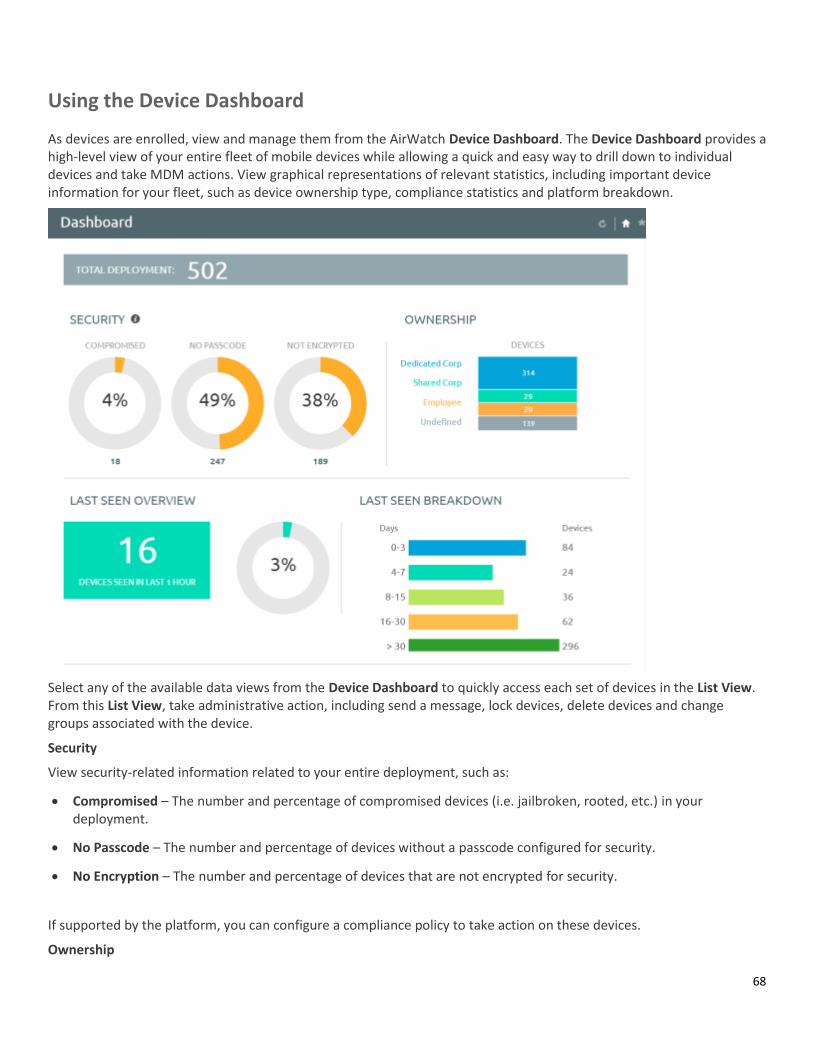
68
Using the Device Dashboard
As devices are enrolled, view and manage them from the AirWatch Device Dashboard. The Device Dashboard provides a high-level view of your entire fleet of mobile devices while allowing a quick and easy way to drill down to individual devices and take MDM actions. View graphical representations of relevant statistics, including important device information for your fleet, such as device ownership type, compliance statistics and platform breakdown.
Select any of the available data views from the Device Dashboard to quickly access each set of devices in the List View. From this List View, take administrative action, including send a message, lock devices, delete devices and change groups associated with the device.
Security
View security-related information related to your entire deployment, such as:
Compromised – The number and percentage of compromised devices (i.e. jailbroken, rooted, etc.) in your deployment.
No Passcode – The number and percentage of devices without a passcode configured for security.
No Encryption – The number and percentage of devices that are not encrypted for security.
If supported by the platform, you can configure a compliance policy to take action on these devices.
Ownership

69
View the total number of devices in each ownership category.
Last Seen Overview
View the number and percentage of devices that have recently communicated with the AirWatch MDM server. For example, if several hundred devices have not been seen in over 30 days, you can select the corresponding bar graph to pull of a List View of those devices, add additional filters if needed (e.g. Corporate Dedicated), and follow-up with the employees accordingly.
Platforms
View the total number of devices in each device platform category.
Enrollment
View the total number of devices in each enrollment category.
Using the Device List View
Switch to List View (Devices ► List View) at any time to sort and manage devices by filtering the columns and fields available in the Device Dashboard, including:
Last Seen
Friendly Name
Ownership
o Corporate - Dedicated
o Corporate - Shared
o Employee-Owned
Username
Display Name
Platform/OS/Model
Organization Group
Compliance Status
Select on a device Friendly Name at any time to open up the device details page for that device.
Sort columns and configure information filters to gain insight on device activity based on specific information you are curious about. For example, sort the Compliance Status column to view only devices that are currently out-of-compliance and take action or message only those specific devices. Search all devices for a friendly name or user's name to isolate one device or user. Once you have sorted or filtered dashboard information, export, save and send the data for review.

70
Using the Search List, Filters, and Bulk Messaging
At times, you will need to search for a single device for quick access to its information and take remote action on the device. For example, search for a specific device, platform or user. Navigate to Devices ► List View ► Search List and search for all devices within the current Organization Group and all child groups.
You can also drill down to specific sets of devices by filtering device criteria, including by Platform, Ownership Type, Passcode, Last Seen, Enrollment, Encryption and Compromised status.
You can also search specific information across all fields associated with devices and users, allowing you to search user name ("John Doe") or device type.
Once you have applied a filter to show a specific set of devices, perform bulk actions to multiple, selected devices by clicking the check box for those devices and selecting an action from the Management tabs.
You can also select Send Message to All to send a message to all devices according to your current filters.
For example, if no filters are set, you will send a message to every device; but if you have filters set for Android Compromised devices, then you will only send a message to those devices.
This action is only available if enabled in the system settings (Groups & Settings ► All Settings ► System ► Security ► Restricted Actions) and requires a PIN to perform.

71
Using the Management Tabs
With the categorized devices displayed, take bulk action on specific devices by selecting the check box next to each device and using the top Control Panel to:
Note: The actions listed below vary depending on factors such as device platform, AirWatch Admin Console settings and enrollment status.
With the categorized devices displayed, take bulk action on specific devices by selecting the check box next to each device and using the top Control Panel to:
Query – Query all selected devices for current device info, including last seen, OS, model and compliance status.
Send – Access Send Message menu and compose message to send to selected devices.
Lock – Lock all selected devices and force users to re-enter device security PIN.
More – View commands that you can perform on all selected devices. For example:
Management – Query, lock or perform Enterprise Wipe on all selected devices.
Support – Send a message to a device with instructions or communication to end user. Locate current GPS location of all selected devices.
Admin – Change AirWatch Admin Console settings, including changing Organization Group, Ownership type or device group of selected devices or deleting devices from AirWatch MDM.
Advanced – Perform a warm boot on devices to remotely reboot those devices. Select Provision Now to perform a number of configuration for selected devices. Select Install Product to install a particular apps to selected devices.

72
Using the Device Details Page
Use the Device Details page to track detailed device information and quickly access user and device management actions. You can access the Device Details page by either selecting a device's Friendly Name from the Device Search page, from one of the available Dashboards or by using any of the available search tools with the AirWatch Admin Console.
Use the Device Details menu tabs to access specific device information, including:
Summary – View general statistics such as enrollment status, compliance, last seen, platform/model/OS, Organization Group, contact information, serial number, power status, storage capacity, physical memory and virtual memory.
Compliance – Display the status, policy name, date of the previous and forthcoming compliance check and the actions already taken on the device.
Profiles – View all MDM profiles currently installed on a device.
Apps – View all apps currently installed or pending installation on the device.
Location – View current location or location history of a device.

73
User – Access details about the user of a device as well as the status of the other devices enrolled to this user.

74
The menu tabs below are accessed by clicking More from the main Device Details tab ( ).
Network – View current network (Cellular, Wi-Fi, Bluetooth) status of a device.
Security – View current security status of a device based on security settings.
Notes – View and add notes regarding the device. For example, note the shipping status or if the device is in repair and out of commission.
Certificates – Identify device certificates by name and issuant. This tab also provides information about certificate expiration.
Provisioning – View complete history and status of all packages provisioned to the device and any provisioning errors.
Terms of Use – View a list of End User License Agreements (EULAs) which have been accepted during device enrollment.
Alerts – View all alerts associated with the device.
Shared Device Log – View history of device in terms of Shared Device, including past check-ins and check-outs and current status.
Event Log – View history of device in relation to MDM, including instances of debug, information and server check-ins.
Status History – View history of device in relation to enrollment status.
Management – Lock or perform Enterprise Wipe on all selected devices.
When you lock a SAFE 4 device, you can configure a customized lockscreen. Set the Message Template to Custom Message. Then, in the Message field, provide your text and provide a Phone Number.
Support – Send a message to email AirWatch Technical Support regarding selected device. Also, locate the device according to its current GPS location.
Admin – Change AirWatch Admin Console settings, including changing Organization Group of selected devices or deleting devices from AirWatch MDM.
Advanced – Perform a warm boot on devices to remotely reboot those devices. Select Provision Now to perform a number of configurations for selected devices.

75
Performing Remote Actions
The More drop-down on the Device Details page enables you to perform remote actions over-the-air to the selected device. See below for detailed information about each remote action.
Note: The actions listed below vary depending on factors such as device platform, AirWatch Admin Console settings, and enrollment status.
Query – Query the device for all information.
Clear Passcode – Clear either the device-level passcode or the SSO Passcode.
Management – Lock the device or SSO session, reboot the device or perform an enterprise or device wipe.
Support – Perform support actions such as sending the device a message, finding the device by playing an audible tone or syncing the device.
Admin – Change AirWatch Admin Console settings, including changing Organization Group and editing/deleting devices from AirWatch MDM.
Utilizing Reports
AirWatch has extensive reporting capabilities that provide administrators with actionable, result-driven statistics about their device fleets. IT administrators can leverage these pre-defined reports or create custom reports based on specific devices, User Groups, date ranges or file preferences.
In addition, the administrator can schedule any of these reports for automated distribution to a group of users and recipients on either a defined schedule or a recurring basis. For example, you can run reports to see the number of compromised devices, how many devices there are for a specific make or model, or the total amount of devices running a particular version of an operating system.

76
Using the Hub
Utilize the AirWatch Hub as your central portal for fast access to critical information. Quickly identify important issues or devices and take action from a single location in the AirWatch Admin Console. Select any metric to open the Device List View for that specific set of devices, where you can perform actions such as sending a message to those devices.
For more information about using the Hub to filter and view specific information, refer to the Managing Devices section of the AirWatch Mobile Device Management Guide.
Configuring AirWatch Cloud Messaging
Console-to-device commands and messages are delivered through cloud messaging. AirWatch Cloud Messaging (AWCM) provides an internal communication solution for the entire AirWatch solution as a comprehensive replacement for Google Cloud Messaging (GCM). AWCM provides real-time device management status and command pushes for:
Devices that cannot be configured with a Google Account.
Devices restricted to internal network communication.
Devices without public Internet access.
Enable AWCM by navigating to Devices ► Settings ► Android ► Agent Settings ► AirWatch Cloud Messaging.
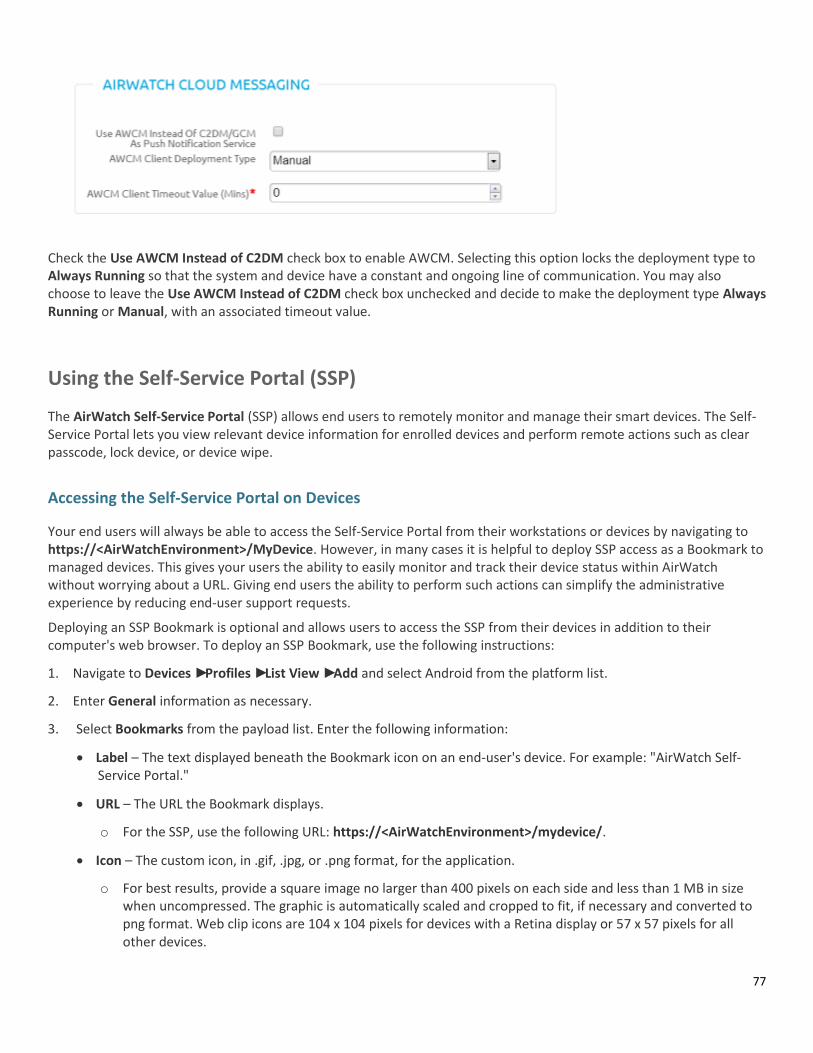
77
Check the Use AWCM Instead of C2DM check box to enable AWCM. Selecting this option locks the deployment type to Always Running so that the system and device have a constant and ongoing line of communication. You may also choose to leave the Use AWCM Instead of C2DM check box unchecked and decide to make the deployment type Always Running or Manual, with an associated timeout value.
Using the Self-Service Portal (SSP)
The AirWatch Self-Service Portal (SSP) allows end users to remotely monitor and manage their smart devices. The Self-Service Portal lets you view relevant device information for enrolled devices and perform remote actions such as clear passcode, lock device, or device wipe.
Accessing the Self-Service Portal on Devices
Your end users will always be able to access the Self-Service Portal from their workstations or devices by navigating to https://<AirWatchEnvironment>/MyDevice. However, in many cases it is helpful to deploy SSP access as a Bookmark to managed devices. This gives your users the ability to easily monitor and track their device status within AirWatch without worrying about a URL. Giving end users the ability to perform such actions can simplify the administrative experience by reducing end-user support requests.
Deploying an SSP Bookmark is optional and allows users to access the SSP from their devices in addition to their computer's web browser. To deploy an SSP Bookmark, use the following instructions:
1. Navigate to Devices ► Profiles ► List View ► Add and select Android from the platform list.
2. Enter General information as necessary.
3. Select Bookmarks from the payload list. Enter the following information:
Label – The text displayed beneath the Bookmark icon on an end-user's device. For example: "AirWatch Self-Service Portal."
URL – The URL the Bookmark displays.
o For the SSP, use the following URL: https://<AirWatchEnvironment>/mydevice/.
Icon – The custom icon, in .gif, .jpg, or .png format, for the application.
o For best results, provide a square image no larger than 400 pixels on each side and less than 1 MB in size when uncompressed. The graphic is automatically scaled and cropped to fit, if necessary and converted to png format. Web clip icons are 104 x 104 pixels for devices with a Retina display or 57 x 57 pixels for all other devices.
78
Add to Homescreen – The option to push the bookmark directly to the device homescreen.
Show As Web App In App Catalog – The option to list the SSP as an application in your Enterprise App Catalog. You might use this setting if you do set the profile to deploy automatically.
4. Click Save and Publish when you are done to immediately send the profile to all appropriate devices.
Note: Access to information and Remote Actions in the Self-Service Portal is determined by both Privacy settings (Devices ► Settings ► General ► Privacy) and Role settings (Administrators ► Roles). If multiple settings are in place, the strictest policy is enforced.

79
Using the SSP
Logging into the SSP
You can access the SSP in two possible ways:
Log in through a browser and manage your devices remotely. To do this, navigate to the SSP website using the URL provided to you. It should look similar to this format: https://mdm.acme.com/mydevice.
Access the SSP from your device by opening the SSP Bookmark, if one has been pushed to your device.
Once you launch the SSP, you can log in using the same credentials (Group ID, username and password) you used to enroll in AirWatch. Optionally, if E-mail Domain registration is configured, you can log in using your corporate email address.
Selecting a Device in the SSP
After logging in to the SSP, a list of all devices tied to your user account displays on the left. Select the device you want to manage. The Device Details screen displays.
Viewing Device Information
The following tabs display device-related information:
Security – This tab displays the information specific to security controls currently in place for the device, including: enrollment status, assigned profile status, installed certificate status, certificates nearing expiry and installed applications.
Compliance – This tab shows the compliance status of the device, including the name and level of all compliance policies that apply to the device. It is important for end users to take note of these policies to ensure devices remain compliant and operate as intended.
Profiles – This tab shows all of the MDM profiles that have been sent to the devices enrolled under your user
account and the status of each profile. From the Profiles view, you can select the install icon ( ) to install a profile
or the delete icon ( ) to remove it from the device.
Apps – This tab displays all applications that have been installed on the selected device and provides basic application information.
Location – This tab displays the coordinates of the selected device, if enabled.
Event Log – This tab contains a comprehensive log of all interactions between the AirWatch Admin Console and the device.
Support – This tab contains detailed device information and contact information for your organization's support representatives.
Perform Remote Actions
The Remote Actions enable you to perform remote actions over-the-air to the selected device. See below for detailed information about each remote action.
Note: All remote action permissions are determined by your administrator and therefore you may not be able to perform all listed actions.
Device Query – Manually requests the device to send a comprehensive set of MDM information to the AirWatch Server.

80
Clear Passcode – Clears the passcode on the selected device and prompts for a new passcode. This is useful if you forget your device passcode and are locked out of your device.
Send Message – Sends an Email, SMS (text) or Push Notification over-the-air to the selected device.
Lock Device – Locks the selected device so that an unauthorized user cannot access it. This feature is useful if the device is lost or stolen (In this case, you may also want to use the GPS feature to locate the device.)
Enterprise Wipe – Wipes all corporate data from the selected device and removes the device from AirWatch MDM. All of the enterprise data contained on the device is removed, including MDM profiles, policies and internal applications. The device returns to the state it was in prior to the installation of AirWatch MDM.
Device Wipe – Wipes all data from the selected device, including all data, email, profiles and MDM capabilities and returns the device to factory default settings.

81
Appendix A: OEM Specific Key Features Matrix
Overview
These features matrices are a representative overview of the key OEM specific functionality available, highlighting the most important features available for device administration. Please review the OEM signifiers in the AirWatch Admin Console for a more comprehensive understanding of the functionality available.
In This Section
OEM Specific Profiles – Summarizes specific functionality and configurations, as available by OEM.
OEM Specific Restrictions – Provides a representational overview of the restriction profile configurations available by OEM.
Samsung Devices – Specifies which device types apply to each SAFE version.
Devices by Manufacturer and Version – Provides a quick glance at some of the available devices by manufacturer and version.
OEM Specific Profiles
This matrix summarizes specific functionality and configurations, as available by OEM.
Standard SAFE LG Lenovo HTC Moto MX Panasonic Kindle Nook Sony Intel
Native Email Configuration v1.0+ v1.0+ v1.0+
Allow Email Forwarding v3.0+
Disable Non-Enterprise Email Account Addition v4.0+
Prevent Enterprise Email Account Removal v4.0+
Application Control
Prevent Installation of Blacklisted Apps v2.0+ v1.0+ v1.0+ v1.0+ v3.0+ v1.0+
Prevent Un-Installation of Required Apps v1.0+ v1.0+ v1.0+ v1.0+ v1.0+
Allow Only Whitelisted Apps v2.0+ v1.0+ v3.0+ v1.0+
Silent Application Install v1.0+ v1.0+ MX v1.3+ v1.0+ v1.0+ v1.0+ v1.0+
Clear Specific Application Data Command v2.0+ v1.0+ MX v1.3+ v1.0+
Allow Voice Dialer v2.0+
Device Administration Silently Set Device Administrator v1.0+ v1.0+
Silently Remove Device Administrator v1.0+ v1.0+
Prevent Device Admin Removal by User v1.0+ v1.0+
Encryption
Require Storage Encryption v3.0+ v2.0+ v1.0+

82
Require SD Card Encryption v2.0+ v1.0+ v1.0+ MX v1.3+ v3.0+
Remote Troubleshooting
Remote Control v3.0+ v1.0+ MX v1.3+ v1.0+
Device Reboot v3.0+ v1.0+
Network
Configure Basic Native VPN Types v2.2-2.3.5 v2.0+ v1.0+ v1.0+ v1.0+
Configure Advanced Native VPN Types v3.0+ v1.0+ v1.0+
Set Minimum Wi-Fi Security Level v2.0+ v2.0+ v1.0+
Certificate Management
Silent Certificate Install v2.0+ v1.0+ v1.0+ MX v1.3+ v1.0+
Lock Screen Customization
Set Enterprise Custom Images on Lock Screen v4.0+
Set Enterprise Contact Info on Lock Screen v4.0+
OEM Specific Restrictions
This matrix provides a representational overview of the restriction profile configurations available by OEM.
Standard SAFE LG Lenovo HTC Moto MX Kindle Nook Sony Intel
Device Functionality
Allow Camera v4.0+ v2.0+ v1.0+ v1.0+
Allow Microphone v2.0+ v2.0+ v1.0+
Allow Factory Reset v2.0+ v1.0+ v1.0+
Allow Airplane Mode v2.0+ MX v1.3+
Allow Screen Capture v2.0+ v1.0+ v1.0+ v1.0+
Allow Mock Locations v2.0+ v2.0+ MX v1.3+
Allow Clipboard v2.0+ v2.2+
Allow USB Media Player v2.0+ v2.2+
Allow NFC v2.0+ v2.0+
Allow Home Key v2.0+ v2.2+ v1.0+ v1.0+
Allow POP / IMAP Email v1.0+
Allow Power Off v3.0+
Allow Status Bar v3.0+ v2.2+
Allow Wallpaper Change v3.0+
Allow Audio Recording v4.0+
Allow Video Recording v4.0+
Allow Ending Activity When Left Idle v4.0+
Allow User to Set Background Process Limit v4.0+
Deactivate Device Admin v1.0+ v1.0+
Silently Deactivate Device Admin v1.0+
Sync and Storage
Allow USB v1.0+
Allow USB Debugging v2.0+ v2.0+ v1.0+ MX v1.3+ v1.0+ v1.0+

83
Allow USB Mass Storage v2.0+ v2.2+ v1.0+ MX v1.3+ v1.0+
Allow Google Backup v2.0+ v2.2+
Allow SD Card Access v2.0+ v1.0+ v1.0+ MX v1.3+ v1.0+ v2.0+ v1.0+
Allow SD Card Write v3.0+
Allow OTA Upgrade v3.0+
Allow USB Host Storage v4.0+ v2.2+
Applications
Allow Google Play v2.0+ v1.0+ v1.0+
Allow YouTube v2.0+ v1.0+ v1.0+
Allow Access to Device Settings v2.0+ v1.0+
Allow Non-Market App Installation v2.0+ v1.0+ v1.0+ MX v1.3+ v1.0+
Allow Background Data v2.0+ v2.2+ MX v1.3+
Allow Voice Dialer v2.0+ v1.0+
Allow Google Crash Report v3.0+
Allow Android Beam v4.0+
Allow S Beam v4.0+
Allow S Voice v4.0+
Allow Copy & Paste Between Applications v4.0+ v1.0+
Allow User to Stop System Signed Applications v4.0+
Bluetooth
Allow Bluetooth v2.0+ v1.0+ v1.0+ MX v.1.3+ v1.0+ v2.0+
Allow Outgoing Calls Via Bluetooth v2.0+
Allow Bluetooth Discoverable Mode v2.0+ v2.0+
Allow Bluetooth Limited Discoverable Mode v2.0+
Allow Bluetooth Pairing v2.0+ v2.2++
Allow Bluetooth Data Transfer v2.2++
Network
Allow Data Connection v2.0+ v1.0+ v1.0+ v1.0+
Allow Wi-Fi Profiles v2.0+ v2.2+
Allow Wi-Fi Changes v2.0+ v1.0+
Allow Unsecure Wi-FI v4.0+
Allow Auto Connection Wi-Fi v4.0+
Allow Prompt for Credentials v2.0+
Minimum Wi-Fi Security Level v2.0+ v2.0+
Allow Only Secure VPN Connections v4.0+
Block Wi-Fi Networks by SSID v2.0+ v1.0+
Allow Native VPN v2.0+
Allow Sending SMS v1.0+
Allow Wi-Fi Direct v4.0+ v2.2+
Roaming

84
Allow Data Usage on Roaming v2.0+ v1.0+ v1.0+ MX v1.3+ v1.0+ v4.0+
Allow Automatic Sync on Roaming v2.0+ v1.0+ v1.0+
Allow Push Messages on Roaming v2.0+
Disable Voice Calls While Roaming v3.0+ v2.2+
Tethering
Allow All Tethering v2.0+ v1.0+ v1.0+ v2.0+ v1.0+
Allow Wi-Fi Tethering v2.0+ v2.0+ v1.0+ v1.0+
Allow Bluetooth Tethering v2.0+ v2.0+
Allow USB Tethering v2.0+ v2.0+
Browser
Allow Native Android Browser v2.0+ v1.0+ v2.0+
Allow Pop-Ups v2.0+
Allow Cookies v2.0+
Enable Autofill v2.0+
Enable JavaScript v2.0+
Force fraud warning v2.0+
Location Services
Allow GPS Location Services v2.0+ v1.0+ MX v1.3+ v1.0+
Allow Wireless Network Location Services v2.0+ v1.0+ MX v1.3+
Allow Passive Location Services v2.0+ v2.2+
Phone and Data
Allow Non-Emergency Calls v2.0+ v2.2+
Allow User to Set Mobile Data Limit v4.0+
Allow SMS with Storage v4.0+
Allow MMS with Storage v4.0+
Allow WAP Push v4.0+
Enable SIM PIN Lock v4.0+
Maximum Data Usage v2.0+
Miscellaneous
Set Device Font v4.0+
Set Device Font Size v4.0+
Hardware Restrictions
Allow System Bar v3.0+ v2.2+
Allow Task Manager v3.0+ v2.2+
Allow Menu Key v3.0+ v2.2+
Allow Back Key v3.0+ v2.2+
Allow Search Key v3.0+
Allow Volume Key v3.0+

85
Samsung Devices
The matrix below specifies which device types apply to each SAFE version.
Devices that are SAFE 4.0 and above are also KNOX compatible as long as they meet the minimum firmware requirements. Please contact your mobile device provider to ensure your devices meet these requirements.
SAFE 1.0 SAFE 2.0 SAFE 3.0 SAFE 4.0
Galaxy Tab
✓
Galaxy Tab 10.1
✓* ✓‡
Galaxy Tab 8.9
✓* ✓‡
Galaxy Tab 7.0 Plus
✓*
Galaxy Tab 7.7
✓
Galaxy Tab 2 7.0
✓‡
Galaxy Tab 2 10.1
✓‡
Galaxy Note 10.1
✓‡ ✓
Galaxy Note 8.0
✓‡
Galaxy Note ✓‡
Galaxy Note 2 ✓‡
Galaxy Note 3 ✓‡
Galaxy S ✓
Galaxy SII ✓
Galaxy SIII ✓
Galaxy S IV ✓
*For devices running Ice Cream Sandwich and below.
‡For devices running Ice Cream Sandwich and above.
Note: The matrix above applies to devices available as of November 5, 2013.

86
Devices by Manufacturer and Version
Review this matrix as a quick glance at some of the available devices by manufacturer and version.
1.0+ 1.3+ 2.0+ 3.0+ 4.0+ 5.0+
LG LG Optimus G by Sprint
LG Intuition by VzW
LG G2
LG G2 980
HTC HTC One X
HTC One X Plus
HTC One S
HTC One V
HTC Evo 4g
HTC One
Moto
ET1 N0
ET1 N1
MC40
Panasonic Toughpad
Lenovo Thinkpad Tablet
Amazon Kindle Fire HDX
Barnes and Noble Nook HD
Intel Baytrail
Grandhill
Flaghill
Sony Z
Tablet Z
ZL
ZR
A
UL
Z1*
Z Ultra*
Z1f*
Z1‡
Z Ultra‡
Z1f‡
Z2
Tablet Z2
*For devices running Jelly Bean 4.3
‡For devices running Kit Kat


![Android Platform Overview[1]](https://img.pdfslide.us/doc/110x75/577d296b1a28ab4e1ea6bba8/android-platform-overview1.jpg)