Embed Size (px)
Citation preview

Introduction to System z Mini-Boot Camp Machine Exercises
April 2010 Page 2 of 52 © Copyright IBM Corporation
Table of Contents How to Use This Guide ......................................................................................... 3
Why You Need Assistance from your Technical Knowledge Partner/Mentor .... 3 Files Needed for Exercises ............................................................................... 3 Sources of the Exercises ................................................................................... 4
I. Module - Interactive Facilities of z/OS ................................................................ 5 A. Logging On to z/OS and Entering TSO Commands ...................................... 5 B. Navigating through the ISPF Menu Options .................................................. 6 C. Using the ISPF Editor ................................................................................... 7 D. Opening the z/OS UNIX Shell and Entering Commands .............................. 9 E. Using the OEDIT and OBROWSE Commands ............................................. 9
II. Module - Working with Data Sets .................................................................... 11 A. Exploring the Master Catalog ...................................................................... 11 B. Exploring ISPF Option 3.4........................................................................... 11 C. Allocating a Data Set with ISPF 3.2 ............................................................ 13 D. Copying a Source Library ........................................................................... 14 E. Working with Data Set Members ................................................................. 14 F. Listing a Data Set and Other ISPF 3.4 Options ........................................... 15 G. Performing a Catalog Search ..................................................................... 16
III. Module - Using Job Control Language (JCL) and System Display and Search Facility (SDSF) .................................................................................................... 17
A. Creating a Simple Job ................................................................................. 17 B. Using SDSF ................................................................................................ 20
IV. Module - Batch Processing and JES ............................................................. 22 A. Submitting a Job and Checking the Results ............................................... 22
V. Module - Using Programming Languages in z/OS .......................................... 23 A. Display the Source Code for an HLL Application ........................................ 23
VI. Module - Compiling and Binding Programs ................................................... 27 A. Submitting a COBOL Compile .................................................................... 27 B. Checking the Compile Results .................................................................... 31
VII. Module - z/OS System Programming ........................................................... 38 A. SMF ............................................................................................................ 38
VIII. Module - Security on z/OS ........................................................................... 40 A. Controlling Data Set Access with RACF ..................................................... 40 B. Testing Access to Your Data Sets .............................................................. 44 C. Protecting a Specific Data Set .................................................................... 45 D. Granting the User Access to the Profile ...................................................... 48 E. Deleting the Data Set Profile ....................................................................... 51

April 2010 Page 3 of 52 © Copyright IBM Corporation
How to Use This Guide This guide contains exercises that complement the Introduction to System z modules. As you complete each module, you should meet with your Technical Knowledge Partner (TKP)/mentor to perform any exercises for that module. Each exercise has been reviewed by an experienced expert in System z®. Some of the exercises are based on those that can be found in the Introduction to the New Mainframe: z/OS Basics IBM Redbooks® publication that is referenced throughout the course.
Why You Need Assistance from your Technical Knowledge Partner/Mentor Your Technical Knowledge Partner/mentor will assist you in obtaining access to a System z for performing the exercises. Your TKP will verify that the exercise environment has been set up on the target System z and will ensure that the exercise data sets are available for your specific use. Your TKP/mentor will assist you during the exercises as well as meet with you to review the significance of each module.
Files Needed for Exercises These exercises require a zipped file that your TKP must restore. Ask your Technical Knowledge Partner/mentor for assistance. The files necessary for the exercises (packaged in zprof.zip) follow:
INSTRUCTOR DATA SET * FROM SOURCE DATA SET ********************* ****************************** ZPROF.AREA.CODES * ZPROF.ZSCHOLAR.AREA.CODES ZPROF.CLASS.LOAD * ZPROF.ZSCHOLAR.CLASS.LOAD ZPROF.CLASS.SAMPLIB * ZPROF.ZSCHOLAR.CLASS.SAMPLIB ZPROF.CLASS.SOURCE * ZPROF.ZSCHOLAR.CLASS.SOURCE ZPROF.EMP.UNLOAD.CNTL * ZPROF.ZSCHOLAR.EMP.UNLOAD.CNTL ZPROF.EMP.UNLOAD.DATA * ZPROF.ZSCHOLAR.EMP.UNLOAD.DATA ZPROF.INST.CNTL * ZPROF.ZSCHOLAR.INST.CNTL ZPROF.JCL * ZPROF.ZSCHOLAR.JCL ZPROF.JCL.NO.DELETE * ZPROF.ZSCHOLAR.JCL ZPROF.LANG.CNTL * ZPROF.ZSCHOLAR.LANG.CNTL ZPROF.LANG.LOAD * ZPROF.ZSCHOLAR.LANG.LOAD ZPROF.LANG.SOURCE * ZPROF.ZSCHOLAR.LANG.SOURCE ZPROF.LIB.SOURCE * ZPROF.ZSCHOLAR.LIB.SOURCE ZPROF.PROCLIB * ZPROF.ZSCHOLAR.PROCLIB ZPROF.PROGRAM.LOAD * ZPROF.ZSCHOLAR.PROGRAM.LOAD ZPROF.SORT.CNTL * ZPROF.ZSCHOLAR.SORT.CNTL

April 2010 Page 4 of 52 © Copyright IBM Corporation
ZPROF.SPUFI.CNTL * ZPROF.ZSCHOLAR.SPUFI.CNTL STUDENT DATA SET * FROM SOURCE DATA SET ********************* ****************************** ZUSER##.JCL * ZPROF.ZSCHOLAR.JCL ZUSER##.LANG.CNTL * ZPROF.ZSCHOLAR.LANG.CNTL ZUSER##.LANG.SOURCE * ZPROF.ZSCHOLAR.LANG.SOURCE ZUSER##.PROGRAM.LOAD * ZPROF.ZSCHOLAR.PROGRAM.LOAD ZUSER##.SPUFI.CNTL * ZPROF.ZSCHOLAR.SPUFI.CNTL STUDENT DATA SET * PARTITIAL FROM SOURCE ********************* ****************************** ZUSER##.LANG.LOAD * ZPROF.ZSCHOLAR.LANG.LOAD
Sources of the Exercises Some exercises are extracted from the course Redbook, The New Mainframe: An Introduction to z/OS. Others have been developed by experienced System z professionals. In some cases, the exercises include screen captures (not available in the accessible version) that are included at the discretion of the System z professional that developed the particular exercise. In both cases, the exercises have been reviewed and chosen based on their value to you.

April 2010 Page 5 of 52 © Copyright IBM Corporation
I. Module - Interactive Facilities of z/OS These exercises will help you develop skills in using Time Sharing Option/Extensions (TSO/E), Interactive System Productivity Facility (ISPF), and the z/OS® UNIX® command shell. These skills are required for performing lab exercises in the remainder of this course. To perform the lab exercises, each student or team needs a TSO user ID and password (for assistance, contact your Technical Knowledge Partner/mentor).
A. Logging On to z/OS and Entering TSO Commands Establish a 3270 connection with z/OS using a workstation 3270 emulator and log on with your user ID (we will call this yourid). From the TSO READY prompt (after you have keyed in =x to exit out of ISPF into native TSO), enter the following commands:
1. PROFILE - What is the prefix value? Make a note of this prefix value; it is your user ID on the system.
2. PROFILE NOPREFIX - This command changes your profile so that TSO
will not place a prefix at the beginning of your commands. Specifying PROFILE PREFIX (with a value) instructs the system to use a value, such as your user ID, to find files in the system. Specifying NOPREFIX instructs the system not to use a value, such as your user ID, to find files in the system. NOPREFIX instructs the system not to limit the results—for example, to files beginning with your user ID—as it would otherwise do by default.
3. LISTC - The LISTCAT command (or LISTC, for short) lists the data sets in
a particular catalog. Your 3270 emulator has a PA1 (attention) key. You can use the PA1 key to end the command output.
Note: When you see the three asterisks (***), your screen is filled to capacity. In TSO, the *** indicates that there is more output waiting and you must press Enter or PA to see it.
4. PROFILE PREFIX(userid) - This command specifies that your user ID is
to be prefixed to all non-fully-qualified data set names, which will filter the results of the next command.
5. LISTC – Enter this command again. What is displayed? Contrast the
output to step 3 above.
6. ISPF (or ISPPDF) - Enter the ISPF menu-driven interface of TSO.

April 2010 Page 6 of 52 © Copyright IBM Corporation
Note: In some systems, you will need to select option P to access the main ISPF screen.
B. Navigating through the ISPF Menu Options From the ISPF Primary Option Menu, do the following:
1. Select Utilities; then select DSLIST from the Utility Selection Panel. 2. Type “SYS1” in the DSNAME LEVEL field and press Enter. What is
displayed?
3. Press F8 to page down or forward, F7 to page up or backward, F10 to shift left, and F11 to shift right. Press F3 to exit.
4. Type SYS1.PROCLIB in the DSNAME LEVEL field and press Enter.
What is displayed?
5. Type the letter v in the command column to the left of SYS1.PROCLIB. SYS1.PROCLIB is a partitioned data set (PDS) with numerous members. Type the letter s to the left of any member to select the member for viewing. Press F1. What specific help is provided?
6. Type =0 on the ISPF command or option line. What is the first option
listed in this ISPF Settings panel? Change your settings to place the command line at the bottom of the panel. This change is effective on exit from the ISPF Settings panel.
7. Type PFSHOW OFF; then type PFSHOW ON. What is the difference?
How is PFSHOW ON useful?
8. Using the Exit function key, return to the ISPF Primary Option Menu. What value is used to select Utilities?
9. Select Utilities. 10. In the Utilities Selection panel, what value is used to select DSLIST? Using
the Exit function key, return to the ISPF Primary Option Menu. On the option line, enter the Utilities selection value followed by a period; then enter the DSLIST selection value. What panel is displayed?
11. Using the Exit function key, return to the ISPF Primary Option Menu. Place
your cursor on the Status entry at the very top of the panel and press Enter. Select the Calendar value and press Enter; then select the Session value. What changed?

April 2010 Page 7 of 52 © Copyright IBM Corporation
12. Now, set your screen to the original configuration by using the Status pull-down menu and selecting Session.
C. Using the ISPF Editor From the ISPF Primary Option Menu, do the following:
1. Go to the DSLIST Utility panel and type yourid.JCL in the DSNAME LEVEL field. Press Enter.
2. Type the letter e (edit) to the left of yourid.JCL. Type the letter s (select) to
the left of the member EDITTEST. Type PROFILE on the edit command line. Observe that the data is preceded by profile and message lines. Read the profile settings and messages; then type RESET on the command line. What is the result?
3. Enter any string of characters at the end of the first data line; then press
Enter. On the command line, type CAN (cancel). Press Enter to confirm the cancel request. Again, edit EDITTEST in the data set. Were any of your previous changes saved?
Tip: As you become more familiar with ISPF, you will learn the letters and numbers for some of the commonly used options. Preceding an option with the = key takes you directly to that option, bypassing the menus in between.
You can also go directly to nested options with the = sign. For example, =3.4 takes you directly to a commonly used data set utility menu.
4. Move your cursor to one of the top lines on your display. Press F2. The result is a second ISPF panel. What occurs when F9 is pressed repeatedly?
5. Press F9 to switch to the ISPF Primary Option Menu; then press F1 to
display the ISPF Tutorial panel. 6. From the ISPF Tutorial panel, select Edit; then select Edit Line
Commands. Finally, select Basic Commands. Press Enter to scroll through the basic commands tutorial. As you do so, frequently switch (by pressing F9) to the edit session and use the Basic Commands in EDITTEST. Repeat this same process for Move/Copy commands and shifting commands.
7. From the ISPF Tutorial panel, select Edit; then select Edit Primary
Commands. Finally, select FIND/CHANGE/EXCLUDE commands. Press Enter to scroll through the FIND/CHANGE/EXCLUDE commands

April 2010 Page 8 of 52 © Copyright IBM Corporation
tutorial. As you do so, frequently switch (by pressing F9) to the edit session and use the FIND/CHANGE/EXCLUDE commands in EDITTEST.
8. Enter =X on the ISPF Help panel to end the second ISPF panel session. Save and exit the Edit Panel by pressing F3 to return to the ISPF Primary Option Menu.
Using ISPF in split screen mode Most ISPF users favor a split screen. This is easily done:
1. Move your cursor to the bottom (or top) line. 2. Press PF2 to split the screen. 3. Press PF9 to switch between the two screens. 4. Press PF3 (perhaps several times) to exit from one of the splits. The
screen need not be split at the top or bottom. The split line can be positioned on any line by placing the cursor under that line and pressing PF2. More than two screens can be used. Try to use these ISPF commands:
START SWAP LIST SWAP <screen number>
Manipulating text in ISPF After logging on to TSO/E, activate ISPF; next, look at the ISPF Primary Option Menu.
1. Try each option by typing its number and pressing Enter; write down the purpose and function of each option. Note that z/OS installations often heavily customize the ISPF panels to suit their needs.
2. Create a test member in a PDS. Enter some lines of information; then
experiment with the commands below. Press PF1 if you need help. i Insert a line. Enter key Press Enter without entering anything to
escape insert mode. i5 Obtain 5 input lines. d Delete a line. d5 Delete 5 lines. dd/dd Delete a block of lines (place a DD on the first
line of the block and another DD on the last line of the block).
April 2010 Page 9 of 52 © Copyright IBM Corporation
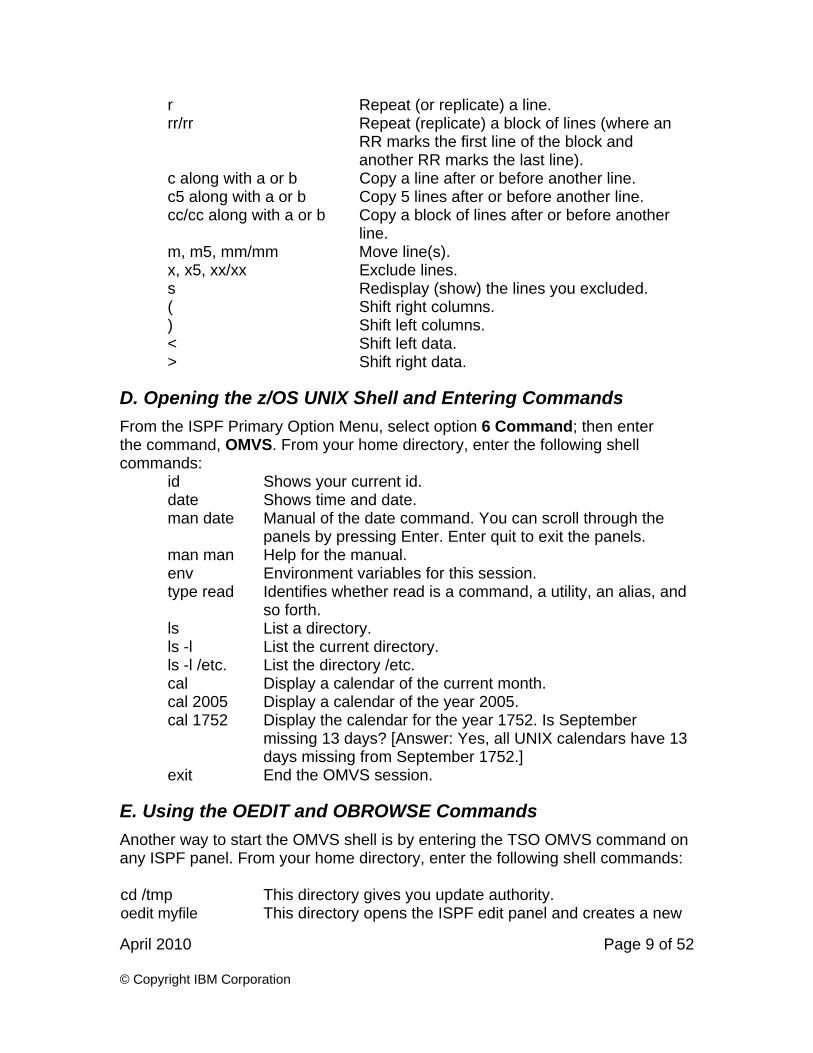
r Repeat (or replicate) a line. rr/rr Repeat (replicate) a block of lines (where an
RR marks the first line of the block and another RR marks the last line).
c along with a or b Copy a line after or before another line. c5 along with a or b Copy 5 lines after or before another line. cc/cc along with a or b Copy a block of lines after or before another
line. m, m5, mm/mm Move line(s). x, x5, xx/xx Exclude lines. s Redisplay (show) the lines you excluded. ( Shift right columns. ) Shift left columns. < Shift left data. > Shift right data.
D. Opening the z/OS UNIX Shell and Entering Commands From the ISPF Primary Option Menu, select option 6 Command; then enter the command, OMVS. From your home directory, enter the following shell commands:
id Shows your current id. date Shows time and date. man date Manual of the date command. You can scroll through the
panels by pressing Enter. Enter quit to exit the panels. man man Help for the manual. env Environment variables for this session. type read Identifies whether read is a command, a utility, an alias, and
so forth. ls List a directory. ls -l List the current directory. ls -l /etc. List the directory /etc. cal Display a calendar of the current month. cal 2005 Display a calendar of the year 2005. cal 1752 Display the calendar for the year 1752. Is September
missing 13 days? [Answer: Yes, all UNIX calendars have 13 days missing from September 1752.]
exit End the OMVS session.
E. Using the OEDIT and OBROWSE Commands Another way to start the OMVS shell is by entering the TSO OMVS command on any ISPF panel. From your home directory, enter the following shell commands: cd /tmp This directory gives you update authority. oedit myfile This directory opens the ISPF edit panel and creates a new

April 2010 Page 10 of 52 © Copyright IBM Corporation
text file in the current path. Write some text into the editor. Save and press F3 to exit.
ls Display the current directory listing in terse mode. ls –l Display the current directory listing in verbose mode. myfile myfile can be any file you choose to create. obrowse myfile Browse the file you just created. exit End the OMVS session.

April 2010 Page 11 of 52 © Copyright IBM Corporation
II. Module - Working with Data Sets The exercises in this module help you to develop skills in working with data sets using ISPF. To perform these exercises, you require a TSO user ID and password (see your Technical Knowledge Partner/mentor for assistance).
A. Exploring the Master Catalog Go to ISPF option 6 and do the following:
1. Type the LISTC LEVEL(SYS1) command for a basic listing of all the SYS1 data sets in the master catalog.
2. Notice that the data sets are either NONVASM or CLUSTER (and
associated DATA and INDEX entries). The CLUSTERs are for VSAM data sets.
3. Press the PA1 key to end the listing.
4. Type the LISTC LEVEL(SYS1) ALL command for a more extended listing.
Note the Volume Serial Number (volser) and device type data for the NONVSAM data sets, which is the basic information in the catalog.
5. Type LISTC LEVEL(xxx) to view one of the ALIAS levels and note that it comes from a user catalog.
Note: If you type the profile command with NOPREFIX, it produces a system-wide display when you type the commands LISTC and LISTC ALL. These commands allow you to display all of the entries in the master catalog, including ALIAS entries.
B. Exploring ISPF Option 3.4 One of the most useful ISPF panels is Option 3.4. Option 3.4 means, starting from the ISPF Primary Option Menu, select Option 3 (Utilities); then select Option 4 (DSLIST, for data set list). This sequence can be abbreviated by entering 3.4 in the primary menu, or =3.4 from any panel. Many ISPF users work almost exclusively within the 3.4 panels. We cover some of the 3.4 functions here and others in subsequent exercises in this text. Use care in working with 3.4 options; they can effect changes on an individual or system-wide basis.
April 2010 Page 12 of 52 © Copyright IBM Corporation
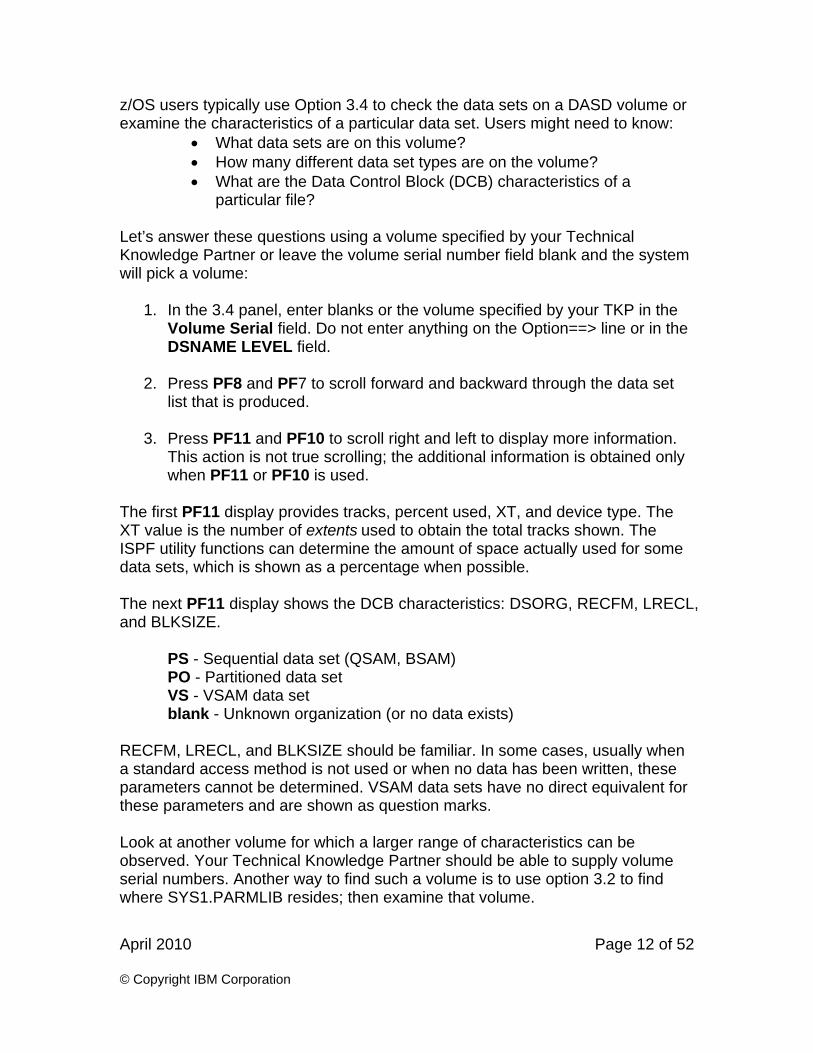
z/OS users typically use Option 3.4 to check the data sets on a DASD volume or examine the characteristics of a particular data set. Users might need to know:
What data sets are on this volume? How many different data set types are on the volume? What are the Data Control Block (DCB) characteristics of a
particular file? Let’s answer these questions using a volume specified by your Technical Knowledge Partner or leave the volume serial number field blank and the system will pick a volume:
1. In the 3.4 panel, enter blanks or the volume specified by your TKP in the Volume Serial field. Do not enter anything on the Option==> line or in the DSNAME LEVEL field.
2. Press PF8 and PF7 to scroll forward and backward through the data set
list that is produced.
3. Press PF11 and PF10 to scroll right and left to display more information. This action is not true scrolling; the additional information is obtained only when PF11 or PF10 is used.
The first PF11 display provides tracks, percent used, XT, and device type. The XT value is the number of extents used to obtain the total tracks shown. The ISPF utility functions can determine the amount of space actually used for some data sets, which is shown as a percentage when possible. The next PF11 display shows the DCB characteristics: DSORG, RECFM, LRECL, and BLKSIZE.
PS - Sequential data set (QSAM, BSAM) PO - Partitioned data set VS - VSAM data set blank - Unknown organization (or no data exists)
RECFM, LRECL, and BLKSIZE should be familiar. In some cases, usually when a standard access method is not used or when no data has been written, these parameters cannot be determined. VSAM data sets have no direct equivalent for these parameters and are shown as question marks. Look at another volume for which a larger range of characteristics can be observed. Your Technical Knowledge Partner should be able to supply volume serial numbers. Another way to find such a volume is to use option 3.2 to find where SYS1.PARMLIB resides; then examine that volume.

April 2010 Page 13 of 52 © Copyright IBM Corporation
C. Allocating a Data Set with ISPF 3.2 ISPF provides a convenient method for allocating data sets. In this exercise, you create a new library that you can use later in the course for storing program source data. The new data sets should be placed on the WORK02 volume and should be named yourid.LIB.SOURCE (where yourid is your student user ID). For this exercise, assume that 10 tracks of primary space and 5 tracks for secondary extents are sufficient, and that 10 directory blocks is sufficient. Furthermore, you want to store 80-byte fixed-length records in the library. We can do this as follows:
1. Start at the ISPF Primary Options Menu. 2. Go to option 3.2, or go to option 3 (Utilities); then go to option 2 (Data Set). 3. Type the letter A in the Option ==> field, but do not press Enter yet. 4. Type the name of the new data set in the Data Set Name field, but do not
press Enter yet. The name can be with single quotations marks (for example, ‘yourid.LIB.SOURCE’) or without quotation marks (LIB.SOURCE). TSO/ISPF automatically uses the current TSO user ID as the High Level Qualifier (HLQ).
4. Type WORK02 in the Volume Serial field and press Enter.
5. Complete the indicated fields and press Enter:
Space units = TRKS Primary quantity = 10 Secondary quantity = 5 Directory blocks = 10 Record format = FB Record length = 80 Block size = 0 (this entry directs z/OS to select an optimum value) Data set type = PDS
These field entries should allocate a new PDS on WORK02. Check the upper right corner, where the following message appears:
Menu RefList Utilities Help -------------------------------------------------------------------- - Data Set Utility Data set allocated Option ===> A Allocate new data set C Catalog data set .....

April 2010 Page 14 of 52 © Copyright IBM Corporation
D. Copying a Source Library A number of source programs are needed for exercises in ZPROF.ZSCHOLAR.LIB.SOURCE on WORK02. There are several ways to copy data sets (including libraries). Use the following steps:
1. Go to ISPF option 3.3 (Utilities, Move/Copy). 2. On the first panel:
a. Type the letter C in the Option==> field. b. Type ‘ZPROF.ZSCHOLAR.LIB.SOURCE’ in the Data Set Name
field. The single quotation marks are needed in this case. c. The Volume Serial is not needed because the data set is cataloged. d. Press Enter.
3. On the second panel: a. Type ‘yourid.LIB.SOURCE’ in the Data Set Name field and press
Enter. If this PDS does not exist, type 1 to inherit the attributes of the source library. This action produces a panel that lists all the members in the input library.
b. Type the letter S before every member name; then press Enter. This action copies all the indicated members from the source library to the target library. Alternatively, specify ZPROF.ZSCHOLAR.LIB.SOURCE(*)’ for the input data set to automatically copy all the members. This situation is one of only a few where wild cards are used with z/OS data set names.
4. Create another library named ‘yourid.MOVE.SOURCE’. Move several members from LIB.SOURCE into the new library. Verify that the moved members are in the new library and no longer in the old one. Copy those members back into the LIB library. Verify that they exist in both libraries.
5. Rename a member in your ‘yourid.MOVE.SOURCE’ library. Rename your
‘yourid.MOVE.SOURCE’ library to ‘yourid.TEST.SOURCE’.
E. Working with Data Set Members There are several ways to add a new member to a library. Create a new member named TEST2 in your library edited previously:
1. From the ISPF Primary Options Menu, go to option 2.
2. Type the name of your library without specifying a member name, for example, yourid.JCL. This action provides a list of member names already in the library.
3. Verify that the member EDITTEST has the same contents you used
earlier: a. If necessary, scroll to display the member name EDITTEST.

April 2010 Page 15 of 52 © Copyright IBM Corporation
b. Move your cursor to the left of this line. c. Type the letter S and press Enter. d. Look at your earlier work to assure yourself it is unchanged. e. Press PF3 to exit member EDITTEST. You will see the library
member name list again.
4. Type S TEST2 (S TEST2 can be read as “select TEST2”) on the command line at the top of the screen and press Enter. This action creates member TEST2 and places the screen in input mode.
5. Type a few lines of anything, using the commands and functions we
discussed earlier.
6. Press PF3 to save TEST2 and exit from it.
7. Press PF3 again to exit from the ISPF Edit function. For the remainder of the exercises, we will simply say “Enter xxx” when editing something or using other ISPF functions. This instruction means (1) type xxx and (2) press the Enter key. The New Line key (which has Enter printed on it) is used only to position the cursor on the screen.
F. Listing a Data Set and Other ISPF 3.4 Options 1. Go to the ISPF 3.4 panel. Enter yourid in the DSNAME LEVEL field to list
all the cataloged data sets in the system with the indicated HLQ.
An alternative is to leave the DSNAME LEVEL field blank and enter WORK02 in the Volume Serial field; this action lists all the data sets on the indicated volume. (If both fields are used, the list will contain only the cataloged data sets with a matching HLQ that appear on the specified volume.)
You can invoke a number of functions by entering the appropriate letter before a data set name. For example, position the cursor before one of the data set names and press PF1 (Help). The Help panel lists all the line commands that can be used from the data set name list of the 2.4 panel. Do not experiment with these without understanding their functions. Not all of these functions are relevant to this class. The relevant commands are:
E - Edit the data set. B - Browse the data set. D - Delete the data set. R - Rename the data set. Z - Compress a PDS library to recover lost space. C - Catalog the data set. U - Uncatalog the data set.

April 2010 Page 16 of 52 © Copyright IBM Corporation
When you display a member list (as when you edit or browse a library), several line commands are available:
S - Select this member for editing or browsing. R - Rename the member. D - Delete the member.
G. Performing a Catalog Search The ISPF 3.4 option can be used for catalog searches on partial names. Use PF1 Help to learn more about this important function, as follows:
1. Select option 3.4.
2. Press PF1 for help and select Display a data set list. Press Enter to scroll through the information panels.
3. Select Specifying the DSNAME LEVEL. Press Enter to scroll through
the information panels.
4. Press PF3 to exit the Help function. Notice that the 3.4 DSNAME LEVEL field does not use quotation marks and the current TSO/E user ID is not automatically used as a prefix for names in this field. This situation is one of the few exceptions to the general rule for specifying data set names in TSO. .
April 2010 Page 17 of 52 © Copyright IBM Corporation
III. Module - Using Job Control Language (JCL) and System Display and Search Facility (SDSF) This lab exercise helps you develop skills in creating batch jobs and submitting them for execution on z/OS. To perform the following exercises, you require a TSO user ID and password (for assistance, see your Technical Knowledge Partner/mentor).
A. Creating a Simple Job
1. From ISPF, navigate to the Data Set List Utility panel and enter yourid.JCL in the DSNAME LEVEL field.
2. Enter the letter e (edit) to the left of yourid.JCL in the command
column. Enter the letter s (select) to the left of the member JCLTEST. Type RESET on the editor command line.
3. Look for the line of the JCL in the data set, //STEP1 EXEC
PGM=IEFBR14. This system utility, IEFBR14, does not request any input or output and is designed to complete with a successful return code (0). Please delete all code in the data set that was restored except this one line of code.
4. Enter SUBMIT or SUB on the command line.
5. Enter 1 in response to the message:
IKJ56700A ENTER JOBNAME CHARACTER(S) The result will be the message:
IKJ56250I JOB yourid1(JOB00037) SUBMITTED Note: Whenever you see three asterisks (***), it means there is more data to display. Press Enter to continue.
6. When the job finishes, you receive the message: $HASP165 yourid1 ENDED AT SYS1 MAXCC=0 CN(INTERNAL)
7. Add (insert) a new first line in your file that will hold a JOB statement. The JOB statement must precede the EXEC statement. (Hint: Replicate (r) the single EXEC statement; then overwrite the EXEC statement with your JOB statement.) This JOB statement reads:
//youridA JOB 1
8. Replace yourid with your team user ID, leave the “A,” and then submit this JCL and press PF3 to save the file and exit the editor.
9. From the ISPF Primary Option Menu, find SDSF. You can use the

April 2010 Page 18 of 52 © Copyright IBM Corporation
split screen function for a new screen session, giving you one session for the DSLIST and the other for SDSF.
10. In the SDSF menu, enter PREFIX yourid*; then enter ST (Status
Panel). The system displays both jobs that you submitted. Enter the letter S (select) to the left of either job; then page up and page down to view the messages produced from the execution. Press PF3 to exit.
11. Edit JCLTEST again, and insert the following lines at the
bottom: //CREATE DD DSN=yourid.MYTEST,DISP=(NEW,CATLG), // UNIT=SYSDA,SPACE=(TRK,1)
12. Submit the content of JCLTEST created above, press PF3 (save and
exit edit), and view the output of this job using SDSF. Notice that you have two jobs with the same job name. The job name with the highest JOBID number is the last one that was run. a. What was the condition code? If it was greater than 0, page
down to the bottom of the output listing to locate the JCL error message. Correct the JCLTEST and resubmit. Repeat until you receive cond code=0000.
b. Navigate to the Data Set List Utility panel (=3.4) and enter yourid.MYTEST in the DSNAME Level field. What volume was used to store the data set?
c. Enter DEL / in the numbered left (command) column of the data set to delete the data set. A confirmation message may appear asking you to confirm that you want to delete the data set.
d. The batch execution of program IEFBR14, which requires no inputs or outputs, returns a condition code 0 (success) if there were no JCL errors. Although IEFBR14 does no I/O, JCL instructions are read and executed by the system. This program is useful for creating (DISP=NEW) and deleting (DISP=(OLD,DELETE)) data sets on a DD statement.
13. From any ISPF panel, in the TSO Command field, type:
SUBMIT JCL(JCLERROR)
Your user ID is the prefix (HLQ) of the data set JCL containing the member JCLERROR. a. The system will prompt you to enter a suffix character for a
generated job card. Take note of the job name and job number from the submit messages.
b. Use SDSF and select the job output. Page down to the bottom. Do

April 2010 Page 19 of 52 © Copyright IBM Corporation
you see the JCL error? What are the incorrect and correct JCL DD operands? Correct the JCL error located in yourid.JCL(JCLERROR). Resubmit JCLERROR to validate your correction.
14. From any ISPF panel, enter TSO SUBMIT JCL(SORT). Your user
ID is the assumed prefix of the data set JCL containing the member SORT. a. The system will prompt you to enter a suffix character for a
generated job card. Take note of the job name and job number from the submit messages.
b. Use SDSF and type a ? to the left of the job name. The system displays the individual listing from the job. Enter the letter s (select) to the left of SORTOUT to view the sort output; then press PF3 to return. Select JESJCL. Notice the “job statement generated message” and the “substitution JCL” messages.
15. Now, purge some (or all) unnecessary job output. From SDSF, enter
the letter p (purge) to the left of any job that you would like to purge from the JES output queue.
16. From the ISPF panel, enter TSO SUBMIT JCL(SORT) and review the
output.
17. From the ISPF panel, enter TSO SUBMIT JCL(SORTPROC) and review the output. You may not see the output in the SDSF ST panel because the job name does not start with yourid. To see all output, enter PRE *, and then OWNER yourid to see only the jobs that are owned by you.
18. What JCL differences exist between SORT and SORTPROC? In both
JCL streams, the SYSIN DD statement references the sort control statement. Where is the sort control statement located?
Tip: All JCL references to &SYSUID are replaced with the user ID that submitted the job.
19. Edit the PDS member containing the SORT control statement.
Change FIELD=(1,3,CH,A) to FIELD=(6,20,CH,A). Press PF3; then, from the ISPF panel, enter TSO SUBMIT JCL(SORT). Review the job’s output using SDSF. Was the output sorted by code or area? From the ISPF panel, enter TSO LISTC ALL. By default, the system lists all catalog entries for data sets beginning with yourid. The system catalog returns the data set names, the name of the catalog storing the

April 2010 Page 20 of 52 © Copyright IBM Corporation
detailed information, the volume location, and a device type (devtype) number that equates to specific values for JCL UNIT= operand. LISTC is an abbreviation for LISTCAT.
B. Using SDSF From the ISPF Primary Option Menu, locate and select System Display and Search Facility (SDSF), which is a utility that lets you display output data sets. Select More to find the SDSF option (5), or simply enter =M.5 (if your system is set up to support this shortcut). The ISPF Primary Option Menu typically includes more selections than those listed on the first panel, with instructions on how to display the additional selections. 1. Enter LOG; then press F10 (shift left), F11 (shift right), F7 (page up), and F8
(page down). Enter TOP; then enter BOTTOM on the command input line. Enter DOWN 500 and UP 500 on the command input line. You will learn how to read this system log later.
2. Observe the SCROLL value to the far left on the command
input line. Scroll ===> PAGE Tab to the SCROLL value. The values for SCROLL can be: C or CSR Scroll to where you placed the cursor P or PAGE Full page or screen H or HALF Half page or half screen
3. You will find the SCROLL value on many ISPF panels, including the editor.
You can change this value by entering the first letter of the scroll mode you select over the first letter of the current value. Change the value to CSR, place the cursor on another line in the body of the system log, and press F7. Did doing this place the line with the cursor at the top?
4. Enter ST (status) on the SDSF command input line; then SET DISPLAY ON.
Observe the values for Prefix, Best, Owner, and Susanne. To display all of the current values for each, enter * as a filter, for example:
PREFIX * OWNER * DEST The result should be: PREFIX=* DEST=(ALL) OWNER=*
5. Enter DA to display all active jobs. Enter ST to retrieve the status of all jobs in the input, active, and output queues. Once again, press F7 (page up), F8 (page down), F10 (shift left), and F11 (shift right).

April 2010 Page 21 of 52 © Copyright IBM Corporation
April 2010 Page 22 of 52 © Copyright IBM Corporation
IV. Module - Batch Processing and JES
A. Submitting a Job and Checking the Results Edit member COBOL1 in the yourid.LIB.SOURCE library and inspect the COBOL program. There is no JCL included in the COBOL program. Now, edit member COBOL1 in yourid.JCL. Inspect the JCL carefully. It uses a JCL procedure to compile and run a COBOL program. Follow these steps:
1. Change the job name to yourid plus additional characters.
2. Change the NOTIFY parameter to your user ID.
3. Add TYPRUN=SCAN to your job card.
4. Enter SUB on the ISPF command line to submit the job.
5. Split your ISPF screen and go to SDSF on the new screen (you might already have this split screen from an earlier exercise).
6. In SDSF, go to the ST (Status) display and look for your job name.
You may need to enter a PRE or OWNER command on the SDSF command line to see any job names. (A previous user may have issued a prefix command to see only certain job names.)
7. Enter the letter S beside your job name to see all of the printed output: Messages from JES2 Messages from the initiator Messages from the COBOL compiler Messages from the binder Output from the COBOL program
8. Remove TYPRUN=SCAN when you are ready to run your job.
9. Press PF3 to return and type ? beside your job name to display another
output format. Ask your Technical Knowledge Partner to tell you the purposes of the various JES2 and initiator messages.
Resubmit the job with MSGLEVEL=(1,1) on the JOB statement. Resubmit the job with MSGLEVEL=(0,0) on the JOB statement.
The MSGLEVEL parameter controls the number of initiator messages that are produced.

April 2010 Page 23 of 52 © Copyright IBM Corporation
V. Module - Using Programming Languages in z/OS
A. Display the Source Code for an HLL Application The following exercise is based on the demonstration for this module. Even if you viewed the demonstration, please follow these instructions and try it yourself.
1. Log on to TSO with your user ID.
2. If ISPF does not start automatically and you see the TSO READY prompt, enter ISPF and press Enter.
3. Select option 1, View - Display source data or listings, from the ISPF
menu.
4. Below the heading, Other Partitioned, Sequential or VSAM Data Set, or z/OS UNIX file, enter:
‘userid.LANG.SOURCE’
5. Replace userid with your user ID and enclose the data set name in
quotation marks.
6. Press Enter to open the data set.

April 2010 Page 24 of 52 © Copyright IBM Corporation

April 2010 Page 25 of 52 © Copyright IBM Corporation
7. Select the COBOL or COBOL 2 member by entering the letter S next to it; press the Enter key to view the member.
8. Review the contents of the source code.
9. Press F7 and F8 to scroll through the source code member.
10. When you finish reviewing the source code, press F3 (end function key) to close the browse window and return to the member list.

April 2010 Page 26 of 52 © Copyright IBM Corporation
11. Review the other source members in the data set.

April 2010 Page 27 of 52 © Copyright IBM Corporation
VI. Module - Compiling and Binding Programs
A. Submitting a COBOL Compile The following exercise is based on the demonstration for this module. Even if you have viewed the demonstration, please follow these instructions and try it yourself.
1. Enter 3.4 on the ISPF main menu.
2. Press Enter.
April 2010 Page 28 of 52 © Copyright IBM Corporation
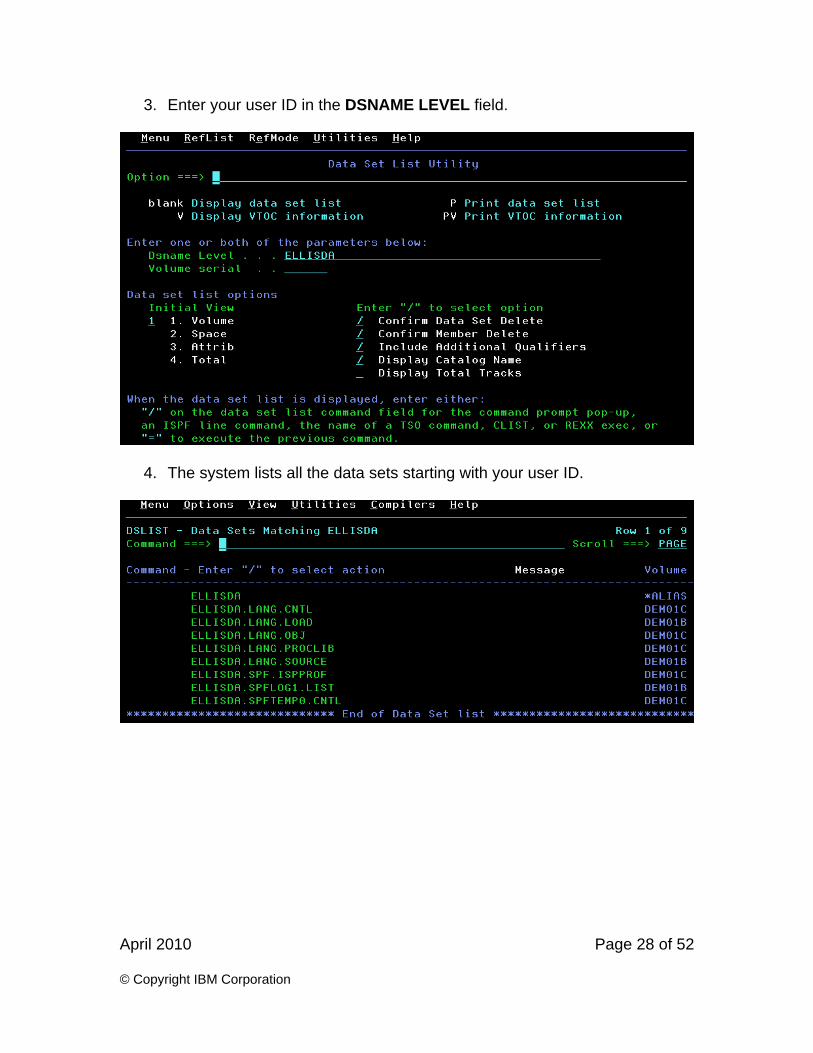
3. Enter your user ID in the DSNAME LEVEL field.
4. The system lists all the data sets starting with your user ID.
April 2010 Page 29 of 52 © Copyright IBM Corporation
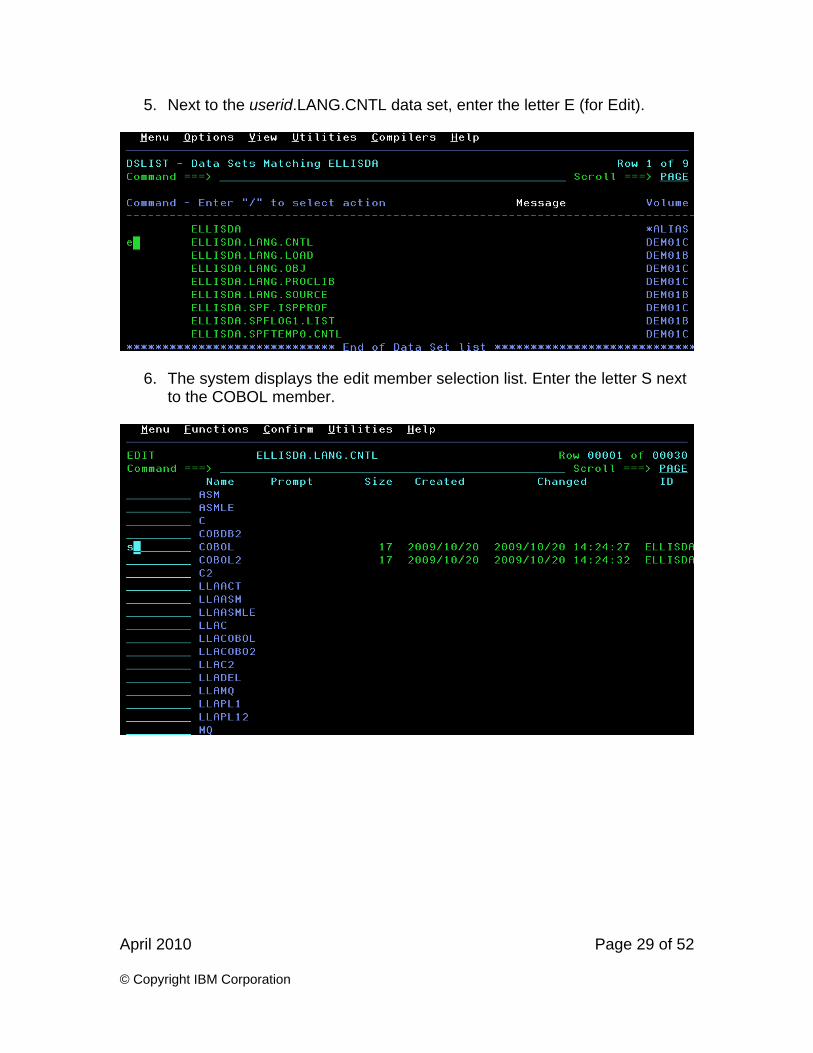
5. Next to the userid.LANG.CNTL data set, enter the letter E (for Edit).
6. The system displays the edit member selection list. Enter the letter S next to the COBOL member.

April 2010 Page 30 of 52 © Copyright IBM Corporation
7. Edit the JCL to add a valid job statement (or card). Also, enter the data set name and the member name of the source member for the SYSIN DD and the load library and the member name for the SYSLMOD DD statement (or card).
8. Edit the COBOL.SYSLIB DD card to point to the SCEESAMP library.
9. To submit the compile, enter SUB (for submit) on the command line.

April 2010 Page 31 of 52 © Copyright IBM Corporation
B. Checking the Compile Results The following exercise is based on the demonstration for this module. Even if you have viewed the demonstration, please follow these instructions and try it yourself.
1. Go to SDSF and enter ST (for job status) on the command line.
April 2010 Page 32 of 52 © Copyright IBM Corporation
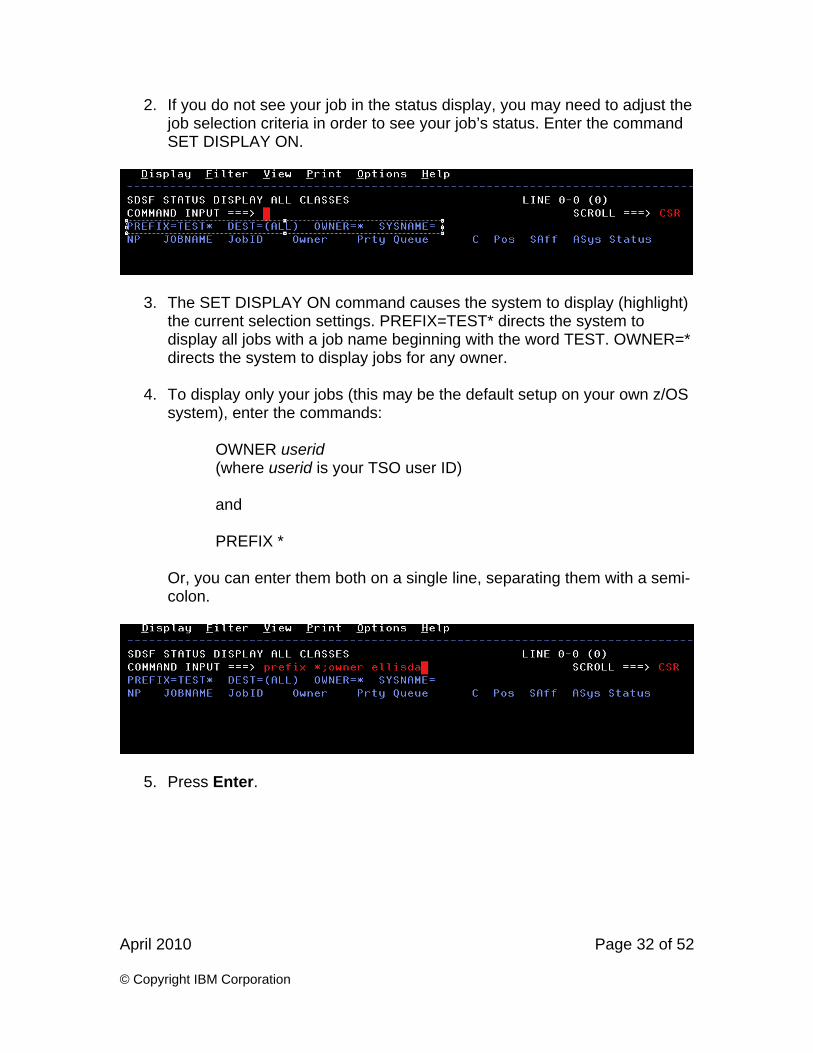
2. If you do not see your job in the status display, you may need to adjust the job selection criteria in order to see your job’s status. Enter the command SET DISPLAY ON.
3. The SET DISPLAY ON command causes the system to display (highlight) the current selection settings. PREFIX=TEST* directs the system to display all jobs with a job name beginning with the word TEST. OWNER=* directs the system to display jobs for any owner.
4. To display only your jobs (this may be the default setup on your own z/OS
system), enter the commands:
OWNER userid (where userid is your TSO user ID) and PREFIX *
Or, you can enter them both on a single line, separating them with a semi-colon.
5. Press Enter.

April 2010 Page 33 of 52 © Copyright IBM Corporation
6. To display all the output from the job in a single stream, enter the letter S
next to it; or, you can view the individual parts by entering a question mark (?) next to each part.
7. The system displays the output. (Your output may vary from the example below depending upon your system).
8. Enter the letter S next to each part of the output to view it.

April 2010 Page 34 of 52 © Copyright IBM Corporation
9. The JESMSGLG (JES Message Log) output contains Job Entry Subsystem (JES) messages and may also contain information about the completion code for each job step (this information is provided via an installation exit and not all systems may show this information in the JES message log).
In this example, you can see that both steps of the job (the compile and the link edit) ended with return code zero (under the RC heading).
10. Press F3 to return to the list of job output parts. The SYSPRINT output
from the LKED step contains the linkage editor (binder) output.

April 2010 Page 35 of 52 © Copyright IBM Corporation
11. In the output, the system provides information such as where the load module was saved.
12. In this example, the load module was saved as member name COBOL in load library ELLISDA.LANG.LOAD. The module attributes Section lists information about the module.
13. AMODE and RMODE refer to where in storage the program will reside (above or below the 16 MB line, RMODE) and in which addressing mode it will initially execute (31 bit or 24 bit, AMODE). The AC indicator shows if this program is flagged as being Authorized Program Facility (APF) authorized. In order to execute as an APF authorized program, the load library where it resides must also be APF authorized.

April 2010 Page 36 of 52 © Copyright IBM Corporation
Most application programs do not need to be APF authorized. The EXECUTABLE flag shows that this program is indeed executable. If the link edit/binding operation contained an error, such as a required module not being found, then the program may have been flagged as not executable.
14. The message summary section lists the message numbers by severity of
all the messages issued by the linkage editor/binder.
15. To quickly find any error messages in the listing, search for the message number using the find (F) command in SDSF. The messages are prefixed by IEW. In this example, there is an IEW2008 message, which is simply an informational message to show that the link edit/binding operation was successful.

April 2010 Page 37 of 52 © Copyright IBM Corporation

April 2010 Page 38 of 52 © Copyright IBM Corporation
VII. Module - z/OS System Programming
A. SMF Set up a job to dump the current contents of the active SMF data set to a file on DASD. Do the following:
1. On your system, determine the active SMF data sets with records.
2. Create a job that will copy the active SMF data set contents to a DASD file. The job should copy only SMF record types 30 and 110 for the current day to the output data set.
3. Submit the job. Upon successful completion, determine the number of
records written.
4. View the output data set records. With your Technical Knowledge Partner:
1. Use SDSF /D SMF to determine which active data sets have records.
2. To set up the output data set, the SMF manual may need to be referenced to determine data set characteristics and defaults and for information on the dump parameters. The job should look similar to the following:
//STEPSMF EXEC PGM=IFASMFDP //INDD1 DD DISP=SHR,DSN=SYS1.DEMOZOS1.MANA //OUTDD1 DD DSN=ZOSINTRO.DUMPSMF.DEMOZOS1.TESTOUT, // DISP=(NEW,CATLG), // UNIT=3390,SPACE=(CYL,(1,5)) //SYSPRINT DD SYSOUT=A //SYSIN DD * INDD(INDD1,OPTIONS(DUMP)) OUTDD(OUTDD1,TYPE(30,110)) DATE(2009317,2009317) /* //
In the above sample JCL, since DCB parameters were not specified, the
April 2010 Page 39 of 52 © Copyright IBM Corporation
default IFASMFDP job values were used. Note that depending on which records are being dumped, DCB parameters can be specified that may make the handling of the output data set records easier to manage for further processing.
3. In SDSF, view the SMF Summary Activity Report, which should be
produced in the SYSPRINT (in the above example job) output. This report indicates information about the SMF records, including records read and written.
4. SMF records have a variable logical record length (lrecl) of up to 32767
bytes. The system records, including the type 30 records, can have a length of up to 32756 bytes. Since ISPF does not allow viewing or browsing of variable record length data sets with maximum lrecl greater than 32752 bytes, an IDCAMs print job or TSO command needs to be used to view the output data set, such as:
tso print indataset('zosintro.dumpsmf.demozos1.tetsout’) count(nnn)

April 2010 Page 40 of 52 © Copyright IBM Corporation
VIII. Module - Security on z/OS
A. Controlling Data Set Access with RACF In this exercise, you will explore how to grant and deny access to your data sets using RACF profiles.
1. From the RACF – SERVICES OPTION MENU screen, select option 1, DATA SET PROFILES.
2. The RACF - DATA SET PROFILE SERVICES menu screen opens.

April 2010 Page 41 of 52 © Copyright IBM Corporation
3. To list your RACF profiles, select option S (Search) and press Enter.
4. Enter your user ID in the MASK1 field.
5. Enter ALL in the TYPE field and NO in the TO GENERATE A TSO CLIST and TO SPECIFY ADDITIONAL SEARCH CRITERIA fields.

April 2010 Page 42 of 52 © Copyright IBM Corporation
6. The system lists all the profiles starting with your user ID.
7. In this example, there is only one generic profile that covers all data sets. To display the data sets, copy (using the mouse) the profile (ELLISDA.** in this example); then, press F3 until you return to the RACF - DATA SET PROFILE SERVICES menu and select option D to display the profiles.
8. To display the data set profiles, enter the letter D at the OPTION prompt.
9. Paste (or enter) the profile name into the PROFILE NAME field.
April 2010 Page 43 of 52 © Copyright IBM Corporation
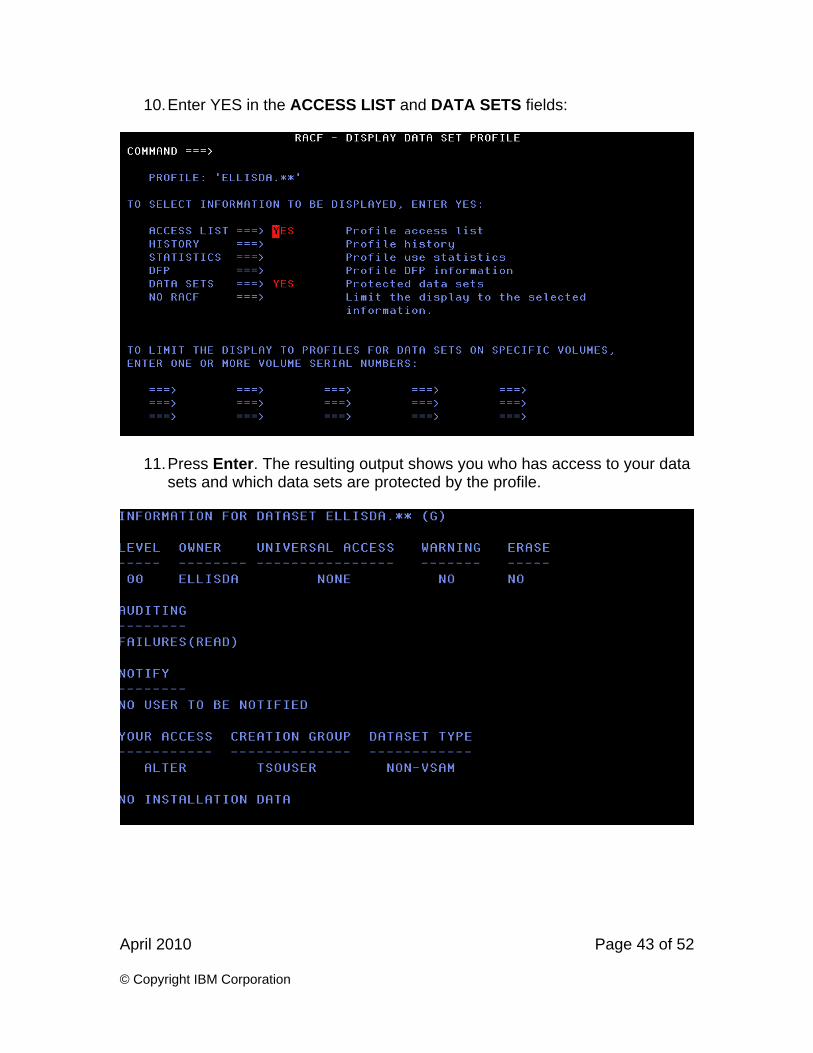
10. Enter YES in the ACCESS LIST and DATA SETS fields:
11. Press Enter. The resulting output shows you who has access to your data sets and which data sets are protected by the profile.

April 2010 Page 44 of 52 © Copyright IBM Corporation
12. The Universal Access should be NONE (to conform to IBM security guidelines).
Your access should be ALTER (everything), which means you can create, delete, edit, and read all data sets with an HLQ of your user ID.
The sections NO ENTRIES IN STANDARD ACCESS LIST and NO ENTRIES IN CONDITIONAL ACCESS LIST in this example indicate that no one else is authorized to access these data sets.
B. Testing Access to Your Data Sets
1. Verify that no one else can access your data sets. Ask another user in your group to try to browse one of your data sets. They should receive a not authorized error.
2. Grant that user access to ONE of your data sets.
The generic profile that you listed above protects ALL of this user’s data sets (because there are no other profiles). If you grant access to this

April 2010 Page 45 of 52 © Copyright IBM Corporation
generic profile to another user, that user could access ALL of this user’s data sets, which is not desirable. Create a profile that will protect just the data sets for which you want to grant access, and then give this other user access to that profile.
C. Protecting a Specific Data Set In this exercise, you are going to grant another user specific access to the userid.LANG.CNTL data set.
1. From the RACF - DATA SET PROFILE SERVICES menu screen, select option 1, ADD.
2. In the PROFILE NAME field, enter the full data set name, enclosed in quotation marks.

April 2010 Page 46 of 52 © Copyright IBM Corporation
3. Press Enter. On the following screen, enter the default settings for the
profile. You should enter NONE in the UACC (Universal ACCess) field to ensure that the default protection for the profile is to deny access to the data set it protects (per IBM internal guidelines).
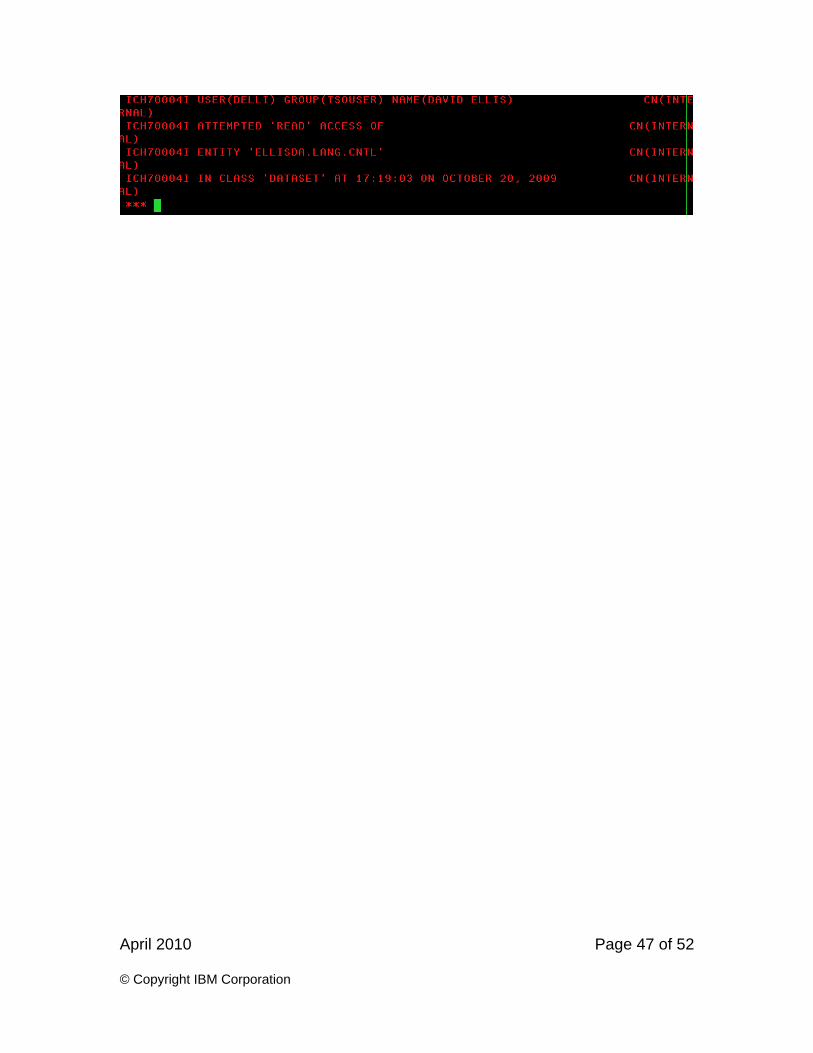
4. If you want to be notified of unauthorized attempts to access the data set protected by this profile through an operator message to your TSO/ISPF session, enter your user ID in the NOTIFY field.
5. You can repeat the Display Data Set Profiles step above using this
specific profile name in place of the generic one previously used to list the data set(s) protected by this profile. There should only be one data set now.
6. Ask the other user to try to access the data set again. They should still receive a security violation. If you entered your user ID in the NOTIFY field, then you will receive a message the next time that you press Enter.
April 2010 Page 47 of 52 © Copyright IBM Corporation

April 2010 Page 48 of 52 © Copyright IBM Corporation
D. Granting the User Access to the Profile You give users (and groups) access to the resources protected by a profile by granting them access to the profile that protects them.
1. From the RACF - DATA SET PROFILES menu screen, select option 4, ACCESS.
2. Ensure the PROFILE NAME field contains the specific profile name enclosed in quotation marks.
3. Press Enter to go to next menu screen.
April 2010 Page 49 of 52 © Copyright IBM Corporation
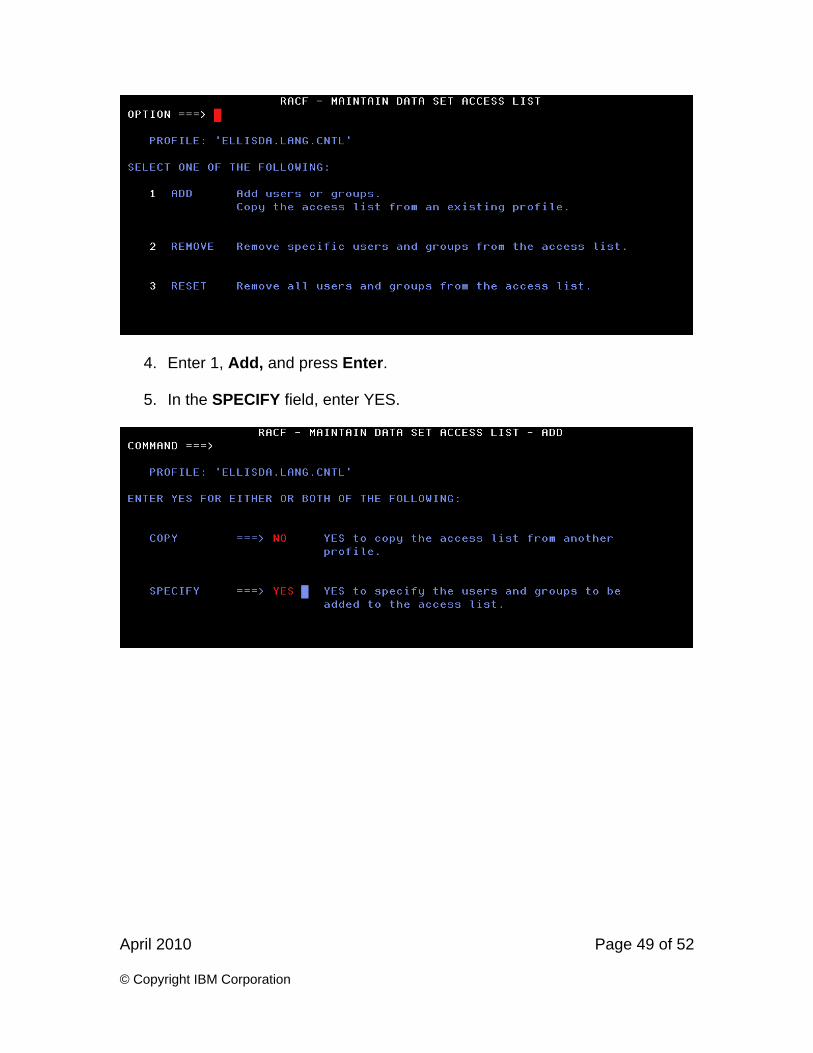
4. Enter 1, Add, and press Enter.
5. In the SPECIFY field, enter YES.
April 2010 Page 50 of 52 © Copyright IBM Corporation
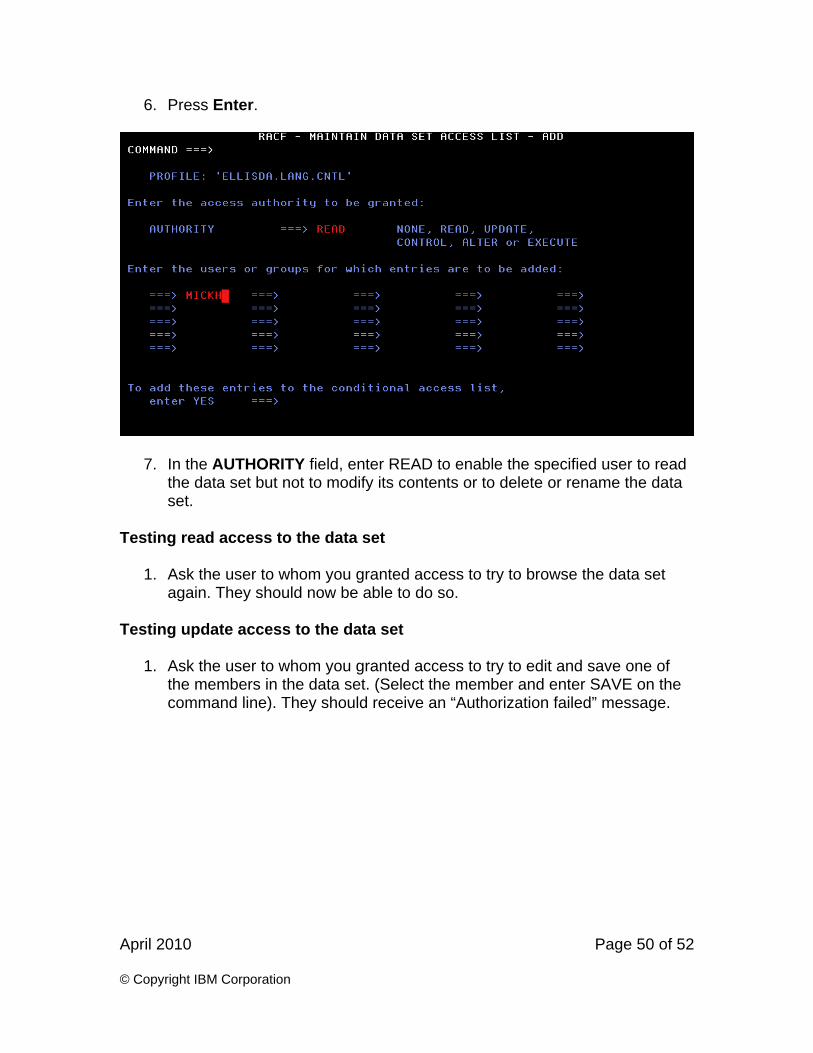
6. Press Enter.
7. In the AUTHORITY field, enter READ to enable the specified user to read the data set but not to modify its contents or to delete or rename the data set.
Testing read access to the data set
1. Ask the user to whom you granted access to try to browse the data set again. They should now be able to do so.
Testing update access to the data set
1. Ask the user to whom you granted access to try to edit and save one of the members in the data set. (Select the member and enter SAVE on the command line). They should receive an “Authorization failed” message.

April 2010 Page 51 of 52 © Copyright IBM Corporation
E. Deleting the Data Set Profile
1. On the RACF - DATA SET PROFILE SERVICES menu screen, select option 3, DELETE, and press Enter.
2. Enter the profile name in quotes in the PROFILE NAME field.

April 2010 Page 52 of 52 © Copyright IBM Corporation
3. Press Enter.
4. Leave the setting as SET (press F1, Help, to read about SET and NOSET) and press Enter to delete the profile.
Testing access to the data set
1. Ask the user to whom you granted access to try to browse the data set again. They should now NOT be able to do so.