Embed Size (px)
Citation preview
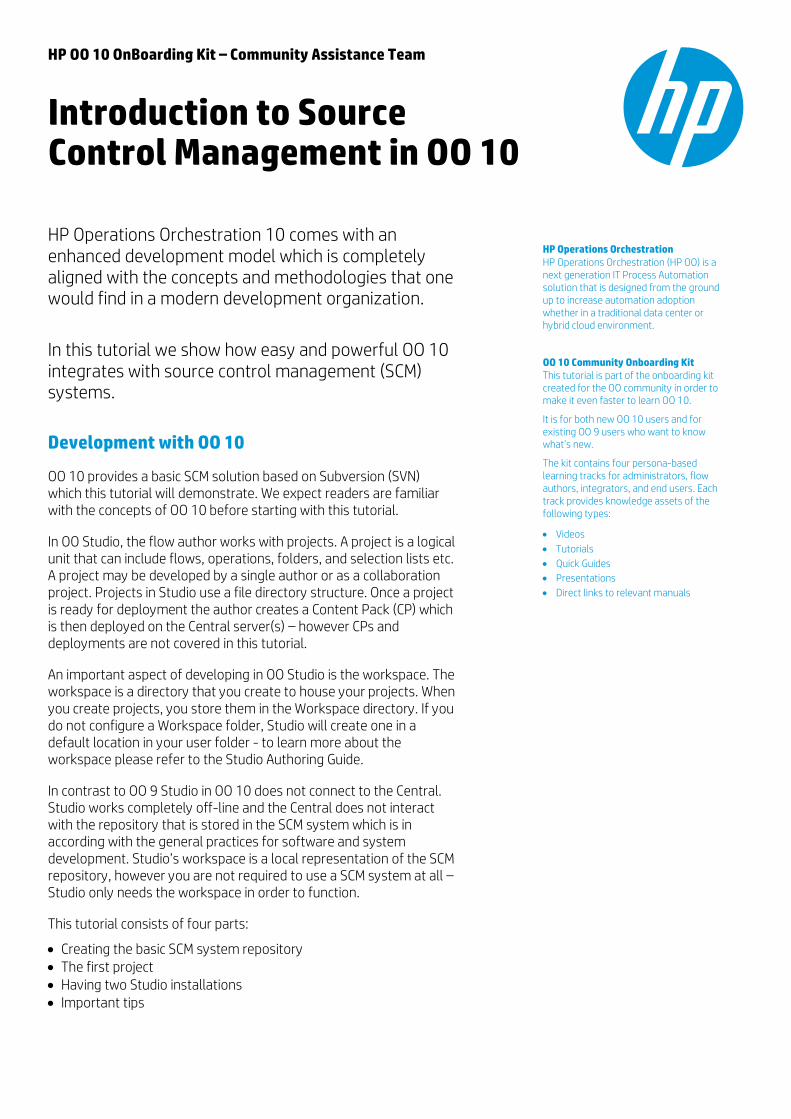
HP OO 10 OnBoarding Kit – Community Assistance Team
Introduction to Source Control Management in OO 10
HP Operations Orchestration 10 comes with an enhanced development model which is completely aligned with the concepts and methodologies that one would find in a modern development organization.
In this tutorial we show how easy and powerful OO 10 integrates with source control management (SCM) systems.
Development with OO 10
OO 10 provides a basic SCM solution based on Subversion (SVN) which this tutorial will demonstrate. We expect readers are familiar with the concepts of OO 10 before starting with this tutorial.
In OO Studio, the flow author works with projects. A project is a logical unit that can include flows, operations, folders, and selection lists etc. A project may be developed by a single author or as a collaboration project. Projects in Studio use a file directory structure. Once a project is ready for deployment the author creates a Content Pack (CP) which is then deployed on the Central server(s) – however CPs and deployments are not covered in this tutorial.
An important aspect of developing in OO Studio is the workspace. The workspace is a directory that you create to house your projects. When you create projects, you store them in the Workspace directory. If you do not configure a Workspace folder, Studio will create one in a default location in your user folder - to learn more about the workspace please refer to the Studio Authoring Guide.
In contrast to OO 9 Studio in OO 10 does not connect to the Central. Studio works completely off-line and the Central does not interact with the repository that is stored in the SCM system which is in according with the general practices for software and system development. Studio’s workspace is a local representation of the SCM repository, however you are not required to use a SCM system at all – Studio only needs the workspace in order to function.
This tutorial consists of four parts:
Creating the basic SCM system repository The first project Having two Studio installations Important tips
HP Operations Orchestration HP Operations Orchestration (HP OO) is a next generation IT Process Automation solution that is designed from the ground up to increase automation adoption whether in a traditional data center or hybrid cloud environment.
OO 10 Community Onboarding Kit This tutorial is part of the onboarding kit created for the OO community in order to make it even faster to learn OO 10.
It is for both new OO 10 users and for existing OO 9 users who want to know what’s new.
The kit contains four persona-based learning tracks for administrators, flow authors, integrators, and end users. Each track provides knowledge assets of the following types:
Videos
Tutorials
Quick Guides
Presentations
Direct links to relevant manuals
SCM Tutorial
HP Operations Orchestration, June 2014
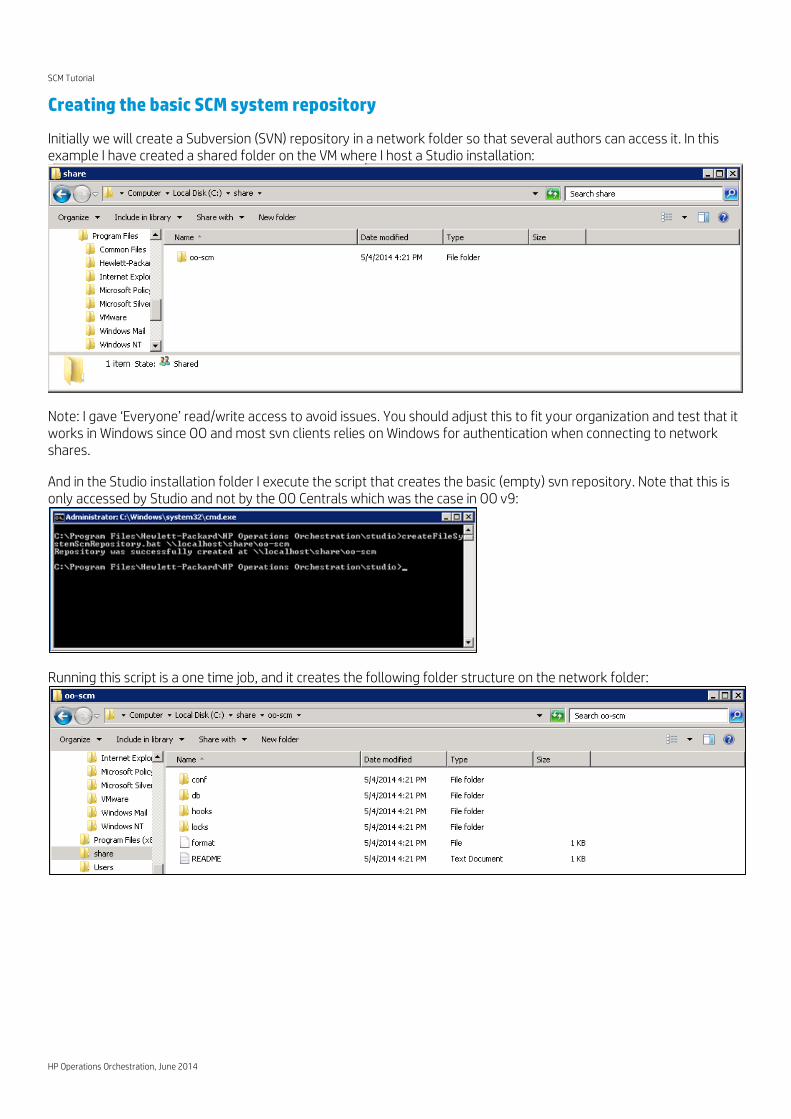
Creating the basic SCM system repository
Initially we will create a Subversion (SVN) repository in a network folder so that several authors can access it. In this example I have created a shared folder on the VM where I host a Studio installation:
Note: I gave ‘Everyone’ read/write access to avoid issues. You should adjust this to fit your organization and test that it works in Windows since OO and most svn clients relies on Windows for authentication when connecting to network shares.
And in the Studio installation folder I execute the script that creates the basic (empty) svn repository. Note that this is only accessed by Studio and not by the OO Centrals which was the case in OO v9:
Running this script is a one time job, and it creates the following folder structure on the network folder:
SCM Tutorial
HP Operations Orchestration, June 2014
The first project
In this tutorial we will first create a project and then add it to the SCM. We will then see how another Author can retrieve the project from the SCM system.
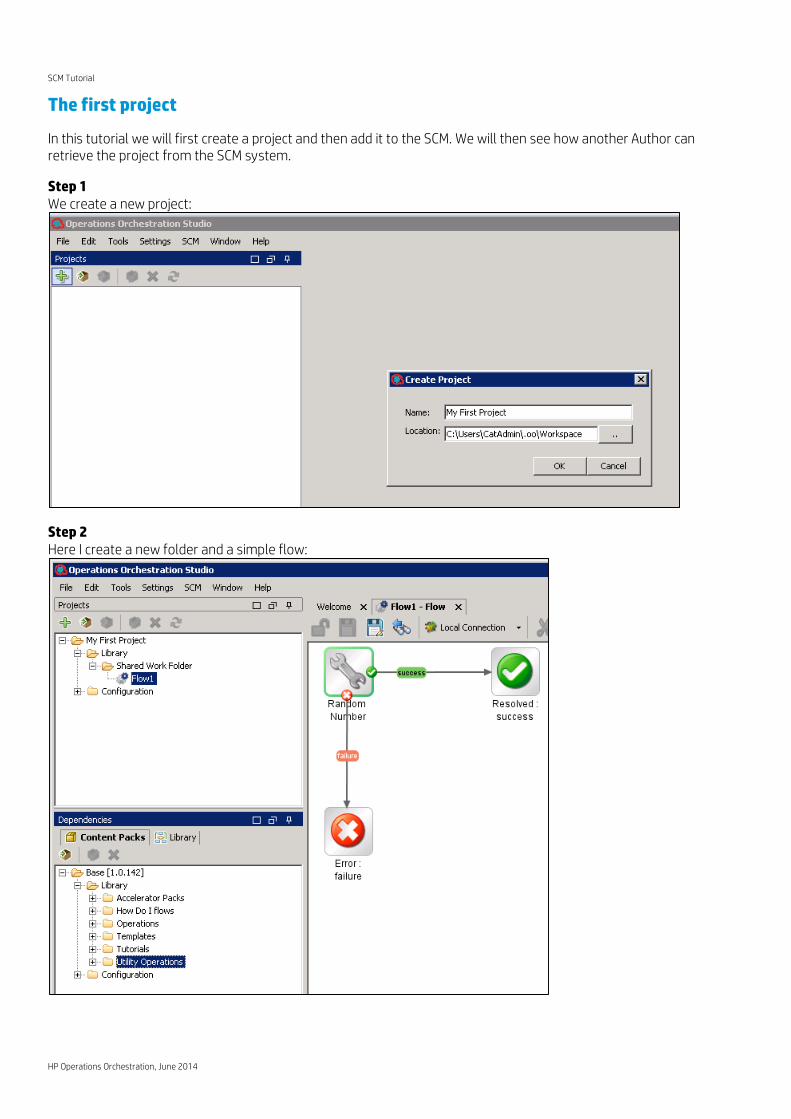
Step 1 We create a new project:
Step 2 Here I create a new folder and a simple flow:
SCM Tutorial
HP Operations Orchestration, June 2014
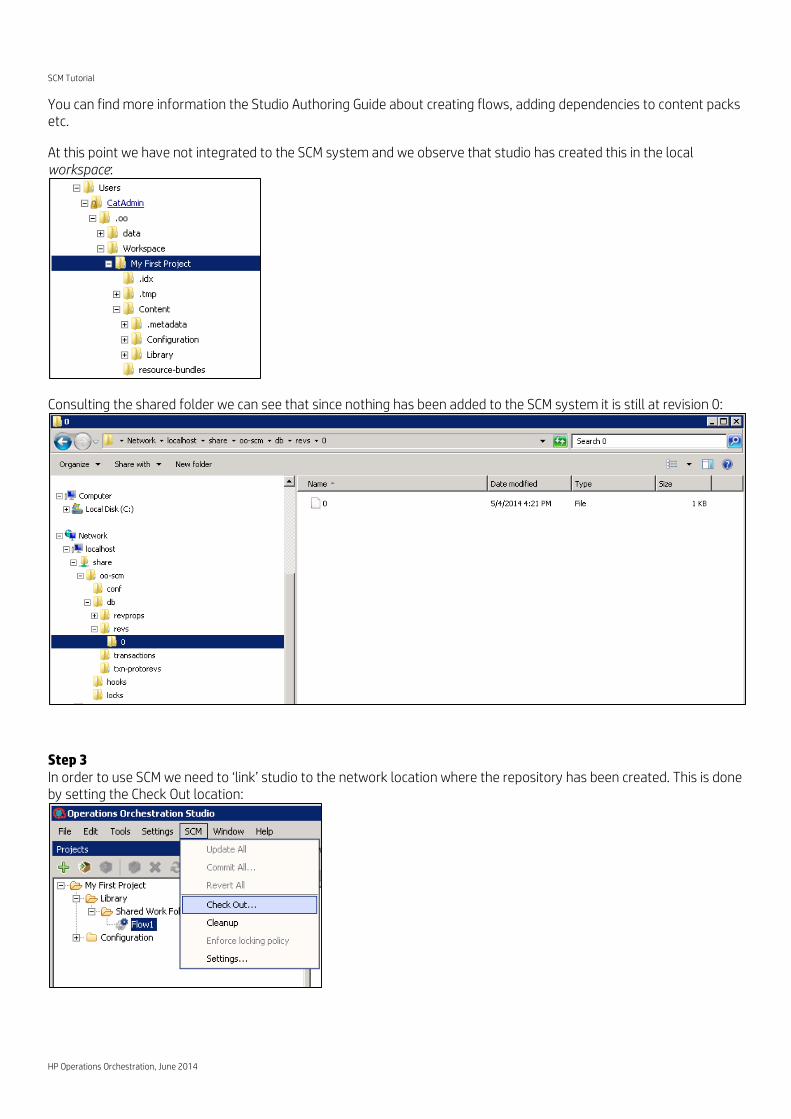
You can find more information the Studio Authoring Guide about creating flows, adding dependencies to content packs etc.
At this point we have not integrated to the SCM system and we observe that studio has created this in the local workspace:
Consulting the shared folder we can see that since nothing has been added to the SCM system it is still at revision 0:
Step 3 In order to use SCM we need to ‘link’ studio to the network location where the repository has been created. This is done by setting the Check Out location:
SCM Tutorial
HP Operations Orchestration, June 2014
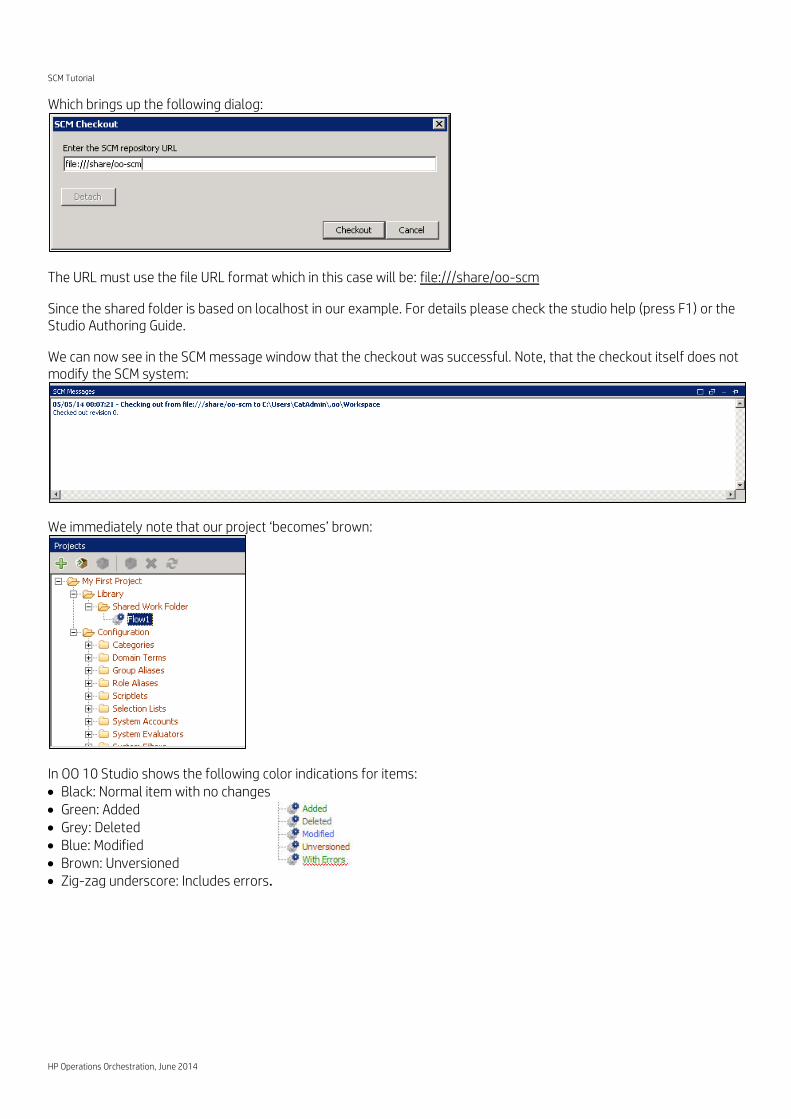
Which brings up the following dialog:
The URL must use the file URL format which in this case will be: file:///share/oo-scm
Since the shared folder is based on localhost in our example. For details please check the studio help (press F1) or the Studio Authoring Guide.
We can now see in the SCM message window that the checkout was successful. Note, that the checkout itself does not modify the SCM system:
We immediately note that our project ‘becomes’ brown:
In OO 10 Studio shows the following color indications for items: Black: Normal item with no changes Green: Added Grey: Deleted Blue: Modified Brown: Unversioned Zig-zag underscore: Includes errors.

SCM Tutorial
HP Operations Orchestration, June 2014
Step 4 Unversioned means that the items has not yet been Added to the SCM versioning system. This is done by adding the items to the SCM system as shown here (in this case I right click the entire project):
We now observe that the color changes to green – meaning added:
Furthermore, we can see the SCM confirmation messages:
Important: in the log we can see the status A which means added locally. Adding items notifies the SCM system that the project will soon get items (files and folders) with the names as listed in the log. But NOTHING changed on the share! In order to update the share we need to commit the changes – or in this case all the additions.
This is further illustrated in the SCM changes we see that we must commit the changes to the SCM:
SCM Tutorial
HP Operations Orchestration, June 2014
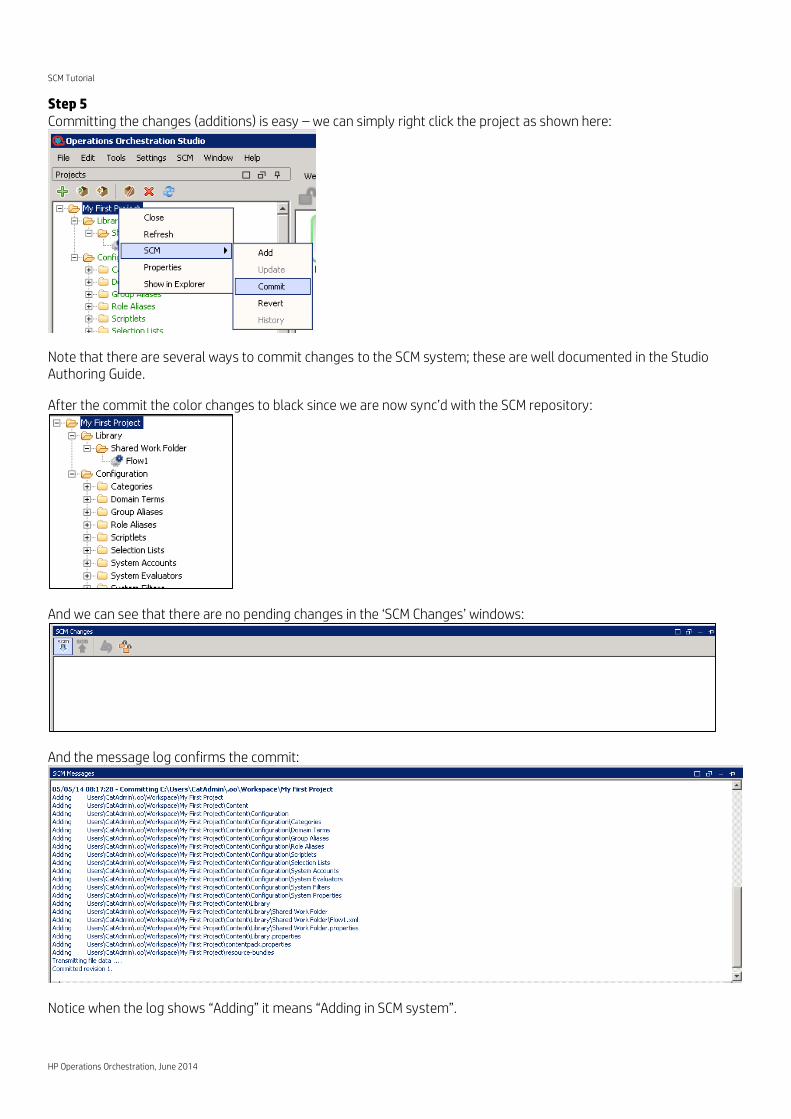
Step 5 Committing the changes (additions) is easy – we can simply right click the project as shown here:
Note that there are several ways to commit changes to the SCM system; these are well documented in the Studio Authoring Guide.
After the commit the color changes to black since we are now sync’d with the SCM repository:
And we can see that there are no pending changes in the ‘SCM Changes’ windows:
And the message log confirms the commit:
Notice when the log shows “Adding” it means “Adding in SCM system”.
SCM Tutorial
HP Operations Orchestration, June 2014
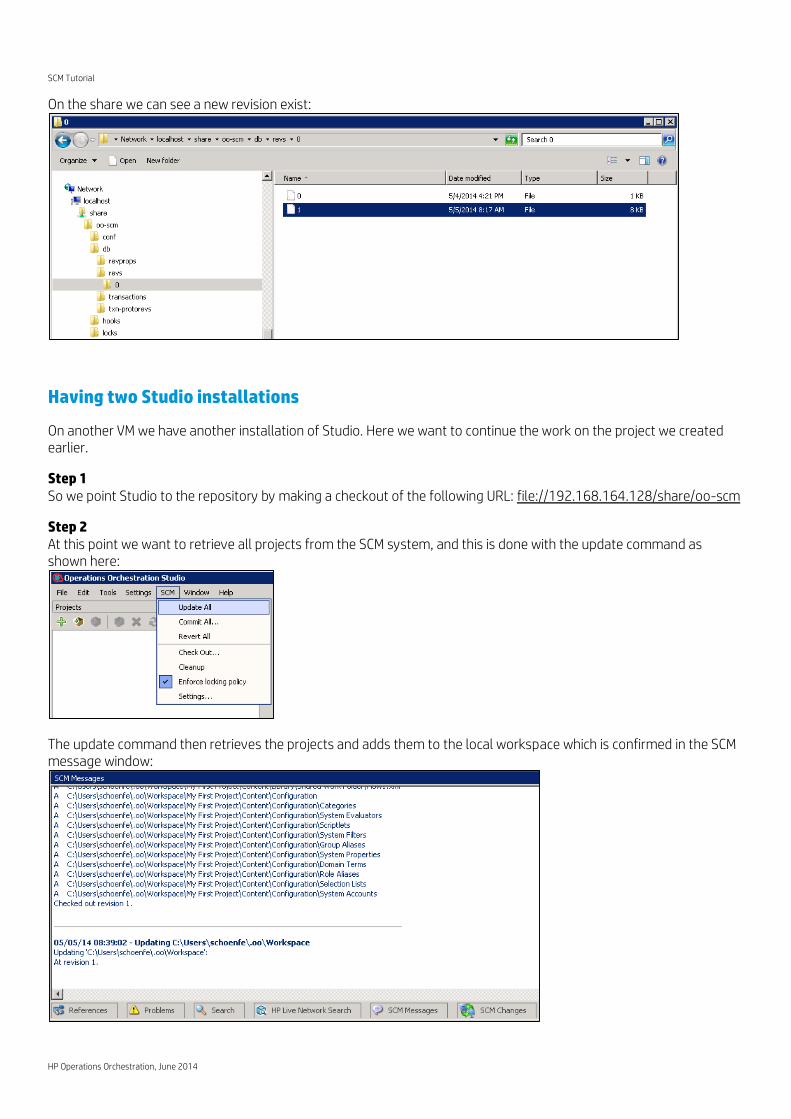
On the share we can see a new revision exist:
Having two Studio installations
On another VM we have another installation of Studio. Here we want to continue the work on the project we created earlier.
Step 1 So we point Studio to the repository by making a checkout of the following URL: file://192.168.164.128/share/oo-scm
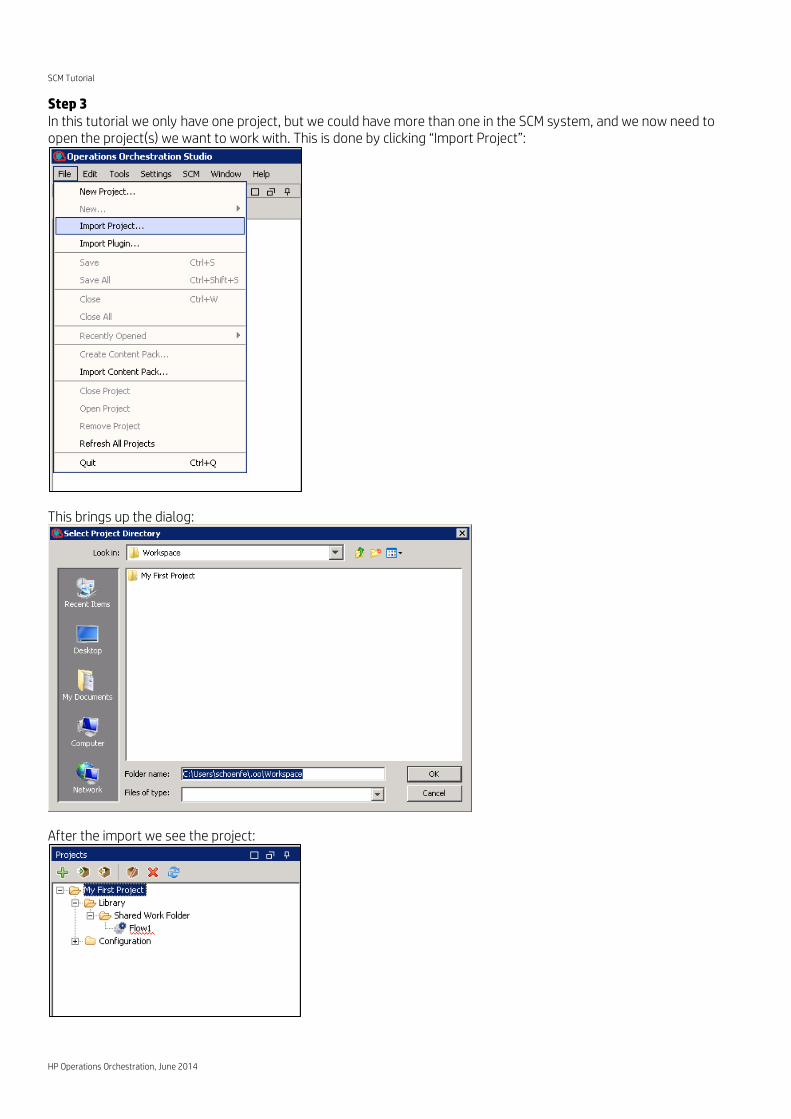
Step 2 At this point we want to retrieve all projects from the SCM system, and this is done with the update command as shown here:
The update command then retrieves the projects and adds them to the local workspace which is confirmed in the SCM message window:
SCM Tutorial
HP Operations Orchestration, June 2014
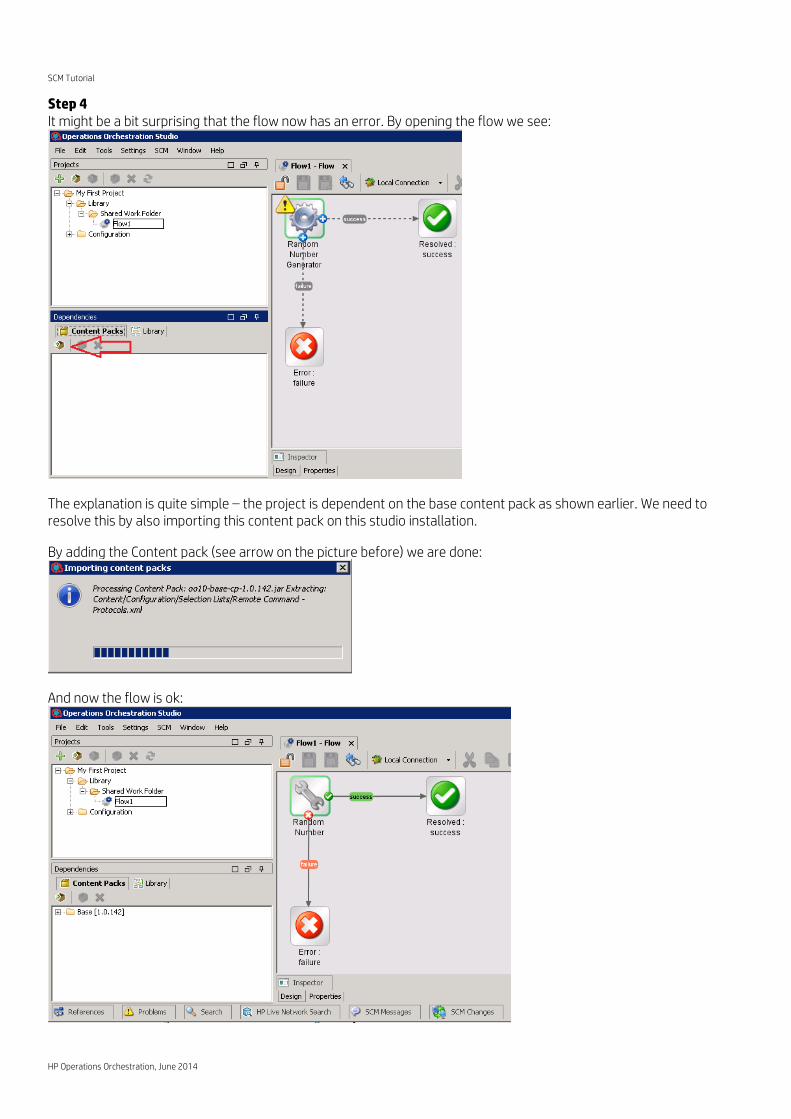
Step 3 In this tutorial we only have one project, but we could have more than one in the SCM system, and we now need to open the project(s) we want to work with. This is done by clicking “Import Project”:
This brings up the dialog:
After the import we see the project:
SCM Tutorial
HP Operations Orchestration, June 2014
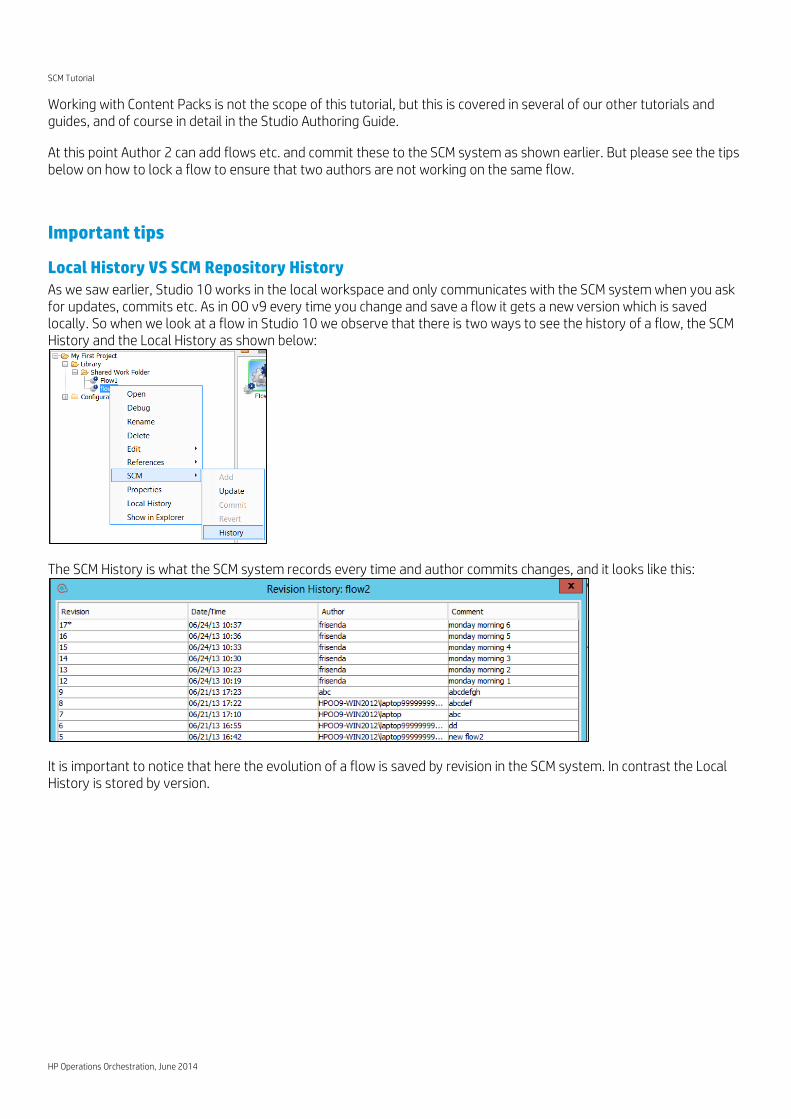
Step 4 It might be a bit surprising that the flow now has an error. By opening the flow we see:
The explanation is quite simple – the project is dependent on the base content pack as shown earlier. We need to resolve this by also importing this content pack on this studio installation.
By adding the Content pack (see arrow on the picture before) we are done:
And now the flow is ok:
SCM Tutorial
HP Operations Orchestration, June 2014
Working with Content Packs is not the scope of this tutorial, but this is covered in several of our other tutorials and guides, and of course in detail in the Studio Authoring Guide.
At this point Author 2 can add flows etc. and commit these to the SCM system as shown earlier. But please see the tips below on how to lock a flow to ensure that two authors are not working on the same flow.
Important tips
Local History VS SCM Repository History As we saw earlier, Studio 10 works in the local workspace and only communicates with the SCM system when you ask for updates, commits etc. As in OO v9 every time you change and save a flow it gets a new version which is saved locally. So when we look at a flow in Studio 10 we observe that there is two ways to see the history of a flow, the SCM History and the Local History as shown below:
The SCM History is what the SCM system records every time and author commits changes, and it looks like this:
It is important to notice that here the evolution of a flow is saved by revision in the SCM system. In contrast the Local History is stored by version.
SCM Tutorial
HP Operations Orchestration, June 2014
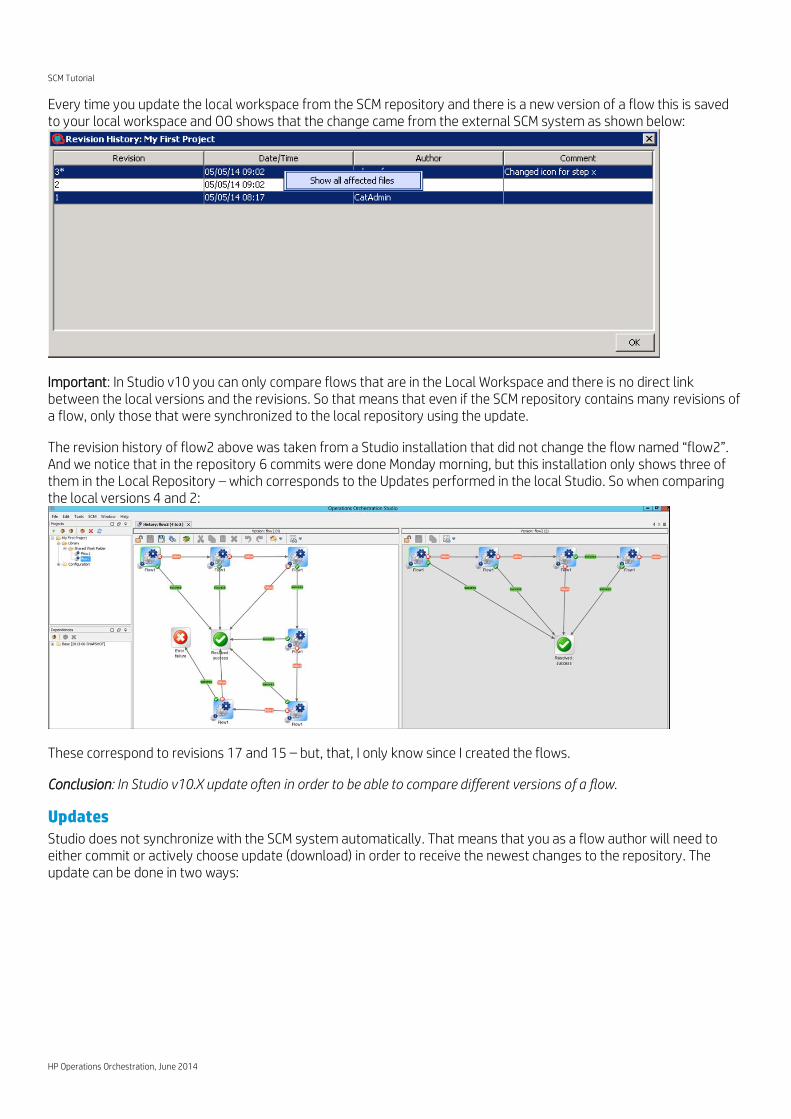
Every time you update the local workspace from the SCM repository and there is a new version of a flow this is saved to your local workspace and OO shows that the change came from the external SCM system as shown below:
Important: In Studio v10 you can only compare flows that are in the Local Workspace and there is no direct link between the local versions and the revisions. So that means that even if the SCM repository contains many revisions of a flow, only those that were synchronized to the local repository using the update.
The revision history of flow2 above was taken from a Studio installation that did not change the flow named “flow2”. And we notice that in the repository 6 commits were done Monday morning, but this installation only shows three of them in the Local Repository – which corresponds to the Updates performed in the local Studio. So when comparing the local versions 4 and 2:
These correspond to revisions 17 and 15 – but, that, I only know since I created the flows.
Conclusion: In Studio v10.X update often in order to be able to compare different versions of a flow.
Updates Studio does not synchronize with the SCM system automatically. That means that you as a flow author will need to either commit or actively choose update (download) in order to receive the newest changes to the repository. The update can be done in two ways:
SCM Tutorial
HP Operations Orchestration, June 2014
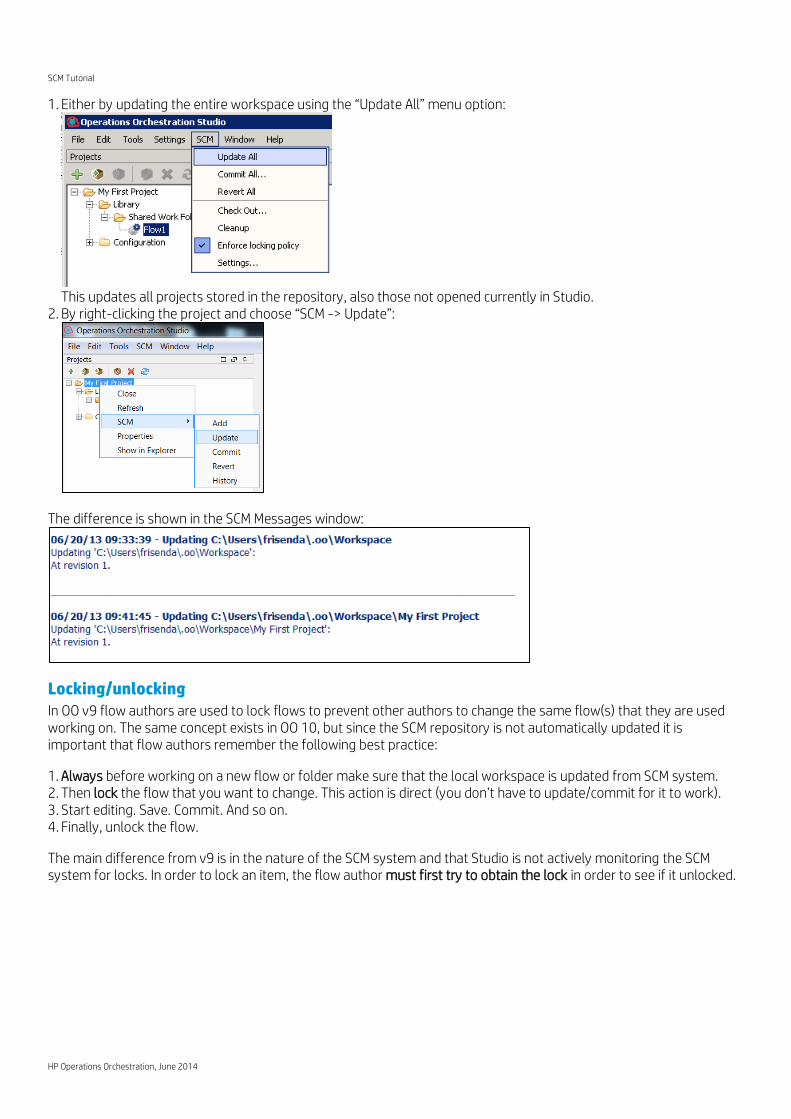
1. Either by updating the entire workspace using the “Update All” menu option:
This updates all projects stored in the repository, also those not opened currently in Studio.
2. By right-clicking the project and choose “SCM -> Update”:
The difference is shown in the SCM Messages window:
Locking/unlocking In OO v9 flow authors are used to lock flows to prevent other authors to change the same flow(s) that they are used working on. The same concept exists in OO 10, but since the SCM repository is not automatically updated it is important that flow authors remember the following best practice:
1. Always before working on a new flow or folder make sure that the local workspace is updated from SCM system. 2. Then lock the flow that you want to change. This action is direct (you don’t have to update/commit for it to work). 3. Start editing. Save. Commit. And so on. 4. Finally, unlock the flow.
The main difference from v9 is in the nature of the SCM system and that Studio is not actively monitoring the SCM system for locks. In order to lock an item, the flow author must first try to obtain the lock in order to see if it unlocked.

SCM Tutorial
HP Operations Orchestration, June 2014
HP OO 10.10 Studio introduces the “Enforce locking policy” feature”. It is best to make sure this option is checked:
The locking policy will allow you to edit a flow which is on SCM only after you locked it.
The flow will become read only again after you commit your changes to SCM, enforcing you to lock it in case you want to change it again. The locking policy will also automatic lock the item prior to delete, move, rename or revert to a previous version actions.
In some cases, acquiring the lock may fail. It can be due to several reasons:
In case the flow is locked by another user, try to reach the locking user before using the force unlock procedure which is described in the next section.
In case the lock fails because the item is not updated- it means you forgot to perform an SCM update before locking. In any other case, contact the SCM admin.
In case the lock fails, a pop-up dialog will appear and you will be asked if you want to continue editing the item without having a lock. This is not recommended.
Conclusion: Always start by updating and locking the flow(s) before editing, and always commit when done!
SVN Manager Tools
In the Tools section on the OO community front page you can find the “SVN Manager Tools”. These tools allows you to see reports of locks and updates as well as unlocking flows that are locked by other users. These tools are not required though, and the details are explained in the sections below.
Force Unlock Sometimes there is a need to unlock flows that have been locked by other users. As an admin this can be done in Studio 9.x. In OO 10.00 is not possible to do from the Studio UI – note that it is in the backlog for future updates, but today this can be done using the command line. OO 10 ships with SlikSVN and it is easy to perform a force unlock:
1. From a prompt, go to the SlikSVN folder: <studio_dir>\SlikSvn\bin 2. And execute this command: svn unlock <file_path> --force
Where <file_path> is the flow to unlock, for example: C:\Users\frisenda\.oo\Workspace\My First Project\Content\Library\Shared Work Folder\Flow1.xml
SCM Tutorial
HP Operations Orchestration, June 2014
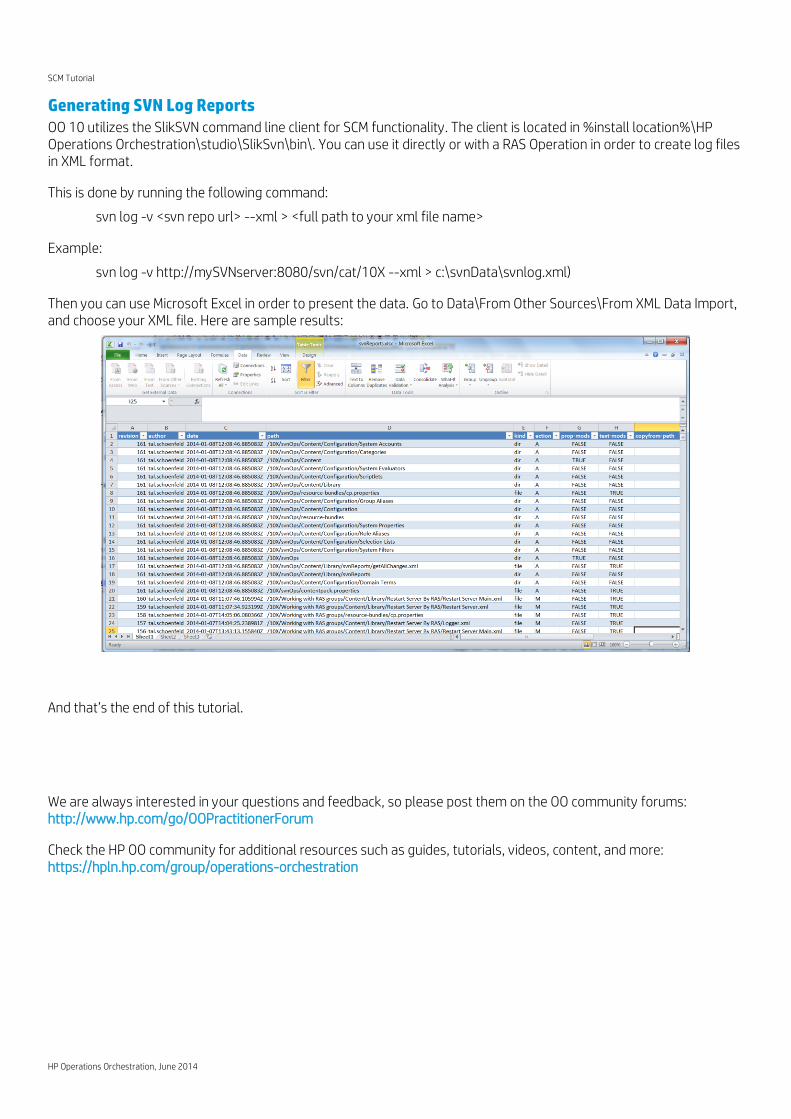
Generating SVN Log Reports OO 10 utilizes the SlikSVN command line client for SCM functionality. The client is located in %install location%\HP Operations Orchestration\studio\SlikSvn\bin\. You can use it directly or with a RAS Operation in order to create log files in XML format.
This is done by running the following command:
svn log -v <svn repo url> --xml > <full path to your xml file name>
Example:
svn log -v http://mySVNserver:8080/svn/cat/10X --xml > c:\svnData\svnlog.xml)
Then you can use Microsoft Excel in order to present the data. Go to Data\From Other Sources\From XML Data Import, and choose your XML file. Here are sample results:
And that’s the end of this tutorial.
We are always interested in your questions and feedback, so please post them on the OO community forums: http://www.hp.com/go/OOPractitionerForum
Check the HP OO community for additional resources such as guides, tutorials, videos, content, and more: https://hpln.hp.com/group/operations-orchestration


![Language Ö30 min players age oo 10 00000 00000 oo ... - · PDF fileLanguage Ö30 min players age oo 10 00000 00000 oo oo oc 35 (7X5ß) ooooooooooooo 000000000000 25 & o Y] IA db b](https://img.pdfslide.us/doc/110x75/5aba49857f8b9a567c8b550c/language-30-min-players-age-oo-10-00000-00000-oo-30-min-players-age-oo-10.jpg)