Embed Size (px)
Citation preview
Bootcamp In A Book! Part TWO eBook By Lilly Walters Page 1
© 2017 by Lilly Walters Do not duplicate without written permission of Lilly Walters, www.funfacepainting.com, 909-398-1228
Thank you for looking at these sample pages! I am
so excited about this book!
Following are a few sample pages from the VERY
full 77 page PART 2 of Lilly Walters’ Face Painting
Bootcamp In A Book.
Section 1, $20
Section 2 $20
Both Sections, $30
http://funfacepainting.com/books.html
Bootcamp In A Book! Part TWO eBook By Lilly Walters Page 2
© 2017 by Lilly Walters Do not duplicate without written permission of Lilly Walters, www.funfacepainting.com, 909-398-1228
Bootcamp In A Book! Part TWO eBook By Lilly Walters Page 3
© 2017 by Lilly Walters Do not duplicate without written permission of Lilly Walters, www.funfacepainting.com, 909-398-1228
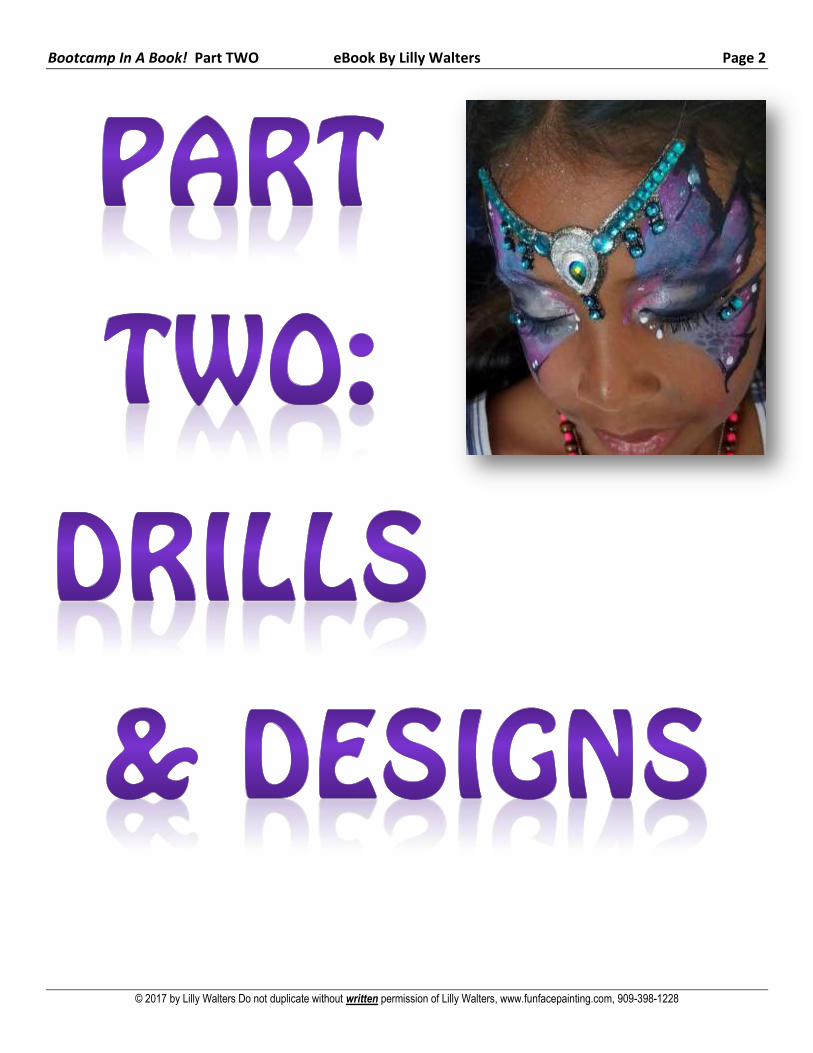
PART TWO: Drills & Designs 1
Elements: What Are They? 4
Before We Get Started on the Drills ................................................................... 5
How To Do The Drills ......................................................................................... 6
Variety – The Spice of Life 8
Single Color Line Work and Brush Strokes .......................................................... 9
Dots 9 Carousel Strokes 12 Expanding Your Line Work 23 Tribal Tricks 24 Five Fast Tribal Designs: Dragon, Butterfly, Scorpion, Tyson, Snake Eyes 25 Cyclone Strokes 28 Cheetah Spots 30 Putting Round Brush Single-Color Stroke Ideas Together 31
Multi-Color & Layers! Split-Cakes & Double Dips .............................................. 32
Bases & Blending With Sponges & Split-Cakes 35 Flat Brush Split-Cake Mastery 38
Creating Designs That Compliment the Face .................................................... 59
Avoiding Bushy Eyebrows and Beards 59 It’s the Shape of Things 60 Focal Points, Landmarks & Essential Lines 61
The Need for Speed! 1 – 2 Minute Designs ....................................................... 65
33 Speed Designs 66
Putting it Together! Designs ............................................................................. 67
Design Tips - Shading and Highlights 67
Thank you! Error! Bookmark not defined.
Bootcamp In A Book! Part TWO eBook By Lilly Walters Page 4
© 2017 by Lilly Walters Do not duplicate without written permission of Lilly Walters, www.funfacepainting.com, 909-398-1228
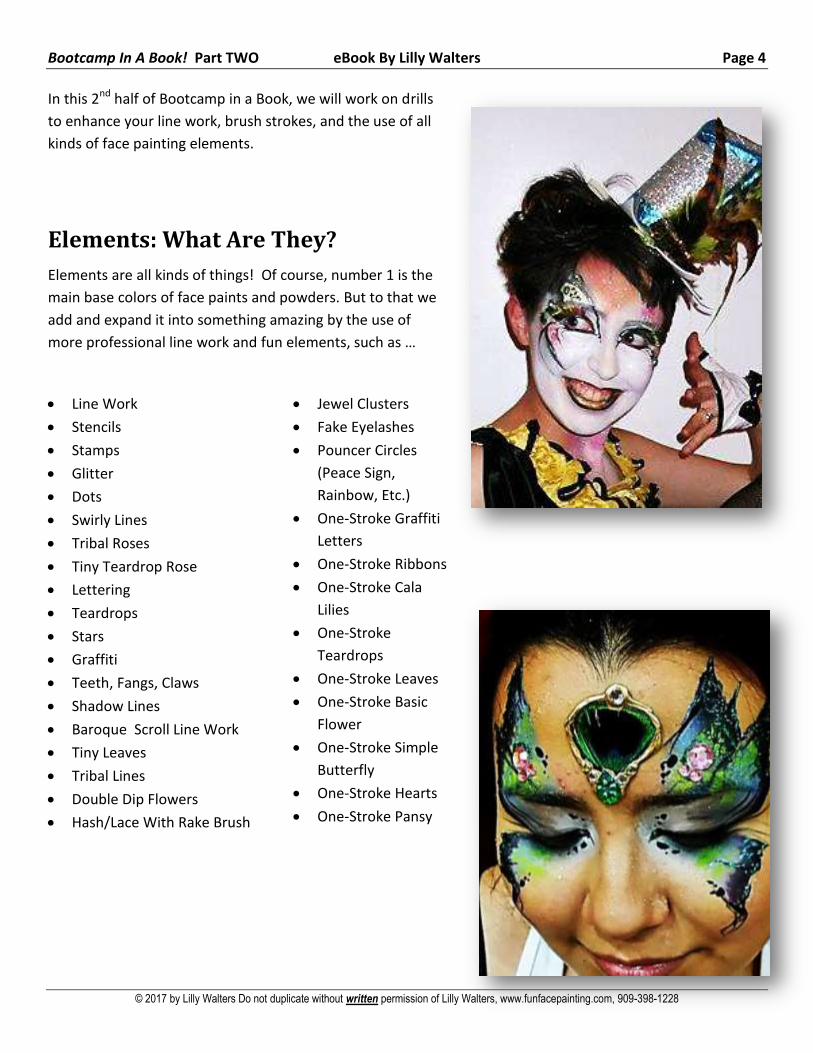
In this 2nd half of Bootcamp in a Book, we will work on drills
to enhance your line work, brush strokes, and the use of all
kinds of face painting elements.
Elements: What Are They?
Elements are all kinds of things! Of course, number 1 is the
main base colors of face paints and powders. But to that we
add and expand it into something amazing by the use of
more professional line work and fun elements, such as …
Line Work
Stencils
Stamps
Glitter
Dots
Swirly Lines
Tribal Roses
Tiny Teardrop Rose
Lettering
Teardrops
Stars
Graffiti
Teeth, Fangs, Claws
Shadow Lines
Baroque Scroll Line Work
Tiny Leaves
Tribal Lines
Double Dip Flowers
Hash/Lace With Rake Brush
Jewel Clusters
Fake Eyelashes
Pouncer Circles
(Peace Sign,
Rainbow, Etc.)
One-Stroke Graffiti
Letters
One-Stroke Ribbons
One-Stroke Cala
Lilies
One-Stroke
Teardrops
One-Stroke Leaves
One-Stroke Basic
Flower
One-Stroke Simple
Butterfly
One-Stroke Hearts
One-Stroke Pansy
Bootcamp In A Book! Part TWO eBook By Lilly Walters Page 5
© 2017 by Lilly Walters Do not duplicate without written permission of Lilly Walters, www.funfacepainting.com, 909-398-1228
BEFORE WE GET STARTED ON THE DRILLS
Why Line Work Is So Important
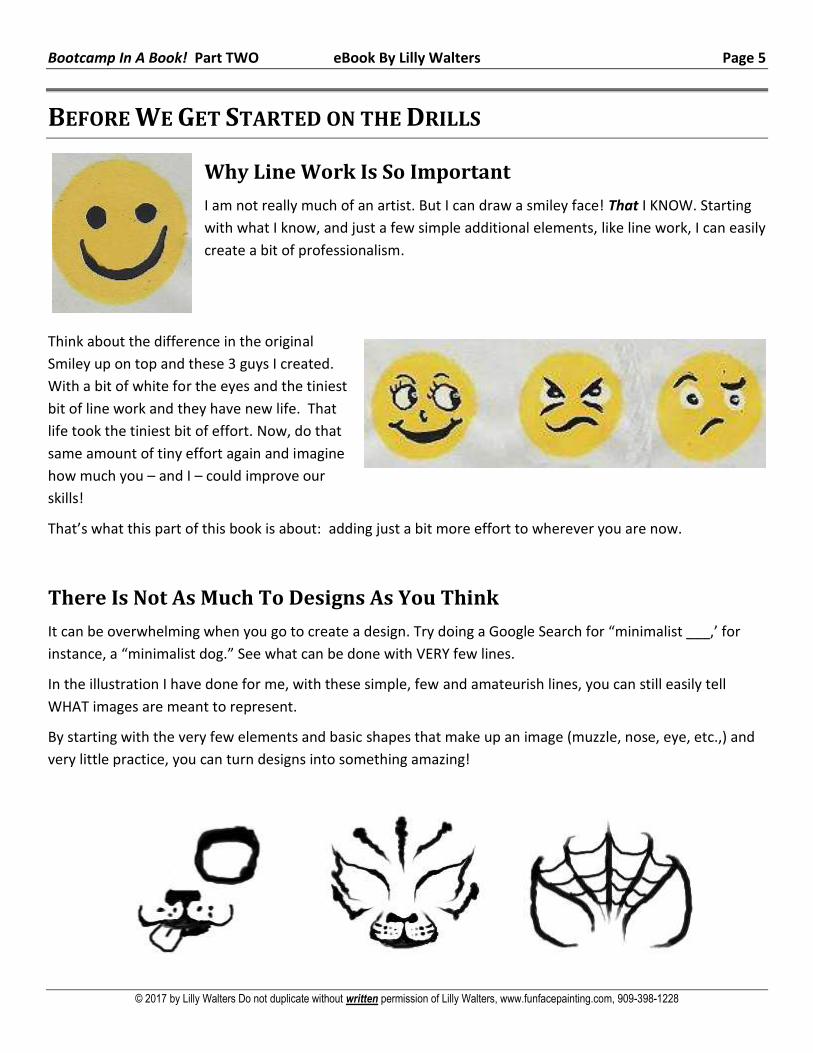
I am not really much of an artist. But I can draw a smiley face! That I KNOW. Starting
with what I know, and just a few simple additional elements, like line work, I can easily
create a bit of professionalism.
Think about the difference in the original
Smiley up on top and these 3 guys I created.
With a bit of white for the eyes and the tiniest
bit of line work and they have new life. That
life took the tiniest bit of effort. Now, do that
same amount of tiny effort again and imagine
how much you – and I – could improve our
skills!
That’s what this part of this book is about: adding just a bit more effort to wherever you are now.
There Is Not As Much To Designs As You Think
It can be overwhelming when you go to create a design. Try doing a Google Search for “minimalist ___,’ for
instance, a “minimalist dog.” See what can be done with VERY few lines.
In the illustration I have done for me, with these simple, few and amateurish lines, you can still easily tell
WHAT images are meant to represent.
By starting with the very few elements and basic shapes that make up an image (muzzle, nose, eye, etc.,) and
very little practice, you can turn designs into something amazing!
Bootcamp In A Book! Part TWO eBook By Lilly Walters Page 6
© 2017 by Lilly Walters Do not duplicate without written permission of Lilly Walters, www.funfacepainting.com, 909-398-1228
Variety – The Spice of Life
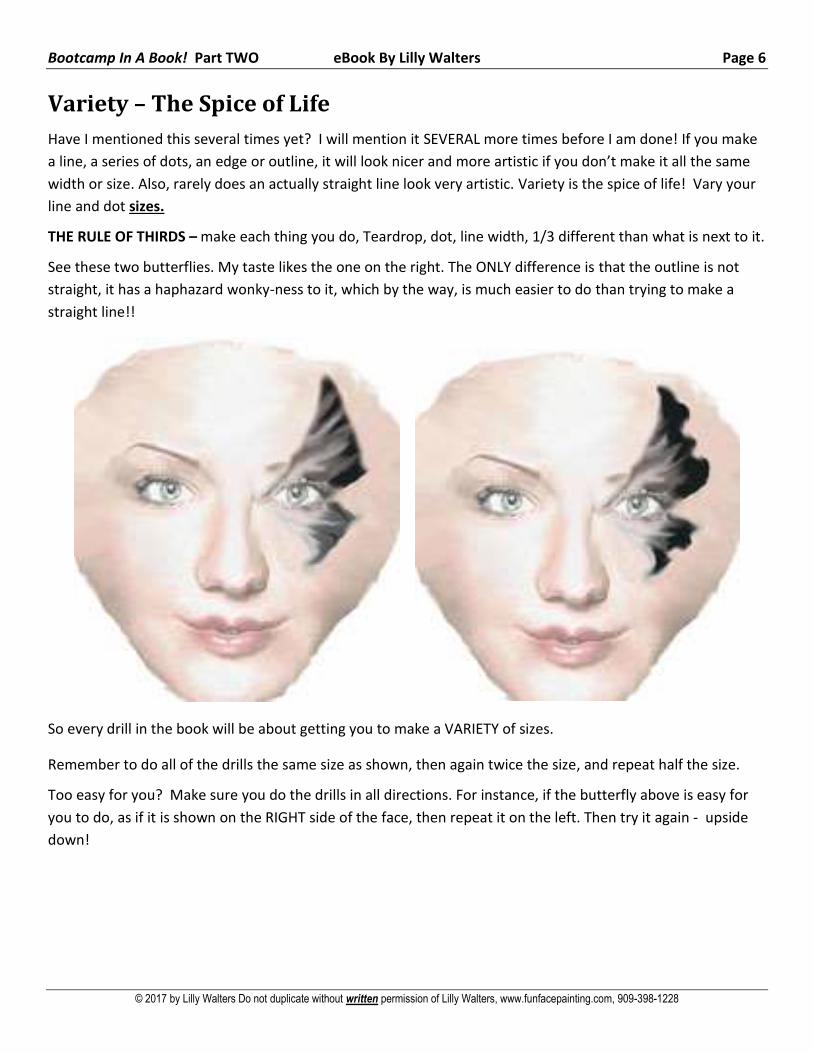
Have I mentioned this several times yet? I will mention it SEVERAL more times before I am done! If you make
a line, a series of dots, an edge or outline, it will look nicer and more artistic if you don’t make it all the same
width or size. Also, rarely does an actually straight line look very artistic. Variety is the spice of life! Vary your
line and dot sizes.
THE RULE OF THIRDS – make each thing you do, Teardrop, dot, line width, 1/3 different than what is next to it.
See these two butterflies. My taste likes the one on the right. The ONLY difference is that the outline is not
straight, it has a haphazard wonky-ness to it, which by the way, is much easier to do than trying to make a
straight line!!
So every drill in the book will be about getting you to make a VARIETY of sizes.
Remember to do all of the drills the same size as shown, then again twice the size, and repeat half the size.
Too easy for you? Make sure you do the drills in all directions. For instance, if the butterfly above is easy for
you to do, as if it is shown on the RIGHT side of the face, then repeat it on the left. Then try it again - upside
down!
Bootcamp In A Book! Part TWO eBook By Lilly Walters Page 7
© 2017 by Lilly Walters Do not duplicate without written permission of Lilly Walters, www.funfacepainting.com, 909-398-1228
SINGLE COLOR LINE WORK AND BRUSH STROKES
Dots
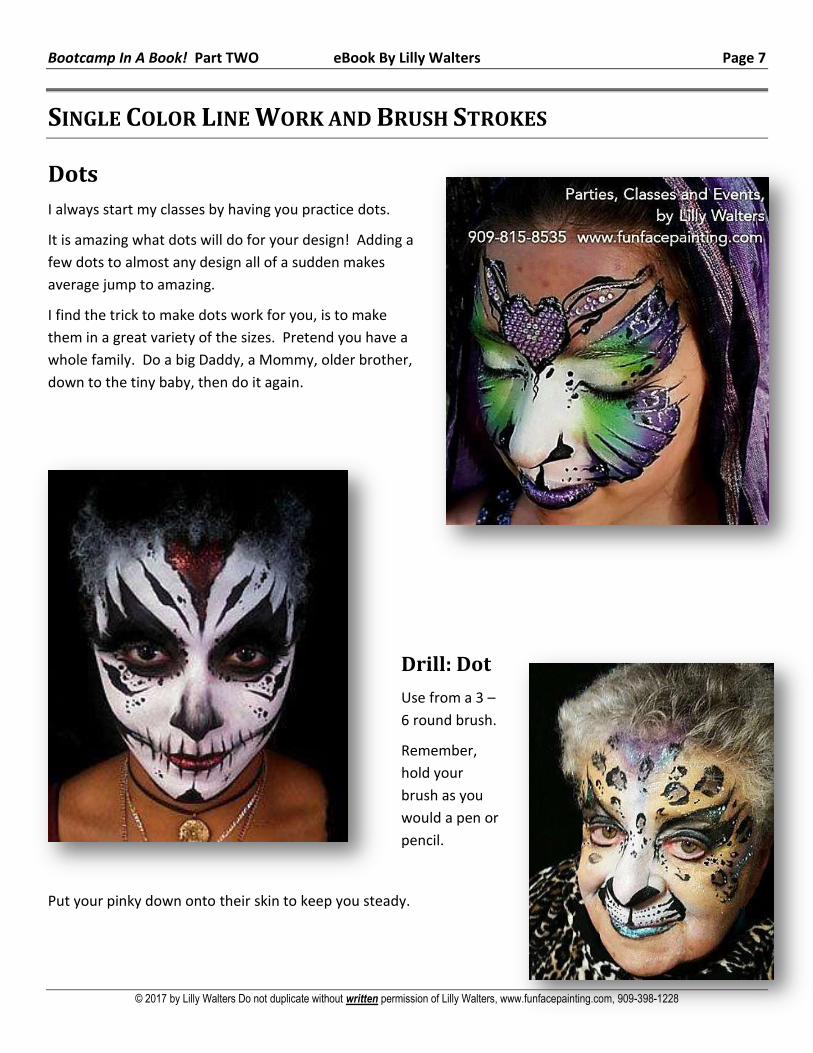
I always start my classes by having you practice dots.
It is amazing what dots will do for your design! Adding a
few dots to almost any design all of a sudden makes
average jump to amazing.
I find the trick to make dots work for you, is to make
them in a great variety of the sizes. Pretend you have a
whole family. Do a big Daddy, a Mommy, older brother,
down to the tiny baby, then do it again.
Drill: Dot
Use from a 3 –
6 round brush.
Remember,
hold your
brush as you
would a pen or
pencil.
Put your pinky down onto their skin to keep you steady.
Bootcamp In A Book! Part TWO eBook By Lilly Walters Page 8
© 2017 by Lilly Walters Do not duplicate without written permission of Lilly Walters, www.funfacepainting.com, 909-398-1228
Drill: Dot into Hanging Flowers and Icicles
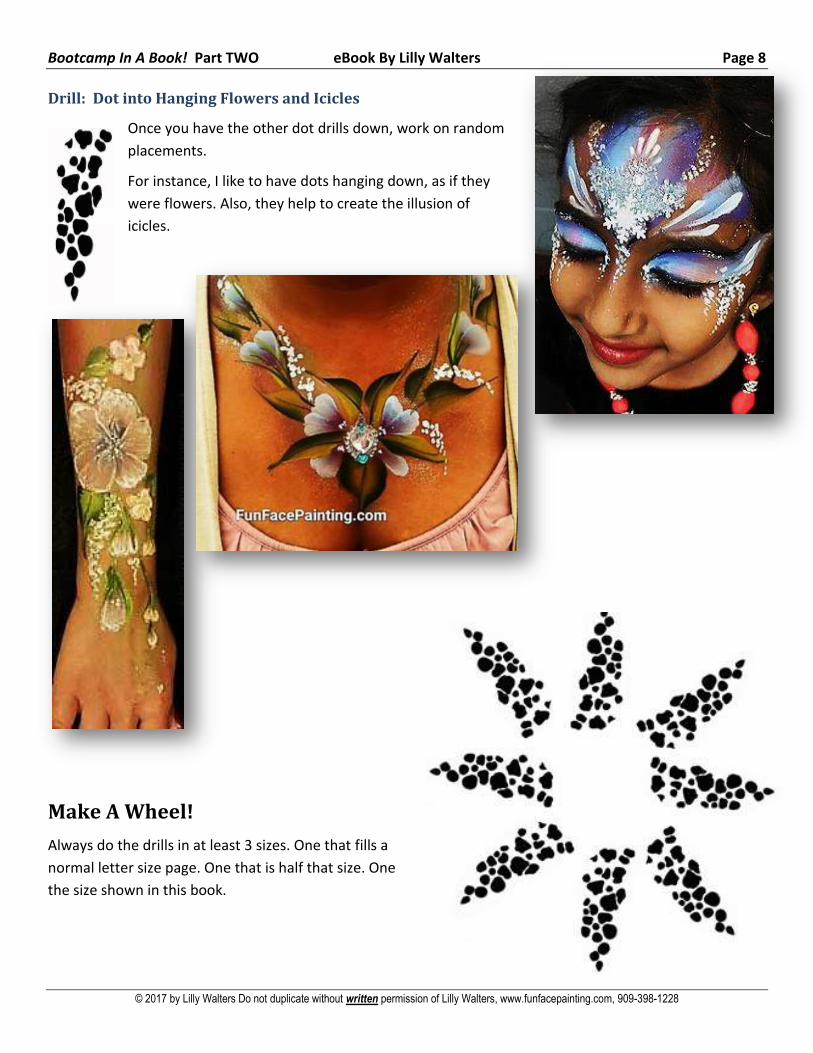
Once you have the other dot drills down, work on random
placements.
For instance, I like to have dots hanging down, as if they
were flowers. Also, they help to create the illusion of
icicles.
Make A Wheel!
Always do the drills in at least 3 sizes. One that fills a
normal letter size page. One that is half that size. One
the size shown in this book.
Bootcamp In A Book! Part TWO eBook By Lilly Walters Page 9
© 2017 by Lilly Walters Do not duplicate without written permission of Lilly Walters, www.funfacepainting.com, 909-398-1228
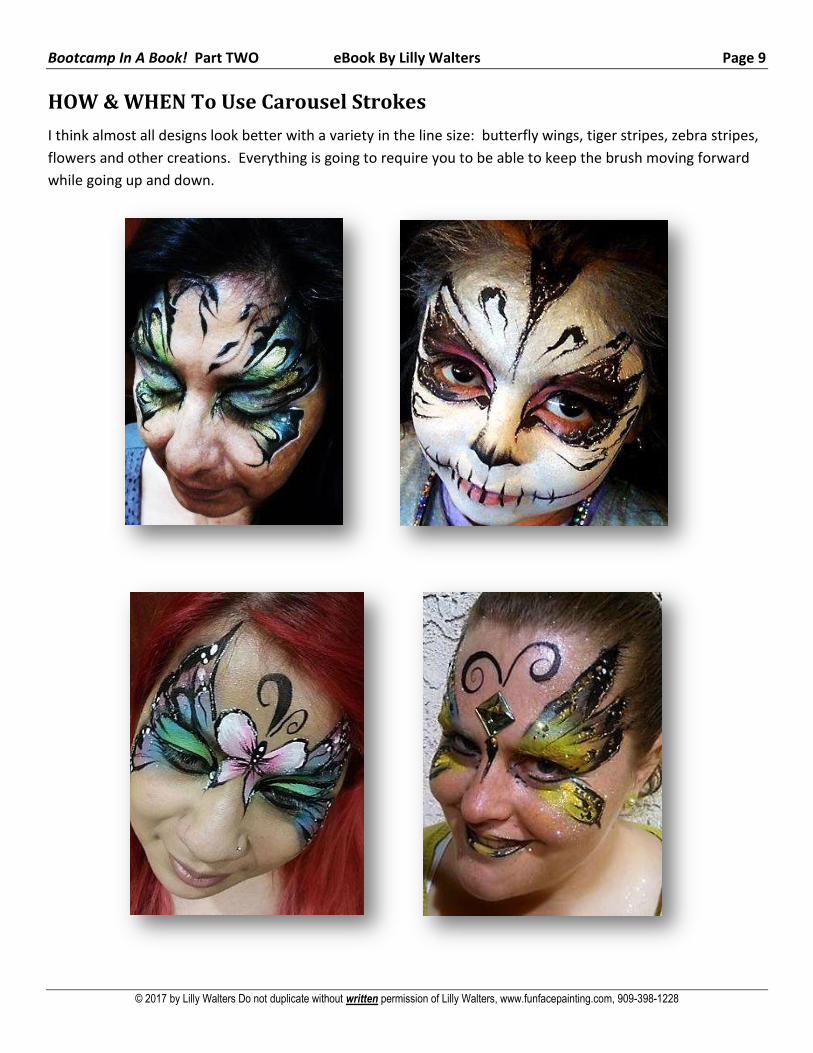
HOW & WHEN To Use Carousel Strokes
I think almost all designs look better with a variety in the line size: butterfly wings, tiger stripes, zebra stripes,
flowers and other creations. Everything is going to require you to be able to keep the brush moving forward
while going up and down.
Bootcamp In A Book! Part TWO eBook By Lilly Walters Page 10
© 2017 by Lilly Walters Do not duplicate without written permission of Lilly Walters, www.funfacepainting.com, 909-398-1228
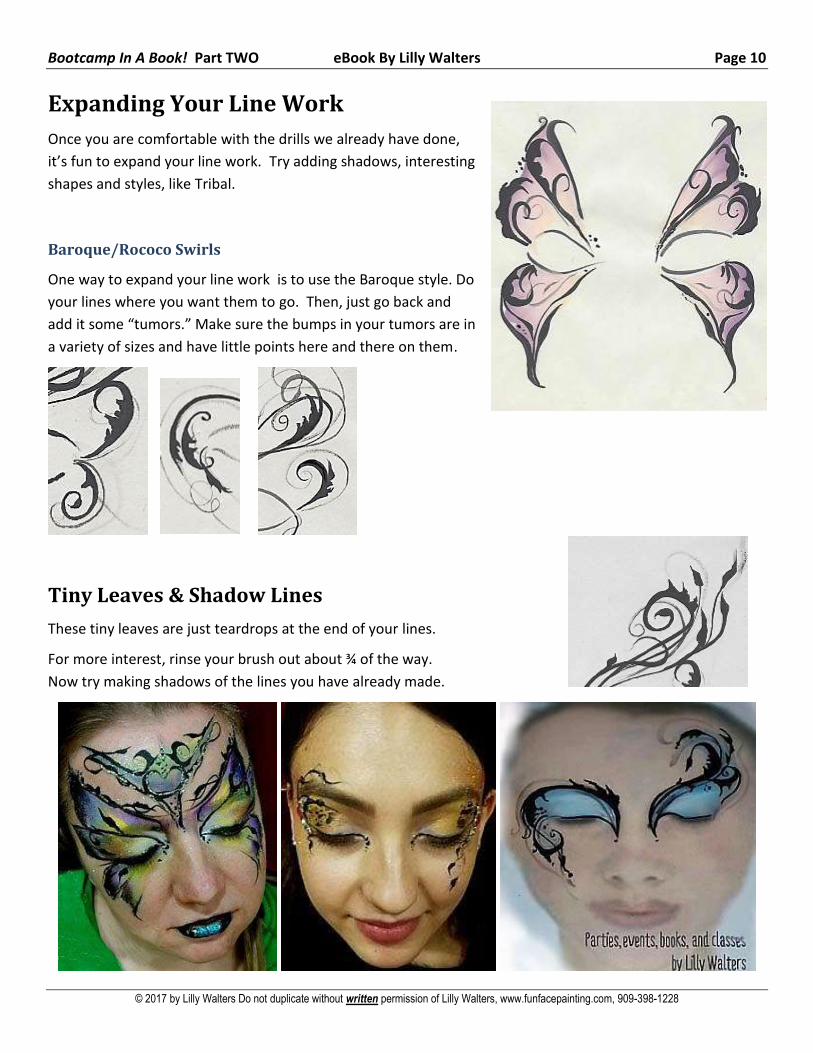
Expanding Your Line Work
Once you are comfortable with the drills we already have done,
it’s fun to expand your line work. Try adding shadows, interesting
shapes and styles, like Tribal.
Baroque/Rococo Swirls
One way to expand your line work is to use the Baroque style. Do
your lines where you want them to go. Then, just go back and
add it some “tumors.” Make sure the bumps in your tumors are in
a variety of sizes and have little points here and there on them.
Tiny Leaves & Shadow Lines
These tiny leaves are just teardrops at the end of your lines.
For more interest, rinse your brush out about ¾ of the way.
Now try making shadows of the lines you have already made.
Bootcamp In A Book! Part TWO eBook By Lilly Walters Page 11
© 2017 by Lilly Walters Do not duplicate without written permission of Lilly Walters, www.funfacepainting.com, 909-398-1228
MULTI-COLOR & LAYERS! SPLIT-CAKES & DOUBLE DIPS
Thoughts on Colors
With the advent of split-cakes, I hardly have any single solid color cakes in my kit. I can use them and
sometimes I do. In fact, I think it is very important that you know how to use them. BUT, split-cakes have just
made it all so much faster and easier than using single color cakes, there isn’t much point in using anything
else.
Which Colors?
Are you ever at a loss on which colors to use? I have taken those classes that talk about the ‘color wheel’ and
complimentary colors, I NEVER think about that - I should, but I don’t.
I start with whichever colors they say they want. Usually, that is enough to get my brushes moving. However,
all too often when I ask their favorite colors, I hear things like, “I want
pink and purple and blue and red and yellow and aqua (where does a 5
year old learn aqua?!) and orange and zebra and rainbow.”
OK, remember: It’s all in the way you present it! I reply to those
requests with, “ABSOLUTELY! Great idea! Hey, like this beautiful shirt
you have on?” Which probably has none of that nice list of things they
said they wanted. Usually I get lucky with the clothes reference
because I present the idea as if it was theirs and with enthusiasm.
Matching their clothes is probably my number 1 way to get color
inspiration. Plus, some smart person designed that shirt and paid
attention to that whole color wheel thing!
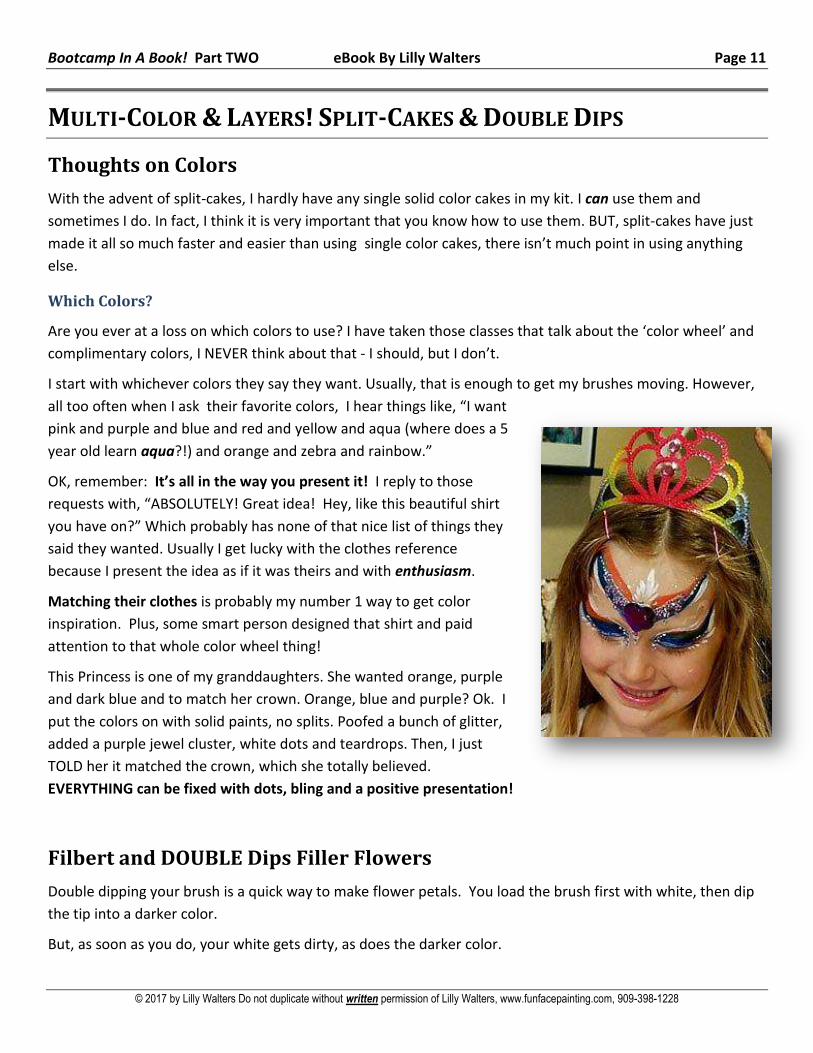
This Princess is one of my granddaughters. She wanted orange, purple
and dark blue and to match her crown. Orange, blue and purple? Ok. I
put the colors on with solid paints, no splits. Poofed a bunch of glitter,
added a purple jewel cluster, white dots and teardrops. Then, I just
TOLD her it matched the crown, which she totally believed.
EVERYTHING can be fixed with dots, bling and a positive presentation!
Filbert and DOUBLE Dips Filler Flowers
Double dipping your brush is a quick way to make flower petals. You load the brush first with white, then dip
the tip into a darker color.
But, as soon as you do, your white gets dirty, as does the darker color.

Bootcamp In A Book! Part TWO eBook By Lilly Walters Page 12
© 2017 by Lilly Walters Do not duplicate without written permission of Lilly Walters, www.funfacepainting.com, 909-398-1228
Putting It Together: Pouncer, Tribal, Carousel & Cyclone Strokes
Step-by-Step Colored
Tattoo/Tribal Roses
Take a pouncer, run it
through almost any
split-cake.
Make a circle by
twisting one way, then
another.
Now just go over it
with those tribal roses we worked on before!
They look best when they are not perfectly round.
Step-by-Step Scary Tribal Snake/Monster Eye
1) Pouncer for eyeball – just about any color, make eye ball
2) Round or small flat with black paint, create lines
3) Round with white paint, create white highlights
Here are more variations on that same theme.
Bootcamp In A Book! Part TWO eBook By Lilly Walters Page 13
© 2017 by Lilly Walters Do not duplicate without written permission of Lilly Walters, www.funfacepainting.com, 909-398-1228
Flat Brush Split-Cake Mastery
Frankly, designs are faster to do when you use a split-cake with a flat brush, rather than a sponge. The
coverage is larger with a sponge, but you have better control with a flat brush and you don’t need to go back
and “clean” the messy bits.
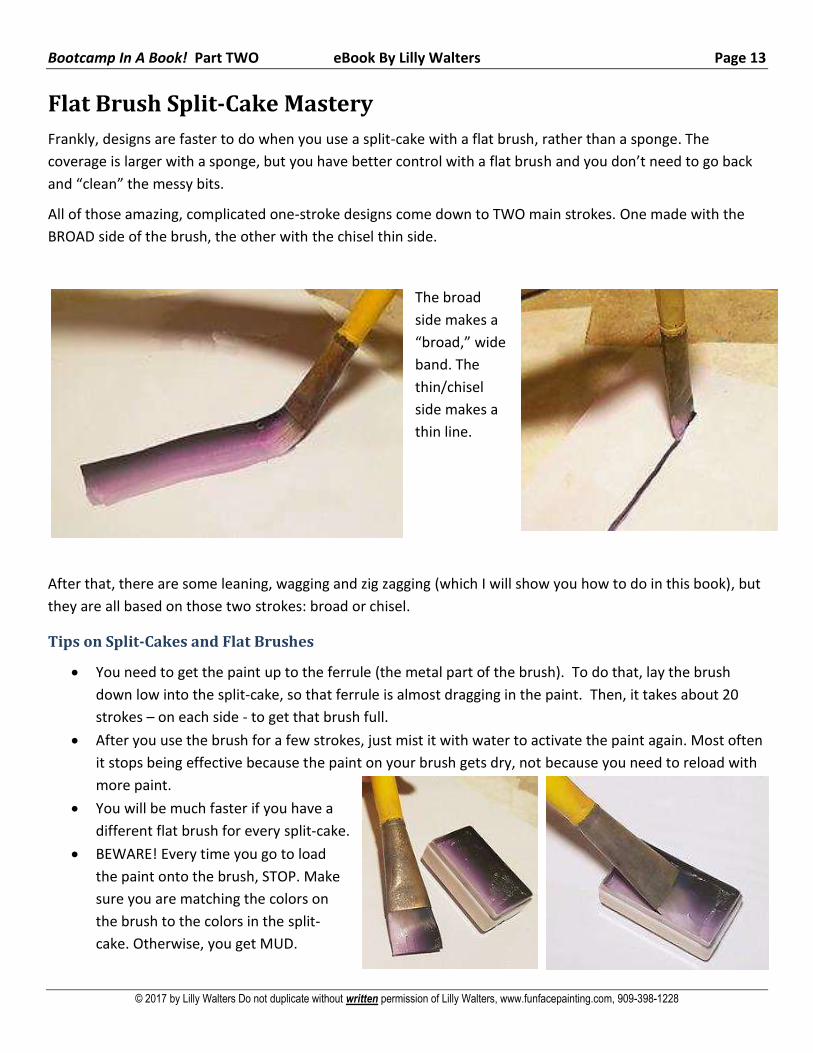
All of those amazing, complicated one-stroke designs come down to TWO main strokes. One made with the
BROAD side of the brush, the other with the chisel thin side.
The broad
side makes a
“broad,” wide
band. The
thin/chisel
side makes a
thin line.
After that, there are some leaning, wagging and zig zagging (which I will show you how to do in this book), but
they are all based on those two strokes: broad or chisel.
Tips on Split-Cakes and Flat Brushes
You need to get the paint up to the ferrule (the metal part of the brush). To do that, lay the brush
down low into the split-cake, so that ferrule is almost dragging in the paint. Then, it takes about 20
strokes – on each side - to get that brush full.
After you use the brush for a few strokes, just mist it with water to activate the paint again. Most often
it stops being effective because the paint on your brush gets dry, not because you need to reload with
more paint.
You will be much faster if you have a
different flat brush for every split-cake.
BEWARE! Every time you go to load
the paint onto the brush, STOP. Make
sure you are matching the colors on
the brush to the colors in the split-
cake. Otherwise, you get MUD.
Bootcamp In A Book! Part TWO eBook By Lilly Walters Page 14
© 2017 by Lilly Walters Do not duplicate without written permission of Lilly Walters, www.funfacepainting.com, 909-398-1228
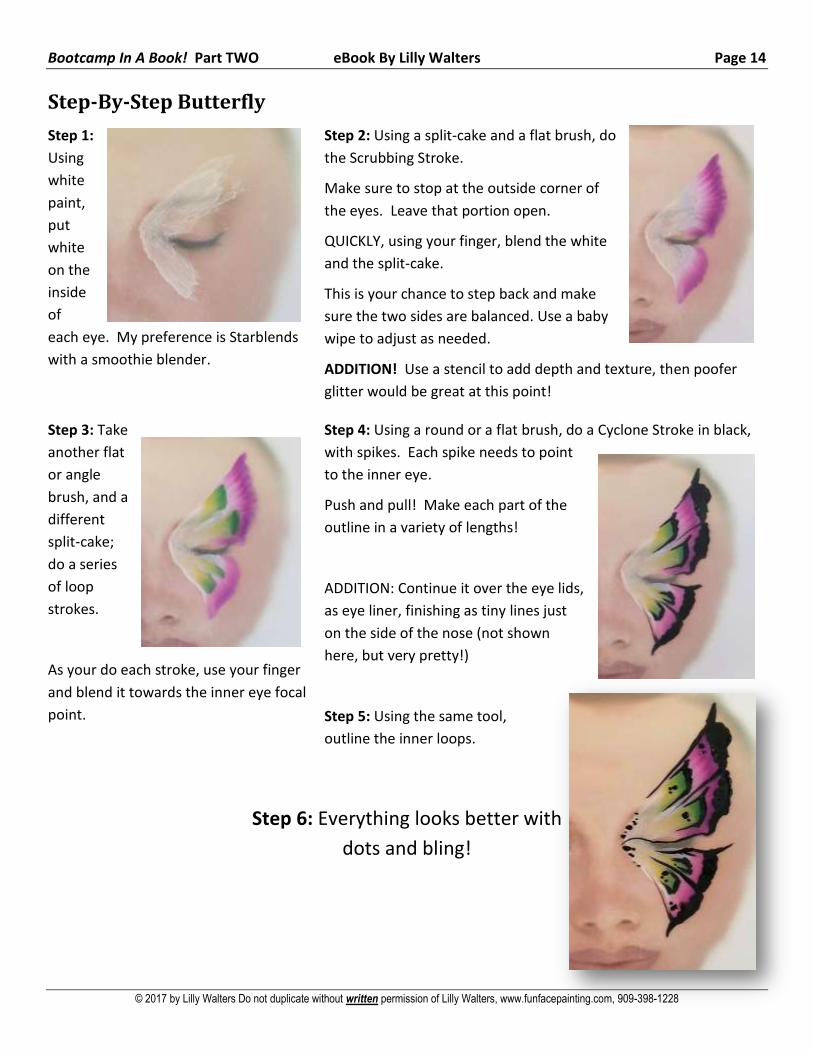
Step-By-Step Butterfly
Step 1:
Using
white
paint,
put
white
on the
inside
of
each eye. My preference is Starblends
with a smoothie blender.
Step 2: Using a split-cake and a flat brush, do
the Scrubbing Stroke.
Make sure to stop at the outside corner of
the eyes. Leave that portion open.
QUICKLY, using your finger, blend the white
and the split-cake.
This is your chance to step back and make
sure the two sides are balanced. Use a baby
wipe to adjust as needed.
ADDITION! Use a stencil to add depth and texture, then poofer
glitter would be great at this point!
Step 3: Take
another flat
or angle
brush, and a
different
split-cake;
do a series
of loop
strokes.
As your do each stroke, use your finger
and blend it towards the inner eye focal
point.
Step 4: Using a round or a flat brush, do a Cyclone Stroke in black,
with spikes. Each spike needs to point
to the inner eye.
Push and pull! Make each part of the
outline in a variety of lengths!
ADDITION: Continue it over the eye lids,
as eye liner, finishing as tiny lines just
on the side of the nose (not shown
here, but very pretty!)
Step 5: Using the same tool,
outline the inner loops.
Step 6: Everything looks better with
dots and bling!
Bootcamp In A Book! Part TWO eBook By Lilly Walters Page 15
© 2017 by Lilly Walters Do not duplicate without written permission of Lilly Walters, www.funfacepainting.com, 909-398-1228
I hope you got some good ideas from
Part 2 of Bookcamp In A Book!
Want the rest?
http://funfacepainting.com/books.html