Embed Size (px)
Citation preview
Instructor’s Manual
to accompany
Introduction to Organic Laboratory
Techniques
A Microscale Approach Fourth Edition
Donald L. Pavia Gary M. Lampman
George S. Kriz Western Washington University
Randall G. Engel North Seattle Community College
Australia • Brazil • Canada • Mexico • Singapore • Spain United Kingdom • United States
Full file at http://testbank360.eu/solution-manual-introduction-to-organic-laboratory-techniques-4th-edition-pavia
© 2007 Brooks/Cole, a division of Thomson Learning, Inc.
TABLE OF CONTENTS Preface 4 Equipping the Organic Chemistry Laboratory 7 Waste Management Guidelines 11 Laboratory Equipment and Supplies 16
Chemicals and Supplies for Each Experiment Answers to Questions
Experiment 1 Introduction to Microscale Laboratory 22 Experiment 2 Solubility 22 Experiment 3 Crystallization 26 Experiment 4 Extraction 29 Experiment 5 Chromatography 32 Experiment 6 Simple and Fractional Distillation 37 Experiment 7 Infrared Spectroscopy and Boiling-Point Determination 39 Experiment 8 Acetylsalicylic acid 41 Experiment 9 Isolation of the Active Ingredient in an Analgestic Drug 43 Experiment 10 Acetaminophen 45 Experiment 11 TLC of Analgesic Drugs 47 Experiment 12 Isolation of Caffeine from Tea or Coffee 52 Experiment 13 Isopentyl Acetate (Banana Oil) 55 Experiment 14 Essential Oils: Extraction of Oil of Cloves 59 Experiment 15 Spearmint and Caraway Oil: (+)- and (-)-Carvones 61 Experiment 16 Isolation of Chlorophyll and Carotenoid Pigments from Spinach 66 Experiment 17 Ethanol from Sucrose 68 Experiment 18 An Introduction to Molecular Modeling 70 Experiment 19 Computation Chemistry 71 Experiment 20 Reactivity of Some Alkyl Halides 72 Experiment 21 Nucleophilic Substitution Reactions: Competing Nucleophiles 75 Experiment 22 Hydrolysis of Some Alkyl chlorides 80 Experiment 23 Synthesis of n-Butyl Bromide and t-pentyl chloride 81 Experiment 24 Elimination Reactions: Dehydration and Dehydrohalogenation 85 Experiment 25 4-Methylcyclohexene 88 Experiment 26 Phase Transfer Catalysis: Addition of Dichlorocarbene 90 to Cyclohexene Experiment 27 Relative Reactivities of Several Aromatic Compounds 93 Experiment 28 Nitration of Methyl Benzoate 96 Experiment 29 Methyl Stearate from Methyl Oleate 97 Experiment 30 Preparation of Soap 101 Experiment 31 Preparation of a Detergent 102 Experiment 32 Gas Chromatographic Analysis of Gasolines 105 Experiment 33 Chiral Reduction of Ethyl Acetoacetate; 107 Optical Purity Determination Experiment 34 Nitration of Aromatic Compounds Using a 110 Recyclable Catalyst Experiment 35 An Oxidation-Reduction Scheme: Borneol, 111 Camphor, Isoborneol
Full file at http://testbank360.eu/solution-manual-introduction-to-organic-laboratory-techniques-4th-edition-pavia
© 2007 Brooks/Cole, a division of Thomson Learning, Inc.
2
Experiment 36 Multistep ReactionSequence: The Conversion of 115 Benzaldehyde to Benzilic Acid Experiment 37 Tetraphenylcyclopentadienone 122 Experiment 38 Triphenylmethanol and Benzoic Acid 123 Experiment 39 Aqueous-Based Organozinc Reactions 131 Experiment 40 Resolution of α-Phenylethylamine and 133 Determination of Optical Purity Experiment 41 The Aldol Condensation: Preparation 138 of Benzalacetophenones (Chalcones) Experiment 42 Preparation of an α,β-Unsaturated Ketone 140 via Michael and Aldol Condensation Reactions Experiment 43 Enamine Reactions: 2-Acetylcyclohexanone 141 Experiment 44 1,4-Diphenyl-1,3-Butadiene 146 Experiment 45 Benzocaine 149 Experiment 46 Methyl Salicylate (Oil of Wintergreen) 154 Experiment 47 N,N-Diethyl-m-Toluamide: The Insect 157 Repellent “OFF” Experiment 48 Sulfa Drugs: Preparation of Sulfanilamide 159 Experiment 49 Preparation and Properties of Polymers: 168 Polyester, Nylon,and Polystyrene Experiment 50 The Diels-Alder Reaction of Cyclopentadiene 172 with Maleic Anhydride Experiment 51 Photoreduction of Benzophenone and 174 Rearangement of Benzpinacol to Benzopinacolone Experiment 52 Luminol 177 Experiment 53 Analysis of a Diet Soft Drink by HPLC 178 Experiment 54 Identification of Unknowns 180 Experiment 55 A Separation and Purification Scheme 193 Experiment 56 Preparation of a C-4 or C-5 Acetate Ester 196 Experiment 57 Extraction of Essential Oils from Caraway, Cinnamon, Cloves 198 Cumin, or Fennel by Steam Distillation Experiment 58 Competing Nucleophiles in SN1 and SN2 Reactions 202 Experiment 59 Friedel-Crafts Acylation 205 Experiment 60 The Analysis of Antihistamine Drugs by Gas 218 Chromatography-Mass Spectrometry Experiment 61 The Use of Organozinc Reagents in Synthesis 219 Experiment 62 The Aldehyde Enigma 220 Experiment 63 Synthesis of Substituted Chalcones: A Guided- 222 Inquiry Experience Experiment 64 Michael and Aldol Condensation Reactions 224 Experiment 65 Esterification Reactions of Vanillin: 225 The Use of NMR to Determine a Structure Experiment 66 An Oxidation Puzzle 226
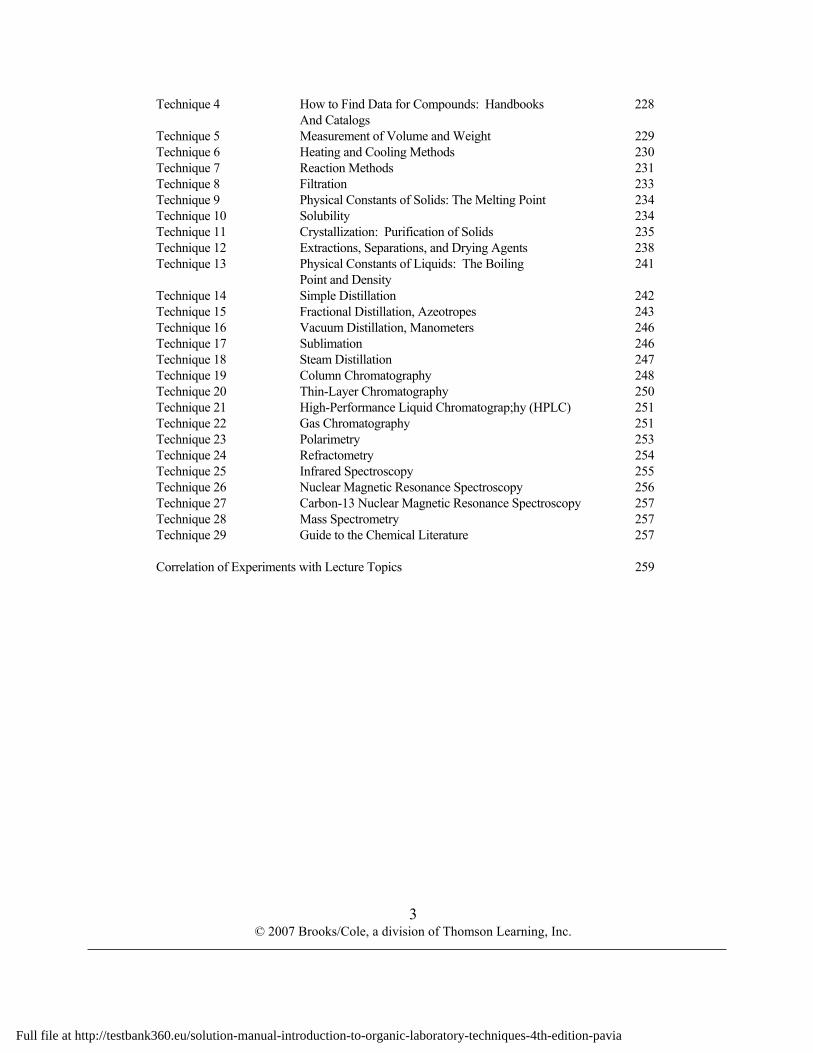
Answers to Problems in the Techniques Section Technique 1 Laboratory Safety 227 Technique 2 The Laboratory Notebook, Calculations, and 227 Laboratory Records Technique 3 Laboratory Glassware: Care and Cleaning 227
Full file at http://testbank360.eu/solution-manual-introduction-to-organic-laboratory-techniques-4th-edition-pavia
© 2007 Brooks/Cole, a division of Thomson Learning, Inc.
3
Technique 4 How to Find Data for Compounds: Handbooks 228 And Catalogs Technique 5 Measurement of Volume and Weight 229 Technique 6 Heating and Cooling Methods 230 Technique 7 Reaction Methods 231 Technique 8 Filtration 233 Technique 9 Physical Constants of Solids: The Melting Point 234 Technique 10 Solubility 234 Technique 11 Crystallization: Purification of Solids 235 Technique 12 Extractions, Separations, and Drying Agents 238 Technique 13 Physical Constants of Liquids: The Boiling 241 Point and Density Technique 14 Simple Distillation 242 Technique 15 Fractional Distillation, Azeotropes 243 Technique 16 Vacuum Distillation, Manometers 246 Technique 17 Sublimation 246 Technique 18 Steam Distillation 247 Technique 19 Column Chromatography 248 Technique 20 Thin-Layer Chromatography 250 Technique 21 High-Performance Liquid Chromatograp;hy (HPLC) 251 Technique 22 Gas Chromatography 251 Technique 23 Polarimetry 253 Technique 24 Refractometry 254 Technique 25 Infrared Spectroscopy 255 Technique 26 Nuclear Magnetic Resonance Spectroscopy 256 Technique 27 Carbon-13 Nuclear Magnetic Resonance Spectroscopy 257 Technique 28 Mass Spectrometry 257 Technique 29 Guide to the Chemical Literature 257 Correlation of Experiments with Lecture Topics 259
Full file at http://testbank360.eu/solution-manual-introduction-to-organic-laboratory-techniques-4th-edition-pavia
4 © 2007 Brooks/Cole, a division of Thomson Learning, Inc.
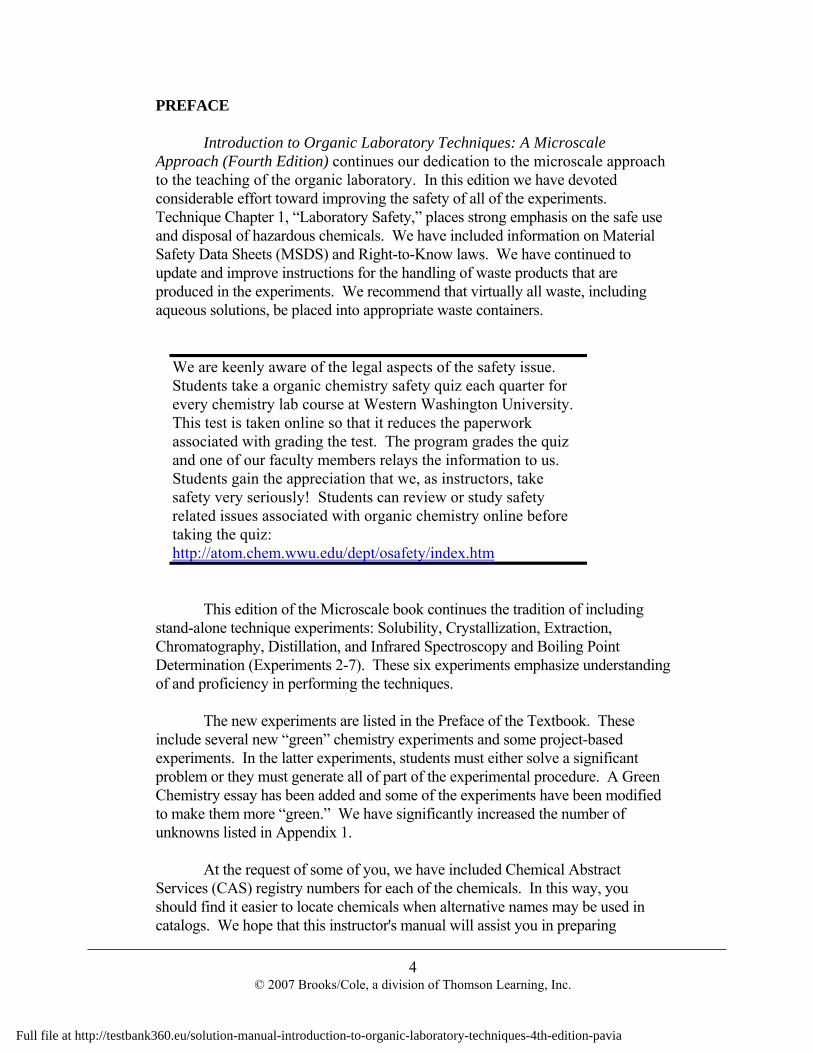
PREFACE
Introduction to Organic Laboratory Techniques: A Microscale Approach (Fourth Edition) continues our dedication to the microscale approach to the teaching of the organic laboratory. In this edition we have devoted considerable effort toward improving the safety of all of the experiments. Technique Chapter 1, “Laboratory Safety,” places strong emphasis on the safe use and disposal of hazardous chemicals. We have included information on Material Safety Data Sheets (MSDS) and Right-to-Know laws. We have continued to update and improve instructions for the handling of waste products that are produced in the experiments. We recommend that virtually all waste, including aqueous solutions, be placed into appropriate waste containers.
This edition of the Microscale book continues the tradition of including stand-alone technique experiments: Solubility, Crystallization, Extraction, Chromatography, Distillation, and Infrared Spectroscopy and Boiling Point Determination (Experiments 2-7). These six experiments emphasize understanding of and proficiency in performing the techniques. The new experiments are listed in the Preface of the Textbook. These include several new “green” chemistry experiments and some project-based experiments. In the latter experiments, students must either solve a significant problem or they must generate all of part of the experimental procedure. A Green Chemistry essay has been added and some of the experiments have been modified to make them more “green.” We have significantly increased the number of unknowns listed in Appendix 1. At the request of some of you, we have included Chemical Abstract Services (CAS) registry numbers for each of the chemicals. In this way, you should find it easier to locate chemicals when alternative names may be used in catalogs. We hope that this instructor's manual will assist you in preparing
We are keenly aware of the legal aspects of the safety issue. Students take a organic chemistry safety quiz each quarter for every chemistry lab course at Western Washington University. This test is taken online so that it reduces the paperwork associated with grading the test. The program grades the quiz and one of our faculty members relays the information to us. Students gain the appreciation that we, as instructors, take safety very seriously! Students can review or study safety related issues associated with organic chemistry online before taking the quiz: http://atom.chem.wwu.edu/dept/osafety/index.htm
Full file at http://testbank360.eu/solution-manual-introduction-to-organic-laboratory-techniques-4th-edition-pavia
5 © 2007 Brooks/Cole, a division of Thomson Learning, Inc.
solutions, chemical reagents, supplies, and equipment necessary for each experiment that you choose to do. The lists of chemicals and equipment required for each experiment are based on the amount required for ten students. For chemicals, the amounts indicated include at least a 20% excess. At the end of the manual we have included a section that correlates the experiments with topics presented in standard organic lecture courses. The time required for each experiment is given in laboratory periods. It is assumed that a laboratory period is about three hours in length. For laboratory periods that are either shorter or longer, appropriate adjustments must be made. The technique chapters of the textbook are designed to stand independently from the experiments. You may have a favorite experiment that you like to do in your course. If this is the case, you can freely add your experiment and still take advantage of the technique chapters in the textbook. Since both standard-scale and microscale techniques are described in the technique chapters, you may even add some small-scale experiments and still be able to refer your students to the appropriate sections in these chapters for information on each technique. If you encounter problems with any of the experiments in the Textbook or if you need help in setting up your laboratory, please contact us. We would also like to hear from you if you have any suggestions for improvements in techniques or in any of the experiments. Donald L. Pavia Phone: (360)-650-3155 E-Mail: [email protected] Gary M. Lampman Phone: (360)-650-3151 E-Mail: [email protected] George S. Kriz Phone: (360)-650-3126 E-Mail: [email protected] Randall G. Engel Phone: (360)-671-2189 E-Mail: [email protected] Department of Chemistry, MS 9150 FAX: (360)-650-2826 Western Washington University Bellingham, Washington 98225
Full file at http://testbank360.eu/solution-manual-introduction-to-organic-laboratory-techniques-4th-edition-pavia
6 © 2007 Brooks/Cole, a division of Thomson Learning, Inc.
We have also set up a special electronic mail address for questions and comments. This address is: [email protected] We also encourage you to visit our home page at: http://lightning.chem.wwu.edu/dept/staff/org/plkhome.html
Full file at http://testbank360.eu/solution-manual-introduction-to-organic-laboratory-techniques-4th-edition-pavia
7 © 2007 Brooks/Cole, a division of Thomson Learning, Inc.
EQUIPPING THE ORGANIC CHEMISTRY LABORATORY
SETTING UP A MICROSCALE LABORATORY
This section will be most useful for laboratory instructors who have not yet taught the organic laboratory using microscale techniques. For instructors already experienced in teaching microscale, there may be some new ideas presented here. In addition, this section will provide information for all instructors on some of the laboratory requirements for doing the experiments found in the textbook. Dispensing and Measuring Liquids Where possible liquid reagents and solvents should be stored in a hood in small glass or plastic bottles. To avoid waste, the exact amount of liquid should be transferred to the student's container by one of the methods described below. Students should not pour an approximate amount of liquid into one container and then measure the required volume, leaving some excess liquid behind which must be discarded. When accuracy is not important, one-piece polyethylene transfer pipets or calibrated Pasteur pipets shown in Technique 5, Figures 5.5B and 5.5C provide an efficient method for delivering liquids, especially solvents to be used for extractions or crystallizations. We tape a test tube to the bottle containing the liquid in order to hold the pipet. Dispensing pumps (Technique 5, Figure 5.2) may be used to deliver liquids accurately. Care must be taken to ensure that the tip is filled with liquid and that no air bubbles are observed in the tubing. These units easily lose their "prime" especially with more volatile solvents. We have observed that some solvents swell the plastic plunger such that it can not be pulled up easily. If this happens to you, remove the solvent from the unit. After drying out thoroughly, the unit can be used again (with another solvent!).
For a class of 20 students, one 10-100 µL automatic pipet for smaller volumes and two 100-1000 µL pipets for larger volumes are adequate. The tips should be reused as much as possible. The automatic pipet should be placed near the appropriate reagent and supported in a vertical holding device. When the maximum volume of the pipet is required, students may occasionally draw liquid past the disposable tip into the barrel of the pipet. The automatic pipet is very accurate with aqueous solutions, but it is not as accurate with organic liquids. With all limiting reagents, it will be necessary to obtain the weight in order to determine accurately the amount of substance used. Automatic pipets should not be used with corrosive or caustic liquids, such as sulfuric acid, hydrochloric acid, or sodium hydroxide. Since most of the errors that occur in the laboratory may be attributed to "sloppy" transfers, you should give a thorough
Full file at http://testbank360.eu/solution-manual-introduction-to-organic-laboratory-techniques-4th-edition-pavia
8 © 2007 Brooks/Cole, a division of Thomson Learning, Inc.
demonstration of how to use the automatic pipet. Students should be alerted to looking carefully to see that liquid is being drawn up into the automatic pipet. If the unit sticks or drips when withdrawing a liquid, you will need to correct the problem. The instructor should place the appropriate measuring device with each reagent and solvent. In most cases, the device will be an automatic pipet, a dispensing pump, or a one-piece polyethylene pipet. The person who prepares the laboratory for an experiment should read the procedure in order to determine which device is appropriate. Dispensing Solids and Weighing Reagents Four top-loading balances that read to 0.01 or 0.001 gram are required for a class of 20 students. The balances should be used with draft shields to improve accuracy. It is convenient to store solids in containers near the balances. To avoid the possibility of contamination, we provide a community spatula with the reagent. Evaporation of Solvents
Ideally, the laboratory should be equipment with rotary evaporators. However, students can remove solvent by directing a stream of nitrogen or air through a Pasteur pipet into a flask or conical flask in order to evaporate a solvent. This procedure gives a student complete control of the evaporation process, but only works well in a laboratory with many individual hoods. In laboratories where there are only a few hoods it becomes necessary to have a permanent community evaporation station assembled in the hood. One method is to provide a community sand bath heated by a hot plate with a source of nitrogen gas or dry air. By using a series of Y-tube connectors and screw clamps with flexible tubing, it is possible to provide a gas source for several students from one tank of gas. Pasteur pipets or blunt-end syringe needles are connected to each open end of the flexible tubing. Using three-finger clamps, the Pasteur pipets or needles can be directed into containers placed in the warm sand bath. Generally a temperature of 50-60 oC will be sufficient. The disadvantages of this system are that pressure changes will occur as screw clamps are loosened or tightened and occasionally sand may be blown around, possibly resulting in contamination of samples.
This second problem may be solved by replacing the sand bath with a large aluminum block or several small aluminum heating blocks [see Lodwig, S.N. "The Use of Solid Aluminum Heat Transfer Devices in Organic Chemistry Laboratory Instruction and Research." Journal of Chemical Education, 66 (1989): 77]. A system which solves both problems is the N-EVAP evaporator. Several models are available from Organomation Associates, Inc., 266 River Road West, Berlin, MA 01503; phone: 888-838-7300. These units consist of an electrically heated water-bath container and a gas manifold equipped with
Full file at http://testbank360.eu/solution-manual-introduction-to-organic-laboratory-techniques-4th-edition-pavia
9 © 2007 Brooks/Cole, a division of Thomson Learning, Inc.
blunt-end, stainless-steel needles. The holders are made with 12, 24, or 36 positions and will accept a variety of containers including conical vials, test tubes, and Erlenmeyer flasks. The smallest model with 12 positions provides an exceptionally efficient means of evaporating solvents in a lab with 20 students. This model costs about $1600. Stirrer/Hot Plates
For most reactions or distillations requiring heating or stirring, we use a
small stirrer/hot plate with an aluminum top and an aluminum block as our heating source. You should not use hot plates with ceramic tops unless you are certain that the tops will withstand high temperatures without cracking. Instead of an aluminum block, you may use a sand bath consisting of a crystallizing dish (80 x 40 mm) filled with about 1 cm of sand. A Petri dish can be used instead of the crystallizing dish, but sand spills are more likely. We prefer to use the aluminum heating block rather than a sand bath. The holes that have been drilled in the aluminum block easily support and accommodate conical vials and Craig tubes. We also provide a second aluminum block that holds small round-bottom flasks. The aluminum block is especially useful when temperatures above 200 oC are required. The stirrer/hot plate units should provide a temperature range of about 60 to above 250 oC.
We recommend that you replace all of your mercury thermometers, with non-mercury thermometers. We do not recommend that either type of thermometer be inserted in an aluminum block, especially mercury ones. Glass thermometers break too easily especially when inserted in the aluminum blocks. We have switched over to metal dial thermometer for use in our aluminum blocks and hot plates. See Technique 6, Fig 6.3 of the Textbook for suggestions. Unfortunately, we have found that the non-mercury thermometers do not work as well when determining boiling points. We keep a few of the mercury thermometers in the laboratory, but we do not issue them to each student unless needed for determining boiling points.
Students often worry more about what the temperature is on the hot plate or aluminum block rather that what is happening in the boiling flask! Because of this, we have removed much of the emphasis on the temperature of the hot plate and have students pay close attention to what is happening in the flask or conical vial. Obviously, if a student is refluxing the contents of a flask, the temperature of the hot plate isn’t all that important! Melting Point Apparatus
Three or four electrically-heated melting point apparatus should be provided for a class of 20 students. If they are to be used for micro boiling point determinations, it is desirable to use a device with a rapid temperature response such as the Thomas-Hoover Uni-Melt apparatus. A less expensive and
Full file at http://testbank360.eu/solution-manual-introduction-to-organic-laboratory-techniques-4th-edition-pavia
10 © 2007 Brooks/Cole, a division of Thomson Learning, Inc.
more serviceable alternative is the Mel-Temp apparatus; however, the tempera-ture response is not as rapid and micro boiling point determinations may be more difficult to perform. You should try several different melting point units before buying them to see which one is the best for you.
Gas Chromatographs
At least two gas chromatographs should be provided for every 20 students, if students are expected to perform their own injections. Conditions for running samples on the Gow-Mac 69-350 or Hewlett Packard 5890 gas chromatographs are given in this textbook. If students are expected to collect samples from a chromatograph, Gow-Mac models 69-350 or 580 can be equipped with a convenient sample collection device. Gow-Mac instruments should be equipped with an 8-foot column packed with Carbowax 20M and an 8-foot column containing 20% DC-710. Columns required for the Hewlett Packard chromatographs are given in the textbook or in this manual. Centrifuges
Several microscale techniques require the use of a centrifuge. One or two "clinical" centrifuges are adequate for 20 students. They should hold 15 mL centrifuge tubes. A number of other centrifuges are also available, but check to see if the Craig tube assembly will fit into the unit with the top down. Some centrifuges will need to be modified in order for the Craig tubes to fit properly into the unit. Vortex Mixer
Extractions can be carried out conveniently in a 15-mL centrifuge tube. Although the tube can be stoppered and shaken to mix the layers, mixing can be accomplished efficiently with a vortex mixer. This method eliminates the problems of pressure buildup and leakage. One mixer easily serves 20 students. Syringes and Rubber Septa
In several experiments a syringe is used to add reagents to a reaction mixture or to remove gaseous products. A 1-mL glass or plastic syringe should be provided to allow use with organic solvents without contamination occurring. The plastic syringes are readily available and are much cheaper and durable than glass syringes. Disposable hypodermic needles may be used for most applications. The "disposable" syringe needles should be dispensed from the stockroom or by the instructor. We recommend 1 1/2- or 2-inch needles (21 or 22 gauge). When the experiment is completed, they should be saved for reuse. In general, needles should not be included with individual student glassware and equipment.
Full file at http://testbank360.eu/solution-manual-introduction-to-organic-laboratory-techniques-4th-edition-pavia
11 © 2007 Brooks/Cole, a division of Thomson Learning, Inc.
Although the Teflon inserts provided with conical vials can be punctured with a needle when a reagent must be added without opening the system to air, the punctured insert may cause problems in future experiments. Specifically, it may leak when the insert is used with a cap and conical vial in extraction procedures. One alternative is to replace the cap and Teflon insert with a standard rubber septum (serum bottle stopper) when it is necessary to add a reagent with a syringe. It should be noted, however, that some septa will partially degrade when exposed to organic vapors. Another alternative, which may prevent this problem, is to use a disc cut with a cork borer from a sheet of silicone rubber. This material is normally used to make septa for the injection ports in a gas chromatograph. A disc cut the same size as the Teflon insert can be used with the plastic cups provided in the microscale glassware kits. Washing Glassware and Equipment A plastic dishpan provides a convenient container in which to soak and wash dirty glassware. You may want to consider buying an ultrasound cleaner (sonicator) cleaner for the laboratory. Especially dirty glassware can often be effectively cleaned with one of these devices. There are some disadvantages: they are noisy and students often forget to retrieve their glassware.
Spectrometers/Polarimeters The laboratory should have at least one FT-infrared spectrometer and one polarimeter for every 20 students. The FT-infrared instruments increase the through-put of students in the laboratory. We usually recommend that students determine the infrared spectrum using the dry film method, if possible. We have available two of the hand press units shown on page 839 for KBr pellets. NMR spectroscopy is a valuable addition to the modern chemistry laboratory. The availability of both proton and carbon NMR increases student interest especially when solving unknowns. Monometers Several monometers should be available in the laboratory for use in vacuum distillations. A simple U-tube manometer is shown on page 742 of the Textbook. ________________________________________________________________ WASTE MANAGEMENT GUIDELINES These guidelines are intended for schools where the chemistry department is responsible for its own waste management. Although most of this information should apply to your situation, specific waste management practices will depend on the size of your program, other hazardous wastes generated on your campus, and
Full file at http://testbank360.eu/solution-manual-introduction-to-organic-laboratory-techniques-4th-edition-pavia
12 © 2007 Brooks/Cole, a division of Thomson Learning, Inc.
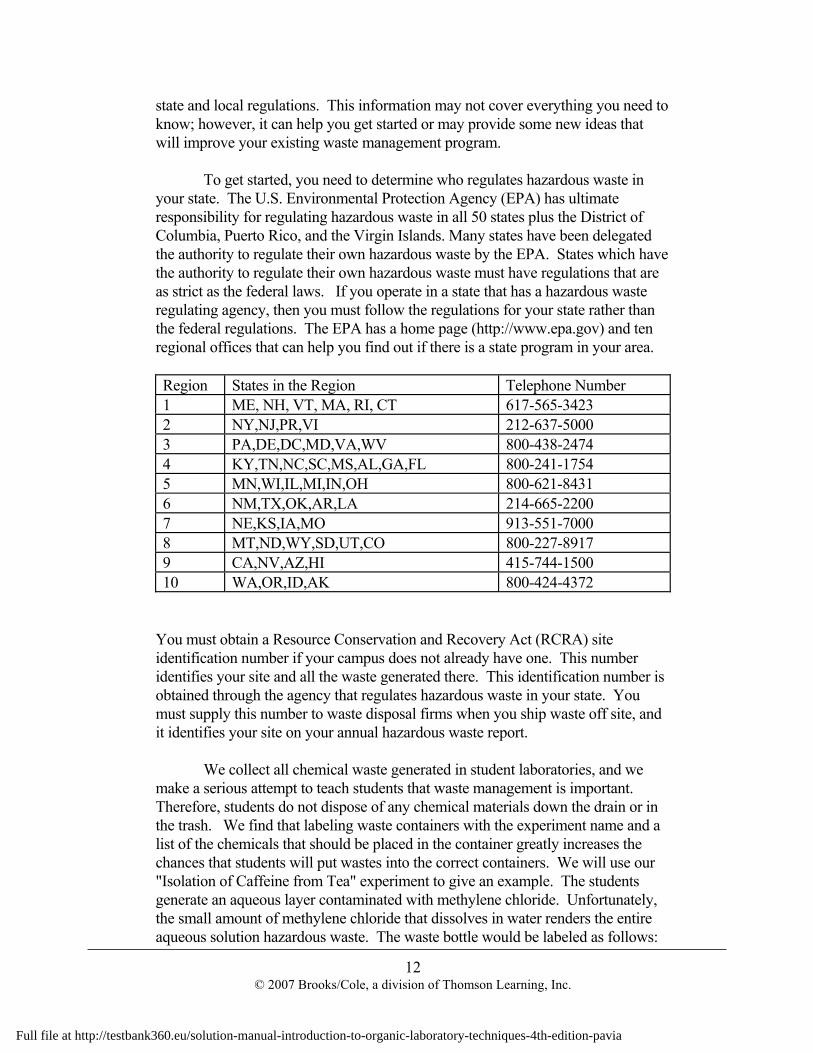
state and local regulations. This information may not cover everything you need to know; however, it can help you get started or may provide some new ideas that will improve your existing waste management program. To get started, you need to determine who regulates hazardous waste in your state. The U.S. Environmental Protection Agency (EPA) has ultimate responsibility for regulating hazardous waste in all 50 states plus the District of Columbia, Puerto Rico, and the Virgin Islands. Many states have been delegated the authority to regulate their own hazardous waste by the EPA. States which have the authority to regulate their own hazardous waste must have regulations that are as strict as the federal laws. If you operate in a state that has a hazardous waste regulating agency, then you must follow the regulations for your state rather than the federal regulations. The EPA has a home page (http://www.epa.gov) and ten regional offices that can help you find out if there is a state program in your area. Region States in the Region Telephone Number 1 ME, NH, VT, MA, RI, CT 617-565-3423 2 NY,NJ,PR,VI 212-637-5000 3 PA,DE,DC,MD,VA,WV 800-438-2474 4 KY,TN,NC,SC,MS,AL,GA,FL 800-241-1754 5 MN,WI,IL,MI,IN,OH 800-621-8431 6 NM,TX,OK,AR,LA 214-665-2200 7 NE,KS,IA,MO 913-551-7000 8 MT,ND,WY,SD,UT,CO 800-227-8917 9 CA,NV,AZ,HI 415-744-1500 10 WA,OR,ID,AK 800-424-4372
You must obtain a Resource Conservation and Recovery Act (RCRA) site identification number if your campus does not already have one. This number identifies your site and all the waste generated there. This identification number is obtained through the agency that regulates hazardous waste in your state. You must supply this number to waste disposal firms when you ship waste off site, and it identifies your site on your annual hazardous waste report. We collect all chemical waste generated in student laboratories, and we make a serious attempt to teach students that waste management is important. Therefore, students do not dispose of any chemical materials down the drain or in the trash. We find that labeling waste containers with the experiment name and a list of the chemicals that should be placed in the container greatly increases the chances that students will put wastes into the correct containers. We will use our "Isolation of Caffeine from Tea" experiment to give an example. The students generate an aqueous layer contaminated with methylene chloride. Unfortunately, the small amount of methylene chloride that dissolves in water renders the entire aqueous solution hazardous waste. The waste bottle would be labeled as follows:
Full file at http://testbank360.eu/solution-manual-introduction-to-organic-laboratory-techniques-4th-edition-pavia

13 © 2007 Brooks/Cole, a division of Thomson Learning, Inc.
Isolation of Caffeine from Tea Hazardous Waste Aqueous layer contaminated w/ methylene chloride Suspect Human Carcinogen Note that "Hazardous Waste" must be included on the label, as required by law. Also, the primary hazard of the waste, the last entry on this label, is required by law. Refer to the material safety data sheet (MSDS) for the primary or most hazardous constituent of the waste to determine an appropriate warning. Wastes collected from student labs are consolidated by waste type or treated, if it is safe and legal to do so. We find that all wastes we generate fit into one of the following categories:
Nonhazardous Solids such as paper, tea bags, and corks are disposed of with the ordinary trash.
Broken Glassware is disposed of in a container designated for this purpose. When the container is full, it is packaged securely and disposed of with the
ordinary trash. Organic Solids with halogens are consolidated with our halogenated organic
solvents, and those without halogens are consolidated with our non-halogenated organic solvents.
Inorganic Solids such as alumina and drying agents are accumulated together
and disposed of as hazardous waste. Non-Halogenated Organic Solvents such as alcohols, toluene, hexane, and
diethyl ether are disposed of as hazardous waste. Intentional evaporation or drain disposal of these materials is illegal. However, evaporation of these solvents as part of the workup in an experiment is legal, since the material is not yet waste and the evaporation is a legitimate part of the procedure.
Halogenated Organic Solvents such as dichloromethane (methylene
chloride), chloroform, and carbon tetrachloride are disposed of as hazardous waste. Intentional evaporation or drain disposal of these materials is illegal. However, evaporation of these solvents as part of the workup in an experiment is legal, since the material is not yet waste and the evaporation is a legitimate part of the procedure.
Inorganic Acids without heavy metals or halogenated solvent contamination
are neutralized and discharged to the sewer. A log of these treatment activities is maintained.
Full file at http://testbank360.eu/solution-manual-introduction-to-organic-laboratory-techniques-4th-edition-pavia
14 © 2007 Brooks/Cole, a division of Thomson Learning, Inc.
Inorganic Bases without heavy metals or halogenated solvent contamination are neutralized and discharged to the sewer. A log of these treatment activities is maintained.
Aqueous Solutions Contaminated with Halogenated Solvents are disposed
of as hazardous waste. Intentional evaporation or drain disposal of these materials is illegal.
Aqueous Solutions with Heavy Metals may either be treated to remove the
heavy metal or disposed of as hazardous waste. If you treat these wastes, you must test the pH and metal levels before discharge of the treated waste to the sewer to confirm successful treatment. In most states, the water may be legally evaporated to reduce the waste volume, and the remaining metal sludge treated as hazardous waste. The original amount of waste including water must be reported on your annual hazardous waste report.
Most states allow some forms of treatment by the waste generator without the need for special permits. Before you treat a waste you must make sure that your regulators allow the treatment practice. Prior to waste treatment, all of the constituents of the waste, such as heavy metal, solvent content, and low or high pH must be determined. You also need to contact your local sewer district to find out if they have limits on what may be discharged to their system. In many cases a material may not be considered hazardous waste by the EPA or a State Environmental Regulatory Agency, but is restricted from disposal to the sanitary sewer. Treatment and discharge of waste is not recommended if you are on a septic system. If you elect to treat waste, you are required to test the treated waste for each constituent that made the untreated waste hazardous before you discharge it to the sewer. For example, if you treated an aqueous waste that contained silver, barium, and chromium by precipitating the metals, you would have to check the barium, silver, and chromium levels of the treated waste before discharge to the sewer. Because of this burden, we limit our treatment to neutralization of non-heavy-metal-bearing aqueous wastes that have a low or high pH. Also, remember that intentional evaporation of solvents, and dilution and drain disposal of hazardous wastes not only violates EPA regulations but is also harmful to the environment. Maintain a log of all wastes treated on site. At a minimum this log should include: a description of the waste, the amount of waste treated, the name of the person treating the waste, the treatment method, and the treatment date. Hazardous wastes that are treated on site must be "counted" and reported on your annual hazardous waste report. Maintain a waste generation log, which includes the total amount of waste treated and generated. At a minimum this log should include: date, description of
Full file at http://testbank360.eu/solution-manual-introduction-to-organic-laboratory-techniques-4th-edition-pavia
15 © 2007 Brooks/Cole, a division of Thomson Learning, Inc.
the waste, amount, and identity of generator. This log must be included in the annual hazardous waste report that is described below. We recommend that you limit the amount of waste you accumulate not only to simplify your regulatory requirements, but also to minimize the risk of leaks and spills. In most states, by accumulating less than 55 gallons of each type of waste you simplify the storage and record keeping requirements associated with waste storage. Larger waste accumulation areas must be inspected weekly and equipped with emergency response supplies. Waste must be stored in a secure (locked) area, segregated by type, capped when not in use, and provided with secondary containment (several bottles of the same type of waste can be placed in a tray or individual bottles may be stored in pails). We recommend hazardous waste shipments at intervals as dictated by your operation to limit the amount of waste stored. At smaller schools you may find that annual waste shipments are a good management practice. At larger schools shipments each semester, quarterly, or even monthly may be required. At Western Washington University, the motor pool and the physical plant operations generate far more waste than the chemistry department. You may find it worthwhile to coordinate your waste disposal with other departments or operations within your school. If you elect to ship your own waste, you must learn and follow all of the mandated procedures. As a simpler alternative, there are private contractors who will consolidate, treat, package, and ship your waste for you. However, this alternative does not keep you from having to keep good records. Contact your local fire department to find out about requirements concerning hazardous material storage. Often these agencies require chemical inventory and storage information about your site so that they can respond appropriately in the event of an emergency. Establish written hazardous waste management procedures for your campus and communicate these procedures to those involved with waste handling. Also, assure that the person on your campus who signs manifests has received Department of Transportation training on hazardous material shipping. Retain copies of all manifests and land disposal restriction certifications, sometimes known as "land bans", of waste sent off site for disposal. Manifests can be thought of as the shipping papers for hazardous waste shipments. Land disposal restriction certifications accompany manifests and document disposal and treatment restrictions based on the characteristics of the waste being sent for disposal. Complete an annual hazardous waste report for all hazardous waste activities on your campus. This report is required by law and must be submitted to
Full file at http://testbank360.eu/solution-manual-introduction-to-organic-laboratory-techniques-4th-edition-pavia
16 © 2007 Brooks/Cole, a division of Thomson Learning, Inc.
the agency that regulates hazardous waste in your area. The report summarizes your hazardous waste activities for the previous calendar year. To complete this report you will need: your RCRA site identification number, copies of all manifests for the past year and your treatment and generation logs. ________________________________________________________________
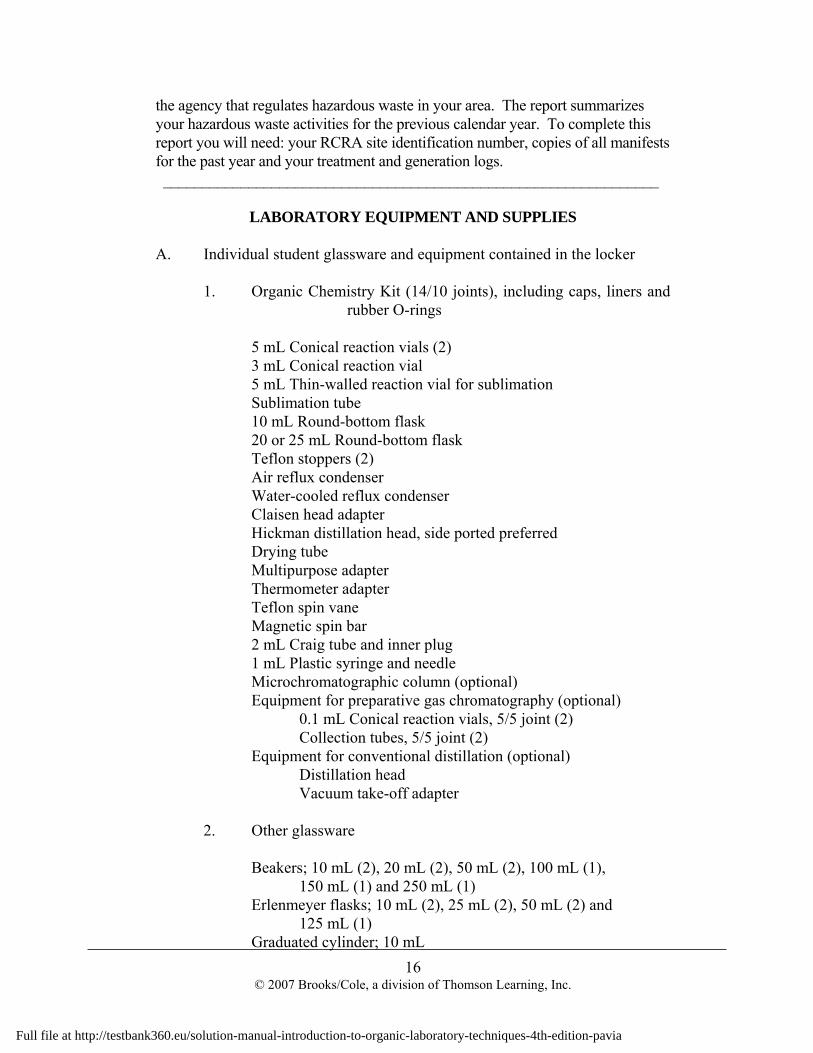
LABORATORY EQUIPMENT AND SUPPLIES A. Individual student glassware and equipment contained in the locker
1. Organic Chemistry Kit (14/10 joints), including caps, liners and rubber O-rings
5 mL Conical reaction vials (2) 3 mL Conical reaction vial 5 mL Thin-walled reaction vial for sublimation Sublimation tube 10 mL Round-bottom flask 20 or 25 mL Round-bottom flask Teflon stoppers (2) Air reflux condenser Water-cooled reflux condenser Claisen head adapter Hickman distillation head, side ported preferred Drying tube Multipurpose adapter Thermometer adapter Teflon spin vane Magnetic spin bar 2 mL Craig tube and inner plug 1 mL Plastic syringe and needle Microchromatographic column (optional) Equipment for preparative gas chromatography (optional)
0.1 mL Conical reaction vials, 5/5 joint (2) Collection tubes, 5/5 joint (2)
Equipment for conventional distillation (optional) Distillation head Vacuum take-off adapter
2. Other glassware
Beakers; 10 mL (2), 20 mL (2), 50 mL (2), 100 mL (1),
150 mL (1) and 250 mL (1) Erlenmeyer flasks; 10 mL (2), 25 mL (2), 50 mL (2) and
125 mL (1) Graduated cylinder; 10 mL
Full file at http://testbank360.eu/solution-manual-introduction-to-organic-laboratory-techniques-4th-edition-pavia
17 © 2007 Brooks/Cole, a division of Thomson Learning, Inc.
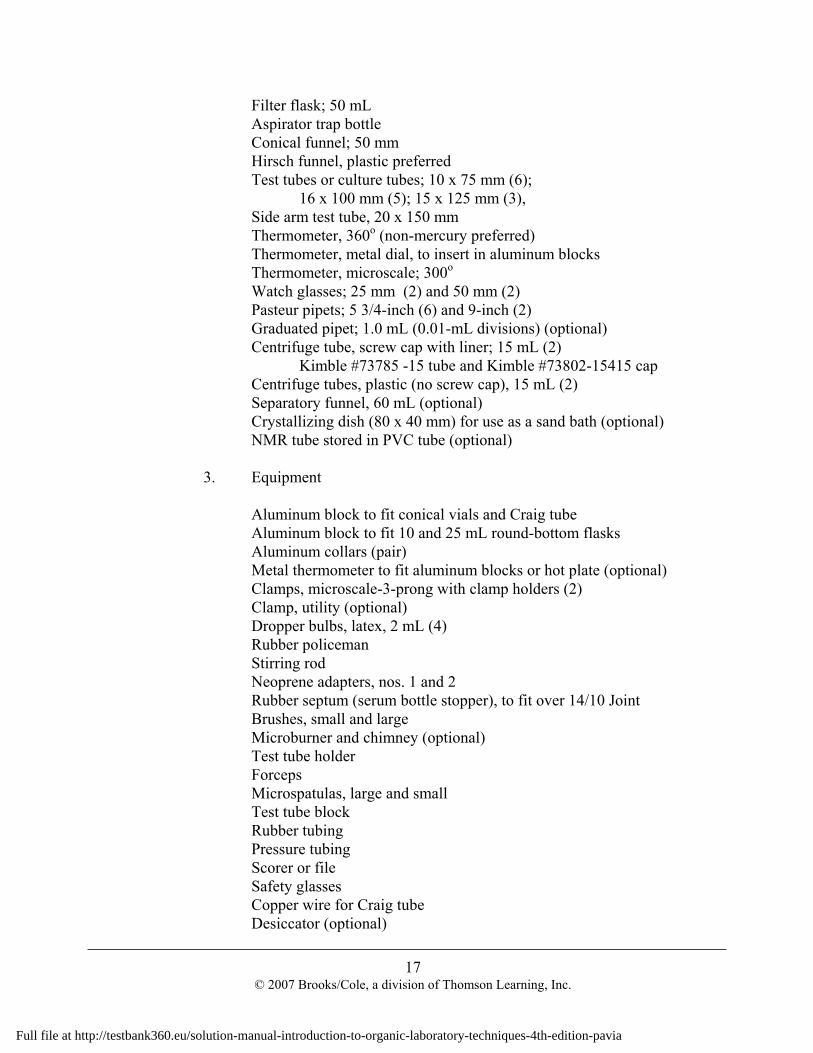
Filter flask; 50 mL Aspirator trap bottle Conical funnel; 50 mm Hirsch funnel, plastic preferred Test tubes or culture tubes; 10 x 75 mm (6);
16 x 100 mm (5); 15 x 125 mm (3), Side arm test tube, 20 x 150 mm Thermometer, 360o (non-mercury preferred) Thermometer, metal dial, to insert in aluminum blocks Thermometer, microscale; 300o Watch glasses; 25 mm (2) and 50 mm (2) Pasteur pipets; 5 3/4-inch (6) and 9-inch (2) Graduated pipet; 1.0 mL (0.01-mL divisions) (optional) Centrifuge tube, screw cap with liner; 15 mL (2)
Kimble #73785 -15 tube and Kimble #73802-15415 cap Centrifuge tubes, plastic (no screw cap), 15 mL (2) Separatory funnel, 60 mL (optional) Crystallizing dish (80 x 40 mm) for use as a sand bath (optional) NMR tube stored in PVC tube (optional)
3. Equipment
Aluminum block to fit conical vials and Craig tube Aluminum block to fit 10 and 25 mL round-bottom flasks Aluminum collars (pair) Metal thermometer to fit aluminum blocks or hot plate (optional) Clamps, microscale-3-prong with clamp holders (2) Clamp, utility (optional) Dropper bulbs, latex, 2 mL (4) Rubber policeman Stirring rod Neoprene adapters, nos. 1 and 2 Rubber septum (serum bottle stopper), to fit over 14/10 Joint Brushes, small and large Microburner and chimney (optional) Test tube holder Forceps Microspatulas, large and small Test tube block Rubber tubing Pressure tubing Scorer or file Safety glasses Copper wire for Craig tube Desiccator (optional)
Full file at http://testbank360.eu/solution-manual-introduction-to-organic-laboratory-techniques-4th-edition-pavia
18 © 2007 Brooks/Cole, a division of Thomson Learning, Inc.
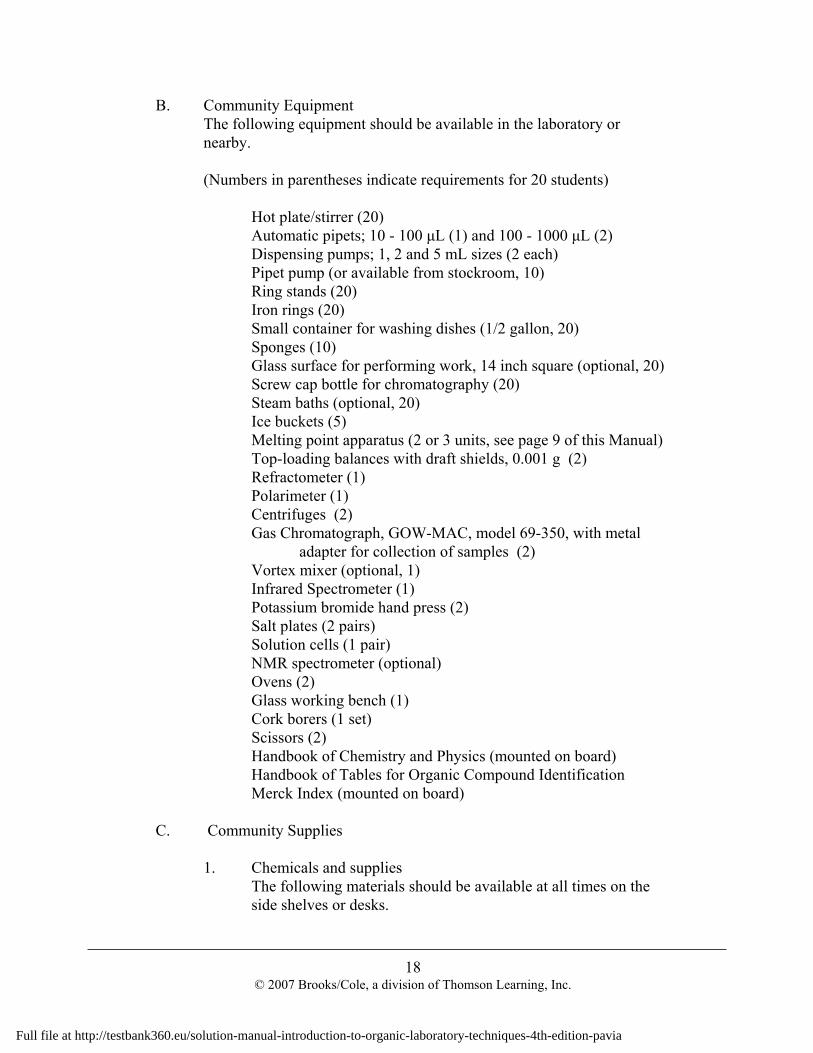
B. Community Equipment The following equipment should be available in the laboratory or nearby. (Numbers in parentheses indicate requirements for 20 students)
Hot plate/stirrer (20) Automatic pipets; 10 - 100 µL (1) and 100 - 1000 µL (2) Dispensing pumps; 1, 2 and 5 mL sizes (2 each) Pipet pump (or available from stockroom, 10) Ring stands (20) Iron rings (20) Small container for washing dishes (1/2 gallon, 20) Sponges (10) Glass surface for performing work, 14 inch square (optional, 20) Screw cap bottle for chromatography (20) Steam baths (optional, 20) Ice buckets (5) Melting point apparatus (2 or 3 units, see page 9 of this Manual) Top-loading balances with draft shields, 0.001 g (2) Refractometer (1) Polarimeter (1) Centrifuges (2) Gas Chromatograph, GOW-MAC, model 69-350, with metal
adapter for collection of samples (2) Vortex mixer (optional, 1) Infrared Spectrometer (1) Potassium bromide hand press (2) Salt plates (2 pairs) Solution cells (1 pair) NMR spectrometer (optional) Ovens (2) Glass working bench (1) Cork borers (1 set) Scissors (2) Handbook of Chemistry and Physics (mounted on board) Handbook of Tables for Organic Compound Identification Merck Index (mounted on board)
C. Community Supplies
1. Chemicals and supplies The following materials should be available at all times on the side shelves or desks.
Full file at http://testbank360.eu/solution-manual-introduction-to-organic-laboratory-techniques-4th-edition-pavia
19 © 2007 Brooks/Cole, a division of Thomson Learning, Inc.
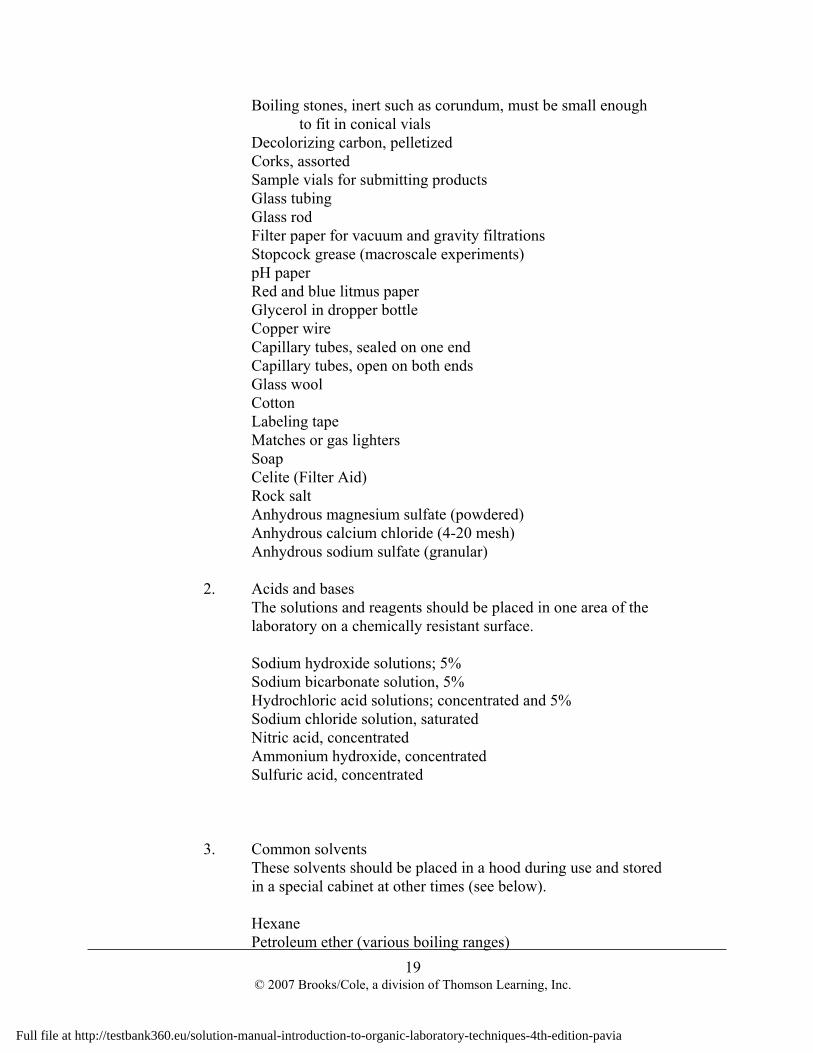
Boiling stones, inert such as corundum, must be small enough to fit in conical vials
Decolorizing carbon, pelletized Corks, assorted Sample vials for submitting products Glass tubing Glass rod Filter paper for vacuum and gravity filtrations Stopcock grease (macroscale experiments) pH paper Red and blue litmus paper Glycerol in dropper bottle Copper wire Capillary tubes, sealed on one end Capillary tubes, open on both ends Glass wool Cotton Labeling tape Matches or gas lighters Soap Celite (Filter Aid) Rock salt Anhydrous magnesium sulfate (powdered) Anhydrous calcium chloride (4-20 mesh) Anhydrous sodium sulfate (granular)
2. Acids and bases
The solutions and reagents should be placed in one area of the laboratory on a chemically resistant surface.
Sodium hydroxide solutions; 5% Sodium bicarbonate solution, 5% Hydrochloric acid solutions; concentrated and 5% Sodium chloride solution, saturated Nitric acid, concentrated Ammonium hydroxide, concentrated Sulfuric acid, concentrated
3. Common solvents
These solvents should be placed in a hood during use and stored in a special cabinet at other times (see below).
Hexane Petroleum ether (various boiling ranges)
Full file at http://testbank360.eu/solution-manual-introduction-to-organic-laboratory-techniques-4th-edition-pavia
20 © 2007 Brooks/Cole, a division of Thomson Learning, Inc.
Acetone Methanol Toluene Methylene chloride 95% Ethanol Diethyl ether Carbon tetrachloride (1 pt), kept in a hood near the infrared
spectrometer, with an Pasteur pipet attached.
4. Test reagent shelves We usually keep the reagents and known compounds for Experiment 54 (qualitative analysis) in a designated area of the laboratory at all times. The noxious chemicals are kept in a hood.
D. Safety
Storage cabinet for flammable organic solvents Fire extinguishers Eye wash fountains Showers and Fire blankets Solvent waste containers (see individual experiment)
E. Safety References (see page 557 and 558 of the Textbook) F. Gloves
There are a number of different types of gloves that are available for use with chemicals (see the Fisher Catalog). Care should be taken to try to match the type of glove to the actual application. The wrong type of glove may provide little or no protection. Often the Aright@ type of glove is so bulky that it is nearly impossible to wear them all the time, especially with the small equipment used in the microscale lab. As a compromise, one can use the gloves during transfers of solvents and then remove them following use. It is a good idea to remove the gloves if an organic solvent is splashed on them. Otherwise, it is likely that the solvent will penetrate through the gloves. Six types of gloves are in common use. This is a very general discussion; see a catalog for complete descriptions.
Nitrile gloves. These gloves come in several styles varying from bulky ones that use thicker material (11- 22 mil) to form-fitting ones that use thinner material (6 mil). The latter style fit tightly and provides more protection than latex gloves. Although nitrile gloves do provide some protection when used for routine transfer, they often will not protect the student totally! Students should be informed of this. The thicker nitrile gloves work reasonably well with many
Full file at http://testbank360.eu/solution-manual-introduction-to-organic-laboratory-techniques-4th-edition-pavia
21 © 2007 Brooks/Cole, a division of Thomson Learning, Inc.
organic solids and with strong inorganic acids and bases. They can be used with acetic acid, chromic acid and alcohols. Nitrile gloves provide some, but limited protection, with organic solvents. Unfortunately, methylene chloride and many other solvents will easily penetrate them. When wearing nitrile gloves, you don=t want to splash large quantities of organic solvents on them. If so, the gloves should be removed immediately, and the hands washed. The bulky versions of nitrile gloves provide more protection than the form-fitting ones.
Butyl gloves. These gloves are often loose fitting and so are bulky to use in general applications. Because of their bulk, you are not likely to wear them all the time. They work reasonably well with some acids, acetone, dimethyl sulfoxide, acetonitrile and dimethylformamide. Butyl gloves are not recommended for diethyl ether or for hydrocarbon solvents.
Viton gloves. These gloves are the best choice when working with some chlorinated hydrocarbon solvents, mainly polychlorinated ones. They are also used with hydrocarbon solvents. Since they are usually bulky to wear, Viton gloves are usually not worn all the time. Some chlorinated hydrocarbon solvents such as methylene chloride will penetrate Viton gloves.
Silver Shield Laminate gloves. These gloves are made of Norfoil, a lightweight and flexible laminate. Gloves made of this material are impervious to most all solvents, including methylene chloride. They can be used as an inner glove with other types of gloves for protection against tears or punctures.
Neoprene gloves. These gloves are often used when someone is handling petroleum products such as greases and oils. They are also used with nitric acid and other strong acids and bases. Because of their bulk, they are only worn when transferring solvents when spills are likely.
Latex gloves. Latex Aexamination@ gloves are widely used in the medical field. Although they provide some protection when working with solids and aqueous solutions, they provide little or no protection against organic solvents. Because of this problem, latex gloves are not recommended for use in the organic laboratory. _______________________________________________________________
Full file at http://testbank360.eu/solution-manual-introduction-to-organic-laboratory-techniques-4th-edition-pavia
22 © 2007 Brooks/Cole, a division of Thomson Learning, Inc.
Experiment 1
INTRODUCTION TO MICROSCALE
TIME ESTIMATE: 1 hour CHEMICALS AND SUPPLIES PER 10 STUDENTS: Laboratory Exercise 1
Hexane 6 mL
Automatic pipet (100 to 1000 µL range) (Option A)
Dispensing pump, 1-mL size, adjusted to deliver
0.500 mL (Option B)
Graduated pipets, 1.0 mL (Option C) 10
Pipet pumps (Option C) 10
Waste disposal container for hexane Laboratory Exercise 2
Pasteur (disposable pipets) 10
Rubber bulbs 10
CAS Registry number: Hexanes 110-54-3 __________________________________________________________
Experiment 2
SOLUBILITY
TIME ESTIMATE: Parts A-D (3 hours); Part E (1 hour) CHEMICALS AND SUPPLIES PER 10 STUDENTS:
Full file at http://testbank360.eu/solution-manual-introduction-to-organic-laboratory-techniques-4th-edition-pavia
23 © 2007 Brooks/Cole, a division of Thomson Learning, Inc.
Part A Benzophenone (Grind up the flakes into a powder) 0.5 g
Malonic acid 0.5 g Biphenyl 0.5 g
Methyl alcohol 40 mL
Hexane 40 mL
Part B
Methyl alcohol 13 mL
1-Butanol 13 mL
1-Octanol 13 mL
Hexane 40 mL Part C
95 % Ethyl alcohol (denatured alcohol is OK) 13 mL
Diethyl ether 13 mL
Methylene chloride 25 mL
Hexane 13 mL Part D
Benzoic acid 1.2 g
Ethyl 4-aminobenzoate 1.2 g
1M NaOH 25 mL
1M HCl 25 mL
6M NaOH 6 mL
6M HCl 6 mL
Litmus paper
Full file at http://testbank360.eu/solution-manual-introduction-to-organic-laboratory-techniques-4th-edition-pavia
24 © 2007 Brooks/Cole, a division of Thomson Learning, Inc.
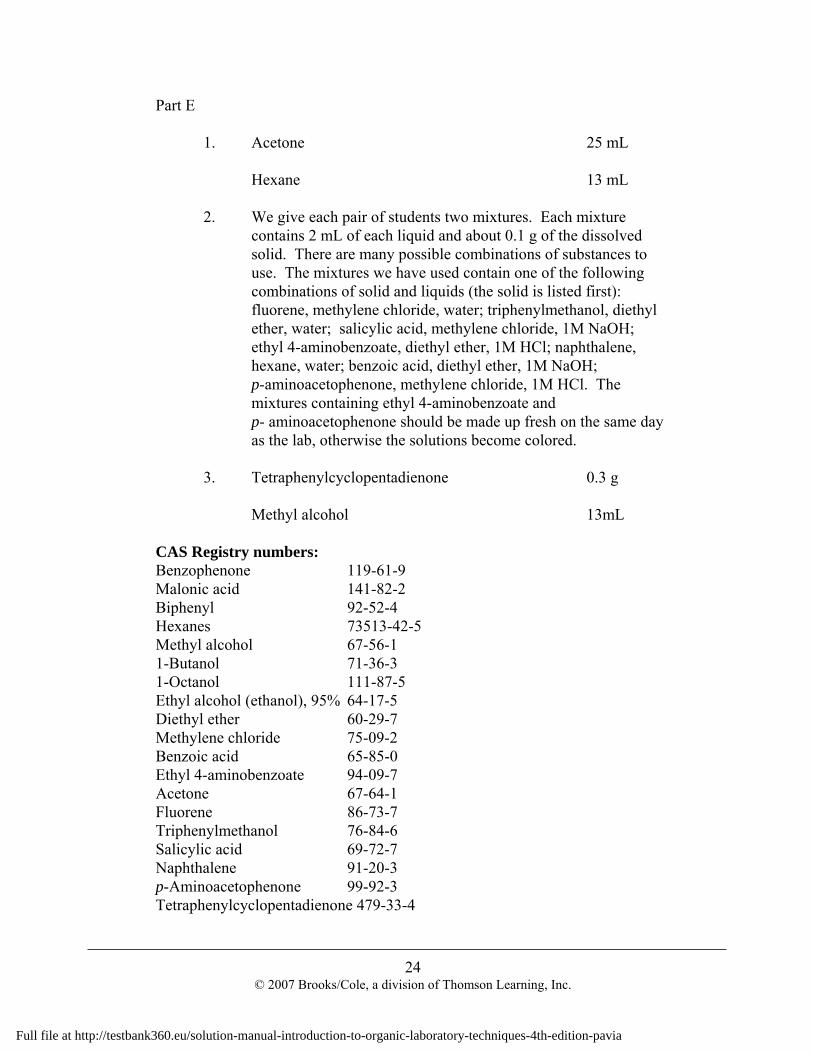
Part E
1. Acetone 25 mL
Hexane 13 mL
2. We give each pair of students two mixtures. Each mixture contains 2 mL of each liquid and about 0.1 g of the dissolved solid. There are many possible combinations of substances to use. The mixtures we have used contain one of the following combinations of solid and liquids (the solid is listed first): fluorene, methylene chloride, water; triphenylmethanol, diethyl ether, water; salicylic acid, methylene chloride, 1M NaOH; ethyl 4-aminobenzoate, diethyl ether, 1M HCl; naphthalene, hexane, water; benzoic acid, diethyl ether, 1M NaOH; p-aminoacetophenone, methylene chloride, 1M HCl. The mixtures containing ethyl 4-aminobenzoate and
p- aminoacetophenone should be made up fresh on the same day as the lab, otherwise the solutions become colored.
3. Tetraphenylcyclopentadienone 0.3 g
Methyl alcohol 13mL
CAS Registry numbers: Benzophenone 119-61-9 Malonic acid 141-82-2 Biphenyl 92-52-4 Hexanes 73513-42-5 Methyl alcohol 67-56-1 1-Butanol 71-36-3 1-Octanol 111-87-5 Ethyl alcohol (ethanol), 95% 64-17-5 Diethyl ether 60-29-7 Methylene chloride 75-09-2 Benzoic acid 65-85-0 Ethyl 4-aminobenzoate 94-09-7 Acetone 67-64-1
Fluorene 86-73-7 Triphenylmethanol 76-84-6 Salicylic acid 69-72-7 Naphthalene 91-20-3 p-Aminoacetophenone 99-92-3
Tetraphenylcyclopentadienone 479-33-4
Full file at http://testbank360.eu/solution-manual-introduction-to-organic-laboratory-techniques-4th-edition-pavia
25 © 2007 Brooks/Cole, a division of Thomson Learning, Inc.
SPECIAL NOTES
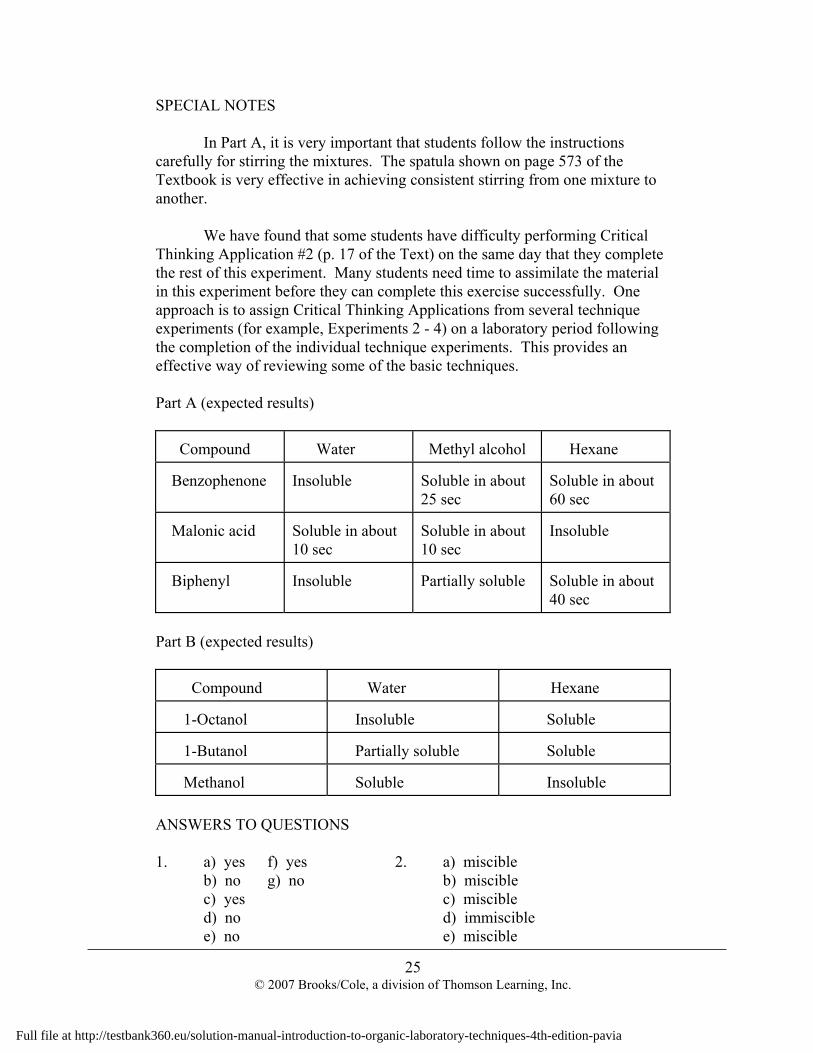
In Part A, it is very important that students follow the instructions carefully for stirring the mixtures. The spatula shown on page 573 of the Textbook is very effective in achieving consistent stirring from one mixture to another.
We have found that some students have difficulty performing Critical Thinking Application #2 (p. 17 of the Text) on the same day that they complete the rest of this experiment. Many students need time to assimilate the material in this experiment before they can complete this exercise successfully. One approach is to assign Critical Thinking Applications from several technique experiments (for example, Experiments 2 - 4) on a laboratory period following the completion of the individual technique experiments. This provides an effective way of reviewing some of the basic techniques. Part A (expected results)
Compound
Water
Methyl alcohol
Hexane
Benzophenone
Insoluble
Soluble in about 25 sec
Soluble in about 60 sec
Malonic acid
Soluble in about 10 sec
Soluble in about 10 sec
Insoluble
Biphenyl
Insoluble
Partially soluble
Soluble in about 40 sec
Part B (expected results)
Compound
Water
Hexane
1-Octanol
Insoluble
Soluble
1-Butanol
Partially soluble
Soluble
Methanol
Soluble
Insoluble
ANSWERS TO QUESTIONS 1. a) yes f) yes 2. a) miscible
b) no g) no b) miscible c) yes c) miscible d) no d) immiscible e) no e) miscible
Full file at http://testbank360.eu/solution-manual-introduction-to-organic-laboratory-techniques-4th-edition-pavia

26 © 2007 Brooks/Cole, a division of Thomson Learning, Inc.
3. Ibuprofen is a carboxylic acid which is converted to a water-soluble salt in 1.0M NaOH.
4. Thymol has a phenolic OH group which is acidic. In 1.0M NaOH,
thymol is converted into a water-soluble salt. 5. Cannibinol is only slightly soluble in methyl alcohol because the large
hydrocarbon component of cannibinol negates the fact that they belong to the same family.
____________________________________________________________
Experiment 3
CRYSTALLIZATION TIME ESTIMATE: Parts A and C (3 hours) or Parts B and C (3 hours)
Note: most students cannot do Parts A, B, and C in 3 hours CHEMICALS AND SUPPLIES PER 10 STUDENTS: Part A
Impure sulfanilamide (5% acetanilide as the impurity) 4.0 g Grind thoroughly to make homogeneous.
95% Ethyl alcohol 100 mL
Filter paper for Hirsch funnel
Melting point capillary tubes
Waste container for non-halogenated organic wastes.
Part B
Impure sulfanilamide (5% acetanilide as the impurity) 1.3 g Grind thoroughly to make homogeneous.
95% Ethyl alcohol 35 mL
Copper wire for Craig tube assembly
Melting point capillary tubes
Waste container for non-halogenated organic wastes.
Full file at http://testbank360.eu/solution-manual-introduction-to-organic-laboratory-techniques-4th-edition-pavia
27 © 2007 Brooks/Cole, a division of Thomson Learning, Inc.
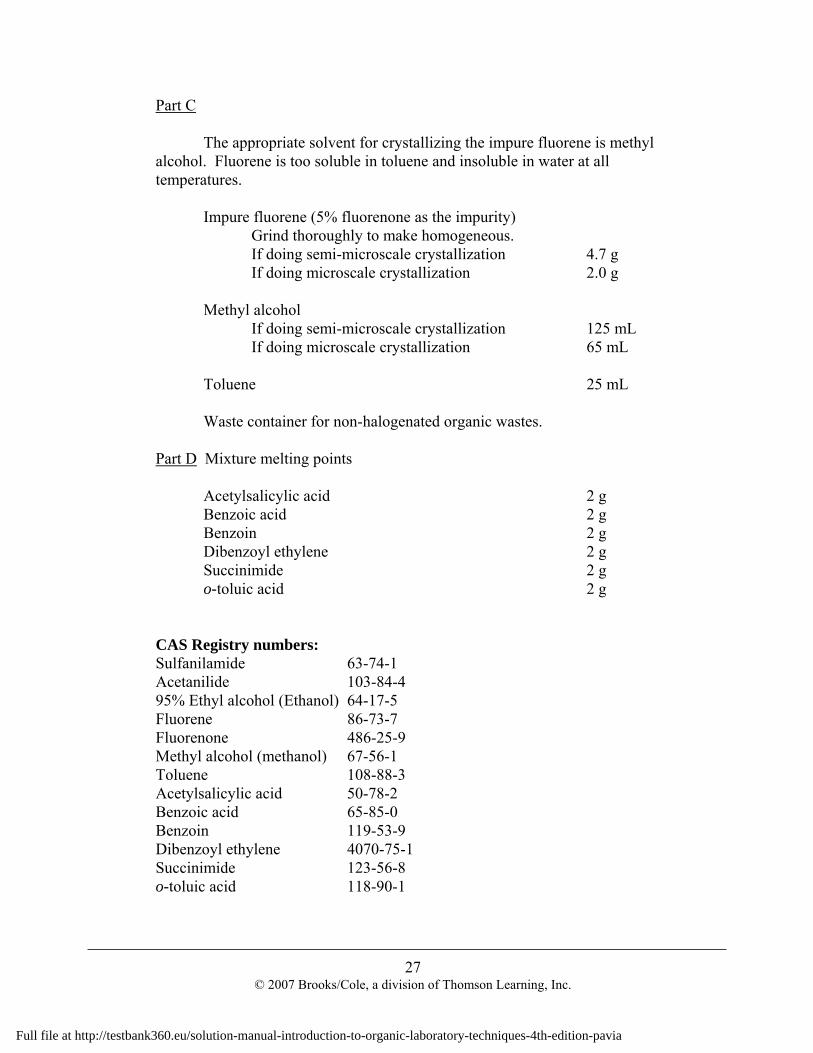
Part C
The appropriate solvent for crystallizing the impure fluorene is methyl alcohol. Fluorene is too soluble in toluene and insoluble in water at all temperatures.
Impure fluorene (5% fluorenone as the impurity) Grind thoroughly to make homogeneous. If doing semi-microscale crystallization 4.7 g If doing microscale crystallization 2.0 g
Methyl alcohol
If doing semi-microscale crystallization 125 mL If doing microscale crystallization 65 mL
Toluene 25 mL
Waste container for non-halogenated organic wastes.
Part D Mixture melting points
Acetylsalicylic acid 2 g Benzoic acid 2 g Benzoin 2 g Dibenzoyl ethylene 2 g Succinimide 2 g o-toluic acid 2 g
CAS Registry numbers: Sulfanilamide 63-74-1 Acetanilide 103-84-4 95% Ethyl alcohol (Ethanol) 64-17-5 Fluorene 86-73-7 Fluorenone 486-25-9 Methyl alcohol (methanol) 67-56-1 Toluene 108-88-3 Acetylsalicylic acid 50-78-2 Benzoic acid 65-85-0 Benzoin 119-53-9 Dibenzoyl ethylene 4070-75-1 Succinimide 123-56-8 o-toluic acid 118-90-1
Full file at http://testbank360.eu/solution-manual-introduction-to-organic-laboratory-techniques-4th-edition-pavia
28 © 2007 Brooks/Cole, a division of Thomson Learning, Inc.
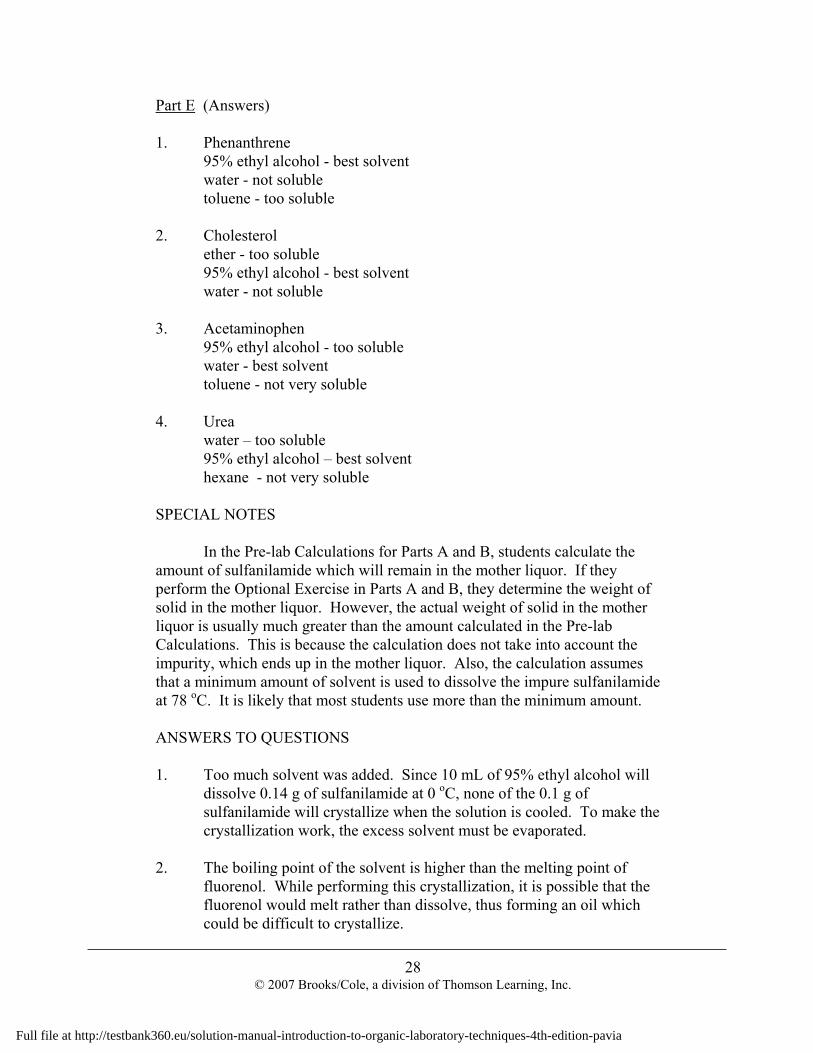
Part E (Answers) 1. Phenanthrene
95% ethyl alcohol - best solvent water - not soluble toluene - too soluble
2. Cholesterol
ether - too soluble 95% ethyl alcohol - best solvent water - not soluble
3. Acetaminophen
95% ethyl alcohol - too soluble water - best solvent toluene - not very soluble
4. Urea water – too soluble 95% ethyl alcohol – best solvent hexane - not very soluble SPECIAL NOTES
In the Pre-lab Calculations for Parts A and B, students calculate the amount of sulfanilamide which will remain in the mother liquor. If they perform the Optional Exercise in Parts A and B, they determine the weight of solid in the mother liquor. However, the actual weight of solid in the mother liquor is usually much greater than the amount calculated in the Pre-lab Calculations. This is because the calculation does not take into account the impurity, which ends up in the mother liquor. Also, the calculation assumes that a minimum amount of solvent is used to dissolve the impure sulfanilamide at 78 oC. It is likely that most students use more than the minimum amount. ANSWERS TO QUESTIONS 1. Too much solvent was added. Since 10 mL of 95% ethyl alcohol will
dissolve 0.14 g of sulfanilamide at 0 oC, none of the 0.1 g of sulfanilamide will crystallize when the solution is cooled. To make the crystallization work, the excess solvent must be evaporated.
2. The boiling point of the solvent is higher than the melting point of
fluorenol. While performing this crystallization, it is possible that the fluorenol would melt rather than dissolve, thus forming an oil which could be difficult to crystallize.
Full file at http://testbank360.eu/solution-manual-introduction-to-organic-laboratory-techniques-4th-edition-pavia
29 © 2007 Brooks/Cole, a division of Thomson Learning, Inc.
3. Biphenyl is highly soluble in both hot and cold benzene. The solubility curve would like C in Figure 11.1 on page 648 of the Textbook.
Experiment 4
EXTRACTION TIME ESTIMATE: Parts A-D (4-5 hours); Part E (30 minutes) CHEMICALS AND SUPPLIES PER 10 STUDENTS: Part A
Caffeine 1.0 g
Methylene chloride 75 mL
Anhydrous sodium sulfate (granular) 5 g
Evaporation station in a hood (optional, see p 8 in this manual)
Waste containers for aqueous and non-halogenated organic wastes (note: there will be some methylene chloride in the aqueous waste)
Part B (These quantities are based on the assumption that each student does this part with only one of the compounds.)
Benzoic acid 0.3 g
Succinic acid 0.3 g
Sodium benzoate 0.3 g
Methylene chloride 25 mL Anhydrous sodium sulfate (granular) 5 g
Evaporation station in a hood (optional, see p 8 in this manual)
Waste containers for aqueous and non-halogenated organic wastes (note:
there will be some methylene chloride in the aqueous waste)
Full file at http://testbank360.eu/solution-manual-introduction-to-organic-laboratory-techniques-4th-edition-pavia