Embed Size (px)
Citation preview

1
Introduction to MS Word 2007
Table of Contents
Pg 2-3 Intro to Word
Pg 4 Ribbons, tabs
Pg 5 Cursor, Help, Mini Tool Bar
Pg 6 Default Font and Size
Pg 7 Setting the default spacing and indentation
Pg 8 Automatic Formatting and Zooming
Pg 9 Insert Your File Name
Pg 10-11Styles of Text
Pg 12 Copy and Paste (words, and pictures from the internet)
Pg 13 Creating numbered lists (1,2,3 or A, B, C, or I, II, III )
Pg 14 Clip Art – positioning and text wrapping
Pg 15-16 Smart Art
Pg 17 Tables
Pg 18 Charts
Pg 19 Math Equations
Pg 20 Page Numbers
Pg 21 Page Layout, References (Bibliography)
Pg 22 Mailings, Review (Inserting Comments) and View Tab
Pg 23 How to complete an Email Merge
Pg 24 How to complete a Letter Mail Merge
Pg 25 How to complete a Label Merge
Pg 26 Converting Files from Wordperfect to MS Word
Pg 27 Sub-Divide your document (for creating tickets)
Pg 28 Difference between .doc and .docx
Pg 29 Instructions for access to Microsoft Online Tutorials

2
Introduction to Microsoft 2007 Office
The Microsoft Office Button
The first thing you‟ll notice, when you
open a 2007 Office application is that
there is no longer a File choice in the
Menu Bar. The arrow above points to
the Microsoft Office Button – which
replaces File.
As you move your cursor over the Microsoft
Office Button a preview image (image on right)
will appear.
Click the Microsoft Office button.
When you click the Microsoft Office
button, it will turn orange and a “File
like” menu will appear (similar to the
image on the right).

3
Each Microsoft Office Button menu is tailored to Word, Excel or PowerPoint.
You can personalize it, through selecting the Developer Tab and inserting your name and initials
Quick Access Toolbar
In the upper left corner – to the right of the Microsoft
Office Button - you will see an area called the Quick
Access Toolbar (image on left). This area is quite
handy as it currently contains several of the most used
buttons in Office applications – Save, Undo, Redo,
Print and Print Preview. You can customize this toolbar by adding and removing any feature
If you right click on any feature, such as bold, spacing, font size, etc, you can select
“Add to Quick Access Toolbar”, and add this
feature to your quick access tool bar

4
Ribbons
This is the new term you hear a lot about in 2007 Office. Ribbons stretch across the top of your
application screen with features to assist you as you click the Ribbon Tabs. To us, Tabs and
Ribbons are the same. It like unreeling holiday ribbon from a spool and seeing new images on
the ribbon – very cool! So, we‟ll cover Tabs/Ribbons in great detail.
Tabs
Below the Microsoft Office Button and Quick Access Toolbar we see a series of
Tabs/Ribbons.
Tabs are similar to the Drop Down Menu choices in previous versions of Office. The Tabs are,
logically, a bit different for each 2007 Office application to assist you with the most common
features of that application. All the 2007 Office applications begin with the Home tab.
The Home Tab/Ribbon for Word 2007 looks like the image below.
You‟ll quickly notice that the Home Tab/Ribbon for each application shows the Clipboard as
the left “Group” (except in Access)
.
Groups
In the image below, the arrows point to a new topic – Groups.
Ribbon
Tab
Group

5
Clipboard Font Paragraph Styles Editing
The Cursor
Writing anywhere on the screen
-> You can also type anywhere on your screen. Hover your mouse over various areas on your
page, until it changes shape. You may need to left click once.
- Now double left click and start writing
Help
The help icon, if found at the top right of the screen.
Select Text Mini Toolbar
When you‟re working with text and fonts a really ingenious “new thing” occurs as you
highlight text - a Select Text Mini Toolbar appears!
It is a quick way to change your
formatting.

6
Paragraph Formatting MS Word for Font and Size
Default Font Size for Microsoft if Calibri 11. If you want to change that for your computer,
follow these directions
Right click on
AaBdCcIi (found under
The home tab)
Left Click on Modify
In this pop up
Select your font, font size
Click on New documents based on this
Template.
Click OK

7
Formatting MS Word for Spacing and Indentation
For some reason, Microsoft believes Spacing should be 10 pt and line spacing should be 1.15
To change this, and turn your own preferences into default, follow these guidelines
Left click on this down arrow
Modify Indentation to your
own preference (usually at zero)
Ensure spacing is at Zero
And line spacing is at single
Left Click Default

8
Automatic FormattingCan be convenient and annoying
Whenever you are typing and Word ‘thinks’ there is a possibility of automatic formatting…it will turn it onType-> Or-Or 2nd
(then hit the space bar and type …the …this symbol should appear you turn it on or off by right clicking on stop automatically creating bulleted listsPlease do not click yet !!
Zooming in and out
If at any point you find yourself squinting to see what you are typing, your page might be
zoomed in to far. At the bottom right of your screen you find the zoom buttons

9
Insert Your File Name
Under the insert tab, you can also include the saved file path of your document.Insert
-> Quick Parts (first ensure your cursor is where you want -> Field your file path to go)-
Select Filename
Upper or lowercase
Click Add path to Filename
Click OK

10
Styles
Hang on! The next Group on the Word Home Tab/Ribbon is Styles. If you go back to Page 6
and glance at the Word, PowerPoint and Excel Home Tabs, you‟ll see that the right portion of a
Tab is where the application selections change to fit the application. In Word you can now
select a style from the Styles Group (image below). If you click the More arrow in the lower
right corner of the Styles group, you will see additional choices.
When you click the More arrow you will see an image similar to the one below. Notice that we
are in Times New Roman – Normal. On the next page we‟ll show you one of the really, really
neat new features in 2007 Office.
More Arrow

11
Style cont’d
We‟re going to highlight this paragraph (when we have finished typing it). Then we‟re going
to open the Styles Group. When the Group is open we‟ll move our cursor over the choices,
and as we do, you‟ll see, in the images below, that the entire paragraph changes to that Style!
We selected this Style. Look
how the text now appears!
And another………..
Other Tabs/Ribbons –
When you move to the other Tabs/Ribbons, you‟ll notice that they contain their own Groups –
associated with that Tab. The Insert Tab/Ribbon (below) has logical “things” that you would
insert into a document – Shapes, Pages, Tables, Illustrations, Links, Headers/Footers, Text and
Symbols. Again, depending on your choices, many selections allow you to “preview” what
you‟ve highlighted – similar to the two illustrations above.

12
Copy/Paste
To Copy and Paste a word or phrase from one area of your document to another (or
from one document to another)
Highlight with your mouse what you want to copy
Right click on the highlighted part, and left click on copy
Go to where you want the copied text to go
Right click again, and left click on paste.
You can also copy and paste pictures from the internet
Ensure you are under google images
->Right click
on a picture
you like
->Left click
on copy
Now, go to
your word
document,
and right click
where you
want it, and
left click on
copy
13
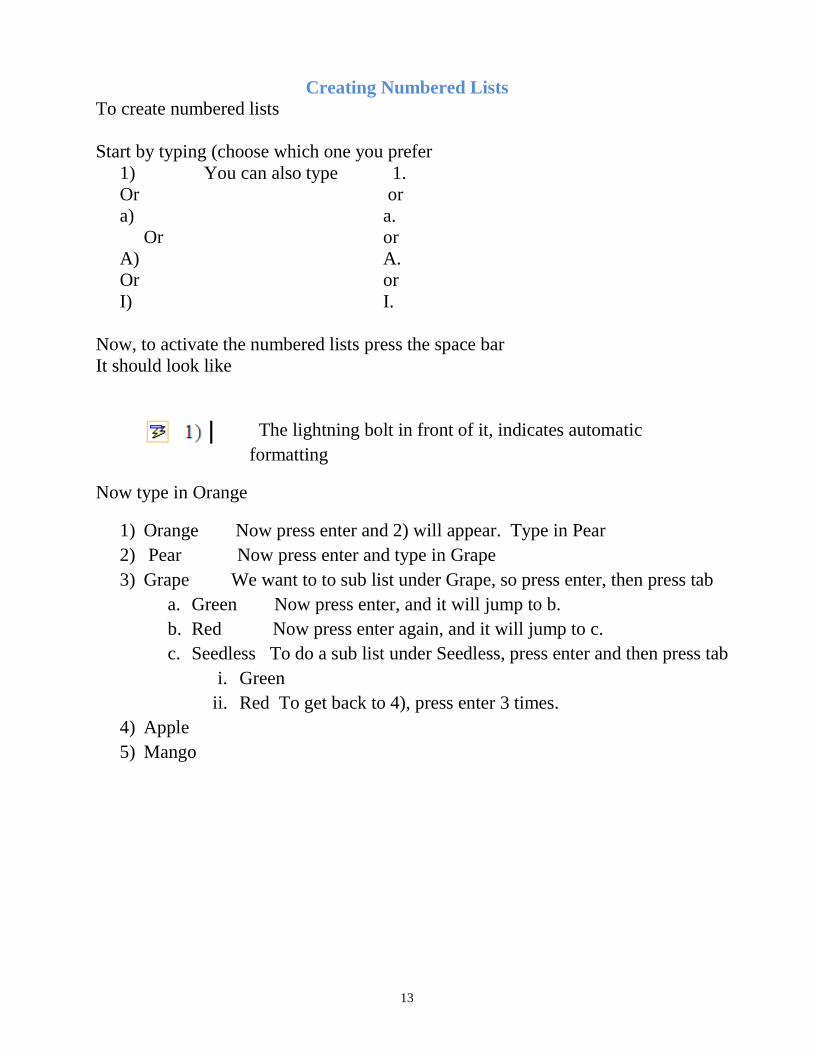
Creating Numbered Lists
To create numbered lists
Start by typing (choose which one you prefer
1) You can also type 1.
Or or
a) a.
Or or
A) A.
Or or
I) I.
Now, to activate the numbered lists press the space bar
It should look like
The lightning bolt in front of it, indicates automatic
formatting
Now type in Orange
1) Orange Now press enter and 2) will appear. Type in Pear
2) Pear Now press enter and type in Grape
3) Grape We want to to sub list under Grape, so press enter, then press tab
a. Green Now press enter, and it will jump to b.
b. Red Now press enter again, and it will jump to c.
c. Seedless To do a sub list under Seedless, press enter and then press tab
i. Green
ii. Red To get back to 4), press enter 3 times.
4) Apple
5) Mango

14
Clip Art (google.ca is a far better source of pictures though) Currently, when you click an image in PowerPoint 2007, a Picture Tools Tab/Ribbon will be available to you.
We placed a Microsoft Clip Art frog on the left. When we click the frog a Picture Tools Tab appears above of
the other Tabs/Ribbons.
When you click the Picture Tools Tab (we‟re still in P.Point) the Picture Tools Ribbon below appears.
Notice, like the other Ribbons, that Picture Tools also has its own Groups – Picture Tools, Shadow Effects,
Border, Arrange, and Size.
You can turn this picture, into this picture by using all the features under Picture Tools
->
** The most important part of pictures
Positioning Your Picture (Move your picture) In MS Word, often you have to „fix‟ your picture in a certain spot. The bonus is that no matter
how many times you hit enter the picture will not move. This is found under the Format Tab,
and Position. Once you „fix‟ your picture in place, you can text wrap around it, and you can
move the pictures with your mouse
Text Wrapping If you need to write on your picture, or beside it, click on Text Wrapping found under the
Format Tab. To write over your picture, select behind text.
Note -> you cannot just write on your picture. You must click on your mouse above your
picture, and then hit enter several times (and tab) in order to write where you want to write.

15
SmartArt Under the Insert Tab, select Smart Art
When you click SmartArt a
Choose a SmartArt Graphic
menu (image below) will appear.
If you have used SmartArt in the
past, you‟ll quickly see that it has
been greatly enhanced.
We‟ll click on the Pyramid and then click the OK button.
A Pyramid Diagram, similar to the one on
the right, will appear. Now it gets
exciting!
When you click the Pyramid you‟ll
notice a new SmartArt Tools
Ribbon/Tab appears (top of next page).
Here you can add more shapes, and change the color of the smart art.

16
Similar to Picture Tools, you‟ll notice several Layout and SmartArt Styles Groups designed
for enhancing the Pyramid on which you‟re working.
If you click the Change
Colors button in the
SmartArt Styles Group an
image like the one the right
will appear. As you move
your cursor arrow over the
Primary Theme Colors,
you‟ll see that the Pyramid
changes to that color.
If you now move your cursor
arrow over one of the images in
SmartArt Styles you‟ll see an
image similar to the one on the
right.

17
Insert Tables You can draw your own table
If you want more columns or rows than the tab
offers, go to Insert Tab and write in how many
columns/rows you want
Notice during you have two tabs
just for tables (Design and
Layout). As soon as you click off
your table, those tabs will
disappear.
Under the tabs design and format, you can
- change the colour of your table
- add or delete rows/columns
- change your text direction
- use the eraser to delete specific columns, rows or lines
- justify words in each cell in 9 different ways

18
Insert Charts Under Insert
Select Insert Charts
Select any style of chart
Now your chart will appear, along with fake data in Excel. You do not need to
separately save your excel data, as it saves automatically with your Word
document. You can go ahead and change your data.
Remember -> When
you click on your
chart, three tabs will
appear
These tabs will allow
you to
change
-> colour -> change the x axis value and y axis value
-> angle -> change the legend, axis
-> chart type -> text wrapping
-> position -> fix the chart in a specific of position

19
Insert also has Math formulas
How to insert math calculations?
Under insert tab, click the top part ofor Click Insert New Equation (on bottom)
Notice the New Tab in the Ribbon specifically for math equations.
You can choose from blank equations, and then fillthem in with letters/numbers
You will notice the equation will appear in the middle of your screen. In order to ensure your equation is where you want it, place your cursor in the position you want the equation to go.
Often times, math teachers will include the math icon into their quick access tool bar, so that it is a one click away. To do this, right click (say on fractions) and select Add to Quick Access toolbar.

20
Inserting Page Numbers
Under Insert
Select any page number you want.
If you want the second page to be page 1
Under page number, select Format Page Number
Put in Zero
Now, click on your page number, and select different first page
If you desire your page 5 to be page 1, then you have to insert a page break. At page 4, under page layout Select breaks
Next page Now your document is separated into 2 ‘quasi’ documents. You now can insert a new page number at page 5 and page 5 will be page 1.

21
Page Layout Tab
It is suggested that you click the Tabs/Ribbons in each application you‟ll be using to get a
“feel” for them.
The Page Layout Tab/Ribbon also has logical selections – Themes, Page Setup, Page
Background, Paragraph and Arrange.
The Watermark feature is great. If you go under watermark, and select custom watermark, you
can add pictures or include any text you want into your watermark.
Page Border allows you to create a number of border styles for pages and paragraphs
Reference Tab
The References Tab/Ribbon will really come in handy for those publishing long documents,
articles or books – Table of Contents, Footnotes, Citations & Bibliography, Captions, Index, and
Table of Authorities.
It gives you the option of MLA, APA
or any number of different styles of
referencing
Click on Insert Citation, and insert
all the different references you are
using.
When you are all done, select
bibliography, and your bibliography
will be created

22
Mailings The Mailings Tab/Ribbon lets you work with Envelops, Labels, Mail Merge, Fields and
Preview. It includes Create, Start Mail Merge, Write and Insert Fields, Preview Results and
Finish.
Review Tab
The Review Tab/Ribbon has the Proofing Tools, Comments, Tracking, Changes, Compare and
Protect features.
It also contains the Spelling, thesaurus and word count. Notice, word count is also found at the
bottom left of your screen.
To comment on study essays/projects on your computer and then send them back via email, you
have 2 options
1) New comment -> is for making general comments about a concept
2) Track Changes -> allows you to make actual changes in the document. All your
changes will appear red underline.
You can click Accept or Reject to add the change or to delete it.
View Tab The View Tab/Ribbon allows you to change the document
Views, do Show/Hide, Zoom and arrange your Windows.
This gives you a “feel” for how the Tabs/Ribbons work in Word 2007. Again, it would be
prudent to look at the other 2007 Office applications you will be using - to get a similar
sense for these new features.

23
How to complete an Email Merge
Stage 1 – Excel – Setting up your data
1) Ensure your data has column headers (or column titles).
2) In Excel, ensure your file is saved. Let‟s call this the Excel file (you can also input
your file directly from trevlac into a crv file)
3) Now highlight your data.
4) Under Formulas, select Define Name
5) Insert any name you prefer. Lets calls this the Defined Name file.
Stage 2 – Word – Setting up the Mail Merge
1) Under Mailings, select Start mail merge and Email
2) Under Select Recipients, search for your Excel file.
3) After selecting your file, now select your Define Named file
Stage 3 – Word – Writing your Email
1) Now write your email.
2) While writing your letter, make use of the Insert Merge Field to insert data from
Excel.
Stage 4 – Word
1) Under Mailings, select Preview results to ensure spacing is adequate
3) Under Mailings, select Finish and Merge.
4) If you want to examine your letters, select edit
5) To email, select Email
a) Insert a Subject Line
**b) Change HTML to text

24
How to complete a Letter Mail Merge
Stage 1 – Excel – Setting up your data
1) Ensure your data has column headers (or column titles),
2) In Excel, ensure your file is saved. Let‟s call this the Excel file (you can also input
your file directly from trevlac into a crv file)
3) Now highlight your data.
4) Under Formulas, select Define Name
5) Insert any name you prefer. Let‟s calls this the Defined Name file.
Stage 2 – Word – Setting up the Mail Merge
1) If you are inserting your mail merge into an already written document, open that
document now. If you are starting a new document from scratch, open up a new
document.
2) Under Mailings, select Start mail merge and Letters
3) Under Select Recipients, search for your Excel file.
4) After selecting your file, now select your Define Named file
Stage 3 – Word – Writing your Letter
1) Now a) write your letter
b) fill in the blanks on your previously written letter
2) While writing your letter, make use of the Insert Merge Field to insert Data from
Excel.
Stage 4 – Word
1) Under Mailings, select preview results
2) Ensure spacing is adequate
3) Under Mailings, select Finish and Merge.
4) a) If you want to just print your letters, select print
b) If you want to examine your letters, select edit

25
How to complete a Label Merge
Stage 1 – Excel – Setting up your data
1) Ensure your data has column headers (or column titles),
2) In Excel, ensure your file is saved. Let‟s call this the Excel file. (you can also input
your file directly from trevlac into a crv file)
3) Now highlight your data.
4) Under Formulas, select Define Name
5) Insert any name you prefer. Let‟s calls this the Defined Name file.
Stage 2 – Word – Setting up the Label Merge
1) Under Mailings, select start mail merge and Labels. (note, you must select the labels
icon from Start Mail Merge)
2) Select what type of labels you have (check the package the labels have come in)
2) Under Select Recipients, search for your Excel file.
3) After selecting your file, now select your Define Named file
Stage 3 – Word – Writing the label
1) Now insert what you want into the label.
2) Under Insert Merge Field, insert in order, what you want to put into your label
3) Under mailings, select Preview your results (check spacing)
4) Under Mailings, select Update labels
5) Under Mailings, select Finish and Merge
6) a) If you want to just print your letters, select print
b) If you want to examine your letters, select edit

26
Converting Files from WordPerfect to MS Word
(also works for Quattro Pro to Excel)
In Wordperfect,
Select File
-> Save As
Under File Type,
select
MS Word 97/200/2002/2003
for Windows
Now, your document is saved as a .doc
Back in Word
Open up your document
Click on the Office Button
Select Convert
Now, when you click the save button, your document
will automatically save as a .docx

27
Subdivide Your Document
To Subdivide your document into 4 equal parts (usually for tickets)
Including page numbers (so your tickets are numbered)
1) Create your tickets as normal (on a full page). For
the moment, each ticket will be on a full page
2) Ensure you insert page numbers on your tickets
(through the page layout tab)
3) Under Office Button and Print
Pages per sheet -> select 4 pages

28
Microsoft Office Tutorials
In addition to this tutorial, other Office tutorials are available below. The Department of
Education and Early Childhood Development has bought the rights to access Microsoft‟s own
tutorials. Please see the directions below.
Difference between .doc and .docx
As you save your files in Word, you can choose
between saving them as
.docx - Word 2007 (not compatible with
WordPerfect)
.doc - Word 97-2003 (Compatible with
WordPerfect)
When to save .doc – if you plan on going back and forth between Word and WordPerfect, then
save it as a .doc (97-2003 document)
When to save .docx – if you plan on staying in Word 2007, with no plans of going back to
WordPerfect
29
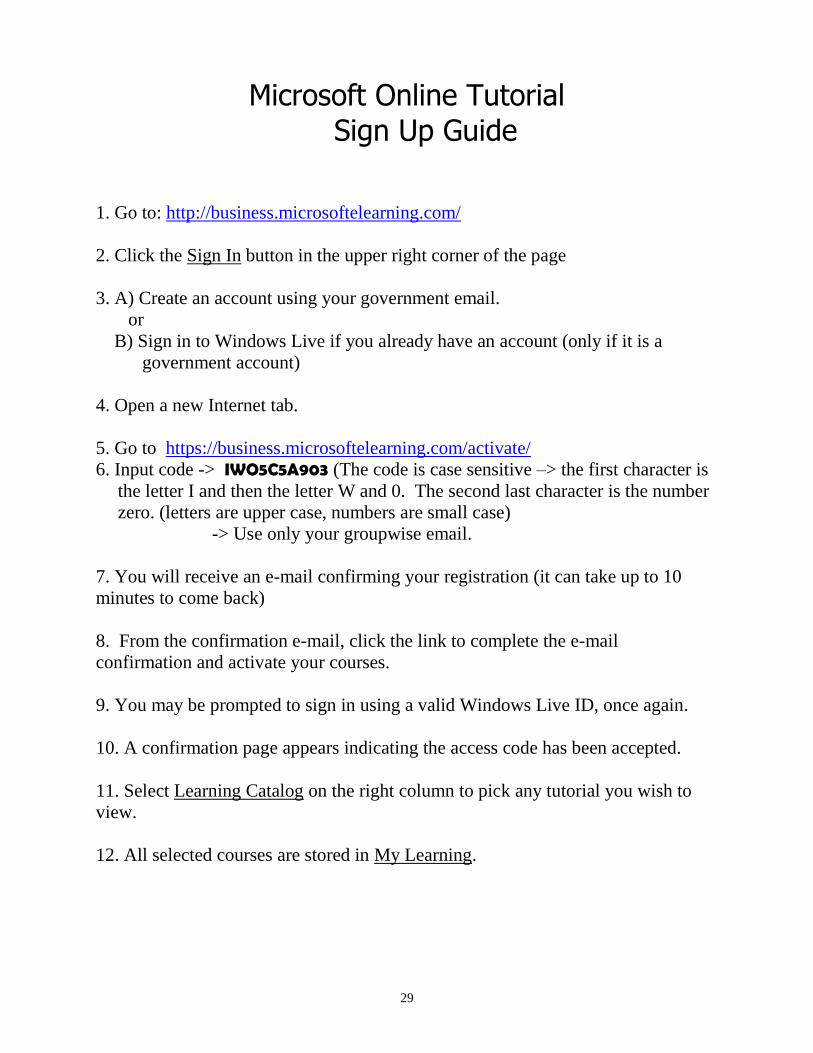
Microsoft Online Tutorial Sign Up Guide
1. Go to: http://business.microsoftelearning.com/
2. Click the Sign In button in the upper right corner of the page
3. A) Create an account using your government email.
or
B) Sign in to Windows Live if you already have an account (only if it is a
government account)
4. Open a new Internet tab.
5. Go to https://business.microsoftelearning.com/activate/
6. Input code -> IWO5C5A903 (The code is case sensitive –> the first character is
the letter I and then the letter W and 0. The second last character is the number
zero. (letters are upper case, numbers are small case)
-> Use only your groupwise email.
7. You will receive an e-mail confirming your registration (it can take up to 10
minutes to come back)
8. From the confirmation e-mail, click the link to complete the e-mail
confirmation and activate your courses.
9. You may be prompted to sign in using a valid Windows Live ID, once again.
10. A confirmation page appears indicating the access code has been accepted.
11. Select Learning Catalog on the right column to pick any tutorial you wish to
view.
12. All selected courses are stored in My Learning.