Embed Size (px)
Citation preview
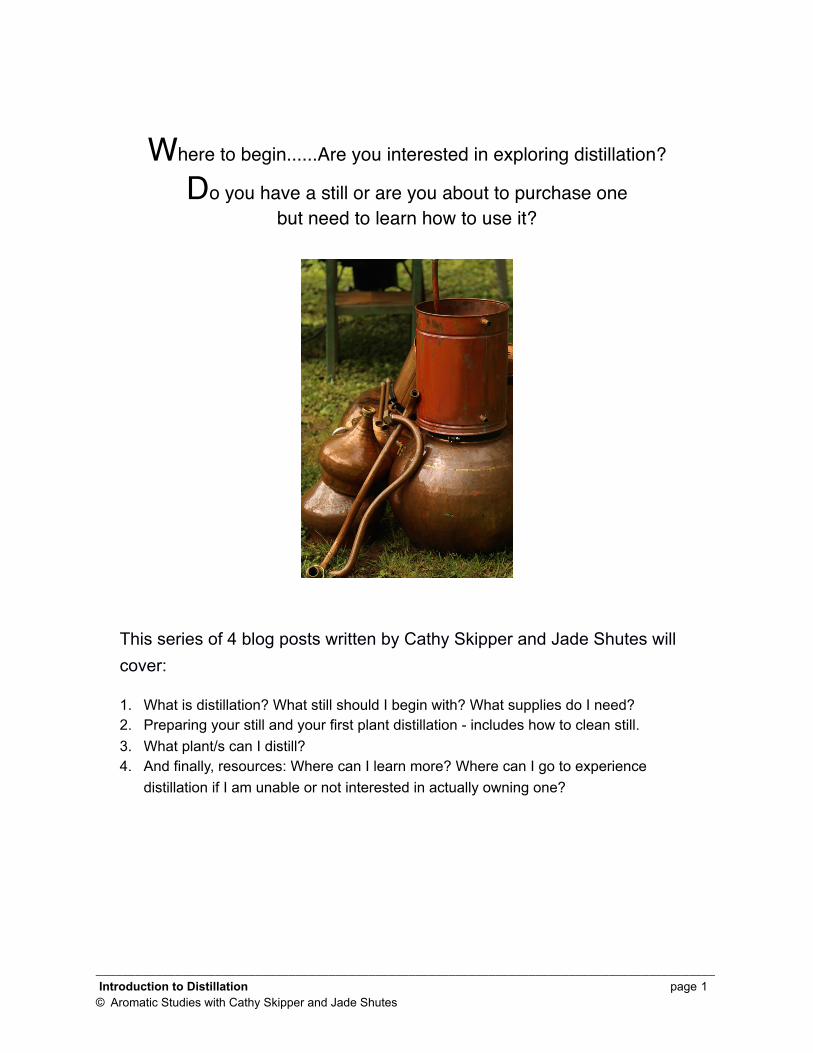
Where to begin......Are you interested in exploring distillation?
Do you have a still or are you about to purchase one but need to learn how to use it?
This series of 4 blog posts written by Cathy Skipper and Jade Shutes will cover:
1. What is distillation? What still should I begin with? What supplies do I need?2. Preparing your still and your first plant distillation - includes how to clean still.3. What plant/s can I distill?4. And finally, resources: Where can I learn more? Where can I go to experience
distillation if I am unable or not interested in actually owning one?
_____________________________________________________________________________________________ Introduction to Distillation page 1© Aromatic Studies with Cathy Skipper and Jade Shutes
Part I: What is Distillation?
Distillation as Alchemy
When we pick up an essential oil, we could say that we are holding a physical manifestation of alchemy - a substance of transformation. We could describe this process of alchemy in the language of the five elements. As plant material (Earth) is placed inside a container (Space) it is then mixed with water/steam (Water) and heated by fire/gas (Fire) which transforms water/earth (water/plant material) into a vapor (Ether). This vapor condenses down into aromatic water (hydrosol) and essential oil.
One of the reasons we recommend the split top distillation unit is that it will allow you to do three different types of distillation. The three types of distillation include:
→ Hydrodistillation (water distillation): During this type of distillation you will remove the column, place weighed plant material and weighted water into the pot. Ann Harman recommends a 3:1 (w/w) ratio. 3 pounds of water with 1 pound of plant material. Too much water may result in a weak hydrosol where as too little water could result in the burning of the pot and/or plant material. For watery plants, such as cucumber or the citruses, Ann recommends a 2:1 (w/w) ratio. NOTE: A gallon of water is approximately 8lb. We tend to use hydrodistillation for roots, hardier material such as seeds and for grasses (e.g. lemongrass). Most plants work great either for hydrodistillation or combo.
Note: In the case of water distillation (also known as hydrodistillation), the plant matter is entirely emerged in the water (between 2-6 times the amount of water to plant matter), which is then boiled. A grill is sometimes placed at the bottom of the boiler to stop the plants from sticking to the bottom of the boiler and getting burned. The grill can also be inserted higher up so that the water level is below it in the boiler and the plants are not directly immersed in the boiling water and this is called steam distillation. The steam extracts and carries the essences with it and this mix of essences and water is then turned into liquid and collected in the condenser. Using a grill in the boiler is one way to steam distill and can be done with a simple still.
→ Steam Distillation: During this type of distillation, you will be using the column. Place weighed and prepared (if necessary) plant material into the column. Add water (make sure you get the pH of the water you are using and note in your distillation journal) into the pot, just below the handles or at least 1/2 way full. Attach column to pot, place hat on and connect up the remainder to the condenser. Heat water to low boil, the steam will pass through the plant material, carrying the steam to the condenser, which then returns as hydrosol and maybe, a little bit of essential oil too!
→ Hydro/Steam Distillation (Water and Steam): During the hydro/steam distillation, you will be placing material in the pot with water as well as plant material in the column. Kind of like a double distillation! Often with this method, you will end up with a slightly stronger hydrosol then one or the other method used alone. Great for the Lamiaceae family of plants.
Note on Boiling Point: The boiling point represents the temperature at which a liquid is converted to a gas at a specified pressure. The fundamental nature of steam distillation is that it enables a compound or mixture of compounds to be distilled (and subsequently recovered) at a temperature substantially below that of the boiling point(s) of the individual constituent(s).
_____________________________________________________________________________________________ Introduction to Distillation page 2© Aromatic Studies with Cathy Skipper and Jade Shutes
Essential oils contain substances with boiling points up to 200°C or higher, including some that are solids at normal temperatures. In the presence of steam or boiling water, however, these substances are volatilized at a temperature close to 100°C at atmospheric pressure.
During distillation the plant material is placed upon a grid inside the column or in water inside the pot, or both. Once inside, the still is sealed by placing the hat, swan neck and extension onto the condenser. The pot is then heated and as it begins to boil, the water/steam slowly breaks through the plant material to remove its volatile constituents. These volatile constituents rise upward into the hat through the connecting tubes leading into the condenser. The condenser cools the rising vapor back into liquid form. The liquid is then collected in a glass container below the condenser. Since the aromatic waters and essential oil do not mix, the essential oil, if any, may be seen on the surface of the water where it can be siphoned off. Occasionally an essential oil is heavier than water and is found on the bottom rather than the top, such as with clove essential oil.
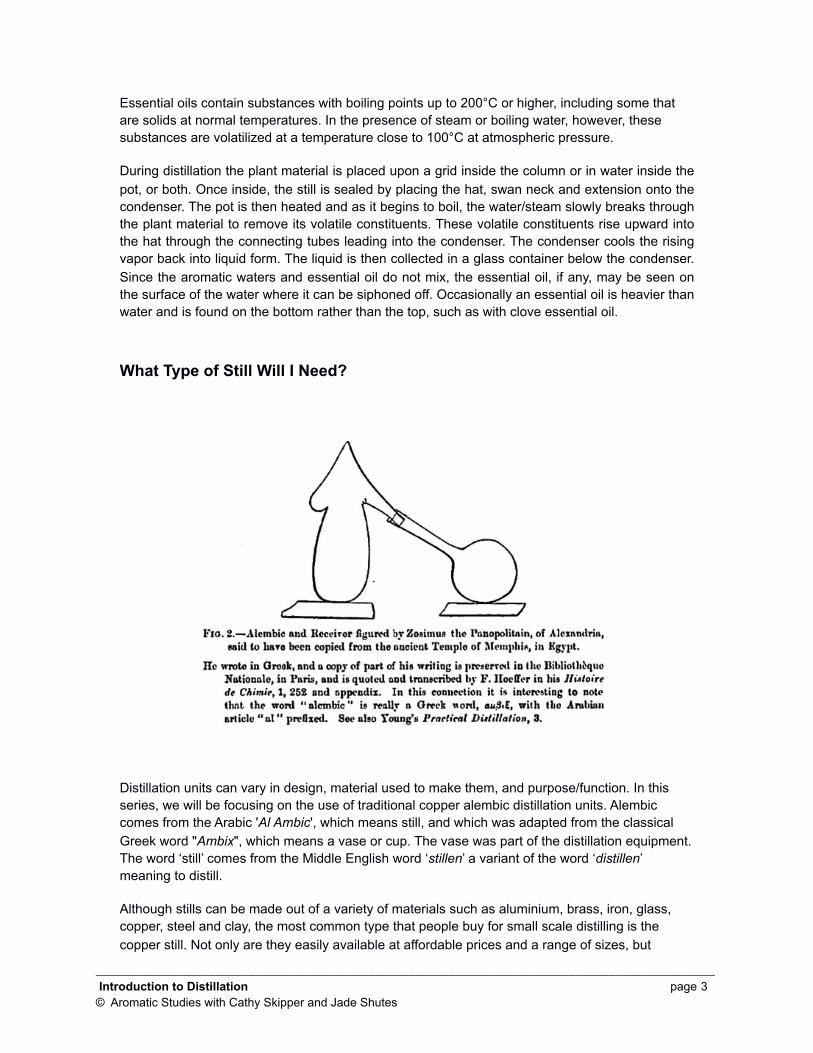
What Type of Still Will I Need?
Distillation units can vary in design, material used to make them, and purpose/function. In this series, we will be focusing on the use of traditional copper alembic distillation units. Alembic comes from the Arabic 'Al Ambic', which means still, and which was adapted from the classical Greek word "Ambix", which means a vase or cup. The vase was part of the distillation equipment. The word ‘still’ comes from the Middle English word ‘stillen’ a variant of the word ‘distillen’ meaning to distill.
Although stills can be made out of a variety of materials such as aluminium, brass, iron, glass, copper, steel and clay, the most common type that people buy for small scale distilling is the copper still. Not only are they easily available at affordable prices and a range of sizes, but
_____________________________________________________________________________________________ Introduction to Distillation page 3© Aromatic Studies with Cathy Skipper and Jade Shutes
copper is also a noble metal that has been used traditionally for distilling for thousands of years. Old time moonshiners in the Appalachians used copper and modern commercial distilleries continue to employ copper stills.
Since we are most experienced in the use of copper stills compared to other still types, we will continue to refer to copper stills in this series on distillation. We will provide resources as each material or supply arises. Please remember that when buying or making a still only use materials that have been approved for food-grade use, such as stainless steel, glass or copper.
Why Copper? One of the most important properties of copper is that it removes any sulphur compounds that can occur naturally in the source materials, due to the yeast species that live on the plants to be distilled. Using a copper still will avoid any off taste or smell from the sulphur that could contaminate the hydrosol.
Copper also has very high thermal and electrical conductivity, which helps distribute the heat applied during distillation evenly and quickly and also allows the vapours to cool quickly and thoroughly. It is a resilient, malleable, long-lasting material.
Copper is also very resistant to corrosion, especially under extreme temperatures and humidity, which explains why copper artifacts in great condition have been found in various archaeological sites, some dating back to ancient Egypt and Rome (4). Copper has been scientifically proven to have antimicrobial effects and so destroys a wide range of bacteria and viruses that may otherwise develop in the hydrosol. It has been observed that copper surfaces had more than 90% less bacteria when compared to surfaces of other traditional materials.(5) Copper has been used traditionally to purify water.
Is it better to use a riveted or a welded copper still?A rivet is a small metal pin used to fasten flat pieces of metal together. It is a cylinder with forged heads, one formed at the time of making the rivet and the other formed on the hot rivet after it has been inserted. The joining of parts with these cylindrical fasteners passing through holes dates back to Egyptian times. Durable connections between metal parts are required for most applications and are a critical part of every design of metal equipment.
Rivets have been used in all major types of metal-based construction, including airplanes, ships, steam engines, skyscrapers, etc., and have proven to be very reliable and long-lasting. In industrial steel fabrication, however, welding has almost completely replaced riveting as a means of making connections.(8)
Some of the copper stills on the market are riveted together, others are soldered/welded. I personally think a riveted still will be less inclined to ‘leak.' By this I mean that sometimes welded stills have areas where the welding hasn’t taken completely and steam can leak out of the gaps between the welding. It is not a difficult job for someone who knows how to weld metal to rectify this, but this problem does not tend to occur in riveted stills. **We will be making recommendations for specific stills below!
_____________________________________________________________________________________________ Introduction to Distillation page 4© Aromatic Studies with Cathy Skipper and Jade Shutes
Copper PrecipitateThe main criticism of copper compared to stainless steel, for example, as a material for alembics is that copper can leave a precipitate in the hydrosol. Copper precipitate is a red substance that colours the hydrosol, finally settling at the bottom of the bottle after a month or so. I have personally been lucky enough in over ten years of distilling in small copper stills never to have had any problems with precipitate. If distillation results in copper precipitate, the quality of the hydrosol will be compromised and it should be discarded.
Size of StillThe size of still you will would like to purchase will be determined principally by the quantity of plant matter you are growing or are able to ethically wild craft, how much you are planning to distill, and the quantity of hydrosol desired. If it is for personal and family use, a 10 or 20 liter still should be big enough. Smaller copper stills do exist, but we do not recommend any smaller than 10 liter, as the water evaporates too quickly and the size significantly limits the amount of hydrosol one can produce. A 10 or 20 liter still can be transported and stored easily and is a great size to begin exploring distillation.
30 liter stills and larger take up slightly more space during distilling and storage and require more plant material. However, you are not require to fill up the still with plant material—a half- or quarter-full still works fine. For busy herbalists and aromatherapists planning to produce hydrosols for their practices, including using them to make cosmetics etc., a 30 liter still is ideal. For those of you planning to venture into the commercial production of hydrosols a 30 or 50 liter still will be big enough, unless you want to also produce essential oils. In that case, a 60-150 liter still is really the minimum useful size.
Regarding essential oil yield, there are occasions where it is possible to extract a few milliliters of essential oil with a still as small as 20 liters. I have been lucky enough when distilling highly aromatic and high yield plants such as wild lavender and wild thyme from areas that are very dry and hot to have harvested a few milliliters of essential oil in a 20 liter copper still with a column. A few milliliters of essential oil is enough to easily collect with a syringe or pipette from the top of the distilled water, since the oil floats on top due to its lower density. However, it is important to understand that this is a rare occurrence and stills smaller than 40 liters will generally be used to produce hydrosols.
_____________________________________________________________________________________________ Introduction to Distillation page 5© Aromatic Studies with Cathy Skipper and Jade Shutes
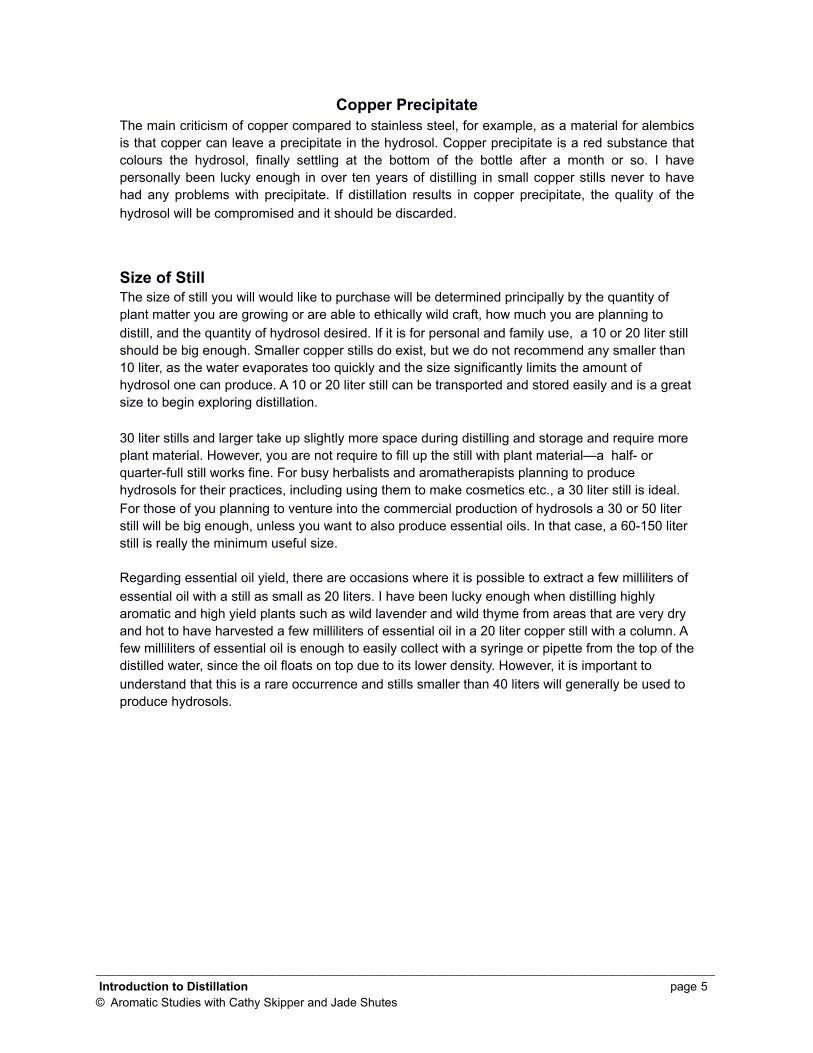
We recommend the following suppliers for distillation units and/or kits.
Copper Alembic: Direct from Portugal
This is our favorite supplier for getting distillation units. If you are only ordering one or two, it is typically quite easy for them to go through customs and get to you! When you order a distillation unit direct, you will need to gather up all other supplies needed. (see Beginning to Distill post).
We recommend the Split Top Rotating Column Copper Alembic Stills (20L - 60L) premium version or the 20 L Traditional Riveted Alembic Still Premium..
_____________________________________________________________________________________________ Introduction to Distillation page 6© Aromatic Studies with Cathy Skipper and Jade Shutes
CopperStills
If you would like to purchase a distillation kit, Ann Harman has 20L and 40L copper alembic distillation kits that includes 2000 ml Separatory Funnel with Heavy duty Stand and 6″ Ring and Funnel Brush, pH Kit (Digital Hanna pH meter.calibration solutions for 4.0 & 7.0, cleaning solution, storage solution, thermometer, 1 testing vial), Copper Funnel and 10 Paint Strainers, Condenser Snake (for cleaning). Other supplies will still need to be gathered.
She also sells distillation accessories, such as the valuable condenser snake for stills 20L+, and other tools you may eventually want to gather. **See Distillation Calendar Listings for her classes.
_____________________________________________________________________________________________ Introduction to Distillation page 7© Aromatic Studies with Cathy Skipper and Jade Shutes
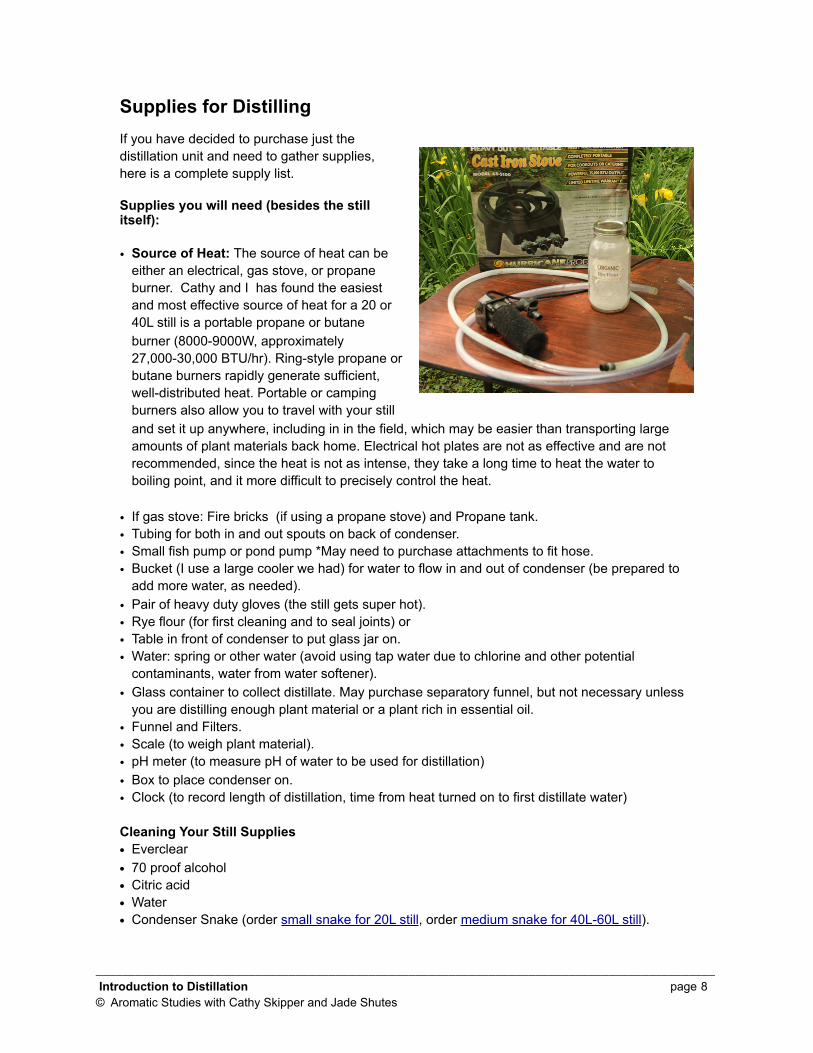
Supplies for DistillingIf you have decided to purchase just the distillation unit and need to gather supplies, here is a complete supply list.
Supplies you will need (besides the still itself):
• Source of Heat: The source of heat can be either an electrical, gas stove, or propane burner. Cathy and I has found the easiest and most effective source of heat for a 20 or 40L still is a portable propane or butane burner (8000-9000W, approximately 27,000-30,000 BTU/hr). Ring-style propane or butane burners rapidly generate sufficient, well-distributed heat. Portable or camping burners also allow you to travel with your still and set it up anywhere, including in in the field, which may be easier than transporting large amounts of plant materials back home. Electrical hot plates are not as effective and are not recommended, since the heat is not as intense, they take a long time to heat the water to boiling point, and it more difficult to precisely control the heat.
• If gas stove: Fire bricks (if using a propane stove) and Propane tank.• Tubing for both in and out spouts on back of condenser. • Small fish pump or pond pump *May need to purchase attachments to fit hose.• Bucket (I use a large cooler we had) for water to flow in and out of condenser (be prepared to
add more water, as needed). • Pair of heavy duty gloves (the still gets super hot).• Rye flour (for first cleaning and to seal joints) or • Table in front of condenser to put glass jar on.• Water: spring or other water (avoid using tap water due to chlorine and other potential
contaminants, water from water softener).• Glass container to collect distillate. May purchase separatory funnel, but not necessary unless
you are distilling enough plant material or a plant rich in essential oil.• Funnel and Filters.• Scale (to weigh plant material).• pH meter (to measure pH of water to be used for distillation)• Box to place condenser on.• Clock (to record length of distillation, time from heat turned on to first distillate water)
Cleaning Your Still Supplies• Everclear• 70 proof alcohol• Citric acid• Water• Condenser Snake (order small snake for 20L still, order medium snake for 40L-60L still).
_____________________________________________________________________________________________ Introduction to Distillation page 8© Aromatic Studies with Cathy Skipper and Jade Shutes
Where to Get Supplies
Local Hardware Store:_____ Fire bricks_____ Propane tank (or find at your local grocery store)_____ Tubing for condenser (bring the condenser into the store with you, to ensure a solid fit)_____ Small pond pump with attachments_____ Bucket (we used a large cooler) - this is for the condenser water_____ Pair of heavy duty gloves_____ Teflon tape (as sealant, if not using rye flour)
Grocery Store:_____ Rye flour_____ Large Glass jars
Liquor Store:_____ Everclear or 190 proof alcohol (may be able to order online depending on your state laws). I tend to use vodka to clean my still although I have also used organic grain alcohol a few times as well._____ Citric acid (can get from mountain rose herbs or bulk natural apothecary or sometimes at your natural food coop/store).
Other Supplies:_____ Source of Heat: We recommend this stove or one similar to it as it allows for more control over temperature.
_____ Scale (to weigh plant material): Depending on how much plant material you may be harvesting, you will want to make sure you have a good scale that is large or small enough for what you plan on weighing.
_____ pH meter (I use this one.) and extra calibration solution.
_____ Filters: such as these. I have also used coffee filters.
_____ Funnel (copper, stainless steel, or glass only. avoid plastic. Etsy sometimes has copper funnels, otherwise you can get them from our recommended distillation unit suppliers.
_____ Glass container to collect distillate: Recommend either a canning jar or other large jar. You will probably need 2-6 three-pint jars. Once you have completed the distillation, you will want to combine all the hydrosol together, clean and dry jars, then pour hydrosol into glass jars using a funnel with filter in it. ***You can also use a separatory funnel with stand. These are a bit pricey and I have yet to use mine, so it is up to you entirely. I will probably use it sometime this summer for some plants I believe I will also get essential oil from.
_____________________________________________________________________________________________ Introduction to Distillation page 9© Aromatic Studies with Cathy Skipper and Jade Shutes
Additional Notes:
→ Water: The quality of the water is essential when making hydrosols for therapeutic use, since water makes up the bulk of the hydrosol. The best water is that of an unpolluted, clean and vibrant spring. Higher calcium content, commonly called 'hard water', is better. The pH should ideally be around 6.0-6.5, i.e. slightly acidic. The recommended range is any where between 3 - 6.5. Since fresh spring water with such properties is not always available, other kinds of water may need to be used. We recommend using bottled spring water rather than tap water, which commonly contains disinfectants such as chlorine and is often vibrationally dead. If tap water is the only possibility, filter it (ideally using reverse osmosis) and leave it in an open container for 24 hours to allow the chlorine to evaporate. In terms of the quantity of water to plant material, Ann Harman, (6) in her book on hydrosols, states that the recommended ratio is 1 part plant matter to 3 parts water, for example 1kg of plant material to 3 liters of water (since 1 liter of water weighs1 kg). I tend to do as I do in cooking and that is to use my instinct and eye-measure to judge, making sure the fresh plant matter is well-covered by water. In my experience, this is usually an adequate approximation.
→ Filtering: It is important to filter the hydrosols before bottling and storing. A fine sieve, paper coffee filter or muslin material (cheese cloth) do the job well enough to get rid of any unwanted particulate material that may be suspended in the hydrosol.
→ Sealing the Still: In order to avoid the steam from escaping from one of the many joints that connect the different parts of the still it is necessary to have an effective sealant. Rye flour is commonly used for this as it dries into a cement-like paste and is easy to remove when cleaning the apparatus at the end of the distillation process.
→ Scales: You will need scales large enough to weigh the plant matter.
→ Electronic pH Meter: An electronic pH meter is better than pH strips as it is easier to use and gives a more precise reading. These meters are not very expensive. Hydrosols are usually in the acidic pH range, anywhere from 3 to 6.5 but this depends on many factors including the water, place and time of harvest etc.
It is interesting to keep a log of the pH from the beginning to the end of the distillation. Since the pH of the water you will be distilling with the plant material will have an effect on the final pH, do not forget to measure its pH before adding the plant material. Then measure the pH at regular intervals, from the first drops of hydrosol that come out of the still until the you've collected all of the hydrosol, just before bottling. Keep a log book of the distillation process and details for each plant that you distill (including date and time of day you harvested, which part of the plant you used, how long you let the plant material dry before distillation, weather conditions, etc.) and record the pH readings along with the rest of your distilling information for each batch. It is interesting to regularly measure the pH of your stored hydrosols, too, as a change in pH could indicate bacterial growth for example.
_____________________________________________________________________________________________ Introduction to Distillation page 10© Aromatic Studies with Cathy Skipper and Jade Shutes
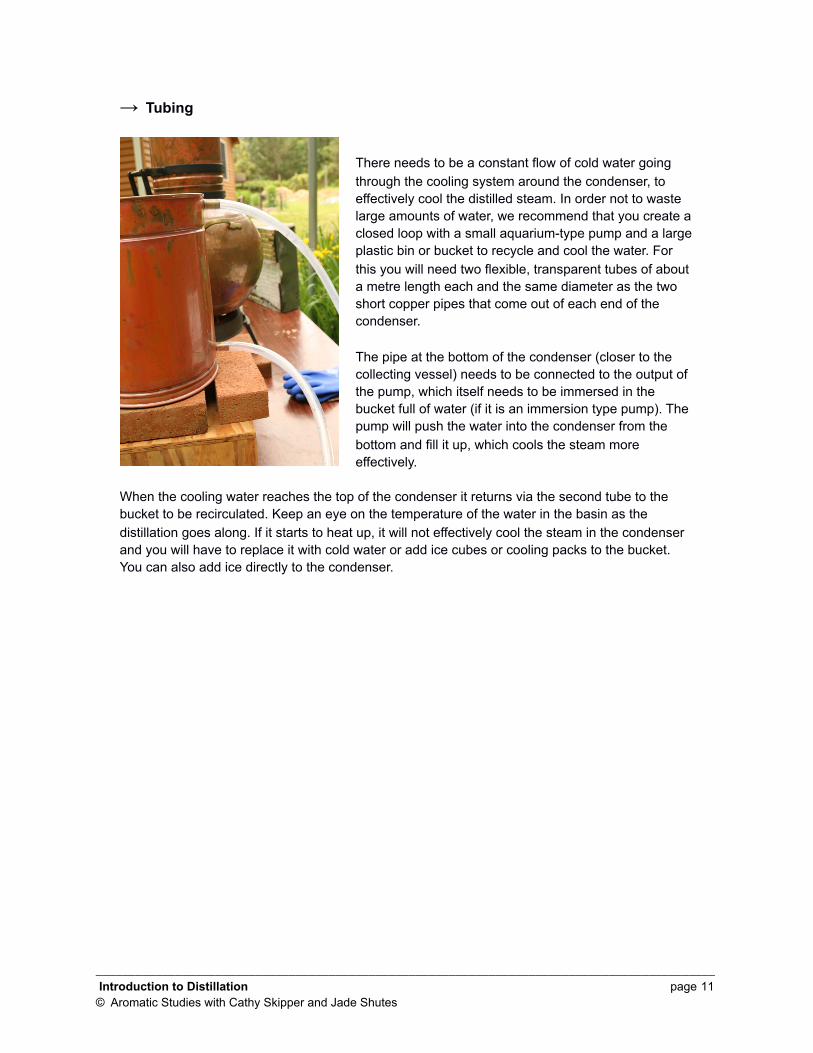
→ Tubing
There needs to be a constant flow of cold water going through the cooling system around the condenser, to effectively cool the distilled steam. In order not to waste large amounts of water, we recommend that you create a closed loop with a small aquarium-type pump and a large plastic bin or bucket to recycle and cool the water. For this you will need two flexible, transparent tubes of about a metre length each and the same diameter as the two short copper pipes that come out of each end of the condenser.
The pipe at the bottom of the condenser (closer to the collecting vessel) needs to be connected to the output of the pump, which itself needs to be immersed in the bucket full of water (if it is an immersion type pump). The pump will push the water into the condenser from the bottom and fill it up, which cools the steam more effectively.
When the cooling water reaches the top of the condenser it returns via the second tube to the bucket to be recirculated. Keep an eye on the temperature of the water in the basin as the distillation goes along. If it starts to heat up, it will not effectively cool the steam in the condenser and you will have to replace it with cold water or add ice cubes or cooling packs to the bucket. You can also add ice directly to the condenser.
_____________________________________________________________________________________________ Introduction to Distillation page 11© Aromatic Studies with Cathy Skipper and Jade Shutes
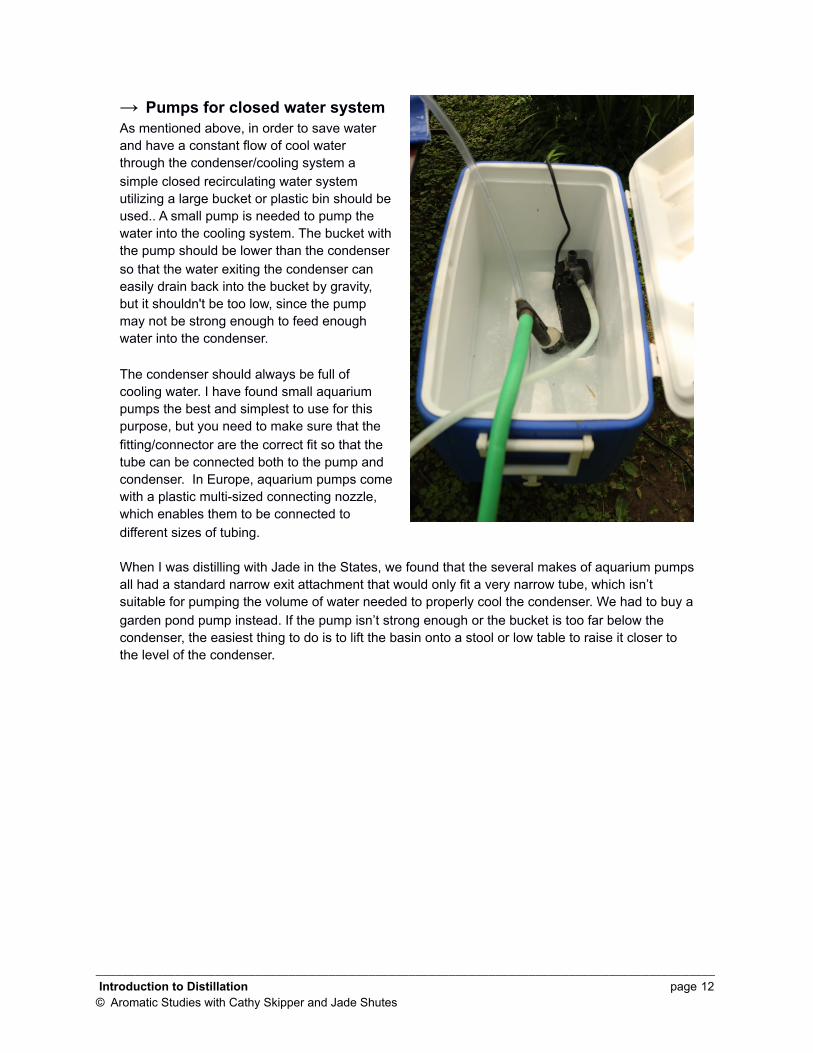
→ Pumps for closed water systemAs mentioned above, in order to save water and have a constant flow of cool water through the condenser/cooling system a simple closed recirculating water system utilizing a large bucket or plastic bin should be used.. A small pump is needed to pump the water into the cooling system. The bucket with the pump should be lower than the condenser so that the water exiting the condenser can easily drain back into the bucket by gravity, but it shouldn't be too low, since the pump may not be strong enough to feed enough water into the condenser.
The condenser should always be full of cooling water. I have found small aquarium pumps the best and simplest to use for this purpose, but you need to make sure that the fitting/connector are the correct fit so that the tube can be connected both to the pump and condenser. In Europe, aquarium pumps come with a plastic multi-sized connecting nozzle, which enables them to be connected to different sizes of tubing.
When I was distilling with Jade in the States, we found that the several makes of aquarium pumps all had a standard narrow exit attachment that would only fit a very narrow tube, which isn’t suitable for pumping the volume of water needed to properly cool the condenser. We had to buy a garden pond pump instead. If the pump isn’t strong enough or the bucket is too far below the condenser, the easiest thing to do is to lift the basin onto a stool or low table to raise it closer to the level of the condenser.
_____________________________________________________________________________________________ Introduction to Distillation page 12© Aromatic Studies with Cathy Skipper and Jade Shutes

Resources
Harman, A. (2015). Harvest to Hydrosol. Fruitland, WA: IAG Botanics.
“L’ALAMBIC – l’Art de la Distillation – Alcools, Parfums, Médecines”Matthieu Frecon
(8) http://www.copper-alembic.com/ns/cms.php?id_cms=21
‘The art of distillation’ (1650) by John French – accessible at http://www.morningmystbotanics.com/wp-content/uploads/The-Art-of-Distillation.pdf
_____________________________________________________________________________________________ Introduction to Distillation page 13© Aromatic Studies with Cathy Skipper and Jade Shutes

![Organic Qualitative Analysishomepage.smc.edu/kline_peggy/Organic/Lab_Reports_Ch_24/Mohrig_Qual_Proc.pdf11.3a] or microscale distillation [see Technique 11.3b]. The boiling point of](https://img.pdfslide.us/doc/110x75/5e5472feee6c1c7864204cfc/organic-qualitative-113a-or-microscale-distillation-see-technique-113b-the.jpg)