Embed Size (px)
Citation preview
Introduction to Canvas
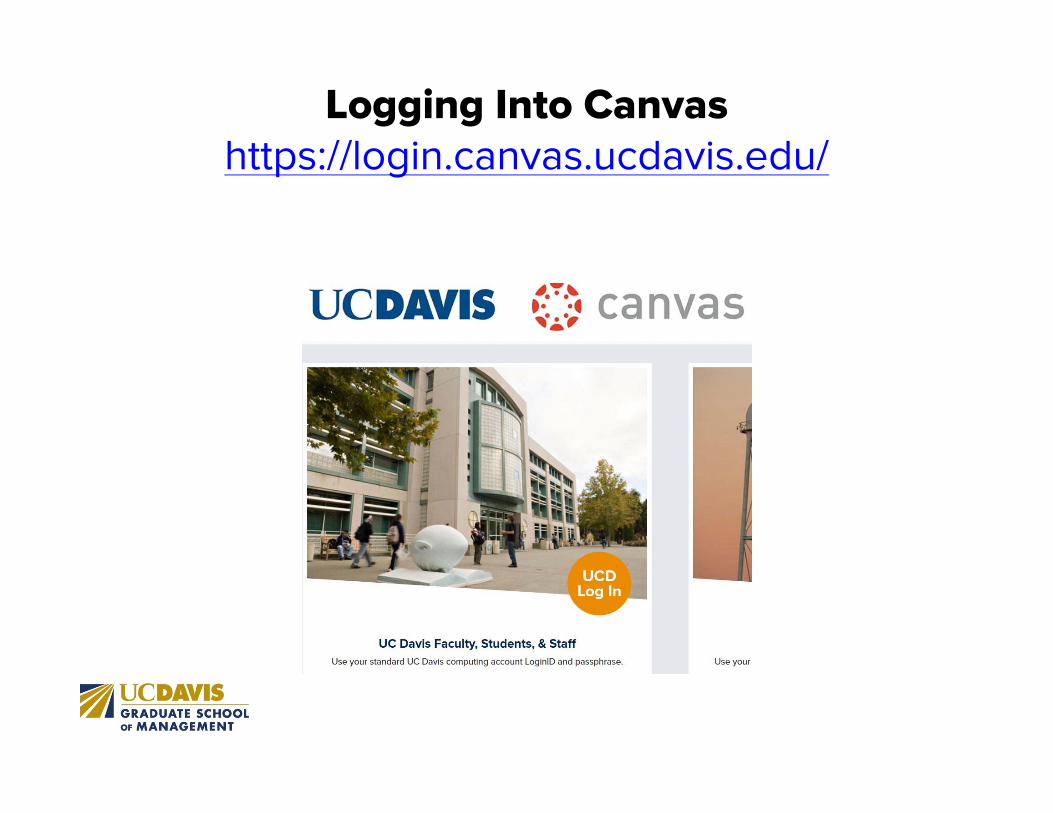
Logging Into Canvashttps://login.canvas.ucdavis.edu/
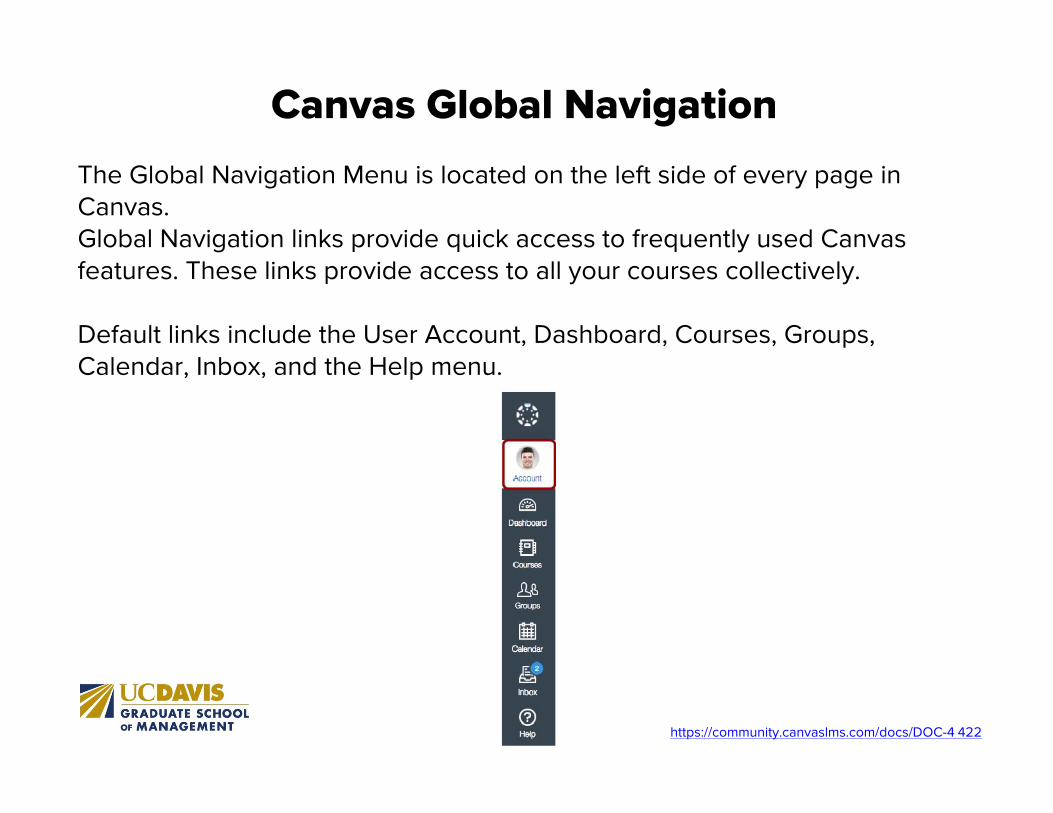
Canvas Global NavigationThe Global Navigation Menu is located on the left side of every page in Canvas.Global Navigation links provide quick access to frequently used Canvas features. These links provide access to all your courses collectively.
Default links include the User Account, Dashboard, Courses, Groups, Calendar, Inbox, and the Help menu.
https://community.canvaslms.com/docs/DOC-4 422
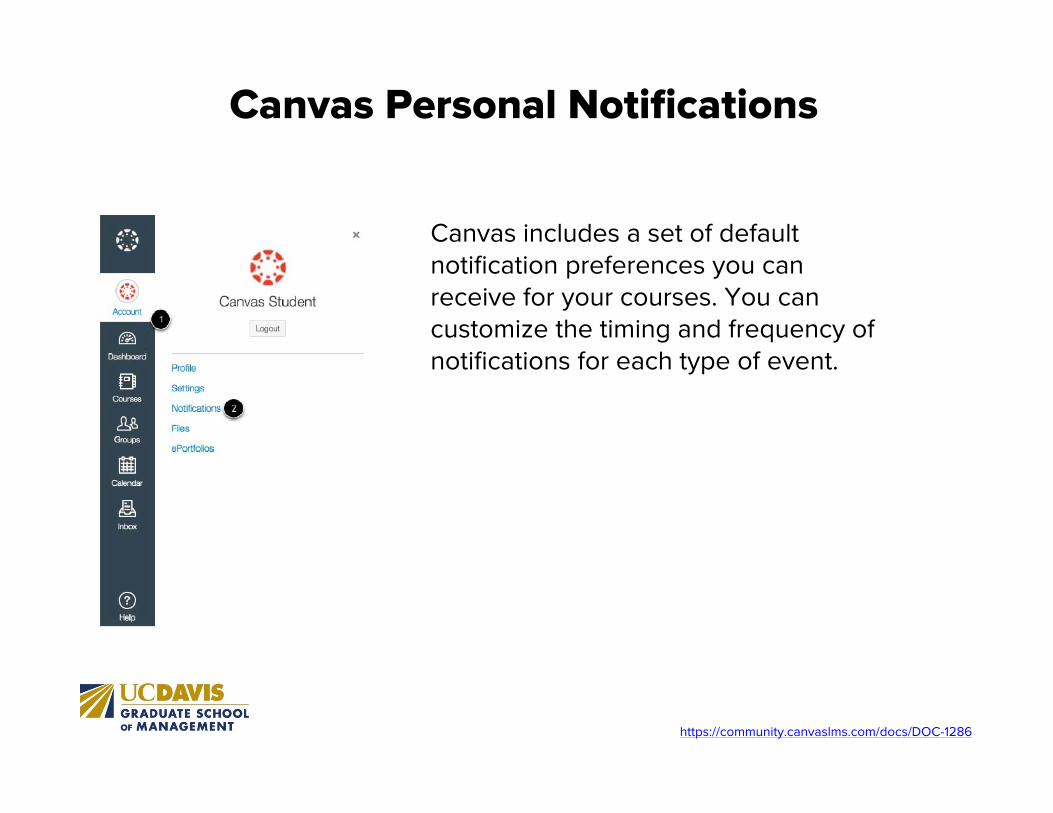
Canvas Personal Notifications
Canvas includes a set of default notification preferences you can receive for your courses. You can customize the timing and frequency of notifications for each type of event.
https://community.canvaslms.com/docs/DOC-1286
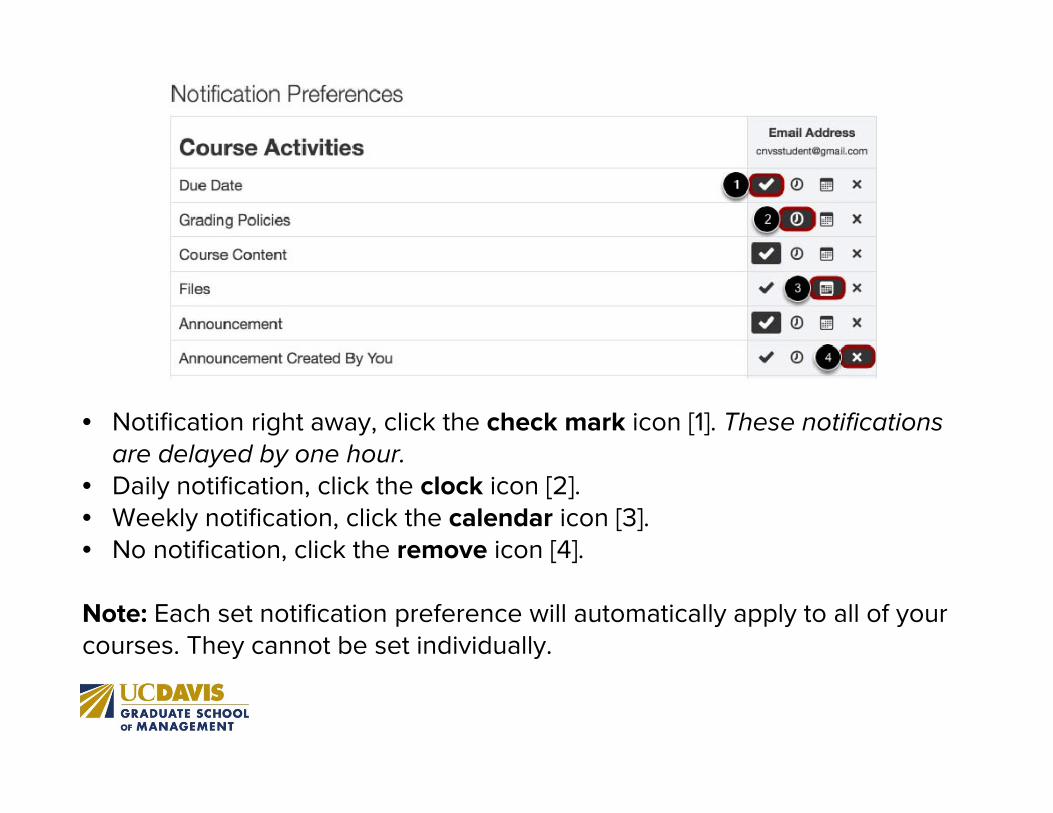
• Notification right away, click the check mark icon [1]. These notifications are delayed by one hour.
• Daily notification, click the clock icon [2].• Weekly notification, click the calendar icon [3].• No notification, click the remove icon [4].
Note: Each set notification preference will automatically apply to all of your courses. They cannot be set individually.
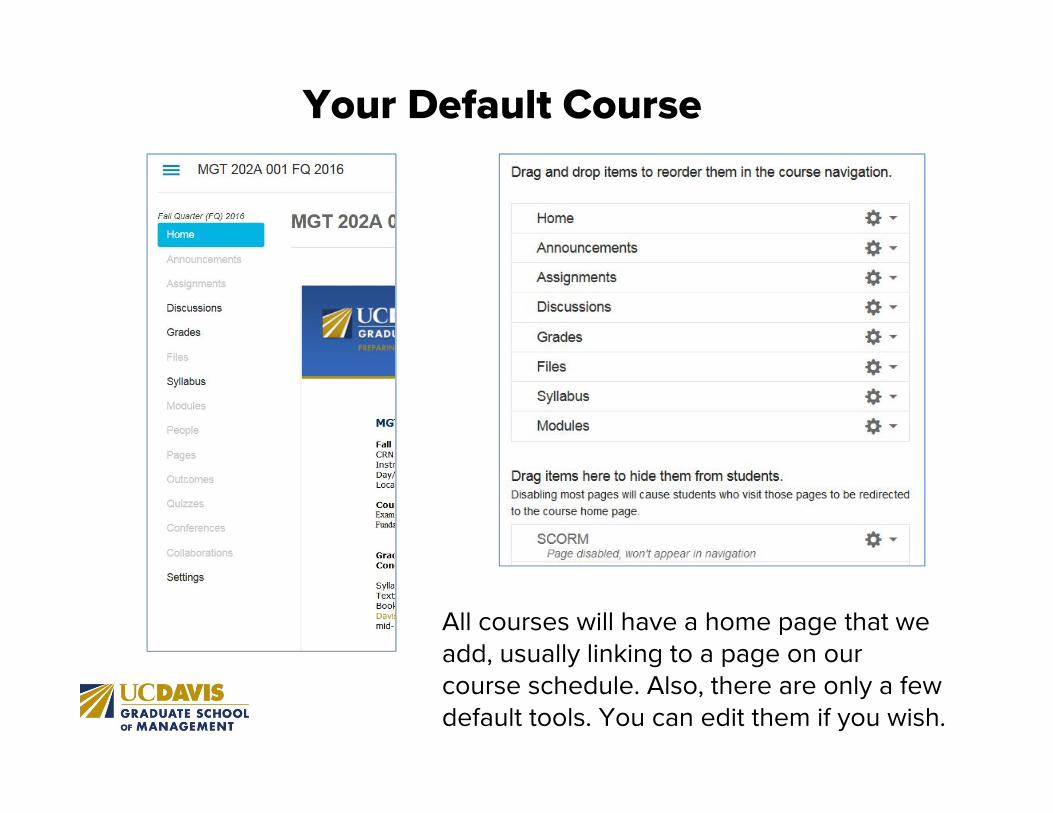
Your Default Course
All courses will have a home page that we add, usually linking to a page on our course schedule. Also, there are only a few default tools. You can edit them if you wish.
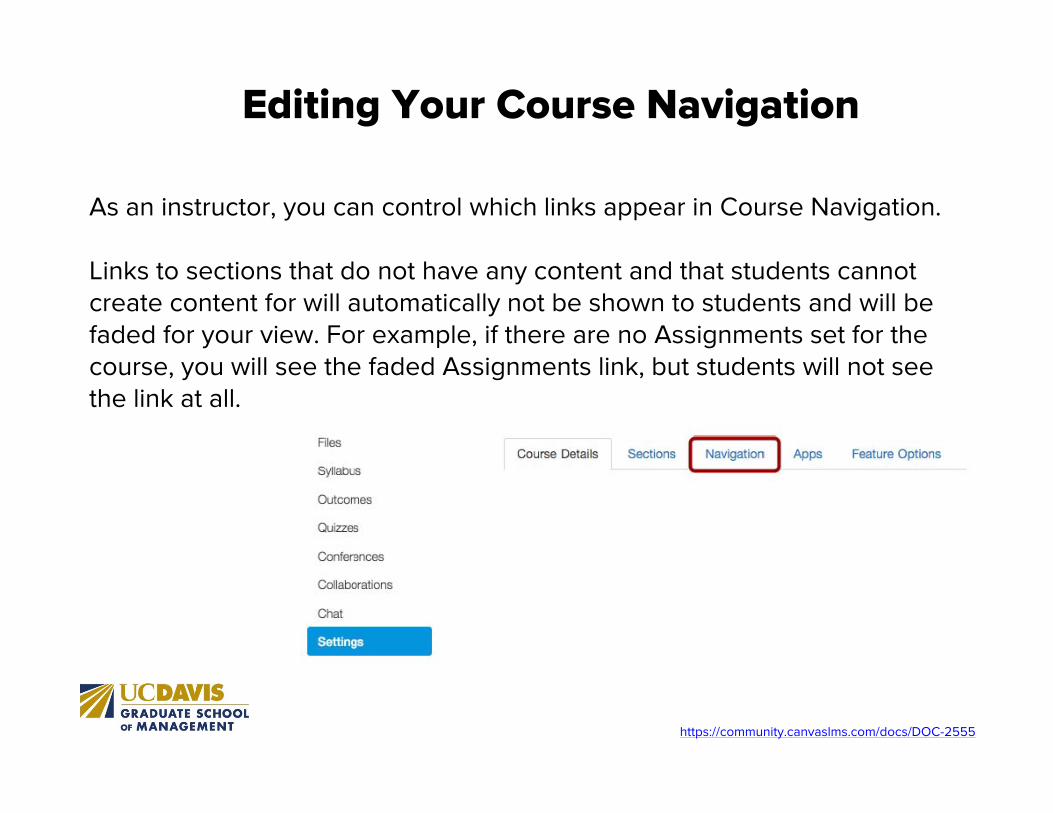
Editing Your Course Navigation
As an instructor, you can control which links appear in Course Navigation.
Links to sections that do not have any content and that students cannot create content for will automatically not be shown to students and will be faded for your view. For example, if there are no Assignments set for the course, you will see the faded Assignments link, but students will not see the link at all.
https://community.canvaslms.com/docs/DOC-2555

To reorder navigation links, you can drag and drop links to create a custom order [1]. You can also click the link Settings icon [2] and select the Move/Disable option [3].
You must remember to click the Save button at the bottom of the page for your changes to take effect.
Communicating With Your StudentsAnnouncements
• Announcements allow you to communicate with your students about course activities and post interesting course-related topics.
• Announcements go out to the entire course. There is no easy way to differentiate who will see the announcement
Conversations
• Conversations is the messaging tool used instead of email to communicate with a course, a group, an individual student, or a group of students. You can communicate with other people in your course at any time.
• This tool can be used to communicate with a specific section of a joint course.

Announcements
• In Course Navigation, click the Announcements link.
• Click the Add Announcement button.
http://guides.instructure.com/m/4152/l/50731-how-do-i-make-an-announcement-in-a-course
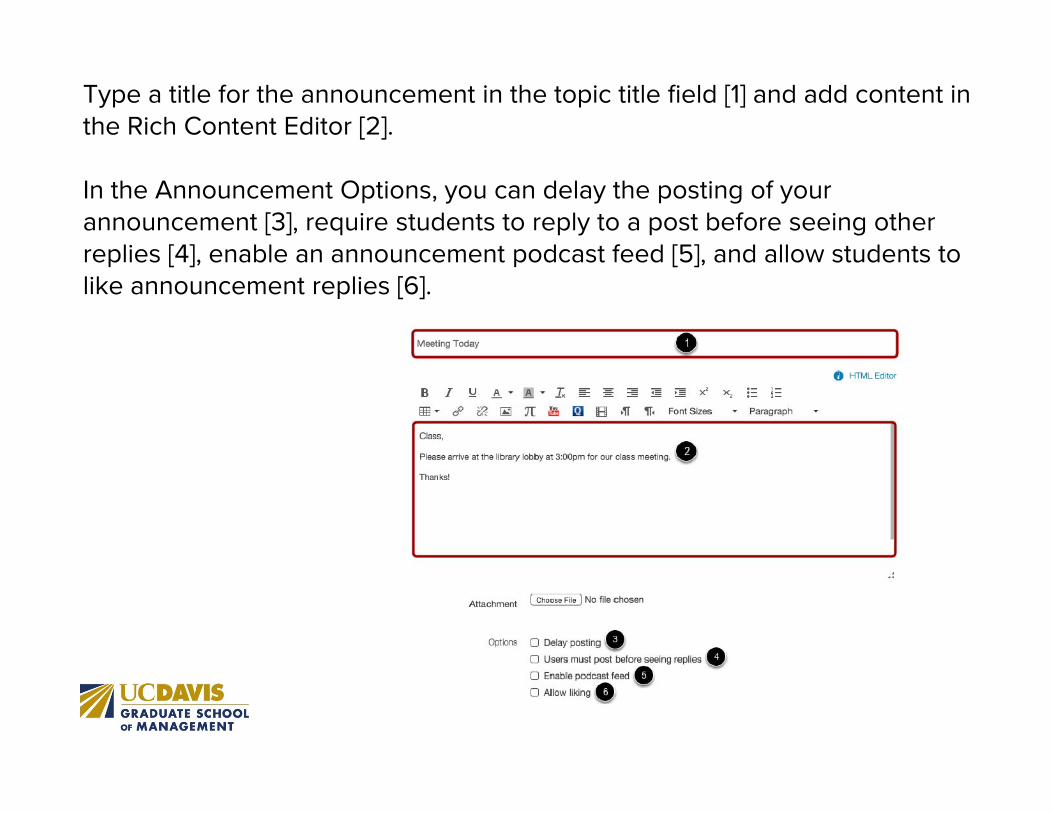
Type a title for the announcement in the topic title field [1] and add content in the Rich Content Editor [2].
In the Announcement Options, you can delay the posting of your announcement [3], require students to reply to a post before seeing other replies [4], enable an announcement podcast feed [5], and allow students to like announcement replies [6].
Conversations
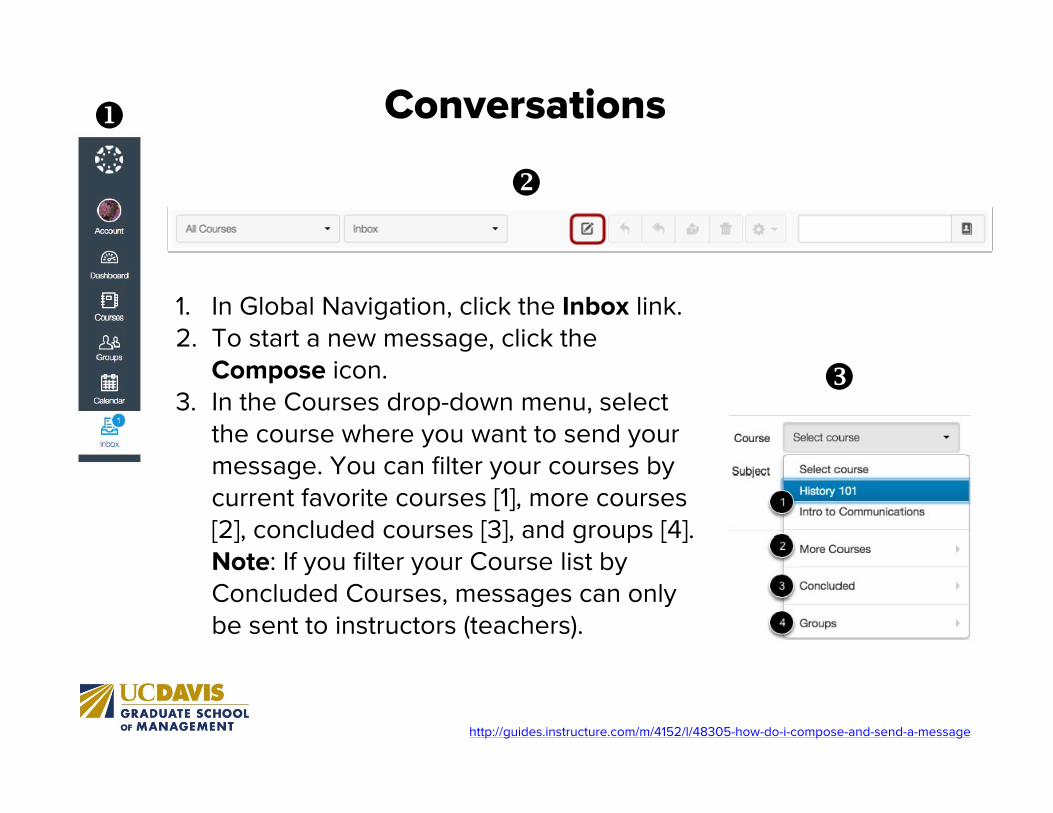
http://guides.instructure.com/m/4152/l/48305-how-do-i-compose-and-send-a-message
1. In Global Navigation, click the Inbox link.2. To start a new message, click the
Compose icon.3. In the Courses drop-down menu, select
the course where you want to send your message. You can filter your courses by current favorite courses [1], more courses [2], concluded courses [3], and groups [4].Note: If you filter your Course list by Concluded Courses, messages can only be sent to instructors (teachers).
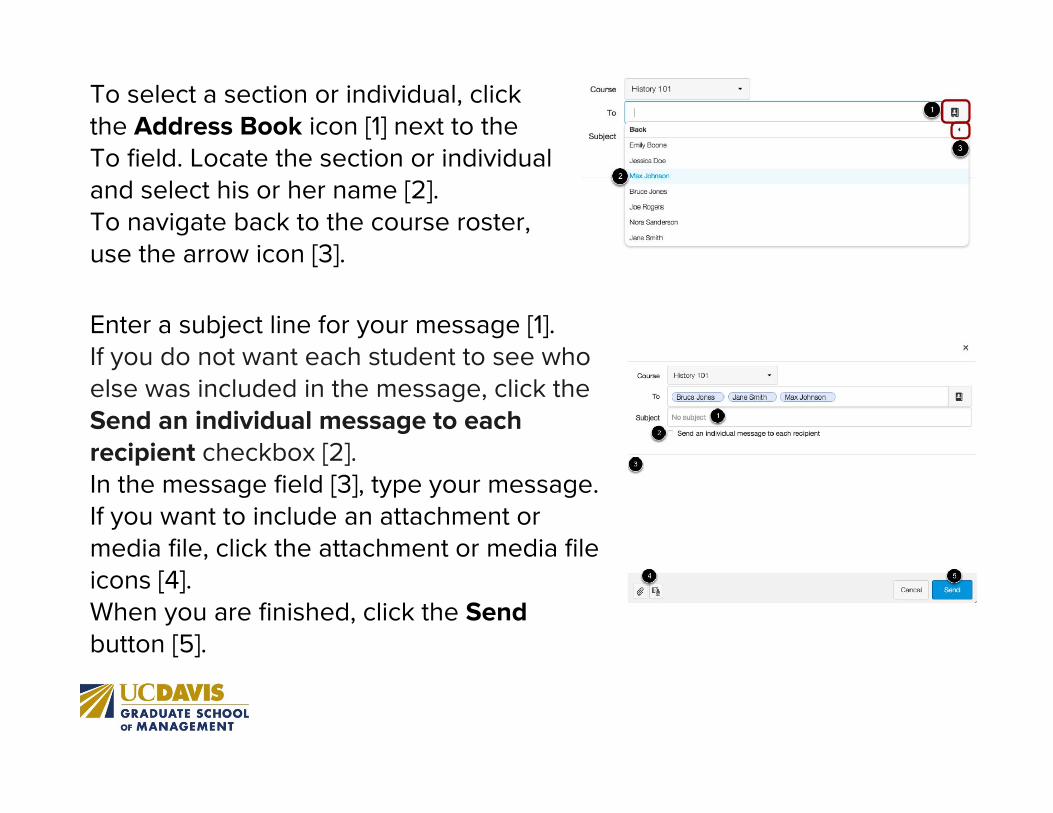
To select a section or individual, click the Address Book icon [1] next to the To field. Locate the section or individual and select his or her name [2]. To navigate back to the course roster, use the arrow icon [3].
Enter a subject line for your message [1].If you do not want each student to see who else was included in the message, click the Send an individual message to each recipient checkbox [2].In the message field [3], type your message. If you want to include an attachment or media file, click the attachment or media file icons [4].When you are finished, click the Sendbutton [5].
Adding Files/Folders to a Course
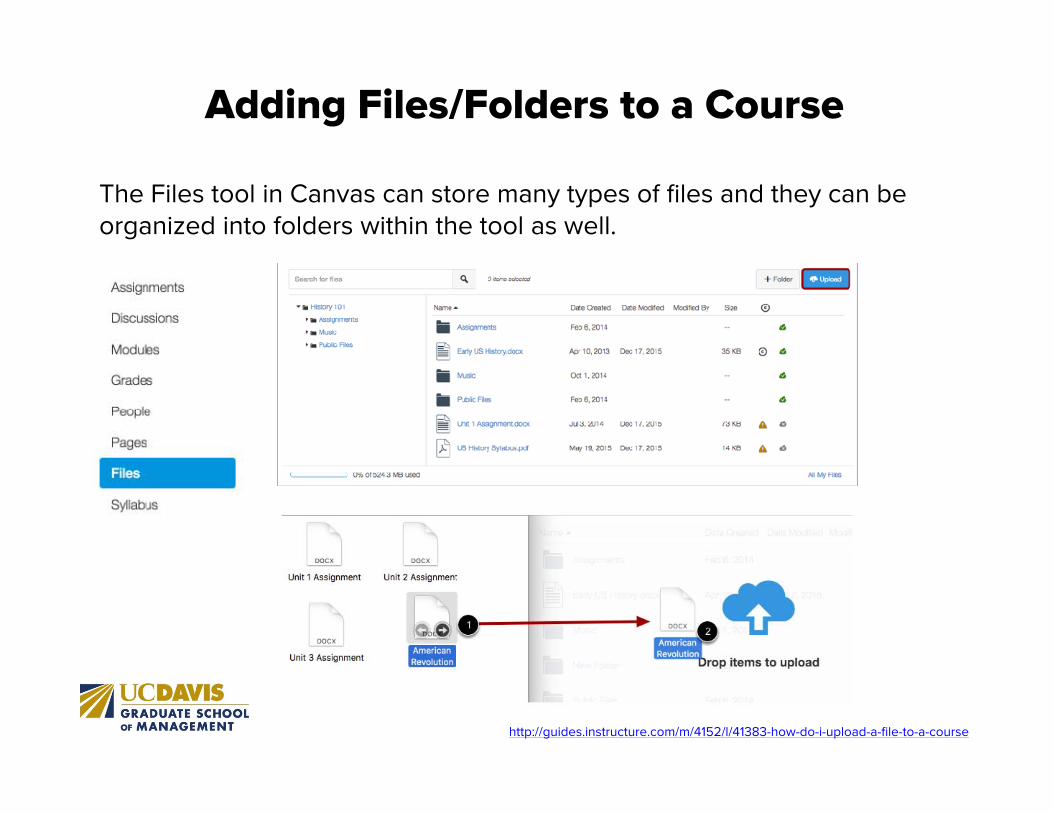
The Files tool in Canvas can store many types of files and they can be organized into folders within the tool as well.
http://guides.instructure.com/m/4152/l/41383-how-do-i-upload-a-file-to-a-course
http://guides.instructure.com/m/4152/l/56630-how-do-i-create-a-folder-in-files-as-an-instructor
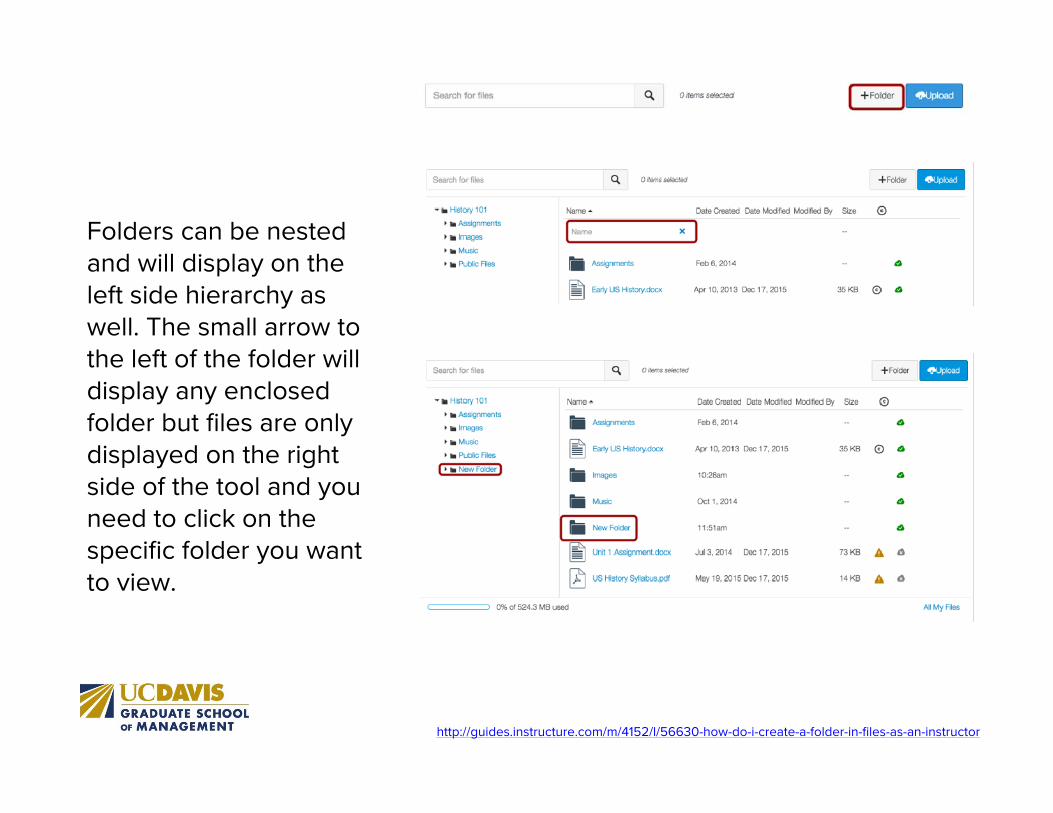
Folders can be nested and will display on the left side hierarchy as well. The small arrow to the left of the folder will display any enclosed folder but files are only displayed on the right side of the tool and you need to click on the specific folder you want to view.
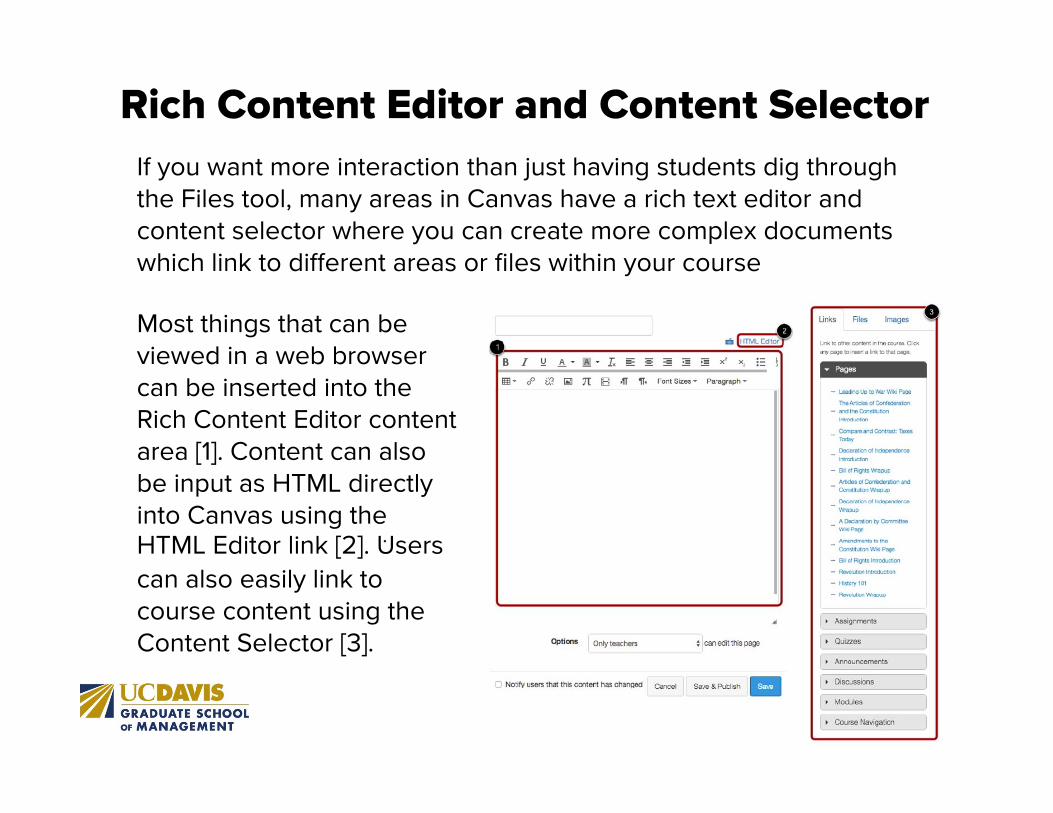
Rich Content Editor and Content SelectorIf you want more interaction than just having students dig through the Files tool, many areas in Canvas have a rich text editor and content selector where you can create more complex documents which link to different areas or files within your course
Most things that can be viewed in a web browser can be inserted into the Rich Content Editor content area [1]. Content can also be input as HTML directly into Canvas using the HTML Editor link [2]. Users can also easily link to course content using the Content Selector [3].
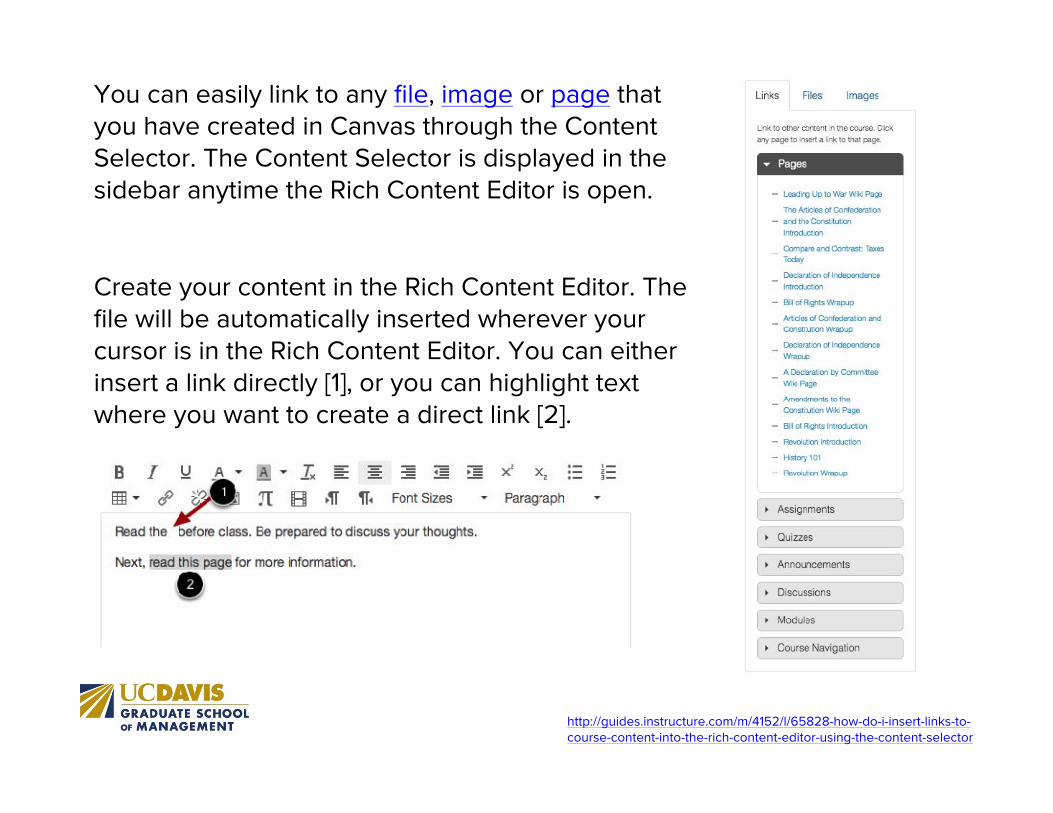
You can easily link to any file, image or page that you have created in Canvas through the Content Selector. The Content Selector is displayed in the sidebar anytime the Rich Content Editor is open.
http://guides.instructure.com/m/4152/l/65828-how-do-i-insert-links-to-course-content-into-the-rich-content-editor-using-the-content-selector
Create your content in the Rich Content Editor. The file will be automatically inserted wherever your cursor is in the Rich Content Editor. You can either insert a link directly [1], or you can highlight text where you want to create a direct link [2].
A New Mindset on Grading
In SmartSite, graded items were either created through the Assignment/Text and Quizzes tool or manually.
In Canvas, there is no easy way to manually add items to the Grades tool.
In Canvas, columns in the Grades tool are automatically created when you create and publish assignments, graded discussions, and graded quizzes and surveys. A column is also automatically added for the Attendance tool, if it is being used.
This means that if you want to have a specific item to show up in the Grades tool, you must create some sort of placeholder to display an item to grade.
Assignment ShellsAssignment shells are the easiest way to create placeholders in the Grades tool. These are just items you create in the Assignments tool with a name, due date (if applicable) and point value.
In the Grades tool, a column will be created with this new item to be graded.
The students will see an assignment but there will be no specific information regarding the actual work.
These are useful if a lot of your work is specified in the syllabus or if it will be turned in on paper. The students will know when things are due and how many points they are worth but the actual assignment may be obtained elsewhere.
http://guides.instructure.com/m/4152/l/41283-how-do-i-create-an-assignment-shell-in-an-assignment-group
http://guides.instructure.com/m/4152/l/406523-how-do-i-create-extra-assignment-columns-for-non-submission-assignments-in-the-gradebook
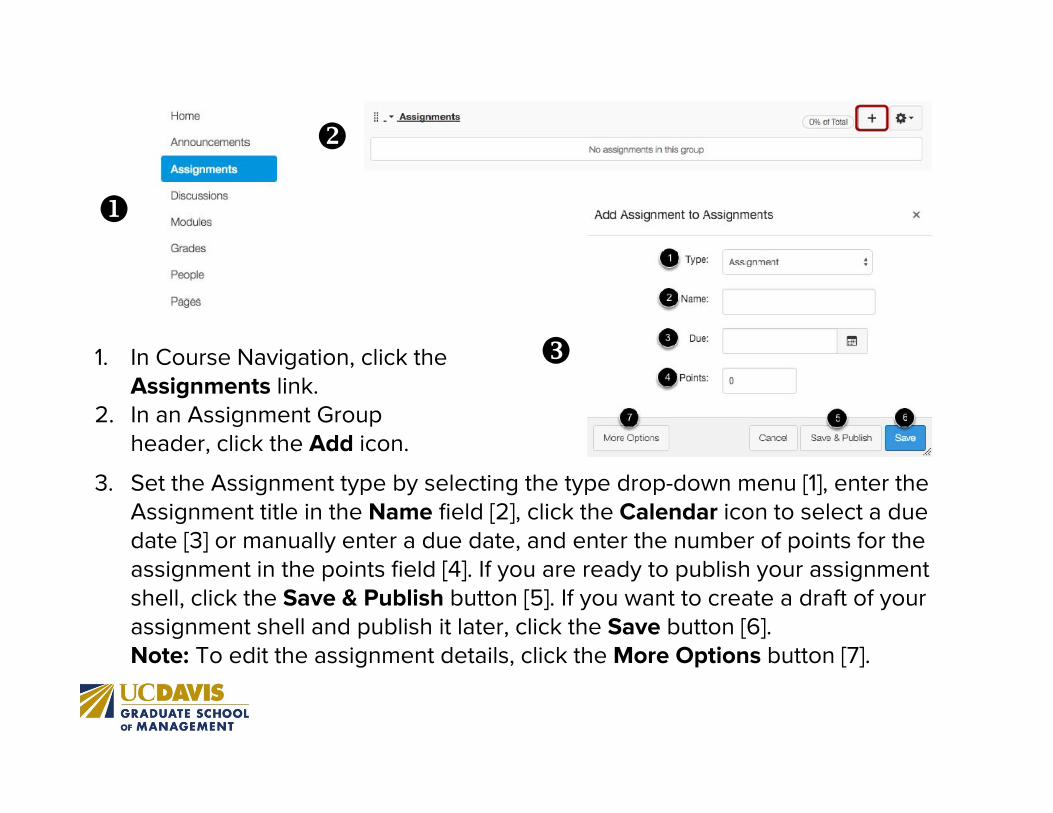
1. In Course Navigation, click the Assignments link.
2. In an Assignment Group header, click the Add icon.
3. Set the Assignment type by selecting the type drop-down menu [1], enter the Assignment title in the Name field [2], click the Calendar icon to select a due date [3] or manually enter a due date, and enter the number of points for the assignment in the points field [4]. If you are ready to publish your assignment shell, click the Save & Publish button [5]. If you want to create a draft of your assignment shell and publish it later, click the Save button [6].Note: To edit the assignment details, click the More Options button [7].
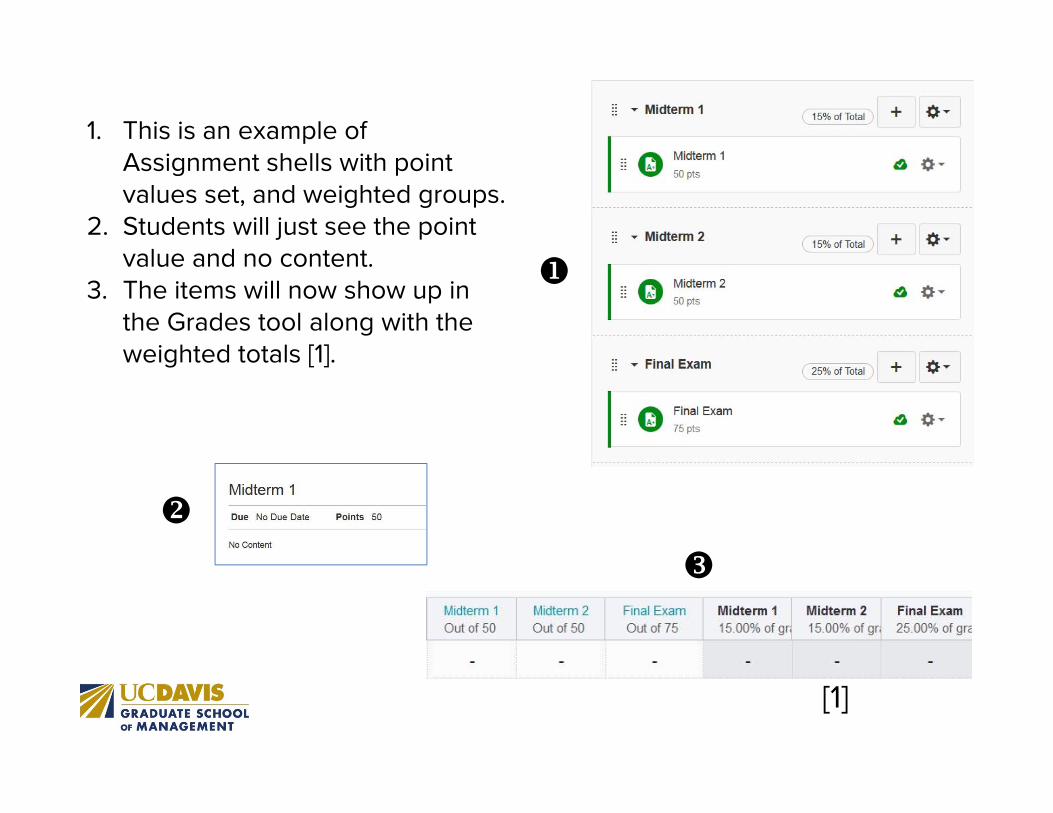
1. This is an example of Assignment shells with point values set, and weighted groups.
2. Students will just see the point value and no content.
3. The items will now show up in the Grades tool along with the weighted totals [1].
[1]
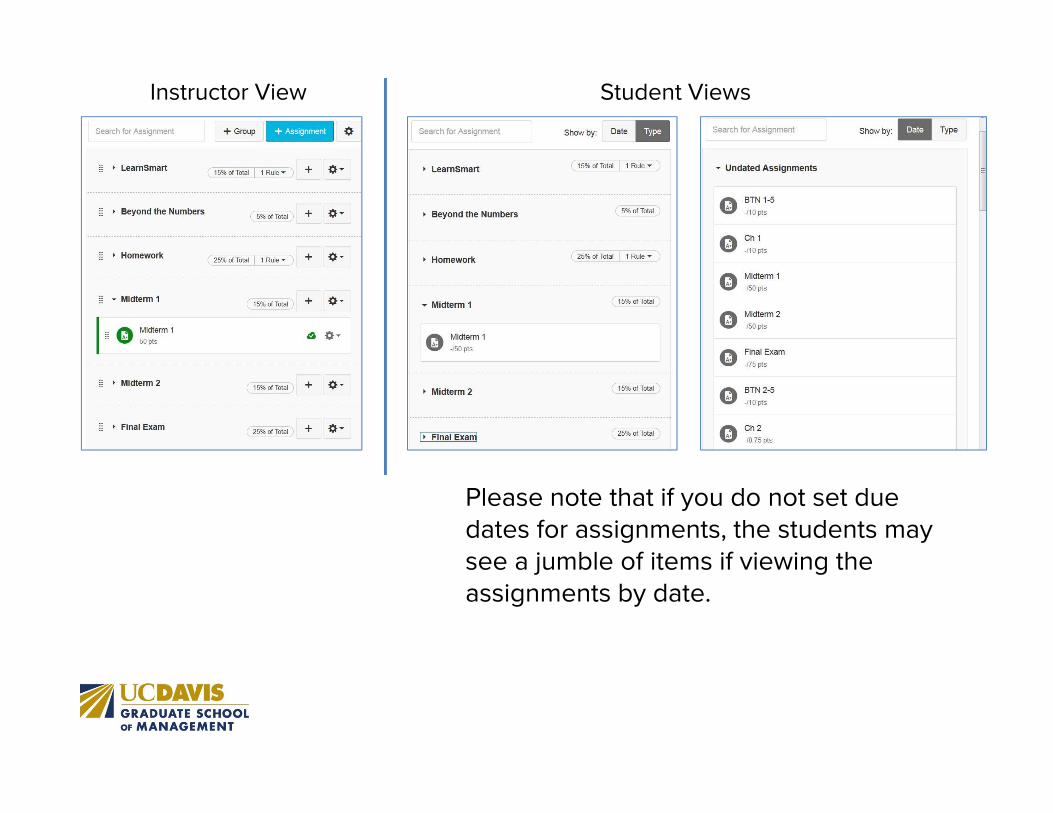
Instructor View Student Views
Please note that if you do not set due dates for assignments, the students may see a jumble of items if viewing the assignments by date.
Grades in Canvas
http://guides.instructure.com/m/4152/l/220009-how-do-i-use-the-gradebook
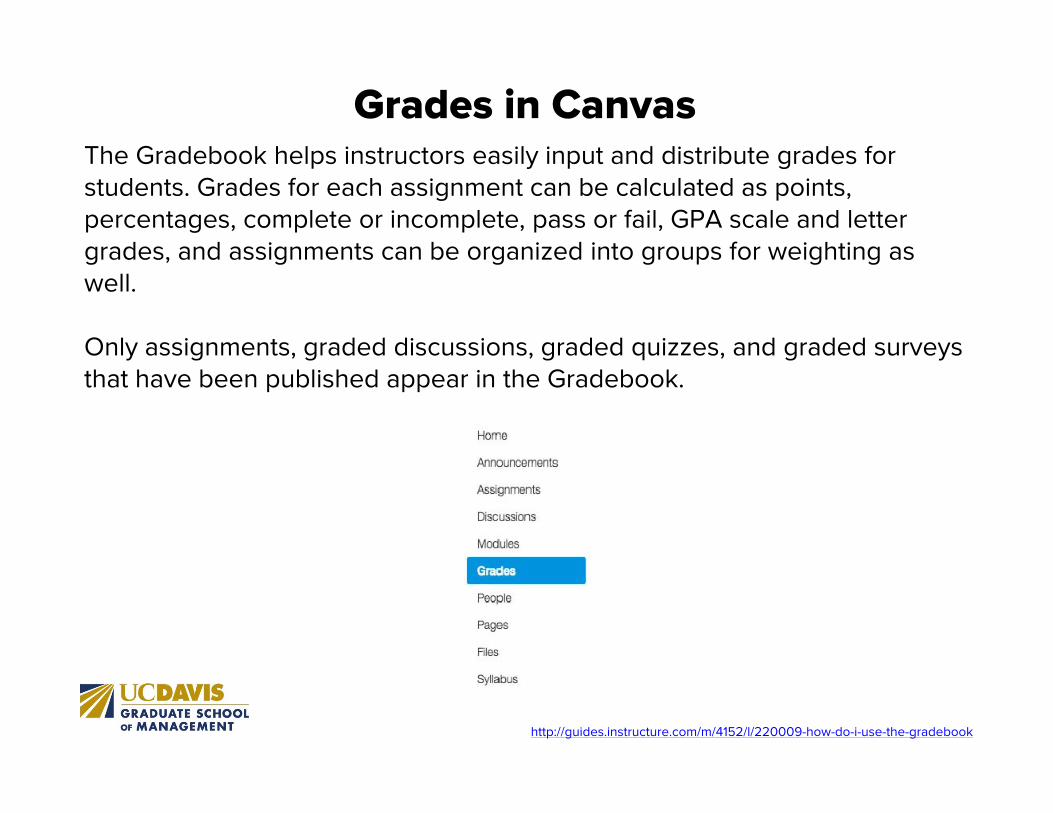
The Gradebook helps instructors easily input and distribute grades for students. Grades for each assignment can be calculated as points, percentages, complete or incomplete, pass or fail, GPA scale and letter grades, and assignments can be organized into groups for weighting as well.
Only assignments, graded discussions, graded quizzes, and graded surveys that have been published appear in the Gradebook.

The top of the Gradebook includes sorting options and settings you can use to organize your Gradebook [1], which will populate the select student data [2] and assignment data [3].
There are many options within the Grades tool and much will depend on how you organize and grade your course
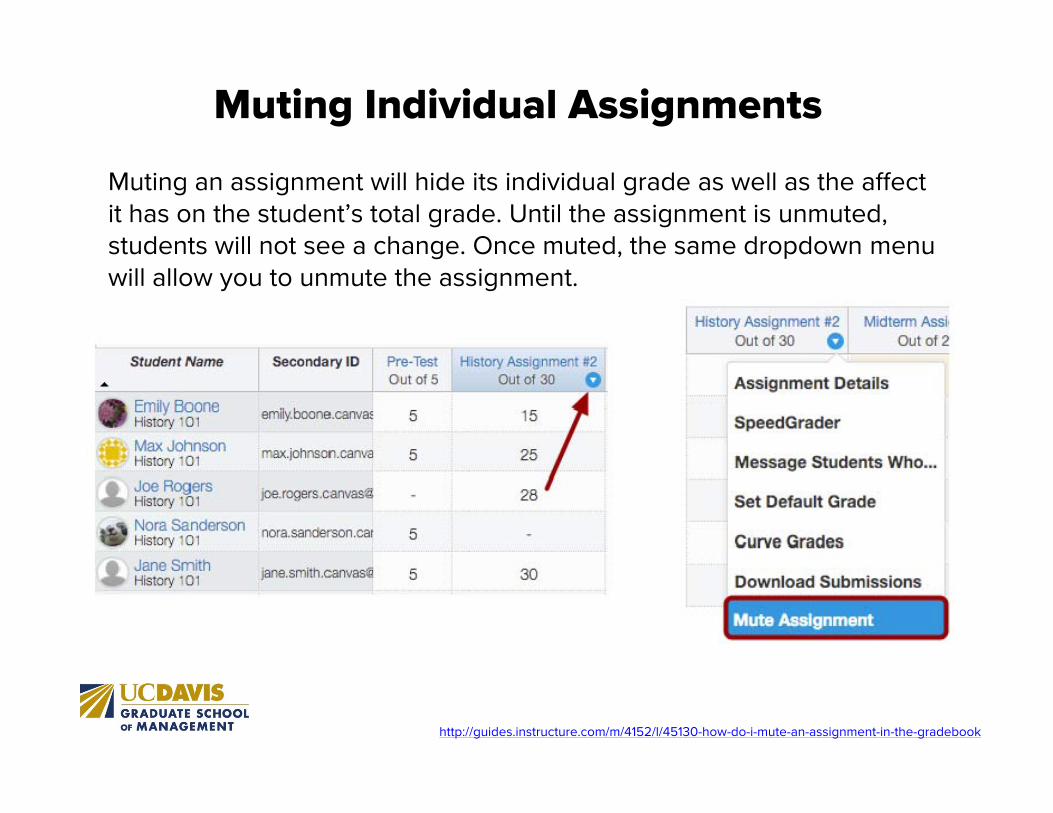
Muting Individual Assignments
Muting an assignment will hide its individual grade as well as the affect it has on the student’s total grade. Until the assignment is unmuted, students will not see a change. Once muted, the same dropdown menu will allow you to unmute the assignment.
http://guides.instructure.com/m/4152/l/45130-how-do-i-mute-an-assignment-in-the-gradebook
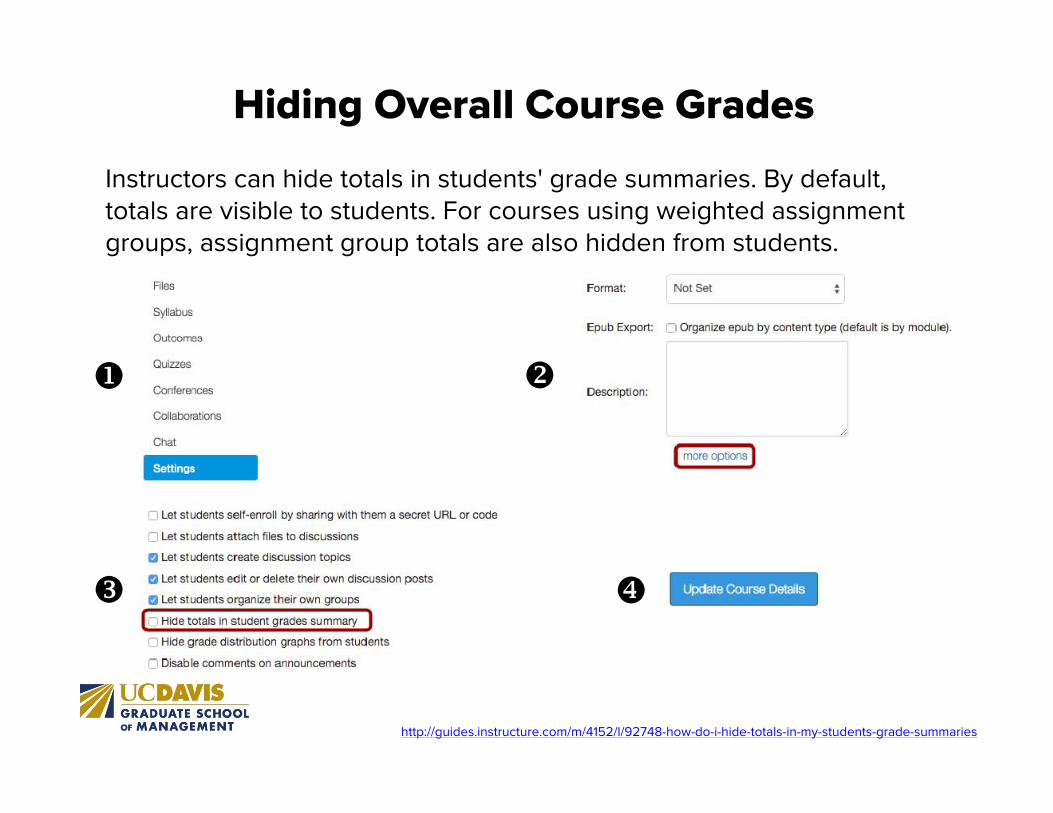
Instructors can hide totals in students' grade summaries. By default, totals are visible to students. For courses using weighted assignment groups, assignment group totals are also hidden from students.
http://guides.instructure.com/m/4152/l/92748-how-do-i-hide-totals-in-my-students-grade-summaries
Hiding Overall Course Grades
Submitting Final Course Grades
Course grades are submitted directly to the registrar’s office through the campus grade submission tool. Currently, the feature is not working in Canvas.
If you are using the Grades tool within Canvas, you will either need to export your grades and import them into the campus tool, or enter them manually.
Grades exported from Canvas only display a percentage, not a letter grade unless a grading scheme has been set for your course.

Exporting Grades from CanvasGrades exported from Canvas are in .CSV format.
The exported grades will reflect the current view of the Grades tool. The CSV download includes read-only columns for current and final score. Current score reflects the total while ignoring unsubmitted assignments, and the final score counts unsubmitted assignments as zero.
http://guides.instructure.com/m/4152/l/55012-how-do-i-download-scores-from-the-gradebook
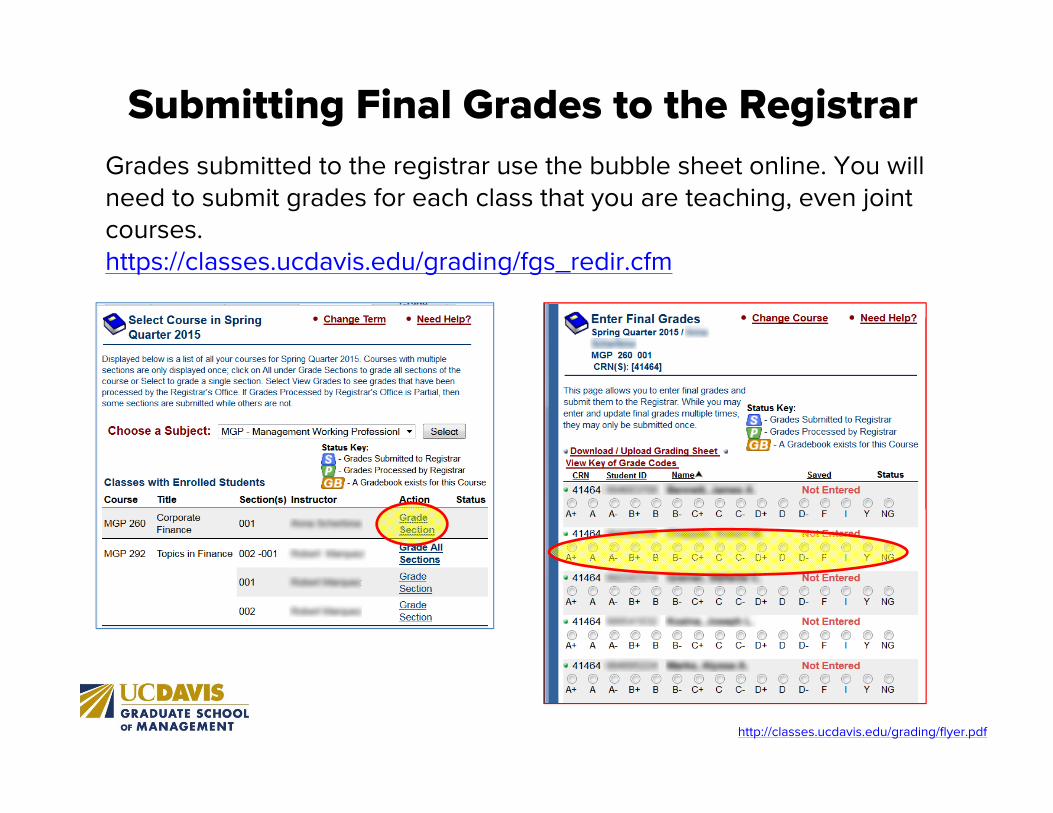
Submitting Final Grades to the RegistrarGrades submitted to the registrar use the bubble sheet online. You will need to submit grades for each class that you are teaching, even joint courses.https://classes.ucdavis.edu/grading/fgs_redir.cfm
http://classes.ucdavis.edu/grading/flyer.pdf
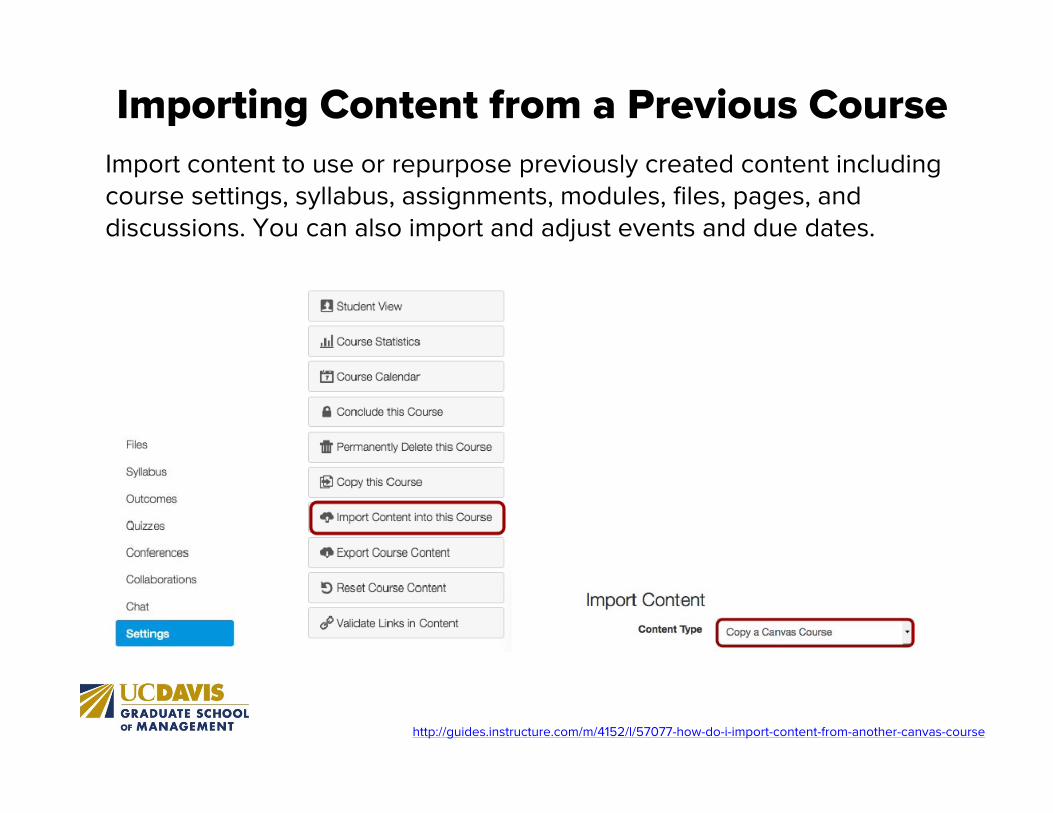
Importing Content from a Previous Course
http://guides.instructure.com/m/4152/l/57077-how-do-i-import-content-from-another-canvas-course
Import content to use or repurpose previously created content including course settings, syllabus, assignments, modules, files, pages, and discussions. You can also import and adjust events and due dates.
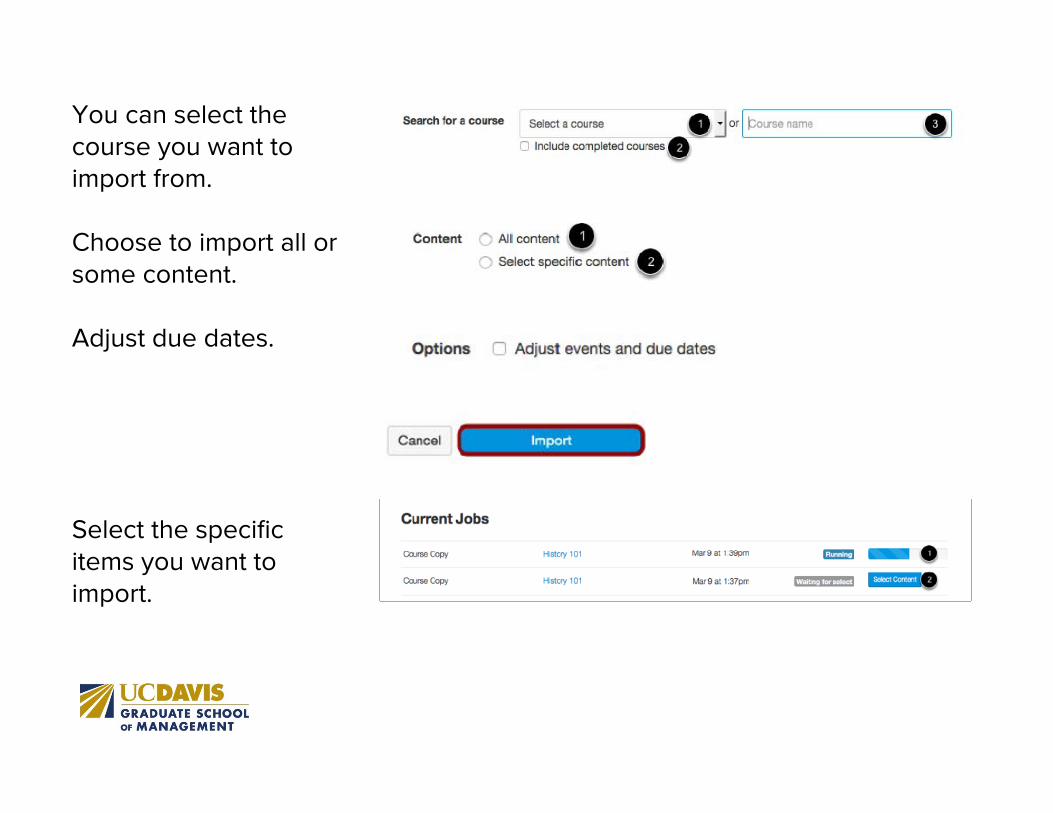
You can select the course you want to import from.
Choose to import all or some content.
Adjust due dates.
Select the specific items you want to import.
References/ResourcesUC Davis Canvas Loginhttps://login.canvas.ucdavis.edu/Canvas Instructor Tour Videos (pre-recorded, watch at your leisure):https://resources.instructure.com/courses/31/pages/canvas-instructor-tour-videosGetting Started with Canvas as an Instructorhttps://community.canvaslms.com/docs/DOC-2035UC Davis Canvas FAQshttps://ucdavisit.service-now.com/ess/knowledge_detail.do?sysparm_article=KB0000692SmartSite to Canvas Functional Mappinghttps://ucdavisit.service-now.com/ess/knowledge_detail.do?sysparm_article=KB0000837Canvas Comprehensive Instructor Guide:http://guides.instructure.com/m/4152Instructor-Led Webinars (Account Creation):https://ucdavisit.service-now.com/ess/knowledge_detail.do?sysparm_article=KB0000822Canvas Webinars (Once account has been created)https://www.cysalesteam.com/instructure/Submitting Final Grades to the Registrarhttp://classes.ucdavis.edu/grading/