Embed Size (px)
Citation preview

Contents-1
Introduction to Atlas.ti
Course Contents
page Introduction i Conventions used throughout the Course Notes ii The Course Data iii Session 1 : Getting Started Preparing your Data 1-1 The Atlas.ti Interface (toolbars, menus & ‘combo’ boxes) 1-3 Creating a New Project 1-5 Assigning Primary Documents 1-6 Saving your Project 1-6 Practical Session 1 1-8 Session 2 : Quotations and Codes Creating ‘free’ quotations 2-1 Creating ‘free’ codes 2-3 Open coding 2-3 Coding by list 2-5 In-vivo coding 2-5 ‘Quick’ coding 2-6 ‘Drag & Drop’ coding 2-7 Auto-coding 2-8 Practical Session 2 2-11 Session 3 : Comments & Memos and correcting your work Adding comments to documents, quotations or codes 3-1 Creating free memos 3-2 Why use memos? 3-3 Creating a memo for selected text 3-3 Correcting a quotation 3-4 Renaming a code 3-4 Un-linking & deleting codes & quotations 3-5 Practical Session 3 3-8 Session 4 : Creating Reports (some useful output options) General points 4-1 Document reports 4-2 Quotation reports 4-3 Code reports 4-4 Practical Session 4 4-5
Introduction
page Introduction to Atlas.ti i Conventions used throughout the Course Notes ii
General notes ii Menu selection ii
Principles & Practice of Textual Analysis iii The Course Data iv

i
Introduction Atlas.ti is a popular package that assists with the qualitative analysis of textual, graphical and audio data. It offers a variety of tools which can help you manage, extract, compare and explore the meaningful data within your texts. This package in particular allows you to work closely with your data at all times. Atlas.ti is recommended by many researchers and has clearly been of use to many projects at Lancaster University. The tools provided make it extremely simple to mark up and code your text and it is one of the more flexible packages for qualitative analysis. Atlas.ti, as with many other qualitative analysis packages, does offer some automatic searching - and even allows a certain amount of ‘auto -coding’. However, it cannot do all the work for you! It cannot interpret text in any way and while you can search for specific text ‘strings’ or words, Atlas cannot tell you whether a particular word is relevant to the data you are trying to focus on. For example, you may be interested in different patterns of pain management in NHS patients. You can ask Atlas.ti to search for the string ‘pain’ but Atlas.ti just sees text strings – it cannot interpret whether the ‘pain’ it finds in the text is to do with pain management – or due to the teenager of some family describing their hospital experiences as ‘a real pain’. Similarly you might actually be searching for things that are not specifically referred to in the text – a manner of speech or the way in which an argument is being presented. So it is important to remember that Atlas is not always a ‘quick fix’ in terms of qualitative analysis. This course covers the basics of using Atlas.ti. While some qualitative methods will be discussed during the course, as well as the different ways in which some researchers may use Atlas.ti, this course cannot give you a prescriptive method for using Atlas.ti. The course will cover: § tips for transcribing qualitative data for use with Atlas.ti; § assigning documents; § creating quotations and codes; § different ways of coding text - including automatic coding; § using the query tool to search for co-occurrences of codes; § creating subgroups (families) of documents or codes; § examining the output available; § and creating network diagrams to display relationships.

ii
Conventions used throughout the Course Notes General Notes The notes in this document follow the sessions in the course timetable – each ‘chapter’ referring to a particular practical session. Within each ‘chapter’ (or session) the notes start with general reference material on how to accomplish the tasks contained within that session. These will be the tasks demonstrated by the tutor at the start of each session. Bulleted comments explain the steps required in order to accomplish the task in hand, e.g. § First, make sure that a primary document is displayed in the main
Atlas.ti window. § Now select a paragraph of text from your document.
Each chapter ends with a section called ‘Practical session X’. These are the step-by-step tasks that you should attempt, using the data as specified, in order to practice the tasks and techniques that have been demonstrated. In many cases you may need to refer back to the reference section of the course notes. Menu Selection Throughout the course selection from the main menu in Atlas.ti is written in the same format, so … ‘Select File Ø Open from the main menu’ means that you should first click on the ‘File’ option of the main Atlas.ti menu, and then select ‘Open’ from the drop-down sub-menu that appears.
iii
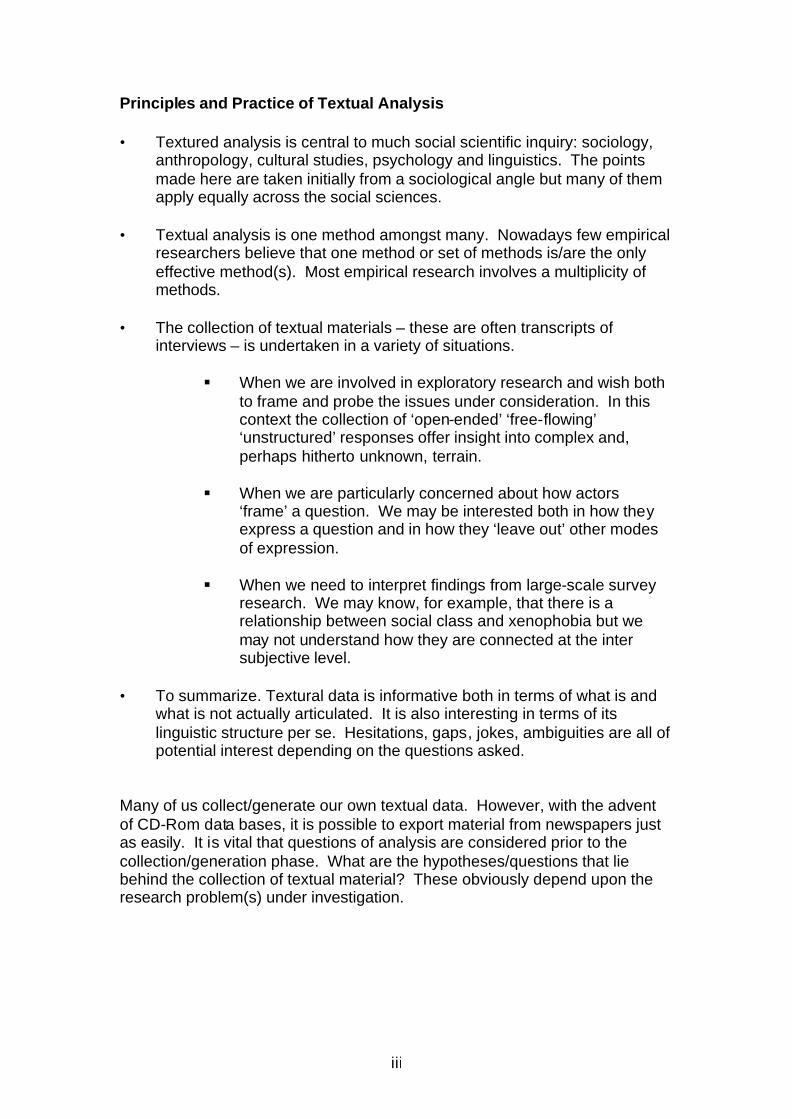
Principles and Practice of Textual Analysis • Textured analysis is central to much social scientific inquiry: sociology,
anthropology, cultural studies, psychology and linguistics. The points made here are taken initially from a sociological angle but many of them apply equally across the social sciences.
• Textual analysis is one method amongst many. Nowadays few empirical
researchers believe that one method or set of methods is/are the only effective method(s). Most empirical research involves a multiplicity of methods.
• The collection of textual materials – these are often transcripts of
interviews – is undertaken in a variety of situations.
§ When we are involved in exploratory research and wish both to frame and probe the issues under consideration. In this context the collection of ‘open-ended’ ‘free-flowing’ ‘unstructured’ responses offer insight into complex and, perhaps hitherto unknown, terrain.
§ When we are particularly concerned about how actors
‘frame’ a question. We may be interested both in how they express a question and in how they ‘leave out’ other modes of expression.
§ When we need to interpret findings from large-scale survey
research. We may know, for example, that there is a relationship between social class and xenophobia but we may not understand how they are connected at the inter subjective level.
• To summarize. Textural data is informative both in terms of what is and
what is not actually articulated. It is also interesting in terms of its linguistic structure per se. Hesitations, gaps, jokes, ambiguities are all of potential interest depending on the questions asked.
Many of us collect/generate our own textual data. However, with the advent of CD-Rom data bases, it is possible to export material from newspapers just as easily. It is vital that questions of analysis are considered prior to the collection/generation phase. What are the hypotheses/questions that lie behind the collection of textual material? These obviously depend upon the research problem(s) under investigation.

iv
There are a series of protocols that should be observed in analysing textual data:
1. Consistency Any categorization device used to code textual material must be used consistently. This is often very difficult to achieve, partly as a result of the differing contexts for the generation of textual material itself but also due to the inherent nature of language image itself. When does a word/string of words equate with another? One way of increasing the degree of consistency is to have more than one person code the text. This is often utilized in large-scale team situations but is less common amongst individual researches/postgraduate students. Nonetheless, it is an important aspect to be considered. 2. Scepticism. One major danger of textual material is that the researcher will tend to find whatever (s)he is looking for. As a method of proceeding, a researcher should operate with a permanent sceptical ‘alter ego’. It is imperative to imagine another researcher who needs considerable persuasion that what you are finding/interpreting is plausible and not wish fulfilling. Imagine that someone else will examine your textual data sometime in the future! In practice this rarely happens but Atlas-Ti technology does make it far easier and perhaps a little more likely.
The Course Data The data used in this course is a small subset of data gathered for a project entitled ‘Fathers, Work and Family Life’. The project was funded by the Joseph Rowntree Foundation and focused on fathering of teenage children. It was located in Rochdale and involved a follow-up of respondents first interviewed in 1986 as part of the ESRC’s Social Changes and Economic Life Research Initiative. In 1986 a random sample of about 1000 respondents aged between 20 and 60 were interviewed to form part of the ESRC’s Social Change and Economic Life Initiative (SCELI). The interviews involved the collection of extensive longitudinal data, in particular retrospective work and life histories. From these interviews, we were able to predict who would have teenage children aged between 11 and 16 in 1996 – a decade after the initial interview. A list of potential respondents was drawn up and the addresses collated. Interviewers then approached these addresses and sought a follow-up interview with the respondent. Subsequently further interviews were sought with the respondent, his/her spouse/partner and all children aged between 11 and 16.

v
95 respondents were located for the first follow-up interview (53 females and 42 males). 74 households were recruited to take part in the family interviews. These were conducted with the father, the mother and all children aged between 11 and 16. The interviews were based upon a series of semi-structured schedules that covered daily life in the home, the father’s role and how fathering was perceived, family relationships and how the family juggled home and employment activities. The opportunity of interviewing both parents and teenagers was used to gain their perspectives on the same events and experiences. All the interviews were transcribed in full and names were changed to maintain anonymity. For this course we have selected the interviews from four of these families – making available a total of 16 interview transcripts. You may not necessarily work on all these during the course, but are welcome to take them away with you and use them to work with the course notes at a later date. Equally if you already have some of your own data to work with, feel free to bring this along and use it throughout the course. A summary of the 4 families is given here …
Family 125 Family 516 Family 565 Family 997
Father Jack Peter Paul Derek
Mother Pat Mary Liz Sharon
Son(s) John James Greg Kevin
Paul Peter
Daughter(s) Leanne Fran Karen
Others (not interviewed)
David (younger son)
Luke (Paul’s brother,
Kevin’s father)
Graham (Paul’s brother)
Kimberley Joanne (other
children)
Contents-2
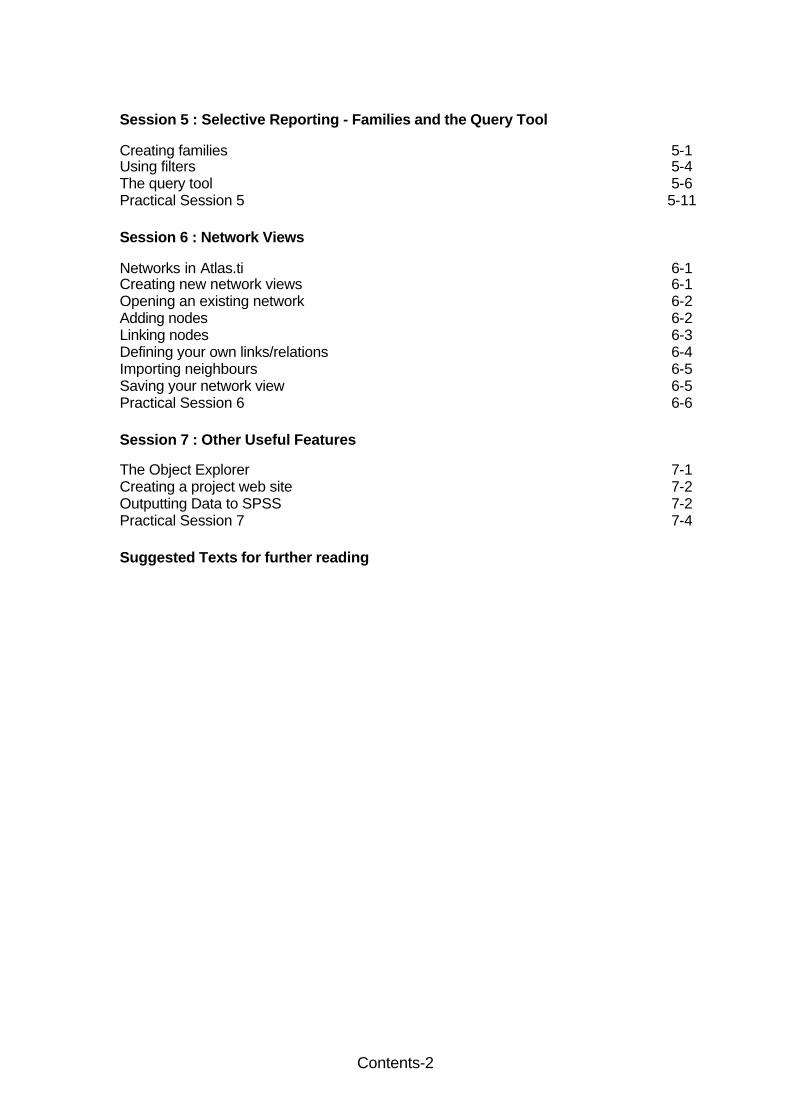
Session 5 : Selective Reporting - Families and the Query Tool
Creating families 5-1 Using filters 5-4 The query tool 5-6 Practical Session 5 5-11 Session 6 : Network Views
Networks in Atlas.ti 6-1 Creating new network views 6-1 Opening an existing network 6-2 Adding nodes 6-2 Linking nodes 6-3 Defining your own links/relations 6-4 Importing neighbours 6-5 Saving your network view 6-5 Practical Session 6 6-6 Session 7 : Other Useful Features The Object Explorer 7-1 Creating a project web site 7-2 Outputting Data to SPSS 7-2 Practical Session 7 7-4 Suggested Texts for further reading

Session 1
Getting Started
page Preparing your Data 1-1
Setting your margins 1-1 Interpreting paragraphs & sentences 1-1 Adding demographic information 1-2 Saving your word-processed file as text 1-2
The Atlas.ti Interface (toolbars, menus & ‘combo’ boxes) 1-3
The main menu 1-3 The toolbars 1-3 The main toolbar 1-3 The primary document toolbar 1-4 Object Drop-Down Lists 1-4
Creating a New Project 1-5
From the ‘Welcome Wizard’ 1-5 From the main Atlas.ti window 1-5 Adding a project description 1-5
Assigning Primary Documents 1-6 Saving your project 1-6 Practical Session 1 1-7
1. Open the text file in Word 1-8 2. Changing the Margins 1-8 3. Things to think about – is there anything you need to change ? 1-8 4. Saving the file as ‘Text with Linebreaks’ 1-9 5. Starting a new Atlas.ti project 1-9 6. Assigning primary documents 1-10 7. Viewing document 125F.txt 1-10 8. Saving the project 1-11

1-1
Preparing your Data At the present time, Atlas.ti does not read files stored in the format used by word processors such as Word or WordPerfect. So the files you read into Atlas must be saved as text files. Having said that you can do all the preparation of your data in a word processor and then simply save a copy of the file in text format at the last minute – when all your editing is complete. It is useful to note here that while it is possible to edit files once they have been included in an Atlas.ti project, it is really not a good idea. This is due to the way Atlas.ti works with the text and will become clearer later on in the course.
Make sure you have done all the editing you want to do on your data before you start using Atlas.ti. Thinking about how you might work with Atlas.ti at this stage may save you a lot of trouble later on in your project !
Setting your margins One of the major advantages of Atlas.ti is that it interacts with your data at all times – so whatever you are doing you will be able to see your data on the screen. Within the program window your screen is split into two – your data is displayed on the left and your codes are shown in the margin on the right. As you start coding your project you will need the right margin to be at least a third of the size of the screen, so in order to see all your data within the window, you need to ensure that the lines are a maximum of about 60 characters wide.
When working in Word a good guideline is to use Courier font, size 10 and to set your margins (do this in the page setup) to about 1.25 inches (or 3.17 cm). Try using different settings with one of your documents and see how it looks in Atlas.ti first. Once you are happy with one, you can make the same settings in all your documents.
Interpreting paragraphs & sentences Think in advance about any automatic searches./selections you might want to make within your texts when working with Atlas. When using automatic selection techniques within Atlas, the software interprets text as follows; Full stops, question marks, exclamation marks and colons are recognised as being the end of a sentence. Bear this in mind if you decide to use multiple full-stops (…. ) to denote pauses in a conversation. Two hard returns (i.e. a blank line) is recognised as being the end of a paragraph.

1-2
It is therefore worthwhile thinking about what automatic selections you might want to make. If your data is an interview transcript for example, are you likely to want Atlas to automatically code relevant questions in your text .. or to include both the question and the answer given by the interviewee? If the latter is the case then you must not insert blank lines between the question and the answer. Adding demographic information Here again it’s worthwhile thinking a little about the sort of demographic information you might want to code. If each of your documents (texts) is a different interview for example, then there are ways of storing and sub-setting your documents in Atlas based on the demographic information of the interviewees. But you might also like to automatically add codes describing the document. The automatic searching tools in Atlas can be case sensitive, so you might want to put demographic information into your text in upper case for example, or pre-fixed with a particular character. In that way you could distinguish the demographic information, ‘FEMALE’ or %female from other occurrences of the string ‘female’ which may appear anywhere in the body of your text Saving your word-processed file as text In order to preserve the margins that you have so carefully added to your documents within your word processor you must save your files with the filetype ‘text with linebreaks’. Saving as text only is not good enough in many packages – and certainly would not be sufficient if you were using Word as your word processor. If using Word, you would select Save As from the File menu … and then use the drop-down file type option to select ‘Text Only with Line breaks’.
1-3
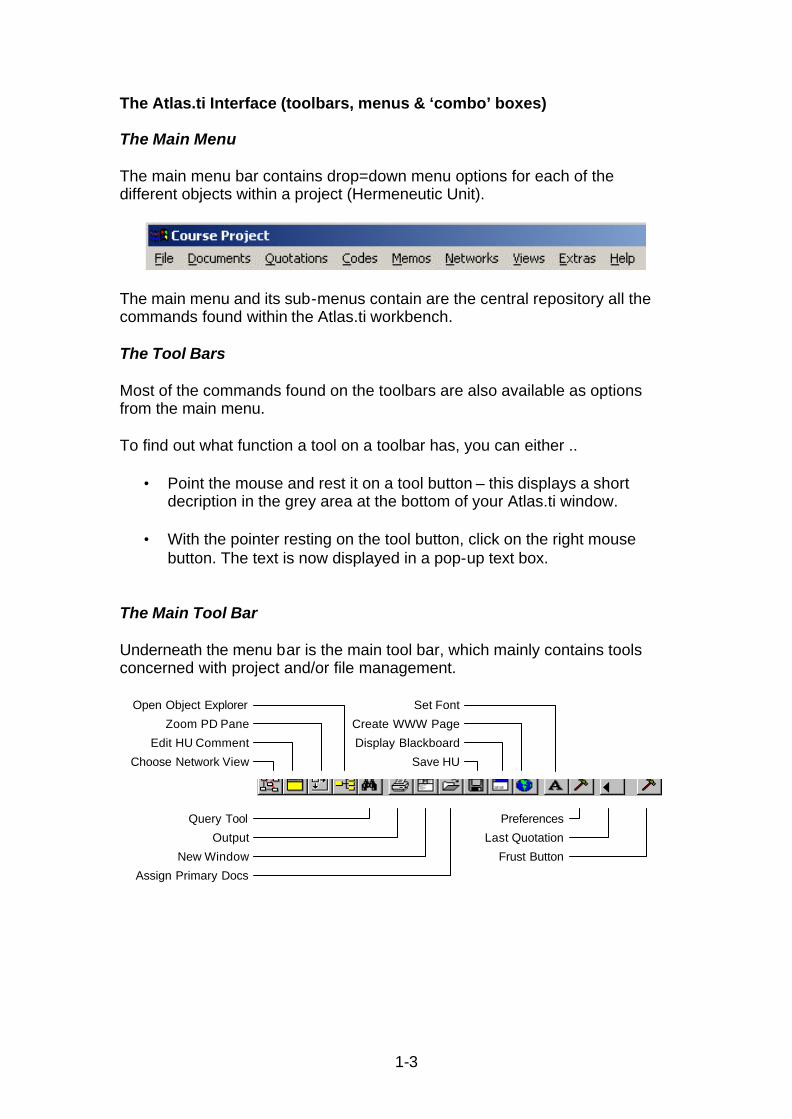
The Atlas.ti Interface (toolbars, menus & ‘combo’ boxes)
The Main Menu The main menu bar contains drop=down menu options for each of the different objects within a project (Hermeneutic Unit).
The main menu and its sub-menus contain are the central repository all the commands found within the Atlas.ti workbench. The Tool Bars Most of the commands found on the toolbars are also available as options from the main menu. To find out what function a tool on a toolbar has, you can either ..
• Point the mouse and rest it on a tool button – this displays a short decription in the grey area at the bottom of your Atlas.ti window.
• With the pointer resting on the tool button, click on the right mouse
button. The text is now displayed in a pop-up text box. The Main Tool Bar Underneath the menu bar is the main tool bar, which mainly contains tools concerned with project and/or file management.
Choose Network View
Edit HU Comment
Zoom PD Pane
Open Object Explorer
Query Tool
Output
New Window
Assign Primary Docs
Save HU
Display Blackboard
Create WWW Page
Set Font
Preferences
Last Quotation
Frust Button

1-4
The Primary Document Toolbar The primary document toolbar is on the left side of your screen. Note that this toolbar only becomes functional once a document in loaded (even the help information about each tool is not displayed until a document is displayed).
Go to Line
Search
Free Quotation
Open CodingIn-Vivo Coding
Code by ListQuick Coding
Create MemoModify Quotation
Line numbers
Margin Area
Hyper Source
Hyper Target
Show Quotations
‘Go to Line’ displays the text at a specific line number.
‘Search’ activates the text search tool.
this button creates a free quotation from the current text selection.
The four coding buttons allow easy access to the most common coding functions.
Create Memo attaches a new memo to the current text selection.
Modify Quotation resets the size of a quotation.
These two buttons turn the display of Line Numbers and Margin Area within your document window on/off.
Hyper Source and Hyper Target make the text selection part of a hypertext structure.
Show Quotations displays a list of all the quotations which contain the current text cursor position.
Object Drop-Down Lists Under the main menu bar, you will find the following four drop-down lists (or combos):
The combos will 'come to life' as soon as you start working with the program.
for primary documents for quotations for codes for memos (texts)

1-5
Creating a New Project / Hermeneutic Unit A Hermeneutic Unit within Atlas.ti stores references to all the texts/primary documents that that you bring into your project, as well as all the quotations and codes that you define and any diagrams, links, comments or memos that you may create within your project. From the ‘Welcome Wizard’ When Atlas.ti first starts up it displays the ‘Welcome Wizard’ shown here. Selecting ‘Create a new Hermenetic Unit’ and click on ‘OK’ will create a new, empty Hermeneutic Unit and allow you to give it a name.
If you select ‘Just continue’ from the ‘Welcome Wizard’ – or you simply do nothing then the Wizard will disappear and leave you with the Atlas.ti main window. From the main Atlas.ti window To create a new project from the main menu, simply select the menu options File Ø New Hermeneutic Unit. You will again be asked to type in a name for your project. This name will appear at the top of your Atlas.ti window. Adding a project description Once you have created your new project, you can add a description. You will see that this can be useful when creating output – or displaying information about your project on the Web (we look at this in session 7). To add a description, click on the second tool on the main tool bar After adding your text in the text window, you can save the comment by selecting File Ø Save from the text window menu.
1-6
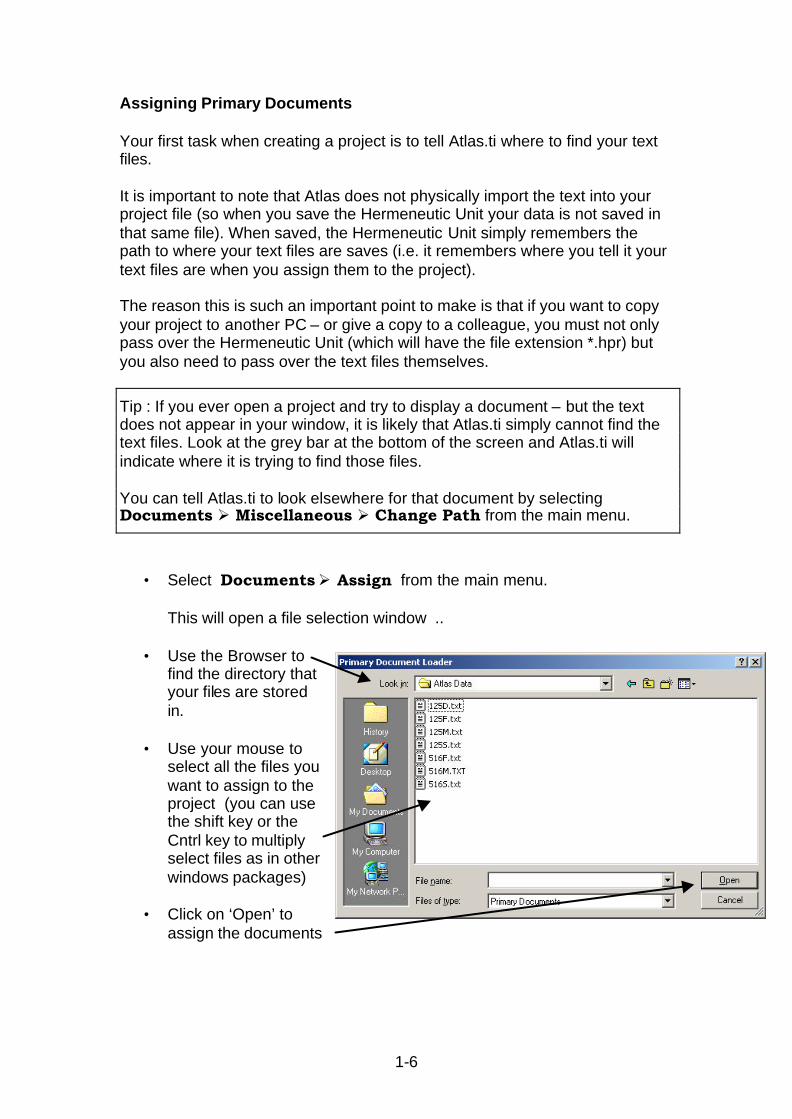
Assigning Primary Documents Your first task when creating a project is to tell Atlas.ti where to find your text files. It is important to note that Atlas does not physically import the text into your project file (so when you save the Hermeneutic Unit your data is not saved in that same file). When saved, the Hermeneutic Unit simply remembers the path to where your text files are saves (i.e. it remembers where you tell it your text files are when you assign them to the project). The reason this is such an important point to make is that if you want to copy your project to another PC – or give a copy to a colleague, you must not only pass over the Hermeneutic Unit (which will have the file extension *.hpr) but you also need to pass over the text files themselves.
Tip : If you ever open a project and try to display a document – but the text does not appear in your window, it is likely that Atlas.ti simply cannot find the text files. Look at the grey bar at the bottom of the screen and Atlas.ti will indicate where it is trying to find those files. You can tell Atlas.ti to look elsewhere for that document by selecting Documents Ø Miscellaneous Ø Change Path from the main menu.
• Select Documents Ø Assign from the main menu.
This will open a file selection window ..
• Use the Browser to find the directory that your files are stored in.
• Use your mouse to
select all the files you want to assign to the project (you can use the shift key or the Cntrl key to multiply select files as in other windows packages)
• Click on ‘Open’ to
assign the documents

1-7
[ Note that you can assign new documents to your project at any time. You can also assign the same file more than once. Atlas.ti gives each document a reference number (P1, P2, P3 etc..) so you could assign the same file more than once if you wanted to code it in more than one way perhaps.] Once documents have been assigned they will appear in the primary document combo list. Selecting a document from list will cause it to be displayed in the main window.
Tip : You can also open your File Browser on your desktop (‘My Computer’). Browse to open the folder in which your text files are saved, and simply ‘Drag & Drop’ files into the Atlas.ti window. This will automatically assign the files to the current hermeneutic unit (project).
Saving your project To save your project, select File Ø Save from the main menu. The first time you save your project you will be prompted to tell Atlas.ti which folder you want to save the file in. Note that the project will automatically have the file extension .hpr, i.e. the default filename will be ‘projectname.hpr’.

1-8
Practical Session 1 In this fairly short session we are going to read a raw text file into Word, change the margins and save the file in the format needed for Atlas.ti. We will then start a new project in Atlas.ti, assign some primary documents, , explore the Atlas.ti interface a little, and save the project. 1. Open the text file in Word § Start up Word for Windows
§ Open the document (file) c:\Atlas Intro\125F.doc. This is the father of
family 125’s interview transcript.
Use File Ø Open from the main Word menu.
§ Make sure that you can see the page layout as it would be printed. This makes it much easier to see any strange paragraph indents
Use View Ø Print Layout from the main Word menu.
2. Changing the Margins § Now change the margins on the page setup so that the left & right
margins are 3.2cm
Use File Ø Page Setup from the main Word menu – then enter the new margin sizes in the dialog box.
3. Things to think about – is there anything you need to change ?
Now that we have the margins set correctly – is there anything else we need to change ?
1-9
We might decide to take out the … pauses and replace them with (pause) instead (use the Word feature ‘Find & Replace’ … use Edit Ø Replace from the main Word menu ). The interviewee in this transcript is denoted by their speech starting with a C. The interviewee’s passages start with a J. This is fine as they are capital letters, but we might want to change them to C: and/or J: as a simple text search in Atlas for C or J might bring up other text sections, such as words like Car or Jane etc.. Again, try replacing these using the ‘Find & Replace’ facility in Word.
Other useful things to do at this stage (apart from proof-reading the
transcript!) are to at least spell-check it . Once you get started with coding in your project it will be too late to change the text !
4. Saving the file as ‘Text with Linebreaks’
Once you are happy that you have the final version of your transcript in front of you as a Word document you need to save the file as ‘text only with linebreaks’. (Use File Ø Save As.. from the main Word menu ).
l
Tip : When you start a new project make a new folder for this project and save all the data files into this folder. You can then save your Hermeneutic Unit to the same folder and all the elements of your project will be kept together nicely.
For this course we will use the folder C:\Atlas Intro, which already contains
some text files.
§ Save your copy of this file as ‘Text only with linebreaks’ into the folder C:\Atlas Intro. You could call it ‘my125F.txt’.
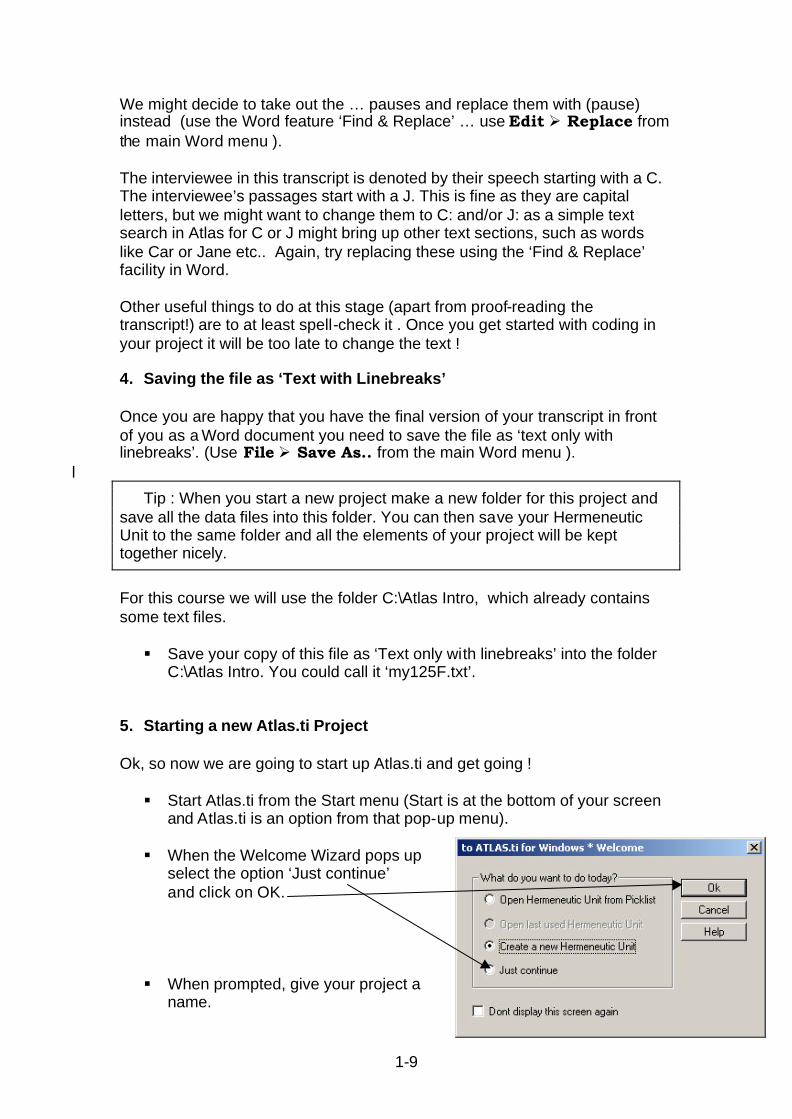
5. Starting a new Atlas.ti Project Ok, so now we are going to start up Atlas.ti and get going !
§ Start Atlas.ti from the Start menu (Start is at the bottom of your screen and Atlas.ti is an option from that pop-up menu).
§ When the Welcome Wizard pops up
select the option ‘Just continue’ and click on OK.
§ When prompted, give your project a name.

1-10
6. Assigning primary documents Right – now’s where we really start to see something happen. Following the instructions given on page 1 -6 we ..
• Select Documents Ø Assign from the main menu.
This will open a file selection window ..
• Use the Browser to find the directory that your files are stored in. The course files are actually in C:\Atlas Intro
• Use your mouse to
select all the files for family 125.
• Click on ‘Open’ to
assign the documents
7. Viewing document 125F.txt The documents will appear in the primary document combo list. § Click on the down-arrow at the right of the combo
box to see the list of primary documents already assigned to the project.
§ Click to select document 125F.txt from the list .
The document should then appear in the main window, as shown on the next page.

1-11
Note here that you can drag & drop the red margin line to alter the size of your margin area. If you make the margin so wide that it overlaps the width of your text, scroll bars appear at the bottom of your window which enable you to scroll backwards & forwards across your text (NOT a good idea as it gets very tedious. This is why we set our margins in Word before we start !).
§ Try clicking on the line-number and margin tool buttons to see what happens. Press twice on each one !
8. Saving the project And now we save our project.
• Select File Ø Save As from the main menu. Atlas.ti will now automatically give your project a name. Either change this or leave it as it is, but save your .hpr project file in the same directory as the data .. in C:\Atlas Intro

Session 2
Quotations and Codes
page Creating ‘free’ quotations 2-1
Manual text selection 2-1 Semi-automatic text selection 2-1 Atlas.ti quotation descriptions 2-2
Creating ‘free’ codes 2-3 Coding the text 2-3
Open coding 2-3 Coding by list 2-5 In-vivo coding 2-5 ‘Quick’ coding 2-6 ‘Drag & Drop’ coding 2-7 Atlas.ti code descriptions 2-7
Auto-coding 2-8 Practical Session 2 2-11
1. Open your hermeneutic unit 2-112. Display primary document 125f.txt 2-113. Create a few free quotations 2-114. Creating some ‘free’ codes (parent, child, homework) 2-125. Coding using new codes (open coding & coding in-vivo) 2-126. Coding using existing codes (code by list & quick coding) 2-147. Having a go at ‘drag & drop’ 2-158. Auto coding 2-17

Creating ‘free’ quotations By the time your data is in the form of primary documents assigned to an Atlas.ti project you will no doubt have familiarised yourself with it to some extent. Some researchers would start their work by simply reading the through the text, highlighting passages that are of interest but not yet working with codes. Any selected passage of text within Atlas.ti is known as a ‘Quotation’ (Quotations are accessed via the second ‘combo’ list in Atlas.ti). A quotation that has not yet been associated with any codes is known as a ‘free’ quotation. First, you clearly need to have the contents of one of your primary
documents displayed in the main Atlas.ti window, so select one of your documents from the primary document combo box.
Next select a passage of text: you can simply use your mouse as in
any other Windows package (manual selection) or you can use some of the semi-automatic selection features within Atlas.ti.
Manual Selection o Move the mouse pointer to the beginning of the text you want to
select. o Drag the mouse cursor (click and hold the left mouse button, then
move it) to the end of the intended selection and release the mouse button.
Semi-automatic Selection o Move the cursor to one word in your document. Double-click the
word to highlight it. o Double-click on the highlighted word. Now the entire sentence will
be highlighted. o Double-click on the highlighted sentence: Now the entire
paragraph is selected. (A paragraph is any text enclosed with at least one empty line above and below.)
o One more double-click selects the whole document. (A fifth double-click brings you back to step 1.)
Once you have highlighted your text you need to tell Atlas.ti that you want this to be recognized as a free quotation. Either click on the tool on the primary document toolbar, OR select Quotations Create Free Quotation from the main menu.
2-1

Now you have created a new quotation .. Your quotation appears in the combo list .. and a bar appears in the margin
Tip : When selecting existing quotations for further coding (or amendment) click on the bar in the margin – this will select the exact text contained in the quotation (so you won’t accidentally select a very slightly different text and create a new quotation by mistake).
Atlas.ti quotation descriptions: If we open the quotation reference list (click on list button on the left of the quotation ‘combo’) , we see a list of quotations, and these descriptions give us some information about the quotation.
2 :1 The ‘2’ tells us that the quotation is from primary document 2 – and the ‘1’ tells us it was the first quotation created in this document .. the numbering of the quotations will not necessarily be in same order as they appear in the text.
‘we all sort of see each other …’ . This is quite simply the first part of the quotation.
(13:14). This tells us that the quotation starts on line 13 of the text, and finishes on line 14 (you can check this by displaying the line numbers using the line number tool,
2-2

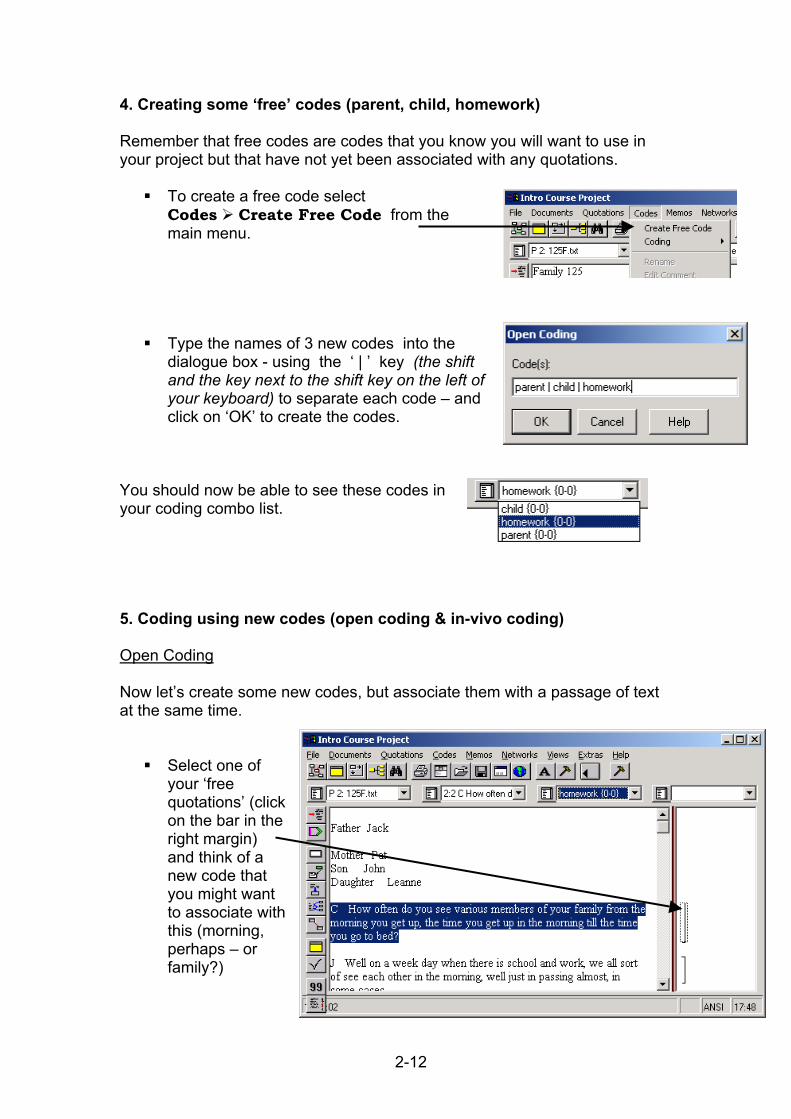
Creating ‘free’ codes When starting to look at your text you may have a clear and concise idea of the areas that you want to explore. So you may have a preconceived idea of the codes you want to use – at least at the start of your project. For example, the project of Dr Yvette Solomon et. al.1 into Homework patterns and tensions between teenagers & parents explores some well-defined concepts, such as parenting styles, perceptions of the home-school relationships, and the use of homework as an opportunity for closeness between parent and child. Faced with such perceptions to investigate we might want to start with a set of codes such as ‘homework’, ‘parent & child’, ‘role of school’, ‘working alone’ , ‘feeling inadequate’, etc. Remember that Atlas.ti allows us to look at combinations of codes (we see this when using the Query tool in session 5) so it is often a good idea to start by using single concepts – later combining perhaps ‘homework’ with other codes to find quotations where ‘Parent & child’ and ‘homework’ overlap. So – we might start our project by creating some ‘free’ codes .. codes that have not yet been associated with any quotations, or passages of text. To create a free code select
Codes Create Free Code from the main menu.
You will then be asked to enter the names of the code(s) you want to create in a text box. Either type in a single code – say ‘homework’ or type in multiple codes
by using the ‘ | ’ key (the shift and the key next to the shift key on the left of your keyboard) to separate each code.
Entering the codes as shown here creates 2 new codes.
Click on ‘OK’ to create the codes.
2-3
1 Solomon Y, Warin J, Lewis C, 2002, ‘Helping with homework? Homework as a site of tension for parents and teenagers’, British Educational Research Journal, 2002: 28 (4)

Coding the text Very quickly you will want to start attaching codes to quotations – indeed some people dive straight in and start this way. Atlas.ti gives you a number of tools to help you directly code passages of text. Open coding Open coding is the tool you use when you want to create a new code for the passage of text selected. It is similar to creating free codes but it will ..
− Create a new quotation from the selected passage of text (if the same quotation does not already exist),
− Create a new code (or codes) as specified, and at the same time .. − Associate the new codes with the quotation created
Start by selecting the passage of text that you want to code (note that
you can also select an existing quotation) To create the code(s) either click on the ‘Open Coding’ tool
on the document toolbar , or select Codes Coding Open Coding from the main menu.
This will open up a text box for you to enter the name of your code(s) – it is in fact the same text box that you see when creating free codes, and you follow the same process … Either type in a single code – say ‘parents&children’ - or type in
multiple codes by using the ‘ | ’ key (the shift and the key next to the shift key on the left of your keyboard) to separate each code.
Entering the codes as shown here creates 2 new codes.
Click on ‘OK’ to create the codes.
2-4

So – what has this done? We now see the new codes in the code ‘combo’ list, and in the margin the quotation bar show the codes associated with the quotation.
oding by list
ode by List’ is the tool you use when you want to associate exiting code(s) r the passage of text selected. Open Code by List will…
− Create a new quotation from the selected passage of text (if the same quotation does not already exist),
− Associate the existing codes you select with the quotation created
Start by selecting the passage of text that you want to code
To select the existing the code(s) either click on the ‘Code by List’ tool on the document toolbar , or select Codes Coding Code by List from the main menu.
Thi
C ‘Cfo
s will open up your list of existing codes in a window.
2-5

Select all the codes that you want to associate
he association of code(s) with quotations will again ppear in your margin on the right.
-vivo coding
-Vivo coding creates a quotation from the selected text passage and uses
haracters you can use as an in-vivo code is 40.
Mo tain more of the surrou ations in the next session.
Again you start by selecting the passage of text that you want to code (remember this must be less than 40 characters long).
o’ tool on the
OR select Codes Coding Code In Vivo from the main menu.
The example here
fe’ to create the codassoci
iece of text. The codthe cocan be used in the same other c
with your quotation and click on OK.
Ta In Inthe passage itself as the name for the code. The maximum number of c
re often that not you will want your quotation to connding text. We look at amending quot
To code in-vivo, either click on the ‘Code In-Viv
document toolbar ,
used the text selection ‘social li
e social life an ate with that
pe appears in
de list and
way as any ode.
2-6

‘Quick’ coding
s useful if you want to concentrate on a single code (say ‘social rough your text creating new quotations and associating the them as you go along.
s really only ever quick if you use the tool button on the toolbar menus is not very quick !!).
o use quick coding the code you are working with must t – and must be the selected code in the code combo box.
he drop-down combo list select the code you want.
Select the passage(s) of text that you want to associate with this code. Finally click on the Quick-coding tool in the primary document toolbox.
‘Drag & Drop’ coding Drag & Drop is not really a method of coding on its own – but you can use drag and drop to quickly code by list – or to code in-vivo Drag & drop using the code list :
Quick coding ilife’) and work thcode ‘social life’ to ‘Quick’ coding i(going through the In order t
already exis
Using t
Start by selecting a text passage to code. (Again this can be a new
passage, or an existing quotation).
Open the code list by clicking on the 'list' symbol, next to the combo box for codes:
From the code list window, click once on the code you want to use then drag (don't double-click) it into the primary documents pane.
Release the mouse button and the selected piece of
text has been coded. Note: You can only code with one code at a time using this method.
2-7

To Code In-Vivo using Drag & Drop :
Make a selection in your text (of less than 40 characters).
Atlas.t
you open the code list window you will notice that each ode has some numbers enclosed in brackets along side it.
Theuotations the code has been linked to (across the whole
pro
he second tells us how many other objects have been nked to this code (we will cover this idea in more detail in ession 6).
uto coding allows you to search for a text string in your data (either in the oughout all primary texts). Once found you
an ask Atlas.ti to create a quotation (using the string found, the word enc it with th
Let
the interview with the father of family 125 (125F.txt) we have questions sked by the interviewer, marked as C – and answers given by the father,
Jac d so Atla
e may perhaps want to mark everything that Jack said with a code named ‘Jack’. [We could then at later stage look for quotations that have been coded bothomew
Move the mouse pointer inside the selected text and drag it into the
code list (or the code combo box). Release the mouse button and the code appears in the list, the text is
selected as a quotation, and the code is associated with the new quotation.
i code descriptions Ifc
first number in the brackets tells us how many q
ject). Tlis Auto-coding Acurrent primary text, or indeed thrc
losing the string, the sentence, paragraph or entire document) and codee selected code.
’s consider an example.
Ina
k, marked as J. Each question and answer is separates.ti will treat each as individual paragraphs.
by a blank line –
t Jack talks about
W
h as ‘homework’ and as ‘Jack’ to find all the instances thaork.]
2-8

2-9
he auto-coding tool:
ack’) already exists. If it doesn’t you need to create a free code first.
o work with is displayed in your
is
Open the auto-code dialog window by selecting Codes Coding Auto Coding from the main menu.
This is very quick and easy if we use t Start by making sure that the code you want to work with (‘J
Make sure the document you want tmain Atlas.ti window and move the cursor to the first line of this document. If you want to search through ALL primary documents, open/display the first one (P1) and move the cursor to the top of thdocument.
The dialog box appears …
2-9

Make sure that the code you want to use is the one selected in the top drop-own list.
want to search for (note
g for ‘J ‘
simply searching the current primary text (we discuss PT families in
Finally select what you want Atlas.ti to use as the quotation, once it finds the text string in your document(s). Here we want the whole paragraph to be selected.
Click on the start button to start the automatic search.
Atlas.ti quickly searches through the document. When it finishes a note at the bottom of the dialog box tells us that it has created 293 quotations and we can see that the code ‘Jack’ has indeed been linked to 293 quotations.
d
Enter the expression you
that this can also be multiple expressions – each separated from each other with a | ). Here we are searchin
Select the scope of the
search – here we are
session 5).
Note that an alternative to simply letting Atlas.ti go through coding everything it finds, is to ask Atlas.ti to stop each time it finds the string, and ask for confirmation that you do indeed want it to create a quotation here and code it. To do this click on the ‘Confirm always’ check box (above the start button) BEFORE you click on Start. Each time the string is found you either click on the ‘Code it ‘ button or the ‘Skip it’ button. This can be a useful way of checking that your search expression is what you wanted. You can ‘Stop’ at any time and un-check the ‘Confirm always’ check box to start auto-coding without checking again.
After completing your automatic coding, click on the ‘Close’ button to
close the dialog box.
2-10

Practical Session 2 In this session we are going to start creating some quotations and create some codes. We will use all the different coding styles, including auto coding, then sa can continue to use it in the next session. 1. Ope your saved Hermeneutic Unit from session 1
Intro 2.hpr’).
2. D 125f.txt (father’s interview for family 125). ument from your primary document combo box.
3. Cre ns
e want to select a passage of text - let’s start by selecting a paragraph using sem d in your document. Double-click the word
lighted word. Now the entire sentence will be
the highlighted sentence: Now the entire paragraph is selected. (A paragraph is any text enclosed with at least one empty line
Click on the ‘create free quotation’ tool button
r the
Try selecting a few more passages that look interesting .. don’t necessarily select whole paragraphs .. sometimes sentences are also of interest. Also try selecting a passage manually .. just using the
ve our project so that we
n a hermeneutic unit
If it is not still open, open (or open the file ‘Atlas
isplay primary document
Select the correct doc
ate a few free quotatio
Wi-automatic selection …
Move the cursor to one worto highlight it. Double-click on the highhighlighted. Double-click on
above and below.)
You should now have a new quotation in your combo box, and a bar foquotation in your margin on the right.
mouse to make your selection.
2-11
2-12
e’ codes (parent, child, homework)
To create a free code select Code from the
main menu.
dialogue box - using the ‘ | ’ key (the shift t key on the left of
your keyboard) to separate each code – and
You should now be able to see these codes in you
5. C coding)
pen Coding
4. Creating some ‘fre Remember that free codes are codes that you know you will want to use inyour project but that have not yet been associated with any quotations.
Codes Create Free
Type the names of 3 new codes into the
and the key next to the shif
click on ‘OK’ to create the codes.
r coding combo list.
oding using new codes (open coding & in-vivo O
ow let’s create some new codest the same time.
Select one of your ‘free quotations’ (click
and think of a new code that
family?)
N , but associate them with a passage of text a
on the bar in the right margin)
you might want to associate with this (morning, perhaps – or

2-13
and enter the names of your codes in the dialog box that appears,
he new codes should appear next to the bar in the right margin, as well as in e code combo box above.
in
t Atlas.t u know whaot create a new code, because the one you ill warn you that that code is not being created anew – and it will still create e quotation and associate the existing code to the new quotation.
-Vivo coding
Click on the ‘open coding tool button in the toolbar
before clicking on ‘OK’.
Tth
Try selecting another text passage and creatthis time enter a code that already exists. Wha
i is generally very good at letting yo
g another new code, but happens ?
t is going on. Here it will requested already exists .. but it n
wth In
ere we create a code from the text selected as the quotation.
Scroll down a little and select the text selection ‘fairly direct questions’
here.
Now click on
l
.. and both code & quobe
Try making another selection and creating another code & quotation.
H
as shown
the in-vivo coding too
tation should created !

2-14
6. Cod
ing using existing codes (code by list and quick coding)
Code by List Here we will associate two of the existing code(s) with a selected passage of
xt – and create a new quotation at the same time.
Start by selecting some text to code .. you can select one of your free quotations or highlight a new one.
Select two of these codes to associate with the new quotation.
uick Coding
te
Click on the ‘Code by List’ tool to bring up the list of existing codes.
Q
o …
Select a code (from the combo box drop-down list ).
If the code you want does not already exist create a
Select a passage of text that could be coded as ‘morning’ and click on the Quick-coding tool.
Now select another text passage and code this with the same code.
his is fairly quick – but is it quick enough ? Let’s try some dragging & ropping and see if we can speed things up a bit.
Clicking on the quick coding tool button creates a quotation from the selected text, and codes it with the code that is currently selected in the coding combo box. S
new free code first !
Td
2-15
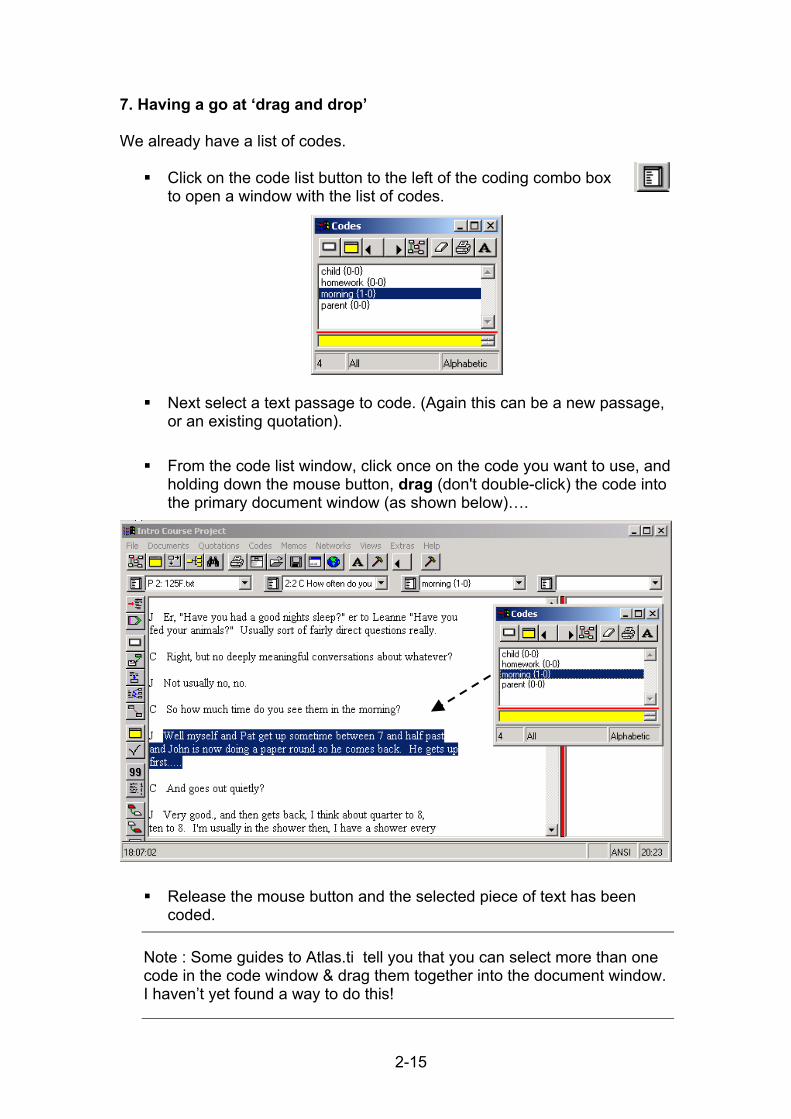
7. Having a go at ‘drag and drop’
e already have a list of codes.
Click on the code list button to the left of the coding combo box
Release the mouse button and the selected piece of text has been coded.
W
to open a window with the list of codes.
Next select a text passage to code. (Again this can be a new passage,
or an existing quotation).
From the code list window, click once on the code you want to use, and holding down the mouse button, drag (don't double-click) the code into the primary document window (as shown below)….
Note : Some guides to Atlas.ti tell you that you can select more than one code in the code window & drag them together into the document window. I haven’t yet found a way to do this!

2-16
e can also use drag & drop to create codes from the text selection itself ( a bit Make a selection in your text (of less than 40 characters).
Move the mouse pointer inside the selected text and ‘drag’ it into the
code list (or the code combo box).
Wlike in-vivo coding).
Release the mouse button and the code appears in the list, the text is selected as a quotation, and the code is associated with the new quotation.

2-17
. Auto-coding
As discussed on page 8, auto coding allows you to search for a text string in
.
Noexpres We want to create a code called ‘family’ and code any references to close relatives. Create a free code called ‘family’.
In the primary document combo drop-down list, select primary
document 1 (P1). Move the cursor to the very start of this document. Open the auto-code dialog window by selecting
Codes Coding Auto Coding from the main menu. The code ‘family’ should be selected at the top.
Enter the expression you
want to search forselect CLOSERELATI– a previously saved expression - move the
e rest of the family so you have the expression given below (*).
Select the scope of the search as being All PTs
Finally select what you want Atlas.ti to use as the quotation, once it finds the text string in your document(s). Here we want just the sentence to be selected.
* CLOSERELATIVE:=*father|*mother|brother|child*|sister|Pat|John|Leanne|son|daughter
8
your data, use it to create a quotation and code it with the currently selected code. Start by working through the example on pages 2-8 to 2-10
w let’s do some auto coding with a slightly more complex search
sion.
- first VE
cursor to the end of this expression and add the names of th

2-18
sion is a little complicated, let’s test it first.
Click on Start
he coding tool with search for the first string it can find which matches the on at the
cument.
Click on ‘Code it ‘ to apply the code to the sentence containing the
, then
. Click on Start to start the automatic search through all the family 125
matic coding, click on the ‘Close’ button to
Since this expres
Click to select the ‘Confirm always’ check box
Texpression. This should be the word ‘daughter’ in the family descriptitop of the do Click on ‘Skip it’ and continue until a sensible text string is found.
string. Repeat this a few times until you are happy with the expression
click on ‘Stop’. Click to un-select the ‘Confirm always’ check box
documents.
After completing your autoclose the dialog box.
Session 3
Comments & Memos and Correcting your work
page Adding comments to documents, quotations or codes 3-1 Creating free memos 3-2 Why use memos ? 3-3 Creating a memo for selected text 3-3 Correcting a quotation 3-4 Renaming a code 3-4 Un-linking & deleting codes & quotations 3-5
Unlinking a Code 3-5 Deleting a quotation 3-6 Deleting codes 3-6
Practical Session 3 3-8
1. Adding comments to document 1 & some of your codes 3-8 2. Creating a diary memo 3-9 3. Creating a memo for a quotation 3-10 4. Creating an in-vivo code and correcting the quotation 3-11 5. Renaming a code 3-11 6. Quick coding a quotation .. and un-coding it again! 3-12 7. Deleting a quotation 3-13 8. Creating & deleting a code 3-13

3-1
Adding comments to documents, quotations or codes You may have noticed that when you open a list of your documents, quotations or codes and select any one of these objects, there is a red line near the bottom of the window, underneath which the window is yellow. This yellow part of the window is designed for you to add comments or descriptions about each of the objects in your project – whether they be documents, quotations, or codes. To add a comment/description simply .. § Select the object you want to write about from the list above (here we
have selected primary document 2 § Place the cursor in the yellow window and start typing !!
If you have a particularly long comment / description to write, you can open the comment editor in its own window by clicking on the yellow ‘comment’ tool
When you select another object the comment is saved automatically. A tilda, ~, appears next to the document description, indicating that the document has a comment attached to it.

3-2
Creating free memos A memo is really an extension of the idea of a comment. Comments are fixed to the object for which they have been written. A memo, however is like a ‘free’ comment. It can be thought of as a comment with a name – which exists as an object in its own right, and which can later be linked to any other object in the project. A free memo is then a comment which has been given a name (this turns it into a memo) but which has not been linked to any object. Memos are stored and accessed via the final combo box at the far right of your window.
Primary documents
Quotations Codes Memos
To open a window in which to start creating a ‘free’ memo.. § Select Memo Ø Create free memo from the main menu.
OR
§ Click on the 'create a memo' tool
but first making sure that no text is highlighted in the primary document.
OR
§ Open the memo list using the button on the
left of the combo box, and click on the ‘create new item’ tool
Whichever method you use you will be asked to enter the name of your new memo.
§ You then need to select/open the menu from the combo list in order to start typing in the memo text.

3-3
Why use memos ? The first time I attended an Atlas.ti workshop the tutor started by talking about memos in Atlas.ti. She said that she had a single memo without which she would be lost. The name of this memo was ‘Diary’. The diary memo was a free memo, not designed ever to be attached to any other object within the project. It provided a record of the work she carried out – her thoughts – and where she had got to on each session. With long breaks between Atlas.ti sessions it was an invaluable tool. Many people write such notes in a project notebook – the advantage of keeping the records in a memo was that it was stored as part of the Atlas.ti p roject itself. You could extend this idea further and have memos for different types of notes .. a memo for unfinished ideas .. or analytical thoughts. You could leave messages for co-workers on your project. In fact – anything you might record on a scrap of paper can be stored within the project itself using a memo… and as long as you have a good system for backing up your project files, you are unlikely to lose your notes ! Creating a memo for selected text You may at times want to write a note about a particular segment of your text – this will create a quotation and then associated the memo created with that quotation – but it is not the same as simply writing a comment about a particular quotation. Writing a memo about a particular text segment will allow you to attach that memo at a later stage to other similar text segments about which you would want to write the same notes. To write a memo about some text ..
§ Select a text passage for which you want to create the memo.
§ Click on the 'create a memo' tool, in the primary document tool bar on the left
As when creating a free memo, an entry window pops up.
§ Enter a memo name/title and click OK. The memo now appears in the memo combo box. If you open the list of memos in their own window you can select this memo and type your notes into the yellow comment area. Note that an icon representing the memo will appear in the margin on the right next to the selected text.

3-4
Correcting a quotation Sometimes you may want to amend the selection of text included in your quotation. A good example of this is when you have created your quotation via in-vivo coding. The selection of text you chose then was concerned with selecting an appropriate name for your new code . Another example is if you have used autocoding, and requested the quotation to be created from perhaps the line or the sentence in which your text string was found. You may then want to go back and select more appropriate text passages to be your quotations. To correct a quotation .. § Select the quotation to be corrected using the bar in the right margin (to
ensure you select exactly the quotation you want to amend). § With the mouse, highlight the section of text that you actually want the
quotation to contain.
§ Click on the ‘Correct quotation’ tool, in the primary document toolbar and the quotation should be corrected.
Renaming a code To rename a code..
§ Open the code list window by selecting the list tool, , on the left of the codes combo box.
§ Highlight / select the code you wish to rename
§ Click on the right mouse button and select ‘Rename’ from the context menu.
§ Enter the new name in the box that appears
and click on ‘OK’.

3-5
Un-linking & deleting codes & quotations Sometimes you might create quotations and wish you hadn’t – or you might even take it a step further and have assigned codes to this quotation. Unlinking a code If you simply want to ‘un-link’ or ‘un-assign’ a particular code from a quotation, then .. § Select the quotation using the bar in the margin on the right.
§ Use the right mouse button and click again on the quotation bar.
§ Select ‘unlink codes’ from the
context menu that appears. If more than one code has been linked to this quotation a dialog box will appear. § From the dialog box, select / highlight the
codes you want to unlink, and click on ‘OK’.
Tip : Another way of selecting an existing quotation precisely is to place the cursor in the text where you want to make your selection. Then click on the
‘display quotations’ tool, in the primary document toolbar (at the bottom) and a list of quotations which contain that cursor position will appear. You can select the quotation you want from the list.
3-6
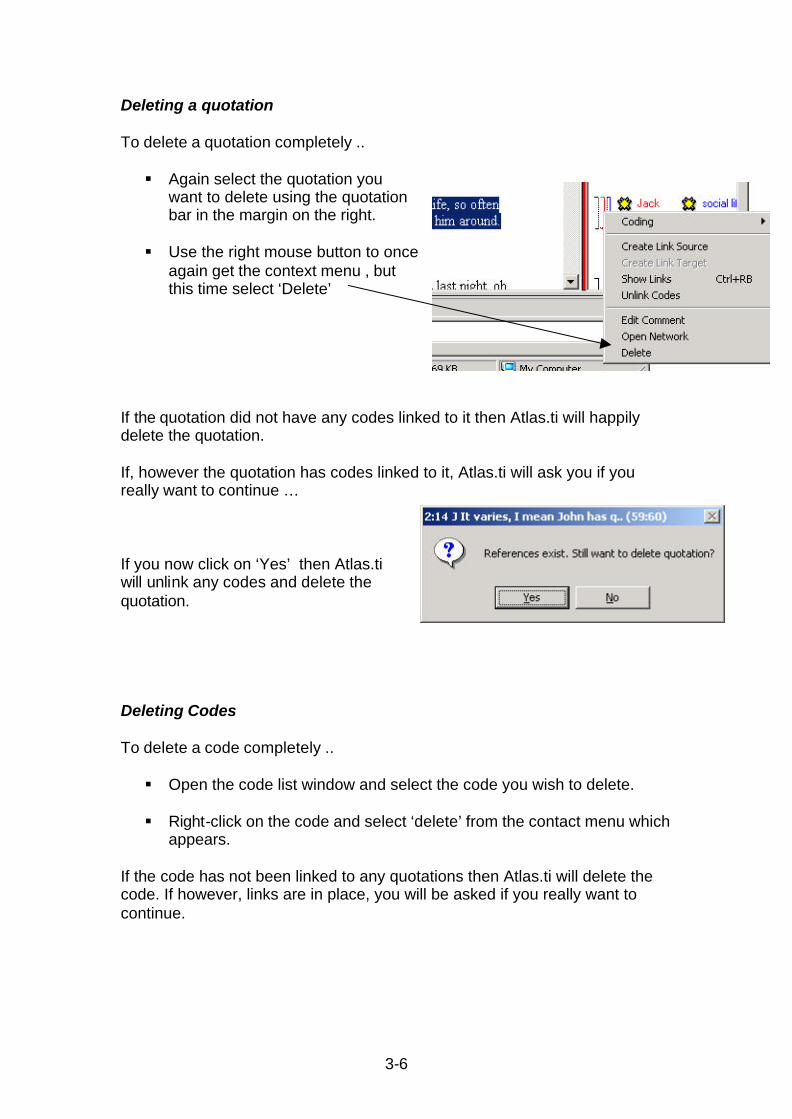
Deleting a quotation To delete a quotation completely .. § Again select the quotation you
want to delete using the quotation bar in the margin on the right.
§ Use the right mouse button to once
again get the context menu , but this time select ‘Delete’
If the quotation did not have any codes linked to it then Atlas.ti will happily delete the quotation. If, however the quotation has codes linked to it, Atlas.ti will ask you if you really want to continue … If you now click on ‘Yes’ then Atlas.ti will unlink any codes and delete the quotation. Deleting Codes To delete a code completely .. § Open the code list window and select the code you wish to delete.
§ Right-click on the code and select ‘delete’ from the contact menu which
appears. If the code has not been linked to any quotations then Atlas.ti will delete the code. If however, links are in place, you will be asked if you really want to continue.

3-7
If you again click on ‘yes’ then you are asked whether or not you want to remove any quotations which have no further references. In other words – if this is the only code linked to a quotation, do you want to delete the quotation as well – or do you want to leave it as a free quotation ? v Selecting ‘Yes’ deletes all quotations which have this code as their only
code. v Selecting ‘No’ unlinks the code (before deleting it) and leaves all
quotations in place as free quotations.
3-8
Practical Session 3 § Start by opening either the hermeneutic unit you saved at the end of
practical session 2 – or open the file Atlas Intro 3.hpr from the folder C:\Atlas Intro
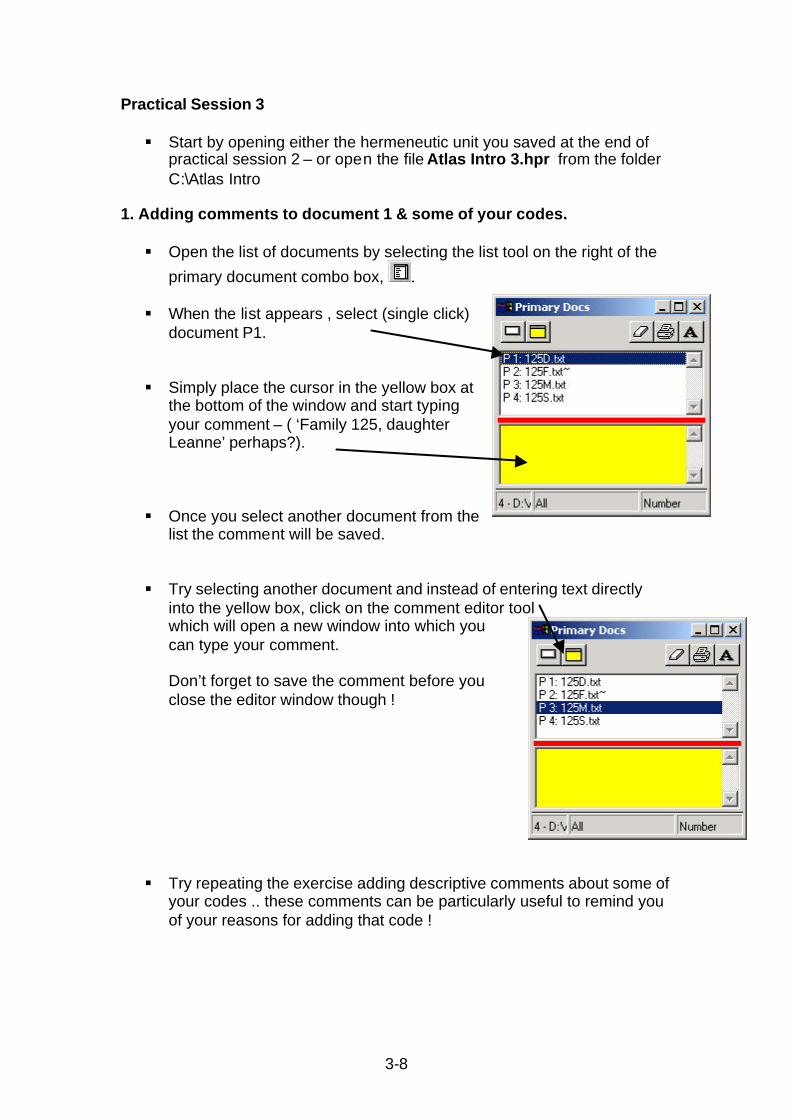
1. Adding comments to document 1 & some of your codes. § Open the list of documents by selecting the list tool on the right of the
primary document combo box, . § When the list appears , select (single click)
document P1. § Simply place the cursor in the yellow box at
the bottom of the window and start typing your comment – ( ‘Family 125, daughter Leanne’ perhaps?).
§ Once you select another document from the
list the comment will be saved. § Try selecting another document and instead of entering text directly
into the yellow box, click on the comment editor tool which will open a new window into which you can type your comment. Don’t forget to save the comment before you close the editor window though !
§ Try repeating the exercise adding descriptive comments about some of
your codes .. these comments can be particularly useful to remind you of your reasons for adding that code !

3-9
2. Creating a diary memo Let’s start by creating a diary memo …
Select Memo Ø Create free memo from the main menu.
OR § Open the memo list using the button on the
left of the combo box, and click on the ‘create new item’ tool
§ When prompted, enter the name of your memo ( ‘Diary’, perhaps ?!) – and click on ‘OK’
This creates your memo and it will appear in the memo combo box .. but it doesn’t yet contain any text !
§ Open the list of memos by selecting the list tool on the right of the
memo combo box, .
§ Select/open the menu from the combo list in order to start typing in the memo text.

3-10
3. Creating a memo for a quotation
§ With a document displayed in the primary document area, select one of your quotations by clicking on the quotation bar in the margin area on the right.
§ Click on the 'create a memo' tool, in the primary document tool bar on the left
As when creating a free memo, an entry window pops up.
§ Enter a memo name/title and click OK. Again the memo appears in the memo combo box. If you open the list of memos in their own window you can select this memo and type your notes into the yellow comment area. An icon representing the memo will appear in the margin on the right next to the selected text.
Note : If your memo does not appear in your margin, it may be that all objects are not being displayed in the margin. To display all objects point the mouse at a black space somewhere in the margin area and click once with the right mouse button. A context menu appears and you can select Object TypeØ All.

3-11
4. Creating an in-vivo code and correcting the quotation § Select a small portion of text and use the in-vivo tool on the primary
document toolbar to create a new quotation and a new code from the text.
In many such cases you then might want to expand the quotation, so now let’s correct our quotation. § The quotation should still be selected, so use the mouse to highlight
the section of text that you actually want the quotation to contain.
§ Click on the ‘Correct quotation’ tool, in the primary document toolbar and the quotation should be corrected.
5. Renaming a code To rename a code..
§ Open the code list window by selecting the list tool, , on the left of the codes combo box.
§ Highlight / select the code you wish to rename
§ Click on the right mouse button and select ‘Rename’ from the context menu.
§ Enter the new name in the box that appears
and click on ‘OK’. This will rename the code wherever it is used throughout the entire project.

3-12
6. Quick coding a quotation .. and un-coding it again! § Display one of your primary documents and select a quotation - it can
be a free quotation or one that already has codes linked to it. (Or simply select a new passage of text from which to create a new quotation !)
§ Click on the quick-coding tool on the primary document toolbar to code this quotation with whatever code is currently displayed in the coding combo box.
§ Use the right mouse button and click on the quotation bar in the margin
area on the right. § Select ‘unlink codes’ from the
contact menu that appears. If the quotation was coded only with the code that you have just linked to it then you will have accomplished your task & unlinked the code again. If, however, more than one code has now been linked to this quotation a dialog box will appear. § From the dialog box, select / highlight the
codes you want to unlink, and click on ‘OK’.
3-13
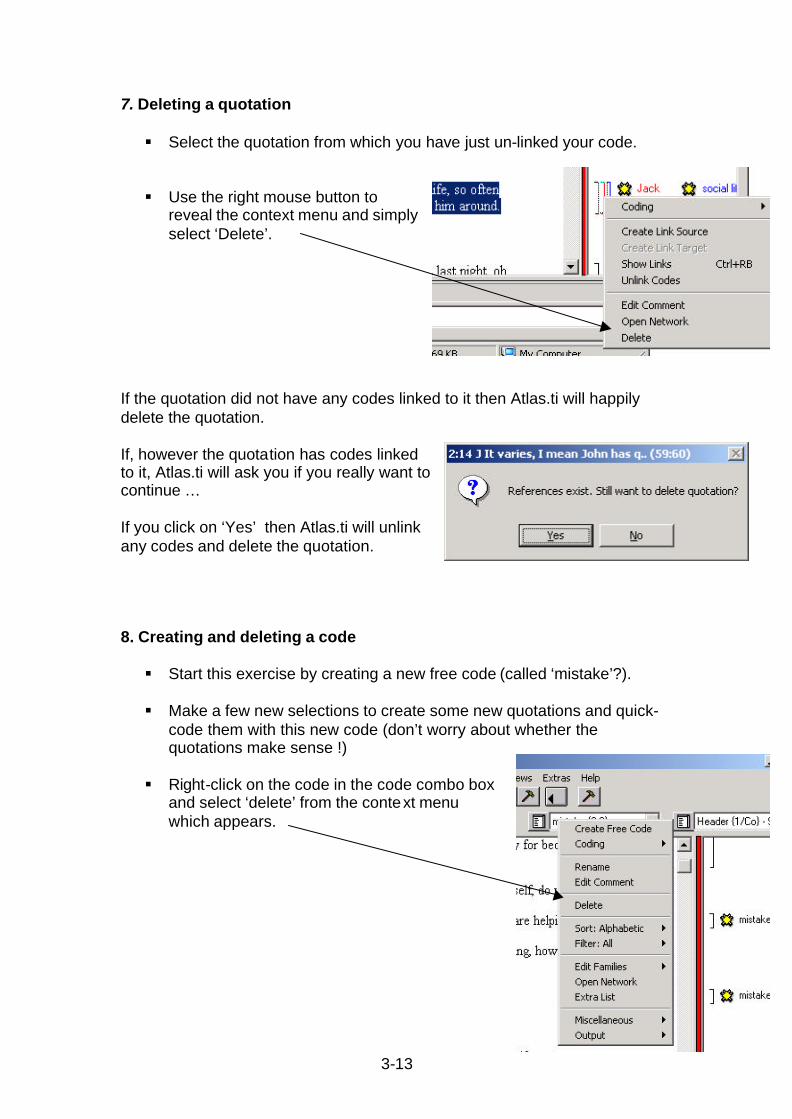
7. Deleting a quotation § Select the quotation from which you have just un-linked your code.
§ Use the right mouse button to
reveal the context menu and simply select ‘Delete’.
If the quotation did not have any codes linked to it then Atlas.ti will happily delete the quotation. If, however the quotation has codes linked to it, Atlas.ti will ask you if you really want to continue … If you click on ‘Yes’ then Atlas.ti will unlink any codes and delete the quotation. 8. Creating and deleting a code § Start this exercise by creating a new free code (called ‘mistake’?).
§ Make a few new selections to create some new quotations and quick-
code them with this new code (don’t worry about whether the quotations make sense !)
§ Right-click on the code in the code combo box
and select ‘delete’ from the context menu which appears.

3-14
Since the code has been linked with quotations you will be asked if you really want to continue.
( I linked it with 3 quotations hence the reference here)
§ Click on ‘yes’ and you will be asked whether or not you want to remove
any quotations which have no further references § Select ‘Yes’ to delete all quotations which have this code as their only
code. (i.e. the quotations that you have just created). When finished, the status bar at the bottom of the window tells you that the code (called mistake) and the 3 quotations have been deleted.
Session 4
Creating Reports (some useful output options)
page General points 4-1
Finding the reports/output 4-1 Using the output editor 4-1 Include comments? 4-2 Filters 4-2
Reports available in Atlas.ti 4-2
Document reports 4-2 Quotation reports 4-3 Code reports 4-4
Practical Session 4 4-5

4-1
General points Finding the reports/output The drop-down menus for each of the 4 objects (documents, quotations, codes & memos) each have an option ‘Output’. It is from these menu options that we access most of the reports/output that are automatically generated by Atlas.ti. However many of them can also be accessed from the print button which appears in the list window (when you open an object list window using the button to the left of each combo box). Using the output editor When you request a report to be generated, Atlas with usually ask you whether you want to send the report to the editor, to the printer, or to a file. Generally it is sensible always to send the output to the editor. The editor is simply a new window (example shown below) in which you can view your output or make some very basic changes. From this window you can then send the output to a printer – or save it as a file.

4-2
Include comments ? Very often Atlas will ask you whether or not you want comments included in your reports. These are simply the comments you have added to your objects (in the yellow comment boxes – as we did in session 3). Filters Filters will be discussed further in session 5. If document or code filters are being applied they will apply also to all outputs (so if a report is for all quotations, it is for all quotations that apply within the filtered documents). Reports available in Atlas.ti As previously mentioned, the reports are either accessed via each the drop-down menus for each object type, or from the print button in the object list window. It is simply too time-consuming to give examples of all of these reports so I will briefly list here the reports available, indicating with an asterisk those which I personally think are particularly useful ( * might be useful, ** extremely useful). We will use the practical session to experiment with some of these reports – you can make up your own mind about which reports you think are useful when you work on your own project ! Document reports In the document sub-menu there are 5 reports that you can request via the ‘output’ option (i.e. using Documents Ø Output) but there is also a useful report that is available from the miscellaneous option (i.e. using Documents Ø Miscellaneous) From the output menu option : List Outputs a list of the documents – including the path
where Atlas.ti is expecting to find them. Hierarchy A brief outline of quotations in the current primary
document & the codes associated with them. Includes only the quotation numbers and code names. No text or description is output.
4-3
Quotations* Lists all the quotations for the current document – with text and the codes associated with each quotations – in the order that they were created
Numbered file Output the current document with line numbers at the
start of each line. You can specify the number you want to start numbering from !
Print with Margin ** This prints the current document exactly as it is
displayed on the screen – including colour if you have a colour printer. The printout goes directly to the printer and not to an editor. If line numbers are displayed on the screen, then line numbers will appear on the printout. Tip : If you select a section of your document on the screen and then request this report , only the selected section will be printed (along with the margin).
From the ‘miscellaneous’ menu option : Word Frequencies** Produces a word count of ALL the words in the current
document. This can be useful if you are thinking about using auto-coding - are there particular words that crop up time & time again? Unfortunately you can only produce this for one document at a time.
Quotation reports Selected Quotation Outputs the full text of the currently selected quotation,
along with document details and a list of codes associated with the quotation. This is only available if there is a quotation selected in the primary document window.
All Quotations Outputs the full text of ALL quotations in the project
(not just in the selected document). Includes references to which primary document the quotation is from, and which codes have been associated with each quotation.
All Quotations (List) Outputs a list of the first line of each quotation (across
all documents). Comments are added if requested but not details of associated codes.

4-4
Code reports Quotations for selected code**
Lists the full text and document references of all quotations that have been associated with the selected code (the code currently selected in the code combo box). Other codes associated with each quotation are also given.
Quotation List* Lists the first line of all quotations associated with the
selected code – along with their quotation reference. Comments are added if requested but not details of associated codes.
Include sub-terms The same report as for ‘quotations for selected code’
but also includes quotations for any sub-codes associated with the selected code (associations are made via the network diagram (session 6))
Quotation Retrieval** Takes you into the query tool (session 5) Code List Outputs a list of all codes being used in the project Code Hierarchy Lists the codes in the project , structured according
to any hierarchies that exist (as defined in the network diagram)
Code Neighbours* Outputs a list of all the codes – along with any other
codes that have been linked to them (the link need not be directly hierarchical).
Code-Primary Documents table**
Outputs a count of how many quotations each code has been associated with for each primary document, (i.e. the number of times each code has been used within each document).
Quotation References Lists – for each code, and by each primary document
- the start & end lines of each quotation that has been associated with that code (in the order that they appear in the text).
All Codes with Quotations
Produces the same output as ‘Quotations for selected code’ .. but gives this for all the codes in the project in turn.
Print codes with comments
Lists all codes with any comments written about them – also includes the date the code was created, and the last time the code was modified.

4-5
Practical Session 4
• Open the project file AtlasIntro4.hpr
• Use the guidelines above to create a few reports.
• Have a play with the options and make your own notes about how you might use the reports in your own project.
Try particularly to use the editor. Look at the different editing options and note how you would save the output to a file.

Session 5
Selective Reporting :
Families and the Query Tool page Creating families 5-1
Document families 5-1 Code families 5-2
Using filters 5-4 The Query tool 5-6
Displaying quotations for a code in context 5-6 Displaying quotations using the query tool 5-6 Query tool operators 5-8 Filtering documents (textbase selection) 5-10 Outputting results of queries 5-11 Saving results of queries (supercodes) 5-11
Practical Session 5 5-12
1. Creating document families ‘parents’ and ‘children’. 5-13 2. Filtering using the parent document family 5-14 3. Creating a simple query 5-15 4. Restricting the query to the parents of family 125 5-17 5. Creating & using a super-code 5-18 6. Some further questions 5-20

5-1
Creating families As your project grows you are likely to find it quickly becomes unmanageable – you may have a lot of different interview transcripts (the study from which this data was taken involved 94 families – most of which involved at least 3 interviews) and as your code list grows it will get longer & longer. Atlas.ti gives you a tool to help you categorise and group together your documents and your codes. It calls these groups ‘families’. Document families We can create groups, or families of documents base on whatever criteria we like. We may want different groups for different interview months - or, more likely, we may want to group our documents by the demographic details associated with them. For example, we may want a ‘family’ of documents containing all interviews with women (mothers in our study) .. or another containing the inteviewed with sons – or daughters .. or more generally parents and perhaps then children. Or we may want to group our documents by demographic area. A document may belong to more than one family – so we can literally create as many different families as we like. Creating a large number of families can be time consuming – but most researchers find that it is wirth taking this time and that it provides an invaluable tool. So how do we use families ? We can tell Atlas.ti to filter out everything in our project except a particular document family. This allows us to focus in on one particular area of a project at a time. Filtering is covered below on page 3-4. To create a document family … § Open the document family browser by selecting
Documents Ø Edit families Ø Family Browser from the main Atlas.ti menu.
§ Click on the symbol for creating a new family:
An entry window opens and you are asked to enter a name for your family (such as ‘parents’ or ‘females’ or ‘family 125’) .
§ Enter a name and click on ‘OK’ to continue.
The family editor opens, as shown on the next page…

5-2
The document family editor (below) allows you to select documents from your entire document list and make them members of your family by clicking on the arrow which points to the left. (Equally you can remove members of your family by selecting them on the left of your screen and clicking on the arrow pointing right to move them back into the general document list.)
In the picture above a new family (parents) has been created, but does not yet contain any members (documents) .. hence the (0) after the family name – and the empty membership box on the left.
In this project there are currently only 4 documents – primary document 2 (P2) is the interview with the father , and P3 is the interview with the mother.
§ Move the two documents, P2 and P3 from the list on the right of the window over to the left by clicking on the < button.
The parent family should now have (2) next to it, denoting that 2 documents have been assigned to this family. Note that if you now create another new family, all 4 documents will again be available to become members of that family. So documents can be members of more than one family. Code families Code families are created in exactly the same way as document families .. except the members of each family are codes ! Code families are a way of grouping together your codes into meaningful sub-groups .. we may have groups of codes all to do with homework, or groups to do with inter-family relationships, school in general, social life etc.

5-3
To create a code family then … § Open the code family browser by selecting
Codes Ø Edit families Ø Family Browser from the main Atlas.ti menu.
§ Click on the symbol for creating a new family,
An entry window opens and you are asked to enter a name for your code family .
§ Enter a name and click on ‘OK’ to continue.
The code family editor opens, as shown on the next page…
The code family editor (below) works in exactly the same way as the document family editor - allowing you to select codes from your entire code list and make them members of your family by clicking on the arrow which points to the left. (Equally you can remove members of your family by selecting them on the left of your screen and clicking on the arrow pointing right to move them back into the general document list.)
In the picture above a new family (out of school) has been created, but does not yet contain any members (codes) – and again we see a (0) after the family name to tell us that this family has 0 members.
Note that a comment has also been added here – in the yellow box at the bottom. So families can have comments attached too !
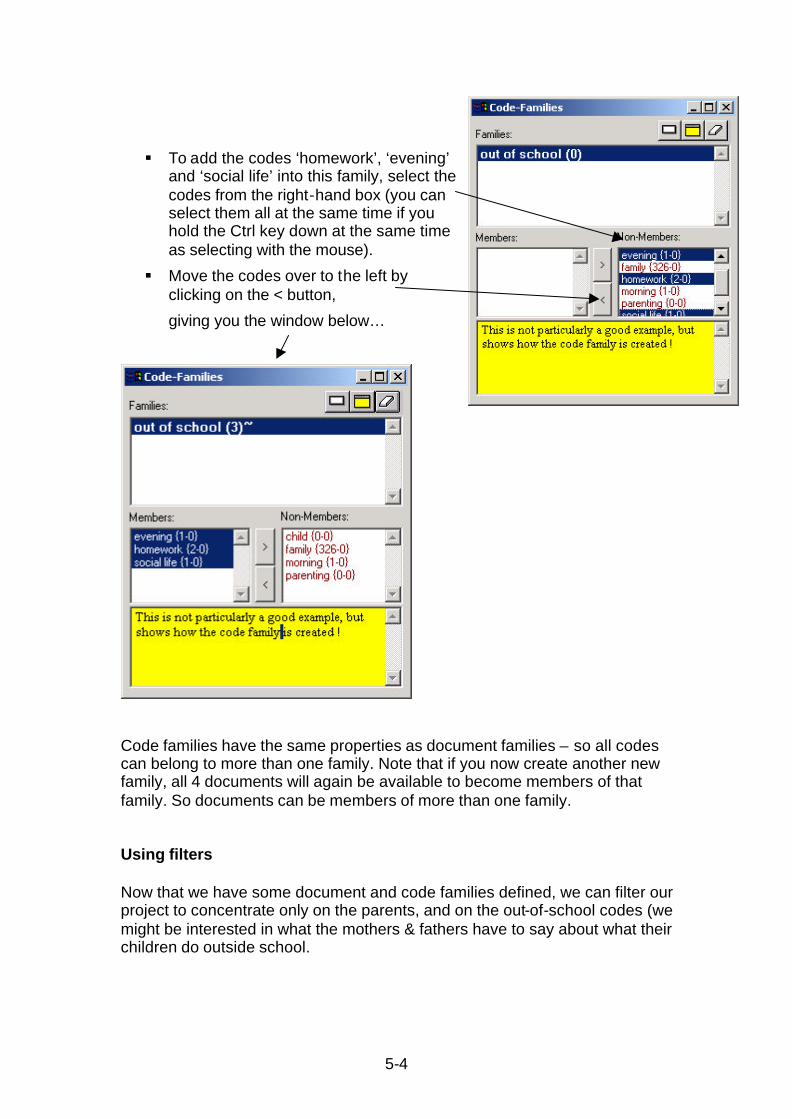
5-4
§ To add the codes ‘homework’, ‘evening’ and ‘social life’ into this family, select the codes from the right-hand box (you can select them all at the same time if you hold the Ctrl key down at the same time as selecting with the mouse).
§ Move the codes over to the left by clicking on the < button,
giving you the window below…
Code families have the same properties as document families – so all codes can belong to more than one family. Note that if you now create another new family, all 4 documents will again be available to become members of that family. So documents can be members of more than one family. Using filters Now that we have some document and code families defined, we can filter our project to concentrate only on the parents, and on the out-of-school codes (we might be interested in what the mothers & fathers have to say about what their children do outside school.

5-5
To filter on a document family … § Select Documents Ø Filter Ø Family from
the main Atlas.ti menu. This will bring up a list of current families (there is only one in this example – parents).
§ Select the family you want to filter on from this list.
From this point – until you change the document filter options – you will only be able to see the documents in this document family in your project (as you can see from the combo box here).
Note that any output / results that you request will also be filtered to show only the documents in this family.
You can use exactly the same process to filter on a code family, and you can filter on both document families and code families at the same time.

5-6
You can also filter out other types of documents & codes. If you are working with other colleagues on the same project you can set up a system where each person ‘logs on’ to the project. With this system in place, you can filter only on your own documents – or your own codes. You can also filter on codes generated ‘today’ – or only those with comments. The Query tool Displaying Quotations for a code in context The simplest way of retrieving the subset of quotations that have been coded with a particular code is to view these quotations in context. To do this you simply have to .. § Open up the code list using the list tool on the left of the code combo
box. § Double –click on the code you are
interested in – a list of quotations appears.
§ Select any of these quotations and it
will be displayed for you in the primary document window.
Displaying quotations using the query tool The query tool takes this selection of quotation a step further (or indeed a few steps further). Using the query tool you can display quotations for any combination of codes . To open the query tool, click on the ‘binoculars’ tool on the main tool bar, . This gives you the query dialog box (see next page) – which is actually far less frightening that it looks at first!
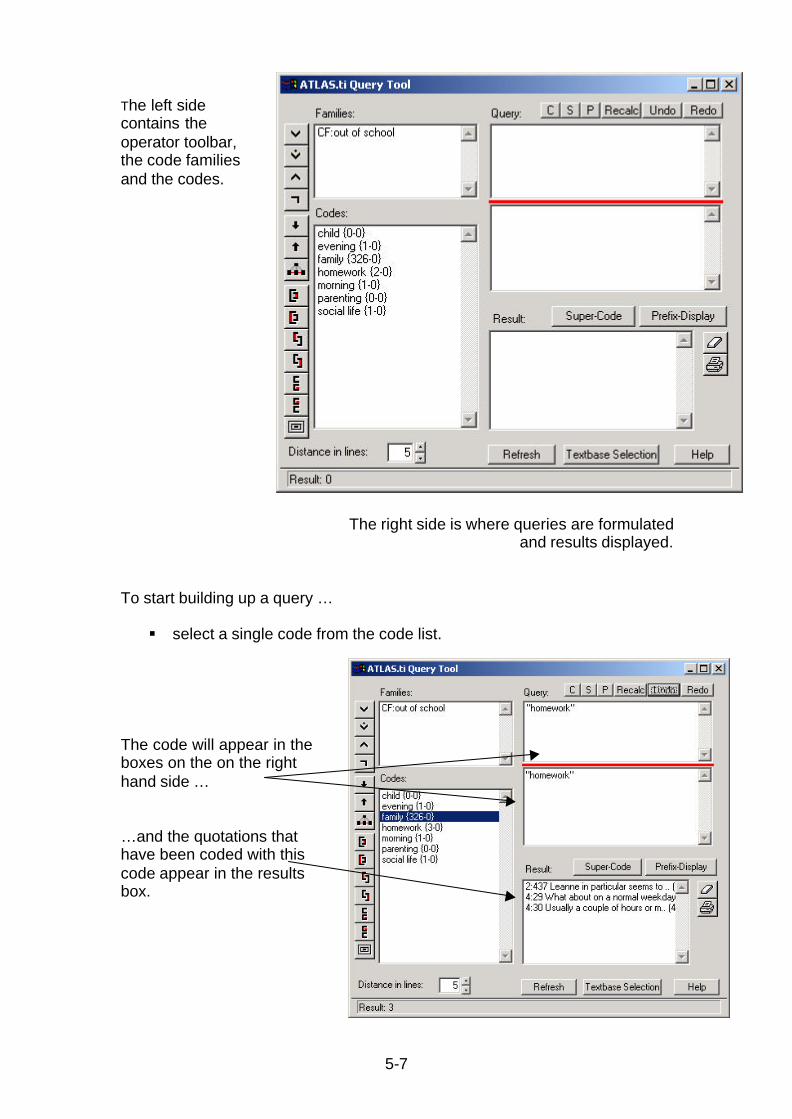
5-7
The left side contains the operator toolbar, the code families and the codes.
The right side is where queries are formulated and results displayed.
To start building up a query … § select a single code from the code list.
The code will appear in the boxes on the on the right hand side … …and the quotations that have been coded with this code appear in the results box.

5-8
§ If we now select a second code (family) then this code appears in the bottom box on the right-hand side but both codes are displayed in the top box on the right.
The bottom box (under the red dividing line) shows the query for which quotations are currently being displayed in the results box underneath (so because we selected a second code ‘family’ the results box gives us all the quotations associated with family) The top box on the right. This box displays our query as it is being built. So – we have so far selected two codes in our query. In order to create a query out of these 2 codes (which will then give us the results we want) we need to tell Atlas.ti how to connect these two codes. We do this using the query tool operators. Query tool operators Three sets of operators are available: Boolean operators, Semantic operators and Proximity operators.

5-9
Boolean Operators OR : A or B
XOR: Only A or only B, exactly one of the terms matches
AND: A and B must co-occur exactly, all terms match
NOT: None of the search term matches
Semantic Operators SUB: All A including sub-groups, (works only for transitive relations!)
UP: All A including super-ordinate codes
SIB: All A including all the quotations from codes that are linked to A
Proximity operators
WITHIN: A within B
ENCLOSES: A encloses B
OVERLAPPED: A overlaps B
OVERLAPPED: B overlaps A
FOLLOWS: A follows B
PRECEDES: A precedes B
CO-OCCURRENCE: All A that co-occur with B in any combination
To see how these work we go back to our query ..
§ Click on the co-occurrence operator , Our query underneath the red line now becomes the full query .. .. and our result shows that there is only one occurrence where ‘homework’ co-occurs with ‘family’.

5-10
With practice, it is possible to build up almost any combination of codes you can think of. You can use the code families in your query as well as the codes .. so you could ask for all the quotations where any of the ‘out of school’ codes co-occur with the code Leanne, say (assuming that you had a code for Leanne). You can also use the textbase selection tool to select a subset of documents to search across. Filtering documents (textbase selection) Once you have built a query based on codes, you can also ask Atlas.ti to look for quotations that satisfy this query but that only occur in particular documents – or document families. So, for example, you could search for quotations coded with ‘out of school’ codes but only in documents that are in the ‘parent’ document family. In other words, search for times that the parents talked about out of school activities. To use the textbase selection.. § Click on the button at the bottom of the query tool window.
This opens a window with the title: Define scope of query.
This window looks very similar to the main query tool window, except that is contains documents rather than codes, and has only Boolean operators.
Here you can select documents or families or combinations of the two.
The quotations in the result pane of the query tool will change accordingly to reflect the filter you have set.

5-11
Outputting results of queries To output results from the query tool, click on the icon on the bottom right of the query tool that shows a printer. You will then be asked whether you want to just see a list of quotations (i.e. the first 32 characters of each text segment) or the full text of the quotations. As with most of the printout from Atlas.ti you then have the option to send the output to an editor, the printer or a disk – and the output will be in ASCII text format. Saving results of queries (supercodes) While experimenting with the queries you may come across a query that you think is really interesting and you would like to recreate again at a later stage – perhaps when you have done further coding. Instead of making a note for yourself (or even writing a memo named ‘useful queries’ !) you could also save your query by creating a ‘supercode’. To save your current query as a supercode, § click on the ‘Super-code’ button.
You will be asked to give your supercode a name (although the query text, if short, is often offered as a default name for your super-code). § Enter a name and click on ‘Ok’ to continue
Your supercode has now been created and appears in your code combo box. As you continue coding, the query stored in the super-code automatically updates itself – so that if you display the quotations (or indeed, print them out – for output purposes the supercode works in the same way as any other code), new ones that satisfy the query will automatically appear in the list.

5-12
Practical Session 5 For this session you need to open the hermeneutic unit called Atlas Intro 5.hpr Note that much of the coding in this project has been done via autocoding – and not all of the references and codes make perfect sense in terms of a ‘real’ investigation. Plus there are plenty of instances where text should have been coded with one of these codes, but where code shave not yet been assigned (perhaps you can assign them as you spot them?!). Please try to see past the inadequacies of the coding and concentrate on the skills/techniques being applied ! 1. Creating document families ‘parents’ and ‘children’. This project already has document families for each of our real-life familes, but we may want a way of just looking at something parents say – and perhaps seeing whether the children say similar things. To do this we can define 2 more document families. § Open the document family browser by selecting
Documents Ø Edit families Ø Family Browser from the main Atlas.ti menu.
§ Click on the symbol for creating a new family:
§ Enter ‘parents’ for the name of the family and click on ‘OK’ to continue.
§ Repeat the last two tasks to create a new family called ‘children’.
Both families should now appear in the family browser – both with 0 members.

5-13
Now we need to add documents to our families.
§ Select children from the family browser list
§ From the non-member document list (on the right) use the Ctrl key with the mouse to select documents P1, P4 and P7 at the same time.
§ Click on < to move these documents to the ‘children’ list.
§ Now select the family name ‘parents’ from the family list.
§ Select documents P2, P3, P5 & P6 and ‘place’ these in the member list for the parent document family.
2. Filtering using families
Perhaps we just want to look at what the parents said about some topic. To do this, we need to filter on the document family ‘parents’. § Select Documents Ø Filter Ø Family from the main Atlas.ti menu.
This will bring up a list of current families,
§ Select the family ‘parents’ from this list.
From this point – until you change the document filter options – you will only be able to see the documents associated with parents (as you can see from the combo box here).

5-14
§ Produce a codes-primary documents table for the project. It should only show the results for the interviews with parents.
§ Experiment with the different types of filter available (you won’t be able
to use them all!
3. Creating a simple query
Here we are going to try to find evidence of conversation at mealtimes. We have the codes ‘meals’ and ‘conversation’ so we can use the query tool to see if there is any evidence of these occurring together.
§ Click on the query tool button (the binoculars) in the main toolbar.
§ In the code list, double click on the code ‘meals’
Note that ‘meals’ has been assigned to 60 different quotations…
.. and these quotations are being displayed in the ‘results’ box (you can scroll through them using the scroll bar on the right).

5-15
§ In the code list again, double click on the code ‘conversation’
‘Conversation’ has been assigned to 128 quotations.
The results box currently only shows the 128 quotations that have been coded with ‘coversation’. We know this because the query for which results are being displayed is shown underneath the red split bar.
§ Now complete your query by clicking on the ‘co-occurrence’ operator. We want to see how many times quotations coded with ‘meals’ co-occur with quotations coded with ‘conversation’.
The result is shown on the next page.

5-16
The status bar tells us that we have found 6 quotations – and these are displayed in the results box.
§ Click on the output button to have a look at the quotations in more detail in the output editor.

5-17
4. Restricting the query to the parents of family 125 If we look at the results of the above query we can actually see that all the occurrences are in the first four documents, so we know that they are all from family 125. However – let’s assume that we have more results. How would we now go about restricting the query so that we only saw quotations that satisfied the query and were from interviews with the parents of family 125. To do this we need to use the textbase selection tool. § From the query window, click on the textbase selection button.
This brings up a new window which looks similar to our query window but has documents rather than codes as its selection objects. We want to restrict the documents included in our query to the parents in family 125…. § Double-click on the ‘family
125’ document family, and ..
§ Double-click on the ‘parents’ document family.
We want documents that are both in family 125 AND are parents, so
§ click on the AND operator, ∧ , to complete the query
The results box in this window gives us all the quotations which are associated with parents of family 125, but if we go back to the Query window (see next page) we see that the result of the query is now a single quote (from document 3, the mother of family 125) .

5-18
§ To get back to the original query go to the textbase selection window and click on the ‘Reset’ button,
5. Creating & using a super-code
If we decide that this would be a really useful query to hold on to we can save it by creating a ‘super-code’.
§ In the query window, click on the ‘Super-code’ button,
§ When prompted for a super-code name, simply click on ‘OK’ to accept the default
Back in the your main Atlas.ti window, the super-code appears at the top of your codes combo box.
Clearl

5-19
Clearly a super-code cannot be directly assigned to a quotation .. in other words you cannot select it from the code list and link it to a particular quotation yourself.
However, if you continue coding, and another quotation is created which satisfies the query stored in the super-code, then this quotation will be added to the ‘resulting quotations associated with that super-code.
As far as output is concerned, the super-code works in exactly the same way as any other code. For example, if you view the code list and double-click on the super-code you will get a list of quotations which satisfy the query…
… or if you request a codes-primary documents table , the super-code will also be included in the table.

5-20
6. Some further questions
Try investigating some further questions using the query tool, such as ..
§ Do the children talk about their parents when they mention the weekend ?
§ How often does John talk about his sister Leanne ? (note that John is document P4 : 125S.txt)
§ Does John ever talk about having conversations with his sister?
..and I’m sure you can think of others!

Session 6
Network Views
page Networks in Atlas.ti 6-1 Creating new network views 6-1
From the main menu 6-1 A new focussed network view 6-1
Opening an existing network 6-2 Adding nodes 6-2 Linking nodes 6-3
Linking 2 nodes 6-3 Linking more than 2 nodes 6-4
Defining your own links/relations 6-4
Importing Neighbours 6-5 Saving your network view 6-5 Practical Session 6 6-6
1. Creating a new blank network 6-6 2. Adding some codes 6-6 3. Talking at mealtime? 6-6 4. Creating a new relation for John 6-7 5. Saving the network view 6-9 6. Saving the network as a graphics file 6-9
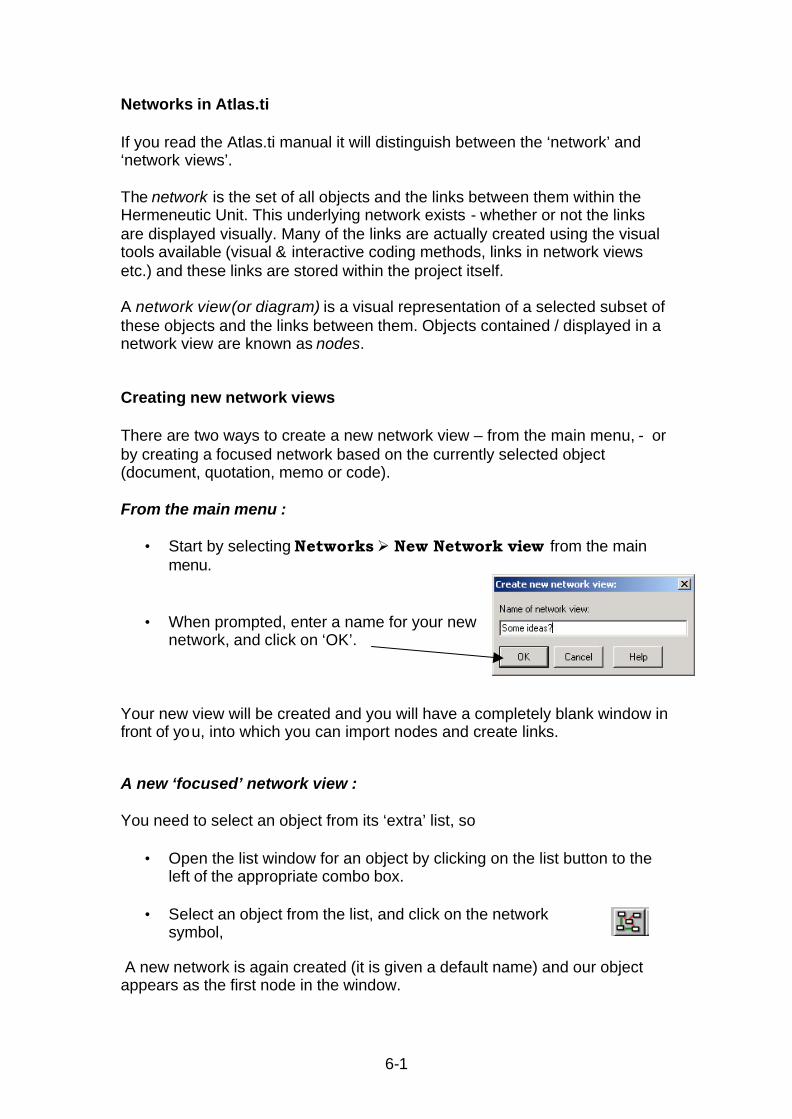
6-1
Networks in Atlas.ti If you read the Atlas.ti manual it will distinguish between the ‘network’ and ‘network views’. The network is the set of all objects and the links between them within the Hermeneutic Unit. This underlying network exists - whether or not the links are displayed visually. Many of the links are actually created using the visual tools available (visual & interactive coding methods, links in network views etc.) and these links are stored within the project itself. A network view (or diagram) is a visual representation of a selected subset of these objects and the links between them. Objects contained / displayed in a network view are known as nodes. Creating new network views There are two ways to create a new network view – from the main menu, - or by creating a focused network based on the currently selected object (document, quotation, memo or code). From the main menu :
• Start by selecting Networks Ø New Network view from the main menu.
• When prompted, enter a name for your new network, and click on ‘OK’.
Your new view will be created and you will have a completely blank window in front of you, into which you can import nodes and create links. A new ‘focused’ network view : You need to select an object from its ‘extra’ list, so
• Open the list window for an object by clicking on the list button to the left of the appropriate combo box.
• Select an object from the list, and click on the network
symbol,
A new network is again created (it is given a default name) and our object appears as the first node in the window.
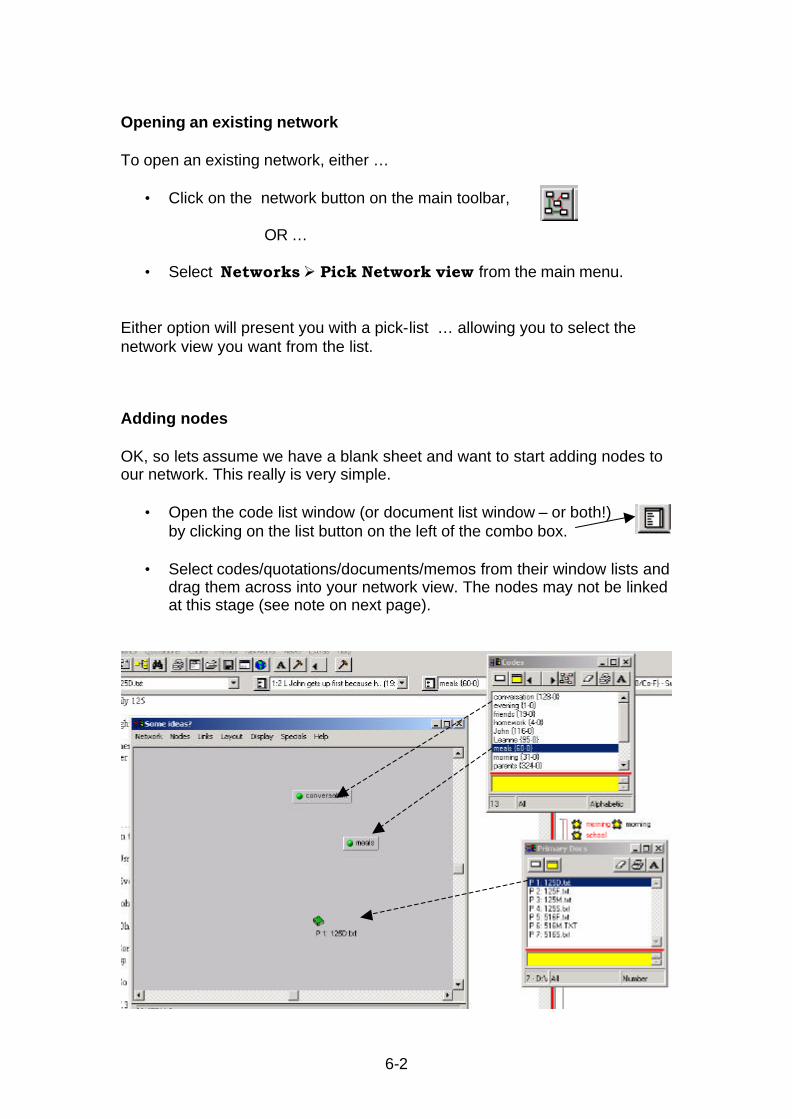
6-2
Opening an existing network To open an existing network, either …
• Click on the network button on the main toolbar, OR …
• Select Networks Ø Pick Network view from the main menu. Either option will present you with a pick-list … allowing you to select the network view you want from the list. Adding nodes OK, so lets assume we have a blank sheet and want to start adding nodes to our network. This really is very simple.
• Open the code list window (or document list window – or both!) by clicking on the list button on the left of the combo box.
• Select codes/quotations/documents/memos from their window lists and
drag them across into your network view. The nodes may not be linked at this stage (see note on next page).
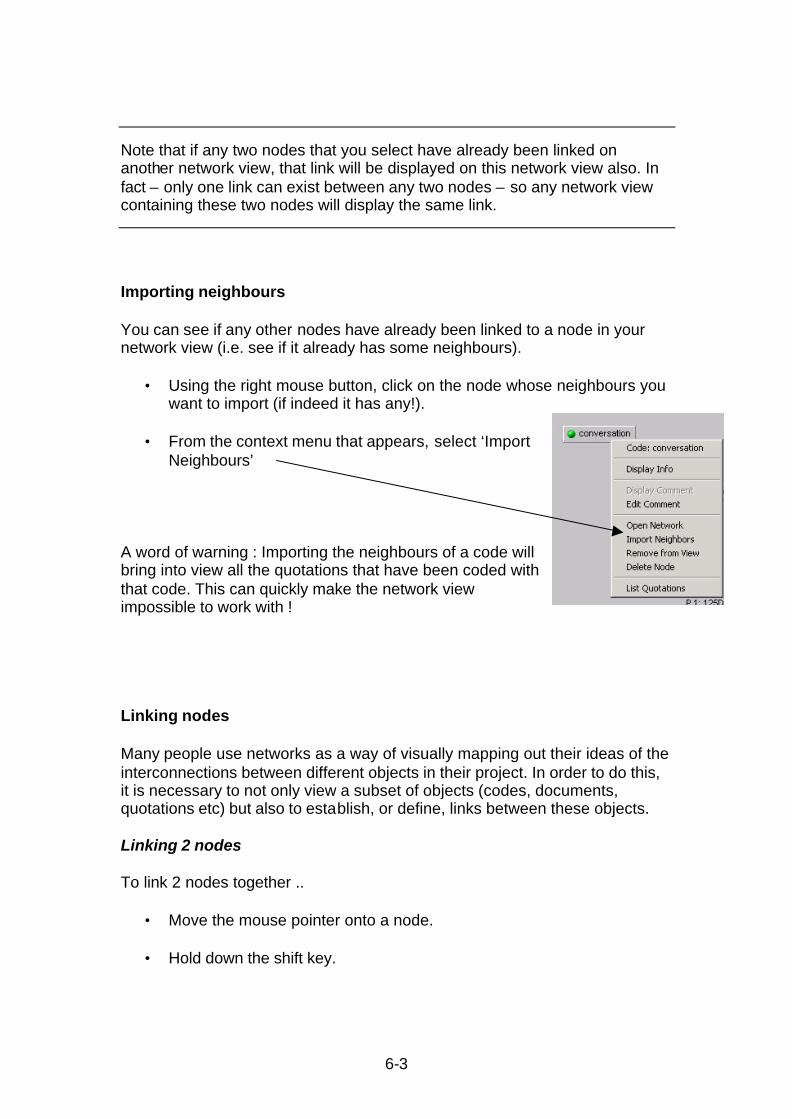
6-3
Note that if any two nodes that you select have already been linked on another network view, that link will be displayed on this network view also. In fact – only one link can exist between any two nodes – so any network view containing these two nodes will display the same link.
Importing neighbours You can see if any other nodes have already been linked to a node in your network view (i.e. see if it already has some neighbours).
• Using the right mouse button, click on the node whose neighbours you want to import (if indeed it has any!).
• From the context menu that appears, select ‘Import
Neighbours’ A word of warning : Importing the neighbours of a code will bring into view all the quotations that have been coded with that code. This can quickly make the network view impossible to work with ! Linking nodes Many people use networks as a way of visually mapping out their ideas of the interconnections between different objects in their project. In order to do this, it is necessary to not only view a subset of objects (codes, documents, quotations etc) but also to establish, or define, links between these objects. Linking 2 nodes To link 2 nodes together ..
• Move the mouse pointer onto a node.
• Hold down the shift key.

6-4
• Hold down the left mouse button and move it onto another node, just as if you wanted to move the node. A "rubber band" appears and tracks the movement of the mouse.
• Once you have reached the second node, release the shift key, then
release the mouse button. At this stage a selection of relations pops up. These relations have previously been defined in Atlas.ti and represent the type of association (or link) between the nodes. Here we are selecting a relation for the link between ‘conversation’ and ‘meals’ so we might select ‘is associated with’ (if indeed we believe that conversation is associated with mealtimes). Linking more than 2 nodes To link more than 2 nodes at the same time ..
• Select two or more nodes by holding down the Ctrl-key as you select.
• From the network editor's menu, select Link ØLink Nodes You now see two or more red "rubber bands".
• Move the mouse pointer onto the node you want to link the other nodes with, and click on the left mouse button.
You will now be prompted for a relation type - as many times as you have nodes to link. Defining your own links/relations You might decide that none of the relations available with Atlas.ti really describe the association you have between 2 of your nodes. This is not a problem, because Atlas.ti allows you to define your own (noting that they are only available for code-code links or quotation-quotation links).
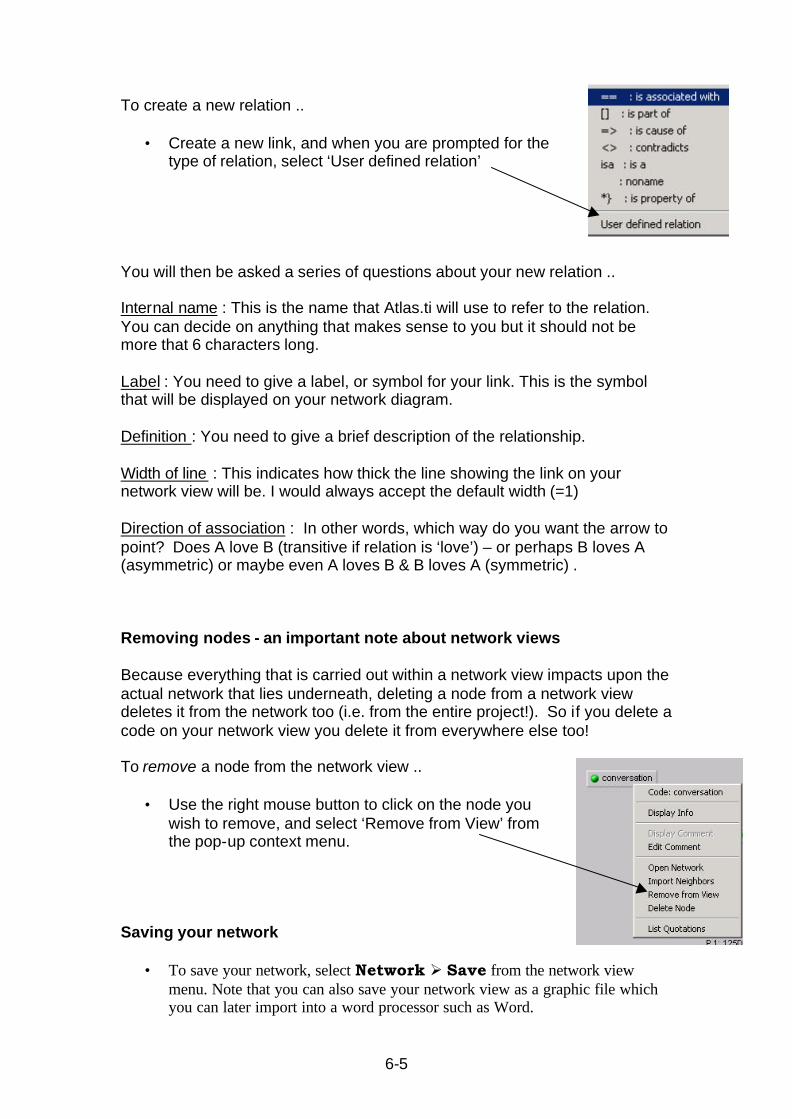
6-5
To create a new relation ..
• Create a new link, and when you are prompted for the type of relation, select ‘User defined relation’
You will then be asked a series of questions about your new relation .. Internal name : This is the name that Atlas.ti will use to refer to the relation. You can decide on anything that makes sense to you but it should not be more that 6 characters long. Label : You need to give a label, or symbol for your link. This is the symbol that will be displayed on your network diagram. Definition : You need to give a brief description of the relationship. Width of line : This indicates how thick the line showing the link on your network view will be. I would always accept the default width (=1) Direction of association : In other words, which way do you want the arrow to point? Does A love B (transitive if relation is ‘love’) – or perhaps B loves A (asymmetric) or maybe even A loves B & B loves A (symmetric) . Removing nodes - an important note about network views Because everything that is carried out within a network view impacts upon the actual network that lies underneath, deleting a node from a network view deletes it from the network too (i.e. from the entire project!). So if you delete a code on your network view you delete it from everywhere else too! To remove a node from the network view ..
• Use the right mouse button to click on the node you wish to remove, and select ‘Remove from View’ from the pop-up context menu.
Saving your network
• To save your network, select Network Ø Save from the network view menu. Note that you can also save your network view as a graphic file which you can later import into a word processor such as Word.
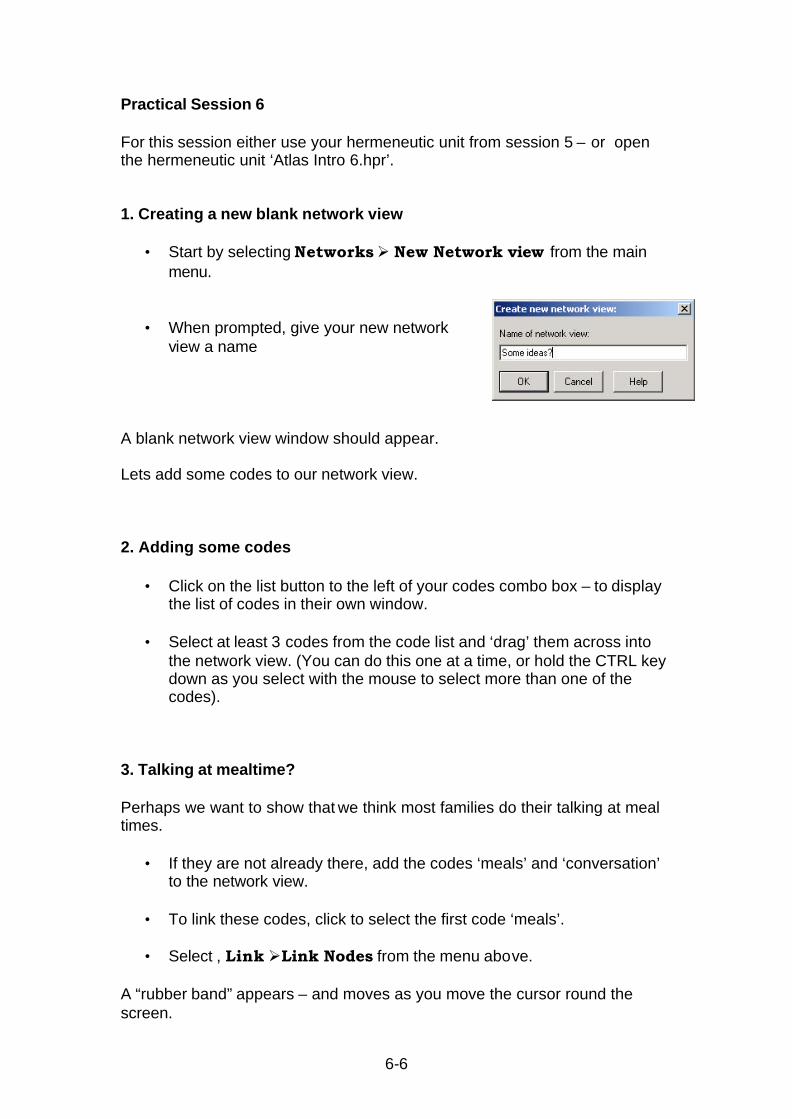
6-6
Practical Session 6 For this session either use your hermeneutic unit from session 5 – or open the hermeneutic unit ‘Atlas Intro 6.hpr’. 1. Creating a new blank network view
• Start by selecting Networks Ø New Network view from the main menu.
• When prompted, give your new network view a name
A blank network view window should appear. Lets add some codes to our network view. 2. Adding some codes
• Click on the list button to the left of your codes combo box – to display the list of codes in their own window.
• Select at least 3 codes from the code list and ‘drag’ them across into
the network view. (You can do this one at a time, or hold the CTRL key down as you select with the mouse to select more than one of the codes).
3. Talking at mealtime? Perhaps we want to show that we think most families do their talking at meal times.
• If they are not already there, add the codes ‘meals’ and ‘conversation’ to the network view.
• To link these codes, click to select the first code ‘meals’.
• Select , Link ØLink Nodes from the menu above.
A “rubber band” appears – and moves as you move the cursor round the screen.

6-7
• Click on the second code ‘conversation’.
You will be asked to select the type of relation you want for the association between meals & conversation.
• Select ‘is associated with’ and your link appears. 4. Creating a new relation for John Now perhaps we want to indicate that John doesn’t like talking much (actually I’m not sure the data backs this up, but we do need to practice creating a new relation !!).
• If it is not already there, add the code ‘John’ to the network view. To link ‘John’ with ‘conversation’ let’s try a new way of linking the nodes ..
• Move the mouse pointer onto the node ‘John’.
• Hold down the shift key, and at the same time …
• Hold down the left mouse button and move it onto the node ‘conversation’. A "rubber band" again tracks the movement of the mouse.
• With the mouse on ‘conversation’, release the shift key, then release
the mouse button. Once again our selection of relations pops up.
• Click on ‘User defined relation’ You will then be asked a series of questions ..

6-8
1. This is the name that Atlas.ti will use to refer to the relation. It can be just about anything, but it should not be more that 6 characters long. 2. This is the label, or symbol that will be displayed on your network diagram in the center of the link.It can either be a ‘code’ such as DSLK for ‘dislikes’ or a single character such as ‘X’ . 3. You may also be asked for a second symbol. 4. A brief description of the relationship which will be displayed in the menu choice. 5. This indicates how thick the line representing the link on your network view will be. The default width is 1.
6. You need to decide on the direction of association. In other words, which way do you want the arrow to point? Here we have a transitive relation, because we want to say ‘John dislikes conversation’ .. the arrow points from ‘John’ to ‘conversation’. Phew! We now have a new link on our network view - and next time we ask for a new link, our relationship ‘dislikes’ will be one of the relationship options.
• Test this by adding Leanne to the view and creating a link from Leanne to meals!

6-9
5. Saving the network view
• Save the network view by selecting Network Network Ø Save from the network view menu.
6. Saving the network as a graphics file You might want to import your network view as a picture into a wordprocessor (such as Word) or another presentation tool (such as Powerpoint). To do this ..
• Select Network Ø Save as Graphics File from the network view menu.
In the save window that appears.. • Browse to the
folder in which you want to save your file
• Give the file a
name
• Select either Windows metafile or Windows bitmap as your filetype
• Click on ’Save’ ! Windows metafiles are saved with file extension .wmf. Windows bitmaps are saved with file extension .bmp.

Session 7
Other Useful Features page The Object Explorer 7-1
Using the Object Explorer 7-1 Coding with the Object Explorer 7-1
Creating a project web site 7-2 Outputting Data to SPSS 7-2 Practical Session 7 7-4
1. Using the object explorer 7-4 2. Creating & viewing your project web summary! 7-5

7-1
The Object Explorer The Object Explorer allows you to ‘explore’ the objects in your hermeneutic unit. It is similar in "look & feel" to the Explorer used by Windows. It offers a hierarchical view of the objects with the Hermeneutic Unit itself as the "root" object. The hierarchy of objects can be expanded or collapsed using the little boxes left to an object. The “top” level list displays the main object types - primary documents, quotations, codes, memos, the families and the network views. Like many of the windows in Atlas.ti the explorer window is divided into two parts, the upper part showing the objects and the lower displaying a comment for the selected object. Using the Object Explorer
• To open the object explorer click on the explorer tool button in the main tool bar.
• To open your project, click on the root "your project name". Any
comment for this HU is displayed in the lower text pane.
• If you click on the p lus (+) signs, the ‘tree’ will expand and if you click on the minus (-) sign, it will shrink.
• If you click on an object, the definition/comment that has been written
for that object is displayed it the lower text pane.
• Every object type has its own context menu associated with it, which is accessed by clicking on the object with the right mouse button.
Coding with the object explorer It is also possible to use the Object Explorer for coding:
• Highlight a text passage, then .. • Click on a code in the Explorer and ‘drag’ it over into the text area. • Release the mouse button.
7-2
Creating a project web site Atlas.ti has a really clever tool that allows you to create a summary of your project in .html (that can be read by any Web browser) in a matter of minutes. To create the project summary, ...
• Click on the ‘world’ tool in the main toolbar .
• When asked, tell Atlas.ti you’d like the output saved to a file, and
• Specify a file name (with file extension .html) and the folder that you want the file to be saved in.
To view the project summary, …
• Using your file explorer (‘My computer’) go to the folder you saved the file in
• Double-click on the file
Your web browser (Internet Explorer, Netscape, ..) should open a window and your project summary will appear. Outputting Data to SPSS For those people who like to count things Atlas.ti allows you to export your project to SPSS. Here you can produce any number of table or charts, in essence expanding on the kind of output available with the ‘codes-primary document table’ option. A line of data (case) in SPSS will be stored giving details of each quotation in your project …
• which primary document it is in, • which primary document family (families) it is in, • the lines on which it starts & ends, • the character on those lines in which it start & ends • whether this quotation has been associated with each of the codes /
supercodes / code families In SPSS you can use this information to summarise occurrences of codes within primary documents – or within document families, which may represent certain demographic information. You can use it to produce tables or charts.

7-3
To output your project to SPSS ..
• Select Extras Ø Export to Ø SPSS Job from the main menu
• Tell Atlas.ti to save the output to a file
• Give a name for your file (with file extension .sps) and browse to the folder you want the file to be stored in.
This actually creates an SPSS syntax (program) file. You need to run this in SPSS in order to look at your data in the SPSS worksheet …
• Start SPSS
• Select File Ø Open Ø Syntax from the main SPSS menu, and browse to find your file.
This will open your program in a Syntax window.
• Run the syntax by selecting Run Ø All from the syntax window menu. Your data should now appear in the SPSS Data Window.

7-4
Practical Session 7 For this session please open the Hermeneutic Unit Atlas Intro 7.hpr 1. Using the Object Explorer
• Open the object Explorer by clicking on the explorer tool button in the main tool bar.
The number in brackets next to each object tells us how many of each object we have in our project (so there are 13 codes created).
• Click on the root – which is the name of your HU, "Intro Course".
The comment for this HU is displayed in the lower text pane.
• Click on the plus (+) sign, next to ‘Codes’.
The ‘tree’ will expand to show all 13 codes.
• Select the code ‘conversation’ and the
comment for that code is displayed it the lower text pane.
• Click on the plus (+) sign next to the code conversation.
The tree expands again to show all the other codes that have been associated (linked) to this code .. remember we created these links using our network view.

7-5
Looking at some context menus
• Point the mouse at different objects in turn and click on them with the right mouse button.
• Look at the different context menus that pop-up.
Note that you can assign documents or codes to existing families from here. You also have access to some of the reports & output options. Coding with the object explorer Lets’ try doing some ‘drag & drop’ coding using the codes from the object explorer.
• Highlight a quotation in the current primary document (either a new one or an existing one)
• Click on a code in the Explorer and ‘drag’ it over into the text area.
• Release the mouse button and your quotation has been coded !
2. Creating and Viewing your project web site
• Click on the ‘world’ tool in the main toolbar .
• Select the output option File, and click on ‘OK’
• Browse to folder C:\Atlas Intro
• Enter a file name with file extension .html (Atlas Intro.html)
• Click on ‘Save’

7-6
From your desktop ..
• Start your file explorer (Click on ‘My computer’ on your desktop)
• Browse to folder C:\Atlas Intro
• Double-click on the file Atlas Intro.html
Your web browser (Internet Explorer, Netscape, ..) should open a window and your project summary will appear.
• Browse around the project and be amazed by all the detail that is given ☺

Suggested Texts for further reading page On qualitative analysis techniques / tools B-2 SCELI Thematic Volumes B-2 Fathering Literature B-3
Bibliography - p1
Bibliography – for further reading On qualitative analysis techniques / tools M.Miles and M.Huberman (1994) Qualitative Data Analysis (Second Edition) London: Sage. E.Babbie (1989) The Practice of Social Research (5th Edition) Belmont: Wadsworth A.Bryman (2001) Social Research Methods Oxford: Oxford University Press. L.Cohen, L.Manion and K.Morrison (2000) Research Methods in Education (5th Edition) London: Routledge. D.Ezzy (2002) Qualitative Analysis: Practice and Innovation London: Routledge. C.Frankfort-Nachmias and D.Nachmias (1992) Research Methods in the Social Sciences London: Arnold. M.Hammersley and P.Atkinson (1995) Ethnography: Principles in Practice (Second Edition) London: Routledge. C.Marsh (1988) Exploring Data: An Introduction to Data Analysis for Social Scientists Oxford: Polity. J.Potter and M.Wetherall (1987) Discourse and Social Psychology: Beyond Attitude and Behaviour London: Sage. D.Weinberg (ed) (2002) Qualitative Research Methods Oxford: Blackwell. SCELI Thematic Volumes D.Gallie et.al (eds) (1993) Social Change and the Experience of Unemployment. A.Scott (ed) (1994) Gender Segregation and Social Change: Men and Women in Changing Labour Markets. R.Penn et.al (eds) (1994) Skill and Occupational Change. M.Anderson et.al (eds) The Social and Political Economy of the Household. D.Gallie et al (eds) (1996) Trade Unionism in Recession.

Bibliography - p2
Fathering Literature J.Warin et,al (1999) Fathers, Work and Family Life Joseph Rowntree Foundation: York. J.Brannen et.al (1995) Employment and Family Life: A Review of Research in the UK Research Series Report 41, Department of Employment: London. L.Burghes et.al (1997) Fathers and Fatherhood in Britain Family Policy Studies Centre: London. C.Lewis and M.O’Brien (1987) Reassessing Fatherhood: New Observations on Fathers and the Modern Family London: Sage. M.Young and P.Willmott (1973) The Symmetrical Family London: Routledge & Kegan Paul.