Embed Size (px)
Citation preview


3
INTRODUCTION P. 4
GUIDE TO READ INSTRUCTIONS P. 4
GENERAL INFORMATION P. 5
DANGER ICONS P. 8
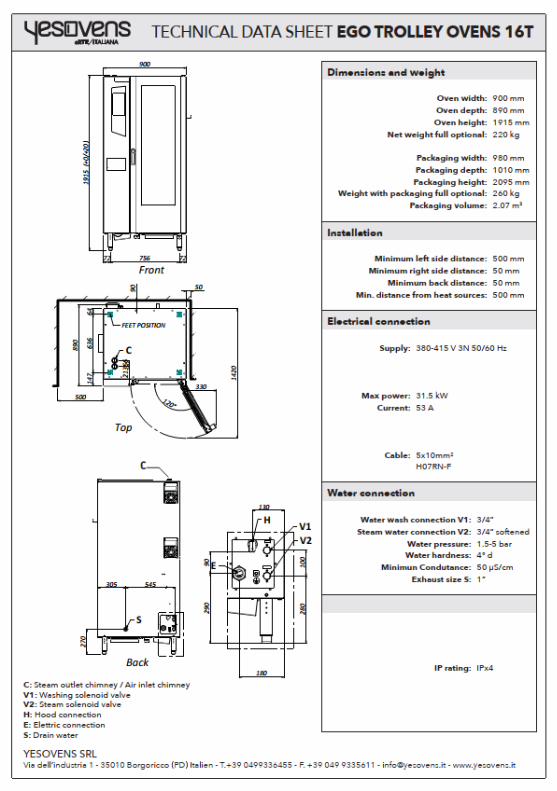
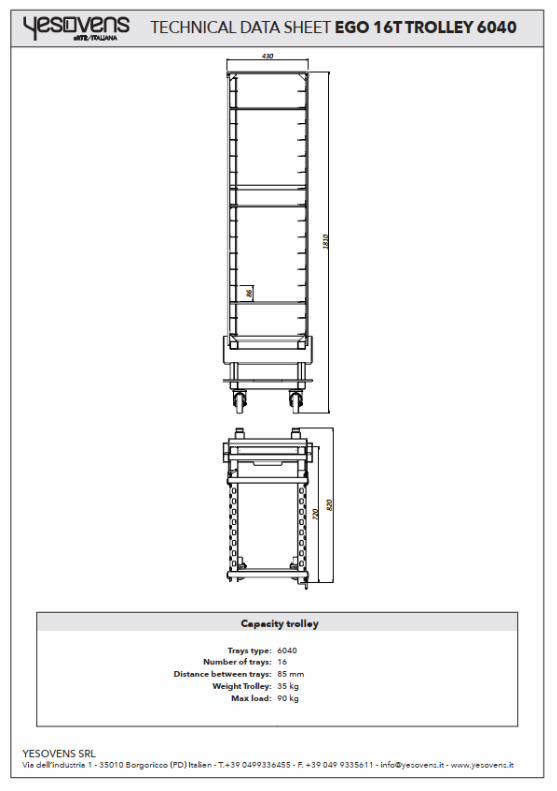
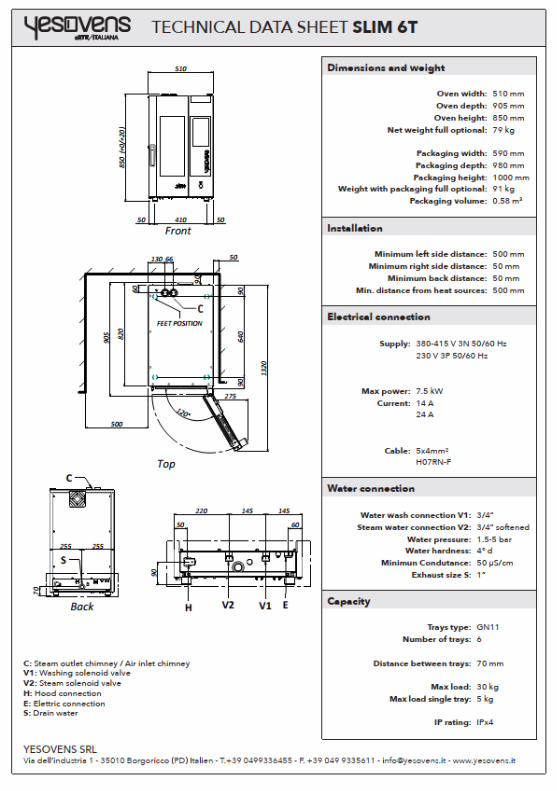
TECHNICAL DATA SHEET P. 10
HANDLING, TRANSPORT AND UNLOADING P. 20
INSTALLATION INSTRUCTIONS P. 24
INSTRUCTIONS FOR USE P. 33
CLEANING AND MAINTENANCE P. 42
INSTRUCTIONS FOR THE USER P. 50
ALARMS AND WARNINGS P. 53

Original Instructions

5
INTRODUCTION:
• This user manual refers exclusively to the touch ovens EGO and STAR.• This manual is addressed to any person fulfilling any role, appointed
and/or authorised to use and/or run the oven.• The intended use and stated versions are the only ones allowed by the
manufacturer; do not attempt to use the ovens in disregard of theprovided instructions. The stated intended use applies only to ovensthat are fully efficient from a structural, mechanical and engineeringpoint of view.
• This manual is also addressed to the employer, company's managersand workers in charge that must carefully read it and understand it sothat they can use it as a valid help to fulfil at least part of theobligations that the laws and regulations in force impose on them withregard to health and safety in the workplace.
• The employer, in whose production site the oven is installed, as well asmanagers and workers in charge of it, must guarantee for theoperators responsible for the various specific functions, appropriateinformation, education and, if required, training (that must take intoaccount the level of acumen that can reasonably be expected fromthose operators) about its correct and safe use and the general andspecific risks of the workplace and/or task; this manual can be a validhelp in fulfilling this delicate task.
Pay particular attention to the bold or underlined texts or to texts in aLARGER font as these refer to particularly important operations orinformation.The manual must be kept until the machine's final disposal in a suitablelocation, in order that the manual is always available for consultation inthe best possible condition. In case of loss or deterioration, areplacement copy must be requested from the manufacturer or retailer.
GUIDE TO READING INSTRUCTIONS

6
GENERAL INFORMATION
Read the instructions in this booklet carefully before installing and usethe oven, in order to be aware of the precautions that must be followedto:• install the oven;• maintain and clean it;• use it in the best possible way.
This equipment must be used only as expressly intended, i.e. tocook/bake or heat food; any other use shall be considered improperbecause not in conformity with the intended use and thereforedangerous.
The equipment is designed for professional use and must be used byqualified personnel.
These appliances are are intended to be used for commercialapplications, not for continuous mass production food.
To avoid scalding, do not use loaded containers with liquids or cookinggoods which becomes fluid by heathing in higher levels than those whichcan be easily observed.
Before leaving the factory, this equipment has been tested and set up byexpert and specialised personnel, in order to guarantee bestperformance.
Installation and/or any repairs or adjustments that may subsequentlybecome necessary must be performed with maximum care and attentionby qualified personnel. It is recommended to always contact your dealerand specify the problem, model and serial number of the oven in yourpossession.
7
In case of repair and/or replacement of any components, correctivemaintenance, fault or malfunction it is necessary professional know-howand use only original spare parts, penalty the extinction of the guaranteeand of the responsibility of the manufacturer. For these activities contactonly personnel authorised.
Before installation, check that power and water values are compatiblewith the values printed on the data plate.
The oven's electrical safety is guaranteed provided, it is connected to anefficient grounding system (please remember this must be checkedregularly), which must comply with the national and local regulations inforce at the time.
When in operation, the oven must be used and monitored by specificallytrained personnel only.
Avoid installing the oven near heat sources such as: fryers, open fires, etc.
Do not obstruct suction vents for any reason; do not prevent heatdissipation and do not obstruct the oven steam discharge system.
Ask the installer to provide instructions on the correct use of the watersoftener/descaler (caution: a less than perfect resin regeneration processmay cause corrosion in the equipment).
Before operating the oven for the first time, it is necessary to clean itaccurately - externally it must be only cleaned with a wet cloth; the insideof the cooking chamber must be cleaned with water; in any case, neveruse steel wool to clean the oven.
Failure to comply with these fundamental rules may compromise theoven's safety and harm the user. The manufacturer declines allliability in the case of non-compliance with the instructions providedin this manual by either the user or the installer, and any accidents ordamage caused by said non-compliance cannot be attributed to themanufacturer.

8
KEY SIMBOLS
HAZARD FIRE HAZARD SHOCK HAZARD BURN HAZARD TERMINAL BOARD
GROUNDING
PAY ATTENTION
EQUIPOTENTIAL RING
DANGER ICONS
While the oven is cooking and cooling down, pay attention to:• Wear heat protective gloves and clothing.• Touch only the controls or the oven handle or the part limited by the
oven adhesive, since external parts are hot (temperature over 60°C).• Use the utmost caution when opening the door since steam at high
temperature is released.• When inserted onto the rails, trays must be blocked.• Pay the utmost attention when taking the trays out of the chamber.• Do not open the oven door while washing to avoid injuries caused by
the steam and chemicals used.
DANGER OF BURNS AND INJURIES
The manufacturer declines all liability for any inaccuracies in thisbooklet attributable to transcription errors or misprints. Themanufacturer also reserves the right to make the modifications thatit deems useful or necessary to the product, without compromisingits essential characteristics.

9
DANGER OF ELECTRIC SHOCK
• Opening the compartments marked with this symbol is reserved onlyto YESOVENS qualified staff; non-compliance with this provision willmake the warranty null and void.
• Do not touch any electrical switch so as not to cause any sparks orflames.
• Keep the fume exhaust pipe free from obstructions at all times.• If present, turn the fume extraction hood on while using the oven.• The oven must be installed far from drafts or wind.• Ensure the oven vents are clean and unobstructed.
DANGER OF FIRE
• Ensure the fume exhaust is free from obstructions and that there areno flammable materials nearby.
• Ensure no foreign objects (instruction manual, bags, gloves, etc.) ordetergent residues have been left inside the oven.
• Do not bring flammable objects or substances (petrol, diesel, spirits,etc.) near the oven.
• Do not use food or liquids that can easily ignite while cooking.• The cooking chamber must always be clean. If not removed, oil or fat
can ignite at high temperatures.

10

11

12

13
14
15
16

17

18

19

20
HANDLING, TRANSPORT AND UNLOADING
The oven is packed by the company according to signed agreements on a case by case basis, or in any case according to the country of destination or means of transport used. After installation, all packaging can be recycled or disposed of incompliance with the regulations in force in the buyer's country.
Ovens must be transported near the installationsite complete with their packaging. Specialised staffmust be appointed to perform all operationsinvolving the lifting and handling of the oven or itsseparately transported parts. The shipped materialis carefully checked before being delivered to thecarrier.
On receipt of the oven, check that it has not been damaged duringtransport, that the packaging has not been tampered with and that nointernal parts have been removed.If there is found to be damage or missing parts, immediately inform boththe carrier and the manufacturer and provide photographic evidence.
Please check that the supply matches the order specifications. The ovenmust not be dragged or tilted under any circumstances. The oven must belifted perpendicular to the floor, moved horizontally and placed verticallyon the floor.The oven is supplied on a pallet, kept in place by plastic strapping bandsand protected by cardboard packaging. Loading/Unloading the ovenonto/from the transport vehicle is normally done using a forklift truck ortrolley.
Indoor handling must take place with all the necessaryprecautions so that the oven components are not damaged.

21
Loading and unloading into/from the transport vehicle can be carriedout:• Using a forklift truck.• All precautions aimed at preventing the oven from being damaged
must be adopted during the transport.• While handling, pay particular attention not to hit the "surroundings"
such as columns, walls, other machinery, etc.• In particular, the oven must not be placed on top of other materials, or
other materials on top of the oven, either during transport or storage.• During transport, the oven must be placed in such a way as not to be
hit by other materials loaded on the same vehicle.• Before unloading it from the transport vehicle, check that the
packaging is undamaged and that there is no risk of it tipping over.• While unloading, place the oven on the ground cautiously, to avoid
damaging shocks.
The installation, transformation and maintenance of the equipment mustbe carried out by authorized fitters or the electricity supplier in compliancewith the safety regulations in force.
On receipt of the oven, check that it has not been damagedduring transport, that the packaging has not been tampered withand that no internal parts have been removed. If damage ormissing parts are found, immediately inform both the carrier andthe manufacturer, providing photographic evidence. It isrecommended to check that the supply matches the orderspecifications.

22
UNPACKING THE OVEN
PAY ATTENTION ! When you are handling packaging, youmust take into account the symbolsprinted on the packaging itself. Theprotection of the environment is anobligation explicitly laid down in the lawsand regulations in force.All possible precautions must be takenwhen handling and/or transporting theoven to avoid or limit any damage toproperty or injury to animals and, aboveall, people.• Cut the plastic straps holding the
cardboard packaging in place.(pic_1)• Remove the cardboard.(pic_2)• Remove the Styrofoam corners and
top.(pic_3)• Remove the pallet from the oven
without using lifting trucks; the lowerstructure of the oven is not suitable tolift it.
• Remove the protective film from themetal parts. Slowly remove theprotective film from the oven. Anyglue residue must be removed usingappropriate solvents and without anytools that might scratch or damagethe surfaces.
After removing all packaging from theoven, check its integrity and condition;then separate all the packaging materials(wood, plastic, cardboard) and placeappropriate collection sites, accessible toauthorized people only, waiting forcollection by specialized companies.Packaging materials must be kept out ofreach of children or animals.
Pic_1
Pic_2
Pic_3
Pic_4
23
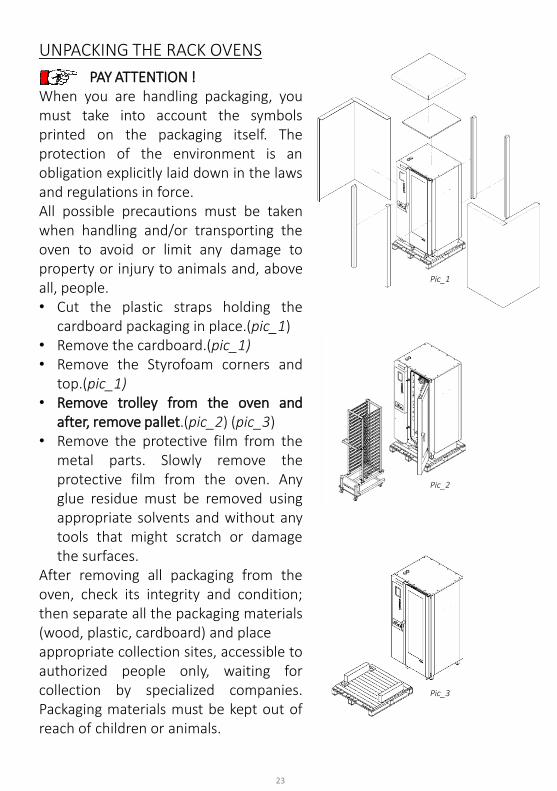
UNPACKING THE RACK OVENS
PAY ATTENTION ! When you are handling packaging, youmust take into account the symbolsprinted on the packaging itself. Theprotection of the environment is anobligation explicitly laid down in the lawsand regulations in force.All possible precautions must be takenwhen handling and/or transporting theoven to avoid or limit any damage toproperty or injury to animals and, aboveall, people.• Cut the plastic straps holding the
cardboard packaging in place.(pic_1)• Remove the cardboard.(pic_1)• Remove the Styrofoam corners and
top.(pic_1)• Remove trolley from the oven and
after, remove pallet.(pic_2) (pic_3)• Remove the protective film from the
metal parts. Slowly remove theprotective film from the oven. Anyglue residue must be removed usingappropriate solvents and without anytools that might scratch or damagethe surfaces.
After removing all packaging from theoven, check its integrity and condition;then separate all the packaging materials(wood, plastic, cardboard) and placeappropriate collection sites, accessible toauthorized people only, waiting forcollection by specialized companies.Packaging materials must be kept out ofreach of children or animals.
Pic_1
Pic_2
Pic_3
24
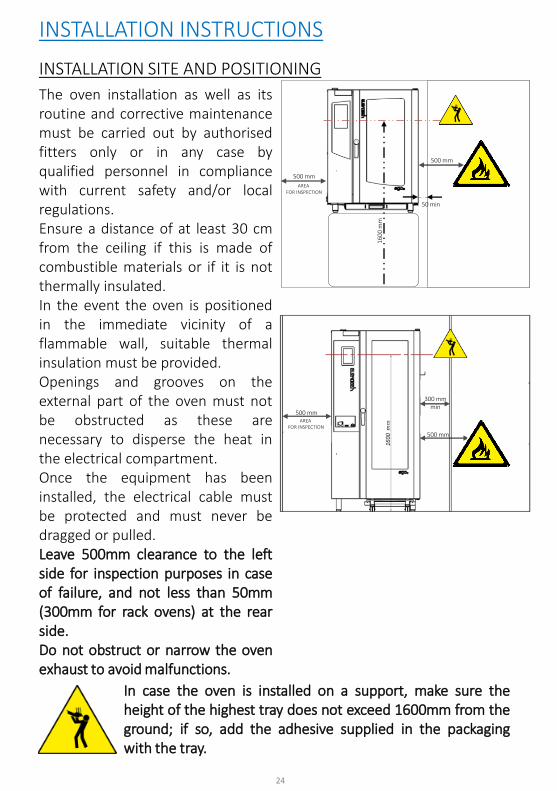
INSTALLATION SITE AND POSITIONING
The oven installation as well as itsroutine and corrective maintenancemust be carried out by authorisedfitters only or in any case byqualified personnel in compliancewith current safety and/or localregulations.Ensure a distance of at least 30 cmfrom the ceiling if this is made ofcombustible materials or if it is notthermally insulated.In the event the oven is positionedin the immediate vicinity of aflammable wall, suitable thermalinsulation must be provided.Openings and grooves on theexternal part of the oven must notbe obstructed as these arenecessary to disperse the heat inthe electrical compartment.Once the equipment has beeninstalled, the electrical cable mustbe protected and must never bedragged or pulled.Leave 500mm clearance to the leftside for inspection purposes in caseof failure, and not less than 50mm(300mm for rack ovens) at the rearside.Do not obstruct or narrow the ovenexhaust to avoid malfunctions.
INSTALLATION INSTRUCTIONS
In case the oven is installed on a support, make sure theheight of the highest tray does not exceed 1600mm from theground; if so, add the adhesive supplied in the packagingwith the tray.
500 mm
50 min
500 mm
AREAFOR INSPECTION
1600
mm
300 mm
500 mm
500 mm
300 mm min
500 mm
500 mmAREA
FOR INSPECTION

25
POSITIONING THE OVENS
For the proper operation of theoven, the work station must beperfectly flat and levelled.The working surface has to be:• perfectly levelled;• flat;• it has to bear the weight of the
oven with no deformationwhatsoever;
• it must not be flammable orheat-sensitive.
The oven has to be positionedperfectly levelled by adjusting thefeet provided on the lower roundedside.
POSITIONING THE RACK OVENS
For the proper operation of theoven, the work station must beperfectly flat and levelled.The working surface has to be:• perfectly levelled;• flat;• it has to bear the weight of the
oven with no deformationwhatsoever;
• it must not be flammable orheat-sensitive.
The oven has to be positionedperfectly levelled by adjusting thefeet provided on the lower roundedside.
19
0 m
m ±
3

CONNECTIONS SCHEME
26
H
B
E
L
D
V1
V2
S
The room where the oven is to be installed must be provided with power,water and gas connections compliant with the regulations regarding thesystems and safety at work of the country where it is to be used.
27
H
E
L
V1V2
S
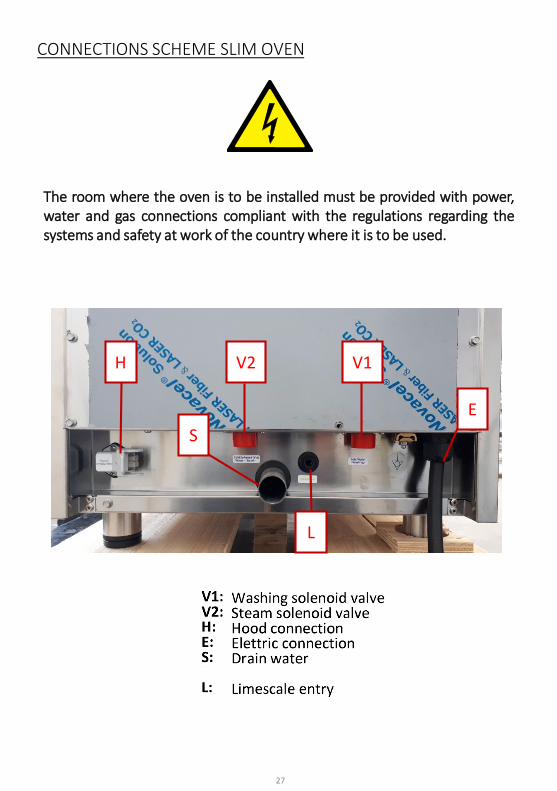
CONNECTIONS SCHEME SLIM OVEN
The room where the oven is to be installed must be provided with power,water and gas connections compliant with the regulations regarding thesystems and safety at work of the country where it is to be used.

28
The room where the oven is to be installed must be provided with power,water and gas connections compliant with the regulations regarding thesystems and safety at work of the country where it is to be used.
CONNECTIONS SCHEME RACK – TROLLEY OVEN
E
V1
V2S
H
It is necessary to insert the supplied siphon before connectingthe exhaust (S in the picture) to the water system.

29
The connection to the power supply must be made according to currentinternational, national and local regulations. Prior to making theconnection, check that the voltage and frequency of the power networkmatches the values shown on the data plate positioned on the back ofthe oven.
A variation of ± 5% on the power rated is allowed.
CONNECTION TO THE POWER SUPPLY
The oven must be permanently connected to the power supply using acable type of at least H07RN-F (in polychloroprene heavyweight rubber)or higher, making sure the wire gauge of the conductor wires iscompatible with the maximum absorbed load. A unipolar general switchmust be placed between the oven and the power supply network, withan opening of at least 3 mm between contacts, whose capacity iscompatible with the load and fitted with suitable safety devices.Differential, high-sensitivity automatic safety devices must be provided soas to ensure protection against direct and indirect contact with live partsand ground-fault currents according to current regulations; the maximumallowed leakage current is 1 mA/kW. This switch must be installed as partof the installation site's permanent electrical system and in theimmediate vicinity of the equipment in order to facilitate operatoraccess. Refer to the table of technical data for information on thedimensions of the power line, general switch and cable.Ovens are supplied with a H07RN-F cable.
To connect or replace the supply cable to the oven terminal board,proceed as follows:• Connect the wires of the electrical cable to the terminal board on the
back of the oven, as shown in the electrical diagram.• Make sure the yellow/green earth wire is about 3 cm longer than the
others (phase and neutral) so that if pulled, it will be the last one todetach, ensuring protection against any electric shocks.
• Block the cable into place and close the terminal board cover.

30
EARTHING
The oven must be connected to an efficient groundingsystem. The yellow/green wire of the supply cable mustbe connected to the terminal marked with the earthsymbol.
CONNECTION TO THE WATER SUPPLY
The oven must be included in an equipotential systemand connected with a conductor having a minimumwire gauge of 10 mm², connected to the terminallocated on the back of the oven bearing theappropriate symbol.
• Connect the 3/4" fittings of the ovento the water supply pipe; to use afiltering system is strictlyrecommended.
• For greater effectiveness of the steamcomponents and considering thatwater goes inside during cooking it ismandatory to provide a filteringsystem to optimize and soften thewater (YESOVENS ACCESSORY).
NOTE FOR RACK OVENS
• It is necessary to insert the supplied siphon before connecting the exhaustto the water system.
V1
V2
V1V2
• The allowed suppliedpressure is 1,5 barminimum, 5 barmaximum.
• The tube connected tothe outlet must nothave narrowed sectionand it must not beblocked.

31
• Check is possible by starting a rinse(that can be stopped or paused everytime you want) and watching if thereis water leaking.
• In the absence of water or theautomatic washing system, thecontrol can be performed by placinga thin tape of paper between thegasket and the glass (see photo 1 and2). Place the tape in several positionsto ensure that the gasket adherescompletely. If the tape runs smoothly,it means that the inner glass needsbetter adjustment.
1
2
DOOR SETTING
After the oven installation is needful to check that the inner glass correctlyseal to the gasket. During the transport of the device, especially in thecase of long journeys, the door could lose part of the adjustment carriedout during the testing phase.

32
• In the absence of water or theautomatic washing system, thecontrol can be performed byplacing a thin tape of paperbetween the gasket and the glass(see photo 1 and 2). Place the tapein several positions to ensure thatthe gasket adheres completely. Ifthe tape runs smoothly, it meansthat the inner glass needs betteradjustment.
• Once understood the points whereit is necessary to make the glassadhere more to the gasket, makethe adjustment by placing anappropriate number of shimsunder the hinges of the inner glass(photos 3 and 4) and / or screwingthe door pin (picture 5) until it isnecessary.
3
4
5
33
INSTRUCTIONS FOR USE
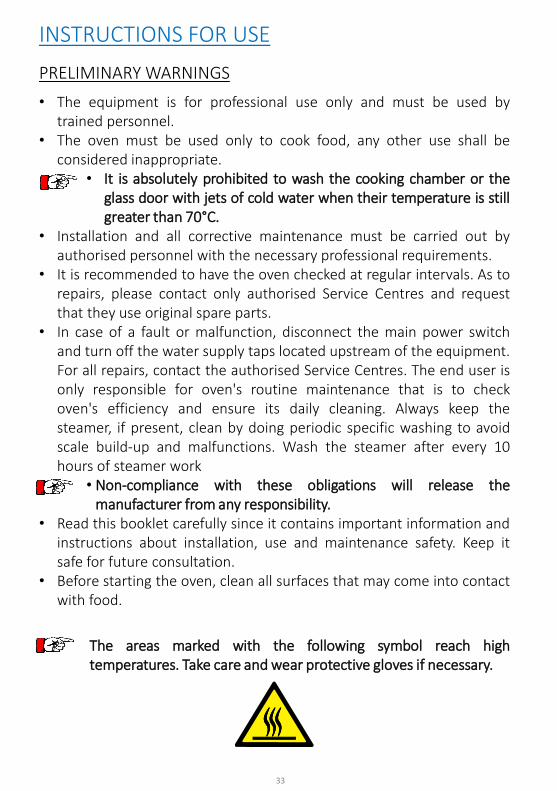
• The equipment is for professional use only and must be used bytrained personnel.
• The oven must be used only to cook food, any other use shall beconsidered inappropriate.
• It is absolutely prohibited to wash the cooking chamber or theglass door with jets of cold water when their temperature is stillgreater than 70°C.
• Installation and all corrective maintenance must be carried out byauthorised personnel with the necessary professional requirements.
• It is recommended to have the oven checked at regular intervals. As torepairs, please contact only authorised Service Centres and requestthat they use original spare parts.
• In case of a fault or malfunction, disconnect the main power switchand turn off the water supply taps located upstream of the equipment.For all repairs, contact the authorised Service Centres. The end user isonly responsible for oven's routine maintenance that is to checkoven's efficiency and ensure its daily cleaning. Always keep thesteamer, if present, clean by doing periodic specific washing to avoidscale build-up and malfunctions. Wash the steamer after every 10hours of steamer work
• Non-compliance with these obligations will release themanufacturer from any responsibility.
• Read this booklet carefully since it contains important information andinstructions about installation, use and maintenance safety. Keep itsafe for future consultation.
• Before starting the oven, clean all surfaces that may come into contactwith food.
PRELIMINARY WARNINGS
The areas marked with the following symbol reach hightemperatures. Take care and wear protective gloves if necessary.

34
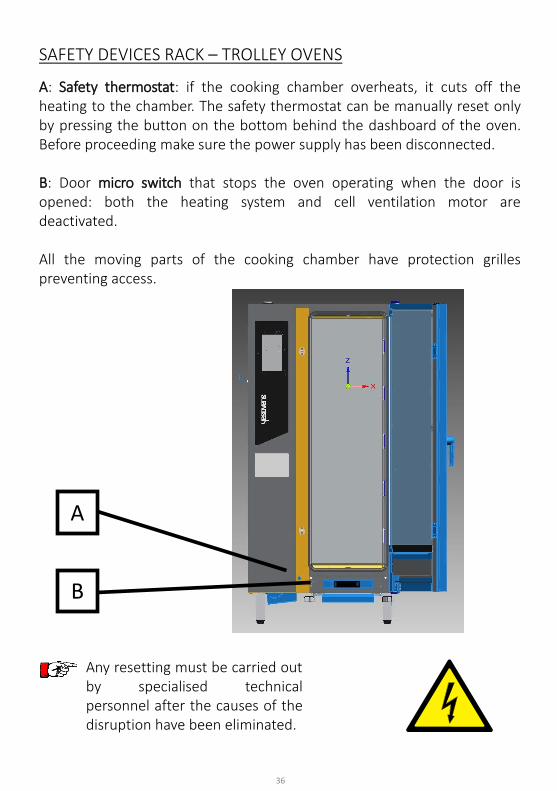
A: Safety thermostat: if the cooking chamber overheats, it cuts off theheating to the chamber. The safety thermostat can be manually reset onlyby pressing the button on the bottom behind the dashboard of the oven.Before proceeding make sure the power supply has been disconnected.
B: Door micro switch that stops the oven operating when the door isopened: both the heating system and cell ventilation motor aredeactivated.
All the moving parts of the cooking chamber have protection grillespreventing access.
SAFETY DEVICES
Any resetting must be carried outby specialised technicalpersonnel after the causes of thedisruption have been eliminated.
A
B

35
SAFETY DEVICES SLIM OVEN
A: Safety thermostat: if the cooking chamber overheats, it cuts off theheating to the chamber. The safety thermostat can be manually reset onlyby pressing the button on the top of the oven by removing the roof or therear panel. Before proceeding make sure the power supply has beendisconnected.
B: Door micro switch that stops the oven operating when the door isopened: both the heating system and cell ventilation motor aredeactivated.
All the moving parts of the cooking chamber have protection grillespreventing access.
Any resetting must be carried outby specialised technicalpersonnel after the causes of thedisruption have been eliminated.
A
B
36
SAFETY DEVICES RACK – TROLLEY OVENS
A: Safety thermostat: if the cooking chamber overheats, it cuts off theheating to the chamber. The safety thermostat can be manually reset onlyby pressing the button on the bottom behind the dashboard of the oven.Before proceeding make sure the power supply has been disconnected.
B: Door micro switch that stops the oven operating when the door isopened: both the heating system and cell ventilation motor aredeactivated.
All the moving parts of the cooking chamber have protection grillespreventing access.
Any resetting must be carried outby specialised technicalpersonnel after the causes of thedisruption have been eliminated.
A
B

37
DOOR OPENING AND CLOSING STANDARD HOOK
The equipment is for professional use only and must be used by trainedpersonnel.
Handle position (pic_1).
Move the handle on the different stagefor open the door; to close the doorsimply push.

38
Move the handle on the different stagefor open the door, close the door or ifyou need to remove the hot humidity onsafety (STEAM EXHAUST POSITION).(pic_2)
38
DOOR OPENING AND CLOSING TWO POSITIONS HOOK
The equipment is for professional use only and must be used by trainedpersonnel.
39
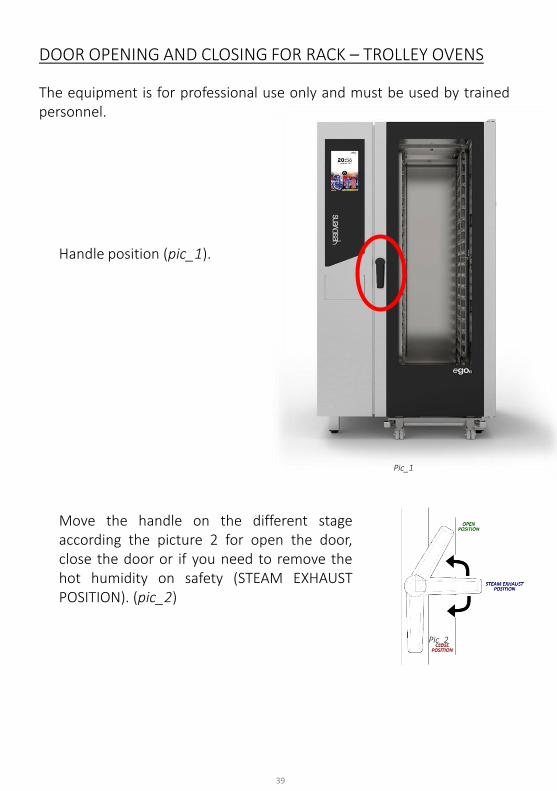
The equipment is for professional use only and must be used by trainedpersonnel.
Handle position (pic_1).
Move the handle on the different stageaccording the picture 2 for open the door,close the door or if you need to remove thehot humidity on safety (STEAM EXHAUSTPOSITION). (pic_2)
DOOR OPENING AND CLOSING FOR RACK – TROLLEY OVENS
Pic_1
Pic_2
4040
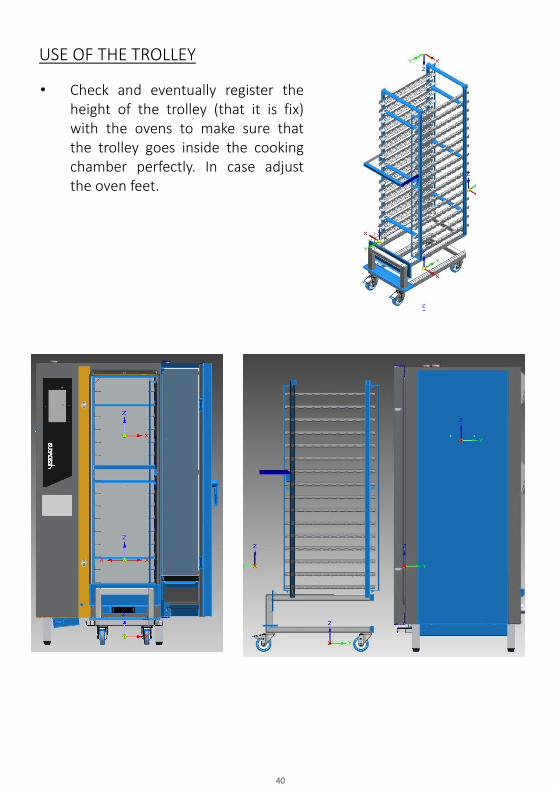
• Check and eventually register theheight of the trolley (that it is fix)with the ovens to make sure thatthe trolley goes inside the cookingchamber perfectly. In case adjustthe oven feet.
USE OF THE TROLLEY

41
• Lock the trays after placing theblock in the correct position. (pic_4)
• Lock the wheels at each trolleyinsertion.
• Pay attention to handling the trolleywhen it contains hot liquids.
• Pay attention the inclination oftrolley.
• Fix the bracket in position lock withthe screw insert in the packaging, itused for hang up the trolley handle(pic_5).
Pic_3
Pic_4
Pic_5
42
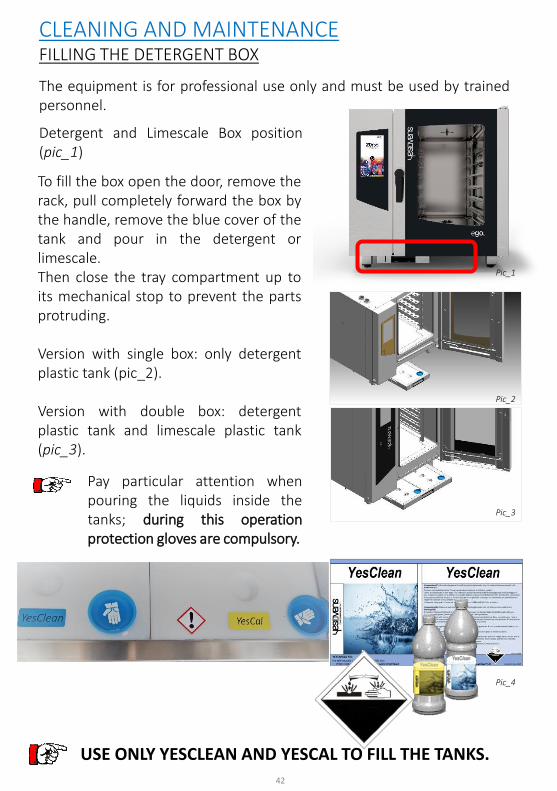
The equipment is for professional use only and must be used by trainedpersonnel.
Detergent and Limescale Box position(pic_1)
FILLING THE DETERGENT BOX
Pic_3
Pic_1
Pic_2
CLEANING AND MAINTENANCE
USE ONLY YESCLEAN AND YESCAL TO FILL THE TANKS.
To fill the box open the door, remove therack, pull completely forward the box bythe handle, remove the blue cover of thetank and pour in the detergent orlimescale.Then close the tray compartment up toits mechanical stop to prevent the partsprotruding.
Version with single box: only detergentplastic tank (pic_2).
Version with double box: detergentplastic tank and limescale plastic tank(pic_3).
Pic_4
Pay particular attention whenpouring the liquids inside thetanks; during this operationprotection gloves are compulsory.

43
The equipment is for professional use only and must be used by trainedpersonnel.
FILLING THE DETERGENT BOX ON THE SLIM OVENS
Pic_1
Pic_2
USE ONLY YESCLEAN AND YESCAL TO FILL THE TANKS.
Detergent box positioned in the bottompart rear the door (pic_1).
To fill the box open the door, remove therack, pull completely forward the box bythe handle, remove the blue cover of thetank and pour in the detergent orlimescale.Then close the tray compartment up toits mechanical stop to prevent the partsprotruding.
For Limescale connect directly the bottleor an external box, filled with theproduct, to the dedicated junctionlocated at the rear of the oven. To seenext page.
Pay particular attention whenpouring the liquids inside thetanks; during this operationprotection gloves are compulsory.

44
EXTERNAL LINING ANTI-SCALE TANK
USE ONLY YESCLEAN AND YESCAL TO FILL THE TANKS.
45
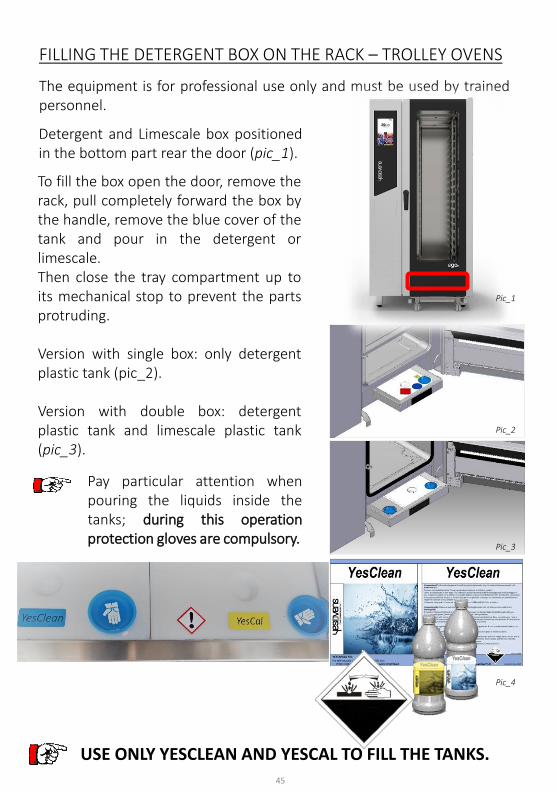
The equipment is for professional use only and must be used by trainedpersonnel.
Detergent and Limescale box positionedin the bottom part rear the door (pic_1).
To fill the box open the door, remove therack, pull completely forward the box bythe handle, remove the blue cover of thetank and pour in the detergent orlimescale.Then close the tray compartment up toits mechanical stop to prevent the partsprotruding.
Version with single box: only detergentplastic tank (pic_2).
Version with double box: detergentplastic tank and limescale plastic tank(pic_3).
FILLING THE DETERGENT BOX ON THE RACK – TROLLEY OVENS
Pic_4
Pay particular attention whenpouring the liquids inside thetanks; during this operationprotection gloves are compulsory.
Pic_1
Pic_2
Pic_3
USE ONLY YESCLEAN AND YESCAL TO FILL THE TANKS.

46
All Touch ovens are equipped with anautomatic washing systems run by annozzle located in the upper part of thechamber.To use this function, consult the specificinstruction manual enclosed with thepresent documentation.The automatic washing system is set on4 cleaning levels: quick, soft, mediumand hard. The final user has to select thetype of washing depending on how dirtythe chamber is.In case of residues, clean manually andthen repeat the cleaning cycle.
AUTOMATIC CLEANING OF THE COOKING CHAMBER
The RACK OVENS must
always be washed with the
trolley on board.
No trolley on board isrequired for preheating onthe RACK OVENS.
Preheating door
Warring concerning possible
slippery floor adjacent to the
appliance.
In case of power failureduring washing, start a newcycle or, if the previous cyclewas finished, restart from apre-washing cycle.

47
In compliance with the regulations in force,the oven's perfect hygienic conditions mustbe guaranteed; the oven must be cleanedand disinfected as thoroughly as possible,both externally and internally at the end ofevery day and/or work shift.Clean and disinfect the oven carefully on adaily basis to prevent biological risks due tothe proliferation of mould, bacteria, etc. orbuild ups that might damage the operationof the oven itself.
It is important to electricallydisconnect the equipment whencleaning must take place (frequently).It is essential for the oven to becleaned daily when it is at atemperature between 40 and 50°C.Do not use any abrasive, aggressiveor corrosive detergents.Do not use these substances to cleanthe floor underneath the oven either.Do not use abrasive pointed tools.Do not use abrasive sponges.Do not use high pressure cleanerswith hot water jets and high-pressuresteam.
MANUAL CLEANING OF THE COOKING CHAMBER
Wait for the glass to cool down.Use a soft cloth soaked in a littlesoapy water or a glass-cleaningdetergent.
CLEANING THE GLASS
Oven door
Rack oven door
48
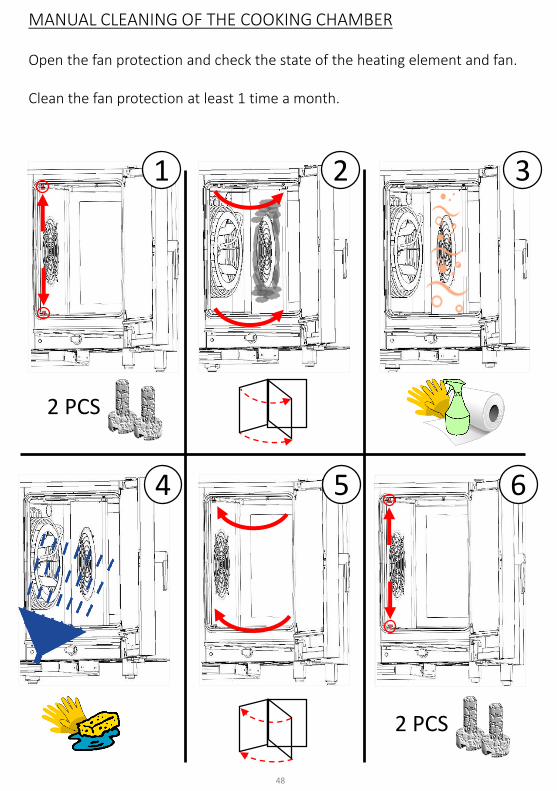
MANUAL CLEANING OF THE COOKING CHAMBER
Open the fan protection and check the state of the heating element and fan.
Clean the fan protection at least 1 time a month.
2 PCS
2 PCS
1 2 3
4 5 6
49
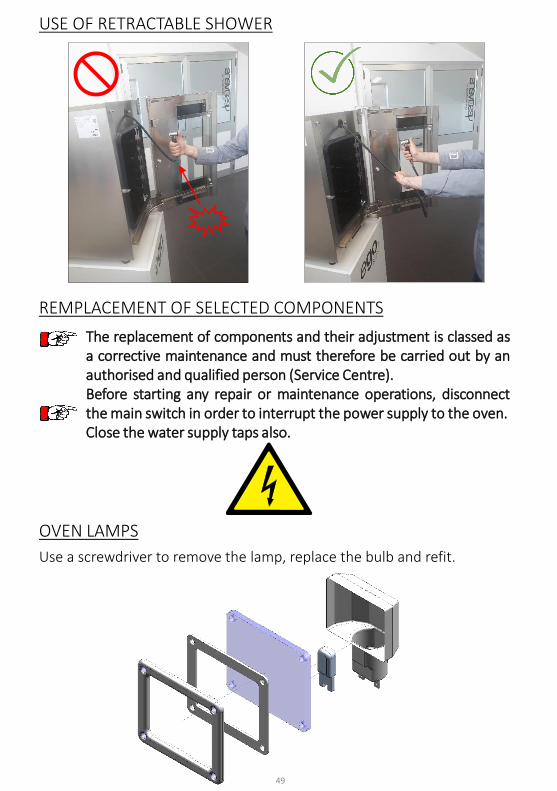
REMPLACEMENT OF SELECTED COMPONENTS
Use a screwdriver to remove the lamp, replace the bulb and refit.
OVEN LAMPS
The replacement of components and their adjustment is classed asa corrective maintenance and must therefore be carried out by anauthorised and qualified person (Service Centre).Before starting any repair or maintenance operations, disconnectthe main switch in order to interrupt the power supply to the oven.Close the water supply taps also.
USE OF RETRACTABLE SHOWER

50
Make the user aware of the fact that every repair and/or maintenanceoperation necessary over time must be performed exclusively by anauthorised Service Centre.
Instruct the user that in the event of a fault or malfunction, all suppliesmust be immediately cut off (water, electricity).Concerning the power, if the removal of the plug is foreseen, it is clearlyindicated that the removal of the plug has to be such that an operatorcan check from any of the points to which he has access that the plugremains removed. If this is not possible, due to the construction of theappliance or its installation, a disconnection with a locking system in theisolated position is provided.
With the manual at hand, illustrate the functions, safeties, appropriateuse, and especially the oven maintenance intervals to the user.
Maintenance must be performed at least once a year.For this purpose we recommend signing a maintenance contract.
Keep this manual and the wiring diagram for any interventions.
Notify the user that the manual provided with the oven must be kept in avisible location near the oven to have them always at hand.
Notify the user that certain operation anomalies are often caused byusage errors such as, closed supplies, so it is best to train service staff inthe use and operation of the appliance.
Recurrent anomalies require technical support.
Make the user informed regarding the use of personal protectionequipment in case of spreading hot food stuff.
Warning concerning slippery floor adjacent to the appliance.
On airborne noise emissions, the A-weighted sound pressure level isbelow 70 dB(A).
INSTRUCTION FOR THE USER

51
"Implementation of Directives 2002/95/EC, 2002/96/EC and2003/108/EC, regarding the reduction of hazardous substances inelectrical and electronic equipment, and disposal of waste". The "crossedwheelie bin" symbol shown on the equipment indicates that at the end ofthe product's useful life, it must be collected separately from otherwaste.At the end of its useful life, the user must therefore deliver theequipment (or have the equipment delivered) to authorised electricaland electronic waste sorting centres, or return it to the retailer at thesame time as purchasing new, equivalent equipment, in a ratio of one toone. Proper waste sorting for the subsequent recycling, treatment andenvironmental disposal of decommissioned equipment contributes topreventing potentially negative impacts on the environment and onhuman health, encouraging the reuse and/or recycling of the materialscomposing the equipment. The incorrect disposal of the product by theuser shall result in the application of fines provided for by currentlegislation.
DISMANTLING AND DISPOSAL
The ovens comply with the safety requirements of the followingEuropean Directives and their relative standards:• Machinery Directive 2006/42/EC and its subsequent amendments• Low Voltage Directive 2006/95/EC and subsequent amendments (EN
60335-1, EN 60335-2, EN 62233:2008 and EN 61000-4 standards)• Electromagnetic Compatibility (EMC) Directive 2004/108/EC and its
subsequent amendments (EN 50165, EN 55014, EN 50366 and EN61000-4 standards).
Following this compliance, the manufacturer declares that its productscomply with the European legislation in force and are therefore stampedwith the appropriate CE mark allowing them to be marketed in Europeancountries.
COMPLIANCE WITH REGULATIONS AND STANDARDS
52
Follow the indication below to have the oven always in the correct state and to respect the HACCP rules. For all the damage and the extraordinary maintenance it must be calledqualified personnel and used original spare part.
• Wash and clean the oven with a washing program (not rinse) atleast 1 time in a day.
• Clean manually the cooking chamber if the oven is not equippedwith washing.
• Wash the boiler every 10 Hours of steam with boiler.
• Wash the clima control at least 1 time in a week.
• Install the water treatment filter for the steaming.(Yesovens optional)
• Clean the air flow filter at least 1 time a month.
• Open the fan protection and check the state of the heatingelement and fan.
• Open the techinical compartment and check the state of the components (contactors, motors, boards).
• Check the state of the washing/steam circuit and look the pipes(the pipes must not to be rigid).
• Check and touch the door gasket.If the gasket is not perfect, and is rigid- hard please replace it.
MAINTENANCE CHECK LIST

53
ALARMS AND WARNING
WARNING CODE
COMMUNICATION ON DISPLAY ACTIONS
W01 Detergent in exhaustion. Recharge detergent.
W02 Limescale in exhaustion. Limescale detergent.
W03 Failure to read the vapor removal probe reading.Contact Service. The oven will continue
to work.
W04Warning missed heart probe reading during probe
operation.
Insert core probe.The oven does not allow the use of cooking that involves the use of the
probe.
W05Warning not reading climatic probe (where
present).Contact Service.
NO ACT will appear on the screen.
W06 Abnormal power-off to power failures. Oven in stand-by.
W07Abnormal interruption of the chamber washing
cycle.
Stand by, automatic rinsing phase.Wait for restoration of security
conditions.
W08 Abnormal interruption of the steamer wash cycle.Stand by, automatic rinsing phase.
Wait for restoration of security conditions.
W09Abnormal interruption of the climatic probe
washing cycle.
Stand by, automatic rinsing phase.Wait for restoration of security
conditions.
W10 Power supply interruption during cooking phases. Oven in stand-by.
W11 Execute boiler washingIt is strongly reccomended not to
neglect this signal and to perform the boiler cleaning as soon as possible
The alarms block the oven and bring it back to the stand-byscreen.
The warnings do not block the oven, but indicate an anomaly thatmust be resolved as soon as possible.
E13Alarm Failure to
read steamer drain, valve malfunction.
W06Abnormal power-
off to power failures.
WARNING EXAMPLE
ALARMEXAMPLE

54
ALARMS AND WARNING
ALARM CODE
COMMUNICATION ON DISPLAY ACTIONS
E01 Lack of water.Check water connection and
relative pressure.Minimum pressure 2 bar.
E02 Cooking chamber temperature malfunction alarm. Contact Service.
E03 Motor temperature malfunction alarm. Contact Service.
E04 Steamer temperature malfunction alarm.
Contact Service.The oven excludes the steamer, but
it will make working with direct humidification.
BOILERLESS will appear on the display.
E05Alarm exceeding working temperature threshold in
the room.Contact Service.
E06 Failure alarm room probe reading. Contact Service.
E07 Engine rpm reading alarm. Contact Service.
E08 Alarm connection power board Contact Service.
E09Maximum temperature alarm card in the technical
compartment.Contact Service.
E10 Alarm exceeding working temperature steamer.
Contact Service.The oven excludes the steamer, but
it will make working with direct humidification.
BOILERLESS will appear on the display.
E11 Alarm Failure to read steamer water level.
Contact Service.The oven excludes the steamer, but
it will make working with direct humidification.
BOILERLESS will appear on the display.
E12 Failure alarm steamer temperature probe reading.
Contact Service.The oven excludes the steamer, but
it will make working with direct humidification.
BOILERLESS will appear on the display.
E13Alarm Failure to read steamer drain, valve
malfunction.
Contact Service.The oven excludes the steamer, but
it will make working with direct humidification.
BOILERLESS will appear on the display.


Yesovens srlVia dell’industria, 135010 Borgoricco (PD) – Italy
353500034 Inst
alla
tio
n a
nd
Use
r M
anual To
uch
line
Ove
ns
R_0
1122019

![West Contra Costa Unified School District · ELD 2A ELD 2B ELD 3A ELD 3B ELD 4 [P] Eng/Read(R180) English 1 [P] English 2 [P] ... English/Reading Ensemble [P] Environmental Science](https://img.pdfslide.us/doc/110x75/5ed3ab4e89ea24219c3ce538/west-contra-costa-unified-school-district-eld-2a-eld-2b-eld-3a-eld-3b-eld-4-p.jpg)


![4-1 Eastern European professor P. Slinwinski.ppt [Read-Only]](https://img.pdfslide.us/doc/110x75/61a186aeb137af6c0a12fa95/4-1-eastern-european-professor-p-read-only.jpg)
![Aging with P and P Health Care.pptx [Read-Only]](https://img.pdfslide.us/doc/110x75/620aec57d736a1196e3c8396/aging-with-p-and-p-health-carepptx-read-only.jpg)