Embed Size (px)
Citation preview
8/10/2019 Introduction Access 2007
http://slidepdf.com/reader/full/introduction-access-2007 1/62
Modified: 7/29/2011
Introduction
To
Database Design & Microsoft Access 2007
8/10/2019 Introduction Access 2007
http://slidepdf.com/reader/full/introduction-access-2007 2/62
Table of Contents
Overview ........................................................................................................................ 1
Objectives ............................................................................................................................. 1
What is a Database? ..................................................................................................... 2
Flat Database ................................................................................................................. 3
Relational Database ...................................................................................................... 4
Database Design ........................................................................................................... 5
Getting Started .............................................................................................................. 9
Navigating a Database ................................................................................................ 10
Access Database Objects ........................................................................................... 11
Tables ........................................................................................................................... 12
Datasheet View ....................................................................................................................12 Forms ........................................................................................................................... 13
Queries ......................................................................................................................... 14
Reports ......................................................................................................................... 17
Working in Datasheet View ........................................................................................ 18
Datasheet Toolbar ...............................................................................................................18
Add Records ........................................................................................................................19
Save a Record .....................................................................................................................20
Select a Record ...................................................................................................................20 Edit a Record .......................................................................................................................20
Delete a Record ...................................................................................................................20
Check Your Spelling ...........................................................................................................21
Filter by Selection ....................................................................................................... 21
Fil ter by Form .............................................................................................................. 21
Load from Query ......................................................................................................... 23
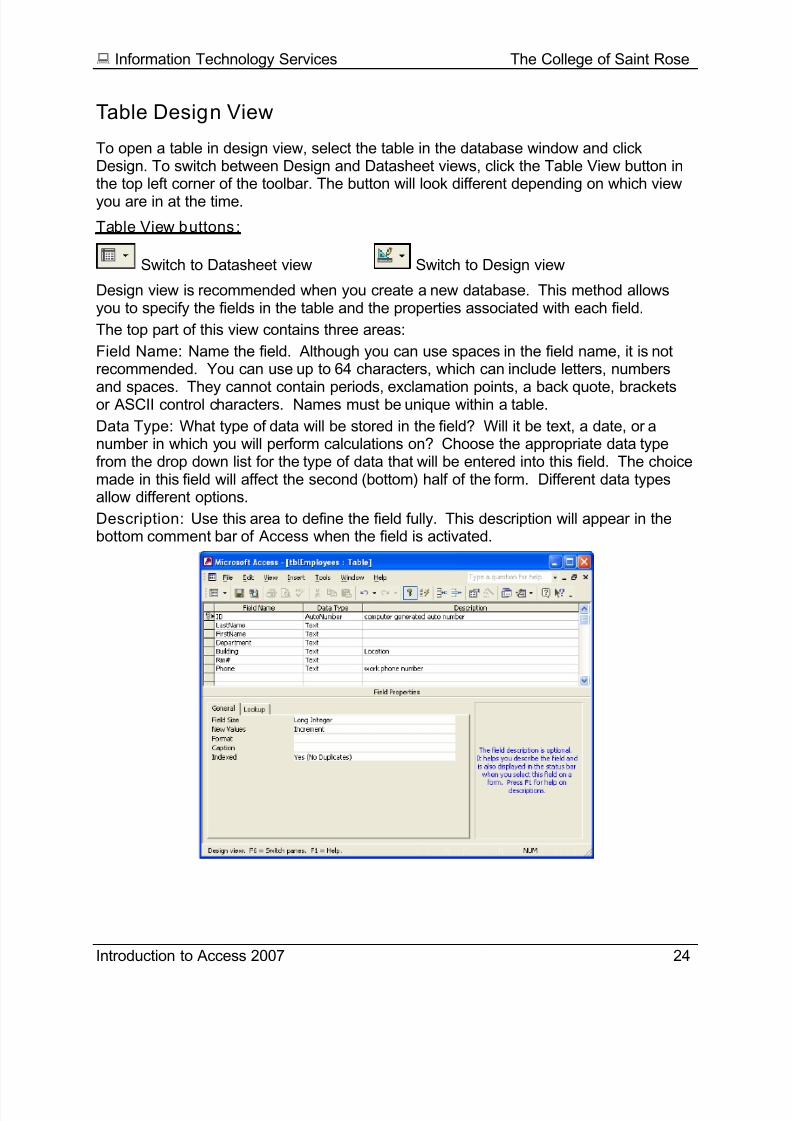
Table Design View ....................................................................................................... 24
Field Properties ...................................................................................................................26 Primary Key .........................................................................................................................30
Create a Database ....................................................................................................... 31
Saving a Table .....................................................................................................................34
Creating a Lookup Wizard Field .........................................................................................37
Multiple-value problems ............................................................................................. 39
8/10/2019 Introduction Access 2007
http://slidepdf.com/reader/full/introduction-access-2007 3/62
Intermediary Tables ............................................................................................................41
Types of Relationships .......................................................................................................42
Create Relationships ................................................................................................... 43
Referential Integrity ............................................................................................................44
Modify Table ........................................................................................................................45
Adding a Field .....................................................................................................................45
Deleting a Field ....................................................................................................................45
Moving a Field .....................................................................................................................46
Modifying Database Objects ...................................................................................... 47
Renaming a Table ...............................................................................................................47
Copying a Table ..................................................................................................................48
Deleting a Table ...................................................................................................................50
Printing the Table ................................................................................................................50
Printing Selected Records ..................................................................................................50
Queries ......................................................................................................................... 51
What is a Query? .................................................................................................................51
The Simple Query Wizard ........................................................................................... 52
Running Queries .................................................................................................................54
Switch between Views ........................................................................................................54
Query Design View (Query-By-Example grid) ...................................................................55
Creating a Query in Design View ............................................................................... 56 Running Queries .................................................................................................................58
Summary ...................................................................................................................... 59
8/10/2019 Introduction Access 2007
http://slidepdf.com/reader/full/introduction-access-2007 4/62
Information Technology Services The College of Saint Rose
Introduction to Access 2007 1
Overview
Many of us have been using Microsoft Office applications such as Word and Excel, butthere is another program in the MS Office suite called Access, which many of us havenot used. What is Access?
Access is a database management program that allows you to store, organize andretrieve information. Access also allows you to query data and produce some nicelooking reports. Many of us may be using Word or Excel to store data. In Word youmay be using a table to store data. Excel does have some limited database capability.The difference is that Access is a relational database. Excel does NOT have thefunctionality or power of a relational database like Access.
If you are still undecided about what program to choose for the task at hand, watch thisvideo.
Objectives
In this class, you will learn the how to design and create a database, create tables,become familiar with the different objects in an Access database. When you havecompleted this class, you will be able to:
Be familiar with basic relational database concepts and database design
Identify all of the Access database objects
Create tables
Distinguish between table datasheet and design view
Create fields and set their data types and properties
Define the primary key Modify table records - edit, add, delete records
Navigate in a table
Modify table properties

8/10/2019 Introduction Access 2007
http://slidepdf.com/reader/full/introduction-access-2007 5/62
Information Technology Services The College of Saint Rose
Introduction to Access 2007 2
What is a Database?
A database is a collection of related data. The database stores information. Thisinformation can be manipulated and viewed in many different ways.
A Database Management program such as Access stores information in tables that arerelated to each other. It is primarily designed for two main purposes:
To store, add, delete, and update the data in the database.
To provide various ways to view the data in the database. For example, you can
display data on your screen in a form or print out a report.
With the power of Access you can maintain and manipulate large amounts of data andcreate reports.
Can you think of some examples where a database could be used? Some examplesare:
Store and/or query information on applicants, training or programs.
Query or extract information on donors and donations made to the college andproduce reports.
Store a list of students, addresses for a mail merge.
Personnel database with separate but related tables for employees, departmentsand payroll information.
Databases allow us to organize, manipulate, analyze information and create reports.

8/10/2019 Introduction Access 2007
http://slidepdf.com/reader/full/introduction-access-2007 6/62
Information Technology Services The College of Saint Rose
Introduction to Access 2007 3
Flat Database
Many of you have probably created a flat database which consists of only one table.Below is an example of a Word table that stores information on computer books.
What problems do you see with a single flat database?
Unnecessary duplication of data. Wastes storage space.
It is more difficult to update and maintain.
It can be cumbersome to find or summarize information.
Greater chance for data entry errors.
The main problem with a flat table is redundancy.
The publishers name and phone number are repeated. If their phone numberchanges, how many updates would you have to make?
The authors’ name and phone number is duplicated. If an authors Phonenumber changes how many updates would you have to make?
To avoid these problems, you need to break up the information into separate relatedtables. This is where the power and versatility of a relational database such as Accessshould be used. In this example, you would have the following tables: Publisher’s,
Author’s, Books, and an Intermediary table Book/Author. Intermediary tables consist ofmany to many relationships. For example, an author can write many books and a book
can have more than 1 author. So this table could have ISBN and Author ID. An ISBNcan be repeated many times depending on how many authors wrote the book. Anauthor can be listed many times for different books.
Same ISBN 2 authors (ID) 2 ISBN 1 author (ID)
0-55-123456-9 9 1-1111-1111-1 4
0-55-123456-9 10 1-22-233700-0 4
8/10/2019 Introduction Access 2007
http://slidepdf.com/reader/full/introduction-access-2007 7/62
Information Technology Services The College of Saint Rose
Introduction to Access 2007 4
Relational Database
Access is a relational database. In a relational database data is organized in relatedtables. In related tables, one or more fields are linked to fields in another table. This
link ensures that you can enter only those values that have corresponding entries in theother table. For example, you can’t enter an order without a customer!
A relational database can have multiple tables that contain data about various entities,such as customers, orders products. An entity is any object that has a distinct set ofproperties.
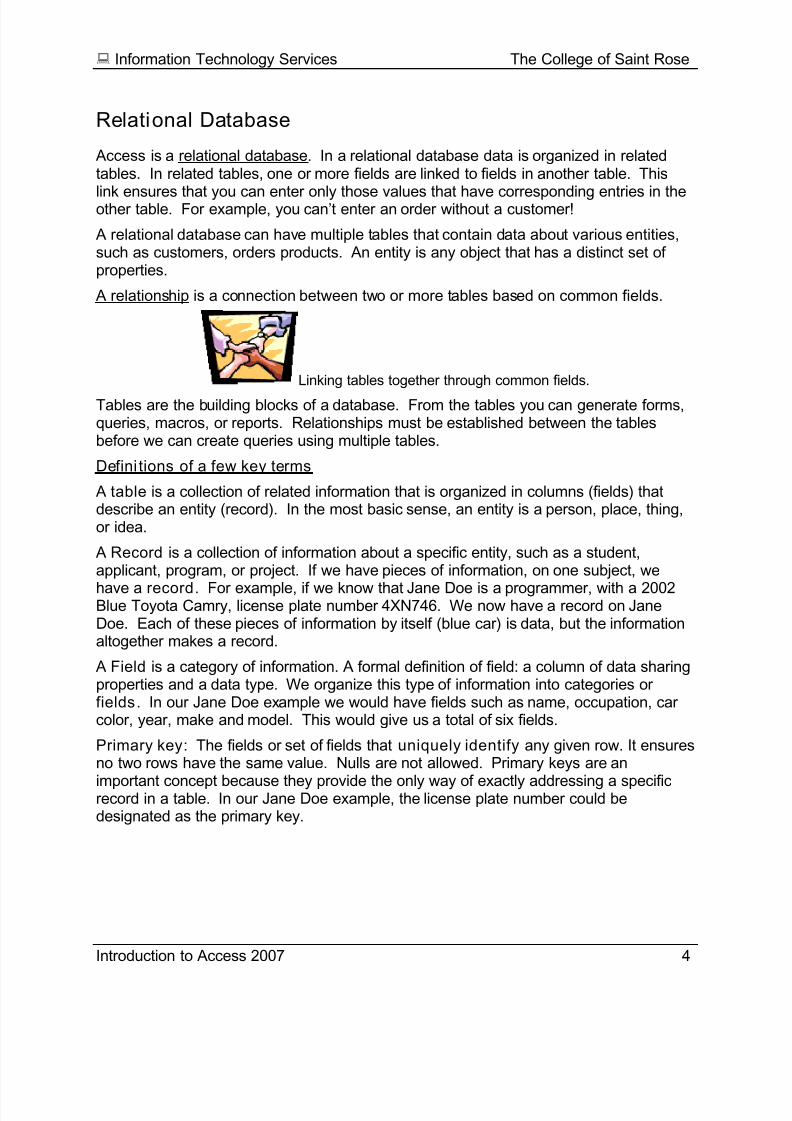
A relationship is a connection between two or more tables based on common fields.
Linking tables together through common fields.
Tables are the building blocks of a database. From the tables you can generate forms,queries, macros, or reports. Relationships must be established between the tablesbefore we can create queries using multiple tables.
Defini tions of a few key terms
A table is a collection of related information that is organized in columns (fields) thatdescribe an entity (record). In the most basic sense, an entity is a person, place, thing,or idea.
A Record is a collection of information about a specific entity, such as a student,applicant, program, or project. If we have pieces of information, on one subject, we
have a record. For example, if we know that Jane Doe is a programmer, with a 2002Blue Toyota Camry, license plate number 4XN746. We now have a record on JaneDoe. Each of these pieces of information by itself (blue car) is data, but the informationaltogether makes a record.
A Field is a category of information. A formal definition of field: a column of data sharingproperties and a data type. We organize this type of information into categories orfields. In our Jane Doe example we would have fields such as name, occupation, carcolor, year, make and model. This would give us a total of six fields.
Primary key: The fields or set of fields that uniquely identify any given row. It ensuresno two rows have the same value. Nulls are not allowed. Primary keys are an
important concept because they provide the only way of exactly addressing a specificrecord in a table. In our Jane Doe example, the license plate number could bedesignated as the primary key.
8/10/2019 Introduction Access 2007
http://slidepdf.com/reader/full/introduction-access-2007 8/62
Information Technology Services The College of Saint Rose
Introduction to Access 2007 5
Database Design
Step 1: Identify the purpose of your database.
What type of information are you trying to store and retrieve from your database? Eachdatabase should be set up for a specific purpose. For example if you’re keeping trackof donations, you need to plan and design a database that can store related data suchas donors and events as well. Consider the following issues:
What types of queries do you need to perform on the database?
What types of reports will need to be produced?
What forms will be needed for data entry purposes?
How will the data be sorted, grouped or filtered?
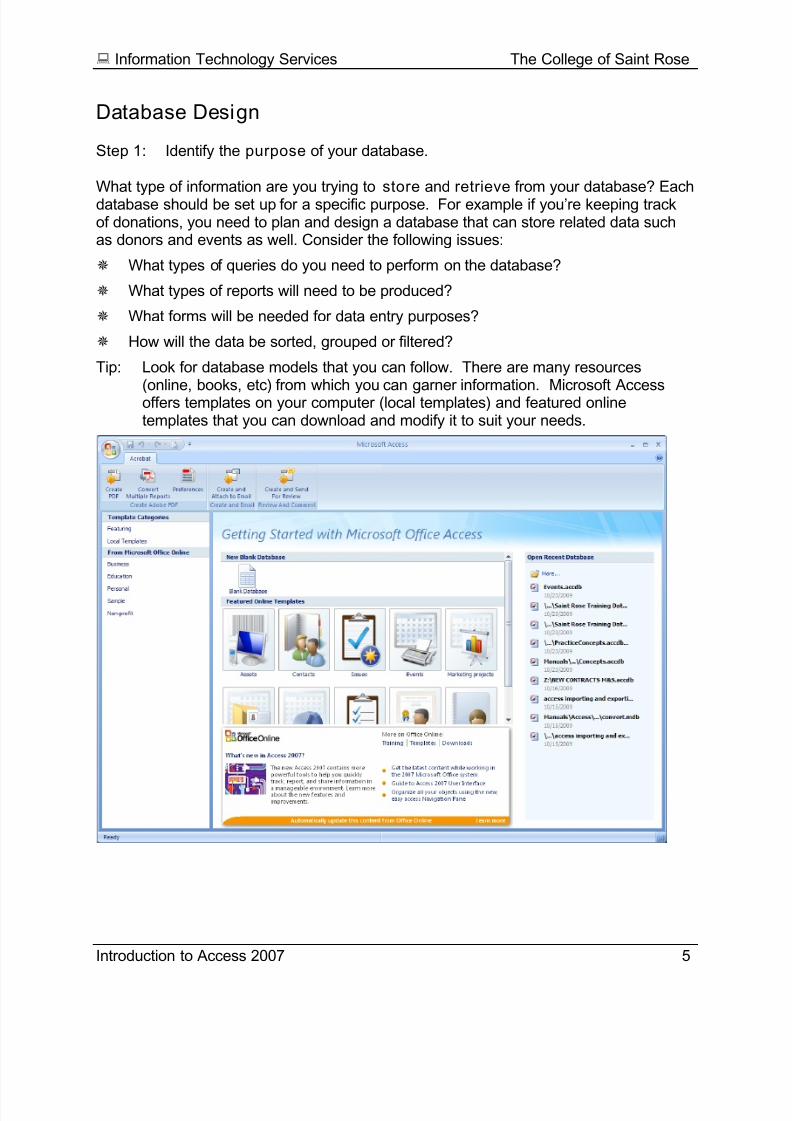
Tip: Look for database models that you can follow. There are many resources
(online, books, etc) from which you can garner information. Microsoft Accessoffers templates on your computer (local templates) and featured onlinetemplates that you can download and modify it to suit your needs.
8/10/2019 Introduction Access 2007
http://slidepdf.com/reader/full/introduction-access-2007 9/62
Information Technology Services The College of Saint Rose
Introduction to Access 2007 6
Step 2: Determine the tables you need.
Each table should focus on one topic and should store only the data related to thattopic. For example, to track donations you may have separate tables for Donors,Donations and Events.
Remember our flat database example? You should separate fields into related tablesfor the following reasons:
Eliminate redundant information. For example a customer address change is mucheasier to implement if the data is stored only in the Customers table. It is onlynecessary to make the change once, thereby reducing the amount of data entryrequired and potential for data-entry errors. It also saves storage space.
Manage data easier. Large tables can be difficult to work with. It may becumbersome to find or summarize information.
To make future changes to the database design easier. Maintaining separatetables makes it easier to accommodate change. You can avoid having tofrequently restructure the fields to accommodate new data.
Join or relate the tables to one another to view information from multiple tables in aquery.
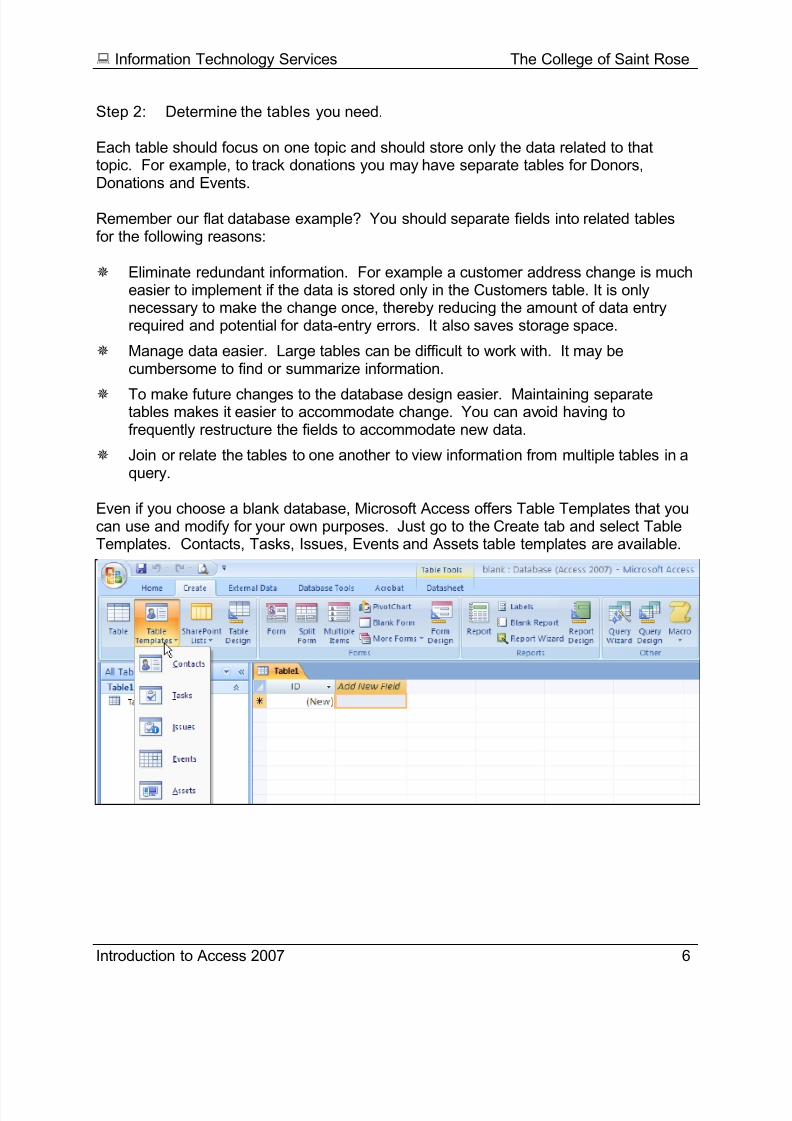
Even if you choose a blank database, Microsoft Access offers Table Templates that youcan use and modify for your own purposes. Just go to the Create tab and select TableTemplates. Contacts, Tasks, Issues, Events and Assets table templates are available.
8/10/2019 Introduction Access 2007
http://slidepdf.com/reader/full/introduction-access-2007 10/62

8/10/2019 Introduction Access 2007
http://slidepdf.com/reader/full/introduction-access-2007 11/62
Information Technology Services The College of Saint Rose
Introduction to Access 2007 8
Step 5: Refine the Design. Create your tables, specify relationships between thetables, enter a few records and see if the database gives you the answersyou want. Create rough drafts of your forms and reports and see if they showthe data you expect. Look for unnecessary duplications of data and eliminatethem.
Did you forget any fields? Go back and add them.
The intersection of every column and record should contain one and only onevalue.
Did you choose a good primary key for each table? Can you search for specificrecords? Make sure that you won't need to enter a value in a primary key field thatwill result in a duplicate value.
Are you repeatedly entering duplicate information in one of your tables? If so youprobably need to divide the table into two tables, with a one-to-many relationship.
Do you have tables with many fields, a limited number of records and many emptyfields in individual records? If so think about redesigning the table so it has fewerfields and more records.
8/10/2019 Introduction Access 2007
http://slidepdf.com/reader/full/introduction-access-2007 12/62
Information Technology Services The College of Saint Rose
Introduction to Access 2007 9
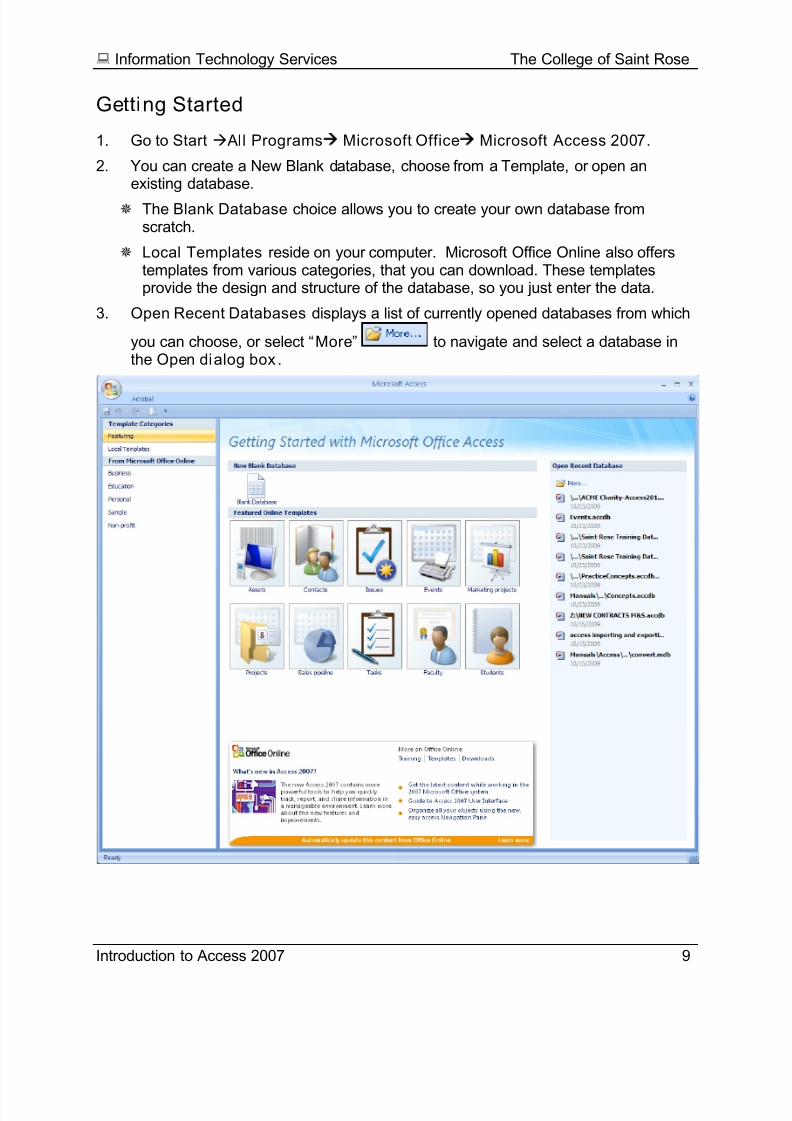
Getting Started
1. Go to Start All Programs Microsoft Office Microsoft Access 2007.
2. You can create a New Blank database, choose from a Template, or open anexisting database.
The Blank Database choice allows you to create your own database fromscratch.
Local Templates reside on your computer. Microsoft Office Online also offerstemplates from various categories, that you can download. These templatesprovide the design and structure of the database, so you just enter the data.
3. Open Recent Databases displays a list of currently opened databases from which
you can choose, or select “More” to navigate and select a database inthe Open dialog box.
8/10/2019 Introduction Access 2007
http://slidepdf.com/reader/full/introduction-access-2007 13/62
Information Technology Services The College of Saint Rose
Introduction to Access 2007 10
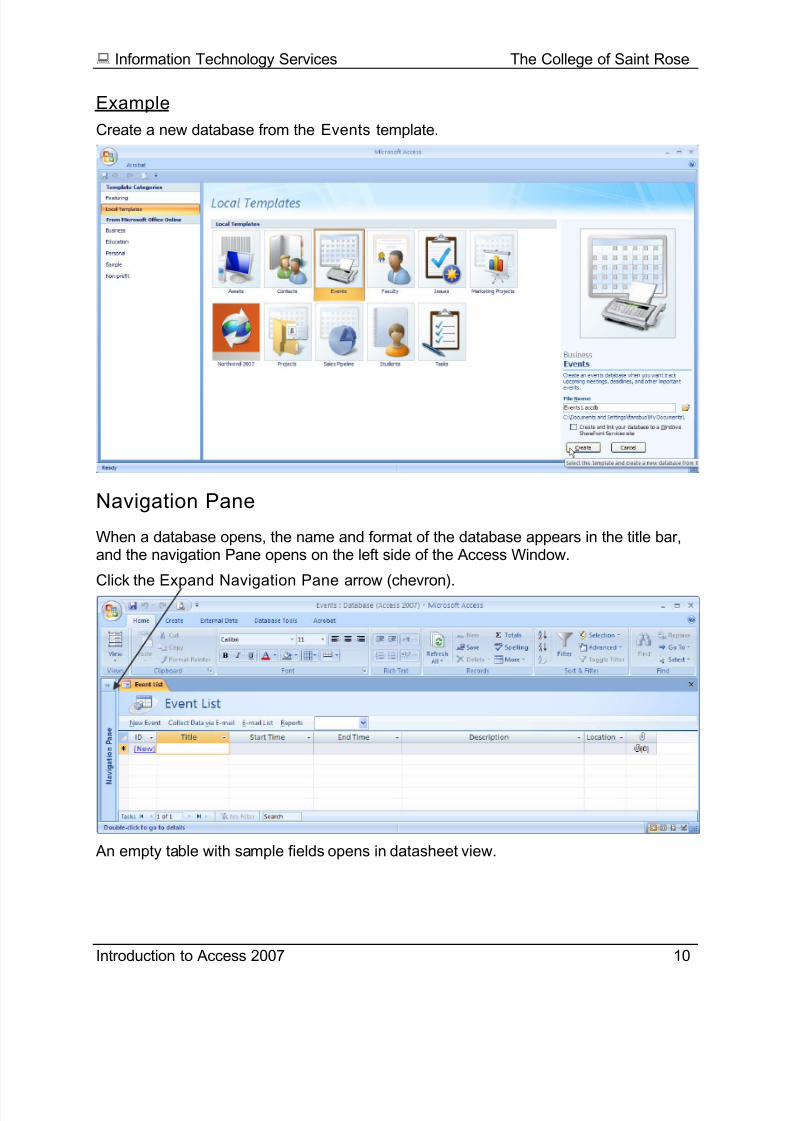
Example
Create a new database from the Events template.
Navigation Pane
When a database opens, the name and format of the database appears in the title bar,and the navigation Pane opens on the left side of the Access Window.
Click the Expand Navigation Pane arrow (chevron).
An empty table with sample fields opens in datasheet view.
8/10/2019 Introduction Access 2007
http://slidepdf.com/reader/full/introduction-access-2007 14/62
Information Technology Services The College of Saint Rose
Introduction to Access 2007 11
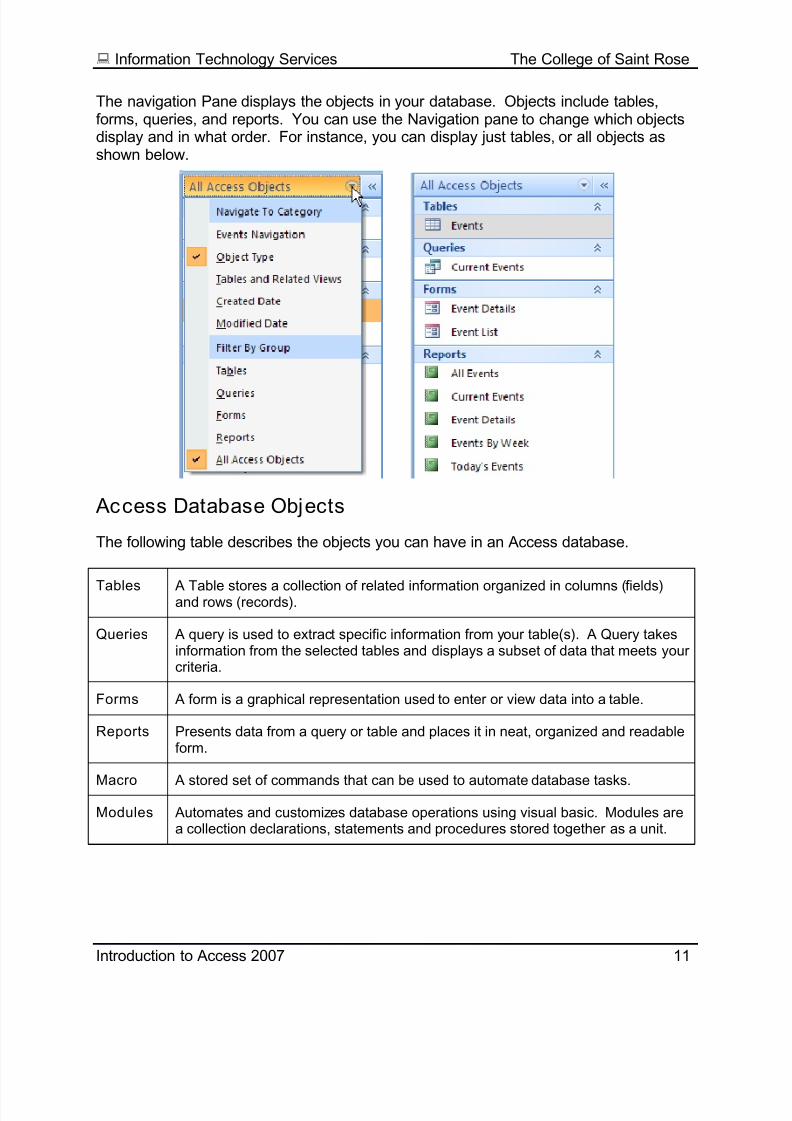
The navigation Pane displays the objects in your database. Objects include tables,forms, queries, and reports. You can use the Navigation pane to change which objectsdisplay and in what order. For instance, you can display just tables, or all objects asshown below.
Access Database Objects
The following table describes the objects you can have in an Access database.
Tables A Table stores a collection of related information organized in columns (fields)and rows (records).
Queries A query is used to extract specific information from your table(s). A Query takesinformation from the selected tables and displays a subset of data that meets yourcriteria.
Forms A form is a graphical representation used to enter or view data into a table.
Reports Presents data from a query or table and places it in neat, organized and readableform.
Macro A stored set of commands that can be used to automate database tasks.
Modules Automates and customizes database operations using visual basic. Modules area collection declarations, statements and procedures stored together as a unit.
8/10/2019 Introduction Access 2007
http://slidepdf.com/reader/full/introduction-access-2007 15/62
Information Technology Services The College of Saint Rose
Introduction to Access 2007 12
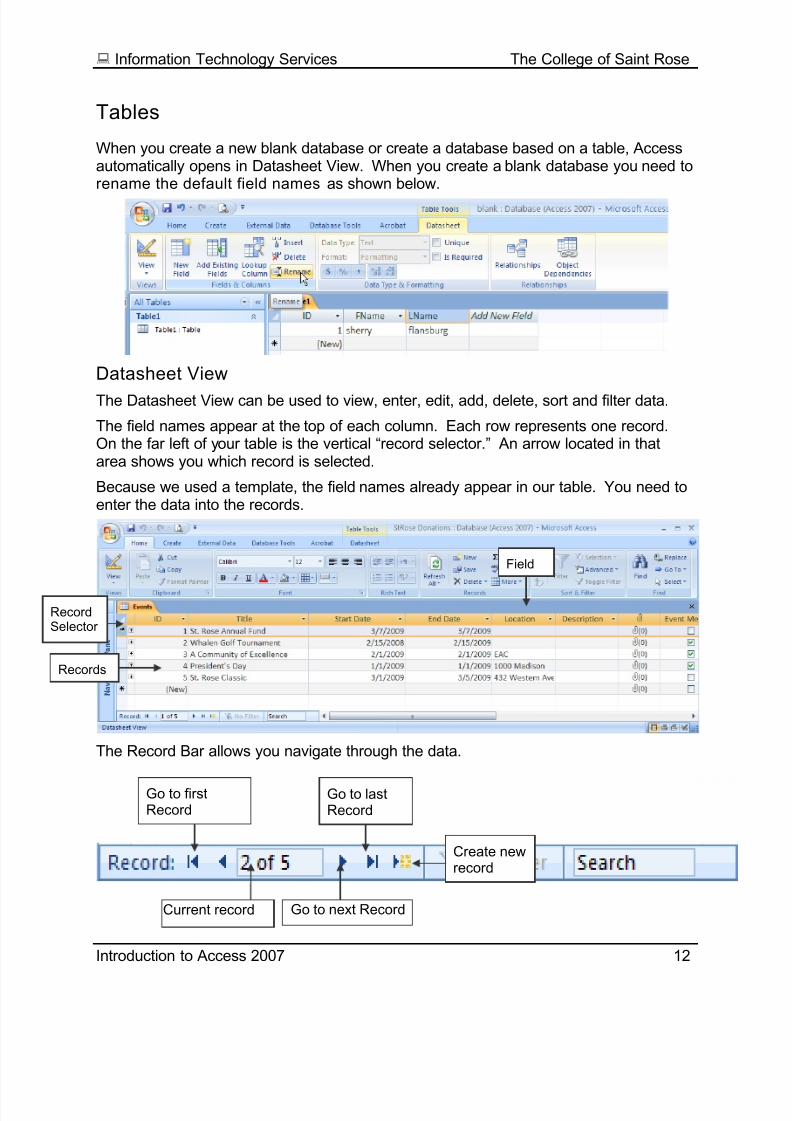
Tables
When you create a new blank database or create a database based on a table, Accessautomatically opens in Datasheet View. When you create a blank database you need torename the default field names as shown below.
Datasheet View
The Datasheet View can be used to view, enter, edit, add, delete, sort and filter data.
The field names appear at the top of each column. Each row represents one record.On the far left of your table is the vertical “record selector.” An arrow located in thatarea shows you which record is selected.
Because we used a template, the field names already appear in our table. You need toenter the data into the records.
The Record Bar allows you navigate through the data.
Field
Records
Create newrecord
Go to lastRecord
Go to firstRecord
RecordSelector
Current record Go to next Record
8/10/2019 Introduction Access 2007
http://slidepdf.com/reader/full/introduction-access-2007 16/62
Information Technology Services The College of Saint Rose
Introduction to Access 2007 13
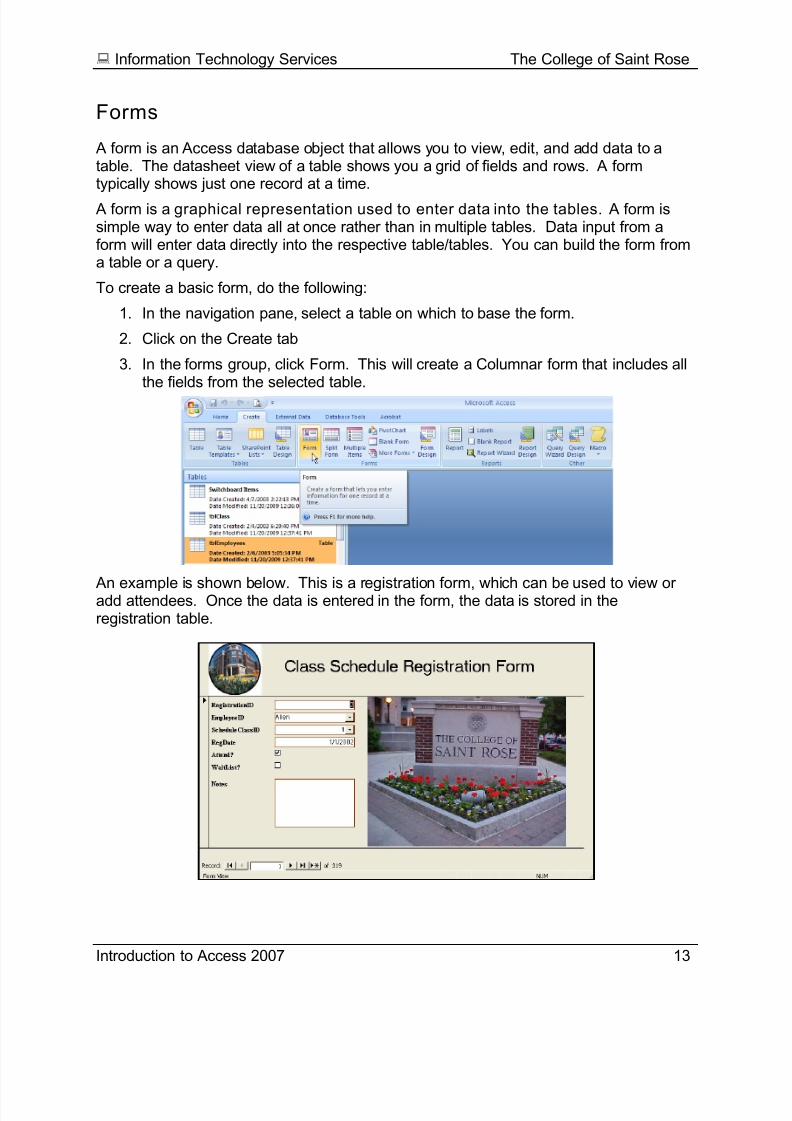
Forms
A form is an Access database object that allows you to view, edit, and add data to atable. The datasheet view of a table shows you a grid of fields and rows. A formtypically shows just one record at a time.
A form is a graphical representation used to enter data into the tables. A form issimple way to enter data all at once rather than in multiple tables. Data input from aform will enter data directly into the respective table/tables. You can build the form froma table or a query.
To create a basic form, do the following:
1. In the navigation pane, select a table on which to base the form.
2. Click on the Create tab
3. In the forms group, click Form. This will create a Columnar form that includes allthe fields from the selected table.
An example is shown below. This is a registration form, which can be used to view oradd attendees. Once the data is entered in the form, the data is stored in theregistration table.
8/10/2019 Introduction Access 2007
http://slidepdf.com/reader/full/introduction-access-2007 17/62
Information Technology Services The College of Saint Rose
Introduction to Access 2007 14
Queries
A query is a database object that retrieves and displays selective data from one ormore tables or from other queries. You can use a query to retrieve data meeting
specific conditions. For example, I can display all classes a John Doe attended inJune. Query results are similar to the results of a filter, but a query can be savedpermanently, whereas a filter provides only a temporary view.
When you run a query it displays the results in datasheet view. The result of thequery is dynamic; hence the results are called a dynaset. The dynaset looks andacts like a table; it is a “live” view of one or more tables. WARNING: If you makechanges to the data in the query, the data in the table will also change!!
A query can be based on data from one or more tables. Queries usually connecttwo or more tables through a relationship between a common field in both tables,such as a key field (a field unique to each table).
Queries allow you to perform calculations on the data; to create data sources forforms, reports, charts and other queries; to make changes to tables and create newtables.
Select Query - This is the most common type of query; it selects information fromone or more tables and returns only the records that meet the criteria.
Plan a Query
1. Determine the tables from which you will extract the fields
2. Determine the fields that you want to see in the query result
3. Specific the conditions that you want the data to meet.
8/10/2019 Introduction Access 2007
http://slidepdf.com/reader/full/introduction-access-2007 18/62
Information Technology Services The College of Saint Rose
Introduction to Access 2007 15
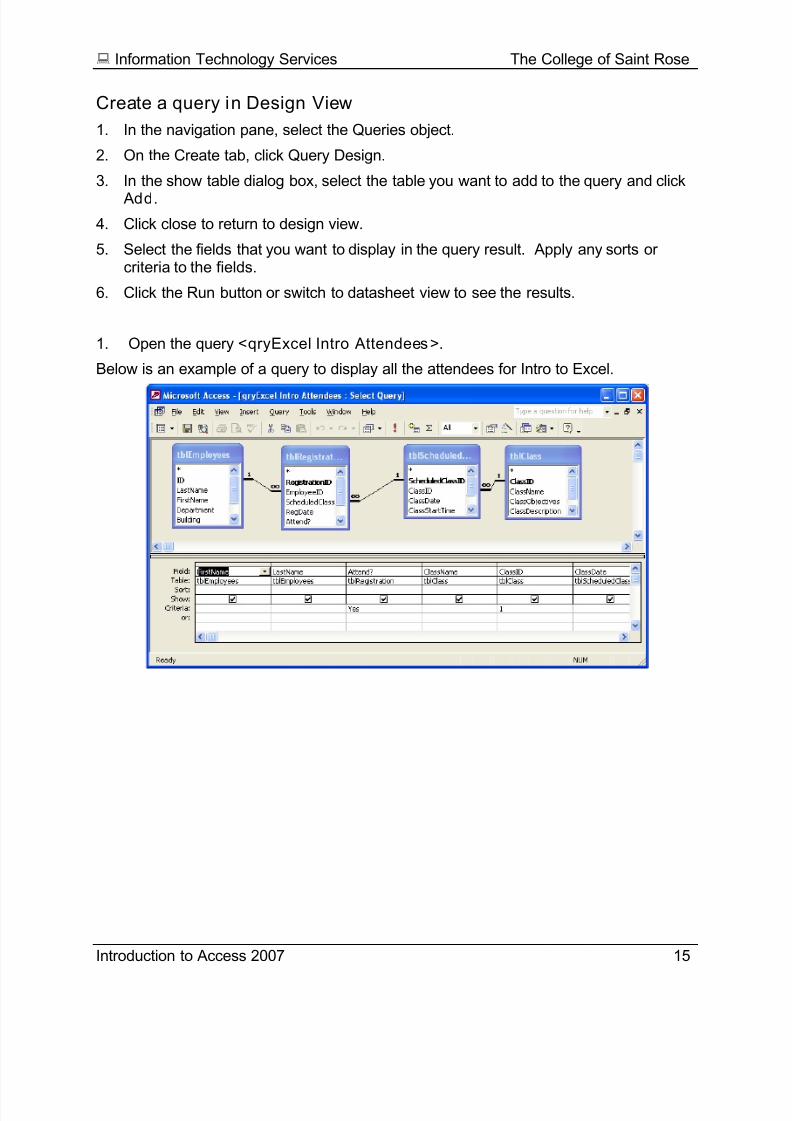
Create a query in Design View
1. In the navigation pane, select the Queries object.
2. On the Create tab, click Query Design.
3. In the show table dialog box, select the table you want to add to the query and click
Add.
4. Click close to return to design view.
5. Select the fields that you want to display in the query result. Apply any sorts orcriteria to the fields.
6. Click the Run button or switch to datasheet view to see the results.
1. Open the query <qryExcel Intro Attendees>.
Below is an example of a query to display all the attendees for Intro to Excel.
8/10/2019 Introduction Access 2007
http://slidepdf.com/reader/full/introduction-access-2007 19/62
Information Technology Services The College of Saint Rose
Introduction to Access 2007 16
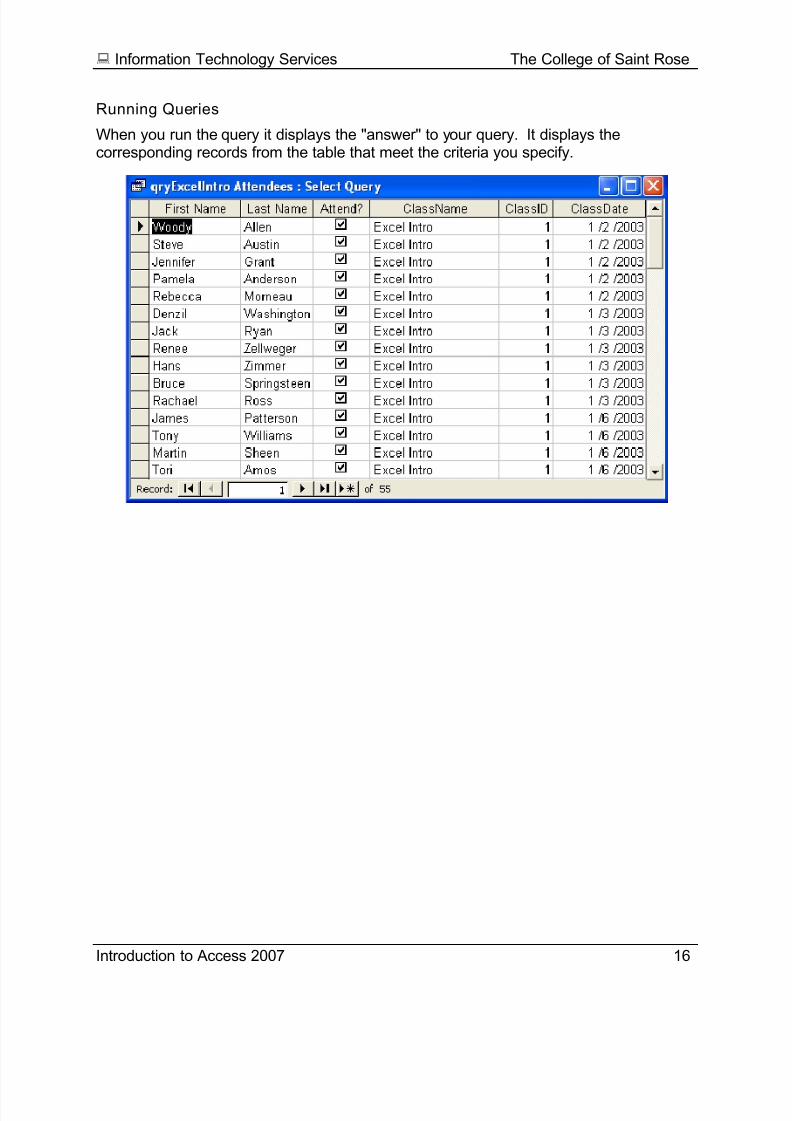
Running Queries
When you run the query it displays the "answer" to your query. It displays thecorresponding records from the table that meet the criteria you specify.
8/10/2019 Introduction Access 2007
http://slidepdf.com/reader/full/introduction-access-2007 20/62
Information Technology Services The College of Saint Rose
Introduction to Access 2007 17
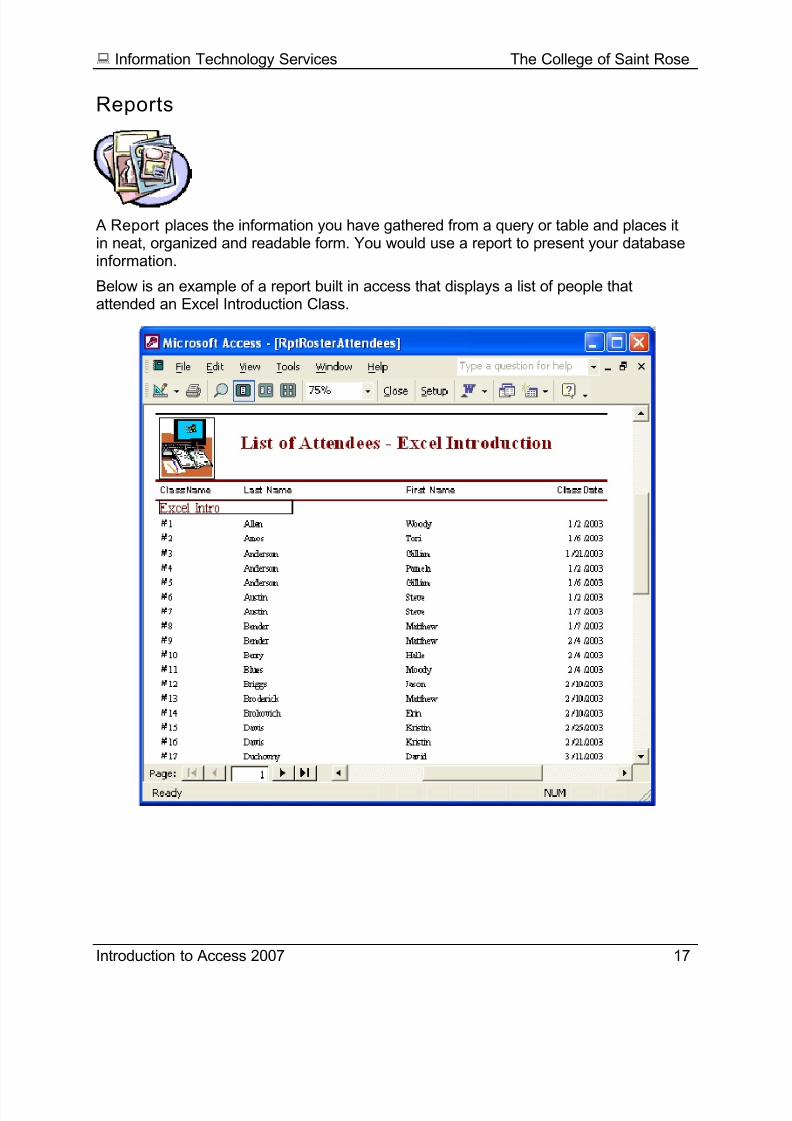
Reports
A Report places the information you have gathered from a query or table and places itin neat, organized and readable form. You would use a report to present your databaseinformation.
Below is an example of a report built in access that displays a list of people thatattended an Excel Introduction Class.
8/10/2019 Introduction Access 2007
http://slidepdf.com/reader/full/introduction-access-2007 21/62
Information Technology Services The College of Saint Rose
Introduction to Access 2007 18
Working in Datasheet View
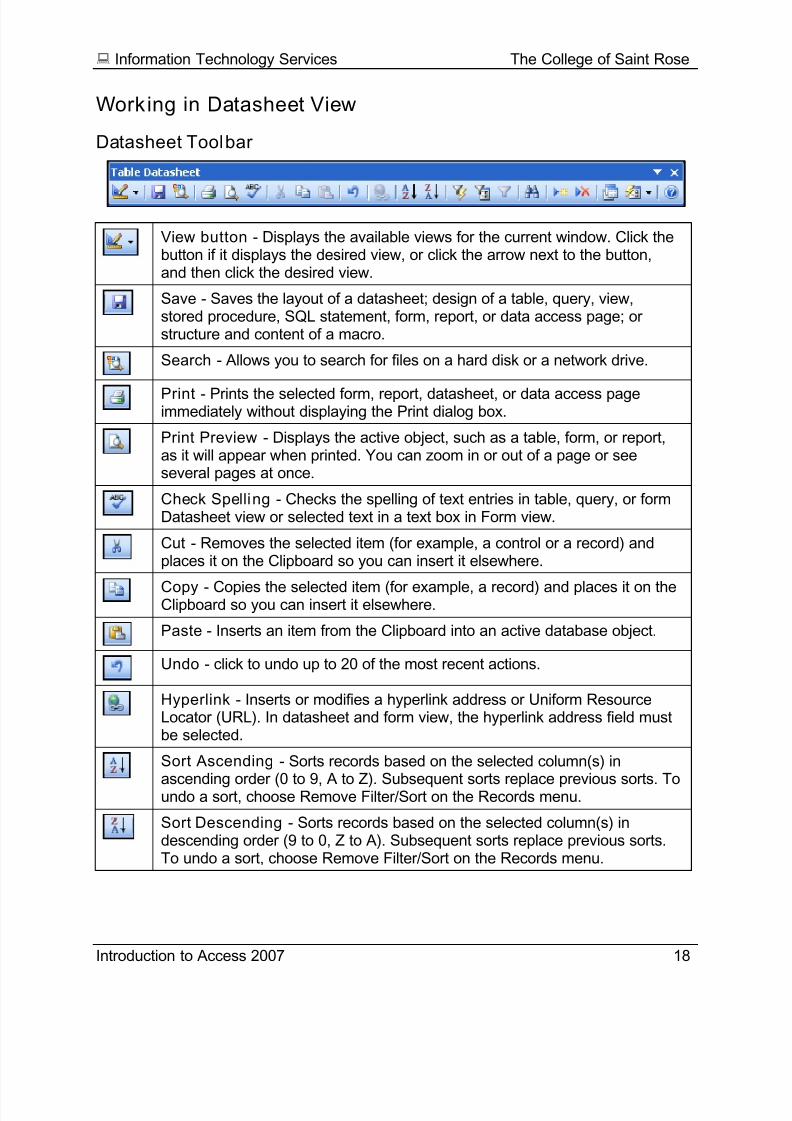
Datasheet Toolbar
View button - Displays the available views for the current window. Click thebutton if it displays the desired view, or click the arrow next to the button,and then click the desired view.
Save - Saves the layout of a datasheet; design of a table, query, view,stored procedure, SQL statement, form, report, or data access page; orstructure and content of a macro.
Search - Allows you to search for files on a hard disk or a network drive.
Print - Prints the selected form, report, datasheet, or data access pageimmediately without displaying the Print dialog box.
Print Preview - Displays the active object, such as a table, form, or report,as it will appear when printed. You can zoom in or out of a page or seeseveral pages at once.
Check Spelling - Checks the spelling of text entries in table, query, or formDatasheet view or selected text in a text box in Form view.
Cut - Removes the selected item (for example, a control or a record) andplaces it on the Clipboard so you can insert it elsewhere.
Copy - Copies the selected item (for example, a record) and places it on theClipboard so you can insert it elsewhere.
Paste - Inserts an item from the Clipboard into an active database object.
Undo - click to undo up to 20 of the most recent actions.
Hyperlink - Inserts or modifies a hyperlink address or Uniform ResourceLocator (URL). In datasheet and form view, the hyperlink address field mustbe selected.
Sort Ascending - Sorts records based on the selected column(s) in
ascending order (0 to 9, A to Z). Subsequent sorts replace previous sorts. Toundo a sort, choose Remove Filter/Sort on the Records menu.
Sort Descending - Sorts records based on the selected column(s) indescending order (9 to 0, Z to A). Subsequent sorts replace previous sorts.To undo a sort, choose Remove Filter/Sort on the Records menu.
8/10/2019 Introduction Access 2007
http://slidepdf.com/reader/full/introduction-access-2007 22/62
Information Technology Services The College of Saint Rose
Introduction to Access 2007 19
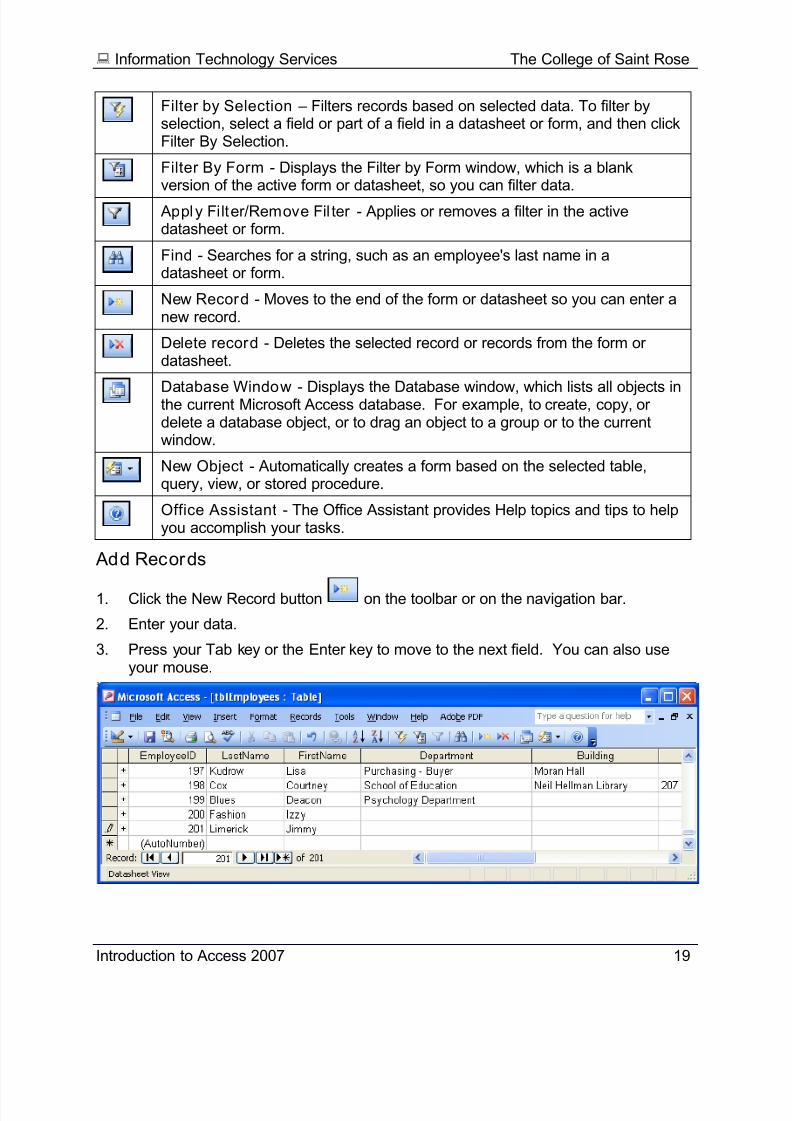
Filter by Selection – Filters records based on selected data. To filter byselection, select a field or part of a field in a datasheet or form, and then clickFilter By Selection.
Filter By Form - Displays the Filter by Form window, which is a blankversion of the active form or datasheet, so you can filter data.
Apply Filter/Remove Fil ter - Applies or removes a filter in the activedatasheet or form.
Find - Searches for a string, such as an employee's last name in adatasheet or form.
New Record - Moves to the end of the form or datasheet so you can enter anew record.
Delete record - Deletes the selected record or records from the form ordatasheet.
Database Window - Displays the Database window, which lists all objects inthe current Microsoft Access database. For example, to create, copy, ordelete a database object, or to drag an object to a group or to the currentwindow.
New Object - Automatically creates a form based on the selected table,query, view, or stored procedure.
Office Assistant - The Office Assistant provides Help topics and tips to helpyou accomplish your tasks.
Add Records
1. Click the New Record button on the toolbar or on the navigation bar.
2. Enter your data.
3. Press your Tab key or the Enter key to move to the next field. You can also useyour mouse.
8/10/2019 Introduction Access 2007
http://slidepdf.com/reader/full/introduction-access-2007 23/62
8/10/2019 Introduction Access 2007
http://slidepdf.com/reader/full/introduction-access-2007 24/62
Information Technology Services The College of Saint Rose
Introduction to Access 2007 21
3. A dialog box will display a message to confirm the action and warn you that itcannot be undone. Deletions cannot be undone. Click OK to confirm deletion.
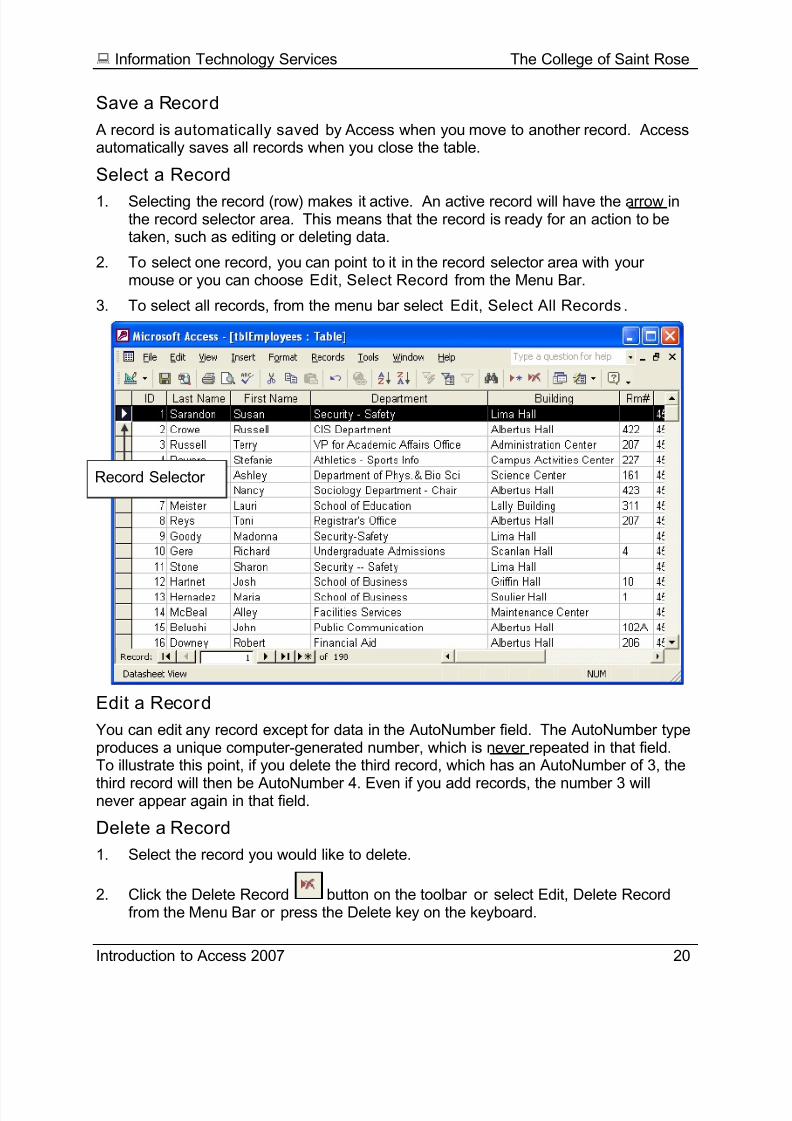
Check Your Spelling
In Datasheet View you can check the spelling in your records.
Click the Spelling button on the toolbar
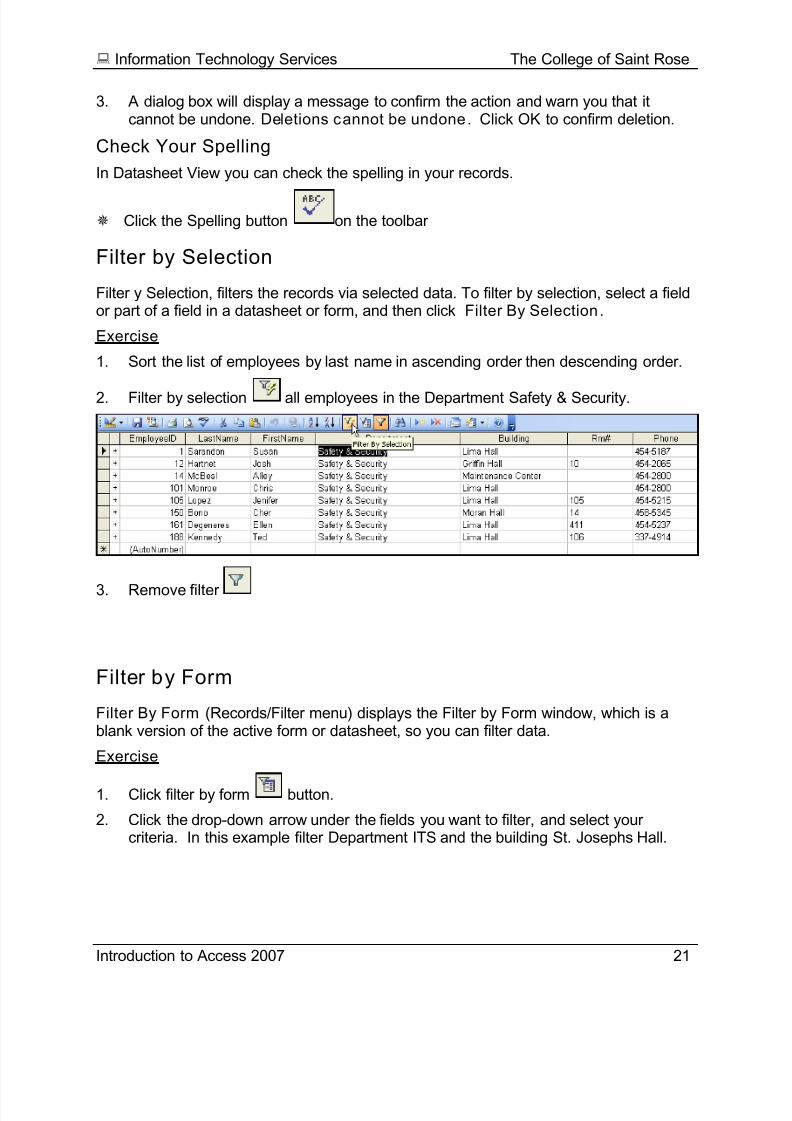
Filter by Selection
Filter y Selection, filters the records via selected data. To filter by selection, select a fieldor part of a field in a datasheet or form, and then click Filter By Selection.
Exercise
1. Sort the list of employees by last name in ascending order then descending order.
2. Filter by selection all employees in the Department Safety & Security.
3. Remove filter
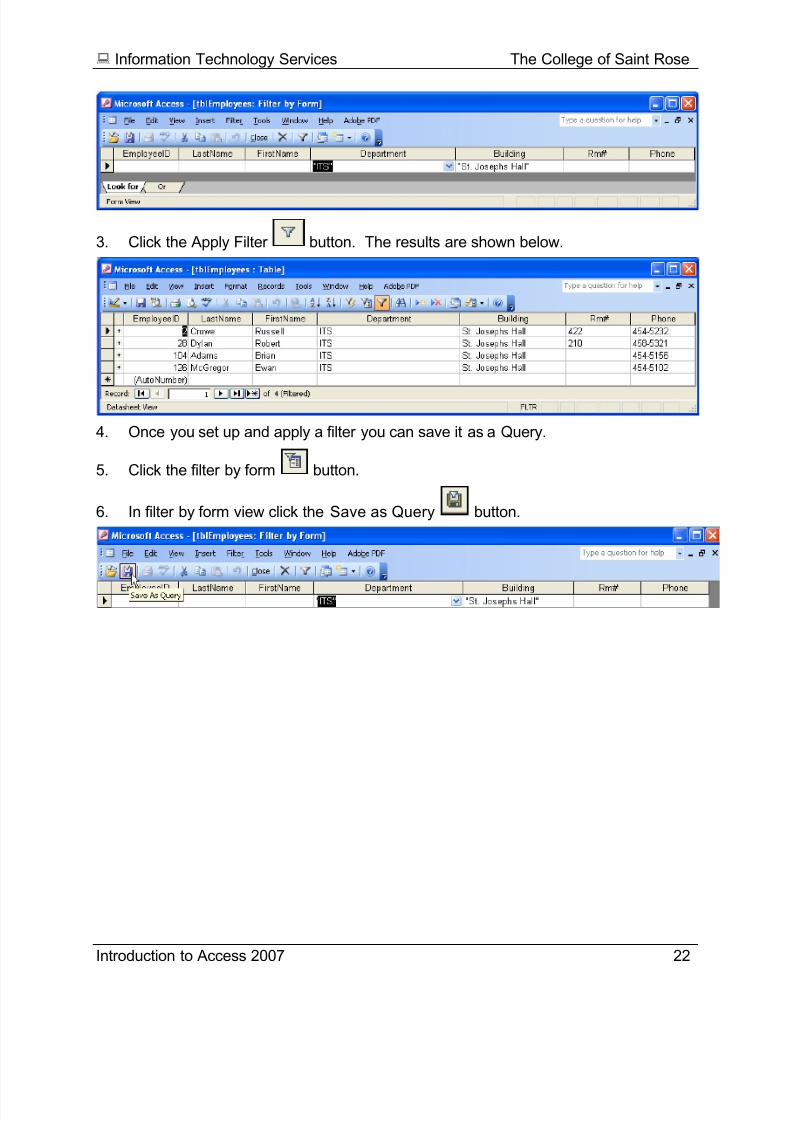
Filter by Form
Filter By Form (Records/Filter menu) displays the Filter by Form window, which is ablank version of the active form or datasheet, so you can filter data.
Exercise
1. Click filter by form button.
2. Click the drop-down arrow under the fields you want to filter, and select yourcriteria. In this example filter Department ITS and the building St. Josephs Hall.
8/10/2019 Introduction Access 2007
http://slidepdf.com/reader/full/introduction-access-2007 25/62
Information Technology Services The College of Saint Rose
Introduction to Access 2007 22
3. Click the Apply Filter button. The results are shown below.
4. Once you set up and apply a filter you can save it as a Query.
5. Click the filter by form button.
6. In filter by form view click the Save as Query button.

8/10/2019 Introduction Access 2007
http://slidepdf.com/reader/full/introduction-access-2007 26/62
Information Technology Services The College of Saint Rose
Introduction to Access 2007 23
7. In the Save As Query dialog box, type in a name. Click OK.
8. Click remove filter to get back into datasheet view.
Load from Query
Once the query is saved, you can go back at a later date and open the query.
1. Go back into filter by form view. Click Load from query
2. In the Applicable Filter dialog box select the filter you want to view.
3. Click OK.
4. Click Apply Filter .
5. Your data is displayed.
Note: Since you saved it as a query, you can also open the filter in the query objectstab.
8/10/2019 Introduction Access 2007
http://slidepdf.com/reader/full/introduction-access-2007 27/62
8/10/2019 Introduction Access 2007
http://slidepdf.com/reader/full/introduction-access-2007 28/62
Information Technology Services The College of Saint Rose
Introduction to Access 2007 25
After a description is entered, you can press [ENTER] or [Tab] to move to the next fieldname.
The order of the field names in design view will determine the order they will appear ascolumn headings in your table. The order does not matter to the database, but for yourown comfort you may wish to place them in a logical order.
To change the order you can click and drag the field to a new location.
Data Types
The following are a list of the data types available:
Text: A string of up to 255 characters; however, you can limit the length to asmaller number by specifying the maximum number of characters in the “fieldsize” property on the bottom half of the form. This data type should also be usedfor numbers that will not be used in calculations.
Memo: Used to store longer strings of characters. Access places a limit of64,000 characters for data of this type.
Number: Used to store numeric data. Access offers a selection of formats forthe date and time. This data type is best for numeric data that will be used incalculations.
Date/Time: Used to store dates and time. Access will let you store a specificformat for displaying the date and time. General Date is the default but otherformats are available using the drop-down list or creating a custom format.
Currency: Used for monetary data. This form does not round numbers.
AutoNumber: Places a computer-generated number in the field. This is a read-only field assigned by Access. This data type is commonly used as a key field
(to be discussed) as it is unique to each row in the table. Yes/No: Used for Boolean data, when an either/or situation is present.
OLE Object: Used for “Object Linking and Embedding” from the OLE serverprovided in the Windows environment. An Excel spreadsheet or Word documentcan be an OLE object.
Hyperlink: Insert a hyperlink address.
Lookup Wizard: Allows you to define a field where the database user can selecta value from another table or from a predefined list.
8/10/2019 Introduction Access 2007
http://slidepdf.com/reader/full/introduction-access-2007 29/62
Information Technology Services The College of Saint Rose
Introduction to Access 2007 26
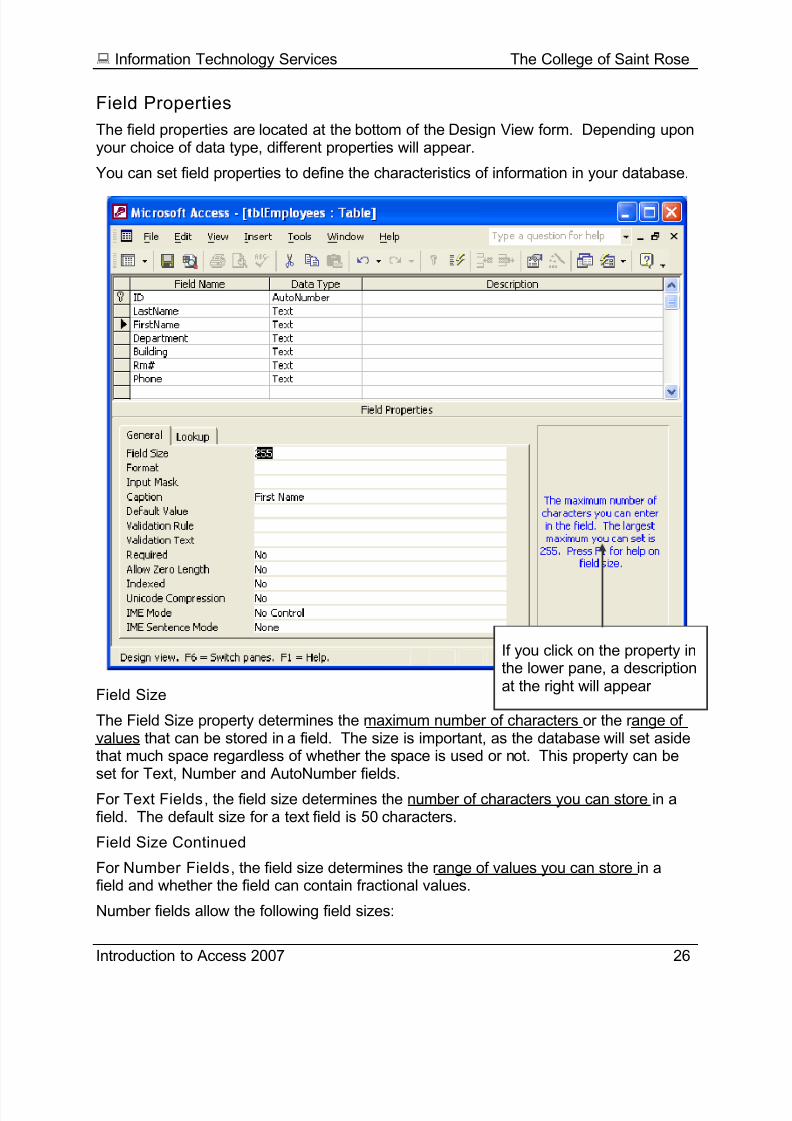
Field Properties
The field properties are located at the bottom of the Design View form. Depending uponyour choice of data type, different properties will appear.
You can set field properties to define the characteristics of information in your database.
Field Size
The Field Size property determines the maximum number of characters or the range ofvalues that can be stored in a field. The size is important, as the database will set asidethat much space regardless of whether the space is used or not. This property can beset for Text, Number and AutoNumber fields.
For Text Fields, the field size determines the number of characters you can store in afield. The default size for a text field is 50 characters.
Field Size Continued
For Number Fields, the field size determines the range of values you can store in afield and whether the field can contain fractional values.
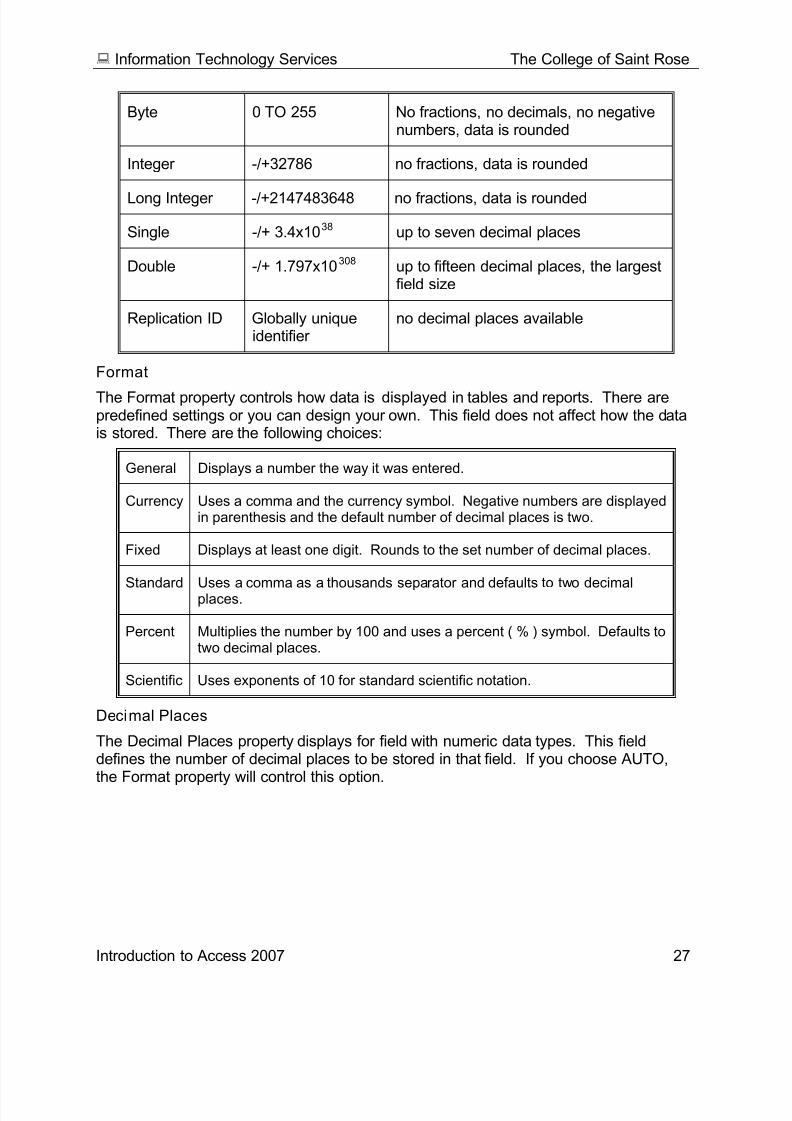
Number fields allow the following field sizes:
If you click on the property inthe lower pane, a descriptionat the right will appear
8/10/2019 Introduction Access 2007
http://slidepdf.com/reader/full/introduction-access-2007 30/62
Information Technology Services The College of Saint Rose
Introduction to Access 2007 27
Byte 0 TO 255 No fractions, no decimals, no negativenumbers, data is rounded
Integer -/+32786 no fractions, data is rounded
Long Integer -/+2147483648 no fractions, data is rounded
Single -/+ 3.4x1038 up to seven decimal places
Double -/+ 1.797x10308 up to fifteen decimal places, the largestfield size
Replication ID Globally uniqueidentifier
no decimal places available
Format
The Format property controls how data is displayed in tables and reports. There arepredefined settings or you can design your own. This field does not affect how the datais stored. There are the following choices:
General Displays a number the way it was entered.
Currency Uses a comma and the currency symbol. Negative numbers are displayedin parenthesis and the default number of decimal places is two.
Fixed Displays at least one digit. Rounds to the set number of decimal places.
Standard Uses a comma as a thousands separator and defaults to two decimalplaces.
Percent Multiplies the number by 100 and uses a percent ( % ) symbol. Defaults totwo decimal places.
Scientific Uses exponents of 10 for standard scientific notation.
Decimal Places
The Decimal Places property displays for field with numeric data types. This fielddefines the number of decimal places to be stored in that field. If you choose AUTO,the Format property will control this option.
8/10/2019 Introduction Access 2007
http://slidepdf.com/reader/full/introduction-access-2007 31/62
Information Technology Services The College of Saint Rose
Introduction to Access 2007 28
Caption
This property defines the label that will be placed on the datasheet view of the table,queries, reports or forms when that field is used. If this field is left blank, the field’sname will be used.
Default Value
A default value automatically appears in the field when a new record is entered. Thisvalue may be an expression (a calculation), which can be created activating theExpression Builder. The Expression builder allows you to choose fields and createformulas. To activate the expression builder, just click in the default value property in
the lower pane then click the expression builder . For example, if you type Now() inthis area, the current date and time will appear in that field by default.
Validation Rule
Allows you to specify what data can be entered in the field. The Validation Rule is anexpression that tests the data that is entered into the field. For example: >1000. The
value entered must be greater than 1000.Validation Text
This text appears in a message box when an invalid value is entered into the field.
Require User Input
Set this property to say yes if it is required that data is entered into this field. This waythe user will not be able to leave this field blank. It is advisable that you do not set thisproperty until you are finished testing your database.
Indexed
By creating an index on a field, it speeds up sorting and searching on that field.However, you only want to create Indexes on fields that will be sorted by or searchedoften because it can slow down data entry.
Types: Yes (Duplicates OK) - will allow duplicate values in the field.
Yes (No Duplicates) - cannot have duplicate values in the field.
8/10/2019 Introduction Access 2007
http://slidepdf.com/reader/full/introduction-access-2007 32/62
Information Technology Services The College of Saint Rose
Introduction to Access 2007 29
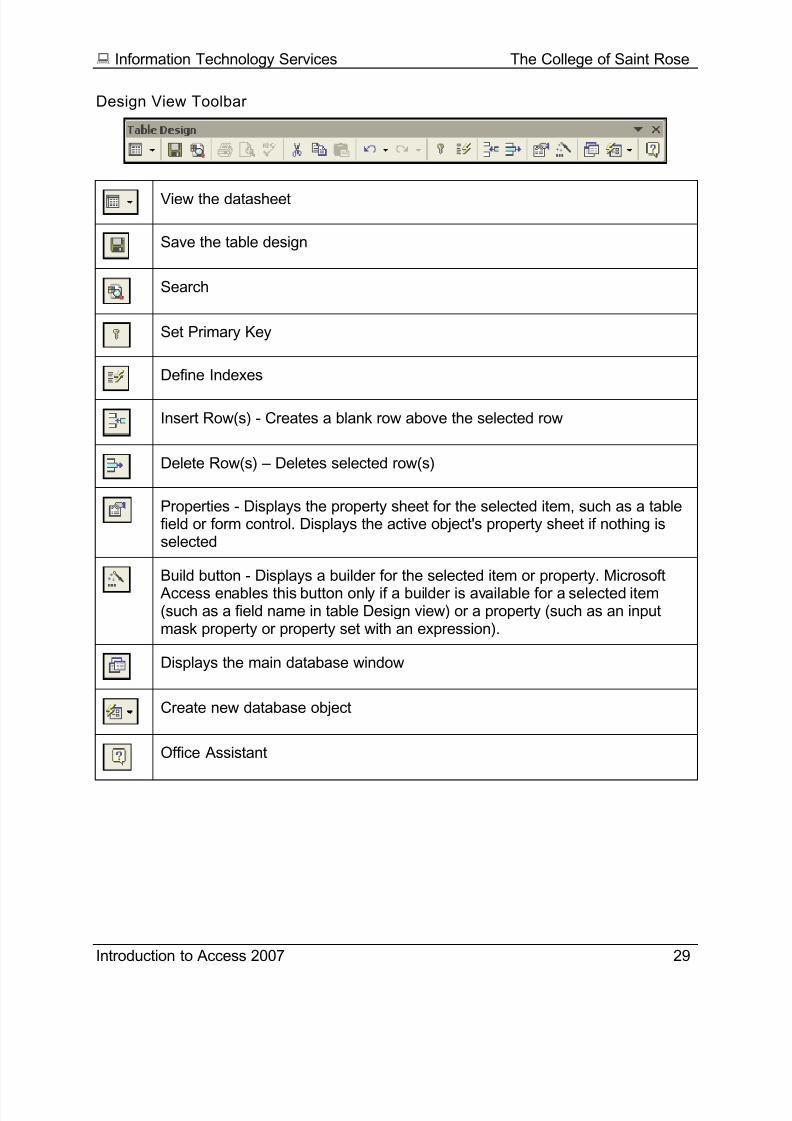
Design View Toolbar
View the datasheet
Save the table design
Search
Set Primary Key
Define Indexes
Insert Row(s) - Creates a blank row above the selected row
Delete Row(s) – Deletes selected row(s)
Properties - Displays the property sheet for the selected item, such as a tablefield or form control. Displays the active object's property sheet if nothing isselected
Build button - Displays a builder for the selected item or property. Microsoft
Access enables this button only if a builder is available for a selected item(such as a field name in table Design view) or a property (such as an inputmask property or property set with an expression).
Displays the main database window
Create new database object
Office Assistant
8/10/2019 Introduction Access 2007
http://slidepdf.com/reader/full/introduction-access-2007 33/62
Information Technology Services The College of Saint Rose
Introduction to Access 2007 30
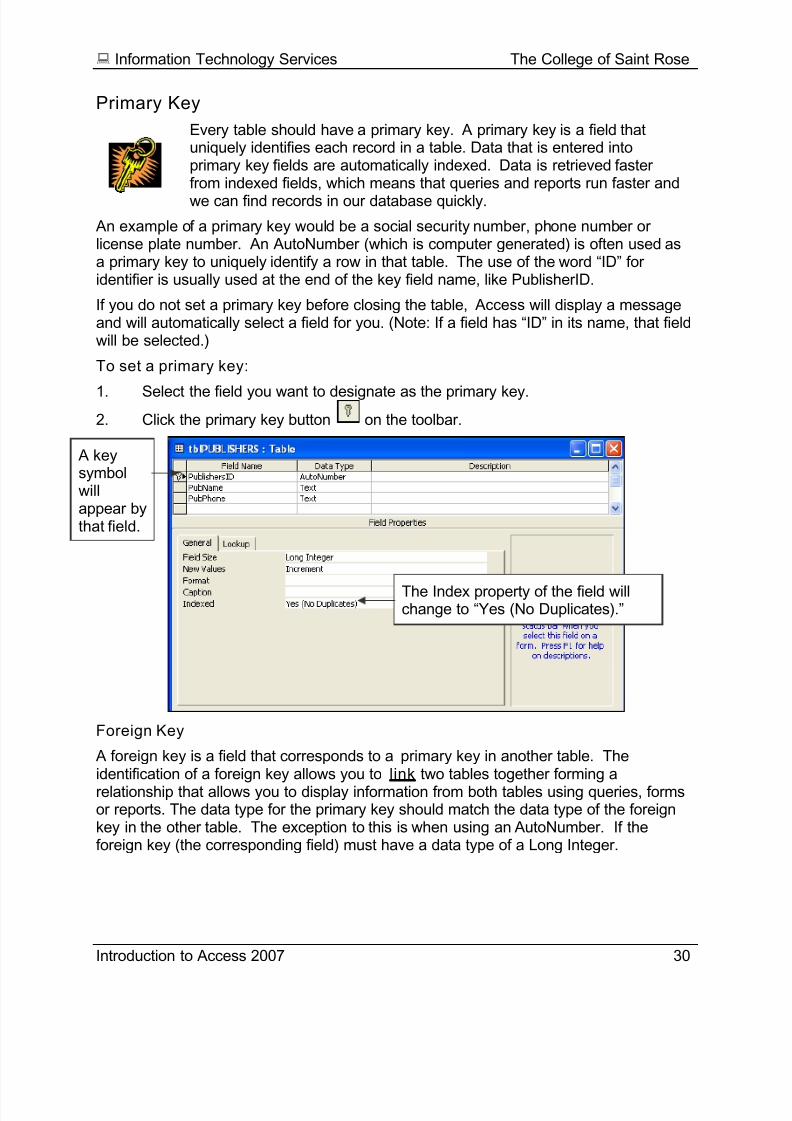
Primary Key
Every table should have a primary key. A primary key is a field thatuniquely identifies each record in a table. Data that is entered intoprimary key fields are automatically indexed. Data is retrieved fasterfrom indexed fields, which means that queries and reports run faster and
we can find records in our database quickly.
An example of a primary key would be a social security number, phone number orlicense plate number. An AutoNumber (which is computer generated) is often used asa primary key to uniquely identify a row in that table. The use of the word “ID” foridentifier is usually used at the end of the key field name, like PublisherID.
If you do not set a primary key before closing the table, Access will display a messageand will automatically select a field for you. (Note: If a field has “ID” in its name, that fieldwill be selected.)
To set a primary key:
1. Select the field you want to designate as the primary key.
2. Click the primary key button on the toolbar.
Foreign Key
A foreign key is a field that corresponds to a primary key in another table. Theidentification of a foreign key allows you to link two tables together forming arelationship that allows you to display information from both tables using queries, formsor reports. The data type for the primary key should match the data type of the foreignkey in the other table. The exception to this is when using an AutoNumber. If theforeign key (the corresponding field) must have a data type of a Long Integer.
A keysymbolwillappear bythat field.
The Index property of the field willchange to “Yes (No Duplicates).”
8/10/2019 Introduction Access 2007
http://slidepdf.com/reader/full/introduction-access-2007 34/62
Information Technology Services The College of Saint Rose
Introduction to Access 2007 31
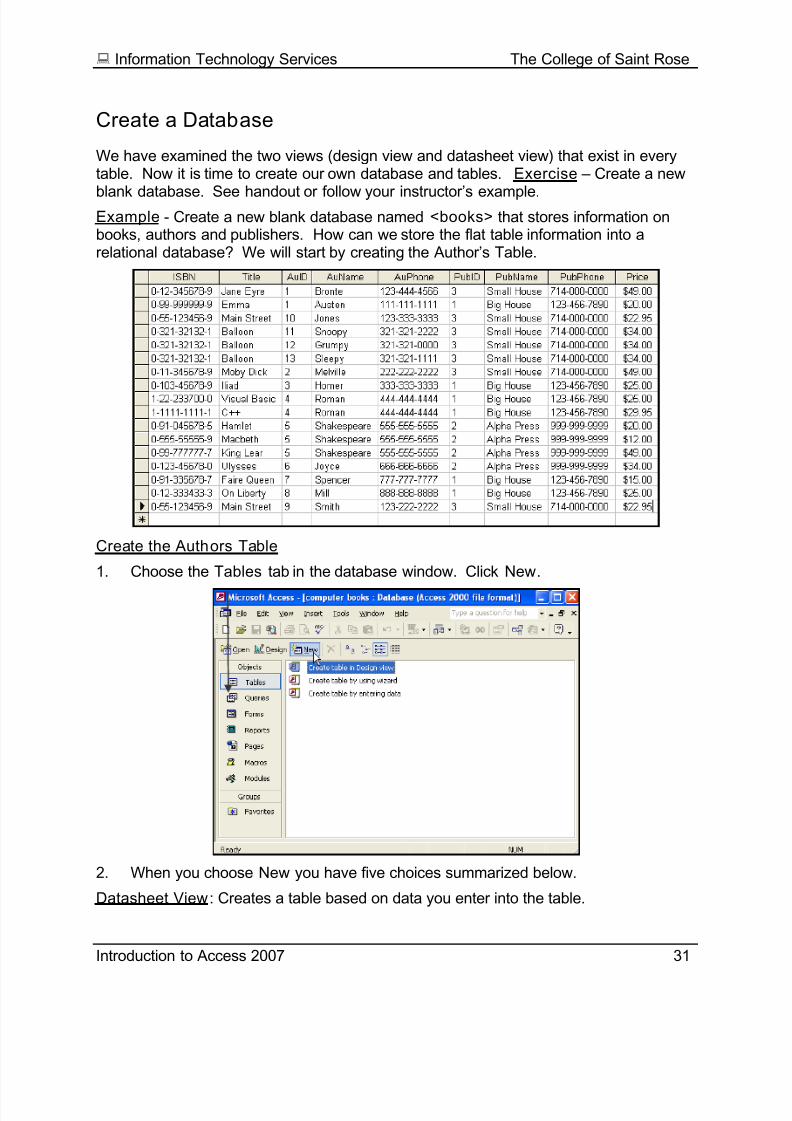
Create a Database
We have examined the two views (design view and datasheet view) that exist in everytable. Now it is time to create our own database and tables. Exercise – Create a new
blank database. See handout or follow your instructor’s example.Example - Create a new blank database named <books> that stores information onbooks, authors and publishers. How can we store the flat table information into arelational database? We will start by creating the Author’s Table.
Create the Authors Table
1. Choose the Tables tab in the database window. Click New.
2. When you choose New you have five choices summarized below.
Datasheet View: Creates a table based on data you enter into the table.
8/10/2019 Introduction Access 2007
http://slidepdf.com/reader/full/introduction-access-2007 35/62
Information Technology Services The College of Saint Rose
Introduction to Access 2007 32
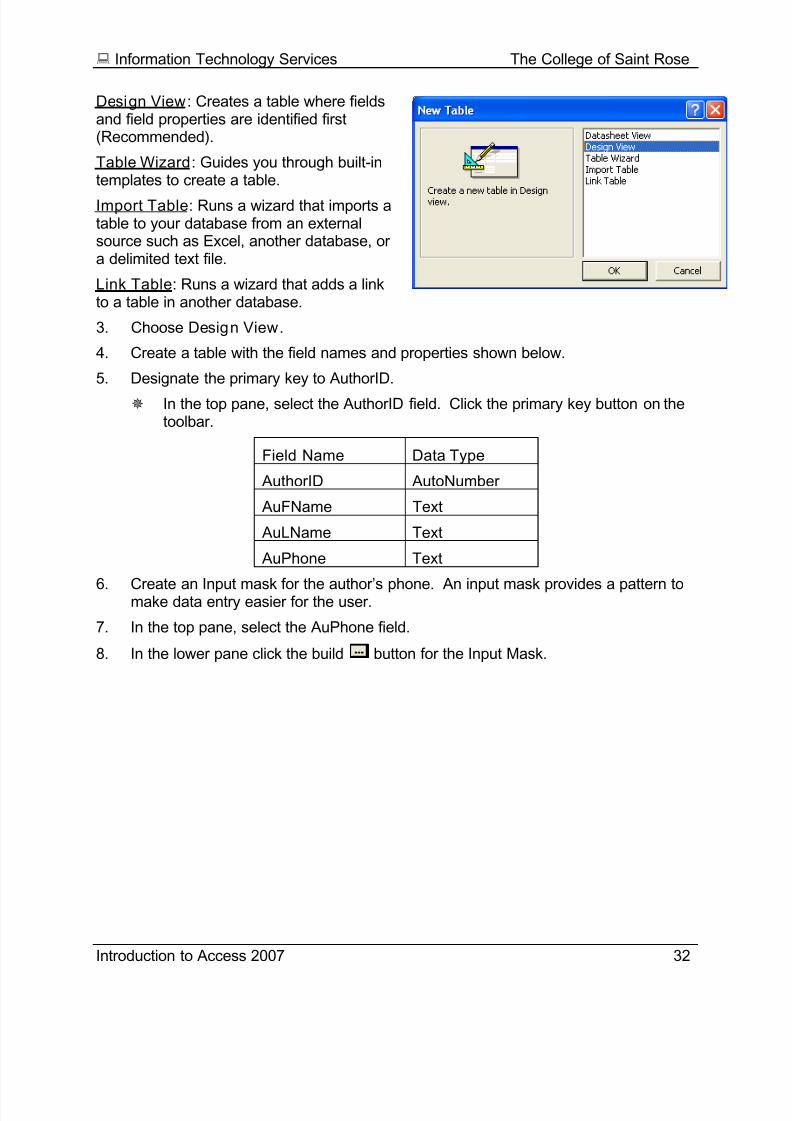
Design View: Creates a table where fieldsand field properties are identified first(Recommended).
Table Wizard: Guides you through built-intemplates to create a table.
Import Table: Runs a wizard that imports atable to your database from an externalsource such as Excel, another database, ora delimited text file.
Link Table: Runs a wizard that adds a linkto a table in another database.
3. Choose Design View.
4. Create a table with the field names and properties shown below.
5. Designate the primary key to AuthorID.
In the top pane, select the AuthorID field. Click the primary key button on thetoolbar.
Field Name Data Type
AuthorID AutoNumber
AuFName Text
AuLName Text
AuPhone Text
6. Create an Input mask for the author’s phone. An input mask provides a pattern tomake data entry easier for the user.
7. In the top pane, select the AuPhone field.
8. In the lower pane click the build button for the Input Mask.

8/10/2019 Introduction Access 2007
http://slidepdf.com/reader/full/introduction-access-2007 36/62
Information Technology Services The College of Saint Rose
Introduction to Access 2007 33
Input Mask Wizard
Step 1: Select a mask that matches how you want your data to appear.
Select Phone Number. Click Next.
Step 2 Select the placeholder character youwant. Click Next.
Step 3 Choose to store the data with thesymbols or without the symbols.
Select “with the symbols in the mask”.
Step 4: Click Finish.
8/10/2019 Introduction Access 2007
http://slidepdf.com/reader/full/introduction-access-2007 37/62
Information Technology Services The College of Saint Rose
Introduction to Access 2007 34
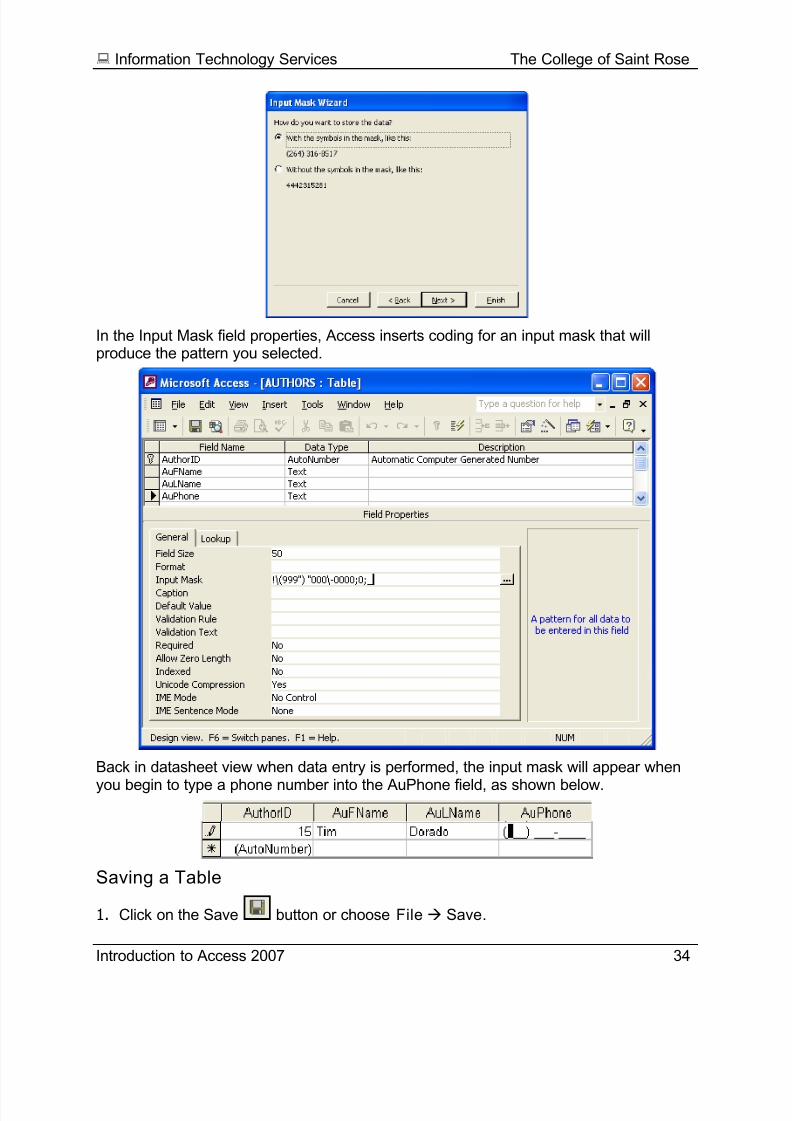
In the Input Mask field properties, Access inserts coding for an input mask that willproduce the pattern you selected.
Back in datasheet view when data entry is performed, the input mask will appear when
you begin to type a phone number into the AuPhone field, as shown below.
Saving a Table
1. Click on the Save button or choose File Save.
8/10/2019 Introduction Access 2007
http://slidepdf.com/reader/full/introduction-access-2007 38/62
Information Technology Services The College of Saint Rose
Introduction to Access 2007 35
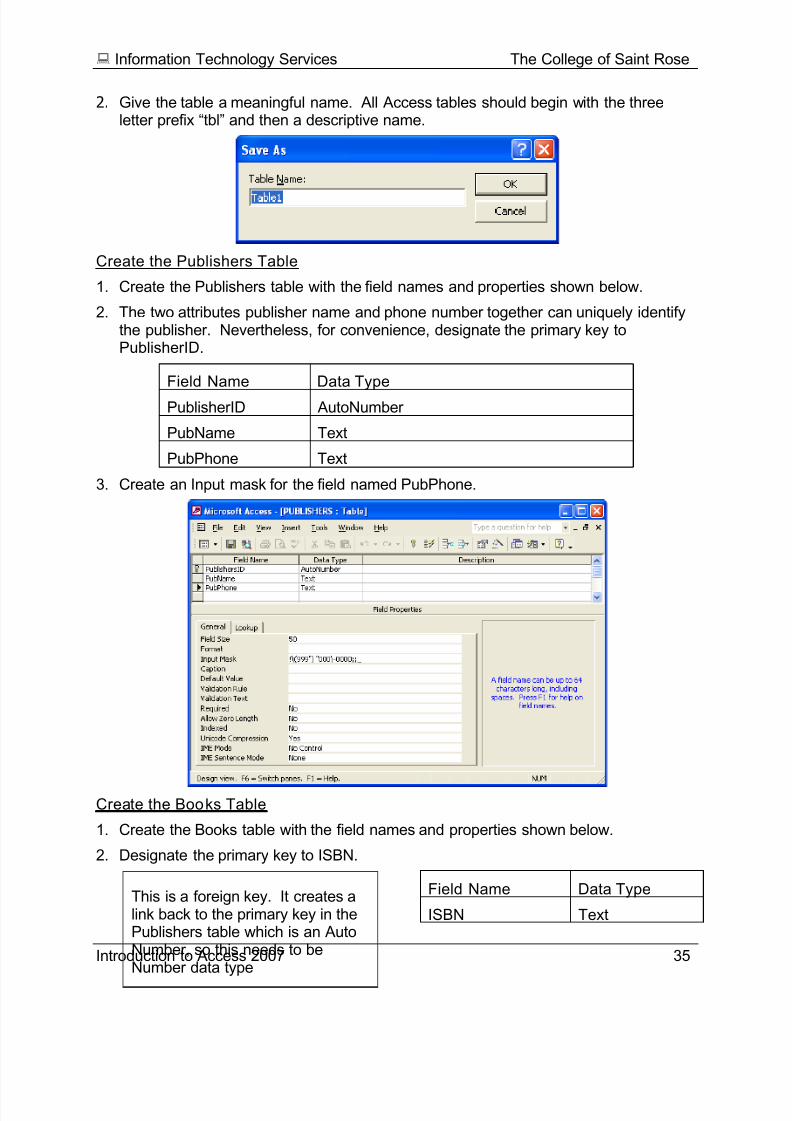
2. Give the table a meaningful name. All Access tables should begin with the threeletter prefix “tbl” and then a descriptive name.
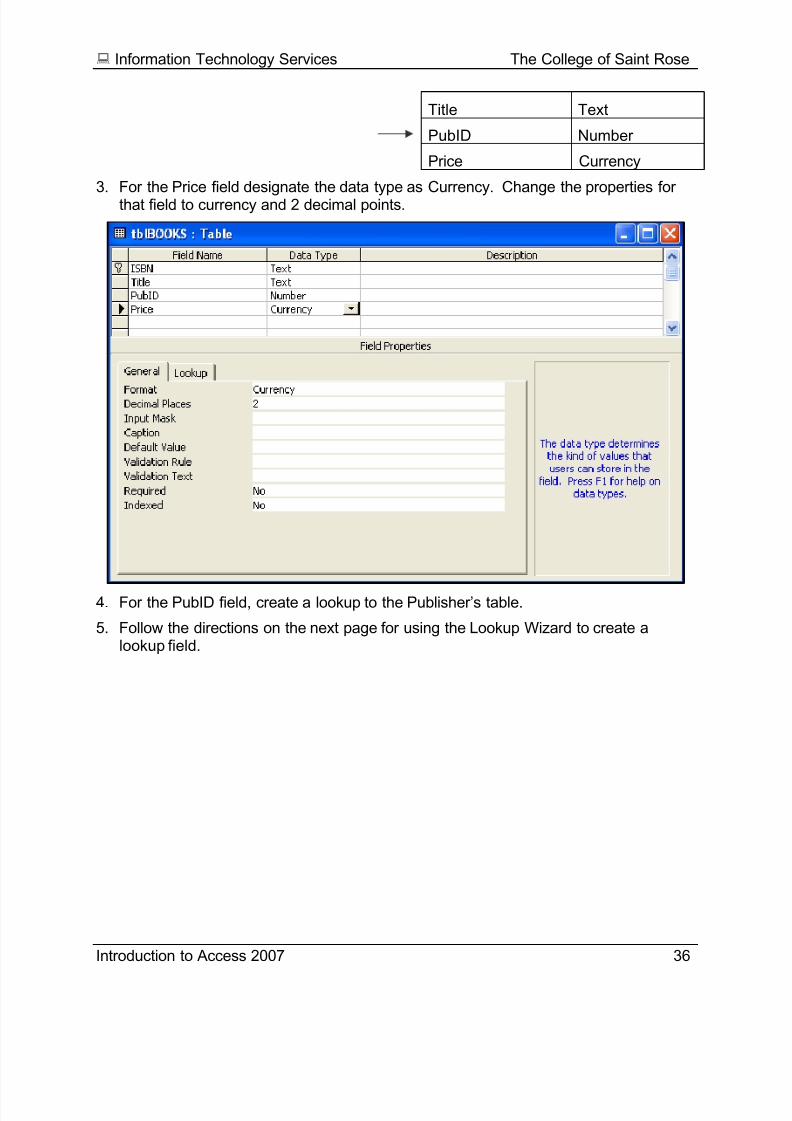
Create the Publishers Table
1. Create the Publishers table with the field names and properties shown below.
2. The two attributes publisher name and phone number together can uniquely identifythe publisher. Nevertheless, for convenience, designate the primary key toPublisherID.
Field Name Data Type
PublisherID AutoNumber
PubName Text
PubPhone Text
3. Create an Input mask for the field named PubPhone.
Create the Books Table
1. Create the Books table with the field names and properties shown below.
2. Designate the primary key to ISBN.
Field Name Data Type
ISBN Text
This is a foreign key. It creates alink back to the primary key in thePublishers table which is an AutoNumber, so this needs to beNumber data type
8/10/2019 Introduction Access 2007
http://slidepdf.com/reader/full/introduction-access-2007 39/62
Information Technology Services The College of Saint Rose
Introduction to Access 2007 36
Title Text
PubID Number
Price Currency
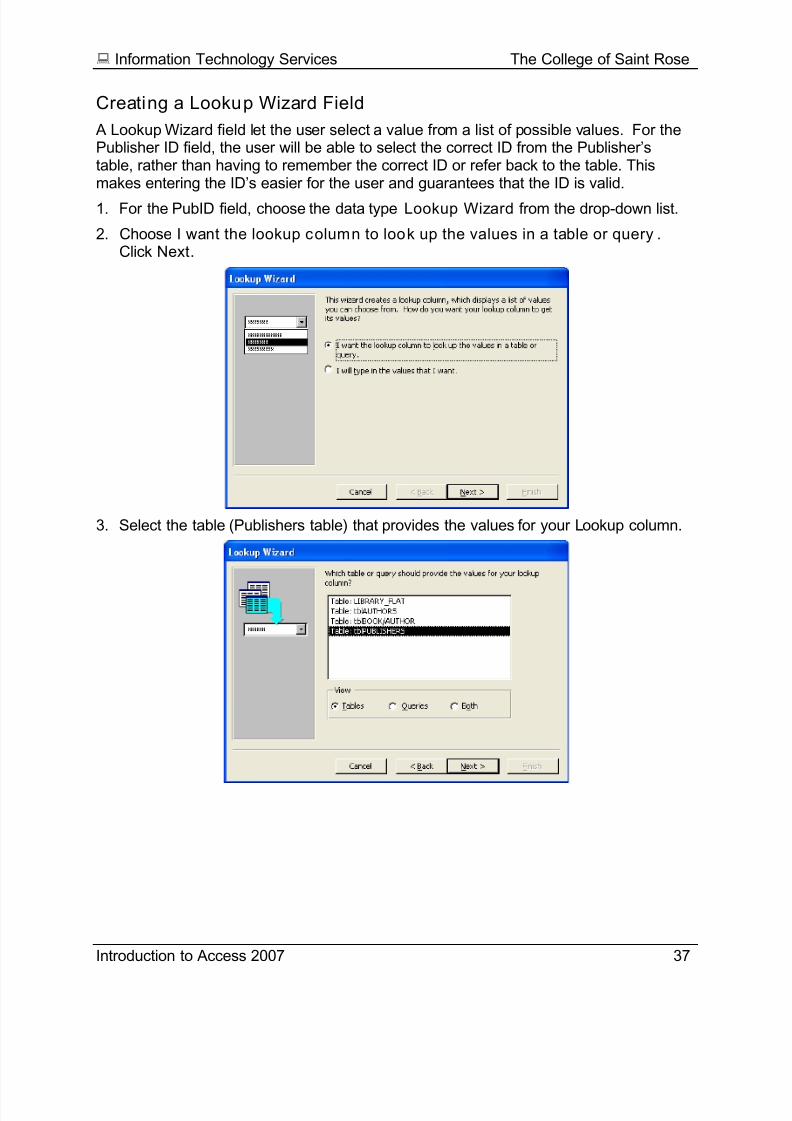
3. For the Price field designate the data type as Currency. Change the properties forthat field to currency and 2 decimal points.
4. For the PubID field, create a lookup to the Publisher’s table.
5. Follow the directions on the next page for using the Lookup Wizard to create alookup field.
8/10/2019 Introduction Access 2007
http://slidepdf.com/reader/full/introduction-access-2007 40/62
Information Technology Services The College of Saint Rose
Introduction to Access 2007 37
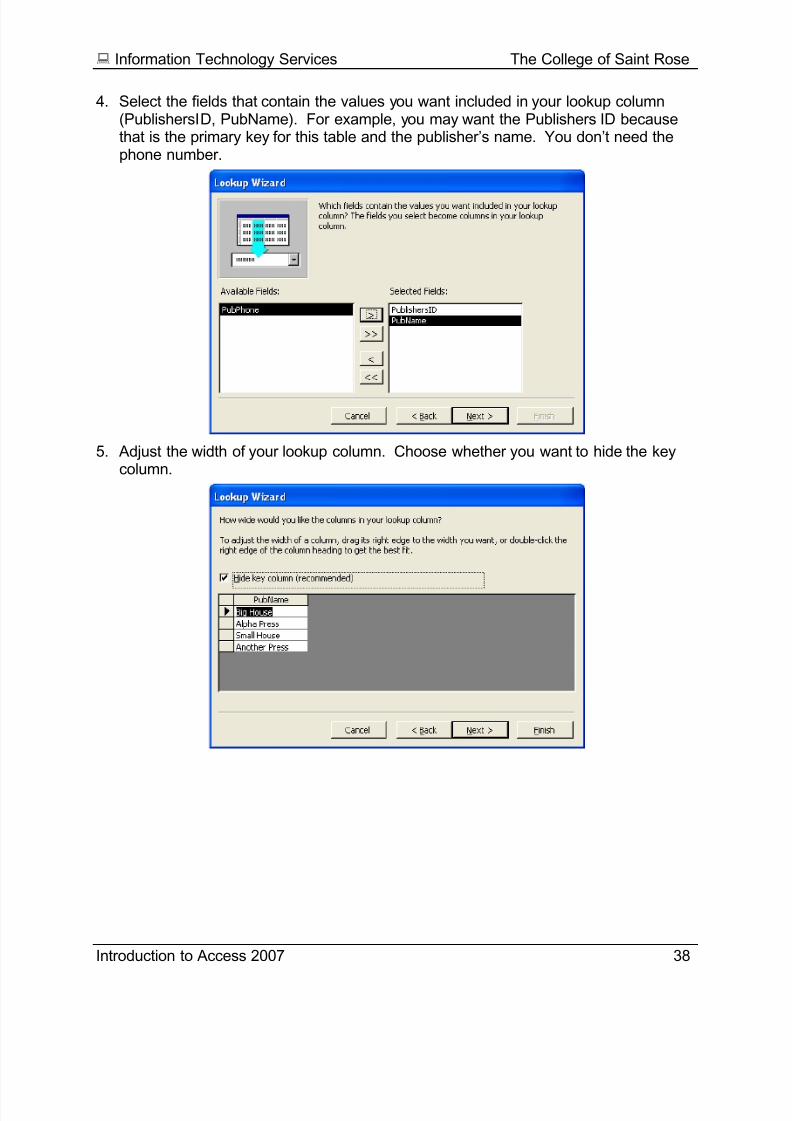
Creating a Lookup Wizard Field
A Lookup Wizard field let the user select a value from a list of possible values. For thePublisher ID field, the user will be able to select the correct ID from the Publisher’stable, rather than having to remember the correct ID or refer back to the table. Thismakes entering the ID’s easier for the user and guarantees that the ID is valid.
1. For the PubID field, choose the data type Lookup Wizard from the drop-down list.
2. Choose I want the lookup column to look up the values in a table or query.Click Next.
3. Select the table (Publishers table) that provides the values for your Lookup column.
8/10/2019 Introduction Access 2007
http://slidepdf.com/reader/full/introduction-access-2007 41/62
Information Technology Services The College of Saint Rose
Introduction to Access 2007 38
4. Select the fields that contain the values you want included in your lookup column(PublishersID, PubName). For example, you may want the Publishers ID becausethat is the primary key for this table and the publisher’s name. You don’t need thephone number.
5. Adjust the width of your lookup column. Choose whether you want to hide the keycolumn.
8/10/2019 Introduction Access 2007
http://slidepdf.com/reader/full/introduction-access-2007 42/62
Information Technology Services The College of Saint Rose
Introduction to Access 2007 39
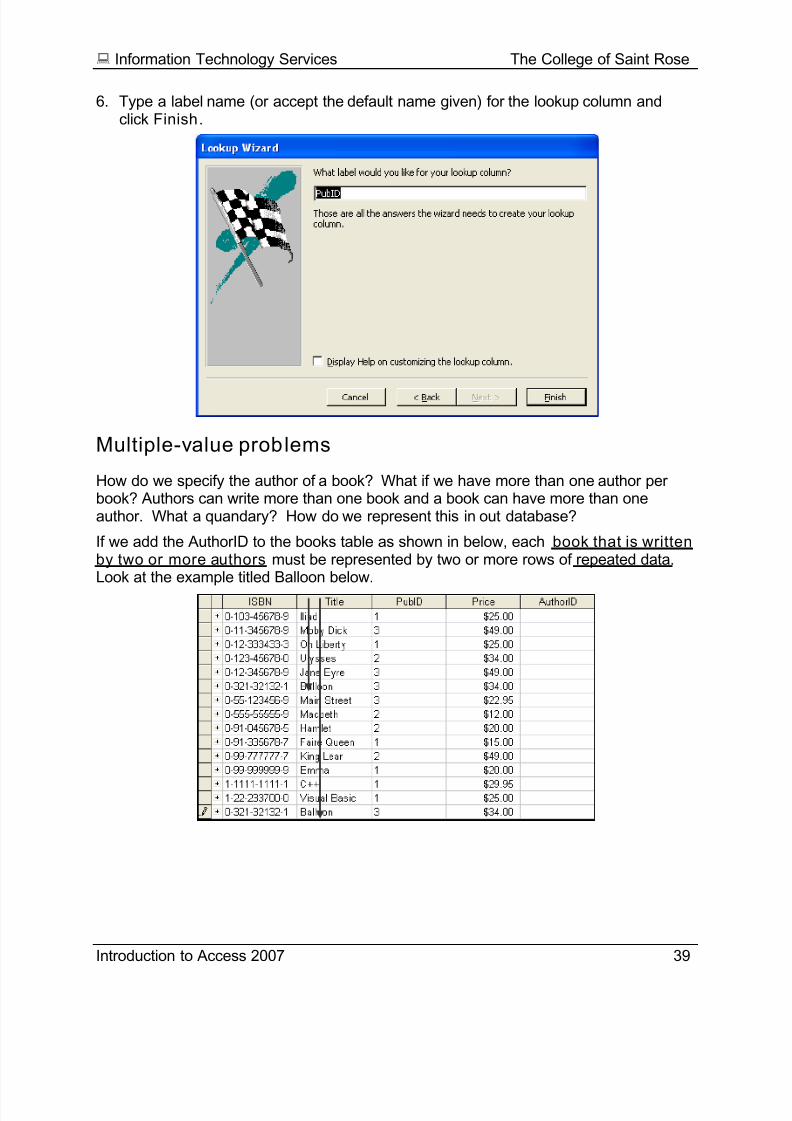
6. Type a label name (or accept the default name given) for the lookup column andclick Finish.
Multiple-value problems
How do we specify the author of a book? What if we have more than one author perbook? Authors can write more than one book and a book can have more than oneauthor. What a quandary? How do we represent this in out database?
If we add the AuthorID to the books table as shown in below, each book that is writtenby two or more authors must be represented by two or more rows of repeated data.Look at the example titled Balloon below.
8/10/2019 Introduction Access 2007
http://slidepdf.com/reader/full/introduction-access-2007 43/62
Information Technology Services The College of Saint Rose
Introduction to Access 2007 40
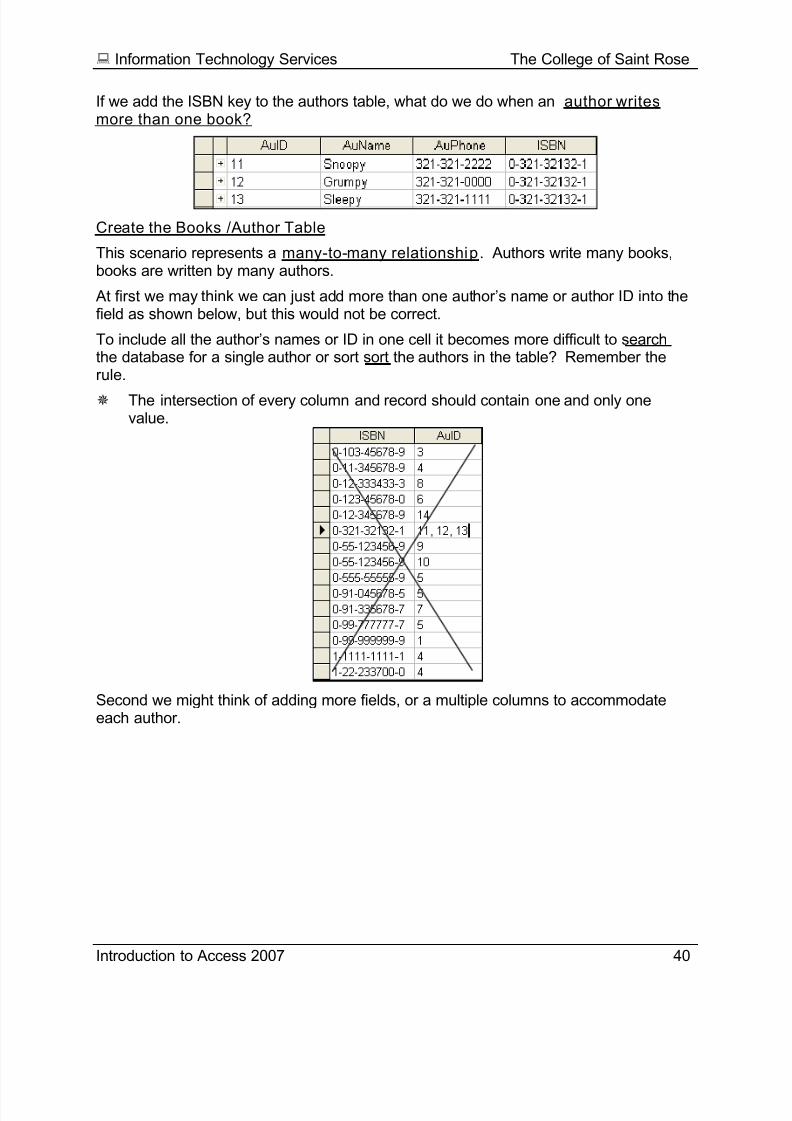
If we add the ISBN key to the authors table, what do we do when an author writesmore than one book?
Create the Books /Author Table
This scenario represents a many-to-many relationship. Authors write many books,books are written by many authors.
At first we may think we can just add more than one author’s name or author ID into thefield as shown below, but this would not be correct.
To include all the author’s names or ID in one cell it becomes more difficult to searchthe database for a single author or sort sort the authors in the table? Remember therule.
The intersection of every column and record should contain one and only onevalue.
Second we might think of adding more fields, or a multiple columns to accommodateeach author.
8/10/2019 Introduction Access 2007
http://slidepdf.com/reader/full/introduction-access-2007 44/62
Information Technology Services The College of Saint Rose
Introduction to Access 2007 41
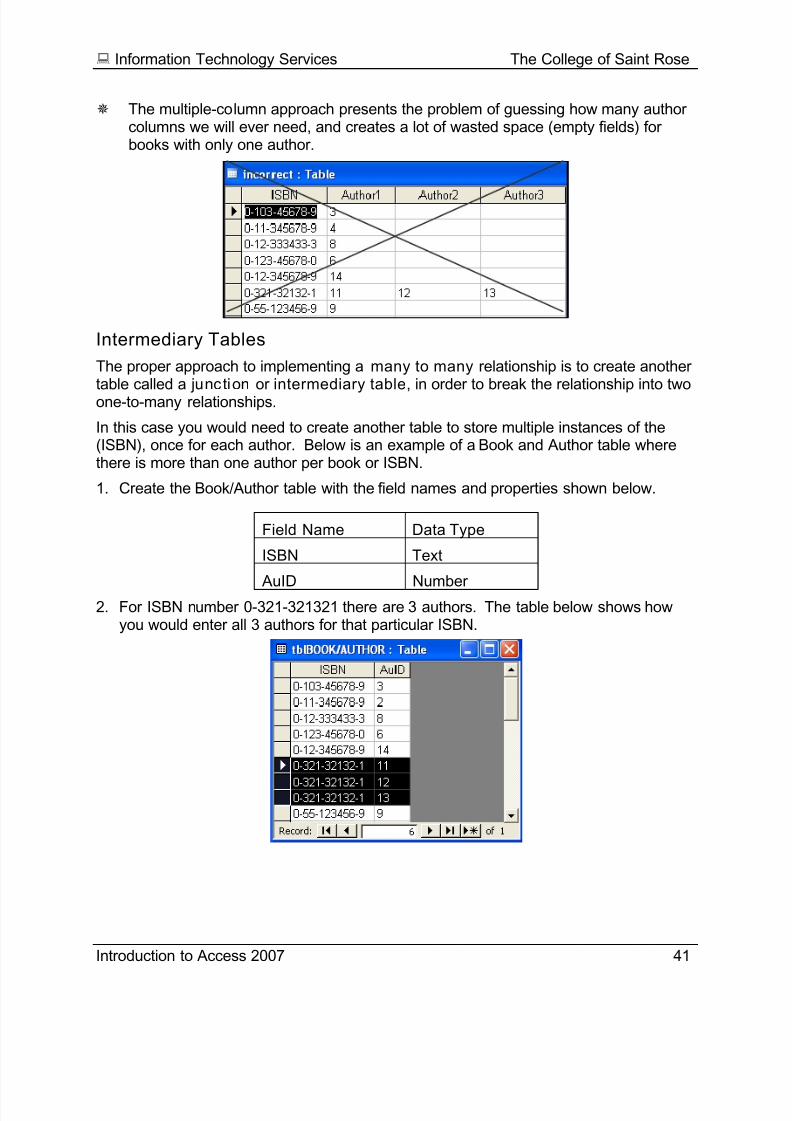
The multiple-column approach presents the problem of guessing how many authorcolumns we will ever need, and creates a lot of wasted space (empty fields) forbooks with only one author.
Intermediary Tables
The proper approach to implementing a many to many relationship is to create anothertable called a junction or intermediary table, in order to break the relationship into twoone-to-many relationships.
In this case you would need to create another table to store multiple instances of the(ISBN), once for each author. Below is an example of a Book and Author table wherethere is more than one author per book or ISBN.
1. Create the Book/Author table with the field names and properties shown below.
Field Name Data Type
ISBN Text
AuID Number2. For ISBN number 0-321-321321 there are 3 authors. The table below shows how
you would enter all 3 authors for that particular ISBN.

8/10/2019 Introduction Access 2007
http://slidepdf.com/reader/full/introduction-access-2007 45/62
Information Technology Services The College of Saint Rose
Introduction to Access 2007 42
Types of Relationships
One-to-One Relationship
This type of relationship is very rare. If you find you have a one-to-one relationship, youshould reevaluate the database design. The tables can most likely be combined into
one table.
One-to-Many relationship
A record in Table A has one or more related records in Table B.
• For example a customer places many orders.
• An publisher publishes many books
Many-to-Many relationship
A record in Table A has one or more matching records in Table B, and a record in TableB can be related to more than one record in Table A.
Example: A many-to-many relationship is possible between an author’s table and abooks table. Each author could have several books and each book couldhave several authors.
A many-to-many relationship is often a symptom that the two tables are not directlyrelated, but instead are related through some additional table.
8/10/2019 Introduction Access 2007
http://slidepdf.com/reader/full/introduction-access-2007 46/62
Information Technology Services The College of Saint Rose
Introduction to Access 2007 43
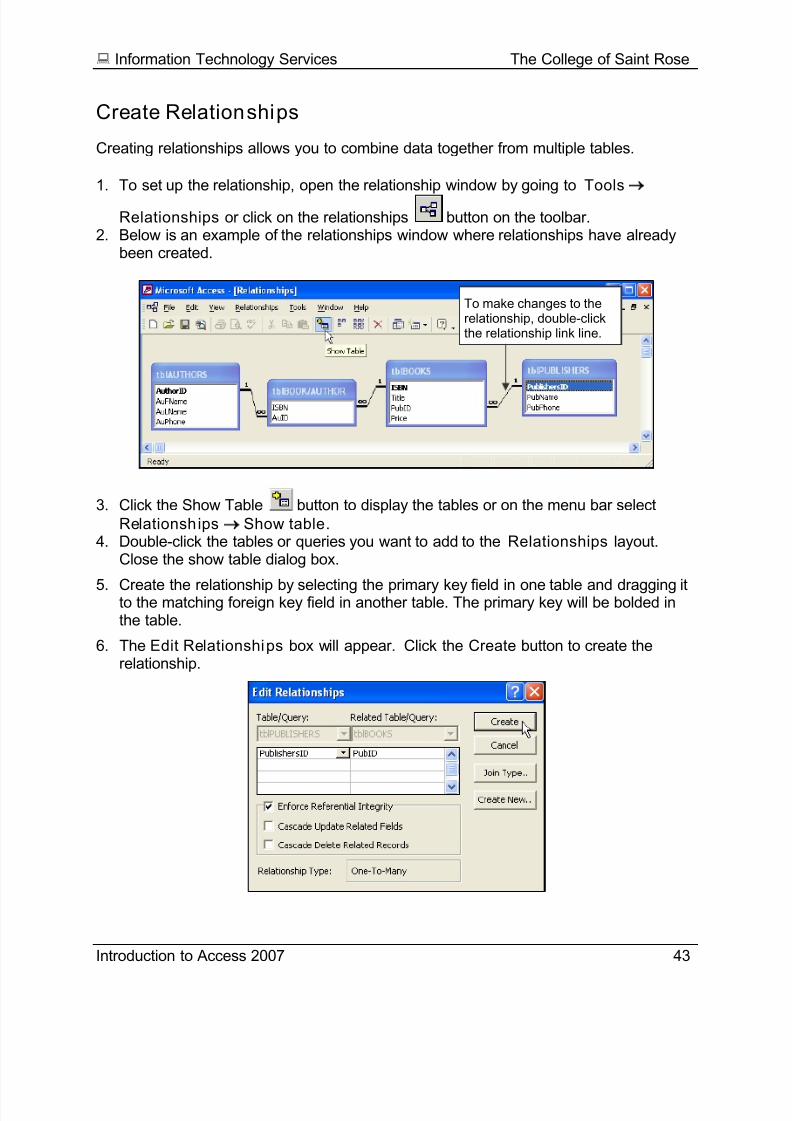
Create Relationships
Creating relationships allows you to combine data together from multiple tables.
1. To set up the relationship, open the relationship window by going to Tools
Relationships or click on the relationships button on the toolbar.2. Below is an example of the relationships window where relationships have already
been created.
3. Click the Show Table button to display the tables or on the menu bar select
Relationships Show table.4. Double-click the tables or queries you want to add to the Relationships layout.
Close the show table dialog box.
5. Create the relationship by selecting the primary key field in one table and dragging itto the matching foreign key field in another table. The primary key will be bolded inthe table.
6. The Edit Relationships box will appear. Click the Create button to create therelationship.
To make changes to therelationship, double-clickthe relationship link line.
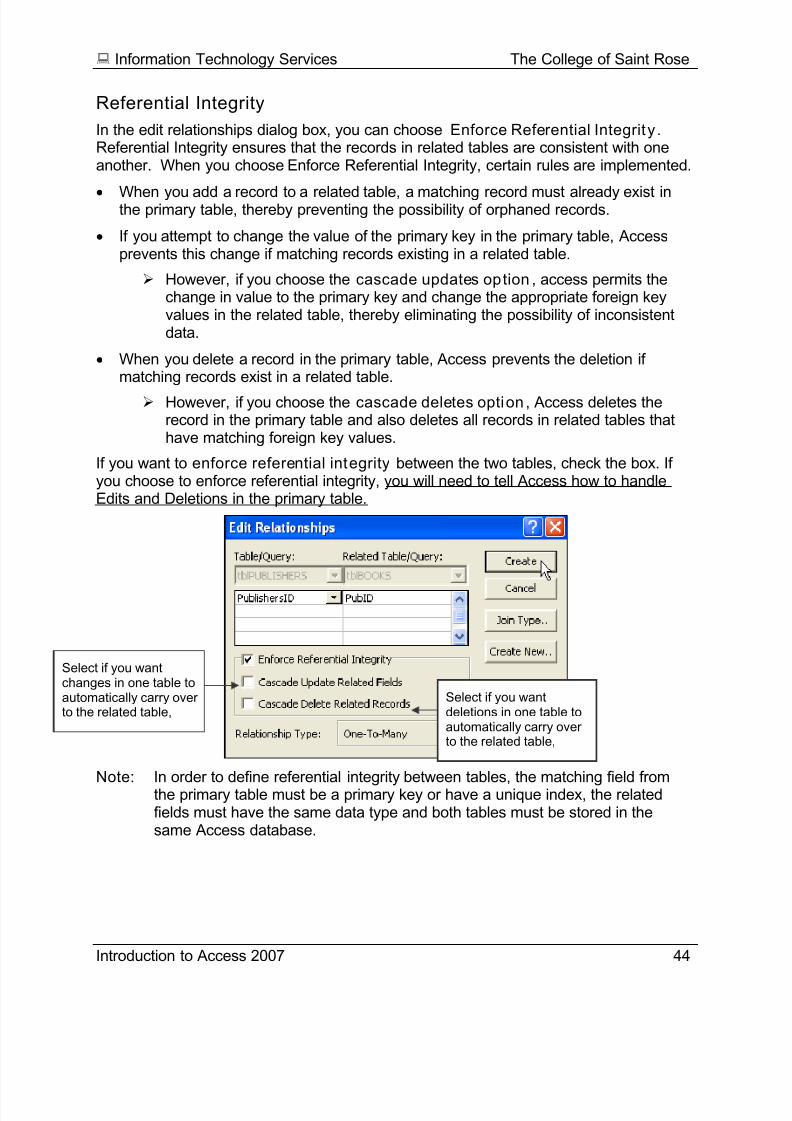
8/10/2019 Introduction Access 2007
http://slidepdf.com/reader/full/introduction-access-2007 47/62
8/10/2019 Introduction Access 2007
http://slidepdf.com/reader/full/introduction-access-2007 48/62
Information Technology Services The College of Saint Rose
Introduction to Access 2007 45
Modify Table
Changing a Field Name
To change a field name, go to design view and type in a new name.But, before you do this check to see if that field is referenced in any
calculations, expressions or validation rules. If so, you will have tochange the field name in every reference.
As an alternative, you can leave the field name as is but enter thename you wish to use in the Caption property. Captions display in thestatus bar when the field is activated on forms and reports.
Changing a Field’s Properties
You can change the properties of a field at the bottom of the DesignView form. If the modification affects the data already entered into thedatabase, Access will display a message to that effect.
Adding a Field
To add a new field to the table, select the row where you want the new field to appear,and do one of the following:
Select Insert, Field from the menu bar.
Press the Insert key on the keyboard.
Click the Insert Field button on the toolbar.
Deleting a Field
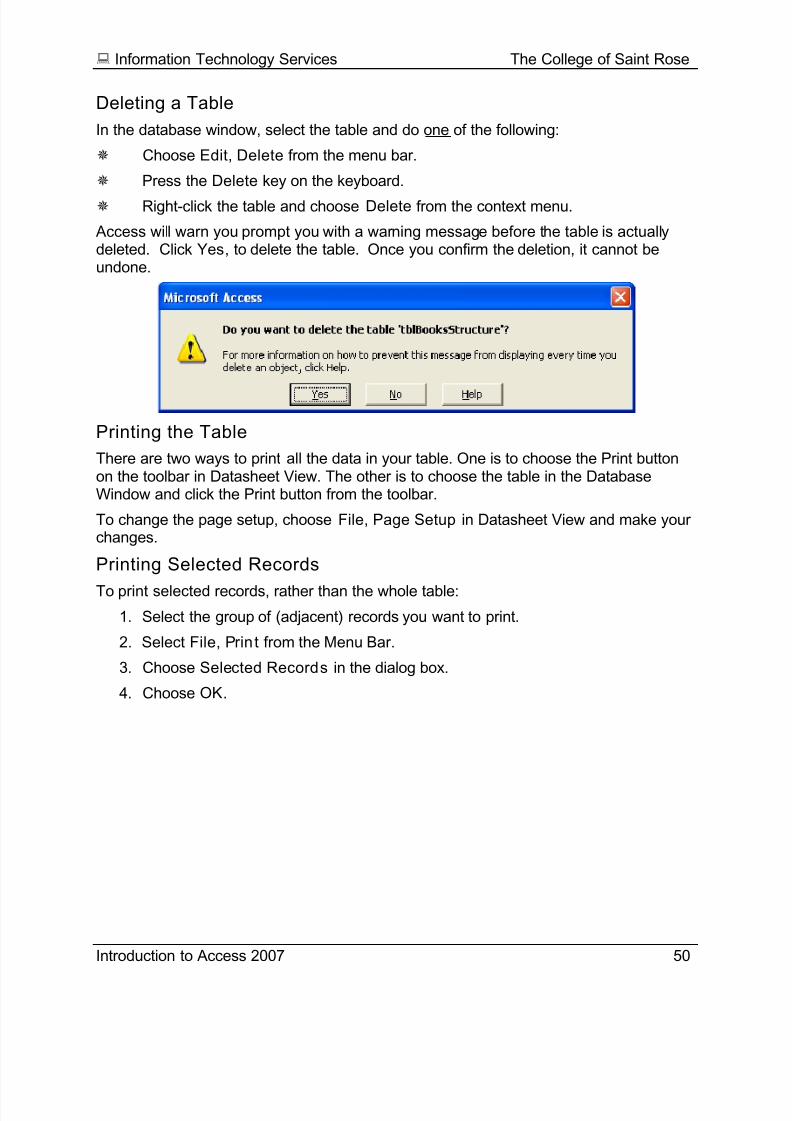
To delete, select the row and do one of the following: Select Edit, Delete or Edit, Delete Row from the menu bar. Choose Yes on the
dialog box to permanently delete the field.
Press the Delete key on the keyboard.
Click the Delete Field button on the toolbar.

8/10/2019 Introduction Access 2007
http://slidepdf.com/reader/full/introduction-access-2007 49/62
Information Technology Services The College of Saint Rose
Introduction to Access 2007 46
Moving a Field
You can move fields in both Datasheet and Design views.
To move a field in Design View:
1. Click in the selector bar at the field you wish to move.
2. Point at the selected field. A white arrow appears.
3. Hold the mouse button down and drag the field to its new location.
4. Release the mouse.
Note: You can undo this move immediately after it is performed by going to the Edit menu and selecting Undo.
To move a field in Datasheet View:
1. Point to the field name of the column you wish to move. A black down arrowappears.
2. Click once to select the column and release the mouse.
3. Hold the mouse button down and drag the column to its new location.
4. Release the mouse.
This change only appears in Datasheet View. If you choose to save the changes uponclosing the table, the change will appear in Design View as well.
8/10/2019 Introduction Access 2007
http://slidepdf.com/reader/full/introduction-access-2007 50/62
Information Technology Services The College of Saint Rose
Introduction to Access 2007 47
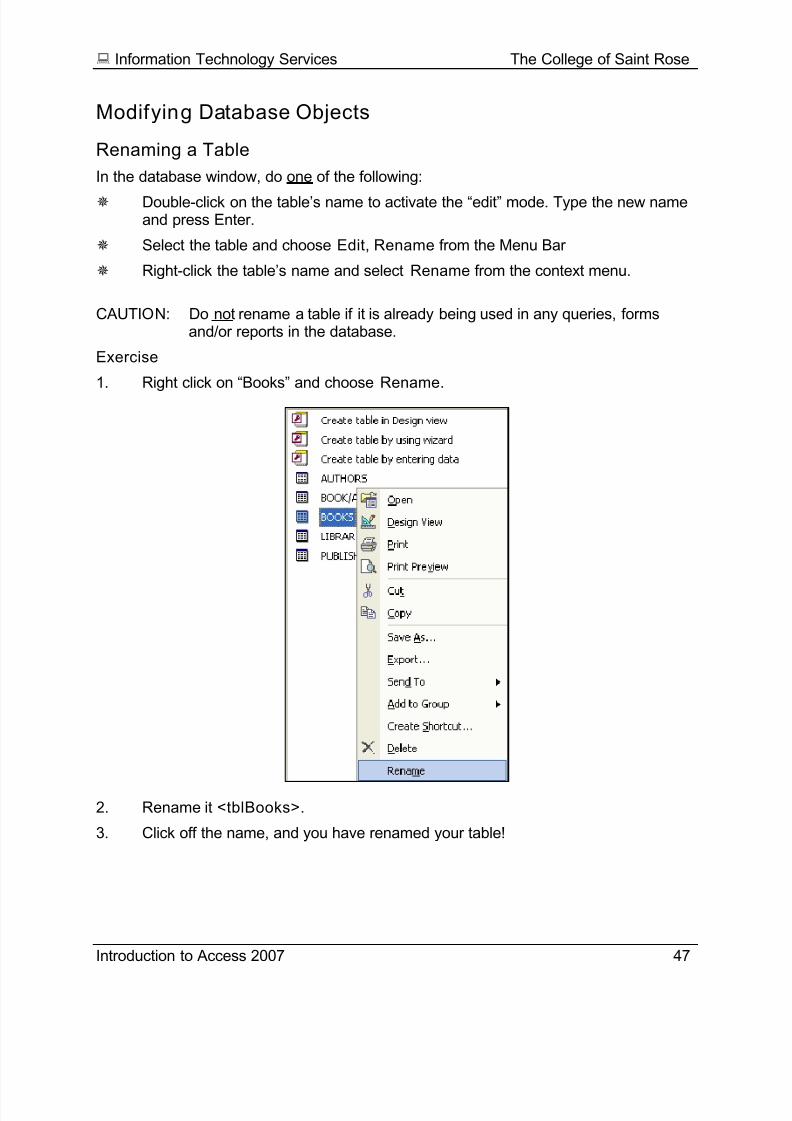
Modifying Database Objects
Renaming a Table
In the database window, do one of the following:
Double-click on the table’s name to activate the “edit” mode. Type the new nameand press Enter.
Select the table and choose Edit, Rename from the Menu Bar
Right-click the table’s name and select Rename from the context menu.
CAUTION: Do not rename a table if it is already being used in any queries, formsand/or reports in the database.
Exercise
1. Right click on “Books” and choose Rename.
2. Rename it <tblBooks>.
3. Click off the name, and you have renamed your table!
8/10/2019 Introduction Access 2007
http://slidepdf.com/reader/full/introduction-access-2007 51/62
Information Technology Services The College of Saint Rose
Introduction to Access 2007 48
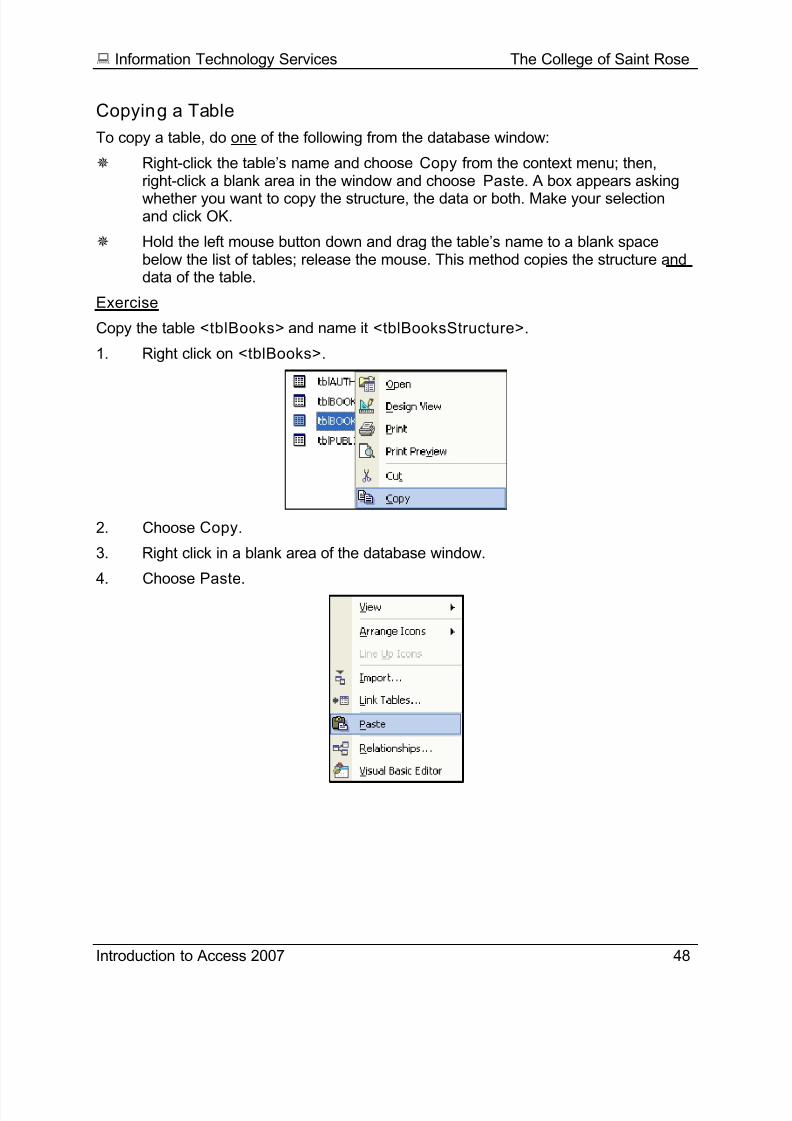
Copying a Table
To copy a table, do one of the following from the database window:
Right-click the table’s name and choose Copy from the context menu; then,right-click a blank area in the window and choose Paste. A box appears asking
whether you want to copy the structure, the data or both. Make your selectionand click OK.
Hold the left mouse button down and drag the table’s name to a blank spacebelow the list of tables; release the mouse. This method copies the structure anddata of the table.
Exercise
Copy the table <tblBooks> and name it <tblBooksStructure>.
1. Right click on <tblBooks>.
2. Choose Copy.
3. Right click in a blank area of the database window.
4. Choose Paste.
8/10/2019 Introduction Access 2007
http://slidepdf.com/reader/full/introduction-access-2007 52/62
Information Technology Services The College of Saint Rose
Introduction to Access 2007 49
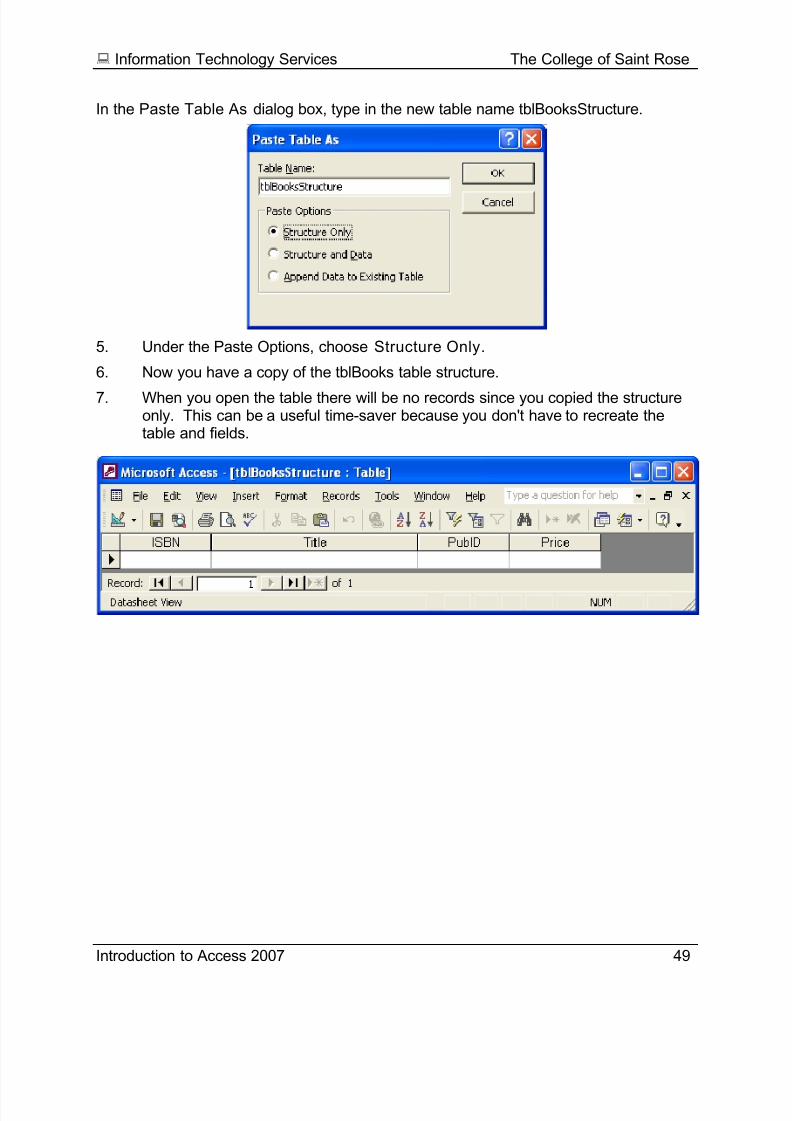
In the Paste Table As dialog box, type in the new table name tblBooksStructure.
5. Under the Paste Options, choose Structure Only.
6. Now you have a copy of the tblBooks table structure.
7. When you open the table there will be no records since you copied the structureonly. This can be a useful time-saver because you don't have to recreate thetable and fields.
8/10/2019 Introduction Access 2007
http://slidepdf.com/reader/full/introduction-access-2007 53/62
8/10/2019 Introduction Access 2007
http://slidepdf.com/reader/full/introduction-access-2007 54/62
Information Technology Services The College of Saint Rose
Introduction to Access 2007 51
Queries
What is a Query?
A query is a question that you ask about data. Queries help you to obtain specific
information about the data. A Query takes information from the selected tables anddisplays a subset of data that meets your criteria. Learning how to create queries is thekey to unlocking the data in your database!!
The result of the query is temporary or dynamic; hence the results are called adynaset. The dynaset looks and acts like a table; it is a “live” view of one or moretables. WARNING: If you make changes to the data in the query, the data in thetable will also change!!
A query can be based on data from one or more tables. Queries usually connecttwo or more tables through a relationship between a common field that exists inboth tables, such as a key field (a field unique to each table).
Queries allow you to perform calculations on the data; to create data sources forforms, reports, charts and other queries; to make changes to tables and createnew tables.
Select Query - This is the most common type of query; it selects information fromone or more tables and returns only the records that meet the criteria.
8/10/2019 Introduction Access 2007
http://slidepdf.com/reader/full/introduction-access-2007 55/62
Information Technology Services The College of Saint Rose
Introduction to Access 2007 52
The Simple Query Wizard
This wizard will help you build the background of the query. It assists with the selectionof the tables and fields to be included. You can also create simple calculations. If youwant to create a more complicated query, you will need to work in the query design
window directly.
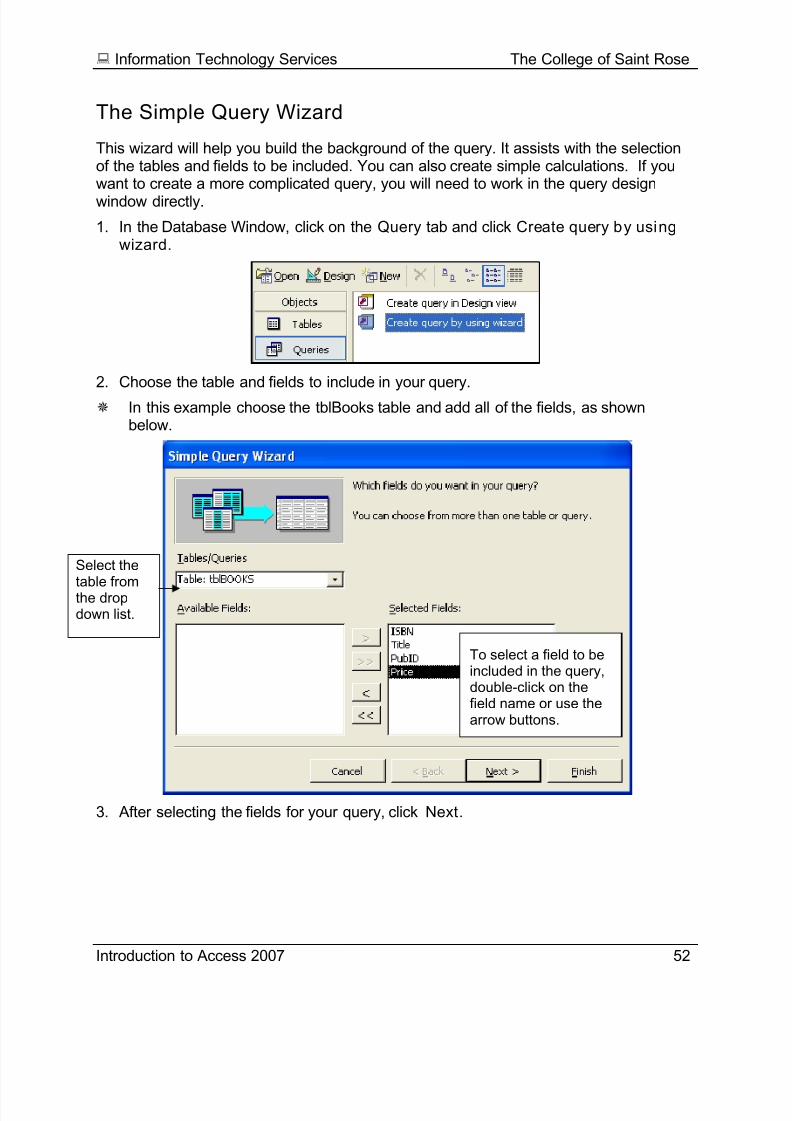
1. In the Database Window, click on the Query tab and click Create query by usingwizard.
2. Choose the table and fields to include in your query.
In this example choose the tblBooks table and add all of the fields, as shownbelow.
3. After selecting the fields for your query, click Next.
Select the
table fromthe dropdown list.
To select a field to beincluded in the query,double-click on thefield name or use thearrow buttons.
8/10/2019 Introduction Access 2007
http://slidepdf.com/reader/full/introduction-access-2007 56/62
Information Technology Services The College of Saint Rose
Introduction to Access 2007 53
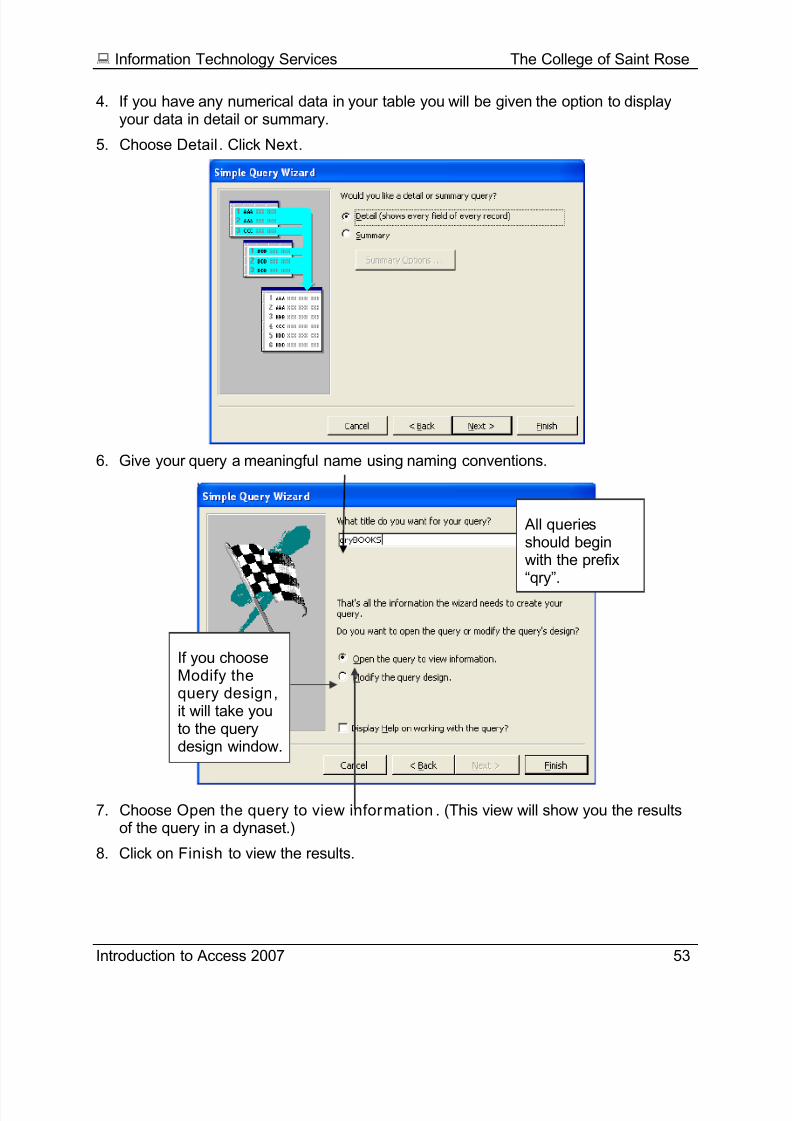
4. If you have any numerical data in your table you will be given the option to displayyour data in detail or summary.
5. Choose Detail. Click Next.
6. Give your query a meaningful name using naming conventions.
7. Choose Open the query to view information. (This view will show you the resultsof the query in a dynaset.)
8. Click on Finish to view the results.
If you chooseModify thequery design,it will take youto the querydesign window.
All queriesshould beginwith the prefix“qry”.
8/10/2019 Introduction Access 2007
http://slidepdf.com/reader/full/introduction-access-2007 57/62
Information Technology Services The College of Saint Rose
Introduction to Access 2007 54
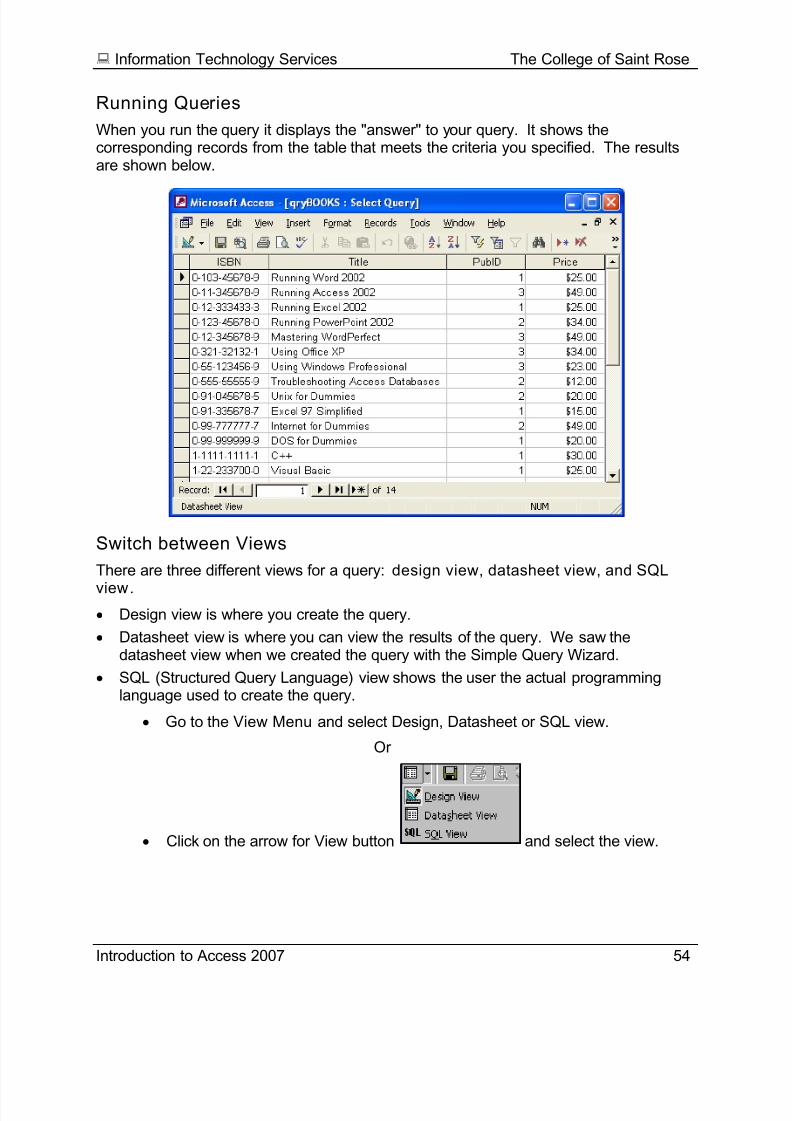
Running Queries
When you run the query it displays the "answer" to your query. It shows thecorresponding records from the table that meets the criteria you specified. The resultsare shown below.
Switch between Views
There are three different views for a query: design view, datasheet view, and SQL
view .
• Design view is where you create the query.
• Datasheet view is where you can view the results of the query. We saw thedatasheet view when we created the query with the Simple Query Wizard.
• SQL (Structured Query Language) view shows the user the actual programminglanguage used to create the query.
• Go to the View Menu and select Design, Datasheet or SQL view.
Or
• Click on the arrow for View button and select the view.
8/10/2019 Introduction Access 2007
http://slidepdf.com/reader/full/introduction-access-2007 58/62
Information Technology Services The College of Saint Rose
Introduction to Access 2007 55
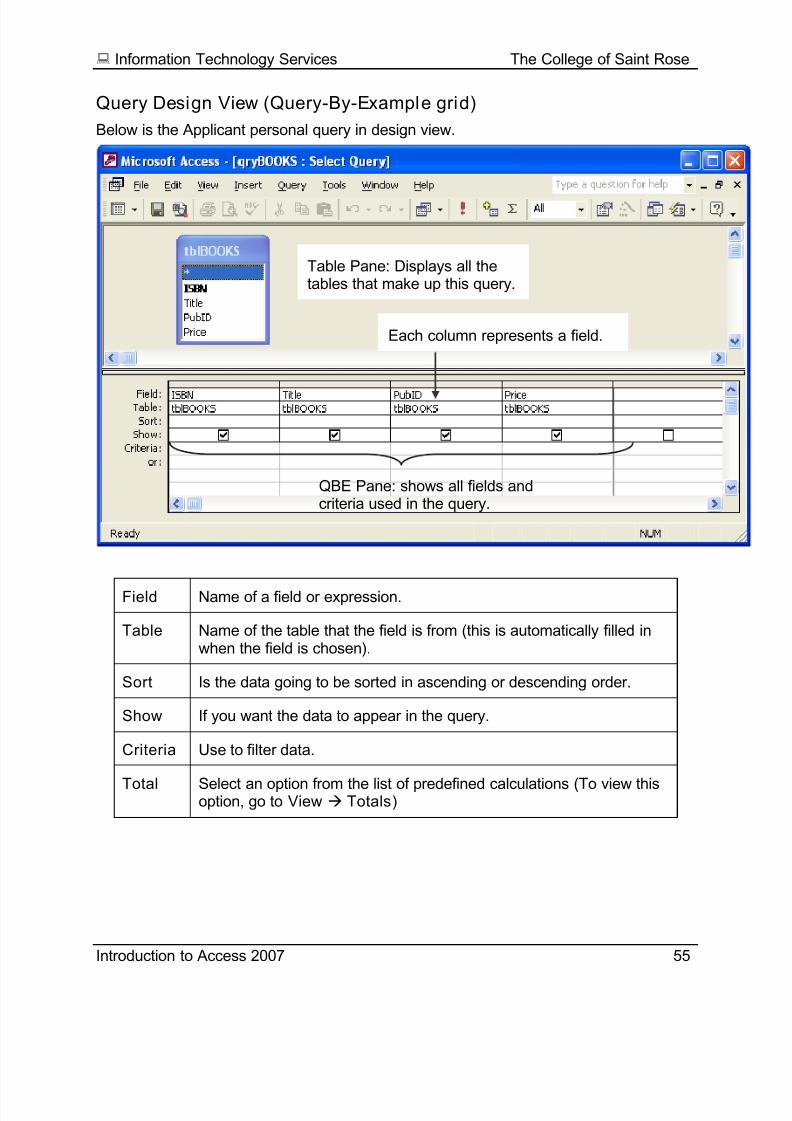
Query Design View (Query-By-Example grid)
Below is the Applicant personal query in design view.
Field Name of a field or expression.
Table Name of the table that the field is from (this is automatically filled inwhen the field is chosen).
Sort Is the data going to be sorted in ascending or descending order.
Show If you want the data to appear in the query.
Criteria Use to filter data.
Total Select an option from the list of predefined calculations (To view thisoption, go to View Totals)
QBE Pane: shows all fields andcriteria used in the query.
Each column represents a field.
Table Pane: Displays all thetables that make up this query.
8/10/2019 Introduction Access 2007
http://slidepdf.com/reader/full/introduction-access-2007 59/62
Information Technology Services The College of Saint Rose
Introduction to Access 2007 56
Creating a Query in Design View
The simple query wizard took care of the simple steps in the design of the query for you.If you want to get into the thick of designing a query, you need to go into the querydesign view.
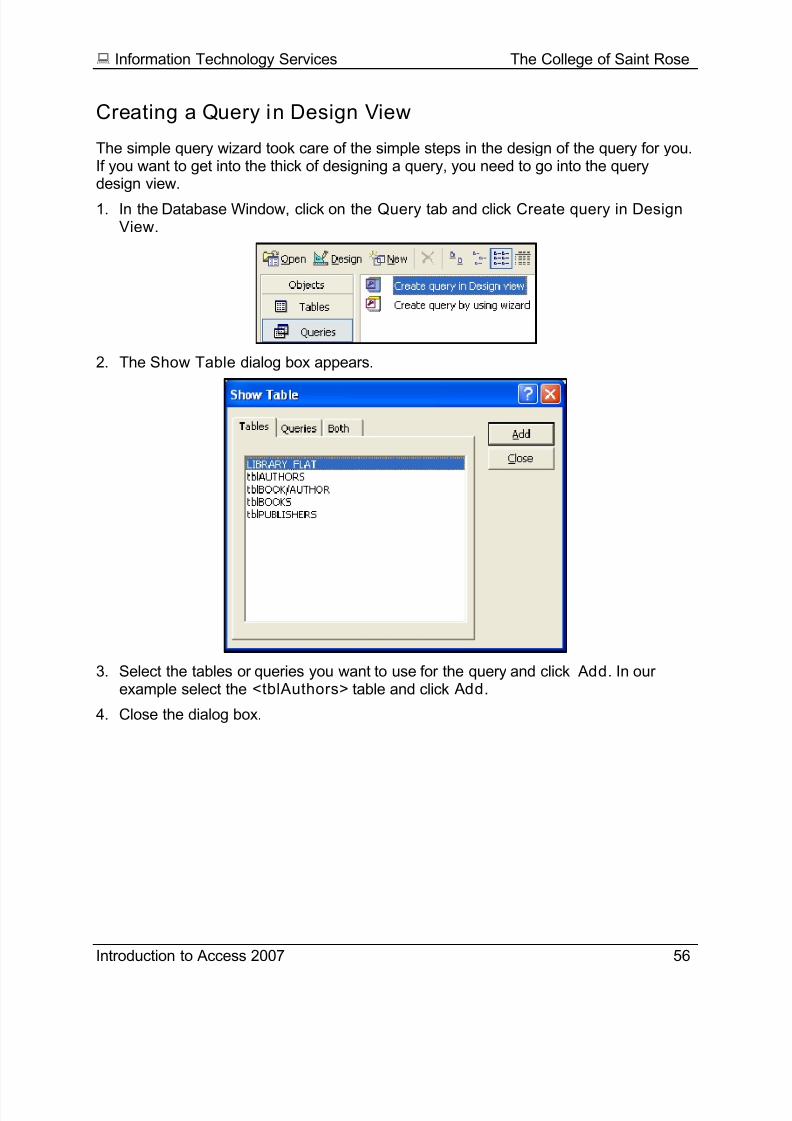
1. In the Database Window, click on the Query tab and click Create query in DesignView.
2. The Show Table dialog box appears.
3. Select the tables or queries you want to use for the query and click Add. In ourexample select the <tblAuthors> table and click Add.
4. Close the dialog box.
8/10/2019 Introduction Access 2007
http://slidepdf.com/reader/full/introduction-access-2007 60/62
Information Technology Services The College of Saint Rose
Introduction to Access 2007 57
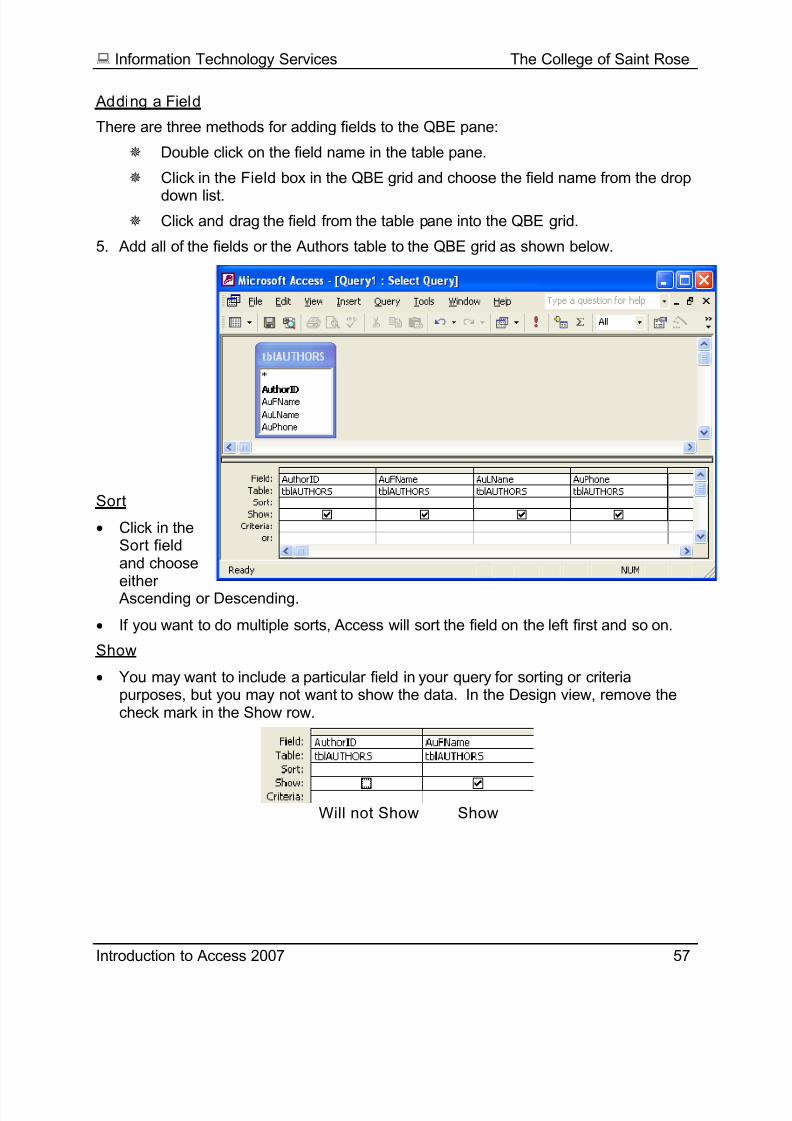
Adding a Field
There are three methods for adding fields to the QBE pane:
Double click on the field name in the table pane.
Click in the Field box in the QBE grid and choose the field name from the drop
down list.
Click and drag the field from the table pane into the QBE grid.
5. Add all of the fields or the Authors table to the QBE grid as shown below.
Sort
• Click in theSort fieldand choose
either Ascending or Descending.
• If you want to do multiple sorts, Access will sort the field on the left first and so on.
Show
• You may want to include a particular field in your query for sorting or criteriapurposes, but you may not want to show the data. In the Design view, remove thecheck mark in the Show row.
ShowWill not Show
8/10/2019 Introduction Access 2007
http://slidepdf.com/reader/full/introduction-access-2007 61/62
Information Technology Services The College of Saint Rose
Introduction to Access 2007 58
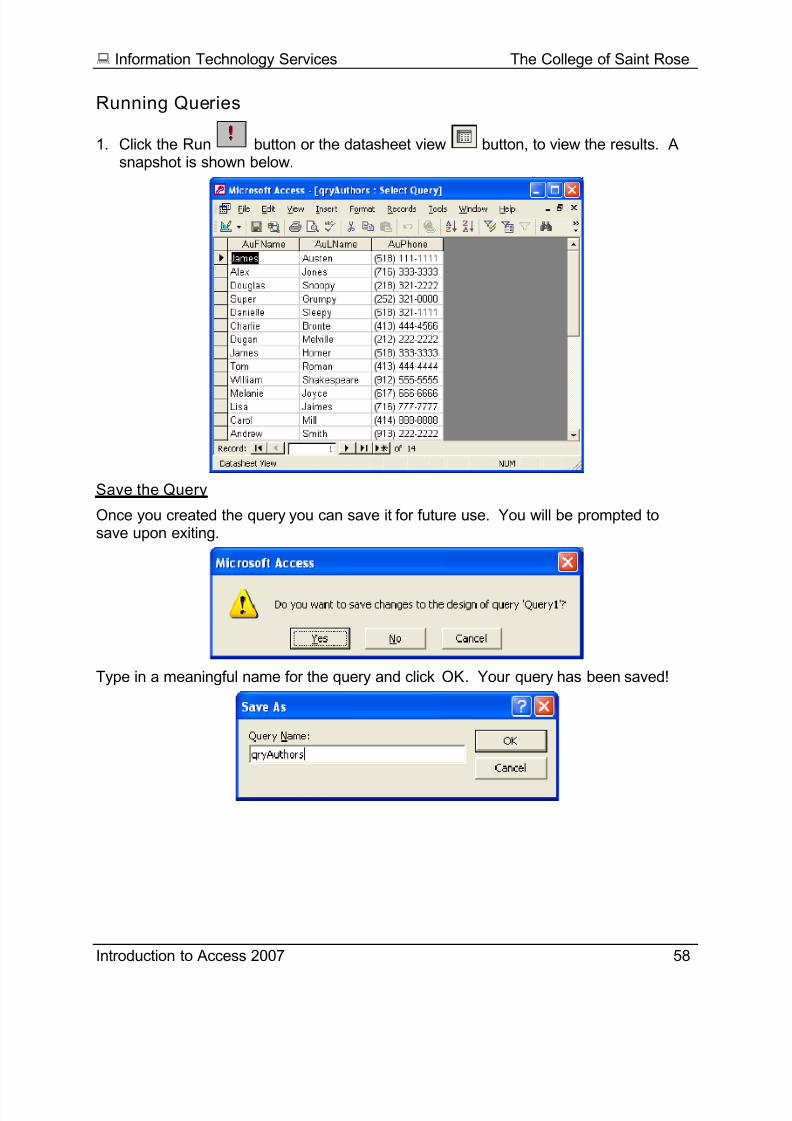
Running Queries
1. Click the Run button or the datasheet view button, to view the results. Asnapshot is shown below.
Save the Query
Once you created the query you can save it for future use. You will be prompted tosave upon exiting.
Type in a meaningful name for the query and click OK. Your query has been saved!

8/10/2019 Introduction Access 2007
http://slidepdf.com/reader/full/introduction-access-2007 62/62
Information Technology Services The College of Saint Rose
Summary
In this class we covered the concepts of a relational database and summarized the sixsteps to designing a sound relational database. Database design is the most difficultand important part in creating a database. Several relational database concepts were
covered including: data types, primary and foreign keys, and relationships betweentables. You should have a basic look and feel of Access as we viewed the DatabaseWindow and the different database objects that make up the Database Window. Wedeveloped a table and examined datasheet and design view, fields, data types andprimary keys. Now that you have an idea of what Microsoft Access looks like, in the nextclass you will learn how to create a query to obtain or extract the information you needfrom your database.
Source: Access Database Design & Programming, 3rd Edition January 2002, by SteveRoman, O’Reilly publishing, ISBN 1-56592-626-9.
New Perspectives on Microsoft Access 2002, Aadamski, Joseph andFinnegan, Kathleen.