Embed Size (px)
Citation preview
INTIAL OVERVIEW
AND RESOURCE GUIDE
FOR
WINDOWS VISTA
By
Marcy Wright
February 2007
CONTENTS
EXECUTIVE SUMMARY ....................................................................................................................................... 1
INTRODUCTION.................................................................................................................................................. 1
BACKGROUND ................................................................................................................................................... 2
FEATURES OF VISTA ........................................................................................................................................... 2
WINDOWS VISTA ENTERPRISE ADDITION ........................................................................................................... 3
SECURITY ........................................................................................................................................................... 5
USER ACCOUNT CONTROL.................................................................................................................................5
WINDOWS FIREWALL .......................................................................................................................................5
MALICIOUS AND POTENTIALLY UNWANTED SOFTWARE ............................................................................................6
INTERNET EXPLORER ENHANCEMENTS .................................................................................................................7
NETWORK ACCESS PROTECTION .........................................................................................................................7
ROUTING COMPARTMENTS ...............................................................................................................................8
WIRELESS SINGLE SIGN‐ON...............................................................................................................................8
BROAD SUPPORT FOR WIRELESS SECURITY PROTOCOLS...........................................................................................9
PLATFORM IMPROVEMENTS...............................................................................................................................9
MULTI‐TIERED DATA PROTECTION....................................................................................................................10
RELIABILITY AND PERFORMANCE ......................................................................................................................10
Automatic Recovery .............................................................................................................................11
Built‐in Diagnostics ..............................................................................................................................11
Startup Repair Tool ..............................................................................................................................12
Application Reliability ..........................................................................................................................12
Performance Improvements ................................................................................................................13
ii
DEPLOYMENT ...............................................................................................................................................13
Modularization ....................................................................................................................................14
Windows Imaging ................................................................................................................................14
Nondestructive Imaging.......................................................................................................................15
Unattended Installations .....................................................................................................................16
MANAGEABILITY............................................................................................................................................16
Configuration Management ................................................................................................................16
Group Policy .........................................................................................................................................17
Policy‐based Quality of Service ............................................................................................................17
Eventing, Instrumentation, and Error Reporting..................................................................................17
Automation..........................................................................................................................................18
Supportability.......................................................................................................................................18
PRODUCTIVITY ..............................................................................................................................................19
Usability and End‐User Productivity.....................................................................................................19
AERO ....................................................................................................................................................20
Explorers ..............................................................................................................................................20
Information Visualization.....................................................................................................................20
Search ..................................................................................................................................................21
Start Menu ...........................................................................................................................................21
Sharing.................................................................................................................................................21
Mobility Improvements........................................................................................................................22
IPv6 ......................................................................................................................................................23
WINDOWS VISTA LICENSING .............................................................................................................................23
MULTIPLE ACTIVATION KEY ..............................................................................................................................24
KEY MANGEMENT SERVICE .............................................................................................................................25
iii
VIEWING VOLUME LICENSING INFORMATION ......................................................................................................27
MEDIA CONSIDERTIONS ..................................................................................................................................28
THE FIVE LICENSING STATES .............................................................................................................................29
REDUCED FUNCTINALITY MODE ........................................................................................................................30
Reduced Functionality Mode Scenarios ...............................................................................................31
Remeding Reduced Functinality Mode ................................................................................................31
RESOLVING NON‐GENUINE ISSUES....................................................................................................................32
HARDWARE ......................................................................................................................................................33
WINDOW VISTA HARDWARE ASSESSMENT .........................................................................................................35
LINKS TO MANUFACTURER INFORMATION ABOUT CPU.........................................................................................35
LINKS TO MANUFACTURER INFORMATION ABOUT GRAPHICS PROCESSOR .................................................................36
WINDOWS VISTA HARDWARE COMPATIBILITY LIST...............................................................................................36
WINDOWS VISTA UPGRADE ADVISOR .................................................................................................................37
NETWORKING...................................................................................................................................................45
TCP/IP STACK AND THE WINDOWS FILTERING PLATFORM ....................................................................................45
NETWORKING: KERNEL MODE IP HELPER APIS ...................................................................................................47
NETWORKING: IPV6 ......................................................................................................................................48
NETWORKING: TURNING OFF THE WINDOWS FIREWALL........................................................................................49
WIRELESS ....................................................................................................................................................51
SOFTWARE........................................................................................................................................................51
PROGRAM COMPATIBILITY ASSISTANT (PCA) IN WINDOWS VISTA ..........................................................................51
THIRTY‐MINUTE COMPATIBILITY CHECK.............................................................................................................54
Working with a Clean Installation of Windows Vista...........................................................................54
Working with an Upgrade from Windows XP Service Pack 2...............................................................55
iv
OPERATING SYSTEM VERSIONING .....................................................................................................................56
USER ACCOUNT CONTROL...............................................................................................................................57
COMPATIBILITY RISKS .....................................................................................................................................60
VISTA SOFTWARE COMPATIBILITY LIST ................................................................................................................61
CONCLUSION ....................................................................................................................................................62
RECCOMENDATIONS.........................................................................................................................................63
APPENDIX A ‐ WINDOWS VISTA MIGRATION STEP‐BY‐STEP GUIDE.....................................................................65
WINDOWS VISTA MIGRATION SCENARIOS..........................................................................................................65
REQUIREMENTS FOR INSTALLING WINDOWS VISTA ..............................................................................................65
OVERVIEW OF SCENARIOS ...............................................................................................................................66
UPGRADING TO WINDOWS VISTA .....................................................................................................................66
Avoiding Software Conflicts .................................................................................................................66
Steps for Upgrading to Windows Vista ................................................................................................67
Step 1: Assess Hardware Requirements...............................................................................................67
Step 2: Backup Important Data ...........................................................................................................68
Step 3: Upgrade to Windows Vista ......................................................................................................68
MIGRATING TO WINDOWS VISTA .....................................................................................................................69
Steps for Migrating to Windows Vista .................................................................................................70
Step 1: Migrate User Settings Using the User State Migration Tool....................................................70
Step 2: Migrate User Settings Using Windows Easy Transfer..............................................................71
APPENDIX B ‐ 10 THINGS YOU NEED TO KNOW ABOUT DEPLOYING WINDOWS VISTA........................................78
TOOLS YOU NEED; TOOLS TO FORGET ...............................................................................................................82
v
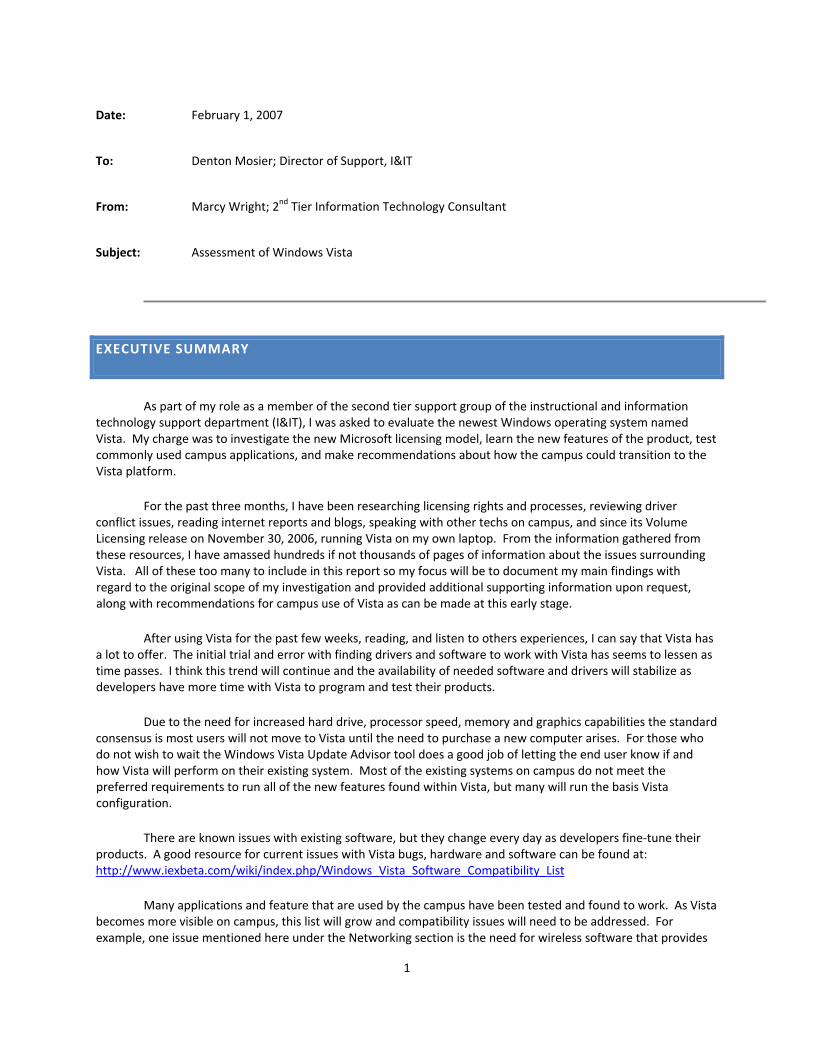
Date: February 1, 2007
To: Denton Mosier; Director of Support, I&IT
From: Marcy Wright; 2nd Tier Information Technology Consultant
Subject: Assessment of Windows Vista
EXECUTIVE SUMMARY
As part of my role as a member of the second tier support group of the instructional and information technology support department (I&IT), I was asked to evaluate the newest Windows operating system named Vista. My charge was to investigate the new Microsoft licensing model, learn the new features of the product, test commonly used campus applications, and make recommendations about how the campus could transition to the Vista platform.
For the past three months, I have been researching licensing rights and processes, reviewing driver conflict issues, reading internet reports and blogs, speaking with other techs on campus, and since its Volume Licensing release on November 30, 2006, running Vista on my own laptop. From the information gathered from these resources, I have amassed hundreds if not thousands of pages of information about the issues surrounding Vista. All of these too many to include in this report so my focus will be to document my main findings with regard to the original scope of my investigation and provided additional supporting information upon request, along with recommendations for campus use of Vista as can be made at this early stage.
After using Vista for the past few weeks, reading, and listen to others experiences, I can say that Vista has a lot to offer. The initial trial and error with finding drivers and software to work with Vista has seems to lessen as time passes. I think this trend will continue and the availability of needed software and drivers will stabilize as developers have more time with Vista to program and test their products.
Due to the need for increased hard drive, processor speed, memory and graphics capabilities the standard consensus is most users will not move to Vista until the need to purchase a new computer arises. For those who do not wish to wait the Windows Vista Update Advisor tool does a good job of letting the end user know if and how Vista will perform on their existing system. Most of the existing systems on campus do not meet the preferred requirements to run all of the new features found within Vista, but many will run the basis Vista configuration.
There are known issues with existing software, but they change every day as developers fine‐tune their products. A good resource for current issues with Vista bugs, hardware and software can be found at: http://www.iexbeta.com/wiki/index.php/Windows_Vista_Software_Compatibility_List
Many applications and feature that are used by the campus have been tested and found to work. As Vista becomes more visible on campus, this list will grow and compatibility issues will need to be addressed. For example, one issue mentioned here under the Networking section is the need for wireless software that provides
1
LEAP authentication for the campus. Users may also struggle with the lack of a built it video decoders in the Enterprise addition. DVD decoders will need to be added to run most DVD’s, K‐Lite Codec Pack is one option that is free and has been tested.
Over all my thoughts about Vista is that it is here now and working. I think it is working better than most expected. We will need to continue to investigate how it runs in our environment and make careful decisions on deployment, support and training as a campus.
As users transitions over to Vista and we see Vista more and more on campus our need for a Vista plan increases. In my view, steps can be taken to help immediately in the support of Vista on campus.
• Share what we know. • This paper can be a start to provide an overview of Vista to the local campus tech community. • eHelp ‐ http://www.csupomona.edu/~ehelp/software/vista.html • Software Compatibility:
This page can be expanded to show many of the software titles already tested on Vista. This link from Carnegie Mellon already includes the software they have tested and is a good example of what might work here. http://www.cmu.edu/computing/msvista/index.html
• Hardware Issues: This page could also list know hardware issues and machine types know to run Vista well.
• Bugs & Fixes: As issues arise, regarding Vista this page could communicated them to the campus and list the fixes when found.
• Find out what we don’t know: • As all of us use Vista, find out what works, and does not work a convenient way to share this
information within the campus would be helpful. This could save time and help in learning the new platform.
• Provide training to campus techs to help mitigate potential support problems. • Provide training to end users through handouts, Breeze tutorials, and in a classroom setting. • Detailed planning at the centralized level to decided what feature of Vista would be helpful to
use and work within our existing systems. • Decide how licensing of Vista is best supported on campus. MAK use is necessary for laptops, but
a KMS server would allow for instant activation and motoring of license use and system resources.
• Discuss wide deployment of Vista in departments and labs before it happens to evaluate the impact on other campus departments.
• Regroup every few months, evaluate the impact Vista has made on the campus, and see if our efforts need to be redirected.
2

INTRODUCTION
As part of my role as a member of the second tier support group of the instructional and information
technology support department (I&IT), I was asked to evaluate the newest Windows operating system named
Vista. My charge was to investigate the new Microsoft licensing model, learn the new features of the product, test
commonly used campus applications, and make recommendations about how the campus could transition to the
Vista platform.
For the past three months, I have been researching licensing rights and processes, reviewing driver
conflict issues, reading internet reports and blogs, speaking with other techs on campus, and since Vista’s Volume
Licensing release on November 30, 2006, running it on my own laptop. From the information gathered from these
resources, I have amassed hundreds if not thousands of pages of information about the issues surrounding Vista.
All of these too many to include in this report so my focus will be to document my main findings with regard to the
original scope of my investigation and provided additional supporting information upon request, along with
recommendations for campus use of Vista as can be made at this early stage. Most of the information included in
this report has been taken from many Microsoft websites, article and guidelines. I have included much of it as
written as to be sure of capturing the exact intent and context. References have been provide along the way to
allow readers to research information in more detail. The intent was only to provide a compressed document that
is easy to refer to and allow many different sources to be condensed into a usable reference.
The computer used in this evaluation was originally a Dell Latitude D610 laptop 1.6GHz computer with
1GB of RAM and then a Dell Latitude D620 laptop with 2GB of memory. At the end of November, my first attempt
at installation of the Vista operating system was through upgrading the existing D610 laptop from the Windows XP
platform. The update went smoothly, with the exception of the video display. The same was true for a clean
installation on a wiped drive on the D620 laptop.
1
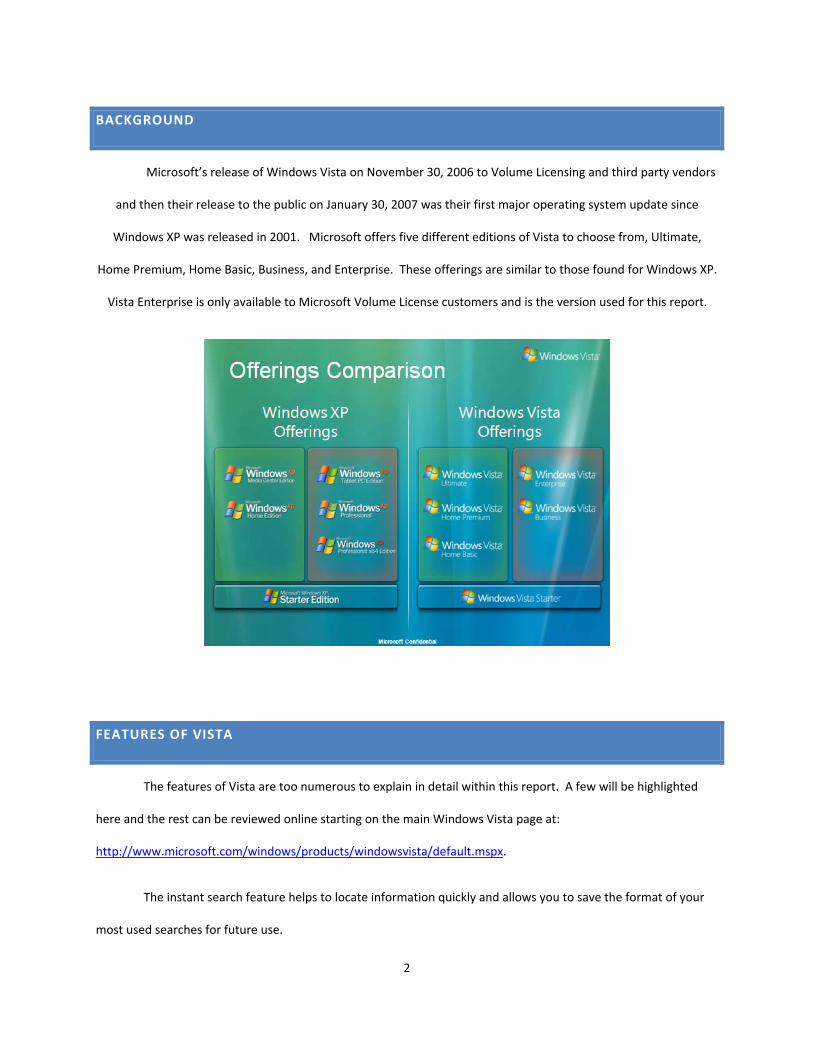
BACKGROUND
Microsoft’s release of Windows Vista on November 30, 2006 to Volume Licensing and third party vendors
and then their release to the public on January 30, 2007 was their first major operating system update since
Windows XP was released in 2001. Microsoft offers five different editions of Vista to choose from, Ultimate,
Home Premium, Home Basic, Business, and Enterprise. These offerings are similar to those found for Windows XP.
Vista Enterprise is only available to Microsoft Volume License customers and is the version used for this report.
FEATURES OF VISTA
The features of Vista are too numerous to explain in detail within this report. A few will be highlighted
here and the rest can be reviewed online starting on the main Windows Vista page at:
http://www.microsoft.com/windows/products/windowsvista/default.mspx.
The instant search feature helps to locate information quickly and allows you to save the format of your
most used searches for future use.
2
• Windows Aero allows users to navigate open files and programs with glass‐like visuals.
• Windows Sidebar holds mini programs (Gadgets) to provide information at a glance.
• Windows Complete PC Backup and Restore backs up everything on the hard drive to a place you
choose.
• Encrypting File System allows you to password protect shared documents.
• Windows Defender protects your system from unwanted software and blocks spyware.
• User Account Control prevents changes to your computer without consent.
• Windows Easy Transfer allows you to transfer data and setting to a new computer.
• Windows Mobility Center allows you to adjust display, presentation and power settings easily.
WINDOWS VISTA ENTERPRISE ADDITION
Windows Vista Enterprise is designed to help organizations with complex IT infrastructures lower IT costs,
reduce risk, and stay connected. Windows Vista Enterprise provides higher levels of data protection, improve
application compatibility, and enables an organization to standardize by using a single deployment image.
Windows Vista Enterprise is available only to Volume License customers who have PCs covered by
Microsoft Software Assurance. These customers are also eligible to acquire an optional subscription license for the
Microsoft Desktop Optimization Pack for Software Assurance. This software extends the value of Windows Vista
Enterprise by reducing application deployment costs, enabling delivery of applications as services, and allowing for
better management and control of enterprise desktop environments.
The Enterprise edition is a beefed up version of the Business edition with added enhancements specific to
large organization need. Additional details about the Windows Vista Enterprise Edition can be found at:
http://www.microsoft.com/windows/products/windowsvista/editions/enterprise/default.mspx
3
Windows Vista Enterprise includes Windows BitLocker Drive Encryption. Windows BitLocker uses
hardware‐based data encryption technology to encrypt the entire hard drive.
Windows Vista Enterprise includes built‐in tools to improve application compatibility with previous
versions of Microsoft operating systems, as well as with UNIX operating systems. It also provides the right to run
four virtual operating system sessions, which enables you to run a legacy application in a virtual environment on
top of Windows Vista Enterprise. Additionally, Windows Vista Enterprise includes Subsystem for UNIX‐based
Applications (SUA), which enables you to run UNIX applications unchanged on a Windows Vista Enterprise‐based
PC. Whereas today a UNIX database administrator or system administrator needs to have a UNIX workstation in
addition to a Windows‐based PC. Windows Vista Enterprise enables you to consolidate both functions into a
single Windows Vista‐based PC.
Windows Vista Enterprise customers that subscribe to the Desktop Optimization Pack for Software
Assurance have additional options for minimizing application compatibility challenges. This service can accelerate
deployment with tools such as SoftGrid for application virtualization, which can reduce application‐to‐application
conflicts, and with Asset Inventory Services, to help you more quickly compile information about applications
running inside your organization.
An interface language controls which language a user sees in the Windows Start menu, in the help system,
in built‐in management tools, and in Windows dialog boxes. Windows Vista Enterprise includes all available
interface languages in one offering. Access to all worldwide Windows interface languages enables organizations to
build a single deployment image that can be used worldwide and to deploy individual PCs that simultaneously
offer different interface languages for different users.
Parts of this section were taken from:
http://www.microsoft.com/windows/products/windowsvista/editions/enterprise/default.mspx
4
SECURITY
With Windows Vista, Microsoft is making fundamental investments in technology to help make customers
more secure. Efforts include using a security development lifecycle to develop more secure software and
providing technology innovation in the platform to provide layered defense, or defense‐in‐depth. Windows Vista
includes many security features and improvements to protect client computers from the latest generation of
threats, including spyware and other types of malware.
USER ACCOUNT CONTROL
With Windows XP and earlier operating systems, IT departments had to choose between the application
compatibility and convenience of having users log on as an administrator, and the security and stability provided
by having users log on as a standard user. User Account Control in Windows Vista gives administrators the option
of restricting permissions while still enabling most applications to run.
To help provide this combination of security and compatibility, File and Registry Virtualization
automatically redirects writes and subsequent reads to areas that the standard user does not have access to.
Changes made to the virtualized registry settings and folders are visible to only that user account and the
applications the user runs, so the integrity of the computer is protected. If an application does require
administrator credentials, Windows Vista will prompt the user for the credentials before allowing the application
to run.
WINDOWS FIREWALL
The personal firewall built into Windows Vista builds on the functionality that is included with Microsoft
Windows XP Service Pack 2. For example, Windows Vista's firewall blocks all inbound traffic until a computer has
the latest security updates installed. The bi‐directional firewall also includes outbound filtering that enables users
5
to configure it to selectively block both outbound traffic and inbound traffic. Every aspect of Windows Vista's
firewall can be configured using Group Policy settings, so client security settings remain constant. For the first
time in a Windows operating system, Windows Vista firewall management is integrated with IPsec. The firewall
works closely with Windows Service Hardening to restrict what services can do on the system, providing defense‐
in‐depth and reducing opportunities for attackers to compromise vulnerable computers. Windows Service
Hardening restricts critical Windows services from doing abnormal activities in the file system, registry, network, or
any other resources that could be used to allow malware to install itself or attack other computers. For example,
the Remote Procedure Call (RPC) service can be restricted from replacing system files or modifying the registry.
In Windows Vista, Internet Protocol security (IPsec) and firewall management are integrated in a single
console, known as Windows Firewall with Advanced Security. This console centralizes inbound and outbound
traffic filtering along with IPSec server and domain isolation settings in the user interface, enabling increased
visibility into security settings.
MALICIOUS AND POTENTIALLY UNWANTED SOFTWARE
User Account Control and security improvements to Internet Explorer can reduce the impact of malicious
and unwanted software in Windows Vista. In addition to these features, Windows Vista can detect and clean
many malware applications including spyware and other potentially unwanted software using Windows Defender
and the monthly delivery of the Malicious Software Removal Tool (MSRT) through Automatic Updates (AU). These
technologies help protect the integrity of the operating system and the privacy of users' data. Although Windows
Vista includes many anti‐malware technologies, a full anti‐virus solution is still recommended for the best
protection. Note that the built‐in anti‐malware detection, cleaning, and real‐time blocking is primarily targeted at
unmanaged users. Windows Vista does not include enterprise management level support for anti‐malware via
group policy beyond troubleshooting and enabling/disabling Windows Defender.
6
INTERNET EXPLORER ENHANCEMENTS
Windows Vista builds upon the User Account Control initiative to limit Internet Explorer to just enough
privileges to browse the Web, but not enough to modify user files or settings by default. This Windows Vista‐only
feature, known as Protected mode, will be in Beta 2. As a result, even if a malicious site attacks a potential
vulnerability in Internet Explorer, the site's code won't have enough privileges to install software, copy files to the
user's Startup folder, or hijack the settings for the browser's homepage or search provider.
• To help protect a user's personal information, Internet Explorer:
• Highlights the new security status bar when visiting a Secure Sockets Layer‐protected site and
lets the user easily check the validity of a site's security certificate.
• Has a phishing filter, which helps users browse more safely by advising them when Web sites
may be attempting to steal their confidential information. The filter works by analyzing Web site
content, looking for known characteristics of phishing techniques and using a global network of
data sources to decide if the Web site should be trusted. Filter data is updated several times an
hour, which is important given the speed with which phishing sites can appear and potentially
collect a user's data.
• Clears all cached data with a single click.
NETWORK ACCESS PROTECTION
Windows Vista includes an agent that can provide information about a client’s health state and
configuration to network access servers or peers. With Network Access Protection, clients that lack current
security updates, lack virus signatures, or otherwise fail to meet your computer health requirements cannot
communicate on your private network. Network Access Protection can be used to protect your network from
remote access clients as well as local area network (LAN) clients using wired or wireless connections. The agent
reports Windows Vista client health status, such as having current updates and up‐to‐date virus signatures
7
installed, to a server‐based Network Access Protection enforcement service. A Network Access Protection
infrastructure, included with Windows Server "Longhorn", determines whether to grant the client access to your
private network or to a restricted network.
ROUTING COMPARTMENTS
To prevent unwanted forwarding of traffic between interfaces for virtual private network (VPN), Terminal
Server, and multi‐user logon configurations, the Next Generation TCP/IP stack supports routing compartments. A
routing compartment is the combination of a set of interfaces with a login session that has its own IP routing
tables. A computer can have multiple routing compartments that are isolated from each other. Each interface can
only belong to a single compartment. For example, when a user initiates a VPN connection across the Internet with
the current TCP/IP stack, the user's computer has partial connectivity to both the Internet and a private intranet by
manipulating entries in the IPv4 routing table. In some situations, it is possible for traffic from the Internet to be
forwarded across the VPN connection to the private intranet. Routing compartments in the Next Generation
TCP/IP stack isolate the Internet connectivity from the private intranet connectivity with separate IP routing tables.
WIRELESS SINGLE SIGN‐ON
The deployment of wireless networks has promoted the use of Layer 2 network authentication, such as
802.1X, to ensure that only an appropriate user or device is allowed on the protected network and that their data
is secure at the radio transmission level. The Single Sign‐On feature executes Layer 2 network authentication at
the appropriate time given the network security configuration, while at the same time seamlessly integrating with
the user's Windows log‐on experience. Administrators can use Group Policy or the Command Line Interface to
deploy Single Sign‐On profiles to client machines. Once a Single Sign‐On profile is configured, 802.1X
authentication will precede the Windows logon. This feature enables scenarios such GPO updates, Log‐On scripts
and wireless Bootstrap, which require network connectivity prior to user logon.
8

BROAD SUPPORT FOR WIRELESS SECURITY PROTOCOLS
The native WiFi architecture in Windows Vista has wide support for the latest security protocols, including
WiFi Protected Access (WPA), WiFi Protected Access 2 (WPA2), Extensible Authentication Protocol (EAP), Protected
Extensible Authentication Protocol‐Transport Layer Security (PEAP‐TLS), Wired Equivalent Privacy (WEP), and
others. This broad support ensures interoperability between Windows Vista and almost any wireless
infrastructure. Personal networks at home or in small businesses can also be more secure through WPA‐PSK and
WPA2‐PSK using a pre‐shared key. The capabilities of the wireless network card are examined by Windows Vista,
and the most secure protocol is chosen by default when creating a new wireless network Security in Windows
Vista is also extensible. Using the EAP‐HOST framework, Windows Vista is able to support custom authentication
mechanisms defined by a hardware vendor or by an organization itself.
PLATFORM IMPROVEMENTS
Windows Vista's authentication capabilities are more flexible, providing a variety of choices for
customized authentication mechanisms such as fingerprint scanners and smart cards. Deployment and
management tools, such as self‐service personal identification number (PIN) reset tools, make smart cards easier
to manage and deploy. Smart cards can now be used to log on to Windows Vista, too. Further, Windows Vista
enables authentication using Internet Protocol version 6 (IPv6) or Web services.
Certificate enrollment is made easier because Windows Vista includes Credential Manager enhancements
that enable backing up and restoring credentials stored on the local computer. The new Digital Identity
Management Service (DIMS) provides certificate and credential roaming within an Active Directory forest and end‐
to‐end certificate life cycle management scenarios.
Windows Vista's auditing capabilities make it easier to track what users do. Auditing categories now
include multiple subcategories, reducing the number of irrelevant events. Windows Vista integrated audit event
9
forwarding collects and forwards critical audit data to a central location, enabling enterprises to better organize
and analyze audit data.
http://technet.microsoft.com/en‐us/windowsvista/aa906027.aspx#EBB
MULTI‐TIERED DATA PROTECTION
Theft or loss of corporate intellectual property is an increasing concern for organizations. Windows Vista
has improved support for data protection at the document, file, directory, and machine levels. The integrated
Rights Management client allows organizations to enforce policies around document usage. The Encrypting File
System, which provides user‐based file and directory encryption, has been enhanced to allow storage of
encryption keys on smart cards, providing better protection of encryption keys. In addition, the new BitLocker™
Drive Encryption enterprise feature adds machine‐level data protection. It provides full volume encryption of the
system volume, including Windows system files and the hibernation file, which helps protect data from being
compromised on a lost, stolen or decommissioned machine. In order to provide a solution that is easy to deploy
and manage, a Trusted Platform Module (TPM) 1.2 chip is used to store the keys that encrypt and decrypt sectors
on the Windows hard drive. It requires the TPM and an enterprise management infrastructure to ensure that the
feature is easy to use for end users.
http://technet.microsoft.com/en‐us/windowsvista/aa906027.aspx#ELC
RELIABILITY AND PERFORMANCE
While Windows Vista takes advantage of modern computing hardware, it also runs faster and more
reliably on the same computers used to run Windows XP. The operating system is more dependable, and Restart
Manager reduces the number of times users need to restart their computers. Applications that run on Windows
Vista are more reliable too, because applications can recover from deadlocked situations and improved error
10
reporting enables developers to fix common problems. Windows Vista can even help detect and recover failing
hard disks and memory.
AUTOMATIC RECOVERY
With Windows XP and earlier operating systems, recovering from a service failure typically required users
to restart their computers. With Windows Vista, most service failures are not noticeable to users, because
Windows Vista will automatically restart most services in the unlikely event that they fail. If necessary, Windows
Vista can automatically address service dependencies and restart multiple services to maintain the reliability of the
operating system. Because users often restarted their computer to resolve problems with failed services,
automatic recovery also reduces the number of restarts.
BUILT‐IN DIAGNOSTICS
Windows Vista can self‐diagnose and resolve a number of common problems. For example, Windows Disk
Diagnostics proactively detects impending disk failures and can alert the support center to replace the failing hard
disk before total failure occurs. For administrators, Windows Vista will guide them through the process of backing
up their data so the hard disk can be replaced without data loss.
Windows Vista also includes memory diagnostics to help administrators track down problems with
unreliable memory. Previously, memory diagnostics were available only as a download and were difficult for many
IT professionals to use. In Windows Vista, if Windows Error Reporting (WER) or Microsoft Online Crash Analysis
(MOCA) determines that a failure may be caused by failing memory, Windows Vista prompts the user to perform
memory diagnostics without requiring an additional download or separate boot disk. If memory diagnostics
identifies a memory problem, Windows Vista can avoid using the affected portion of physical memory to enable
the operating system to start successfully and to avoid application crashes. Upon startup, Windows Vista provides
an easy‐to‐understand report detailing the problem. Windows Vista also includes the Network Diagnostics
11
Framework (NDF). The NDF provides users with advanced means to assist in problem resolution for network‐
related issues. When unable to connect to a network resource, the user is presented with clear repair options
rather than error messages which can be difficult to understand. If Windows Vista can repair the issue
automatically, it will; if not, the user is directed to perform simple steps to correct the problem without having to
call for support.
STARTUP REPAIR TOOL
Windows Vista includes the Startup Repair Tool (StR) to automatically fix many common problems and
enable end users and IT professionals to quickly diagnose and repair more complex startup problems. When a
startup failure is detected, the system fails over into StR. Once started, StR performs diagnostics to determine the
cause of the startup failure. StR even analyzes startup log files so that you don't have to. Once StR determines the
cause of the failure, it attempts to fix the problem automatically. The entire process requires little to no user input.
Problems StR can automatically repair include:
• Incompatible drivers
• Missing or corrupted startup configuration settings
• Corrupted disk metadata
After the operating system has been repaired, Windows Vista notifies the user of the repairs and provides
logging so that IT professionals can determine exactly which steps StR performed. StR also includes tools to assist
IT professionals in manually troubleshooting startup problems. StR reduces support calls related to startup
problems, and when users do need assistance, StR enables you to quickly solve the problem.
APPLICATION RELIABILITY
Windows Vista is engineered to reduce the frequency and impact of user disruptions. It includes fixes for
known crashes and hangs, and enhanced instrumentation that will provide greater insight into what causes
unresponsive conditions.
12
Windows Vista will offer improved application reliability from the first day that businesses deploy it, and
the new error reporting capabilities will enable applications to continue to become more reliable over time. With
earlier versions of Windows, application hangs were very hard for developers to troubleshoot because error
reporting provided limited or no information about hangs. Windows Vista improves error reporting to give
developers the information they need identify the root cause of problems. This enables continuous improvements
in reliability.
PERFORMANCE IMPROVEMENTS
Windows Vista offers improved performance and responsiveness compared with Windows XP. For
example, Windows Vista can automatically detect problems related to long startup times or an unresponsive user
interface, and add an event to the event log that describes the condition and that possibly provides information
about the root cause of the performance problem. Administrators can use this information to troubleshoot
problems on a case‐by‐case basis, or aggregate the event log data by using a tool such as Microsoft Operations
Manager (MOM) to analyze performance for the entire enterprise.
The Next‐Generation TCP/IP stack automatically senses the network environment and adjusts key
performance settings, such as the TCP receive window. Improved stack auto‐tuning and configuration reduces the
need for manual configuration of TCP/IP settings. It enables faster network transfers, more intelligent bandwidth
usage, and fewer retransmissions of lost data on the network. This can lead to a significant reduction in the time
required to transfer a large file or back up a hard drive across the network.
http://technet.microsoft.com/en‐us/windowsvista/aa906027.aspx#EOC
DEPLOYMENT
Deploying a new operating system to an enterprise is no small task, but Windows Vista image‐based
deployment makes the process as efficient as possible. Images are the most reliable and quickest way to deploy an
13
operating system, but they have not historically been part of the standard Windows operating system installation,
requiring additional software and many hours of labor to maintain. To help reduce the complexity of the
deployment process, Microsoft based the installation of Windows Vista on the file‐based disk imaging technology
called Windows Imaging (WIM); modularized Windows Vista to make customization and deployment of the images
easier; and made significant other deployment enhancements to the core operating system.
MODULARIZATION
Windows Vista is modularized, which makes it easier to customize. When preparing to distribute
Windows Vista to an organization, IT professionals configure and add optional components to distribute to a given
set of computers. Languages, for example, are components, so the English language can be distributed to one set
of computers, while French, German, and Spanish go to a different group. Drivers and updates are also
components, making it easy to update images as hardware and software requirements change.
WINDOWS IMAGING
WIM is a file‐based image format, which provides significant benefits as compared to the more common
sector‐based image formats. The WIM image format is hardware‐agnostic, enabling you to maintain only a single
image for multiple hardware configurations. WIM can also store multiple images within a single image file, making
image management easier and saving disk space by storing only a single copy of each file. For example, you might
store two images in a single WIM file — one image that contains only the Windows Vista operating system and a
second image that also contains core applications. The WIM format reduces image file sizes significantly by using a
compressed file format and single‐instance storage techniques. (The image file contains one physical copy of a file
for each instance of it in the image file, which significantly reduces the size of image files that contain multiple
images.)
14
Maintaining WIM images is easy, because drivers, updates, and some other Windows components can be
added and removed offline without ever starting the operating system image. Windows Vista includes tools to
directly edit images to change general and regional settings, apply operating system updates, add drivers, and
install updates. This feature saves hours of work maintaining setup images, because there is no need to start the
image to make configuration changes.
Additionally, the WIM image format allows for non‐destructive deployment. This means that you can
leave data on the volume to which you apply the image because the application of the image does not erase the
disk's existing contents.
Either modularization or WIM alone can dramatically simplify deployment; but together, they
revolutionize the way client operating systems are installed. In other words, the combination of the two
technologies provides a greater benefit than the two technologies would if offered separately. Most notably, the
two technologies significantly reduce the number of operating system images that must be maintained. In other
words, IT departments that previously maintained different images for each language and computer type can
probably use just one or two Windows Vista images, thereby freeing the staff for other priorities.
NONDESTRUCTIVE IMAGING
With previous versions of Windows, imaging could only be used for new Windows installations since
deploying an image would overwrite the computer's hard disk. To upgrade a user's computer, IT professionals had
to copy the user's files and settings to a different computer, and then restore the files and settings after deploying
the image. Windows Vista includes nondestructive imaging using the WIM image format, which copies files and
settings to a reserved portion of the computer's hard disk before deploying the Windows Vista image. After the
Windows Vista image is deployed, Windows Vista migrates the files and settings and then restores the portion of
the computer's hard disk that had been reserved. Overall, migrating to Windows Vista is much more reliable than
migrating to Windows XP.
15
UNATTENDED INSTALLATIONS
Most Windows Vista administrative tools, including Windows System Image Manager and the Microsoft
Windows User State Migration Tool (USMT), can be controlled from a command line or script. This functionality
saves time when the user must repeatedly perform the same, or similar, tasks. IT departments that do not use
scripting will still save time configuring unattended setup by editing a single file: Unattend.xml. Windows Vista
includes graphical tools that make it simple to configure an unattended installation without manually editing the
file. Because Extensible Markup Language (XML) files are text‐based, they can be edited manually or
programmatically using a script.
http://technet.microsoft.com/en‐us/windowsvista/aa906027.aspx#EMD
MANAGEABILITY
Monitoring, maintaining, and troubleshooting hundreds or thousands of computers can be both time‐
consuming and expensive. Windows Vista represents a significant step forward in Microsoft's commitment to
reducing Windows computers' total cost of ownership (TCO). Windows Vista is designed to reduce the cost of
desktop support, to simplify desktop configuration management, to enable better centralized management of the
desktop and to decrease the cost of keeping systems updated. Expanded Group Policy settings make almost every
aspect of Windows Vista centrally configurable, and powerful command‐line and scripting tools enable IT
professionals to automate monotonous tasks. Monitoring and reporting are designed to be centralized as well.
CONFIGURATION MANAGEMENT
Windows Vista technology ensures that changes to Windows files and settings happen in a predictable
and reliable way. Windows Resource Protection (WRP) technology allows the system to protect itself from
undesirable changes to system files, folders, or registry keys — changes that could render a computer or
application inoperable. System settings in the registry are protected from inadvertent changes by users or
16
unauthorized software; only the Windows trusted installer can make changes to protected system files and
settings.
GROUP POLICY
Almost every new configuration setting in Windows Vista can be controlled using Group Policy.
Additionally, Group Policy Management Console (GPMC) is now included with Windows Vista. To make Windows
Vista more flexible in environments in which multiple users use a single computer, such as schools and libraries,
Windows Vista can have multiple Local Group Policy objects applied. This feature improves security and
manageability in such shared‐use environments as libraries and schools.
POLICY‐BASED QUALITY OF SERVICE
With Policy‐based QoS, an IT department will be able to define flexible QoS policies to prioritize and/or
throttle outbound network traffic without requiring modifications to applications. These QoS policies will apply to
outbound traffic based on any or all of the following conditions: sending application; deployment through Group
Policy (such as a set of users, machines); source/destination IP address; source/destination port; and protocol.
EVENTING, INSTRUMENTATION, AND ERROR REPORTING
Windows Vista is easier to manage, saving IT professionals both time and effort. Event descriptions
contain more data to help you identify the root cause of a problem and include event information in XML format,
making it easy to expose events data to be leveraged by the management tools. For common problems, the
process can be automated to launch tasks when a specific event appears. Windows Vista makes manually analyzing
events easier, too, by enabling you to customize how the Event Viewer displays them. Additionally, Windows Vista
can forward events to a central location to make identifying, tracking, and troubleshooting problems easier.
17
AUTOMATION
Windows Vista automation capabilities let repetitive management tasks be performed without human
intervention, reducing the likelihood of manual errors. Windows Vista adds several key automation capabilities:
Web Services for Management (WS‐Management), an industry‐standard Web services protocol for
protected remote management of hardware and software components, makes Windows Vista easier to manage
across a network by allowing administrators to remotely run scripts and perform other management tasks.
Key administrative tasks that can be performed from a user interface (UI) can also be completed from a
command line, expanding the Windows XP command‐line interface even further. This feature enables scripting and
one‐to‐many administration.
An improved Task Scheduler lets administrators launch a set of tasks in a specific sequence, ensuring they
do not run simultaneously, and automatically launch tasks in response to events or when the computer is idle. The
credentials used to launch the tasks can now be stored in Active Directory rather than on the local computer in
order to improve the security of the passwords and simplify mandatory password changes.
SUPPORTABILITY
Windows Vista is designed to drive down user support costs in four key ways:
• Reduce the number of incidents. Windows Vista features such as Windows Resource Protection
and User Account Control help users be productive while preventing them from making system
changes that would affect the system's performance. Additionally, Windows Vista's failure
recovery automatically resolves many common problems.
• Help users help themselves. Windows Vista is engineered to help users help themselves, greatly
reducing the need for support from IT administrators or support center professionals. User
18
Assistance — Windows Vista's version of help files — in Windows Vista provides better search
capabilities, is easier for end users to understand, and can be customized by the IT department.
• Reduce support time. When problems occur, Windows Vista provides IT and support center
professionals with tools, detailed events, and performance counters to make it easier to
determine what happened and how to fix it. The ability to detect failing disks and memory allows
IT professionals to proactively replace hardware before a problem becomes catastrophic,
enabling the problem to be resolved in a few minutes rather than several hours.
• Reduce the cost of supporting remote users. Windows Vista's improved Remote Assistance tool
makes it easier and less costly to service computers in remote locations. To reduce bandwidth
costs, the greatly improved Background Intelligent Transfer Service (BITS) enables clients on a
local area network (LAN) to share updates directly, instead of downloading the same files
repeatedly across wide area networks (WANs).
http://technet.microsoft.com/en‐us/windowsvista/aa906027.aspx#E5D
PRODUCTIVITY
User productivity is still one of the key considerations for IT departments evaluating a new operating
system. Windows Vista seeks to add value to enterprises by substantially improving user productivity.
Improvements to the user interface help both end users and skilled IT professionals become more productive. By
allowing users to easily find what they need, Windows Vista helps users focus on what is most important for them
to get job done.
USABILITY AND END‐USER PRODUCTIVITY
Microsoft has improved the usability of almost every aspect of Windows Vista, including the Start menu,
Windows Explorer, and Control Panel. For example, the Control Panel now lists specific tasks that the user may
want to perform, such as changing the screen's resolution. Users can even use the Quick Search text box to search
19
for applications on the Start menu or for specific Control Panel tasks. These usability improvements mean users
spend less time figuring out how to use the operating system and more time completing their work.
AERO
Windows Vista's user interface, code‐named "AERO" (Authentic, Energetic, Reflective, and Open), is easier
and more fun, even as it makes users more productive. Computers designed for Windows Vista create a
professional and attractive environment based on a theme of translucent glass. Even applications created before
Windows Vista become more attractive because Windows Vista has improved wizards and common dialog boxes
that are shared by all applications.
Users with high‐resolution monitors can finally take full advantage of their displays because Windows
Vista smoothly scales icons and windows. As a result, users do not have to squint to read an e‐mail message on
their new 1600x1200 laptop display. Users who have previously used lower resolutions to make text more
readable can increase the display resolution for added clarity and sharpness without decreasing readability.
EXPLORERS
Windows XP includes several specialized Explorers to enhance users' experience when interacting with
specific types of content, such as Documents, Photos, and Music. Windows Vista builds on this concept by
including layout, command, and organizational tools that are appropriate for the information the Explorer displays
onscreen.
INFORMATION VISUALIZATION
Windows Vista has amazing information management capabilities that enable users to find documents, e‐
mail messages, and other information in seconds and then to work with that data in ways that are most intuitive to
20
them. In fact, Windows Vista's new tools are so flexible and so easy to use that users will rarely need to search for
information on their computers.
First, the new Document Explorer, replacing the My Documents folder in Windows XP, is much more
powerful. Instead of simply showing icons for documents, the Explorer shows high‐resolution thumbnails that
preview the document's content. Users can dynamically adjust the size of these thumbnails up to 256x256 pixels,
which is large enough for users to know whether they've found the right document without opening it.
SEARCH
Users can search documents, e‐mail, contacts, and Web sites right from their desktop. Windows Vista
searches are not limited to the local computer and can include shared folders, and other network resources. For all
those times users think, "I know I've seen that somewhere, but where was it?" search capability makes it easy to
find the content that user is looking for.
START MENU
The Windows Vista Start menu makes it easier to open specific applications and browse all applications.
Users can type part of the application's name in the Start menu's Quick Search box to launch the application. For
example, to launch the Calculator tool, users press the Windows key, type Calc, and press Enter. Windows Vista
makes it easier to browse the applications installed on the computer by replacing the Windows XP All Programs
menu with a tree view, similar to Windows Explorer. This feature helps users find applications that are nested in
folders several levels deep.
SHARING
Windows Vista makes it easy for users to share files, whether on a single computer or network. First,
Windows Vista gives users the option to save their files into a personal or public profile, thereby differentiating
21

whether the content will be available for personal or public use. Next, the new Sharing Wizard shows every person
who has an account on that computer or in the Active Directory, enabling the user to choose which individual can
access which files. Finally, Windows Vista enables users to more easily keep track of shared content by showing
two Search Folders: one that displays all shared content and one that displays all content that has been taken
offline.
MOBILITY IMPROVEMENTS
Windows Vista provides a single, easy interface for connecting to any type of network, including wireless
local area networks (WLANs), wireless wide area networks (WWANs), ad hoc wireless networks, and Virtual Private
Networks (VPNs). Once connected, the Windows Vista Network Explorer enables users to visually browse all
network resources, including computers and devices, people on the network, and shared folders. The speed and
reliability of discovering networked computers, servers, and devices is improved significantly over that provided by
Windows XP.
Windows Vista provides a single user interface for managing all types of data and device synchronization
called SyncManager. SyncManager is capable of managing almost any type of device synchronization, including
music files to a portable audio player, calendar information and e‐mail messages to a PDA, contact information to
a mobile phone, files between two networked computers and lies between a network computer and a file server.
Windows Vista's new default power‐off state is Sleep mode. Sleep combines the resume speed of the
Windows XP Standby mode with the data protection and low power‐consumption characteristics of Hibernate. In
the Sleep state, Windows Vista records the contents of memory to the hard disk, just as it would with Hibernate.
However, it also maintains the memory for a short period of time, just as Windows XP maintains the memory in
Standby mode.
22
IPV6
IPv6 support in Windows Vista enables enterprises to support a larger network address space while
eliminating the need for NAT or other workarounds. IPv6 scales well beyond the IPv4 address space, and provides
additional security with full support for IPSec. Enterprises can deploy IPv6 within their infrastructure without
having to completely upgrade their network with IPv6 transition tunneling mechanisms to support the tunneling of
IPv6 traffic across an IPv4‐only infrastructure.
http://technet.microsoft.com/en‐us/windowsvista/aa906027.aspx#EPF
WINDOWS VISTA LICENSING
As a member of the California State University System (CSU) Cal Poly Pomona’s Microsoft licensing falls
under a CSU wide volume licensing agreement. Each campus signs up for their own access to this master
agreement rights so that tracking of access and use can be associated with each campus. The agreements are
renegotiated every three years and are handled at the Chancellor’s office level. Once a new agreement is in place,
a main Microsoft contact at each campus is then passed the information to handle campus needs.
Each product from Microsoft may have different licensing guidelines. Most fall into groups of guidelines
that overtime users on campus become aware of and comfortable with. Amid the release of Windows Vista a
change in the way licensing operating system licensing has been done was introduced. Vista is based on a Volume
Activation 2.0 process (VA 2.0). This type of volume licensing involves the use of two types of keys; Multiple
Activation Keys and Key Management Service.
23
MULTIPLE ACTIVATION KEY
The Multiple Activation Key (MAK) is the most similar to what the campus has used in the past. Each
product key can activate a specific number of computers. For our campus, we have 500 activations available per
key. If the use of volume‐licensed media is not controlled, excessive activations result in depletion of the
activation pool. The MAK numbers are activation keys only. They are not used to install Vista but rather to activate
it after installation. You can use them to activate any volume edition of Windows Vista. A MAK is used to
activate each system under MAK management.
This key activates a single computer by directly contacting Microsoft’s activation servers through the
internet or by telephone. The Multiple Activation Key (MAK), although on the individual computer, is encrypted
and kept in a trusted store so that users are not able to obtain the key once it has been installed on the computer.
Volume licensing editions do not require a product key to be entered during setup, but the computer must be
activated during a 30‐day grace period or the system will fall into a degraded mode.
There are two ways to activate computers using MAKs:
• MAK Proxy Activation: A solution that enables a centralized activation request on behalf of
multiple desktops with one connection to Microsoft. MAK Proxy Activation will be available in
the solution code name Volume Activation Management Tool (VAMT) which is currently under
development with expected availability in 2007.
• MAK Independent Activation: Each desktop independently connects and activates against
Microsoft’s servers.
The number of MAK’s currently activated can be seen on the MVLS page by the campus Microsoft
contact. As each computer contacts Microsoft’s, the activation pool is reduced. After 500 activations the MAK
will no longer work. The campus can immediately request a new MAK through the Microsoft Volume Licensing
24
Site (MVLS) managed by the local campus Microsoft contact. The new MAK will have another 500 activations
possible. Again, when those run out, another MAK can be requested.
With the use of MAK activation there is no requirement to periodically renew activations. Reactivation
will only be needed when significant hardware changes occur. More details about the MAK processes can be view
at: http://www.microsoft.com/licensing/resources/vol/default.mspx and
http://www.microsoft.com/technet/windowsvista/plan/volact1.mspx
KEY MANGEMENT SERVICE
The Key Management Service (KMS) activation process involves the use of a local campus server to act as
a host to activate Vista systems. And is targeted for managed environments where more than 25 computers are
consistently connected to an organization’s network. A KMS host must have at least 25 physical Windows Vista
clients connected to it before any of them will activate. Systems operating in virtual machine (VM) environments
can also be activated using KMS, but they do not contribute to the system count.
The Key Management Service (KMS) key used for KMS activation is only installed on the KMS host and
never on individual computers which provides for control of the key and less risk of key piracy. Initial KMS keys
allow for 1000 activations. If additional activations are needed the local campus Microsoft contact requests that
the activation number be increased through the MVLS page.
The KMS service can easily be co‐hosted with other services, and it does not require any additional
software for downloading or installing. KMS can coexist with common server roles, including domain controllers.
It has a small resource footprint during normal operation, although it can become compute‐bound after a large
deployment of KMS clients or if most users start their computers in a short period. If CPU consumption is an issue,
KMS supports a low priority option. Currently the KMS software needed to run this service will only run on the
Vista or Longhorn Windows Server operating systems. The Windows Server 2003 KMS service for Volume
Activation 2.0 is currently under development with expected availability in 2007. A single KMS host can support
25
hundreds of thousands of KMS clients. It is expected that most organizations will be able to operate with just two
KMS hosts for their entire infrastructure (one main KMS host and one backup host for redundancy).
With a server in place, local machines will contact the server for activation instead of Microsoft and will
need to contact the server every six months at least to keep their activation current. Clients not yet activated will
attempt to connect with the KMS host every two hours (value configurable). Once activated, they will attempt to
connect to the KMS host every seven days (value configurable) and if successful will renew their 180‐day activation
life span. Clients locate the KMS host using one of the two methods:
• Auto‐Discovery, in which a KMS client uses domain name service records to automatically locate
a local KMS host.
• Direct connection, where a system administrator specifies the KMS host location and
communication port.
Clients have a 30‐day grace period to complete activation. Clients not activated within this time period
will go into Reduced Functionality Mode (RFM) which will be discussed later. A KMS clients activated with KMS will
periodically try to renew their activation. If they are unable to connect to a KMS host for more than 180 days, they
enter a 30‐day grace period, after which they enter RFM until a connection can be made with a KMS host, or until a
MAK is installed and the system and activated online or via telephone. This feature prevents computers that have
been removed from the campus from functioning indefinitely without adequate license coverage.
KMS activation requires TCP/IP connectivity (port TCP/1688 default). A KMS activation request and
response takes approximately 450 bytes. Consider the impact of periodic activation for slow and/or high‐latency
links. Dynamic DNS and SRV record support are required for the default auto‐publishing and auto‐discovery
functionality used by KMS. Both Microsoft Windows 2000 or later DNS and BIND 8.x or newer fully support these
features.
26

KMS requests are only a few hundred bytes each and when attempting to activate, the client computers
make a KMS request every two hours (default) and only once every seven days when activated. Normally, a client
computer activates with the initial request.
Following are some considerations for planning a KMS host:
• KMS is compute‐cycle intensive while actively processing requests. CPU usage can momentarily reach 100 percent on a single‐processor computer during request processing.
• KMS memory usage can vary from approximately 10 MB to around 25 MB, depending on the number of incoming requests.
• Network overhead is minimal • Less than 250 bytes are sent in each direction for a complete client‐KMS exchange, plus TCP
session setup and teardown. The only additional network traffic is for auto‐discovery, which usually occurs only once per client computer, as long as the same KMS continues to be available for subsequent renewals
• Large organizations may want multiple KMS hosts for load‐balancing and redundancy purposes • System Administrators of the KMS server can count KMS activations using standard system
management software, such as, Microsoft Operations Manager (MOM) and others in the future. Windows Management Infrastructure (WMI), extensive event logging, and built‐in Application Programming Interfaces (APIs) may provide details about installed licenses and about the license state and current grace or expiration period of MAK and KMS‐activated computers.
According to Microsoft Volume Activation 2.0 products, such as Vista, also may provide enhanced security
through frequent background validations for Genuine modules. This is currently limited to critical software, but
may be expanded greatly over time.
More details about the KMS processes can be view at:
http://www.microsoft.com/licensing/resources/vol/default.mspx and
http://www.microsoft.com/technet/windowsvista/plan/volact1.mspx
VIEWING VOLUME LICENSING INFORMATION
You can display information about your Volume License computers using the slmgr.vbs –dli script. This
provides general information about the current license, including the license state and remaining expiration time
or grace period, and information for KMS clients or KMS hosts. You can view more licensing information by using
the slmgr.vbs –dlv. Activation information is unavailable in Safe Mode.
27
The following procedure helps display Volume License information.
1. Launch the command window. (Administrator privilege is not required here.) 2. Run the following script: cscript \windows\system32\slmgr.vbs –dli 3. Information displayed includes the following:
Global information (example) Name: Windows(TM) Vista, Enterprise edition Description: Windows Operating System ‐ Vista, ENVIRONMENT channel Partial Product Key: RHXCM License Status: Licensed Volume activation expiration: 43162 minutes (29 days) Evaluation End Date: 8/29/2007 4:59:59 PM
For KMS clients (example) Key Management Service client information Client Machine ID (CMID): 45d450a8‐2bef‐4f04‐9271‐6104516a1b60 DNS auto‐discovery: KMS name not available from DNS
KMS machine extended PID: 11111‐00140‐008‐805425‐03‐1033‐5384.0000 1752006 Activation interval: 120 minute(s) Renewal interval: 10080 minute(s)
For KMS machines (example) Key Management Service is enabled on this machine Current count: 7 Listening on Port: 1688 DNS Publishing: Enabled KMS priority: Normal
4. Run the following script to display more licensing support information that may be useful for support purposes: cscript \windows\system32\slmgr.vbs –dlv For example: Software licensing service version: 6.0.5384.4 ActivationID: 14478aca‐ea15‐4958‐ac34‐359281101c99 ApplicationID: 55c92734‐d682‐4d71‐983e‐d6ec3f16059f Extended PID: 11111‐00140‐009‐000002‐03‐1033‐5384.0000‐1942006 Installation ID: 000963843315259493598506854253663081409973656140419231
5. Run the following script to display more licensing support information for all installed licenses: cscript \windows\system32\slmgr.vbs ‐dlv all Note: Only one license can be in use, namely the one that has a partial product key.
http://www.microsoft.com/technet/windowsvista/plan/volact1.mspx#GeneralConsiderations
MEDIA CONSIDERTIONS
Volume License Product Use Rights require that you have a previous qualifying operating system license
for each copy of Windows Vista you deploy. The default 32‐bit Volume License media are upgrade‐only and are
not bootable (64‐bit Volume License media are not restricted in this way, since there is no supported upgrade
28
path). You must first boot a previous version of Windows and then run the setup to install Windows Vista.
Bootable media is also available on request through your Volume License portal.
Volume editions of Windows Vista default to KMS‐based activation and do not require a product key to be
entered during setup. Windows Vista Volume License editions use a specific pre‐defined setup key in the
sources\pid.txt file. MAKs can be specified with a variety of methods during deployment or post deployment.
THE FIVE LICENSING STATES
Windows Vista utilizes five license states to track activation. The five states are:
• Licensed o A“Licensed” computer has been properly activated. Activation can happen in several
ways including Internet and phone activation. Additionally, KMS clients can activate themselves after contacting an activated KMS.
• Initial Grace o Initial Grace (or OOB Grace) starts the first time you start your computer after you
install the operating system. It provides 30 days for the computer to be activated. The Initial Grace period can only be restarted by running sysprep /generalize, or by using slmgr.vbs –rearm. These processes reset the Initial Grace timer to 30 days. This will only work three times.
• Non‐Genuine Grace o Non‐Genuine Grace occurs only on a computer that has the Windows Genuine ActiveX
control installed, and then fails Genuine Validation. The computer is marked non‐Genuine, and the License State may be changed to non‐Genuine Grace. If this happens, non‐Genuine Grace provides 30 days for the computer to be re‐activated and validated Genuine by re‐visiting the WGA website at http://www.microsoft.com/genuine.
• Out of Tolerance Grace o Out of Tolerance Grace begins when cumulative hardware changes on an activated
computer push it beyond a tolerance level, or when a KMS client goes for 180 days without contacting a KMS. OOT Grace provides 30 days for a computer to be re‐activated. A computer may be activated and then fall into OOT grace any number of times, and each time the OOT Grace timer will be reset to 30 days.
• Unlicensed o When any grace period is allowed to expire, the computer becomes Unlicensed. An
Unlicensed computer runs in Reduced Functionality Mode (RFM), which provides users very limited access to the system in one‐hour increments, and presents a window containing links to properly license and activate the computer. If the computer falls into RFM from non‐Genuine Grace, the user is presented with a window containing links and solutions specific to recovery from non‐Genuine RFM.
The term “grace period” refers to a length of time provided to allow any necessary actions to return the
computer to the licensed state. All grace periods last 30 days.
29
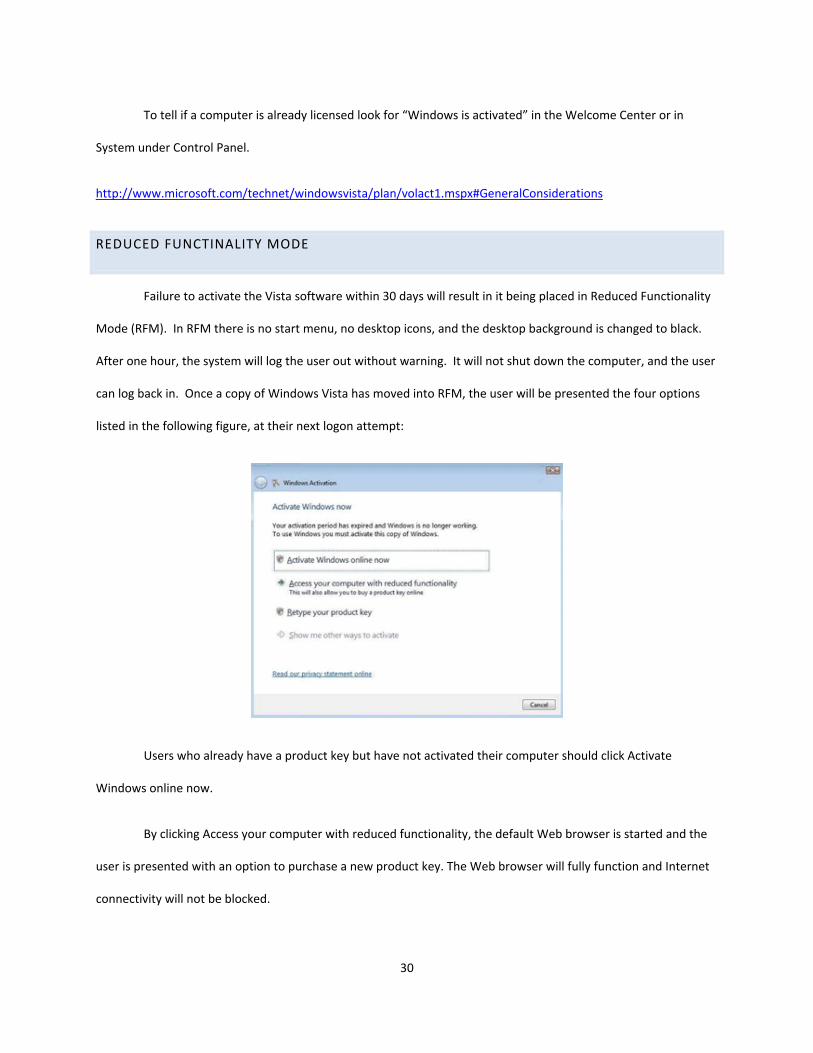
To tell if a computer is already licensed look for “Windows is activated” in the Welcome Center or in
System under Control Panel.
http://www.microsoft.com/technet/windowsvista/plan/volact1.mspx#GeneralConsiderations
REDUCED FUNCTINALITY MODE
Failure to activate the Vista software within 30 days will result in it being placed in Reduced Functionality
Mode (RFM). In RFM there is no start menu, no desktop icons, and the desktop background is changed to black.
After one hour, the system will log the user out without warning. It will not shut down the computer, and the user
can log back in. Once a copy of Windows Vista has moved into RFM, the user will be presented the four options
listed in the following figure, at their next logon attempt:
Users who already have a product key but have not activated their computer should click Activate
Windows online now.
By clicking Access your computer with reduced functionality, the default Web browser is started and the
user is presented with an option to purchase a new product key. The Web browser will fully function and Internet
connectivity will not be blocked.
30
If the user has acquired another product key (either through eligibility for a MAK or by purchasing a key
online), they can use the new key to activate by clicking Retype your product key.
If no Internet connection is detected, the user can click Show me other ways to activate to use telephone
activation. This option will not be active if an Internet connection is present on the system.
REDUCED FUNCTIONALITY MODE SCENARIOS
A copy of Windows Vista can go into RFM under the following two scenarios:
Scenario 1: If any of the following events occurs for the given license type:
• For MAK activated and KMS host computers: Failure to activate within the grace period (that is, 30 days after installation) or failure to renew activation within 30 days of a major hardware replacement
• For KMS activated computers: Failure to activate with a KMS within 30 days of installation, failure to renew activation with KMS within 210 (180 days plus 30 days grace period) days of previous renewal, or failure to renew activation with KMS within 30 days of hard drive replacement
Scenario 2: A copy of Windows Vista may be required to reactivate for the following reasons, and failure
to successfully reactivate during the 30‐day grace period will cause the copy of Windows Vista to go into RFM:
• The activation process has been determined to have been tampered with or worked around, or other tampering of license files is detected.
• A leaked, stolen, or prohibited product key is detected and blocked by Microsoft Product Activation servers.
• Product keys may be prohibited for any of the following reasons: • The product key is abused, stolen, or pirated; • the product key is seized as a result of anti‐piracy enforcement efforts; • the key is beta or test key and has been disabled; • there was a manufacturing error in the key; or the key has been returned.
When a copy of Windows enters RFM as a result of this scenario, the user is notified of this status via a
message pop‐up.
REMEDING REDUCED FUNCTINALITY MODE
In the event that a system is placed into RFM, the following remedies are available:
31
If a client has exceeded the grace period, the Windows Activation dialog box appears, as shown in the
figure above. Follow the prescribed activation process and the options already described.
• Entering a new product key, • Obtaining a new product key, • Re‐entering the original product key. • Reconnect a KMS‐activated client to the network that houses the KMS host. The client
automatically contacts the KMS host to renew its activation. • If a KMS client cannot be returned to its home network but is able to access the Internet, it can
be activated using a MAK. • In the RFM dialog box, click Change Product Key to type the MAK. • If the client is unable to connect to the Internet, you can also use telephone activation. Changing
to a MAK does not provide an additional grace period. The client remains in RFM until the computer is activated—either via the Internet or by telephone.
• You can also supply the MAK through scripting by using the slmgr.vbs script with the ‐ipk option.
A client can be returned to its initial activation state for the current license by using the slmgr.vbs script
with the ‐rearm option. This option resets the computer’s activation timer and reinitializes some activation
parameters, including a KMS client’s unique machine ID (also known as client machine ID, or CMID). The number of
times this can be repeated is limited and depends on how many times sysprep /generalize is run to create the
distribution media. The maximum number of rearms possible is three. Note that rearm requires administrator
privilege. However, an Administrator can enable use by ordinary users by creating the following registry entry:
HKEY_LOCAL_MACHINE\SOFTWARE\Microsoft\Windows NT\
CurrentVersion\SL\UserOperations (REG_DWORD) to 1.
http://www.microsoft.com/technet/windowsvista/plan/volact1.mspx#GeneralConsiderations
RESOLVING NON‐GENUINE ISSUES
If either our campus or Microsoft detects that a KMS key or a MAK has been misused, after discussions
between Microsoft, and us the product key can be marked as invalid for activation and as non‐Genuine.
When a volume edition client visits Microsoft Web sites requiring Genuine Validation, it will have to
download and run either an ActiveX control or a small .exe application to access the download. If the computer is
32

configured with an invalid key or tampered files are detected, the computer will fail Genuine Validation. The user
will be notified by a watermark on the desktop and periodic notifications to validate the Genuine status of the
system by visiting a Microsoft Web site.
In addition, the computer may be placed in a 30‐day non‐Genuine grace period during which it needs to
be configured with a new product key or reinstalled if tampered files are detected. For MAK configured systems, a
new MAK must be installed and activated on the computer. For computers activated with an invalid KMS key, the
KMS host must first be activated with a new KMS key. KMS clients will then reactivate themselves after contacting
the reconfigured KMS host.
In both scenarios, computers that have downloaded the Genuine Advantage ActiveX control must also
visit the Genuine Advantage Web site to change their Genuine status from non‐Genuine to Genuine after being
activated with a new product key.
If a new product key has not been installed and activated, and the status has not changed during the 30‐
day non‐Genuine grace period, the computer will start in non‐Genuine RFM. In RFM, a user will only have options
to access Web sites using their browser for an hour, before being logged off by the system.
http://www.microsoft.com/technet/windowsvista/plan/volact1.mspx#GeneralConsiderations
HARDWARE
A Windows Vista Capable PC logo identifies hardware that meets or exceeds the requirements to deliver
core experiences such as security, reliability, organizing and finding information. All Windows Vista Capable PCs
will run these core experiences, at a minimum.
33
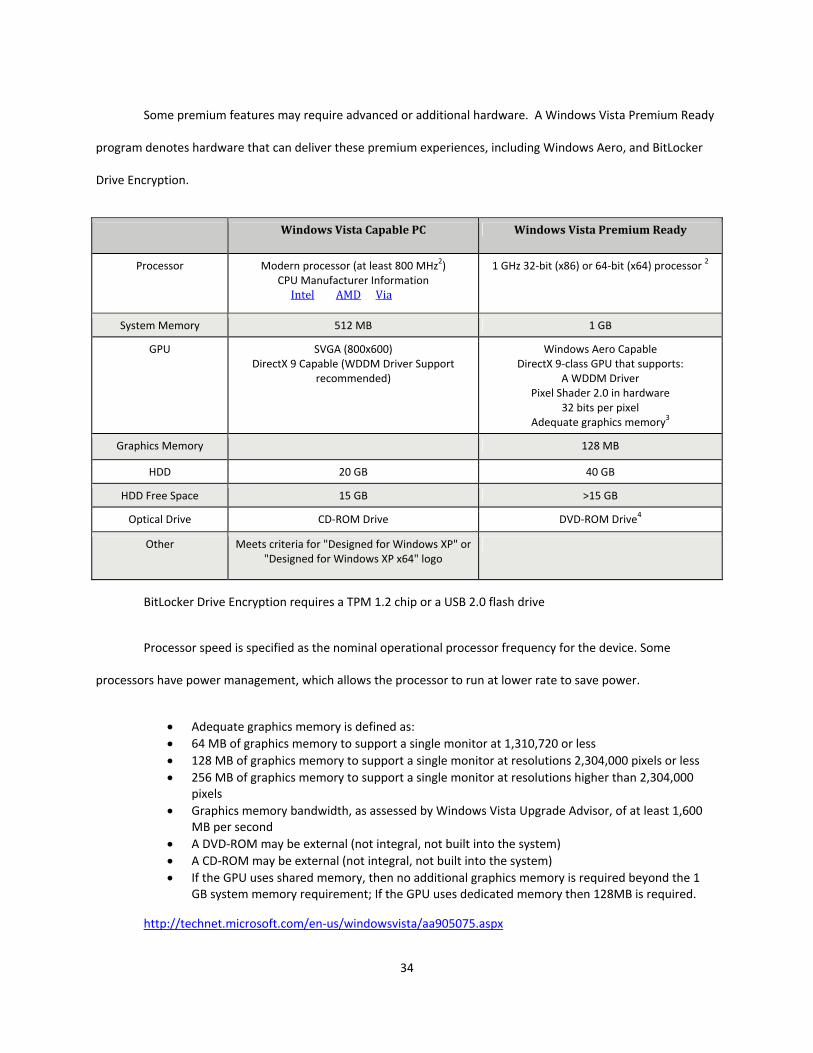
Some premium features may require advanced or additional hardware. A Windows Vista Premium Ready
program denotes hardware that can deliver these premium experiences, including Windows Aero, and BitLocker
Drive Encryption.
Windows Vista Capable PC Windows Vista Premium Ready
Processor Mode t le 800 MHzrn processor (a astU Manufacture
2) CP r Information Intel AMD Via
1 GHz 32‐bit (x86) or 64‐bit (x64) processor 2
System Memory 512 MB 1 GB
GPU SVGA (800x600) DirectX 9 Capable (WDDM Driver Support
recommended)
Windows Aero Capable DirectX 9‐class GPU that supports:
A WDDM Driver Pixel Shader 2.0 in hardware
32 bits per pixel Adequate graphics memory3
Graphics Memory 128 MB
HDD 20 GB 40 GB
HDD Free Space 15 GB >15 GB
Optical Drive CD‐ROM Drive DVD‐ROM Drive4
Other Meets criteria for "Designed for Windows XP" or "Designed for Windows XP x64" logo
BitLocker Drive Encryption requires a TPM 1.2 chip or a USB 2.0 flash drive
Processor speed is specified as the nominal operational processor frequency for the device. Some
processors have power management, which allows the processor to run at lower rate to save power.
• Adequate graphics memory is defined as: • 64 MB of graphics memory to support a single monitor at 1,310,720 or less • 128 MB of graphics memory to support a single monitor at resolutions 2,304,000 pixels or less • 256 MB of graphics memory to support a single monitor at resolutions higher than 2,304,000
pixels • Graphics memory bandwidth, as assessed by Windows Vista Upgrade Advisor, of at least 1,600
MB per second • A DVD‐ROM may be external (not integral, not built into the system) • A CD‐ROM may be external (not integral, not built into the system) • If the GPU uses shared memory, then no additional graphics memory is required beyond the 1
GB system memory requirement; If the GPU uses dedicated memory then 128MB is required.
http://technet.microsoft.com/en‐us/windowsvista/aa905075.aspx
34
WINDOW VISTA HARDWARE ASSESSMENT
The Windows Vista Hardware Assessment is an assessment and inventory tool designed to help customers
quickly assess their PCs’ readiness for Windows Vista upgrades network‐wide with a single networked PC. It is
designed to remotely connect to PCs on a network, assess their hardware and device compatibility with Windows
Vista, and automatically create a comprehensive report with assessment results and upgrade recommendations
for each PC. The Windows Vista Hardware Assessment does not require the installation of any software agents on
PCs to perform the assessment.
The Windows Vista Hardware Assessment will provide the following information in two output documents
in Microsoft Word and Microsoft Excel:
• Deployment Blockers: Devices and BIOS versions that are not compatible with Windows Vista.
• Windows Vista Experience: Windows Vista experience based on currently available system
resources
• Upgrade Recommendations: Specific recommendations for upgrading PC hardware to improve
the Windows Vista experience.
LINKS TO MANUFACTURER INFORMATION ABOUT CPU
Current CPU Guidelines
Get a list of Intel CPUs
Intel is supplying this data and is solely responsible for its contents; please look for CPUs.
Get a list of AMD CPUs
Note: AMD is supplying this data and is solely responsible for its contents.
Get a list of Via CPUs
Note: Via is supplying this data and is solely responsible for its contents.
35
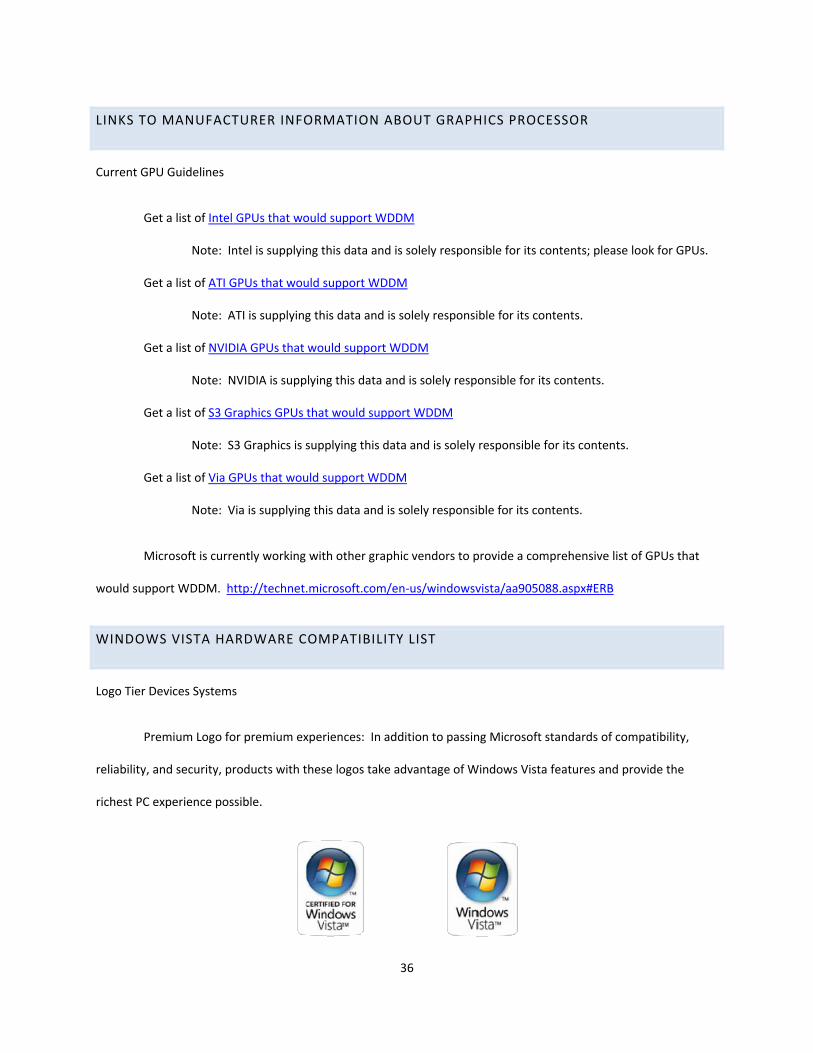
LINKS TO MANUFACTURER INFORMATION ABOUT GRAPHICS PROCESSOR
Current GPU Guidelines
Get a list of Intel GPUs that would support WDDM
Note: Intel is supplying this data and is solely responsible for its contents; please look for GPUs.
Get a list of ATI GPUs that would support WDDM
Note: ATI is supplying this data and is solely responsible for its contents.
Get a list of NVIDIA GPUs that would support WDDM
Note: NVIDIA is supplying this data and is solely responsible for its contents.
Get a list of S3 Graphics GPUs that would support WDDM
Note: S3 Graphics is supplying this data and is solely responsible for its contents.
Get a list of Via GPUs that would support WDDM
Note: Via is supplying this data and is solely responsible for its contents.
Microsoft is currently working with other graphic vendors to provide a comprehensive list of GPUs that
would support WDDM. http://technet.microsoft.com/en‐us/windowsvista/aa905088.aspx#ERB
WINDOWS VISTA HARDWARE COMPATIBILITY LIST
Logo Tier Devices Systems
Premium Logo for premium experiences: In addition to passing Microsoft standards of compatibility,
reliability, and security, products with these logos take advantage of Windows Vista features and provide the
richest PC experience possible.
36
Basic Logo for basic experiences
Products with these logos have been tested to pass Microsoft standards of compatibility, reliability, and
security and will work with all PCs running Windows Vista.
To search the Windows Vista Hardware Compatibility List visit:
http://winqual.microsoft.com/hcl/
WINDOWS VISTA UPGRADE ADVISOR
Windows Vista Upgrade Advisor is a downloadable web application that helps Windows XP users identify
which edition of Windows Vista meets their needs, whether their PCs are ready for an upgrade to Windows Vista,
and which features of Windows Vista will be able to run on their PCs.
The Windows Vista Upgrade Advisor depends on technology that only runs on computers with these
editions of Windows:
• All 32‐bit editions of Windows XP • All 32‐bit editions of Windows Vista, except Enterprise edition
To install and run the Windows Vista Upgrade Advisor, you will need:
• Administrator privileges • .NET 2.0* • MSXML6* • 20 MB of free hard disk space • An internet connection
Below is a sample report run on a campus Dell Latitude D610:
37
38
39
40
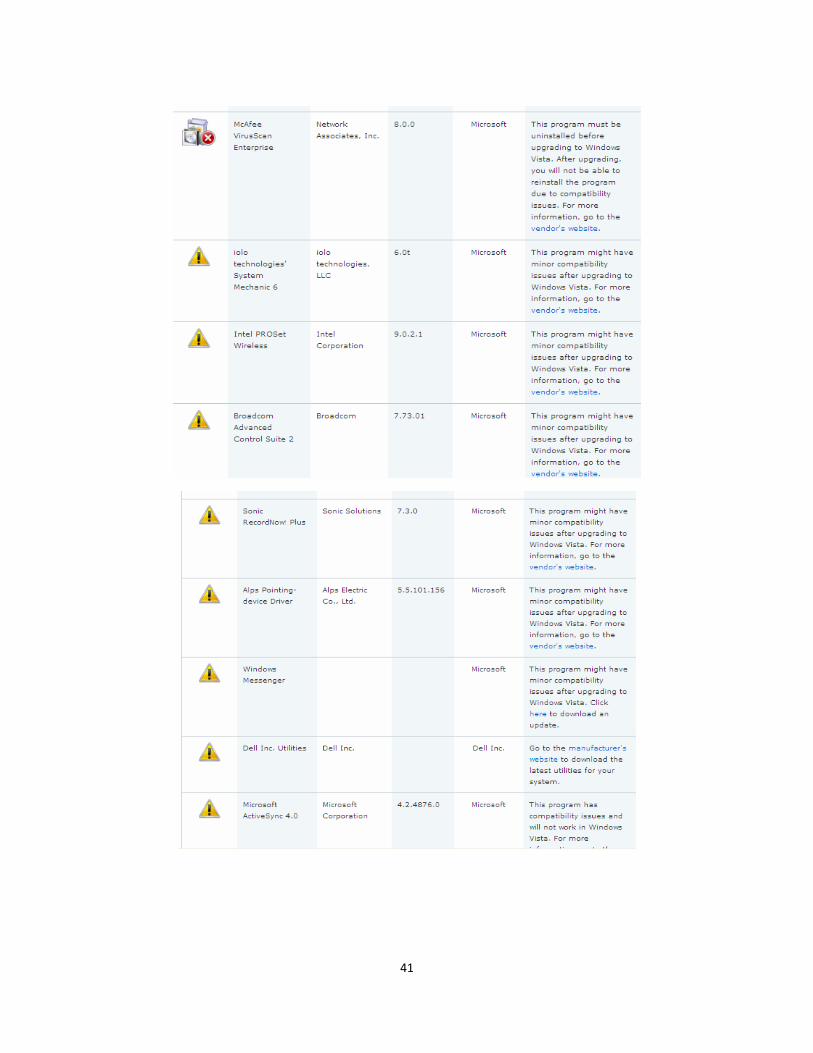
41
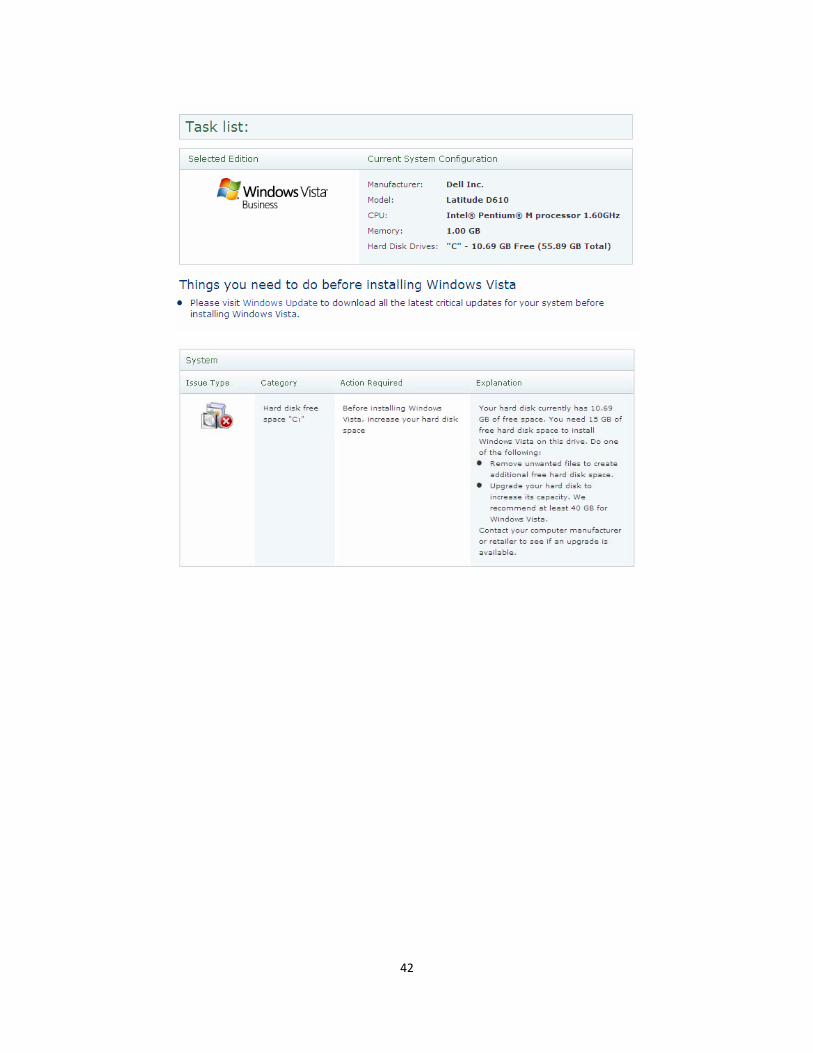
42

43
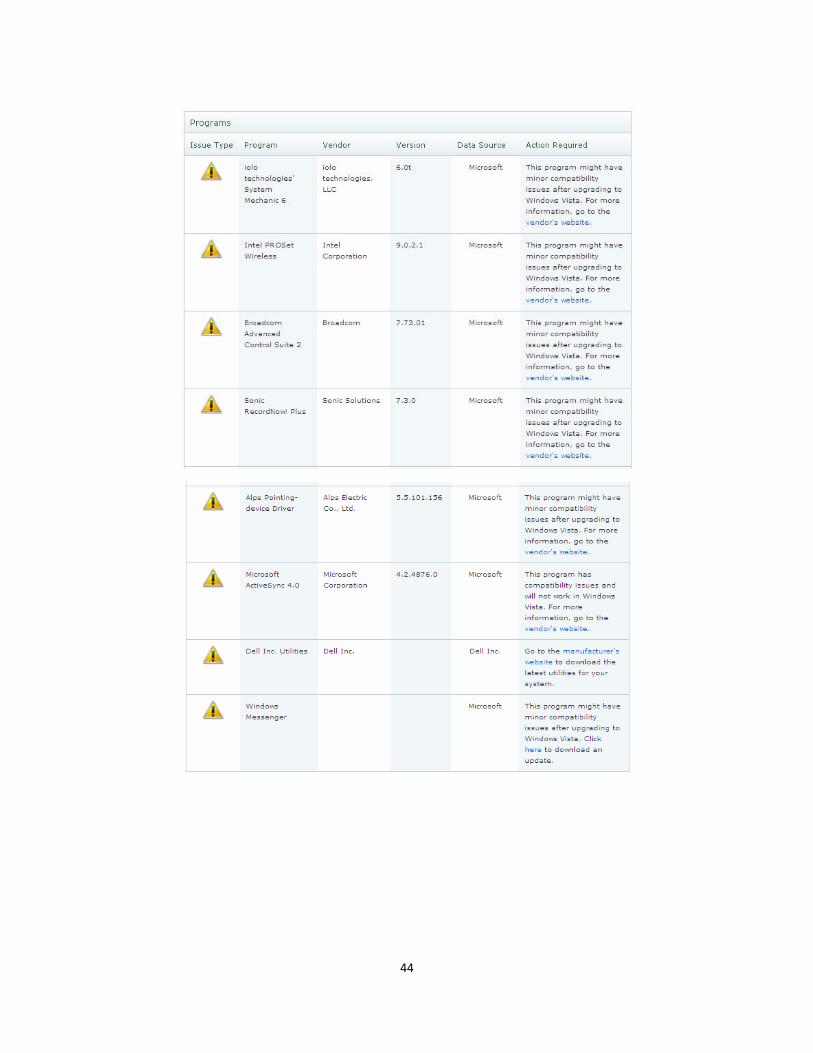
44
NETWORKING
Windows Vista includes innovations in networking technologies, including:
• Streamlined user interface
• A high‐performance, auto‐tuning TCP/IP stack
• Integrated support for both IPv4 and IPv6
• End‐to‐end security solutions
• Network diagnostics
• Manageability features such as policy‐based Quality of Service, Windows Firewall with IPsec
integration, and wireless network configuration
The description of these new features and general networking in Vista are too numerous to describe
within this document only a few are covered here. Detailed information can be found at:
http://technet.microsoft.com/en‐us/windowsvista/aa905087.aspx
TCP/IP STACK AND THE WINDOWS FILTERING PLATFORM
The Windows Vista networking stack has been completely rewritten. Instead of the dual stack model that
exists in Windows XP or Windows Server 2003 (to support IPv4 and IPv6), Windows Vista implements a new
architecture whereby there is a single transport and framing layer that support multiple IP layers. There are
several new features and protocols enhancements. The new stack is very modular, flexible, and extensible. While
all attempts have been made to maintain application compatibility with the existing applications that interface
with the stack at various layers, nevertheless, there are changes (that are mostly side‐effects of the improvements)
that may have potential application compatibility issues and that application developers must carefully evaluate to
understand the impact of these changes on their applications.
45
The Microsoft Windows Filtering Platform (WFP) API allows developers to create code that interacts with
the filtering that takes place at several layers in the Windows Vista and Microsoft Windows Server Code Name
"Longhorn" operating system networking stack and throughout the operating system. WFP also integrates with
and provides support for firewall features, such as authenticated communication and dynamic firewall
configuration, based on an application's use of the sockets API. Note: WFP is not a firewall itself. It is a set of
system services and APIs that enable firewalls to be implemented.
The following elements of the TCP/IP stack will not be supported on Windows Vista:
• The firewall‐hook driver functions and the filter‐hook driver functions have been deprecated.
• The R‐series tools, including rexec, rsh, finger, and so on. These tools are available from the
Services For Unix components, if needed.
• The Internetwork Packet Exchange (IPX) protocol. IPX has been deprecated and is not used much,
if at all. There should be no or minimal application compatibility impact because of this change.
If an application built for Windows XP was using only public functions for networking, it should not see
any break in functionality. It should be tested on Windows Vista to verify its functionality.
Applications using any of the firewall‐hook driver or filter‐hook driver functions will not work.
Applications relying on internal structures and functions calls that were never published by Microsoft will
fail.
Transport Driver Interface (TDI) filter drivers written in Kernel mode may not work properly after an OS
upgrade. Note: The TDI interface is on a path to deprecation in a future release. However, these drivers will still
work on Windows Vista.
Leverage Windows Vista capability solution:
46
• The WFP exposes a rich set of functions and services for the network security developers and
provides guidance and documentation on the available feature sets. Note: Applications and
scripts that rely on Services for Unix and R‐series must now install these tools first.
http://msdn2.microsoft.com/en‐us/library/aa480152.aspx#appcomp_topic11
NETWORKING: KERNEL MODE IP HELPER APIS
In prior releases of Windows, Winsock clients did not have an API set to access the kernel. This will
change in Windows Vista. Also, Windows Vista now supports IPv6 by default. Instead of providing separate APIs
for IPv4 and IPv6, a new Helper API set was designed to provide a common functionality across all the new
technologies, as follows:
• Kernel mode functions for Windows Sockets in Kernel (WSK) clients.
• IPv6 support.
• Single set of functions for IPv4 and IPv6 addressing.
• Provides a consistent, extensible object model.
• Provides a well‐defined security model based on the network service interface.
• Exposes new stack functionality, such as compartments and subinterfaces.
Applications using the older Helper APIs or undocumented kernel function calls will fail to function and
may become unstable.
Applications need to support and implement the new kernel mode IP helper APIs.
http://msdn2.microsoft.com/en‐us/library/aa480152.aspx#appcomp_topic12
47
NETWORKING: IPV6
The TCP/IP stack in Windows Vista has IPv6 enabled by default. IPv6 connectivity is preferred, if available.
This has the following implications for applications that hook into the TCP/IP stack:
• IPv6 traffic will be sent by the Windows Vista stack regardless of whether the network supports
IPv6 or not. Therefore, for example, router solicitation and neighbor discovery messages will be
generated by default.
• IPv6 addresses will be present and on by default. There may be multiple IPv6 addresses
associated with link‐local, global, temporary, or transition technologies like 6to4, 6over4, ISATAP,
or Teredo. Note: Teredo will be enabled by default.
• Windows Vista will allow a system to be configured in an IPv6‐only mode. In this case, no IPv4
support will be available.
The TCP/IP stack in Windows Vista supports a strong host routing model. This means that packets are
routed from a multi‐homed machine not only based on the destination address but also based on the source
address of a packet. This change is needed because in IPv6, each machine gets multiple IP addresses and, with
transition technologies, essentially appears as a multi‐homed machine as far as routing is concerned. To ensure
proper connectivity happens in these scenarios, the networking stack has to implement a strong host routing
model.
Applications using the Windows XP TCP/IP stack and/or unaware of the IPv6 protocol will not function
properly and may crash or create an unstable system.
The implication of the strong host routing model for the applications is as follows:
• Connection from a non‐loopback address to a loopback address and vice‐versa will fail.
48
• Packets with a source address of 127.0.0.0/8 will not be allowed to be sent by a Windows Vista
machine on a network.
Applications will need to be re‐authored as follows:
• Any application that hooks into the stack must be capable of handling IPv6 traffic. Minimally, it
should not crash on receiving IPv6 traffic.
• Any application that relies on there being a single IPv4 address will need to be modified to
handle multiple IPv6 addresses. Further, any application that picked the first address may have
to more carefully identify the IPv6 address to use. This is because an IPv6 link‐local address is not
routable and hence, the application may not work. Instead, the application should use functions
that allow connection by name and choose the most appropriate address automatically.
• Applications must handle and support IPv6‐only scenarios.
• Applications must support and implement the strong host routing model.
http://msdn2.microsoft.com/en‐us/library/aa480152.aspx#appcomp_topic13
NETWORKING: TURNING OFF THE WINDOWS FIREWALL
In order to avoid the situation where a user–installed firewall (which is compatible with Windows XP but
is incompatible with Windows Vista) attempts to turn off the Windows Firewall in Windows Vista, Microsoft has
deprecated the Windows Firewall XP SP2 INetFwProfile.put_FirewallEnabled(VARIANT_FALSE) function in
Windows Vista. When called on Windows Vista, this function will return and error code of E_NOTIMPL, show a
message to the user and will log an appropriate event in the Windows event log.
Applications using the Windows XP SP2 INetFwProfile.put_FirewallEnabled(VARIANT_FALSE) function to
turn‐off the Windows Firewall on Windows Vista will receive an error code.
49

Applications (typically firewalls) replacing the Windows Firewall with their own firewall solution, must
carefully consider the following security‐related points:
• Windows Vista supports IPv6 and IPv4 out‐of‐the‐box and will automatically have link local IPv6
address; therefore, it is essential that your firewall solution filters BOTH IPv4 & IPv6.
• Windows Vista also supports additional IP protocols (e.g., GRE, L2TP, PGM & ICMPv6); therefore,
it is essential that your firewall solution filters arbitrary protocol filtering (IANA Protocol 0‐255) &
ICMP type and code filtering.
• In Windows Vista there are listening processes in both user mode and kernel mode (i.e., system
process, http.sys, smb.sys); therefore, it is essential to filter BOTH User mode and Kernel mode
network traffic.
• Microsoft further recommends that these applications:
• Do not replace the Windows Firewall unless all of the security‐related points specified above are
addressed.
• Check the firewall status before your application turns‐off or disables Windows Firewall with
Advanced Security.
• Do not turn off the firewall service (mpssvc) since this is the service that enforces Windows
Service Hardening restrictions.
• Allow their firewall solution to overlap with Windows Firewall with Advanced Security in order to
minimize your customers' exposure to security threats.
Applications can disable Windows Firewall with Advanced Security by using the following code example.
To protect users, they you should only disable Windows Firewall with Advanced Security after: (1) you have
successfully turned on your firewall solution with the recommended settings; and (2) you have notified the user
that Windows Firewall with Advanced Security is going to be disabled.
http://msdn2.microsoft.com/en‐us/library/aa480152.aspx#appcomp_topic13a
50
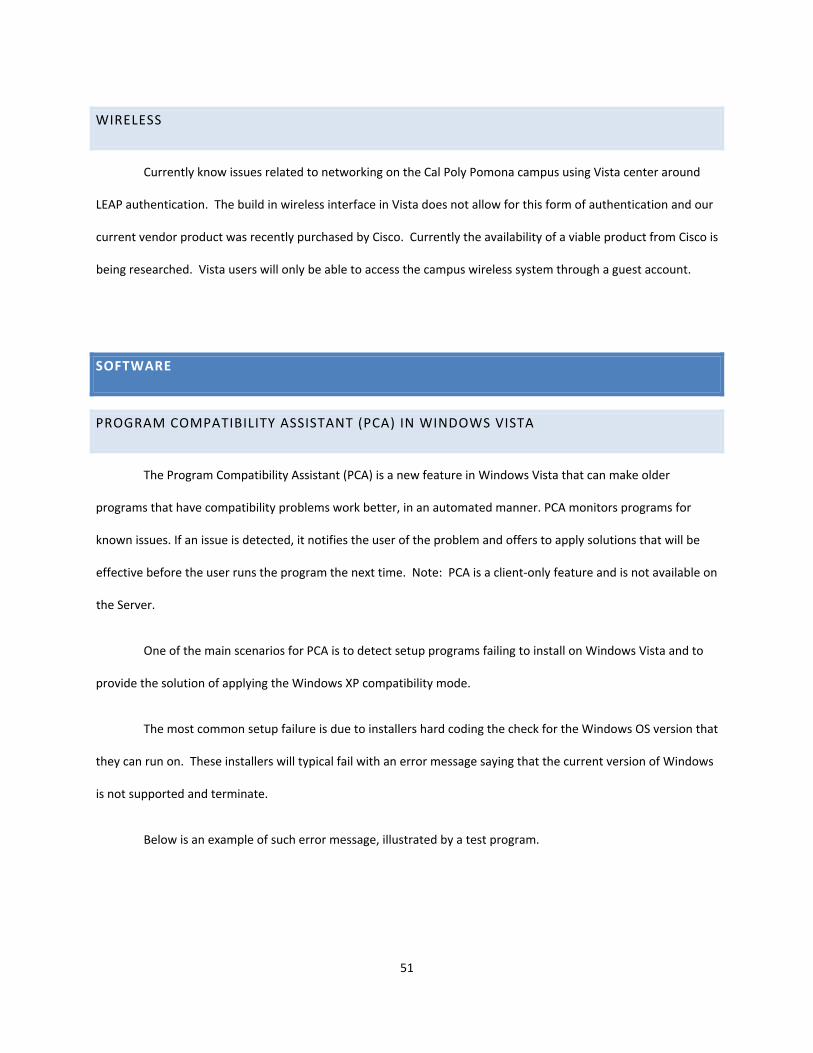
WIRELESS
Currently know issues related to networking on the Cal Poly Pomona campus using Vista center around
LEAP authentication. The build in wireless interface in Vista does not allow for this form of authentication and our
current vendor product was recently purchased by Cisco. Currently the availability of a viable product from Cisco is
being researched. Vista users will only be able to access the campus wireless system through a guest account.
SOFTWARE
PROGRAM COMPATIBILITY ASSISTANT (PCA) IN WINDOWS VISTA
The Program Compatibility Assistant (PCA) is a new feature in Windows Vista that can make older
programs that have compatibility problems work better, in an automated manner. PCA monitors programs for
known issues. If an issue is detected, it notifies the user of the problem and offers to apply solutions that will be
effective before the user runs the program the next time. Note: PCA is a client‐only feature and is not available on
the Server.
One of the main scenarios for PCA is to detect setup programs failing to install on Windows Vista and to
provide the solution of applying the Windows XP compatibility mode.
The most common setup failure is due to installers hard coding the check for the Windows OS version that
they can run on. These installers will typical fail with an error message saying that the current version of Windows
is not supported and terminate.
Below is an example of such error message, illustrated by a test program.
51
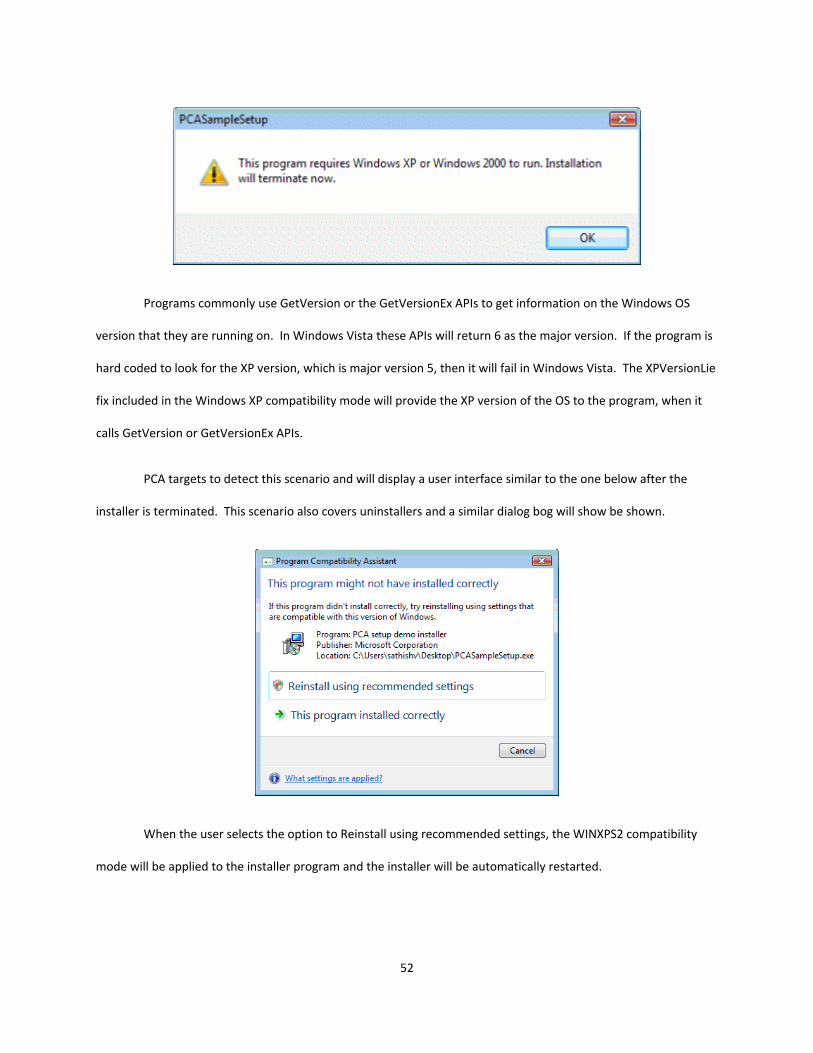
Programs commonly use GetVersion or the GetVersionEx APIs to get information on the Windows OS
version that they are running on. In Windows Vista these APIs will return 6 as the major version. If the program is
hard coded to look for the XP version, which is major version 5, then it will fail in Windows Vista. The XPVersionLie
fix included in the Windows XP compatibility mode will provide the XP version of the OS to the program, when it
calls GetVersion or GetVersionEx APIs.
PCA targets to detect this scenario and will display a user interface similar to the one below after the
installer is terminated. This scenario also covers uninstallers and a similar dialog bog will show be shown.
When the user selects the option to Reinstall using recommended settings, the WINXPS2 compatibility
mode will be applied to the installer program and the installer will be automatically restarted.
52
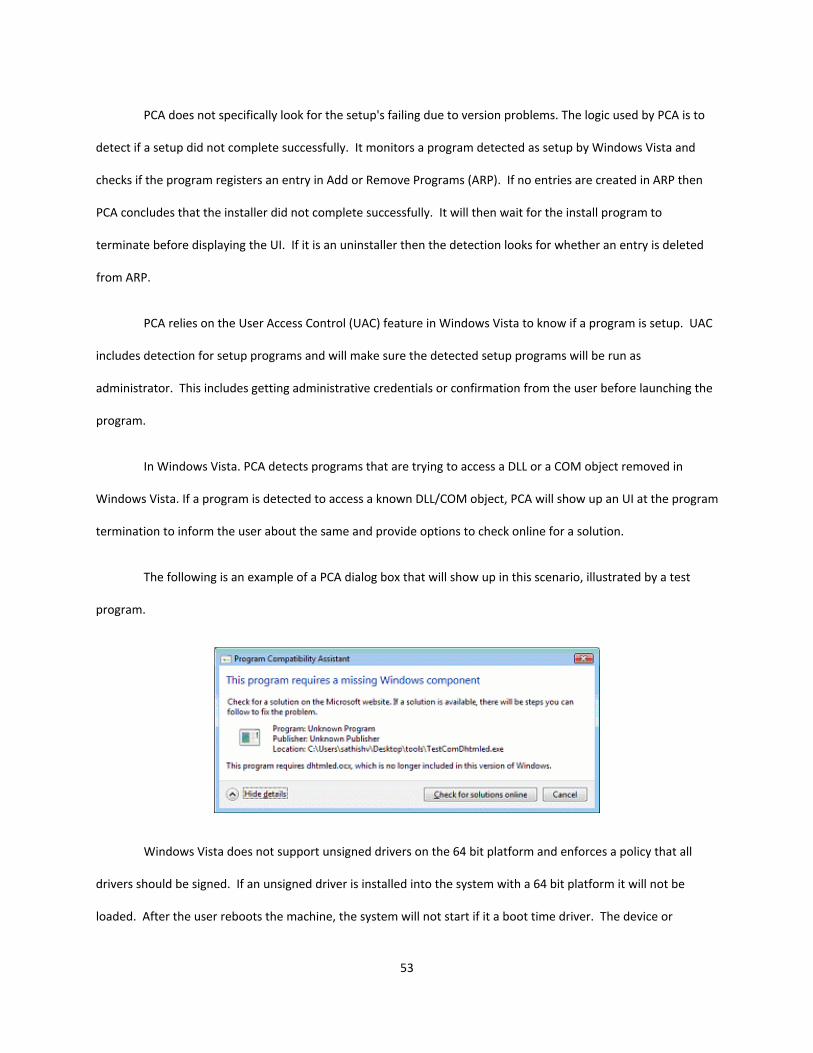
PCA does not specifically look for the setup's failing due to version problems. The logic used by PCA is to
detect if a setup did not complete successfully. It monitors a program detected as setup by Windows Vista and
checks if the program registers an entry in Add or Remove Programs (ARP). If no entries are created in ARP then
PCA concludes that the installer did not complete successfully. It will then wait for the install program to
terminate before displaying the UI. If it is an uninstaller then the detection looks for whether an entry is deleted
from ARP.
PCA relies on the User Access Control (UAC) feature in Windows Vista to know if a program is setup. UAC
includes detection for setup programs and will make sure the detected setup programs will be run as
administrator. This includes getting administrative credentials or confirmation from the user before launching the
program.
In Windows Vista. PCA detects programs that are trying to access a DLL or a COM object removed in
Windows Vista. If a program is detected to access a known DLL/COM object, PCA will show up an UI at the program
termination to inform the user about the same and provide options to check online for a solution.
The following is an example of a PCA dialog box that will show up in this scenario, illustrated by a test
program.
Windows Vista does not support unsigned drivers on the 64 bit platform and enforces a policy that all
drivers should be signed. If an unsigned driver is installed into the system with a 64 bit platform it will not be
loaded. After the user reboots the machine, the system will not start if it a boot time driver. The device or
53
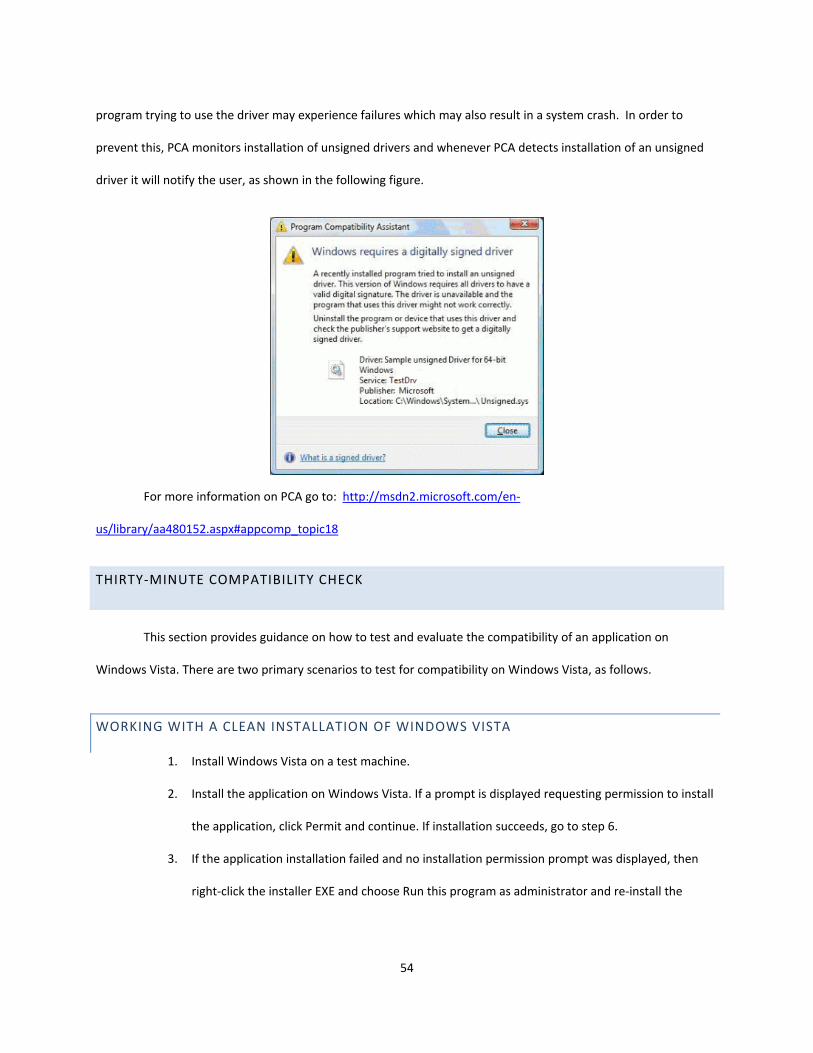
program trying to use the driver may experience failures which may also result in a system crash. In order to
prevent this, PCA monitors installation of unsigned drivers and whenever PCA detects installation of an unsigned
driver it will notify the user, as shown in the following figure.
For more information on PCA go to: http://msdn2.microsoft.com/en‐
us/library/aa480152.aspx#appcomp_topic18
THIRTY‐MINUTE COMPATIBILITY CHECK
This section provides guidance on how to test and evaluate the compatibility of an application on
Windows Vista. There are two primary scenarios to test for compatibility on Windows Vista, as follows.
WORKING WITH A CLEAN INSTALLATION OF WINDOWS VISTA
1. Install Windows Vista on a test machine.
2. Install the application on Windows Vista. If a prompt is displayed requesting permission to install
the application, click Permit and continue. If installation succeeds, go to step 6.
3. If the application installation failed and no installation permission prompt was displayed, then
right‐click the installer EXE and choose Run this program as administrator and re‐install the
54
application. If the install succeeds, go to step 6.
Note This step is not necessary if an MSI is used to install.
4. If you receive any errors, such as OS version, CLSID registration, or file copy, then right‐click the
installer EXE file, choose the Compatibility tab, and choose the Windows XP SP2 compatibility
mode.
5. Go back to step 2. If you cannot install the application, go to step 9.
6. The application should now be installed.
7. Launch the application. If the application did not launch properly or if errors are displayed, apply
the Windows XP SP2 compatibility mode to the application EXE and try again.
8. If the application launches successfully, run through the full suite of tests that would typically be
used to test the application on Windows XP. Verify your application functionality and confirm
that the application performs properly. If all major functionality tests pass, go to step 10.
9. If the application does not install, launch successfully, crashes, encounters an error, or fails major
functionality tests, it may be one of the small set of applications that are impacted by
Windows Vista changes. Use the topics in this document to check your application.
10. You have completed the scenario.
WORKING WITH AN UPGRADE FROM WINDOWS XP SERVICE PACK 2
1. Install Windows XP SP2 on a test machine and then install the application. Verify all the
functionality of the application before proceeding.
2. Upgrade the test machine to Windows Vista. Follow the Windows Vista setup and upgrade
instructions. Once the upgrade is complete, log on as you would on Windows XP.
3. Launch the application. If the application did not launch properly or if errors are displayed, apply
the Windows XP SP2 compatibility mode to the application EXE and try again.
55
4. If the application launches successfully, run through the full suite of tests that would typically be
used to test the application on Windows XP. Verify your application functionality and confirm
that the application performs properly. If all major functionality tests pass, go to step 6.
5. If the application does not install, launch successfully, crashes, encounters an error, or fails major
functionality tests, it may be one of the small set of applications that are impacted by
Windows Vista changes. Use the topics in this document to check your application.
6. You have completed the scenario.
If both scenarios have been completed and the application has performed properly, then the application
functions correctly under Windows Vista. For information about obtaining certification for your application, see
the Windows Vista Home Page.
http://msdn2.microsoft.com/en‐us/library/aa480152.aspx#appcomp_topic2
OPERATING SYSTEM VERSIONING
The internal version number for Windows Vista is 6. The GetVersion function will now return this
version number to applications when queried. Note: This is the next major version number from Windows XP
(version 5.x).
The manifestation of this version change is very application‐specific, as follows:
• Any application that specifically checks for the OS version will get a higher version number.
• Application installers may prevent themselves from installing the application and applications
may prevent themselves from starting.
• Applications may warn users and continue to function properly.
• Some applications may become unstable or crash.
56
Most applications will function properly on Windows Vista because the application compatibility in
Windows Vista is very high. However, for applications and installers that check for OS version, a Compatibility
mode is provided in Windows Vista.
Users can right‐click the shortcut or the EXE and apply the Windows XP SP2 compatibility mode from the
Compatibility tab. In most cases, this should enable the application to work as it did on Windows XP without a
need for any changes to the application.
• Generally, applications should not perform OS version checks or, at minimum, always accept
version 6 or later for the OS. This behavior should be followed unless there is a very specific legal,
business, or system‐component need to do this version check.
• Application installers should not use 16‐bit installers to ensure 64‐bit system compatibility.
• Ensure that any drivers an application uses are user mode drivers as much as possible to
maintain multiplatform (32‐bit and 64‐bit) compatibility.
http://msdn2.microsoft.com/en-us/library/aa480152.aspx#appcomp_topic3
USER ACCOUNT CONTROL
A fundamental step toward increasing the security of Windows is enabling interactive users to run with a
standard user account, which gives them access to only a limited set of permissions and privileges. By default,
Windows Vista will run every application as a standard user even if you log on as a member of the administrator's
group. Conversely, when users attempt to launch an application that has been marked as requiring administrator
permissions, the system will explicitly ask them to confirm their intention to do so. Only applications running with
administrator privileges can modify system and global settings and behavior. This feature of Windows Vista is the
User Account Control (UAC).
• Custom installers, uninstallers, and updaters may not be detected and elevated to run as
administrator.
57
• Standard user applications that require administrative privileges to perform their tasks may fail
or not make this task available to standard users.
• Applications that attempt to perform tasks for which the current user does not have the
necessary permissions, may fail. How the failure manifests itself is dependent upon how the
application was written.
• Control panel applications that perform administrative tasks and make global changes may not
function properly and may fail.
• DLL applications that run using RunDLL32.EXE may not function properly if they perform global
operations.
• Standard user applications writing to global locations will be redirected to per‐user locations
through virtualization.
Quick solution for custom installers:
• A user can launch the installer or updater by right‐clicking and selecting Run this program as
administrator.
• Apply an application compatibility fix to indicate that specific installers require elevation. To do
so, right‐click the shortcut or the EXE and apply the Windows XP SP2 compatibility mode from
the Compatibility tab.
Quick solution for applications that require administrative privileges to perform system modifications or
write to privileged areas:
• Corporate users will be able to apply an application compatibility fix to indicate that the legacy
application requires administrator permissions or privileges to run correctly.
• Reducing the restrictions of access control lists (ACLs) on certain restricted files may help
applications that attempt to write these files.
58
o Check the virtualized folders or registry keys to see if applications are accessing
something that requires administrator privileges. This information can be used to
remove the requirements of accessing administrator‐protected locations from future
versions of the application. For more information about virtualized files, folders, and
locations, see the "Links" section.
• Wrap a "Run DLL as an app" DLL call in a separate EXE and include a manifest for this EXE to
require elevated privileges.
Compatibility test:
• Any install, uninstall, or update scenario should prompt the user for consent or credentials. Upon
receiving user approval, the action should succeed.
• Attempt to reproduce the failing scenario as the built‐in‐administrator. If this scenario passes,
the failure is probably due to a lack of privileges.
• Use the User Account Control predictor tool of the Application Compatibility Toolkit's
Compatibility Administrator to identify those areas of an application that are performing
administrator operations.
Leverage Windows Vista capability solution:
• Windows Vista based applications need to:
o Follow the prescribed guidelines found in the Windows Vista LOGO program and user
experience (UX) guidelines documentation (see the "Links" section).
o Use embedded manifests to indicate their specific requestedExecutionLevel (formerly
known as RunLevel).
o Separate all administrative and non‐administrative functions into separate EXEs. All
functions that need higher privileges should be in a separate executable EXE with
59
manifested execution level or a COM object running with administrative privileges.
Launch the administrative tasks only when required. This holds true for all applications.
• For applications that are not specifically administrative in nature, modify code to eliminate need
for administrator permissions or privileges.
• For applications that are only used by administrators, mark the application so it will run with
administrator permissions or privileges.
• When updating an application, use a separate updater EXE to update the target application.
• Control panel applications must move away from .cpl files to .exe files, and include a manifest for
their EXE‐based control panel applications that specifies the execution level required.
• DLLs running under RunDLL32.EXE that need elevation should be modified into an executable
EXE with its elevation level indicated in its manifest.
• Always open files and registry keys with read‐only access when possible. Use read‐write access
only when needed and revert the permissions back to read‐only once the operation is complete.
http://msdn2.microsoft.com/en‐us/library/aa480152.aspx#appcomp_topic4
COMPATIBILITY RISKS
Deprecated Components: The following components from earlier Windows releases will not be present in
Windows Vista:
• Kernel mode Printer driver support: All printer drivers will now have to follow the User mode
driver framework. All kernel mode printer drivers will be blocked from loading on Windows Vista.
For more information, see the User-Mode Driver Framework (UMDF) site.
• Windows Help (WinHelp.exe and WinHlp32.exe) is being deprecated for Windows Vista.
Windows Help is not supported in Beta 2 and some of the Windows Help code has been removed
for the release. To view Help files with the .HLP file name extension in Windows Vista, you will
need to download and install Windows Help from the Microsoft Download Center. This
60
download will not be available for Beta 2 or RC1. For more information, see Help Engine Support.
Note HTML Help and .CHM files will continue to be supported for Windows Vista.
• Microsoft FrontPage server extensions. Windows SharePoint Services now provides an enhanced
feature set to the developer community.
• Services for Macintosh.
• D3DRM. DirectX will be the only supported graphics package for Windows Vista.
• Web Publishing Wizard.
• NetDDE—For security reasons, Windows Vista does not support NetDDE. (NetDDE is disabled by
default on Windows XP SP 2 and Windows Server 2003.) Regular DDE is still supported. NetDDE is
a technology that allows applications that use the DDE transport to transparently exchange data
over a network. The result is the application fails to exchange data over the network. To
workaround, use a different networking technology, such as DCOM or Windows Communication
Foundation. For more information about NetDDE, see
http://support.microsoft.com/default.aspx?scid=kb;en-us;125703.
http://msdn2.microsoft.com/en‐us/library/aa480152.aspx#appcomp_topic14
VISTA SOFTWARE COMPATIBILITY LIST
These are two resources to find Vista software compatibility lists:
http://www.iexbeta.com/wiki/index.php/Windows_Vista_Software_Compatibility_List
http://forumz.tomshardware.com/software/List‐Vista‐Supported‐Hardware‐amp‐Software‐
ftopict232602.html
61

CONCLUSION
After using Vista for the past few weeks, reading, and listen to others experiences, I can say that Vista has
a lot to offer. The initial trial and error with finding drivers and software to work with Vista has seems to lessen as
time passes. I think this trend will continue and the availability of needed software and drivers will stabilize as
developers have more time with Vista to program and test their products.
Due to the need for increased hard drive, processor speed, memory and graphics capabilities the standard
consensus is most users will not move to Vista until the need to purchase a new computer arises. For those who
do not wish to wait the Windows Vista Update Advisor tool does a good job of letting the end user know if and
how Vista will perform on their existing system. Most of the existing systems on campus do not meet the
preferred requirements to run all of the new features found within Vista, but many will run the basic Vista
configuration.
There are known issues with existing software, but they change every day as developers fine‐tune their
products. A good resource for current issues with Vista bugs, hardware and software can be found at:
http://www.iexbeta.com/wiki/index.php/Windows_Vista_Software_Compatibility_List
Many applications and feature that are used by the campus have been tested and found to work. The
lists below are those programs or features that have been used by me or reported to me as currently working:
Adobe Acrobat 7, 8
Adobe Acrobat Reader 8
Adobe Captivate 2
Adobe Designer 7
Adobe Illustrator CS2
Adobe ImageReady CS2
Adobe InDesign CS2
Adobe Photoshop CS2
Adobe Premiere Pro 2
Blackboard/WebCT
Breeze/Acrobat Connect
Bronco Direct
Firefox
IE7
Macromedia Flash 8
Macromedia Dreamweaver 8
Macromedia Fireworks 8
Macromedia Contribute 3
Macromedia Flashpaper 2
McAfee VirusScan 8.5i
62
Office 2007 WIN Domain Connection
Remote Desktop Connection Windows Vista
VPN
NOTE: All campus applications are under‐going extensive testing. Results that will verify compatibility or
report any known issues will be published on a separate web page.
As Vista becomes more visible on campus, this list will grow and compatibility issues will need to be
addressed. For example, one issue mentioned here under the Networking section is the need for wireless
software that provides LEAP authentication for the campus. Users may also struggle with the lack of a built it
video decoders in the Enterprise addition. DVD decoders will need to be added to run most DVD’s, K‐Lite Codec
Pack is one option that is free and has been tested.
Over all my thoughts about Vista is that it is here now and working. I think it is working better than most
expected. We will need to continue to investigate how it works in our environment and make careful decisions on
deployment, support and training as a campus.
RECCOMENDATIONS
As users transitions over to Vista and we see Vista more and more on campus our need for a Vista plan
increases. In my view, steps can be taken to help immediately in the support of Vista on campus.
• Share what we know.
• This paper can be a start to provide an overview of Vista to the local campus tech community.
• eHelp ‐ http://www.csupomona.edu/~ehelp/software/vista.html
o Software Compatibility:
This page can be expanded to show many of the software titles already tested on Vista.
63
This link from Carnegie Mellon already includes the software they have tested and is a
good example of what might work here.
http://www.cmu.edu/computing/msvista/index.html
o Hardware Issues:
This page could also list know hardware issues and machine types know to run Vista
well.
o Bugs & Fixes:
As issues arise, regarding Vista this page could communicated them to the campus and
list the fixes when found.
• Find out what we don’t know:
o As all of us use Vista, find out what works, and does not work a convenient way to share
this information within the campus would be helpful. This could save time and help in
learning the new platform.
• Provide training to campus techs to help mitigate potential support problems.
• Provide training to end users through handouts, Breeze tutorials, and in a classroom setting.
• Detailed planning at the centralized level to decided what feature of Vista would be helpful to
use and work within our existing systems.
• Decide how licensing of Vista is best supported on campus. MAK use is necessary for laptops, but
a KMS server would allow for instant activation and motoring of license use and system
resources.
• Discuss wide deployment of Vista in departments and labs before it happens to evaluate the
impact on other campus departments.
• Regroup every few months, evaluate the impact Vista has made on the campus, and see if our
efforts need to be redirected.
64
APPENDIX A ‐ WINDOWS VISTA MIGRATION STEP‐BY‐STEP GUIDE
Windows Vista introduces new setup methods and processes, based on the new image‐based setup
feature of Windows Vista. This document provides the steps to use when upgrading a computer from the
Microsoft Windows XP Professional operating system or the Microsoft Windows XP Home Edition operating
system to Windows Vista, and also how to migrate existing files and settings from Windows XP to Windows Vista.
WINDOWS VISTA MIGRATION SCENARIOS
This document covers two primary scenarios for installing Windows Vista: upgrading an existing
Windows XP computer "in‐place" on the same computer hardware, and migrating user settings to a new computer
running Windows Vista. If you purchase a new computer to run Windows Vista and want to move your files and
settings from Windows XP to the new computer running Windows Vista, refer to the "Migrating to Windows Vista"
scenario. If you are planning to install Windows Vista on a computer running Windows XP, refer to the "Upgrading
to Windows Vista" scenario.
Upgrading to Windows Vista
This scenario assumes that you are installing Windows Vista on a computer running Windows XP
Professional or Windows XP Home Edition.
Migrating to Windows Vista
This scenario assumes that you are installing Windows Vista on a new computer, and then transferring
your user settings and files from a computer running Windows XP Professional or Windows XP Home
Edition.
REQUIREMENTS FOR INSTALLING WINDOWS VISTA
Hardware requirements for Windows Vista are as follows:
65
• A 32‐bit (x86) or 64‐bit (x64) computer with 800 megahertz or higher processor clock speed
(single or dual processor system); Intel Pentium/Celeron family, or AMD Athlon/Duron family, or
compatible processor recommended.
• 512 megabytes (MB) of RAM or higher recommended
• At least 15 gigabytes (GB) of available hard disk space
• A video adapter capable of supporting the Windows Display Driver Model (WDDM) drivers used
in Windows Vista
• CD‐ROM drive (a DVD drive is strongly recommended). Drives may be internal or external.
OVERVIEW OF SCENARIOS
These scenarios cover the steps required to install Windows Vista as either an upgrade to an existing
operating system, or on a new computer to which you will transfer settings and files. The steps are very similar for
the Windows Vista setup in both scenarios; the scenarios differ in the state of the computer at the beginning of the
procedures, and the transfer of data after the Windows Vista installation.
UPGRADING TO WINDOWS VISTA
AVOIDING SOFTWARE CONFLICTS
This section addresses a temporary issue that may be present when you upgrade from Windows XP to
Windows Vista.
If you are upgrading a computer running Windows XP and Windows AntiSpyware Beta 1, you may see
software conflicts with Windows Defender when you upgrade to Windows Vista. To avoid this, uninstall Windows
AntiSpyware Beta 1 before starting the upgrade process described in this section.
66
STEPS FOR UPGRADING TO WINDOWS VISTA
Step 1: Assess Hardware Requirements
Step 2: Backup Important Data
Step 3: Upgrade to Windows Vista
STEP 1: ASSESS HARDWARE REQUIREMENTS
The above‐noted hardware requirements for Windows Vista are general guidelines only. For better
performance, consider the following "minimum recommended" configuration:
• A computer with a modern CPU, as detailed in the Windows Vista Capable PC Hardware
Guidelines (http://go.microsoft.com/fwlink/?LinkID=54987). One gigahertz or higher processor
clock speed recommended.
• 512 megabytes (MB) of RAM or higher recommended
• At least 15 gigabytes of available hard disk space (exact amount depends upon several factors,
including features installed and virtual memory settings selected)
• A DirectX 9–class graphics adapter that supports WDDM and Pixel Shader 2.0, capable of
supporting the Windows Display Driver Model (WDDM) drivers used in Windows Vista
• A DVD writer is required by the Windows DVD Maker program included with Home Premium and
Ultimate editions.
To determine if your PCs meet the hardware requirements for Windows Vista network‐wide, you are
recommended to use the Windows Vista Hardware Assessment.
67
STEP 2: BACKUP IMPORTANT DATA
You should back up files, or save them to a safe location, before upgrading to Windows Vista. While this
step is optional, it is important to have a current backup of important data before making significant changes to
the computer to prevent data loss.
To save your important data to a safe location, your options will depend on the original operating system
and the backup options available to you. The following list provides a few suggestions:
• Windows Backup, or other backup software
• Copy the important data to a network folder
• Burn the data to a CD or DVD
• Backup to an external hard disk
STEP 3: UPGRADE TO WINDOWS VISTA
The procedure for upgrading to Windows Vista assumes that you are already running a previous version
of Windows on your computer. Upgrades are supported for the following versions of Windows:
• Windows XP SP 2
• Windows Vista
UPGRADE TO WINDOWS VISTA
1. Start Windows Vista Setup by inserting the DVD while running Windows, and click Install Now. If
the autorun program does not open the Install Windows screen, browse to the root folder of the
DVD and double click setup.exe.
2. Click Next to begin the Setup process.
68
1. Click Go online to get the latest updates (recommended) to retrieve any important updates for
Windows Vista. This step is optional. If you choose not to check for updates during Setup, click
Do not get the latest updates.
2. In Product key, type your product ID exactly as it appears on your DVD case. Click Next to
proceed.
3. Read and accept the License Terms. Click I accept the License Terms (required to use Windows),
and then click Next. If you click I decline (cancel installation) Windows Vista Setup will exit.
4. Click Upgrade (recommended) to perform an upgrade to your existing installation of Windows.
5. Windows Vista Setup will proceed without further interaction.
Note: To perform this procedure, you must be a member of the Administrators group on the local computer, or
you must have been delegated the appropriate authority. If the computer is joined to a domain, members of the
Domain Admins group might be able to perform this procedure. As a security best practice, consider using Run as
to perform this procedure.
MIGRATING TO WINDOWS VISTA
To migrate to Windows Vista from a previous version of Windows, you should have a computer running a
supported version of Windows that contains applications, settings, and data to be moved to a new computer
running Windows Vista. The migration tools in Windows Vista provide three options for migrating your settings
and files:
• Network connection
• Removable media (such as a USB flash drive or external hard disk)
• CD or DVD
In addition to a choice of transfer method, you have a choice of migration tools. Windows Easy Transfer,
included in Windows Vista, can be used to migrate settings and files for all of the users on a single computer to a
69
new computer. If you want to migrate files and settings for a number of users on multiple computers, use the User
State Migration Tool (USMT).
STEPS FOR MIGRATING TO WINDOWS VISTA
Step 1: Migrate User Settings Using the User State Migration Tool
Step 2: Migrate User Settings Using Windows Easy Transfer
STEP 1: MIGRATE USER SETTINGS USING THE USER STATE MIGRATION TOOL
You can use Microsoft Windows User State Migration Tool (USMT) 3.0 to migrate user accounts during
large deployments of Microsoft Windows XP and Windows Vista operating systems. USMT captures user accounts
including desktop, and application settings, as well as a user's files, and then migrates them to a new Windows
installation. Using USMT can help you improve and simplify your migration process. You can use USMT for both
side‐by‐side (where you are copying the data from the old computer to a new computer) and wipe‐and‐load
(where you are saving the data and then formatting the computer's hard disk and performing a clean install)
migrations. If you are only upgrading your operating system, USMT is not needed.
USMT is intended for administrators who are performing automated deployments. If you are migrating
the user states of only a few computers, you can use Windows Easy Transfer. For more information about USMT,
see "Step‐by‐Step Guide to Migrating Files and Settings" on the Microsoft Web site
(http://go.microsoft.com/fwlink/?LinkID=37680).
USMT allows you to do the following:
• Configure USMT for your unique situation, using the migration rule (.xml) files to control exactly
which user accounts, files and settings are migrated and how they are migrated.
70
• Automate your migration using the two USMT command‐line tools, which control collecting and
restoring the user files and settings.
USMT is described in full detail in "Getting Started with User State Migration Tool" on the Microsoft Web
site (http://go.microsoft.com/fwlink/?LinkID=56578).
STEP 2: MIGRATE USER SETTINGS USING WINDOWS EASY TRANSFER
You can use Windows Easy Transfer to move user accounts, files and folders, program settings, Internet
settings and favorites, and e‐mail settings from an existing Windows computer to a new computer running
Windows Vista.
Step 1: Preparing for the Transfer
Step 2: Capturing Files and Settings from the Existing Computer
STEP 1: PREPARING FOR THE TRANSFER
Windows Easy Transfer in Windows Vista supports the following operating systems:
1. Windows 2000 SP 4
2. Windows XP SP 2
3. Windows Vista
PREPARING WINDOWS EASY TRANSFER
1. Open Windows Easy Transfer on your Windows Vista computer: click Start, click All Programs,
click Accessories, click System Tools, and then click Windows Easy Transfer. Click Next to
proceed.
71
2. If you have any programs open, you will be prompted to close them. You can opt to save your
work in each program, and then close them individually, or you can click Close All in Windows
Easy Transfer to close all running programs at once. Click Next.
3. Click Start new to begin the process of preparing Windows Easy Transfer to gather information
from existing computers.
4. Click This is my new computer.
5. Select the destination for Windows Easy Transfer files. You have the option of creating the wizard
files on CD or DVD, removable media, or a network drive. To use removable media or CD/DVD,
you must have a drive in your computer that supports writing data to the appropriate media.
Click Network drive.
Note: Both computers must support the transfer method you choose. For example, if you write
the data to CD or DVD, the destination computer must also have a CD or DVD drive. If you choose
to transfer the data across the network, both computers must be connected on the same
network.
6. Type a path and folder name in which you will store the Windows Easy Transfer files. The default
value is C:\migwiz. Click Next.
STEP 2: TRANSFERRING FILES AND SETTINGS
Perform this step on the existing computer from which you are migrating user settings and files. Once the
files and settings have been collected from your old computer and saved, you will move to the new computer to
complete the wizard.
TRANSFER FILES AND SETTING USING A NETWORK
72
1. Start Windows Easy Transfer on the computer from which you wish to migrate settings and files
by browsing to the removable media or network drive containing the wizard files, and then
double clicking migwiz.exe.
2. If you have any programs open, you will be prompted to close them. You can opt to save your
work in each program, and then close them individually, or you can click Close All in Windows
Easy Transfer to close all running programs at once. Click Next.
3. Determine the transfer method to use. Click Through a network.
Note: Both computers must support the transfer method you choose. For example, both
computers must be connected to the same network.
4. Click Connect directly via network to begin the transfer. Alternately, click Save to network
location if you want to store the files and settings in a file to be loaded later. If you choose to
store the data in a network location, you will be prompted to provide the path.
5. Click Everything ‐ all user accounts, files, and program settings (recommended) to transfer all
files and settings. You can also choose to determine exactly which files should be migrated by
clicking either Only my user account, files, and program settings, or Custom.
6. Review the list of files and settings to be transferred, and then click Start to begin the transfer.
Click Customize if you want to add or remove files or settings.
TRANSFER FILES AND SETTINGS USING REMOVABLE MEDIA
1. Start Windows Easy Transfer on the computer from which you wish to migrate settings and files
by browsing to the removable media or network drive containing the wizard files, and then
double clicking migwiz.exe.
73
2. If you have any programs open, you will be prompted to close them. You can opt to save your
work in each program, and then close them individually, or you can click Close All in Windows
Easy Transfer to close all running programs at once. Click Next.
3. Determine the transfer method to use. Click On a CD or other removable media, such as a flash
drive.
Note: Both computers must support the transfer method you choose. For example, both
computers must support the same type of removable media.
4. Click To a network drive to save the files to either a network folder or a folder on a removable
drive.
5. In Where do you want to save your files, type the path to a folder on the removable drive, and
then click Next.
6. Click Everything ‐ all user accounts, files, and program settings (recommended) to transfer all
files and settings. You can also choose to determine exactly which files should be migrated by
clicking either Only my user account, files, and program settings, or Custom.
7. Review the list of files and settings to be transferred, and then click Start to begin the transfer.
Click Customize if you want to add or remove files or settings.
8. Click Close once Windows Easy Transfer has completed moving files.
9. Move the removable media to the new computer and launch Windows Easy Transfer. Click Next.
10. Click Continue a transfer in progress.
11. In Where did you copy your files, click Removable media. If Removable Media is unavailable,
click Network Drive. Click Next.
74
12. In Locate your saved files, type the path to your saved files or click Browse. Click Next once you
have located the files.
13. Choose user names on your new computer that match the names on the old computer. You may
have to create new accounts in this step. Type in a user name to create an account on the local
computer. Type in a user name in the format domain\user to create a profile for a domain user.
14. In Choose the drives for files on your new computer, select the destination drive for each source
drive location. For example, for files that came from the D: drive on your old computer, you must
determine which drive they should be moved to on the new computer.
15. Review the list of files and settings to be transferred, and then click Start to begin the transfer.
Click Customize if you want to add or remove files or settings.
16. Click Close once Windows Easy Transfer has completed moving files.
TRANSFER FILES AND SETTINGS USING A WRITABLE CD OR DVD
1. Start Windows Easy Transfer on the computer from which you wish to migrate settings and files
by browsing to the removable media or network drive containing the wizard files, and then
double clicking migwiz.exe.
2. If you have any programs open, you will be prompted to close them. You can opt to save your
work in each program, and then close them individually, or you can click Close All in Windows
Easy Transfer to close all running programs at once. Click Next.
3. Determine the transfer method to use. Click Burn a CD or DVD.
Note: Both computers must support the transfer method you choose. For example, both
computers must have a working CD or DVD drive.
4. In Choose your media, type the path to the writeable CD or DVD media. Click Next.
75
5. Click Everything ‐ all user accounts, files, and program settings (recommended) to transfer all
files and settings. You can also choose to determine exactly which files should be migrated by
clicking either Only my user account, files, and program settings, or Custom.
6. Review the list of files and settings to be transferred, and then click Start to begin the transfer.
Click Customize if you want to add or remove files or settings. If there is not enough free space
on the writeable media, Windows Easy Transfer will tell you how many blank discs will be
required.
7. Click Next once the CD or DVD burn process has completed.
8. Click Close once Windows Easy Transfer has completed moving files.
9. Move the CD or DVD media to the new computer and launch Windows Easy Transfer. Click Next.
10. Click Continue a transfer in progress.
11. In Where did you copy your files, click Read CD or DVD.
12. In Choose your media, select the drive letter for your CD or DVD drive where the disc is located.
Click Next once you have located the files.
13. Choose user names on your new computer that match the names on the old computer. You may
have to create new accounts in this step. Type in a user name to create an account on the local
computer. Type in a user name in the format domain\user to create a profile for a domain user.
14. In Choose the drives for files on your new computer, select the destination drive for each source
drive location. For example, for files that came from the D: drive on your old computer, you must
determine which drive they should be moved to on the new computer.
15. Review the list of files and settings to be transferred, and then click Start to begin the transfer.
Click Customize if you want to add or remove files or settings.
76

16. Click Close once Windows Easy Transfer has completed moving files.
http://technet.microsoft.com/en‐us/windowsvista/aa905082.aspx
77
APPENDIX B ‐ 10 THINGS YOU NEED TO KNOW ABOUT DEPLOYING WINDOWS VISTA
You've deployed Windows XP in the past, and now you're thinking ahead to Windows Vista. Whether you'll be deploying to 10, 100, or 100,000 computers, just knowing how the process has changed from Windows XP will make the deployment run much more smoothly.
So here are 10 deployment differences between Windows® XP and Windows Vista™ that you'll be glad you
discovered when it's time to make the move.
1. Windows Vista Images Are Bigger
With Windows XP and Windows 2000, it was possible to create images that would fit easily on a single CD (less
than 700MB). Even organizations that added applications, drivers, and utilities to their image typically ended up
with an operating system image in the 1GB to 3GB range.
With Windows Vista, image size begins at about 2GB—compressed. Once this image is deployed, the size is often
around 5GB or more, and there's no way to reduce it. If you add additional applications, drivers, or other files, this
image obviously grows even larger.
So how will you deploy the image? Does your network have the necessary capacity? (10MB networks or non‐
switched networks are not sufficient.) If you want to use CDs, how many can you deal with? You'll need three or
four. DVDs (with a capacity of 4.7GB each) are now easy to create, so you can deploy using DVD drives if you have
them. (If not, consider adding DVD drives when buying the next round of PCs.)
78

With USB memory keys growing in size (as large as 4GB or more) and shrinking in price, it would be quite easy to
use one for deploying Windows Vista, since you can make a bootable key as long as the computer's BIOS supports
it.
Finally (though this doesn't relate to image size), take note that there is no longer an I386 directory. Instead, all
components, whether installed or not, reside in the Windows directory (although not in the standard SYSTEM32
directory). When installing a new component, the necessary files will be pulled from this location.
2. Security Is Enhanced
A number of Windows Vista security enhancements will impact deployment. For example, configuring Windows
Vista to support "low rights" users, where the logged‐on user does not have administrator rights, is easier. Some
applications failed to work on Windows XP when users did not have administrator access because they assumed
they would have full access to the C: drive and all parts of the registry. With Windows Vista, applications that
attempt to write to restricted areas will have those writes transparently redirected to other locations in the user's
profile.
The second big change here is that non‐administrators can load drivers. This lets users attach new devices without
needing to call the help desk in tears.
The third difference you'll find is that Internet Explorer® can automatically install ActiveX® controls using elevated
rights. A new service can perform these installations on the user's behalf (if, of course, the IT administrator allows
this via Group Policy).
Some of you may currently be using Power User rights on Windows XP, but this really does not offer many benefits
(in terms of restricting user rights) over simply granting full Administrator privileges. Because of this, the Power
79
Users group in Windows Vista has been removed, although it can be put back if required using a separate security
template that can be applied to an installation of Windows Vista.
Sometimes you will need administrator rights, but this doesn't mean you want to run with admin rights all the
time. So Windows Vista adds User Access Control (UAC), which causes most user applications—even for
Administrators—to run with restricted rights. For applications that require additional rights, UAC will prompt for
permission, asking either for permission to run with elevated privileges or for other user credentials that can
replace the logged‐on users.
There are also enhancements to the firewall built into Windows Vista. The new firewall can now control both
inbound and outbound traffic, while still being fully configurable via Group Policy.
Finally, BitLocker™ full‐volume encryption, which is included with Windows Vista Enterprise and Ultimate, allows
the entire operating system volume to be encrypted. The volume can then be read only from within Windows Vista
and only when the right keys are provided, either from the computer's built‐in Trusted Platform Module (TPM) 1.2
chip, a USB key, or typed into the keyboard. (Note that only TPM 1.2 or later is supported.)
3. Windows Vista Is Componentized
One of the biggest architectural changes in Windows Vista is that it is now a completely componentized operating
system. This affects deployment in the following ways.
Configuring which Windows Vista features should be installed requires configuring the components to be enabled.
New tools, like the Windows System Image Manager, shown in Figure 1, assist with this.
Security updates, language packs, and service packs are simply components. Tools such as Package Manager
(PKGMGR) can be used to apply these to Windows Vista.
80
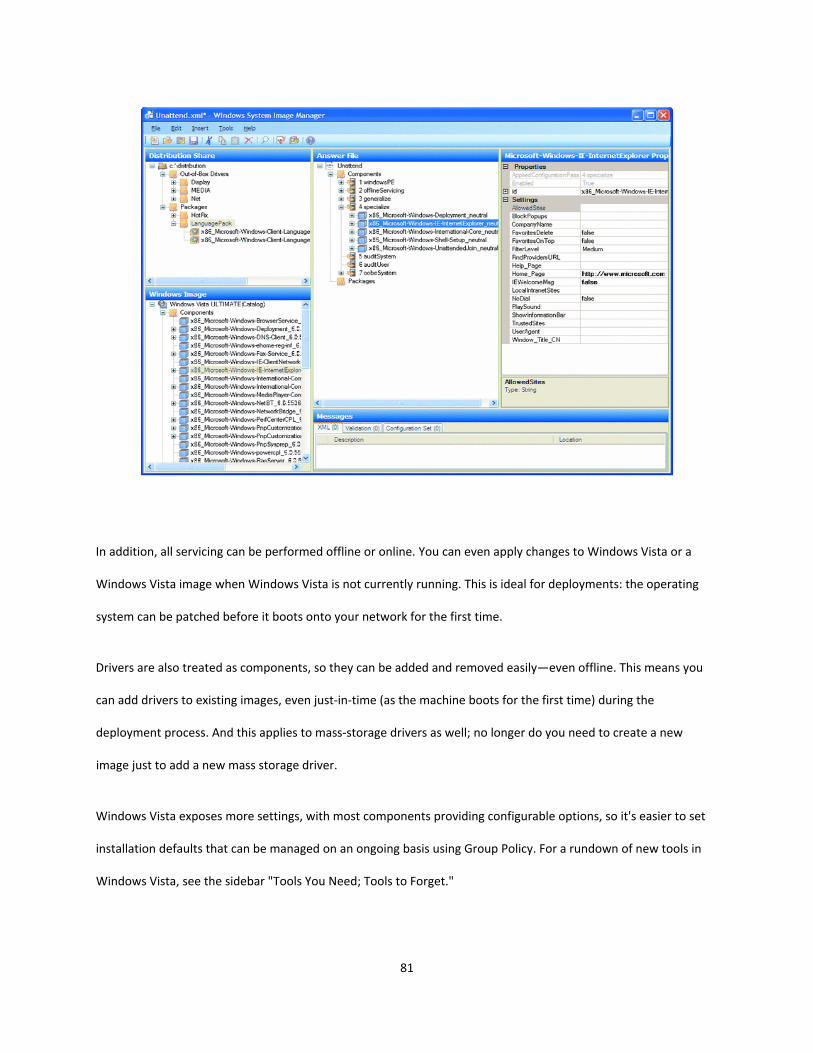
In addition, all servicing can be performed offline or online. You can even apply changes to Windows Vista or a
Windows Vista image when Windows Vista is not currently running. This is ideal for deployments: the operating
system can be patched before it boots onto your network for the first time.
Drivers are also treated as components, so they can be added and removed easily—even offline. This means you
can add drivers to existing images, even just‐in‐time (as the machine boots for the first time) during the
deployment process. And this applies to mass‐storage drivers as well; no longer do you need to create a new
image just to add a new mass storage driver.
Windows Vista exposes more settings, with most components providing configurable options, so it's easier to set
installation defaults that can be managed on an ongoing basis using Group Policy. For a rundown of new tools in
Windows Vista, see the sidebar "Tools You Need; Tools to Forget."
81
TOOLS YOU NEED; TOOLS TO FORGET
Here’s a rundown of the tools you’ll be using when you roll out Windows Vista, followed by a list of the tools you
can retire for good once Windows Vista arrives.
USE THESE:
• SYSPREP This is the updated version, modified for Windows Vista.
• SETUP A new installation tool for Windows Vista, replaces WINNT and WINNT32.
• IMAGEX The new command‐line tool for creating WIM images.
• Windows System Image Manager A tool for creating and modifying unattend.xml files.
• PEIMG The tool for customizing Windows PE 2.0 images.
• Windows Deployment Services The new version of RIS, which adds the ability to deploy Windows Vista and Windows XP images, as well as Windows PE 2.0 boot images.
• PNPUTIL This is the new tool for adding and removing drivers from the Windows Vista driver store.
• PKGMGR Also new, this Windows Vista tool is used for servicing the operating system.
• OCSETUP This replaces SYSOCMGR and is used for installing Windows components.
• BCDEDIT A new Windows Vista tool for editing boot configuration data.
• Application Compatibility Toolkit 5.0 This updated tool lets you assess whether your applications are compatible with Windows Vista.
• User State Migration Tool 3.0 An updated tool for capturing and restoring user state, supports Windows XP and Windows Vista, as well as all versions of Office including 2007.
• BitLocker The full‐volume drive encryption capability included in Windows Vista Enterprise and Ultimate editions.
FORGET THESE:
• Remote Installation Services RIS has been replaced by Windows Deployment Services (WDS) but still offers legacy support on Windows Server 2003; RIPREP and RISETUP are not possible with Windows Vista.
• Setup Manager/Notepad Use Windows System Image Manager instead for editing unattended setup configuration files.
• WINNT.EXE and WINNT32.EXE Use SETUP instead.
• SYSOCMGR Replaced by OCSETUP, PKGMGR.
• MS‐DOS Boot Floppies Forget them. Use Windows PE!
82
4. Text-Mode Installation Is Gone
The basic process used to install Windows XP has been unchanged since the earliest days of Windows NT®. This
time‐consuming procedure involved an initial text‐mode installation step in which every operating system file was
decompressed and installed, all registry entries were created, and all security was applied. Now with Windows
Vista, this text‐mode installation phase is completely gone. Instead, a new setup program performs the
installation, applying a Windows Vista image to a computer.
Once this image is applied, it needs to be customized for the computer. This customization takes the place of what
was called mini‐setup in Windows XP and Windows 2000. The purpose is the same: the operating system picks the
necessary settings and personality for the specific computer it was deployed to.
The image preparation process has also changed. With Windows XP, you would "Sysprep" a machine to prepare
the reference operating system for deployment. With Windows Vista, you'll still run Sysprep.exe (installed by
default in C:\Windows\System32\Sysprep), which will "generalize" the machine for duplication.
Windows Vista (any version) is provided on the DVD as an already‐installed, generalized (Sysprepped) image, ready
to deploy to any machine. Some customers may choose to deploy this image as‐is (possibly injecting fixes or
drivers using the servicing capabilities described earlier).
5. Boot.ini Is History
That's right, the Boot.ini file is not used in Windows Vista or in the new Windows PE 2.0. Instead, a new boot
loader, bootmgr, reads boot configuration data from a special file named BCD. A brand new tool called bcdedit.exe
(or a separate Windows Management Instrumentation or WMI provider) is used to maintain the contents of the
BCD. A Windows PE 2.0 boot image can be configured in BCD too, making it easy to boot into either Windows Vista
83
or Windows PE without making any other changes to the machine. This flexibility can be useful in recovery or
maintenance scenarios.
6. Settings Are Configured in XML
With Windows XP (and previous versions of Windows PE) configuration information was stored in various text files.
These text files have been replaced with an XML file.
Unattend.txt, which was used to configure how Windows XP is installed, has been replaced by unattend.xml.
Unattend.xml also replaces three other files:
• Sysprep.inf, which was used to configure how a Windows XP image is customized when deployed to a
machine using a mini‐setup.
• Wimbom.ini, which was used to configure Windows PE.
• Cmdlines.txt, which was used to specify a list of commands to execute during mini‐setup.
An example of unattend.xml can be downloaded from TechNet Magazine at
microsoft.com/technet/technetmag/code06.aspx.
You may still use separate files if you want, though. You don't need to put all configuration items in a single
unattend.xml file. The high‐level schema of the new XML configuration file is well defined, with each phase of the
deployment process represented. The actual configuration items are specified on the appropriate operating
system components and these items are dynamically discovered from the components themselves.
With Windows XP, most IT professionals used Notepad to edit the various configuration files. You can still do that,
but the Windows System Image Manager tool I discussed earlier can be used to inspect the Windows Vista image,
determine what settings are available, and allow you to configure each one.
84
Another tool to aid deployment is the User State Migration Tool (USMT) 3.0, which is expected to be
released at the same time as Windows Vista. It will also use XML configuration files in place of the .inf files that
were used in previous versions. See "Migrating to Windows Vista Through the User State Migration Tool" for more
information.
7. No More HAL Complications
With Windows XP, technical restrictions prevented the creation of a single image that could be deployed to all
computers. Different hardware abstraction layers (HALs) meant you had to maintain multiple images. (For more on
this see the Knowledge Base article "HAL options after Windows XP or Windows Server 2003 Setup") Most
organizations needed two or three images per platform (x86 and x64) and some chose to have even more—though
each image brings added costs and complexity.
In Windows Vista, those technical restrictions are gone; the operating system is able to detect which HAL is
required and automatically install it.
8. Windows PE Rules
Windows PE 2.0, the new version that will be released with Windows Vista, is a key part of the deployment
process. Even the standard DVD‐based installation of Windows Vista uses Windows PE 2.0, and most organizations
will be using it (often customized for the organization's specific needs) as part of their deployment processes.
Compared to MS‐DOS®‐based deployment, Windows PE 2.0 brings numerous benefits, including less time spent
trying to find 16‐bit real‐mode drivers. (It's not even possible to find these any more for some newer network
cards and mass storage adapters.) Better performance from 32‐bit and 64‐bit networking stacks and tools, as well
85
as large memory support are also advantages. And don't forget support for tools such as Windows Scripting Host,
VBScript, and hypertext applications.
Windows PE has been available for a few years (the latest version, Windows PE 2005, was released at the same
time as Windows XP SP2 and Windows Server 2003 SP1), but not all organizations could use it; it required that you
have Software Assurance on your Windows desktop operating system licenses. With Windows PE 2.0, that's no
longer the case. All organizations will be able to download Windows PE 2.0 from microsoft.com and use it freely
for the purposes of deploying licensed copies of Windows Vista.
Like Windows Vista itself, Windows PE 2.0 is provided as an image that is componentized and can be serviced both
online and off. As with Windows PE 2005, several optional components can be added, although Windows PE 2.0
includes some new ones: MSXML 3.0, Windows Recovery Environment, language packs, font packs, and so on.
New tools like peimg.exe are provided for servicing Windows PE 2.0. Peimg.exe can also be used for adding
drivers—including mass storage devices, which no longer require any special handling.
For more information on Windows PE 2.0, see Wes Miller's article in this issue of TechNet Magazine.
9. It's All about Images
With Windows XP, some companies used the image creation capabilities of the Systems Management Server (SMS)
2003 OS Deployment Feature Pack or third‐party image creation tools. There was no generic image creation tool
available from Microsoft. That's changed with Windows Vista: new tools have been created to support the
Windows Imaging (WIM) file format. Unlike many other image formats, WIM images are file‐based, enabling them
to be applied to an existing partition non‐destructively. This has great advantages in deployment processes, since
user state can be saved locally instead of on a network server, eliminating what is frequently the largest source of
network traffic during a deployment.
86
Because WIM files are file‐based images, they (obviously) are not sector‐based, so there are no issues around
different‐sized disks or partitions. A WIM image contains only the contents of a single disk volume or partition, so if
you have multiple partitions to capture, you create a separate image for each one. But each of these images can be
stored in the same WIM file, since the WIM file format supports multiple images per file.
The WIM file format also supports single‐instance storage, so duplicate files (even from different images) are
automatically removed. Between this and the advanced compression techniques employed, WIM images are
typically smaller than images created by other tools. However, because of the extra processing, they do take
longer to create. This size versus performance trade‐off is fair enough; since you typically capture the image only
once and then deploy it many times, the network traffic savings can be substantial.
The IMAGEX command‐line tool interfaces with the lower‐level WIMGAPI API (which is fully documented for use in
custom tools too), and is used to create and manipulate WIM images. It also provides a mechanism for mounting a
WIM image as a file system. Once mounted, the image can be read and modified using standard Windows tools
since it looks like a normal removable media drive. This facility opens up whole new servicing opportunities.
10. Deployment Is Language-Neutral
Windows XP supported different languages in two ways. You could either deploy localized versions of Windows XP,
requiring a different image for each language, or you could deploy an English Multilanguage User Interface (MUI)
version with added language packs. There were advantages and disadvantages to each approach, but in most cases
organizations that needed to support multiple languages took the MUI route, dealing with the limitations of
running with an operating system that was effectively English at its core. Organizations that worked only with one
language typically chose to use only the localized versions.
87
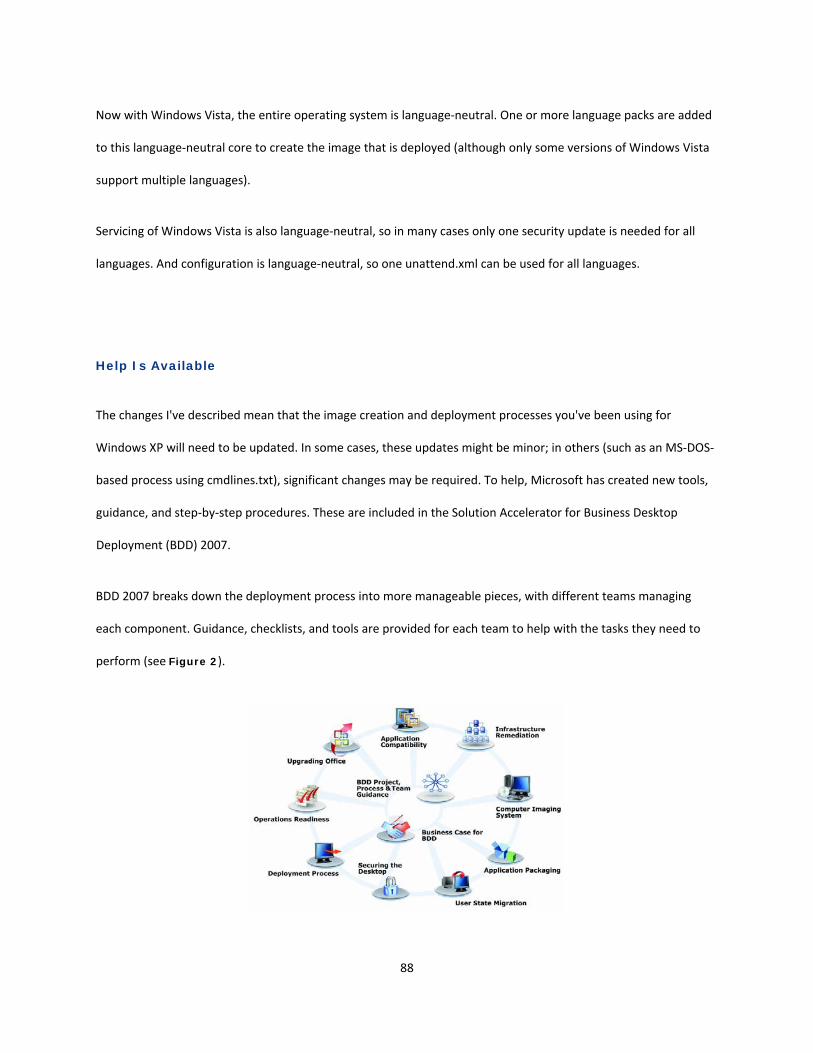
Now with Windows Vista, the entire operating system is language‐neutral. One or more language packs are added
to this language‐neutral core to create the image that is deployed (although only some versions of Windows Vista
support multiple languages).
Servicing of Windows Vista is also language‐neutral, so in many cases only one security update is needed for all
languages. And configuration is language‐neutral, so one unattend.xml can be used for all languages.
Help Is Available
The changes I've described mean that the image creation and deployment processes you've been using for
Windows XP will need to be updated. In some cases, these updates might be minor; in others (such as an MS‐DOS‐
based process using cmdlines.txt), significant changes may be required. To help, Microsoft has created new tools,
guidance, and step‐by‐step procedures. These are included in the Solution Accelerator for Business Desktop
Deployment (BDD) 2007.
BDD 2007 breaks down the deployment process into more manageable pieces, with different teams managing
each component. Guidance, checklists, and tools are provided for each team to help with the tasks they need to
perform (see Figure 2).
88

BDD 2007 is currently available for download from connect.microsoft.com after you sign up for the open beta
program. Contained in the download are all the required Windows Vista deployment tools, including Windows PE
2.0, ImageX, Windows System Image Manager, and USMT 3.0, along with documentation explaining how to use
them in an end‐to‐end process. The final version of BDD 2007 will be released at about the same time as Windows
Vista. For a look at BDDWorkbench, see Figure 3.
The goal of BDD 2007 is simplification. Even if you don't have an existing image creation and deployment process,
you should be able to use BDD to set one up quickly. Two deployment methods are provided:
• Lite Touch, which was completely rewritten, requires user interaction to start deployment. It doesn't
require any special infrastructure although it can utilize Windows Deployment Services, the next version
of Remote Installation Service (RIS).
• Zero Touch, which requires no user intervention, is layered on top of the SMS 2003 OS Deployment
Feature Pack.
89
The new features in BDD 2007 include driver repository and injection, full computer backup processing, integration
of all the Windows Vista deployment tools, and more. BDD 2007 will include all the source code for all of its
automation tools, so you can modify it to meet your specific needs or copy and paste it into your own solutions.
The source code is provided without restriction.
http://www.microsoft.com/technet/technetmag/issues/2006/11/Deployment/default.aspx
For more information on BDD 2007, see the TechNet Desktop Deployment center.
Michael Niehaus Michael Niehaus is a Systems Design Engineer in the Core Infrastructure Solutions group at
Microsoft. He is responsible for developing best practices, tools, and scripts for Business Desktop Deployment.
Reach him at [email protected].
90