Embed Size (px)
Citation preview

Illinois Department of Healthcare and Family Services
Internet Electronic Claims (IEC) System
Institutional Invoice Claim Submission Direct Data Entry (DDE)
Last Update: May, 2017 Version 1.15
Institutional Invoice Claim Submission DDE Instructions 2
Table of Contents
IEC System – Institutional Claim Submission DDE Training Materials ................................ 3 General Navigation .......................................................................................................... 7
Institutional Claim Invoice Header Information ........................................................... 10 Patient/Subscriber Tab ............................................................................................... 11 Provider Tab ............................................................................................................... 13 Claim Tab ................................................................................................................... 14 Principal Diagnosis and Procedure Information ......................................................... 17 Other Diagnosis and Procedure Information .............................................................. 19 Value, Condition, Occurrence Codes Tab .................................................................. 21 Physician Info Tab ...................................................................................................... 24 Claim TPL Tab ........................................................................................................... 26 Service Line Tab ........................................................................................................ 29
Entering a Claim – errors returned .................................................................................... 32 Entering a Claim – successful submission ........................................................................ 33
Patient/Subscriber Tab .................................................................................................. 33 Provider Tab .................................................................................................................. 34 Claim Tab ...................................................................................................................... 35 Principal Diagnosis and Procedures Tab ....................................................................... 36 Other Diagnosis and Procedure Information Tab ........................................................... 37 Value, Condition, Occurrence Codes Tab ...................................................................... 39 Physician Info Tab ......................................................................................................... 41 Claim TPL Tab ............................................................................................................... 42 Service Line Tab ............................................................................................................ 48 Confirmation Page ......................................................................................................... 55
Entering another Claim ...................................................................................................... 59
Institutional Invoice Claim Submission DDE Instructions 3
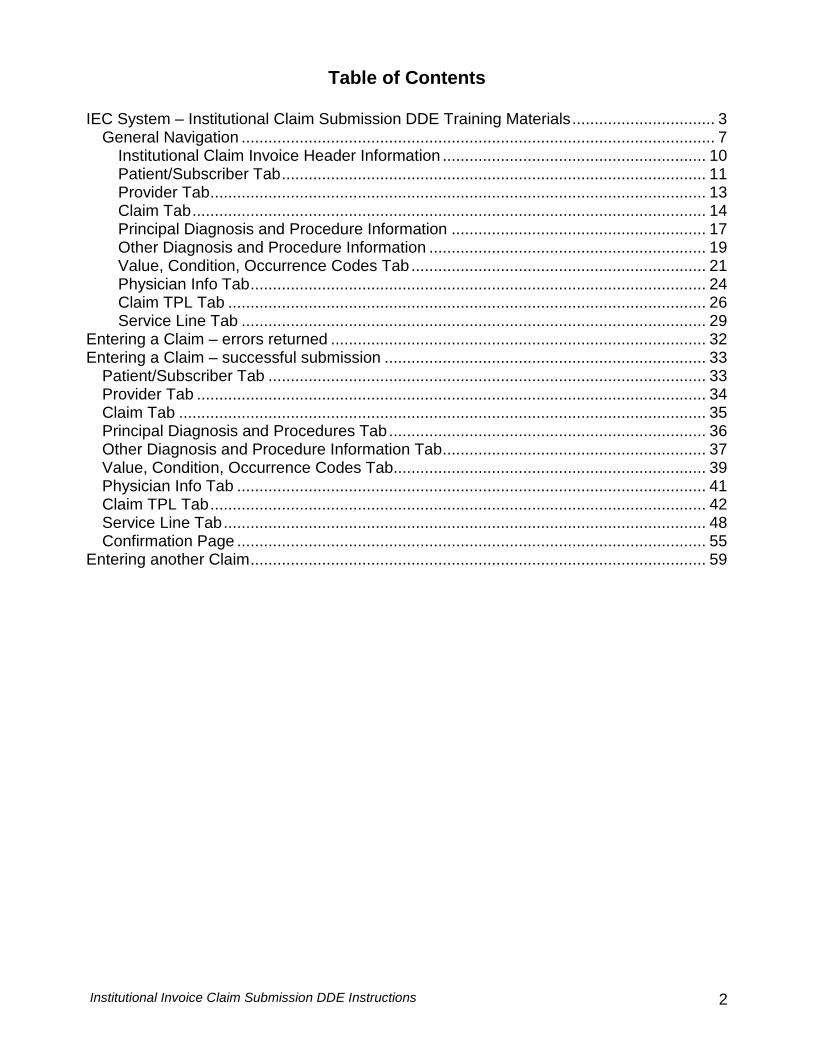
IEC System – Institutional Claim Submission DDE Training Materials Type the following URL into your browser address line: www.myhfs.illinois.gov
Institutional Invoice Claim Submission DDE Instructions 4
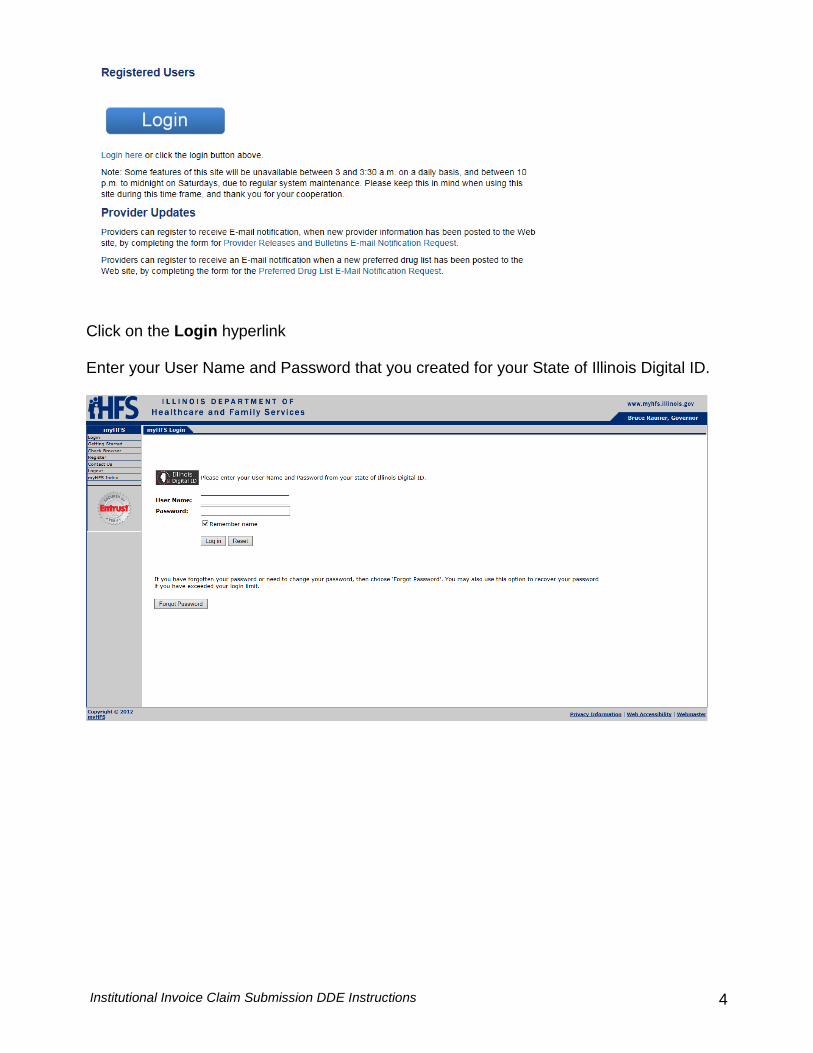
Click on the Login hyperlink Enter your User Name and Password that you created for your State of Illinois Digital ID.
Institutional Invoice Claim Submission DDE Instructions 5
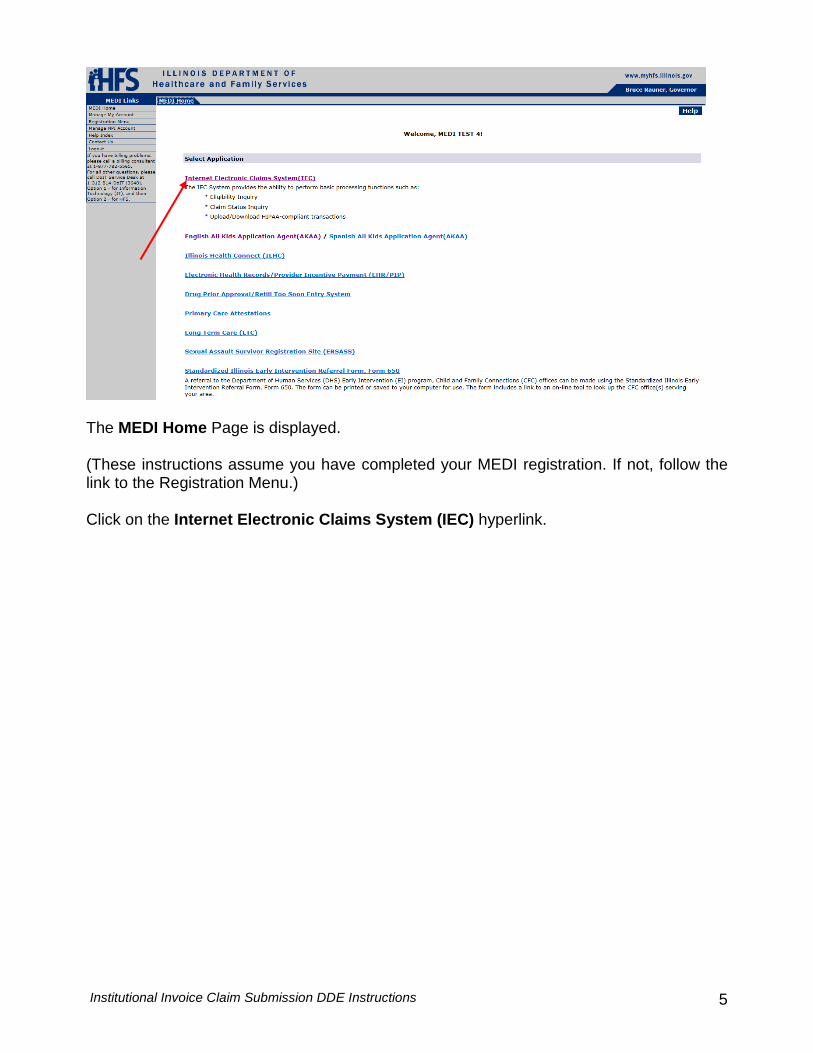
The MEDI Home Page is displayed. (These instructions assume you have completed your MEDI registration. If not, follow the link to the Registration Menu.) Click on the Internet Electronic Claims System (IEC) hyperlink.
Institutional Invoice Claim Submission DDE Instructions 6
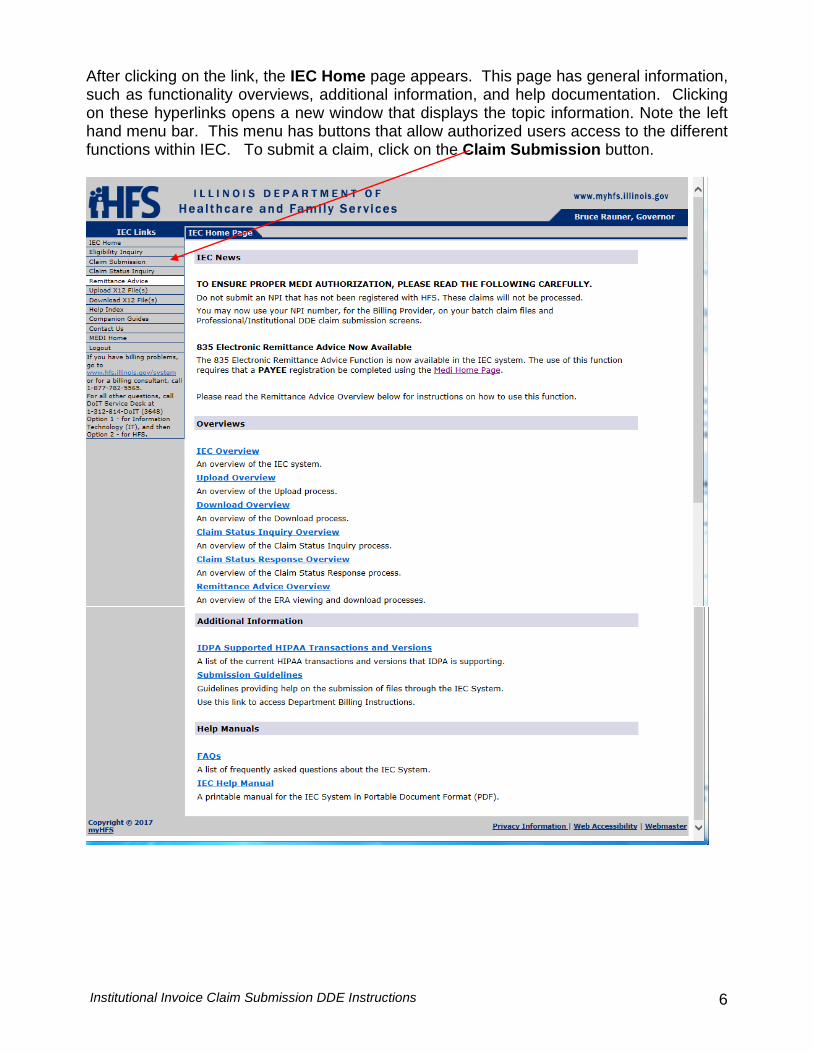
After clicking on the link, the IEC Home page appears. This page has general information, such as functionality overviews, additional information, and help documentation. Clicking on these hyperlinks opens a new window that displays the topic information. Note the left hand menu bar. This menu has buttons that allow authorized users access to the different functions within IEC. To submit a claim, click on the Claim Submission button.
Institutional Invoice Claim Submission DDE Instructions 7
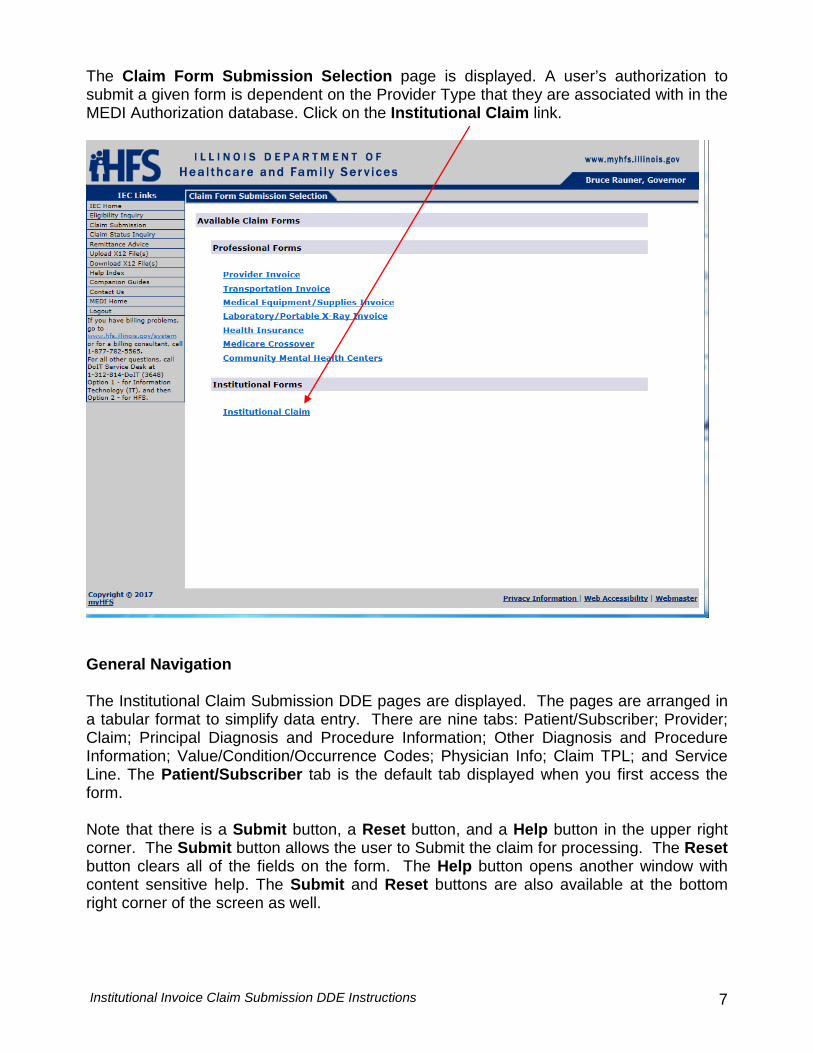
The Claim Form Submission Selection page is displayed. A user’s authorization to submit a given form is dependent on the Provider Type that they are associated with in the MEDI Authorization database. Click on the Institutional Claim link.
General Navigation The Institutional Claim Submission DDE pages are displayed. The pages are arranged in a tabular format to simplify data entry. There are nine tabs: Patient/Subscriber; Provider; Claim; Principal Diagnosis and Procedure Information; Other Diagnosis and Procedure Information; Value/Condition/Occurrence Codes; Physician Info; Claim TPL; and Service Line. The Patient/Subscriber tab is the default tab displayed when you first access the form. Note that there is a Submit button, a Reset button, and a Help button in the upper right corner. The Submit button allows the user to Submit the claim for processing. The Reset button clears all of the fields on the form. The Help button opens another window with content sensitive help. The Submit and Reset buttons are also available at the bottom right corner of the screen as well.
Institutional Invoice Claim Submission DDE Instructions 8
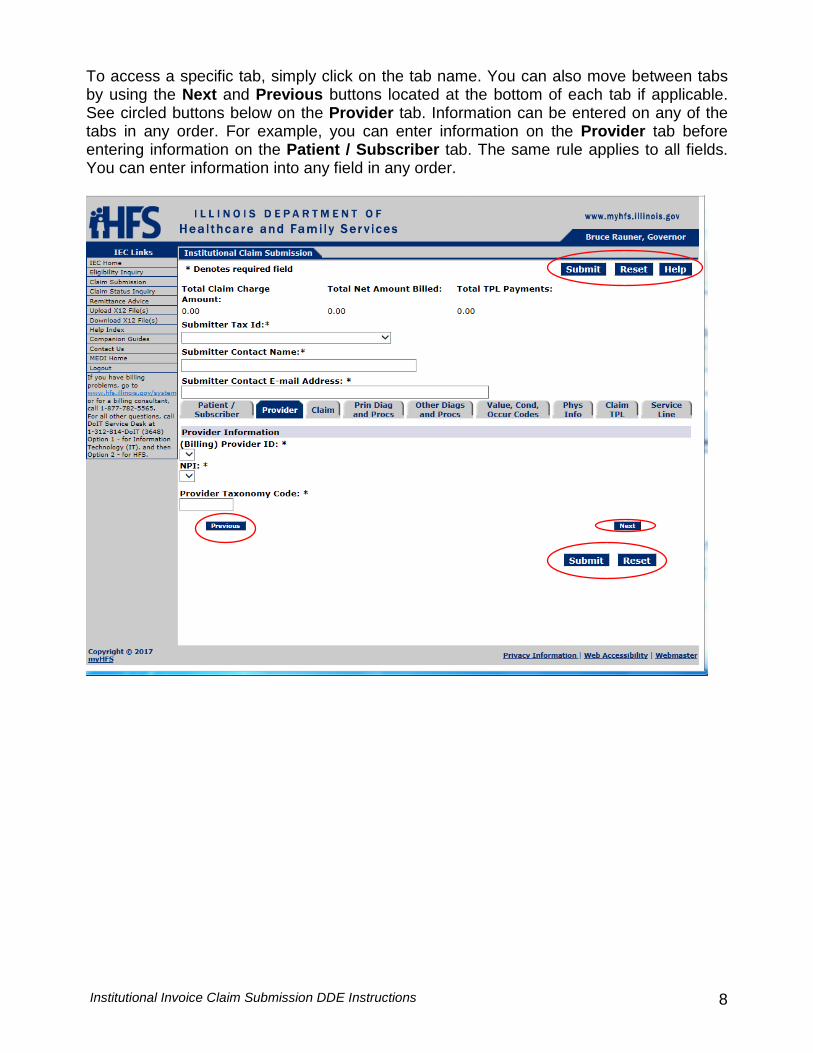
To access a specific tab, simply click on the tab name. You can also move between tabs by using the Next and Previous buttons located at the bottom of each tab if applicable. See circled buttons below on the Provider tab. Information can be entered on any of the tabs in any order. For example, you can enter information on the Provider tab before entering information on the Patient / Subscriber tab. The same rule applies to all fields. You can enter information into any field in any order.
Institutional Invoice Claim Submission DDE Instructions 9
Data entry notes:
1. A user can navigate through the fields on a page by using the Tab key on your keyboard. Using the Tab key will move from one field to the next field moving from the left to the right.
2. After tabbing to a button, pressing the Enter key on your keyboard will engage the
button, and has the same effect as clicking on the button with your mouse. 3. When working with dropdown lists, using the Up and Down Arrows on your
keyboard will navigate through the options in the dropdown list. 4. When working with radio buttons such as those used for Gender (Male, Female,
Unknown), the Up and Down Arrows on your keyboard can be used to move through the choices and the Space Bar on your keyboard can be used to select an option.
5. When working with dates, the Year portion of any date must be entered as YYYY
(4-digits). Month can be entered as M or MM (5 or 05 for example). Day can be entered as D or DD (7 or 07 for example). All dates entered must be valid calendar dates, must be numeric, and must be on or before the current date.
6. Dollar amounts can be entered with or without decimal places. Amounts that are
whole numbers (dollars only with no cents) can be entered with or without the decimal places. For example, $50 can be entered as 50 or 50.00. The dollar sign is not needed and is not valid.
7. Zip code fields must be numeric and can contain either the five or nine-digit zip
code. For nine-digit zip codes enter all nine digits without the dash (-) in between the first five digits and the last four digits.
8. In order to print the claim form, users will click on Print a Copy of Claim
Submission button, which will print all of the tabs from the claim submission and will include the claim submission confirmation number.
9. Each of the fields on a tab will either be Required or Situational. A required field,
which will be denoted with an asterisk (*) following the field name, is mandatory under all circumstances. A situational field is essentially not required, but may be required under certain circumstances.
10. All required fields on each tab are denoted with an asterisk. If you ever have a
question about a specific field and what is required, select the Help button in the upper right corner of the page. This will provide details on all fields on the page.
11. In a dropdown list, typing a letter will automatically jump to the first entry in the list
that begins with that letter.
Institutional Invoice Claim Submission DDE Instructions 10
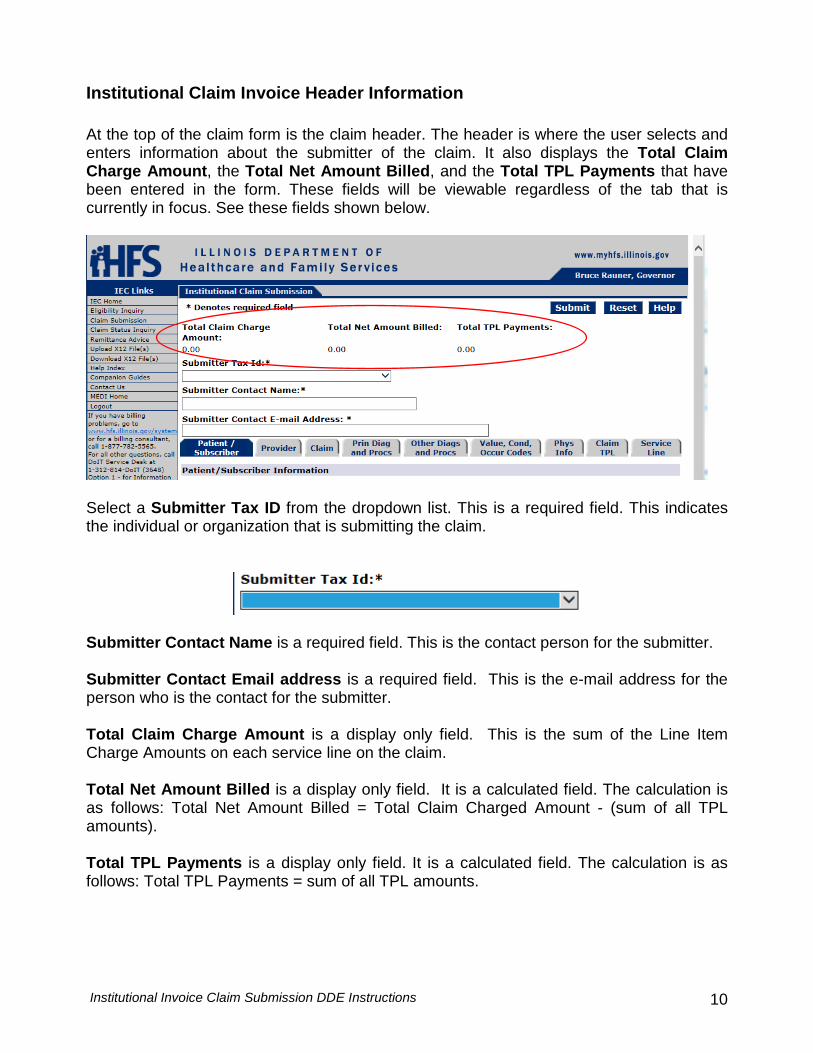
Institutional Claim Invoice Header Information At the top of the claim form is the claim header. The header is where the user selects and enters information about the submitter of the claim. It also displays the Total Claim Charge Amount, the Total Net Amount Billed, and the Total TPL Payments that have been entered in the form. These fields will be viewable regardless of the tab that is currently in focus. See these fields shown below.
Select a Submitter Tax ID from the dropdown list. This is a required field. This indicates the individual or organization that is submitting the claim.
Submitter Contact Name is a required field. This is the contact person for the submitter. Submitter Contact Email address is a required field. This is the e-mail address for the person who is the contact for the submitter. Total Claim Charge Amount is a display only field. This is the sum of the Line Item Charge Amounts on each service line on the claim. Total Net Amount Billed is a display only field. It is a calculated field. The calculation is as follows: Total Net Amount Billed = Total Claim Charged Amount - (sum of all TPL amounts). Total TPL Payments is a display only field. It is a calculated field. The calculation is as follows: Total TPL Payments = sum of all TPL amounts.
Institutional Invoice Claim Submission DDE Instructions 11
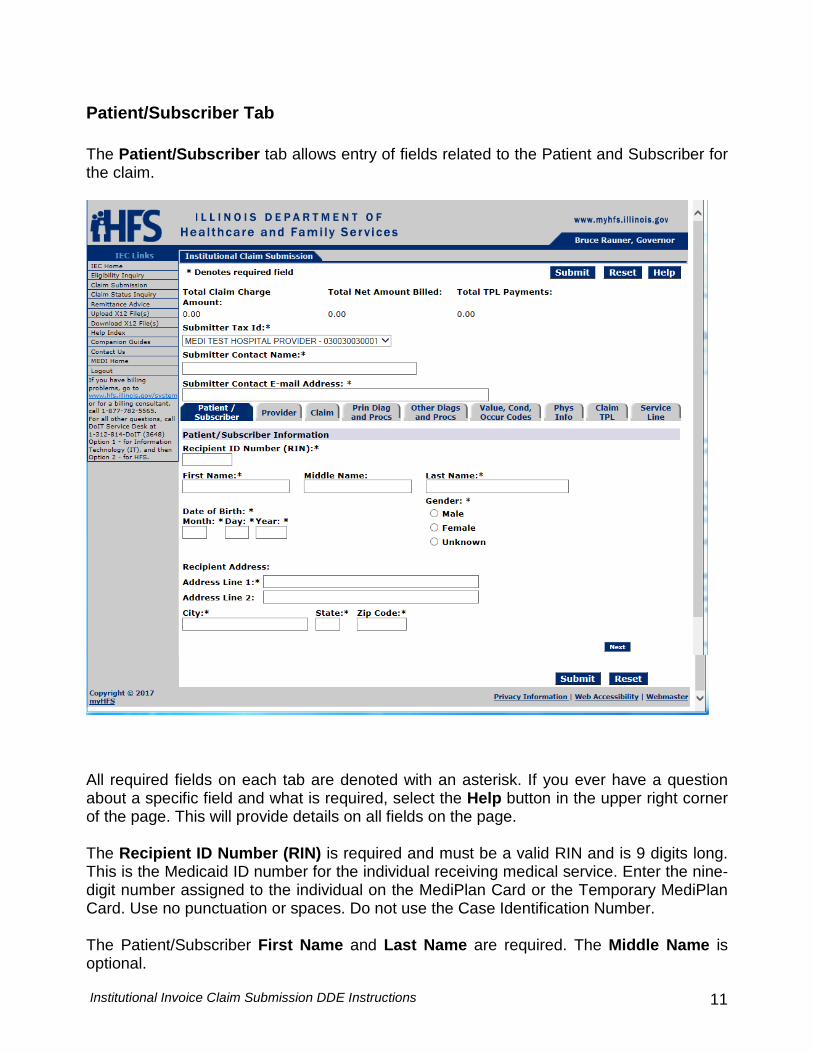
Patient/Subscriber Tab The Patient/Subscriber tab allows entry of fields related to the Patient and Subscriber for the claim.
All required fields on each tab are denoted with an asterisk. If you ever have a question about a specific field and what is required, select the Help button in the upper right corner of the page. This will provide details on all fields on the page. The Recipient ID Number (RIN) is required and must be a valid RIN and is 9 digits long. This is the Medicaid ID number for the individual receiving medical service. Enter the nine-digit number assigned to the individual on the MediPlan Card or the Temporary MediPlan Card. Use no punctuation or spaces. Do not use the Case Identification Number. The Patient/Subscriber First Name and Last Name are required. The Middle Name is optional.
Institutional Invoice Claim Submission DDE Instructions 12
The Date of Birth is required. The Date of Birth must be numeric and must be on or before the Service From Date. Year must be entered as YYYY (4 digits), for example you must enter the year as 2005. The Day and Month fields can be entered as either one digit or two. For example, the month of July can be entered as 7 or as 07. A subscriber can have a birth date up to 125 years earlier than the current date. Gender is required. You must select one of the radio buttons for Male, Female, or Unknown. A user would enter unknown if they cannot tell by the name if it is male or female. The Recipient Address is required. There are two address lines, and Address Line 1 is required. This is the street address. Address Line 2 is optional, and this is for additional information such as Apartment number, or Suite number. The City field is required and should be the recipient’s city. The State field is required, and should be the two character State code. For example Illinois should be entered as IL. The Zip Code field is required. It must be numeric and can contain either the five or nine-digit zip code. For nine-digit zip codes, enter all nine digits without the dash (-) in between the first five digits and the last four digits. Tab to the Next Button and press the Enter key on your keyboard, or click on the Next button with your mouse. This takes you to the Provider tab. See the next page for a screen print of the Provider tab.
Institutional Invoice Claim Submission DDE Instructions 13
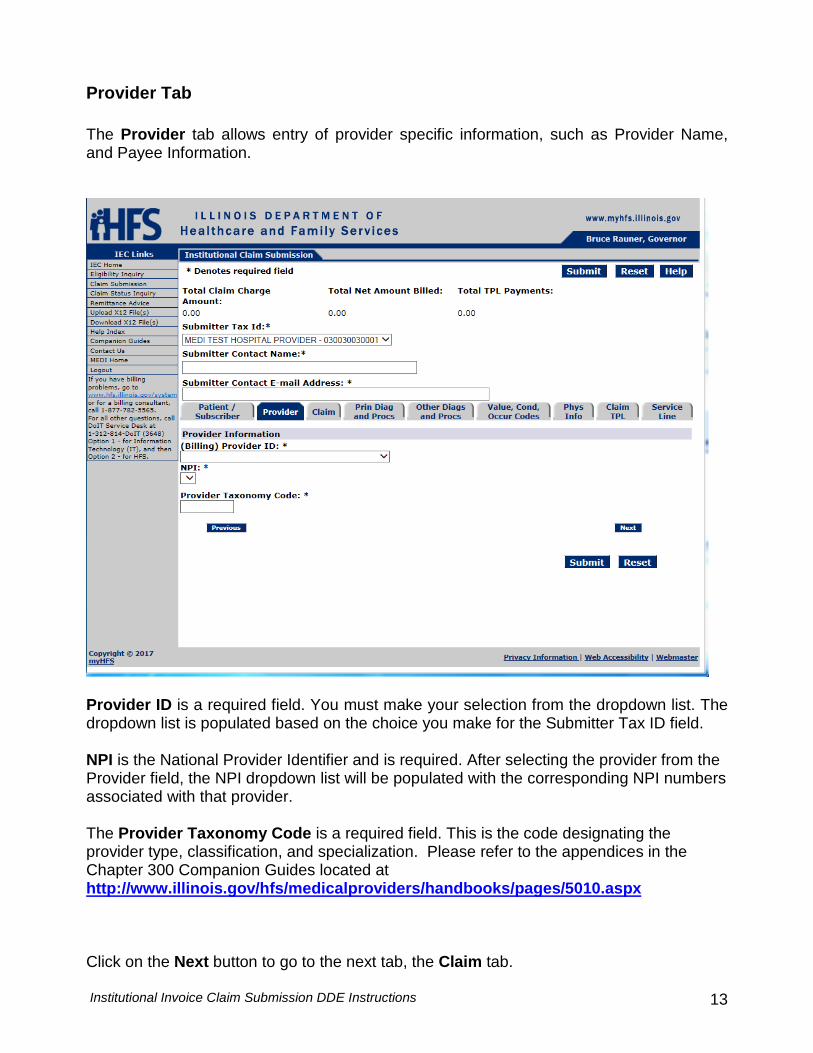
Provider Tab The Provider tab allows entry of provider specific information, such as Provider Name, and Payee Information.
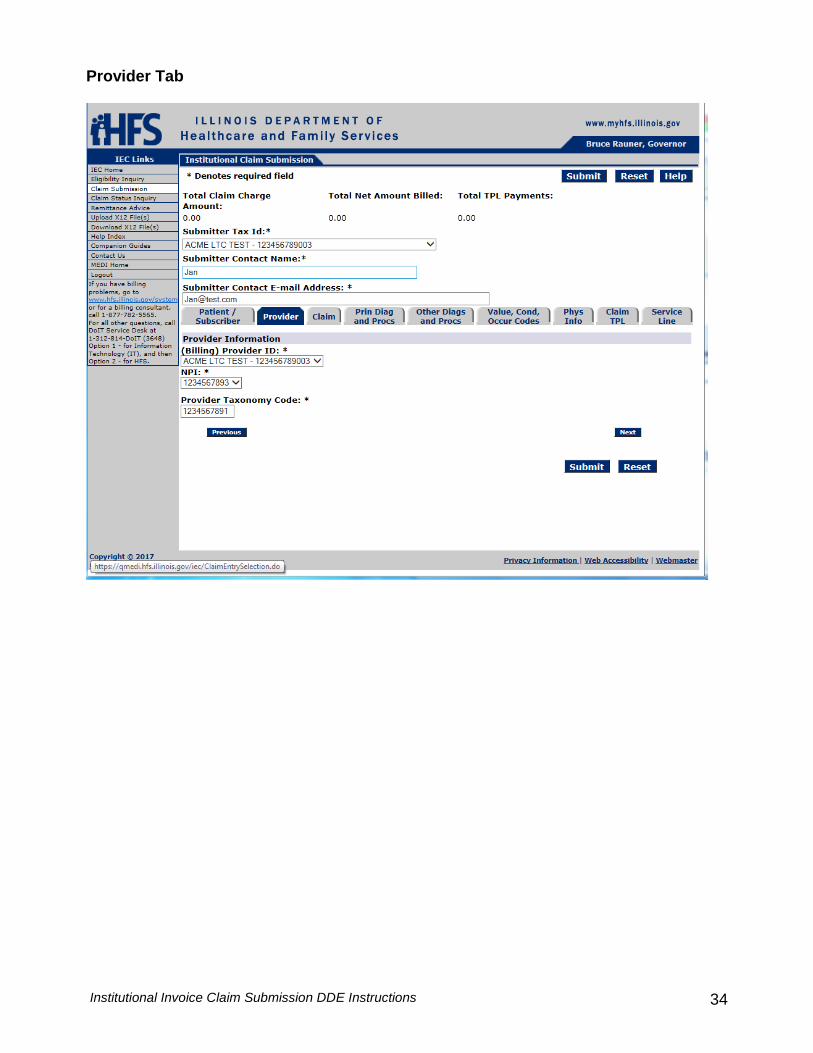
Provider ID is a required field. You must make your selection from the dropdown list. The dropdown list is populated based on the choice you make for the Submitter Tax ID field. NPI is the National Provider Identifier and is required. After selecting the provider from the Provider field, the NPI dropdown list will be populated with the corresponding NPI numbers associated with that provider. The Provider Taxonomy Code is a required field. This is the code designating the provider type, classification, and specialization. Please refer to the appendices in the Chapter 300 Companion Guides located at http://www.illinois.gov/hfs/medicalproviders/handbooks/pages/5010.aspx Click on the Next button to go to the next tab, the Claim tab.
Institutional Invoice Claim Submission DDE Instructions 14
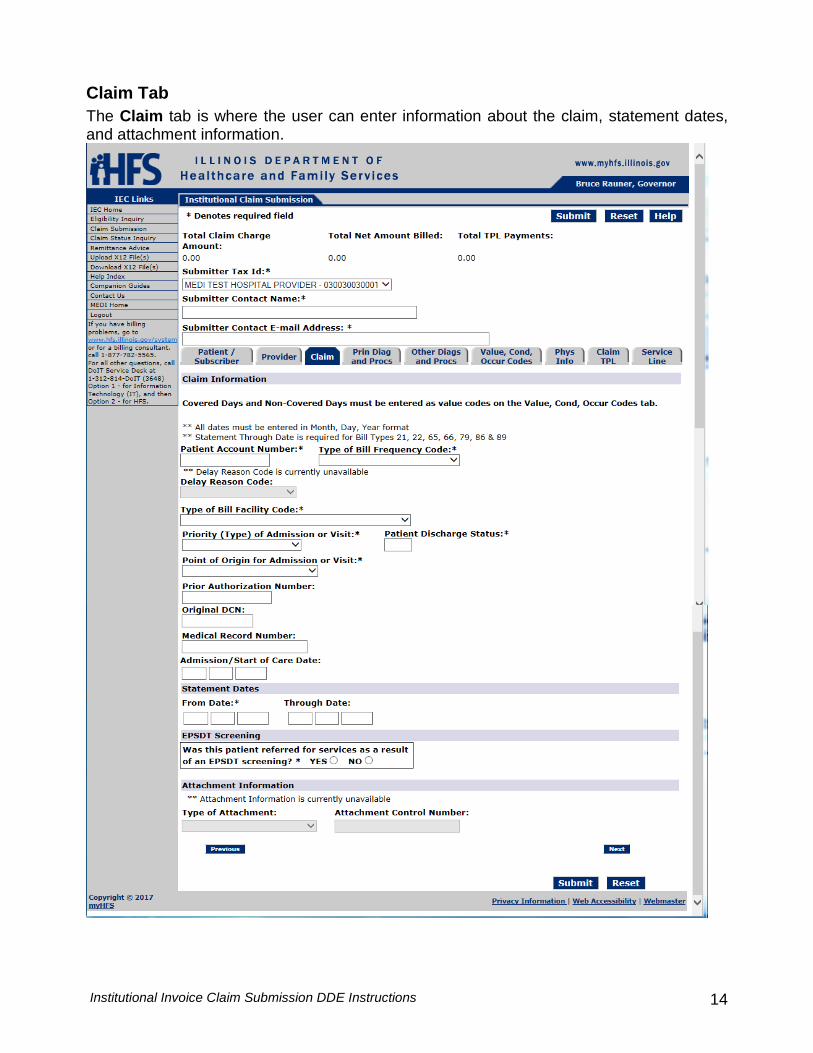
Claim Tab The Claim tab is where the user can enter information about the claim, statement dates, and attachment information.
Institutional Invoice Claim Submission DDE Instructions 15
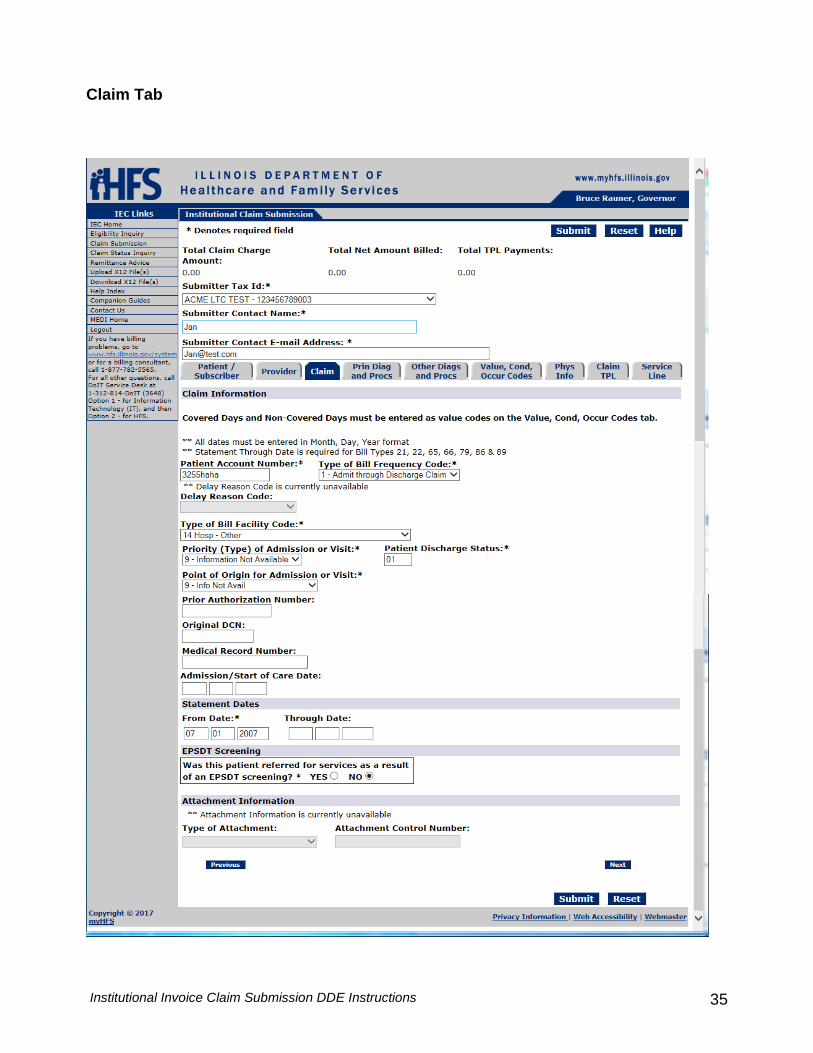
Patient Account Number is a required field. This should be a number used in the Submitter's accounting system for identification. This value will be reported back to the provider on the Department’s Remittance Advice, up to 20 characters. Type of Bill Frequency Code is a required field. You must select from a dropdown list. This is a code specifying the frequency of the claim.
The Delay Reason Code is currently unavailable. In the future, users may select from a dropdown list. This is a code indicating the reason why a request was delayed.
Type of Bill Facility Code is a required field. You must select a value from a dropdown list. This is the code identifying the type of facility where services were performed. Priority (Type) of Admission or Visit is a required field. You can select a value from a dropdown list. This is the code indicating the priority of this admission. The Patient Discharge Status is a required field. This is the code indicating the disposition or discharge status of the patient at the end service for the period covered on this bill, as reported in FL6, Statement Covers Period. The Point of Origin for Admission or Visit is a required field. You can select a value from a dropdown list. This is a code indicating the point of patient origin for this admission or visit. Prior Authorization Number is not required. This is the claim level Referral or Prior Authorization Number. A number, code or other value that indicates the services provided on this claim have been authorized by the payee or other service organization. The Original DCN is not required. This is the original document control number for replacement and void of prior claims. This if reference information as defined for a particular Transaction Set or as specified by the Reference Identification Qualifier. The Medical Record Number field is not required. This is used to record the Medical Record Number if available. This is a unique number assigned to patient by the provider to assist in retrieval of medical records. Admission/Start of Care Date is situationally required. There are three fields for Month, Day and Year. When working with dates, the Year portion of any date must be entered as YYYY (4-digits). Month can be entered as M or MM (5 or 05 for example). Day can be entered as D or DD (7 or 07 for example). All dates entered must be valid calendar dates, must be numeric, and must be on or before the current date. Statement From and Through Dates are required. There are three fields for Month, Day and Year. When working with dates, the Year portion of any date must be entered as YYYY (4-digits). Month can be entered as M or MM (5 or 05 for example). Day can be entered as D or DD (7 or 07 for example). All dates entered must be valid calendar dates, must be numeric, and must be on or before the current date.
Institutional Invoice Claim Submission DDE Instructions 16
EPDST Screening is a situationally required entry depending on claim submittal. You must click on the radio button choosing either Yes or No. Type of Attachment is currently not available. In the future users will be able to select from a dropdown list. Attachment Control Number is currently not available. In the future users will be able to type a control number into this field. Click on the Next button to go to the Principal Diagnosis and Procedures Information tab. See the next page for a screen shot of the Principal Diagnosis and Procedures Information tab.
Institutional Invoice Claim Submission DDE Instructions 17
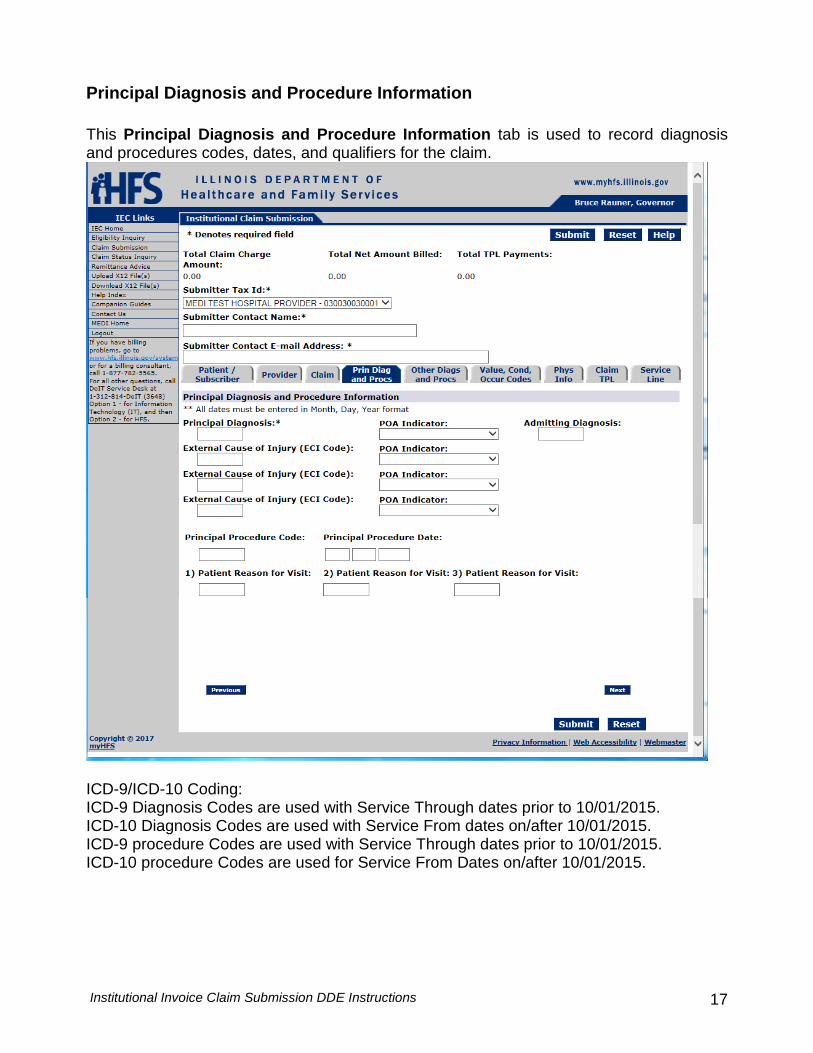
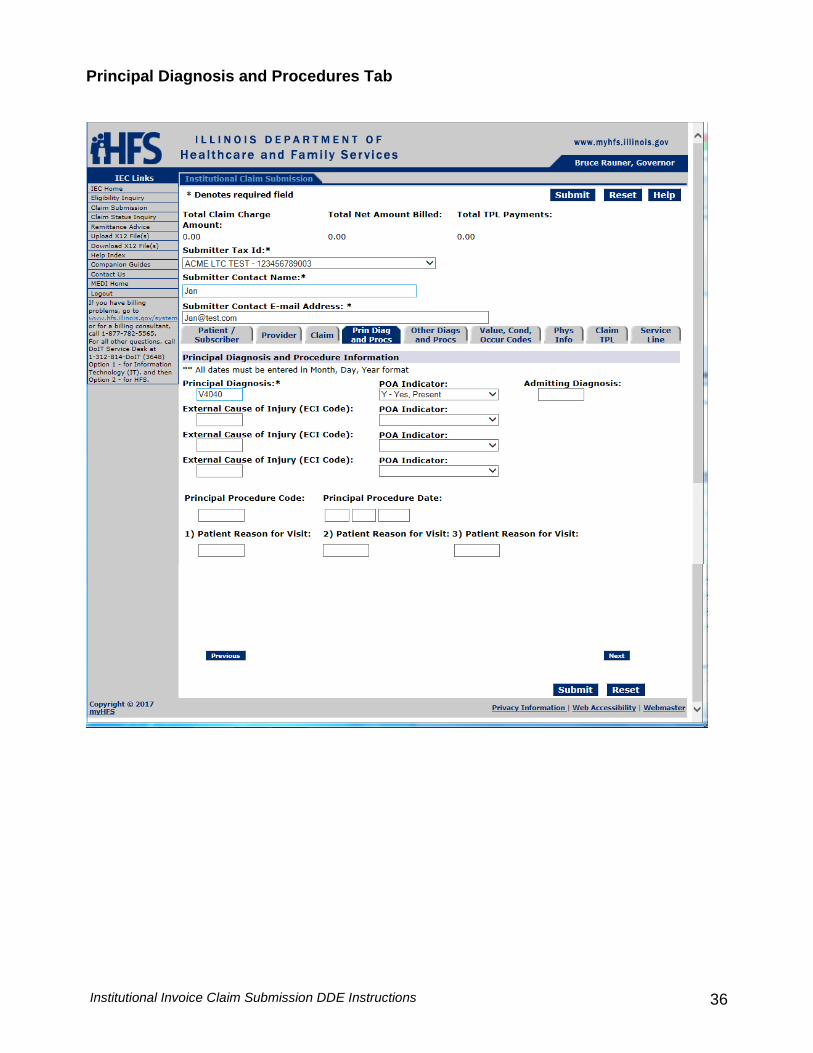
Principal Diagnosis and Procedure Information This Principal Diagnosis and Procedure Information tab is used to record diagnosis and procedures codes, dates, and qualifiers for the claim.
ICD-9/ICD-10 Coding: ICD-9 Diagnosis Codes are used with Service Through dates prior to 10/01/2015. ICD-10 Diagnosis Codes are used with Service From dates on/after 10/01/2015. ICD-9 procedure Codes are used with Service Through dates prior to 10/01/2015. ICD-10 procedure Codes are used for Service From Dates on/after 10/01/2015.
Institutional Invoice Claim Submission DDE Instructions 18
The Principal Diagnosis is a required field. The user should enter the code indicating the main diagnosis from a specific industry code list. The POA Indicator associated with the Principal Diagnosis is situationally required based on the type of claim submitted. The user will select from a drop down menu one of the following values for a claim where POA is being sent: Y = meaning “Yes, present at the time of inpatient admission” N = meaning “No, not present at the time of inpatient admission” U = meaning “Unknown, documentation is insufficient to determine if condition is present
at the time of inpatient admission” W = meaning “Clinically undetermined, provider is unable to clinically determine whether
condition was present at time of inpatient admission or not” 1 = meaning “Unreported/Not Used – Exempt from POA reporting. This code is equivalent
of a blank on the UB04, but blanks are not desirable when submitting data via the 4010A1 format (837I).”
Admitting Diagnosis is situationally required. The user can enter the code indicating the diagnosis upon admission from a specific industry code list. External Cause of Injury (ECI Code) is not required. The user can enter the code indicating the ECI: diagnosis from a specific industry code list. “E” codes are obsolete with ICD-10 coding. Please refer to ICD-10 coding manuals for replacement coding requirements. Principal Procedure Code is a situationally required field depending on claim submittal. Principal Procedure Date is a situationally required field depending on claim submittal. If a Principal Procedure Code is entered then a Principal Procedure Date is required. There are three fields for Month, Day and Year. When working with dates, the Year portion of any date must be entered as YYYY (4-digits). Month can be entered as M or MM (5 or 05 for example). Day can be entered as D or DD (7 or 07 for example). All dates entered must be valid calendar dates, must be numeric, and must be on or before the current date. Patient Reason for Visit is unavailable at this time.
Institutional Invoice Claim Submission DDE Instructions 19
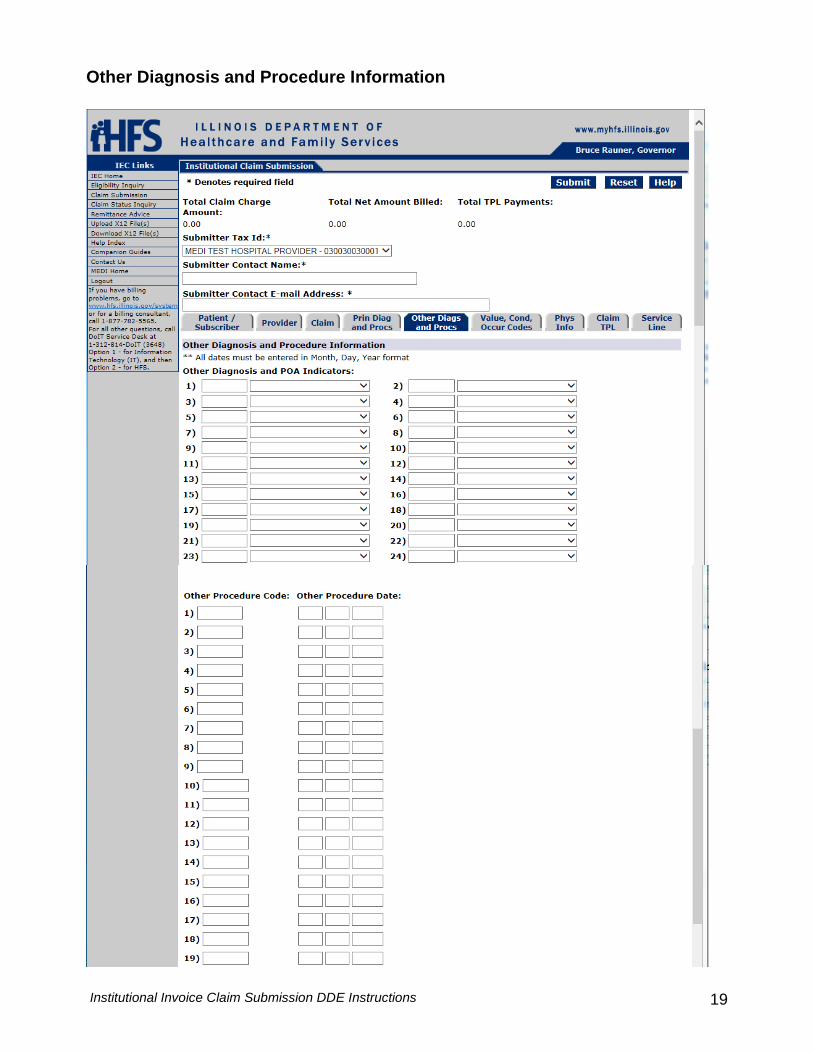
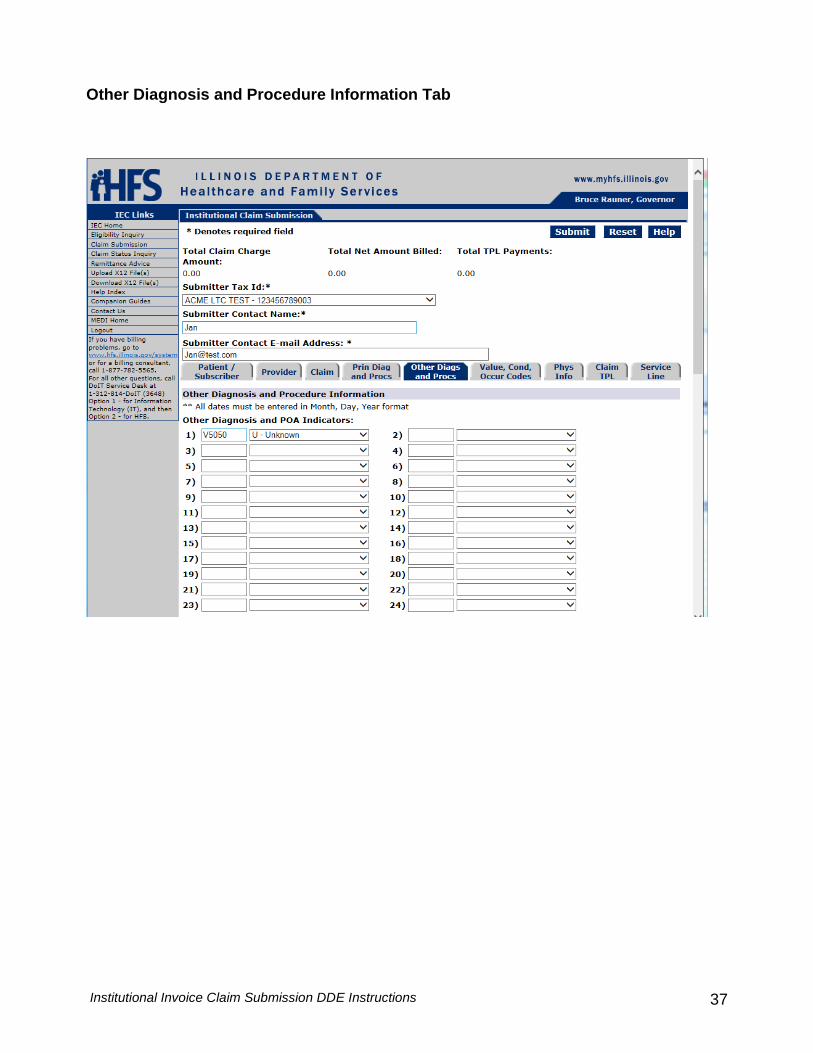
Other Diagnosis and Procedure Information
Institutional Invoice Claim Submission DDE Instructions 20
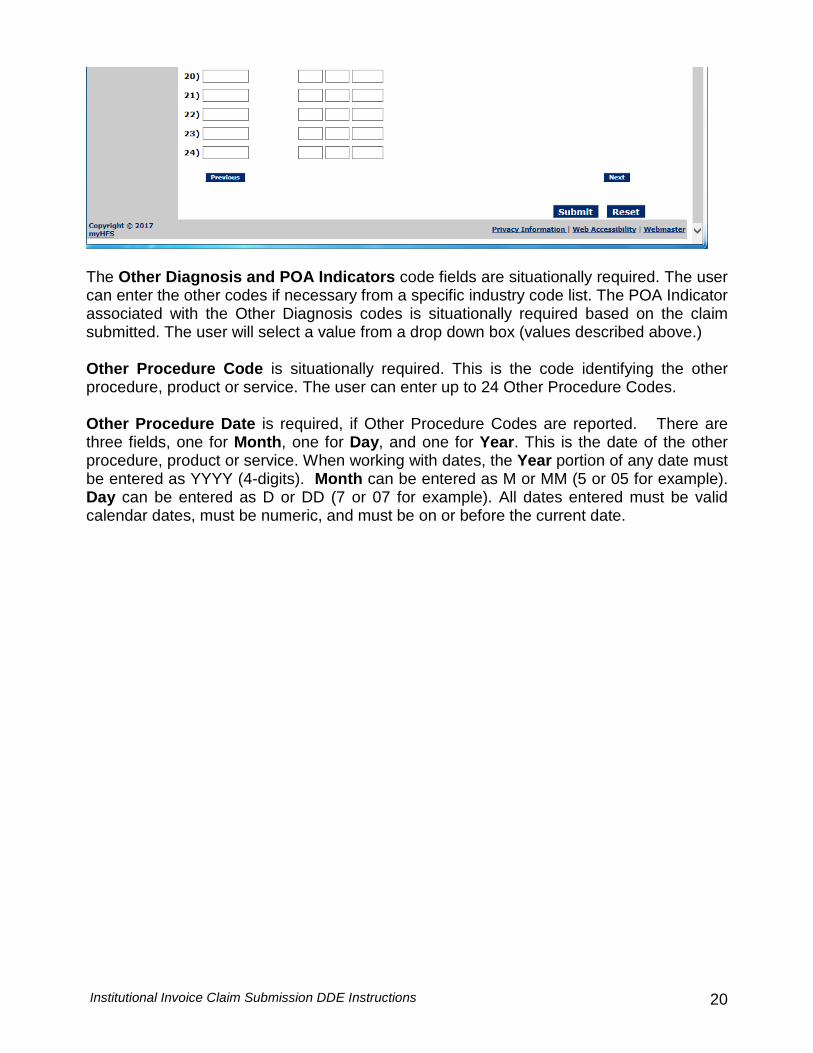
The Other Diagnosis and POA Indicators code fields are situationally required. The user can enter the other codes if necessary from a specific industry code list. The POA Indicator associated with the Other Diagnosis codes is situationally required based on the claim submitted. The user will select a value from a drop down box (values described above.) Other Procedure Code is situationally required. This is the code identifying the other procedure, product or service. The user can enter up to 24 Other Procedure Codes. Other Procedure Date is required, if Other Procedure Codes are reported. There are three fields, one for Month, one for Day, and one for Year. This is the date of the other procedure, product or service. When working with dates, the Year portion of any date must be entered as YYYY (4-digits). Month can be entered as M or MM (5 or 05 for example). Day can be entered as D or DD (7 or 07 for example). All dates entered must be valid calendar dates, must be numeric, and must be on or before the current date.
Institutional Invoice Claim Submission DDE Instructions 21
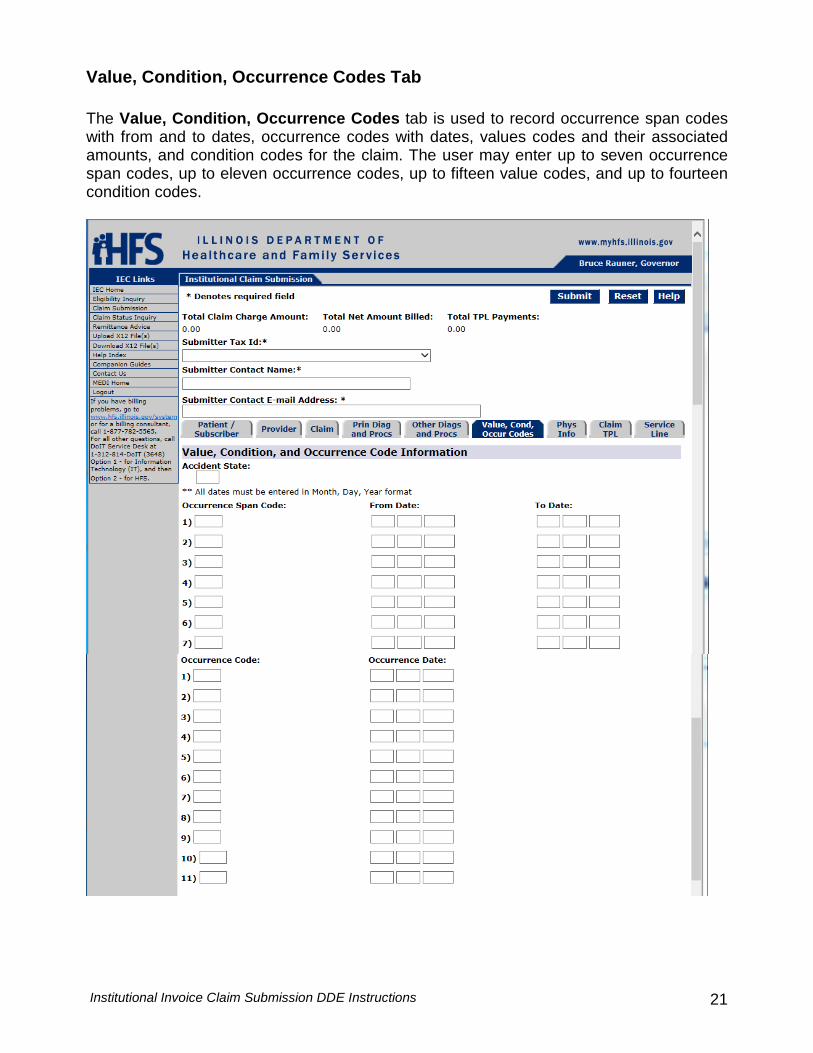
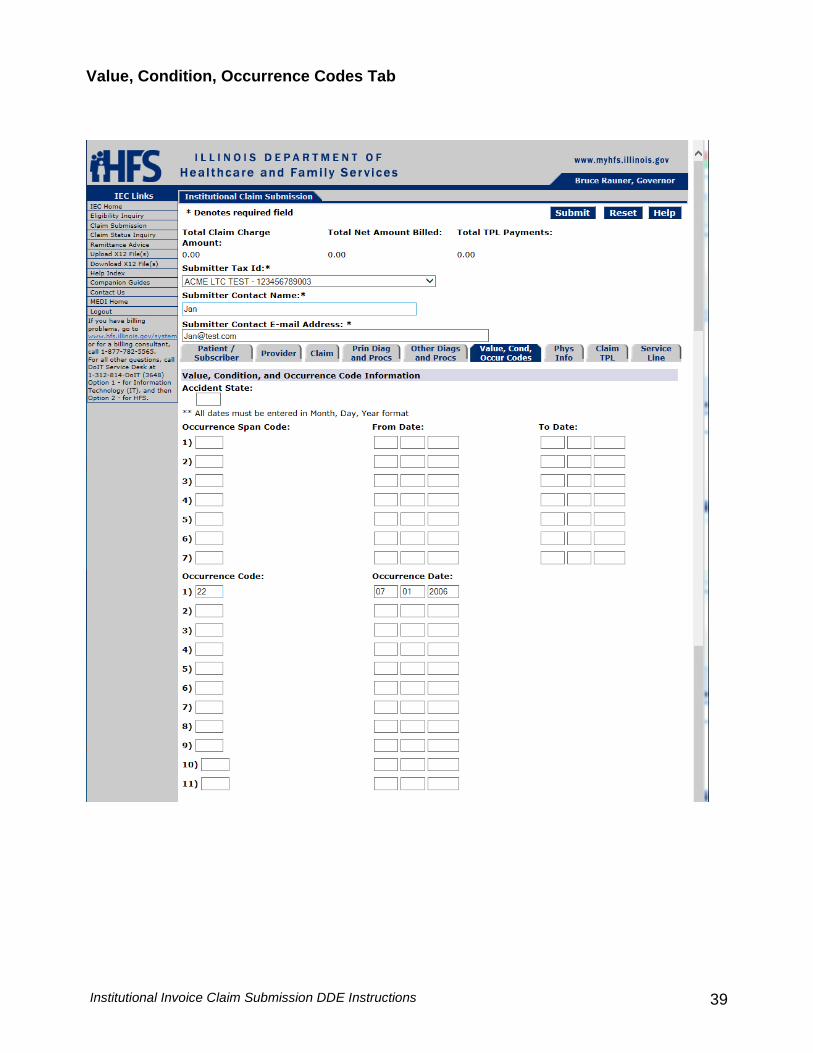
Value, Condition, Occurrence Codes Tab The Value, Condition, Occurrence Codes tab is used to record occurrence span codes with from and to dates, occurrence codes with dates, values codes and their associated amounts, and condition codes for the claim. The user may enter up to seven occurrence span codes, up to eleven occurrence codes, up to fifteen value codes, and up to fourteen condition codes.
Institutional Invoice Claim Submission DDE Instructions 22
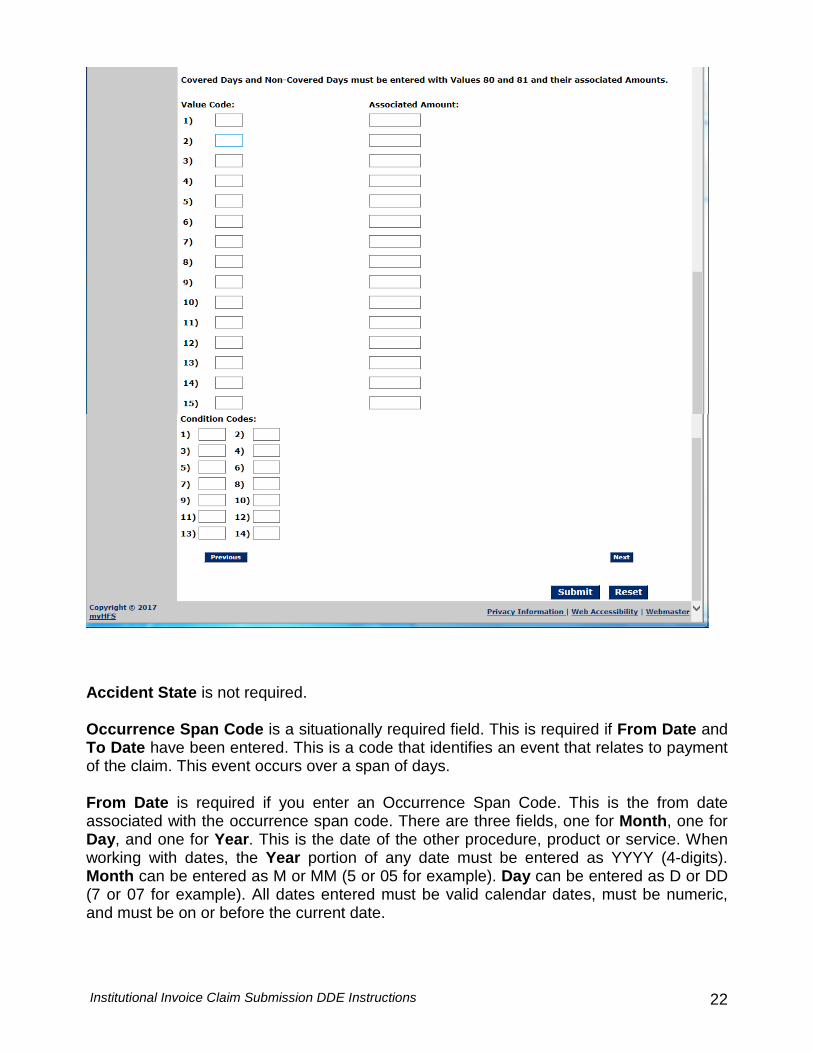
Accident State is not required. Occurrence Span Code is a situationally required field. This is required if From Date and To Date have been entered. This is a code that identifies an event that relates to payment of the claim. This event occurs over a span of days. From Date is required if you enter an Occurrence Span Code. This is the from date associated with the occurrence span code. There are three fields, one for Month, one for Day, and one for Year. This is the date of the other procedure, product or service. When working with dates, the Year portion of any date must be entered as YYYY (4-digits). Month can be entered as M or MM (5 or 05 for example). Day can be entered as D or DD (7 or 07 for example). All dates entered must be valid calendar dates, must be numeric, and must be on or before the current date.
Institutional Invoice Claim Submission DDE Instructions 23
To Date is required if you enter an Occurrence Span Code. This is the To date associated with the occurrence span code. There are three fields, one for Month, one for Day, and one for Year. This is the date of the other procedure, product or service. When working with dates, the Year portion of any date must be entered as YYYY (4-digits). Month can be entered as M or MM (5 or 05 for example). Day can be entered as D or DD (7 or 07 for example). All dates entered must be valid calendar dates, must be numeric, and must be on or before the current date. Occurrence Code is a situationally required field. This is required if an Occurrence Date has been provided. This is a code defining a significant event relating to this bill that may affect payer processing. Occurrence Date is required if you enter an Occurrence Code. This is the date associated with the occurrence code. There are three fields, one for Month, one for Day, and one for Year. This is the date of the other procedure, product or service. When working with dates, the Year portion of any date must be entered as YYYY (4-digits). Month can be entered as M or MM (5 or 05 for example). Day can be entered as D or DD (7 or 07 for example). All dates entered must be valid calendar dates, must be numeric, and must be on or before the current date. Value Code is a situationally required field depending on claim submittal. This is required if an Associated Amount has been provided. This is a code that identifies data of a monetary nature necessary for processing the claim as required by the payer organization. Effective with dates of service on/after 07/01/2007, Value Codes A1, A2, A7, B1, B2, B7, C1, C2, C7 cannot be used in electronic claims. Please refer to the Claim TPL tab for further instructions. Certain claim submittals require value codes such as, but not limited to, Covered Days, Non-Covered Days, Facility Code for Day Training Services, Hospice MSA Code, and others. Associated Amount is required if you enter a Value Code. This is the Amount associated with indicated code value. Dollar amounts can be entered with or without decimal places. Amounts that are whole numbers (dollars only with no cents) can be entered with or without the decimal places. For example, $50 can be entered as 50 or 50.00. The dollar sign is not needed and is not valid. Condition Code is a situationally required field. These codes are used to identify condition(s) relating to this bill or relating to the patient.
Institutional Invoice Claim Submission DDE Instructions 24
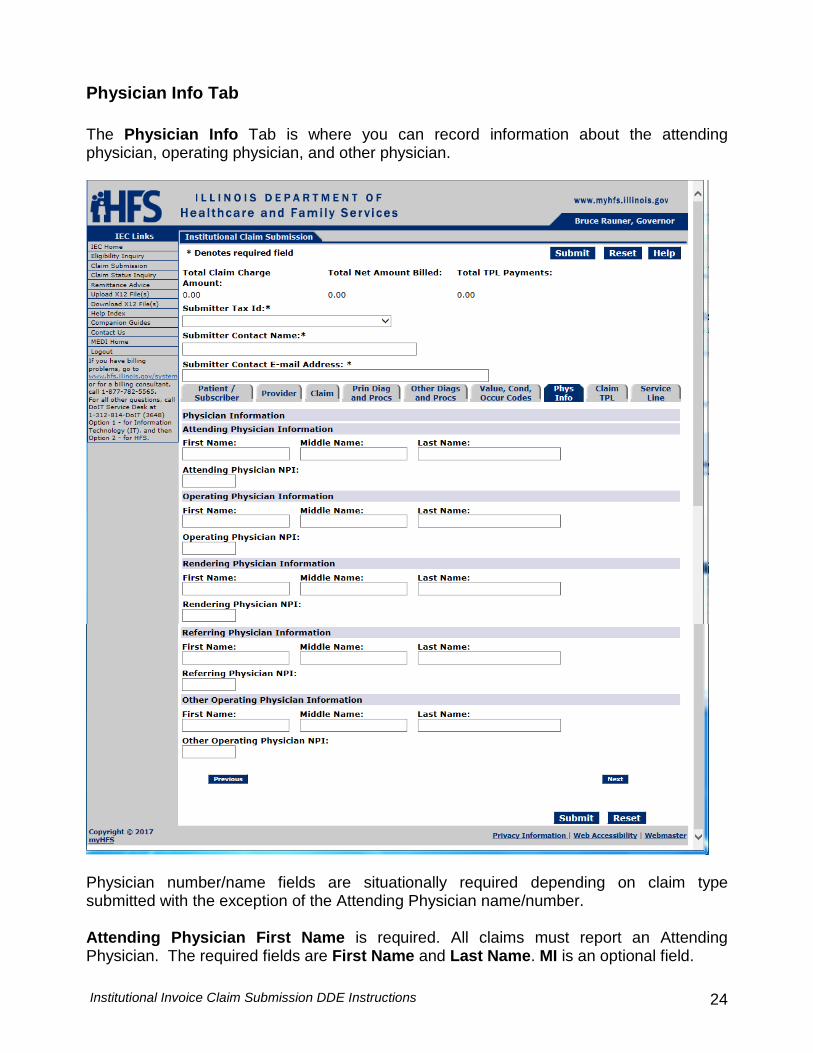
Physician Info Tab The Physician Info Tab is where you can record information about the attending physician, operating physician, and other physician.
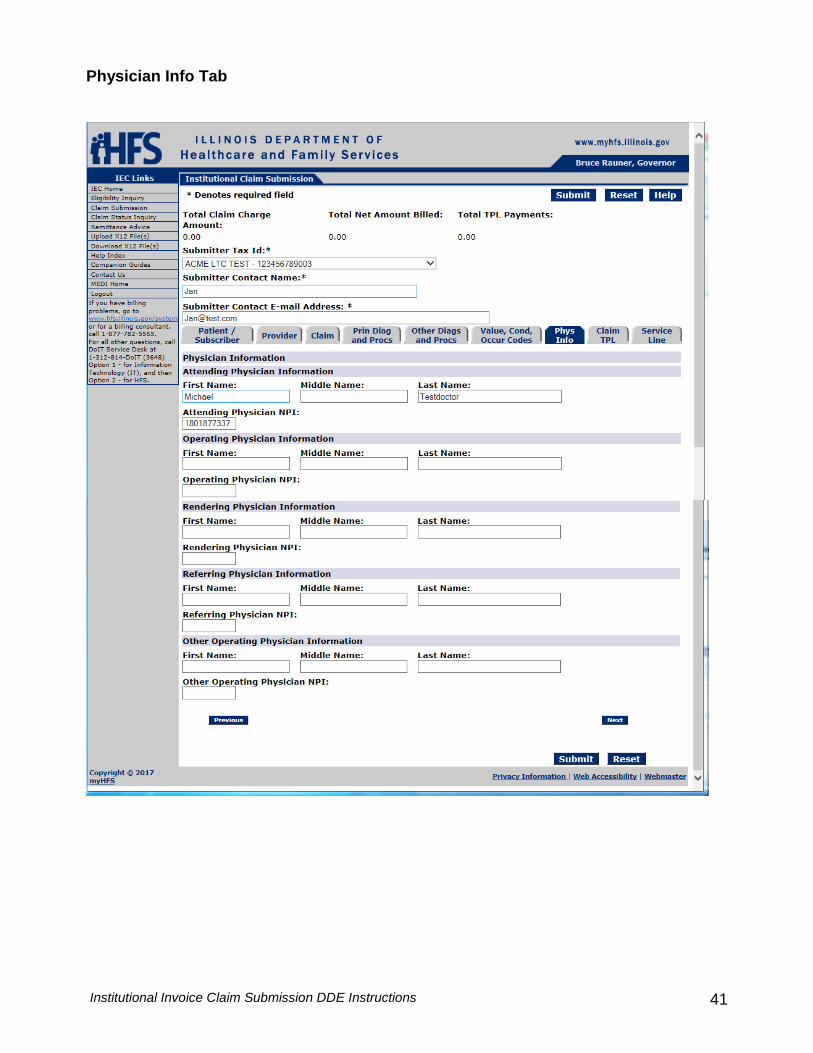
Physician number/name fields are situationally required depending on claim type submitted with the exception of the Attending Physician name/number. Attending Physician First Name is required. All claims must report an Attending Physician. The required fields are First Name and Last Name. MI is an optional field.
Institutional Invoice Claim Submission DDE Instructions 25
Attending Physician Middle Name is optional field but is not required. Attending Physician Last Name is required. Attending Physician NPI is required. A Physician NPI is a 10-digit number. Operating Physician First Name is not required unless something is entered into one of the other fields for operating physician. Operating Physician Middle Name is not required. The operating physician middle name can be entered if provided. Operating Physician Last Name is not required unless something is entered into one of the other fields for operating physician. Operating Provider NPI is not required unless something is entered into one of the other fields for operating physician. Rendering/Referring/Other Physician First Name is not required unless something is entered into one of the other fields for other physician. Rendering/Referring/Other Physician Middle Name is not required. The other physician middle name can be entered if provided. Rendering/Referring/Other Physician Last Name is not required unless something is entered into one of the other fields for other physician. Rendering/Referring/Other Physician Provider NPI is not required unless something is entered into one of the other fields for other physician.
Institutional Invoice Claim Submission DDE Instructions 26
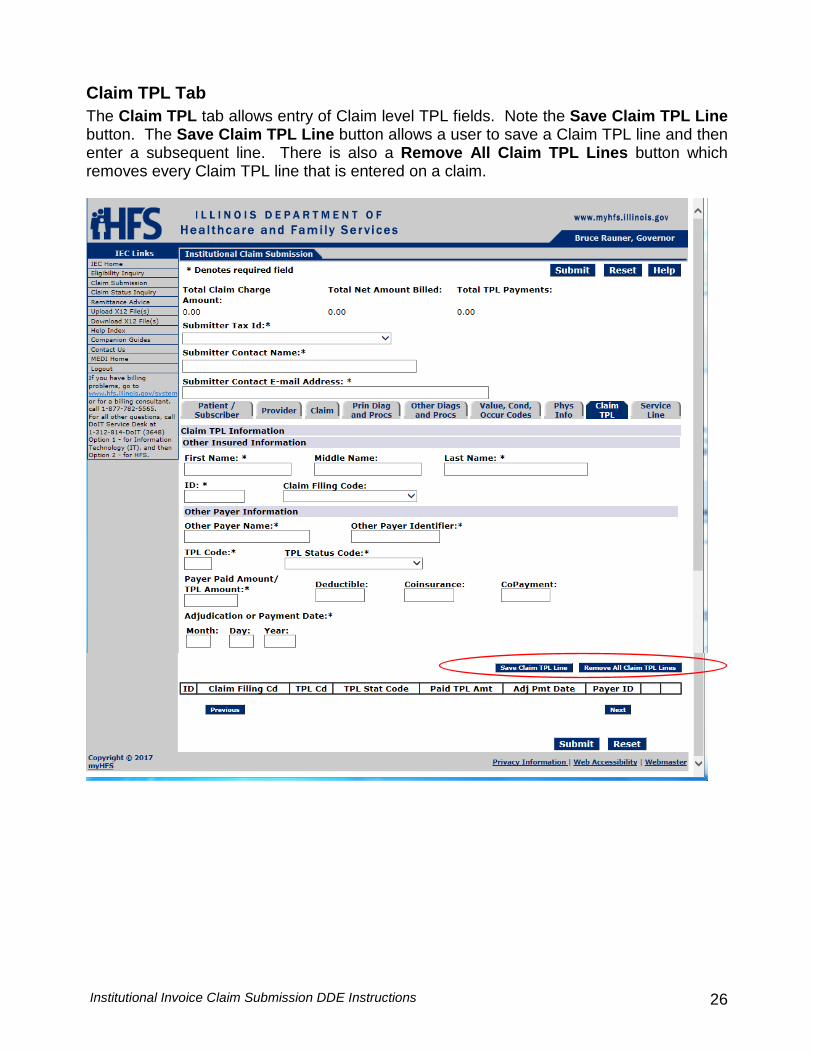
Claim TPL Tab The Claim TPL tab allows entry of Claim level TPL fields. Note the Save Claim TPL Line button. The Save Claim TPL Line button allows a user to save a Claim TPL line and then enter a subsequent line. There is also a Remove All Claim TPL Lines button which removes every Claim TPL line that is entered on a claim.
Institutional Invoice Claim Submission DDE Instructions 27
This tab is situationally required depending on claim submittal. If TPL is reported, the user should follow the instructions for each field on the screen. The other insured First Name is required if Claim TPL information is entered. This is the first name of the other insured party. The other insured Middle Name is optional. The other insured Last Name is required if Claim TPL information is entered. This is the last name of the other insured party. The other insured ID is required if Claim TPL information is entered. The Claim Filing Code is not required. The user can select from a dropdown list. This is the code identifying the type of claim or expected adjudication process. Other Payer Name is required if Claim TPL information is entered. This is for the name of the other payer if provided. Other Payer Identifier is required if Claim TPL information is entered. This is for the other payer identifier if provided. The TPL Code is required if Claim TPL information is entered. The TPL Code contained on the patient's MediPlan Card (MEC) is to be entered in this field. The TPL Status Code is required if Claim TPL information is entered. This is a two-digit code indicating the disposition of the third party billing must be entered. The user can select from a dropdown list. The Payer Paid Amount/TPL Amount is required if Claim TPL information is entered. Enter the amount of payment received from the third party resource. Dollar amounts can be entered with or without decimal places. Amounts that are whole numbers (dollars only with no cents) can be entered with or without the decimal places. For example, $50 can be entered as 50 or 50.00. The dollar sign is not needed and is not valid. Deductible code is a situationally required field. This is a monetary amount assumed by the provider to be applied to the patient’s policy/program deductible amount involving the indicated payer. Coinsurance code is a situationally required field. This is a monetary amount assumed by the provider to be applied toward the patient’s coinsurance amount involving the indicated payer. Copayment code is a situationally required field. This is a monetary amount assumed by the provider to be applied toward the patient’s coinsurance amount involving the indicated payer. The Adjudication or Payment Date is required if Claim TPL information is entered. The Year must be entered as YYYY (4 digits), for example you must enter the year as 2005. The Day and Month fields can be entered as either one digit or two. For example, the month of July can be entered as 7 or as 07. This indicates the date of the claim level TPL Payment.
Institutional Invoice Claim Submission DDE Instructions 28
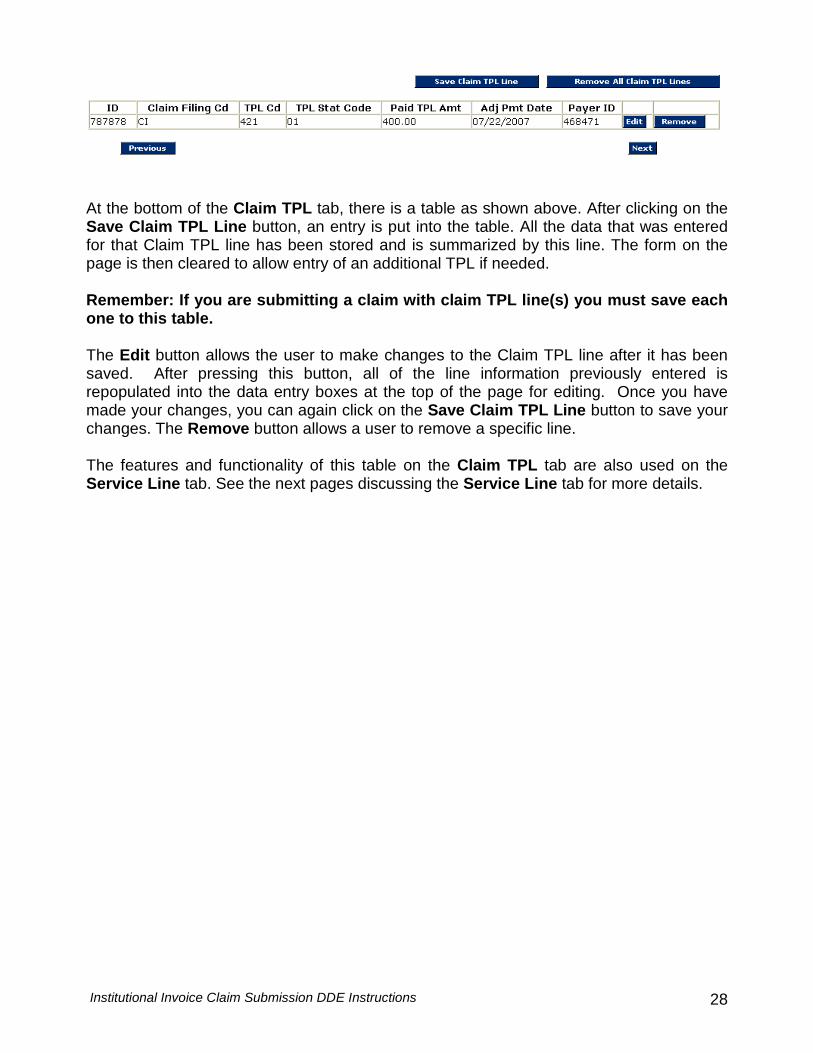
At the bottom of the Claim TPL tab, there is a table as shown above. After clicking on the Save Claim TPL Line button, an entry is put into the table. All the data that was entered for that Claim TPL line has been stored and is summarized by this line. The form on the page is then cleared to allow entry of an additional TPL if needed. Remember: If you are submitting a claim with claim TPL line(s) you must save each one to this table. The Edit button allows the user to make changes to the Claim TPL line after it has been saved. After pressing this button, all of the line information previously entered is repopulated into the data entry boxes at the top of the page for editing. Once you have made your changes, you can again click on the Save Claim TPL Line button to save your changes. The Remove button allows a user to remove a specific line. The features and functionality of this table on the Claim TPL tab are also used on the Service Line tab. See the next pages discussing the Service Line tab for more details.
Institutional Invoice Claim Submission DDE Instructions 29
Service Line Tab The Service Line tab allows entry of service line fields. Note the Save Service Line button. As with the Claim TPL tab, the Save Service Line button allows a user to save a service line and then enter a subsequent service line, which will populate the table at the bottom of the tab. Note: You MUST save your service line information before entering information for a second service line. There is also a Remove All Service Lines button which removes every Service Line that is entered on a claim. The Edit button allows the user to make changes to the service line after it has been saved. After pressing this button, the line information will appear in the data entry boxes at the top of the page. The Remove button allows a user to remove a specific service line. See the next page for a screen shot of the Service Line tab.
Institutional Invoice Claim Submission DDE Instructions 30
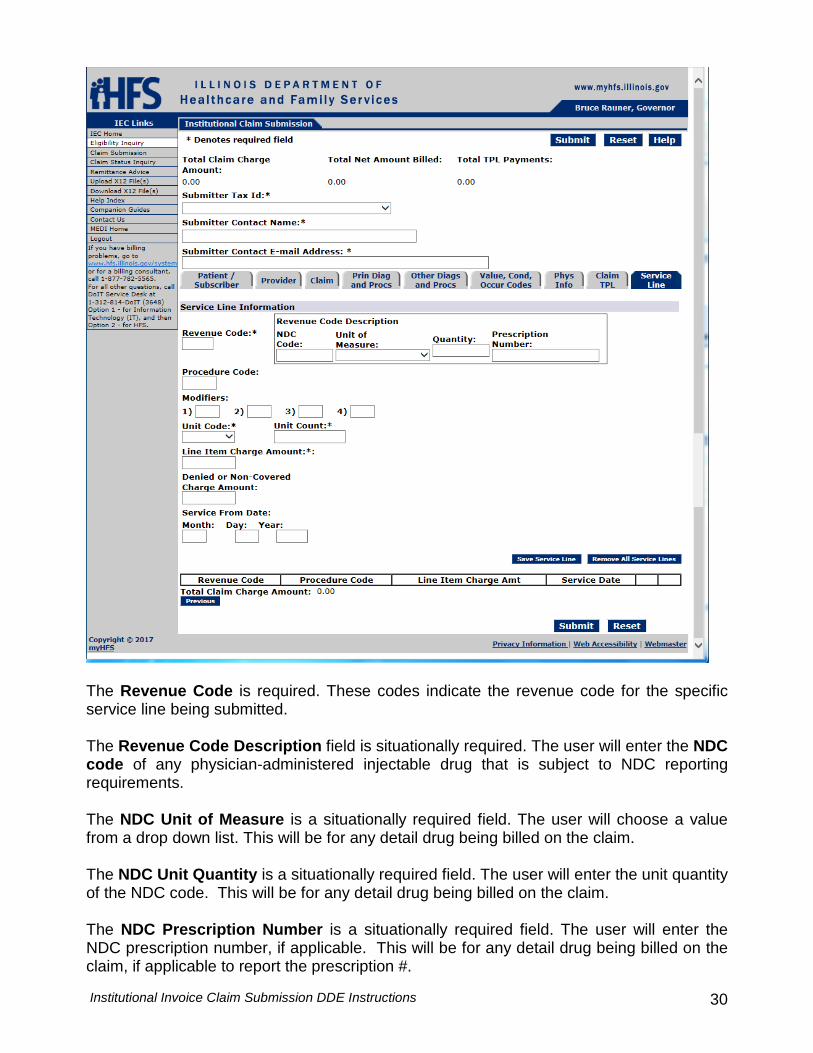
The Revenue Code is required. These codes indicate the revenue code for the specific service line being submitted. The Revenue Code Description field is situationally required. The user will enter the NDC code of any physician-administered injectable drug that is subject to NDC reporting requirements. The NDC Unit of Measure is a situationally required field. The user will choose a value from a drop down list. This will be for any detail drug being billed on the claim. The NDC Unit Quantity is a situationally required field. The user will enter the unit quantity of the NDC code. This will be for any detail drug being billed on the claim. The NDC Prescription Number is a situationally required field. The user will enter the NDC prescription number, if applicable. This will be for any detail drug being billed on the claim, if applicable to report the prescription #.
Institutional Invoice Claim Submission DDE Instructions 31
The Procedure Code (HCPCS/Rate field) is situationally required. These codes indicate the procedure code for the specific service line being submitted. If you enter a Procedure Code, you cannot enter a Service Line Rate. The Modifier field(s) is situationally required. This is for the procedure modifiers and the user can enter up to four modifiers. Each Modifier can be two characters. Unit Code is required. This is a dropdown list describing the units in which a value is being expressed. There are only 3 values, minutes, units, and international units. Unit Count is a required field. This is the quantity, units or minutes as described by the unit code. The Line Item Charge Amount is a required field. This is the amount changed for the service line. Dollar amounts can be entered with or without decimal places. Amounts that are whole numbers (dollars only with no cents) can be entered with or without the decimal places. For example, $50 can be entered as 50 or 50.00. The dollar sign is not needed and is not valid. Denied or Non-Covered Charge Amount is a situationally required field. This is the amount changed for the service line. Dollar amounts can be entered with or without decimal places. Amounts that are whole numbers (dollars only with no cents) can be entered with or without the decimal places. For example, $50 can be entered as 50 or 50.00. The dollar sign is not needed and is not valid. The Service From Date is required. The Year must be entered as YYYY (4 digits), for example you must enter the year as 2005. The Day and Month fields can be entered as either one digit or two. For example, the month of July can be entered as 7 or as 07.
Institutional Invoice Claim Submission DDE Instructions 32
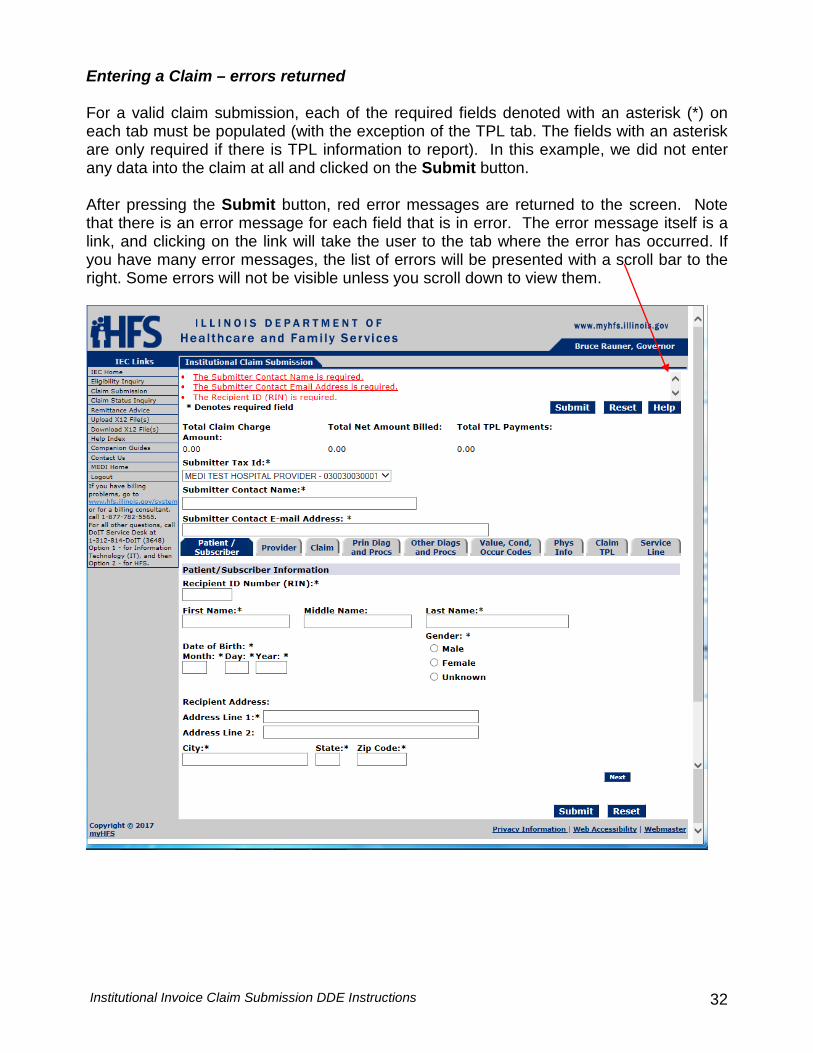
Entering a Claim – errors returned For a valid claim submission, each of the required fields denoted with an asterisk (*) on each tab must be populated (with the exception of the TPL tab. The fields with an asterisk are only required if there is TPL information to report). In this example, we did not enter any data into the claim at all and clicked on the Submit button. After pressing the Submit button, red error messages are returned to the screen. Note that there is an error message for each field that is in error. The error message itself is a link, and clicking on the link will take the user to the tab where the error has occurred. If you have many error messages, the list of errors will be presented with a scroll bar to the right. Some errors will not be visible unless you scroll down to view them.
Institutional Invoice Claim Submission DDE Instructions 33
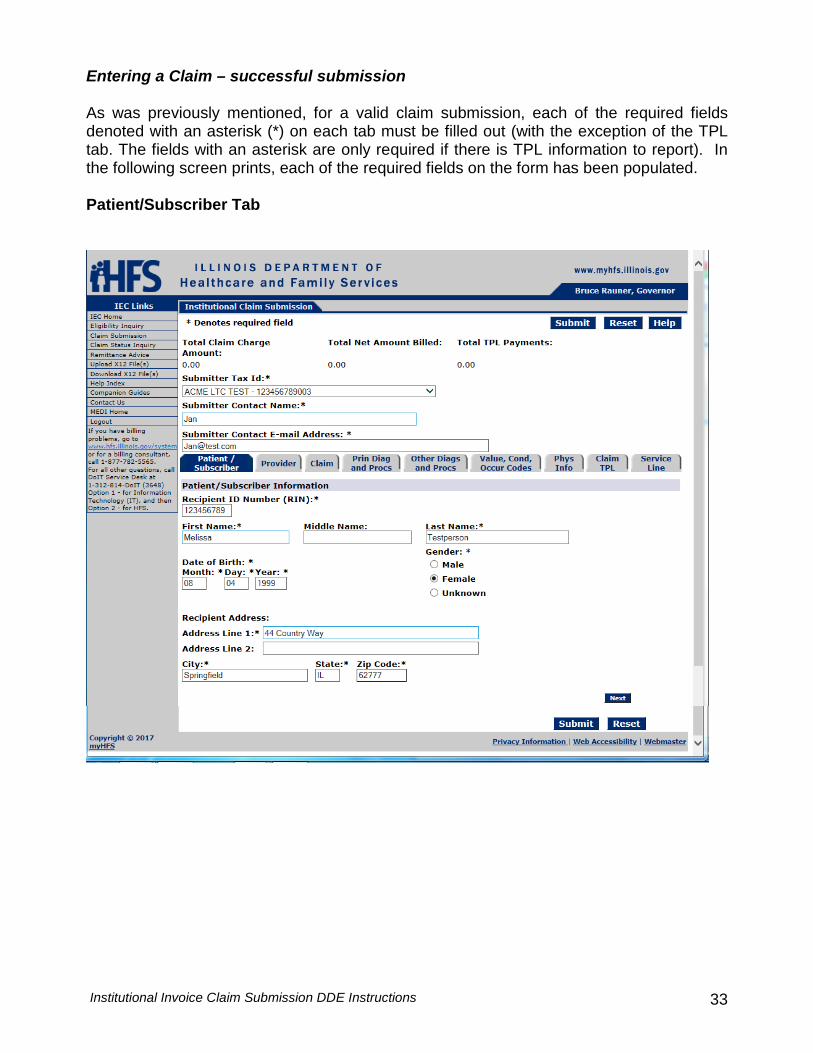
Entering a Claim – successful submission As was previously mentioned, for a valid claim submission, each of the required fields denoted with an asterisk (*) on each tab must be filled out (with the exception of the TPL tab. The fields with an asterisk are only required if there is TPL information to report). In the following screen prints, each of the required fields on the form has been populated. Patient/Subscriber Tab
Institutional Invoice Claim Submission DDE Instructions 34
Provider Tab
Institutional Invoice Claim Submission DDE Instructions 35
Claim Tab
Institutional Invoice Claim Submission DDE Instructions 36
Principal Diagnosis and Procedures Tab
Institutional Invoice Claim Submission DDE Instructions 37
Other Diagnosis and Procedure Information Tab
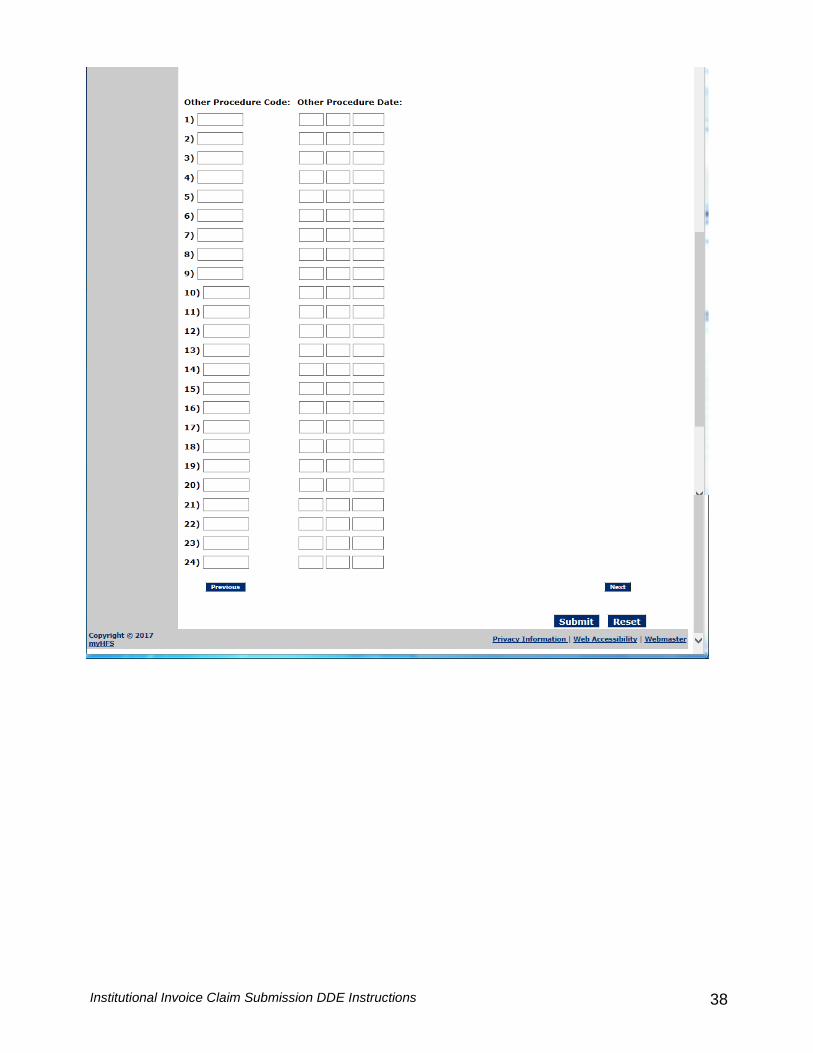
Institutional Invoice Claim Submission DDE Instructions 38
Institutional Invoice Claim Submission DDE Instructions 39
Value, Condition, Occurrence Codes Tab

Institutional Invoice Claim Submission DDE Instructions 40
Institutional Invoice Claim Submission DDE Instructions 41
Physician Info Tab
Institutional Invoice Claim Submission DDE Instructions 42
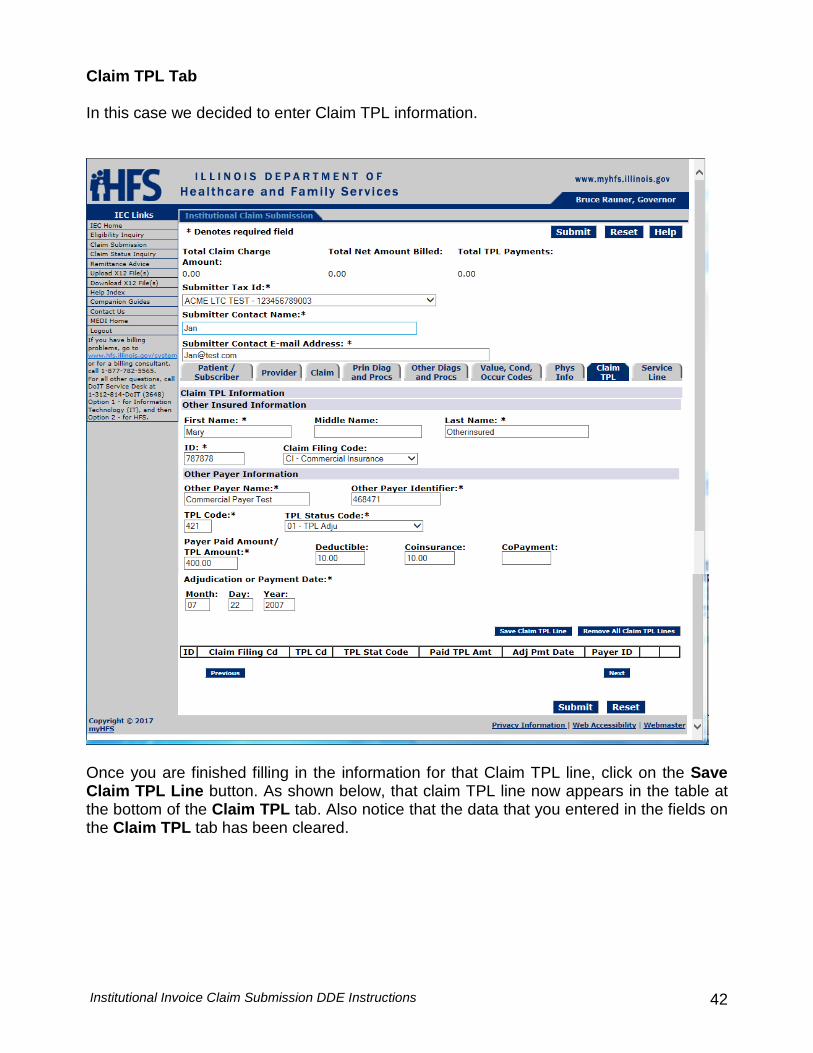
Claim TPL Tab In this case we decided to enter Claim TPL information.
Once you are finished filling in the information for that Claim TPL line, click on the Save Claim TPL Line button. As shown below, that claim TPL line now appears in the table at the bottom of the Claim TPL tab. Also notice that the data that you entered in the fields on the Claim TPL tab has been cleared.

Institutional Invoice Claim Submission DDE Instructions 43
The Claim TPL now appears in the table at the bottom of the Claim TPL tab.
Institutional Invoice Claim Submission DDE Instructions 44
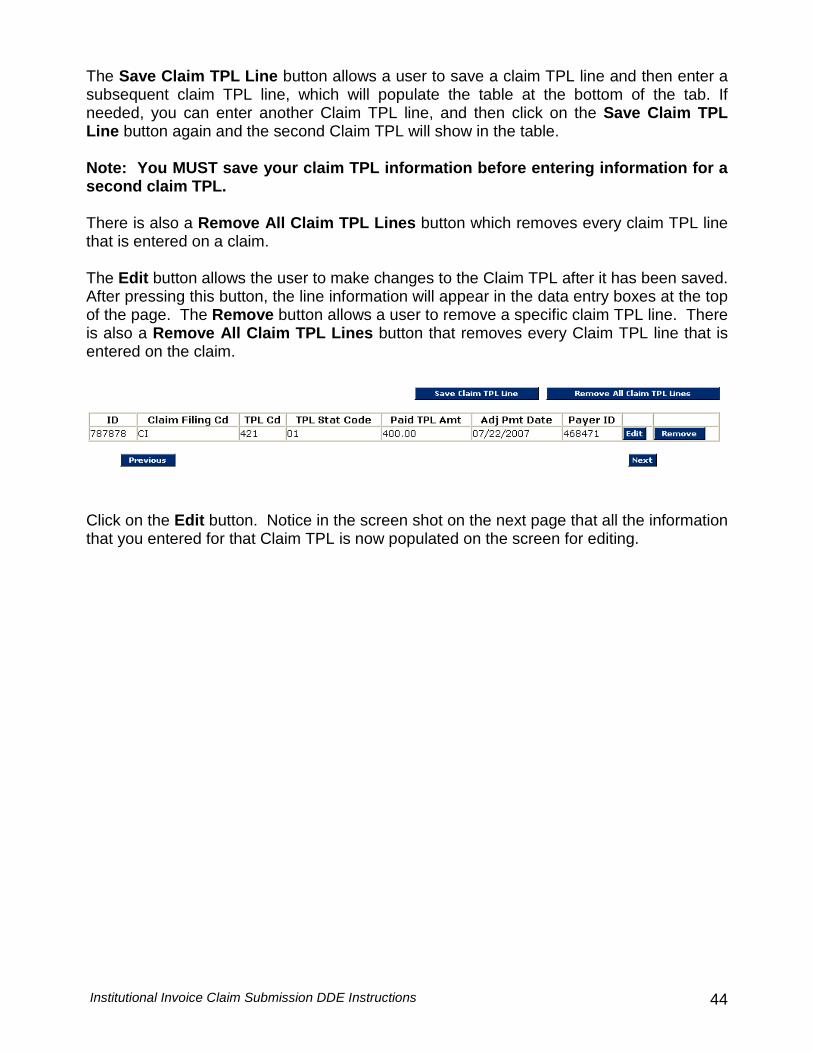
The Save Claim TPL Line button allows a user to save a claim TPL line and then enter a subsequent claim TPL line, which will populate the table at the bottom of the tab. If needed, you can enter another Claim TPL line, and then click on the Save Claim TPL Line button again and the second Claim TPL will show in the table. Note: You MUST save your claim TPL information before entering information for a second claim TPL. There is also a Remove All Claim TPL Lines button which removes every claim TPL line that is entered on a claim. The Edit button allows the user to make changes to the Claim TPL after it has been saved. After pressing this button, the line information will appear in the data entry boxes at the top of the page. The Remove button allows a user to remove a specific claim TPL line. There is also a Remove All Claim TPL Lines button that removes every Claim TPL line that is entered on the claim.
Click on the Edit button. Notice in the screen shot on the next page that all the information that you entered for that Claim TPL is now populated on the screen for editing.
Institutional Invoice Claim Submission DDE Instructions 45
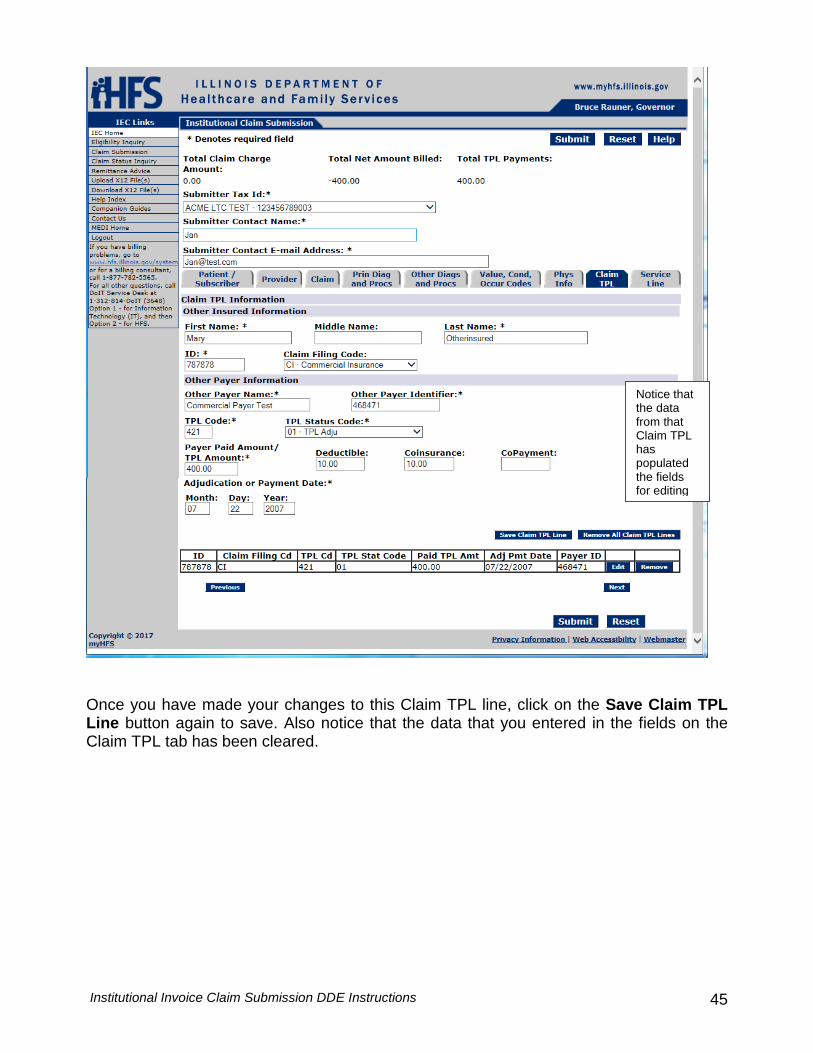
Once you have made your changes to this Claim TPL line, click on the Save Claim TPL Line button again to save. Also notice that the data that you entered in the fields on the Claim TPL tab has been cleared.
Notice that the data from that Claim TPL has populated the fields for editing
Institutional Invoice Claim Submission DDE Instructions 46
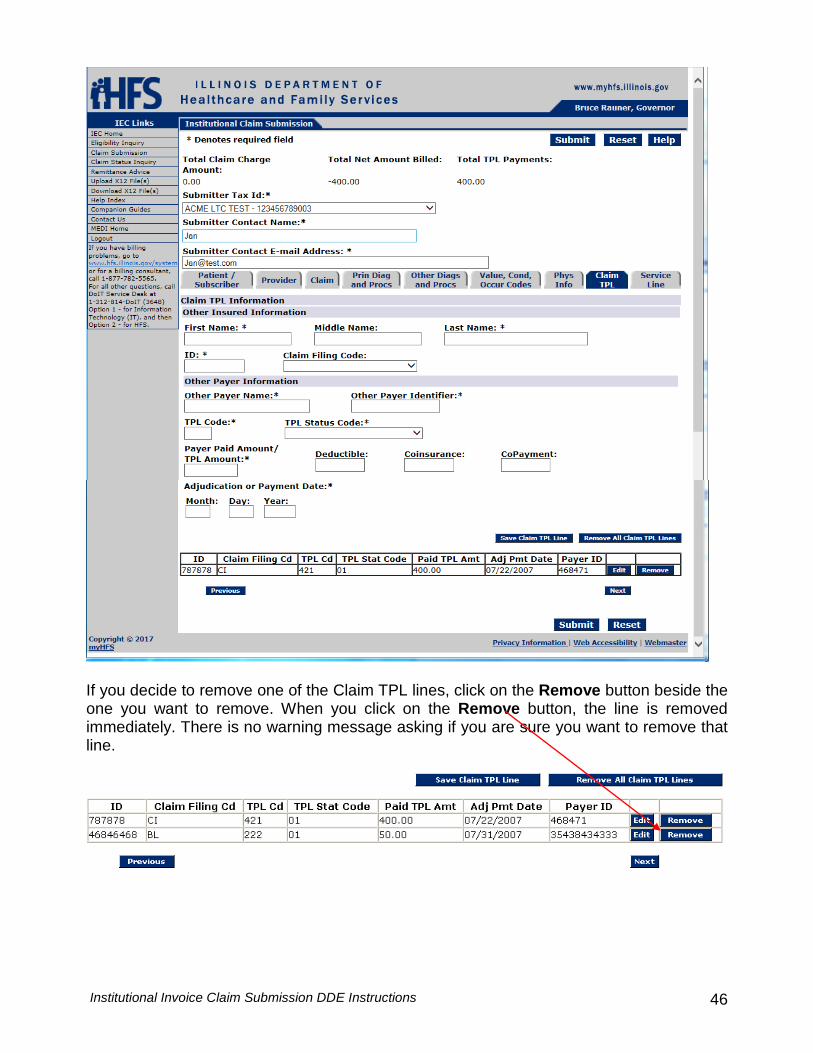
If you decide to remove one of the Claim TPL lines, click on the Remove button beside the one you want to remove. When you click on the Remove button, the line is removed immediately. There is no warning message asking if you are sure you want to remove that line.
Institutional Invoice Claim Submission DDE Instructions 47
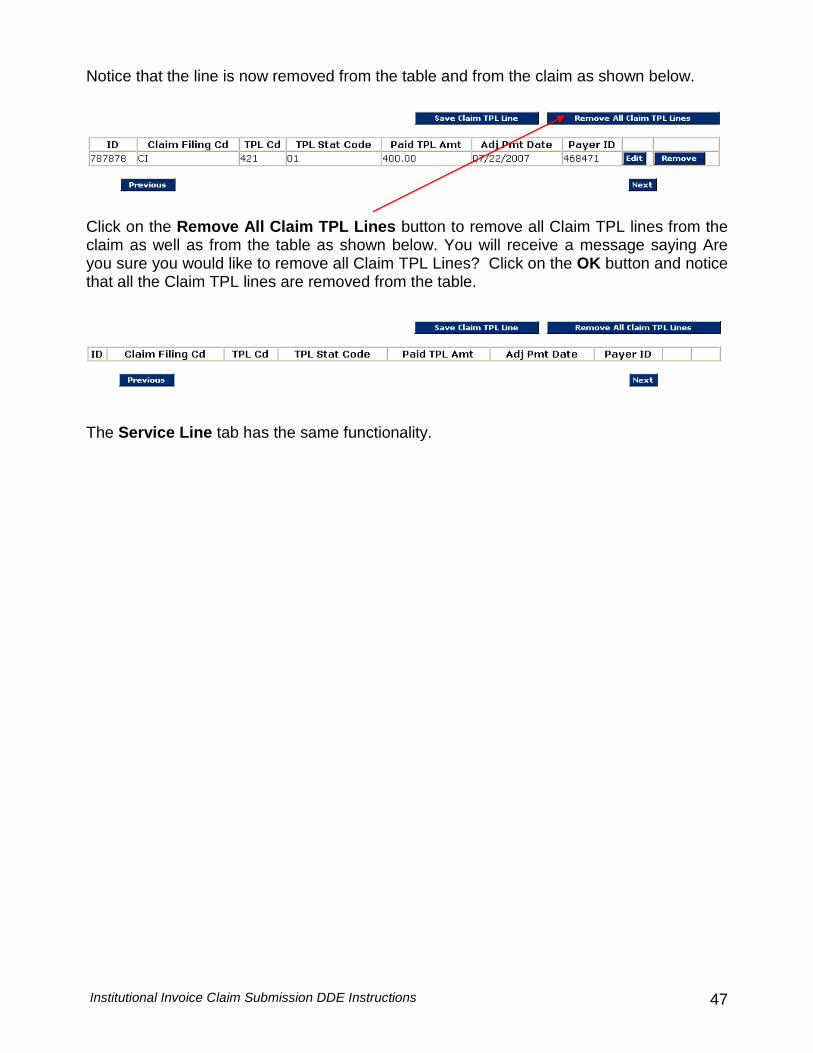
Notice that the line is now removed from the table and from the claim as shown below.
Click on the Remove All Claim TPL Lines button to remove all Claim TPL lines from the claim as well as from the table as shown below. You will receive a message saying Are you sure you would like to remove all Claim TPL Lines? Click on the OK button and notice that all the Claim TPL lines are removed from the table.
The Service Line tab has the same functionality.
Institutional Invoice Claim Submission DDE Instructions 48
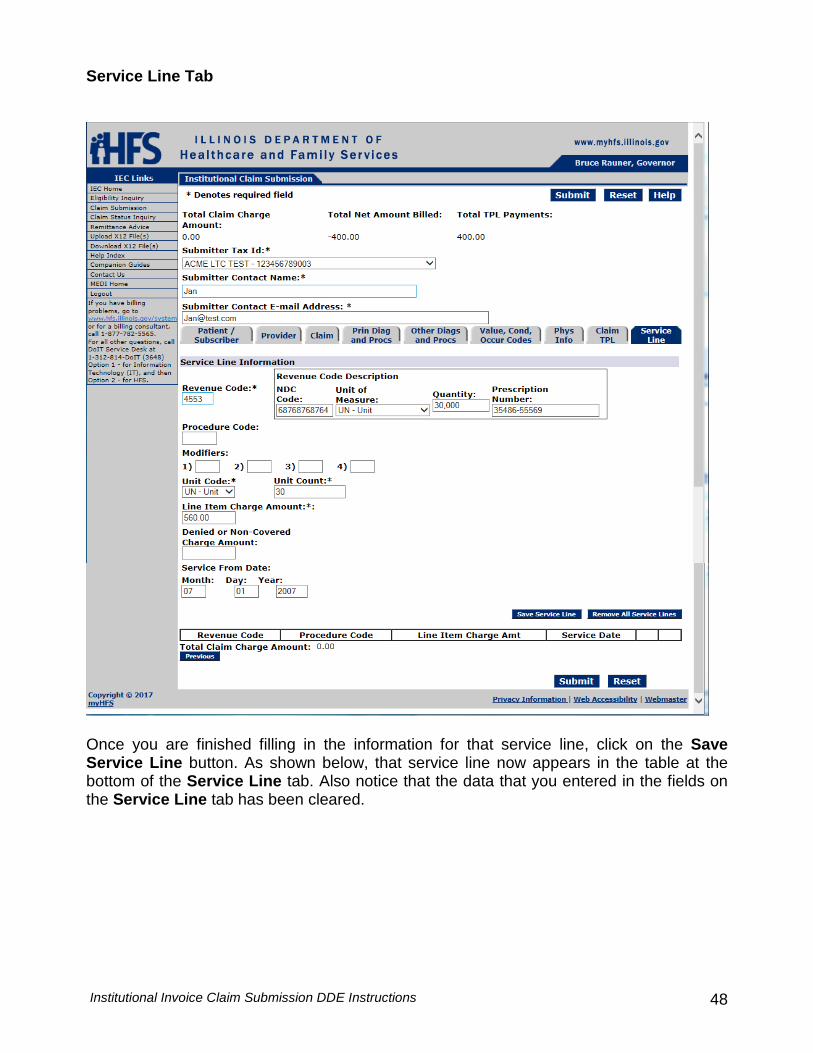
Service Line Tab
Once you are finished filling in the information for that service line, click on the Save Service Line button. As shown below, that service line now appears in the table at the bottom of the Service Line tab. Also notice that the data that you entered in the fields on the Service Line tab has been cleared.
Institutional Invoice Claim Submission DDE Instructions 49
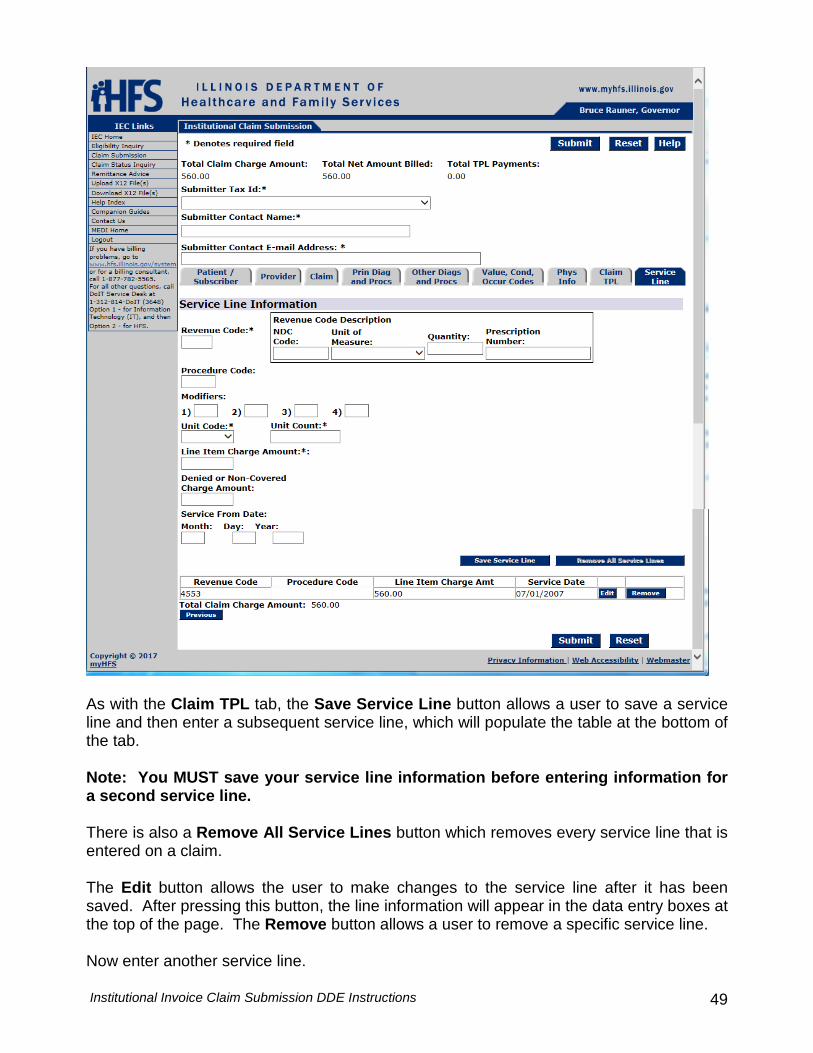
As with the Claim TPL tab, the Save Service Line button allows a user to save a service line and then enter a subsequent service line, which will populate the table at the bottom of the tab. Note: You MUST save your service line information before entering information for a second service line. There is also a Remove All Service Lines button which removes every service line that is entered on a claim. The Edit button allows the user to make changes to the service line after it has been saved. After pressing this button, the line information will appear in the data entry boxes at the top of the page. The Remove button allows a user to remove a specific service line. Now enter another service line.
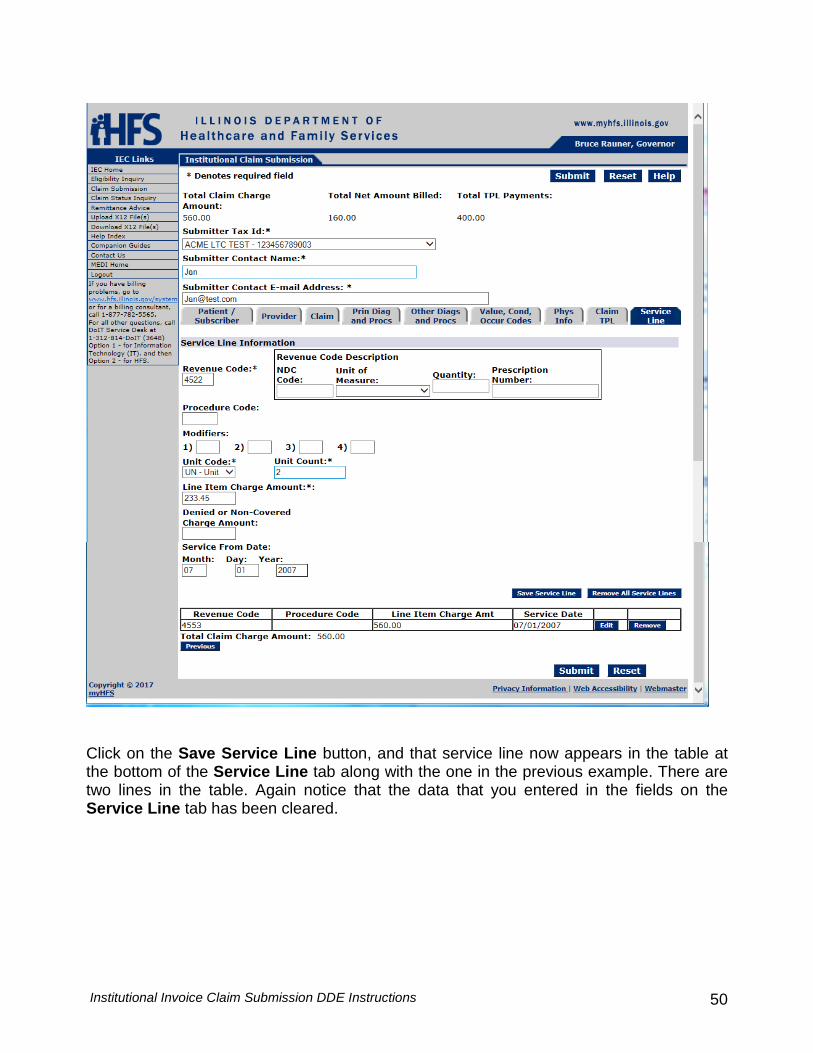
Institutional Invoice Claim Submission DDE Instructions 50
Click on the Save Service Line button, and that service line now appears in the table at the bottom of the Service Line tab along with the one in the previous example. There are two lines in the table. Again notice that the data that you entered in the fields on the Service Line tab has been cleared.
Institutional Invoice Claim Submission DDE Instructions 51
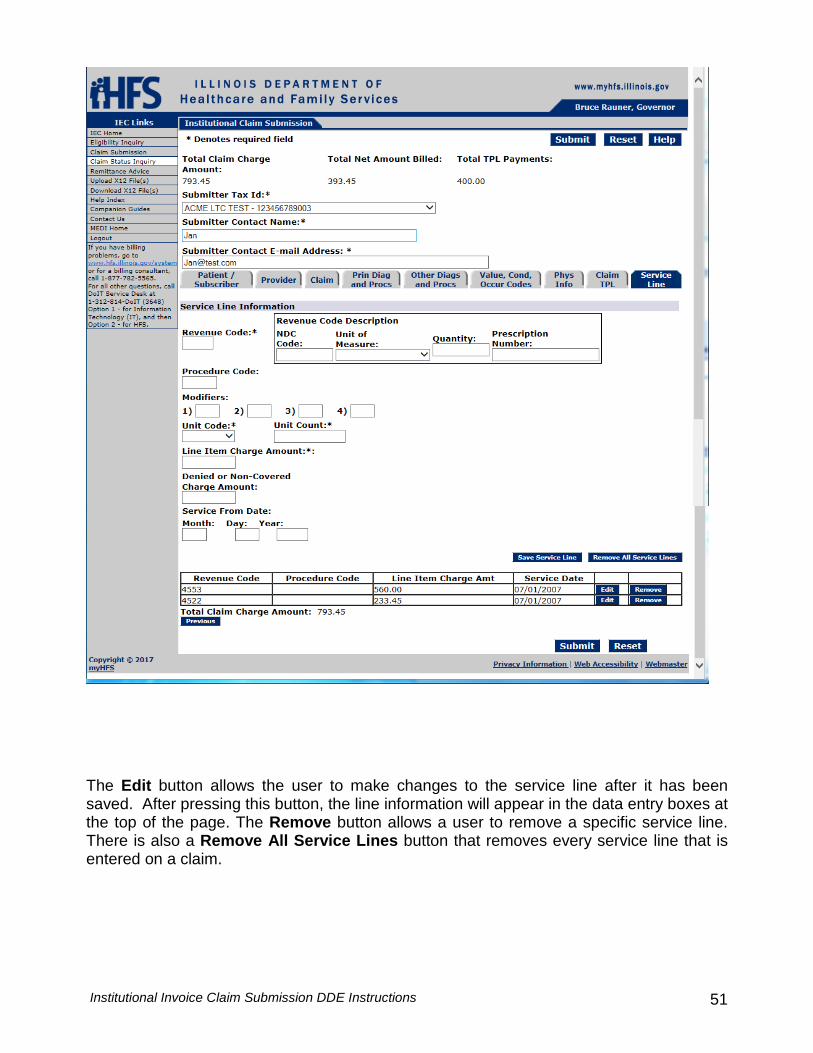
The Edit button allows the user to make changes to the service line after it has been saved. After pressing this button, the line information will appear in the data entry boxes at the top of the page. The Remove button allows a user to remove a specific service line. There is also a Remove All Service Lines button that removes every service line that is entered on a claim.

Institutional Invoice Claim Submission DDE Instructions 52
Click on the Edit button. Notice in the screen shot below that all the information that you entered for that service line is now populated on the screen for editing.
Edit button
Notice that the data from that service line has populated the fields for editing

Institutional Invoice Claim Submission DDE Instructions 53
Once you have made your changes, click on the Save Service Line button again to save. Now notice that the data that you entered in the fields on the Service Line tab has been cleared.

Institutional Invoice Claim Submission DDE Instructions 54
If you decide to remove one of the service lines, click on the Remove button beside the one you want to remove. When you click on the Remove button, the line is removed immediately. There is no warning message asking if you are sure you want to remove that line.
Notice that the line is now removed from the table and from the claim as shown below.
Click on the Remove All Service Lines button to remove all service lines from the claim as well as from the table as shown below. You will receive a message saying Are you sure you would like to remove all Service Lines? Click on the OK button and notice that all the service lines are removed from the table.
The Claim TPL tab has this same functionality.
Institutional Invoice Claim Submission DDE Instructions 55
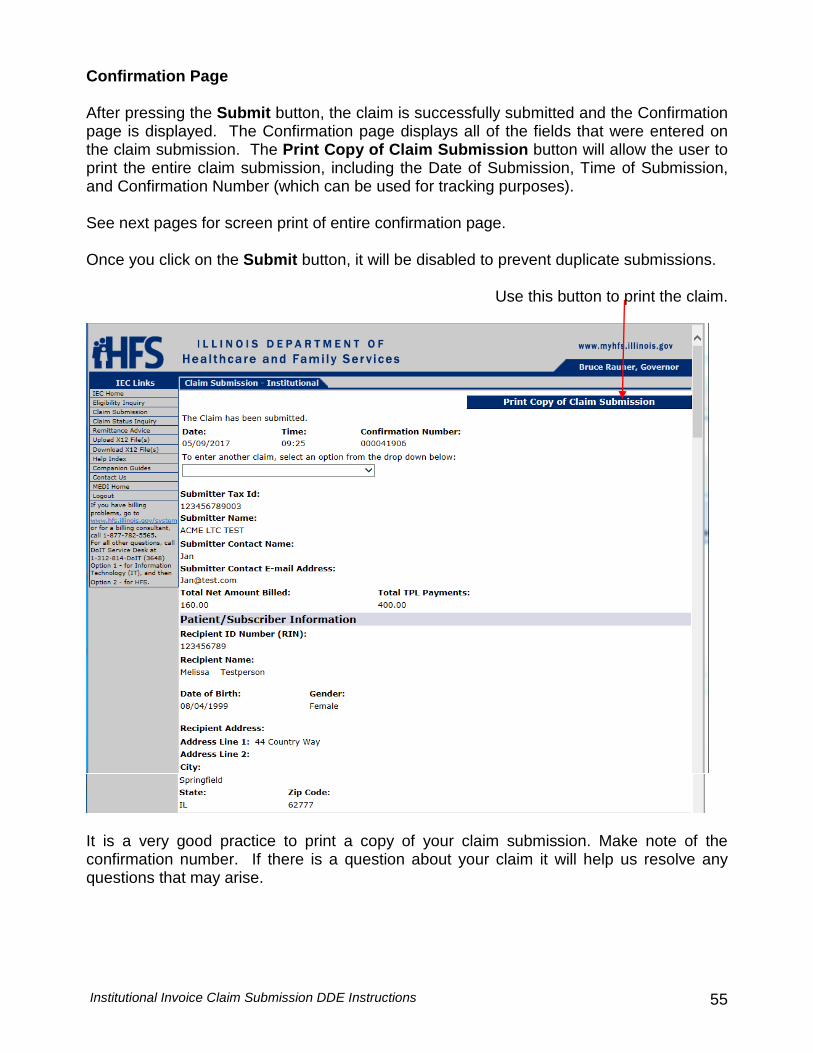
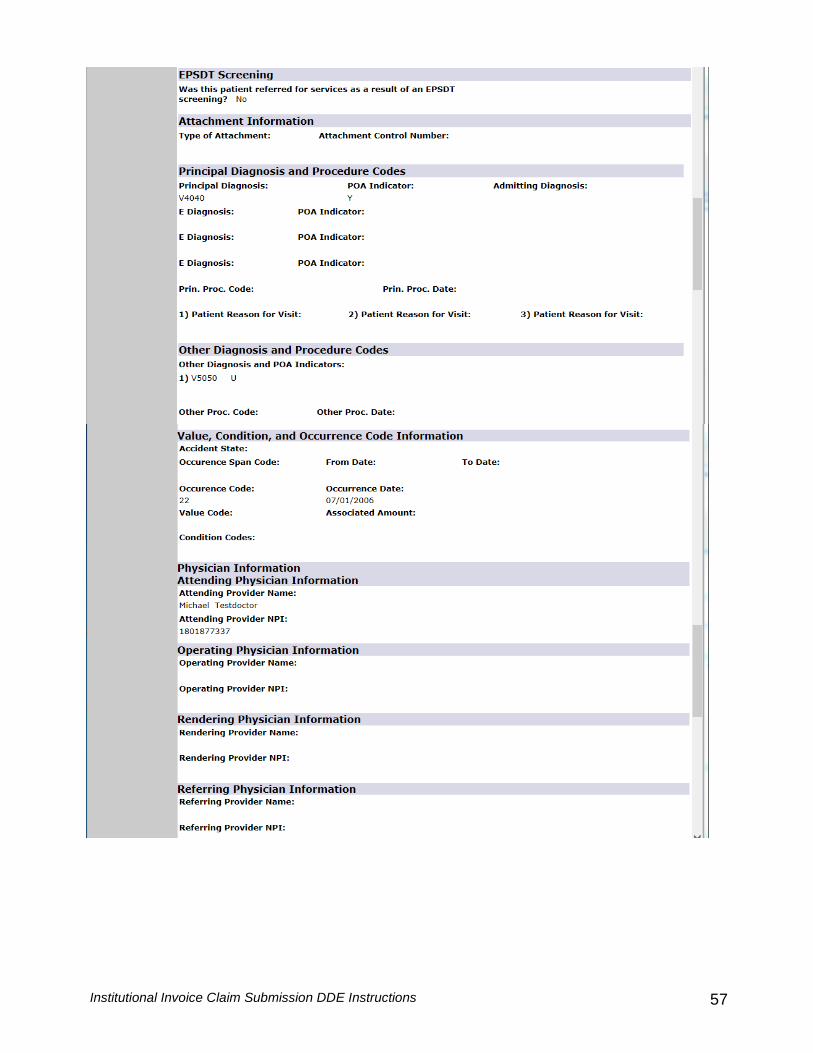
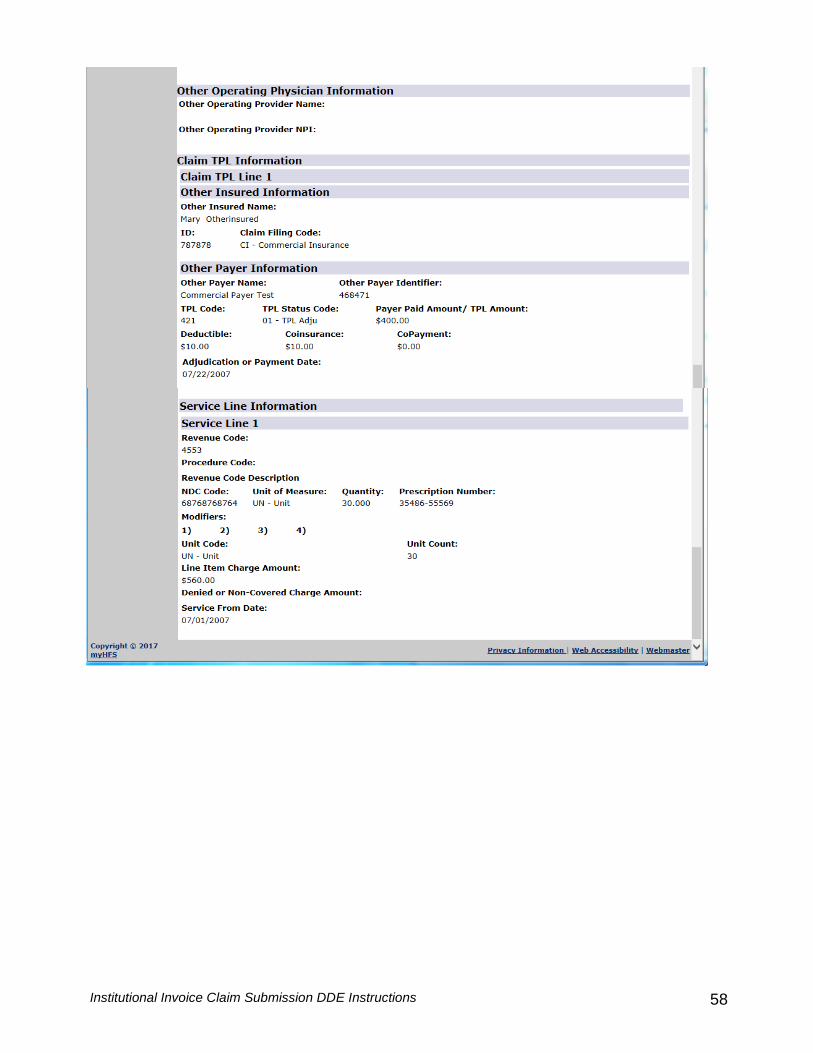
Confirmation Page After pressing the Submit button, the claim is successfully submitted and the Confirmation page is displayed. The Confirmation page displays all of the fields that were entered on the claim submission. The Print Copy of Claim Submission button will allow the user to print the entire claim submission, including the Date of Submission, Time of Submission, and Confirmation Number (which can be used for tracking purposes). See next pages for screen print of entire confirmation page. Once you click on the Submit button, it will be disabled to prevent duplicate submissions.
Use this button to print the claim.
It is a very good practice to print a copy of your claim submission. Make note of the confirmation number. If there is a question about your claim it will help us resolve any questions that may arise.
Institutional Invoice Claim Submission DDE Instructions 56
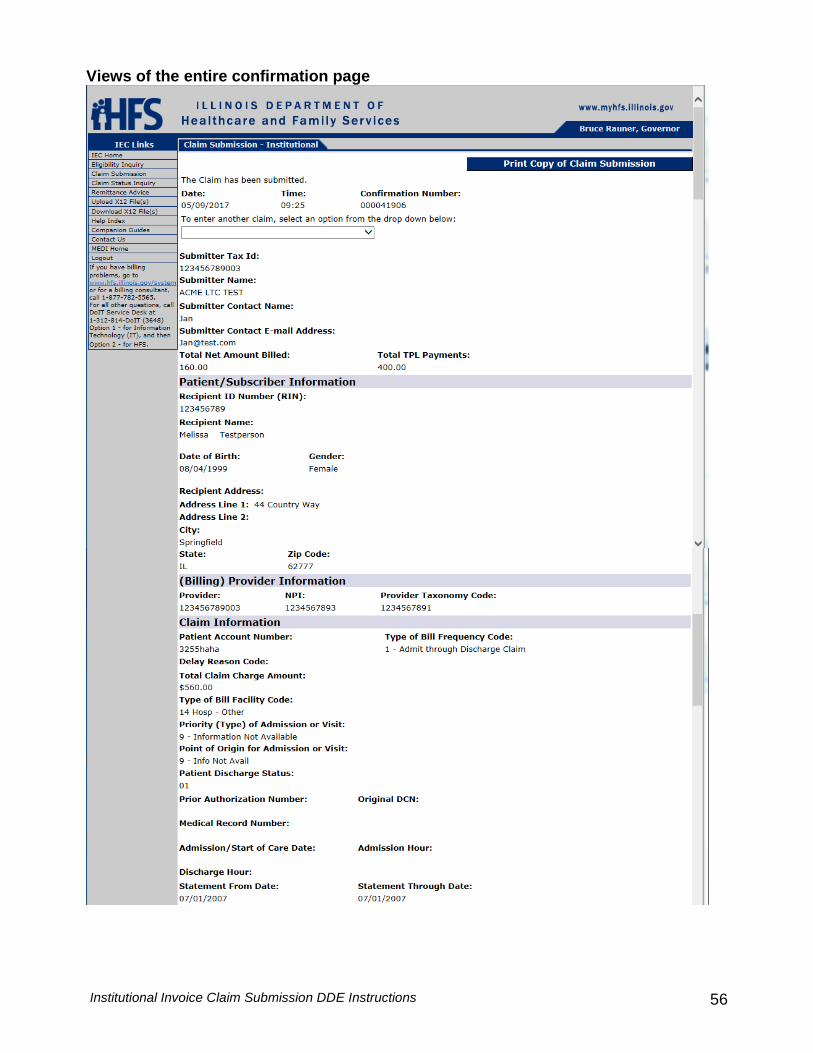
Views of the entire confirmation page
Institutional Invoice Claim Submission DDE Instructions 57
Institutional Invoice Claim Submission DDE Instructions 58
Institutional Invoice Claim Submission DDE Instructions 59
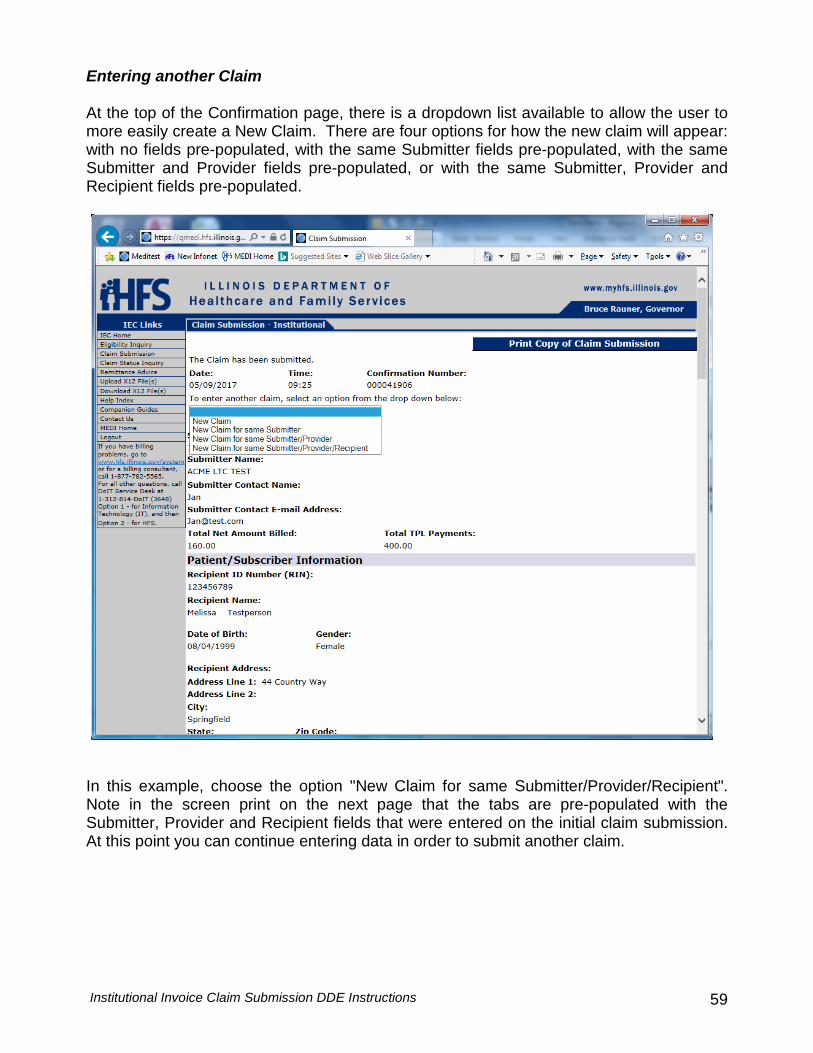
Entering another Claim At the top of the Confirmation page, there is a dropdown list available to allow the user to more easily create a New Claim. There are four options for how the new claim will appear: with no fields pre-populated, with the same Submitter fields pre-populated, with the same Submitter and Provider fields pre-populated, or with the same Submitter, Provider and Recipient fields pre-populated.
In this example, choose the option "New Claim for same Submitter/Provider/Recipient". Note in the screen print on the next page that the tabs are pre-populated with the Submitter, Provider and Recipient fields that were entered on the initial claim submission. At this point you can continue entering data in order to submit another claim.

Institutional Invoice Claim Submission DDE Instructions 60