Embed Size (px)
Citation preview
INTERGROWTH-21st Ultrasound Handbook – 10
th August 2009 1
ULTRASOUND OPERATIONS MANUAL
Measurement Techniques
Equipment
Step by step guide
Backing up ultrasound data, images and volumes
Local standardisation and training exercise
March 2009
INTERGROWTH-21st
International Fetal and Newborn Growth Standards for the 21st Century
The International Fetal and Newborn Growth Consortium
INTERGROWTH-21st Ultrasound Handbook – 10
th August 2009 2
Permissions: We would like to thank Philips Healthcare for allowing us to use the images of the HD9 system, and Professor Gianluigi Pilu for the use of the fetal line drawings.
This Operations Manual was prepared by the INTERGROWTH-21st Ultrasound Coordinating Unit. It is based on the INTERGROWTH-21
st Protocol and in particular
Appendix C. It has been written by Aris Papageorghiou with input from Laurent Salomon, Christos Ioannou, Ippokratis Sarris and the INTERGROWTH-21st Anthropometry team. INTERGROWTH-21st is a large project involving health institutions from eight geographically diverse countries. It is therefore essential that the participating institutions follow the same data collection procedures. This manual is designed to familiarize all staff involved in ultrasound measurement with the techniques for uniform measurement, ultrasound equipment and quality control procedures.
Please read this manual carefully and refer to it throughout the study if any clarification is needed.

INTERGROWTH-21st Ultrasound Manual 3
TABLE OF CONTENTS
List of Abbreviations ............................................................................................................................................ 4
PART 1: AIMS AND INTRODUCTION ................................................................................................................... 5
1.1 Aims of this manual ........................................................................................................................................ 6
1.2 Introduction ..................................................................................................................................................... 6 1.2.1 Measurements in INTERGROWTH 21
st ............................................................................................... 6
1.2.2 Aims of standardization ........................................................................................................................ 7 1.2.3 Selection and Training of ultrasonographers ........................................................................................ 7
PART 2: OBTAINING ULTRASOUND MEASUREMENTS .................................................................................... 8
2.1 Initial ultrasound examination and dating the pregnancy: measuring the crown rump length ............... 9 2.1.1 Aims ..................................................................................................................................................... 9 2.1.2 Dating ................................................................................................................................................... 9 2.1.3 How to do it:.......................................................................................................................................... 9 2.1.4 Questions, answers and examples: .................................................................................................... 12
2.2 Subsequent ultrasound examinations for the fgls .................................................................................... 13 2.2.1. Aims .................................................................................................................................................. 13 2.2.2 Head measurements .......................................................................................................................... 14 2.2.3 Abdominal measurements .................................................................................................................. 18 2.2.4 Femur length measurement ............................................................................................................... 23 2.2.5 Questions, answers and examples: .................................................................................................... 27
PART 3: 3D VOLUMES; AFI; ASSESSMENT OF PRESENTATION & PLACENTAL LOCALISATION ............. 28
3.1 Taking 3d volumes for quality control ........................................................................................................ 29 3.1.1 Aims: .................................................................................................................................................. 29 3.1.2 Required volumes .............................................................................................................................. 29 3.1.3 Techniques for 3D measurements: .................................................................................................... 30 A. Head ....................................................................................................................................................... 30
3.2 Assessment of amniotic fluid ...................................................................................................................... 33 3.2.1 Subjective assessment ....................................................................................................................... 33 3.2.2 Amniotic fluid index ............................................................................................................................ 33
3.3 Assessment of presentation and placental localisation ........................................................................... 34 3.3.1 Fetal Presentation: ............................................................................................................................. 34 3.3.2 Placental localisation .......................................................................................................................... 34
PART 4: TAKING ADDITIONAL MEASUREMENTS OR VOLUMES .................................................................. 35
4.1 Aims ............................................................................................................................................................... 36
4.2 Limitations ..................................................................................................................................................... 36
4.3 Optional 2D measurements.......................................................................................................................... 36
4.4 Optional 3D measurements.......................................................................................................................... 36
PART 5: ULTRASOUND EQUIPMENT ................................................................................................................ 37
5.1 The Philips HD 9 System .............................................................................................................................. 38
5.2 Control Panel ................................................................................................................................................. 38
PART 6: THE TYPICAL ULTRASOUND EXAMINATION: A STEP BY STEP GUIDE ........................................ 41
PART 7: MEASURING SYMPHYSIS FUNDAL HEIGHT AND BLOOD PRESSURE .......................................... 50
PART 8: DATA BACKUP ..................................................................................................................................... 51
8.1 Aims of data backup ..................................................................................................................................... 54
8.2 Procedure for data backup........................................................................................................................... 54 8.2.1 Schedule of backup ............................................................................................................................ 54 8.2.2 Step-by-step guide to data backup ..................................................................................................... 54
PART 9: SITE SPECIFIC STANDARDISATION .................................................................................................. 55
9.1 Purpose of site specific standardisation .................................................................................................... 56
9.2 Who should coordinate the site specific standardisation exercise ......................................................... 56
9.3 Conducting the Site specific standardisation exercise ............................................................................. 56 9.3.1 Selection of ultrasonographers and training ....................................................................................... 56 9.3.2 Theory component of training ............................................................................................................. 57 9.3.3 Practical component of training .......................................................................................................... 57
9.4 Site visits ....................................................................................................................................................... 58
APPENDIX 1: CROWN RUMP LENGTH CHART FOR PREGNANCY DATING ................................................ 60
APPENDIX 2: RECRUITMENT RATES FOR THE STUDY .................................................................................. 61

INTERGROWTH-21st Ultrasound Manual 4
List of Abbreviations
3D 3-Dimensional Ultrasound
AC Abdominal Circumference
AFI Amniotic Fluid Index
APAD Antero-Posterior Abdominal Diameter
BPD Biparietal Diameter
CRL Crown Rump Length
DP Deepest Pool of Amniotic fluid
FGLS Fetal Growth Longitudinal Study
FL Femur Length
HC Head Circumference
LMP Last Menstrual Period
OFD Occipito Frontal Diameter
TAD Transverse Abdominal Diameter

INTERGROWTH-21st Ultrasound Manual 5
Part 1
Aims and Introduction
INTERGROWTH-21st Ultrasound Manual 6
1.1 AIMS OF THIS MANUAL The aims of this Manual are to ensure all ultrasonographers are familiar with:
The standardised way measurements should be taken for the purposes of the
study.
The equipment to be used.
The recording of ultrasound findings.
Data entry and transfer.
The process of standardization by training, assessment and certification.
This manual is not intended to teach those involved in ultrasound how to scan. It is
recognized that local ultrasonographers already have a high standard of training, and in
fact this is a prerequisite for taking part. However, different sites and sonographers use
different protocols for fetal measurements, different definitions of calliper placement,
and a variety of ultrasound equipment. In order to achieve standardised results all these
have to be unified for the purposes of this study.
This manual should be read in conjunction with Appendix C of the main
INTERGROWTH 21st study protocol.
1.2 INTRODUCTION
1.2.1 Measurements in INTERGROWTH 21st
Measurements will be used in INTERGROWTH-21
st for the following purposes:
To confirm the gestational age of the pregnancy by measurement of the fetal Crown Rump Length (CRL) at 9+0 to 13+6 weeks gestation the Fetal Growth Longitudinal Study (FGLS).
Part 2
To measure serially the Biparietal Diameter (BPD), Occipito Frontal Diameter (OFD), Head Circumference (HC), Transveres Abdominal Diameter (TAD) Antero-Posterior Abdominal Diameter (APAD), Abdominal Circumference (AC) and Femur Length (FL) in the FGLS.
Part 2
To obtain 3D volumes of the fetal head, abdomen and femur. Part 3
To assess and measure amniotic fluid volume. Part 3
To document placental localization. Part 3
To document fetal presentation. Part 3
To measure maternal symphysis fundal height and blood pressure Part 7
INTERGROWTH-21st Ultrasound Manual 7
1.2.2 Aims of standardization
The primary aim of this study is to develop new "prescriptive" standards describing
normal fetal and preterm growth and newborn nutritional status. Therefore, the
measurement values used for construction of these standards should reflect the
distribution of growth and nutritional status and must be only minimally influenced by
other sources of variation.
Standardization of procedures is necessary to achieve maximal validity. It is therefore
important for each study site to use the same equipment and procedures so that the
data collected at each site may be combined into a single data set for the purposes of
generating the new international growth references.
Some sites will have unique conditions that may cause the local study team to want
to depart from this standardised protocol. Where this occurs the Principal
Investigator should contact the study Coordinating Unit to determine that such a
departure meets with their approval.
Think and check carefully before deviating from this protocol - this will have
implications on the overall study.
1.2.3 Selection and training of ultrasonographers
At each site a number of study ultrasonographers must be selected and standardised.
The number of sonographers in most centres will be two, but this can vary with local
needs. When selecting the number of sonographers it must be borne in mind that,
during the study, some may need to be replaced due to personal or professional
reasons; that workload may fluctuate, and that holiday cover must be achievable.
The selected sonographers should be motivated and reliable, well trained in ultrasound,
have readable handwriting, speak the local language(s), and be able to work positively
within a team structure. In addition, they should successfully complete the training
period.

INTERGROWTH-21st Ultrasound Manual 8
Part 2
Obtaining Ultrasound Measurements
INTERGROWTH-21st Ultrasound Manual 9
2.1 INITIAL ULTRASOUND EXAMINATION AND DATING THE
PREGNANCY: MEASURING THE CROWN RUMP LENGTH All mothers will have a transabdominal ultrasound scan between 9
+0 to 13
+6 weeks
from the first day of the last menstrual period (LMP).
2.1.1 Aims
To confirm intrauterine pregnancy, viability and singleton gestation.
To confirm gestational age.
2.1.2 Dating
Gestational age will be calculated from the LMP. In order to allow accurate assessment of gestation women need to have certain dates, a known LMP, regular menstrual cycles with a cycle between 25 and 31 days, and no hormonal contraception use or breastfeeding in the 2 months preceding the LMP. Only those with spontaneous conception should be included.
This gestation is confirmed by fetal crown-rump length (CRL). The gestational age from the CRL will be calculated automatically by the study ultrasound machine using established charts. If the dating scan is done on another machine ensure you use the attached chart to look up the estimated gestation. When the gestational age based on CRL is within 7 days of that calculated from LMP we will consider the LMP to be reliable, and take it as the true biological date.
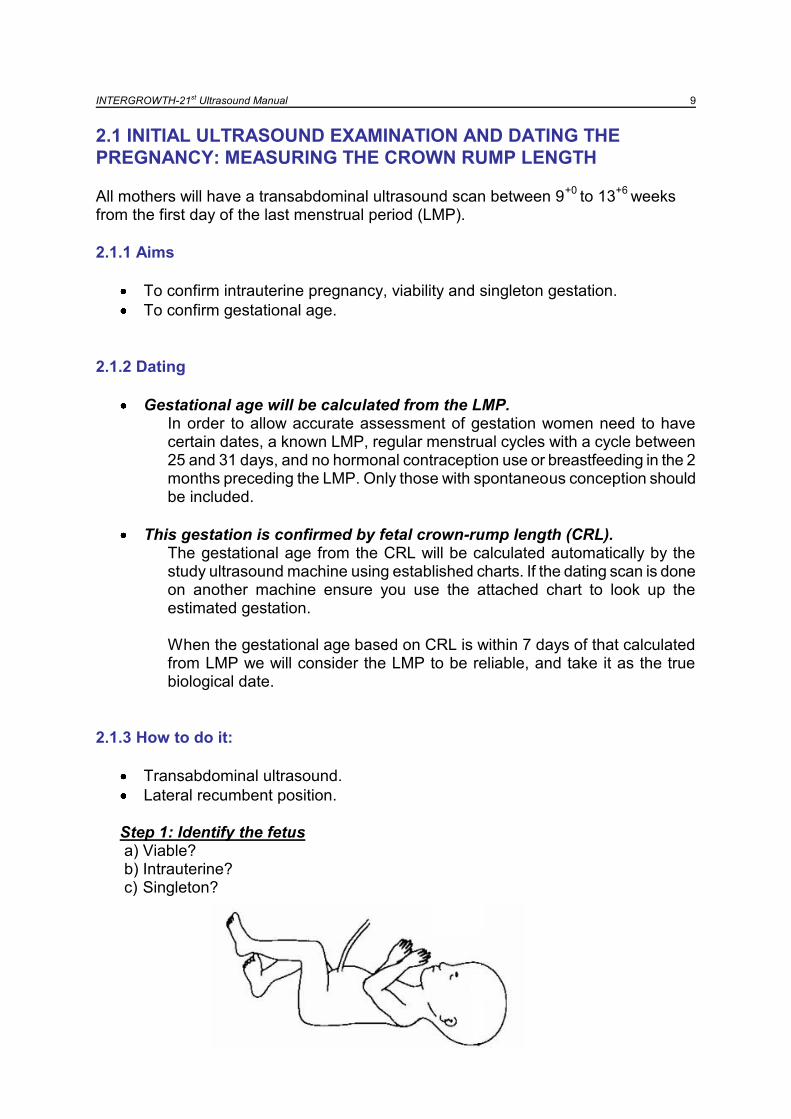
2.1.3 How to do it:
Transabdominal ultrasound.
Lateral recumbent position. Step 1: Identify the fetus a) Viable? b) Intrauterine? c) Singleton?
INTERGROWTH-21st Ultrasound Manual 10
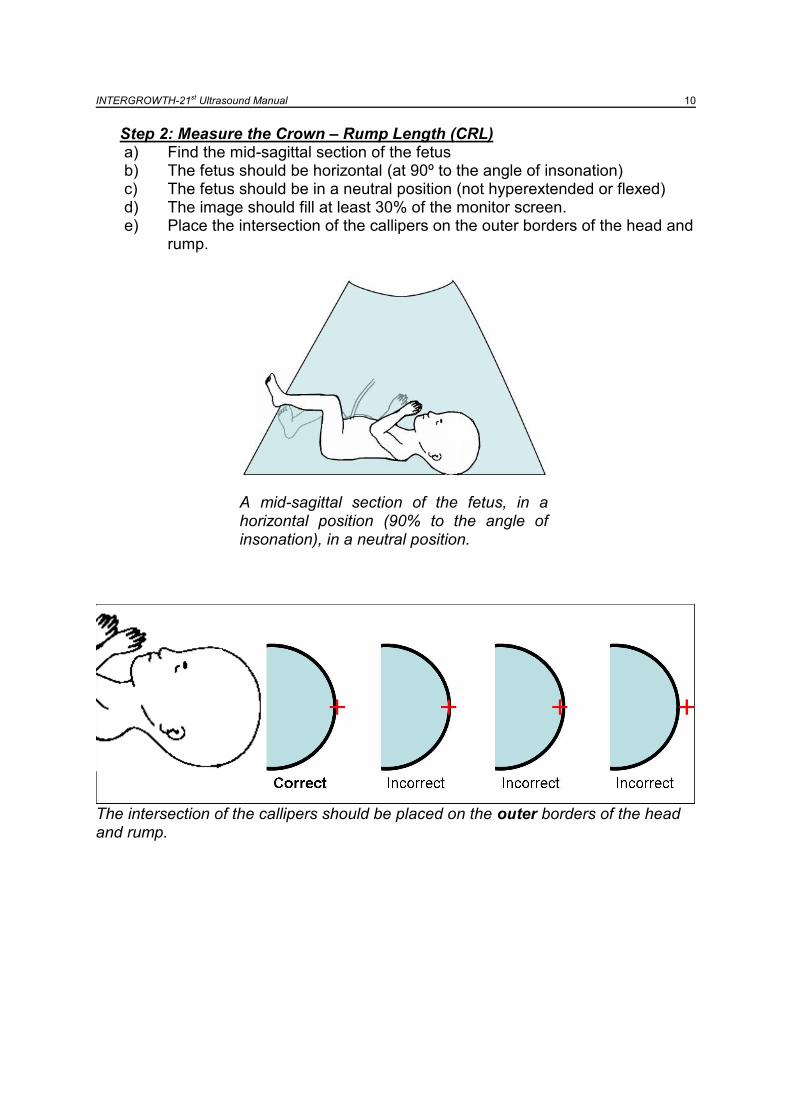
Step 2: Measure the Crown – Rump Length (CRL) a) Find the mid-sagittal section of the fetus b) The fetus should be horizontal (at 90º to the angle of insonation) c) The fetus should be in a neutral position (not hyperextended or flexed) d) The image should fill at least 30% of the monitor screen. e) Place the intersection of the callipers on the outer borders of the head and
rump.
A mid-sagittal section of the fetus, in a horizontal position (90% to the angle of insonation), in a neutral position.
The intersection of the callipers should be placed on the outer borders of the head and rump.
INTERGROWTH-21st Ultrasound Manual 11
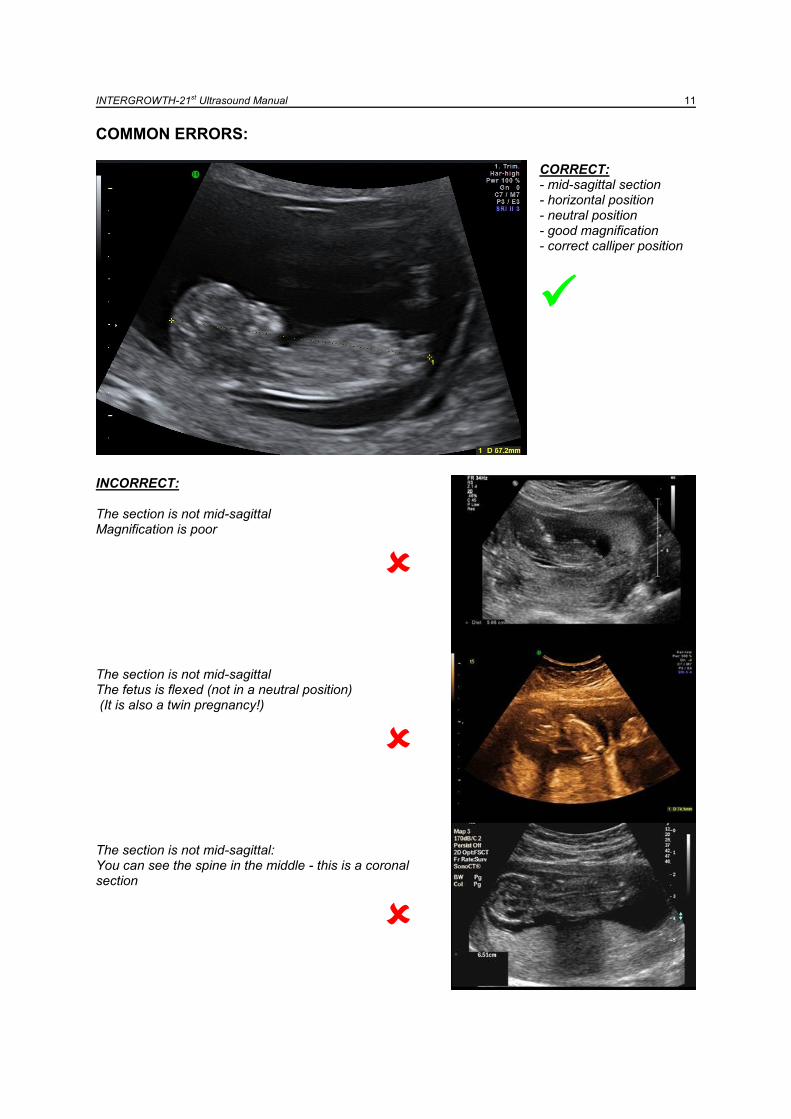
COMMON ERRORS: CORRECT: - mid-sagittal section - horizontal position - neutral position - good magnification - correct calliper position
INCORRECT: The section is not mid-sagittal Magnification is poor
The section is not mid-sagittal The fetus is flexed (not in a neutral position) (It is also a twin pregnancy!)
The section is not mid-sagittal: You can see the spine in the middle - this is a coronal section
INTERGROWTH-21st Ultrasound Manual 12
2.1.4 Questions, answers and examples:
It is not possible to obtain a good quality CRL Accurate measurement of CRL is of obvious importance in ensuring that a woman is eligible to take part in the study. Every effort should be made to obtain the best possible measurement. This may require allowing the woman to leave and return for the scan at a later time or on another day (but always within the 9
+0 to 13
+6 week window).
If despite all attempts it is not possible to obtain a CRL measurement that allows confirmation of gestational age the woman is not eligible for the study.
The mother is over 13+6
weeks by LMP but CRL is within 9+0
– 13+6
weeks
The mother is NOT eligible for the study
The mother is less than 9+0
weeks by LMP
The mother is not eligible for the study now BUT should come back when she is 9+0
weeks to 13
+6 weeks as she may then become eligible
The mother is 13+6
weeks by LMP but 14+6
weeks by ultrasound The discrepancy is 7 days exactly: this is OK and the mother is eligible for the study.
Remember that dating is by LMP and the mother has to be 9+0
– 13+6
weeks by
LMP. She is only excluded if the CRL suggests the gestation is more than 7 days discrepant.
The mother is 9+3
weeks by LMP but 8+4
weeks by ultrasound The discrepancy is 6 days: this is OK and the mother is eligible for the study.
Remember that dating is by LMP and the mother has to be 9+0
– 13+6
weeks by
LMP. She is only excluded if the CRL suggests the gestation is more than 7 days discrepant.
The discrepancy between LMP and CRL dates is more than 7 days
The mother is NOT eligible for the study.
The discrepancy between LMP and CRL dates is exactly 7 days
This is OK: the mother is eligible for the study.
This is a multiple pregnancy. The woman is not eligible for the study, and should be managed according to the local multiple pregnancy protocol.
The fetus is not viable. The woman can obviously not be enrolled in the study, and should be managed according to the local protocol for management of a non-viable pregnancy.
The fetus is not intrauterine. The woman can obviously not be enrolled in the study, and should be managed according to the local ectopic pregnancy protocol.
INTERGROWTH-21st Ultrasound Manual 13
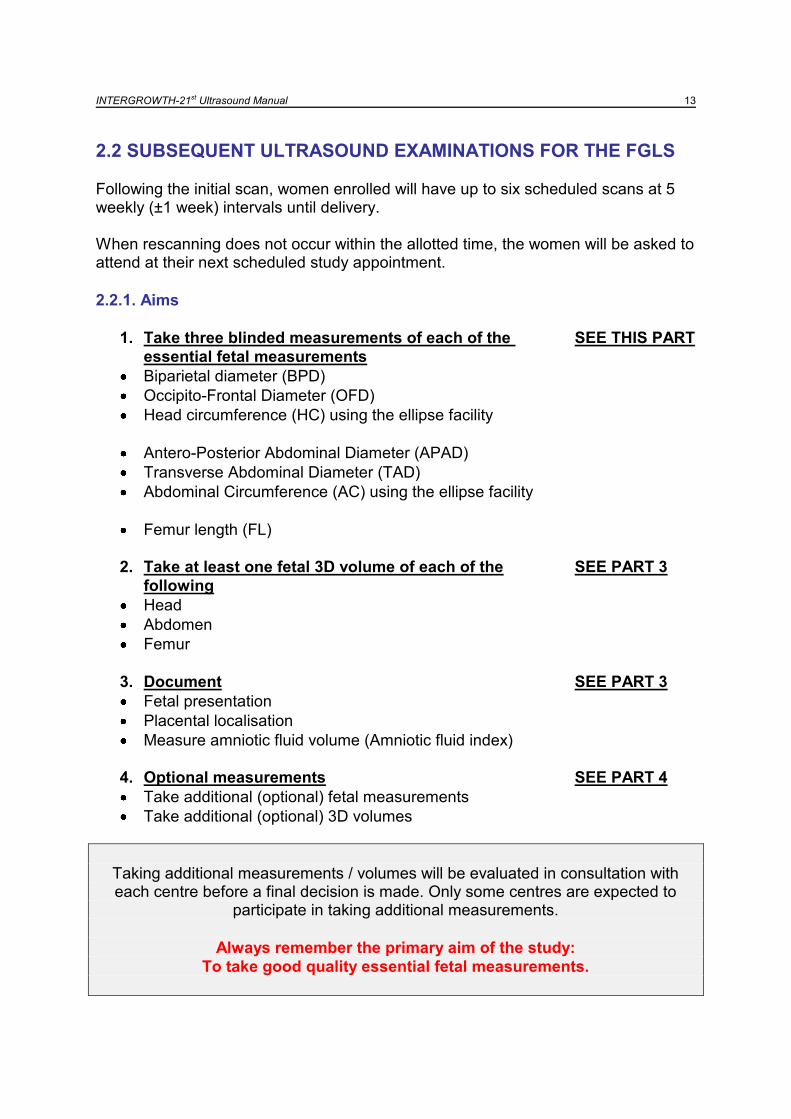
2.2 SUBSEQUENT ULTRASOUND EXAMINATIONS FOR THE FGLS
Following the initial scan, women enrolled will have up to six scheduled scans at 5 weekly (±1 week) intervals until delivery. When rescanning does not occur within the allotted time, the women will be asked to attend at their next scheduled study appointment.
2.2.1. Aims
1. Take three blinded measurements of each of the SEE THIS PART
essential fetal measurements
Biparietal diameter (BPD)
Occipito-Frontal Diameter (OFD)
Head circumference (HC) using the ellipse facility
Antero-Posterior Abdominal Diameter (APAD)
Transverse Abdominal Diameter (TAD)
Abdominal Circumference (AC) using the ellipse facility
Femur length (FL)
2. Take at least one fetal 3D volume of each of the SEE PART 3
following
Head
Abdomen
Femur
3. Document SEE PART 3
Fetal presentation
Placental localisation
Measure amniotic fluid volume (Amniotic fluid index)
4. Optional measurements SEE PART 4
Take additional (optional) fetal measurements
Take additional (optional) 3D volumes
Taking additional measurements / volumes will be evaluated in consultation with each centre before a final decision is made. Only some centres are expected to
participate in taking additional measurements.
Always remember the primary aim of the study:
To take good quality essential fetal measurements.
INTERGROWTH-21st Ultrasound Manual 14
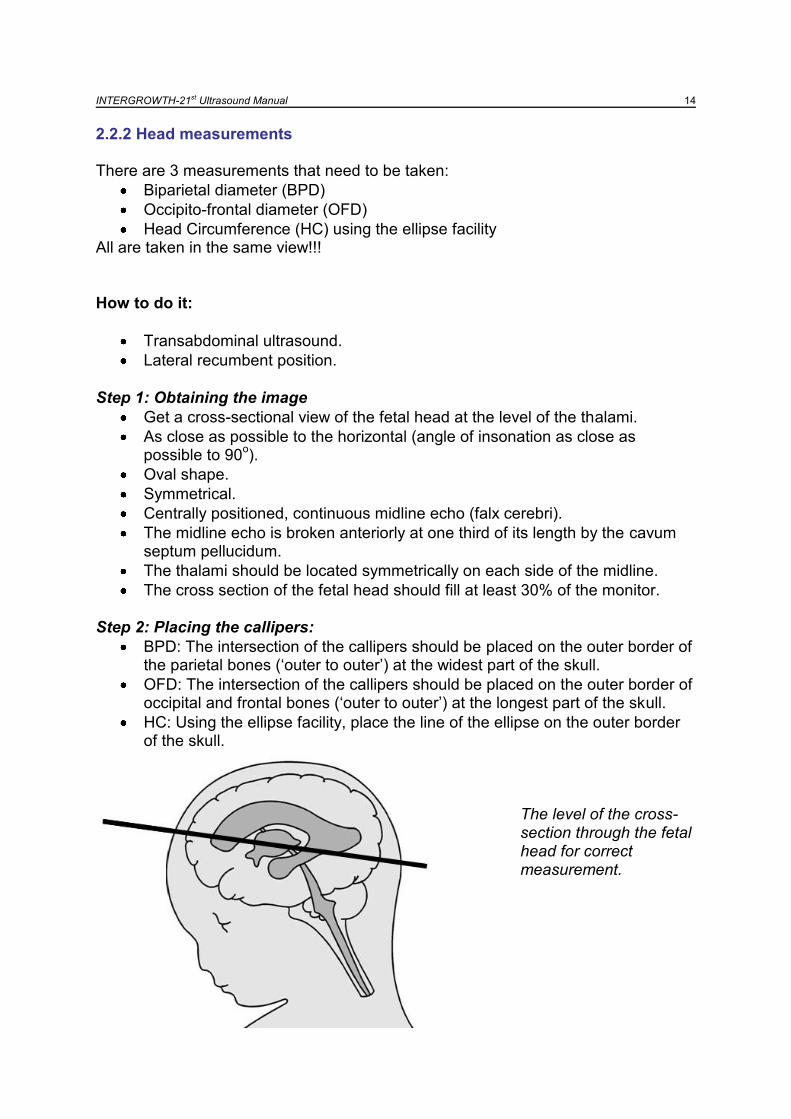
2.2.2 Head measurements There are 3 measurements that need to be taken:
Biparietal diameter (BPD)
Occipito-frontal diameter (OFD)
Head Circumference (HC) using the ellipse facility All are taken in the same view!!!
How to do it:
Transabdominal ultrasound.
Lateral recumbent position. Step 1: Obtaining the image
Get a cross-sectional view of the fetal head at the level of the thalami.
As close as possible to the horizontal (angle of insonation as close as possible to 90
o).
Oval shape.
Symmetrical.
Centrally positioned, continuous midline echo (falx cerebri).
The midline echo is broken anteriorly at one third of its length by the cavum septum pellucidum.
The thalami should be located symmetrically on each side of the midline.
The cross section of the fetal head should fill at least 30% of the monitor.
Step 2: Placing the callipers:
BPD: The intersection of the callipers should be placed on the outer border of the parietal bones („outer to outer‟) at the widest part of the skull.
OFD: The intersection of the callipers should be placed on the outer border of occipital and frontal bones („outer to outer‟) at the longest part of the skull.
HC: Using the ellipse facility, place the line of the ellipse on the outer border of the skull.
The level of the cross-section through the fetal head for correct measurement.
INTERGROWTH-21st Ultrasound Manual 15
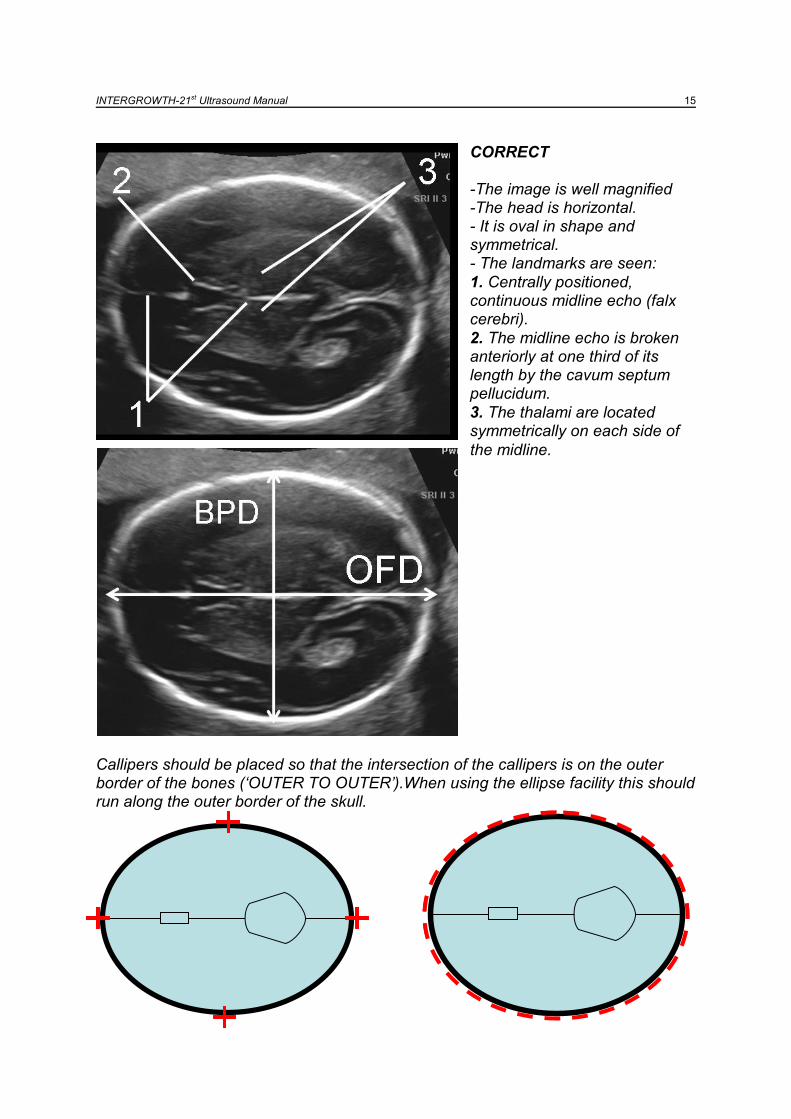
CORRECT -The image is well magnified -The head is horizontal. - It is oval in shape and symmetrical. - The landmarks are seen:
1. Centrally positioned, continuous midline echo (falx cerebri).
2. The midline echo is broken anteriorly at one third of its length by the cavum septum pellucidum.
3. The thalami are located symmetrically on each side of
the midline.
Callipers should be placed so that the intersection of the callipers is on the outer border of the bones (‘OUTER TO OUTER’).When using the ellipse facility this should run along the outer border of the skull.

INTERGROWTH-21st Ultrasound Manual 16
COMMON ERRORS:
CORRECT: the main anatomic landmarks (1: thalami; 2: cavum septum pellucidum) are displayed.
INCORRECT: the wings of the sphenoid bone (3) and cerebral peduncles (4) are demonstrated: this section is too low in the fetal head
INCORRECT: the cerebellum (5) is demonstrated: this section is obtained along the suboccipitobregmatic plane and does not allow proper measurement of the occipitofrontal diameter.
INTERGROWTH-21st Ultrasound Manual 17
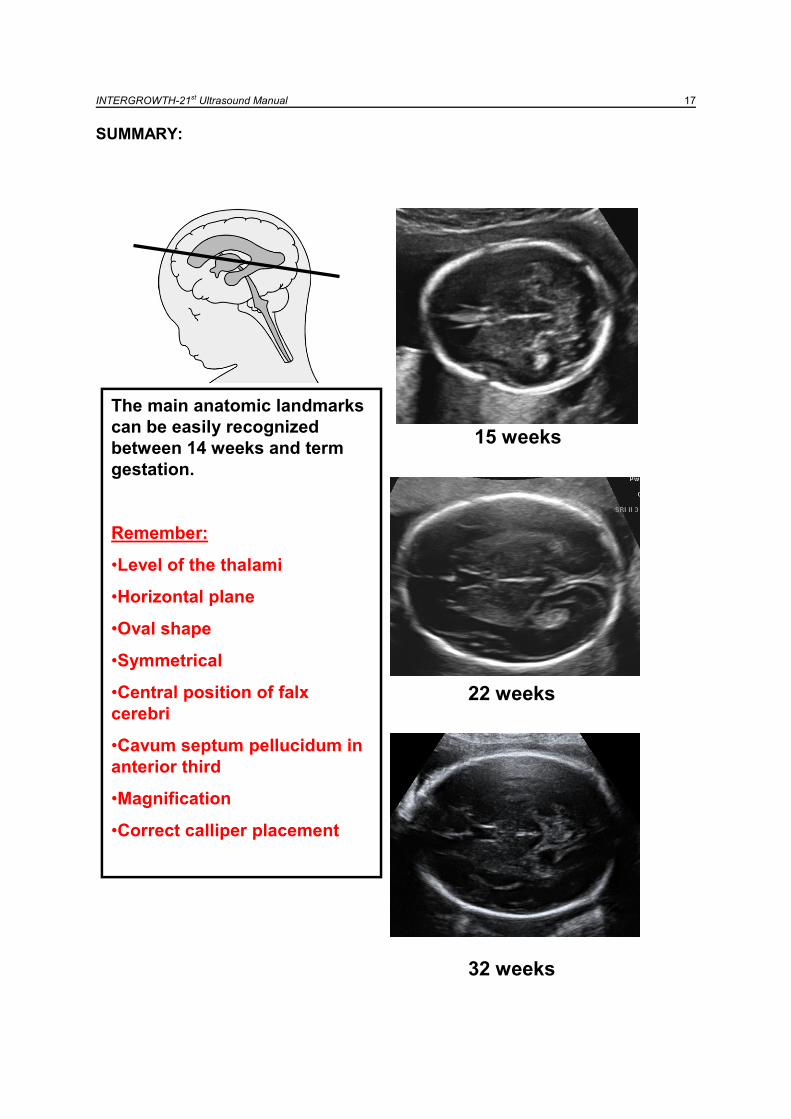
SUMMARY:
15 weeks
22 weeks
32 weeks
The main anatomic landmarks
can be easily recognized
between 14 weeks and term
gestation.
Remember:
•Level of the thalami
•Horizontal plane
•Oval shape
•Symmetrical
•Central position of falx
cerebri
•Cavum septum pellucidum in
anterior third
•Magnification
•Correct calliper placement

INTERGROWTH-21st Ultrasound Manual 18
2.2.3 Abdominal measurements
There are 3 measurements that need to be taken:
Apntero-Posterior Abdominal Diameter (APAD)
Transverse Abdominal Diameter (TAD)
Abdominal Circumference (AC) using the ellipse facility
All are taken in the same view!!!
How to do it:
Transabdominal ultrasound.
Lateral recumbent position. Step 1: Obtaining the image
Transverse section of the fetal abdomen as close as possible to circular.
Umbilical vein in its anterior third.
Stomach bubble visible.
Kidneys not visible.
Bladder not visible.
Magnify: The cross section of the fetal abdomen should fill at least 30% of the monitor screen.
Ensure not to distort the circular shape of the fetal abdomen by applying too much pressure with the transducer.
Step 2: Placing the callipers:
The intersection of the callipers is placed on the outer borders of the body outline (skin covering).
APAD: from the posterior aspect (skin covering the spine) to the anterior abdominal wall.
TAD: at 900 to the APAD, across the abdomen at the widest point.
AC: Using the ellipse facility place the line of the ellipse on the outer border of the abdomen.
The level of the cross-section through the fetal abdomen for correct measurement.

INTERGROWTH-21st Ultrasound Manual 19
The level of cross-section through the abdomen for correct measurement
CORRECT: -The image is well magnified -The section is circular. -The landmarks are seen:
1. Short segment of umbilical vein in the anterior third. 2. Stomach bubble visible. 3. Spine.
- The bladder and kidneys are not visible The callipers are positioned correctly, outer to outer. When using the ellipse facility this should run along the outer border of the abdomen.
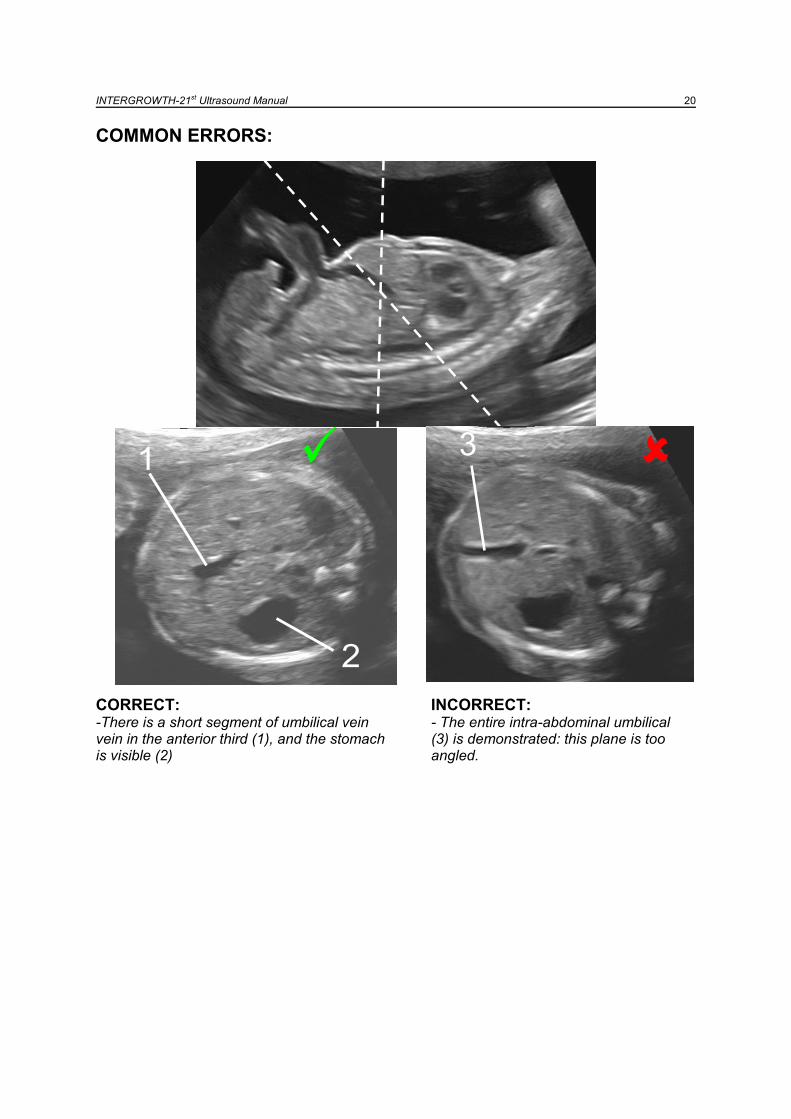
INTERGROWTH-21st Ultrasound Manual 20
COMMON ERRORS:
CORRECT: INCORRECT: -There is a short segment of umbilical vein - The entire intra-abdominal umbilical vein in the anterior third (1), and the stomach (3) is demonstrated: this plane is too is visible (2) angled.
1
2
1
2
33
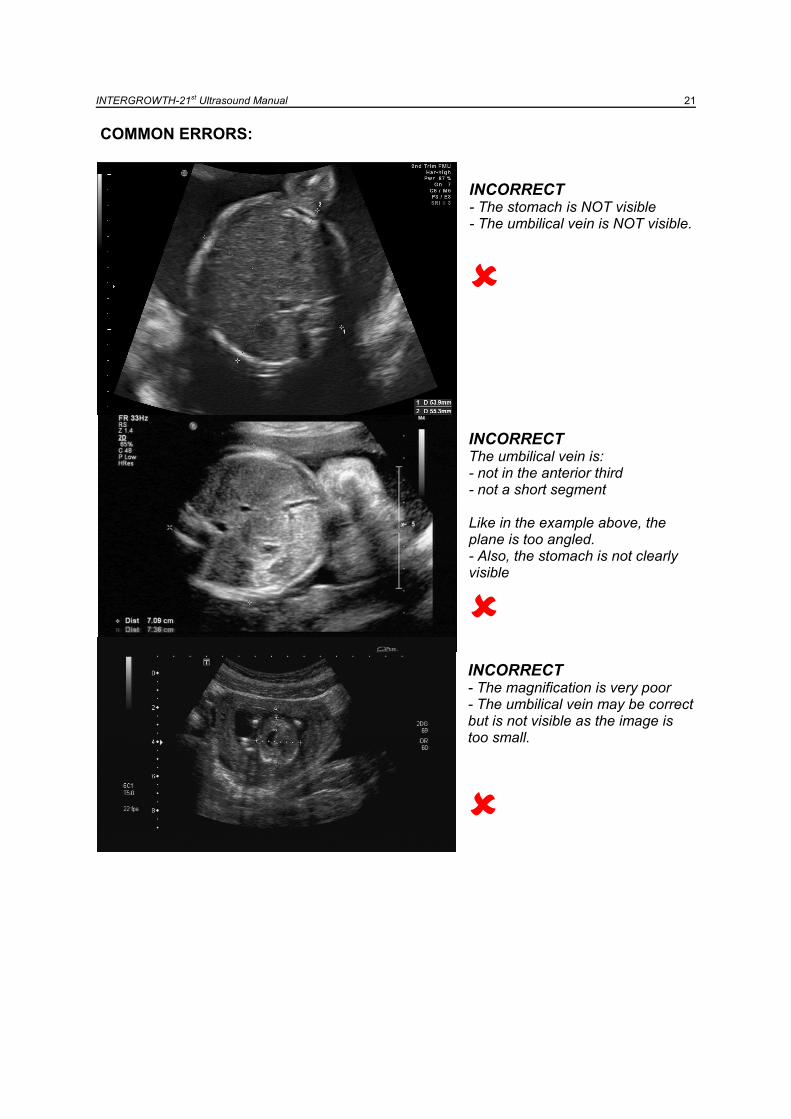
INTERGROWTH-21st Ultrasound Manual 21
COMMON ERRORS:
INCORRECT - The stomach is NOT visible - The umbilical vein is NOT visible.
INCORRECT The umbilical vein is: - not in the anterior third - not a short segment Like in the example above, the plane is too angled. - Also, the stomach is not clearly visible
INCORRECT - The magnification is very poor - The umbilical vein may be correct but is not visible as the image is too small.
INTERGROWTH-21st Ultrasound Manual 22
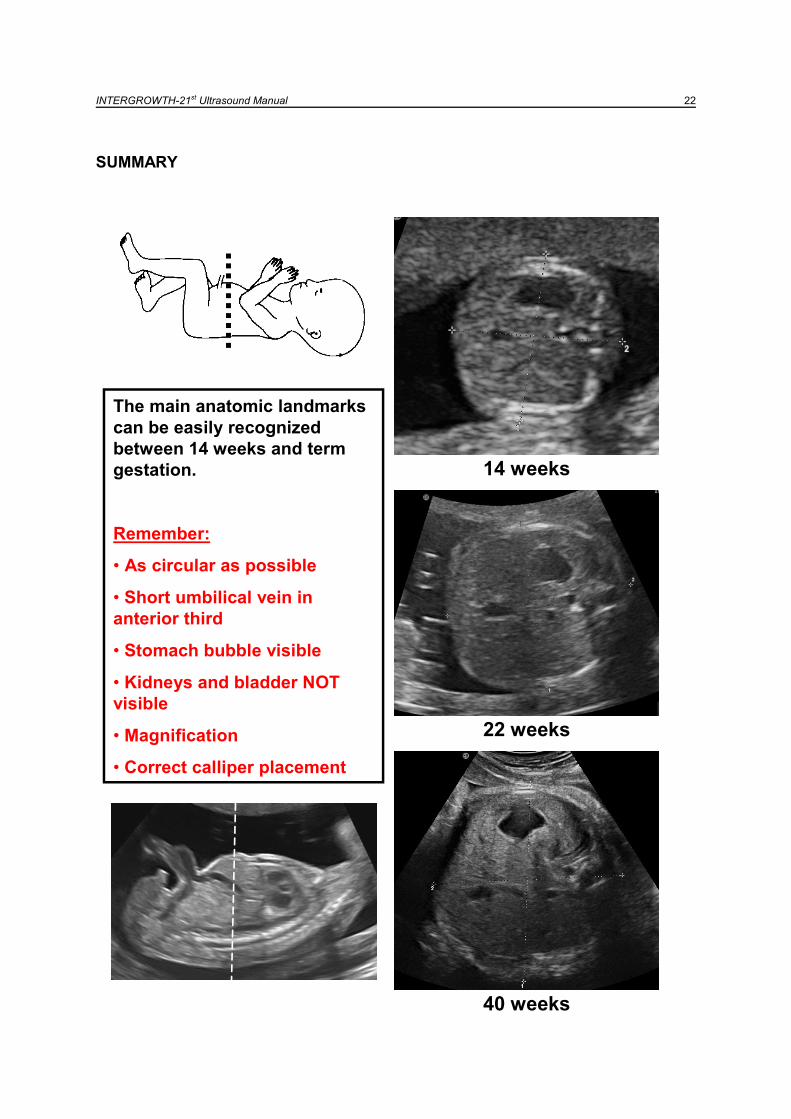
SUMMARY
14 weeks
22 weeks
40 weeks
The main anatomic landmarks
can be easily recognized
between 14 weeks and term
gestation.
Remember:
• As circular as possible
• Short umbilical vein in
anterior third
• Stomach bubble visible
• Kidneys and bladder NOT
visible
• Magnification
• Correct calliper placement
14 weeks
22 weeks
40 weeks
The main anatomic landmarks
can be easily recognized
between 14 weeks and term
gestation.
Remember:
• As circular as possible
• Short umbilical vein in
anterior third
• Stomach bubble visible
• Kidneys and bladder NOT
visible
• Magnification
• Correct calliper placement
INTERGROWTH-21st Ultrasound Manual 23
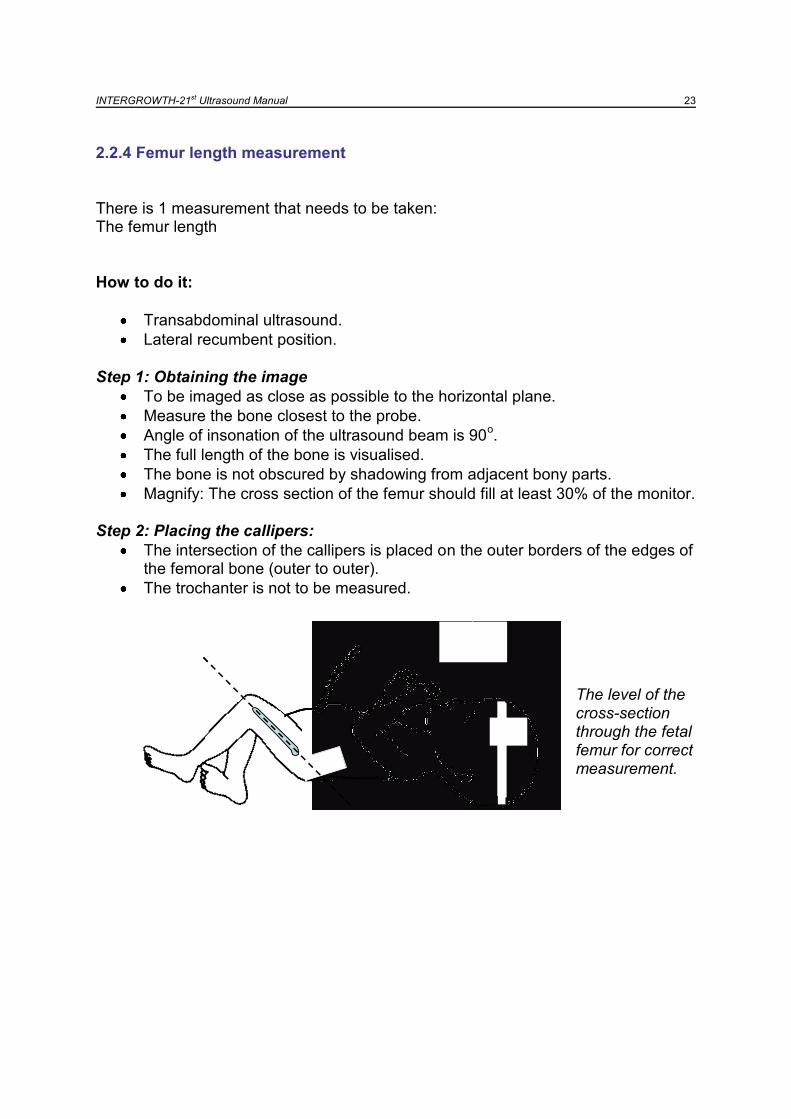
2.2.4 Femur length measurement
There is 1 measurement that needs to be taken: The femur length
How to do it:
Transabdominal ultrasound.
Lateral recumbent position. Step 1: Obtaining the image
To be imaged as close as possible to the horizontal plane.
Measure the bone closest to the probe.
Angle of insonation of the ultrasound beam is 90o.
The full length of the bone is visualised.
The bone is not obscured by shadowing from adjacent bony parts.
Magnify: The cross section of the femur should fill at least 30% of the monitor.
Step 2: Placing the callipers:
The intersection of the callipers is placed on the outer borders of the edges of the femoral bone (outer to outer).
The trochanter is not to be measured.
The level of the cross-section through the fetal femur for correct measurement.
INTERGROWTH-21st Ultrasound Manual 24
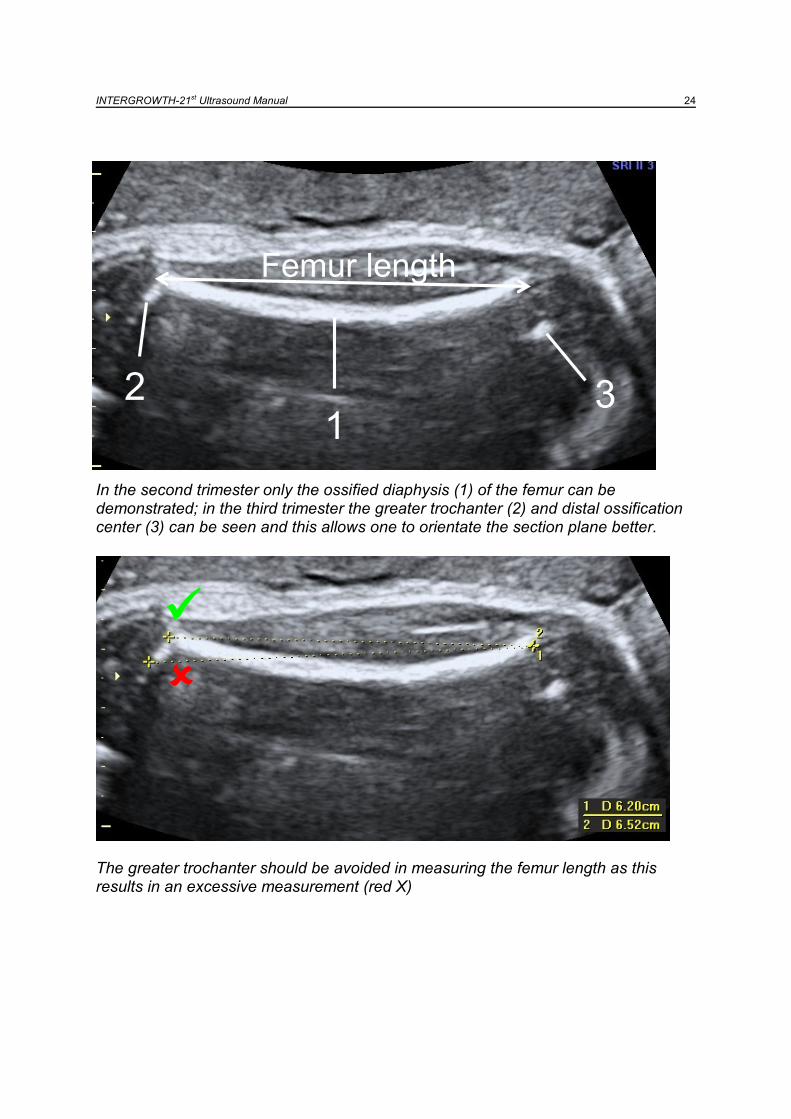
In the second trimester only the ossified diaphysis (1) of the femur can be demonstrated; in the third trimester the greater trochanter (2) and distal ossification center (3) can be seen and this allows one to orientate the section plane better.
The greater trochanter should be avoided in measuring the femur length as this results in an excessive measurement (red X)
12 3
Femur length
12 3
Femur length
INTERGROWTH-21st Ultrasound Manual 25
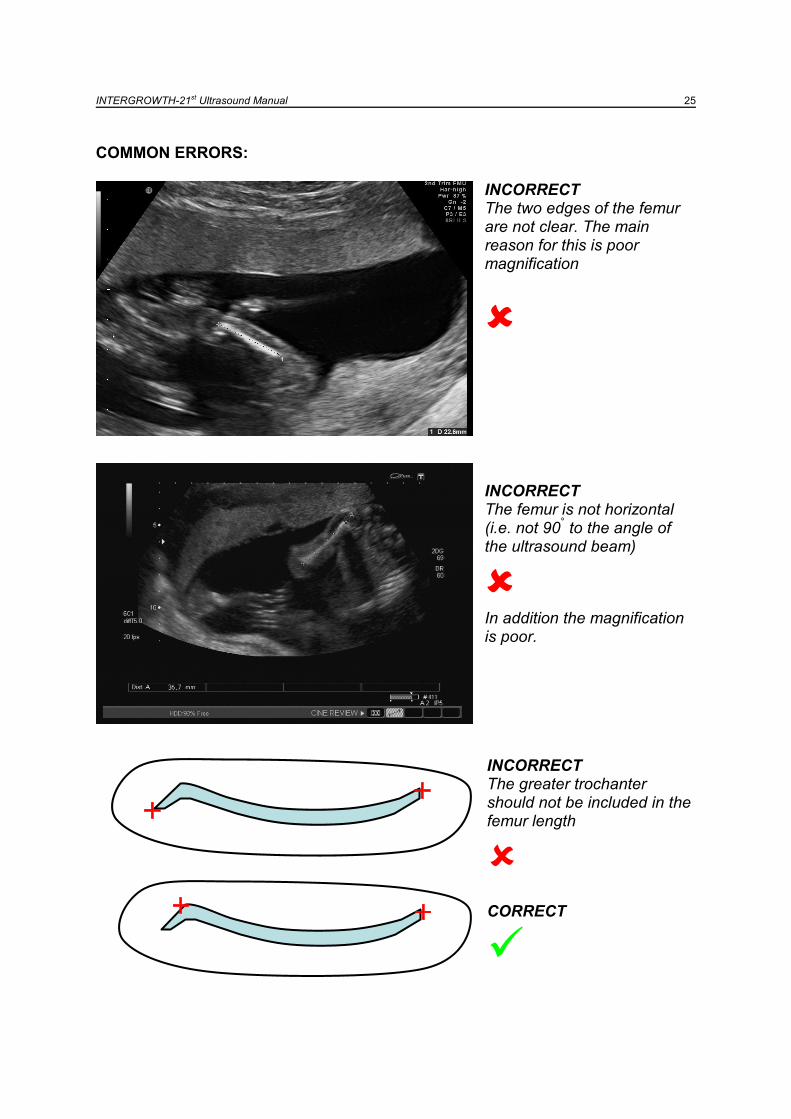
COMMON ERRORS:
INCORRECT The two edges of the femur are not clear. The main reason for this is poor magnification
INCORRECT The femur is not horizontal (i.e. not 90
° to the angle of
the ultrasound beam)
In addition the magnification is poor. INCORRECT The greater trochanter should not be included in the femur length
CORRECT

INTERGROWTH-21st Ultrasound Manual 26
SUMMARY:
15 weeks
26 weeks
38 weeks
The femur can be easily
recognized between 14 weeks
and term gestation
Remember:
Horizontal as possible
Measure the bone closest to
the probe.
See the full length of the bone
The bone is not obscured by
shadows
Magnification
Correct calliper placement
Do not include greater
trochanter

INTERGROWTH-21st Ultrasound Manual 27
2.2.5 Questions, answers and examples:
It is not possible to obtain a good quality measurement Every effort should be made to obtain the best possible measurements taking into account the definitions. This may require allowing the woman to leave and return for the scan at a later date or time (within one week). If it remains impossible to obtain a good quality measurement this should not be taken. The next scheduled
appointment should be made as normal. This does not apply to CRL – see
section 2.1.4
The mother has missed her scan appointment If possible rearrange another appointment within one week. If it is not possible to re-arrange the appointment within one week, the next scheduled appointment should be kept as previously scheduled at the normal 5-week interval.
There is a fetal abnormality A fetal morphological evaluation will be conducted following standard practice at each centre. Fetuses diagnosed with any minor abnormalities will be managed as per local clinical guidelines. If the clinical decision is to continue with the pregnancy the mother will remain in the study. Study follow-up for these cases will be identical, but eventual exclusion at the time of data analysis will be carried out.
There is a multiple pregnancy which was not previously diagnosed The woman is not eligible for the study, and should be excluded from further study. She should be managed according to the local multiple pregnancy protocol.
INTERGROWTH-21st Ultrasound Manual 28
Part 3
Taking 3D volumes
Measuring amniotic fluid
Assessment of fetal presentation and
placental localisation

INTERGROWTH-21st Ultrasound Manual 29
3.1 TAKING 3D VOLUMES FOR QUALITY CONTROL
3.1.1 Aims
To provide volumetric data to assess the quality of the 2D measurements (BPD, OFD,
HC, APAD, TAD, AC, FL)
3.1.2 Required volumes
There are three 3D volumes that are needed:
1. The head (at the level of the BPD)
2. The abdomen (at the level of the AC)
3. The femur (in the same view as measuring the FL)
NOTE: These measurements are taken in the same standard planes
as described in Part 2 of this manual

INTERGROWTH-21st Ultrasound Manual 30
3.1.3 Techniques for 3D measurements
A. Head
Step 1: Obtain the image
A 2D plane of the fetal head as described for the BPD measurement should be
obtained.
Step 2: Get ready to acquire the volume
Adjust the volume data box to include the entire skull
Adjust the angle of sweep to include the entire skull – usually 700
Typical volume acquisition time 4 sec
Step 3: Minimise movement artefact and acquire the volume
Hold transducer steady on maternal abdomen
Fetus at rest
If possible ask the mother to hold her breath during acquisition
Observe real time images during acquisition to confirm that
o The sweep includes the entire skull
o There is no maternal or fetal movement during the sweep
Step 4: Try again, if:
o The whole skull was not included - increase the sweep angle
o There is movement
o You are unhappy with the quality of the volume
INTERGROWTH-21st Ultrasound Manual 31
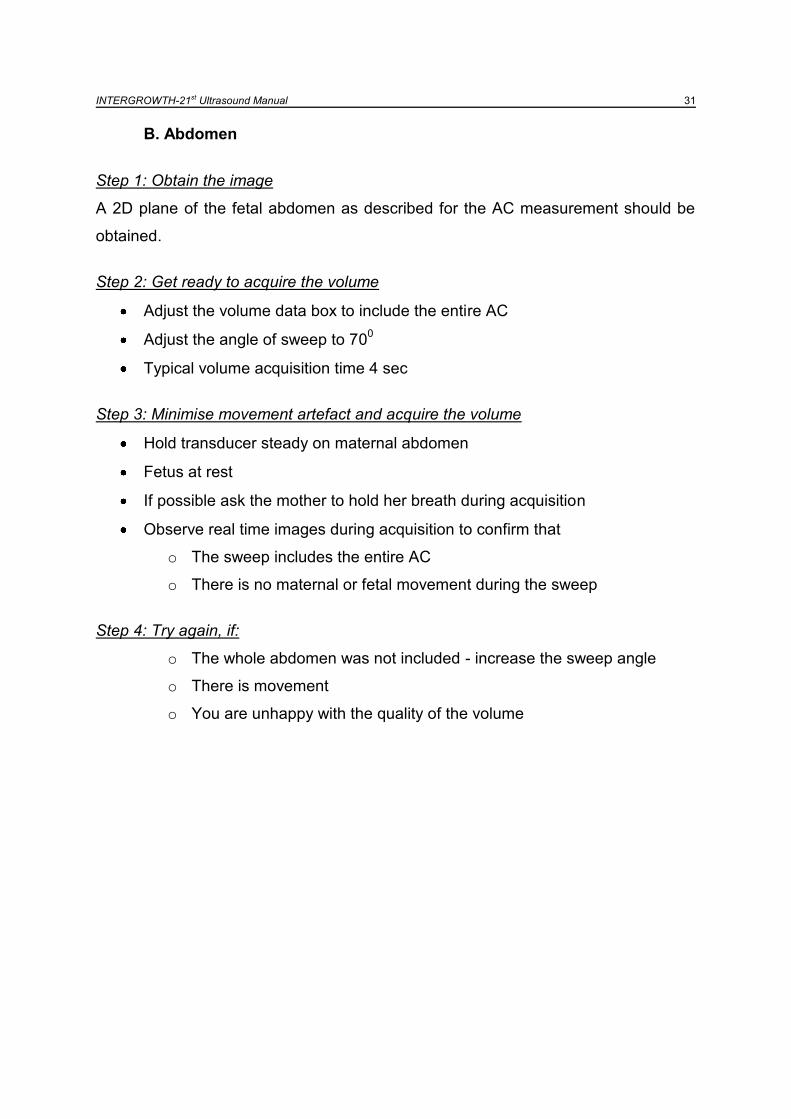
B. Abdomen
Step 1: Obtain the image
A 2D plane of the fetal abdomen as described for the AC measurement should be
obtained.
Step 2: Get ready to acquire the volume
Adjust the volume data box to include the entire AC
Adjust the angle of sweep to 700
Typical volume acquisition time 4 sec
Step 3: Minimise movement artefact and acquire the volume
Hold transducer steady on maternal abdomen
Fetus at rest
If possible ask the mother to hold her breath during acquisition
Observe real time images during acquisition to confirm that
o The sweep includes the entire AC
o There is no maternal or fetal movement during the sweep
Step 4: Try again, if:
o The whole abdomen was not included - increase the sweep angle
o There is movement
o You are unhappy with the quality of the volume
INTERGROWTH-21st Ultrasound Manual 32
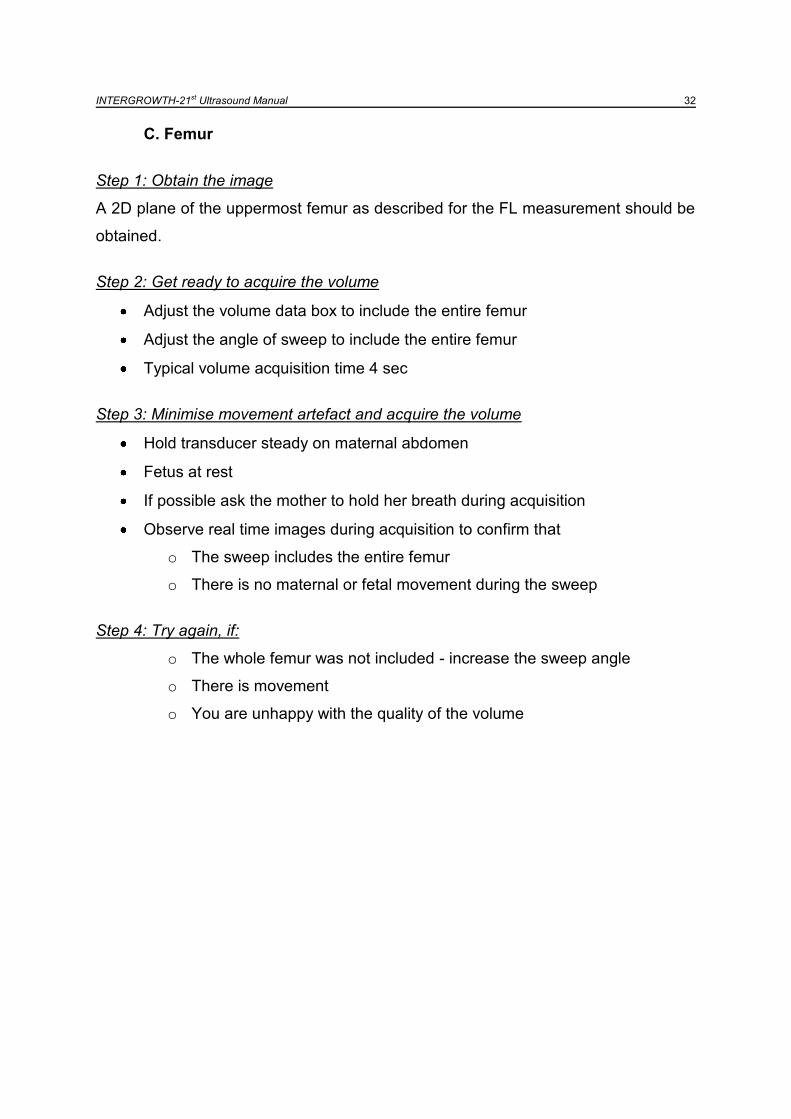
C. Femur
Step 1: Obtain the image
A 2D plane of the uppermost femur as described for the FL measurement should be
obtained.
Step 2: Get ready to acquire the volume
Adjust the volume data box to include the entire femur
Adjust the angle of sweep to include the entire femur
Typical volume acquisition time 4 sec
Step 3: Minimise movement artefact and acquire the volume
Hold transducer steady on maternal abdomen
Fetus at rest
If possible ask the mother to hold her breath during acquisition
Observe real time images during acquisition to confirm that
o The sweep includes the entire femur
o There is no maternal or fetal movement during the sweep
Step 4: Try again, if:
o The whole femur was not included - increase the sweep angle
o There is movement
o You are unhappy with the quality of the volume
INTERGROWTH-21st Ultrasound Manual 33
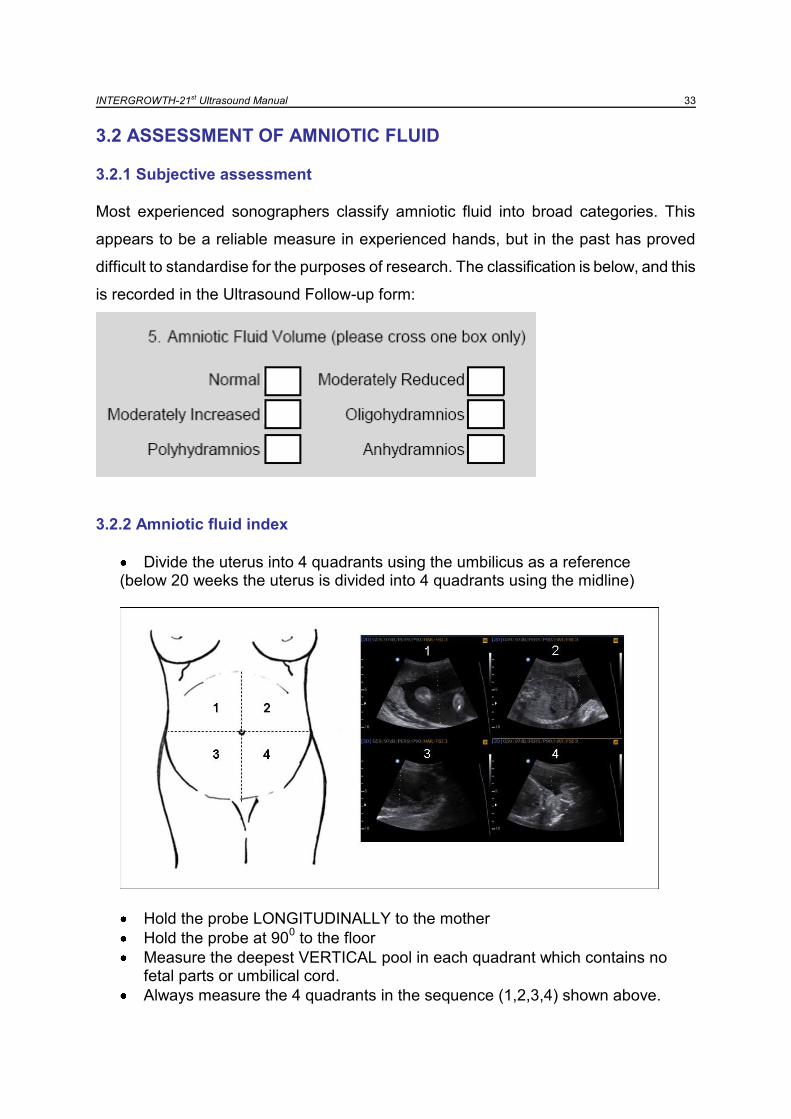
3.2 ASSESSMENT OF AMNIOTIC FLUID
3.2.1 Subjective assessment
Most experienced sonographers classify amniotic fluid into broad categories. This
appears to be a reliable measure in experienced hands, but in the past has proved
difficult to standardise for the purposes of research. The classification is below, and this
is recorded in the Ultrasound Follow-up form:
3.2.2 Amniotic fluid index
Divide the uterus into 4 quadrants using the umbilicus as a reference (below 20 weeks the uterus is divided into 4 quadrants using the midline)
Hold the probe LONGITUDINALLY to the mother
Hold the probe at 900 to the floor
Measure the deepest VERTICAL pool in each quadrant which contains no fetal parts or umbilical cord.
Always measure the 4 quadrants in the sequence (1,2,3,4) shown above.
INTERGROWTH-21st Ultrasound Manual 34
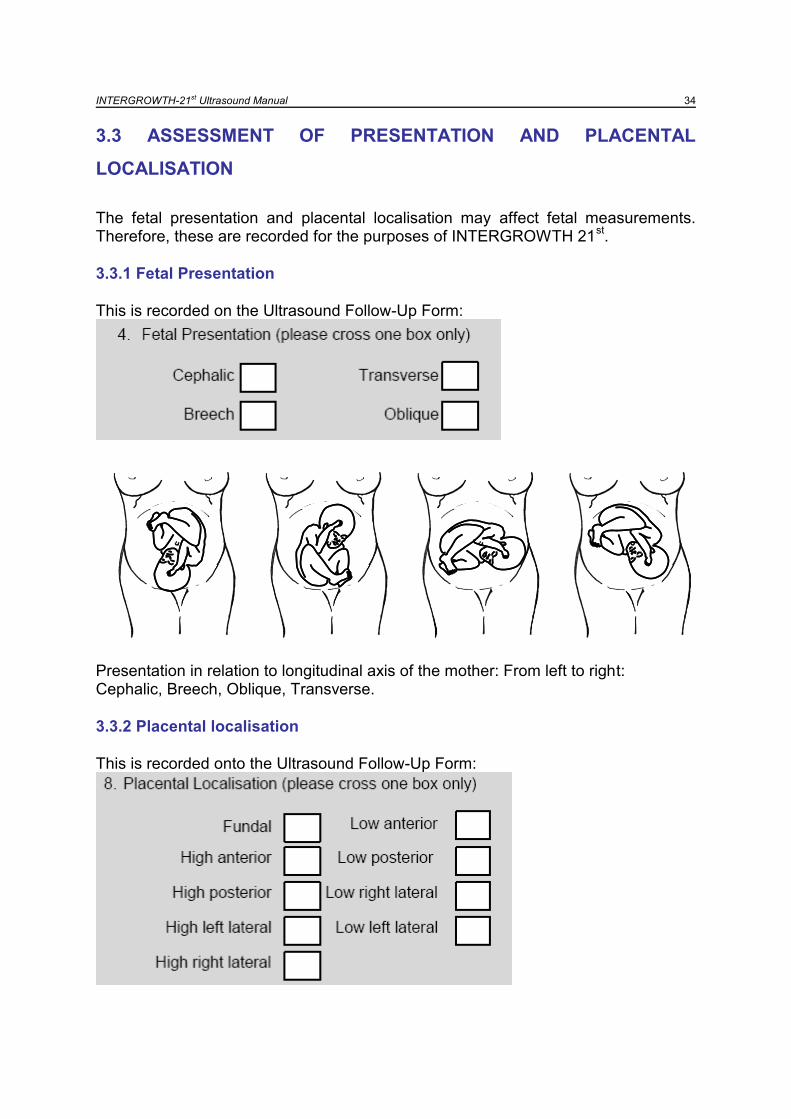
3.3 ASSESSMENT OF PRESENTATION AND PLACENTAL
LOCALISATION
The fetal presentation and placental localisation may affect fetal measurements. Therefore, these are recorded for the purposes of INTERGROWTH 21
st.
3.3.1 Fetal Presentation
This is recorded on the Ultrasound Follow-Up Form:
Presentation in relation to longitudinal axis of the mother: From left to right: Cephalic, Breech, Oblique, Transverse.
3.3.2 Placental localisation
This is recorded onto the Ultrasound Follow-Up Form:

INTERGROWTH-21st Ultrasound Manual 35
Part 4
Taking additional measurements or
volumes

INTERGROWTH-21st Ultrasound Manual 36
4.1 Aims
To obtain measurements (other than the essential measurements) of fetal biometry in order to create charts.
4.2 Limitations Introduction of extra tasks into the study could reduce the overall quality of the four main measurements, detract focus of the researchers as to the importance of the essential measurements, and inconvenience participants. Therefore, the feasibility of taking additional measurements will be evaluated in consultation with each centre before a final decision is made. Only some centres are expected to participate in these additional studies.
4.3 Optional 2D measurements
In descending order of importance, additional measurements could include: 1. Humerus 2. Radius / Ulna 3. Tibia / Fibula 4. Width of cerebral ventricles 5. Trans-cerebellar diameter
4.4 Optional 3D measurements In order to establish a unique “biological databank” for future research, additional 3D volumes of other organs can be taken specifically for these purposes. These will be considered ancillary studies and will be dependent upon the local availability of capacity and upon approval of the Steering Committee. In descending order of importance, additional measurements could include: 1. Heart 2. Placenta 3. Liver 4. Long bones 5. Brain 6. Cerebellum
Note that these are optional measurements.
Detailed description for these is beyond the scope of this manual – guidelines
will be created depending on the need and feasibility of taking these
measurements.

INTERGROWTH-21st Ultrasound Manual 37
Part 5
Ultrasound equipment

INTERGROWTH-21st Ultrasound Manual 38
5.1 The Philips HD 9 System
5.2 Control Panel
35.4 in/
88.5cmDepth
20.4 in/51cmWidth
222/lb101 kgWeight
51 in/127.8cmHeight
Physical Dimensions:
35.4 in/
88.5cmDepth
20.4 in/51cmWidth
222/lb101 kgWeight
51 in/127.8cmHeight
Physical Dimensions:
LCD display
DVD-RW drive and
USB ports for exam
data export
Retractable
keyboard
Electronic switching of
up to 4 transducers
Four wheel swivel wheels
Handle for mobility
Control panel
CW
PW
3D/4D
CPA
M-Mode 2D Color

INTERGROWTH-21st Ultrasound Manual 39
Patient, Transducer,
Report & Review
Configurable
Option Keys
Scale & Baseline
Toggles
Menu Control
Setups, Change,
Pointer and Exit
Trackball,
Update,
Enter,
Select
Freeze
Button Image ControlsSetups, Change,
Pointer and Exit
Setups, Change,
Pointer and Exit
Trackball,
Update,
Enter,
Select
Freeze
Button Image ControlsImage Controls
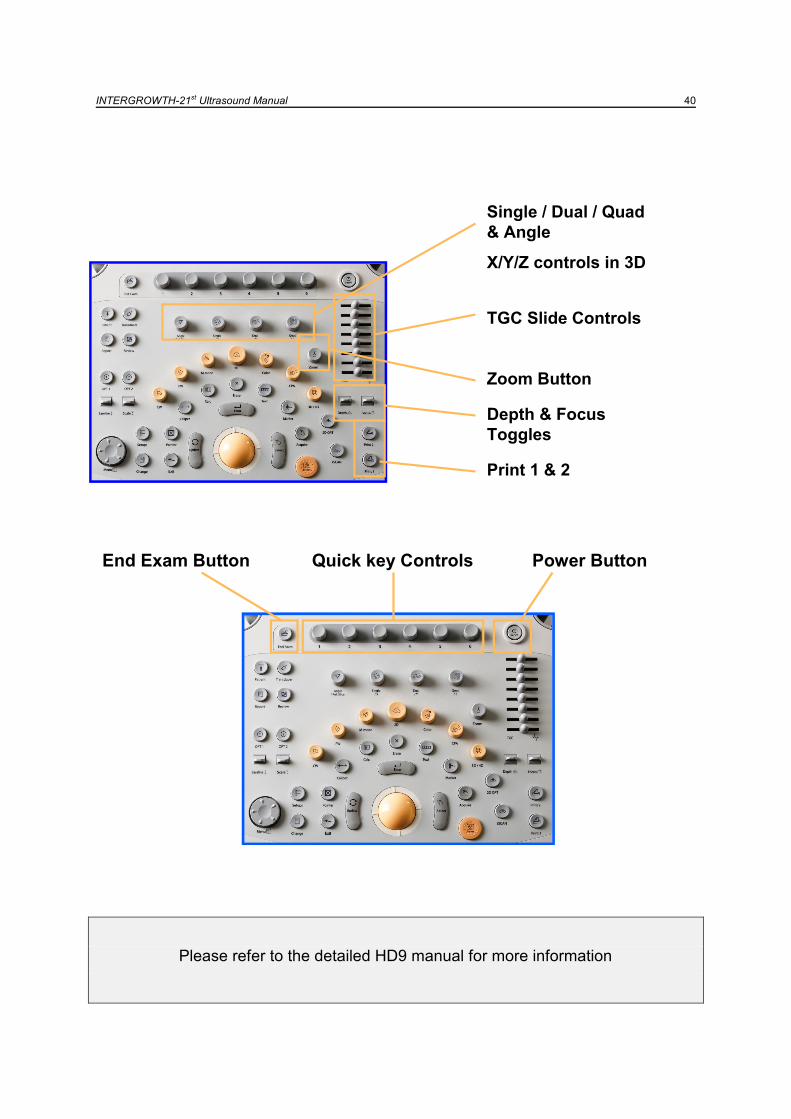
INTERGROWTH-21st Ultrasound Manual 40
Please refer to the detailed HD9 manual for more information
Depth & Focus
Toggles
TGC Slide Controls
Zoom Button
Single / Dual / Quad
& Angle
X/Y/Z controls in 3D
Print 1 & 2
Power ButtonQuick key ControlsEnd Exam Button
INTERGROWTH-21st Ultrasound Manual 41
Part 6
The typical ultrasound examination:
A step by step guide
INTERGROWTH-21st Ultrasound Manual 42
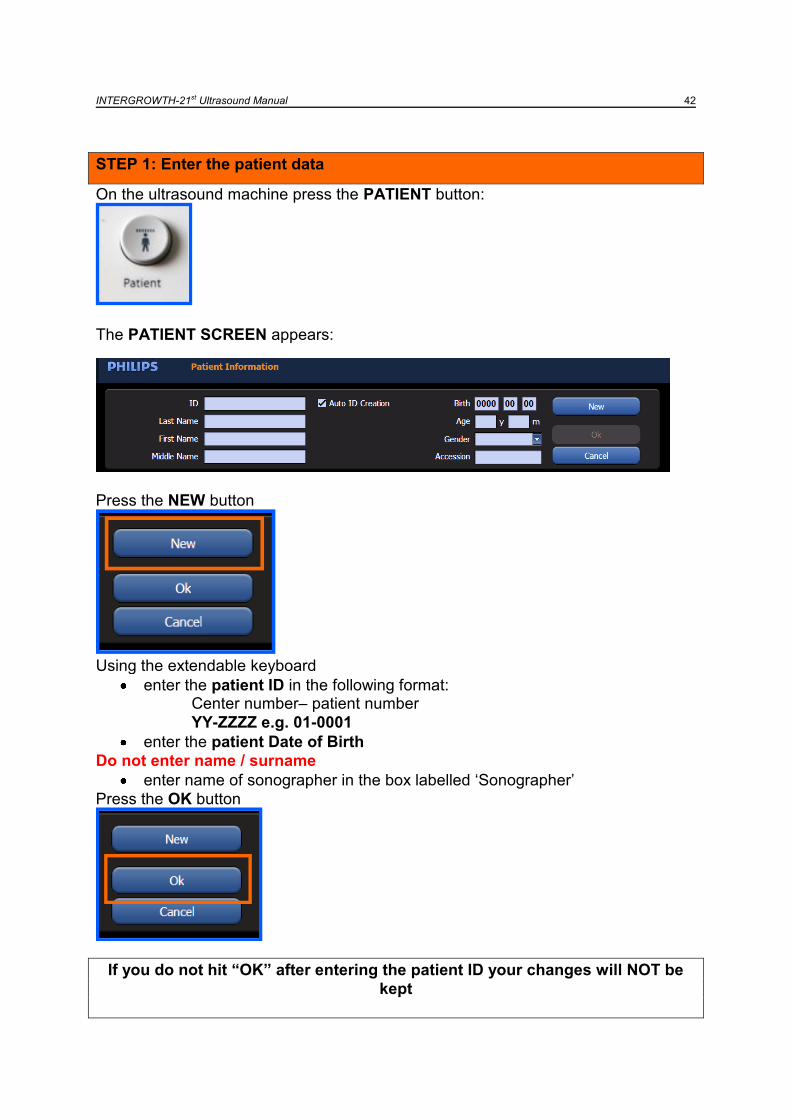
STEP 1: Enter the patient data
On the ultrasound machine press the PATIENT button:
The PATIENT SCREEN appears:
Press the NEW button
Using the extendable keyboard
enter the patient ID in the following format: Center number– patient number
YY-ZZZZ e.g. 01-0001
enter the patient Date of Birth
Do not enter name / surname
enter name of sonographer in the box labelled „Sonographer‟
Press the OK button
If you do not hit “OK” after entering the patient ID your changes will NOT be
kept
INTERGROWTH-21st Ultrasound Manual 43
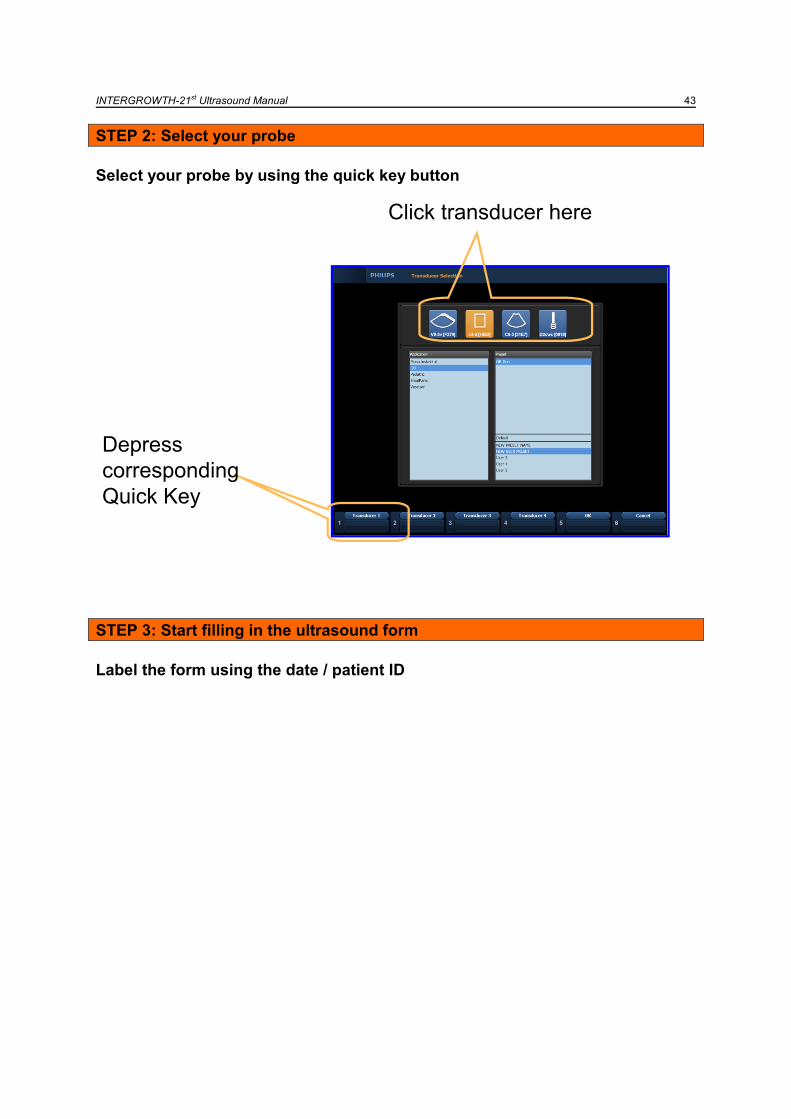
STEP 2: Select your probe
Select your probe by using the quick key button
STEP 3: Start filling in the ultrasound form
Label the form using the date / patient ID
Click transducer here
Depress
corresponding
Quick Key
INTERGROWTH-21st Ultrasound Manual 44
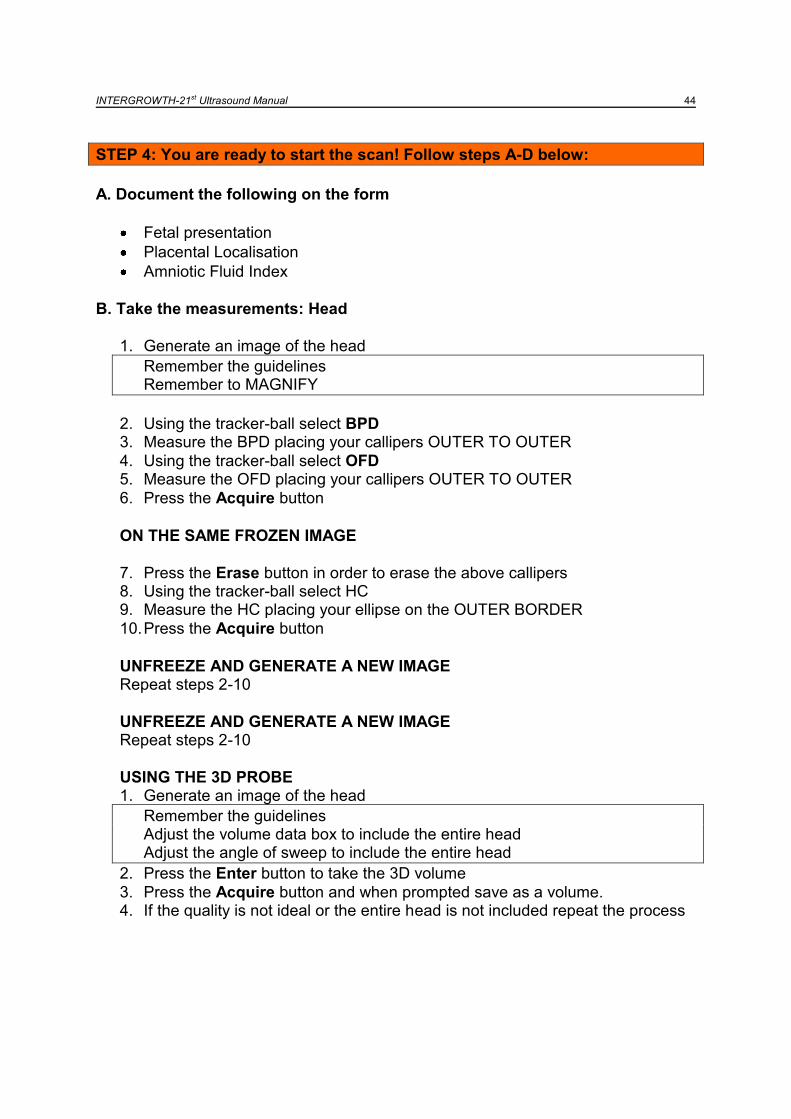
STEP 4: You are ready to start the scan! Follow steps A-D below:
A. Document the following on the form
Fetal presentation
Placental Localisation
Amniotic Fluid Index
B. Take the measurements: Head
1. Generate an image of the head
Remember the guidelines Remember to MAGNIFY
2. Using the tracker-ball select BPD 3. Measure the BPD placing your callipers OUTER TO OUTER
4. Using the tracker-ball select OFD 5. Measure the OFD placing your callipers OUTER TO OUTER
6. Press the Acquire button
ON THE SAME FROZEN IMAGE
7. Press the Erase button in order to erase the above callipers 8. Using the tracker-ball select HC 9. Measure the HC placing your ellipse on the OUTER BORDER
10. Press the Acquire button
UNFREEZE AND GENERATE A NEW IMAGE Repeat steps 2-10
UNFREEZE AND GENERATE A NEW IMAGE Repeat steps 2-10
USING THE 3D PROBE 1. Generate an image of the head
Remember the guidelines Adjust the volume data box to include the entire head Adjust the angle of sweep to include the entire head
2. Press the Enter button to take the 3D volume
3. Press the Acquire button and when prompted save as a volume. 4. If the quality is not ideal or the entire head is not included repeat the process

INTERGROWTH-21st Ultrasound Manual 45
B. Take the measurements: Abdomen
1. Generate an image of the abdomen
Remember the guidelines Remember to MAGNIFY
2. Using the tracker-ball select APAD
3. Measure the APAD placing your callipers OUTER TO OUTER
4. Using the tracker-ball select TAD
5. Measure the TAD placing your callipers OUTER TO OUTER
6. Press the Acquire button
ON THE SAME FROZEN IMAGE
7. Press the Erase button in order to erase the above callipers
8. Using the tracker-ball select AC
9. Measure the AC placing your ellipse on the OUTER BORDER
10. Press the Acquire button
UNFREEZE AND GENERATE A NEW IMAGE Repeat steps 2-10
UNFREEZE AND GENERATE A NEW IMAGE Repeat steps 2-10
USING THE 3D PROBE 5. Generate an image of the abdomen
Remember the guidelines Adjust the volume data box to include the entire AC Adjust the angle of sweep to 70
o
6. Press the Enter button to take the 3D volume
7. Press the Acquire button and when prompted save as a volume. 8. If the quality is not ideal repeat the process

INTERGROWTH-21st Ultrasound Manual 46
C. Take the measurements: Femur
1. Generate an image of the femur
Remember the guidelines Remember to MAGNIFY
2. Using the tracker-ball select FL
3. Measure the FL placing your callipers appropriately
4. Press the Acquire button
UNFREEZE AND GENERATE A NEW IMAGE Repeat steps 2-4
UNFREEZE AND GENERATE A NEW IMAGE Repeat steps 2-4
USING THE 3D PROBE 9. Generate an image of the femur
Remember the guidelines Adjust the volume data box to include the entire femur Adjust the angle of sweep to include the entire femur
10. Press the Enter button to take the 3D volume 11. Press the save button 12. If the quality is not ideal or the whole femur is not included repeat the process
INTERGROWTH-21st Ultrasound Manual 47
D. Take the measurements: Amniotic fluid index
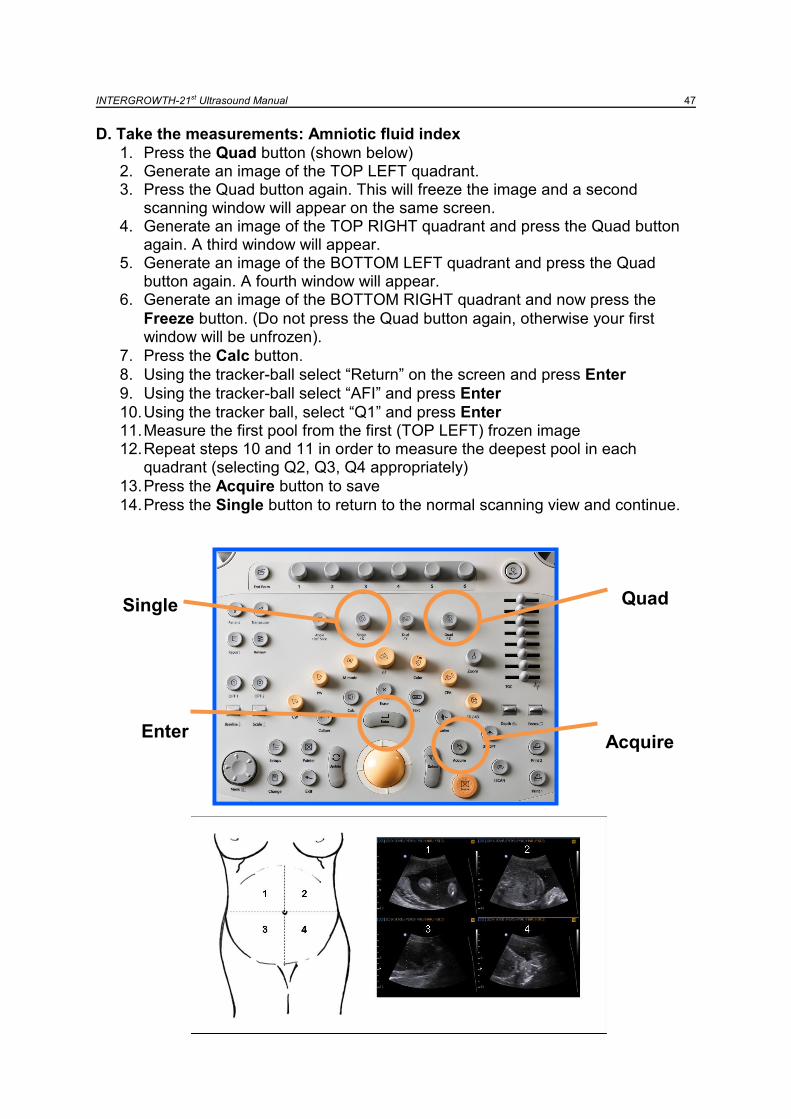
1. Press the Quad button (shown below) 2. Generate an image of the TOP LEFT quadrant. 3. Press the Quad button again. This will freeze the image and a second
scanning window will appear on the same screen. 4. Generate an image of the TOP RIGHT quadrant and press the Quad button
again. A third window will appear. 5. Generate an image of the BOTTOM LEFT quadrant and press the Quad
button again. A fourth window will appear. 6. Generate an image of the BOTTOM RIGHT quadrant and now press the
Freeze button. (Do not press the Quad button again, otherwise your first window will be unfrozen).
7. Press the Calc button.
8. Using the tracker-ball select “Return” on the screen and press Enter
9. Using the tracker-ball select “AFI” and press Enter
10. Using the tracker ball, select “Q1” and press Enter 11. Measure the first pool from the first (TOP LEFT) frozen image 12. Repeat steps 10 and 11 in order to measure the deepest pool in each
quadrant (selecting Q2, Q3, Q4 appropriately)
13. Press the Acquire button to save
14. Press the Single button to return to the normal scanning view and continue.
Quad Single
Acquire Enter
INTERGROWTH-21st Ultrasound Manual 48
STEP 5: Press the Report button
1. Using the tracker-ball press “Print” from the screen. Print 3 reports. 2. Put one in the patient‟s notes 3. Put one into the folder 4. Staple one to the Ultrasound Follow-up form and give it to the data manager
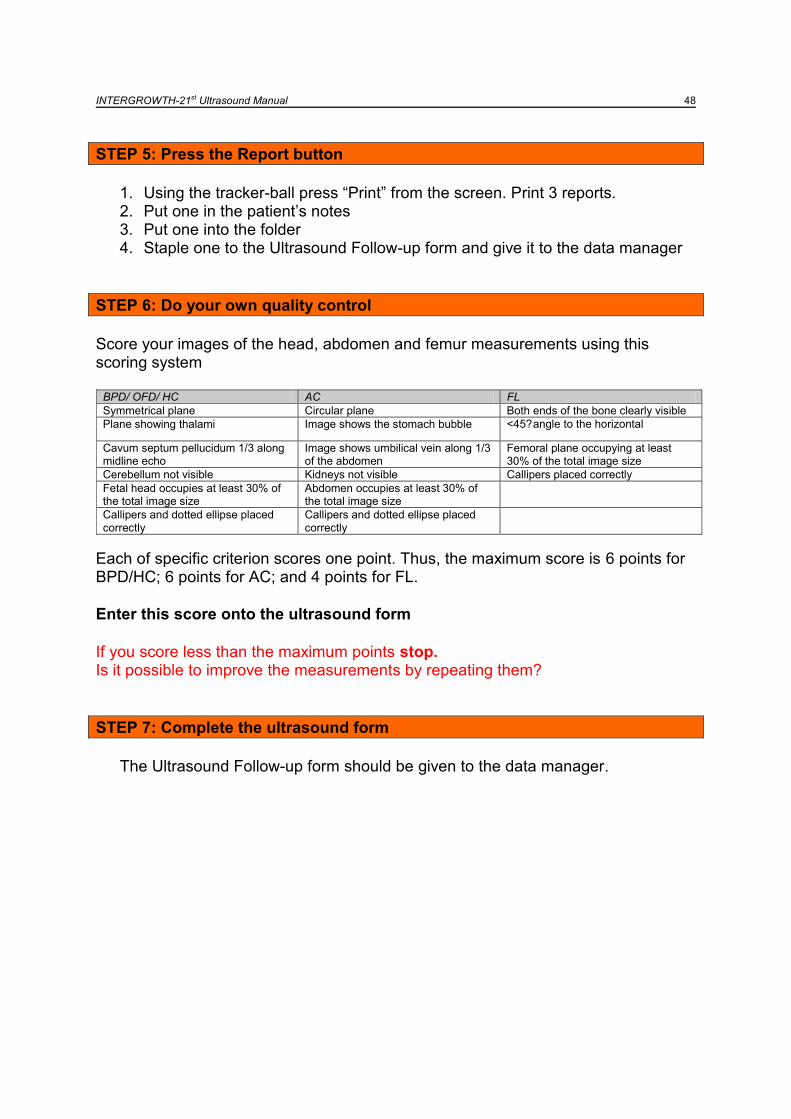
STEP 6: Do your own quality control
Score your images of the head, abdomen and femur measurements using this scoring system
BPD/ OFD/ HC AC FL
Symmetrical plane Circular plane Both ends of the bone clearly visible
Plane showing thalami Image shows the stomach bubble <45? angle to the horizontal
Cavum septum pellucidum 1/3 along midline echo
Image shows umbilical vein along 1/3 of the abdomen
Femoral plane occupying at least 30% of the total image size
Cerebellum not visible Kidneys not visible Callipers placed correctly
Fetal head occupies at least 30% of the total image size
Abdomen occupies at least 30% of the total image size
Callipers and dotted ellipse placed correctly
Callipers and dotted ellipse placed correctly
Each of specific criterion scores one point. Thus, the maximum score is 6 points for BPD/HC; 6 points for AC; and 4 points for FL.
Enter this score onto the ultrasound form
If you score less than the maximum points stop. Is it possible to improve the measurements by repeating them?
STEP 7: Complete the ultrasound form
The Ultrasound Follow-up form should be given to the data manager.

INTERGROWTH-21st Ultrasound Manual 49
Part 7
Measuring symphysis fundal height
and blood pressure
INTERGROWTH-21st Ultrasound Manual 50
7.1 Measurement of Symphysis Fundal Height
The patient should lie in the supine position and should have an empty bladder (the measurement is best done after the ultrasound scan when the woman has voided the bladder).
Measure only using the metric tape of non-elastic material provided by the study
Measurements are to be blinded, by turning the tape measure so that no numbers are visible during the measurement.
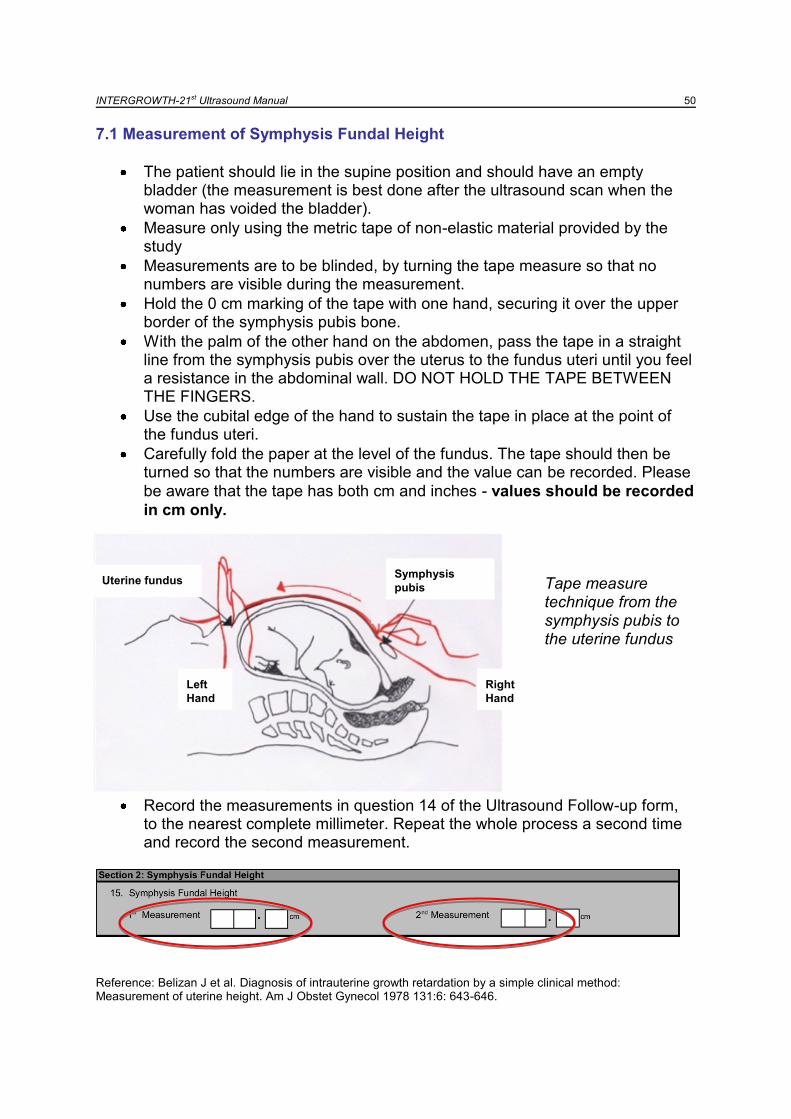
Hold the 0 cm marking of the tape with one hand, securing it over the upper border of the symphysis pubis bone.
With the palm of the other hand on the abdomen, pass the tape in a straight line from the symphysis pubis over the uterus to the fundus uteri until you feel a resistance in the abdominal wall. DO NOT HOLD THE TAPE BETWEEN THE FINGERS.
Use the cubital edge of the hand to sustain the tape in place at the point of the fundus uteri.
Carefully fold the paper at the level of the fundus. The tape should then be turned so that the numbers are visible and the value can be recorded. Please
be aware that the tape has both cm and inches - values should be recorded
in cm only. Tape measure technique from the symphysis pubis to the uterine fundus
Record the measurements in question 14 of the Ultrasound Follow-up form, to the nearest complete millimeter. Repeat the whole process a second time and record the second measurement.
Reference: Belizan J et al. Diagnosis of intrauterine growth retardation by a simple clinical method: Measurement of uterine height. Am J Obstet Gynecol 1978 131:6: 643-646.
Uterine fundusSymphysis
pubis
Right
Hand
Left
Hand
Uterine fundusSymphysis
pubis
Right
Hand
Left
Hand
INTERGROWTH-21st Ultrasound Manual 51 7.1 Measurement of Blood Pressure
Equipment
Microlife Blood Pressure Monitor for Pregnant Women
Cuffs of two sizes (for medium and large arms)
Rubber bladder
Pump with control valve
When to measure it
Blood pressure is to be taken during every follow up visit of the women in the Fetal Growth Longitudinal Study.
The blood pressure monitor should be placed in an accessible location, near to the ultrasound room.
Blood pressure can rise if the patient has recently exercised or is nervous. In late pregnancy, even walking can be strenuous. Ensure that the patient has had time to rest (5-10 minutes) from arrival, put her at ease and make sure the temperature of the clinic is comfortable.
Position of the patient:
The patient should be seated for 5 minutes before taking the blood pressure.
The patient should be seated during the blood pressure reading.
Lying down or standing during the blood pressure reading is unacceptable.
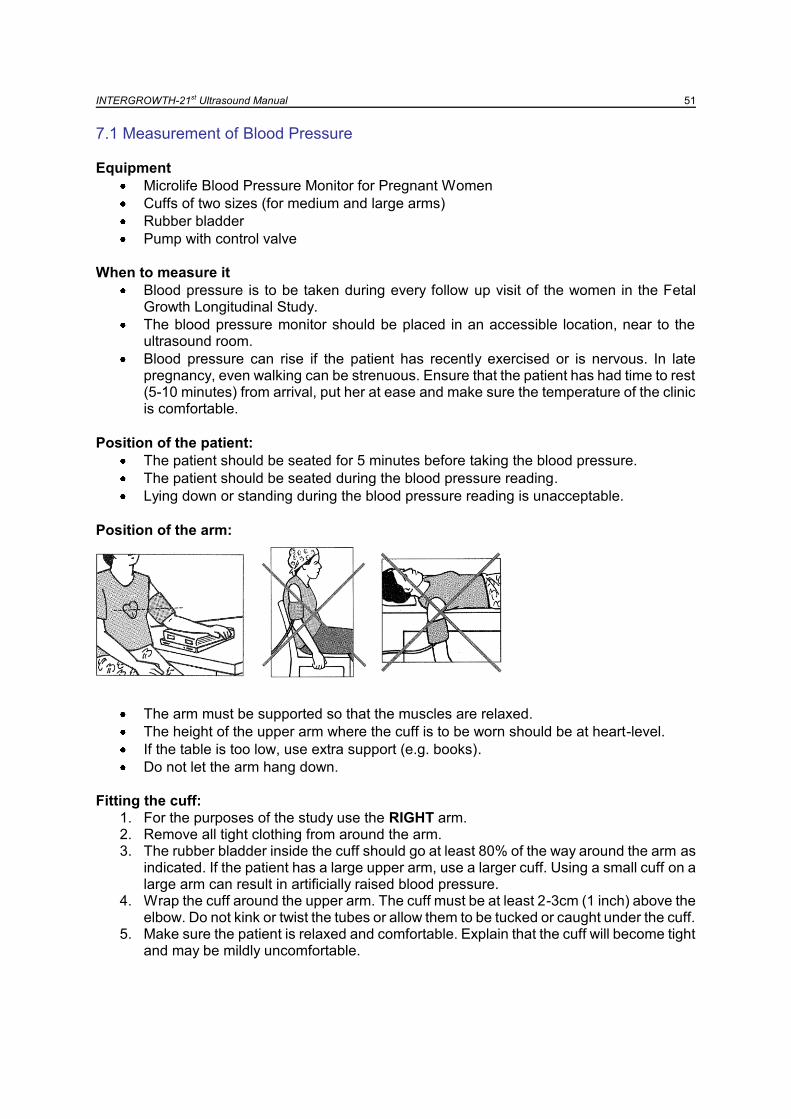
Position of the arm:
The arm must be supported so that the muscles are relaxed.
The height of the upper arm where the cuff is to be worn should be at heart-level.
If the table is too low, use extra support (e.g. books).
Do not let the arm hang down.
Fitting the cuff:
1. For the purposes of the study use the RIGHT arm. 2. Remove all tight clothing from around the arm. 3. The rubber bladder inside the cuff should go at least 80% of the way around the arm as
indicated. If the patient has a large upper arm, use a larger cuff. Using a small cuff on a large arm can result in artificially raised blood pressure.
4. Wrap the cuff around the upper arm. The cuff must be at least 2-3cm (1 inch) above the elbow. Do not kink or twist the tubes or allow them to be tucked or caught under the cuff.
5. Make sure the patient is relaxed and comfortable. Explain that the cuff will become tight and may be mildly uncomfortable.

INTERGROWTH-21st Ultrasound Manual 52 Measuring Procedure:
1. Press the start button. The pump begins to inflate the cuff. The rising pressure in the cuff is shown on the display.
2. After reaching the inflation pressure, the pump stops and the pressure gradually falls. The cuff pressures are displayed. In case that the inflation pressure is not sufficient, the monitor automatically re-inflates to a higher level.
3. When the instrument detects a pulse, the heart symbol in the display starts to flash and a beep is heard for every heartbeat.
4. A longer beep is sounded when the measurement has been completed. The systolic, and diastolic blood pressures and pulse rate now appear in the display.
5. The measurement results are displayed, until you switch the device off. If no button is pressed for 5 minutes, the device switches off automatically, to save the batteries
Recording the Results:
Record both the systolic and diastolic values in the corresponding data collection form in mmHg.
If this is the Maternal Study Entry visit, the form looks like this:
If this is the Pregnancy Follow-up visit, the form looks like this:

INTERGROWTH-21st Ultrasound Manual 53
Part 8
Data backup

INTERGROWTH-21st Ultrasound Manual 54
8.1 Aims of data backup Both measurements and images created during the process of an examination need to be integrated with the rest of the data for the study. In order to achieve this aim we require regular backups to be made from the individual ultrasound machines and handed to the local data manager who will handle the data as appropriate.
8.2 Procedure for data backup
8.2.1 Schedule of backup It is required to perform a daily backup of the images and measurements stored on the ultrasound machine. This will ensure that inadvertent loss of data will be minimised.
8.2.2 Step-by-step guide to data backup
1. Insert a blank memory key in the USB drive on the front of the machine
2. Press the Review button
3. Press the Patient button 4. On the monitor locate the drop-down menu next to the heading “Period” and
select the “Today” option by using the track ball and Enter button 5. A list of all the patients scanned on that date and saved on the machine will
appear on the screen. 6. If the machine has been used for INTERGROWTH-21
st scanning only, it is
sufficient to select the option “Select all” using the tracker ball and Enter button. 7. Once all the relevant patients are highlighted, select the “Backup” option on the
screen by using the tracker ball and Enter button. The machine will prompt you to confirm the selection. Next press to confirm the selection of patients (the numbers selected will be highlighted).
8. You will then be prompted to select the drive from a drop-down menu. Select the USB drive and press OK.
9. The data will take a few minutes to download depending on the number of patients and images. The machine will inform you when the backup process is complete.
10. Once the backup is complete, remove the USB from the drive and hand it over to your data manager.

INTERGROWTH-21st Ultrasound Manual 55
Part 9
Site specific standardisation
INTERGROWTH-21st Ultrasound Manual 56
9.1 Purpose of site specific standardisation The health institutions participating in the INTERGROWTH-21
st project are diverse and
may employ different pathways and protocols for scanning patients in their routine clinical practice. In order for the data collected to be comparable across observers and study sites over the course of the study, all ultrasound measurements must be standardised. These need to be consistent, within and between the multiple study sites from which data will be pooled. It is important for each study site to use the same equipment and procedures so that the data collected at each site may be combined into a single data set for the purposes of generating the new standards. All equipment will be provided to study sites directly by INTERGROWTH-21
st. Some sites will have unique
conditions that may cause the local study team to want to depart from this standardized measurement protocol. However, where this occurs the Principal Investigator should contact the study Coordinating Unit to determine that such a departure meets with their approval. Each site, prior to commencing data collection, should hold a standardization exercise. The purpose of this is to familiarize all staff involved in ultrasound measurement with the techniques for uniform measurement, ultrasound equipment and quality control procedures.
9.2 Who should coordinate the site specific standardisation exercise Each site sent a lead ultrasonographer to Oxford to take part in a training course. During this time, each delegate was familiarised with the equipment, protocols and their measurements were compared to a “gold standard” to assess deviation and improvement over time. It is the task of each of the local lead ultrasonographers to repeat a similar training exercise at their own institution for all the ultrasonographers who will be taking measurements for INTEGROWTH-21
st.
9.3 Conducting the Site specific standardisation exercise It is the responsibility of the local lead ultrasonographer to perform a training and standardisation exercise at their own institution for any ultrasonographers performing scans as part of the study. All ultrasonographers must have gone through this training and standardisation before starting to scan subjects.
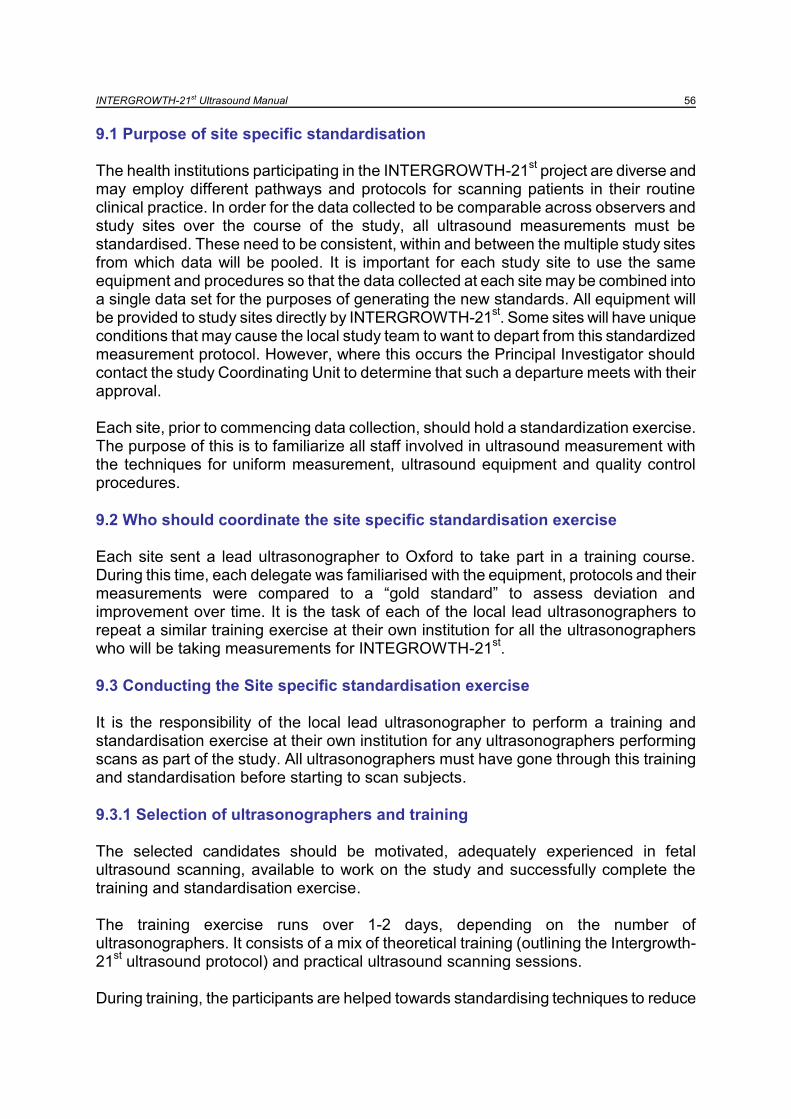
9.3.1 Selection of ultrasonographers and training The selected candidates should be motivated, adequately experienced in fetal ultrasound scanning, available to work on the study and successfully complete the training and standardisation exercise. The training exercise runs over 1-2 days, depending on the number of ultrasonographers. It consists of a mix of theoretical training (outlining the Intergrowth-21
st ultrasound protocol) and practical ultrasound scanning sessions.
During training, the participants are helped towards standardising techniques to reduce

INTERGROWTH-21st Ultrasound Manual 57 variability within and between sites. The training period aims at conveying the following skills:
To familiarise the ultrasonographer with the study equipment
To measure fetuses according to the standardised measurement protocol
To take accurate and precise measurements of the fetal anatomy and compare it to the gold standard measurement (see below)
To effectively back up data, images and voumes During training, ultrasonographers should be helped to understand why certain procedures are to be followed. For example, calliper placements should be as described in order to ensure uniformity across sites; measurements should be taken three times (as this gives a more reliable estimate of the true measurement than would a single measurement); and that the observer should retake any measurements that do not meet the required quality.
9.3.2 Theoretical component of training During the theoretical part of the training course the following should be covered:
General Intergrowth-21st Protocol
Appendix C of the Intergrowth-21st Protocol
Ultrasound operations manual
Data Collection Forms
Quality Control
Recruitment and numbers
HD9 system overview and optimisation
Data management and transfer
Symphysis fundal height and Blood Pressure measurement
9.3.3 Practical component of training During the training exercise, each participant should scan 5 pregnant women of various gestations. During this time, the ultrasonographer will become familiar with the equipment, the scanning protocol, storing and extraction of the data. It is receommended to use as the “gold standard” the overall mean of all observers on each fetus, because it is difficult to have a single observer as a gold standard for all different measurements. For this purpose, the lead local ultrasonographer and all other ultrasonographers undergoing training at the same time should scan the same 5 women during the course. Each participant should take 3 measurements each of the BPD, OFD, HC, TAD, APAD, AC and FL. The measurements for each participant should be recorded in the Excel spread sheet (attached) and sent to the Coordinating Unit in Oxford where the intrarobserver/interobserver variability and the improvement achieved over the training course will be documented.

INTERGROWTH-21st Ultrasound Manual 58 At the end of the standardization exercise, and after each delegate‟s measurements have been sent to the Coordinating Unit in Oxford, each ultrasonographer will receive a certificate of standardisation.
Sonographer
Date (DD/MM/YY)
Session lead
Patient ID
Patient 1 BPD OFD HC APAD TAD AC FL AFI
Measurement 1 (mm)
Measurement 2 (mm)
Measurement 3 (mm)
Sonographer
Date (DD/MM/YY)
Session lead
Patient ID
Patient 1 BPD OFD HC APAD TAD AC FL AFI
Measurement 1 (mm)
Measurement 2 (mm)
Measurement 3 (mm)
Sonographer
Date (DD/MM/YY)
Session lead
Patient ID
Patient 1 BPD OFD HC APAD TAD AC FL AFI
Measurement 1 (mm)
Measurement 2 (mm)
Measurement 3 (mm)
Sonographer
Date (DD/MM/YY)
Session lead
Patient ID
Patient 1 BPD OFD HC APAD TAD AC FL AFI
Measurement 1 (mm)
Measurement 2 (mm)
Measurement 3 (mm)
Sonographer
Date (DD/MM/YY)
Session lead
Patient ID
Patient 1 BPD OFD HC APAD TAD AC FL AFI
Measurement 1 (mm)
Measurement 2 (mm)
Measurement 3 (mm)
9.4 Site visits During the study the ultrasound team from Oxford will arrange site visits specifically to assess ultrasound aspects. These will be in order to support local teams, ensure optimisation of ultrasound equipment, assess calibration, verify adherence to protocols and perform local standardisation exercises.

INTERGROWTH-21st Ultrasound Manual 59
References
The International Fetal and Newborn Growth Standards for the 21st Century. http://www.intergrowth21.org.uk/
de Onis M, Onyango AW, Van den Broeck J, Chumlea WC, Martorell R. Measurement and standardization protocols for anthropometry used in the construction of a new international growth reference. Food Nutr Bull. 2004 Mar;25(1 Suppl):S27-36.
Salomon LJ, Bernard JP, Duyme M, Doris B, Mas N, Ville Y. Feasibility and reproducibility of an image-scoring method for quality control of fetal biometry in the second trimester. Ultrasound Obstet Gynecol. 2006 Jan;27(1):34-40.
The American Institute of Ultrasound in Medicine. AIUM Practice Guideline for the Performance of Obstetric Ultrasound Examinations. 2007
Robinson HP. Sonar measurement of fetal crown-rump length as means of assessing maturity in first trimester of pregnancy. Br Med J 1973 Oct 6; 4(5883): 28–31.
The British Medical Ultrasound Society. Fetal size and dating: Charts recommended for clinical obstetric practice. http://www.bmus.org. 2008
INTERGROWTH-21st Ultrasound Manual 60
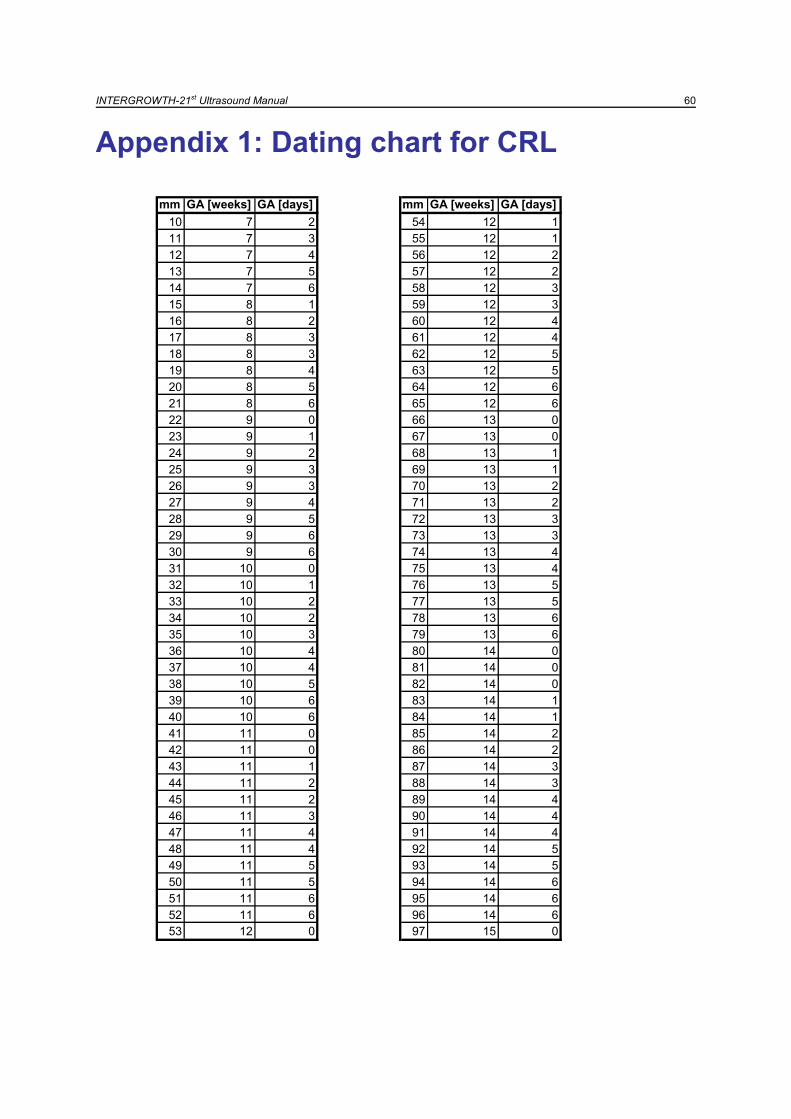
Appendix 1: Dating chart for CRL
mm GA [weeks] GA [days] mm GA [weeks] GA [days]
10 7 2 54 12 1
11 7 3 55 12 1
12 7 4 56 12 2
13 7 5 57 12 2
14 7 6 58 12 3
15 8 1 59 12 3
16 8 2 60 12 4
17 8 3 61 12 4
18 8 3 62 12 5
19 8 4 63 12 5
20 8 5 64 12 6
21 8 6 65 12 6
22 9 0 66 13 0
23 9 1 67 13 0
24 9 2 68 13 1
25 9 3 69 13 1
26 9 3 70 13 2
27 9 4 71 13 2
28 9 5 72 13 3
29 9 6 73 13 3
30 9 6 74 13 4
31 10 0 75 13 4
32 10 1 76 13 5
33 10 2 77 13 5
34 10 2 78 13 6
35 10 3 79 13 6
36 10 4 80 14 0
37 10 4 81 14 0
38 10 5 82 14 0
39 10 6 83 14 1
40 10 6 84 14 1
41 11 0 85 14 2
42 11 0 86 14 2
43 11 1 87 14 3
44 11 2 88 14 3
45 11 2 89 14 4
46 11 3 90 14 4
47 11 4 91 14 4
48 11 4 92 14 5
49 11 5 93 14 5
50 11 5 94 14 6
51 11 6 95 14 6
52 11 6 96 14 6
53 12 0 97 15 0
INTERGROWTH-21st Ultrasound Manual 61
Appendix 2: Recruitment rates
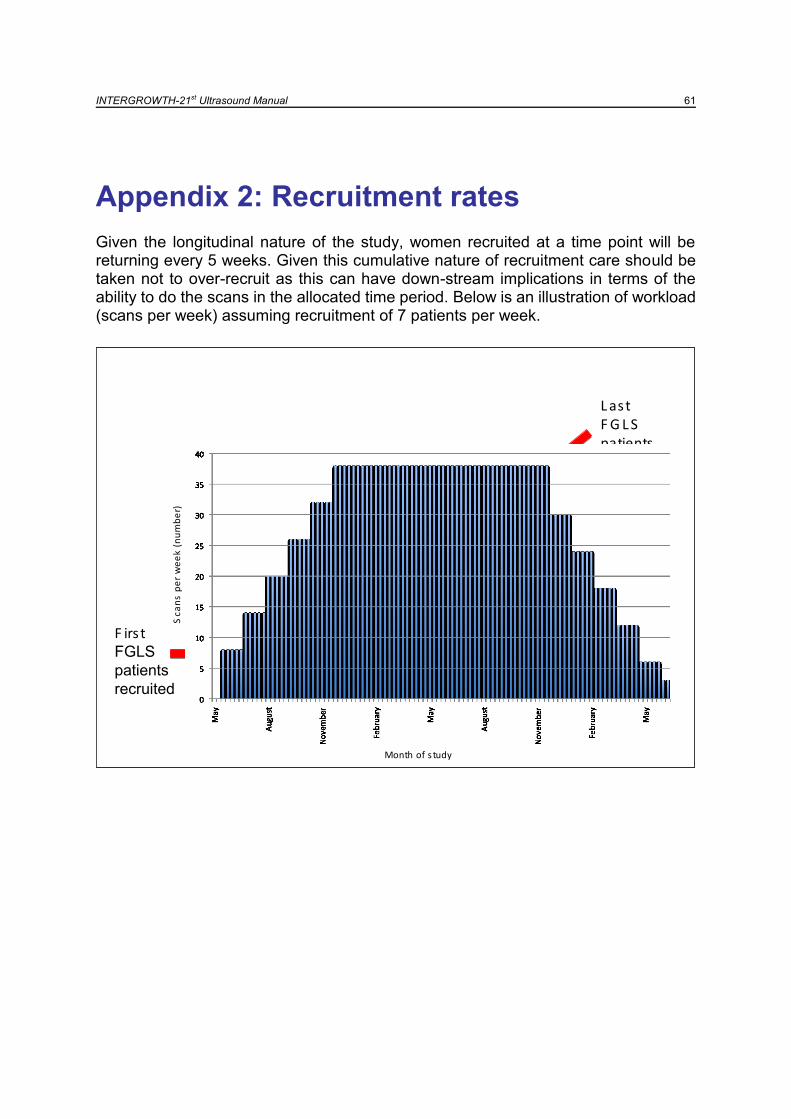
Given the longitudinal nature of the study, women recruited at a time point will be returning every 5 weeks. Given this cumulative nature of recruitment care should be taken not to over-recruit as this can have down-stream implications in terms of the ability to do the scans in the allocated time period. Below is an illustration of workload (scans per week) assuming recruitment of 7 patients per week.
F irs t FGLS
patients
recruited
L ast F G L S patients recruited
Sca
ns
pe
r w
ee
k (n
um
be
r)
Month of s tudy
F irs t FGLS
patients
recruited
L ast F G L S patients recruited
Sca
ns
pe
r w
ee
k (n
um
be
r)
Month of s tudy