Embed Size (px)
Citation preview
IT TrainingKimberlin Library
Tel: (0116) 257 7160email: [email protected]
Office 2007
Word
Intermediate
June 2011
Word2007Intermediate (020611) i ©De Montfort University, IT Training 2011
CONTENTS
INTRODUCTION ............................................................................. 1
GETTING STARTED ......................................................................... 3
THE OFFICE BUTTON ......................................................................... 4
THE QUICK ACCESS TOOLBAR ................................................................ 6
THE RIBBON .................................................................................. 8
TEMPLATES ................................................................................. 10
CREATING A NEW TEMPLATE ................................................................. 11
CREATING A TEMPLATE USING THE SAVE AS OPTION ........................................... 18
TEMPLATES ON-LINE ........................................................................ 19
AMENDING A TEMPLATE ...................................................................... 20
USING A TEMPLATE .......................................................................... 21
PRODUCING AN ENVELOPE ................................................................... 24
PRODUCING A LABEL ......................................................................... 27
PRODUCING A PAGE OF LABELS ............................................................... 29
NUMBERED AND BULLETED LISTS ...................................................... 31
CHANGING THE BULLETS TO NUMBERS ........................................................ 33
CHANGING THE INDENT POSITION ............................................................ 33
INDENTING TEXT WITHIN A LIST .............................................................. 36
TURNING THE AUTOMATIC BULLETING AND NUMBERING OFF ................................... 38
FORMATTING TEXT ....................................................................... 39
PARAGRAPH SPACING ........................................................................ 39
MULTILEVEL LISTS ........................................................................... 40
CONTROLLING TEXT ...................................................................... 42
WIDOWS AND ORPHANS ...................................................................... 42
VIEWING A DOCUMENT ................................................................... 45
NAVIGATING A DOCUMENT .............................................................. 46
BROWSING .................................................................................. 46
GO TO ...................................................................................... 47
SECTIONS ................................................................................... 49
EXAMPLES OF SECTION BREAKS ............................................................... 50 Continuous ..................................................................................... 50 Next Page ...................................................................................... 50
INSERTING A SECTION BREAK ................................................................. 51
DELETING A SECTION BREAK ................................................................. 52
PAGE NUMBERS ............................................................................ 53
INSERTING PAGE NUMBERS USING THE PAGE NUMBER BUTTON ................................. 53
PAGE NUMBER FORMATS ..................................................................... 55
START PAGE NUMBER ........................................................................ 56
Word2007Intermediate (020611) ii ©De Montfort University, IT Training 2011
HEADERS AND FOOTERS ................................................................. 57
INSERTING A FOOTER ........................................................................ 57 Deleting a page number ..................................................................... 59 Inserting the date ............................................................................ 60 Odd and even pages .......................................................................... 61 Different first page footer ................................................................. 63 Different Header/Footer .................................................................... 64 Inserting the document name and path into the footer ............................... 66
BUILDING BLOCKS ........................................................................ 69
COLUMNS ................................................................................... 73
FORMATTING COLUMNS...................................................................... 74
BORDERS AND SHADING ................................................................. 75
TEXT BORDER ............................................................................... 75
PAGE BORDER ............................................................................... 78 Graphical page border ....................................................................... 79
FORMAT PAINTER ......................................................................... 80
SYMBOLS ................................................................................... 81
INTERNATIONAL CHARACTERS ......................................................... 83
PRINTING A BOOKLET .................................................................... 84
Word2007Intermediate (020611) 1 ©De Montfort University, IT Training 2011
INTRODUCTION These notes and exercises are aimed at those who already know how to use Word 2007 but would like to further their knowledge of the application. Knowledge assumed
you will have a working knowledge of Word 2007 experience of using Windows Areas covered
creating and use templates inserting objects into a document creating and import charts linking and embed and object working with headers and footers working with sections quick parts and building blocks
borders and shading
Word2007Intermediate (020611) 2 ©De Montfort University, IT Training 2011
Document signposts Instructions for you to type
Bold text
Shortcuts
Reminders
Notes
Exercises
Word2007Intermediate (020611) 3 ©De Montfort University, IT Training 2011
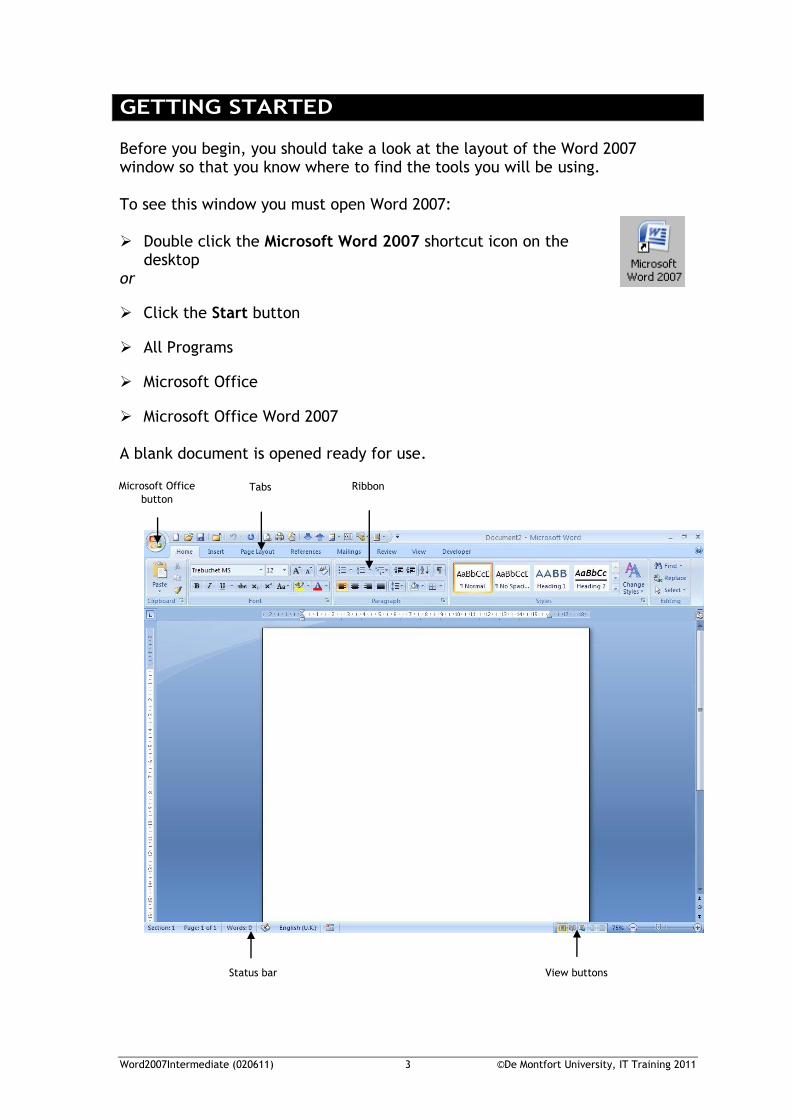
GETTING STARTED Before you begin, you should take a look at the layout of the Word 2007 window so that you know where to find the tools you will be using. To see this window you must open Word 2007: Double click the Microsoft Word 2007 shortcut icon on the
desktop or
Click the Start button
All Programs
Microsoft Office
Microsoft Office Word 2007 A blank document is opened ready for use. Microsoft Office
button Tabs Ribbon
View buttons Status bar
Word2007Intermediate (020611) 4 ©De Montfort University, IT Training 2011
THE OFFICE BUTTON
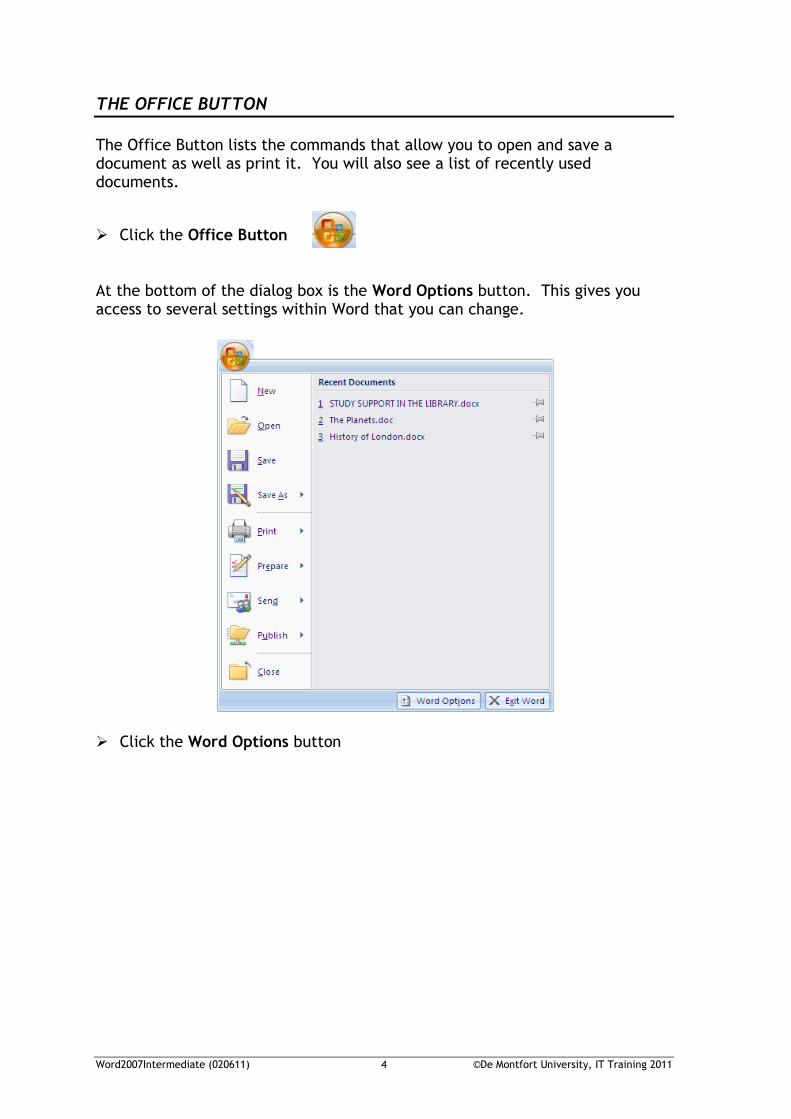
The Office Button lists the commands that allow you to open and save a document as well as print it. You will also see a list of recently used documents.
Click the Office Button At the bottom of the dialog box is the Word Options button. This gives you access to several settings within Word that you can change.
Click the Word Options button
Word2007Intermediate (020611) 5 ©De Montfort University, IT Training 2011
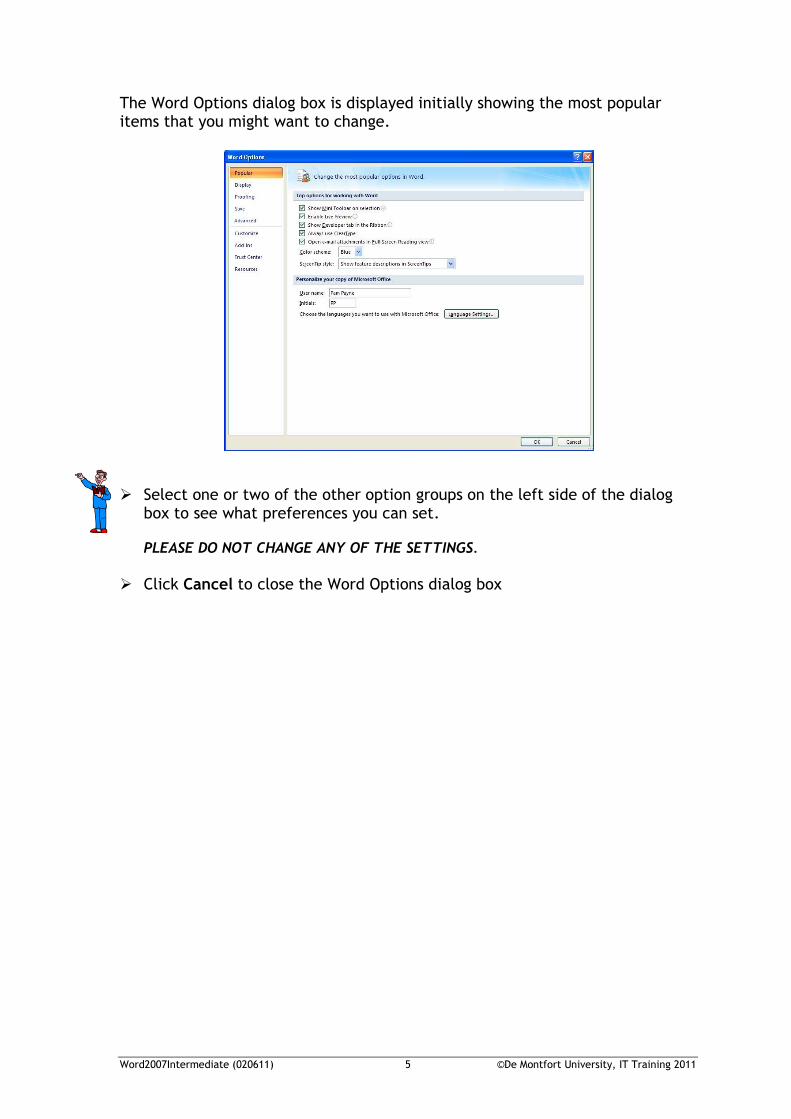
The Word Options dialog box is displayed initially showing the most popular items that you might want to change.
Select one or two of the other option groups on the left side of the dialog box to see what preferences you can set.
PLEASE DO NOT CHANGE ANY OF THE SETTINGS.
Click Cancel to close the Word Options dialog box
Word2007Intermediate (020611) 6 ©De Montfort University, IT Training 2011
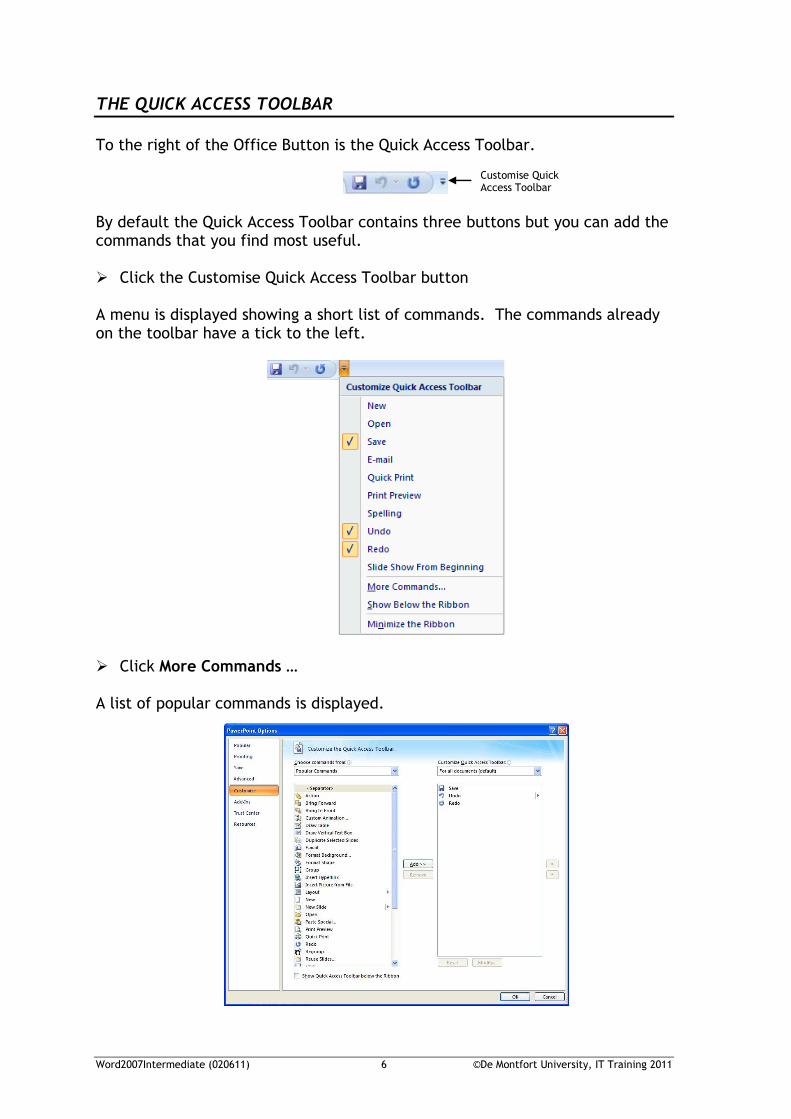
THE QUICK ACCESS TOOLBAR
To the right of the Office Button is the Quick Access Toolbar.
By default the Quick Access Toolbar contains three buttons but you can add the commands that you find most useful. Click the Customise Quick Access Toolbar button A menu is displayed showing a short list of commands. The commands already on the toolbar have a tick to the left.
Click More Commands … A list of popular commands is displayed.
Customise Quick Access Toolbar
Word2007Intermediate (020611) 7 ©De Montfort University, IT Training 2011
To add the Open command to the toolbar: Scroll down the list on the left hand side and select the Open
Command Click Add>>
The Open command is added to the list of items in the right had window.
Click OK The Open command is displayed on the Quick Access Toolbar.
Customise the Quick Access Toolbar, select the Open command in the right
hand window and click the Remove button The Open command is no longer on the Quick Access Toolbar.
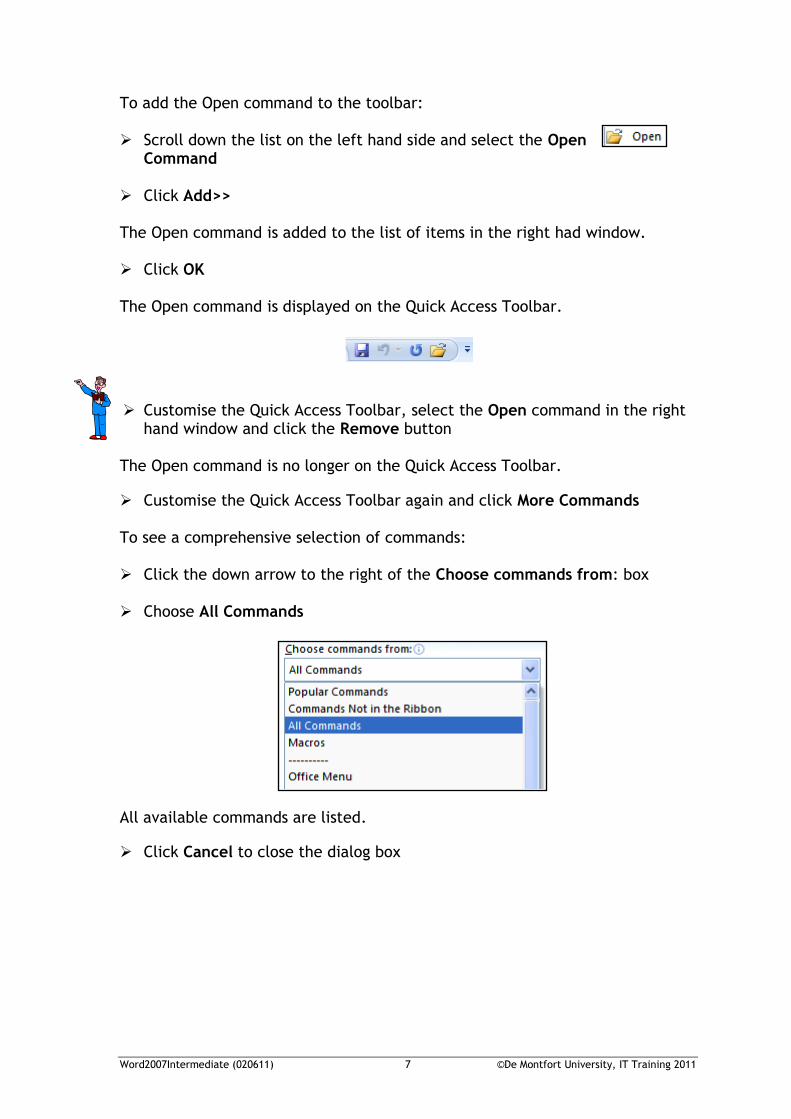
Customise the Quick Access Toolbar again and click More Commands To see a comprehensive selection of commands: Click the down arrow to the right of the Choose commands from: box
Choose All Commands
All available commands are listed.
Click Cancel to close the dialog box
Word2007Intermediate (020611) 8 ©De Montfort University, IT Training 2011
Add a ribbon command to the Quick Access Toolbar
Point to the command
Click the right mouse button
Choose Add to Quick Access Toolbar
If you prefer, you can customise the Quick Access Toolbar so that is displays below the ribbon.
THE RIBBON
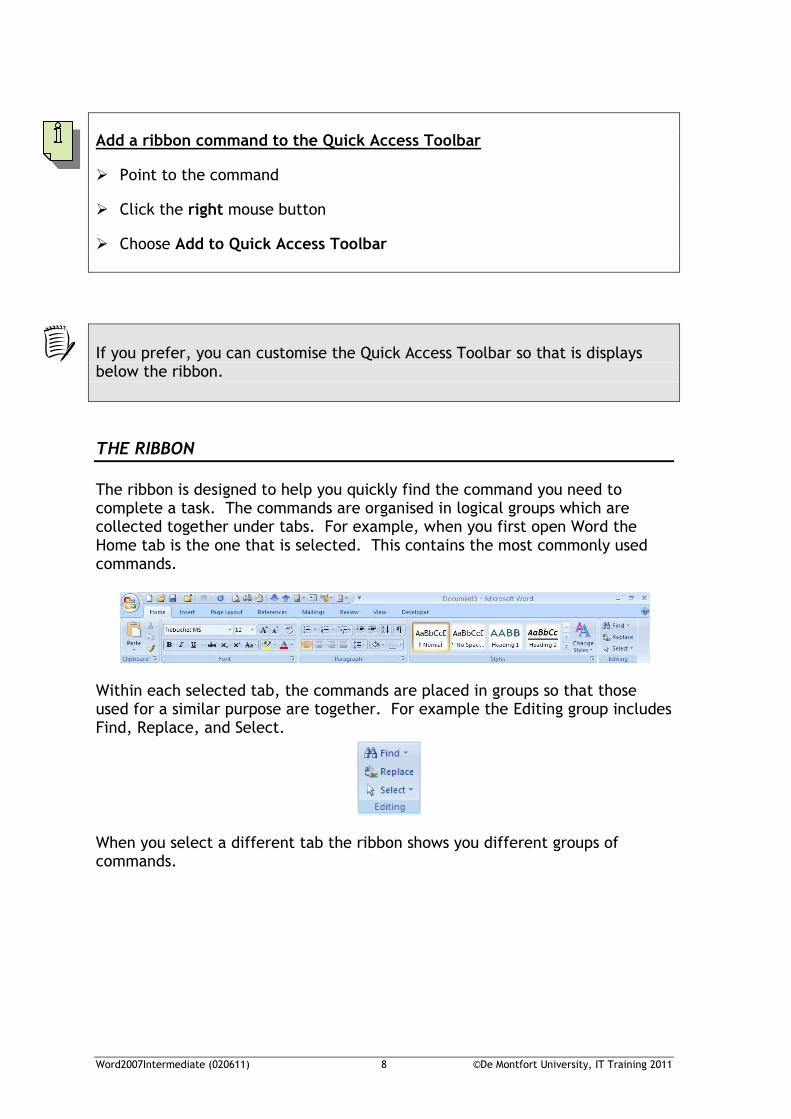
The ribbon is designed to help you quickly find the command you need to complete a task. The commands are organised in logical groups which are collected together under tabs. For example, when you first open Word the Home tab is the one that is selected. This contains the most commonly used commands.
Within each selected tab, the commands are placed in groups so that those used for a similar purpose are together. For example the Editing group includes Find, Replace, and Select.
When you select a different tab the ribbon shows you different groups of commands.
Word2007Intermediate (020611) 9 ©De Montfort University, IT Training 2011
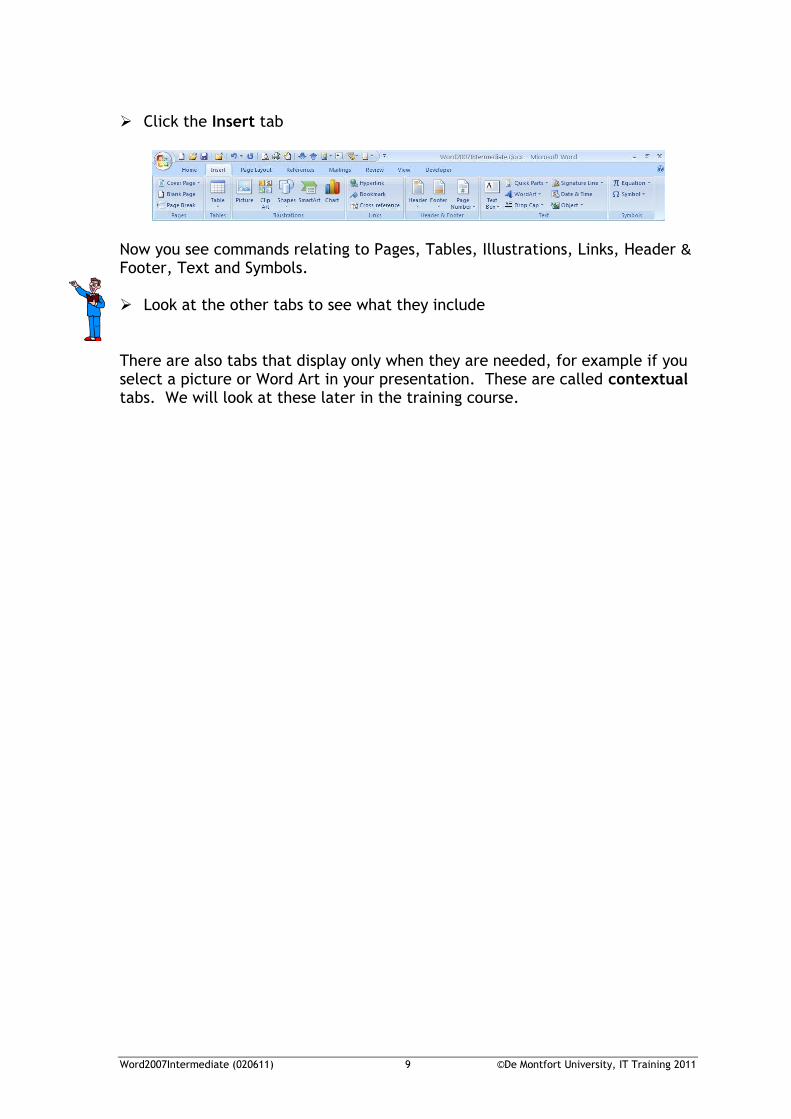
Click the Insert tab
Now you see commands relating to Pages, Tables, Illustrations, Links, Header & Footer, Text and Symbols. Look at the other tabs to see what they include There are also tabs that display only when they are needed, for example if you select a picture or Word Art in your presentation. These are called contextual tabs. We will look at these later in the training course.
Word2007Intermediate (020611) 10 ©De Montfort University, IT Training 2011
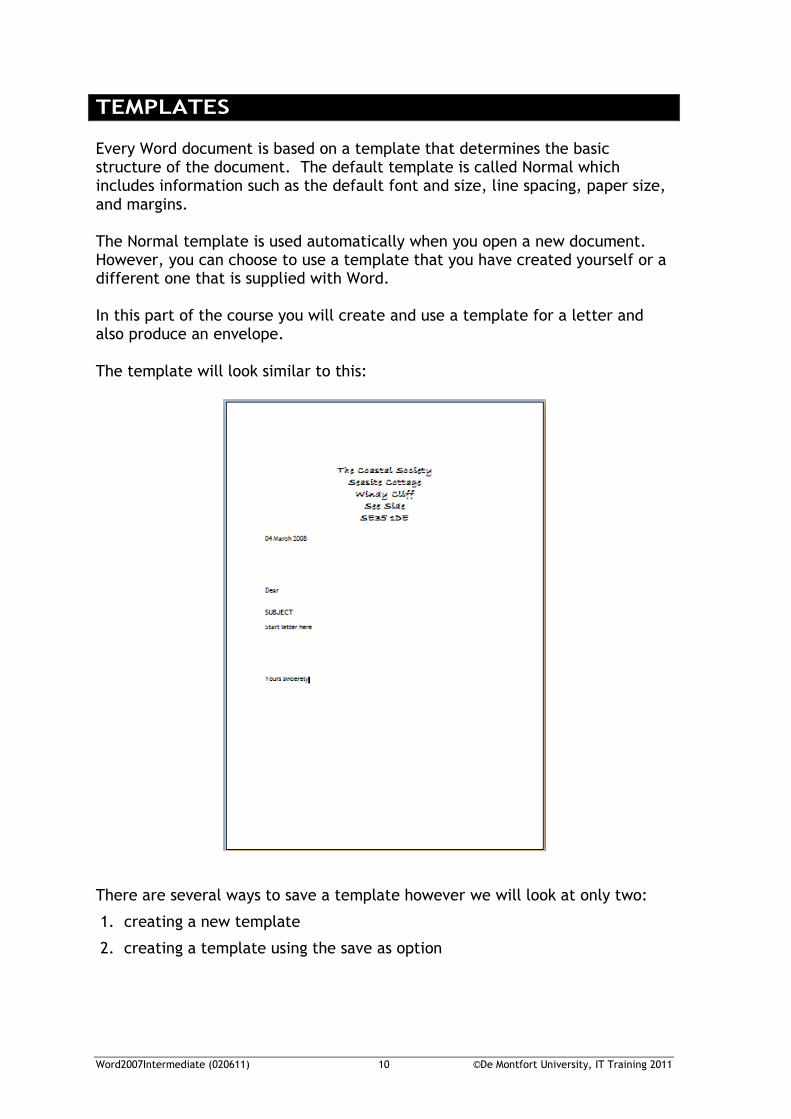
TEMPLATES Every Word document is based on a template that determines the basic structure of the document. The default template is called Normal which includes information such as the default font and size, line spacing, paper size, and margins. The Normal template is used automatically when you open a new document. However, you can choose to use a template that you have created yourself or a different one that is supplied with Word. In this part of the course you will create and use a template for a letter and also produce an envelope. The template will look similar to this:
There are several ways to save a template however we will look at only two:
1. creating a new template
2. creating a template using the save as option
Word2007Intermediate (020611) 11 ©De Montfort University, IT Training 2011
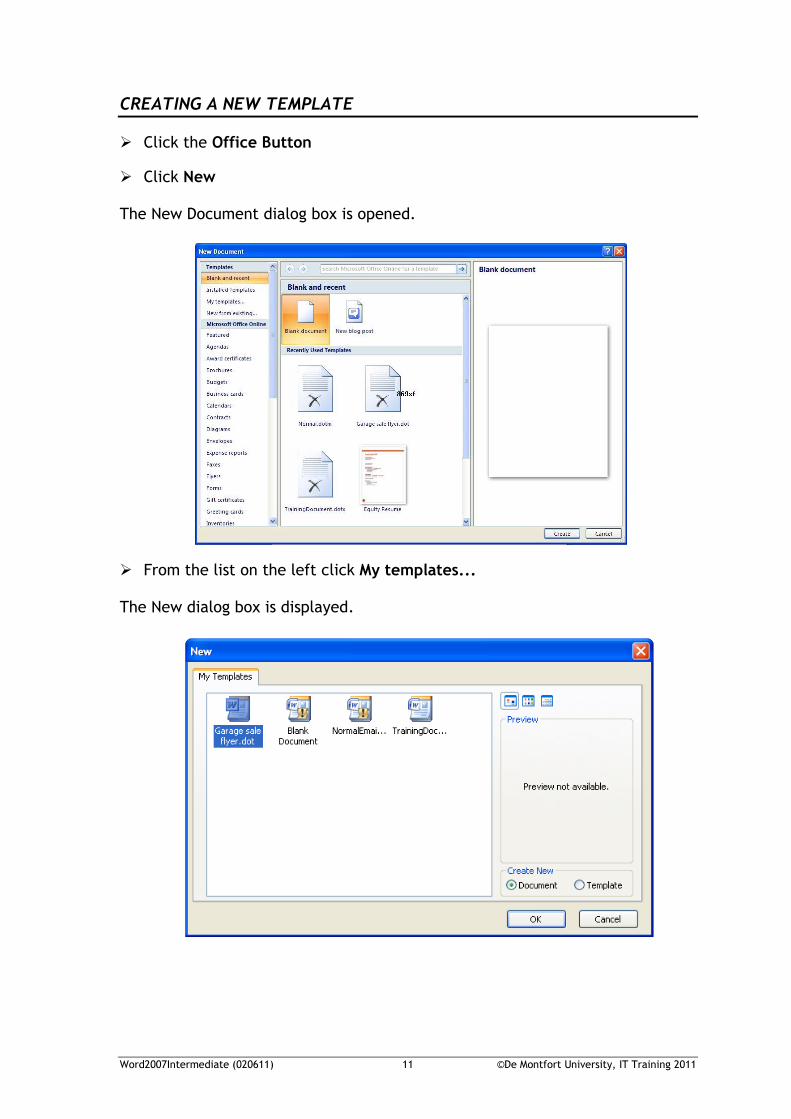
CREATING A NEW TEMPLATE
Click the Office Button
Click New The New Document dialog box is opened.
From the list on the left click My templates... The New dialog box is displayed.
Word2007Intermediate (020611) 12 ©De Montfort University, IT Training 2011
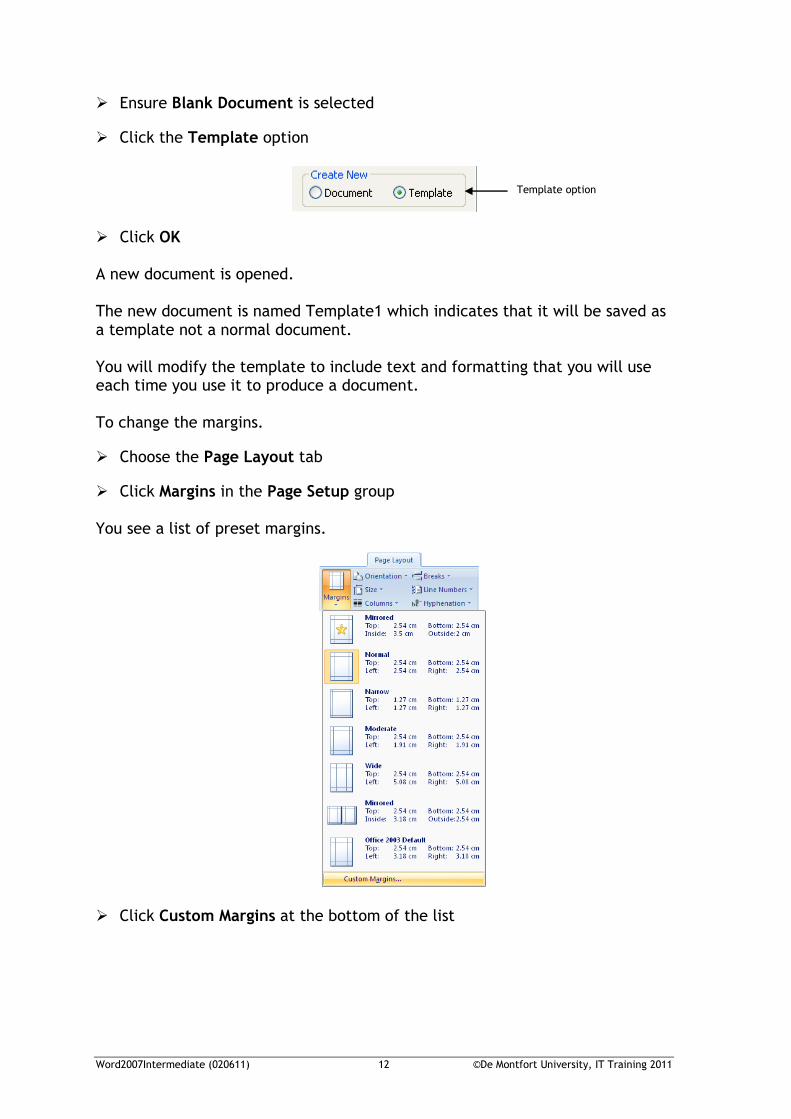
Ensure Blank Document is selected
Click the Template option
Click OK A new document is opened. The new document is named Template1 which indicates that it will be saved as a template not a normal document. You will modify the template to include text and formatting that you will use each time you use it to produce a document. To change the margins.
Choose the Page Layout tab
Click Margins in the Page Setup group You see a list of preset margins.
Click Custom Margins at the bottom of the list
Template option
Word2007Intermediate (020611) 13 ©De Montfort University, IT Training 2011
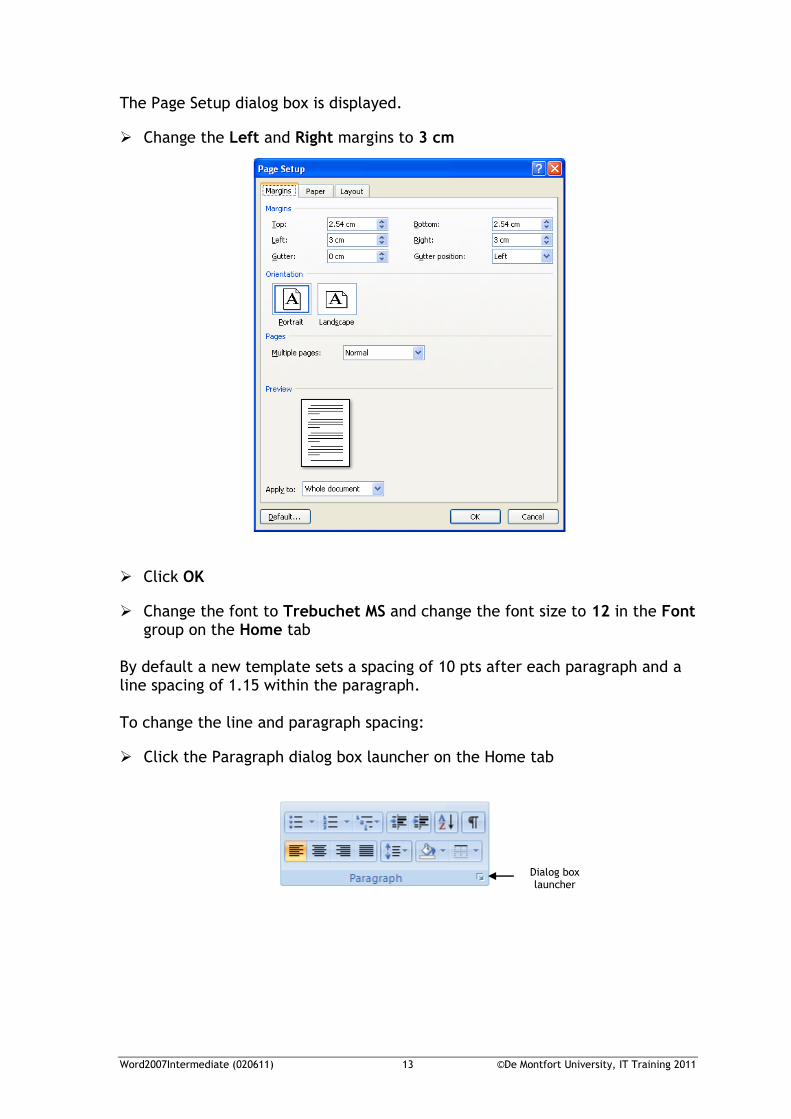
The Page Setup dialog box is displayed.
Change the Left and Right margins to 3 cm
Click OK
Change the font to Trebuchet MS and change the font size to 12 in the Font group on the Home tab
By default a new template sets a spacing of 10 pts after each paragraph and a line spacing of 1.15 within the paragraph. To change the line and paragraph spacing:
Click the Paragraph dialog box launcher on the Home tab
Dialog box launcher
Word2007Intermediate (020611) 14 ©De Montfort University, IT Training 2011
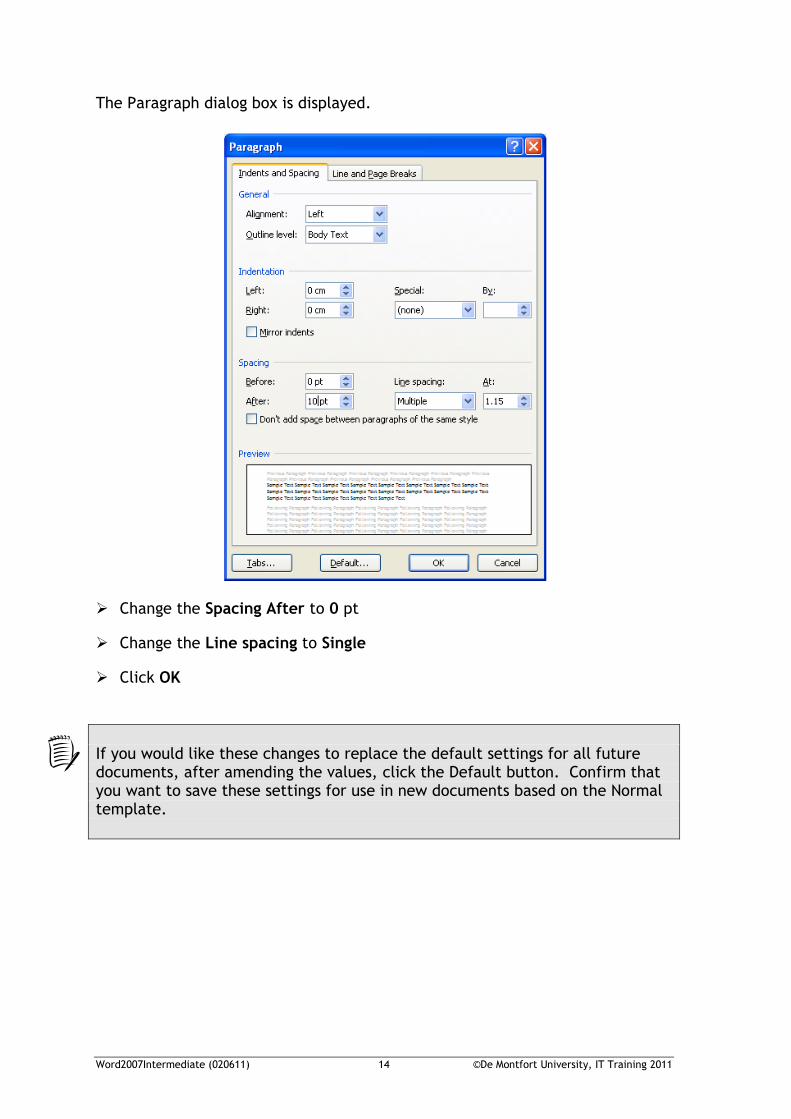
The Paragraph dialog box is displayed.
Change the Spacing After to 0 pt
Change the Line spacing to Single
Click OK
If you would like these changes to replace the default settings for all future documents, after amending the values, click the Default button. Confirm that you want to save these settings for use in new documents based on the Normal template.
Word2007Intermediate (020611) 15 ©De Montfort University, IT Training 2011
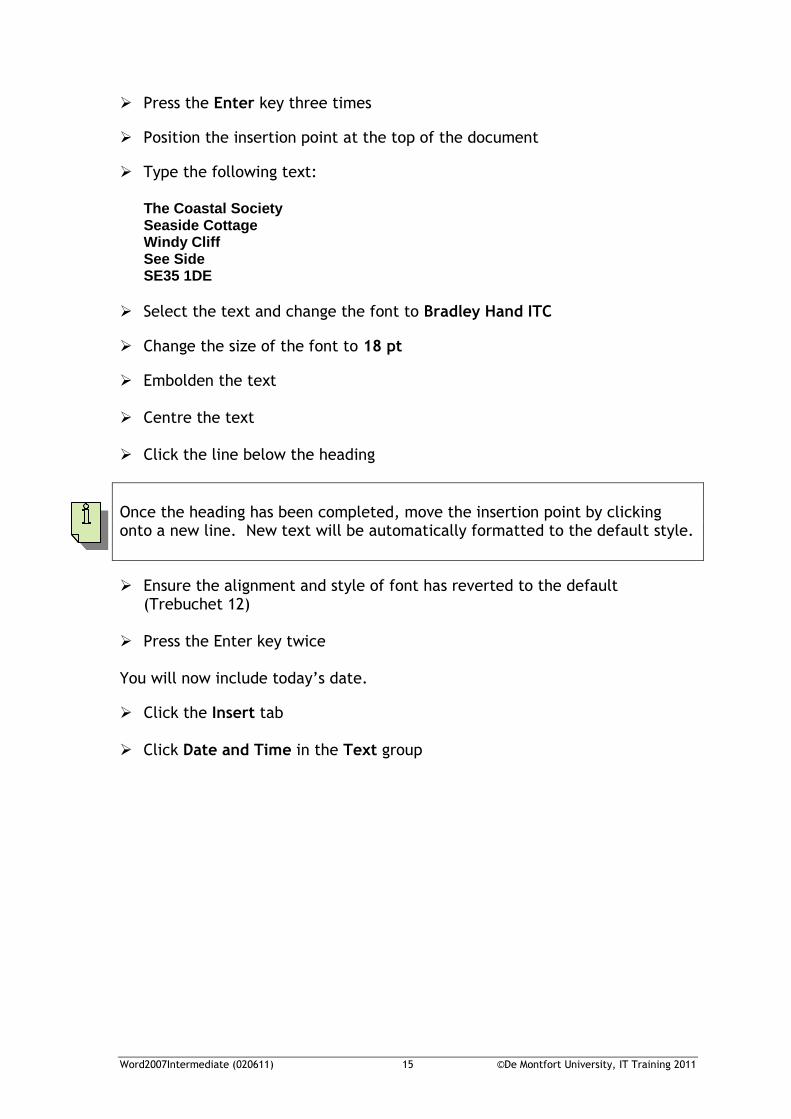
Press the Enter key three times
Position the insertion point at the top of the document
Type the following text: The Coastal Society Seaside Cottage Windy Cliff See Side SE35 1DE
Select the text and change the font to Bradley Hand ITC
Change the size of the font to 18 pt
Embolden the text Centre the text Click the line below the heading
Once the heading has been completed, move the insertion point by clicking onto a new line. New text will be automatically formatted to the default style.
Ensure the alignment and style of font has reverted to the default (Trebuchet 12)
Press the Enter key twice You will now include today’s date.
Click the Insert tab Click Date and Time in the Text group
Word2007Intermediate (020611) 16 ©De Montfort University, IT Training 2011
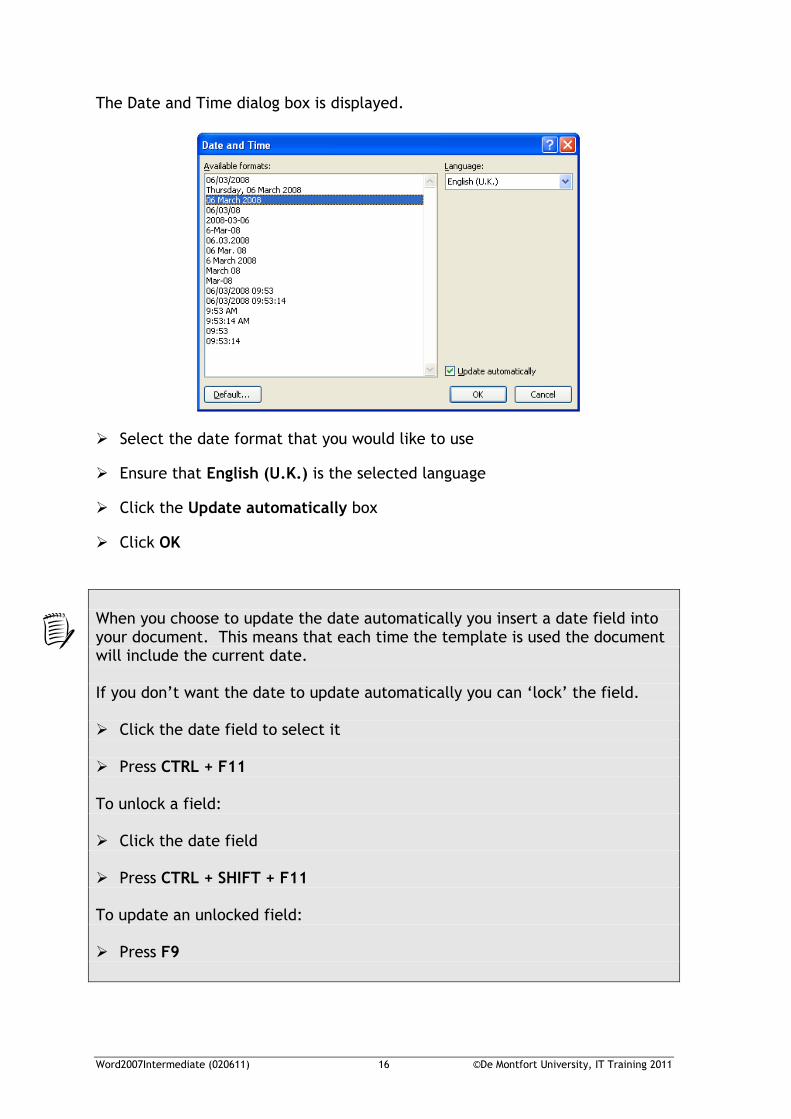
The Date and Time dialog box is displayed.
Select the date format that you would like to use
Ensure that English (U.K.) is the selected language
Click the Update automatically box
Click OK
When you choose to update the date automatically you insert a date field into your document. This means that each time the template is used the document will include the current date. If you don’t want the date to update automatically you can ‘lock’ the field. Click the date field to select it Press CTRL + F11 To unlock a field: Click the date field Press CTRL + SHIFT + F11 To update an unlocked field: Press F9
Word2007Intermediate (020611) 17 ©De Montfort University, IT Training 2011
Press the Enter key five times – this leaves a space where the address of the recipient will be typed when the template is used
Type Dear Press the Enter key twice Type SUBJECT – this is where the subject of the correspondence will be
entered
Press the Enter key twice Type Start letter here Press the Enter key six times
Type Yours sincerely The template is complete and will now be saved.
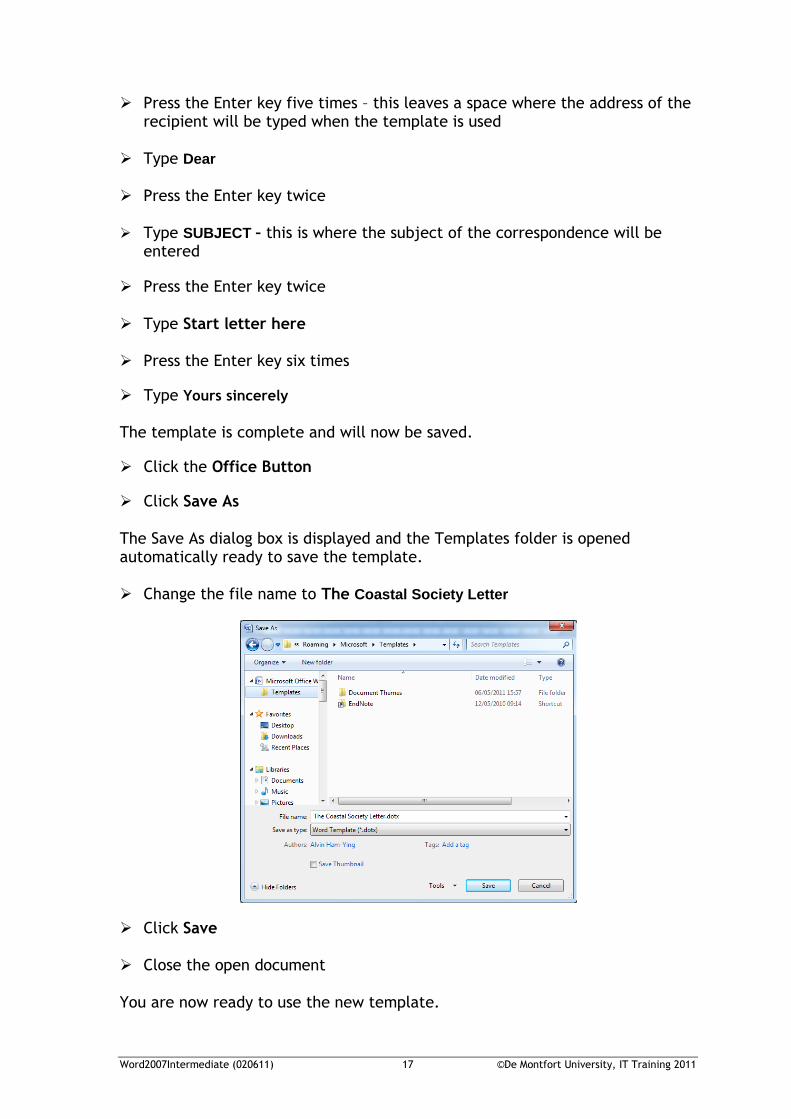
Click the Office Button
Click Save As The Save As dialog box is displayed and the Templates folder is opened automatically ready to save the template. Change the file name to The Coastal Society Letter
Click Save Close the open document You are now ready to use the new template.
Word2007Intermediate (020611) 18 ©De Montfort University, IT Training 2011
CREATING A TEMPLATE USING THE SAVE AS OPTION
The situation may arise where you are working on a document that you would like to save as a template. This may be an afterthought and, when the document was opened, you did not intend to create a template so did not follow the instructions as detailed on page 10.
Open the document named Letter from C:\WordIntermediate To save an open document as a template:
Click the Office Button
Point to Save As
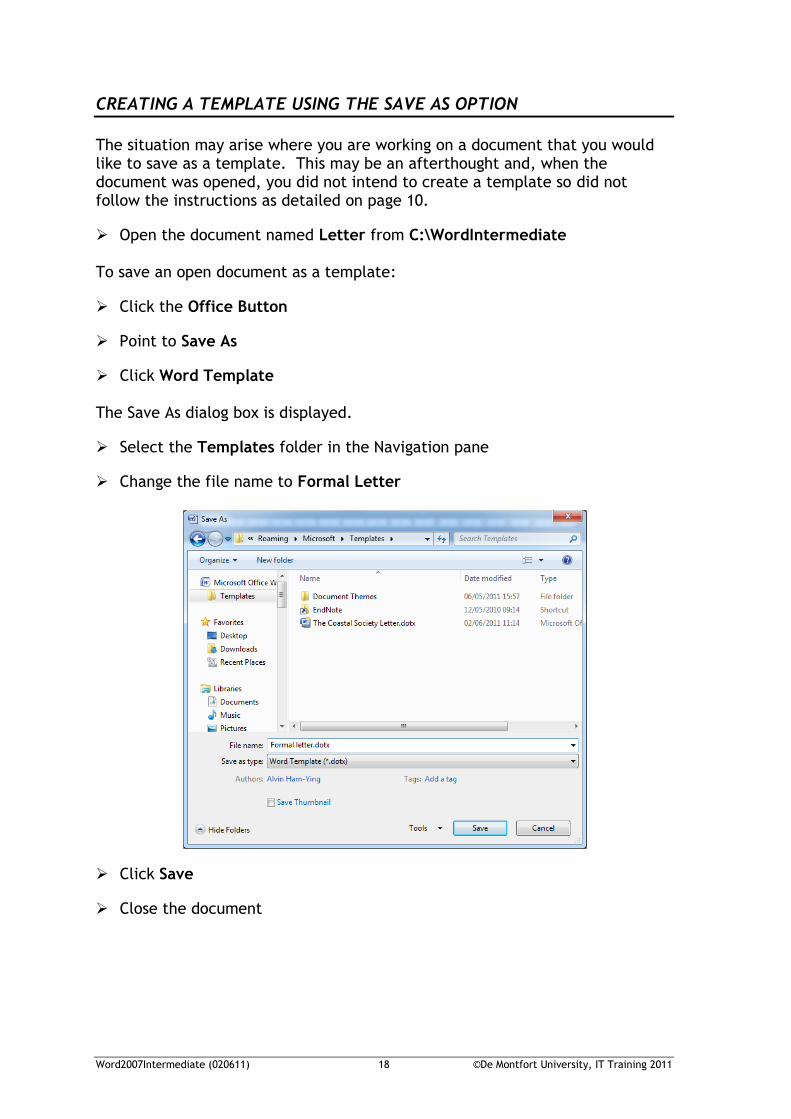
Click Word Template The Save As dialog box is displayed.
Select the Templates folder in the Navigation pane
Change the file name to Formal Letter
Click Save
Close the document
Word2007Intermediate (020611) 19 ©De Montfort University, IT Training 2011
TEMPLATES ON-LINE
As well as using templates that you create you have the opportunity to download them from the Internet.
Click the Office Button
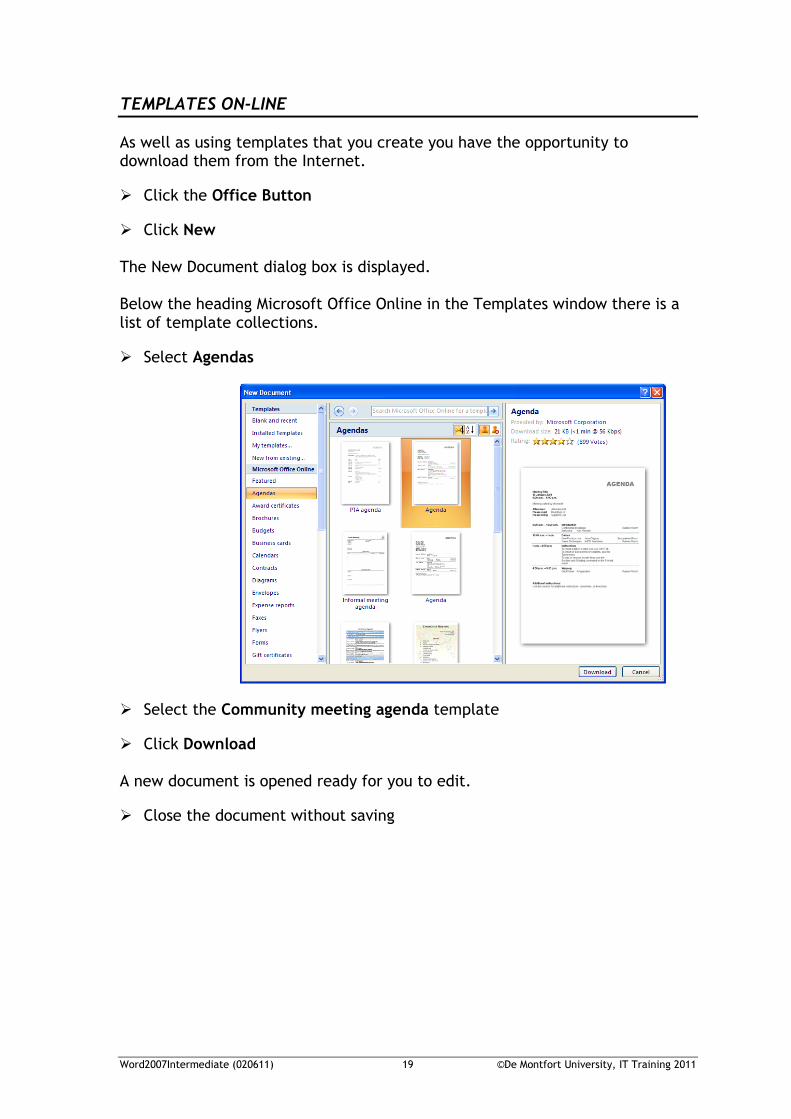
Click New The New Document dialog box is displayed. Below the heading Microsoft Office Online in the Templates window there is a list of template collections.
Select Agendas
Select the Community meeting agenda template
Click Download A new document is opened ready for you to edit.
Close the document without saving
Word2007Intermediate (020611) 20 ©De Montfort University, IT Training 2011
AMENDING A TEMPLATE
When you create a template it is ‘protected’ so that you can’t accidentally overwrite it. So, if you need to make a change, there is a specific way to do it.
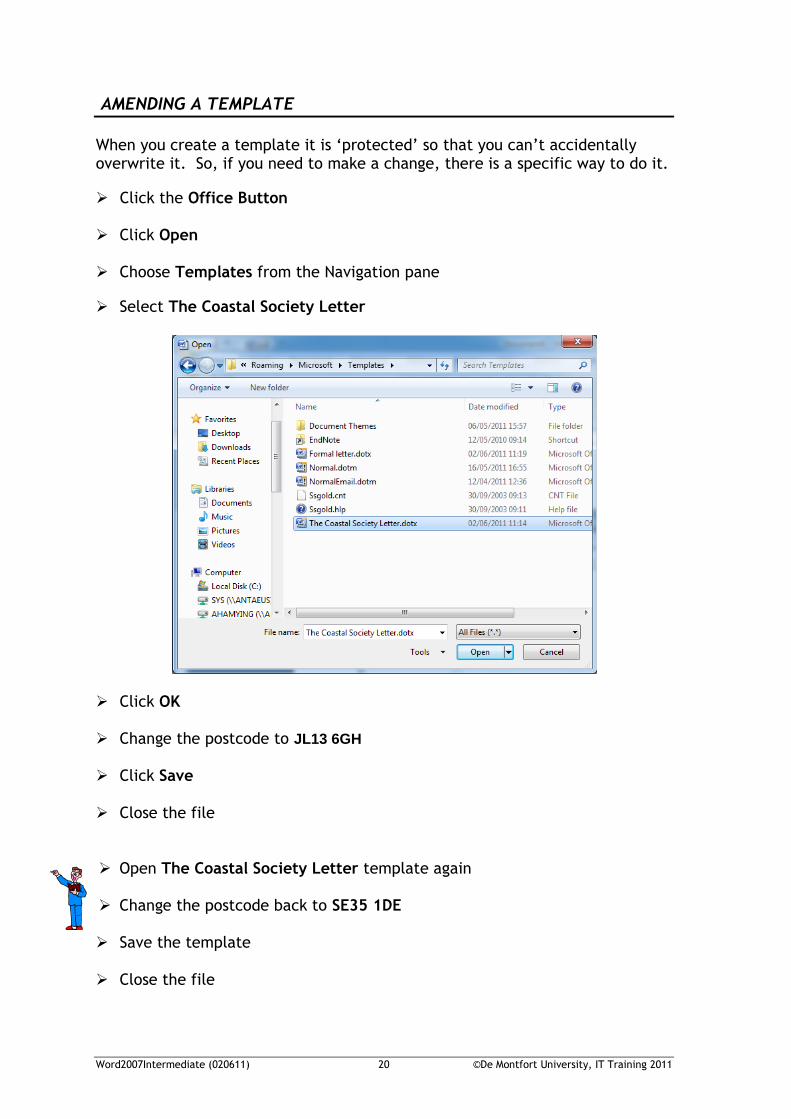
Click the Office Button Click Open Choose Templates from the Navigation pane
Select The Coastal Society Letter
Click OK Change the postcode to JL13 6GH Click Save Close the file Open The Coastal Society Letter template again Change the postcode back to SE35 1DE Save the template Close the file
Word2007Intermediate (020611) 21 ©De Montfort University, IT Training 2011
USING A TEMPLATE
There has been a competition and you are going to write to the winner to tell her that she has won a prize. You are going to prepare the letter using the template that you created earlier.
Click the Office Button
Click New
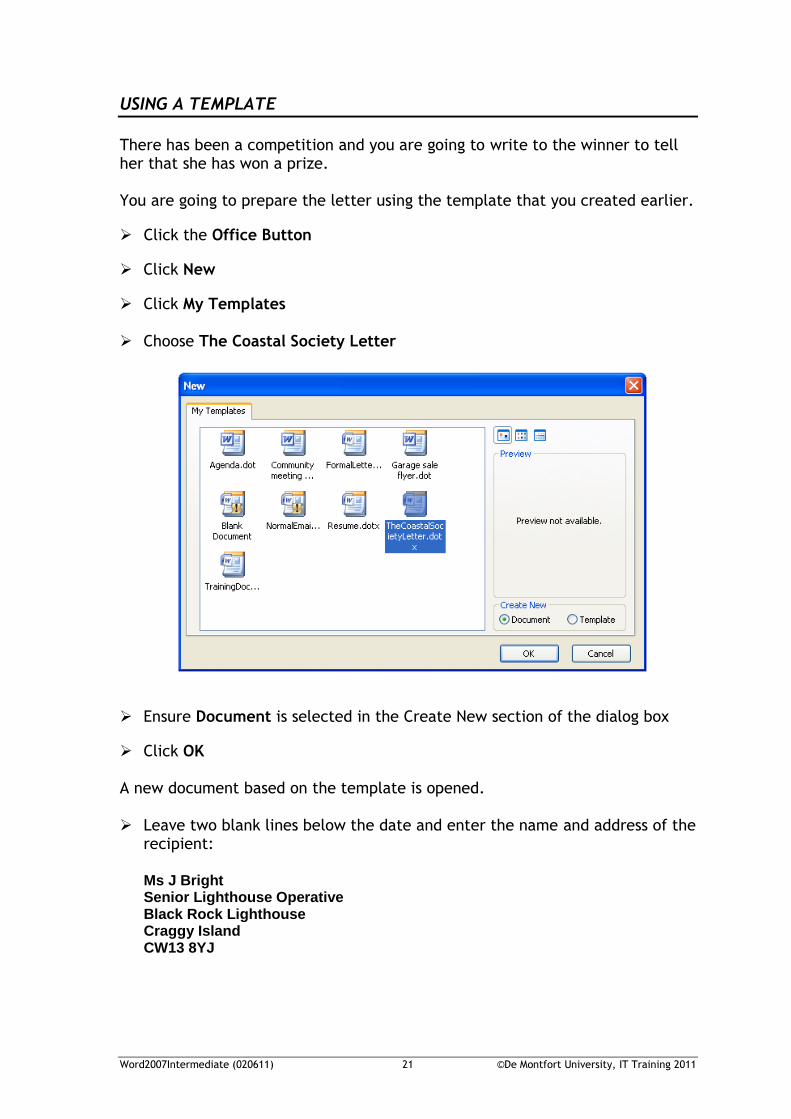
Click My Templates Choose The Coastal Society Letter
Ensure Document is selected in the Create New section of the dialog box
Click OK A new document based on the template is opened. Leave two blank lines below the date and enter the name and address of the
recipient:
Ms J Bright Senior Lighthouse Operative Black Rock Lighthouse Craggy Island CW13 8YJ
Word2007Intermediate (020611) 22 ©De Montfort University, IT Training 2011
Add the recipient’s name, Ms Bright, to the salutation
Replace the prompt SUBJECT with COMPETITION RESULT Delete the prompt Start letter here and type the following text:
I am delighted to inform you that you have won the competition for the best kept lighthouse. Please find enclosed a cheque for £50.
I should be grateful if you would contact Jeremy Jones on 01783 950158 to arrange for our photographer to visit and take photographs of you and your wonderful lighthouse.
We look forward to hearing from you.
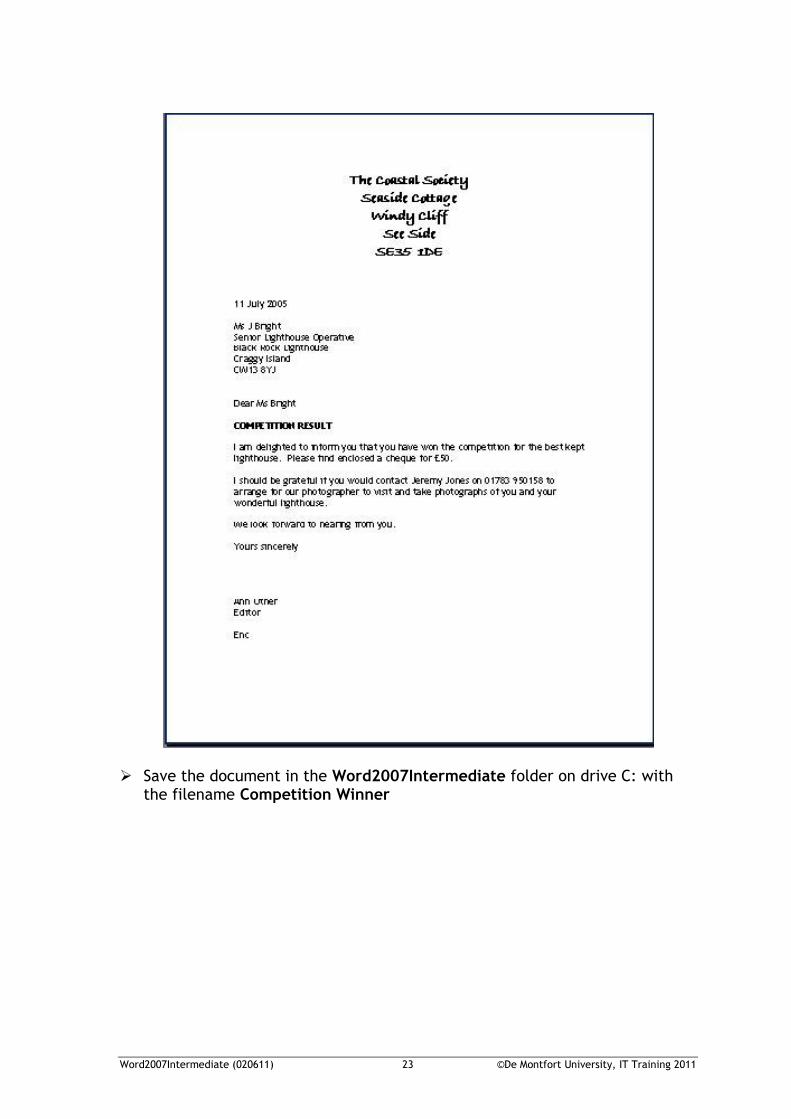
At the bottom of the letter type your name Below your name type Editor as your job title Add two blank lines below the job title Type Enc to indicate an enclosure Your letter should look something like that shown on the following page Use Print Preview to check the layout:
Click the Office Button
Print Preview
Close Print Preview
Adjust the spacing if necessary
If you turn off the Magnifier whilst in Print Preview you can make minor changes to the document while seeing a full page on the screen.
Word2007Intermediate (020611) 23 ©De Montfort University, IT Training 2011
Save the document in the Word2007Intermediate folder on drive C: with
the filename Competition Winner
Word2007Intermediate (020611) 24 ©De Montfort University, IT Training 2011
PRODUCING AN ENVELOPE
While you have the letter open you are going to use the name and address to produce an envelope. You will also attach the envelope to the letter so that both items can be saved in the same file. Select the name and address of Ms J Bright
Click the Mailings tab
Click Envelopes in the Create group
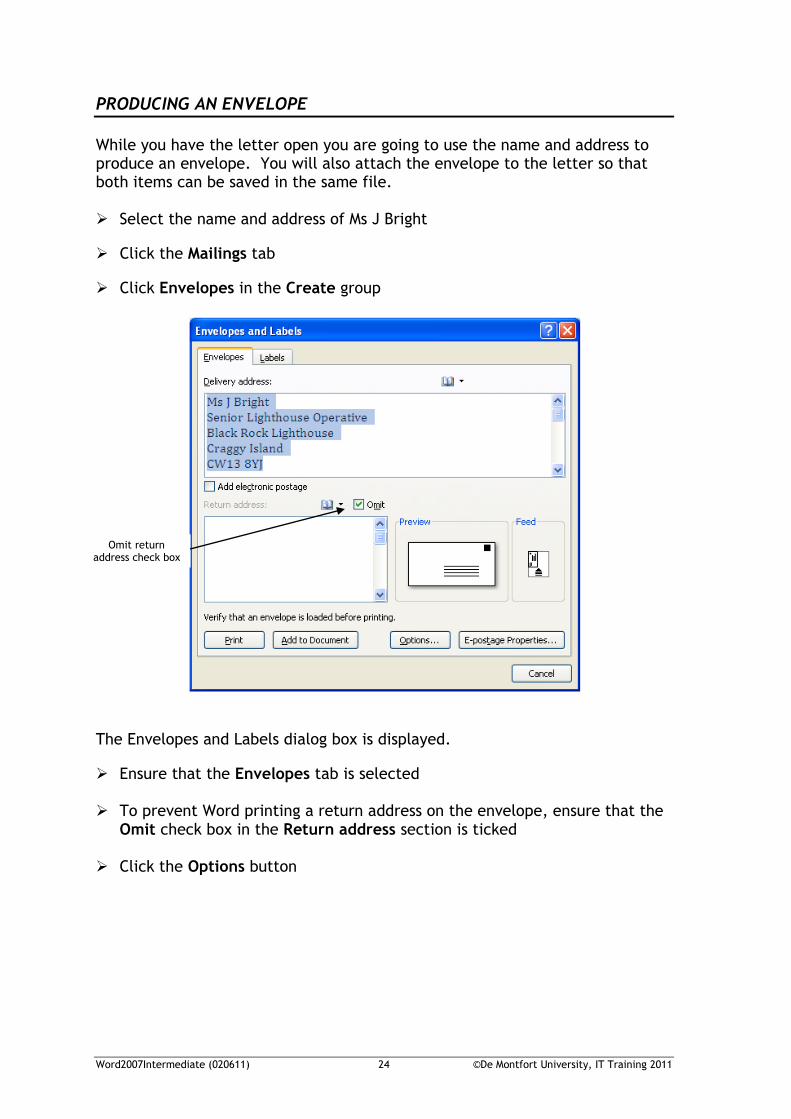
The Envelopes and Labels dialog box is displayed.
Ensure that the Envelopes tab is selected To prevent Word printing a return address on the envelope, ensure that the
Omit check box in the Return address section is ticked Click the Options button
Omit return address check box
Word2007Intermediate (020611) 25 ©De Montfort University, IT Training 2011
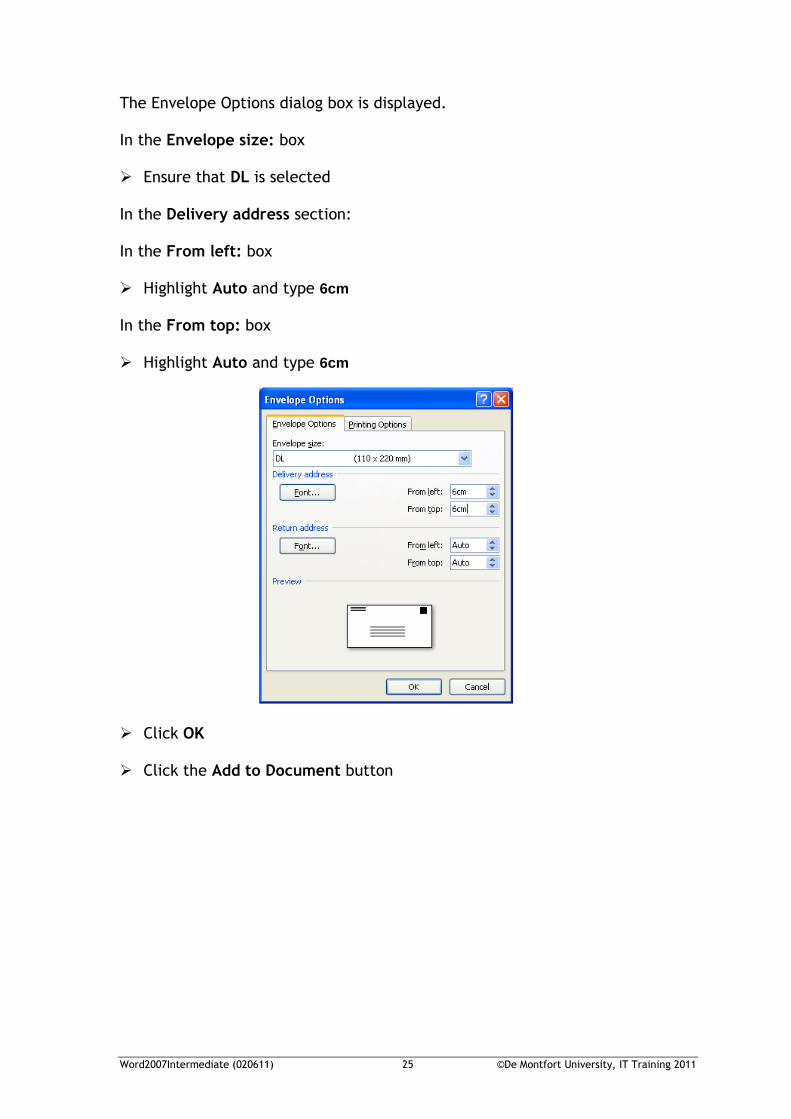
The Envelope Options dialog box is displayed. In the Envelope size: box Ensure that DL is selected In the Delivery address section: In the From left: box Highlight Auto and type 6cm In the From top: box Highlight Auto and type 6cm
Click OK Click the Add to Document button
Word2007Intermediate (020611) 26 ©De Montfort University, IT Training 2011
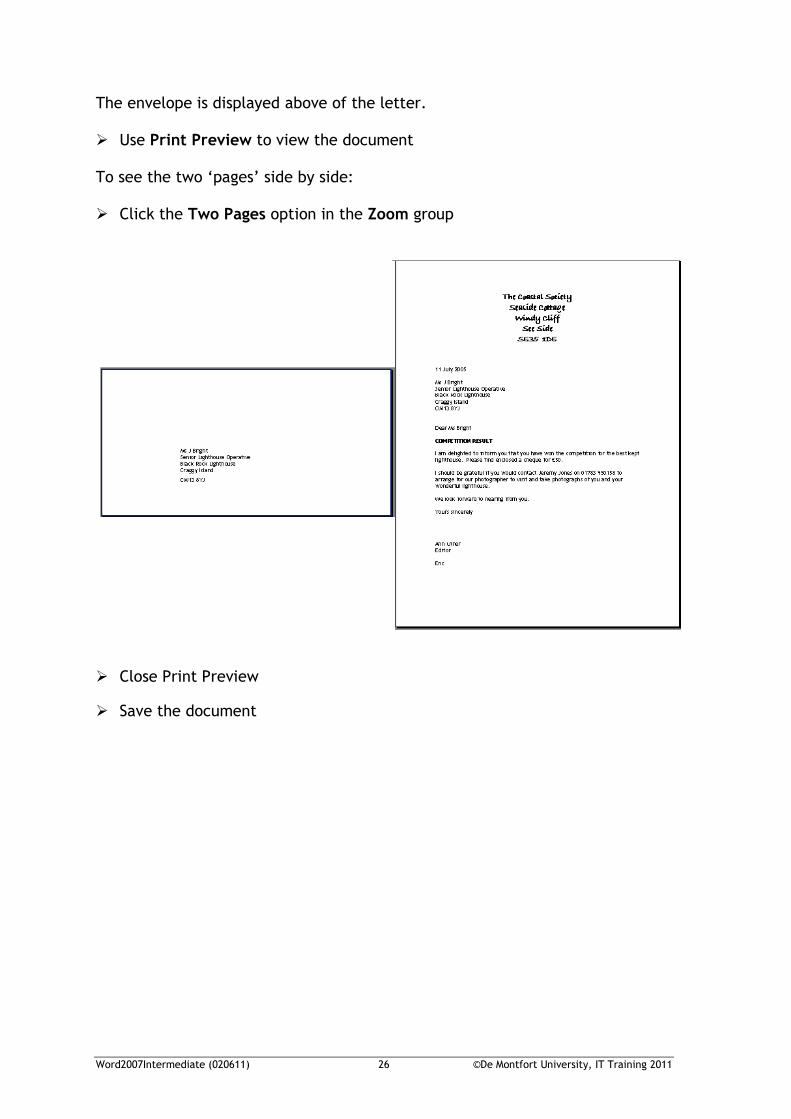
The envelope is displayed above of the letter. Use Print Preview to view the document To see the two ‘pages’ side by side:
Click the Two Pages option in the Zoom group
Close Print Preview
Save the document
Word2007Intermediate (020611) 27 ©De Montfort University, IT Training 2011
PRODUCING A LABEL
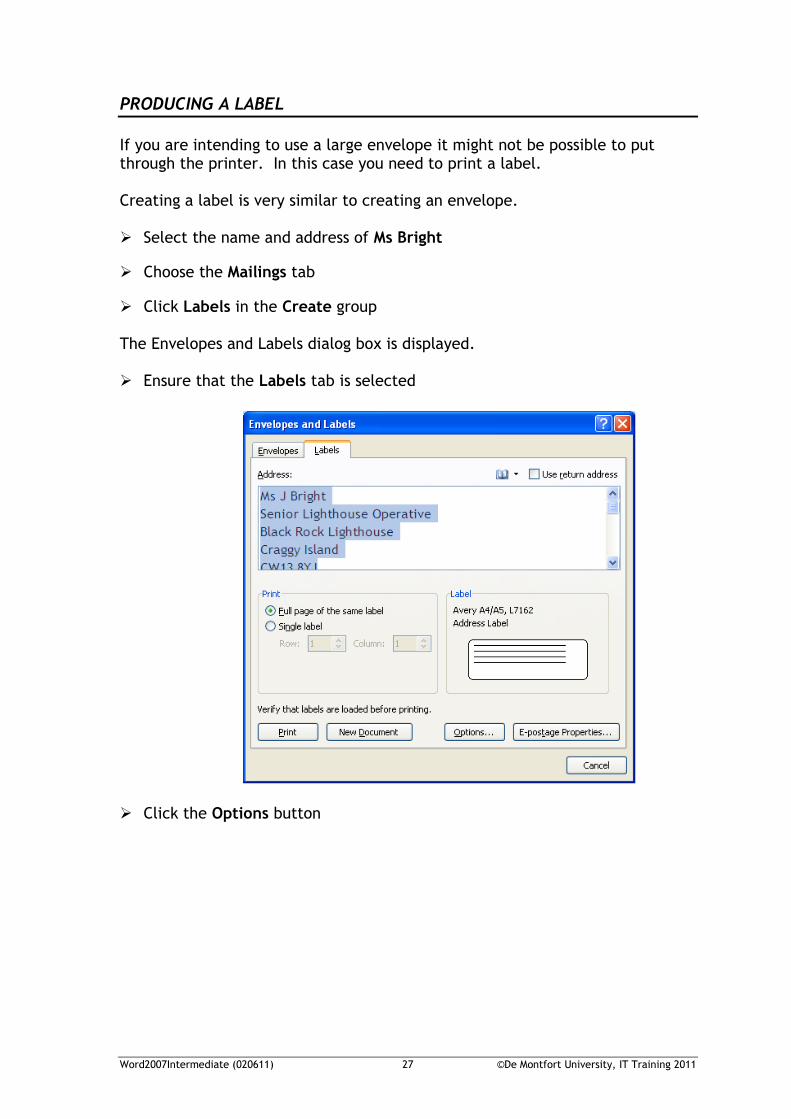
If you are intending to use a large envelope it might not be possible to put through the printer. In this case you need to print a label. Creating a label is very similar to creating an envelope. Select the name and address of Ms Bright
Choose the Mailings tab
Click Labels in the Create group The Envelopes and Labels dialog box is displayed. Ensure that the Labels tab is selected
Click the Options button
Word2007Intermediate (020611) 28 ©De Montfort University, IT Training 2011
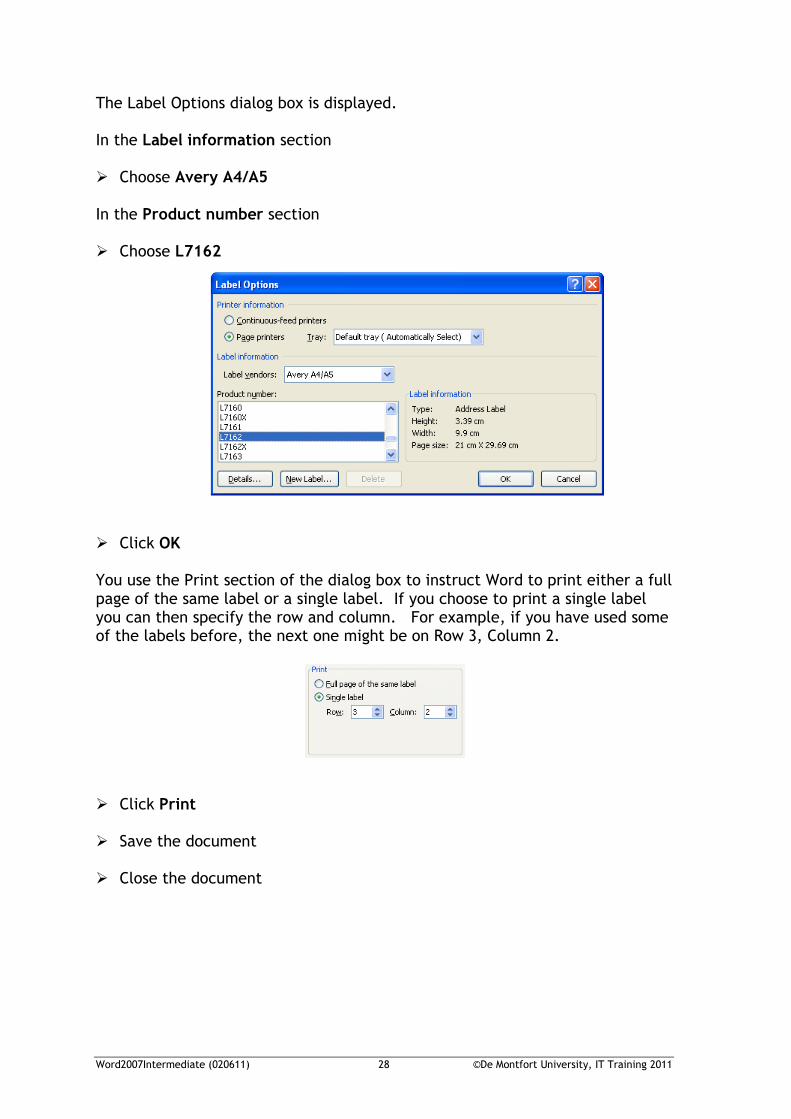
The Label Options dialog box is displayed. In the Label information section Choose Avery A4/A5 In the Product number section Choose L7162
Click OK You use the Print section of the dialog box to instruct Word to print either a full page of the same label or a single label. If you choose to print a single label you can then specify the row and column. For example, if you have used some of the labels before, the next one might be on Row 3, Column 2.
Click Print Save the document Close the document
Word2007Intermediate (020611) 29 ©De Montfort University, IT Training 2011
PRODUCING A PAGE OF LABELS
You may find that you need to produce a page of labels that are all the same. For example, labels asking that a specific document should be used only as reference. This is what you will do now. Create a new document using the Blank document template
Click the Mailings tab Choose Labels in the Create group
Ensure the Labels tab is selected
In the Address window type:
This document for reference only DO NOT REMOVE
Select the text and, while pointing to the selection click the right mouse
button Choose Font from the shortcut menu
Change the font to Trebuchet 14 pt Bold
Click OK
Right click the selection again
Choose Paragraph from the shortcut menu
In the General section of the dialog box change the alignment to Centered
Click OK
Ensure you have selected the correct label size (L7162)
Click the New Document button
Word2007Intermediate (020611) 30 ©De Montfort University, IT Training 2011
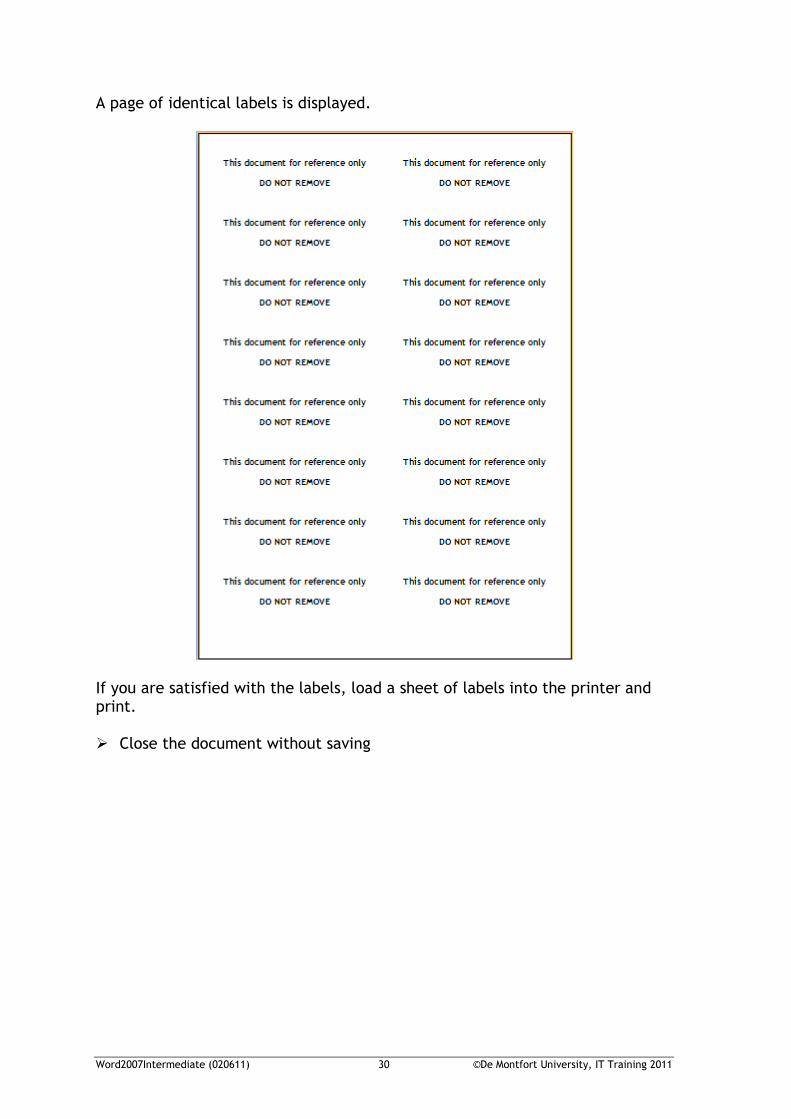
A page of identical labels is displayed.
If you are satisfied with the labels, load a sheet of labels into the printer and print. Close the document without saving
Word2007Intermediate (020611) 31 ©De Montfort University, IT Training 2011
NUMBERED AND BULLETED LISTS
You can format text as a numbered or bulleted list as you type, or the required formatting can be applied afterwards.
Create a new document using the Blank document template
Type the heading Hogwarts Library To start a new bulleted list:
On a new line type an asterisk and press space The line is automatically indented and a bullet point is inserted as the first character on the line.
If you change the bullet to a different style, the button on the ribbon ‘remembers’ the last one you used and will use this when you create another list.
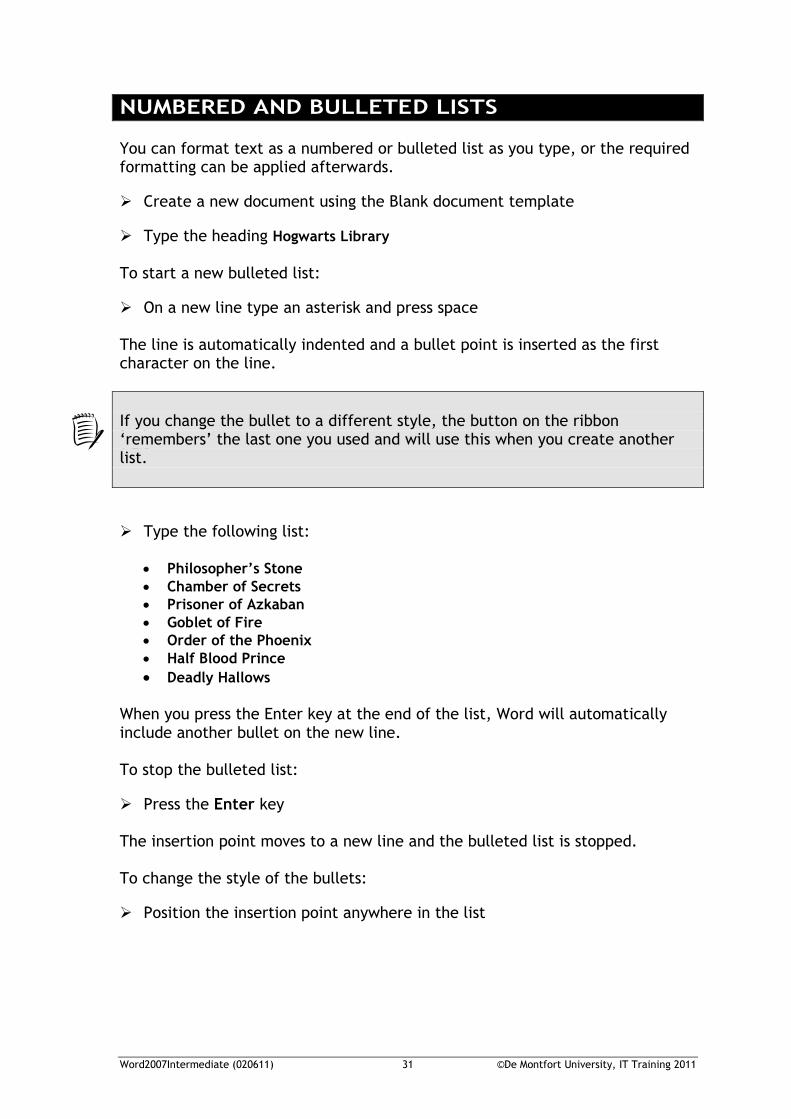
Type the following list:
Philosopher’s Stone
Chamber of Secrets
Prisoner of Azkaban
Goblet of Fire
Order of the Phoenix
Half Blood Prince
Deadly Hallows When you press the Enter key at the end of the list, Word will automatically include another bullet on the new line. To stop the bulleted list:
Press the Enter key The insertion point moves to a new line and the bulleted list is stopped. To change the style of the bullets:
Position the insertion point anywhere in the list
Word2007Intermediate (020611) 32 ©De Montfort University, IT Training 2011
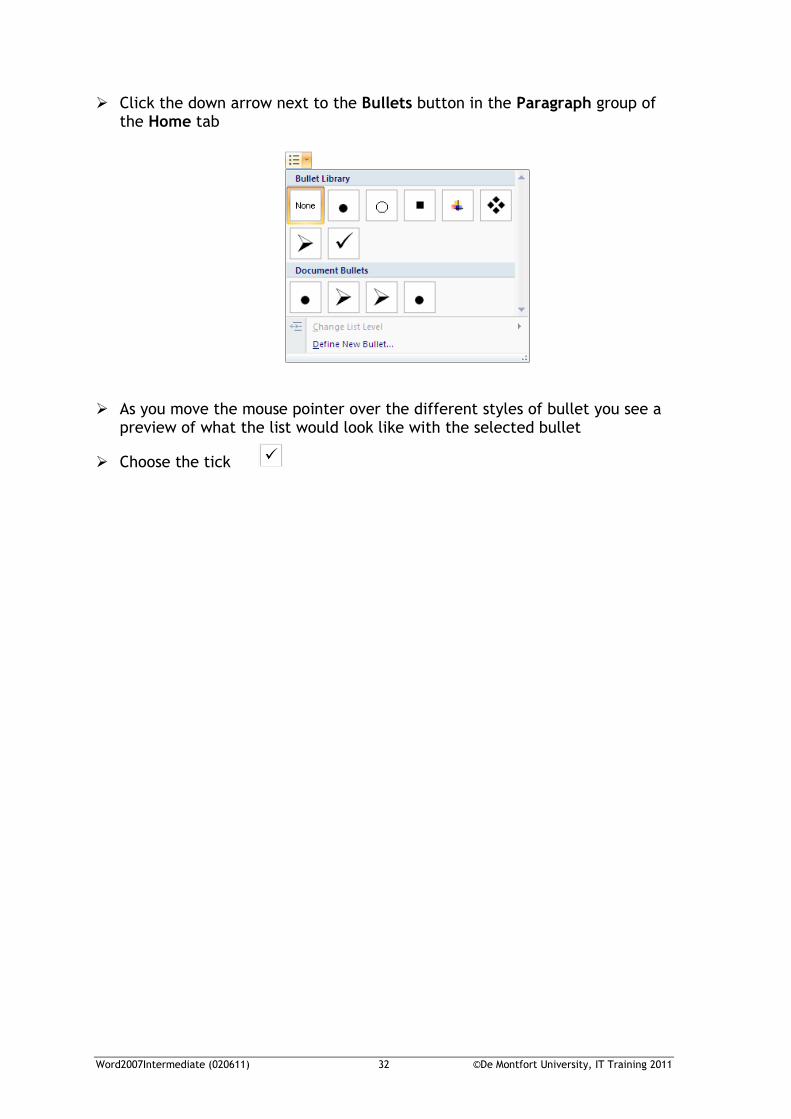
Click the down arrow next to the Bullets button in the Paragraph group of the Home tab
As you move the mouse pointer over the different styles of bullet you see a preview of what the list would look like with the selected bullet
Choose the tick
Word2007Intermediate (020611) 33 ©De Montfort University, IT Training 2011
CHANGING THE BULLETS TO NUMBERS
Position the insertion point in the list:
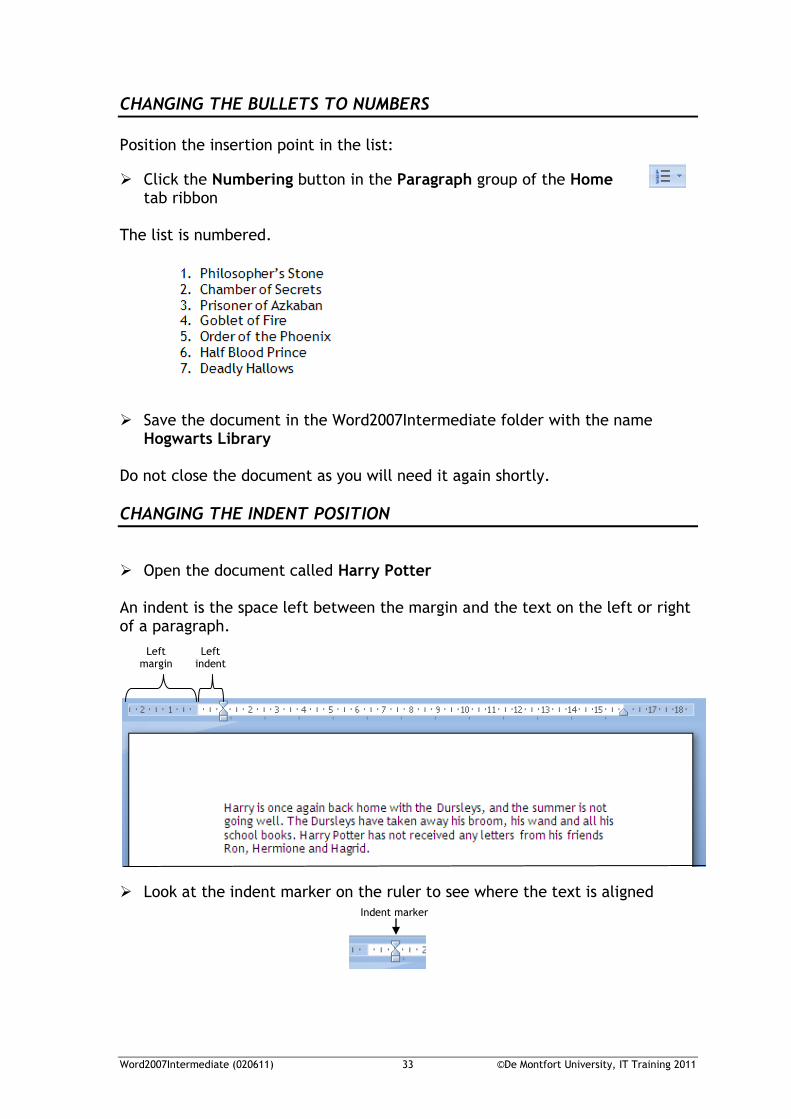
Click the Numbering button in the Paragraph group of the Home tab ribbon
The list is numbered.
Save the document in the Word2007Intermediate folder with the name Hogwarts Library
Do not close the document as you will need it again shortly.
CHANGING THE INDENT POSITION
Open the document called Harry Potter An indent is the space left between the margin and the text on the left or right of a paragraph.
Look at the indent marker on the ruler to see where the text is aligned
Left margin
Left indent
Indent marker
Word2007Intermediate (020611) 34 ©De Montfort University, IT Training 2011
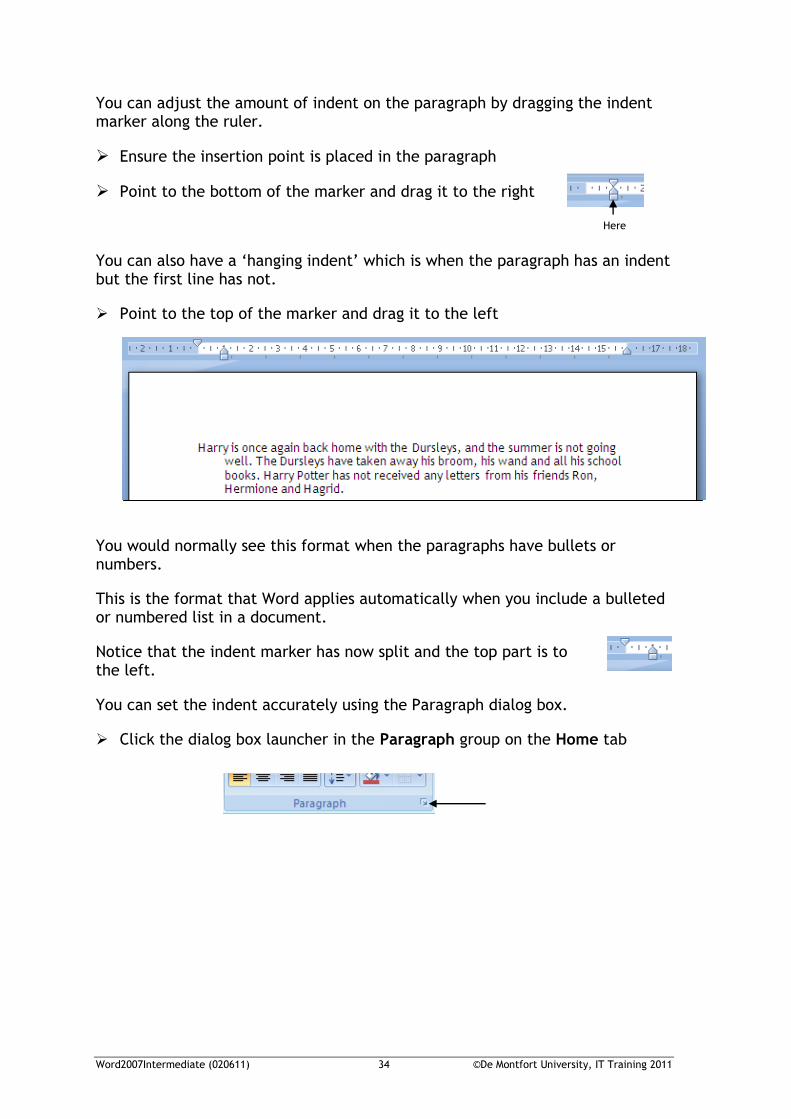
You can adjust the amount of indent on the paragraph by dragging the indent marker along the ruler.
Ensure the insertion point is placed in the paragraph
Point to the bottom of the marker and drag it to the right
You can also have a ‘hanging indent’ which is when the paragraph has an indent but the first line has not.
Point to the top of the marker and drag it to the left
You would normally see this format when the paragraphs have bullets or numbers.
This is the format that Word applies automatically when you include a bulleted or numbered list in a document.
Notice that the indent marker has now split and the top part is to the left.
You can set the indent accurately using the Paragraph dialog box.
Click the dialog box launcher in the Paragraph group on the Home tab
Here
Word2007Intermediate (020611) 35 ©De Montfort University, IT Training 2011
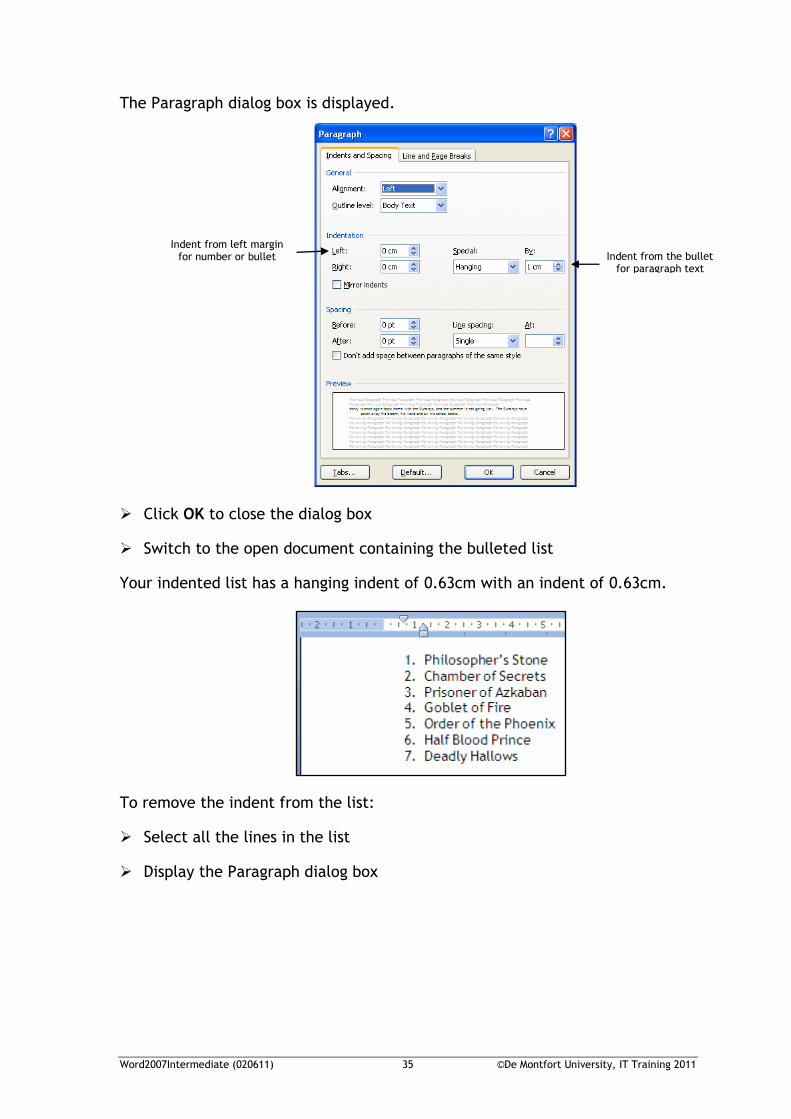
The Paragraph dialog box is displayed.
Click OK to close the dialog box
Switch to the open document containing the bulleted list
Your indented list has a hanging indent of 0.63cm with an indent of 0.63cm.
To remove the indent from the list:
Select all the lines in the list
Display the Paragraph dialog box
Indent from left margin for number or bullet Indent from the bullet
for paragraph text
Word2007Intermediate (020611) 36 ©De Montfort University, IT Training 2011
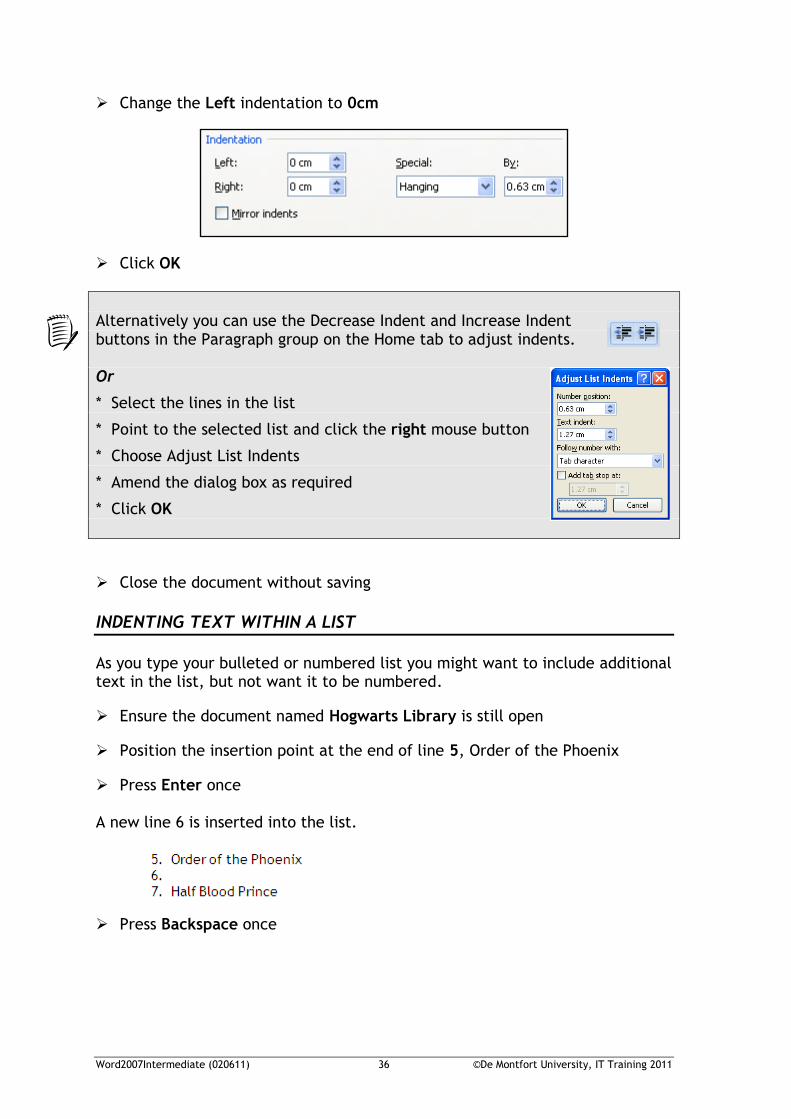
Change the Left indentation to 0cm
Click OK
Alternatively you can use the Decrease Indent and Increase Indent buttons in the Paragraph group on the Home tab to adjust indents. Or
* Select the lines in the list
* Point to the selected list and click the right mouse button
* Choose Adjust List Indents
* Amend the dialog box as required
* Click OK
Close the document without saving
INDENTING TEXT WITHIN A LIST
As you type your bulleted or numbered list you might want to include additional text in the list, but not want it to be numbered.
Ensure the document named Hogwarts Library is still open
Position the insertion point at the end of line 5, Order of the Phoenix
Press Enter once A new line 6 is inserted into the list.
Press Backspace once
Word2007Intermediate (020611) 37 ©De Montfort University, IT Training 2011
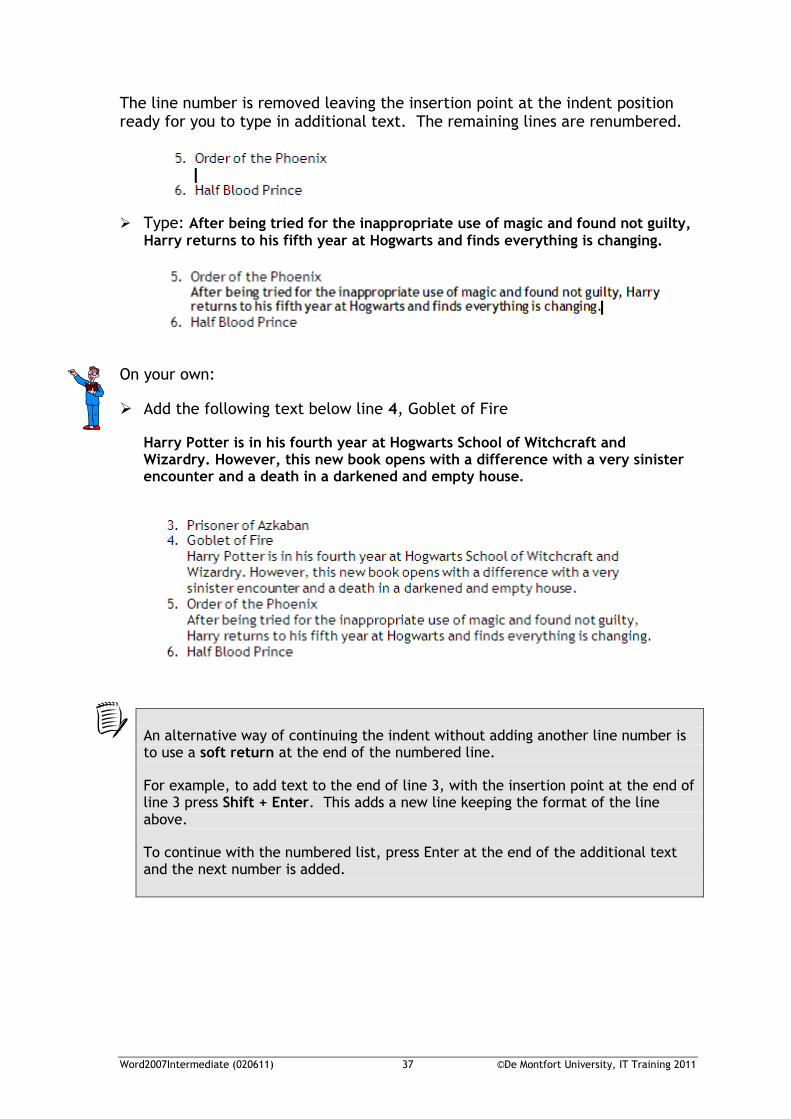
The line number is removed leaving the insertion point at the indent position ready for you to type in additional text. The remaining lines are renumbered.
Type: After being tried for the inappropriate use of magic and found not guilty, Harry returns to his fifth year at Hogwarts and finds everything is changing.
On your own:
Add the following text below line 4, Goblet of Fire
Harry Potter is in his fourth year at Hogwarts School of Witchcraft and Wizardry. However, this new book opens with a difference with a very sinister encounter and a death in a darkened and empty house.
An alternative way of continuing the indent without adding another line number is to use a soft return at the end of the numbered line.
For example, to add text to the end of line 3, with the insertion point at the end of line 3 press Shift + Enter. This adds a new line keeping the format of the line above.
To continue with the numbered list, press Enter at the end of the additional text and the next number is added.
Word2007Intermediate (020611) 38 ©De Montfort University, IT Training 2011
TURNING THE AUTOMATIC BULLETING AND NUMBERING OFF
For information only If you don’t want Word to apply bullets and numbering automatically as you type you can turn it off.
Click the Office Button
Select Word Options
Choose Proofing
Click the AutoCorrect Options button
Select the AutoFormat As You Type tab
Uncheck the Automatic bulleted lists and Automatic numbered lists options in the Apply as you type section
Click OK
Click OK
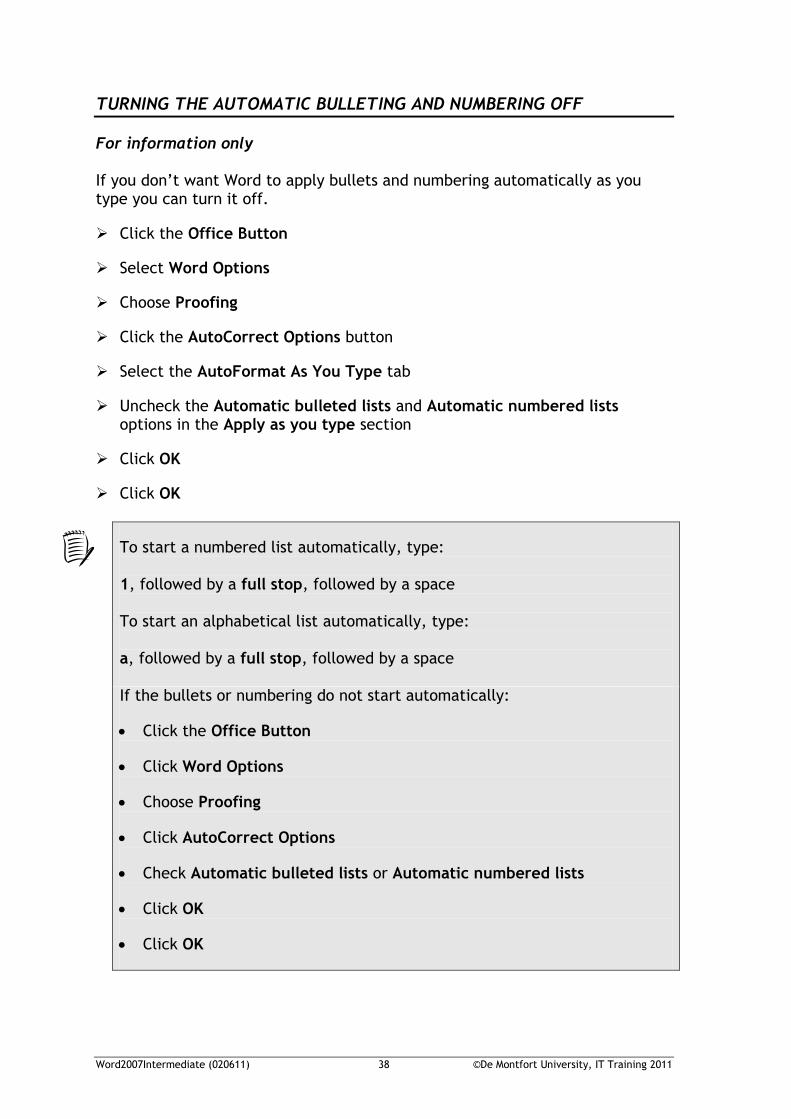
To start a numbered list automatically, type: 1, followed by a full stop, followed by a space To start an alphabetical list automatically, type: a, followed by a full stop, followed by a space If the bullets or numbering do not start automatically:
Click the Office Button
Click Word Options
Choose Proofing
Click AutoCorrect Options
Check Automatic bulleted lists or Automatic numbered lists
Click OK
Click OK
Word2007Intermediate (020611) 39 ©De Montfort University, IT Training 2011
FORMATTING TEXT PARAGRAPH SPACING
Many factors determine how text is positioned. Margins specify the distance from the edge for all the text on a page, while paragraph indentation and alignment controls how paragraphs fit between the margins. You can also determine how much space occurs between lines, and before and after paragraphs.
You should still have the document Hogwarts Library open
Click the Show/Hide button in the Paragraph group of the Home tab
Each paragraph is currently separated by a paragraph mark . You are now going to specify the amount of space you want between the paragraphs.
Select all the text in the list
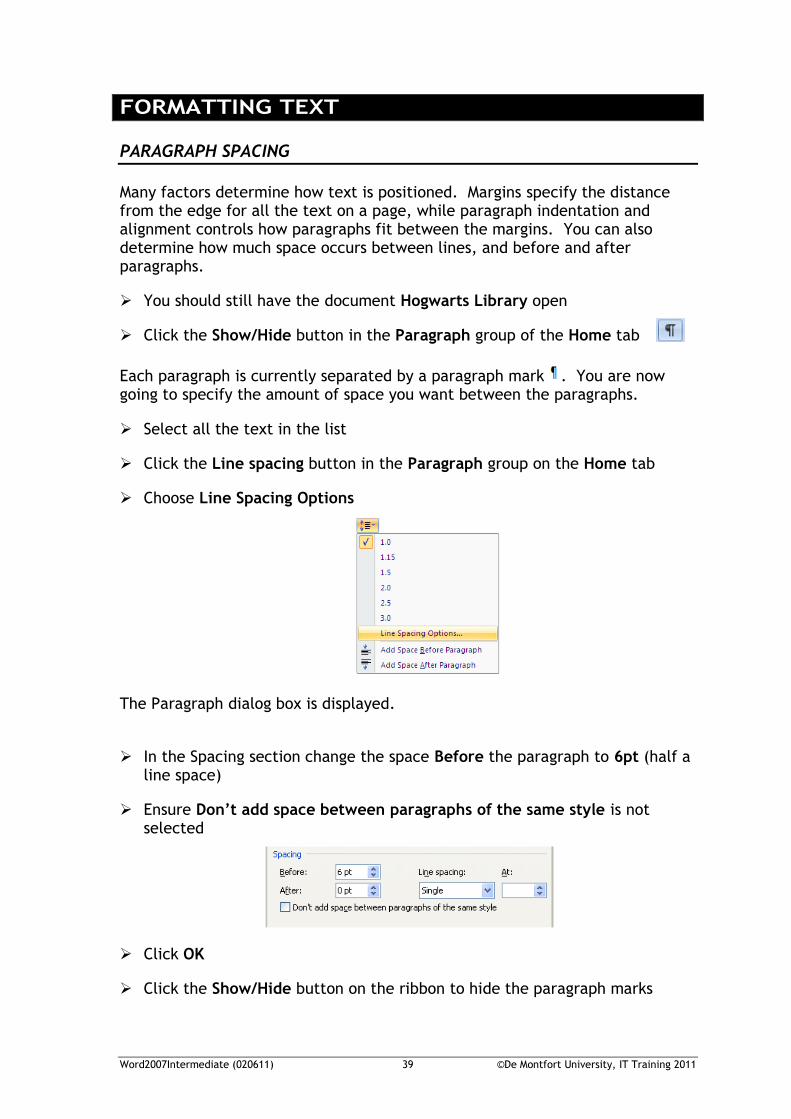
Click the Line spacing button in the Paragraph group on the Home tab
Choose Line Spacing Options
The Paragraph dialog box is displayed.
In the Spacing section change the space Before the paragraph to 6pt (half a line space)
Ensure Don’t add space between paragraphs of the same style is not selected
Click OK
Click the Show/Hide button on the ribbon to hide the paragraph marks
Word2007Intermediate (020611) 40 ©De Montfort University, IT Training 2011
MULTILEVEL LISTS
Lists with multilevels are easy to create.
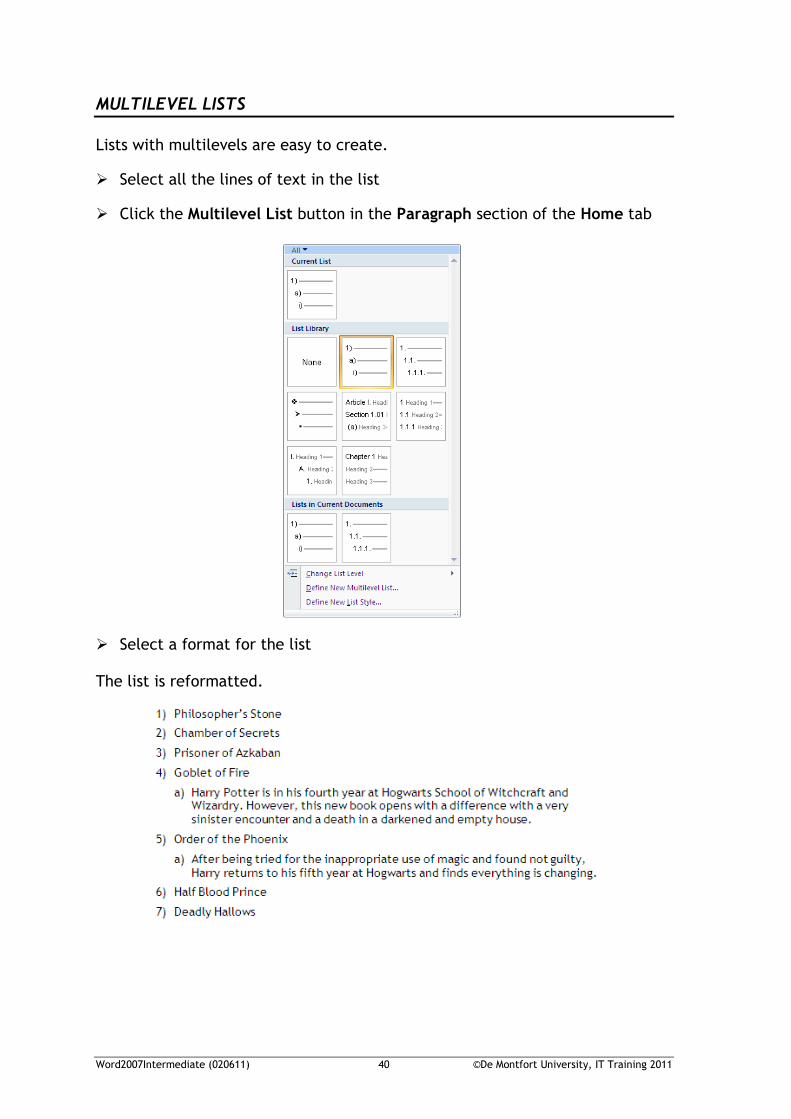
Select all the lines of text in the list
Click the Multilevel List button in the Paragraph section of the Home tab
Select a format for the list
The list is reformatted.
Word2007Intermediate (020611) 41 ©De Montfort University, IT Training 2011
If you want to create a multilevel list as you type:
Open a new document
Use the Multilevel List button to choose the format for the new list
Type the first line in the list: Hogwarts School of Witchcraft and Wizardry
Press Enter once
Press Tab once
Type the second line: Is a school of magic for witches and wizards between the
ages of eleven and eighteen living in the United Kingdom.
Press Enter twice
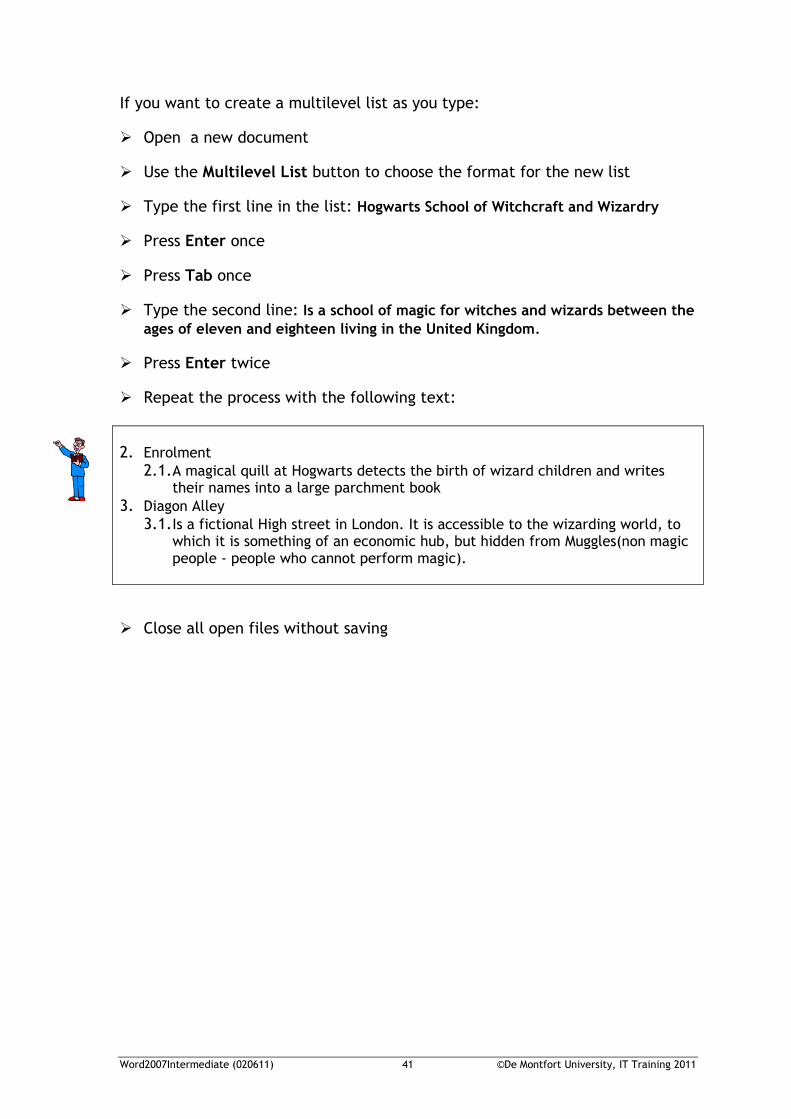
Repeat the process with the following text:
2. Enrolment
2.1. A magical quill at Hogwarts detects the birth of wizard children and writes their names into a large parchment book
3. Diagon Alley
3.1. Is a fictional High street in London. It is accessible to the wizarding world, to which it is something of an economic hub, but hidden from Muggles(non magic people - people who cannot perform magic).
Close all open files without saving
Word2007Intermediate (020611) 42 ©De Montfort University, IT Training 2011
CONTROLLING TEXT
WIDOWS AND ORPHANS
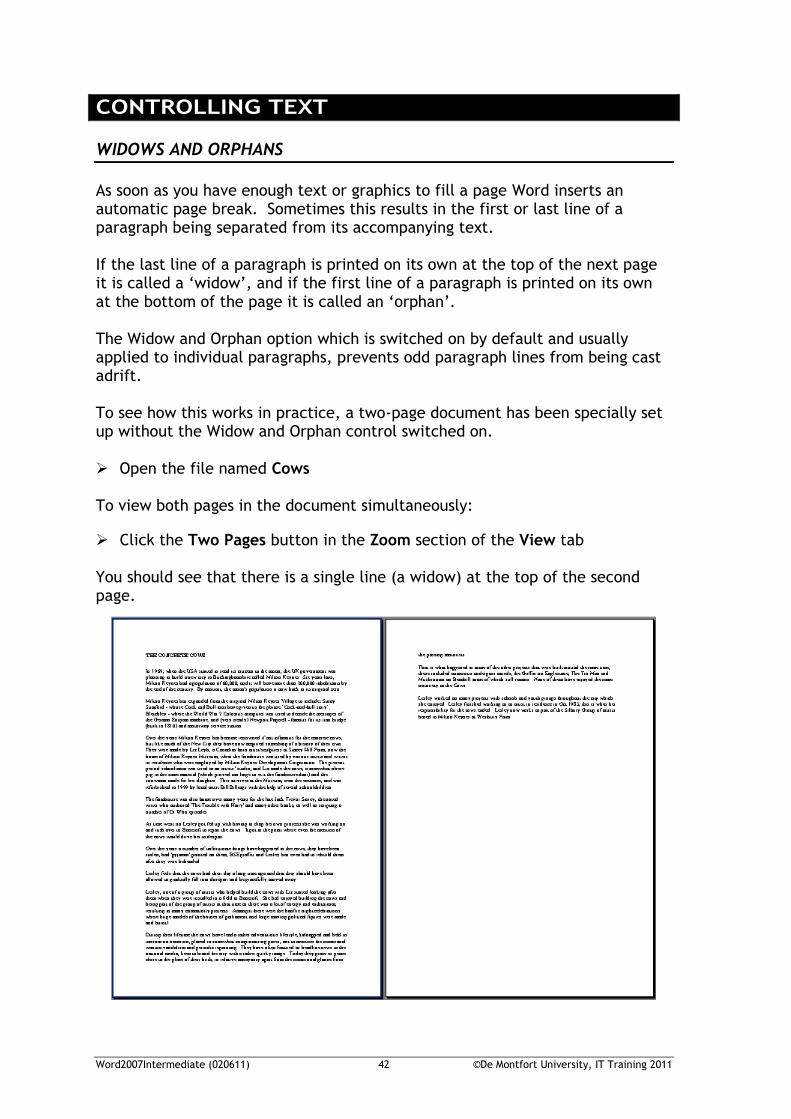
As soon as you have enough text or graphics to fill a page Word inserts an automatic page break. Sometimes this results in the first or last line of a paragraph being separated from its accompanying text. If the last line of a paragraph is printed on its own at the top of the next page it is called a ‘widow’, and if the first line of a paragraph is printed on its own at the bottom of the page it is called an ‘orphan’. The Widow and Orphan option which is switched on by default and usually applied to individual paragraphs, prevents odd paragraph lines from being cast adrift. To see how this works in practice, a two-page document has been specially set up without the Widow and Orphan control switched on. Open the file named Cows To view both pages in the document simultaneously:
Click the Two Pages button in the Zoom section of the View tab You should see that there is a single line (a widow) at the top of the second page.
Word2007Intermediate (020611) 43 ©De Montfort University, IT Training 2011
Click anywhere in the final paragraph of the first page
Ensure the Home tab is selected
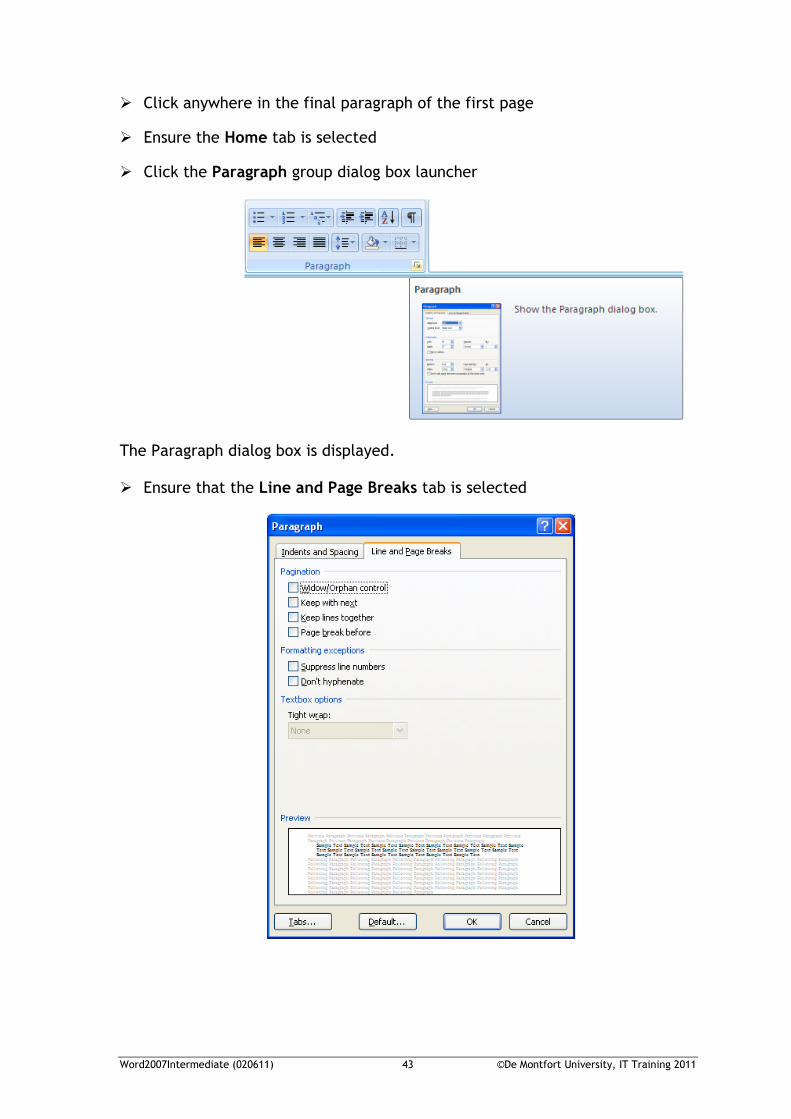
Click the Paragraph group dialog box launcher
The Paragraph dialog box is displayed. Ensure that the Line and Page Breaks tab is selected
Word2007Intermediate (020611) 44 ©De Montfort University, IT Training 2011
Click Widow/Orphan control Click OK Another line of the paragraph is moved to the top of the second page to eliminate the widow.
Close the document without saving
Word2007Intermediate (020611) 45 ©De Montfort University, IT Training 2011
VIEWING A DOCUMENT
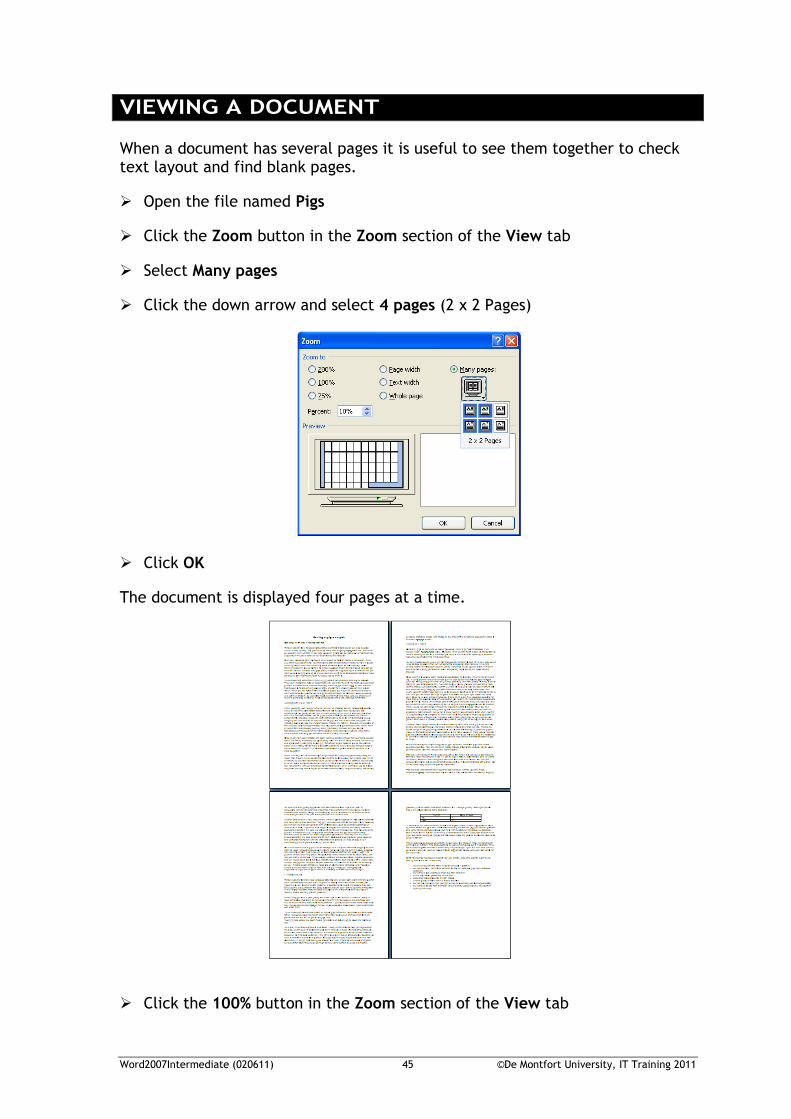
When a document has several pages it is useful to see them together to check text layout and find blank pages.
Open the file named Pigs
Click the Zoom button in the Zoom section of the View tab
Select Many pages
Click the down arrow and select 4 pages (2 x 2 Pages)
Click OK
The document is displayed four pages at a time.
Click the 100% button in the Zoom section of the View tab

Word2007Intermediate (020611) 46 ©De Montfort University, IT Training 2011
NAVIGATING A DOCUMENT
BROWSING
There are quick ways to navigate and locate objects within a document. The file Pigs should still be open At the bottom right-hand corner of your screen you will see the navigation tools: The default Browse Object is Page. Use the Next Page and Previous Page buttons to move through the
document Click the Select Browse Object button to see a sub-menu of options
Go to FInd Edits Heading Graphic Table
Field Endnote Footnote Comment Section Page
Select Browse by Table You are immediately moved to the first (and only) table in the document.
Select Browse Object
Previous Page
Next Page
Word2007Intermediate (020611) 47 ©De Montfort University, IT Training 2011
Point to the Previous button Notice that instead of ‘Previous Page’, the button is now labelled ‘Previous Table’.
GO TO
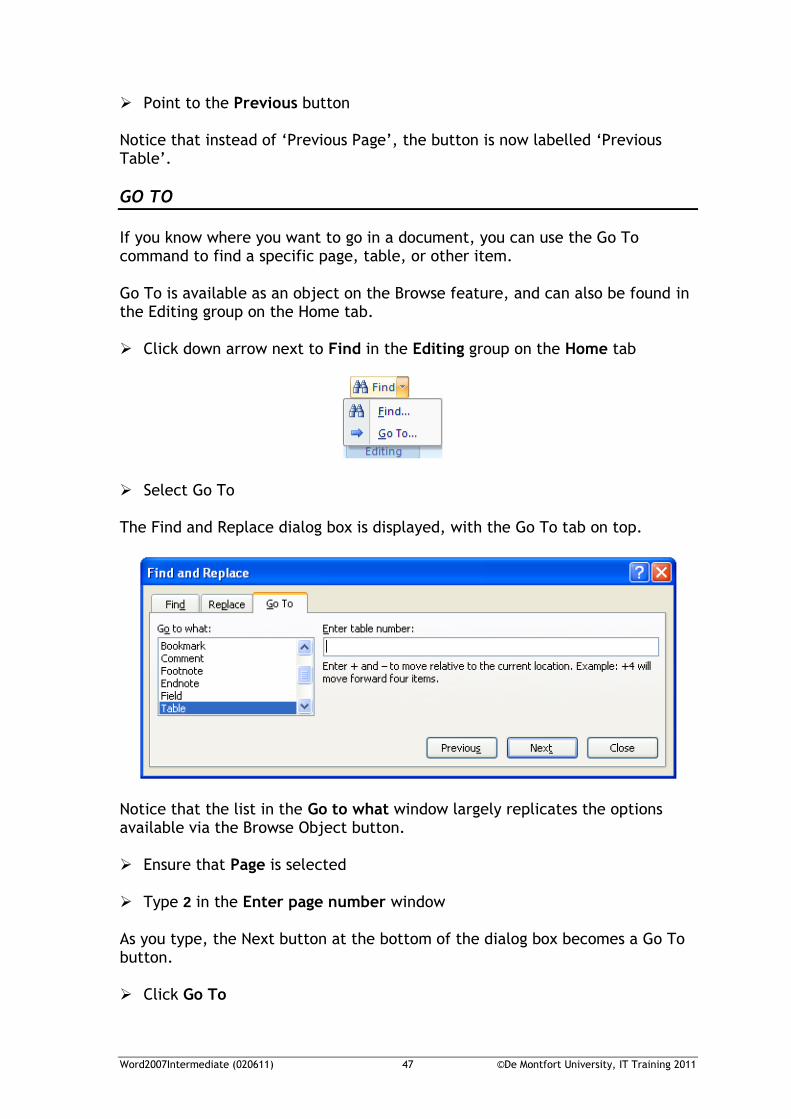
If you know where you want to go in a document, you can use the Go To command to find a specific page, table, or other item. Go To is available as an object on the Browse feature, and can also be found in the Editing group on the Home tab. Click down arrow next to Find in the Editing group on the Home tab
Select Go To The Find and Replace dialog box is displayed, with the Go To tab on top.
Notice that the list in the Go to what window largely replicates the options available via the Browse Object button. Ensure that Page is selected Type 2 in the Enter page number window As you type, the Next button at the bottom of the dialog box becomes a Go To button. Click Go To
Word2007Intermediate (020611) 48 ©De Montfort University, IT Training 2011
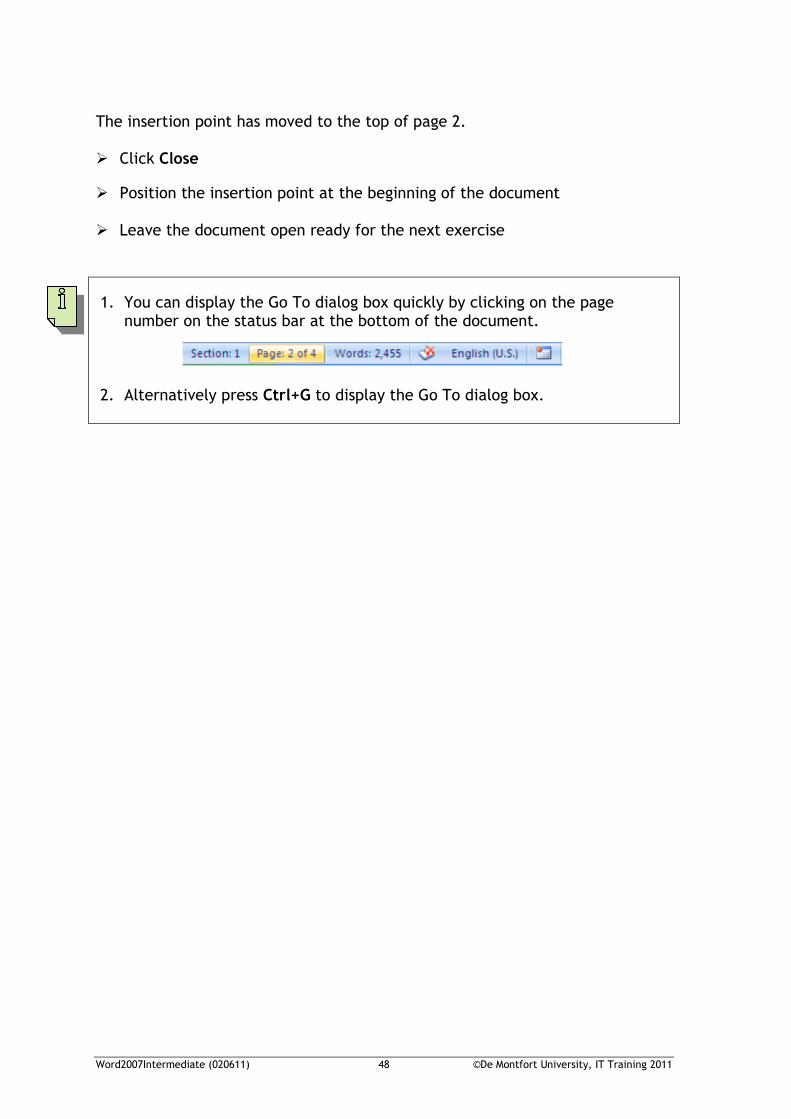
The insertion point has moved to the top of page 2. Click Close
Position the insertion point at the beginning of the document Leave the document open ready for the next exercise
1. You can display the Go To dialog box quickly by clicking on the page number on the status bar at the bottom of the document.
2. Alternatively press Ctrl+G to display the Go To dialog box.
Word2007Intermediate (020611) 49 ©De Montfort University, IT Training 2011
SECTIONS A section contains a common layout, for example two columns of text, or a wide left margin. When you open a new blank document, it consists of a single section. Changes made to the margins or orientation, will affect the whole document, not just the page you make the changes to. If you need to vary the layout of a document within a page, or between pages, you must insert section breaks to divide the document into separate sections. Each section can then be formatted as required. Bear in mind that a section break controls the section formatting of the text that precedes it. So, if you delete a section break, the preceding text becomes part of the following section and assumes its section formatting. The last paragraph mark (¶) in the document holds the section formatting of the last section in the document. A paragraph mark is inserted into the document each time you press the Enter key.
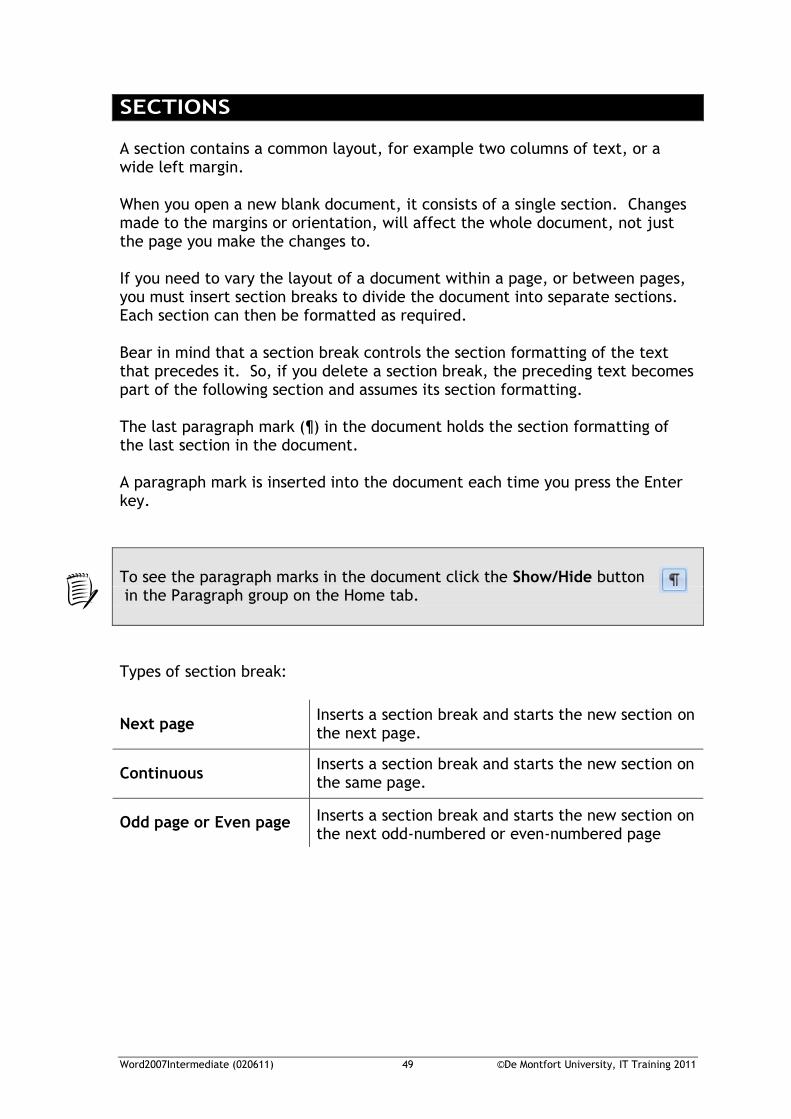
To see the paragraph marks in the document click the Show/Hide button in the Paragraph group on the Home tab.
Types of section break:
Next page Inserts a section break and starts the new section on the next page.
Continuous Inserts a section break and starts the new section on the same page.
Odd page or Even page Inserts a section break and starts the new section on the next odd-numbered or even-numbered page
.
Word2007Intermediate (020611) 50 ©De Montfort University, IT Training 2011
EXAMPLES OF SECTION BREAKS
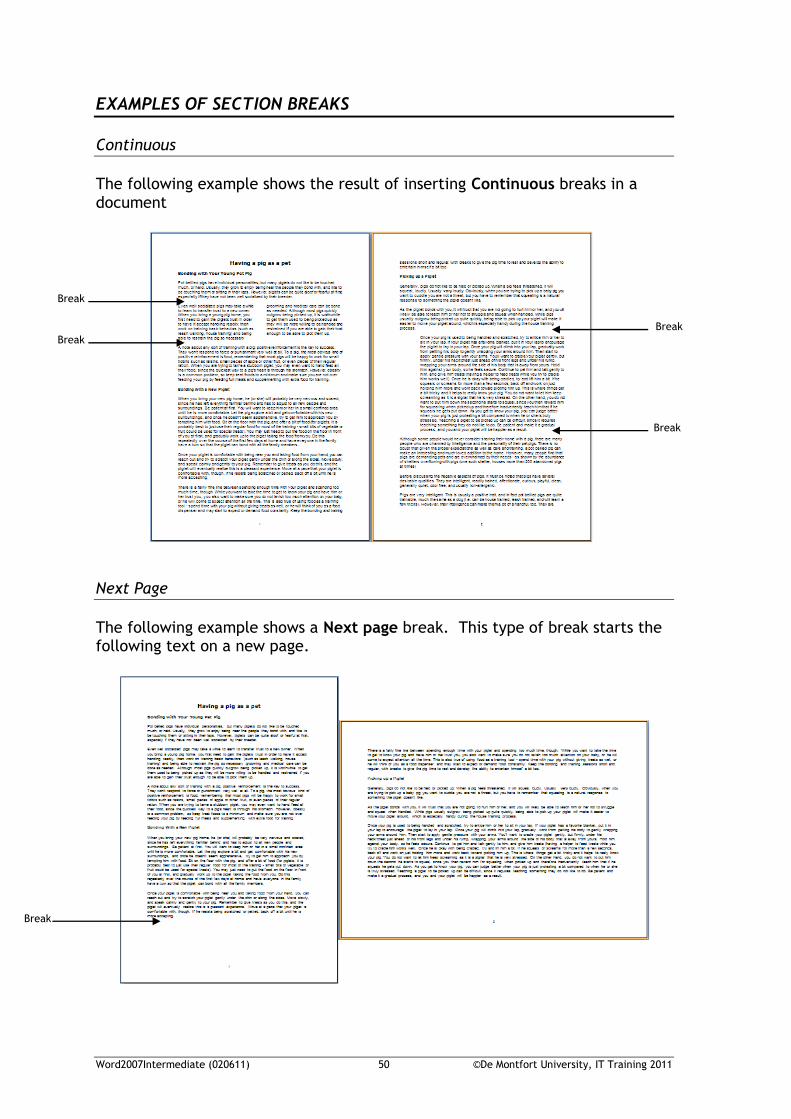
Continuous
The following example shows the result of inserting Continuous breaks in a document
Next Page
The following example shows a Next page break. This type of break starts the following text on a new page.
Break
Break
Break
Break
Break
Word2007Intermediate (020611) 51 ©De Montfort University, IT Training 2011
INSERTING A SECTION BREAK
You should still have the file named Pigs open. Position the insertion point where you want the section break to be, for this
exercise immediately to the left of the first letter in the second paragraph on the first page (Even well socialised pigs etc.)
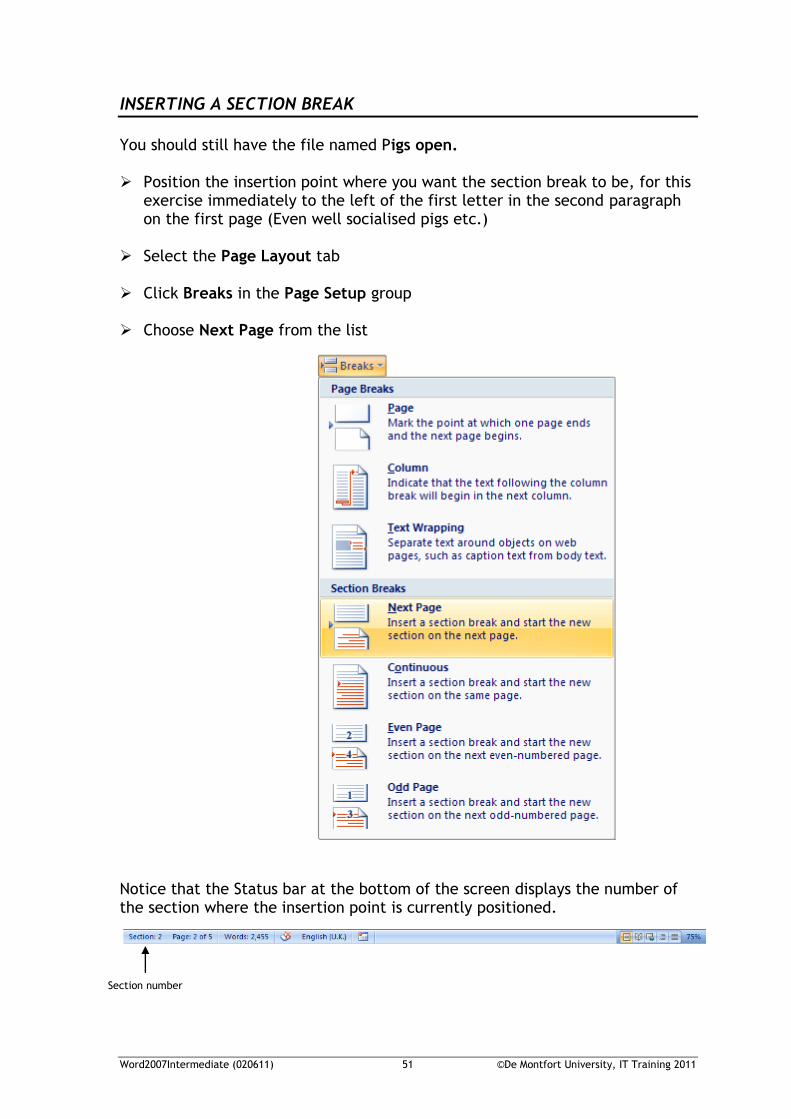
Select the Page Layout tab Click Breaks in the Page Setup group
Choose Next Page from the list
Notice that the Status bar at the bottom of the screen displays the number of the section where the insertion point is currently positioned.
Section number
Word2007Intermediate (020611) 52 ©De Montfort University, IT Training 2011
Select page 1 and then page 2 of the document to see the section number change
DELETING A SECTION BREAK
To delete a section break: Click the Show/Hide button in the Paragraph group on the Home tab to see
the breaks Position the insertion point on the section break Press the Delete key
Click the Show/Hide button to hide the paragraph marks
Word2007Intermediate (020611) 53 ©De Montfort University, IT Training 2011
PAGE NUMBERS There are two methods of including page numbers in a document:
using Page Number in the Header & Footer group on the Insert tab
using either Header or Footer in the Header & Footer group on the Insert tab
This section will cover the former option, while the latter option is dealt with on page 57.
INSERTING PAGE NUMBERS USING THE PAGE NUMBER BUTTON
Ensure that the file Pigs is still open The insertion point can be positioned anywhere within the document.
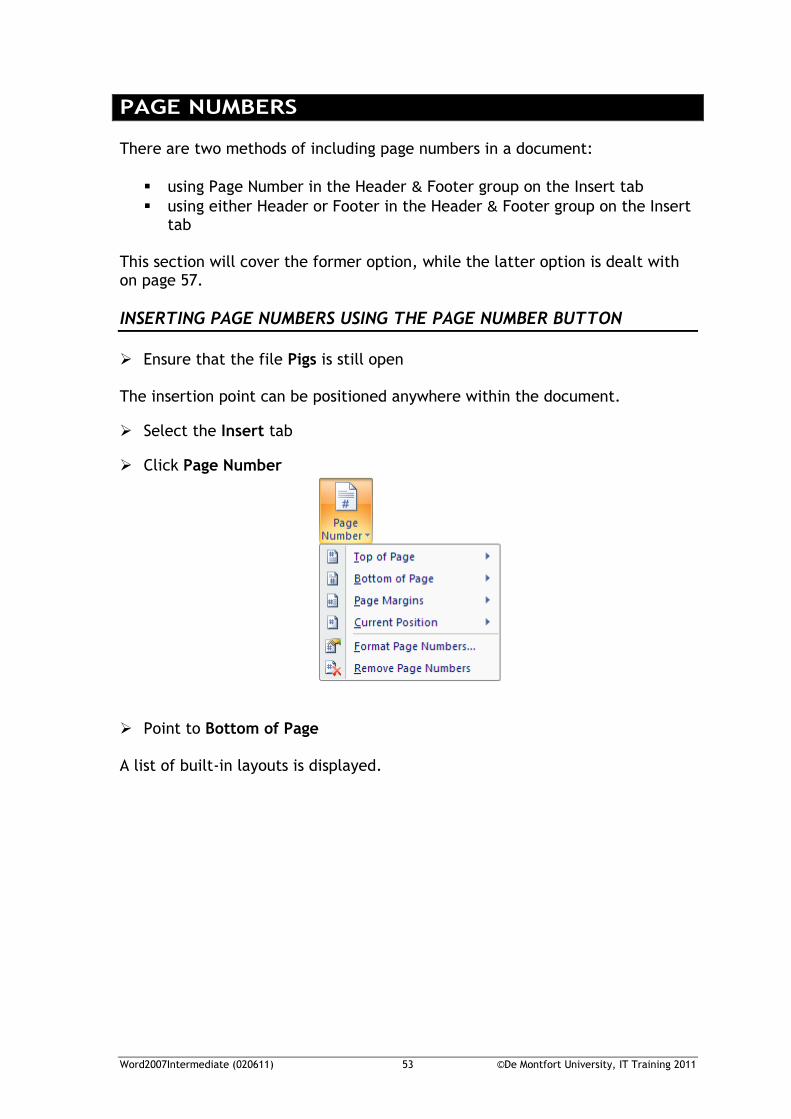
Select the Insert tab
Click Page Number
Point to Bottom of Page A list of built-in layouts is displayed.
Word2007Intermediate (020611) 54 ©De Montfort University, IT Training 2011
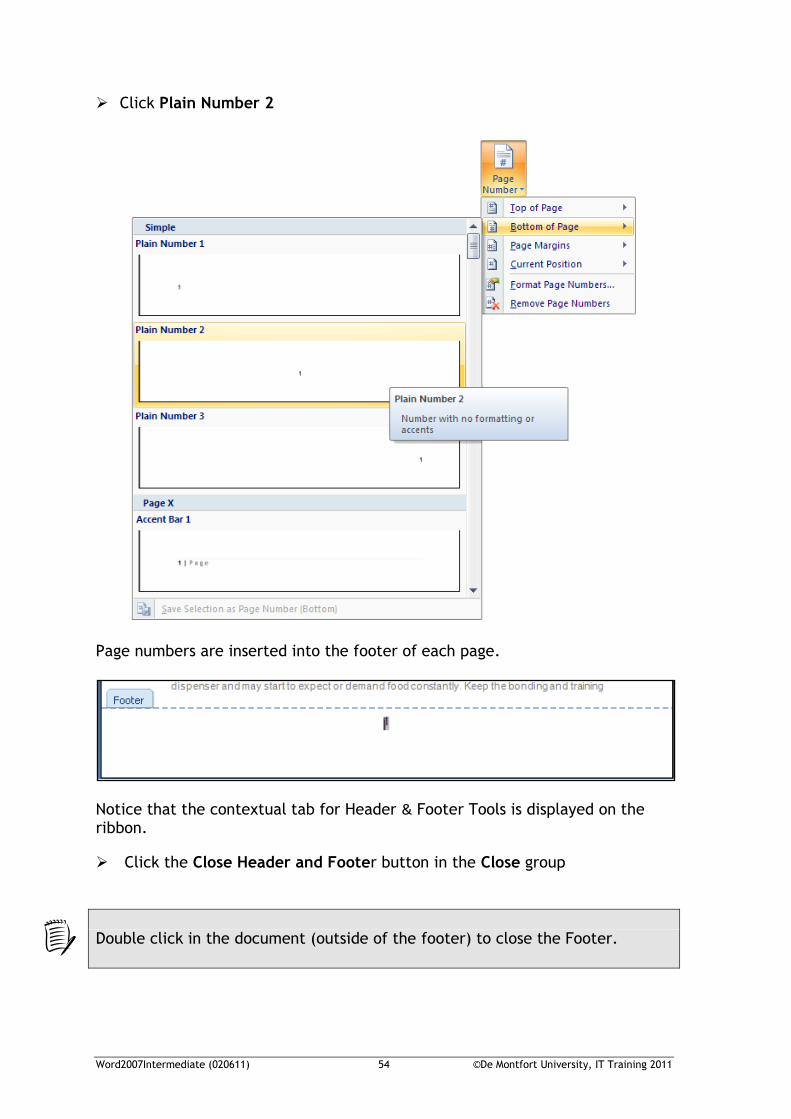
Click Plain Number 2
Page numbers are inserted into the footer of each page.
Notice that the contextual tab for Header & Footer Tools is displayed on the ribbon.
Click the Close Header and Footer button in the Close group
Double click in the document (outside of the footer) to close the Footer.
Word2007Intermediate (020611) 55 ©De Montfort University, IT Training 2011
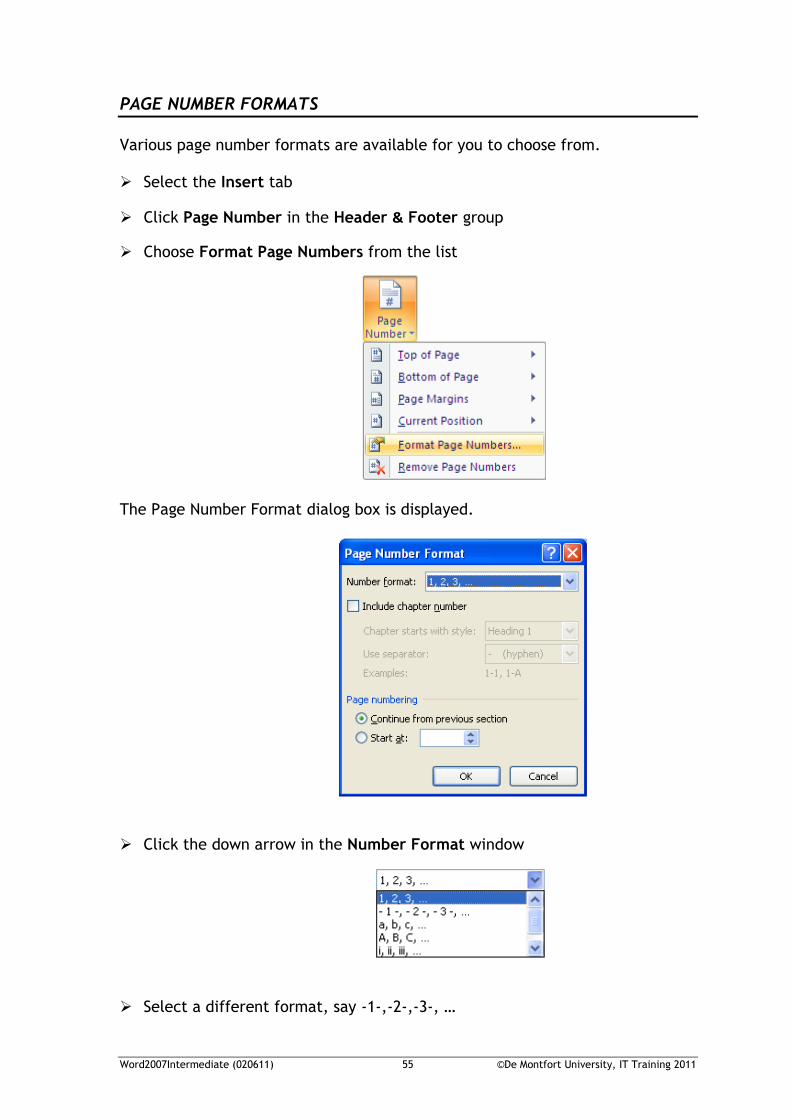
PAGE NUMBER FORMATS
Various page number formats are available for you to choose from. Select the Insert tab
Click Page Number in the Header & Footer group
Choose Format Page Numbers from the list
The Page Number Format dialog box is displayed.
Click the down arrow in the Number Format window
Select a different format, say -1-,-2-,-3-, …

Word2007Intermediate (020611) 56 ©De Montfort University, IT Training 2011
START PAGE NUMBER
In the Page numbering section of the dialog box, the Start at radio button gives you the option to specify the starting page number. Click the Start at: radio button and type 5 in the box
Click OK
Preview the document to see the numbering format Close Print Preview
When you add page numbers, they are applied to the entire document. If you want page numbers on only part of the document, or to change the format of the numbering, say you want contents page to be numbered with a Roman numeral, you must use Section breaks to split the document.
Word2007Intermediate (020611) 57 ©De Montfort University, IT Training 2011
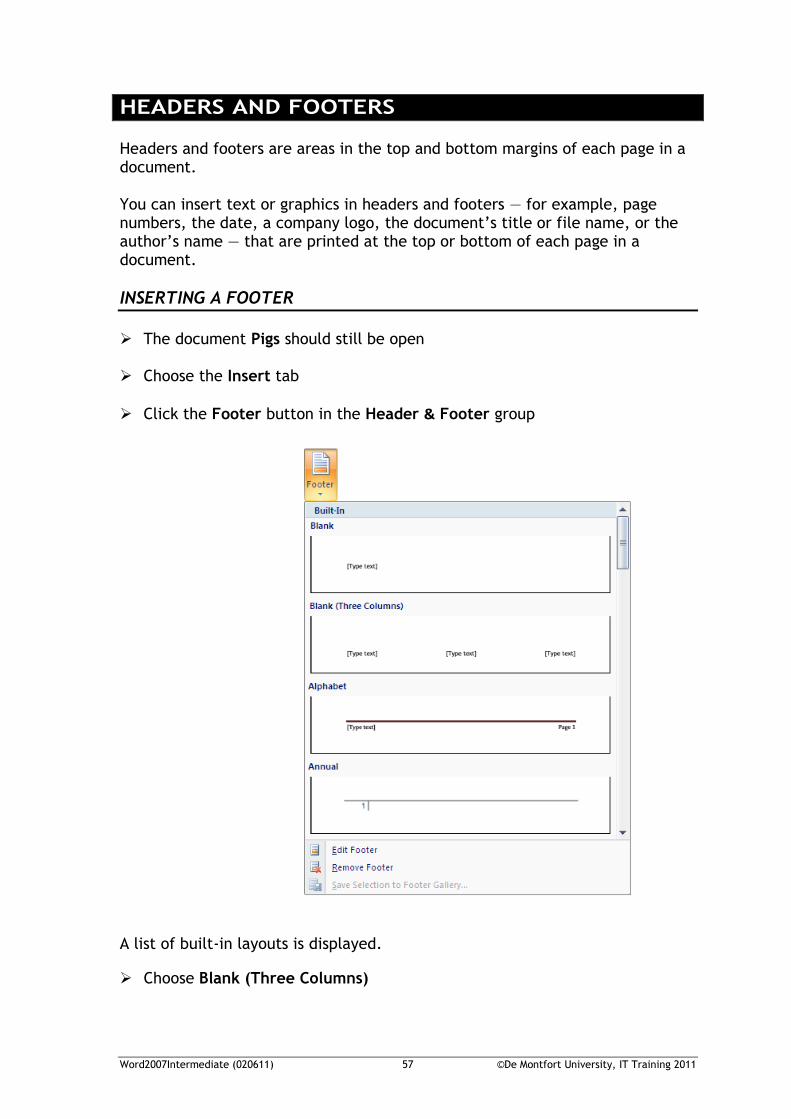
HEADERS AND FOOTERS Headers and footers are areas in the top and bottom margins of each page in a document. You can insert text or graphics in headers and footers — for example, page numbers, the date, a company logo, the document’s title or file name, or the author’s name — that are printed at the top or bottom of each page in a document.
INSERTING A FOOTER
The document Pigs should still be open Choose the Insert tab
Click the Footer button in the Header & Footer group
A list of built-in layouts is displayed.
Choose Blank (Three Columns)

Word2007Intermediate (020611) 58 ©De Montfort University, IT Training 2011
You can see that a footer has been included in the document but the page number that you inserted in the previous exercise has been deleted.
Select the ‘Type text’ prompt in the left position and type Intermediate Word 2007
Select the ‘Type text’ prompt in the centre position
Ensure the Design tab in the Header & Footer Tools contextual tab is selected
Click Page Number in the Header & Footer group
Select Current Position
Select Plain Number
A page number is added to the footer in the same format as the one that was deleted when you inserted the built-in footer.
Word2007Intermediate (020611) 59 ©De Montfort University, IT Training 2011
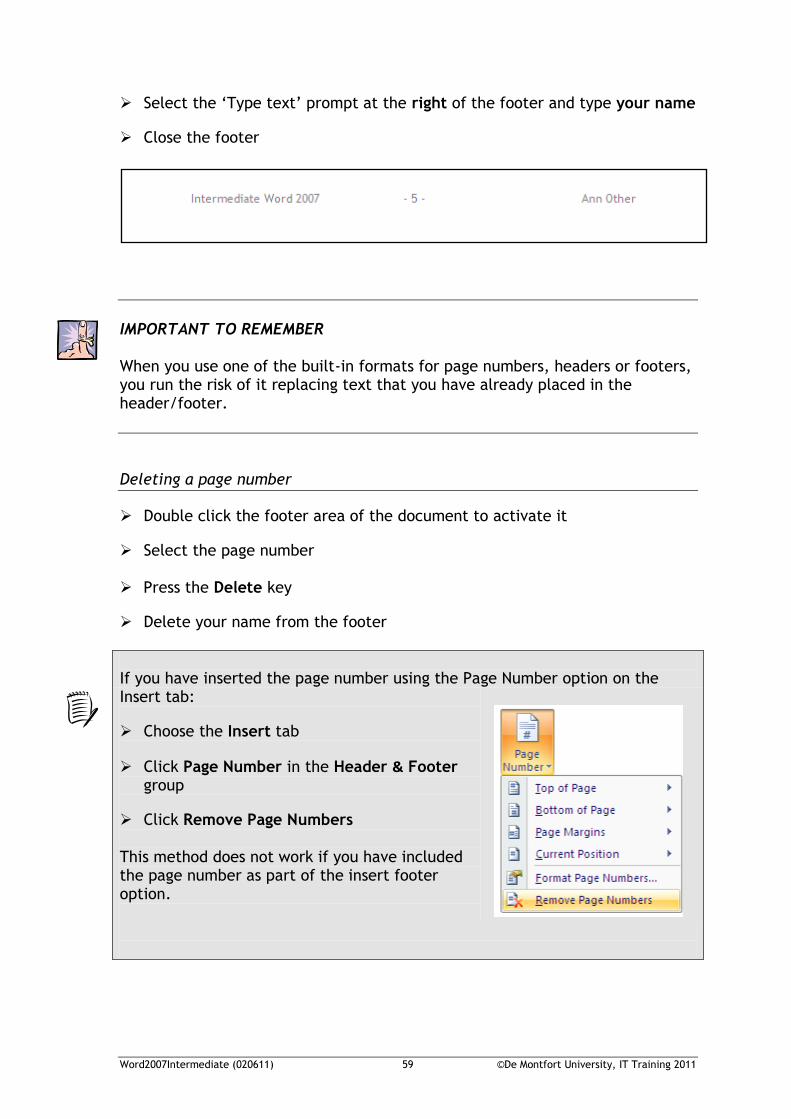
Select the ‘Type text’ prompt at the right of the footer and type your name
Close the footer
IMPORTANT TO REMEMBER When you use one of the built-in formats for page numbers, headers or footers, you run the risk of it replacing text that you have already placed in the header/footer.
Deleting a page number
Double click the footer area of the document to activate it
Select the page number Press the Delete key
Delete your name from the footer
If you have inserted the page number using the Page Number option on the Insert tab:
Choose the Insert tab
Click Page Number in the Header & Footer group
Click Remove Page Numbers This method does not work if you have included the page number as part of the insert footer option.
Word2007Intermediate (020611) 60 ©De Montfort University, IT Training 2011
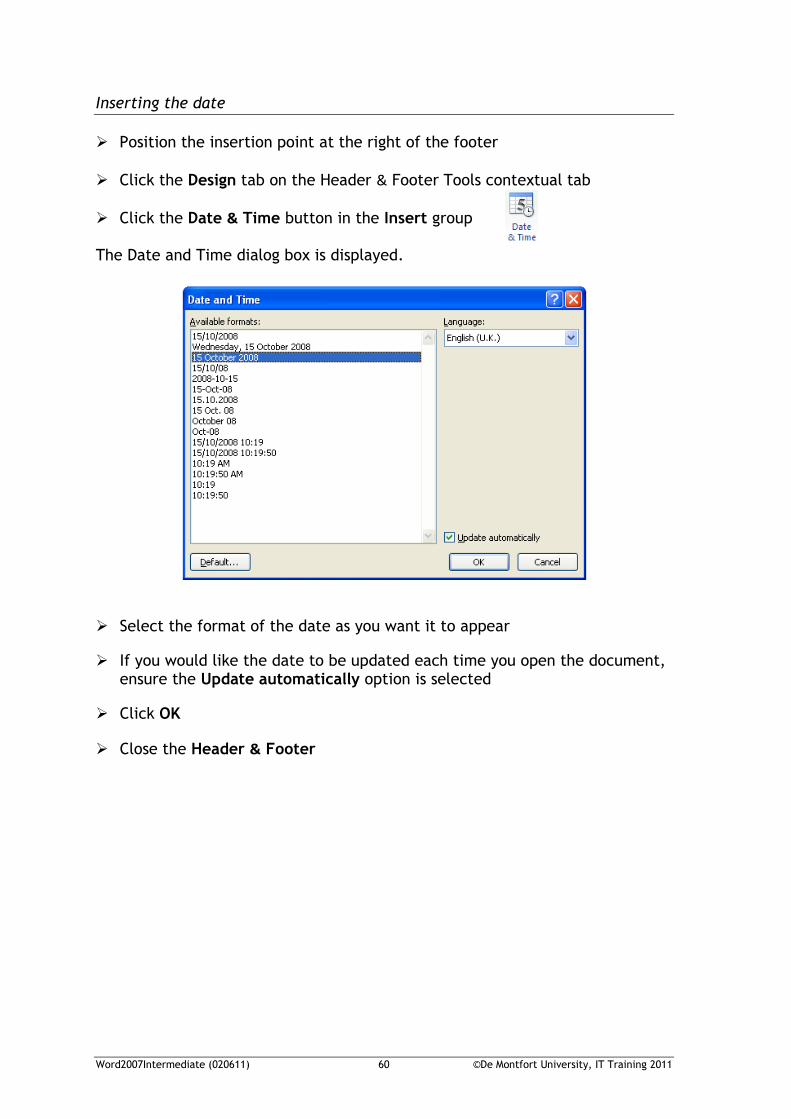
Inserting the date
Position the insertion point at the right of the footer
Click the Design tab on the Header & Footer Tools contextual tab
Click the Date & Time button in the Insert group The Date and Time dialog box is displayed.
Select the format of the date as you want it to appear
If you would like the date to be updated each time you open the document, ensure the Update automatically option is selected
Click OK
Close the Header & Footer
Word2007Intermediate (020611) 61 ©De Montfort University, IT Training 2011
Odd and even pages
If it is intended that the document will be bound, you may have to consider having a wider margin on alternating pages to accommodate the binding. In this case you might also choose to have the page numbers on alternating sides of the page (left on the even numbered pages and right on odd numbered pages). The document called Pigs should still be open. To clear the current footer in the document:
Click into the first page
Double click in the footer area to activate the footer
Click Footer in the Header & Footer group of the Design tab
Click Remove Footer
Save the document To set an alternating margin:
Ensure the insertion point is in the footer
Click Margins in the Page Setup group of the Page Layout tab
Choose Mirrored
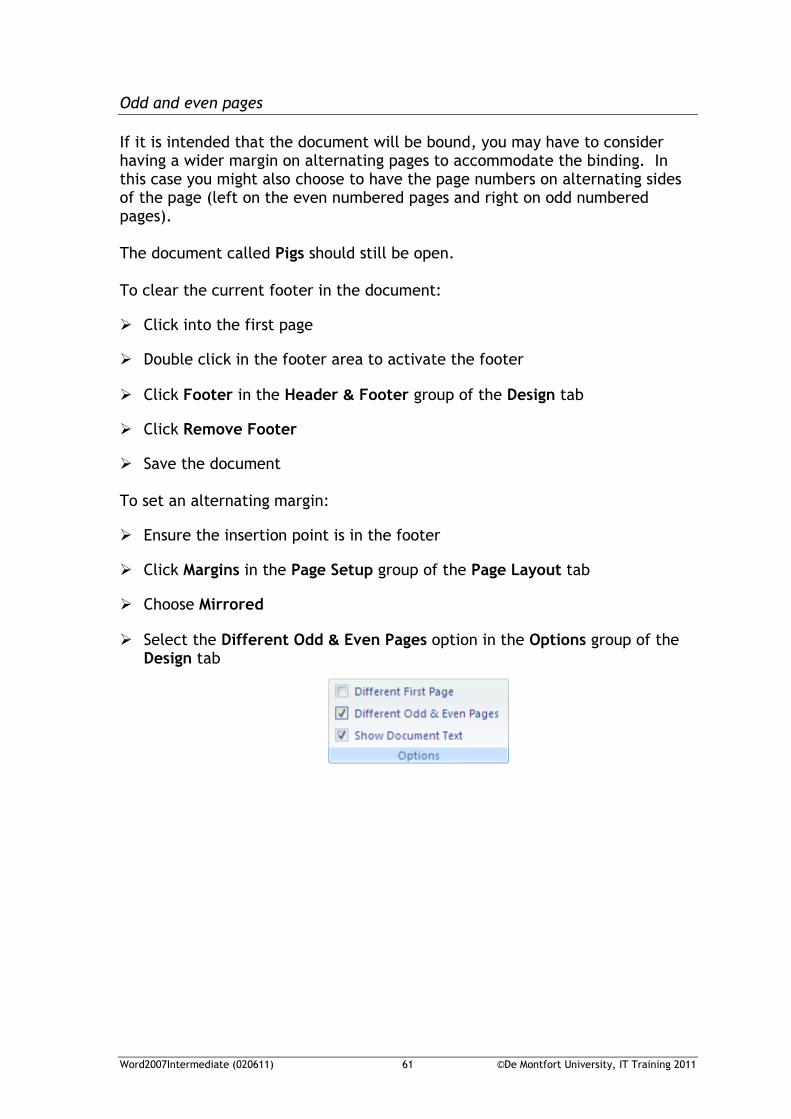
Select the Different Odd & Even Pages option in the Options group of the Design tab

Word2007Intermediate (020611) 62 ©De Montfort University, IT Training 2011
With the insertion point positioned in the Odd Page Footer.
Click Page Number in the Header & Footer group of the Design tab
Choose Bottom of Page
Choose Plain Number 3 This inserts a page number on the right side of the footer but it still retains the format to start at number 5.
Click Page Number in the Header & Footer group
Click Format Page Numbers
Change the number to start at 1
Click OK
Click Next Section in the Navigation group of the Design tab
The insertion point is moved to Even Page Footer and page number 2 is displayed in the centre.
Click Page Number in the Header & Footer group
Click Bottom of Page
Click Plain Number 1
Close the Header and Footer
Word2007Intermediate (020611) 63 ©De Montfort University, IT Training 2011
Look at the document in Print Preview to see the result.
Close Print Preview
Close the document without saving Different first page footer
You may want a different Header or Footer on the first page. There is an option within the design of the header and footer to do this and, once you have selected it a First Page Header or Footer is inserted into the document. This gives you the opportunity of either typing something different or leaving it blank.
Create a new document
Press Ctrl and Enter three times This gives you a document with four pages in it. With the insertion point in the first page:
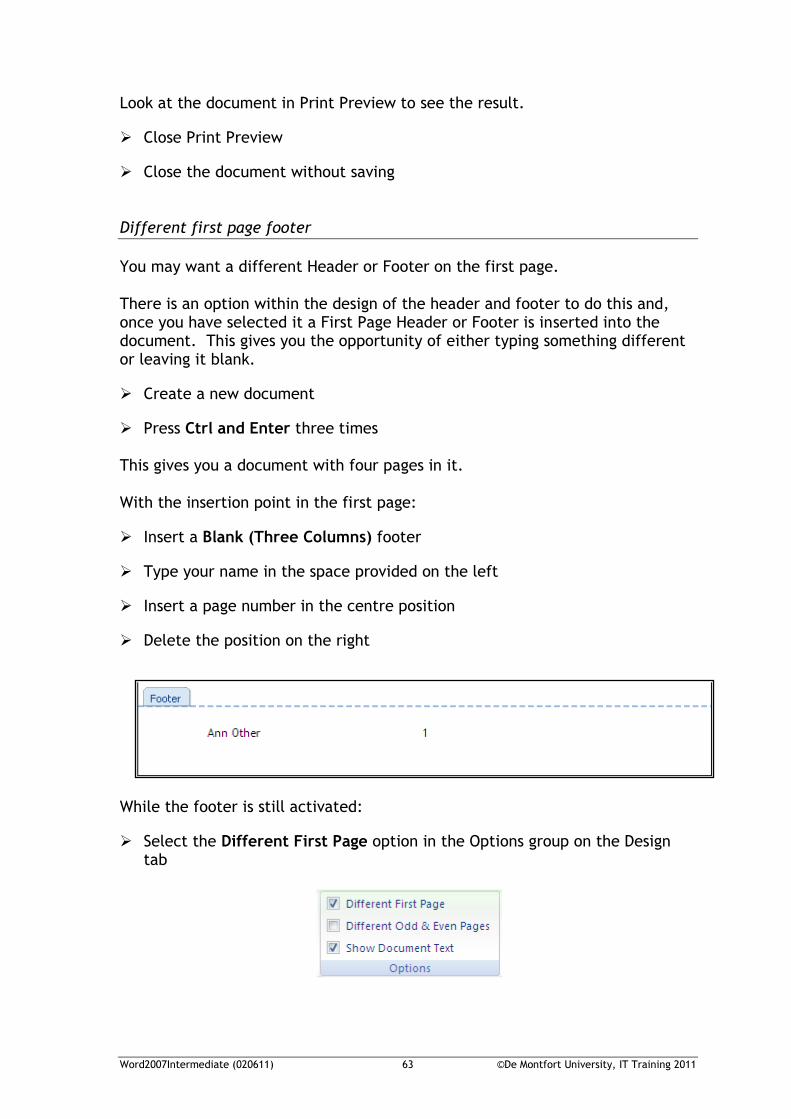
Insert a Blank (Three Columns) footer
Type your name in the space provided on the left
Insert a page number in the centre position
Delete the position on the right
While the footer is still activated:
Select the Different First Page option in the Options group on the Design tab
Word2007Intermediate (020611) 64 ©De Montfort University, IT Training 2011
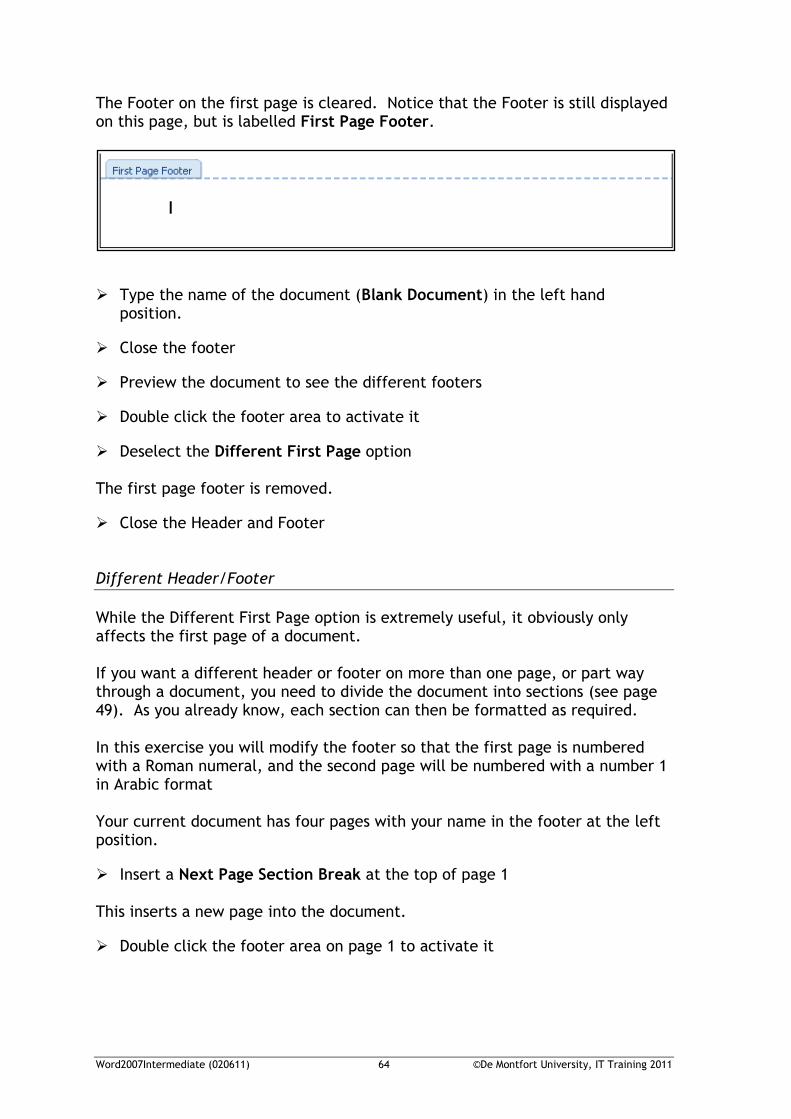
The Footer on the first page is cleared. Notice that the Footer is still displayed on this page, but is labelled First Page Footer.
Type the name of the document (Blank Document) in the left hand position.
Close the footer
Preview the document to see the different footers
Double click the footer area to activate it
Deselect the Different First Page option The first page footer is removed.
Close the Header and Footer Different Header/Footer
While the Different First Page option is extremely useful, it obviously only affects the first page of a document. If you want a different header or footer on more than one page, or part way through a document, you need to divide the document into sections (see page 49). As you already know, each section can then be formatted as required. In this exercise you will modify the footer so that the first page is numbered with a Roman numeral, and the second page will be numbered with a number 1 in Arabic format Your current document has four pages with your name in the footer at the left position.
Insert a Next Page Section Break at the top of page 1 This inserts a new page into the document.
Double click the footer area on page 1 to activate it
Word2007Intermediate (020611) 65 ©De Montfort University, IT Training 2011
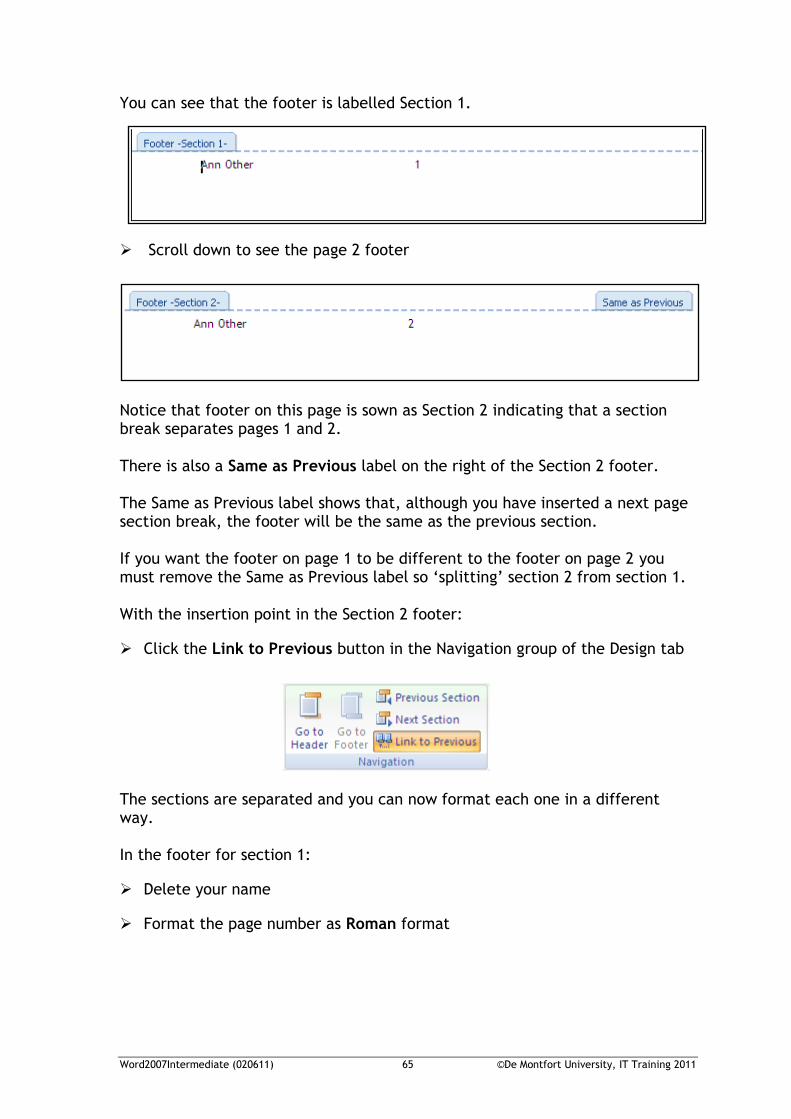
You can see that the footer is labelled Section 1.
Scroll down to see the page 2 footer
Notice that footer on this page is sown as Section 2 indicating that a section break separates pages 1 and 2. There is also a Same as Previous label on the right of the Section 2 footer. The Same as Previous label shows that, although you have inserted a next page section break, the footer will be the same as the previous section. If you want the footer on page 1 to be different to the footer on page 2 you must remove the Same as Previous label so ‘splitting’ section 2 from section 1. With the insertion point in the Section 2 footer:
Click the Link to Previous button in the Navigation group of the Design tab
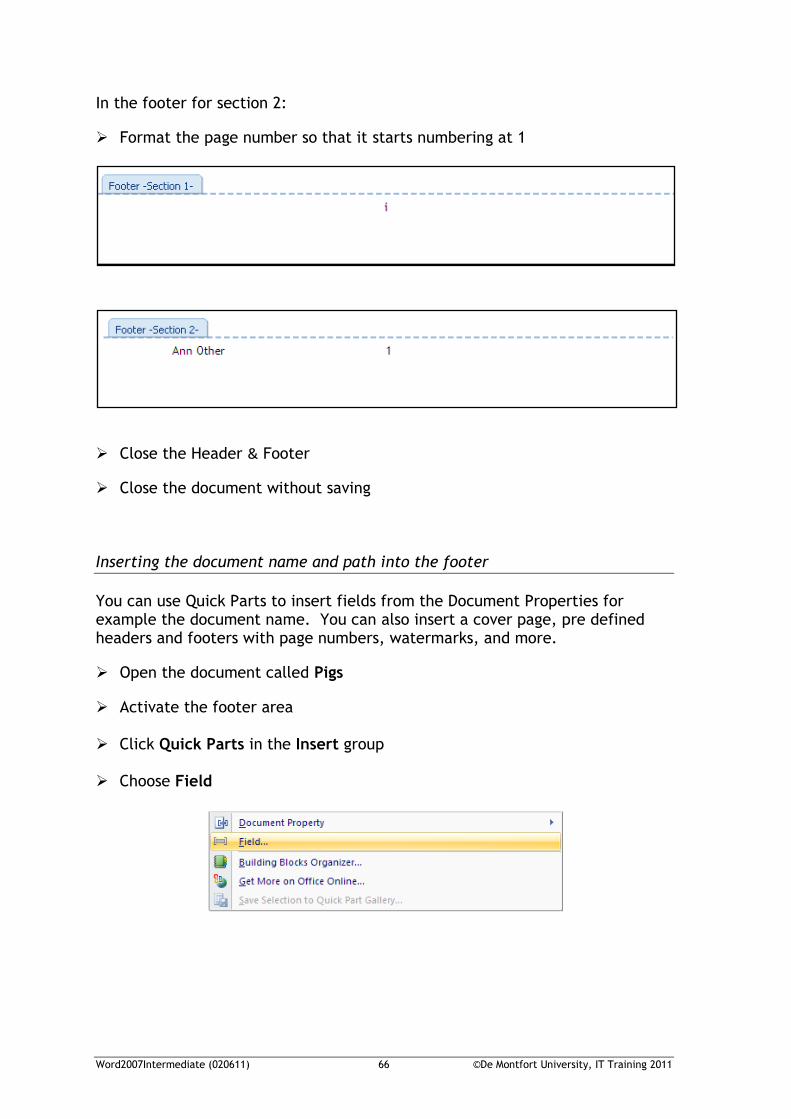
The sections are separated and you can now format each one in a different way. In the footer for section 1:
Delete your name
Format the page number as Roman format
Word2007Intermediate (020611) 66 ©De Montfort University, IT Training 2011
In the footer for section 2:
Format the page number so that it starts numbering at 1
Close the Header & Footer
Close the document without saving
Inserting the document name and path into the footer
You can use Quick Parts to insert fields from the Document Properties for example the document name. You can also insert a cover page, pre defined headers and footers with page numbers, watermarks, and more.
Open the document called Pigs
Activate the footer area Click Quick Parts in the Insert group
Choose Field
Word2007Intermediate (020611) 67 ©De Montfort University, IT Training 2011
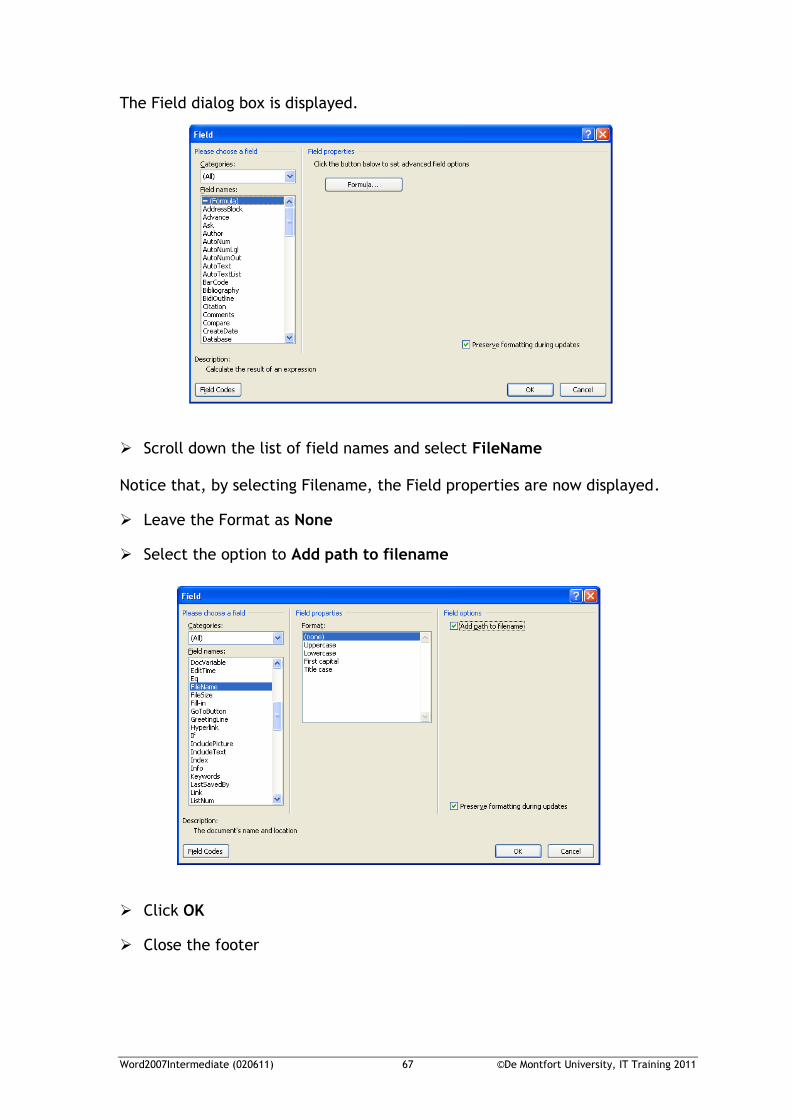
The Field dialog box is displayed.
Scroll down the list of field names and select FileName Notice that, by selecting Filename, the Field properties are now displayed.
Leave the Format as None
Select the option to Add path to filename
Click OK
Close the footer
Word2007Intermediate (020611) 68 ©De Montfort University, IT Training 2011
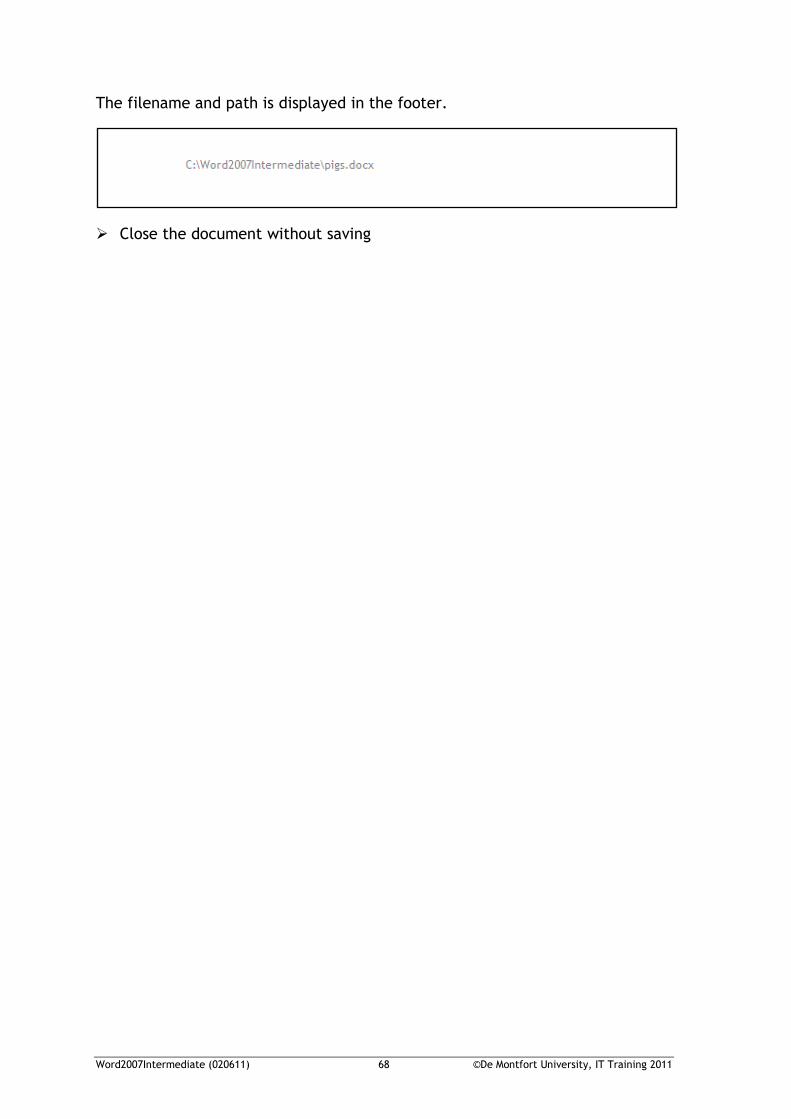
The filename and path is displayed in the footer.
Close the document without saving
Word2007Intermediate (020611) 69 ©De Montfort University, IT Training 2011
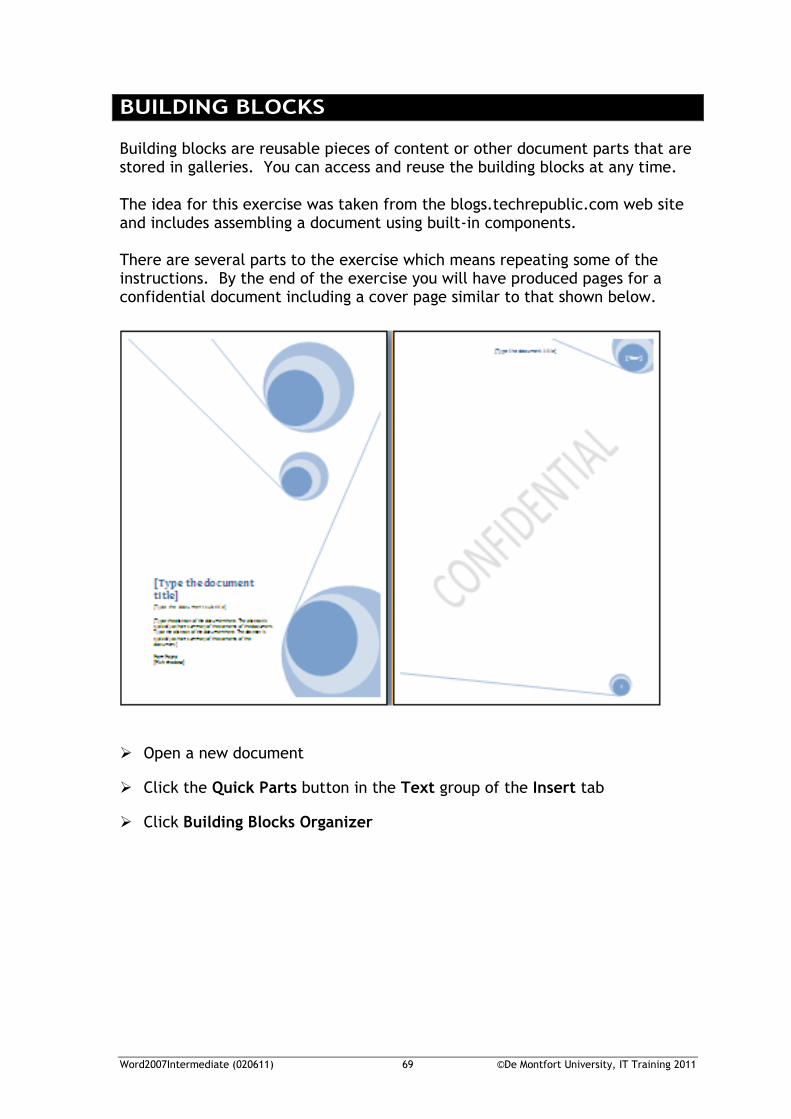
BUILDING BLOCKS Building blocks are reusable pieces of content or other document parts that are stored in galleries. You can access and reuse the building blocks at any time. The idea for this exercise was taken from the blogs.techrepublic.com web site and includes assembling a document using built-in components. There are several parts to the exercise which means repeating some of the instructions. By the end of the exercise you will have produced pages for a confidential document including a cover page similar to that shown below.
Open a new document
Click the Quick Parts button in the Text group of the Insert tab
Click Building Blocks Organizer
Word2007Intermediate (020611) 70 ©De Montfort University, IT Training 2011
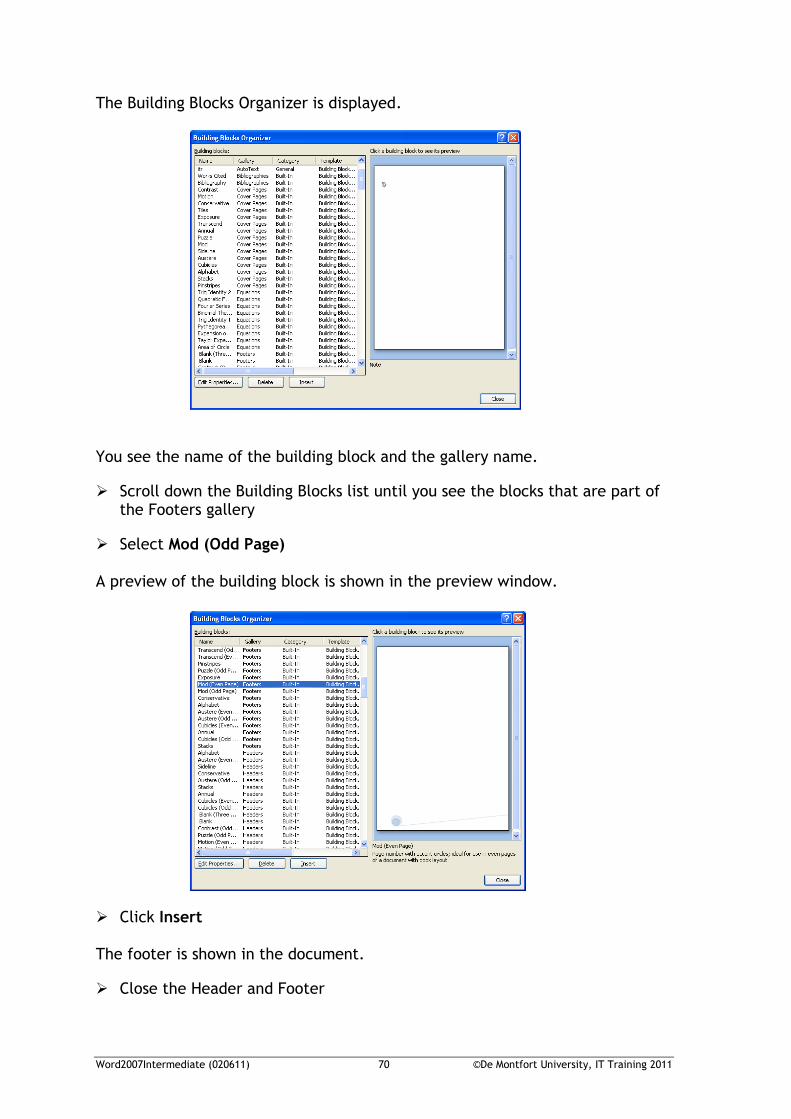
The Building Blocks Organizer is displayed.
You see the name of the building block and the gallery name.
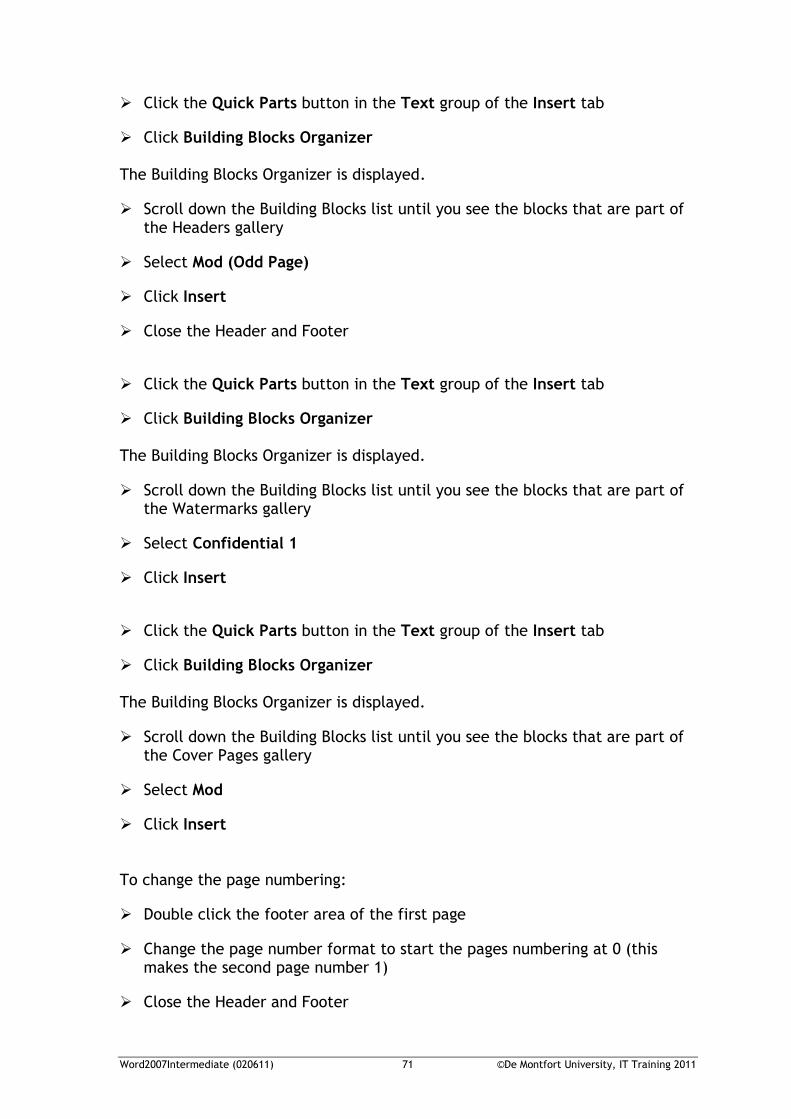
Scroll down the Building Blocks list until you see the blocks that are part of the Footers gallery
Select Mod (Odd Page) A preview of the building block is shown in the preview window.
Click Insert The footer is shown in the document.
Close the Header and Footer
Word2007Intermediate (020611) 71 ©De Montfort University, IT Training 2011
Click the Quick Parts button in the Text group of the Insert tab
Click Building Blocks Organizer The Building Blocks Organizer is displayed.
Scroll down the Building Blocks list until you see the blocks that are part of the Headers gallery
Select Mod (Odd Page)
Click Insert
Close the Header and Footer
Click the Quick Parts button in the Text group of the Insert tab
Click Building Blocks Organizer The Building Blocks Organizer is displayed.
Scroll down the Building Blocks list until you see the blocks that are part of the Watermarks gallery
Select Confidential 1
Click Insert
Click the Quick Parts button in the Text group of the Insert tab
Click Building Blocks Organizer The Building Blocks Organizer is displayed.
Scroll down the Building Blocks list until you see the blocks that are part of the Cover Pages gallery
Select Mod
Click Insert To change the page numbering:
Double click the footer area of the first page
Change the page number format to start the pages numbering at 0 (this makes the second page number 1)
Close the Header and Footer
Word2007Intermediate (020611) 72 ©De Montfort University, IT Training 2011
Preview the document
Close the document without saving
Word2007Intermediate (020611) 73 ©De Montfort University, IT Training 2011
COLUMNS You can lay out text in newsletter-style columns, and the text will flow from the bottom of one column to the top of the next. You have previously learnt that any formatting changes will affect the entire document. Therefore, unless you want your whole document to be formatted in columns, the newsletter-style text will need to be contained in its own section. If the text is already typed Word will take care of this for you. When you select the text and choose the Columns option, section breaks are inserted at the beginning and end of the highlighted text. Open the document called Pigs Highlight the text in the second paragraph starting ‘Even well socialized
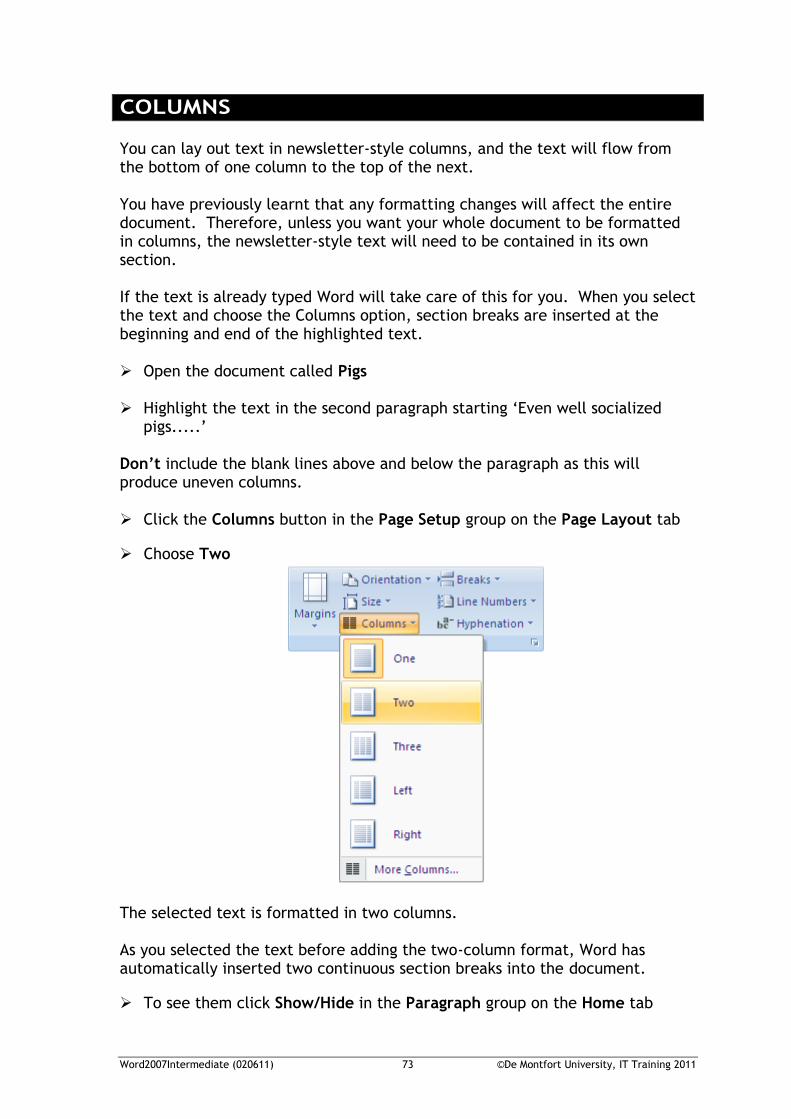
pigs.....’ Don’t include the blank lines above and below the paragraph as this will produce uneven columns. Click the Columns button in the Page Setup group on the Page Layout tab
Choose Two
The selected text is formatted in two columns.
As you selected the text before adding the two-column format, Word has automatically inserted two continuous section breaks into the document.
To see them click Show/Hide in the Paragraph group on the Home tab
Word2007Intermediate (020611) 74 ©De Montfort University, IT Training 2011
FORMATTING COLUMNS
There are several options for formatting the columns. Position the insertion point in one of the columns
Click Columns in the Page Setup group on the Page Layout tab
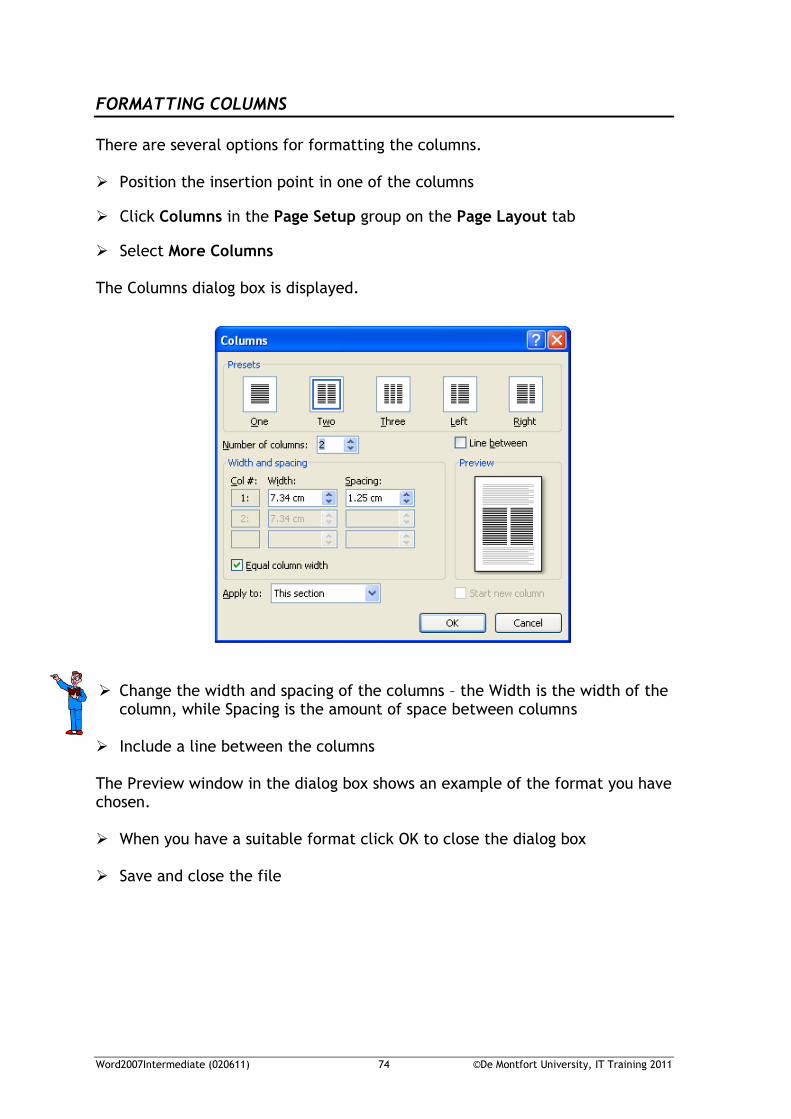
Select More Columns The Columns dialog box is displayed.
Change the width and spacing of the columns – the Width is the width of the
column, while Spacing is the amount of space between columns Include a line between the columns The Preview window in the dialog box shows an example of the format you have chosen. When you have a suitable format click OK to close the dialog box Save and close the file
Word2007Intermediate (020611) 75 ©De Montfort University, IT Training 2011
BORDERS AND SHADING You can add a border to a page or to text. This is useful if you want to draw a line underneath a paragraph or enclose a paragraph or title within a border. You can also use shading to highlight text or fill in the background of a table.
TEXT BORDER
Open the document called Halloween
Position the insertion point in the document heading
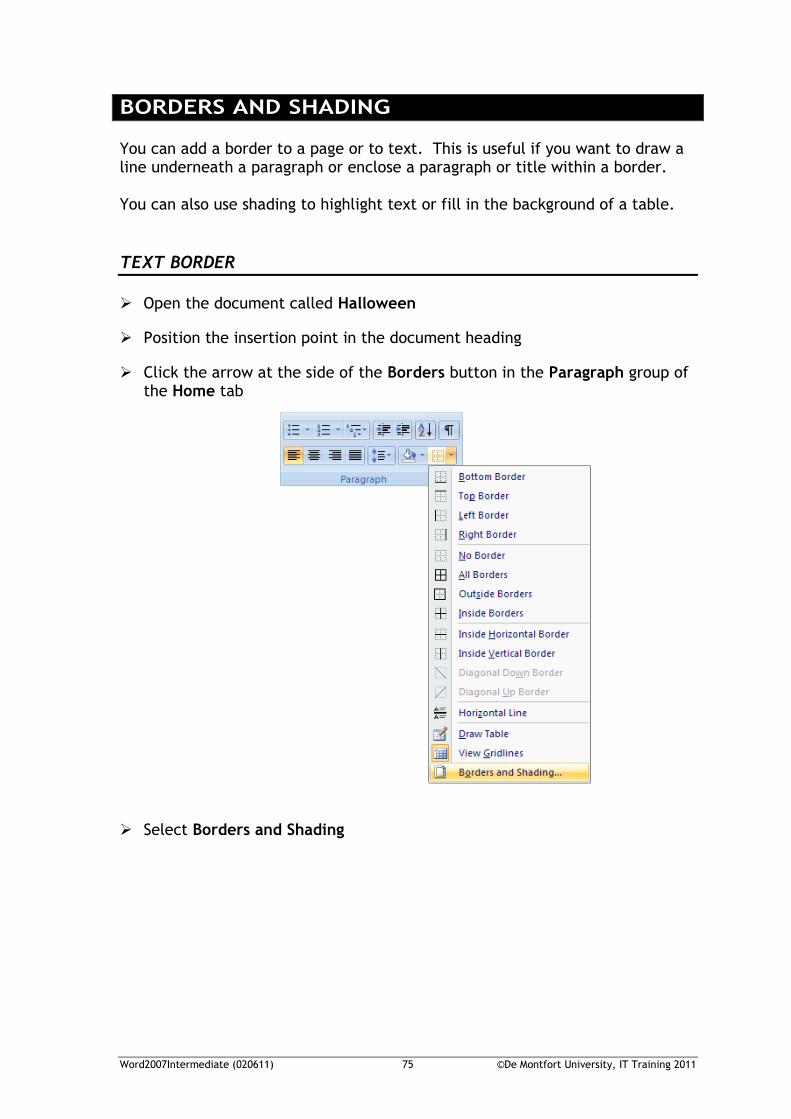
Click the arrow at the side of the Borders button in the Paragraph group of the Home tab
Select Borders and Shading
Word2007Intermediate (020611) 76 ©De Montfort University, IT Training 2011
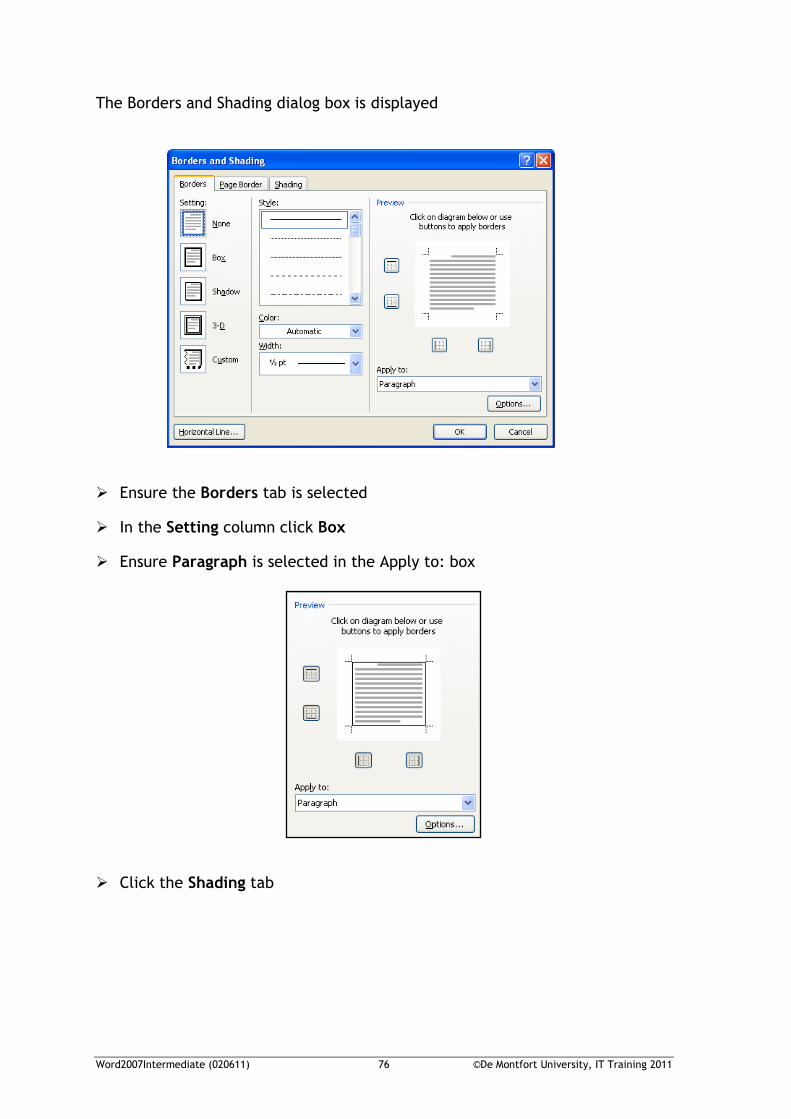
The Borders and Shading dialog box is displayed
Ensure the Borders tab is selected
In the Setting column click Box
Ensure Paragraph is selected in the Apply to: box
Click the Shading tab
Word2007Intermediate (020611) 77 ©De Montfort University, IT Training 2011
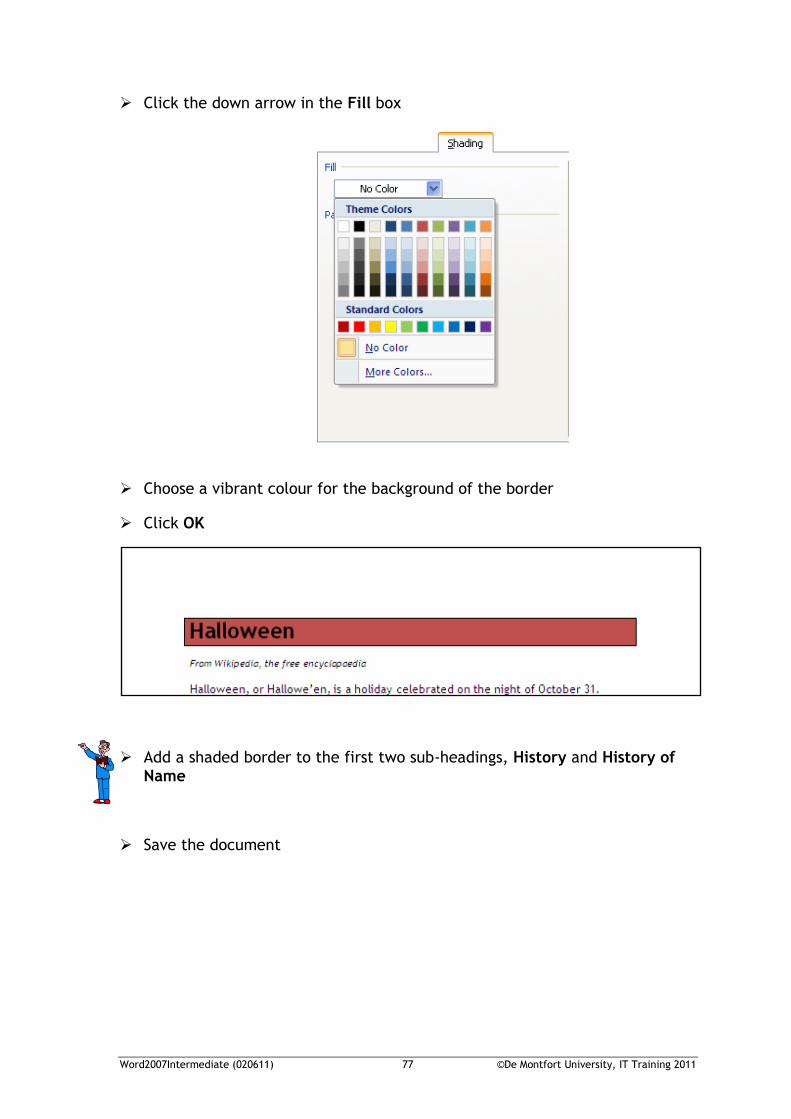
Click the down arrow in the Fill box
Choose a vibrant colour for the background of the border
Click OK
Add a shaded border to the first two sub-headings, History and History of Name
Save the document
Word2007Intermediate (020611) 78 ©De Montfort University, IT Training 2011
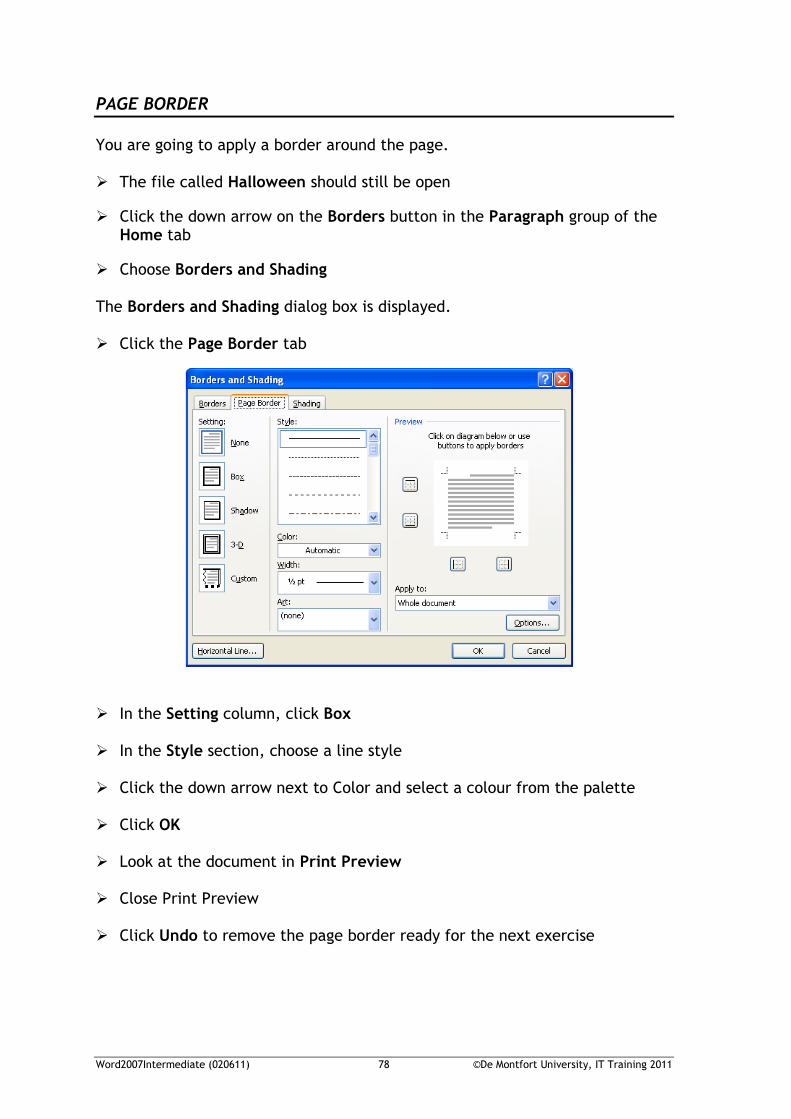
PAGE BORDER
You are going to apply a border around the page. The file called Halloween should still be open
Click the down arrow on the Borders button in the Paragraph group of the Home tab
Choose Borders and Shading The Borders and Shading dialog box is displayed. Click the Page Border tab
In the Setting column, click Box In the Style section, choose a line style Click the down arrow next to Color and select a colour from the palette Click OK
Look at the document in Print Preview
Close Print Preview
Click Undo to remove the page border ready for the next exercise
Word2007Intermediate (020611) 79 ©De Montfort University, IT Training 2011
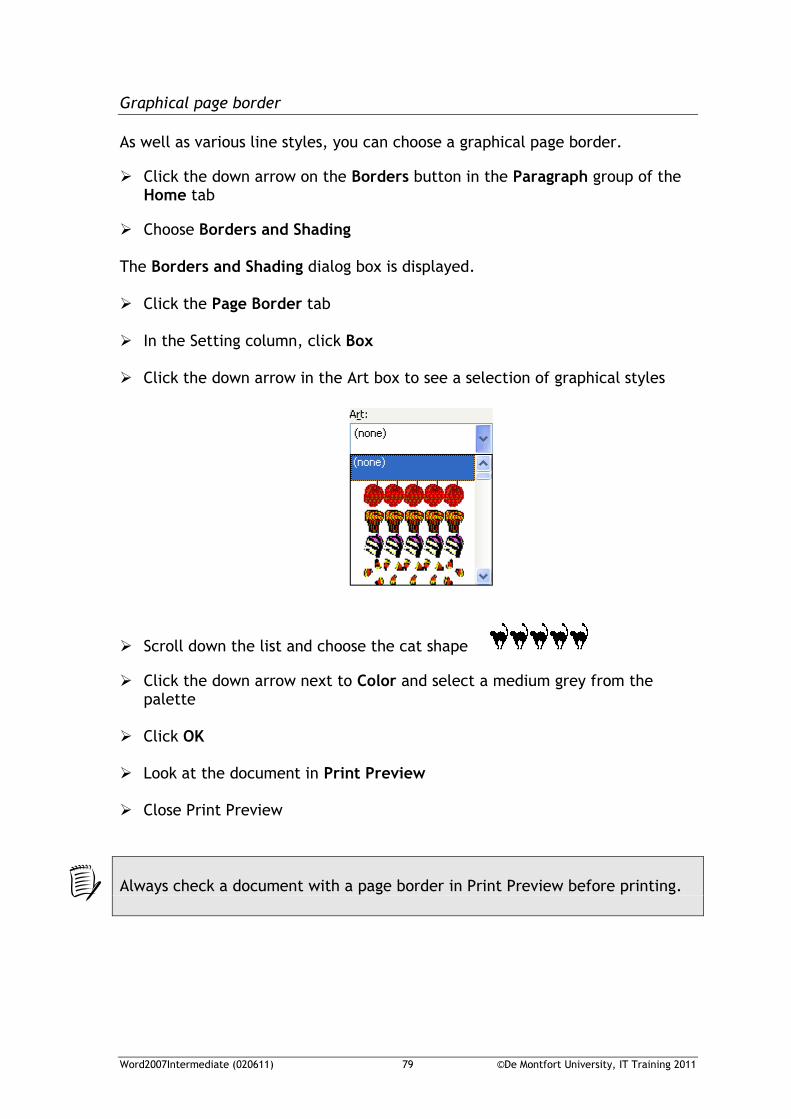
Graphical page border
As well as various line styles, you can choose a graphical page border.
Click the down arrow on the Borders button in the Paragraph group of the Home tab
Choose Borders and Shading The Borders and Shading dialog box is displayed. Click the Page Border tab In the Setting column, click Box Click the down arrow in the Art box to see a selection of graphical styles
Scroll down the list and choose the cat shape
Click the down arrow next to Color and select a medium grey from the palette
Click OK
Look at the document in Print Preview
Close Print Preview
Always check a document with a page border in Print Preview before printing.
Word2007Intermediate (020611) 80 ©De Montfort University, IT Training 2011
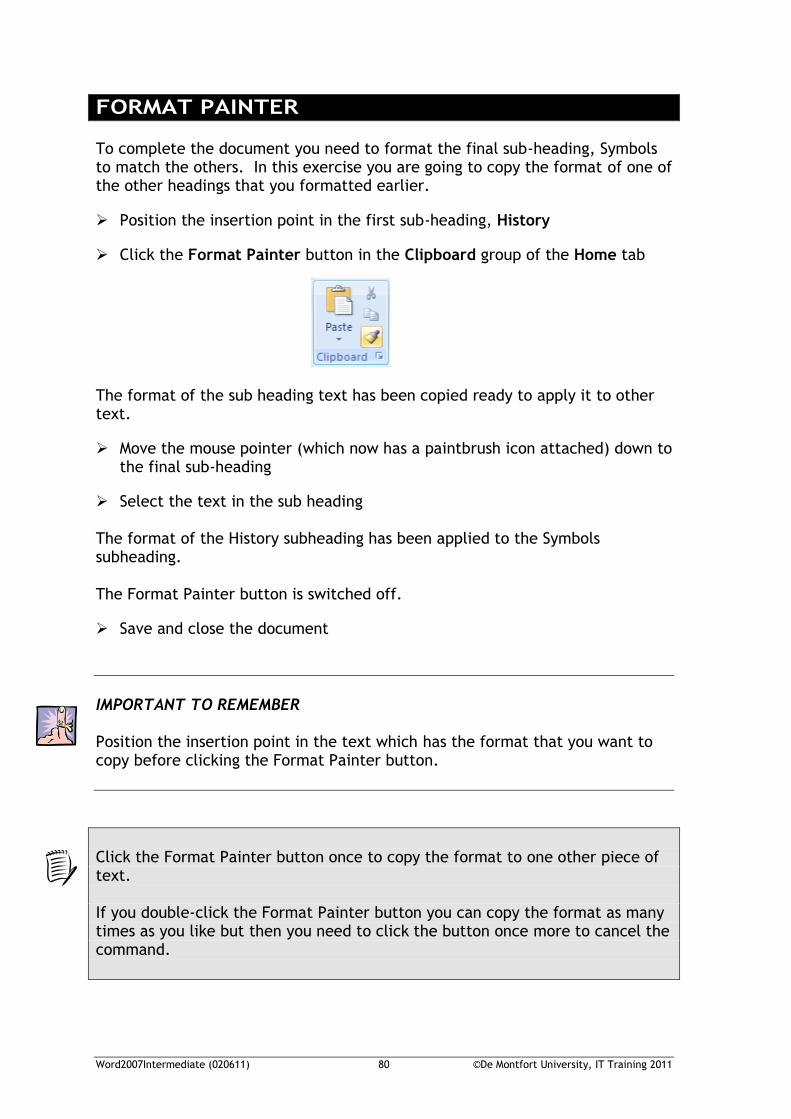
FORMAT PAINTER To complete the document you need to format the final sub-heading, Symbols to match the others. In this exercise you are going to copy the format of one of the other headings that you formatted earlier.
Position the insertion point in the first sub-heading, History
Click the Format Painter button in the Clipboard group of the Home tab
The format of the sub heading text has been copied ready to apply it to other text.
Move the mouse pointer (which now has a paintbrush icon attached) down to the final sub-heading
Select the text in the sub heading The format of the History subheading has been applied to the Symbols subheading. The Format Painter button is switched off.
Save and close the document
IMPORTANT TO REMEMBER Position the insertion point in the text which has the format that you want to copy before clicking the Format Painter button.
Click the Format Painter button once to copy the format to one other piece of text. If you double-click the Format Painter button you can copy the format as many times as you like but then you need to click the button once more to cancel the command.
Word2007Intermediate (020611) 81 ©De Montfort University, IT Training 2011
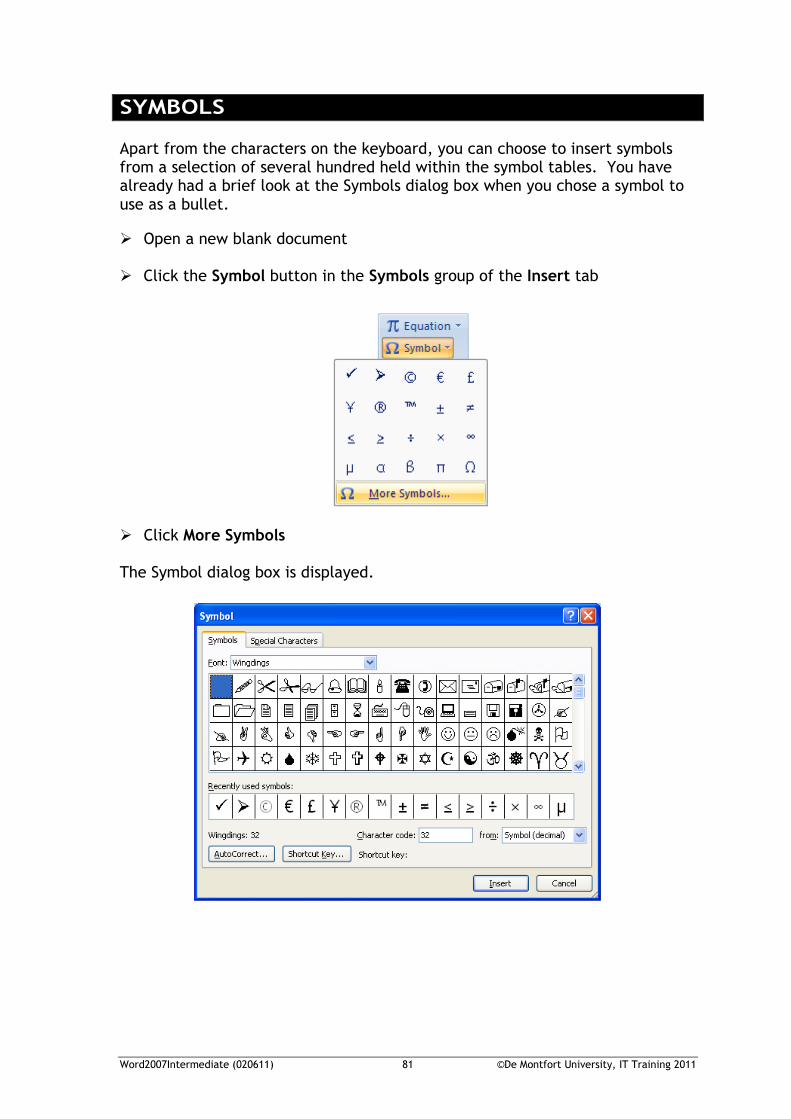
SYMBOLS Apart from the characters on the keyboard, you can choose to insert symbols from a selection of several hundred held within the symbol tables. You have already had a brief look at the Symbols dialog box when you chose a symbol to use as a bullet.
Open a new blank document Click the Symbol button in the Symbols group of the Insert tab
Click More Symbols The Symbol dialog box is displayed.
Word2007Intermediate (020611) 82 ©De Montfort University, IT Training 2011
The symbols and characters you can insert depend upon the font that you choose. There are a variety of fonts and you might need to search through them to find what you are looking for. Click the down arrow next to Font Select Webdings The Webdings symbols include more unusual characters. Choose a symbol Click the Insert button The symbol is inserted into the document. Click Close
You treat a symbol in the same way as any other character – if you need to make it bigger, select the symbol and a larger font size.
Word2007Intermediate (020611) 83 ©De Montfort University, IT Training 2011
INTERNATIONAL CHARACTERS Although international characters such as â are included in the Symbols tables, it is tedious to have to search for these characters when you need them. To produce é Hold down the CTRL key and press ‘ (apostrophe) Release the CTRL key and press e Try reproducing the following characters:
ö Ctrl+Shift+:(colon)+o
ñ Ctrl+Shift+~(tilde)+n
ç Ctrl+,(comma)+c
ß Ctrl+Shift+&+s
ù Ctrl+`(accent grave)+u
To see a list of characters, type International Characters into Word Help.
Close the document without saving
Word2007Intermediate (020611) 84 ©De Montfort University, IT Training 2011
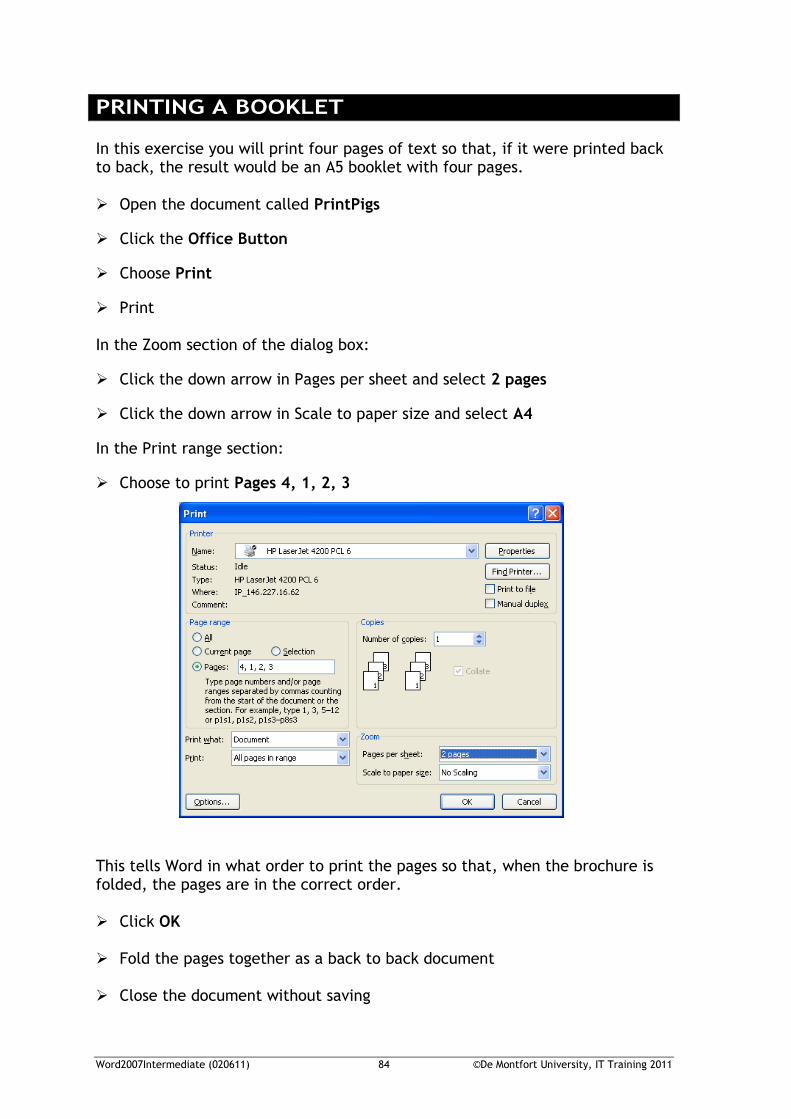
PRINTING A BOOKLET In this exercise you will print four pages of text so that, if it were printed back to back, the result would be an A5 booklet with four pages. Open the document called PrintPigs
Click the Office Button
Choose Print
Print In the Zoom section of the dialog box:
Click the down arrow in Pages per sheet and select 2 pages
Click the down arrow in Scale to paper size and select A4
In the Print range section:
Choose to print Pages 4, 1, 2, 3
This tells Word in what order to print the pages so that, when the brochure is folded, the pages are in the correct order. Click OK Fold the pages together as a back to back document Close the document without saving