Embed Size (px)
Citation preview
Interactive Art Display Year level band: 78
Description:
In this lesson, students will explore the requirements of an interactive art display project. They will build a prototype of the interactive art display build a popup computer companion that pops up from behind the screen whenever a sound is heard. The companion’s voice is programmed using Scratch. This project introduces students to the littleBits kit and the Makey Makey bit and discusses how they can be used to build digital systems.
Type: Visual programming, systems thinking
Resources:
● littleBits Rule Your Room Kit ● littleBits Rule Your Room Invention Guide (included with the kit) ● Various art implements, scissors, cardboard, glue stick, coloured paper ● Spare 9V batteries
Prior Student Learning:
A basic understanding of circuits is useful.
An understanding of programming concepts input and output, algorithms, loops and debugging.
An understanding of how littleBits work and the various types of bits, including the Makey Makey bit.
If the class is not familiar with littleBits, the companion lesson plan, called Introduction to littleBits and Makey Makey should be used instead of this lesson.
Digital Technologies Summary
This activity explores the design of an interactive art display, where an abstract art project uses littleBits circuitry such as light, sound sensors, motors etc. for interaction. At the same time, the same art project is displayed in the Scratch program, and, as various pieces of the realworld art display interact, the Scratch program interact in a similar manner, that is, by lighting up, moving, making sounds, etc. Students also write the pseudo code or flowchart of the Scratch program that performs the interactions, and, in their groups, present their designs to the peers.
Band Content Descriptors
78 Design the user experience of a digital system, generating, evaluating and communicating alternative designs (ACTDIP028)
● Identify features that make a HID interface easy to use and incorporate these into their own design
● Identifying similar digital systems and their user interfaces, assessing whether user interface elements can be reused.
● Presenting and comparing alternative designs to a solution for a problem, for example presenting alternative design mockups to the class
Design algorithms represented diagrammatically and in English, and trace algorithms to predict output for a given input and to identify errors (ACTDIP029)
● Flowcharts present how each element of the display becomes interactive and when, e.g., when button is pressed, slider moved etc
● Flowcharts present the branching algorithm for the Scratch program, identifying key sprites (corresponding to the parts of the interactive display) and decomposition their behaviour into key blocks
Implement and modify programs with user interfaces involving branching, iteration and functions in a generalpurpose programming language (ACTDIP030)
● Decomposition the project into key Scratch sprites (corresponding to parts of the art display) and decomposing their behaviour into instructions
● Using the input from the Makey Makey and branching to determine the behaviour of the Scratch program
The particular elements of Critical and Creative Thinking addressed by this content description Inquiring – identifying, exploring and organising information and ideas · Identify and clarify information and ideas · Organise and process information
Generating ideas, possibilities and actions · Consider alternatives · Seek solutions and put ideas into action · Imagine possibilities and connect ideas
Analysing, synthesising and evaluating reasoning and procedures · Apply logic and reasoning
Reflecting on thinking and processes
· Transfer knowledge into new contexts
Element Summary of tasks
Learning hook We are going to use a Makey Makey bit to connect our littleBits prototypes to a computer program. If you haven’t done so before, you may want to go through the littleBits basics with the class (p23 in the Invention Guide): Anatomy, Colorcoded categories, Magnets, Order of Bits. Similarly, ask students explore the bits in the kit so they know their features and functions. Pages 611 introduce all the available Bits and how they can interact.
If students have not used Makey Makeys before, introduce them to the Makey Makey. This YouTube tutorial might be useful:
https://www.youtube.com/watch?v=X3hb__YynM
Ask students to think about how to make art projects more interactive and more fun, to capture the attention of younger viewers. Show them a simple abstract painting (by Mondrian for example, see below) and ask them questions like:
● How could we make this artwork more interactive? ● What littleBits could we use if we were to embark on this project using
littleBits?

Achievement
Standards
Students plan and manage digital projects to create interactive information.
They define and decompose problems in terms of functional requirements and
constraints. Students design user experiences and algorithms incorporating
branching and iterations, and test, modify and implement digital solutions.
They evaluate information systems and their solutions in terms of meeting
needs, innovation and sustainability. They analyse and evaluate data from a
range of sources to model and create solutions.
Learning Map (Sequence)
● Students build a simple prototype of their art installation, identifying
the elements of the art project that will be interactive, and describing
how this interaction will happen
● Students list the requirements they have derived from their prototyping
activity, taking care to list constraints as well (e.g, is the shape of the
art easy to draw in Scratch? Or, is a littleBits circuitry possible for all
their selected interactive art pieces?)
● Students build a prototype of the littleBits circuitry that will make the
interactive art display possible
● Students draw the flowchart of their Scratch algorithm
Learning input
1. Ask students to select the littleBits that they would need for this project and
to explain why they have selected them.
2. Explain that inputs can be digital or analogue. Digital has two states (on/off,
3. Students draw the circuitry and connections, showing the input/output flow,
as well as the type of input: digital/analogue.
4. Once they are sure the circuitry is correct, students build the circuit using
littleBits.
5. Students write the flowchart for the Scratch program
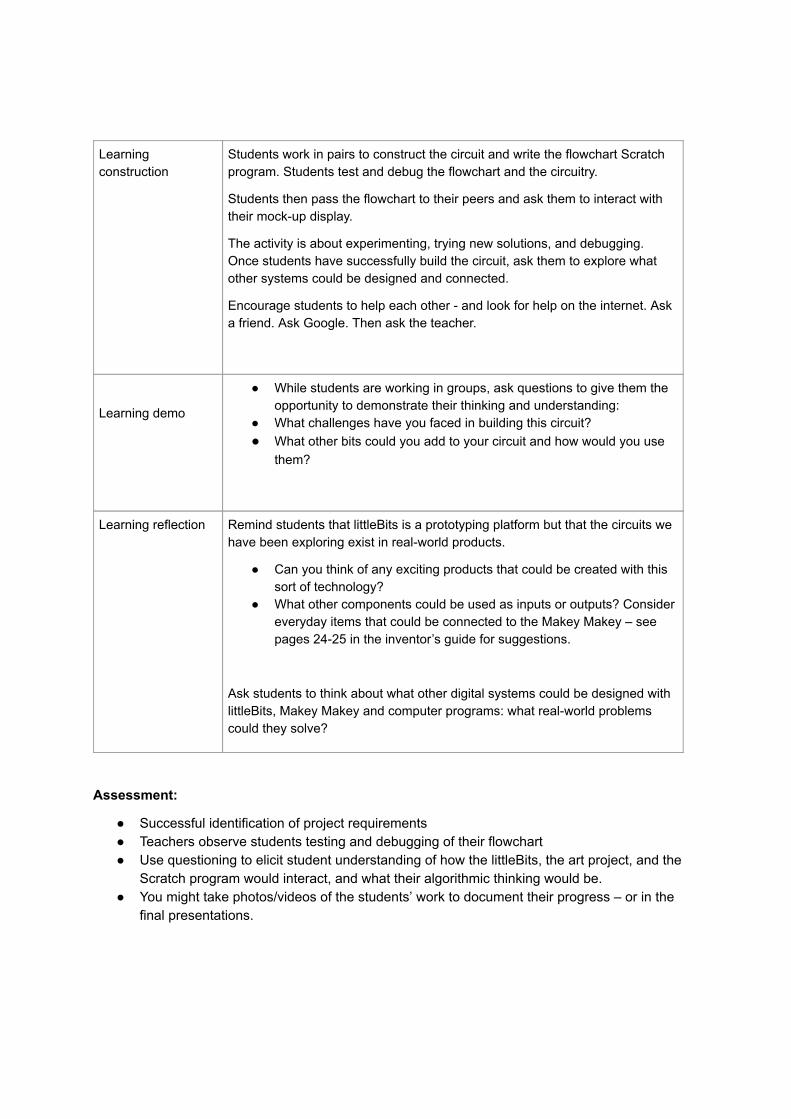
Learning
construction
Students work in pairs to construct the circuit and write the flowchart Scratch
program. Students test and debug the flowchart and the circuitry.
Students then pass the flowchart to their peers and ask them to interact with
their mockup display.
The activity is about experimenting, trying new solutions, and debugging.
Once students have successfully build the circuit, ask them to explore what
other systems could be designed and connected.
Encourage students to help each other and look for help on the internet. Ask
a friend. Ask Google. Then ask the teacher.
Learning demo
● While students are working in groups, ask questions to give them the
opportunity to demonstrate their thinking and understanding:
● What challenges have you faced in building this circuit?
● What other bits could you add to your circuit and how would you use
them?
Learning reflection Remind students that littleBits is a prototyping platform but that the circuits we
have been exploring exist in realworld products.
● Can you think of any exciting products that could be created with this
sort of technology?
● What other components could be used as inputs or outputs? Consider
everyday items that could be connected to the Makey Makey – see
pages 2425 in the inventor’s guide for suggestions.
Ask students to think about what other digital systems could be designed with
littleBits, Makey Makey and computer programs: what realworld problems
could they solve?
Assessment:
● Successful identification of project requirements ● Teachers observe students testing and debugging of their flowchart ● Use questioning to elicit student understanding of how the littleBits, the art project, and the
Scratch program would interact, and what their algorithmic thinking would be. ● You might take photos/videos of the students’ work to document their progress – or in the
final presentations.
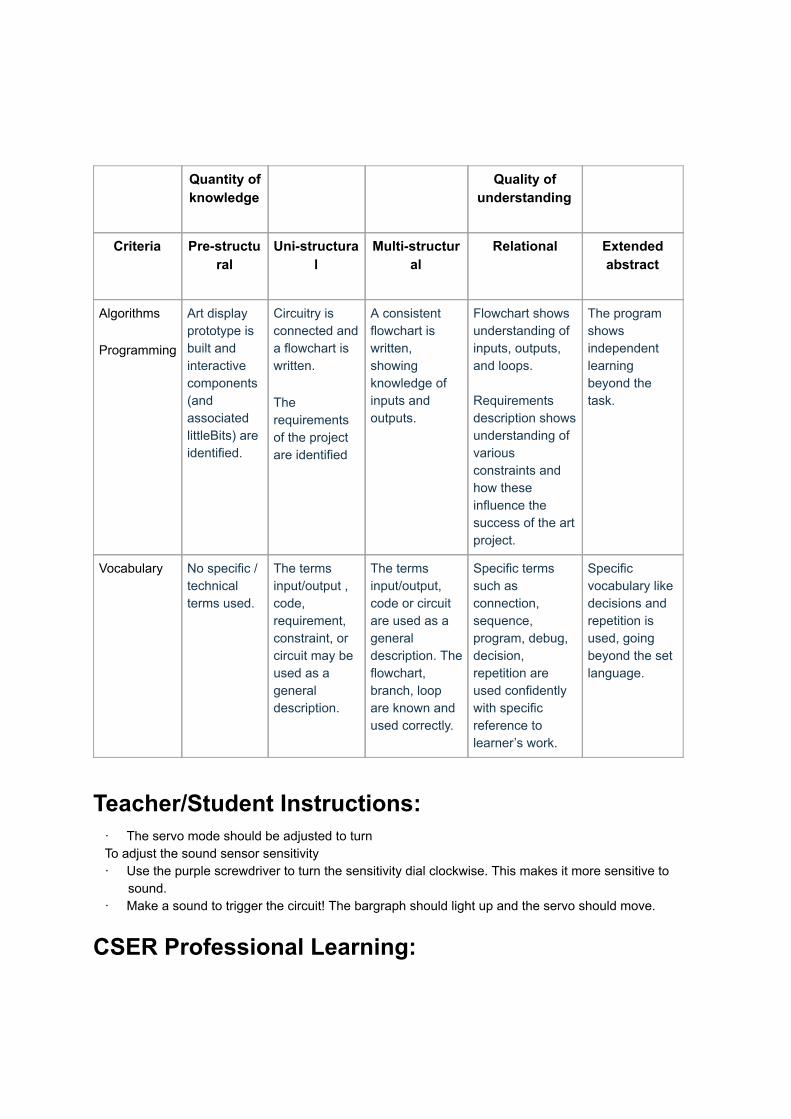
Quantity of knowledge
Quality of understanding
Criteria Prestructural
Unistructural
Multistructural
Relational Extended abstract
Algorithms
Programming
Art display prototype is built and interactive components (and associated littleBits) are identified.
Circuitry is connected and a flowchart is written.
The requirements of the project are identified
A consistent flowchart is written, showing knowledge of inputs and outputs.
Flowchart shows understanding of inputs, outputs, and loops. Requirements description shows understanding of various constraints and how these influence the success of the art project.
The program shows independent learning beyond the task.
Vocabulary No specific / technical terms used.
The terms input/output , code, requirement, constraint, or circuit may be used as a general description.
The terms input/output, code or circuit are used as a general description. The flowchart, branch, loop are known and used correctly.
Specific terms such as connection, sequence, program, debug, decision, repetition are used confidently with specific reference to learner’s work.
Specific vocabulary like decisions and repetition is used, going beyond the set language.
Teacher/Student Instructions: · The servo mode should be adjusted to turn To adjust the sound sensor sensitivity · Use the purple screwdriver to turn the sensitivity dial clockwise. This makes it more sensitive to
sound. · Make a sound to trigger the circuit! The bargraph should light up and the servo should move.
CSER Professional Learning:

This lesson plan corresponds to professional learning in the following CSER Digital Technologies
MOOCs:
7 & 8 Digital Technologies: Next Steps Making Apps, Unit 2 See: http://csermoocs.adelaide.edu.au/moocs
Further Resources: 1. Information about the littleBits Rule Your Room Kit and some example projects:
http://littlebits.cc/projects 2. The littleBits Educator Guide, available online here:
https://d2q6sbo7w75ef4.cloudfront.net/littleBitsEducatorsGuide_FINAL.pdf
Author: Claudia Szabo
This work is licensed under a Creative Commons AttributionNonCommercial 4.0 International License . Computer Science Education Research (CSER) Group, The University of Adelaide.