Embed Size (px)
Citation preview
Veritas Storage Foundation™
Intelligent Storage Provisioning Solutions Guide
5.0
N18457C

Symantec Intelligent Storage Provisioning Solutions Guide
Copyright © 2006 Symantec Corporation. All rights reserved.
Veritas Storage Foundation 5.0
Symantec, the Symantec Logo, Veritas and Veritas Storage Foundation are trademarks or registered trademarks of Symantec Corporation or its affiliates in the U.S. and other countries. Other names may be trademarks of their respective owners.
The product described in this document is distributed under licenses restricting its use, copying, distribution, and decompilation/reverse engineering. No part of this document may be reproduced in any form by any means without prior written authorization of Symantec Corporation and its licensors, if any.
THIS DOCUMENTATION IS PROVIDED “AS IS” AND ALL EXPRESS OR IMPLIED CONDITIONS, REPRESENTATIONS AND WARRANTIES, INCLUDING ANY IMPLIED WARRANTY OF MERCHANTABILITY, FITNESS FOR A PARTICULAR PURPOSE OR NON-INFRINGEMENT, ARE DISCLAIMED, EXCEPT TO THE EXTENT THAT SUCH DISCLAIMERS ARE HELD TO BE LEGALLY INVALID, SYMANTEC CORPORATION SHALL NOT BE LIABLE FOR INCIDENTAL OR CONSEQUENTIAL DAMAGES IN CONNECTION WITH THE FURNISHING PERFORMANCE, OR USE OF THIS DOCUMENTATION. THE INFORMATION CONTAINED IN THIS DOCUMENTATION IS SUBJECT TO CHANGE WITHOUT NOTICE.
The Licensed Software and Documentation are deemed to be “commercial computer software” and “commercial computer software documentation” as defined in FAR Sections 12.212 and DFARS Section 227.7202.
Symantec Corporation 20330 Stevens Creek Blvd. Cupertino, CA 95014 www.symantec.com
Third-party legal notices
Third-party software may be recommended, distributed, embedded, or bundled with this Symantec product. Such third-party software is licensed separately byits copyright holder. All third-party copyrights associated with this product are listed in the accompanying release notes.
AIX is a registered trademark of IBM Corporation.HP-UX is a registered trademark of Hewlett-Packard Development Company,L.P.Linux is a registered trademark of Linus Torvalds.Solaris is a trademark of Sun Microsystems, Inc.
Licensing and registration Veritas Storage Foundation is a licensed product. See the Veritas Storage Foundation Installation Guide for license installation instructions.
Technical support For technical assistance, visit http://support.veritas.com and select phone or email support. Use the Knowledge Base search feature to access resources such as TechNotes, product alerts, software downloads, hardware compatibility lists, and our customer email notification service.

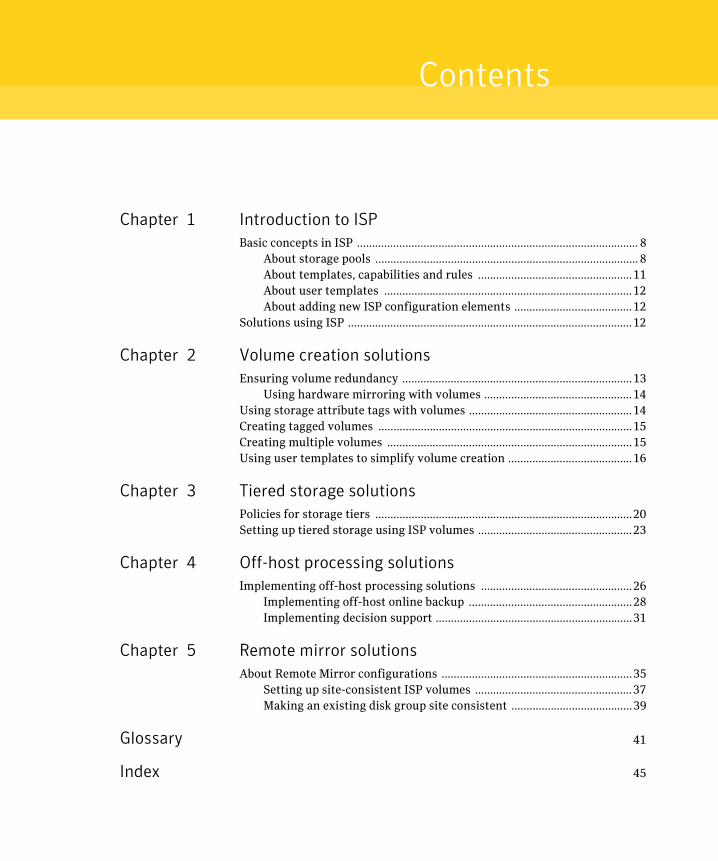
Contents
Chapter 1 Introduction to ISP Basic concepts in ISP ............................................................................................. 8
About storage pools ....................................................................................... 8About templates, capabilities and rules ...................................................11About user templates ..................................................................................12About adding new ISP configuration elements .......................................12
Solutions using ISP ..............................................................................................12
Chapter 2 Volume creation solutions Ensuring volume redundancy ............................................................................13
Using hardware mirroring with volumes .................................................14Using storage attribute tags with volumes ......................................................14Creating tagged volumes ....................................................................................15Creating multiple volumes .................................................................................15Using user templates to simplify volume creation .........................................16
Chapter 3 Tiered storage solutions Policies for storage tiers .....................................................................................20Setting up tiered storage using ISP volumes ...................................................23
Chapter 4 Off-host processing solutions Implementing off-host processing solutions ..................................................26
Implementing off-host online backup ......................................................28Implementing decision support .................................................................31
Chapter 5 Remote mirror solutions About Remote Mirror configurations ...............................................................35
Setting up site-consistent ISP volumes ....................................................37Making an existing disk group site consistent ........................................39
Glossary 41
Index 45

6 Contents
Chapter
1Introduction to ISP
Intelligent Storage Provisioning (ISP) is a feature of Veritas Storage FoundationTM that provides new approaches to virtualizing network storage. ISP allows application volumes to be created from the available storage that adhere to a set of specified criteria. Using ISP simplifies and standardizes storage provisioning, allows the redundancy and performance characteristics to be preserved over time, and helps to eliminate human error when allocating storage to volumes.
This solutions guide is one in a series from Symantec. Solution guides present products in a real-world context, and provide concise guidelines for commonly-performed procedures. This solutions guide describes scenarios where ISP can be used to enforce installation standards and to simplify common storage provisioning tasks.
A larger companion book, the Veritas Storage Foundation Intelligent Storage Provisioning Administrator’s Guide, which is provided as part of the documentation set that is included with the Storage Foundation product, serves as a comprehensive reference to ISP concepts, operations, administration and the ISP specification language.
Together these books offer a comprehensive approach to understanding the complexity and power of ISP as applied to storage management.
The remainder of this chapter introduces some basic but essential ISP concepts and terminology. Subsequent chapters apply these concepts to implement various storage provisioning scenarios. For a more detailed explanation on any topic in this chapter, see the Veritas Storage Foundation Intelligent Storage Provisioning Administrator’s Guide.
8 Introduction to ISP Basic concepts in ISP
Basic concepts in ISP Provisioning storage so that it can be used by applications involves:
■ Configuring the physical storage devices (disks and derived logical units).
■ Ensuring that the appropriate hosts can access the devices.
■ Aggregating the available storage capacity into virtual storage devices known as volumes.
■ Providing a method for applications to store and retrieve data on the volumes, such as through a file system or a database.
ISP is concerned with step 3, and the establishment and enforcement of installation-defined standards on the volumes that are created by aggregating capacity from one or more disks within a disk group.
A volume appears as a disk device to host software, but one with enhanced availability, performance, and flexibility that enables simplified management across heterogeneous environments.
ISP builds upon the existing volume management capabilities that are provided by Veritas Volume Manager (VxVM), so the first step is to create a disk group that contains disks which have been initialized for use with VxVM. You can use the vxdiskadm command or the graphical user interface to set up one or more disk groups that contain suitably-initialized disks.
Note: A logical unit (LUN) is a storage device such as a disk, or a collection of disks that are abstracted as a single entity by the disk array hardware (usually after applying a RAID configuration such as RAID-0 (striping), RAID-1 (mirroring) or RAID-5 (striping with parity) to the disks). The Device Discovery Layer (DDL) of Veritas Volume Manager (VxVM) discovers LUNs and gathers details on how they are implemented. ISP can use this information to assist you in configuring application volumes. Unless the hardware-derived characteristics of a LUN are important to the discussion, such devices are referred to as disks in this book.
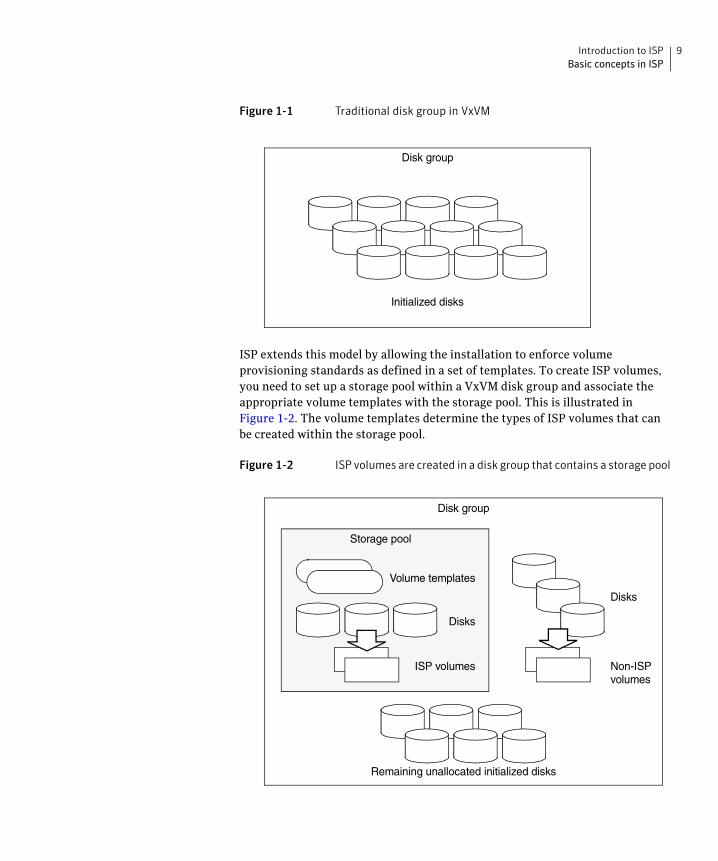
About storage pools Figure 1-1 illustrates a traditional disk group containing disks that have been initialized for VxVM use. You can create volumes from the disks in this disk group by using the vxassist command or the graphical user interface.
Introduction to ISP 9 Basic concepts in ISP
Figure 1-1 Traditional disk group in VxVM
Disk group
Initialized disks
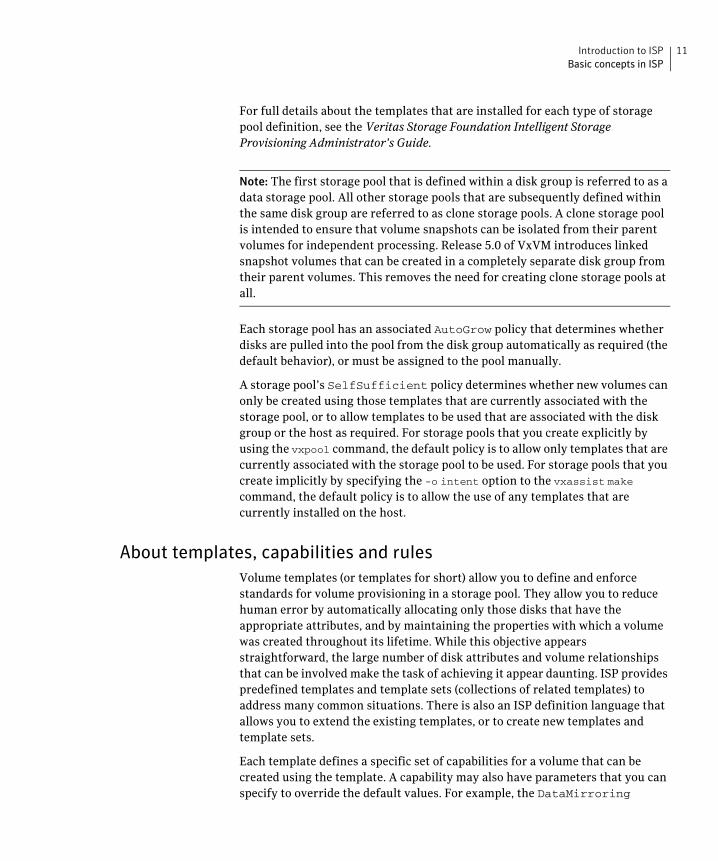
ISP extends this model by allowing the installation to enforce volume provisioning standards as defined in a set of templates. To create ISP volumes, you need to set up a storage pool within a VxVM disk group and associate the appropriate volume templates with the storage pool. This is illustrated in Figure 1-2. The volume templates determine the types of ISP volumes that can be created within the storage pool.
Figure 1-2 ISP volumes are created in a disk group that contains a storage pool
Disk group
Remaining unallocated initialized disks
Storage pool
Volume templates
Disks
ISP volumes Non-ISP
Disks
volumes

10 Introduction to ISP Basic concepts in ISP
Any traditional non-ISP volumes that you create in a disk group with a storage pool remain outside the storage pool.
To create a storage pool within a disk group, use the vxpool create command and specify a storage pool definition that is appropriate for the kind of volumes that you wish to create. This sets up the storage pool and installs the correct templates in it. Alternatively, if you specify the -o intent to the vxassist make command to create an ISP volume, a storage pool is set up automatically for you in the disk group.
The following table lists the standard pool definitions that are included in the ISP configuration database.
Pool definition Description of supported volumes
any_volume_type Any template in the ISP configuration database.
mirror_stripe_volumes Distribution of I/O from and to volumes across multiple columns within mirrors.
mirrored_prefab_raid5_volumes Multiple copies of data configured on prefabricated RAID-5 disks that are exported by an array.
mirrored_prefab_striped_volumes Multiple copies of data configured on prefabricated striped disks that are exported by an array.
mirrored_volumes Multiple copies of data.
prefab_mirrored_volumes Prefabricated data mirrors that are exported by an array.
prefab_raid5_volumes Prefabricated RAID-5 disks that are exported by an array.
prefab_striped_volumes Prefabricated striped disks that are exported by an array.
raid5_volumes Use parity to maintain redundant data.
stripe_mirror_volumes Distribution of I/O from and to volumes across multiple columns, where each column has multiple copies of data.
striped_prefab_mirrored_volumes Distribution of I/O from and to volumes across multiple columns that are configured on prefabricated data mirrors exported by an array.
striped_volumes Distribution of I/O from and to volumes across multiple columns.
Introduction to ISP 11 Basic concepts in ISP
For full details about the templates that are installed for each type of storage pool definition, see the Veritas Storage Foundation Intelligent Storage Provisioning Administrator’s Guide.
Note: The first storage pool that is defined within a disk group is referred to as a data storage pool. All other storage pools that are subsequently defined within the same disk group are referred to as clone storage pools. A clone storage pool is intended to ensure that volume snapshots can be isolated from their parent volumes for independent processing. Release 5.0 of VxVM introduces linked snapshot volumes that can be created in a completely separate disk group from their parent volumes. This removes the need for creating clone storage pools at all.
Each storage pool has an associated AutoGrow policy that determines whether disks are pulled into the pool from the disk group automatically as required (the default behavior), or must be assigned to the pool manually.
A storage pool’s SelfSufficient policy determines whether new volumes can only be created using those templates that are currently associated with the storage pool, or to allow templates to be used that are associated with the disk group or the host as required. For storage pools that you create explicitly by using the vxpool command, the default policy is to allow only templates that are currently associated with the storage pool to be used. For storage pools that you create implicitly by specifying the -o intent option to the vxassist make command, the default policy is to allow the use of any templates that are currently installed on the host.
About templates, capabilities and rules Volume templates (or templates for short) allow you to define and enforce standards for volume provisioning in a storage pool. They allow you to reduce human error by automatically allocating only those disks that have the appropriate attributes, and by maintaining the properties with which a volume was created throughout its lifetime. While this objective appears straightforward, the large number of disk attributes and volume relationships that can be involved make the task of achieving it appear daunting. ISP provides predefined templates and template sets (collections of related templates) to address many common situations. There is also an ISP definition language that allows you to extend the existing templates, or to create new templates and template sets.
Each template defines a specific set of capabilities for a volume that can be created using the template. A capability may also have parameters that you can specify to override the default values. For example, the DataMirroring
12 Introduction to ISP Solutions using ISP
capability creates a volume with 2 mirrors by default, and has a parameter, nmirs, that you can use to specify a different number of mirrors.
In addition to specifying the capabilities of a volume, templates can include storage selection rules that specify how to select the appropriate storage, and storage layout rules that define how volumes are to be created.
About user templates A user template is a list of capabilities and rules that you can use to create similar volumes whenever required. You create user templates either by editing them directly or by using the GUIs, and then add them to the ISP configuration database by using the vxusertemplate create command.
About adding new ISP configuration elements The ISP language allows you to define new volume templates, storage pool definitions and capabilities. It may help to use the definitions that are provided in the /etc/vx/alloc/configuration_database.txt file as a model. After saving the new definitions in a file, you can use the vxtemplate install command to add them to the ISP configuration database.
For full details, see the Veritas Storage Foundation Intelligent Storage Provisioning Administrator’s Guide.
Solutions using ISP The following chapters contain details of how to use ISP to deploy solutions for different real-world scenarios.
■� Volume creation solutions describes some simple cases of how using ISP volumes enhances storage usage.
■� Tiered storage solutions describes how to create storage tiers from ISP volumes to make the best use of the available storage.
■� Off-host processing solutions describes how to move ISP volume snapshots to a different host for independent processing.
■� Remote mirror solutions describes how to use the Remote Mirror feature with ISP volumes to protect against site failure.
Chapter
2Volume creation solutions
Volumes that you create by using Intelligent Storage Provisioning (ISP) are similar to traditional non-ISP volumes that you create using the vxassist utility, but have the advantage that their intent is preserved and cannot accidentally be degraded. ISP volumes can be managed by using commands such as vxassist or vxvoladm, or by using the VEA client graphical user interface.
In release 5.0 of VxVM, it is possible to use the vxassist command to create ISP volumes. This chapter provides an overview of the various ways in which you can use vxassist to create ISP volumes for use by applications.
For full details, refer to the Veritas Storage Foundation Intelligent Storage Provisioning Administrator’s Guide.
Ensuring volume redundancy ISP automatically ensures that a volume retains its redundancy when it is resized or if the disk array moves data across disks. It also ensures that volume mirrors do not reside on the same physical disk while the volume is created or resized.
The following example command creates a 2-gigabyte mirrored volume with 2 mirrors, with the mirrors located on separate enclosures:
# vxassist -g mydg -P mypool make strpvol 2g \ capability=’DataMirroring,MirrorsOnSeparateComponents’
Such a volume tolerates the failure of one enclosure and provides greater reliability. This volume could also be created by specifying traditional vxassist storage specification parameters:
# vxassist -g mydg -P mypool make strpvol 2g layout=mirror \ nmir=2 mirror=enclosure
However, it is not possible to use the old-style vxassist specification attributes to replicate all of ISP’s advanced allocation features. For example, the capabilities that specify the creation of a volume mirrored across enclosures can
14 Volume creation solutions Using storage attribute tags with volumes
be combined with a multipathing capability to provide resilience against the failure of one of the paths to an enclosure:
# vxassist -g mydg -P mypool make strpvol 2g \ capability=’DataMirroring,MirrorsOnSeparateComponents,\
MultipathingThroughMultiplePaths’
If no storage can be allocated that fulfills the requested capability, the command fails.
Using hardware mirroring with volumes ISP allows you to create a striped volume from LUNs that are mirrored in the array hardware. The inbuilt rules also ensure that this redundancy is retained when the volume is grown or shrunk. The following example demonstrates how to create a 10-gigabyte striped-mirror volume with 8 columns using prefabricated mirrors to form each column:
# vxassist -g mydg -P mypool make strpvol 2g \ capability=’Striping(ncols=8),PrefabricatedDataMirroring’
Using storage attribute tags with volumes A storage attribute allows the properties of a LUN to be defined in an arbitrary conceptual space. For example, attributes can describe properties such as:
■ Disk access name
■ Disk media name
■ Manufacturer
■ Model type
■ Physical location, such as rack number, frame number, floor, building, or site
■ Hardware RAID configuration
■ Failover properties
■ Performance properties
■ Cost per gigabyte
You can use disk tags to create storage attributes in addition to those that are intrinsically associated with the disk hardware, and which are automatically discovered or assigned by VxVM. Disk tags are administered by using the vxdisk command or the VEA graphical user interface. For example, the vxdisk settag command can been used to assign tags and optional values to each disk:
# vxdisk -g mydg settag Room=room1 mydg01 mydg02 mydg03 mydg04 # vxdisk -g mydg settag Room=room2 mydg05 mydg06 mydg07 mydg08
Volume creation solutions 15 Creating tagged volumes
This sets the attribute tag Room on the disks (mydg01 through mydg08) with values that represent the physical location (room1 or room2).
The following command uses the new attribute tag to create a mirrored volume that tolerates the failure of a single enclosure, where each enclosure is in a different room. This avoids single point of failure and ensures greater reliability.
# vxassist -g mydg -P mypool make mirvol 10g \ capability=’DataMirroring’ \ rules=’separateby "Room","Enclosure"’
Creating tagged volumes Volume tags allow volumes to be used in conjunction with the Dynamic Storage Tiering and Remote Mirror features of the Storage Foundation software.
Volumes can be assigned tag names and optional tag values, either when the volume is created, or at a later time.
To create a volume with an associated tag and optional tag value, specify the tag attribute as shown in this example:
# vxassist -g dbdg -P dgpool make products 1g \ user_template=DBTable tag=db_table=Products
This creates a volume with a tag named db_table, which has the value Products.
You can use the vxassist settag command to set a named tag and optional tag value on a volume as shown in this example:
# vxassist -g dbdg settag customers db_table=Customers
Creating multiple volumes The ISP language can also be used to define groups of volumes (volume groups) that are to be created in a single operation. If insufficient storage is available to the storage pool to fulfill the specified requirements, the operation fails and no volumes are created. Volume groups can also be used to enforce the separation of roles between the volumes that are defined. For example, separation of database data files, index files and logs could be enforced in this manner. However, it is important to understand that this separation does not extend to any other volumes, such as those created subsequently for the database.
One or more volume groups may be defined in a file which is used as input to the vxvoladm -M make command. The disk group, rules, and volume parameters are specified at the volume group level.
The following example volume group definition is for four 10-gigabyte volumes with the prefix name mirvol in the disk group dg1. The rules state that the
16 Volume creation solutions Using user templates to simplify volume creation
mirrors in each volume should be allocated on separate enclosures, and that enclosure ENC1 should not be used at all.
volumegroup { diskgroup "dg1" rules {
separateby "Enclosure" exclude "Enclosure"="ENC1"
} volume "mirvol" 10g {
nvol 4 capability ’DataMirroring(nmirs=2)’
} };
After saving the definition to a file, you can have vxassist read it to create the volumes as shown here:
# vxassist -M make < filename
The first time that this command is run, four volumes named mirvol1 through mirvol4 are created (assuming that none of these already exist). If the command is run again, the additional volumes are named mirvol5 through mirvol8.
Using user templates to simplify volume creation You can use a user template to create consistent volumes with minimal input to avoid maintaining a library of vxassist scripts.
If an IT department is establishing the standards for volume provisioning, a subject-matter expert (SME) would define the correct user template using the ISP language to specify templates, capabilities, and rules. They would then use the following command to add the template to the configuration:
# vxusertemplate -d definition_file create
To create a volume using the simplified format
1 List the ISP user templates to locate a model for creating your own volume. # vxusertemplate list
2 Review the definitions to verify that a volume created with one does not included unwanted characteristics.
# vxusertemplate print usertemplate1 usertemplate2 ...
3 After finding the correct template, create a volume with the required capacity.
# vxassist -g diskgroup -p pool make volume size \ user_template=usertemplate1
Volume creation solutions 17 Using user templates to simplify volume creation
4 Verify that all volumes in the disk group conform to the template, pool, volume group, and user-specified rules.
# vxvoladm -g diskgroup verify
You can use the following command to list the complete set of rules that are associated with a volume:
# vxvoladm printrules volume

18 Volume creation solutions Using user templates to simplify volume creation
Chapter
3Tiered storage solutions
The typical requirements of enterprise-level storage management are to store and reliably maintain data from a number of different sources, such as inventory, customer, billing, business intelligence and personnel records. Such data is usually stored in file systems on several host systems.
Much enterprise data is mission-critical, and it must be stored so that it is readily available for secure update and retrieval by staff over the internal network, and by customers over the Internet. However, storing all an enterprise’s data in the same way is expensive, and so it is usual to store data that is not mission-critical on media that are cheaper and perhaps less readily accessible.
Storage tiers establish quality of storage service (QoSS) criteria that allow an enterprise’s data to be organized with varying degrees of availability and performance on storage with varying degrees of performance, accessibility and cost.
The following table shows typical criteria for organizing storage tiers according to cost and benefit.
Cost Benefit Application
High High Mission-critical business data to which employees and customers need frequent, fast, reliable access. These files are stored on high-end storage arrays with fast, reliable network connections.
High Low Data that is not directly related to an enterprise’s business, but which nevertheless must be retained. Examples are compliance reports and employee HR records. These files are stored on high-end arrays, but performance is not a priority.
20 Tiered storage solutions Policies for storage tiers
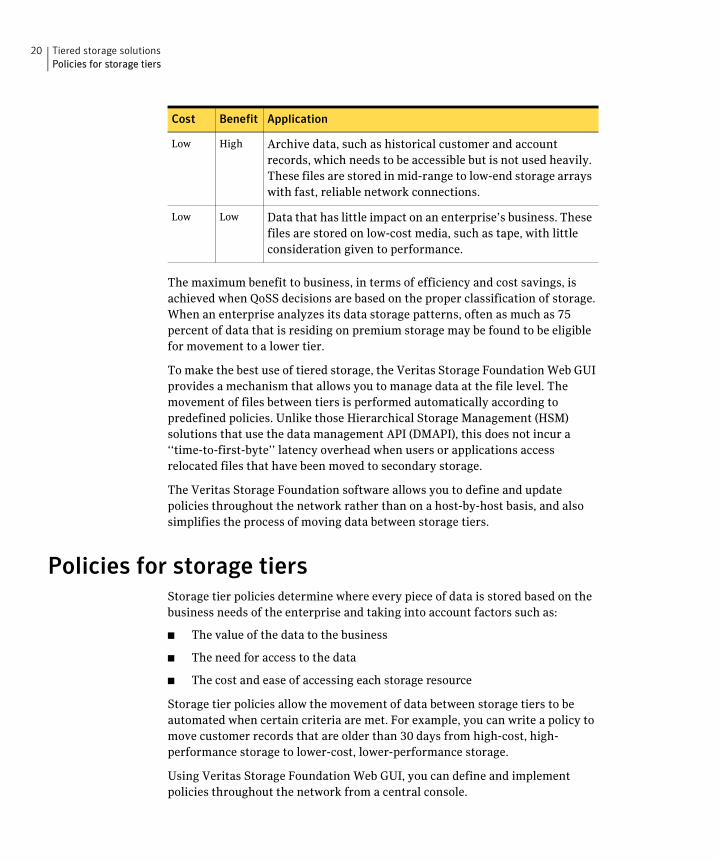
Low High Archive data, such as historical customer and account records, which needs to be accessible but is not used heavily. These files are stored in mid-range to low-end storage arrays with fast, reliable network connections.
Low Low Data that has little impact on an enterprise’s business. These files are stored on low-cost media, such as tape, with little consideration given to performance.
Cost Benefit Application
The maximum benefit to business, in terms of efficiency and cost savings, is achieved when QoSS decisions are based on the proper classification of storage. When an enterprise analyzes its data storage patterns, often as much as 75 percent of data that is residing on premium storage may be found to be eligible for movement to a lower tier.
To make the best use of tiered storage, the Veritas Storage Foundation Web GUI provides a mechanism that allows you to manage data at the file level. The movement of files between tiers is performed automatically according to predefined policies. Unlike those Hierarchical Storage Management (HSM) solutions that use the data management API (DMAPI), this does not incur a ‘‘time-to-first-byte’’ latency overhead when users or applications access relocated files that have been moved to secondary storage.
The Veritas Storage Foundation software allows you to define and update policies throughout the network rather than on a host-by-host basis, and also simplifies the process of moving data between storage tiers.
Policies for storage tiers�Storage tier policies determine where every piece of data is stored based on the business needs of the enterprise and taking into account factors such as:
■ The value of the data to the business
■ The need for access to the data
■ The cost and ease of accessing each storage resource
Storage tier policies allow the movement of data between storage tiers to be automated when certain criteria are met. For example, you can write a policy to move customer records that are older than 30 days from high-cost, high-performance storage to lower-cost, lower-performance storage.
Using Veritas Storage Foundation Web GUI, you can define and implement policies throughout the network from a central console.
Tiered storage solutions 21 Policies for storage tiers
The following table shows the typical factors that can be taken into account when implementing policies for storage tiers.
Factor Description
Availability Some files are more valuable than others to an enterprise. For example, losing a day's business transactions is significant but probably survivable. Losing quarterly or annual closing figures, on the other hand, might be catastrophic. Losing an entire day's work is a significant setback for an employee, but losing the finished product is a much more serious setback for the company.
Business considerations Enterprise accounting, security, and regulatory compliance may require that specific files or types of files be confined to certain storage devices.
Expected access patterns Different types of data need different levels of I/O performance. Streamed data requires high bandwidth for data transfer performance, but moderate I/O request rates are often acceptable. Transactional data requires high I/O request rates, but the bandwidth requirements may not be critical if only small amounts of data are involved.
Load balancing Applications that run concurrently may compete for I/O resources unless their data is placed on separate storage devices with separate access paths.
An ideal policy ensures that files are placed on the most appropriate type of storage when they are created, and that they are relocated to different tiers of storage during their life cycle. File relocation may be triggered according to various criteria such as frequency of access, ownership and size changes.
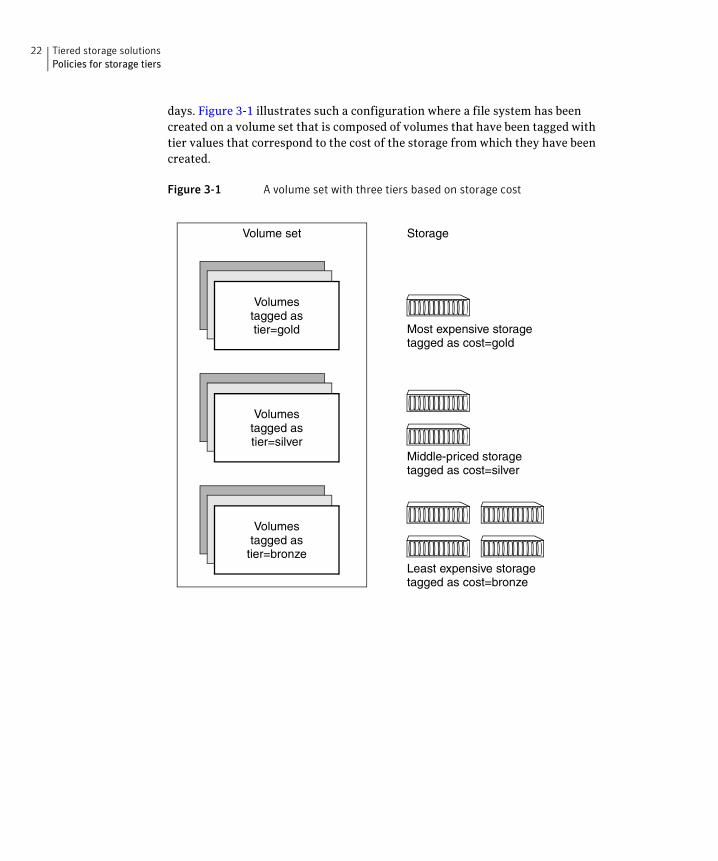
To set up a storage tier begin by tagging those volumes that you want to place in a tiered hierarchy, add these volumes to a volume set, and then implement the policies your enterprise has decided to use. For example, a policy might say that customer transaction records should be moved from the top tier (for example, gold) to a middle tier (silver) when they have not been accessed for 30 days, and from the middle tier to the lowest tier when they have not been accessed for 120
22 Tiered storage solutionsPolicies for storage tiers
days. Figure 3-1 illustrates such a configuration where a file system has been created on a volume set that is composed of volumes that have been tagged with tier values that correspond to the cost of the storage from which they have been created.
Figure 3-1 A volume set with three tiers based on storage cost
Volumestagged as
tier=bronze
Volumestagged astier=silver
Volumestagged astier=gold
Volume set
Most expensive storage
Least expensive storage
Middle-priced storage
tagged as cost=gold
tagged as cost=silver
tagged as cost=bronze
Storage
Tiered storage solutions 23 Setting up tiered storage using ISP volumes
Setting up tiered storage using ISP volumes�
To establish a storage tier using ISP volumes in a volume set�
1� Use the vxdiskadm command or the GUI to create the disk group that will be used to hold the tiered volumes and the volume set to which they will be added. Add all the disks that are required to this disk group.
2 Define the rules to categorize the disks into storage tiers. This can be done by disk vendor, array model, or by using the vxdisk settag command to apply appropriate tags to the disks. The following example assigns cost tags to disks from three different arrays:
# vxdisk -g dstdg settag cost=gold emc1_1 emc1_2# vxdisk -g dstdg settag cost=silver hds1_1 hds1_2# vxdisk -g dstdg settag cost=bronze jbod1_1 jbod1_2 jbod1_3
3 Use the vxpool command to create a storage pool in the disk group, for example:
# vxpool -g dstdg create dstpool autogrow=diskgroup \selfsufficient=pool
4� If required, define the capabilities, rules and templates that are required to express the storage services that are to be provided by each tier. For example, you can create new volume templates that associate the correct tier tag for the class of storage that is used. The following is an example of such a template definition:
volume_template SilverStorage {extends DataMirroringPrefabricatedStripingrules {
tag "tier"="silver"confineto "cost"="silver"
}};
Use the vxtemplate command to install your template definition file in the ISP configuration database:
# vxtemplate -C -d dst_template_file install
Use the vxpool command to associate your templates and any others that you require with the storage pool, as shown in this example.
# vxpool -g mydg assoctemplate dstpool \template=GoldStorage,SilverStorage,BronzeStorage
5 You can now create the volumes. The following command would use the template to create a 20-gigabyte mirrored volume with 2 mirrors composed of LUNs striped in hardware, and with the mirrors located on separate enclosures:
# vxassist -g dstdg make silvervol 20g \volume_template=’SilverStorage,\
MirrorsOnSeparateComponents’
24 Tiered storage solutions Setting up tiered storage using ISP volumes
If you are creating many volumes at the same time, or you may need to repeat the procedure in the future, it is preferable to define the volumes to be created as a volume group in a definitions file, and then use the vxassist -M make command to read this and set up the volumes. For details, see “Creating multiple volumes” on page 15 and the Veritas Storage Foundation Intelligent Storage Provisioning Administrator’s Guide.
If you use the predefined templates rather than creating your own, you can use the vxassist settag command to add the appropriate tier tag to each volume as shown in this example:
# vxassist -g mydg settag silvervol tier=silver
6 Use the vxvset command to add the individual volumes to a volume set. For example, the following command creates a volume set, dst_vset, that contains the volumes goldvol, silvervol and bronzevol:
# vxvset -g dstdg -t vxfs make dst_vset goldvol# vxvset -g dstdg addvol dst_vset silvervol# vxvset -g dstdg addvol dst_vset bronzevol
7� You can now create a Veritas File System (VxFS) on the volume set, and apply placement policies to the files in that file system. For details, see the Veritas File System Administrator’s Guide.
Chapter
4Off-host processing solutions
Veritas Volume Manager (VxVM) allows point-in-time copies of a volume’s data, or snapshots, to be processed by alternate hosts while an application continues to access the data in the volume. Off-host processing reduces downtime and allows you to implement the following activities:
Data backup
Decision support analysis and reporting
Testing and training
As the requirement for 24 x 7 availability becomes essential for many businesses, organizations cannot afford the downtime involved in backing up critical data offline. By taking a snapshot of the data, and backing up from this snapshot, business-critical applications can continue to run without extended down time or impacted performance.
Because snapshots hold a point-in-time copy of a production database, a replica of the database can be set up using the snapshots. Operations such as decision support analysis and business reporting do not require access to up-to-the-minute information. This means that they can use a database copy that is running on a host other than the primary. When required, the database copy can quickly be synchronized with the data in the primary database.
Development or service groups can use snapshots as test data for new applications. Snapshot data provides developers, system testers and QA groups with a realistic basis for testing the robustness, integrity and performance of new applications.
26 Off-host processing solutions Implementing off-host processing solutions
Database error recovery Logic errors caused by an administrator or an application program can compromise the integrity of a database. By restoring the database table files from a snapshot copy, the database can be recovered more quickly than by full restoration from tape or other backup media.
Off-host processing is made simpler by using linked break-off snapshots, which can be set up in a different disk group from the data volume. This makes them especially suitable for off-host processing applications where you may want to create the snapshot on storage with different characteristics from that used for the data volumes.
Implementing off-host processing solutions�As shown in Figure 4-1, by accessing snapshot volumes from a lightly-loaded host (shown here as the OHP host), CPU- and I/O-intensive operations for online backup and decision support do not degrade the performance of the primary host that is performing the main production activity (such as running a database). Also, if you place the snapshot volumes on disks that are attached to different host controllers than the disks in the primary volumes, it is possible to avoid contending with the primary host for I/O resources.
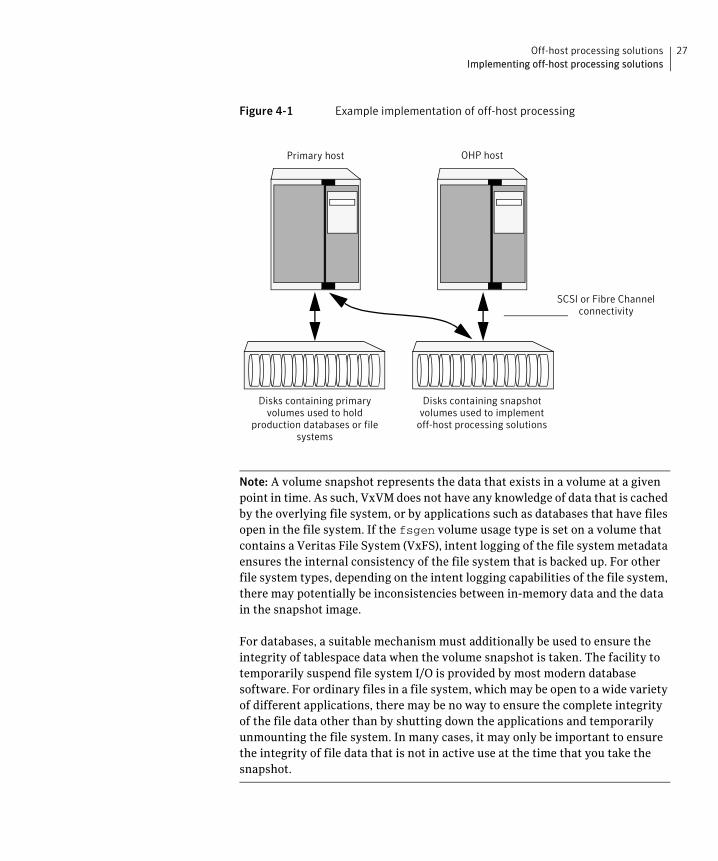
Off-host processing solutions 27 Implementing off-host processing solutions
Figure 4-1 Example implementation of off-host processing
Primary host OHP host
connectivity SCSI or Fibre Channel
Disks containing primary Disks containing snapshot volumes used to hold volumes used to implement
production databases or file off-host processing solutions systems
Note: A volume snapshot represents the data that exists in a volume at a given point in time. As such, VxVM does not have any knowledge of data that is cached by the overlying file system, or by applications such as databases that have files open in the file system. If the fsgen volume usage type is set on a volume that contains a Veritas File System (VxFS), intent logging of the file system metadata ensures the internal consistency of the file system that is backed up. For other file system types, depending on the intent logging capabilities of the file system, there may potentially be inconsistencies between in-memory data and the data in the snapshot image.
For databases, a suitable mechanism must additionally be used to ensure the integrity of tablespace data when the volume snapshot is taken. The facility to temporarily suspend file system I/O is provided by most modern database software. For ordinary files in a file system, which may be open to a wide variety of different applications, there may be no way to ensure the complete integrity of the file data other than by shutting down the applications and temporarily unmounting the file system. In many cases, it may only be important to ensure the integrity of file data that is not in active use at the time that you take the snapshot.
28 Off-host processing solutions Implementing off-host processing solutions
The following sections describe how you can apply off-host processing to implement regular online backup of a volume in a private disk group, and to set up a replica of a production database for decision support. Two applications are outlined:
■ Implementing off-host online backup
■ Implementing decision support
These applications use the Persistent FastResync feature of VxVM in conjunction with linked break-off snapshots.
Implementing off-host online backup This section describes a procedure for implementing off-host online backup for a volume in a private disk group. The intention is to present an outline of how to set up a regular backup cycle by combining the Persistent FastResync and linked break-off snapshot features of VxVM. It is beyond the scope of this guide to describe how to configure a database to use this procedure, or how to perform the backup itself.
To back up a volume in a private disk group�
1� On the primary host, create a new volume, snapvol, in a separate disk group, snapvoldg, for use as the snapshot volume. This volume must be the same size as the original volume, but it can differ in its layout and other characteristics, such as the quality of storage. It is recommended that the snapshot disk group contains storage that is dedicated to off-host processing.
2 On the primary host, link the snapshot volume in the snapshot disk group to the data volume:
# vxsnap -g volumedg -b addmir volume mirvol=snapvol \ mirdg=snapvoldg
You can use the vxsnap snapwait command to wait for synchronization of a linked snapshot volume to complete:
# vxsnap -g volumedg snapwait volume mirvol=snapvol \ mirdg=snapvoldg
This step sets up the snapshot volumes, and starts tracking changes to the original volumes. When you are ready to create a backup, proceed to step 3.
3� On the primary host, suspend updates to the volume that contains the database tables. The database may have a hot backup mode that allows you to do this by temporarily suspending writes to its tables.
Off-host processing solutions 29 Implementing off-host processing solutions
4 Create the snapshot volume, snapvol, by running the following command on the primary host:
# vxsnap -g volumedg make \ source=volume/snapvol=snapvol/snapdg=snapvoldg
If a database spans more than one volume, you can specify all the volumes and their snapshot volumes using one command, as shown in this example:
# vxsnap -g dbasedg make \ source=vol1/snapvol=snapvol1/snapdg=sdg \ source=vol2/snapvol=snapvol2/snapdg=sdg \ source=vol3/snapvol=snapvol3/snapdg=sdg
5� On the primary host, if you temporarily suspended updates to the volume by a database in step 3, release all the tables from hot backup mode.
6 On the primary host, deport the snapshot volume’s disk group using the following command:
# vxdg deport snapvoldg
7 On the OHP host where the backup is to be performed, use the following command to import the snapshot volume’s disk group:
# vxdg import snapvoldg
8 The snapshot volume is initially disabled following the join. Use the following commands on the OHP host to recover and restart the snapshot volume:
# vxrecover -g snapvoldg -m snapvol # vxvol -g snapvoldg start snapvol
9 On the OHP host, back up the snapshot volume. If you need to remount the file system in the volume to back it up, first run fsck on the volume. The following are sample commands for checking and mounting a file system:
# fsck -F vxfs /dev/vx/rdsk/snapvoldg/snapvol # mount -F vxfs /dev/vx/dsk/snapvoldg/snapvol mount_point
On Linux, use the -t option, and on AIX, use the -V option, instead of the -F option for both commands.
Back up the file system at this point, and then use the following command to unmount it.
# umount mount_point
10 On the OHP host, use the following command to deport the snapshot volume’s disk group:
# vxdg deport snapvoldg
11 On the primary host, re-import the snapshot volume’s disk group using the following command:
# vxdg import snapvoldg
30 Off-host processing solutions Implementing off-host processing solutions
12 The snapshot volume is initially disabled following the join. Use the following commands on the primary host to recover and restart the snapshot volume:
# vxrecover -g snapvoldg -m snapvol # vxvol -g snapvoldg start snapvol
13 On the primary host, reattach the snapshot volume to its original volume using the following command:
# vxsnap -g snapvoldg reattach snapvol source=vol \ sourcedg=volumedg
For example, to reattach the snapshot volumes svol1, svol2 and svol3: # vxsnap -g sdg reattach svol1 \
source=vol1 sourcedg=dbasedg \ svol2 source=vol2 sourcedg=dbasedg \ svol3 source=vol3 sourcedg=dbasedg
You can use the vxsnap snapwait command to wait for synchronization of the linked snapshot volume to complete:
# vxsnap -g volumedg snapwait volume mirvol=snapvol
Repeat step 3 through step 13 each time that you need to back up the volume.
Off-host processing solutions 31 Implementing off-host processing solutions
Implementing decision support This section describes a procedure for implementing off-host decision support for a volume in a private disk group. The intention is to present an outline of how to set up a replica database by combining the Persistent FastResync and linked break-off snapshot features of VxVM. It is beyond the scope of this guide to describe how to configure a database to use this procedure.
To set up a replica database using the table files that are configured within a�volume in a private disk group�
1� Prepare the OHP host to receive the snapshot volume that contains the copy of the database tables. This may involve setting up private volumes to contain any redo logs, and configuring any files that are used to initialize the database.
2� On the primary host, create a new volume, snapvol, in a separate disk group, snapvoldg, for use as the snapshot volume. This volume must be the same size as the original volume, but it can differ in its layout and other characteristics, such as the quality of storage. It is recommended that the snapshot disk group contains storage that is dedicated to off-host processing.
3 On the primary host, link the snapshot volume in the snapshot disk group to the data volume:
# vxsnap -g volumedg -b addmir volume mirvol=snapvol \ mirdg=snapvoldg
You can use the vxsnap snapwait command to wait for synchronization of a linked snapshot volume to complete:
# vxsnap -g volumedg snapwait volume mirvol=snapvol \ mirdg=snapvoldg
This step sets up the snapshot volumes, and starts tracking changes to the original volumes. When you are ready to create a replica database, proceed to step 4.
4� On the primary host, suspend updates to the volume that contains the database tables. The database may have a hot backup mode that allows you to do this by temporarily suspending writes to its tables.
5 Create the snapshot volume, snapvol, by running the following command on the primary host:
# vxsnap -g volumedg make \ source=volume/snapvol=snapvol/snapdg=snapvoldg
If a database spans more than one volume, you can specify all the volumes and their snapshot volumes using one command, as shown in this example:
# vxsnap -g dbasedg make \ source=vol1/snapvol=snapvol1/snapdg=sdg \
32 Off-host processing solutions Implementing off-host processing solutions
source=vol2/snapvol=snapvol2/snapdg=sdg \source=vol3/snapvol=snapvol3/snapdg=sdg
This step sets up the snapshot volumes ready for the backup cycle, and starts tracking changes to the original volumes.
6� On the primary host, if you temporarily suspended updates to the volume by a database in step 4, release all the tables from hot backup mode.
7 On the primary host, deport the snapshot volume’s disk group using the following command:
# vxdg deport snapvoldg
8 On the OHP host where the replica database is to be set up, use the following command to import the snapshot volume’s disk group:
# vxdg import snapvoldg
9 The snapshot volume is initially disabled following the join. Use the following commands on the OHP host to recover and restart the snapshot volume:
# vxrecover -g snapvoldg -m snapvol # vxvol -g snapvoldg start snapvol
10 On the OHP host, check and mount the snapshot volume. The following are sample commands for checking and mounting a file system:
# fsck -F vxfs /dev/vx/rdsk/snapvoldg/snapvol # mount -F vxfs /dev/vx/dsk/snapvoldg/snapvol mount_point
On Linux, use the -t option, and on AIX, use the -V option, instead of the -F option for both commands.
11� On the OHP host, use the appropriate database commands to recover and start the replica database for its decision support role.
To resynchronize the snapshot volume’ s data with the primary database by�refreshing the snapshot plexes from the original volume�
1� On the OHP host, shut down the replica database, and use the following command to unmount the snapshot volume:
# umount mount_point
2 On the OHP host, use the following command to deport the snapshot volume’s disk group:
# vxdg deport snapvoldg
3 On the primary host, re-import the snapshot volume’s disk group using the following command:
# vxdg import snapvoldg
4� The snapshot volume is initially disabled following the join. Use the following commands on the primary host to recover and restart the snapshot volume:
Off-host processing solutions 33 Implementing off-host processing solutions
# vxrecover -g snapvoldg -m snapvol # vxvol -g snapvoldg start snapvol
5 On the primary host, reattach the snapshot volume to its original volume using the following command:
# vxsnap -g snapvoldg reattach snapvol source=vol \ sourcedg=volumedg
For example, to reattach the snapshot volumes svol1, svol2 and svol3: # vxsnap -g sdg reattach svol1 \
source=vol1 sourcedg=dbasedg \ svol2 source=vol2 sourcedg=dbasedg \ svol3 source=vol3 sourcedg=dbasedg
You can use the vxsnap snapwait command to wait for synchronization of the linked snapshot volume to complete:
# vxsnap -g volumedg snapwait volume mirvol=snapvol
You can then resume the procedure from step 4 on page 31.

34 Off-host processing solutions Implementing off-host processing solutions
Chapter
5Remote mirror solutions
The Remote Mirror feature of the Storage Foundation software mirrors volumes �at separate sites, which allows applications to be recovered at an alternate site�in case of site failure. An enterprise can thus continue to function despite the�loss of one site. This feature supports both non-ISP and ISP volumes. The �solution presented below is intended to highlight how to implement the remote �mirrors for ISP volumes.�
Further information on the Remote Mirror feature including recovery procedures can be found in the Veritas Volume Manager Administrator’s Guide.
Note: The Remote Mirror feature requires that the Site Awareness license has�been installed on all hosts at all sites that are participating in the configuration.�
About Remote Mirror configurations�In a Remote Mirror configuration the hosts and storage of a cluster that would�usually be located in one place, are instead divided between two or more sites. �These sites are typically connected via a redundant high-capacity network that �provides access to storage and private link communication between the cluster�nodes. A typical two-site remote mirror configuration is illustrated in Figure 5-�1.�
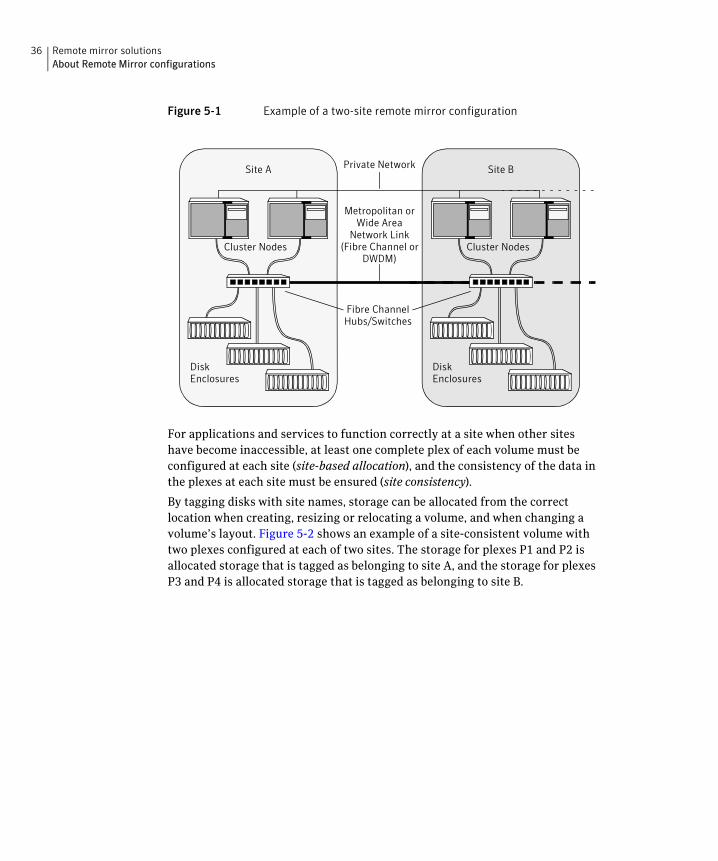
36 Remote mirror solutionsAbout Remote Mirror configurations
Figure 5-1 Example of a two-site remote mirror configuration
For applications and services to function correctly at a site when other sites have become inaccessible, at least one complete plex of each volume must be configured at each site (site-based allocation), and the consistency of the data in the plexes at each site must be ensured (site consistency).
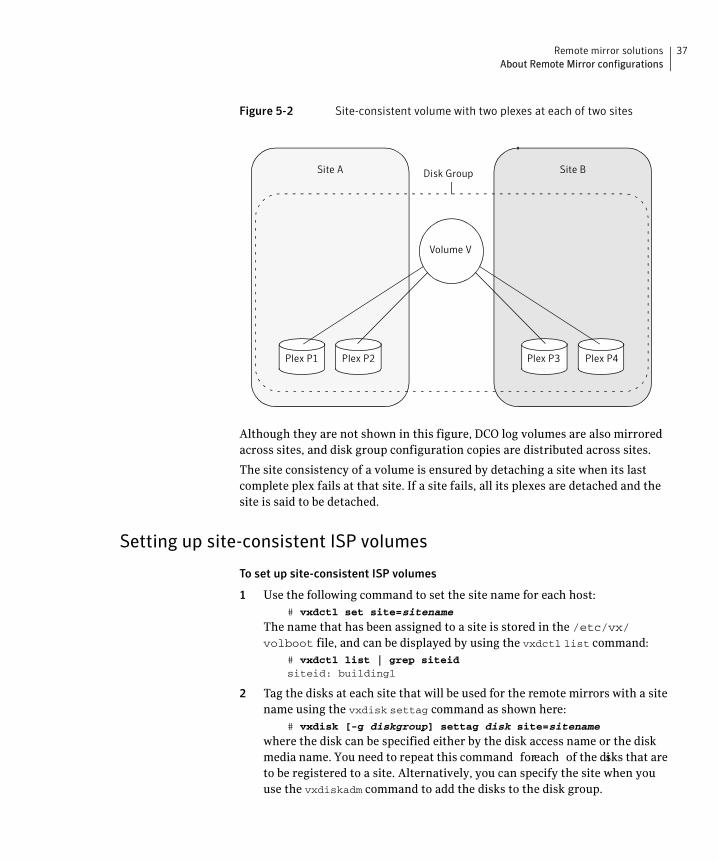
By tagging disks with site names, storage can be allocated from the correct location when creating, resizing or relocating a volume, and when changing a volume’s layout. Figure 5-2 shows an example of a site-consistent volume with two plexes configured at each of two sites. The storage for plexes P1 and P2 is allocated storage that is tagged as belonging to site A, and the storage for plexes P3 and P4 is allocated storage that is tagged as belonging to site B.
Fibre Channel Hubs/Switches
Site A Site B
Metropolitan or Wide Area
Network Link(Fibre Channel or
DWDM)Cluster Nodes
DiskEnclosures
Cluster Nodes
DiskEnclosures
Private Network
Remote mirror solutions 37 About Remote Mirror configurations
Figure 5-2 Site-consistent volume with two plexes at each of two sites
Site A Site BDisk Group
Plex P3 Plex P4Plex P1 Plex P2
Volume V
Although they are not shown in this figure, DCO log volumes are also mirrored �across sites, and disk group configuration copies are distributed across sites.�
The site consistency of a volume is ensured by detaching a site when its last �complete plex fails at that site. If a site fails, all its plexes are detached and the �site is said to be detached.�
Setting up site-consistent ISP volumes
To set up site-consistent ISP volumes�
1 Use the following command to set the site name for each host:�# vxdctl set site=sitename
The name that has been assigned to a site is stored in the /etc/vx/volboot file, and can be displayed by using the vxdctl list command:�
# vxdctl list | grep siteidsiteid: building1
2� Tag the disks at each site that will be used for the remote mirrors with a site �name using the vxdisk settag command as shown here:�
# vxdisk [-g diskgroup] settag disk site=sitename
where the disk can be specified either by the disk access name or the disk �media name. You need to repeat this command foreach of the disks that are �to be registered to a site. Alternatively, you can specify the site when you�use the vxdiskadm command to add the disks to the disk group.�
38 Remote mirror solutions About Remote Mirror configurations
To check which disks are registered to a site, use this form of the vxdiskcommand:�
# vxdisk listtag
Note: All the disks in a disk group must be registered to one of the sites �before you can set the siteconsistent attribute on the disk group in the �next step.�
3 Turn on the site-based allocation requirement for a site that is registered to�a disk group. Use the following form of the vxdg command for each site at�which site-based allocation is required:�
# vxdg -g diskgroup [-f] addsite sitename
Each volume is checked to ensure that it has at least one plex at each site, �and the command fails if this condition is not met unless the volume’s�allsites attribute is set to off. If the -f option is specified, the command�does not fail, but instead it sets the allsites attribute for the volume to �off.�
4 Turn on the site consistency requirement for the disk group using the �following form of the vxdg command:�
# vxdg -g diskgroup set siteconsistent=on
This command fails if any of the following conditions are not met:�
■ Each of the disks in the disk group must be registered to one of the sites.�
■ Each volume in the disk group must have at least one complete plex at each site.�
■ The disk group must not contain any RAID-5 volumes.
To verify whether site consistency has been enabled for a disk group, use �the following command:�
# vxdg list diskgroup | grep siteconsistentflags: siteconsistent
5 To set the site consistency requirement when creating a volume in the disk �group, specify the siteconsistent attribute to the vxassist makecommand, for example:�
# vxassist [-g diskgroup] make volume size \nmir=4 siteconsistent={on|off}
By default, a volume inherits the value of siteconsistent that is set on its �disk group. If a volume is intended to be site consistent, the number of�mirrors that are specified should be a multiple of the number of sites.�
ISP saves the intent to provision volumes across sites and follows these �rules for future allocations.�
Remote mirror solutions 39 About Remote Mirror configurations
Making an existing disk group site consistent
To make an existing disk group site consistent�
1 Ensure that the disk group is updated to at least version 140, by running the �vxdg upgrade command on it:�
# vxdg upgrade diskgroup
2 On each host that can access the disk group, define the site name:�# vxdctl set site=sitename
3 Tag all the disks in the disk group with the appropriate site name:�# vxdisk [-g diskgroup] settag disk site=sitename
4 Register a site record for each site with the disk group:�# vxdg -g diskgroup -f addsite sitename
Note: As a side effect of this command, any volumes with unsupported�configurations (for example, RAID-5 volumes) or with an incorrect layout�(not mirrored across the sites) have the allsites=off attribute set on�them.�
5 Turn on site consistency for the disk group:�# vxdg -g diskgroup set siteconsistent=on
6� If required, use the vxassist transform commands to convert any�unsupported volumes to a supported layout such as mirror or mirror-stripe. Specify the siteconsistent=on attribute to ensure that the �plexes are mirrored across the sites.�

40 Remote mirror solutions About Remote Mirror configurations
Glossary
application volume�
An application volume is created by ISP, and then exported for use by an application such as a database or file system. It is used with applications in the same way that you would use traditional non-ISP volumes that you have created by using vxassist and other VxVM commands, or via the graphical user interface.
capability�
A capability is a feature that is provided by a volume. For example, a volume may exhibit capabilities such as performance and reliability to various degrees. Each type of capability is defined as a set of rules.
disk group�
A disk group is a named collection of disks that share a common configuration. Volumes and other VxVM objects must be created within a disk group, and are restricted to using disks from within that disk group.
intent�
A volume’s intent is a conceptualization of the volume’s purpose as defined by itscharacteristics and implemented by a template. ISP attempts to preserve the intent of a volume whenever the volume is reconfigured, resized, or relocated. Intent preservationautomatically conserves capabilities such as reliability and performance, and observesadditional rules such as allocating storage based on confinement and exclusion specifications.
LUN�
A LUN, or logical unit, can either correspond to a single physical disk, or to a collection of disks that are exported as a single logical entity, or virtual disk, by a device driver or by anintelligent disk array’s hardware. VxVM and other software modules may be capable ofautomatically discovering the special characteristics of LUNs, or you can use disk tags todefine new storage attributes. Disk tags are administered by using the vxdisk commandor the graphical user interface.
pool�
See storage pool.
remote mirror�
The Remote Mirror feature of the Veritas Storage Foundation software.
rule�
A rule is a statement written in the ISP language that specifies how a volume is to be created. A rule can define selection of storage or layout of storage. Rules are usually gathered together as templates for creating volumes, rather than being specified individually.
42 Glossary
snapshot�
A copy of the data in a volume (volume snapshot) or in a file system ( file system snapshot) ata moment in time.
storage attribute�
A storage attribute allows the properties of a LUN to be defined in an arbitrary conceptual space. You can use disk tags to create storage attributes in addition to those that are intrinsically associated with the disk hardware, and which are automatically discovered or assigned by VxVM. Disk tags are administered by using the vxdisk command or the graphical user interface.
storage pool�
A storage pool is defined within a disk group in VxVM for use by ISP. A storage pool is a policy-based container for LUNs and volumes. This means that the templates, capabilities and policies that are associated with a storage pool define how storage is organized within the pool.
storage pool policy�
A storage pool policy defines how the storage pool behaves when more storage is required, and when you try to create volumes whose capabilities are not permitted by the current templates.
storage tier�
Storage tiers establish quality of storage service (QoSS) criteria that allow an enterprise’s data to be organized with varying degrees of availability and performance on storage with varying degrees of performance, accessibility and cost.
tag�
A tag is a label with an optional value that can be used to identify a property of disks and volumes in VxVM.
template�
See volume template.
user template�
A user template (or user-defined template) defines an arbitrary collection of capabilities, templates and rules to which you want volumes of a certain type to conform. For example, you might want all volumes that you create to store database tables to share the same reliability and performance capabilities, and also that they only be allocated from a restricted set of storage. It is useful to create user templates if you regularly create volumes with similar capabilities.
volume�
A volume in VxVM is a virtual disk, which represents an addressable range of disk blocks used by applications such as file systems or databases.
Also see application volume.
volume snapshot�
See snapshot.
Glossary 43
volume template�
A volume template (or template for short) is a meaningful collection of rules that provide a capability. A template can specify one or more capabilities that a volume created using the template may have, and consists of a collection of storage selection and layout rules. For example, a template may allow you to create a volume that is able to tolerate the failure of a certain number of controllers, or that has a certain number of copies of the volume data.

44 Glossary
Index
C€capabilities
introduced 11
D€decision support
implementing 31disk groups
making site-consistent 39
Intelligent Storage Provisioning (ISP)introduced 7
ISPbasic concepts 8creating volumes 13introduced 7language 12solutions 12
L€logical units (LUNs)
introduced 8LUNs
introduced 8tagging 14
M€mirrored volumes
creating 14
O€off-host online backup
implementing 28off-host processing
implementing 26
I
46 Index
introduced 25
P€point-in-time copies
introduced 25
R€redundancy
of volumes 13 Remote Mirror feature
configurations 35 introduced 35 site consistency 36 site-based allocation 36
rules introduced 11
S€site consistency 36 site-based allocation 36 site-consistent disk groups 39 site-consistent volumes 37 snapshots
introduced 25 solutions
off-host processing 25 Remote Mirror 35 tiered storage 19 using ISP 12
storage attributes tags 14
storage pools introduced 8
storage tiers introduced 19 policies for 20 setting up 23
T€tags
applying to volumes 15 storage attributes 14
templates introduced 11
tiered storage introduced 19
Index 47
U€user templates
introduced 12using to create volumes 16
V€volume templates
introduced 11volumes
creating multiple 15creating using ISP 13ensuring redundancy of 13making site consistent 37mirroring 14simplifying creation of 16tagging 15

48 Index