Embed Size (px)
Citation preview
Intel® VTune™ Amplifier 2019Installation Guide - macOS*Intel Corporation
www.intel.com
Legal Information
ContentsLegal Information ................................................................................ 3
Chapter 1: Introduction
Chapter 2: Prerequisites
Chapter 3: Installation StepsInstalling with the Intel® VTune™ Amplifier Installer Graphical User Interface......6Installing Intel® VTune™ Amplifier for Use with a Virtual Machine ......................7
Chapter 4: Post-Installation StepsSet Up Linux* System for Remote Analysis ...................................................9Embedded Linux* Targets......................................................................... 11
Configure Yocto Project* and VTune™ Amplifier with the VTuneAmplifier Integration Layer ........................................................... 17
Configure Yocto Project*/Wind River* Linux* and Intel® VTune™Amplifier with the Intel System Studio Integration Layer .................. 18
Configure Yocto Project* and Intel® VTune™ Amplifier with the Linux*Target Package ........................................................................... 20
Set Up FreeBSD* System ......................................................................... 21Set Up Android* System........................................................................... 22
Enable Java* Analysis on Android* System......................................... 24Prepare an Android* Application for Analysis....................................... 27Search Directories for Android* Targets.............................................. 28
Targets in Virtualized Environments ........................................................... 28Profile Targets on a Xen* Virtualization Platform.................................. 30Profile Targets on a Parallels* Guest System ....................................... 31
Targets in a Cloud Environment ................................................................. 32Configure SSH Access for Remote Collection ............................................... 33Sampling Drivers..................................................................................... 34
Build and Install the Sampling Drivers for Linux* Targets...................... 35Build and Install Sampling Drivers for Android* Targets........................ 39
Driverless Event-Based Sampling Collection ................................................ 39
Chapter 5: Getting Started with Intel® VTune™ Amplifier
Chapter 6: Intel® VTune™ Amplifier Installation FAQsHow do I install the drivers required by Intel VTune Amplifier?....................... 43
Error Message: Installing and Starting VTSS++ Driver...FAILED............. 43Error Message: No Pre-built Driver Exists for This System..................... 43
What features are available if I install Intel VTune Amplifier as a non-root ornon-administrator user? ....................................................................... 44
How do I configure remote data collection using Intel VTune Amplifier?........... 44Can I install multiple versions of Intel VTune Amplifier on the same system? ... 45Problem: Platform Not Authorized.............................................................. 45
Chapter 7: Uninstalling Intel® VTune™ Amplifier
Chapter 8: Additional Resources
Intel® VTune™ Amplifier 2019 Installation Guide - macOS*
2

Legal InformationNo license (express or implied, by estoppel or otherwise) to any intellectual property rights is granted by thisdocument.
Intel disclaims all express and implied warranties, including without limitation, the implied warranties ofmerchantability, fitness for a particular purpose, and non-infringement, as well as any warranty arising fromcourse of performance, course of dealing, or usage in trade.
This document contains information on products, services and/or processes in development. All informationprovided here is subject to change without notice. Contact your Intel representative to obtain the latestforecast, schedule, specifications and roadmaps.
The products and services described may contain defects or errors which may cause deviations frompublished specifications. Current characterized errata are available on request.
Intel, the Intel logo, Intel Atom, Intel Core, Intel Xeon Phi, VTune and Xeon are trademarks of IntelCorporation in the U.S. and/or other countries.
*Other names and brands may be claimed as the property of others.
Intel, the Intel logo, Intel Atom, Intel Core, Intel Xeon Phi, VTune and Xeon are trademarks of IntelCorporation in the U.S. and/or other countries.
Microsoft, Windows, and the Windows logo are trademarks, or registered trademarks of Microsoft Corporationin the United States and/or other countries.
Java is a registered trademark of Oracle and/or its affiliates.
OpenCL and the OpenCL logo are trademarks of Apple Inc. used by permission by Khronos.
Copyright 2015-2019 Intel Corporation.
This software and the related documents are Intel copyrighted materials, and your use of them is governedby the express license under which they were provided to you (License). Unless the License providesotherwise, you may not use, modify, copy, publish, distribute, disclose or transmit this software or therelated documents without Intel's prior written permission.
This software and the related documents are provided as is, with no express or implied warranties, otherthan those that are expressly stated in the License.
Legal Information
3
Introduction 1Use VTune Amplifier to locate or determine:
• The most time-consuming (hot) functions in your application and/or on the whole system• Sections of code that do not effectively utilize available processor time• The best sections of code to optimize for sequential performance and for threaded performance• Synchronization objects that affect the application performance• Whether, where, and why your application spends time on input/output operations• The performance impact of different synchronization methods, different numbers of threads, or different
algorithms• Thread activity and transitions• Hardware-related issues in your code such as data sharing, cache misses, branch misprediction, and
others
This document explains how to install and configure Intel VTune Amplifier on a macOS* system. Intel VTuneAmplifier on macOS* can be used to view results collected using VTune Amplifier on a Linux* or Windows*system. Results cannot be collected on a macOS* system.
To install VTune Amplifier, you can use:
• Graphical user interface (GUI) installer: Presents installation options and allows you to choose productcomponents.
1 Intel® VTune™ Amplifier 2019 Installation Guide - macOS*
4
Prerequisites 2The following information is important to consider before beginning to install Intel® VTune™ Amplifier.
System RequirementsReview the full list of system requirements listed in the Release Notes document. The document can be foundonline and in your installation media.
User Permissions for InstallIt is recommended that an administrator account is used to install, change, or uninstall the product. Userswithout administrator (or root user) access can install the product, but not all collectors will be available.
The user installing the product should have read and write permissions for the /tmp and /Users/Shared/Library/Application Support/Intel/Licenses directories.
Previous Versions of Intel VTune AmplifierYou do not need to uninstall previous versions or updates of VTune Amplifier before installing a newerversion. However, if you do not remove older updates before installing a newer version, all productcomponents that belong to the same major release will be replaced with the latest version for each majorrelease update.
For example, if you have VTune Amplifier 20xx Update 1 installed and are currently installing VTune Amplifier20xx Update 2, the older version will be uninstalled and replaced with the new content for Update 2. If youare installing the next major release, VTune Amplifier 20xy, your installation of VTune Amplifier 20xx Update1 will remain and the new release will be installed beside the old version, duplicating common files,documentation, samples, and product components.
Installing in a Cluster EnvironmentIf you are installing in a cluster environment, you can install and use multiple versions of the product on thesame system. However, kernel driver usage is limited to a single version of VTune Amplifier. This means youcan have multiple copies of VTune Amplifier installed without the SEP drivers and a single version of theproduct with the drivers installed. The latter would be enabled with the advanced types of analysis usinghardware event based sampling analysis data collection.
Xcode* SupportIf you will be using Xcode*, make sure that a supported version of Xcode is installed. If you install a newversion of Xcode in the future, you need to reinstall VTune Amplifier.
Prerequisites 2
5
Installation Steps 3The Intel® VTune™ Amplifier installation package contains all components of the product in a downloadablefile. The installer can be run as an administrator from a GUI.
The Intel® Software Manager installs automatically with all Intel® Software Development Products onWindows*, Linux*, and macOS* systems. The Intel Software Manager is a utility that allows users to:
• Download and install updates for your Intel Software Development Products.• Manage subscription status and activate serial numbers of installed software (if applicable).• Find out about the latest news for Intel Software Development Products.• Intel Software Manager requires an internet connection to connect to a remote server for information and
updates.
Refer to the following site for more information about Intel Software Manager: https://registrationcenter-ssl.intel.com/Docs/ism.htm
The following sections detail the steps required to install Intel VTune Amplifier.
• Installing with the Installer Graphical User Interface• Installing for Use with a Virtual Machine
Installing with the Intel® VTune™ Amplifier InstallerGraphical User Interface
NOTERefer to the Prerequisites before you begin the installation.
Use the following steps to launch the installer GUI:
1. Double click the vtune_amplifier_<version>.dmg file to mount the disk image.2. Double click the Intel VTune Amplifier <version>.app file to start the installation program.3. Use the information in the installer panels to complete the installation.
The installation process includes the following steps:
• Installation Location and Components
Lists the default installation location and options. Select the components to install and change the defaultinstallation location (optional).
• Prerequisites
Lists all prerequisites that would prevent a fully successful installation. Prerequisites could includeadditional requirements, information about setting up drivers, a reminder to restart your system afterinstallation completes, and so on.
• Options
Install all options or click Customize to select a subset of options.
Click the Install button to begin installation.• Complete
The Intel VTune Amplifier Getting Started page displays after installation succeeds.
3 Intel® VTune™ Amplifier 2019 Installation Guide - macOS*
6
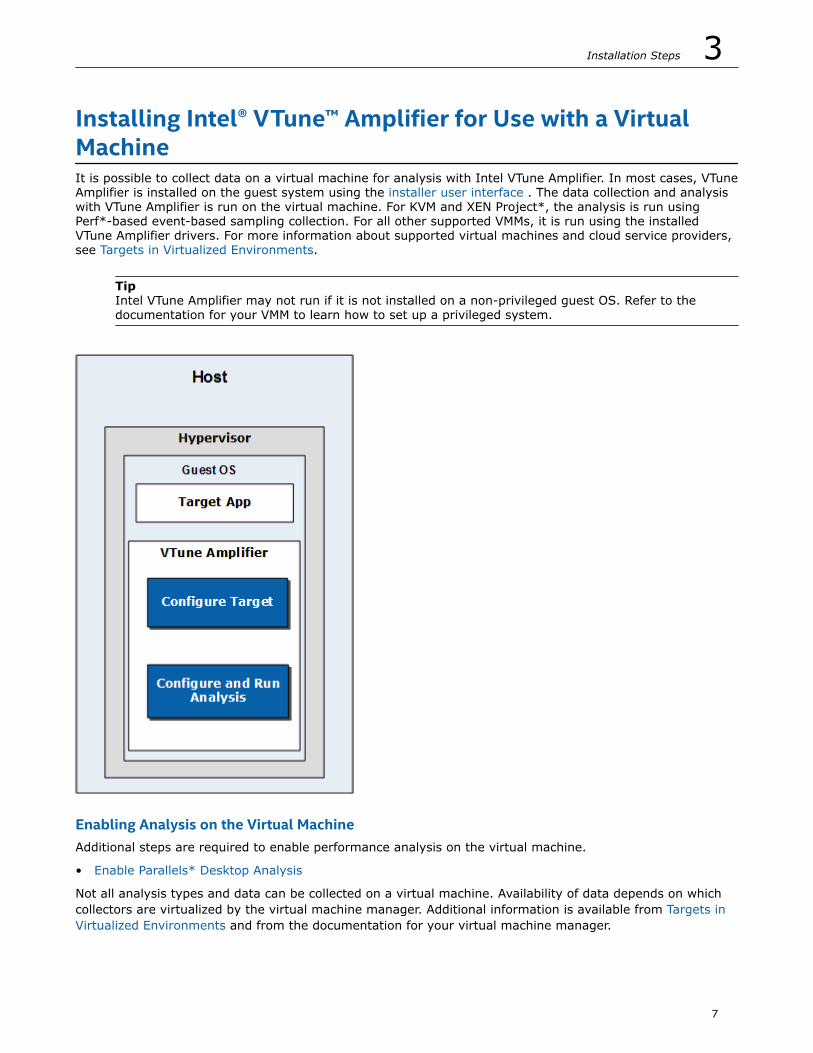
Installing Intel® VTune™ Amplifier for Use with a VirtualMachineIt is possible to collect data on a virtual machine for analysis with Intel VTune Amplifier. In most cases, VTuneAmplifier is installed on the guest system using the installer user interface . The data collection and analysiswith VTune Amplifier is run on the virtual machine. For KVM and XEN Project*, the analysis is run usingPerf*-based event-based sampling collection. For all other supported VMMs, it is run using the installedVTune Amplifier drivers. For more information about supported virtual machines and cloud service providers,see Targets in Virtualized Environments.
TipIntel VTune Amplifier may not run if it is not installed on a non-privileged guest OS. Refer to thedocumentation for your VMM to learn how to set up a privileged system.
Enabling Analysis on the Virtual MachineAdditional steps are required to enable performance analysis on the virtual machine.
• Enable Parallels* Desktop Analysis
Not all analysis types and data can be collected on a virtual machine. Availability of data depends on whichcollectors are virtualized by the virtual machine manager. Additional information is available from Targets inVirtualized Environments and from the documentation for your virtual machine manager.
Installation Steps 3
7
Post-Installation Steps 4The following sections detail the steps required to configure your Intel® VTune™ Amplifier installation.
• Preparing a Target Linux* System for Remote Analysis• Preparing a Target Embedded Linux* System for Remote Analysis• Preparing a Target FreeBSD System for Remote Analysis• Preparing a Target Android System for Remote Analysis• Using Intel VTune Amplifier with a Virtual Machine• Using Intel VTune Amplifier in a Cloud Environment• Configuring SSH Access for Remote Collection• Sampling Drivers•
The table below details the suggested reading paths based on your analysis needs:
Analyze performance on a remote Linux* system Install the remote collectors and configure SSHaccess on a remote Linux system. If the remotecollector installation fails to install the appropriatesampling drivers, the drivers can be installedmanually.1. Configuring SSH Access for Remote Collection2. Preparing a Target Linux System for Remote
Analysis3. Build the Sampling Driver (optional)
Analyze performance on a remote Android* system Configure the Android device for analysis andconnect via ADB. If the appropriate samplingdrivers are not available, the drivers can beinstalled manually. Compile the Android applicationfor analysis. Specify the project search directories.1. Preparing a Target Android System for Remote
Analysis2. Building and Installing the Sampling Driver for
Android Targets (optional)3. Preparing an Android Application for Analysis4. Search Directories for Android
Analyze performance on a FreeBSD* system Install VTune Amplifier collectors and drivers on aFreeBSD system. A FreeBSD license for Intel®System Studio is required. For more information,see Preparing a Target FreeBSD System for RemoteAnalysis.
Analyze performance on embedded Linux systems Review the list of supported embedded Linuxsystems. Configure the embedded Linuxenvironment for performance analysis. Begin with Preparing a Target Embedded Linux* System forRemote Analysis.
Monitor a virtual machine Review the list of supported virtual machinemanagers and analysis type limitations. Configurethe virtual machine for performance analysis. Beginwith Using Intel VTune Amplifier with a VirtualMachine.
4 Intel® VTune™ Amplifier 2019 Installation Guide - macOS*
8
Analyze a target installed on the cloud Review the list of supported cloud environmentsand learn how to configure the cloud target forremote analysis. For more information, see UsingIntel VTune Amplifier in a Cloud Environment
Set Up Linux* System for Remote AnalysisYou can collect data remotely on a target Linux* system by specifying the system as the analysis target inIntel® VTune™ Amplifier by selecting Remote Linux (SSH) in the Where pane when configuring an analysis.VTune Amplifier automatically installs the appropriate collectors on the target system. Specify a location forthe install using the VTune Amplifier installation directory on the remote system field.
NOTEThe automatic installation on the remote Linux system does not build the sampling drivers althoughyou can install the pre-built sampling drivers if you connect via password-less SSH as the root user. Driverless sampling data collection is based on the Linux Perf* tool functionality, which is availablewithout Root access and has a limited scope of analysis options. To collect advanced hardware event-based sampling data, manually install the sampling driver or set up the password-less SSH connectionwith the Root user account.
If the collectors are not automatically installed or you get an error message after an automatic installattempt, use the following steps to manually prepare for data collection on a remote Linux system:
1. Install the VTune Amplifier collector on the target system.2. Set up an SSH access to the target system.3. Set up the analysis target in VTune Amplifier.
Install the VTune Amplifier Collectors on the Target Device ManuallyUse the following steps to set up analysis on a target regular or embedded Linux target system.
1. Copy the required target package archive to the target device using ftp, sftp, or scp. The followingtarget packages are available on the host system where the VTune Amplifier is installed:
• <install_dir>/target/linux/vtune_amplifier_target_sep_x86.tgz - provides hardwareevent-based sampling collector only (SEP) for x86 systems
• <install_dir>/target/linux/vtune_amplifier_target_sep_x86_64.tgz - provides hardwareevent-based sampling collector only (SEP) for 64-bit systems
• <install_dir>/target/linux/vtune_amplifier_target_x86.tgz - provides all VTuneAmplifier collectors for x86 systems
• <install_dir>/target/linux/vtune_amplifier_target_x86_64.tgz - provides all VTuneAmplifier collectors for 64-bit systems
NOTEUse both *_x86 and *_x86_64 packages if you plan to run and analyze 32-bit processes on 64-bitsystems.
2. On the target device, unpack the product package to the /tmp directory or another writable location onthe system:
target> tar -zxvf <target_package>.tgzVTune Amplifier target package is located in the newly created directory /tmp/vtune_amplifier_<version>.<package_num>.
Post-Installation Steps 4
9
When collecting data remotely, the VTune Amplifier looks for the collectors on the target device in its defaultlocation: /tmp/vtune_amplifier_<version>.<package_num>. It also temporary stores performanceresults on the target system in the /tmp directory. If you installed the target package to a different locationor need to specify another temporary directory, make sure to configure your target properties in theConfigure Analysis window as follows:
• Use the VTune Amplifier installation directory on the remote system option to specify the path tothe VTune Amplifier on the remote system. If default location is used, the path is provided automatically.
• Use the Temporary directory on the remote system option to specify a non-default temporarydirectory.
Alternatively, use the-target-install-dir and -target-tmp-dir options from the amplxe-cl commandline.
Build and Install the Drivers Manually
NOTEBuilding the sampling drivers is only required if the drivers were not built as part of the collectorinstallation. The installation output should inform you if building the sampling driver is required.
To enable hardware event-based sampling analysis on your target device:
1. Build the sampling driver on the target system.
NOTE
• Make sure kernel headers correspond to the kernel version running on the device. For details, seethe README.txt file in the sepdk/src directory.
• Make sure compiler version corresponds to the architecture (x86 or x86_64) of the kernel runningon the target system.
• For Hotspots in hardware event-based sampling mode, Microarchitecture Exploration, and Customevent-based sampling analysis types, you may not need root credentials and installing the samplingdriver for systems with kernel 2.6.32 or higher, which exports CPU PMU programming detailsover /sys/bus/event_source/devices/cpu/format file system. Your operating system limits onthe maximum amount of files opened by a process as well as maximum memory mapped to aprocess address space still apply and may affect profiling capabilities. These capabilities are basedon Linux Perf* functionality and all its limitations fully apply to the VTune Amplifier as well. Formore information, see the Tutorial: Troubleshooting and Tips topic at https://perf.wiki.kernel.org/index.php/Main_Page.
2. On the target device, install the drivers.
If the insmod-sep script does not work on the target system due to absence of standard Linuxcommands, you may install drivers manually using the Linux OS insmod command directly.
NOTETo build the sampling driver as RPM using build services as Open Build Service (OBS), use thesepdk.spec file located at the <install_dir>/sepdk/src the directory.
Set up SSH AccessAfter installing the collectors and ensuring that the appropriate drivers are installed, set up SSH access to thetarget system.
4 Intel® VTune™ Amplifier 2019 Installation Guide - macOS*
10
Set up Analysis TargetAfter completing all other configuration steps for the remote Linux system, you can run an analysis usingVTune Amplifier. Before running the first analysis, you must set up the analysis target.
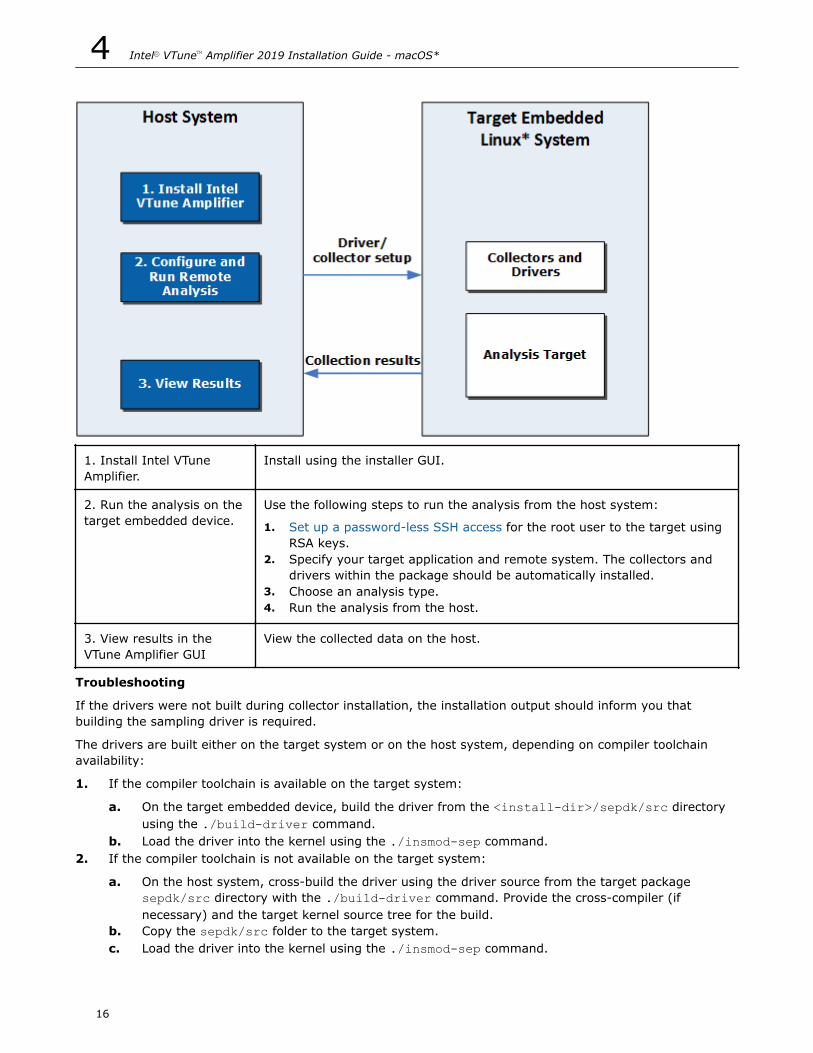
Embedded Linux* TargetsUse the Intel® VTune™ Amplifier for performanceanalysis on Embedded Linux* systems, Wind River*,Yocto Project*, FreeBSD* and others.
Embedded device performance data can be collected remotely on the embedded device and running theanalysis from an instance of VTune Amplifier installed on the host system. This is useful when the targetsystem is not capable of local data analysis (low performance, limited disk space, or lack of user interfacecontrol).
NOTERoot access to the operating system kernel is required to install the collectors and drivers required forperformance analysis using VTune Amplifier.
There are multiple ways to enable performance analysis on an embedded device:
• Using the Intel System Studio integration layer (Wind River* Linux and Yocto Project* only)• Using the Intel VTune Amplifier Yocto Project Integration Layer• Using the bundled VTune Amplifier installation packages
Using the Intel System Studio Integration Layer
NOTEThe Intel System Studio integration layer works for embedded systems with Wind River Linux or YoctoProject installed.
The Intel System Studio integration layer allows the Intel System Studio products to be fully integrated witha target operating system by building the drivers and corresponding target packages into the operatingsystem image automatically. Use this option in the case where a platform build engineer has control over thekernel sources and signature files, but the application engineer does not. The platform build engineer canintegrate the product drivers with the target package and include them in the embedded device image that isdelivered to the application engineer.
Post-Installation Steps 4
11
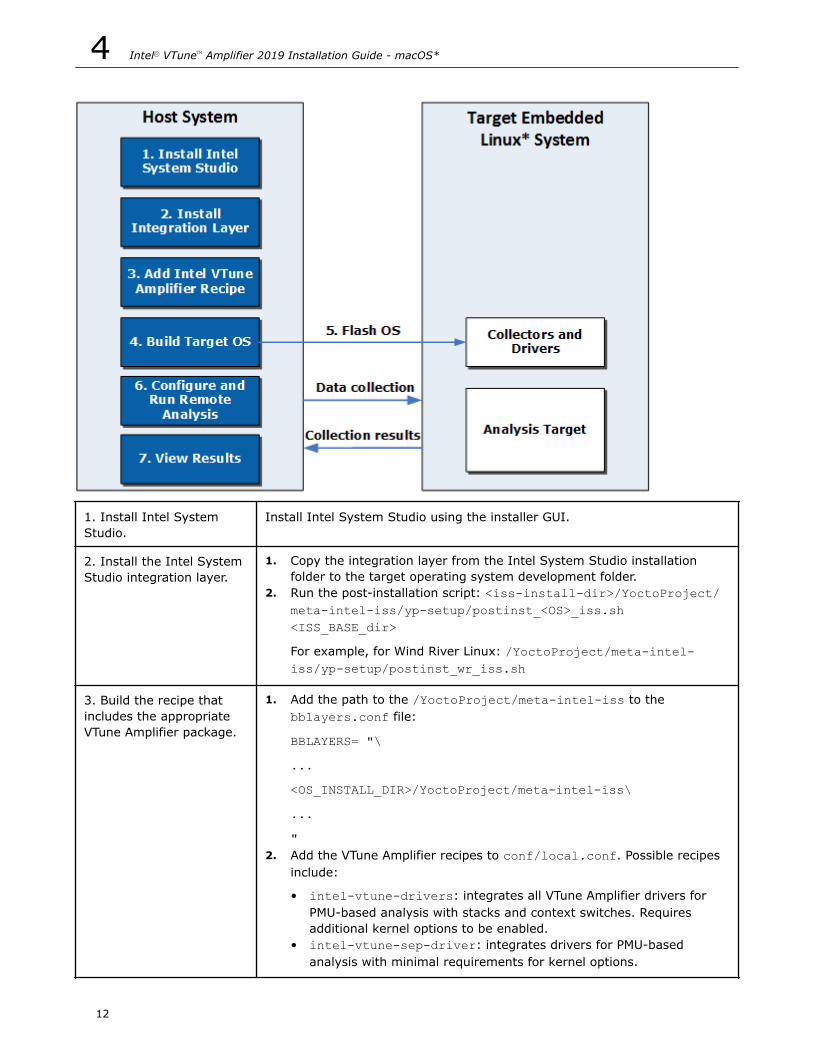
1. Install Intel SystemStudio.
Install Intel System Studio using the installer GUI.
2. Install the Intel SystemStudio integration layer.
1. Copy the integration layer from the Intel System Studio installationfolder to the target operating system development folder.
2. Run the post-installation script: <iss-install-dir>/YoctoProject/meta-intel-iss/yp-setup/postinst_<OS>_iss.sh<ISS_BASE_dir>For example, for Wind River Linux: /YoctoProject/meta-intel-iss/yp-setup/postinst_wr_iss.sh
3. Build the recipe thatincludes the appropriateVTune Amplifier package.
1. Add the path to the /YoctoProject/meta-intel-iss to thebblayers.conf file:
BBLAYERS= "\...<OS_INSTALL_DIR>/YoctoProject/meta-intel-iss\..."
2. Add the VTune Amplifier recipes to conf/local.conf. Possible recipesinclude:
• intel-vtune-drivers: integrates all VTune Amplifier drivers forPMU-based analysis with stacks and context switches. Requiresadditional kernel options to be enabled.
• intel-vtune-sep-driver: integrates drivers for PMU-basedanalysis with minimal requirements for kernel options.
4 Intel® VTune™ Amplifier 2019 Installation Guide - macOS*
12
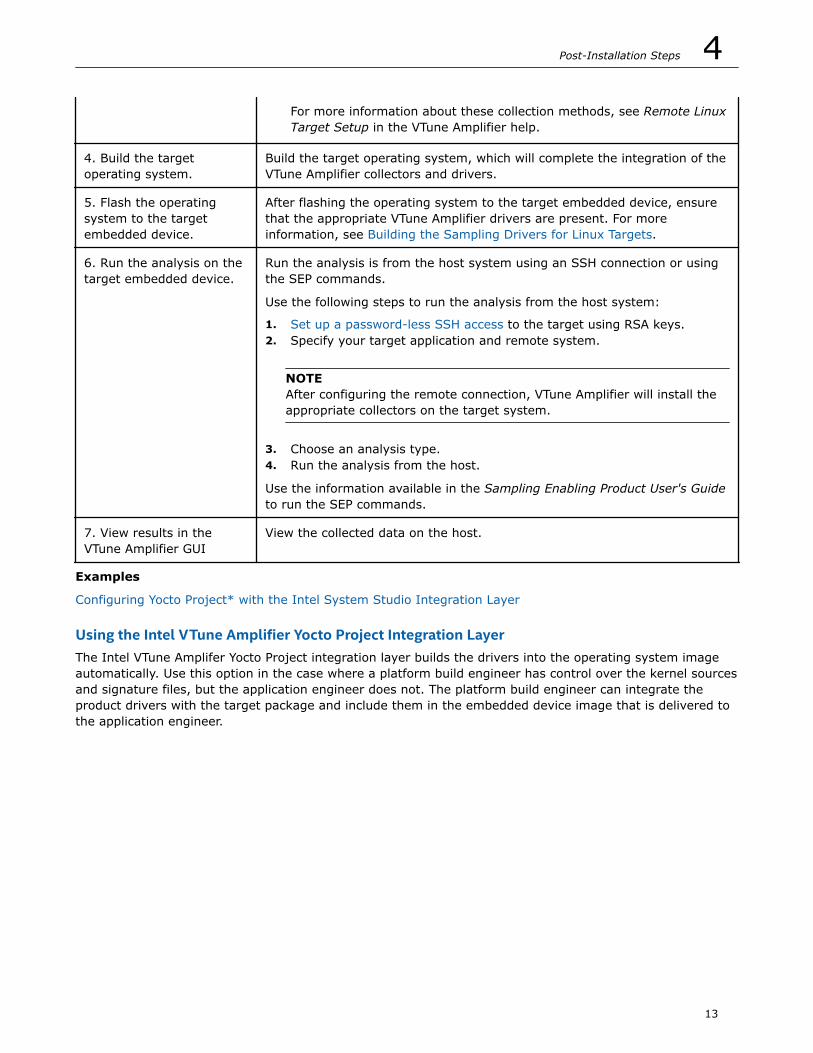
For more information about these collection methods, see Remote LinuxTarget Setup in the VTune Amplifier help.
4. Build the targetoperating system.
Build the target operating system, which will complete the integration of theVTune Amplifier collectors and drivers.
5. Flash the operatingsystem to the targetembedded device.
After flashing the operating system to the target embedded device, ensurethat the appropriate VTune Amplifier drivers are present. For moreinformation, see Building the Sampling Drivers for Linux Targets.
6. Run the analysis on thetarget embedded device.
Run the analysis is from the host system using an SSH connection or usingthe SEP commands.
Use the following steps to run the analysis from the host system:
1. Set up a password-less SSH access to the target using RSA keys.2. Specify your target application and remote system.
NOTEAfter configuring the remote connection, VTune Amplifier will install theappropriate collectors on the target system.
3. Choose an analysis type.4. Run the analysis from the host.
Use the information available in the Sampling Enabling Product User's Guideto run the SEP commands.
7. View results in theVTune Amplifier GUI
View the collected data on the host.
Examples
Configuring Yocto Project* with the Intel System Studio Integration Layer
Using the Intel VTune Amplifier Yocto Project Integration LayerThe Intel VTune Amplifer Yocto Project integration layer builds the drivers into the operating system imageautomatically. Use this option in the case where a platform build engineer has control over the kernel sourcesand signature files, but the application engineer does not. The platform build engineer can integrate theproduct drivers with the target package and include them in the embedded device image that is delivered tothe application engineer.
Post-Installation Steps 4
13
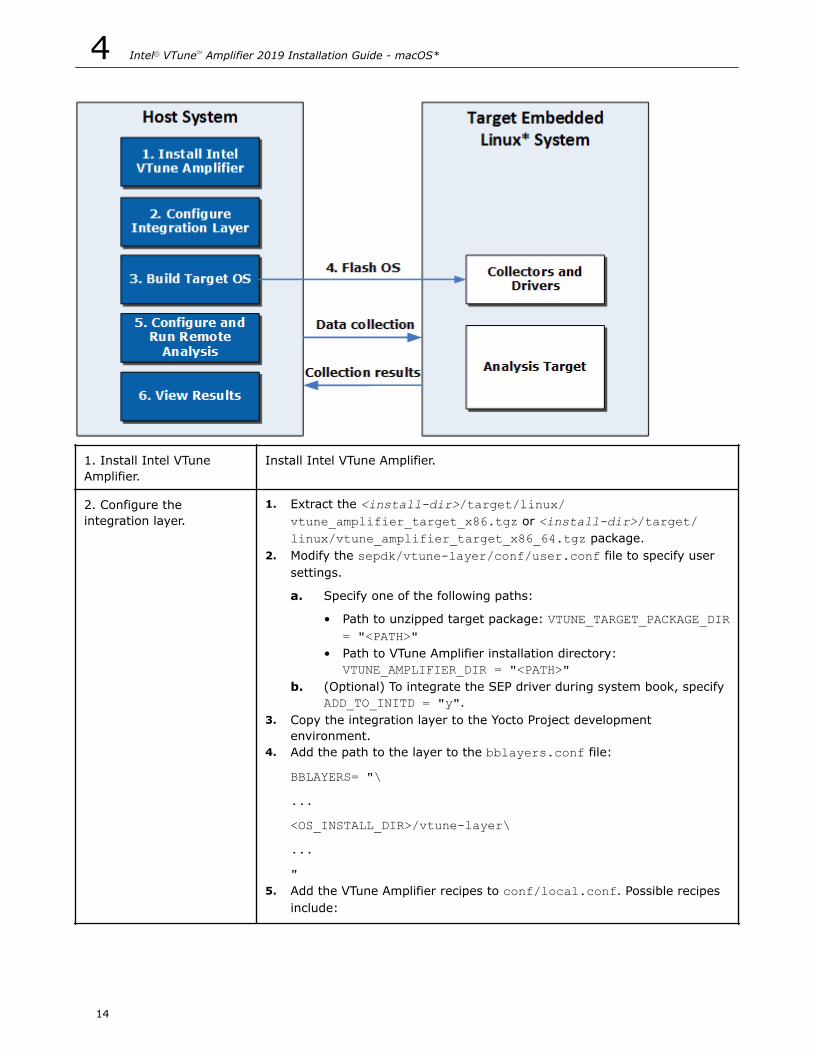
1. Install Intel VTuneAmplifier.
Install Intel VTune Amplifier.
2. Configure theintegration layer.
1. Extract the <install-dir>/target/linux/vtune_amplifier_target_x86.tgz or <install-dir>/target/linux/vtune_amplifier_target_x86_64.tgz package.
2. Modify the sepdk/vtune-layer/conf/user.conf file to specify usersettings.
a. Specify one of the following paths:
• Path to unzipped target package: VTUNE_TARGET_PACKAGE_DIR= "<PATH>"
• Path to VTune Amplifier installation directory:VTUNE_AMPLIFIER_DIR = "<PATH>"
b. (Optional) To integrate the SEP driver during system book, specifyADD_TO_INITD = "y".
3. Copy the integration layer to the Yocto Project developmentenvironment.
4. Add the path to the layer to the bblayers.conf file:
BBLAYERS= "\...<OS_INSTALL_DIR>/vtune-layer\..."
5. Add the VTune Amplifier recipes to conf/local.conf. Possible recipesinclude:
4 Intel® VTune™ Amplifier 2019 Installation Guide - macOS*
14
• intel-vtune-drivers: integrates all VTune Amplifier drivers forPMU-based analysis with stacks and context switches. Requiresadditional kernel options to be enabled.
• intel-vtune-sep-driver: integrates drivers for PMU-basedanalysis with minimal requirements for kernel options.
For more information about these collection methods, see Remote LinuxTarget Setup in the VTune Amplifier help.
3. Build the targetoperating system.
Build the target operating system, which will complete the integration of theVTune Amplifier collectors and drivers.
4. Flash the operatingsystem to the targetembedded device.
After flashing the operating system to the target embedded device, ensurethat the appropriate VTune Amplifier drivers are present. For moreinformation, see Building the Sampling Drivers for Linux Targets.
5. Run the analysis on thetarget embedded device.
Run the analysis is from the host system using an SSH connection or usingthe SEP commands.
Use the following steps to run the analysis from the host system:
1. Set up a password-less SSH access to the target using RSA keys.2. Specify your target application and remote system.3. Choose an analysis type.4. Run the analysis from the host.
Use the information available in the Sampling Enabling Product User's Guideto run the SEP commands.
6. View results in theVTune Amplifier GUI
View the collected data on the host.
Example
Configuring Yocto Project with the VTune Amplifier Integration Layer
Using the Bundled Intel VTune Amplifier Installation PackagesYou can build the appropriate drivers and install the VTune Amplifier collectors on your kernel imagemanually with a command line. This option requires root access to the configured kernel source.
Post-Installation Steps 4
15
1. Install Intel VTuneAmplifier.
Install using the installer GUI.
2. Run the analysis on thetarget embedded device.
Use the following steps to run the analysis from the host system:
1. Set up a password-less SSH access for the root user to the target usingRSA keys.
2. Specify your target application and remote system. The collectors anddrivers within the package should be automatically installed.
3. Choose an analysis type.4. Run the analysis from the host.
3. View results in theVTune Amplifier GUI
View the collected data on the host.
Troubleshooting
If the drivers were not built during collector installation, the installation output should inform you thatbuilding the sampling driver is required.
The drivers are built either on the target system or on the host system, depending on compiler toolchainavailability:
1. If the compiler toolchain is available on the target system:
a. On the target embedded device, build the driver from the <install-dir>/sepdk/src directoryusing the ./build-driver command.
b. Load the driver into the kernel using the ./insmod-sep command.2. If the compiler toolchain is not available on the target system:
a. On the host system, cross-build the driver using the driver source from the target packagesepdk/src directory with the ./build-driver command. Provide the cross-compiler (ifnecessary) and the target kernel source tree for the build.
b. Copy the sepdk/src folder to the target system.c. Load the driver into the kernel using the ./insmod-sep command.
4 Intel® VTune™ Amplifier 2019 Installation Guide - macOS*
16
For more information, see Building the Sampling Drivers for Linux Targets.
Example
Configuring Yocto Project with Intel VTune Amplifier Target Packages
Configure Yocto Project* and VTune™ Amplifier with the VTune Amplifier IntegrationLayerIntel® VTune™ Amplifier can collect and analyze performance data on embedded Linux* devices running YoctoProject*. This topic provides an example of setting up the VTune Amplifier to collect performance data on anembedded device with Yocto Project 1.8 installed using the Intel VTune Amplifier integration layer providedwith the product installation files. The process integrates the VTune Amplifier product drivers with the targetpackage and includes them in the embedded device image. Root access to the kernel is required.
NOTEVTune Amplifier is able to collect some performance data without installing the VTune Amplifier drivers.To collect driverless event-based sampling data, installing the drivers and root access is not required.For full capabilities, install the VTune Amplifier drivers as described here.
Select the Target PackageVTune Amplifier provides two Yocto Project recipes in the following packages:
• The vtune_amplifier_target_sep_x86_64.tgz package includes the intel-vtune-sep-driverrecipe, which enables performance data collection using hardware event-based sampling. Attempting tocollect stacks when using this recipe will automatically switch to driverless collection mode. This recipehas minimal requirements for Linux kernel configuration.
• The vtune_amplifier_target_x86_64.tgz package includes the intel-vtune-drivers recipe, whichenables the full performance data capabilities using hardware event-based sampling. This recipe has additional requirements for Linux kernel configuration. The intel-vtune-drivers recipe is a superset ofthe intel-vtune-sep-driver recipe.
Only one recipe can be used at a time. There is no difference between the x86 and x86_64 target packagesfor building recipes within Yocto Project. Both can be used on either 32 bit or 64 bit systems.
1. Download the VTune Amplifier target package or locate the package in the <install-dir>/target/linux directory on the host system where VTune Amplifier is installed.
2. Copy the selected target package to a location on the Yocto Project build system.
Prepare the Integration Layer1. On the Yocto Project build system, extract the vtune_amplifier_target_sep_x86_64.tgz or
vtune_amplifier_target_x86_64.tgz archive to a writeable location.
cd $HOMEtar xvzf vtune_amplifier_target_x86_64.tgz
2. (Optional) Modify the $HOME/vtune_amplifier_<version>/sepdk/vtune-layer/conf/user.conffile to specify user settings.
a. If the VTune Amplifier recipe has been split from the target package, specify one of the followingpaths:
• Path to unzipped target package: VTUNE_TARGET_PACKAGE_DIR = "$HOME/vtune_amplifier_<version>"
• Path to VTune Amplifier: VTUNE_AMPLIFIER_DIR = "/opt/intel/vtune_amplifier"b. To integrate the SEP driver during system boot, specify ADD_TO_INITD = "y".
Post-Installation Steps 4
17
3. In the Yocto Project development environment, add the path to the layer to the bblayer.conf file. Forexample:
vi conf/bblayers.confBBLAYERS = "$HOME/vtune_amplifier_<version>/sepdk/vtune-layer\"
Your file should look similar to the following:
BBLAYERS ?= " \ $HOME/source/poky/meta \ $HOME/source/poky/meta-poky \ $HOME/source/poky/meta-yocto-bsp \ $HOME/source/poky/meta-intel \ $HOME/vtune_amplifier_2019/sepdk/vtune-layer \ "
4. Specify the Intel VTune Amplifier recipe in conf/local.conf. In this example, the intel-vtune-drivers is used.
vi "conf/local.conf"IMAGE_INSTALL_append = " intel-vtune-drivers"
NOTEYou cannot add both intel-vtune-drivers and intel-vtune-sep-driver at the same time.
Build and Flash the Target Operating System1. Build the target operating system. For example:
bitbake core-image-sato
NOTEIf you modified the kernel configuration options, make sure the kernel is recompiled.
2. Flash the operating system to the embedded device.
Configure and Run Remote AnalysisUse the following steps on the host system to set up and launch the analysis on the embedded device:
1. Set up a password-less SSH access to the target using RSA keys.2. Create a new project.3. Select the remote Linux (SSH) analysis target and specify the collection details.4. Configure the analysis type.5. Start the analysis.
Configure Yocto Project*/Wind River* Linux* and Intel® VTune™ Amplifier with the IntelSystem Studio Integration LayerYou can use Intel® VTune™ Amplifier to collect and analyze performance data on embedded Linux* devicesrunning Yocto Project* or Wind River* Linux*. This example describes how you set up VTune Amplifier usingthe Intel System Studio integration layer, to collect performance data on an embedded device with YoctoProject 1.8 or Wind River* Linux* installed. The integration layer is available with the product installationfiles. The process integrates the VTune Amplifier product drivers with the target package and includes themin the embedded device image. For this example, you need root access to the kernel.
4 Intel® VTune™ Amplifier 2019 Installation Guide - macOS*
18
Install the Intel System Studio Integration LayerPrerequisite: Install Intel System Studio on the host system.
1. Copy the integration layer from the Intel System Studio installation folder to the appropriatedevelopment folder.
For Yocto Project*:
cp -r <ISS_BASE_DIR>/YoctoProject/meta-intel-iss <YOCTO_HOME>/For Wind River* Linux*:
cp -r <ISS_BASE_DIR>/YoctoProject/meta-intel-iss <WR_HOME>/where
• <ISS_BASE_DIR> : Root folder of the Intel System Studio installation. By default, this is /opt/intel/system_studio_<version>.x.y/. For example, for the 2019 version, the root folderis /opt/intel/system_studio_2019.0.0/.
• <YOCTO_HOME> : Root folder of the Yocto Project* cloned directory.• <WR_HOME> : Root folder of the Wind River* Linux* cloned directory.
2. Register the layer by running the post-installation script.
For Yocto Project*:
In the shell console, go to the <YOCTO_HOME> folder and run this command:.
$ meta-intel-iss/yp-setup/postinst_yp_iss.sh <ISS_BASE_DIR>For Wind River* Linux*:
In the shell console, go to the <WR_HOME> folder and run this command:.
$ meta-intel-iss/yp-setup/postinst_wr_iss.sh <ISS_BASE_DIR>To uninstall the Intel System Studio integration:
1. Run the appropriate script to uninstall:
For Yocto Project*:
In the shell console, go to the <YOCTO_HOME> folder and run this command:.
$ meta-intel-iss/yp-setup/uninst_yp_iss.sh For Wind River* Linux*:
In the shell console, go to the <WR_HOME> folder and run this command:.
$ meta-intel-iss/yp-setup/uninst_wr_iss.sh 2. Remove the meta-intel-iss layer.
Add the Intel VTune Amplifier Recipe1. Add the path to the wr-iss-<version> to the bblayer.conf file. For example:
vi /path/to/poky-fido-10.0.0/build/conf/bblayers.confBBLAYERS = "$HOME/source/poky/wr-iss-2019\"
Your file should look similar to the following:
BBLAYERS ?= " \ $HOME/source/poky/meta \ $HOME/source/poky/meta-poky \ $HOME/source/poky/meta-yocto-bsp \
Post-Installation Steps 4
19
$HOME/source/poky/meta-intel \ $HOME/source/poky/wr-iss-2019 \ "
2. Add the Intel VTune Amplifier recipe to conf/local.conf. Two recipes are available,
intel-vtune-drivers and intel-vtune-sep-driver. In this example, the intel-vtune-driversis used so the analysis can be run from the VTune Amplifier GUI on the host system.
vi "conf/local.conf"IMAGE_INSTALL_append = " intel-vtune-drivers"
NOTEYou cannot add both intel-vtune-drivers and intel-vtune-sep-driver at the same time.
Build and Flash the Target Operating System1. Build the target operating system. For example:
bitbake core-image-sato2. Flash the operating system to the embedded device.
Configure and Run Remote AnalysisUse the following steps on the host system to set up and launch the analysis on the embedded device:
1. Set up a password-less SSH access to the target using RSA keys.2. Create a new project.3. Select the remote Linux (SSH) analysis target and specify the collection details.4. Configure the analysis type.5. Start the analysis.
Configure Yocto Project* and Intel® VTune™ Amplifier with the Linux* Target PackageIntel® VTune™ Amplifier can collect and analyze performance data on embedded Linux* devices. This topicprovides an example of setting up Intel VTune Amplifier to collect performance data on an embedded devicerunning Yocto Project*. The first section provides information for a typical use case where the requiredcollectors are automatically installed. The second section provides steps to manually install the collectors andthe VTune Amplifier drivers for hardware event-based sampling data collection.
Automatically Configure and Run Remote AnalysisUse the following steps on the host system to set up and launch the analysis on the embedded device:
1. Set up a password-less SSH access to the target using RSA keys.2. Open VTune Amplifier and create a new project.3. Select the remote Linux (SSH) analysis target and specify the collection details. VTune Amplifier
connects to the target system and installs the appropriate collectors. If the automatic installation failsor if you want to collect hardware event-based sampling with the VTune Amplifier drivers, follow theinstructions below to manually configure the target system.
4. Select the analysis type.5. Start the analysis.
Manually Configure the Linux Target SystemUse these steps only if the automatic installation fails.
1. Copy the target package archive to the target device. The following target packages are available:
4 Intel® VTune™ Amplifier 2019 Installation Guide - macOS*
20
• <install-dir>/target/vtune_amplifier_target_sep_x86.tgz - provides hardware event-based sampling collector only (SEP) for x86 systems
• <install-dir>/target/vtune_amplifier_target_x86.tgz - provides all VTune Amplifiercollectors for x86 systems
• <install-dir>/target/vtune_amplifier_target_sep_x86_64.tgz - provides hardware event-based sampling collector only (SEP) for 64-bit systems
• <install-dir>/target/vtune_amplifier_target_x86_64.tgz - provides all VTune Amplifiercollectors for 64-bit systems
For example, the following command copies the vtune_amplifier_target_x86_64.tgz package tothe embedded device using SCP:
> scp -r vtune_amplifier_target_x86_64.tgz [email protected]:/opt/intel/2. Extract the file on the target system. For example:
> tar -xvsf vtune_amplifier_target_x86_64.tgz3. Make sure the sampling driver is available on the target system. The installation output should inform
you if building the sampling driver is required. If it is not, you will need to build the sampling driver andinstall it on the target system.
If the compiler toolchain is available on the target embedded system, build the driver on the targetdevice using the following steps:
a. Open a command prompt and navigate to the <install-dir>/sepdk/src directory. Forexample:
> cd /opt/intel/vtune_amplifier_2019.0.0.0/sepdk/srcb. Build the driver using the ./build-driver command. For example:
> ./build-driver -ni \ --kernel-src-dir=/usr/src/kernel/ \ --kernel-version=4.4.3-yocto-standard \ --make-args="PLATFORM=x64 ARITY=smp"
c. Load the driver into the kernel using the ./insmod-sep command.
If the compiler toolchain is not available on the target embedded system, build the driver on the hostsystem and install it on the target device using the following steps:
a. Open a command prompt and navigate to the <install-dir>/sepdk/src directory. Forexample:
> cd /opt/intel/vtune_amplifier_2019.0.0.0/sepdk/srcb. Cross-build the driver using the using the ./build-driver command. Provide the cross-compiler
(if necessary) and the target kernel source tree for the build. For example:
> mkdir drivers>./build-driver -ni \--c-compiler=i586-i586-xxx-linux-gcc \--kernel-version=4.4.3-yocto-standard \--kernel-src-dir=/usr/src/kernel/ \--make-args="PLATFORM=x32 ARITY=smp" \--install-dir=./drivers
c. Copy the sepdk/src/drivers folder to the target system.d. Load the driver into the kernel using the ./insmod-sep command.
Set Up FreeBSD* SystemIntel® VTune™ Amplifier allows you to collectperformance data remotely on a FreeBSD* targetsystem.
Post-Installation Steps 4
21
Intel® VTune™ Amplifier includes a target package for collecting event-based sampling data on a FreeBSD*target system either via the remote collection capability or by collecting the results locally on the FreeBSDsystem and copying them to a Linux*, Windows*, or macOS* host system. The collected data is thendisplayed on a host system that supports the graphical interface.
1. Install VTune Amplifier on your Linux, Windows, or macOS host.2. Install the appropriate sampling drivers on the FreeBSD target system. Use the <vtune-install-
dir>/target/freebsd/vtune_amplifier_target_x86_64.tgz file for analysis using VTuneAmplifier or the <vtune-install-dir>/target/freebsd/vtune_amplifier_target_sep_x86_64.tgz file for analysis using the sampling enabling product(SEP) collectors.
3. Collect performance data using one of the following methods. For more information about each of thesemethods, see FreeBSD* Targets and Remote Linux Target Setup in the Intel VTune Amplifier onlinehelp.
• Remote analysis from the host system using the VTune Amplifier command line or GUI.• Native analysis on the target system using the VTune Amplifier command line.• Native analysis on the target system using the SEP collectors.
4. Review the results on the host system.
Install the Sampling Drivers on FreeBSDUse the following steps to configure your FreeBSD target system for event-based sampling analysis. Rootprivileges are required on the target system to install the VTune Amplifier drivers.
1. Copy the <vtune-install-dir>/target/freebsd/vtune_amplifier_target_x86_64.tgz file tothe target system using ftp, sftp, or scp.
2. Extract the archive to the /opt/intel directory on the target system.3. Navigate to the following location: /opt/intel/sepdk/modules4. Run the following commands to build the appropriate drivers:
$ make$ make install
5. Run the following command to install the drivers:
$ kldload sep paxAllow non-root users to run an event-based sampling analysis by running the following commands afterinstalling the drivers:
$ chgrp -R <user_group> /dev/pax$ chgrp -R <user_group> /dev/sep
Remove the Sampling Drivers from FreeBSDRun the following command to unload the sampling drivers:
$ kldunload sep pax
Set Up Android* SystemWhen using the VTune Amplifier to collect data remotely on a target Android device, make sure to:
• Configure your Android device for analysis.• Gain adb access to an Android device.• For hardware event-based sampling, gain a root mode adb access to the Android device.• Use the pre-installed drivers on the target Android system.
Optionally, do the following:
• Enable Java* analysis.• To view functions within Android-supplied system libraries, device drivers, or the kernel, get access from
the host development system to the exact version of these binaries with symbols not stripped.
4 Intel® VTune™ Amplifier 2019 Installation Guide - macOS*
22
• To view sources within Android-supplied system libraries, device drivers, or the kernel, get access fromthe host development system to the sources for these components.
Configure an Android Device for AnalysisTo configure your Android device, do the following:
1. Allow Debug connections to enable adb access:
a. Select Settings > About <device>.b. Tap Build number seven times to enable the Developer Options tab.c. Select the Settings > Developer Options and enable the USB debugging option.
NOTEPath to the Developer Options may vary depending on the manufacture of your device and systemversion.
2. Enable Unknown Sources to install the VTune Amplifier Android package without Google* Play. To dothis, select Settings > Security and enable the Unknown Sources option.
Gain ADB Access to an Android DeviceVTune Amplifier collector for Android requires connectivity to the Android device via adb. Typically Androiddevices are connected to the host via USB. If it is difficult or impossible to get adb access to a device overUSB, you may get adb over Ethernet or WiFi. To connect ADB over Ethernet or WiFi, first connect to Ethernetor connect to a WiFi access point and then do the following:
1. Find the IP Address of the target. The IP address is available in Android for Ethernet viaSettings>Wireless&Networks>Ethernet>IP Address or for Wi-Fi viaSettings>Wireless&Networks>Wi-Fi><Connected Access Point>>IP Address.
2. Make sure adb is enabled on the target device. If not enabled, go to Terminal App (of your choice) onthe device and type:
> su> setprop service.adb.tcp.port 5555> stop adbd> start adbd
3. Connect adb on the host to the remote device. In the Command Prompt or the Terminal on the host,type:
> adb connect <IPAddres>:5555
Gain a Root Mode ADB Access to the Android DeviceFor performance analysis on Android platforms, you typically need a root mode adb access to your device to:
• Install and load drivers needed for hardware event-based sampling.• Enable the Android device to support Java* analysis.• Run hardware event-based sampling analysis.
NOTEThere are several analysis types on Android systems that do NOT require root privileges such asHotspots (user-mode samplingmode) and Perf*-based driverless sampling event-based collection.
Depending on the build, you gain root mode adb access differently:
• User/Production builds : Gaining root mode adb access to a user build of the Android OS is difficult anddifferent for various devices. Contact your manufacturer for how to do this.
Post-Installation Steps 4
23
• Engineering builds : Root-mode adb access is the default for engineering builds. Engineering builds ofthe Android OS are by their nature not "optimized". Using the VTune Amplifier against an engineeringbuild is likely to result in VTune Amplifier identifying code to optimize which is already optimized in userand userdebug builds.
• Userdebug builds : Userdebug builds of the Android OS offer a compromise between good results andeasy-to-run tools. By default, userdebug builds run adb in user mode. VTune Amplifier tools require rootmode access to the device, which you can gain via typing adb root on the host. These instructions arebased on userdebug builds.
Use the Pre-installed Drivers on the Target Android SystemFor hardware event-based sampling analysis, the VTune Amplifier needs sampling drivers to be installed. Onsome versions of Android systems, including most of the Intel supplied reference builds for SDVs, thefollowing drivers are pre-installed in /lib/modules or /system/lib/modules :
• Hardware event-based analysis collectors:
• socperf2_x.ko• pax.ko• sep3_x.ko• sep4_x.ko• vtsspp.ko
Typically having pre-installed drivers is more convenient. You can check for pre-installed drivers by typing:
adb shell ls [/lib/modules|/system/lib/modules]If the drivers are not available or the version does not match requirements, consider building and installingthe drivers.
Enable Java* Analysis on Android* SystemExplore configuration settings required to enable Java analysis with Intel® VTune™ Amplifier on an Androidsystem:
• Enable Java analysis on rooted devices• Enabling Java analysis for code generated with ART* compiler
Enabling Java Analysis on Rooted DevicesBy default, the VTune Amplifier installs the remote collector on the target rooted Android devices with the --jitvtuneinfo=src option. To change the Java profiling option for rooted devices, you need to re-install theremote collector on the target manually using the --jitvtuneinfo=[jit|src|dex|none] option on(Windows) or (Linux). For example:
On Windows*:
<install-dir>\bin32\amplxe-androidreg.bat --package-command=install --jitvtuneinfo=srcOn Linux*:
<install-dir>/bin{32,64}/amplxe-androidreg.sh --package-command=install --jitvtuneinfo=srcVTune Amplifier updates the /data/local.prop file as follows:
1. Basic information about the compiled trace: root@android:/ # cat /data/local.propdalvik.vm.extra-opts=-Xjitvtuneinfo:jit
2. Mapping from JIT code to Java source code and basic information about the compiled trace:root@android:/ # cat /data/local.prop dalvik.vm.extra-opts=-Xjitvtuneinfo:src
4 Intel® VTune™ Amplifier 2019 Installation Guide - macOS*
24
3. Mapping from JIT code to DEX code and basic information about the compiled trace: root@android:/# cat /data/local.prop dalvik.vm.extra-opts=-Xjitvtuneinfo:dex
4. JIT data collection. By default, JIT collection is disabled if you do not supply any options:root@android:/ # cat /data/local.prop dalvik.vm.extra-opts=-Xjitvtuneinfo:none
Additionally, if your Dalvik JVM supports instruction scheduling, disable it by adding -Xnoscheduling at theend of dalvik.vm.extra-opts. For example:
root@android:/ # cat /data/local.prop dalvik.vm.extra-opts=-Xjitvtuneinfo:src -Xnoscheduling
NOTEJava analysis currently requires an instrumented Dalvik JVM. Android systems running on the 4thGeneration Intel® Core™ processors or Android systems using ART vs. Dalvik for Java are notinstrumented to support JIT profiling. You do not need to specify --jitvtuneinfo=N.
TipIf you are able to see the --generate-debug-info option in the logcat output (adb logcat *:Sdex2oat:I), the compiler uses this option.
Enabling Java Analysis for Code Generated with ART* CompilerTo enable a source-level analysis, the VTune Amplifier requires debug information for the analyzed binaryfiles. By default, the ART compiler does not generate the debug information for Java code. Depending onyour usage scenario, you may choose how to enable generating the debug information with the ARTcompiler:
NOTEFor releases prior to Android 6.0 Marshmallow*, the --generate-debug-info in the examples belowshould be replaced with --include-debug-symbols.
To Do This: Do This:
Profile a 3rd partyapplication orsystemapplicationinstalled asan .apk file
1. Set the system property dalvik.vm.dex2oat-flags to --generate-debug-info:
adb shell setprop dalvik.vm.dex2oat-flags --generate-debug-info2. If you use --compiler-filter=interpret-only, set the optimization level to
speed:
adb shell setpropdalvik.vm.dex2oat-filter speed3. (Re-)install the application.
adb shell install -rTheApp.apk
Profile allapplicationsinstalled as .apkor .jar files by
1. On your host system, open the /build/core/dex_preopt_libart.mk file,located in your Android OS directory structure.
2. Modify the --no-generate-debug-info line to --generate-debug-info andsave and close the file.
Post-Installation Steps 4
25
To Do This: Do This:
re-building theAndroid imagewhen pre-optimization forprivateapplications isenabled(LOCAL_DEX_PREOPT:=trueproperty set indevice.mk)
3. Rebuild the Android image and flash it to your device.4. If you are using an Android image that is not PIC configured
(WITH_DEXPREOPT_PIC:=false property set in device.mk), generateclasses.dex from odex using the patchoat command. classes.dex shouldappear in /data/dalvik-cache/x86/system@app@[email protected]@classes.dex
Profile allapplicationsinstalled as .apkor .jar files byre-building theAndroid imagewhen pre-optimization forprivateapplications isdisabled(LOCAL_DEX_PREOPT:=falseproperty set indevice.mk)
1. Set the system property dalvik.vm.dex2oat-flags to --generate-debug-info:
adb shell rm -rf /data/dalvik-cache/x86/system@app@[email protected]@classes.dexadb shell setprop dalvik.vm.dex2oat-flags --generate-debug-info2. Stop and start the adb shell:
adb shell stopadb shell start3. Generate the dex file:
adb shell ls /data/dalvik-cache/x86/system@app@[email protected]@classes.dexadb pull /data/dalvik-cache/x86/system@app@[email protected]@classes.dex
Profile anapplicationexecuted by thedalvikvmexecutable
Add the compiler option --generate-debug-info followed by -Xcompiler-option.Make sure the application has not been compiled yet.
rm –f /data/dalvik-cache/*/*TheApp.jar*adb shell dalvikvm –Xcompiler-option --include-debug-symbols –cp TheApp.jar
Profile systemand core classes
Set the system property dalvik.vm.image-dex2oat-flags to --generate-debug-info and force recompilation:
adb shell stopadb shell rm –f /data/dalvik-cache/*/*adb shell setprop dalvik.vm.dex2oat-flags --generate-debug-infoadb shell setprop dalvik.vm.image-dex2oat-flags --generate-debug-infoadb shell startIf you run the application before the system classes are compiled, you should addanother compiler option -Ximage-compiler-option --generate-debug-info:
adb shell rm –f /data/dalvik-cache/*/*adb shell dalvikvm –Xcompiler-option --generate-debug-info -Ximage-compiler-option --generate-debug-info –cp TheApp.jar
4 Intel® VTune™ Amplifier 2019 Installation Guide - macOS*
26
To Do This: Do This:
NOTEThis action isrequired if Javacore classes getcompiled to the /data/dalvik-cache/subdirectory.Manufacturersmay place them indifferentdirectories. Ifmanufacturessupply theprecompiledboot.oat filein /system/framework/x86, Java coreclasses will not beresolved becausethey cannot be re-compiled withdebug information.
Prepare an Android* Application for AnalysisBefore starting an analysis with the VTune Amplifier, make sure your Android application is compiled withrequired settings:
Compilation SettingsPerformance analysis is only useful on binaries that have been optimized and have symbols to attributesamples to source code. To achieve that:
• Compile your code with release level settings (for example, do not use the /O0 setting on GCC*).• Do not set APP_OPTIM to debug in your Application.mk as this setting disables optimization (it
uses /O0) when the compiler builds your binary.• To run performance analysis (Hotspots) on non-rooted devices, make sure to compile your code setting
the debuggable attribute to true in AndroidManifest.xml.
NOTEIf your application is debuggable (android:debuggable="true"), the default setting will be debuginstead of release. Make sure to override this by setting APP_OPTIM to release.
By default, the Android NDK build process for Android applications using JNI creates a version of your .sofiles with symbols.
The binaries with symbols included go to [ApplicationProjectDir]/obj/local/x86.
Post-Installation Steps 4
27
The stripped binaries installed on the target Android system via the .apk file go to[ApplicationProjectDir]/libs/x86 . These versions of the binaries cannot be used to find source in theVTune Amplifier. However, you may collect data on the target system with these stripped binaries and thenlater use the binaries with symbols to do analysis (as long as it is an exact match).
When the VTune Amplifier finishes collecting the data, it copies .so files from the device (which have hadtheir symbols stripped). This allows the very basic functionality of associating samples to assembly code.
TipUse ITT APIs to control performance data collection by adding basic instrumentation to yourapplication.
Search Directories for Android* TargetsFor accurate module resolution and source analysis of your Android* application, make sure to specify searchpaths for binary and source files when configuring performance analysis:
• from command line, use the --search-dir/--source-search-dir options; for example:
host>./amplxe-cl --collect hotspots -knob sampling-mode=hw -r system_wide_r@@@ --search-dir ~/AndroidOS_repo/out/target/product/ctp_pr1/symbols/
• from GUI, use the Binary/Symbol Search and Source Search dialog boxes
If you have not set the project search directories at the time of collection or import, you will not be able toopen the source code. Only Assembly view will be available for source analysis.
Consider the following when adding search paths:
• By default, the VTune Amplifier pulls many binaries from the target device.• The Kernel [vmlinux] is one file that does not contain symbols on the target device. Typically it is
located in [AndroidOSBuildDir]/out/target/product/[your target]/linux/kernel/vmlinux.• Many operating system binaries with symbols are located in either [AndroidOSBuildDir]/out/target/
product/[your target]/symbols, or [AndroidOSBuildDir]/out/target/product/[yourtarget]/obj.
• Application binaries with symbols are located in [AndroidAppBuildDir]/obj/local/x86.• Application source files for the C/C++ modules are usually located in [AndroidAppBuildDir]/jni , not
in [AndroidAppBuildDir]/src (where the Java *source files are). Some third-party software in Androiddoes not provide binaries with symbols. You must contact the third party to get a version of the binarieswith symbols.
• You can see if a binary has symbols by using the file command in Linux and make sure that it says notstripped.
file MyBinary.extMyBinary.ext: ELF 32-bit LSB shared object, Intel 80386, version 1(SYSV), dynamically linked, not stripped
Targets in Virtualized EnvironmentsConfigure your system to use the Intel® VTune™Amplifier for targets running in such virtualizationenvironments as Hyper-V* on Windows*, KVM* orXen* on Linux*, Parallels* on macOS*, and others.
Virtual machines are made up of the following components:
• Host operating system: system from which the virtual machine is accessed. Supported host systems:Linux*, macOS*, Windows*
• Virtual machine manager (VMM) or cloud service provider: tool used to access and manage the virtualmachine. Examples: VMware*, Parallels*
4 Intel® VTune™ Amplifier 2019 Installation Guide - macOS*
28
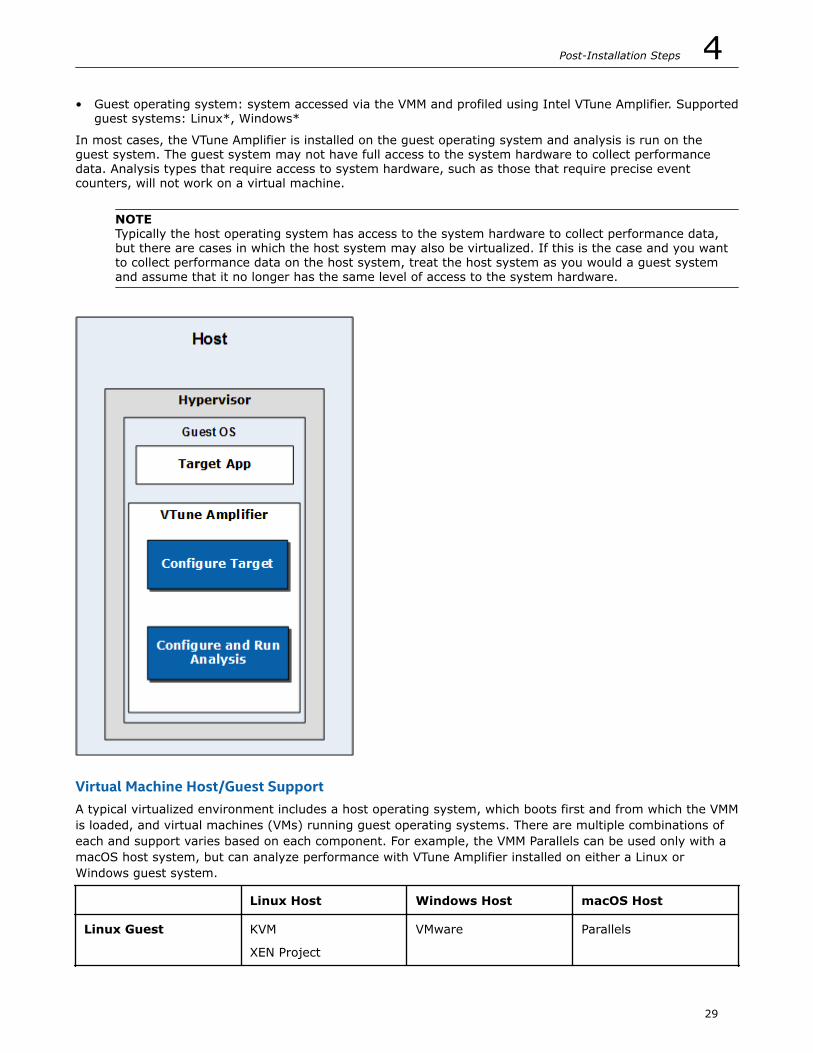
• Guest operating system: system accessed via the VMM and profiled using Intel VTune Amplifier. Supportedguest systems: Linux*, Windows*
In most cases, the VTune Amplifier is installed on the guest operating system and analysis is run on theguest system. The guest system may not have full access to the system hardware to collect performancedata. Analysis types that require access to system hardware, such as those that require precise eventcounters, will not work on a virtual machine.
NOTETypically the host operating system has access to the system hardware to collect performance data,but there are cases in which the host system may also be virtualized. If this is the case and you wantto collect performance data on the host system, treat the host system as you would a guest systemand assume that it no longer has the same level of access to the system hardware.
Virtual Machine Host/Guest SupportA typical virtualized environment includes a host operating system, which boots first and from which the VMMis loaded, and virtual machines (VMs) running guest operating systems. There are multiple combinations ofeach and support varies based on each component. For example, the VMM Parallels can be used only with amacOS host system, but can analyze performance with VTune Amplifier installed on either a Linux orWindows guest system.
Linux Host Windows Host macOS Host
Linux Guest KVM
XEN Project
VMware Parallels
Post-Installation Steps 4
29
VMware
Windows Guest VMware VMware
Hyper-V
Parallels
macOS Guest -- -- --
Additional steps are required to enable performance analysis on the virtual machine after Intel VTuneAmplifier is installed. For more information about installing VTune Amplifier on a virtual machine, see theVTune Amplifier installation guide for your host operating system. Refer to the following topics to enable thevPMU for your hypervisor:
• Enable Parallels Desktop analysis
Analysis Type SupportSupport for VTune Amplifier analysis types varies depending upon which counters have been virtualized bythe VMM. If you run an analysis type that cannot be run in a virtualized environment, VTune Amplifierdisplays a warning message.
In general, the Hotspots analysis type in the user-mode sampling mode will work on every supported VMMbecause the analysis type does not require access to the system hardware. The Hotspots analysis in thehardware event-based sampling mode and other analysis types that use hardware event-based samplingcollection have limited reporting functionality. For example, it will not include accurate results for stacks orcall counts because this data relies on information provided by precise events (uncore). Running analysistypes that rely on precise events will return results, but the collected data will be incomplete or distorted.That is, the result may not point to the actual instruction that caused the event, which can be difficult todifferentiate from correct events. Refer to the documentation for your VMM to understand which countershave been virtualized.
• Full Features
• Hotspots (user-mode sampling mode)• Limited Features
• Hotspots (hardware event-based sampling mode: Stacks not supported)• Microarchitecture Exploration: Stacks not supported
Profile Targets on a Xen* Virtualization PlatformConfigure Intel® VTune™ Amplifier and your systemwith a Xen virtualization platform for performanceprofiling.
You can use the VTune Amplifier for hardware event-based analysis either for a guest OS (DomU), aprivileged OS (Dom0), or all the domains at once.
Configure a Target System for AnalysisBefore running a VTune Amplifier analysis on a system with a Xen virtualization platform, enable full-platformCPU monitoring required for event-based sampling analysis:
$ echo "all" > /sys/hypervisor/pmu/pmu_modeTo get CPU profiling data on a virtualized system (Dom0 and the hypervisor only), enter:
$ echo "hv" > /sys/hypervisor/pmu/pmu_mode
4 Intel® VTune™ Amplifier 2019 Installation Guide - macOS*
30
NOTE
• Some configurations do not support the all mode.• CPU events virtualization requires root privileges.• Unlike CPU profiling, GPU profiling in the hv mode is available for all domains (Dom0 and DomU).
Configure VTune Amplifier for Xen Platform-Wide AnalysisPrerequisites: Make sure the Dom0 remote analysis target is accessible via the Ethernet/SSH connectionfrom your host without any password.
Create a VTune Amplifier project and specify options for your remote target as follows:
1. Select the remote Linux (SSH) type of the target system on the WHERE pane.2. Specify SSH destination details for your Dom0 remote target system.3. Select the Profile System target type to enable platform-wide performance monitoring (WHAT pane).
As soon as you set up the target options, the VTune Amplifier attempts to automatically install requiredcomponents on the specified remote system. If, for some reason, the system cannot be reached, VTuneAmplifier displays an error message. To troubleshoot this potential problem, make sure the default pathspecified as the VTune Amplifier installation on the remote system in the WHERE pane isaccessible, writable, and has 200Mb of available space. If not, specify another location, for example: /tmp.
As soon as the connection is established and the target is configured, select an analysis type supported onthe Xen virtualization platform from the HOW pane:
• Microarchitecture Exploration• GrPU Rendering(preview)
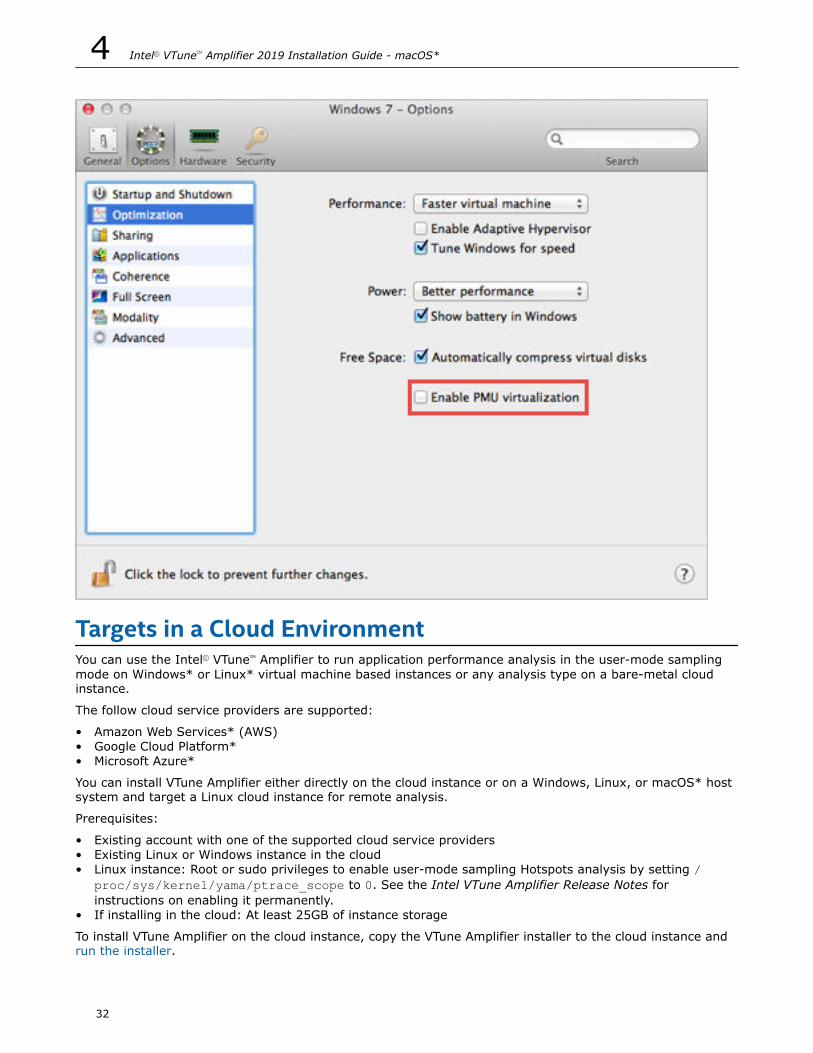
Profile Targets on a Parallels* Guest SystemConfigure the Intel® VTune™ Amplifier to analyzeperformance on a Parallels* guest system.
Parallels* Desktop users can use Intel® VTune™ Amplifier to analyze a Windows* or Linux* virtual guestsystem using a macOS* host. Intel VTune Amplifier is installed and run on the guest system. Additionalinformation about installing VTune Amplifier is available from the installation guides. Refer to the installationguide for the guest system operating system (Windows or Linux).
Use the following steps to enable event based sampling analysis inside Parallels virtual machines. Refer tothe Parallels documentation for the most up-to-date information.
1. Open the configuration options:
• Click the Parallels icon in the menu bar, press and hold the Option (Alt) key, and choose Configure.• Choose Virtual Machine > Configure from the Parallels Desktop menu bar at the top of the
screen.2. Select the Options tab.3. Select Optimization.4. Select the Enable PMU virtualization checkbox.
Post-Installation Steps 4
31
Targets in a Cloud EnvironmentYou can use the Intel® VTune™ Amplifier to run application performance analysis in the user-mode samplingmode on Windows* or Linux* virtual machine based instances or any analysis type on a bare-metal cloudinstance.
The follow cloud service providers are supported:
• Amazon Web Services* (AWS)• Google Cloud Platform*• Microsoft Azure*
You can install VTune Amplifier either directly on the cloud instance or on a Windows, Linux, or macOS* hostsystem and target a Linux cloud instance for remote analysis.
Prerequisites:
• Existing account with one of the supported cloud service providers• Existing Linux or Windows instance in the cloud• Linux instance: Root or sudo privileges to enable user-mode sampling Hotspots analysis by setting /
proc/sys/kernel/yama/ptrace_scope to 0. See the Intel VTune Amplifier Release Notes forinstructions on enabling it permanently.
• If installing in the cloud: At least 25GB of instance storage
To install VTune Amplifier on the cloud instance, copy the VTune Amplifier installer to the cloud instance and run the installer.
4 Intel® VTune™ Amplifier 2019 Installation Guide - macOS*
32
A use case with steps for installing and configuring VTune Amplifier on an Amazon Web Services instance andrunning a Hotspots analysis on that instance is available from https://software.intel.com/en-us/vtune-amplifier-cookbook-profiling-applications-in-aws-ec2-instances.
Configure SSH Access for Remote CollectionTo collect data on a remote Linux* system, apassword-less SSH connection is required.
NOTEA root connection is required to load the sampling drivers and to collect certain performance metrics.You (or your administrator) can configure the system using root permissions and then set uppassword-less SSH access for a non-root user if desired. For example, build and load the samplingdrivers on the target system using root access and then connect to the system and run analysis as anon-root user. If you set up access without using the sampling drivers, then driverless event-basedsampling can still be used.
Use one of the methods below to enable password-less SSH access:
• Manually configure a connection from macOS*/Linux to Linux
Configure a Password-less SSH Access from Linux/macOS to LinuxFor remote collection on a Linux target system, set up the password-less mode on the local Linux or macOShost as follows:
1. Generate the key with an empty passphrase:
host> ssh-keygen -t rsa2. Copy the key to target system:
host> ssh-copy-id user@targetAlternatively, if you do not have ssh-copy-id on your host system, use the following command:
host> cat .ssh/id_rsa.pub | ssh user@target 'cat >> .ssh/authorized_keys'3. Verify that a password is not required anymore, for example:
host> ssh user@target ls
Possible IssuesIf the keys are copied but the VTune Amplifier cannot connect to the remote system via SSH, make sure thepermissions for ~/.ssh and home directories, as well as SSH daemon configuration, are set properly.
Permissions
Make sure your ~/.ssh and ~/.ssh/authorized_keys directory permissions are not too open. Use thefollowing commands:
chmod go-w ~/
chmod 700 ~/.ssh
chmod 600 ~/.ssh/authorized_keysSSH Configuration
Check that the /etc/ssh/sshd_config file is properly configured for the public key authentication.
Post-Installation Steps 4
33
NOTEFor this step, you may need administrative privileges.
If present, make sure the following options are set to yes:
RSAAuthentication yesPubkeyAuthentication yesAuthorizedKeysFile .ssh/authorized_keys
For root remote connections, use:
PermitRootLogin yesIf the configuration has changed, save the file and restart the SSH service with:
sudo service ssh restartsudo service sshd restart (on CentOS)
Sampling DriversIntel® VTune™Amplifier uses kernel drivers to enable the hardware event-based sampling. VTune Amplifierinstaller automatically uses the Sampling Driver Kit to build drivers for your kernel with the defaultinstallation options. If the drivers were not built and set up during installation (for example, lack ofprivileges, missing kernel development RPM, and so on), VTune Amplifier provides an error message and, onLinux* and Android* systems, enables driverless sampling data collection based on the Linux Perf* toolfunctionality, which has some analysis limitations for a non-root user. VTune Amplifier also automatically usesthe driverless mode on Linux when hardware event-based sampling collection is run with stack analysis, forexample, for Hotspots or Threading analysis types.
If not used by default, you may still enable a driver-based sampling data collection by building/installing thesampling drivers for your target system:
• Linux* targets:
• Make sure the driver is installed.
• Build the driver, if required.• Install the driver, if required.
• Verify the driver configuration.• Android* targets: Verify the sampling driver is installed. If required, build and install the driver.
NOTE
• You may need kernel header sources and other additional software to build and load the kerneldrivers on Linux. For details, see the README.txt file in the sepdk/src directory.
• A Linux kernel update can lead to incompatibility with VTune Amplifier drivers set up on the systemfor event-based sampling (EBS) analysis. If the system has installed VTune Amplifier boot scripts toload the drivers into the kernel each time the system is rebooted, the drivers will be automaticallyre-built by the boot scripts at system boot time. Kernel development sources required for driverrebuild should correspond to the Linux kernel update.
• If you loaded the drivers but do not use them and no collection is happening, there is no executiontime overhead of having the drivers loaded. The memory overhead is also minimal. You can let thedrivers be loaded at boot time (for example, via the install-boot-script, which is used bydefault) and not worry about it. Unless data is being collected by the VTune Amplifier, there will beno latency impact on system performance.
4 Intel® VTune™ Amplifier 2019 Installation Guide - macOS*
34
Build and Install the Sampling Drivers for Linux* TargetsPrerequisites for remote Linux target systems: You need root access to the target system.
Prerequisites for all Linux systems: Check the Intel® Developer Zone for updated versions of thesampling driver between releases of Intel® VTune™ Amplifier. Sampling driver downloads are available from https://software.intel.com/en-us/articles/intel-vtune-amplifier-sampling-driver-downloads.
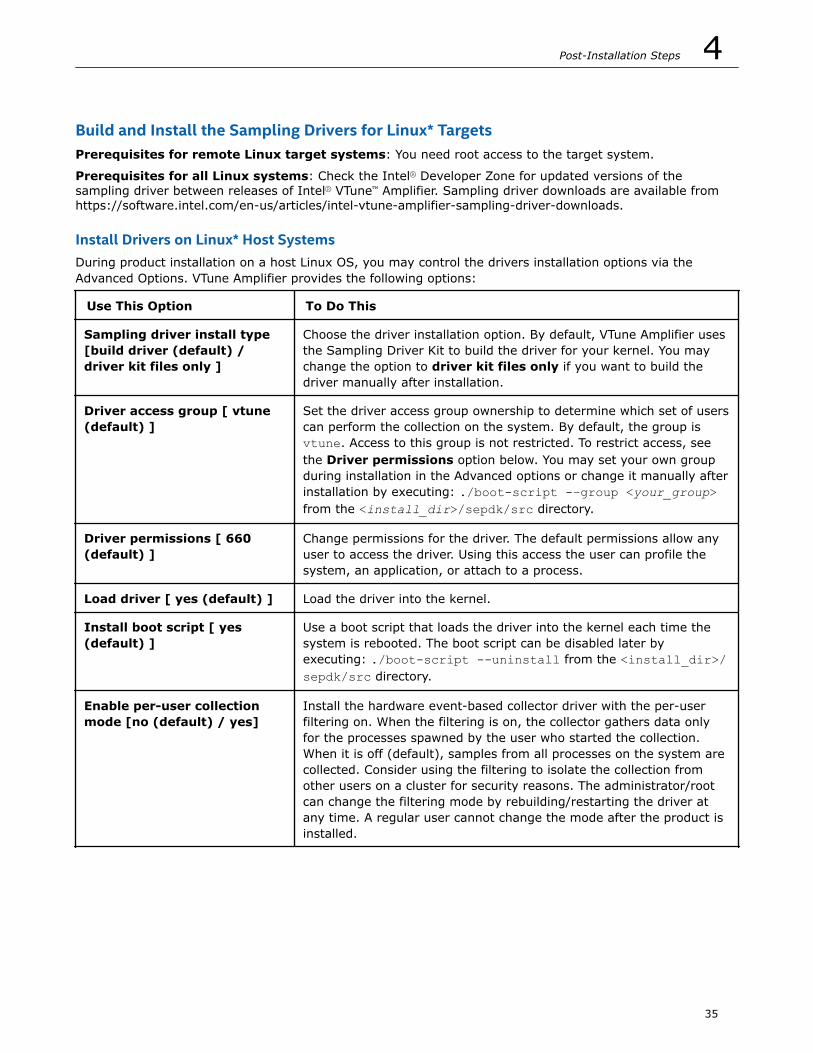
Install Drivers on Linux* Host SystemsDuring product installation on a host Linux OS, you may control the drivers installation options via theAdvanced Options. VTune Amplifier provides the following options:
Use This Option To Do This
Sampling driver install type[build driver (default) /driver kit files only ]
Choose the driver installation option. By default, VTune Amplifier usesthe Sampling Driver Kit to build the driver for your kernel. You maychange the option to driver kit files only if you want to build thedriver manually after installation.
Driver access group [ vtune(default) ]
Set the driver access group ownership to determine which set of userscan perform the collection on the system. By default, the group isvtune. Access to this group is not restricted. To restrict access, seethe Driver permissions option below. You may set your own groupduring installation in the Advanced options or change it manually afterinstallation by executing: ./boot-script -–group <your_group>from the <install_dir>/sepdk/src directory.
Driver permissions [ 660(default) ]
Change permissions for the driver. The default permissions allow anyuser to access the driver. Using this access the user can profile thesystem, an application, or attach to a process.
Load driver [ yes (default) ] Load the driver into the kernel.
Install boot script [ yes(default) ]
Use a boot script that loads the driver into the kernel each time thesystem is rebooted. The boot script can be disabled later byexecuting: ./boot-script --uninstall from the <install_dir>/sepdk/src directory.
Enable per-user collectionmode [no (default) / yes]
Install the hardware event-based collector driver with the per-userfiltering on. When the filtering is on, the collector gathers data onlyfor the processes spawned by the user who started the collection.When it is off (default), samples from all processes on the system arecollected. Consider using the filtering to isolate the collection fromother users on a cluster for security reasons. The administrator/rootcan change the filtering mode by rebuilding/restarting the driver atany time. A regular user cannot change the mode after the product isinstalled.
Post-Installation Steps 4
35
Use This Option To Do This
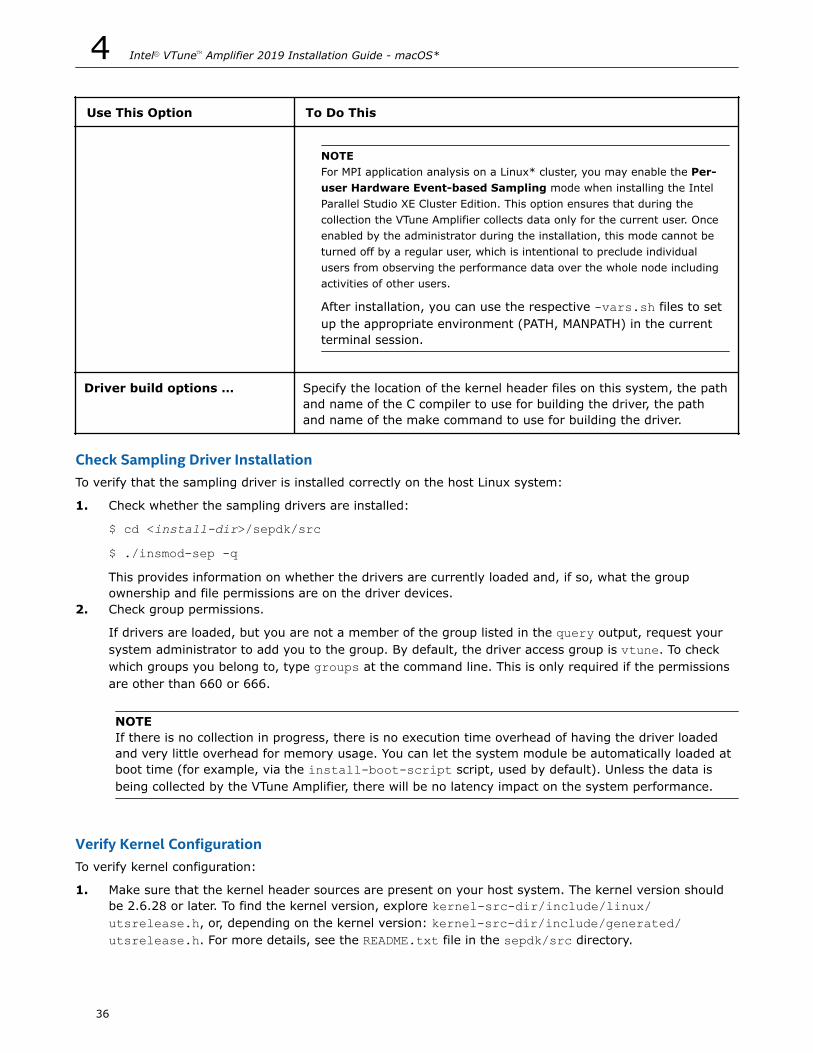
NOTEFor MPI application analysis on a Linux* cluster, you may enable the Per-user Hardware Event-based Sampling mode when installing the IntelParallel Studio XE Cluster Edition. This option ensures that during thecollection the VTune Amplifier collects data only for the current user. Onceenabled by the administrator during the installation, this mode cannot beturned off by a regular user, which is intentional to preclude individualusers from observing the performance data over the whole node includingactivities of other users.
After installation, you can use the respective -vars.sh files to setup the appropriate environment (PATH, MANPATH) in the currentterminal session.
Driver build options … Specify the location of the kernel header files on this system, the pathand name of the C compiler to use for building the driver, the pathand name of the make command to use for building the driver.
Check Sampling Driver InstallationTo verify that the sampling driver is installed correctly on the host Linux system:
1. Check whether the sampling drivers are installed:
$ cd <install-dir>/sepdk/src$ ./insmod-sep -qThis provides information on whether the drivers are currently loaded and, if so, what the groupownership and file permissions are on the driver devices.
2. Check group permissions.
If drivers are loaded, but you are not a member of the group listed in the query output, request yoursystem administrator to add you to the group. By default, the driver access group is vtune. To checkwhich groups you belong to, type groups at the command line. This is only required if the permissionsare other than 660 or 666.
NOTEIf there is no collection in progress, there is no execution time overhead of having the driver loadedand very little overhead for memory usage. You can let the system module be automatically loaded atboot time (for example, via the install-boot-script script, used by default). Unless the data isbeing collected by the VTune Amplifier, there will be no latency impact on the system performance.
Verify Kernel ConfigurationTo verify kernel configuration:
1. Make sure that the kernel header sources are present on your host system. The kernel version shouldbe 2.6.28 or later. To find the kernel version, explore kernel-src-dir/include/linux/utsrelease.h, or, depending on the kernel version: kernel-src-dir/include/generated/utsrelease.h. For more details, see the README.txt file in the sepdk/src directory.
4 Intel® VTune™ Amplifier 2019 Installation Guide - macOS*
36
2. Make sure the following options are enabled in the kernel configuration for hardware event-basedsampling (EBS) collection:
• CONFIG_MODULES=y• CONFIG_MODULE_UNLOAD=y• CONFIG_PROFILING=y• CONFIG_SMP=y• CONFIG_TRACEPOINTS=y (optional but recommended)
3. In addition to the options above, make sure the following options are enabled in the kernelconfiguration for EBS collection with stacks:
• CONFIG_KPROBES=y• CONFIG_RING_BUFFER=y• CONFIG_FRAME_POINTER=y (optional but recommended for kernel stack analysis)
4. For remote target systems, determine if signed kernel modules are required(CONFIG_MODULE_SIG_FORCE=y). If they are, you must have the signed key that matches your targetsystem.
If you are building the sampling drivers from a fresh kernel source and want to use it for an existingtarget system, get the original key files and sign the sampling driver with the original key. Alternatively,build the new kernel and flash it to the target device so the target device uses your kernel build.
Build the Sampling DriverPrerequisites:
• You need kernel header sources and other additional software to build and load the kernel drivers onLinux. Refer to the Verify kernel configuration section.
• To cross-build drivers for a remote target Linux system, extract the package from the <install_dir>/target folder to <extract_dir>.
To build the driver if it is missing:
1. Change the directory to locate the build script:
• To build drivers for a local system: > cd <install_dir>/sepdk/src• To cross-build drivers for a remote target system: > cd <extract_dir>/sepdk/src
2. Use the build-driver script to build the drivers for your kernel. For example:
• $ ./build-driverThe script prompts the build option default for your local system.
• $ ./build-driver -niThe script builds the driver for your local system with default options without prompting for your input.
• $ ./build-driver -ni -puThe script builds the driver with the per-user event-based sampling collection on without prompting foryour input.
• $ ./build-driver -ni \--c-compiler=i586-i586-xxx-linux-gcc \--kernel-version="<kernel-version>" \--kernel-src-dir=<kernel-source-dir> \--make-args="PLATFORM=x32 ARITY=smp"--install-dir=<path>
Post-Installation Steps 4
37
The script builds the drivers with a specified cross-compiler for a specific kernel version. This is usuallyused for the cross-build for a remote target system on the current host. This example uses the followingoptions:
• -ni disables the interactive during the build.• --c-compiler specifies the cross build compiler. The compiler should be available from the PATH
environment. If the option is not specified, the host GCC compiler is used for the build.• --kernel-version specifies the kernel version of the target system. It should match the uname -r
output of your target system and the UTS_RELEASE in kernel-src-dir/include/generated/utsrelease.h or kernel-src-dir/include/linux/utsrelease.h, depending on your kernelversion.
• --kernel-src-dir specifies the kernel source directory.• --make-args specifies the build arguments. For a 32-bit target system, use PLATFORM=x32. For a 64-
bit target system, use PLATFORM=x32_64• --install-dir specifies the path to a writable directory where the drivers and scripts are copied after
the build succeeds.
Use ./build-driver -h to get the detailed help message on the script usage.
To build the sampling driver as RPM using build services such as Open Build Service (OBS):
Use the sepdk.spec file located at the <install_dir>/sepdk/src directory.
Install the Sampling DriversPrerequisites for remote target systems: Copy the sepdk/src folder or the folder specified by the --install-dir option when building the driver to the target system using ssh, ftp, adb, sdb, or othersupported means.
To install the drivers:
1. If building the drivers succeeds, install them manually with the insmod-sep script:
$ cd <install_dir>/sepdk/src$ ./insmod-sep -r -g <group>where <group> is the group of users that have access to the driver.
To install the driver that is built with the per-user event-based sampling collection on, use the -pu (-per-user) option as follows:
$ ./insmod-sep -g <group> -puIf you are running on a resource-restricted environment, add the -re option as follows:
$ ./insmod-sep -re2. Enable the Linux system to automatically load the drivers at boot time:
$ cd <install_dir>/sepdk/src$ ./boot-script --install -g <group>The -g <group> option is only required if you want to override the group specified when the driver wasbuilt.
To remove the driver on a Linux system, run:
./rmmod-sep -s
4 Intel® VTune™ Amplifier 2019 Installation Guide - macOS*
38
Build and Install Sampling Drivers for Android* TargetsOn some versions of Android systems, including most of the Intel® supplied reference builds for SDVs, the required drivers are pre-installed in /lib/modules or /system/lib/modules. If the drivers are not pre-installed in any of these directories, you need to build them manually from the command line. Optionally, youcan get the drivers integrated into the Android build so that they are built and installed when the operatingsystem is built.
Android requires signed drivers. Every time the Android kernel is built, a random private/public key isgenerated. Drivers must be signed with the random private key to be loaded. The drivers (socperf2_x.ko,pax.ko , sep4_x.ko , and vtsspp.ko) must be signed with the same key and be compiled against the samekernel headers/sources as what is installed on the Android target system.
VTune Amplifier has options for building a new driver on the Linux host system and installing it on a targetAndroid system. This is not the default and will only work if you provide the proper kernel headers/sourcesand a signing key. For example, the VTune Amplifier uses the --with-drivers option for building PMUdrivers and --kernel-src-dir option for providing the configured kernel headers/sources tree path.
To build the sampling drivers on the host Linux system, enter:
<install-dir>/bin{32,64}/amplxe-androidreg.sh --package-command=build --with-drivers --kernel-src-dir=/ path /to/configured/kernel/sources [--jitvtuneinfo=jit|src|dex|none]To install the sampling drivers from the Linux host, enter:
<install-dir>/bin{32,64}/amplxe-androidreg.sh --package-command=install --with-drivers--kernel-src-dir=/ path/to/configured/kernel/sources [--jitvtuneinfo=jit|src|dex|none]To sign the drivers after the drivers are built:
Typically the VTune Amplifier automatically signs drivers if kernel sources with the keys are available when itbuilds the drivers. Otherwise, to manually sign the drivers, use the following command:
$KERNEL_SRC/source/scripts/sign-file CONFIG_MODULE_SIG_HASH $KERNEL_SRC/signing_key.priv $KERNEL_SRC/signing_key.x509 driver.kowhere the CONFIG_MODULE_SIG_HASH value is extracted from the $KERNEL_SRC/.config file.
NOTEYou need the "exact" signing key that was produced at the time and on the system where your kernelwas built for your target.
Driverless Event-Based Sampling CollectionTo enable hardware event-based sampling analysis on your platform, the Intel® VTune™ Amplifier can useeither sampling drivers that require root privileges for installation on the Linux* and Android* systems or thePerf* utility, which is part of the default VTune Amplifier installation package.
VTune Amplifier runs the hardware event-based sampling analysis in the driverless mode with the Perf utilityif:
• The sampling drivers cannot be installed (for example, if installed without root privileges)• Collection with stacks is selected with a non-zero stack size and the prerequisites for driverless collection
are satisfied• The option to use driverless collection is selected in the VTune Amplifier user interface and the
prerequisites for driverless collection are statisfied
Post-Installation Steps 4
39
NOTEVTune Amplifier is installed to your default account. For non-root users, it provides a notificationduring the installation claiming that the sampling driver cannot be installed, so some product featurescould be limited or unavailable. To have the sampling driver installed, you need to re-start the installprocess under the root account or contact your administrator.
On Linux, the driverless collection is a default mode for analyses based on hardware event-based samplingwith stacks (for example, Hotspots or Threading).
• Prerequisites• Driverless collection modes• Analysis limitations
Prerequisites for Driverless CollectionVTune Amplifier can use the driverless Perf-based collection if the following requirements are satisfied:
• Your system is based on kernel 2.6.32 or higher, which exports CPU PMU programming detailsover /sys/bus/event_source/devices/cpu/format file system.
• Perf-based collection is enabled in the kernel with a /proc/sys/kernel/perf_event_paranoid valueequal to or less than 1.
• For uncore event analysis, uncore_* devices are available in the /sys/bus/event_source/devicesfolder.
• Context switch data cannot be collected using Perf-based driverless collection if the kernel version is lessthan 4.3.
• The types of context switches (preemption or synchronization) may not be identified on kernels older than4.17.
• Hardware event-based sampling analysis is configured to collect stacks.
Driverless Collection ModesVTune Amplifier supports the following Perf-based collection types:
• Driverless Perf per-process sampling collects samples for a single process and/or its children and canbe done simultaneously from multiple monitoring processes. Since it requires performance countersvirtualization per process, it can bring more overhead in comparison with system-wide collection.Typically, a system has this type of collection enabled by default.
• Driverless Perf system-wide sampling is performed by one monitoring process for the whole system.It usually has less overhead since it does not require to virtualize counters per process. This collectiontype can collect uncore counters and requires kernel configuration.
• Driverless Perf per-process counting provides event counting statistics over an interval for a singleprocess or its children. Event counting can be done simultaneously from multiple monitoring processes.Since it requires performance counters virtualization per process, it can bring more overhead incomparison with system-wide collection. Typically, a system has this type of collection enabled by default.
• Driverless Perf system-wide counting provides event counting statistics performed by one monitoringprocess for the whole system over an interval. It usually has less overhead since it does not require tovirtualize counters per process. This collection type can collect uncore counters and requires kernelconfiguration.
To configure system-wide driverless collection:
Set the /proc/sys/kernel/perf_event_paranoid value to 0 or less. Root privileges are required.
To use only driverless collection, where possible:
Create a custom analysis and select the Enable driverless collection option.
4 Intel® VTune™ Amplifier 2019 Installation Guide - macOS*
40
From the command line, use the -knob enable-driverless-collection=true option. For example:
amplxe-cl -collect-with runsa -knob enable-stack-collection=true -knob stack-size=0 -knob enable-user-tasks=true -knob event-config=CPU_CLK_UNHALTED.THREAD:sa=2000000, INST_RETIRED.ANY:sa=2000000, -knob enable-driverless-collection=true
To disable the driverless collection for your analysis:
Create a custom analysis and set the Stack size option to 0 (unlimited) value.
From the command line, use the -knob stack-size=0 option. For example:
amplxe-cl -collect-with runsa -knob enable-stack-collection=true -knob stack-size=0 -knob enable-user-tasks=true -knob event-config=CPU_CLK_UNHALTED.THREAD:sa=2000000,INST_RETIRED.ANY:sa=2000000
This option disables the Perf driverless collection for stacks and enables the VTune Amplifier driver-basedcollection instead.
Analysis LimitationsPerf-based driverless collection is applicable to all hardware event-based sampling analysis types, such asHotspots (hardware event-based sampling mode), Microarchitecture Exploration, and Custom event-basedsampling analysis types on Linux and Android OS. If the uncore events support is available on the system,the VTune Amplifier also uses the Perf collection for Memory Access, HPC Performance Characterization, andMicroarchitecture Exploration analysis types with the Analyze memory bandwidth option enabled.
The following additional limitations are also possible for the driverless collection:
• Since the driverless collection is based on the Linux Perf functionality, all Perf limitations fully apply to theVTune Amplifier sampling analysis as well. For example, your operating system limits on the maximumamount of files opened by a process as well as maximum memory mapped to a process address space stillapply and may affect Perf-based profiling. For more information, see the Tutorial: Troubleshooting andTips topic at https://perf.wiki.kernel.org/index.php/Main_Page.
• Local and remote Launch Application, Attach to Process and Profile System target types aresupported but this support fully depends on the Linux Perf profiling credentials specified in the /proc/sys/kernel/perf_event_paranoid file and managed by the administrator of your system usingroot credentials. For more information, see Perf Events and tool security at https://www.kernel.org/doc/html/latest/admin-guide/perf-security.html and the perf_event related configuration files topic at http://man7.org/linux/man-pages/man2/perf_event_open.2.html. By default, only user processes profiling atboth user and kernel spaces is permitted, so you need granting wider profiling credentials via theperf_event_paranoid file to employ the Profile System target type.
• Memory bandwidth analysis is not supported on Intel Atom® processors.• Preemption and synchronization context switches may not be differentiated on kernels older than 4.17. To
identify context switch types, make sure the VTune Amplifier sampling driver is loaded and the Stack sizeoption is set to 0.
NOTERun the <install-dir>/bin64/amplxe-self-checker.sh script to explore the analysis typecollection abilities of your system. The script output helps recognize limitations and provides advice onfixing them.
Post-Installation Steps 4
41
Getting Started with Intel®VTune™ Amplifier 5Information about using Intel® VTune™ Amplifier after installing the product is available from the GettingStarted page, which is available from <install-dir>/documentation/<language>/welcomepage/get_started.htm or from the Intel Developer Zone: https://software.intel.com/en-us/get-started-with-vtune.
5 Intel® VTune™ Amplifier 2019 Installation Guide - macOS*
42

Intel® VTune™ AmplifierInstallation FAQs 6The following topics include answers to frequently asked questions about the Intel VTune Amplifierinstallation and configuration process.
How do I install the drivers required by Intel VTuneAmplifier?Intel VTune Amplifier automatically installs the required sampling drivers (SEP) when the product is installed,assuming the user who installed the product has the appropriate permissions (administrative/root/sudoaccess). Drivers are installed on a target system when VTune Amplifier connects to the target system duringanalysis configuration (administrative/root/sudo access required via passwordless SSH connection). If thedrivers fail to install, they can be configured manually.
The Sampling Drivers section includes detailed information about installing the drivers for Linux*, Windows*,or Android* systems.
Error Message: Installing and Starting VTSS++ Driver...FAILED
CauseWhen you install the drivers manually, the Intel® VTune™ Amplifier may display this message if memory in thesystem is insufficient.
SolutionTry rebooting the system.
Error Message: No Pre-built Driver Exists for This SystemWhen executing the build-driver script on Linux*, you may see a warning message similar to the followingif the kernel sources are not configured properly (they do not match the kernel that is running): Warning:Current running kernel is version 2.4.18-e.31smp. After successfully building the driver andrunning the insmod-sep3 or insmod-sep command, the following message appears: No pre-builtdriver exists for this system.
SolutionTo resolve this issue, execute the following commands to configure the kernel sources:
$ cd /usr/src/linux$ make mrproper$ cp /boot/config-'uname-r' .config$ vi MakefileMake sure that EXTRAVERSION matches the tail of the output of uname -r. The resulting /user/src/linux/include/version.h should have a UTS_RELEASE that matches the output of uname -r. Once that is true,run the following commands:
$ make oldconfig
Intel® VTune™ Amplifier Installation FAQs 6
43
$ make depAfter completing these steps, run the build-driver script to build the sampling driver against the kernelsources in /usr/src/linux
What features are available if I install Intel VTune Amplifieras a non-root or non-administrator user?Many Intel VTune Amplifier features work when installed on a system as a user other than Root orAdministrator. If VTune Amplifier is installed by a user with permissions other than root/administrative, thenVTune Amplifier can collect some data. For example, VTune Amplifier may try to use the Perf* utility and runa hardware event-based sampling analysis in the driverless mode.
The following features require root/administrative access:
• Analysis on an Intel Atom® processor• Installing the sampling driver (SEP)• Running a performance analysis using an analysis type that uses event-based sampling (list available
from https://software.intel.com/en-us/vtune-amplifier-help-hardware-event-based-sampling-collection)
How do I configure remote data collection using IntelVTune Amplifier?Intel VTune Amplifier can collect performance data on the system on which it is installed (Windows* orLinux* only; macOS* data collection is not supported) or on a remote target system (Windows, Linux, orAndroid* targets). To analyze performance on a remote system, follow these general steps:
1. (Linux only) Configure password-less SSH access to the target system. Password-less SSH access isrequired for running a remote analysis because VTune Amplifier will not prompt for a password onceanalysis collection begins. For detailed steps, see Configuring SSH Access for Remote Collection.
NOTEVTune Amplifier will not automatically install drivers on the remote system unless you connect via SSHas the root user. If you want to run an event-based collection, but do not want to set up password-lessSSH access using the root user account, manually install the drivers on the target system. For detailedsteps, see Sampling Drivers.
2. (Android only) Configure ADB access to the target system. For detailed steps, see Android SystemSetup .
3. Launch VTune Amplifier and open the Configure Analysis window.4. Select the appropriate target system from the WHERE pane. For Remote Linux (SSH) targets,
specify the username, hostname, and port in the SSH Destination field.
VTune Amplifier connects to the remote target and installs appropriate collectors and drivers (if rootaccess was provided). This can take a few seconds.
5. Specify a target type in the WHAT pane.
• Launch Application: specify the location of the process on the target system.• Attach to Process: select a process from the list of available processes running on the target
system.• Launch Android Package: select an application and corresponding package (*.apk) available on
the target system from the list of available packages.6. Select an analysis type from the HOW pane and click Start to run the analysis on the remote system.
For detailed steps for setting up remote collection on a specific target system, use the following topics:
6 Intel® VTune™ Amplifier 2019 Installation Guide - macOS*
44
• Linux System Setup for Remote Analysis• Android System Setup
Can I install multiple versions of Intel VTune Amplifier onthe same system?You can install multiple major versions of VTune Amplifier on the same system, but you cannot have multipleinstallations of the same major version on the same system.
For example, you can have both VTune Amplifier 2018 Update 1 and VTune Amplifier 2019 on the samesystem. However, if you have VTune Amplifier 2018 Update 1 installed, installing VTune Amplifier 2018Update 2 will uninstall Update 1 and replace it with the Update 2 content.
Problem: Platform Not AuthorizedWhen attempting to use Intel® VTune™ Amplifier with a floating license, you may encounter errors such as:
(License server does not support this feature (-18,327))(This platform not authorized by license (-89,337))
CauseThis error is caused by an outdated license server.
SolutionLogin to the Intel® Registration Center to download the latest license server:
NOTEThe registered owner of the license must log in. Other registered users do not get access to the licenseserver download.
1. Log in to the Intel® Registration Center.2. In your supported products list, look for the entry for Intel® Software License Manager and click the
version number next to it.
You will be taken to the download page for the Intel® Software License Manager.3. In the Platform box on the right, select the operating system for your license server, then download
the appropriate package for your license server.4. Install the new license server software on your license server.5. Ensure that the new license server software is running on the license server.
This should resolve the error. If not, see the Get Help page for your support options.
Intel® VTune™ Amplifier Installation FAQs 6
45
Uninstalling Intel® VTune™Amplifier 7Use the following steps to uninstall Intel® VTune™ Amplifier from your system:
1. Navigate to the Applications folder.2. Double-click the Intel VTune Amplifier <version> Uninstaller.app file to start the process of
uninstalling the product.
7 Intel® VTune™ Amplifier 2019 Installation Guide - macOS*
46

Additional Resources 8The following online resources may be helpful during or after the installation of Intel® VTune™ Amplifier.
• Release Notes (https://software.intel.com/en-us/articles/intel-vtune-amplifier-release-notes): The VTuneAmplifier release notes include helpful information specific to your release version, including systemrequirements and known issues and limitations.
• Intel VTune Amplifier User Guide (https://software.intel.com/en-us/vtune-amplifier-help): Learn aboutusing VTune Amplifier with the online user guide.
• Troubleshooting Help (https://software.intel.com/en-us/vtune-amplifier-help-troubleshooting): Thissection of the VTune Amplifier online user guide includes solutions to common problems.
• Download Intel® Parallel Studio XE documentation | Download Intel® System Studio documentation(https://software.intel.com/en-us/articles/download-documentation-intel-parallel-studio-xe-current-previous and https://software.intel.com/en-us/articles/download-documentation-intel-system-studio-current-previous): Starting with the 2018 releases, most documentation is available on the web only. Youcan download a copy of all documentation for use without an internet connection.
Additional Resources 8
47
IndexAAndroid*
application analysis 27remote analysis 22search directories 28
Bbuild
sampling drivers 34
Ddisclaimer 3driverless sampling collection 39drivers
build 9for Android 22for FreeBSD 21Linux* 9
Eembedded device 11, 17, 18, 20Enter index keyword 32, 43–45, 47error messages
failed to install vtss++ driver 43no pre-built driver exists for this system 43
FFreeBSD*
remote analysis 21FreeBSD* target 21
Iinstall
sampling drivers 34user interface 6
JJava* code analysis
enable on Android 22
Llegal information 3load
sampling drivers 34
Ppassword-less mode 33Perf*-based collection 39prepare
Android application for analysis 27Android system for analysis 22FreeBSD system for analysis 21Linux* system for analysis 9
problemplatform not authorized 45
Rremote analysis 9, 21, 22, 33remote collectors 9, 33
Ssampling driver 39sampling drivers 34, 35, 39search directories
for Android 28SSH access configuration 33
Ttarget system
Linux* 9prepare for analysis 9sampling drivers 34
troubleshootingdrivers 43
Vvirtual machine performance analysis 28
WWind River Linux 11
Yyocto 9Yocto Project 11, 17, 18, 20Yocto* 34
Intel® VTune™ Amplifier 2019 Installation Guide - macOS*
48