Embed Size (px)
Citation preview
1
Intel® RAID Controller Premium Feature Key Training
• AXXRPFKSNSH Snapshot Recovery• AXXRPFKDE Self Encrypting Drive (SED)• AXXRPFKSSD SSD Cache with FastpathNote: Graphics for this training is based on RAID FW1094 and RWC2 9.00.00
2
Copyright © Intel Corporation, 2010. All rights reserved. Third-party marks and brands are the property of their respective owners. All products, dates, and figures are preliminary and subject to change without notice.
Premium Features are additional features that can be added to an Intel® RAID controller through the application of an add-on enablement key.
Implementation of these features is designed to improve specific RAID usage models by adding additional performance, data protection, or other benefit to the targeted usage model.
What are RAID Premium Features?
3
Copyright © Intel Corporation, 2010. All rights reserved. Third-party marks and brands are the property of their respective owners. All products, dates, and figures are preliminary and subject to change without notice.
Supported Intel RAID Controllers
The following Controllers Support addition of Premium Feature Keys:
• RS2BL080• RS2BL040• RS2MB044• RS2PI008• RS2WG160• RS2SG244
4
Copyright © Intel Corporation, 2010. All rights reserved. Third-party marks and brands are the property of their respective owners. All products, dates, and figures are preliminary and subject to change without notice.
Course Agenda
The course includes the following modules: • Module 1: Premium Feature Key Descriptions• Module 2: Premium Feature Key Installation and
Removal• Module 3: Self Encrypting Drive (SED)
Configuration and Use• Module 4: Snapshot Recovery Configuration and
Use• Module 5: SSD Cache with Fastpath*
Configuration and Use
5
Copyright © Intel Corporation, 2010. All rights reserved. Third-party marks and brands are the property of their respective owners. All products, dates, and figures are preliminary and subject to change without notice.
Module 1Premium Feature Key
Descriptions
A High Level Description of the Benefits of Each Premium Feature

6
Copyright © Intel Corporation, 2010. All rights reserved. Third-party marks and brands are the property of their respective owners. All products, dates, and figures are preliminary and subject to change without notice.
Snapshot RecoveryAXXRPFKSNSH
• The Snapshot Recovery feature offers a simplified way to recover data and can also provide automatic protection for the boot volume.
– You can use MegaRAID Recovery to take a snapshot of a volume and to restore a volume or file
• Snapshot functionality allows users to capture data changes to the volume. If data is deleted accidentally or maliciously, you can restore the data from view or roll back to a snapshot at a previous Point in Time (PiT)
– You can make up to 8 snapshots of Point in Times for each volume– You can either restore files or roll back applications to a previous point in time
• Snapshot allows recovery of deleted, modified, or corrupted data from disk in minutes
– Minimizing downtime experienced by users and eliminates the lengthy process of restoring data from tape
• A Snapshot allows easy recovery of a server’s boot volume in case corruption of operating system occurs
– Allows easy recovery of the boot volume in the case of an errant update or a corrupted or deleted file.
NOTE: Snapshot Recovery is not a substitute for a tested backup strategy. Snapshot never makes a complete backup of a volume, only changes to the selected volume are tracked. When a roll back to a snapshot at a previous Point in Time (PiT) is done, you are “undoing” changes to the volume that caused corruption or a file deletion.
7
Copyright © Intel Corporation, 2010. All rights reserved. Third-party marks and brands are the property of their respective owners. All products, dates, and figures are preliminary and subject to change without notice.
Full Disk Encryption AXXRPFKDE
•Full Disk Encryption support allows the RAID controller to manage the encryption keys for Self Encrypting Drives (SED). It enables authentication key management, auto-lock, and instant erase of self-encrypting drives
•Data going to the drive is encrypted by the drive, data read from the drive is decrypted by the drive. The controller provides the key management and password interface to the drive.
–Auto-Locks the volumes when powered down–Encryption secures data when a drive is misplaced, failed, or stolen –Instant Secure Erase deletes encryption keys from the drive before returning leased Drives or when redeploying with the datacenter, making data unreadable.
•Reduces the risk of data being compromised when drives eventually leave the data center
•Significantly reduces the cost and time of repurposing or retiring drives•100% Transparent to Storage Systems / End Users
–Appears the same as traditional non-encrypting drives –Operates at full drive speed - No impact to performance–Automatically encrypts/ decrypts all data
•128Bit encryption, there is no “backdoor”
*Strong enough for the National Security Agency*
8
Copyright © Intel Corporation, 2010. All rights reserved. Third-party marks and brands are the property of their respective owners. All products, dates, and figures are preliminary and subject to change without notice.
SSD Cache with FastPath* I/OAXXRPFKSSD
Two Separate Features resident on the key that are mutually exclusive
•SSD Cache Uses solid-state drives (SSDs) as additional cache for the RAID controller . Frequently accessed information is stored in SSD cache to allow for rapid access.
–SSD Cache can support from 1 to 32 SSD in a second level cache pool
–Data frequently re-read is copied to the cache pool with the benefit of higher SSD throughput and IO response of the SSD drives.
–Based on LSI* Cachecade Technology, it is sometimes referred to as SSD Cache (SSC).
•FastPath I/O Accelerates virtual drives made up of all SSDs by streamlining the RAID FW stack, providing up to 150,000 I/O reads per second for small block I/O activity; this is a dramatic increase over solutions that do not use FastPath.
–Without FastPath enabled, SSD arrays can reach up to 80,000 IOPs.
–FastPath streamlines the software stack for use with SSDs to optimize throughput with up to150,000 IO operations Per Second
9
Copyright © Intel Corporation, 2010. All rights reserved. Third-party marks and brands are the property of their respective owners. All products, dates, and figures are preliminary and subject to change without notice.
Module 2Premium Feature Key
Installation and Removal
Understand how to install and remove the feature key from an Intel® RAID Controller
10
Copyright © Intel Corporation, 2010. All rights reserved. Third-party marks and brands are the property of their respective owners. All products, dates, and figures are preliminary and subject to change without notice.
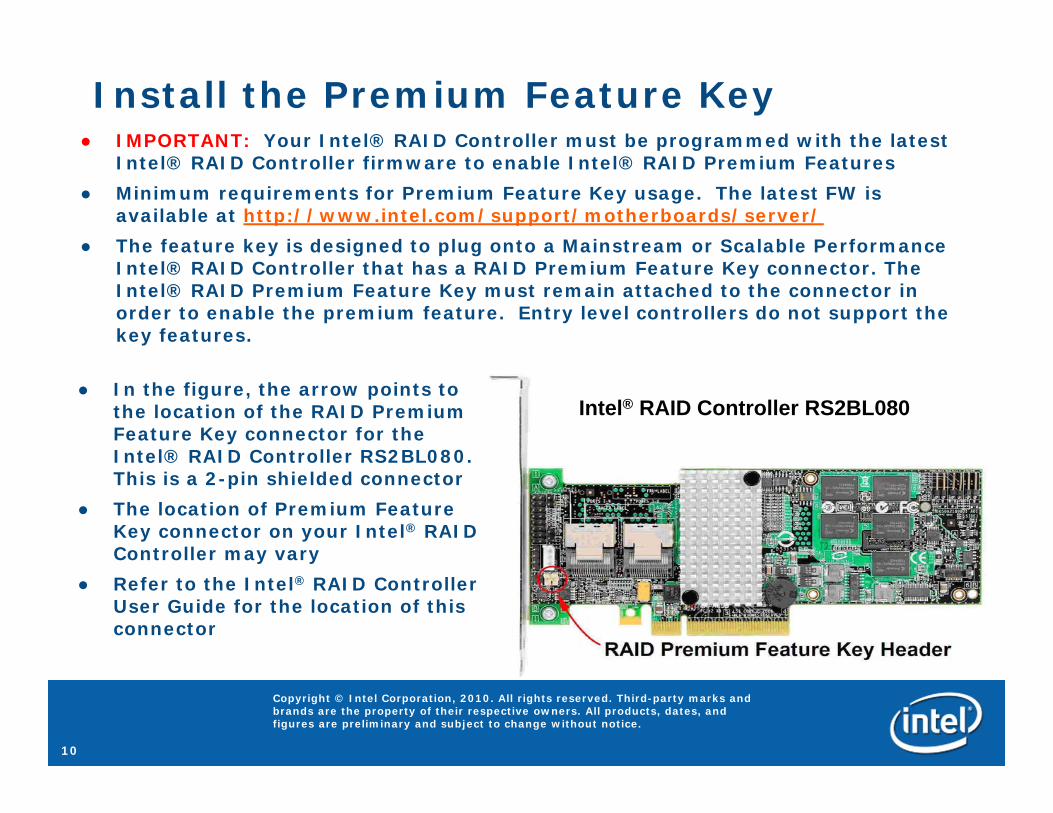
Install the Premium Feature Key● IMPORTANT: Your Intel® RAID Controller must be programmed with the latest
Intel® RAID Controller firmware to enable Intel® RAID Premium Features● Minimum requirements for Premium Feature Key usage. The latest FW is
available at http://www.intel.com/support/motherboards/server/● The feature key is designed to plug onto a Mainstream or Scalable Performance
Intel® RAID Controller that has a RAID Premium Feature Key connector. The Intel® RAID Premium Feature Key must remain attached to the connector in order to enable the premium feature. Entry level controllers do not support the key features.
● In the figure, the arrow points to the location of the RAID Premium Feature Key connector for the Intel® RAID Controller RS2BL080. This is a 2-pin shielded connector
● The location of Premium Feature Key connector on your Intel® RAID Controller may vary
● Refer to the Intel® RAID Controller User Guide for the location of this connector
Intel® RAID Controller RS2BL080
11
Copyright © Intel Corporation, 2010. All rights reserved. Third-party marks and brands are the property of their respective owners. All products, dates, and figures are preliminary and subject to change without notice.
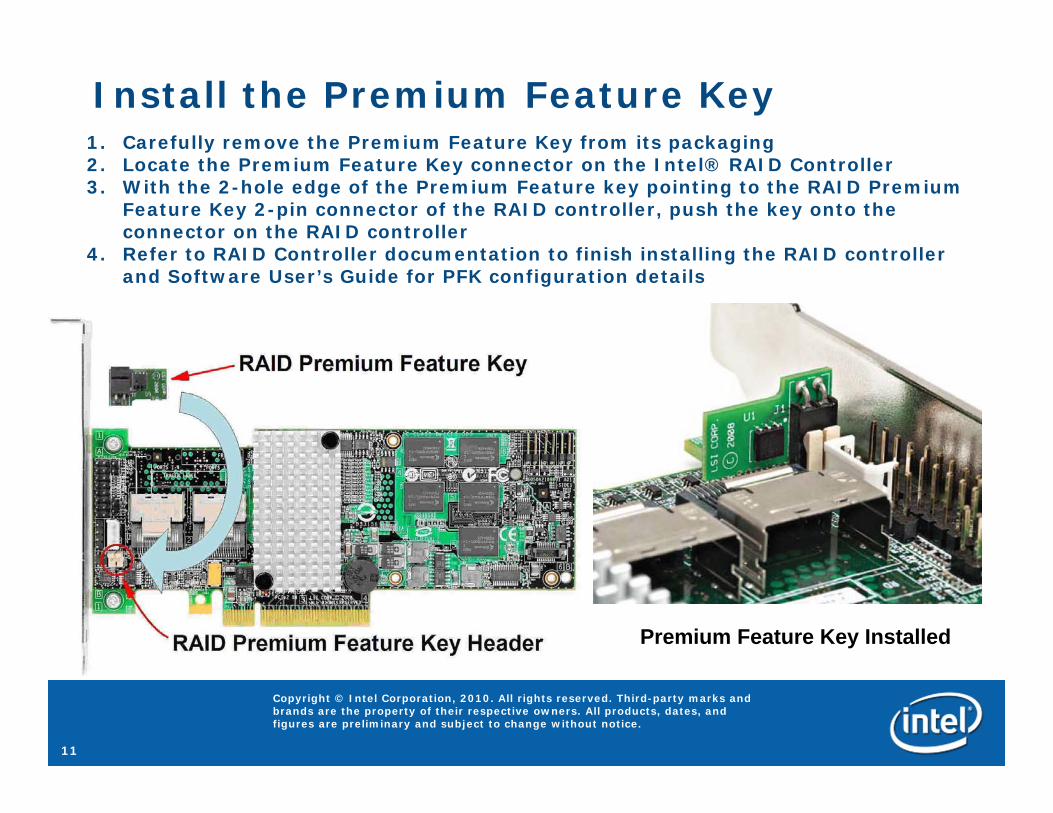
Install the Premium Feature Key1. Carefully remove the Premium Feature Key from its packaging2. Locate the Premium Feature Key connector on the Intel® RAID Controller3. With the 2-hole edge of the Premium Feature key pointing to the RAID Premium
Feature Key 2-pin connector of the RAID controller, push the key onto the connector on the RAID controller
4. Refer to RAID Controller documentation to finish installing the RAID controller and Software User’s Guide for PFK configuration details
Premium Feature Key Installed
12
Copyright © Intel Corporation, 2010. All rights reserved. Third-party marks and brands are the property of their respective owners. All products, dates, and figures are preliminary and subject to change without notice.
Remove the Premium Feature Key● Removing the PFK is done by firmly holding the RAID controller on a flat
surface, and pulling the Intel® RAID Premium Feature Key from the connector
Note: Only single PFK installations are allowed (one PFK header per controller). Multiple premium features may be provided on a single key. When the PFK is removed all premium features provided by the key are disabled
Install the Premium Feature Key
● With the Feature Key installed, unless noted specifically, the added feature must be enabled and/or configured using the RAID BIOS Console utility or RAID Web Console 2 utility.
● For detailed information on enabling and configuring the feature key option, please refer to the Intel® RAID Software User’s Guide available under your selected controller at http://www.intel.com/support/motherboards/server/

13
Copyright © Intel Corporation, 2010. All rights reserved. Third-party marks and brands are the property of their respective owners. All products, dates, and figures are preliminary and subject to change without notice.
Determining PFK EnablementBIOS Console
To determine available features, select Manage Advanced Software Options in the left pane of the main view.
Raid Web Console 2 Feature enabled/disabled status in RWC2 Dashboard view.
14
Copyright © Intel Corporation, 2010. All rights reserved. Third-party marks and brands are the property of their respective owners. All products, dates, and figures are preliminary and subject to change without notice.
Module 3Self Encrypting Drive (SED)
Configuration and Use
Understanding The SED Premium Feature Configuration Steps
15
Copyright © Intel Corporation, 2010. All rights reserved. Third-party marks and brands are the property of their respective owners. All products, dates, and figures are preliminary and subject to change without notice.
Full Disk Encryption - AXXRPFKDE
The Full Disk Encryption Premium Feature is offered as an add-on PFK and is also available on Intel® RAID controllers with product code that ends in DE (RS2BL080DE and RS2PI008DE)● Full Disk Encryption is encrypting data at rest on a hard disk drive.
●Although several methods can accomplish this, including software and host-based encryption, the Intel implementation relies on Self Encrypting Drive Technology (SED)
● Self Encrypting Drive Technology incorporates the encryption circuitry directly on the disk drive.
●SED drives encrypt everything written to the drive and de-crypt everything read from the drive. ●When the drive is powered down the SED drive is “locked” and the encryption key within that drive will not encrypt or decrypt data making the drive unreadable to an individual who does not have the correct authorizations. ●A security-enabled SED drive may be lost or stolen, but it will not expose its data to an unauthorized user
● Enabling encryption key management on the RAID controller allows the controller to manage the encryption key on the drive● SED Auto-Lock functionality is enabled and managed within the RAID controller
configuration utilities. ● Disk Encryption Services are available only for Intel® 6Gbs Mainstream and
Scalable Performance RAID controllers when the AXXRPFKDE PFK is installed
16
Copyright © Intel Corporation, 2010. All rights reserved. Third-party marks and brands are the property of their respective owners. All products, dates, and figures are preliminary and subject to change without notice.
Encryption Management FAQs
● SED functionality affect on disk drive performance• The SED has its AES engine built into the electronics, the throughput affect is imperceptibly small (a few millionths of a second). • SED drives operate at the same throughput and response time levels as non-SED drives. • Incorporation of the SED into the drives allows encryption performance to scale with the number of drives in the system.
● AES 128 bit implementation•Both the NSA and NIST have asserted that AES-128 provides sufficient protection. •There are 2^128 = 3.4 x 10^38 possible keys with 128 bits, which is a huge key space. •NIST estimates that AES 128 is safe from key-search techniques for at least the next 30 years. •The Seagate implementation of AES in drive circuitry has received NIST certification through an independent laboratory, as tested against the FIPS 197 standard.
17
Copyright © Intel Corporation, 2010. All rights reserved. Third-party marks and brands are the property of their respective owners. All products, dates, and figures are preliminary and subject to change without notice.
Encryption Management FAQs (Cont)● There are there no “backdoors” to the SED drives
• There is no way to circumvent the security measures provided by the drive. • Security best practices dictate that sensitive or critical data should be backed up, as well as critical parameters like Security Keys.
● SED and non-SED drives can be mixed in the same Volume• Non-SED drives cannot be part of an encryption-protected RAID set.• SED drives can be used in non-encryption-protected RAID groups.• A customer should purchase all SED drives to achieve an encrypted volume. •The locking function is configured by selecting the appropriate feature on the RAID management console for those drives and defining a Security Key.
● SED drives have the same usable capacity as non SED drives• The usable capacity of a drive is not reduced with SED
18
Copyright © Intel Corporation, 2010. All rights reserved. Third-party marks and brands are the property of their respective owners. All products, dates, and figures are preliminary and subject to change without notice.
Encryption Management FAQs (Cont.)
● Instant secure erase functionality• An authorized administrator can remove the on-board encryption key, thereby rendering the encrypted data unreadable. • Intel RAID supports this feature on all 6Gbs products, even when a PFK is not present. • It is not possible to erase a secure drive that is part of a secure volume group. You must first delete the volume configuration on the drive so that it is marked as Unconfigured.
● Boot protection for a system with SEDs• The server can be configured to pause during the boot sequence for a password. • If the appropriate password is not entered in three attempts, the server will still boot but the data on the SEDs will be inaccessible.• This protects the data on the SEDs in the event the server is stolen.• If the OS boot partition is secured via SED, the server can be configured to pause during the MegaRAID boot sequence for a password. If the appropriate password is not entered in three attempts, the server will not boot
19
Copyright © Intel Corporation, 2010. All rights reserved. Third-party marks and brands are the property of their respective owners. All products, dates, and figures are preliminary and subject to change without notice.
Managing Self Encrypting drives
Three Steps to enable and manage self encrypting drives (graphics on following pages):
1. Verify Encryption Capability after the PFK is installed
2. Enable the controller encryption support within the RAID Utility (BIOS Console or RAID Web Console 2)
3. Build a logical volume containing Self-Encrypting Disks (SEDs)
20
Copyright © Intel Corporation, 2010. All rights reserved. Third-party marks and brands are the property of their respective owners. All products, dates, and figures are preliminary and subject to change without notice.
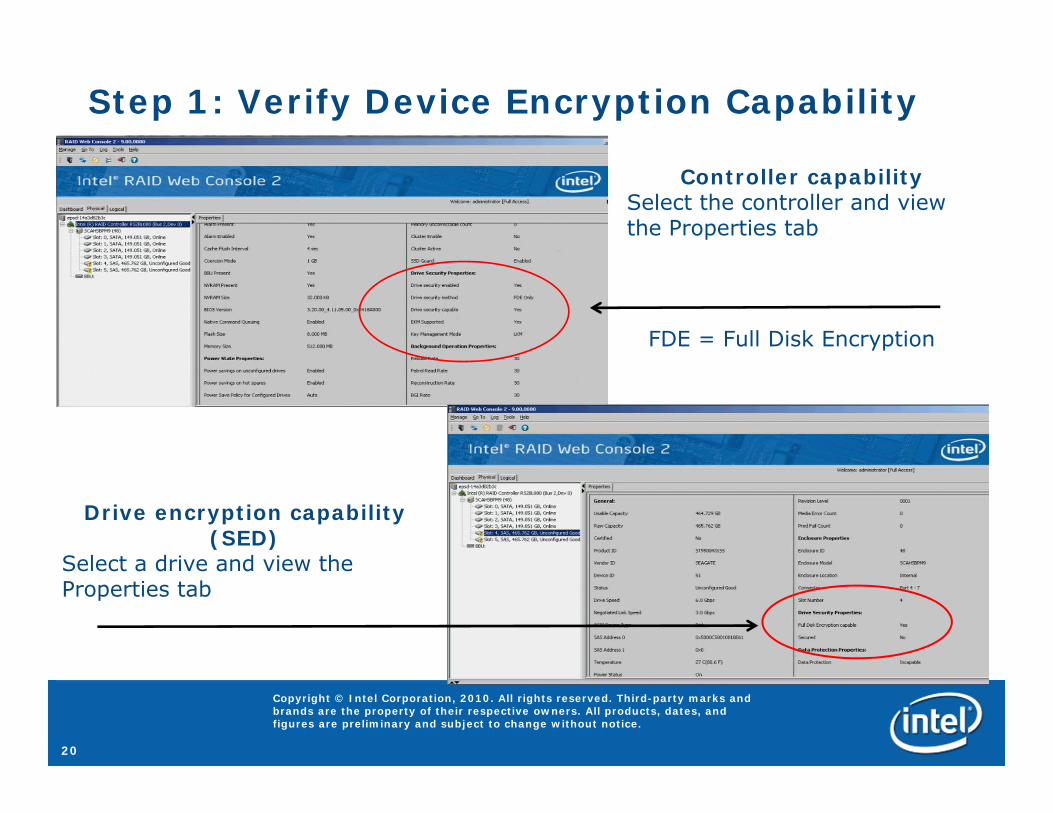
Step 1: Verify Device Encryption Capability
Controller capabilitySelect the controller and view the Properties tab
Drive encryption capability (SED)
Select a drive and view the Properties tab
FDE = Full Disk Encryption
21
Copyright © Intel Corporation, 2010. All rights reserved. Third-party marks and brands are the property of their respective owners. All products, dates, and figures are preliminary and subject to change without notice.
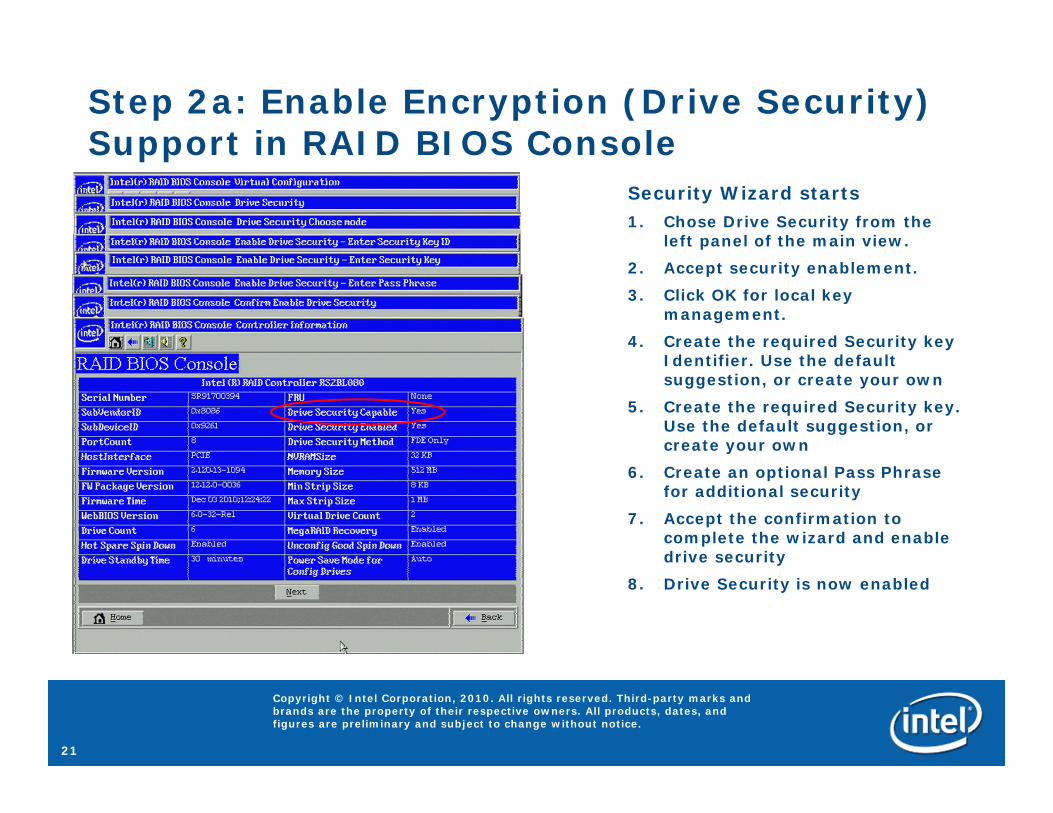
Step 2a: Enable Encryption (Drive Security) Support in RAID BIOS Console
Security Wizard starts1. Chose Drive Security from the
left panel of the main view.2. Accept security enablement.3. Click OK for local key
management.4. Create the required Security key
Identifier. Use the default suggestion, or create your own
5. Create the required Security key. Use the default suggestion, or create your own
6. Create an optional Pass Phrase for additional security
7. Accept the confirmation to complete the wizard and enable drive security
8. Drive Security is now enabled
22
Copyright © Intel Corporation, 2010. All rights reserved. Third-party marks and brands are the property of their respective owners. All products, dates, and figures are preliminary and subject to change without notice.
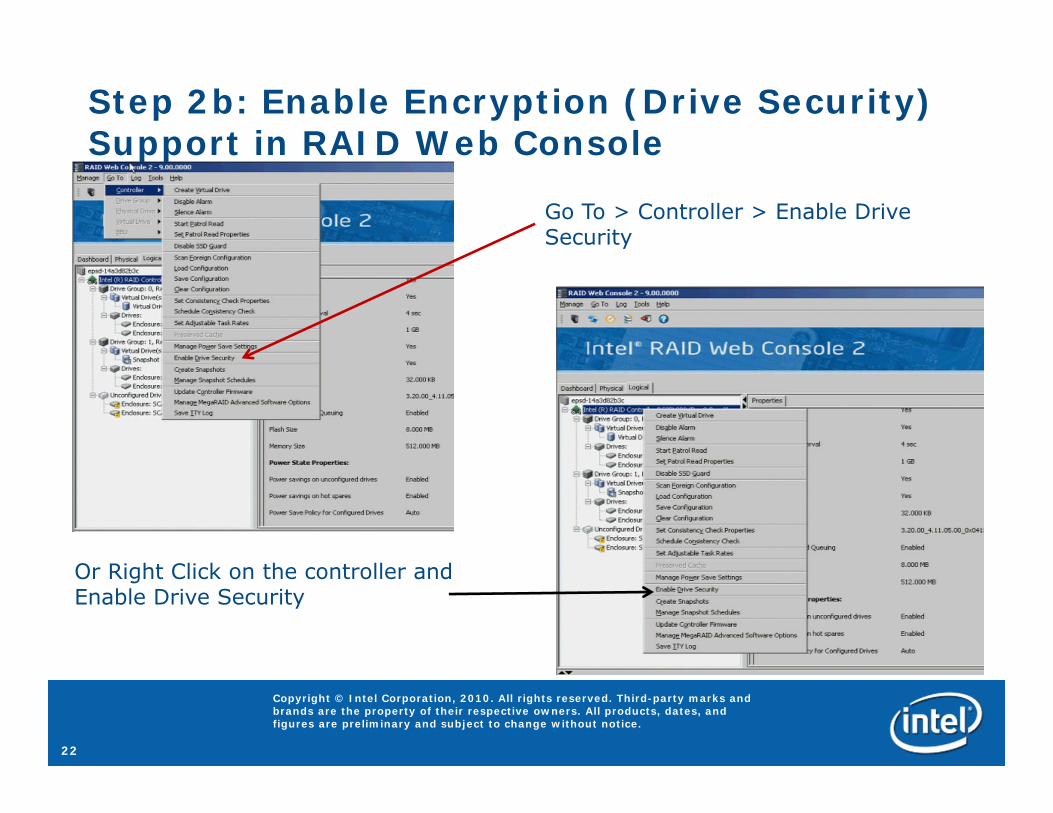
Step 2b: Enable Encryption (Drive Security) Support in RAID Web Console
Go To > Controller > Enable Drive Security
Or Right Click on the controller and Enable Drive Security
23
Copyright © Intel Corporation, 2010. All rights reserved. Third-party marks and brands are the property of their respective owners. All products, dates, and figures are preliminary and subject to change without notice.
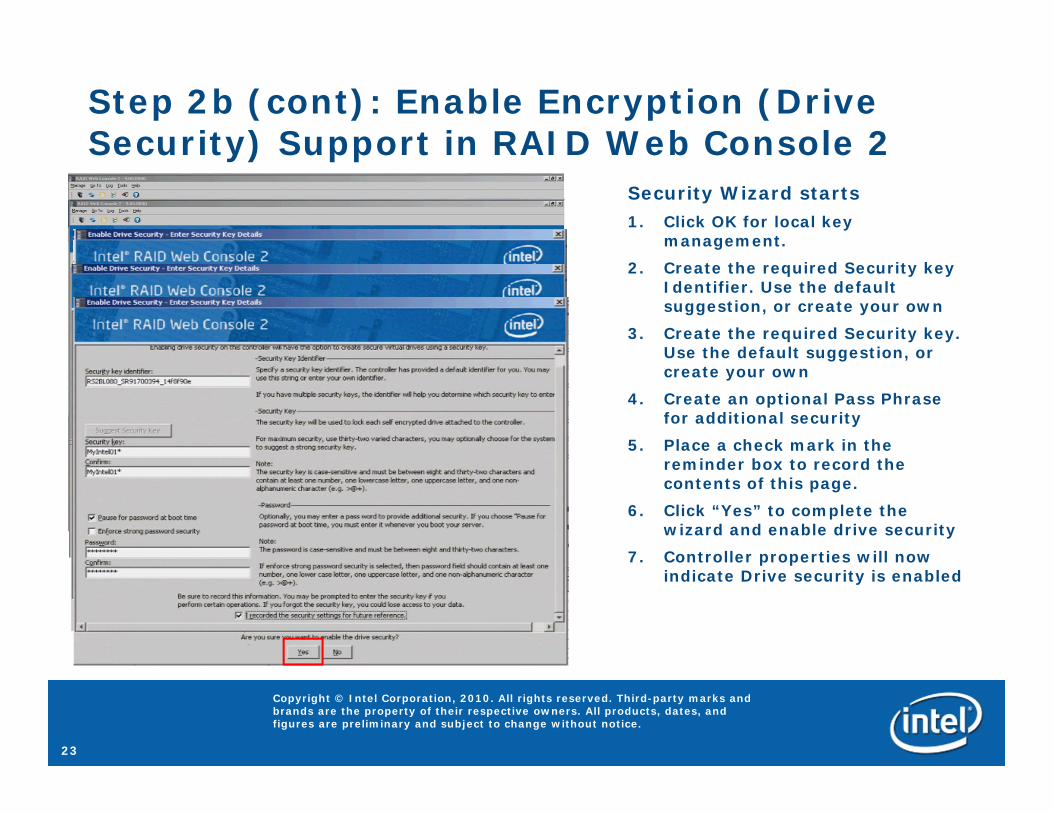
Step 2b (cont): Enable Encryption (Drive Security) Support in RAID Web Console 2
Security Wizard starts1. Click OK for local key
management.2. Create the required Security key
Identifier. Use the default suggestion, or create your own
3. Create the required Security key. Use the default suggestion, or create your own
4. Create an optional Pass Phrase for additional security
5. Place a check mark in the reminder box to record the contents of this page.
6. Click “Yes” to complete the wizard and enable drive security
7. Controller properties will now indicate Drive security is enabled
24
Copyright © Intel Corporation, 2010. All rights reserved. Third-party marks and brands are the property of their respective owners. All products, dates, and figures are preliminary and subject to change without notice.
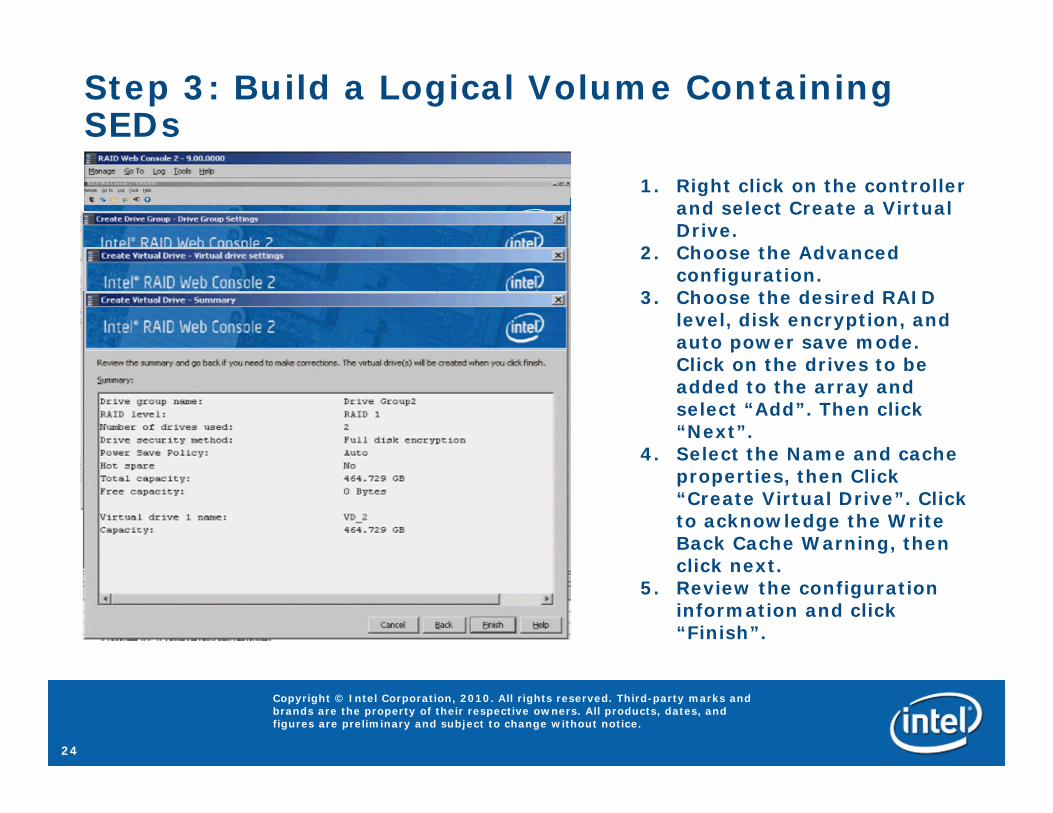
Step 3: Build a Logical Volume Containing SEDs
1. Right click on the controller and select Create a Virtual Drive.
2. Choose the Advanced configuration.
3. Choose the desired RAID level, disk encryption, and auto power save mode. Click on the drives to be added to the array and select “Add”. Then click “Next”.
4. Select the Name and cache properties, then Click “Create Virtual Drive”. Click to acknowledge the Write Back Cache Warning, then click next.
5. Review the configuration information and click “Finish”.
25
Copyright © Intel Corporation, 2010. All rights reserved. Third-party marks and brands are the property of their respective owners. All products, dates, and figures are preliminary and subject to change without notice.
Instant Secure Erase• Description
• Instant Secure Erase removes the drive encryption key from the drive.• Data encrypted with previous key is now unintelligible• This action is Non-reversible
• Benefits• Instant Secure Erase drives for secure disposal or repurposing• It takes less than 1 second to remove the key. • Easy to use from the GUI utility
● Steps to instant Secure Erase are in the following slides. • Note, Instant Secure Erase is only available for Unconfigured Good Drives. The must
be removed from a volume via the GUI before they can be erased.
26
Copyright © Intel Corporation, 2010. All rights reserved. Third-party marks and brands are the property of their respective owners. All products, dates, and figures are preliminary and subject to change without notice.
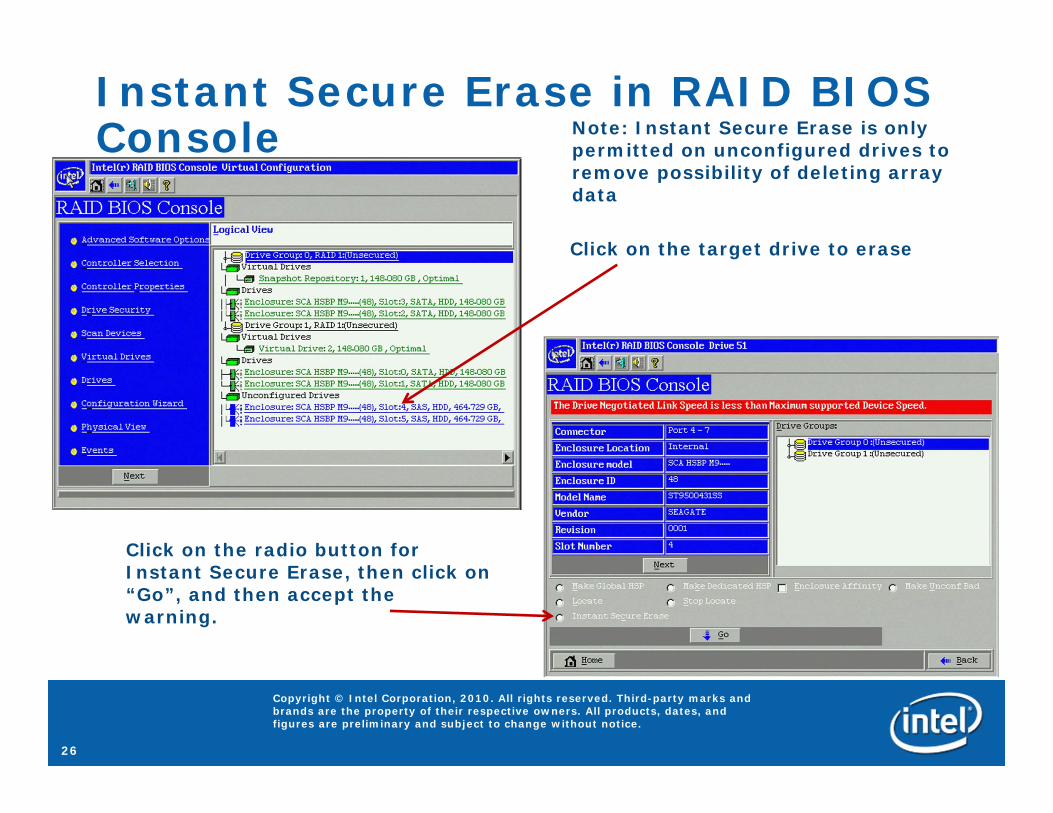
Instant Secure Erase in RAID BIOS Console
Click on the target drive to erase
Click on the radio button for Instant Secure Erase, then click on “Go”, and then accept the warning.
Note: Instant Secure Erase is only permitted on unconfigured drives to remove possibility of deleting array data
27
Copyright © Intel Corporation, 2010. All rights reserved. Third-party marks and brands are the property of their respective owners. All products, dates, and figures are preliminary and subject to change without notice.
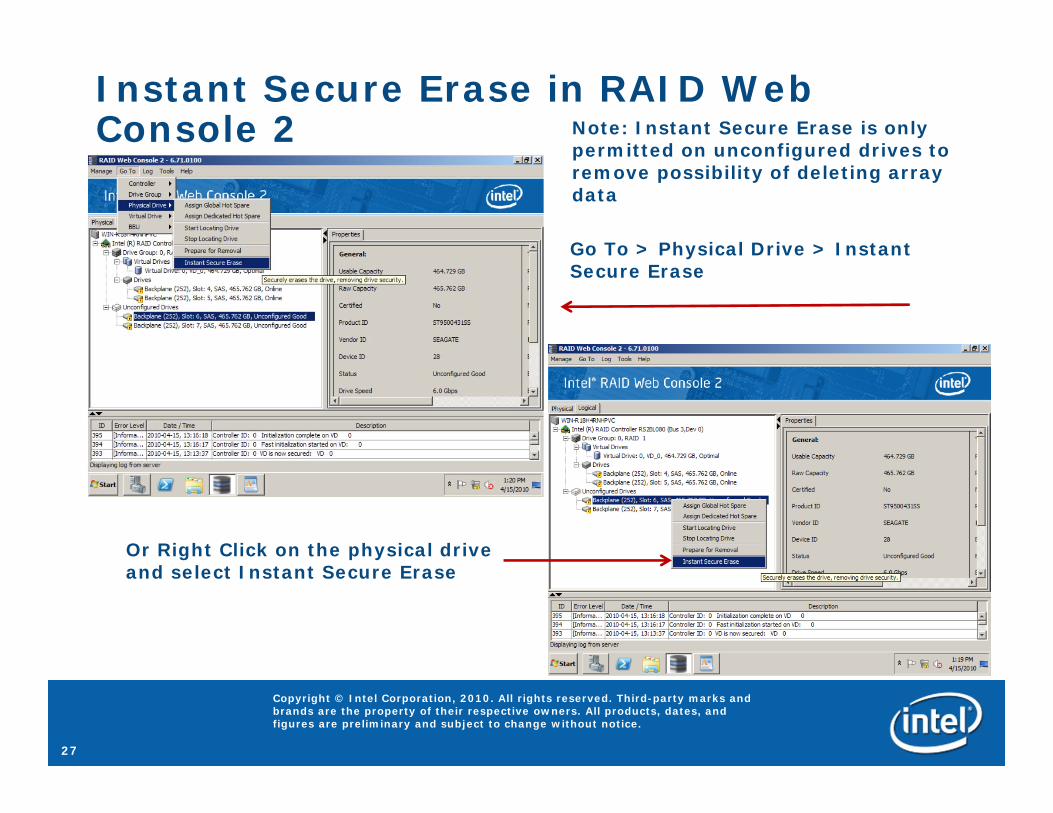
Instant Secure Erase in RAID Web Console 2
Go To > Physical Drive > Instant Secure Erase
Or Right Click on the physical drive and select Instant Secure Erase
Note: Instant Secure Erase is only permitted on unconfigured drives to remove possibility of deleting array data
28
Copyright © Intel Corporation, 2010. All rights reserved. Third-party marks and brands are the property of their respective owners. All products, dates, and figures are preliminary and subject to change without notice.
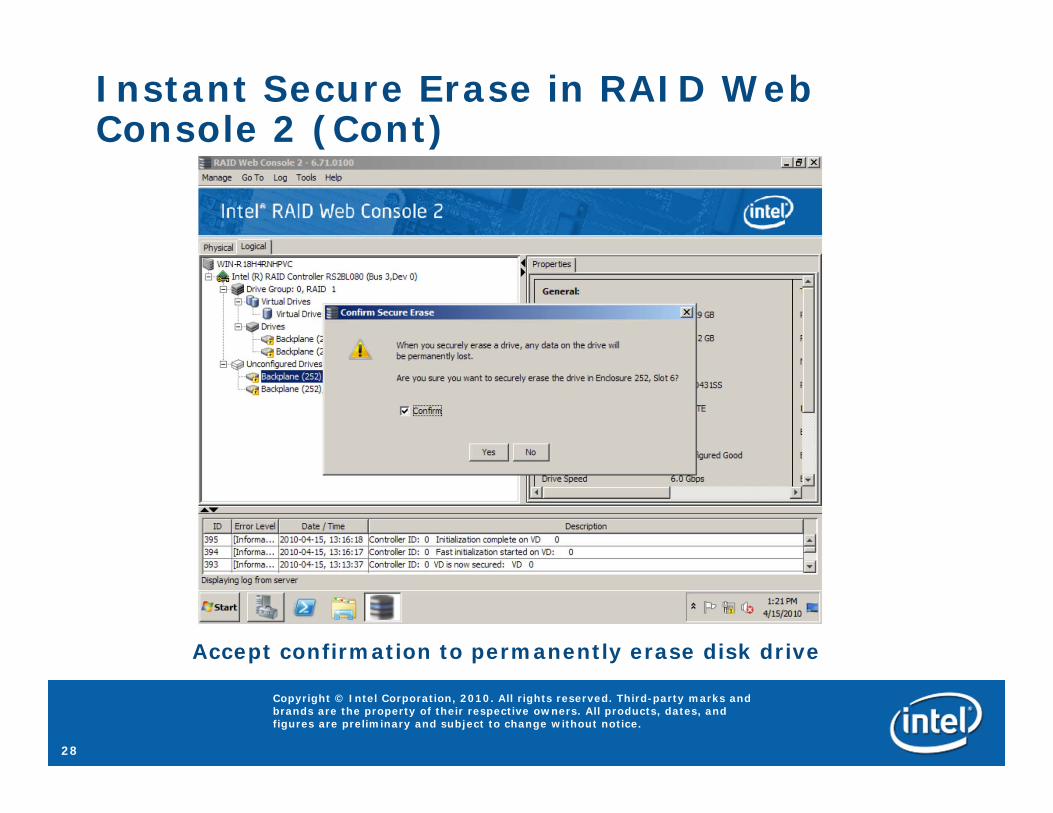
Instant Secure Erase in RAID Web Console 2 (Cont)
Accept confirmation to permanently erase disk drive
29
Copyright © Intel Corporation, 2010. All rights reserved. Third-party marks and brands are the property of their respective owners. All products, dates, and figures are preliminary and subject to change without notice.
Module 4Snapshot Recovery
Configuration and Use
Understand, configure, and use the Snapshot Recovery premium feature.
30
Copyright © Intel Corporation, 2010. All rights reserved. Third-party marks and brands are the property of their respective owners. All products, dates, and figures are preliminary and subject to change without notice.
Snapshot Overview• The Snapshot feature offers a simplified way to recover lost or corrupted
data and provides automatic protection for the boot volume.
• You can use this feature to take a snapshot of a volume at a ‘Point in Time’ (PiT) and then later roll back an individual file or a complete volume to that point in time.
• A “Base” Volume, or volume containing data, is designated and a “repository” volume is created to contain changed data.
• No data is copied at the time the snapshot is created, including the first snapshot.
• A PiT marker is set in the respository and any data that is changed will first be written to the repository volume.
• Data is copied on a block basis, not a file basis. So only blocks to be changed are copied to the repository.
• Note: Snapshot Recovery is not a substitute for a tested backup strategy. When Snapshot Recovery is enabled, a complete copy of the volume is NOT taken, but rather changes to the selected volume are tracked. When a roll back to a snapshot at a previous Point in Time (PiT) is done, you are “undoing” changes.
31
Copyright © Intel Corporation, 2010. All rights reserved. Third-party marks and brands are the property of their respective owners. All products, dates, and figures are preliminary and subject to change without notice.
Snapshot Overview (cont)
• You can use RAID Web Console 2 (RWC2) to create up to eight snapshots of a volume. • Creating a snapshot closes the previous snapshot and future changes are then tracked
in the new snapshot until it is closed by creating a new snapshot.
• RWC2 shows the snapshots in chronological order from the oldest to the newest. Each snapshot is a PiT snapshot of the Base virtual drive
• Once the maximum number of 8 snapshots are created, the Create Snapshot button is disabled until a previous snapshot is deleted.
• Within RWC2 you can create views of the PiT snapshots. • You can search the snapshot view to find and recover data that is not corrupted or
missing.
• Data from view can be copied to the Snapshot Base, or working, volume.
32
Copyright © Intel Corporation, 2010. All rights reserved. Third-party marks and brands are the property of their respective owners. All products, dates, and figures are preliminary and subject to change without notice.
Snapshot Overview (Cont)
● The size of the repository should be determined by the amount of data being written and the frequency of snapshots being taken.● This is highly application dependent on the behavior of the application and how it
manages files.
● If the repository runs out of space and resizing the repository becomes necessary, it is required to disable the feature and re-enable it while re-sizing the repository.● One issue with this process is that the existing snapshots are lost when the feature is
disabled. Repository virtual drives will be lost if you disable snapshots.
● A future update will allow to grow the size of the repository dynamically, without losing snapshots.
33
Copyright © Intel Corporation, 2010. All rights reserved. Third-party marks and brands are the property of their respective owners. All products, dates, and figures are preliminary and subject to change without notice.
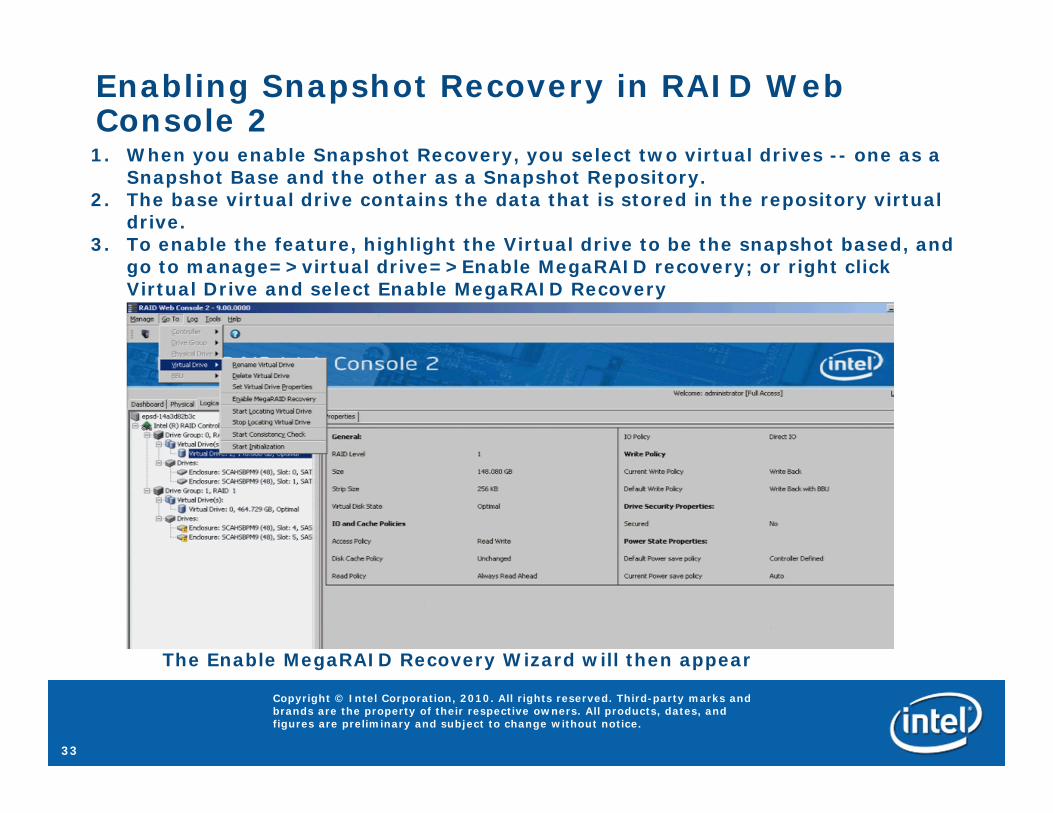
Enabling Snapshot Recovery in RAID Web Console 21. When you enable Snapshot Recovery, you select two virtual drives -- one as a
Snapshot Base and the other as a Snapshot Repository. 2. The base virtual drive contains the data that is stored in the repository virtual
drive.3. To enable the feature, highlight the Virtual drive to be the snapshot based, and
go to manage=>virtual drive=>Enable MegaRAID recovery; or right click Virtual Drive and select Enable MegaRAID Recovery
The Enable MegaRAID Recovery Wizard will then appear

34
Copyright © Intel Corporation, 2010. All rights reserved. Third-party marks and brands are the property of their respective owners. All products, dates, and figures are preliminary and subject to change without notice.
Enabling Snapshot Recovery in RAID Web Console 2 (cont)
4. On the Enable MegaRAID Recovery Wizard screen, highlight the virtual drive to use as the Snapshot Repository in the Snapshot Repository field.
5. Enter the capacity to use in the Snapshot Repository for changes to the base virtual drive. The available capacity is the largest free block of capacity on the snapshot repository virtual drive.
35
Copyright © Intel Corporation, 2010. All rights reserved. Third-party marks and brands are the property of their respective owners. All products, dates, and figures are preliminary and subject to change without notice.
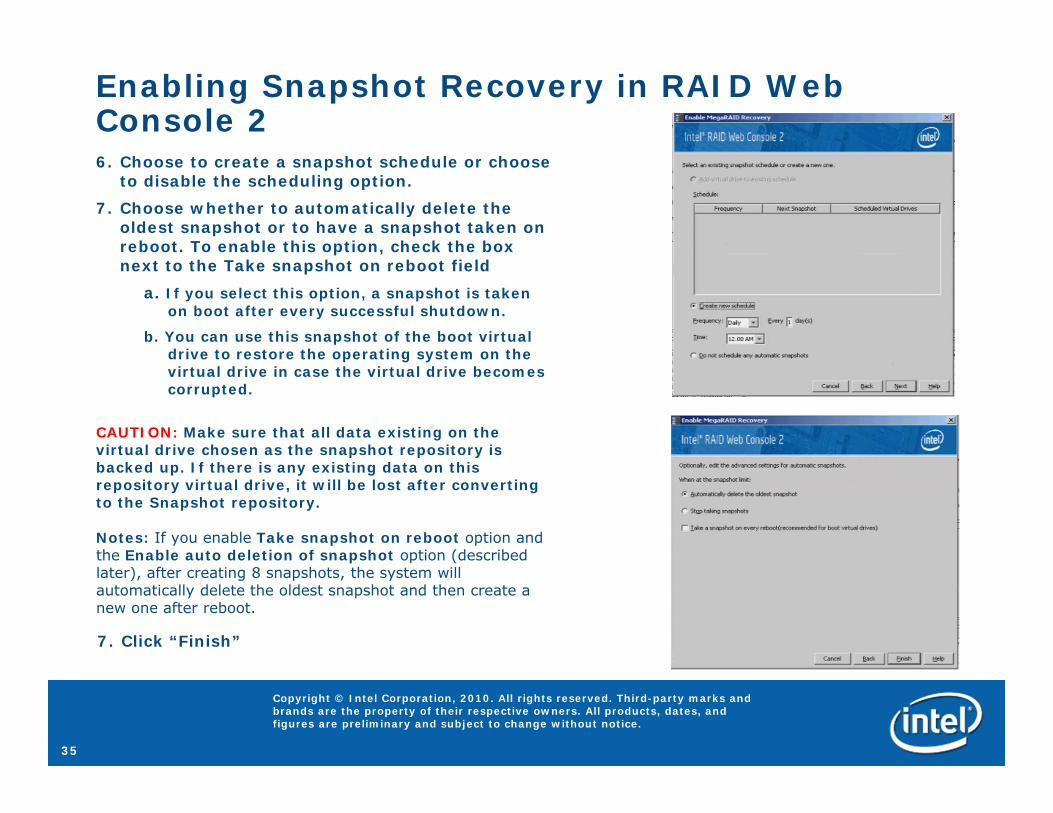
Enabling Snapshot Recovery in RAID Web Console 26. Choose to create a snapshot schedule or choose
to disable the scheduling option.7. Choose whether to automatically delete the
oldest snapshot or to have a snapshot taken on reboot. To enable this option, check the box next to the Take snapshot on reboot field
a. If you select this option, a snapshot is taken on boot after every successful shutdown.
b. You can use this snapshot of the boot virtual drive to restore the operating system on the virtual drive in case the virtual drive becomes corrupted.
CAUTION: Make sure that all data existing on the virtual drive chosen as the snapshot repository is backed up. If there is any existing data on this repository virtual drive, it will be lost after converting to the Snapshot repository.
Notes: If you enable Take snapshot on reboot option and the Enable auto deletion of snapshot option (described later), after creating 8 snapshots, the system will automatically delete the oldest snapshot and then create a new one after reboot.
7. Click “Finish”
36
Copyright © Intel Corporation, 2010. All rights reserved. Third-party marks and brands are the property of their respective owners. All products, dates, and figures are preliminary and subject to change without notice.
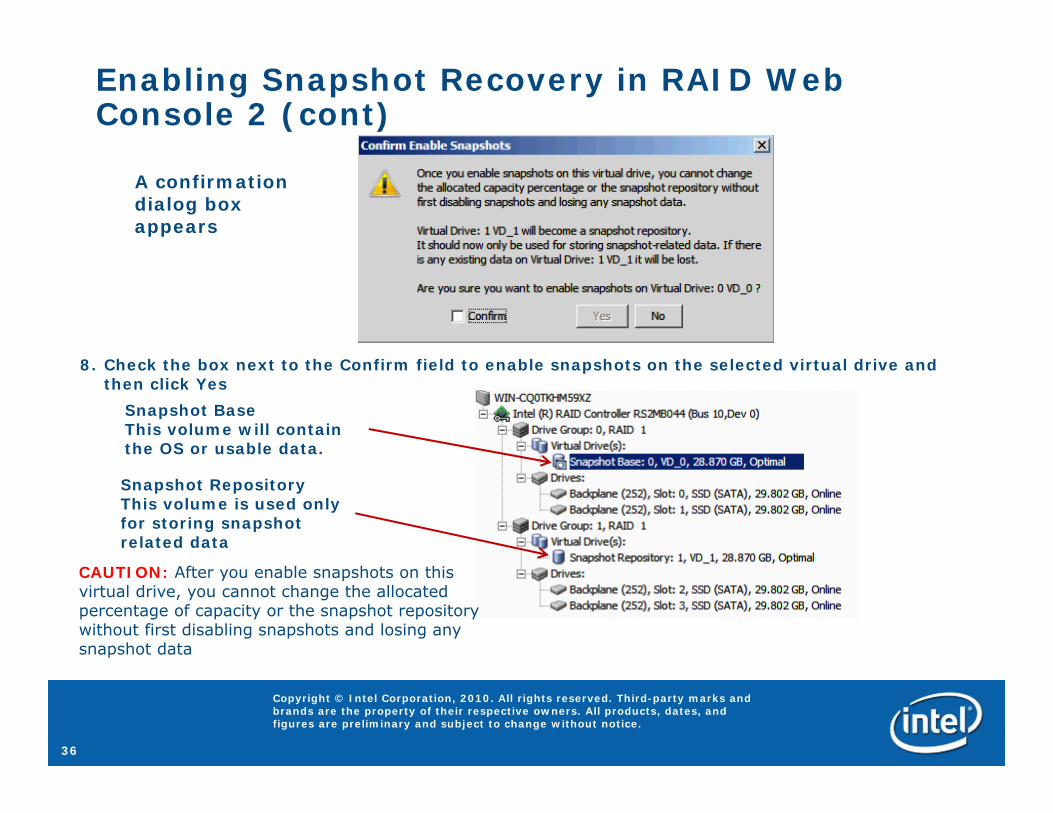
Enabling Snapshot Recovery in RAID Web Console 2 (cont)
A confirmation dialog box appears
8. Check the box next to the Confirm field to enable snapshots on the selected virtual drive and then click Yes
Snapshot Base This volume will contain the OS or usable data.
CAUTION: After you enable snapshots on this virtual drive, you cannot change the allocated percentage of capacity or the snapshot repository without first disabling snapshots and losing any snapshot data
Snapshot RepositoryThis volume is used only for storing snapshot related data
37
Copyright © Intel Corporation, 2010. All rights reserved. Third-party marks and brands are the property of their respective owners. All products, dates, and figures are preliminary and subject to change without notice.
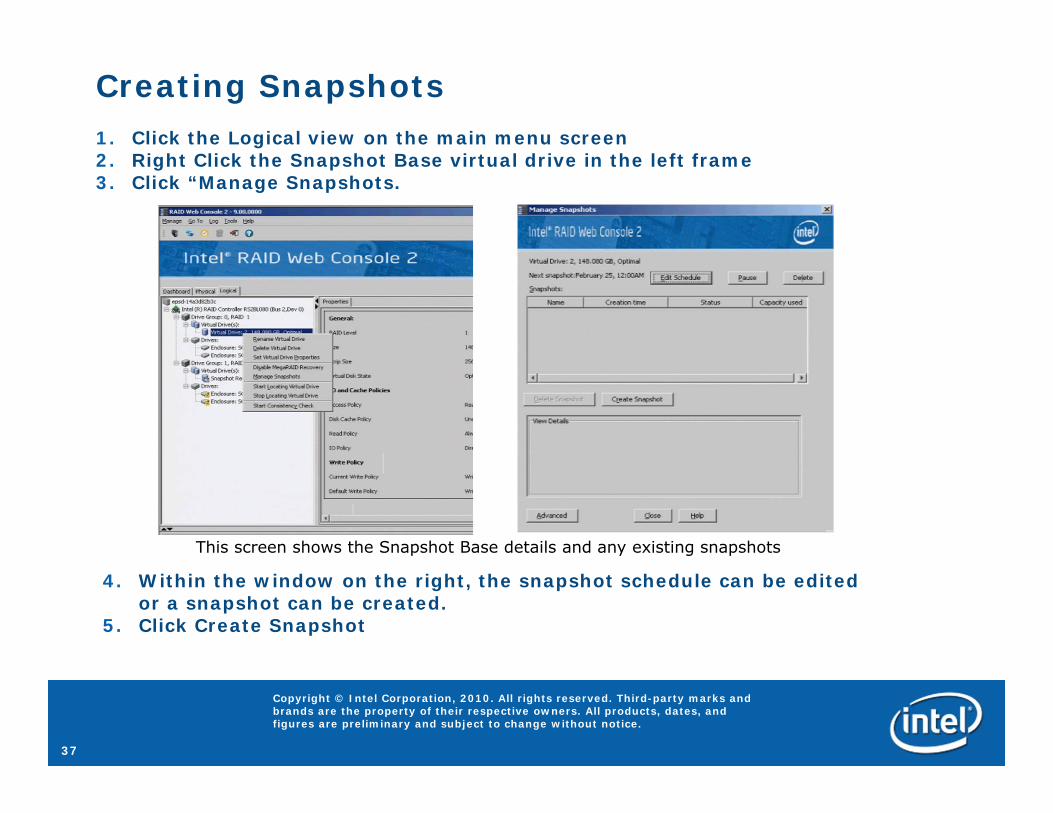
Creating Snapshots1. Click the Logical view on the main menu screen2. Right Click the Snapshot Base virtual drive in the left frame3. Click “Manage Snapshots.
This screen shows the Snapshot Base details and any existing snapshots
4. Within the window on the right, the snapshot schedule can be edited or a snapshot can be created.
5. Click Create Snapshot

38
Copyright © Intel Corporation, 2010. All rights reserved. Third-party marks and brands are the property of their respective owners. All products, dates, and figures are preliminary and subject to change without notice.
Creating Snapshots (Cont)
6. A prompt pops up for a snapshot name. Edit the name as desired and Click “Ok” to continue.
7. The snapshot will appear in the snapshot List.
Note: When you Enable auto deletion of snapshots, after 8 snapshots have been created the oldest snapshot will be automatically deleted when you can continue to create additional snapshots
39
Copyright © Intel Corporation, 2010. All rights reserved. Third-party marks and brands are the property of their respective owners. All products, dates, and figures are preliminary and subject to change without notice.
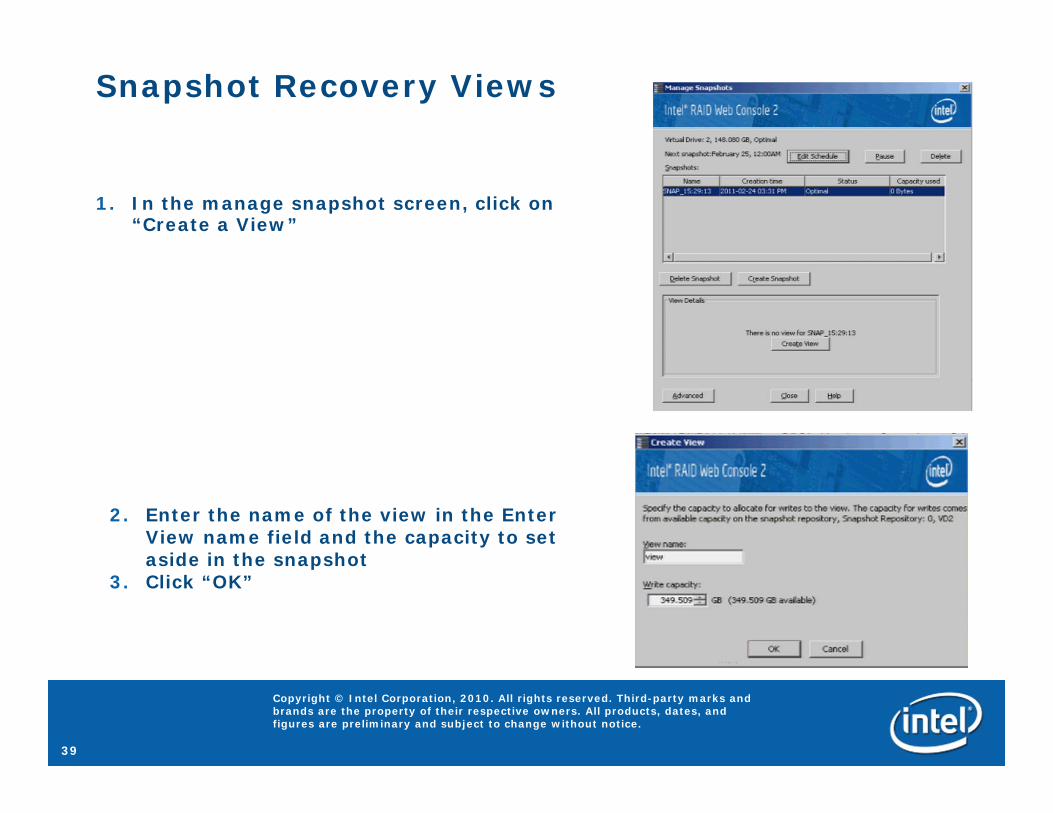
Snapshot Recovery Views
1. In the manage snapshot screen, click on “Create a View”
2. Enter the name of the view in the Enter View name field and the capacity to set aside in the snapshot
3. Click “OK”
40
Copyright © Intel Corporation, 2010. All rights reserved. Third-party marks and brands are the property of their respective owners. All products, dates, and figures are preliminary and subject to change without notice.
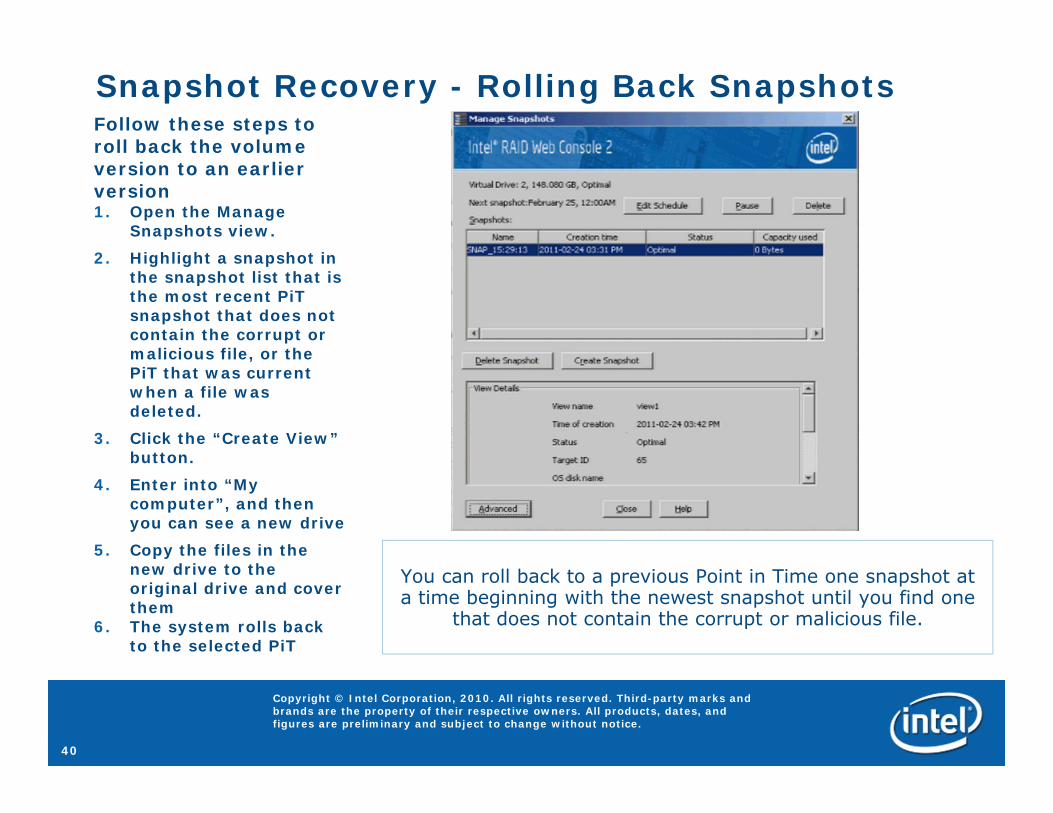
Snapshot Recovery - Rolling Back Snapshots
You can roll back to a previous Point in Time one snapshot at a time beginning with the newest snapshot until you find one
that does not contain the corrupt or malicious file.
Follow these steps to roll back the volume version to an earlier version1. Open the Manage
Snapshots view.2. Highlight a snapshot in
the snapshot list that is the most recent PiTsnapshot that does not contain the corrupt or malicious file, or the PiT that was current when a file was deleted.
3. Click the “Create View” button.
4. Enter into “My computer”, and then you can see a new drive
5. Copy the files in the new drive to the original drive and cover them
6. The system rolls back to the selected PiT
41
Copyright © Intel Corporation, 2010. All rights reserved. Third-party marks and brands are the property of their respective owners. All products, dates, and figures are preliminary and subject to change without notice.
Snapshot Recovery - Deleting and Clearing Snapshots
Note: When deleting snapshots, you can only delete the oldest snapshot
Follow these steps to delete a single snapshot1. Right Click the Snapshot base volume and then “manage snap shots” option 2. Highlight the oldest snap shot and choose “delete snap shot”3. Snapshots must be deleted one at a time.
42
Copyright © Intel Corporation, 2010. All rights reserved. Third-party marks and brands are the property of their respective owners. All products, dates, and figures are preliminary and subject to change without notice.
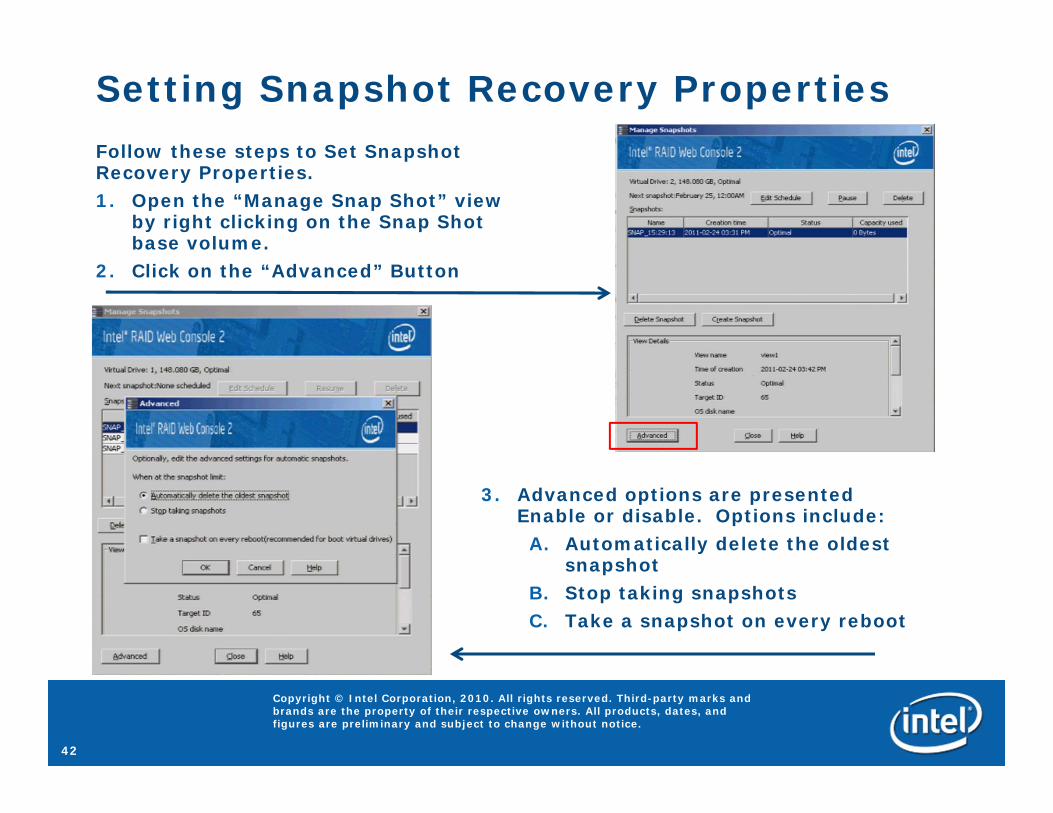
Setting Snapshot Recovery PropertiesFollow these steps to Set Snapshot Recovery Properties.1. Open the “Manage Snap Shot” view
by right clicking on the Snap Shot base volume.
2. Click on the “Advanced” Button
3. Advanced options are presented Enable or disable. Options include:A. Automatically delete the oldest
snapshotB. Stop taking snapshotsC. Take a snapshot on every reboot
43
Copyright © Intel Corporation, 2010. All rights reserved. Third-party marks and brands are the property of their respective owners. All products, dates, and figures are preliminary and subject to change without notice.
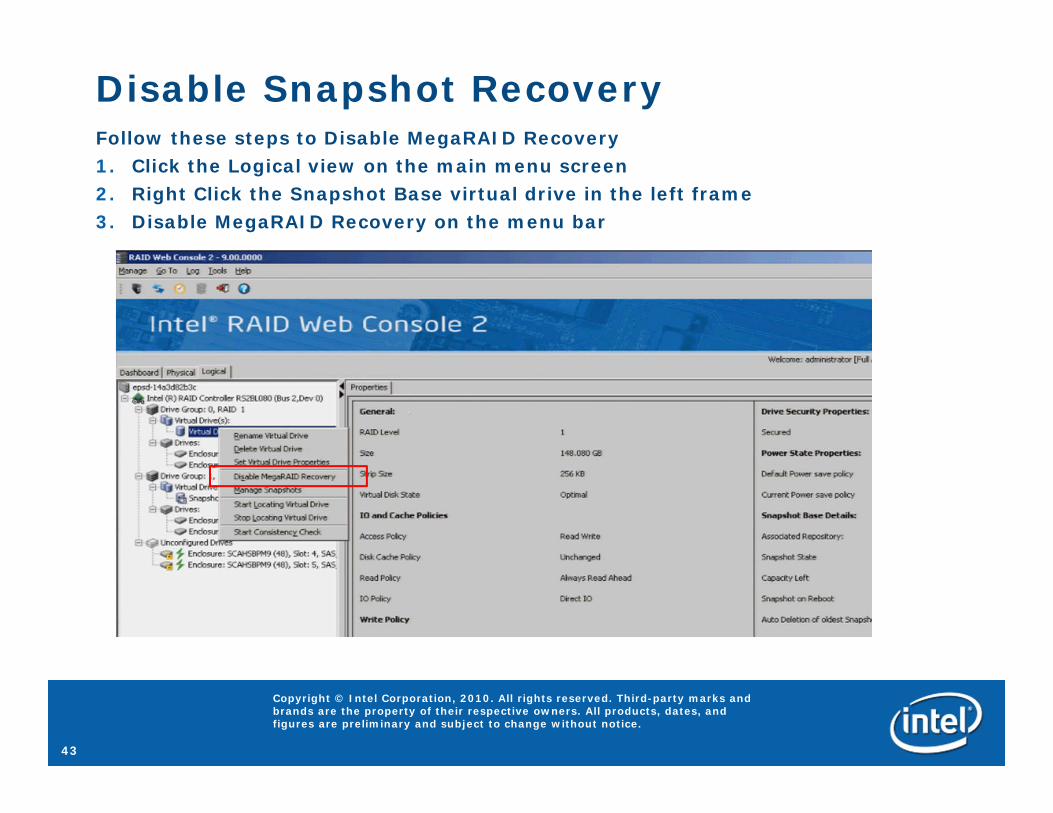
Disable Snapshot RecoveryFollow these steps to Disable MegaRAID Recovery1. Click the Logical view on the main menu screen2. Right Click the Snapshot Base virtual drive in the left frame3. Disable MegaRAID Recovery on the menu bar
44
Copyright © Intel Corporation, 2010. All rights reserved. Third-party marks and brands are the property of their respective owners. All products, dates, and figures are preliminary and subject to change without notice.
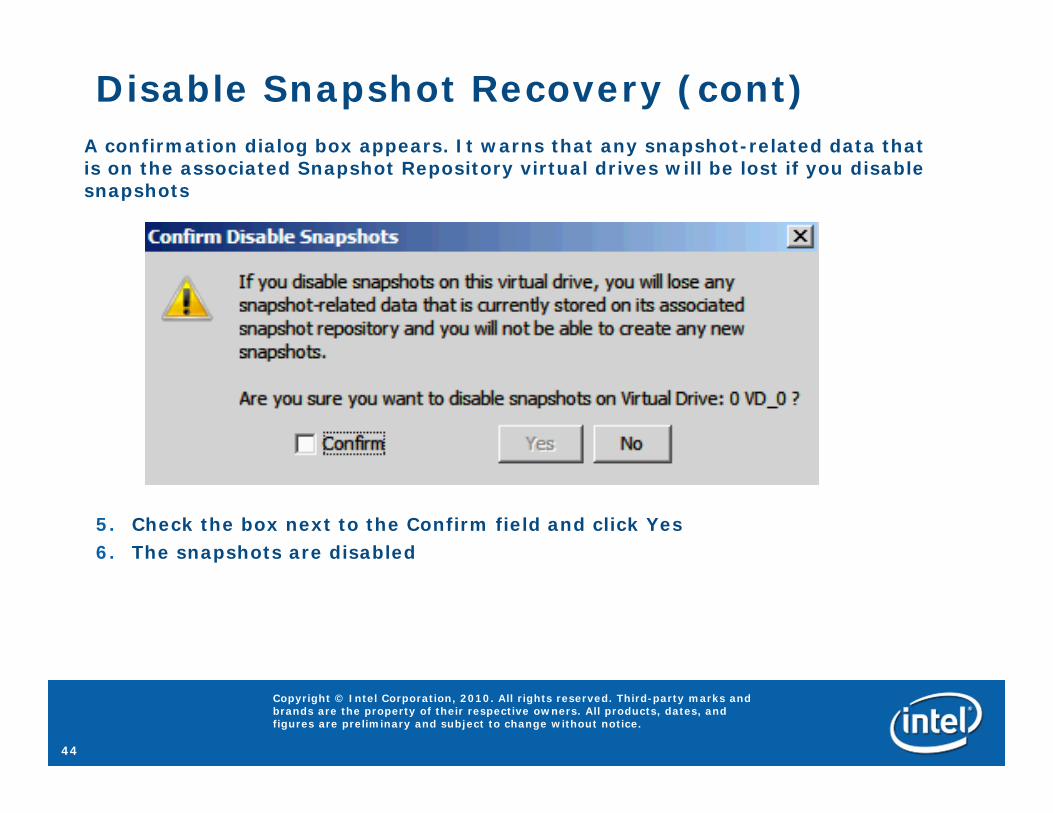
Disable Snapshot Recovery (cont)
5. Check the box next to the Confirm field and click Yes6. The snapshots are disabled
A confirmation dialog box appears. It warns that any snapshot-related data that is on the associated Snapshot Repository virtual drives will be lost if you disable snapshots
45
Copyright © Intel Corporation, 2010. All rights reserved. Third-party marks and brands are the property of their respective owners. All products, dates, and figures are preliminary and subject to change without notice.
Module 5SSD Cache with Fastpath* IO
Configuration and Use
Understanding SSD Cache and Fastpath Premium Feature Configuration and Use

46
Copyright © Intel Corporation, 2010. All rights reserved. Third-party marks and brands are the property of their respective owners. All products, dates, and figures are preliminary and subject to change without notice.
SSD Cache with Fastpath IO
• SSD Cache (also referred to as SSD Cache (SSC) or CacheCade* Technology) uses one or more Solid State Devices (SSD) as additional controller cache, allowing for very large data sets to be copied to that cache to improve performance of data that is re-read. SSD Cache provides performance improvement in READ-intensive applications
• This solution is ideal for cost sensitive server environments, by offering a high-performance upgrade that requires only a small investment in SSD technology. This solution also reduces the need to invest expensive IT cycles to hand-tune applications running on hard drive-only disk arrays
• Up to 32 SSDs can be added as a second level cache pool.
• Fastpath IO is a performance tuned IO Accelerator feature for use with all SSD disk arrays.
• Raid firmware supporting Solid State Drive configurations is tuned for small, random block-size IO activity
• Can sustain over 150,000 IO READS Per Second. • This feature requires that only SSD drives be connected to the RAID controller.• Any Volume created with these SSD drives will then utilized Fastpath IO
47
Copyright © Intel Corporation, 2010. All rights reserved. Third-party marks and brands are the property of their respective owners. All products, dates, and figures are preliminary and subject to change without notice.
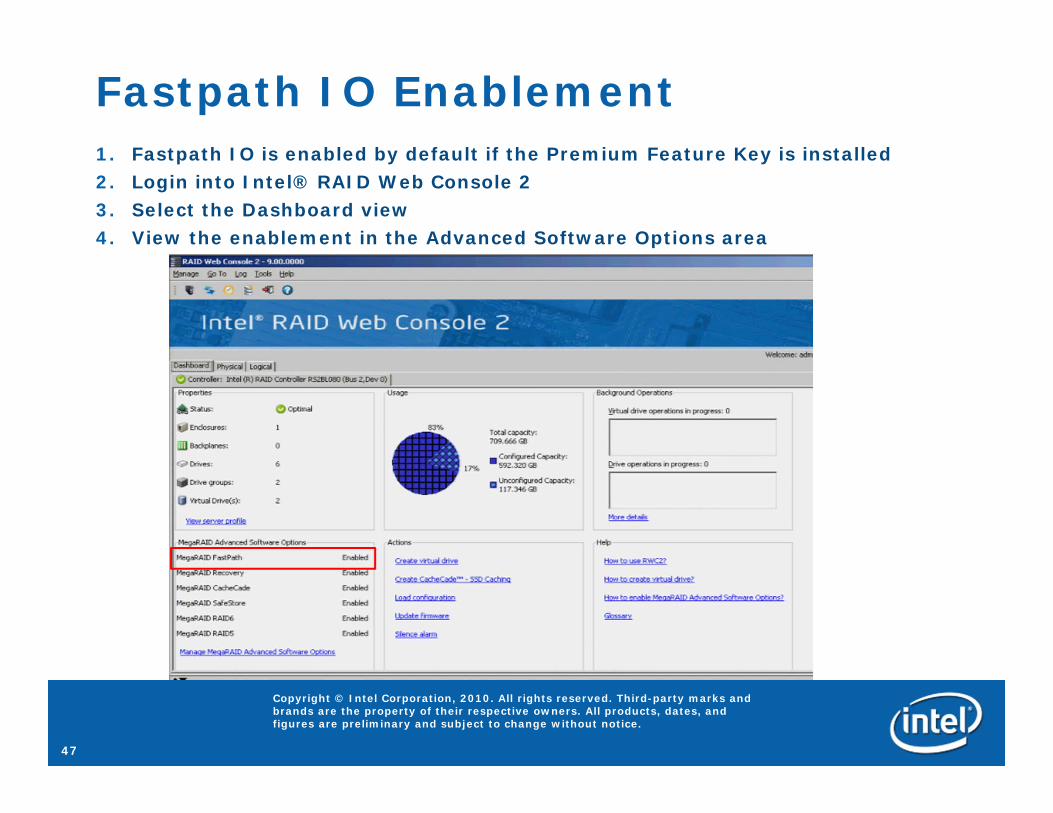
Fastpath IO Enablement1. Fastpath IO is enabled by default if the Premium Feature Key is installed2. Login into Intel® RAID Web Console 23. Select the Dashboard view4. View the enablement in the Advanced Software Options area
48
Copyright © Intel Corporation, 2010. All rights reserved. Third-party marks and brands are the property of their respective owners. All products, dates, and figures are preliminary and subject to change without notice.
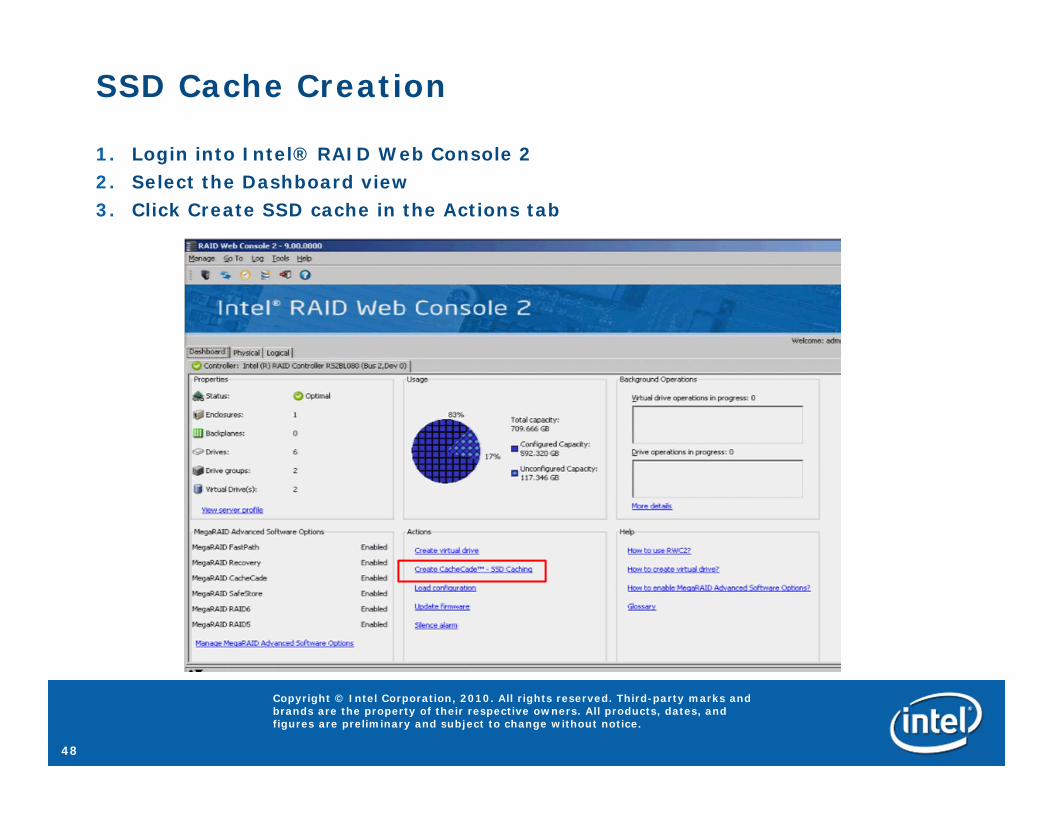
SSD Cache Creation
1. Login into Intel® RAID Web Console 22. Select the Dashboard view3. Click Create SSD cache in the Actions tab
49
Copyright © Intel Corporation, 2010. All rights reserved. Third-party marks and brands are the property of their respective owners. All products, dates, and figures are preliminary and subject to change without notice.
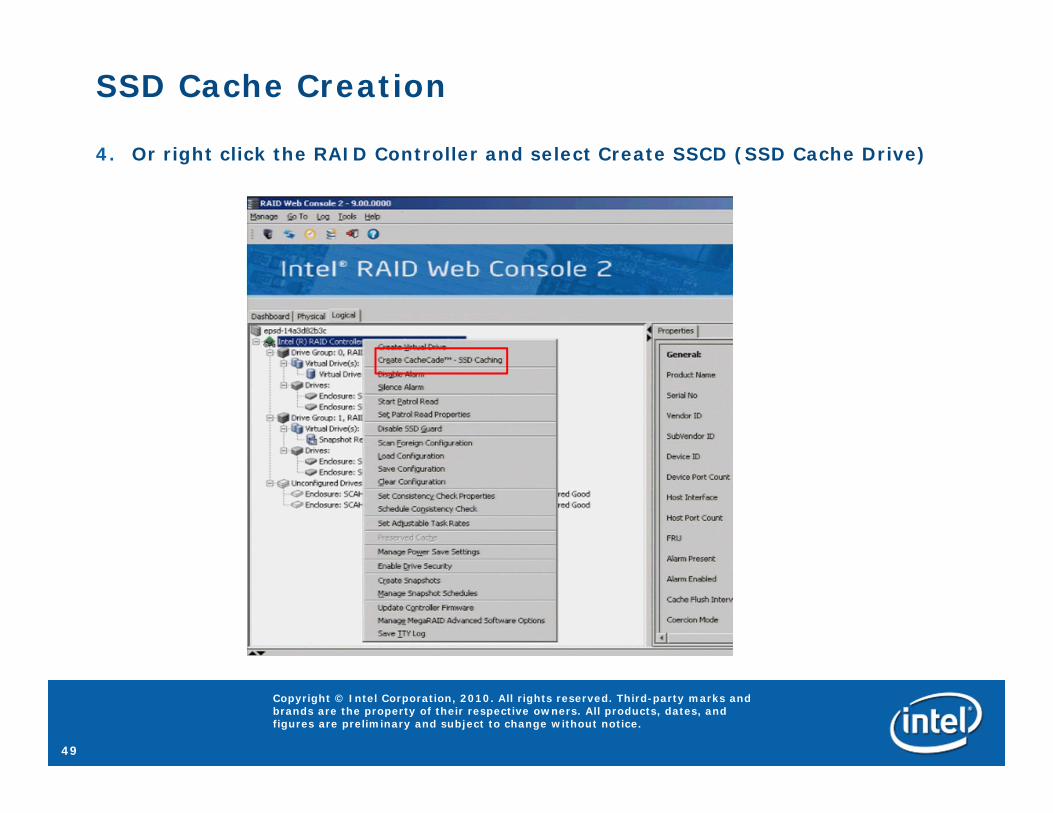
SSD Cache Creation
4. Or right click the RAID Controller and select Create SSCD (SSD Cache Drive)
50
Copyright © Intel Corporation, 2010. All rights reserved. Third-party marks and brands are the property of their respective owners. All products, dates, and figures are preliminary and subject to change without notice.
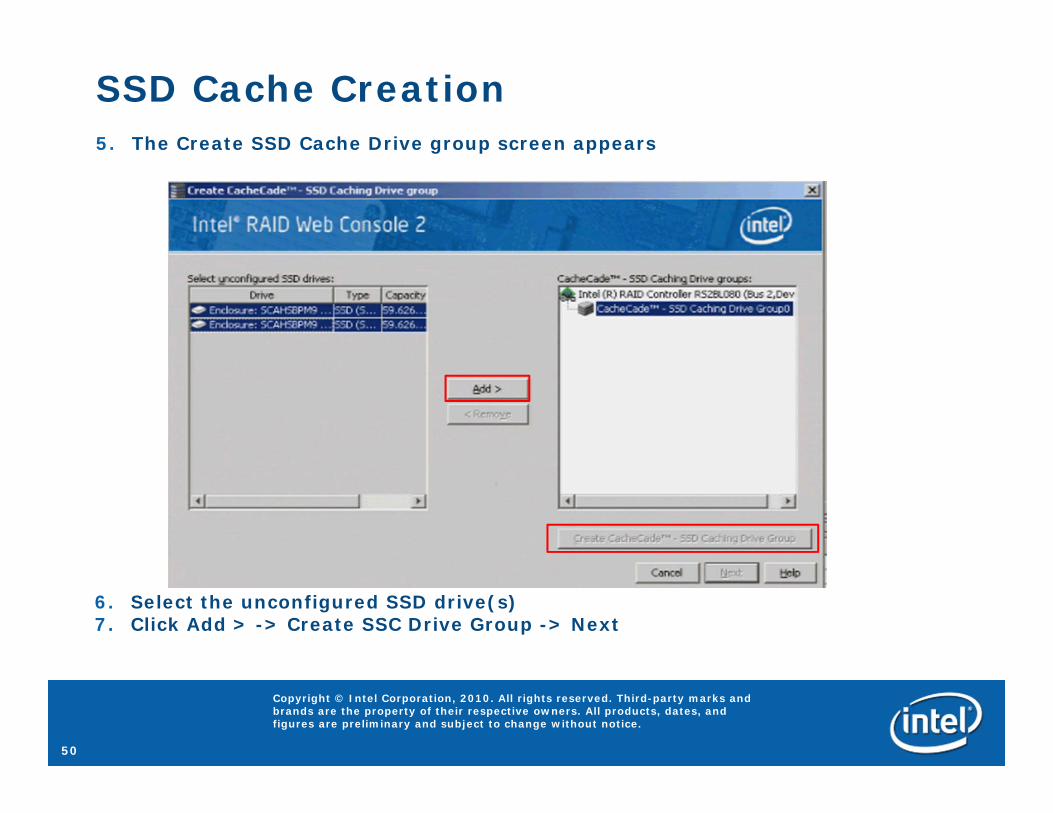
SSD Cache Creation5. The Create SSD Cache Drive group screen appears
6. Select the unconfigured SSD drive(s)7. Click Add > -> Create SSC Drive Group -> Next
51
Copyright © Intel Corporation, 2010. All rights reserved. Third-party marks and brands are the property of their respective owners. All products, dates, and figures are preliminary and subject to change without notice.
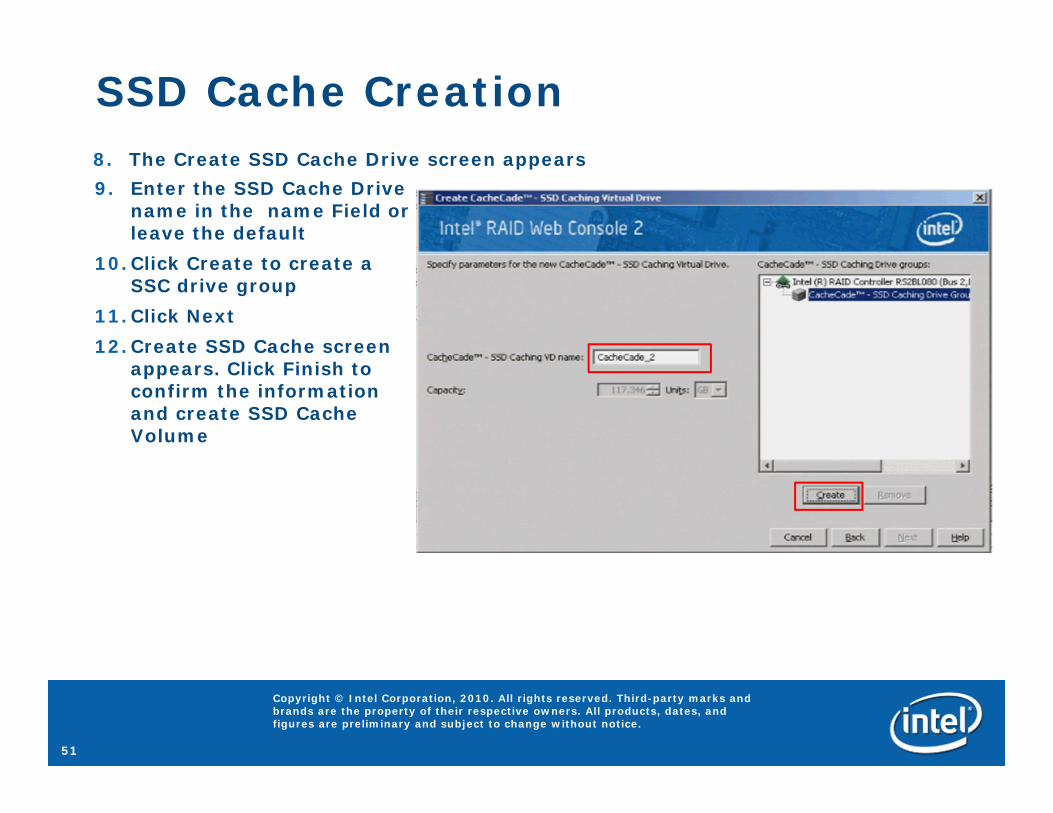
SSD Cache Creation8. The Create SSD Cache Drive screen appears9. Enter the SSD Cache Drive
name in the name Field or leave the default
10.Click Create to create a SSC drive group
11.Click Next12.Create SSD Cache screen
appears. Click Finish to confirm the information and create SSD Cache Volume
52
Copyright © Intel Corporation, 2010. All rights reserved. Third-party marks and brands are the property of their respective owners. All products, dates, and figures are preliminary and subject to change without notice.
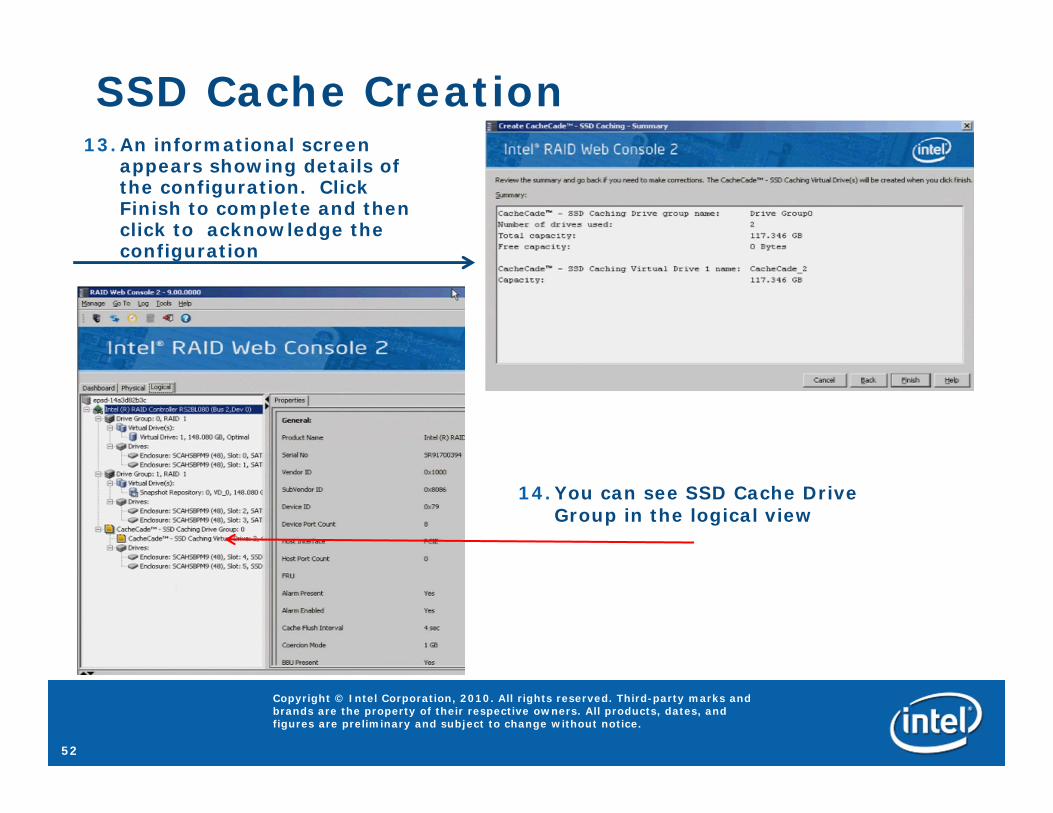
SSD Cache Creation13.An informational screen
appears showing details of the configuration. Click Finish to complete and then click to acknowledge the configuration
14.You can see SSD Cache Drive Group in the logical view
53
Copyright © Intel Corporation, 2010. All rights reserved. Third-party marks and brands are the property of their respective owners. All products, dates, and figures are preliminary and subject to change without notice.
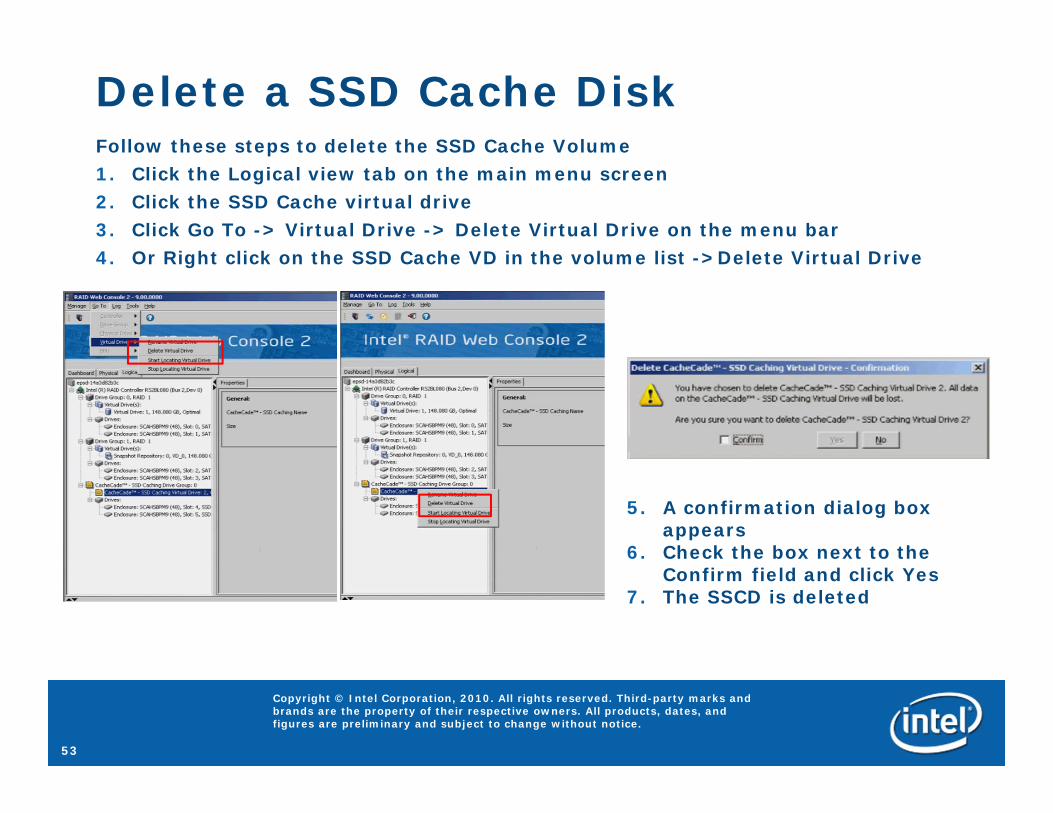
Delete a SSD Cache DiskFollow these steps to delete the SSD Cache Volume1. Click the Logical view tab on the main menu screen2. Click the SSD Cache virtual drive3. Click Go To -> Virtual Drive -> Delete Virtual Drive on the menu bar4. Or Right click on the SSD Cache VD in the volume list ->Delete Virtual Drive
5. A confirmation dialog box appears
6. Check the box next to the Confirm field and click Yes
7. The SSCD is deleted
54