Embed Size (px)
Citation preview

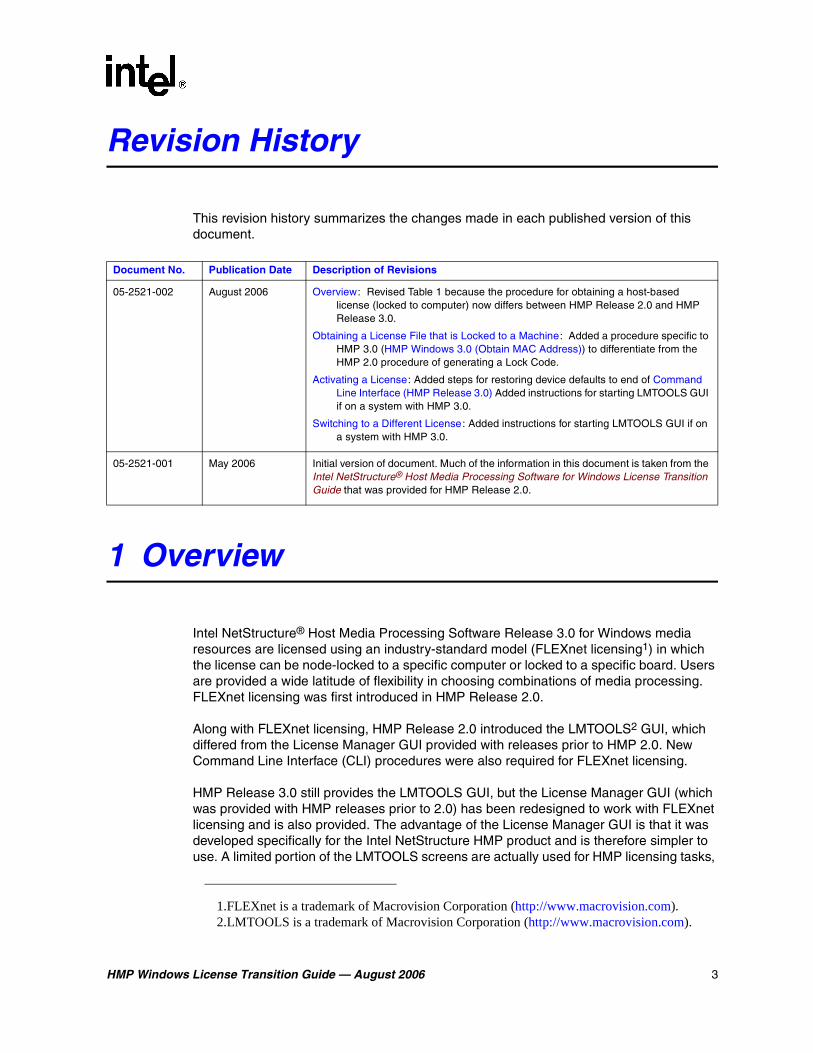
05-2521-002
Intel NetStructure® Host Media Processing Software for WindowsLicense Transition Guide
August 2006

HMP Windows License Transition Guide — August 2006 2
3.About This Publication
Applicability
This publication applies to users of Intel NetStructure® Host Media Processing Software Releases prior to Release 3.0 who are transitioning to Release 3.0.
How to Use this Publication
The information found in this document is organized into the following sections:
• Section 1, “Overview”, on page 3
• Section 2, “Obtaining a Verification License”, on page 7
• Section 3, “Obtaining an Evaluation License”, on page 7
• Section 4, “Generating a License”, on page 8
• Section 5, “Obtaining a Trial, Purchased, or Replacement License”, on page 8
• Section 6, “Activating a License”, on page 13
• Section 7, “Upgrading a License”, on page 20
• Section 8, “Switching to a Different License”, on page 20
Related Information
See the following for additional information:
• The Intel NetStructure® Host Media Processing Release 3.0 for Windows Software Installation Guide provides information about installing the HMP software.
• The Intel NetStructure® Host Media Processing Release 3.0 for Windows Administration Guide provides complete information about obtaining a license and activating a license.
HMP Windows License Transition Guide — August 2006 3
3.Revision History
This revision history summarizes the changes made in each published version of this document.
1 Overview
Intel NetStructure® Host Media Processing Software Release 3.0 for Windows media resources are licensed using an industry-standard model (FLEXnet licensing1) in which the license can be node-locked to a specific computer or locked to a specific board. Users are provided a wide latitude of flexibility in choosing combinations of media processing. FLEXnet licensing was first introduced in HMP Release 2.0.
Along with FLEXnet licensing, HMP Release 2.0 introduced the LMTOOLS2 GUI, which differed from the License Manager GUI provided with releases prior to HMP 2.0. New Command Line Interface (CLI) procedures were also required for FLEXnet licensing.
HMP Release 3.0 still provides the LMTOOLS GUI, but the License Manager GUI (which was provided with HMP releases prior to 2.0) has been redesigned to work with FLEXnet licensing and is also provided. The advantage of the License Manager GUI is that it was developed specifically for the Intel NetStructure HMP product and is therefore simpler to use. A limited portion of the LMTOOLS screens are actually used for HMP licensing tasks,
Document No. Publication Date Description of Revisions
05-2521-002 August 2006 Overview: Revised Table 1 because the procedure for obtaining a host-based license (locked to computer) now differs between HMP Release 2.0 and HMP Release 3.0.
Obtaining a License File that is Locked to a Machine: Added a procedure specific to HMP 3.0 (HMP Windows 3.0 (Obtain MAC Address)) to differentiate from the HMP 2.0 procedure of generating a Lock Code.
Activating a License: Added steps for restoring device defaults to end of Command Line Interface (HMP Release 3.0) Added instructions for starting LMTOOLS GUI if on a system with HMP 3.0.
Switching to a Different License: Added instructions for starting LMTOOLS GUI if on a system with HMP 3.0.
05-2521-001 May 2006 Initial version of document. Much of the information in this document is taken from the Intel NetStructure® Host Media Processing Software for Windows License Transition Guide that was provided for HMP Release 2.0.
1.FLEXnet is a trademark of Macrovision Corporation (http://www.macrovision.com).2.LMTOOLS is a trademark of Macrovision Corporation (http://www.macrovision.com).

HMP Windows License Transition Guide — August 2006 4
which can be confusing. It is essential that you follow the procedures in this document or the HMP Administration Guide if you use the LMTOOLS GUI.
Revised CLI procedures are provided for HMP Release 3.0.
The procedures for performing licensing tasks are different for each release. These differences are summarized in Table 1 and explained in detail in the sections that follow.
Note: The focus of this document is to show the differences in procedures for the various releases. More information about the HMP Release 3.0 procedures is provided in the HMP Release 3.0 Administration Guide.

HMP Windows License Transition Guide — August 2006 5
Table 1. Differences Between HMP 1.3, 2.0, and 3.0 Licensing Procedures
Function HMP Windows 1.3 HMP Windows 2.0 and 3.0
License Types HMP Windows 1.3 provides the following license types:
• Free single-channel Verification License included with HMP Software
• Free four-channel Evaluation License downloaded from Web site (expires in 45 days)
• Free customized four-channel Trial License that requires MAC address when ordering (expires in 45 days)
• Purchased License that requires MAC address when ordering
• Replacement License that requires MAC address when ordering
Note: The file extension for HMP Windows 1.3 license files is .xml.
HMP Windows 2.0 and 3.0 provide the same license types and conditions as HMP 1.3, but because HMP-compatible boards were introduced in HMP 2.0, licenses are locked to either the host computer (in a boardless system) or one of the HMP-compatible boards (Intel NetStructure® DNI or DSI boards) via the board’s serial number.
If you have more than one board, it does not matter which board’s serial number you use, as long as you record which board was used to provide the input data for the license. (If you move the board to another chassis, HMP will no longer function on the original chassis and you will have to move the board’s associated license file to the other chassis so that HMP will function there.)
Note: While it is possible to obtain a license for each board on a particular host, it is not necessary since you only need one license per host and only one license can be used at a time. In other words, if a host has multiple boards and each board has its own license, the only way you can use all the licenses simultaneously is to move each board and associated license to a separate host.
The license file name now reflects the licensing mechanism (refer to the HMP Administration Guide for details).
HMP 2.0 ONLY: In a boardless system, a Lock Code is used. The Lock Code is a 48-bit number provided by the user when ordering a license. This Lock Code is obtained by running the LicenseManagerNSI.exe utility.
HMP 3.0 ONLY: In a boardless system, a Host ID is used. The Host ID is simply the MAC address. The LicenseManagerNSI.exe utility is no longer used. Instead, the user obtains the Host ID via the Show MAC Address(es) button on the License Manager GUI.
Obtaining a Verification License
DCM detects the verification license that will allow you to use the IP Media Server demo program. Running the demo successfully completes the verification process.
Process is the same for HMP Windows 2.0 and 3.0.
Obtaining an Evaluation License
License is downloaded from the Intel Web site after completing information on the form provided.
Process is the same for HMP Windows 2.0 and 3.0.
Generating a License
Uses the Web License Fulfillment utility.
Process is the same for HMP Windows 2.0 and 3.0.

HMP Windows License Transition Guide — August 2006 6
Obtaining a Trial, Purchased, or Replacement License
Uses the HMP License Manager utility and requires a MAC address.
HMP 2.0 ONLY: In a boardless system, a Lock Code is used. The Lock Code is a 48-bit number provided by the user when ordering a license. This Lock Code is obtained by running the LicenseManagerNSI.exe utility.
HMP 3.0 ONLY: In a boardless system, a Host ID is used. The Host ID is simply the MAC address. The LicenseManagerNSI.exe utility is no longer used. Instead, the user obtains the Host ID via the Show MAC Address(es) button on the License Manager GUI.
HMP 2.0 and HMP 3.0: For systems with supported boards, the serial number of a supported board is provided when ordering a license. Any supported board’s serial number can be used if more than one board is in the system.
Note: A license that is locked to a Host ID (MAC address) will not work if an Intel NetStructure DNI or DSI board is physically in the system (even if the DNI or DSI board software is not installed). You must remove the board(s) before you can use a license that is locked to the Host ID.
Activating a License
Uses the HMP License Manager utility with License Manager GUI and CLI.
HMP 2.0 and 3.0 both use FLEXnet licensing. HMP 2.0 provides only the LMTOOLS GUI, but HMP 3.0 also offers a redesigned License Manager GUI that works with FLEXnet licensing. Note that the CLI procedures differ between HMP 2.0 and 3.0.
Upgrading a License
Contact Intel authorized distributor or Intel account manager from whom you purchased the original license.
Process is the same for HMP Windows 2.0 and 3.0.
Changing to a Different License
Uses the HMP License Manager utility with License Manager GUI and CLI.
HMP 2.0 and 3.0 both use FLEXnet licensing. HMP 2.0 provides only the LMTOOLS GUI, but HMP 3.0 also offers a redesigned License Manager GUI that works with FLEXnet licensing. Note that the CLI procedures differ between HMP 2.0 and 3.0.
Transferring a License (Locked to a Board) to a Different Host
Not available in this release. If you are using the supported DNI or DSI boards, the license you obtain will be locked to a board. Therefore, you can transfer that license to another host by moving the license file and its associated board to that host. (For more information about this, refer to the HMP Administration Guide.)
Table 1. Differences Between HMP 1.3, 2.0, and 3.0 Licensing Procedures
Function HMP Windows 1.3 HMP Windows 2.0 and 3.0

HMP Windows License Transition Guide — August 2006 7
2 Obtaining a Verification License
The method for obtaining a Verification license, which is automatically installed and activated when the HMP software is installed, is no different for Intel NetStructure® Host Media Processing Software Release 2.0 and 3.0 than it was for the previous HMP Software release. The Verification License is used in conjunction with the IP Media Server Demo to verify that you have properly set up the HMP Software.
Perform the following procedure to use the Verification license in conjunction with the IP Media Server Demo:
1. Start the HMP system using DCM. DCM will detect the verification license which will then allow you to run the IP Media Server Demo and verify that the HMP Software has been set up properly.
2. Start the IP Media Server Demo.
3. After demo has completed successfully, quit the Demo, when prompted, by entering q.
For details, refer to the Installation Guide for the HMP Software.
3 Obtaining an Evaluation License
The method for obtaining an Evaluation license is no different for Intel NetStructure® Host Media Processing Software Release 2.0 and 3.0 than it was for the previous HMP Software release.
Perform the following procedure to obtain an Evaluation License:
1. Go to the Intel Web site.
2. Scroll down to Enabling HMP Software.
3. From the list of demo licenses, select the license appropriate for the HMP software release. A license agreement appears.
4. Click Accept to proceed with the download.
5. Fill out the required information on the form.

HMP Windows License Transition Guide — August 2006 8
6. Click Submit.
7. Follow the prompts/instructions for downloading the license file.
4 Generating a License
The method used to generate a license is no different for Intel NetStructure® Host Media Processing Software Release 2.0 and 3.0 than it was for the previous HMP Software release. Use the Web License Fulfillment Utility to generate a license.
Note: You may not have access to the License Fulfillment Utility. In that case, you must contact an Intel authorized distributor or Intel account manager.
5 Obtaining a Trial, Purchased, or Replacement License
The method used to obtain trial, purchased, and replacement licenses differs between Intel NetStructure® Host Media Processing Software Release 2.0 and 3.0 and previous HMP Software releases. These license types are defined in the Administration Guide for both releases (the definitions have not changed). This section contains information about the following releases:
• HMP Software Release 1.3 for Windows . . . . . . . . . . . . . . . . . . . . . . . . . . . . . 8
• HMP Software Release 2.0 and 3.0 . . . . . . . . . . . . . . . . . . . . . . . . . . . . . . . . . 9
5.1 HMP Software Release 1.3 for Windows
The process for obtaining a trial, purchased, or replacement license file using HMP Windows Software Release 1.3 or earlier is as follows:
1. Install HMP Software and reboot.
2. Invoke the License Manager GUI.
3. Click the Show MAC address(es) button.
4. Record the MAC address for the NIC card that you will use.

HMP Windows License Transition Guide — August 2006 9
5. Contact an Intel authorized distributor and provide the MAC address determined in the previous step.
6. After receiving the license file from the distributor, save the license file to the computer on which the HMP Software is installed. Note the directory where this file is placed.
5.2 HMP Software Release 2.0 and 3.0
For HMP Windows 2.0 and 3.0, the user has two options:
• Obtaining a License File that is Locked to a Machine
• Obtaining a License File that is Locked to a Board
5.2.1 Obtaining a License File that is Locked to a Machine
This procedure is different for HMP Windows 2.0 and 3.0:
• HMP Windows 2.0 (Generate Lock Code)
• HMP Windows 3.0 (Obtain MAC Address)
5.2.1.1 HMP Windows 2.0 (Generate Lock Code)
The process for obtaining a trial, purchased, or replacement license file that will be locked to a machine using HMP Software Release 2.0 or 3.0 is as follows:
1. Run the LicenseManagerNSI.exe utility, Figure 1. This utility is available at: http://resource.intel.com/telecom/support/HMPWin/hmp20/index.htm
After you install the HMP Software, the utility is also available in C:\Program Files\Intel\HMP\bin (but you don’t have to run it from that location).

HMP Windows License Transition Guide — August 2006 10
Figure 1. LicenseManagerNSI.exe Utility
2. Record the Lock Code number.
3. Contact an Intel authorized distributor and provide the Lock Code number determined in the previous step.
4. After receiving your license file from the distributor, copy the license file to Program Files/Intel/HMP/Data, or to where you want to store your .lic files.
Caution: Do not modify the license file. You do not have any license to, and do not have the rights to, modify the license file in any way. Also, if you modify the license file, the HMP Software will not work. Do not move the license file after you activate it. The license file must remain in the location where it was activated.
Notes:1. A license that is locked to a machine will not work if an Intel NetStructure DNI or DSI board is physically in the system (even if the DNI or DSI board software is not installed). You must remove the board(s) before you can use a license that is locked to a machine.
2. Certain changes to the machine and its environment could cause the lock code to become invalid. This is most likely to occur on machines with multiple network cards. Conditions which might cause the lock code to change are: updates to network card drivers, disabling or uninstalling certain network cards, OS service pack updates, OS upgrade or reinstalls, and computer name changes.
3. If your system has multiple NIC cards, you can avoid having the lock code become invalid by using the procedure provided “System Fails to Start on a Boardless System, License Does Not Work” in the Troubleshooting chapter of the HMP Release 3.0 Administration Guide.

HMP Windows License Transition Guide — August 2006 11
5.2.1.2 HMP Windows 3.0 (Obtain MAC Address)
If you are not using boards in your system, follow this procedure to obtain a trial, purchased, or replacement license from an Intel authorized distributor or Intel account manager.
Note: This host-based licensing procedure ties the license to the machine’s MAC address.
1. Install the HMP Software and reboot (refer to the Installation Guide for the HMP Software).
2. Invoke the License Manager GUI from the Start menu (Start > Programs > Intel NetStructure HMP > HMP License Manager).
3. Click the Show MAC Address(es) button. This will open a window listing all the MAC addresses available on the targeted computer, including a description.
4. Record the MAC address for which you need a license. If multiple MAC addresses are available, you will have to choose one: for example, the MAC address of a card that is least likely to be removed. This MAC address will be known as the Host ID.
5. Contact an Intel authorized distributor and supply the MAC address of the computer on which you are installing the HMP Software when you request the license.
6. When you receive a license from your supplier, save the license file onto the computer on which the HMP Software was installed, in any directory.
Note: Note: When you activate the license, you will have to specify this directory. The default directory for licenses is \Program Files\Intel\HMP\data. The License Manager application will look in this directory by default but give you the option of changing to another directory. So it is easiest to put the license file in the default directory.
Caution: Do not modify the license file. You do not have any license to, and do not have the rights to, modify the license file in any way. Also, if you modify the license file, the HMP Software will not work. Do not move the license file after you activate it. The license file must remain in the location where it was activated.
HMP Windows License Transition Guide — August 2006 12
Notes:1. The license file must be stored and activated on the computer having the Host ID (MAC address) that was specified when the license was obtained.
2. A license that is locked to a machine will not work if an Intel NetStructure DNI or DSI board is physically in the system (even if the DNI or DSI board software is not installed). You must remove the board(s) before you can use a license that is locked to a machine.
Caution: Certain changes to the machine and its environment could cause the Host ID (MAC address) to become invalid. This is most likely to occur on machines with multiple network interface cards (NICs). Conditions which might cause the Host ID (MAC address) to change are: updates to network card drivers, disabling or uninstalling certain NIC cards, operating system service pack updates, operating system upgrade or reinstalls, and computer name changes.
Note: If your system has multiple NIC cards, you can avoid having the Host ID (MAC address) become invalid by using the procedure provided “System Fails to Start on a Boardless System, License Does Not Work” in the Troubleshooting chapter of the HMP Release 3.0 Administration Guide.
5.2.2 Obtaining a License File that is Locked to a Board
The process for obtaining a trial, purchased, or replacement license file that will be locked to a board using HMP Windows Software Release 2.0 or 3.0 is as follows:
Note: This host-based licensing procedure ties the license to the machine’s hostname and MAC address.
1. Identify the serial number of the board with which this license will be associated.
2. Record the board serial number.
3. Contact an Intel authorized distributor and provide the board serial number determined in the previous step.
4. After receiving your license file from the distributor, copy the license file to Program Files/Intel/HMP/Data, or to where you want to store your .lic files.

HMP Windows License Transition Guide — August 2006 13
6 Activating a License
The process for activating a license differs from HMP Release 1.3 to Release 2.0. For HMP Release 3.0, the License Manager GUI used with HMP 1.3 is available again and used the same way, but it works with the FLEXnet licensing and has some new fields. The CLI procedures for activating a license change for HMP 3.0. For each release, you can use either a graphical user interface (GUI) or a command line interface (CLI). This section contains information about the following releases:
• HMP Software Release 1.3 for Windows . . . . . . . . . . . . . . . . . . . . . . . . . . . . . 13
• HMP Software Release 2.0 Windows. . . . . . . . . . . . . . . . . . . . . . . . . . . . . . . . 14
• HMP Software Release 3.0 Windows. . . . . . . . . . . . . . . . . . . . . . . . . . . . . . . . 18
6.1 HMP Software Release 1.3 for Windows
You can use either a GUI or CLI to activate a license as described in these sections:
• License Manager GUI
• Command Line Interface (HMP Release 1.3 only)
6.1.1 License Manager GUI
Using the HMP License Manager, the process for activating a license is as follows:
1. Start the HMP License Manager GUI.
2. Enter the name of the license file you want to use in the License File Name box.
3. Click the Show License Details button to confirm that this is the correct license.
4. Click the Activate License button to activate the license you have selected.
5. Follow the instructions provided by the License Manager GUI.

HMP Windows License Transition Guide — August 2006 14
6.1.2 Command Line Interface (HMP Release 1.3 only)
Using the CLI version of the License Manager, the process for activating a license is as follows:
1. Type one of the following commands (the first one is the short form of the command and the second is the long form of the command):
LicenseManager -s -D <directory> -F <file>
LicenseManager --showdetails --directory <directory> --file <file>
where <directory> is the directory in which the license file was saved and <file> is the license file’s name.
The details of the license will display. After you examine the details and confirm that this is the license you want to activate, go to the next step.
2. To activate the license, type one of the following commands (the first one is the short form of the command and the second is the long form of the command):
LicenseManager -a -D <directory> -F <file>
LicenseManager --activate --directory <directory> --file <file>
where <directory> is the directory in which the license file was put and <file> is the license file’s name.
The license you specified is now active.
6.2 HMP Software Release 2.0 Windows
You can use either a GUI or CLI to activate a license as described in these sections:
• LMTOOLS GUI
• Command Line Interface (HMP Release 2.0 only)
Note: A license that is locked to a machine will not work if an Intel NetStructure DNI or DSI board is physically in the system (even if the DNI or DSI board software is not installed). You must remove the board(s) before you can use a license that is locked to a machine.

HMP Windows License Transition Guide — August 2006 15
6.2.1 LMTOOLS GUI
This section describes how to activate a license using the LMTOOLS utility.
Note: If you are using Windows XP with Service Pack 2, you must follow the procedure in Section 8.3, “Turning DEP Off for the LMTOOLS Utility (Windows XP SP2 Only)”, in the HMP 2.0 Administration Guide before you use the LMTOOLS utility.
Caution: You will only need to use three tabs on the LMTOOLS utility: Service/License File, Config Services, and Start/Stop/Reread. On those three tabs, use only the fields and buttons specified in the procedure. Do not use ANY fields or buttons on the following tabs: System Settings, Utilities, Server Status, Server Diags, and Borrowing or you may cause problems.
Using the LMTOOLS utility, the process for activating a license is as follows:
1. Stop any HMP application that is running and then stop the HMP services using DCM.
Note: If you activate another license while the HMP services are running, the HMP services will automatically be stopped.
2. Start the LMTOOLS utility from the Start menu (Start > Program Files > Intel NetStructure HMP > Licensing Toolkit Utilities).
Note: If you are using this procedure with HMP 3.0, LMTOOLS is not available from the Start menu. You must access LMTOOLS from \Program Files\Intel\HMP\bin (default location).
On the initial Service/License File screen, Figure 2, check that Configuration using Services is selected and that Intel HMP License Manager is selected in the box below.

HMP Windows License Transition Guide — August 2006 16
Figure 2. LMTOOLS Service/License File Screen
3. Click the Config Services tab to display the Config Services screen, Figure 3.
Figure 3. LMTOOLS Config Services Screen

HMP Windows License Transition Guide — August 2006 17
4. Use the Browse button for the Path to the license file box to navigate to your license file and then open the license file you wish to use.
5. Click the Start/Stop/Reread tab to display the Start/Stop/Reread screen, Figure 4. A Save Settings dialog box will then appear. Click YES to save the new license file selection.
Figure 4. LMTOOLS Start/Stop/Reread Screen
6. Click the Stop Server button (Changes status to Stopping Server).
Note: If this message does not clear after a few seconds, proceed to the next step.
7. Click the Start Server button.
Note: Note: Normally, you do not need to click the ReRead button. You would use the ReRead button only if you wanted to forcefully recreate PCD/FCD/Config files. For example, if you want to recreate PCD/FCD/Config files in their original default state for the same currently active license, you can issue a Reread after deleting, moving, or renaming one or all of the previously generated PCD/FCD/Config files.
8. From the DCM Configuration Manager Main Window, right click on the HMP_Software device and select Restore Defaults from the Device submenu. A list of PCD files will be displayed. Select the PCD file that corresponds to your license file and then click OK.

HMP Windows License Transition Guide — August 2006 18
Note: You can no longer select a PCD file that is of lower density than your active license. You must select the explicit PCD file generated by the corresponding license file.
9. Start the system using DCM.
6.2.2 Command Line Interface (HMP Release 2.0 only)
Using the CLI, the procedure for activating a license is as follows:
1. Use this command:
net stop “INTEL HMP license manager”
2. Use this command:
ilmpath {-add | -override} {vendor | all} license_file_list
For example: ilmpath –override all “new_license_file”
3. Use this command:
net start “INTEL HMP license manager”
Normally, you do not need to use the lmreread command. You would use lmreread only if you wanted to forcefully recreate PCD/FCD/Config files. For example, if you want to recreate PCD/FCD/Config files in their original default state for the same currently active license, you can issue a Reread after deleting, moving, or renaming one or all of the previously generated PCD/FCD/Config files.
Should you need to use lmreread, here is the command line:
lmreread [-c license_file_list] [-vendor vendor] [-all]
For example: lmreread –c “new_lincense_file” –all
6.3 HMP Software Release 3.0 Windows
You can use either a GUI or CLI to activate a license as described in these sections:
• Section 6.2.1, “LMTOOLS GUI”, on page 15 (The procedure provided under HMP Release 2.0 for this GUI applies to HMP Release 3.0.)
• Section 6.1.1, “License Manager GUI”, on page 13 (The procedure provided under HMP Release 1.3 for this GUI applies to HMP Release 3.0.)
• Section 6.3.1, “Command Line Interface (HMP Release 3.0)”, on page 19
Note: A license that is locked to a Host ID (MAC address) will not work if an Intel NetStructure DNI or DSI board is physically in the system (even if the DNI or DSI board software is not installed). You must remove the board(s) before you can use a license that is locked to a Host ID.
HMP Windows License Transition Guide — August 2006 19
Although the License Manager GUI has been redesigned to work with FLEXnet licensing and has new fields, it is used the same way as it was used for HMP Release 1.3. Refer to the HMP 3.0 Administration Guide for more information about the redesigned License Manager GUI.
6.3.1 Command Line Interface (HMP Release 3.0)
Using the CLI, the procedure for activating a license is as follows:
1. Use this command:
net stop "INTEL HMP License Manager"
2. Use this command:
"C:\Program Files\Intel\HMP\bin\installs.exe" -r -n "INTEL HMP License Manager"
3. Use this command:
"C:\Program Files\Intel\HMP\bin\installs.exe" -e "C:\Program Files\Intel\HMP\bin\lmgrd.exe" -c "[license file]" -l "C:\Program Files\Intel\HMP\log\Flex.dl" -n "INTEL HMP License Manager" -k "-local"
where “[license file]” includes the path to the license file, such as “C:\Program Files\Intel\HMP\data\60r60v40e40c24s00mf_hib_pur.lic”.
4. Use this command:
net start "INTEL HMP License Manager"
5. From the DCM Configuration Manager Main Window, right click on the HMP_Software device and select Restore Defaults.
6. 6. A dialog will appear, telling you what will happen when you perform the Restore Defaults action and gives you the opportunity to exit from this action. However, in this case, click Yes.
7. The Assign Firmware File screen appears, which has a list of PCD files. Select the PCD file (from the list in the Available Firmware box) that corresponds to your license file and then click OK.
Note: You cannot select a PCD file that is of lower density than your active license. You must select the explicit PCD file generated by the corresponding license file. The resources provided by the PCD file are described in the Firmware Description box. The name of the license file corresponds to the licensed resources. For information about how license files are named, refer to the HMP Administration Guide.
8. Start the system using DCM. To do this you can either click the button with the green arrow on the far left or use the System drop-down menu (System > Start System).
For more information about the CLI commands and their options, refer to the HMP Release 3.0 Administration Guide and also to Macrovision’s documentation at: http://www.macrovision.com/services/support/.

HMP Windows License Transition Guide — August 2006 20
7 Upgrading a License
The method used to upgrade a license is no different for Intel NetStructure® Host Media Processing Software Release 2.0 and 3.0 for Windows than it was for HMP Release 1.3. Contact an Intel authorized distributor or Intel account manager from whom you purchased the original license.
8 Switching to a Different License
The process for switching to a different license differs from HMP Release 1.3 to Release 2.0. For HMP Release 3.0, the License Manager GUI used with HMP 1.3 is available again and used the same way, but it works with the FLEXnet licensing and has some new fields. The CLI procedures for activating a license change for HMP 3.0. For each release, you can use either a graphical user interface (GUI) or a command line interface (CLI). This section contains information about the following releases:
• HMP Software Release 1.3 for Windows . . . . . . . . . . . . . . . . . . . . . . . . . . . . . 20
• HMP Software Release 2.0 Windows. . . . . . . . . . . . . . . . . . . . . . . . . . . . . . . . 22
• HMP Software Release 3.0 Windows. . . . . . . . . . . . . . . . . . . . . . . . . . . . . . . . 25
8.1 HMP Software Release 1.3 for Windows
You can use either a GUI or CLI to switch to a different a license as described in these sections:
• License Manager GUI
• Command Line Interface (HMP Release 1.3 only)

HMP Windows License Transition Guide — August 2006 21
8.1.1 License Manager GUI
Using the HMP License Manager, the process for switching to a different license is as follows:
1. Start the License Manager GUI.
2. On the License Manager screen, enter or select the name of the new license file you want to use.
3. Click the Show License Details button to verify that the license you selected has the features you want.
4. Once you are satisfied, click the Activate License button.
5. If it is already running, stop the System Service using DCM.
6. Select Restore Device Defaults from the DCM Device submenu.
8.1.2 Command Line Interface (HMP Release 1.3 only)
Using the CLI version of the License Manager, the process for switching to a different license is as follows:
1. Open a DOS command prompt window.
2. First, you must locate the license file you want to switch to and look at the configuration details to make sure this license file is the one you want to start using. Type one of the following commands (the first one is the short form of the command and the second is the long form of the command):
LicenseManager -s -D <directory> -F <file>
LicenseManager --showdetails --directory <directory> -- file <file>
where <directory> is the directory in which the license file you want to switch to is located and <file> is the name of the license file you want to switch to.
Note: If you use the command LicenseManager -s (or --showdetails) without any parameters, it will show the details of the active license by default. However, since you are trying to switch from the current active license to a different license, you must use the directory and file parameters to specify the license you want to switch to.
The details of the license you are going to switch to will display. After you examine the details and confirm that this is the license you want to activate, go to the next step.

HMP Windows License Transition Guide — August 2006 22
3. To activate the license you just verified, type one of the following commands (the first one is the short form of the command and the second is the long form of the command):
LicenseManager -a -D <directory> -F <file>
LicenseManager --activate --directory <directory> --file <file>
where <directory> is the directory in which the license file was put and <file> is the license file’s name.
The license you specified is now active.
Note: There can be multiple license files on disk, but only one of them can be active at a particular time. The activate command lets you activate a particular license file.
4. Invoke the DCM GUI. From the Start menu, select Configuration Manager- DCM from the HMP program folder. If you have not started the system yet, start the HMP system. If HMP is already running, go to the next step.
5. On the DCM Main Window click the Stop Service option from the Service pull-down menu or click the Stop Service icon.
6. From the DCM Action pull-down menu, click Restore Defaults. DCM will detect HMP Software and automatically use the new license.
8.2 HMP Software Release 2.0 Windows
You can use either a GUI or CLI to switch to a different a license as described in these sections:
• LMTOOLS GUI
• Command Line Interface (HMP Release 2.0 only)
Note: A license that is locked to a machine will not work if an Intel NetStructure DNI or DSI board is physically in the system (even if the DNI or DSI board software is not installed). You must remove the board(s) before you can use a license that is locked to a machine.

HMP Windows License Transition Guide — August 2006 23
8.2.1 LMTOOLS GUI
This section describes how to switch to a different license using the LMTOOLS utility.
Note: If you are using Windows XP with Service Pack 2, you must follow the procedure in Section 8.3, “Turning DEP Off for the LMTOOLS Utility (Windows XP SP2 Only)”, in the HMP 2.0 Administration Guide before you use the LMTOOLS utility.
Caution: If you switch from using one license to using another license that has the same name, make sure that each license is located in a different directory or the system will fail to start.
Caution: You will only need to use three tabs on the LMTOOLS utility: Service/License File, Config Services, and Start/Stop/Reread. On those three tabs, use only the fields and buttons specified in the procedure. Do not use ANY fields or buttons on the following tabs: System Settings, Utilities, Server Status, Server Diags, and Borrowing or you may cause problems.
Using the LMTOOLS utility, the process for switching to a different license is as follows:
1. Stop any HMP application that is running and then stop the HMP services using DCM.
Note: If you activate another license while the HMP services are running, the HMP services will automatically be stopped.
2. Start the LMTOOLS utility from the Start Menu (Start > Program Files > Intel NetStructure HMP > Licensing Toolkit Utilities).
Note: If you are using this procedure with HMP 3.0, LMTOOLS is not available from the Start menu. You must access LMTOOLS from \Program Files\Intel\HMP\bin (default location).
On the initial Service/License File screen, Figure 2, check that Configuration using Services is selected and that Intel HMP License Manager is selected in the box below.
3. Click the Config Services tab to display the Config Services screen, Figure 3.
4. Use the Browse button for the Path to the license file box to navigate to your license file and then open the license file you wish to use.
5. Click the Start/Stop/Reread tab to display the Start/Stop/Reread screen, Figure 4. A Save Settings dialog box will then appear. Click YES to save the new license file.
6. Click the Stop Server button (Changes status to Stopping Server).
Note: If this message does not clear in a few seconds, proceed to the next step.
7. Click the Start Server button.
Note: Normally, you do not need to click the ReRead button. You would use the ReRead button only if you wanted to forcefully recreate PCD/FCD/Config files. For example, if you want to recreate PCD/FCD/Config files in their

HMP Windows License Transition Guide — August 2006 24
original default state for the same currently active license, you can issue a Reread after deleting, moving, or renaming one or all of the previously generated PCD/FCD/Config files.
8. From the DCM Configuration Manager Main Window, right click on the HMP_Software device and select Restore Defaults from the Device submenu. A list of PCD files will be displayed. Select the PCD file that corresponds to your license file and then click OK.
Note: You can no longer select a PCD file that is of lower density than your active license. You must select the explicit PCD file generated by the corresponding license file.
9. Start the system using DCM.
8.2.2 Command Line Interface (HMP Release 2.0 only)
This section describes how to switch to a different license using the CLI.
Caution: If you switch from using one license to using another license that has the same name, make sure that each license is located in a different directory or the system will fail to start.
Using the CLI, the procedure for switching to a different license is as follows:
1. Use this command:
net stop “INTEL HMP license manager”
2. Use this command:
ilmpath {-add | -override} {vendor | all} license_file_list
For example: ilmpath –override all “new_license_file”
3. Use this command:
net start “INTEL HMP license manager”
Normally, you do not need to use the lmreread command. You would use lmreread only if you wanted to forcefully recreate PCD/FCD/Config files. For example, if you want to recreate PCD/FCD/Config files in their original default state for the same currently active license, you can issue a Reread after deleting, moving, or renaming one or all of the previously generated PCD/FCD/Config files. Should you need to use lmreread, here is the command line:
lmreread [-c license_file_list] [-vendor vendor] [-all]
For example: lmreread –c “new_lincense_file” –all
HMP Windows License Transition Guide — August 2006 25
8.3 HMP Software Release 3.0 Windows
You can use either a GUI or CLI to switch to a different license as described in these sections:
• Section 8.2.1, “LMTOOLS GUI”, on page 23 (The procedure provided under HMP Release 2.0 for this GUI applies to HMP Release 3.0.)
• Section 8.1.1, “License Manager GUI”, on page 21 (The procedure provided under HMP Release 1.3 for this GUI applies to HMP Release 3.0.)
• Section 6.3.1, “Command Line Interface (HMP Release 3.0)”, on page 19 (The procedure is the same as for activating a license.)
Note: A license that is locked to a Host ID (MAC address) will not work if an Intel NetStructure DNI or DSI board is physically in the system (even if the DNI or DSI board software is not installed). You must remove the board(s) before you can use a license that is locked to a Host ID.
Although the License Manager GUI has been redesigned to work with FLEXnet licensing and has new fields, it is used the same way as it was used for HMP Release 1.3. Refer to the HMP 3.0 Administration Guide for more information about the redesigned License Manager GUI.

HMP Windows License Transition Guide 26
INFORMATION IN THIS DOCUMENT IS PROVIDED IN CONNECTION WITH INTEL® PRODUCTS. NO LICENSE, EXPRESS OR IMPLIED, BY ESTOPPEL OR OTHERWISE, TO ANY INTELLECTUAL PROPERTY RIGHTS IS GRANTED BY THIS DOCUMENT. EXCEPT AS PROVIDED IN INTEL'S TERMS AND CONDITIONS OF SALE FOR SUCH PRODUCTS, INTEL ASSUMES NO LIABILITY WHATSOEVER, AND INTEL DISCLAIMS ANY EXPRESS OR IMPLIED WARRANTY, RELATING TO SALE AND/OR USE OF INTEL PRODUCTS INCLUDING LIABILITY OR WARRANTIES RELATING TO FITNESS FOR A PARTICULAR PURPOSE, MERCHANTABILITY, OR INFRINGEMENT OF ANY PATENT, COPYRIGHT OR OTHER INTELLECTUAL PROPERTY RIGHT. Intel products are not intended for use in medical, life saving, or life sustaining applications.
Intel may make changes to specifications and product descriptions at any time, without notice.
This Intel NetStructure® Host Media Processing Software for Windows License Transition Guide as well as the software described in it is furnished under license and may only be used or copied in accordance with the terms of the license. The information in this manual is furnished for informational use only, is subject to change without notice, and should not be construed as a commitment by Intel Corporation. Intel Corporation assumes no responsibility or liability for any errors or inaccuracies that may appear in this document or any software that may be provided in association with this document.
Except as permitted by such license, no part of this document may be reproduced, stored in a retrieval system, or transmitted in any form or by any means without express written consent of Intel Corporation.
Copyright © 2005-2006, Intel Corporation
Celeron, Dialogic, Intel, Intel Centrino, Intel logo, Intel NetMerge, Intel NetStructure, Intel Xeon, Intel XScale, IPLink, and Pentium are trademarks or registered trademarks of Intel Corporation or its subsidiaries in the United States and other countries.
* Other names and brands may be claimed as the property of others.
Publication Date: August 2006
Document Number: 05-2481-004
Intel Converged Communications, Inc.1515 Route 10Parsippany, NJ 07054
For Technical Support, visit the Intel Telecom Support Resources website at:http://developer.intel.com/design/telecom/support
For Products and Services Information, visit the Intel Telecom Products website at:http://www.intel.com/design/network/products/telecom
For Sales Offices and other contact information, visit the Where to Buy Intel Telecom Products page at:http://www.intel.com/buy/wtb/wtb1028.htm