Embed Size (px)
Citation preview
AC 2008-1152: INTEGRATION OF FREESCALE MICROCONTROLLERS INTOTHE ELECTRONICS AND COMPUTER TECHNOLOGY CURRICULUM
David Border, Bowling Green State UniversityDavid A. Border received a Ph.D. degree in Engineering Science from the University of Toledoin Toledo, Ohio (1986). He is a faculty member at Bowling Green State University in BowlingGreen, Ohio. Principle research interest: electronic information systems. Interests includes digitalcommunication and networking, and intelligent networked devices. Previous research includestopics of bandwidth compression and signal specific data manipulation.
Erik Mayer, Bowling Green State UniversityErik A. Mayer received the Ph.D. degree in Engineering Science from the University of Toledo inToledo, Ohio, in 1998. He is a faculty member at Bowling Green State University in BowlingGreen, Ohio. His research interests are in the areas of power electronics,embedded systems,hybrid and electric vehicles, and alternative energy.
© American Society for Engineering Education, 2008
Page 13.774.1
Integration of Freescale Microcontrollers into the Electronics and Computer Technology Curriculum
Electronics and Computer Technology
Department of Technology Systems Bowling Green State University
Bowling Green, Ohio Abstract Learning to program in assembly language has been an excellent way of educating students in microprocessors and computer architecture. Traditionally, our Electronics and Computer Technology program has used Intel microprocessors in our Digital Computer Analysis course. However, jobs that involve programming Intel microprocessors will probably employ Computer Science majors and are more likely to use higher level languages such as C++. The chances that our graduates will be employed in a job involving the programming of Intel processors with assembly language are very low. The number of applications of embedded systems in industry is steadily increasing. Embedded systems utilize microcontrollers which are essentially an entire computer on one chip. Microcontrollers are designed to be used in applications such as appliances in which they will run a single program. They have inputs, such as temperature sensors and switches, and outputs, such as seven-segment displays and electric motors. Along with the processor, the microcontroller can have memory along with other peripherals such as analog-to-digital converters on one chip. As the popularity of embedded systems is increasing, it is important for students in the Electronics and Computer Technology curriculum to be exposed to microcontrollers. Programming the microcontrollers is generally done in assembly language or C. This made microcontrollers an excellent candidate for replacing the Intel microprocessors that were previously used in the class. Unfortunately, Intel has discontinued their line of MCS51 and MCS251 microcontrollers. Currently, major manufacturers of microcontrollers include: Freescale, (formerly a division of Motorola), Atmel, Analog Devices, and Texas Instruments. This paper will detail the integration of the Freescale microcontrollers in our Digital Computer Analysis course. The rationale for using Freescale microntrollers will be discussed. Freescale CodeWarrior was used to debug, compile, and download the assembly programs. A curriculum is presented along with laboratory experiments used in the class. Several options for textbooks are also presented. I. Introduction Concerning the scope of the material to be covered, student instruction in electronics hasn’t gotten much easier over the decades. The number of electronic devices has increased and the
Page 13.774.2

importance of the basic devices to theory and design fundamentals has remained. Considering the fact that while incoming students may have more savvy about consumer electronics features, i.e. they can name large scale devices and technologies within desktop computers (etc.), their knowledge of electronics has not really increased significantly. Therefore the important fundamentals cannot be abandoned when updating curricula. An example of this curriculum content tension is noted in the incoming and current student interest in semi autonomous intelligent devices. While only a few of our students arrive on campus with experience in using (e.g. programming) such devices through commercial products such as Lego Mindstorms, most students do express an interest in and see a value in programming and building such devices. Thus while they are better able to conceive of applications for such devices, in most cases they are no closer to actuating their concepts than past incoming students. With regard to computer electronics, for many years our undergraduate program sought to instill programming and interfacing skills through use of 8085 and 80186 architecture based machines. Laboratory experiments helped students learn Intel x86 machine architecture and assembler language. But now, since these machines are not the best fit for hardware today’s applications involving intelligent devices
1, such as remote monitoring networks and robotic vehicles, and so
forth, the case for a strong relationship between real life applications and course content is hard to make. Further, the traditional rationale that Intel code from the 8080/8085/80x86 family represents an industry standard has weakened over the years. II. Hardware About six years ago our technology program migrated away from its use of its late 1970s era Intel microprocessors to 80186 style microprocessors. This was a decision of convenience since it allowed our program to retain much of its instructional lecture and laboratory material. In reality by the time the 80186 architecture machines were adopted for instruction in our digital computer class, the desktop and laptop “real world” had forever abandoned the wholly Intel x86 assembler code based kernels in favor of C-language kernels. The days of coding an operating system consisting of a few thousand lines of assembler code had vanished for that family of machines. Our use of the 80186 for instruction was abruptly truncated because of a licensing problem. In 2005 our laboratory PC-based computers were swapped out for newer machines. The licensing scheme on the 80186 PC-based development tools of the old PCs was based on a one-installation per-machine non transferable license basis. Thus the program was faced with the expensive option of re-licensing the 80186 development tools software or investing in new microprocessors. The faculty made the decision that it was best to invest in new microprocessors, rather than to stay with the 80186 hardware. The basis of this decision was: (1) the growth of embedded microprocessor applications and their adoption (for the most part) of non x86 architectures and the fact that (2) operating systems use of low level code (such as x86-based assembly code) is now limited to coding at the Hardware Abstraction Layer (HAL) of the OS kernel, thus limiting the relevance of classroom and laboratory instruction of x86 machine and assembly code.
Page 13.774.3
During the selection process of a new, non x86 microprocessor a number of vendors were considered. These included: Freescale, Atmel, Analog Devices and Texas Instruments. All of these vendors were found to have mature microcontroller families. Importantly all vendors offer very good integrated development environments (IDEs). As a point of important differentiation however, only one vendor at that time offered a hardware/software suite compatible with our laboratory’s pre-existing National Instruments-based laboratory software and hardware suite (LabView, NI-ELVIS), Freescale. The Freescale Semiconductor Microcontroller Student Learning Kit (MCUSLK) is marketed by Freescale and this product is compatible with the National Instruments NI-ELVIS (National Instruments Educational Laboratory Virtual Instrumentation Suite) device in our lab. It has been used in a number of academic programs and has been incorporated by some institutions for distance learning
2 uses. The MCUSLK uses an inexpensive microcontroller from the 16-bit
HCS12 family, the MC9S12C32. The MC9S12C32 is built into a small dimension module, the CSM12C32 module. The module provides power conditioning, clock regulation, RS-232 port, jumpers, dip switch, push buttons, LEDS and I/O pins to the external world. The module is pin compatible with a development board that includes a moderate sized breadboard, subminiature LEDs, dip switches, push button switches, LCD two-line multi-character display screen as well as other useful low level prototyping features. In turn, the development board has a form factor and edge connector that is plug-in compatible to the NI-ELVIS hardware station unit. III. Freescale Microcontrollers The HC12 microcontroller family is a line of devices introduced in 1996
3 that have followed
from Motorola’s original 6800 processor series. Unlike the 6800, the HC12 family is a 16 bit device designed for microcontroller applications. Its immediate predecessor was the 68HC11, an 8 bit microcontroller. The HCS12 microcontroller represents yet another refinement of the HC12 family. Chief improvements to the HCS12 family include the addition of faster bus speeds and larger flash memories. As with the HC12 family, the HCS12 family includes the following features (not an exhaustive listing):
• 64 KB addressability
• On-chip EEPROM
• On-chip Flash
• On-chip 10-bit A/D converter
• Multifunction Timer Module
• Pulse Width Modulation
• Synchronous Peripheral Interface (SPI)
• Asynchronous Serial Communication Interface (SCI)
• Controller Area Network Interface (CAN)
• Background Debug Mode IV. The Laboratory and Instructional Curriculum Course work includes weekly lecture and laboratory sessions. Since our past work was based on Intel architecture devices, we had to discard past instruction practices, textbooks and laboratory investigations in favor of new HCS12 based material.
Page 13.774.4
General Remarks on Instruction As mentioned earlier, students are taught the Freescale microcontroller architecture using the low cost MC9S12C32 microcontroller. While different from Intel devices, they are excellent devices to teach the theory and principles of Von Neumann computers. The CPU structure, bus structure, machine code, addressability of data, and so forth remain important topics of early classroom instruction. New to the faculty were the HCS12 assembly code, assembler directives, and the IDE’s support of C-language support and mixed coding support. Students are taught the use and format of assembly instructions. They are also taught the use of the CodeWarrior IDE which is used to write assembly programs, compile and debug them, and download them into the microcontroller. These objectives are achieved by a series of lectures that are followed by laboratory experiments designed to help develop the students’ knowledge of microcontrollers. Textbook and References The textbook used for the class was Huang’s The HCS12/9S12: An Introduction to Software & Hardware Interfacing. This book was found to use a gradual approach when introducing the student to the architecture of the microcontroller and to assembly language. It also included details on interfacing switches, LEDs, and seven-segment displays to the microcontroller ports which was useful in the labs. This book was also used as the source of homework assignments which were at the end of each chapter. However, when it came to using the more advanced features of the microcontroller such as timers and interrupts, it was found that Cady’s Software and Hardware Engineering: Assembly and C Programming for the Freescale HCS12 Microcontroller
4 was more helpful as it is based on
the CodeWarrior IDE while the Huang book was not. However, the Cady book lacks a good step-by-step introduction to assembly language which could be frustrating to students learning assembly language for the first time. The Cady book was a good instructor reference when it came to understanding the intricacies of CodeWarrior and developing the laboratory experiments. Additional student references used in the class were the CPU12 Reference Manual
5 and the
CPU12 Reference Guide6 which were available on the Freescale website. The CPU12 Reference
Manual contained details on the format and use of the assembly instructions. The CPU12 Reference Guide served as a quick reference to the assembly instructions and most of it is duplicated in an appendix of Huang’s book.
Exams In the class, students were given two exams that were taken on the computer. For each exam, students are given two short programs to complete within an hour and 20 minute time limit. These exams tested the students on the use of the instructions that had been covered in lectures and used in laboratory experiments previous to the exam. The tests were given in the middle and towards the end of the semester.
Page 13.774.5
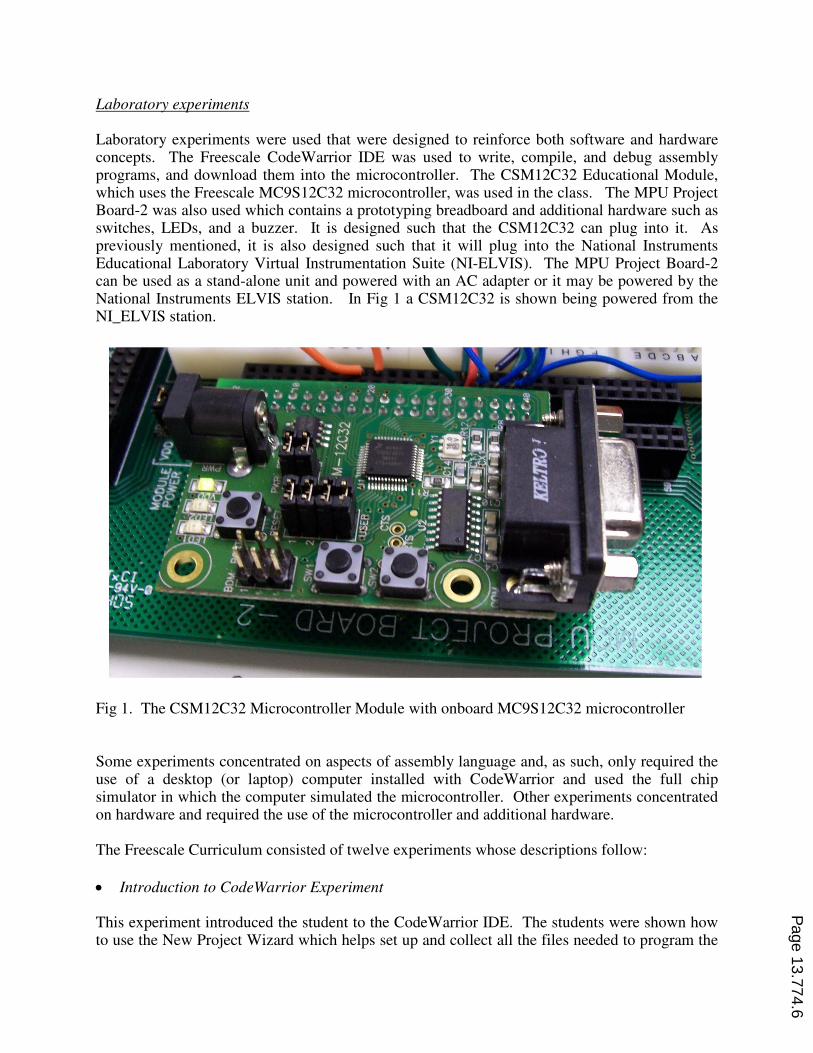
Laboratory experiments Laboratory experiments were used that were designed to reinforce both software and hardware concepts. The Freescale CodeWarrior IDE was used to write, compile, and debug assembly programs, and download them into the microcontroller. The CSM12C32 Educational Module, which uses the Freescale MC9S12C32 microcontroller, was used in the class. The MPU Project Board-2 was also used which contains a prototyping breadboard and additional hardware such as switches, LEDs, and a buzzer. It is designed such that the CSM12C32 can plug into it. As previously mentioned, it is also designed such that it will plug into the National Instruments Educational Laboratory Virtual Instrumentation Suite (NI-ELVIS). The MPU Project Board-2 can be used as a stand-alone unit and powered with an AC adapter or it may be powered by the National Instruments ELVIS station. In Fig 1 a CSM12C32 is shown being powered from the NI_ELVIS station.
Fig 1. The CSM12C32 Microcontroller Module with onboard MC9S12C32 microcontroller Some experiments concentrated on aspects of assembly language and, as such, only required the use of a desktop (or laptop) computer installed with CodeWarrior and used the full chip simulator in which the computer simulated the microcontroller. Other experiments concentrated on hardware and required the use of the microcontroller and additional hardware. The Freescale Curriculum consisted of twelve experiments whose descriptions follow:
• Introduction to CodeWarrior Experiment This experiment introduced the student to the CodeWarrior IDE. The students were shown how to use the New Project Wizard which helps set up and collect all the files needed to program the
Page 13.774.6
microcontroller. The New Project Wizard allows student to concentrate on the basics of the learning the assembly instructions. Students are shown how to navigate the project files and how to edit and write a program. They are shown how to compile, link, and then debug the program by single stepping through it. They are shown how to examine the contents of memory locations and registers. They are then instructed to run an example program and answer questions about how different instructions affect program flow and modify the contents of memory locations and registers. This experiment is done in the simulator mode. • Using LEDs on the MPU Project Board-2 Experiment This experiment introduces the students to using the CSM12C32 Educational Module and the MPU Project Board-2. It uses the microcontroller input/output ports to control four LEDs and their respective drivers that are hard-wired on the MPU Project Board-2. The students are introduced to the data direction registers which allow the pins of the ports to be setup either as inputs or outputs.
• Digital Dice Experiment This experiment introduced the students to constructing their own circuits to be interfaced with the microcontroller. Seven LEDs are arranged in the appropriate pattern to show the pips on the dice. The LEDs are connected to the microcontroller port through inverter gates. A program is written that will make the dice roll by lighting up the LEDs in the appropriate pattern.
• Immediate and Extended Addressing Modes Experiment This experiment introduces the student to the use of the immediate and extended addressing modes in a basic program that stores ten numbers in memory, adds them up, and then stores the sum in memory. It also teaches students how to view memory contents in the CodeWarrior IDE in either binary, hexadecimal, or decimal format.
• Multiprecision Addition Experiment This experiment teaches student concepts of adding numbers and how to utilize the microcontroller carry bit. This is done by writing a program to add two 32-bit numbers together.
• Introduction to Loops Experiment By having the students write a program to add up the numbers from 2 to 16 and store the result, this experiment teaches them the concepts of loops. It also teaches students how to view memory contents in the CodeWarrior IDE in signed and unsigned decimal formats.
• Introduction to Directives Experiment This experiments demonstrates to students the use of assembler directives by writing a program that stores numbers in an arrays and then counts how many numbers are greater then a test value.
Page 13.774.7
• Stoplight Experiment
This experiment has the student connect six LEDs to the microcontroller to simulate two stoplights at an intersection. A program is written that will turn on the LEDs in the appropriate sequence for the two stoplights using AND, OR, bit set, and bit clear instructions.
• Stoplight II Experiment This experiment adds onto the Stoplight experiment. Students learn the concepts of subroutines by writing one that that will delay a specified number of seconds. This allows the stoplight to work automatically.
• Stoplight III Experiment This experiment adds onto the Stoplight II experiment. The program is modified so that the traffic light blinks yellow in one direction and red in the other when a pushbutton on the MPU Project Board-2 is pressed. Students learn how to setup and use the microcontroller ports as inputs.
• Multiplication Experiment Students write a program that will multiply two single byte unsigned numbers in two ways. The first way uses the multiply instruction. The second way uses the shift and add instructions to illustrate how a microcontroller performs multiplication.
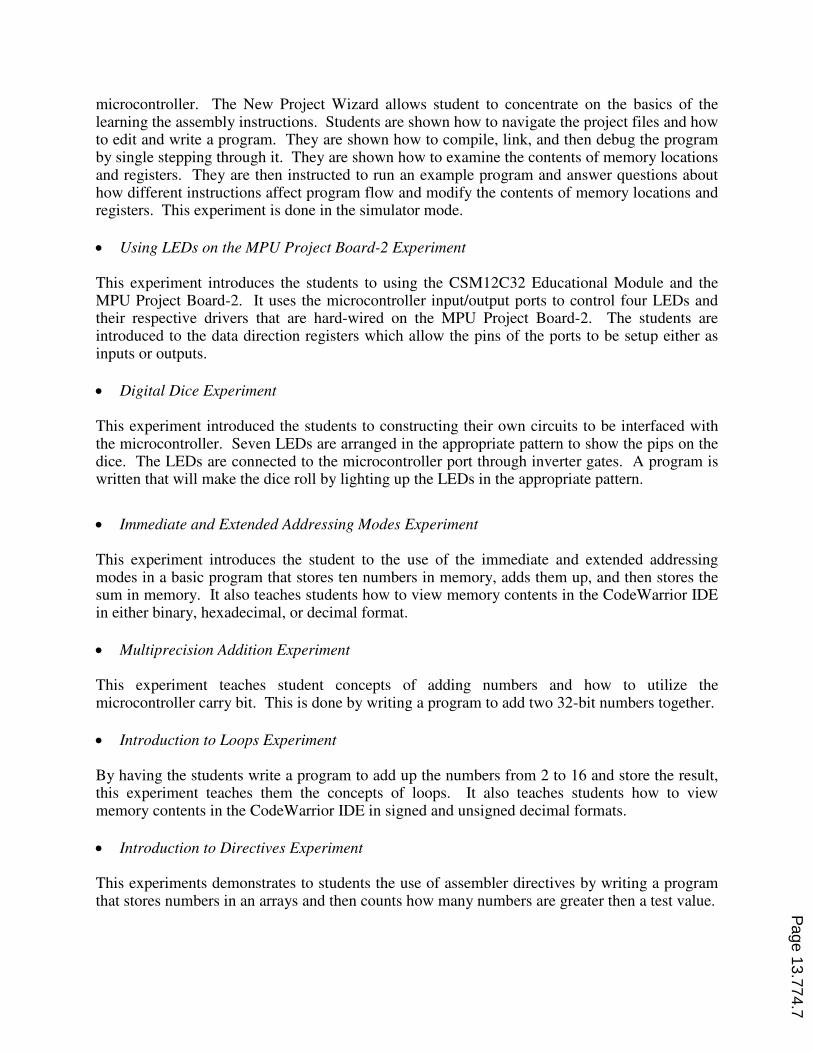
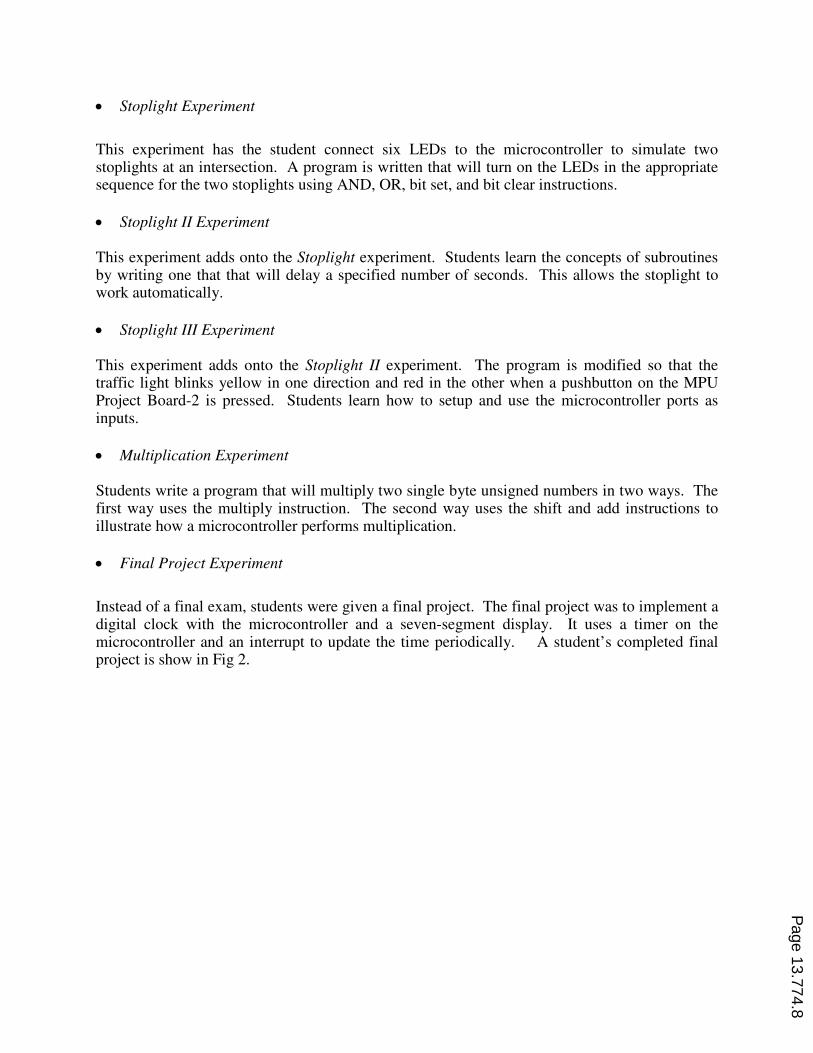
• Final Project Experiment
Instead of a final exam, students were given a final project. The final project was to implement a digital clock with the microcontroller and a seven-segment display. It uses a timer on the microcontroller and an interrupt to update the time periodically. A student’s completed final project is show in Fig 2.
Page 13.774.8
Fig 2. Interrupt driven digital clock display
V. Conclusion In two full years of instruction it has been found that the hardware and IDE suite has functioned well as a tool of instruction. The tool exhibits a high level of reliability. Judging from exam scores, laboratory reports and the ability of students to complete their work in the required time, the tool exhibits sufficient “user friendliness” for coursework and laboratory instruction. The microcontroller itself is extremely reliable. The CodeWarrior IDE suite is very reliable but since it is PC based, it can suffer from student generated “operator errors” such as those that can plague any work performed on a PC. There are a number of microcontroller features that we have not yet incorporated into our course, including the CAN interface feature. Program faculty are currently working with CAN standards devices in our industrial controls course, and future integration of the Freescale microcontroller into that coursework is a possibility. Further, Freescale tools have been used in graduate student work and faculty research work using non-coursework dedicated equipment. For these tasks, the analog-to-digital converter, SPI and SCI ports have been extremely useful. With future adjustments to the course content, or through the introduction of an advanced course, currently unused microcontroller capabilities may yet become a part of undergraduate instruction.
Page 13.774.9
Bibliography
1. Margush, T.S., Using an 8-BIT risc microcontroller in an assembly language programming course. Journal of Computing for Small College, Volume 22, No. 1, 2006. Issn 1937-4771, pp. 15-22, Consortium for Computing Sciences in Colleges USA.
2. Moslehpour, S., Keene, P., Eppes, T., Schuyler, P., Distance Computer Architecture Laboratory. 2005 ASEE Annual Conference & Exposition: The Changing Landscape of Engineering and Technology Education in a Global World; Portland, OR; USA; June 12-15, 2005, 7 pages.
3. Huang, Han-Way, The HCS12/9S12: An Introduction to Software & Hardware Interfacing, Thomson Delmar Learning, 2006.
4. Cady, Fredrick M., Software and Hardware Engineering: Assembly and C Programming for the Freescale HCS12 Microcontroller, Oxford University Press, 2007.
5. CPU12ReferenceManual, http://www.freescale.com/files/microcontrollers/doc/ref_manual/CPU12RM.pdf?fsrch=1
6. CPU12 Reference Guide, http://www.freescale.com/files/microcontrollers/doc/ref_manual/CPU12RG.pdf?fsrch=1
Page 13.774.10