Embed Size (px)
Citation preview
For ConnectWise Automate Versions 10.5 & above
Plugin Version 3.0.1622.68 and above
Doc Version 3.0.7
Integration for ConnectWise Automate
User Guide
Integration for ConnectWise Automate User Guide _________________________________________________________________________________________
Page 2 | © 2018 Webroot Inc. All rights reserved. | Proprietary and Confidential Information April 3, 2018
Table of Contents New Webroot users - Start here ......................................................................................................................... 4
When upgrading from plugin version 2.5 - Start here ......................................................................................... 4
Installation instructions for new Webroot users .................................................................................................. 5
Step 1 – Obtaining the plugin ......................................................................................................................... 5
Step 2 – Plugin settings .................................................................................................................................. 6
Step 3 – Assigning Clients to existing Webroot Sites ..................................................................................... 9
Step 4 – Creating new Webroot sites ........................................................................................................... 10
Step 5 – Activating Auto Deploy ................................................................................................................... 11
Step 6 – Plugin walkthrough ......................................................................................................................... 11
Upgrade instructions ......................................................................................................................................... 12
Step 1 – Upgrading from plugin version 2.5 ................................................................................................. 12
Step 2 – Obtaining the plugin ....................................................................................................................... 12
Step 3 – What happens after an upgrade from plugin version 2.5 ............................................................... 13
Step 4 – Plugin settings ................................................................................................................................ 14
Step 5 – Assigning Clients to existing Webroot Sites ................................................................................... 17
Step 6 – Creating new Webroot sites ........................................................................................................... 18
Step 7 – Activating auto deploy .................................................................................................................... 19
Plugin Walkthrough ........................................................................................................................................... 20
Dashboard ........................................................................................................................................................ 20
Overview ....................................................................................................................................................... 20
Clients ....................................................................................................................................................... 20
Computers in Webroot Clients .................................................................................................................. 21
Threats Detected (last 7 days) ................................................................................................................. 21
Webroot Agent Distribution ....................................................................................................................... 21
Clients ........................................................................................................................................................... 22
Webroot Site ............................................................................................................................................. 22
Webroot group .......................................................................................................................................... 23
Auto Deploy .............................................................................................................................................. 24
Enable Automate scans ............................................................................................................................ 24
Computers .................................................................................................................................................... 25
Send Agent Command ............................................................................................................................. 25
Deactivate and Uninstall (Coming soon) .................................................................................................. 26
Auto Deploy .............................................................................................................................................. 26
Automate scans ........................................................................................................................................ 26
Integration for ConnectWise Automate User Guide _________________________________________________________________________________________
Page 3 | © 2018 Webroot Inc. All rights reserved. | Proprietary and Confidential Information April 3, 2018
Locations ....................................................................................................................................................... 27
Auto Deploy .............................................................................................................................................. 27
Update Available ........................................................................................................................................... 28
GSM Portal ................................................................................................................................................... 29
Settings ......................................................................................................................................................... 29
Help ............................................................................................................................................................... 30
Computer Plugin Page ...................................................................................................................................... 31
System .......................................................................................................................................................... 31
Threat History ............................................................................................................................................... 31
Reports ............................................................................................................................................................. 31
Monitors ............................................................................................................................................................ 32
CW Automate Group ........................................................................................................................................ 33
Scripts ............................................................................................................................................................... 33
Database Tables ............................................................................................................................................... 34
Adding/Updating Plugin via Plugin Manager .................................................................................................... 35
Known issues .................................................................................................................................................... 37
Integration for ConnectWise Automate User Guide _________________________________________________________________________________________
Page 4 | © 2018 Webroot Inc. All rights reserved. | Proprietary and Confidential Information April 3, 2018
New Webroot users - Start here If you are new to Webroot or have not used a Webroot plugin before please follow the step by step Installation instructions for new Webroot users below. This manual assumes you have already purchased Webroot and have signed into the Webroot console. If you have not purchased Webroot, please contact your ConnectWise representative.
When upgrading from plugin version 2.5 - Start here Please allow yourself enough time for the upgrade and actions afterwards. Read and follow the step by step Upgrade instructions below.
Integration for ConnectWise Automate User Guide _________________________________________________________________________________________
Page 5 | © 2018 Webroot Inc. All rights reserved. | Proprietary and Confidential Information April 3, 2018
Installation instructions for new Webroot users
Step 1 – Obtaining the plugin
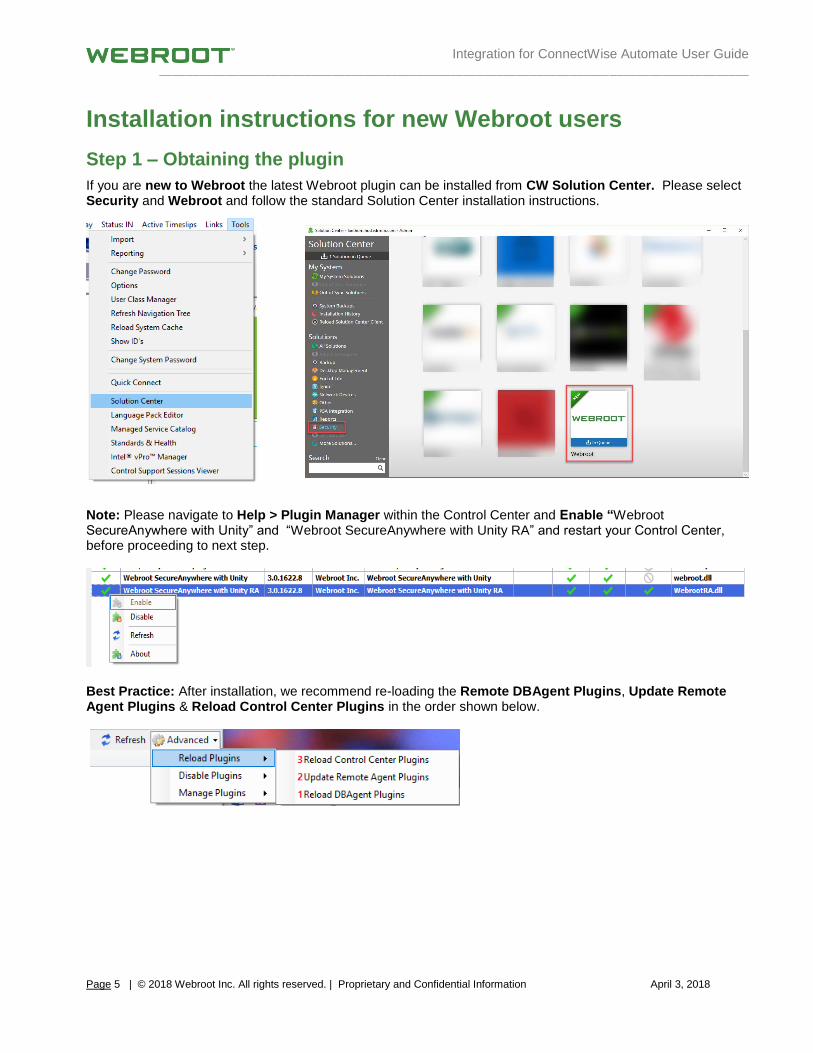
If you are new to Webroot the latest Webroot plugin can be installed from CW Solution Center. Please select Security and Webroot and follow the standard Solution Center installation instructions.
Note: Please navigate to Help > Plugin Manager within the Control Center and Enable “Webroot SecureAnywhere with Unity” and “Webroot SecureAnywhere with Unity RA” and restart your Control Center, before proceeding to next step.
Best Practice: After installation, we recommend re-loading the Remote DBAgent Plugins, Update Remote Agent Plugins & Reload Control Center Plugins in the order shown below.
Integration for ConnectWise Automate User Guide _________________________________________________________________________________________
Page 6 | © 2018 Webroot Inc. All rights reserved. | Proprietary and Confidential Information April 3, 2018
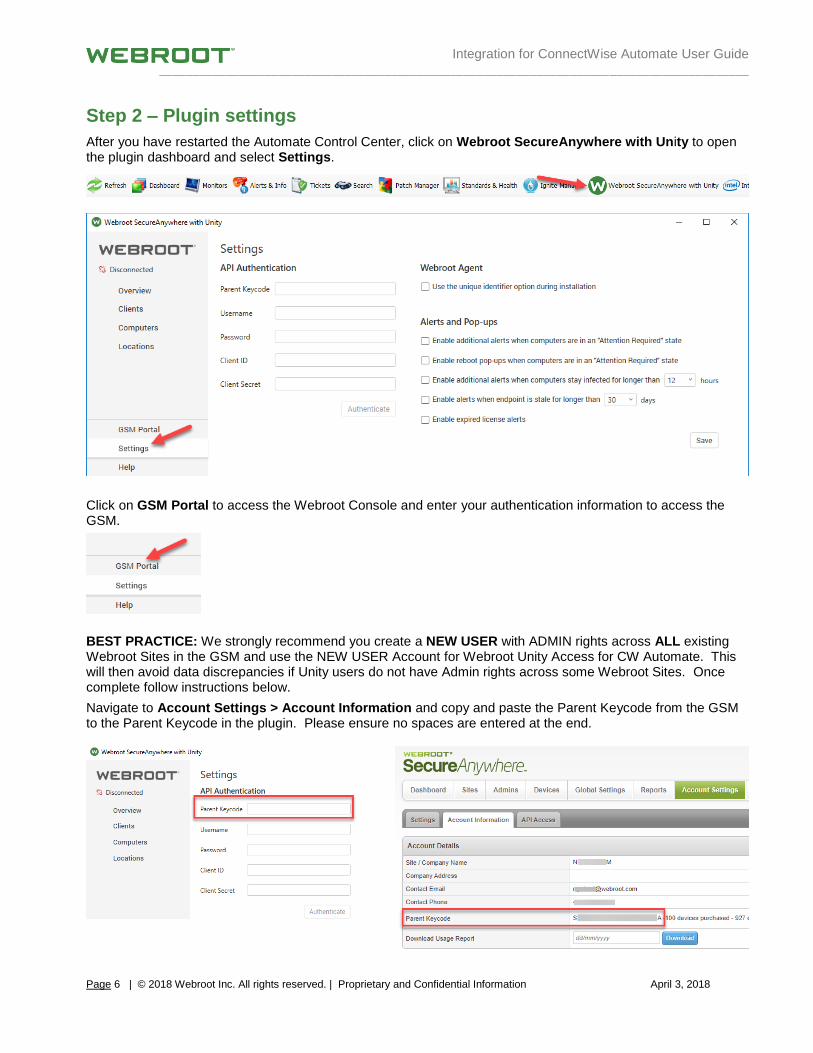
Step 2 – Plugin settings
After you have restarted the Automate Control Center, click on Webroot SecureAnywhere with Unity to open the plugin dashboard and select Settings.
Click on GSM Portal to access the Webroot Console and enter your authentication information to access the GSM.
BEST PRACTICE: We strongly recommend you create a NEW USER with ADMIN rights across ALL existing Webroot Sites in the GSM and use the NEW USER Account for Webroot Unity Access for CW Automate. This will then avoid data discrepancies if Unity users do not have Admin rights across some Webroot Sites. Once complete follow instructions below. Navigate to Account Settings > Account Information and copy and paste the Parent Keycode from the GSM to the Parent Keycode in the plugin. Please ensure no spaces are entered at the end.
Integration for ConnectWise Automate User Guide _________________________________________________________________________________________
Page 7 | © 2018 Webroot Inc. All rights reserved. | Proprietary and Confidential Information April 3, 2018
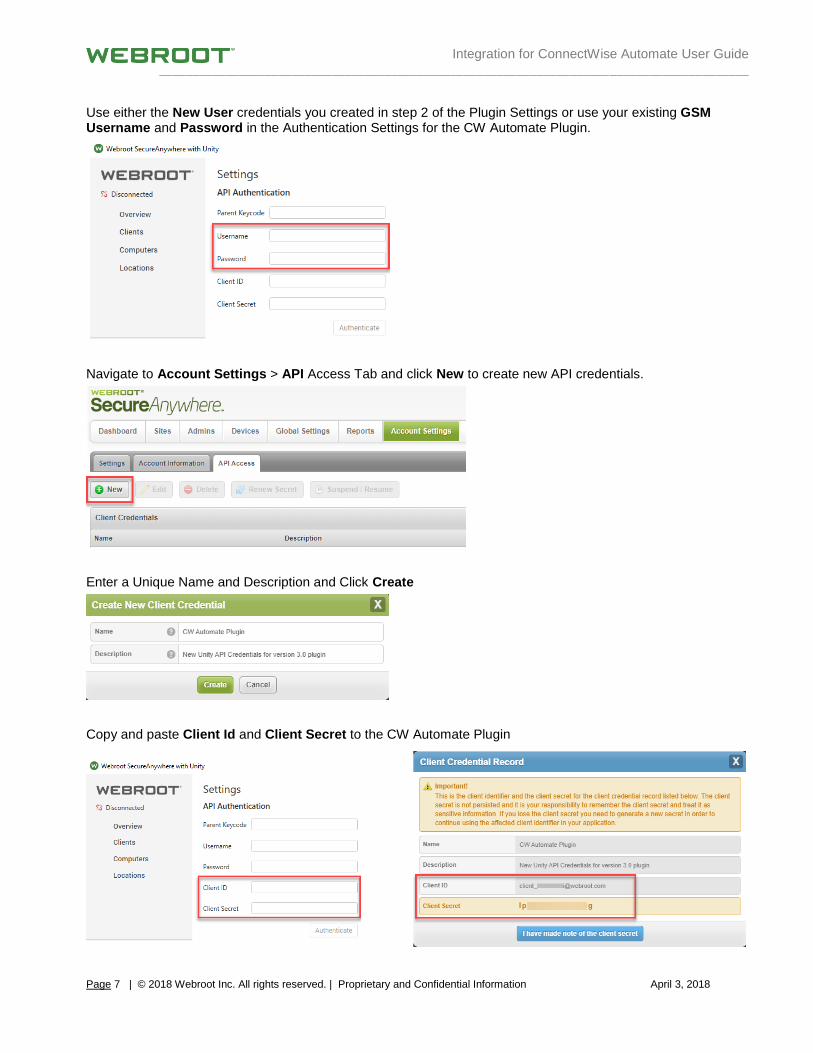
Use either the New User credentials you created in step 2 of the Plugin Settings or use your existing GSM Username and Password in the Authentication Settings for the CW Automate Plugin.
Navigate to Account Settings > API Access Tab and click New to create new API credentials.
Enter a Unique Name and Description and Click Create
Copy and paste Client Id and Client Secret to the CW Automate Plugin
Integration for ConnectWise Automate User Guide _________________________________________________________________________________________
Page 8 | © 2018 Webroot Inc. All rights reserved. | Proprietary and Confidential Information April 3, 2018
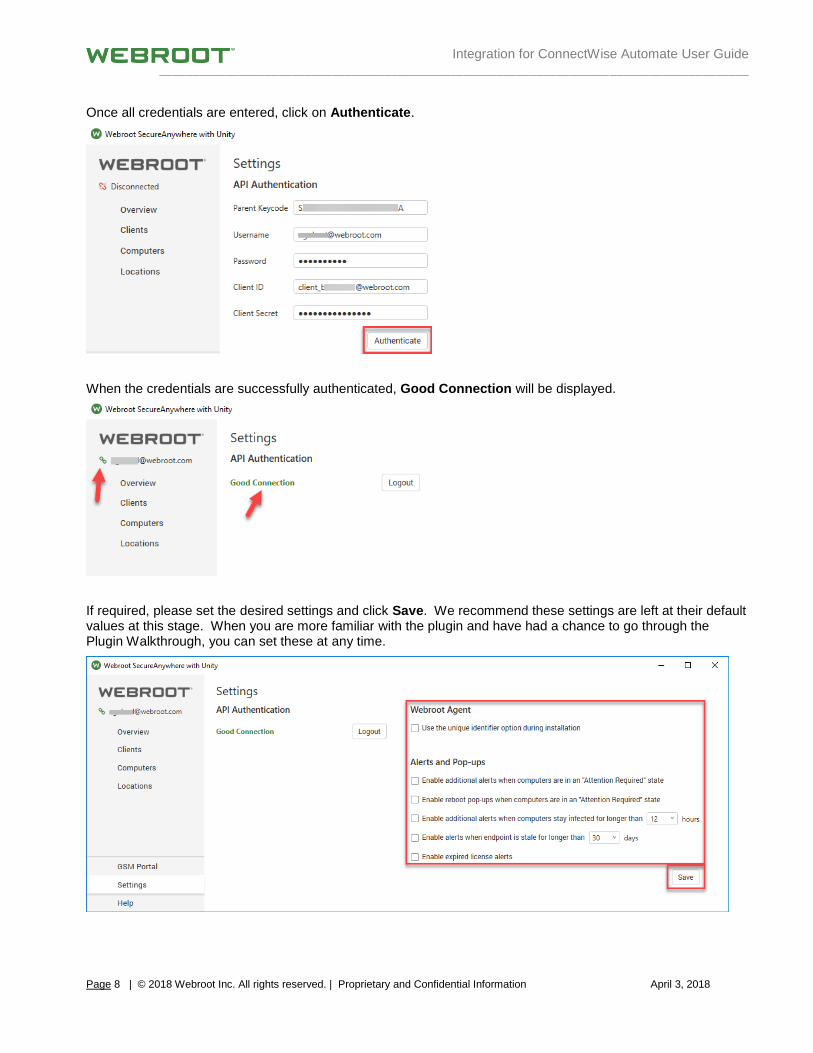
Once all credentials are entered, click on Authenticate.
When the credentials are successfully authenticated, Good Connection will be displayed.
If required, please set the desired settings and click Save. We recommend these settings are left at their default values at this stage. When you are more familiar with the plugin and have had a chance to go through the Plugin Walkthrough, you can set these at any time.

Integration for ConnectWise Automate User Guide _________________________________________________________________________________________
Page 9 | © 2018 Webroot Inc. All rights reserved. | Proprietary and Confidential Information April 3, 2018
Step 3 – Assigning Clients to existing Webroot Sites
If you have already created Sites in the Webroot Global Site Manager that match your Clients and there is a 1 to 1 relationship between CW Automate Clients & Webroot Sites, you must Assign Webroot Sites to Clients within the plugin. This will establish an API connection into GSM for each Site, pulling in correct data and enabling advanced functionality. Please take your time when assigning Clients to Sites, ensure the correct Clients are assigned to correct Sites. If you have not yet created Webroot Sites, please go to the next step. Click on Clients Right click on a specific Client Select Webroot site Select Assign Webroot site Use the drop down menu to assign the correct site (ensure keycode matches the imported key from previous version)
Integration for ConnectWise Automate User Guide _________________________________________________________________________________________
Page 10 | © 2018 Webroot Inc. All rights reserved. | Proprietary and Confidential Information April 3, 2018
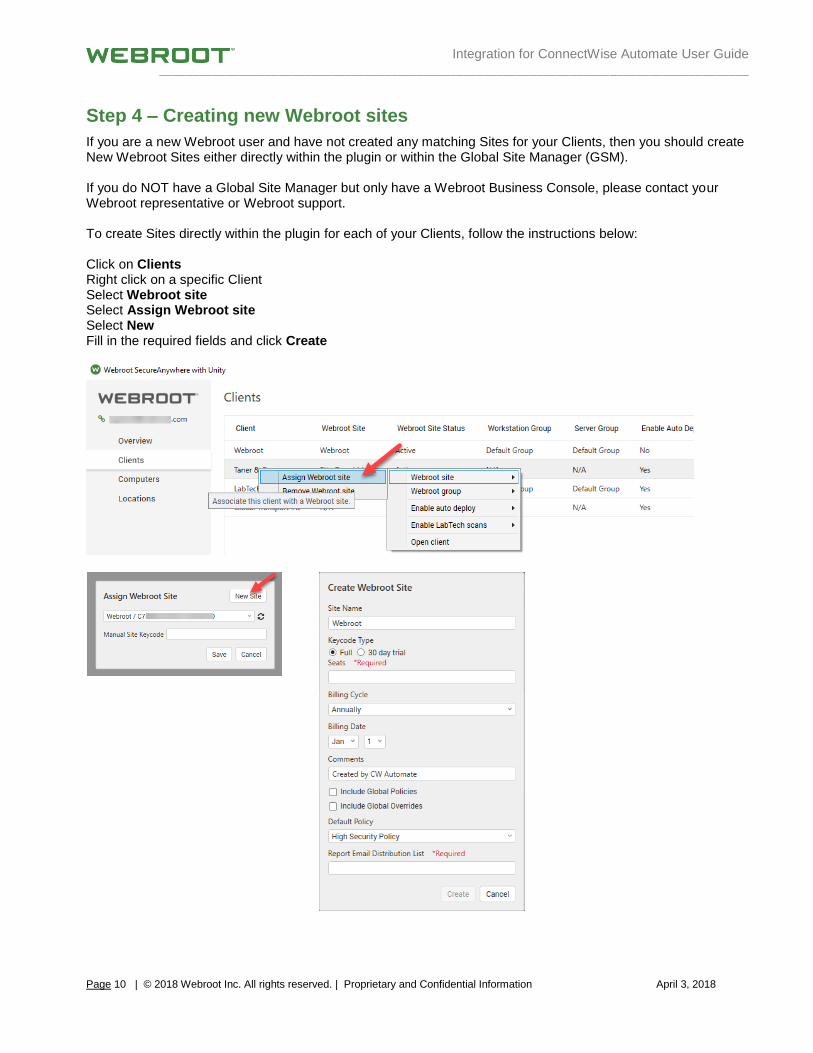
Step 4 – Creating new Webroot sites
If you are a new Webroot user and have not created any matching Sites for your Clients, then you should create New Webroot Sites either directly within the plugin or within the Global Site Manager (GSM). If you do NOT have a Global Site Manager but only have a Webroot Business Console, please contact your Webroot representative or Webroot support. To create Sites directly within the plugin for each of your Clients, follow the instructions below: Click on Clients Right click on a specific Client Select Webroot site Select Assign Webroot site Select New Fill in the required fields and click Create
Integration for ConnectWise Automate User Guide _________________________________________________________________________________________
Page 11 | © 2018 Webroot Inc. All rights reserved. | Proprietary and Confidential Information April 3, 2018
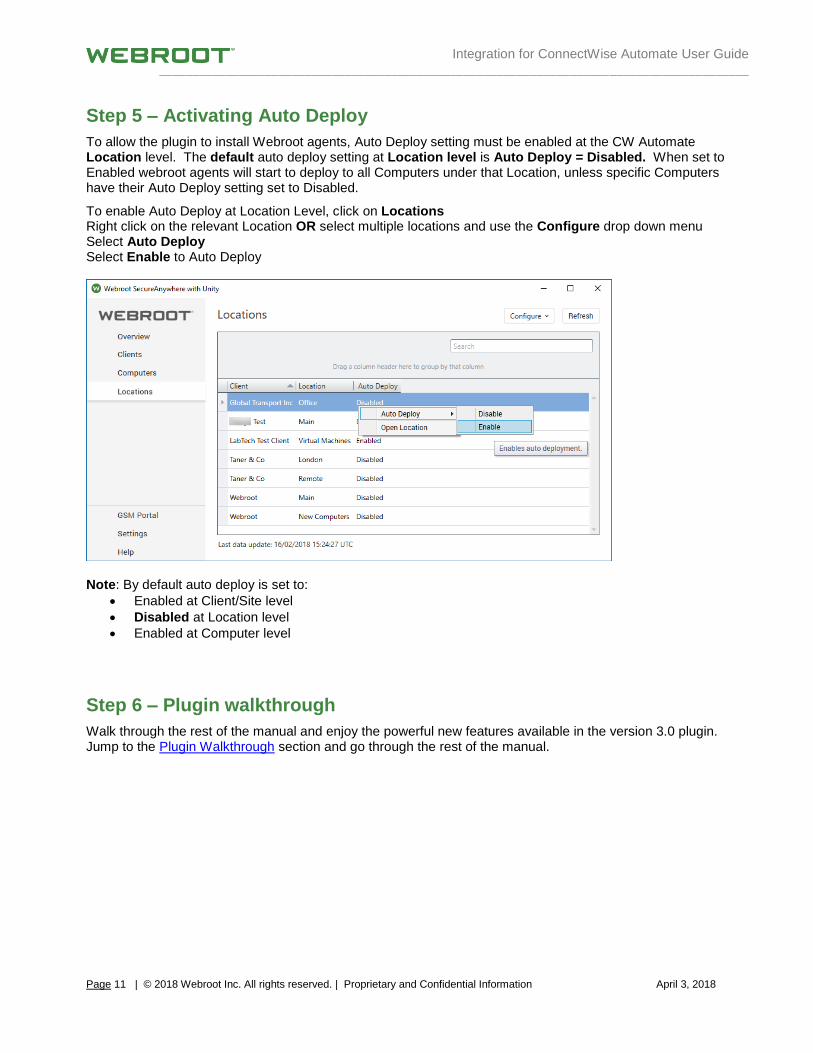
Step 5 – Activating Auto Deploy
To allow the plugin to install Webroot agents, Auto Deploy setting must be enabled at the CW Automate Location level. The default auto deploy setting at Location level is Auto Deploy = Disabled. When set to Enabled webroot agents will start to deploy to all Computers under that Location, unless specific Computers have their Auto Deploy setting set to Disabled.
To enable Auto Deploy at Location Level, click on Locations Right click on the relevant Location OR select multiple locations and use the Configure drop down menu Select Auto Deploy Select Enable to Auto Deploy
Note: By default auto deploy is set to:
• Enabled at Client/Site level
• Disabled at Location level
• Enabled at Computer level
Step 6 – Plugin walkthrough
Walk through the rest of the manual and enjoy the powerful new features available in the version 3.0 plugin. Jump to the Plugin Walkthrough section and go through the rest of the manual.
Integration for ConnectWise Automate User Guide _________________________________________________________________________________________
Page 12 | © 2018 Webroot Inc. All rights reserved. | Proprietary and Confidential Information April 3, 2018
Upgrade instructions
Step 1 – Upgrading from plugin version 2.5
Important: When upgrading from any previous version of the Webroot plugin to Version 3.x you MUST first upgrade your existing plugin to version 2.5.13 before attempting to upgrade to Version 3.x. Version 2.5.13 can be downloaded from the link below:
Version 2.5.x http://download.webroot.com/RMM/LabTech/Webroot-Deploy-Solution_v2-5.zip
Step 2 – Obtaining the plugin
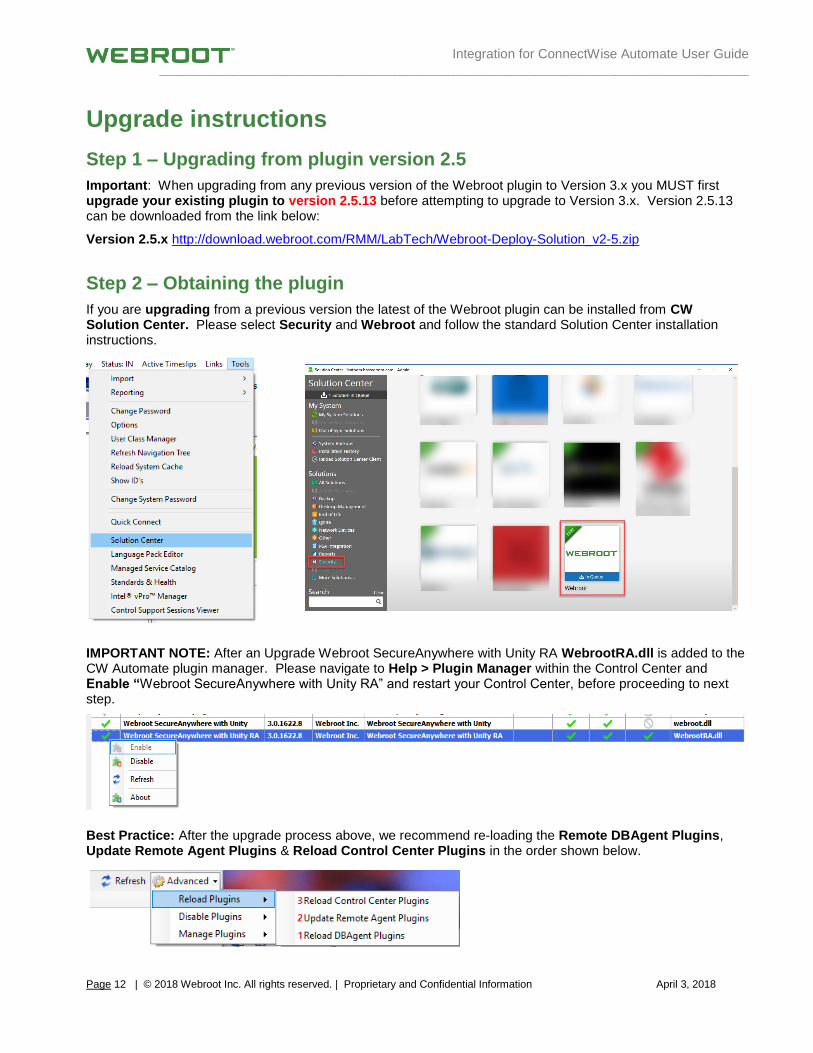
If you are upgrading from a previous version the latest of the Webroot plugin can be installed from CW Solution Center. Please select Security and Webroot and follow the standard Solution Center installation instructions.
IMPORTANT NOTE: After an Upgrade Webroot SecureAnywhere with Unity RA WebrootRA.dll is added to the CW Automate plugin manager. Please navigate to Help > Plugin Manager within the Control Center and Enable “Webroot SecureAnywhere with Unity RA” and restart your Control Center, before proceeding to next step.
Best Practice: After the upgrade process above, we recommend re-loading the Remote DBAgent Plugins, Update Remote Agent Plugins & Reload Control Center Plugins in the order shown below.
Integration for ConnectWise Automate User Guide _________________________________________________________________________________________
Page 13 | © 2018 Webroot Inc. All rights reserved. | Proprietary and Confidential Information April 3, 2018
Step 3 – What happens after an upgrade from plugin version 2.5
After an upgrade from plugin version 2.5.13 of the Webroot ConnectWise Automate (CWA) plugin you should expect the following:
1- Settings below are automatically transferred across
a. The Unique Identifier Setting
b. Alerts and pop-up settings
c. Auto-deploy and exceptions settings
d. Site keycodes without assignment Note: Automate Clients will require to be assigned to Webroot Sites for full Unity API functionality
2- The plugin core functionality such as auto-deployment of Webroot agents will operate but some portions will not show data and will be replaced by N/A and non-GSM until Automate Clients are assigned to Webroot Sites
Integration for ConnectWise Automate User Guide _________________________________________________________________________________________
Page 14 | © 2018 Webroot Inc. All rights reserved. | Proprietary and Confidential Information April 3, 2018
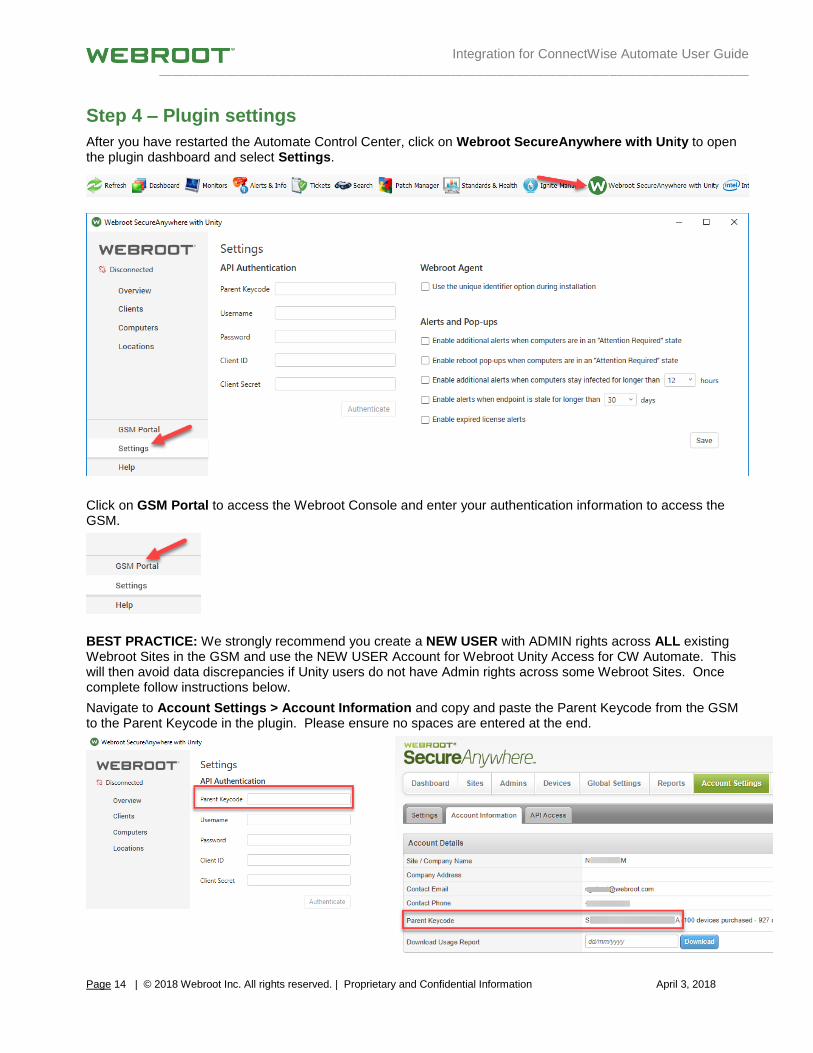
Step 4 – Plugin settings
After you have restarted the Automate Control Center, click on Webroot SecureAnywhere with Unity to open the plugin dashboard and select Settings.
Click on GSM Portal to access the Webroot Console and enter your authentication information to access the GSM.
BEST PRACTICE: We strongly recommend you create a NEW USER with ADMIN rights across ALL existing Webroot Sites in the GSM and use the NEW USER Account for Webroot Unity Access for CW Automate. This will then avoid data discrepancies if Unity users do not have Admin rights across some Webroot Sites. Once complete follow instructions below. Navigate to Account Settings > Account Information and copy and paste the Parent Keycode from the GSM to the Parent Keycode in the plugin. Please ensure no spaces are entered at the end.
Integration for ConnectWise Automate User Guide _________________________________________________________________________________________
Page 15 | © 2018 Webroot Inc. All rights reserved. | Proprietary and Confidential Information April 3, 2018
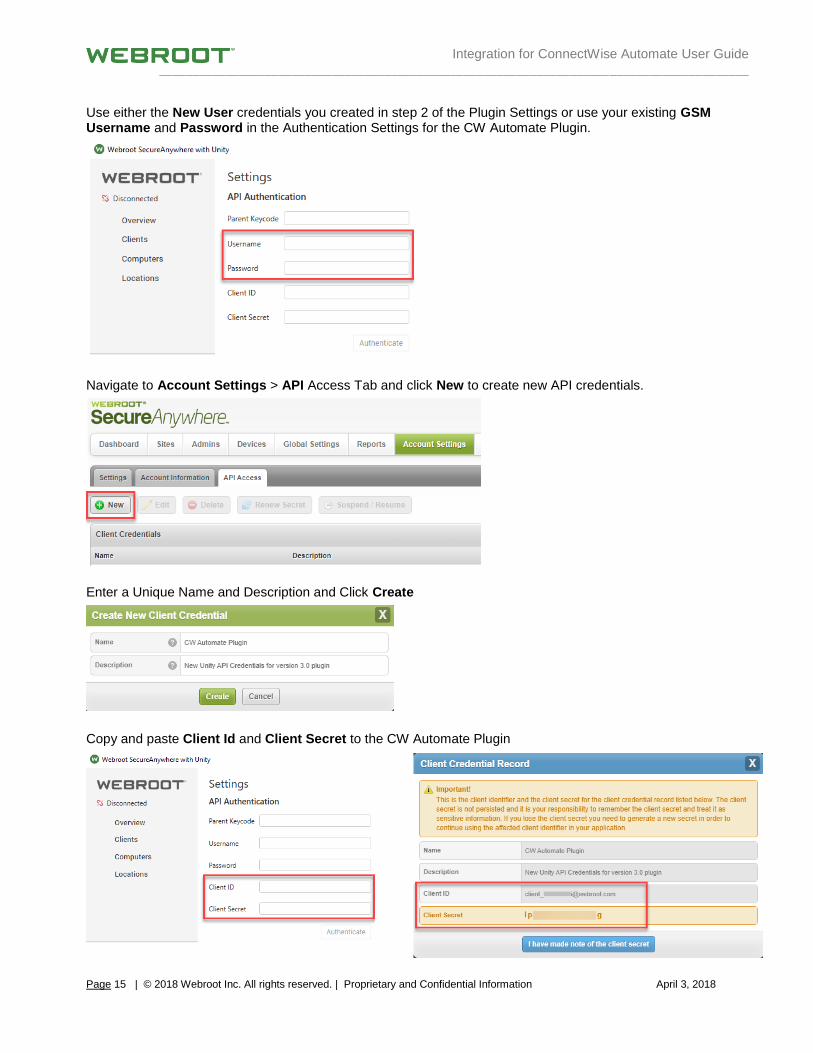
Use either the New User credentials you created in step 2 of the Plugin Settings or use your existing GSM Username and Password in the Authentication Settings for the CW Automate Plugin.
Navigate to Account Settings > API Access Tab and click New to create new API credentials.
Enter a Unique Name and Description and Click Create
Copy and paste Client Id and Client Secret to the CW Automate Plugin
Integration for ConnectWise Automate User Guide _________________________________________________________________________________________
Page 16 | © 2018 Webroot Inc. All rights reserved. | Proprietary and Confidential Information April 3, 2018
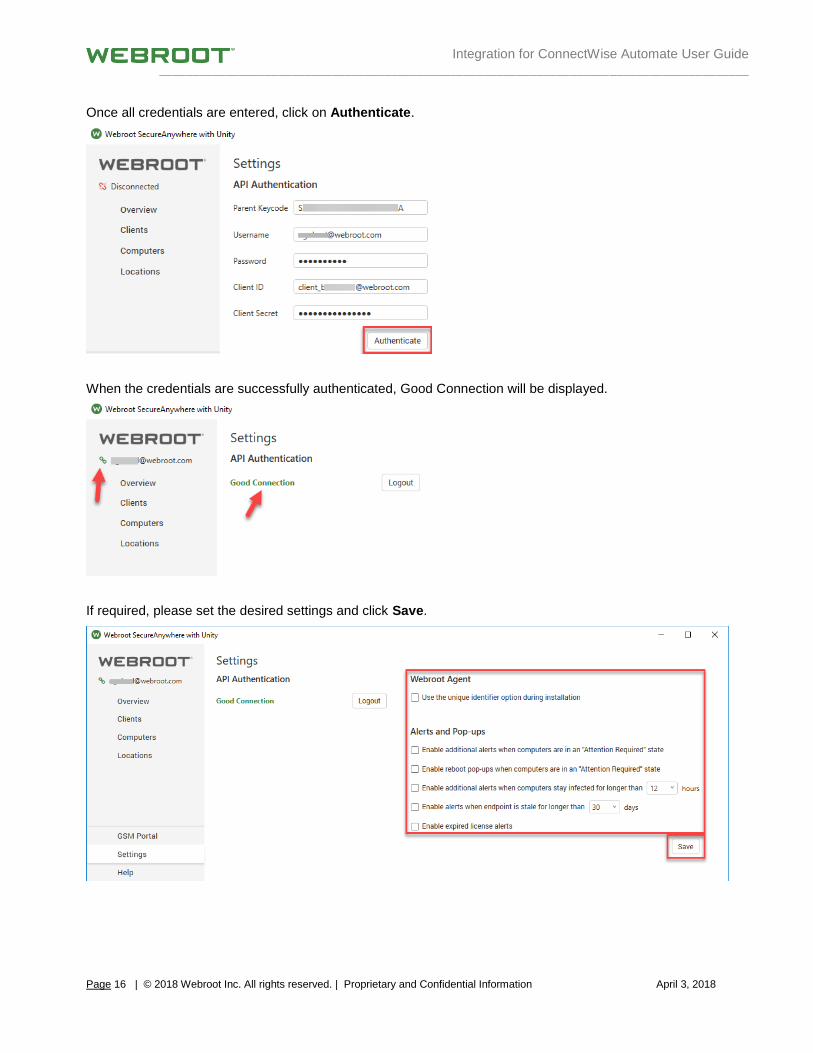
Once all credentials are entered, click on Authenticate.
When the credentials are successfully authenticated, Good Connection will be displayed.
If required, please set the desired settings and click Save.
Integration for ConnectWise Automate User Guide _________________________________________________________________________________________
Page 17 | © 2018 Webroot Inc. All rights reserved. | Proprietary and Confidential Information April 3, 2018
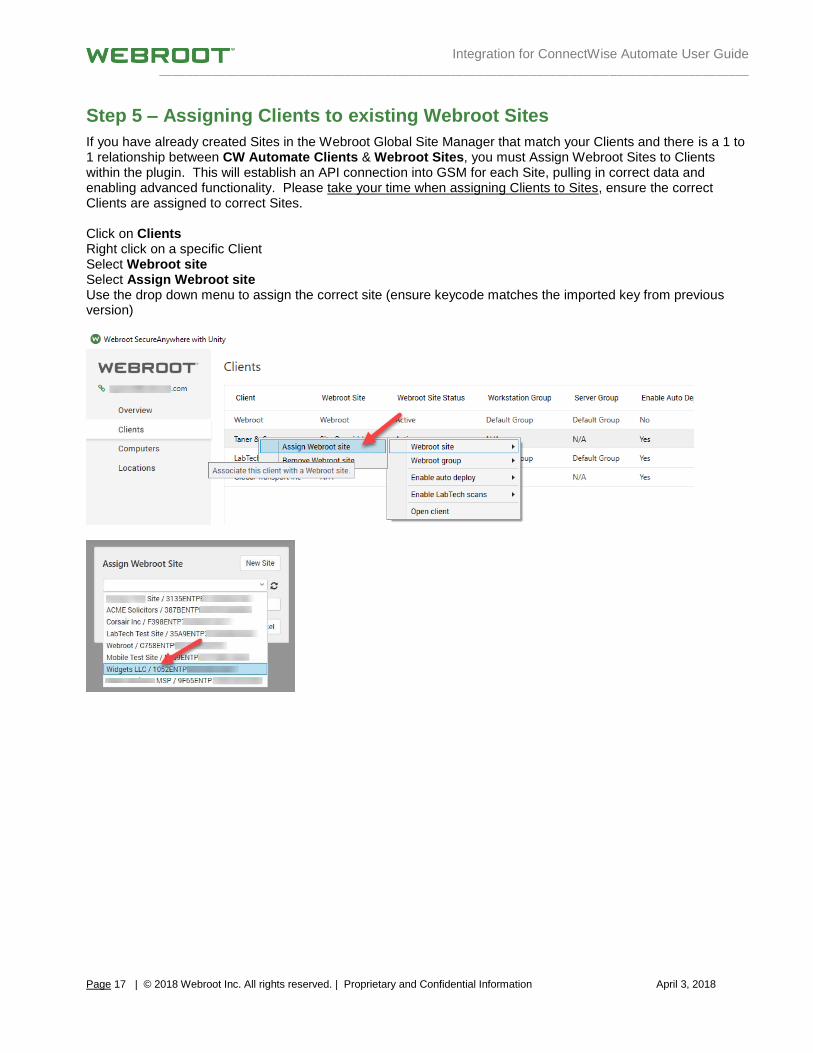
Step 5 – Assigning Clients to existing Webroot Sites
If you have already created Sites in the Webroot Global Site Manager that match your Clients and there is a 1 to 1 relationship between CW Automate Clients & Webroot Sites, you must Assign Webroot Sites to Clients within the plugin. This will establish an API connection into GSM for each Site, pulling in correct data and enabling advanced functionality. Please take your time when assigning Clients to Sites, ensure the correct Clients are assigned to correct Sites. Click on Clients Right click on a specific Client Select Webroot site Select Assign Webroot site Use the drop down menu to assign the correct site (ensure keycode matches the imported key from previous version)

Integration for ConnectWise Automate User Guide _________________________________________________________________________________________
Page 18 | © 2018 Webroot Inc. All rights reserved. | Proprietary and Confidential Information April 3, 2018
Step 6 – Creating new Webroot sites
If you are mapping Webroot Groups to Clients then you must create New Webroot Sites either directly within the plugin or within the Global Site Manager (GSM) and move the endpoints to the new Webroot Sites via Change Keycode command in the Webroot console. If you do NOT have a Global Site Manager but only have a Webroot Business Console, please contact your Webroot representative or support. To create Sites directly within the plugin, follow the instructions below: Click on Clients Right click on a specific Client Select Webroot site Select Assign Webroot site Select New Fill in required fields and click Create
Integration for ConnectWise Automate User Guide _________________________________________________________________________________________
Page 19 | © 2018 Webroot Inc. All rights reserved. | Proprietary and Confidential Information April 3, 2018
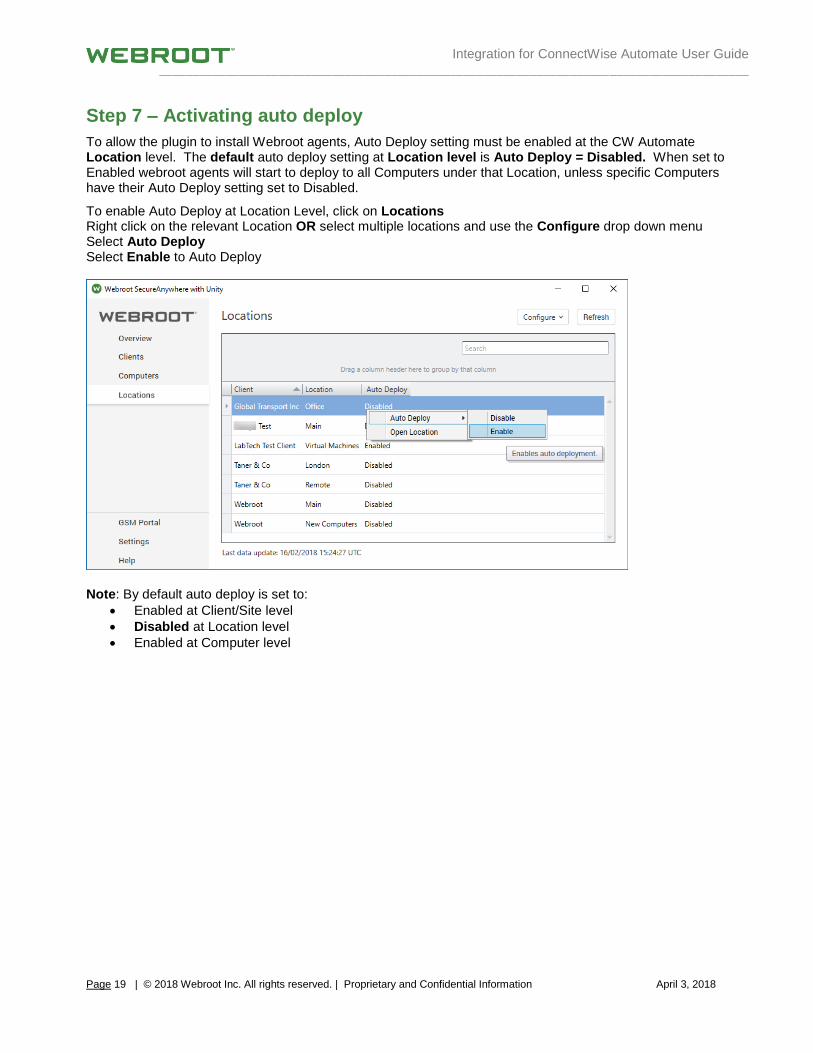
Step 7 – Activating auto deploy
To allow the plugin to install Webroot agents, Auto Deploy setting must be enabled at the CW Automate Location level. The default auto deploy setting at Location level is Auto Deploy = Disabled. When set to Enabled webroot agents will start to deploy to all Computers under that Location, unless specific Computers have their Auto Deploy setting set to Disabled.
To enable Auto Deploy at Location Level, click on Locations Right click on the relevant Location OR select multiple locations and use the Configure drop down menu Select Auto Deploy Select Enable to Auto Deploy
Note: By default auto deploy is set to:
• Enabled at Client/Site level
• Disabled at Location level
• Enabled at Computer level
Integration for ConnectWise Automate User Guide _________________________________________________________________________________________
Page 20 | © 2018 Webroot Inc. All rights reserved. | Proprietary and Confidential Information April 3, 2018
Plugin Walkthrough Webroot plugin version 3.0 is our most advanced plugin to date and makes use of the Webroot Unity API, unleashing more features then previously possible. But we have not just taken the old plugin and added new features, instead we have completely rethought the user experience and built a plugin that is designed to be far more efficient to use on a daily basis. The plugin walkthrough will take you through the features available.
Note: This plugin is compatible with CW Automate v10.5 and above.
Note: This plugin does include a separate Remote Agent plugin dll and should be noted when adding the plugin via the Plugin Manager.
Dashboard The dashboard contains everything needed to configure and use the plugin including all options for clients, computers, locations, plugin settings and help links. The client, computer and location pages all contain right click options which are also available in the upper right as Configure and Action options. There are also various filters in the upper right hand corner to help quickly view only the data desired.
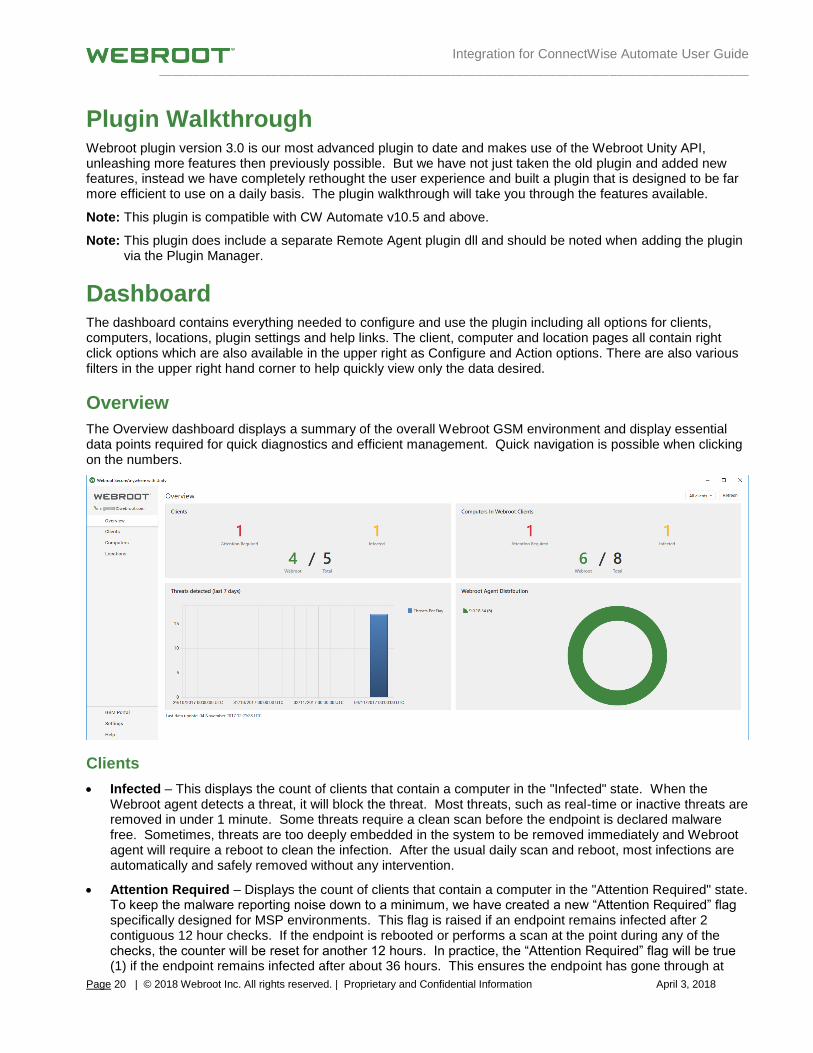
Overview
The Overview dashboard displays a summary of the overall Webroot GSM environment and display essential data points required for quick diagnostics and efficient management. Quick navigation is possible when clicking on the numbers.
Clients
• Infected – This displays the count of clients that contain a computer in the "Infected" state. When the Webroot agent detects a threat, it will block the threat. Most threats, such as real-time or inactive threats are removed in under 1 minute. Some threats require a clean scan before the endpoint is declared malware free. Sometimes, threats are too deeply embedded in the system to be removed immediately and Webroot agent will require a reboot to clean the infection. After the usual daily scan and reboot, most infections are automatically and safely removed without any intervention.
• Attention Required – Displays the count of clients that contain a computer in the "Attention Required" state. To keep the malware reporting noise down to a minimum, we have created a new “Attention Required” flag specifically designed for MSP environments. This flag is raised if an endpoint remains infected after 2 contiguous 12 hour checks. If the endpoint is rebooted or performs a scan at the point during any of the checks, the counter will be reset for another 12 hours. In practice, the “Attention Required” flag will be true (1) if the endpoint remains infected after about 36 hours. This ensures the endpoint has gone through at
Integration for ConnectWise Automate User Guide _________________________________________________________________________________________
Page 21 | © 2018 Webroot Inc. All rights reserved. | Proprietary and Confidential Information April 3, 2018
least 1 reboot/scan cycle before raising the “Attention Required” flag. You can choose to take either manual or automatic action if you wish, such as initiating another scan or to inform the end user to reboot. Some actions such as running a reboot request for the user may be automated. See Settings Section.
Important Note: The “Attention Required” flag is distinctly different than the “Needs Attention” state in the Webroot Console, which is set as soon as an infection is detected. Each indicator works independently.
• Webroot – This displays the count of clients that are assigned to a Webroot site (has a Webroot site key).
• Total – This displays the total count of Automate clients.
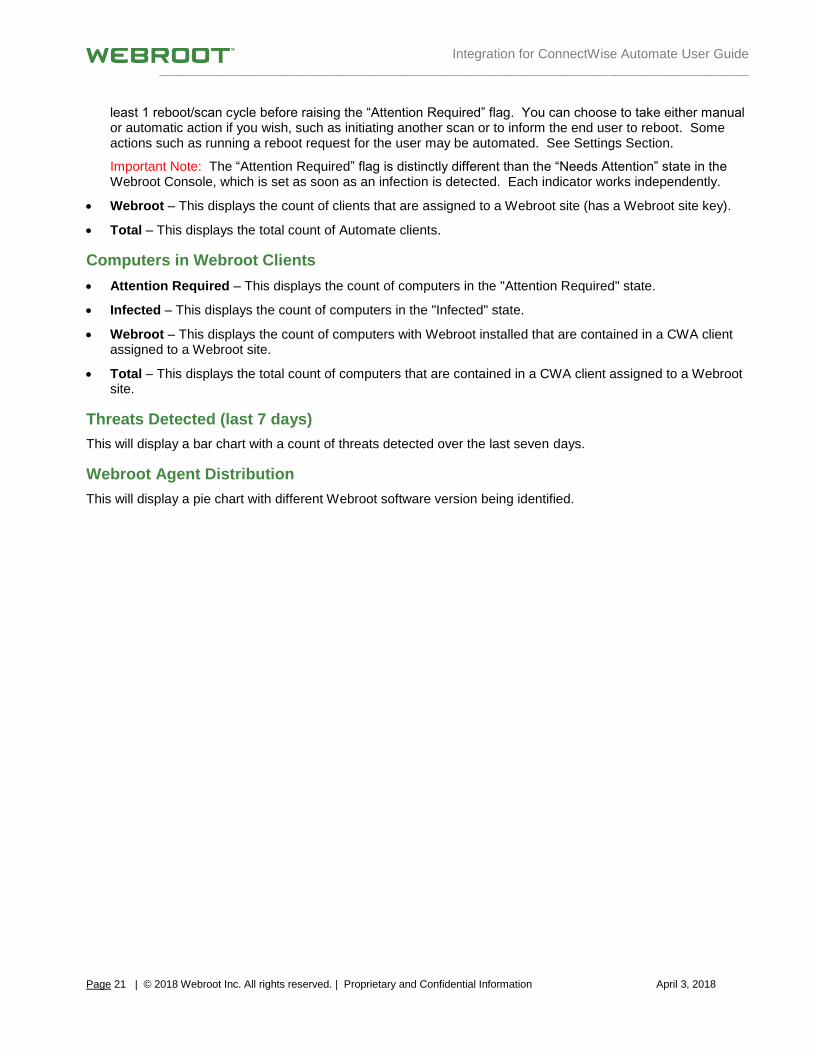
Computers in Webroot Clients
• Attention Required – This displays the count of computers in the "Attention Required" state.
• Infected – This displays the count of computers in the "Infected" state.
• Webroot – This displays the count of computers with Webroot installed that are contained in a CWA client assigned to a Webroot site.
• Total – This displays the total count of computers that are contained in a CWA client assigned to a Webroot site.
Threats Detected (last 7 days)
This will display a bar chart with a count of threats detected over the last seven days.
Webroot Agent Distribution
This will display a pie chart with different Webroot software version being identified.
Integration for ConnectWise Automate User Guide _________________________________________________________________________________________
Page 22 | © 2018 Webroot Inc. All rights reserved. | Proprietary and Confidential Information April 3, 2018
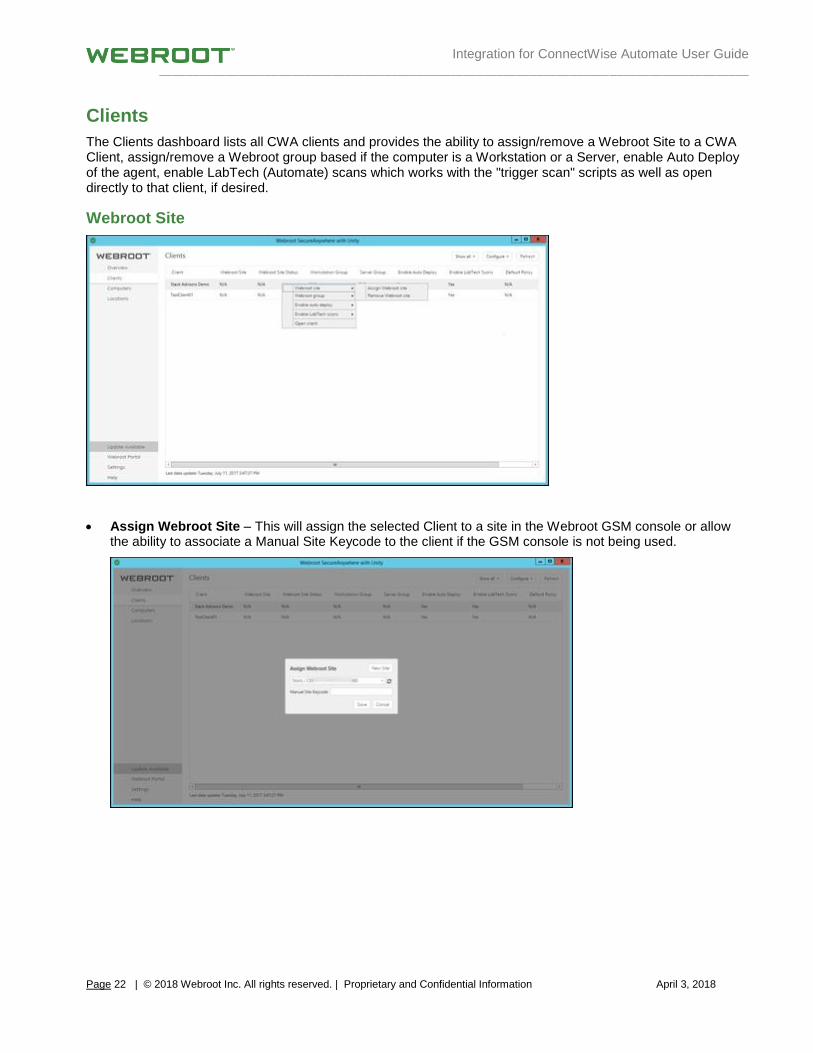
Clients
The Clients dashboard lists all CWA clients and provides the ability to assign/remove a Webroot Site to a CWA Client, assign/remove a Webroot group based if the computer is a Workstation or a Server, enable Auto Deploy of the agent, enable LabTech (Automate) scans which works with the "trigger scan" scripts as well as open directly to that client, if desired.
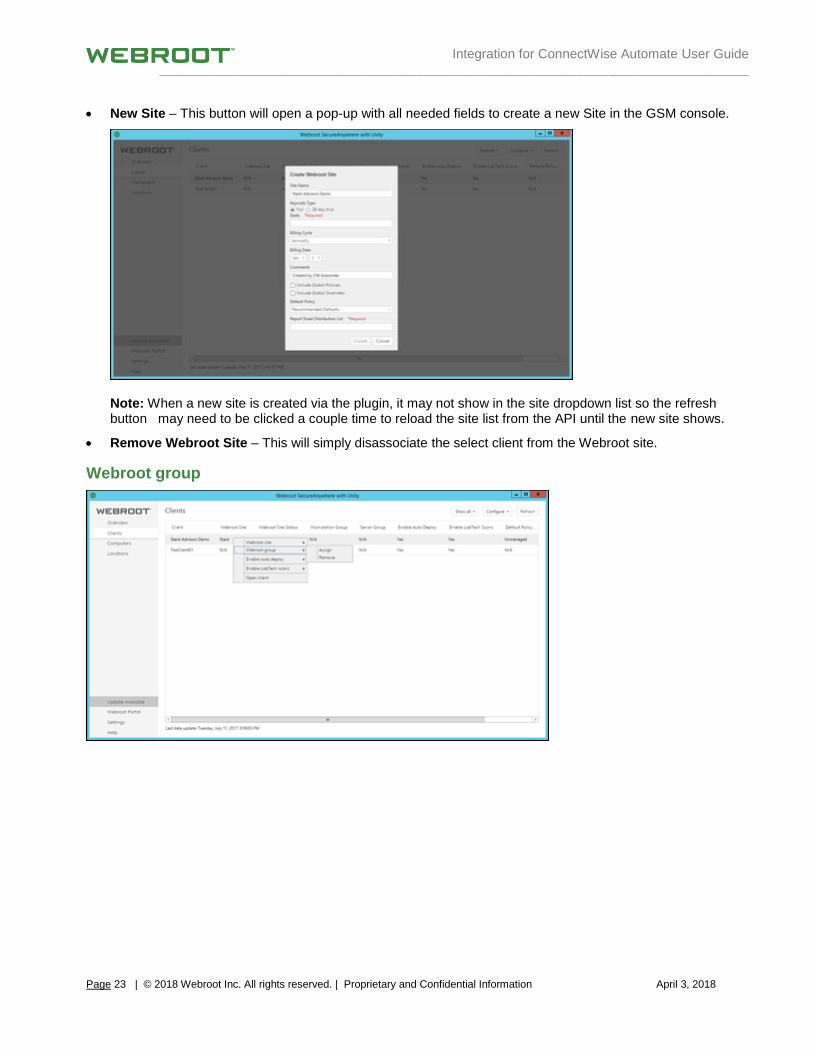
Webroot Site
• Assign Webroot Site – This will assign the selected Client to a site in the Webroot GSM console or allow the ability to associate a Manual Site Keycode to the client if the GSM console is not being used.
Integration for ConnectWise Automate User Guide _________________________________________________________________________________________
Page 23 | © 2018 Webroot Inc. All rights reserved. | Proprietary and Confidential Information April 3, 2018
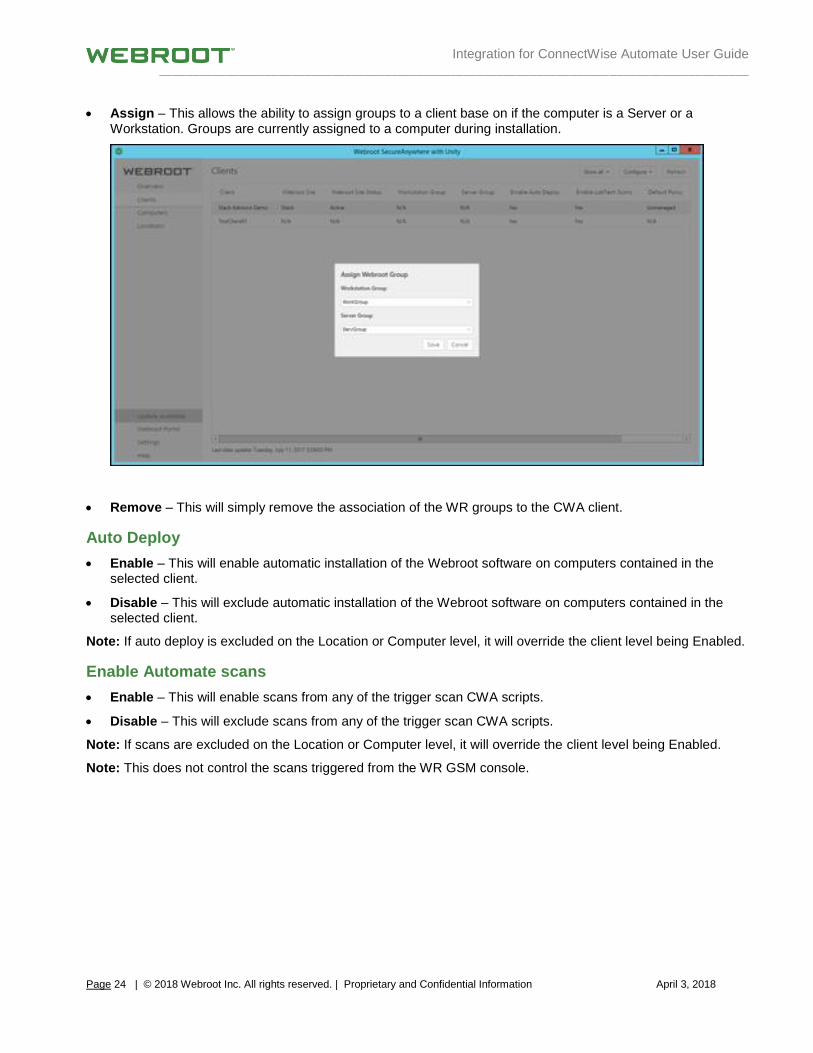
• New Site – This button will open a pop-up with all needed fields to create a new Site in the GSM console.
Note: When a new site is created via the plugin, it may not show in the site dropdown list so the refresh button may need to be clicked a couple time to reload the site list from the API until the new site shows.
• Remove Webroot Site – This will simply disassociate the select client from the Webroot site.
Webroot group
Integration for ConnectWise Automate User Guide _________________________________________________________________________________________
Page 24 | © 2018 Webroot Inc. All rights reserved. | Proprietary and Confidential Information April 3, 2018
• Assign – This allows the ability to assign groups to a client base on if the computer is a Server or a Workstation. Groups are currently assigned to a computer during installation.
• Remove – This will simply remove the association of the WR groups to the CWA client.
Auto Deploy
• Enable – This will enable automatic installation of the Webroot software on computers contained in the selected client.
• Disable – This will exclude automatic installation of the Webroot software on computers contained in the selected client.
Note: If auto deploy is excluded on the Location or Computer level, it will override the client level being Enabled.
Enable Automate scans
• Enable – This will enable scans from any of the trigger scan CWA scripts.
• Disable – This will exclude scans from any of the trigger scan CWA scripts.
Note: If scans are excluded on the Location or Computer level, it will override the client level being Enabled.
Note: This does not control the scans triggered from the WR GSM console.
Integration for ConnectWise Automate User Guide _________________________________________________________________________________________
Page 25 | © 2018 Webroot Inc. All rights reserved. | Proprietary and Confidential Information April 3, 2018
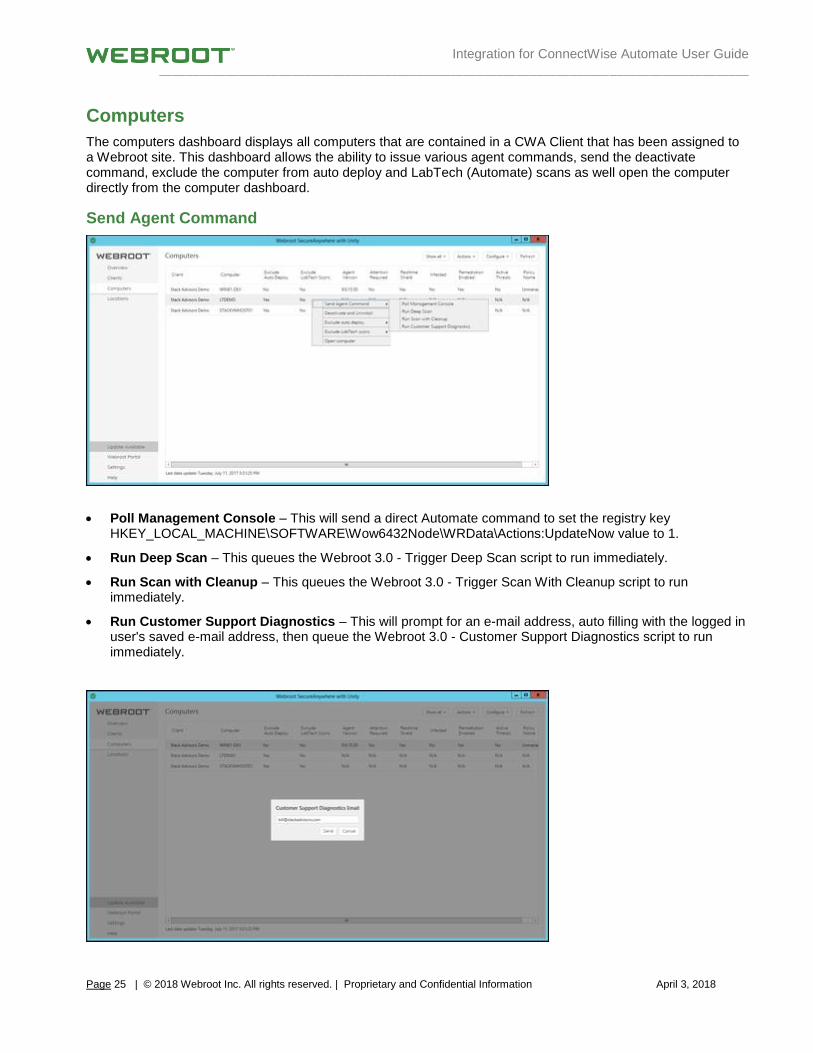
Computers
The computers dashboard displays all computers that are contained in a CWA Client that has been assigned to a Webroot site. This dashboard allows the ability to issue various agent commands, send the deactivate command, exclude the computer from auto deploy and LabTech (Automate) scans as well open the computer directly from the computer dashboard.
Send Agent Command
• Poll Management Console – This will send a direct Automate command to set the registry key HKEY_LOCAL_MACHINE\SOFTWARE\Wow6432Node\WRData\Actions:UpdateNow value to 1.
• Run Deep Scan – This queues the Webroot 3.0 - Trigger Deep Scan script to run immediately.
• Run Scan with Cleanup – This queues the Webroot 3.0 - Trigger Scan With Cleanup script to run immediately.
• Run Customer Support Diagnostics – This will prompt for an e-mail address, auto filling with the logged in user's saved e-mail address, then queue the Webroot 3.0 - Customer Support Diagnostics script to run immediately.
Integration for ConnectWise Automate User Guide _________________________________________________________________________________________
Page 26 | © 2018 Webroot Inc. All rights reserved. | Proprietary and Confidential Information April 3, 2018
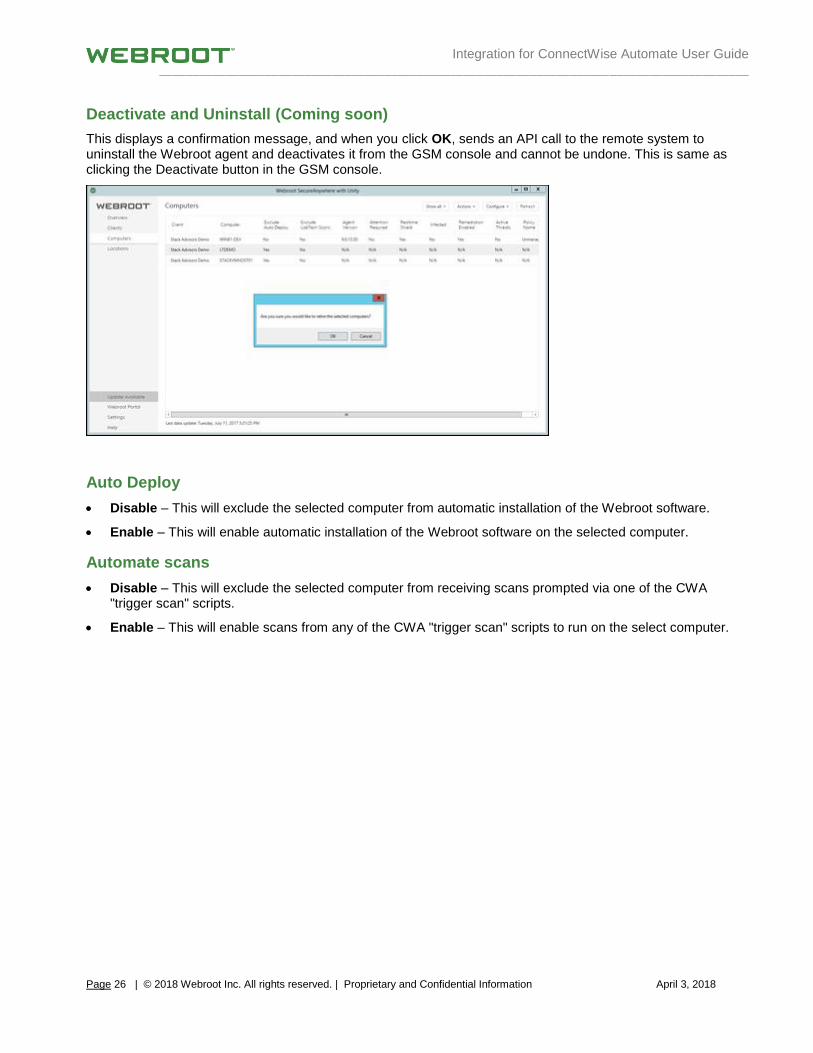
Deactivate and Uninstall (Coming soon)
This displays a confirmation message, and when you click OK, sends an API call to the remote system to uninstall the Webroot agent and deactivates it from the GSM console and cannot be undone. This is same as clicking the Deactivate button in the GSM console.
Auto Deploy
• Disable – This will exclude the selected computer from automatic installation of the Webroot software.
• Enable – This will enable automatic installation of the Webroot software on the selected computer.
Automate scans
• Disable – This will exclude the selected computer from receiving scans prompted via one of the CWA "trigger scan" scripts.
• Enable – This will enable scans from any of the CWA "trigger scan" scripts to run on the select computer.
Integration for ConnectWise Automate User Guide _________________________________________________________________________________________
Page 27 | © 2018 Webroot Inc. All rights reserved. | Proprietary and Confidential Information April 3, 2018
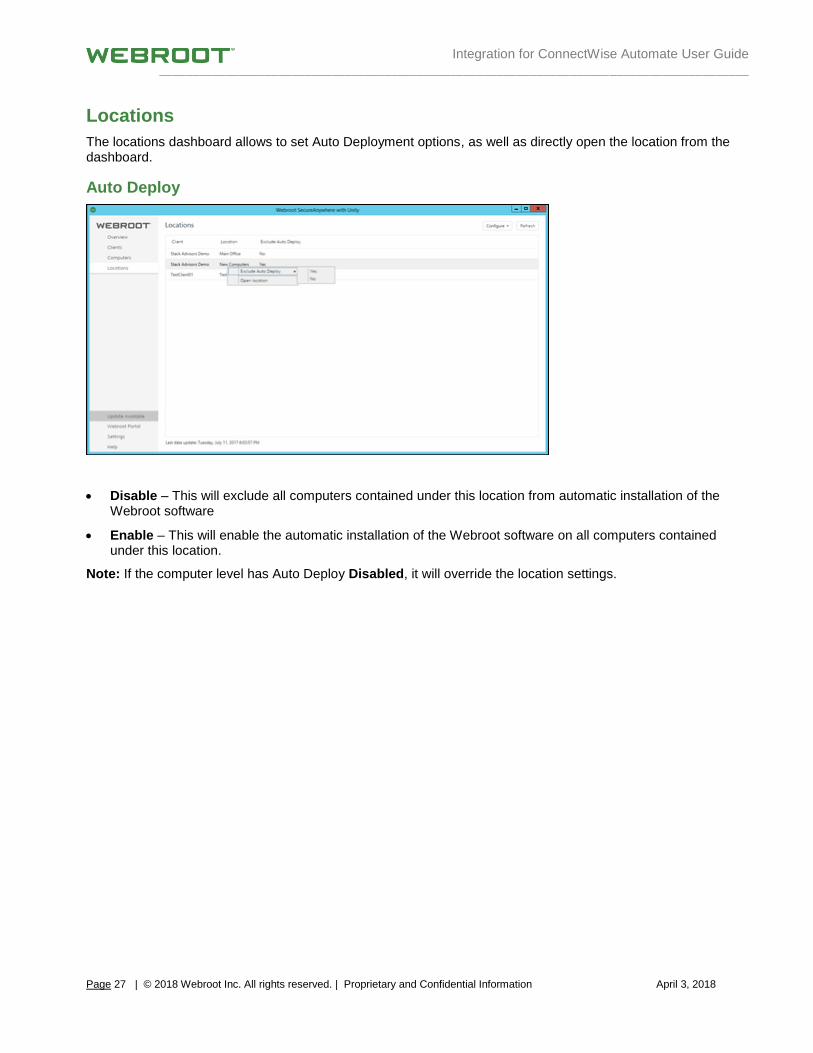
Locations
The locations dashboard allows to set Auto Deployment options, as well as directly open the location from the dashboard.
Auto Deploy
• Disable – This will exclude all computers contained under this location from automatic installation of the Webroot software
• Enable – This will enable the automatic installation of the Webroot software on all computers contained under this location.
Note: If the computer level has Auto Deploy Disabled, it will override the location settings.
Integration for ConnectWise Automate User Guide _________________________________________________________________________________________
Page 28 | © 2018 Webroot Inc. All rights reserved. | Proprietary and Confidential Information April 3, 2018
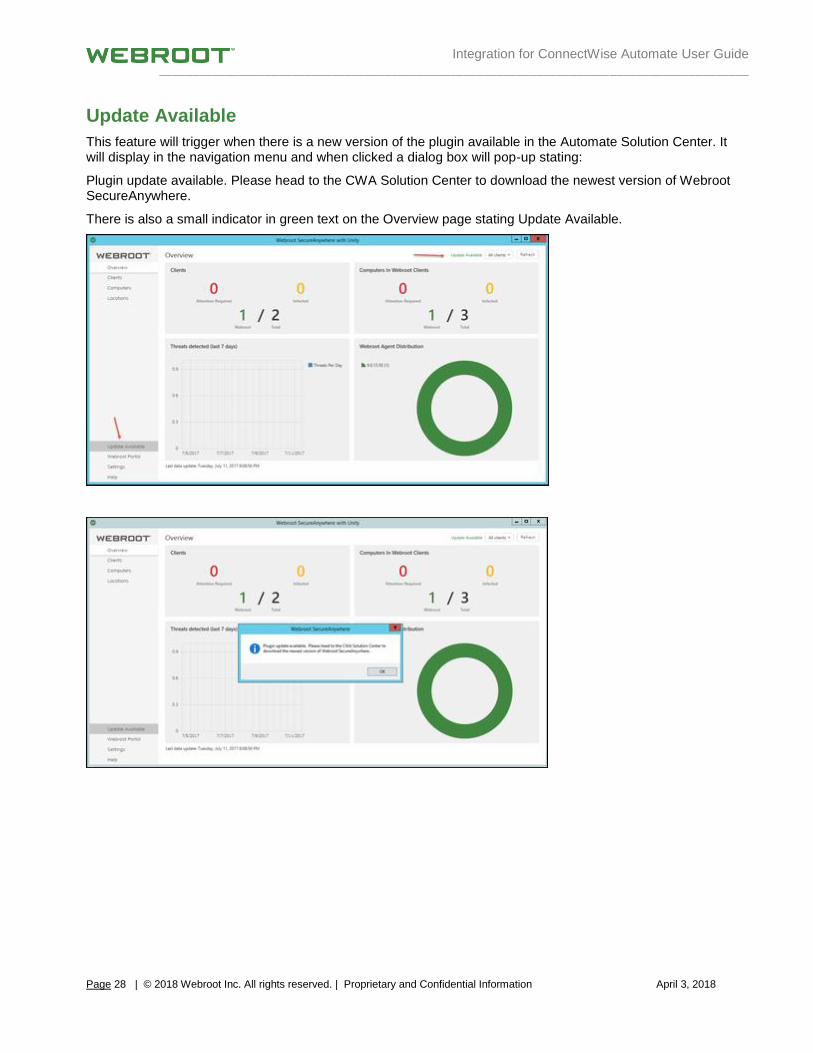
Update Available
This feature will trigger when there is a new version of the plugin available in the Automate Solution Center. It will display in the navigation menu and when clicked a dialog box will pop-up stating:
Plugin update available. Please head to the CWA Solution Center to download the newest version of Webroot SecureAnywhere.
There is also a small indicator in green text on the Overview page stating Update Available.
Integration for ConnectWise Automate User Guide _________________________________________________________________________________________
Page 29 | © 2018 Webroot Inc. All rights reserved. | Proprietary and Confidential Information April 3, 2018
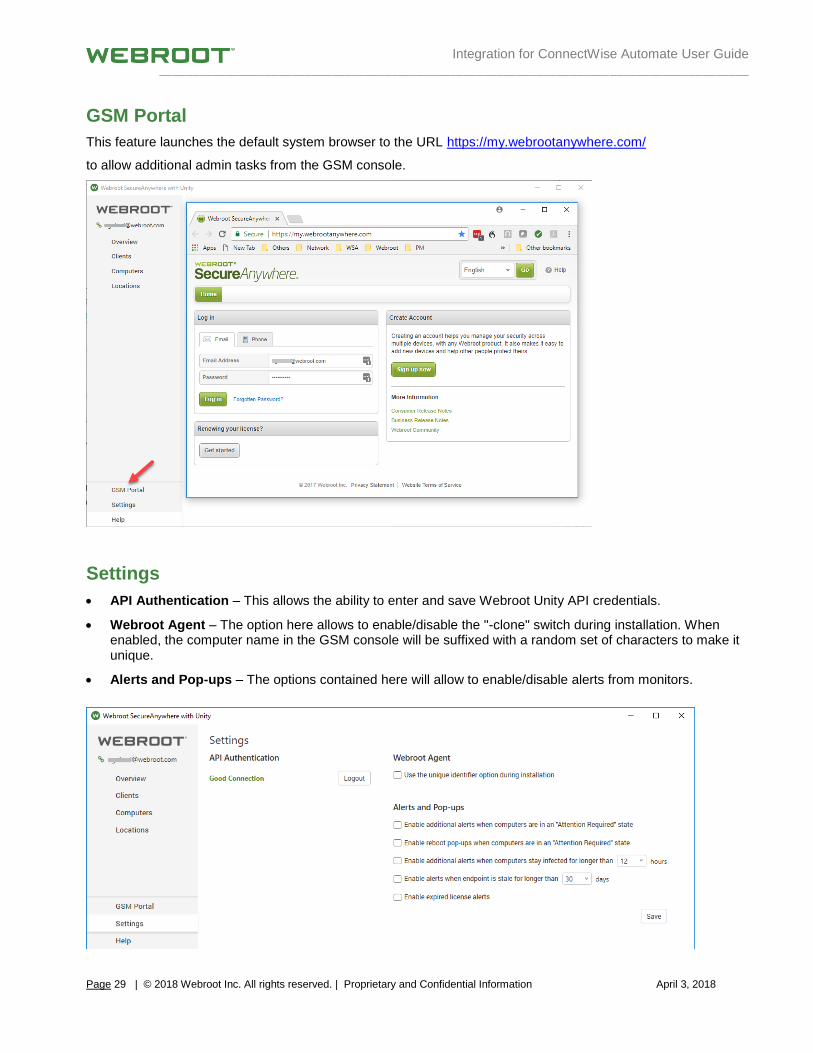
GSM Portal
This feature launches the default system browser to the URL https://my.webrootanywhere.com/
to allow additional admin tasks from the GSM console.
Settings
• API Authentication – This allows the ability to enter and save Webroot Unity API credentials.
• Webroot Agent – The option here allows to enable/disable the "-clone" switch during installation. When enabled, the computer name in the GSM console will be suffixed with a random set of characters to make it unique.
• Alerts and Pop-ups – The options contained here will allow to enable/disable alerts from monitors.
Integration for ConnectWise Automate User Guide _________________________________________________________________________________________
Page 30 | © 2018 Webroot Inc. All rights reserved. | Proprietary and Confidential Information April 3, 2018
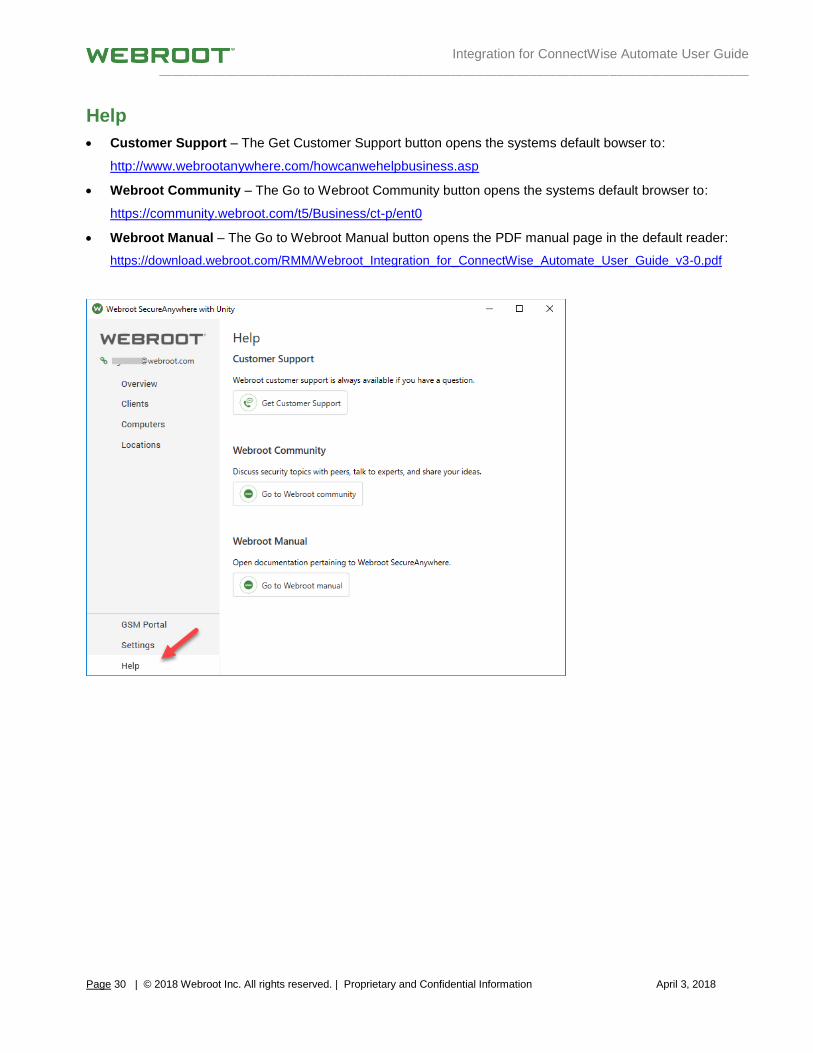
Help
• Customer Support – The Get Customer Support button opens the systems default bowser to:
http://www.webrootanywhere.com/howcanwehelpbusiness.asp
• Webroot Community – The Go to Webroot Community button opens the systems default browser to:
https://community.webroot.com/t5/Business/ct-p/ent0
• Webroot Manual – The Go to Webroot Manual button opens the PDF manual page in the default reader:
https://download.webroot.com/RMM/Webroot_Integration_for_ConnectWise_Automate_User_Guide_v3-0.pdf
Integration for ConnectWise Automate User Guide _________________________________________________________________________________________
Page 31 | © 2018 Webroot Inc. All rights reserved. | Proprietary and Confidential Information April 3, 2018
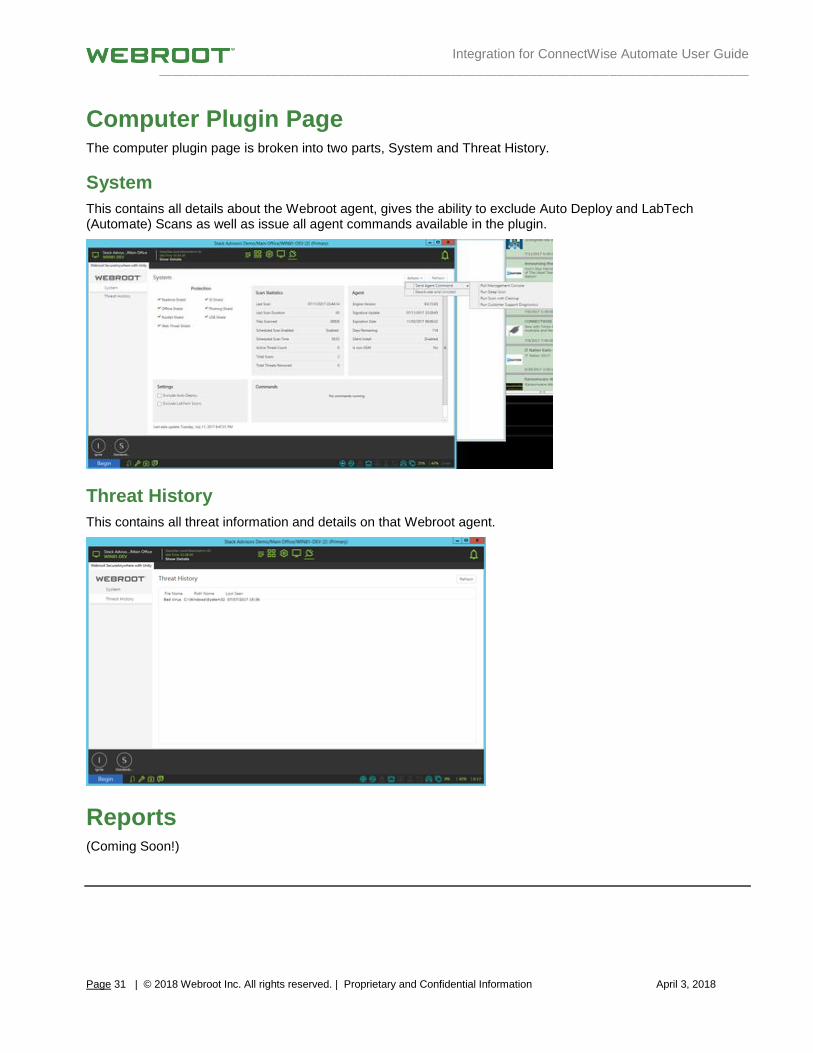
Computer Plugin Page The computer plugin page is broken into two parts, System and Threat History.
System
This contains all details about the Webroot agent, gives the ability to exclude Auto Deploy and LabTech (Automate) Scans as well as issue all agent commands available in the plugin.
Threat History
This contains all threat information and details on that Webroot agent.
Reports (Coming Soon!)
Integration for ConnectWise Automate User Guide _________________________________________________________________________________________
Page 32 | © 2018 Webroot Inc. All rights reserved. | Proprietary and Confidential Information April 3, 2018
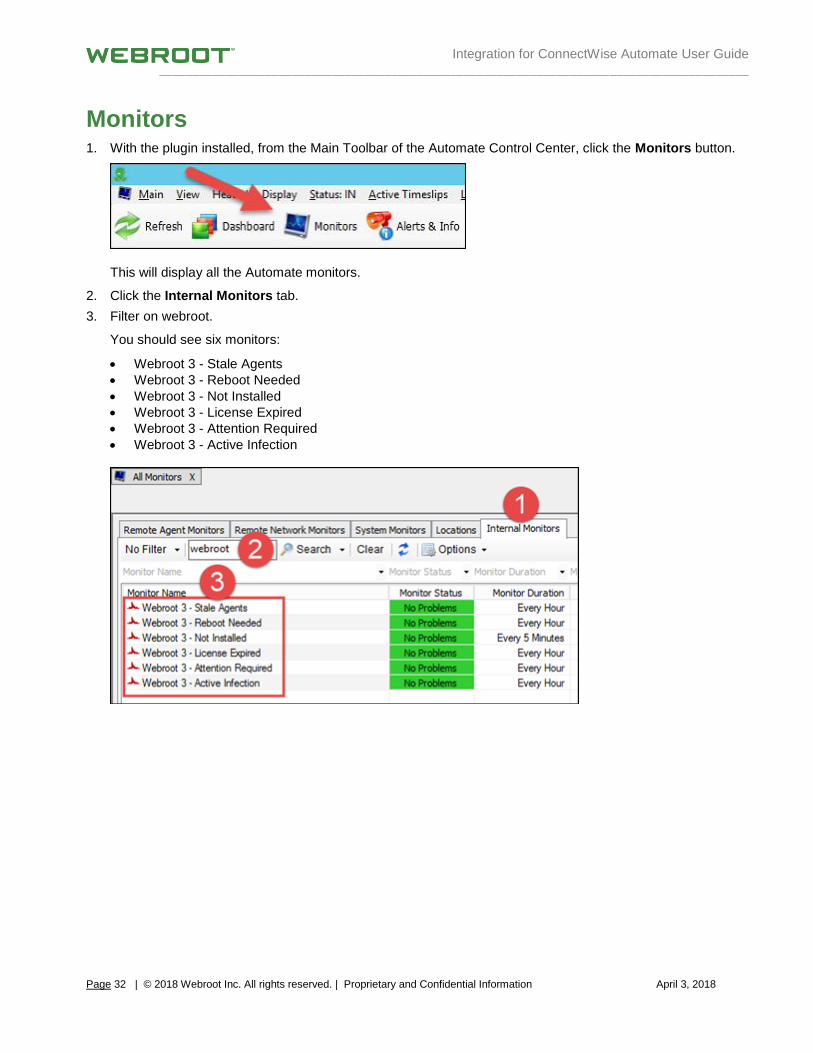
Monitors 1. With the plugin installed, from the Main Toolbar of the Automate Control Center, click the Monitors button.
This will display all the Automate monitors.
2. Click the Internal Monitors tab.
3. Filter on webroot.
You should see six monitors:
• Webroot 3 - Stale Agents
• Webroot 3 - Reboot Needed
• Webroot 3 - Not Installed
• Webroot 3 - License Expired
• Webroot 3 - Attention Required
• Webroot 3 - Active Infection
Integration for ConnectWise Automate User Guide _________________________________________________________________________________________
Page 33 | © 2018 Webroot Inc. All rights reserved. | Proprietary and Confidential Information April 3, 2018
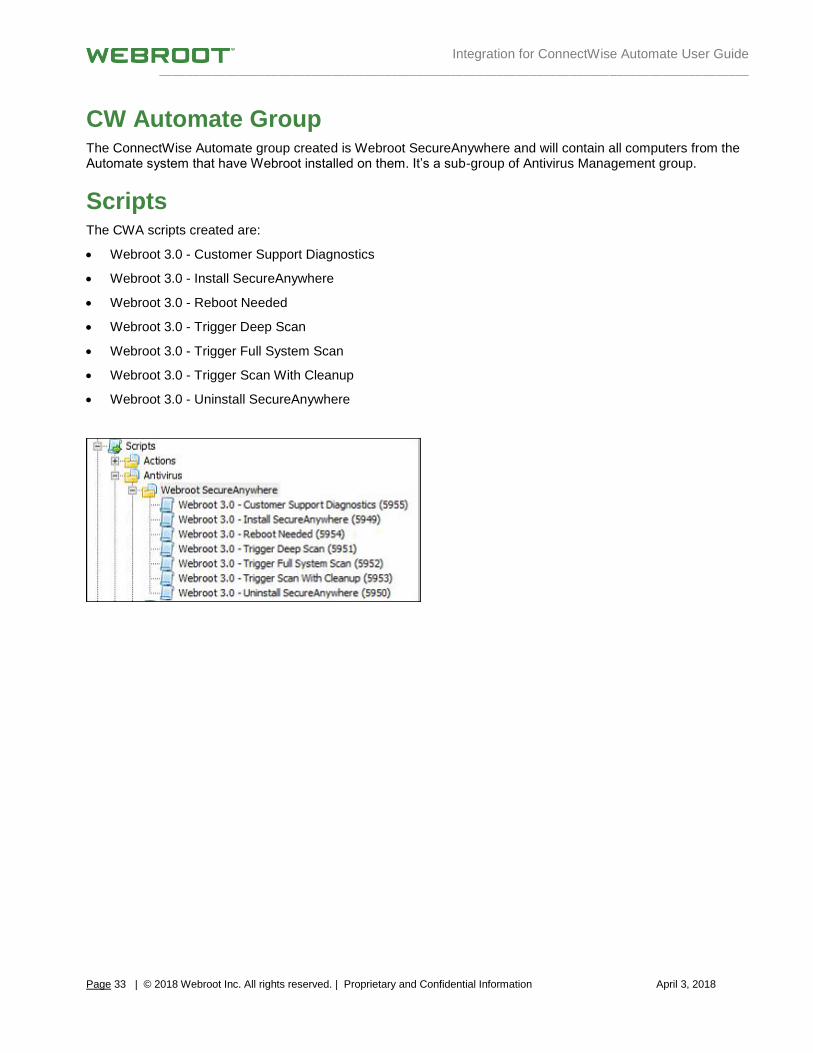
CW Automate Group The ConnectWise Automate group created is Webroot SecureAnywhere and will contain all computers from the Automate system that have Webroot installed on them. It’s a sub-group of Antivirus Management group.
Scripts The CWA scripts created are:
• Webroot 3.0 - Customer Support Diagnostics
• Webroot 3.0 - Install SecureAnywhere
• Webroot 3.0 - Reboot Needed
• Webroot 3.0 - Trigger Deep Scan
• Webroot 3.0 - Trigger Full System Scan
• Webroot 3.0 - Trigger Scan With Cleanup
• Webroot 3.0 - Uninstall SecureAnywhere
Integration for ConnectWise Automate User Guide _________________________________________________________________________________________
Page 34 | © 2018 Webroot Inc. All rights reserved. | Proprietary and Confidential Information April 3, 2018
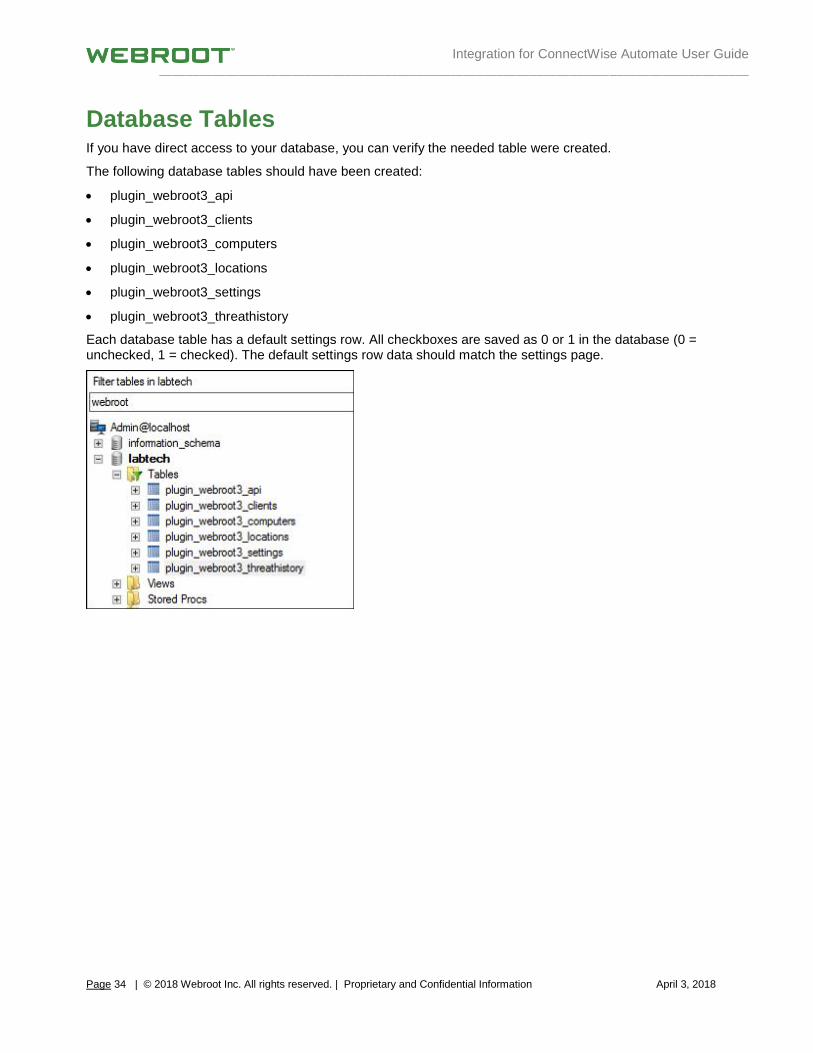
Database Tables If you have direct access to your database, you can verify the needed table were created.
The following database tables should have been created:
• plugin_webroot3_api
• plugin_webroot3_clients
• plugin_webroot3_computers
• plugin_webroot3_locations
• plugin_webroot3_settings
• plugin_webroot3_threathistory
Each database table has a default settings row. All checkboxes are saved as 0 or 1 in the database (0 = unchecked, 1 = checked). The default settings row data should match the settings page.
Integration for ConnectWise Automate User Guide _________________________________________________________________________________________
Page 35 | © 2018 Webroot Inc. All rights reserved. | Proprietary and Confidential Information April 3, 2018
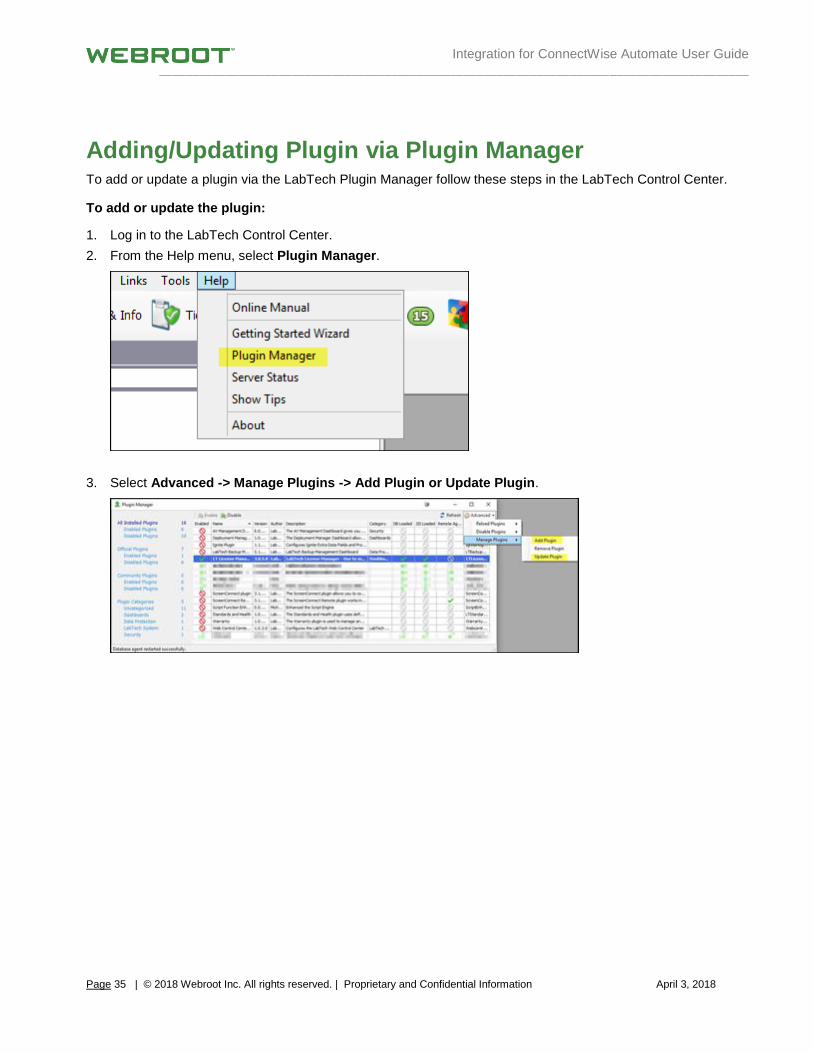
Adding/Updating Plugin via Plugin Manager To add or update a plugin via the LabTech Plugin Manager follow these steps in the LabTech Control Center.
To add or update the plugin:
1. Log in to the LabTech Control Center.
2. From the Help menu, select Plugin Manager.
3. Select Advanced -> Manage Plugins -> Add Plugin or Update Plugin.
Integration for ConnectWise Automate User Guide _________________________________________________________________________________________
Page 36 | © 2018 Webroot Inc. All rights reserved. | Proprietary and Confidential Information April 3, 2018
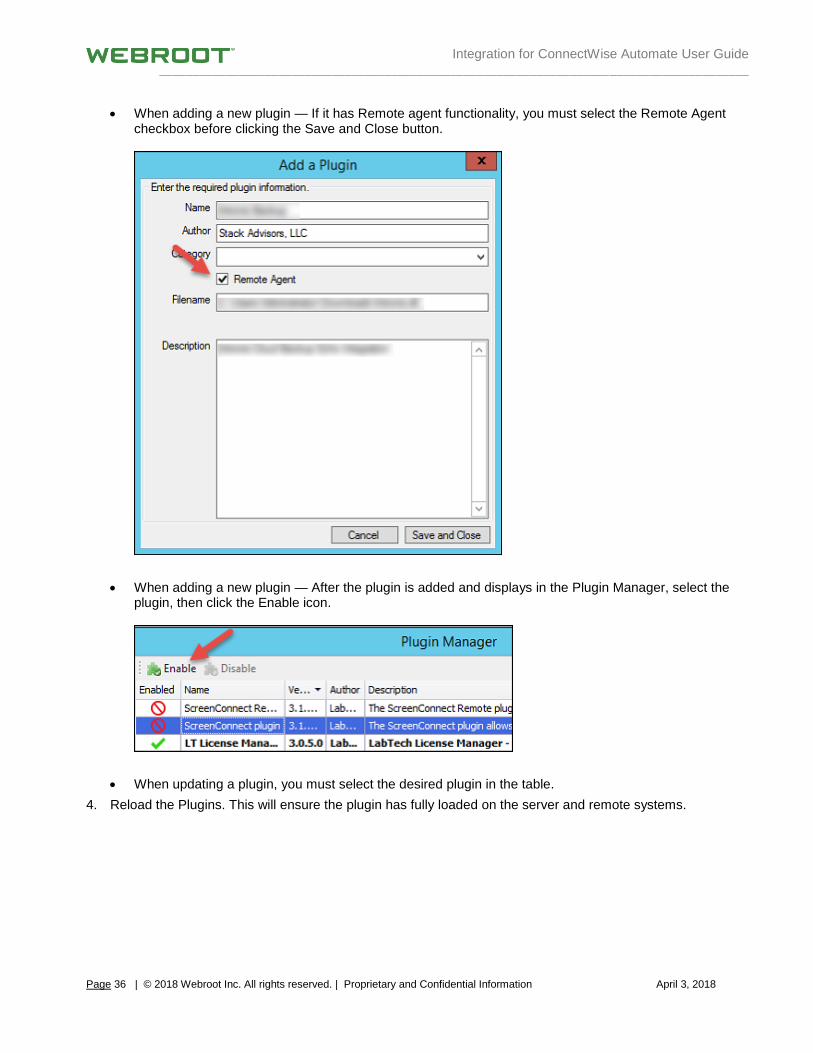
• When adding a new plugin — If it has Remote agent functionality, you must select the Remote Agent checkbox before clicking the Save and Close button.
• When adding a new plugin — After the plugin is added and displays in the Plugin Manager, select the plugin, then click the Enable icon.
• When updating a plugin, you must select the desired plugin in the table.
4. Reload the Plugins. This will ensure the plugin has fully loaded on the server and remote systems.
Integration for ConnectWise Automate User Guide _________________________________________________________________________________________
Page 37 | © 2018 Webroot Inc. All rights reserved. | Proprietary and Confidential Information April 3, 2018
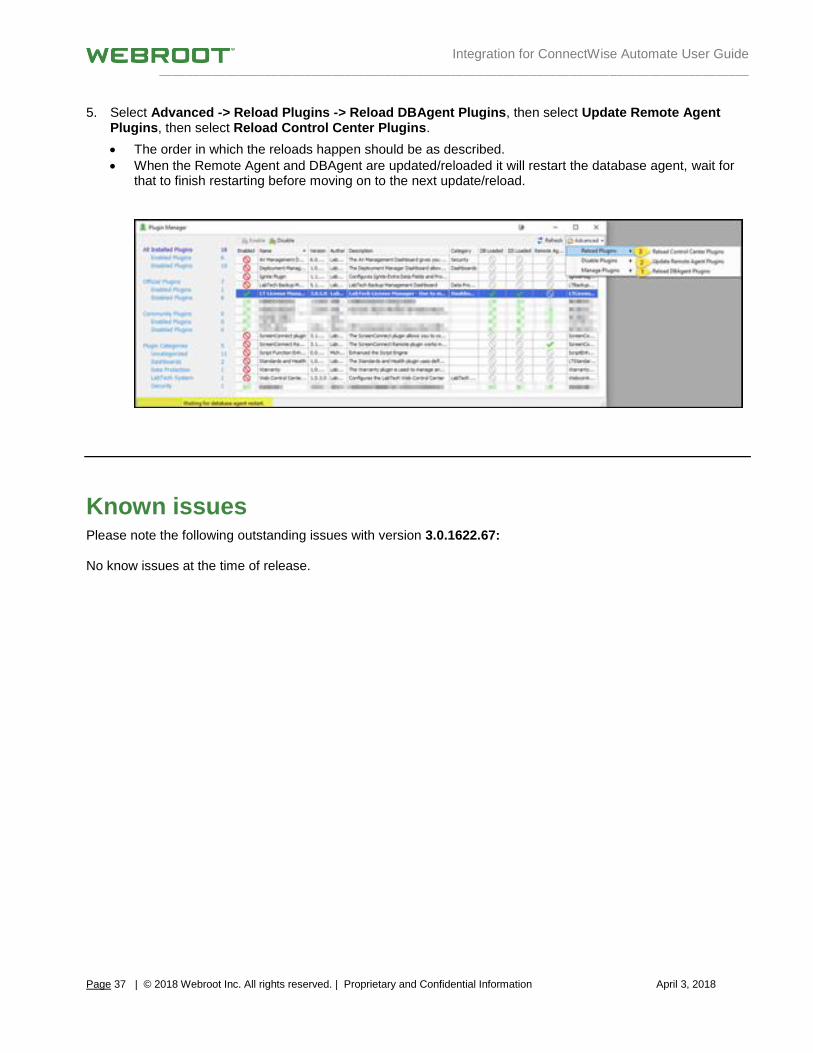
5. Select Advanced -> Reload Plugins -> Reload DBAgent Plugins, then select Update Remote Agent Plugins, then select Reload Control Center Plugins.
• The order in which the reloads happen should be as described.
• When the Remote Agent and DBAgent are updated/reloaded it will restart the database agent, wait for that to finish restarting before moving on to the next update/reload.
Known issues Please note the following outstanding issues with version 3.0.1622.67: No know issues at the time of release.