Embed Size (px)
Citation preview

USER GUIDEIntegrating DIY electronics into
an eCraft2Learn project


TABLE OF CONTENTSOverview 4Learning about DIY electronics 5 EducationalResources 5 Projectdocumentationforteachers 5Planning and simulating electronic circuits 6Working with an Arduino and electronic components 8Connecting and programming an Arduino 10 ProgramminginSnap4Arduino 10 ConnectingSnap4Arduino 10Adding Artificial Intelligence to artifacts 12

Overview
eCraft2LearnisanEUfundedprojectcentredaroundresearching,designing,pilotingandvalidatinganecosystembasedondigitalfabricationandmakingtechnologiesforcreatingcomputer-supportedartefacts.
TheeCraft2Learnecosystemprimarilyprovidesandsupportsthefollowingdigitaltoolsandtechnology:
● Electroniccomponents-forcreatingelectronicscircuits.
● ArduinoUno-forconnectingtoelectroniccomponentsandprogrammingofartifacts.
● Tinkercadcircuits-forplanningandsimulationofcircuitdesignideas.
● Snap4Arduino-forprogrammingtheArduino.
● Snap!-forprogrammingAI(artificialintelligence)intoprojects.
Togetherthesephysicalcomponentsanddigitaltoolscanbeutilisedforexperimenting,learningandimplementingDIYelectronicsintostudentprojects.
ThisguidehasbeencreatedtoassistyoutogetstartedwithcreatingandprogrammingelectronicartifactsusingArduinoandelectroniccomponents.Theguidewilltakeyouthroughthefollowing:
● LearningaboutDIYelectronics
● Planningandsimulatingelectroniccircuits
● Workingwithelectroniccomponents
● ConnectingandprogramminganArduino
● Addingartificialintelligencetoartifacts
Throughout the guide, you will be signposted to other more detailed documentation from theeCraft2Learn academic research and project pilots. These documents provide a more detailedinformationandsupportforDIYelectronics.
4
You can learn more about the eCraft2Learn Project in Teacher Guide 1 Introducing eCraft2Learn which can be downloaded at: https://project.ecraft2learn.eu/introducing-ecraft2learn/

Learning about DIY electronicsPriortoplanninganyelectroniccircuit,itisimportantthatstudentsunderstandthevariouselectroniccomponentsavailabletothemandhowtheywork.TheeCraft2Learnecosystemprovidesarangeofdocumentationandopeneducation resources tohelpeducatorsand students to learnaboutDIYelectronics.
EDUCATION RESOURCES
IntheUUIstudentscanaccessaseriesofeducationresourcestolearnaboutthevariouselectroniccomponents.ClickontheEducationalResourcesLinkinthetoprightoftheinterface,thenclickonElectronicDevicesandtheTroubleshootinglinksinthemenutoaccesstheseresources.
In the electronic devices menu, the components are categorised into three sub-menus; Basics,Sensors andMore…Selectingoneof the submenu’s opensup a list of available resources. Eachresourcecontainsinformationtohelpthestudentslearnmoreandmanyoftheresourcescontainlinkstofurtherresourcesavailableontheinternetsuchasvideotutorials.
TheresourcesintheTroubleshootingmenuwillhelpifyouareexperiencingdifficultiesinusingthetechnology.
PROJECT DOCUMENTATION FOR TEACHERS
In addition to the open education resources available in the UUI. The eCraft2Learn project hasproducedvariousresearchreportsincludingaTeacherTrainingManualwhichincludesaseriesof3DprintingactivitiestogetyoustartedandaUserManualfortheUUI.
Alistofthemainelectroniccomponentsandtoolscanbefoundin Teacher Guide 3 Setting up a eCraft2Learn learning environment which can be downloaded at: https://project.ecraft2learn.eu/setting-up-an-ecraft2learn-learning-environment/
You can access technical training documentation and activities for Arduino and DIY electronics in Project Report D3.4 Section 3.5 at: https://project.ecraft2learn.eu/wp-content/uploads/2018/05/eCraft2Learn_D3.4_M16_Manual-of-Craft-and-Project-based-Learning-STEAM-Training-for-Teachers.pdf
You can access further support for 3D printing in the UUI user manual in Project Report D4.5 Section 7 at: https://project.ecraft2learn.eu/wp-content/uploads/2019/01/D4.5-User-manual-for-programming-of-computer-supported-artefacts-with-integrated-debugger-and-3d-modelling-simulation-and-printing-%E2%80%93-the-unified-user-interface-approach.pdf
5
6
Planning and simulating electronic circuitsStudentsshouldconsidertheiruseofelectronicswhenplanningtheirartifacts.Ataverybasiclevelthiscouldbeassimpleasrecognisingwhatfunctionisrequiredandwhichinputandoutputcompo-nentswillhelpthemtoachievetheseoutcomes.
Forexampleinthelighthouseexemplarproject:RequiredFunction:Thelightatthetopofthelighthouseshouldflashonandoffwhenitgetsdark.Inputdevice:Alightsensor(LDR)tosensethelightlevels.Outputdevice:ALightEmittingDiode(LED)programmedbytheArduinotoflash if the light leveldropsbelowacertainlevel.
TherearetwotoolsintheUUIthatwillhelpstudentstoplanandsimulatetheirelectroniccircuits,eCraftPlanandTinkercadCircuits.
eCraft Plan
eCraftPlanisasketchingtoolthatprovidestoolsfordrawingdifferentshapes and items. These include freehanddrawing tools, erasor, texttool,shapestoolandimageimportfunctionality.
Theimageimportfunctionalityisparticularlyusefulforplanningelectroniccircuitsandaddingnotestoannotatethem.
You can learn more about the eCraft Plan tool and how to use it in Project Report D4.5 Section 4.1 at: https://project.ecraft2learn.eu/wp-content/uploads/2019/01/D4.5-User-manual-for-programming-of-computer-supported-artefacts-with-integrated-debugger-and-3d-modelling-simulation-and-printing-%E2%80%93-the-unified-user-interface-approach.pdf

Tinkercad Circuits
Tinkercad Circuits can be used for simulating different electronic ele-mentsincludingtheArduinoUnomicrocontroller.
Thisisausefultooltoolfordesigningcircuitspriortophysicallymakingthemas the circuit design can be simulated and easily edited until aworkingcircuitdesignhasbeendeveloped.
You can learn more about how Tinkercad operates in Project Report D4.5 Section 6.1 at: https://project.ecraft2learn.eu/wp-content/uploads/2019/01/D4.5-User-manual-for-programming-of-computer-supported-artefacts-with-integrated-debugger-and-3d-modelling-simulation-and-printing-%E2%80%93-the-unified-user-interface-approach.pdf
7
8
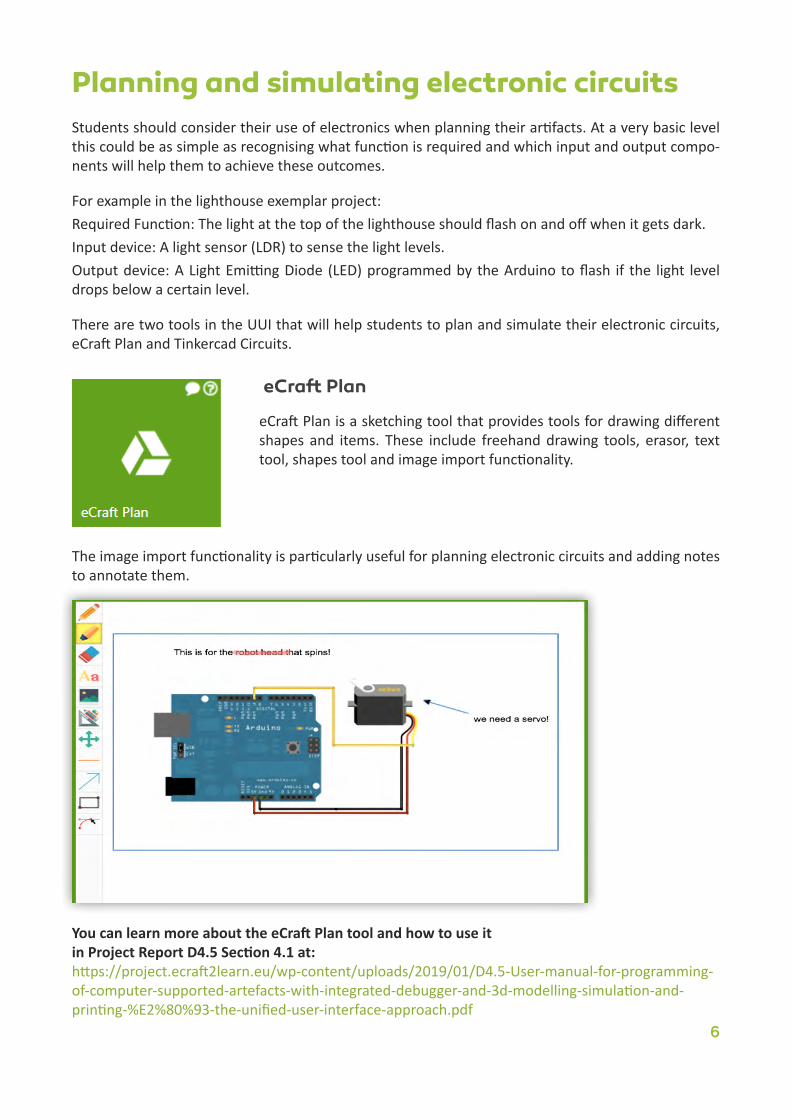
Working with an Arduino and electronic componentsArduinoboardsaresmallcomputerswithwhichyoucanreadinformationfromavarietyofsensorsaswellascontrollights,motorsandotherthings.ArduinoUNOisthebestboardtogetstartedwithelectronicsandcoding.Ifthisisyourfirstexperiencetinkeringwiththeplatform,theUNOisthemostrobustboardyoucanstartplayingwith.TheUNOisthemostusedanddocumentedboardofthewholeArduinofamily.ThediagrambelowshowsthevariouselementsofanArduinoUnoboard.
1. USBsocket:WhenuploadingaprogramtotheUNOitisdonethroughaUSBcable. TheUSBcableisconnectedtoacomputerandtotheUSBsocket. ThecablealsoprovidespowertotheUNOboard.
2. Resetbutton:Whentheresetbuttonispressed,theprogramuploadedtotheboardisrestarted.
3. On-boardLED:ThisLEDisconnectedtodigitalpin13.YoucanturntheLEDonoroff byprogrammingpin13.
4. Digitalpins:Thereare14digitalpins,numberedfrom0to13.
5. ONLED:ThisLEDisturnedonwhentheUNOissuppliedwithpower.
6. Powersocket:ToprovidetheUNOboardwithpoweryoucanconnectabatteryoradapter tothepowersocket.Therecommendedinputvoltageis7-12V.
7. TXandRXLED:s:TheTXLEDblinkswhendataissentbytheUNOovertheserialport. TheRXLEDblinkswhentheUNOreceivesdataovertheserialport.
8. Powerandgroundpins:ThepowerpinsaremarkedIOREF,3.3Vand5V. ThegroundpinsaremarkedwithGND.
9. Analoguepins:TherearesixanaloguepinsnumberedfromA0toA5.

CONNECTING AN ARDUINO TO ELECTRONIC COMPONENTS
InordertocreatecircuitseachgroupofstudentswillneedaccesstoanArduinoUnoboard,anumberofdiffer-entelectroniccomponents,abreadboardandjumperwires.
Arduinoboardshaveanumberofpinsthatarenumberedandgroupedbyfunctionality.OntheArduinoUNO,shownintheimagebelow,thereareagroupofdigitalpinsandagroupofanaloguepins.
Thedigitalpinsareagroupof14pins(numbered0to13),youcanconnectdigitalinputsandoutputstothesepins.
Theanaloguepinsareagroupof6pins(labelledA0toA5),youcanconnectanaloguesensorstothesepins.
Electroniccomponentsandcircuitscanbeconnecteddirectlytotheanalogueanddigitalpinsasshownintheexamplebelow.Thiscanbedoneeitherpluggingacomponentdirectlyintotheboard-asshownontheleftofthediagrambyconnectedtheLEDbetweendigitalpins13andGround.AlternativelyjumperwirescanbeusedtoconnectingtheArduinotocomponentsinabreadboardoranotherassembledcircuit.TheleftofthediagrambelowshowsasimplelightsensorcircuitassembledonbreadboardusinganLDRandaresistor.Thecircuitispoweredbyconnectingtheboardtothe5VandGroundpinsontheArduinoandananalogueinputisbeingtakenfromthesensorbyconnectingajumperwirefromthecircuittopinA0ontheArduino.
You can access technical training documentation and activities for Arduino and DIY electronics including a hands-on practical exercise in Project Report D3.4 Section 3.5 at: https://project.ecraft2learn.eu/wp-content/uploads/2018/05/eCraft2Learn_D3.4_M16_Manual-of-Craft-and-Project-based-Learning-STEAM-Training-for-Teachers.pdf
9

10
Connecting and programming an ArduinoSinceArduinoboards, unlike computers, doesnothave a screenor a keyboard, youneed touseexternalsoftwarerunningonadifferentcomputertowriteprogrammesfortheArduino.Thissoftwarecanbethetext-basedArduino IDE (IntegratedDevelopmentEnvironment)or thevisualprogrammingenvironmentofSna-p4Arduino.IntheeCraft2Learnproject,itisrecommendedthatyouuseSnap4ArduinotoprogramtheArduinoboards.ThisisavailablethroughtheUnifiedUserInterface(UUI).
PROGRAMMING IN SNAP4ARDUINO
SimilarlytoSnap!,inSnap4Arduinodifferentsetsofblocksarearrangedinalibraryofdifferentgroups,collect-edinthetopleftpaneloftheeditorandrepresentedbyclickablebuttonsofdifferentcolours.Onceagroupischosen,youcanaddcommandstoyourprogrambydragginganddroppingtheblocksfromtheleftbottompaneltothecentreoftheeditor.Snap4Arduinoincludesanadditionalgroupofblocks,labelledas‘Arduino’,throughwhichitispossibletoconnectthesoftwareenvironmentwiththeexternalhardware,tosendcom-mandsandtoreadpinvalues.Infacttheseblocksarecommandsthatyoucaninsertintotheprogram:thesecommandswillbesenttotheArduinoboardwhentheprogramisrunning.
TheprogramshownbelowisanexampleofhowSnap4Arduinocanbeusedtoblinktheembeddedledcon-nectedtothepin13oftheArduinoboard.
CONNECTING TO SNAP4ARDUINO
InordertoconnectanArduinoboardtoSnap4ArduinoandtomakecommunicationbetweenthemavailableforSnap!programs,itisrequiredtopre-loadaprogramontotheArduinoboard.Thisisaspecific‘Firmata’softwarewhichwillrunonArduinoandcommunicatetypicallythroughtheUSBconnection.
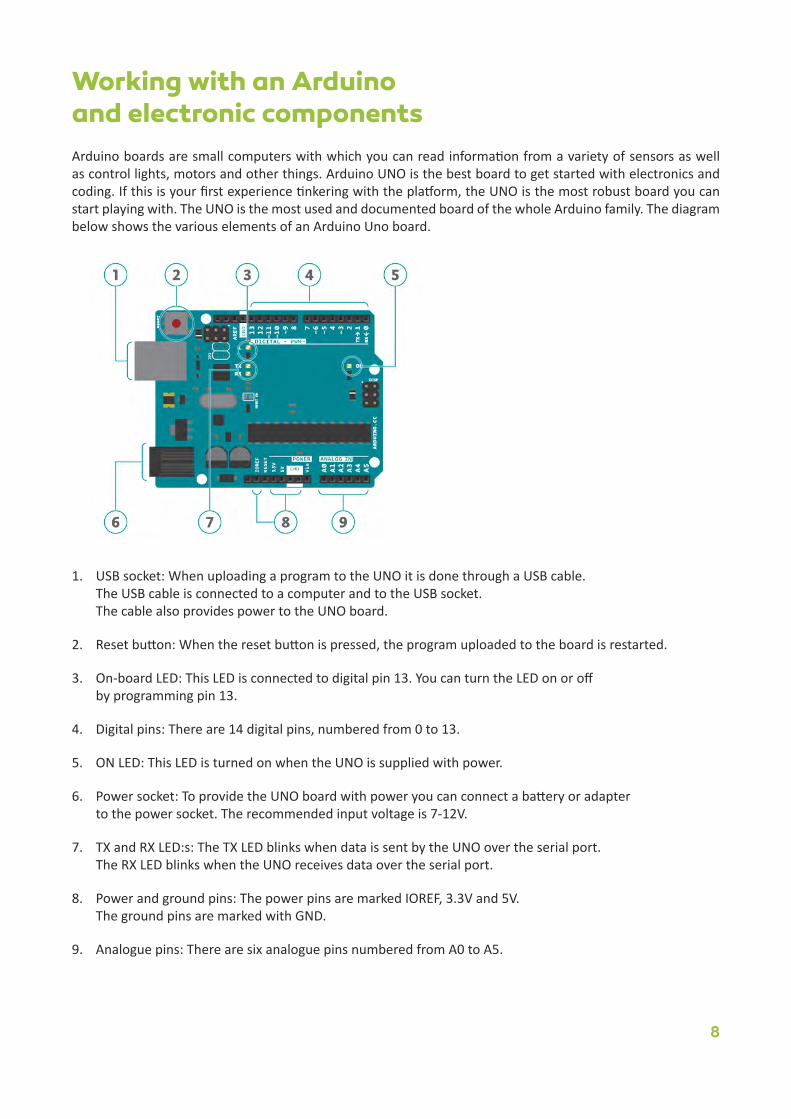
TouploadtheFirmata:closeSnap4Arduinoifopen,connecttheArduinoboardtoaUSBportonthecomputer,andopentheArduinoIDEenvironmentclickingontheArduinoIDEtileintheUUI.
IntheToolsmenu,selecttheboardversionandtheserialportwheretheboardisconnected.Afterthat,goto“Examples”->“FromLibraries”->“Firmata”->“StandardFirmata”,selectthefile“StandardFirmata”(Figure32)anduploadthefileclickingonthearrowicon.Whentheuploadfinished,ArduinoisreadytocommunicatewithSnap4Arduino.NowyoucanclosetheArduinoIDEandopenSnap4Arduino.
Finally,clickonthe“Snap4Arduino”tileintheUUI.TheSnap4ArduinoeditorwillopeninanewUUIwindow.Clickonthe“Arduino”setofblocksandselect“ConnectArduino”.
OncetheboardisconnectedtoSnap4Arduino,programscanbeexecutedintheboard.
You can access the full instructions for connecting and running Snap4Arduino in Project Report D4.5 Section 7.2 at: https://project.ecraft2learn.eu/wp-content/uploads/2019/01/D4.5-User-manual-for-programming-of-computer-supported-artefacts-with-integrated-debugger-and-3d-modelling-simulation-and-printing-%E2%80%93-the-unified-user-interface-approach.pdf
11

12
Adding artificial Intelligence (A.I.) to artifactsStudentscanbuildartefactsthatrelyuponA.I.cloudservicesandmachinelearning.Thisenablesthemtobuildartefactsthatrespondtovoicecommands,generatesspeech,recognisesimages,andmore.
TheeCraft2LearnSnap!A.I.blockslibraryincludesblocksfortrainingthecomputertorecogniseimages,audioandotherdata.Studentscanusethisforexampletobuildprogramswherehandorbodygesturescontrolhowtheirartefactsmoveorbehave.Anartefactcanalsobetrainedtobehavedifferentlydependinguponwhatisinfrontofitscamera.
SeveralsampleprojectsusingtheA.I.extensionstoSnap!havebeendevelopedandtrialledintheeCraft-2Learnprojectpilots,youcanlearnmoreabouttheseprojectsin Project Report D5.5 Sections 4.11, 4.16 and 4.17 at: https://project.ecraft2learn.eu/wp-content/uploads/2019/01/D5.5-Small-scale-case-pilot-report-and-good-practice-videos.pdf
You can also view the best practice video for one of these projects at: https://www.youtube.com/watch?v=Ipm7DKHeySY&index=11&list=PLgKtrHOACe-J6bvq-ka5ue4ERs142f4De

OTHER PROJECT EXAMPLES AND IDEAS INCLUDE:
● Arobot(virtualorreal)thatrespondstovoicecommandstomoveandturn.● Adevicethatlistensforthenameofafamouspersonorplaceandthenspeaksitsdescription
obtainedbyqueryingWikipedia.● Arobotthatcansendimagesfromitscameratocloudservicesthatrespondwithadescription
ofwhatisinfrontofitandtherobotcanactdifferentlydependinguponwhatitsees.● Avehiclethatcanbeconstructedthathasbeentrainedtodrivetotheleftorrightdepending
uponwhetherthestudentinfrontofacameraisleaningleftorright.Itcanbeprogrammedtostopwhenitrecognisesanoutstretchedhand.
● DifferentcolouredLEDsthatcanbeturnedonoroffbyspeakingthenameofthecolour.● Aboxwithacameraandspeakercanbebuiltsothatwhenaleafisplacedinsideitsayswhat
plantitisfrom(afterthestudentshavetrainedittoclassifydifferentleaves).● Agadgetwithacamerathatcanbetrainedtosoundanalarmissomeonefallsdownandfailsto
getup.
The education and training material for students and teachers/coaches on A.I. programming in Snap! and Snap4Arduino can be found in the Education resources that are available through the UUI at: https://ecraft2learn.github.io
You can learn more about how to import and use the Snap! A.I. block in Project Report D4.5 Section 7.1.3 at: https://project.ecraft2learn.eu/wp-content/uploads/2019/01/D4.5-User-manual-for-programming-of-computer-supported-artefacts-with-integrated-debugger-and-3d-modelling-simulation-and-printing-%E2%80%93-the-unified-user-interface-approach.pdf
13

https://project.ecraft2learn.eu/[email protected]/2017–12/2018
ThisprojecthasreceivedfundingfromtheEuropeanUnion’sHorizon2020Coordination&ResearchandInnovationActionunderGrantAgreementNo731345.


![DEVICE OPERATION OF POLYMER LIGHT-EMITTING … Bound... · DEVICE OPERATION OF POLYMER LIGHT-EMITTING DIODES ... and Ca asan electron injector. ... in disordered materials [13]](https://img.pdfslide.us/doc/110x75/5a9e077d7f8b9a39338be6c2/device-operation-of-polymer-light-emitting-bounddevice-operation-of-polymer.jpg)