Embed Size (px)
Citation preview
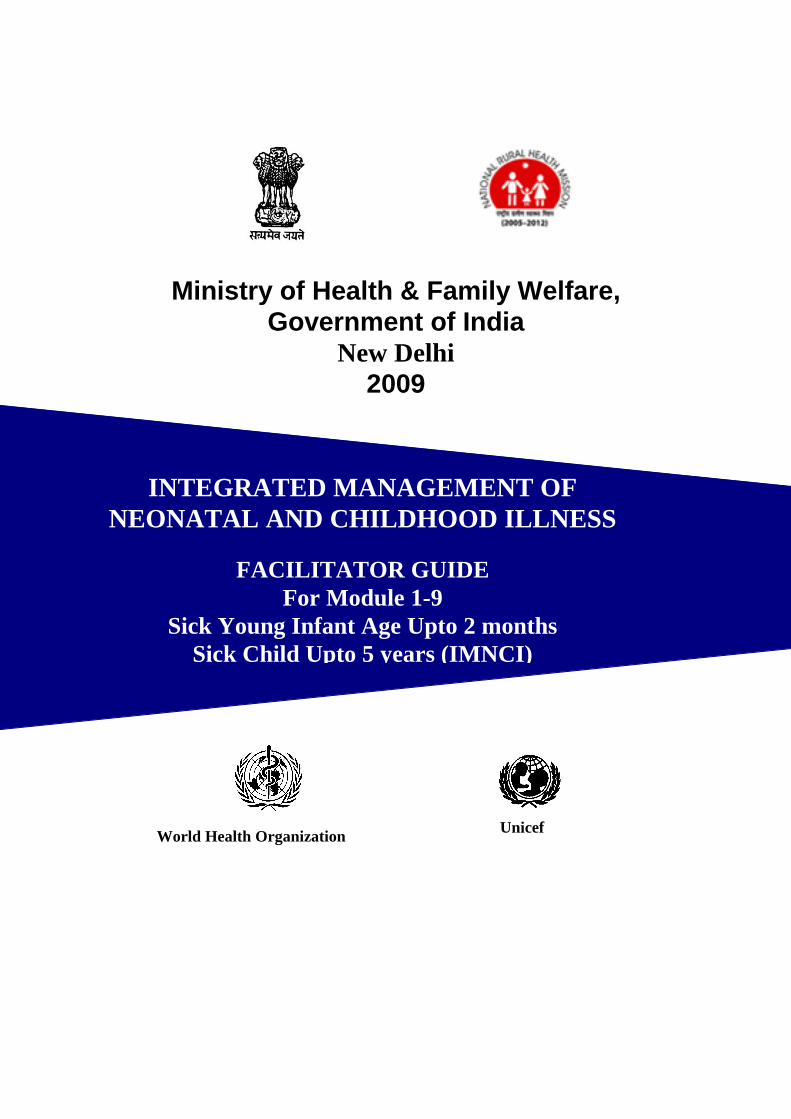
Ministry of Health & Family Welfare,
Government of India New Delhi
2009
World Health Organization
Unicef
INTEGRATED MANAGEMENT OF
NEONATAL AND CHILDHOOD ILLNESS
FACILITATOR GUIDE
For Module 1-9
Sick Young Infant Age Upto 2 months
Sick Child Upto 5 years (IMNCI)
2
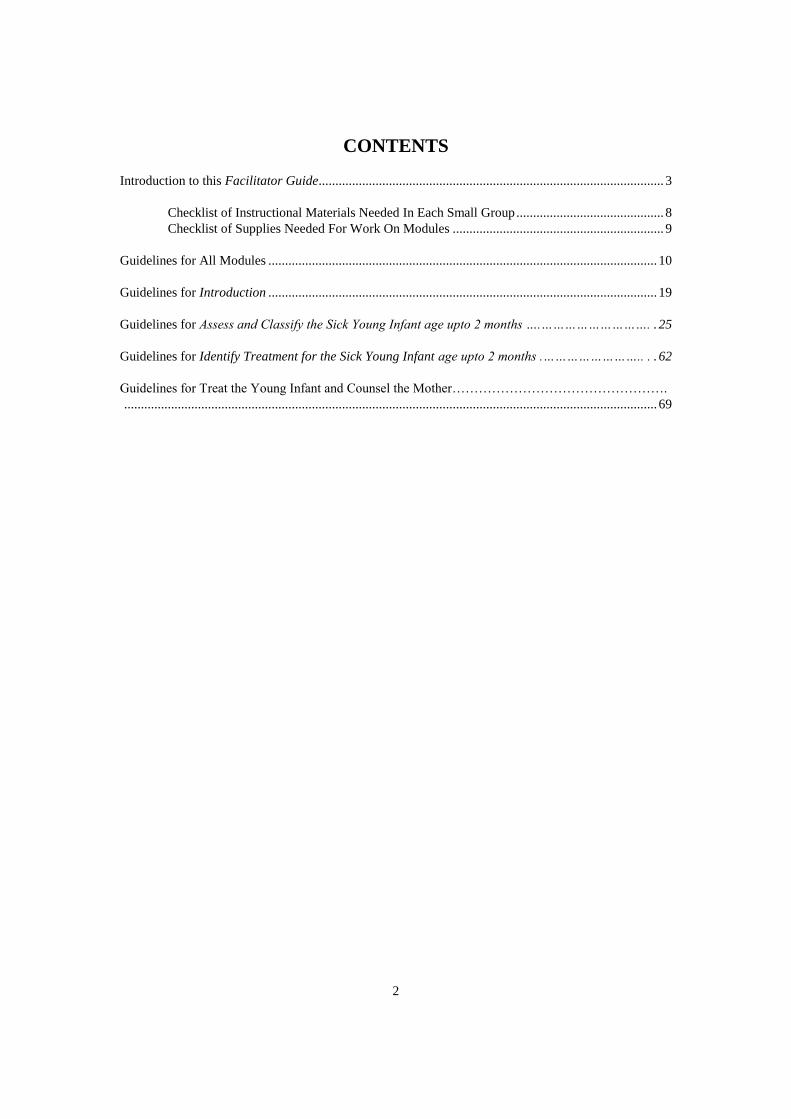
CONTENTS
Introduction to this Facilitator Guide....................................................................................................... 3
Checklist of Instructional Materials Needed In Each Small Group ............................................ 8
Checklist of Supplies Needed For Work On Modules ............................................................... 9
Guidelines for All Modules .................................................................................................................... 10
Guidelines for Introduction .................................................................................................................... 19
Guidelines for Assess and Classify the Sick Young Infant age upto 2 months ….………………………. . 25
Guidelines for Identify Treatment for the Sick Young Infant age upto 2 months .…………………….. . . 62
Guidelines for Treat the Young Infant and Counsel the Mother………………………………………….
............................................................................................................................................................... 69
3
INTRODUCTION TO THIS FACILITATOR GUIDE
How does this course differ from other training courses?
* The material in the course is not presented by lecture. Instead, each participant is given a set
of instructional booklets, called modules, that have the basic information to be learned.
Information is also provided through demonstrations, photographs and videotapes.
* The modules are designed to help each participant develop specific skills necessary for case
management of sick children. Participants develop these skills as they read the modules,
observe live and videotaped demonstrations, and practice skills in written exercises, video
exercises, group discussions, oral drills, or role plays.
* After practicing skills in the modules, participants practice the skills in a real clinical setting,
with supervision to ensure correct patient care.
* Each participant works at his own speed.
* Each participant discusses any problems or questions with a facilitator, and receives prompt
feedback from the facilitator on completed exercises. (Feedback includes telling the
participant how well he has done the exercise and what improvements could be made).
What is a FACILITATOR?
A facilitator is a person who helps the participants learn the skills presented in the course. The
facilitator spends much of his time in discussions with participants, either individually or in small
groups. For facilitators to give enough attention to each participant, a ratio of one facilitator to 3 to 6
participants is desired. In your assignment to teach this course, YOU are a facilitator.
As a facilitator, you need to be very familiar with the material being taught. It is your job to give
explanations, do demonstrations, answer questions, talk with participants about their answers to
exercises, conduct role plays, lead group discussions, organize and supervise clinical practice in
outpatient clinics, and generally give participants any help they need to successfully complete the
course. You are not expected to teach the content of the course through formal lectures. (Nor is this a
good idea, even if this is the teaching method to which you are most accustomed.)
4
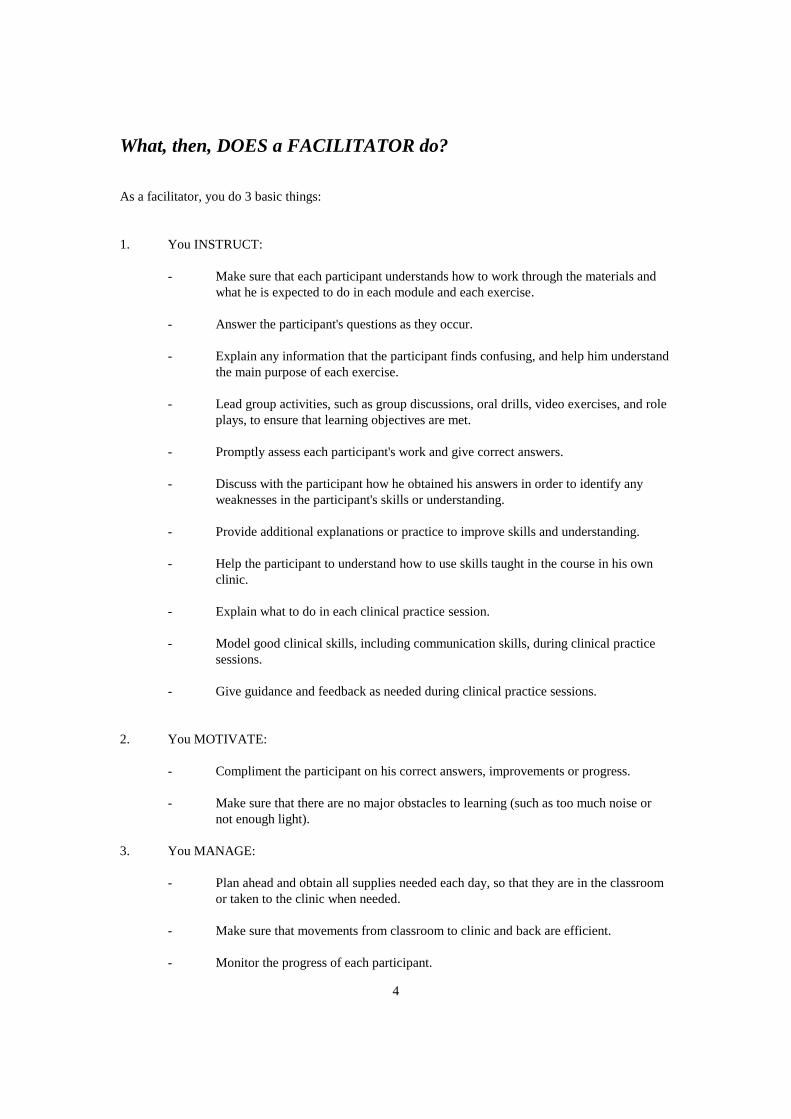
What, then, DOES a FACILITATOR do?
As a facilitator, you do 3 basic things:
1. You INSTRUCT:
- Make sure that each participant understands how to work through the materials and
what he is expected to do in each module and each exercise.
- Answer the participant's questions as they occur.
- Explain any information that the participant finds confusing, and help him understand
the main purpose of each exercise.
- Lead group activities, such as group discussions, oral drills, video exercises, and role
plays, to ensure that learning objectives are met.
- Promptly assess each participant's work and give correct answers.
- Discuss with the participant how he obtained his answers in order to identify any
weaknesses in the participant's skills or understanding.
- Provide additional explanations or practice to improve skills and understanding.
- Help the participant to understand how to use skills taught in the course in his own
clinic.
- Explain what to do in each clinical practice session.
- Model good clinical skills, including communication skills, during clinical practice
sessions.
- Give guidance and feedback as needed during clinical practice sessions.
2. You MOTIVATE:
- Compliment the participant on his correct answers, improvements or progress.
- Make sure that there are no major obstacles to learning (such as too much noise or
not enough light).
3. You MANAGE:
- Plan ahead and obtain all supplies needed each day, so that they are in the classroom
or taken to the clinic when needed.
- Make sure that movements from classroom to clinic and back are efficient.
- Monitor the progress of each participant.
5
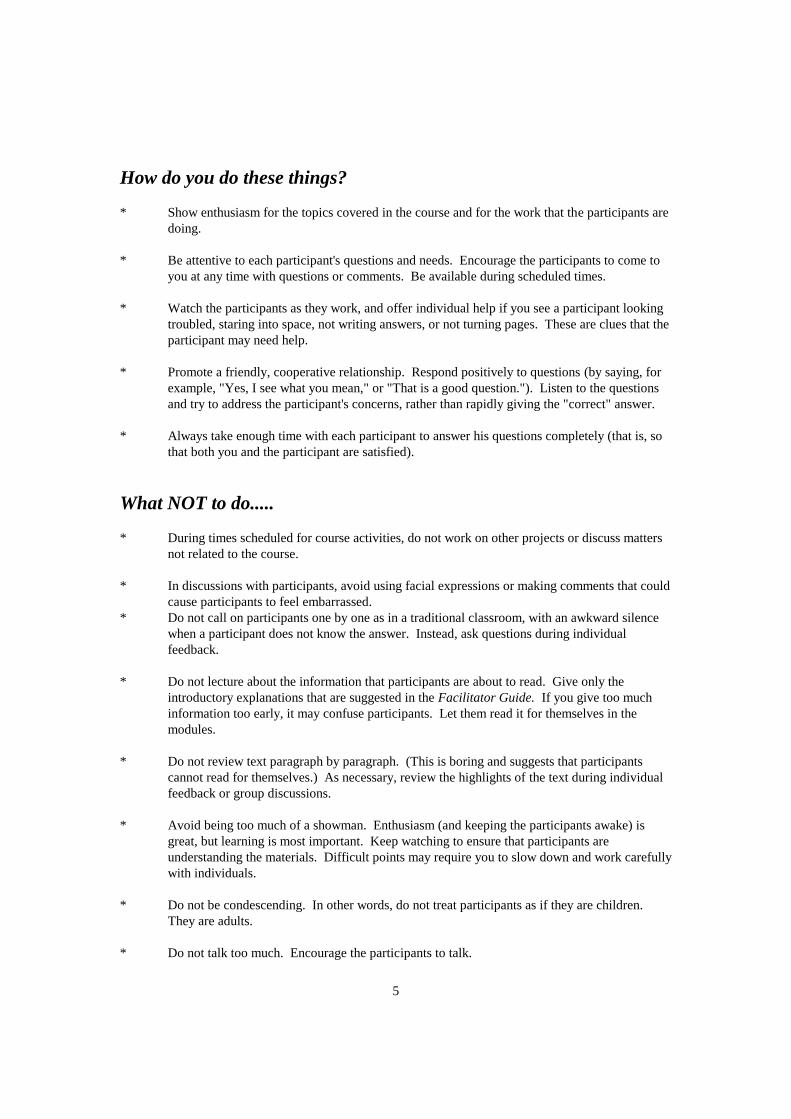
How do you do these things?
* Show enthusiasm for the topics covered in the course and for the work that the participants are
doing.
* Be attentive to each participant's questions and needs. Encourage the participants to come to
you at any time with questions or comments. Be available during scheduled times.
* Watch the participants as they work, and offer individual help if you see a participant looking
troubled, staring into space, not writing answers, or not turning pages. These are clues that the
participant may need help.
* Promote a friendly, cooperative relationship. Respond positively to questions (by saying, for
example, "Yes, I see what you mean," or "That is a good question."). Listen to the questions
and try to address the participant's concerns, rather than rapidly giving the "correct" answer.
* Always take enough time with each participant to answer his questions completely (that is, so
that both you and the participant are satisfied).
What NOT to do.....
* During times scheduled for course activities, do not work on other projects or discuss matters
not related to the course.
* In discussions with participants, avoid using facial expressions or making comments that could
cause participants to feel embarrassed.
* Do not call on participants one by one as in a traditional classroom, with an awkward silence
when a participant does not know the answer. Instead, ask questions during individual
feedback.
* Do not lecture about the information that participants are about to read. Give only the
introductory explanations that are suggested in the Facilitator Guide. If you give too much
information too early, it may confuse participants. Let them read it for themselves in the
modules.
* Do not review text paragraph by paragraph. (This is boring and suggests that participants
cannot read for themselves.) As necessary, review the highlights of the text during individual
feedback or group discussions.
* Avoid being too much of a showman. Enthusiasm (and keeping the participants awake) is
great, but learning is most important. Keep watching to ensure that participants are
understanding the materials. Difficult points may require you to slow down and work carefully
with individuals.
* Do not be condescending. In other words, do not treat participants as if they are children.
They are adults.
* Do not talk too much. Encourage the participants to talk.
6
* Do not be shy, nervous, or worried about what to say. This Facilitator Guide will help you
remember what to say. Just use it!
How can this FACILITATOR GUIDE help you?
This Facilitator Guide will help you teach the course modules, including the video segments. There is
a separate guide to assist you with clinical practice sessions: the Facilitator Guide for Clinical Practice.
For each module, this Facilitator Guide includes the following:
* a list of the procedures to complete the module, highlighting the type of feedback to be given
after each exercise
* guidelines for the procedures. These guidelines describe:
- how to do demonstrations, role plays, and group discussions,
- supplies needed for these activities,
- how to conduct the video exercises,
- how to conduct oral drills,
- points to make in group discussions or individual feedback.
* answer sheets (or possible answers) for most exercises
* a place to write down points to make in addition to those listed in the guidelines
At the back of this Facilitator Guide is a section titled "Guidelines for All Modules" (section I). This
section describes training techniques to use when working with participants during the course. It also
includes important techniques to use when:
- participants are working individually,
- you are providing individual feedback,
- you are leading a group discussion,
- you are coordinating a role play.
The last four pages fold out so that you can refer to them as needed.
To prepare yourself for each module, you should:
* read the module and work the exercises,
* read in this Facilitator Guide all the information provided about the module,
* plan exactly how work on the module will be done and what major points to make,
* collect any necessary supplies for exercises in the module, and prepare for any demonstrations
or role plays,
* think about sections that participants might find difficult and questions they may ask,
* plan ways to help with difficult sections and answer possible questions,
* think about the skills taught in the module and how they can be applied in participants' own
clinics,

7
* ask participants questions that will encourage them to think about using the skills in their
clinics. Questions are suggested in appropriate places in the Facilitator Guide.
8
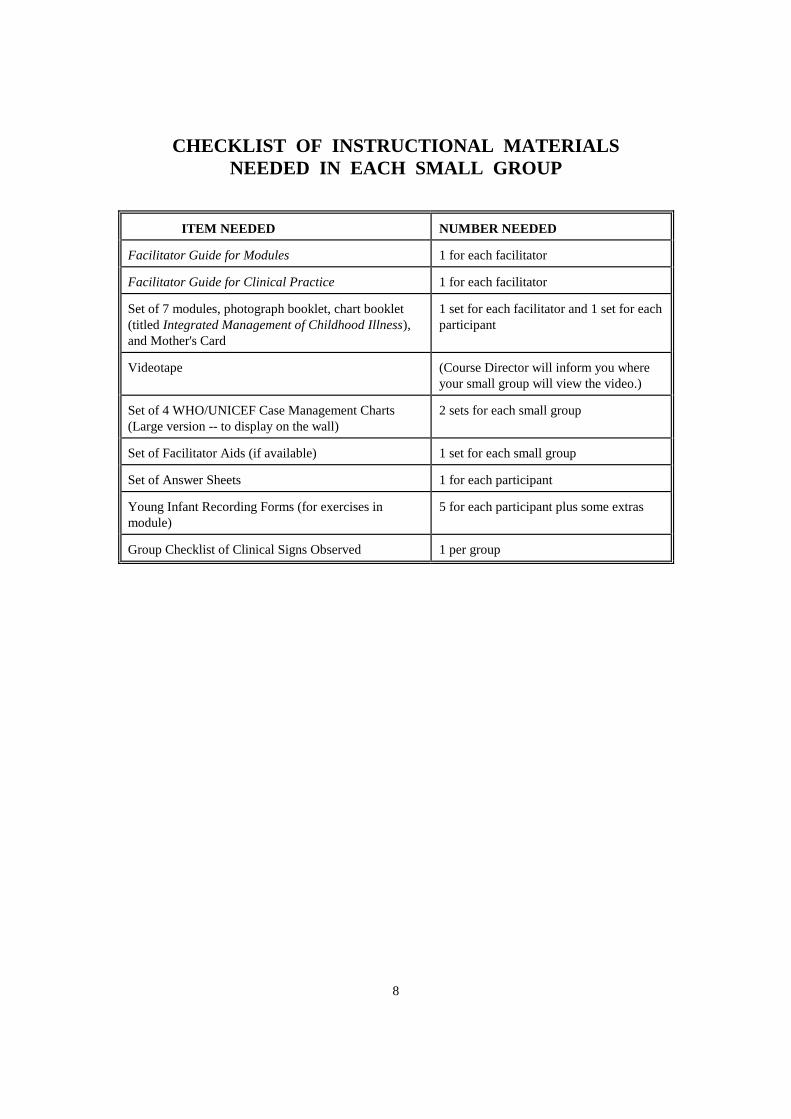
CHECKLIST OF INSTRUCTIONAL MATERIALS
NEEDED IN EACH SMALL GROUP
ITEM NEEDED NUMBER NEEDED
Facilitator Guide for Modules 1 for each facilitator
Facilitator Guide for Clinical Practice 1 for each facilitator
Set of 7 modules, photograph booklet, chart booklet
(titled Integrated Management of Childhood Illness),
and Mother's Card
1 set for each facilitator and 1 set for each
participant
Videotape
(Course Director will inform you where
your small group will view the video.)
Set of 4 WHO/UNICEF Case Management Charts
(Large version -- to display on the wall)
2 sets for each small group
Set of Facilitator Aids (if available) 1 set for each small group
Set of Answer Sheets 1 for each participant
Young Infant Recording Forms (for exercises in
module)
5 for each participant plus some extras
Group Checklist of Clinical Signs Observed 1 per group
9
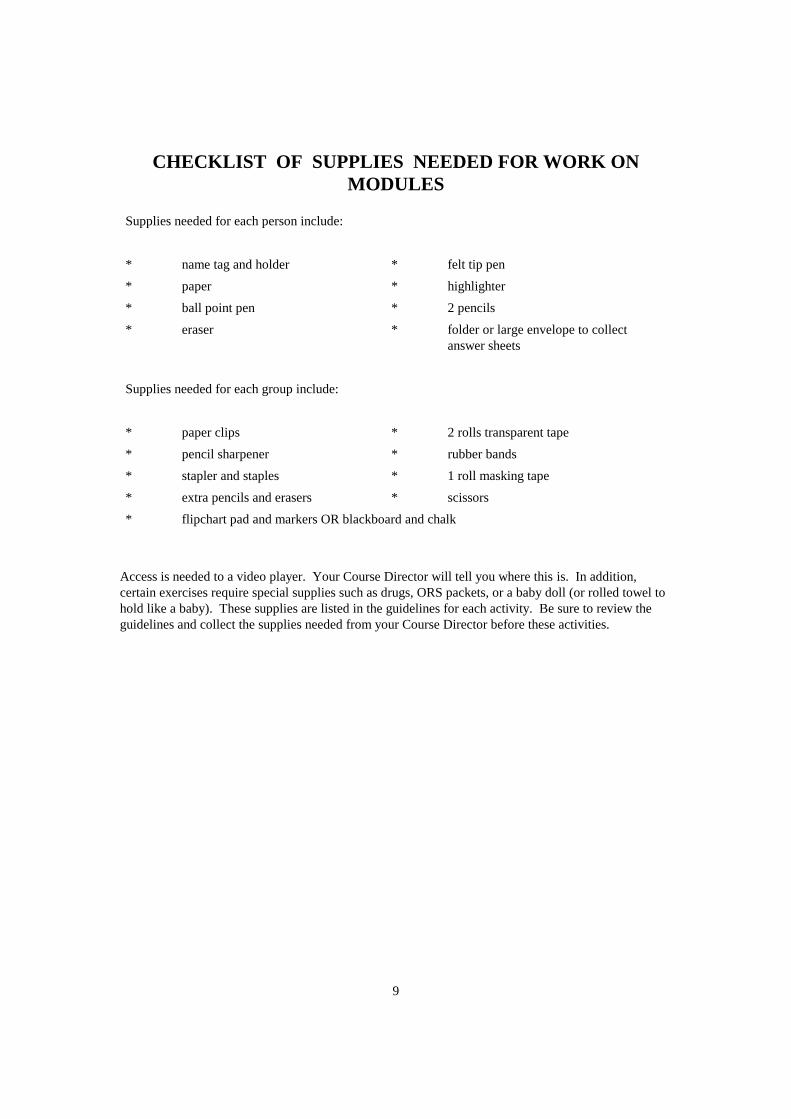
CHECKLIST OF SUPPLIES NEEDED FOR WORK ON
MODULES
Supplies needed for each person include:
* name tag and holder * felt tip pen
* paper * highlighter
* ball point pen * 2 pencils
* eraser * folder or large envelope to collect
answer sheets
Supplies needed for each group include:
* paper clips * 2 rolls transparent tape
* pencil sharpener * rubber bands
* stapler and staples * 1 roll masking tape
* extra pencils and erasers * scissors
* flipchart pad and markers OR blackboard and chalk
Access is needed to a video player. Your Course Director will tell you where this is. In addition,
certain exercises require special supplies such as drugs, ORS packets, or a baby doll (or rolled towel to
hold like a baby). These supplies are listed in the guidelines for each activity. Be sure to review the
guidelines and collect the supplies needed from your Course Director before these activities.
10
GUIDELINES
FOR
ALL MODULES
FACILITATOR TECHNIQUES
11
A. Techniques for Motivating Participants
Encourage Interaction
1. During the first day, you will talk individually with each participant several times (for
example, during individual feedback). If you are friendly and helpful during these
first interactions, it is likely that the participants (a) will overcome their shyness; (b)
will realize that you want to talk with them; and (c) will interact with you more
openly and productively throughout the course.
2. Look carefully at each participant's work (including answers to short-answer
exercises). Check to see if participants are having any problems, even if they do not
ask for help. If you show interest and give each participant undivided attention, the
participants will feel more compelled to do the work. Also, if the participants know
that someone is interested in what they are doing, they are more likely to ask for help
when they need it.
3. Be available to the participants at all times.
Keep Participants Involved in Discussions
4. Frequently ask questions of participants to check their understanding and to keep
them actively thinking and participating. Questions that begin with "what," "why," or
"how" require more than just a few words to answer. Avoid questions that can be
answered with a simple "yes" or "no."
After asking a question, PAUSE. Give participants time to think and volunteer a
response. A common mistake is to ask a question and then answer it yourself. If no
one answers your question, rephrasing it can help to break the tension of silence. But
do not do this repeatedly. Some silence is productive.
5. Acknowledge all participants' responses with a comment, a "thank you" or a definite
nod. This will make the participants feel valued and encourage participation. If you
think a participant has missed the point, ask for clarification, or ask if another
participant has a suggestion. If a participant feels his comment is ridiculed or
ignored, he may withdraw from the discussion entirely or not speak voluntarily again.
6. Answer participants' questions willingly, and encourage participants to ask questions
when they have them rather than to hold the questions until a later time.
7. Do not feel compelled to answer every question yourself. Depending on the situation,
you may turn the question back to the participant or invite other participants to
respond. You may need to discuss the question with the Course Director or another
facilitator before answering. Be prepared to say "I don't know but I'll try to find out."
8. Use names when you call on participants to speak, and when you give them credit or
thanks. Use the speaker's name when you refer back to a previous comment.
12
9. Always maintain eye contact with the participants so everyone feels included. Be
careful not to always look at the same participants. Looking at a participant for a few
seconds will often prompt a reply, even from a shy participant.
Keep the Session Focused and Lively
10. Keep your presentations lively:
* Present information conversationally rather than read it.
* Speak clearly. Vary the pitch and speed of your voice.
* Use examples from your own experience, and ask participants for examples
from their experience.
11. Write key ideas on a flipchart as they are offered. (This is a good way to
acknowledge responses. The speaker will know his suggestion has been heard and
will appreciate having it recorded for the entire group to see.)
When recording ideas on a flipchart, use the participant's own words if possible. If
you must be more brief, paraphrase the idea and check it with the participant before
writing it. You want to be sure the participant feels you understood and recorded his
idea accurately.
Do not turn your back to the group for long periods as you write.
12. At the beginning of a discussion, write the main question on the flipchart. This will
help participants stay on the subject. When needed, walk to the flipchart and point to
the question.
Paraphrase and summarize frequently to keep participants focused. Ask participants
for clarification of statements as needed. Also, encourage other participants to ask a
speaker to repeat or clarify his statement.
Restate the original question to the group to get them focused on the main issue
again. If you feel someone will resist getting back on track, first pause to get the
group's attention, tell them they have gone astray, and then restate the original
question.
Do not let several participants talk at once. When this occurs, stop the talkers and
assign an order for speaking. (For example, say "Let's hear Dr. Samua's comment
first, then Dr. Salvador's, then Dr. Lateau's.") People usually will not interrupt if they
know they will have a turn to talk.
Thank participants whose comments are brief and to the point.
13. Try to encourage quieter participants to talk. Ask to hear from a participant in the
group who has not spoken before, or walk toward someone to focus attention on him
and make him feel he is being asked to talk.
Manage any Problems

13
14. Some participants may talk too much. Here are some suggestions on how to handle
an overly talkative participant:
* Do not call on this person first after asking a question.
* After a participant has gone on for some time say, "You have had an
opportunity to express your views. Let's hear what some of the other
participants have to say on this point." Then rephrase the question and
invite other participants to respond, or call on someone else immediately by
saying, "Dr. Samua, you had your hand up a few minutes ago."
* When the participant pauses, break in quickly and ask to hear from another
member of the group or ask a question of the group, such as, "What do the
rest of you think about this point?"
* Record the participant's main idea on the flipchart. As he continues to talk
about the idea, point to it on the flipchart and say, "Thank you, we have
already covered your suggestion." Then ask the group for another idea.
* Do not ask the talkative participant any more questions. If he answers all the
questions directed to the group, ask for an answer from another individual
specifically or from a specific subgroup. (For example, ask, "Does anyone
on this side of the table have an idea?")
15. Try to identify participants who have difficulty understanding or speaking the course
language. Speak slowly and distinctly so you can be more easily understood and
encourage the participant in his efforts to communicate.
Discuss with the Course Director any language problems which seriously impair the
ability of a participant to understand the written material or the discussions. It may
be possible to arrange help for the participant.
Discuss disruptive participants with your co-facilitator or with the Course Director.
(The Course Director may be able to discuss matters privately with the disruptive
individual.)
Reinforce Participants' Efforts
16. As a facilitator, you will have your own style of interacting with participants.
However, a few techniques for reinforcing participants' efforts include:
* avoiding use of facial expressions or comments that could cause participants
to feel embarrassed,
* sitting or bending down to be on the same level as the participant when
talking to him,
* answering questions thoughtfully, rather than hurriedly,
* encouraging participants to speak to you by allowing them time,
* appearing interested, saying "That's a good question/suggestion."
14
17. Reinforce participants who:
* try hard
* ask for an explanation of a confusing point
* do a good job on an exercise
* participate in group discussions
* help other participants (without distracting them by talking at length about
irrelevant matters).
B. Techniques for Relating Modules to Participants' Jobs
1. Discuss the use of these case management procedures in participants' own clinics.
The guidelines for giving feedback on certain exercises suggest specific questions to
ask. (For example, in Identify Treatment, ask where the participant can refer children
with severe classifications; in Treat the Child, ask what fluids will be recommended
for Plan A, and ask whether he dispensed drugs to mothers; in Follow-up, ask
whether mothers will bring a child back for follow-up.) Be sure to ask these
questions and listen to the participant's answers. This will help participants begin to
think about how to apply what they are learning.
2. Reinforce participants who discuss or ask questions about using these case
management procedures by acknowledging and responding to their concerns.
C. Techniques for Assisting Co-facilitators
1. Spend some time with the co-facilitator when assignments are first made. Exchange
information about prior teaching experiences and individual strengths, weaknesses
and preferences. Agree on roles and responsibilities and how you can work together
as a team.
2. Assist one another in providing individual feedback and conducting group
discussions. For example, one facilitator may lead a group discussion, and the other
may record the important ideas on the flipchart. The second facilitator could also
check the Facilitator Guide and add any points that have been omitted.
3. Each day, review the teaching activities that will occur the next day (such as role
plays, demonstrations, and drills), and agree who will prepare the demonstration, lead
the drill, play each role, collect the supplies, etc.
4. Work together on each module rather than taking turns having sole responsibility for
a module.

15
GUIDELINES FOR ALL MODULES
When Participants are Working:
* Look available, interested and ready to help.
* Watch the participants as they work, and offer individual help if you see a participant looking
troubled, staring into space, not writing answers, or not turning pages. These are clues that the
participant may need help.
* Encourage participants to ask you questions whenever they would like some help.
* If important issues or questions arise when you are talking with an individual, make note of
them to discuss later with the entire group.
* If a question arises which you feel you cannot answer adequately, obtain assistance as soon as
possible from another facilitator or the Course Director.
* Review the points in this Facilitator Guide so you will be prepared to discuss the next exercise
with the participants.
When Providing Individual Feedback:
* Before giving individual feedback, refer to the appropriate notes in this guide to remind
yourself of the major points to make.
* Compare the participant's answers to the answer sheet provided. If the answer sheet is labelled
"Possible Answers," the participant's answers do not need to match exactly, but should be
reasonable. If exact answers are provided, be sure the participant's answers match.
* If the participant's answer to any exercise is incorrect or is unreasonable, ask the participant
questions to determine why the error was made. There may be many reasons for an incorrect
answer. For example, a participant may not understand the question, may not understand
certain terms used in the exercise, may use different procedures at his clinic, may have
overlooked some information about a case, or may not understand a basic process being
taught.
* Once you have identified the reason(s) for the incorrect answer to the exercise, help the
participant correct the problem. For example, you may only need to clarify the instructions.
On the other hand, if the participant has difficulty understanding the process itself, you might
try using a specific case example to show step-by-step how the case management charts are
used for that case. After the participant understands the process that was difficult, ask him to
work the exercise or part of the exercise again.
16
* Summarize, or ask the participant to summarize, what was done in the exercise and why.
Emphasize that it is most important to learn and remember the process demonstrated by the
exercise. Give the participant a copy of the answer sheet, if one is provided.
* Always reinforce the participant for good work by (for example):
- commenting on his understanding,
- showing enthusiasm for ideas for application of the skill in his work,
- telling the participant that you enjoy discussing exercises with him,
- letting the participant know that his hard work is appreciated.
17
When Leading a Group Discussion:
* Plan to conduct the group discussion at a time when you are sure that all participants will have
completed the preceding work. Wait to announce this time until most participants are ready,
so that others will not hurry.
* Before beginning the discussion, refer to the appropriate notes in this guide to remind yourself
of the purpose of the discussion and the major points to make.
* Always begin the group discussion by telling the participants the purpose of the discussion.
* Often there is no single correct answer that needs to be agreed on in a discussion. Just be sure
the conclusions of the group are reasonable and that all participants understand how the
conclusions were reached.
* Try to get most of the group members involved in the discussion. Record key ideas on a
flipchart as they are offered. Keep your participation to a minimum, but ask questions to keep
the discussion active and on track.
* Always summarize, or ask a participant to summarize, what was discussed in the exercise.
Give participants a copy of the answer sheet, if one is provided.
* Reinforce the participants for their good work by (for example):
- praising them for the list they compiled,
- commenting on their understanding of the exercise,
- commenting on their creative or useful suggestions for using the skills on the job,
- praising them for their ability to work together as a group.
When Coordinating a Role Play:
* Before the role play, refer to the appropriate notes in this guide to remind yourself of the
purpose of the role play, roles to be assigned, background information, and major points to
make in the group discussion afterwards.
* As participants come to you for instructions before the role play,
- assign roles. At first, select individuals who are outgoing rather than shy, perhaps by
asking for volunteers. If necessary, a facilitator may be a model for the group by
acting in an early role play.
- give role play participants any props needed, for example, a baby doll, drugs.
- give role play participants any background information needed. (There is usually
some information for the "mother" which can be photocopied or clipped from this
guide.)
- suggest that role play participants speak loudly.
18
- allow preparation time for role play participants.
* When everyone is ready, arrange seating/placement of individuals involved. Have the
"mother" and "doctor" stand or sit apart from the rest of the group, where everyone can see
them.
* Begin by introducing the players in their roles and stating the purpose or situation. For
example, you may need to describe the age of the child, assessment results, and any treatment
already given.
* Interrupt if the players are having tremendous difficulty or have strayed from the purpose of
the role play.
* When the role play is finished, thank the players. Ensure that feedback offered by the rest of
the group is supportive. First discuss things done well. Then discuss things that could be
improved.
* Try to get all group members involved in discussion after the role play. In many cases, there
are questions given in the module to help structure the discussion.
* Ask participants to summarize what they learned from the role play.
19
FACILITATOR GUIDELINES
FOR
MODULE
ON
INTRODUCTION
20
INTRODUCTION
PROCEDURES FEEDBACK
1. Introduce yourself and ask participants to introduce
themselves.
2. Perform any necessary administrative tasks.
3. Distribute and introduce the Introduction module.
Participants read the module.
4. Explain your role as facilitator.
5. Participants tell where they work and tell briefly their
responsibility for care of sick children.
6. Summarize the module and answer any questions.
-------
-------
-------
-------
-------
-------
1. INTRODUCTION OF YOURSELF AND PARTICIPANTS
If participants do not know you or do not know each other, introduce yourself
as a facilitator of this course and write your name on the blackboard or
flipchart. As the participants introduce themselves, write their names on the
blackboard or flipchart. Leave the list of names in a place where everyone can
see it to help you and the participants learn each other's names.
2. ADMINISTRATIVE TASKS
There may be some administrative tasks or announcements that you should
address. For example, you may need to explain the arrangements that have
been made for lunches, the daily transportation of participants from their
lodging to the course, or payment of per diem.
3. INTRODUCTION OF MODULE
Explain that this module is short. Most of the pages are a glossary. The
module briefly describes the problem of childhood illness, the need for
integrated case management guidelines, and the case management charts.
21
Under "Purpose of This Training Course" are the major teaching objectives of
this course. The module also describes the course methods and materials.
Explain that this module, like all the modules that the participants will be
given, is theirs to keep. As they read, they can highlight important points or
write notes on the pages if they wish.
Ask the participants to read the first several pages of the Introduction module
now. They should stop reading when they reach the glossary. After everyone
has finished reading, there will be a short discussion and you will answer any
questions.
Note: Do not review the Glossary or discuss any questions about definitions in the
Glossary now. Participants will learn the terms in logical order as they
study the modules. Tell the participants that if they need help
understanding a word when it is used in a module, they should refer to
the Glossary. They can also ask a facilitator for explanation if needed.
4. EXPLANATION OF YOUR ROLE AS FACILITATOR
Explain to participants that, as facilitator (and along with your co-facilitator, if
you have one), your role throughout this course will be to:
* guide them through the course activities
* answer questions as they arise or find the answer if you do not know
* clarify information they find confusing
* give individual feedback on exercises where indicated
* lead group discussions, drills, video exercises and role plays
* prepare them for each clinical session (explain what they will do and
what to take)
* in outpatient sessions, demonstrate tasks
* observe and help them as needed during their practice in outpatient
sessions.
5. BRIEF DESCRIPTION OF PARTICIPANTS' RESPONSIBILITY FOR
CARE OF SICK CHILDREN
22
Explain to participants that you would like to learn more about their
responsibilities for caring for sick children. This will help you understand
their situations and be a better facilitator for them. For now, you will ask each
of them to tell where they work and what their job is. During the course you
will further discuss what they do in their clinic.
Begin with the first person listed on the flipchart and ask the two questions
below. Note the answers on the flipchart.
* What is the name of the clinic where you work?
* What is your training or position?
Note: Have the participant remain seated. You should ask the questions and
have the participant answer you, as in a conversation. It is very
important at this point that the participant feel relaxed and not
intimidated or put on the spot. (Though it may be interesting to you to
ask the participant more questions about his responsibilities, do not do
that now.)
6. SUMMARIZE THE MODULE AND ANSWER ANY QUESTIONS
To summarize the module, review the following points:
A. The case management process is described on 5 charts: (Point to or
walk to each of the charts on the wall as you say its title.)
Management of the young infant age up to 2 months is described on:
* ASSESS AND CLASSIFY THE SICK YOUNG INFANT
* TREAT THE YOUNG INFANT AND COUNSEL THE
MOTHER
Management of the sick child age 2 months upto 5 years is somewhat
different from young infants. It is described on:
* ASSESS AND CLASSIFY THE SICK CHILD
* TREAT THE CHILD
* COUNSEL THE MOTHER
B. To use the charts, you first decide which age group the child is in:
- Age up to 2 months
- Age 2 months up to 5 years
23
* If the child is not yet 2 months of age, the child is
considered a young infant. Use the chart ASSESS, CLASSIFY
AND TREAT THE SICK YOUNG INFANT.
* If the child is 2 months up to 5 years, select the chart ASSESS
AND CLASSIFY THE SICK CHILD AGE 2 MONTHS UP TO 5
YEARS. "Up to 5 years" means the child has not yet had his
fifth birthday. (Be sure that participants understand "up to"
means up to but not including that age.)
* A child who is 2 months old would be in the group 2 months up
to 5 years, not in the group up to 2 months.
C. In this course you will learn to do all the steps on these charts. You
will learn from:
* Modules (Hold up or point to a set of modules.)
* Clinical sessions. You will go to clinics to practice managing
sick children using what you have learned.
D. Ask participants if they have any questions about what they read in the
module or heard in the opening session. Answer their questions, but
do not explain how to use the case management charts. This will be
taught in the rest of the course.
Note: Participants may ask whether the case management charts can be used for
children who are older or younger than the age groups specified
on the charts. If they ask this question during discussion of the
module Introduction, explain as simply as possible, such as by
using only the explanation in bold italics below. If they ask
later in the course, after they have learned how to assess and
classify, they could understand the entire explanation below.
Why not use this process for children age 5 years or more?
The case management process is designed for children less than 5 years
of age. Although much of the advice on treatment of pneumonia,
diarrhoea, malaria, measles and malnutrition is applicable to older
children, the assessment and classification of older children would
differ. For example, the cut-off rates for determining fast breathing
24
would be different, because normal breathing rates are slower in older
children. Chest indrawing is not a reliable sign of severe pneumonia as
children get older and the bones of the chest become more firm. Older
children can talk and so are able to report additional symptoms which
are not in these charts, such as chest pain and headache, which maybe
useful in deciding whether pneumonia or malaria is present.
In addition, certain treatment recommendations or advice to the mother
on feeding would differ for children over 5 years of age. The drug
dosing tables only apply to children up to 5 years. The feeding advice
for older children may differ and they may have different feeding
problems.
To summarize: Much of the treatment advice may be helpful for a
child age 5 years or more. However, because of differences in the
clinical signs of older and younger children who have these illnesses,
this assessment and classification process using these clinical signs
is not recommended for older children.
E. When there are no more questions, tell participants that they are ready
to begin with the first step of case management, assessing and
classifying a sick Young Infant up to 2 months. This is covered in the
next module.
25
FACILITATOR GUIDELINES
FOR
MODULE ON
ASSESS AND CLASSIFY
THE SICK YOUNG INFANT
UP TO 2 MONTHS
26
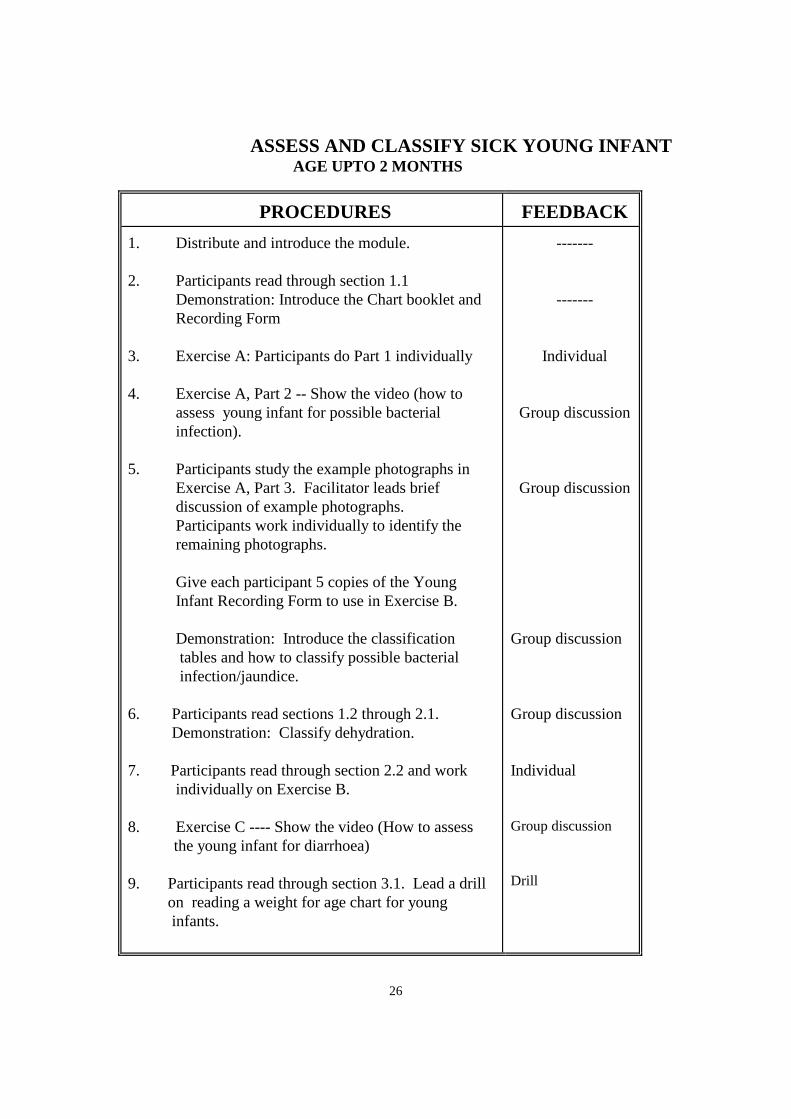
ASSESS AND CLASSIFY SICK YOUNG INFANT AGE UPTO 2 MONTHS
PROCEDURES FEEDBACK
1. Distribute and introduce the module.
2. Participants read through section 1.1
Demonstration: Introduce the Chart booklet and
Recording Form
3. Exercise A: Participants do Part 1 individually
4. Exercise A, Part 2 -- Show the video (how to
assess young infant for possible bacterial
infection).
5. Participants study the example photographs in
Exercise A, Part 3. Facilitator leads brief
discussion of example photographs.
Participants work individually to identify the
remaining photographs.
Give each participant 5 copies of the Young
Infant Recording Form to use in Exercise B.
Demonstration: Introduce the classification
tables and how to classify possible bacterial
infection/jaundice.
6. Participants read sections 1.2 through 2.1.
Demonstration: Classify dehydration.
7. Participants read through section 2.2 and work
individually on Exercise B.
8. Exercise C ---- Show the video (How to assess
the young infant for diarrhoea)
9. Participants read through section 3.1. Lead a drill
on reading a weight for age chart for young
infants.
-------
-------
Individual
Group discussion
Group discussion
Group discussion
Group discussion
Individual
Group discussion
Drill
27
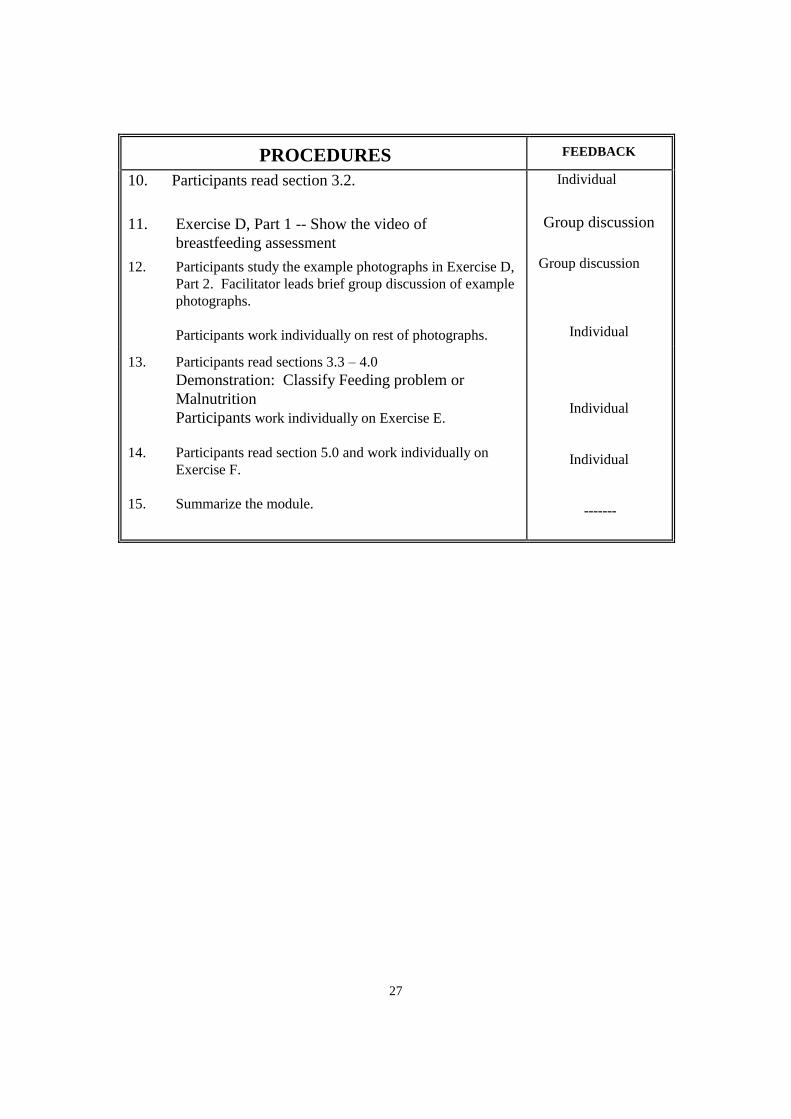
PROCEDURES FEEDBACK
10. Participants read section 3.2.
11. Exercise D, Part 1 -- Show the video of
breastfeeding assessment
12. Participants study the example photographs in Exercise D,
Part 2. Facilitator leads brief group discussion of example
photographs.
Participants work individually on rest of photographs.
Individual
Group discussion
Group discussion
Individual
13. Participants read sections 3.3 – 4.0
Demonstration: Classify Feeding problem or
Malnutrition
Participants work individually on Exercise E.
14. Participants read section 5.0 and work individually on
Exercise F.
15. Summarize the module.
Individual
Individual
-------
28
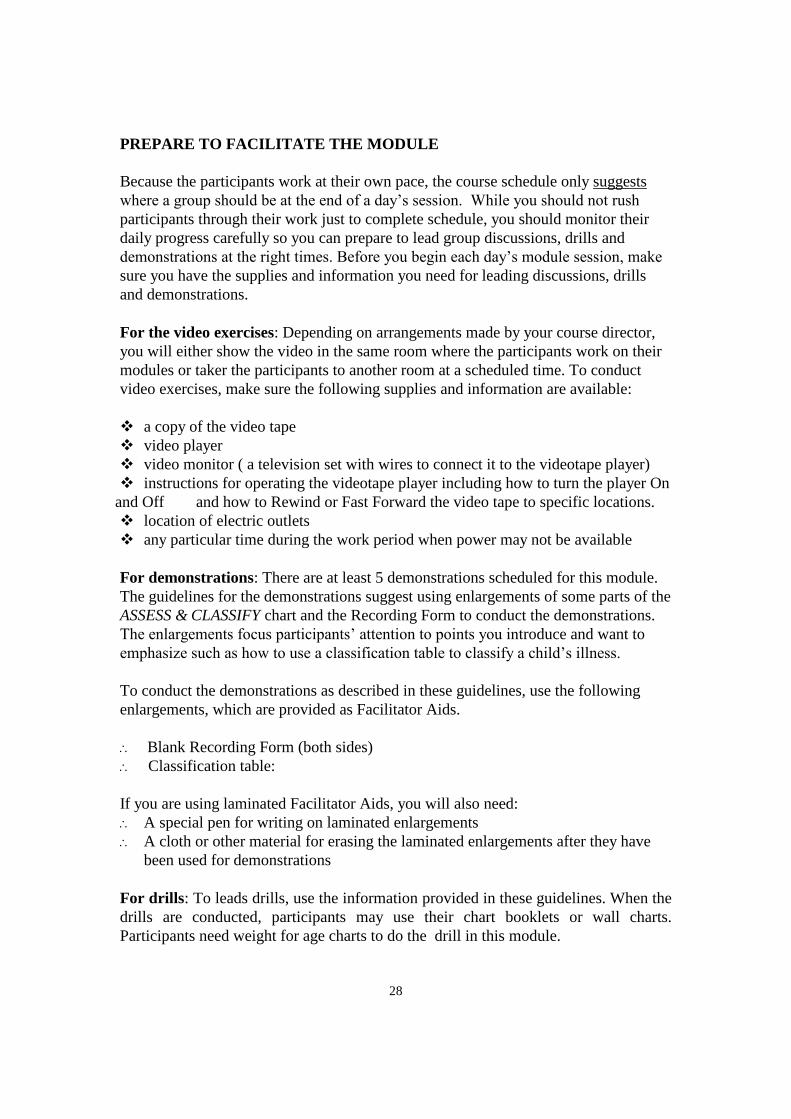
PREPARE TO FACILITATE THE MODULE
Because the participants work at their own pace, the course schedule only suggests
where a group should be at the end of a day’s session. While you should not rush
participants through their work just to complete schedule, you should monitor their
daily progress carefully so you can prepare to lead group discussions, drills and
demonstrations at the right times. Before you begin each day’s module session, make
sure you have the supplies and information you need for leading discussions, drills
and demonstrations.
For the video exercises: Depending on arrangements made by your course director,
you will either show the video in the same room where the participants work on their
modules or taker the participants to another room at a scheduled time. To conduct
video exercises, make sure the following supplies and information are available:
a copy of the video tape
video player
video monitor ( a television set with wires to connect it to the videotape player)
instructions for operating the videotape player including how to turn the player On
and Off and how to Rewind or Fast Forward the video tape to specific locations.
location of electric outlets
any particular time during the work period when power may not be available
For demonstrations: There are at least 5 demonstrations scheduled for this module.
The guidelines for the demonstrations suggest using enlargements of some parts of the
ASSESS & CLASSIFY chart and the Recording Form to conduct the demonstrations.
The enlargements focus participants’ attention to points you introduce and want to
emphasize such as how to use a classification table to classify a child’s illness.
To conduct the demonstrations as described in these guidelines, use the following
enlargements, which are provided as Facilitator Aids.
Blank Recording Form (both sides)
Classification table:
If you are using laminated Facilitator Aids, you will also need:
A special pen for writing on laminated enlargements
A cloth or other material for erasing the laminated enlargements after they have
been used for demonstrations
For drills: To leads drills, use the information provided in these guidelines. When the
drills are conducted, participants may use their chart booklets or wall charts.
Participants need weight for age charts to do the drill in this module.
29
For photographic exercises: Make sure you have enough photograph booklets to
give one to each participant.
For chart booklets to use in clinical sessions: Participants will be introduced to the
chart booklet on Day 1 of the module and begin to use it during the first clinical
practice session on Day 2. Make sure you have enough chart booklets on Day 1.
Guidelines for leading the module ASSESS AND CLASSIFY THE YOUNG
INFANT AGE UPTO 2 MONTHS begin on the next page.
INTRODUCE THE MODULE
Distribute the module. Explain that in this module, participants will learn how to
assess and classify children according the process described on the chart ASSESS
AND CLASSIFY THE YOUNG INFANT AGE UPTO 2 MONTHS. Tell them that
by learning how to use the process shown on the chart, participants will be able to
identify signs of serious disease such as bacterial infection, jaundice, diarrhoea,
feeding problems and malnutrition.
1. Explain that they will learn each part of the chart as they work through the
module over the next few days. Reassure then by explaining that they are
not expected to know and understand all of the steps on the chart in one
day. Each part of the chart represents a step in a process that will be taught
to them in the module and during clinical practice session.
(Note: It is important to not overwhelm participants with extensive details
about the chart at this point. Because this is the first day of the course,
participants may not be able to retain extensive and detailed points. They
are still adjusting to the course method, to you as the facilitator and to their
surroundings.)
2. Ask the participants to read the Introduction the Learning Objectives on
page 1.
When they have finished reading page 1, ask the participants to move
closer so that they can see the wall chart more closely.
-- Tell the participants that this chart has three main sections. They are
indicated by three headings: Assess, Classify and Identify
Treatment.
30
-- Point to each heading and column. Explain that this module will teach
participants how to assess and classify. Later, they will learn how
to identify treatment.
Next review the learning objectives with the participants. State each objective
as you point to the relevant assess step or classification table of the wall chart.
Ask the mother about the child’s problem.
Assess the young infant for signs related to possible bacterial infection/
jaundice
- classify the infant’s illness according to the signs which are present
or absent
Ask the mother about diarrhoea
- assess the young infant further for signs related to diarrhoea
- classify the infant’s illness according to the signs which are
present or absent
Check for feeding problem or signs of malnutrition and classify the
infant for feeding problem or its nutritional status.
Check the infant’s immunization status and decide if the infant needs
any immunization today.
Assess any other problem
3. Introduce the first section of the module: “ask the mother what the infant’s
problems are”. Show the participants where the steps are located on the
large wall chart. For example:
31
Now you will read about how to do the first step on the chart. Here is
where the step is located on the chart. ( Point to the top of the Assess
column). First ask the mother what the young infant’s problems are. (Point
to the relevant question on the chart.) She will tell you the young infant’s
problems and why she brought her infant to the clinic today.
Next you must decide if this is an initial or follow-up visit. (Point to where
this step is listed in the Assess column.) An “initial” visit is the first visit
for a problem. A “follow-up” visit means that the infant was seen a few
days ago for the problem, and now has returned for further evaluation.
Ask the participants to turn to section 1.0. Ask The Mother What the
Young Infant’s problems are. Explain that when they have finished reading
till Exercise A that they should tell a facilitator. There will be a
demonstration before they do exercise A.
2. DEMONSTRATION: Introduce the chart booklet and the recording
Form
Distribute the chart booklet. Introduce it by briefly stating the following
points:
* This booklet is called the chart booklet. You can use the wall chart to find
information about assessing and classifying sick young infants and children
or you can use the chart booklet. Both describe the same process. The
chart booklet contains the same information that is on the wall charts. It
also contains blank copies of the two Recording Forms.
* The chart you are learning now is called ASSESS AND CLASSIFY THE SICK
YOUNG INFANT UPTO AGE 2 MONTHS. All the assess column boxes
and all the classification tables from the ASSESS & CLASSIFY wall chart
are in the first section of the chart booklet. The assessment box and
classification table for each main symptom are grouped together like this.
(Show a sample page such as the one for possible bacterial infection so
participants see it matches with the assess box, the classification arrow and
classification table on the wall chart.)
The chart booklet is convenient to use when you work with modules at a
table and when you practice assessing and classifying sick children during
clinical sessions. We will begin using the chart booklet today so you can
become familiar with it before using it for the first time tomorrow morning
during clinical practice.
32
Look at the table of contents.. It tells you where to find each part of the chart.
The ASSESS & CLASSIFY charts are listed in the first column. They begin on
page 2 where you see the charts that tell you how to check for possible
bacterial infection.1
Introduce the recording Form
Materials needed to do this demonstration:
Enlarged Blank Recording Form
To conduct the demonstration:
When all the participants are ready, introduce the form by briefly
mentioning each part of the form and its purpose. Use enlarged Recording
Form, to help participants see each part as you refer to it. For example:
“This is a recording Form. Its purpose is to help you record
information collected about the infant’s signs and symptoms when you do
exercises in the module and when you see infants during clinical practice
sessions.
There are 2 sides to the form. The front side is similar to the ASSESS &
CLASSIFY chart. The other side of the form has spaces for you to use
when you plan the infant’s treatment. In this module, however, you will
use the front side only. You will learn how to use the reverse side later in
the course.
Look at the top of the front side of the form. (Point to each space as you
say:) There are spaces for writing:
the infant’s name, age, weight and temperature.
the mother’s answer about the infant’s problems.
whether this is an initial visit or follow-up visit.
Look at how the Recording Form is arranged. Notice that :
the form is divided into 2 columns: (Point to each column as you
mention it) one is for “Assess” and the other is for “Classify.”
These two columns relate to the Assess and Classify columns on the
ASSESS & CLASSIFY wall chart.
1 If the classification tables in the chart booklets do not have coloured rows, participants can use
markers to color them pink, yellow and green. Before they begin this activity, explain
clearly to them what color each row should be.
33
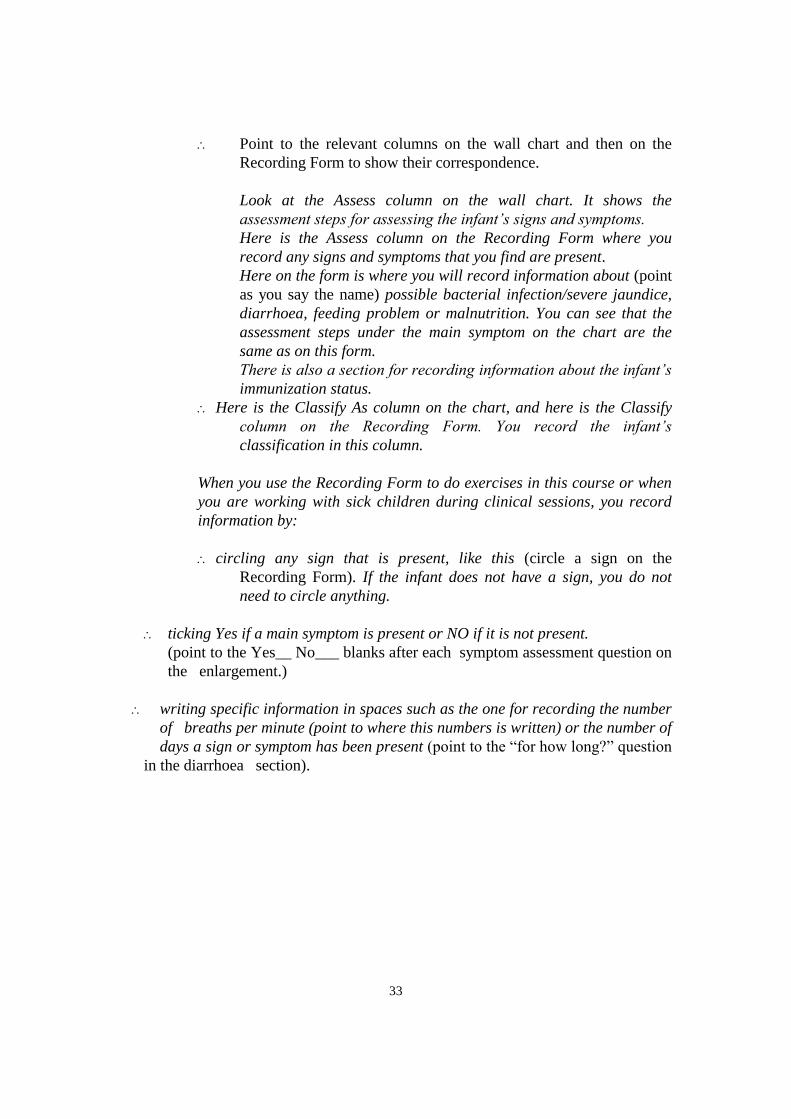
Point to the relevant columns on the wall chart and then on the
Recording Form to show their correspondence.
Look at the Assess column on the wall chart. It shows the
assessment steps for assessing the infant’s signs and symptoms.
Here is the Assess column on the Recording Form where you
record any signs and symptoms that you find are present.
Here on the form is where you will record information about (point
as you say the name) possible bacterial infection/severe jaundice,
diarrhoea, feeding problem or malnutrition. You can see that the
assessment steps under the main symptom on the chart are the
same as on this form.
There is also a section for recording information about the infant’s
immunization status.
Here is the Classify As column on the chart, and here is the Classify
column on the Recording Form. You record the infant’s
classification in this column.
When you use the Recording Form to do exercises in this course or when
you are working with sick children during clinical sessions, you record
information by:
circling any sign that is present, like this (circle a sign on the
Recording Form). If the infant does not have a sign, you do not
need to circle anything.
ticking Yes if a main symptom is present or NO if it is not present.
(point to the Yes__ No___ blanks after each symptom assessment question on
the enlargement.)
writing specific information in spaces such as the one for recording the number
of breaths per minute (point to where this numbers is written) or the number of
days a sign or symptom has been present (point to the “for how long?” question
in the diarrhoea section).
34
Writing the classification of the main symptom
As you work through the exercises in this module, you will only see the part of the
form for the main symptoms and signs you have learned.
At the end of the demonstration, ask if there are any questions. When there are no
additional questions, ask the participants to turn to Exercise A and begin the
exercises. Explain that they should tell a facilitator when they have completed
their work on the exercises, and that the facilitator will, discuss their answers with
them individually.
3. EXERCISE A: Part 1. Individual work followed by individual feedback-
Check for Possible Bacterial Infection/ Jaundice
Compare the participant’s answers to the answer sheet and discuss any
differences between them.
This is the first time participants use the Recording Form make sure participants
learn to use the form correctly. As you discuss each case with the participant:
make sure the participant has written the infant’s name, age weight and
temperature in the appropriate places.
make sure the participant has written the infant’s problems in the space
provided and ticked whether this is an initial or follow-up visit.
Sentences follow each case to help guide the participant in the completion of
the Recording Form. Talk through these sentences to review with the
participant the steps for filling in the Recording Form.
Praise the participant for what they have done well. Answer their questions and
provide guidance as needed. Give the participant a copy of the answer sheet.
35
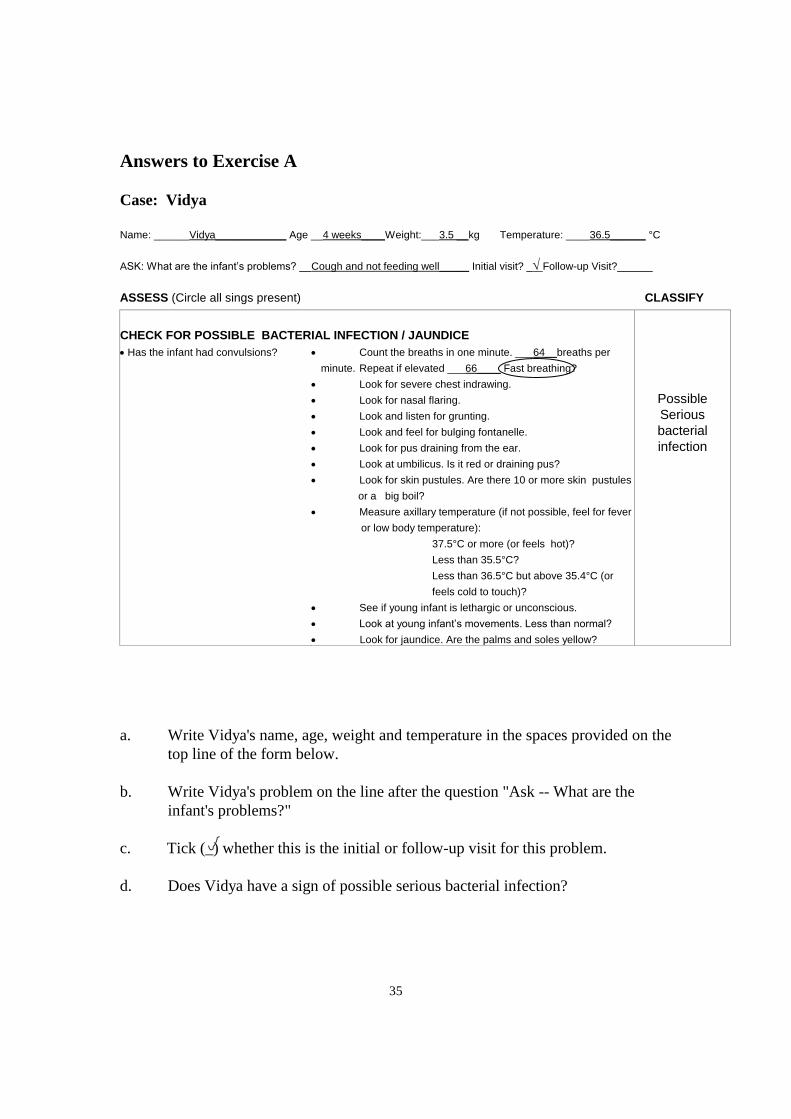
Answers to Exercise A
Case: Vidya
Name: ______Vidya____________ Age __4 weeks____Weight:___3.5 __kg Temperature: ____36.5______ °C
ASK: What are the infant’s problems? __Cough and not feeding well_____ Initial visit? _ Follow-up Visit?______
ASSESS (Circle all sings present) CLASSIFY
CHECK FOR POSSIBLE BACTERIAL INFECTION / JAUNDICE
Has the infant had convulsions? Count the breaths in one minute. ___64__breaths per
minute. Repeat if elevated ___66____ Fast breathing?
Look for severe chest indrawing.
Look for nasal flaring.
Look and listen for grunting.
Look and feel for bulging fontanelle.
Look for pus draining from the ear.
Look at umbilicus. Is it red or draining pus?
Look for skin pustules. Are there 10 or more skin pustules
or a big boil?
Measure axillary temperature (if not possible, feel for fever
or low body temperature):
37.5°C or more (or feels hot)?
Less than 35.5°C?
Less than 36.5°C but above 35.4°C (or
feels cold to touch)?
See if young infant is lethargic or unconscious.
Look at young infant’s movements. Less than normal?
Look for jaundice. Are the palms and soles yellow?
Possible
Serious
bacterial
infection
a. Write Vidya's name, age, weight and temperature in the spaces provided on the
top line of the form below.
b. Write Vidya's problem on the line after the question "Ask -- What are the
infant's problems?"
c. Tick (_) whether this is the initial or follow-up visit for this problem.
d. Does Vidya have a sign of possible serious bacterial infection?
36
4. EXERCISE A: Part 2: Video demonstration – Assessing for possible
Bacterial Infection/Jaundice
When all the participants are ready, arrange for them to move to where the
video exercise will be shown. Make sure they bring their modules and chart
booklets.
To show the video exercise:
1. Tell participants that they will watch a demonstration of how to assess
a young infant for possible bacterial infection/jaundice. The video will
show examples of abnormal signs.
2. Ask if participants have any questions before you start the video. When
there are no additional questions, start the video.
3. Show the video. Follow the instructions given in the video. Pause the
video and give explanations or discuss what the participants are seeing
as needed to be sure the participants understand how to assess these
signs.
4. At the end of the video, lead a short discussion. If the participants are
not clear about the assessment of any signs, rewind the video and show
the relevant portions again.
Important points to emphasize about the assessment in this video are:
It is particularly difficult to count breathing rate in a young
infant because of irregular breathing. Repeat any count, which
is 60 or more.
Grunting can be difficult to hear. Many infants make occasional
noises. Grunting is regular, soft, short noises when breathing
out (at the beginning of expiration). (If participants are having
trouble understanding grunting, demonstrate it.)
You need to look very closely for nasal flaring – the nostrils of
a young infant are small.
37
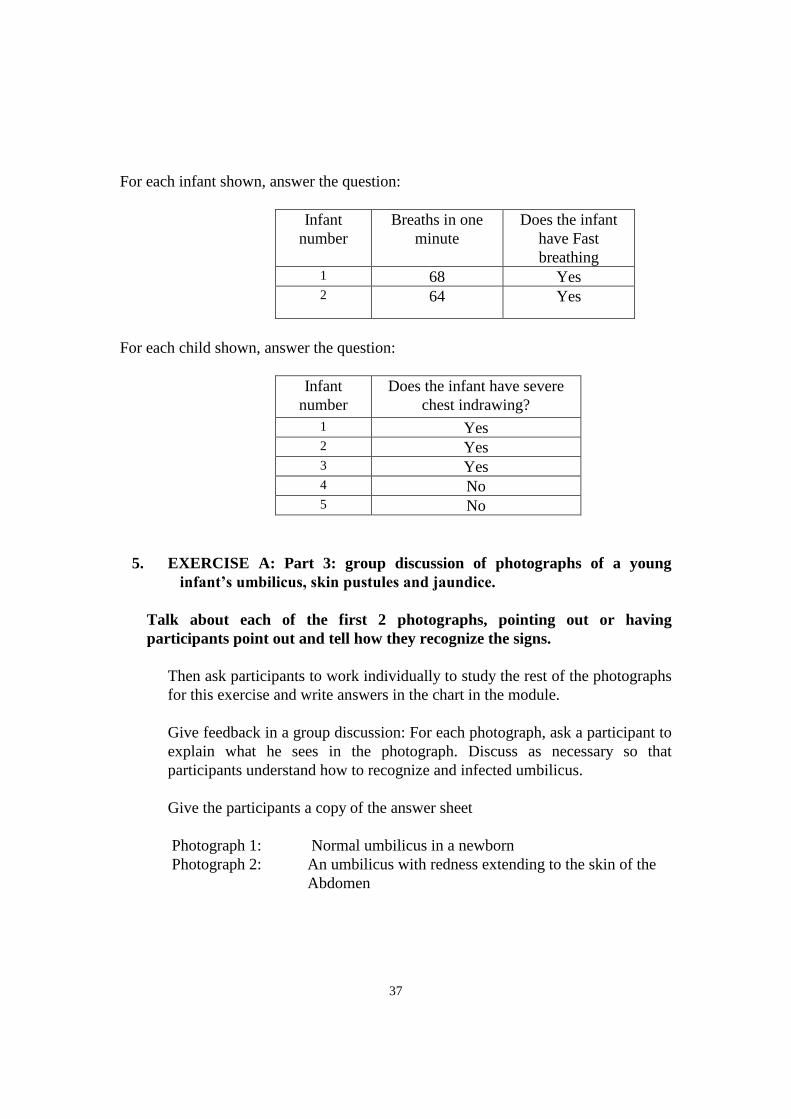
For each infant shown, answer the question:
Infant
number
Breaths in one
minute
Does the infant
have Fast
breathing 1 68 Yes 2
64 Yes
For each child shown, answer the question:
Infant
number
Does the infant have severe
chest indrawing?
1 Yes 2 Yes 3 Yes 4 No 5 No
5. EXERCISE A: Part 3: group discussion of photographs of a young
infant’s umbilicus, skin pustules and jaundice.
Talk about each of the first 2 photographs, pointing out or having
participants point out and tell how they recognize the signs.
Then ask participants to work individually to study the rest of the photographs
for this exercise and write answers in the chart in the module.
Give feedback in a group discussion: For each photograph, ask a participant to
explain what he sees in the photograph. Discuss as necessary so that
participants understand how to recognize and infected umbilicus.
Give the participants a copy of the answer sheet
Photograph 1: Normal umbilicus in a newborn
Photograph 2: An umbilicus with redness extending to the skin of the
Abdomen
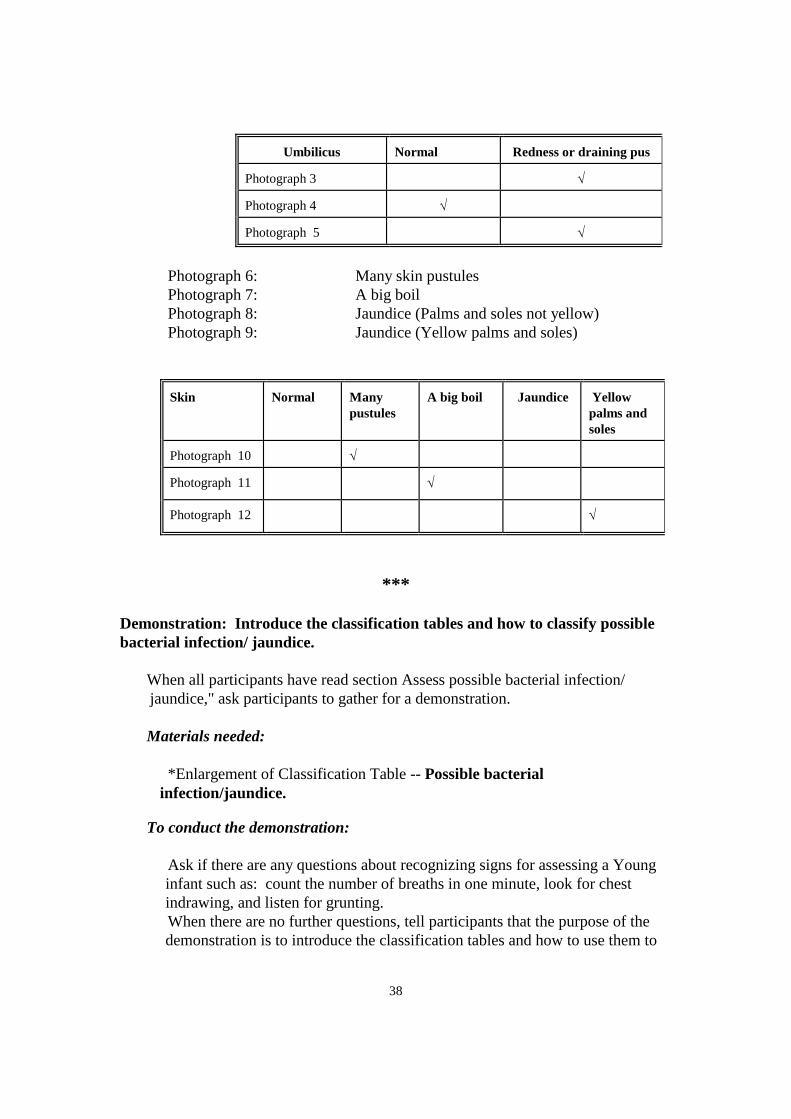
38
Umbilicus Normal Redness or draining pus
Photograph 3
Photograph 4
Photograph 5
Photograph 6: Many skin pustules
Photograph 7: A big boil
Photograph 8: Jaundice (Palms and soles not yellow)
Photograph 9: Jaundice (Yellow palms and soles)
Skin Normal Many
pustules
A big boil Jaundice
Yellow
palms and
soles
Photograph 10
Photograph 11
Photograph 12
***
Demonstration: Introduce the classification tables and how to classify possible
bacterial infection/ jaundice.
When all participants have read section Assess possible bacterial infection/
jaundice," ask participants to gather for a demonstration.
Materials needed:
*Enlargement of Classification Table -- Possible bacterial
infection/jaundice.
To conduct the demonstration:
Ask if there are any questions about recognizing signs for assessing a Young
infant such as: count the number of breaths in one minute, look for chest
indrawing, and listen for grunting.
When there are no further questions, tell participants that the purpose of the
demonstration is to introduce the classification tables and how to use them to
39
classify illness in sick Young Infants and children. Details about individual
classifications will be described later.
Point to the wall chart and show participants where the classification tables are
located on the chart. Mention points such as:
-- In general, most of the classification tables on the ASSESS & CLASSIFY chart
have 3 rows (except Possible bacterial infection/jaundice).
-- Each row is coloured either pink, yellow, or green.
-- The colour of the row helps to identify rapidly whether the Young infant has a
serious disease requiring urgent attention.
-- A classification in a pink row means the Young infant has a severe
classification and needs urgent attention and referral or admission for
inpatient care.
-- A classification in a yellow row means the Young infant needs a specific
medical treatment such as an appropriate antibiotic, or other treatment.
Treatment includes teaching the mother how to give the oral drugs or to
treat local infections at home. The doctor advises her about caring for the
Young infant at home and when she should return.
-- A classification in a green row is not given a specific medical treatment such
as antibiotics or other treatments. The doctor teaches the mother how to
care for her Young infant at home. For example, you might advise her on
feeding her sick child.
Now display the enlargement of the classification table for Possible Bacterial
infection/jaundice. Point out the ‘Signs’ column and the ‘Classify As’ column.
As you talk through the steps for classifying Possible Bacterial
infection/jaundice, point to each row as you describe it. Explain that there is no
green row in the classification table for Possible Bacterial infection/jaundice.
Depending on the combination of the young infant's signs and symptoms, the
young infant is classified in either the pink, yellow, or green row. However,
the young infant may have more than one classification with the same color
code in a classification table.
All young infants must be assessed for possible bacterial infection / jaundice. There
are two pink and three yellow classifications.
Pink classifications:
POSSIBLE SERIOUS BACTERIAL INFECTION and/or
SEVERE JAUNDICE
OR
40
Yellow classifications:
LOCAL BACTERIAL INFECTION and/or
JAUNDICE and/or
LOW BODY TEMPERATURE
Here is the classification table for possible bacterial infection / jaundice.
1. Look at the pink (or top) rows.
Does the young infant have any of the signs of possible serious bacterial infection?
If the young infant has any of the signs of possible serious bacterial infection,
select the severe classification, POSSIBLE SERIOUS BACTERIAL INFECTION.
2. If the young infant does not have the severe classifications, look at the yellow
rows.
This young infant does not have a severe classification. Is the umbilicus red or
draining pus? Is there pus discharge from ear? Does the young infant have < 10
skin pustules?
3. Whenever you use a classification table, start with the top row. In each
classification limb, a young infant receives classifications in one colour only. If
the infant has signs from more than one row, always select the more serious
classification.
4. Young infants have also to be classified for jaundice or Low Body temperature if
present. You have to select an appropriate classification for these conditions too.
5. For the classification tables that have a green row, if the young infant does not have
any of the signs in the pink or yellow rows, select the classification in the green
row.
When all discussion is complete, ask participants to continue working in the module.
They should read sections 1.2 through 2.1.
6. DEMONSTRATION: Classify dehydration
When all the participants have read through Assess Diarrhoea, gather the
participants together for a short demonstration.
Materials needed:
* Enlarged Blank Recording Form
* Enlarged Classification Table - Dehydration
41
To conduct this demonstration:
1. Briefly review with participants the steps for classifying Possible bacterial
infection/ jaundice.
2. Introduce the enlarged classification table for diarrhoea. Explain that
classifying diarrhoea is slightly different than classifying Possible bacterial
infection/ jaundice.
All Young Infants with diarrhoea are classified for dehydration. To select
a classification for dehydration, the Young Infants must have two or more
of the signs in either the pink or yellow row. One sign is not enough to
select a pink or yellow classification. If the Young Infants has only one
sign in a row, look at the next row.
* Only classify Severe persistent diarrhoea if the Young Infants has had
diarrhoea lasting 14 days or more.
* Only classify Severe dysentery if the Young Infants has blood in the stool.
7. Ask participants to read through 2.2 and work individually on Exercise B.
Give each participant 5 copies of the young infant Recording Form to use in
Exercise B.
EXERCISE B: Individual work followed by individual feedback --
Assess and classify possible bacterial infection and diarrhoea in case
studies
Watch to see when participants are beginning Exercise B. Be sure that each
participant has 5 copies of the Young Infant Recording Form and understands
that he should record the information about each case in Exercise B on these
forms. If any participant seems confused, explain or show him individually
how to use the Recording Forms, so that he can get started on the exercise
without delay.
Compare the participant's Recording Forms with the Answer Sheets for
Exercise B. Where the participant has recorded something different, discuss
why he did that, and go back to the case study as needed to verify the reason
for the answer. Give the participant a copy of the answer sheet to keep.
Tell the participant that later exercises in this module will continue these same
5 case studies. The participant will continue completing the same 5 Recording
Forms as he continues to work through the module.
In order to better understand the participant's work situation, discuss with the
participant whether he sees sick young infants at his clinic.

42
Ask the participant to read through section 3.1 and to let you know when he
has finished. (If you do not plan to do the drill on reading a weight for age
chart right away, ask the participant to read section 3.2 also and to let you
know when he comes to Exercise C. Exercises C and D are video exercises).
43
Answers to Exercise B
CASE-1
MANAGEMENT OF THE SICK YOUNG INFANT AGE UP TO 2 MONTHS
Name: Harish Age: 3 weeks ____ Weight: ___3.6___ kg Temperature: _36.5_ °C
ASK: What are the infant’s problems? _Difficulty in breathing Initial visit? ____ Follow-up Visit?______
ASSESS (Circle all sings present) CLASSIFY
CHECK FOR POSSIBLE BACTERIAL INFECTION / JAUNDICE
Has the infant had convulsions?
Count the breaths in one minute. 74 breaths per minute
Repeat if elevated __70______ Fast breathing?
Look for severe chest indrawing.
Look for nasal flaring.
Look and listen for grunting.
Look and feel for bulging fontanelle.
Look for pus draining from the ear.
Look at the umbilicus. Is it red or draining pus?
Look for skin pustules. Are there 10 or more pustules or a big
boil?
Measure axillary temperature (if not possible, feel for fever or
low body temperature):
37.5°C or more (or feels hot)?
Less than 35.5°C?
Less than 36.5°C but above 35.4°C (or feels cold to touch)?
See if young infant is lethargic or unconscious
Look at young infant’s movements. Less than normal?
Look for jaundice. Are the palms and soles yellow?
Possible Serious
Bacterial
Infection
DOES THE YOUNG INFANT HAVE DIARRHOEA? Yes ___No ___
Look at the young infant’s general condition. Is the infant:
Lethargic or unconscious?
Restless and irritable?
Look for sunken eyes.
Very slowly (longer than 2 seconds)?
Slowly?
44
Answers to Exercise B
CASE - 2
MANAGEMENT OF THE SICK YOUNG INFANT AGE UP TO 2 MONTHS
Name: Shashi Age: 4 days___ Weight: ___2.7___ kg Temperature: 37_ °C
ASK: What are the infant’s problems? _Yellow and has rash Initial visit? ____ ollow-up Visit?______
ASSESS (Circle all sings present) CLASSIFY
CHECK FOR POSSIBLE BACTERIAL INFECTION / JAUNDICE
Has the infant had convulsions?
Count the breaths in one minute 55 breaths per minute
Repeat if elevated _____Fast breathing?
Look for severe chest indrawing.
Look for nasal flaring.
Look and listen for grunting.
Look and feel for bulging fontanelle.
Look for pus draining from the ear.
Look at the umbilicus. Is it red or draining pus?
Look for skin pustules. Are there 10 or more pustules or a big
boil?
Measure axillary temperature (if not possible, feel for fever or
low body temperature):
37.5°C or more (or feels hot)?
Less than 35.5°C?
Less than 36.5°C but above 35.4°C (or feels cold to touch)?
See if young infant is lethargic or unconscious
Look at young infant’s movements. Less than normal?
Look for jaundice. Are the palms and soles yellow?
Severe Jaundice
Local Bacterial
infection
DOES THE YOUNG INFANT HAVE DIARRHOEA? Yes ___No ___
For how long? ____ Days
Is there blood in the stool?
Look at the young infant’s general condition. Is the infant:
Lethargic or unconscious?
Restless and irritable?
Look for sunken eyes.
Very slowly (longer than 2 seconds)?
Slowly?
45
Answers to Exercise B
CASE - 3
MANAGEMENT OF THE SICK YOUNG INFANT AGE UP TO 2 MONTHS
Name: Ankit Age: 2 weeks__ Weight: ___2.5___ kg Temperature: 35.7_ °C
ASK: What are the infant’s problems? small,umbilical dischargeInitial visit? ____ Follow-up Visit?______
ASSESS (Circle all sings present) CLASSIFY
CHECK FOR POSSIBLE BACTERIAL INFECTION / JAUNDICE
Has the infant had convulsions?
Count the breaths in one minute 55 breaths per minute
Repeat if elevated _______ Fast breathing?
Look for severe chest indrawing.
Look for nasal flaring.
Look and listen for grunting.
Look and feel for bulging fontanelle.
Look for pus draining from the ear.
Look at the umbilicus. Is it red or draining pus?
Look for skin pustules. Are there 10 or more pustules or a big
boil?
Measure axillary temperature (if not possible, feel for fever or
low body temperature):
37.5°C or more (or feels hot)?
Less than 35.5°C?
Less than 36.5°C but above 35.4°C (or feels cold to touch)?
See if young infant is lethargic or unconscious
Look at young infant’s movements. Less than normal?
Look for jaundice. Are the palms and soles yellow?
Local Bacterial
Infection
Low Body
Temperature
DOES THE YOUNG INFANT HAVE DIARRHOEA? Yes ___No ___
Look at the young infant’s general condition. Is the infant:
Lethargic or unconscious?
Restless and irritable?
Look for sunken eyes.
Very slowly (longer than 2 seconds)?
Slowly?
46
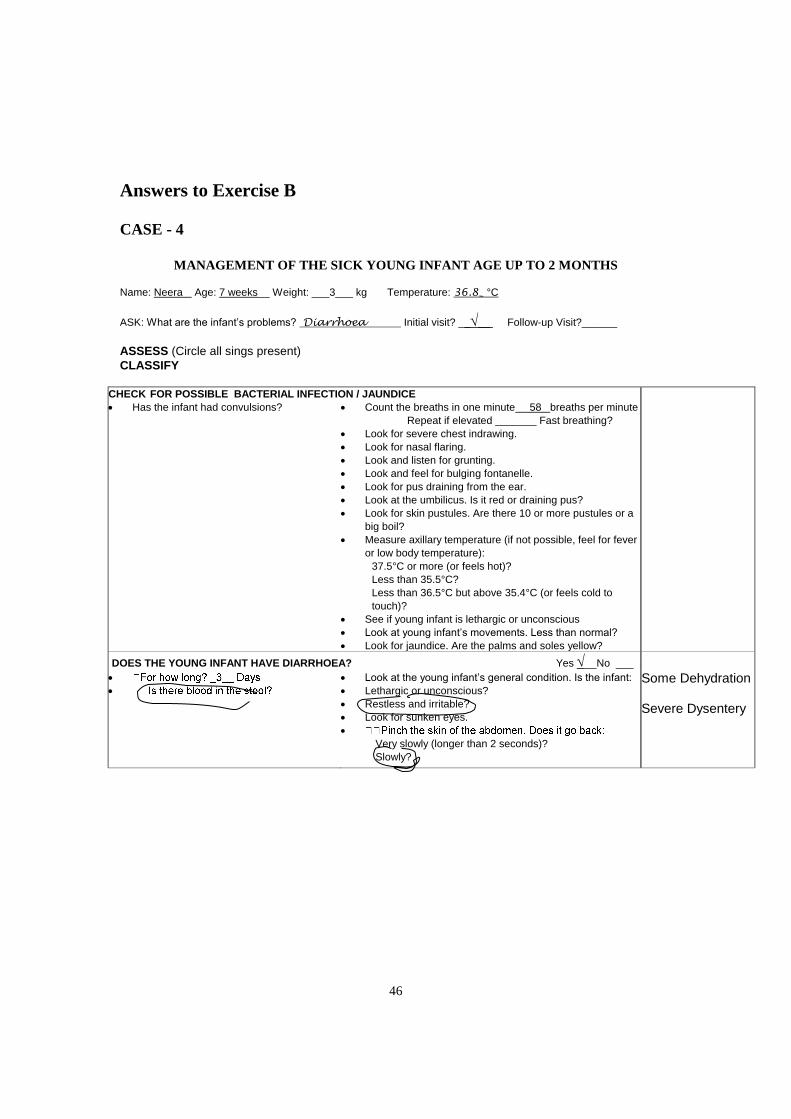
Answers to Exercise B
CASE - 4
MANAGEMENT OF THE SICK YOUNG INFANT AGE UP TO 2 MONTHS
Name: Neera Age: 7 weeks__ Weight: ___3___ kg Temperature: 36.8_ °C
ASK: What are the infant’s problems? Diarrhoea Initial visit? ____ Follow-up Visit?______
ASSESS (Circle all sings present)
CLASSIFY
CHECK FOR POSSIBLE BACTERIAL INFECTION / JAUNDICE
Has the infant had convulsions?
Count the breaths in one minute 58 breaths per minute
Repeat if elevated _______ Fast breathing?
Look for severe chest indrawing.
Look for nasal flaring.
Look and listen for grunting.
Look and feel for bulging fontanelle.
Look for pus draining from the ear.
Look at the umbilicus. Is it red or draining pus?
Look for skin pustules. Are there 10 or more pustules or a
big boil?
Measure axillary temperature (if not possible, feel for fever
or low body temperature):
37.5°C or more (or feels hot)?
Less than 35.5°C?
Less than 36.5°C but above 35.4°C (or feels cold to
touch)?
See if young infant is lethargic or unconscious
Look at young infant’s movements. Less than normal?
Look for jaundice. Are the palms and soles yellow?
DOES THE YOUNG INFANT HAVE DIARRHOEA? Yes __No ___
Look at the young infant’s general condition. Is the infant:
Lethargic or unconscious?
Restless and irritable?
Look for sunken eyes.
Very slowly (longer than 2 seconds)?
Slowly?
Some Dehydration Severe Dysentery

47
8. EXERCISE C: Video case study -- Group viewing and discussion of
assessing and classifying a young infant for possible bacterial infection
and diarrhoea
When all the participants are ready, arrange for them to move to where the
video exercise will be shown. Make sure they bring their modules and chart
booklets.
To conduct the video exercise:
1. Tell participants that during this exercise they will watch a case study
of a young infant. The young infant will be assessed for possible
bacterial infection and diarrhoea. They should record their assessment
results on the recording form in the module. They will be given time
to classify the young infant and write the classifications on the form.
2. Ask if participants have any questions before you start the video.
When there are no additional questions, start the video.
3. At the end of the video, lead a short discussion. If participants are not
clear about the assessment of any signs, rewind the video and show the
relevant portions again. If there are any questions about the
classifications, review the infant's signs and how they were classified,
referring to a classification table.
Give participants a copy of the answer sheet.
If you are not doing the drill now, ask participants to read through section 3.2
48
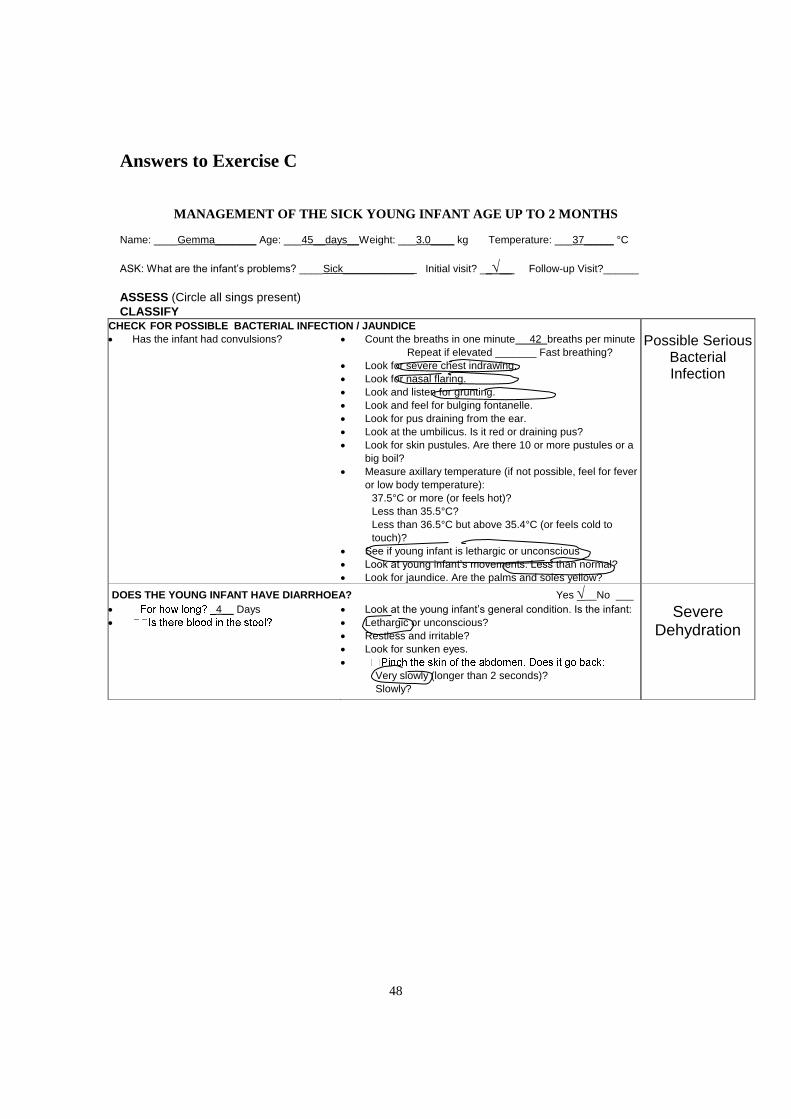
Answers to Exercise C
MANAGEMENT OF THE SICK YOUNG INFANT AGE UP TO 2 MONTHS
Name: ____Gemma_______ Age: ___45__days__Weight: ___3.0____ kg Temperature: ___37_____ °C
ASK: What are the infant’s problems? ____Sick____________ Initial visit? ____ Follow-up Visit?______
ASSESS (Circle all sings present)
CLASSIFY CHECK FOR POSSIBLE BACTERIAL INFECTION / JAUNDICE
Has the infant had convulsions?
Count the breaths in one minute 42 breaths per minute
Repeat if elevated _______ Fast breathing?
Look for severe chest indrawing.
Look for nasal flaring.
Look and listen for grunting.
Look and feel for bulging fontanelle.
Look for pus draining from the ear.
Look at the umbilicus. Is it red or draining pus?
Look for skin pustules. Are there 10 or more pustules or a
big boil?
Measure axillary temperature (if not possible, feel for fever
or low body temperature):
37.5°C or more (or feels hot)?
Less than 35.5°C?
Less than 36.5°C but above 35.4°C (or feels cold to
touch)?
See if young infant is lethargic or unconscious
Look at young infant’s movements. Less than normal?
Look for jaundice. Are the palms and soles yellow?
Possible Serious Bacterial Infection
DOES THE YOUNG INFANT HAVE DIARRHOEA? Yes __No ___
4__ Days
Look at the young infant’s general condition. Is the infant:
Lethargic or unconscious?
Restless and irritable?
Look for sunken eyes.
Very slowly (longer than 2 seconds)?
Slowly?
Severe Dehydration
49
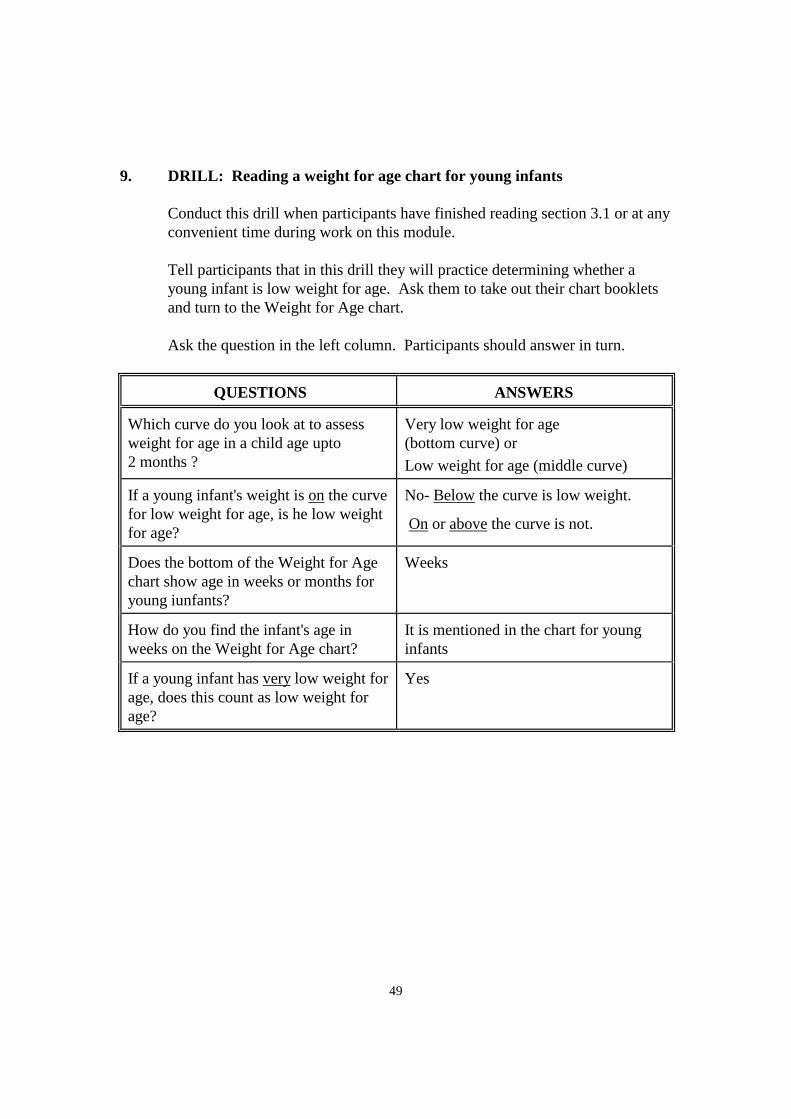
9. DRILL: Reading a weight for age chart for young infants
Conduct this drill when participants have finished reading section 3.1 or at any
convenient time during work on this module.
Tell participants that in this drill they will practice determining whether a
young infant is low weight for age. Ask them to take out their chart booklets
and turn to the Weight for Age chart.
Ask the question in the left column. Participants should answer in turn.
QUESTIONS ANSWERS
Which curve do you look at to assess
weight for age in a child age upto
2 months ?
Very low weight for age
(bottom curve) or
Low weight for age (middle curve)
If a young infant's weight is on the curve
for low weight for age, is he low weight
for age?
No- Below the curve is low weight.
On or above the curve is not.
Does the bottom of the Weight for Age
chart show age in weeks or months for
young iunfants?
Weeks
How do you find the infant's age in
weeks on the Weight for Age chart?
It is mentioned in the chart for young
infants
If a young infant has very low weight for
age, does this count as low weight for
age?
Yes
50
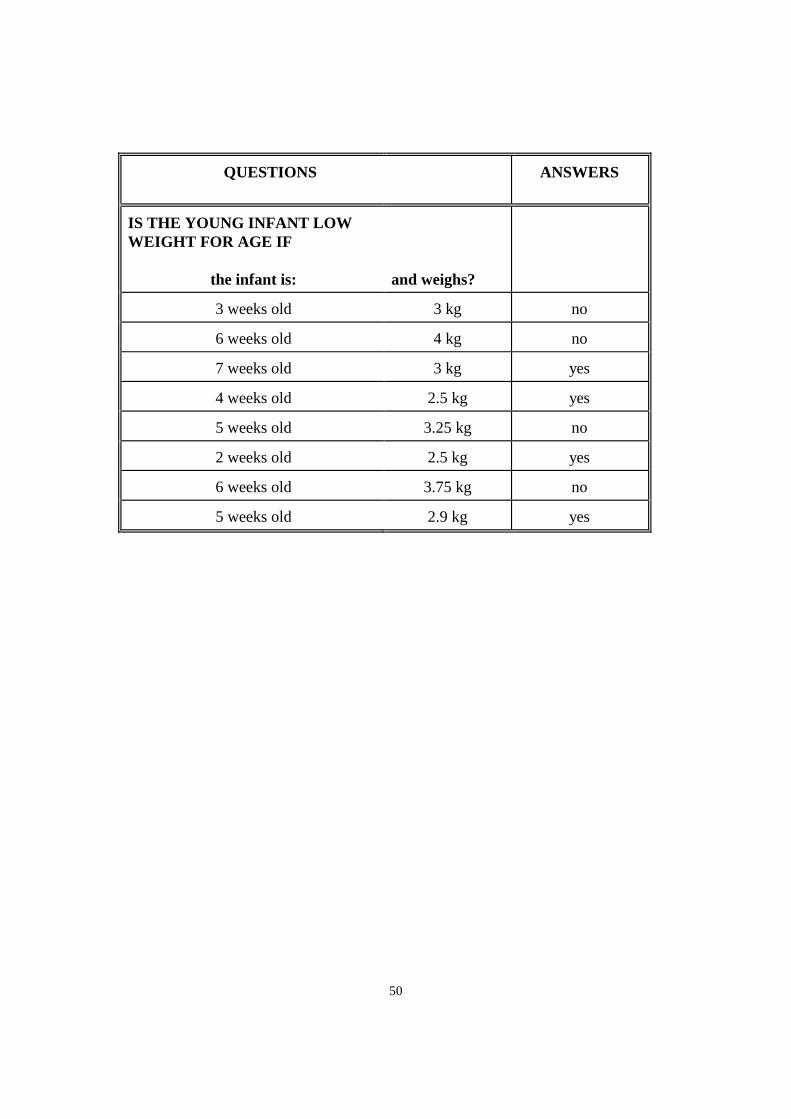
QUESTIONS
ANSWERS
IS THE YOUNG INFANT LOW
WEIGHT FOR AGE IF
the infant is:
and weighs?
3 weeks old 3 kg no
6 weeks old 4 kg no
7 weeks old 3 kg yes
4 weeks old 2.5 kg yes
5 weeks old 3.25 kg no
2 weeks old 2.5 kg yes
6 weeks old 3.75 kg no
5 weeks old 2.9 kg yes
51
10. EXERCISE D - Part 1: Video demonstration of breastfeeding assessment
If possible, in the room where the video is being shown, display the enlarged
section of the chart: Assess Breastfeeding.
Tell participants that they will see a demonstration of assessing feeding. In
particular they will see how to assess breastfeeding. Point to the enlargement
and review the steps of assessing breastfeeding. (Or, ask participants to turn in
the chart booklet to the YOUNG INFANT chart and read over the steps to
assess feeding of a young infant.) The video will show examples of the signs
of good and poor attachment and effective and ineffective suckling.
Ask if participants have any questions before you start the video. When there
are no additional questions, start the videotape.
At the end of the video, lead a short discussion. If participants are not clear
about the assessment of any signs, rewind the video and show the relevant
portions again.
Important points to emphasize in the discussion are:
* The four signs of good attachment. (Point to these on the enlargement
as you review them.)
* An infant who is well attached does not cause any pain or discomfort
to the breast. Good attachment allows the infant to suckle effectively.
Signs of effective suckling are:
- the infant suckles with slow deep sucks
- you may see or hear swallowing
* An infant who is suckling effectively may pause sometimes and then
start suckling again. Remember that the mother should allow her baby
to finish the feed and release the breast himself. A baby who has been
suckling effectively will be satisfied after a breastfeed.

52
11. EXERCISE D - Part 2: Group discussion of example photographs.
Then individual work followed by individual feedback -- Recognizing
signs of good attachment
Talk about each of the first 4 photographs, pointing out or having participants
point out and tell how they can see each sign of good or poor attachment.
Participants should refer to the descriptions of each photograph in their
module.
Then ask participants to work individually to study the rest of the photographs
for this exercise and write the answers in the chart. They should look for the
signs of good attachment present in each photograph and make an overall
assessment of the infant's attachment.
To give individual feedback on this exercise, compare the participant's
answers with the answers on the answer sheet. If the participant had a
different answer, look at the photograph together and discuss how to recognize
the sign.
Then look at photographs 22 and 23 (thrush) with the participant. Answer any
questions that the participant may have about these photographs.
Give the participant a copy of the answer sheet for this exercise.
Ask the participant to read sections 3.3 through 4.0 and do Exercise E.

53
Answers to Exercise D
Photo
Signs of Good Attachment
Assessment
Comments
Chin
Touchin
g Breast
Mouth
Wide
Open
Lower Lip
Turned
Outward
More
Areola
Showing
Above
13
yes
(almost)
yes yes yes Good
attachment
14 no no yes no (equal
above
and
below)
Not well
attached
15
yes no no yes Not well
attached
lower lip
turned in
16 no no no no Not well
attached
cheeks
pulled in
17
yes yes yes can not
see
Good
attachment
18
no no yes no (equal
above
and
below)
Not well
attached
19
yes yes yes yes Good
attachment
20
yes
(almost)
yes yes yes Good
attachment
21 yes no no no (more
below)
Not well
attached
lower lip
turned in
Photographs 22 and 23: White patches (thrush) in the mouth of an infant.
54
11. Demonstration: Classify Feeding problem or Malnutrition
Before doing Exercise E Conduct a demonstration
Materials needed:
* Enlarged Blank Recording Form
* Enlarged Classification Table – Feeding Problem or Malnutrition
To conduct this demonstration:
Briefly review with participants the steps for classifying Feeding Problem or
Malnutrition.
Display the enlarged section of the chart:
Tell participants that there are two sections in this chart, above and below the dotted
lines. The part below the dotted line deals with assessing feeding.
Point to the enlargement and review the steps of assessing feeding problem or
malnutrition.
Look at the top row.
A young infant with the signs not able to feed or no attachment at all or no sucking at
all has the classification Not Able To Feed-Possible Serious Bacterial Infection
A young infant with very low weight for age has the classification Severe
Malnutrition.
Now assess for breastfeeding.
* If the infant is exclusively breastfed without difficulty and is not low weight
for age, there is no need to assess breastfeeding.
* If the infant is not breastfed at all, do not assess breastfeeding.
* If the infant has a serious problem requiring urgent referral to a hospital, do
not assess breastfeeding.In these situations, classify the feeding based on the
information that you have already.
If the mother's answers or the infant's weight indicates a difficulty, observe a
breastfeed . Low weight for age is often due to low birth weight. Low birth weight
infants are particularly likely to have a problem with breastfeeding.
The four signs of good attachment. (Point to these on the enlargement as you review
them.)
An infant who is well attached does not cause any pain or discomfort to the breast.
Good attachment allows the infant to suckle effectively. Signs of effective suckling
are:
The infant suckles with slow deep sucks you may see or hear swallowing
55
An infant who is suckling effectively may pause sometimes and then start suckling
again. Remember that the mother should allow her baby to finish the feed and release
the breast himself. A baby who has been suckling effectively will be satisfied after a
breastfeed.
A Young Infant with no signs in the pink row and having any of the signs Not well
attached to breast or Not suckling effectively or Less than 8 breastfeeds in 24 hours or
Receives other foods or drinks or Low weight for age or Thrush or Breast or nipple
problem has the Classification Feeding Problem or Low Weight.
If a Young Infant is Not Low Weight For Age and has No Other Signs Of Inadequate
Feeding has the Classification No Feeding Problem.
REMEMBER: At least one classification needs to be picked in all Young Infants
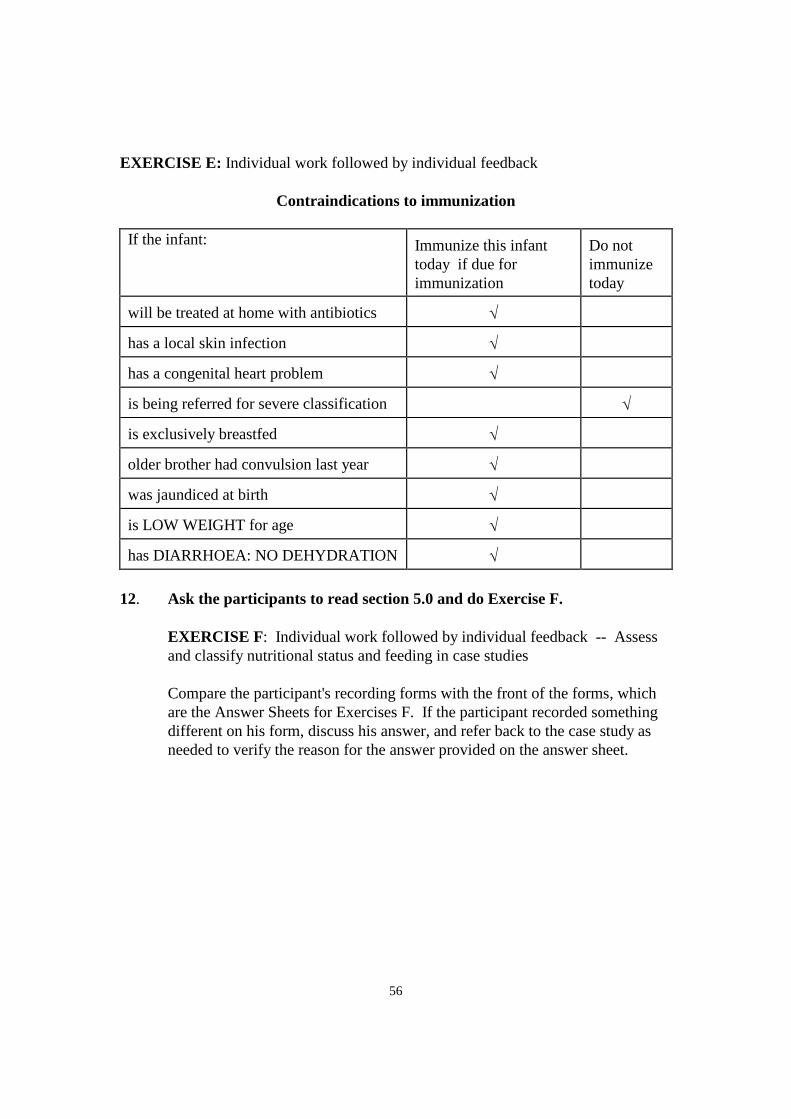
56
EXERCISE E: Individual work followed by individual feedback
Contraindications to immunization
If the infant: Immunize this infant
today if due for
immunization
Do not
immunize
today
will be treated at home with antibiotics
has a local skin infection
has a congenital heart problem
is being referred for severe classification
is exclusively breastfed
older brother had convulsion last year
was jaundiced at birth
is LOW WEIGHT for age
has DIARRHOEA: NO DEHYDRATION
12. Ask the participants to read section 5.0 and do Exercise F.
EXERCISE F: Individual work followed by individual feedback -- Assess
and classify nutritional status and feeding in case studies
Compare the participant's recording forms with the front of the forms, which
are the Answer Sheets for Exercises F. If the participant recorded something
different on his form, discuss his answer, and refer back to the case study as
needed to verify the reason for the answer provided on the answer sheet.
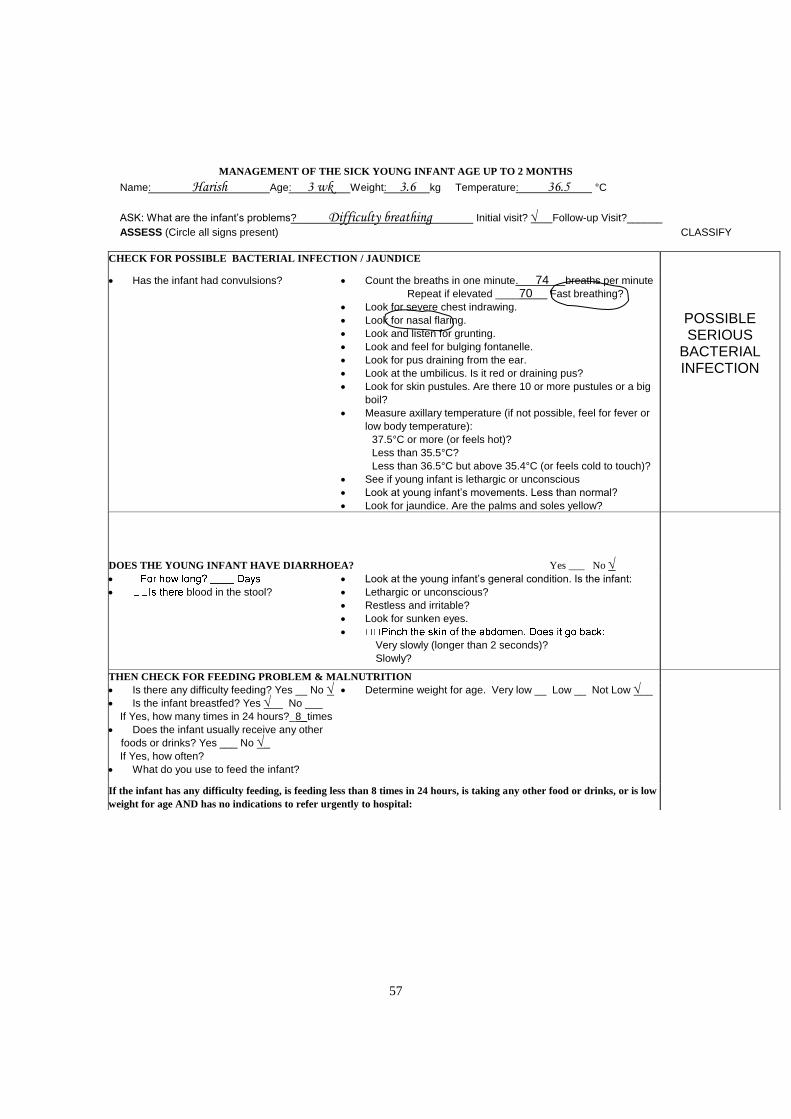
57
MANAGEMENT OF THE SICK YOUNG INFANT AGE UP TO 2 MONTHS
Name: Harish Age: 3 wk Weight: 3.6 kg Temperature: 36.5 °C
ASK: What are the infant’s problems? Difficulty breathing Initial visit? Follow-up Visit?______
ASSESS (Circle all signs present) CLASSIFY
CHECK FOR POSSIBLE BACTERIAL INFECTION / JAUNDICE
Has the infant had convulsions?
Count the breaths in one minute. 74 breaths per minute
Repeat if elevated ____70 Fast breathing?
Look for severe chest indrawing.
Look for nasal flaring.
Look and listen for grunting.
Look and feel for bulging fontanelle.
Look for pus draining from the ear.
Look at the umbilicus. Is it red or draining pus?
Look for skin pustules. Are there 10 or more pustules or a big
boil?
Measure axillary temperature (if not possible, feel for fever or
low body temperature):
37.5°C or more (or feels hot)?
Less than 35.5°C?
Less than 36.5°C but above 35.4°C (or feels cold to touch)?
See if young infant is lethargic or unconscious
Look at young infant’s movements. Less than normal?
Look for jaundice. Are the palms and soles yellow?
POSSIBLE SERIOUS
BACTERIAL INFECTION
DOES THE YOUNG INFANT HAVE DIARRHOEA? Yes ___ No
blood in the stool?
Look at the young infant’s general condition. Is the infant:
Lethargic or unconscious?
Restless and irritable?
Look for sunken eyes.
Very slowly (longer than 2 seconds)?
Slowly?
THEN CHECK FOR FEEDING PROBLEM & MALNUTRITION
Is there any difficulty feeding? Yes __ No
Is the infant breastfed? Yes __ No ___
If Yes, how many times in 24 hours?_8_times
Does the infant usually receive any other
foods or drinks? Yes ___ No _
If Yes, how often?
What do you use to feed the infant?
Determine weight for age. Very low __ Low __ Not Low __
If the infant has any difficulty feeding, is feeding less than 8 times in 24 hours, is taking any other food or drinks, or is low
weight for age AND has no indications to refer urgently to hospital:
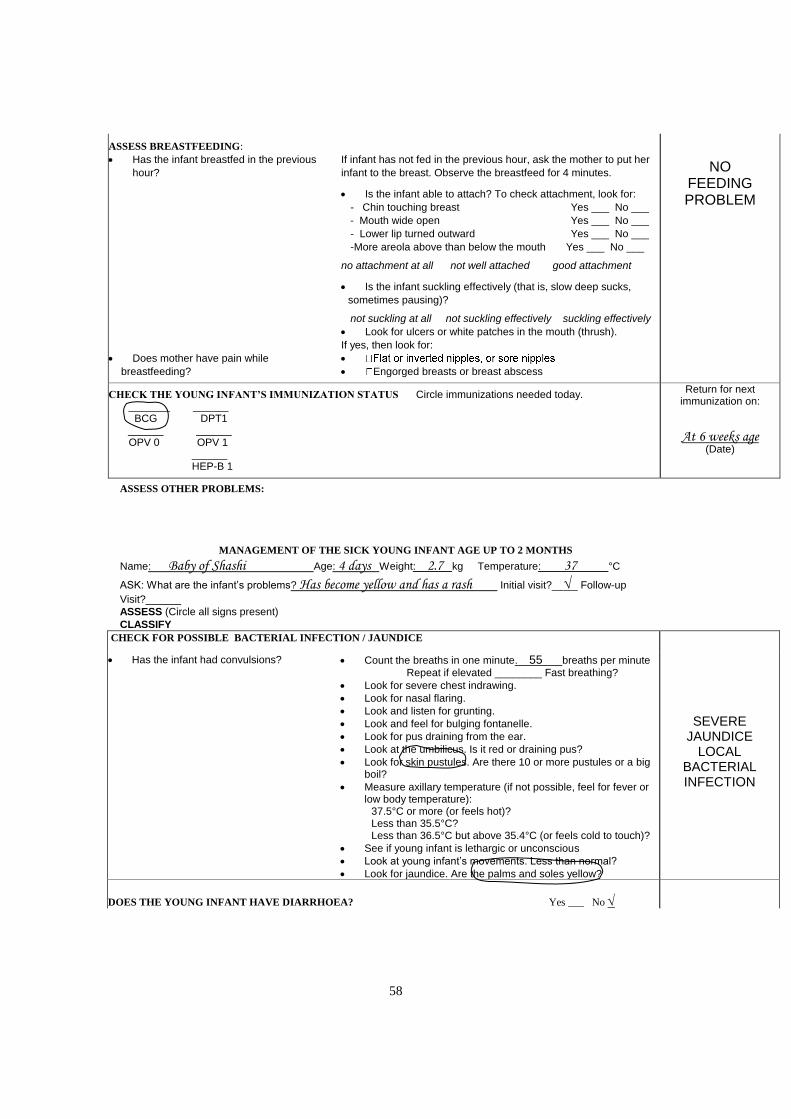
58
ASSESS BREASTFEEDING:
Has the infant breastfed in the previous
hour?
Does mother have pain while
breastfeeding?
If infant has not fed in the previous hour, ask the mother to put her
infant to the breast. Observe the breastfeed for 4 minutes. Is the infant able to attach? To check attachment, look for:
- Chin touching breast Yes ___ No ___
- Mouth wide open Yes ___ No ___
- Lower lip turned outward Yes ___ No ___
-More areola above than below the mouth Yes ___ No ___ no attachment at all not well attached good attachment
Is the infant suckling effectively (that is, slow deep sucks,
sometimes pausing)? not suckling at all not suckling effectively suckling effectively
Look for ulcers or white patches in the mouth (thrush).
If yes, then look for:
Engorged breasts or breast abscess
NO FEEDING PROBLEM
CHECK THE YOUNG INFANT’S IMMUNIZATION STATUS Circle immunizations needed today. _______ ______ BCG DPT1 ______ ______ OPV 0 OPV 1 ______ HEP-B 1
Return for next immunization on:
At 6 weeks age (Date)
ASSESS OTHER PROBLEMS:
MANAGEMENT OF THE SICK YOUNG INFANT AGE UP TO 2 MONTHS
Name: Baby of Shashi Age: 4 days Weight: 2.7 kg Temperature: 37 °C
ASK: What are the infant’s problems? Has become yellow and has a rash Initial visit?___ Follow-up
Visit?______
ASSESS (Circle all signs present)
CLASSIFY
CHECK FOR POSSIBLE BACTERIAL INFECTION / JAUNDICE
Has the infant had convulsions?
Count the breaths in one minute. 55 breaths per minute
Repeat if elevated ________ Fast breathing?
Look for severe chest indrawing.
Look for nasal flaring.
Look and listen for grunting.
Look and feel for bulging fontanelle.
Look for pus draining from the ear.
Look at the umbilicus. Is it red or draining pus?
Look for skin pustules. Are there 10 or more pustules or a big boil?
Measure axillary temperature (if not possible, feel for fever or low body temperature):
37.5°C or more (or feels hot)? Less than 35.5°C? Less than 36.5°C but above 35.4°C (or feels cold to touch)?
See if young infant is lethargic or unconscious
Look at young infant’s movements. Less than normal?
Look for jaundice. Are the palms and soles yellow?
SEVERE JAUNDICE
LOCAL BACTERIAL INFECTION
DOES THE YOUNG INFANT HAVE DIARRHOEA? Yes ___ No
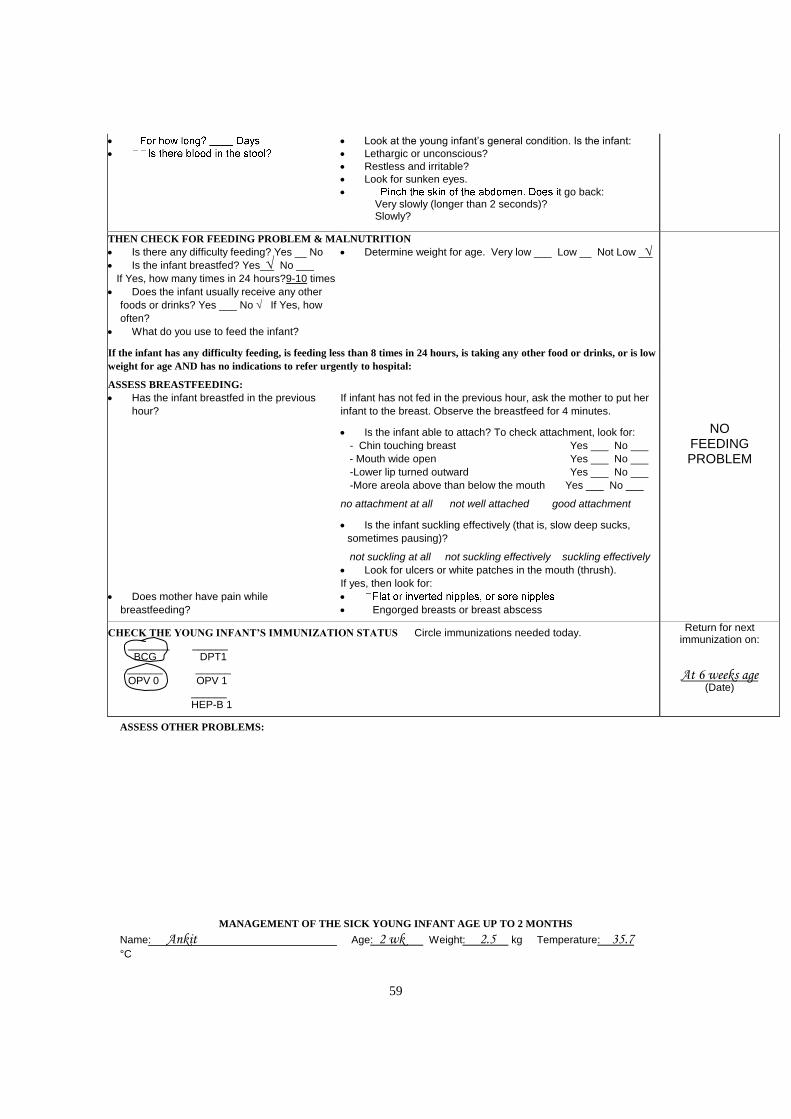
59
Look at the young infant’s general condition. Is the infant:
Lethargic or unconscious?
Restless and irritable?
Look for sunken eyes.
t go back: Very slowly (longer than 2 seconds)? Slowly?
THEN CHECK FOR FEEDING PROBLEM & MALNUTRITION
Is there any difficulty feeding? Yes __ No
Is the infant breastfed? Yes_ No ___
If Yes, how many times in 24 hours?9-10 times
Does the infant usually receive any other
foods or drinks? Yes ___ No If Yes, how
often?
What do you use to feed the infant?
Determine weight for age. Very low ___ Low __ Not Low _
If the infant has any difficulty feeding, is feeding less than 8 times in 24 hours, is taking any other food or drinks, or is low
weight for age AND has no indications to refer urgently to hospital:
ASSESS BREASTFEEDING:
Has the infant breastfed in the previous
hour?
Does mother have pain while
breastfeeding?
If infant has not fed in the previous hour, ask the mother to put her
infant to the breast. Observe the breastfeed for 4 minutes. Is the infant able to attach? To check attachment, look for:
- Chin touching breast Yes ___ No ___
- Mouth wide open Yes ___ No ___
-Lower lip turned outward Yes ___ No ___
-More areola above than below the mouth Yes ___ No ___ no attachment at all not well attached good attachment
Is the infant suckling effectively (that is, slow deep sucks,
sometimes pausing)? not suckling at all not suckling effectively suckling effectively
Look for ulcers or white patches in the mouth (thrush).
If yes, then look for:
Engorged breasts or breast abscess
NO FEEDING PROBLEM
CHECK THE YOUNG INFANT’S IMMUNIZATION STATUS Circle immunizations needed today. _______ ______ BCG DPT1 ______ ______ OPV 0 OPV 1 ______ HEP-B 1
Return for next immunization on:
At 6 weeks age (Date)
ASSESS OTHER PROBLEMS:
MANAGEMENT OF THE SICK YOUNG INFANT AGE UP TO 2 MONTHS
Name: Ankit Age: 2 wk Weight: 2.5 kg Temperature: 35.7 °C
60
ASK: What are the infant’s problems? Premature & small at birth, umbilicus infected Initial visit? ___ Follow-up Visit?______
ASSESS (Circle all signs present)
CLASSIFY
CHECK FOR POSSIBLE BACTERIAL INFECTION / JAUNDICE
Has the infant had convulsions
Count the breaths in one minute. 55 breaths per minute Repeat if elevated ________ Fast breathing?
Look for severe chest indrawing.
Look for nasal flaring.
Look and listen for grunting.
Look and feel for bulging fontanelle.
Look for pus draining from the ear.
Look at the umbilicus. Is it red or draining pus?
Look for skin pustules. Are there 10 or more pustules or a big boil?
Measure axillary temperature (if not possible, feel for fever or low body temperature):
37.5°C or more (or feels hot)? Less than 35.5°C? Less than 36.5°C but above 35.4°C (or feels cold to touch)?
See if young infant is lethargic or unconscious
Look at young infant’s movements. Less than normal?
Look for jaundice. Are the palms and soles yellow?
LOCAL BACTERIAL INFECTION
and LOW BODY
TEMPERATURE
DOES THE YOUNG INFANT HAVE DIARRHOEA? Yes ___ No
For how long? ____ Days
Look at the young infant’s general condition. Is the infant:
Lethargic or unconscious?
Restless and irritable?
Look for sunken eyes.
Very slowly (longer than 2 seconds)?
Slowly?
THEN CHECK FOR FEEDING PROBLEM & MALNUTRITION
Is there any difficulty feeding? Yes __ No Is
the infant breastfed? Yes _No ___
If Yes, how many times in 24 hours? 6-7 times
Does the infant usually receive any other
foods or drinks? Yes ___ No _
If Yes, how often?
What do you use to feed the infant?
Determine weight for age. Very low __ Low _ Not Low__
If the infant has any difficulty feeding, is feeding less than 8 times in 24 hours, is taking any other food or
drinks, or is low weight for age AND has no indications to refer urgently to hospital:
ASSESS BREASTFEEDING:
Has the infant breastfed in the previous
hour?
Does mother have pain while
breastfeeding?
If infant has not fed in the previous hour, ask the mother to put her
infant to the breast. Observe the breastfeed for 4 minutes. Is the infant able to attach? To check attachment, look for:
-Chin touching breast Yes _ No ___
-Mouth wide open Yes _ No ___
-Lower lip turned outward Yes _ No ___
-More areola above than below the mouth Yes _ No ___ no attachment at all not well attached good attachment
Is the infant suckling effectively (that is, slow deep sucks,
sometimes pausing)? not suckling at all not suckling effectively suckling effectively
Look for ulcers or white patches in the mouth (thrush).
If yes, then look for:
Engorged breasts or breast abscess
FEEDING PROBLEM
and
LOW WEIGHT
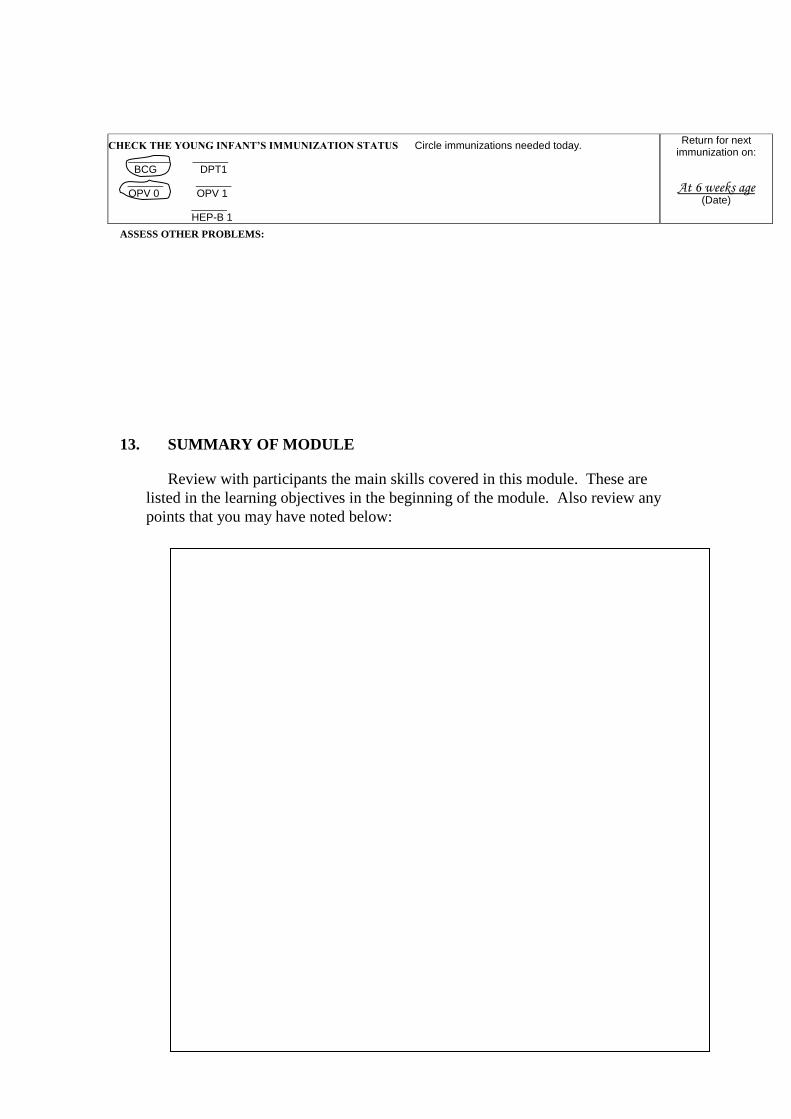
61
CHECK THE YOUNG INFANT’S IMMUNIZATION STATUS Circle immunizations needed today. _______ ______ BCG DPT1 ______ ______ OPV 0 OPV 1 ______ HEP-B 1
Return for next immunization on:
At 6 weeks age (Date)
ASSESS OTHER PROBLEMS:
13. SUMMARY OF MODULE
Review with participants the main skills covered in this module. These are
listed in the learning objectives in the beginning of the module. Also review any
points that you may have noted below:
62
FACILITATOR GUIDELINES
FOR
IDENTIFY
TREATMENT
FOR THE SICK YOUNG
INFANT
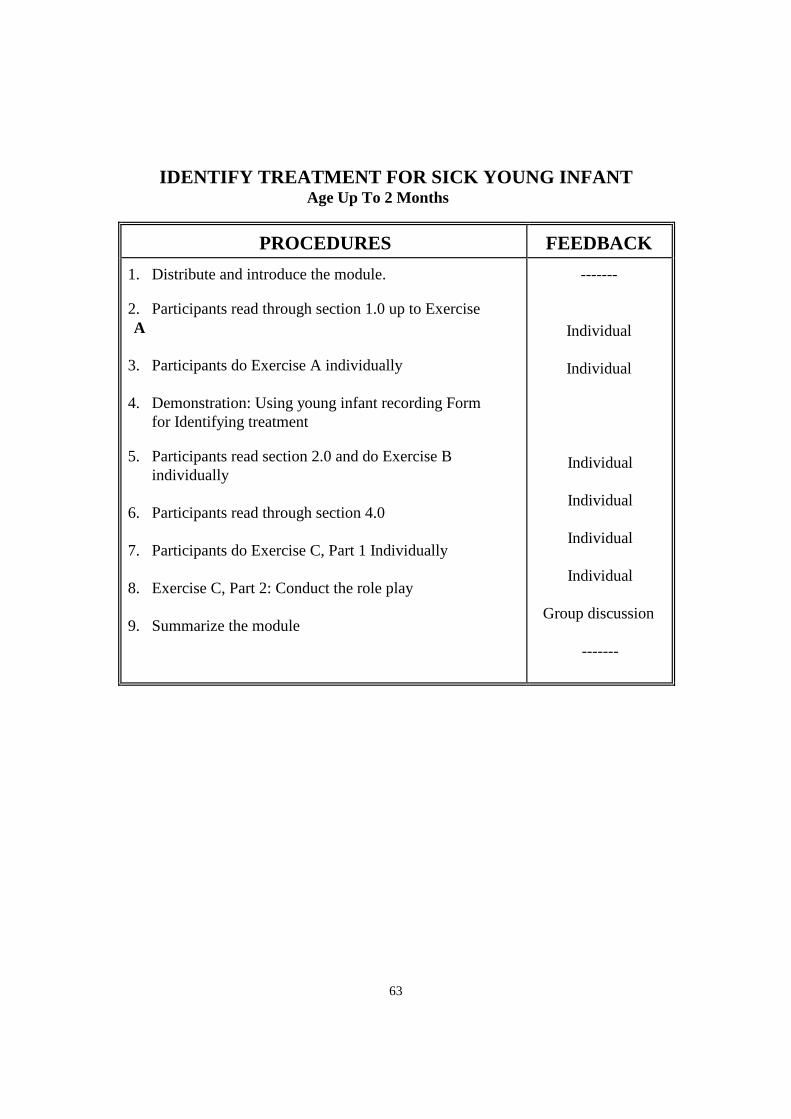
63
IDENTIFY TREATMENT FOR SICK YOUNG INFANT Age Up To 2 Months
PROCEDURES FEEDBACK
1. Distribute and introduce the module.
2. Participants read through section 1.0 up to Exercise
A
3. Participants do Exercise A individually
4. Demonstration: Using young infant recording Form
for Identifying treatment
5. Participants read section 2.0 and do Exercise B
individually
6. Participants read through section 4.0
7. Participants do Exercise C, Part 1 Individually
8. Exercise C, Part 2: Conduct the role play
9. Summarize the module
-------
Individual
Individual
Individual
Individual
Individual
Individual
Group discussion
-------
64
1. INTRODUCTION OF MODULE
Briefly introduce the module by explaining that it describes the final step on the
ASSESS & CLASSIFY chart: "Identify Treatment."
Pointing to the wall chart, explain how to read across the chart from each
classification to the list of treatments needed. Point to the treatments listed for
POSSIBLE SERIOUS BACTERIAL INFECTION/JAUNDICE and read them
aloud (or have a participant read them aloud). Point to the treatments listed for
diarrhoea with NO DEHYDRATION and read them aloud (or have a participant
read them aloud). Ask a participant to point to the classification SEVERE
DYSENTERY. Then ask that participant to read aloud the treatments for
dysentery.
Explain that severe classifications usually require referral to a hospital. For these
classifications, the instruction is given to "Refer URGENTLY to hospital." Point
to the treatment instructions for POSSIBLE SERIOUS BACTERIAL
INFECTION and read them aloud, including the instruction to refer urgently to
the hospital. Ask a participant to point to the classification SEVERE
PERSISTENT DIARRHOEA. Then ask that participant to read aloud the
treatments for SEVERE PERSISTENT DIARRHOEA .
Explain what is meant by "hospital": a health facility with inpatient
beds and supplies and expertise to treat a very sick child. (If some participants
work in facilities with inpatient beds, these participants may refer severe cases to
their own inpatient departments. Participants working in clinics will usually refer
to a hospital some distance away.)
Ask participants to look at the flowchart on the first page of the module. Explain
that this flowchart shows the steps described in this module. The first step, in the
diamond, is a decision: 1.0 Determine if urgent referral is needed. If NO, you
follow the upper arrow to step 2.0 to identify treatments. If YES, you quickly do
steps 3.0, 4.0 and 5.0 to refer the child.
Explain that this module does not describe how to do the treatments, but simply
how to identify which treatments are needed. Participants will learn how to do
the treatments in the module Treat the Young Infant and Counsel the Mother.
Tell the participants to read through 1.0 till Exercise A.
65
3. EXERCISE A: Individual work followed by Individual feedback –
Whether or not urgent referral is needed.
1. No. Sarla has no severe classification
2. Yes. Neena has a severe classification:
NOT ABLE TO FEED – POSSIBLE SERIOUS BACTERIAL
INFECTION or SEVERE MALNUTRITION
3. No. Hanif has no severe classification
4. Yes. Habib has a severe classification:
POSSIBLE SERIOUS BACTERIAL INFECTION & NOT ABLE
TO FEED – POSSIBLE SERIOUS BACTERIAL INFECTION or
SEVERE MALNUTRION.
4. Demonstration of how to use the back of the Sick Young Infant Recording
Form
Hold up a blank Sick Young Infant Recording Form. Until now participants
have used only the front. Explain that they are now going to record treatments
needed on the back.
Show how to fold the "Classify" column of the Sick Young Infant Recording
Form so that it can be seen while looking at the back of the form. Ask the
participants to fold the example form for Ankit (in section 2.0 of the module) in
the same way.
As participants look at the folded back of Ankit’s form, make the following
points:
* Look at the ASSESS & CLASSIFY chart to find the treatments needed for each
classification.
* List treatments needed on the back of the form, across from the classification.
* Write only the relevant treatments.
Point to Ankit’s first classification, LOCAL BACTERIAL INFECTION, and
read aloud all the listed treatments. Show participants that only the relevant
treatments were listed on the form. The treatment that begins "If child also has
a severe classification...." is not written, because Ankit does not have a severe
classification. ("Advise when to return immediately" is already on the form, so
does not need to be written again.)
66
Ask another participant to point to Ankit’s next classification, FEEDING
PROBLEM and LOW WEIGHT, and read aloud the treatments.
* Follow-up times are listed in the treatments. These mean to tell the mother to
return in a certain number of days. You may abbreviate "Follow-up" as
"F/up." If you list several follow-up times, you will tell the mother the
earliest, definite time. This is the time to record in the designated space on the
recording form.
* Notice that the recording form already lists the item,"Advise mother when to
return immediately,” because it is needed for every sick child going home. Do
not list this again. (You will learn the signs, which indicate when to return
immediately later in this module.)
* Notice the space on the back of the recording form to record immunizations
needed today.
* If the same treatment is needed for more than one classification, you only need
to list it once.
Ask participants to read section 2.0 of the module and do Exercise B.
5. EXERCISE B: Individual work followed by Individual feedback – Identify
treatment
Compare the participant's answers to those on the answer sheet and discuss any
differences.
Give the participant a copy of the answer sheet. Ask the participant to read
sections 4.0 and do the written part of Exercise C.
Answers to Exercise B
1. Harish needs urgent referral.
2. Baby Shashi needs urgent referral
3. Ankit’s treatment:
a. Warm by skin to skin contact for 1 hour & Reassess
b. Give oral amoxycillin
c. Teach mother to treat local infection at home
d. Treat to prevent low blood sugar
e. Increase frequency of breast feeding
f. Teach mother to keep young infant warm at home
67
g. F/up in 2 days
4. Neera needs referral
7. EXERCISE C, Part 1: Individual work followed by Individual feedback –
Referral
1. Harish should be referred because he has a severe classification: POSSIBLE
SERIOUS BACTERIAL INFECTION
2. – First dose of IM ampicillin and Gentamicin
– Warm the young infant while arranging referral
– Treat to prevent low blood sugar
3. Referral note for Harish
8. EXERCISE C, Part 2: Role Play – Counselling a Mother for Referral
Conduct the role-play as in Exercise C. Give the “mother” the situation described
in the next page. Remind her that she may make up additional realistic
information that fits the situation if necessary.
After the role play, use questions in the module to lead a group discussion.
EXERCISE C, Role Play - Description for Harish’s Mother
You have a 3 week-old son named Harish who has difficulty in breathing. The
doctor has already explained to you that Harish needs urgent referral.
You are timid with the doctor and do not volunteer information unless asked. You
have come a long way to the clinic and you are tired. You are reluctant to go to the
hospital because transportation is difficult for you as you have no money and your
husband is away at work. You are also concerned about where to leave your 2 year
old elder daughter if you were to go away to the hospital. You also have concerns
about how to manage yourself in a large hospital in a large city.
9. Summarize the module
Review with participants the main skills covered in this module. These are listed
in the learning objectives on the first page of the module. Also review any points

68
that you may have noted below:
FACILITATOR GUIDELINES
FOR
TREAT THE YOUNG

69
INFANT AND COUNSEL
THE MOTHER
70
TREAT THE YOUNG INFANT & COUNSEL THE MOTHER
PROCEDURES FEEDBACK
1. Distribute and introduce the module.
2. Participants read Introduction through section 1.2.2
and work individually on Exercise A
3. Lead drill on asking checking questions
4. Participants read sections 1.3 - 1.5.1 and work
individually on Exercise B.
5. Participants read through 1.5.3
Demonstration: Kangaroo mother care
6. Participants read through 1.8
Exercise C, Part 1:Video on position and attachment
for Breast feeding
7. Exercise C, Part 2: Participants study the example
photographs. And work individually to identify the
remaining photographs.
Facilitator leads a brief group discussion.
8. Participants read through sections 2.2 and work
individually on Exercise D.
9. Participants read through sections 3.7 and work
individually on Exercise E
10. Lead a drill on advise to mothers
11. Participants read sections 3.8 – 4.1.5 and do Exercise
F individually
12. Summarise module
--------
Individual
Drill
Individual
Individual
Group Discussion
Group Discussion
Individual
Individual
Drill
Individual
----------
71
1. INTRODUCTION OF MODULE
Introduce the module. State briefly that it will teach doctors how to use the
TREAT chart. The chart contains information on how to provide treatment to
sick young infant and how to teach the mother to continue providing treatment
at home.
The TREAT chart is organized into several main sections. As you mention a
section, point to it on the wall chart. The sections are:
* Teach the Mother to Give Oral Drugs at Home
* Teach the Mother to Treat Local Infections at Home
* Teach correct positioning and Attachment for Breastfeeding
* Teach the mother how to keep young infant warm
* Teach the mother to treat breast and nipple problems
* Immunize Every Sick Young Infant, as Needed
* Give Follow-Up Care
This module will teach how to give the treatment described in each section.
Tell participants that many sick young infants will need to be treated with oral
drugs at home. Introduce section 1.0 - Select the Appropriate Oral Drug and
determine the Dose and Schedule. Ask participants to read through section 1.2.1
2. EXERCISE A – Individual work and individual feedback --- Review good
communication skills
1. Nurse Kanta must teach a mother to wick her infant's ear dry.
First she explains how drying the ear will help the infant, and how to do it.
Then she shows the mother how to make a wick and dry the infant's ear. Then,
Nurse Kanta asks the mother to practice wicking the infant's ear while she
observes and offers feedback. Before the mother and the infant leave the
clinic, Nurse Kanta asks the mother several questions. She wants to make sure
the mother understands why, how and when to give the treatment at home.
a. What information did Nurse Kanta give the mother about the
treatment?
72
She explains how drying the ear will help her infant and how to dry the
ear
b. In the paragraph above, underline the sentence that describes how the
nurse gave examples.
c. What did the nurse do while the mother practiced?
Nurse Kanta observed the mother and gave her feedback
2. Doctor Basaka must teach a mother to prepare ORS solution for her infant
with diarrhoea. First he explains how to mix the ORS, and then he shows her
how to do it. He asks the mother, "Do you understand?" The mother answers
"yes". So Basaka gives her 2 ORS packets and says good-bye.
a. What information did Basaka give the mother about the task?
Basaka explained how to mix ORS
b. Did he show her an example?
Yes, See underlined sentence above
c. Did he ask her to practice?
No
d. How did Basaka check the mother's understanding?
By asking “Do you understand?”
e. Did Basaka check the mother's understanding correctly?
No
f. How would you have checked the mother's understanding?
By asking checking questions, such as:
“How will you prepare ORS soultion? Show me.”
“How much water will you use?’
“How will you measure 1 litre of water at home?”
73
3. If a mother tells you that she already knows how to give a treatment, what
should you do?
Praise her for her knowledge. Ask checking questions such as:
"When did you give the antibiotic before? How did you give it?" Then explain the dose and schedule for the antibiotic, giving her more
information and examples as needed. Observe her practice giving the treatment. Ask more checking questions to make sure the mother does know how to give the treatment correctly.
4. Which of the following is the best checking question after advice about
increasing fluids during diarrhoea? (Tick one.)
___ a. Do you remember some good fluids to give your infant?
___ b. Will you be sure to give your infant extra fluid?
__ c. How much fluid will you give your infant?
5. The following questions can be answered "yes" or "no". Rewrite the questions
as good checking questions.
a. Do you remember when to give the antibiotic?
When will you give the antibiotic? For how many days?
b. Do you understand how much syrup to give your infant?
How much syrup would you give your infant? Show me.
c. Did the nurse explain to you how to apply the paint?
How will you apply the paint?
d. Can you wick your infant's ears?
What material will you use to make a wick?
How would you wick your infant’s ear? Show me.
74
e. Do you know how to get to the hospital?
How will you go to the hospital?
3. DRILL: Practice asking checking questions Conduct this drill at any time after the participants have read section 1.2.2 of
the module. You may wish to do it when participants need a break from reading, or after a lunch or tea break as a review.
Tell participants that this drill will review how to ask checking questions. To conduct the drill:
Refer to the table on the following page. Read aloud each question in the first
column. Ask participants to rephrase the question as a good checking question.
Make sure that each participant is given the opportunity to answer.
A participant's checking question may be worded somewhat differently than
the examples given. The question is acceptable if it asks a mother to describe how she will treat her child. If the question can be answered with a "yes" or "no", it is not acceptable.
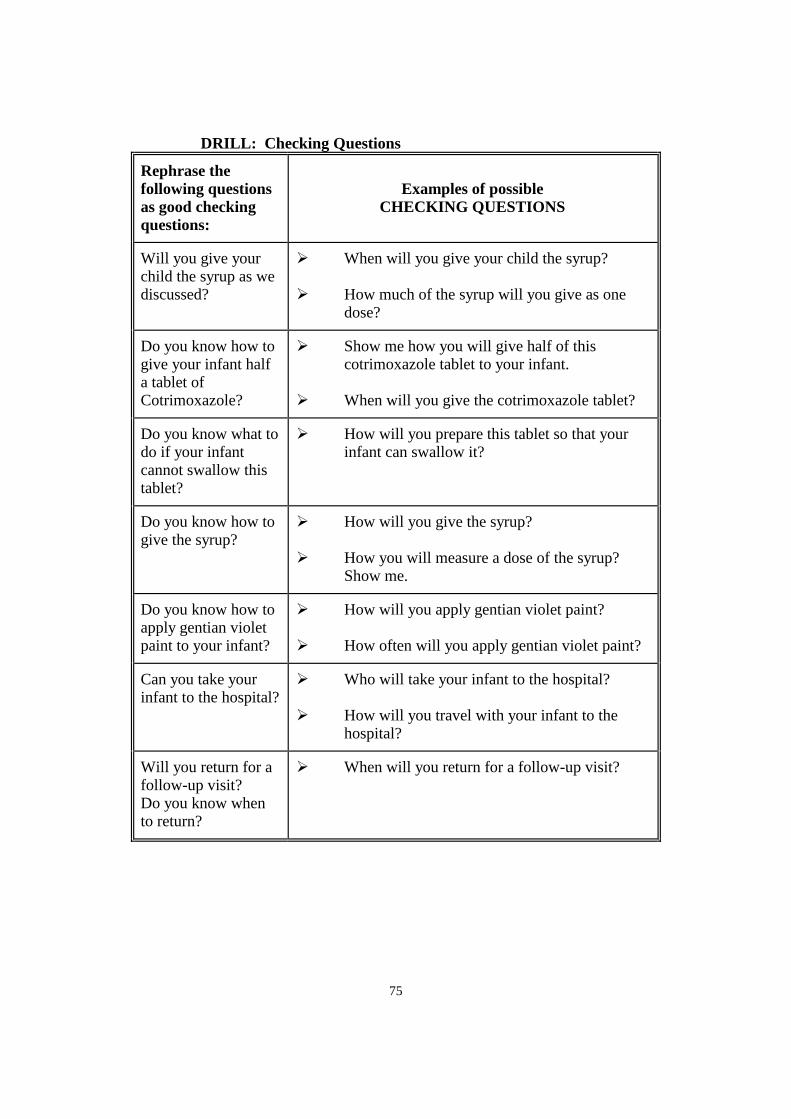
75
DRILL: Checking Questions
Rephrase the
following questions
as good checking
questions:
Examples of possible
CHECKING QUESTIONS
Will you give your child the syrup as we discussed?
When will you give your child the syrup? How much of the syrup will you give as one
dose?
Do you know how to give your infant half a tablet of Cotrimoxazole?
Show me how you will give half of this cotrimoxazole tablet to your infant.
When will you give the cotrimoxazole tablet?
Do you know what to do if your infant cannot swallow this tablet?
How will you prepare this tablet so that your infant can swallow it?
Do you know how to give the syrup?
How will you give the syrup? How you will measure a dose of the syrup?
Show me.
Do you know how to apply gentian violet paint to your infant?
How will you apply gentian violet paint? How often will you apply gentian violet paint?
Can you take your infant to the hospital?
Who will take your infant to the hospital? How will you travel with your infant to the
hospital?
Will you return for a follow-up visit? Do you know when to return?
When will you return for a follow-up visit?

76
4. EXERCISE B – Individual work and individual feedback --- Identify
treatments
1. Harish needs urgent referral.
- Give first dose of IM Ampicillin (2.0ml) and IM Gentamicin (1.5ml)
- Ask mother to breast feed the infant
- Advise mother to keep infant warm during transport
2. Baby Shashi needs urgent referral
Give oral Amoxycillin 1.25 ml - Ask mother to breast feed the infant
- Advise mother to keep infant warm during transport
3. Ankit does not need urgent referral
- Warm by skin to skin contact for 1 hour & Reassess
- Give oral amoxycillin (1.25 ml three times daily for 5 days)
- Teach mother to apply gentian violet twice a day at home
- Ask mother to breast feed infant
- F/up in 2 days
4. Neera needs referral
5. Give first dose of IM Ampicillin (1.5ml) and IM Gentamicin (1.5ml)
- Ask mother to breast feed the infant . Advise mother to keep infant warm during transport
- Give ORS on way to the hospital
5. DEMONSTRATION
When all the participants have finished reading through section 1.5.3 do the demonstration
Material Needed: Enlargement of the Section Warm The Young Infant Using
Skin To Skin Contact (Kangaroo Mother Care), A Baby Doll
Review the steps written on the chart.
Provide privacy to the mother.
Request the mother to sit or recline comfortably.
Undress the baby gently, except for cap, nappy and socks.
between her breasts, in Skin to Skin contact; turn baby’s head to one side to keep
airways clear
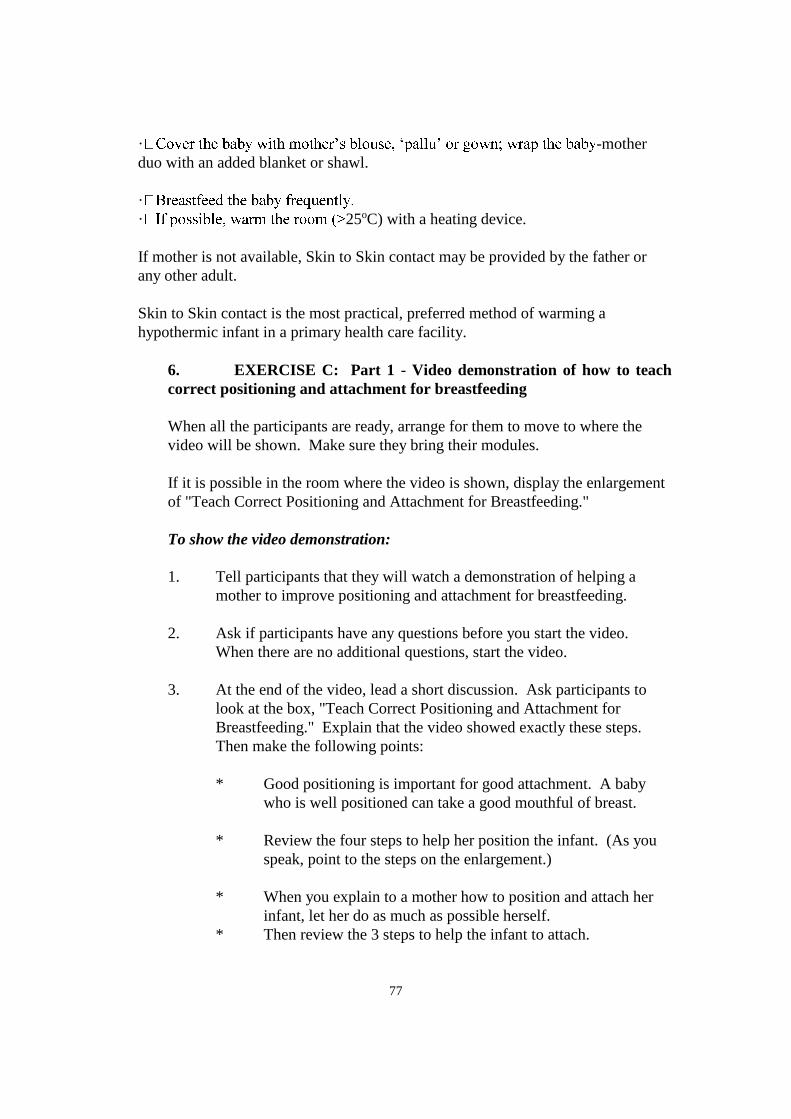
77
· -mother
duo with an added blanket or shawl.
·
· 25oC) with a heating device.
If mother is not available, Skin to Skin contact may be provided by the father or
any other adult.
Skin to Skin contact is the most practical, preferred method of warming a
hypothermic infant in a primary health care facility.
6. EXERCISE C: Part 1 - Video demonstration of how to teach
correct positioning and attachment for breastfeeding
When all the participants are ready, arrange for them to move to where the
video will be shown. Make sure they bring their modules.
If it is possible in the room where the video is shown, display the enlargement
of "Teach Correct Positioning and Attachment for Breastfeeding."
To show the video demonstration:
1. Tell participants that they will watch a demonstration of helping a
mother to improve positioning and attachment for breastfeeding.
2. Ask if participants have any questions before you start the video.
When there are no additional questions, start the video.
3. At the end of the video, lead a short discussion. Ask participants to
look at the box, "Teach Correct Positioning and Attachment for
Breastfeeding." Explain that the video showed exactly these steps.
Then make the following points:
* Good positioning is important for good attachment. A baby
who is well positioned can take a good mouthful of breast.
* Review the four steps to help her position the infant. (As you
speak, point to the steps on the enlargement.)
* When you explain to a mother how to position and attach her
infant, let her do as much as possible herself.
* Then review the 3 steps to help the infant to attach.
78
* Check for signs of good attachment and effective suckling. It
may take several attempts before the mother and baby are able
to achieve good attachment.
If participants are not clear about the steps, rewind the tape and show it
again.
7. EXERCISE C: Part 2 -- Photographs -- Group discussion of example
photographs. Individual work, then group discussion -- Recognizing
signs of good positioning
Talk about the first three photographs by describing or asking participants to
describe the signs of good and poor positioning in each photograph.
Ask participants to work individually and study each remaining photograph to
identify the signs of good or poor positioning. They should record whether
each of the signs of good positioning is present and write any comments about
the infant's attachment.
Give feedback in a group discussion:
Display the enlargement of "Teach Correct Positioning and Attachment for
Breastfeeding."
For each photograph, ask a participant to explain the signs of good or poor
position (such as baby's body is twisted away from mother). After the
photograph has been assessed, ask a participant what he would advise this
woman to do differently to improve her baby's position (for example, hold the
baby closer to her body, with the baby's head and body straight.) During this
discussion, have the participants continually refer to the enlargement (or to the
box on the YOUNG INFANT chart, "Teach Correct Positioning and
Attachment for Breastfeeding") so that they repeat and learn all the correct
steps.
Tell participants that when teaching a mother to position and attach her infant
for breastfeeding, the doctor can place her hand on the mother's arm or hand to
guide it into the appropriate position.
Pass out the answer sheets for Exercise C.
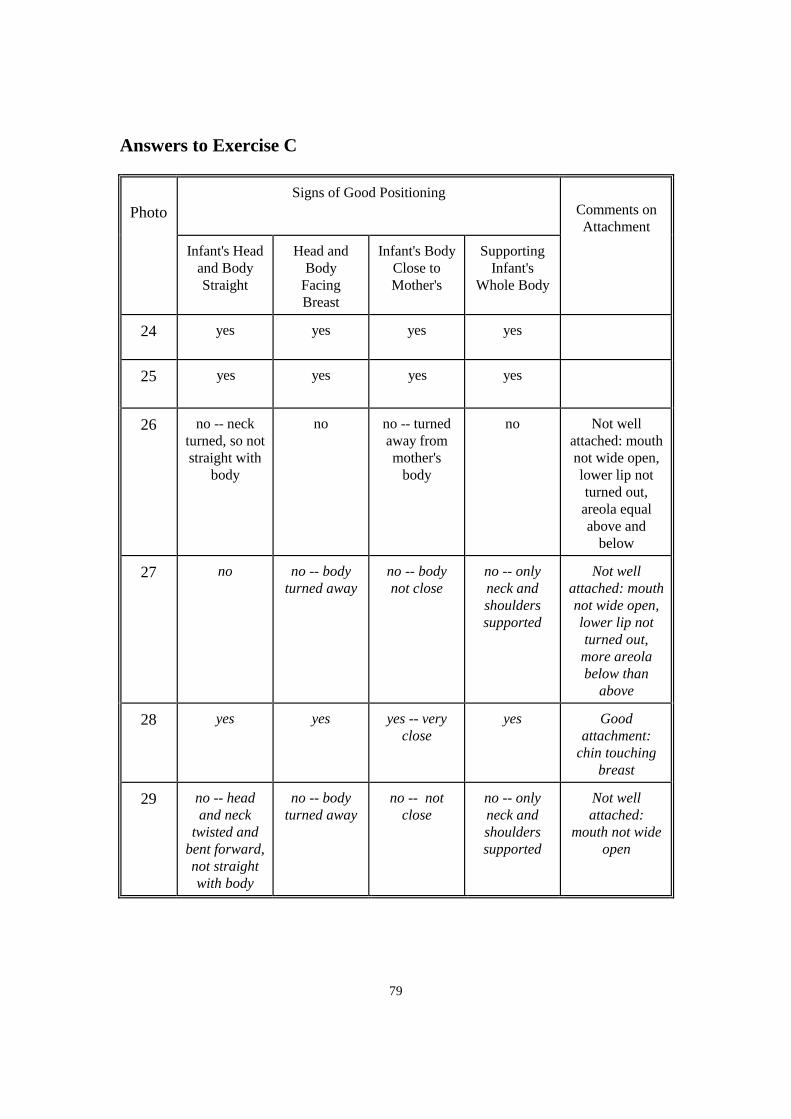
79
Answers to Exercise C
Photo
Signs of Good Positioning
Comments on
Attachment
Infant's Head
and Body
Straight
Head and
Body
Facing
Breast
Infant's Body
Close to
Mother's
Supporting
Infant's
Whole Body
24 yes
yes yes yes
25
yes yes yes yes
26
no -- neck
turned, so not
straight with
body
no no -- turned
away from
mother's
body
no Not well
attached: mouth
not wide open,
lower lip not
turned out,
areola equal
above and
below
27
no no -- body
turned away
no -- body
not close
no -- only
neck and
shoulders
supported
Not well
attached: mouth
not wide open,
lower lip not
turned out,
more areola
below than
above
28
yes yes yes -- very
close
yes Good
attachment:
chin touching
breast
29
no -- head
and neck
twisted and
bent forward,
not straight
with body
no -- body
turned away
no -- not
close
no -- only
neck and
shoulders
supported
Not well
attached:
mouth not wide
open
80
7. Ask the participants to read through section 2.2 and work individually on
Exercise D.
EXERCISE D:
List of the treatments that Manisha should get and the doses of the drugs.
The physician classified Manisha as POSSIBLE SERIOUS BACTERIAL
INFECTION, LOW BODY TEMPERATURE, DIARRHOEA WITH NO
DEHYDRATION AND LOW WEIGHT FOR AGE.
1. Injection Ampicillin and Gentamicin 1.0 ml intramuscularly.
2. Treat the young infant to prevent low blood sugar. This can be done by breast
feeding or feeding expressed breast milk with a cup and spoon.
3. Warm the young infant using skin to skin contact. Teach the care at home
especially how to keep a low weight baby warm at home.
4. Give ORS to prevent dehydration at home.
5. Counsel about breast feeding after assessing breast-feeding as the infant is low
weight for age.
9. Participants read through section 3.7 and work on Exercise E.
EXERCISE E: Individual work followed by individual feedback -- Describing
treatment for young infants, including treatment for local infection, home care
Compare the participant's answers to the answer sheet. If there are differences,
refer to the chart and have the participant locate the correct instructions.
Answers to Exercise E
Case : Vinod
1. Steps that her mother should take to treat the skin pustules at home:
* Wash hands
* Gently wash off pus and crusts with soap and water
* Dry the area
* Paint with gentian violet
* Wash hands
81
2. How often should her mother treat the skin pustules? Twice each day
3. The 2 main points to advise the mother about home care are:
* Food/Fluids: Breastfeed frequently, as often and for as long as the
infant wants, day and night, during sickness and health
* Make sure the young infant stays warm at all times
4. What would you tell Vinod’s mother about when to return?
Return in 2 days for follow-up (to be sure the skin pustules are improving).
Return immediately if Vinod is breastfeeding poorly, becomes sicker,
develops a fever, cold to touch, breathing becomes fast or difficult, or if there
is blood in her stool.
10. DRILL: Review of points of advice for mothers of young infants
Conduct this drill at a convenient time after this point in the module. If possible, do
the drill before the participants go to the last clinical session which should include
counseling for mothers of young infants.
Tell the participants that in this drill, they will review important points of advice for
mothers of infants, including
- improving positioning and attachment for breastfeeding
- home care.
They may look at the YOUNG INFANT chart if needed, but should try to learn these
points so they can recall them from memory.
Ask the question in the left column. Participants should answer in turn. When a
question has several points in the answer, you may ask each participant to give one
point of the answer. This will move along smoothly and quickly if participants are
sitting in a circle or semi-circle and they reply in order.
82
QUESTIONS ANSWERS
When advising a mother about Home
Care for a young infant, what are the
three major points of advice?
Food / Fluids
When to return
Make sure the young infant stays warm
What is the advice to give about food
and fluids?
- Breastfeed frequently, as often and
for as long as the infant wants, day
and night, during sickness and
health.
- Exclusive breastfeeding is best.
- Do not use a bottle.
What are the signs to teach a mother to
return immediately with the young
infant?
Return immediately with the infant if:
- Breastfeeding or drinking poorly
- Becomes sicker
- Develops a fever
- Cold to touch
- Fast breathing
- Difficult breathing
- Blood in stool
What is another reason that a mother
may return with the young infant?
Return for a follow-up visit as
scheduled.
Return for immunization.
83
QUESTIONS ANSWERS
If a young infant has a feeding problem,
when should the mother bring him back
for follow-up?
In 2 days
What advice would you give about
keeping the infant warm?
In cool weather, cover the infant's head
and feet and dress the infant with extra
clothing.
What are the four signs of good
attachment?
Chin touching breast
Mouth wide open
Lower lip turned outward
More areola visible above than below
the mouth
Describe effective suckling. The infant takes slow, deep sucks,
sometimes pausing.
When you help a mother hold and
position her infant for breastfeeding,
what are 4 points to show her?
Show her how to hold the infant
- with the infant's head and body straight
facing her breast, with infant's nose
opposite her nipple
- with infant's body close to her body
supporting infant's whole body, not
just neck and shoulders
To show a mother how to help her
infant attach, what are 3 points to show
her?
She should
- touch her infant's lips with her nipple
wait until her infant's mouth is opening
wide
- move her infant quickly onto her
breast, aiming the infant's lower lip
well below the nipple
When the infant has attached, what
should you do?
Look for the signs of good attachment
and effective suckling.
84
QUESTIONS ANSWERS
Again, what are the signs of good
attachment?
Chin touching breast
Mouth wide open
Lower lip turned outward
More areola visible above the mouth
than below
If attachment or suckling is not good,
what should you do?
Ask the mother to take the infant off the
breast.
Help the mother position and attach the
infant again.
11. EXERCISE F: Individual work followed by individual feedback --
Managing a sick young infant who returns for follow-up
The purpose of this exercise is for the participant to practice how to assess and
select treatment for a young infant who has come for follow-up care.
Compare the participant's answers with those on the answer sheet. Ask the
participant to show you on the YOUNG INFANT chart where he looked to find
instructions about reassessing and treating young infants.
Give the participant a copy of the answer sheet.
1. a) How would you reassess Sashie?
Look at the skin pustules. Decide if they are many pustules or a boil.
When you look at the skin of her buttocks, you see that there are fewer
pustules and less redness.
b) What treatment does Sashie need now?
Tell the mother that Shashi’s infection is improving, but she must
complete the 5 days of antibiotic. She should also continue cleaning
the skin and applying gentian violet on those days.
2. a) How would you reassess this infant?
85
Reassess feeding as in the box “Then Check for Feeding problem or
malnutrition”. Ask about the feeding problems found in the initial visit.
Look for ulcers or white patches in the mouth.
b) How will you treat this infant?
Praise the mother and encourage her to continue breastfeeding Afiya
as she is now doing. Tell her that the thrush is improving. She should
continue cleaning the mouth and painting it with 0.25% gentian violet
for a total of 5 days.
12. When all the participants are ready, summarize the module.
Review the learning objectives and the portions of the chart where the
objectives were learnt. Write down any special points you want to record
below.
91
LIST OF PHOTOGRAPHS OF
THE SICK YOUNG INFANT
AGE UP TO 2 MONTHS
Photograph
Number:
POSSIBLE BACTERIAL INFECTION/JAUNDICE
1: This is a normal umbilicus in a newborn.
2: This is an umbilicus with redness extending to the skin of the abdomen.
3: This is an umbilicus with redness extending to the skin of the abdomen.
4: This is a normal umbilicus.
5: This umbilicus is draining pus.
6: This infant has many skin pustules.
7: This infant has a big boil
8 : This infant has jaundice (Palms and soles not yellow).
9: This infant has jaundice ( Yellow palms and soles).
10: This infant has many skin pustules.
11: This infant has a big boil
12: This infant has jaundice ( Yellow palms and soles).
92
Photograph
Number:
13- 21 : ASSESSMENT NT OF FEEDING
Photograph
Number:
22 : White patches (thrush)
23: White patches (thrush)
Photo Signs of Good Attachment
Assessment
Comments
Chin
Touching
Breast
Mouth Wide
Open
Lower Lip
Turned
Outward
More Areola
Showing
Above
13
yes
(almost)
yes yes yes Good
attachment
14 no no yes no (equal
above and
below)
Not well
attached
15
yes no no yes Not well
attached
lower lip
turned in
16 no no no no Not well
attached
cheeks pulled
in
17
yes yes yes cannot see Good
attachment
18
no no yes no (equal
above and
below)
Not well
attached
19
yes yes yes yes Good
attachment
20
yes
(almost)
yes yes yes Good
attachment
21 yes no no no (more
below)
Not well
attached
lower lip
turned in
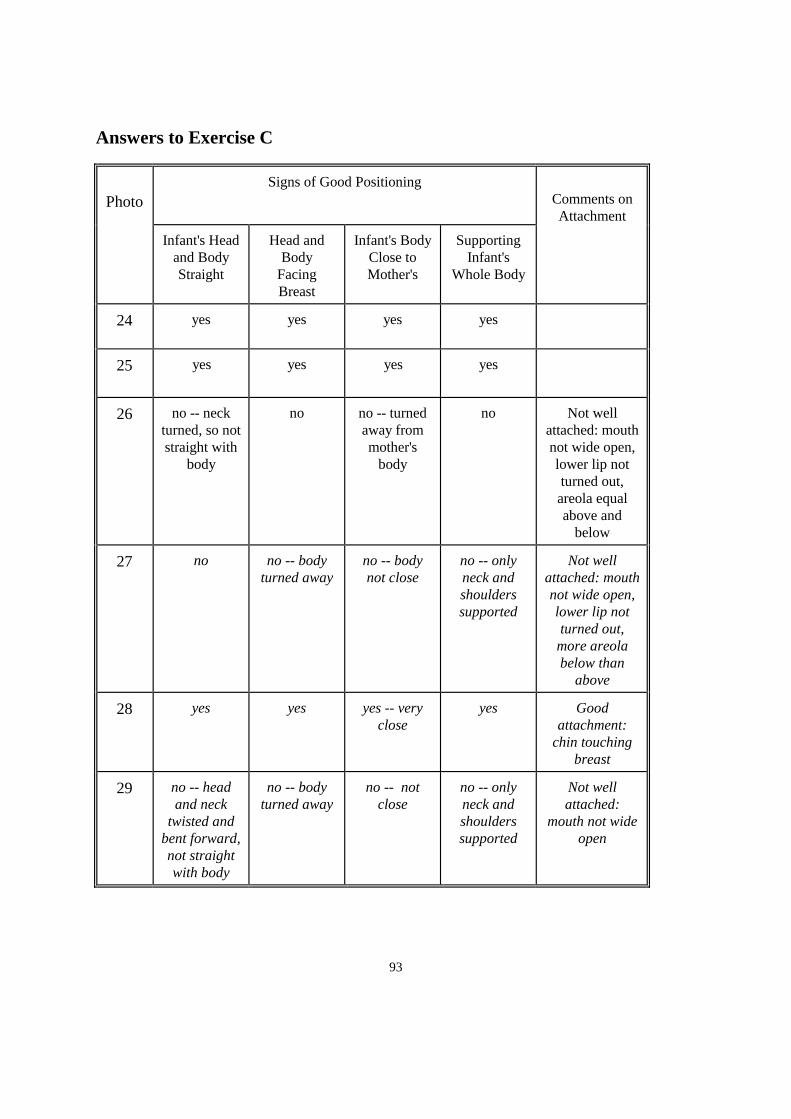
93
Answers to Exercise C
Photo
Signs of Good Positioning
Comments on
Attachment
Infant's Head
and Body
Straight
Head and
Body
Facing
Breast
Infant's Body
Close to
Mother's
Supporting
Infant's
Whole Body
24 yes
yes yes yes
25
yes yes yes yes
26
no -- neck
turned, so not
straight with
body
no no -- turned
away from
mother's
body
no Not well
attached: mouth
not wide open,
lower lip not
turned out,
areola equal
above and
below
27
no no -- body
turned away
no -- body
not close
no -- only
neck and
shoulders
supported
Not well
attached: mouth
not wide open,
lower lip not
turned out,
more areola
below than
above
28
yes yes yes -- very
close
yes Good
attachment:
chin touching
breast
29
no -- head
and neck
twisted and
bent forward,
not straight
with body
no -- body
turned away
no -- not
close
no -- only
neck and
shoulders
supported
Not well
attached:
mouth not wide
open